


Products
DPG1K
• Up/down drive
DPG1M
• Up/down drive
• 2 memory positions
• LED diode reminder
• Bluetooth
®
DPG1B
• Up/down drive
• 2 memory positions
• Light strip reminder
• Bluetooth
®
DPG1C
• Up/down drive
• 4 memory positions
• Light strip reminder
• Bluetooth
• Display
®
Desk Control™ Apps
• Up and down drive (if supported by the
connected product)
• Displays actual height
• Displays error codes and links to LINAK
website support
• Up to 4 memory positions
BRC DPG CONTROLLER USER GUIDE
• Reminder notifications when to stand up
• Possibility to enable automatic drive on memory
positions (if supported by the connected product)
• Works via Bluetooth
®
Low Energy Technology
• Available in English, German, French, Spanish,
Italian, Korean, Chinese and Japanese
DESK CONTROL APP PLACEMENT & MOUNTING RESET DPG1B/C OPERATION DPG OPERATION PRODUCT MAP

Operation of the DPG series:
The Desk Panel is operated by tilting; Tilt and hold the DPG up to make the desk drive up, press and hold the
DPG down to make the desk drive down. Release the DPG when you have reached your requested position.
Figure 1: Tilt and hold the DPG1K to make the desk drive up
Figure 2: Press and hold the DPG1K to make the desk drive down
BRC DPG CONTROLLER USER GUIDE
DESK CONTROL APP PLACEMENT & MOUNTING RESET DPG1B/C OPERATION DPG OPERATION PRODUCT MAP

Operation of the DPG1B/C
The Desk Panel is operated by tilting; Tilt and hold the DPG up to make the desk drive up, press and hold the
DPG down to make the desk drive down. Release the DPG, when you have reached your requested position.
Figure 1: Tilt and hold the DPG to make the desk drive up
Figure 2: Press and hold the DPG to make the desk drive down
BRC DPG CONTROLLER USER GUIDE
DESK CONTROL APP PLACEMENT & MOUNTING RESET DPG1B/C OPERATION DPG OPERATION PRODUCT MAP

Storing the memory positions
DPG1B:
Memory positions
The DPG1B has a “store memory” button to the right symbolised with a star.
Adjust the desk to a preferred position and press the “Star”-button for 2 seconds. The light strip will now flash
white two times to indicate that saving the position is in progress. When the light strip becomes static white,
the position is saved. If the user adjusts the desk to another position and saves the position, it will overwrite the
memory position closest to the current position.
DPG1C:
Memory positions 1 and 2
The DPG1C has a “store memory” button to the right symbolised with a star.
Adjust the desk to a preferred position and press the “Star”-button for 2 seconds. The light strip will now flash
white two times to indicate that saving the position is in progress. When the light strip becomes static white, the
position has been saved. The display will indicate the saved position with a star and a number of the position. The
number inside the star indicates the order according to which the positions are saved; First position saved; A star
with a “1” inside. This is how to save 2 memory positions “1” and “2”. If the user adjusts the desk to another
position and saves the position, it will overwrite the memory position 1 or 2 closest to the current position.
Memory positions 3 and 4
The DPG1C features 4 memory positions. Pressing the “Star” shortly will make the display show the 4 memory
positions: A “star” with the number next to it. Now the user can toggle through these 4 memory positions in
the display and choose which one to save the current position as. E.g. a user wants to store the current position
as memory 3: Press the “star”-button and toggle to the “star” with “3” next to it. Now use the same storing
procedure as described above: Press the star for 2 seconds and the memory position is saved.
BRC DPG CONTROLLER USER GUIDE
DESK CONTROL APP PLACEMENT & MOUNTING RESET DPG1B/C OPERATION DPG OPERATION PRODUCT MAP

Driving to memory positions
After storing the memory positions, the positions can be reached simply by tilting the DPG. Tilt and hold - when
a stored position is reached, the desk stops. This way the user can easily change between sitting and standing
position without looking at the DPG in the meantime. While driving the display in the DPG1C will show the
height of the desk. When a position is reached, this will be indicated in the display by the star and the memory
number.
The DPG will stop at all stored memory positions, which means up to 4 different positions (in DPG1C) during the
stroke length of the desk. When the desk stops at a memory position, the user can continue to tilt the DPG for 1
second and the desk will move past the memory position and continue in the direction of the tilt. Furthermore,
when the desk stops at a memory position, the user can release the DPG and tilt again immediately to move
past a memory position.
Driving to memory positions
(Automatic drive enabled via the Desk Control™ App, only possible for “Full version”)
After storing the memory positions, the positions can be reached simply by tilting the DPG. Double tab on the
DPG to let the desk adjust automatically to the first position in the direction of the double tap. Simply tab the
DPG again to stop the driving of the desk.
Figure 3: Double tap to adjust the desk to a memory position automatically
BRC DPG CONTROLLER USER GUIDE
DESK CONTROL APP PLACEMENT & MOUNTING RESET DPG1B/C OPERATION DPG OPERATION PRODUCT MAP

Erase memory positions
Pressing the “Memory” button for 8 seconds will erase all saved memory positions. The light strip will blink red
to indicate when the action is completed.
Connecting Bluetooth
®
Pressing the Bluetooth® button in the middle for 2 seconds will enable pairing mode.
A blue flashing light in the light strip indicates this.
Download the Desk Control™ App suited for your device in App store or Google Play
and pair the app and the device. Search for Desk Control and look for the app icon:
The display on the DPG1C will inform about the Bluetooth-ID of the desk, which is “DESK” followed by a 4-digit
number – look for this ID in the list of “Desks nearby”.
DESK CONTROL APP PLACEMENT & MOUNTING RESET DPG1B/C OPERATION DPG OPERATION PRODUCT MAP
BRC DPG CONTROLLER USER GUIDE

Reminder
Setting the reminder interval
The DPG has a “Reminder” button to the left symbolised with a bell. Pressing this button will adjust the interval
of how often to get reminders to change position. Each white block represents an interval and the 3 standards
are:
- Interval 1: Reminder after 55 minutes sitting
- Interval 2: Reminder after 50 minutes sitting
- Interval 3: Reminder after 45 minutes sitting
The default interval chosen is reminding after 55 mins, which means one white block will be lit up. Simply toggle
through the intervals by pressing the bell button. When no white blocks are lit up, the reminder is turned off.
Through the apps, it is possible to personalise the three intervals to custom values.
Interval 1: Reminder after 55 minutes sitting Interval 2: Reminder after 50 minutes sitting
Interval 3: Reminder after 45 minutes sitting Reminder off
Reminder reset
It is possible to reset the reminder to default values by pressing the “bell” symbol for 8 seconds. The light strip
will flash red to indicate when the action is completed.
BRC DPG CONTROLLER USER GUIDE
DESK CONTROL APP PLACEMENT & MOUNTING RESET DPG1B/C OPERATION DPG OPERATION PRODUCT MAP

Light strip reminder
The light strip is a thin line of LED light shining through the surface of the DPG. The light strip is intended to
indicate the status of the desk user. The status depends on the reminder interval chosen. When the user is in
position in an appropriate amount of time according to the interval, the light strip calmly pulsates green. When
the sitting interval runs out, the calm pulsating green turns into fast pulsating orange for 1 min hereafter static
orange – this is an indication to the user to adjust the desk to standing height. In standing height, the light strip
will pulsate green until a potential timeout. When the desk is adjusted back to sitting position, the light strip will
pulsate green until the reminder goes off again.
After 4 hours without any action, the light strip will time out. When the DPG is tilted, the green light will come
back on.
TM
Please be aware; When the light strip is enabled for reminders, the DPG is no longer in ZERO
mode as
long as the light is on/active.
Figure 4: Pulsating green light strip indicates that everything is okay
Figure 5: Pulsating orange light strip indicates that the user needs to change position
BRC DPG CONTROLLER USER GUIDE
DESK CONTROL APP PLACEMENT & MOUNTING RESET DPG1B/C OPERATION DPG OPERATION PRODUCT MAP

Factory reset
Pressing and holding the “Memory” and “Reminder” for 8 seconds will set the DPG to factory default. The LED
will flash red 3 times. If a factory reset is performed, it sets the DPG back to the configured state. That means all
configurations made in the DPG configurator will not be reset – only the settings changed directly on the DPG or
in the App by the end-user will be deleted.
DPG1C
Display
The DPG1C has an OLED display, which shows the height during drive of the desk and many other texts to guide
the user.
Adjust the initial height of the desk
If the height shown in the display is not correct the height can be adjusted. When pressing the “Reminder” and
the “Bluetooth” button on the DPG1C at the same time in 5 seconds; the height in the display starts to blink.
When tilting the DPG1C the height in the display changes without moving the desk. Tilt up to increase the
height, tilt down to decrease the shown height in the display. Pressing any button will confirm the choice or wait
for 10 seconds and the confirmation happens automatically.
Switching between centimetre and inch
Pressing the “Memory” and the “Bluetooth” button on the DPG1C at the same time for 5 seconds; the current
measurement unit blinks. When e.g. CM is blinking and the user wants to change to inch; Tilt the DPG once and
it now says “Inch” in the display. Pressing any button will confirm the choice or wait for 10 seconds and the
confirmation happens automatically.
Error codes
The DPG1C shows error codes in case of errors in the system. The most common errors loop between the error
code (EXX) and the cause, check the code below:
Error codes in CBD6S Cause
E53-E64 COLLISION
E41-E52 OVERLOAD
E01 INITIALISATION
BRC DPG CONTROLLER USER GUIDE
DESK CONTROL APP PLACEMENT & MOUNTING RESET DPG1B/C OPERATION DPG OPERATION PRODUCT MAP

Placement of the DPG1K:
The drawings below are side views examples on
how to position the DPG1K according to the edge
of the tabletop.
Placement of the DPG1M:
The drawings below are side views examples on
how to position the DPG1M according to the edge
of the tabletop.
BRC DPG CONTROLLER USER GUIDE
DESK CONTROL APP PLACEMENT & MOUNTING RESET DPG1B/C OPERATION DPG OPERATION PRODUCT MAP

Placement of the DPG1B:
The drawings below are side views examples on
how to position the DPG proportionally to the
edge of the tabletop. Because of the light strip,
we recommend placing the DPG1B in a visible
position.
Placement of the DPG1C:
The drawings below are side views examples on
how to position the DPG1C proportionally to the
edge of the tabletop. Because of the light strip,
we recommend placing the DPG1C in a visible
position.
BRC DPG CONTROLLER USER GUIDE
DESK CONTROL APP PLACEMENT & MOUNTING RESET DPG1B/C OPERATION DPG OPERATION PRODUCT MAP

Mounting of the DPG:
When mounting the DPG, there are a few things of which to be aware.
1. Predrill the holes
We recommend predrilling the holes for the DPG to ensure the same aligned position for every desk.
If no holes are predrilled, a bulge of wood might
occur between the tabletop and the DPG – which
causes the DPG not to be tightened sufficiently
to the tabletop. This might lead to incorrect
functionality of the DPG.
DPG without cover DPG with cover
Max screw length 19 mm + thickness
of the tabletop
Please observe that a DPG version with cover requires a 13 mm longer screw
BRC DPG CONTROLLER USER GUIDE
DESK CONTROL APP PLACEMENT & MOUNTING RESET DPG1B/C OPERATION DPG OPERATION PRODUCT MAP

2. Use correct screws
When mounting the DPG to the tabletop, screws
with the following specification must be used:
- Ø4.5 mm
- 90° countersink screw
Do not use screws with a milling head as
they will cut into the housing of the DPG.
The screws must be fastened sufficiently, without overtightening the screws. It is not possible to mention a
specific torque as this depends on the type of screw, the material of tabletop and whether there are predrilled
holes or not.
3. Do not overtighten the screws
4. When mounting the DPG, make sure that the
cable is not tightened too much
Do not overtighten the screws. They must of course
be fastened sufficiently, but without damaging the
plastic.
When mounting the DPG, it is important to ensure
that the cable is not tightened, but has free mobility
in the first centimetres from the housing. We
recommend attaching the cable to the tabletop
with a clip as shown on the drawing above.
Find more information about how to use the DPG in this short film: (link)
DESK CONTROL APP PLACEMENT & MOUNTING RESET DPG1B/C OPERATION DPG OPERATION PRODUCT MAP
Above-mentioned mounting guidelines are directly accessible via the label on the cover of the DPG. Use either
the QR code or type in the web address.
BRC DPG CONTROLLER USER GUIDE
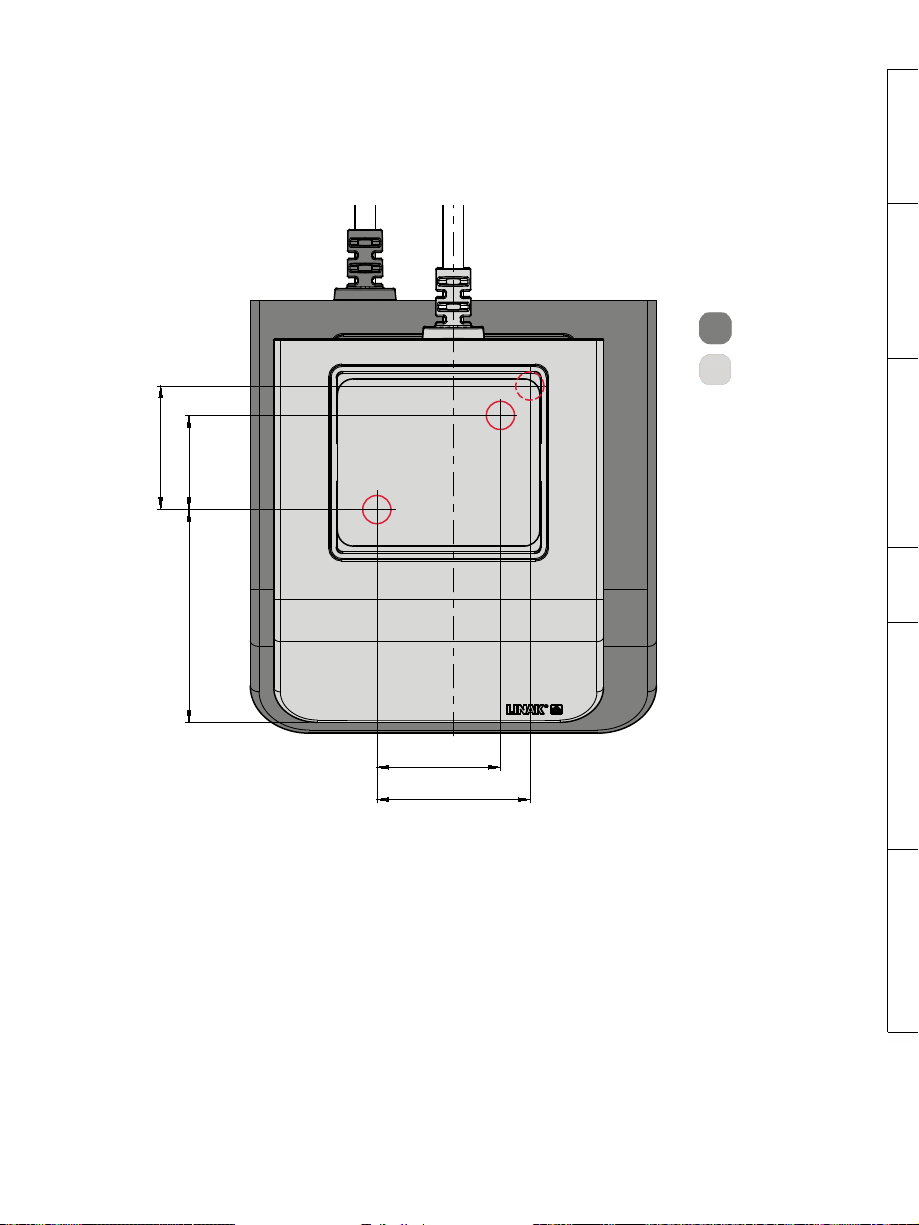
Preparing the tabletop for both DPG sizes (DPG1K/M and DPG1B/C)
The DPG series consists of 4 different desk panels in 2 different sizes. The DPG1K and the DPG1M are the same
size and the DPG1B and the DPG1C are the same size.
The two sizes share one hole in the hole pattern, which means 3 predrilled holes in the tabletop will make it
possible to mount both sizes of the DPG and all 4 versions.
DPG1B/C
DPG1K/M
21
36 16
Figure 6: Hole pattern of the DPG sizes. The dashed line is the second hole of the DPG1B/C
BRC DPG CONTROLLER USER GUIDE
21
26
DESK CONTROL APP PLACEMENT & MOUNTING RESET DPG1B/C OPERATION DPG OPERATION PRODUCT MAP

The front hole of all 4 DPG variants are shared; Here indicated by the green line.
As the DPG1K and the DPG1M are the same size, they share the hole indicated by the red line.
As the DPG1B and the DPG1C are the same size, they share the hole indicated by the black line.
DPG1K
DPG1M
BRC DPG CONTROLLER USER GUIDE
DPG1B
DPG1C
DESK CONTROL APP PLACEMENT & MOUNTING RESET DPG1B/C OPERATION DPG OPERATION PRODUCT MAP

Desk Control™ App
Desk Control is an app developed for users of sit-stand desks. The app allows the user to connect to the desk
via Bluetooth
Control” app, the desk user comes one step closer to changing the prolonged sitting behaviour and the user gets
the friendly reminder needed to build a healthy routine during the workday. Via the app the desk can also be
adjusted and the user can drive to prestored memory positions. The app comes in 8 languages and is available
for 2 different platforms: iOS for iPhones and iPads and Android for Android smartphones and tablets.
®
wireless technology and will now remind the user to use the desk. By downloading the “Desk
BRC DPG CONTROLLER USER GUIDE
DESK CONTROL APP PLACEMENT & MOUNTING RESET DPG1B/C OPERATION DPG OPERATION PRODUCT MAP

Downloading apps
The apps are called “Desk Control™” and have the following app logo
in iTunes and Apple App store and Google Play store:
How to download the App for iOS
Step 1: Use your iPhone or iPad to log into Apple App store
Step 2: Type “Desk Control” in the search column
Step 3: Select the “Desk Control” app
Step 4: Click install to download the app to your device
How to download the App for Android
Step 1: Use your Android device to log into Google Play Store
Step 2: Type “Desk Control” in the search column
Step 3: Select the “Desk Control” app
Step 4: Click install to download the app to your device
BRC DPG CONTROLLER USER GUIDE
DESK CONTROL APP PLACEMENT & MOUNTING RESET DPG1B/C OPERATION DPG OPERATION PRODUCT MAP

Onboarding flow
The first time you start the Desk Control app; An onboarding flow will show to guide the user to the first-time
use of the app.
The two main purposes of the onboarding flow is to inform the user of the benefits of changing posture during
the workday and get the connection between the app and the device established. Pressing “connect to your
desk” on the below screen will lead to the “Pairing Bluetooth
®
” guide.
BRC DPG CONTROLLER USER GUIDE
DESK CONTROL APP PLACEMENT & MOUNTING RESET DPG1B/C OPERATION DPG OPERATION PRODUCT MAP

Pairing Bluetooth®
®
To get a functional app, you must have the LINAK Bluetooth
desk panel with integrated Bluetooth
®
such as DPG1M, DPG1B or DPG1C.
Adapter or
The screen to the left informs the user how to get the product they received
in pairing mode.
®
The Bluetooth
Adapter must be plugged into the DESKLINE® control box
and it will blink blue and be in pairing mode for 3 minutes.
®
To set a DPG1M/B/C in pairing mode, the Bluetooth
button in the front of
the desk panel must be pressed for 2 seconds and the light strip or light LED
will blink blue to indicate that it is in pairing mode.
When pressing “Hide pairing guide” the screen with the list of devices in
pairing mode will appear. Press the “connect” button to the right of the
device to pair.
®
All Bluetooth
4-digit number. All DPG desk panel Bluetooth
Adapters Bluetooth® IDs are named BLE2LIN followed by a
®
IDs are named DESK followed
by a 4 digit-number.
BRC DPG CONTROLLER USER GUIDE
Demo:
By selecting “Try the demo”, you will get access to explore the functionality
of the Desk Control
TM
App but without connection to a product.
After pressing the “connect” button and the connection has been established
successfully, the user will be lead to the “Control” page of the app.
The following question pops up on the screen, which the user have to answer.
If the user only uses one desk with this app; Press yes
If the user uses this app for multiple desk; Press no
DESK CONTROL APP PLACEMENT & MOUNTING RESET DPG1B/C OPERATION DPG OPERATION PRODUCT MAP

How to use the app
TM
The Desk Control
App consists of 3 different tabs to navigate between; “Control”, “You” and “Settings”
Adjustment of the desk (if supported by connected the device)
Set your goal
All settings
Control
This is the landing page after the Bluetooth
®
connection is established. The functionality of the control page
depends on the product to which app is connected. The screen below shows when the app is connected to a
“full version” of a DPG or Bluetooth® Adapter. When the connection is with a “Limited version” of the DPG or
Bluetooth® Adapter; Adjustment of the desk through the app will not be possible and it is not possible to store
memory positions. The graphics will adjust to the possibilities.
®
Bluetooth
device connected
Current height of the desk
Interactive application drawing
Up/down drive of the desk
Save up to 4 memory positions
Up/down drive
Moves the application upwards/downwards while pressing and holding the button.
®
Bluetooth
device
Leads back to “Desks nearby” and lets the user connect to another product in pairing mode
Height
Current height of the desk. In case an error occurs, the error code will be displayed instead of the height.
BRC DPG CONTROLLER USER GUIDE
DESK CONTROL APP PLACEMENT & MOUNTING RESET DPG1B/C OPERATION DPG OPERATION PRODUCT MAP

Favourite positions
The stars symbolise the favourite positions.
Drive the desk to the preferred position; press one of the circles with a star inside. A pop-up notification
will ask if the position should be saved as a favourite position, press “Yes, please” and the position is saved.
The circle will now show the height of the favourite position. By pressing and holding the button, the
application will take you to your favourite position.
Press the star to save Conform the choice Two saved positions Driving to a favorite position
Automatic drive
If “Automatic drive” is enabled in the “settings” menu, pressing the button once will make the application adjust
to the stored position without holding the button. Pressing any button or closing the app will interrupt the drive of
the desk. Please observe, by enabling automatic drive, the user accepts the responsibility and danger that can occur
under these circumstances.
Automatic drive is only possible to enable when the app is connected to a “full version” product.
The DPG will reflect the favourite positions saved through the app, so you can tilt between the positions via the
desk panel instead of using the app.
BRC DPG CONTROLLER USER GUIDE
DESK CONTROL APP PLACEMENT & MOUNTING RESET DPG1B/C OPERATION DPG OPERATION PRODUCT MAP

You
“You” is the page for setting the daily goal of standing at the desk.
The first time you press the “You” tab will require following input:
- Choose a goal of sitting and standing. Choose a predefined one or customise it by pressing the symbol to the right.
- Choose if the smart device should remind via pop-up notifications when it is time to change position
Choose between the 3 predefined
intervals and press save
Please note: If an interval for sitting/standing has already been chosen via the DPG, these settings will be shown when
opening the app.
OR press the symbol to the right
and choose your own interval
Via the arrows adjust the interval
you prefer and press done
DESK CONTROL APP PLACEMENT & MOUNTING RESET DPG1B/C OPERATION DPG OPERATION PRODUCT MAP
BRC DPG CONTROLLER USER GUIDE

Settings
Pressing the “Settings” will provide a list of choices:
Change the favourite positions
The favourite positions are stored through the control page. If the user wants to change the height of the stored
positions, it can be done through this menu.
Ways to be reminded
Enable or disable reminders as pop-up notifications on smartphones.
If supported by the connected product, e.g. the DPG1B, enable or disable the light strip as a reminder function.
Set desk name
Change the name of the connected product. The renaming will only affect the local name in the smartphone or
computer - not in the DPG or Bluetooth
®
Adapter.
Set desk height
Set the current height of the desk. An illustration guides the user on how to measure. Choose in which units the
height is shown: cm or inches.
BRC DPG CONTROLLER USER GUIDE
DESK CONTROL APP PLACEMENT & MOUNTING RESET DPG1B/C OPERATION DPG OPERATION PRODUCT MAP

I use one desk only
Choose between “Yes” or “No”.
Yes: This is the only desk, you use and to which you connect your app. Your reminder and memory settings
are stored in the DPG on the desk.
No: You connect to several desks. Your reminder and memory settings are stored on your smart device and
when you connect to a desk, the settings will reflect in the DPG. When you are no longer connected,
the DPG will go back to the settings it had before you connected after 2 hours.
Automatic drive
Enable automatic drive on memory positions. The user has to accept the terms in the pop-up notification before
this feature can be enabled. This feature can only be enabled via this app and only when connected to “full
versions” of the DPG1M/B/C and BLE2LIN, not the “limited versions”. An animation shows the user how this
feature works.
Set language
Choose between 8 different languages in the app. This change does not affect the language in the display of a
DPG1C.
Benefits of changing posture
An overview of some of the benefits by using a sit/stand desk and changing posture.
Terms & conditions
Terms & conditions for using the Desk Control
TM
app.
About
Use your desk
Link to the “Made to Move” area; Get guidance on how to use a sit/stand desk correctly.
Product information
Link to LINAK website with information about this app.
Support
Link to LINAK website with troubleshooting videos on the DPG products.
DESK CONTROL APP PLACEMENT & MOUNTING RESET DPG1B/C OPERATION DPG OPERATION PRODUCT MAP
BRC DPG CONTROLLER USER GUIDE

Reminder notifications
When reminder notifications are enabled on the smart device, pop-up notifications will occur to help guide the
user when there is a need to change position. Below are examples on the notifications that will pop up on your
screen when it is time to adjust your desk again. The reminders will appear based on your settings.
The notification will tell the user to change position. There are 3 notification options:
- Snooze the reminder: The notification will pop up one hour later.
- Disable reminders for today: The notifications will stop for the day, but they will be enabled again the next day.
- Open app: Opens the app allowing the user to adjust the desk. (If supported by the connected product)
Be aware, that the notification only works, when they are answered via the Desk ControlTM App. If the
notification is answered on the DPG or other controls, the app do not understand users input, as the notifications
only respond to actions taken in the app. This means that the notifications are going out of synchronisation, and
will not give you more notifications until these have been reset in the app or the next day.
The notifications are based on users goal set under ‘You’. If the goal is set to 10 min standing, 50 min sitting.
The notification will be send after the user have been sitting for 50 minutes. When the table is moved aboved 95
cm, the DPG and app are put into standing position until it is moved down again. When reaching sitting position
(under 95 cm), the notification is being reset and a new notification will appear after 50 min.
Notifications ONLY appears, when user is sitting – not in standing position.
BRC DPG CONTROLLER USER GUIDE
DESK CONTROL APP PLACEMENT & MOUNTING RESET DPG1B/C OPERATION DPG OPERATION PRODUCT MAP

Recommendations on how to use Desk ControlTM
Overriding a learned sedentary behaviour is a true behavioural challenge. We have put together a guide for how
to break up with your chair during your workday.
If you are not used to stand up and work, start with short intervals focusing on learning and getting into a habit.
When this behaviour is starting to get a habit, continue to stand for longer periods e.g. using the below guide or
simply testing what feels comfortable for you.
How to vary between standing and sitting while your work
The most important thing is to vary your position and to move around, preferably three times an hour.
Instead of sitting for too long at a time, you can switch between standing and sitting position.
Remember good posture and to stand with your body weight evenly distributed on both legs.
• Start by raising your desk and stand for 15 minutes each hour before you go to lunch.
• Raise your desk just before your lunch break. Then your desk will be in the right position when you get back
from lunch.
• Just after lunch, stand for 15 minutes before lowering your desk to sit for 45 minutes.
• Raise your desk again every hour, so that you stand up working for 15 minutes each hour or the rest of the day.
• Raise your desk before you leave for the day – then it is ready for the next day.
Important reservations when varying between standing and sitting position:
If you are pregnant, have varicose veins or have a health condition that may prevent you from standing for
5-15 minutes at a time every hour, you should contact your doctor to make sure that this will not be
detrimental to your health.
BRC DPG CONTROLLER USER GUIDE
DESK CONTROL APP PLACEMENT & MOUNTING RESET DPG1B/C OPERATION DPG OPERATION PRODUCT MAP
 Loading...