

Page 1

24 Armstrong AVE
Georgetown L7G 3R9
1-877-260-4309
www.brc.group
Emotion
1 of 8
BOM
1
2
H
A - Upper frame - A
x2
B - Upper frame - B
x2
C - Upper frame - End
x2
D1 - Spanner bars
x2
D2 - Set Screws
x4
E - Adjustable leg
x2
F - Feet with levelers
x2
G - Insert
x12
H - M6x15 Hex screw
x12
I - M6x15 Hex bolt
x8
J - #10x3/4" pan head screw
(9200818) x18
K - Worksurface
x1
L - Wire Clips
x10
M - #6x5/8 flat head phillip
screw x10
N - #5x3/4 pan head phillip
screw x3
O - #8x5/8 pan head phillip
screw x2
P - Wire bascket x1
E
C
A
B
G
Note: Direction
arrow towards
worksurface
Note: Direction
arrow towards
worksurface
Alta Assembly Guide
Page 2
24 Armstrong AVE
Georgetown L7G 3R9
1-877-260-4309
www.brc.group
Emotion
3
K
2 of 8
C
5
4
L
C
L
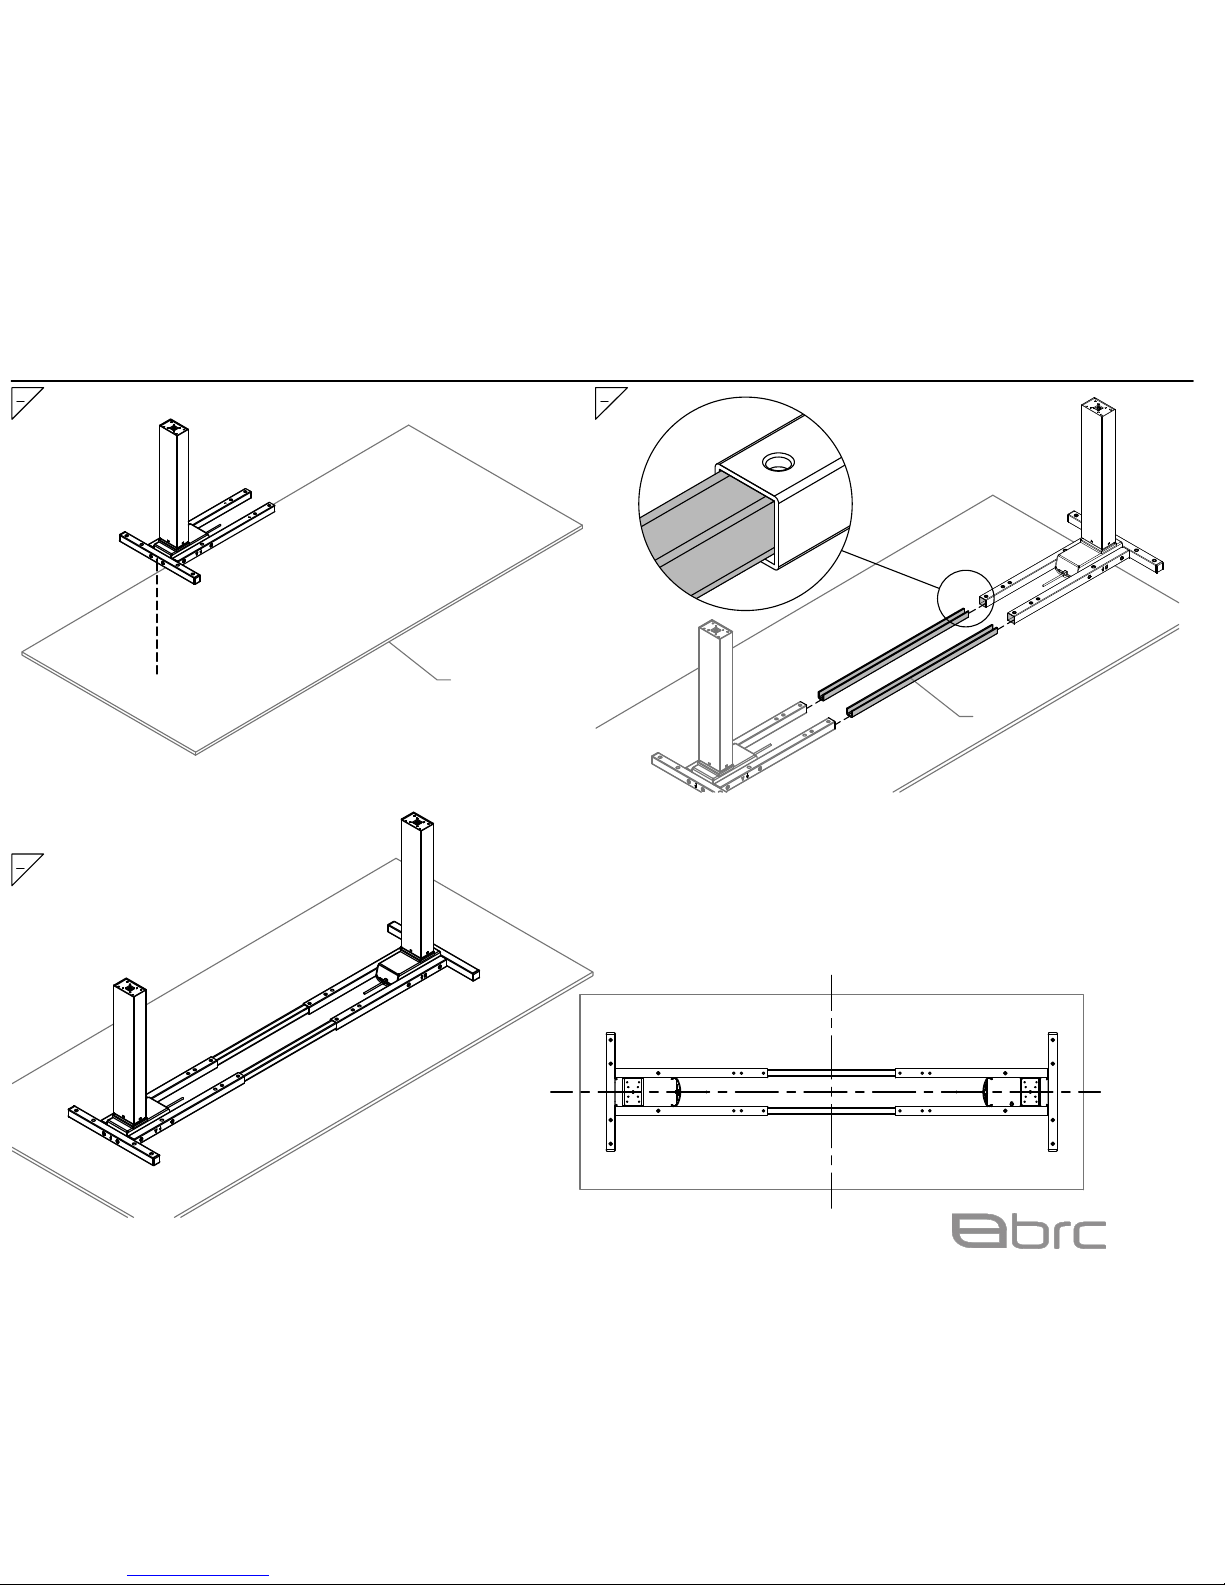
Note: Position Table Frame to on
the center of the Worksurface.
D1
Alta Assembly Guide
Page 3
24 Armstrong AVE
Georgetown L7G 3R9
1-877-260-4309
www.brc.group
Emotion
8
3 of 8
6 7
J
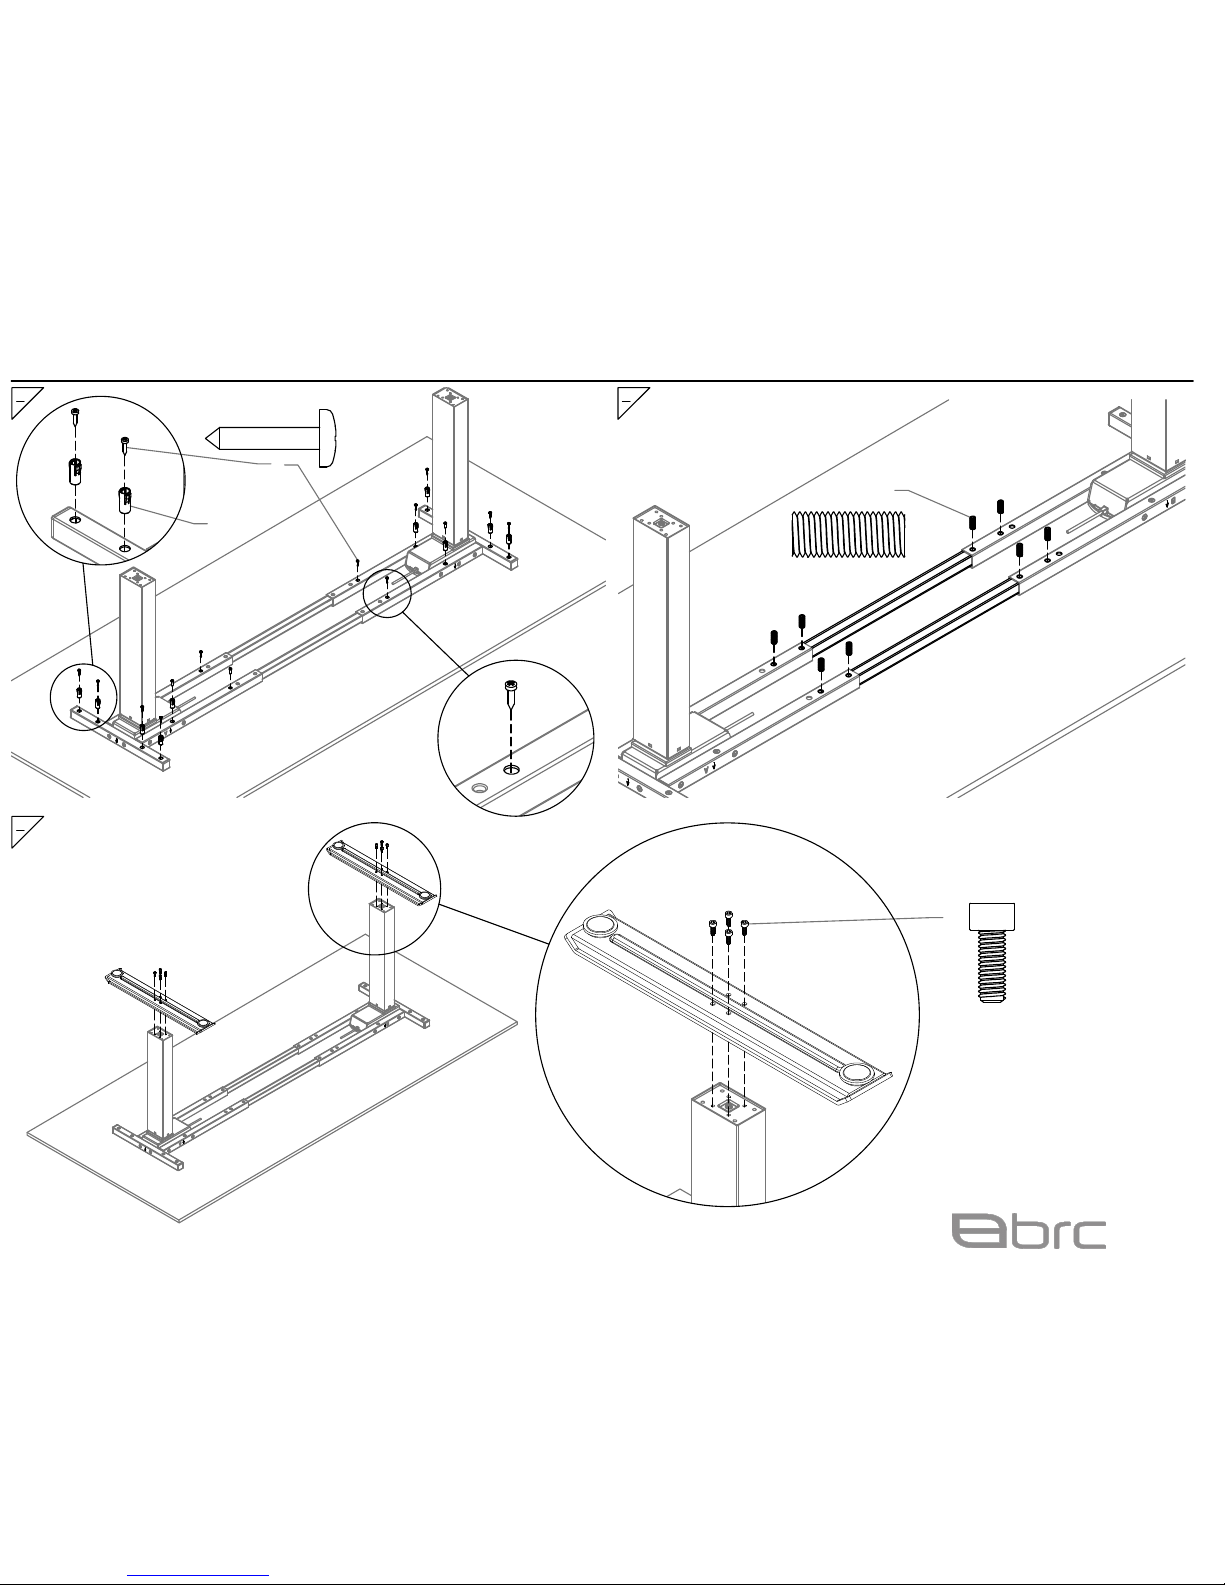
D2
G
I
Alta Assembly Guide
Page 4
24 Armstrong AVE
Georgetown L7G 3R9
1-877-260-4309
www.brc.group
Emotion
4 of 8
10a
9a
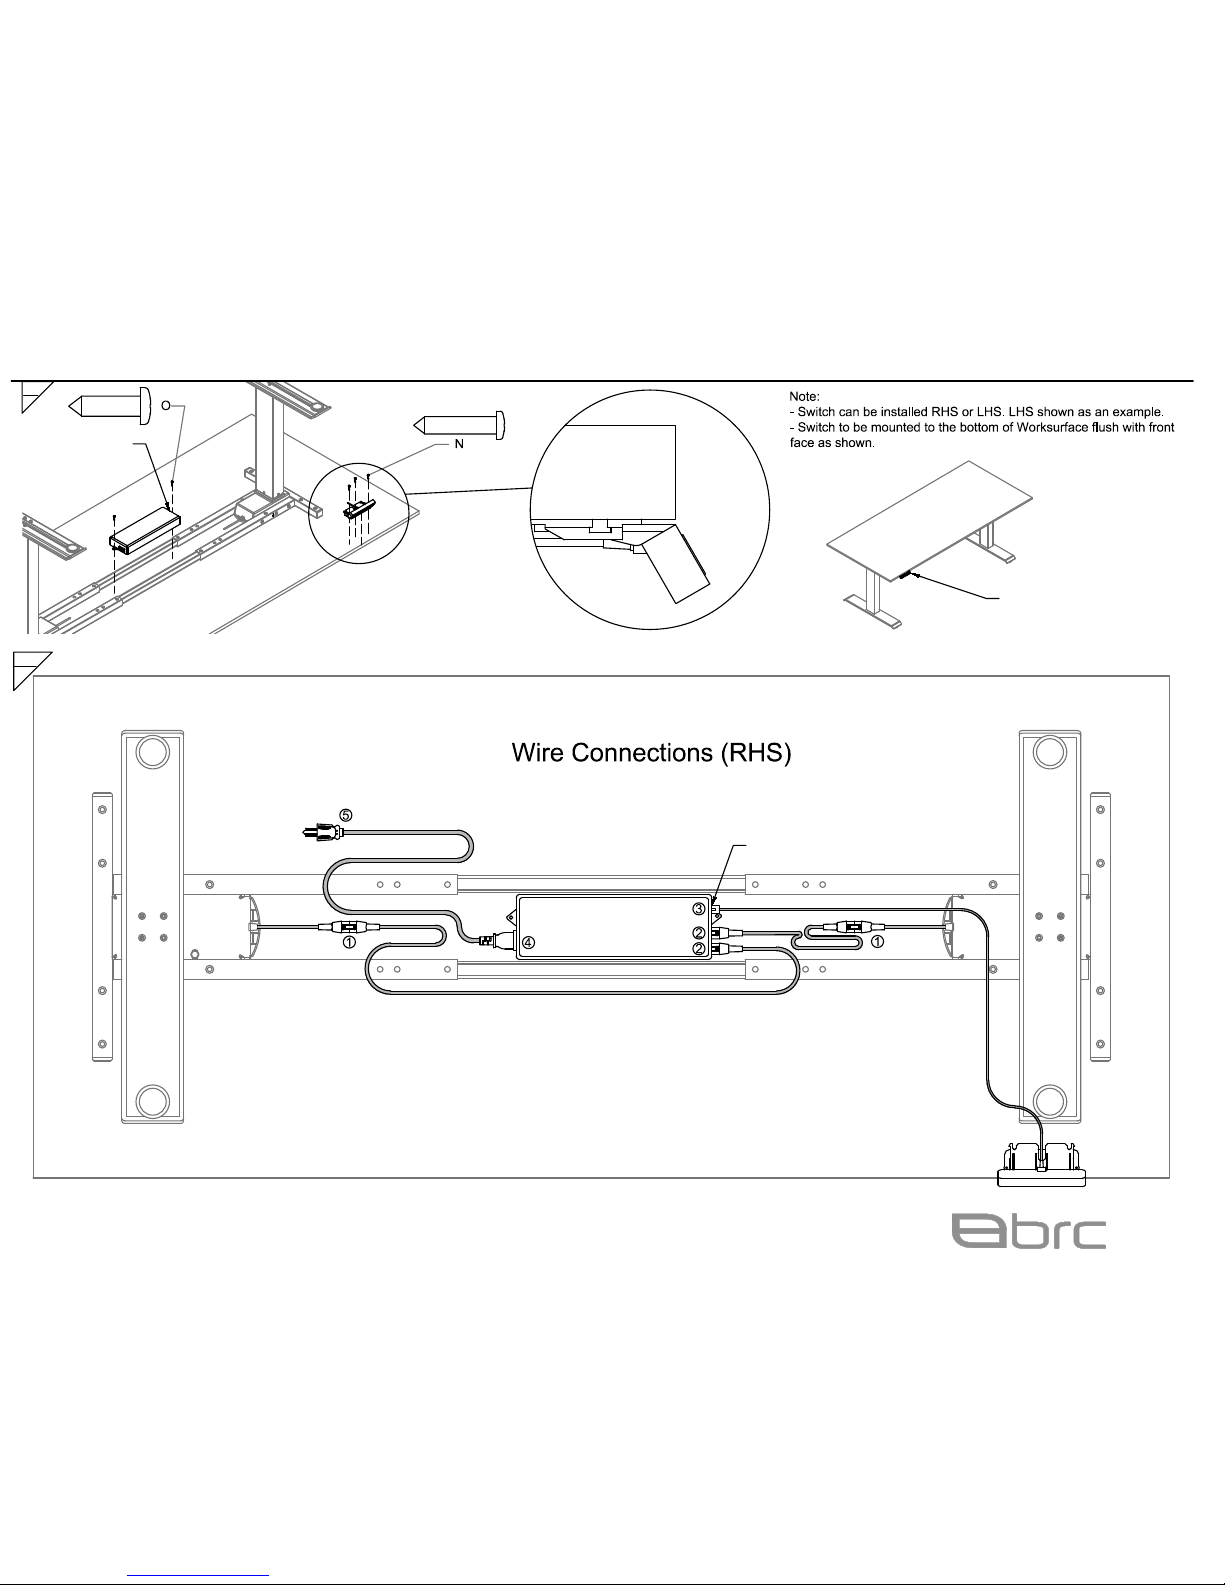
Note:
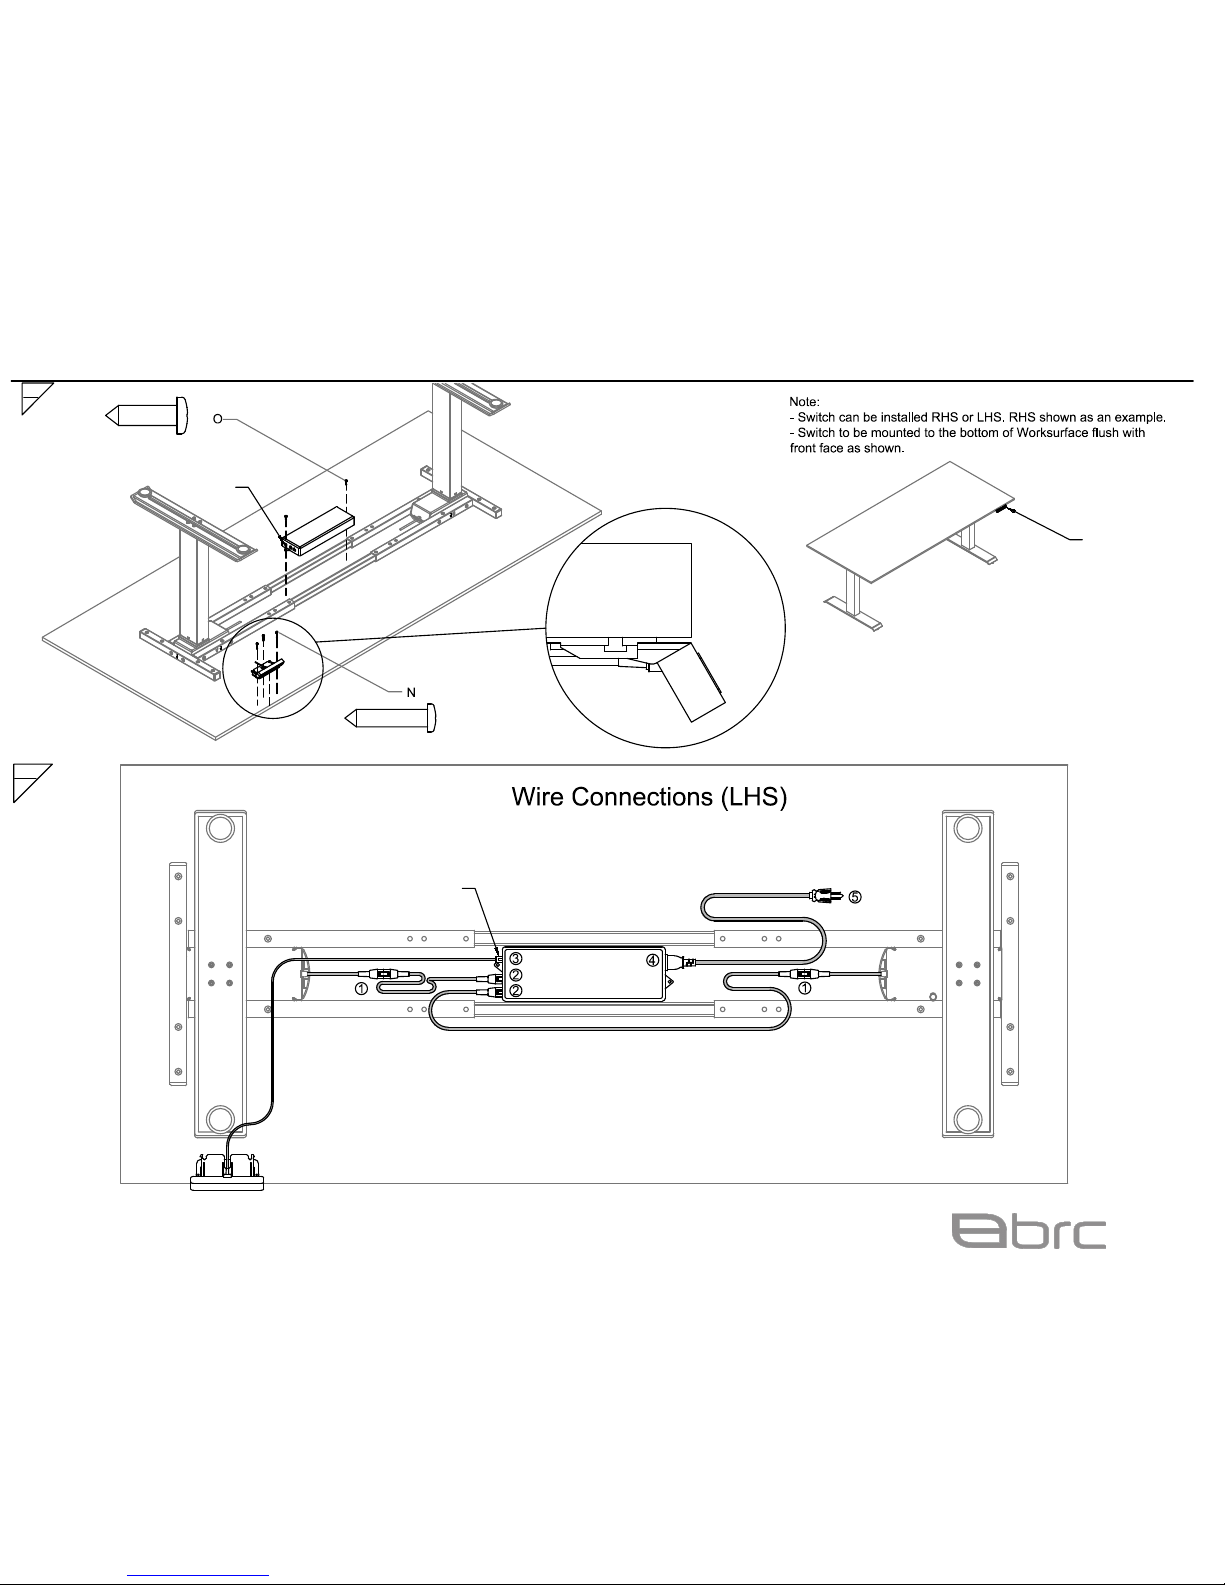
- Please follow sequence as shown to
connect wires.
- Switch install on RHS shown.
- Flip Table and level by adjusting levelers.
Switch
Plug
Switch
Plug
Switch
Alta Assembly Guide
Page 5
24 Armstrong AVE
Georgetown L7G 3R9
1-877-260-4309
www.brc.group
Emotion
5 of 8
11a
Alta Assembly Guide
Page 6
24 Armstrong AVE
Georgetown L7G 3R9
1-877-260-4309
www.brc.group
Emotion
6 of 8
10b
9b
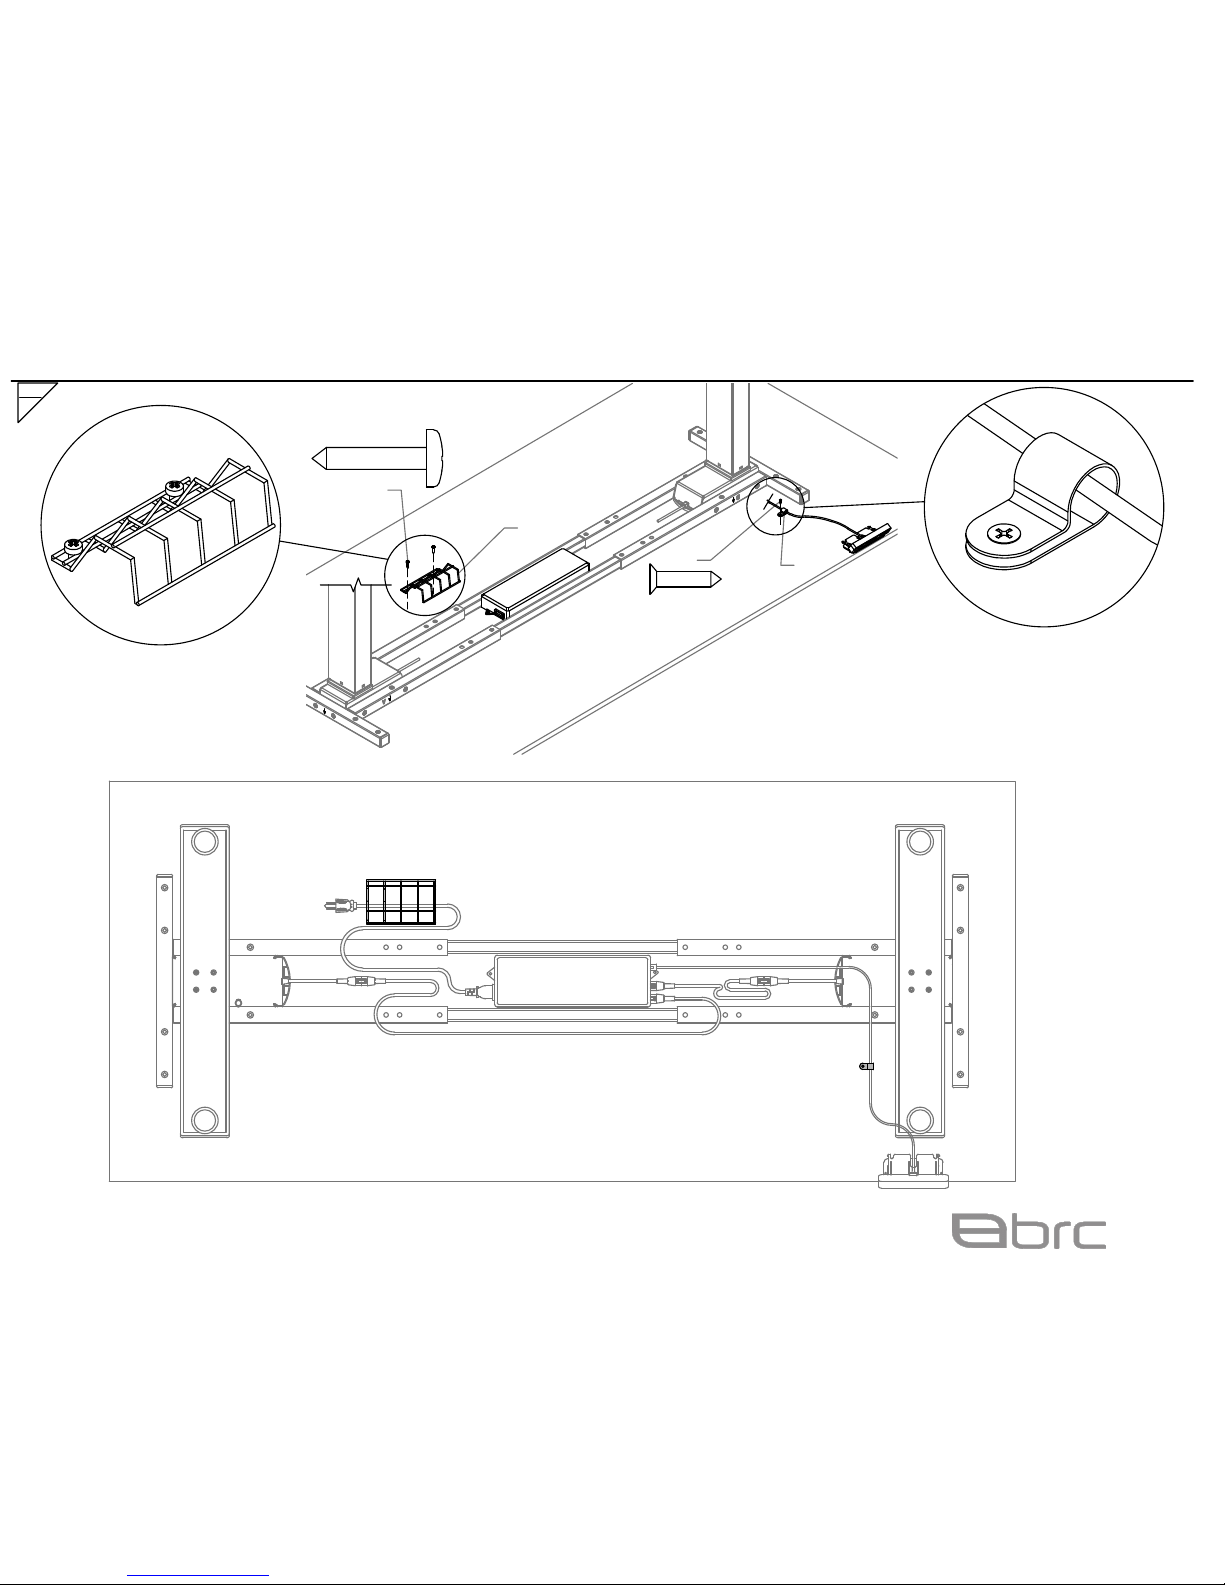
Note:
- Please follow sequence as shown to
connect wires.
- Switch install on LHS shown.
- Flip Table and level by adjusting levelers.
Switch
Plug
Switch
Plug
Switch
Alta Assembly Guide
Page 7
24 Armstrong AVE
Georgetown L7G 3R9
1-877-260-4309
www.brc.group
Emotion
7 of 8
11b
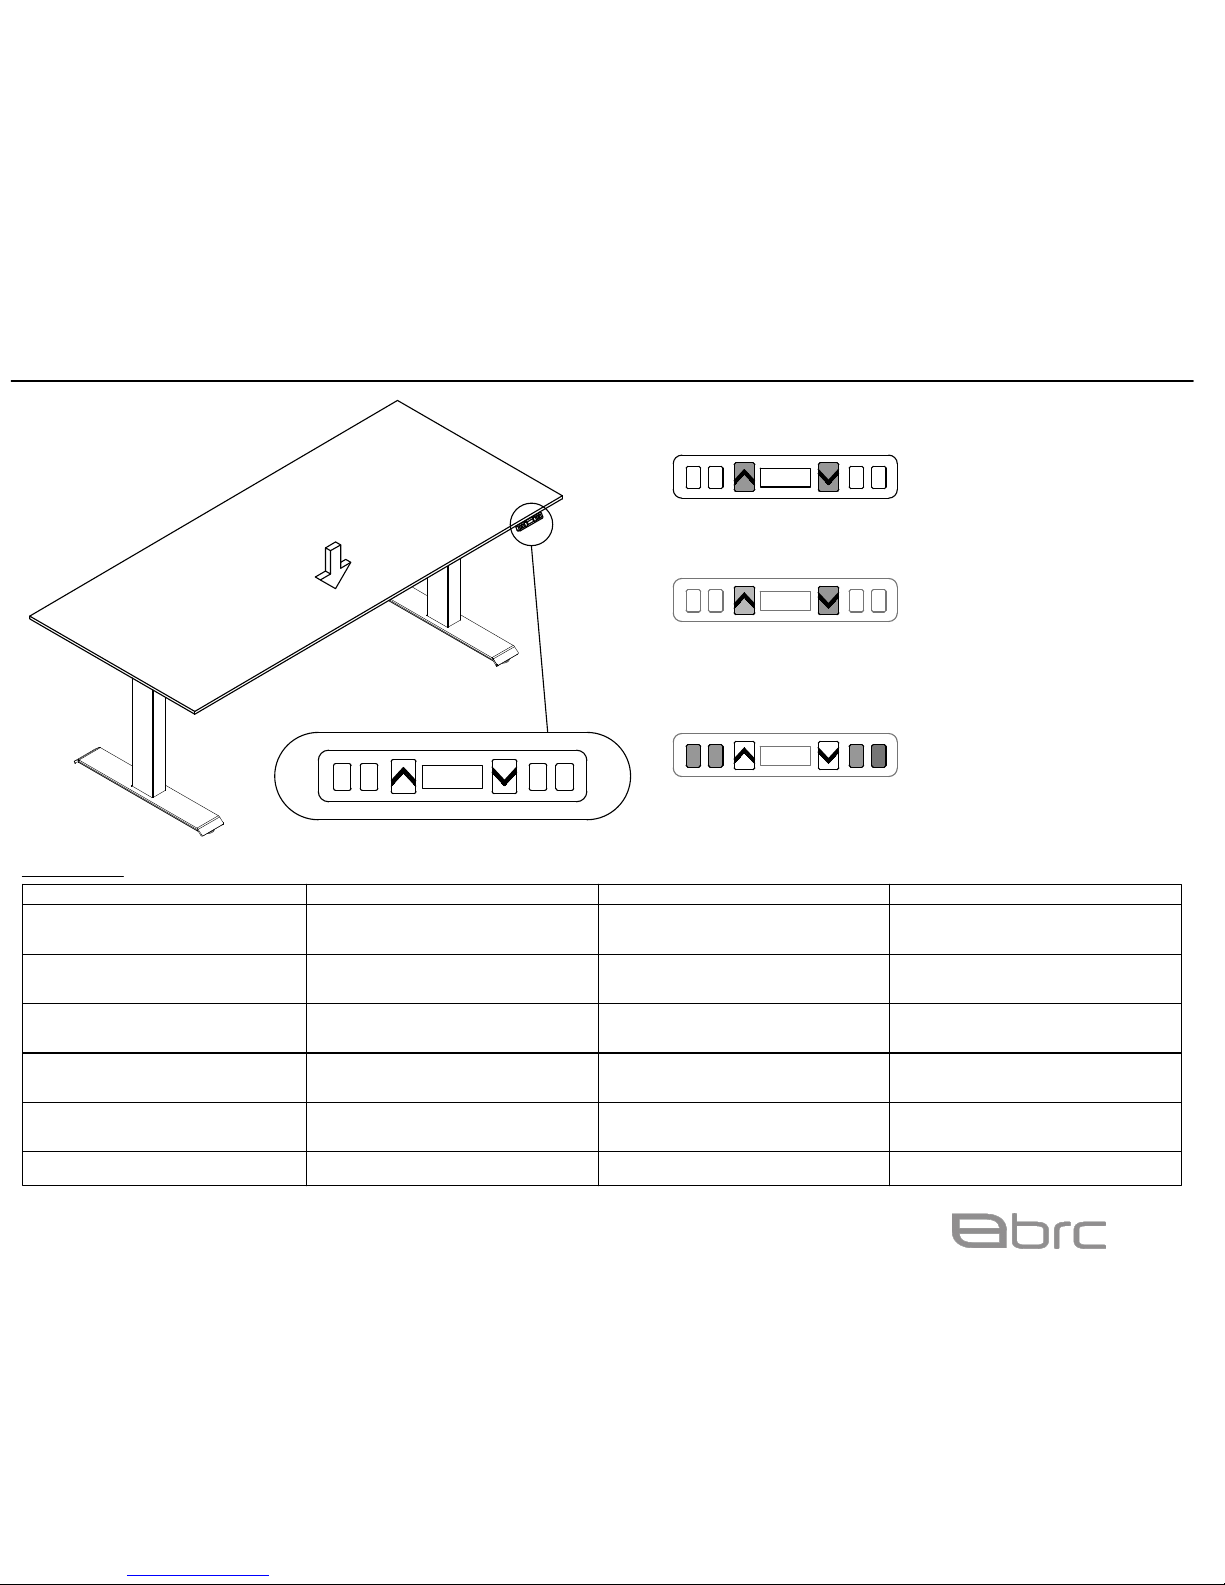
J
P
L
M
Alta Assembly Guide
Page 8
24 Armstrong AVE
Georgetown L7G 3R9
1-877-260-4309
www.brc.group
Emotion
8 of 8
Initialisation of the systems
1) Press and hold UP & DOWN button simultaneously for more than 3 seconds until Legs move
down to the lowest position and rebound 2-5mm.
Control height
1) Press and hold UP or DOWN button, and release button at desired height.
Set memory height
1) Press and hold UP or DOWN button, and release button at desired height.
2) Press button S, then press 1, 2 or 3 within 3 seconds to save to memory.
Troubleshooting
Description of Problem
After connecting the power, press up or down,
the legs have no response.
Re-initialize the table.
Verify power is supplied to Table.
Please contact your supplier.
After Connecting the power, press and hold up
& down together, the legs have no response.
**Note testing sequence should include the initialization sequence prior to usage
Solution 1 Solution 2 Solution 3
Check if the connection is correct.
Verify power is supplied to table.
Please contact your supplier.
The legs rising slowly.
Check if the input power is correct.
The legs don't move according to your
operation.
Please contact your supplier.
One leg moves while the other leg does not
move.
Check if the connection is correct.
Ensure all motor cables are properly connected .
Legs only move down and don't move up. Re-initialize the table. Please contact your supplier.
1 2 3 S
1 2 3
S
1 2 3
S
1 2 3 S
Please contact your supplier.
Please contact your supplier.
Check if the connection is correct.
Alta Assembly Guide
 Loading...