

Page 1

Instruction manual
Инструкция по эксплуатации
Bread maker BR2701
Хлебопечь BR2701
brayer.pro
Page 2

СОДЕРЖАНИЕ
EN ......................................................................................................................................3
DE ....................................................................................................................................25
RU ...................................................................................................................................49
KZ ....................................................................................................................................74
Page 3
EN
EN
3
BREAD MAKER BR2701
The home bread maker is intended for bread and
cake baking and dough kneading, making jam and
yoghurt.
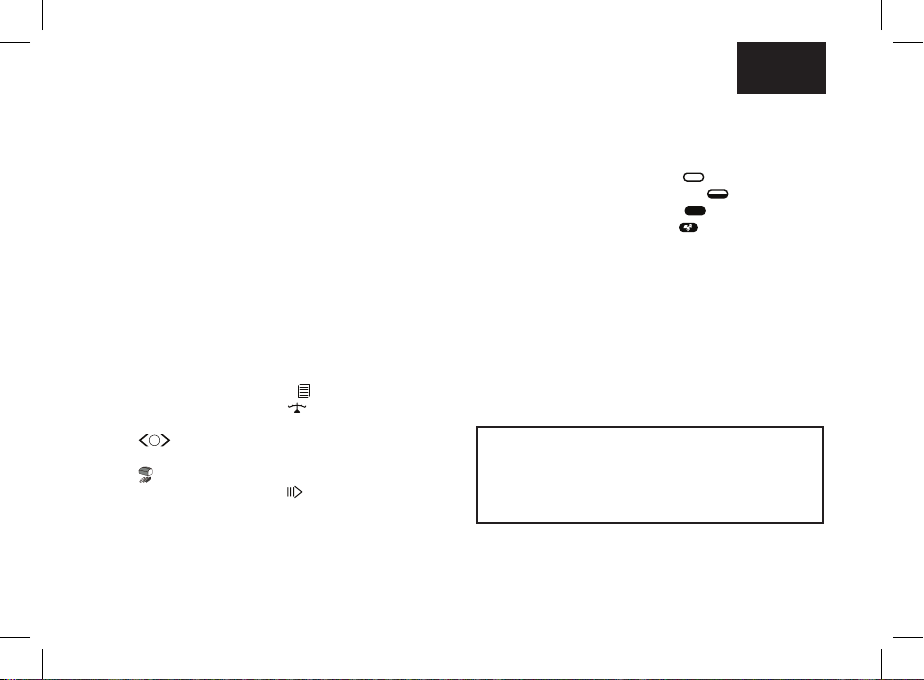
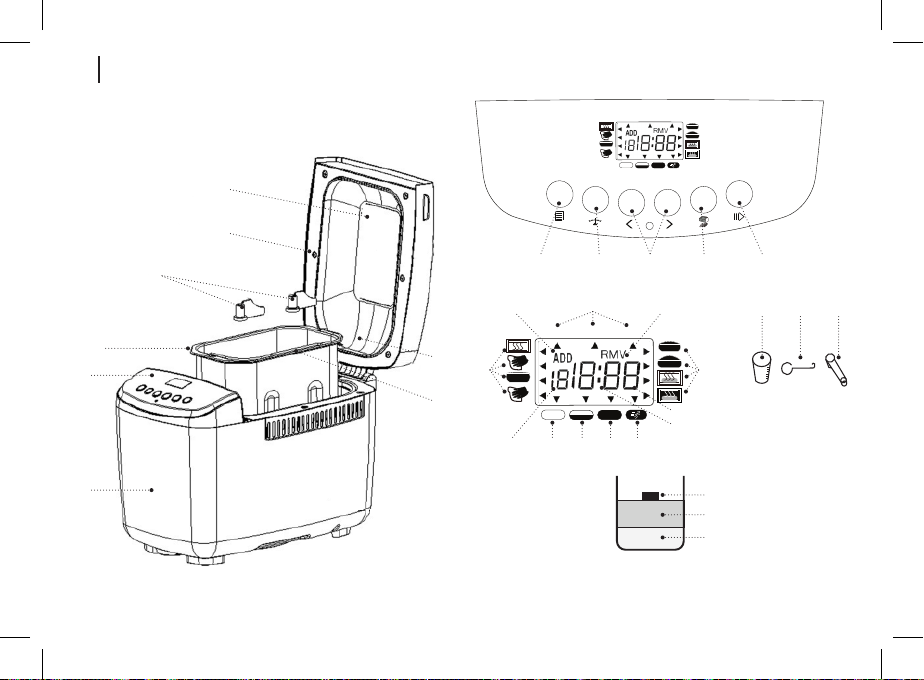
DESCRIPTION
1. Body
2. Control panel
3. Baking form
4. Kneading paddles
5. Lid
6. Viewing window
7. Hot air outlets
8. Handle of the baking form
Control panel
9. Program selection button «
10. Weight selection button «
11. Delayed start/operation cycle time setting buttons
«
12. Crust color selection/fast baking mode on button
13. Start/stop/pause button «
»
« »
»
»
»
Display and symbols
14. Baking program operation cycle symbols
15. Baking programs 1-16 / user programs 1-8 digital
symbols
16. Crust color symbol — light «
17. Crust color symbol — medium « »
18. Crust color symbol — dark « »
19. Fast baking mode symbol « »
20. Ingredient adding option symbol «ADD»
21. Weight symbols «900 g — 1 150 g — 1 350 g»
22. 10 minute pause symbol «RMV»
23. Digital symbols of the program operation time/
delayed start time
24. Separating dots
Accessories
25. Measuring cup
26. Hook for extracting the paddle
27. Measuring spoon
ATTENTION!
For additional protection it is reasonable to install a
residual current device (RCD) with nominal operation
current not exceeding 30 mA into the mains. To install
RCD, contact a specialist.
»
Page 4

4
EN
6
5
4
9 10
20 22 25 26 27
3
2
7
14 14
8
1615
17 18 19
1
21
11 12 13
23
24
Yeast
Flour
Liquid ingredients
Рiс. 1
Page 5

5
EN
SAFETY MEASURES AND OPERATION
RECOMMENDATIONS
Read the operation instructions carefully before
using the Bread maker and keep it for future
reference.
• Use the Bread maker for its intended purpose only,
as it is stated in this manual.
• Mishandling the Bread maker can lead to its
breakage and cause harm to the user or damage to
his/her property and it is not covered by warranty.
• Make sure that operating voltage of the Bread maker
indicated on the label corresponds to your home
mains voltage.
• The power plug is equipped with a grounding contact,
plug it into the socket with reliable grounding contact.
In case of short circuit the grounding reduces the risk
of electric shock.
• Contact an electrical technician, if you are not
sure that your sockets are installed properly and
grounded.
• To prevent re do not use adapters designed for
connecting the plug to the mains socket without
grounding contact.
• In case of sparking in the mains socket and
occurrence of smell of burning, unplug the unit and
apply to the organization maintaining your home
mains.
• If smoke appears from the body of the Bread maker,
unplug the unit and take measures to prevent re
spreading.
• Do not use the Bread maker outdoors.
• It is not recommended to use the unit during lightning
storms.
• Protect the unit from impacts, falling, vibrations and
other mechanical stress.
• Do not place the Bread maker next to the walls or
close to the kitchen furniture.
• Place the Bread maker keeping at least 20 cm gap
between the Bread maker body and the wall and at
least 50 cm gap above the Bread maker .
• Never leave the plugged-in Bread maker unattended.
• Do not use the Bread maker in proximity to kitchen
sink, in bathrooms, near swimming pools or other
containers lled with water.
• Do not use the Bread maker near heating appliances,
heat sources or open ame.
• Do not use the Bread maker in places where
aerosols are used or sprayed, and in proximity to
inammable liquids.
• Place the Bread maker on a at stable surface; do
not place it on the edge of a table. Do not let the
power cord hang from the edge of the table and
make sure it does not touch hot surfaces or sharp
edges of furniture.
• During the operation do not touch hot surfaces of the
bread maker.
Page 6

6
EN
• Do not close the ventilation openings on the bread
maker lid.
• During the bread maker operation do not leave the
lid open.
• When taking the ready bread out, take hold of the
handle of the baking form, use heat-resistant kitchen
potholders.
• To prevent damage of the baking form non-stick
coating, when taking bread out, do not use metal
objects, turn the form upside down and shake the
ready bread out of it.
• In case of non-compliance with the recommendations
on baking, bread burning and smoke appearance are
possible.
• Before cleaning the bread maker, remove the baking
form and allow complete cooling-down of the unit.
• Unplug the Bread maker before cleaning or when you
are not using it. When unplugging the Bread maker
hold only the power cord plug and carefully remove it
from the mains socket, do not pull the power cord —
this can lead to damage of the power cord or the
socket or cause short circuit.
• To avoid electric shock do not immerse the Bread
maker into water or any other liquids.
• Do not wash the Bread maker in a dishwashing
machine.
• For children safety reasons do not leave polyethylene
bags, used as a packaging, unattended.
ATTENTION!
Do not allow children to play with polyethylene bags
or packaging lm. Danger of suocation!
• The Bread maker is not intended for usage by
children.
• Do not leave children unattended to prevent using
the unit as a toy.
• Do not allow children to touch the unit and the power
cord during the Bread maker operation.
• Place the unit out of reach of children during the
operation and cooling down.
• This unit is not intended for usage by physically or
mentally disabled persons (including children) or by
persons lacking experience or knowledge if they are
not under supervision of a person who is responsible
for their safety or if they are not instructed by this
person on the usage of the unit.
• Check the integrity of the power cord, the power plug
and the Bread maker body periodically.
• If the power cord is damaged, it should be replaced
by the manufacturer, a maintenance service or
similar qualied personnel to avoid danger.
• If the power cord is damaged, it should be replaced
with a power cord received from the manufacture or
service.
• Transport the Bread maker in the original package.
• Keep the unit out of reach of children and disabled
persons.
Page 7

7
EN
BREAD MAKER IS INTENDED FOR HOUSEHOLD
USE ONLY, DO NOT USE THE COFFEE
MAKER FOR COMMERCIAL OR LABORATORY
PURPOSES.
BEFORE USING THE BREAD MAKER
After unit transportation or storage at low
temperature keep it for at least 3 hours at room
temperature before switching on.
• Unpack the Bread maker and remove all the
packaging materials.
• Keep the original package.
• Read the safety measures and operating
recommendations.
• Check the delivery set.
• Examine the Bread maker for damages, in case of
damage do not plug it into the mains.
• Make sure that the specications of power supply
voltage specied on the label correspond to the
specications of your mains.
• Wipe the outer surface of the unit body (1) with a
clean, slightly damp cloth to remove dust.
• Open the lid (5).
• Take the handle (8) of the baking form (3) and lift it
slightly, pull the handle (8) upwards and take the form
(3) out.
• Wash the form (3), the paddles (4), the measuring
cup (25), the hook (26), the measuring spoon (27)
with warm water using neutral detergent, rinse and
dry them.
• Install the baking form (3) back to its place, press
on it until clicking and make sure that the form (3) is
xed properly.
• Install the kneading paddles (4) on the driving axes in
the baking form (3).
• Close the lid (5).
• Place the bread maker so that the distance between
the bread maker and the wall or furniture is at least
20 cm and the free space above the bread maker is
at least 50 cm.
• Note: — the bread maker is intended for operation
within a wide range of temperatures, however,
excessively high or low temperature in the room
aects the dough rise process and consequently
the size and density of bread. The optimal room
temperature shall be from +15 to +34°C.
THE FIRST SWITCHING-ON OF THE BREAD
MAKER
• To remove foreign smells, it is recommended to
switch the bread maker on for the rst time without
loading ingredients and with the open lid (5).
• Insert the power plug into the mains socket, you will
hear a sound signal and digital symbols (15) of the
baking program -1- will be shown on the display,
digital symbols of the program operation time (23)
«3:05» and the separating dots (24) will be glowing
constantly.
Page 8

8
EN
• Crust color indication (17): «MEDIUM» « ».
• Weight indication (13): «1000 g».
• These settings are set by default.
• Press the « » button (13) to switch the default
baking program on, the separating dots (24) will be
ashing on the display.
• Press the « » button (13) again in 10 minutes to
switch the baking program o, press and hold the «
» button (13) one more time to switch the bread
maker o, unplug the unit, open the lid (5) and allow
complete cooling down of the bread maker.
• Note: — when switching the bread maker on for the
rst time, a foreign smell or some smoke from the
heating element can appear — this is acceptable and
it is not covered by warranty.
• Open the lid (5), take the handle (8) of the baking
form (3) and lift it slightly, pull the handle (8) upwards
and take the form (3) out.
• Wash the form (3) and the paddles (4) with warm
water using neutral detergent, rinse and dry them.
• Install the baking form (3) back to its place, press
on it until clicking and make sure that the form (3) is
xed properly.
• Install the kneading paddles (4) on the driving axes in
the baking form (3).
• Close the lid (5).
• The bread maker is ready for usage.
CONTROL PANEL
Before using the bread maker, please get acquainted with
the buttons on the control panel (2), baking programs and
recommendations on selection of ingredients for baking.
• Press the buttons on the control panel (2) to select
the necessary program for baking bread or cakes,
kneading dough, making jam and yoghurt, to set
the delayed start time, to set the baking program
operation time and to control the whole process of
baking via the display.
• Every pressing of the active button is accompanied
by a sound signal.
• During the baking program operation time all the
buttons on the control panel (2) are blocked, except
the « » button (13).
PROGRAM SELECTION BUTTON (9) «
• By pressing the «
of 12 programs, the program number is shown on the
display by digital symbols (15).
• To improve avor of the ready baking you can add
the necessary ingredients (nuts, dried fruits etc.)
during the second dough kneading, you will hear
sound signals at the right moment, open the lid (5),
add the necessary ingredients, close the lid (5) (see
the table).
» button (9), you can select one
»
Page 9

9
EN
-1- «BASIC»
• You can add the necessary ingredients (nuts, dried
fruits etc.) during the second dough kneading, you
will hear sound signals at the right moment. When
the symbol (20) «ADD» appears on the display, open
the lid (5), add the necessary ingredients, close the
lid (5).
• Note: — you can add ingredients in the programs 1,
2, 3, 4, 5, 6, 10 and 16. Chop the nuts or fruit before
adding.
-2- «FRENCH»
• Bread making takes longer, the bread has large
porous crumb and crispy crust.
-3- «WHOLE-WHEAT BREAD»
• Bake healthy bread of ne and crude our. This
baking program provides for a longer time of
preheating so that crude our absorbs liquid better
and swells better. It is not recommended to use the
delay function when making this bread as that may
cause undesirable results.
-4- «SWEET»
• Add leaven or soda to sweet dough and make savory
pastry.
• Note: — you can use the fast baking mode in the
programs -1-2-3-4-.
FAST BAKING MODE IN THE PROGRAMS
-1-2-3-4-
• Press the program selection buttons (9) « » to
select one of the four programs provided with the fast
baking mode 1-2-3-4 , the number of the program will
be shown on the display with the symbols (15).
• Press the button (12) «
select the fast baking mode which is shown with the
symbol (19) « ». The digital symbols (23) will
indicate the fast baking mode operation time (see the
table of programs operation time).
-5- «Diet»
• Use this program to bake low carb bread.
-6- «Gluten free»
• Bake bread of gluten free our. This baking program
provides for a longer time of preheating so that
our absorbs liquid better and swells better. It is not
recommended to use the delay function when making
this bread as that may cause undesirable results.
-7- «Fast baking»
• Bread baking takes less time than in the «Classic»
program, but the bread is usually smaller in size and
has denser texture.
» to select the crust color,
Page 10

10
EN
ATTENTION!
When selecting program7, pour water with the
temperature of 48-50°C into the baking form (3)
(use cooking thermometer for measuring water
temperature precision). Water temperature plays
a crucial role in fastbread making: too low water
temperature will not allow the dough to rise in time,
and excessively high temperature will result in yeast
destruction.
-10- «Yeasted dough»
• The bread maker kneads dough and lets it rise. Use
dough for further making of home-baked pastry (pies,
pizza, etc.).
-11- «Pasta dough»
• Use this program to make dough for pasta.
• The operation time for this program is 15 minutes
and it includes only dough kneading.
-12- «Pizza dough»
• Program for making the pizza dough. The operation
time for this program is 45 minutes and it includes
two cycles of dough kneading and dough rise.
-13- «Yoghurt»
• Program for making yoghurt (see the recipe book).
-14- «Jam»
• Use this program to make jam, conture, marmalade
or fruit jelly.
-15- Dough kneading
• The bread maker kneads dough and lets it rise. Use
dough for further making of home-baked pastry (pies,
pizza, etc.).
-16- «Manual setting»
The »Manual setting” program is intended for
experienced users who are familiar with the process of
making dough and baking bread. In accordance with
your own ideas, you can set the operation time cycles
of the bread baking program. As you learn the bread
maker better, you will be able to set up and save 8 of
your own bread baking programs.
• Press the program selection button (9) «
select the program -16-.
• Press the button (12) the crust color selection
« » to select the user menu of the programs 1- 8,
the programs are shown on the display with the
digital symbols (15).
• To select a user program, press the program
selection button (9) « », select the desired user
program 1-8.
» and
Page 11

11
EN
• By pressing the weight selection button (10) « »,
select the program operation cycle (14) in which it
is necessary to change the time of its operation, the
arrow on the display shows the cycle of operation:
- preheating «
» — kneading 1 « » — rise 1
« » — kneading 2 « » — kneading 3 «
» — baking «
» — heating « ».
• After selecting the desired program operation cycle,
press the buttons (11) time setting « » to set the
operation time of each program cycle (see the table).
• After setting the operating time of the program cycle,
by pressing the weight selection button (10)
• Press the start/stop/pause button (13) «
conrm the set user program.
• In the »Manual setting” program the settings for the
operating time of each cycle are stored in memory,
the settings do not change until the next change in
the operating time of the program cycle or until the
default factory settings are restored.
• To reset user programs, simultaneously press and
hold for 1 second the program selection button (9)
« » and the weight selection button (10) « »,
all user settings will be reset and the default factory
settings will be restored.
« » proceed to setting the operating time of the
next cycle (14) of the baking program.
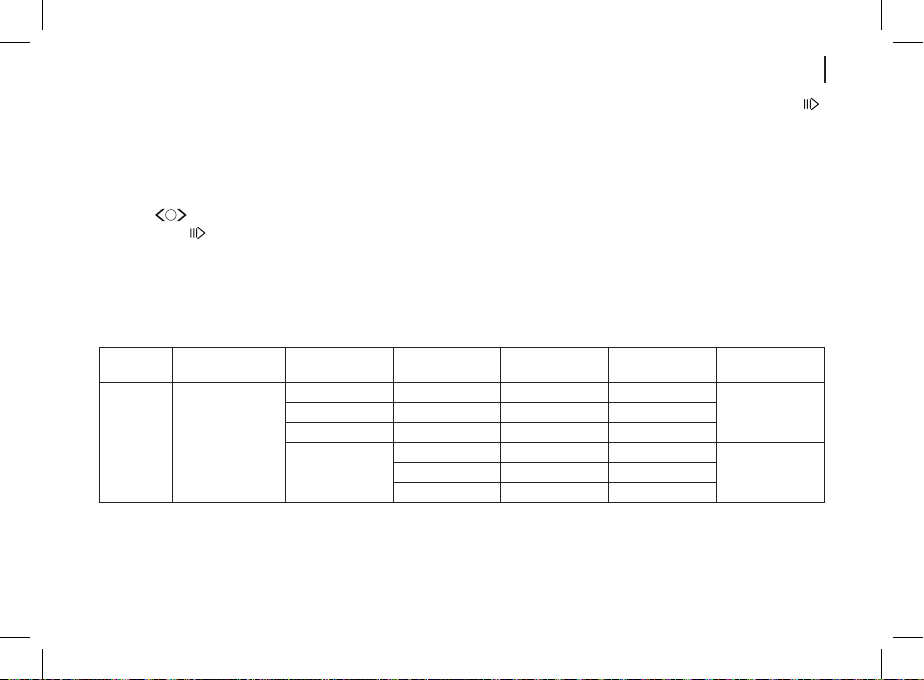
Table for setting the operating time of the cycles in the «Manual setting» program:
Operation cycle Default time Time setting range:
Preheating
Kneading 1
Rise 1
Kneading 2
Rise 2
Rise 3
Baking
Heating «
« »
« »
« »
« »
« »
« »
« »
»
0:15 0:00-0:20
0:13 0:00-0:15
0:25 0:20-0:40
0:12 0:00-0:20
0:30 0:00-1:00
0:30 0:00-1:00
1:00 0:00-1:20
1:00 0:00-1:00
» to
Page 12
12
EN
«WEIGHT SELECTION» button (10) « »
• You can select the pastry weigh — 700 g or 1000 g
with the button (10) «
of loaded ingredients. Pastry weight is shown by
indication (13) «700g — 1000g»
• Note: — the programs 9-10-11-12-13-14-15 do not
provide the weight selection option.
Crust color selection button (12) «
baking mode (19) « »
• Press the button (12) to select the desired crust
color, the selected crust color is displayed by the
symbols: — light (16) «
» — dark (18) « ».
• The symbol (19) « » means the fast baking mode
in the baking programs 1-2-3-4 (see the chapter
FAST BAKING MODE
• Note: — the programs 6-7-11 do not provide the
crust color selection option.
» button (13)
«
• The selected baking program is switched on by
pressing the «
will be ashing on the display.
• The «pause» mode is switched on by the repeated
pressing the « » button (13), digital symbols of
remaining time (23) of operation will be ashing
on the display. To continue the baking program
operation, press the « » button (13) one more
time.
» depending on the amount
» and the fast
» — medium (17) «
» button (13), separating dots (24)
• To switch the baking program o, press and hold the
«
» button (13), you will hear a sound signal, and
the set program will be switched o.
Time setting buttons «
• If you want the bread maker not to start operating
immediately, you can use buttons (11) «
«TIME ADJUSTMENT» to set the time of delay of
start of operation of the baking program.
• Please note that delay time shall include the baking
program operation time (see the table), i.e. upon
the expiry of the delay time the baking program will
switch on.
• Select the necessary program by the « » button
(9), the program will be shown on the display by
digital symbols (15).
• Set the weight «700g or 1000 g» (13) by the
«WEIGHT SELECTION» button (10) « ».
• Select the crust color with the crust color selection
button (12) « » — light (16) « » — medium
(17) « » — dark (18) « ».
• Set the delay time by the «TIME ADJUSTMENT»
buttons (11) « » (please note that during setting
the delay time you should take into account the
baking program operation time), setting step is 10
minutes.
• The maximal time of delay is 13 hours.
• The delay time will be shown on the display with
digital indications (23).
»
»
Page 13
13
EN
Example:
it is 8:00 AM, and you want the bread to be ready in 7
hours, at 15:00 PM.
• Select a baking program, for example, -1-, the
loaf weight is 900 g, the crust color is medium, the
program runs for 3 hours, by pressing the buttons
(11) «
», set the delay time 7:00 on the display.
• Press the « » button (13) to switch the delay
function on, separating dots (24) will be ashing on
the display.
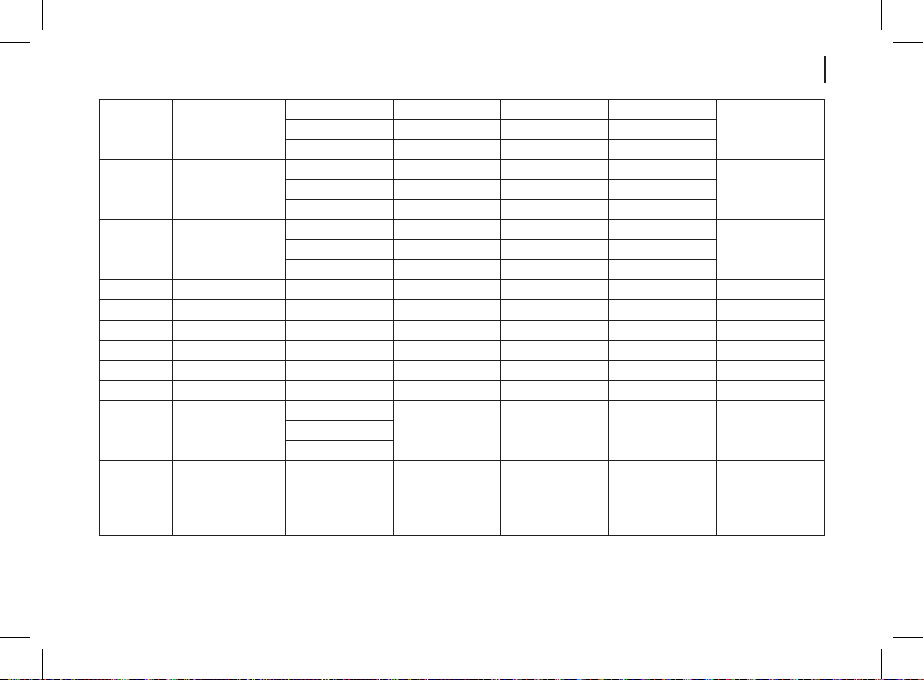
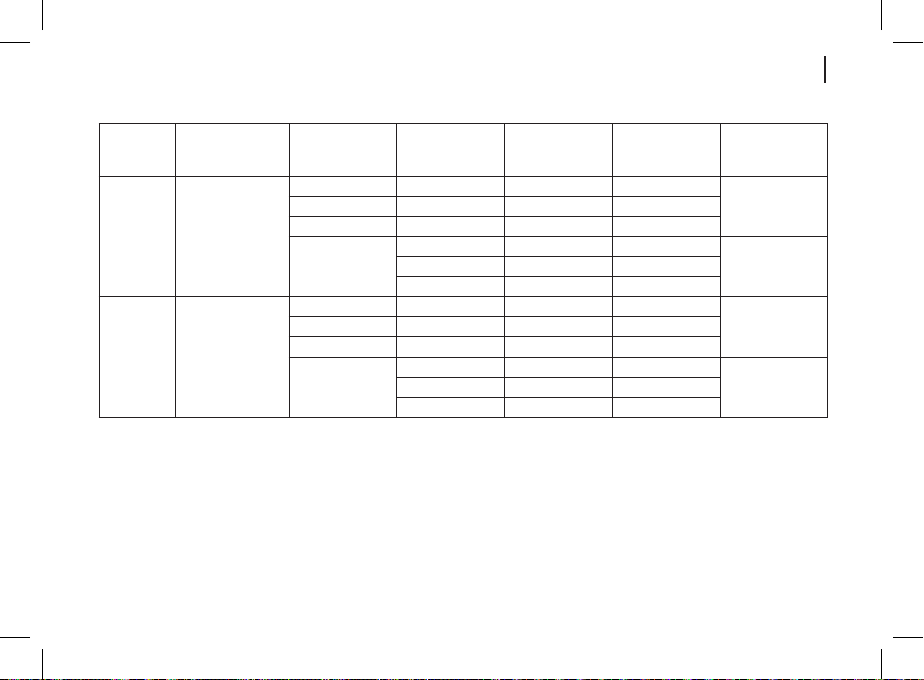
Table of program operation time:
№
programm
1 Basic
Programm Color crust Weight Work time Delay Time
Light 900 g 3:00 15:00
Dark 1350 g 3:15 15:00
Fast
• To cancel the delay function, press and hold the «
» button (13), you will hear a sound signal, and the
delay program will be switched o.
• Upon the expiry of the delay time, the set baking
program will switch on.
• If you do not take the ready bread immediately, the
keep warm function will switch on, the keep warm
function operation time is 60 minutes.
• To bake with the time delay, do not use perishable
ingredients, such as eggs, fresh milk, fruit, onion etc.
• Note: — the delay function is not available for the
programs: 9-11-13-14-15.
900 g 2:15 15:00
1350 g 2:25 15:00
Additional
ingredients
+Middle 1150г g 3:05 15:00
+1150 g 2:20 15:00
Page 14

14
EN
2 French
3 Whole
4 Sweet
5 Diet
Light 900 g 3:10 15:00
Dark 1350 g 3:25 15:00
900 g 2:20 15:00
Fast
1350 g 2:30 15:00
Light 900 g 3:20 15:00
Dark 1350 g 3:35 15:00
900 g 2:25 15:00
Fast
1350 g 2:35 15:00
Light 900 g 2:55 15:00
Dark 1350 g 3:10 15:00
900 g 2:10 15:00
Fast
1350 g 2:20 15:00
Light 900 g 3:09 15:00
Dark 1350 g 3:33 15:00
+Middle 1150 g 3:15 15:00
+1150 g 2:25 15:00
+Middle 1150 g 3:25 15:00
+1150 g 2:30 15:00
+Middle 1150 g 3:00 15:00
+1150 g 2:15 15:00
+Middle 1150 g 3:21 15:00
Page 15
15
EN
Light 900 g 3:40 15:00
6 Gluten free
Dark 1350 g 3:55 15:00
Light 900 g 1:15 15:00
7 Fast baking
Dark 1350 g 1:20 15:00
Light 900 g 1:30 15:00
8 Cake
Dark 1350 g 1:40 15:00
9 Knead - - 0:10 - 10 Yeasted dough - - 1:40 15:00 +
11 Pasta dough - - 0:15 - 12 Pizza dough - - 0:45 15:00 13 Yoghurt - - 8:00 — 12:00 - 14 Jam - - 1:20 - -
Light
15 Bake
Dark
16 Manual setting
- 1:00 - -Middle
By default
3:05
Time of cycles
sets by user
15:00 +
+Middle 1150 g 3:45 15:00
-Middle 1150 g 1:18 15:00
-Middle 1150 g 1:35 15:00
Page 16
16
EN
KEEP WARM FUNCTION
• Upon the expiry of the baking program operation
time, the keep warm function will switch on, the keep
warm function operation time is 60 minutes.
• If you want to remove the bread, switch the keep
warm function o by pressing the « » button (13).
MEMORY FUNCTION
• In case of emergency power cuto during the bread
maker operation, the memory function with the
duration of up to 10 minutes is activated.
• If the power supply is restored within 10 minutes,
the bread maker will continue to perform the pre-set
program from the moment the program operation has
been stopped at.
• In case of absence of power supply for more than 10
minutes, it is necessary to load the ingredients again,
to set the program and to switch the bread maker on.
BREAD MAKER OPERATION CYCLES
The operation cycles are shown with the symbols
(14):
- preheating «
dough rise cycles «
», heating « »».
», 2 kneading cycles « », 3
, , », baking «
REMOVING THE KNEADING PADDLES (4)
• This function is optional, but it is related to easier
removing of the ready bread from the baking form
(3), in the absence of paddles (4) there will be only
small holes from the drive axes on the ready bread.
• During the second kneading cycle « you will hear
sound signals and the ashing symbol (22) »RMV”
will appear on the display, press the start/stop/pause
button (13) « » to pause the baking program for 10
minutes, while the operation time digital symbols (23)
will be ashing.
• Open the lid (5), remove the form (3), remove the
dough from the form (3), take out the paddles (4),
put the dough back into the form (3), put the form (3)
back to its place, close the lid (5).
• To resume the baking program operation press the
start/stop/pause button (13) « », the program will
switch on after 10 minute pause.
• Note: — the paddles (4) removing function is not
available in the programs -7-8-9-11-12-13-14-15-.
IMPORTANT RECOMMENDATIONS ON
INGREDIENTS FOR BAKING
Flour
• Flour is the most important component of bread
making.
Page 17

17
EN
• The characteristics of our are determined not
only by the sort but also by the conditions of grain
cultivation, processing method and storage. Try to
bake bread of our of dierent manufacturers and
brands and nd the one complying with your needs.
• The basic types of bread our are wheat and rye
our.
• Wheat our nds ever-growing use owing to nice
palatability traits and high nutritional value of wheat
our products.
Bread our
• Bread (rened) our made of inner part of grain only,
contains the maximal gluten quantity that provides
the crumb elasticity and prevents bread dropping.
• Pastry made of bread our is puer.
Whole-grain our (wholemeal)
• Whole-grain (wholemeal) our is obtained by grinding
whole wheat grains together with the membrane.
This sort of our is distinguished for its enhanced
nutritional value.
• Whole-grain bread is usually smaller in size. To
improve the consumer properties of bread, whole-
wheat our is often mixed with bread our.
Corn and oatmeal our
• To improve the texture of bread and to give it
additional avor properties, mix wheat or rye our
with corn or oatmeal one.
Sugar
• Sugar enriches the pastry in additional avors and
gives bread golden color.
• Sugar is a nutritional medium for yeast growth. Add
to pastry not only rened but also brown sugar and
sugar powder.
Yeast
• Yeast growth is accompanied by emission of carbon
dioxide that contributes to the formation of porous
crumb.
• Flour and sugar are a nutritional medium for yeast
growth. Add fresh compressed yeast or fast-acting
yeast powder. Dissolve fresh compressed yeast in
warm liquid (water, milk, etc.), add fast-acting yeast
to the our (it does not require preliminary activation,
i.e. adding of water).
• Follow the recommendations on the packing or
observe the following proportions:
• 1 tea spoon of fast-acting yeast powder is equal to
1.5 of tea spoon of fresh compressed yeast.
• Store fresh yeast in a refrigerator. Yeast is destructed
at high temperatures, and in this case the dough
rises poorly.
Salt
• Salt gives bread additional avor and color, but slows
down the yeast growth.
Page 18

18
DE
• Do not use excessive quantities of salt. Always use
ne salt (coarse salt can damage the baking form’s
non-stick coating).
Eggs
• Eggs improve the structure and volume of the pastry,
enrich avor.
• Before adding eggs to the dough, it is recommended
to whip them thoroughly.
Animal and vegetable fats
• Animal and vegetable fats make the pastry softer and
increase storage life.
• Before adding butter, it should be cut into small
cubes and warm up to room temperature.
Baking powder and soda
• Soda and baking powder (leaven) shorten the time
necessary for dough rise.
• Use leaven or soda when using programs
«SUPERFAST 1 and 2».
• It is necessary to mix soda with citric acid and a little
our beforehand (5 g of baking soda, 3 g of citric acid
and 12 g of our). This amount of powder (20 g) is
rated for 500 g of our.
• Do not use vinegar for soda slaking, use of vinegar
makes the crumb damper and less homogeneous.
• Baking powder (leaven) is just to be poured into the
form following recipe instructions.
Water
• Water temperature plays the crucial role in bread
baking.
• Optimal water temperature is from 20 to 25°C, and
for «SUPERFAST 1, 2» program is from 45 to 50°C.
• You may use milk instead of water or enrich bread
avor by adding some natural juice.
Dairy products
• Dairy products improve the nutritional value and
avor of the bread. The bread crumb will be more
beautiful and savory.
• Use fresh dairy products or powdered milk.
Weight of ingredients
• One of the important conditions for bread making is
use of precise quantity of ingredients.
• It is strongly recommended to use kitchen scale, the
measuring cup (25) and the measuring spoon (27) to
measure precise quantity of ingredients, otherwise
the ready bread may not comply with your need.
• Fill the measuring cup (25) with liquid to the
appropriate mark. Check dosage by placing the cup
(25) on a at surface.
• Clean the measuring cup (25) thoroughly from the
remaining previous ingredient.
• Do not compact dry ingredients when putting them
into the measuring cup (25).
Page 19

19
DE
• It is important to screen the our through the strainer
before the use to saturate it with air; this provides the
best baking result.
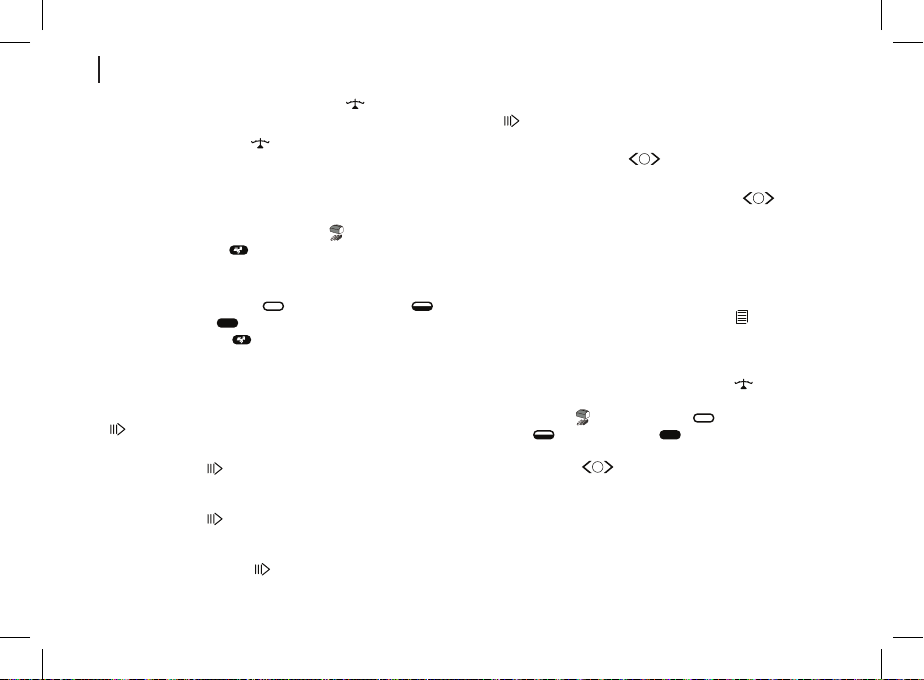
PROCEDURE FOR LOADING INGREDIENTS
IN THE BAKING FORM (PIC. 1)
• It is necessary to observe the sequence of loading of
ingredients in the baking form (3).
• The following sequence is recommended:
- liquid ingredients, eggs, salt, vegetable oil or
butter, milk powder etc.;
- our; our should not be completely damped with
liquid ingredients;
- yeast may be put only on dry our, yeast should
not be in contact with salt;
- make a small cavity in the our and put the yeast
in the cavity.
INGREDIENTS ADDING
• You can add the necessary ingredients (nuts, dried
fruits etc.) during the second dough kneading, you
will hear sound signals at the right moment, open
the lid (5), add the necessary ingredients, close the
lid (5).
• If you use the delay function for a long time, never
add perishable ingredients, such as eggs, fruit
ingredients.
BREAD BAKING
• Before plugging the bread maker in make sure that
the operating voltage of the unit corresponds to the
voltage of your mains.
• Open the lid (5) and take out the baking form (3).
• Make sure that the paddle (4) is installed to its place.
• Note: — before installing the paddle (4) it is desirable
to grease it with butter, margarine or vegetable oil, it
will facilitate its removal from the fresh bread.
• Put the ingredients into the form (3) in the sequence
described in the recipe. Usually the ingredients are
put in the following order (pic. 1):
1. Liquid ingredients.
2. Flour, dry ingredients (sugar, salt).
3. Yeast and leaven. Make a small cavity in the our
and put the yeast or leaven in the cavity.
• Remove the crumbled products or spilled liquids from
the form (3) outer surface.
• Install the form (3) back to its place and turn it
clockwise as far as it will go.
• Close the lid (5).
• Insert the power plug into the mains socket, you will
hear a sound signal and digital symbols (15) of the
baking program -1- will be shown on the display,
digital symbols of the program operation time (23)
«3:05» and the separating dots (22) will be glowing
constantly.
• Crust color indication (17) — medium « ».
• Weight indication (21) «1150 g».
Page 20

20
DE
• These settings are set by default.
• By pressing the « » button (9) you can select one
of 12 programs, the program number is shown on the
display by digital symbols (15).
• You can select the pastry weight — 700 g or 1000 g
with the button (10) « » depending on the amount
of loaded ingredients. Pastry weight is shown by
indication (13) «700g — 1000g».
• The symbol (19) « » means the fast baking mode
in the baking programs 1-2-3-4 (see the chapter
FAST BAKING MODE
• Set the cooking delay time by pressings of buttons
(11) « » «TIME ADJUSTMENT» (see
description in the section «CONTROL PANEL»).
• Note: — if you want to start the preset baking
program performing immediately, skip delay time
setting.
• Press the « » button (13) to switch the baking
program on, separating dots (24) will be ashing
on the display, the time remaining to the end of the
baking program operation will be shown with digital
symbols (23).
• The bread maker operation cycles are shown by
indication (14).
• Recommendation: — after 5-minute dough
kneading, it is recommended to check its
consistency. The dough should form a soft glutinous
lump, if the dough lump is very dry, add some liquid
to it, if the dough lump is too damp, add some our
(from 1/2 to 1 teaspoon or as necessary).
• You can control the bread baking process through the
viewing window (6) in the lid (5).
ATTENTION!
During the baking program operation, never open the
lid (5), in case of sudden change of temperature, the
dough can drop and will not rise any more.
• After nishing of the baking program, you will hear
sound signals and the keep warm function will switch
on, the keep warm function operation time is 60
minutes.
• To cancel the keep warm function and to switch the
bread maker o, press and hold the «
(13) within 3 seconds.
• Remove the power plug from the mains socket.
• Open the lid (5) using the heat-resistant potholders,
take the handle (8) of the baking form (3) and lift it
slightly, pull the handle (8) upwards and take the form
(3) out of the bread maker. Leave the form to cool, for
approximately 10-15 minutes.
• Separate the pastry from the form (3) walls using a
plastic kitchen spatula.
• Do not use metal objects that can damage the nonstick coating of the form (3).
• To remove the pastry turn the form (3) upside down
and shake it.
• Before cutting the bread, remove the paddle (4) with
the hook (26).
• Cut the bread with a sharp bread knife.
» button
Page 21

21
DE
• After use wash the form (3) and the paddle (4) with
warm water using neutral detergent, rinse and dry
them. Install the paddle (4) in the form (3), install the
form (3) in the bread maker, close the lid (5).
CLEANING AND MAINTENANCE
• Switch the bread maker o, unplug it, open the lid (5)
and let the bread maker cool down.
• Remove the baking form (3).
• Clean the body (1) and the lid (5) with a slightly damp
cloth, then wipe it dry.
• Wash the baking form (3), the paddle (4), the
measuring cup (25), the hook (26) and the spoon
(27) with warm water with neutral detergent, rinse
and dry them.
• Note: — if the paddle (4) can not be removed from
detergents and solvents for cleaning the bread maker
and the baking form (3).
• Dry the baking form (3) and the paddle (4) thoroughly
before installing them in the bread maker.
• If the inner surface of the bread maker is dirty,
remove dirt and wipe the surface with a slightly damp
cloth, then wipe it dry.
• Do not immerse the bread maker body, the power
cord and the power plug into water or any other
liquids.
STORAGE
• Clean the bread maker before taking it away for
storage.
• Keep the unit in a dry cool place out of reach of
children and disabled persons.
the axle, ll the form (3) with warm water and wait for
about 20-30 minutes.
• Do not use metal objects or scourers, abrasive
Before applying to the service center.
Malfunction Possible reason Troubleshooting method
The bread maker cannot be
switched on. The symbols
«HHH» appear on the
display.
The bread maker has not cooled down yet
after the previous baking.
Switch the bread maker o and unplug it. Remove the
baking form and let the bread maker cool down to the
room temperature.
Page 22

22
EN
If the symbols «LLL» are
shown on the display when
you switch the bread maker
on.
If the symbols « EE0» are
shown on the display when
you switch the bread maker
on.
The temperature inside the bread maker
is too low.
Malfunctioning
Table of malfunctions and defects during bread baking and recommendations on
further troubleshooting.
Malfunction/Defect Possible reason Troubleshooting method
Smoke from the openings
in the lid during bread
baking
Thick bread crust.
The kneading paddle can
not be removed from the
baking form.
Ingredients are mixed
unevenly and are baked
poorly.
During the rst use of the bread maker, the
surface of the heating element burns.
Getting of ingredients on the heating
element.
The ready bread was left in the baking
form and lost a lot of moisture.
Dough has got in the gap between the
driving shaft and the dough kneading
paddle.
The preset program does not suit for this
set of ingredients.
During the baking program operation the
bread maker lid opened several times, the
dough dropped and did not rise any more.
Small quantity of liquid ingredients, the
kneading paddle is not capable to knead
dough for pastry.
Switch the bread maker o and unplug it. Open the
bread maker lid, remove the baking form and let the unit
heat up to the room temperature for 10 — 20 minutes.
Switch the bread maker o and unplug it. Wait for some
time and then switch the bread maker on again. If the
symbols «EE0» still glow, apply to the authorized service
center.
Before the rst use of the bread maker, switch it on for
10-15 minutes with the open lid.
Switch the bread maker o, allow its cooling, clean the
heating element.
Remove the ready bread from the form, right after
baking.
After you have removed bread from the form, ll the
baking form with warm water. Remove the paddle in
20-30 minutes.
Select the baking program that corresponds to the
ingredients loaded in the baking form.
Do not open the bread maker lid.
Check the conformity of loaded ingredients.
Remove the baking form and try to rotate the baking
paddle with your hand, if it does not work, contact the
authorized service center.
Page 23

23
EN
The sound of the electric
motor operation can be
heard, but the dough can
not be mixed.
During baking the bread
overlls the baking form.
The bread size is too small
or the bread does not rise.
The bread cracks very
much during baking.
Structure of the baked
bread is very dense.
Very large cavities are
inside the ready bread.
A lot of dry our is on the
bread crust.
The baking form is installed improperly.
A great deal of our was added to the
dough.
Improper proportion of amount of
yeast, our and liquid ingredients. The
temperature of liquid ingredients or
environment is too high.
Absence of yeast or insucient quantity
thereof. Poor quality of yeast, high
temperature of liquid ingredients.
Yeast came into contact with salt.
Low temperature in the room.
The used our contains very little gluten.
Very high speed of yeast growth or high
temperature of liquid ingredients.
Improper proportion of our and liquid
ingredients.
Too much whole wheat our was used.
Surplus of liquid ingredients, water or salt
is not added.
High temperature of liquid ingredients.
Flour with increased amount of gluten and
insucient quantity of butter was used.
Small quantity of liquid ingredients.
Check the proper installation of the baking form and
proper recipe for baking. Always measure precisely
the amount of ingredients using kitchen scale and the
measuring cup.
Always check the proper proportion of ingredients, their
temperature and the room temperature.
Use the bread maker at ambient temperature in the
range from +15 to +34°C.
Do not use expired yeast.
Measure precise amount of yeast using the measuring
spoon.
Do not allow contact of yeast with salt.
Use the bread maker at ambient temperature in the
range from +15 to +34°C.
Use the reliable brand of bread our.
Use the reliable yeast brand and observe temperature of
liquid ingredients.
Get the right proportion of our and liquid ingredients.
Reduce the amount of whole our and increase the
amount of yeast.
Choose the right proportion of ingredients.
Always check the temperature of liquid ingredients.
Use our with correct amount of gluten and add butter.
Add precise amount of liquid ingredients in accordance
with recipe.
Page 24
24
EN
Very dark crust of bread
or cake.
The crust of bread or cake can burn
because of excess amount of sugar.
DELIVERY SET
1. Bread maker — 1 pc.
2. Power cord — 1 pc.
3. Manual — 1 pc.
ECHNICAL SPECIFICATIONS
• Power supply 220-240 V, ~ 50-60 Hz
• Rated input power: 850 W
RECYCLING
To prevent possible damage to the
environment or harm to the health of
people by uncontrolled waste disposal,
after expiration of the service life of the
unit or the batteries (if included), do not
take the unit and the batteries to specialized stations for
further recycling.
The waste generated during the disposal of products
is subject to mandatory collection and consequent
disposal in the prescribed manner.
discard them with usual household waste,
Add precise amount of sugar in accordance with recipe.
If you noticed that bread or cake starts burning, it is
recommended to stop the baking program 5-10 minutes
before its end. Before removing the ready product, it is
recommended to leave it in the bread maker for 15-20
minutes with the closed lid.
For further information about recycling of this product
apply to a local municipal administration, a household
waste disposal service or to the shop where you
purchased this product.
The manufacturer reserves the right to change the
design, structure and specications not aecting
general operation principles of the unit, without prior
notice.
The unit operating life is 3 years
The manufacturing date is specied in the serial
number.
In case of any malfunctions, it is necessary to apply
promptly to the authorized service center.
Page 25

DE
DE
25
BROTBACKOFEN BR2701
Der Hausbrotbackofen ist zum Brot-,
Kuchenbacken, Teigkneten, Marmelade- oder
Joghurtzubereiten bestimmt.
BESCHREIBUNG
1. Gehäuse
2. Bedienungsplatte
3. Backform
4. Teigknetpaddel
5. Deckel
6. Sichtfenster
7. Heißluftauslassönungen
8. Backformgri
Bedienungsplatte
9. Programmwahltaste «
10. Gewichtswahltaste «
11. Einstelltasten der Startrückstellungs-/
Programmzyklenzeit «
12. Krustenfarbenwahl-/Schnellbackbetriebseinschalt
taste « »
13. Start-/Stopp-/Pause-Taste «
»
»
»
»
Bildschirm und Symbole
14. Backprogrammzyklensymbole
15. Zahlensymbole der Backprogramme 1-16/
Benutzerprogramme 1-8
16. Krustenfarbensymbol — hell «
17. Krustenfarbensymbol — mittel « »
18. Krustenfarbensymbol — dunkel « »
19. Schnellbackbetriebssymbol « »
20. Zutatenzugabesymbol «ADD»
21. Gewichtssymbole «900 g — 1150 g — 1350 g»
22. 10-Minuten-Pause-Symbol «RMV»
23. Zahlensymbole der Programm-/
Startrückstellungszeit
24. Trennpunkte
Zubehör
25. Meßbecher
26. Paddelausziehhaken
27. Meßlöel
ACHTUNG!
Als zusätzlicher Schutz ist es zweckmäßig, den
FI-Schalter mit Nennstrom maximal bis 30 mA im
Stromversorgungskreis aufzustellen; wenden Sie sich
dafür an einen Spezialisten.
»
Page 26
26
DE
6
5
4
9 10
20 22 25 26 27
3
2
7
14 14
8
1615
17 18 19
1
21
11 12 13
23
24
Hefe
Mehl
Flüssige Zutaten
Abb. 1
Page 27

27
DE
SICHERHEITSHINWEISE UND
GEBRAUCHSANLEITUNG
Bevor Sie den Bread maker benutzen, lesen Sie
die Bedienungsanleitung aufmerksam durch und
bewahren Sie sie zum späteren Gebrauch auf.
• Verwenden Sie den Bread maker nur
bestimmungsgemäß, wie es in dieser
Gebrauchsanleitung beschrieben ist.
• Nicht ordnungsgemäße Nutzung des Bread
maker s kann zu seiner Störung führen, einen
gesundheitlichen oder materiellen Schaden beim
Nutzer hervorrufen, und ist kein Garantiefall.
• Vergewissern Sie sich, dass die auf dem
Bezeichnungszettel angegebene Betriebsspannung
und die Netzspannung übereinstimmen.
• Der Netzstecker hat einen Erdungskontakt; stecken
Sie ihn nur in eine Steckdose
• mit dem zuverlässigen Erdungskontakt. Bei
einem Kurzschluss verringert die Erdung das
Stromschlagrisiko.
• Wenden Sie sich an einen Elektriker, wenn Sie sich
nicht sicher sind, ob Ihre Steckdosen richtig installiert
und geerdet sind.
• Verwenden Sie keine Adapterstecker, die zum
Anschließen des Netzsteckers an eine Steckdose
ohne Erdungskontakt bestimmt sind, um das
Brandrisiko zu vermeiden.
• Bei Brandgeruch und Funken in der Steckdose
ziehen Sie den Netzstecker aus der Steckdose
heraus und wenden Sie sich an den Ihr
Hausstromnetz leistenden Dienst.
• Wenn Rauch aus dem Bread maker austritt, ziehen
Sie das Netzkabel aus der Steckdose heraus und
treen Sie die Feuerverhinderungsmaßnahmen.
• Es ist nicht gestattet, den Bread maker draußen zu
benutzen.
• Es ist nicht empfohlen, das Gerät bei Gewitter zu
benutzen.
• Schützen Sie das Gerät vor Stößen, Stürzen,
Vibrationen und anderen mechanischen
Einwirkungen.
• Stellen Sie das Bread maker in keiner Nähe von
Wänden oder Küchenmöbeln auf.
• Stellen Sie das Bread maker so auf, dass ein
Abstand zwischen ihm und einer Wand oder den
Möbeln mindestens 20 cm und der Freiraum darüber
nicht weniger als 50 cm beträgt.
• Lassen Sie den ans Stromnetz angeschlossenen
Bread maker nie unbeaufsichtigt.
• Benutzen Sie den Bread maker in der Nähe von
Spülbecken, in Badezimmern und neben den
Wasserbecken oder anderen mit Wasser gefüllten
Behältern nicht.
• Benutzen Sie den Bread maker in direkter Nähe von
Heizgeräten, Wärmequellen oder oenem Feuer
nicht.
Page 28

28
DE
• Es ist verboten, den Bread maker an den Orten, wo
Sprays verwendet werden, sowie in der Nähe von
leichtentzündbaren Flüssigkeiten, zu verwenden.
• Stellen Sie den Bread maker auf eine ebene
standfeste Oberäche auf, stellen Sie ihn an den
Tischrand nicht auf. Achten Sie darauf, dass das
Netzkabel vom Tisch nicht herabhängt und heiße
Oberächen und scharfe Möbelkanten nicht berührt.
• Berühren Sie das Netzkabel und den Netzstecker mit
nassen Händen nicht.
• Berühren Sie keine heißen Bread maker oberächen
während des Betriebs.
• Sperren Sie die Lüftungsönungen am Bread maker
deckel nicht ab.
• Lassen Sie den Deckel während des Bread maker
betriebs nicht oen.
• Wenn Sie das fertiggebackene Brot herausnehmen,
fassen Sie den Backformgri an und benutzen Sie
hitzebeständige Topfhandschuhe.
• Um die Backformantihaftbeschichtung nicht zu
beschädigen, verwenden Sie beim Brotherausziehen
keine Metallgegenstände, drehen Sie die Form um
und schütteln Sie das fertige Brot heraus.
• Wenn Sie die Backempfehlungen nicht befolgen,
kann das Brot anbrennen und rauchen.
• Entfernen Sie die Backform, bevor Sie den Bread
maker reinigen, und lassen Sie das Gerät vollständig
abkühlen.
• Seien Sie sehr vorsichtig, wenn Sie Heißwasser aus
dem Bread maker abgießen.
• Trennen Sie den Bread maker vor der Reinigung
oder wenn Sie ihn nicht benutzen vom Stromnetz
ab. Wenn Sie den Bread maker vom Stromnetz
abtrennen, halten Sie nur den Netzstecker fest und
ziehen Sie ihn aus der Steckdose vorsichtig heraus;
ziehen Sie das Netzkabel nicht, da es zu seiner
Beschädigung und Steckdosenstörung sowie einem
Kurzschluss führen kann.
• Tauchen Sie den Bread maker ins Wasser oder
andere Flüssigkeiten nicht, um das Stromschlagrisiko
zu vermeiden.
• Es ist nicht gestattet den Bread maker in der
Spülmaschine zu waschen.
• Aus Kindersicherheitsgründen lassen Sie
Plastiktüten, die als Verpackung verwendet werden,
nie ohne Aufsicht.
ACHTUNG! Lassen Sie Kinder mit Plastiktüten oder
Verpackungsfolien nicht spielen. Erstickungsgefahr!
• Der Bread maker ist nicht für Gebrauch von Kindern
geeignet.
• Beaufsichtigen Sie Kinder, damit sie das Gerät als
Spielzeug nicht benutzen.
• Lassen Sie Kinder das Gerät und das Netzkabel
während des Betriebs vom Bread maker nicht
berühren.
Page 29

29
DE
• Während des Betriebs und des Abkühlens stellen
Sie das Gerät an einen für Kinder unzugänglichen
Ort auf.
• Dieses Gerät ist für Personen (darunter Kinder) mit
• Körper-, Nerven- und Geistesstörungen oder
Personen ohne ausreichende Erfahrung und
Kenntnisse nicht geeignet, wenn sie sich unter
Aufsicht der Person, die für ihre Sicherheit
verantwortlich ist, nicht benden oder entsprechende
Anweisungen über die Nutzung des Geräts nicht
bekommen haben.
• Überprüfen Sie regelmäßig den Zustand des
Netzkabels, des Netzsteckers und des Bread maker
gehäuses.
• Wenn das Netzkabel beschädigt ist, soll es vom
Hersteller, vom Kundendienst oder von ähnlich
qualiziertem Personal ersetzt werden, um Gefahren
zu vermeiden.
• Es ist nicht gestattet, das Gerät selbständig
zu reparieren. Es ist nicht gestattet, das Gerät
selbständig auseinanderzunehmen; bei der
Feststellung jeglicher Beschädigungen, sowie im
Sturzfall, trennen Sie das Gerät vom Stromnetz ab
und wenden Sie sich an einen Kundendienst.
• Transportieren Sie den Bread maker nur in der
Fabrikverpackung.
• Bewahren Sie das Gerät an einem für Kinder und
behinderte Personen unzugänglichen Ort auf.
DIE Bread maker IST NUR FÜR DEN GEBRAUCH IM
HAUSHALT GEEIGNET, ES IST VERBOTEN, SIE ZU
INDUSTRIE- ODER LABORZWECKEN ZU BENUTZEN.
BREAD MAKER VORBEREITUNG ZUM
BETRIEB
Falls das Gerät bei niedrigen Temperaturen
transportiert oder aufbewahrt wurde, lassen Sie
es bei der Raumlufttemperatur nicht weniger als 3
Stunden bleiben.
• Packen Sie das Bread maker aus und entfernen Sie
alle Verpackungsmaterialien.
• Bewahren Sie die Originalverpackung auf.
• Lesen Sie die Sicherheitsmaßnahmen und
Bedienungsempfehlungen.
• Prüfen Sie die Komplettheit.
• Prüfen Sie das Bread maker auf Beschädigungen;
wenn es beschädigt ist, schließen Sie es ans
Stromnetz nicht an.
• Vergewissern Sie sich, dass die
Stromversorgungsparameter am Zettel und die
Netzstromparameter übereinstimmen.
• Wischen Sie die Außenoberäche des Gehäuses (1)
mit einem sauberen, leicht angefeuchteten Tuch zur
Entstaubung ab.
• Önen Sie den Deckel (5).
Page 30

30
DE
• Heben und fassen Sie den Gri (8) der Backform (3)
an, ziehen Sie den Gri (8) nach oben und nehmen
Sie die Form (3) heraus.
• Waschen Sie die Form (3), die Paddel (4), den
Meßbecher (25), den Haken (26) und den Meßlöel
(27) mit Warmwasser und einem neutralen
Reinigungsmittel, spülen und trocknen Sie diese ab.
• Stellen Sie die Backform (3) zurück auf, drücken
Sie sie von oben nach unten bis zum Einrasten und
vergewissern Sie sich, dass die Form (3) sicher
befestigt ist.
• Setzen Sie die Teigknetpaddel (4) auf die
Antriebsachsen in der Backform (3) auf.
• Machen Sie den Deckel (5) zu.
• Stellen Sie den Bread maker so auf, dass der
Abstand zwischen ihm und der Wand oder den
Möbeln mindestens 20 cm und der Freiraum darüber
nicht weniger als 50 cm beträgt.
• Anmerkung: — der Bread maker ist für den
Betrieb im breiten Temperaturbereich geeignet,
jedoch beeinusst zu hohe oder zu niedrige
Raumtemperatur den Teigtriebverlauf und
dementsprechend die Größe und die Dichte des
Backproduktes. Die optimale Raumlufttemperatur soll
im Bereich von +15 bis +34°C liegen.
ERSTE BREAD MAKER EINSCHALTUNG
• Um Fremdgerüche zu entfernen, ist es empfohlen,
den Bread maker ohne Zutaten und bei geönetem
Deckel (5) erstmals einzuschalten.
• Stecken Sie den Netzstecker in eine Steckdose
ein, dabei ertönt ein Tonsignal, der Bildschirm
zeigt die Zahlensymbole (15) des Backprogramms
-1-, die Zahlensymbole der Programmzeit (23)
«3:05», die Trennpunkte (24) leuchten konstant.
Krustenfarbeanzeige (17) «MITTEL» « ».
• Gewichtsanzeige (13) «1000 g».
• Diese Einstellungen sind standardmäßig festgelegt.
• Drücken Sie die « » -Taste (13), um das
standardeingestellte Backprogramm zu aktivieren,
dabei blinken die Trennpunkte (24) auf dem
Bildschirm.
• Nach 10 Minuten drücken Sie erneut die « »-Taste
(13), um das Backprogramm auszuschalten, halten
Sie die « »-Taste (13) nochmals gedrückt, um
die Bread maker auszuschalten, ziehen Sie den
Netzstecker aus der Steckdose heraus, önen Sie
den Deckel (5) und warten Sie ab, bis der Bread
maker vollständig abkühlt.
• Anmerkung: — bei erster Bread maker einschaltung
können ein Fremdgeruch und eine kleine Menge
Rauch vom Heizelement entstehen, es ist normal
und kein Garantiefall.
• Önen Sie den Deckel (5), heben und fassen Sie den
Gri (8) der Backform (3) an, ziehen Sie den Gri (8)
nach oben und nehmen Sie die Form (3) heraus.
• Nach dem Gebrauch waschen Sie die Form (3) und
die Paddel (4) mit Warmwasser und einem neutralen
Page 31

31
DE
Reinigungsmittel, spülen Sie und trocknen Sie sie ab.
• Stellen Sie die Backform (3) zurück auf, drücken
Sie sie von oben nach unten bis zum Einrasten und
vergewissern Sie sich, dass die Form (3) sicher
befestigt ist.
• Setzen Sie die Teigknetpaddel (4) auf die
Antriebsachsen in der Backform (3) auf.
• Machen Sie den Deckel (5) zu.
• Der Bread maker ist betriebsbereit.
BEDIENUNGSPLATTE
Bevor Sie den Bread maker benutzen, sehen
Sie bitte die Tasten auf der Bedienungsplatte (2)
und die Backprogramme ein, sowie lesen Sie die
Backzutatenwahlempfehlungen.
• Durchs Drücken der Tasten auf der Bedienungsplatte
(2) können Sie das gewünschte Programm
zum Brot-, Kuchenbacken, Teigkneten,
Marmelade- oder Joghurtzubereiten wählen,
die Backenrückstellungszeit einstellen, die
Backprogrammzyklenzeit selbst eingeben und
den gesamten Backvorgang auf dem Bildschirm
überwachen.
• Bei jedem Drücken der aktiven Taste ertönt ein
Tonsignal.
• Während des Backprogrammbetriebs sind alle Tasten
auf der Bedienungsplatte (2) mit Ausnahme der
»-Taste (13) gesperrt.
«
Programmwahltaste
• Durchs Drücken der «
Sie eines von 12 Programmen wählen, die
Programmnummer wird auf dem Bildschirm mit den
Zahlensymbolen (15) angezeigt.
• Um den Geschmack des fertigen Gebäcks zu
verbessern, können Sie erforderliche Zutaten
(Nüsse, Trockenfrüchte usw.) beim zweiten
Teigkneten hinzufügen, dabei ertönen die Tonsignale
im richtigen Moment; önen Sie den Deckel (5),
fügen Sie erforderliche Zutaten hinzu und schließen
Sie den Deckel (5) (siehe die Tabelle).
-1- «HAUPT»
• Beinhaltet alle Brotbackstufen: Anteigen, Teigtrieb
und Backen. Sie können erforderliche Zutaten
(Nüsse, Trockenfrüchte usw.) beim zweiten
Teigkneten hinzufügen, dabei ertönen die Tonsignale
im richtigen Moment; der Bildschirm zeigt das
Symbol (20) «ADD» an, önen Sie den Deckel (7 5),
fügen Sie erforderliche Zutaten hinzu und schließen
Sie den Deckel (7 5).
• Anmerkung: — Sie können zusätzliche Zutaten
in den Programmen 1, 2, 3, 4, 5, 6, 10 und 16
hinzufügen; wenn Sie Früchte oder Nüsse zugeben,
ist es empfohlen, diese klein zu zerkleinern.
-2- «FRANZÖSISCH»
• Das Brotbacken dauert länger, das Brot wird mit
großer Lochkrume und knuspriger Kruste erhalten.
»-Taste (9) können
Page 32

32
DE
-3- «VOLLKORN»
• Backen Sie bekömmliches Brot aus feinem und
grobem Mehl. In diesem Backprogramm ist eine
längere Vorwärmzeit vorgesehen, damit das
Schrotmehl die Flüssigkeit besser absorbiert
und besser auftreibt. Es ist nicht empfohlen, die
Rückstellungsfunktion beim Backen dieses Brotes zu
verwenden, da dies zu unerwünschten Ergebnissen
führen kann.
-4- «SÜSS»
• Fügen Sie dem süßen Teig Backpulver oder Soda
hinzu und backen Sie duftendes Gebäck.
• Anmerkung: — in den Backprogrammen 1-2-3-4
können Sie den Schnellbackbetrieb verwenden.
SCHNELLBACKBETRIEB IN DEN
PROGRAMMEN -1-2-3-4-
• Durchs Drücken der Programmwahltaste (9)
« » wählen Sie eines der vier Programme, in
denen der Schnellbackbetrieb 1-2-3-4 vorgesehen
ist, die Programmnummer wird auf dem Bildschirm
mit den Zahlensymbolen (15) angezeigt.
• Durchs Drücken der Krustenfarbenwahltaste
(12) « » wählen Sie den Schnellbackbetrieb,
der mit dem Symbol (19) « » angezeigt
wird, die Zahlensymbole (23) zeigen die
Schnellbackbetriebszeit an (siehe die
Programmzeittabelle).
-5- «Diätetisch»
• Verwenden Sie dieses Programm, um
kohlenhydratarmes Brot zu backen.
-6- «Glutenfrei»
• Backen Sie Brot aus glutenfreiem Mehl. In diesem
Backprogramm ist eine längere Vorwärmzeit
vorgesehen, damit das Mehl die Flüssigkeit
besser absorbiert und besser auftreibt. Es ist
nicht empfohlen, die Rückstellungsfunktion beim
Backen dieses Brotes zu verwenden, da dies zu
unerwünschten Ergebnissen führen kann.
-7- «Schnellbacken»
• Das Brotbacken ist schneller als im «Klassisch»Programm, aber das Brot ist in der Regel kleiner und
dichter.
ACHTUNG!
Nach der Wahl der Programme 6 oder 7 gießen Sie
Wasser mit einer Temperatur von 48-50°C in die
Backform (3) (messen Sie die Wassertemperatur mit
einem Küchenthermometer) ein. Die Wassertemperatur
spielt beim schnellen und ultraschnellen Brotbacken
eine entscheidende Rolle: eine zu niedrige
Wassertemperatur lässt den Teig nicht rechtzeitig
ansteigen, und eine zu hohe Temperatur führt zum
Hefetod.
Page 33

33
DE
-9- Anteigen
• Backen Sie Brot aus glutenfreiem Mehl. In diesem
Backprogramm ist eine längere Vorwärmzeit
vorgesehen, damit das Mehl die Flüssigkeit
besser absorbiert und besser auftreibt. Es ist
nicht empfohlen, die Rückstellungsfunktion beim
Backen dieses Brotes zu verwenden, da dies zu
unerwünschten Ergebnissen führen kann.
-10- «Hefeteig»
• Der Brotbackofen knetet den Teig und lässt ihn
auftreiben. Verwenden Sie den Teig für weitere
Zubereitung von Hausgebäck (Piroggen, Pizza u.ä.).
-11- «Nudelteig»
• Mit diesem Programm können Sie Nudelteig
zubereiten.
• Das Programm läuft 15 Minuten und besteht nur aus
einem Teigknetzyklus.
-12- «Pizzateig»
• Das Programm für Pizzateigzubereitung. Das
Programm läuft 45 Minuten und besteht aus zwei
Teigknetzyklen und einem Triebzyklus.
-13- «Joghurt»
• Das Programm für Joghurtzubereitung (siehe das
Rezeptbuch).
-14- «Marmelade»
• Verwenden Sie dieses Programm, um Marmelade,
Kontüre, Jam oder Fruchtgelee zuzubereiten.
-15- «Anteigen»
• Der Bread maker funktioniert wie ein normaler
Elektroofen. Das Programm schließt das Anteigen
und den Teigtrieb aus. Das Programm wird
verwendet, um vorfertigten Teig zu backen oder
gebackenes Brot zusätzlich zu bräunen.
-16- «Handeinstellung»
Das «Handeinstellung»-Programm ist für erfahrene
Benutzer bestimmt, die das Teigzubereitungs- und
Brotbackverfahren gut kennen, nach eigenen Ideen
können Sie die Brotbackprogrammzeitzyklen einstellen.
Wenn Sie den Brotbackofen beherrschen, können Sie
8 Ihrer eigenen Brotbackprogramme schaen und im
Speicher speichern.
• Drücken Sie die Programmwahltaste (9) «
wählen Sie das Programm -16-.
• Drücken Sie die Krustenfarbenwahltaste (12) «
um das Benutzerprogrammmenü 1-8 zu wählen, die
Programme werden mit den Zahlensymbolen (15) auf
dem Bildschirm angezeigt.
• Um ein Benutzerprogramm zu wählen, drücken Sie
die Programmwahltaste (9) « » und wählen Sie
das gewünschte Benutzerprogramm 1-8.
» und
»,
Page 34

34
DE
• Durchs Drücken der Gewichtswahltaste (10)
« » wählen Sie den Programmzyklus (14), in dem
Sie die Betriebszeit ändern möchten, der Zeiger auf
dem Bildschirm zeigt den Betriebszyklus an:
- Vorwärmung «
» — Anteigen 1 « » —
Trieb 1 « » — Anteigen 2 « » — Anteigen
3 «
» — Backen « » — Aufwärmung «
».
• Nachdem Sie den gewünschten Programmzyklus
gewählt haben, können Sie die Betriebszeit
für jeden Programmzyklus durchs Drücken der
Zeiteinstelltasten « » einstellen (siehe die Tabelle).
• Nachdem Sie die Programmzyklusbetriebszeit
eingestellt haben, gehen Sie zur Einstellung der
Betriebszeit der nächsten Backprogrammzyklus (14)
durchs Drücken der Gewichtswahltaste (10) « »
über.
Tabelle zum Zyklenzeiteinstellen im «Handeinstellung»-Programm:
Betriebszyklus Standardeingestellte Zeit Zeiteinstellbereich
Vorwärmung
Anteigen 1
Trieb 1
Anteigen 2
Trieb 2
« »
« »
« »
« »
« »
0:15 0:00-0:20
0:13 0:00-0:15
0:25 0:20-0:40
0:12 0:00-0:20
0:30 0:00-1:00
• Um das eingestellte Benutzerprogramm zu
bestätigen, drücken Sie die Start-/Stopp-/ PauseTaste (13) «
».
• Im «Handeinstellung»-Programm werden die
Betriebszeiteinstellungen jedes Zyklus gespeichert,
die Einstellungen werden erst bei der nächsten
Änderung der Programmzyklusbetriebszeit
oder Rückschaltung zu betrieblichen
Standardeinstellungen geändert.
• Um die Benutzerprogramme zurückzusetzen, halten
Sie gleichzeitig die Programmwahltaste (9) « » und
die Gewichtswahltaste (10) « » 1 Sekunde lang
gedrückt, dabei werden alle Benutzereinstellungen
zurückgesetzt und zu betrieblichen
Standardeinstellungen zurückgeschaltet.
Page 35

35
DE
Trieb « »
Backen
« »
Aufwärmung «
»
«GEWICHTSWAHL»-Taste (10) « »
• Abhängig von der Menge eingelegter Zutaten können
Sie das Gebäckgewicht — 700 g oder 1000 g — mit
der Taste (10) «
» wählen. Das Gebäckgewicht
wird mit der Anzeige (13) «700 g — 1000 g»
angezeigt.
• Anmerkung: — In den Programmen 9-10-11-12-13-
14-15 ist keine Gewichtswahl vorgesehen.
Krustenfarbenwahl- (12) «
» und Schnellbackbetri
ebseinschalttaste (19) « »
• Durchs Drücken der Taste (12) können Sie die
gewünschte Krustenfarbe wählen, die gewählte
Krustenfarbe wird mit den folgenden Symbolen
angezeigt: — hell (16) «
» — mittel (17) «
» — dunkel (18) « ».
• Das Symbol (19) « » ist der Schnellbackbetrieb in
den Backprogrammen -1-2-3-4- (siehe den Abschnitt
«SCHNELLBACKBETRIEB»).
• Anmerkung: — In den Programmen 6-7-11 ist keine
Krustenfarbenwahl vorgesehen.
0:30 0:00-1:00
1:00 0:00-1:20
1:00 0:00-1:00
«START/STOP”-Taste (13)
• Drücken Sie die «
»-Taste (13), um das gewählte
Backprogramm zu aktivieren, dabei blinken die
Trennpunkte (24) auf dem Bildschirm.
• Nach dem Einschalten des Backprogramms sind alle
Tasten auf der Bedienungsplatte (2) mit Ausnahme
der « »-Taste (13) gesperrt.
• Durch erneutes Drücken der « »-Taste (13)
wird der «Pause»-Betrieb aktiviert, dabei blinken
die Rückstellungszahlensymbole (23) auf dem
Bildschirm. Um das Backprogramm fortzusetzen,
drücken Sie die « »-Taste (13) erneut.
• Um das Backprogramm auszuschalten, halten Sie
die « »-Taste (13) gedrückt, dabei ertönt ein
Tonsignal, und das eingestellte Programm wird
ausgeschaltet.
Zeiteinstelltasten
• Wenn der Bread maker nicht sofort betrieben werden
soll, können Sie die Rückstellungszeit zum Starten
des Backprogramms mit den «ZEITEINSTELLUNG”Tasten (11) «
» einstellen.
Page 36

36
DE
• Beachten Sie bitte, dass die Rückstellungszeit die
Backprogrammlaufzeit enthalten muss (siehe die
Tabelle), das heißt, nach Ablauf der Rückstellungszeit
startet das Backprogramm.
• Wählen Sie das gewünschte Programm mit der
« »-Taste (9), das auf dem Bildschirm mit den
Zahlensymbolen (15) angezeigt wird.
• Stellen Sie das Gewicht «700 g oder 1000 g» (13) mit
der «GEWICHTSWAHL»-Taste (10) « » ein.
• Wählen Sie die Krustenfarbe «HELL–MITTEL–
DUNKEL» (17) mit der Taste (12).
• Stellen Sie die Rückstellungszeit mit den
«ZEITEINSTELLUNG”-Tasten (11) « » ein
(beachten Sie bitte, dass die Backprogrammlaufzeit
beim Einstellen der Rückstellungszeit zu
berücksichtigen ist), der Einstellschritt beträgt 10
Minuten.
• Die maximale Rückstellungszeit beträgt 13 Stunden.
• Die Rückstellungszeit wird auf dem Bildschirm mit
den Zahlensymbolen (23) angezeigt.
Beispiel:
Jetzt ist es 8 Uhr morgens, Sie möchten, dass das Brot
in 7 Stunden um 15 Uhr gebacken ist.
• Wählen Sie ein Backprogramm, z. B. -1-, das
Backgewicht beträgt -900 g, die Krustenfarbe ist
mittel, das Programm läuft 3 Stunden, durchs
Drücken der Tasten (11) « » stellen Sie die
Rückstellungszeit auf 7:00 auf dem Bildschirm ein.
• Drücken Sie die « »-Taste (13), um die
Rückstellungsfunktion zu aktivieren, dabei blinken die
Trennpunkte (24) auf dem Bildschirm.
• Um die Rückstellungsfunktion abzubrechen,
halten Sie die « »-Taste (13) gedrückt,
dabei ertönt ein Tonsignal, und das eingestellte
Rückstellungsprogramm wird ausgeschaltet.
• Nach Ablauf der Rückstellungszeit startet das
eingestellte Backprogramm.
• Wenn Sie das fertige Brot nicht sofort
herausnehmen, wird die Vorwärmfunktion aktiviert,
die Vorwärmfunktionslaufzeit beträgt 60 Minuten.
• Benutzen Sie keine leicht verderblichen Zutaten
wie Eier, frische Milch, Obst, Zwiebeln usw. zum
rückstellten Backen.
• Anmerkung: — Die Rückstellungsfunktion ist für
Programme: -9-11-13-14-15-.
Page 37
37
DE
Programmzeittabelle:
№
Programme
Titel Programme Farbe der Kruste Gewicht
1 Klassisch
2 Französisch
Betriebsdauer
Programme
Hell 900 g 3:00 15:00
Dunkel 1350 g 3:15 15:00
900 g 2:15 15:00
Schnell
1350 g 2:25 15:00
Hell 900 g 3:10 15:00
Dunkel 1350 g 3:25 15:00
900 g 2:20 15:00
Schnell
1350 g 2:30 15:00
Verzögerte
Startzeit
Hinzufügen von
Zutaten
+Mittel 1150 g 3:05 15:00
+1150 g 2:20 15:00
+Mittel 1150 g 3:15 15:00
+1150 g 2:25 15:00
Page 38

38
DE
3 Vollkorn
4 Süß
5 Diätetisch
6 Glutenfrei
7 Schnellbacken
8 Anteigen
Hell 900 g 3:20 15:00
Dunkel 1350 g 3:35 15:00
900 g 2:25 15:00
Schnell
1350 g 2:35 15:00
Hell 900 g 2:55 15:00
Dunkel 1350 g 3:10 15:00
900 g 2:10 15:00
Schnell
1350 g 2:20 15:00
Hell 900 g 3:09 15:00
Dunkel 1350 g 3:33 15:00
Hell 900 g 3:40 15:00
Dunkel 1350 g 3:55 15:00
Hell 900 g 1:15 15:00
Dunkel 1350 g 1:20 15:00
Hell 900 g 1:30 15:00
Dunkel 1350 g 1:40 15:00
+Mittel 1150 g 3:25 15:00
+1150 g 2:30 15:00
+Mittel 1150 g 3:00 15:00
+1150 g 2:15 15:00
+Mittel 1150 g 3:21 15:00
+Mittel 1150 g 3:45 15:00
-Mittel 1150 g 1:18 15:00
-Mittel 1150 g 1:35 15:00
Page 39

39
DE
9 Teigkneten - - 0:10 - -
10 Hefeteig - - 1:40 15:00 +
11 Nudelteig - - 0:15 - 12 Pizzateig - - 0:45 15:00 13 Joghurt - - 8:00 — 12:00 - 14 Marmelade - - 1:20 - -
Hell
15 Gebäck
Dunkel
16 Handeinstellung
AUFWÄRMFUNKTION
• Nach Ablauf des Backprogramms wird
die Aufwärmfunktion eingeschaltet, die
Aufwärmfunktionslaufzeit beträgt 60 Minuten.
• Wenn Sie das Brot herausnehmen möchten, schalten
Sie die Aufwärmfunktion aus, indem Sie die «
»-Taste (13) drücken.
- 1:00 - -Mittel
Stillschweigend
3:05 Die Zeit der
Arbeitszyklen wird
vom Benutzer
festgelegt
15:00 +
• Wenn die Stromversorgung innerhalb von 10 Minuten
wiederhergestellt ist, setzt der Bread maker das
eingestellte Programms da fort, wo es unterbrochen
wurde.
• Wenn es keine Stromversorgung länger als 10
Minuten gibt, müssen Sie die Zutaten erneut
einladen, das Programm einstellen und den Bread
maker einschalten.
SPEICHERFUNKTION
• Bei einem Stromausfall während des Bread maker
betriebs wird die Speicherfunktion für bis zu 10
Minuten aktiviert.
Page 40

40
DE
BREAD MAKER BETRIEBSZYKLEN
Die Betriebszyklen werden mit den Symbolen (14)
angezeigt:
• - Vorwärmung «
Teigtriebzyklen «
», Aufwärmung « ».
«
ENTFERNEN DER TEIGKNETPADDEL (4)
• Diese Funktion ist optional, sie ist jedoch mit einem
leichteren Entfernen des fertigen Brotes aus der
Backform (3) verbunden, bei keinen Paddeln (4) im
fertigen Brot sind nur kleine Antriebsachsenlöcher
vorhanden.
• Im zweiten Anteigzyklus «
und das blinkende Symbol (22) «RMV» erscheint
auf dem Bildschirm, drücken Sie die Start-/Stopp-/
Pause-Taste (13) «
für 10 Minuten anzuhalten, dabei werden die
Programmzeitzahlensymbole (23) blinken.
• Önen Sie den Deckel (5), nehmen Sie die Form (3)
heraus, entfernen Sie den Teig aus der Form (3),
nehmen Sie die Paddel (4) heraus, legen Sie den
Teig in die Form (3) wieder ein, stellen Sie die Form
(3) zurück auf und schließen Sie den Deckel (5).
• Um das Backprogramm fortzusetzen, drücken Sie die
Start-/Stopp-/Pause-Taste (13) «
startet nach einer 10-Minuten-Pause.
», 2 Anteigzyklen « », 3
, , », Backen
» ertönen Tonsignale
», um das Backprogramm
», das Programm
• Anmerkung: — Die Teigknetpaddelentfernen-
Funktion (4) ist in den Programmen 7-8-9-11-12-1314-15 inaktiv.
WICHTIGE
BACKZUTATENEMPFEHLUNGEN
Mehl
• Mehl ist eine wesentliche Brotbackzutat.
• Die Eigenschaften des Mehls werden nicht
nur durch die Sorte, sondern auch durch die
Kornanbaubedingungen, die Bearbeitungsmethode
und der Lagerung bestimmt. Versuchen Sie,
das Brot aus Mehl verschiedener Hersteller und
Marken zu backen, und nden Sie eines, das Ihren
Anforderungen entspricht.
• Weizen- und Roggenmehl sind die Hauptarten von
Backmehl.
• Weizenmehl wird aufgrund seines angenehmen
Geschmacks und des hohen Nährwerts von
Weizenmehlprodukten häuger verwendet.
Brotmehl
• Das Brotmehl (raniertes Mehl), das nur aus dem
inneren Kornteil besteht, enthält die maximale
Glutenmenge, die die Elastizität der Krume
gewährleistet und das Zusammenfallen des Brots
verhindert.
• Backprodukte aus Brotmehl werden mästiger.
Page 41

41
DE
Vollkornmehl (Weizenvollkornmehl)
• Vollkornmehl (Weizenvollkornmehl) wird durchs
Mahlen von Vollkornweizen zusammen mit der
Schale erhalten. Diese Mehlsorte unterscheidet sich
durch den erhöhten Nahrungswert.
• Vollkornbrot kommt normalerweise kleiner heraus.
Um die Verbrauchereigenschaften von Brot zu
verbessern, wird Vollkornmehl häug mit Brotmehl
gemischt.
Mais- und Hafermehl
• Um die Brottextur zu verbessern und ihm
zusätzlichen Geschmack zu verleihen, mischen Sie
Weizen- oder Roggenmehl mit Mais- oder Hafermehl.
Zucker
• Zucker bereichert das Gebäck mit zusätzlichen
Geschmacktönen und verleiht dem Brot einen
goldenen Farbton.
• Zucker ist ein Nährboden fürs Hefewachstum. Geben
Sie in den Backprodukten nicht nur ranierten,
sondern auch Braun- und Puderzucker zu.
Backhefe
• Das Hefewachstum geht mit der
Kohlendioxidfreisetzung einher, das zur Bildung einer
porösen Krume beiträgt.
• Mehl und Zucker sind ein Nährboden fürs
Hefewachstum. Fügen Sie frisch gepresste oder
schnelle Trockenhefe hinzu. Lösen Sie frisch
gepresste Hefe in einer warmen Flüssigkeit (Wasser,
Milch usw.), geben Sie schnellwirkende Hefe zu Mehl
(erfordern keine Voraktivierung, d. h. Wasserzugabe).
• Befolgen Sie die Empfehlungen auf der Verpackung
oder beachten Sie die folgenden Proportionen:
• 1 Teelöel schnellwirkender Trockenhefe = 1,5
Teelöel frisch gepresster Hefe.
• Bewahren Sie frische Backhefe im Kühlschrank auf.
Bei hoher Temperatur stirbt Hefe ab und Teig geht
schlecht auf.
Salz
• Salz verleiht dem Brot zusätzlichen Geschmack und
Farbe, verlangsamt jedoch das Hefewachstum.
• Verwenden Sie nicht zu viel Salz. Verwenden
Sie immer feines Salz (grobes Salz kann die
Antihaftbeschichtung der Backform beschädigen).
Eier
• Eier verbessern die Struktur und die Menge des
Backproduktes, bereichern den Geschmack.
• Vor dem Zugeben von Eiern in Teig ist es empfohlen,
diese gründlich zu schlagen.
Tierische und panzliche Fette
• Tierische und panzliche Fette machen Backprodukte
weicher und verlängern ihre Haltbarkeit.
• Vor dem Zugeben von Milchbutter schneiden
Sie es in kleine Würfel und erwärmen Sie es auf
Raumtemperatur.
Page 42

42
DE
Backpulver und Soda
• Soda und Backpulver (Quellmehl) verkürzen die zum
Teigtrieb erforderliche Zeit.
• Benutzen Sie Backpulver oder Soda, wenn Sie die
Programme «SUPERSCHNELL 1 und 2» betreiben.
• Soda muss vorher mit Zitronensäure und einer
kleinen Menge Mehl (5 g Speisesoda, 3 g
Zitronensäure und 12 g Mehl) gemischt werden.
Diese Pulvermenge (20 g) ist für 500 g Mehl
gerechnet.
• Verwenden Sie keinen Essig zum Löschen von
Soda, Essig macht die Krume feuchter und weniger
gleichmäßig.
• Schütten Sie Backpulver (Quellmehl) in die
Form einfach ein, befolgen Sie dabei die
Rezeptanweisungen.
Wasser
• Die Wassertemperatur spielt beim Brotbacken eine
wichtige Rolle.
• Die optimale Wassertemperatur liegt zwischen 20°C
und 25°C, fürs Programm «SUPERSCHNELL 1 und
2» — zwischen 45°C und 50°C.
• Sie können Wasser durch Milch ersetzen oder
den Brotgeschmack durch eine bestimmte Menge
natürlichen Safts bereichern.
Milchprodukte
• Milchprodukte verbessern den Nährwert und den
Brotgeschmack. Das ergibt eine schönere und
appetitlichere Brotkrume.
• Verwenden Sie frische Milchprodukte oder
Trockenmilch.
Zutatengewicht
• Eine der wichtigsten Brotbackbedingungen ist
genaue Zutatenmenge.
• Es ist dringend empfohlen, eine Küchenwaage,
einen Meßbecher (25) und einen Meßlöel (27)
zu verwenden, um die genaue Zutatenmenge zu
messen, anderenfalls wird das fertige Brot Ihren
Anforderungen möglicherweise nicht entsprechen.
• Füllen Sie den Meßbecher (25) mit Flüssigkeit
bis zum entsprechenden Zeichen. Prüfen Sie die
Dosierung, indem Sie den Meßbecher (25) auf einer
ebenen Oberäche stellen.
• Reinigen Sie den Meßbecher (25) gründlich von
Resten vorheriger Zutat.
• Verdichten Sie trockene Zutaten nicht, wenn Sie
diese dem Meßbecher (25) zugeben.
• Es ist wichtig, das Mehl vor dem Gebrauch durch
ein Sieb zu sieben, um es mit Luft zu sättigen, dies
garantiert das beste Backergebnis.
Page 43

43
DE
EINLEGEN DER ZUTATEN IN DIE
BACKFORM (ABB. 1)
• Eine bestimmte Reihenfolge des Zutateneinlegens in
die Backform (3) ist zu beachten.
• Die folgende Reihenfolge ist empfohlen:
- üssige Zutaten, Eier, Salz, Gemüse oder Butter,
Trockenmilch usw.;
- Mehl; Mehl soll nicht vollständig von üssigen
Zutaten angefeuchtet werden;
- Hefe kann nur auf trockenes Mehl gegeben
werden, Hefe darf nicht mit Salz in Berührung
kommen;
- machen Sie eine kleine Vertiefung im Mehl und
legen Sie die Hefe in die Vertiefung.
ZUTATENZUGEBEN
• Sie können Sie die erforderlichen Zutaten (Nüsse,
Trockenfrüchte usw.) beim zweiten Teigkneten
hinzufügen, dabei ertönen die Tonsignale im richtigen
Moment; önen Sie den Deckel (5), fügen Sie
erforderliche Zutaten hinzu und schließen Sie den
Deckel (5).
• Wenn Sie die Rückstellungsfunktion während einer
längeren Zeit verwenden, fügen Sie keine leicht
verderblichen Zutaten wie Eier oder Fruchtzutaten
hinzu.
BROTBACKEN
• Stellen Sie vor dem Anschließen des Bread maker
s ans Stromnetz sicher, dass die Betriebsspannung
des Geräts und die Netzspannung übereinstimmen.
• Önen Sie den Deckel (5) und nehmen Sie die
Backform (3) heraus.
• Vergewissern Sie sich, dass das Paddel (4) zurück
aufgestellt ist.
• Anmerkung: — vor dem Aufsetzen des Paddels (4)
ist es wünschenswert, es mit Butter, Margarine oder
Panzenöl zu schmieren, um sein Herausnehmen
aus frisch gebackenem Brot zu erleichtern.
• Legen Sie die Zutaten in der im Rezept
beschriebenen Reihenfolge in die Form (3) ein.
Normalerweise werden Zutaten in folgender
Reihenfolge eingelegt (Abb. 1):
1. Flüssige Zutaten.
2. Mehl, rieselfähige Zutaten (Zucker, Salz).
3. Hefe und Backpulver. Machen Sie eine kleine
Vertiefung im Mehl und legen Sie die Hefe oder
Backpulver in die Vertiefung.
• Entfernen Sie verschüttete Nahrungsmittel oder
vergossene Flüssigkeiten von der Außenoberäche
der Form (3).
• Stellen Sie die Form (3) zurück auf und drehen Sie
sie im Uhrzeigersinn bis zum Anschlag.
Page 44

44
DE
• Machen Sie den Deckel (5) zu.
• Stecken Sie den Netzstecker in eine Steckdose ein,
dabei ertönt ein Tonsignal, der Bildschirm zeigt die
Zahlensymbole (15) des Backprogramms -1-, die
Zahlensymbole der Programmzeit (23) «3:05», die
Trennpunkte (22) leuchten konstant.
• Krustenfarbeanzeige (17) — mittel « ».
• Gewichtsanzeige (21) «1150 g».
• Diese Einstellungen sind standardmäßig festgelegt.
• Durchs Drücken der « »-Taste (9) können
Sie eines von 12 Programmen wählen, die
Programmnummer wird auf dem Bildschirm mit den
Zahlensymbolen (15) angezeigt.
• Abhängig von der Menge eingelegter Zutaten können
Sie das Gebäckgewicht — 700 g oder 1000 g — mit
der Taste (10) « » wählen. Das Gebäckgewicht
wird mit der Anzeige (13) «700 g — 1000 g»
angezeigt.
• Durchs Drücken der Taste (12) können Sie die
gewünschte Krustenfarbe wählen, die gewählte
Krustenfarbe wird mit den Symbolen (17) «HELL–
MITTEL–DUNKEL» angezeigt.
• Das Symbol (19) « » ist der Schnellbackbetrieb in
den Backprogrammen 1-2-3-4 (siehe den Abschnitt
«SCHNELLBACKBETRIEB»).
• Stellen Sie die Rückstellungszeit durchs Drücken
der «ZEITEINSTELLUNG”-Tasten (11) «
» ein (siehe die Beschreibung im Abschnitt
«BEDIENUNGSPLATTE»).
• Anmerkung: — überspringen Sie die
Rückstellungszeiteinstellung, wenn Sie das
eingestellte Backprogramm sofort starten möchten.
• Drücken Sie die « »-Taste (13), um das
Backprogramm zu aktivieren, dabei blinken
die Trennpunkte (24) auf dem Bildschirm, die
Zahlensymbole (23) zeigen die Restzeit bis zum
Ende des Backprogramms an.
• Die Bread maker betriebszyklen werden mit den
Anzeigen (14) angezeigt.
• Ratschlag: — Nach einem 5-Minuten-Teigkneten
ist es empfohlen, die Konsistenz zu prüfen. Der
Teig sollte ein weicher, klebriger Klumpen sein;
wenn der Teigklumpen sehr trocken ist, fügen Sie
etwas Flüssigkeit hinzu, wenn der Teigklumpen zu
feucht ist, fügen Sie ein wenig Mehl hinzu (1/2 bis 1
Teelöel oder nach Bedarf).
• Der Brotbackvorgang kann übers Sichtfenster (6) im
Deckel (5) beobachtet werden.
ACHTUNG!
Önen Sie den Deckel (5) während des
Backprogramms nicht, wenn sich die Temperatur stark
ändert, kann der Teig abfallen und treibt nicht auf.
• Nach Ablauf des Backprogramms ertönen Tonsignale
und die Aufwärmfunktion wird eingeschaltet. Die
Aufwärmfunktion läuft 60 Minuten.
Page 45

45
DE
• Um die Aufwärmfunktion abzubrechen und den
Bread maker auszuschalten, halten Sie die «
»-Taste (13) 3 Sekunden lang gedrückt.
• Ziehen Sie den Netzstecker aus der Steckdose
heraus.
• Önen Sie den Deckel (5) mit hitzebeständigen
Küchentopappen, heben und fassen Sie den Gri
(8) an, ziehen Sie den Gri (8) nach oben und
nehmen Sie die Form (3) aus dem Brotbackofen
heraus.
• Lassen Sie die Form ca. 10-15 Minuten abkühlen.
• Trennen Sie das Gebäck mit einem
Plastikpfannenwender von den Wänden der Form
(3) ab.
• Verwenden Sie keine Metallgegenstände, die die
Antihaftbeschichtung der Form (3) beschädigen
können.
• Um das Gebäck herauszunehmen, drehen Sie die
Form (3) um und schütteln Sie sie.
• Vor dem Brotschneiden entfernen Sie das Paddel (4)
mit dem Haken (26).
• Schneiden Sie das Brot mit einem scharfen
Brotmesser.
• Nach dem Gebrauch waschen Sie die Form (3) und
das Paddel (4) mit Warmwasser und einem neutralen
Reinigungsmittel, spülen Sie und trocknen Sie sie
ab. Setzen Sie das Paddel (4) in die Form (3) ein,
stellen Sie die Form (3) in den Bread maker auf und
schließen Sie den Deckel (5).
REINIGUNG UND PFLEGE
• Schalten Sie den Bread maker aus, ziehen Sie den
Netzstecker aus der Steckdose heraus, önen Sie
die Deckel (5) und lassen Sie den Bread maker
abkühlen.
• Wischen Sie das Gehäuse (1) und den Deckel (5) mit
einem leicht angefeuchteten Tuch, danach trocknen
Sie es ab.
• Waschen Sie die Backform (3), das Paddel (4),
den Meßbecher (25), den Haken (26) und den
Meßlöel (27) mit Warmwasser und einem neutralen
Reinigungsmittel, spülen und trocknen Sie diese ab.
• Anmerkung: — falls das Paddel (4) von der Achse
nicht abgenommen werden kann, füllen Sie die
Form (3) mit Warmwasser und warten Sie ca. 20-30
Minuten ab.
• Verwenden Sie zum Reinigen des Bread maker und
der Backform (3) keine Metallgegenstände oder
Waschlappen, Scheuer- oder Lösungsmittel.
• Trocknen Sie die Backform (3) und das Paddel
(4) sorgfältig, bevor Sie diese in den Bread maker
einsetzen.
• Bei Verschmutzung im Inneren der Bread maker
s entfernen Sie den Schmutz und wischen Sie die
Oberäche mit einem leicht feuchten Tuch, danach
trocknen Sie diese ab.
Page 46

46
DE
Vor der Anwendung an einen Kundendienst.
Störung Mögliche Ursache Beseitigung
Der Brotbackofen schaltet
sich nicht ein. Der Bildschirm
zeigt die Zeichen «HHH».
Beim Einschalten des
Brotbackofens werden die
Symbole «LLL» angezeigt.
Beim Einschalten des
Brotbackofens werden die
Symbole «EE0» angezeigt.
Der Brotbackofen hat nach dem vorherigen
Backen noch nicht abgekühlt.
Die Temperatur im Brotbackofen ist sehr
niedrig.
Betriebsfehler
Die Tabelle mit Störungen und Fehlern beim Brotbacken und Empfehlungen für
deren Beseitigung weiterhin.
Dicke Brotkruste.
Das Knetpaddel kann
nicht aus der Backform
herausgenommen werden.
Das fertige Brot blieb in der Backform und
verlor viel Feuchtigkeit.
Der Teig gelangte in den Raum zwischen
der Antriebswelle und dem Knetpaddel.
Schalten Sie den Brotbackofen aus und ziehen Sie den
Netzstecker aus der Steckdose heraus. Nehmen Sie die
Backform heraus und lassen Sie den Brotbackofen auf
Raumtemperatur abkühlen.
Schalten Sie den Brotbackofen aus und ziehen Sie den
Netzstecker aus der Steckdose heraus. Önen Sie den
Deckel des Brotbackofens, nehmen Sie die Backform
heraus und lassen Sie das Gerät 10 bis 20 Minuten auf
Raumtemperatur erwärmen.
Schalten Sie den Brotbackofen aus und ziehen Sie
den Netzstecker aus der Steckdose heraus, warten Sie
einige Zeit ab und schalten Sie den Brotbackofen wieder
ein, wenn die Symbole «EE0» nicht erlöschen, wenden
Sie sich dann an einen autorisierten Kundendienst.
Nehmen Sie das fertige Brot sofort nach dem Backen
heraus.
Nachdem Sie das Brot aus der Backform
herausgenommen haben, füllen Sie diese mit
Warmwasser an. Entfernen Sie das Paddel nach 20-30
Minuten.
Page 47

47
DE
Die Zutaten sind
ungleichmäßig gerührt und
schlecht gebacken.
Das Elektromotorgeräusch
ist hörbar, aber der Teig
wird nicht gerührt.
Während des Backens ist
die Backform mit dem Brot
überfüllt.
Das Brot ist zu klein oder
treibt nicht auf.
Brot wird beim Backen sehr
rissig.
Das eingestellte Programm ist für diese
Zutaten ungeeignet.
Während des Backprogramms wurde der
Brotbackofendeckel mehrmals geönet,
der Teig el und stieg nicht mehr auf.
Einer kleine Menge üssiger Zutaten, das
Teigknetpaddel kann den Backteig nicht
kneten.
Die Backform ist nicht richtig aufgestellt.
Dem Teig wurde viel Mehl zugesetzt.
Falsches Verhältnis von Hefe, Mehl und
üssigen Zutaten. Die Temperatur der
üssigen Zutaten oder der Umgebung ist
zu hoch.
Keine oder unzureichende Hefe. Schlechte
Hefequalität, hohe Temperatur der
üssigen Zutaten.
Hefe kam mit Salz in Kontakt.
Niedrige Raumtemperatur.
Das verwendete Mehl enthält sehr wenig
Gluten.
Starkes Hefewachstum oder hohe
Temperatur üssiger Zutaten.
Wählen Sie ein Backprogramm, das den Zutaten in der
Backform entspricht.
Önen Sie den Brotbackofendeckel nicht.
Prüfen Sie die Übereinstimmung der Zutaten.
Nehmen Sie die Backform heraus und versuchen Sie,
das Teigknetpaddel mit der Hand zu drehen, wenn dies
fehlschlägt, wenden Sie sich an einen autorisierten
Kundendienst.
Prüfen Sie, ob die Backform richtig aufgestellt ist
und ob das Backrezept korrekt ist. Messen Sie die
Zutatenmenge immer genau mit einer Küchenwaage und
einem Meßbecher.
Prüfen Sie immer das richtige Verhältnis der Zutaten zu
ihrer Temperatur und Raumtemperatur.
Verwenden Sie den Brotbackofen bei einer
Umgebungstemperatur von +15°C bis + 34°C.
Verwenden Sie keine abgelaufene Hefe.
Messen Sie die genaue Hefemenge mit einem Meßlöel.
Lassen Sie Hefe mit Salz in keinen Kontakt kommen.
Verwenden Sie den Brotbackofen bei einer
Umgebungstemperatur von +15°C bis + 34°C.
Verwenden Sie eine bewährte Brotmehlmarke.
Verwenden Sie eine bewährte Hefemarke und achten
Sie auf die Temperatur üssiger Zutaten.
Page 48

48
DE
Sehr dichte Backbrottextur.
Große Hohlräume im
fertigen Brot.
Viel trockenes Mehl auf der
Brotkruste.
Sehr dunkle Brot- oder
Kuchenkruste.
Falsches Verhältnis von Mehl und üssigen
Zutaten.
Es wurde zu viel Vollkornmehl verwendet.
Zu viel üssige Zutaten, Wasser oder kein
Salz hinzugefügt.
Erhöhte Temperatur üssiger Zutaten.
Sie benutzten Mehl mit erhöhter
Glutenmenge und unzureichende
Ölmenge.
Kleine Menge üssiger Zutaten.
Brot- oder Kuchenkruste kann durch
Zuckerüberschuss anbrennen.
Erreichen Sie das richtige Verhältnis von Mehl zu
üssigen Zutaten.
Reduzieren Sie die Vollmehlmenge und erhöhen Sie die
Hefemenge.
Wählen Sie das richtige Verhältnis der Zutaten.
Prüfen Sie immer die Temperatur der üssigen Zutaten.
Verwenden Sie Mehl mit normaler Glutenmenge und
fügen Sie Öl hinzu.
Fügen Sie die genaue Menge üssiger Zutaten gemäß
dem Rezept hinzu.
Fügen Sie die genaue Menge Zucker gemäß dem
Rezept hinzu.
Wenn Sie bemerken, dass das Brot oder der
Kuchen anzubrennen beginnt, ist es empfohlen,
das Backprogramm 5-10 Minuten vor dem Ende
zu unterbrechen. Bevor Sie das fertige Produkt
herausnehmen, ist es empfohlen, es 15-20 Minuten bei
geschlossenem Deckel im Brotbackofen zu lassen.
Page 49

49
DE
• Es ist nicht gestattet, das Bread maker gehäuse,
das Netzkabel und den Netzstecker ins Wasser oder
jegliche andere Flüssigkeiten einzutauchen.
AUFBEWAHRUNG
• Bevor den Bread maker zur Aufbewahrung
wegzunehmen, reinigen Sie ihn.
• Bewahren Sie das Gerät an einem trockenen,
kühlen und für Kinder und behinderte Personen
unzugänglichen Ort auf.
LIEFERUMFANG
1. Bread maker — 1 Stk.
2. Netzkabel — 1 Stk.
3. Bedienungsanleitung — 1 Stk.
TECHNISCHE EIGENSCHAFTEN
• Stromversorgung 220-240 V, ~ 50-60 Hz
• Nennleistungsaufnahme: 850 W
ENTSORGUNG
Um mögliches Schaden für die Umwelt
oder die menschliche Gesundheit
durch unkontrollierte Abfallentsorgung
zu vermeiden, werfen Sie das Gerät
und die Batterien (falls mitgeliefert)
nach Beendigung ihrer Nutzungsdauer
zusammen mit gewöhnlichen Haushaltsabfällen nicht
weg, geben Sie das Gerät und die Batterien in die
Spezialpunkte für weitere Entsorgung über.
Die bei der Entsorgung der Erzeugnisse entstehenden
Abfälle sind unbedingt zu sammeln und weiter
ordnungsmäßig zu entsorgen.
Mehrere Information zur Entsorgung dieses Produkts
erhalten Sie bei Ihrer lokalen Stadtverwaltung, einem
Abfallentsorgungsdienst oder beim Geschäft, wo Sie
dieses Produkt gekauft haben.
Der Hersteller behält sich das Recht vor, das
Design, die Konstruktion und die das gemeine
Gerätebetriebsprinzip nicht beeinussenden
technischen Eigenschaften ohne Vorbenachrichtigung
zu verändern.
Die Gerätenutzungsdauer beträgt 3 Jahre
Das Herstellungsdatum ist in der Fabrikationsnummer
angegeben.
Bei Störungsfeststellung wenden Sie sich baldigst an
einen autorisierten Kundendienst.
Page 50

50
RU
RU
ХЛЕБОПЕЧЬ BR2701
Домашняя хлебопечь предназначена для выпечки хлеба, кексов, замешивания теста, приготовления джема или йогурта.
ОПИСАНИЕ
1. Корпус
2. Панель управления
3. Форма для выпечки
4. Лопасти для замешивания теста
5. Крышка
6. Смотровое окно
7. Отверстия выхода горячего воздуха
8. Ручка формы для выпечки
Панель управления
9. Кнопка выбора программы «
10. Кнопка выбора веса « »
11. Кнопки установки времени отложенного старта/
времени циклов работы программы «
12. Кнопка выбора цвета корочки/включения режи-
ма быстрой выпечки «
13. Кнопка старт/стоп/пауза « »
»
»
Дисплей и символы
14. Символы циклов работы программы выпечки
15. Цифровые символы программ выпечки 1-16/
пользовательских программ 1-8
16. Символ цвета корочки — светлый «
17. Символ цвета корочки — средний « »
18. Символ цвета корочки — тёмный « »
19. Символ режима быстрой выпечки « »
20. Символ возможности добавления ингредиентов
«ADD»
21. Символы веса «900 г — 1150 г — 1350 г»
22. Символ 10 минутной паузы «RMV»
23. Цифровые символы времени работы програм-
мы/времени отложенного старта
24. Разделительные точки
Аксессуары
25. Мерный стакан
26. Крючок для извлечения лопасти
27. Мерная ложка
»
ВНИМАНИЕ!
Для дополнительной защиты в цепи питания
целесообразно установить устройство защитного
отключения (УЗО) с номинальным током срабатывания, не превышающим 30 мА, для установки
УЗО обратитесь к специалисту.
»
Page 51

51
RU
6
5
4
9 10
20 22 25 26 27
3
2
7
14 14
8
1615
17 18 19
1
21
11 12 13
23
24
Дрожжи
Мука
Жидкие ингредиенты
Рис. 1
Page 52

52
RU
МЕРЫ БЕЗОПАСНОСТИ И РЕКОМЕНДАЦИИ ПО ЭКСПЛУАТАЦИИ
Перед использованием хлебопечки внимательно
ознакомьтесь с руководством по эксплуатации и
сохраните его для использования в будущем.
• Используйте хлебопечку только по ее прямому
назначению, как изложено в данной инструкции.
• Неправильное обращение с хлебопечкой может
привести к ее поломке, причинению вреда
пользователю или его имуществу и не является
гарантийным случаем.
• Убедитесь, что рабочее напряжение хлебопечки,
указанное на этикетке, соответствует напряжению
электросети.
• Вилка шнура питания имеет контакт заземления,
вставляйте её в электрическую розетку, имеющую
надёжный контакт заземления. При коротком
замыкании, заземление снижает риск поражения
электрическим током.
• Обратитесь к специалисту-электрику, если вы
не уверены в том, что ваши розетки правильно
установлены и заземлены.
• Во избежание возникновения пожара запрещается
использовать «переходники», предназначенные
для подключения сетевой вилки к электрической
розетке, не имеющей контакта заземления.
• При искрении в электрической розетке и присут-
ствии запаха гари выньте вилку шнура питания из
розетки и обратитесь в организацию, обслуживающую вашу домашнюю электрическую сеть.
• При появлении дыма из корпуса хлебопечки выньте вилку шнура питания из электрической розетки
и примите меры к нераспространению огня.
• Запрещается использовать хлебопечь вне помещений.
• Не рекомендуется использовать устройство во
время грозы.
• Оберегайте устройство от ударов, падений, вибраций и иных механических воздействий.
• Запрещается располагать хлебопечь рядом со
стенами или вблизи стенок кухонной мебели.
• Установите хлебопечь так, чтобы от стены или
мебели до хлебопечки оставалось расстояние
не менее 20 см, а свободное пространство над
хлебопечкой составляло не менее 50 см.
• Не оставляйте хлебопечь, включённую в сеть, без
присмотра.
• Не используйте хлебопечь вблизи от кухонной
раковины, в ванных комнатах, около бассейнов
или других ёмкостей, наполненных водой.
• Не используйте хлебопечь в непосредственной
близости от нагревательных приборов, источников
тепла или открытого пламени.
• Запрещается использовать хлебопечь в местах,
где используются или распыляются аэрозоли,
а также вблизи от легковоспламеняющихся
жидкостей.
Page 53

53
RU
• Устанавливайте хлебопечь на ровную и устойчивую поверхность, не ставьте ее на край стола.
Не допускайте, чтобы шнур питания свешивался
со стола, а также следите, чтобы он не касался
горячих поверхностей и острых кромок мебели.
• Запрещается прикасаться к шнуру питания и
вилке шнура питания мокрыми руками.
• Во время работы не дотрагивайтесь до горячих
поверхностей хлебопечки.
• Не закрывайте вентиляционные отверстия на
крышке хлебопечки.
• Во время работы хлебопечки не оставляйте крышку открытой.
• Вынимая готовый хлеб, беритесь за ручку формы
для выпечки, используйте термостойкие кухонные
прихватки.
• Во избежание повреждения антипригарного
покрытия формы для выпечки, вынимая хлеб, не
используйте металлические предметы, переверните форму и вытряхивайте из неё готовый хлеб.
• При несоблюдении рекомендаций по выпечке,
возможно подгорание хлеба и появление дыма.
• Перед чисткой хлебопечки извлеките форму для
выпечки и дождитесь полного остывания прибора.
• Отключайте хлебопечку от электрической сети
перед чисткой или в том случае, если вы им не
пользуетесь. При отключении хлебопечки от электрической сети держитесь только за вилку шнура
питания и аккуратно выньте её из электрической
розетки, не тяните за шнур питания — это может
привести к повреждению шнура питания, электрической розетки или вызвать короткое замыкание.
• Во избежание удара электрическим током не
погружайте хлебопечку в воду или любые другие
жидкости.
• Запрещается помещать хлебопечь в посудомоечную машину.
• Из соображений безопасности не оставляйте полиэтиленовые пакеты, используемые в качестве
упаковки, без присмотра и в местах доступных
для детей.
ВНИМАНИЕ! Не разрешайте детям играть с полиэтиленовыми пакетами или упаковочной плёнкой.
Опасность удушья!
• Хлебопечь не предназначена для использования
детьми.
• Осуществляйте надзор за детьми, чтобы не допустить использования прибора в качестве игрушки.
• Не разрешайте детям прикасаться к устройству и
к шнуру питания во время работы хлебопечки.
• Во время работы и остывания размещайте
устройство в местах, недоступных для детей.
• Данное устройство не предназначено для использования лицами (включая детей) с пониженными
физическими, психическими или умственными
способностями, или при отсутствии у них опыта
Page 54

54
RU
или знаний, если они не находятся под контролем
или не проинструктированы об использовании
прибора лицом, ответственным за их безопасность.
• Периодически проверяйте состояние шнура питания и вилки шнура питания.
• При повреждении шнура питания его замену
во избежание опасности должны производить
изготовитель, сервисная служба или подобный
квалифицированный персонал.
• Запрещается самостоятельно ремонтировать прибор. Не разбирайте прибор самостоятельно, при
возникновении любых неисправностей, а также
после падения устройства выключите прибор из
электрической розетки и обратитесь в сервисный
центр.
• Перевозите хлебопечь в заводской упаковке.
• Храните устройство в местах, недоступных для
детей и людей с ограниченными возможностями.
УСТРОЙСТВО ПРЕДНАЗНАЧЕНО ТОЛЬКО ДЛЯ
БЫТОВОГО ИСПОЛЬЗОВАНИЯ, ЗАПРЕЩАЕТСЯ
ИСПОЛЬЗОВАТЬ УСТРОЙСТВО В КОММЕРЧЕСКИХ ИЛИ ЛАБОРАТОРНЫХ ЦЕЛЯХ.
ПОДГОТОВКА ХЛЕБОПЕЧКИ К РАБОТЕ
После транспортировки или хранения устройства при пониженной температуре необходимо
выдержать его при комнатной температуре не
менее 3 часов.
• Распакуйте хлебопечь и удалите все упаковочные
материалы.
• Сохраните заводскую упаковку.
• Ознакомьтесь с мерами безопасности и рекомен-
дациями по эксплуатации.
• Проверьте комплектацию.
• Осмотрите хлебопечь на наличие повреждений
при наличии повреждений не включайте ее в
электрическую сеть.
• Убедитесь, что параметры напряжения питания,
указанные на этикетке, соответствуют параметрам
электрической сети.
• Протрите наружную поверхность корпуса (1) чистой, слегка влажной тканью для удаления пыли.
• Откройте крышку (5).
• Приподнимите и возьмитесь за ручку (8) формы
для выпечки (3), потяните за ручку (8) по направлению вверх и выньте форму (3).
• Промойте форму (3), лопасти (4), мерный стакан
(25), крючок (26), мерную ложку (27) теплой водой
с использованием нейтрального моющего средства, ополосните и просушите.
• Установите форму для выпечки (3) на место, нажмите на неё сверху вниз до фиксации, убедитесь
в надёжной фиксации формы (3).
• Установите лопасти для замешивания теста (4) на
приводные оси в форме для выпечки (3).
• Закройте крышку (5).
Page 55

55
RU
• Установите хлебопечь так, чтобы от стены или
мебели до хлебопечки оставалось расстояние
не менее 20 см, а свободное пространство над
хлебопечкой составляло не менее 50 см.
• Примечание: — хлебопечь предназначена для
работы в широком диапазоне температур, однако
чрезмерно высокая или низкая температура в
помещении влияет на процесс подъема теста и,
следовательно, на размер и плотность хлеба.
Оптимальная температура в помещении должна
быть от +15 до +34 °С.
ПЕРВОЕ ВКЛЮЧЕНИЕ ХЛЕБОПЕЧКИ
• Для удаления посторонних запахов, рекомендуется произвести первое включение хлебопечки без
загрузки ингредиентов, и с открытой крышкой (5).
• Вставьте вилку шнура питания в электрическую
розетку, при этом прозвучит звуковой сигнал и на
дисплее отобразятся цифровые символы (15) программы выпечки -1-, цифровые символы времени
работы программы (15) «3:05»,, разделительные
точки (24) будут светиться постоянно.
• Индикация цвета корочки (17) — средняя « ».
• Индикация веса (21) «1150 г.».
• Данные настройки установлены по умолчанию.
• Нажмите кнопку (13) старт/стоп/пауза « » для
включения программы выпечки, установленной по
умолчанию, при этом на дисплее разделительные
точки (24) будут мигать.
• Через 10 минут повторно нажмите кнопку (13)
старт/стоп/пауза «
мы выпечки, еще раз нажмите и удерживайте
кнопку (13) старт/стоп/пауза « » для выключения хлебопечки, выньте вилку шнура питания
из электрической розетки, и дождитесь полного
остывания хлебопечки.
• Примечание: — при первом включении хлебопеч-
ки, возможно появление постороннего запаха или
небольшого количества дыма от нагревательного
элемента — это допустимо и не является гарантийным случаем.
• Откройте крышку (5), приподнимите и возьмитесь
за ручку (8) формы для выпечки (3), потяните за
ручку (8) по направлению вверх и выньте форму
(3).
• Промойте форму (3) и лопасти (4) тёплой водой с
использованием нейтрального моющего средства,
ополосните и просушите.
• Установите форму для выпечки (3) на место, нажмите на неё сверху вниз до фиксации, убедитесь
в надёжной фиксации формы (3).
• Установите лопасти для замешивания теста (4) на
приводные оси в форме для выпечки (3).
• Закройте крышку (5).
• Хлебопечь готова к использованию.
» для выключения програм-
Page 56

56
RU
ПАНЕЛЬ УПРАВЛЕНИЯ
Перед использованием хлебопечки, пожалуйста,
ознакомьтесь с кнопками на панели управления
(2), программами выпечки и рекомендациями по
выбору ингредиентов для выпечки.
• Нажатием кнопок на панели управления (2), Вы
можете выбрать необходимую программу выпечки
хлеба, кексов, замешивания теста, приготовления джема, йогурта, установить время отсрочки
приготовления, самостоятельно ввести время
работы циклов программы выпечки, а на дисплее
контролировать весь процесс выпечки.
• Каждое нажатие активной кнопки сопровождается
звуковым сигналом.
• Во время работы программы выпечки, все кнопки
на панели управления (2) блокируются, кроме
кнопки (13) старт/стоп/пауза «
КНОПКА ВЫБОРА ПРОГРАММЫ «
• Нажатием кнопки (9) «
одну из 16 программ, номер программы отображается на дисплее цифровыми символами (15).
• Для улучшения вкуса готовой выпечки Вы можете
добавлять необходимые ингредиенты (орехи,
сухофрукты и т.п.) во время второго замешивания
теста, при этом в нужный момент будут звучать
звуковые сигналы, откройте крышку (5), добавьте
необходимые ингредиенты, закройте крышку (5)
(см. таблицу).
».
» (9)
», Вы можете выбрать
-1- «Классический»
• Включает все стадии приготовления хлеба: замес
теста, расстойка (подъем) теста и выпечка, для
улучшения вкуса готовой выпечки Вы можете
добавлять необходимые ингредиенты (орехи,
сухофрукты и т.п.) во время второго замешивания
теста, при этом в нужный момент будут звучать
звуковые сигналы, на дисплее отобразится
символ (20) «ADD», откройте крышку (5), добавьте
необходимые ингредиенты, закройте крышку (5).
• Примечание: — вы можете добавлять дополни-
тельные ингредиенты в программах 1, 2, 3, 4, 5,
6, 10 и 16, при добавлении фруктов или орехов,
рекомендуется их измельчить на мелкие кусочки.
-2- «Французский»
• Приготовление хлеба занимает более продолжительное время, хлеб получается с крупным
ноздреватым мякишем и хрустящей корочкой.
-3- «Цельнозерновой»
• Выпекайте полезный хлеб из муки тонкого и
грубого помола. Эта программа выпечки предусматривает более длительное время предварительного нагрева, для того, чтобы грубая мука
лучше впитывала жидкость и лучше набухала. Не
рекомендуется пользоваться функцией отсрочки
при приготовлении этого хлеба, так как это может
привести к нежелательным результатам.
Page 57

57
RU
-4- «СЛАДКИЙ»
• Добавьте в сладкое тесто разрыхлитель или соду
и приготовьте ароматную выпечку.
• Примечание: — в программах выпечки -1-2-3-4-
вы можете использовать режим быстрой выпечки.
РЕЖИМ БЫСТРОЙ ВЫПЕЧКИ В ПРОГРАММАХ 1-2-3-4
• Нажатиями кнопки выбора программ (9) « »,
выберите одну из четырёх программ, в которых
предусмотрен режим быстрой выпечки -1-2-34-, номер программы отображается на дисплее
цифровыми символами (15).
• Нажатиями на кнопку (12) цвет корочки « »,
выберите режим быстрой выпечки, который
отображается символом (11) « », цифровыми
символами (23) будет показано время работы
режима быстрой выпечки (см. таблицу времени
работы программ).
-5- «Диетический»
• Используйте эту программу для выпечки хлеба с
низким содержанием углеводов.
-6- «Безглютеновый»
• Выпекайте хлеб из муки, не содержащей глютена.
Эта программа выпечки предусматривает более
длительное время предварительного нагрева, для
того, чтобы мука лучше впитывала жидкость и
лучше набухала. Не рекомендуется пользоваться
функцией отсрочки при приготовлении этого хлеба, так как это может привести к нежелательным
результатам.
-7- «Быстрая выпечка»
• Выпечка хлеба происходит быстрее, чем в программе «Классический», но хлеб, как правило,
получается меньше по объёму и с более плотной
текстурой.
ВНИМАНИЕ!
Выбрав программу 7, вливайте в форму для
выпечки (3) воду, температура которой 48-50 °С
(точность температуры воды измеряйте кухонным
термометром). Температура воды играет решающую роль при быстром приготовлении хлеба:
слишком низкая температура воды не позволит
тесту подняться вовремя, а чрезмерно высокая
приведет к гибели дрожжей.
-9- «Замес теста»
• Хлебопечь только замешивает тесто. Используйте
тесто для дальнейшего приготовления домашней
выпечки.
-10- «Дрожжевое тесто»
• Хлебопечь замешивает тесто и дает ему подняться. Используйте тесто для дальнейшего
Page 58

58
RU
приготовления домашней выпечки (пирожков,
пиццы и т.п.).
-11- «Тесто для пасты»
• С помощью этой программы вы можете приготовить тесто для макаронных изделий.
• Время работы программы 15 минут и состоит
только из цикла замешивания теста.
-12- «Тесто для пиццы»
• Программа для приготовления теста для пиццы.
Время работы программы 45 минут и состоит из
двух циклов замешивания и подъёма теста.
-13- «Йогурт»
• Программа приготовления йогурта (см. книгу
рецептов).
-14- «Джем»
• Используйте эту программу для приготовления
джема, конфитюра, мармелада или фруктового
желе.
-15- «Выпечка»
• Хлебопечь работает как обычная электрическая
духовка. Программа исключает режимы замеса
и подъема теста. Программа используется для
выпекания уже готового теста или дополнительного подрумянивания испеченного хлеба.
-16- «Ручная настройка»
• Программа «Ручная настройка» предназначена
для опытных пользователей, которые знакомы с
процессом приготовления теста и выпечкой хлеба,
в соответствии с собственными идеями, можно
установить временные циклы работы программы
выпечки хлеба. По мере освоения хлебопечки, Вы
можете создать и сохранить в памяти 8 собственных программ выпечки хлеба.
• Нажатиями кнопки выбора программ (9) «
выберите программу -16-.
• Нажмите кнопку (12) выбор цвета корочки « »,
чтобы выбрать пользовательское меню программ
1-8, программы отображаются на дисплее цифровыми символами (15).
• Для выбора пользовательской программы нажмите кнопку выбора программ (9) « », выберите
нужную пользовательскую программу 1-8.
• Нажатиями кнопки выбора веса (10) « »,
выберите цикл работы программы (14) в котором
необходимо изменить время её работы, стрелка
на дисплее показывает цикл работы: предварительный нагрев «
подъём 1 « » — замес 2 « » — замес 3 «
» — выпечка « » — подогрев « ».
• Выбрав нужный цикл работы программы, нажатием кнопок (11) регулировка времени « », Вы
можете установить время работы каждого цикла
программы (см. таблицу).
» — замес 1 « » —
»,
Page 59

59
RU
• Установив время работы цикла программы, нажатием кнопки выбора веса (10) « » перейдите к
установке времени работы следующего цикла (14)
работы программы выпечки.
• Для подтверждения установленной пользовательской программы нажмите кнопку старт/стоп/пауза
(13) « ».
• Для сброса пользовательских программ, одно-
временно нажмите и удерживайте в течение 1
секунды кнопку выбора программы (9) « » и
кнопку выбора веса (10) « », при этом все
пользовательские настройки сбросятся и восстановятся заводские настройки установленные по
умолчанию.
• В программе «ручная настройка», настройки
времени работы каждого цикла сохраняются в
памяти, настройки не изменяются до момента
следующего изменения времени работы цикла
программы или до восстановления заводских
настроек по умолчанию.
Таблица настройки времени работы циклов в программе «Ручная настройка»:
Цикл работы Время по умолчанию Диапазон установки времени
Предварительный нагрев
Замес 1
« »
Подъём 1
« »
Замес 2
« »
Подъём 2 «
Подъём 3 «
Выпечка
« »
« »
Подогрев
« »
»
»
0:15 0:00-0:20
0:13 0:00-0:15
0:25 0:20-0:40
0:12 0:00-0:20
0:30 0:00-1:00
0:30 0:00-1:00
1:00 0:00-1:20
1:00 0:00-1:00
Page 60

60
RU
КНОПКА ВЫБОРА ВЕСА (10) « »
• В зависимости от количества заложенных ингредиентов, кнопкой (10), Вы можете выбрать вес
выпечки — 900 г-1150 г-1350 г. Вес выпечки отображается индикацией (21) «900 г-1150 г-1350 г».
• Примечание: — в программах 9-10-11-12-13-14-
15 не предусмотрена установка выбора веса.
КНОПКА ВЫБОРА ЦВЕТА КОРОЧКИ (12) «
И РЕЖИМА БЫСТРОЙ ВЫПЕЧКИ (19) « »
• Нажатием на кнопку (12) «
выбрать необходимый цвет корочки, выбранный
цвет корочки отображается символами: — светлый (16) « » — средний (17) « » — тёмный
(18) « ».
• Символ (19) « » — это режим быстрой выпечки
в программах выпечки 1-2-3-4- (см. раздел РЕЖИМ БЫСТРОЙ ВЫПЕЧКИ.
• Примечание: — в программах -6-7-11- не пред-
усмотрен выбор цвета корочки.
КНОПКА СТАРТ/СТОП/ПАУЗА «
• Нажатием на кнопку старт/стоп/пауза (13)
», включается выбранная программа выпеч-
«
ки, при этом на дисплее разделительные точки
(24) будут мигать.
• Повторным нажатием на кнопку старт/стоп/пауза
(13) « » включается режим «пауза», при этом
», Вы можете
» (13)
на дисплее цифровые символы оставшегося
времени (23) работы будут мигать. Для продолжения работы программы выпечки, ещё раз нажмите
кнопку старт/стоп/пауза (13) «
• Для выключения программы выпечки, нажмите и
удерживайте кнопку старт/стоп/пауза (13) « »,
при этом прозвучит звуковой сигнал, и установ-
»
ленная программа выключится.
КНОПКИ УСТАНОВКИ ВРЕМЕНИ (11) «
• Если Вы хотите, чтобы хлебопечь не начала работать сразу, вы можете использовать кнопки (11)
» для установки времени отсрочки начала
«
работы программы выпечки.
• Обратите внимание, что время отсрочки должно
включать время работы программы выпечки (см.
таблицу времени работы программ), то есть, по
истечении времени отсрочки включится программа выпечки.
• Кнопкой выбора программ (9) « » выберите
нужную программу, которая будет отображаться
на дисплее цифровыми символами (15).
• Кнопкой выбора веса (10) « », установите вес
«900г-1150г-1350г» (13 21).
• Кнопкой выбора цвета корочки (12) « », выберите цвет корочки — светлый (16) « » — средний
(17) « » — тёмный (18) « ».
• Кнопками (11) « » установите время отсрочки
(обратите внимание, во время установки времени
».
»
Page 61

61
RU
отсрочки учитывайте время работы программы
выпечки), шаг установки 10 минут.
• Максимальное время отсрочки составляет 15
часов.
• Время отсрочки будет отображаться на дисплее
цифровыми значениями (23).
Пример:
Сейчас 8 часов утра, вы хотите, чтобы хлеб приготовился через 7 часов в 15 часов дня.
• выберите программу выпечки, например, -1-, вес
выпечки -900 г, цвет корочки — средний, время
работы этой программы 3 часа, нажатием кнопок
(11) «
», установите на дисплее время
отсрочки 7:00.
• Нажмите кнопку (13) старт/стоп/пауза « », для
Таблица времени работы программ:
№ про-
граммы
Название про-
граммы
1 Классический
Цвет корочки Вес
Светлый 900г 3:00 15:00
Тёмный 1350г 3:15 15:00
Быстрый
включения функции отсрочки, при этом на дисплее будут мигать разделительные точки (24).
• Для отмены функции отсрочки нажмите и удерживайте кнопку (13) старт/стоп/пауза « », при этом
прозвучит звуковой сигнал, и программа отсрочки
выключится.
• По истечении времени отсрочки включится установленная программа выпечки.
• Если Вы не сразу достанете готовый хлеб, то
включится функция подогрева, время работы
функции подогрева 60 минут.
• Для выпечки с отсрочкой по времени не используйте скоропортящиеся ингредиенты, такие как
яйца, свежее молоко, фрукты, лук и т.п.
• Примечание: — функция отсрочки недоступна
для программ: — 9-11-13-14-15.
Время работы
программы
900г 2:15 15:00
1350г 2:25 15:00
Время отложен-
ного старта
Добавление
ингредиентов
+Средний 1150г 3:05 15:00
+1150г 2:20 15:00
Page 62

62
RU
2 Французский
3 Цельнозерновой
4 Сладкий
5 Диетический
6 Безглютеновый
Светлый 900г 3:10 15:00
Тёмный 1350г 3:25 15:00
900г 2:20 15:00
Быстрый
1350г 2:30 15:00
Светлый 900г 3:20 15:00
Тёмный 1350г 3:35 15:00
900г 2:25 15:00
Быстрый
1350г 2:35 15:00
Светлый 900г 2:55 15:00
Тёмный 1350г 3:10 15:00
900г 2:10 15:00
Быстрый
1350г 2:20 15:00
Светлый 900г 3:09 15:00
Тёмный 1350г 3:33 15:00
Светлый 900г 3:40 15:00
Тёмный 1350г 3:55 15:00
+Средний 1150г 3:15 15:00
+1150г 2:25 15:00
+Средний 1150г 3:25 15:00
+1150г 2:30 15:00
+Средний 1150г 3:00 15:00
+1150г 2:15 15:00
+Средний 1150г 3:21 15:00
+Средний 1150г 3:45 15:00
Page 63

63
RU
Светлый 900г 1:15 15:00
7 Быстрая выпечка
Тёмный 1350г 1:20 15:00
Светлый 900г 1:30 15:00
8 Кекс
Тёмный 1350г 1:40 15:00
9 Замес теста - - 0:10 - -
10 Дрожжевое тесто - - 1:40 15:00 +
11 Тесто для пасты - - 0:15 - -
12 Тесто для пиццы - - 0:45 15:00 13 Йогурт - - 8:00 — 12:00 - 14 Джем - - 1:20 - -
Светлый
15 Выпечка
Тёмный
16 Ручная настройка
- 1:00 - -Средний
По умолчанию
3:05
Время циклов
работы, уста-
навливается
пользователем
15:00 +
-Средний 1150г 1:18 15:00
-Средний 1150г 1:35 15:00
Page 64

64
RU
ФУНКЦИЯ ПОДОГРЕВА
• По истечении времени работы программы выпечки включится функция подогрева, время работы
функции подогрева 60 минут.
• Если вы хотите вынуть хлеб, выключите функцию
подогрева нажатием кнопки (13) старт/стоп/пауза
« ».
ФУНКЦИЯ ПАМЯТЬ
• При аварийном отключении электроэнергии во
время работы хлебопечки, активируется функция
памяти продолжительностью до 10 минут.
• При восстановлении электропитания в течение
10 минут хлебопечка продолжит работу установленной программы с момента, когда работа
программы была приостановлена.
• В случае отсутствия электропитания более 10
минут необходимо заново загрузить ингредиенты,
установить программу и включить хлебопечку.
ЦИКЛЫ РАБОТЫ ХЛЕБОПЕЧКИ
• Циклы работы отображаются символами (14):
- предварительный нагрев «
замешивания теста « », 3 цикла подъёма
теста «
подогрев «
, , », выпечка « »,
».
», 2 цикла
УДАЛЕНИЯ ЛОПАСТЕЙ ДЛЯ ЗАМЕШИВАНИЯ
ТЕСТА (4)
• Данная функция является необязательной, но
она связана с более лёгким извлечением готового
хлеба из формы для выпечки (3), при отсутствии
лопастей (4) на готовом хлебе будут только маленькие отверстия от приводных осей.
• Во втором цикле замешивания теста « » прозвучат звуковые сигналы, и на дисплее отобразится
мигающий символ (22) «RMV», нажмите кнопку
старт/стоп/пауза (13) «
работы программы выпечки на 10 минут, при этом
цифровые символы времени работы (23) будут
мигать.
• Откройте крышку (5), выньте форму (3), выньте из
формы (3) тесто, выньте лопасти (4), поместите
тесто обратно в форму (3), установите форму (3)
на место, закройте крышку (5).
• Для продолжения работы программы выпечки
нажмите кнопку старт/стоп/пауза (13) « »,
программа включится по прошествии 10 минутной
паузы.
• Примечание: — функция удаления лопастей для
замешивания теста (4) не доступна в программах
7-8-9-11-12-13-14-15.
» для приостановки
Page 65

65
RU
ВАЖНЫЕ РЕКОМЕНДАЦИИ ПО ИНГРЕДИЕНТАМ ДЛЯ ВЫПЕЧКИ
Мука
• Мука является важнейшим компонентом приготовления хлеба.
• Свойства муки определяются не только сортом,
но и условиями выращивания зерна, способом
обработки и хранения. Пробуйте печь хлеб из
муки разных производителей и марок и найдите
ту, которая удовлетворяет вашим потребностям.
• Пшеничная и ржаная мука являются основными
видами хлебопекарной муки.
• Пшеничная мука находит более широкое применение, что обусловлено приятными вкусовыми качествами и высокой пищевой ценностью изделий
из пшеничной муки.
Хлебопекарная мука
• Хлебопекарная (рафинированная) мука, состоящая только из внутренней части зерна, содержит
максимальное количество клейковины, которая
обеспечивает эластичность мякиша и предотвращает опадание хлеба.
• Выпечка из хлебопекарной муки получается
более пышной.
Цельнозерновая мука (обойная)
• Цельнозерновую (обойную) муку получают путем
перемалывания цельных зерен пшеницы вместе с
оболочкой. Этот сорт муки отличается повышенной питательной ценностью.
• Цельнозерновой хлеб обычно получается меньшего размера. Для улучшения потребительских
свойств хлеба цельнозерновую муку часто смешивают с хлебопекарной.
Кукурузная и овсяная мука
• Для улучшения текстуры хлеба и придания ему
дополнительных вкусовых качеств смешивайте
пшеничную или ржаную муку с кукурузной или
овсяной.
Сахар
• Сахар обогащает выпечку дополнительными
вкусовыми оттенками и придает хлебу золотистый
оттенок.
• Сахар является питательной средой для роста
дрожжей. Добавляйте в выпечку не только рафинированный, но и коричневый сахар, а также
сахарную пудру.
Дрожжи
• Рост дрожжей сопровождается выделением углекислого газа, который способствует образованию
пористого мякиша.
Page 66

66
RU
• Мука и сахар являются питательной средой для
роста дрожжей. Добавляйте свежие прессованные
или быстродействующие сухие дрожжи. Свежие
прессованные дрожжи растворяйте в теплой жидкости (воде, молоке и т.п.), быстродействующие
дрожжи добавляйте в муку (не требуют предварительной активации, т.е. добавления воды).
• Следуйте рекомендациям на упаковке или соблюдайте следующие пропорции: 1 чайная ложка
быстродействующих сухих дрожжей = 1,5 чайной
ложки свежих прессованных дрожжей.
• Храните свежие дрожжи в холодильнике. Высокая
температура убивает дрожжи, и в этом случае
тесто поднимается плохо.
Соль
• Соль придает хлебу дополнительный вкус и цвет,
но замедляет рост дрожжей.
• Не используйте чрезмерное количество соли.
Всегда используйте мелкую соль (крупная соль
может повредить антипригарное покрытие формы
для выпечки).
Яйца
• Яйца улучшают структуру и объем выпечки,
обогащают вкус.
• Перед добавлением яиц в тесто, рекомендуется
их тщательно взбить.
Животные и растительные жиры
• Животные и растительные жиры делают выпечку
мягче и увеличивают срок хранения.
• Прежде чем добавить сливочное масло, его следует порезать на небольшие кубики и подогреть
до комнатной температуры.
Пекарский порошок и сода
• Сода и пекарский порошок (разрыхлитель) укорачивают время, необходимое для подъема теста.
• Используйте разрыхлитель или соду при использовании программы -7- «Быстрая выпечка».
• Соду необходимо предварительно смешать с лимонной кислотой и небольшим количеством муки
(5 г пищевой соды, 3 г лимонной кислоты и 12 г
муки). Это количество порошка (20 г) рассчитано
на 500 г муки.
• Не используйте для гашения соды уксус, использование уксуса делает мякиш более влажным и
менее однородным.
• Пекарский порошок (разрыхлитель) просто засыпьте в форму, следуя указаниям в рецепте.
Вода
• Температура воды играет важную роль при
выпечке хлеба.
• Оптимальная температура воды составляет от 20
до 25 °С, для программы -7- «Быстрая выпечка»
от 45 до 50 °С.
Page 67

67
RU
• Можно заменить воду молоком или обогатить вкус
хлеба, добавив некоторое количество натурального сока.
Молочные продукты
• Молочные продукты улучшают питательную ценность и вкус хлеба. Хлебный мякиш получается
более красивый и аппетитный.
• Используйте свежие молочные продукты или
сухое молоко.
Вес ингредиентов
• Одним из важных условий для приготовления
хлеба, является использование точного количества ингредиентов.
• Настоятельно рекомендуется использовать
кухонные весы, мерный стаканчик (25) и мерную
ложку (27), чтобы отмерить точное количество
ингредиентов, в противном случае готовый хлеб
может не удовлетворить вашу потребность.
• Наполните мерный стакан (25) жидкостью до
соответствующей отметки. Проверьте дозировку,
установив стакан (25) на ровной поверхности.
• Тщательно очищайте мерный стакан (25) от остатков предыдущего ингредиента.
• Сухие ингредиенты не уплотняйте, насыпая их в
мерный стакан (25).
• Важно перед использованием, просеивать муку
через сито для насыщения её воздухом, это
гарантирует наилучший результат выпечки.
ПОРЯДОК ЗАКЛАДКИ ИНГРЕДИЕНТОВ В
ФОРМУ ДЛЯ ВЫПЕЧКИ (РИС. 1)
• Необходимо соблюдать последовательность
закладки ингредиентов в форму для выпечки (3).
• Рекомендуется следующая последовательность:
- жидкие ингредиенты, яйца, соль, растительное
или сливочное масло, сухое молоко и т.п.;
- мука; мука не должна полностью смачиваться
жидкими ингредиентами;
- дрожжи можно класть только на сухую муку,
дрожжи не должны соприкасаться с солью;
- сделайте небольшое углубление в муке и поместите дрожжи в углубление.
ДОБАВЛЕНИЕ ИНГРЕДИЕНТОВ
• Вы можете добавлять необходимые ингредиенты
(орехи, сухофрукты и т.п.) во время второго замешивания теста, при этом в нужный момент прозвучат звуковые сигналы, на дисплее отобразится
символ (20) «ADD», откройте крышку (5), добавьте
необходимые ингредиенты, закройте крышку (5).
• Если Вы используете функцию отсрочки в течение
длительного времени, никогда не добавляйте
скоропортящиеся ингредиенты, такие как яйца,
фруктовые ингредиенты.
Page 68

68
RU
ВЫПЕЧКА ХЛЕБА
• Перед включением хлебопечки в сеть убедитесь,
что рабочее напряжение устройства соответствует напряжению в электрической сети.
• Откройте крышку (5) и выньте форму для выпечки
(3).
• Убедитесь, что лопасти (4), установлена на место.
• Примечание: — перед установкой лопастей (4) их
желательно смазать сливочным маслом, маргарином или растительным маслом, это облегчит их
извлечение из свежевыпеченного хлеба.
• Поместите ингредиенты в форму (3) в той
последовательности, которая описана в рецепте.
Обычно ингредиенты помещаются в следующей
последовательности (рис. 1):
1. Жидкие ингредиенты.
2. Мука, сыпучие ингредиенты (сахар, соль).
3. Дрожжи и разрыхлитель. Сделайте небольшое
углубление в муке и поместите дрожжи или
разрыхлитель в углубление.
• Просыпавшиеся продукты или пролившиеся жидкости удалите с внешней поверхности формы (3).
• Установите форму (3) на место и нажмите на неё
сверху вниз до фиксации, убедитесь в надёжной
фиксации формы (3).
• Закройте крышку (5).
• Вставьте вилку шнура питания в электрическую
розетку, при этом прозвучит звуковой сигнал и на
дисплее отобразятся цифровые символы (15) про-
граммы выпечки -1-, цифровые символы времени
работы программы (23) «3:05», разделительные
точки (24) будут светиться постоянно.
• Индикация цвета корочки (17) — средняя «
• Индикация веса (21) «1150 г».
• Данные настройки, установлены по умолчанию.
• Нажатием кнопки выбора программ (9) « »,
Вы можете выбрать одну из 16 программ, номер
программы отображается на дисплее цифровыми
символами (15).
• В зависимости от количества заложенных ингредиентов, кнопкой (10) « », Вы можете выбрать
вес выпечки (21). Вес выпечки отображается
индикацией «900 г — 1150 г -1350 г».
• Нажатием на кнопку (12) « », Вы можете выбрать необходимый цвет корочки, выбранный цвет
корочки отображается символами (12) «СВЕТЛЫЙ-СРЕДНИЙ-ТЁМНЫЙ» — светлый (16) «
» — средний (17) « » — тёмный (18) « ».
• Символ (19) « » это режим быстрой выпечки в
программах выпечки -1-2-3-4 (см. раздел РЕЖИМ
БЫСТРОЙ ВЫПЕЧКИ.
• Установите время отсрочки приготовления
нажатиями кнопок (11) « » (см. описание в
разделе «ПАНЕЛЬ УПРАВЛЕНИЯ»).
• Примечание: — пропустите установку времени
отсрочки, если хотите начать работу установлен-
».
Page 69

69
RU
ной программы выпечки немедленно.
• Нажмите кнопку (13) старт/стоп/пауза « » для
включения программы выпечки, при этом на
дисплее разделительные точки (24) будут мигать,
цифровыми символами (23) будет показано время, оставшиеся до окончания работы программы
выпечки.
• Циклы работы хлебопечки отображаются индикацией (14).
• Совет: — после 5 минутного замешивания теста,
рекомендуется проверить его консистенцию.
Тесто должно представлять мягкий, липкий комок,
если комок теста очень сухой, добавьте в него
немного жидкости, если комок теста слишком
влажный, добавьте немного муки (от 1/2 до 1
чайной ложки или по мере необходимости).
• Процесс выпечки хлеба можно контролировать
через смотровое окно (6) в крышке (5).
ВНИМАНИЕ!
Во время работы программы выпечки никогда
не открывайте крышку (5), при резком изменении температуры тесто может опасть и уже не
поднимется.
• После завершения программы выпечки прозвучат
звуковые сигналы и включится функция подогрев,
время работы функции подогрев 60 минут.
• Для отмены функции подогрева и выключения
хлебопечки, нажмите и удерживайте кнопку (13)
старт/стоп/пауза « » в течение 3 секунд.
• Выньте вилку шнура питания из электрической
розетки.
• Откройте крышку (5), используя термостойкие
кухонные прихватки, приподнимите и возьмитесь
за ручку (8), потяните за ручку (8) по направлению
вверх и выньте форму (3) из хлебопечки.
• Дайте форме остыть, приблизительно 10-15
минут.
• Отделите выпечку от стенок формы (3), используя
пластиковую кухонную лопатку.
• Запрещается использовать металлические предметы, которые могут повредить антипригарное
покрытие формы (3).
• Для извлечения выпечки переверните форму (3) и
потрясите её.
• Перед нарезкой хлеба выньте лопасти (4) при
помощи крючка (26).
• Режьте хлеб острым хлебным ножом.
• После использования промойте форму (3) и лопа-
сти (4) тёплой водой с использованием нейтрального моющего средства, ополосните и просушите.
Установите лопасти (4) в форму (3), установите
форму (3) в хлебопечку, закройте крышку (5).
Page 70

70
RU
ЧИСТКА И УХОД
• Выключите хлебопечку, выньте вилку шнура питания из электрической розетки, откройте крышку
(5) и дайте хлебопечке остыть.
• Выньте форму для выпечки (3).
• Протрите корпус (1) и крышку (5) слегка влажной
тканью, после чего вытрите насухо.
• Форму для выпечки (3), лопасти (4), мерный
стакан (25), крючок (26) и ложку (27) промойте
теплой водой с нейтральным моющим средством,
ополосните и просушите.
• Примечание: — если лопасти (4) не снимаются
с оси, наполните форму (3) теплой водой и подождите около 20-30 минут.
• Не используйте металлические предметы или
мочалки, абразивные чистящие средства и растворители для чистки хлебопечки и формы для
выпечки (3).
• Тщательно просушите форму для выпечки (3)
и лопасти (4), прежде чем устанавливать их в
хлебопечку.
• При наличии загрязнений на внутренней поверхности хлебопечки, удалите загрязнения и
протрите поверхность слегка влажной тканью,
после чего вытрите насухо.
• Не погружайте корпус хлебопечки, шнур питания
и вилку шнура питания в воду или любые другие
жидкости.
ХРАНЕНИЕ
• Прежде чем убрать хлебопечь на длительное
хранение, отключите ее от электросети, дайте
устройству остыть и слейте воду.
• Проведите чистку хлебопечки.
• Храните хлебопечь в местах, недоступных для
детей и людей с ограниченными возможностями.
КОМПЛЕКТ ПОСТАВКИ
1. Хлебопечка — 1 шт.
2. Мерный стакан — 1 шт.
3. Крючок — 1 шт.
4. Мерная ложка — 1 шт.
ТЕХНИЧЕСКИЕ ХАРАКТЕРИСТИКИ
• Электропитание: 220-240 В ~ 50-60 Гц
• Номинальная потребляемая мощность: 850 Вт
Page 71

71
RU
Перед обращением в сервисный центр.
Неисправность Возможная причина Способ устранения
Отключите хлебопечь и выньте вилку
Хлебопечь не включается. На дисплее
отображаются символы «HHH».
Если при включении хлебопечки, на дисплее отображаются символы «LLL».
Если при включении хлебопечки, на дисплее отображаются символы «EE0».
Хлебопечь еще не остыла после предыдущей выпечки.
Температура внутри хлебопечки очень
низкая.
Сбой в работе.
шнура питания из электрической
розетки. Выньте форму для выпечки и
дайте хлебопечке остыть до комнатной
температуры.
Отключите хлебопечь и выньте вилку
шнура питания из электрической розетки. Откройте крышку хлебопечки, выньте
форму для выпечки и дайте устройству
прогреться до комнатной температуры в
течение 10 — 20 минут.
Выключите хлебопечку и выньте
вилку шнура питания из электрической
розетки, подождите некоторое время
и снова включите хлебопечку, если
символы «EE0» не погасли, в этом
случае обратитесь в авторизованный
сервисный центр.
Таблица неисправностей и недостатков при выпечке хлеба и рекомендации
по их устранению в дальнейшем.
Неисправность/
Недостаток
Дым из отверстий в
крышке при выпекании
хлеба
Возможная причина Способ устранения
"При первом использовании хлебопечки,
обгорает поверхность нагревательного
элемента.
Попадание ингредиентов на нагревательный элемент."
"Перед первым использованием хлебопечки включите её на 10-15 минут с открытой крышкой.
Отключите хлебопечку, дождитесь её остывания,
очистите нагревательный элемент. "
Page 72

72
RU
Толстая корка хлеба.
Лопасти для замешивания, не вынимается из
формы для выпечки.
Ингредиенты неравномерно перемешиваются и
плохо выпекаются.
Слышен звук работы
электромотора, но тесто
не перемешивается.
Во время выпечки, хлеб
переполняет форму для
выпечки.
Размер хлеба слишком
мал или хлеб не поднимается.
Готовый хлеб оставался в форме для
выпечки и потерял много влаги.
Тесто попало в зазор между приводным
валом и лопастию для замешивания
теста.
Установленная программа не подходит к
этому набору ингредиентов.
Во время работы программы выпечки,
несколько раз открывалась крышка
хлебопечки, тесто опало и больше не
поднялось.
Малое количество жидких ингредиентов,
лопасти для замешивания теста не способна замесить тесто для выпечки.
Форма для выпечки неправильно
установлена.
В тесто добавлено очень много муки.
Неправильное соотношение количества
дрожжей, муки и жидких ингредиентов.
Температура жидких ингредиентов или
окружающей среды слишком высокая.
Отсутствие дрожжей или недостаточное их количество. Плохое качество
дрожжей, высокая температура жидких
ингредиентов.
Дрожжи вступили в контакт с солью.
Низкая температура в помещении.
Вынимайте готовый хлеб из формы, сразу после
выпечки.
После того, как вы вынули хлеб из формы, залейте
форму для выпечки тёплой водой. Через 20-30 минут
выньте лопасти.
Выбирайте программу выпечки, которая соответствует заложенным в форму для выпечки ингредиентам.
Не открывайте крышку хлебопечки.
Проверьте соответствие заложенных ингредиентов.
Выньте форму для выпечки и попробуйте рукой про-
крутить лопасти для выпечки, если это не удаётся,
обратитесь в авторизованный сервисный центр.
Проверьте правильность установки формы для
выпечки и правильность рецепта для выпечки.
Всегда точно отмеряйте количество ингредиентов,
используя кухонные весы и мерный стакан.
Всегда проверяйте правильность соотношения
ингредиентов их температуру и температуру в
помещении.
Используйте хлебопечку при температуре окружающей среды в пределах от +15 до +34 °С.
Не используйте дрожжи с прошедшем сроком
годности.
Отмеряйте точное количество дрожжей, используя
мерную ложку.
Не допускайте соприкосновение дрожжей с солью.
Используйте хлебопечку при температуре окружаю-
щей среды в пределах от +15 до +34 °С.
Page 73

73
RU
Хлеб сильно растрескивается при выпечке.
Структура выпеченного
хлеба очень плотная.
Внутри готового хлеба
очень большие полости.
На корочке хлеба много
сухой муки.
Очень тёмная корка хлеба
или кекса.
Используемая мука содержит очень
мало клейковины.
Очень высокая скорость роста дрожжей
или высокая температура жидких
ингредиентов.
Неправильное соотношение муки и
жидких ингредиентов.
Использовалось слишком много цельной
пшеничной муки.
Избыток жидких ингредиентов, воды или
не добавлена соль.
Повышенная температура жидких
ингредиентов.
Использовалась мука с повышенным
количеством клейковины, и недостаточное количество масла.
Малое количество жидких ингредиентов.
Из-за избыточного количества сахара,
корка хлеба или кекса может подгореть.
Используйте проверенную марку хлебной муки.
Используйте проверенную марку дрожжей и соблю-
дайте температуру жидких ингредиентов.
Добейтесь правильного соотношения муки и жидких
ингредиентов.
Уменьшите количество цельной муки и увеличьте
количество дрожжей.
Выбирайте правильное соотношение ингредиентов.
Всегда проверяйте температуру жидких ингреди-
ентов.
Используйте муку с нормальным количеством клейковины и добавляйте масло.
Добавляете точное количество жидких ингредиентов
в соответствии с рецептом.
Добавляйте точное количество сахара в соответствие с рецептом.
Если вы заметили, что хлеб или кекс начинает подгорать, рекомендуется прервать программу выпечки за
5-10 минут до её окончания. Перед тем, как вынуть
готовый продукт, рекомендуется оставить его в хлебопечке на 15-20 минут при закрытой крышке.
Page 74

74
RU
УТИЛИЗАЦИЯ
вместе с обычными бытовыми отходами, передайте
прибор и элементы питания в специализированные
пункты для дальнейшей утилизации.
Отходы, образующиеся при утилизации изделий,
подлежат обязательному сбору с последующей
утилизацией в установленном порядке.
Для получения дополнительной информации об
утилизации данного продукта обратитесь в местный
муниципалитет, службу утилизации бытовых отходов
или в магазин, где Вы приобрели данный продукт.
Производитель сохраняет за собой право изменять дизайн, конструкцию и технические характеристики, не влияющие на общие принципы работы
устройства, без предварительного уведомления.
Срок службы устройства — 3 года
Дата производства указана в серийном номере.
В случае обнаружения каких-либо неисправностей
необходимо обратиться в авторизированный сервисный центр.
Чтобы предотвратить возможный вред
окружающей среде или здоровью
людей от неконтролируемой утилизации
отходов, после окончания срока службы
устройства или элементов питания (если
входят в комплект) не выбрасывайте их
Page 75

KZ
KZ
75
НАН ПІСІРЕТІН ПЕШ BR2701
Үйде нан пісіретін пеш нан, кекстер пісіруге,
қамыр илеуге, джем немес йогурт зірлеуге
арналған.
СИПАТТАМАСЫ
1. Корпусы
2. Басқару панелі
3. Пісіруге арналған қалып
4. Қамыр илеуге арналған қалақтар
5. Қақпақ
6. Қарау терезесі
7. Ыстық ауа шығатын тесіктер
8. Пісімеге арналған қалып тұтқасы
Басқару панелі
9. Бағдарламаны таңдау батырмасы «
10. Салмақты таңдау батырмасы « »
11. Уақытты кейінге қалдыруды/бағдарламалар
жұмысы циклының уақытын орнату батырмалары « »
12. Қыртыс түсін таңдау батырмасы/жылдам пісіру
режимін қосу батырмасы « »
13. Старт/тоқтау/кідіріс батырмасы « »
»
Дисплей және таңбалар
14. Пісірме бағдарламасының жұмысы циклдарының таңбалары
15. Пісірме бағдарламаларының 1-16/пайдаланушы
бағдарламаларының 1-8 цифрлық таңбалары
16. Қыртыс түсінің таңбасы — ақшыл «
17. Қыртыс түсінің таңбасы — орташа « »
18. Қыртыс түсінің таңбасы — күңгірт « »
19. Жылдам пісірме режимінің таңбасы « »
20. Ингредиенттерді қосу мүмкіндігінің таңбасы
«ADD»
21. Салмақ таңбасы «900 г — 1150 г — 1350 г»
22. 10 минуттық кідіріс таңбасы «RMV»
23. Бағдарлама жұмысы уақытының/кейінге қалды-
рылған старт уақытының цифрлық таңбалары
24. Бөлу нүктелері
Аксессуарлар
25. Өлшеуіш стақан
26. Қалақты алуға арналған ілгек
27. Өлшеуіш қасық
НАЗАР АУДАРЫҢЫЗ!
Қосымша қорғаныс үшін қоректендіру тізбегінде
номиналдық іске қосылу тогы 30 мА аспайтын
қорғаныс сөндіру құралын (ҚСҚ) орнатқан дұрыс,
ҚСҚ-ны орнату үшін маманға жүгініңіз.
»
Page 76

76
KZ
6
5
4
9 10
20 22 25 26 27
3
2
7
14 14
8
1615
17 18 19
1
21
11 12 13
23
24
Ашытқы
Ұн
Сұйық ингредиенттер
Сур. 1
Page 77

77
KZ
ҚАУІПСІЗДІК ШАРАЛАРЫ ЖӘНЕ ПАЙДАЛАНУҒА БЕРУ БОЙЫНША КЕҢЕСТЕР
Нан пісіретін пеш пайдалану алдында пайдалану
нұсқаулығын мұқият оқып шығыңыз, оқыған соң
болашақта пайдалану үшін сақтап қойыңыз.
• Нан пісіретін пеш осы нұсқаулықта көрсетілгендей
тікелей мақсатына бойынша ғана пайдаланыңыз.
• Нан пісіретін пеш дұрыс қолданбау оның бұзылуына, және пайдаланушыға немесе оның мүлкіне
зиян келтіруге әкеп соғуы мүмкін және кепілдік
жағдайы болып саналмайды.
• Заттаңбада көрсетілген нан пісіретін пеш ң жұмыс
кернеуі электр желісінің кернеуіне сәйкес екеніне
көз жеткізіңіз.
• Қуаттандыру бауы айырының тұйықтандыру
байланысы бар, оны тұйықтандырудың сенімді
байланысы бар электрлік розеткаға қосыңыз.
Қысқа матасу кезінде тұйықтандыру электрлік ток
соғу қаупін төмендетеді.
• Егер розетканың дұрыс орнатылғанына және жерге қосуына сенімді болмасаңыз, электр маманына
хабарласыңыз.
• Өрттің шығуын болдырмау үшін жерге қосу
түйісуі жоқ электр розеткасына қосуға арналған,
желілік айыр «өткізгіштерін» пайдалануға тыйым
салынады.
• Күйік иісі және от ұшқыны пайда болған кезде, розеткадан желі бауының айырын шығарыңыз және
үйдің электр желісіне қызмет көрсететін ұйымға
хабарласыңыз.
• Нан пісіретін пеш корпусынан түтін шыққан кезде
қуаттандыру бауының айырын электрлік розеткадан шығарыңыз және от таралмауға қатысты
шараларды қолданыңыз.
• Нан пісіретін пеш үй-жайдан тыс жерде пайдалануға тыйым салынады.
• Найзағай кезінде құралды пайдалануға кеңес
берілмейді.
• Құралды соққыдан, құлаудан, дірілден және басқа
да механикалық әсерлерден сақтаңыз.
• Нан пісіретін пеш қабырғалардың қасында немесе
асүйлік жиһаз қабырғаларына таяу орналастыруға
тыйым салынады.
• Нан пісіретін пеш қабырғадан немесе жиһаздан
нан пісіретін пеш қа дейін кемінде 20 см аралық
болатындай, ал нан пісіретін пеш ң үстіндегі бос
кеңістік кемінде 50 см құратындай етіп орналастыру керек.
• Желіге қосулы тұрған нан пісіретін пеш қараусыз
қалдырмаңыз.
• Нан пісіретін пеш ас үй раковинасына жақын,
жуынатын бөлмеде, бассейндер немесе басқа да
су толтырылған сыйымдылықтарға жақын жерде
пайдалануға болмайды.
• Нан пісіретін пеш жылытатын аспаптардың, ашық
оттың немесе жылу көздерінің тікелей қасында
пайдалануға болмайды.
Page 78

78
KZ
• Нан пісіретін пеш аэрозольдар пайдаланылатын
немесе шашырайтын жерлерде, сондай-ақ тез
тұтанатын сұйықтықтарға жақын жерлерде пайдалануға тыйым салынады.
• Нан пісіретін пеш тегіс және тұрақты бетке
орнатыңыз, оны үстелдің шетіне қоймаңыз.
Желілік бауының үстелден салбырап тұруына жол
бермеңіз, сонымен бірге оның ыстық беттермен
және жиһаздың үшкір жиектерімен жанаспауын
қадағалаңыз.
• Жұмыс кезінде нан пісіретін пештің ыстық бетіне
тиіспеңіз.
• Нан пісіретін пештің қақпағындағы желдеткіш
тесіктерін жаппаңыз.
• Нан пісіретін пештің жұмысы кезінде қақпағын
ашық қалдырмаңыз.
• Дайын нанды алып жатқанда, пісірмеге арналған
қалып тұтқасынан ұстаңыз, термотөзімді асүйлік
қолғаптарды қолданыңыз.
• Пісірмеге арналған қалыптың күюге қарсы жабынының бүлінуін болдырмау үшін нанды алу барысында металл заттарды пайдаланбаңыз, қалыпты
аударыңыз және одан дайын нанды сілкіңіз.
• Пісірме бойынша ұсынымдарды сақтамаған
жағдайда, нанның күюі және түтіннің пайда болуы
мүмкін.
• Нан пісіретін пешті тазаламас бұрын пісірмеге
арналған қалыпты шығарыңыз және аспаптың
толық суығанын күтіңіз.
• Қайнаған суға толы нан пісіретін пеш тасымалдаған кезде сақ болыңыз. Нан пісіретін пеш суын
төккенде абайлаңыз, нан пісіретін пеш күрт еңкейтпеңіз, нан пісіретін пеш ұқыпсыз пайдаланғанда,
сіз ыстық суға күйіп қалуыңыз мүмкін.
• Нан пісіретін пеш тазалау алдында немесе
пайдаланбайтын болған жағдайда, оны электр
желісінен ажыратыңыз. Нан пісіретін пеш желіден
ажыратқан кезде тек айырынан ұстаңыз және оны
электр розеткасынан абайлап шығарыңыз, сымнан тартпаңыз — бұл сымның және розетканың
зақымдануына әкелуі және қысқа тұйықталуын
тудыруы мүмкін.
• Электр тогының соғу қаупін болдырмас үшін нан
пісіретін пеш суға немесе кез-келген басқа да
сұйықтыққа салуға болмайды.
• Нан пісіретін пеш ыдыс жуатын машинаға салуға
тыйым салынады.
• Балалардың қауіпсіздігі мақсатында орама
ретінде қолданылатын полиэтилен қапшықтарды
қараусыз қалдырмаңыз.
НАЗАР АУДАРЫҢЫЗ! Балаларға полиэтилен
пакеттерімен немесе қаптама үлдірімен ойнауға
рұқсат етпеңіз. Тұншығу қаупі бар!
• Электрлік нан пісіретін пеш балалардың пайдалануына арналмаған.
Page 79

79
KZ
• Аспапты ойыншық ретінде пайдаланбас үшін
балаларды қадағалап отырыңыз.
• Электрлік нан пісіретін пеш жұмыс істеп тұрғанда,
балаларға қуаттандыру бауына және құралға
тиісуіне балаларға рұқсат бермеңіз.
• Жұмыс кезінде және жуу кезінде құралды балалардың қолы жетпейтін жерге қойыңыз.
• Осы құрал дене, психикалық немесе ақыл-ой
мүмкіндіктері төмендетілген тұлғалардың
• (балаларды қоса) немесе олардың тәжірибесі
немесе білімі болмаса, егер олар бақыланбаса
немесе олардың қауіпсіздігі үшін жауап беретін
тұлғамен аспапты пайдалану туралы нұсқаулықтар берілген болмаса, олардың пайдалануына
арналмаған.
• Қуаттандыру бауының желі айыры және нан
пісіретін пеш корпусының жағдайын мезгілімен
тексеріңіз.
• Қуаттандыру бауы зақымданғанда қауіп тудырмау
үшін оны дайындаушы, сервистік қызмет немесе
баламалы білікті маман ауыстыруы тиіс.Аспапты
өз бетіңізбен жөндеуге тыйым салынады. Аспапты
өз бетіңізбен жөндемеңіз, кез-келген ақаулықтар
пайда болған кезде, сондай-ақ құрал құлағаннан
кейін аспапты электр розеткасынан ажыратып,
қызмет көрсету орталығына хабарласыңыз.
• Құралды тек зауыт қаптамасымен ғана тасымалдаңыз.
• Құралды балалардың және мүмкіндіктері шектеулі
адамдардың қолы жетпейтін жерде сақтаңыз.
НАН ПІСІРЕТІН ПЕШ ТЕК ТҰРМЫСТЫҚ ПАЙДАЛАНУҒА АРНАЛҒАН, КОФЕҚАЙНАТҚЫШТЫ КОМЕРЦИЯЛЫҚ НЕМЕСЕ ЗЕРТХАНАЛЫҚ МАҚСАТТАРДА ПАЙДАЛАНУҒА ТЫЙЫМ САЛЫНАДЫ.
НАН ПІСІРЕТІН ПЕШ ЖҰМЫСҚА ДАЙЫНДАУ
Құралды төмен температура кезінде тасымалдағаннан немесе сақтағаннан кейін оны бөлме
температурасында 3 сағаттан кем емес уақыт
ұстау керек.
• Нан пісіретін пеш қаптамадан шығарыңыз және
барлық қаптамалық материалдарды алып тастаңыз.
• Зауыттық қаптамасын сақтап қойыңыз.
• Қауіпсіздік шаралары мен пайдалануға беруге
қатысты кеңестермен танысыңыз.
• Жинақталымын тексеріңіз.
• Нан пісіретін пеш зақымдануына қатысты тексеріп
алыңыз, зақымдануы болған жағдайда оны электрлік желіге қоспаңыз.
• Заттаңбада көрсетілген қуаттандыру кернеуінің
параметрлері электр желісінің параметрлеріне
сәйкес келетініне көз жеткізіңіз.
• Корпустың (1) сыртқы бетін таза, шаңды сүртуге
арналған сәл дымқыл матамен сүртіңіз.
Page 80

80
KZ
• Қақпақты (5) ашыңыз.
• Көтеріңкіреңіз және пісіруге арналған қалып
(3) тұтқасынан (8) ұстаңыз, тұтқаны (8) жоғары
бағытқа тартыңыз және қалыпты (3) шығарыңыз.
• Қалыпты (3), қалақты (4), өлшеуіш стақанды (25),
ілгекті (26), өлшеуіш қасықты (27) бейтарап жуу
құралын пайдаланып жылы сумен жуып жіберіңіз,
шайыңыз және кептіріңіз.
• Пісірмеге арналған қалыпты (3) орнына орнатыңыз, оны бекітілгенге дейін жоғарыдан төмен
басыңыз, қалыптың (3) сенімді бекітілгеніне көз
жеткізіңіз.
• Пісірмеге (3) арналған қалыптағы жетекші оське
қамыр илеуге арналған қалақты (4) орнатыңыз.
• Қақпақты (5) жабыңыз.
• Нан пісіретін пешті қабырғадан немесе жиһаздан
нан пісіретін пешке дейінгі қашықтық 20 см-ден
кем болмайтындай, ал нан пісіретін пештің үстіндегі бос кеңістік 50 см-ден кем болмайтындай етіп
орнатыңыз.
• Ескертпе: — нан пісіретін пеш температураның
кең ауқымында жұмыс істеуге арналған, алайда
үй-жайдағы тым жоғары немесе төмен температура қамырдың көтерілу процесіне және, демек,
нанның мөлшері мен тығыздығына әсер етеді.
Үй-жайдағы тиімді температура +15-тен +34 °С-ге
дейін болуы керек.
НАН ПІСІРЕТІН ПЕШТІ БІРІНШІ РЕТ ҚОСУ
• Бөтен иістерді жою үшін нан пісіретін пешті бірінші
рет қосқанда ингредиенттерді салмай, және
қақпағы (5) ашық күйінде жүзеге асыру ұсынылады.
• Қуаттандыру бауының ашасын электр розеткасына салыңыз, бұл ретте дыбыс белгісі дыбысталады және дисплейде пісірме бағдарламасының -1цифрлық таңбалары (15), бағдарлама жұмысының
уақытының цифрлық таңбалары (23) «3:05»
көрінеді, бөлу нүктелері (24) тұрақты жарқырайды.
Қыртыс түсінің индикациясы (17) «ОРТАША»
».
«
• Салмақ индикациясы (21) «1150 г.».
• Баптау деректері әдепкі бойынша орнатылған.
• Әдепкі бойынша орнатылған, пісіру бағдарлама-
сын қосу үшін батырманы (13) « » басыңыз,
осы ретте дисплейде бөлу нүктелері (24) жыпылықтайды.
• Пісіру бағдарламасын қосу үшін 10 минуттан
кейін батырманы (13) « » қайта басыңыз, нан
пісіретін пешті сөндіру үшін батырманы (13) «
» тағы бір рет басыңыз және ұстап тұрыңыз,
электр розеткасынан қуаттандыру бауының ашасын шығарыңыз, қақпақты (5) ашыңыз және нан
пісіретін пештің толық сууын күтіңіз.
Page 81

81
KZ
• Ескертпе: — нан пісіретін пешті алғашқы пай-
даланған кезде қыздыру элементінен бөгде иіс
және аздаған түтін шығуы мүмкін — бұл қалыпты
жағдай және кепілдік оқиғасы болып табылмайды.
• Қақпақты (5) ашыңыз, пісірмеге арналған қалып
(3) тұтқасын (8) ұстаңыз және көтеріңкіреңіз, тұтқаны (8) жоғары бағытқа тартыңыз және қалыпты (3)
шығарыңыз.
• Қалыпты (3) және қалақты (4) бейтарап жуу құралын пайдаланып, жылы сумен жуыңыз, шайыңыз
және кептіріңіз.
• Пісірмеге арналған қалыпты (3) орнына орнатыңыз, оны бекітілгенге дейін жоғарыдан төмен
басыңыз, қалыптың (3) сенімді бекітілгеніне көз
жеткізіңіз.
• Пісірмеге (3) арналған қалыптағы жетекші оське
қамыр илеуге арналған қалақты (4) орнатыңыз.
• Қақпақты (5) жабыңыз.
• Нан пісіретін пеш пайдалануға дайын.
БАСҚАРУ ПАНЕЛІ
Нан пісіретін пешті пайдаланар алдында басқару
панеліндегі батырмалармен (2), пісіру бағдарламаларымен және пісіруге арналған ингредиенттерді таңдау жөніндегі ұсыныстармен танысуыңызды өтінеміз.
• Басқару панеліндегі (2) батырмаларды басу
арқылы, сіз қажетті нан пісіру, кекстер, қамыр
илеу, джем, йогурт дайындау бағдарламасын
таңдай аласыз, дайындауды кейінге қалдыру
уақытын белгілей аласыз, пісіру бағдарламасы
циклдарының жұмыс уақытын өздігінен енгізе
аласыз, ал дисплейде пісірудің барлық процесін
бақылай аласыз.
• Белсенді батырманың әрбір басуы дыбыстық
белгімен сүйемелденеді.
• Пісіру бағдарламасы жұмысы кезінде, басқару
панеліндегі (2) барлық батырмалар бұғатталады,
батырмадан (13) «
БАҒДАРЛАМАНЫ ТАҢДАУ БАТЫРМАСЫ
• Батырмаға (9) «
ның бірін таңдай аласыз, бағдарлама нөмірі дисплейде цифрлық таңбалармен (15) көрсетіледі.
• Дайын пісірме дәмін жақсарту үшін, сіз қамырды екінші илеу кезінде қажетті ингредиенттерді
(жаңғақтар, кептірілген жемістер және т.б.) қоса
аласыз, осы ретте қажетті сәтте дыбыс белгілері
естіледі, қақпақты (5) ашыңыз, қажетті ингредиенттерді қосыңыз, қақпақты (5) жабыңыз (кестені
қараңыз).
» басқалары.
» басу арқылы 12 бағдарлама-
Page 82

82
KZ
-1- «НЕГІЗГІ»
• Қамырды екінші рет илеу кезінде қажетті ингредиенттерді (жаңғақтар, кептірілген жемістер және
т. б.) қоса аласыз, бұл ретте қажетті сәтте дыбыс
белгілері естіледі, дисплейде таңбалар (20)
«ADD» көрінеді, қақпақты (7 5) ашыңыз, қажетті
ингредиенттерді қосыңыз, қақпақты (7 5) жабыңыз.
• Ескертпе: — бағдарламаларда 1, 2, 3, 4, 5, 6, 10
және 16 қосымша ингредиенттер қоса аласыз,
жемістерді немесе жаңғақтарды қосарда, оларды
ұсақ бөліктерге ұсақтау ұсынылады.
-2- «ФРАНЦИЯЛЫҚ»
• Нанды дайындау біршама ұзақ уақыт алады, нан
қыртысы күтірлек және жұмсағы ірі кеуекті болып
шығады.
-3- «БҮТІН ДӘНДІ»
• Ұсақ немесе ірі тартылған ұннан жасалған пайдалы нан пісіріңіз. Бұл пісірме бағдарламасы ірі
тартылған ұн сұйықтықты жақсы сіңіріп, жақсы
көтерілуі үшін ұзақ уақыт алдын-ала қыздыруды
көздейді. Осындай нанды дайындау кезінде кейінге қалдыру қызметін пайдалану ұсынылмайды,
өйткені мұның салдары қолайсыз болуы мүмкін.
-4- «ТӘТТІ»
• Тәтті қамырға қопсытқыш немесе соданы қосыңыз
және хош иісті пісірме жасаңыз.
• Ескертпе: — пісіру бағдарламаларында -1-2-3-4-
сіз жылдам пісіру режимін пайдалана аласыз.
БАҒДАРЛАМАЛАРДАҒЫ -1-2-3-4- ЖЫЛДАМ ПІСІРУ РЕЖИМІ
• Бағдарламаларды таңдау батырмасын (9) «
» басып, төрт бағдарламаның бірін таңдаңыз,
оларда жылдам пісіру режимі -1-2-3-4- қарастырылған, бағдарлама нөмірі цифрлық таңбалармен
(15) көрсетіледі.
• Батырманы (12) қыртыс түсі « » басу арқылы,
жылдам пісіру режимін таңдаңыз, ол таңба (19)
« » арқылы көрінеді, цифрлық таңбалармен
(23) жылдам пісіру режимінің жұмыс уақыты көрсетіледі (бағдарлама жұмысының уақыты кестесін
қараңыз).
-5- «Диеталық»
• Бұл бағдарламаны төмен көмірсулар бар нан
пісіру үшін пайдаланыңыз.
-6- «Глютенсіз»
• Құрамында глютені жоқ ұннан нан пісіріңіз. Бұл
пісірме бағдарламасы ұн сұйықтықты жақсы
сіңіріп, жақсы көтерілуі үшін ұзақ уақыт алдын-ала
Page 83

83
KZ
қыздыруды көздейді. Осындай нанды дайындау
кезінде кейінге қалдыру функциясын пайдалану
ұсынылмайды, өйткені мұны пайдалану қолайсыз
нәтижелерге әкелуі мүмкін.
-7- «Жылдам пісіру»
• Нанды пісіру «Классикалық» бағдарламасына
қарағанда жылдамырақ жүзеге асады, бірақ нан,
әдетте, көлемі жағынан кішірек және текстурасы
тығыздау болып шығады.
НАЗАР АУДАРЫҢЫЗ!
немесе 7 бағдарламаларын таңдап, пісіруге
арналған қалыпқа (3) температурасы 48-50 °С
су құйыңыз (су температурасының дәлдігін ас үй
термометрімен өлшеңіз). Судың температурасы
нанды жылдам және өте жылдам әзірлеу кезінде
шешуші рөл атқарады: судың тым төмен температурасы қамырдың уақытында көтерілуіне мүмкіндік
бермейді, ал тым жоғарысы ашытқының өліміне
әкеледі.
-9- Қамырды илеу
• Нан пісіретін пеш қамырды илейді және оның
көтерілуіне мүмкіндік береді. Қамырды келесі үй
пісірмесін жасауға пайдаланыңыз (пирожки, пицца
және т.с.с.).
-10- «Ашытқылы қамыр»
• Нан пісіретін пеш қамырды илейді және оның
көтерілуіне мүмкіндік береді. Қамырды келесі үй
пісірмесін жасауға пайдаланыңыз (пирожки, пицца
және т.с.с.).
-11- «Пастаға арналған қамыр»
• Осы бағдарламаның көмегімен макарон өнімдеріне арналған қамыр дайындай аласыз.
• Бағдарламаның жұмыс уақыты 15 минут және тек
қамырды илеу циклынан тұрады.
-12- «Пиццаға арналған қамыр»
• Пиццаға арналған қамыр дайындау бағдарламасы. Бағдарламаның жұмыс уақыты 45 минут және
қамырды илеу және көтерілту екі циклдарынан
тұрады.
-13- «Йогурт»
• Йогурт дайындау бағдарламасы (рецепт кітабын
қараңыз).
-14- «Джем»
• Бұл бағдарламаны джем, конфитюр, мармелад
немесе жеміс желесін дайындау үшін пайдаланыңыз.
Page 84

84
KZ
-15- «ПІСІРМЕ»
• Нан пісіретін пеш дәстүрлі электр тұмшапеш
сияқты жұмыс істейді. Бағдарлама қамырды илеу
және көтерілту режимдерін қоспайды. Бағдарлама
дайын қамырды пісіруге немесе пісірілген нанды
қосымша қызартып пісіруге пайдаланылады.
-16- «Қолмен баптау»
«Қолмен баптау» бағдарламасы өз идеяларына сәйкес қамырды дайындау және нан пісіру үдерісімен
таныс тәжірибелі пайдаланушыларға арналған, нан
пісіру бағдарламасының уақытша циклдарын орнатуға болады. Нан пісіретін пешті игеру барысында,
сіз 8 өз нан пісіру бағдарламаңызды жасай аласыз
және сақтап қалуыңызға болады.
• Бағдарламаны таңдау батырмасын (9) «
арқылы, бағдарламаны -16- таңдаңыз.
• Тұтынушының бағдарлама мәзірін 1-8 таңдау
үшін, қыртыс түсін таңдау « » батырмасын (12)
басыңыз, бағдарламалар дисплейде цифрлық
таңбалармен (15) көрінеді.
• Тұтынушы бағдарламасын таңдау үшін, бағдарламаларды таңдау (9) « » батырмаларын
басыңыз, қажетті тұтынушы бағдарламасын 1-8
таңдаңыз.
• Салмақты таңдау батырмасын (10) « » басу
арқылы, бағдарлама жұмысы циклын таңдаңыз
(14) онда оның жұмысының уақытын өзгерту
», басу
қажет болады, дисплейдегі көрсеткі жұмыс циклын
көрсетеді:
- алдын ала қыздыру «
» — көтерілу1 « » — илеу 2 « » — илеу
3
» — пісіру « » — қыздыру « ».
«
• Бағдарлама жұмысының қажетті циклын таңдап,
уақытты баптау « » батырмасын (11) таңдап,
сіз әр бағдарлама циклының жұмыс уақытын
орната аласыз (кестені қараңыз).
• Бағдарлама жұмысы циклының уақытын орнатып,
салмақты таңдау батырмасын (10) « » басып,
пісіру бағдарламасының келесі цикл жұмысының
уақытын (14) орнатуға көшіңіз.
• Орнатылған тұтынушы бағдарламасын бекіту үшін
батырманы старт/тоқта/кідіріс (13) « » басыңыз.
• «Қолмен баптау» бағдарламасында, әрбір
циклдың уақыт баптаулары жадыда сақталады,
баптаулар бағдарлама циклының келесі жұмыс
уақыты өзгергенге дейін немесе әдепкі зауыттық
баптаулар қалпына келтірілгенге дейін өзгертілмейді.
• Тұтынушылар бағдарламаларын жою үшін, бір
сәтте бағдарламаны таңдау батырмасын (9)
« » және салмақты таңдау (10) « » батырмасын басыңыз және 1 секунд бойы басып тұрыңыз,
осы ретте барлық тұтынушылар баптаулары
жойылады және әдепкі бойынша орнатылған
зауыттық баптаулар қалпына келтіріледі.
» — илеу 1 «
Page 85

85
KZ
«Қолмен баптау» бағдарламасында циклдардың жұмыс уақытын баптау кестесі:
Жұмыс циклы Әдепкі уақыт Уақытты орнату диапазоны
Алдын ала қыздыру
Илеу 1
Көтерілу 1
Илеу 2
Көтерілу 2 «
Көтерілу 3 «
Пісіру
Қыздыру«
« »
« »
« »
« »
»
»
« »
»
«САЛМАҚТЫ ТАҢДАУ» (10) « » БАТЫРМАСЫ
• Салынған ингредиенттердің мөлшеріне байланысты, батырма (10) «
» арқылы, сіз пісірме
салмағын таңдай аласыз — 700 гр. немесе 1000
гр. Пісірме салмағы индикациямен (13) «700г —
1000г» көрсетіледі.
• Ескертпе: — бағдарламаларда -9-10-11-12-13-14-
15- салмақ таңдауын орнату қарастырылмаған.
Қыртыс түсін таңдау (12) «
» және жылдам
пісіру режимі (19) « » батырмасы
• Батырмаға (12) басып, сіз қажетті қыртыс түсін
0:15 0:00-0:20
0:13 0:00-0:15
0:25 0:20-0:40
0:12 0:00-0:20
0:30 0:00-1:00
0:30 0:00-1:00
1:00 0:00-1:20
1:00 0:00-1:00
мен көрінеді: — ақшыл (16) «
« » — күңгірт (18) « ».
• Таңба (19) « » — бұл пісіру бағдарламаларын-
дағы -1-2-3-4-жылдам пісіру режимі (ЖЫЛДАМ
ПІСІРУ РЕЖИМІ бөлімін қараңыз.
• Ескертпе: — бағдарламаларда -6-7-11- қыртыс
түсін таңдау қарастырылмаған.
» (13) БАТЫРМАСЫ
«
• Батырмаға (13) «
» басып, пісірменің таңдалған
бағдарламасы қосылады, осы ретте дисплейде
бөлу нүктелері (24) жыпылықтап тұрады.
таңдай аласыз, таңдалған қыртыс түсі таңбалар-
» — орташа (17)
Page 86

86
KZ
• Батырмаға (13) « » қайта басу арқылы, «кідіріс»
режимі қосылады, осы ретте дисплейде цифрлық
таңбалар арқылы жұмыстың қалған уақытының
цифрлық таңбалары (23) жыпылықтап тұрады.
Пісірме бағдарламасын жалғастыру үшін тағы бір
рет батырмаға (13) « » басыңыз.
• Пісірме бағдарламасын өшіру үшін батырмаға (13)
« » басып, ұстап тұрыңыз, бұл ретте дыбыс
белгісі естіледі және орнатылған бағдарлама
өшіріледі.
УАҚЫТТЫ БЕЛГІЛЕУ БАТЫРМАЛАРЫ
• Нан пісіретін пеш бірден жұмыс істей бастамасын десеңіз, пісірме бағдарламасының жұмысын
бастау уақытын кейінге қалдыруды орнату үшін
(11) «
пайдалана аласыз.
• Кейінге қалдыру уақыты пісірме бағдарламасының
жұмыс уақытын қамтуы тиіс (кестені қараңыз)
екеніне назар аударыңыз, яғни кейінге қалдыру
уақыты аяқталғаннан кейін, пісірме бағдарламасы
қосылады.
• Батырма (9) «
таңбалармен (15) көрініп тұратын, қажетті бағдарламаны таңдаңыз.
• Батырма (10) «
арқылы, салмақты орнатыңыз «900 г-1150 г-1350
г» (13).
» «УАҚЫТТЫ РЕТТЕУ» батырмасын
» арқылы дисплейде цифрлық
» «САЛМАҚТЫ ТАҢДАУ»
• Қыртыс түсін таңдау батырмасы (12) «
қыртыстың түсін таңдаңыз — ақшыл (16) «
» — орташа (17) « » — күңгірт (18) « ».
• Батырмалармен (11) « » «УАҚЫТТЫ РЕТТЕУ» кейінге қалдыру уақытын орнатыңыз (кейінге
қалдыру уақытын орнату кезінде пісірме бағдарламасының жұмыс уақытын ескеріңіз), орнату
қадамы 10 минут.
• Максималды кейінге қалдыру уақыты 13 сағатты
құрайды.
• Кейінге қалдыру уақыты дисплейде цифрлық
мәндермен (23) көрсетіледі.
Мысал:
Қазір таңертеңгі сағат 8, сіз 7 сағаттан кейін сағат
күндізгі 15-те нан дайын болғанын қалайсыз.
• Пісіру бағдарламасын таңдаңыз, мысалы, -1-,
пісірме салмағы — 900 г, қыртыс түсі — орташа,
осы бағдарламаның жұмыс уақыты 3 сағат, батырмаларды (11) «
қалдыру уақытын 7:00 орнатыңыз.
• Кейінге қалдыру функциясын қосу үшін, батырмаға (13) « » басыңыз, осы ретте дисплейде
бөлу нүктелері (24) жыпылықтайды.
• Кейінге қалдыру функциясын болдырмау үшін (13)
старт/стоп/пауза « » батырмасын басып, ұстап
тұрыңыз, бұл ретте дыбыс белгісі естіледі және
кейінге қалдыру бағдарламасы өшіріледі.
» басып, дисплейде кейінге
»,
Page 87

KZ
• Кейінге қалдыру уақыты өткеннен кейін, орнатылған пісірме бағдарламасы қосылады.
• Егер сіз дайын нанды бірден ала алмасаңыз, онда
қыздыру функциясы қосылады, қыздыру функциясының жұмыс істеу уақыты 60 минут.
Бағдарламалардың жұмыс уақыты кестесі:
№ бағдар-
лама
Атауы бағдар-
лама
1 Негізгі
2 Француз
Қабық түсі Салмағы
Ақшыл 900г 3:00 15:00
Күңгірт 1350г 3:15 15:00
Таңбасы
1350г 2:25 15:00
Ақшыл 900г 3:10 15:00
Күңгірт 1350г 3:25 15:00
Таңбасы
1350г 2:30 15:00
• Уақытты кейінге қалдыра отырып пісіру үшін
жұмыртқа, жаңа сауылған сүт, жеміс, пияз және т.
б. сияқты тез бұзылатын ингредиенттерді пайдаланбаңыз.
• Ескертпе: — кейінге қалдыру мүмкіндігі жоқ
бағдарламалар: 9-11-13-14-15.
Жұмыс уақыты
бағдарлама
900г 2:15 15:00
900г 2:20 15:00
Кейінге қалды-
рылған старт
уақыты
Ингредиенттерді
қосу
+Орташа 1150г 3:05 15:00
+1150г 2:20 15:00
+Орташа 1150г 3:15 15:00
+1150г 2:25 15:00
87
Page 88

88
KZ
3 Бүкіл
4 Тәтті
5 Диеталық
6 Глютенсіз
7 «Жылдам пісіру»
Ақшыл 900г 3:20 15:00
Күңгірт 1350г 3:35 15:00
900г 2:25 15:00
Таңбасы
1350г 2:35 15:00
Ақшыл 900г 2:55 15:00
Күңгірт 1350г 3:10 15:00
900г 2:10 15:00
Таңбасы
1350г 2:20 15:00
Ақшыл 900г 3:09 15:00
Күңгірт 1350г 3:33 15:00
Ақшыл 900г 3:40 15:00
Күңгірт 1350г 3:55 15:00
Ақшыл 900г 1:15 15:00
Күңгірт 1350г 1:20 15:00
+Орташа 1150г 3:25 15:00
+1150г 2:30 15:00
+Орташа 1150г 3:00 15:00
+1150г 2:15 15:00
+Орташа 1150г 3:21 15:00
+Орташа 1150г 3:45 15:00
-Орташа 1150г 1:18 15:00
Page 89

89
KZ
Ақшыл 900г 1:30 15:00
8 Торт
Күңгірт 1350г 1:40 15:00
9 Қамырдың илесі - - 0:10 - -
10 Ашытқылы қамыр - - 1:40 15:00 +
Пастаға арналған
11
12
13 Йогурт - - 8:00 — 12:00 - 14 Джем - - 1:20 - -
15 Пеш
16 Қолмен баптау
қамыр
Пиццаға арналған
қамыр
- - 0:15 - -
- - 0:45 15:00 -
Ақшыл
- 1:00 - -Орташа
Күңгірт
Әдетті 3:05
Циклдар уақы-
тын пайдала-
нушы белгілейді
15:00 +
-Орташа 1150г 1:35 15:00
Page 90

90
KZ
ҚЫЗДЫРУ ФУНКЦИЯСЫ
• Пісірме бағдарламасының жұмыс уақыты
аяқталғаннан кейін, қыздыру функциясы қосылады, қыздыру функциясының жұмыс уақыты 60
минут.
• Егер сіз нанды шығарып алғыңыз келсе, батырманы (13) « » басу арқылы қыздыру функциясын
өшіріңіз.
ЖАДЫ ФУНКЦИЯСЫ
• Нан пісіретін пеш жұмыс істеп тұрған кезде электр
энергиясының апаттық өшірілуі болса, ұзақтығы
10 минут жады функциясы белсендіріледі.
• Электр қуаты 10 минут ішінде қалпына келтірілген
кезде, нан пісіретін пеш орнатылған бағдарламаның жұмысын бағдарлама тоқтатылған сәтінен
бастап жалғастырады.
• 10 минуттан артық электр қуаты болмаған жағдайда ингредиенттерді қайта жүктеу қажет, бағдарламаны орнатып, нан пісіретін пешті қосу қажет.
НАН ПІСІРЕТІН ПЕШТІҢ ЖҰМЫС ЦИКЛДАРЫ
• Жұмыс циклдары таңбалармен (14) көрсетіледі:
- алдын ала қыздыру «
циклы « », қамыр көтерілуінің 3 циклы
«
, , », пісіру « », қыздыру
».
«
», қамыр илеудің 2
ҚАМЫР ИЛЕУГЕ АРНАЛҒАН ҚАЛАҚТАРДЫ (4) ШЕШІП АЛУ
• Бұл функция міндетті емес, бірақ ол пісіруге
арналған қалыптан (3) дайын нанды жеңіл алып
шығаруға байланысты, дайын нанда қалақтар
(4) болмаған жағдайда жетек осьтерінен кішкене
тесіктер ғана болады.
• Қамырды илеудің екінші циклында « » дыбыс
белгілері естіледі, және дисплейде (22) «RMV»
жыпылықтайтын таңба көрінеді, пісіру бағдарламасының жұмысын 10 минутқа тоқтату үшін старт/
тоқтау/кідіріс (13) «
ретте жұмыс уақытының цифрлық белгілері (23)
жыпылықтайды.
• Қақпақты (5) ашыңыз, қалыпты (3) шығарып
алыңыз, қалыптан (3) қамырды шағарыңыз, қалақты (4) шағарыңыз, қамырды қайтадан қалыпқа
(3) салыңыз, қалыпты (3) орнына орнатыңыз,
қақпақты (5) жабыңыз.
• Пісіру бағдарламасының жұмысын жалғастыру
үшін старт/тоқтау/кідіріс (13) «
басыңыз, бағдарлама 10 минуттық үзілістен кейін
қосылады.
• Ескертпе: — қамыр илеуге арналған қалақты
(4) шешіп алу функциясы -7-8-9-11-12-13-14-15бағдарламаларда қол жетімсіз.
» батырмасын басыңыз, бұл
» батырмасын
Page 91

91
KZ
ПІСІРМЕГЕ АРНАЛҒАН ИНГРЕДИЕНТТЕР БОЙЫНША МАҢЫЗДЫ ҰСЫНЫСТАР
Ұн
• Ұн нан дайындаудың маңызды компоненті болып
табылады.
• Ұнның қасиеті оның сұрыпталуымен ғана емес, сонымен қатар астықтың өсірілген жағдайымен, оны
өңдеу мен қалай сақталғандығымен анықталады.
Нанды әртүрлі өндірушілер мен маркаларынан
пісіріп көріңіз және сіздің талаптарыңызға жауап
беретінін табыңыз.
• Бидай және қара бидай ұны нан пісіруге арналған
ұнының негізгі түрлері болып табылады.
• Бидай ұны анағұрлым кең қолданыста болады,
бұл жағымды дәмдік қасиеттерге және бидай
ұнынан жасалған өнімдердің жоғары тағамдық
құндылығына байланысты.
Нан пісіруге арналған ұн
• Дәннің ішкі бөлігінен ғана тұратын нан пісіруге
арналған (тазартылған) ұн, нанның басылып қалуын болдырмайтын және жұмсағының иілгіштігін
қамтамасыз ететін көп мөлшердегі желімшеден
тұрады.
• нан пісіруге арналған ұннан жасалған пісірмелер
аса үлпілдек болады.
Бүтін дәнді ұн (ірі тартылған ұн)
• Бүтін дәнді (ірі тартылған ұн) ұн бидайдың бүтін
дәндерін кебегімен бірге тарту жолымен алады.
Ұнның бұл сұрпы жоғары құнарлық құндылығымен
ерекшеленеді.
• Бүтін дәнді нан әдетте көлемі шағын болып шығады. Нанның тұтынушылық қасиеттерін жақсарту
үшін бүтін дәнді ұнды нан пісіруге арналған ұнмен
араластырады.
Жүгері және сұлы ұны
• Нанның текстурасын жақсарту үшін және оған
қосымша дәмдік қасиеттер беру үшін бидай немесе қара бидай ұнын жүгері немесе сұлы ұнымен
араластырыңыз.
Қант
• Қант нанға сарғыш реңк береді де пісірмелерге
қосымша дәмдік қасиеттермен байытады.
• Қант ашытқының өсуі үшін қоректендіргіш орта
болып саналады. Пісірмеге тек қана тазартылған
емес, сонымен қатар қоңыр қант пен қант ұнтағын
да қосыңыз.
Ашытқы
• Ашытқының өсуі нан жұмсағында кеуек түзілуіне
ықпал ететін, көмірқышқыл газы бөлініп шығуымен
бірге жүреді.
Page 92

92
KZ
• Ұн және қант ашытқының өсуі үшін қоректендіргіш
орта болып табылады. Сығылған жас немесе
жылдам әрекет ететін құрғақ ашытқыны қосыңыз.
Сығылған жас ашытқыны жылы суда ерітіңіз (суда,
сүтте және т.с.с.), жылдам әрекет ететін ашытқыны ұнға қосыңыз (алдын ала белсендіруді, яғни су
қосуды қажет етпейді).
• Қаптамадағы нұсқаулықтарды орындаңыз немесе
мына төмендегі пропорцияларды сақтаңыз:
• 1 шай қасық тез көтерілетін құрғақ ашытқы = 1,5
шай қасық сығымдалған жас ашытқы.
• Жас ашытқыны тоңазытқышта сақтаңыз. Жоғары
температура ашытқыны өлтіріп тастайды, мұндай
жағдайда қамыр нашар көтеріледі.
Тұз
• Тұз нанға қосымша түс пен дәм береді, бірақ ол
ашытқының өсуін баяулатады.
• Тұзды Тым көп мөлшерде пайдаланбаңыз. Үнемі
ұсақ тұзды пайдаланыңыз (ірі тұз пісірмеге
арналған қалыптың күюге қарсы қабатын бүлдіруі
мүмкін).
Жұмыртқалар
• Жұмыртқа нанның құрылымы мен көлемін жақсартады, дәмін байытады.
• Жұмыртқаны қамырға қосар алдында оларды
мұқият шайқау ұсынылады.
Малдың майы мен өсімдік майлары
• Малдың майы мен өсімдік майлары пісірмені жұмсақ етеді және оны сақтаудың мерзімін ұзартады.
• Сары май қоспас бұрын, оны кішкене текшелерге кесіңіз және бөлме температурасына дейін
қыздырыңыз.
Наубайхана ұнтағы мен сода
• Сода мен наубайхана ұнтағы (қопсытқыш) қамырдың көтерілуіне қажет уақытты қысқартады.
• «СУПЕРЖЫЛДАМ 1 және 2» бағдарламасын
пайдаланғанда, қопсытқыш немесе сода пайдаланыңыз.
• Соданы алдын-ала лимон қышқылымен және
ұнның шағын мөлшерімен араластыру қажет
(5 г ас содысы, 3 г лимон қышқылы және 12 г
ұн). Ұнтақтың осындай мөлшері (20 г) 500 г ұнға
есептелген.
• Соданы сөндіру үшін сірке суын пайдаланбаңыз,
сірке суын пайдалану нан жұмсағы ылғалдылығын
арттырады және біртектілігін азайтады.
• Наубайхана ұнтағын (қопсытқышты) рецепт бойынша көрсетілгендей қалыпқа жай ғана себіңіз.
Су
• Нан пісіру кезінде судың температурасы маңызды
роль ойнайды.
• Судың оңтайлы температурасы 20-дан 25 °С-ге
дейін, «СУПЕРЖЫЛДАМ 1, 2» бағдарламасы үшін
45-тен 50 °С-ге дейін.
Page 93

93
KZ
• Судың орнына сүтті қолдануға болады немесе біраз мөлшерде табиғи шырын қосып нанның дәмін
байытуға болады.
Сүт өнімдері
• Сүт өнімдері нанның дәмі мен қоректендіргіш
құндылығын жақсартады. Нанның жұмсағы көркемдірек болып тәбетті ашатын болады.
• Жаңа сауылған сүт өнімдерін немесе құрғақ сүтті
пайдаланыңыз.
Ингредиенттер салмағы
• Нан дайындаудың маңызды шарттарының бірі,
ингредиенттердің мөлшерін нақты пайдалану
болып табылады.
• Ингредиенттердің нақты санын өлшеу үшін
асүйлік таразыны, өлшеуіш стақанды (25) және
өлшеуіш қасықты (27) міндетті түрде пайдалану
ұсынылады, олай болмаған жағдайда, дайын нан
сіздің қажеттілігіңізді қанағаттандырмауы мүмкін.
• Өлшеуіш стақанды (25) сұйықтықпен тиісті белгіге
дейін толтырыңыз. Тегіс бетке стақанды (25)
қойып, мөлшерлемесін тексеріңіз.
• Алдыңғы ингредиенттің қалдықтарынан өлшеуіш
стақанды (25) мұқият тазалаңыз.
• Құрғақ ингредиенттерді өлшегіш стақанға (25)
себу барысында, тығыздамаңыз.
• Пайдалану алдында ұнды ауамен қанықтыру үшін
електен өткізу маңызды, бұл пісірменің ең жақсы
нәтижесіне кепілдік береді.
ПІСІРМЕГЕ АРНАЛҒАН ҚАЛЫПҚА ИНГРЕДИЕНТТЕРДІ САЛУ ТӘРТІБІ (СУР. 1)
• Ингредиенттерді пісірмеге арналған қалыпқа (3)
салу ретін сақтау қажет.
• Келесі бірізділік ұсынылады:
- сұйық ингредиенттер, жұмыртқалар, тұз, өсімдік
немесе сары май, құрғақ сүт және т. б.;
- ұн; ұн сұйық ингредиенттермен толық суланбауы керек;
- ашытқыны құрғақ ұнға ғана салуға болады,
ашытқы тұзбен жанаспауы керек;
- ұнға кішкене шұңқырша жасаңыз және ашытқыны шұңқыршаға салыңыз.
ИНГРЕДИЕНТТЕРДІ ҚОСУ
• Қамырды екінші илеу кезінде қажетті ингредиенттерді (жаңғақтар, кептірілген жемістер және т.б.)
қосуға болады, бұл ретте қажетті сәтте дыбыс
белгілері естіледі, қақпақты (5) ашыңыз, қажетті
ингредиенттерді қосыңыз, қақпақты (5) жабыңыз.
• Сіз ұзақ уақыт бойы кейінге қалдыру функциясын
пайдалансаңыз, жұмыртқа, жеміс ингредиенттері
сияқты тез бұзылатын ингредиенттерді ешқашан
қоспаңыз.
Page 94

94
KZ
НАН ПІСІРУ
• Нан пісіретін пешті желіге алғашқы қосу алдында,
құрылғының жұмыс кернеуі электр желісіндегі
кернеуге сәйкес келетініне көз жеткізіңіз.
• Қақапақты (5) ашыңыз және пісірмеге арналған
қалыпты (3) шығарыңыз.
• Қалақ (4) орнына орнатылғанына көз жеткізіңіз.
• Ескертпе: — қалақты (4) орнатар алдында оны
сары маймен, маргаринмен немесе өсімдік майымен майлаған жөн, бұл оны жаңа піскен наннан
алып шығуды жеңілдетеді.
• Ингредиенттерді қалыпқа (3) рецептте сипатталған ретпен салыңыз. Негізінен ингредиенттер
мына келесі тәртіппен салынады (сур. 1):
1. Сұйық ингредиенттер.
2. Ұн, сусымалы ингредиенттер (қант, тұз).
3.Ашытқы және қопсытқыш. Ұнға кішкене шұңқырша жасаңыз және ашытқы немесе қопсытқышты
шұңқыршаға салыңыз.
• Шашылған өнімдерді немесе төгілген сұйықтықтарды қалыптың (3) сыртқы бетінен алып
тастаңыз.
• Қалыпты (3) орнына орнатыңыз және оны сағат
тілі бағытымен тірелгенге дейін бұраңыз.
• Қақпақты (5) жабыңыз.
• Қуаттандыру бауының ашасын электр розетка-
сына салыңыз, бұл ретте дыбыс белгісі дыбысталады және дисплейде пісіру бағдарламасының
-1- цифрлық таңбалары (15) көрінеді, бағдарлама
жұмысы уақытының цифрлық таңбалары (23)
«3:05», бөлу нүктелері (22) тұрақты жарқырайды.
• Қыртыс түсінің индикациясы (17) — орташа «
».
• Салмақ индикациясы (21) «1150г».
• Баптау деректері әдепкі бойынша орнатылған.
• Батырмаға (9) « » басу арқылы 12 бағдарлама-
ның бірін таңдай аласыз, бағдарлама нөмірі дисплейде цифрлық таңбалармен (15) көрсетіледі.
• Салынған ингредиенттердің мөлшеріне байланысты батырмамен (10) « », сіз пісірме салмағын
таңдай аласыз — 700 гр. немесе 1000 гр. Пісіру
салмағы индикациямен (13) «700г — 1000г»
көрсетіледі.
• Батырманы (12) басу арқылы, сіз қыртыстың
қажетті түсін таңдай аласыз, қыртыстың таңдалған
түсі таңбаларымен (17) «АҚШЫЛ-ОРТАША-КҮҢГІРТ» бейнеленеді.
• Таңба (19) « » бұл пісіру бағдарламаларында
-1-2-3-4 жылдам пісіру режимі (ЖЫЛДАМ ПІСІРУ
РЕЖИМІ бөлімін қараңыз).
• Батырманы (11) « » «УАҚЫТТЫ РЕТТЕУ»
басу арқылы дайындауды кейінге қалдыру уақытын орнатыңыз («БАСҚАРУ ПАНЕЛІ» бөліміндегі
сипаттаманы қараңыз).
• Ескертпе: — орнатылған пісірме бағдарламасын
дереу бастағыңыз келсе, кейінге қалдыру уақытын
орнатуды өткізіп жіберіңіз.
Page 95

95
KZ
• Пісірме бағдарламасын қосу үшін батырманы (13) «
» басыңыз, бұл ретте дисплейде бөлу нүктелері
(24) жыпылықтайды, цифрлық таңбалармен (23)
пісірме бағдарламасының жұмысы аяқталғанға
дейін қалған уақыт көрсетіледі.
• Нан пісіретін пеш жұмысы циклдары индикациямен
(14) көрсетіледі.
• Кеңес: — қамырды 5 минуттық илеуден кейін оның
консистенциясын тексеру ұсынылады. Қамыр
жұмсақ, жабысқақ кесек болуы керек, егер қамыр
кесектері өте құрғақ болса, оған аздап сұйықтық
қосыңыз, егер қамыр кесектері тым ылғалды болса,
оған аздап ұн қосыңыз (1/2-ден 1 шай қасыққа дейін
немесе қажеттілігіне қарай).
• Нан пісіру процесін қақпақтағы (5) қарау терезесі (6)
арқылы бақылауға болады.
НАЗАР АУДАРЫҢЫЗ!
Пісірме бағдарламасының жұмысы кезінде ешқашан
қақпақты (5) ашпаңыз, температураның күрт өзгеруі
кезінде қамыр басылып қалуы мүмкін және кейін
көтерілмейді.
• Пісірме бағдарламасы аяқталғаннан кейін дыбыс
белгілері естіледі және қыздыру функциясы қосылады, қыздыру функциясы жұмысының уақыты 60
минут.
• Нан пісіретін пешті сөндіру үшін және қыздыру
функциясын болдырмау үшін батырманы (13) «
басыңыз және 3 секунд бойы басып тұрыңыз.
• Қуаттандыру бауының ашасын электр розеткасынан ажыратыңыз.
• Ққапақты (5) ашыңыз, термо төзімді ұстағыштарды
пайдаланып, тұтқадан (8) ұстаңыз және көтеріңкіреңіз, тұтқаны (8) жоғары бағытқа тартыңыз
және қалыпты (3) нан пісіретін пештен шығарып
алыңыз. Қалыпты шамамен 10-15 минуттай
суытыңыз.
• Пісірмені қалыптың (3) қабырғаларынан асүйлік
пластик қалақты пайдаланып ажыратып алыңыз.
• Қалыптың (3) күюге қарсы қабатын бүлдірмес
үшін, металл заттарды пайдалануға тыйым
салынады.
• Пісірмені шығарып алу үшін қалыпты (3) аударыңыз және оны сілкіңіз.
• Нанды кесер алдында қалақты (4) ілмектің (26)
көмегімен шығарыңыз.
• Нанды өткір нан пышағымен кесіңіз.
• Қолданғаннан кейін қалыпты (3) және қалақты (4)
бейтарап жуу құралын пайдаланып, жылы сумен
жуыңыз, шайыңыз және кептіріңіз. Қалақты (4)
қалыпқа (3) орнатыңыз, қалыпты (3) нан пісіретін
пешке орнатыңыз, қақпақты (5) жабыңыз.
ТАЗАЛАУЫ МЕН КҮТІМІ
• Нан пісіретін пешті өшіріңіз, электр розеткасынан
қуаттандыру бауының ашасын ажыратыңыз,
»
қақпақты (5) ашыңыз және нан пісіретін пешті
суытыңыз.
Page 96

96
KZ
• Пісіруге арналған қылыпты (3) шығарыңыз.
• Корпус (1) пен қақпақты (5) сәл дымқыл матамен
сүртіңіз, содан соң құрғатып сүртіңіз.
• Пісірмеге арналған қалыпты (3), қалақты (4),
өлшеуіш стақанды (25), ілгекті (26) және қасықты
(27) бейтарап жуу құралы бар жылы сумен
жуыңыз, шайыңыз және кептіріңіз.
• Ескертпе: — егер қалақ (4) осьтен алынбаса,
қалыптарды (3) жылы сумен толтырыңыз және
шамасы 20-30 минуттай күтіңіз.
Сервистік орталыққа жүгінудің алдында.
Ақаулық Ықтимал себеп Жою тәсілі
Нан пісіретін пеш қосылмайды. Дисплейде таңбалар «HHH» көрсетіледі.
Егер нан пісіретін пешті
қосқанда, дисплейде «LLL»
таңбалары пайда болса.
Егер нан пісіретін пешті
қосқанда, дисплейде таңбалар «EE0» көрсетілсе.
Нан пісіретін пеш алдыңғы пісіруден кейін әлі суымады.
Нан пісіретін пештің ішіндегі температура өте төмен.
Жұмыста ақаулық
• Нан пісіретін пешті және пісірмеге арналған
қалыптарды (3) тазалау үшін металл заттарды немесе жөкелерді, абразивті тазалағыш құралдарды
және еріткіштерді пайдаланбаңыз.
• Пісірмеге арналған қалыпты (3) және қалақты
(4) нан пісіретін пешке орнатпас бұрын, мұқият
кептіріп алыңыз.
• Нан пісіретін пештің ішкі бетінде ластанулар
болған жағдайда, ластануды жойыңыз және бетін
сәл дымқыл матамен сүртіңіз, содан кейін құрғатып сүртіңіз.
• Нан пісіретін пештің корпусын, қуаттандыру бауын
және қуаттандыру бауының ашасын суға немесе
кез-келген басқа сұйықтықтарға салмаңыз.
Нан пісіретін пешті өшіріңіз және қуаттандыру бауының
ашасын электр розеткасынан ажыратыңыз. Пісірмеге арналған қалыпты шығарып алыңыз және нан пісіретін пешті
бөлме температурасына дейін суытыңыз.
Нан пісіретін пешті өшіріңіз және қуаттандыру бауының
ашасын электр розеткасынан ажыратыңыз. Нан пісіретін
пештің қақпағын ашыңыз, пісірмеге арналған қалыпты
шығарып алыңыз және құрылғыны 10-20 минут бойы
бөлме температурасына дейін жылытыңыз.
Нан пісіретін пешті өшіріңіз және электр розеткасынан
қуаттандыру бауының ашасын суырып алңыз, біраз уақыт
күтіңіз және нан пісіретін пешті қайтадан қосыңыз, егер
«EE0» таңбалары өшірілмесе, бұл жағдайда авторландырылған сервис орталығына жүгініңіз.
Page 97

97
KZ
Нан пісіру кезіндегі ақаулар мен кемшіліктер кестесі және оларды одан әрі
жою жөніндегі ұсыныстар.
Ақаулық/Кемшілік Ықтимал себеп Жою тәсілі
Нан пісіру кезінде
қақпақтағы тесіктен түтін
Нанның қыртысы қалың.
Араластыруға арналған
қалақ, пісірмеге арналған
қалыптан шығарылмайды.
Ингредиенттер біркелкі
араласпайды және нашар
пісіріледі.
Электр моторының дыбысы естіледі, бірақ қамыр
араласпайды.
Нан пісіретін пешті бірінші пайдаланған
кезде қыздыру элементінің беті күйеді.
Қыздыру элементіне ингредиенттердің
түсуі.
Дайын нан пісіруге арналған қалыпта
қалды және көп ылғал жоғалтты.
Қамыр жетек білігі мен қамырды илеуге
арналған қалақ арасындағы саңылауға
түсті.
Орнатылған бағдарлама бұл ингредиенттер жиынтығына сәйкес келмейді.
Пісірме бағдарламасының жұмысы
барысында нан пісіретін пештің қақпағы
бірнеше рет ашылды, қамыр басылып
қалды және содан кейін көтерілмеді.
Сұйық ингредиенттердің мөлшері аз, қамырды илеуге арналған қалақ пісірмеге
арналған қамырды илеуге келмейді.
Пісірмеге арналған қалып дұрыс орнатылмаған.
Қамырға өте көп ұн қосылған.
Нан пісіретін пешті бірінші қолданар алдында оны
10-15 минутқа қақпағы ашық күйінде қосыңыз.
Нан пісіретін пешті өшіріңіз, оны суығанын күтіңіз,
қыздыру элементін тазалаңыз.
Дайын нанды қалыптан, пісіргеннен кейін бірден
шығарып алыңыз.
Нанды қалыптан шығарғаннан кейін, пісірмеге
арналған қалыпқа жылы су құйыңыз. 20-30 минуттан
кейін қалақты шығарып алыңыз.
Пісірмеге арналған қалыпқа салынған ингредиенттерге сәйкес келетін пісірме бағдарламасын
таңдаңыз.
Нан пісіретін пештің қақпағын ашпаңыз.
Салынған ингредиенттердің сәйкестігін тексеріңіз.
Пісірмеге арналған қалыпты шағарып алыңыз және
пісірмеге арналған қалақты қолмен айналдырып
көріңіз, егер бұл мүмкін болмаса, авторландырылған
сервистік орталыққа жүгініңіз.
Пісірмеге арналған қалыптың дұрыс орнатылғанын
және пісірмеге арналған рецептінің дұрыстығын
тексеріңіз. Асүйлік таразы мен өлшеуіш стақанды
пайдаланып, ингредиенттердің мөлшерін үнемі дәл
өлшеңіз.
Page 98

98
KZ
Пісіру кезінде, нан пісірмеге арналған қалыпты
толтырады.
Нанның мөлшері тым
кішкентай немесе нан
көтерілмейді.
Нан пісіру кезінде қатты
жарылып кетеді.
Пісірілген нанның
құрылымы өте тығыз.
Дайын нанның ішіндегі
қуыстар өте үлкен.
Ашытқы, ұн және сұйық ингредиенттер
мөлшерінің дұрыс емес қатынасы. Сұйық ингредиенттердің немесе қоршаған
ортаның температурасы тым жоғары.
Ашытқының болмауы немесе олардың
жеткіліксіз мөлшері. Ашытқы сапасы
нашар, сұйық ингредиенттердің жоғары
температурасы.
Ашытқы тұзбен байланысқа түсті.
Бөлмедегі төмен температура.
Қолданылатын ұн құрамындағы желімше
өте аз.
Ашытқы өсуінің жоғары жылдамдығы
немесе сұйық ингредиенттердің жоғары
температурасы.
Ұн және сұйық ингредиенттер мөлшерінің дұрыс емес қатынасы.
Тым көп бүтін бидай ұны қолданылды.
Сұйық ингредиенттердің, судың мөлшері
артық немесе тұз қосылмаған.
Сұйық ингредиенттердің жоғары температурасы.
Әрқашанда ингредиенттер арақатынасының дұрыстығын олардың температурасын және үй-жайдағы
температура.
Нан пісіретін пешті қоршаған ортаның температурасы
+15-тен +34 °С аралығында пайдаланыңыз.
Жарамдылық мерзімі өткен ашытқыны пайдаланбаңыз.
Өлшеуіш қасық арқылы ашытқының нақты мөлшерін
өлшеңіз.
Ашытқының тұзбен жанасуына жол бермеңіз.
Нан пісіретін пешті қоршаған ортаның температурасы
+15-тен +34 °С аралығында пайдаланыңыз.
Нан ұнының тексерілген маркасын пайдаланыңыз.
Тексерілген ашытқы маркасын пайдаланыңыз және
сұйық ингредиенттердің температурасын сақтаңыз.
Ұн мен сұйық ингредиенттердің дұрыс арақатынасына қол жеткізіңіз.
Бүтін дәнді ұн мөлшерін азайтыңыз және ашытқы
мөлшерін көбейтіңіз.
Ингредиенттердің дұрыс қатынасын таңдаңыз.
Сұйық ингредиенттердің температурасын әрқашан
тексеріп отырыңыз.
Page 99

99
KZ
Желімше жоғары мөлшері жоғары ұн
Нан қыртысында құрғақ
ұн көп.
Нанның немесе кекстің
қыртысы өте күңгірт.
пайдаланылды, және майдың мөлшері
жеткіліксіз.
Сұйық ингредиенттердің мөлшері аз.
Қанттың мөлшері артық болса, нан немесе кекс қыртысы күйіп кетуі мүмкін.
САҚТАЛУЫ
• Нан пісіретін пешті сақтауға алып қоярдан бұрын,
оны тазалап алыңыз.
• Құрылғыны салқын және құрғақ жерде, балалардың және мүмкіндігі шектеулі адамдардың қолы
жетпейтін жерде сақтаңыз.
ЖЕТКІЗІЛІМ ЖИЫНТЫҒЫ
1. Нан пісіретін пеш — 1 дана.
2. Қуаттандыру бауы — 1 дана.
3. Нұсқаулық — 1 дана.
Желімшесі қалыпты мөлшердегі ұнды пайдаланыңыз
және май қосыңыз.
Рецептке сәйкес сұйық ингредиенттердің нақты
мөлшерін қосыңыз.
Рецептке сәйкес қанттың нақты мөлшерін қосыңыз.
Егер сіз нан немесе кекс күйе бастағанын байқа-
саңыз, пісірме бағдарламасын оның аяқталғанына
дейін 5-10 минут бұрын тоқтату ұсынылады. Дайын
өнімді шағару алдында оны нан пісіретін пештің
ішінде қақпағы жабық күйінде 15-20 минутқа қалдыру
ұсынылады.
ТЕХНИКАЛЫҚ СИПАТТАМАЛАРЫ
• Электр қуаттандыруы 220-240 В, ~ 50-60 Гц
• Номиналды тұтыну қуаты: 850 Вт
Page 100

100
KZ
КӘДЕГЕ АСЫРУ
кейін оларды әдеттегі тұрмыстық қалдықтармен бірге
тастамаңыз, аспапты және қуаттандыру элементтерін одан әрі кәдеге асыру үшін арнайы пункттерге
жіберіңіз.
Бұйымдарды кәдеге асыру кезінде пайда болатын
қалдықтар белгіленген тәртіп бойынша келесі пайдаға асырылатын тәртіппен міндетті түрде жинауға
жатады.
Берілген өнімді кәдеге асыру туралы қосымша
ақпаратты алу үшін жергілікті муниципалитетке,
тұрмыстық қалдықтарды пайдаға асыру қызметіне
немесе осы өнімді сатып алған дүкенге жүгініңіз.
Өндіруші алдын-ала ескертусіз, құралдың дизайнын, конструкциясы мен оның жалпы жұмыс
ұстанымдарына әсер етпейтін техникалық сипаттамаларын өз-герту құқығын өзіне қалдырады.
Құралдың қызмет ету мерзімі — 3 жыл
Өндірілген күні сериялық нөмірде көрсетілген.
Қандай да бір ақаулықтар табылған жағдайда дереу
авторландырылған сервистік орталыққа жүгіну керек.
Қалдықтардың бақыланбай пайдаға
асыруынан қоршаған ортаға немесе
адамдардың денсаулығына зиян келтірмеу үшін, құралдың немесе қуаттандыру элементтерінің (егер жинағына
кірсе) қызмет ету мерзімі аяқталғаннан
 Loading...