

Page 1

Instruction manual
Инструкция по эксплуатации
Blender BR1246
Блендер BR1246
brayer.ru
Page 2

EN
3EN
СОДЕРЖАНИЕ
EN ......................................................................................................................................3
DE ....................................................................................................................................16
RU ...................................................................................................................................30
KZ ....................................................................................................................................44
BLENDER BR1246
The blender set is intended for chopping, mixing,
combined processing of liquid and hard products,
making potato mash and cutting soft fruit or boiled
vegetables into cubes.
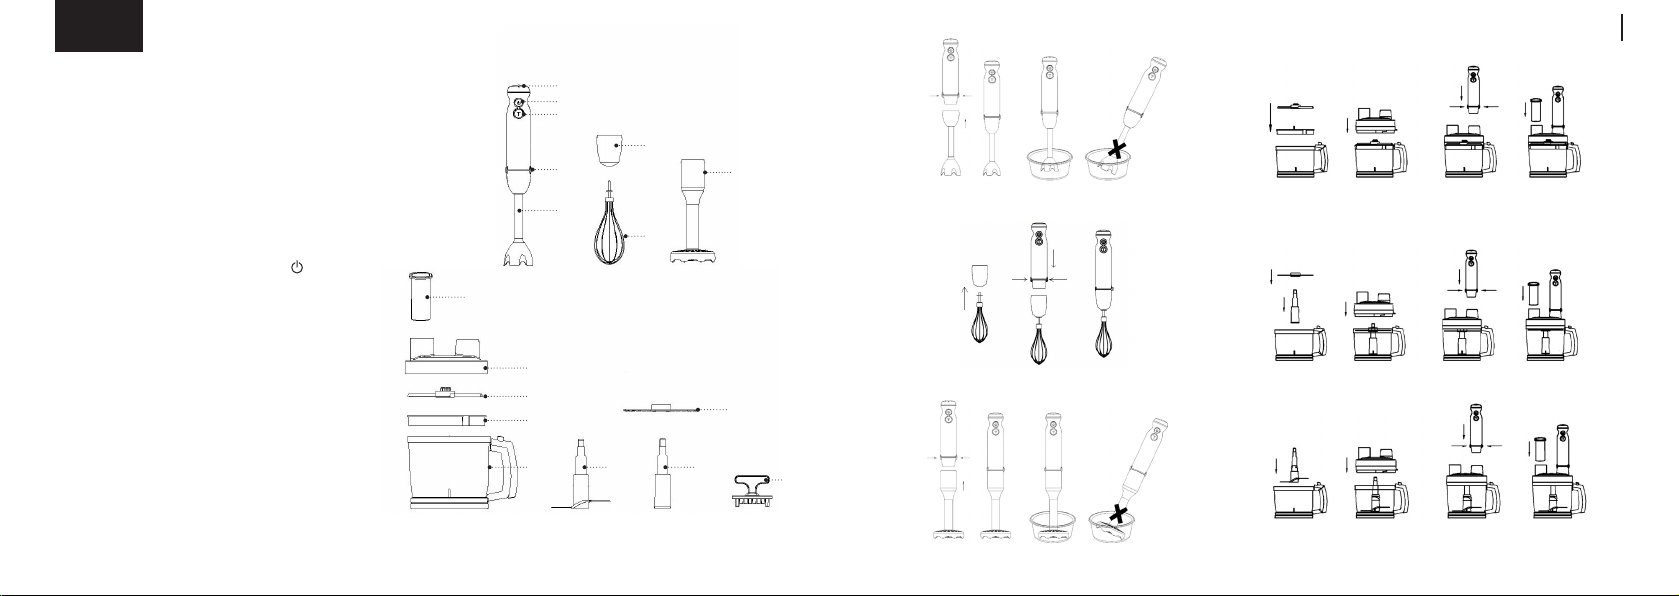
DESCRIPTION
1. Blender attachment
2. Attachment release buttons
3. Speed «T» on button
4. ON/OFF button «
5. Rotation speed control knob «1---5»
6. Whisk attachment gear
7. Whisk attachment
8. Potato mash making attachment
9. Pusher
10. Bowl lid
11. Cubic knife
12. Cubic attachment
13. Bowl
14. Chopping knife
15. Grating/shredding disc
16. Driving shaft
17. Mesh (12) cleaning device
»
5
4
3
6
2
1
7
9
10
11
12
13 14
8
15
16
17
Page 3
4 5EN EN
Рiс. 1 Рiс. 4
Рiс. 2
Рiс. 3
Рiс. 5
Рiс. 6
SAFETY MEASURES AND OPERATION
RECOMMENDATIONS
Read the operation instructions carefully before
using the unit, after reading keep them for future
reference.
• Use the unit for its intended purpose only, as it is
stated in this manual.
• Mishandling the unit can lead to its breakage and
cause harm to the user or damage to the user’s
property, which is not covered by warranty.
• Make sure that the operating voltage of the unit
indicated on the label corresponds to your home
mains voltage.
ATTENTION! Continuous operation time using the
blender attachment should not exceed 30 seconds,
1 minute while using the whisk attachment, no
more than 1 minute while using the mashed potato
attachment, when chopping and dicing products,
the operating time is 3 cycles of 10 seconds
each. Make at least 3 minutes breaks between the
operation cycles.
• Do not use the unit outdoors.
• It is recommended not to use the unit during lightning
storms.
• Protect the unit from impacts, falling, vibrations and
other mechanical stress.
• Never leave the unit connected to the mains
unattended.
• Do not use the unit near heating appliances, heat
sources or open ame.
• Do not use the unit in places where aerosols are used
or sprayed, and in proximity to inammable liquids.
• Do not use the unit in proximity to the kitchen sink, in
bathrooms, near swimming pools or other containers
lled with water.
• If the unit is dropped into water, unplug it immediately,
and only then you can take the unit out of water. Apply
to the authorized service center for testing or repairing
the unit.
• Do not let the power cord touch hot surfaces and sharp
edges of furniture.
• Unplug the unit after usage or before cleaning. When
unplugging the unit, hold the power plug and carefully
remove it from the mains socket, do not pull the power
cord, as this can lead to its damage and cause a short
circuit.
• Do not touch the unit body, the power cord and the
power plug with wet hands.
• Before using the unit for the rst time, thoroughly wash
all the removable attachments and containers that will
contact food.
• Use only the parts supplied.
• Do not touch rotating parts of the unit. Do not let hair
or free hanging clothes get into the rotation area of the
blender attachment knife or whisk.
• Before using the unit, make sure that the attachments
are installed properly and xed.
• Place the chopper bowl on a at and steady surface.
• Put the products into the chopper bowl before switching
the unit on. Do not switch the unit on if the chopper bowl
is empty.
Page 4

6 7EN EN
• Cool down hot products before putting them into the
chopper bowl.
• Watch the amount of products put in the chopper
bowl and the level of poured liquids.
• Cutting edges of the chopping knife and the blender
attachment are sharp and dangerous. Be careful
while using the chopping knife and the blender
attachment.
• If the chopping knife stops during the unit operation,
switch the unit o, unplug it and open the geared
lid, remove the product which is hindering the knife
rotation. If the chopping knife or blender attachment
rotation is hindered, it is recommended to add some
water, juice, liquor etc. into the chopper bowl or the
container used with the blender attachment.
• Use the cubic attachment only for cutting preliminary
boiled vegetables. Do not cut frozen or hard
products.
• Control the bowl lling, do not allow it to ll up.
Remove the processed products as the bowl lls up.
• Remove the motor unit from the chopper bowl only
after disconnecting the motor unit from the mains.
• Do not place the chopper bowl and the measuring
cup into a microwave oven.
• Do not put the attachments and bowls in a
dishwashing machine.
• For children safety reasons do not leave polyethylene
bags used as a packaging unattended.
ATTENTION! Do not allow children to play with
polyethylene bags or packaging lm. Danger of
suocation!
• The unit is not intended for usage by children.
• Do not leave children unattended to prevent using
the unit as a toy.
• Do not allow children to touch the operating surface,
the unit body, the power cord or the power plug
during operation of the unit.
• Be especially careful if children or disabled persons
are near the operating unit.
• During the unit operation and breaks between
operation cycles, place the unit out of reach of
children.
• The unit is not intended for usage by physically or
mentally disabled persons (including children) or by
persons lacking experience or knowledge if they are
not under supervision of a person who is responsible
for their safety or if they are not instructed by this
person on the usage of the unit.
• From time to time check the power cord integrity.
• If the power cord is damaged, it should be replaced
by the manufacturer, a maintenance service or
similar qualied personnel to avoid danger.
• Do not repair the unit by yourself. Do not
disassemble the unit by yourself, if any malfunction
is detected, and after the unit was dropped, unplug it
and apply to the service center.
• To avoid damages, transport the unit in the original
package.
• Keep the unit in a dry cool place out of reach of
children and disabled persons.
THE UNIT IS INTENDED FOR HOUSEHOLD USE
ONLY, DO NOT USE THE UNIT FOR COMMERCIAL
OR LABORATORY PURPOSES.
BEFORE THE FIRST USE
After the unit’s transportation or storage at negative
temperature, unpack it and wait for at least 3 hours
before using it.
• Unpack the unit and remove all the packaging
materials.
• Keep the original package.
• Read the safety measures and operating
recommendations.
• Check the delivery set.
• Examine the unit for damages, in case of damage do
not plug it into the mains.
• Make sure that the indicated specications of the
power supply voltage of the unit correspond to the
specications of your mains. When using the unit in
the mains with 60 Hz frequency, the unit does not
need any additional settings.
• Before using the unit wash the details (7, 9, 11, 12,
13, 14, 15, 16, 17) with warm water and a neutral
detergent and dry them.
• Wash only the lower part of the blender attachment
(1) and the potato mash making attachment (8),
clean the outer surface with a slightly damp cloth.
Never immerse the blender attachment (1) and the
potato mash making attachment (8) into water or any
other liquids completely.
• Wipe the motor unit, the lid (10), the whisk
attachment gear (6) with a soft, slightly damp cloth
and then wipe them dry.
ATTENTION! Do not immerse the blender attachment
(1), the motor unit, the lid (10), the whisk attachment
gear (6), the potato mash making attachment (12), the
power cord and the power plug into water or any other
liquids.
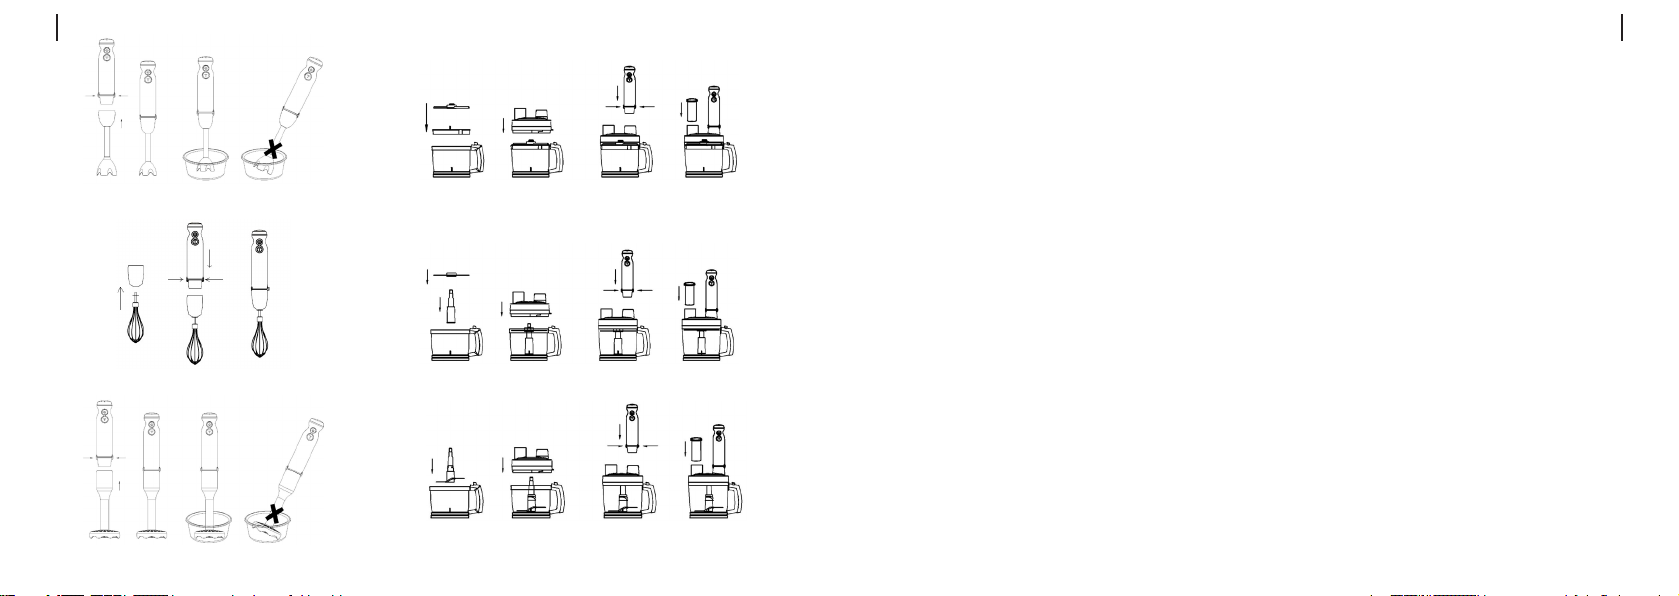
USING THE BLENDER ATTACHMENT
Continuous operation time should not exceed
30 seconds while using the blender attachment
(1). Make at least 3 minutes break between the
operation cycles.
• Use the blender attachment (1) for making sauces,
mayonnaise, fruit puree, baby food, mixing various
ingredients and for processing fruit and vegetables
containing enough liquid.
• Before installing the blender attachment (1), make
sure that the power plug is not inserted into the
mains socket.
• Insert the blender attachment (1) into the motor unit
until the release buttons (2) clicking, make sure that
the attachment is xed properly (pic. 1).
Page 5
8 9EN EN
• Insert the power plug into the mains socket.
• Immerse the blender attachment (1) into the bowl
with food that you want to chop/mix.
ATTENTION!
Hold the motor unit with the blender attachment (1)
vertically while processing the food (pic.1).
• To switch the unit on, press and hold down the button
». Use this operation mode for mixing liquid
(4) «
products.
• When you press and hold the button (4) «
can control the attachment rotation speed by turning
the control knob (5). Use this operation mode for
processing of liquid and solid products.
• For operation at the maximal rotation speed, press
and hold down the button (3) «T».
• Notes:
- products should be put into the bowl before the
unit is switched on. The amount of products to be
processed should not exceed 2/3 of the capacity
of the bowl in which they are processed.
- before chopping and mixing peel the fruit, remove
inedible parts, such as stones, and cut fruit into
15x15x15 mm cubes. Put them into a bowl and
add some juice or water. The maximal amount of
products should not exceed 350 g and 250 ml of
water or juice.
- do not chop or mix frozen food.
» you
ATTENTION! When chopping hard vegetables, for
example, car rots — cut the carrot into small 15x15x15
mm pieces and put them in the suitable container.
The maximal weight of the carrot should not exceed
150g. Add 250 ml of water.
• To switch the blender attachment (1) rotation o
release the button (3 or 4).
• After you nish the unit operation, take the power
plug out of the mains socket and remove the blender
attachment (1) by pressing the release buttons (2)
(pic. 1).
ATTENTION!
- Do not remove the blender attachment (1) during
the unit operation.
- To avoid damaging the knives of the blender
attachment (1) do not process very hard products,
such as cereals, rice, coee beans, hard cheese,
frozen food etc.
- If the foodstus are hard to chop with the blender
attachment (1), add some water, juice, liquor etc.
USING THE WHISK ATTACHMENT
• Continuous operation time should not exceed 1
minute while using the whisk attachment (7). Make at
least a 3-minute break between operation cycles.
ATTENTION! Do not use the whisk attachment (7) to
knead tight dough (pic.1).
• Use the whisk attachment (7) only for beating egg
whites, making biscuit dough or for mixing ready
desserts.
Before installing the whisk attachment (7), make
sure that the power plug is not inserted into the
mains socket.
• Insert the whisk attachment (7) into the whisk gear
(6).
• Insert the whisk gear (6) into the motor unit, make
sure that the gear (6) and the whisk (7) are xed
properly (g. 2).
• Insert the power plug into the mains socket.
• Immerse the whisk attachment (7) into a suitable
bowl with food.
• To switch the unit on, press and hold down the button
».
(4) «
• When you press and hold the button (4) «
control the attachment rotation speed
• by turning the control knob (5).
• For operation at the maximal rotation speed, press
and hold down the button (3) «T».
• Release the button (3 or 4) to switch o.
• After you nish using the unit, disconnect the power
plug from the mains socket, disconnect the whisk
gear (6) from the motor unit (pic. 3).
• Remove the whisk attachment (7) from the gear (6).
» you can
POTATO MASH MAKING ATTACHMENT
Continuous operation time should not exceed
1 minute while using the potato mash making
attachment (8). Make at least a 3-minute break
between operation cycles.
• Before installing the attachment (8), make sure that
the power plug is not inserted into the mains socket.
• Insert the attachment (8) into the motor unit, and turn
it counterclockwise as far as it will go, make sure that
the attachment (8) is xed properly (pic. 3).
• Insert the power plug into the mains socket.
• Immerse the attachment (8) into the bowl with boiled
potatoes.
ATTENTION! When making the potato mash hold the
motor unit with the attachment (8) vertically (pic. 3).
• To switch the unit on, press and hold down the button
».
(4) «
• When you press and hold the button (4) «
can control the attachment rotation speed by turning
the control knob (5).
• For operation at the maximal rotation speed, press
and hold down the button (3) «T».
• When you make potato mash, add warm milk or
some potato pot liquor.
• Release the button (3 or 4) to switch o.
• After you nish the unit operation, take the power
plug out of the mains socket and remove the
attachment (8).
», you
Page 6

10 11EN EN
• Wash the lower part of the attachment (8), wipe the
outer part of the attachment (8) body with a damp
cloth. Do not immerse the attachment (8) into water
or other liquids.
USING THE CHOPPER
Continuous operation time while using the
chopping attachment should not exceed 3 cycles
of 10 seconds each. Make at least 3 minutes break
between the operation cycles.
• The attachment is used to chop meat, cheese, onion,
herbs, garlic, carrots, walnuts, prunes, vegetables
or fruit.
ATTENTION! Do not chop very hard products, such
as nutmegs, coee beans, cereals, frozen food or ice.
PREPARING THE FOOD BEFORE CHOPPING:
• Remove bones, veins, cartilage and fat from meat.
• Cut meat, cheese, onions, vegetables or fruit into
pieces approximately 60x20x20 mm in size.
• Remove stems of herbs, shell nuts.
CHOPPING
Before assembling the chopper, make sure that the
power plug is not inserted into the mains socket.
• Place the bowl (13) on a at and steady surface.
• Install the chopping knife (14) on the axis inside the
bowl (13).
ATTENTION! The blades of chopping knife (14) are
very sharp! Always hold the chopping knife (14) by the
plastic end.
• Put the products into the bowl (13).
Note: — do not switch the unit on when the bowl (13)
is empty.
• Install the geared lid (8) on the bowl (10).
• Place the lid (10) on the bowl (13) and turn it
clockwise as far as it will go.
• Install the motor unit on the geared lid (8) feeding
chute, make sure that the motor unit is xed properly.
Install the motor unit evenly in vertical position (g.
4).
• Insert the pusher (9) into the lid (10) opening.
• Insert the power plug into the mains socket.
• To switch the unit on, press and hold down the button
».
(4) «
• When you press and hold the button (4) «
can control the chopping knife (14) rotation speed by
turning the control knob (5).
• For operation at the maximal rotation speed, press
and hold down the button (3) «T».
• During the unit operation hold the motor unit with one
hand and the bowl (13) with the other hand.
• Release the button (3 or 4) to switch o.
• If necessary, you can add additional products to
the bowl (13) for chopping, remove the pusher (9)
through the pusher (9) opening, add the products and
» you
install the pusher (9) back to its place.
• After the unit operation, wait till the chopping knife
(14) completely stops rotating.
• Remove the power plug from the mains socket.
• Disconnect the motor unit from the lid (10) by
pressing the release buttons (2) (pic. 4).
• Remove the geared lid (8) from the bowl (10).
• Carefully remove the chopping knife (14) from the
bowl (13) holding it by the plastic end.
• Take the chopped products out of the bowl (13).
USING THE GRATING OR SHREDDING DISC
Continuous operation time while using the grating
(15) or shredding (16) disc should not exceed
3 cycles of 10 seconds each. Make at least a 3
minutes break between the operation cycles.
• The discs (15 and 16) are used for chopping
vegetables or fruit.
• Before assembling make sure that the power plug is
not inserted into the mains socket.
• Place the bowl (13) on a at and steady surface.
• Install the driving shaft (16) on the axis inside the
bowl (13).
• Install the grating disc or the shredding disc (15) on
the driving shaft (16 ).
• Place the lid (10) on the bowl (13) and turn it
clockwise as far as it will go.
• Press on the locks (2) and install the motor unit on
the lid (10) feeding chute, make sure that the motor
unit is xed properly. Install the motor unit evenly in
vertical position (pic. 5).
• Insert the pusher (9) into the lid (10) opening.
• Insert the power plug into the mains socket.
• To switch the unit on, press and hold down the button
».
(4) «
• When you press and hold the button (4) «
control the disc (15 or 16) rotation speed by turning
the control knob (5).
• For operation at the maximal rotation speed, press
and hold down the button (3) «T».
• During the operation put the products into the pusher
opening and use the pusher (9) to feed products.
Press the pusher (9) gently while feeding products.
Never push products with your hands or other
objects, use the pusher (9) only.
• Watch the lling of the bowl (13), as it lls, switch the
blender o and remove the food from the bowl (13).
• Release the button (3 or 4) to switch o.
• After using the unit, wait until the discs (15 or 16)
fully stop.
• Remove the power plug from the mains socket.
• Disconnect the motor unit from the lid (10) by
pressing the locks (2) (pic. 5).
• Remove the lid (10) from the bowl (13) by turning the
lid (10) counterclockwise.
• Remove the installed disc (15) from the driving shaft
(16), take out the driving shaft (16).
• Take the chopped products out of the bowl (13).
» you can
Page 7

12 13EN EN
CUBIC ATTACHMENT
Continuous operation time while using the cubic
attachment should not exceed 3 cycles of 10
seconds each. Make at least a 3 minutes break
between the operation cycles.
• Use the cubic attachment for cutting soft fruit and
boiled vegetables into cubes.
ATTENTION! Do not use the attachment for
processing hard or frozen products to avoid damaging
it.
• Before assembling make sure that the power plug is
not inserted into the mains socket.
• Place the bowl (13) on a at and steady surface.
• Install the cubic attachment (12) into the bowl (13),
the groove on the attachment (12) should match the
ledge on the bowl (13).
• Install the cubic knife (11) on the attachment (12).
• Place the lid (10) on the bowl (13) and turn it
clockwise as far as it will go.
• Press on the locks (2) and install the motor unit on
the lid (10) feeding chute, make sure that the motor
unit is xed properly. Install the motor unit evenly in
vertical position (pic. 6).
• Insert the pusher (9) into the lid (10) opening.
• Insert the power plug into the mains socket.
• To switch the unit on, press and hold down the button
».
(4) «
• When you press and hold the button (4) « » you can
control the disc (15) rotation speed by turning the
control knob (5).
• For operation at the maximal rotation speed, press
and hold down the button (3) «T».
• During the operation put the products into the pusher
opening and use the pusher (9) to feed products.
Press the pusher (9) gently while feeding products.
Never push products with your hands or other
objects, use the pusher (9) only.
• Watch the lling of the bowl (13), as it lls, switch the
blender o and remove the food from the bowl (13).
• Release the button (3 or 4) to switch o.
• After using the unit, wait until the chopping knife (11)
fully stops.
• Remove the power plug from the mains socket.
• Disconnect the motor unit from the lid (10) by
pressing the release buttons (2) (pic. 6).
• Remove the lid (10) from the bowl (13) by turning the
lid (10) counterclockwise.
• Remove the knife (11), take the cubic attachment
(12) out of the bowl (13).
• Take the products out of the bowl (13).
CLEANING
ATTENTION! The blades of the chopping knife (9)
are very sharp and may be dangerous. Handle the
chopping knife (9) very carefully!
• Unplug the unit after you nish using it.
• Wash the parts that contacted products with warm
water and a neutral detergent and dry them.
• For easy cleaning of the attachment (12) mesh use
the device (17).
• Wash only the lower part of the blender attachment
(1), clean the outer surface with a slightly damp cloth.
Never immerse the blender attachment (1) into water
or any other liquids completely.
• Wipe the motor unit, the geared lid (10) and the
whisk attachment gear (6) with a soft slightly damp
cloth and then wipe them dry.
• After processing salty or sour products, it is
necessary to rinse the blender attachment (1) or the
chopping knife (14) with water immediately.
• While possessing products with dyeing properties
(for instance, carrot or beetroot) the attachments and
bowls can get colored, wipe the attachments and the
bowls with a cloth, dampened in vegetable oil; after
that wash the attachments and bowls with a neutral
detergent, rinse and dry them.
• Do not immerse the motor unit, the gear (6), the lid
(10) into any liquids, do not wash them under water
jet or in a dishwashing machine.
• Do not use abrasives and solvents to clean the motor
unit body and the removable parts.
STORAGE
• Clean the unit parts before taking it away for long
storage.
• Do not wind the power cord around the motor unit.
• Keep the unit in a dry cool place out of reach of
children and disabled persons.
DELIVERY SET
1. Motor unit — 1 pc.
2. Blender attachment — 1 pc.
3. Whisk gear — 1 pc.
4. Whisk attachment — 1 pc.
5. Geared lid — 1 pc.
6. Bowl – 1 pc.
7. Cup — 1 pc.
8. Potato mash making attachment — 1 pc.
9. Grating/shredding disc - 1 pc.
10. Cubic knife – 1 pc.
11. Cubic attachment – 1 pc.
12. Instruction manual — 1 pc.
TECHNICAL SPECIFICATIONS
• Power supply: 220-240 V, ~ 50-60 Hz
• Rated input power: 1400 W
• Chopper bowl – 2 l
Page 8

14 15EN EN
RECYCLING
To prevent possible damage to the
environment or harm to the health of
people by uncontrolled waste disposal,
after expiration of the service life of the
unit or the batteries (if included), do not
take the unit and the batteries to specialized stations for
further recycling.
The waste generated during the disposal of products
is subject to mandatory collection and consequent
disposal in the prescribed manner.
For further information about recycling of this product
apply to a local municipal administration, a household
waste disposal service or to the shop where you
purchased this product.
The manufacturer reserves the right to change the
design, structure and speci-cations not aecting
general operation principles of the unit, without prior
notice.
The unit operating life is 3 years
The manufacturing date is specied in the serial
number.
In case of any malfunctions, it is necessary to apply
promptly to the authorized service center.
discard them with usual household waste,
Page 9
DE
16 17DE DE
STABMIXER BR1246
Der Mixer-Set ist bestimmt für Zerkleinern,
Vermischen, gemeinsames Verarbeiten von
üssigen und harten Lebensmitteln, Zubereitung
von Kartoelpüree und Würfeln von weichen
Früchten oder gekochtem Gemüse.
BESCHREIBUNG
1. Stabmixeraufsatz
2. Aufsatzverriegelungstasten
3. Geschwindigkeitseinschalttaste «T»
4. Geschwindigkeitseinschalttaste «
5. Drehgeschwindigkeitsregler «1---5»
6. Schlagbesengetriebe
7. Schlagbesenaufsatz
8. Kartoelpüreeaufsatz
9. Schieber
10. Deckel des Behälters
11. Messer zum Würfeln
12. Würfelschneider
13. Behälter für Lebensmittel
14. Zerkleinerungsmesser
15. Raspelscheibe/ Hobelscheibe
16. Antriebswelle
17. Einrichtung zum Reinigen der Einsatzgitter (12)
»
5
4
3
6
2
1
7
9
10
11
12
13 14
8
Abb. 1 Abb. 4
Abb. 2
15
16
17
Abb. 3
Abb. 5
Abb. 6
Page 10

18 19DE DE
SICHERHEITSHINWEISE UND
BEDIENUNGSANLEITUNG
Bevor Sie das Gerät benutzen, lesen Sie zuerst
die Bedienungsanleitung aufmerksam durch und
bewahren Sie sie zum späteren Gebrauch auf.
• Benutzen Sie das Gerät nur bestimmungsmäßig und
laut dieser Bedienungsanleitung.
• Missbrauch des Geräts kann zu seiner Störung
führen, den Benutzer oder sein Eigentum
beschädigen und ist kein Garantiefall.
• Vergewissern Sie sich, dass die auf dem
Bezeichnungszettel angegebene Betriebsspannung
und die Netzspannung übereinstimmen.
ACHTUNG! Der ununterbrochene Betrieb mit dem
Mixereinsatz darf nicht länger als 30 Sekunden
dauern, mit dem Besenaufsatz - 1 Minute, mit
dem Kartoelpüreeaufsatz - max. 1 Minute, beim
Zerkleinern oder Würfeln von Lebensmitteln - 3
Betriebszyklen je 10 Sekunden. Die Pausen
zwischen den Betriebszyklen müssen min. 3
Minuten betragen.
• Es ist nicht gestattet, das Gerät draußen zu
benutzen.
• Es ist nicht empfohlen, das Gerät bei Gewitter zu
benutzen.
• Schützen Sie das Gerät vor Stößen, Stürzen,
Vibrationen und anderen mechanischen
Einwirkungen.
• Lassen Sie das ans Stromnetz angeschlossene
Gerät nie unbeaufsichtigt.
• Benutzen Sie das Gerät in direkter Nähe von
Heizgeräten, Wärmequellen oder oenem Feuer
nicht.
• Es ist verboten, das Gerät an den Orten, wo
Sprays verwendet werden, sowie in der Nähe von
leichtentzündbaren Flüssigkeiten zu benutzen.
• Benutzen Sie das Gerät in der Nähe von Spülbecken,
in Badezimmern und neben den Wasserbecken oder
anderen mit Wasser gefüllten Behältern nicht.
• Falls das Gerät ins Wasser gefallen ist, ziehen Sie
den Netzstecker aus der Steckdose sofort heraus,
erst danach holen Sie das Gerät aus dem Wasser
heraus. Wenden Sie sich an einen autorisierten
Kundendienst, um das Gerät prüfen oder reparieren
zu lassen.
• Achten Sie darauf, dass das Netzkabel heiße
Oberächen und scharfe Möbelkanten nicht berührt.
• Trennen Sie das Gerät nach dem Gebrauch oder
vor der Reinigung vom Stromnetz ab. Wenn Sie
das Gerät vom Stromnetz abtrennen, halten Sie
den Netzstecker fest und ziehen Sie ihn aus der
Steckdose vorsichtig heraus; ziehen Sie das
Netzkabel nicht, da es zu seiner Beschädigung und
einem Kurzschluss führen kann.
• Berühren Sie das Gerätegehäuse, das Netzkabel
und den Netzstecker mit nassen Händen nicht.
• Vor der ersten Gerätenutzung spülen Sie alle mit den
Nahrungsmitteln zu kontaktierenden abnehmbaren
Aufsätze und Behälter sorgfältig durch.
• Benutzen Sie nur die mitgelieferten Teile.
• Berühren Sie keine drehenden Geräteteile. Halten
Sie Haar oder frei hängende Kleiderstücke vom
Drehbereich des Messers des Stabmixeraufsatzes
oder des Schlagbesens fern.
• Vergewissern Sie sich vor der Gerätenutzung, dass
die Aufsätze richtig aufgestellt und befestigt sind.
• Stellen Sie den Zerkleinerungsbehälter auf eine
ebene und standfeste Oberäche auf.
• Legen Sie die Nahrungsmittel in den
Zerkleinerungsbehälter vor der Geräteeinschaltung
ein, es ist verboten, das Gerät ohne Nahrungsmittel
im Zerkleinerungsbehälter einzuschalten.
• Kühlen Sie heiße Nahrungsmittel ab, bevor Sie sie in
den Zerkleinerungsbehälter einlegen.
• Beachten Sie die Nahrungsmittelmenge und den
Flüssigkeitenfüllstand im Zerkleinerungsbehälter.
• Die Schneidkanten des Zerkleinerungsmessers und
des Stabmixeraufsatzes sind scharf und gefährlich,
gehen Sie mit den Zerkleinerungsmessern und dem
Stabmixeraufsatz vorsichtig um.
• Wenn das Zerkleinerungsmesser während des
Betriebs stoppt, schalten Sie das Gerät aus,
ziehen Sie den Netzstecker aus der Steckdose
heraus, nehmen Sie den Getriebedeckel ab und
entfernen Sie das die Zerkleinerungsmesserdrehung
verhindernde Nahrungsmittel. Bei schwer drehendem
Zerkleinerungsmesser und Stabmixeraufsatz ist
es empfohlen, Wasser, Saft, Brühe usw. in den
Zerkleinerungsbehälter oder in den Behälter mit
verwendetem Stabmixeraufsatz einzugeben.
• Verwenden Sie den Würfelschneider nur für
gekochtes Gemüse. Gefriergut oder harte
Lebensmittel dürfen nicht gewürfelt werden.
• Achten Sie auf den Füllstand des Behälters, lassen
Sie keine Behälterüberfüllung zu, verarbeitete
Lebensmittel sind je nach der Füllung des Behälters
zu entnehmen.
• Nehmen Sie die Motoreinheit vom
Zerkleinerungsbehälter erst nach dem Abtrennen der
Motoreinheit vom Stromnetz ab.
• Es ist nicht gestattet, den Zerkleinerungsbehälter und
den Messbecher in den Mikrowellenofen zu stellen.
• Es ist nicht gestattet, die Aufsätze und die Behälter in
der Geschirrspülmaschine zu waschen.
• Aus Kindersicherheitsgründen lassen Sie die als
Verpackung verwendeten Plastiktüten nie ohne
Aufsicht.
ACHTUNG! Lassen Sie Kinder mit Plastiktüten oder
Verpackungsfolien nicht spielen. Erstickungsgefahr!
• Das Gerät ist nicht für Kinder bestimmt.
• Beaufsichtigen Sie Kinder, damit sie das Gerät als
Spielzeug nicht benutzen.
• Lassen Sie Kinder die Arbeitsäche, das
Gerätegehäuse, das Netzkabel oder den Netzstecker
während des Gerätebetriebs nicht berühren.
• Besondere Vorsichtsmaßnahmen sind in den
Fällen angesagt, wenn sich Kinder oder behinderte
Personen während des Gerätebetriebs in der Nähe
aufhalten.
Page 11

20 21DE DE
• Während des Betriebs und der Pausen zwischen
den Betriebszyklen stellen Sie das Gerät an einen für
Kinder unzugänglichen Ort auf.
• Dieses Gerät ist für Personen (darunter Kinder)
mit Körper-, Nerven- und Geistesstörungen
oder Personen ohne ausreichende Erfahrung
und Kenntnisse nicht geeignet, wenn sie sich
unter Aufsicht der Person, die für ihre Sicherheit
verantwortlich ist, nicht benden oder entsprechende
Anweisungen über die Nutzung des Geräts nicht
bekommen haben.
• Prüfen Sie die Unversehrtheit des Netzkabels von
Zeit zu Zeit.
• Wenn das Netzkabel beschädigt ist, soll es vom
Hersteller, vom Kundendienst oder von ähnlich
qualiziertem Personal ersetzt werden, um Gefahren
zu vermeiden.
• Es ist nicht gestattet, das Gerät selbständig
zu reparieren. Es ist nicht gestattet, das Gerät
selbständig auseinanderzunehmen; bei der
Feststellung jeglicher Beschädigungen, sowie im
Sturzfall, trennen Sie das Gerät vom Stromnetz ab
und wenden Sie sich an einen Kundendienst.
• Um Beschädigungen zu vermeiden, transportieren
Sie das Gerät nur in der Fabrikverpackung.
• Bewahren Sie das Gerät an einem trockenen,
kühlen und für Kinder und behinderte Personen
unzugänglichen Ort auf.
DAS GERÄT IST NUR FÜR DEN GEBRAUCH IM
HAUSHALT GEEIGNET, ES IST VERBOTEN, DAS
GERÄT ZU INDUSTRIE- ODER LABORZWECKEN ZU
BENUTZEN.
VOR DEM ERSTEN BETRIEB
Packen Sie das Gerät aus und warten Sie
mindestens 3 Stunden, bevor Sie es bei einer
negativen Temperatur transportieren oder
bewahren.
• Packen Sie das Gerät aus und entfernen Sie alle
Packen Sie das Gerät aus und entfernen Sie alle
Verpackungsmaterialien.
• Bewahren Sie die Originalverpackung auf.
• Lesen Sie die Sicherheitsmaßnahmen und
Bedienungsempfehlungen.
• Prüfen Sie die Komplettheit.
• Prüfen Sie das Gerät auf Beschädigungen; wenn
es beschädigt ist, schließen Sie es ans Stromnetz
nicht an.
• Vergewissern Sie sich, dass die angegebenen
Parameter der Geräteversorgungsspannung und die
Stromnetzparameter übereinstimmen. Beim 60-Hz-
Stromnetz-Gerätebetrieb sind keine zusätzlichen
Maßnahmen erforderlich.
• Vor der Gerätenutzung waschen Einzelheiten (7,
9, 11, 12, 13, 14, 15, 16, 17) mit Warmwasser und
einem neutralen Reinigungsmittel und trocknen Sie
sie ab.
• Am Stabmixeraufsatz (1) und des
Kartoelpüreeaufsätzes (8) spülen Sie nur den
Unterteil aus und wischen Sie die Außenseite
mit einem leicht angefeuchteten Tuch ab. Es ist
nicht gestattet, den Stabmixeraufsatz (1) und des
Kartoelpüreeaufsätzes (8) ins Wasser oder jegliche
andere Flüssigkeiten vollständig einzutauchen.
• Wischen Sie die Motoreinheit das
Schlagbesengetriebe (6) mit einem weichen, leicht
angefeuchteten Tuch, danach trocknen Sie sie ab.
ACHTUNG! Es ist verboten, den Stabmixeraufsatz
(1), die Motoreinheit, das Schlagbesengetriebe (6),
des Kartoelpüreeaufsätzes (12), das Netzkabel
und den Netzkabelstecker ins Wasser oder jegliche
andere Flüssigkeiten einzutauchen.
NUTZUNG DES STABMIXERAUFSATZES
Der Betrieb mit dem Stabmixeraufsatz (1) soll 30
Sekunden nicht überschreiten. Machen Sie eine
mindestens 3-Minuten-Betriebszyklenpause.
• Verwenden Sie den Stabmixeraufsatz (1) zum
Zubereiten von Soßen, Mayonnaise, Fruchtpürees,
Säuglingsnahrung, zum Mischen verschiedener
Zutaten und zum Bearbeiten von Obst und Gemüse
mit einer ausreichenden Saftmenge.
Vergewissern Sie sich vor dem Aufstellen des
Stabmixeraufsatzes (1), dass der Netzstecker an die
Steckdose nicht angeschlossen ist.
• Setzen Sie den Mixeraufsatz (1) in die Motoreinheit
ein, bis die Verriegelungen (2) einrasten,
vergewissern Sie sich, dass der Aufsatz sicher
befestigt ist (Abb. 1).
• Stecken Sie den Netzstecker in die Steckdose ein.
• Tauchen Sie den Stabmixeraufsatz (1) in einen
Behälter mit Nahrungsmitteln, die Sie zerkleinern/
mixen möchten.
ACHTUNG! Bei der Verarbeitung von
Nahrungsmitteln halten Sie die Motoreinheit mit dem
Stabmixeraufsatz (1) aufrecht. (Abb. 1)
• Um das Gerät einzuschalten, drücken und halten Sie
die Taste (4) «
üssige Nahrungsmittel zu mixen.
• Beim Drücken und Halten der Taste (4) «
Sie die Aufsatzdrehgeschwindigkeit mit dem Regler
(5) einstellen. Benutzen Sie diesen Betrieb, um
üssige und harte Nahrungsmittel zusammen zu
bearbeiten.
• Für die Höchstgeschwindigkeit drücken und halten
Sie die Taste (3) «T».
Anmerkungen:
- legen Sie die Nahrungsmittel in den Behälter
vor der Geräteeinschaltung ein. Die Menge
der zu verarbeitenden Nahrungsmittel soll 2/3
des Fassungsvermögens des Behälters nicht
überschreiten.
». Benutzen Sie diesen Betrieb, um
» können
Page 12

22 23DE DE
- vor dem Zerkleinern und Mischen ist es
notwendig, die Früchte zu schälen, ungenießbare
Teile wie Samen zu entfernen, die Früchte in
15×15×15 mm große Würfel zu schneiden, sie
in einen Behälter einzulegen und dann Saft oder
Wasser zu zugeben; die Maximalmenge soll 350
g für Nahrungsmittel und 250 ml für Wasser oder
Saft betragen.
- Es ist verboten, Gefriernahrungsmittel zu
zerkleinern oder zu mixen.
ACHTUNG! Wenn Sie hartes Gemüse wie Karotte
zerkleinern, schneiden Sie die Karotte in kleine
Stücke von 15×15 ×15 mm und legen Sie sie
in geeigneter Behälter, dabei soll das maximale
Karottengewicht 150 g nicht überschreiten, und geben
Sie 250 ml Wasser hinzu.
• Lassen Sie die Taste (3 oder 4) los, um die Drehung
des Stabmixaufsatzes (1) auszuschalten.
• Nach der Gerätenutzung ziehen Sie den
Netzstecker aus der Steckdose heraus und
nehmen Sie den Mixeraufsatz (1) ab, indem Sie die
Verriegelungstasten (2) drücken (Abb. 1).
ACHTUNG!
- Es ist verboten, den Stabmixeraufsatz (1) während
des Betriebs zu entfernen.
- Um die Stabmixeraufsatzmesser (1) nicht
zu beschädigen, sollen keine sehr harten
Nahrungsmittel wie Getreide, Reis, Kaeebohnen,
Hartkäse, Gefrierprodukte usw. bearbeitet werden.
- Wenn die Nahrungsmittel mit dem
Stabmixeraufsatz (1) schwer zu bearbeiten sind,
müssen Sie eine kleine Menge Wasser, Saft,
Brühe usw. hinzufügen.
NUTZUNG DES
SCHLAGBESENAUFSATZES
Der Betrieb mit dem Schlagbesenaufsatz (7) soll
1 Minute nicht überschreiten. Machen Sie eine
mindestens 3-Minuten-Betriebszyklenpause.
ACHTUNG! Es ist nicht gestattet, den
Schlagbesenaufsatz (7) zum Anrühren des festen
Teigs zu benutzen.
• Der Schlagbesenaufsatz (7) wird nur zum Schlagen
von Eiweiß, zum Zubereiten von leichtem Teig oder
zum Mischen von fertigen Desserts verwendet.
Vergewissern Sie sich vor dem Aufstellen des
Schlagbesenaufsatz (7), dass der Netzstecker an die
Steckdose nicht angeschlossen ist.
• Setzen Sie den Stabmixeraufsatz (7) in das
Schlagbesengetriebe (6) ein.
• Setzen Sie das Schlagbesengetriebe (6) in die
Motoreinheit ein und drehen Sie es entgegen dem
Uhrzeigersinn, vergewissern Sie sich, dass das
Getriebe (6) und das Schlagbesen (7) fest befestigt
sind (Abb. 2).
• Stecken Sie den Netzstecker in die Steckdose ein.
• Tauchen Sie den Schlagbesen (7) in einen
geeigneten Behälter, in den Sie die Nahrungsmittel
gelegt haben, ein.
• Um das Gerät einzuschalten, drücken und halten Sie
die Taste (4) «
• Beim Drücken und Halten der Taste (4) «
Sie die Drehgeschwindigkeit des Schlagbesens mit
dem Regler (5) einstellen.
• Für die Höchstgeschwindigkeit drücken und halten
Sie die Taste (3) «T».
• Lassen Sie die Taste (3 oder 4) zum Ausschalten los.
• Nach der Gerätenutzung ziehen Sie den Netzstecker
aus der Steckdose heraus, trennen Sie das
Schlagbesengetriebe (6) von der Motoreinheit ab,
indem Sie das Getriebe (6) im Uhrzeigersinn drehen
(Abb. 3).
• Nehmen Sie den Schlagbesenaufsatz (7) aus dem
Getriebe (6) heraus.
».
»können
KARTOFFELPÜREE MACHEN
BEFESTIGUNG
Dauerbetrieb Zeit sollte nicht mehr als 1 minute,
während die Kartoel Maische Herstellung Anlage
(8). Machen Sie mindestens eine 3-minütige Pause
zwischen den Betriebszyklen.
• Achten Sie vor der Installation des Anhangs (8)
darauf, dass der Netzstecker nicht in die Steckdose
gesteckt wird.
• Legen Sie die Befestigung (8) in die Motoreinheit und
drehen Sie Sie gegen den Uhrzeigersinn, so weit
es geht, stellen Sie sicher, dass die Befestigung (8)
richtig xiert ist (Abb. 3).
• Stecken Sie den Netzstecker in die Steckdose.
Den Anhang (8) mit Salzkartoeln in die Schüssel
geben.
ACHTUNG! Beim Zubereiten von Kartoelpüree
halten Sie die Motoreinheit mit dem Aufsatz (12)
senkrecht (Abb. 3).
• Um das Gerät einzuschalten, drücken und halten Sie
die Taste (4) «
Wenn Sie die Taste (4) «
können Sie die Drehzahl durch drehen des
regelknopfes (5) Steuern.
• Für den Betrieb mit der maximalen Drehzahl,
drücken und halten Sie die Taste (3) «T».
• Wenn Sie Kartoelpüree machen, fügen Sie warme
Milch oder etwas kartoeltopf Likör hinzu.
• Lassen Sie die Taste (3 oder 4) zum Ausschalten los.
• Nachdem Sie das Gerät beendet haben, nehmen Sie
den Netzstecker aus der Steckdose und entfernen
die Befestigung (8) im Uhrzeigersinn (Abb.3).
• Waschen Sie den unteren Teil der Anlage (8),
wischen Sie den äußeren Teil der Anlage (8) Körper
mit einem feuchten Tuch. Den Anbau (8) nicht in
Wasser oder andere Flüssigkeiten Tauchen.
» gedrückt.
» drücken und halten,
Page 13

24 25DE DE
ZERKLEINERERBETRIEB
Der ununterbrochene Betrieb mit dem
Zerkleinerungsaufsatz darf nicht länger als 3 Zyklen
je 10 Sekunden dauern.
• Der Aufsatz wird zum Zerkleinern von Fleisch, Käse,
Zwiebeln, Kräuter, Knoblauch, Karotten, Walnüsse,
Backpaumen, Gemüse oder Obst verwendet.
ACHTUNG! Es ist verboten, sehr harte
Nahrungsmittel wie Muskatnüsse, Kaeebohnen,
Getreide sowie Gefriernahrungsmittel oder Eis zu
zerkleinern.
VORBEREITUNG DER NAHRUNGSMITTEL VOR
DEM ZERKLEINERN:
• Entfernen Sie Knochen, Sehnen, Knorpel und Fett
vom Fleisch.
• Schneiden Sie Fleisch, Käse, Zwiebel, Gemüse und
Früchte in Stücke ca. 60х20х20 mm groß.
• Entfernen Sie Stängel bei Kräutern, schälen Sie
Nüsse.
ZERKLEINERUNG
Vergewissern Sie sich vor dem Zusammensetzen
des Zerkleinerers, dass der Netzstecker an die
Steckdose nicht angeschlossen ist.
• Stellen Sie den Zerkleinerungsbehälter (13) auf eine
ebene und standfeste Oberäche auf.
• Setzen Sie das Zerkleinerungsmesser (14) auf die
Achse im Behälter (13) auf.
ACHTUNG! Die Klingen des Zerkleinerungsmessers
(14) sind sehr scharf! Halten Sie das
Zerkleinerungsmesser (14) immer nur am
Plastikendstück.
• Legen Sie die Nahrungsmittel in den Behälter (13) ein.
Anmerkung: schalten das Gerät mit dem leeren Behälter
(13) nicht ein.
• Setzen Sie den Deckel (10) auf den Behälter (13) auf
und drehen Sie den Deckel im Uhrzeigersinn bis zum
Anschlag.
• Setzen Sie den Getriebedeckel (10) auf den Behälter
(10) auf (Abb. 4).
• Setzen Sie den Schieber (9) in die Önung des Deckels
(10) ein.
• Setzen Sie die Motoreinheit am Halsloch des
Getriebedeckels (8) auf, drehen Sie die Motoreinheit im
Uhrzeigersinn bis zum Anschlag und vergewissern Sie
sich, dass die Motoreinheit sicher befestigt ist. Stellen
Sie die Motoreinheit senkrecht und verwindungsfrei auf
(Abb. 2).
• Stecken Sie den Netzstecker in die Steckdose ein.
• Um das Gerät einzuschalten, drücken und halten Sie die
Taste (4) «
• Beim Drücken und Halten der Taste (4) «
die Drehgeschwindigkeit des Zerkleinerungsmessers
(14) mit dem Regler (5) einstellen.
».
» können Sie
• Für die Höchstgeschwindigkeit drücken und halten
Sie die Taste (3) «T».
• Während des Betriebs halten Sie die Motoreinheit mit
einer Hand und den Zerkleinerungsbehälter (10) mit
der anderen.
• Lassen Sie die Taste (3 oder 4) zum Ausschalten los.
• Gegebenenfalls kann zusätzliches Zerkleinerungsgut
in den Behälter (13) gegeben werden. Dazu den
Schieber (9) aus der Önung für den Schieber (9)
rausnehmen, Lebensmittel hineingeben und den
Schieber (9) wieder einsetzen.
• Nach der Gerätenutzung warten Sie ab, bis das
Zerkleinerungsmesser (14) vollständig
• stoppt.
• Ziehen Sie den Netzstecker aus der Steckdose
heraus.
• Trennen Sie die Motoreinheit vom Getriebedeckel
(10) durchs Drücken der Verriegelungstasten (2) ab
(Abb. 2).
• Nehmen Sie den Getriebedeckel (10) vom Behälter
(9) ab.
• Nehmen Sie das Zerkleinerungsmesser (13) aus
dem Behälter (14) vorsichtig aus, indem Sie es am
Kunststoendstück festhalten.
• Nehmen Sie die zerkleinerten Nahrungsmittel aus
dem Behälter (13) heraus.
RASPEL ODER HOBEL BENUTZEN
• Der Betrieb mit der Raspelscheibe (15) /
Hobelscheibe (16) darf nicht länger als drei Zyklen
je 10 Sekunden dauern. Die Pausen zwischen den
Betriebszyklen müssen min. 3 Minuten betragen.
• Die Scheiben (15 und 16) dienen zum Zerkleinern
von Obst und Gemüse.
• Vergewissern Sie sich vor dem Zusammensetzen,
dass der Netzstecker nicht in der Steckdose ist.
• Stellen Sie den Behälter (13) auf eine ebene und
standfeste Oberäche.
• Setzen Sie die Antriebswelle (16) auf die Achse im
Behälter (13) auf.
• Setzen Sie die Raspelscheibe oder Hobelscheibe
(15) auf die Antriebswelle (16) auf.
• Setzen Sie den Deckel (10) auf den Behälter (13) auf
und drehen Sie den Deckel im Uhrzeigersinn bis zum
Anschlag.
• Drücken Sie die Verriegelungen (2) und setzen Sie
die Motoreinheit auf das Füllrohr des Deckels (10),
achten Sie darauf, dass die Motoreinheit sicher
befestigt ist. Setzen Sie die Motoreinheit senkrecht
und verwindungsfrei auf (Abb. 5).
• Setzen Sie den Schieber (9) in die Önung des
Deckels (10) ein.
• Stecken Sie den Netzstecker in die Steckdose ein.
• Um das Gerät einzuschalten, drücken und halten Sie
die Taste (4) «
• Beim Drücken und Halten der Taste (4) «
Sie die Drehgeschwindigkeit der Scheibe (15 oder
16) mit dem Regler (5) einstellen.
• Für die Höchstgeschwindigkeit drücken und halten
Sie die Taste (3) «T».
».
» können
Page 14

26 27DE DE
• Während des Betriebs geben Sie die Lebensmittel
in die Önung des Schiebers ein, benutzen Sie den
Schieber (9) für die Lebensmittelzugabe. Drücken
Sie leicht auf den Schieber (9), um Lebensmittel
zuzugeben. Benutzen Sie keine Fremdgegenstände
für die Lebensmittelzugabe, schieben Sie die
Lebensmittel nicht mit den Händen durch, benutzen
Sie dazu nur den Schieber (9).
• Achten Sie auf den Füllstand des Behälters (13), je
nach der Füllung ist der Mixer auszuschalten und
die Lebensmittel sind aus dem Behälter (13) zu
entnehmen.
• Zum Ausschalten lassen Sie die Taste (3 oder 4) los.
• Nach dem Benutzen des Geräts warten Sie, bis die
Scheiben (15 oder 16) vollständig stillstehen.
• Ziehen Sie den Netzstecker aus der Steckdose.
• Drücken Sie auf die Tasten der Verriegelung (2), um
die Motoreinheit vom Deckel (10) abzutrennen (Abb.
5).
• Drehen Sie den Deckel (10) entgegen dem
Uhrzeigersinn, um den von dem Behälter (13)
abzunehmen.
• Nehmen Sie die aufgesetzte Scheibe (15) von
der Antriebswelle (16) ab, entnehmen Sie die
Antriebswelle (16).
• Nehmen Sie die zerkleinerten Lebensmittel aus dem
Behälter (13) heraus.
WÜRFELSCHNEIDER
• Der Betrieb mit dem Würfelschneider darf nicht
länger als drei Zyklen je 10 Sekunden dauern. Die
Pausen zwischen den Betriebszyklen müssen min. 3
Minuten betragen.
• Der Würfelschneider ist für das Würfeln von weichem
Obst und gekochtem Gemüse geeignet.
ACHTUNG! Um Schaden zu verhindern, darf
dieser Einsatz nicht für die Verarbeitung von harten
Lebensmitteln oder Gefriergut verwendet werden.
• Vergewissern Sie sich vor dem Zusammensetzen,
dass der Netzstecker nicht in der Steckdose ist.
• Stellen Sie den Behälter (13) auf eine ebene und
standfeste Oberäche.
• Setzen Sie den Würfelschneider (12) in den Behälter
(13) ein, die Aussparung auf dem Würfelschneider
(12) muss mit dem Vorsprung des Behälters (13)
zusammenpassen.
• Setzen Sie das Würfelmesser (11) auf den
Würfelschneider (12) auf.
• Setzen Sie den Deckel (10) auf den Behälter (13) auf
und drehen Sie den Deckel im Uhrzeigersinn bis zum
Anschlag.
• Drücken Sie die Verriegelungen (2) und setzen
Sie die Motoreinheit auf das Füllrohr des Deckels
(10), achten Sie darauf, dass die Motoreinheit
sicher befestigt ist. Stellen Sie die Motoreinheit (2)
senkrecht und verwindungsfrei auf (Abb. 2).
• Setzen Sie den Schieber (9) in die Önung des
Deckels (10) ein.
• Stecken Sie den Netzstecker in die Steckdose ein.
• Um das Gerät einzuschalten, drücken und halten Sie
die Taste (4) «
• Beim Drücken und Halten der Taste (4) «
Sie die Drehgeschwindigkeit der Scheibe (15) mit
dem Regler (5) einstellen.
• Für die Höchstgeschwindigkeit drücken und halten
Sie die Taste (3) «T».
• Während des Betriebs geben Sie die Lebensmittel
in die Önung des Schiebers ein, benutzen Sie den
Schieber (9) für die Lebensmittelzugabe. Drücken
Sie leicht auf den Schieber (9), um Lebensmittel
zuzugeben. Benutzen Sie keine Fremdgegenstände
für die Lebensmittelzugabe, schieben Sie die
Lebensmittel nicht mit den Händen durch, benutzen
Sie dazu nur den Schieber (9).
• Achten Sie auf den Füllstand des Behälters (13), je
nach der Füllung ist der Mixer auszuschalten und
die Lebensmittel sind aus dem Behälter (13) zu
entnehmen.
• Zum Ausschalten lassen Sie die Taste (3 oder 4) los.
• Nach der Nutzung des Geräts warten Sie, bis das
Messer (11) vollständig stillsteht.
• Ziehen Sie den Netzstecker aus der Steckdose.
• Drücken Sie auf die Tasten der Verriegelung (2) ,
um die Motoreinheit vom Deckel (10) abzutrennen
(Abb. 6).
• Drehen Sie den Deckel (10) entgegen dem
Uhrzeigersinn, um den von dem Behälter (13)
abzunehmen.
».
» können
• Nehmen Sie das Messer (11) ab, entnehmen Sie den
Würfelschneider (12) aus dem Behälter (13).
• Entnehmen Sie die Lebensmittel aus dem Behälter
(13).
REINIGUNG
ACHTUNG! Die Klingen des Zerkleinerungsmessers
(14) sind sehr scharf und können gefährlich sein.
Gehen Sie mit dem Zerkleinerungsmesser (14) sehr
vorsichtig um!
• Nach dem Gerätebetrieb ziehen Sie den Netzstecker
aus der Steckdose heraus.
• Waschen Sie die Teile, die mit Lebensmitteln in
Berührung gekommen sind, mit Warmwasser und
neutralem Waschmittel und trocknen Sie diese.
• Benutzen Sie die Einrichtung (17) zur bequemen
Reinigung des Einsatzgitters (8).
• Am Stabmixeraufsatz (1) spülen Sie nur den Unterteil
aus und wischen Sie die Außenseite mit einem
leicht angefeuchteten Tuch ab. Es ist nicht gestattet,
den Stabmixeraufsatz (1) ins Wasser oder jegliche
andere Flüssigkeiten vollständig einzutauchen.
• Wischen Sie die Motoreinheit, den Getriebedeckel (8)
und das Schlagbesengetriebe (6) mit einem weichen,
leicht angefeuchteten Tuch ab, danach trocknen Sie
sie ab.
• Nach der Zerkleinerung von salzigen oder saueren
Nahrungsmitteln spülen Sie den Stabmixeraufsatz
(1) und das Zerkleinerungsmesser (14) mit Wasser
sofort aus.
Page 15

28 29DE DE
• Bei der Zerkleinerung von Nahrungsmitteln mit
starken Farbeigenschaften, z.B. Karotte oder Rüben,
können sich die Aufsätze oder die Behälter färben,
wischen Sie die Aufsätze und die Behälter mit
einem mit Panzenöl angefeuchteten Tuch, danach
waschen Sie die Aufsätze und die Behälter mit einem
neutralen Waschmittel, spülen und trocknen Sie
diese ab.
• Es ist nicht gestattet, die Motoreinheit, das
Getriebe (6) und den Getriebedeckel (10) in
jegliche Flüssigkeiten einzutauchen, sowie diese
unter dem Wasserstrahl zu spülen und in der
Geschirrspülmaschine zu waschen.
• Zum Reinigen des Motoreinheitsgehäuses und der
abnehmbaren Teile dürfen keine Schleifreinigungsund Lösungsmittel verwendet werden.
AUFBEWAHRUNG
• Reinigen Sie die Geräteteile, bevor Sie das Gerät für
längere Zeit lagern.
• Wickeln Sie das Netzkabel über die Motoreinheit
nicht auf.
• Bewahren Sie das Gerät an einem trockenen,
kühlen und für Kinder und behinderte Personen
unzugänglichen Ort auf.
LIEFERUMFANG
1. Motoreinheit — 1 Stk.
2. Stabmixeraufsatz — 1 Stk.
3. Schlagbesengetriebe — 1 Stk.
4. Schlagbesenaufsatz — 1 Stk.
5. Getriebedeckel — 1 Stk.
6. Behälter – 1 Stk.
7. Zerkleinerungsmesser — 1 Stk.
8. Kartoelpüree machen Befestigung — 1 Stk.
9. Raspelscheibe/Hobelscheibe – 1 Stk.
10. Messer zum Würfeln – 1 Stk.
11. Würfelschneider – 1 Stk.
12. Bedienungsanleitung — 1 Stk.
TECHNISCHE EIGENSCHAFTEN
• Stromversorgung: 220-240 V, ~ 50-60 Hz
• Nennleistungsaufnahme: 1400 W
• Becher – 600 ml
• Zerkleinerungsbehälter – 2 l
ENTSORGUNG
Um mögliches Schaden für die Umwelt
oder die menschliche Gesundheit
durch unkontrollierte Abfallentsorgung
zu vermeiden, werfen Sie das Gerät
und die Batterien (falls mitgeliefert)
nach Beendigung ihrer Nutzungsdauer
zusammen mit gewöhnlichen Haushaltsabfällen nicht
weg, geben Sie das Gerät und die Batterien in die
Spezialpunkte für weitere Entsorgung über.
Die bei Entsorgung der Erzeugnisse entstehenden
Abfälle sind unbedingt zu sammeln und weiter
ordnungsmäßig zu entsorgen.
Mehrere Information zur Entsorgung dieses Produkts
erhalten Sie bei Ihrer lokalen Stadtverwaltung, einem
Abfallentsorgungsdienst oder beim Geschäft, wo Sie
dieses Produkt gekauft haben.
Der Hersteller behält sich das Recht vor, das
Design, die Konstruktion und die das gemeine
Gerätebetriebsprinzip nicht beeinussenden
technischen Eigenschaften ohne Vorbenachrichtigung
zu verändern.
Die Gerätenutzungsdauer beträgt 3 Jahre
Das Herstellungsdatum ist in der Fabrikationsnummer
angegeben.
Bei Störungsfeststellung wenden Sie sich baldigst an
einen autorisierten Kundendienst.
Page 16

RU
30 31RU RU
БЛЕНДЕР BR1246
Блендерный набор предназначен для измельчения, перемешивания, совместной обработки жидких и твёрдых продуктов, а также для приготовления картофельного пюре.
ОПИСАНИЕ
1. Насадка-блендер
2. Кнопки фиксатора насадок
3. Кнопка включения максимальной скорости «T»
4. Кнопка включения «
5. Регулятор скорости вращения «1---5»
6. Редуктор насадки-венчика
7. Насадка-венчик
8. Насадка для картофельного пюре
9. Толкатель
10. Крышка ёмкости
11. Нож для нарезки кубиками
12. Насадка для нарезки кубиками
13. Ёмкость для продуктов
14. Нож-измельчитель
15. Диск-тёрка/шинковка
16. Приводной вал
17. Приспособление для чистки сетки насадки (12)
»
5
4
3
6
2
1
7
9
10
11
12
13 14
8
Рис. 1 Рис. 4
Рис. 2
15
16
17
Рис. 3
Рис. 5
Рис. 6
Page 17

32 33RU RU
МЕРЫ БЕЗОПАСНОСТИ И РЕКОМЕНДАЦИИ ПО ЭКСПЛУАТАЦИИ
Перед использованием устройства внимательно
ознакомьтесь с руководством по эксплуатации,
после прочтения сохраните его для использования в будущем.
• Используйте устройство только по его прямому
назначению, как изложено в данной инструкции.
• Неправильное обращение с устройством может
привести к его поломке, причинению вреда
пользователю или его имуществу и не является
гарантийным случаем.
• Убедитесь, что рабочее напряжение устройства,
указанное на этикетке, соответствует напряжению
электросети.
ВНИМАНИЕ! Время непрерывной работы
с насадкой-блендером не должно превышать
30 секунд, с насадкой-венчиком 1 минуту, с
насадкой для картофельного пюре не более 1
минуты, при измельчении продуктов и нарезке
их кубиками время работы 3 цикла по 10 секунд.
Между рабочими циклами делайте перерыв не
менее 3 минут.
• Запрещается использовать устройство вне
помещений.
• Не рекомендуется использовать устройство во
время грозы.
• Оберегайте устройство от ударов, падений, вибраций и иных механических воздействий.
• Не оставляйте устройство, включённое в сеть, без
присмотра.
• Не используйте устройство в непосредственной
близости от нагревательных приборов, источников
тепла или открытого пламени.
• Запрещается использовать устройство в местах,
где используются или распыляются аэрозоли,
а также вблизи от легковоспламеняющихся
жидкостей.
• Не используйте устройство вблизи от кухонной
раковины, в ванных комнатах, около бассейнов
или других ёмкостей, наполненных водой.
• Если устройство упало в воду, немедленно выньте
вилку шнура питания из электрической розетки, и
только после этого можно достать устройство из
воды. Обратитесь в сервисный центр для осмотра
или ремонта устройства.
• Не допускайте, чтобы шнур питания касался горячих поверхностей и острых кромок мебели.
• Отключайте устройство от электросети после
использования или перед чисткой. При отключении устройства от электрической сети держитесь
за вилку шнура питания и аккуратно выньте её
из электрической розетки, не тяните за шнур
питания — это может привести к его повреждению
и вызвать короткое замыкание.
• Не прикасайтесь к корпусу устройства, к шнуру
питания и к вилке шнура питания мокрыми
руками.
• Перед первым использованием устройства тщательно промойте все съёмные насадки и ёмкости,
которые будут контактировать с продуктами.
• Используйте только детали, которые входят в
комплект поставки.
• Не прикасайтесь к вращающимся деталям устройства. Не допускайте попадания волос или свободно висящих элементов одежды в зону вращения
ножа насадки-блендера или венчика.
• Перед использованием устройства убедитесь,
что насадки установлены правильно и зафиксированы.
• Устанавливайте ёмкость на ровную и устойчивую
поверхность.
• Помещайте продукты в ёмкость для измельчениядо включения устройства, запрещается включать
устройство, если в ёмкости нет продуктов.
• Охлаждайте горячие продукты прежде, чем
помес тить их в ёмкость измельчителя.
• Следите за количеством продуктов, помещённых
в ёмкость и уровнем налитых жидкостей.
• Режущие кромки ножа-измельчителя и насадки-блендера острые и представляют опасность,
обращайтесь с ножом-измельчителя и насадкой-блендер осторожно.
• Если во время работы произошла остановка ножа-измельчителя, выключите устройство, выньте
вилку шнура питания из электрической розетки,
снимите крышку-редуктор и удалите продукт,
мешающий вращению ножа-измельчителя. При
затруднении вращения ножа-измельчителя и
насадки-блендера рекомендуется добавить в
ёмкость измельчителя или в ёмкость, в которой
используется насадка-блендер, воду, сок, отвар
и т.д.
• Используйте насадку для нарезки кубиками
только для предварительно отваренных овощей,
запрещается производить нарезку кубиками замороженных или твёрдых продуктов.
• Следите за наполнением ёмкости, не допускайте
переполнения ёмкости, вынимайте переработанные продукты по мере наполнения ёмкости.
• Снимать моторный блок с ёмкости измельчителя
можно только после отключения моторного блока
от электрической сети.
• Запрещается помещать ёмкость в микроволновую
печь.
• Не помещайте насадки и ёмкость в посудомоечную машину.
• Из соображений безопасности детей не оставляйте полиэтиленовые пакеты, используемые в
качестве упаковки, без надзора.
ВНИМАНИЕ! Не разрешайте детям играть с полиэтиленовыми пакетами или упаковочной плёнкой.
Опасность удушья!
• Устройство не предназначено для использования
детьми.
• Осуществляйте надзор за детьми, чтобы не
допустить использования устройства в качестве
игрушки.
Page 18

34 35RU RU
• Не разрешайте детям прикасаться к рабочей
поверхности, к корпусу устройства, к шнуру питания или к вилке шнура питания во время работы
устройства.
• Будьте особенно внимательны, если поблизости
от работающего устройства находятся дети или
лица с ограниченными возможностями.
• Во время работы и в перерывах между рабочими
циклами размещайте устройство в местах, недоступных для детей.
• Прибор не предназначен для использования лицами (включая детей) с пониженными физическими, психическими или умственными способностями, или при отсутствии у них опыта или знаний,
если они не находятся под контролем или не
проинструктированы лицом, ответственным за их
безопасность, об использовании прибора.
• Периодически проверяйте целостность шнура
питания.
• При повреждении шнура питания его замену,
во избежание опасности, должны производить
изготовитель, сервисная служба или подобный
квалифицированный персонал.
• Запрещается самостоятельно ремонтировать
устройство. Не разбирайте устройство самостоятельно, при возникновении любых неисправностей, а также после падения устройства отключите его от электросети и обратитесь сервисный
центр.
• Во избежание повреждений перевозите устройство в заводской упаковке.
• Храните устройство в сухом прохладном месте,
недоступном для детей и людей с ограниченными
возможностями.
УСТРОЙСТВО ПРЕДНАЗНАЧЕНО ТОЛЬКО ДЛЯ
БЫТОВОГО ИСПОЛЬЗОВАНИЯ, ЗАПРЕЩАЕТСЯ
ИСПОЛЬЗОВАТЬ УСТРОЙСТВО В КОММЕРЧЕСКИХ ИЛИ ЛАБОРАТОРНЫХ ЦЕЛЯХ.
ПЕРЕД ПЕРВЫМ ИСПОЛЬЗОВАНИЕМ
После транспортировки или хранения устройства при отрицательной температуре, распакуйте его и подождите не менее 3 часов перед
использованием.
• Распакуйте устройство и удалите все упаковочные материалы.
• Сохраните заводскую упаковку.
• Ознакомьтесь с мерами безопасности и рекомен-
дациями по эксплуатации.
• Проверьте комплектацию.
• Осмотрите устройство на наличие повреждений,
при наличии повреждений не включайте его в
сеть.
• Убедитесь, что указанные параметры напряжения
питания устройства соответствуют параметрам
электрической сети. При использовании устройства в электрической сети частотой 60 Гц, никаких
дополнительных действий не требуется.
• Перед использованием устройства детали (7, 8, 9,
11, 12, 13, 14, 15, 16, 17) тёплой водой с нейтральным моющим средством и просушите.
• У насадки-блендера (1) и насадки для картофельного пюре (8) промывайте только нижнюю часть,
внешнюю поверхность протрите слегка влажной
тканью. Запрещается полностью погружать насадку-блендер (1) и насадку для картофельного пюре
(8) в воду или любые другие жидкости.
• Моторный блок, крышку ёмкости (10), редуктор
насадки-венчика (6) протрите мягкой, слегка
влажной тканью, после чего вытрите насухо.
ВНИМАНИЕ! Запрещается погружать насадку-блендер (1), моторный блок, крышку, редуктор
насадки-венчика (6), насадку для картофельного
пюре (8), шнур питания и вилку шнура питания в
воду или любые другие жидкости.
ИСПОЛЬЗОВАНИЕ НАСАДКИ-БЛЕНДЕРА
Время непрерывной работы с насадкой-блендером (1) не должно превышать 30 секунд. Между
рабочими циклами делайте перерыв не менее
3 минут.
• Насадку-блендер (1) используйте для приготовления соусов, майонеза, фруктовых пюре, детских
смесей, смешивания разнообразных ингредиентов, для переработки фруктов и овощей, содержащих достаточное количество сока.
• Перед установкой насадки-блендера (1) убедитесь в том, что вилка шнура питания не вставлена
в электрическую розетку.
• Вставьте насадку-блендер (1) в моторный блок
до срабатывания фиксаторов (2), убедитесь в
надёжной фиксации насадки (рис.1).
• Вставьте вилку шнура питания в электрическую
розетку.
• Погрузите насадку-блендер (1) в ёмкость с
продуктами, которые вы хотите измельчить/перемешать.
ВНИМАНИЕ! При переработке продуктов держите
моторный блок с насадкой-блендером (1) вертикально (рис. 1).
• Для включения нажмите и удерживайте кнопку (4)
». Используйте этот режим работы для смеши-
«
вания жидких продуктов.
• При нажатии и удержании кнопки (4) «
можете регулировать скорость вращения насадки
поворотом регулятора (5). Используйте этот
режим работы для переработки жидких и твёрдых
продуктов.
• Для работы в режиме максимальной скорости
нажмите и удерживайте кнопку (3) «T».
Примечания:
- продукты помещаются в ёмкость до включения устройства. Объём перерабатываемых
продуктов не должен превышать 2/3 от объёма
» Вы
Page 19

36 37RU RU
ёмкости, в которой они перерабатываются.
- перед измельчением и смешиванием необходимо очистить фрукты от кожуры, удалить несъедобные части, такие как косточки, порезать
фрукты кубиками размером около 15×15×15
мм, поместить их в ёмкость, затем добавить
сок или воду, максимальный объем продуктов
не должен превышать 350 г и 250 мл воды или
сока.
- запрещается измельчать или смешивать замороженные продукты.
ВНИМАНИЕ! При измельчении твёрдых овощей,
например, моркови, нарежьте морковь на мелкие
кусочки 15×15×15 мм и поместите их в подходящую ёмкость, при этом максимальный вес
моркови не должен превышать 150 г, и добавьте
250 мл воды.
• Для выключения вращения насадки-блендера (1)
отпустите кнопку (3 или 4).
• После завершения работы выньте вилку шнура
питания из электрической розетки и снимите
насадку-блендер (1), нажав на кнопки фиксатора
(2) (рис. 1).
ВНИМАНИЕ!
- Во время работы запрещается снимать насадку-блендер (1).
- Во избежание повреждения ножей насадки-блендера (1) запрещается перерабатывать
очень твёрдые продукты, такие как крупы, рис,
зёрна кофе, твёрдые сорта сыра, замороженные продукты и т.п.
- Если во время работы с насадкой-блендером (1) возникают трудности в измельчении
продуктов, необходимо добавить небольшое
количество воды, сока, отвара и т.п.
ИСПОЛЬЗОВАНИЕ НАСАДКИ-ВЕНЧИКА
Время непрерывной работы с насадкой-венчиком (7) не должно превышать 1 минуту. Между
рабочими циклами делайте перерыв не менее 3
минут.
ВНИМАНИЕ! Запрещается использовать насад-
ку-венчик (7) для замешивания крутого теста.
• Насадка-венчик (7) используется только для взбивания яичного белка, приготовления лёгкого теста
или для перемешивания готовых десертов.
• Перед установкой насадки-венчика (7) убедитесь
в том, что вилка шнура питания не вставлена в
электрическую розетку.
• Вставьте насадку-венчик (7) в редуктор венчика
(6).
• Вставьте редуктор венчика (6) в моторный блок до
срабатывания фиксаторов (2), убедитесь в надежной фиксации редуктора (6) и венчика (7) (рис. 2).
• Вставьте вилку шнура питания в электрическую
розетку.
• Опустите насадку-венчик (7) в подходящую ёмкость, в которую Вы поместили продукты.
• Для включения нажмите и удерживайте кнопку
» .
(4) «
• При нажатии и удержании кнопки (4) «
можете регулировать скорость вращения насадки-венчика поворотом регулятора (5).
• Для работы в режиме максимальной скорости
нажмите и удерживайте кнопку (3) «T».
• Для выключения отпустите кнопку (3 или 4).
• После использования устройства выньте вилку
шнура питания из электрической розетки, отсоедините редуктор венчика (6) от моторного блока,
нажав на кнопки фиксатора (2) (рис. 3).
• Выньте насадку-венчик (7) из редуктора (6).
» Вы
НАСАДКА ДЛЯ КАРТОФЕЛЬНОГО ПЮРЕ
Время непрерывной работы с насадкой для
картофельного пюре (8) не должно превышать
1 минуту. Между рабочими циклами делайте
перерыв не менее 3 минут.
• Перед установкой насадки (8) убедитесь в том,
что вилка шнура питания не вставлена в электрическую розетку.
• Вставьте насадку (8) в моторный блок (до срабатывания фиксаторов (2), убедитесь в надёжной
фиксации насадки (8) (рис. 4).
• Вставьте вилку шнура питания в электрическую
розетку.
• Погрузите насадку (8) в ёмкость с отварным
картофелем.
ВНИМАНИЕ! При приготовлении картофельного
пюре держите моторный блок с насадкой (8) вертикально (рис. 3).
• Для включения нажмите и удерживайте кнопку
».
(4) «
• При нажатии и удержании кнопки (4) «
можете регулировать скорость вращения насадки
поворотом регулятора (5).
• Для работы в режиме максимальной скорости,
нажмите и удерживайте кнопку (3) «T».
• Во время приготовления картофельного пюре
добавляйте подогретое молоко или картофельный
отвар.
• Для выключения отпустите кнопку (3 или 4).
• По завершению работы выньте вилку шнура пи-
тания из электрической розетки, снимите насадку
(8), нажав на кнопки фиксатора (2) (рис. 3).
• Промойте нижнюю часть насадки (8), наружную
часть корпуса насадки (8) протрите влажной тканью, запрещается полностью погружать насадку
(8) в воду или другие жидкости.
» Вы
ИСПОЛЬЗОВАНИЕ ИЗМЕЛЬЧИТЕЛЯ
Время непрерывной работы с насадкой измельчителем не должно превышать трёх циклов по
10 . Между рабочими циклами делайте перерыв
не менее 3 минут.
Page 20

38 39RU RU
• Насадка используется для измельчения мяса,
сыра, лука, трав, чеснока, моркови, грецких орехов, чернослива, овощей или фруктов.
ВНИМАНИЕ! Запрещается измельчать очень твёрдые продукты, такие как мускатный орех, зёрна
кофе, злаки, а также замороженные продукты или
лёд.
ПОДГОТОВКА ПРОДУКТОВ ПЕРЕД ИЗМЕЛЬЧЕНИЕМ:
• Удалите из мяса кости, жилы, хрящи и жир.
• Нарежьте мясо, сыр, лук, овощи или фрукты
кусочками приблизительно 60х20х20 мм.
• Удалите у трав стебли, очистите орехи от скорлупы.
Измельчение
Перед сборкой измельчителя убедитесь в том,
что вилка шнура питания не вставлена в электрическую розетку.
• Установите ёмкость (13) на ровную и устойчивую
поверхность.
• Установите нож-измельчитель (14) на ось внутри
ёмкости (13).
Внимание: лезвия ножа-измельчителя (14) очень
острые! Всегда держите нож-измельчитель (14)
за пластмассовый хвостовик.
• Поместите продукты в ёмкость (13).
Примечание: не включайте устройство с пустой
ёмкостью (13).
• Установите крышку (10) на ёмкость (13) и поверните её почасовой стрелке до упора.
• Нажмите на фиксаторы (2) и установите моторный
блок на горловину крышки (10), убедитесь в надежной фиксации моторного блока. Устанавливайте моторный блок вертикально и без перекосов
(рис. 4).
• Вставьте толкатель (9) в отверстие крышки (10).
• Вставьте вилку шнура питания в электрическую
розетку.
• Для включения нажмите и удерживайте кнопку
» .
(4) «
• При нажатии и удержании кнопки (4) «
можете регулировать скорость вращения ножа-измельчителя (14) поворотом регулятора (5).
• Для работы в режиме максимальной скорости
нажмите и удерживайте кнопку (3) «T».
• Во время работы держите моторный блок одной
рукой, а ёмкость (13) — придерживайте другой
рукой.
• Для выключения отпустите кнопку (3 или 4).
• При необходимости вы можете добавить в ём-
кость (13) дополнительные продукты для измельчения, выньте толкатель (9) через отверстие для
толкателя (9), добавьте продукты и установите
толкатель (9) на место.
• При необходимости вы можете добавить в ёмкость (13) дополнительные продукты для измель-
» Вы
чения, выньте толкатель (9) через отверстие для
толкателя (9), добавьте продукты и установите
толкатель (9) на место.
• После использования устройства дождитесь полной остановки вращения ножа-измельчителя (14).
• Выньте вилку шнура питания из электрической
розетки.
• Отсоедините моторный блок от крышки (10),
нажав на кнопки фиксатора (2) (рис. 4).
• Снимите крышку(10) с ёмкости (13), повернув
крышку (10) против часовой стрелки.
• Соблюдая осторожность, выньте из ёмкости (13)
нож-измельчитель (14), держась за пластмассовый хвостовик.
• Извлеките измельчённые продукты из ёмкости
(13).
ИСПОЛЬЗОВАНИЕ ТЁРКИ ИЛИ ШИНКОВКИ
• Время непрерывной работы с дисками тёрка (15)/
шинковка (16) не должно превышать трёх циклов
по 10 секунд. Между рабочими циклами делайте
перерыв не менее 3 минут.
• Диски (15 и 16) используется для измельчения
овощей или фруктов.
• Перед сборкой, убедитесь в том, что вилка шнура
питания не вставлена в электрическую розетку.
• Установите ёмкость (13) на ровную и устойчивую
поверхность.
• Установите приводной вал (16) на ось внутри
ёмкости (13).
• Установите на приводной вал (16) диск тёрку или
диск шинковку (15).
• Установите крышку (10) на ёмкость (13) и поверните её почасовой стрелке до упора.
• Нажмите на фиксаторы (2) и установите моторный
блок на горловину крышки (10), убедитесь в надежной фиксации моторного блока. Устанавливайте моторный блок вертикально и без перекосов
(рис. 5).
• Вставьте толкатель (9) в отверстие крышки (10).
• Вставьте вилку шнура питания в электрическую
розетку.
• Для включения нажмите и удерживайте кнопку
».
(4) «
• При нажатии и удержании кнопки (4) «
можете регулировать скорость вращения диска
(15 или 16) поворотом регулятора (5).
• Для работы в режиме максимальной скорости
нажмите и удерживайте кнопку (3) «T».
• Во время работы помещайте продукты в отверстие толкателя, для подачи продуктов используйте толкатель (9). Нажимайте на толкатель (9) с
незначительным усилием для подачи продуктов.
Запрещается использовать для подачи продуктов
посторонние предметы, запрещается проталкивать продукты руками, используйте только
толкатель (9).
• Следите за наполнением ёмкости (13), по мере её
наполнения, выключайте блендер, и извлекайте
продукты из ёмкости (13).
• Для выключения отпустите кнопку (3 или 4).
», Вы
Page 21

40 41RU RU
• После использования устройства дождитесь полной остановки вращения дисков (15 или 16).
• Выньте вилку шнура питания из электрической
розетки.
• Отсоедините моторный блок от крышки (10),
нажав на кнопки фиксатора (2) (рис. 5).
• Снимите крышку (10) с ёмкости (13), повернув
крышку (10) против часовой стрелки.
• Снимите с приводного вала (16) установленный
диск (15), выньте приводной вал (16).
• Извлеките измельчённые продукты из ёмкости
(13).
НАСАДКА ДЛЯ НАРЕЗКИ КУБИКАМИ
• Время непрерывной работы с насадкой для нарезки кубиками не должно превышать трёх циклов
по 10 секунд. Между рабочими циклами делайте
перерыв не менее 3 минут.
• Насадка для нарезки кубиками предназначена
для нарезки кубиками мягких фруктов и отварных
овощей.
ВНИМАНИЕ! Во избежание повреждения, запрещается использовать насадку при переработке
твердых или замороженных продуктов.
• Перед сборкой, убедитесь в том, что вилка шнура
питания не вставлена в электрическую розетку.
• Установите ёмкость (13) на ровную и устойчивую
поверхность.
• Установите насадку для нарезки кубиками (12) в
ёмкость (13), углубление на насадке (12) должно
совпасть с выступом на ёмкости (13).
• Установите нож для нарезки кубиками (11) на
насадку (12).
• Установите крышку (10) на ёмкость (13) и поверните её почасовой стрелке до упора.
• Нажмите на фиксаторы (2) и установите моторный
блок на горловину крышки (10), убедитесь в надежной фиксации моторного блока. Устанавливайте моторный блок вертикально и без перекосов
(рис. 6).
• Вставьте толкатель (9) в отверстие крышки (10).
• Вставьте вилку шнура питания в электрическую
розетку.
• Для включения нажмите и удерживайте кнопку
».
(4) «
• При нажатии и удержании кнопки (4) «
можете регулировать скорость вращения диска
(15) поворотом регулятора (5).
• Для работы в режиме максимальной скорости
нажмите и удерживайте кнопку (3) «T».
• Во время работы помещайте продукты в отверстие толкателя, для подачи продуктов используйте толкатель (9). Нажимайте на толкатель (9) с
незначительным усилием для подачи продуктов.
Запрещается использовать для подачи продуктов
посторонние предметы, запрещается проталкивать продукты руками, используйте только
толкатель (9).
», Вы
• Следите за наполнением ёмкости (13), по мере её
наполнения, выключайте блендер, и извлекайте
продукты из ёмкости (13).
• Для выключения отпустите кнопку (3 или 4).
• После использования устройства дождитесь
полной остановки вращения ножа (11).
• Выньте вилку шнура питания из электрической
розетки.
• Отсоедините моторный блок от крышки (10),
нажав на кнопки фиксатора (2) (рис. 6).
• Снимите крышку (10) с ёмкости (13), повернув
крышку (10) против часовой стрелки.
• Снимите нож (11), выньте насадку для нарезки
кубиками (12) из ёмкости (13).
• Извлеките продукты из ёмкости (13).
ЧИСТКА
ВНИМАНИЕ! Лезвия ножа-измельчителя (14)
очень острые и могут представлять опасность.
Обращайтесь с ножом-измельчителем (14) крайне
осторожно!
• После использования устройства выньте вилку
шнура питания из электрической розетки.
• Промойте детали, которые контактировали с продуктами, тёплой водой с нейтральным моющим
средством и просушите их.
• Для удобства чистки сетки насадки (12), используйте приспособление (17).
• У насадки-блендера (1) и насадки (8) промывайте
только нижнюю часть, внешнюю поверхность
протрите слегка влажной тканью. Запрещается
полностью погружать насадку-блендер (1), насадку для картофельного пюре (8) в воду или любые
другие жидкости.
• Моторный блок, крышку (10), редуктор насадки-венчика (6) протрите мягкой, слегка влажной
тканью, после чего вытрите насухо.
• После переработки солёных или кислых продуктов необходимо сразу ополоснуть водой
насадку-блендер (1), нож (11) или нож-измельчитель (14).
• При переработке продуктов с красящими свойствами, например, моркови или свёклы, насадки
и ёмкость могут окраситься, протрите насадки
и ёмкость тканью, смоченной растительным
маслом, после чего промойте насадки и ёмкость
с нейтральным моющим средством, ополосните и
просушите.
• Запрещается погружать моторный блок, редуктор
(6), крышку (10) в любые жидкости, а также
промывать их под струёй воды или помещать в
посудомоечную машину.
• Запрещается для чистки корпуса моторного блока
и съёмных деталей использовать абразивные
чистящие средства и растворители.
Page 22

42 43RU RU
ХРАНЕНИЕ
• Перед тем, как убрать устройство на длительное
хранение, проведите чистку деталей устройства.
• Запрещается наматывать шнур питания на моторный блок.
• Храните устройство в сухом прохладном месте,
недоступном для детей и людей с ограниченными
возможностями.
КОМПЛЕКТ ПОСТАВКИ
1. Моторный блок — 1 шт.
2. Насадка-блендер — 1 шт.
3. Редуктор венчика — 1 шт.
4. Насадка-венчик — 1 шт.
5. Крышка ёмкости — 1 шт.
6. Ёмкость — 1 шт.
7. Нож-измельчитель — 1 шт.
8. Насадка для картофельного пюре — 1шт.
9. Диск-тёрка/шинковка – 1 шт.
10. Нож для нарезки кубиками – 1 шт.
11. Насадка для нарезки кубиками – 1 шт.
12. Инструкция — 1 шт.
ТЕХНИЧЕСКИЕ ХАРАКТЕРИСТИКИ
• Электропитание: 220-240 В, ~ 50-60 Гц
• Номинальная потребляемая мощность: 1400 Вт
• Стакан – 600 мл
• Ёмкость измельчителя – 2 л
УТИЛИЗАЦИЯ
Чтобы предотвратить возможный вред
окружающей среде или здоровью людей от неконтролируемой утилизации
отходов, после окончания срока службы
устройства или элементов питания
(если входят в комплект), не выбрасывайте их вместе с обычными бытовыми отходами,
передайте прибор и элементы питания в специализированные пункты для дальнейшей утилизации.
Отходы, образующиеся при утилизации изделий,
подлежат обязательному сбору с последующей
утилизацией в установленном порядке.
Для получения дополнительной информации об
утилизации данного продукта обратитесь в местный
муниципалитет, службу утилизации бытовых отходов
или в магазин, где Вы приобрели данный продукт.
Производитель сохраняет за собой право изменять дизайн, конструкцию и технические характеристики, не влияющие на общие принципы работы
устройства, без предварительного уведомления.
Срок службы устройства — 3 года
Дата производства указана в серийном номере.
В случае обнаружения каких-либо неисправностей
необходимо обратиться в авторизированный сервисный центр.
Page 23

KZ
44 45KZ KZ
БЛЕНДЕР BR1246
Блендерлік жинақ ұсақтауға, араластыруға, сұйық және қатты өнімдерді бірге өңдеуге, картоп езбесін дайындауға және жұмсақ жемістерді немесе
пісірілген көкөністерді текшелеп кесуге арналған.
ОПИСАНИЕ
1. Қондырма-блендер
2. Қондырма бекіткішінің түймелері
3. «T» жылдамдығын қосу батырмасы
4. Жылдамдығын қосу батырмасы «
5. Айналдыру жылдамдығының реттегіші «1---5»
6. Бұлғауыш-қондырмасының редукторы
7. Бұлғауыш-қондырма
8. Картоп езбесіне арналған қондырма
9. Итергіш
10. Сыйымдылық қақпағы
11. Текшелеп турауға арналған пышақ
12. Текшелеп турауға арналған қондырма
13. Өнімдерге арналған сыйымдылық
14. Ұсақтағыш-пышақ
15. Үккіш/ Ұсақтағыш диск
16. Жетекті білік
17. Қондырма (12) торын тазалауға арналған
құрылғы
»
5
4
3
6
2
1
7
9
10
11
12
13 14
8
Сур. 1 Сур. 4
Сур. 2
15
16
17
Сур. 3
Сур. 5
Сур. 6
Page 24

46 47KZ KZ
ҚАУІПСІЗДІК ШАРАЛАРЫ ЖӘНЕ ПАЙДАЛАНУ БОЙЫНША НҰСҚАУЛЫҚ
Құрылғыны пайдалану алдында пайдалану
нұсқаулығын мұқият оқып шығыңыз, оқыған соң
болашақта пайдалану үшін сақтап қойыңыз.
• Құрылғыны осы нұсқаулықта баяндалғандай, оның
тікелей мақсаты бойынша ғана пайдаланыңыз.
• Құрылғыны дұрыс қолданбау оның бұзылуына,
және пайдаланушыға немесе оның мүлкіне зиян
келтіруге әкелуі мүмкін және кепілдік жағдайы
болып табылмайды.
• Заттаңбада көрсетілген құрылғының жұмыс
кернеуі электр желісінің кернеуіне сәйкес екеніне
көз жеткізіңіз.
НАЗАР АУДАРЫҢЫЗ! Қондырма-блендермен
үздіксіз жұмыс істеу уақыты 30 секундтан аспауы тиіс, қондырма-бұлғауышпен 1 минут, картоп
езбесі үшін қондырмаға 1 минуттан аспауы тиіс,
өнімдерді ұсақтау және оларды текшелеп кесу
кезінде 3 циклдың жұмыс уақыты 10 секундтан.
Жұмыс циклдары арасында кемінде 3 минут
үзіліс жасаңыз.
• Құрылғыны үй-жайдан тыс жерде пайдалануға
тыйым салынады.
• Найзағай кезінде құрылғыны пайдалану ұсынылмайды.
• Құрылғыны соққыдан, құлаудан, дірілден және
басқа да механикалық әсерлерден сақтаңыз.
• Желіге қосылған құрылғыны қараусыз қалдырмаңыз.
• Құрылғыны жылу көздерінің, жылыту аспаптарының
немесе ашық оттың тікелей жанында пайдаланбаңыз.
• Құрылғыны аэрозольдар пайдаланылатын немесе
шашырайтын жерлерде, сондай-ақ тез тұтанатын
сұйықтықтарға жақын жерлерде пайдалануға тыйым салынады.
• Құрылғыны ас үй раковинасына жақын, жуынатын
бөлмеде, бассейндер немесе басқа да су толтырылған сыйымдылықтарға жақын жерде пайдаланбаңыз.
• Егер құрылғы суға құлап кетсе, дереу қуаттандыру
бауының ашасын электр розеткасынан сурыңыз,
содан кейін ғана құрылғыны судан алып шығуға
болады. Құрылғыны тексерту немесе жөндету үшін
сервис орталығына жүгініңіз.
• Қуаттандыру бауы ыстық беттерге және жиһаздың
өткір жиектеріне тиюін болдырмаңыз.
• Құрылғыны пайдаланып болғаннан кейін немесе тазалау алдында электр желісінен сөндіріңіз.
Құрылғыны электр желісінен ажыратқан кезде тек
қуаттандыру бауының ашасынан ұстаңыз және оны
электр розеткасынан абайлап шығарыңыз, қуаттандыру бауынан тартпаңыз — бұл оның зақымдануына әкелуі және қысқа тұйықталуын тудыруы мүмкін.
• Құрылғы корпусына, қуаттандыру бауына және
қуаттандыру бауының ашасына сулы қолыңызбен
тиіспеңіз.
• Құрылғыны алғаш пайдалану алдында өнімдермен түйісетін, барлық шешілмелі қондырмалар
мен сыйымдылықтарды жақсылап жуыңыз.
• Жеткізілім жиынтығына кіретін бөлшектерді ғана
пайдаланыңыз.
• Құрылғының айналып жатқан бөлшектеріне
тиіспеңіз. Блендер-қондырмасы пышағының немесе бұлғауышының айналатын аймағына шаштың
немесе киімнің салбыраған элементтері түсуіне
жол бермеңіз.
• Құрылғыны пайдалану алдында қондырмалардың
дұрыс орнатылғанына және бекітілгендігіне көз
жеткізіңіз.
• Ұсақтағыш сыйымдылығын тегіс және тұрақты
бетке орналастырыңыз.
• Ұсақтағыш сыйымдылығына өнімдерді құрылғыны
қосқанға дейін салыңыз, егер ұсақтағыш сыйымдылығы ішінде өнімдер болмаса, құрылғыны
қосуға тыйым салынады.
• Ыстық өнімдерді ұсақтағыш сыйымдылығына
салардан бұрын оларды салқындатыңыз.
• Ұсақтағыш сыйымдылығына салынған өнімдер
мөлшері мен құйылған сұйықтықтың деңгейін
бақылаңыз.
• Ұсақтағыш-пышақтың және қондырма-блендердің кескіш жиектері өткір және қауіп төндіреді,
ұсақтағыш-пышақты және қондырма-блендерді
абайлап ұстаңыз.
• Егер жұмыс кезінде пышақтардың айналуы тоқтаса, құрылғыны өшіріңіз, розеткадан қуаттандыру
бауының ашасын суырыңыз, қақпақ-редукторды
шешіп алыңыз және ұсақтағыш-пышақтардың айналуына кедергі келтірген өнімді алып тастаңыз.
Ұсақтағыш-пышақтың және қондырма-блендердің
айналуы қиындаған кезде, ұсақтағыш сыйымдылығына немесе қондырма-блендер пайдаланылатын сыйымдылық ішіне су, шырын, қайнатпа
және т. б. қосу ұсынылады.
• Текшелеп кесуге арналған қондырманы алдын
ала пісірілген көкөністер үшін пайдаланыңыз,
мұздатылған немесе қатты өнімдерді текшелеп
кесуге тыйым салынады.
• Сыйымдылықтың толтырылуын қадағалаңыз,
сыйымдылықтың толып кетуіне жол бермеңіз,
сыйымдылық толтырылуына қарай қайта өңделген өнімдерді шығарып отырыңыз.
• Мотор блогын электр желісінен ажыратқаннан
кейін ғана, ұсақтағыш сыйымдылығынан мотор
блогын шешіп алуға болады.
• Ұсақтағыш тостағаны мен өлшеуіш стақанды микротолқынды пешке салуға тыйым салынады.
• Қондырғылар мен сыйымдықтарды ыдыс жуу
машинасына салмаңыз.
• Балалардың қауіпсіздігі үшін қаптама ретінде пайдаланылатын, полиэтилен пакеттерді қадағалаусыз қалдырмаңыз.
НАЗАР АУДАРЫҢЫЗ! Балаларға полиэтилен
пакеттерімен немесе қаптама үлдірімен ойнауға
рұқсат етпеңіз. Тұншығу қаупі бар!
Page 25

48 49KZ KZ
• Құрылғы балалардың пайдалануына арналмаған.
• Құрылғыны ойыншық ретінде пайдалануын бол-
дырмау үшін, балаларды қадағалаңыз.
• Құрылғы жұмыс істеп тұрғанда балалар жұмыс
бетіне, құрылғы корпусына, қуаттандыру бауына
немесе қуаттандыру бауының ашасына тиісуіне
рұқсат бермеңіз.
• Егер жұмыс істеп тұрған құрылғының маңында
балалар немесе мүмкіндіктері шектеулі адамдар
болса, онда ерекше назарда болыңыз.
• Жұмыс істеу уақытында және жұмыс циклдері
арасындағы үзілістерде құрылғыны балалардың
қолы жетпейтін жерде орналастырыңыз.
• Аспап дене, жүйке немесе сана мүмкіндіктері
төмендетілген тұлғалардың (балаларды қоса)
пайдалануына арналмаған, сондай-ақ егер
олардың тәжірибесі немесе білімі болмаса, егер
олар бақыланбаса немесе олардың қауіпсіздігі
үшін жауап беретін тұлғамен аспапты пайдалану
туралы нұсқаулықтар берілмесе.
• Қуаттандыру бауының бүтіндігін мезгілімен тексеріп отырыңыз.
• Қуаттандыру бауы зақымданғанда қауіп тудырмау
үшін оны дайындаушы, сервистік қызмет немесе
баламалы білікті маман ауыстыруы тиіс.
• Құрылғыны өздігіңізден жөндеуге тыйым салынады. Құрылғыны өз бетіңізбен бөлшектемеңіз, кезкелген ақаулықтар пайда болған кезде, сондай-ақ
құрылғы құлағаннан кейін, оны электр желісінен
ажыратыңыз және сервис орталығына жүгініңіз.
• Құрылғының зақымдануын болдырмау үшін зауыт
қаптамасында тасымалдаңыз.
• Құрылғны салқын және құрғақ, балалардың және
мүмкіндігі шектеулі адамдардың қолы жетпейтін
жерде сақтаңыз.
ҚҰРЫЛҒЫ ТЕК ТҰРМЫСТЫҚ ПАЙДАЛАНУҒА АРНАЛҒАН, ҚҰРЫЛҒЫНЫ КОМЕРЦИЯЛЫҚ НЕМЕСЕ
ЗЕРТХАНАЛЫҚ МАҚСАТТАРДА ПАЙДАЛАНУҒА
ТЫЙЫМ САЛЫНАДЫ.
АЛҒАШ РЕТ ПАЙДАЛУ АЛДЫНДА
Құрылғыны кері температурада тасымалдағаннан немесе сақтағаннан кейін оны қаптамадан
шығарыңыз және пайдаланудың алдында 3
сағаттан кем емес уақыт күтіңіз.
• Құрылғыны қаптамадан шығарыңыз және барлық
қаптама материалдарын жойыңыз.
• Зауыт қаптамасын сақтап қойыңыз.
• Қауіпсіздік шаралары мен пайдалану нұсқаула-
рымен танысыңыз.
• Жинақталымын тексеріңіз.
• Құрылғыны зақымдануына қатысты тексеріп
алыңыз, зақымдануы болған жағдайда оны желіге
қоспаңыз.
• Құрылғының көрсетілген қуаттандыру кернеуі
параметрлері электр желісінің параметрлеріне
сәйкес келетініне көз жеткізіңіз. Құралды 60 Гц
жиіліктегі электр желісінде пайдаланғанда, ешқандай қосымша әрекет талап етілмейді.
• Құрылғыны пайдалану алдында егжей (7, 9, 11,
12, 13, 14, 15, 16, 17) бейтарап жуғыш заты бар
жылы сумен жуыңыз және құрғатыңыз.
• Блендер-қондырамасының (1) және картоп
езбесіне (8) арналған қондырма төменгі бөлігін
ғана жуыңыз, сыртқы бетін сәл дымыл матамен
сүртіңіз. Қондырама-блендерді (1) және картоп
езбесіне 8) арналған қондырма суға немесе
кез-келген басқа сұйықтықтарға салуға тыйым
салынады.
• Моторлық блокты, ұсақтағыштың қақпағын (10),
бұлғауыш қондырмасының сәл дымқыл, жұмсақ
матамен сүртіп, содан кейін құрғатып сүртіңіз.
НАЗАР АУДАРЫҢЫЗ! Қондырама-блендерді (1),
моторлық блокты, редуктор-қақпақты (8), бұлғауыш
қондырмасының редукторын (6), картоп езбесіне (12) арналған қондырма, қуаттандыру бауын
және қуаттандыру бауының ашасын суға немесе
кез-келген басқа сұйықтықтарға батыруға тыйым
салынады.
ҚОНДЫРАМА-БЛЕНДЕРДІ ПАЙДАЛАНУ
Қондырма-блендермен (1) үздіксіз жұмыс істеу
уақыты 30 секундтан аспауы тиіс. Жұмыс
циклдерінің арасында кемінде 3 минут үзіліс
жасаңыз.
• Қондырма-блендерді (1) тұздықтар, майонез,
жеміс пюресі, балалар қоспаларын дайындау
үшін, әр түрлі ингредиенттерді араластыру үшін,
жеткілікті мөлшерде шырыны бар жемістер мен
көкөністерді өңдеу үшін пайдаланыңыз.
Қондырма-блендерді (1) орнату алдында қуаттандыру бауының ашасы электр розеткасына
салынбағанына көз жеткзіңіз.
• Қондырма-блендерді (1) бекіткіштер (2) іске
қосылғанға дейін моторлық блокқа салыңыз,
қондырманың сенімді бекітілгендігіне көз жеткізіңіз
(1-сурет).
• Қуаттандыру бауының ашасын электр розеткасына салыңыз.
• Қондырма-блендерді (1) сіздің ұсақтағыңыз/араластырғыңыз келген өнім салынған сыйымдылыққа
салыңыз.
НАЗАР АУДАРЫҢЫЗ! Өнімдерді өңдеу кезінде
қондырма-блендері (1) бар моторлық блокты
тігінен ұстаңыз (сур. 1).
• Қосу үшін батырманы (4) « » басыңыз және ұстап
тұрыңыз. Бұл жұмыс режимін сұйық өнімдерді
араластыру үшін пайдаланыңыз.
• Батырманы (4) «
тұрғанда, Сіз реттегішті (5) бұрап қондырманың
айналу жылдамдығын реттей аласыз. Осы жұмыс
режимін сұйық және қатты өнімдерді өңдеу үшін
пайдаланыңыз.
• Максималды жылдамдық режимінде жұмыс істеу
үшін батырмасын (3) «T» басыңыз және ұстап
тұрыңыз.
» басқанда және ұстап
Page 26

50 51KZ KZ
Ескертпе:
- өнімдер сыйымдылыққа құрылғы іске
қосылғанға дейін салынады. Өндірілетін өнімдердің көлемі оларды өңдейтін сыйымдылық
көлемінің 2/3 бөлігінен аспауы керек.
- ұсақтау және араластыру алдында жемістерді
қабығынан, сүйектер сияқты жеуге жарамсыз бөліктерден тазарту қажет, жемістерді
15×15×15 мм өлшемдегі текшелерге кесіп,
оларды сыйымдылыққа салып, содан кейін
шырын немесе су қосу қажет, өнімдердің максималды көлемі 350 г және 250 мл су немесе
шырыннан аспауы тиіс.
- мұздатылған өнімдерді ұсақтауға немесе араластыруға тыйым салынады.
НАЗАР АУДАРЫҢЫЗ! Қатты көкөністерді
ұсақтаған кезде, мысалы, сәбізді 15×15×15 мм
ұсақ бөліктерге кесіңіз және оларды ыңғайлы сыйымдылықты салыңыз, бұл ретте сәбіз салмағы 150
г аспауы тиіс, және 250 мл су қосыңыз.
• Қондырма-блендердің (1) айналуын өшіру үшін
батырмасын (3 немесе 4) босатыңыз.
• Жұмысты аяқтағаннан кейін қуаттандыру бауының
айырын электрлік розеткадан шығарыңыз және
бекіткіштің (2) түймелерін басып, қондырма-блендерді (1) шешіңіз (1-сурет).
НАЗАР АУДАРЫҢЫЗ!
- Жұмыс кезінде қондырма-блендерді (1) шешіп
алуға тыйым салынады.
- Қондырма-блендер (1) пышақтарының
зақымдануын болдырмау үшін жарма, күріш,
кофе дәндері, ірімшіктің қатты сұрыптарын,
мұздатылған өнімдерді және т. б. осы сияқты
өте қатты өнімдерді өңдеуге тыйым салынады.
- Егер қондырма-блендермен (1) жұмыс кезінде
өнімдерді ұсақтауда қиындықтар туындаса,
судың, шырынның, қайнатпаның және т. б.
аздаған мөлшерін қосу қажет.
БЫЛҒАУЫШ-ҚОНДЫРМАНЫ ПАЙДАЛАНУ
Бұлғауыш-қондырмамен (7) үздіксіз жұмыс
істеу уақыты 1 минуттан аспауы тиіс. Жұмыс
циклдерінің арасында 3 минуттан кем емес үзіліс
жасаңыз.
НАЗАР АУДАРЫҢЫЗ! Бұлғауыш-қондырманы
(7) қою қамырды илеу үшін пайдалануға тыйым
салынады.
• Бұлғауыш-қондырмасын (7) тек крем, жұмыртқа
ақуызын шайқауға, бисквит қамырын дайындауға
немесе дайын десерттерді араластыруға ғана
пайдаланыңыз.
Бұлғауыш-қондырманы (7) орнату алдында қуаттандыру бауының ашасы электр розеткасына
салынбағанына көз жеткзіңіз.
• Бұлғауыш-қондырманы (7) бұлғауыш редукторына
(6) салыңыз.
• Бұлғауыш қондырманы (6) мотролық блокқа
салыңыз және оны сағат тіліне қарсы бұраңыз,
редуктор (6) мен бұлғауыштың (7) сенімді бекітілгеніне көз жеткізіңіз (сур. 2).
• Қуаттандыру бауының ашасын электр розеткасына салыңыз.
• Бұлғауыш-қондырманы (7) өнімдерді Сіз салған
ыңғайлы сыйымдылыққа салыңыз.
• Қосу үшін батырманы (4) «
тұрыңыз.
• Батырмасын (4) «
да, Сіз.
• бұлғауыш-қондырманың реттегішін (5) бұрау
арқылы айналдыру жылдамдығын реттей аласыз.
• Максималды жылдамдық режимінде жұмыс істеу
үшін батырмасын (3) «T» басыңыз және ұстап
тұрыңыз.
• Сөндіру үшін батырманы (3 немесе 4) босатыңыз.
• Құрылғыны пайдаланып болғаннан кейін қуат-
тандыру бауының ашасын электр розеткасынан
шығарыңыз, бұлғауыш редукторын (6) сағат тілі
бойынша бұрап, бұлғауыш редукторын (6) моторлық блоктан ажыратыңыз (Сур. 2).
• Бұлғауыш-қондырманы (7) редуктордан (6) шығарыңыз.
» басыңыз және ұстап
» басқанда және ұстап тұрған-
КАРТОП ЕЗБЕСІНЕ АРНАЛҒАН ҚОНДЫРМА
Картоп пюресіне арналған қондырмамен (8)
үздіксіз жұмыс істеу уақыты 1 минуттан аспауы
тиіс. Жұмыс циклдерінің арасында 3 минуттан
кем емес үзіліс жасаңыз.
• Қондырманы (8) орнату алдында қуаттандыру бауының айыры электрлік розеткаға салынбағанына
көз жеткзіңіз (сур. 3).
• Қондырманы (8) моторлық блокқа салыңыз және
оны сағат тіліне қарсы тірелгенге дейін бұраңыз,
қондырманың (8) сенімді бекітілгеніне көз жеткізіңіз.
• Қуаттандыру бауының айырын электрлік розеткаға
салыңыз.
• Қондырманы (8) піскен картобы бар ыдысқа
салыңыз.
НАЗАР АУДАРЫҢЫЗ! Картоп езбесін дайындау
кезінде қондырмасы (12) бар моторлық блокты тік
ұстаңыз (3-сурет)
• Қосу үшін түймені (4) « » басыңыз және ұстап
тұрыңыз.
• Түймені (4) «
реттегішті (5) бұрау арқылы қондырманың айналу
жылдамдығын реттей аласыз.
• Максималдық жылдамдық тәртібінде жұмыс істеу
үшін «T» түймесін (3) басып, ұстап тұрыңыз.
» басып, ұстап тұрған кезде сіз
Page 27

52 53KZ KZ
• Картоп езбесін дайындаған кезде қыздырылған
сүтті немесе картоп тұнбасын қосыңыз.
• Өшіру үшін түймені (3 немесе 4) босатыңыз.
• Жұмыс аяқталғаннан кейін желілік баудың айырын
электрлік розеткадан шығарыңыз, қондырманы (8)
сағат тілі бағыты бойынша бұрып (сур. 3).
• Қондырманың (8) төменгі бөлігін жуыңыз, қондырма (8) корпусының сыртқы бөлігін дымқыл
матамен сүртіңіз, қондырманы (8) толығымен
суға немесе басқа сұйықтықтарға салуға тыйым
салынады.
ҰСАҚТАҒЫШТЫ ҚОЛДАНУ
Ұсақтағышпен үздіксіз жұмыс істеу уақыты
10 секундтан үш циклдан аспауы тиіс. Жұмыс
циклдарының арасында кемінде 3 минут үзіліс
жасаңыз.
• Қондырма етті, сырды, пиязды, шөптерді, сарымсақты, сәбізді, грек жаңғағын, қара өрікті, жемістер
немесе көкеністерді ұсақтау үшін қолданылады.
НАЗАР АУДАРЫҢЫЗ! Өте қатты өнімдерді, яғни
жұпар жаңғағы, кофе дәндері, дақылдар, сондай-ақ мұз және мұздатылған өнімдер сияқтыларды ұсақтауға тыйым салынады.
ҰСАҚТАУ АЛДЫНДА ӨНІМДЕРДІ ДАЙЫНДАУ:
• Еттің сүйектерін, сіңірлерін және шеміршектерін
және майларын алып тастаңыз.
• Етті, сырды, пиязды, жемістерді және көкеністерді
шамамен 60х20х20 мм кесектерге тураңыз.
• Шөптердің сабағын алып тастаңыз, жаңғақтарды
қабығынан тазартыңыз.
ҰСАҚТАУ
Ұсақтағышты жинастыру алдында желі бауының
ашасы электр розеткасына қосылмағандығына
көз жеткізіңіз.
• Ұнтақтағыш сыйымдылығын (13) тегіс және
тұрақты бетке орнатыңыз.
• Ұсақтағыш-пышақты (14) сыйымдылық (13) ішіндегі білікке орнатыңыз.
НАЗАР АУДАРЫҢЫЗ: ұсақтағыш-пышақтың (14)
жүзі өте өткір! Ұсақтағыш-пышақты (14) әрқашан
пластмассалы ілмегінен ұстаңыз.
• Өнімдерді сыйымдылыққа (13) салыңыз.
Ескертпе: сыйымдылығы (13) бос құрылғыны
қосыпаңыз.
• Қақпақты (10) сыйымдылыққа (13) орнатыңыз
және оны сағат тілі бағытымен тірелгенге дейін
бұраңыз.
• Моторлық блокты қақпақ (10) аузына орнатыңыз,
моторлық блокты сағат тілі бойынша тірелгенге
дейін бұраңыз, моторлық блоктың сенімді бекітілгеніне көз жеткізіңіз. Моторлық блокты тік және
қисайтпай орнатыңыз (сур. 4).
• Итергішті (9) қақпақтың (10) тесігіне салыңыз.
• Қуаттандыру бауының ашасын электр розеткасы-
на салыңыз.
• Қосу үшін батырманы (4) «
тұрыңыз.
• Батырманы (4) «
Сіз реттегішті (5) бұрап ұсақтағыш-пышақтың (14)
айналу жылдамдығын реттей аласыз.
• Максималды жылдамдық режимінде жұмыс істеу
үшін батырмасын (3) «T» басыңыз және ұстап
тұрыңыз.
• Жұмыс істеу уақытында моторлық блокты бір
қолыңызбен, ал ұсақтағыш сыйымдылығын (13)
басқа қолыңызбен ұстап тұрыңыз.
• Сөндіру үшін батырманы (3 немесе 4) босатыңыз.
• Қажет болған жағдайда сыйымдылыққа (13)
ұсақтауға арналған қосымша өнімдерін қосуға
болады, итергішті (9) шығарыңыз, итергішке (9)
арналған тесіктен өнімдерді қосыңыз және итергішті (9) орнына орнатыңыз.
• Құрылғыны пайдаланғаннан кейін ұсақтағыш-
• пышақтың (14) айналуы тоқтағанын күтіңіз.
• Желі бауының ашасын электр розеткасынан
суырыңыз.
• Бекіткіштің (2) түймелерін басып, моторлық блокты қақпағынан (10) шешіңіз (4-сурет).
• Қақпақ (10) сыйымдылықтан (9) шешіп алыңыз.
• Абайлық сақтап, сыйымдылықтан (14)
ұсақтағыш-пышақты (13) алып шығыңыз, ол үшін
пластмасса ілмектен ұстаңыз.
» басып ұстап тұрған кезде,
» басыңыз және ұстап
• Ұсақталған өнімдерді сыйымдылықтан (13) шығарыңыз.
ҰСАҚТАҒЫШТЫ НЕМЕСЕ ҮККІШТІ ПАЙДАЛАНУ
Үккіш (15) /ұсақтағыш (16) дискілермен үздіксіз
жұмыс істеу уақыты 10 секундтан үш циклдан
аспауы тиіс. Жұмыс циклдары арасында 3 минуттан кем емес уақыт үзіліс жасаңыз.
• Дискілер (15 және 16) көкөністерді немесе жемістерді ұсақтау үшін қолданылады.
• Құрастыру алдында қуаттандыру бауының ашасы
электр розеткасына салынбағанына көз жеткізіңіз.
• Сыйымдылықты (13) тегіс және тұрақты бетке
орнатыңыз.
• Жетекті білікті (16) сыйымдылық ішіндегі оське
(13) орнатыңыз.
• Жетекті білікке (16) үккіш дискіні немесе
ұсақтағыш дискіні (15) орнатыңыз.
• Қақпақты (10) сыйымдылыққа (13) орнатыңыз
және оны сағат тілі бағытымен тірелгенге дейін
бұраңыз.
• Бекіткіштерді (2) басыңыз және мотор блогын
қақпақтың аузына (10) орнатыңыз, мотор блогының сенімді бекітілгеніне көз жеткізіңіз. Мотор
блогын тігінен және қисайтпай орнатыңыз (сур. 5).
• Итергішті (9) қақпақтың (10) тесігіне салыңыз.
• Қуаттандыру бауының ашасын электр розеткасы-
на тығыңыз.
• Қосу үшін батырманы (4) «
тұрыңыз.
» басыңыз және ұстап
Page 28

54 55KZ KZ
• Батырманы (4) «
тегішті (5) бұрап, дискінің (15 немесе 16) айналу
жылдамдығын реттей аласыз.
• Максималды жылдамдық режимінде жұмыс істеу
үшін батырмасын (3) «T» басыңыз және ұстап
тұрыңыз.
• Жұмыс кезінде өнімдерді итергіштің тесігіне
салыңыз, өнімдерді беру үшін итергішті (9)
пайдаланыңыз. Өнімдерді беру үшін итергішке
(9) сәл күш салып басыңыз. Өнімдерді беру үшін
бөгде заттарды пайдалануға тыйым салынады,
өнімдерді қолмен итеруге тыйым салынады, тек
итергішті (9) ғана пайдаланыңыз.
• Сыйымдылықтың (13) толтырылуына қарай
блендерді өшіріп, сыйымдылықтан (13) өнімдерді
шығарып отырыңыз.
• Сөндіру үшін батырманы (3 немесе 4) босатыңыз.
• Құрылғыны пайдаланғаннан кейін дискілердің
толық тоқтауын күтіңіз (15 немесе 16).
• Қуаттандыру бауының ашасын электр розеткасынан ажыратыңыз.
• Бекіткіштің (2) батырмаларын басып, мотор блогын қақпақтан (10) шешіп алыңыз (сур. 5).
• Қақпақты (10) сыйымдылықтан (13) шешіп
алыңыз, ол үшін қақпақты (10) сағат тіліне қарсы
бұраңыз.
• Жетекті біліктен (16) орнатылған дискіні (15)
шешіп алыңыз, жетекті білікті (16) шығарыңыз.
• Ұсақталған өнімдерді сыйымдылықтан (13) шығарыңыз.
» басып ұстап тұрған кезде, рет-
ТЕКШЕЛЕП ТУРАУҒА АРНАЛҒАН ҚОНДЫРМА
Текшелеп кесуге арналған қондырманың үздіксіз
жұмыс істеу уақыты 10 секундтан үш циклдан
аспауы тиіс. Жұмыс циклдары арасында кемінде
3 минут үзіліс жасаңыз.
• Текшелеп турауға арналған қондырма жемістерді
және пісірілген көкөністерді текшелеп труауға
арналған.
НАЗАР АУДАРЫҢЫЗ! Зақымдануды болдырмау
үшін қондырманы қатты немесе мұздатылған өнімдерді өңдеу үшін пайдалануға тыйым салынады.
• Құрастыру алдында қуаттандыру бауының ашасы
электр розеткасына салынбағанына көз жеткізіңіз.
• Сыйымдылықты (13) тегіс және тұрақты бетке
орнатыңыз.
• Текшелеп кесуге арналған қондырманы(12)
сыйымдылыққа (13) орнатыңыз, қондырмадағы
(12) шұңқыр сыйымдылықтағы (13) шығыңқымен
сәйкес келуі тиіс.
• Текшелеп кесетін пышақты (11) қондырмаға (12)
орнатыңыз.
• Қақпақты (10) сыйымдылыққа (13) орнатыңыз
және оны сағат тілі бағытымен тірелгенге дейін
бұраңыз.
• Бекіткіштерді (2) басыңыз және мотор блогын
қақпақтың аузына (10) орнатыңыз, мотор блогының сенімді бекітілгеніне көз жеткізіңіз. Мотор
блогын тігінен және қисайтпай орнатыңыз (сур. 6).
• Итергішті (9) қақпақтың (10) тесігіне салыңыз.
• Қуаттандыру бауының ашасын электр розеткасы-
на тығыңыз.
• Қосу үшін батырманы (4) «
тұрыңыз.
• Батырманы (4) «
реттегішті (5) бұрап, дискінің (15) айналу жылдамдығын реттей аласыз.
• Максималды жылдамдық режимінде жұмыс істеу
үшін батырмасын (3) «T» басыңыз және ұстап
тұрыңыз.
• Жұмыс кезінде өнімдерді итергіштің тесігіне
салыңыз, өнімдерді беру үшін итергішті (9)
пайдаланыңыз. Өнімдерді беру үшін итергішке
(9) сәл күш салып басыңыз. Өнімдерді беру үшін
бөгде заттарды пайдалануға тыйым салынады,
өнімдерді қолмен итеруге тыйым салынады, тек
итергішті (9) ғана пайдаланыңыз.
• Сыйымдылықтың (13) толтырылуына қарай
блендерді өшіріп, сыйымдылықтан (13) өнімдерді
шығарып отырыңыз.
• Сөндіру үшін батырманы (3 немесе 4) босатыңыз.
• Құрылғыны пайдаланғаннан кейін пышақ (11)
айналымының толық тоқтауын күтіңіз.
• Қуаттандыру бауының ашасын электр розеткасынан ажыратыңыз.
• Мотор блогын қақпақтан (10) шешіп алыңыз, ол
үшін бекіткіш батырмаларына (2) басыңыз (сур. 6).
• Қақпақты (10) сыйымдылықтан (13) шешіп
» басып ұстап тұрған кезде,
» басыңыз және ұстап
алыңыз, ол үшін қақпақты (10) сағат тіліне қарсы
бұраңыз.
• Пышақты (11) шешіп алыңыз, текшелеп кесуге
арналған қондырманы (12) сыйымдылықтан (13)
шығарыңыз.
• Өнімдерді сыйымдылықтан (13) шығарыңыз.
ТАЗАЛАУ
НАЗАР АУДАРЫҢЫЗ! Ұсақтағыш пышақтың
(14) жүздері өте өткір және қауіп төндіруі мүмкін.
Ұсақтағыш-пышақты (14) қолданғанда өте абай
болыңыз!
• Құрылғыны пайдаланғаннан кейін желі бауының
ашасын электр розеткадан суырыңыз.
• Өнімдермен жанасқан бөлшектерді, бейтарап
жуу құралы қосылған жылы сумен жуыңыз және
оларды кептіріңіз.
• Қондырма (12) торын тазалау ыңғайлы болу үшін,
құрылғыны (17) пайдаланыңыз.
• Блендер-қондырамасының (1) төменгі бөлігін
ғана жуыңыз, сыртқы бетін сәл дымыл матамен
сүртіңіз. Қондырама-блендерді (1) суға немесе
кез-келген басқа сұйықтықтарға салуға тыйым
салынады.
• Моторлық блокты, қақпақты (10), бұлғауыш қондырмасының редукторын (6) жұмсақ, сәл дымқыл
матамен сүртіңіз, содан кейін құрғатып сүртіңіз.
• Тұзды немесе қышқыл тағамдарды өңдегеннен
кейін бірден қондырма-блендерді (1) немесе
ұсақтағыш-пышақты (14) сумен шаю қажет.
Page 29

56 57KZ KZ
• Күшті бояғыш қасиеттері бар азық-түлікті, мысалы,
сәбізді немесе қызылшаны өңдеген кезде қондырмалар мен сыйымдылықтар боялуы мүмкін,
қондырмалар мен сыйымдылықтарды өсімдік
майына матырылған матамен сүртіңіз, содан кейін
қондырмалар мен сыйымдылықтарды бейтарап
жуғыш заты бар сумен жуыңыз және құрғатыңыз.
• Моторлық блокты және редукторды (6), қақпақты
(10) кез келген сұйықтықтарға батыруға, сондай-ақ
оларды ағын судың астында жууға немесе ыдыс
жуатын машинаға салуға тыйым салынған.
• Моторлық блоктың корпусын және алынбалы
детальдарды тазалау үшін абразивтік тазалау
құралдары мен еріткіштерді пайдалануға тыйым
салынады.
САҚТАУ
• Құрылғыны ұзақ уақыт сақтауға қояр алдында,
құрылғы бөлшектерінің тазалауын жүргізіңіз.
• Қуаттандыру бауын мотор блогына орауға тыйым
салынады.
• Құрылғны салқын және құрғақ, балалардың және
мүмкіндігі шектеулі адамдардың қолы жетпейтін
жерде сақтаңыз.
ЖЕТКІЗІЛІМ ЖИЫНТЫҒЫ
1. Моторлық блок — 1 дн.
2. Қондырма-блендер — 1 дн.
3. Бұлғауыш редукторы — 1 дн.
4. Бұлғауыш-қондырма — 1 дн.
5. Редуктор-қақпақ — 1 дн.
6. Сыйымдылық – 1 дн.
7. Ұсақтағыш-пышақ — 1 дн.
8. Картоп езбесіне арналған қондырма — 1 дн.
9. Үккіш/Ұсақтағыш диск – 1 дн.
10. Текшелеп турауға арналған пышақ – 1 дн.
11. Текшелеп турауға арналған қондырма – 1 дн.
12. Нұсқаулық– 1 дн.
ТЕХНИКАЛЫҚ СИПАТТАМАЛАРЫ
• Электр қуаттандыруы: 220-240 В, ~ 50-60 Гц
• Номиналды тұтыну қуаты: 1400 Вт
• Ұсақтағыш сыйымдылығы – 2 л
КӘДЕГЕ АСЫРУ
Қалдықтардың бақыланбай кәдеге
асыруынан қоршаған ортаға немесе
адамдардың денсаулығына зиян келтірмеу үшін, құрылғының немесе қуаттандыру элементтерінің (егер жиынтыққа
кірсе) қызмет ету мерзімі аяқталғаннан
кейін оларды әдеттегі тұрмыстық қалдықтармен бірге
тастамаңыз, аспапты және қуаттандыру элементтерін одан әрі кәдеге асыру үшін арнайы пункттерге
жіберіңіз.
Бұйымдарды кәдеге асыру кезінде пайда болатын
қалдықтар белгіленген тәртіп бойынша келесі кәдеге
асырылатын тәртіппен міндетті түрде жинауға
жатады.
Берілген өнімді кәдеге асыру туралы қосымша
ақпаратты алу үшін жергілікті муниципалитетке,
тұрмыстық қалдықтарды пайдаға асыру қызметіне
немесе осы өнімді сатып алған дүкенге жүгініңіз.
Өндіруші алдын-ала ескертусіз, құрылғының
дизайнын, конструкциясы мен оның жалпы жұмыс
ұстанымдарына әсер етпейтін техникалық сипаттамаларын өзгерту құқығын өзіне қалдырады.
Құрылғының қызмет ету мерзімі — 3 жыл
Өндірілген күні сериялық нөмірде көрсетілген.
Қандай да бір ақаулықтар табылған жағдайда дереу
авторландырылған сервистік орталыққа жүгіну керек.
Page 30

Hergestellt für «Ruste GmbH»,
Berggasse 18/18, 1090 Wien,
Osterreich
Produced for «Ruste GmbH»,
Berggasse 18/18, 1090 Vienna, Austria
Изготовлено по заказу Русте Гмбх,
Бергассе 18/18, 1090 Вена, Австрия
Уполномоченное изготовителем
лицо: ООО «Грантэл»
143912, МО, г. Балашиха,
ш. Энтузиастов, вл. 1А
т.: +7 (495) 297-50-20,
e-mail: info@brayer.su
Made in China/Произведено в Китае
Page 31

brayer.ru
 Loading...