

Page 1
Instruction manual
Инструкция по эксплуатации
Coffee maker BR1103
Кофеварка BR1103
brayer.ru
Page 2

СОДЕРЖАНИЕ
EN ......................................................................................................................................3
DE ....................................................................................................................................14
RU ...................................................................................................................................26
KZ ....................................................................................................................................38
Page 3
EN
COFFEE MAKER BR1103
The coee maker is intended for making espresso
or cappuccino coee.
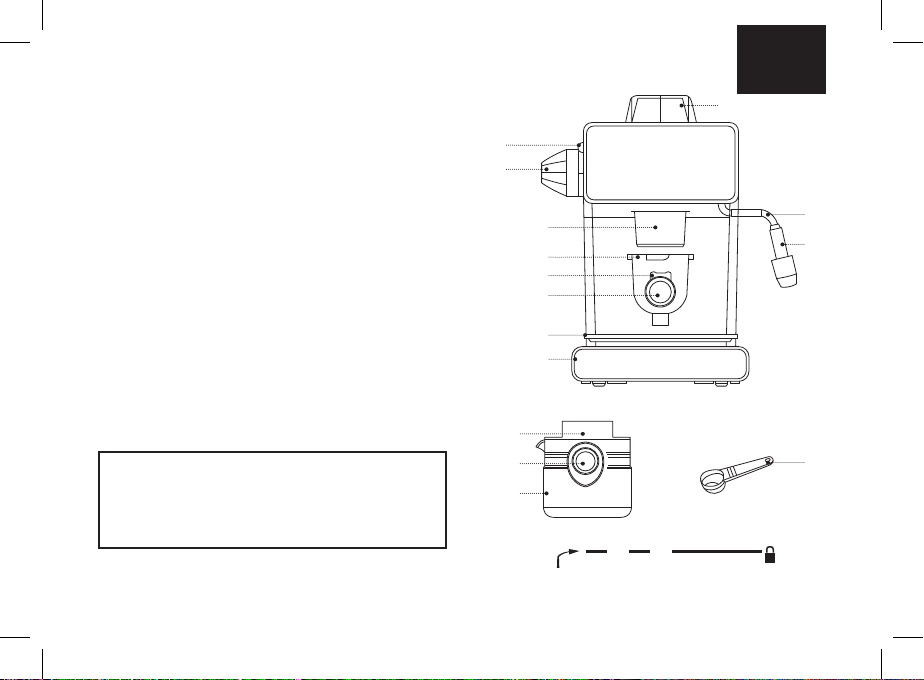
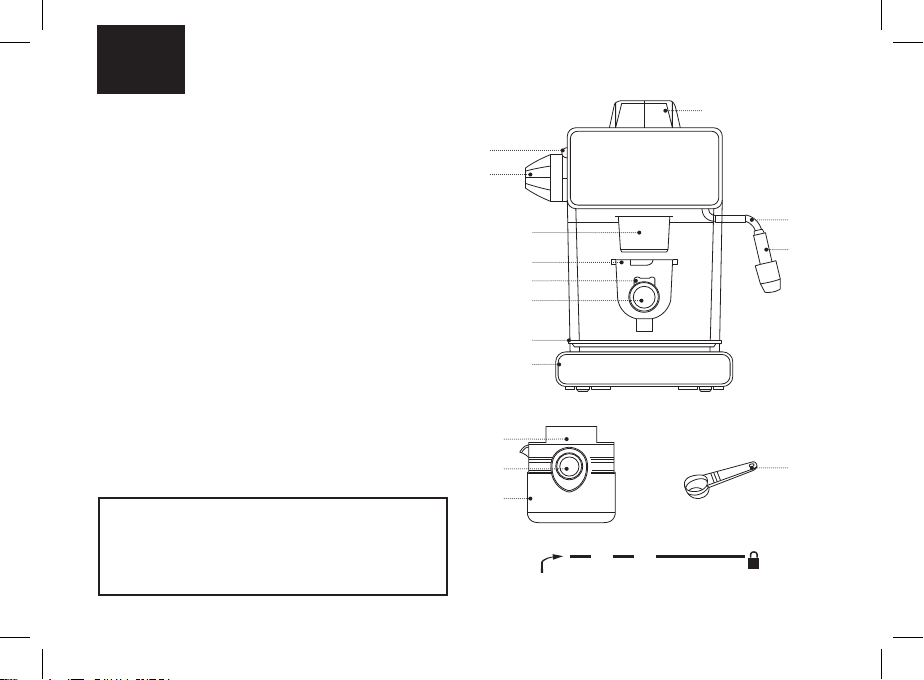
DESCRIPTION
1. Drip tray
2. Tray grid
3. Filter holder handle
4. Filter retainer
5. Filter holder
6. Coee lter
7. Operation mode switch
8. Light indicator
9. Water tank lid
10. Cappuccinator pipe
11. Cappuccinator tip
12. Flask lid
13. Flask handle
14. Glass ask
15. Measuring spoon
ATTENTION!
For additional protection it is reasonable to install a
residual current device (RCD) with nominal operation
current not exceeding 30 mA, to install RCD, contact
a specialist.
EN
9
8
7
6
5
4
3
2
1
12
13
14
Рiс. 1
3
10
11
15
Page 4

4
EN
SAFETY MEASURES AND COFFEE MAKER
OPERATION RECOMMENDATIONS
Read the operation instructions carefully before
using the coee maker and keep it for future
reference.
• Use the coee maker for its intended purpose only,
as specied in this manual.
• Mishandling the coee maker can lead to its
breakage and cause harm to the user or damage to
his/her property and it is not covered by warranty.
• The coee maker is intended for making espresso
and cappuccino coee and warming up ready drinks.
Do not warm any other liquids.
• Make sure that the operating voltage of the coee
maker indicated on the label corresponds to your
home mains voltage.
• The power plug is equipped with a grounding contact,
plug it into the socket with reliable grounding contact.
In case of short circuit the grounding reduces the risk
of electric shock.
• Contact an electrical technician, if you are not
sure that your sockets are installed properly and
grounded.
• To prevent re do not use adapters designed for
connecting the power plug to the mains socket
without grounding contact.
• In case of sparking in the mains socket and
occurrence of smell of burning, unplug the unit and
apply to the organization maintaining your home
mains.
• If smoke appears from the unit body, unplug the unit
and take measures to prevent re spreading. Apply to
the service center for repairing the coee maker.
• Always drain the remaining water from the water
tank. Do not store the coee maker with the lled
water tank at temperature below 0°C.
• Do not use the coee maker outdoors.
• It is not recommended to use the unit during lightning
storms.
• Protect the unit from impacts, falling, vibrations and
other mechanical stress.
• Never leave the plugged-in coee maker unattended.
• To avoid re, electric shock or physical injuries, do
not immerse the power plug, the power cord or the
coee maker body into water or any other liquids.
• Do not use the coee maker in proximity to the
kitchen sink, in bathrooms, near swimming pools or
other containers lled with water.
• If the unit is dropped into water, unplug it
immediately, and only then you can take the unit out
of water.
• Do not use the coee maker near heating appliances,
heat sources or open ame.
• Do not use the unit in places where aerosols are
Page 5
EN
used or sprayed, and in proximity to inammable
liquids.
• Place the coee maker on a at stable surface; do
not place it on the edge of a table. Do not let the
power cord hang from the edge of the table and
make sure it does not touch hot surfaces or sharp
edges of furniture.
• Do not place the coee maker on hot surfaces.
• Do not touch the power cord and the power plug with
wet hands.
• Use only the coee maker parts and accessories
supplied with the unit.
• Before switching the coee maker on, make sure that
all removable parts are installed properly.
• Do not switch the coee maker on if the water tank
is empty.
• Handle the glass coee ask with care to avoid
damaging it!
• Do not use the ask for other purposes, do not place
it on electric and gas cookers and do not use the
ask in microwave ovens.
• Use the coee maker only with the coee ask
installed.
• Do not remove the ask during coee making.
• Avoid sharp temperature dierence. Otherwise the
glass ask may crack.
• Do not put a hot glass ask on a cold surface.
• Do not use the coee maker if the glass ask is
damaged.
• To avoid burns, do not touch hot surfaces of the
coee maker during coee making and right after
switching it o. Let the coee maker cool down.
• Let the unit cool down completely before cleaning
and removing the accessories.
• Unplug the coee maker before cleaning or when you
are not using it. When unplugging the coee maker
hold only the power cord plug and carefully remove it
from the mains socket, do not pull the power cord —
this can lead to damage of the power cord or the
socket or cause short circuit.
• For children safety reasons do not leave polyethylene
bags, used as a packaging, unattended.
ATTENTION!
Do not allow children to play with polyethylene bags
or packaging lm. Danger of suocation!
• The coee maker is not intended for usage by
children.
• Do not leave children unattended to prevent using
the unit as a toy.
• Do not allow children to touch the unit and the power
cord during the coee maker operation.
• Place the unit out of reach of children during the
operation and cooling down.
• This unit is not intended for usage by physically or
mentally disabled persons (including children) or by
5
Page 6
6
EN
persons lacking experience or knowledge if they are
not under supervision of a person who is responsible
for their safety or if they are not instructed by this
person on the usage of the unit.
• From time to time check the power cord and the
power plug integrity.
• If the power cord is damaged, it should be replaced
by the manufacturer, a maintenance service or
similar qualied personnel to avoid danger.
• Do not repair the unit by yourself. Do not
disassemble the unit by yourself, if any malfunction
is detected, and after it was dropped, unplug the unit
and apply to the service center.
• Transport the coee maker in the original package.
• Keep the unit out of reach of children and disabled
persons.
COFFEE MAKER IS INTENDED FOR HOUSEHOLD
USE ONLY, DO NOT USE THE COFFEE MAKER FOR
COMMERCIAL OR LABORATORY PURPOSES.
BEFORE USING THE COFFEE MAKER
After unit transportation or storage at low
temperature, it is necessary to keep it for at least
three hours at room temperature.
• Unpack the coee maker and remove all the
packaging materials.
• Keep the original package.
• Read the safety measures and operating
recommendations.
• Check the delivery set.
• Examine the coee maker for damages, in case of
damage do not plug it into the mains.
• Make sure that the specications of power supply
voltage specied on the lower panel of the unit
correspond to the specications of your mains.
• Wipe the surface of the coee maker body with a
clean, slightly damp cloth to remove dust.
• Wash all removable parts in warm water with a
neutral detergent: the ask lid (12), the coee ask
(14), the lter holder (5), the lter (6), the grid (2) and
the tray (1), rinse them and dry.
• Install the tray (1) and the grid (2) back to their
places.
• Make sure that the power plug is not inserted into the
mains socket, and the operation mode switch (7) is
set to the position «
• Remove the water tank lid (9) turning it
counterclockwise and ll the water tank, using the
ask (14). Do not exceed the maximal capacity of the
water tank.
• Install the lid (9) back to its place and thread it
rotating clockwise.
• Put the lter (6) into the holder (5), do not add ground
coee into the lter (6).
• Set the lter holder (5) to the position «
holder (5) ledges should match the grooves in the
».
», the lter
Page 7
EN
boiler. Turn the lter holder (5) counterclockwise to
the position «
» (pic. 1).
• Place the ask (14) on the grid (2).
• Insert the power plug into the mains socket.
• Set the operation mode switch (7) to the position «
brew
», the light indicator (8) will light up, the heating
element will switch on and water will start pouring
into the ask (14) under pressure.
• After water pouring set the operation mode switch (7)
to the position « », and the indicator (8) will go out.
• Pour the water out of the ask (14).
• If necessary, repeat the washing cycle of the coee
maker 2-3 times.
• To wash the cappuccinator pipe (10), remove the
water tank lid (9) by turning it counterclockwise
and pour some water into the tank using the ask
(14). Install the lid (9) back to its place and thread it
rotating clockwise until xed.
• Put the lter (6) into the holder (5), do not add ground
coee into the lter (6).
• Set the lter holder (5) to the position «
», turn the
lter holder (5) counterclockwise to the position «
» (pic. 1).
• Place the ask (14) under the cappuccinator pipe
(10) tip (11).
• Insert the power plug into the mains socket.
• Set the operation mode switch (7) to the position «
steam
», the light indicator (8) will light up, the heating
element will switch on and steam under pressure will
be released into the ask (14).
• After steam release set the operation mode switch
(7) to the position « » to switch the coee maker
o, and the indicator (8) will go out.
• The coee maker is ready for usage.
MAKING ESPRESSO
Recommendations on making espresso
• Use ground coee for espresso coee makers or
freshly ground coee beans.
• Slightly tamp the ground coee in the lter (6) with
the back side of the measuring spoon (15).
• The taste of ready coee depends on the quality and
grinding degree of coee beans. If coee is pouring
out too long, this means the coee powder is too ne
or it is tamped too strongly.
ATTENTION!
- Do not remove the lter holder (5) during coee
maker operation.
- When making coee do not leave the operating
coee maker unattended, as it is necessary to
watch the ask (14) being lled with ready coee!
7
Page 8
8
EN
• Make sure that the power plug is not inserted into the
mains socket, and the operation mode switch (7) is
set to the position «
• Remove the water tank lid (9) turning it
counterclockwise and ll the water tank, using the
ask (14). Do not exceed the maximal capacity of the
water tank.
Note: there are water level marks on the ask (14), the
maximal level mark is for 4 cups of coee, the minimal
mark is for 2 cups of coee.
• Install the lid (9) back to its place and thread it
rotating clockwise.
• Put the lter (6) into the holder (5), add ground coee
into the lter (6) with the measuring spoon (15).
Note: there are marks on the lter (6) for the amount of
ground coee for making 2 or 4 cups of coee. Add the
required amount of ground coee into the lter (6).
• Set the lter holder (5) to the position «
holder (5) ledges should match the grooves in the
boiler. Turn the lter holder (5) counterclockwise to
the position «
• Place the ask (14) on the grid (2).
• Insert the power plug into the mains socket.
• Set the operation mode switch (7) to the position «
brew
», the light indicator (8) will light up, the heating
element will switch on and the ready coee will start
pouring into the ask (14).
».
», the lter
» (pic. 1).
• After making coee set the operation mode switch (7)
to the position « » to switch the coee maker o,
and the indicator (8) will go out.
• Pour the ready coee into cups.
• Remove the lter holder (5) by turning it clockwise,
wash the lter (6). Use the lter retainer (4) to avoid
the lter (6) dropping.
• Control the tray (1) lling, when the tray (1) is full,
remove the grid (2) and the tray (1), pour the liquid out
of the tray (1). Wash the tray (1) and the grid (2), dry
them and install the tray (1) and the grid (2) back to
their places.
MAKING CAPPUCCINO
Attention! When making cappuccino be careful to avoid
getting burns by outgoing hot steam.
• Make coee, as described in the chapter «MAKING
ESPRESSO», pour coee in the cup with enough
capacity to add frothed milk.
• Milk for making foam must be cold, fresh and without
additives. Use whole milk with fat content from 4%
to 6%, the cream fat content should be not less than
10%.
• Set the operation mode switch (7) to the position «
» to switch the coee maker o and release the
pressure, then unplug the unit.
• Remove the water tank lid (9) turning it
counterclockwise and pour some water into the tank
Page 9
EN
using the ask (14). Install the lid (9) back to its place
and thread it rotating clockwise.
• Place a cup with cold milk or cream under the tip
(11).
• Switch the coee maker on by setting the operation
steam
mode switch (7) to the position «
», the indicator (8)
will light up, the heating element will switch on and
the steam under pressure will be released from the
tip (11).
• Put the tip (11) into the cup with cold milk or cream.
• The tip (11) should not touch the bottom of the cup,
as this can prevent the steam release.
• The outgoing steam creates whirls which froth milk;
from time to time lift and lower the cup with milk or
cream against the tip (11) to make the milk foam.
Note: always put the tip (11) for approximately 1-2 cm
into milk or cream.
• If you cannot make frothed milk, don’t worry and
experiment until you achieve good results. Try
making frothed milk with the removed tip (11).
• Set the operation mode switch (7) to the position «
» to switch the coee maker o and to release the
pressure.
• Add frothed milk to the ready espresso, add sugar to
taste. You can decorate the frothed milk with cocoa
powder.
• After frothing the milk clean the cappuccinator pipe
(10) and wash the tip (11).
• Remove the tip (11), wash it under a warm water jet,
then dry it.
• Immerse the cappuccinator pipe (10) into a container
with water, switch the steam supply on by setting the
operation mode switch (7) to the position «
steam
». In
10-15 seconds set the operation mode switch (7) to
the position «
» to switch the coee maker o.
DESCALING
• For eective operation of the coee maker it is
necessary to clean (descale) the coee maker from
mineral deposits every 2-3 months.
Note: to remove the scale you can use special
descaling agents for coee makers and coee
machines, strictly following the instructions on their
usage.
1. Make sure that the power plug is not inserted into
the mains socket, and the operation mode switch
(7) is set to the position «
2. Remove the water tank lid (9) turning it
counterclockwise and pour the descaling agent into
the water tank, using the ask (14). Do not exceed
the maximal capacity of the water tank.
3. Install the lid (9) back to its place and thread it
rotating clockwise.
4. Put the lter (6) into the holder (5), do not add
ground coee into the lter (6).
».
9
Page 10
10
EN
5. Set the lter holder (5) to the position « », the
lter holder (5) ledges should match the grooves in
the boiler. Turn the lter holder (5) counterclockwise
to the position «
6. Place the ask (14) on the grid (2).
7. Insert the power plug into the mains socket.
8. Set the operation mode switch (7) to the position «
brew
», the light indicator (8) will light up, the heating
element will switch on and water will start pouring
into the ask (14) under pressure.
9. In 10-15 seconds set the operation mode switch
(7) to the position «
go out.
10. Place the ask (14) under the tip (11) and set the
operation mode switch (7) to the position «
5 seconds set the operation mode switch (7) to the
position « ».
11. Set the ask (14) on the grid (2), wait for 10-15
minutes and switch the water supply on by setting
the switch (7) to the position «
cleaning agent release stops completely.
12. Set the operation mode switch (7) to the position «
» to switch the coee maker o and to release the
pressure. Unplug the unit, unscrew the lid (9) and
ll the tank with clean water. Insert the power plug
into the mains socket.
13. Set the ask (14) under the tip (11) and switch the
» (pic. 1).
», and the indicator (8) will
brew
», wait until the
steam
», in
steam supply on «
steam
», in 15 seconds switch the
steam supply o and place the ask (14) on the
grid (2). Switch the water supply on and wait until
the water release stops completely.
14. Set the operation mode switch (7) to the position «
» to switch the coee maker o and to release
the pressure.
• If necessary, repeat the washing of the coee maker
2-3 times.
CLEANING AND CARE
• Always switch the coee maker o and unplug it
before cleaning.
• Let the coee maker cool down completely and clean
the outer surfaces of the unit body with a soft, slightly
damp cloth, then wipe dry.
• Use soft detergents to remove dirt; do not use metal
brushes, abrasive detergents and solvents.
• Remove the water tank lid (9) by turning it
counterclockwise, turn the coee maker upside down
and drain the remaining water from the water tank,
screw the lid (9).
• If the lter (6) openings are blocked with the ground
coee, clean them with a small brush.
• Remove the grid (2) and the tray (1), pour the water
out, wash the tray (1) and the grid (2), rinse them and
dry. Install the tray (1) and the grid (2) back to their
places.
Page 11
EN
• Wash the removable parts (5, 6, 12, 14) with warm
water and a neutral detergent, then rinse and dry,
insert the lter (5) into the holder (6), install the lter
holder (5) back to its place, turn the funnel to the
operating position «
» (pic. 1).
• Do not immerse the coee maker, the power cord
and the power plug into water or any other liquids.
STORAGE
• Before taking the coee maker away for long storage,
unplug it and let it cool down completely.
• Clean the coee maker.
• Always drain the remaining water from the water
tank. Do not store the coee maker with the lled
water tank at temperature below 0°C.
• Keep the coee maker in a dry cool place out of
reach of children and disabled persons.
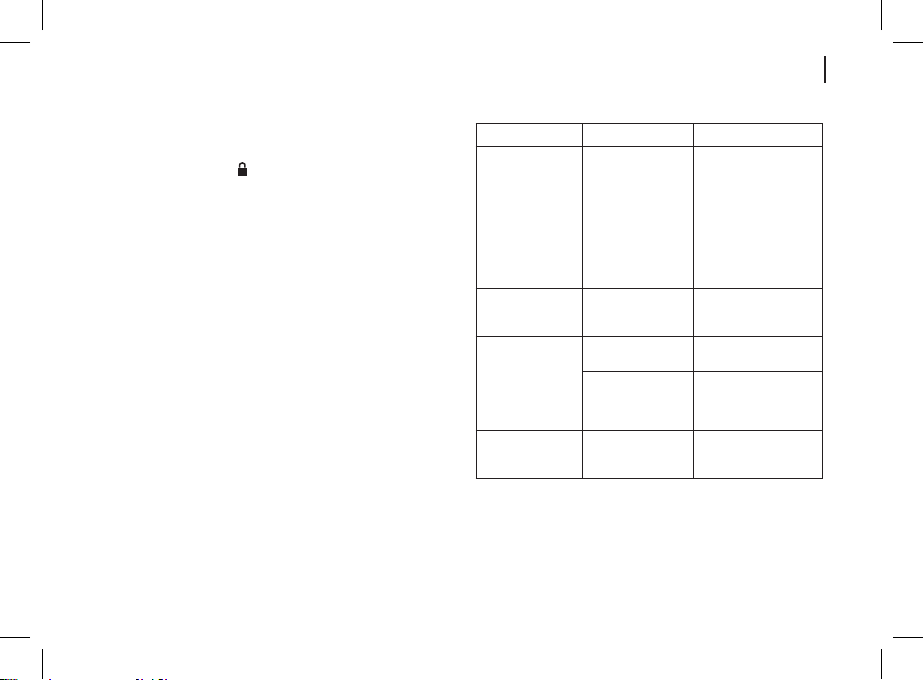
Troubles and troubleshooting
Malfunction Cause Solution
The coee maker
can’t be switched on
Coee leakage from
the ask
Water is leaking
from the bottom part
of the coee maker
body
Water is leaking
from the outer side
of the lter holder
The power plug
is not connected
to the mains, the
malfunction of the
mains socket
The ask is installed
improperly
The tray is full Remove the tray and
The coee maker is
malfunctioning
Ground coee on
the edges of the
coee lter
Insert the power plug into
the mains socket.
Make sure that the
mains socket is working
properly by connecting
another known good
electric appliance to it.
If the coee maker does
not switch on, contact the
service center
Make sure that the ask
is set properly on the
removable tray grid
pour out the liquid
Apply to the service
center for testing or
repairing the coee
maker
Make sure that there is
no ground coee on the
edges of the coee lter
11
Page 12

12
EN
Ready coee has
some foreign taste
Milk or cream does
not foam
There is some
cleaning detergent
left after descaling
Used ground coee
is of low quality
The container for
milk or cream is
too large or does
not have a suitable
shape
You have used non-
fat or warm milk
DELIVERY SET
• Coee maker — 1 pc.
• Filter holder – 1 pc.
• Coee lter – 1 pc.
• Flask – 1 pc.
• Measuring spoon – 1 pc.
• Instruction manual — 1 pc.
Wash the coee maker
with clean water several
times
Use freshly ground coee
beans.
Keep ground coee in a
hermetic container in a
dry cool place
Use a high and narrow
container for milk or
cream
Milk or cream used for
making foam should be
cold, fresh and without
additives. Use whole
milk with fat content from
4% to 6%, the cream fat
content should be not
less than 10%
TECHNICAL SPECIFICATIONS
• Power supply: 220-240 V, ~ 50 Hz
• Rated input power: 800-950 W
• Water tank capacity: 0,24 l
RECYCLING
For environment protection apply to the
specialized centers for further recycling
after the service life expiration of the unit.
The waste generated during the disposal of
the unit is subject to mandatory collection
and consequent disposal in the prescribed manner.
For further information about recycling of this product
apply to a local municipal administration, a disposal
service or to the shop where you purchased this
product.
The manufacturer reserves the right to change the
design, structure and specications not aecting
general principles of the unit operation, without prior
notice.
Page 13

EN
The unit operating life is 3 years
The manufacturing date is specied in the serial
number.
In case of any malfunctions promptly apply to the
authorized service center.
13
Page 14
DE
DE
14
ESPRESSOKAFFEEMASCHINE
BR1103
Die Kaeemaschine ist zur Kaeezubereitung
bestimmt.
BESCHREIBUNG
1. Tropfschale
2. Schalengitter
3. Gri des Filterhalters
4. Filterfesthalter
5. Filterhalter
6. Kaeelter
7. Betriebsschalter
8. Kontrolleuchte
9. Wasserbehälterdeckel
10. Cappuccinatore-Rohr
11. Cappuccinatore-Endstück
12. Kolbendeckel
13. Kolbengri
14. Glaskolben
15. Messlöel
ACHTUNG!
Als zusätzlicher Schutz ist es zweckmäßig, den
FI-Schalter mit Nennstrom maximal bis 30 mA im
Stromversorgungskreis aufzustellen; wenden Sie sich
dafür an einen Spezialisten.
9
8
7
6
5
4
3
2
1
12
13
14
Abb. 1
10
11
15
Page 15

DE
SICHERHEITSHINWEISE UND BEDIENUNGSANLEITUNG FÜR DIE KAFFEEMASCHINE
Bevor Sie die Kaeemaschine benutzen, lesen Sie
die Bedienungsanleitung aufmerksam durch und
bewahren Sie sie zum späteren Gebrauch auf.
• Benutzen Sie die Kaeemaschine nur bestimmungsmäßig und laut dieser Bedienungsanleitung.
• Der Missbrauch der Kaeemaschine kann zu ihrer
Störung führen, den Benutzer oder sein Eigentum
beschädigen und ist kein Garantiefall.
• Die Kaeemaschine ist zum Zubereiten von Espresso und Cappuccino, zum Aufheizen von Fertiggetränken und zu keinem Erhitzen anderer Flüssigkeiten
bestimmt.
• Vergewissern Sie sich, dass die auf dem Bezeich-
nungszettel angegebene Betriebsspannung der Kaffeemaschine und die Netzspannung übereinstimmen.
• Der Netzstecker hat einen Erdungskontakt; stecken
Sie ihn nur in eine Steckdose
• mit dem zuverlässigen Erdungskontakt. Bei einem
Kurzschluss verringert die Erdung das Stromschlagrisiko.
• Wenden Sie sich an einen Elektriker, wenn Sie sich
nicht sicher sind, ob Ihre Steckdosen richtig installiert
und geerdet sind.
• Verwenden Sie keine Adapterstecker, die zum An-
schließen des Netzsteckers an eine Steckdose ohne
Erdungskontakt bestimmt sind, um das Brandrisiko
zu vermeiden.
• Bei Brandgeruch und Funken in der Steckdose
ziehen Sie den Netzstecker aus der Steckdose
heraus und wenden Sie sich an den Ihr Hausstromnetz leistenden Dienst. Wenden Sie sich an einen
Kundendienst, um die Kaeemaschine reparieren zu
lassen.
• Wenn Rauch aus dem Gerätegehäuse austritt,
ziehen Sie das Netzkabel aus der Steckdose heraus
und treen Sie die Feuerverhinderungsmaßnahmen.
• Gießen Sie immer das Restwasser aus dem Behälter
aus; es ist verboten, die Kaeemaschine mit Wasser
im Behälter unter 0°C zu lagern.
• Es ist nicht gestattet, die Kaeemaschine draußen
zu benutzen.
• Es ist nicht empfohlen, das Gerät bei Gewitter zu
benutzen.
• Schützen Sie das Gerät vor Stößen, Stürzen, Vibrationen und anderen mechanischen Einwirkungen.
• Lassen Sie die ans Stromnetz angeschlossene
Kaeemaschine nie unbeaufsichtigt.
• Um Brand, Stromschlag oder Verletzungen zu vermeiden, tauchen Sie den Netzstecker, das Netzkabel
oder das Gehäuse der Kaeemaschine ins Wasser
oder jegliche andere Flüssigkeiten nicht ein.
• Benutzen Sie die Kaeemaschine in der Nähe
von Spülbecken, in Badezimmern und neben den
15
Page 16

16
DE
Wasserbecken oder anderen mit Wasser gefüllten
Behältern nicht.
• Falls das Gerät ins Wasser gefallen ist, ziehen Sie
den Netzstecker aus der Steckdose sofort heraus,
erst danach holen Sie das Gerät aus dem Wasser
heraus.
• Benutzen Sie die Kaeemaschine in direkter Nähe
von Heizgeräten, Wärmequellen oder oenem Feuer
nicht.
• Es ist verboten, das Gerät an den Orten, wo Sprays
verwendet werden, sowie in der Nähe von leichtent-
zündbaren Flüssigkeiten, zu benutzen.
• Stellen Sie die Kaeemaschine auf eine ebene
standfeste Oberäche auf, stellen Sie sie an den
Tischrand nicht auf. Achten Sie darauf, dass das
Netzkabel vom Tisch nicht herabhängt und heiße
Oberächen und scharfe Möbelkanten nicht berührt.
• Es ist nicht gestattet, die Kaeemaschine auf heiße
Oberächen zu stellen.
• Berühren Sie das Netzkabel und den Netzstecker mit
nassen Händen nicht.
• Benutzen Sie nur die mitgelieferten Kaeemaschinenteile und -zubehör.
• Vergewissern Sie sich vor der Einschaltung der Kaf-
feemaschine, dass alle abnehmbaren Teile korrekt
aufgestellt sind.
• Achten Sie darauf, dass der Wasserstand im Behälter nicht unter der Minimalmarke liegt.
• Behandeln Sie den Glaskolben vorsichtig, um ihn
nicht zu beschädigen!
• Benutzen Sie den Kolben zu keinen anderen Zwe-
cken, stellen Sie diesen auf Elektro- und Gasherde
nicht auf, benutzen Sie den Kolben in den Mikrowellenöfen nicht.
• Benutzen Sie die Kaeemaschine nur mit dem aufgestellten Kaeekolben.
• Nehmen Sie den Kolben von der Heizplatte während
der Kaeezubereitung nicht ab.
• Lassen Sie keine starken Temperaturschwankungen
zu, da sonst das Kolbenglas bersten kann.
• Stellen Sie keinen heißen Glaskolben auf eine kalte
Oberäche.
• Benutzen Sie die Kaeemaschine nicht, wenn der
Glaskolben beschädigt ist.
• Um Verbrennung zu vermeiden, berühren Sie heiße
Oberächen der Kaeemaschine während der Kaffeezubereitung und gleich nach ihrer Ausschaltung
nicht. Lassen Sie die Kaeemaschine abkühlen.
• Lassen Sie das Gerät vollständig abkühlen, bevor
Sie das Zubehör entfernen und reinigen.
• Trennen Sie die Kaeemaschine vor der Reinigung
oder wenn Sie sie nicht benutzen vom Stromnetz
ab. Wenn Sie die Kaeemaschine vom Stromnetz
abtrennen, halten Sie nur den Netzstecker fest und
ziehen Sie ihn aus der Steckdose vorsichtig heraus;
ziehen Sie das Netzkabel nicht, da es zu seiner
Beschädigung und Steckdosenstörung sowie einem
Kurzschluss führen kann.
Page 17

DE
• Aus Kindersicherheitsgründen lassen Sie Plastiktüten, die als Verpackung verwendet werden, nie ohne
Aufsicht.
ACHTUNG!
Lassen Sie Kinder mit Plastiktüten oder Verpackungsfolien nicht spielen. Erstickungsgefahr!
• Die Kaeemaschine ist nicht für Kinder bestimmt.
• Beaufsichtigen Sie Kinder, damit sie das Gerät als
Spielzeug nicht benutzen.
• Lassen Sie Kinder das Gerät und das Netzkabel
während des Kaeemaschinenbetriebs nicht berühren.
• Während des Betriebs und des Abkühlens stellen
Sie das Gerät an einen für Kinder unzugänglichen
Ort auf.
• Dieses Gerät ist für Personen (darunter Kinder) mit
• Körper-, Nerven- und Geistesstörungen oder Perso-
nen ohne ausreichende Erfahrung und Kenntnisse
nicht geeignet, wenn sie sich unter Aufsicht der
Person, die für ihre Sicherheit verantwortlich ist, nicht
benden oder entsprechende Anweisungen über die
Nutzung des Geräts nicht bekommen haben.
• Überprüfen Sie regelmäßig den Zustand des Netzkabels und des Netzsteckers.
• Wenn das Netzkabel beschädigt ist, soll es vom
Hersteller, vom Kundendienst oder von ähnlich
qualiziertem Personal ersetzt werden, um Gefahren
zu vermeiden.
• Es ist nicht gestattet, das Gerät selbständig zu reparieren. Es ist nicht gestattet, das Gerät selbständig
auseinanderzunehmen; bei der Feststellung jeglicher
Beschädigungen, sowie im Sturzfall, trennen Sie das
Gerät vom Stromnetz ab und wenden Sie sich an
einen Kundendienst.
• Transportieren Sie die Kaeemaschine nur in der
Fabrikverpackung.
• Bewahren Sie das Gerät an einem für Kinder und
behinderte Personen unzugänglichen Ort auf.
DIE KAFFEEMASCHINE IST NUR FÜR DEN GEBRAUCH IM HAUSHALT GEEIGNET, ES IST VERBOTEN, SIE ZU INDUSTRIE- ODER LABORZWECKEN
ZU BENUTZEN.
VORBEREITUNG DER KAFFEEMASCHINE
ZUR INBETRIEBNAHME
Nachdem Sie das Gerät bei niedriger Temperatur
transportiert oder gelagert haben, müssen Sie es
mindestens drei Stunden bei Raumtemperatur
aufbewahren.
• Packen Sie die Kaeemaschine aus und entfernen
Sie alle Verpackungsmaterialien.
• Bewahren Sie die Originalverpackung auf.
• Lesen Sie die Sicherheitsmaßnahmen und Bedie-
nungsempfehlungen.
• Prüfen Sie die Komplettheit.
17
Page 18

18
DE
• Prüfen Sie die Kaeemaschine auf Beschädigungen; wenn sie beschädigt ist, schließen Sie sie ans
Stromnetz nicht an.
• Vergewissern Sie sich, dass die Stromversor-
gungsparameter auf der Geräteunterplatte und die
Netzstromparameter übereinstimmen.
• Wischen Sie das Kaeemaschinengehäuse mit
einem sauberen, leicht angefeuchteten Tuch zur
Staubentfernung ab.
• Waschen Sie alle abnehmbaren Teile mit Warmwasser und einem neutralen Waschmittel: den Kolben-
deckel (12), den Kaeekolben (14), den Filterhalter
(5), das Filter (6), das Gitter (2), die Tropfschale (1),
spülen und trocknen Sie diese ab.
• Setzen Sie die Tropfschale (1) und das Gitter (2)
zurück auf.
• Vergewissern Sie sich, dass der Netzstecker an
keine Steckdose angeschlossen ist und der Betriebsschalter (7) auf « » eingestellt ist.
• Entfernen Sie den Wasserbehälterdeckel (9), indem
Sie ihn entgegen dem Uhrzeigersinn drehen, und
gießen Sie Wasser in den Behälter mit dem Kolben
(14) ein. Überschreiten Sie das maximale Fassungsvermögen des Wasserbehälters nicht.
• Setzen Sie den Deckel (9) zurück auf und drehen Sie
ihn laut Gewinde im Uhrzeigersinn zu.
• Setzen Sie das Filter (6) in den Halter (5) ein und
schütten Sie keinen gemahlenen Kaee ins Filter
(6) ein.
• Stellen Sie den Filterhalter (5) auf «
» ein, die
Vorsprünge des Filterhalters (5) sind mit den Aussparungen am Boiler zusammenzufallen, drehen Sie den
Filterhalter (5) entgegen dem Uhrzeigersinn in die
Position «
» (Abb. 1).
• Stellen Sie den Kolben (14) aufs Gitter (2) auf.
• Stecken Sie den Netzstecker in eine Steckdose ein.
• Drehen Sie den Gri des Betriebsschalters (7) in die
Position «
brew
», dabei leuchtet die Kontrolleuchte (8),
das Heizelement schaltet sich ein, und das Druck-
wasser ießt in den Kolben (14) aus.
• Nachdem das Wasser ausießt, drehen Sie den Gri
des Betriebsschalters (7) in die Position « », die
Kontrolleuchte (8) erlischt.
• Gießen Sie das Wasser aus dem Kolben (14) aus.
• Bei Bedarf wiederholen Sie den Spülzyklus der
Kaeemaschine 2-3 Mal.
• Um das Cappuccinatore-Rohr (10) durchzuspülen,
entfernen Sie den Wasserbehälterdeckel (9), indem
Sie ihn entgegen dem Uhrzeigersinn drehen, gießen
Sie eine kleine Wassermenge in den Behälter mit
dem Kolben (14) ein, setzen Sie den Deckel (9)
zurück auf und drehen Sie ihn laut Gewinde im
Uhrzeigersinn bis zum Einrasten zu.
• Setzen Sie das Filter (6) in den Halter (5) ein und
schütten Sie keinen gemahlenen Kaee ins Filter
(6) ein.
Page 19

DE
• Stellen Sie den Filterhalter (5) auf « » ein, drehen
Sie den Filterhalter (5) entgegen dem Uhrzeigersinn
in die Position «
» (Abb. 1).
• Stellen Sie den Kolben (14) unter den Aufsatz (11)
des Cappuccinatore-Rohrs (10) auf.
• Stecken Sie den Netzstecker in eine Steckdose ein.
• Drehen Sie den Gri des Betriebsschalters (7) in die
steam
Position «
», dabei leuchtet die Kontrolleuchte (8),
das Heizelement schaltet sich ein, und das Druck-
wasser ießt in den Kolben (14) aus.
• Nachdem das Wasser ausießt, drehen Sie den Gri
des Betriebsschalters (7) in die Position « », die
Kontrolleuchte (8) erlischt.
• Die Kaeemaschine ist betriebsbereit.
ESPRESSOZUBEREITUNG
Espressozubereitungsempfehlungen
• Verwenden Sie gemahlenen Kaee für Espressomaschinen oder frisch gemahlene Kaeebohnen.
• Stampfen Sie den gemahlenen Kaee im Filter (6)
mit der Rückseite des Messlöels (15) leicht ein.
• Der Geschmack des zubereiteten Kaees hängt von
der Qualität und dem Mahlgrad der Kaeebohnen ab.
Wenn der Kaee zu lange eingegossen wird, bedeutet das, dass der Kaee sehr fein gemahlen oder zu
stark gestampft ist.
ACHTUNG!
- Es ist nicht gestattet, den Filterhalter (5) während
des Betriebs der Kaeemaschine abzunehmen.
- Lassen Sie die Kaeemaschine bei der
Kaeezubereitung nicht unbeaufsichtigt, da der
Füllvorgang des Kolbens (14) mit dem fertigen
Kaee überwacht werden muss!
• Vergewissern Sie sich, dass der Netzstecker an
keine Steckdose angeschlossen ist und der Betriebs-
schalter (7) auf «
» eingestellt ist.
• Entfernen Sie den Wasserbehälterdeckel (9), indem
Sie ihn entgegen dem Uhrzeigersinn drehen, und
gießen Sie Wasser in den Behälter mit dem Kolben
(14) ein. Überschreiten Sie das maximale Fassungsvermögen des Wasserbehälters nicht.
Anmerkung: am Kolben (14) gibt es die
Wassermengenmarkierungen, die maximale Markierung
für 4 Tassen Kaee und die minimale Markierung für 2
Tassen Kaee.
• Setzen Sie den Deckel (9) zurück auf und drehen Sie
ihn laut Gewinde im Uhrzeigersinn zu.
• Setzen Sie das Filter (6) in den Halter (5) ein und
schütten Sie den gemahlenen Kaee ins Filter (6) mit
dem Messlöel (15) ein.
Anmerkung: am Filter (6) gibt es die
Mahlkaeemarkierungen für die Zubereitung von 2 oder
4 Tassen Kaee, gießen Sie die erforderliche Menge
Mahlkaee ins Filter (6) ein.
19
Page 20

20
DE
• Stellen Sie den Filterhalter (5) auf « » ein, die
Vorsprünge des Filterhalters (5) sind mit den Aussparungen am Boiler zusammenzufallen, drehen Sie den
Filterhalter (5) entgegen dem Uhrzeigersinn in die
Position «
• Stellen Sie den Kolben (14) aufs Gitter (2) auf.
• Stecken Sie den Netzstecker in eine Steckdose ein.
• Drehen Sie den Gri des Betriebsschalters (7) in die
Position « », dabei leuchtet die Kontrolleuchte (8),
das Heizelement schaltet sich ein, und der fertige
Kaee ießt in den Kolben (14) aus.
• Um die Kaeemaschine nach der Kaeezubereitung
auszuschalten, drehen Sie den Gri des Betriebs-
schalters (7) in die Position « », die Kontrolleuchte
(8) erlischt.
• Gießen Sie den fertigen Kaee in die Tassen aus.
• Entfernen Sie den Filterhalter (5) durchs Drehen im
Uhrzeigersinn, waschen Sie das Filter (6); um zu
verhindern, dass das Filter (6) herausfällt, verwenden
Sie den Halter (4).
• Beobachten Sie das Befüllen der Tropfschale (1),
entfernen Sie das Gitter (2) beim Befüllen der
Tropfschale (1), entfernen Sie die Tropfschale (1),
gießen Sie die Flüssigkeit aus der Tropfschale (1) ab,
spülen Sie die Tropfschale (1) und das Gitter (2) ab,
trocknen und stellen Sie die Tropfschale (1) und das
Gitter (2) zurück auf.
» (Abb. 1).
CAPPUCCINOZUBEREITUNG
Achtung! Bei der Cappuccinozubereitung hüten Sie
sich vor Austrittsheißdampfverbrühung.
• Bereiten Sie Kaee laut dem Abschnitt «ESPRESSOZUBEREITUNG» zu und gießen ihn in eine
Tasse, deren Fassungsvermögen lässt, Milchschaum
zuzugeben.
• Die zur Schaumzubereitung benutzte Milch soll kalt,
frisch und konservierungsstofrei sein. Verwenden
Sie 4 bis 6% Vollmilch und mindestens 10% Sahne.
• Stellen Sie den Betriebsschalter (7) in die Position «
»; um die Kaeemaschine auszuschalten und den
Druck abzulassen, ziehen Sie den Netzstecker aus
der Steckdose heraus.
• Entfernen Sie den Wasserbehälterdeckel (9), indem
Sie ihn entgegen dem Uhrzeigersinn drehen, gießen
Sie eine kleine Wassermenge in den Behälter mit
dem Kolben (14) ein, setzen Sie den Deckel (9)
zurück auf und drehen Sie ihn laut Gewinde im
Uhrzeigersinn zu.
• Stellen Sie einen Behälter mit kalter Milch oder Sah-
ne unter das Endstück (11).
• Schalten Sie die Kaeemaschine ein, indem Sie den
steam
Betriebsschalter (7) auf «
» stellen, dabei leuchtet
die Kontrolleuchte (8), das Heizelement schaltet sich
ein, und der Druckdampf tritt aus dem Endstück (11)
aus.
Page 21

DE
• Tauchen Sie das Endstück (11) in einen Behälter mit
kalter Milch oder Sahne ein.
• Das Endstück (11) darf den Behältersboden nicht
berühren, da sonst der Dampfaustritt behindert wird.
• Der Austrittsdampf erzeugt Milchschaum schaende
Wirbel, lassen Sie den Behälter mit Milch oder Sahne
relativ zum Endstück (11) periodisch herunter und
herauf, bis sich Milchschaum bildet.
Anmerkung: tauchen Sie das Endstück (11) immer für
ca. 1-2 cm in Milch oder Sahne ein.
• Wenn der Milchschaum nicht geschat wird, verzwei-
feln Sie nicht und experimentieren Sie, bis Sie das
Ergebnis erreichen. Versuchen Sie, den Milchschaum
mit dem entfernten Endstück (11) zuzubereiten.
• Stellen Sie den Betriebsschalter (7) in die Position «
» ein, um die Kaeemaschine auszuschalten und
den Druck abzulassen.
• Geben Sie den Milchschaum in den zubereiteten Espresso zu und süßen nach Geschmack ab, der Milchschaum kann mit Kakaopulver dekoriert werden.
• Reinigen Sie das Cappuccinatore-Rohr (10) und
spülen Sie das Endstück (11) nach dem Milchaufschäumen aus.
• Entfernen Sie das Endstück (11), spülen Sie es unter
dem Warmwasserstrahl und trocknen Sie es ab.
• Tauchen Sie das Cappuccinatore-Rohr (10) in einen
Behälter mit Wasser ein, schalten Sie die Dampfzu-
fuhr ein, indem Sie den Betriebsschalter (7) auf «
steam
stellen; nach 10-15 Sekunden, um die Kaeemaschine auszuschalten, stellen Sie den Betriebsschalter
(7) auf «
» ein.
KALKENTFERNUNG
• Für einen eektiven Kaeemaschinenbetrieb muss
die Kaeemaschine alle 2-3 Monate von Mineralabla-
gerungen (Wasserstein) gereinigt werden.
• Sie können ein «hausgemachtes Entkalkungsmittel»
verwenden — eine Lösung von Zitronensäure in
einem Verhältnis von einhundert Teilen Wasser zu
drei Teilen Zitronensäure.
Anmerkung: Zur Entkalkung können Sie unter
Beachtung der Bedienungsanleitungen spezielle
Entkalkungsmittel für Kaeekocher und -maschinen
verwenden.
1. Vergewissern Sie sich, dass der Netzstecker
an keine Steckdose angeschlossen ist und der
Betriebsschalter (7) auf «
2. Entfernen Sie den Wasserbehälterdeckel (9), indem
Sie ihn entgegen dem Uhrzeigersinn drehen, und
gießen Sie einen Entkalker in den Behälter mit dem
Kolben (14) ein. Überschreiten Sie das maximale
Fassungsvermögen des Wasserbehälters nicht.
3. Setzen Sie den Deckel (9) zurück auf und drehen
Sie ihn laut Gewinde im Uhrzeigersinn zu.
4. Setzen Sie das Filter (6) in den Halter (5) ein und
»
schütten Sie keinen gemahlenen Kaee ins Filter
(6) ein.
» eingestellt ist.
21
Page 22

22
DE
5. Stellen Sie den Filterhalter (5) auf « » ein, die
Vorsprünge des Filterhalters (5) sind mit den
Aussparungen am Boiler zusammenzufallen,
drehen Sie den Filterhalter (5) entgegen dem
Uhrzeigersinn in die Position «
6. Stellen Sie den Kolben (14) aufs Gitter (2) auf.
7. Stecken Sie den Netzstecker in eine Steckdose ein.
8. Drehen Sie den Gri des Betriebsschalters (7) in
die Position «
brew
», dabei leuchtet die Kontrolleuchte
(8), das Heizelement schaltet sich ein, und das
Druckwasser ießt in den Kolben (14) aus.
9. Nach 10-15 Sekunden drehen Sie den Gri des
Betriebsschalters (7) in die Position « », die
Kontrolleuchte (8) erlischt.
10. Stellen Sie den Kolben (14) unter das Endstück
(11) auf und drehen Sie den Betriebsschalter (7) in
steam
die Position «
», nach 5 Sekunden stellen Sie den
Betriebsschalter (7) in die Position « » ein.
11. Stellen Sie den Kolben (14) aufs Gitter (2) auf,
warten Sie 10-15 Minuten ab und schalten Sie die
Wasserzufuhr ein, indem Sie den Schalter (7) in
die Position «
brew
» einstellen, warten Sie ab, bis das
Reinigungsmittel vollständig heraustritt.
12. Stellen Sie den Betriebsschalter (7) in die Position
« » ein, um die Kaeemaschine auszuschalten
und den Druck abzulassen. Ziehen Sie den
Netzstecker aus der Steckdose heraus, drehen Sie
» (Abb. 1).
den Deckel (9) ab und füllen Sie den Behälter mit
sauberem Wasser an. Stecken Sie den Netzstecker
in eine Steckdose ein.
13. Stellen Sie den Kolben (14) unter das Endstück
(11) auf und schalten Sie die Dampfzufuhr «
steam
» ein, nach 15 Sekunden schalten Sie die
Dampfzufuhr aus und stellen Sie den Kolben (14)
aufs Gitter (2) um, schalten Sie die Wasserzufuhr
ein und warten Sie ab, bis das Wasser aus dem
Behälter vollständig heraustritt.
14. Stellen Sie den Betriebsschalter (7) in die Position
« » ein, um die Kaeemaschine auszuschalten
und den Druck abzulassen.
• Bei Bedarf wiederholen Sie den Spülzyklus der
Kaeemaschine mehrmals.
REINIGUNG UND PFLEGE
• Vor dem Reinigen schalten Sie die Kaeemaschine
immer aus und ziehen Sie den Netzstecker aus der
Steckdose heraus.
• Lassen Sie die Kaeemaschine vollständig abkühlen
und wischen Sie die Außenoberächen des Gehäuses mit einem weichen, leicht angefeuchteten Tuch,
danach trocknen Sie sie ab.
• Für Entfernung von Verschmutzungen benutzen Sie
weiche Reinigungsmittel, aber keine Metallbürsten,
Abrasiv- und Lösungsmittel.
• Entfernen Sie den Wasserbehälterdeckel (9), indem
Sie ihn entgegen dem Uhrzeigersinn drehen, kippen
Page 23

DE
Sie die Kaeemaschine um, gießen Sie das Restwasser aus dem Behälter ab und drehen Sie den
Deckel (9) zu.
• Wenn die Filterlöcher (6) mit gemahlenem Kaee
verstopft sind, reinigen Sie die Löcher mit einer
kleinen Bürste.
• Entfernen Sie das Gitter (2) und die Tropfschale (1)
und gießen Sie die Flüssigkeit daraus ab, spülen
Sie das Gitter (2), die Tropfschale (1), spülen und
trocknen Sie sie ab, stellen Sie die Tropfschale (1)
und das Gitter (2) zurück auf.
• Waschen Sie die abnehmbaren Teile (5, 6, 11, 14) mit
Warmwasser und einem neutralen Reinigungsmittel
ab, spülen und trocknen Sie sie, setzen Sie das Filter
(6) in den Halter (5) ein, stellen Sie den Filterhalter
(5) zurück auf und drehen Sie den Trichter in die
Betriebsposition um «
»(Abb. 1).
• Es ist nicht gestattet, die Kaeemaschine, das Netz-
kabel und den Netzstecker ins Wasser oder jegliche
andere Flüssigkeiten einzutauchen.
AUFBEWAHRUNG
• Bevor Sie die Kaeemaschine zur langen Aufbewahrung wegnehmen, trennen Sie sie vom Stromnetz ab
und lassen Sie sie abkühlen.
• Reinigen Sie die Kaeemaschine.
• Gießen Sie immer das Restwasser aus dem Behälter
aus; es ist verboten, die Kaeemaschine mit Wasser
im Behälter unter 0°C zu lagern.
• Bewahren Sie die Kaeemaschine an einem trocke-
nen, kühlen und für Kinder und behinderte Personen
unzugänglichen Ort auf.
Störungen und Abhilfe
Störung Ursache Abhilfe
Die Kaeemaschine
schaltet sich
nicht ein
Kaee ießt aus
dem Kolben aus
Wasser ießt aus
dem Unterteil des
Kaeemaschinenge-
häuses aus
Der Netzstecker ist
an keine Steckdose
angeschlossen, die
Steckdose ist defekt
Der Kolben ist
unrichtig aufgestellt
Die Tropfschale ist
überfüllt
Die Kaeemaschine
ist defekt
Stecken Sie den
Netzstecker in eine
Steckdose ein.
Vergewissern Sie sich,
dass die Steckdose
funktioniert, indem
Sie ein gewißlich
funktionsfähiges
Elektrogerät anschließen.
Wenn sich die
Kaeemaschine nicht
einschalten lässt,
wenden Sie sich an
einen Kundendienst
Vergewissern Sie sich,
dass der Kolben auf
dem abnehmbaren
Schalengitter richtig
aufgestellt ist
Entfernen Sie die
Tropfschale und gießen
Sie die Flüssigkeit ab
Wenden Sie sich an
einen Kundendienst,
um die Kaeemaschine
prüfen oder reparieren
zu lassen
23
Page 24

24
DE
Wasser tritt an der
Außenseite des
Filterhalters aus
Fremdgeschmack
des fertigen Kaees
Milch oder Sahne
schäumen nicht
Gemahlener Kaee
an den Rändern des
Kaeelters
Nach dem
Entfernen von
Mineralablagerungen
gibt es noch
Reinigungsmittel in
der Kaeemaschine
Der verwendete
gemahlene Kaee ist
qualitätsschlecht
Der Milch- oder
Sahnebehälter ist zu
groß oder passt nach
der Form nicht
Sie haben Mageroder warme Milch
verwendet
Achten Sie darauf, dass
es keinen gemahlenen
Kaee an den Rändern
des Kaeelters gibt
Spülen Sie die
Kaeemaschine
mehrmals mit sauberem
Wasser aus
Verwenden Sie
frisch gemahlene
Kaeebohnen.
Lagern Sie gemahlenen
Kaee in einem
luftdichten Behälter
an einem kühlen und
trockenen Ort
Verwenden Sie
einen hohen und
schmalen Milch- oder
Sahnebehälter
Die zur
Schaumzubereitung
benutzte Milch
oder Sahne sollen
kalt, frisch und
konservierungsstofrei
sein. Verwenden Sie 4
bis 6% Vollmilch und
mindestens 10% Sahne
LIEFERUMFANG
• Kaeemaschine — 1 St.
• Filterhalter – 1 Stk.
• Kaeelter – 1 Stk.
• Kolben – 1 Stk.
• Messlöel – 1 Stk.
• Bedienungsanleitung — 1 St.
TECHNISCHE EIGENSCHAFTEN
• Stromversorgung: 220-240 V, ~ 50 Hz
• Nennleistungsaufnahme: 800-950 W
• Fassungsvermögen des Wasserbehälters: 0,24 l
ENTSORGUNG
Zwecks Umweltschutzes geben Sie
das Gerät nach Beendigung dessen
Nutzungsdauer in einen Spezialpunkt für
weitere Entsorgung über.
Die bei der Entsorgung der Erzeugnisse
entstehenden Abfälle sind unbedingt zu sammeln und
weiter ordnungsmäßig zu entsorgen.
Mehrere Information zur Entsorgung dieses Produkts
erhalten Sie bei Ihrer lokalen Stadtverwaltung, einem
Abfallentsorgungsdienst oder beim Geschäft, wo Sie
dieses Produkt gekauft haben.
Page 25

DE
Der Hersteller behält sich das Recht vor, das
Design, die Konstruktion und die das gemeine
Gerätebetriebsprinzip nicht beeinussenden
technischen Eigenschaften ohne Vorbenachrichtigung
zu verändern.
Die Gerätenutzungsdauer beträgt 3 Jahre
Das Herstellungsdatum ist in der Fabrikationsnum-
mer angegeben.
Bei Störungsfeststellung wenden Sie sich baldigst
an einen autorisierten Kundendienst.
25
Page 26

RU
RU
26
КОФЕВАРКА BR1103
Кофеварка предназначена для приготовления
кофе эспрессо или кофе капучино.
ОПИСАНИЕ
1. Поддон для капель
2. Решётка поддона
3. Ручка держателя фильтра
4. Удерживатель фильтра
5. Держатель фильтра
6. Фильтр для кофе
7. Переключатель режимов работы
8. Световой индикатор
9. Крышка резервуара для воды
10. Трубка-капучинатора
11. Наконечник капучинатора
12. Крышка колбы
13. Ручка колбы
14. Стеклянная колба
15. Мерная ложка
ВНИМАНИЕ!
Для дополнительной защиты в цепи питания
целесообразно установить устройство защитного
отключения (УЗО) с номинальным током срабатывания, не превышающим 30 мА, для установки
УЗО обратитесь к специалисту.
9
8
7
6
5
4
3
2
1
12
13
14
Рис. 1
10
11
15
Page 27

RU
МЕРЫ БЕЗОПАСНОСТИ И РЕКОМЕНДАЦИИ ПО ЭКСПЛУАТАЦИИ КОФЕВАРКИ
Перед использованием кофеварки внимательно
ознакомьтесь с руководством по эксплуатации,
и сохраните его для использования в будущем.
• Используйте кофеварку только по её прямому
назначению, как изложено в данной инструкции.
• Неправильное обращение с кофеваркой может
привести к её поломке, причинению вреда
пользователю или его имуществу и не является
гарантийным случаем.
• Кофеварка предназначена для приготовления
кофе эспрессо или кофе капучино.
• Убедитесь, что рабочее напряжение кофеварки,
указанное на этикетке, соответствует напряжению
электросети.
• Вилка шнура питания имеет контакт заземления,
вставляйте её в электрическую розетку, имеющую
надёжный контакт заземления. При коротком
замыкании заземление снижает риск поражения
электрическим током.
• Обратитесь к специалисту-электрику, если вы
не уверены в том, что ваши розетки правильно
установлены и заземлены.
• Во избежание возникновения пожара запрещается использовать «переходники», предназначенные для подключения вилки шнура питания
к электрической розетке, не имеющей контакта
заземления.
• При искрении в электрической розетке и присутствии запаха гари, выньте вилку шнура питания из
розетки и обратитесь в организацию, обслуживающую вашу домашнюю электрическую сеть.
• При появлении дыма из корпуса устройства,
выньте вилку шнура питания из электрической
розетки и примите меры к нераспространению
огня. Обратитесь в сервисный центр для ремонта
кофеварки.
• Запрещается использовать кофеварку вне помещений.
• Всегда выливайте остатки воды из резервуара, запрещается хранить кофеварку с водой в резервуаре при температуре ниже 0°C.
• Не рекомендуется использовать устройство во
время грозы.
• Оберегайте устройство от ударов, падений, вибраций и иных механических воздействий.
• Не оставляйте кофеварку, включённую в сеть, без
присмотра.
• Во избежание пожара, удара электрическим током
или физических повреждений не погружайте
вилку шнура питания, шнур питания или корпус
кофеварки в воду или любые другие жидкости.
• Не используйте кофеварку вблизи от кухонной
раковины, в ванных комнатах, около бассейнов
или других ёмкостей, наполненных водой.
• Если устройство упало в воду, немедленно выньте
вилку шнура питания из розетки и только после
этого достаньте устройство из воды.
27
Page 28

28
RU
• Не используйте кофеварку в непосредственной
близости от нагревательных приборов, источников
тепла или открытого пламени.
• Запрещается использовать устройство в местах,
где используются или распыляются аэрозоли,
а также вблизи от легковоспламеняющихся
жидкостей.
• Устанавливайте кофеварку на ровную и устойчивую поверхность, не ставьте её на край стола.
Не допускайте, чтобы шнур питания свешивался
со стола, а также следите, чтобы он не касался
горячих поверхностей и острых кромок мебели.
• Не ставьте кофеварку на горячие поверхности.
• Запрещается прикасаться к шнуру питания и
вилке шнура питания, мокрыми руками.
• Используйте только детали кофеварки и принадлежности, входящие в комплект поставки.
• Перед включением кофеварки убедитесь, что все
съемные детали установлены правильно.
• Не включайте кофеварку без воды.
• Осторожно обращайтесь со стеклянной колбой
для кофе, во избежание её повреждения!
• Не используйте колбу для иных целей, не ставьте
её на электрические и газовые плиты, не используйте колбу в микроволновых печах.
• Используйте кофеварку только с установленной
колбой для кофе.
• Не снимайте колбу в процессе приготовления
кофе.
• Не допускайте резких температурных перепадов,
в противном случае стекло колбы может треснуть.
• Не ставьте горячую стеклянную колбу на холодную поверхность.
• Не используйте кофеварку, если стеклянная колба
повреждена.
• Во избежание ожога не дотрагивайтесь до горячих
поверхностей кофеварки в процессе приготовления кофе и сразу после её выключения. Дайте
кофеварке остыть.
• Дайте устройству полностью остыть перед
чисткой.
• Отключайте кофеварку от электрической сети
перед чисткой или в том случае, если вы ей не
пользуетесь. При отключении кофеварки от электрической сети держитесь только за вилку шнура
питания и аккуратно выньте её из электрической
розетки, не тяните за шнур питания — это может
привести к повреждению шнура питания, электрической розетки или вызвать короткое замыкание.
• Из соображений безопасности детей не оставляйте полиэтиленовые пакеты, используемые в
качестве упаковки, без присмотра.
ВНИМАНИЕ!
Не разрешайте детям играть с полиэтиленовыми
пакетами или упаковочной плёнкой. Опасность
удушья!
Page 29

RU
• Кофеварка не предназначена для использования
детьми.
• Осуществляйте надзор за детьми, чтобы не допустить использования прибора в качестве игрушки.
• Не разрешайте детям прикасаться к устройству и
к шнуру питания во время работы кофеварки.
• Во время работы и остывания размещайте
устройство в местах, недоступных для детей.
• Данное устройство не предназначено для использования лицами (включая детей) с пониженными
физическими, психическими или умственными
способностями, или при отсутствии у них опыта
или знаний, если они не находятся под контролем
или не проинструктированы об использовании
прибора лицом, ответственным за их безопасность.
• Периодически проверяйте состояние шнура питания и вилки шнура питания.
• При повреждении шнура питания его замену,
во избежание опасности, должны производить
изготовитель, сервисная служба или подобный
квалифицированный персонал.
• Запрещается самостоятельно ремонтировать прибор. Не разбирайте прибор самостоятельно, при
возникновении любых неисправностей, а также
после падения устройства выключите прибор из
электрической розетки и обратитесь в сервисный
центр.
• Перевозите кофеварку в заводской упаковке.
• Храните устройство в местах, недоступных для
детей и людей с ограниченными возможностями.
КОФЕВАРКА ПРЕДНАЗНАЧЕНА ТОЛЬКО ДЛЯ
БЫТОВОГО ИСПОЛЬЗОВАНИЯ, ЗАПРЕЩАЕТСЯ
ИСПОЛЬЗОВАТЬ КОФЕВАРКУ В КОММЕРЧЕСКИХ
ИЛИ ЛАБОРАТОРНЫХ ЦЕЛЯХ.
ПОДГОТОВКА КОФЕВАРКИ К РАБОТЕ
После транспортировки или хранения устройства при пониженной температуре необходимо
выдержать его при комнатной температуре не
менее трёх часов.
• Распакуйте кофеварку и удалите все упаковочные
материалы.
• Сохраните заводскую упаковку.
• Ознакомьтесь с мерами безопасности и рекомен-
дациями по эксплуатации.
• Проверьте комплектацию.
• Осмотрите кофеварку на наличие повреждений,
при наличии повреждений не включайте её в
электрическую розетку.
• Убедитесь, что параметры напряжения питания,
указанные на нижней панели изделия, соответствуют параметрам электрической сети.
• Протрите поверхность корпуса кофеварки чистой,
слегка влажной тканью для удаления пыли.
29
Page 30

30
RU
• Промойте тёплой водой с нейтральным моющим
средством все съёмные детали: крышку колбы
(12), колбу для кофе (14), держатель фильтра (5),
фильтр (6), решётку (2), поддон (1), ополосните их
и просушите.
• Установите поддон (1) и решётку (2) на место.
• Убедитесь, что вилка шнура питания не вставлена
в электрическую розетку, а переключатель режимов работы (7) установлен в положение « ».
• Снимите крышку резервуара для воды (9), поворачивая её против часовой стрелки, используя колбу
(14), налейте воду в резервуар. Не превышайте
максимальную вместимость резервуара для воды.
• Установите крышку (9) на место, и закрутите её по
резьбе, поворачивая по часовой стрелке.
• Поместите фильтр (6) в держатель (5), не засыпайте молотый кофе в фильтр (6).
• Установите держатель фильтра (5) в положение
«
», выступы держателя фильтра (5) должны совпасть с пазами на бойлере, поверните
держатель фильтра (5) против часовой стрелки в
положение «
• Поставьте колбу (14) на решётку (2).
• Вставьте вилку шнура питания в электрическую
розетку.
• Поверните ручку переключателя режимов работы
(7) в положение «
вой индикатор (8), включится нагревательный
» (рис. 1).
brew
», при этом загорится свето-
элемент, и вода под давлением будет вытекать в
колбу (14).
• После выхода воды поверните ручку переключателя режимов работы (7) в положение «
»,
индикатор (8) погаснет.
• Вылейте воду из колбы (14).
• При необходимости повторите цикл промывки
кофеварки 2-3 раза.
• Для промывки трубки капучинатора (10), снимите
крышку резервуара для воды (9), повернув ее
против часовой стрелки, используя колбу (14),
налейте небольшое количество воды в резервуар,
установите крышку (9) на место и закрутите её
по резьбе, поворачивая ее по часовой стрелке до
фиксации.
• Поместите фильтр (6) в держатель (5), не засыпайте молотый кофе в фильтр (6).
• Установите держатель фильтра (5) в положение
«
», поверните держатель фильтра (5) против
часовой стрелки в положение «
» (рис. 1).
• Поставьте колбу (14) под насадку (11), трубки
капучинатора (10).
• Вставьте вилку шнура питания в электрическую
розетку.
• Поверните ручку переключателя режимов работы
steam
(7) в положение «
», при этом загорится световой индикатор (8), включится нагревательный
элемент, и пар под давлением будет выходить в
колбу (14).
Page 31

RU
• После выхода пара, для выключения кофеварки,
поверните ручку переключателя режимов работы
(7) в положение « », индикатор (8) погаснет.
• Кофеварка готова к использованию.
ПРИГОТОВЛЕНИЕ КОФЕ
ПРИГОТОВЛЕНИЕ КОФЕ ЭСПРЕССО
Рекомендации по приготовлению кофе эспрессо
• Используйте молотый кофе, предназначенный
для кофеварок «эспрессо» или используйте свежемолотые зёрна кофе.
• С небольшим усилием утрамбовывайте молотый
кофе в фильтре (6) обратным концом мерной
ложки (15).
• Вкус приготовленного кофе зависит от качества
и степени помола кофейных зерен. Если кофе
наливается слишком долго, это означает, что
кофе очень мелкого помола или слишком сильно
утрамбован.
ВНИМАНИЕ! Запрещается снимать держатель
фильтра (5) во время работы кофеварки.Во время
приготовления кофе не оставляйте кофеварку без
присмотра, так как необходимо следить за процессом наполнения колбы (14) готовым кофе!
• Убедитесь, что вилка шнура питания не вставлена
в электрическую розетку, а переключатель режимов работы (7) установлен в положение «
».
• Снимите крышку резервуара для воды (9), повора-
чивая её против часовой стрелки, используя колбу
(14), налейте воду в резервуар. Не превышайте
максимальную вместимость резервуара для воды.
Примечание: на колбе (14) есть отметки количества
воды, максимальная отметка для 4 чашек кофе,
минимальная отметка для 2 чашек кофе.
• Установите крышку (9) на место, и закрутите её по
резьбе, поворачивая по часовой стрелке.
• Поместите фильтр (6) в держатель (5), засыпьте
мерной ложкой (15) молотый кофе в фильтр (6).
Примечание: на фильтре (6) есть отметки количество молотого кофе для приготовления 2 или 4
чашек кофе, засыпьте необходимое количество
молотого кофе в фильтр (6).
• Установите держатель фильтра (5) в положение
«
», выступы держателя фильтра (5) должны совпасть с пазами на бойлере, поверните
держатель фильтра (5) против часовой стрелки в
положение «
» (рис. 1).
• Поставьте колбу (14) на решётку (2).
• Вставьте вилку шнура питания в электрическую
розетку.
• Поверните ручку переключателя режимов работы
(7) в положение «
brew
», при этом загорится световой индикатор (8), включится нагревательный элемент, и готовый кофе будет вытекать в колбу (14).
31
Page 32

32
RU
• После приготовления кофе для выключения кофеварки поверните ручку переключателя режимов
работы (7) в положение « », индикатор (8)
погаснет.
• Разлейте готовый кофе в чашки.
• Снимите держатель фильтра (5), повернув его по
часовой стрелке, промойте фильтр (6), для предотвращения выпадения фильтра (6), используйте удерживатель (4).
• Следите за наполнением поддона (1), при наполнении поддона (1), снимите решётку (2), снимите
поддон (1), слейте из поддона (1) жидкость,
промойте поддон (1) и решётку (2), просушите и
установите поддон (1) и решётку (2) на место.
ПРИГОТОВЛЕНИЕ КОФЕ КАПУЧИНО
Внимание! Во время приготовления кофе капучино,
опасайтесь получения ожогов выходящим горячим
паром.
• Приготовьте кофе, как описано в разделе «ПРИГОТОВЛЕНИЕ КОФЕ ЭСПРЕССО», налейте кофе
в чашку, объема, которой будет достаточно для
добавления молочной пенки.
• Молоко, используемое для приготовления пенки,
должно быть холодным, свежим и без консервантов. Используйте цельное молоко жирностью от
4 до 6%, жирность сливок должна быть не менее
10%.
• Установите переключатель режимов работы (7) в
положение « » для выключения кофеварки и
сброса давления, выньте вилку шнура питания из
электрической розетки.
• Снимите крышку резервуара для воды (9),
поворачивая против часовой стрелки, используя
колбу (14), налейте небольшое количество воды
в резервуар, установите крышку (9) на место, и
закрутите её по резьбе, поворачивая по часовой
стрелке.
• Подставьте под наконечник (11) ёмкость с холодным молоком или сливками.
• Включите кофеварку, установив переключатель
steam
режимов работы (7) в положение «
», при этом
загорится световой индикатор (8), включится
нагревательный элемент, и пар под давлением
будет выходить из наконечника (11).
• Опустите наконечник (11) в ёмкость с холодным
молоком или сливками.
• Наконечник (11) не должен касаться дна ёмкости,
иначе выход пара будет затруднён.
• Выходящий пар создаёт завихрения, способствующие образованию молочной пенки, периодически приподнимайте и опускайте ёмкость с
молоком или сливками относительно наконечника
(11) до образования молочной пенки.
Примечание: всегда погружайте наконечник (11)
приблизительно на 1- 2 см в молоко или сливки.
Page 33

RU
• Если молочная пенка не получается, не отчаивайтесь и экспериментируйте, пока не добьётесь
результата. Попробуйте приготовить молочную
пенку, сняв наконечник (11).
• Установите переключатель режимов работы (7) в
положение « » для выключения кофеварки и
сброса давления.
• Добавьте молочную пенку в приготовленный кофе
эспрессо, добавьте по вкусу сахар, вы можете
украсить молочную пенку какао порошком.
• После приготовления молочной пенки, прочистите
трубку-капучинатора (10) и промойте наконечник
(11).
• Снимите наконечник (11), промойте его под струёй
тёплой воды и просушите.
• Опустите трубку-капучинатора (10) в ёмкость с
водой, включите подачу пара, установив пере-
steam
ключатель режимов работы (7) в положение «
»,
через 10-15 секунд, для выключения кофеварки,
установите ручку переключателя режимов работы
(7) в положение «
».
УДАЛЕНИЕ НАКИПИ
• Для обеспечения эффективной работы кофеварки, необходимо каждые 2-3 месяца очищать
кофеварку от минеральных отложений (накипи).
• Можно использовать «домашнее средство для
удаления накипи» — это раствор лимонной кислоты в соотношении на сто частей воды три части
лимонной кислоты.
Примечание: для удаления накипи можно использовать специальные средства для удаления накипи
в кофеварках и кофе-машинах, строго соблюдая
инструкции по их использованию.
1. Убедитесь, что вилка шнура питания не встав-
лена в электрическую розетку, а переключатель
режимов работы (7) установлен в положение «
».
2. Снимите крышку резервуара для воды (9),
поворачивая против часовой стрелки, используя
колбу (14), налейте средство для удаления накипи в резервуар. Не превышайте максимальную
вместимость резервуара для воды.
3. Установите крышку (9) на место, и закрутите её
по резьбе, поворачивая по часовой стрелке.
4. Поместите фильтр (6) в держатель (5), не засы-
пайте молотый кофе в фильтр (6).
5. Установите держатель фильтра (5) в положение
«
», выступы держателя фильтра (5) должны
совпасть с пазами на бойлере, поверните
держатель фильтра (5) против часовой стрелки
в положение «
» (рис. 1).
6. Поставьте колбу (14) на решётку (2).
7. Вставьте вилку шнура питания в электрическую
розетку.
33
Page 34

34
RU
8. Поверните ручку переключателя режимов работы (7) в положение «
товой индикатор (8), включится нагревательный
элемент, и вода под давлением будет вытекать
в колбу (14).
9. Через 10-15 секунд поверните ручку переключателя режимов работы (7) в положение « »,
индикатор (8) погаснет.
10. Поставьте колбу (14) под наконечник (11) и поверните ручку переключателя режимов работы
(7) в положение «
ручку переключателя режимов работы (7) в
положение « ».
11. Установите колбу (14) на решётку (2), подождите
10-15 минут и включите подачу воды, установив
переключатель (7) в положение «
тесь полного выхода чистящего средства.
12. Установите переключатель режимов работы (7)
в положение « » для выключения кофеварки
и сброса давления. Выньте вилку шнура питания
из электрической розетки, открутите крышку (9)
и залейте в резервуар чистую воду. Вставьте
вилку шнура питания в электрическую розетку.
13. Подставьте колбу (14) под наконечник (11) и
включите подачу пара «
выключите подачу пара и переставьте колбу (14)
на решётку (2), включите подачу воды и дождитесь полного выхода воды из резервуара.
brew
», при этом загорится све-
steam
», через 5 секунд установите
brew
», дожди-
steam
», через 15 секунд,
14. Установите переключатель режимов работы (7)
в положение «
» для выключения кофеварки
и сброса давления.
• При необходимости повторите промывку кофевар-
ки несколько раз.
ЧИСТКА И УХОД
• Перед чисткой всегда выключайте кофеварку и
вынимайте вилку шнура питания из электрической
розетки.
• Дайте кофеварке полностью остыть и протрите
внешние поверхности корпуса (9) мягкой, слегка
влажной тканью, затем вытрите насухо.
• Для удаления загрязнений используйте мягкие
чистящие средства, не используйте металлические щётки, абразивные чистящие средства и
растворители.
• Снимите крышку резервуара для воды (9), пово-
рачивая против часовой стрелки, переверните
кофеварку и слейте остатки воды из резервуара,
закрутите крышку (9).
• Если отверстия фильтра (6) засорены молотым
кофе, для прочистки отверстий воспользуйтесь
небольшой щёточкой.
• Снимите решётку (2), снимите поддон (1) и слейте
из него жидкость, промойте решётку (2), поддон
(1), ополосните и просушите, установите поддон
(1) и решётку (2) на место.
Page 35

RU
• Съёмные детали (5, 6, 12, 14) промойте тёплой
водой с нейтральным моющим средством,
ополосните и просушите, вставьте фильтр (6) в
держатель (5), установите держатель фильтра (5),
поверните держатель фильтра (5) в положение «
» (рис. 1).
• Не погружайте кофеварку, шнур питания и вилку
шнура питания в воду или любые другие жидкости.
ХРАНЕНИЕ
• Прежде чем убрать кофеварку на хранение, отключите её от электросети и дайте её полностью
остыть.
• Произведите чистку кофеварки.
• Всегда выливайте остатки воды из резервуара,
запрещается хранить кофеварку, с водой в резервуаре при температуре ниже 0°C.
• Храните кофеварку в сухом прохладном месте,
недоступном для детей и людей с ограниченными
возможностями.
Неисправности и способы их устранения
Неисправность Причина Устранение
Кофеварка не
включается
Утечка кофе из
колбы
Утечка воды из
нижней части корпуса кофеварки
Утечка воды с
внешней стороны
держателя
фильтра
Вилка шнура питания не вставлена
в электрическую
розетку, неисправность электрической розетки.
Колба неправильно
установлена
Переполнен поддон Снимите поддон и
Неисправность
кофеварки
Молотый кофе на
краях фильтра для
кофе
Вставьте вилку шнура
питания в электрическую розетку.
Убедитесь в исправности электрической
розетки, включив в неё
заведомо исправный
электроприбор.
Если кофеварка не
включается, обратитесь
в сервисный центр.
Следите за правильностью установки колбы
на съёмной решётке
поддона
слейте жидкость
Обратитесь в сервисный центр для осмотра
и ремонта кофеварки
Следите за тем, чтобы
молотого кофе не было
на краях фильтра для
кофе
35
Page 36

36
RU
Посторонний
привкус готового
кофе
Молоко или сливки
не вспениваются
После очистки от
минеральных отложений в кофеварке
осталось чистящее
средство
Используемый
молотый кофе
ненадлежащего
качества
Ёмкость для
молока или сливок
слишком большая
или не подходит по
форме
Вы использовали
обезжиренное или
тёплое молоко
КОМПЛЕКТ ПОСТАВКИ
• Кофеварка — 1 шт.
• Держатель фильтра – 1 шт.
• Фильтр для кофе _ 1 шт.
• Колба -1 шт.
• Мерная ложка – 1 шт.
• Инструкция — 1 шт.
Промойте кофеварку
чистой водой несколько
раз
Используйте свежемолотые зёрна кофе.
Храните молотый кофе
в герметичной таре в
сухом и прохладном
месте
Используйте высокую
и узкую ёмкость для
молока или сливок
Молоко или сливки,
используемые для
приготовления
пенки, должны быть
холодными, свежими
и без консервантов.
Используйте цельное
молоко жирностью
от 4 до 6%, жирность
сливок должна быть не
менее 10%
ТЕХНИЧЕСКИЕ ХАРАКТЕРИСТИКИ
• Электропитание: 220-240 В, ~ 50 Гц
• Номинальная потребляемая мощность: 800-950
Вт
• Объём резервуара для воды: 0,24 л
УТИЛИЗАЦИЯ
Чтобы предотвратить возможный вред
окружающей среде или здоровью
людей от неконтролируемой утилизации
отходов, после окончания срока службы
устройства или элементов питания (если
входят в комплект), не выбрасывайте их вместе с
обычными бытовыми отходами, передайте прибор
и элементы питания в специализированные пункты
для дальнейшей утилизации.
Отходы, образующиеся при утилизации изделий,
подлежат обязательному сбору с последующей
утилизацией в установленном порядке.
Для получения дополнительной информации об
утилизации данного продукта обратитесь в местный
муниципалитет, службу утилизации бытовых отходов
или в магазин, где Вы приобрели данный продукт.
Производитель сохраняет за собой право изменять дизайн, конструкцию и технические характеристики, не влияющие на общие принципы работы
устройства, без предварительного уведомления.
Page 37

RU
Срок службы устройства — 3 года
Дата производства указана в серийном номере.
В случае обнаружения каких-либо неисправностей
необходимо обратиться в авторизированный сервисный центр.
37
Page 38

KZ
KZ
38
BR1103 МҮЙІЗДІ КОФЕҚАЙНАТҚЫШ
Кофеқайнатқыш эспрессо кофесін немесе капучино кофесін әзірлеуге арналған
СИПАТТАМАСЫ
1. Тамшыларға арналған табандық
2. Табандықтың торы
3. Сүзгі ұстағышының тұтқасы
4. Сүзгіні ұстап тұрғыш
5. Сүзгі ұстағышы
6. Кофеге арналған сүзгі
7. Жұмыс режимдерінің ауыстырғышы
8. Жарық индикаторы
9. Суға арналған сұйыққойма қақпағы
10. Капучинатор-түтік
11. Капучинатор ұштығы
12. Құты қақпағы
13. Құты тұтқасы
14. Шыны құты
15. Өлшеуіш қасық
НАЗАР АУДАРЫҢЫЗ!
Қосымша қорғаныс үшін қуаттандыру тізбегінде
номиналдық іске қосылу тогы 30 мА аспайтын
қорғаныс сөндіру құралын (ҚСҚ) орнатқан дұрыс,
ҚСҚ-ны орнату үшін маманға жүгініңіз.
9
8
7
6
5
4
3
2
1
12
13
14
Сур. 1
10
11
15
Page 39

KZ
ҚАУІПСІЗДІК ШАРАЛАРЫ ЖӘНЕ КОФЕҚАЙНАТҚЫШТЫ ПАЙДАЛАНУ БОЙЫНША ҰСЫНЫСТАР
Кофеқайнатқышты пайдалану алдында пайдалануға беру жөніндегі нұсқаулығын мұқият оқып
шығыңыз, одан кейін болашақта пайдалану үшін
сақтап қойыңыз.
• Кофеқайнатқышты осы нұсқаулықта баяндалғандай оның тікелей мақсаты бойынша ғана
пайдаланыңыз.
• Кофеқайнатқышты дұрыс қолданбау оның
бұзылуына, және пайдаланушыға немесе оның
мүлкіне зиян келтіруге әкеп соғуы мүмкін және
кепілдік жағдайы болып табылмайды.
• Кофеқайнатқыш эспрессо және капучино кофесін
дайындауға, дайын сусындарды жылытуға арналған, кез келген басқа сұйықтықтарды жылытуға
тыйым салынады.
• Заттаңбада көрсетілген кофеқайнатқыштың
жұмыс кернеуі электр желісінің кернеуіне сәйкес
екеніне көз жеткізіңіз.
• Қуаттандыру бауы ашасының жерге қосу байланысы бар, оны жерге қосудың сенімді байланысы
бар электр розеткасына қосыңыз. Қысқа тұйықталу кезінде, жерге қосуы электр тоғы соққысы
қаупін төмендетеді.
• Егер розетканың дұрыс орнатылғанына және
жерге қосылуына сенімді болмасаңыз, электр-маманына жүгініңіз.
• Өрттің шығуын болдырмау үшін жерге қосу байланысы жоқ электр розеткасына қосуға арналған,
қуаттандыру бауы ашасының «өткізгіштерін»
пайдалануға тыйым салынады.
• Күйік иісі және электр розеткасынан от ұшқыны
пайда болған кезде, розеткадан желі бауының
ашасын суырыңыз және сіздің үйіңіздің электр
желісіне қызмет көрсететін ұйымға жүгініңіз.
• Құрылғы корпусынан түтін шыққан кезде қуаттандыру бауының ашасын электр розеткасынан
шығарыңыз және от таралмауға қатысты шараларды қолданыңыз. Кофе қайнатқышты жөндету
үшін сервис орталығына жүгініңіз.
• Электр кофеқайнатқышты үй-жайдан тыс жерде
пайдалануға тыйым салынады.
• Әрқашан сұйыққоймадағы қалған суды төгіп
отырыңыз, кофеқайнатқышты сұйыққоймасындағы
суымен 0°C-тан төмен температурада сақтауға
тыйым салынады.
• Найзағай кезінде құрылғыны пайдалану ұсынылмайды.
• Құрылғыны соққыдан, құлаудан, дірілден және
басқа да механикалық әсерлерден сақтаңыз.
• Желіге қосылған кофеқайнатқышты қараусыз
қалдырмаңыз.
• Өрттің шығуын, электр тоғы соққысын немесе
физикалық жарақат алуды болдырмау үшін желі
39
Page 40

40
KZ
бауының ашасын, желі бауын немесе кофеқайнатқыш корпусын суға немесе басқа да сұйықтықтарға батырмаңыз.
• Кофеқайнақышты ас үй раковинасына жақын,
жуынатын бөлмеде, бассейндер немесе басқа да
су толтырылған сыйымдылықтарға жақын жерде
пайдаланбаңыз.
• Құрылғы суға құлап кеткен жағдайда, дереу желі
бауының ашасын электр розеткасынан сурыңыз,
содан кейін ғана құрылғыны судан алып шығыңыз.
• Кофеқайнатқышты жылу көздерінің, жылыту аспаптарының немесе ашық оттың тікелей жанында
пайдаланбаңыз.
• Құрылғыны аэрозольдар пайдаланылатын немесе
шашырайтын жерлерде, сондай-ақ тез тұтанатын
сұйықтықтарға жақын жерлерде пайдалануға
тыйым салынады.
• Кофеқайнатқышты тегіс және тұрақты бетке
орнатыңыз, оны үстелдің шетіне қоймаңыз.
Желі бауының үстелден салбырап тұруына жол
бермеңіз, сонымен бірге оның ыстық беттермен
және жиһаздың өткір жиектерімен жанаспауын
қадағалаңыз.
• Кофеқайнатқышты ыстық беттерге қоймаңыз.
• Қуаттандыру бауы мен қуаттандыру бауының аша-
сына сулы қолмен тиісуге тыйым салынады.
• Жеткізілім жиынтығына кіретін кофеқайнатқыш
бөлшектері мен жабдықтарын ғана пайдаланыңыз.
• Суқоймадағы судың деңгейі минималдық белгіден
төмен болмауын қадағалаңыз.
• Суы жоқ кофеқайнатқышты қоспаңыз.
• Кофенің шыны құтысының зақымдануын болдыр-
мау үшін, оны абайлап ұстаңыз!
• Құтыны басқа мақсаттар үшін пайдаланбаңыз,
оны электр және газ пештеріне қоймаңыз, құтыны
қысқа толқынды пештерде пайдаланбаңыз.
• Кофеқайнатқышты кофеге арналған құтысы орнатулы тұрған кезде ғана пайдаланыңыз.
• Кофе әзірлеу барысында құтыны қыздыруға
арналған тұғырдан шешіп алмаңыз.
• Ыстық шыны құтыны суық бетке қоймаңыз.
• Егер шыны құты бүлінген болса, кофеқай-
натқышты пайдаланбаңыз.
• Күйік алуға жол бермеу үшін кофе әзірлеу
барысында және оны сөндіргеннен кейін бірден
кофеқайнатқыштың ыстық беттеріне қолыңызды
тигізбеңіз. Кофеқайнатқышты салқындатыңыз.
• Тазалау және жабдықтарын шешу алдында
құрылғыны толығымен суытыңыз.
• Кофеқайнатқышты тазалау алдында немесе
пайдаланбайтын болған жағдайда, оны электр
желісінен ажыратыңыз. Кофеқайнатқышты желіден ажыратқан кезде тек қуаттандыру бауының
ашасынан ұстаңыз және оны электр розеткасынан
абайлап шығарыңыз, қуаттандыру бауынан
тартпаңыз — бұл қуаттандыру бауының, электр
Page 41

KZ
розетканың зақымдануына әкелуі немесе қысқа
тұйықталуын тудыруы мүмкін.
• Балалардың қауіпсіздігі мақсатында қаптама
ретінде қолданылатын полиэтилен пакеттерді
қараусыз қалдырмаңыз.
НАЗАР АУДАРЫҢЫЗ!
Балаларға полиэтилен пакеттерімен немесе қаптама үлдірімен ойнауға рұқсат етпеңіз. Тұншығу
қаупі бар!
• Кофеқайнатқыш балалардың пайдалануына
арналмаған.
• Аспапты ойыншық ретінде пайдаланбаулары үшін
балаларды қадағалап отырыңыз.
• Кофеқайнатқыш жұмыс істеп тұрғанда балаларға
қуаттандыру бауына және құрылғыға тиісуіне жол
бермеңіз.
• Жұмыс кезінде және суу кезінде құрылғыны балалардың қолы жетпейтін жерге қойыңыз.
• Осы құрылғы дене, психикалық немесе ақыл-ой
мүмкіндіктері төмендетілген тұлғалардың
• (балаларды қоса) немесе олардың тәжірибесі
немесе білімі болмаса, егер олар бақыланбаса
немесе олардың қауіпсіздігі үшін жауап беретін
тұлғамен аспапты пайдалану туралы нұсқаулықтар берілген болмаса, олардың пайдалануына
арналмаған.
• Қуаттандыру бауының, қуаттандыру бауының
ашасы және құрылғы корпусының жағдайын мезгілімен тексеріп отырыңыз.
• Қуаттандыру бауы зақымданғанда қауіп тудырмау
үшін оны дайындаушы, сервистік қызмет немесе
баламалы білікті маман ауыстыруы тиіс.
• Аспапты өз бетіңізбен жөндеуге тыйым салынады.
Аспапты өз бетіңізбен жөндемеңіз, кез-келген
ақаулықтар пайда болған кезде, сондай-ақ құрал
құлағаннан кейін құрылғыны электр розеткасынан
ажыратып, қызмет көрсету орталығына хабарласыңыз.
• Кофеқайнатқышты тек зауыт қаптамасымен ғана
тасымалдаңыз.
• Құрылғыны балалардың және мүмкіндіктері
шектеулі адамдардың қолы жетпейтін жерде
сақтаңыз.
КОФЕҚАЙНАТҚЫШ ТЕК ТҰРМЫСТЫҚ ПАЙДАЛАНУҒА АРНАЛҒАН, КОФЕҚАЙНАТҚЫШТЫ КОМЕРЦИЯЛЫҚ НЕМЕСЕ ЗЕРТХАНАЛЫҚ МАҚСАТТАРДА
ПАЙДАЛАНУҒА ТЫЙЫМ САЛЫНАДЫ.
КОФЕҚАЙНАТҚЫШТЫ ЖҰМЫСҚА ДАЙЫНДАУ
Құрылғыны төмен температурада тасымалдағаннан кейін немесе сақтағаннан кейін оны бөлме
температурасында үш сағаттан кем емес уақыт
ұстау қажет.
41
Page 42

42
KZ
• Кофеқайнатқышты қаптамадан шығарыңыз және
барлық қаптама материалдарын алып тастаңыз.
• Зауыт қаптамасын сақтап қойыңыз.
• Қауіпсіздік шаралары мен пайдалану нұсқаула-
рымен танысыңыз.
• Жинақталымын тексеріңіз.
• Кофеқайнатқышты зақымдануға тексеріңіз,
зақымданған жері бар болған жағдайда оны
электр розеткасына қоспаңыз.
• Бұйымның төменгі панелінде көрсетілген қуаттандыру кернеуінің параметрлері электр желісінің
параметрлеріне сәйкес келетініне көз жеткізіңіз.
• Кофеқайнатқыш корпусының сыртқы бетін таза,
шаңды сүртуге арналған сәл дымқыл матамен
сүртіңіз.
• Барлық шешілмелі бөлшектерді: құты қақпағын
(12), кофеге арналған құтыны (14), сүзгі
ұстағышын (5), сүзгіні (6), торды (2), табандықты
(1), шайыңыз және оларды кептіріңіз.
• Табандықты (1) және торды (2) орнына қойыңыз.
• Қуаттандыру бауының ашасы, электр розеткасына
қосылмағандығына, ал жұмыс режимдерінің (7)
ауыстырғышын күйіне « » қойылғанына көз
жеткізіңіз.
• Суға арналған сұйыққойма қақпағын (9) шешіп
алыңыз, оны сағат тіліне қарсы бұрап, құтыны
(14) пайдаланып, сұйыққоймаға су құйыңыз. Суға
арналған сұйыққойманың максималды сыйымдылығынан аспаңыз.
• Қақпақты (9) орнына орнатыңыз, және оны сағат
тілі бағытымен бұрып, бұрандасы бойынша бұрап
қойыңыз.
• Сүзгіні (6) ұстағышқа (5) салыыз, ұнтақталған
кофені сүзгіге (6) сеппеңіз.
• Сүзгі ұстағышын (5) күйіне «
сүзгі ұстағышының шығыңқылары (5) бойлердегі
ойықтарға сәйкес келуі керек, сүзгі ұстағышын (5)
сағат тіліне қарсы күйіне «
• Құтыны (14) торға (2) қойыңыз.
• Қуаттандыру бауының ашасын электр розеткасы-
на салыңыз.
• Жұмыс режимдері ауыстырғышы тұтқасын (7)
күйіне « » бұрыңыз, осы ретте жарық индикаторы
(8) жанады, қыздырғыш элемент қосылады, және
су қысым арқылы құтыға (14) ағады.
• Су шыққаннан кейін, жұмыс режимдері ауыстырғышы тұтқасын (7) күйіне « » бұрыңыз, индикатор (8) сөнеді.
• Суды құтыдан (14) төгіңіз.
• Қажет болса, кофеқайнатқыштың жуу циклын 2-3
рет қайталаңыз.
• Капучинатор түтігін (10) жуу үшін, суға арналған
сұйыққойма қақпағын (9) шешіп алыңыз, ол үшін
оны сағат тіліне қарсы бұрыңыз, құтыны (14)
пайдаланып, суға арналған сұйыққоймаға біраз
су құйыңыз, қақпақты (9) орнына орнатыңыз, бекігенге дейін сағат тілі бағытына бұрып, бұрандасы
бойынша бұрап қойыңыз.
» орнатыңыз,
» (сур. 1) бұрыңыз.
Page 43

KZ
• Сүзгіні (6) ұстағышқа (5) салыыз, ұнтақталған
кофені сүзгіге (6) сеппеңіз.
• Сүзгі ұстағышын (5) күйіне «
сүзгі ұстағышын (5) сағат тіліне қарсы күйіне «
» орнатыңыз,
»
бұрыңыз (сур. 1).
• Құтыны (14) капучинатор түтігінің (10) қондырмасы
(11) астына қойыңыз.
• Қуаттандыру бауының ашасын электр розеткасына салыңыз.
• Жұмыс режимдерінің ауыстырғышын (7) күйіне «
steam
» бұрыңыз, осы ретте жарық индикаторы (8)
жанады, қыздыру элементі қосылады, және қысым
арқылы бу құтыға (14) шығады.
• Бу шыққаннан кейін, кофеқайнатқышты сөндіру
үшін, жұмыс режимдерін ауыстырғышы тұтқасын
(7) күйіне «
» бұрыңыз, индикатор (8) сөнеді.
• Кофеқайнатқыш пайдалануға дайын.
ЭСПРЕССО КОФЕСІН ӘЗІРЛЕУ
• Эспрессо кофесін дайындау бойынша ұсыныстар
• «Эспрессо» кофеқайнатқыштарына арналған
ұнтақталған кофені қолданыңыз немесе жаңа
ұнтақталған кофе дәндерін қолданыңыз.
• Ұнтақталған кофені сүзгіге (6) өлшегіш қасықтың
(15) теріс жағымен күш салмай тығыздаңыз.
• Дайындалған кофеның дәмі кофе дәндерінің
ұнтақталу дәрежесі мен сапасына бай-ланысты
болады. Егер кофе тым ұзақ құйылса, бұл кофе
тым ұсақ ұнтақталған екенін немесе тым қатты
тығыздалғанын білдіреді.
НАЗАР АУДАРЫҢЫЗ!
- Сүзгі ұстағышын (5) кофеқайнатқыш жұмыс
істеп тұрған кезде шешіп алуға тыйым салынады.
- Кофені әзірлеу кезінде кофеқайнатқышты қараусыз қалдырмаңыз, себебі дайын кофені құтыға
(14) толтыру процесін қадағалау қажет!
• Қуаттандыру бауының ашасы, электр розеткасына
қосылмағандығына, ал жұмыс режимдерінің (7)
ауыстырғышын күйіне «
» қойылғанына көз
жеткізіңіз.
• Суға арналған сұйыққойма қақпағын (9) шешіп
алыңыз, оны сағат тіліне қарсы бұрап, құтыны
(14) пайдаланып, сұйыққоймаға су құйыңыз. Суға
арналған сұйыққойманың максималды сыйымдылығынан аспаңыз.
Ескертпе: құтыда (14) су мөлшерінің белгілері,
4 тостаған кофеге арналған максималды белгі, 2
тостаған кофеге арналған минималды белгі бар.
• Қақпақты (9) орнына орнатыңыз, және оны сағат
тілі бағытымен бұрып, бұрандасы бойынша бұрап
қойыңыз.
• Сүзгіні (6) ұстағышқа (5) салыңыз, ұнтақталған
кофені сүзгіге (6) өлшегіш қасықпен (15) себіңіз.
43
Page 44

44
KZ
Ескертпе: сүзгіде (6) 2 немесе 4 тостаған ұнтақталған кофе мөлшерін білдіретін белгі бар,
ұнтақталған кофенің қажетті мөлшерін сүзгіге (6)
себіңіз.
• Сүзгі ұстағышын (5) күйіне «
сүзгі ұстағышының шығыңқылары (5) бойлердегі
ойықтарға сәйкес келуі керек, сүзгі ұстағышын (5)
сағат тіліне қарсы күйіне «
Құтыны (14) торға (2) қойыңыз.
• Қуаттандыру бауының ашасын электр розеткасына салыңыз.
• Жұмыс режимдерінің ауыстырғышы тұтқасын (7)
brew
күйіне «
» орнатыңыз, бұл ретте жарық индикаторы (8) жанады, қыздыру элементі қосылады, және
су құтыға (14) ағады.
• Кофені әзірлеп болғаннан кейін, кофеқайнатқышты сөндіру үшін, жұмыс режимдерін
ауыстырғышы тұтқасын (7) күйіне « » бұрыңыз,
индикатор (8) сөнеді.
• Дайын кофені тостағандарға құйыңыз.
• Сүзгі ұстағышын (5) шешіп алыңыз, ол үшін оны
сағат тілі бағытына бұрыңыз, сүзгіні (6) жуыңыз,
сүзгінің (6) құлап кетуін болдырмау үшін, ұстап
тұрғышты (4) пайдаланыңыз.
• Табандықтың (1) толуын тексеріп отырыңыз,
табандық (1) толғаннан кейін, торды (2) шешіп
алыңыз, табандықты (1) шешіп алыңыз, табандықтағы (1) сұйықтықты төгіп тастаңыз, табан-
» орнатыңыз,
» (сур. 1) бұрыңыз.
дықты (1) және торды (2) жуып жіберіңіз, кептіріңіз
және табандықты (1) және торды (2) орнына
орнатыңыз.
КАПУЧИНО КОФЕСІН ӘЗІРЛЕУ
Назар аударыңыз! Капучино кофесін әзірлеу кезін-
де, шығып жатқан будан күйік алудан сақ болыңыз.
• «ЭСПРЕССО КОФЕСІН ӘЗІРЛЕУ» тарауында
сипатталғандай, сүт көбігін қосу үшін көлемі жеткілікті тостағанға кофе құйыңыз.
• Көбікті дайындау үшін қолданылатын сүт суық,
балғын және консервантсыз болуы керек. Қаймағы алынбаған майлылығы 4-тен 6% дейінгі
сүтті қолданыңыз, кілегей майлылығы 10% кем
болмауға тиіс.
• Кофеқайнатқышты өшіру және қысымды төмендету үшін жұмыс режимін ауыстырғышын (7) күйіне
» орнатыңыз, қуаттандыру сымының ашасын
«
электр розеткасынан алыңыз.
• Суға арналған сұйыққойма қақпағын (9) шешіп
алыңыз, ол үшін оны сағат тіліне қарсы бұрыңыз,
құтыны (14) пайдаланып, суға арналған сұйыққоймаға біраз су құйыңыз, қақпақты (9) орнына орнатыңыз, бекігенге дейін сағат тілі бағытына бұрып,
бұрандасы бойынша бұрап қойыңыз.
• Ұштықтың (11) астына суық сүт немесе кілегей бар
сыйымдылықты қойыңыз.
Page 45

KZ
• Жұмыс режимдерінің ауыстырғышын (7) күйіне «
steam
» орнатып, кофеқайнатқышты қосыңыз, бұл
ретте жарық индикаторы (8) жанады, қыздыру
элементі қосылады, және қысымның әсерінен бу
ұштықтан (11) шығады.
• Ұштықты (11) суық сүт немесе кілегей бар сыйымдылыққа түсіріңіз.
• Ұштық (11) сыймдылық түбіне тиіп кетпеуі керек,
әйтпесе бу шығару қиынға соғады.
• Шығып жатқан бу құйын түзеді, ол сүт көбігінің
пайда болуына әсер етеді, сүті немесе кілегейі
бар сыйымдылықты ұштыққа (11) қатысты сүт
көбігі пайда болғанға дейін мезгілімен көтеріп
және түсіріп тұрыңыз.
Ескертпе: әрқашан ұштықты (11) шамамен 1-2 см
сүтке немесе кілегейге батырыңыз.
• Егер сүт көбігі шықпай жатса, қам жемеңіз және
жақсы нәтижеге қол жеткізгенге дейін тәжірибе
жасаңыз. Ұштықты (11) алып тастау арқылы, сүт
көбігін дайындап көріңіз.
• Кофеқайнатқышты өшіру үшін және қысымды
түсіру үшін, жұмыс режимдерінің ауыстырғышын
(7) күйіне «
» орнатыңыз.
• Әзірленген эспрессо кофесіне сүт көбігін қосыңыз,
дәміне қарай қант қосыңыз, какао ұнтағымен сүт
көбігін безендіре аласыз.
• Сүт көбігін дайындағаннан кейін капучинатор-түтігін (10) тазалаңыз және ұштықты (11) шайыңыз.
• Ұштықты (11) шешіп алыңыз, оны жылы сумен
шайыңыз және құрғатыңыз.
• Капучинатор-түтігін (10) суы бар сыйымдылыққа
батырыңыз, жұмыс режимдерінің қосқышын (7)
steam
күйіне «
» орнатыңыз, кофеқайнатқышты өшіру
үшін, 10-15 секундтан кейін, жұмыс режимдерінің
қосқышының тұтқасын (7) күйіне « » орнатыңыз.
ҚАҚТЫ КЕТІРУ
• Кофеқайнатқыштың тиімді жұмысын қамтамасыз ету үшін, кофеқайнатқышты минералдық
шөгінділерден (қақтан) әрбір 2-3 айда тазалап
тұру керек.
• «Қақты кетіретін үй құралын» қолдануға болады
бұл лимон қышқылының үш бөлігін судың жүз
бөлігіне қатысты лимон қышқылының ерітіндісі.
Ескертпе: қақты кетіру үшін кофеқайнатқыштар мен
кофе-машиналардағы қақты кетіруге арналған арнайы құралдарды, оларды пайдалану нұсқаулығын
қатаң сақтай отырып, қолдануға болады.
1. Қуаттандыру бауының ашасы, электр розеткасы-
на қосылмағандығына, ал жұмыс режимдерінің
(7) ауыстырғышын күйіне «
көз жеткізіңіз.
2. Суға арналған сұйыққойма қақпағын (9) шешіп
алыңыз, ол үшін оны сағат тіліне қарсы бұраңыз,
құтыны (14) пайдаланып, сұйыққоймаға қақты
кетіретін құралды құйыңыз. Суға арналған
» қойылғанына
45
Page 46

46
KZ
сұйыққойманың максималды сыйымдылығынан
аспаңыз.
3. Қақпақты (9) орнына орнатыңыз, және оны сағат
тілі бағытымен бұрып, бұрандасы бойынша
бұрап қойыңыз.
4. Сүзгіні (6) ұстағышқа (5) салыңыз, ұнтақталған
кофені сүзгіге (6) сеппеңіз.
5. Сүзгі ұстағышын (5) күйіне «
гі ұстағышының шығыңқылары (5) бойлердегі ойықтарға сәйкес келуі керек, сүзгі ұстағышын (5)
сағат тіліне қарсы күйіне «
6. Құтыны (14) торға (2) қойыңыз.
7. Қуаттандыру бауының ашасын электр розетка-
сына салыңыз.
8. Жұмыс режимдері ауыстырғышы тұтқасын (7)
brew
күйіне «
» бұрыңыз, осы ретте жарық индикаторы (8) жанады, қыздырғыш элемент қосылады,
және су қысым арқылы құтыға (14) ағады.
9. 10-15 секундтан кейін жұмыс режимдері ауыстырғышы тұтқасын (7) күйіне « » бұрыңыз,
индикатор (8) сөнеді.
10. Құтыны (14) ұштықтың (11) астына қойыыз
және жұмыс режимдері ауыстырғышының (7)
steam
тұтқасын күйіне «
» бұраңыз, 5 секундтан кейін
жұмыс режимдерін ауыстырғышының (7) тұтқасын күйіне « » орнатыңыз.
11. Құтыны (14) торға (2) орнатыңыз, 10-15 минут
күтіңіз және су беруді ошіріңіз, ол үшін ауысты-
» орнатыңыз, сүз-
» (сур. 1) бұрыңыз.
brew
рғышты (7) күйіне «
» орнатыңыз, тазалағыш
құралдың толық шығуын күтіңіз.
12. Кофеқайнатқышты өшіру үшін және қысымды
түсіру үшін, жұмыс режимдерінің ауыстырғышын (7) күйіне « » орнатыңыз. Қуаттандыру бауының ашасын электр розеткасынан
алыңыз, қақпақты (9) бұрап шешіп алыңыз және
сұйыққоймаға таза су құйыңыз. Қуаттандыру
бауының ашасын электр розеткаға салыңыз.
13. Құтыны (14) ұштықтың (11) астына қойыңыз
steam
және бу беруді «
» қосыңыз, 15 секундтан кейін
бу беруді өшіріңіз және құтыны (14) торға (2)
қойыңыз, су беруді қосыңыз және судың сыйымдылықтан толық шығуын күтіңіз.
14. Кофеқайнатқышты өшіру үшін және қысымды
түсіру үшін, жұмыс режимдерінің ауыстырғышын
(7) күйіне « » орнатыңыз.
• Қажет болса, кофеқайнатқыштың жууды бірнеше
рет қайталаңыз.
ТАЗАРТУ ЖӘНЕ КҮТІМІ
• Тазалау алдында әрқашан кофеқайнатқышты
өшіріңіз және қуаттандыру бауының ашасын желі
розеткасынан алып тастаңыз.
• Кофеқайнатқышты толық суытыңыз, корпустың
сыртқы беттерін сәл дымқыл жұмсақ матамен
сүртіп, содан кейін құрғатып сүртіңіз.
Page 47

KZ
• Ластануды жою үшін жұмсақ тазалағыш құралдарды пайдаланыңыз, металл қылшақтарды және
абразивті тазартқыш құралдарды және еріткіштерді пайдаланбаңыз.
• уға арналған сұйыққойма қпағын (9) шешіп
алыңыз, ол үшін оны сағат тіліне қарсы бұраңыз,
кофеқайнатқышты төңкеріп, қалған суды сұйыққоймадан төгіп тастаңыз, қақпақты (9) бұрап
қойыңыз.
• Егер сүзгі тесіктері (6) ұнтақталған кофемен
бітелген болса, тесіктерді тазалау үшін кішкене
қылшақтарды қолданыңыз.
• Торды (2) шешіп алыңыз, табандықты (1) шешіп
алыңыз және одан сұйықтықты төгіп тастаңыз,
торды (2), табандықты (1) жуып жіберіңіз, шайыңыз және құрғатыңыз, табандықты (1) және
торды (2) орнына қойыңыз.
• Барлық шешілмелі бөлшектерді (5, 6, 12, 14) бейтарап жуатын құралы бар жылы сумен жуыңыз,
шайыңыз және кептіріңіз, сүзгіні (6) ұстағышқа (5)
салыңыз, сүзгі ұстағышын (5) орнына орнатыңыз,
құйғышты жұмыс күйіне бұрыңыз «
» (сур.1 ).
• Кофеқайнатқышты, қуаттандыру бауын және желі
бауының ашасын суға немесе кез-келген басқа
сұйықтықтарға салмаңыз.
САҚТАЛУЫ
• Кофеқайнатқышты ұзақ уақыт бойы сақтауға алып
қоймас бұрын, оны электр желісінен ажыратыңыз
және оны толық суытыңыз.
• Кофеқайнатқыштың тазалауын жүргізіңіз.
• Әрқашан сұйыққоймадағы қалған суды төгіп
отырыңыз, кофеқайнатқышты сұйыққоймасындағы
суымен 0°C-тан төмен температурада сақтауға
тыйым салынады
• Кофеқайнатқышты салқын және құрғақ жерде,
балалардың және мүмкіндігі шектеулі адамдардың
қолы жетпейтін жерде сақтаңыз.
Ақаулықтар және оларды жою жолдары
Ақаулық Себебі Жою
Кофеқайнатқыш
қосылмайды
Құтыдан кофенің
ағуы
Кофеқайнатқыш
корпусының
төменгі бөлігінен
судың ағуы.
Қуаттандыру
бауыны ашасын
электр розеткасына
салынбаған, электр
розеткасының
ақаулығы
Колба неправильно
установлена
Переполнен поддон Снимите поддон и
Табандықтың толып
кетуі.
Қуаттандыру бауының
ашасын электр розеткаға салыңыз
Следите за правильностью установки колбы
на съёмной решётке
поддона
слейте жидкость
Табандықты шешіп
алыңыз және сұйықтықты төгіңіз.
47
Page 48

48
KZ
Сүзгі ұстағышының
сыртқы жағынан
судың ағуы
Дайын кофенің
бөтен дәмі бар
Сүт немесе кілегей
көбіктенбейді
Кофе сүзгісінің шеттерінде ұнтақталған
кофе бар
Минералды
шөгінділерден тазартылғаннан кейін
кофеқайнатқышта
тазартқыш құрал
қалды
Пайдаланған ұнтақталған кофенің
сапасы нашар
Сүт немесе
кілегейге арналған
сыйымдылық тым
үлкен немесе пішінге сәйкес келмейді
Сіз майсыз немесе
жылы сүтті қолдандыңыз
Кофе сүзгісінің
шеттерінде ұнтақталған
кофе жоқ екеніне көз
жеткізіңіз
Кофеқайнатқышты
бірнеше рет таза сумен
жуып жіберіңіз
Жаңа ұнтақталған кофе
дәндерін қолданыңыз.
Ұнтақталған кофені
герметикалық тарада,
құрғақ және салқын
жерде сақтаңыз.
Сүт немесе кілегей
үшін жоғары және
тар сыйымдылықты
қолданыңыз
Көбік жасау үшін қолданылатын сүт немесе
кілегей суық, балғын
және консерванттарсыз
болуы керек. Қаймағы
алынбаған майлылығы
4-тен 6% дейінгі сүтті
қолданыңыз, кілегей
майлылығы 10% кем
болмауға тиіс
ЖЕТКІЗІЛІМ ЖИЫНТЫҒЫ
• Кофеқайнатқыш — 1 дн.
• Сүзгі ұстағышы – 1 дн.
• Кофеге арналған сүзгі – 1 дн.
• Құты – 1 дн.
• Өлшегіш қасық – 1 дн.
• Нұсқаулық– 1 дн.
ТЕХНИКАЛЫҚ СИПАТТАМАЛАРЫ
• Электр қуаттандыруы: 220-240 В, ~ 50 Гц
• Номиналды тұтыну қуаты: 800-950 Вт
• Суға арналған суқойманың көлемі: 0,24 л
ПАЙДАҒА АСЫРУ
Қоршаған ортаны қорғау мақсатында, аспаптың қызмет ету мерзімі аяқталғаннан
кейін оны одан әрі пайдаға асыру үшін
арнайы пункттерге жіберіңіз.
Бұйымдарды пайдаға асыру кезінде пай-
да болатын қалдықтар белгіленген тәртіп
бойынша келесі пайдаға асыру үшін міндетті түрде
жинастуруға жатады.
Берілген өнімді пайдаға асыру туралы қосымша
ақпаратты алу үшін жергілікті муниципалитетке,
тұрмыстық қалдықтарды пайдаға асыру қызметіне
немесе берілген өнімді Сіз сатып алған дүкенге
жүгініңіз.
Page 49

KZ
Өндіруші құрылғының жалпы жұмыс ұстанымдарына әсер етпейтін дизайнды, алдын ала ескертусіз
құрастырылымын және техникалық сипаттамаларды өзгерту құқығын өзінде сақтайды.
Құрылғының қызмет ету мерзімі — 3 жыл
Өндірілген күні сериялық нөмірде көрсетілген.
Қандай да бір ақаулықтар табылған жағдайда
дереу авторландырылған сервистік орталыққа
жүгіну керек.
49
Page 50

Page 51

Hergestellt für «Ruste GmbH»,
Berggasse 18/18, 1090 Wien,
Osterreich
Produced for «Ruste GmbH»,
Berggasse 18/18, 1090 Vienna, Austria
Изготовлено по заказу Русте Гмбх,
Бергассе 18/18, 1090 Вена, Австрия
Уполномоченное изготовителем
лицо: ООО «Грантэл»
143912, МО, г. Балашиха,
ш. Энтузиастов, вл. 1А
т.: +7 (495) 297-50-20,
e-mail: info@brayer.su
Made in China/Произведено в Китае
Page 52

brayer.ru
 Loading...