

Page 1
Instruction manual
Инструкция по эксплуатации
Thermopot BR1090
Термопот BR1090
brayer.pro
Page 2

СОДЕРЖАНИЕ
EN ......................................................................................................................................3
DE ....................................................................................................................................14
RU ...................................................................................................................................26
KZ ....................................................................................................................................38
Page 3
EN
EN
3
THERMOPOT BR1090
Thermopot is intended for boiling water and
maintaining its temperature at a set level.
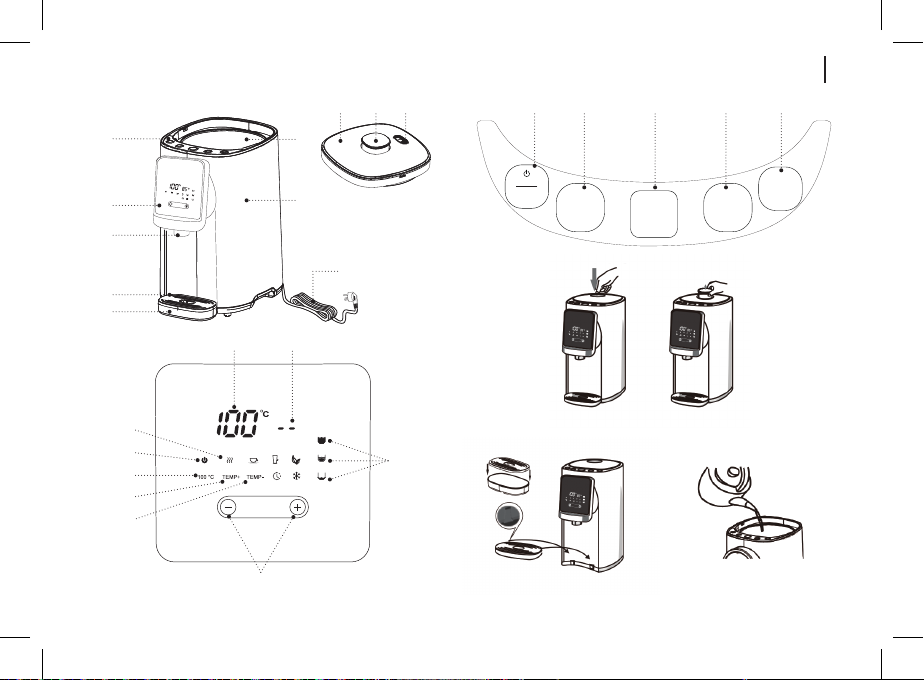
DESCRIPTION
1. Tray
2. Tray grid
3. Spout for pouring water
4. Indication/temperature selection panel
5. Control panel
6. Thermopot ask
7. Body
8. Power cord
9. Detachable lid
10. Lid lock handle
11. Steam release openings
Control panel
12. On/o/re-boil button «Start/re-boil»
13. Water temperature selection button «Temperature
selection»
14. Water dispense on button «Water dispense»
15. Lock on/o button «Lock»
16. Switching on the water cooling mode «Quick
cooling»
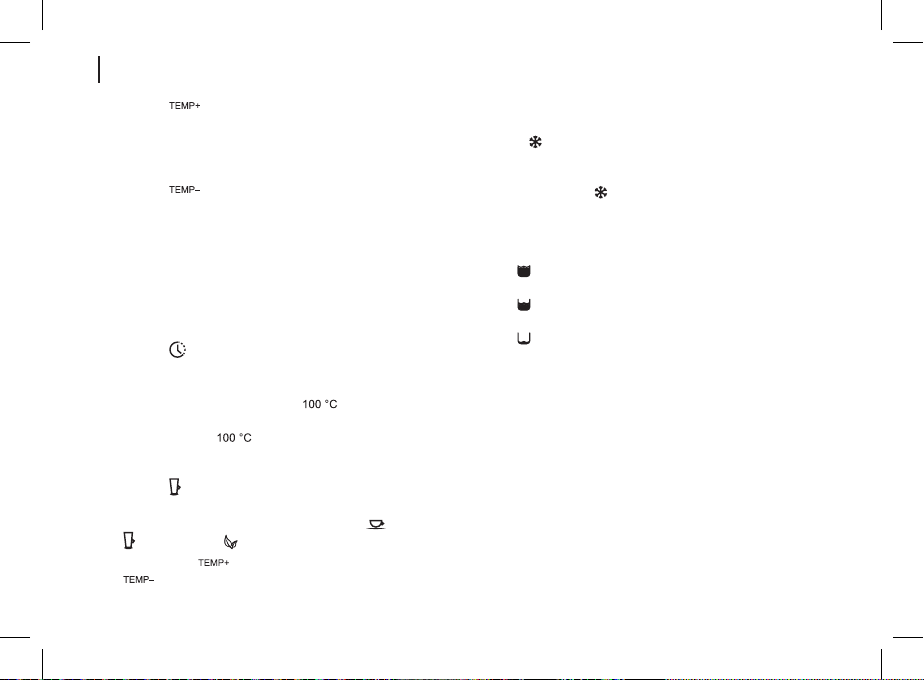
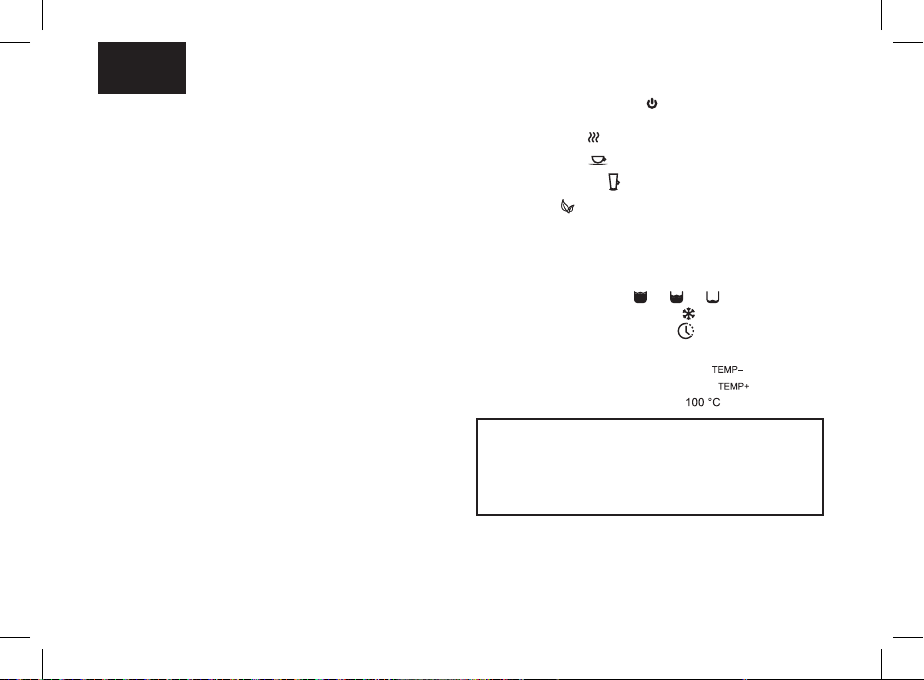
Indication/temperature selection panel
17. Stand-by mode symbol «
18. Symbols of modes:
- water boiling « »
- water for black tea brewing «
- water for coee brewing «
- water for herbal tea brewing «
19. Water heating temperature digital symbols
20. Hot water keep warm mode digital symbols
21. Symbols of volume of water in the thermopot ask
», « », « »
«
22. Water cooling mode on symbol « »
23. Long boiling mode symbol «
24. Temperature mode setting buttons «-/+»
25. Water temperature setting symbol « »
26. Water temperature setting symbol « »
27. Water boiling mode symbol « »
ATTENTION!
For additional protection it is reasonable to install a
residual current device (RCD) with nominal operation
current not exceeding 30 mA into the mains. To install
RCD, contact a specialist.
»
»
»
»
»
Page 4

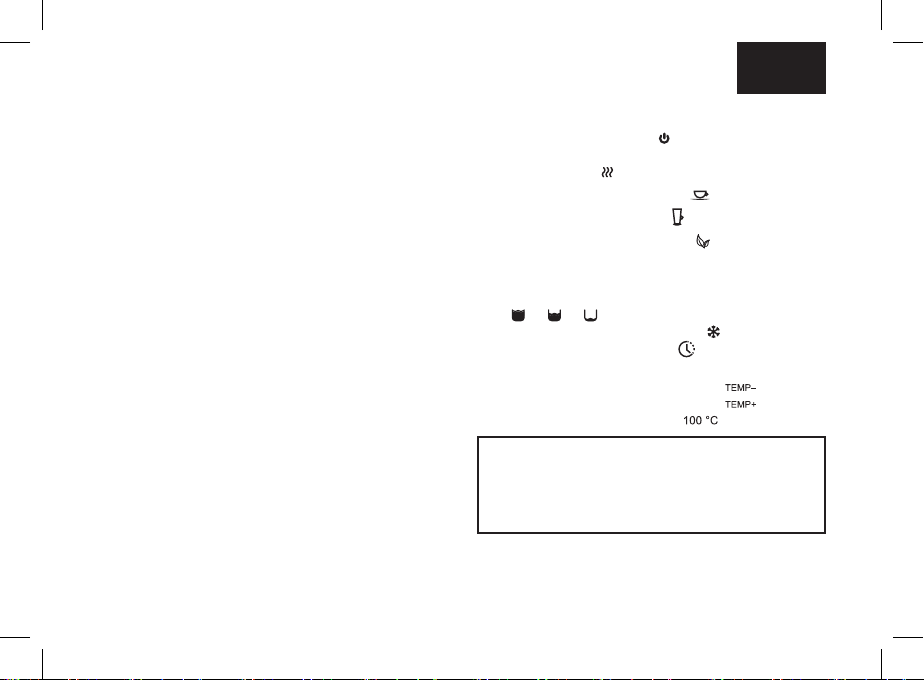
4 EN
5
9 1210 1311 14 15 16
6
Старт
100 °C
4
TEMP+ TEMP–
7
3
Повторное
кипячение
Выбор
температуры
Подача
воды
Блокировка
Быстрое
охлаждение
8
2
1
19 20
18
17
27
20
Рис. 1
26
25
24
Рис. 2 Рис. 3
Page 5

5
EN
SAFETY MEASURES AND OPERATION
RECOMMENDATIONS
Read the operation instructions carefully before
using the thermopot and keep it for future reference.
• Use the thermopot for its intended purpose only, as it
is stated in this manual.
• Mishandling the thermopot can lead to its breakage
and cause harm to the user or damage to his/her
property and it is not covered by warranty.
• The thermopot is intended for heating and boiling
drinking water only, do not heat or boil any other
liquids.
• Make sure that operating voltage of the thermopot
indicated on the label corresponds to your home mains
voltage.
• The power plug is equipped with a grounding contact,
plug it into the socket with
• reliable grounding contact. In case of short circuit the
grounding reduces the risk of electric shock.
• Contact an electrical technician, if you are not sure
that your sockets are installed properly and grounded.
• To prevent re do not use adapters designed for
connecting the plug to the mains socket without
grounding contact.
• In case of sparking in the mains socket and
occurrence of smell of burning, unplug the unit and
apply to the organization maintaining your home
mains.
• If smoke appears from the body of the thermopot,
unplug the unit and take measures to prevent re
spreading.
• Do not use the thermopot outdoors.
• It is not recommended to use the unit during lightning
storms.
• Protect the unit from impacts, falling, vibrations and
other mechanical stress.
• Do not switch the thermopot on if the water tank is
empty.
• Do not ll the thermopot with water directly from the
faucet; to ll the thermopot use a suitable bowl.
• Do not place the thermopot next to the walls or close
to the kitchen furniture.
• Place the thermopot keeping at least 20 cm gap
between the thermopot body and the wall and at
least 50 cm gap above the thermopot.
• Never leave the plugged-in thermopot unattended.
• Do not use the thermopot in proximity to kitchen
sink, in bathrooms, near swimming pools or other
containers lled with water.
• Do not use the thermopot near heating appliances,
heat sources or open ame.
• Do not use the thermopot in places where aerosols
are used or sprayed, and in proximity to inammable
liquids.
• Place the thermopot on a at stable surface; do not
place it on the edge of a table. Do not let the power
cord hang from the edge of the table and make sure
Page 6
6
EN
it does not touch hot surfaces or sharp edges of
furniture.
• Do not touch the power cord and the power plug with
wet hands.Do not switch the thermopot on without
water, after the thermopot is lled, close the lid tightly.
• Ensure that the water level is not above the maximal
mark. If the water level exceeds the maximal mark,
boiling water can splash out of the thermopot during
boiling.
• To avoid burns by hot steam, do not bend over the
steam release openings in the thermopot lid. Do not
block the steam release openings with any objects.
• Do not open the thermopot lid while water boiling.
• Be careful while carrying the thermopot lled with
boiling water.
• Be very careful when pouring hot water out of the
thermopot.
• Unplug the thermopot before cleaning or when you
are not using it. When unplugging the thermopot hold
only the power cord plug and carefully remove it from
the mains socket, do not pull the power cord — this
can lead to damage of the power cord or the socket
or cause short circuit.
• To avoid electric shock do not immerse the thermopot
into water or any other liquids.
• Do not wash the thermopot in a dishwashing
machine.
• For children safety reasons do not leave polyethylene
bags, used as a packaging, unattended.
ATTENTION!
Do not allow children to play with polyethylene bags
or packaging lm. Danger of suocation!
• The thermopot is not intended for usage by children.
• Do not leave children unattended to prevent using
the unit as a toy.
• Do not allow children to touch the unit and the power
cord during the thermopot operation.
• Place the unit out of reach of children during the
operation and cooling down.
• This unit is not intended for usage by physically or
mentally disabled persons (including children) or by
persons lacking experience or knowledge if they are
not under supervision of a person who is responsible
for their safety or if they are not instructed by this
person on the usage of the unit.
• Check the integrity of the power cord, the power plug
and the thermopot body periodically.
• If the power cord is damaged, it should be replaced
by the manufacturer, a maintenance service or
similar qualied personnel to avoid danger.
• If the power cord is damaged, it should be replaced
with a power cord received from the manufacture or
service.
• Transport the thermopot in the original package.
• Keep the unit out of reach of children and disabled
persons.
Page 7

7
EN
THERMOPOT IS INTENDED FOR HOUSEHOLD USE
ONLY, DO NOT USE THE COFFEE MAKER FOR
COMMERCIAL OR LABORATORY PURPOSES.
BEFORE USING THE THERMOPOT
After unit transportation or storage at low
temperature keep it for at least 3 hours at room
temperature before switching on.
• Unpack the thermopot and remove all the packaging
materials.
• Keep the original package.
• Read the safety measures and operating
recommendations.
• Check the delivery set.
• Examine the thermopot for damages, in case of
damage do not plug it into the mains.
• Make sure that the specications of power supply
voltage specied on the label correspond to the
specications of your mains.
• Wipe the outer surface of the unit body (7) with a
clean, slightly damp cloth to remove dust.
• Remove the lid (9), to do this, press the lid lock
handle (10), take it and remove the lid (9) (pic. 1).
• Wipe the inner surface of the thermopot ask (6) with
a clean, slightly damp cloth to remove dust. Install
the lid (9) back to its place and press the lock handle
(10).
•
SWITCHING ON FOR THE FIRST TIME
• Place the thermopot on a dry at surface so that
the distance between the thermopot and the wall or
furniture is at least 20 cm and the free space above
the thermopot is at least 50 cm.
• Place the grid (2) on the tray (1), place the tray (1) on
the installation place (pic. 2).
• Remove the lid (9), to do this, press the lid lock
handle (10), take it and remove the lid (9) (pic. 1).
• Fill the thermopot with water using a suitable
cookware, do not exceed the maximal water level
mark «FULL» which is located on the inner surface
of the ask (6). Do not ll the thermopot directly
from the faucet; to ll the thermopot use a suitable
cookware (pic. 3).
Note: to reduce the mineral deposit (scale) level, it is
recommended to use the water cleaned with domestic
water lters.
• Install the lid (9) back to its place and press the lock
handle (10) (pic. 1).
• Insert the plug of the power cord (8) into the mains
socket, you will hear a sound signal and all the
symbols will be shown on the display, after that
only the stand-by mode symbol (17) «
glowing, illumination of the button (13) «Temperature
selection» will be glowing on the control panel (5).
• Symbols (21) will show the presence of water in the
thermopot ask (6):
» will be
Page 8
8
EN
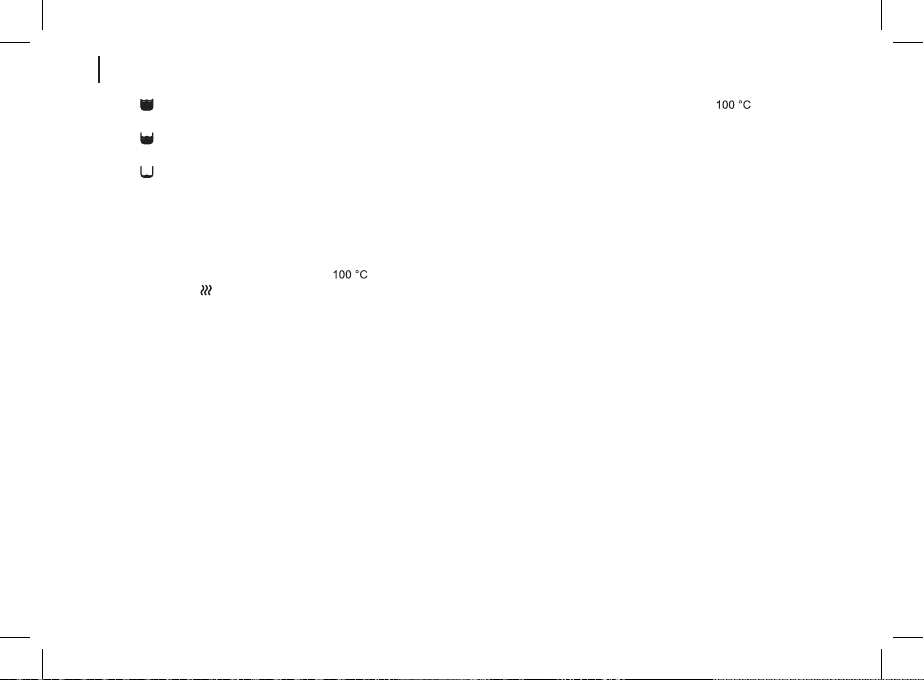
- « » - the thermopot ask is lled with water by
3/3 of its capacity.
- « » - the thermopot ask is lled by 2/3 of its
capacity.
- « » - low water level, the thermopot ask is lled
by 1/3 of its capacity, it is necessary to ll the
thermopot ask with water, otherwise the heating
element will not switch on.
• Press the button (12) «Start/re-boil» on the control
panel (5), the indicator of the button (12) «Start/reboil» will light up, the symbol (27) « » and the
symbol (18) « » will light up, water will start heating
up, the water temperature is shown with digital
symbols (19).
Notes:
- every pressing of buttons on the control panel (5)
is accompanied by a sound signal;
- when switching on for the rst time, a foreign
smell from the heating element can appear, this is
acceptable and it is not covered by warranty.
• The hot water keeping temperature will be shown
with digital symbols (20), the hot water keeping
temperature «85°C» is set by default.
• To avoid suering hot steam burns, do not bend
over the steam release openings (11) located in the
thermopot lid (9). Do not block the steam release
openings (11) with any objects.
• After water boiling the symbol (27) «
ashing for 60 seconds, then it will go out, you will
hear sound signals, the indicator of the button (12)
«Start/re-boil» will go out as well, the thermopot will
switch on in the keep warm mode, the hot water
keeping temperature «85°C» is set by default.
• Drain the water after the rst boiling. Hot water
resulting from the rst boiling is not recommended to
consume, you may use it for domestic needs.
ATTENTION!
Be careful during pouring out water to avoid
suering hot water burns.
• Unlock the activation of the water dispense pump
by pressing the button (15) «Lock», illuminations of
buttons (15) «Lock» and (14) «Water dispense» will
light up.
• Place the cup on the grid (2) and press and hold the
button (14) «Water dispense», once the cup is lled
with the necessary quantity of water, release the
button (14) «Water dispense».
Notes:
- the water is dispensed only when the indicators
of the buttons (14 and 15) are switched on; if
you pressed the button (15) «Lock» and did not
perform any actions, in this case the indicators of
the buttons (14 and 15) will go out in 10 seconds;
- all the water level indicators (21) will be glowing
during water pouring;
» will be
Page 9

9
EN
- control the tray (1) lling with water drops; when
the tray (1) is lled up, remove it, drain water and
install the tray (1) back to its place;
- if you have not used the thermopot for a long time,
the water dispense may malfunction. In this case it
is recommended to open and close the lid (9) and
to switch the water dispense on again.
• To switch the thermopot o press and hold the button
(12) «Start/re-boil» for 5 seconds, take the plug of the
power cord (8) out of the mains socket.
• Remove the lid (9) (pic. 1) and allow complete
cooling-down of the thermopot.
• Tilt the thermopot and drain the remaining water,
install the lid (9) back to its place and press the lock
button (10) (pic. 1).
USAGE OF THERMOPOT
• Prepare the thermopot for operation, as specied in
the previous section (ll with water, insert the power
plug into the mains socket).
• Water heating up and keep warm modes selection
• Press the button (12) «Start/re-boil» on the control
panel (5), the indicator of the button (12) «Start/reboil» will light up, the symbol (27) «
symbol (18) « » will light up, water will start heating
up, the water temperature is shown with digital
symbols (19).
• After water boiling the symbol (27) « » will be
ashing for 60 seconds, then it will go out, you will
» and the
hear sound signals, the indicator of the button (12)
«Start/re-boil» will go out as well, the thermopot will
switch on in the keep warm mode, the hot water
keeping temperature «85°C» is set by default.
• In the hot water keeping warm mode you can set the
hot water keeping temperature for various beverages
by pressing the button (13) «Temperature selection»,
the respective symbols (18) light up:
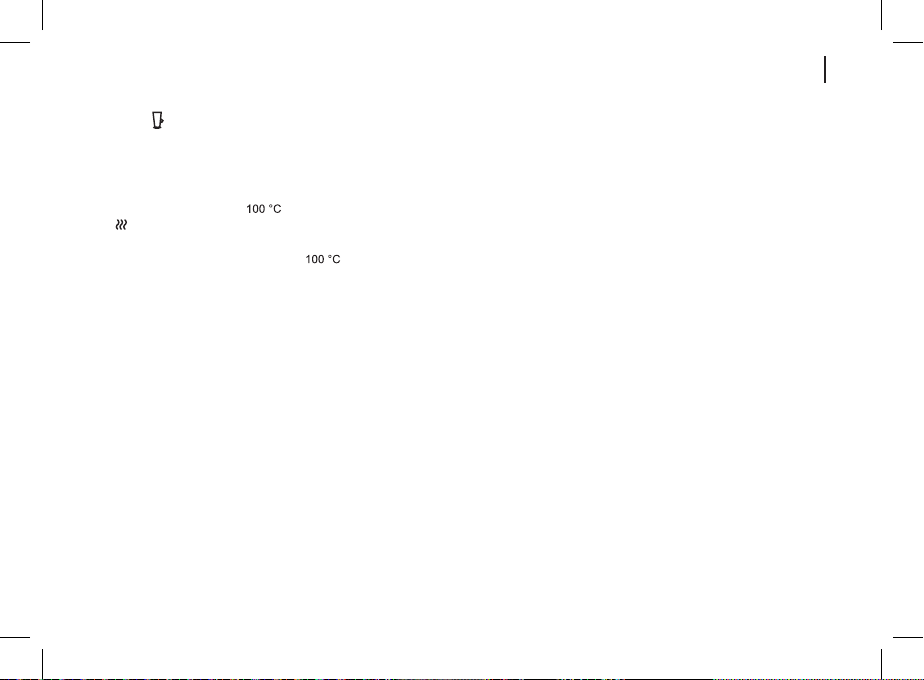
- «
» - water boiling mode, water is heated up to
the boil and digital symbols (19) «100°C» are
shown.
- « » - hot water keeping mode up to «95°C»
for black tea brewing, the temperature «95°C»
is set by default. To change the water heating up
temperature use the buttons (24) «- … +», the
range of temperature selection is from 87°C to
95°C.
» - hot water keeping mode up to «85°C»
- «
for coee brewing, the temperature «85°C» is
set by default. To change the water heating up
temperature use the buttons (24) «-/+», the range
of temperature selection is from 80°C to 86°C.
» - hot water keeping mode up to «65°C» for
- «
making herbal tea, the temperature «65°C» is
set by default. To change the water heating up
temperature use the buttons (24) «-/+», the range
of temperature selection is from 65°C to 79°C.
Page 10
10
EN
- (26) «
«55°C», the temperature «55°C» is set by default.
To change the water heating up temperature use
the buttons (24) «-/+», the range of temperature
selection is from 50°C to 64°C.
- (25) « » - hot water keeping mode up to
«45°C», the temperature «45°C» is set by default.
To change the water heating up temperature use
the buttons (24) «-/+», the range of temperature
selection is from 40°C to 49°C.
Note:
- when the hot water keeping warm is set below
40°C, the symbols «- -» will be shown instead of
digital symbols (20).
- (23) «
this mode is used to reduce the level of chlorine
dissolved in water. In this mode water is heated up
to 100°C, the symbol (27) « » will be ashing,
water will be boiling for 3 minutes, after that the
symbol (27) « » will go out, you will hear
sound signals and the thermopot will be switched
to the hot water keeping mode for coee brewing
(18) «
shown with symbols (20).
• Hot water keeping modes for black tea « », coee
», herbal tea « », water temperature in a range
«
of 50-64 °C «
«
»- hot water keeping mode up to
» - switching on the long boiling mode,
», the water temperature «85°C» will be
» and water temperature 40-49 °C
» can be selected with buttons (24) «-/+».
Water cooling mode
• Press the «Quick cooling» button (16), the symbol
Water level scale
• You can control the water level in the thermopot ask
• Remove the lid (9), to do this, press the lid lock
• The thermopot will switch on in the water boiling
» will light up and will be ashing, the
(22) «
thermopot cooling fan will switch on. To switch the
cooling mode o, press the «Quick cooling» button
(16) again, the « » symbol (22) will go out.
(6) with symbols (21):
» - the thermopot ask is lled with water by
- «
3/3 of its capacity.
- « » - the thermopot ask is lled by 2/3 of its
capacity.
- « » - low water level, the thermopot ask is lled
by 1/3 of its capacity, it is necessary to ll the
thermopot ask with water, otherwise the heating
element will not switch on.
handle (10), take it and remove the lid (9) (pic. 1). Fill
the thermopot with water using a suitable cookware,
do not exceed the maximal water level mark «FULL»
on the inner surface of the ask (6). Do not ll
the thermopot directly from the faucet; to ll the
thermopot use a suitable cookware (pic. 3).
mode, after water boiling you will hear sound signals
and the thermopot will be switched to the hot water
Page 11
11
EN
keeping warm mode for coee brewing, the symbol
» and digital symbols (20) «85°C» will light
(18) «
up.
• Where it is necessary to re-boil water, press the
button (12) «Start/re-boil» on the control panel (5),
the indicator of the button (12) «Start/re-boil» will light
up, the symbol (27) « » and the symbol (18) «
» will light up, water will start heating up, the water
temperature is shown with digital symbols (19). After
water boiling the symbol (27) « » will be ashing
for 60 seconds, then it will go out, you will hear sound
signals, the indicator of the button (12) «Start/re-boil»
will go out as well, the thermopot will switch on in the
keep warm mode, the hot water keeping temperature
«85°C» is set by default.
• To switch the thermopot o press and hold the button
(12) «Start/re-boil» for 5 seconds, take the plug of the
power cord (8) out of the mains socket.
Child lock
• Use this function to protect children from hot water
burns.
• To switch the child lock on, press and hold the
«Lock» button (15) for 5 seconds, the indicator of
the buttons (14) «Water dispense» and «Lock» will
light up.
• The button (14) «Water dispense» on the control
panel (5) is inactive in the child lock condition.
• To switch the child lock o press and hold the button
(15) «Lock» for 1 seconds, the indicators of the
buttons (14) «Water dispense» and (15) «Lock» will
light out.
• To switch the thermopot o press and hold the button
(12) «Start/re-boil» for 5 seconds, unplug the unit.
CLEANING AND MAINTENANCE
• Before cleaning the thermopot unplug (8) it, remove
the lid (9) and allow complete cooling-down of the
thermopot. (pic. 1)
• Always drain the remaining water from the thermopot
ask, to do this remove the lid (9).
• Carefully tilt the thermopot to drain the remaining
water.
• Remove the tray (1), remove the grid (2), pour the
water out of the tray (1), wash the tray (1) and the
grid (2). Place the grid (2) on the tray (1) and place
the tray (1) on its installation place.
• Clean the outer surface of the thermopot body (7)
with a slightly damp cloth and then wipe it dry.
• Use neutral detergents to remove dirt, do not use
metal brushes, abrasives and solvents.
• Do not immerse the thermopot and the power cord
(20) into water or other liquids.
• Do not put the thermopot in a dishwashing machine.
Stains on the inner surface of the thermopot ask
• Water contains various minerals that can cause
stains on the inner surface of the thermopot ask, the
Page 12

12
EN
stains do not aect the operation of the thermopot,
stains are not covered by the warranty.
• You can remove the stains from the inner surface of
the thermopot ask with citric acid solution or table
vinegar.
• To remove the avour of citric acid or vinegar, boil
water and pour it out.
• Repeat this procedure until the smell and foreign
taste vanish completely.
Removing the mineral deposits (descaling)
• Scale, appearing inside the thermopot ask,
inuences the water taste and disturbs the heat
exchange between water and the heating element.
It also risks damaging the heating element. Burning
of the heating element caused by the large amount
of scale in the thermopot ask is not covered by
warranty.
• To remove the scale ll the thermopot with a mixture
of one part ordinary vinegar and two parts water up
to the maximal level mark «FULL».
• Insert the power cord (8) plug into the mains socket.
• Switch the thermopot on in the water boiling mode.
After water boiling switch the thermopot o, to do
this, press and hold the button (12) «Start/re-boil» for
5 seconds, take the plug of the power cord (20 8) out
of the mains socket and leave the thermopot with the
vinegar solution overnight.
• In the morning pour out the vinegar solution, ll the
thermopot with water up to the maximal level, boil it
and pour out the water.
• You can use special descaling agents for electric
kettles, strictly following the instruction.
• Clean the thermopot from scale regularly.
STORAGE
• Before taking the thermopot away for long storage,
disconnect it from the mains, let the unit cool down
and pour out the water.
• Clean the thermopot.
• Keep the thermopot out of reach of children and
disabled persons.
DELIVERY SET
1. Thermopot – 1 pc.
2. Manual – 1 pc.
ECHNICAL SPECIFICATIONS
• Power supply 220-240 V, ~ 50-60 Hz
• Rated input power: 1200 W
• Water tank capacity: 5 l
Page 13
13
EN
RECYCLING
To prevent possible damage to the
environment or harm to the health of
people by uncontrolled waste disposal,
after expiration of the service life of the unit
or the batteries (if included), do not discard
them with usual household waste, take the
unit and the batteries to specialized stations for further
recycling.
The waste generated during the disposal of products
is subject to mandatory collection and consequent
disposal in the prescribed manner.
For further information about recycling of this product
apply to a local municipal administration, a household
waste disposal service or to the shop where you
purchased this product.
The manufacturer reserves the right to change the
design, structure and specications not aecting
general operation principles of the unit, without prior
notice.
The unit operating life is 3 years
The manufacturing date is specied in the serial
number.
In case of any malfunctions, it is necessary to apply
promptly to the authorized service center.
Page 14
DE
DE
14
THERMOPOT BR1090
Mit dem Thermopot können Sie Wasser kochen und
seine Temperatur eingestellt zu halten.
BESCHREIBUNG
1. Schale
2. Schalengitter
3. Wasserablauftülle
4. Anzeige-/Temperaturwahlplatte
5. Bedienungsplatte
6. Thermopotbehälter
7. Gehäuse
8. Netzkabel
9. Abnehmbarer Deckel
10. Deckelsperrgri
11. Dampfablasslöcher
Bedienungsplatte
12. Ein-/Aus-/Wiederkochtaste «Start/Wiederkochen»
13. Wassertemperaturwahltaste «Temperaturwahl»
14. Wasserzufuhreinschalttaste «Wasserzufuhr»
15. Ein-/Ausschalttaste der Verriegelung
«Verriegelung»
16. Ein-/Ausschalttaste des Wasserkühlbetriebs
«Schnellkühlung»
Anzeige-/Temperaturwahlplatte
17. Wartebetriebssymbol « »
18. Betriebssymbole:
- Wasserkochen « »
- Schwarzer Tee «
- Kaeebrühwasser «
- Kräutertee «
19. Wasserheiztemperaturzahlensymbole
20. Zahlensymbole des Heißwassertemperaturhaltun
gsbetriebs
21. Symbole des Wasservolumens im
Thermopotbehälter «
22. Wasserkühlbetriebssymbol « »
23. Dauerkochbetriebssymbol «
24. Temperaturbetriebseinstelltasten «-/+»
25. Wassertemperatureinstelltasten « »
26. Wassertemperatureinstellsymbol «
27. Wasserkochbetriebssymbol «
ACHTUNG!
Als zusätzlicher Schutz ist es zweckmäßig, den
FI-Schalter mit Nennstrom maximal bis 30 mA im
Stromversorgungskreis aufzustellen; wenden Sie sich
dafür an einen Spezialisten.
»
»
»
», « », « »
»
»
»
Page 15
15DE
9 1210 1311 14 15 16
5
6
Старт
100 °C
4
TEMP+ TEMP–
7
3
Повторное
кипячение
Выбор
температуры
Подача
воды
Блокировка
Быстрое
охлаждение
8
2
1
19 20
18
17
27
20
Рис. 1
26
25
24
Рис. 2 Рис. 3
Page 16

16
DE
SICHERHEITSHINWEISE UND
GEBRAUCHSANLEITUNG
Bevor Sie den Thermopot benutzen, lesen Sie
die Bedienungsanleitung aufmerksam durch und
bewahren Sie sie zum späteren Gebrauch auf.
• Verwenden Sie den Thermopot nur
bestimmungsgemäß, wie es in dieser
Gebrauchsanleitung beschrieben ist.
• Nicht ordnungsgemäße Nutzung des Thermopots
kann zu seiner Störung führen, einen
gesundheitlichen oder materiellen Schaden beim
Nutzer hervorrufen, und ist kein Garantiefall.
• Benutzen Sie den Thermopot nur fürs
Wasserkochen, es ist nicht gestattet, andere
Flüssigkeiten darin aufzuwärmen oder aufzukochen.
• Vergewissern Sie sich, dass die auf dem
Bezeichnungszettel angegebene Betriebsspannung
und die Netzspannung übereinstimmen.
• Der Netzstecker hat einen Erdungskontakt; stecken
Sie ihn nur in eine Steckdose
• mit dem zuverlässigen Erdungskontakt. Bei
einem Kurzschluss verringert die Erdung das
Stromschlagrisiko.
• Wenden Sie sich an einen Elektriker, wenn Sie sich
nicht sicher sind, ob Ihre Steckdosen richtig installiert
und geerdet sind.
• Verwenden Sie keine Adapterstecker, die zum
Anschließen des Netzsteckers an eine Steckdose
ohne Erdungskontakt bestimmt sind, um das
Brandrisiko zu vermeiden.
• Bei Brandgeruch und Funken in der Steckdose
ziehen Sie den Netzstecker aus der Steckdose
heraus und wenden Sie sich an den Ihr
Hausstromnetz leistenden Dienst.
• Wenn Rauch aus dem Thermopot austritt, ziehen Sie
das Netzkabel aus der Steckdose heraus und treen
Sie die Feuerverhinderungsmaßnahmen.
• Es ist nicht gestattet, den Thermopot draußen zu
benutzen.
• Es ist nicht empfohlen, das Gerät bei Gewitter zu
benutzen.
• Schützen Sie das Gerät vor Stößen, Stürzen,
Vibrationen und anderen mechanischen
Einwirkungen.
• Schalten Sie das Thermopot ohne Wasser nicht ein.
• Es ist nicht gestattet, das Thermopot direkt aus dem
Wasserhahn anzufüllen, benutzen Sie dafür ein
passendes Geschirr.
• Stellen Sie das Thermopot in keiner Nähe von
Wänden oder Küchenmöbeln auf.
• Stellen Sie das Thermopot so auf, dass ein Abstand
zwischen ihm und einer Wand oder den Möbeln
mindestens 20 cm und der Freiraum darüber nicht
weniger als 50 cm beträgt.
• Lassen Sie den ans Stromnetz angeschlossenen
Thermopot nie unbeaufsichtigt.
Page 17

17
DE
• Benutzen Sie den Thermopot in der Nähe von
Spülbecken, in Badezimmern und neben den
Wasserbecken oder anderen mit Wasser gefüllten
Behältern nicht.
• Benutzen Sie den Thermopot in direkter Nähe von
Heizgeräten, Wärmequellen oder oenem Feuer
nicht.
• Es ist verboten, den Thermopot an den Orten, wo
Sprays verwendet werden, sowie in der Nähe von
leichtentzündbaren Flüssigkeiten, zu verwenden.
• Stellen Sie den Thermopot auf eine ebene standfeste
Oberäche auf, stellen Sie ihn an den Tischrand
nicht auf. Achten Sie darauf, dass das Netzkabel vom
Tisch nicht herabhängt und heiße Oberächen und
scharfe Möbelkanten nicht berührt.
• Berühren Sie das Netzkabel und den Netzstecker mit
nassen Händen nicht.
• Schalten Sie den Thermopot ohne Wasser nicht ein,
nachdem der Thermopot gefüllt ist, machen Sie den
Deckel dicht zu.
• Achten Sie darauf, dass der Wasserstand im
Thermopot nicht über der Wasserstandsmarke liegt.
Falls der Wasserstand über der maximalen Marke ist,
kann sich das kochende Wasser aus dem Thermopot
während des Kochens ausgießen.
• Um sich mit heißem Dampf nicht zu verbrühen,
beugen Sie sich über keinen Dampfablasslöchern
im Thermopotdeckel. Decken Sie die
Dampfablasslöcher mit keinen Gegenständen ab.
• Önen Sie den Deckel des Thermopots während
des Wasserkochens nicht. Die Oberäche des
Thermopots kann eine ziemlich hohe Temperatur
haben.
• Seien Sie beim Tragen des mit siedendem Wasser
gefüllten Thermopots vorsichtig.
• Seien Sie sehr vorsichtig, wenn Sie Heißwasser aus
dem Thermopot abgießen.
• Trennen Sie den Thermopot vor der Reinigung oder
wenn Sie ihn nicht benutzen vom Stromnetz ab.
Wenn Sie den Thermopot vom Stromnetz abtrennen,
halten Sie nur den Netzstecker fest und ziehen Sie
ihn aus der Steckdose vorsichtig heraus; ziehen Sie
das Netzkabel nicht, da es zu seiner Beschädigung
und Steckdosenstörung sowie einem Kurzschluss
führen kann.
• Tauchen Sie den Thermopot ins Wasser oder andere
Flüssigkeiten nicht, um das Stromschlagrisiko zu
vermeiden.
• Es ist nicht gestattet den Thermopot in der
Spülmaschine zu waschen.
• Aus Kindersicherheitsgründen lassen Sie
Plastiktüten, die als Verpackung verwendet werden,
nie ohne Aufsicht.
ACHTUNG! Lassen Sie Kinder mit Plastiktüten oder
Verpackungsfolien nicht spielen. Erstickungsgefahr!
Page 18

18
DE
• Der Thermopot ist nicht für Gebrauch von Kindern
geeignet.
• Beaufsichtigen Sie Kinder, damit sie das Gerät als
Spielzeug nicht benutzen.
• Lassen Sie Kinder das Gerät und das Netzkabel
während des Betriebs vom Thermopot nicht
berühren.
• Während des Betriebs und des Abkühlens stellen
Sie das Gerät an einen für Kinder unzugänglichen
Ort auf.
• Dieses Gerät ist für Personen (darunter Kinder) mit
• Körper-, Nerven- und Geistesstörungen oder
Personen ohne ausreichende Erfahrung und
Kenntnisse nicht geeignet, wenn sie sich unter
Aufsicht der Person, die für ihre Sicherheit
verantwortlich ist, nicht benden oder entsprechende
Anweisungen über die Nutzung des Geräts nicht
bekommen haben.
• Überprüfen Sie regelmäßig den Zustand
des Netzkabels, des Netzsteckers und des
Thermopotgehäuses.
• Wenn das Netzkabel beschädigt ist, soll es vom
Hersteller, vom Kundendienst oder von ähnlich
qualiziertem Personal ersetzt werden, um Gefahren
zu vermeiden.
• Es ist nicht gestattet, das Gerät selbständig
zu reparieren. Es ist nicht gestattet, das Gerät
selbständig auseinanderzunehmen; bei der
Feststellung jeglicher Beschädigungen, sowie im
Sturzfall, trennen Sie das Gerät vom Stromnetz ab
und wenden Sie sich an einen Kundendienst.
• Transportieren Sie den Thermopot nur in der
Fabrikverpackung.
• Bewahren Sie das Gerät an einem für Kinder und
behinderte Personen unzugänglichen Ort auf.
DIE THERMOPOT IST NUR FÜR DEN GEBRAUCH IM
HAUSHALT GEEIGNET, ES IST VERBOTEN, SIE ZU
INDUSTRIE- ODER LABORZWECKEN ZU BENUTZEN.
THERMOPOTVORBEREITUNG ZUM BETRIEB
Falls das Gerät bei niedrigen Temperaturen
transportiert oder aufbewahrt wurde, lassen Sie
es bei der Raumlufttemperatur nicht weniger als 3
Stunden bleiben.
• Packen Sie das Thermopot aus und entfernen Sie
alle Verpackungsmaterialien.
• Bewahren Sie die Originalverpackung auf.
• Lesen Sie die Sicherheitsmaßnahmen und
Bedienungsempfehlungen.
• Prüfen Sie die Komplettheit.
• Prüfen Sie das Thermopot auf Beschädigungen;
wenn es beschädigt ist, schließen Sie es ans
Stromnetz nicht an.
• Vergewissern Sie sich, dass die
Stromversorgungsparameter am Zettel und die
Netzstromparameter übereinstimmen.
Page 19

19
DE
• Wischen Sie die Außenoberäche des Gehäuses (7)
mit einem sauberen, leicht angefeuchteten Tuch zur
Entstaubung ab.
• Entfernen Sie den Deckel (9), drücken Sie dazu den
Deckelsperrgri (10), fassen Sie ihn an und nehmen
Sie den Deckel (9) ab (Abb. 1).
• Wischen Sie die Außenoberäche des
Thermopotbehälters mit einem sauberen, leicht
angefeuchteten Tuch zur Entstaubung ab. Setzen
Sie den Deckel (9) zurück auf und drücken Sie den
Deckelsperrgri (10).
ERSTE EINSCHALTUNG
• Stellen Sie das Thermopot auf einer trockenen
und ebenen Oberäche so auf, dass ein Abstand
zwischen ihm und einer Wand oder den Möbeln
mindestens 20 cm und der Freiraum darüber nicht
weniger als 50 cm beträgt.
• Stellen Sie das Gitter (2) auf die Schale (1) auf,
stellen Sie die Schale (1) auf den Aufstellplatz auf
(Abb. 2).
• Entfernen Sie den Deckel (9), drücken Sie dazu den
Deckelsperrgri (10), fassen Sie ihn an und nehmen
Sie den Deckel (9) ab (Abb. 1).
• Gießen Sie Wasser ins Thermopot ein, indem Sie
ein passendes Geschirr benutzen, übersteigen
Sie keine Maximalfüllstandsmarke «FULL» an
der Innenoberäche des Behälters (6). Es ist
nicht gestattet, das Thermopot direkt aus dem
Wasserhahn anzufüllen, benutzen Sie dafür ein
passendes Geschirr (Abb. 3).
Anmerkung: zur Verringerung von
Mineralablagerungen (Kalkstein) ist es empfohlen,
das mit Haushaltswasserltern gereinigtes Wasser zu
benutzen.
• Setzen Sie den Deckel (9) zurück auf und drücken
Sie den Deckelsperrgri (10) (Abb. 1).
• Stecken Sie den Stecker des Netzkabels (8) in eine
Steckdose ein, dabei ertönt ein Tonsignal, und alle
Symbole erscheinen auf dem Bildschirm, danach
leuchtet nur das Wartebetriebssymbol (17) «
der Bedienungsplatte (5) leuchtet die Beleuchtung
der «Temperaturwahl»-Taste (13).
• Die Symbole (21) zeigen das Wasservorhandensein
im Thermopotbehälter (6) an:
- « » - der Thermopotbehälter ist zu 3/3 mit
Wasser gefüllt;
- « » - der Thermopotbehälter ist zu 2/3 gefüllt;
- « » - niedriger Wasserstand, der
Thermopotbehälter ist zu 1/3 gefüllt, Wasser
muss hinzugegossen werden, da sich sonst das
Heizelement nicht einschaltet.
• Drücken Sie die «Start/Wiederkochen»-Taste (12) auf
der Bedienungsplatte (5), dabei leuchten die Anzeige
der «Start/Wiederkochen»-Taste (12), das Symbol
(27) « » und das Symbol (18) « », Wasser
beginnt sich zu erwärmen, die Wassertemperatur
wird mit den Zahlensymbolen (19) angezeigt.
», auf
Page 20

20
DE
Anmerkungen:
- bei jedem Drücken der Tasten der
Bedienungsplatte (5) ertönt ein Tonsignal;
- bei erster Einschaltung kann ein Fremdgeruch
vom Heizelement entstehen, es ist normal und ist
kein Garantiefall.
• Die Zahlensymbolen (20) zeigen die
Heißwasserhalttemperatur an, die
Heißwasserhalttemperatur ist standardmäßig auf
«85°C» eingestellt.
• Um sich mit heißem Dampf nicht zu verbrühen,
beugen Sie sich über keinem Dampfablassloch
(11) im Thermopotdeckel (9). Decken Sie die
Dampfablasslöcher (11) mit keinen Gegenständen
ab.
• Nach dem Wasserkochen blinkt das Symbol (27)
» 60 Sekunden lang, danach erlischt es,
«
die Tonsignale ertönen, die Anzeige der «Start/
Wiederkochen»-Taste (12) erlischt, das Thermopot
wird in den Temperaturhaltungsbetrieb umgeschaltet,
die Heißwasserhalttemperatur ist standardmäßig auf
«85°C» eingestellt.
• Gießen Sie Wasser nach dem ersten Kochen ab.
Das beim ersten Kochen erhaltene Heißwasser ist
nicht zum Trinken empfohlen, Sie können es für den
häuslichen Bedarf verwenden.
ACHTUNG!
Seien Sie beim Wasserabgießen vorsichtig, um
Heißwasserverbrühungen zu vermeiden.
• Entriegeln Sie die Wasserzufuhrpumpe durchs
Drücken der Taste «Verriegelung» (15), dabei
leuchten die Beleuchtungen der Tasten (15)
«Verriegelung» und (14) «Wasserzufuhr».
• Stellen Sie eine Tasse aufs Gitter (2) und halten Sie
die «Wasserzufuhr»-Taste (14) gedrückt, nachdem
erforderliche Wassermenge in die Tasse eingegossen
ist, lassen Sie die «Wasserzufuhr»-Taste (14) los.
Anmerkungen:
- Wasser wird nur dann zugeführt, wenn die
Anzeigen der Tasten (14 und 15) leuchten; wenn
Sie die «Verriegelung»-Taste (15) gedrückt
haben, ohne das Gerät zu betreiben, erlöschen
die Anzeigen (14 und 15) in diesem Fall nach 10
Sekunden;
- beim Wasserabgießen leuchten alle
Wasserstandsanzeigen (21).
- achten Sie aufs Füllen der Schale (1) mit
Wassertropfen, beim Auüllen der Schale (1)
entfernen Sie sie, gießen Sie Wasser ab und
setzen Sie die Schale (1) zurück auf;
- wenn Sie das Thermopot längere Zeit nicht
benutzt haben, kann die Wasserzufuhr zeitweise
aussetzen. In diesem Fall ist es empfohlen,
Page 21

21
DE
den Deckel (9) auf- und zuzumachen und die
Wasserzufuhr wieder einzuschalten.
• Um das Thermopot auszuschalten, halten Sie die
«Start/Wiederkochen»-Taste (12) 5 Sekunden lang
gedrückt und ziehen Sie den Stecker des Netzkabels
(8) aus der Steckdose heraus.
• Entfernen Sie den Deckel (9) (Abb. 1) und warten Sie
ab, bis das Thermopot vollständig abkühlt.
• Kippen Sie das Thermopot und gießen Sie
Restwasser ab, setzen Sie den Deckel (9) zurück auf
und drücken Sie die Sperrtaste (10) (Abb. 1)
THERMOPOTBETRIEB
• Bereiten Sie das Thermopot für den Betrieb laut
vorheriges Abschnitts vor (gießen Sie Wasser ein
und stecken Sie den Netzstecker in eine Steckdose
ein).
Wahl der Wasserheiz- und
Temperaturhaltungsbetriebe
• Drücken Sie die «Start/Wiederkochen»-Taste (12) auf
der Bedienungsplatte (5), dabei leuchten die Anzeige
der «Start/Wiederkochen»-Taste (12), das Symbol
(27) «
beginnt sich zu erwärmen, die Wassertemperatur
wird mit den Zahlensymbolen (19) angezeigt.
• Nach dem Wasserkochen blinkt das Symbol (27)
« » 60 Sekunden lang, danach erlischt es,
die Tonsignale ertönen, die Anzeige der «Start/
» und das Symbol (18) « », Wasser
Wiederkochen»-Taste (12) erlischt, das Thermopot
wird in den Temperaturhaltungsbetrieb umgeschaltet,
die Heißwasserhalttemperatur ist standardmäßig auf
«85°C» eingestellt.
• Im Heißwassertemperaturhaltungsbetrieb können
Sie die Heißwasserhalttemperatur mit der
«Temperaturwahl»-Taste (13) für verschiedene
Getränke einstellen, dabei leuchten die
entsprechenden Symbole (18):
- «
» - Wasserkochbetrieb, Wasser wird zum
Kochen gebracht, und die Zahlensymbole (19)
«100°C» werden angezeigt.
- « » - Betrieb der Heißwassertemperaturhaltung
bis «95°C» zum Teeaufbrühen, die Temperatur
«95°C» ist standardmäßig eingestellt.
Verwenden Sie die Tasten (24) «-/+», um
die Wasserheiztemperatur zu ändern, der
Temperaturwahlbereich ist von 87°C bis 95°C.
» - Betrieb der Heißwassertemperaturhaltung
- «
bis «85°C» zum Kaeeaufbrühen, die Temperatur
«85°C» ist standardmäßig eingestellt.
Verwenden Sie die Tasten (24) «-/+», um
die Wasserheiztemperatur zu ändern, der
Temperaturwahlbereich ist von 80°C bis 86°C.
» - Betrieb der Heißwassertemperaturhaltung
- «
bis «65°C» für Kräutertee, die Temperatur «65°C»
ist standardmäßig eingestellt. Verwenden Sie die
Tasten (24) «-/+», um die Wasserheiztemperatur
zu ändern, der Temperaturwahlbereich ist von
65°C bis 79°C.
Page 22

22
DE
- (26) « » - Betrieb der
Heißwassertemperaturhaltung bis «55°C»,
die Temperatur «55°C» ist standardmäßig
eingestellt. Verwenden Sie die Tasten (24) «-/+»,
um die Wasserheiztemperatur zu ändern, der
Temperaturwahlbereich ist von 50°C bis 64°C.
- (25) « » - Betrieb der
Heißwassertemperaturhaltung bis «45°C»,
die Temperatur «45°C» ist standardmäßig
eingestellt. Verwenden Sie die Tasten (24) «-/+»,
um die Wasserheiztemperatur zu ändern, der
Temperaturwahlbereich ist von 40°C bis 49°C.
Anmerkung:
- wenn Sie die Heißwasserhalttemperatur unter
40°C einstellen, werden die Symbole «- -» anstelle
der Zahlensymbole (20) angezeigt.
- (25) «
wird verwendet, um den Gehalt an in Wasser
gelöstem Chlor zu verringern. In diesem Betrieb
wird das Wasser auf 100°C erhitzt, dabei blinkt
das Symbol (27) « », Wasser kocht 3 Minuten
lang, danach erlischt das Symbol (27) «
», die Tonsignale ertönen, und das Thermopot
wird in den Heißwasserhaltungsbetrieb zum
Kaeeaufbrühen (18) «
Wassertemperatur «85°C» wird mit den Symbolen
(20) angezeigt.
» - Dauerkochbetrieb; dieser Betrieb
» umgeschaltet, die
• Der Betrieb der Heißwassertemperaturhaltung für
Schwarzer Tee «
die Wassertemperatur im Bereich 50-64 °С «
und die Wassertemperatur 40-49 °С « » können
mit den Tasten (24) «-/+» gewählt werden.
Wasserkühlbetrieb
• Drücken Sie die «Schnellkühlung»-Taste (16),
dabei leuchtet und blinkt das Symbol (22) «
Kaltlüfter des Thermopots schaltet sich ein. Um
den Kühlbetrieb auszuschalten, drücken Sie die
«Schnellkühlung»-Taste (16) erneut, das Symbol (22)
« » erlischt.
Wasserstandsskala
• Sie können den Wasserstand im Thermopotbehälter
(6) mit den Symbolen (21) prüfen:
» - der Thermopotbehälter ist zu 3/3 mit
- «
Wasser gefüllt;
- « » - der Thermopotbehälter ist zu 2/3 gefüllt;
- « » - niedriger Wasserstand, der
Thermopotbehälter ist zu 1/3 gefüllt, Wasser
muss hinzugegossen werden, da sich sonst das
Heizelement nicht einschaltet.
• Entfernen Sie den Deckel (9), drücken Sie dazu
den Deckelsperrgri (10), fassen Sie ihn an und
nehmen Sie den Deckel (9) ab (Abb. 1). Gießen
Sie Wasser ins Thermopot ein, indem Sie ein
passendes Geschirr benutzen, übersteigen
Sie keine Maximalfüllstandsmarke «FULL» an
», Kaee « », Kräutertee « »,
»
», der
Page 23

23
DE
der Innenoberäche des Behälters (6). Es ist
nicht gestattet, das Thermopot direkt aus dem
Wasserhahn anzufüllen, benutzen Sie dafür ein
passendes Geschirr (Abb. 3).
• Das Thermopot schaltet sich im Wasserkochbetrieb
ein, nach dem Wasserkochen ertönen die
Tonsignale, und das Thermopot wird in den
Betrieb der Heißwassertemperaturhaltung zum
Kaeeaufbrühen umgeschaltet, das Symbol (18) «
und die Zahlensymbole (20) «85°C» leuchten.
• Falls es erforderlich ist, Wasser erneut zu kochen,
drücken Sie die «Start/Wiederkochen»-Taste (12) auf
der Bedienungsplatte (5), dabei leuchten die Anzeige
der «Start/Wiederkochen»-Taste (12), das Symbol
(27) « » und das Symbol (18) « », Wasser
beginnt, sich zu erwärmen, die Wassertemperatur
wird mit den Zahlensymbolen (19) angezeigt. Nach
dem Wasserkochen blinkt das Symbol (27) « »
60 Sekunden lang, danach erlischt es, die Tonsignale
ertönen, die Anzeige der «Start/Wiederkochen»-
Taste (12) auch erlischt, das Thermopot wird in
den Temperaturhaltungsbetrieb umgeschaltet, die
Heißwasserhalttemperatur ist standardmäßig auf
«85°C» eingestellt.
• Um das Thermopot auszuschalten, halten Sie die
«Start/Wiederkochen»-Taste (12) 5 Sekunden lang
gedrückt und ziehen Sie den Stecker des Netzkabels
(8) aus der Steckdose heraus.
Kindersicherung
• Verwenden Sie diese Funktion, um zu verhindern,
dass Kinder durch Heißwasser verbrüht werden.
• Um die Kindersicherung einzuschalten, halten Sie
die Taste «Lock» (15) 5 Sekunden lang gedrückt,
während die Anzeige der Taste «Lock» (14) und die
Anzeige der Taste «Water Supply» aueuchten.
• Im Kindersicherungsbetrieb ist die «Wasserzufuhr»-
»
Taste (14) auf der Bedienungsplatte (5) inaktiv.
• Um die Kindersicherung zu deaktivieren, halten
Sie die Taste (15) «Blockieren» 1 Sekunde lang
gedrückt, während die Anzeigen der Tasten (14)
«Wasserversorgung» und (15) «Blockieren»
erlöschen.
• Um das Thermopot auszuschalten, halten Sie die
«Start/Wiederkochen»-Taste (12) 5 Sekunden lang
gedrückt und ziehen Sie den Netzstecker aus der
Steckdose heraus.
REINIGUNG UND PFLEGE
• Vor der Reinigung trennen (8) Sie das Thermopot
vom Stromnetz ab, entfernen Sie den Deckel (9)
und warten Sie ab, bis das Thermopot vollständig
abkühlt.(Abb. 1)
• Gießen Sie Restwasser aus dem Thermopotbehälter
immer ab, entfernen Sie dazu den Deckel (5).
• Gießen Sie Restwasser vorsichtig ab, indem Sie das
Thermopot umkippen.
Page 24

24
DE
• Entfernen Sie die Schale (1), das Gitter (2), gießen
Sie Wasser aus der Schale (1) ab, spülen Sie die
Schale (1) und das Gitter (2) aus. Setzen Sie das
Gitter (2) auf die Schale (1) auf und stellen Sie die
Schale (1) auf ihren Aufstellplatz auf.
• Wischen Sie die Außenoberäche des
Thermopotgehäuses (7) mit einem leicht
angefeuchteten Tuch, dann trocknen Sie diese ab.
• Benutzen Sie neutrale Waschmittel zur
Entschmutzung, es ist nicht gestattet, Metallbürsten,
Abrasiv- und Lösungsmittel zu benutzen.
• Tauchen Sie das Thermopot und das Netzkabel (8)
ins Wasser oder jegliche andere Flüssigkeiten nicht
ein.
• Es ist nicht gestattet, das Thermopot in der
Geschirrspülmaschine zu spülen.
Flecke an der Innenseite des Thermopotbehälters
• Wasser enthält verschiedene Mineralien, die
Flecke an der Innenseite des Thermopotbehälters
verursachen können. Die Flecke beeinträchtigen den
Thermopotbetrieb nicht und sind kein Garantiefall.
• Entfernen Sie die Flecke an der Innenseite des
Thermopotbehälters mit einer Zitronensäurelösung
oder Essig.
• Um den Geschmack von Zitronensäure oder Essig
zu beseitigen, kochen Sie Wasser und gießen Sie
es ab.
• Wiederholen Sie den Vorgang, bis der Geruch oder
Fremdgeschmack von Wasser vollständig beseitigt
ist.
Entfernung von Mineralablagerungen (Kalkstein)
• Die im Thermopotbehälter gebildeten
Kalkablagerungen beeinträchtigen den
Wassergeschmack, stören den Wärmeaustausch
zwischen Wasser und dem Heizelement und können
das Heizelement beschädigen. Das Durchbrennen
des Heizelements bei starker Kalkablagerung im
Thermopotbehälter ist kein Garantiefall.
• Zur Entkalkung füllen Sie das Thermopot mit Wasser
und darin aufgelöstem Speiseessig im Verhältnis 2:1
bis zur Maximalfüllstandsmarke an.
• Stecken Sie den Stöpsel des Netzkabels in eine
Steckdose ein.
• Schalten Sie das Thermopot im Wasserkochbetrieb
ein. Nach dem Wasserkochen schalten Sie das
Thermopot aus, halten Sie dazu die «Start/
Wiederkochen»-Taste (12) 5 Sekunden lang
gedrückt, ziehen Sie den Netzstecker des Netzkabels
(20 8) aus der Steckdose heraus und lassen Sie das
Thermopot über Nacht mit Essiglösung.
• Gießen Sie die Essiglösung morgens ab,
füllen Sie das Thermopot mit Wasser bis zur
Maximalfüllstandsmarke an, lassen Sie es aufkochen
und gießen Sie Wasser ab.
Page 25

25
DE
• Zum Entkalken ist es empfohlen, spezielle Mittel für
elektrische Wasserkocher zu verwenden, befolgen
Sie die Gebrauchsanweisungen streng.
• Reinigen Sie das Thermopot vom Kalkstein
regelmäßig.
AUFBEWAHRUNG
• Bevor Sie das Thermopot zur Langzeitlagerung
wegnehmen, trennen Sie es vom Stromnetz ab,
lassen Sie das Gerät abkühlen und gießen Sie
Wasser ab.
• Reinigen Sie das Thermopot.
• Bewahren Sie das Thermopot an einem für Kinder
und behinderte Personen unzugänglichen Ort auf.
LIEFERUMFANG
• Thermopot – 1 Stk.
• mBedienungsanleitung – 1 Stk.
TECHNISCHE EIGENSCHAFTEN
• Stromversorgung 220-240 V, ~ 50-60 Hz
• Nennleistungsaufnahme: 1200 W
• Fassungsvermögen des Wasserbehälters: 5 l
ENTSORGUNG
Um mögliches Schaden für die Umwelt
oder die menschliche Gesundheit
durch unkontrollierte Abfallentsorgung
zu vermeiden, werfen Sie das Gerät
und die Batterien (falls mitgeliefert)
nach Beendigung ihrer Nutzungsdauer
zusammen mit gewöhnlichen Haushaltsabfällen nicht
weg, geben Sie das Gerät und die Batterien in die
Spezialpunkte für weitere Entsorgung über.
Die bei der Entsorgung der Erzeugnisse entstehenden
Abfälle sind unbedingt zu sammeln und weiter
ordnungsmäßig zu entsorgen.
Mehrere Information zur Entsorgung dieses Produkts
erhalten Sie bei Ihrer lokalen Stadtverwaltung, einem
Abfallentsorgungsdienst oder beim Geschäft, wo Sie
dieses Produkt gekauft haben.
Der Hersteller behält sich das Recht vor, das
Design, die Konstruktion und die das gemeine
Gerätebetriebsprinzip nicht beeinussenden
technischen Eigenschaften ohne Vorbenachrichtigung
zu verändern.
Die Gerätenutzungsdauer beträgt 3 Jahre
Das Herstellungsdatum ist in der Fabrikationsnummer
angegeben.
Bei Störungsfeststellung wenden Sie sich baldigst an
einen autorisierten Kundendienst.
Page 26

26
RU
RU
ТЕРМОПОТ BR1090
Термопот предназначен для кипячения воды и поддержания её температуры на заданном уровне.
ОПИСАНИЕ
1. Поддон
2. Решётка поддона
3. Носик слива воды
4. Панель индикации/выбора температуры
5. Панель управления
6. Колба термопота
7. Корпус
8. Шнур питания
9. Съёмная крышка
10. Ручка-фиксатор крышки
11. Отверстия выхода пара
Панель управления
12. Кнопка включения/выключения/повторного кипячения «Старт/повторное кипячение»
13. Кнопка выбора температуры воды «Выбор температуры»
14. Кнопка включения подачи воды «Подача воды»
15. Кнопка включения/выключения блокировки «Бло-
кировка»
16. Включение режима охлаждения воды «Быстрое
охлаждение»
Панель индикации/выбора температуры
17. Символ режима ожидания «
18. Символы режимов:
- кипячение воды « »
- вода для заваривания чёрного чая «
- вода для заваривания кофе «
- вода для заваривания травяного чая «
19. Цифровые символы температуры нагрева воды
20. Цифровые символы режима поддержания температу-
ры горячей воды
21. Символы объёма воды в колбе термопота «
« »
22. Символ включения режима охлаждения воды « »
23. Символ режима длительного кипячения «
24. Кнопки установки температурных режимов «-/+»
25. Символ установки температуры воды « »
26. Символ установки температуры воды « »
27. Символ режима кипячения воды « »
ВНИМАНИЕ!
Для дополнительной защиты в цепи питания
целесообразно установить устройство защитного
отключения (УЗО) с номинальным током срабатывания, не превышающим 30 мА, для установки
УЗО обратитесь к специалисту.
»
»
»
»
», « »,
»
Page 27

27RU
9 1210 1311 14 15 16
5
6
Старт
100 °C
4
TEMP+ TEMP–
7
3
Повторное
кипячение
Выбор
температуры
Подача
воды
Блокировка
Быстрое
охлаждение
8
2
1
19 20
18
17
27
20
Рис. 1
26
25
24
Рис. 2 Рис. 3
Page 28

28
RU
МЕРЫ БЕЗОПАСНОСТИ И РЕКОМЕНДАЦИИ ПО ЭКСПЛУАТАЦИИ
Перед использованием термопота внимательно
ознакомьтесь с руководством по эксплуатации, и
сохраните его для использования в будущем.
• Используйте термопот только по его прямому
назначению, как изложено в данной инструкции.
• Неправильное обращение с термопотом может
привести к его поломке, причинению вреда
пользователю или его имуществу и не является
гарантийным случаем.
• Термопот предназначен только для подогрева и
кипячения питьевой воды, запрещается подогревать или кипятить любые другие жидкости.
• Убедитесь, что рабочее напряжение термопота,
указанное на этикетке, соответствует напряжению
электросети.
• Вилка шнура питания имеет контакт заземления,
вставляйте её в электрическую розетку, имеющую
надёжный контакт заземления. При коротком
замыкании, заземление снижает риск поражения
электрическим током.
• Обратитесь к специалисту-электрику, если вы
не уверены в том, что ваши розетки правильно
установлены и заземлены.
• Во избежание возникновения пожара запрещается
использовать «переходники», предназначенные
для подключения сетевой вилки к электрической
розетке, не имеющей контакта заземления.
• При искрении в электрической розетке и присутствии запаха гари, выньте вилку шнура питания из
розетки и обратитесь в организацию, обслуживающую вашу домашнюю электрическую сеть.
• При появлении дыма из корпуса термопота выньте вилку шнура питания из электрической розетки
и примите меры к нераспространению огня.
• Запрещается использовать термопот вне помещений.
• Не рекомендуется использовать устройство во
время грозы.
• Оберегайте устройство от ударов, падений, вибраций и иных механических воздействий.
• Не включайте термопот без воды.
• Запрещается наполнять термопот непосредствен-
но из водопроводного крана, для наполнения
термопота используйте подходящую посуду.
• Запрещается располагать термопот рядом со
стенами или вблизи стенок кухонной мебели.
• Установите термопот так, чтобы от стены или
мебели до термопота оставалось расстояние
• не менее 20 см, а свободное пространство над
термопотом составляло не менее 50 см.
• Не оставляйте термопот, включённый в сеть, без
присмотра.
• Не используйте термопот вблизи от кухонной
раковины, в ванных комнатах, около бассейнов
или других ёмкостей, наполненных водой.
Page 29

29
RU
• Не используйте термопот в непосредственной
близости от нагревательных приборов, источников
тепла или открытого пламени.
• Запрещается использовать термопот в местах, где
используются или распыляются аэрозоли, а также
вблизи от легковоспламеняющихся жидкостей.
• Устанавливайте термопот на ровную и устойчивую поверхность, не ставьте его на край стола.
Не допускайте, чтобы шнур питания свешивался
со стола, а также следите, чтобы он не касался
горячих поверхностей и острых кромок мебели.
• Запрещается прикасаться к шнуру питания и
вилке шнура питания, мокрыми руками.
• Не включайте термопот без воды, после наполнения термопота, плотно закрывайте крышку.
• Следите, чтобы уровень воды в термопоте был
не выше максимальной отметки. Если уровень
воды будет выше максимальной отметки, кипящая
вода может выплеснуться из термопота во время
кипячения.
• Во избежание получения ожога горячим паром не
наклоняйтесь над отверстиями для выхода пара,
расположенными в крышке термопота. Не закрывайте отверстия для выхода пара какими-либо
предметами.
• Запрещается открывать крышку термопота во
время кипячения воды.
• Будьте осторожны при переносе термопота,
наполненного кипятком.
• Соблюдайте особую осторожность, когда сливаете из термопота горячую воду.
• Отключайте термопот от электрической сети
перед чисткой или в том случае, если вы им не
пользуетесь. При отключении термопота от электрической сети держитесь только за вилку шнура
питания и аккуратно выньте её из электрической
розетки, не тяните за шнур питания — это может
привести к повреждению шнура питания, электрической розетки или вызвать короткое замыкание.
• Во избежание удара электрическим током не
погружайте термопот в воду или любые другие
жидкости.
• Запрещается помещать термопот в посудомоечную машину.
• Из соображений безопасности не оставляйте полиэтиленовые пакеты, используемые в качестве
упаковки, без присмотра и в местах доступных
для детей.
ВНИМАНИЕ! Не разрешайте детям играть с полиэтиленовыми пакетами или упаковочной плёнкой.
Опасность удушья!
• Термопот не предназначен для использования
детьми.
• Осуществляйте надзор за детьми, чтобы не допустить использования прибора в качестве игрушки.
• Не разрешайте детям прикасаться к устройству и
к шнуру питания во время работы термопота.
Page 30

30
RU
• Во время работы и остывания размещайте
устройство в местах, недоступных для детей.
• Данное устройство не предназначено для использования лицами (включая детей) с пониженными
физическими, психическими или умственными
способностями, или при отсутствии у них опыта
или знаний, если они не находятся под контролем
или не проинструктированы об использовании
прибора лицом, ответственным за их безопасность.
• Периодически проверяйте состояние шнура питания и вилки шнура питания.
• При повреждении шнура питания его замену
во избежание опасности должны производить
изготовитель, сервисная служба или подобный
квалифицированный персонал.
• Запрещается самостоятельно ремонтировать прибор. Не разбирайте прибор самостоятельно, при
возникновении любых неисправностей, а также
после падения устройства выключите прибор из
электрической розетки и обратитесь в сервисный
центр.
• Перевозите термопот в заводской упаковке.
• Храните устройство в местах, недоступных для
детей и людей с ограниченными возможностями.
УСТРОЙСТВО ПРЕДНАЗНАЧЕНО ТОЛЬКО ДЛЯ
БЫТОВОГО ИСПОЛЬЗОВАНИЯ, ЗАПРЕЩАЕТСЯ
ИСПОЛЬЗОВАТЬ УСТРОЙСТВО В КОММЕРЧЕСКИХ ИЛИ ЛАБОРАТОРНЫХ ЦЕЛЯХ.
ПОДГОТОВКА ТЕРМОПОТА К РАБОТЕ
После транспортировки или хранения устройства при пониженной температуре необходимо
выдержать его при комнатной температуре не
менее 3 часов.
• Распакуйте термопот и удалите все упаковочные
материалы.
• Сохраните заводскую упаковку.
• Ознакомьтесь с мерами безопасности и рекомен-
дациями по эксплуатации.
• Проверьте комплектацию.
• Осмотрите термопот на наличие повреждений
при наличии повреждений не включайте его в
электрическую сеть.
• Убедитесь, что параметры напряжения питания,
указанные на этикетке, соответствуют параметрам
электрической сети.
• Протрите наружную поверхность корпуса (7) чистой, слегка влажной тканью для удаления пыли.
• Снимите крышку (9), для этого нажмите на
ручку-фиксатор крышки (10), возьмитесь за неё и
снимите крышку (9) (рис. 1).
• Протрите внутреннюю поверхность колбы (6)
термопота чистой, слегка влажной тканью для
удаления пыли. Установите крышку (9) на место и
нажмите на ручку-фиксатор (10).
Page 31

31
RU
ПЕРВОЕ ВКЛЮЧЕНИЕ
• Установите термопот на сухой ровной поверхности так, чтобы от стены или мебели до термопота
оставалось расстояние не менее 20 см, а свободное пространство над термопотом составляло не
менее 50 см.
• Установите на поддон (1) решётку (2), установите
поддон (1) на место установки (рис. 2).
• Снимите крышку (9), для этого нажмите на
ручку-фиксатор крышки (10), возьмитесь за неё и
снимите крышку (9) (рис. 1).
• Залейте в тепмопот воду, используя подходящую
посуду, не превышайте отметку максимального
уровня воды «FULL», расположенную на внутренней поверхности колбы (6). Запрещается наполнять термопот непосредственно из водопроводного крана, для наполнения термопота используйте
подходящую посуду (рис. 3).
Примечание: для уменьшения количества минеральных отложений (накипи), рекомендуется
использовать воду, прошедшую очистку бытовыми
фильтрами воды.
• Установите крышку (9) на место и нажмите на
ручку-фиксатор (10) (рис. 1).
• Вставьте вилку шнура питания (8) в электрическую розетку, при этом прозвучит звуковой сигнал
и на дисплее отобразится все символы, после
этого будет светиться только символ режима
ожидания (17) «
», на панели управления (5)
будет светиться подсветка кнопки (13) «Выбор
температуры».
• Символы (21) будут показывать наличие воды в
колбе термопота (6):
- «
» - колба термопота наполнена водой на 3/3
объёма.
- « » - колба термопота наполнена на 2/3
объёма.
- « » - низкий уровень воды, колба термопота наполнена на 1/3 объёма, необходимо
наполнить колбу термопота водой, в противном
случае нагревательный элемент не включится.
• Нажмите на панели управления (5) кнопку (12)
«Старт/повторное кипячение», при этом загорится
индикатор кнопки (12) «Старт/повторное кипячение», загорится символ (27) « » и символ (18)
« », вода начнёт нагреваться, температура воды
отображается цифровыми символами (19).
Примечания:
- каждое нажатие кнопок на панели управления
(5) сопровождается звуковым сигналом;
- при первом включении возможно появление
постороннего запаха от нагревательного элемента, это допустимо и не является гарантийный случаем.
• Цифровыми символами (20) будет отображаться температура поддержания горячей воды,
температура поддержания горячей воды «85°С»,
установлена по умолчанию.
Page 32

32
RU
• Во избежание получения ожога горячим паром не
наклоняйтесь над отверстиями для выхода пара
(11), расположенными в крышке термопота (9).
Не закрывайте отверстия для выхода пара (11)
какими-либо предметами.
• После закипания воды, символ (27) « », будет
мигать в течение 60 секунд, после чего погаснет,
прозвучат звуковые сигналы, также погаснет
индикатор кнопки (12) «Старт/повторное кипячение», термопот включится в режим поддержания
температуры, температура поддержания горячей
воды «85°С», установлена по умолчанию.
• После первого кипячения слейте воду. Полученную в результате первого кипячения горячую воду
не рекомендуется употреблять в пищу, вы можете
использовать ее для бытовых нужд.
ВНИМАНИЕ!
Во время слива воды соблюдайте осторожность
во избежание получения ожогов горячей водой.
• Разблокируйте включение помпы подачи воды,
нажав кнопку (15) «Блокировка», при этом загорятся подсветки кнопок (15) «Блокировка» и (14)
«Подача воды».
• Поставьте чашку на решётку (2) и нажмите и удерживайте кнопку (14) «Подача воды», после того,
как в чашку нальётся необходимое количество
воды, отпустите кнопку (14) «Подача воды».
Примечания:
- подача воды осуществляется только при включенных индикаторах кнопок (14 и15), если вы
нажали кнопку (15) «Блокировка» и не произвели никаких действий, в этом случае индикаторы
кнопок (14 и15) погаснут через 10 секунд;
- во время слива воды будут светиться все индикаторы уровня воды (21);
- следите за наполнением поддона (1) каплями
воды, при наполнении поддона (1), снимите его,
слейте воду и установите поддон (1) на место;
- если вы не пользовались термопотом длительное время, подача воды может работать с перебоями. В этом случае рекомендуется открыть
и закрыть крышку (9), и повторно включить
подачу воды.
• Для выключения термопота, нажмите и удерживайте в течение 5 секунд кнопку (12) «Старт/повторное кипячение», выньте вилку шнура питания
(8) из электрической розетки.
• Снимите крышку (9) (рис. 1) и дождитесь полного
остывания термопота.
• Наклоните термопот и слейте остатки воды,
установите крышку (9) на место и нажмите кнопку-фиксатор (10) (рис. 1).
ИСПОЛЬЗОВАНИЕ ТЕРМОПОТА
• Подготовьте термопот к работе, как указано в предыдущем разделе (налейте воду, вставьте вилку
шнура питания в электрическую розетку).
Page 33

33
RU
• Выбор режимов подогрева воды и поддержания
её температуры
• Нажмите на панели управления (5) кнопку (12)
«Старт/повторное кипячение», при этом загорится
индикатор кнопки (12) «Старт/повторное кипячение», загорится символ (27) « » и символ (18)
« », вода начнёт нагреваться, температура воды
отображается цифровыми символами (19).
• После закипания воды, символ (27) « », будет
мигать в течение 60 секунд, после чего погаснет,
прозвучат звуковые сигналы, также погаснет
индикатор кнопки (12) «Старт/повторное кипячение», термопот включится в режим поддержания
температуры, температура поддержания горячей
воды «85°С», установлена по умолчанию.
• В режиме поддержания температуры горячей
воды, нажатием кнопки (13) «Выбор температуры», вы можете установить температуру поддержания горячей воды для различных напитков, при
этом загораются соответствующие символы (18):
- « » - режим кипячения воды, вода нагревается
до кипения, и отражаются цифровые символы
(19) «100°С».
- « » - режим поддержания горячей воды
до «95°С» для заваривания чая, температура «95°С» установлена по умолчанию. Для
изменения температуры подогрева воды
используйте кнопки (24) «-/+», диапазон выбора
температуры от 87°С до 95°С.
» - режим поддержания горячей воды до
- «
«85°С» для заваривания кофе, температура «85°С» установлена по умолчанию. Для
изменения температуры подогрева воды
используйте кнопки (24) «-/+», диапазон выбора
температуры от 80°С до 86°С.
» - режим поддержания горячей воды до
- «
«65°С» для приготовления травяного чая, температура «65°С» установлена по умолчанию.
Для изменения температуры подогрева воды
используйте кнопки (24) «-/+», диапазон выбора
температуры от 65°С до 79°С.
- (26) « » - режим поддержания горячей воды
до «55°С», температура «55°С» установлена
по умолчанию. Для изменения температуры подогрева воды используйте кнопки (24) «- … +»,
диапазон выбора температуры от 50°С до 64°С.
- (25) « » - режим поддержания горячей воды
до «45°С», температура «45°С» установлена
по умолчанию. Для изменения температуры подогрева воды используйте кнопки (24) «- … +»,
диапазон выбора температуры от 40°С до 49°С.
Примечание:
- при установке поддержания температуры
горячей воды ниже 40°С, вместо цифровых
символов (20), отобразятся символы «- -».
- (23) «
» - включение режима длительного
кипячения, этот режим используется для
Page 34

34
RU
уменьшения содержание растворённого в
воде хлора. В этом режиме вода нагревается
до 100°С, при этом символ (27) «
мигать, вода будет кипеть в течение 3 минут,
после этого символ (27) « » погаснет, прозвучат звуковые сигналы и термопот перейдёт
в режим поддержания горячей воды для зава-
ривания кофе (18) «
отображаться температура воды «85°С».
• Выбор режимов поддержания горячей воды для
чёрного чая «
», выбор температуры воды в диапазоне 50-64 °C
« », и выбор температуры воды в диапазоне
40-49 °С « », может осуществляться кнопками
(24) «-/+».
Режим охлаждения воды
• Нажмите кнопку (16) «Быстрое охлаждение», при
этом загорится и будет мигать символ (22) «
включится вентилятор охлаждения термопота.
Для выключения режима охлаждения, повторно
нажмите кнопку (16) «Быстрое охлаждение»,
символ (22) « » погаснет.
Шкала уровня воды
• Вы можете контролировать уровень воды в колбе
термопота (6) символами (21):
» - колба термопота наполнена водой на 3/3
- «
объёма.
», символами (20) будет
», кофе « », травяного чая «
» будет
»,
- « » - колба термопота наполнена на 2/3
объёма.
- « » - низкий уровень воды, колба термопота наполнена на 1/3 объёма, необходимо
наполнить колбу термопота водой, в противном
случае нагревательный элемент не включится.
• Снимите крышку (9), для этого нажмите на ручку-фиксатор крышки (10), возьмитесь за неё и снимите крышку (9) (рис. 1). Залейте в тепмопот воду,
используя подходящую посуду, не превышайте
отметку максимального уровня воды «FULL» на
внутренней поверхности колбы (6). Запрещается наполнять термопот непосредственно из
водопроводного крана, для наполнения термопота
используйте подходящую посуду (рис. 3).
• Термопот включится в режим кипячения воды, после закипания воды, прозвучат звуковые сигналы
и термопот перейдёт в режим поддержания температуры горячей воды для заваривания кофе,
загорится символ (18) «
(20) «85°С».
• При необходимости повторного кипячения воды
нажмите на панели управления (5) кнопку (12)
«Старт/повторное кипячение», при этом загорится
индикатор кнопки (12) «Старт/повторное кипячение», загорится символ (27) « » и символ
(18) « », вода начнёт нагреваться, температура
воды отображается цифровыми символами (19).
» и цифровые символы
Page 35

35
RU
После закипания воды, символ (27) « », будет
мигать в течение 60 секунд, после чего погаснет,
прозвучат звуковые сигналы, также погаснет
индикатор кнопки (12) «Старт/повторное кипячение», термопот включится в режим поддержания
температуры, температура поддержания горячей
воды «85°С», установлена по умолчанию.
• Для выключения термопота, нажмите и удерживайте в течение 5 секунд кнопку (12) «Старт/повторное кипячение», выньте вилку шнура питания
(8) из электрической розетки.
Блокировка от детей
• Используйте данную функцию для предотвращения получения детьми ожогов горячей водой.
• Для включения блокировки от детей, нажмите и удерживайте кнопку (15) «Блокировка» в
течение 5 секунд, при этом индикатор кнопки (14)
«Блокировка» и индикатор кнопки «Подача воды»
загорятся .
• В состоянии блокировки от детей кнопка (14)
«Подача воды» на панели управления (5) не
активная.
• Для выключения блокировки от детей, нажмите и
удерживайте кнопку (15) «Блокировка» в течение
1 секунды, при этом индикаторы кнопок (14) «Подача воды» и (15) «Блокировка» погaснут.
• Для выключения термопота, нажмите и удерживайте в течение 5 секунд кнопку (12) «Старт/по-
вторное кипячение», выньте вилку шнура питания
из электрической розетки.
ЧИСТКА И УХОД
• Перед чисткой термопота, выньте вилку шнура
питания (8) из электрической розетки, снимите
крышку (9) (рис. 1) и дождитесь полного остывания термопота.
• Всегда сливайте остатки воды из колбы термопота, для этого необходимо снять крышку (9).
• Наклоняя термопот, аккуратно слейте остатки
воды.
• Снимите поддон (1), снимите решётку (2), слейте
из поддона (1) воду, промойте поддон (1) и решётку (2). Установите решётку (2) на поддон (1) и
установите поддон (1) на место его установки.
• Протрите внешнюю поверхность корпуса (7)
термопота слегка влажной тканью, после чего
вытрите насухо.
• Для удаления загрязнений используйте нейтральные моющие средства, запрещается использовать
металлические щетки, абразивные чистящие
средства и растворители.
• Не погружайте термопот и шнур питания (8) в
воду или любые другие жидкости.
• Не помещайте термопот в посудомоечную
машину.
Page 36

36
RU
Пятна на внутренней поверхности колбы термопота
• Вода содержит различные минеральные вещества, которые могут вызвать появление пятен на
внутренней поверхности колбы термопота, пятна
никак не влияют на работу термопота, появление
пятен не является гарантийным случаем.
• Удалить пятна на внутренней поверхности колбы
термопота можно раствором лимонной кислоты
или столовым уксусом.
• Для устранения привкуса лимонной кислоты или
уксуса вскипятите воду и слейте её.
• Повторите процедуру до полного устранения
запаха или постороннего привкуса воды.
Удаление минеральных отложений (накипи)
• Накипь, образующаяся внутри колбы термопота,
влияет на вкусовые качества воды, нарушает
теплообмен между водой и нагревательным
элементом, а также создаёт угрозу выхода из
строя нагревательного элемента, перегорание
нагревательного элемента при наличии большого
количества накипи в колбе термопота, не является гарантийным случаем.
• Для удаления накипи наполните термопот водой
с разведенным в ней столовым уксусом в пропорции 2:1 до максимального уровня.
• Вставьте вилку шнура питания (8) в электрическую розетку.
• Включите термопот в режим кипячения воды.
После закипания воды, выключите термопот, для
этого нажмите и удерживайте в течение 5 секунд
кнопку (12) «Старт/повторное кипячение», выньте
вилку шнура питания (8) из электрической розетки
и оставьте термопот с раствором уксуса на ночь.
• Утром слейте раствор уксуса, наполните термопот
водой до максимального уровня, вскипятите и
слейте воду.
• Для удаления накипи можно использовать специальные средства, предназначенные для
• электрических чайников, строго придерживайтесь
инструкции по их использованию.
• Регулярно очищайте термопот от накипи.
ХРАНЕНИЕ
• Прежде чем убрать термопот на длительное
хранение, отключите его от электросети, дайте
устройству остыть и слейте воду.
• Проведите чистку термопота.
• Храните термопот в местах, недоступных для
детей и людей с ограниченными возможностями.
КОМПЛЕКТ ПОСТАВКИ
1. Термопот – 1 шт.
2. Инструкция – 1 шт.
Page 37

37
RU
ТЕХНИЧЕСКИЕ ХАРАКТЕРИСТИКИ
• Электропитание: 220-240 В ~ 50-60 Гц
• Номинальная потребляемая мощность: 1200 Вт
• Максимальный объем: 5 л
УТИЛИЗАЦИЯ
Чтобы предотвратить возможный вред
окружающей среде или здоровью
людей от неконтролируемой утилизации отходов, после окончания срока
службы устройства или элементов
питания (если входят в комплект) не
выбрасывайте их вместе с обычными бытовыми
отходами, передайте прибор и элементы питания
в специализированные пункты для дальнейшей
утилизации.
Отходы, образующиеся при утилизации изделий,
подлежат обязательному сбору с последующей
утилизацией в установленном порядке.
Для получения дополнительной информации об
утилизации данного продукта обратитесь в местный
муниципалитет, службу утилизации бытовых отходов
или в магазин, где Вы приобрели данный продукт.
Производитель сохраняет за собой право изменять дизайн, конструкцию и технические характеристики, не влияющие на общие принципы работы
устройства, без предварительного уведомления.
Срок службы устройства – 3 года
Дата производства указана в серийном номере.
В случае обнаружения каких-либо неисправностей
необходимо обратиться в авторизированный сервисный центр.
Page 38

38
KZ
KZ
ТЕРМОПОТ BR1090
Термопот суды қайнатуға және оның температурасын берілген деңгейде ұстауға арналған.
СИПАТТАМАСЫ
1. Табандық
2. Табандықтың торы
3. Суды құю шүмегі
4. Температураны индикациялау/таңдау панелі
5. Басқару панелі
6. Термопот құтысы
7. Корпусы
8. Қуаттандыру бауы
9. Шешілмелі қақпақ
10. Қақапақтың бекітпе-тұтқасы
11. Бу шығатын саңылаулар
Басқару панелі
12. Қосу/өшіру/қайта қайнату батырмасы «Старт/
қайта қайнату»
13. Су температурасын таңдау батырмасы «Темпе-
ратураны таңдау»
14. «Су жіберілімі» су жіберуді іске қосу батырмасы
15. «Бұғаттау» бұғаттауды қосу/өшіру батырмасы
16. «Жылдам салқындату» суды салқындату ре-
жимін қосу
Температураны индикациялау/таңдау панелі
17. Күту режимі таңбасы «
18. Күту режимдері:
- суды қайнату « »
- шай демдеуге арналған су «
- кофе демдеуге арналған су «
- Өсімдік шайы «
19. Суды қыздыру температурасының цифрлық
таңбалары
20. Ыстық су температурасын сақтау режимінің
цифрлық таңбалары
21. Термопот құтысындағы су көлемінің таңбалары
», « », « »
«
22. Суыту режимін қосу таңбасы « »
23. Ұзақ қайнату режимінің таңбасы «
24. Температура режимдерін орнату батырмалары
«-/+»
25. Су температурасын орнату таңбасы « »
26. Су температурасын орнату таңбасы «
27. Су қайнату режимінің таңбасы «
НАЗАР АУДАРЫҢЫЗ!
Қосымша қорғаныс үшін қоректендіру тізбегінде
номиналдық іске қосылу тогы 30 мА аспайтын
қорғаныс сөндіру құралын (ҚСҚ) орнатқан дұрыс,
ҚСҚ-ны орнату үшін маманға жүгініңіз.
»
»
»
»
»
»
»
Page 39

39KZ
9 1210 1311 14 15 16
5
6
Старт
100 °C
4
TEMP+ TEMP–
7
3
Повторное
кипячение
Выбор
температуры
Подача
воды
Блокировка
Быстрое
охлаждение
8
2
1
19 20
18
17
27
20
Рис. 1
26
25
24
Рис. 2 Рис. 3
Page 40

40
KZ
ҚАУІПСІЗДІК ШАРАЛАРЫ ЖӘНЕ ПАЙДАЛАНУҒА БЕРУ БОЙЫНША КЕҢЕСТЕР
Термопот пайдалану алдында пайдалану
нұсқаулығын мұқият оқып шығыңыз, оқыған соң
болашақта пайдалану үшін сақтап қойыңыз.
• Термопот осы нұсқаулықта көрсетілгендей тікелей
мақсатына бойынша ғана пайдаланыңыз.
• Термопот дұрыс қолданбау оның бұзылуына,
және пайдаланушыға немесе оның мүлкіне зиян
келтіруге әкеп соғуы мүмкін және кепілдік жағдайы
болып саналмайды.
• Термопот ішуге арналған суды ғана қыздыруға
және қайнатуға арналған, қандай да бір басқа сұйықтықтарды қыздыруға немесе қайнатуға тыйым
салынады.
• Заттаңбада көрсетілген термопотң жұмыс кернеуі
электр желісінің кернеуіне сәйкес екеніне көз
жеткізіңіз.
• Қуаттандыру бауы айырының тұйықтандыру
байланысы бар, оны тұйықтандырудың сенімді
байланысы бар электрлік розеткаға қосыңыз.
Қысқа матасу кезінде тұйықтандыру электрлік ток
соғу қаупін төмендетеді.
• Егер розетканың дұрыс орнатылғанына және жерге қосуына сенімді болмасаңыз, электр маманына
хабарласыңыз.
• Өрттің шығуын болдырмау үшін жерге қосу
түйісуі жоқ электр розеткасына қосуға арналған,
желілік айыр «өткізгіштерін» пайдалануға тыйым
салынады.
• Күйік иісі және от ұшқыны пайда болған кезде, розеткадан желі бауының айырын шығарыңыз және
үйдің электр желісіне қызмет көрсететін ұйымға
хабарласыңыз.
• Термопот корпусынан түтін шыққан кезде қуаттандыру бауының айырын электрлік розеткадан
шығарыңыз және от таралмауға қатысты шараларды қолданыңыз.
• Термопот үй-жайдан тыс жерде пайдалануға
тыйым салынады.
• Найзағай кезінде құралды пайдалануға кеңес
берілмейді.
• Құралды соққыдан, құлаудан, дірілден және басқа
да механикалық әсерлерден сақтаңыз.
• Суы жоқ термопотты қоспаңыз.
• Термопотқа суды тікелей су құбыры шүмегінен
толтыруға тыйым салынады, термопотты толтыру
үшін қолайлы ыдысты пайдаланыңыз.
• Термопотты қабырғалардың қасында немесе
асүйлік жиһаз қабырғаларына таяу орналастыруға
тыйым салынады.
• Термопотты қабырғадан немесе жиһаздан термопотқа дейін кемінде 20 см аралық болатындай, ал
термопоттың үстіндегі бос кеңістік кемінде 50 см
құратындай етіп орналастыру керек.
• Желіге қосулы тұрған термопот қараусыз қалдырмаңыз.
Page 41

41
KZ
• Термопот ас үй раковинасына жақын, жуынатын бөлмеде, бассейндер немесе басқа да су
толтырылған сыйымдылықтарға жақын жерде
пайдалануға болмайды.
• Термопот жылытатын аспаптардың, ашық оттың
немесе жылу көздерінің тікелей қасында пайдалануға болмайды.
• Термопот аэрозольдар пайдаланылатын немесе
шашырайтын жерлерде, сондай-ақ тез тұтанатын
сұйықтықтарға жақын жерлерде пайдалануға
тыйым салынады.
• Термопот тегіс және тұрақты бетке орнатыңыз,
оны үстелдің шетіне қоймаңыз. Желілік бауының үстелден салбырап тұруына жол бермеңіз,
сонымен бірге оның ыстық беттермен және жиһаздың үшкір жиектерімен жанаспауын қадағалаңыз.
• Қуаттандыру бауы мен ақуаттандыру бауының айырына дымқыл қолмен тиісуге тыйым салынады.
• Термопот сусыз қоспаңыз, термопот толтырғаннан
кейін қақпағын тығыз жабыңыз.
• Термопоттегі судың деңгейі термопот құтысы ішіне
салынған максималдық белгісінен жоғары болмауын қадағалаңыз. Егер судың көлемі максималдық
белгіден асып тұрса, қайнаған кезде қайнаған су
термопоттен тасып төгілуі мүмкін.
• Суды қайнату кезінде ыстық буға күйіп қалмау
үшін жұмыс істеп тұрған термопотң шүмегіне
төнбеңіз.
• Суды қайнатқан кезде термопотң қақпағын ашуға
тыйым салынады.
• Термопотң беті өте жоғары температурада болуы
мүмкін. Термопотң қызған беттеріне тиіскен кезде
ұқыптылық пен абайлық сақтаңыз. Термопот
тұтқасынан ұстаңыз.
• Қайнаған суға толы термопот тасымалдаған кезде
сақ болыңыз. Термопот суын төккенде абайлаңыз,
термопот күрт еңкейтпеңіз, термопот ұқыпсыз пайдаланғанда, сіз ыстық суға күйіп қалуыңыз мүмкін.
• Термопот тазалау алдында немесе пайдаланбайтын болған жағдайда, оны электр желісінен ажыратыңыз. Термопот желіден ажыратқан кезде тек
айырынан ұстаңыз және оны электр розеткасынан
абайлап шығарыңыз, сымнан тартпаңыз — бұл
сымның және розетканың зақымдануына әкелуі
және қысқа тұйықталуын тудыруы мүмкін.
• Электр тогының соғу қаупін болдырмас үшін термопот суға немесе кез-келген басқа да сұйықтыққа
салуға болмайды.
• Термопот ыдыс жуатын машинаға салуға тыйым
салынады.
• Балалардың қауіпсіздігі мақсатында орама
ретінде қолданылатын полиэтилен қапшықтарды
қараусыз қалдырмаңыз.
НАЗАР АУДАРЫҢЫЗ! Балаларға полиэтилен
пакеттерімен немесе қаптама үлдірімен ойнауға
рұқсат етпеңіз. Тұншығу қаупі бар!
Page 42

42
KZ
• Электрлік термопот балалардың пайдалануына
арналмаған.
• Аспапты ойыншық ретінде пайдаланбас үшін
балаларды қадағалап отырыңыз.
• Электрлік термопот жұмыс істеп тұрғанда, балаларға қуаттандыру бауына және құралға тиісуіне
балаларға рұқсат бермеңіз.
• Жұмыс кезінде және жуу кезінде құралды балалардың қолы жетпейтін жерге қойыңыз.
• Осы құрал дене, психикалық немесе ақыл-ой
мүмкіндіктері төмендетілген тұлғалардың
• (балаларды қоса) немесе олардың тәжірибесі
немесе білімі болмаса, егер олар бақыланбаса
немесе олардың қауіпсіздігі үшін жауап беретін
тұлғамен аспапты пайдалану туралы нұсқаулықтар берілген болмаса, олардың пайдалануына
арналмаған.
• Қуаттандыру бауының желі айыры және термопот
корпусының жағдайын мезгілімен тексеріңіз.
• Қуаттандыру бауы зақымданған болса, қауіп тудырмау үшін оны дайындаушы, сервистік қызмет
немесе баламалы білікті маман ауыстыруы тиіс.
• Аспапты өз бетіңізбен жөндеуге тыйым салынады.
Аспапты өз бетіңізбен жөндемеңіз, кез-келген
ақаулықтар пайда болған кезде, сондай-ақ құрал
құлағаннан кейін аспапты электр розеткасынан
ажыратып, қызмет көрсету орталығына хабарласыңыз.
• Құралды тек зауыт қаптамасымен ғана тасымалдаңыз.
• Құралды балалардың және мүмкіндіктері шектеулі
адамдардың қолы жетпейтін жерде сақтаңыз.
ТЕРМОПОТ ТЕК ТҰРМЫСТЫҚ ПАЙДАЛАНУҒА
АРНАЛҒАН, КОФЕҚАЙНАТҚЫШТЫ КОМЕРЦИЯЛЫҚ НЕМЕСЕ ЗЕРТХАНАЛЫҚ МАҚСАТТАРДА
ПАЙДАЛАНУҒА ТЫЙЫМ САЛЫНАДЫ.
ТЕРМОПОТТЫ ЖҰМЫСҚА ДАЙЫНДАУ
Құралды төмен температура кезінде тасымалдағаннан немесе сақтағаннан кейін оны бөлме
температурасында 3 сағаттан кем емес уақыт
ұстау керек.
• Термопотты қаптамадан шығарыңыз және барлық
қаптамалық материалдарды алып тастаңыз.
• Зауыттық қаптамасын сақтап қойыңыз.
• Қауіпсіздік шаралары мен пайдалануға беруге
қатысты кеңестермен танысыңыз.
• Жинақталымын тексеріңіз.
• Термопотты зақымдануына қатысты тексеріп
алыңыз, зақымдануы болған жағдайда оны электрлік желіге қоспаңыз.
• Заттаңбада көрсетілген қуаттандыру кернеуінің
параметрлері электр желісінің параметрлеріне
сәйкес келетініне көз жеткізіңіз.
Page 43

43
KZ
• Корпустың (7) сыртқы бетін таза, шаңды сүртуге
арналған сәл дымқыл матамен сүртіңіз.
• Қақпақты (9) шешіп алыңыз, ол үшін қақпақтың
бекіткіш-тұтқасына (10) басыңыз, одан ұстаңыз
және қақпақты (9) шешіп алыңыз (сур. 1).
• Термопот құтысының ішкі бетін таза, шаңды сүртуге арналған сәл дымқыл матамен сүртіңіз. Қақапақты орнына қойыңыз (9) және бекіткіш-тұтқаны
(10) басыңыз.
АЛҒАШҚЫ ІСКЕ ҚОСУ
• Термопотты қабырғадан немесе жиһаздан
термопотқа дейінгі қашықтық 20 см-ден кем болмайтындай, ал термопоттың үстіндегі кеңістік 50
см-ден кем болмайтындай етіп, құрғақ тегіс бетке
орнатыңыз.
• Табандыққа (1) торды (2) орнатыңыз, табандықты
(1) орнату орнына қойыңыз (сур. 2).
• Қақпақты (9) шешіп алыңыз, ол үшін қақпақтың
бекіткіш-тұтқасына (10) басыңыз, одан ұстаңыз
және қақпақты (9) шешіп алыңыз (сур. 1).
• Термопот ішіне қолайлы ыдысты пайдалана отырып су құйыңыз, құтының (6) ішкі бетіне салынған,
судың максималды деңгейінің «FULL» белгісінен асырмаңыз. Термопотқа суды су құбыры
шүмегінен тікелей толтыруға тыйым салынады,
термопотты толтыру үшін қолайлы ыдысты пайдаланыңыз (сур. 3).
Ескертпе: минералдық шөгіндінің (қақтың) көлемін
азайту үшін, судың тұрмыстық сүзгішінен тазалаудан
өткен суды пайдалану ұсынылады.
• Қақапақты (9) орнына орнатыңыз және бекіткіш-тұтқаға (10) басыңыз (сур. 1).
• Қуаттандыру бауының ашасын (8) электр розеткасына салыңыз, бұл ретте дыбыстық белгі естіледі
және дисплейде барлық таңбалар көрінеді, содан
кейін тек күту режимі таңбасы (17) «
жанып тұрады, басқару панелінде (5) батырманың
(13) «Температураны таңдау» жарығы ғана жанып
тұрады.
• Таңбалар (21) термопот құтысында (6) судың
барын көрсетіп тұрады:
- « » - термопот құтысының 3/3 көлемі суға
толтырылған.
- « » - термопот құтысының 2/3 көлемі толтырылған.
- « » - судың деңгейі төмен, термопот құтысының 1/3 көлемі толтырылған, термопот
құтысын сумен толтыру қажет, әйтпесе қыздыру
элементі қосылмайды.
• Басқару панеліндегі (5) батырманы (12) «Старт/
қайта қайнату» басыңыз, осы ретте батырма (12)
«Старт/қайта қайнату» индикаторы жанады, таңба
(27) « » және таңба (18) « » жанады, су қыза
бастайды, су температурасы цифрлық таңбалар
(19) арқылы көрінеді.
» ғана
Page 44

44
KZ
Ескертпе:
- басқару панеліндегі (5) батырмалардың әрбір
басылғаны дыбыстық белгімен сүйемелденеді;
- бірінші рет қосу барысында, қыздыру элементінен бөтен иістің пайда болуы мүмкін, бұл
қалыпты жағдай және кепілдік оқиғасы емес.
• Цифрлық таңбалармен (20) ыстық суды ұстап тұру
температурасы көрсетіледі, ыстық суды ұстап
тұру температурасы «85°С», әдепкі бойынша
орнатылған.
• Ыстық буға күюге жол бермеу үшін термопоттың
қақпағында (9) орналасқан бу шығатын тесікттердің (11) үстіне еңкеймеңіз. Бу шығатын тесіктерді (11) қандай да бір заттармен жаппаңыз.
• Су қайнағаннан кейін, таңба (27) «
секунд бойы жыпылықтап тұрады, содан кейін
өшеді, дыбыс белгілері естіледі, сондай-ақ батырманың индикаторы (12) «Старт/қайта қайнату»
өшеді, термопот температураны ұстап тұру режиміне қосылады, ыстық суды ұстап тұру температурасы «85°С», әдепкі бойынша орнатылған.
• Бірінші рет қайнағаннан кейін суды төгіп тастаңыз.
Бірінші рет қайнату нәтижесінде алынған ыстық
суды тамаққа қолдану ұсынылмайды, оны тұрмыстық қажеттіліктер үшін пайдалануға болады.
НАЗАР АУДАРЫҢЫЗ!
Суды құю кезінде ыстық суға күйіп қалмау үшін
абайлық сақтаңыз.
», 60
• Су жіберу помпасының қосылуын (15) «Бұғаттау»
батырмасын басу арқылы бұғаттаудан шығарыңыз, бұл ретте (15) «Бұғаттау» және (14) «Су
жіберілімі» батырмаларының жарықтары жанады.
• Тостағанды торға (2) қойыңыз және (14) «Су
жіберілімі» батырмасын басыңыз да басып ұстап
тұрыңыз, тостағанға қажетті мөлшердегі су құйылғаннан кейін, (14) «Су жіберілімі» батырмасын
босатыңыз.
Ескертпе:
- су жіберілімі тек батырма индикаторлары (14
және 15) қосулы күйінде ғана іске қосылады,
егер сіз батырманы (15) «Бұғаттау» басып қалсаңыз және ешқандай әрекет жасамасаңыз, бұл
жағдайда батырма индикаторлары (14 және 15)
10 секундтан кейін сөнеді;
- су ағызу кезінде су деңгейінің барлық индикаторлары (21) жанып тұрады;
- табандықтың (1) су тамшысымен толтырылуын
қадағалаңыз, табандық (1) толғанда, оны шешіп
алыңыз, суды ағызыңыз және табандықты (1)
орнына орнатыңыз;
- егер сіз термопотты ұзақ уақыт пайдаланбаған
болсаңыз, онда су жіберу кідіріспен жұмыс
істеуі мүмкін. Бұл жағдайда қақпақты (9) ашу
және жабу ұсынылады, және су жіберуді қайта
қосу керек.
• Термопотты өшіру үшін 5 секунд бойы (12)
«Старт/қайта қайнату» батырмасын басып, ұстап
Page 45

45
KZ
тұрыңыз, электр розеткасынан (8) қуаттандыру
бауының ашасын суырып алыңыз.
• Қақапақты (9) шешіп алыңыз (сур. 1) және термопоттың толық суығанын күтіңіз.
• Термопотты еңкейтіңіз және су қалдықтарын
ағызыңыз, қақпақты (9) орнына орнатыңыз және
бекіткіш-батырмаға (10) басыңыз (сур. 1).
ТЕРМОПОТТЫ ПАЙДАЛАНУ
• Алдыңғы бөлімде көрсетілгендей, термопотты
жұмысқа дайындаңыз (су құйыңыз, электр розеткасына қуаттандыру бауының ашасын салыңыз).
• Суды қыздыру және оның температурасын ұстап
тұру режимдерін таңдау
• Басқару панеліндегі (5) батырманы (12) «Старт/
қайта қайнату» басыңыз, осы ретте батырма (12)
«Старт/қайта қайнату» индикаторы жанады, таңба
(27) «
бастайды, су температурасы цифрлық таңбалар
(19) арқылы көрінеді.
• Су қайнағаннан кейін, таңба (27) « », 60
секунд бойы жыпылықтап тұрады, содан кейін
өшеді, дыбыс белгілері естіледі, сондай-ақ батырманың индикаторы (12) «Старт/қайта қайнату»
өшеді, термопот температураны ұстап тұру режиміне қосылады, ыстық суды ұстап тұру температурасы «85°С», әдепкі бойынша орнатылған.
• Ыстық су температурасын ұстап тұру режимінде,
батырманы (13) «Температураны таңдау» басып,
» және таңба (18) « » жанады, су қыза
сіз түрлі сусындарға арналған ыстық суды ұстап
тұру температурасын орната аласыз, бұл ретте
сәйкесінше таңбалар (18) жанады:
- «
» - суды қайнату режимі, су қайнағанға дейін
қыздырылады, және цифрлық таңбалар (19)
«100°С» көрсетіледі.
- « » - ыстық суды «95°С» дейін ұстап тұру
режимі қара шәй демдеуге арналған, температура «95°С» әдепкі бойынша орнатылған. Суды
қыздыру температурасын өзгерту үшін батырмаларды (24) «-/+» пайдаланыңыз, температураны таңдау диапазоны 87°С-ден 95°С-ге дейін.
» - ыстық суды «85°С» дейін ұстап тұру
- «
режимі кофе демдеуге арналған, температура
«85°С» әдепкі бойынша орнатылған. Суды
қыздыру температурасын өзгерту үшін батырмаларды (24) «-/+» пайдаланыңыз, температураны таңдау диапазоны 80°С-ден 86°С-ге дейін.
» - шөп шай дайындау үшін ыстық суды
- «
«65 ° C» деңгейіне дейін сақтау режимі әдепкі
бойынша орнатылады. Суды қыздыру температурасын өзгерту үшін батырмаларды (24)
«-/+» пайдаланыңыз, температураны таңдау
диапазоны 65°С-ден 79°С-ге дейін.
- (26) « » - ыстық суды «55°С» дейін ұстап
тұру режимі, температура «55°С» әдепкі бойынша орнатылған. Суды қыздыру температурасын
өзгерту үшін батырмаларды (24) «-/+» пайдаланыңыз, температураны таңдау диапазоны
Page 46

46
KZ
50°С-ден 64°С-ге дейін.
- (25) « » - ыстық суды «45°С» дейін ұстап
тұру режимі, температура «45°С» әдепкі бойынша орнатылған. Суды қыздыру температурасын
өзгерту үшін батырмаларды (24) «-/+» пайдаланыңыз, температураны таңдау диапазоны
40°С-ден 49°С-ге дейін.
Ескертпе:
- ыстық су температурасын 40°С-ден төмен
ұстап тұруды орнатқан кезде, цифрлық
таңбалардың орнына (20) «- -» таңбалары
көрсетіледі.
- (23) «
• Қара шәй «
» арналған ыстық суды ұстап тұру режимдерін
таңдауды, диапазондағы су температурасын
таңдауды 50-64 °С « », және су температурасын 40-49 °С « » таңдауды, батырмалары (24)
«-/+» арқылы жүзеге асыруға болады.
» - ұзақ қайнату режимін қосу, бұл
режим суда ерітілген хлордың мөлшерін азайту
үшін қолданылады. Бұл режимде су 100°С-ге
дейін қызады, бұл ретте таңба (27) « » жыпылықтайды, су 3 минут бойы қайнайды, содан
кейін таңба (27) « » өшеді, дыбыстық белгі
естіледі және термопот кофе (18) « » демдеуге
арналған ыстық суды сақтау режиміне өтеді,
таңбаларымен (20) су температурасы «85°С»
көрсетіледі.
», кофеге « », Өсімдік шайы «
Суды салқындату режимі
• Батырманы (16) «Жылдам салқындау» басыңыз, осы ретте таңба (22) «
жыпылықтап тұрады, термопотты салқындату
желдеткіші іске қосылады. Салқындату режимін
өшіру үшін (16) «Жылдам салқындату» батырмасын қайта басыңыз, таңба (22) « » сөнеді.
Су деңгейінің шәкілі
• Сіз термопот құтысындағы (6) суды таңбалар (21)
арқылы су деңгейін бақылай аласыз:
» - термопот құтысының 3/3 көлемі суға
- «
толтырылған.
- « » - термопот құтысының 2/3 көлемі толтырылған.
- « » - судың деңгейі төмен, термопот құтысының 1/3 көлемі толтырылған, термопот
құтысын сумен толтыру қажет, әйтпесе қыздыру
элементі қосылмайды.
• Қақпақты (9) шешіп алыңыз, ол үшін қақпақтың
бекіткіш-тұтқасына (10) басыңыз, одан ұстаңыз
және қақпақты (9) шешіп алыңыз (сур. 1). Термопот ішіне қолайлы ыдысты пайдалана отырып су
құйыңыз, құтының (6) ішкі бетіне салынған, судың
максималды деңгейінің «FULL» белгісінен асырмаңыз. Термопотқа суды су құбыры шүмегінен
тікелей толтыруға тыйым салынады, термопотты
толтыру үшін қолайлы ыдысты пайдаланыңыз
(сур. 3).
» жанады және
Page 47

47
KZ
• Термопот су қайнату режиміне қосылады, су
қайнағаннан кейін, дыбыс белгілері естіледі және
термопот кофе демдеуге арналға ыстық су температурасын ұстап тұру режиміне ауысады, таңба
» және цифрлық таңбалар (20) «85°С»
(18) «
жанады.
• Қажет болған жағдайда басқару панеліндегі (5)
батырманы (12) «Старт/қайта қайнату» басыңыз,
осы ретте батырма (12) «Старт/қайта қайнату» индикаторы жанады, таңба (27) «
(18) « » жанады, су қыза бастайды, су температурасы цифрлық таңбалар (19) арқылы көрінеді. Су
қайнағаннан кейін, таңба (27) « », 60 секунд
бойы жыпылықтап тұрады, содан кейін өшеді,
дыбыс белгілері естіледі, сондай-ақ батырманың
индикаторы (12) «Старт/қайта қайнату» өшеді,
термопот температураны ұстап тұру режиміне
қосылады, ыстық суды ұстап тұру температурасы
«85°С», әдепкі бойынша орнатылған.
• Термопотты өшіру үшін 5 секунд бойы (12)
«Старт/қайта қайнату» батырмасын басып, ұстап
тұрыңыз, электр розеткасынан (8) қуаттандыру
бауының ашасын суырып алыңыз.
Балалардан бұғаттау
• Балалардың ыстық сумен күйіп қалуын болдырмау үшін осы функцияны пайдаланыңыз.
• Балалардан қорғау құралын қосу үшін «Құлыптау»
түймесін (15) 5 секунд басып тұрыңыз, «Құлып-
» және таңба
тау» батырмасы (14) және «Сумен жабдықтау»
индикаторы жанады.
• Балалардан бұғаттау жағдайында басқару панеліндегі (5) батырма (14) «Су жіберу» белсенді
емес.
• Бала қауіпсіздігінің құралын сөндіру үшін «Блок»
түймесін (15) 1 секунд басып тұрыңыз, ал «Су
беру» және (15) «Блоктау» түймешіктерінің индикаторлары сөнеді.
• Термопотты өшіру үшін, 5 секунд бойы батырманы
(12) «Старт/қайта қайнату» басып, ұстап тұрыңыз,
электр розеткасынан қуаттандыру бауының ашасын суырып алыңыз.
ТАЗАЛАУ ЖӘНЕ КҮТІМ
• Термопотты тазаламас бұрын электр розеткасынан (8) қуаттандыру бауының ашасын суырып
алыңыз, қақпақты шешіп алыңыз (9) және термопоттың толық суығанын күтіңіз. (сур. 1)
• Үнемі термопот құтысынан судың қалдығын төгіп
тастау керек, ол үшін қақпақты (9) шешу керек.
• Термопотты еңкейтіп, судың қалдықтарын абайлап төгіңіз.
• Табандықты (1) шешіп алыңыз, торды (2) шешіп
алыңыз, табандықтан (1) суды төгіңіз, табандықты
(1) және торды (2) жуып жіберіңіз. Торды (2)
табандыққа (1) орнатыңыз және табандықты (1)
орнату орнына қойыңыз.
Page 48

48
KZ
• Термопот корпусының (7) сыртқы бетін сәл
дымқыл матамен сүртіңіз, содан кейін құрғатып
сүртіңіз.
• Ластануды кетіру үшін бейтарап жуғыш заттарды
пайдаланыңыз, металл
• қылшақтарды, абразивтік тазалау құралдары мен
еріткіштерді қолдануға тыйым салынады.
• Термопот пен қуаттандыру бауын (8) суға немесе
басқа кез-келген сұйықтықтарға салуға болмайды.
• Термопотты ыдыс жуатын машинаға салмаңыз.
Термопот құтысының ішкі бетіндегі дақтар
• Суда термопот құтысының ішкі беттерінде дақтың
пайда болуына әкелетін әртүрлі минералдық заттар болады, дақтар термопоттың жұмысына әсер
етпейді, дақтың пайда болуы кепілдік жағдайы
болып табылмайды.
• Термопот құтысының ішкі беттеріндегі дақтарды
лимон қышқылы мен ас үйлік сірке суының ерітіндісімен кетіруге болады.
• Лимон қышқылының немесе сірке суының жағымсыз дәмін кетіру үшін суды қайнатыңыз және оны
төгіп тастаңыз.
• Судағы иіс пен дәм толық кеткенге дейін әрекетті
қайталау керек.
Минералдық шөгіндіні (қақты) кетіру
• Термопот құтысының ішінде пайда болған қақ
судың дәміне әсер етеді, су мен қыздыратын эле-
мент арасындағы жылумен алмастыруды бұзады,
сонымен қатар қыздыратын элементтің қатардан
шығу қаупін тудырады, термопот құтысында
қақтың көп болуы кезінде қыздыратын элемент
күйіп кеткен жағдай кепілдік жағдай болып табылмайды.
• Қақты кетіру үшін ас сірке суының 2:1 пропорциясы бойынша араластырылған суды термопоттың
«FULL» максималдық деңгейіне дейін құйыңыз.
• Желілік баудың айырын (8) электрлік розеткаға
қосыңыз.
• Термопотты суды қайнату режиміне қосыңыз.
Су қайнағаннан кейін, термопотты өшіріңіз, ол
үшін 5 секунд бойы (12) «Старт/қайта қайнату»
батырмасын басыңыз және басып ұстап тұрыңыз,
электр розеткасынан (20 8) қуаттандыру бауының
ашасын шығарып алыңыз және сірке суы ерітіндісі
бар термопотты түнгіге қалдырыңыз.
• Таңертең сірке суы ерітіндісін төгіңіз, термопотты
сумен максималдық деңгейіне дейін толтырыңыз,
суды қайнатыңыз және төгіңіз.
• Қақты кетіру үшін
• электрлік шайнектер арналған арнайы құралдар-
ды пайдалануға болады, оларды қолдану жөніндегі нұсқаулықты қатаң сақтау керек.
• Термопотты қақтан жүйелі түрде тазалау керек.
Page 49

49
KZ
САҚТАУ
• Термопотты ұзақ сақтауға алып қоярдың алдында
оны электрлік желіден өшіру керек, құралды суытып, суын төгіңіз.
• Термопотты тазалаңыз.
• Құралды балалардың және мүмкіндіктері шектеулі
адамдардың қолы жетпейтін жерде сақтаңыз.
ЖЕТКІЗІЛІМ ЖИЫНТЫҒЫ
1. Термопот – 1 дана.
2. Нұсқаулық – 1 дана.
ТЕХНИКАЛЫҚ СИПАТТАМАЛАРЫ
• Электр қуаттандыруы 220-240 В, ~ 50-60 Гц
• Номиналды тұтыну қуаты: 1200 Вт
• Суға арналған сыйымдылық көлемі: 5 л
КӘДЕГЕ АСЫРУ
Қалдықтардың бақыланбай пайдаға
асыруынан қоршаған ортаға немесе
адамдардың денсаулығына зиян келтірмеу үшін, құралдың немесе қуаттандыру элементтерінің (егер жинағына
кірсе) қызмет ету мерзімі аяқталғаннан
кейін оларды әдеттегі тұрмыстық қалдықтармен бірге
тастамаңыз, аспапты және қуаттандыру элементтерін одан әрі кәдеге асыру үшін арнайы пункттерге
жіберіңіз.
Бұйымдарды кәдеге асыру кезінде пайда болатын
қалдықтар белгіленген тәртіп бойынша келесі пайдаға асырылатын тәртіппен міндетті түрде жинауға
жатады.
Берілген өнімді кәдеге асыру туралы қосымша
ақпаратты алу үшін жергілікті муниципалитетке,
тұрмыстық қалдықтарды пайдаға асыру қызметіне
немесе осы өнімді сатып алған дүкенге жүгініңіз.
Өндіруші алдын-ала ескертусіз, құралдың дизайнын, конструкциясы мен оның жалпы жұмыс
ұстанымдарына әсер етпейтін техникалық сипаттамаларын өз-герту құқығын өзіне қалдырады.
Құралдың қызмет ету мерзімі – 3 жыл
Өндірілген күні сериялық нөмірде көрсетілген.
Қандай да бір ақаулықтар табылған жағдайда дереу
авторландырылған сервистік орталыққа жүгіну керек.
Page 50

Page 51

Hergestellt für «Ruste GmbH»,
Berggasse 18/18, 1090 Wien,
Osterreich
Produced for «Ruste GmbH»,
Berggasse 18/18, 1090 Vienna, Austria
Изготовлено по заказу Русте Гмбх,
Бергассе 18/18, 1090 Вена, Австрия
Уполномоченное изготовителем
лицо: ООО «Грантэл»
143912, МО, г. Балашиха,
ш. Энтузиастов, вл. 1А
т.: +7 (495) 297-50-20,
e-mail: info@brayer.su
Made in China/Произведено в Китае
Page 52

brayer.pro
 Loading...