

ASSEMBLY
INSTRUCTIONS
INSTRUCTIONS
D’ASSEMBLAGE
INSTRUCCIONES DE
ENSAMBLA JE
WHITE : BLANC : BLANCO
BARK GREY : GRIS ÉCORCE : CORTEZA GRIS
CHOCOLATE : CHOCOLAT : CHOCOLATE

PARTS / PIÈCES / PIEZAS
CODE / CÓDIGO QTY / QTÉ / CANT. CODE / CÓDIGO QTY / QTÉ / CANT.CODE / CÓDIGO QTY / QTÉ / CANT.CODE / CÓDIGO QTY / QTÉ / CANT.
30 1
31 1
32 1
33 1
ASSEMBLY
INSTRUCTIONS
INSTRUCTIONS
D’ASSEMBLAGE
INSTRUCCIONES DE
ENSAMBLAJE
34 1
35 1
40 1
41 2
Model / Modèle:
Production Number
Numéro de production:
Customer Service
Service à la clientèle
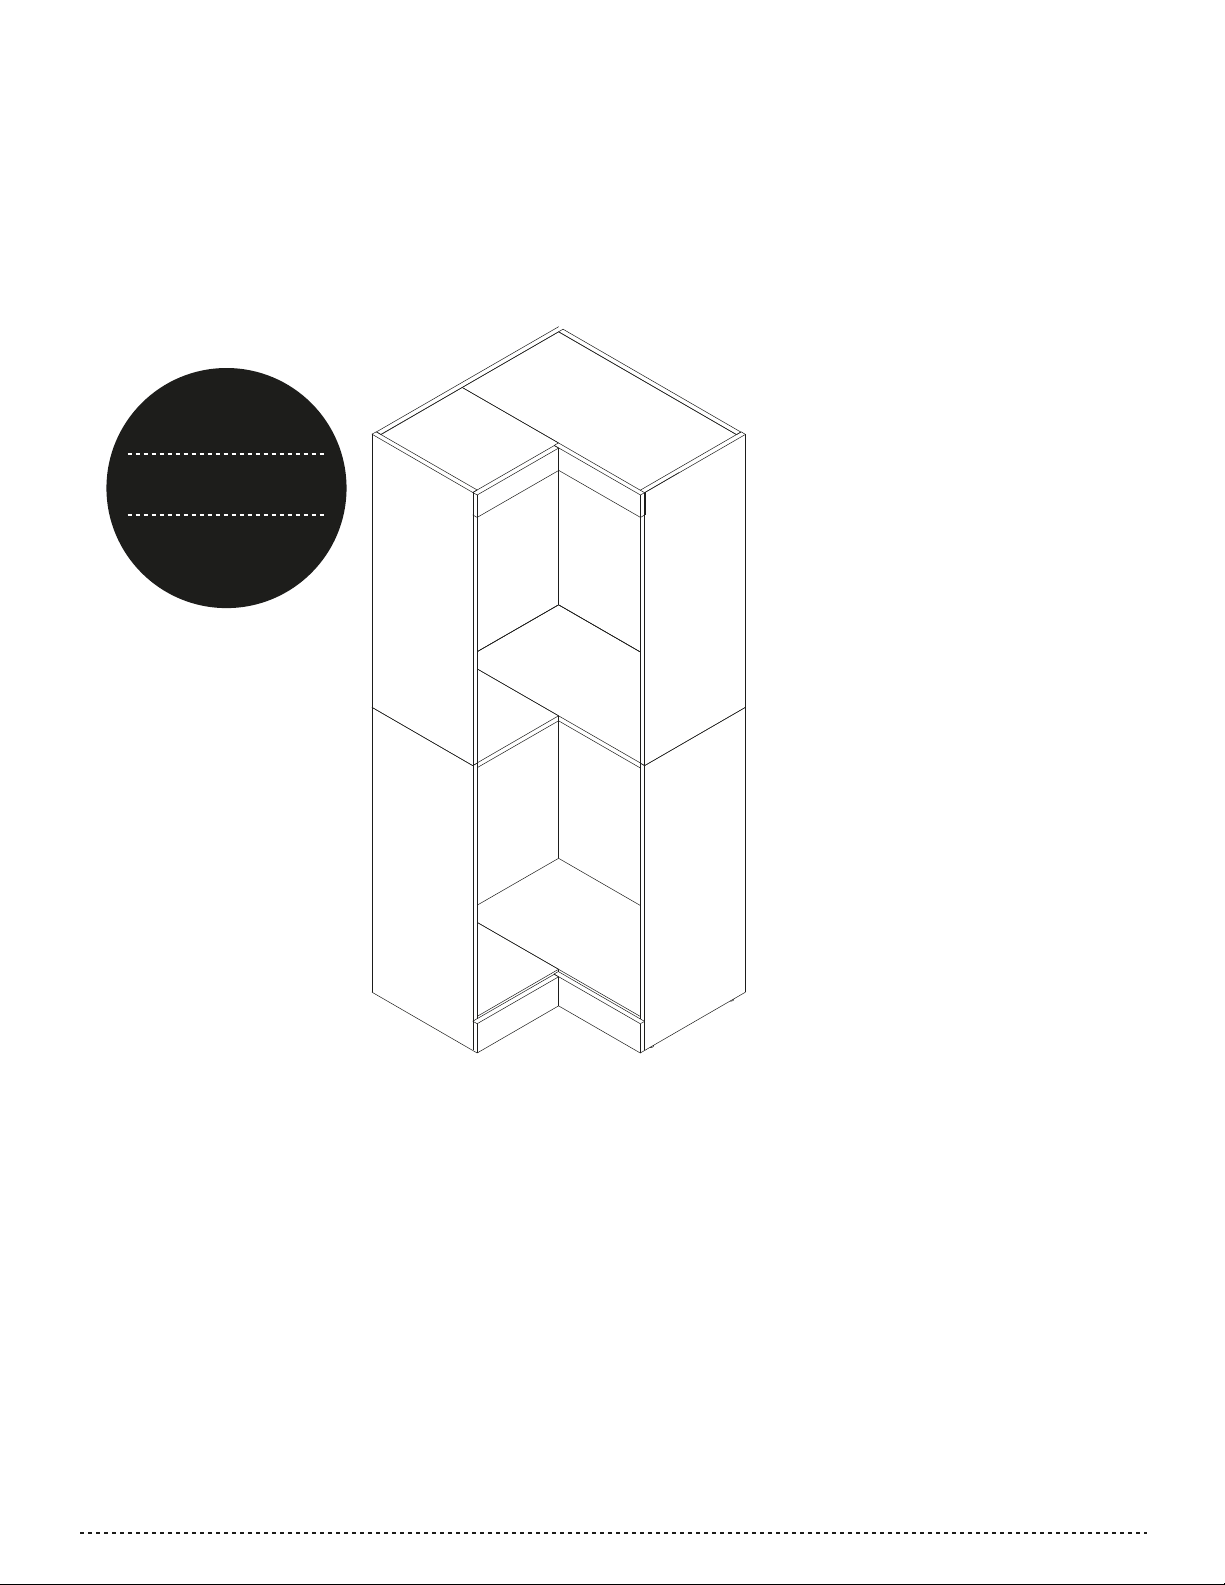
For future reference and to better serve you, please apply the
self-adhesive sticker in an accessible space such as under part 41.
Pour mieux vous servir en cas de besoin, veuillez apposer l’autocollant dans
un endroit facilement accessible tel que le dessous de la pièce 41.
Para contar con una referencia futura y que le sea de mayor utilidad,
coloque la calcomanía autoadhesiva en un lugar accesibe, tal como
debajo de la pieza 41.
43 2
44 1
70 1
71 1
To better serve you!
Pour mieux vous servir!
80 1
81 1
82 1
84 1
CA-99
23/32” (18mm)
H-03
When you have completed the assembly
of your new furniture, install plastic caps
Lorsque vous avez complété l’assemblage
de votre meuble, installez les capuchons
de plastique
Una vez que haya completado el ensamblaje
del mueble, coloque los capuchones de
plástico
PA-844
To level your furniture,
use leg levelers.
Pour niveler votre
meuble utilisez les
pattes ajustables.
Para nivelar su mueble
utilice las patas
ajustables.
32
30
44
82 84
35
43
34
43
81
40
71
33
41
70
31
41
80
2
HARDWARES / QUINCAILLERIES / QUINCALLAS
turn
tournez
haga
girar
A
CODE / CÓDIGO QTY / QTÉ / CANT. CODE / CÓDIGO QTY / QTÉ / CANT.CODE / CÓDIGO QTY / QTÉ / CANT.CODE / CÓDIGO QTY / QTÉ / CANT.
CA-99 32
EQ-314 4
H-03 48
REAL SIZE / GRANDEUR RÉELLE / TAMAÑO REAL
CODE / CÓDIGO QTY / QTÉ / CANT.CODE / CÓDIGOQTY / QTÉ / CANT.
VC-204 1
VR-207 8
1/2” (13 mm)
H-36 48
PA-844 6
ST-760 1
2” (50 mm)
PROBLEMS OR INFORMATION
POUR TOUT PROBLÈME OU INFORMATION
PROBLEMA O INFORMACION
TI-552 2
TU-870 AB 2
2004MM4X35CS 2
VR-210 8
A
Do not use
Ne pas utiliser
No use
Do not use
Ne pas utiliser
No use
M
F
VC-204 1
B
A
VR-207 8
1/2” (13 mm)
VR-210 8
5/8” (16 mm)
5/8” (16 mm)
2” (50 mm)
PRODUCT CARE / ENTRETIEN DU PRODUIT / MANTENIMIENTO DEL PRODUCTO
Avoid placing the furniture in the sunlight or near a source of heat. Use a soft dry cloth for dusting. To clean heavy dirt, use a
cloth dipped in a solution of mild detergent and water. Avoid leaving wet objects on the surface or using commercial
chemical cleaning products.
Évitez d'exposer le meuble au soleil ou près de toute source de chaleur. Pour le nettoyage, utilisez un chiffon doux et sec. Pour la
grosse saleté, utilisez un chiffon humidifié avec un peu de détergent dilué dans l'eau. Évitez de laisser des objets mouillés sur la
surface de votre meuble ou d'utiliser des nettoyants chimiques.
Evite exponer el mueble al sol o las fuentes de calor. Para limpiarlo, utilice un paño suave y seco. Para limpiar las manchas
rebeldes, utilice un trapo húmedo con un poco de detergente diluido en agua. No deje objetos mojados encima del mueble ni
utilice limpiadores que contengan productos químicos.
química.
CONGRATULATIONS! YOU ARE NOW THE OWNER OF A QUALITY PRODUCT
FÉLICITATIONS! VOUS AVEZ MAINTENANT EN VOTRE POSSESSION UN PRODUIT DE QUALITÉ
FELICITACIONES! AHORA ES USTED DUEÑO DE UN PRODUCTO DE CALIDAD.
IMPORTANT NOTICE / NOTE IMPORTANTE / NOTA IMPORTANTE
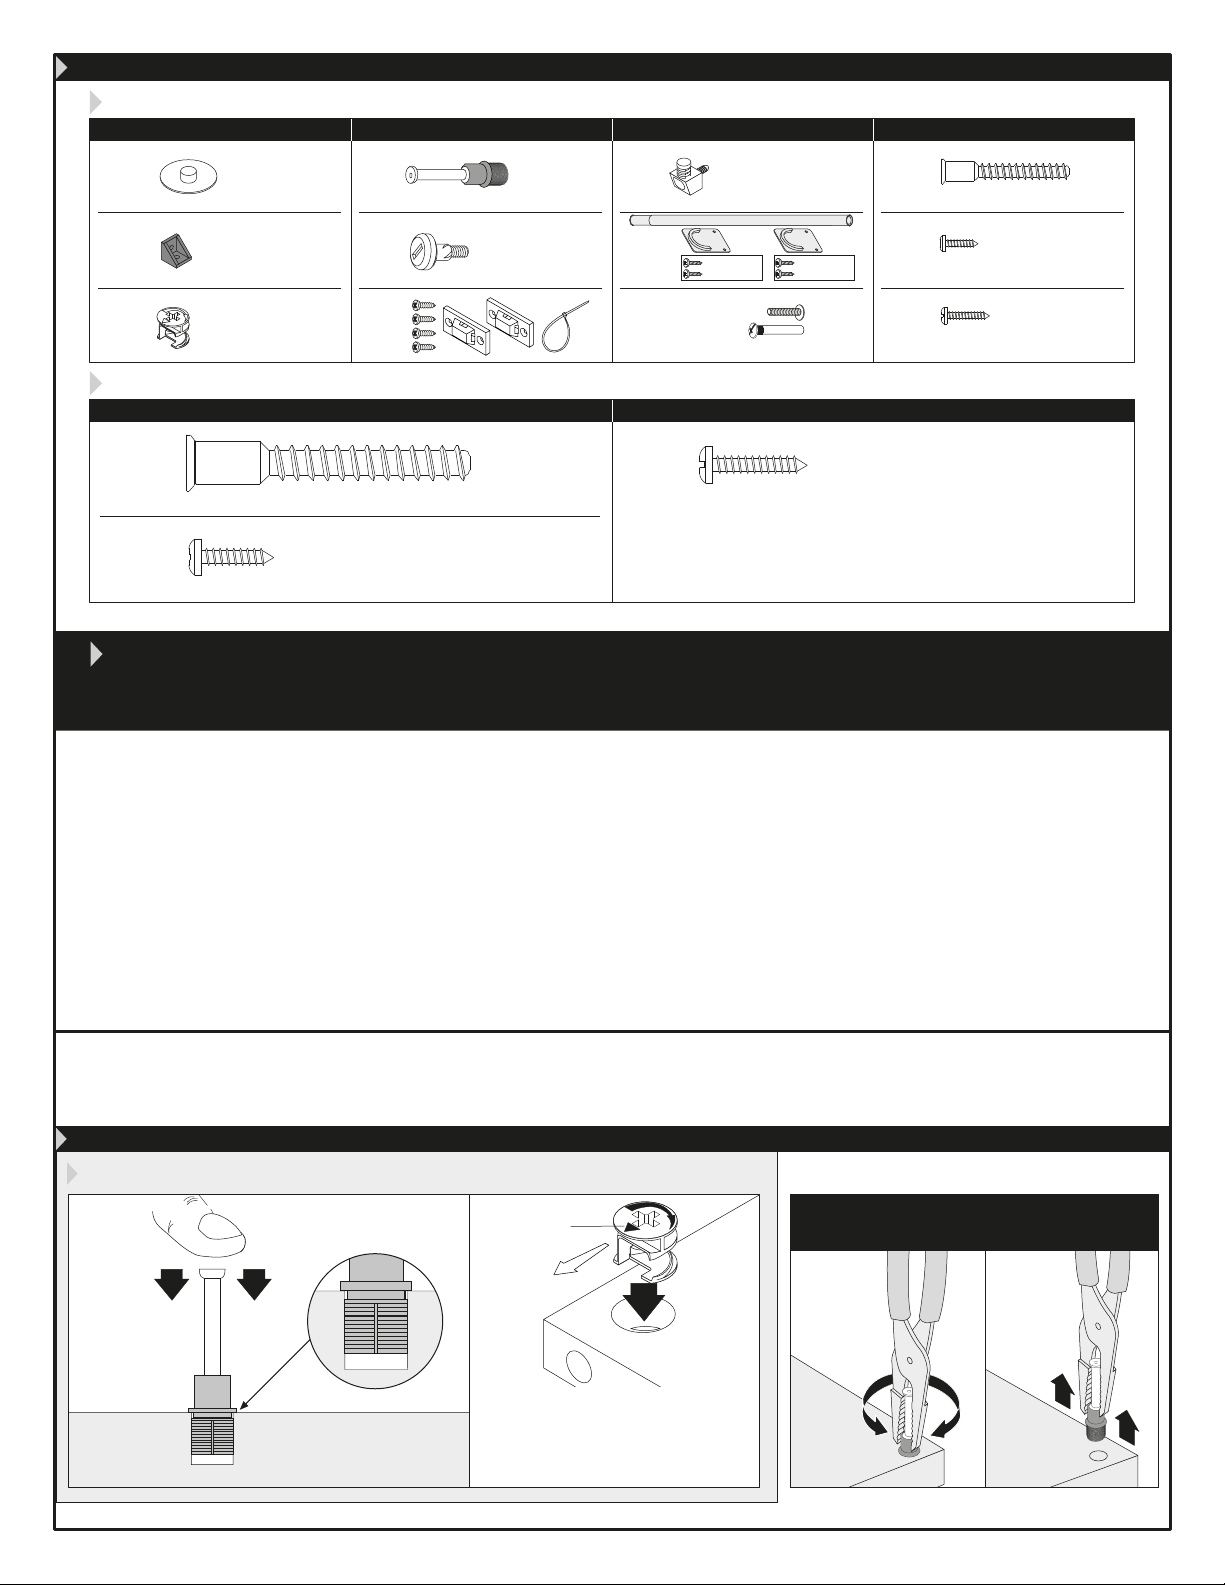
Main hardware system / Système de quincaillerie principal / Artículos de ferretería
1
H-36
push down
enfoncez
presione
hacia
abajo
proper position
bonne position
posición correcta
2
H-03
arrow
flèche
flecha
How to remove a misplaced assembly bolt (H-36).
If needed / En cas de nécessité
En caso de necesidad
Comment retirer un boulon (H-36) mal situé.
Cómo retirar un perno (H-36) mal ubicado.
B
pull out
retirez
retire
Insert the cam with the arrow pointing
towards the hole in the edge.
Insérez la rondelle en pointant la flèche
vers le trou de la bordure.
Inserte la arandela con la flecha hacia el
orificio cerca de la orilla.
3

HARDWARE INSTALLATION / INSTALLATION DES QUINCAILLERIES / INSTALACIÓN DE LAS QUINCALLAS
1
attention / attencíon
Do not use the screws in the
bags with the TU-870, use
instead the VR-210 screws.
Ne pas utiliser les vis ensachées
avec le TU-870, veuillez plutôt
utiliser les VR-210.
No use los tornillos en la bolsa
con el TU-870, use, mas bien,
los tornillos VR-210
VR-210
TU-870 A
31
PA-844
41
X2
70
TI-552
remove the screw
to be used in step 2.
enlever la vis qui
servira à l’étape 2.
sacar el tornillo
que servirà para
la etapa 2.
insert
insérer
insertar
H-36
1
Code / Código
Qty / Qté / Cant.
4
H-03
x 16
H-36
x 11
PA-844
x 2
TI-552
x 1
TU-870 A
x 1
H-03
5/8” (16 mm)
VR-210
x 2

HARDWARE INSTALLATION / INSTALLATION DES QUINCAILLERIES / INSTALACIÓN DE LAS QUINCALLAS
2
30
H-36
PA-844
TI-552
remove the screw
to be used in step 2.
enlever la vis qui
servira à l’étape 2.
sacar el tornillo
que servirà para
la etapa 2.
H-03
insert
insérer
insertar
34
attention / attencíon
Do not use the screws in the
bags with the TU-870, use
instead the VR-210 screws.
Ne pas utiliser les vis ensachées
avec le TU-870, veuillez plutôt
utiliser les VR-210.
No use los tornillos en la bolsa
con el TU-870, use, mas bien,
los tornillos VR-210
For installation on the outside of the storage
Pour l’installation à l’extérieur de l’unité de
Para la instalación al exterior de la unidad
de almacenamiento vea la pagina 15
unit go to page 15
rangement aller à la page 15
H-03
VR-210
TU-870 A
34
2
Code / Código
Qty / Qté / Cant.
H-03
x 7
H-36
x 14
PA-844
x 4
TI-552
x 1
TU-870 A
x 1
Back
Arrière
Parte trasera
5/8” (16 mm)
VR-210
x 2
5
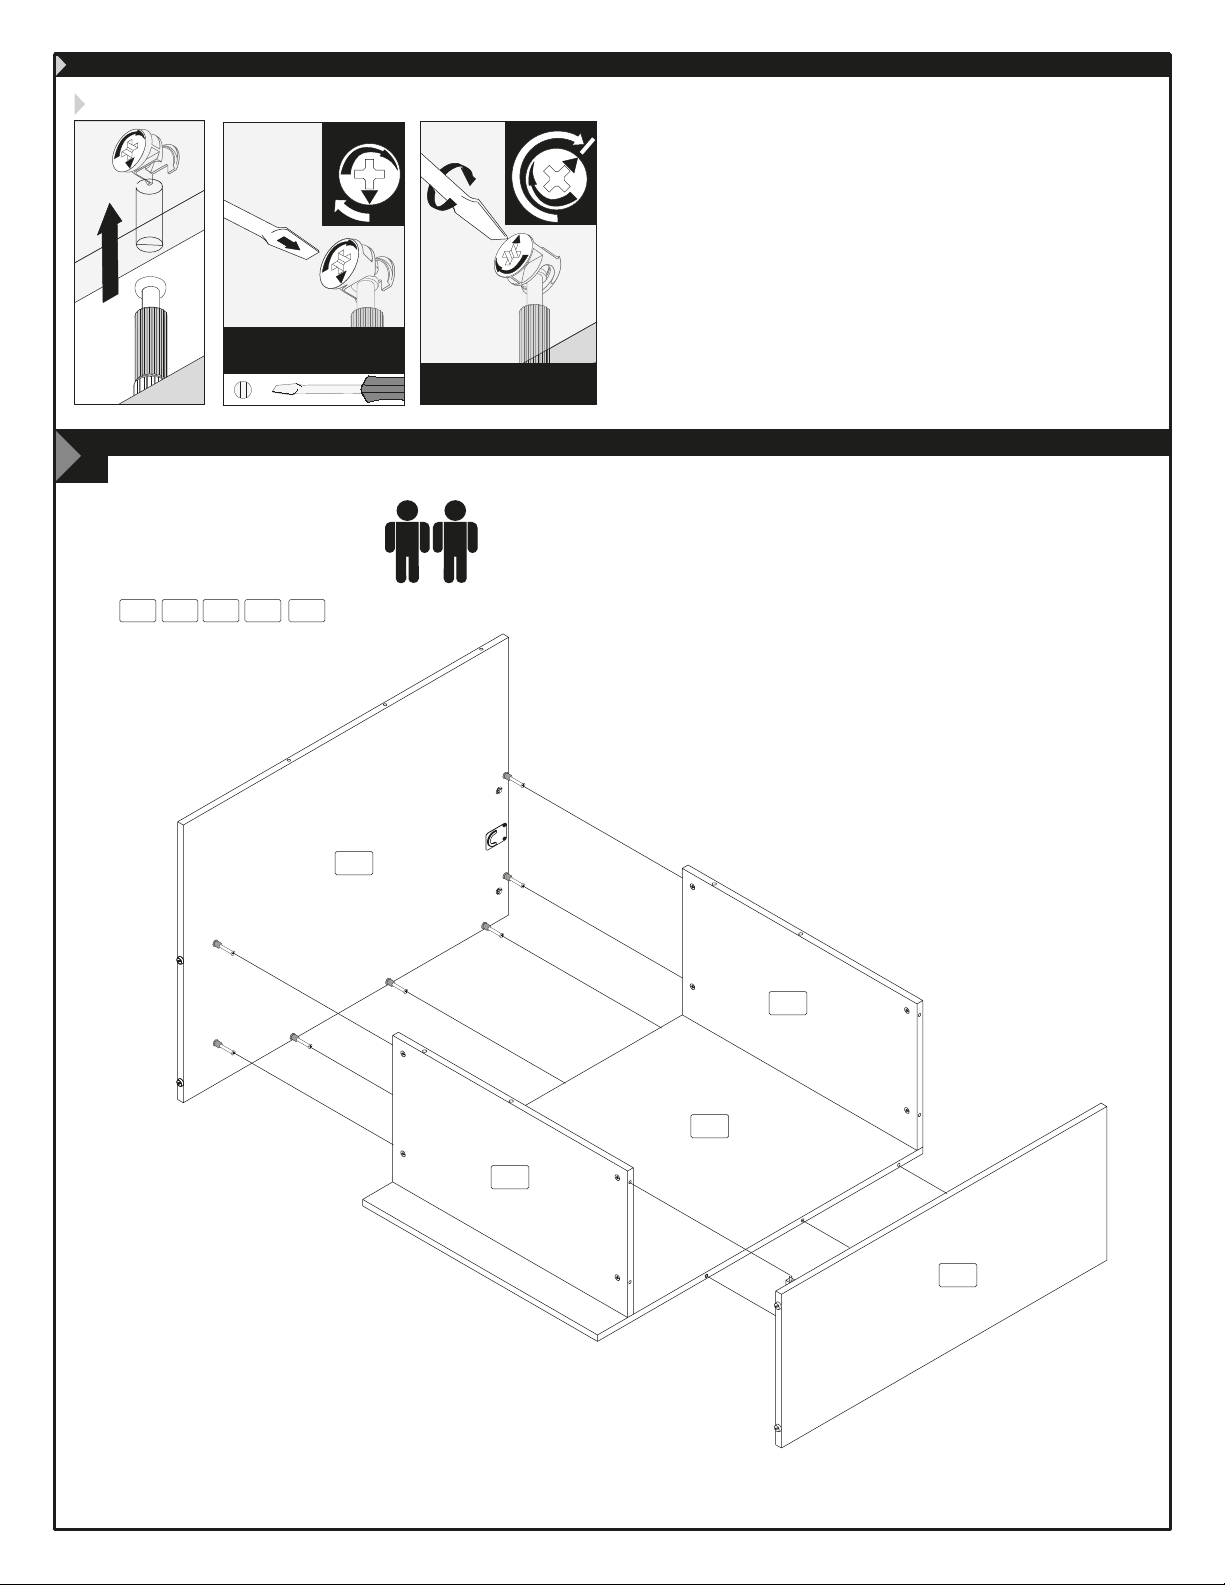
IMPORTANT NOTICE / NOTE IMPORTANTE / NOTA IMPORTANTE
Main hardware system / Système de quincaillerie principal / Sistema principal de quincalla
1 3
insert
insérez
insertar
2
herramientas necesarias
A
tools required
outils requis
tighten
serrez
apretar
B
important
importante
Make sure to properly tighten each cam to ensure furniture
solidity. Otherwise, parts could be damaged or the user
could be injured.
Assurez-vous de bien resserrer chaque rondelle pour assurer
la solidité du meuble. Dans le cas contraire, des pièces
pourraient être endommagées ou l’utilisateur pourrait se
blesser.
Asegúrese de apretar bien cada arandela para garantizar
la solidez del mueble.De lo contrario, podría provocarse
daño a las piezas o las personas.
PRE-ASSEMBLY / PRÉ-ASSEMBLAGE / PREENSAMBLAJE
3
Assembling sequence
Séquence d’assemblage
Secuencia de ensamblaje
Parts / Pièces / Piezas:
41 3170
41
34
34
41
70
41
31
6

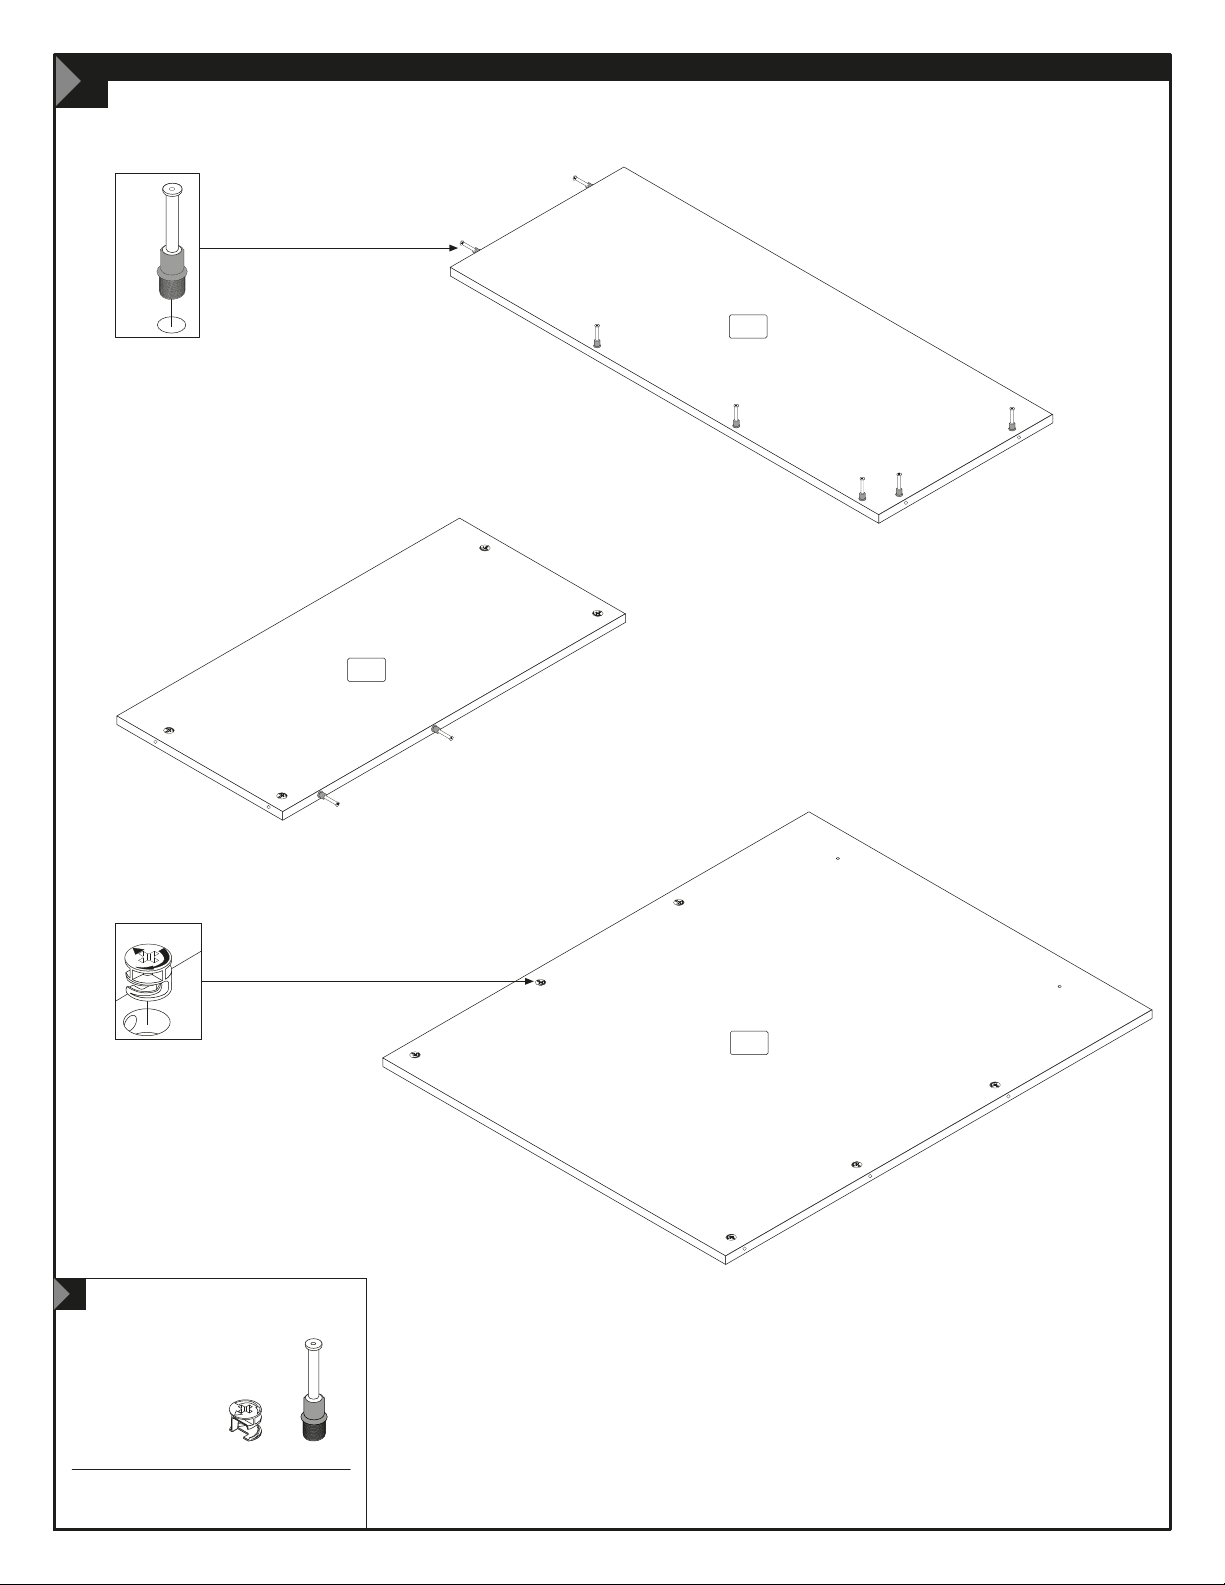
ASSEMBLY / ASSEMBLAGE / ENSAMBLAJE
4
Assembling sequence
Séquence d’assemblage
Secuencia de ensamblaje
Parts / Pièces / Piezas:
41
3441
31 43
+
43
43
30 80
81
81
30
43
H-03
41
34
80
VC-204
41
31
4
Code / Código
Qty / Qté / Cant.
H-03
x 8
2” (50 mm)
VC-204
x 1
7

HARDWARE INSTALLATION / INSTALLATION DES QUINCAILLERIES / INSTALACIÓN DE LAS QUINCALLAS
5
33
44
H-03
H-03
35
Back
Arrière
Parte trasera
35
H-36
attention / attencíon
Do not use the screws in the
bags with the TU-870, use
instead the VR-210 screws.
Ne pas utiliser les vis ensachées
avec le TU-870, veuillez plutôt
utiliser les VR-210.
No use los tornillos en la bolsa
con el TU-870, use, mas bien,
los tornillos VR-210
For installation on the outside of the storage
Pour l’installation à l’extérieur de l’unité de
Para la instalación al exterior de la unidadde
unit go to page 15
rangement aller à la page 15
almacenamiento vea la pagina 15
VR-210
TU-870 A
5
Code / Código
Qty / Qté / Cant.
8
H-03
x 7
H-36
x 14
TU-870 A
x 2
5/8” (16 mm)
VR-210
x 4
HARDWARE INSTALLATION / INSTALLATION DES QUINCAILLERIES / INSTALACIÓN DE LAS QUINCALLAS
6
H-36
32
H-03
40
71
6
Code / Código
Qty / Qté / Cant.
H-03
x 10
H-36
x 9
9

ASSEMBLY / ASSEMBLAGE / ENSAMBLAJE
7
Assembling sequence
Séquence d’assemblage
Secuencia de ensamblaje
Parts / Pièces / Piezas:
8435334071
important / importante
35
ajust the
mouldings and
tight the screws
VR-207
ajuster la moulure
et visser les vis
VR-207
ajustar la moldura
y apretar los
tornillos VR-207
84
40
84
40
VR-207
EQ-314
7
Code / Código
Qty / Qté / Cant.
10
EQ-314
x 2
71
33
1/2” (13 mm)
VR-207
x 4

ASSEMBLY / ASSEMBLAGE / ENSAMBLAJE
8
Assembling sequence
Séquence d’assemblage
Secuencia de ensamblaje
Parts / Pièces / Piezas:
+
3282444035
32
44
important / importante
VR-207
EQ-314
44
VR-207
82
EQ-314
ajust the mouldings and
tight the screws VR-207
ajuster la moulure et visser
les vis VR-207
ajustar la moldura y apretar
los tornillos VR-207
35
40
82
8
Code / Código
Qty / Qté / Cant.
EQ-314
x 2
1/2” (13 mm)
VR-207
x 4
11

ASSEMBLY / ASSEMBLAGE / ENSAMBLAJE
9
Assembling sequence
Séquence d’assemblage
Secuencia de ensamblaje
Parts / Pièces / Piezas:
+
3130
72 3332 73
35
32
30
33
34
31
12

INSTALLATION / INSTALLATION / INSTALACIÓN
10
important / importante
The TU-870 can support an approximative weight of 50 pounds (27.2kg)
Le TU-870 peut supporter une charge de 50 livres ( 22.7kg)
El TU-870 puede soportar approximativamente un peso de 50 libras (27.2kg)
TU-870 B
For installation on the outside of the storage unit
Pour l’installation à l’extérieur de l’unité de rangement
Para la instalación al exterior de la unidad
Drill a 1/8” hole (3 mm) at the height required before
installing the TU-870 B.
Veuillez pré-percer un trou de 1/8” (3 mm) à la hauteur
désirée avant d’installer le TU-870 B.
Haga un agujero para comenzar de 1/8’’ (3mm) al
lugar deseado antes de instalar el TU-870B.
VR-210
TU-870 B
Ouverture maximum 42” (1067 mm)
Maximum opening 42” (1067 mm)
TU-870 A
Do not use the screws in the bags with the TU-870, use
instead the VR-210 screws.
Ne pas utiliser les vis ensachées avec le TU-870, veuillez
plutôt utiliser les VR-210.
No use los tornillos en la bolsa con el TU-870, use, mas
bien, los tornillos VR-210
When attaching the pole to the wall, use the
previously chosen height and choose a screw or brace
(not included) suited to the type of wall where the
TU-870 A will be attached in order to make it secure.
In case of uncertainty, contact a hardware store.
Pour la fixation au mur, reporter la hauteur choisie
précédemment et choisir une vis ou un ancrage
(non-inclus) adapté au type de mur sur lequel sera
fixé le TU-870 A afin de rendre le tout sécuritaire.
En cas de doute, contacter un magasin de bricolage.
Para la fijaciòn contra la pared, utilise la altura
escojida anterioremente y escoja un tornillo o un
anclaje (no incluidos) adaptados para el tipo de pared
donde sera fijada la unidad para que todo esté
seguro. Si tiene dudas, contacte una tienda de
bricolajes para tener consejos.
Apertura maxima 42’’ (1067 mm)
10
Code / Código
Qty / Qté / Cant.
TU-870 B
x 2
13

3
3
3
3
INSTALLATION / INSTALLATION / INSTALACIÓN
11
Caution may tip / Attention risque de bascule /
Precaución puede inclinarnstalación
ST-760
Please properly install the safety bracket following the
directions provided on its hardware bag.
Veuillez bien installer les ferronneries d’attaches selon les
instructions fournies sur le sac de cette quincaillerie.
Instale los dispositivos de anclaje de acuerdo con las
instrucciones de la bolsa de tornillería correspondiente.
If it is impossible to use the anti-tilt devise (ST-760) needed to affix your storage unit to the wall, use the two holes from the
pieces 71 & 73. To affix the unit to the wall, choose a screw or a brace (not included) suitable to the type of wall to which the
unit will be fastened in order to make it more secure. In case of uncertainty, contact a hardware store.
Si il vous est impossible d’utiliser le dispositif anti-bascule (ST-760) pour fixer votre unité de rangement au mur, veuillez utiliser les deux
perçages des pièces 71 et 73. Pour la fixation au mur, choisir une vis ou un ancrage (non-inclus) adapté au type de mur sur lequel
sera vissé l’unité afin de rendre le tout sécuritaire. En cas de doute, contacter un magasin de bricolage.
Si no puede utlisar el despositivo antivolcar (ST-760) para fijar su unidad de almanecenamiento contra la pared, use las dos
perforaciones de las piezas 71 y 73. Para la fijaciòn contra la pared, escoja un tornillo o un anclaje (no incluidos) adaptados para
el tipo de pared donde sera fijada la unidad para que todo esté seguro. Si tiene dudas, contacte una tienda de bricolajes para
tener consejos.
important / importante
14
71
73
11
Code / Código
Qty / Qté / Cant.
ST-760
x 1

12
INSTALLATION / INSTALLATION / INSTALACIÓN
important / importante
For a complete arrangement, you can affix
several storage units from one to another as
illustrated below.
Pour compléter votre aménagement, vous pouvez fixer
plusieurs unités de rangement l’une à l’autre de la façon
illustrée ci-dessous.
Para completar su mueble , ud puede fijar
otras unidades de almacenamiento de la
manera ilustrada abajo.
not included
non-inclus
no se incluye
32
30
33
not included
non-inclus
no se incluye
31
M F
2004-MM4X35CS
Using a drill, make a complete hole that will allow for the
installation of 2004-MM4X35CS.Two 2004-MM4X35CS per
storage unit.
À l’aide d’une perçeuse, veuillez percer complètement
le trou qui servira à l’installation du 2004-MM4X35CS.
Deux 2004-MM4X35CS par unité de rangement.
Con la ayuda de una perforadora, puede perforar
completamente un agujero que va servir para la instalaciòn
de 2004-MM4X35CS. Dos 2004-MM4X35CS para unidad de
almacenamiento.
12
Code / Código
Qty / Qté / Cant.
F
M
2004-MM4X35CS
x 2
15

YOU
and
US
USTEDES
VOUS
et
NOUS
y
NOSOTROS
FOR LONG TIME
POUR LONGTEMPS
POR MUCHO TIEMPO
OUR FURNITURE IS GARANTEED FOR 10 YEARS. NO MATTER THE PROBLEM, OUR CUSTOMER
RVICE IS THERE FOR YOU.
SE
NOS MEUBLES SONT GARANTIS POUR 10 ANS. PEU IMPORTE LE PROBLÈME, N’HÉSITEZ PAS À
COMMUNIQUER AVEC NOTRE SERVICE À LA CLIENTÈLE.
NUESTROS MUEBLES TIENEN UNA GARANTIA DE 10 AÑOS. NO IMPORTA EL PROBLEMA, COMUNIQUE CON
NUESTRO SERVICIO À CLIENTE.
 Loading...