

Page 1
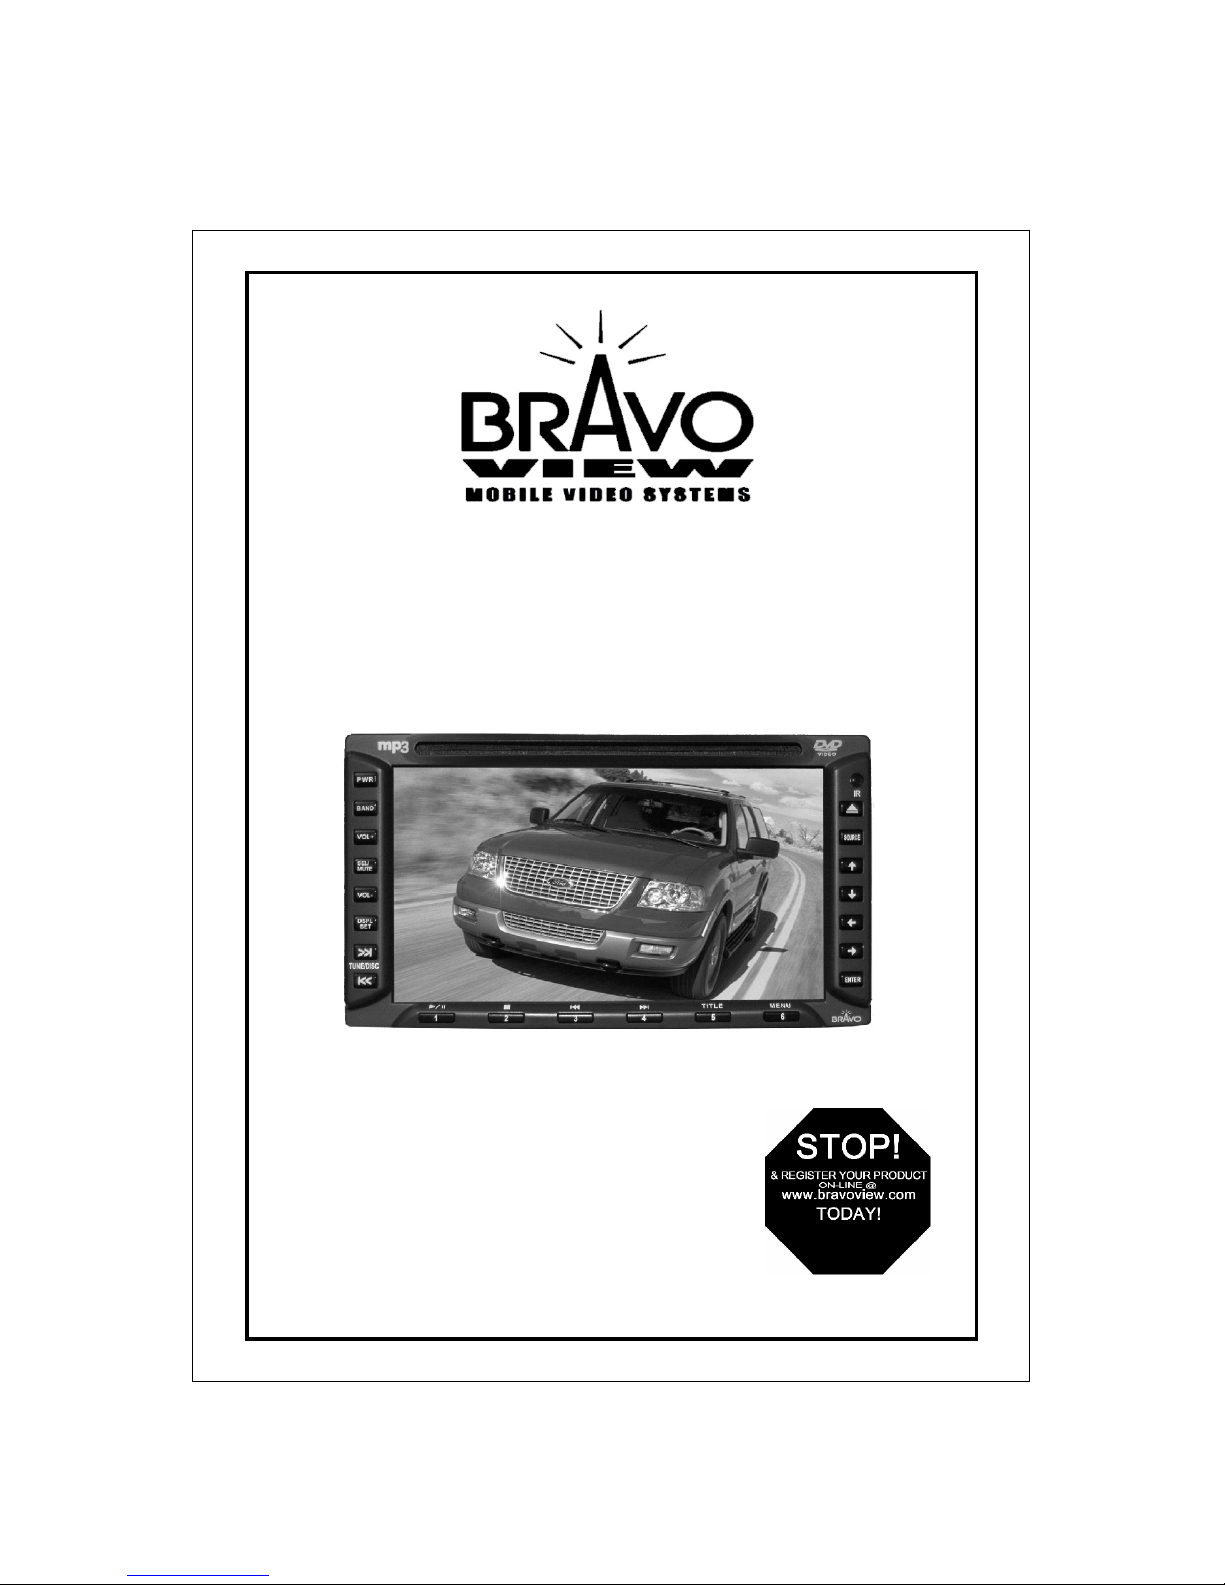
Model: IND-2065
6.5” DOUBLE DIN CAR STEREO
USER MANUAL
V1.2
Bravo View Technology
20153 Paseo Del Prado
Walnut, California 91789
United States of America
909-869-0699
www.bravoview.com
Page 2

MENU
Front Pane l
Gener al operation
Radio f unction
DVD dis c reader funct ion
CD chan ger function
Exter nal function
RGB
Power o n/off
Volume c ontrol
Radio s creen
Radio o peration
DVD rea der operatio n
CD changer menu operation
OSD ope ration
Remot e control oper ation mau nal
Other b uttons opera tion
CCD Bac k up camera oper ation
Basic i nstallatio n
Insta llation Inst ruction
Acces sories
1
2
3
4
5
6
7
8
9
10
11
13
17
17
18
6
19
12
20
21
TAB L E O F CONT E N TS
Page 3
1
2
3
4
5
6
7
8
9
10
11
12
13
14
15
16
17
18 19
20
21
22
23
24
13
14
15
16 ENTER
17
18
19
20
21
22
23
24
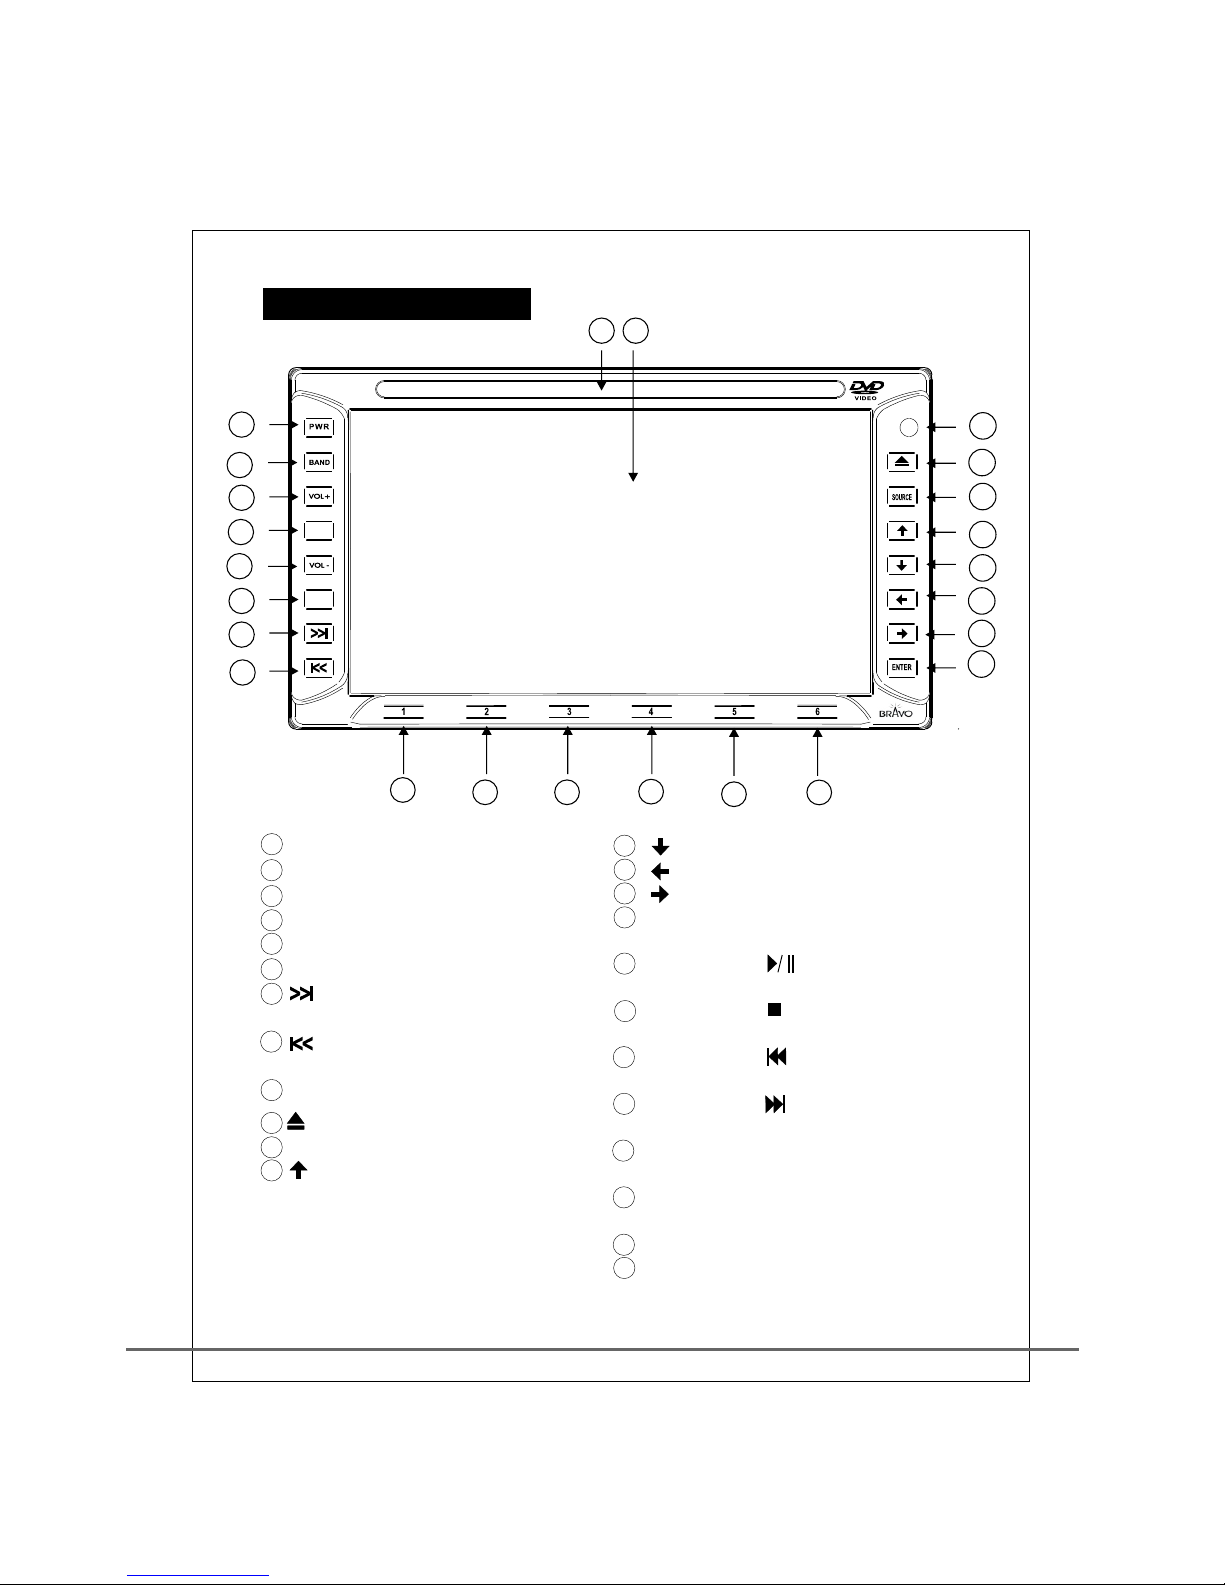
: Menu g oes d own
: Menu g oes l eft
: Menu g oes r ight
: Menu f unc tion
conf irm ation
Pres et ba nd 1/
disc p lay ing/p aus e
Pres et ba nd 2/
disc p lay ing/s top
Pres et ba nd 3/
go bac k to th e last track
Pres et ba nd 4/
go to th e nex t track
Pres et ba nd 5/TI TLE
goes b ack t o the ini tia l playi ng positio n
Pres et ba nd 6/ME NU
goes t o men u funct ion
Disc Input
Lcd Di splay
1
2
3
4 SEL / MUTE
5
6 DESP SET
7
8
9
PWR: p owe r ON/OF F
BAND : Ban d(AM/ FM) selec tion
VOL+ : Volu me cont rol , incre ase
: Freq uen cy sele cti on
VOL- : Volu me cont rol , decre ase
: Date /ti me disp lay
Band f req uency
incr eas es/di sc go es down
: Band f req uency
decr eas es/di sc go es up
IR rec eiv er wind ow
10
11 SOURCE
12
: Disc e jec t
: Play bac k funct ion s elect ion
: Menu g oes u p
1
IND-2065
S E L /
MUTE
DSPL
SET
MP3
FR O NT PAN E L
Page 4
2
BAS S +5
TRE BLE +6
BAL ANCE R3
VOLU ME +24
VOLU ME BALA NC E
TREB LE
BASS
PWR
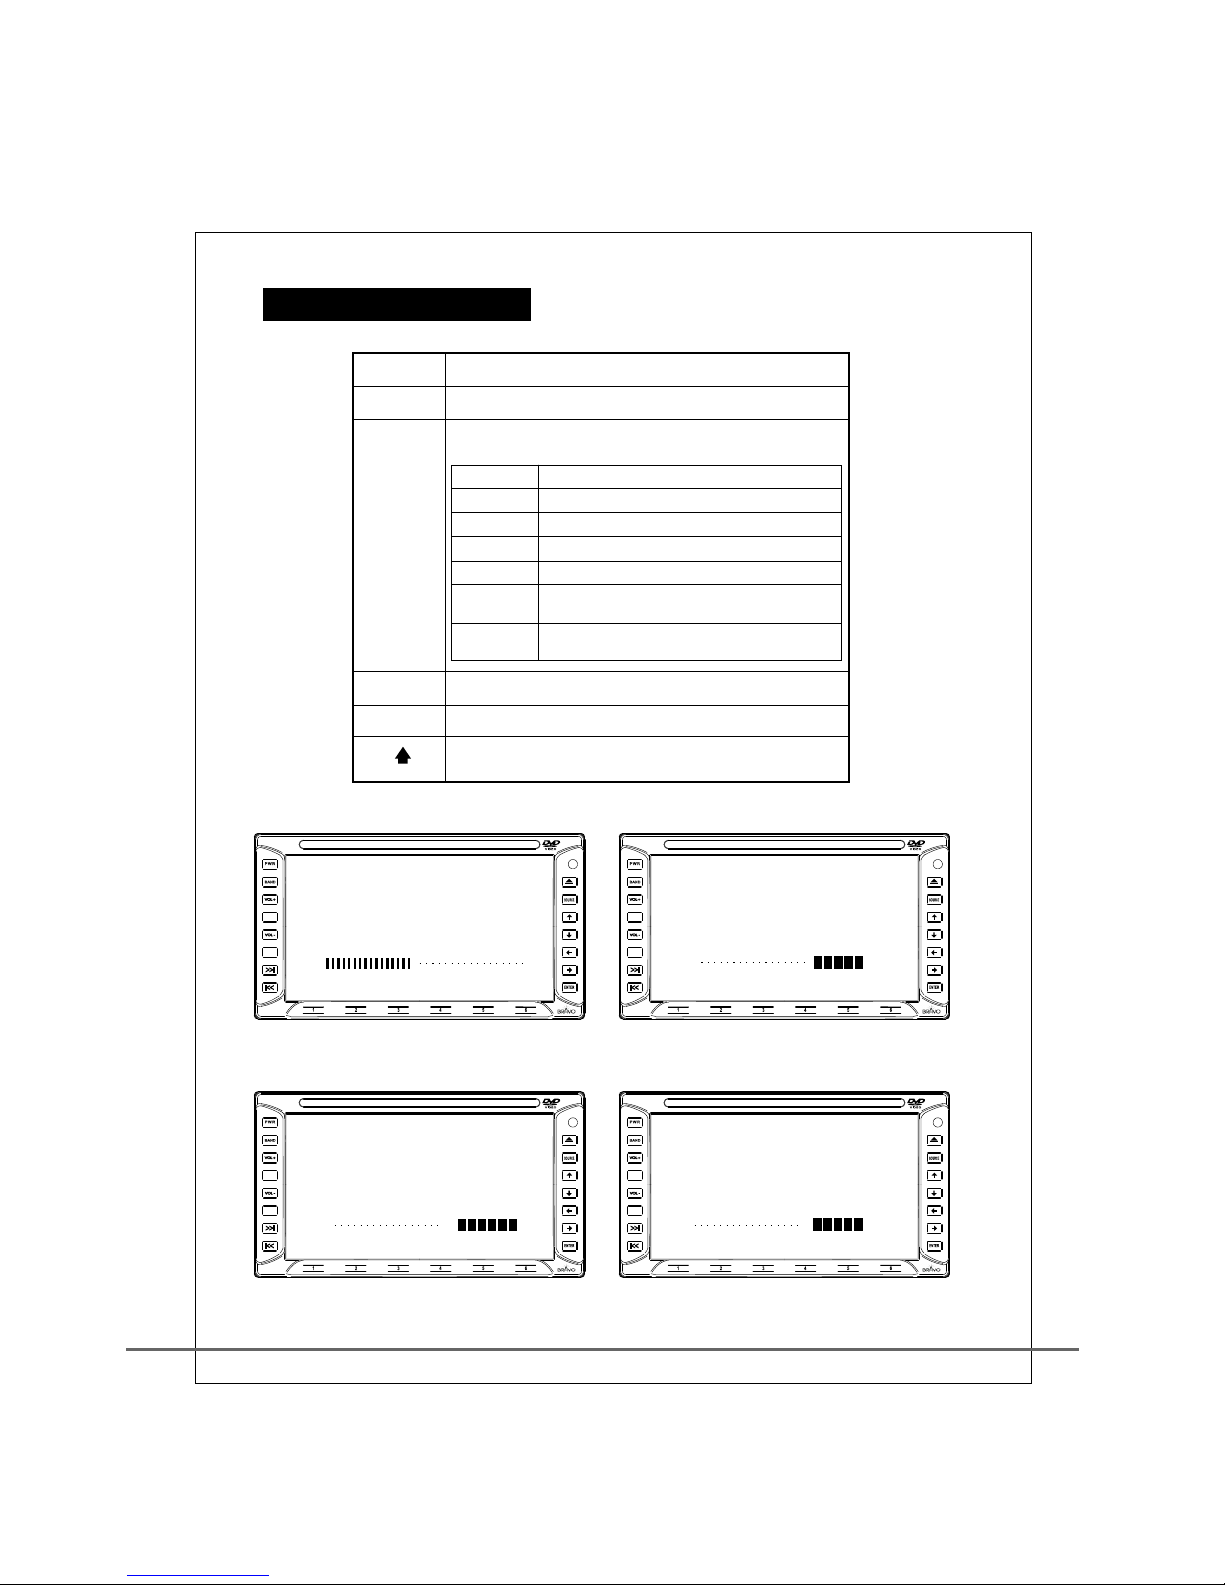
VOL+ Increase t he v ol um e
SEL
Powe r ON /O FF
Set u p volum e adjus tment f uncti on
(ac compa nied wi th VOL+ /VOL- f or adju stmen t)
Pre set VOL UME mai n volum e adjus tment , 0 to 48
Pre ss 2 time s BAS S: Bass a djust ment +8 t o -8
Pre ss 3 time s TRE BLE: Tr eble ad justm ent +8 to - 8
Pre ss 4 time s FAD ER: fro nt and ba ck volu me adju stmen t F8 to R8
Pre ss 5 time s BAL ANCE: l eft and r ight vo lume ad justm ent R8 to L 8
Pre ss 6 time s Go ba ck to pre set
(VO LUME: m ain vol ume adj ustme nt)
Pre ss for
a lon g time Mut e funct ion
VOL-
Decr ea se v olume
Tim e an d date disp la y and setup
Pres s fo r 3 se conds t o tu rn o ff L CD s creen .
/MUT E
DSPL
SET
SE L /
MUTE
DSPL
SET
MP3
SE L /
MUTE
DSPL
SET
MP3
SE L /
MUTE
DSPL
SET
MP3
SE L /
MUTE
DSPL
SET
MP3
GE N E RAL OP E R ATION
Page 5
SE L /
MUTE
DSPL
SET
MP3
7
8
1
2
3
4
5
6
10
11
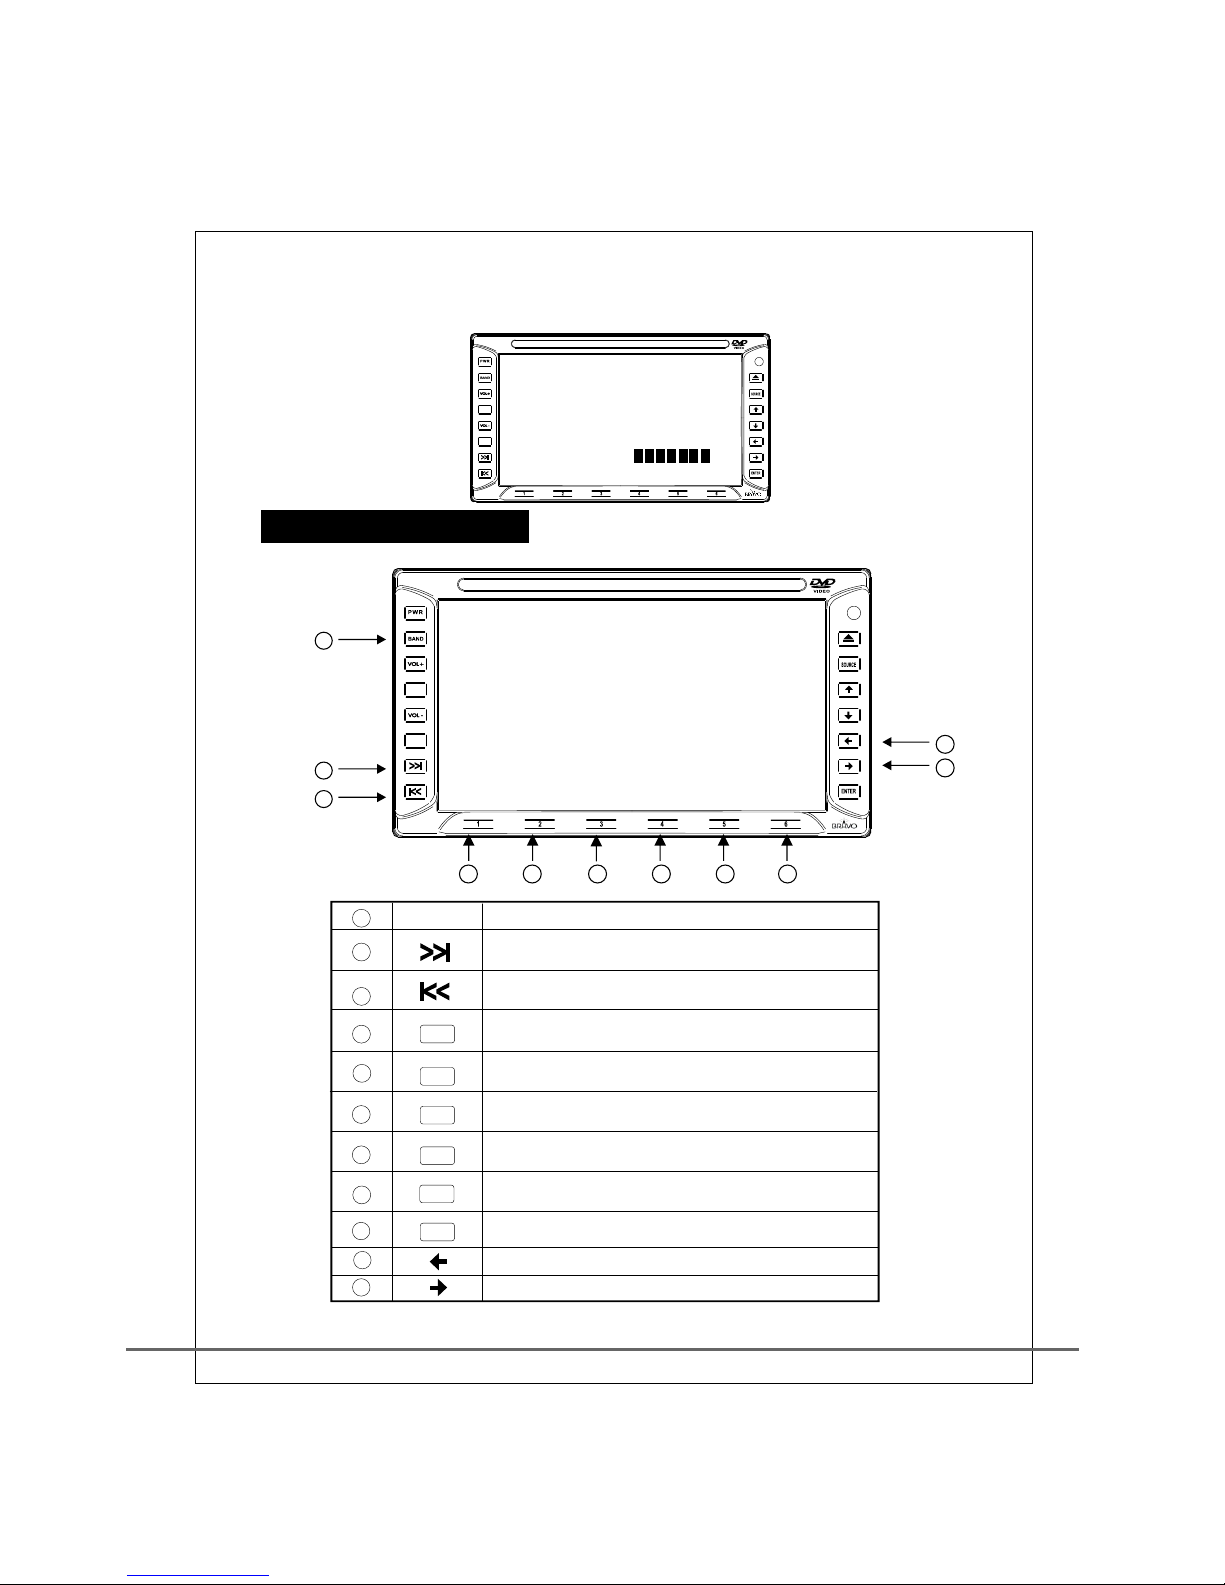
BAN D
3 sec onds
to pr esent c urren t radio s tatio n
3 sec onds
to pr esent c urren t radio s tatio n
3 sec onds
to pr esent c urren t radio s tatio n
3 sec onds
to pr esent c urren t radio s tatio n
3 sec onds
to pr esent c urren t radio s tatio n
3 sec onds
to pr esent c urren t radio s tatio n
Enter to swit ch t he r ad io c ha nn el
Search for ne xt c ha nn el m an ua ll y
(or press f or a l on g ti me t o se ar ch f or t he n ex t channel)
Search for ne xt c ha nn el m an ua ll y
(or press f or a l on g ti me t o se ar ch f or t he l as t channel)
Channel fas t se le ct io n or p re ss f or
Channel fas t se le ct io n or p re ss f or
Channel fas t se le ct io n or p re ss f or
Channel fas t se le ct io n or p re ss f or
Channel fas t se le ct io n or p re ss f or
Channel fas t se le ct io n or p re ss f or
Automatic s ea rc h fo r th e la st c ha nn el
1
2
3
4
5
6
9
FADER
FA D E R R6FA D E R R6
1
2
3
10
11
4 5 6 7 8 9
3
1
2
3
4
5
6
7
8
TUN E
TUN E
SE L /
MUTE
DSPL
SET
MP3
Automatic s ea rc h fo r th e ne xt c ha nn el
RA D I O FUNC T I ON
Page 6
S E L /
MUTE
DSPL
SET
MP3
4
7
8
9
10
11
12
2
3
4
5
6
1
13
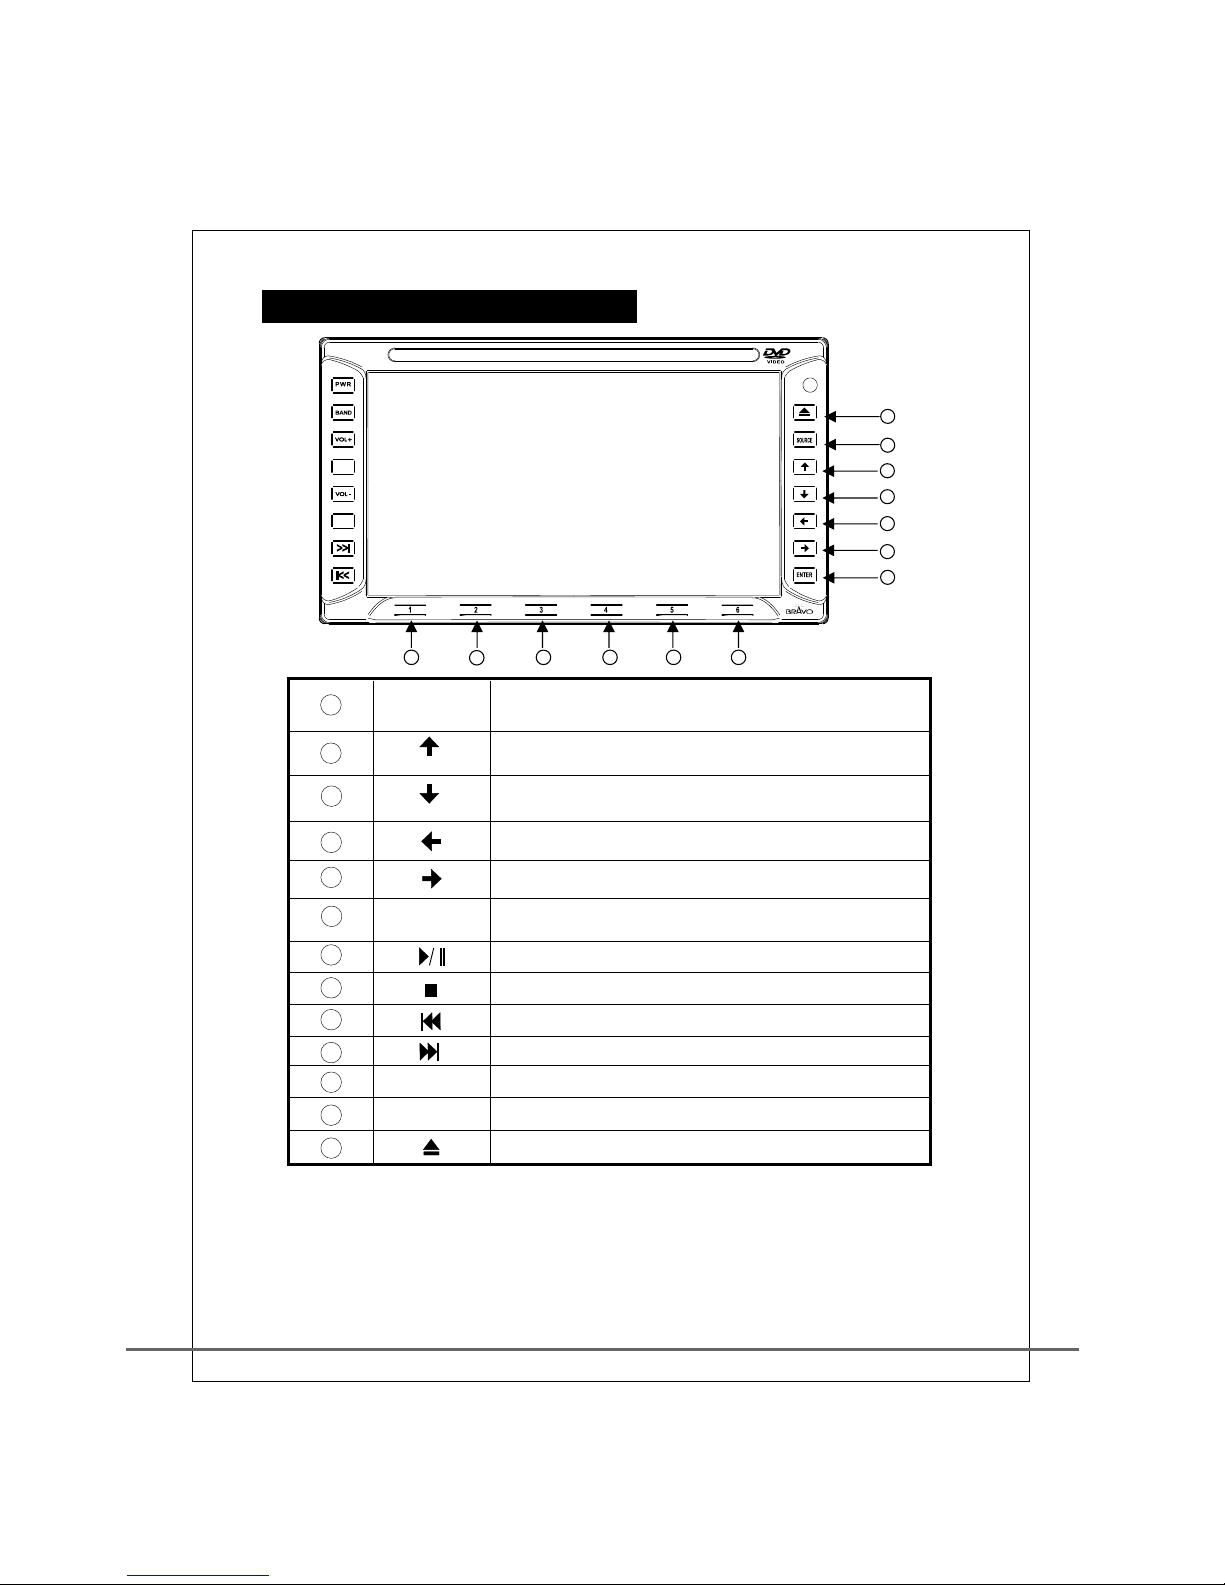
SOURCE E nt er DVD di sc c ha nger func ti on
(Ple as e tu rn on the pow er a fter it has b ee n install ed )
DVD me nu g oe s up
(The f un ct ion dep en ds o n the disc)
DVD me nu g oes down
(The f un ct ion depen ds o n the disc)
DVD me nu g oes left
(The f un ct ion depen ds o n the disc)
DVD me nu g oe s right
(The f un ct ion dep en ds o n the disc)
ENTER DV D me nu exec ut io n
(The fun ct ion depen ds o n the disc)
Play t he v id eo or pau se
Paus e or s to p the pla yi ng
Last s ec ti on or las t so ng o r for rew in di ng
Next s ec tion or nex t so ng o r for for wa rd ing
TITLE Pl ay back fr om t he s tart
MENU M en u of f uncti on s
1
2
3
4
5
6
7
8
9
10
11
12
13
Chan g th e op tical d is c
Note : This fu nctio n onl y works w hen a n optio nal c hange r is install ed.
DV D DISC R E A DER F U N C TIO N
Page 7
5
《 OPTIONAL 》
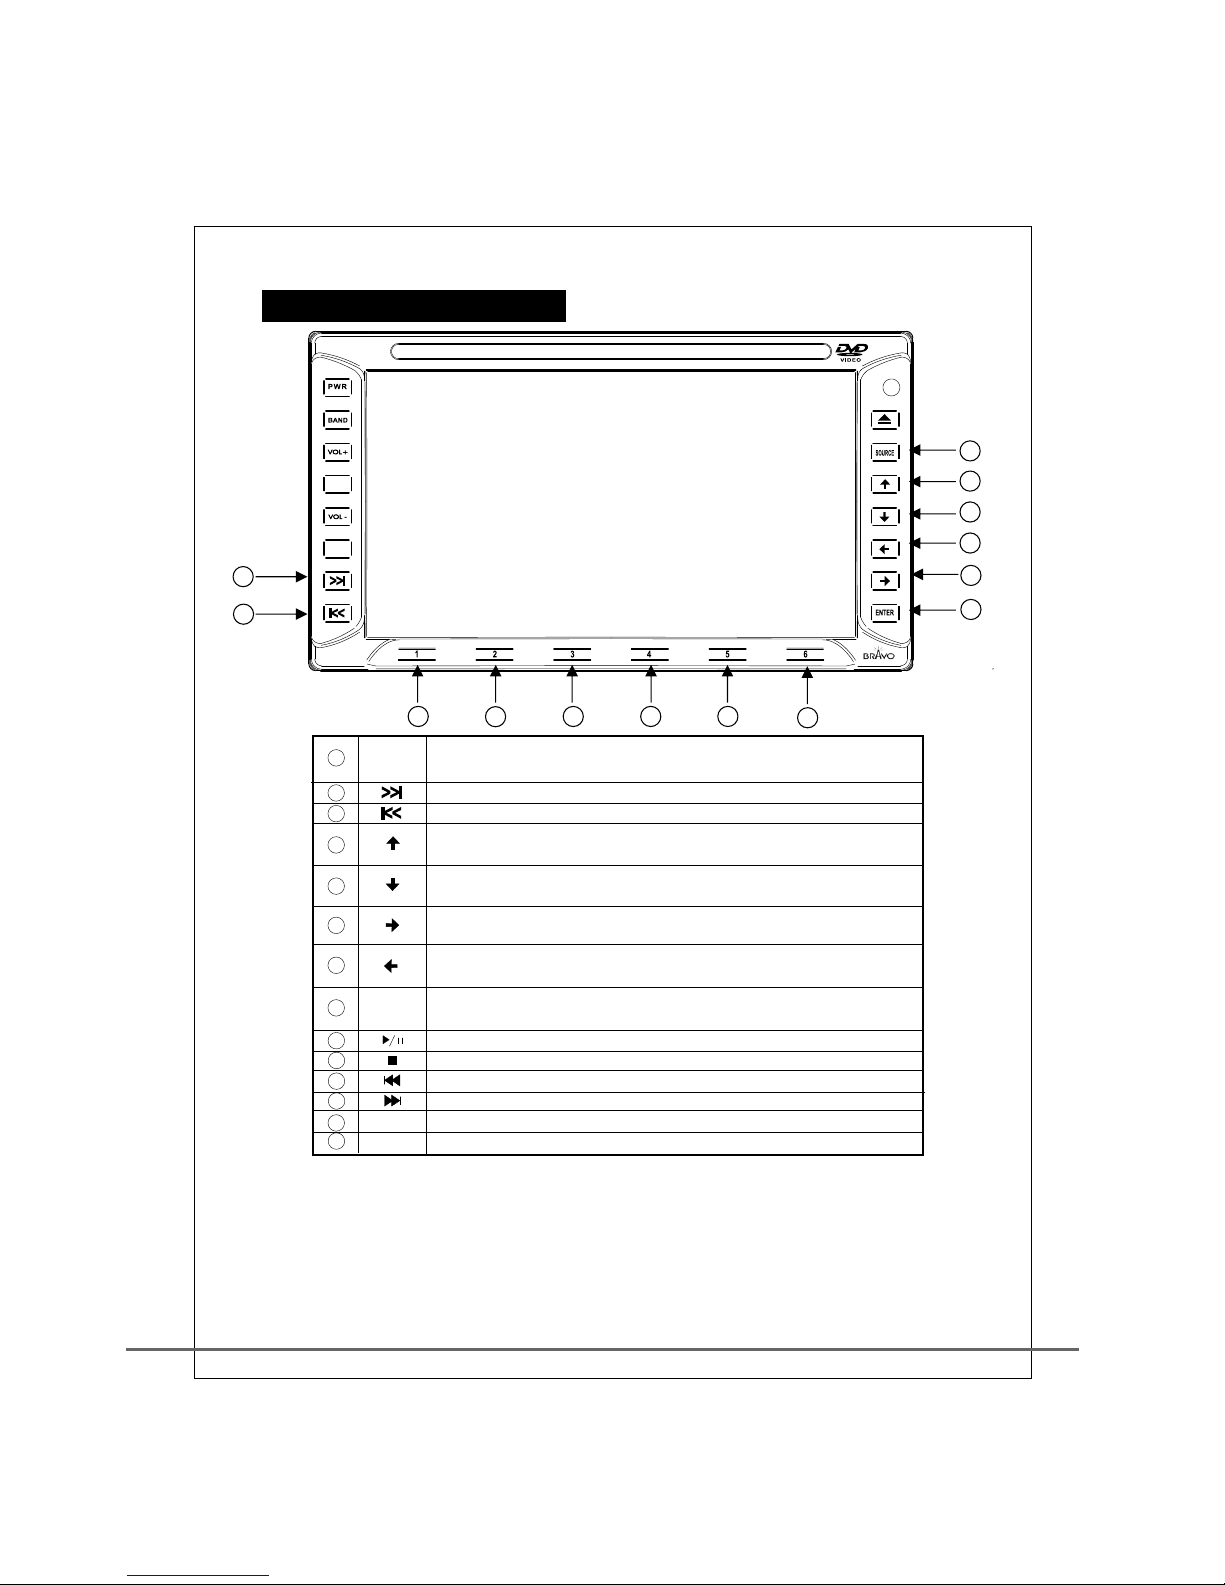
Ente r CD c ha nger func ti on
(Ple as e tu rn on the pow er a fter it has b ee n install ed )
Next d is c1→2→3→4.. .. .
Last d is c10→9→8→7. .. ..
DVD me nu g oes up
(The fun ct io n depen ds o n th e disc)
DVD me nu g oes down
(The fun ct io n depen ds o n th e disc)
DVD me nu g oes left
(The fun ct io n depen ds o n th e disc)
DVD me nu g oes right
(The fun ct io n depen ds o n th e disc)
DVD me nu e xecutio n
(The fun ct io n depen ds o n th e optic al d is c)
Last s ec tion or las t so ng o r press f or 3 seconds f or r ew ardin g
Paus e or s top the pla yi ng
Last s ec tion or las t so ng o r press f or a l on g time fo r re wa rding
Next s ec tion or nex t so ng o r press f or a l on g time for fo rw arding
TITLE Play ba ck f rom the sta rt
MENU Menu of f un ctions
11
12
13
14
10
9
8
7
6
5
4
3
2
1
9
10
11
12
13
14
2
3
1
4
5
6
7
8
S E L /
MUTE
DSPL
SET
MP3
SOURCE
ENTER
CD C H A NGER F U N CTIO N
■ Inse rt t he o ptica l di sc u nder any no n- DVD funct io n
(suc h as r ec eivin g RA DI O), it will j um p immedia te ly to DVD fun ct io n.
■ Noti ce : If t here is a lr ea dy optica l di sc in the DVD , yo u can only us e
FUNC b ut to n to ente r DV D.
In ord er t o pr otect t he m ac hine, whe n yo u leave the D VD S ource, yo u ca n
not en te r DV D again w it hi n 5 seconds .
Page 8
6
RGB
CD CHANGER/AUX1/AUX2
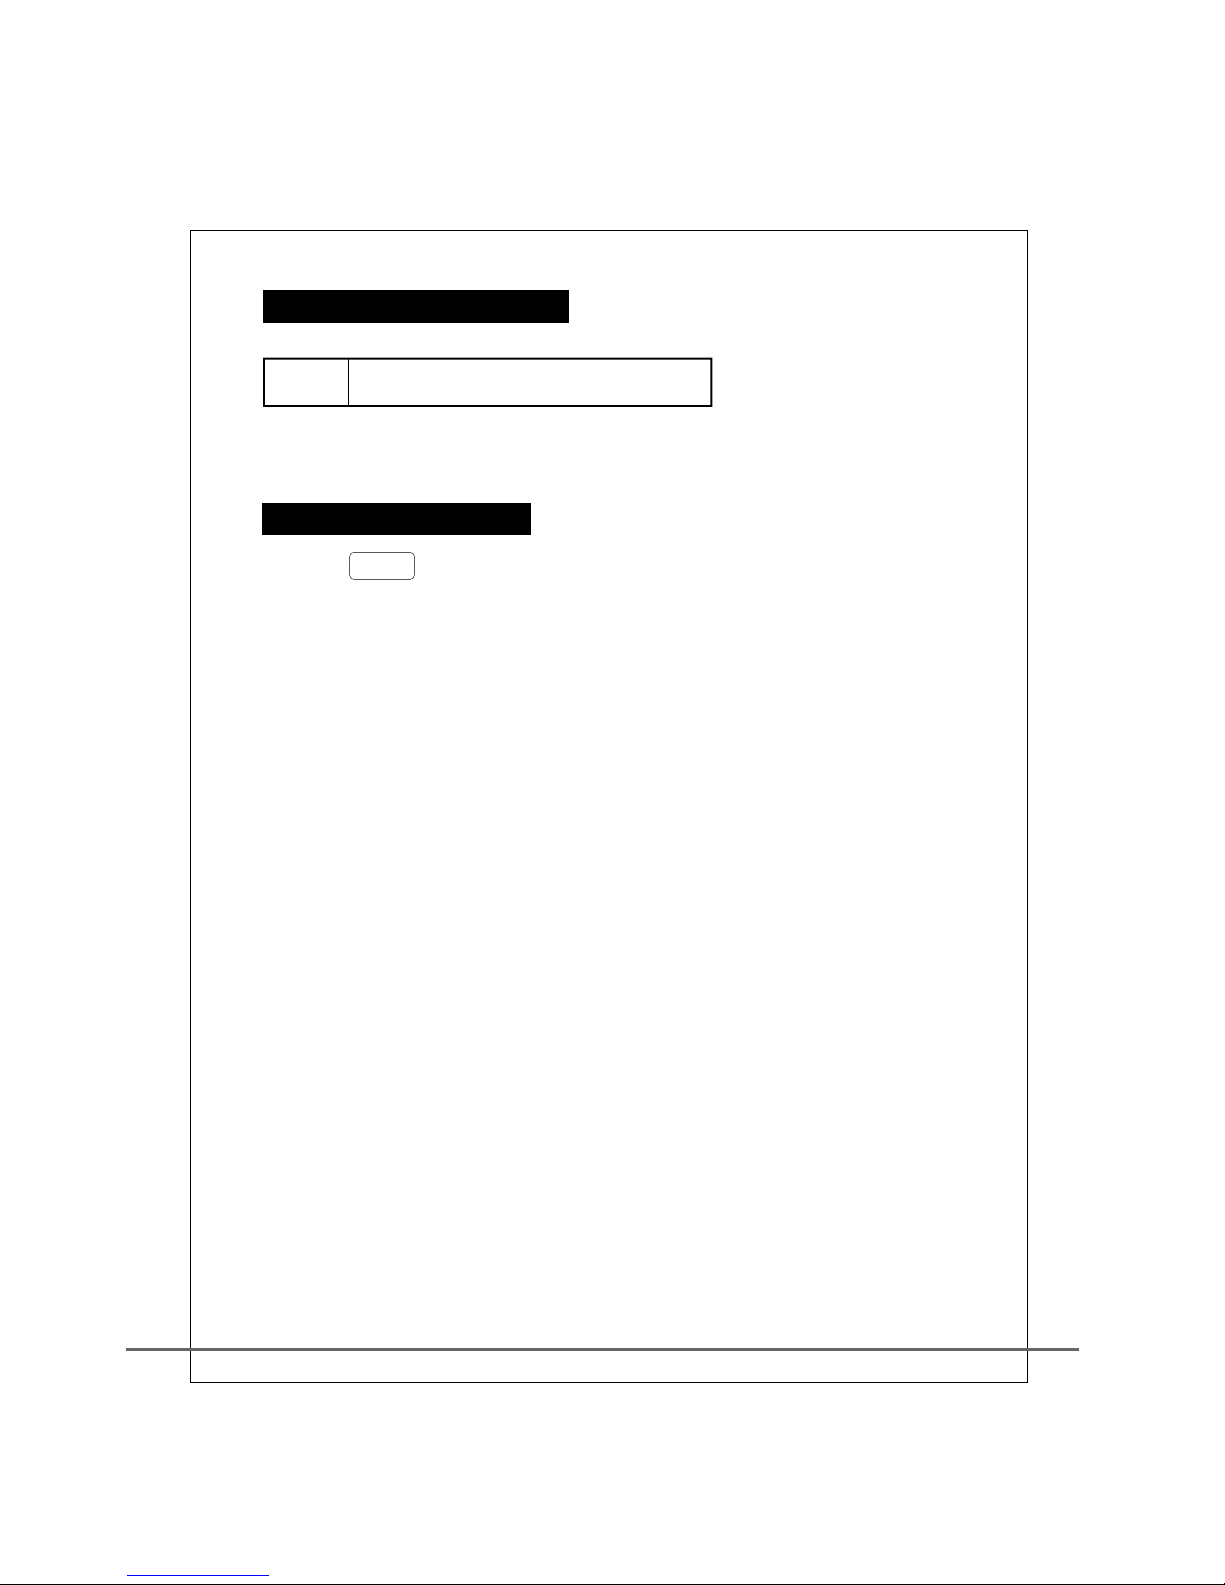
1. Press button for 3 seconds to enter RG B display
source dir ectly,scre en will be switched t o RGB .
SOURCE
SOURCE
EX T E RNA L F U N CTI O N
Page 9
7
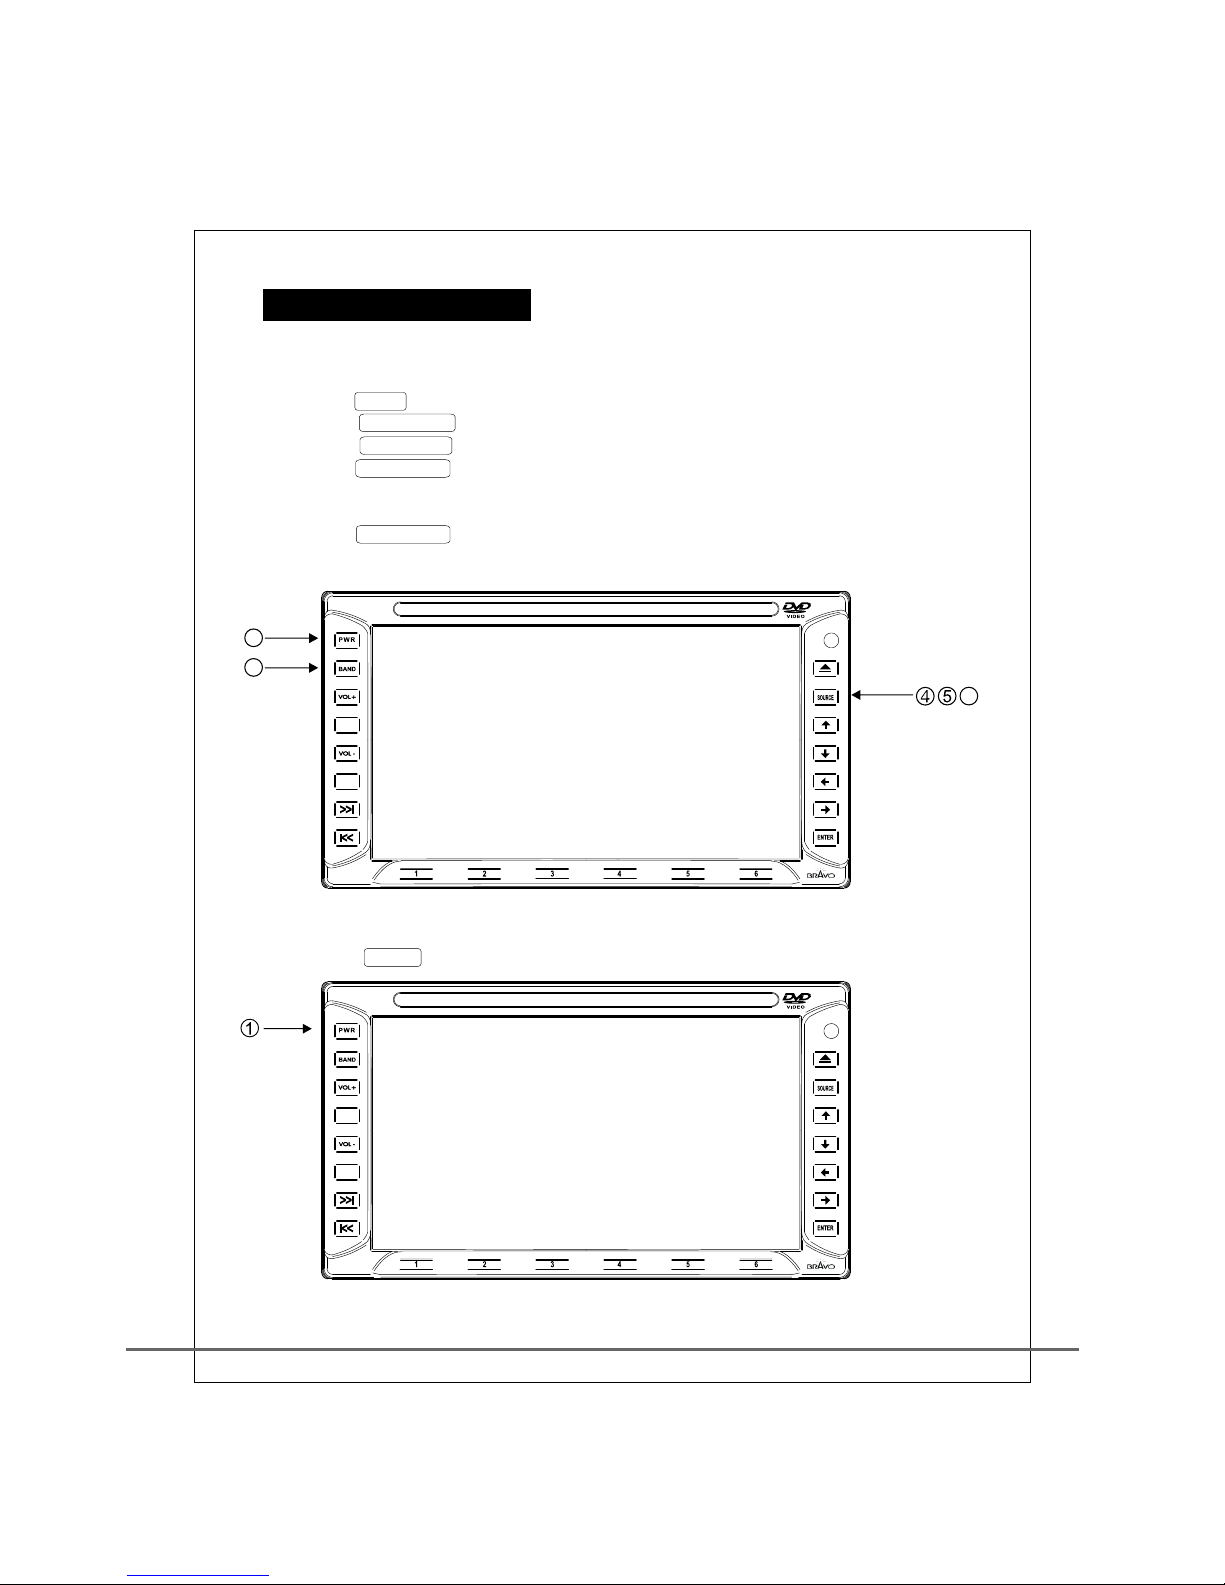
1. Start the engine of the car.
2. Press PWR button to turn on the machine.
3. Press SOURCE to play the radio.
4. Press SOURCE button to play the DVD disc reader.
5. Press SOURCE button to play disc changer
(This function will not be available if it is not
connected to disc changer).
6. Press SOURCE button repeatedly to
play the external AUX signal.
Power on:
Power off:
1. Press PWR b utton to turn off th e machine.
66
2
3
S E L /
MUTE
DSPL
SET
MP3
S E L /
MUTE
DSPL
SET
MP3
PO W ER ON/ O F F
Page 10
8
Main volum e adjustment:
1. Press VOL + to increase the vol ume.
2. Press VOL- t o decrease the volu me.
Bass adjus tment:
1. Press SEL / MUTE to sw itch to bass.
2. Press VOL+ to strengthen ba ss.
3. Press VOL- to weaken bass.
Treble adjustme nt:
1. Press SEL / MUTE to sw itch to TREBL E.
2. Press VOL+ to strengthen TREBLE.
3. Press VOL- to weaken TR EBLE.
Front and ba ck volume ratio adj ustment:
1. Press SEL / MUTE to switch to FADER.
2. to increas e right speaker vol ume.
3. Press VOL- to decrease righ t speaker volume.
Left and rig ht volume ratio adj ustment:
1. Press SEL / MUTE to sw itch to BALANCE.
2. Press Vol + to increa se ri ght volume channe l output power to mor e than
left chann el.
3. Press Vol - to decrea se le ft volume channel o utput power to more t han
right chan nel Loudness.
Loudn ess a djustment:
Press SEL / MUTE f or 3 seconds to enter t he me nu, press 3
to enter AUDI O menu, press to L OUD NESS,
then press o r switch.
Press VOL+
VO LU M E C ONT R O L
Page 11

5 Fast band se arch indicator.
6 FM micro adj ustment indicat ion.
7 Recep tio n frequency indic ation.
8 ~ 13 Indicat ion o f band frequency.
1 Date displ ay.
2 Time display.
3 MONO/STE REO broadcastin g indication.
4 Band in dic ation.
FM1 First FM band.
FM2 Second FM ban d.
FM3 Third FM band.
AM1 First AM band.
AM2 Second AM band .
9
14 Indication o f signal strength o r search progress t able.
00 / 0 0 0:0 700 / 0 0 0:0 7
-- RA D IO -- - -- - -- -- - -- -- - -- -- - -- -- - -- -- - -- M ON O-- RA D IO -- - -- - -- -- - -- -- - -- -- - -- -- - -- -- - -- M ON O
875875
900900
980980
106106
108108
875875
S.M ETERS.M ETER
11 22 33 44 55 66
4
7
8
14
9 10
11
12 13
5
2
3
6
1
90 90 .. 1 1
M M H H Z Z
F F
.. 1 1
M M
..
2 2
SE L /
MUTE
DSPL
SET
MP3
RA D I O SCRE E N
Page 12
10
1. Turn the pow er on.
2. Press BAND to enter radi o mode.
3. Press TUNE to search for ward for the band.
4. Press TUNE for or it wil l sea rch forward fo r
availabl e bands.
5. Press TUNE to search backwa rd for the band.
6. Press TUNE for or , it will sea rch b ackward for
availabl e bands.
7. To save your favor ite radio station t une into it, press an d hold
1 - 6 for 3 second s.
8. Press any one bu tton of 1 to 6 to go bac k to an y previously
stored station..
9. While pla yin g the radio, press BAND to switch th e band
FM I/FM II/F M III/AM I/AM II .
3 seconds
3 seconds
RA D I O OPER AT I ON
Page 13
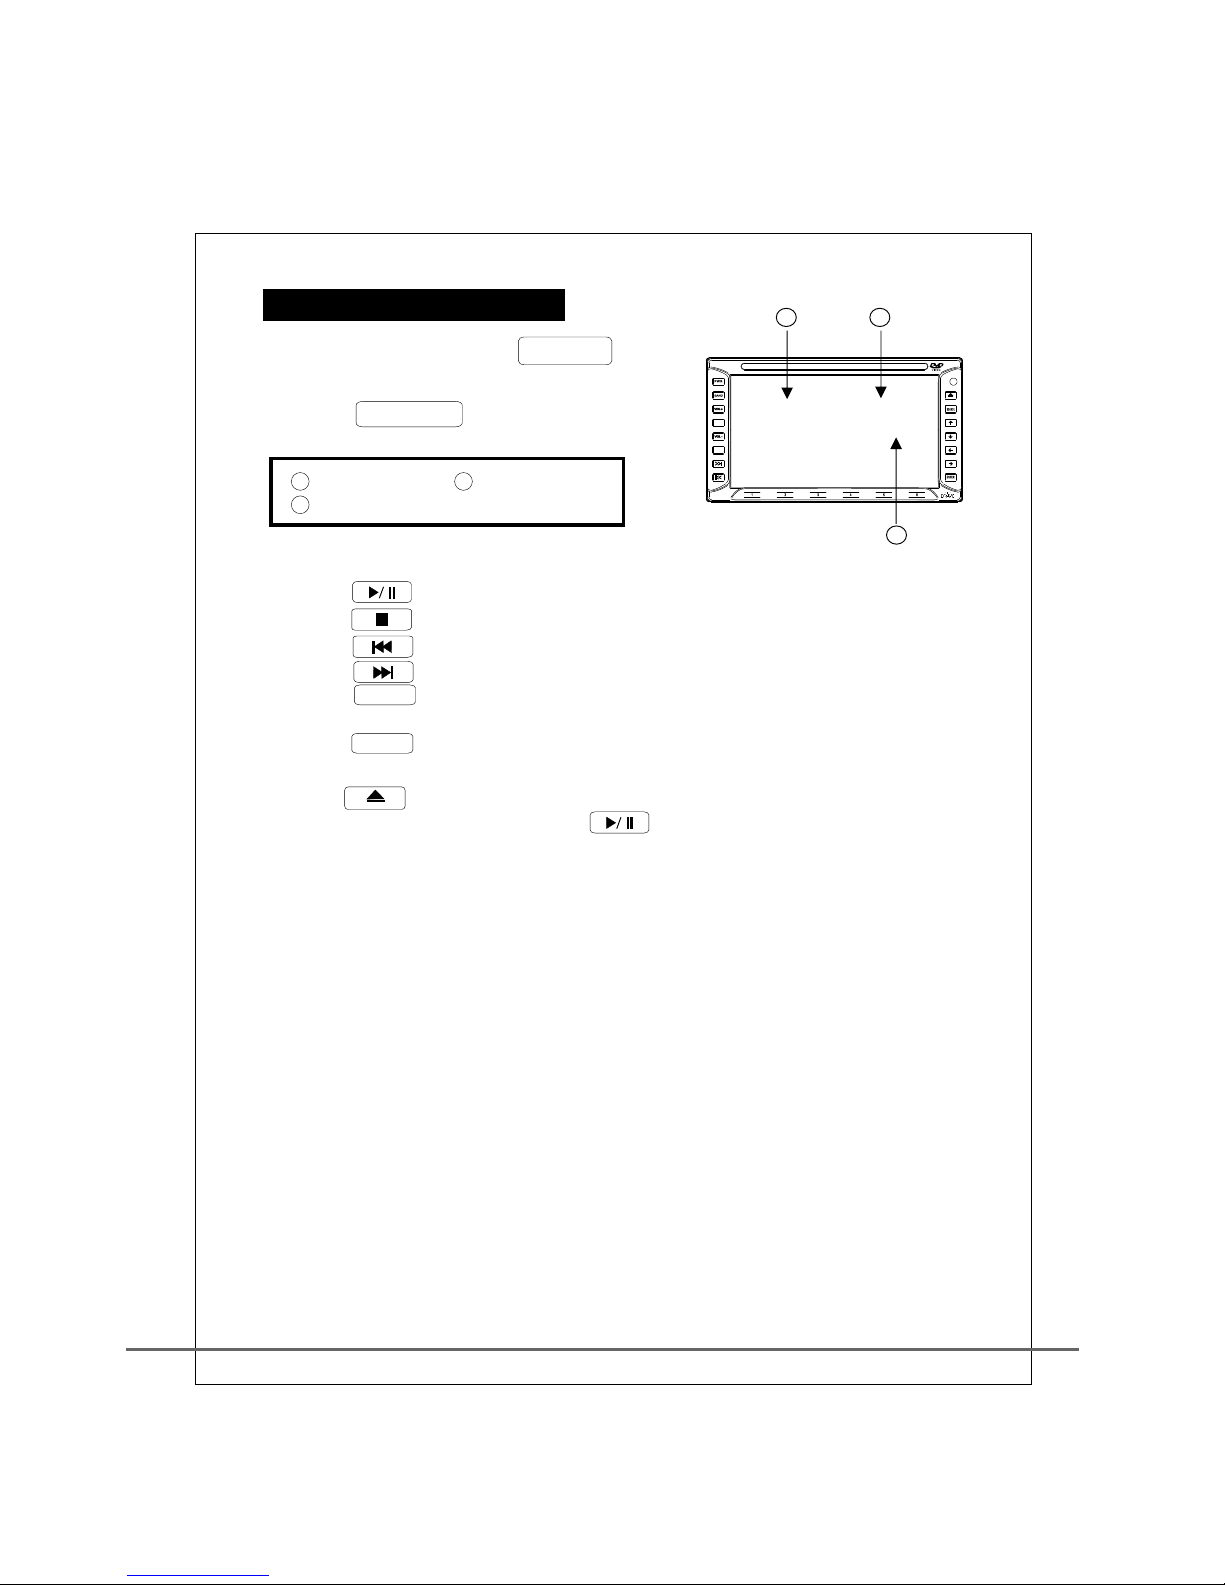
1. Tu rn on the power, press SOURCE button
to select th e DVD/VCD functio n.
2. Press DSPL SET to di splay
or hide the ti me track.
1 3
2
Current ti me Playing trac k
Current pl aying time
11
TRA CK 02 6:3 0
00: 05:20
3 1
2
3. Put DVD, VC D, CD or MP3 disc into th e player.
4. Press to pl ay th e video or music .
5. Press to pa use o r stop playing .
6. Press to th e las t section of the t rac k .
7. Press to th e nex t section of he tr ack .
8. Press TITLE button to pl ay the disc from the be gin ning
(eff ective for DVD/VC D).
9. Press MEN U button to play MENU ( effective f or DV D/VCD).
10. Press button to take out the disc.
11. During CD or VCD playing, press the button for 3 seconds
can be used to switch among MONO→LEFT→
MONO-RIGHT→MIX-MONO→STEREO,pressing and holding the
button will switch between them.
SE L /
MUTE
DSPL
SET
MP3
RE A D ER OPE R AT ION
Page 14
12
Note: Depe nds on your optiona l cd changer model, t he following func tion may
be a little bi t different o r is no t supported.
1. Press MENU to start the menu.
2. Press / to se lect differ ent function.
3. Press ENTER t o execute functio n.
4. Press MENU to exit menu.
5. GO TO DISC N to jump direct ly to designated di sc.
6. REPEAT to play the disc re peatedly.
7. SCAN to play sho rtly the initial of e ach song.
8. RANDOM to play t he song randomly.
CD C H A NGER M E N U OPER AT I ON
Page 15
13
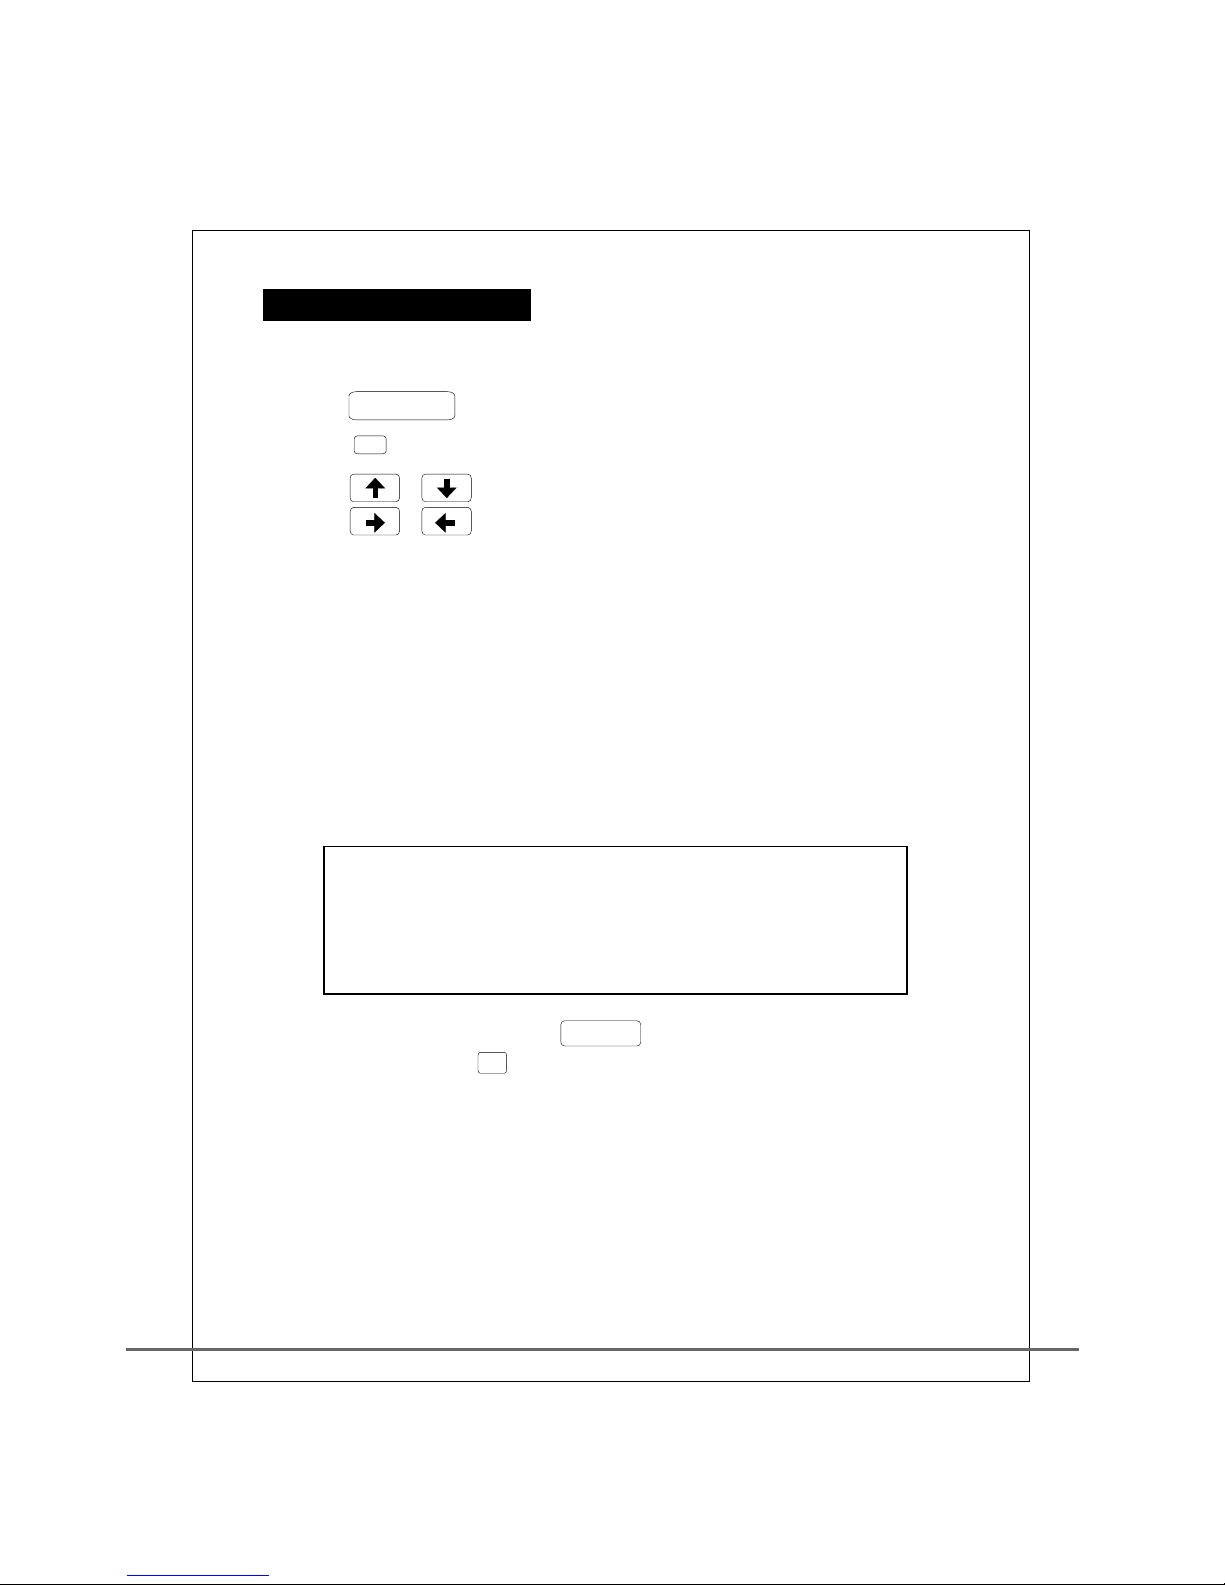
OS D O PERATION
A Set up the time.
1. Press DIS P/SET to enter setu p menu.
2. Press 1 to se t up time.
3. Press / to mo ve the optical r od.
4. Press / to ad just numeric v alu e.
5. Press YEAR to adjust 200 0 to 2099.
6. Select MO NTH to adjust the mon th, 1 to 12.
7. Select DAY to adjus t the date, 1 to 31.
8. Select HO UR to adjust time, 0 to 2 3.
9. Select MI NUTE to adjust minu te, 0 to 59.
12. Select S AVE and EXIT, pres s to st ore and exit.
13. Select E XIT or press 6 bu tton, it will exit wi tho ut saving.
14. During t he saving process , if the date is set up wro ng,
it will be una ble to exit, please m odify and try it agai n. .
ENTER
1 : (A.D.) yy/mm/ dd week hour/minu te
2 : mm/dd week hour /mi nute
3 : mm/dd hour/minut e
4: week hour/minut e
5 : hour/minute
6 : yy/mm/dd hour/mi nute
10. Week is designed by the system automatically, it can not be adjusted.
11. Select TYPE to adjust the time format to be displayed (except the radio).
Page 16
14
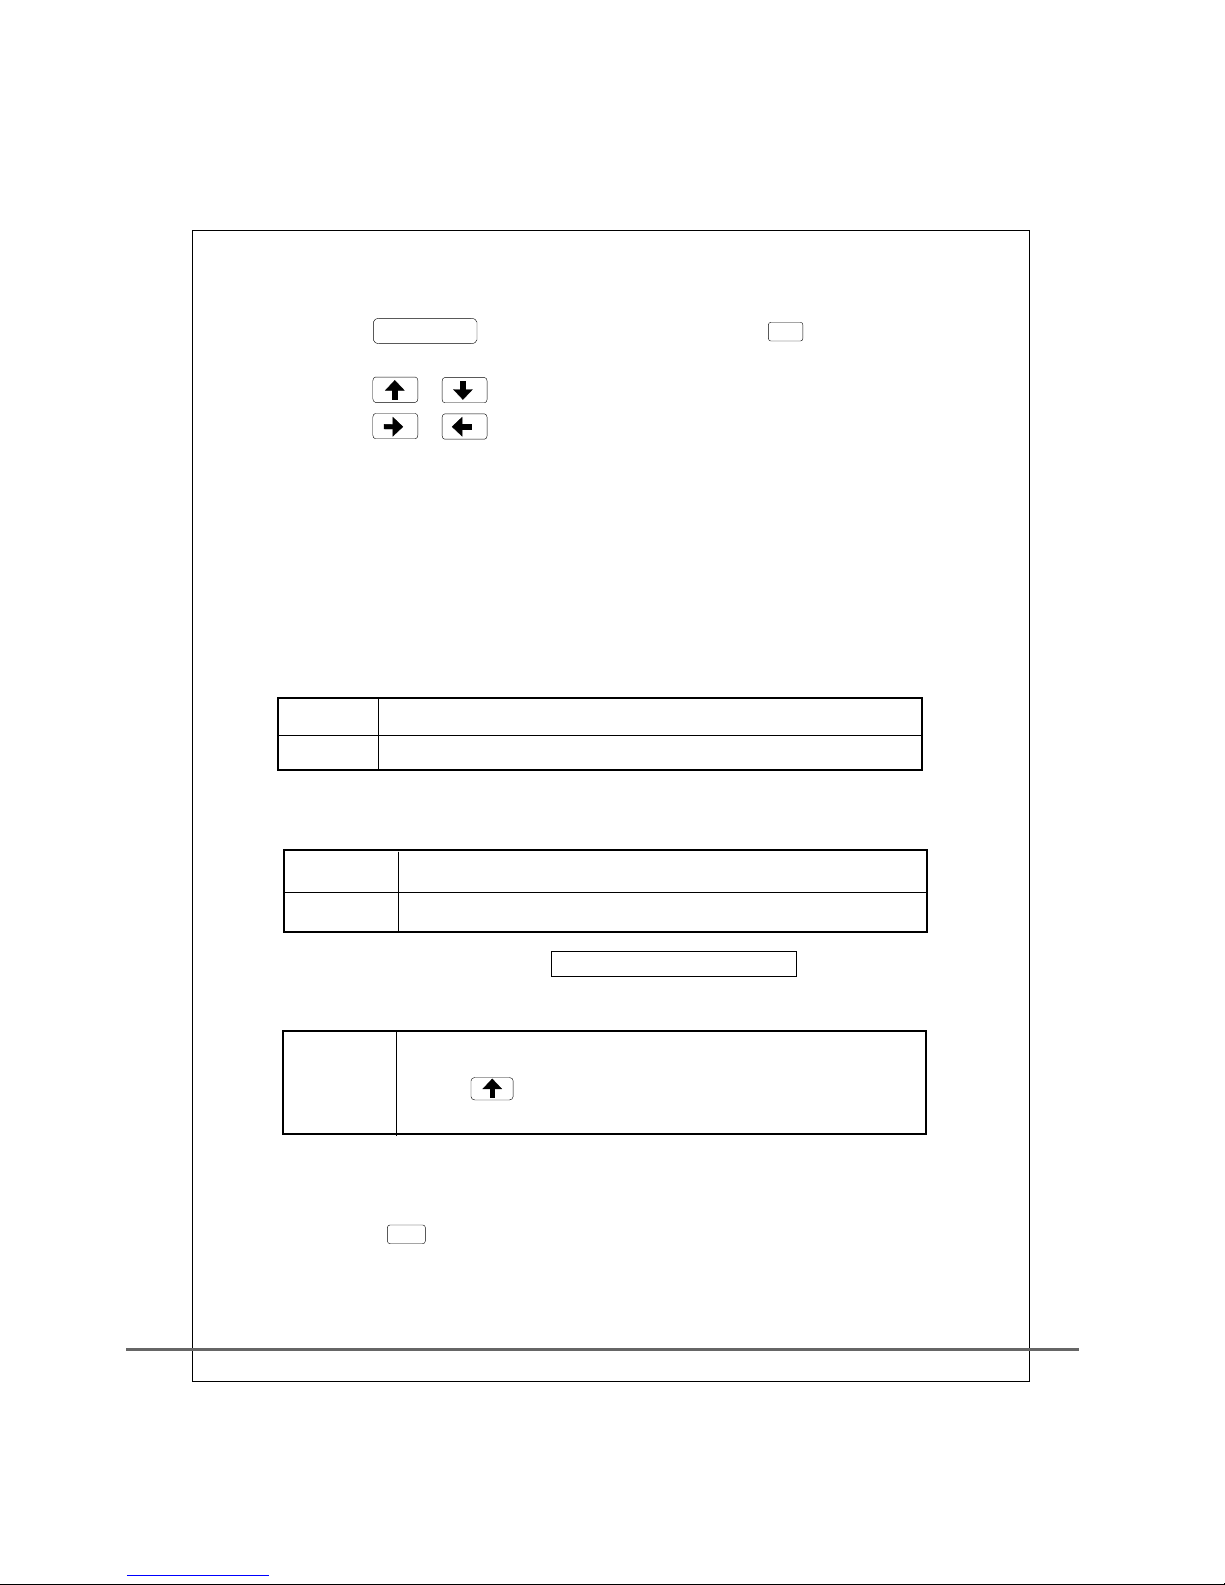
B VIDEO setu p screen
1. Press D ISP /SET to enter OSD set up, then press 2 butt on
to enter set up screen.
2. Press / b utton to move the bri ght b ar.
3. Press / t o adjust numeric va lue.
4. Selec t CON TRAST to adju st the contrast.
5. Selec t COL OR to adjust color.
6. Selec t BRI GHT to adjust b rightness.
7. Selec t TINT to adju st the tint.
8. Selec t MIR ROR to reverse the sc reen in the left to rig ht di rection.
9. Select SCR EEN to set up the scree n display mode (the s ame a s ASPECT).
10. Select DIMMER to s et up night lamp mode .Th is reduces the a mou nt
of ambient l ight coming from th e sur een
11. Sel ect LCD OFF to set up LCD P anel function or no t mod e.
MANUAL turn on and off LCD
(Use button, pl ease refer to gener al
function d esc riptions).
12. Select R ESET to reset a ll the above settin gs to t he default val ue.
13. Press 6 bu tto n to exit.
OFF
AUTO
NORMAL 4 : 3 scre en
FULL 16 :9 scree n
WITH OUT D IMMER F ONC TION
DIMM ER FO NCTIO N
IF cho ose Au to at DIM MER M ode,T HE LCD will be t urned off
auto mat icaly w hen t here in n o action on ke ypad durin g Raido func tion.
Page 17
15
1. Press DSPSET f or 3 seconds to enter O N SCR EEN DISPLAY (OSD) set up ,
2. Press / b utton to move the opt ical rod.
3. Press / t o adjust numeric va lue.
4. Selec t RAD IO to singly adjust t he volume gain of the r adio.
5. Selec t DVD t o singly adjust the v olume gain of the DVD p layer.
6. Select EXTER NAL to si ngly adjust the ext ern al volume inpu t gai n.
7. Select MUTE to t urn on or off the s pea ker.
8 Select LOU DNESS to turn on or off the loudness c ontrol.
9 After pres sing 6 button to exit , the d efault value
will then be u sed.
.
.
C AUDIO setup screen
※Depen ds on t he machine model, t his function migh t not be
availabl e for some models.
Then p ress 3 button to e nte r setup screen.
Page 18
16
D DEVICE set ting screen
A. Setting o f the DVD player
1. Whe n the D VD play er is i n use.
2. Pre ss DS PLSET for 3 s eco nds,t o ent er OSD se tting,
then p res s to set up .
3. Pre ss to move the o ptical rod .
4. Pre ss to execut e the order.
5. Pre ss ANG LE to sel ect n ext ang le (depend s on diff erent t ypes of DVD, t his functi on
will b e dis abled i f it is n ot DVD di sc).
6. Sel ect Z OOM to en lar ge the sc reen.
7. Sel ect t o turn on P BC or t urn off PBC .
8. Sel ect S HUFFL E to tu rn on SHU FFLE.
9. Sel ect R EPEAT AB to start the AB re peat fu nct ion.
B. Settin g for Radio
1. Whe n the r adio is i n use .
2. Pre ss DS PLSET for 3 s eco nds to en ter O SD sett ing, then pr ess 4 to set up.
3. Pre ss to move the o ptical rod .
4. Pre ss to adjust t he numeric v alue.
5. Pre ss SE NSITI VE to adjust t he sensiti vity of band s earch
(1 wea k Dx ~5 s trong L o). When we ak is select ed, it can aut omati cal ly
sear ch al l searc hab le band s, but if stro ng is select ed, onl y ban ds of str ong er sign als
will b e sea rched .
6. Sel ect N ARROW t o tur n on and off th e fil terin g function ,
when i t is tu rned on , it ca n filte r out neighb oring inte rfere d ban ds.
7. Pre ss 6 bu tton to e xit.
C.Settin g for CD changer
1. Whe n the d isc cha nge r is in use .
2. Pre ss DS PLSET to en ter O SD sett ing , then pr ess 4 to set up.
3. Pre ss / to move the o ptical rod .
4. Pre ss EN TER to ex ecu te the or der.
5. Sel ect G O TO DIS C X to change " di rectl y" to d isc X.
6. Sel ect o ther or der i s the sam e as a dedicat ed remote
cont rol , pleas e ref er to the o peration m anual of DVD d isc cha nge r.
10. Se lec t 3D to set u p sou nd effect .
11. Press 6 butt on to exi t.
Page 19
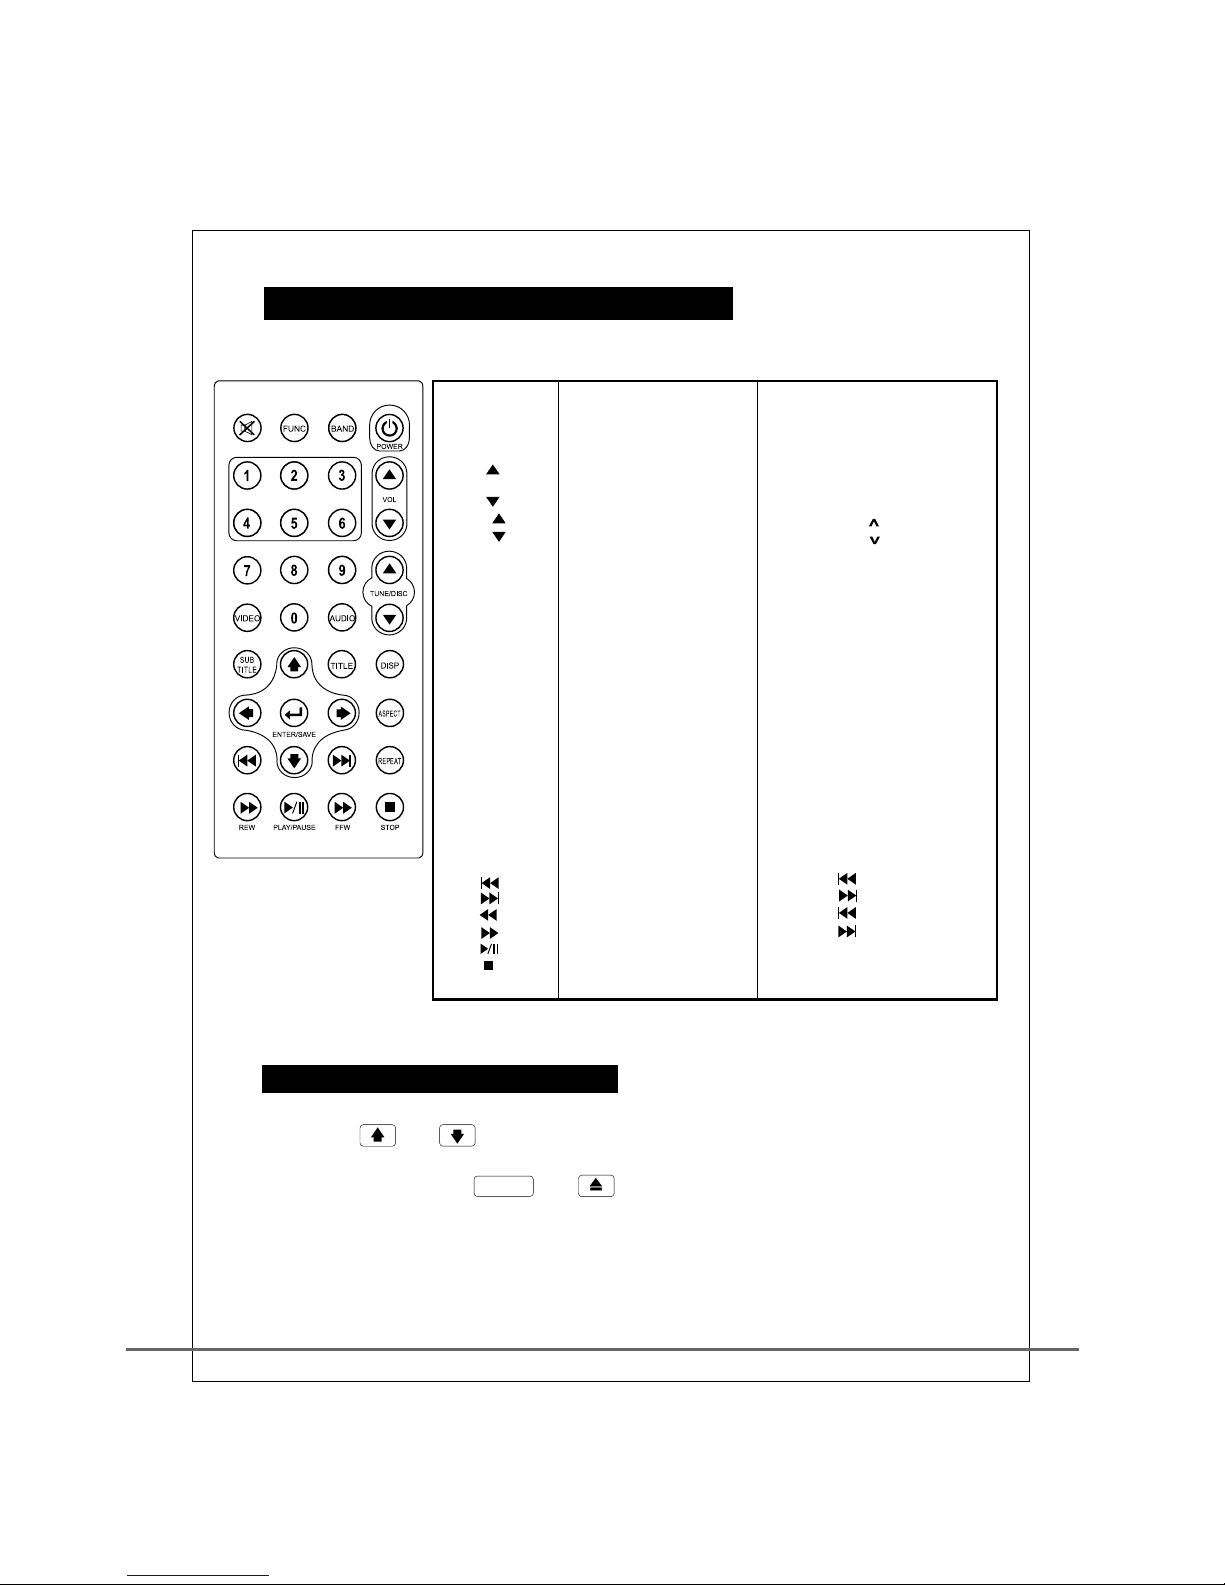
17
POWE R
BAND
FUNC
MUTE
VOL
AUDI O
VOL
TUNE
TUNE
VIDE O
1
2
3
4
5
6
7
8
9
0
DISP /C LO CK
ASPE CT
TITL E
SUBT IT LE
ENTE R/ SAVE
REPE AT
Pow er swit ch
Swi tch or se tting o f time di splay
Scr een dis play mo de swit ch
The s ame as pa nel 6
The s ame as TI ME o n the p an el
Can b e adjus ted in VI DEO set ting
RAD IO func tion
DVD o r EXTER NAL fun ctio n
Spe aker mu te
Inc rease t he volu me
Adj ust and s witch t he volu me func tion
Dec rease t he volu me
Sel ect ban d in the ra dio mod e or
dis c chang e in the di sc chan ger
Adju st the im age se tting
Adju st the im age se tting
Fas t selec tion of r adio ba nd
The s ame as pa nel 5
The s ame as pa nel 4
The s ame as pa nel 3
The s ame as pa nel 2
The s ame as pa nel 1
Lon g press o n MENU
The s ame as TU NE
The s ame asT UNE
The s ame as VO L- on the p anel
The s ame as SE L on th e panel
The s ame as VO L+ on the p anel
The s ame as PO WER on th e panel
The s ame as BA ND on the p anel
The s ame as FU NC on the p anel
Rew ard
For ward
Pla y or paus e
Pau se or sto p
Pla y repea tedly
The s ame as , fo r a long pr ess.
The s ame as , fo r a long pr ess.
The s ame as PL AY
The s ame as ST OP on t he pane l
The s ame as RP T on t he pa nel
Jum p to DVD TI TL E
DVD /MENU E NTER
Las t sectio n
Nex t sectio n
The s ame as
The s ame as
Fas t selec tion of r adio ba nd
Fas t selec tion of r adio ba nd
Fas t selec tion of r adio ba nd
Fas t selec tion of r adio ba nd
Fas t selec tion of r adio ba nd
on th e panel
on th e panel
1. Press or bu tto n for 3 seconds to disp lay or not display to L CD
(Volume wil l not be affect ed).
2. Press pan el button PWR and tog eth er to RESET the s ystem
(the setup v alues will not be affected).
The s ame as TI TLE on th e panel
The s ame as EN TER on th e panel
Lan gua ge Sele ctio n
RE M OTE C O N TRO L O P ERATI O N M ANU ALRE M OTE C O N TRO L O P ERATI O N M ANU AL
OT H ER BU T TO N S OPER AT I ON
Page 20

18
《 OPTIONAL 》
A.
" "
Installa tion
1. The G reen camera trigg er wire must be conne cted to the car rever se wi re.
(This is usu ally found on the rea r tai l lights and sho ws a po sitive 12 volt
signal whe n vehicle is in rever se )
2. The C CD Back up Camera mus t be connected to
CCD IN on the back of the m achine, which is a ye llow RCA connector.
B. O peration
1. When inst alled correctly, the screen wil l aut omatically s how t he camera
image whil e the vehicle is in rev erse gear.
2. While the v ehicle is in revers e, this will supers ede what ever is on the
display.
CC D B AC K U P C A MER A
Page 21
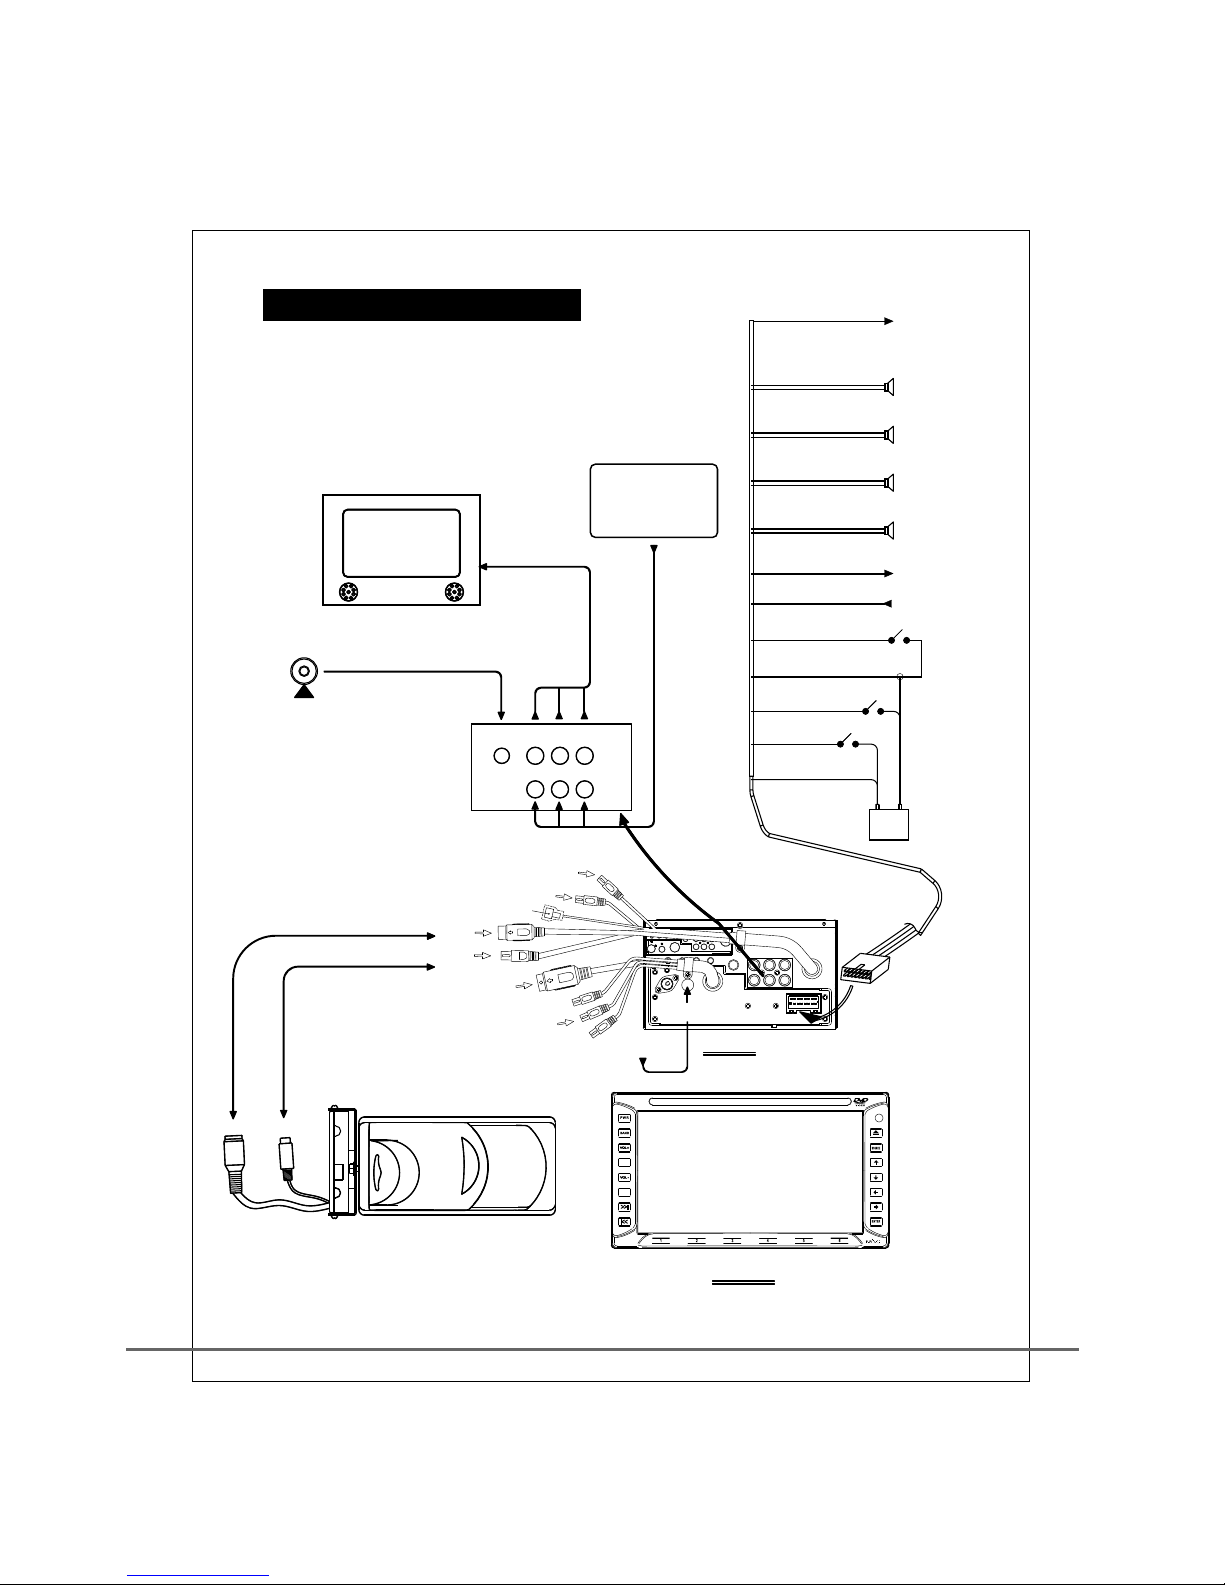
19
CCD IN
RL
V
VIDEO
AUDIO
+12V/0.1A
TEL MUTE
(Red)-ACC
IN
OUT
12V12V
BATTBATT
++
--
(Yellow)-BATT
(Black)-GND
+12V
FRONT/R_SPK
REAR/L_SPK
FRONT/LSPK
REAR/R_SPK
--
--
++
++
--
++
(Brown)-BRAKE
AUX 1
FRONT
AUX Input
ANT
6Pin
8Pin
CCD BACK UP CAMERA
MONITOR
ANT
BACK
(Orange)-DIMMER
(PINK)
(White/Black)
(Blue)-ANT
(Green/Yellow)
(Green)
(Purple/Red))
(Purple)
(Gray)
++
(Gray/Black)
(White)
--
AMP_CONT
(BLUE/RED)
(OP TION)
(OP TION)
(OP TION)
(OP TION)
T
OPT
ININININ ININ
RGBRGB
TO
P
UDIO OUT
AUDIO OUT
P
N
6 I
AUX 2AUX 2
RGBRGB
8
I
P
N
CCD +1 V 2
RADIORADIO
ANTENNAANTENNA
D
AU IO OUT
SE L /
MUTE
DSPL
SET
MP3
GRE EN WIRE
(+1 2VOLT TRI GGER)
REAR
RL
PROF ESS IONAL I NSTALL ATI ON IS HIG HLY RECO MENED
BA S I C I N S TA L L AT I O N
Page 22
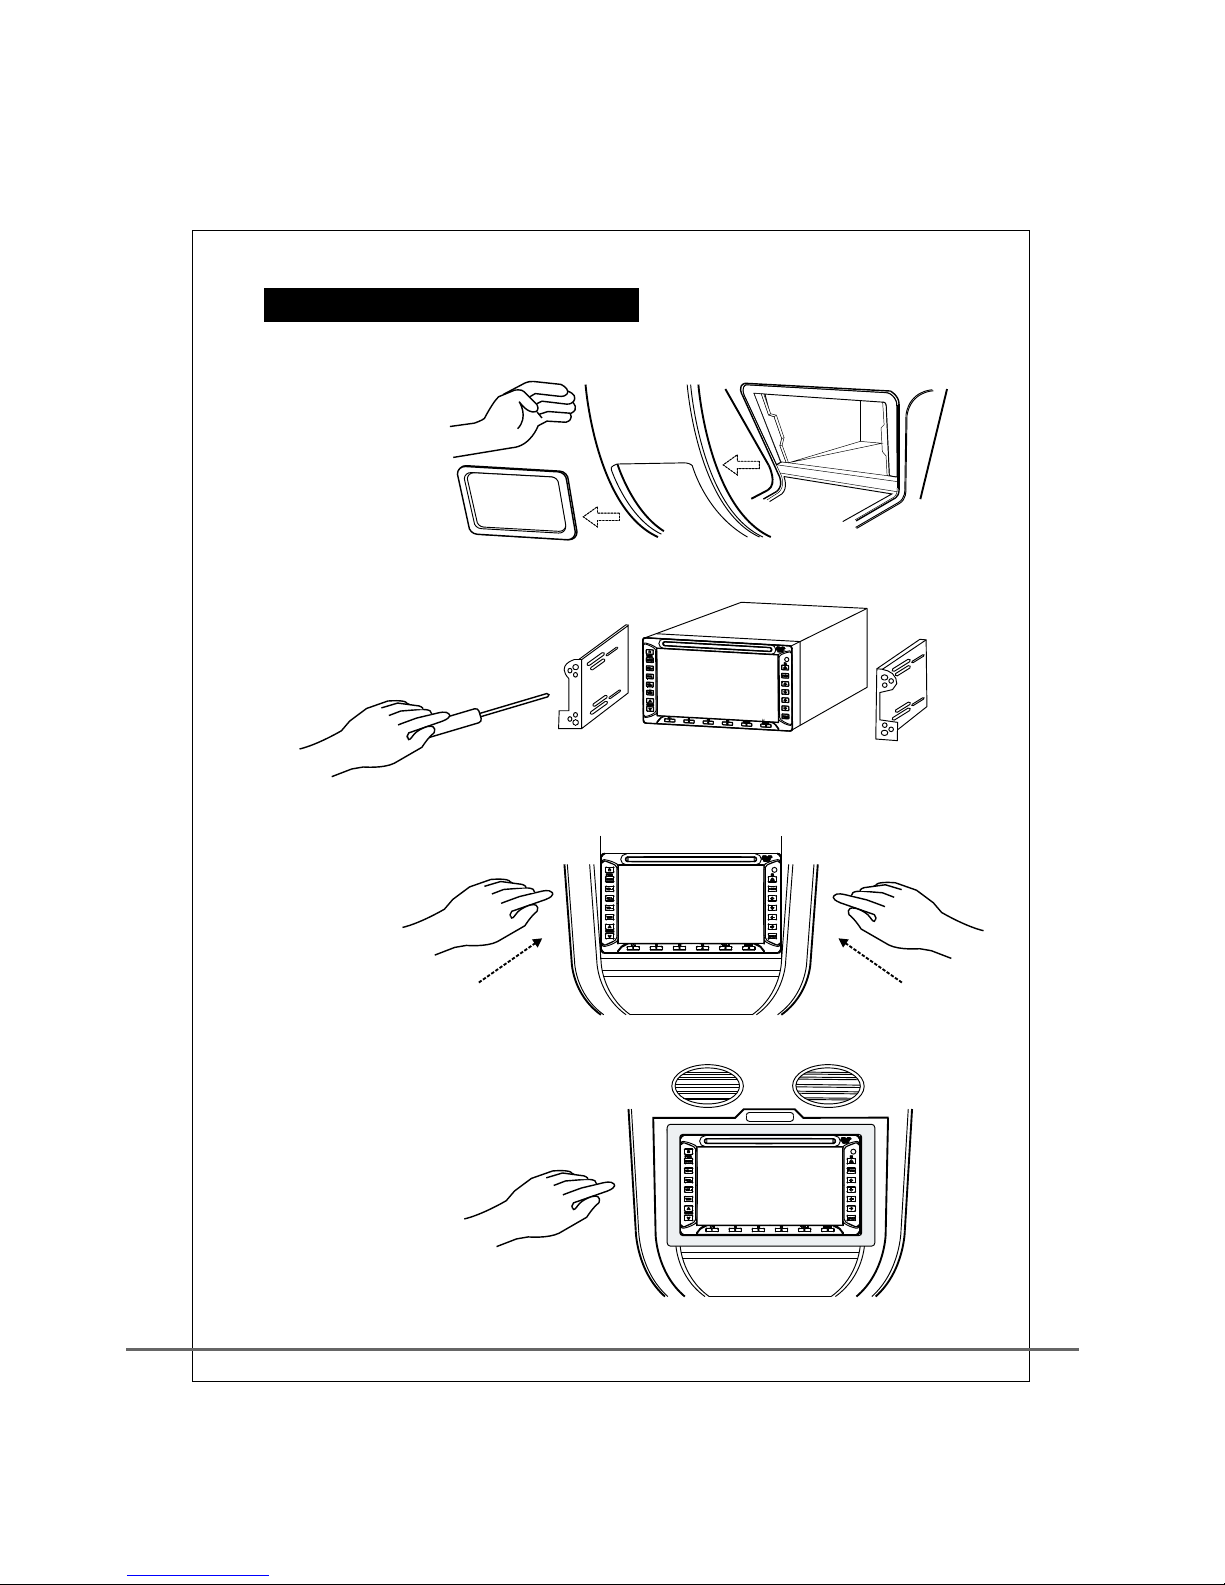
20
1. Rem ove C ar Ster eo pa nel cov er.
2. Use M 4*8 mm scre ws (t otal 8)
moun t lef t and rig ht br acket o n the
unit l eft a nd righ t sid e.
Plea se sc rew on (a s the p ictur es)
and ma ke su re the ba lan ces.
3. Con nec t all sig nal c ables , put the
unit b ack a nd scre w on.
4. Put t he Ca r Stere o pan el cove r back.
IN S TA LLATI O N I NSTR U CTI O N
Page 23
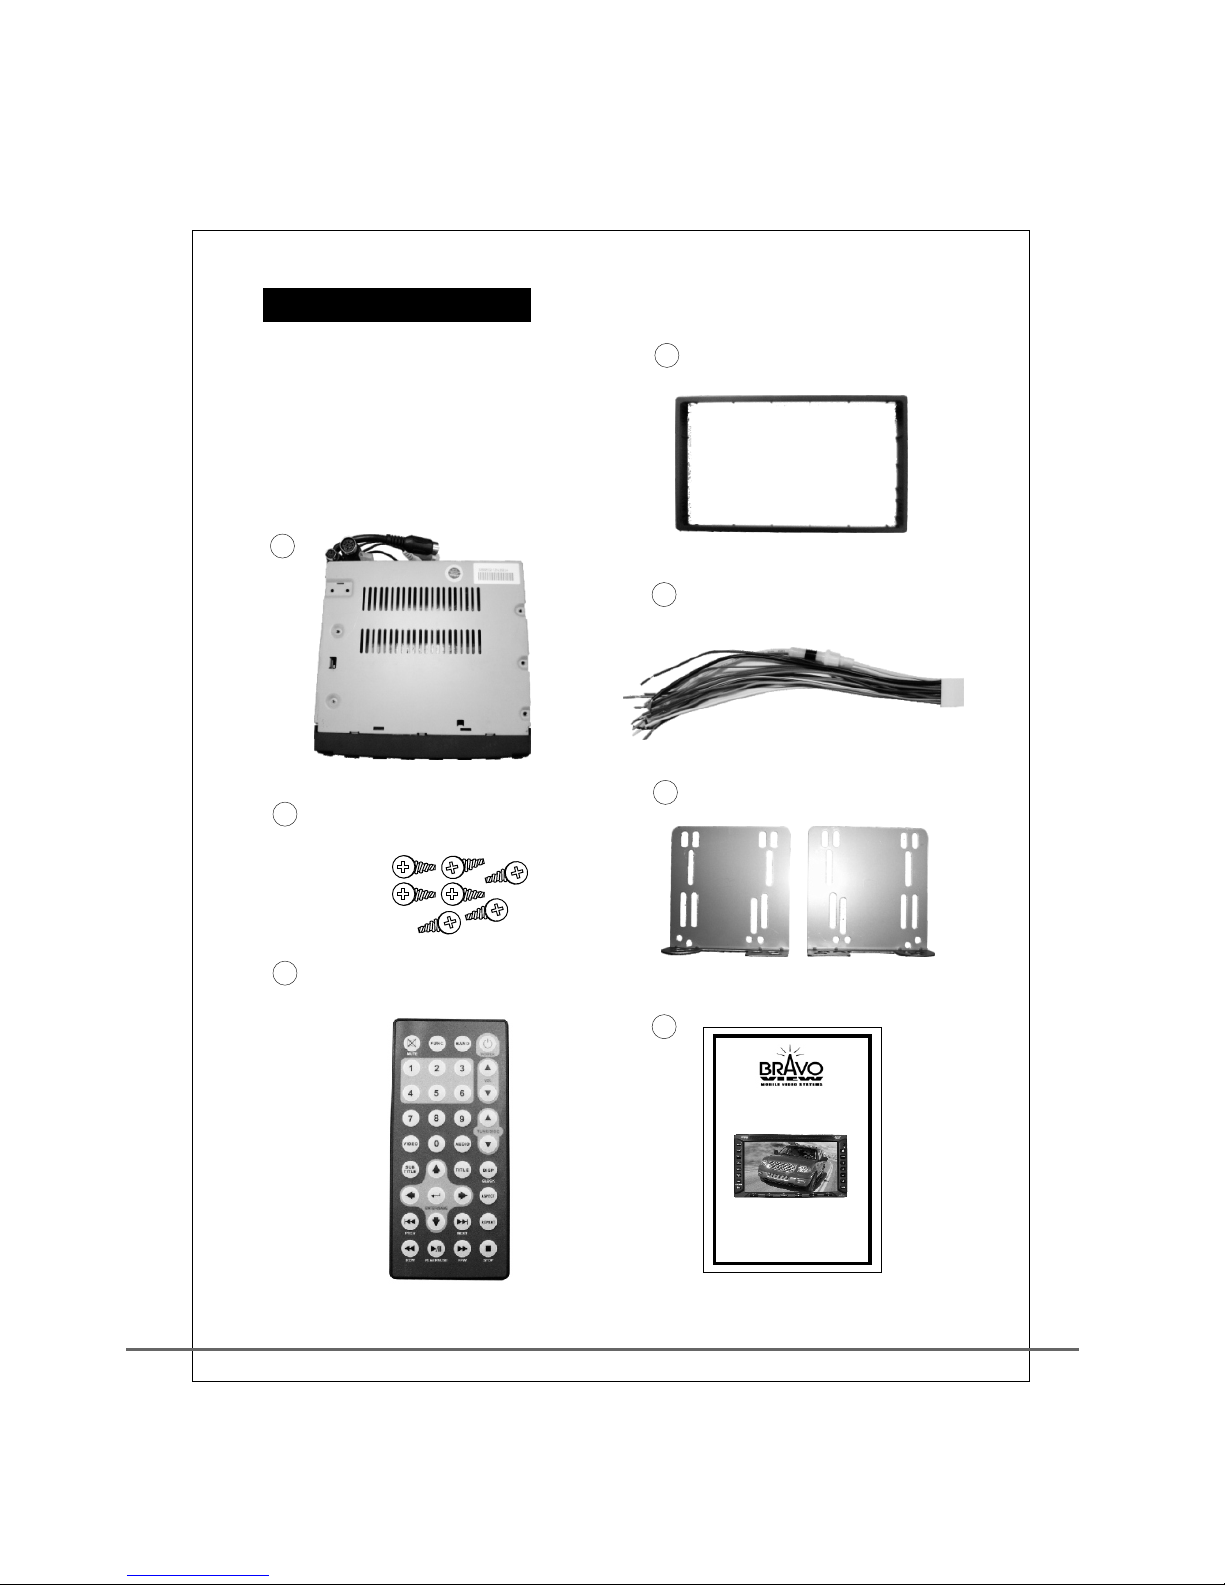
21
1. IND -20 65(Ca r Ste reo)
2. Scr ews
3. Rem ove C ontro l
4. Fra me
5. Cab les
6. Bra cke t ( Left / Ri ght )2 pcs
7. Use r's M anual
AC C ESSOR I ES
IND -2065
6.5 ” DOUBL E DIN CAR
STE REO
USER M ANUAL
V1.2
Bravo Vie w Techn ology
20153 Pas eo Del Pr ado
Walnut, C alifo rnia 91 789
United St ates of A meric a
909-869 -0699
www.bra vovie w.com
1
2
3
4
5
6
7
Page 24
Limited Warranty
Bravo View Technology warrants this product (including any
accessories and/or cables) against defects in material or
workmanship as follows:
1. Labor. For a period of 1 Year from original date of purchase,
if the product is determined to be defective, Bravo View will repair
or replace the product at no charge.
2. Parts. For a period of 1 Year from original date of purchase,
Bravo View will at no charge, replace with new or rebuilt
parts in exchange for defective parts. The warranty will
either continue from date of original purchase or 90 days
from repair (Which ever is longer).
3. Bravo View Technology does not cover the cost of
installation/removal of the product.
To obtain warranty service, you must contact Bravo View
Technologies for a Return Authorization Number (RA#). 866-40BRAVO
This warranty does not cover customer misuse, improper
installation, poor signal (including any “noise”), cosmetic damage,
damage due by accident, abuse, negligence, commercial use, and
improper operation.
Proof of Purchase in the form of a copy of a bill of sale or copy of
receipted invoice, which shows clearly the sale of the unit, is
required.
Repa ir or Replacemen t as provided un der this warra nty is the exc lusive
remedy o f the consum er. Bra vo View Technolog y shall not be l iable for any
inci dental or cons equentia l damages fo r brea ch of any expres s or implied
warr anty on this p ro duct. In no ev ent shall Br avo View Technolo gy be liable
for any incidental o r co nsequent ial damage s whatsoev er arising out o f the use
or inability to use th e product. Und er no circumstan ce shall Bra vo View
Technolog y's liabil ity exceed the purchase price pai d for the product. E xcept
to the e xtent prohib ited by appl icable law, any impl ied warran ty or
mercha ntabilit y or fitness for a par ticular purp ose on this prod uct is limit ed in
dura tion to the du ration of th is warrant y.
 Loading...