

Page 1
r Man
ual
Page 2

Page 3
1
Contents
Introduction
Pager Features
Getting Started
Battery Information
Battery Installation and Removal
Button Definition
Pager On
Pager Off
Backlight
Main Menu Screen
Function Menus
Alert Mode
Quick Access to Vibrate Mode
Time and Date
Private Time
Alarm
Pager Control
Set Contrast
Auto Scroll
Reminder Alert
Set Zoom
Messages
Button Defintion for Mail Folder
Button Definition for Personal and
Notebook Folders
Mail Folder (Information Service)
Mail Folder Function Menu
Personal Folder
Personal Folder Function Menu
Receiving Messages
Error & Priority Messages
Message Full Indication &
Duplicate Messages
Notebook Folder
Notebook Folder Function Menu
Maintenance
Care of your Pager
Contents
1
2
2
3
3
4
5
6
6
6
7
8
9
10
11
12
13
14
15
16
17
18
19
19
20
21
22
24
25
27
28
29
30
31
32
32
Page 4

2
Pager Features
The Bravo 800 offers a wide range of useful features.
- 4-Line, 20 English character screen
- Up to 40 Personal messages
- Up to 24 Maildrop addresses. Memory= 5 Messages per address
- 20 notebook slots for messages transferred from Personal or Maildrop
- 8 user selectable pleasing alerts
- Vibrate alert and Vibra-call
- Quick access to Vibrate mode
- 3 speed auto scrolling option
- Priority alert
- Private Time
- Backlit display for ease of reading in dark
- Message zoom in/out mode
- Unread message indication
- Alarm
Introduction
Page 5
3
Battery Information
This pager is designed to operate on one 'AA' size alkaline battery( Do not
use carbon zinc batteries). If the display shows the battery level is
low. Replace the battery as described on page 4. The correct time and any
stored Messages will remain intact for up to one minute after removing the
battery, if the pager is first turned off in accordance with the "Pager Off"
procedure (Page 6).
WARNING - Use of a battery other than an Energizer E91 1.5V AA Alkaline
Battery may impair Intrinsic Safety.
Getting Started
Page 6
4
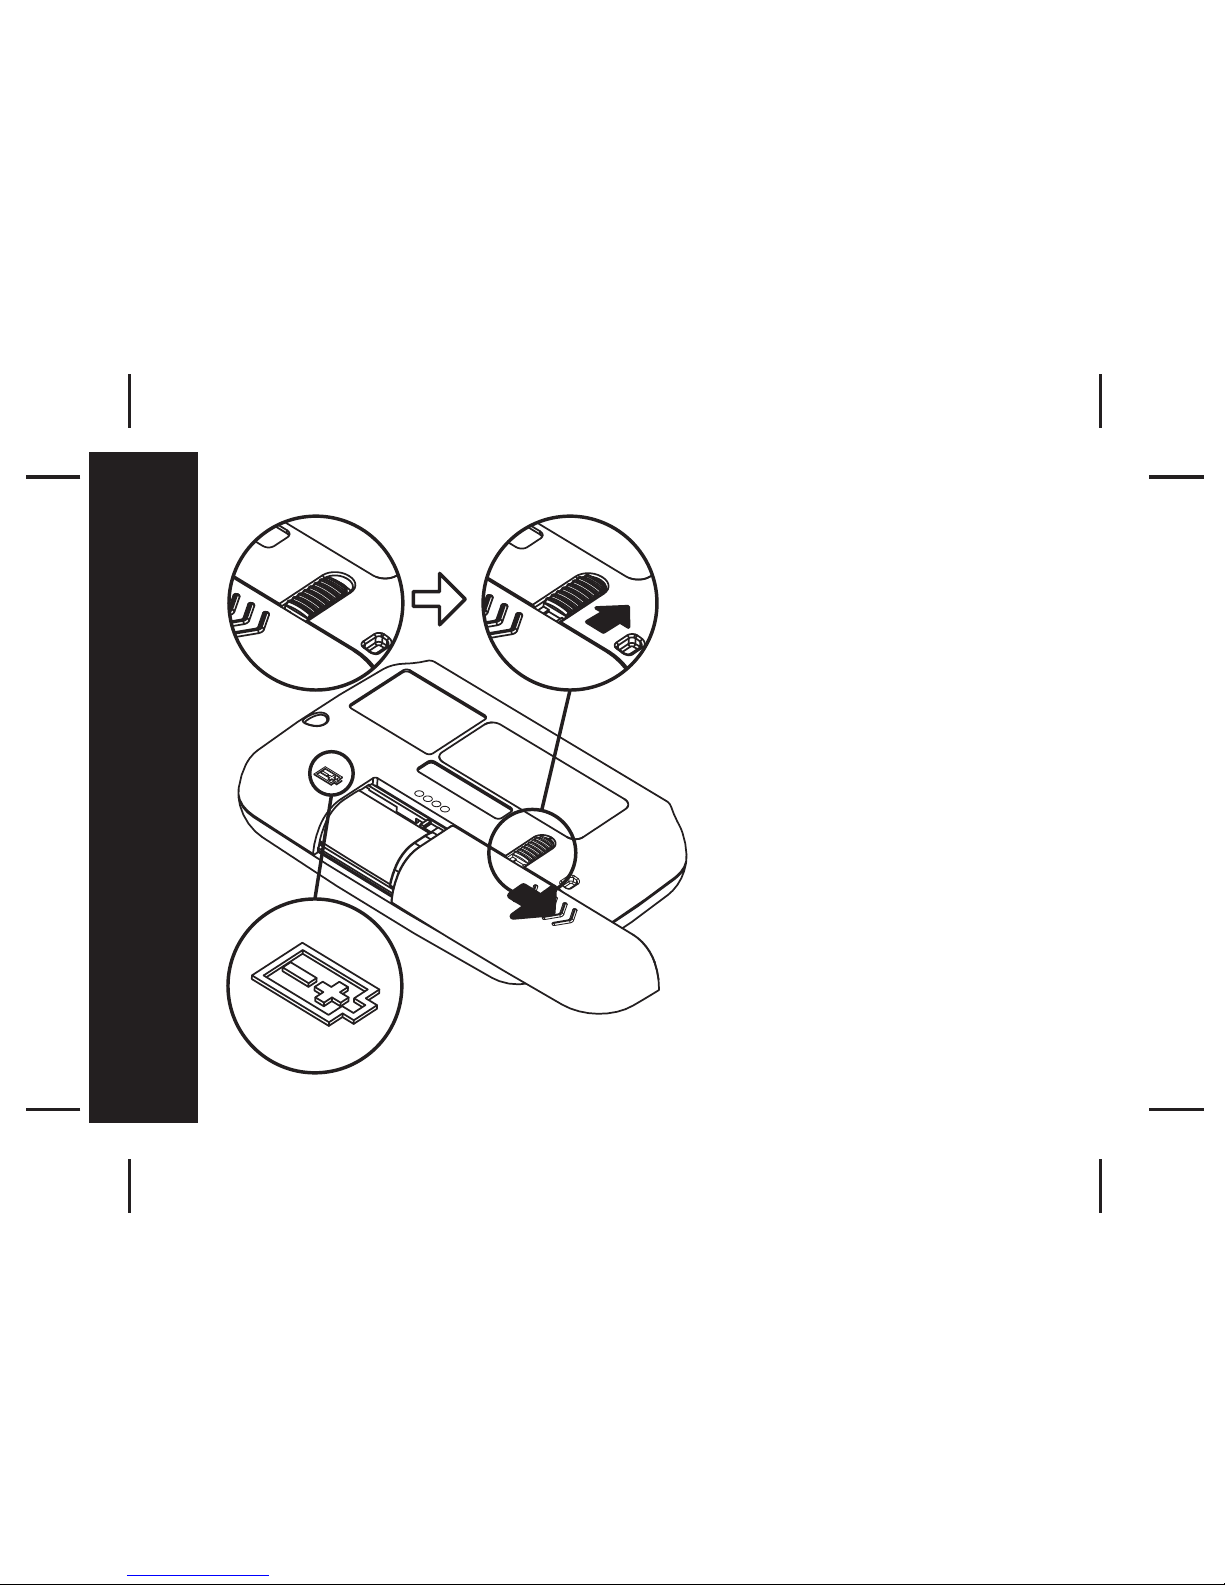
UNLOCK
Battery Installation and
Removal
- Ensure that the pager is off.
Otherwise settings and messages
may be lost! (See page 6 for
instructions on how to turn your
pager off).
- Place the pager face down in the
palm of your hand
- Unlock the battery door lock by
sliding it to the unlocked position.
- Push the battery door and slide it
out as shown.
- Slide a new battery into the battery
compartment.
- Ensure that the battery polarity is
correct as indicated on the housing.
- To close the battery cover, slide the
battery door back into position and
lock it using the battery door lock
Getting Started
Page 7
5
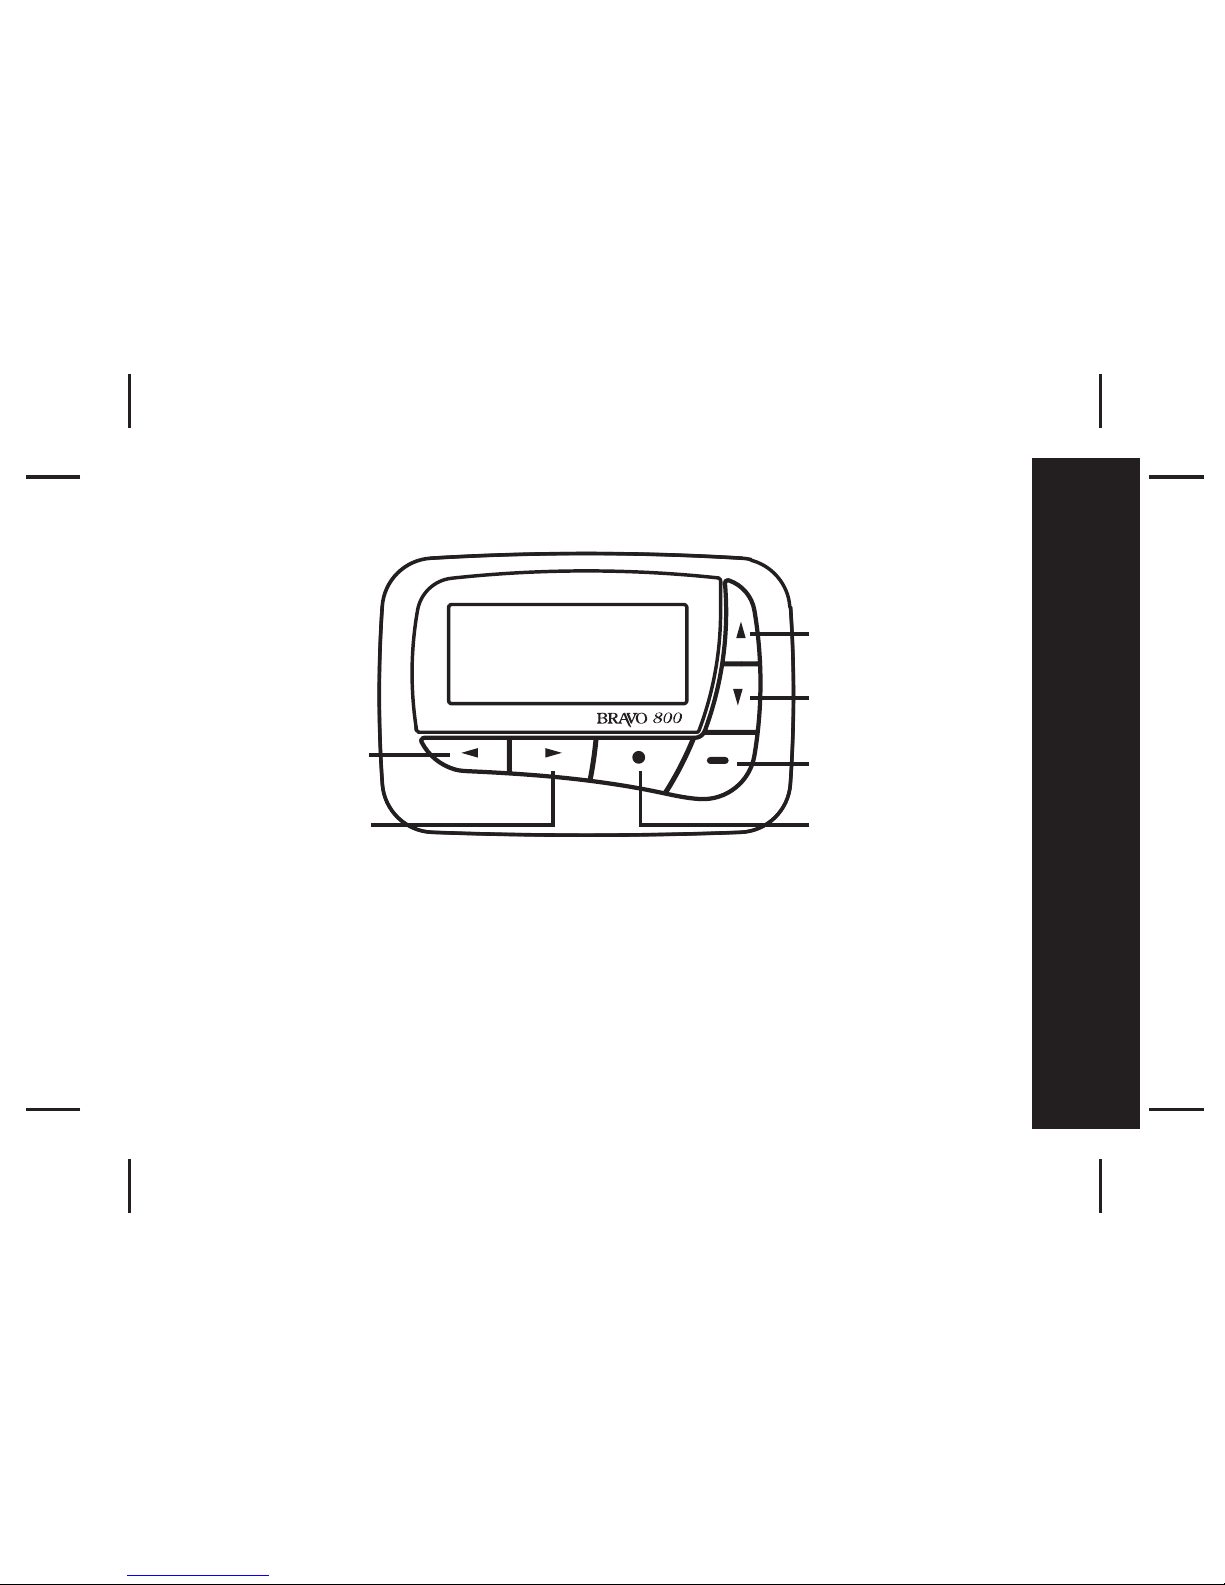
Backward
Button
Forward
Button
Up
Button
Down
Button
Read/On
Button
Function
Button
Getting Started
- Backward Button: navigate back
- Forward Button: navigate forwards
- Function Button: access the function menus
- Read/On Button: read messages/ hold to turn pager on
- Down Button: navigate down/ hold to quick access vibrate mode
- Up Button: navigate up
Button Definition
Page 8
6
Pager ON
Press and hold for 2 seconds to turn on the pager.
Pager OFF
Press the button once from Main Menu screen to go to Function Menu
screen, then press the button five times to select TURN OFF function.
Then press the button "TURN OFF?" is displayed. Press the
button again to confirm turning your pager off, or the button to cancel.
WARNING! Pager must be turned OFF before removing the battery.
Otherwise messages and settings will be lost.
Backlight
Press and hold for 2 seconds to turn ON the backlight manually.
Press and hold for 2 seconds to turn OFF the backlight manually.
Getting Started
Page 9
7
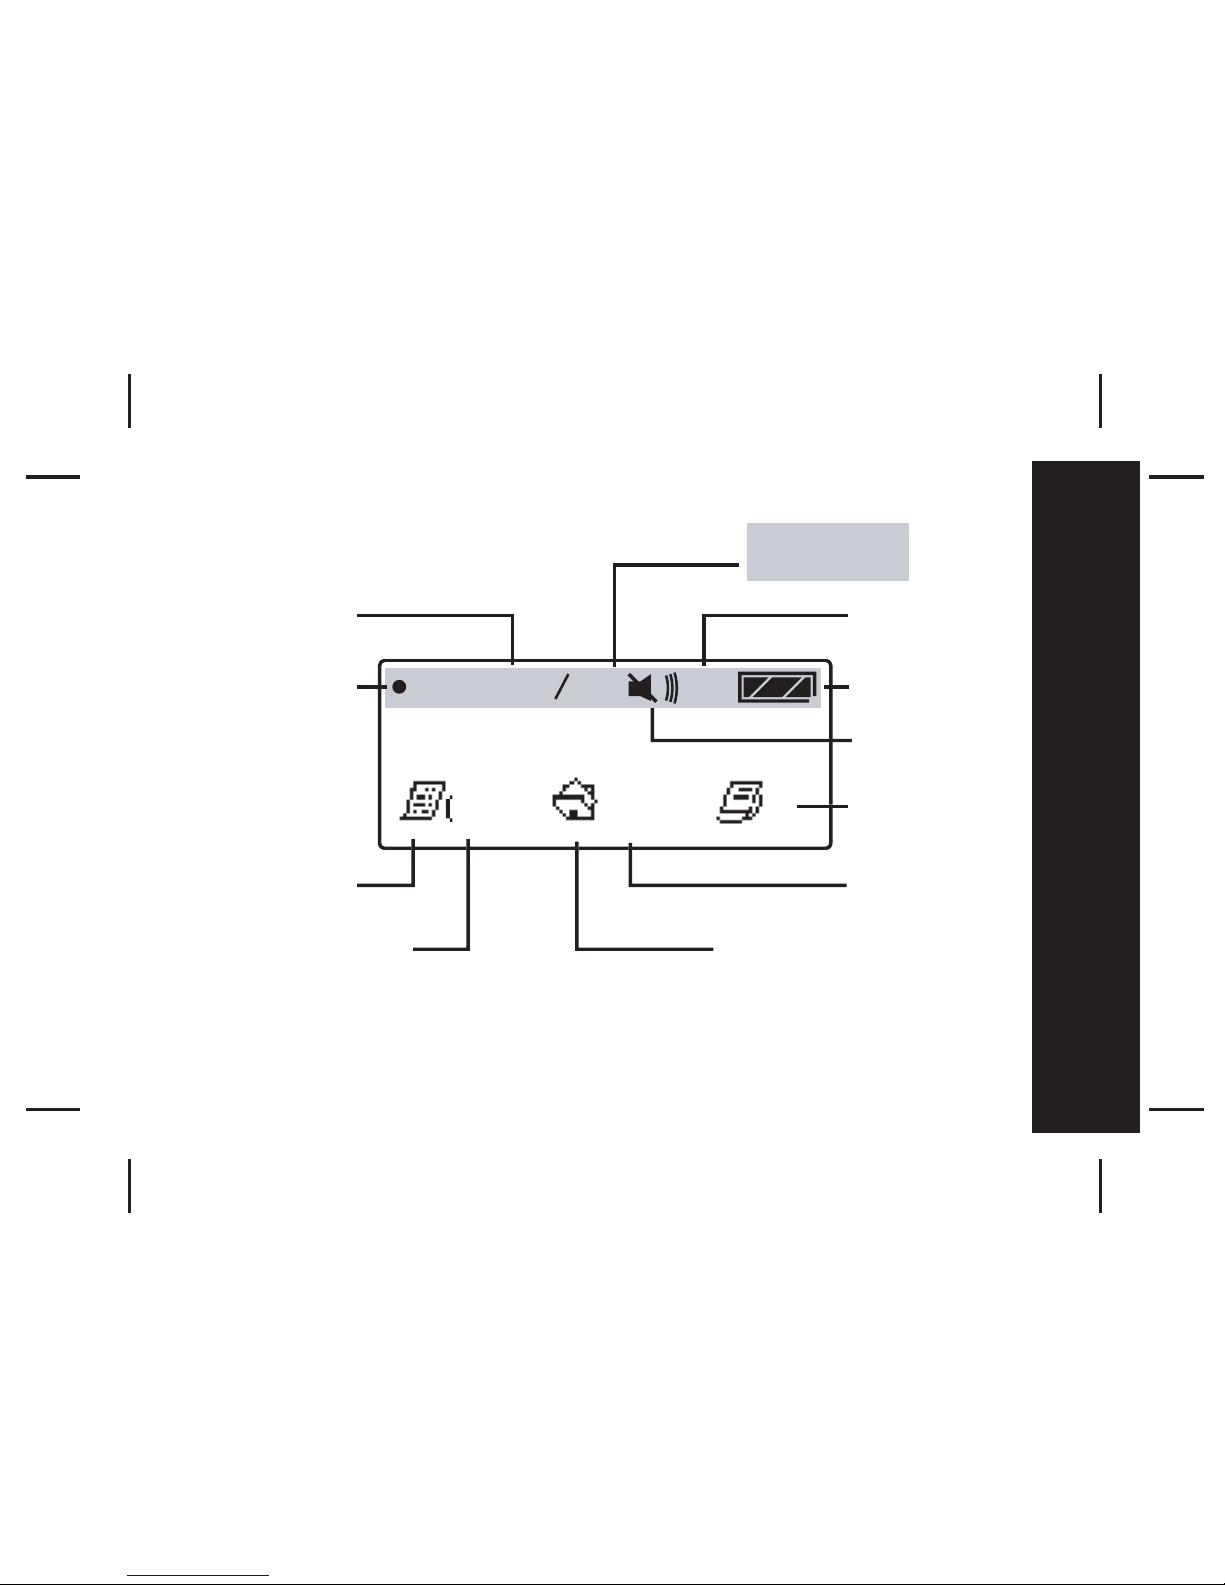
12:00 01 01
#
Day/Date
Display
Battery Level
Mail
Folder
Personal
Folder
N
oteboo
k
F
olde
r
Main Menu Screen
STATUS ICON
DISPLAY
Alarm
Private Time
Indicator
Alert Statu
s
Getting Started
Unread
Message/s
Indicator
Unread Slot/s
Indicator
The pager returns to the standby screen after the time out period. Time,
date, battery level and Private Time are displayed in the standby screen.
Press any button to return to the Main Menu Screen.
Page 10
8
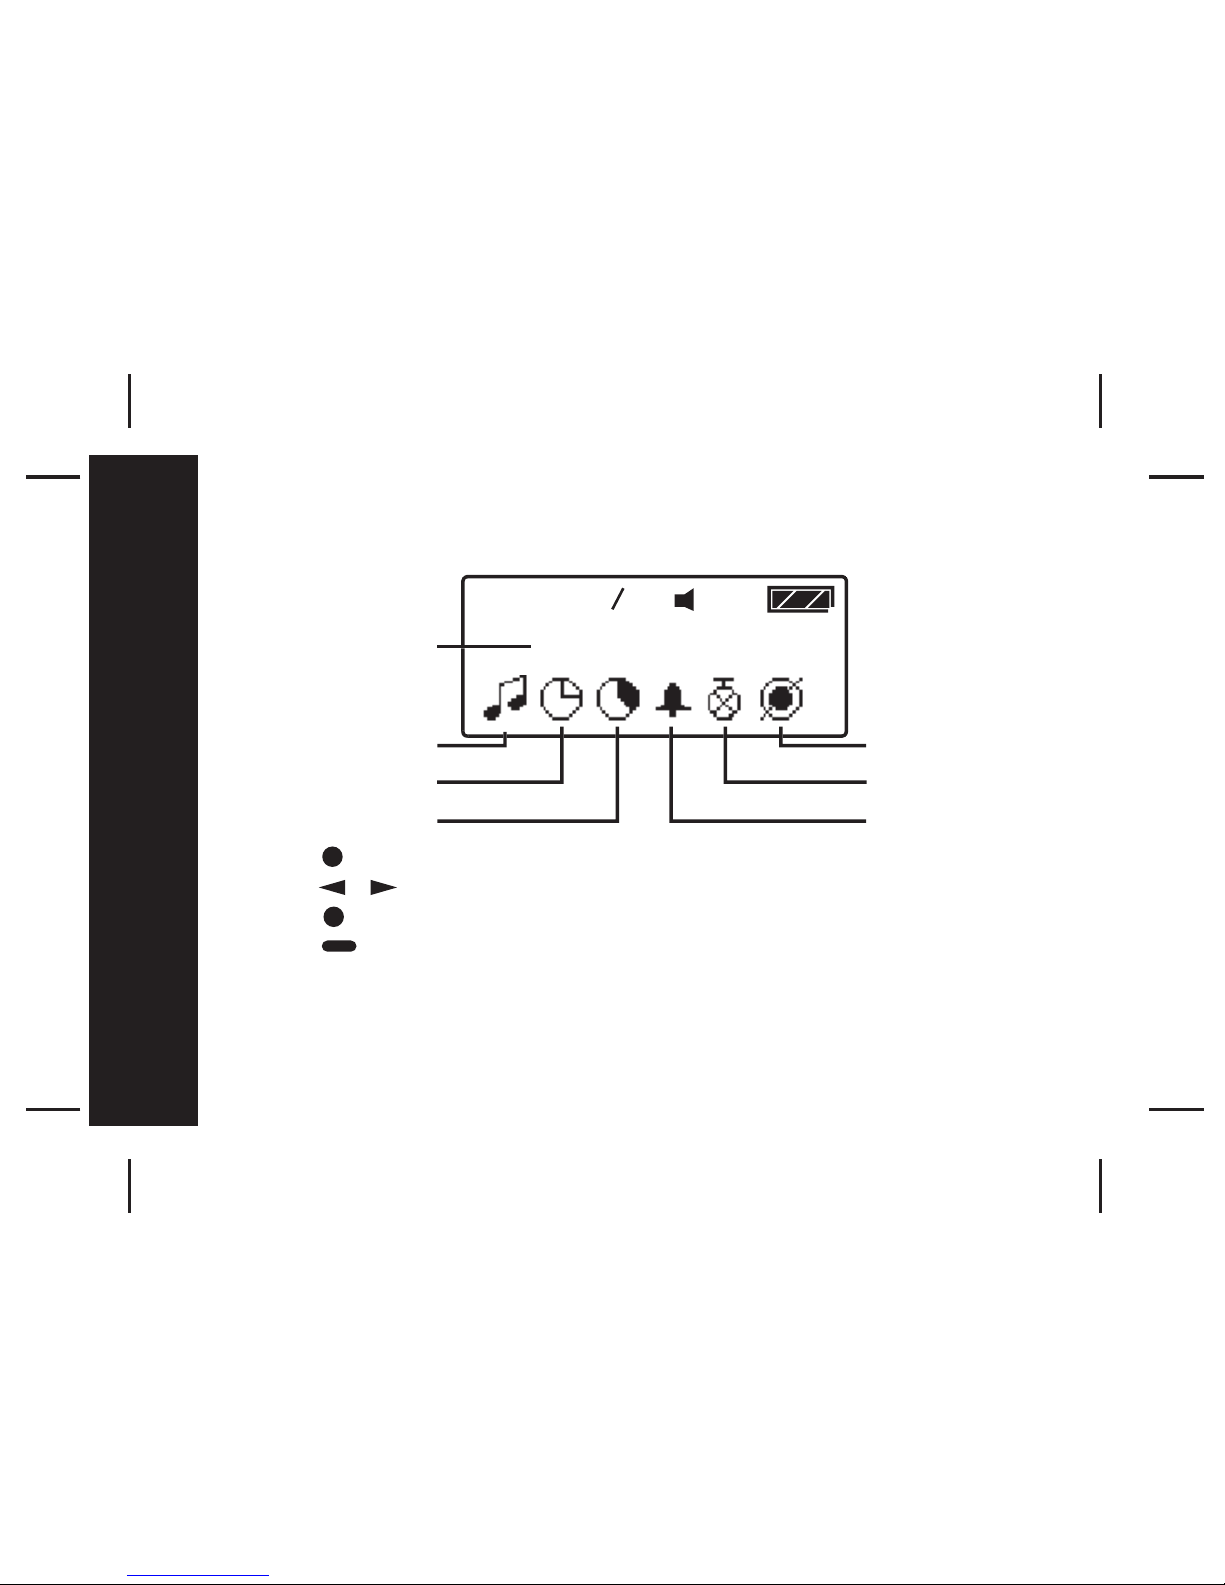
Function Menu
- Press to enter the Function Menu screen from the Main Menu screen.
- Press to move to the previous/next Function Menu icon.
- Press to enter the current selected function sub-menu.
- Press to cancel and return to the Main Menu.
Pager Tips
After 16 seconds of inactivity on any screen, the pager returns to the
standby screen without saving changes.
Current Function
Prompt
Set Alert
Set Time
Private Time
Turn Pager Off
Pager Control
Set Alarm
/
Function Menus
Page 11
9
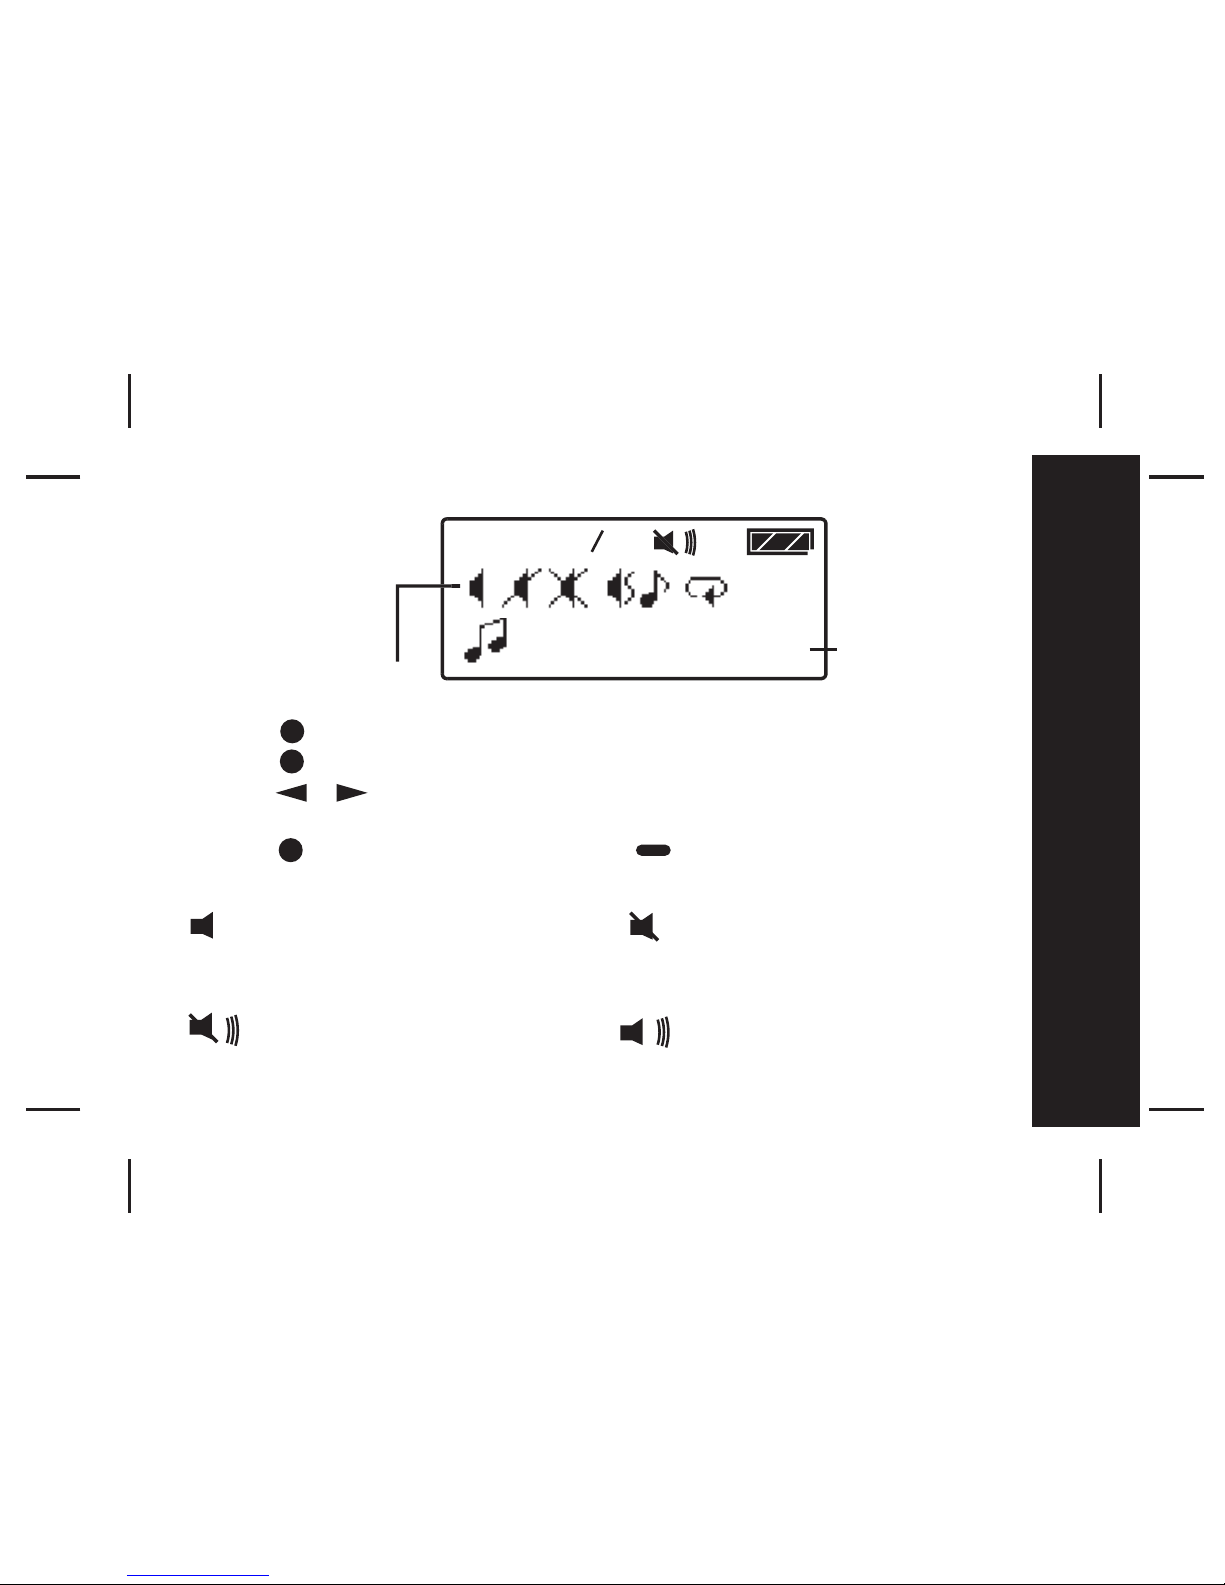
Alert mode
- Press to enter the Function Menu screen from the Main Menu screen.
- Press to enter alert mode sub function.
- Press to move to different alert modes; from vibrate to sleep,
vibra-call, chirp, continuous alert and pleasing alert 1 to 8.
- Press to confirm your selection, or to cancel.
The alert status is updated in the status icon display, as described below:
Audio: Sleep:
Pleasing alert, chirp, Receives message but no
continuous alert. alert.
Vibrate:
Vibration
Melody Mode Icon
s
8 pleasing
alerts
/
Function Menus
Vibra-call:
Vibration followed by
audio alert.
Page 12
10
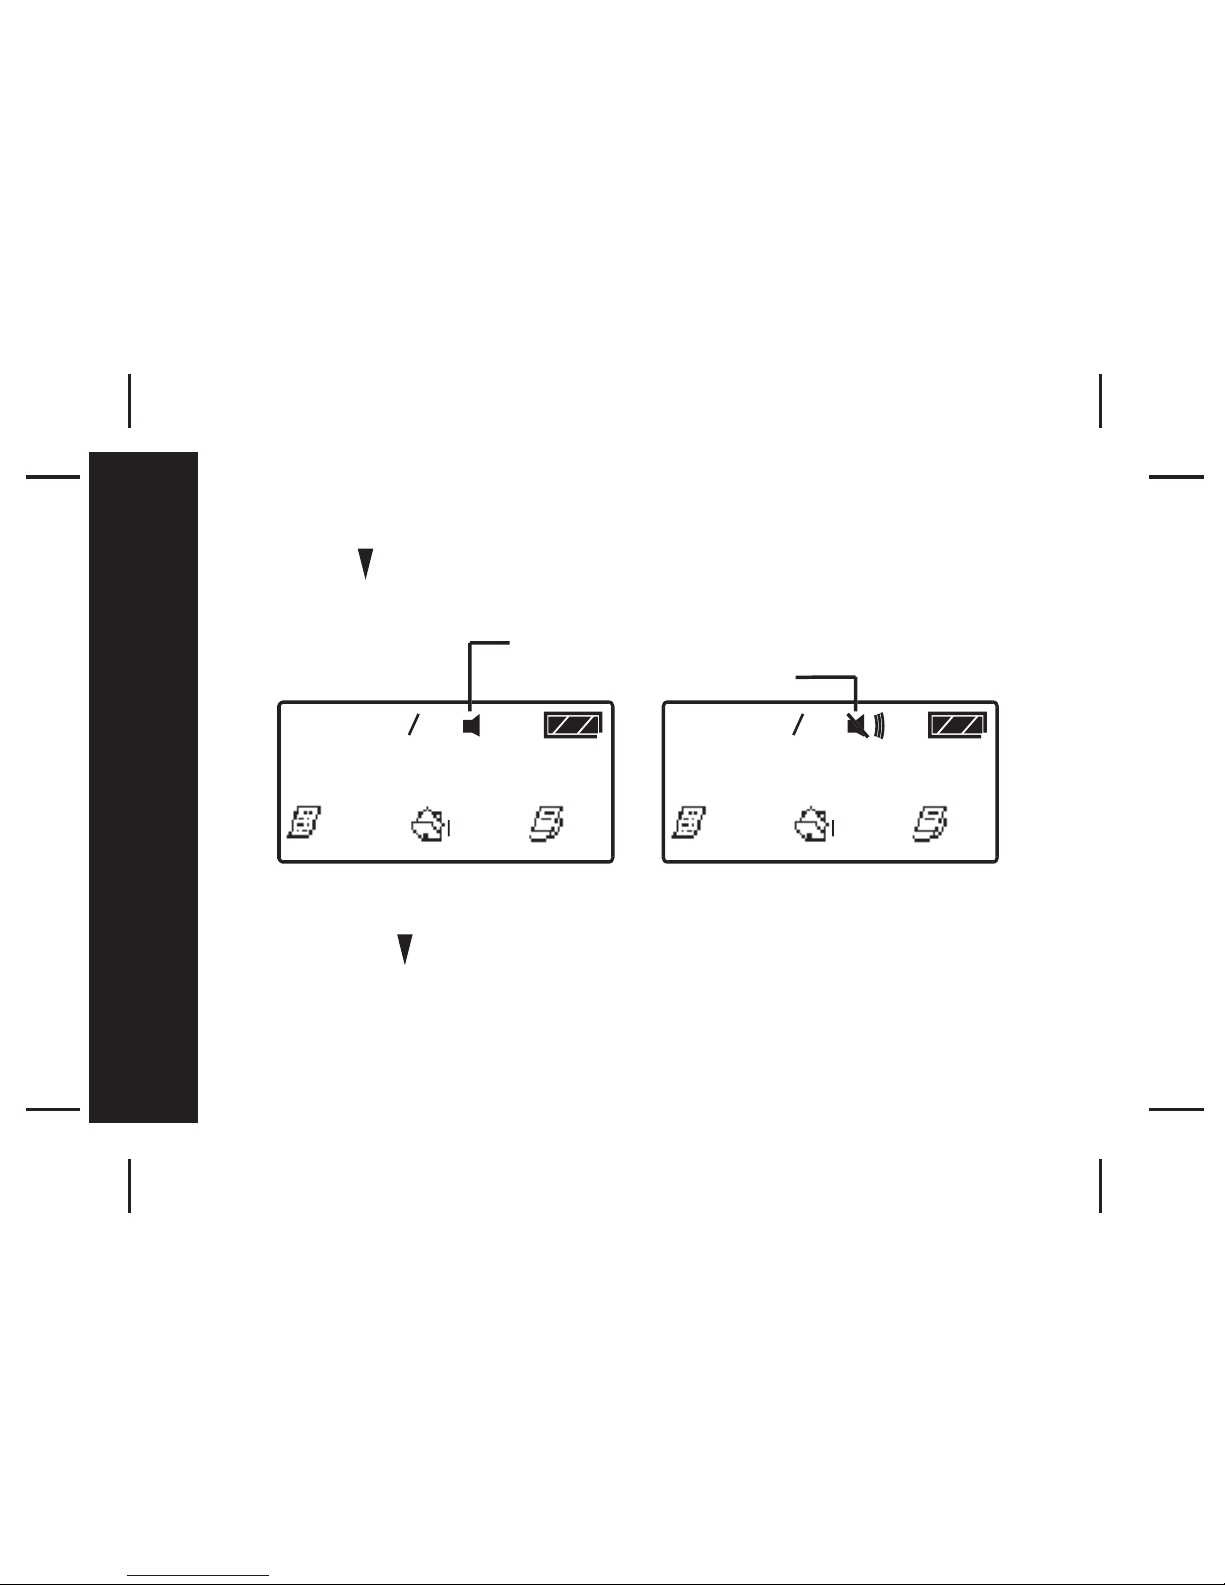
Quick Access to Vibrate mode
You can use to quickly access Vibrate mode if your pager is currently in Audio Alert
mode. (Your pager must be on the Main Menu page in order to use this function).
- Press and hold for 2 seconds to access Vibrate mode.
- Repeat process to return to previously active Alert mode.
- When the pager is in Private Time quick access to Vibrate mode is not available.
88:88 01 01
Function Menus
Alert Mode active
Silent mode active
Page 13
11
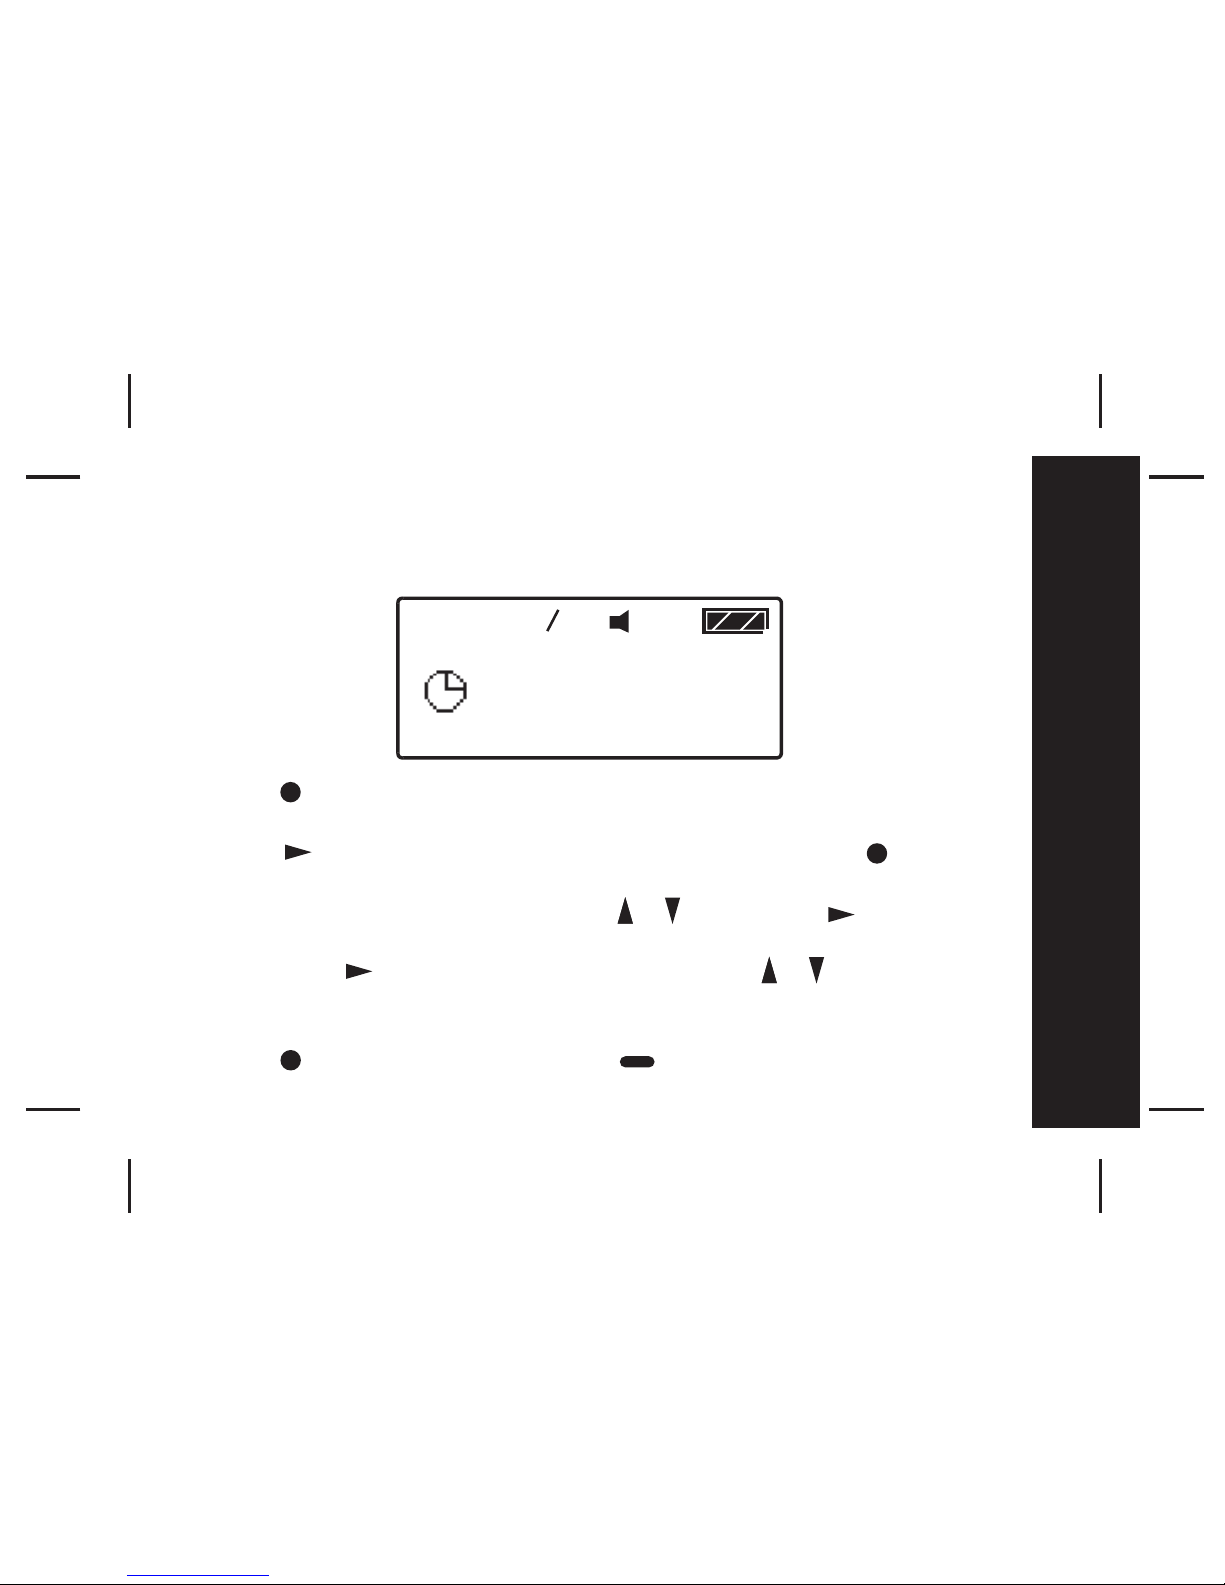
Time and Date
To access and set the time and date of
y
our pager
;
- Pr
ess
once from the Main Menu screen to enter the Function Men
u
screen and SET ALERT will appear.
- Press button once to select "SET TIME", then press the button
and a 12 hour clock appears.
-To select the 12hr or 24hr clock press / then press to advance
and set the hour of your pager.
-After presing to highlight the hour field, use the / button to
choose the value.
- Repeat the above steps for setting minutes, AM/PM, day, month and year.
- Press to confirm your settings, or to cancel.
AM
Function Menus
Page 14
12
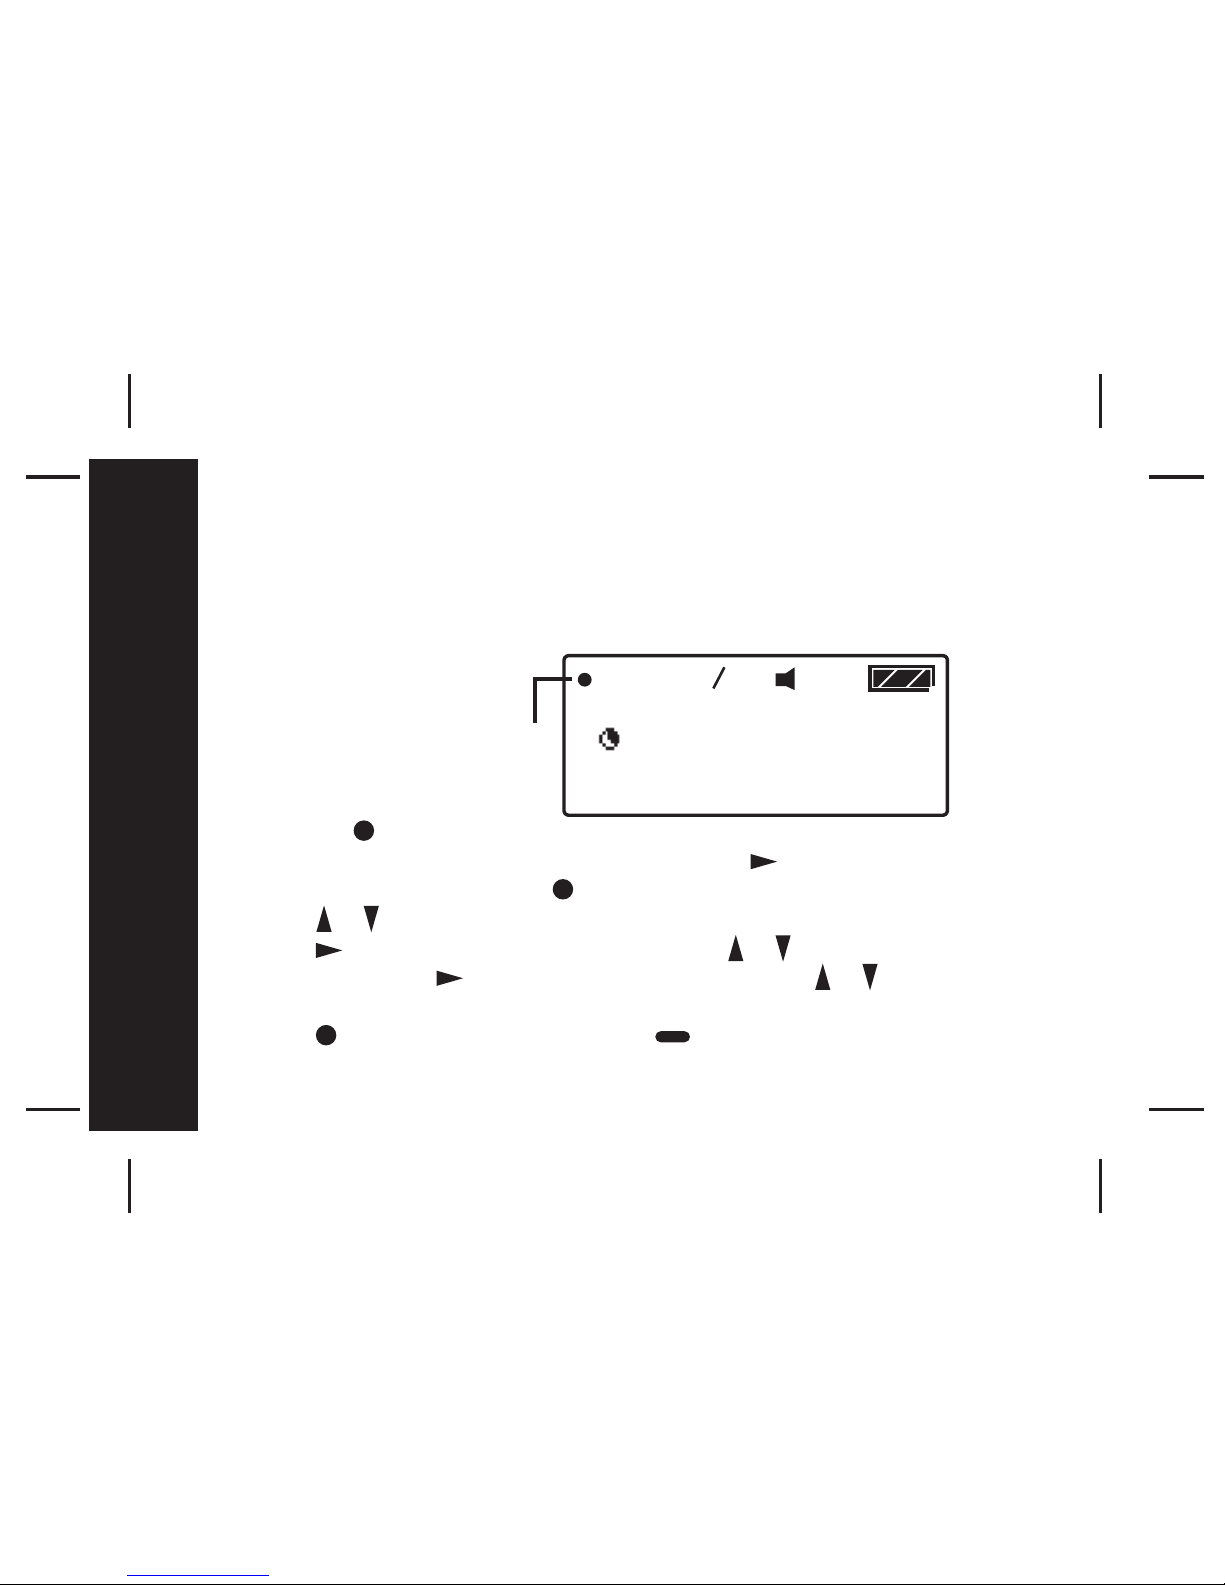
Private Time
Activating Private Time sets a daily period of time in which your pager will
not alert. Private Time overrides any current ALERT MODE status.
However, the pager will still receive messages, the ALARM will still sound
and Priority Alerts will still alert when the pager is in Private Time.
-Press the button once from Main Menu screen to go to the Function
Menu screen, "SET ALERT" will appear. Press twice to select
"PRIVATE TIME", then press to enter. A flashing clock appears.
- Press / to activate or deactivate the Private Time function.*
- Press to go to the "START" field , press / to set the starting
time. Then Press to go to the "END" field, press / to set the
ending time.
- Press to confirm your settings, or to cancel.
* A dot at the left of the Status Icon Display indicates that the function is active.
12:00 01
01
AM
12:00
PM
END
Function Menus
Private time
active
Page 15
13
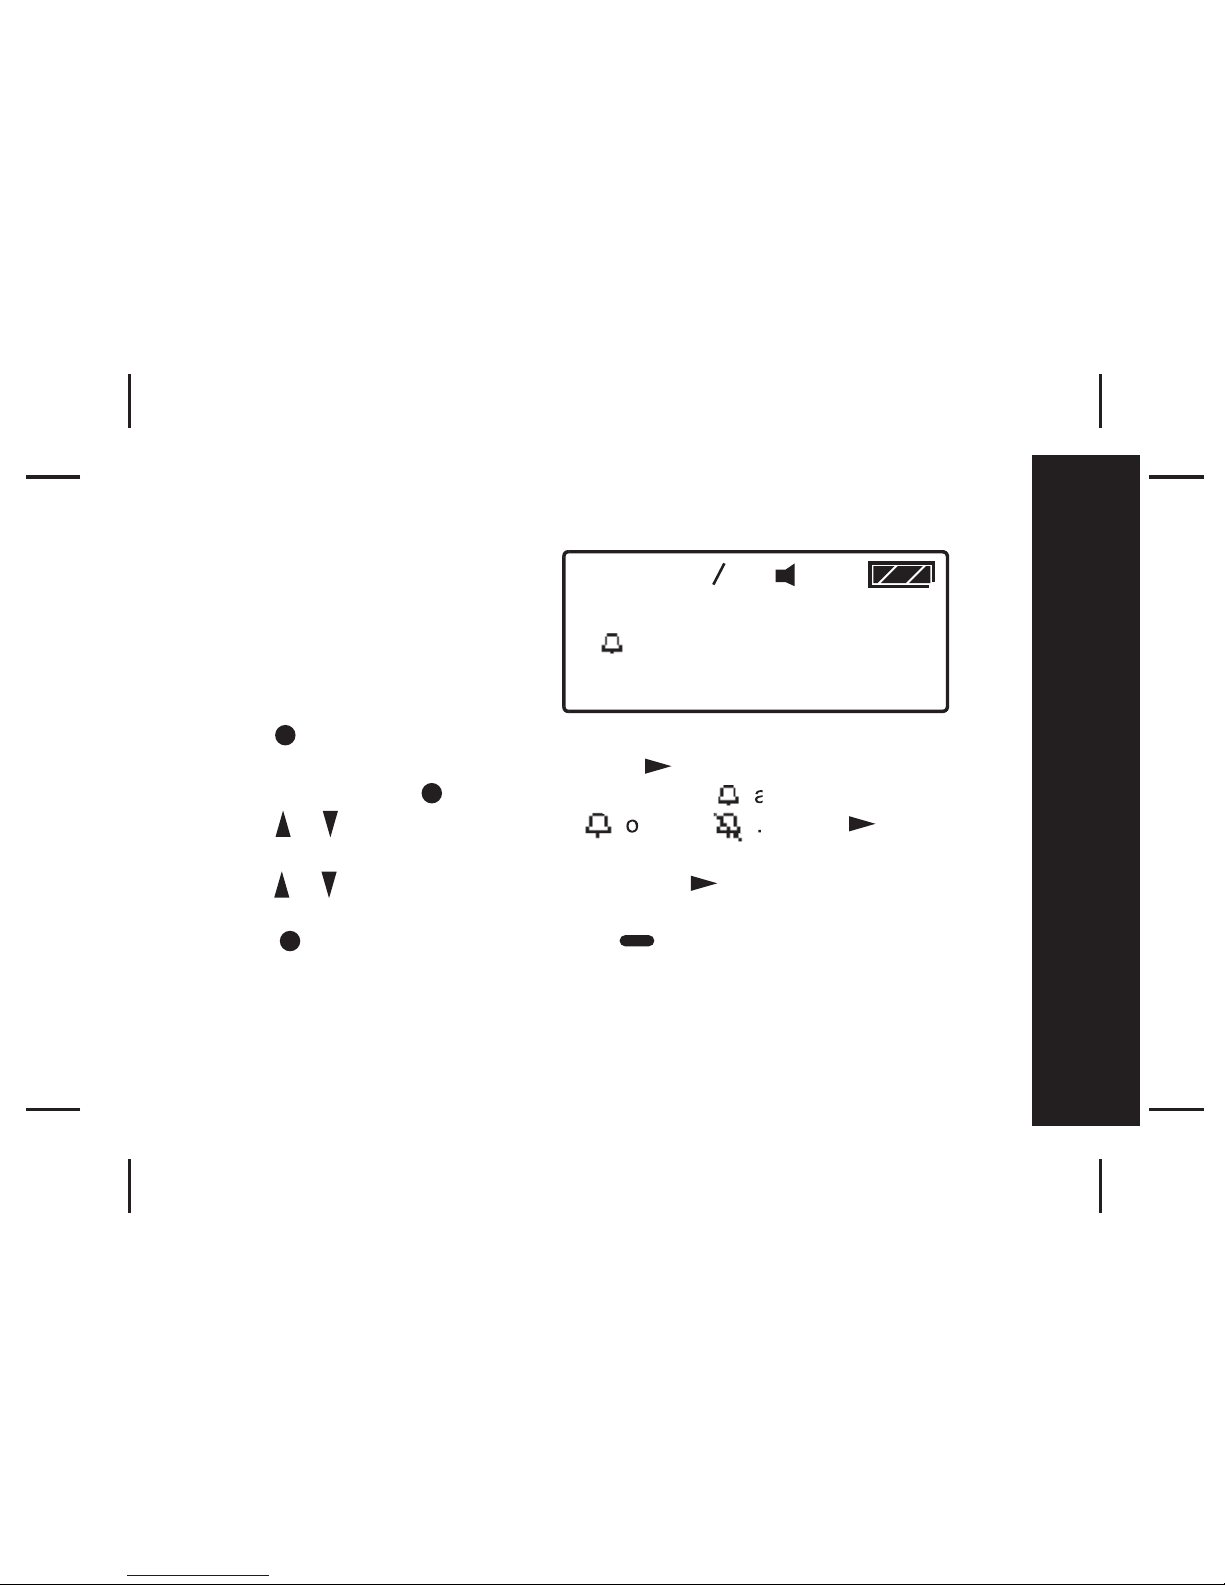
Alarm
To use your pager as an Alarm;
-Press once from Main Menu screen to
g
o to the Function Menu
screen, "SET ALERT" will appear. Press three times to select "SET
ALARM", then press to enter and a flashing appears.
- Press / to turn the alarm ON or OFF . Press to move
to the time field.
- Press / to change the hour then press to move to the next field.
Repeat this step for setting minutes, AM/PM, day, month and year.
- Press to confirm your settings, or to cancel.
- When the Alarm is active an Alarm icon is displayed in the Status Bar.
Pager Tips
By setting no date for your alarm the alarm will sound every day at the
specified time; - example: " 9 : 00 AM -- --- -- "
#
Function Menus
Page 16
14
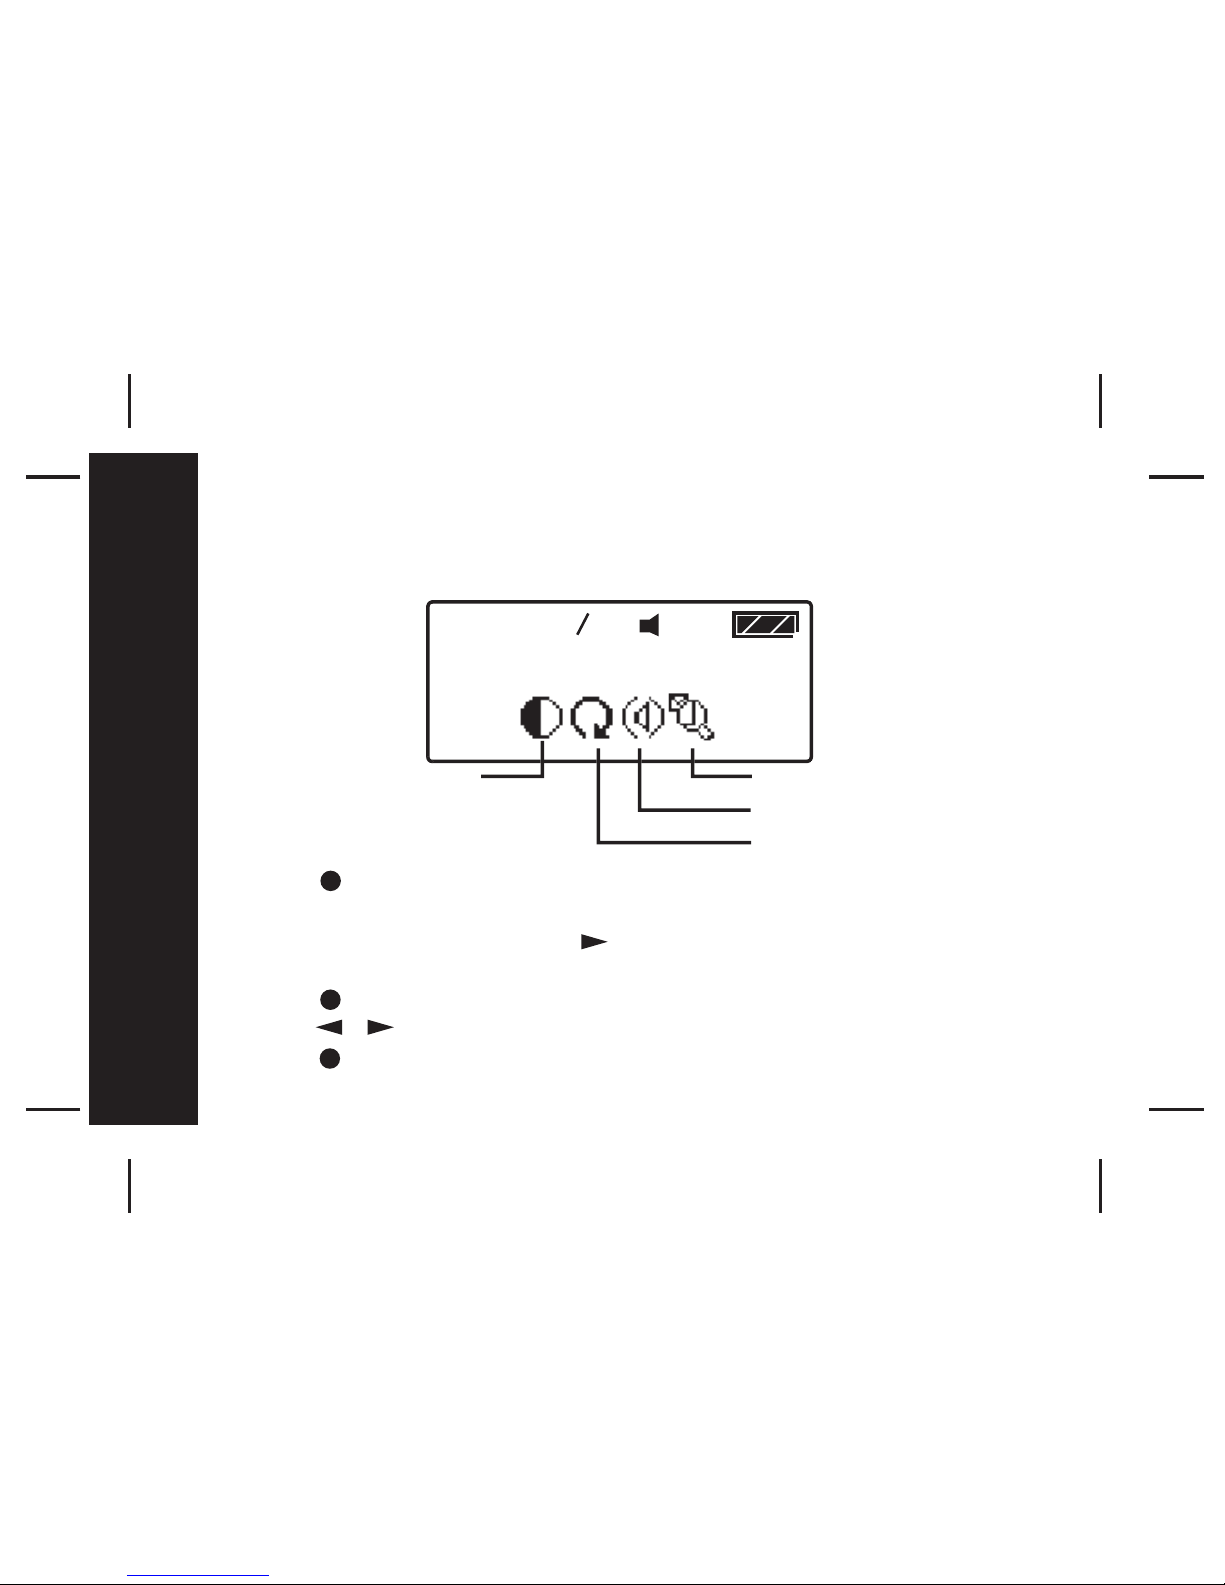
Pager Control
The Pager Control Menu allows you to control the default settings of your
pager.
- Press once from the Main Menu screen to go to the Function Menu
screen
- SET ALERT will appear. Press four times to navigate to PAGER
CONTROL
- Press to enter subfunction screen.
- Press move to the next control icon.
- Press to enter the selected control setting screen.
12:00 01 01
#
Auto Scroll
Reminder
Set ZoomSet Contrast
/
Function Menus
Page 17
15
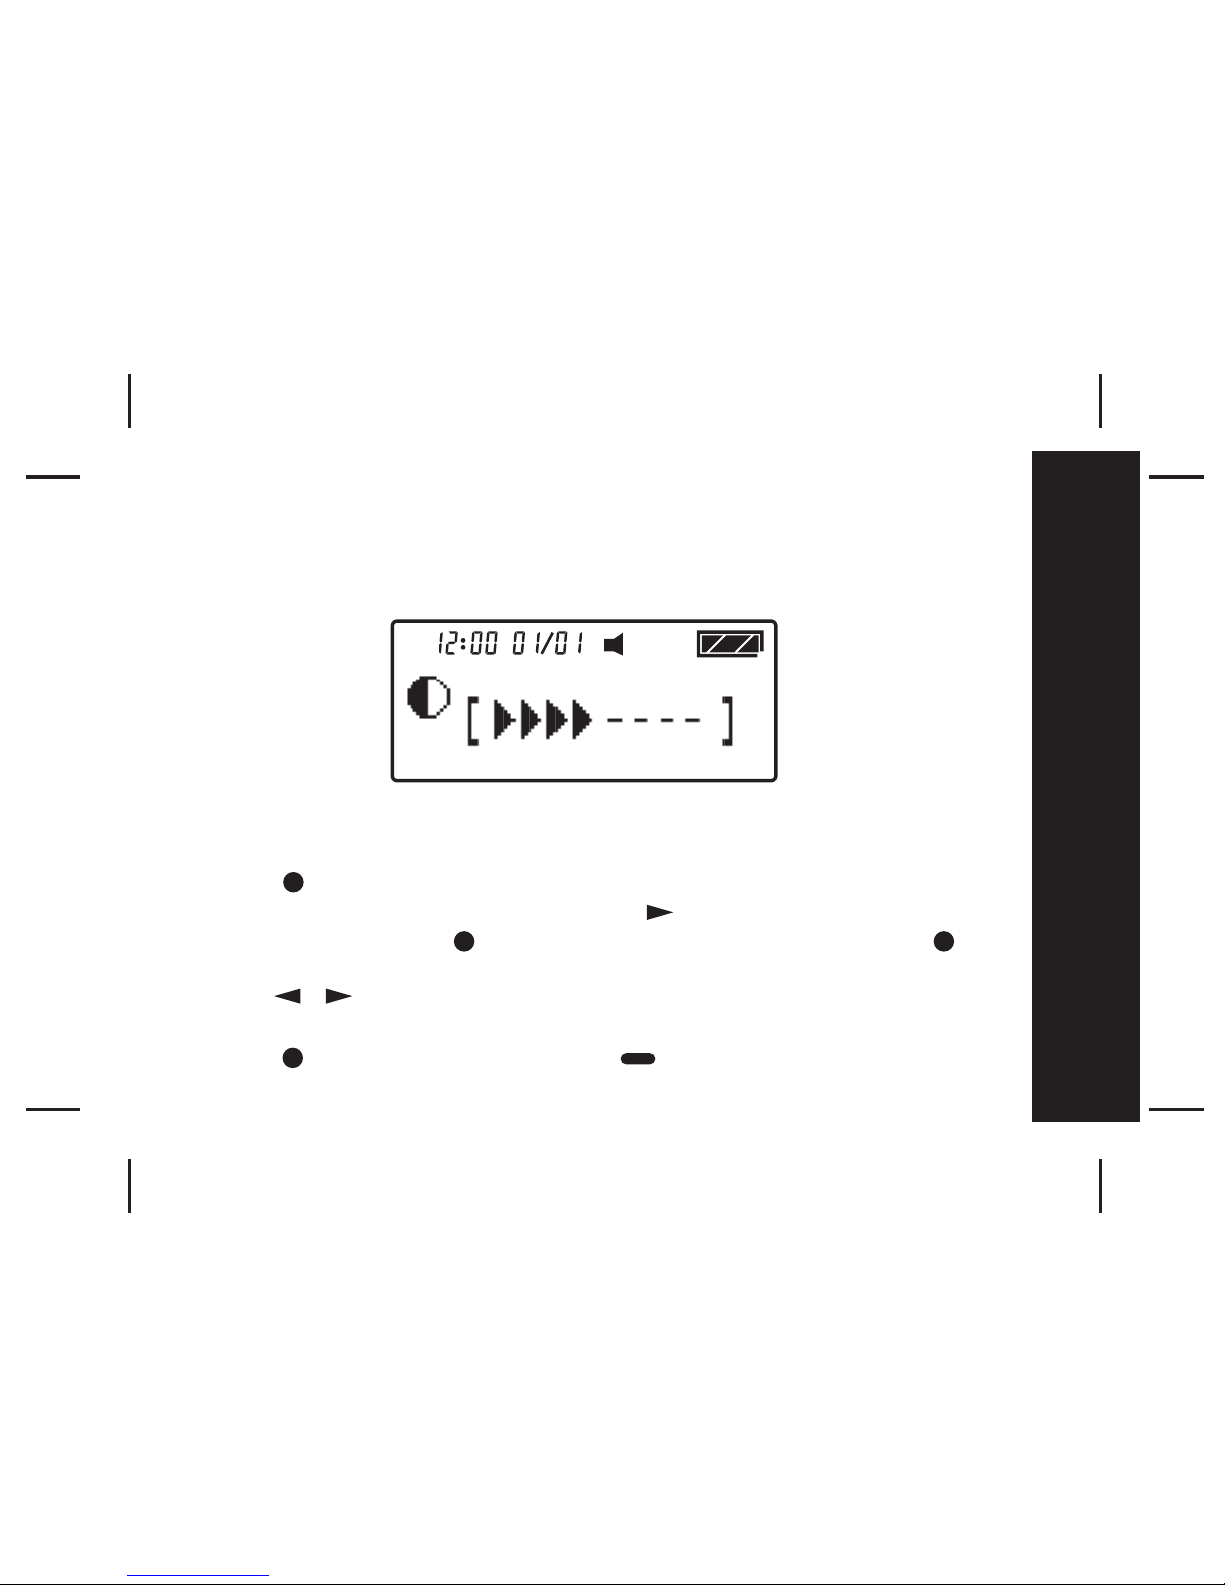
Set Contrast
To change the display contrast of your pager's screen;
- Press once from the Main Menu screen to go to the Function Menu
screen, "SET ALERT" will appear. Press four times to select "PAGER
CONTROL", then press and "SET CONTRAST" appears. Press to
select Set Contrast.
- Press to select and change the display contrast of your pagers
screen.
- Press to confirm your settings, or to cancel.
/
Function Menus
Page 18
16
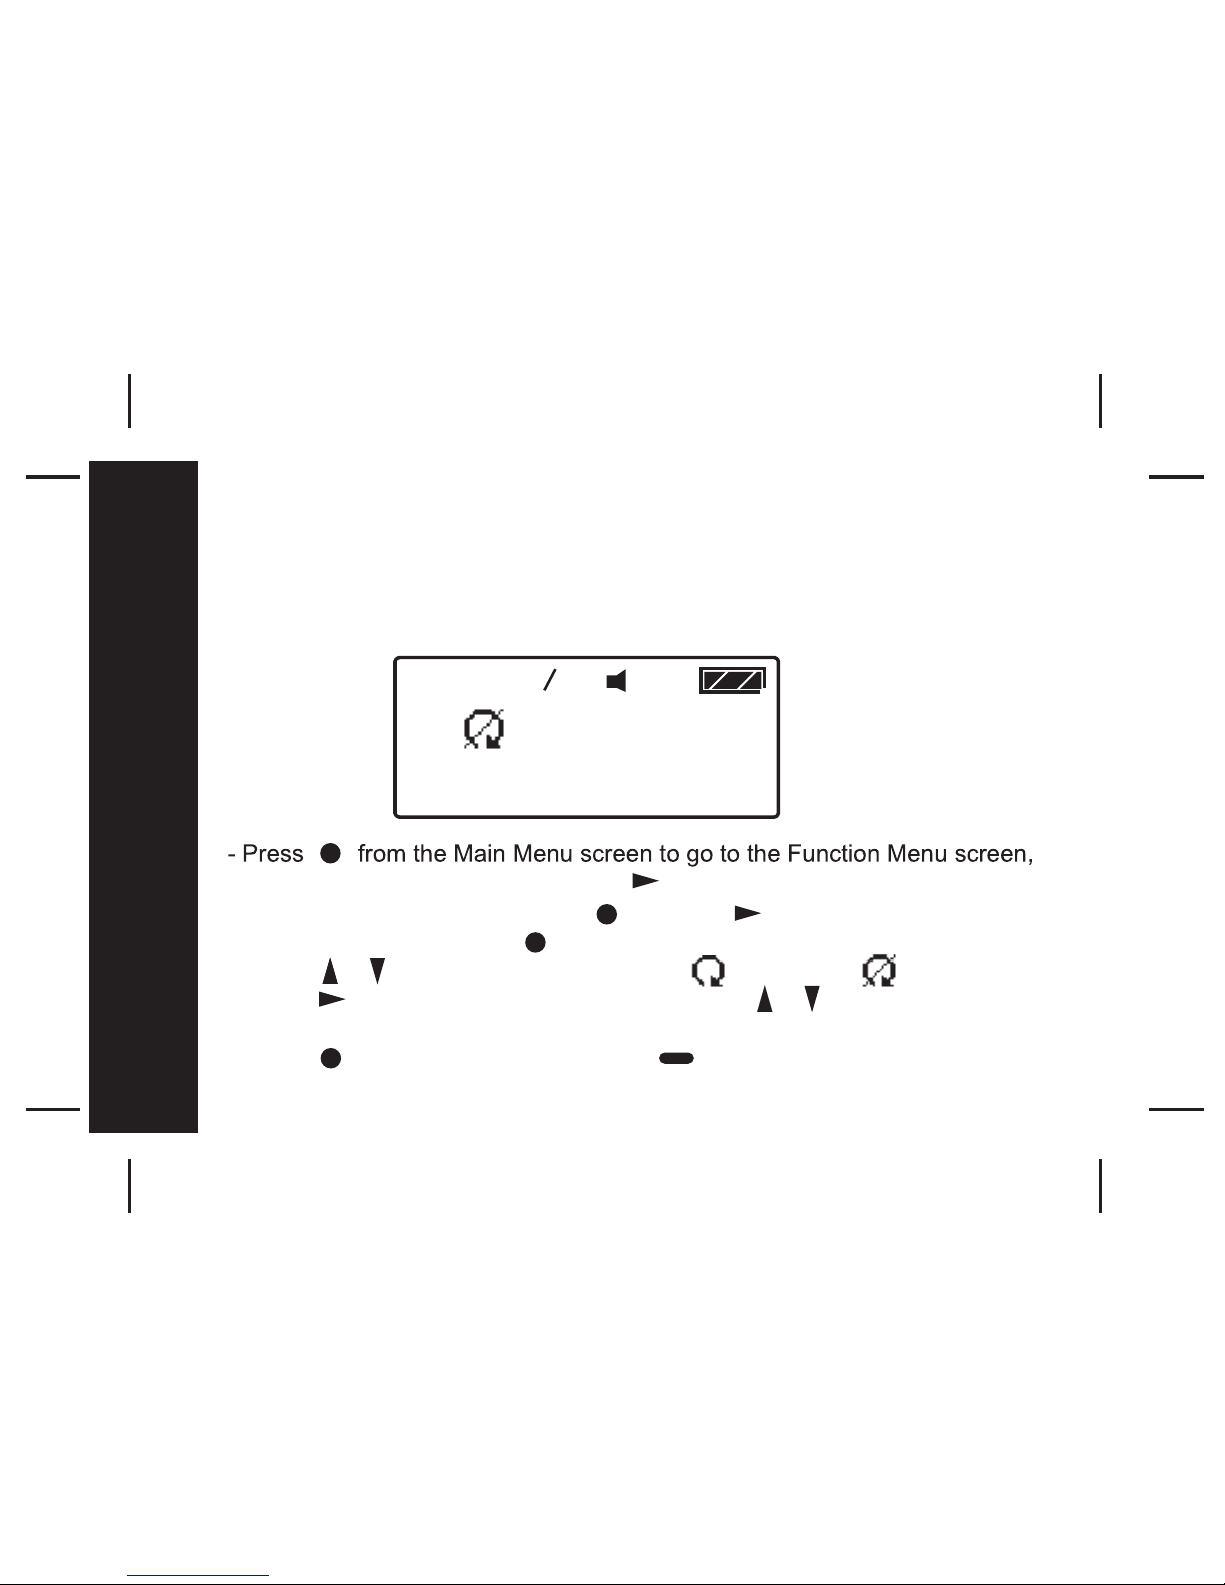
Auto Scroll
Activating Auto Scroll will cause the display to scroll through a message
automatically. The display will scroll faster or slower depending on the set
speed.
"SET ALERT" will appear. Press the button four times to select
"PAGER CONTROL", then press . Press once and "AUTO
SCROLL " appears. Press to select Auto Scroll.
- Press / to make auto scroll active or inactive .
- Press to highlight auto scroll level and use / to select
"MEDIUM", "SLOW" or "FAST" as the scroll speed.
- Press to confirm your settings, or to cancel.
#
Function Menus
Page 19
17
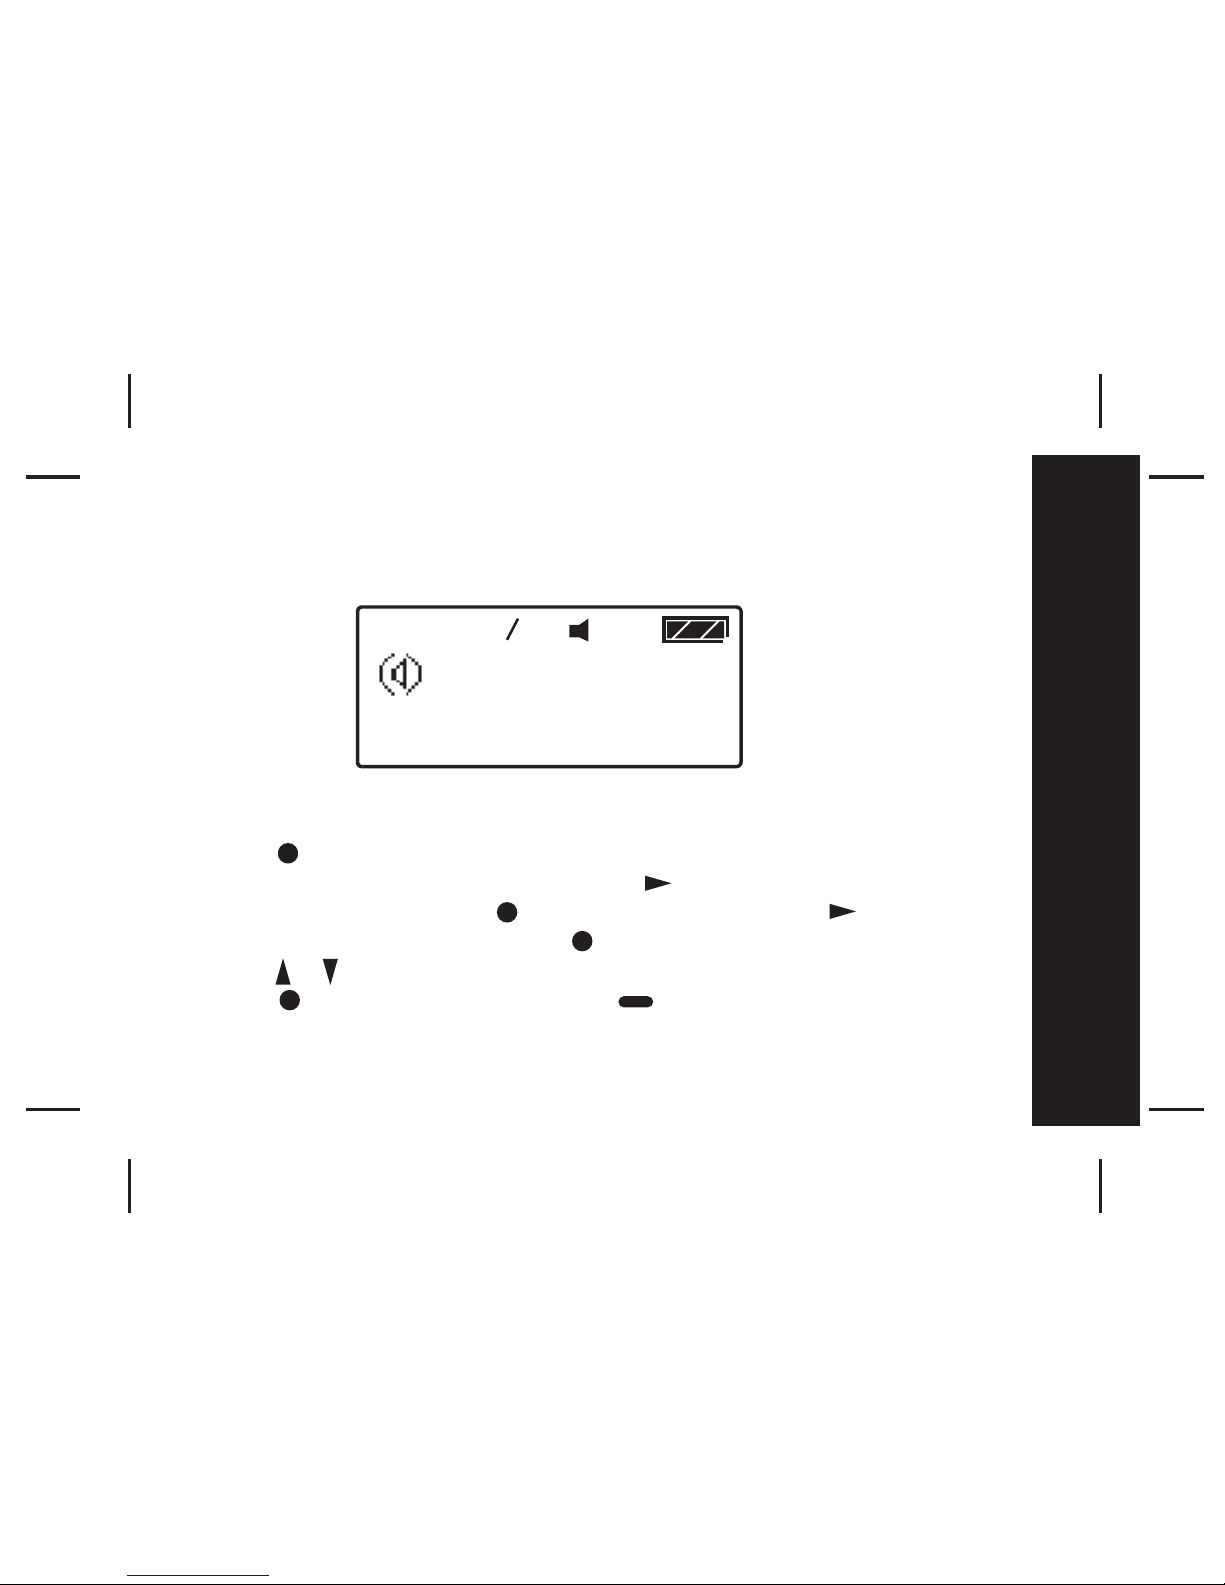
Reminder Alert
turning Reminder on, the pager will alert at 2 minute intervals when there
are unread messa
ges.
- Press once from Main Menu screen to go to the Function Menu
screen, "SET ALERT" will appear. Press four times to select "PAGER
CONTROL", then press the button once and press the button twice
and "REMINDER " appears. Press to enter the Reminder menu.
- Press / Button to switch ON or OFF.
- Press to confirm your settings, or to cancel.
#
Function Menus
Page 20
18
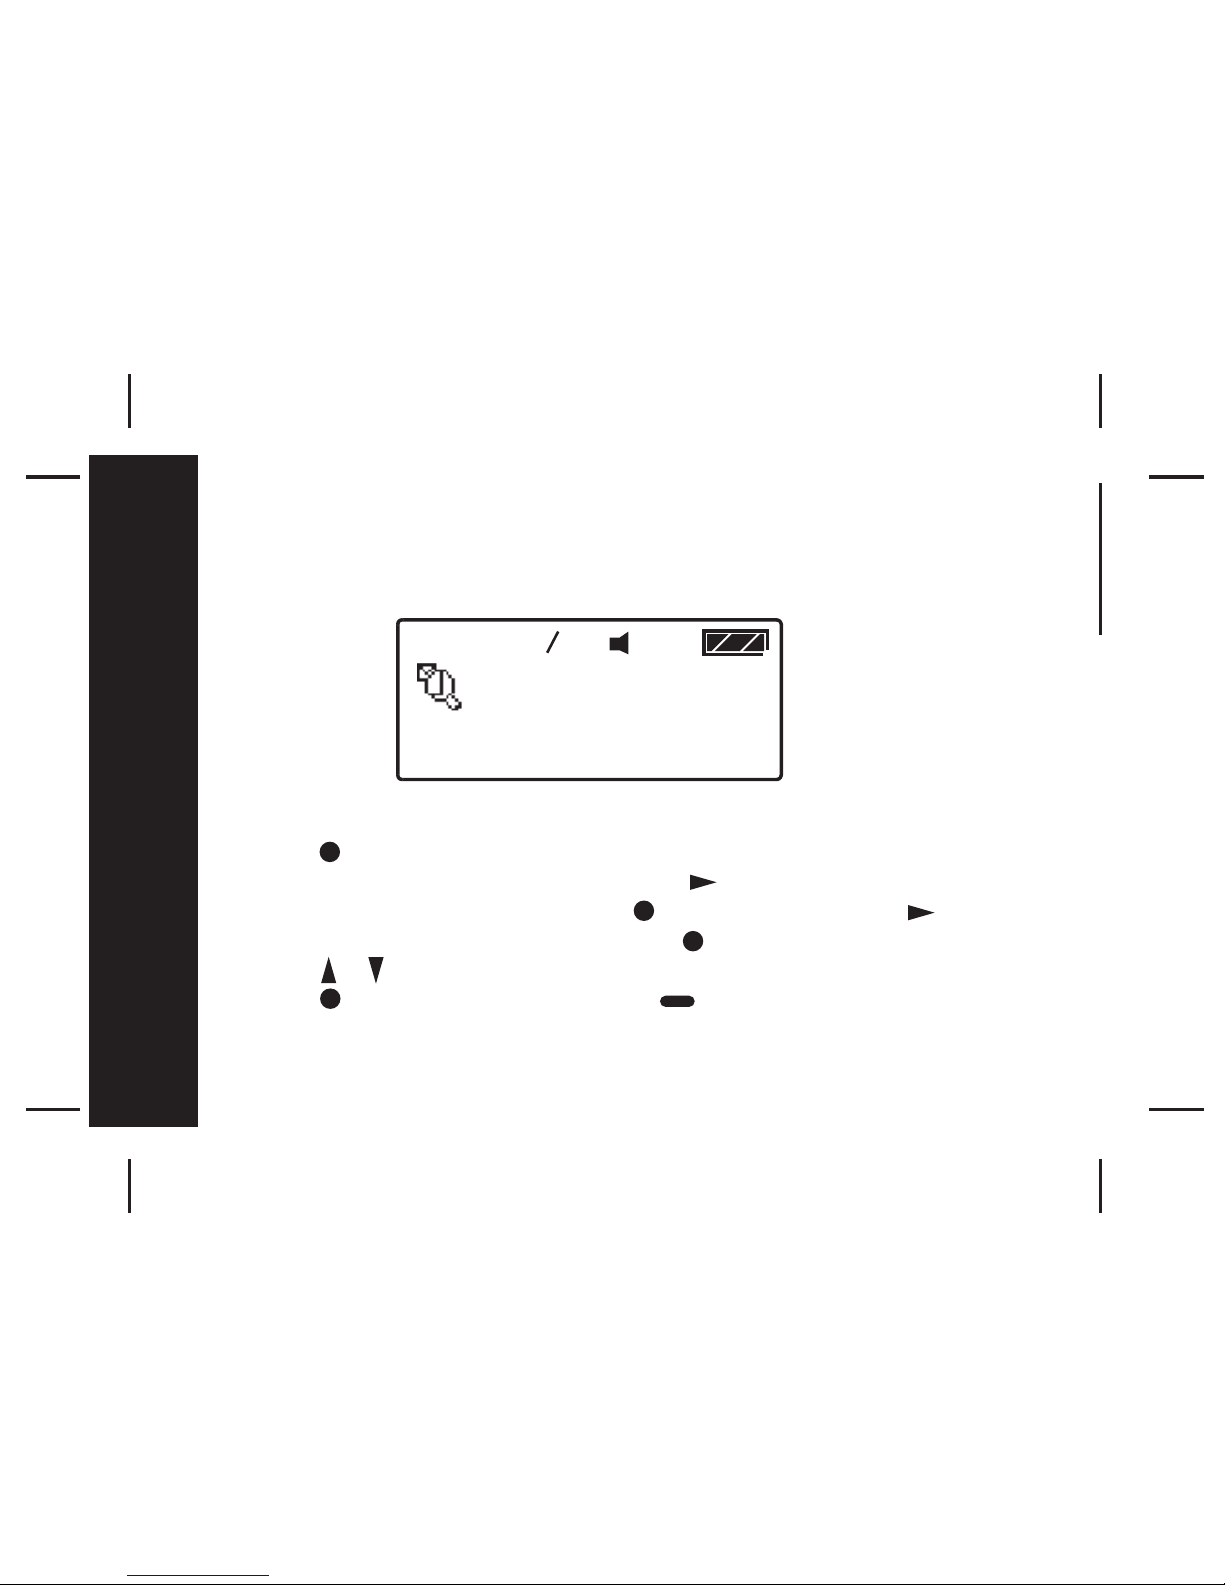
Set Zoom
You can double the font size of
y
our message display for easy readin
g.
- Press once from Main Menu screen to enter the Function Menu screen
and "SET ALERT" will appear. Press the button four times to select
"PAGER CONTROL", then press the button and scroll the button
three times and "ZOOM " appears. Press to enter the Set Zoom menu.
- Press / to switch ZOOM ON or OFF.
- Press to confirm your settings, or to cancel.
12:00 01
01
#
OFF
Function Menus
Page 21
19
Button Definition for Mail Folder
In the Mail Folder Screen;
: displays the content of current message in the slot
: move to the next slot
: move to the previous slot
: preview the previous message in the current slot
: preview the next message in the current slot
: enter Mail Folder Function screen
When reading an Mail Folder Message;
: scrolls down through the message. When it reaches the bottom
it jumps to the next message. When it reaches the last message
in the slot the pager returns to the Mail Folder Screen
: move to the next message
: move to the previous message
: jumps to the top of the message. When at the top it returns to
the Mail Folder Screen
: scrolls down through the message. When it reaches the bottom
it jumps to the next message. When it reaches the last message
in the slot the pager returns to the Mail Folder Screen
: enter Mail Message Function screen
Messages
Page 22
20
Button Definition for Personal and Notebook Folders
In the Personal or Notebook Folder Screen;
: displays content of current message
: move to the next message
: move to the previous message
: move to the previous line of message icons
: move to the next line of message icons
: enter Personal/Notebook Folder Function screen
When reading a Personal or Notebook message;
: scrolls down through the message. When it reaches the bottom
it returns to the Personal/Notebook Folder Screen
: move to the next message
: move to the previous message
:jumps to the top of the message. When at the top of the
message it returns to the Personal/Notebook Folder Screen
: scrolls down through the message. When it reaches the bottom
it returns to the Personal/Notebook Folder Screen
: enter Personal/Notebook Message Function screen
Messages
Page 23
21
Messages
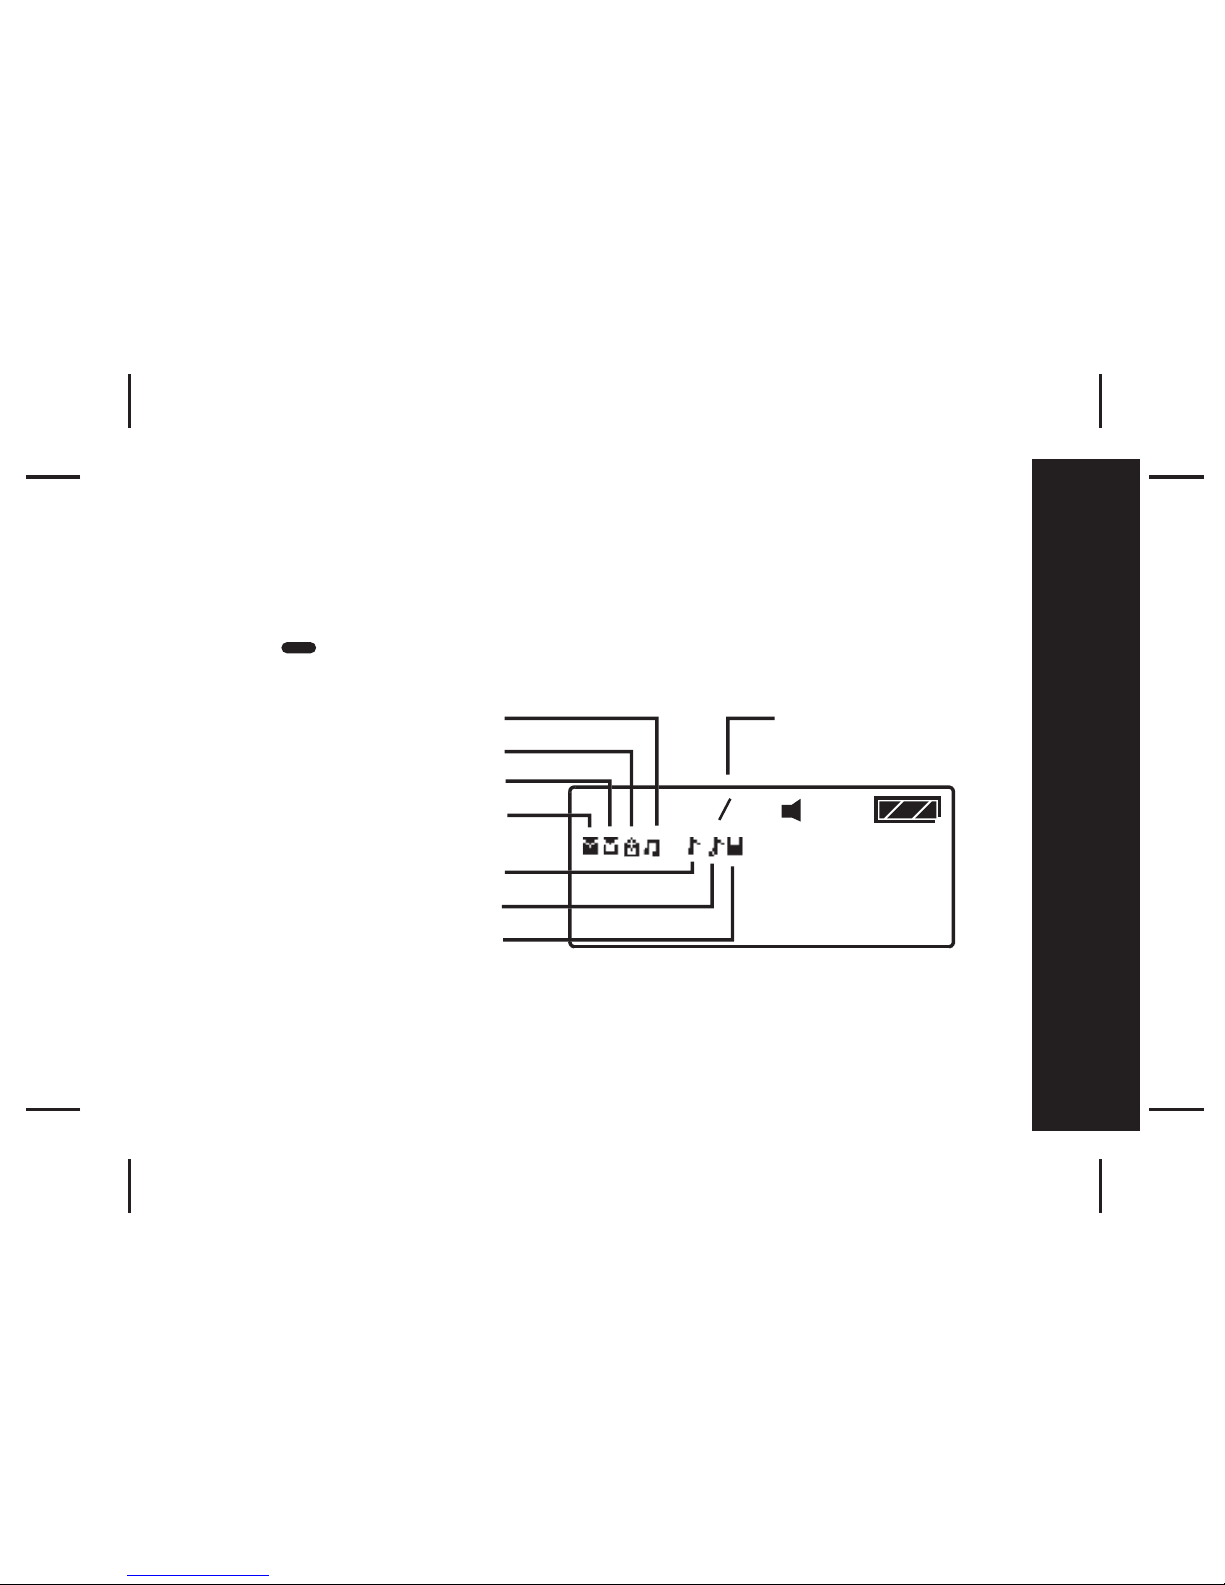
Mail Folder (Information Service)
Your pager can receive information such as world news or financial report
(the extent of the information received depends on your carrier)
- Press any button to enter the Main Menu Screen from the standby screen
- Press to enter the Mail Folder Screen from the Main Menu screen
when the cursor is on the Mail Folder icon.
*You can store a maximum of 5 mail messages from the same source in
one slot.
*After a slot is full(5 messages) the next incoming message will delete the
oldest message.
07 07
No mail, alert inactive
Unread mail, alert inactive
No mail, alert active
Read mail, alert inactive
Current cursor position
Read mail, alert active
Unread mail, alert active
Cursor position/
number of mail slots
Page 24
2222
Messages
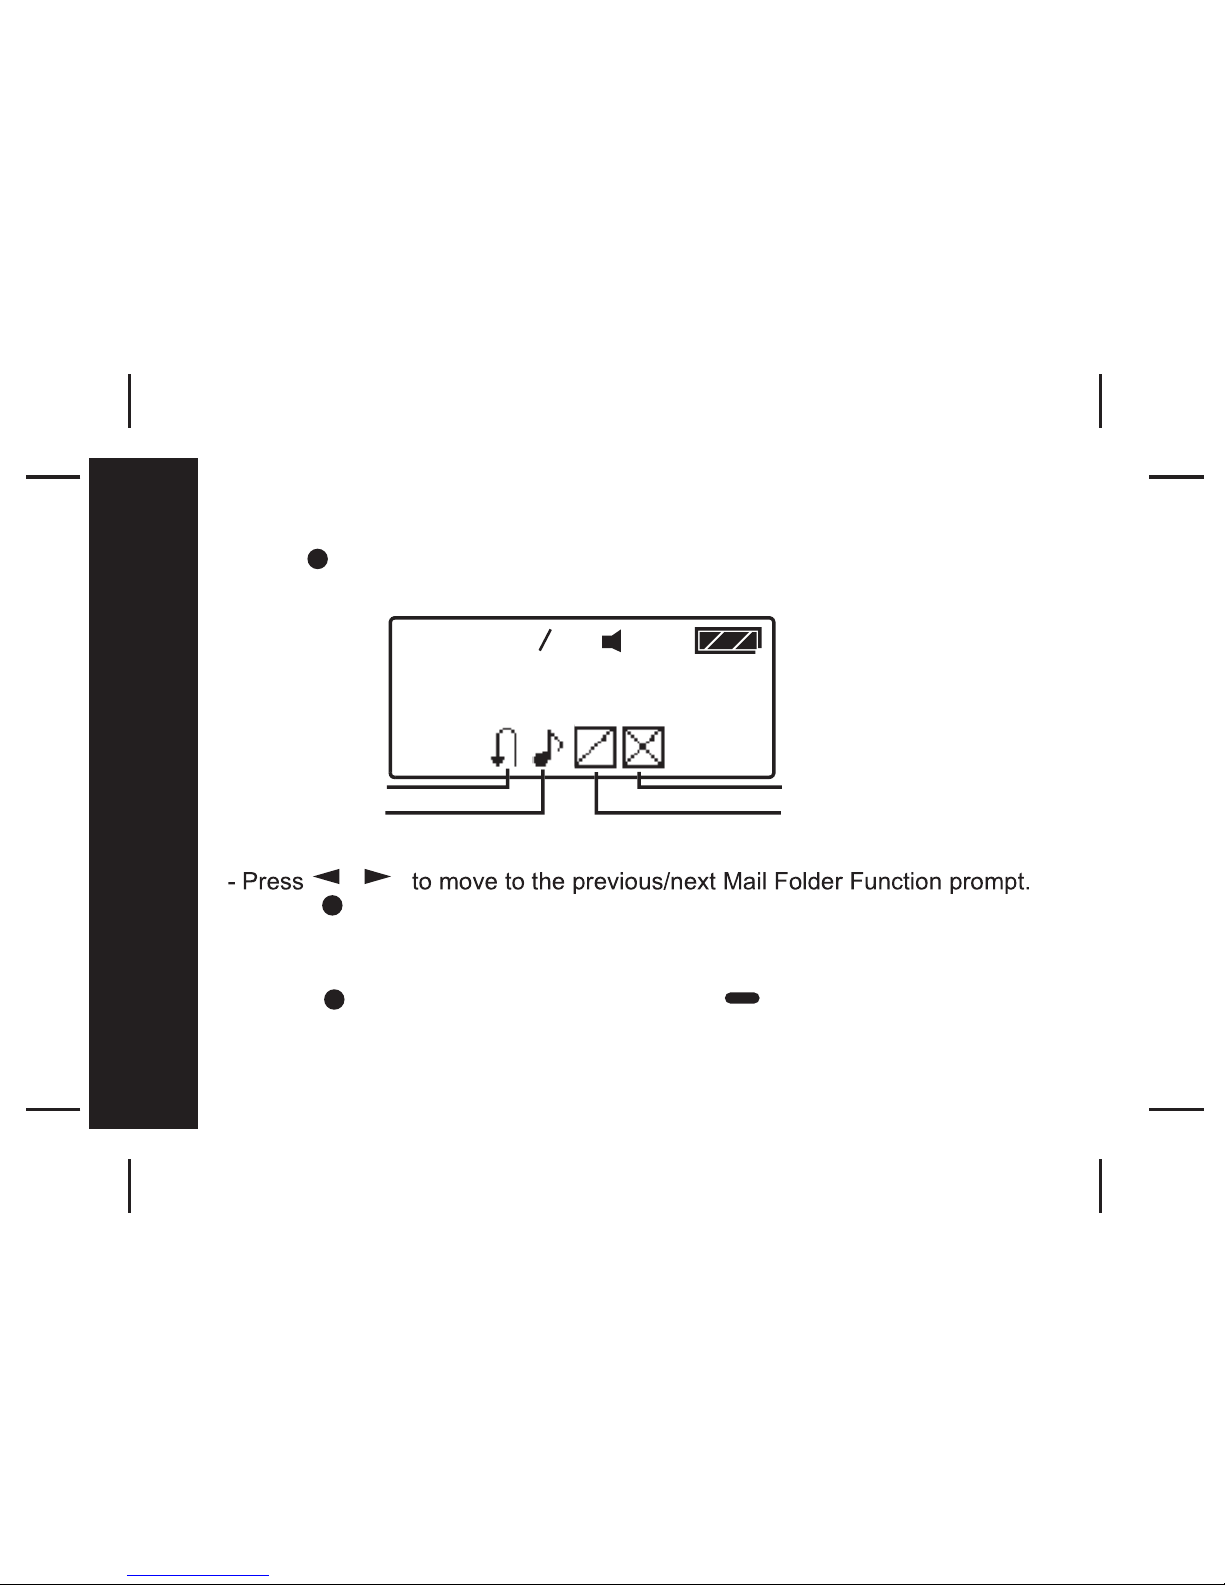
Mail Folder Function Menu
Press to enter the Mail Folder Function Screen from the Mail Folder
Screen
- Press to activate the selected function.
A confirmation message "?" comes with "DELETE SLOT" and "DELETE
ALL SLOTS".
- Press again to confirm your settings, or to cancel.
16 24
ESCAPE
ALERT
ON/OFF
DELETE ALL SLOTS
/
DELETE SLOT
Page 25
23
Messages
- You can enter Mail Message Function menu by pressing when you
are reading mail. The operation is the same as the Mail Folder Function
menu except there is no "DELETE ALL SLOTS" and there is an additional
function of "MOVE TO NOTEBOOK", which allows you to move individual
Mail messages to the Notebook Folder.
Page 26
24
Messages
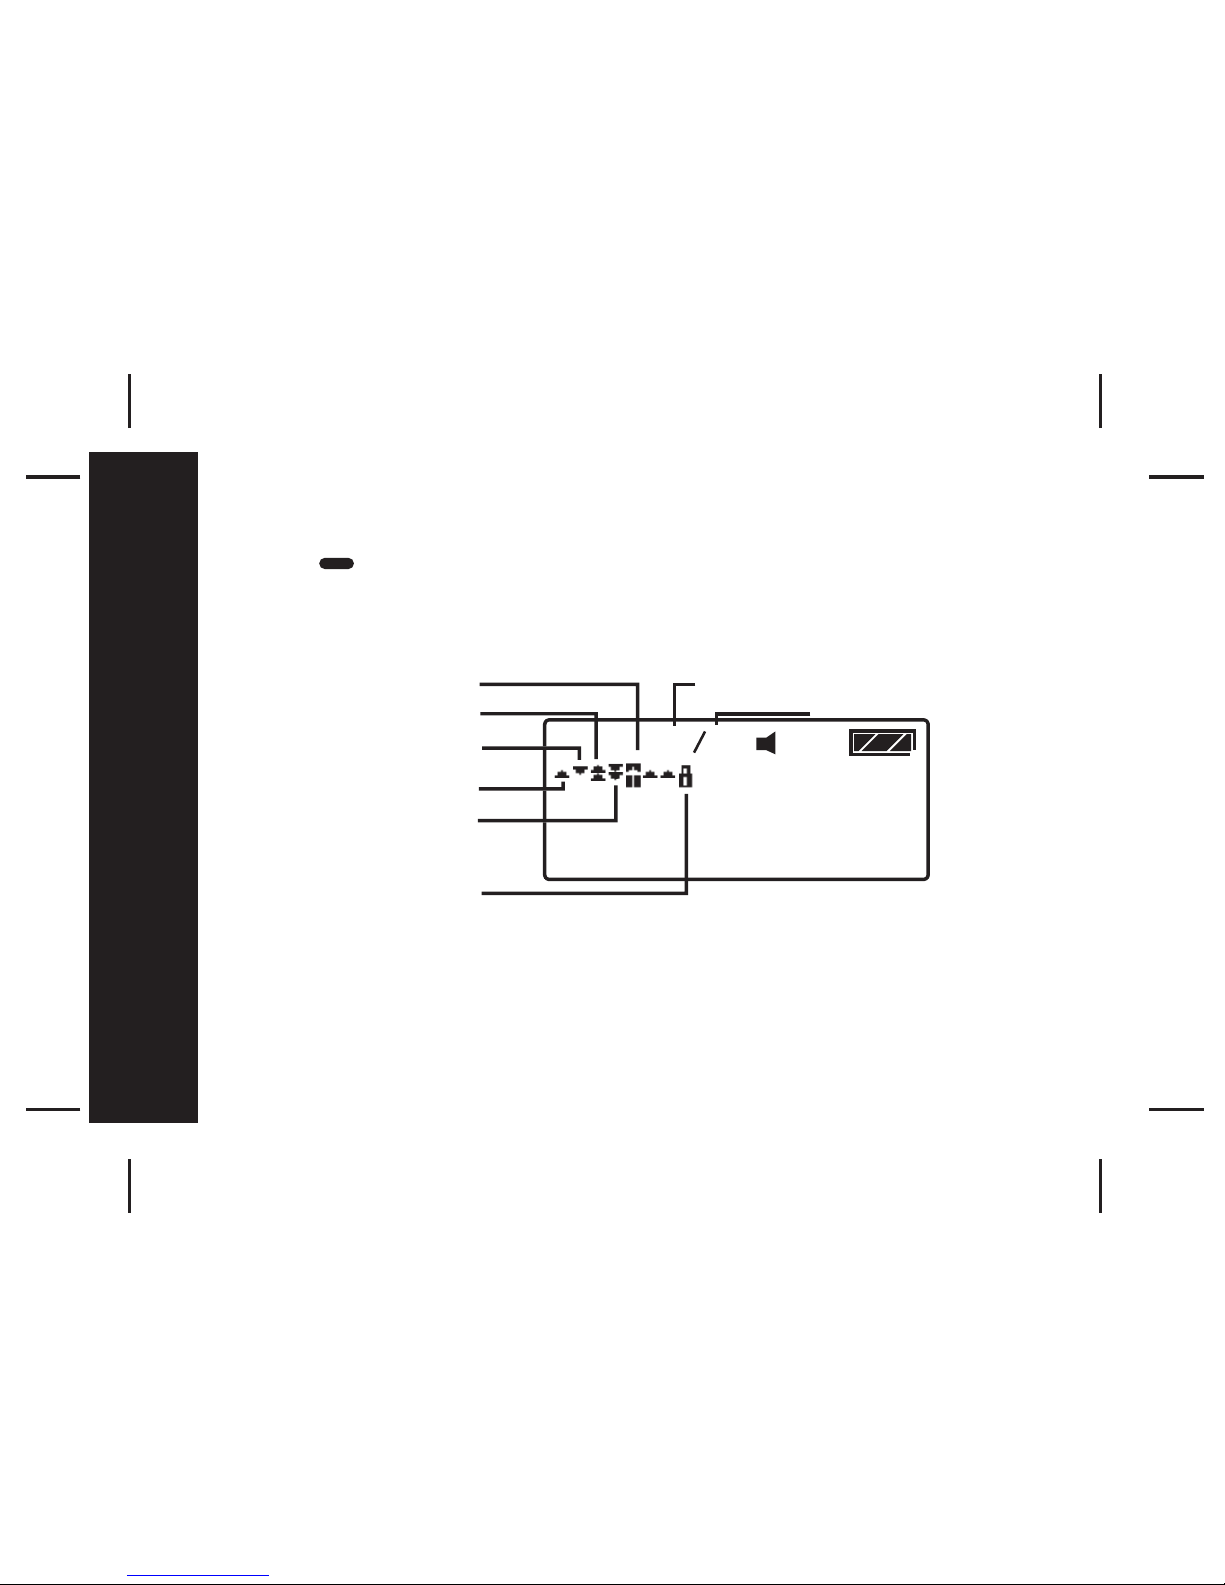
Personal Folder
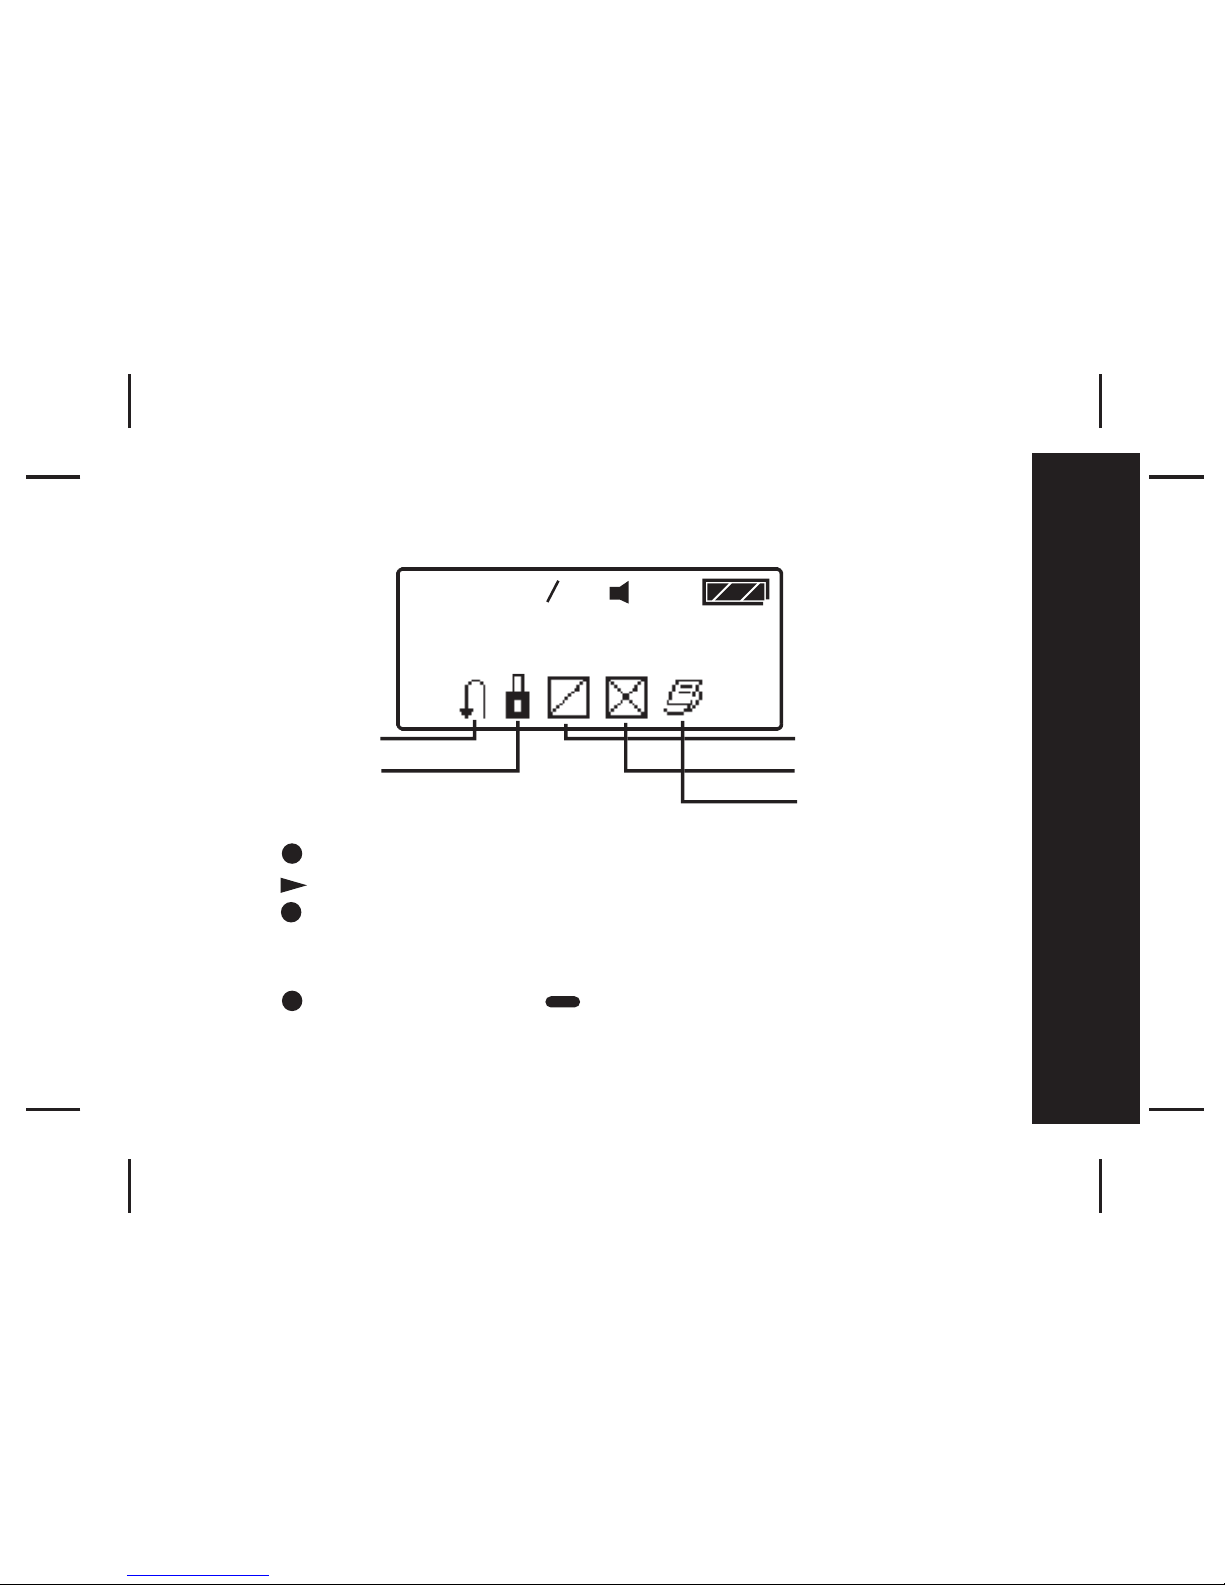
- Press to enter Personal Folder Screen from the Main Menu screen
when the cursor is on the Personal Folder icon.
05 08
Cursor icon
Unread messa
ge
Read messa
ge
Unread grou
p
essa
ge
Read group message
Current message number
Total messages
Locked message
Page 27
25
Messages
Personal Folder Function Menu
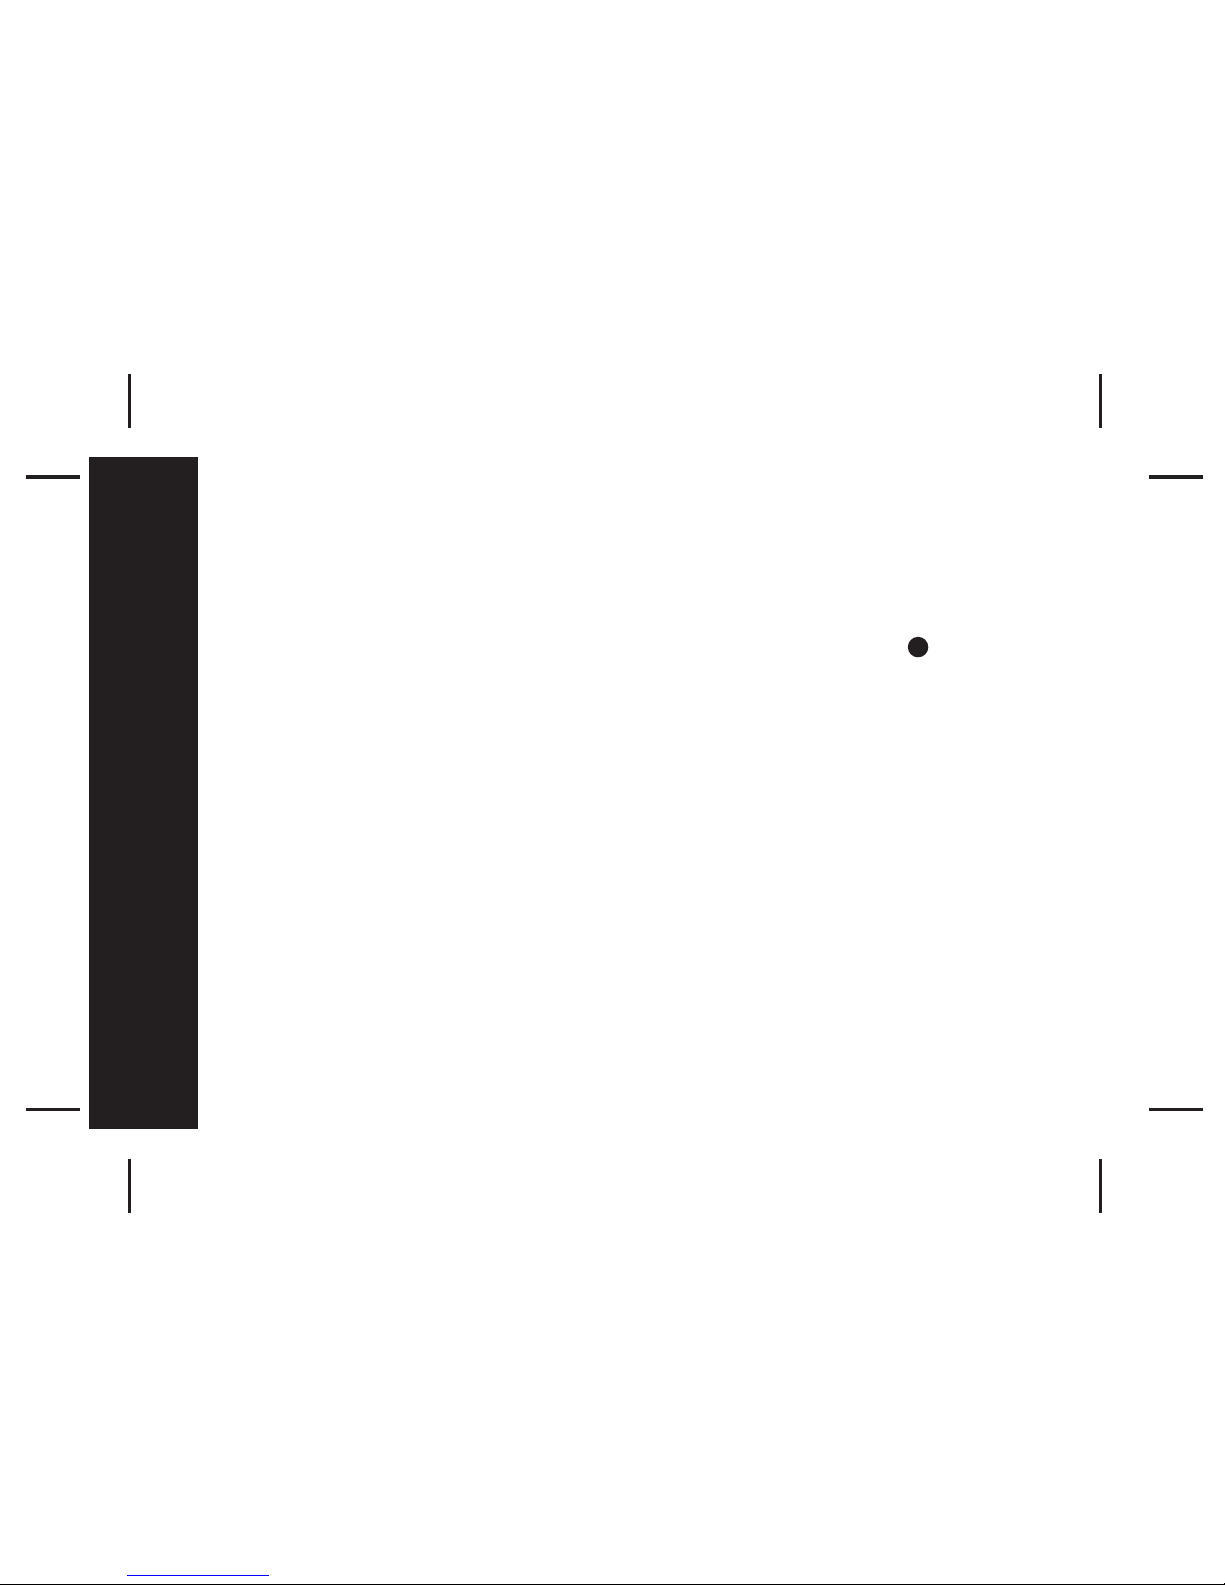
- Press to open the Personal Folder Function Menu screen.
- Press to move to the next Personal Folder Function prompt.
- Press to activate the selected function.
- A confirmation prompt "?" comes with "DELETE ALL" and "DELETE
MESSAGE".
- Press again to confirm, or to cancel.
16 24
ESCAPE
LOCK/UNLOCK
MESSAGE
MESSA
GE
DELETE ALL
MOVE TO
NOTEBOOK
Page 28
26
Messages
- A message is defined as read once the whole message has been read.
Previewing a message is not considered as reading a message.
- Locking a message prevents it from being accidentally deleted or
overwritten by new messages. You can lock up to 20 messages.
- You can enter Personal Message Function menu by pressing when
you are reading the message. The operation is the same as the Personal
Folder Function Menu except there is no "DELETE ALL".
- Please note. Locked messages cannot be deleted. Additionally, unread
messages cannot be deleted by using "DELETE ALL".
Page 29
27
Receiving Messages
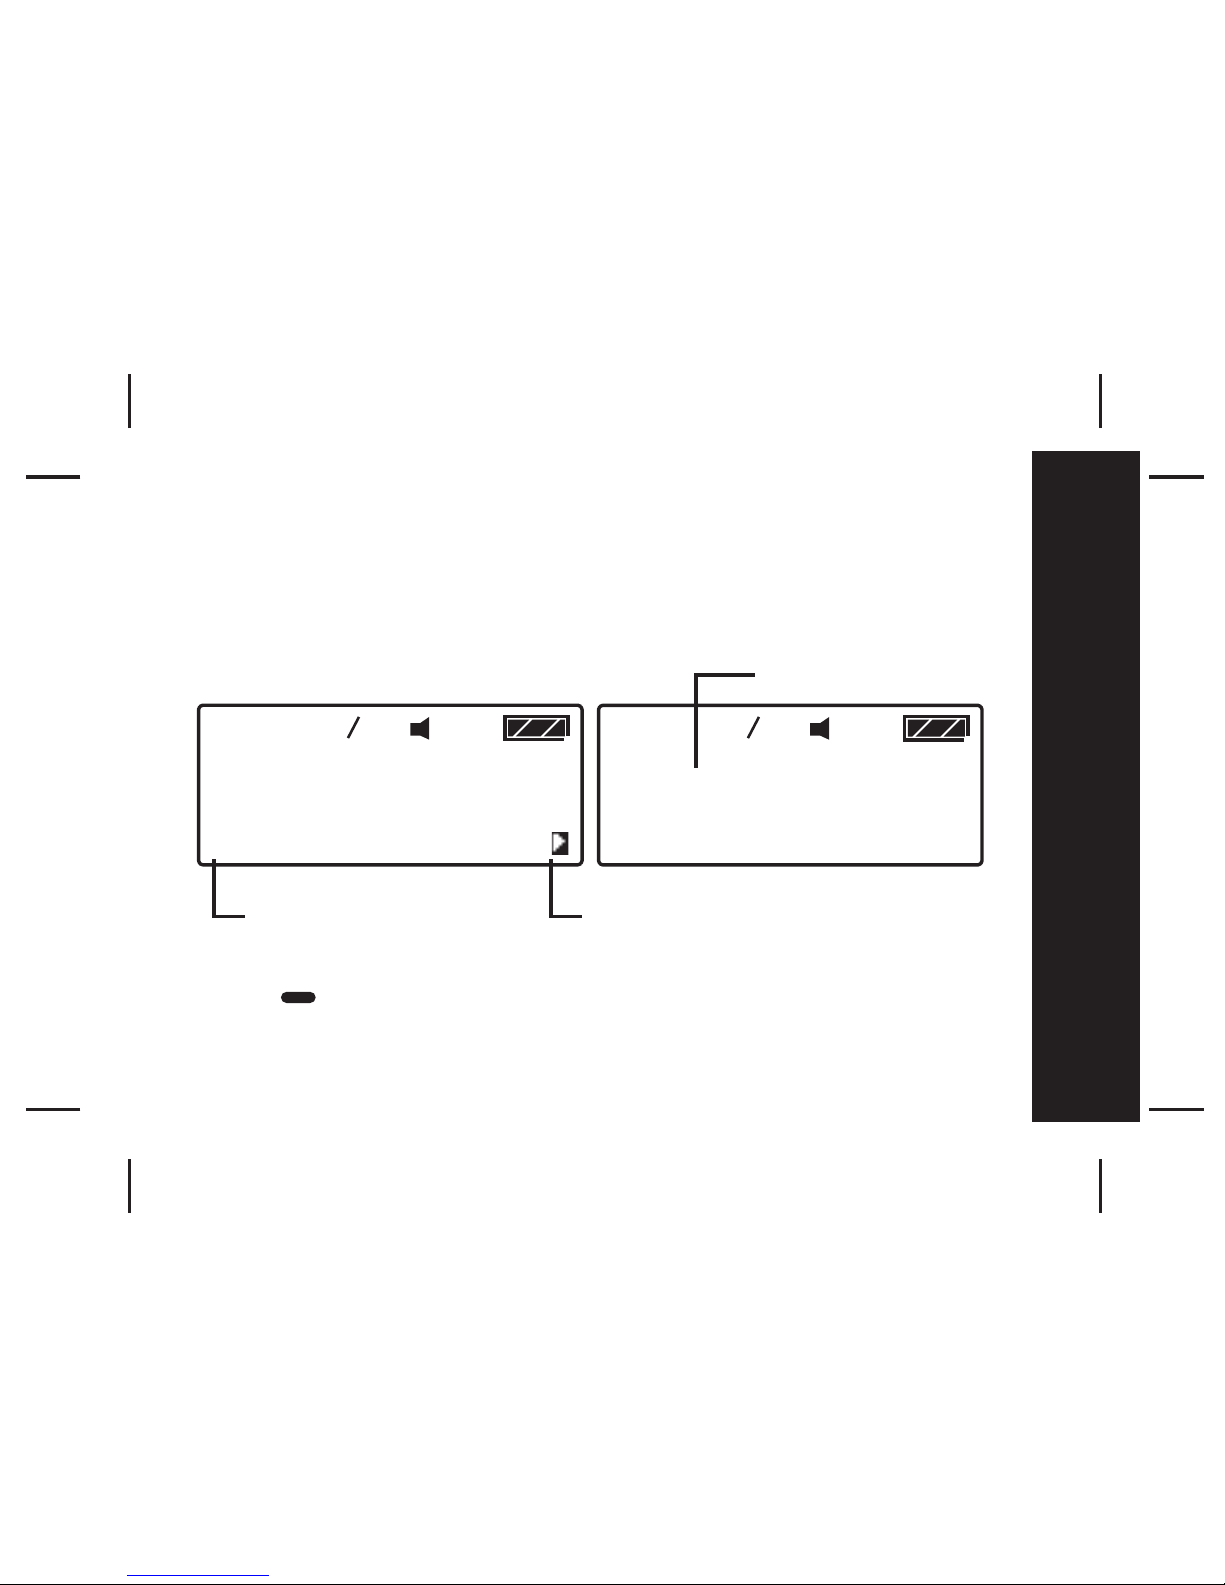
When a message is received, your pager alerts you according to your set
alert mode. The time and date stamp at the end of each message indicates
when the message was received.
- Press to read the message.
05 07
MESSAGE TEXT MESSAGE
TEXT MESSAGE TEXT
MESSAGE TEXT MESSAGE
TEXT MESSAGE TEXT
05 07
CAP-1A
12:01AM 0 1FEB2002
Time and Date stamp
4-line x 20 Alpha characters Arrow indicating that the
message continues on the next
screen
Messages
Page 30
28
Error and Priority Messages
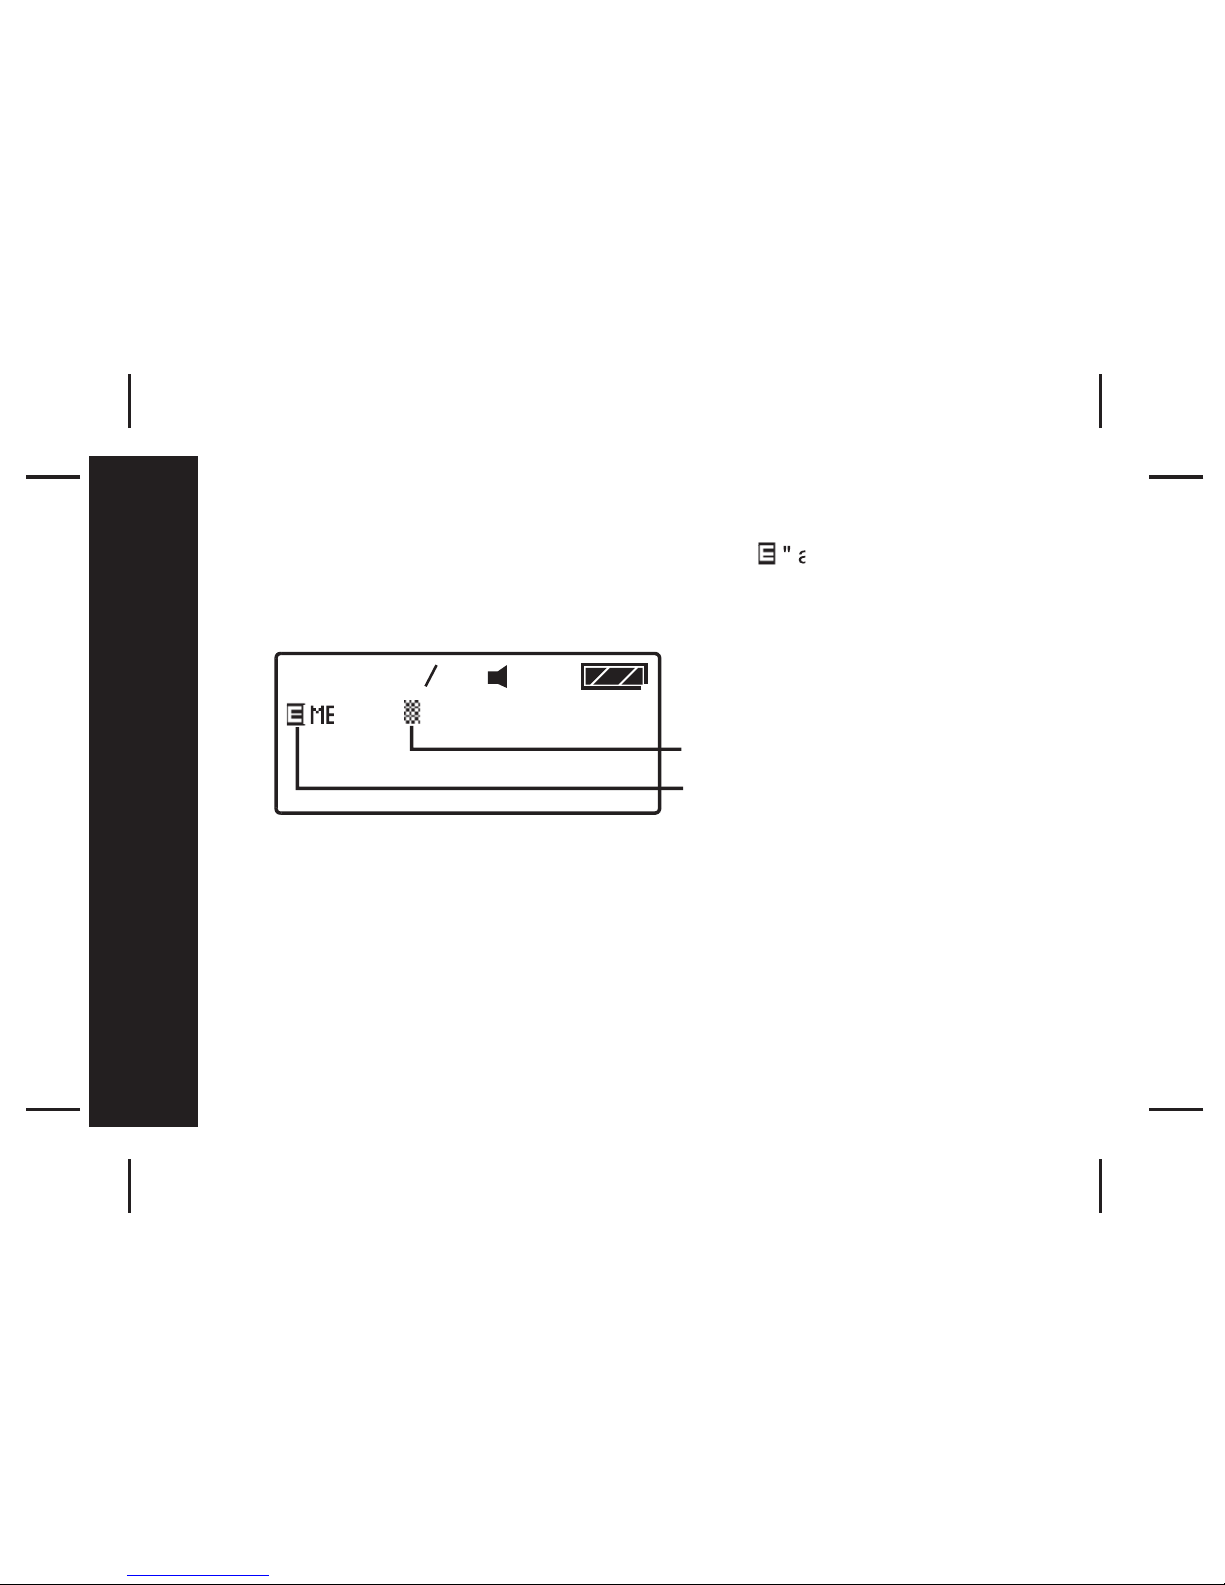
- When an error message is received and read, " " appears in front of the
essage and the incorrect characters blink. Error messages are a result of
poor reception from the pa
ging
station
.
- When a Priority message is received, your pager will alert you with a
unique alert no matter what mode the pager is currently in (eg; sleep,
vibrate, private time etc.). The sender determines priority messages.
05 07
Blinking incorrect character icon
Error message indicator
Messages
Page 31
29
Message Full
Indicator
Messages
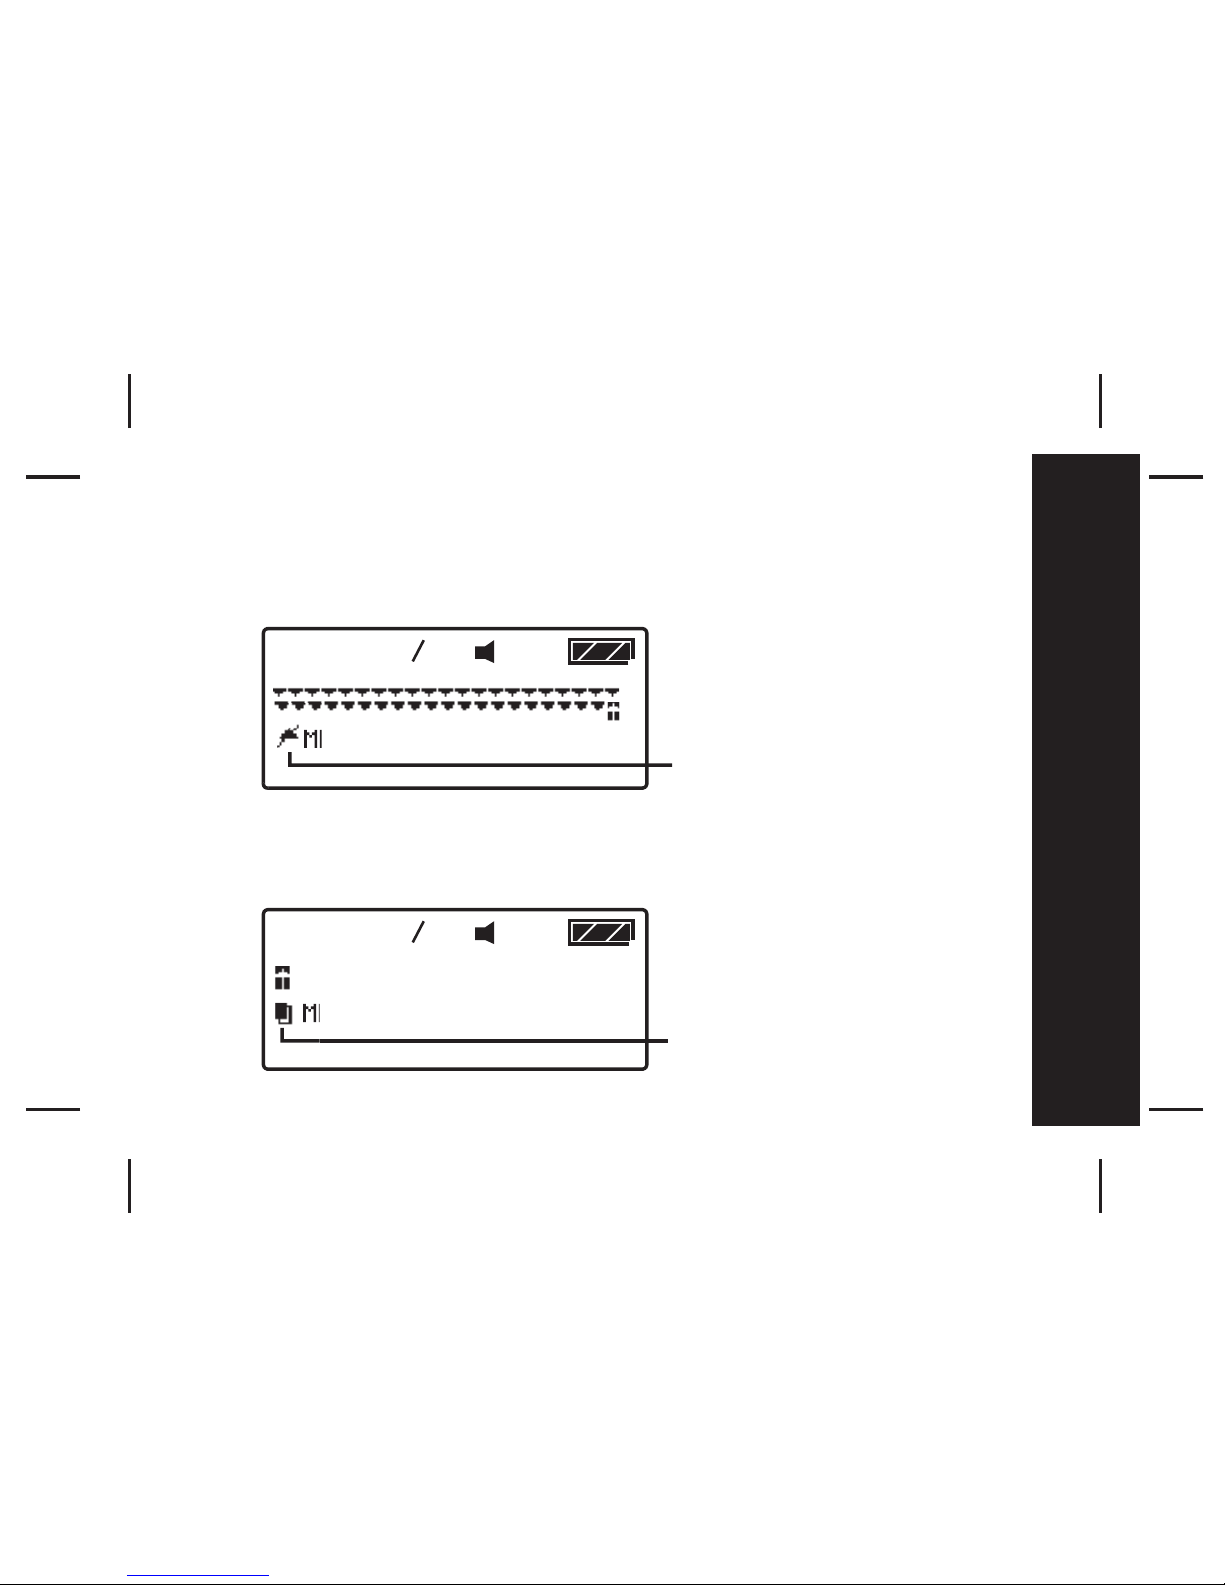
Message Full Indication and Duplicate Messages
-If the Message Full Indicator appears and you have not deleted the old
messages, the new received messages will overwrite the oldest messages
first.
- When your pager receives a duplicate of a message it will not show
multiples of the same message but will show only one message and display
the Duplicate Message icon in the message preview screen.
Duplicate Message icon
01
01
40 40
Page 32
30
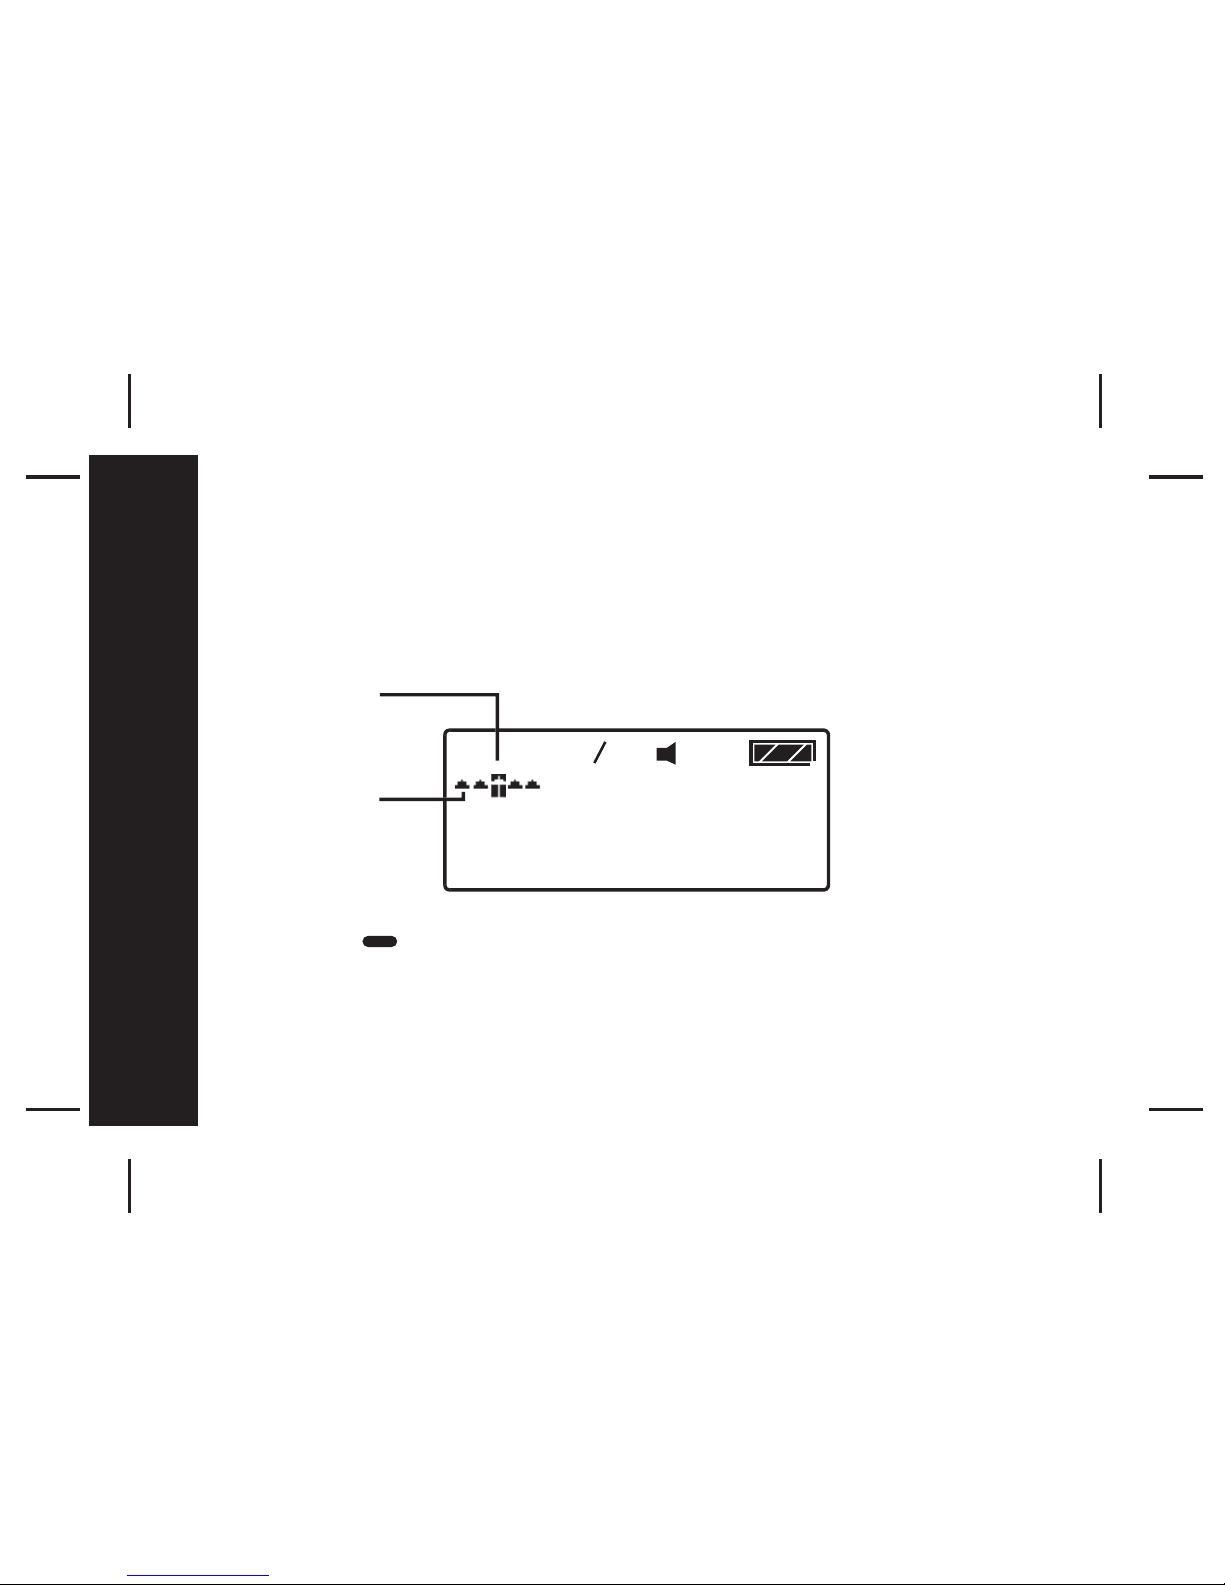
Notebook Folder
You can store up to 20 important Personal or Mail messages in your
Notebook Folder. When the Notebook Folder is full, "MEMORY FULL"
appears if you attempt to store Personal or Mail messages to the Folder.
- Press the Button to enter the Notebook Folder screen from the
status screen when the cursor is on the Notebook Folder icon.
03 05
Cursor icon
Message icon
Messages
Page 33
31
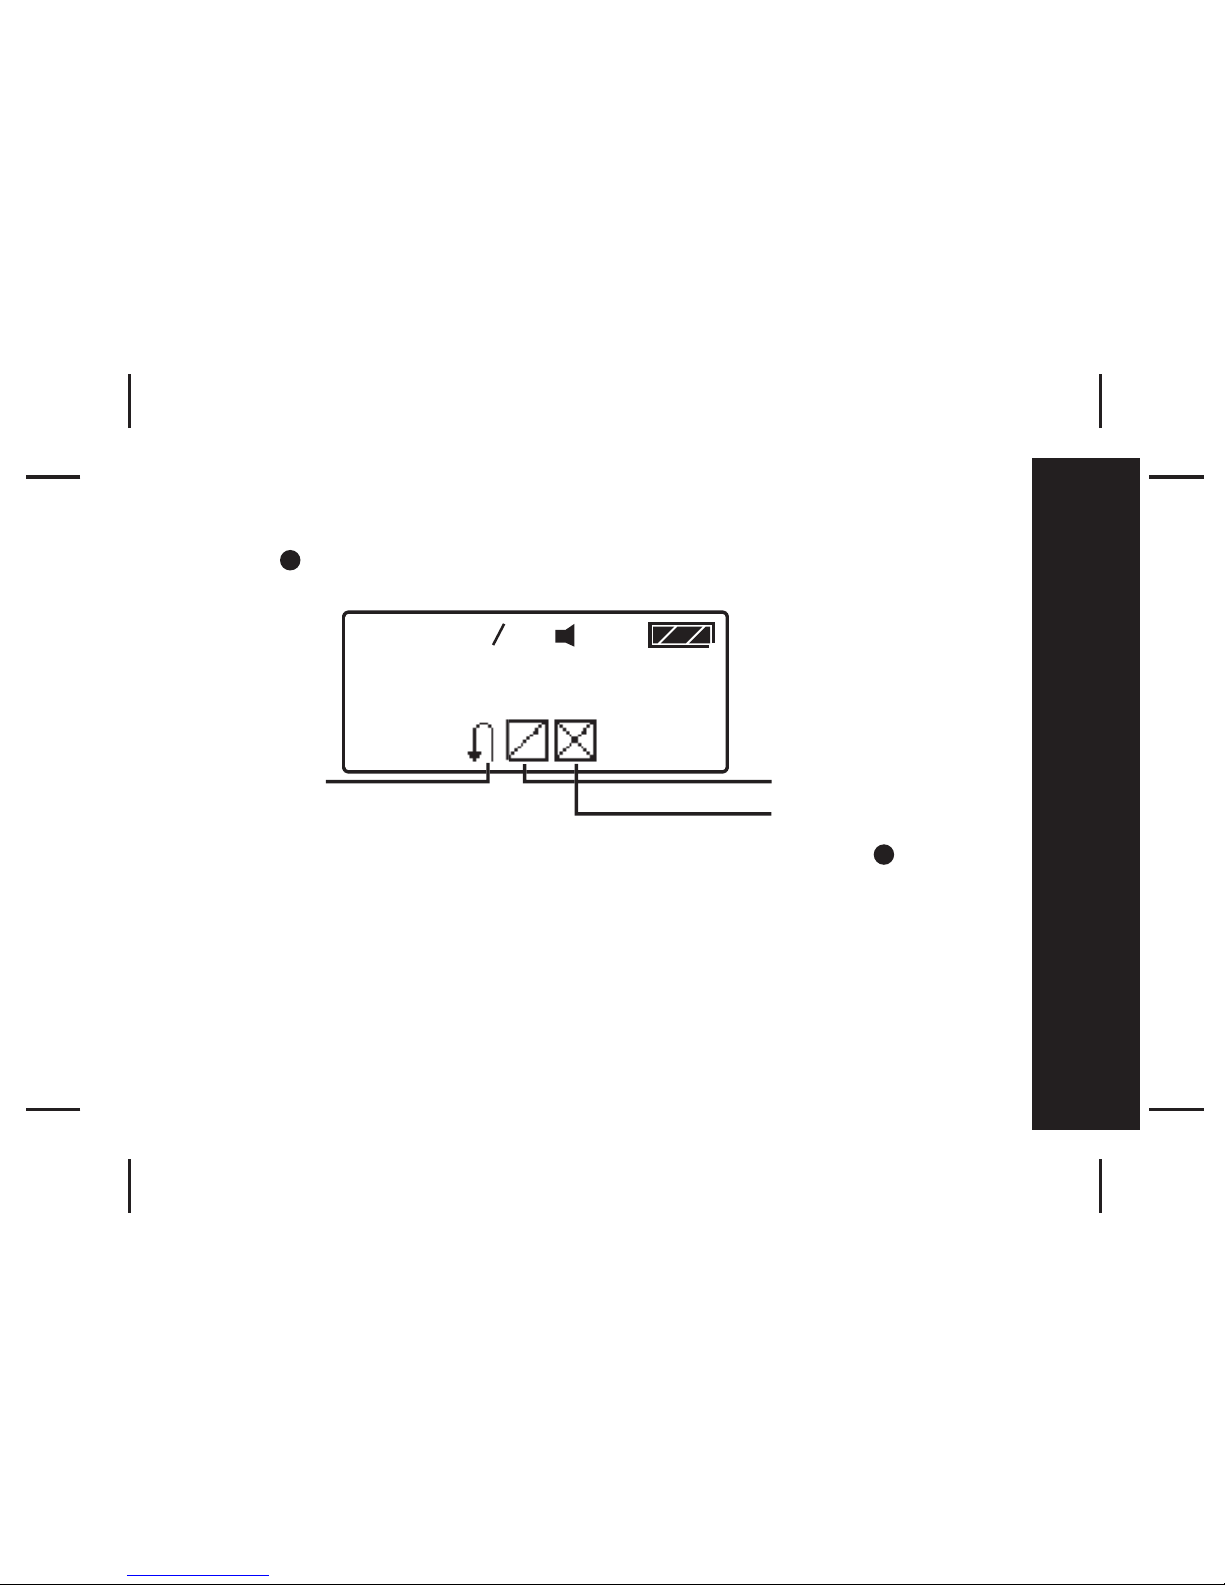
Notebook Folder Function Menu
- Press to enter the Notebook Folder Function Screen from the
Notebook Folder Screen
-You can enter Notebook Message Function menu by pressing when
you are reading the message. The operation is the same as the Notebook
Folder Function menu except there's is no "DELETE ALL".
16 24
ESCAPE
DELETE
MESSAGE
DELETE ALL
Messages
Page 34

32
Maintenance
Care of your Pager
To maintain the fine quality of your pager's display screen, please do not
subject the pager to extreme temperatures or moisture. Clean the pager
housing using a soft non-adhesive cloth. Do not immerse the pager in
water. Do not use any other cleaning solutions.
Maintenance
Page 35
Page 36

DAVISCOMMS (S) PTE LTD
361 Ubi Road 3,#04-06
Armorcoat International Building
Singapore 408664
500022R01
 Loading...