

Page 1
Page 2
6881036b50a.fm Page -1 Friday, October 20, 2000 8:21 AM
Contents
Introduction .................................................... 1
Effective Use of Your Pager......................... 1
Getting Started .............................................. 2
Battery Information..................................... 2
Control Buttons (Bravo 500) ....................... 3
Control Buttons (Bravo 501) ....................... 4
Turning Your Pager On ............................... 5
Turning Your Pager Off............................... 5
Backlight ...................................................... 6
Using the Main Menu.................................. 7
Status Indicators ......................................... 7
Time and Date ................................................ 8
Setting the Time .......................................... 8
Setting the Date........................................... 8
Displaying the Date..................................... 9
Setting the Alarm...................................... 10
Alerts ............................................................ 11
Setting the Alert Type............................... 11
Reminder Alert .......................................... 12
Low Cell Alert............................................ 13
Messages ..................................................... 14
Reading Messages...................................... 14
Locking/Unlocking Messages.................... 15
Message Information................................. 15
Deleting Messages..................................... 16
Page 3
6881036b50a.fm Page 1 Friday, October 20, 2000 8:21 AM
Introduction
Congratulations onyourpurchase o f your
Bravo Numeric pager.
This bookletcontains operation
instructions that explain howto use your
new pager and provides helpful
suggestions for first-timeas well as
experienced users.
Effective Use of Your Pager
Your pager can help you keep in contact
witheveryone important to you. By
giving your pager number to business
associates, family,andfriends,you canbe
contactedwhenever needed .
INTRODUCTION
1
Page 4
6881036b50a.fm Page 2 Friday, October 20, 2000 8:21 AM
Getting Started
Battery Information
Your pager operates with a single
AAA-size alkaline battery (do not use
carbonzinc batteries). See the diagram
on the following page for the b attery
door location.
If lobat displays, the p ager’s AAA-size
battery is low. Rep lace the AAA-size
battery.
Installing/Replacing the Battery
GETTING STARTED
Turnthepageroff(see“Turning Your
Pager Off” on page 5).
Holding the pager facedown, slide
the battery door in the direction of
the arrow (toward the outer edge).
Lift the battery door away from the
pager’s housing to remove it.
Removethe old battery,notingthe
positive (+) and negative (-) polarity
markings.
Insert a new battery so the polarity
markings on the battery match the
polarity diagram in the battery
compartment.
2
Page 5
6881036b50a.fm Page 3 Friday, October 20, 2000 8:21 AM
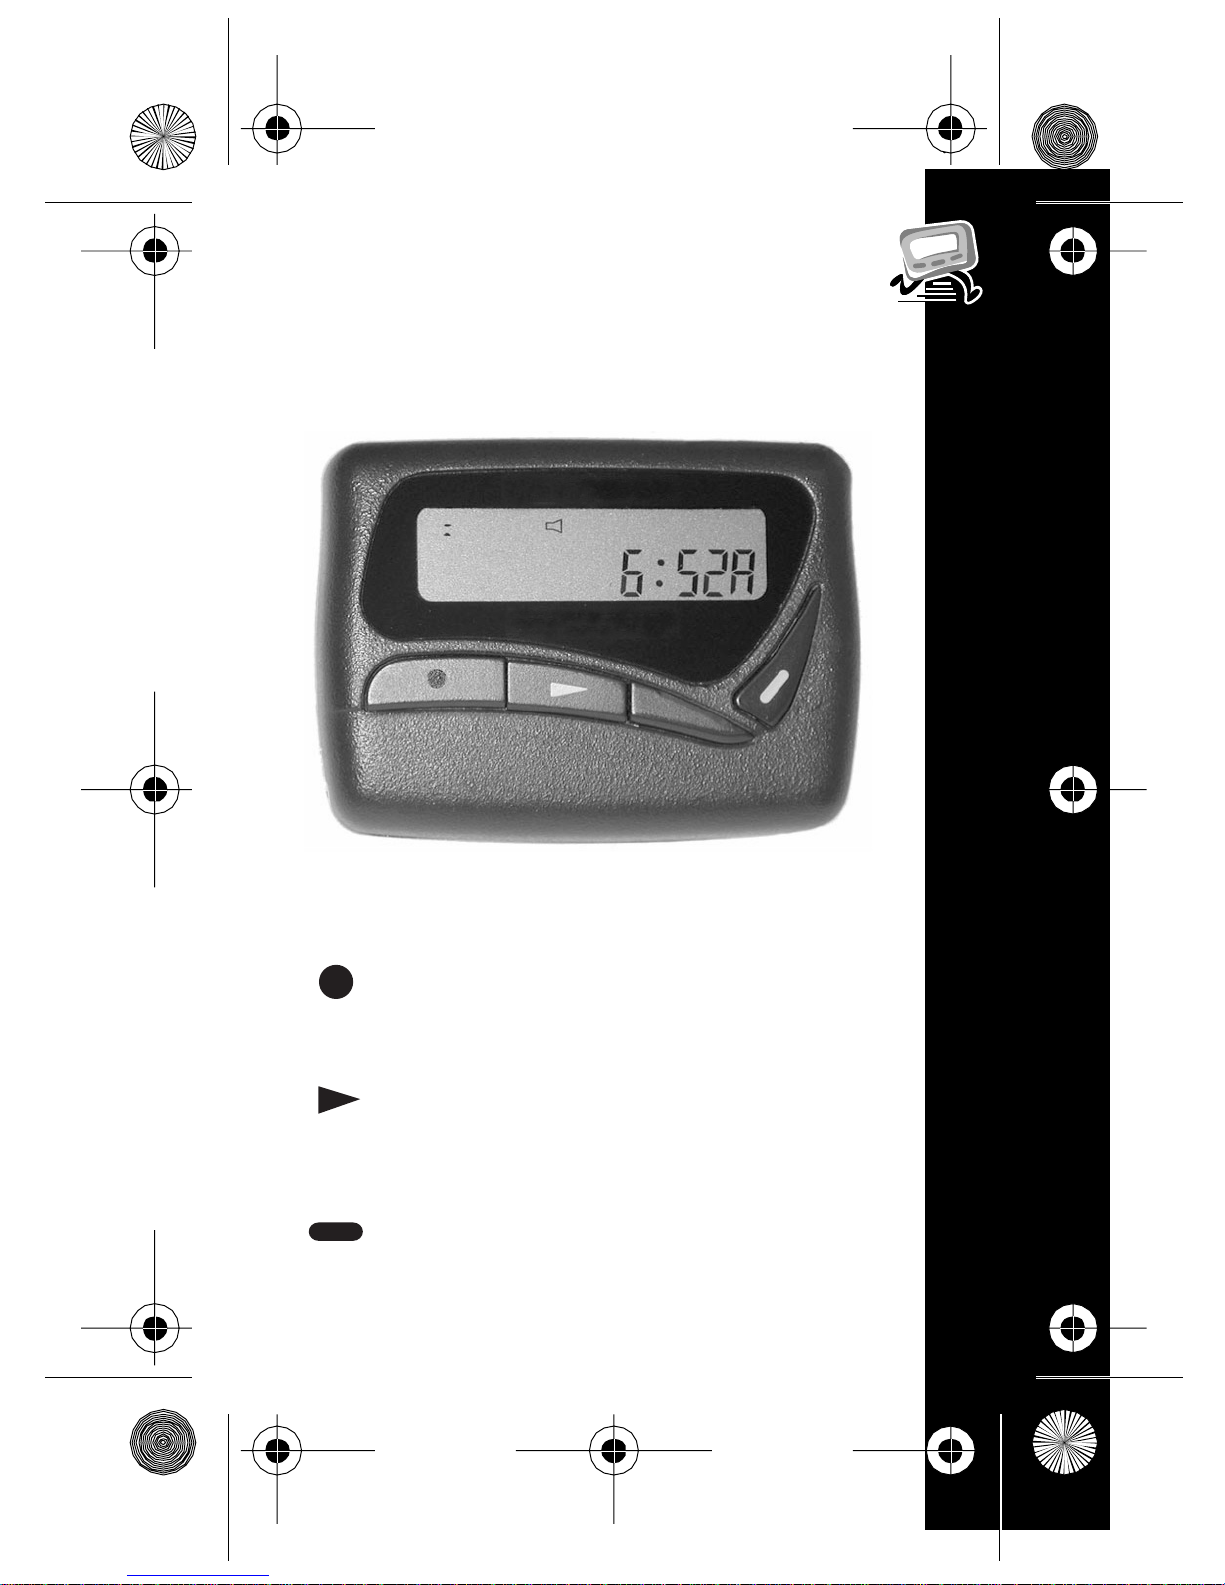
Control Buttons (Bravo 500)
$
(
*
#
Function: Press to move between
features and change values.
Select/Backlight: Press to select
features and turn on/off the
backlight.
Read/Escape: Press to read
messages or return to the Status
screen.
GETTING STARTED
3
Page 6
6881036b50a.fm Page 4 Friday, October 20, 2000 8:21 AM
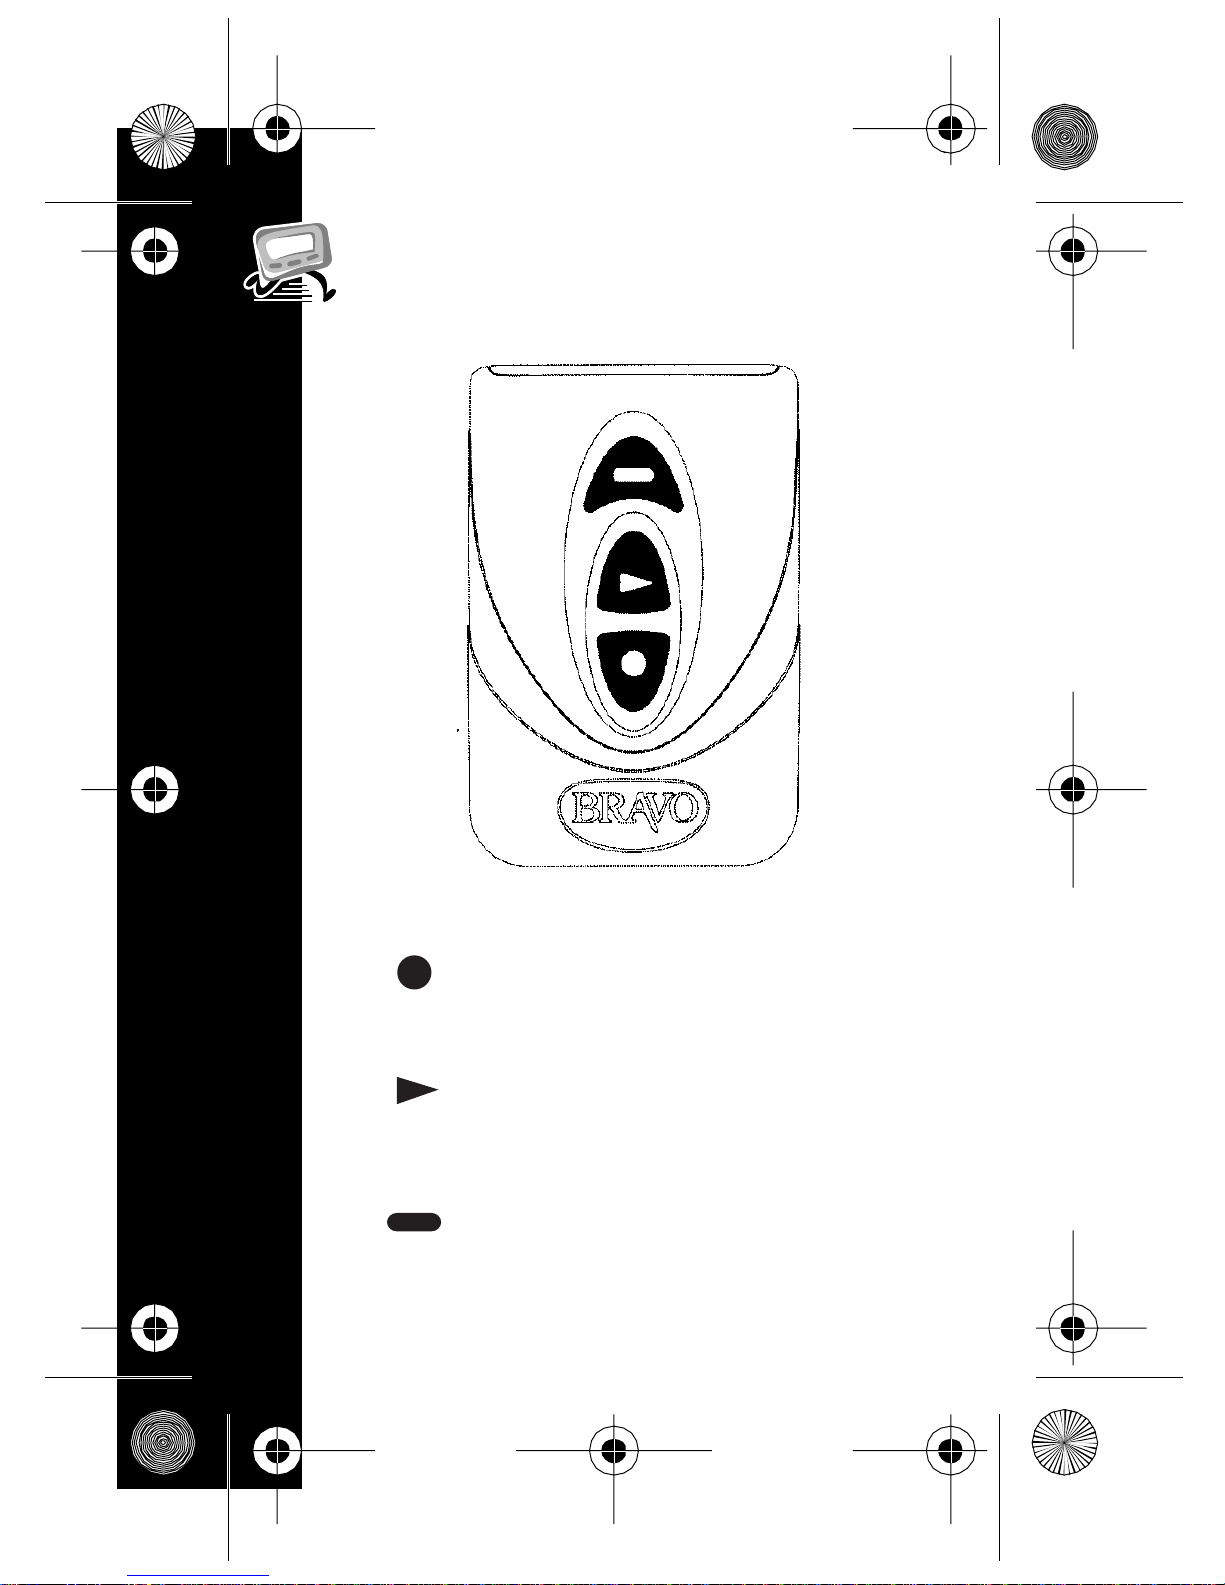
Control Buttons (Bravo 501)
4
Function: Press to move between
features and change values.
GETTING STARTED
Select/Backlight: Press to select
features and turn on/off the
backlight.
Read/Escape: Press to read
messages or return to the Status
screen.
Page 7
6881036b50a.fm Page 5 Friday, October 20, 2000 8:21 AM
Turning Your Pager On
Ensure th at a fresh battery is
properly installed as listed in
“Installing/Replacing the Battery”on
page 2.
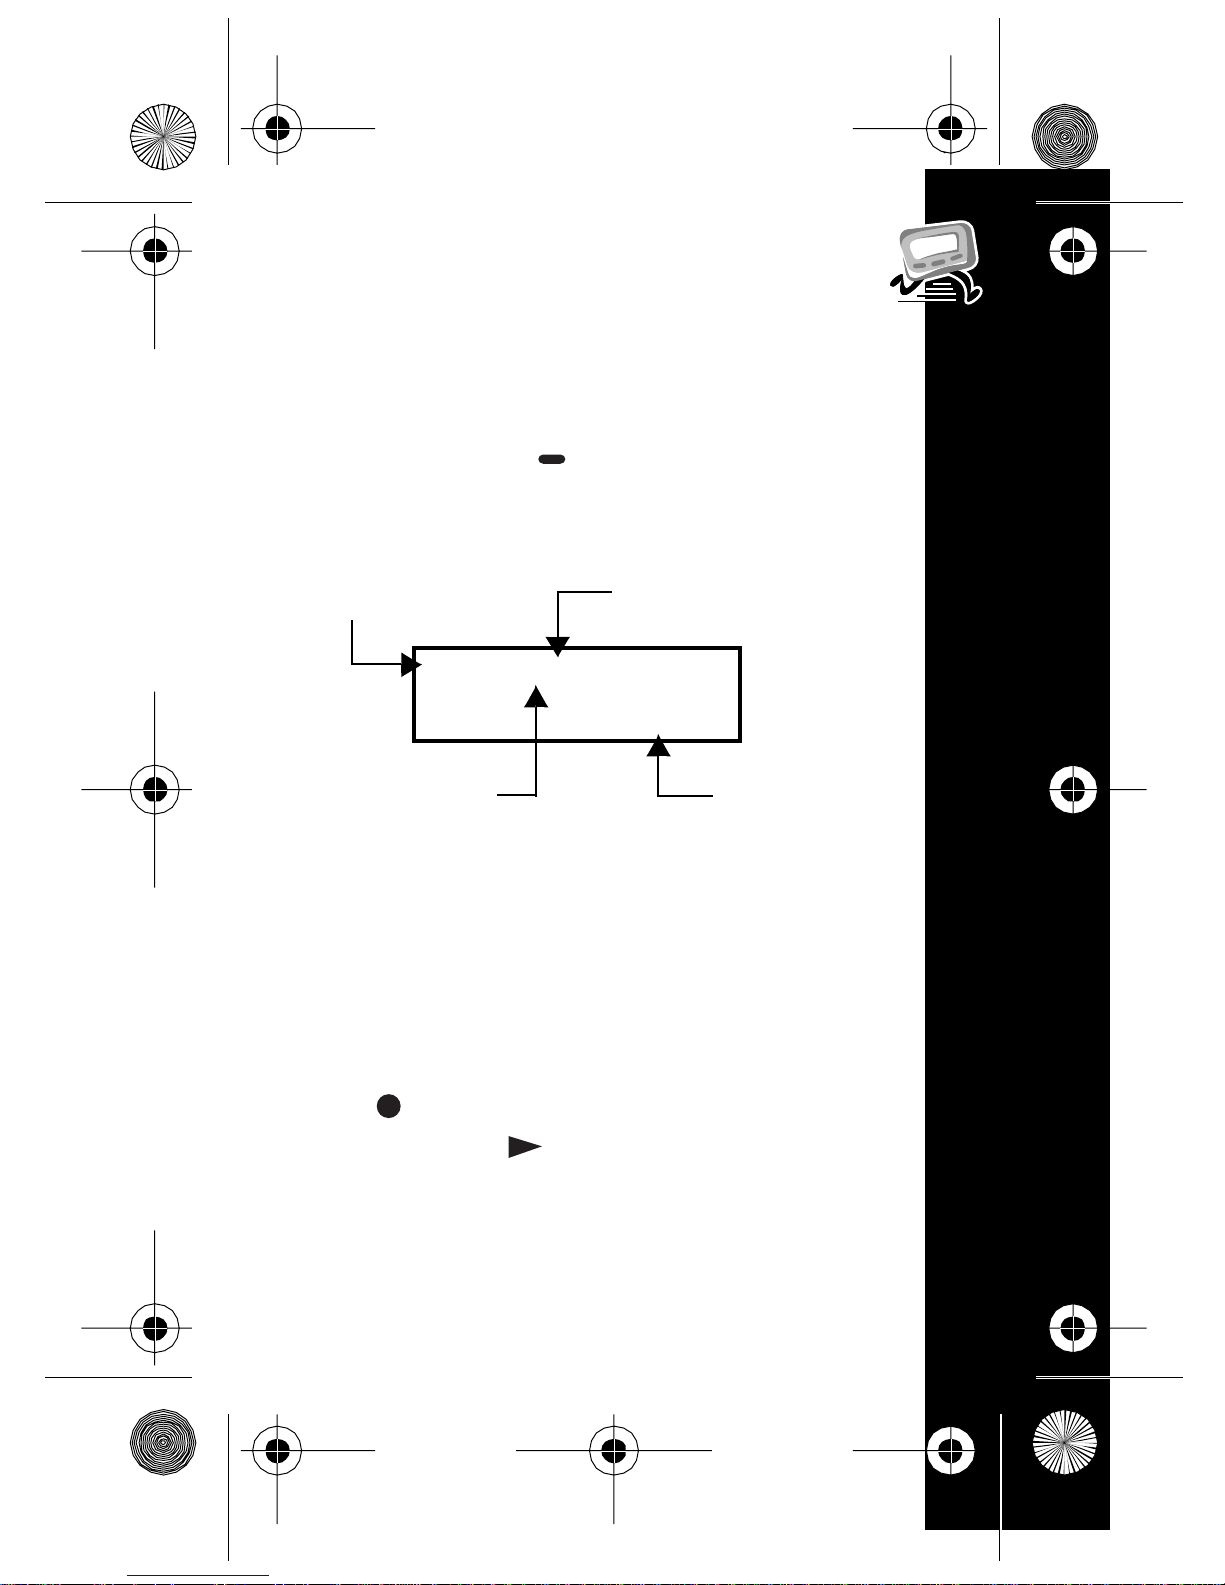
Press and hold for 3 to 4 seconds to
turn your pager on. The Status screen
displays.
Battery Gauge
* \ #
Alarm Indicator
4:29p
Alert Indicator
When thepageris on and no activity is
taking place, the Status screen displays.
The Statusscreendisplays the power-on
indicator and may also display other
pager status indicators.
Turning Your Pager Off
Press until PAgEr OFF displays,
and then press .
Time Display
GETTING STARTED
5
Page 8
6881036b50a.fm Page 7 Friday, October 20, 2000 8:21 AM
Backlight
In low-light conditions,you can turnon
the pager’s backlight on or offat any
time by pressing and holding for two
seconds. The backlight automatically
turns off when th e pager returns to the
Status screen.
GETTING STARTED
6
Page 9
6881036b50a.fm Page 8 Friday, October 20, 2000 8:21 AM
Using the Main Menu
The main menu providesaccess to the
many features of your pager through
the useof symbols and prompts.
To navigate through the main menu,
press .
Press to select the displayed
feature.
Press atanytimetoreturntothe
Status screen.
Status Indicators
The list below describes each of the
status indicators that may display on
your pager.
$ New message
( Musical alert
\ Silent alert
# Alarm
% Locked message
+ Duplicate message
! Out-Of-Rangealert
& Continuous message (press to
display the nextscreen.)
GETTING STARTED
7
Page 10
6881036b50a.fm Page 9 Friday, October 20, 2000 8:21 AM
Time and Date
Setting the Time
From the Status screen, press
untilSet Time displays, and then
press .
12:56 pm
Press to increase the hour. When
thedesiredhourdisplays,press to
advancetothenextfield.
RepeatStep2tosettheminutesand
timeof day (AM or PM).
When you have finished setting the
time, press to save your changes and
return to the Statusscreen.
Setting the Date
TIME AND DATE
From the Status screen, press
untilSet Date displays,and then
press .
jun 21 00
8
Page 11
6881036b50a.fm Page 10 Friday, October 20, 2000 8:21 AM
Press to increase the year.
When the desired year displays,
press .
RepeatStep2tosetthemonth/day.
When you have finished setting the
date,press to saveyour changes
and return to the Status screen.
Displaying the Date
To display the current date,proceed as
follows.
From the Status screen, press .
The currentdate and day of week
displays in the following format.
jun 21 mon
9
Page 12
6881036b50a.fm Page 11 Friday, October 20, 2000 8:21 AM
Setting the Alarm
Your new pager allows you to set a
daily alarm.
From the Status screen, press
untilSet alarm displays, and then
press .
12:34p on
Press to increase the hour. When
thedesiredhourdisplays,press to
advancetothenextfield.
10
TIME AND DATE
RepeatStep2tosettheminutesand
time of day (A or P).
Press to toggle between on and
off. When the desired selection
displays, press to select it.
When you have finished setting the
alarm, press to save your changes
and return to the Status screen.
Page 13
6881036b50a.fm Page 12 Friday, October 20, 2000 8:21 AM
Alerts
Setting the Alert Type
Your new pager has both audible and
silent alert types. Thesealert types are:
silent (vibrate), sleep (no alert), vibra
call(vibrateth enchirp),chirp,and eight
standard audible alerts.
To specify the alert to play whenyour
pager receives a message,p roceed as
follows:
From the Status screen, press
untilSEt ALErt displays, and
press .
uibracall
Press to display the a lert type
and hear a sample of the alert.
Whenthe desiredalerttype displays,
press to select it.
ALERTS
11
Page 14
6881036b50a.fm Page 13 Friday, October 20, 2000 8:21 AM
Reminder Alert
This featureallows you to turnon/off
reminder alerts. Reminder alerts repeat
at two-minute intervals until you have
read all new messages. To turn on/off
reminder alerts, proceed as follows:
From the Status screen, press
untilAdu control displays, and then
press . Rem Alt displays.
Press to toggle between On and
Off.Press to make your
selection.
12
ALERTS
Low Cell Alert
At the onset of a low battery condition,
lobat displays on the Status screen. You
can also program your pager to emit an
alertwhen your pager’s battery is low.
From the Status screen, press
untiladu control displays, and then
press .
Press until L Cell alert
displays, and then press .The
following screen displays.
Page 15
6881036b50a.fm Page 14 Friday, October 20, 2000 8:21 AM
l c alt on
Press to toggle betweenon and
off,andpress to make your
selection.
• The low cell alert repeats hourly
between the hours of 8 a.m. and 8
p.m.
13
ALERTS
Page 16
6881036b50a.fm Page 15 Friday, October 20, 2000 8:21 AM
Messages
The pager can store up to 20
personalmessagesand 2 maildrop
messages. If you have
programmed your pager to alert you
when it receives a message, an alert
sounds (see “Setting the Alert Type” on
page 11).
Reading Messages
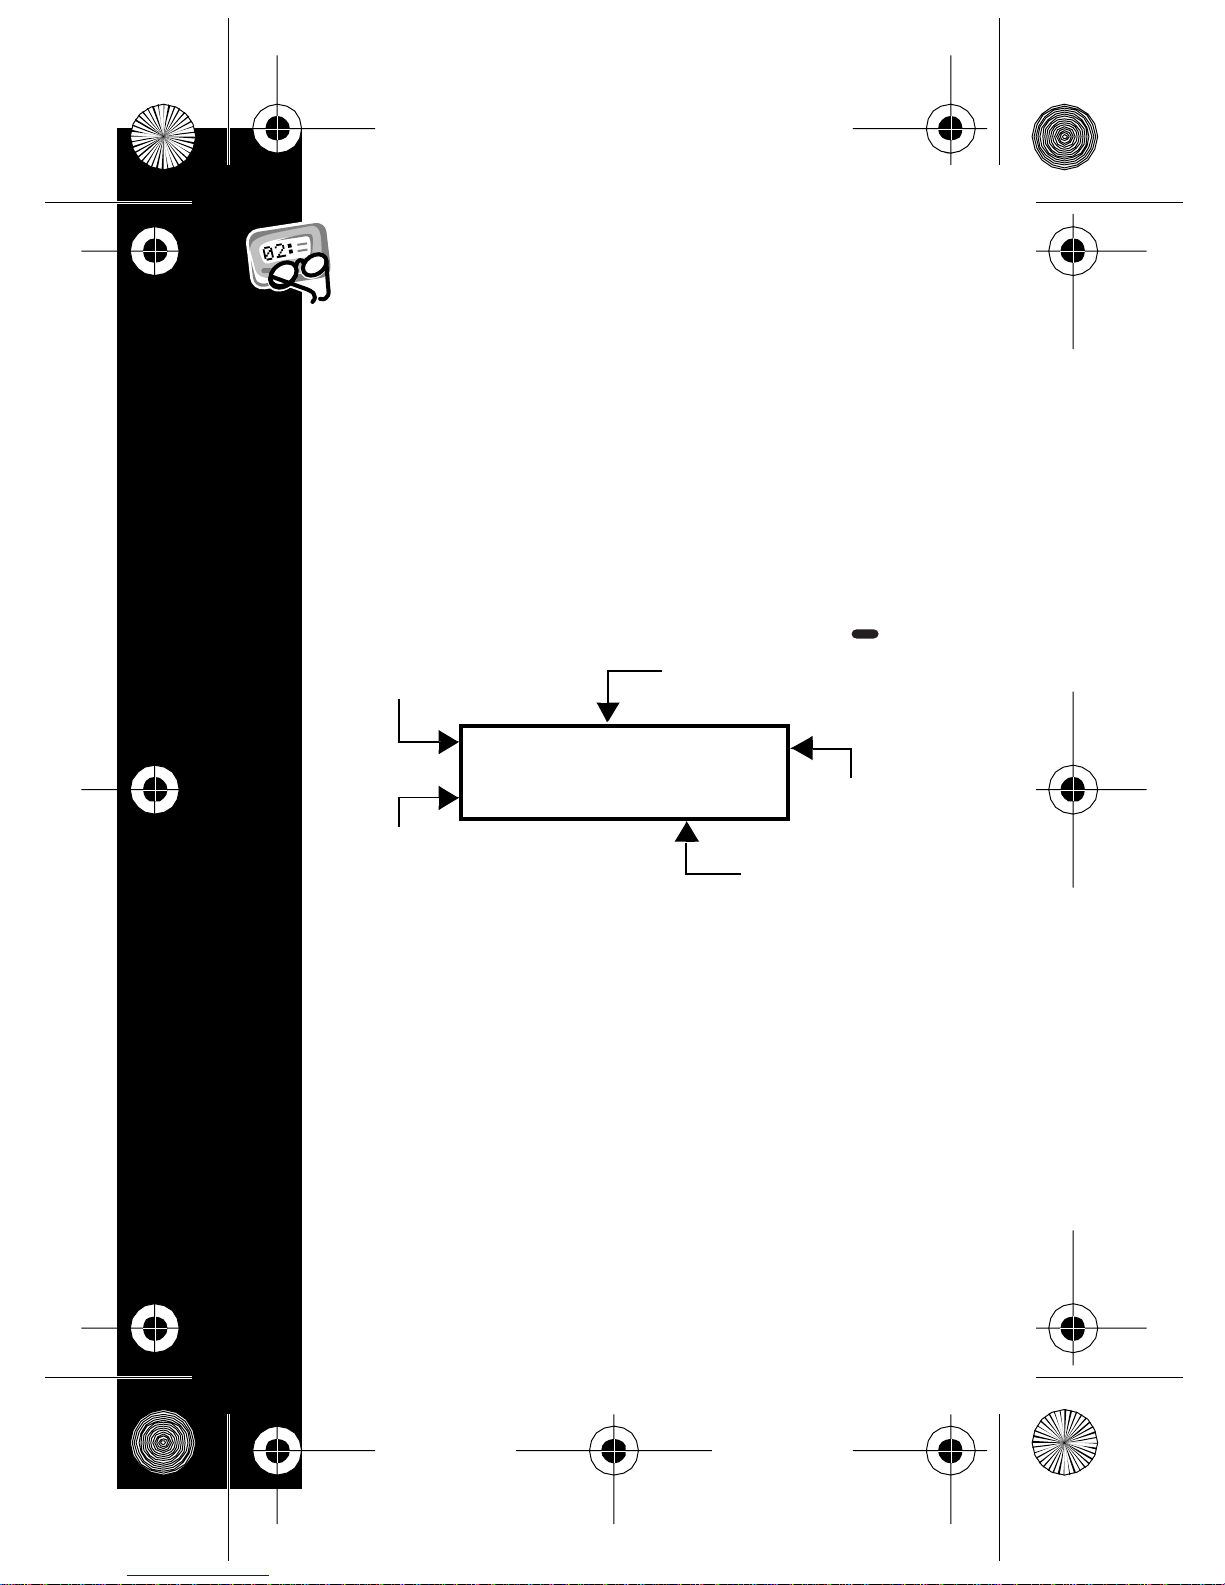
From the Status screen, press .
MESSAGES
Time Stamp
12:38/ % &
e
12345678
Error Indication
(if programmed)
Locked Message
Indicator
Message
Continued
Message
• When your pager receives an error
message, e is placed in the front or
at the end of the message when you
display it.
14
Page 17
6881036b50a.fm Page 16 Friday, October 20, 2000 8:21 AM
Locking/Unlocking Messages
You can lock up to ten messages to
preventthemfrombeingdeletedor
overwritten by new messages when the
pager’smemoryisfull.
• To lock a message, press while
the message displays.
• To unlock a message, press
while the locked message displays.
Message Information
When you r eceive a message,you can
program your pagerto display
additional message inform ation . To turn
this feature on/off, proceed as follows:
From the Status screen, press
untiladu control displays, and
then press .
Press until msg info displays,
and then press .
Press to toggle betweenon and
off,andpress to make your
selection.
MESSAGES
15
Page 18
M ESS A GE S
Deleting Messages
You can delete messages from your
pager at any time. By deleting older
messages, you decide which messages to
keep and which to save before they are
overwritten by new messages. (Se e also
“Locking/Unlocking Messages” on
Deleting an Individual Message
To delete an unlocked message, press
while the message is
displayed.
To delete a locked message, you
must first unlock the message.
(See “Locking/Unlocking Messages”
Press to confirm your decision.
Deleting All Messages
This feature allows you to delete all
unlocked messages at once.
From the Status screen, press
until Delete All displays, and then
press .
When Delete All? displays,
press to confirm your decision.
6881036b50b. fm Page 17 Friday, Nov 21, 2003 8:21 AM
16
page 15.)
on page 15.
)
and hold
2
1
2
1
Page 19
 Loading...