

Page 1
1
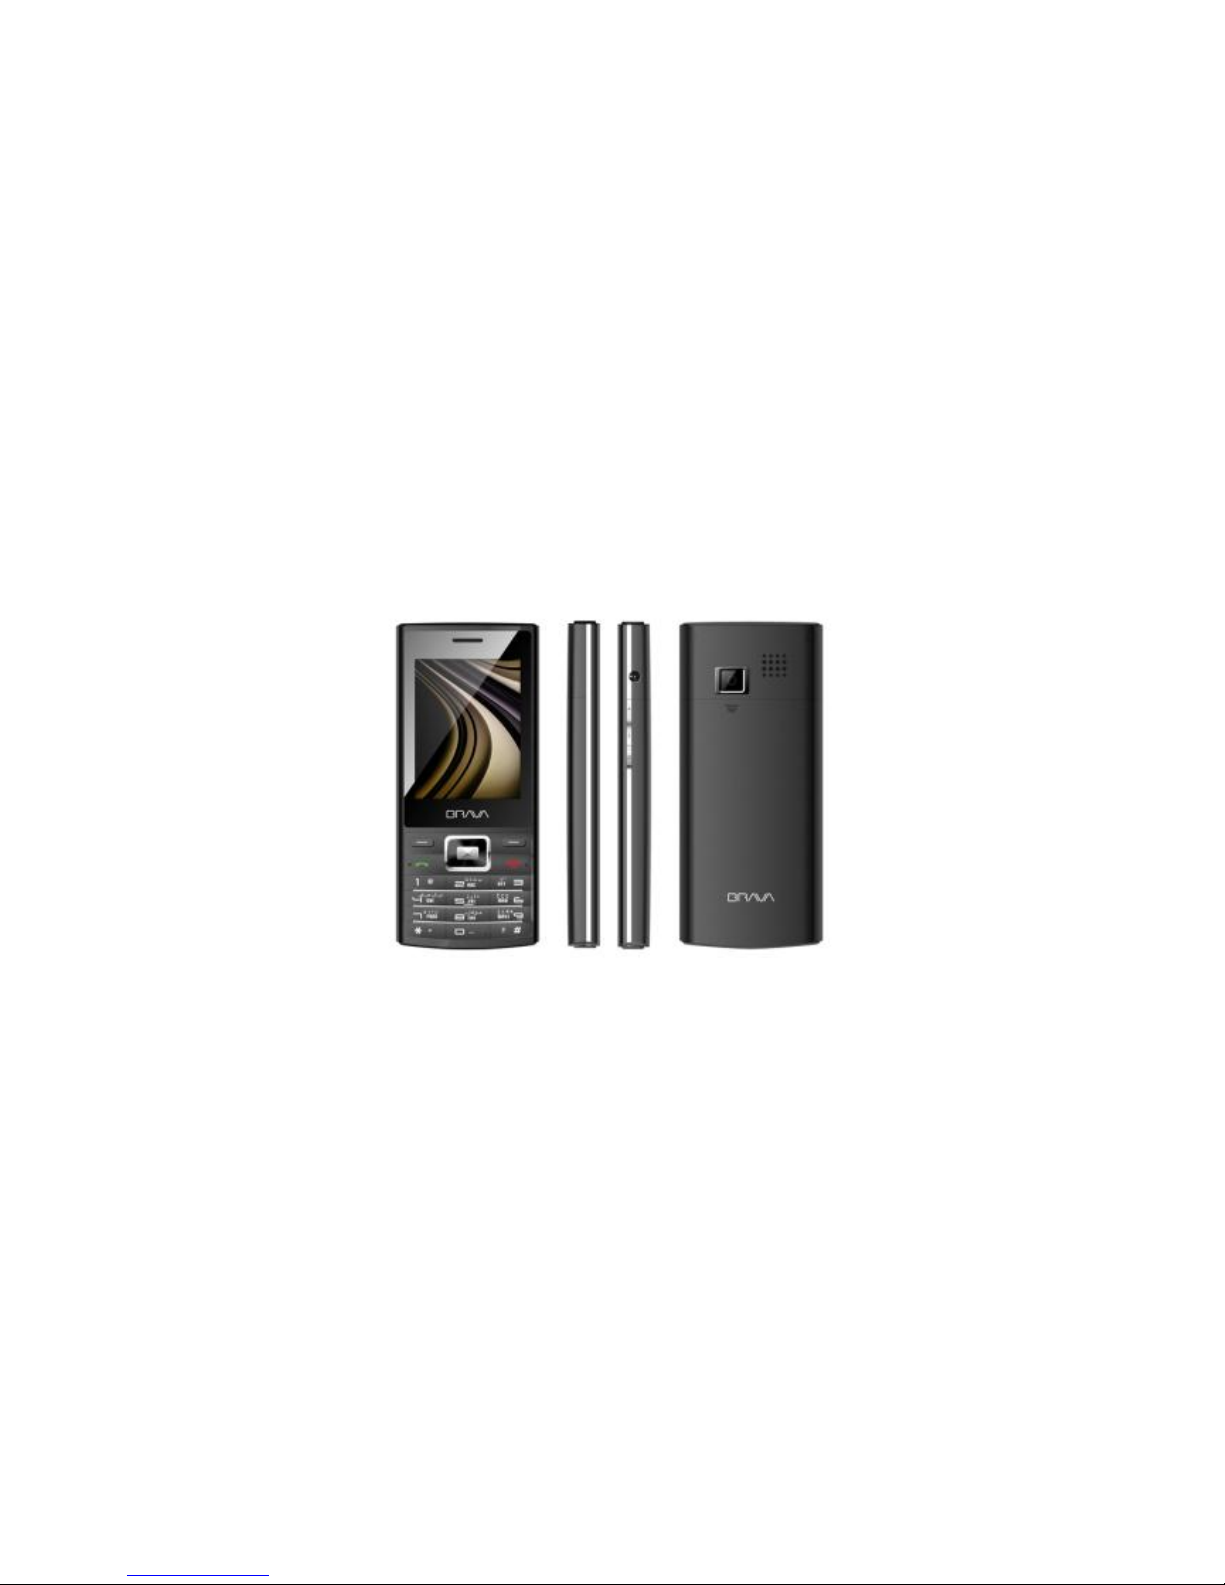
GARNET DM-976 from Brava
User Manual
www.bravatechno.com
Page 2

2
Statement
Thank you for choosing GARNET DM-976 from Brava, your best partner for wireless
communication.
The contents of this manual maybe different with the cell phone, when there is please
according the cell phone.
Brava reserves the right to revise this document or withdraw it at any time without
prior notice.
Copyright©2011 Brava Techno Corporation Ltd.
All Rights Reserved
No part of this manual is allowed to be reproduced or forwarded in any form or by any
means without prior written consent of Brava.
Page 3

3
Contents
1 Getting to Know Your Phone........................................................................... 6
2 Getting Started ........................................................................................... 10
3 Basic Functions ........................................................................................... 14
4 Input modes ............................................................................................... 17
5 Phone Book ................................................................................................ 19
6 Messages .................................................................................................... 21
7 Call history.................................................................................................. 26
8 File Manager ............................................................................................... 28
9 Multimedia .................................................................................................. 29
10 Profiles ....................................................................................................... 33
11 Tools .......................................................................................................... 35
12 Network Services ......................................................................................... 38
13 Camera ...................................................................................................... 41
14 Entertainment ............................................................................................. 44
15 Connections ................................................................................................ 45
16 Settings ...................................................................................................... 47
17 Other Functions .......................................................................................... 55
18 Maintenance Guideline ................................................................................. 56
Page 4
4
Safety Precautions
Please read these simple guidelines. Not following them may be dangerous or illegal.
For further information, see the section of “Safety information”.
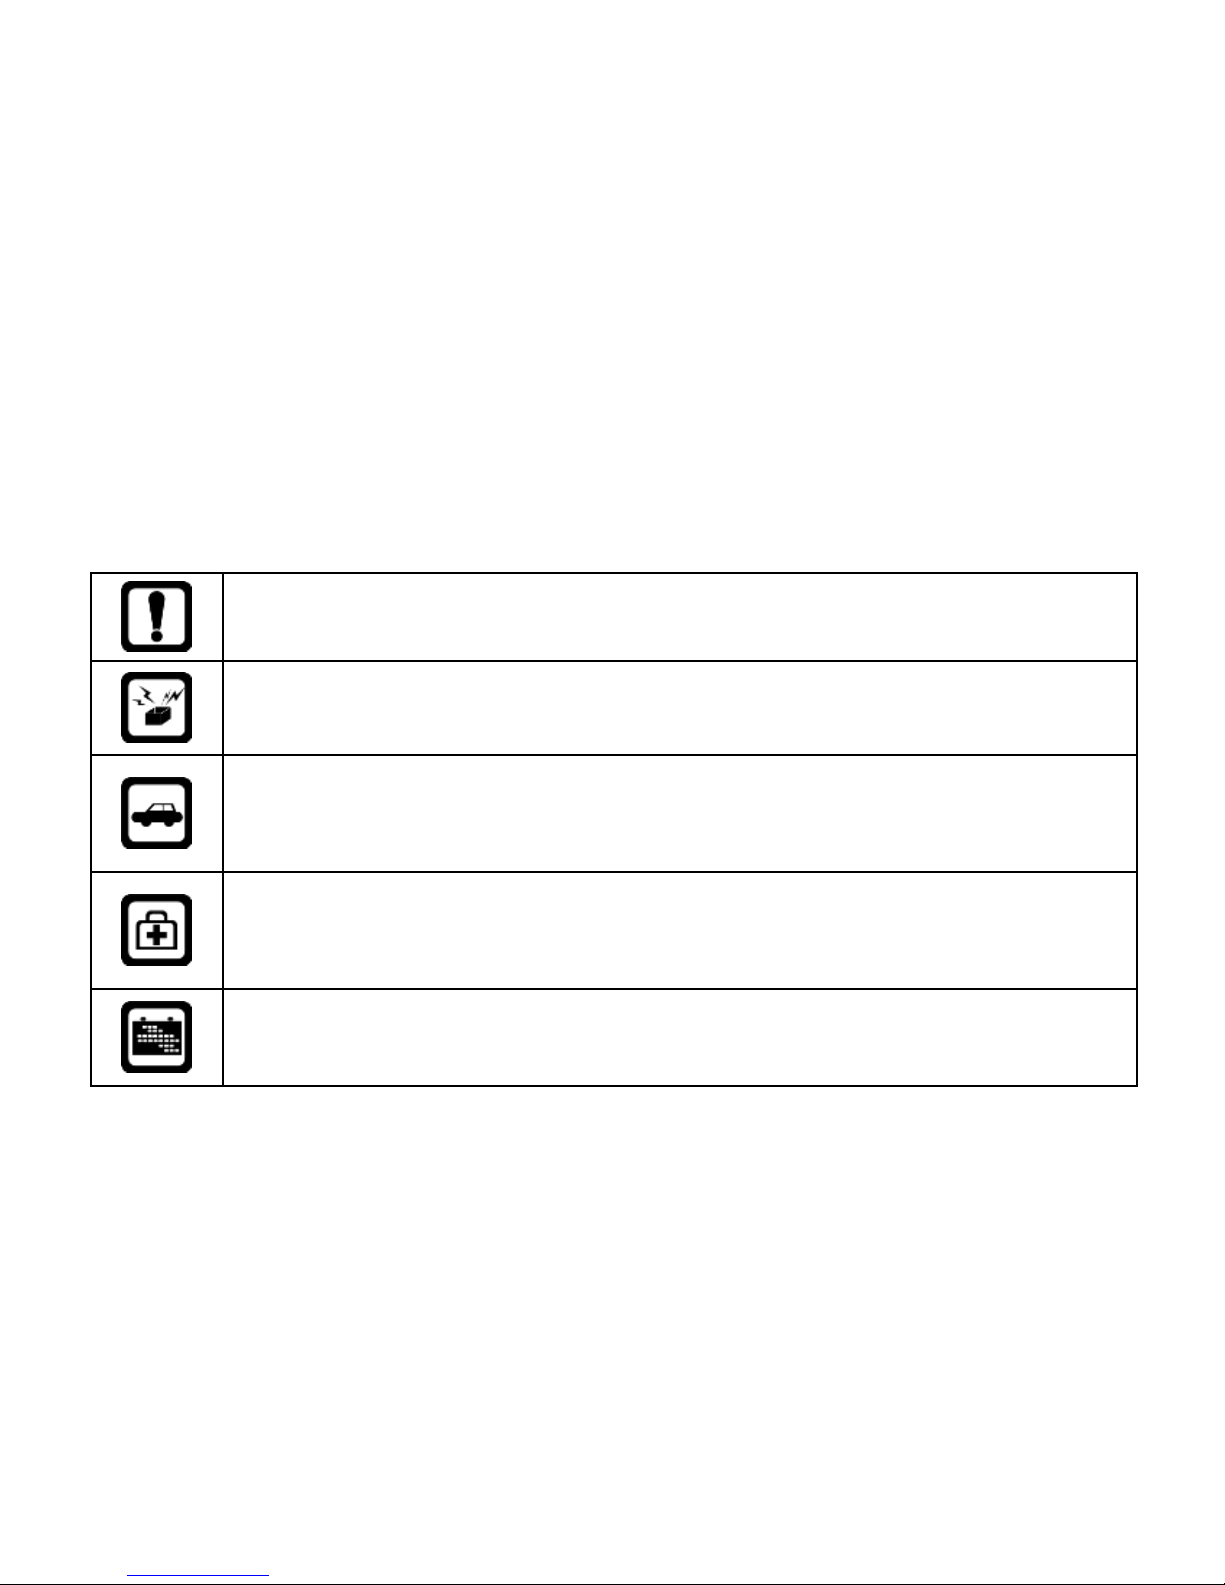
Do not switch the phone when the use of mobile phone is prohibited or
may cause interference or danger.
Do not place your phone and its accessories in containers with strong
electromagnetic field.
Obey all local laws. Always keep your hands free to operate the vehicle
while driving. Your first consideration while driving should be road
safety.
Hospitals or health care facilities may be using equipment that could be
sensitive to external radio frequency energy. Follow any regulations or
rules in force.
Do not use the phone at a refueling point. Do not use near fuel or
chemicals.
Page 5
5
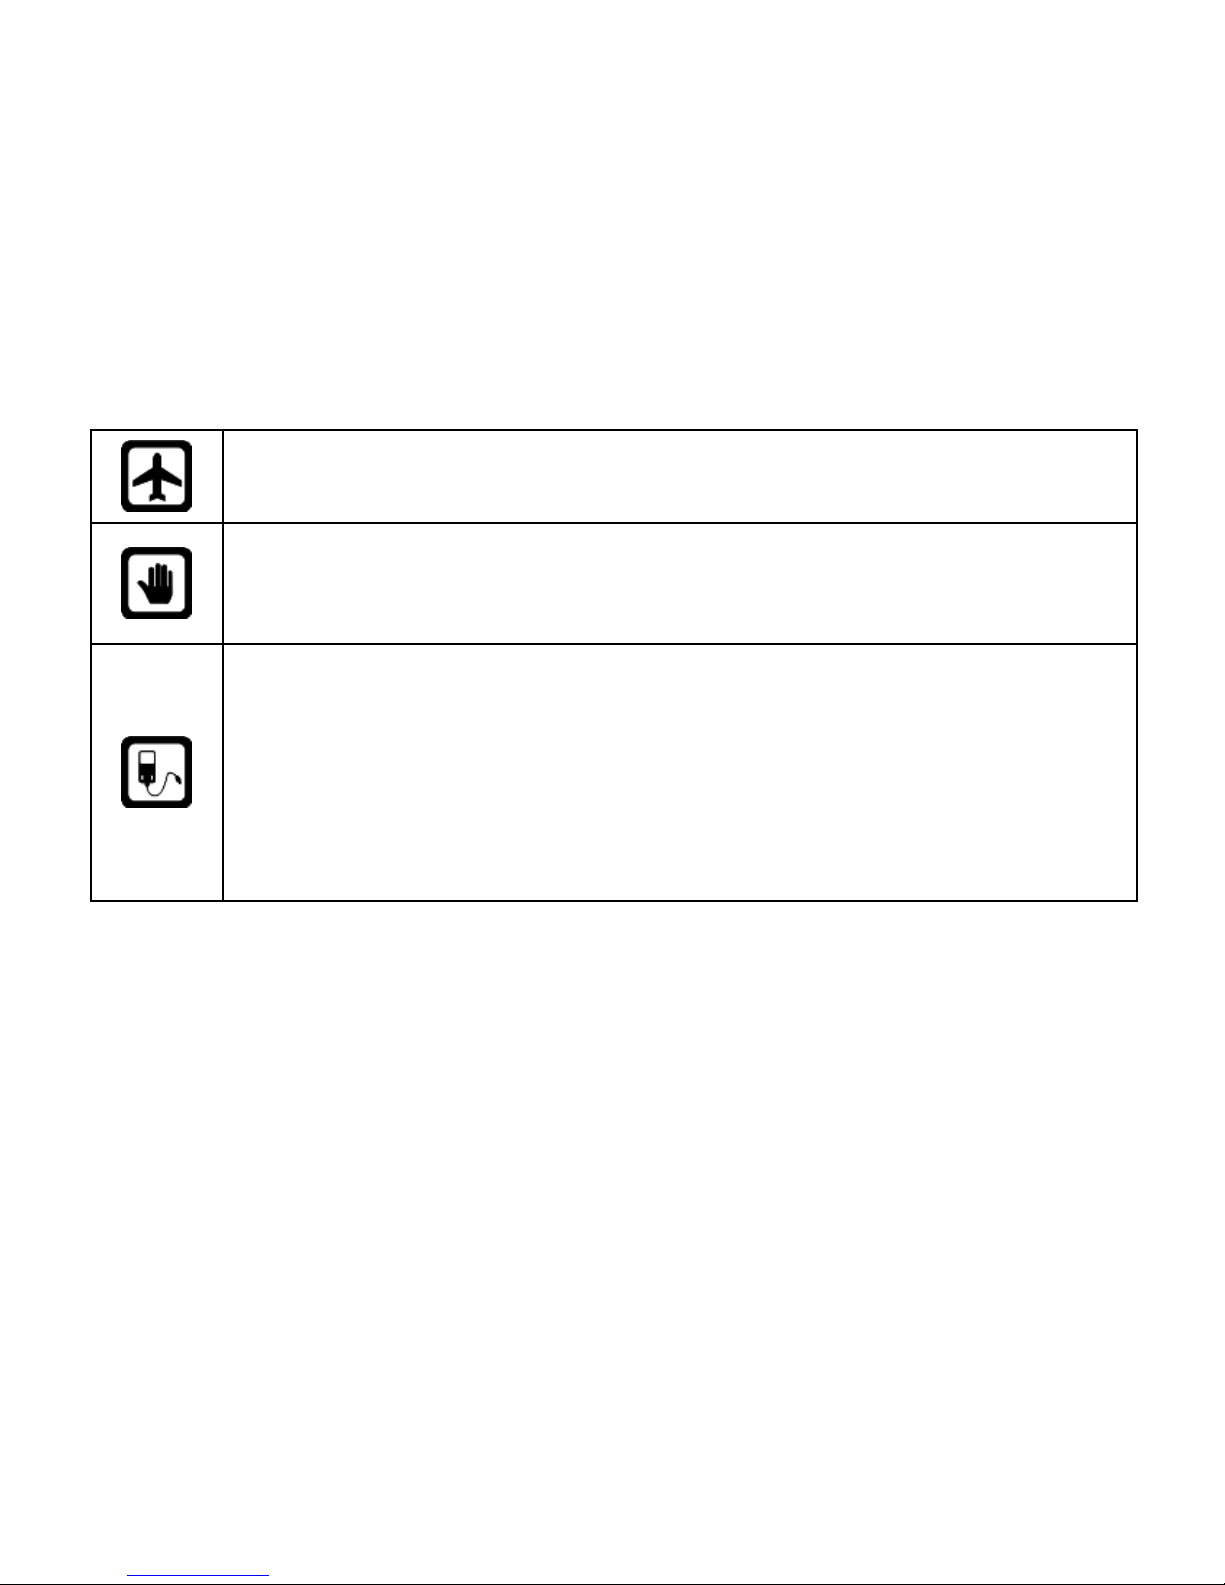
Follow any restrictions. Wireless devices can cause interference in
aircraft.
Keep the phone and all its parts, including accessories, out of the reach
of small children.
Use only Brava approved batteries and chargers. Disconnect the
charger from the power source when it is not in use. Do not leave the
battery connected to a charger for more than a week, since
overcharging may shorten its Life
Please remove the battery only after the phone is switched off
normally, otherwise it could cause unpredictable damage for the
phone.
Page 6

6
1 Getting to Know Your Phone
Package list
Your phone package box contains the following items:
One GARNET DM-976 mobile phone
One battery
One charger
One Mini-USB data cable
One 3.5mm Headset
One user manual
One warranty card
Page 7
7
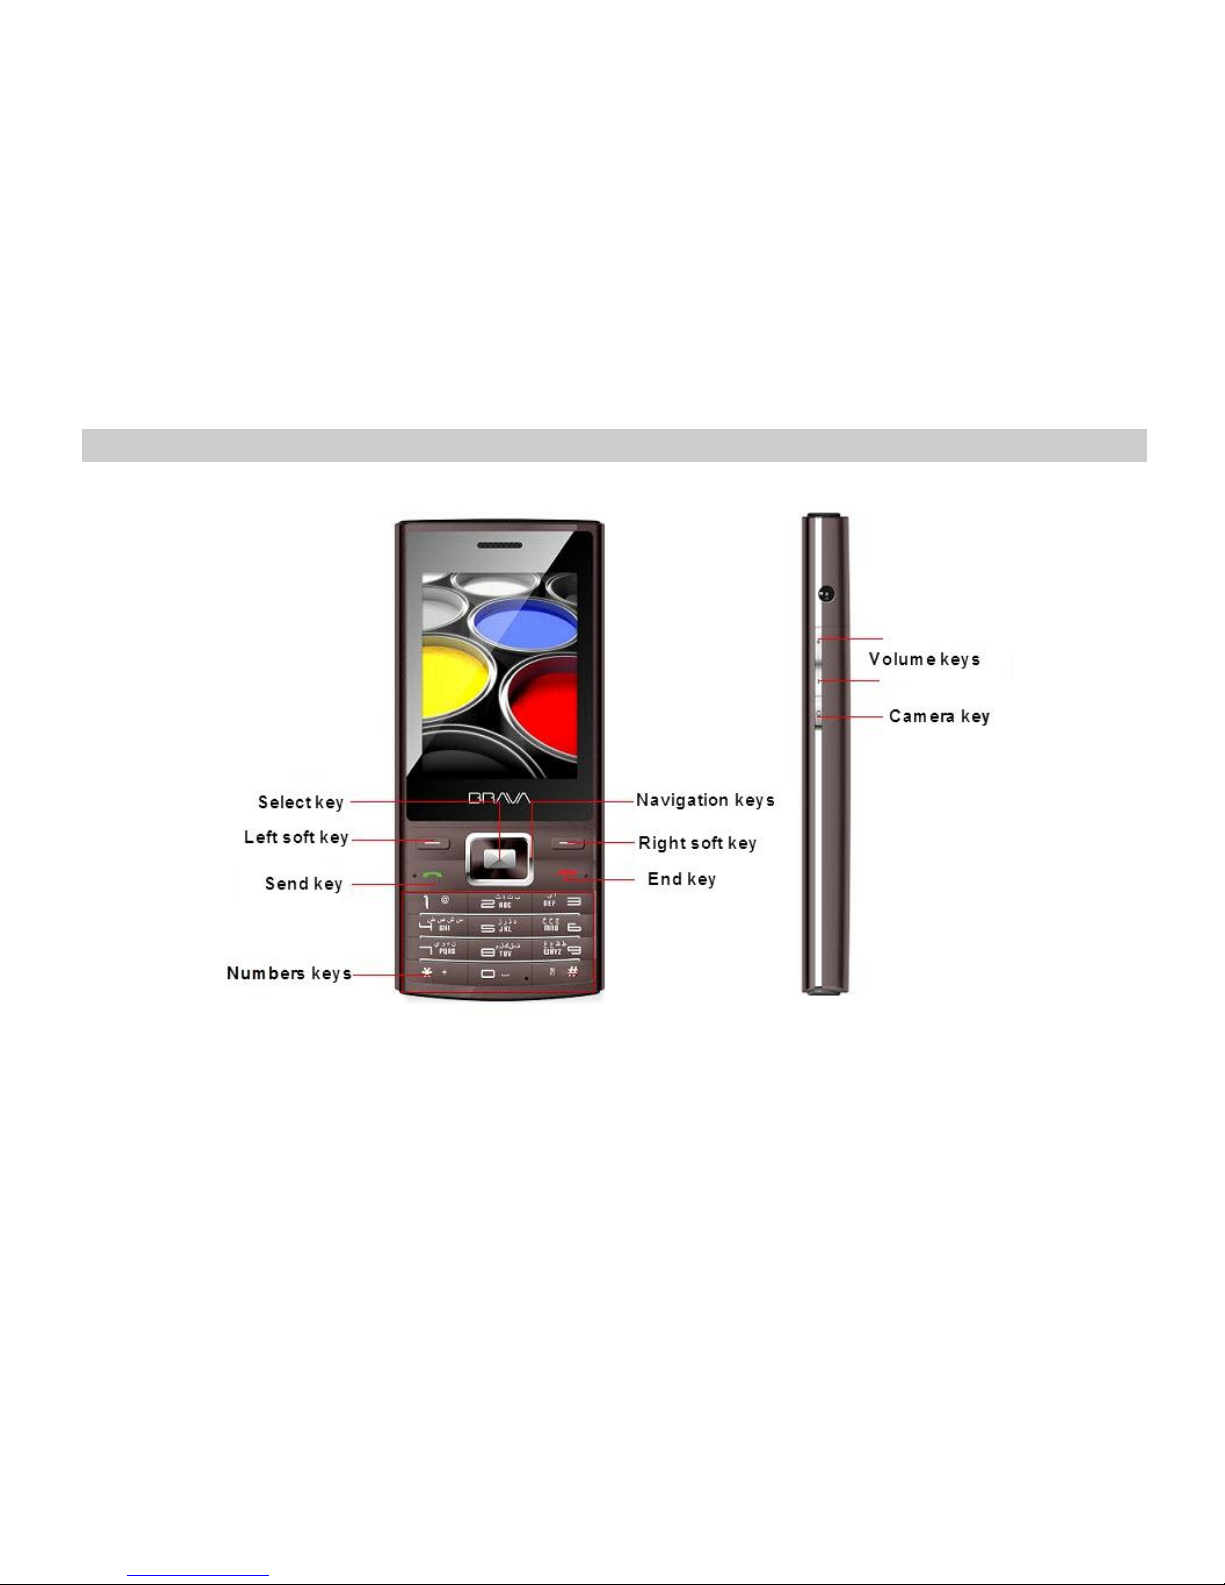
Mobile phone appearance
Page 8
8
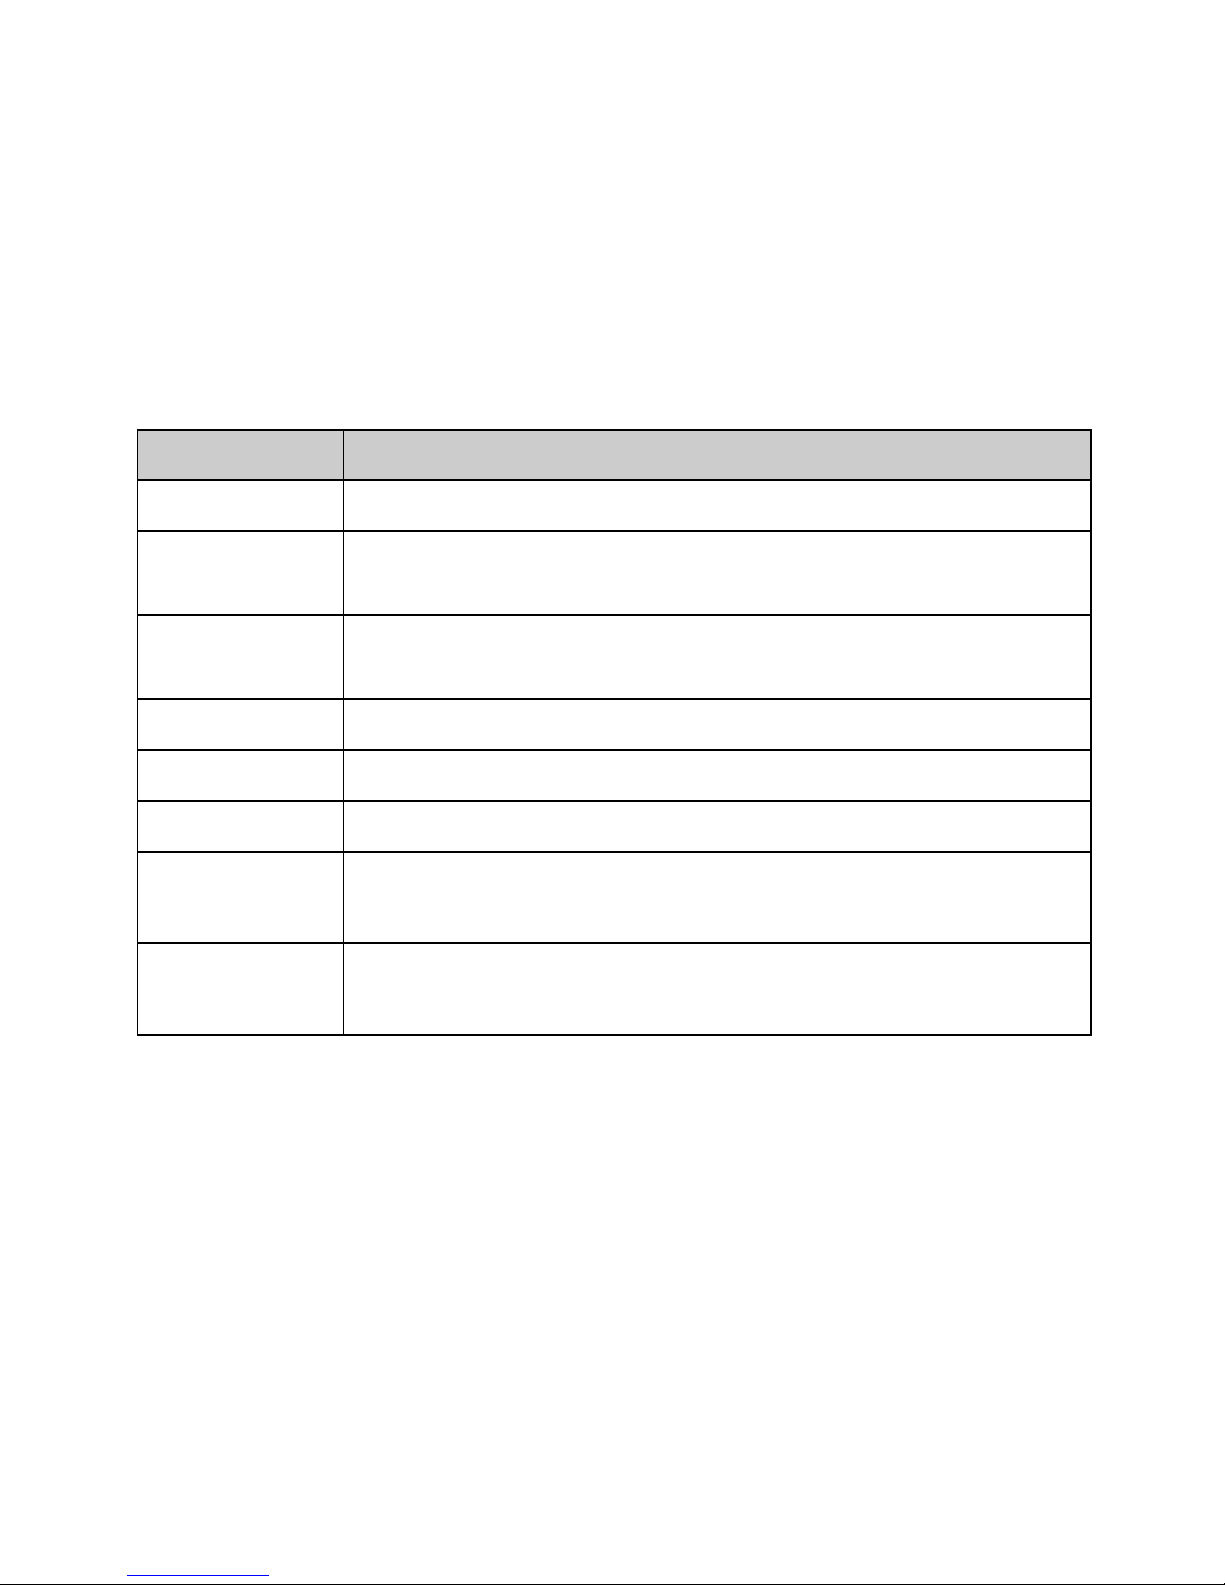
Name
Description
Left soft key
Press to activate the option shown above the key.
Right soft key
In standby mode, press right soft key to access
Shortcuts.
Up key
In standby mode, press up key to access the Music
Player.
Down key
In standby mode, press down key to access Contacts list.
Left key
In standby mode, press left key to access File Manager.
Right key
In standby mode, press right key to access Messages.
Select key
Confirm the selection.
In standby mode, press select key to access Main menu.
Send key
Making or answering a call.
In standby mode, press this key to access Calls History.
Page 9
9
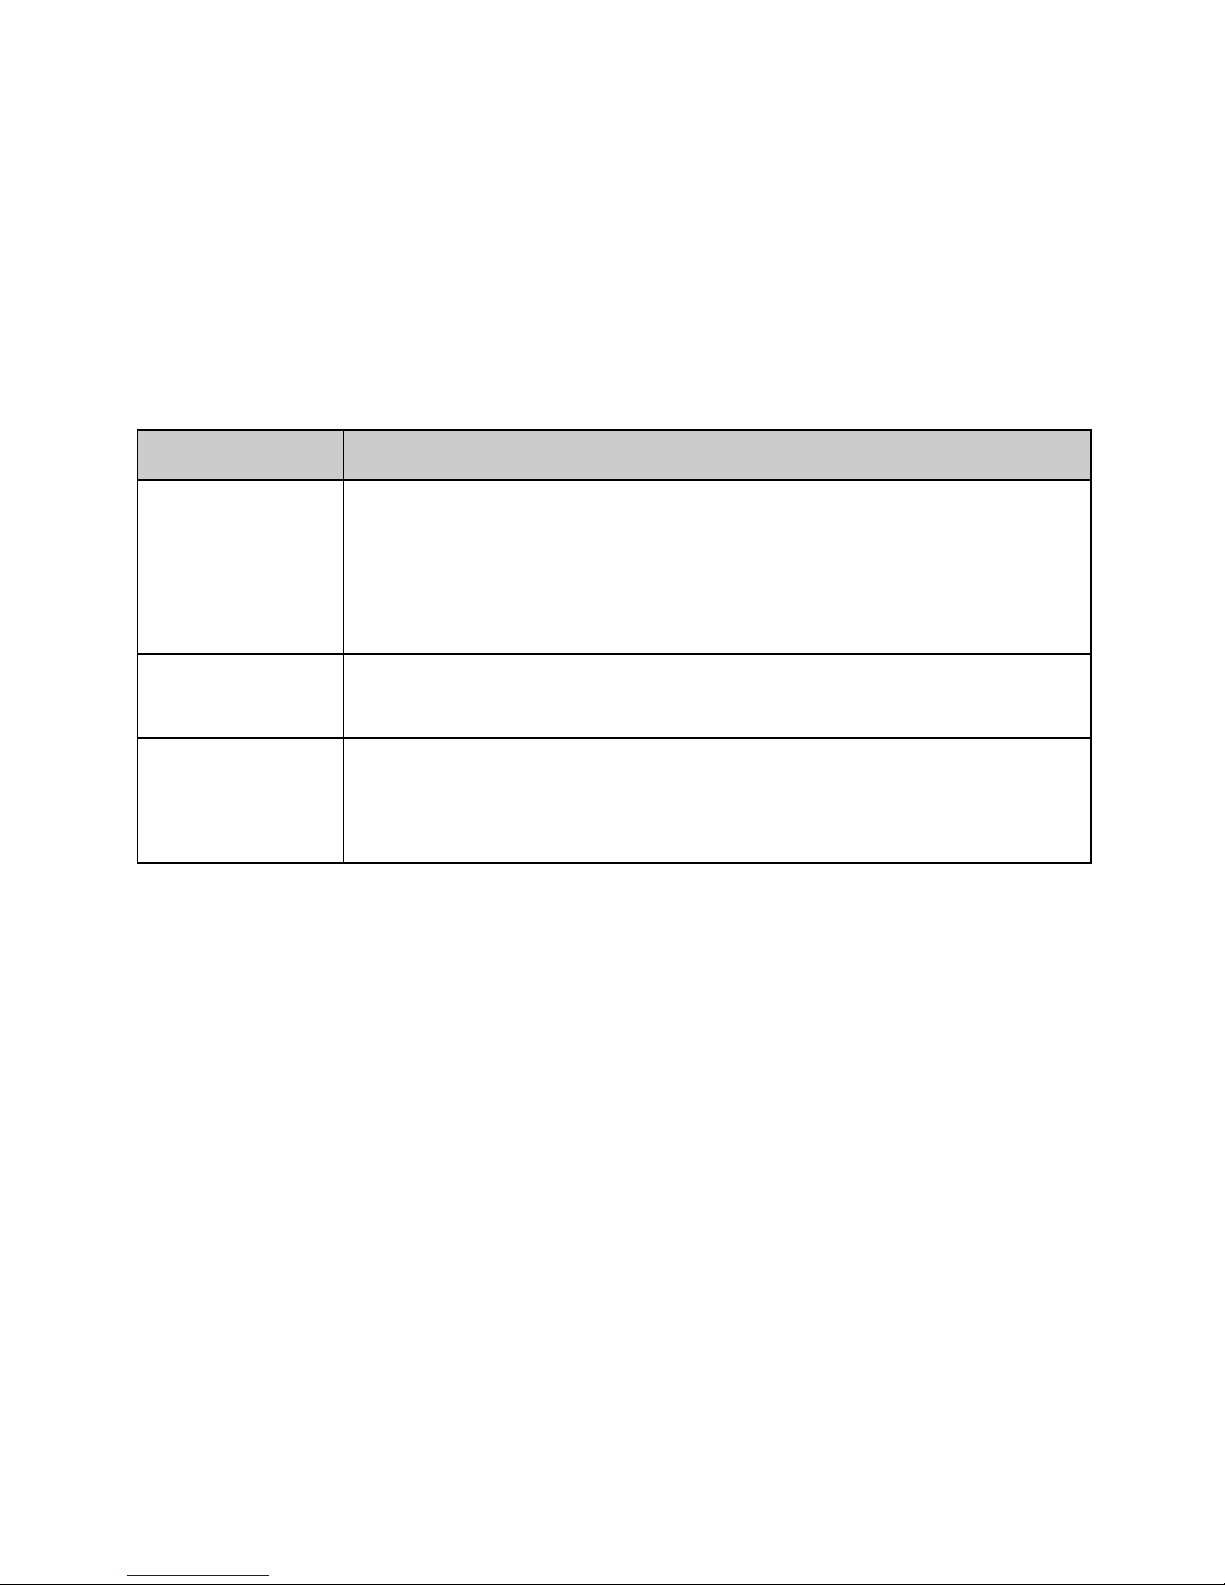
Name
Description
End key
Press and hold to tu
rn the phone on/off.
Press to end your calls, or exit to the standby mode.
In standby mode, press End key to turn on/off LCD light.
Camera key
Press to open the camera. In the camera mode, press to
capture the photo.
Number keys
Enter numbers, letters, and some special characters.
In standby mode, press and hold [#] key to enable silent
mode.
Page 10
10
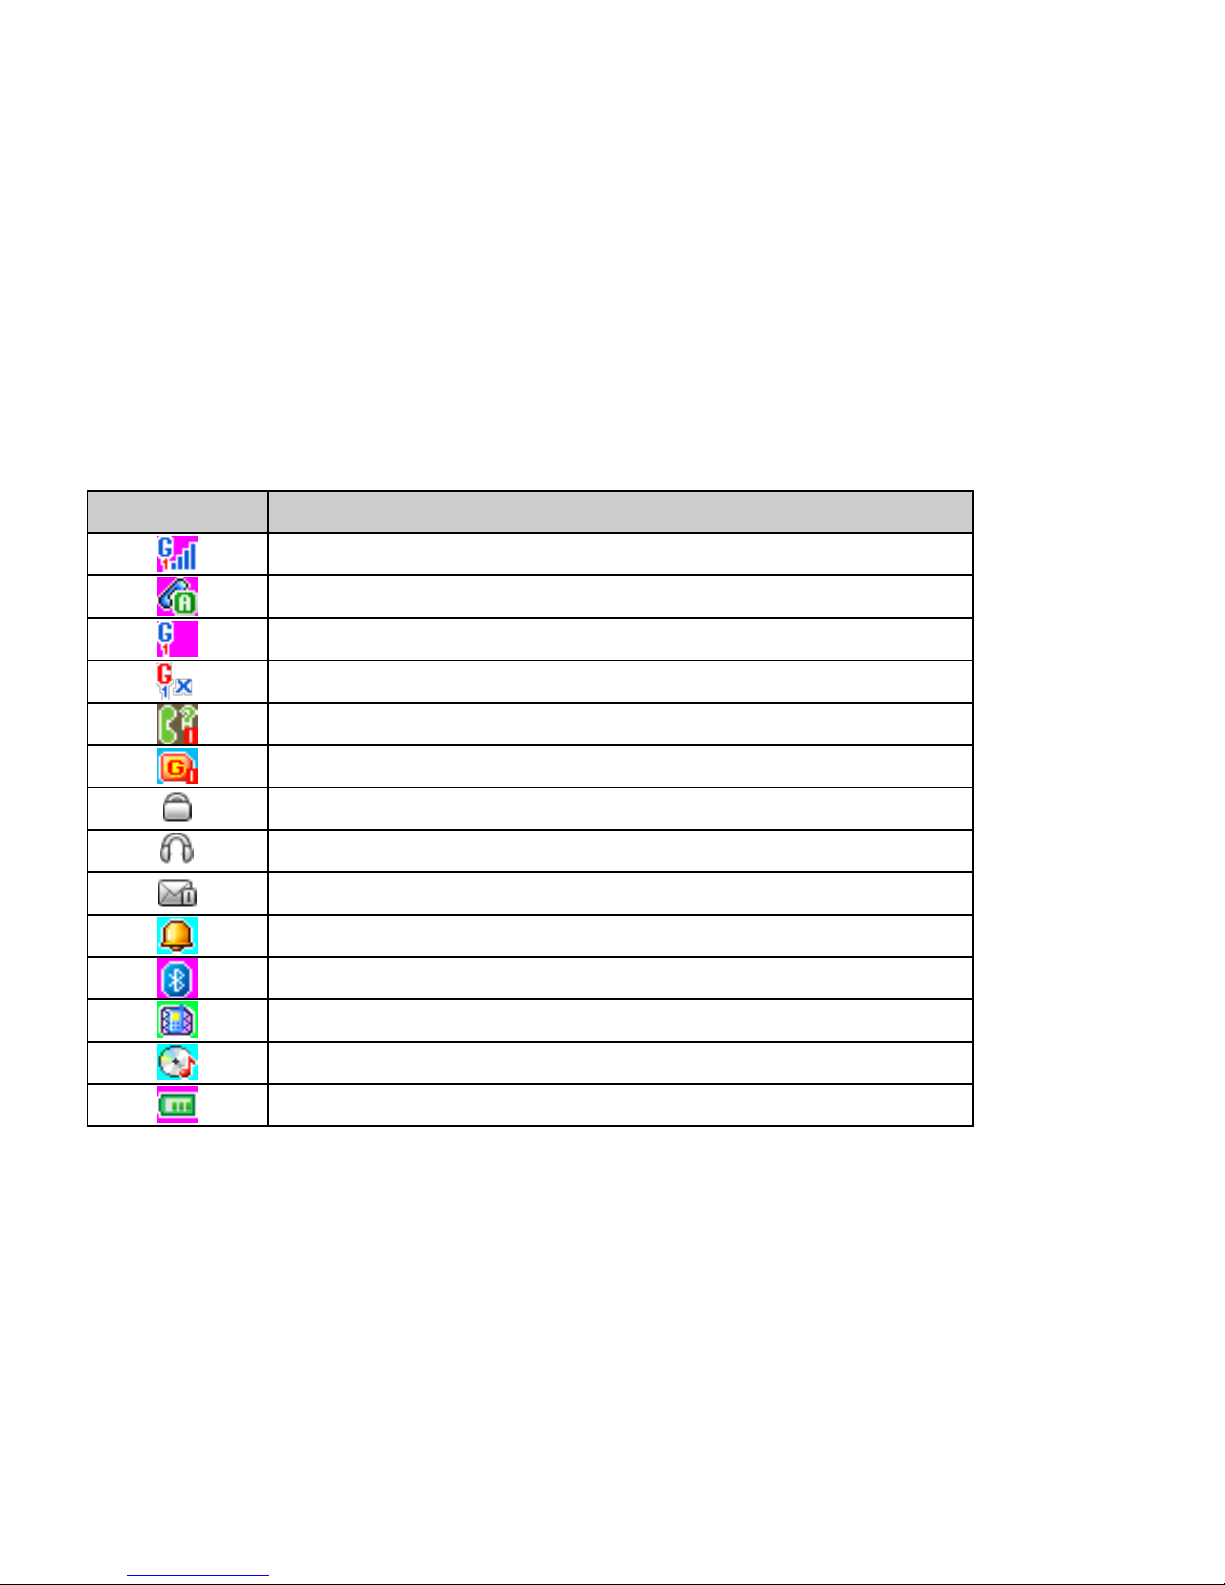
Icon bar
Icon
Description
The signal strength of the network.
The phone is in call status.
No network.
The Phone is closed (network is disabled)
You have one or more missed call.
The phone is in data connection mode (GPRS).
The keypad is locked.
A headset is connected to the phone.
You have one or more unread massages in the inbox.
The alarm clock is set to on.
The Bluetooth is activated.
Meeting mode is activated.
The music playback is in progress.
Battery power level.
Page 11
11
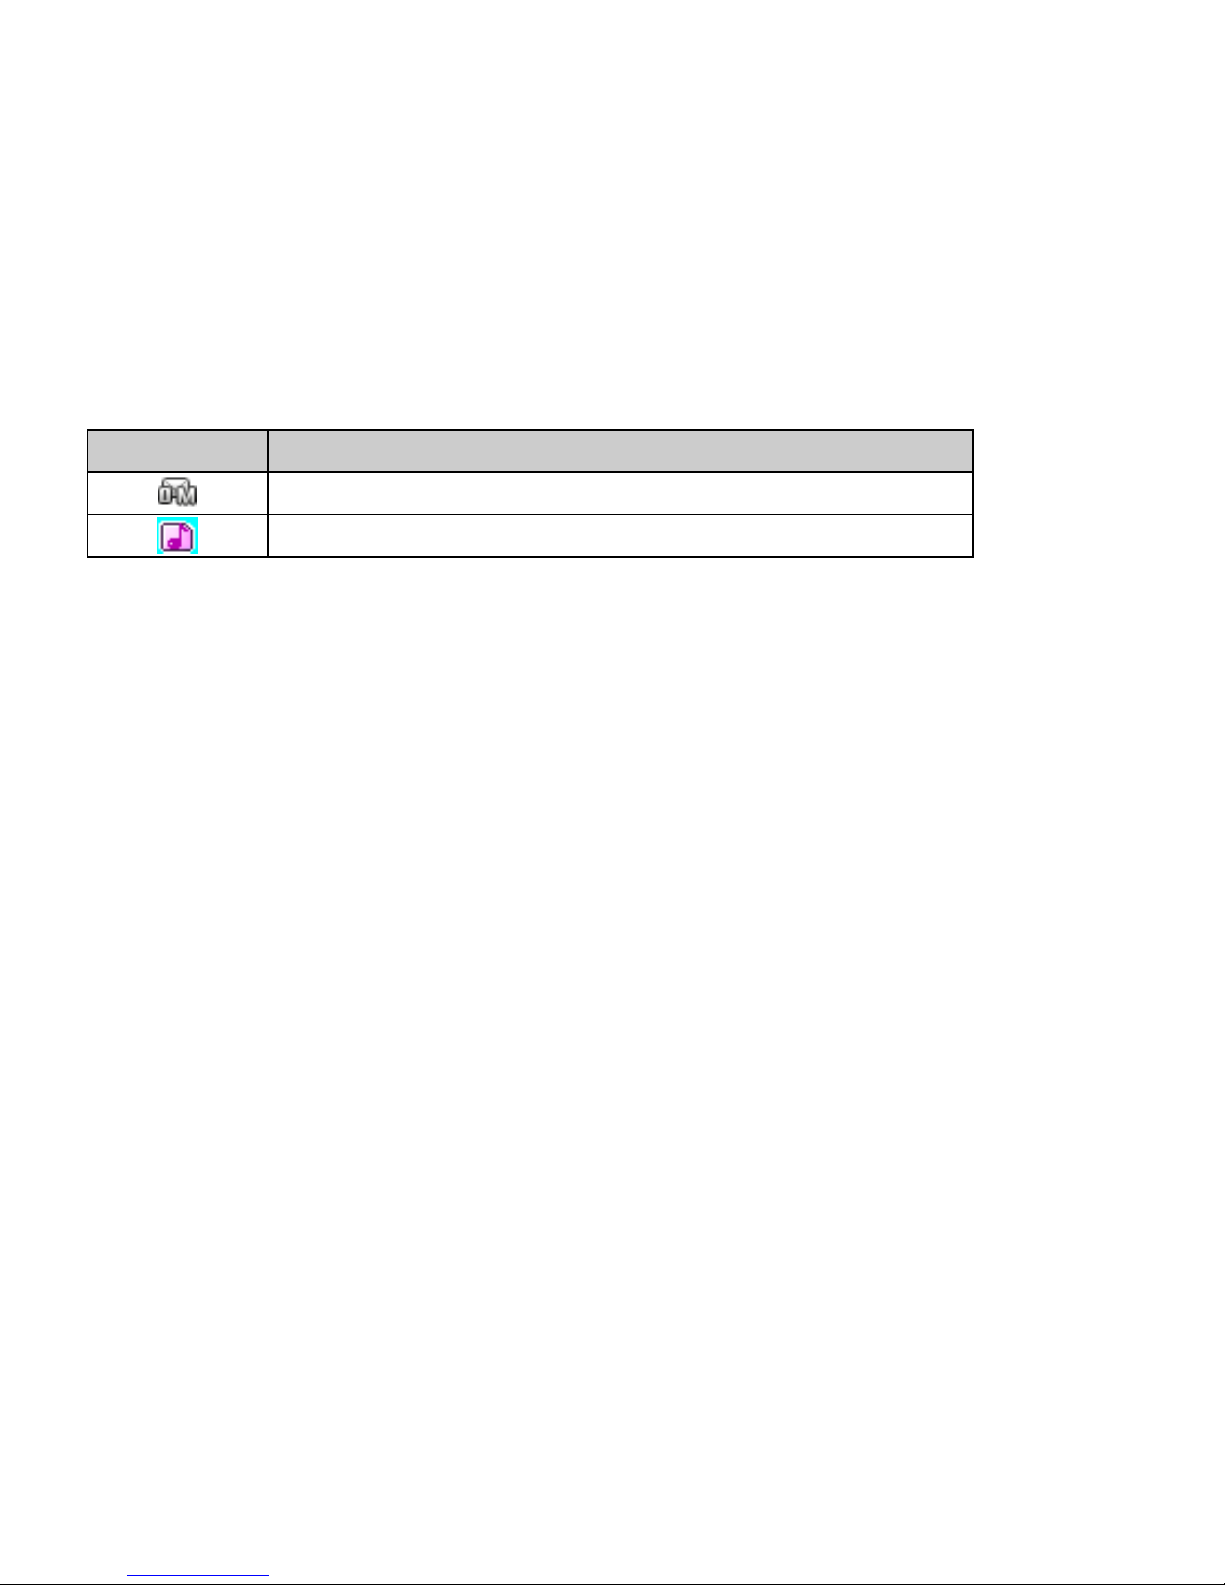
Icon
Description
You have one or more unread multimedia massages.
One of the ringing modes is activated (not silent
Page 12

12
2 Getting Started
Insert the battery
Before battery replacement, please confirm you have switched off the phone.
Insert SIM/UIM cards:
1. Before SIM/UIM card installation or replacement, please make sure you have
switched off your phone and taken the battery out.
2. Make the metal magnetic strip of the SIM/UIM card contact with the metal strip,
and place it in the slot.
Charger the battery
1. Before charging, please confirm you have correctly installed the battery into the
phone.
2. Plug the charger port into the jack and then connect the charger with AC power.
3. If the phone is off during charging, the screen will display the charging animation.
When the phone is on, the user may use the phone during charging. When the
charging is completed, the charging animation on the screen will stop in
full-capacity state of the battery. Please use the phone when the battery is fully
Page 13

13
charged after the power is completely used up for the first time; charge it after the
power is completely used up for the second time, as a result, the battery will reach
the best state after three consecutive cycles.
4. If the battery voltage is too low due to long-term non-use and other reasons, the
screen will be blank when charging and will display the charging animation after
several minutes.
Warning: please do not move or remove the battery during charging to avoid severe
burning of the phone circuit.
Page 14

14
3 Basic Functions
Lock/Unlock keypad
Lock: Press LSK key and then press “*” key in standby mode.
Unlock: firstly press unlock key and then press “*” key.
Make a phone call
Making phone call using the keypad
1. In the standby mode, enter the phone number you want to dial, and press the
Send Key to make the call, then select through SIM1 or UIM.
To delete a number on the left of the cursor, press <Delete>.
2. To end the call, press the End Key.
Making phone call using contacts
1. In the standby mode, press down key to open contacts list or press Select Key to
access the Main menu > Phone book.
2. Select the contact you want to call.
3. To make the phone call, press the Send Key then select through SIM1 or UIM.
Page 15

15
Making phone call using last Call History
1. In the standby mode, press the Send Key to display the call history, then select
SIM1 or UIM all calls, dialed, answered, and missed calls.
2. Scroll to the number or name you wish to redial, and press the Send Key, then
select to call via SIM1 or UIM.
Making phone call using speed dial
In standby mode, long press a number key to make phone call. Make sure the speed
dial option is enabled in the Phonebook settings.
Making a conference call
Conference call is a network service that allows you to make a call with more than one
person in the same time.
1. Make a call to the first person.
2. Enter the phone number of the second person or retrieve a number from the Phone
book.
3. Press the Send Key, the first person is put on hold.
4. When the second call is answered, press the Options and select “Conference”
options to make the conference call.
5. To end the conference call, press the End Key.
Page 16

16
Answer a call
Press the Send Key for answering a call, press Silent to mute the ringing before
answering, or press End Key to reject the call. Press Options to perform
corresponding operations during the call. If you want to end a call, press the End
Key.
Page 17
17
4 Input modes
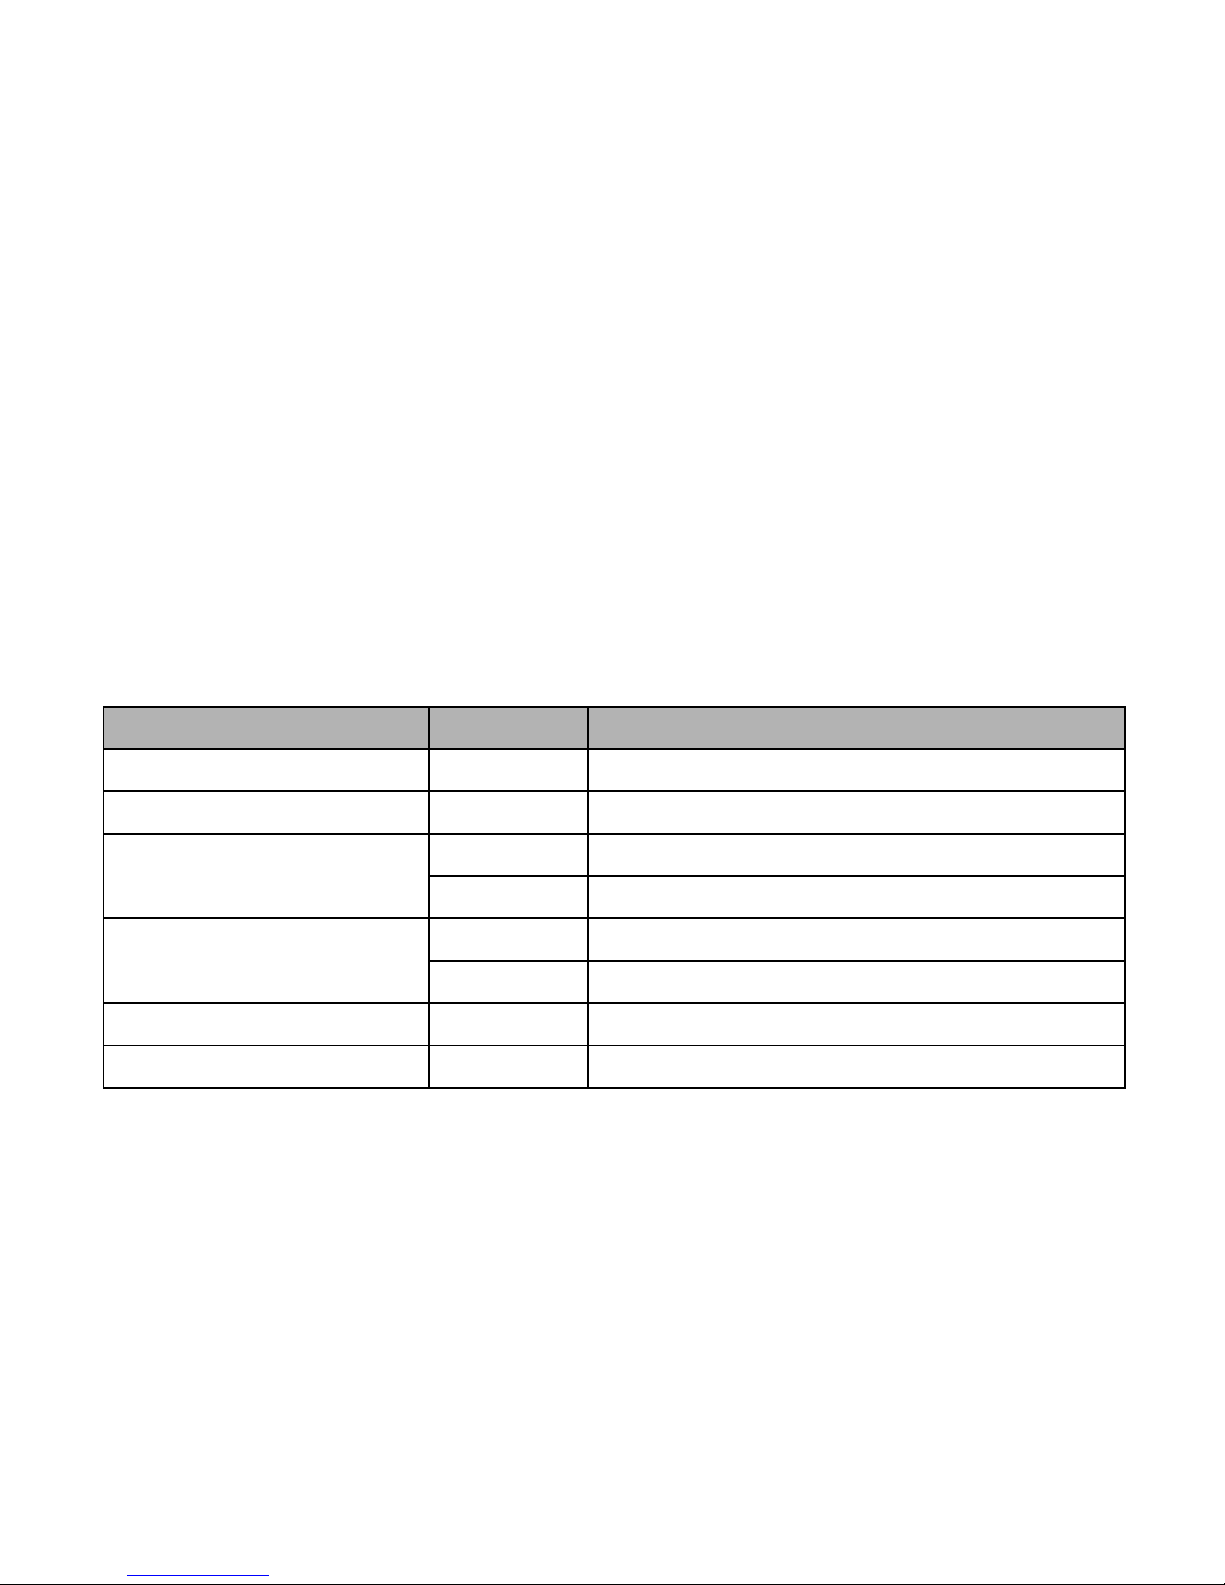
Your Brava DM-976 mobile phone provides the following text input methods:
English input method: To input English characters;
Arabic input method: To input Arabic characters;
Numeric input method: To input Numeric characters;
Input method
Icon
Letter case
Traditional (Arabic)
AR
-
Smart (Arabic)
eZi AR
-
Smart (English)
eZi ABC
Upper case
eZi abc
Lower case
Traditional (English)
ABC
Upper case
abc
Lower case
Numeric
123
-
Arabic numbers
AR321
-
Page 18

18
Changing the input modes
Press # Key for switching between the different input modes in the text editing mode.
(Click the icon of the input mode on the screen to switch the input mode if there is no
keyboard on the phone).
To enter the symbols list, press * Key.
Notice:
Press [1] Key to insert common symbols.
Press [0] Key to insert “space, 0”.
Page 19

19
5 Phone Book
You can save names, phone numbers, emails, and other details in your phone book.
You can also save names with phone numbers in SIM card 1 or SIM card 2.
Add new
1. In the standby mode, press Select Key to access the Main menu > Phone
book > Add new contact;
2. Choose storing phone numbers in your phone memory, in SIM1, or in UIM memory.
3. Input information about the contact.
View a contact
1. In the standby mode, press Down Key or press Select Key to access the Main
menu > Phone book;
2. Press Select Key to view the details of the contact.
3. Highlight a contact; press <Options> to have the following options:
View: View the details of the contact.
Send text message: Send a message to the contact.
Send multimedia message: Send a multimedia message to the contact.
Page 20

20
Call: Make a phone call with the contact (via SIM1 or UIM).
IP call: Insert the IP number in front of the number then dial out.
Edit: Edit the details of the contact.
Delete: Delete the contact.
Copy: Copy the contact between phone memory and SIM1/UIM memories.
Move: Move the contact between phone memory and SIM1/SIM2 memories.
Export: Export the contact to the memory.
Send contact: Send the business card via SMS, MMS or via Bluetooth.
Add to blacklist: Add the selected number in the contact to the blacklist.
Mark: Select contacts for applying events to the selected contacts.
Settings: change the phone book settings which include: Storage, Speed
dial, My number, Import/Export all, …etc.
Groups
1. In the standby mode, press Select Key to access the Main menu > Phone book;
2. Press the left/right navigation key to switch to Groups.
3. Highlight Add new group to add new group.
4. Highlight a group; press <Options>to have the following options:
View members: to view the contacts inside the group.
Settings: to change the settings of the group.
Page 21

21
6 Messages
In the messages you can create, send, receive, view, edit, and organize text
messages and multimedia messages.
Text messages (SMS)
Create message
Create and send messages.
1. In the standby mode, press Select Key to access the Main menu > Messages >
Create message;
2. Write your message.
3. Press <Options> and select Send to.
4. Enter a destination number.
To send the message to more than one recipient, fill in additional destination fields.
5. Press<OK>, then choose through SIM1 or UIM to send the message.
Inbox
Text messages and multimedia messages are automatically stored in the inbox when
they are received. A notification appears for the new unread messages.
Page 22

22
1. In the standby mode, press Select Key to access the Main menu > Messages >
Inbox;
2. Highlight a message, press <Options> to access the following options:
View: to view the message contents.
Forward: Edit and forward the message to other people.
Delete: Delete the message.
Delete all: Delete all the inbox messages.
Sort by: change the sorting criteria
Move to favorites: Move the message to the favorites box.
Filter by: to filter the inbox items (SIM1, UIM, all).
Mark: Mark several messages to apply some actions to the selected messages.
Advance options: Copy or move messages between the phone and SM1/UIM
memories.
Sent items
Text messages that have been sent or not are automatically stored in this box, if “Auto
save” in the message settings is enabled.
1. In the standby mode, press Select Key to access the Main menu > Messages >
Sent items;
2. Highlight a message, press <Options> to access the following options:
Page 23

23
View: to view the message contents.
Forward: Edit and forward the message to other people.
Delete: Delete the message.
Delete all: Delete all the inbox messages.
Sort by: change the sorting criteria
Mark: Mark several messages to apply some actions to the selected messages.
Advance options: Copy or move messages between the phone and SM1/UIM
memories..
Drafts
Save incomplete text messages in the draft box.
1. In the standby mode, press Select Key to access the Main menu > Messages >
Drafts;
2. Press <Options> to access the following options: Send, Edit, Delete, Advanced
options and Edit options.
Templates
1. In the standby mode, press Select Key to access the Main menu > Messages >
Templates;
2. Highlight the template message you want to use.
Page 24

24
3. Press <Options> to Edit, Delete and Send.
Settings
In the standby mode, press Select Key to access the Main menu > Messages >
Settings and have the following options:
Profile settings: change the SMS profile settings
Voicemail server: set the voice mail server number(s).
Common settings: To set the common message options: Delivery report,
Reply bath and Save sent items.
Memory status: View the currently used memory for messages.
Delivery report: Set the network to inform you when your messages have
been delivered.
Auto delete: Delete the message automatically when memory status is full.
Page 25

25
Multimedia messages (MMS)
Multimedia messages contain combination text, photos, audio, and video contents.
Creating a new MMS has the same way of creating a text message; in addition to
inserting photos, sounds, and videos.
The other options are similar to basic text message options.
MMS settings:
Profile settings: change the profile settings for the desired SIM card which
includes the network settings for MMS.
Common settings: To set the common multimedia messages options:
Compose, Sending, Retrieve, Preferred storage and MMS Memory
status.
Page 26

26
7 Call history
Call history stores information about the missed, rejected, answered, or dialed calls. It
also adds the total duration of all calls. When the number of calls exceeds the
maximum, the latest call replaces the oldest.
There are two call history menus, SIM1 call history and UIM call history (SIM2 in case
of using SIM2). The following details for SIM1 call history which are almost same with
UIM call history.
All calls
1. In the standby mode, press Select Key to access the Main menu > Call
history > SIM1 call history;
2. All calls show the calls that you dialed, answered, rejected, or missed.
3. Go to All calls, Dialed calls, Answered calls, Missed calls, or Rejected calls,
select a call record, press <Options> to access the following options:
View: View the selected missed call details.
Call: Dial the number.
Send text message: Send text message to the selected number.
Send multimedia message: Send multimedia message to the selected
number.
Page 27

27
Save number: Save the number to Phone book.
Add to blacklist: Add the number to blacklist.
Edit before call: Edit the number before dial it.
Delete: Delete the selected record.
Delete all: Delete all records.
Calls durations: show the calls durations, calls cost, and GPRS counter.
Dialed calls
The dialed calls are previous calls you have dialed from your phone. Dialed calls have
the same options as the All calls.
Answered calls
The answered calls are calls that have been answered or rejected. Answered calls
have the same options as the All calls.
Missed calls
The missed calls are calls that have been missed or rejected. Missed calls have the
same options as the All calls.
Page 28

28
8 File Manager
Manage your file and folder in your phone and memory card using file manager. You
can create folders, rename, copy, move, and delete files and folders.
By using file manager, you can also send files via multimedia messages or Bluetooth.
You can also show the details of the selected file. There is an option for sorting files
and folders according to different criteria, such as Name, Type, Time, Size, or
Random.
Before opening your memory, you can open the options menu that gives you different
options: Open, Format* (to format your memory card), Rename, and Details.
* By formatting your memory card, all your files and folders inside the memory will be
lost.
Page 29
29
9 Multimedia
Music player
Your device includes a music player for listening to music files or other MP3 sound
files that you have saved to the device memory.
Music files stored in your memory card can be added to the music libraries of the
music player.
Play music files
In the standby mode, press Select Key to access the Main menu > Multimedia >
Music player. The details of the first track on the default track list are shown.
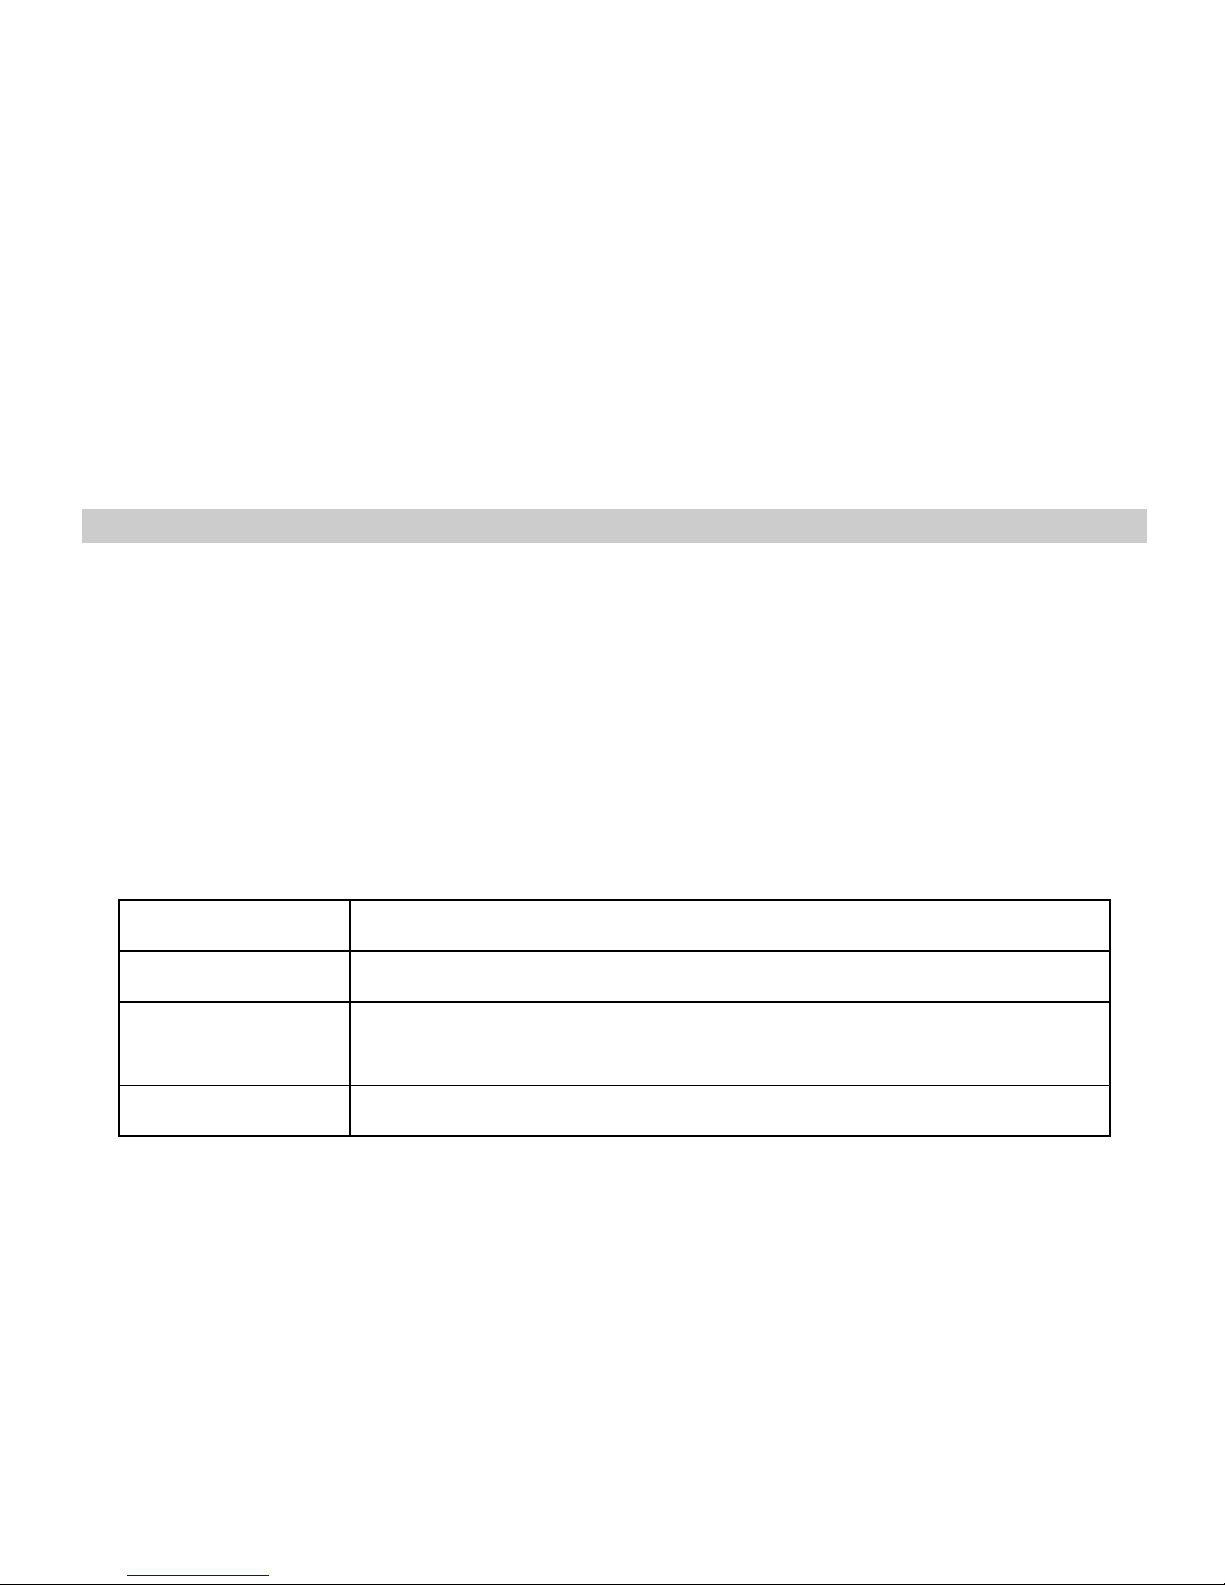
During playback, use the following keys:
Up key
Play, pause or resume playback.
Down key
Stop playing the file.
Left key
Return to the previous file. Move backward in a file when
held down.
Right key
Skip to the next file. Skip forward in a file when held down.
Page 30
30
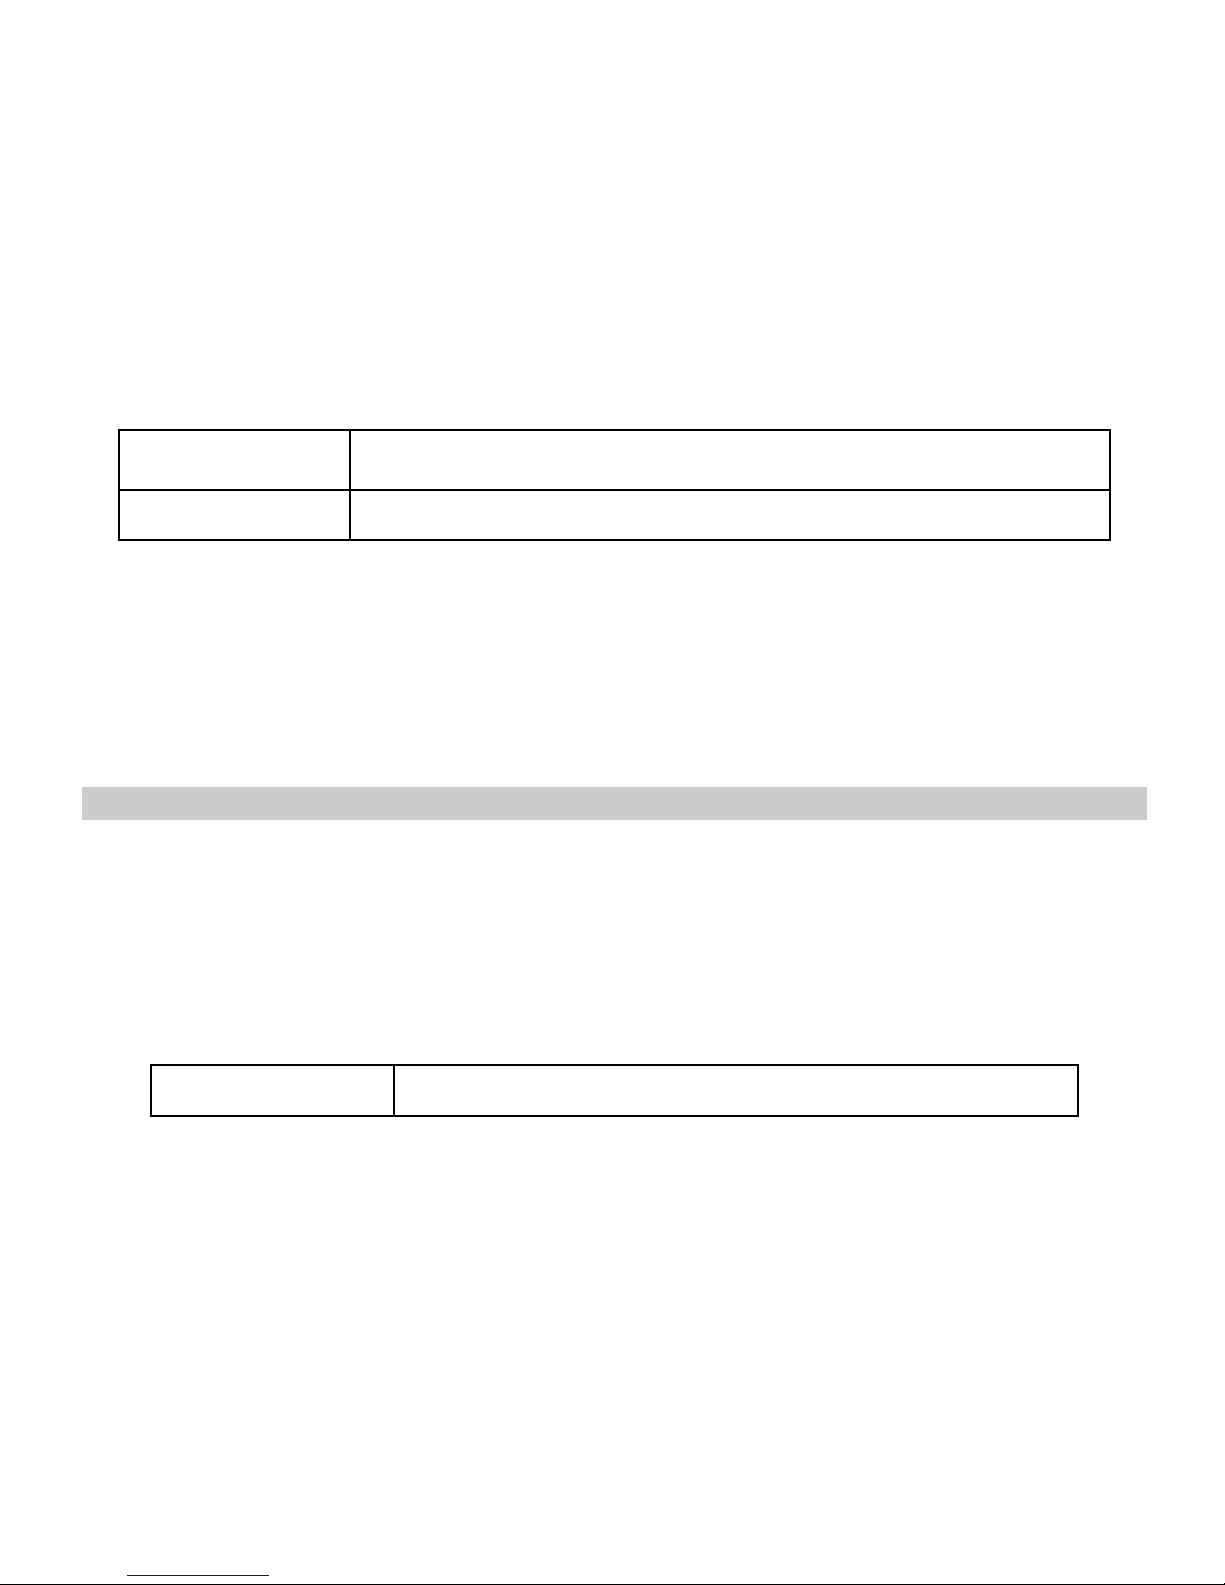
Select key
Default to track list
Side keys
To increase and decrease the volume level.
Music player list options
Play: Play selected track in the list.
Details: Display selected file details.
Add to ringtones: Add the selected file to the ringtones list.
Refresh list: to refresh the music player files list.
Settings: change the music player settings.
Video player
Your device includes a video player for playing video clips in MP4 or 3GP format.
Play the video clips
In the standby mode, press Select Key to access the Main menu > Multimedia >
Video player.
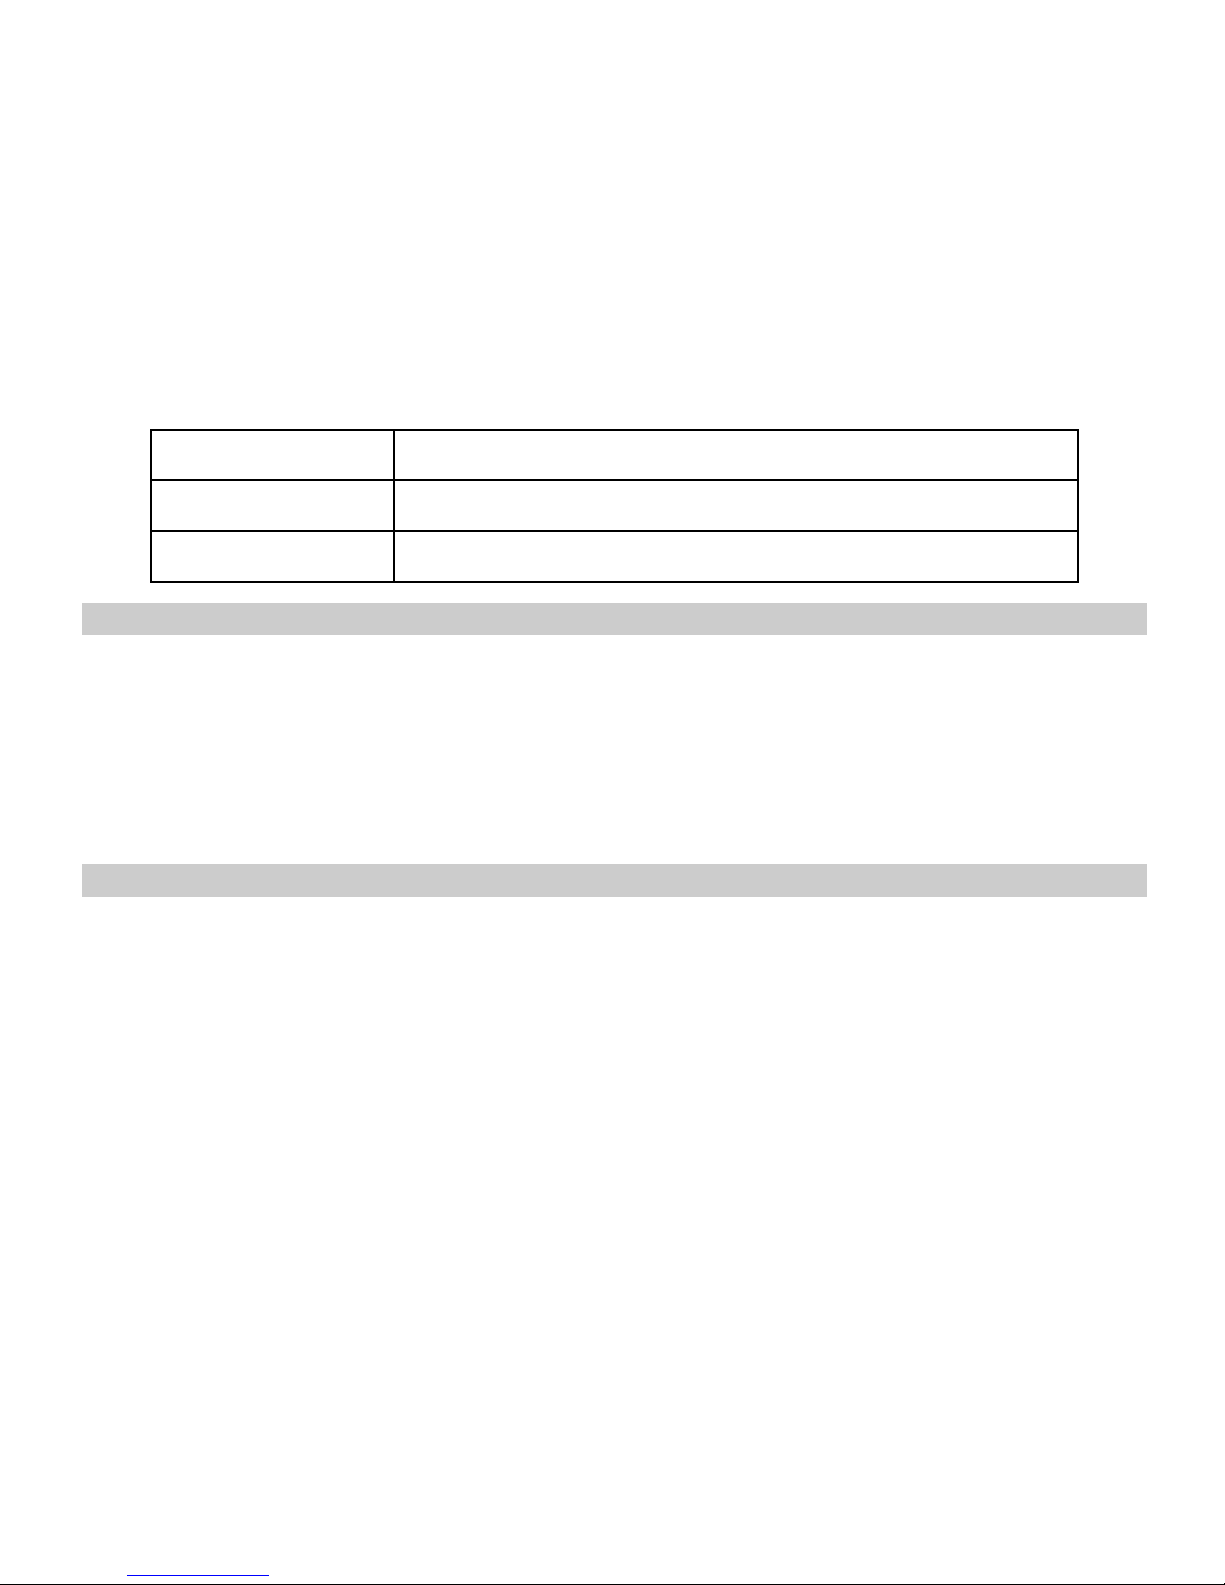
During playback, use the following keys:
Select key
Play, pause or resume playback.
Page 31
31
Left key
Fast backward.
Right key
Fast forward.
Side keys
To increase and decrease the volume level.
Image viewer
Use this menu to view images stored in your memory.
Viewing images
In the standby mode, press Select Key to access the Main menu > Multimedia >
Image viewer.
Use the 3 key to rotate the photo, use the keys 1 and 2 to zoom in/out the photo.
Voice recorder
Use this menu to record voice memos.
Record a voice memo
In the standby mode, press Select Key to access the Main menu > Multimedia >
Voice recorder.
Page 32

32
Radio
A compatible headset needs to be attached to the device for the FM radio to work
properly.
The quality of a radio broadcast depends on coverage of the radio station in that
particular area.
Play radio
In the standby mode, press Select Key to access the Main menu > Multimedia >
FM Radio > FM radio Receiver.
Radio options
Channel list: View the channels list.
Set frequency: Manually set the frequency of a known radio station.
Auto search: Search channels automatically.
Settings: Change the radio settings:
Background play: to play radio in background.
Load speaker: to play radio by the speaker.
Record: Record the running FM channel.
Append: select an audio file to add new extended part to the selected file.
File list: List the recording files in the memory card.
Page 33

33
10 Profiles
Profiles define how your phone reacts when you receive a call or message, and other
settings. Your phone has various setting groups of profiles, for which you can
customize the phone tones for different events and environments.
Activate a profile:
In the standby mode, press Select Key to access the Main menu > Profiles >
General, Meeting, Outdoor, Indoor, Headset, Bluetooth, or Power save >
Activate;
Customize a profile:
In the standby mode, press Select Key to access the Main menu > Profiles >
General, Meeting, Outdoor, Indoor, Headset, Bluetooth, or Power save >
Personalize and set the related options:
Ring tone: Use this menu to change the ring tone for Incoming call and SMS
for SIM1 and UIM, also Alarm and Scheduler individually.
Ring type, Ring method: Ring method: single, repeat, ascending
Ring type: ring only, vibrate only, vibrate and ring, vibrate then ring
Use this menu to change the ringing method for Incoming calls for SIM1 and
UIM.
Page 34

34
Volume: Use this menu to change the sound volume of Ring volume and
keypad key press volume. You can use the [Up/Down/Left/Right] navigation
keys to adjust the volume.
Other alerts: such as answering call notice, warning, error.
Page 35

35
11 Tools
This menu contains some organizing functions. In the standby mode, press Select
Key to access the Main menu > Tools to open the Tools menu.
Alarm
There are 5 alarms in your mobile phone. The functions and using methods of the 5
alarms are completely same. You can set to turn on/off respectively.
Set alarm
Select an alarm, enter the setting interface of this alarm, you can turn on/off this
alarm, and set the time of the alarm, at the same time, you can set this alarm in
detail.
Alarm snooze
According to the alarm settings, when the alarming time comes, there is alarm hint in
handset.
If the mobile phone is power off, when the time of alarm sound come, pop up the
power on confirmation interface, here, you can select power on or not.
Page 36

36
Calendar
Enter calendar interface, the current month calendar is displayed and the current date
has a frame around the number with special color. When you enter the settings to
change the date for your mobile phone, the calendar information on main screen is
changed accordingly.
View: view the tasks of today.
View all: view all the tasks.
Add event: add new event, you should select corresponding task type and
input the relative information first.
Delete event: delete an event(s), you can delete all, expired, or events of
specific period.
Jump to date: input the date need to be switched (in a valid period of time),
there will display the inputted date.
Go to today: Move the selection to today date.
To do list
This function is used for add and view task items.
Calculator
The calculator performs four operations as addition, subtraction, multiplication and
Page 37

37
division. Enter calculator interface, you can input numbers directly and press
navigation key to switch the operation which you need, then start calculation.
When the calculation of dividing 0 overflows, the result is larger than 999999999999
or less than -999999999999, the mobile phone will display the wrong hint “E”.
Schedule power on/off
After setting and activating this function, the mobile phone will be automatically
powered on/off at the corresponding setting time.
Page 38

38
12 Network Services
This menu contains the network services provided by your network operator. Press
Select Key to access the Main menu > Network services to open this menu.
Internet service
The mobile phone has WAP (Wireless Application Protocol) function, with which you
can browse websites through WAP service. You can normally use the WAP internet
service under the premise of correctly setting the network. This function is provided
by the network operator, Please contact your network operator or service provider.
Enter WAP browser there displays the following options:
Homepage: you can access the default website directly.
Bookmarks: bookmark is used to save the websites URLs that you are
interested in.
Input address: enter the website editing interface.
Recent Pages: look over the recent history that you have browsed.
Service inbox: stored the service message.
Settings: enter the Settings menu list and the following operations are
available:
Select SIM: set the SIM card for connect to GPRS.
Page 39

39
Profiles: you can activate or edit an account for the SIM card. You can
surf on the internet only when you set and activate correctly according to
local network.
Browser options: set relevant parameter of browser.
Clear cache: the pages that you have visited will be stored in the
cache of the mobile phone. Select the operation to erase the
temporary message in the cache. Please erase the temporary files
recording your internet surfing message.
Clear cookies: remove the browsed website message stored in the
cache of the mobile phone.
Clear auth. info: remove the authentication information.
Preferences: Set the preferred settings for your browser.
Service message settings: turn on/off receiving service message.
STK
This function is provided by the network operator. According to the services provided
by the SIM card, there will be different options appearing in this directory. The name
and content of the menu are based entirely on the services provided by the network
operator. For more information, please contact with the network operator.
Page 40

40
Note:
This function depends on whether the network operator provides this service and
whether you have ordered this service.
UTK
UTK function is similar to STK. UTK is provided by the CDMA network operator
through the UIM card. It depends also on the support of the service from the operator.
Page 41

41
13 Camera
Video recorder
Your mobile phone supports video recorder function by its 2MP camera, Press
Select Key to access the Main menu > Camera > Video Recorder.
Press Left soft key to access the following options:
Camcorder Settings: set related parameters for camcorder.
Video Settings: set video parameters.
White balance: set the white balance.
Effect Settings: set video effects.
Storage: set storage location.
Restore Default: restore default setting.
Shortcut key operation:
Press OK key to Start/Pause recording.
Press Left/Right key to adjust the focal distance.
Press Up/Down key or Volume keys to adjust EV.
Camera
Your mobile phone supports capturing photos by its 2MP camera, Press Select Key
Page 42

42
to access the Main menu > Camera > Camera.
Press Left soft key to access the following options:
Photos: go to the album.
Camera Settings: set related parameters for photo taking.
Image Settings: set photo’s size and quality.
White Balance: choose a light mode for photo taking.
Scene Mode: according to the environment to choose a mode
Effect Settings: choose screen style.
Storage: select storage location in phone or memory card.
Restore Default: restore default setting.
Shortcut key operation:
Press OK key to take a photo.
Press Up/Down key to adjust the focal distance.
Press Left/Right key to adjust EV.
Press 3 key to change image size.
Press 2 key to change image quality
Press 1 key to change Scene mode.
Page 43

43
Press 4 key to change white balance.
Press 6 key to change delay timer.
Press 7 key to change cont shot.
Press 8 key to change Effect setting.
Press # key to show/hide the icons.
Page 44

44
14 Entertainment
Beside the built-in games, your GARNET mobile phone provides you with the Java
runtime environment to enable you install and run variety of Java applications and
games, in addition to the pre-installed game in your phone. Press Select Key to
access the Main menu > Entertainment to open this menu.
Java: Show the Java applications installed. Select the application and press
Options > Launch to run it.
Java settings: Set the corresponding options of Java applications.
Java network: Select network profile of SIM1 or UIM.
Games: The mobile phone has built-in classic game(s), such as Push box. You
can set some functions before starting the game. Please refer to the game help
for more information.
Page 45

45
15 Connections
Bluetooth
Using the Bluetooth feature, you can connect the phone wirelessly to other Bluetooth
devices and exchange data with them.
Bluetooth technology allows free wireless connections between all
Bluetooth-compliant devices within a range of 10 meters.
In the standby mode, press Select Key to access the Main menu >
Connections > Bluetooth.
Status: turn on/off the Bluetooth function. When Bluetooth function is turned
off, all Bluetooth connection are ended, you cannot transmit and receive data
by using Bluetooth. Please turn off the Bluetooth function when your phone is
used for other operations, because Bluetooth connection will consume the
battery capacity.
Visibility: allow other Bluetooth devices to search for your phone.
Device list: If you have connected with some Bluetooth devices, it will show
the devices list, you can select search new device to search and pair with the
mobile phone.
Page 46

46
Search audio device: system will automatically search the hands-free device,
and then shows the results after searching.
My Name: assign a Bluetooth device name to your phone, which is then
displayed on other devices.
Advanced: set the Bluetooth functions of this mobile phone.
Audio Path: choose the sound source output when Bluetooth connected.
Sharing permission: set the sharing permission of files.
My address: show my address.
Remote control: phone can be connected with some BT device which can
control the phone remotely.
My services: show supported services by the Bluetooth.
Data accounts
In this menu, you will see a list of GSM-GPRS and CDMA Data accounts. Select one
account and you can edit the contents of Account name, APN, User name, Password
and Authentication type.
In the standby mode, press Select Key to access the Main menu >
Connections > Data accounts.
Page 47

47
16 Settings
The settings menu provides you with various setting options to customize the phone
to your preferences and needs. You can also reset the settings to their default status.
In the standby mode, press Select Key to access the Main menu >Settings to
open the Settings menu.
Phone setup
Language
Use this menu to select a language for the display text.
Time and date
Set time zone: modify the current city in which the mobile phone is located.
Set time/date: set the time and date of the mobile phone.
Set format: set the time and date format of the mobile phone.
Auto keypad lock
Use this menu to set the phone keypad to lock automatically after a preset time delay
when the phone is in the standby mode and no function of the phone is in progress.
Input methods
Enter the Preferred input methods list, there are many input methods to be selected.
Page 48

48
You can choose one as the default original input method for text editing.
Shortcuts
Use this menu to set some usually functions. The phone can set 8 shortcuts at most.
Press Option to go to the options for changing a shortcut or to change shortcuts
order.
Dedicated key
Enter the dedicated key interface; you can select the program for the dedicated
navigation key.
Smart dialing
By enabling this option, the phone will search for all the matching numbers in your
contacts list automatically when you input the number for dialing.
Display
Enter the Display characteristics list, you can set the Wallpaper, Screen saver, Show
date and time, etc.
LCD backlight
Enter the LCD backlight interface; you can set the Brightness and Time of the LCD
backlight respectively.
Page 49

49
Call settings
SIM1 call settings
Caller ID
This function is whether to allow the mobile number being displayed in the mobile
phone of the person being called or not. This function needs to be supported by the
network service provider.
Set by Network: Use the network default settings.
Hide ID: hide own number while calling (requires service provider’s support).
Send ID: show own number while calling.
Call waiting
Call waiting service notifies you of an incoming call while you are in a call. You can
accept or ignore the incoming call. In the call waiting menu, you can activate or
deactivate the function and can query status of the call waiting.
Call divert
This network service reroutes the incoming calls to a phone number that you specify.
The system will give appropriate setting tips.
When setting this function, you need to input the phone number to transfer incoming
calls correctly to the designated phone.
Page 50

50
Enter the call divert screen and following operations are available: All calls,
Unreachable, No answer, Busy, All data calls, Cancel all.
Call barring
This function needs network support. Please contact your network provider to open
this service. Network provider will provide the network password for you to activate
this service.
Line switching
Through this function, you can switch between Line 1 and Line 2.
Note:
The UIM call settings have the similar options of SIM1 call settings of call waiting and
call divert.
SIM2 call settings have the same steps of SIM call settings.
Common settings
Another four options common for both SIM1 and UIM; these options are auto redial,
call time display, call time reminder, and auto quick end.
Network settings
In network settings, you can select how your phone can search and select the
network.
Page 51

51
Network selection:
New search: re-search for the network according to the network searching mode set
in the mobile phone.
Select network: searching for network; you can select the network you need from
the network list.
Selection mode: you can select automatic or manual mode.
Dual settings
In this function you can select the mode for your mobile phone, such as: Dual SIM
active, Only one card active, Flight mode.
Security
SIM 1 security settings
SIM 1 lock
This function can prevent others from using your SIM card without your permission.
After the SIM card PIN code is activated, correct PIN code must be input every time
when the mobile phone is powered on; otherwise you can only make emergency call.
Note:
PIN code is the operating password and relative with the SIM card. The SIM
Page 52

52
card will be locked, if the PIN code is wrong for 3 consecutive times. At this
time, you need the PUK code to unlock the SIM card. The PUK code may be
provided for you together with the PIN code and the SIM card. If not, please
contact your network provider.
Fixed dial
After the function is activated, the mobile phone is only allowed to be used to dial the
telephone numbers existing in the list. To turn on the function, you need to input your
PIN2 code. Please consult your network service provider for specific situations.
Note:
When Fixed dial function is active, the function of SIM card will be restricted,
such as dial call, send SMS, and send MMS and so on.
Change PIN code
SIM 1 PIN: if the PIN is enabled, you can change the current PIN.
SIM 1 PIN2: the current PIN2 can be changed. You can make it through pressing
the system prompts.
Note:
UIM lock settings are similar to SIM1 lock settings, it includes only UIM lock and UIM
Page 53

53
PIN code change.
Phone lock
This function is to lock the phone and prevent other people from using the mobile
phone without permission (default password is 0000). After enable the phone lock,
you must input the correct security code every time powering on the mobile phone,
unless the mobile phone cannot be used normally.
Change security code
Phone security code: the current phone security code can be changed. You can
make it through pressing the system prompts.
Call firewall
Use this menu to block some numbers to call you.
In the Black list, you can add numbers to the list and then you can change the mode
to turn the black list on/off.
Privacy protection
In this menu, you can protect your phone book, messages, and call history. Enabling
Privacy protection for any of the above items will prevent other people from opening
these items.
Page 54

54
Restore factory settings
Enter the restore factory settings menu list interface, select anyone, the mobile
phone will prompt you to input security code (default code is 0000). You can carry on
corresponding operation after inputting the correct code.
After running the Restore factory settings, the environment setup (e.g. user profile)
restore to factory default setting.
Page 55

55
17 Other Functions
Mass Storage Function
Your GARNET mobile phone supports Mass Storage function, if the memory card is
inserted. Connect the mobile phone and PC with the attached USB cable, then the
mobile phone becomes a mass storage. If you connect USB cable to PC under the
power on status, you will get an options menu by which you can select Mass
Storage to enable USB mass storage function or select Back to maintain the power
on status, and charging the mobile phone.
Webcam Function
In power on status, connect the phone to PC through USB cable and select Webcam,
the Webcam function is activated, you can do the video chat with other people using
your phone camera through the PC.
Requirements on PC configuration for use of webcam function:
The PC’s operation system is or newer than Windows XP SP2.
The tools for video chat need to be installed.
Page 56

56
18 Maintenance Guideline
Welcome to using GARNET DM-976 from Brava. If there is any problem while
using your mobile phone, please contact the nearest Brava customer service
center to you, try to check Brave website for more details, or submit your
problem through Brava website. If your mobile phone is in need of repair, you
can take your mobile phone to the local Brava service center, if there is no local
service center, please pass your phone and the purchasing invoice to the local
authorized vendor by Brava.
Page 57

57
19 Safety Information
Electronic Device
Most modern electronic equipments are shielded from radio frequency (RF)
signals. However, certain electronic equipment maybe is not shielded against the
RF signals from your Mobile Phone. Consult the manufacturer to discuss
alternatives.
Hospital
Do not take your phone into the operating room (OR), intensive care unit (ICU), or
coronary care unit (CCU).
Do not use your phone at places for medical treatment where it is prohibited to
use mobile phones.
When you use your phone near someone who is suffering from a heart disease,
turn down the ring tone volume or turn Vibrate mode on, so that it does not
influence the person.
Storage Environment
Switch off your phone when you are in any area with a potentially explosive
Page 58

58
atmosphere, and obey all signs and instructions. Sparks in such areas could cause
an explosion or fire resulting in bodily injury or even death.
Users are advised to switch off the phone at a refueling point (service station).
Users need to observe restrictions on the use of radio equipment in fuel depots
(fuel storage and distribution areas), chemical plants, or where blasting
operations are in progress.
Areas with a potentially explosive atmosphere are often (but not always) marked
clearly. They include the areas below decks on boats, chemical transfer or storage
facilities, vehicles using liquefied petroleum gas, such as propane or butane, areas
where the air contains chemicals or particles, such as grain, dust or metal powders,
and any other area where you would be advised to turn off your vehicle engine.
Children Safety
Put your phone, battery, and charger in places beyond the reach of children. Do
not allow children to use the phone, battery, or charger without guidance.
Do not allow children to put the battery in mouth, the electrolyte in the battery is
poisonous.
Do not allow children to touch the small fittings. Otherwise, suffocation or gullet
jam can be caused if children swallow the small fittings.
Operating Environment
Page 59

59
Remember to follow any special regulations in force applied in the area you are in,
and always switch off your phone whenever it is forbidden to use it, or when it
may cause interference or danger. When connecting the phone or any accessory
to another device, read its user’s guide for detailed safety instructions. Do not
connect incompatible products.
Like with other mobile radio transmitting equipment, users are recommended to
use the equipment in the normal operating position (held to your ear with the
antenna pointing over your shoulder).This advice for the satisfactory operation of
the equipment and for the safety of personnel.
Battery
Never use a charger or battery that is damaged in any way.
Use the battery only for its intended purpose.
If you use the phone near the network’s base station, it uses less power. Talk and
standby time are greatly affected by the signal strength on the cellular network
and the parameters set by the network operator.
Your device is powered by a rechargeable battery. The full performance of a new
battery is achieved only after two or three complete charge and discharge cycles.
Battery charging time depends on the remaining battery charge, the type of
battery, and the charger used. The battery can be charged and discharged
Page 60

60
hundreds of times, but it will gradually wear out. When the operation time is
noticeably shorter than normal, it is time to buy a new battery.
If the battery left unused, a fully charged battery will discharge itself over time.
Extreme temperatures will affect the charging capacity of your battery.
Do not leave the battery in hot or cold places because the capacity and lifetime of
the battery will be reduced. Try to keep the battery at room temperature. A phone
with a hot or cold battery may not work temporarily, even when the battery is fully
charged. Li-ion batteries are particularly affected by temperatures below 0°C
(32°F).
Use only approved batteries and chargers. Disconnect the charger from the power
source when it is not in use. Do not leave the battery connected to a charger for
more than a week, since overcharging may shorten its life.
 Loading...