

Page 1
i
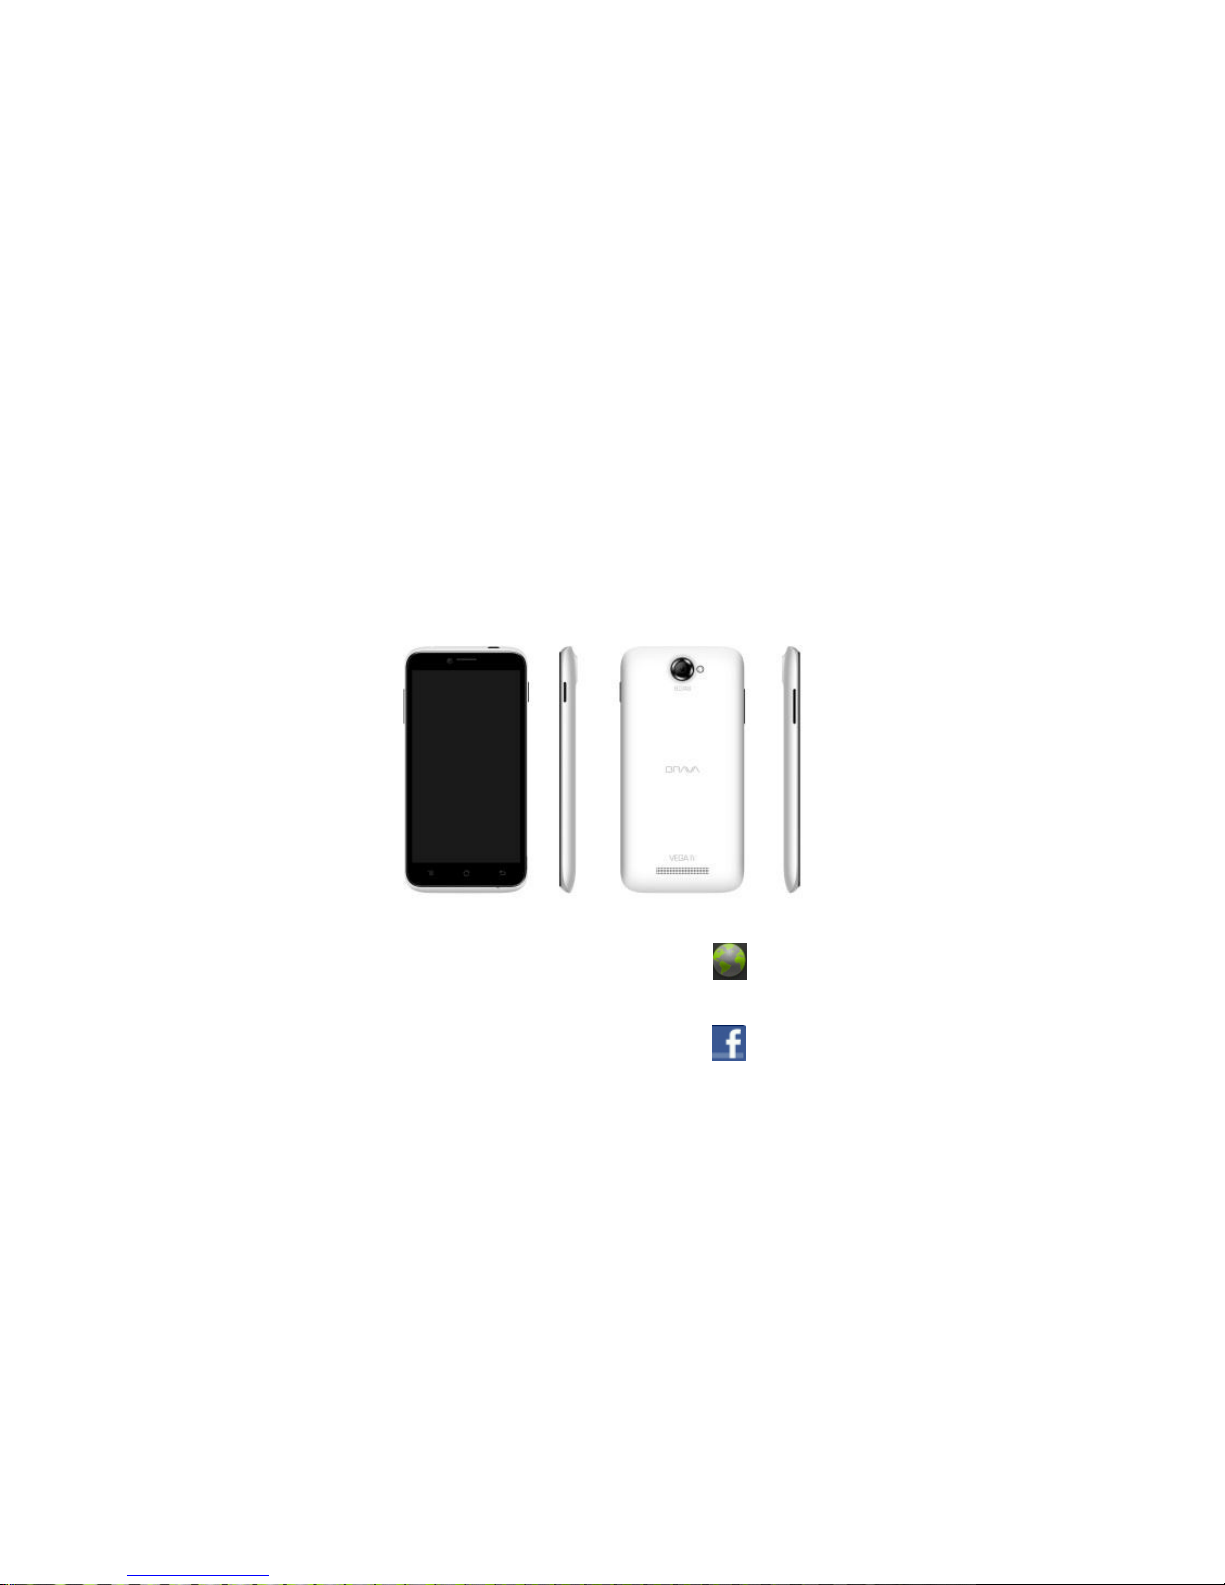
VEGA IV DM-994 from Brava
User Manual
www.bravatechno.com
www.facebook.com/brava.mobiles
Page 2

ii
INTRODUCTION
Thank you for choosing the VEGA IV DM-994, the Dual Mode Android smart phone from Brava. This
smartphone is running on Android OS 4.1.2 (Jelly Bean). If you’d like your phone to live a long and
fruitful life, please read this guide carefully and keep it for future reference. You never know when you
might need it.
Android 4.1.2 (Jelly Bean) is the Operating System for your Touch Screen Smartphone
And don’t worry if the pictures we use to demonstrate your phone’s functions look a little different
from what you see on its screen. It’s the functions that matter.
Copyright©2013 Brava Techno Corporation Ltd.
All Rights Reserved
No part of this manual is allowed to be reproduced or forwarded in any form or by any means without
prior written consent of Brava.
Page 3

iii
Table of Contents
1 Safety ................................................................................................................................................. 1
Safety Precautions .................................................................................................................................. 1
Using your phone safely ......................................................................................................................... 1
2 Basics ................................................................................................................................................. 5
Inside the box .......................................................................................................................................... 5
Product Overview .................................................................................................................................... 5
Before turning on your phone ................................................................................................................ 12
3 Getting started ................................................................................................................................ 16
Turning on your phone ............................................................................................................................ 16
Turning off your phone ............................................................................................................................ 16
Preinstalled widgets and applications ................................................................................................... 16
Home ......................................................................................................................................... 19
Phone status and notifications ............................................................................................................... 21
Personalize your phone .......................................................................................................................... 25
Copying files to and from the Storage card .......................................................................................... 28
4 Phone calls ........................................................................................................................................ 29
Making Calls ............................................................................................................................................ 29
Received Calls ......................................................................................................................................... 31
During Call options .................................................................................................................................. 32
Call Log (History)..................................................................................................................................... 33
Favorites .................................................................................................................................................. 33
5 Contacts ............................................................................................................................................. 34
Managing your Contacts ........................................................................................................................ 35
Page 4

iv
6 Text Input and keyboard ............................................................................................................. 37
Using the onscreen keyboard ................................................................................................................ 37
Changing the onscreen keyboard layout .............................................................................................. 37
7 Messages ........................................................................................................................................... 38
Sending text and multimedia messages ............................................................................................... 38
Setting text and multimedia message options ..................................................................................... 41
8 Emails and Accounts ...................................................................................................................... 44
Email Setup.............................................................................................................................................. 44
Delete Email Account .............................................................................................................................. 45
Read Email messages ............................................................................................................................ 45
Send Email messages ............................................................................................................................ 46
Gmail Setup ............................................................................................................................................. 46
9 Internet ............................................................................................................................................. 47
10 Tools ................................................................................................................................................... 52
11 Camera ............................................................................................................................................... 54
12 Gallery ................................................................................................................................................ 57
Viewing photos and videos .................................................................................................................... 57
Watching video ........................................................................................................................................ 57
13 Music .................................................................................................................................................. 58
Access and play music ........................................................................................................................... 58
Add songs to new play list ...................................................................................................................... 58
Delete play lists ....................................................................................................................................... 59
14 Maps and location .......................................................................................................................... 60
Using Google Maps ................................................................................................................................ 60
15 Wireless communication .............................................................................................................. 62
Page 5

v
Wi-Fi Connection ..................................................................................................................................... 62
Bluetooth® ............................................................................................................................................... 65
FM Radio .................................................................................................................................................. 66
16 Settings .............................................................................................................................................. 67
Dual SIM Settings ................................................................................................................................... 73
Wireless & networks ............................................................................................................................... 69
Call Settings ............................................................................................................................................. 73
Sound ......................................................................................................................................... 74
Display ......................................................................................................................................... 75
Location & security .................................................................................................................................. 77
Applications.............................................................................................................................................. Error!
Bookmark not defined.
Accounts & sync ...................................................................................................................................... 80
Privacy ......................................................................................................................................... 83
Storage ................................................................................................................................................... Error!
Bookmark not defined.
Language & keyboard............................................................................................................................. Error!
Bookmark not defined.
Accessibility ............................................................................................................................................. 84
Date & time .............................................................................................................................................. Error!
Bookmark not defined.
About phone ............................................................................................................................................ 88
17 Maintenance Guideline ................................................................................................................. 90
Page 6
1
1
1
SSaaffeettyy
Safety Precautions
Please read through the following briefings carefully, and act in accordance with these rules, so
as to prevent causing any danger or violating any law.
Your mobile phone model has been designed to compile with applicable safety requirements for
exposure to radio waves. The radio wave exposure guidelines employ a unit of measurement
called Specific Absorption Rate (SAR). The recommended SAR limit for mobile handset is 1.6
W/Kg averaged over a 6 minutes period and taken over a volume containing a mass 1g of
human tissue.
The highest SAR value for this mobile phone model is 1.150w/kg averaged over a 6 minutes
period and taken over a volume containing a mass 1g of human tissue.
Use cell phone when the signal strength is good.
If you are using a Bluetooth headset device, please make sure it has a low power emitter.
Using your phone safely
On The Road
Using a phone while driving is illegal in many countries. Please follow local laws and drive safely at all
times.
Page 7

2
Near Sensitive Electronics
Don’t use your phone near sensitive electronic equipment – particularly medical devices such as
pacemakers – as it could cause them to malfunction. It can also interfere with the operation of fire
detectors and other automatic-control equipment.
For more information about how your phone affects pacemakers or other electronic equipment,
please contact the manufacturer or your local distributor.
Your phone may cause interference when used near TVs, radios or automated office equipment.
While Flying
Your phone can cause interference with aircraft equipment. So it’s essential you follow airline
regulations. And if airline personnel ask you to switch off your phone, or disable its wireless
functions, please do as they say.
In Hospital
Your phone may interfere with the normal operation of medical equipment. Follow all hospital
regulations and turn it off when you’re asked to by posted warnings or medical staff.
At a Petrol Station
Page 8

3
Don’t use your phone at petrol stations. In fact, it’s always best to switch off whenever you’re near
fuels, chemicals or explosives.
Around Water
Keep your phone away from water (or any other liquid). It’s not a waterproof model.
Making Repairs
Never take your phone apart. Please leave that to the professionals. Unauthorized repairs could break
the terms of your warranty.
Broken Antenna
Don’t use your phone if the antenna is damaged, as it could cause injury.
Around Children
Keep your mobile out of children’s reach. It should never be used as a toy and it might not be good
for their health.
Original Accessories
Page 9
4
Only use the original accessories supplied with your phone or those approved by the manufacturer.
Using unapproved accessories may affect performance, make the warranty void, break national
regulations on the use of mobile phones, or even cause injury.
Near Explosives
Turn off your phone in or near areas where explosive materials are used. Always obey local laws and
turn off your phone when requested.
Emergency Calls
To make an emergency call your phone must be turned on and in an area where there’s network
coverage. Dial the national emergency number and press ‘send’. Explain exactly where you are and
don’t hang up until help has arrived.
Working Temperature
The working temperature for the phone is between 0 Degree and 40 Degree Celsius. Please don’t use
the phone outside the range. Using the phone under too high or too low temperature might cause
problems.
At very high volume, prolonged listening to a mobile phone can damage your hearing.
Page 10

5
2
2
BBaassiiccss
Inside the box
You will find the following inside the box:
Phone
USB cable
Battery
AC Charger
3.5mm cord headset
User manual and running guide
Warranty card
Product Overview
This section provides an overview of the smart phone, including the locations of the connectors and
controls and phone specifications.
Page 11
6
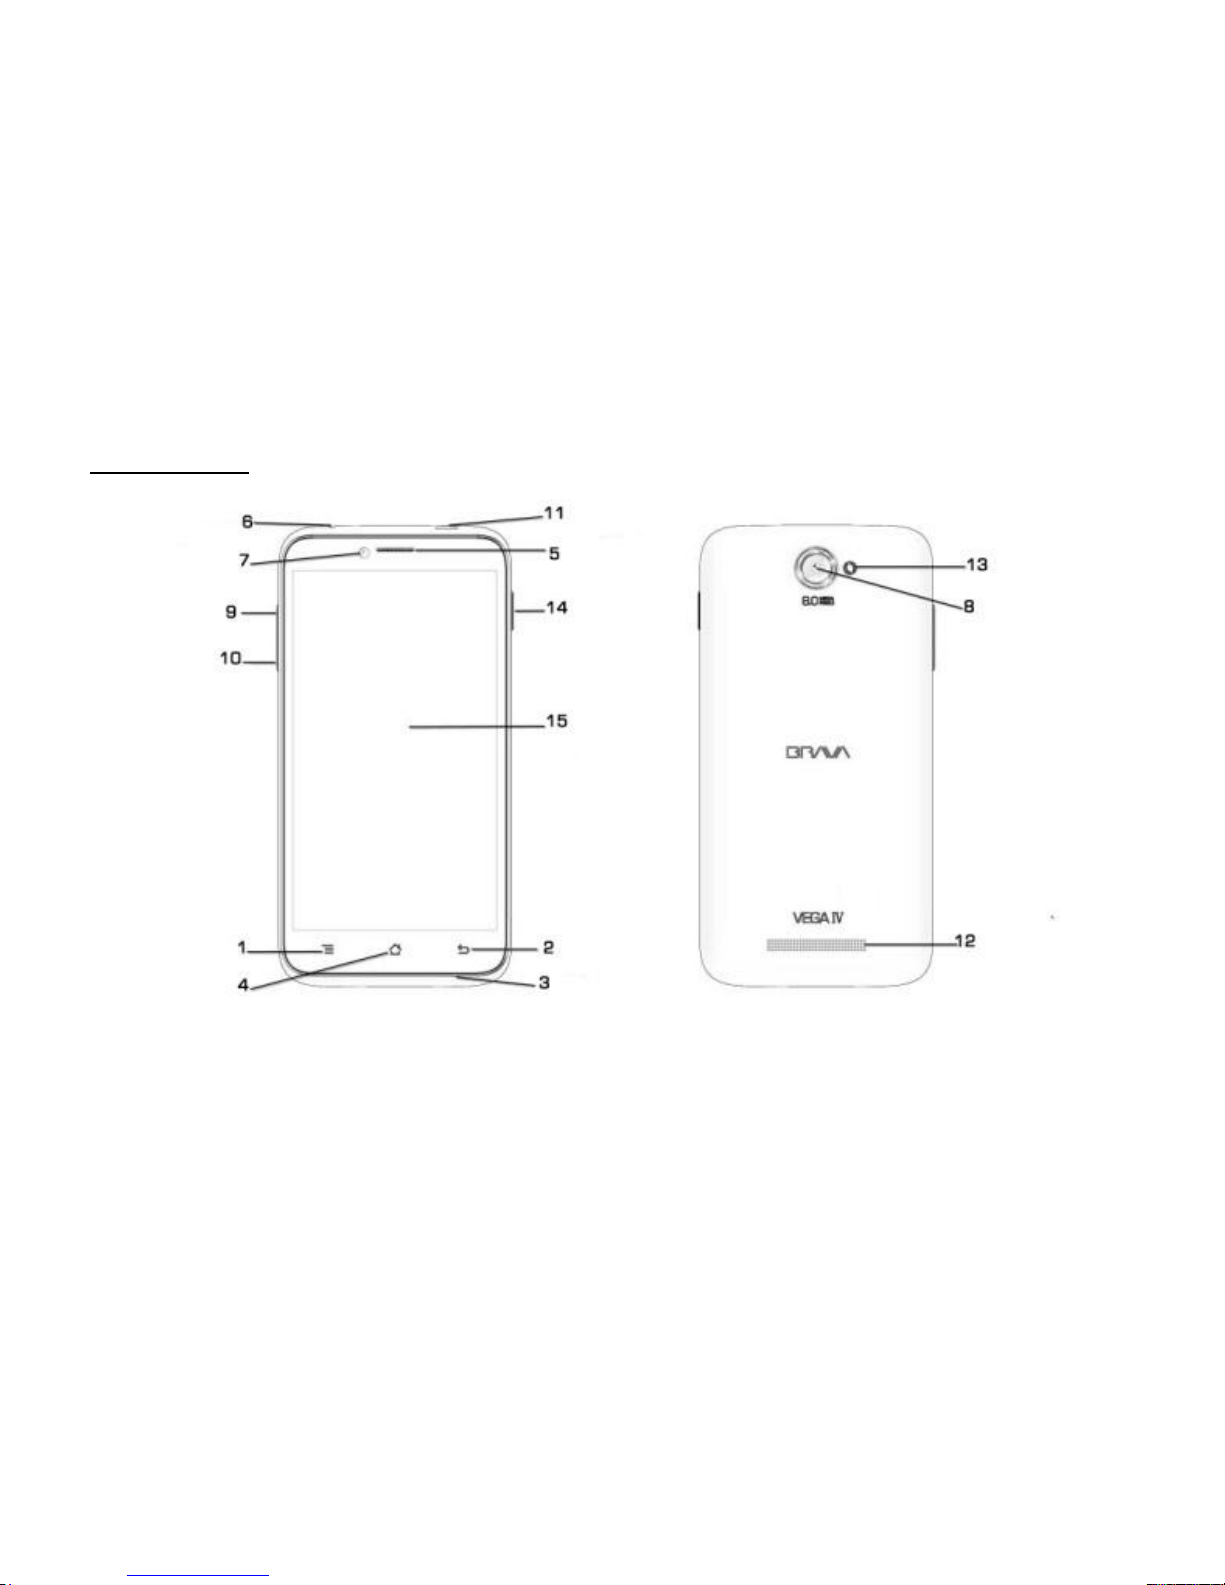
Phone Layout
Page 12

7
1
MENU
9
Volume up
2
BACK (Return)
10
Volume down
3
Microphone
11
Micro-USB port
4
HOME
12
Speaker
5
Receiver
13
Flash light
6
3.5mm headset jack
14
Power button
7
Front-facing camera
15
Multi-touch screen
8
5 megapixel AF camera
16
1
MENU
Press to open a list of actions that you can do on the current screen.
2
BACK button
(Return)
Press to go back to the previous screen, or to close a dialog box, options
menu, the Notifications Panel, or onscreen keyboard.
3
Microphone
The built-in microphone captures sound and voice when it is used with
an application capable of handling audio.
Page 13

8
4
HOME
While on any application or screen, press to return to the Home
screen.
Press and hold to open the recently-used applications window.
5
Receiver
Listen to incoming call
6
3.5mm jack
Connect headphones to the connector to listen to sound from the phone
or connect a microphone to record audio or make calls. You can also
connect a headset with an integrated microphone that uses a combined
audio/microphone connector.
7
Front-facing
camera
Your phone has a VGA front-facing camera, which you can use to take
pictures, create videos, or make video calls in collaboration with Web
applications.
8
5MP main
camera
Your phone has a 5-megapixel rear-main camera with auto focus
function, which you can use to take pictures and create videos.
9
Volume UP
While on a call, press to increase earpiece volume.
While not on a call, press to increase the ringer volume.
While watching videos or listening to the FM radio, press to increase the
volume.
10
Volume Down
While on a call, press to decrease earpiece volume.
While not on a call, press to decrease the ringer volume.
While watching videos or listening to the FM radio, press to decrease the
volume.
Page 14

9
11
Micro USB
connector
Use the supplied USB cable to connect a personal computer to the micro
USB connector for data transfer.
You also can use the supplied USB cable and the AC charger to charge
the phone when the battery power is low.
12
Speaker
Speaker for incoming call, music, and others.
13
LED flashlight
Flash light is used for camera photos capturing, you can use the LED
flash light as an electric torch.
14
Power button
When the phone is off, press to turn on the phone.
When the phone is on and the screen is unlocked, press to turn the
phone display off or on.
Press and hold power button to open the phone options menu that lets
you turn off the phone, switch your phone to silent mode, vibration
mode, or airplane mode.
15
Multitouch
screen
Touch the screen to use the controls on the screen including buttons,
menu items, and the onscreen keyboard.
Page 15

10
Phone Specifications
Processor
Qualcomm Snapdragon MSM8625 Quad Core 1.2GHz
Operating system
Android 4.1.2 Jelly bean
Memory
RAM 1GBB/ ROM 4GB (2GB System memory/ 2GB Internal storage)
Display
Size: 5.0-inches
Screen resolution: 540x960 Pixels IPS LCD
Automatic brightness control
Capacitive Multitouch technology
Integrated cameras
Main Rear camera; 8.0 Megapixel Auto Focus with flash LED
Front-facing camera; VGA camera
Connectors
One micro USB connector
SIM card slot
UIM card slot
Page 16

11
Micro SD card slot
3.5mm headset jack
Wireless features
GSM GPRS/EDGE
CDMA-1X/EVDO Rev. A
Wireless LAN
Wi-Fi hotspot/ USB tethering/VPN
Bluetooth 4.0 with BLE technology
FM radio
Size
144x73x9.9mm
Battery
2000 mAh Li-ion battery
Page 17
12
Before turning on your phone
Installing the SIM/UIM cards
Your Subscriber/Universal Identity Module (SIM/UIM) card identifies you to the wireless network.
Your phone will not work without the SIM/UIM card.
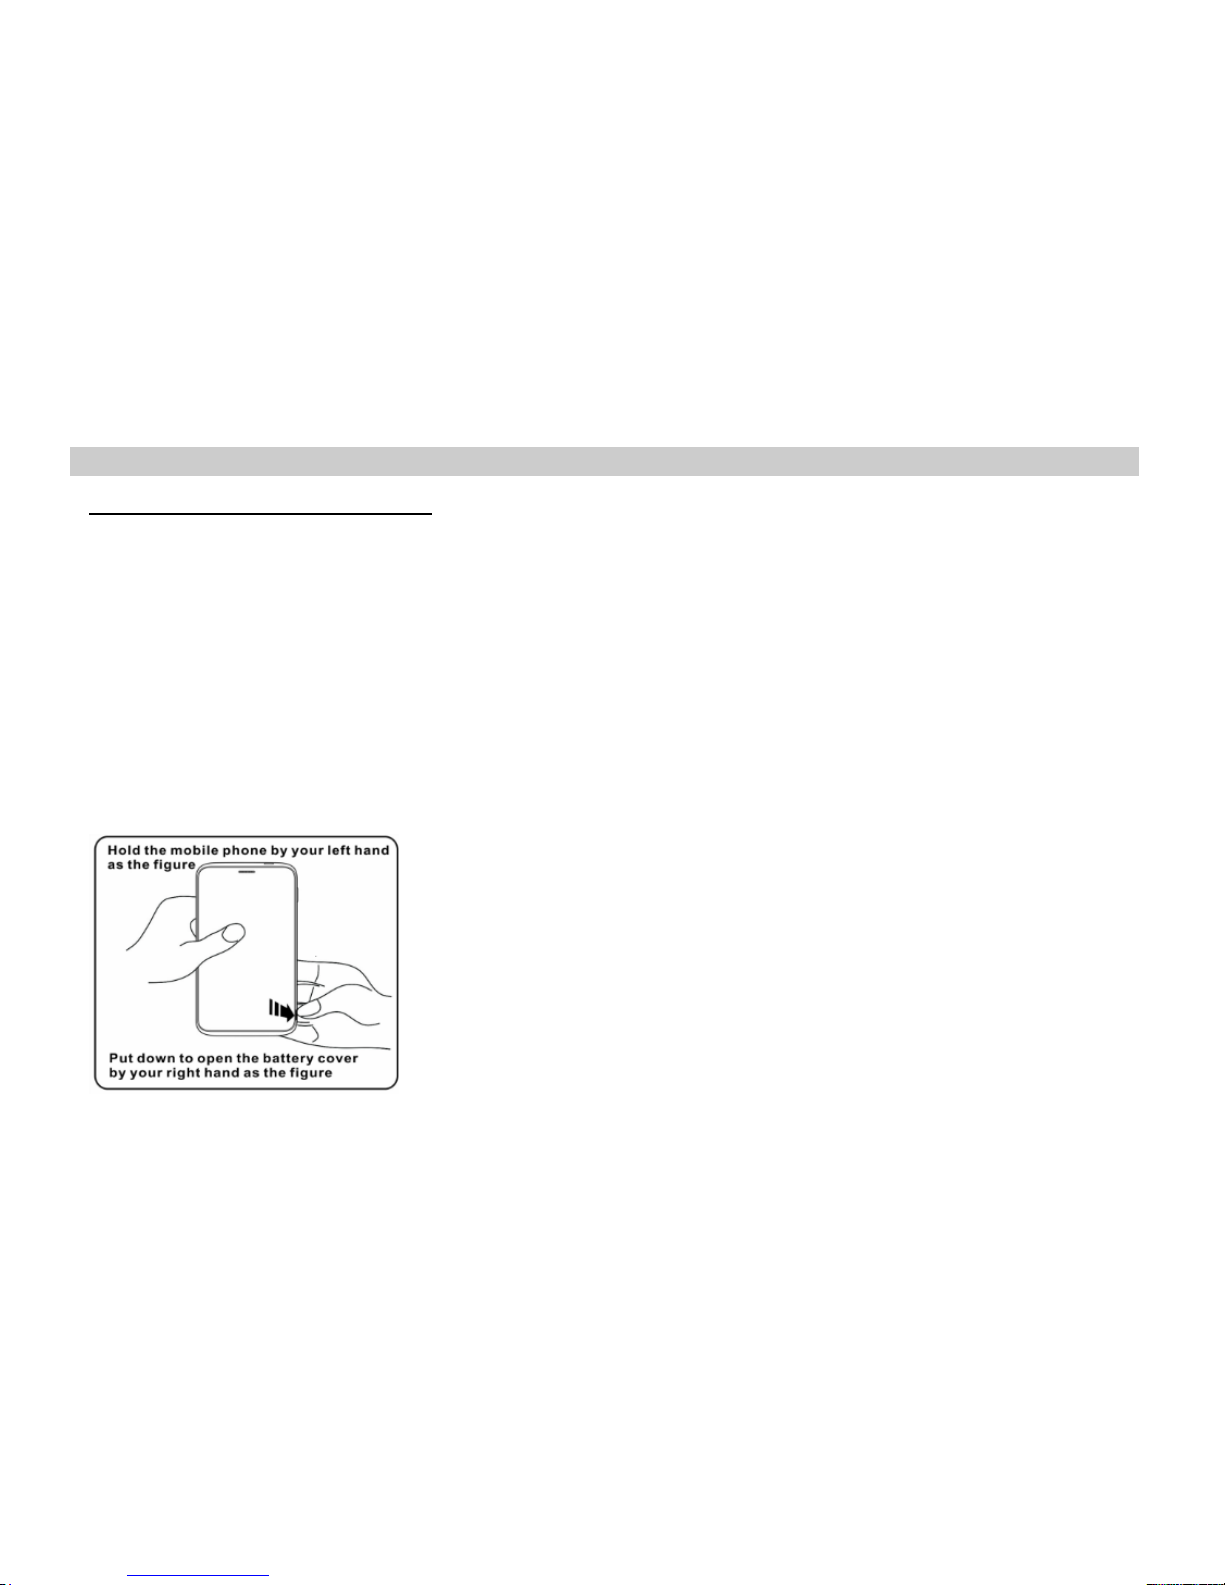
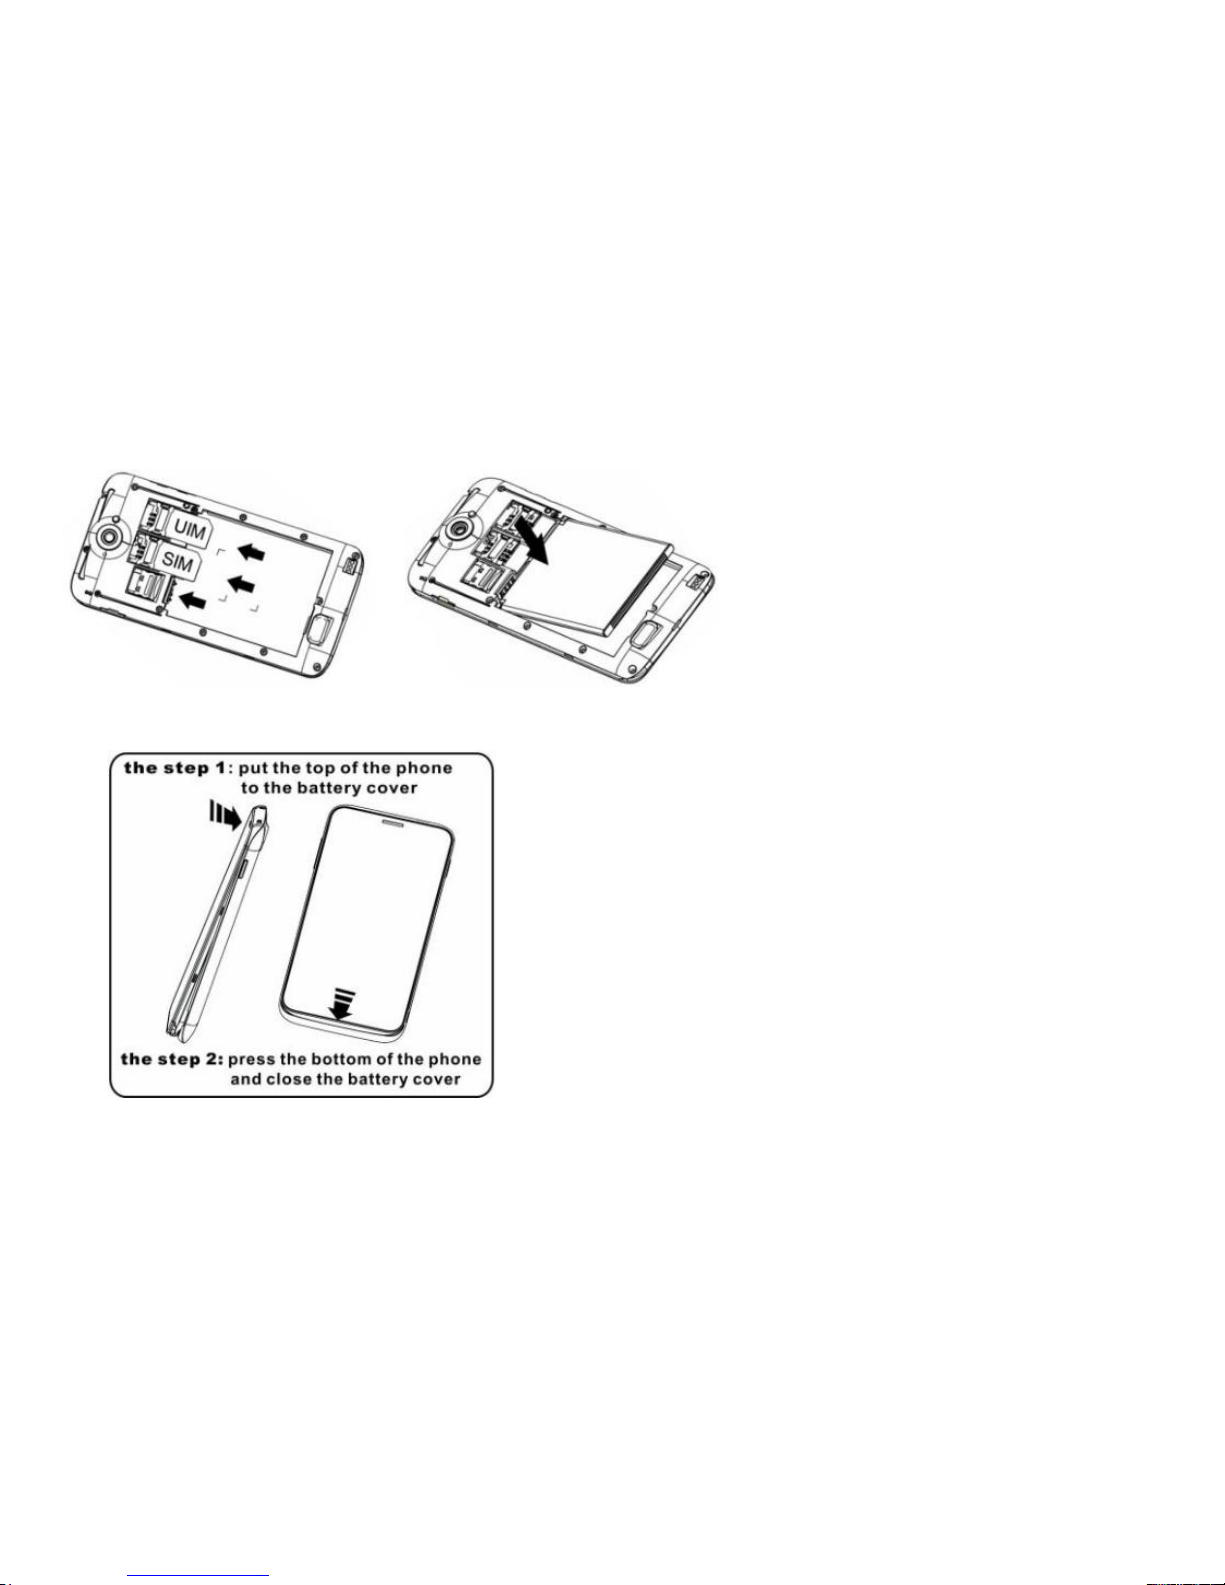
To install a SIM/UIM card, do the following:
1. Open the battery cover on the back of your phone.
2. Detach your SIM/UIM card.
3. Lift the battery up and out of your phone.
4. Insert the GSM Card to SIM slot and CDMA Card to UIM slot aligning the metal contactors in
the phone.
5. Reinstall the back cover
Page 18
13
Page 19

14
Battery
Your phone comes with a rechargeable Lithium-ion battery and is designed to use only manufacturerspecified original batteries and accessories. Battery performance depends on many factors, including
network configuration, signal strength, the temperature of the environment in which you operate
your phone, the features and/or settings you select and use, items attached to connecting ports, and
your voice, data, and other program usage patterns.
Installing the battery
1. Open the battery cover on the back of your phone.
2. Align the battery's contact points with those of the phone and gently press the battery down
into place.
3. Replace the battery cover clicking it back into position.
Removing the battery
1. Switch off your phone (Press and hold power button for a few seconds then choose Power
off).
2. Open the battery cover.
3. Lift the battery up and out of your phone.
4. Replace the battery cover.
Charging the battery
Page 20

15
1. Connect the charger to your phone, and plug it into a socket.
2. The battery indicator in the corner of the screen will scroll to show you it’s charging.
3. When fully charged, the battery indicator will stop scrolling.
4. Disconnect the charger from your mobile, and unplug it.
Memory Card
Store your documents, pictures, music, and applications in the microSD card.
Inserting the Storage card
1. Remove the back cover.
2. Insert the Micro-SD card into the slot with its gold contacts facing down and push it into its
place.
3. Replace the battery cover
Removing the Memory Card
card.
1. Open the battery cover.
2. Lift the memory card up and out of your phone.
3. Replace the battery cover.
Page 21
16
3
3
GGeettttiinngg ssttaarrtteedd
This section helps you quickly start using your phone and provides you with information about the
Preinstalled widgets and applications.
Turning on your phone
Once you’ve installed your battery, you can turn on your phone and start using it. To turn on your
phone Press the POWER button .
Turning off your phone
If you do not need to use your phone, you can turn the power off to save battery life.
If the display is off, press the POWER button to turn the display back on.
Unlock your phone if the Lock screen is displayed.
Press and hold the POWER button for a few seconds.
When the Phone options menu appears, tap Power off.
Preinstalled widgets and applications
This topic provides an overall introduction to the widgets and applications that may preinstalled on
your phone.
Page 22
17
Widgets:
A widget is a small application window that you can place on a Home screen to provide quick and
easy access to information, an application or a function.
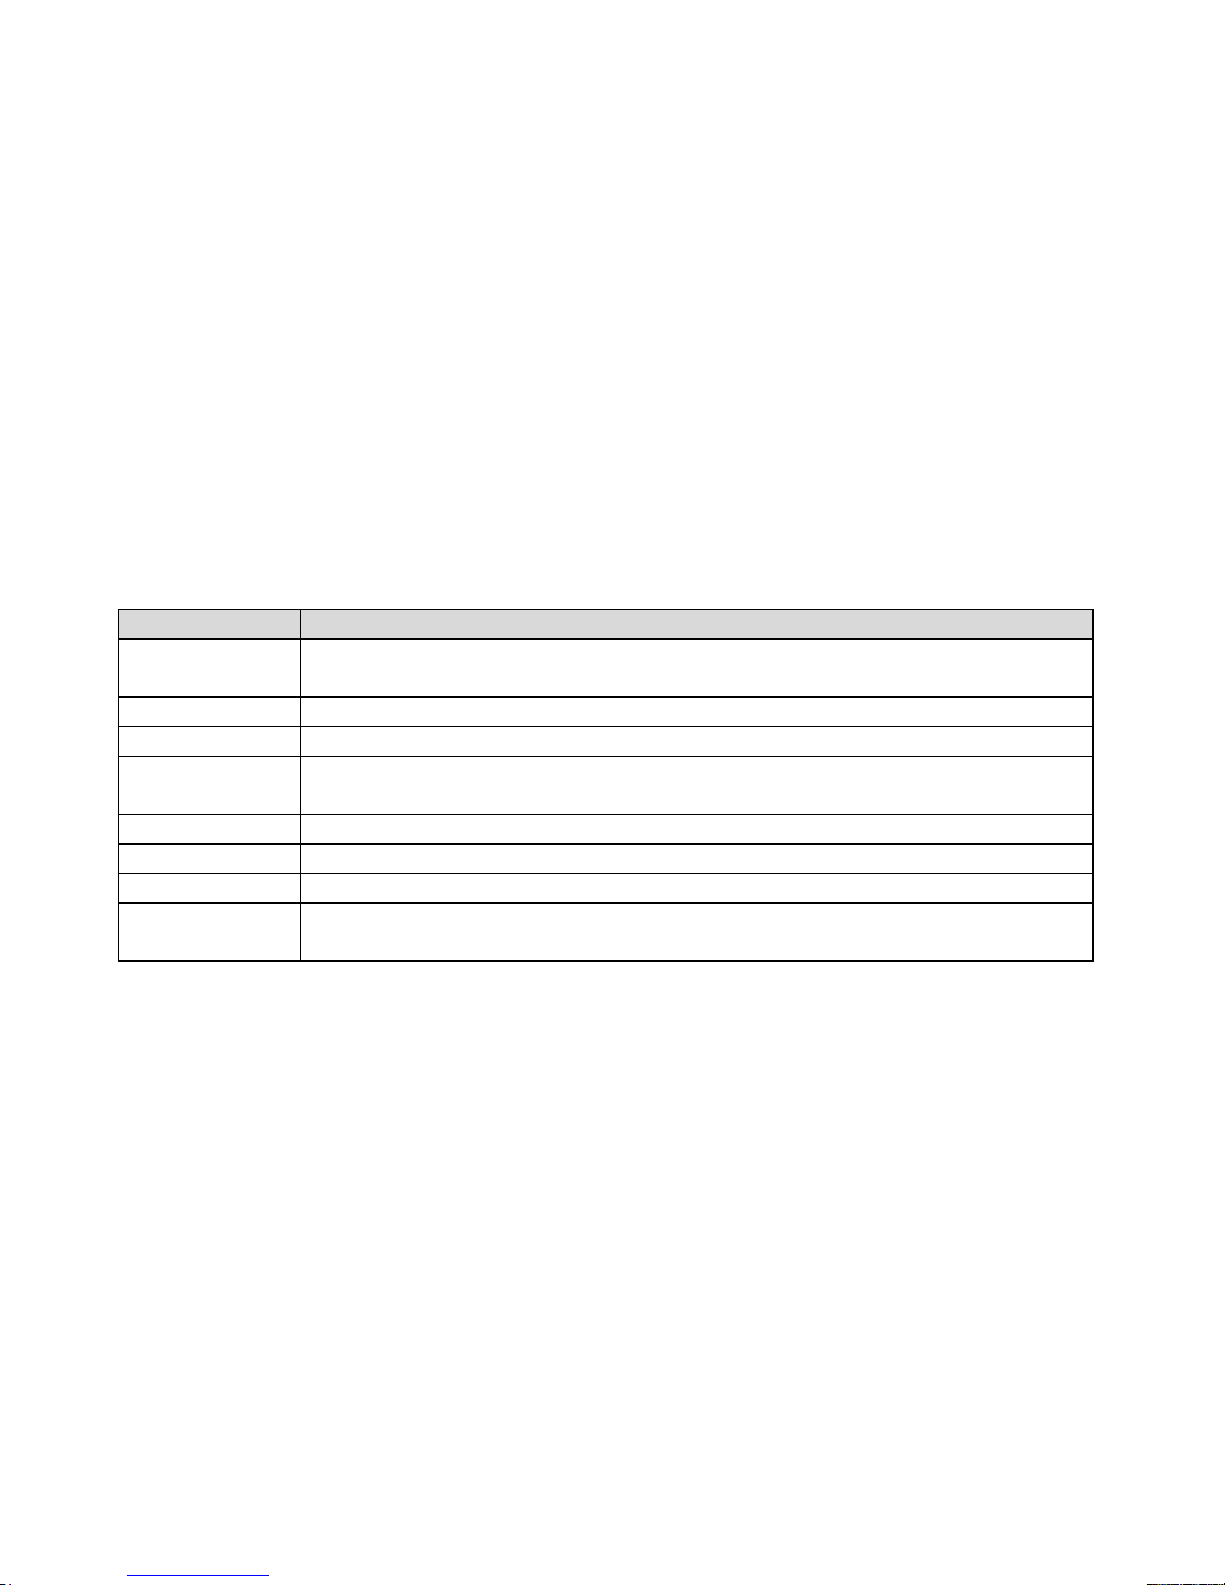
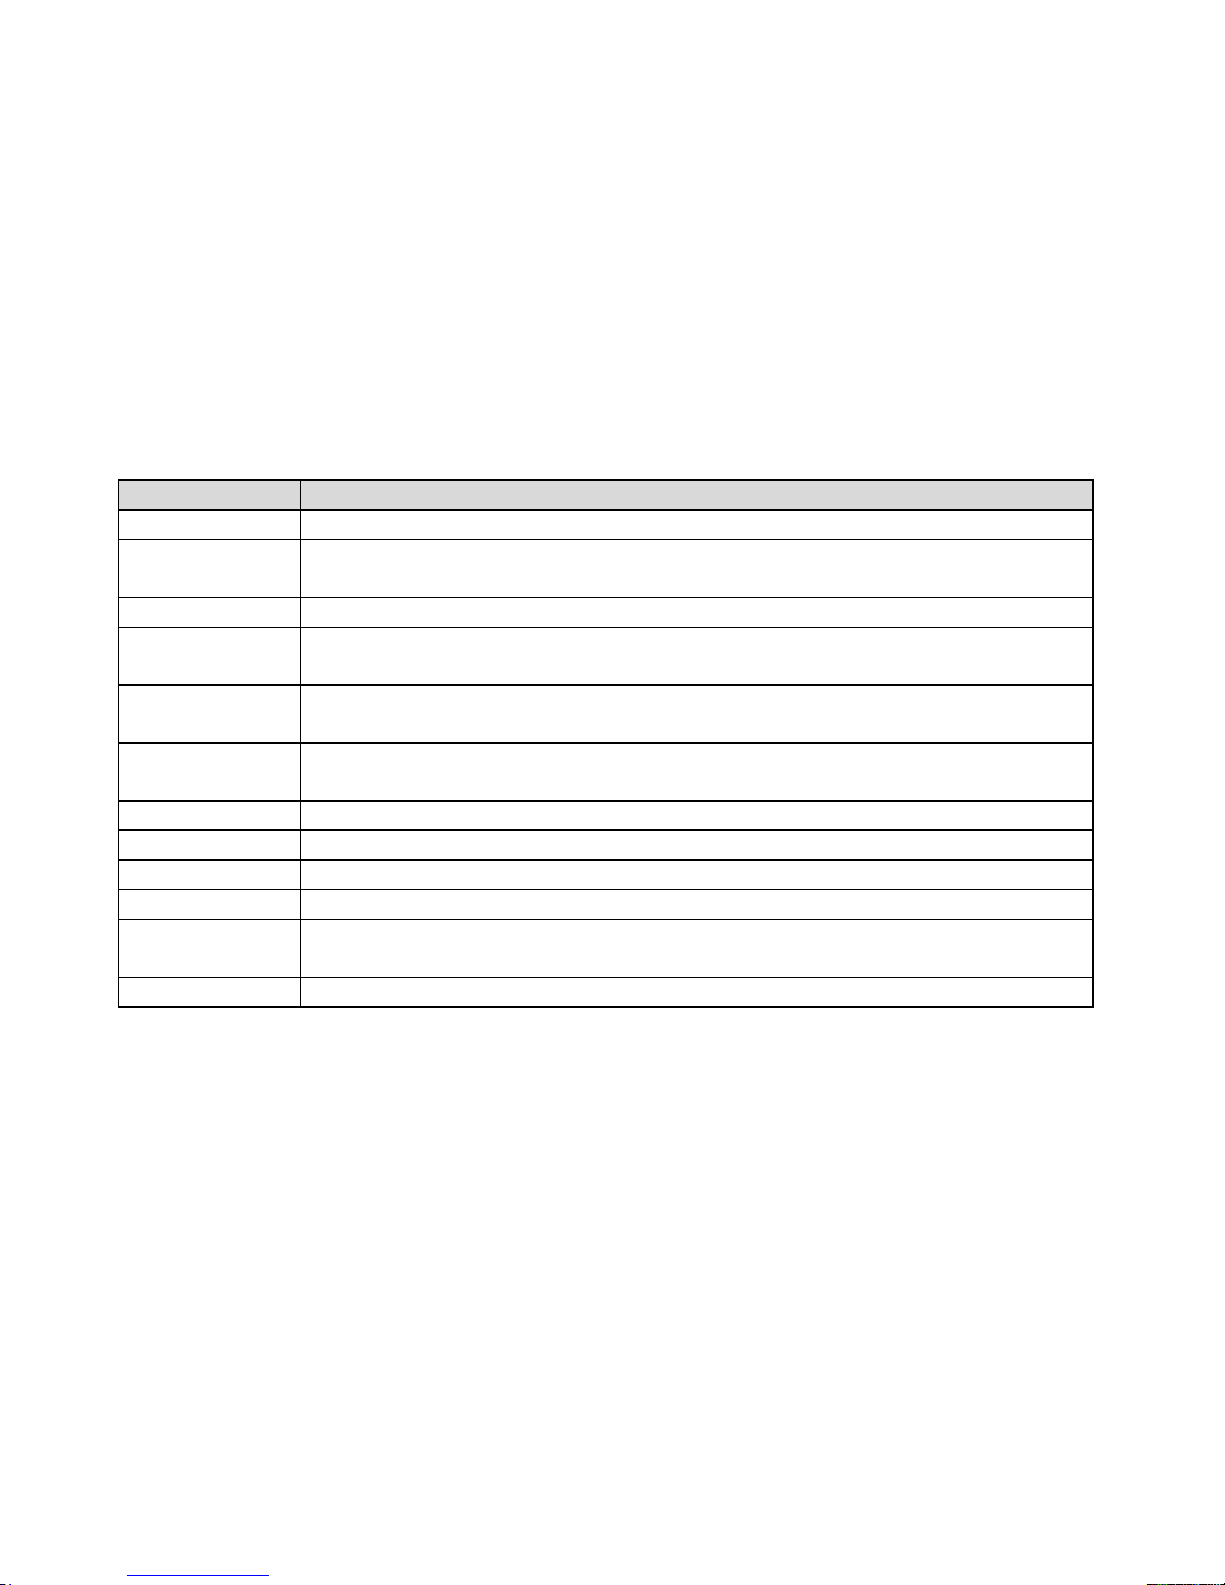
The following table provides a list of examples of some helpful widgets that might be preinstalled on
your Phone:
Widget
Description
Calendar
Check for the date and scheduled events for that date. Tap to open the
Calendar application.
Contact
View selected contacts. Tap to easily get in touch with the contact.
Digital clock
View the current time.
Google
Search
Search for contacts or an application in your phone, also for information
on the Internet.
Gmail
Check for recently received e-mails from your Gmail account.
Play Store
Access Android Market to download thousands of applications.
Music
Play music or other audio files.
Facebook
View last shares in your page, tap to open the current share and open
your facebook application.
Applications
An application is a software program that enables you to perform a specific task.
The following table lists some applications that might be preinstalled on your phone.
Page 23
18
Appication
Description
Gmail
Manage and view your Gmail account messages
Gtalk
The known application for communication by chatting, voice, and video
calls through the internet.
Youtube
View and play the Youtube videos in your phone.
Facebook
Stay connected to your Facebook account to view and share the latest
updates in your page.
Email
Manage your Email account, send and receive your email messages
through the different accounts.
Play Store
Access Android Market to download thousands of applications, games,
and media.
Music
Play music or other audio files.
Google Maps
Viewing Google maps.
Navigation
Locations and navigating by Google maps.
File Browser
Browse and manage your memory files.
News &
weather
Get the latest weather updates and latest news in the different fields.
My prayer
Prayer times, Hijri date, and alarm for each pray time.
Page 24
19
Home
Home screens
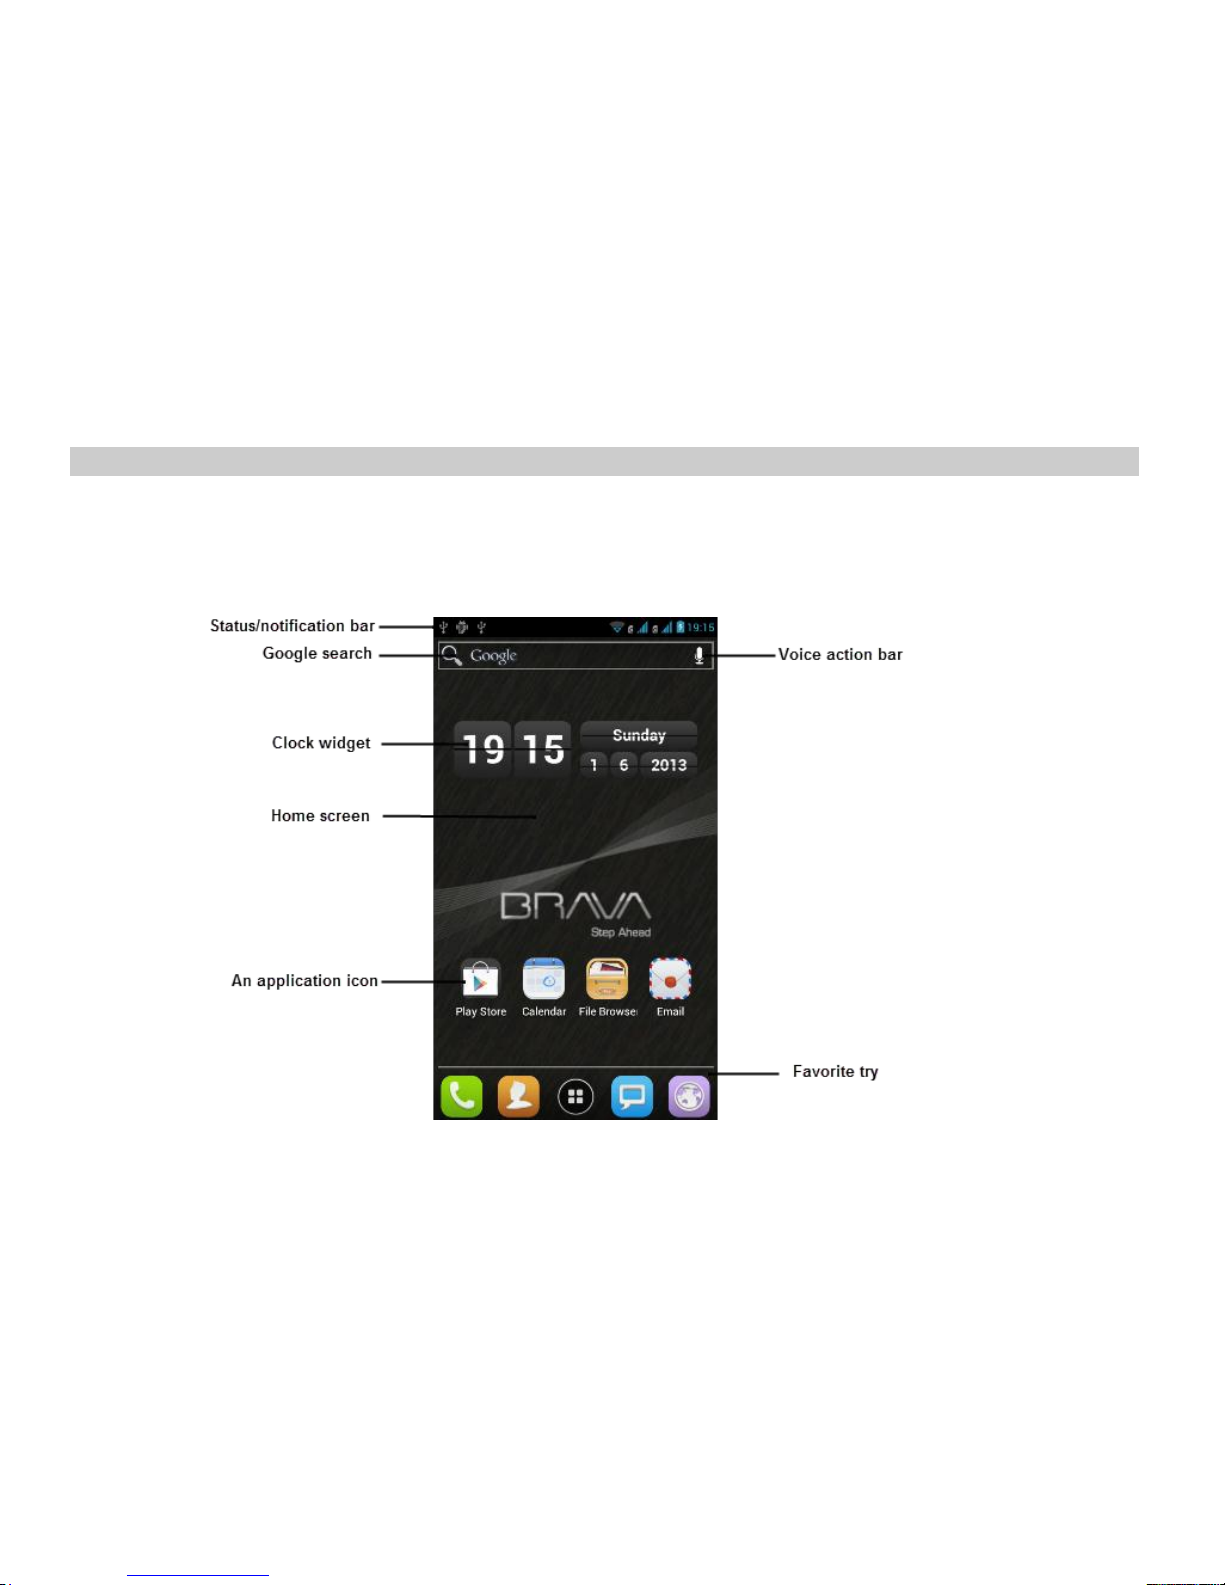
As the starting points to use your phone, Home screens display the status of your phone and provide
you with access to applications. By default, the main Home screen is displayed whenever you turn on
your phone or press the Home button.
Page 25

20
Status Bar: Presents icons to show network status, battery power, and connection details.
Notification area displays those icons associated with end-user notifications such as: email
messages, calls, etc.
Google search is an on-screen Internet search engine powered by Google™. Touch to access the
Voice Actions feature where you can verbally enter a search term and initiate an online search.
• Widgets are self-contained on-screen applications (not shortcuts). These can be placed onto any
of the available screens (Home or extended).
• Shortcuts are icons that launch available device applications such as Camera, YouTube, Voice talk,
Contacts, Phone, Email, Play Store, etc.
Extended Home screen
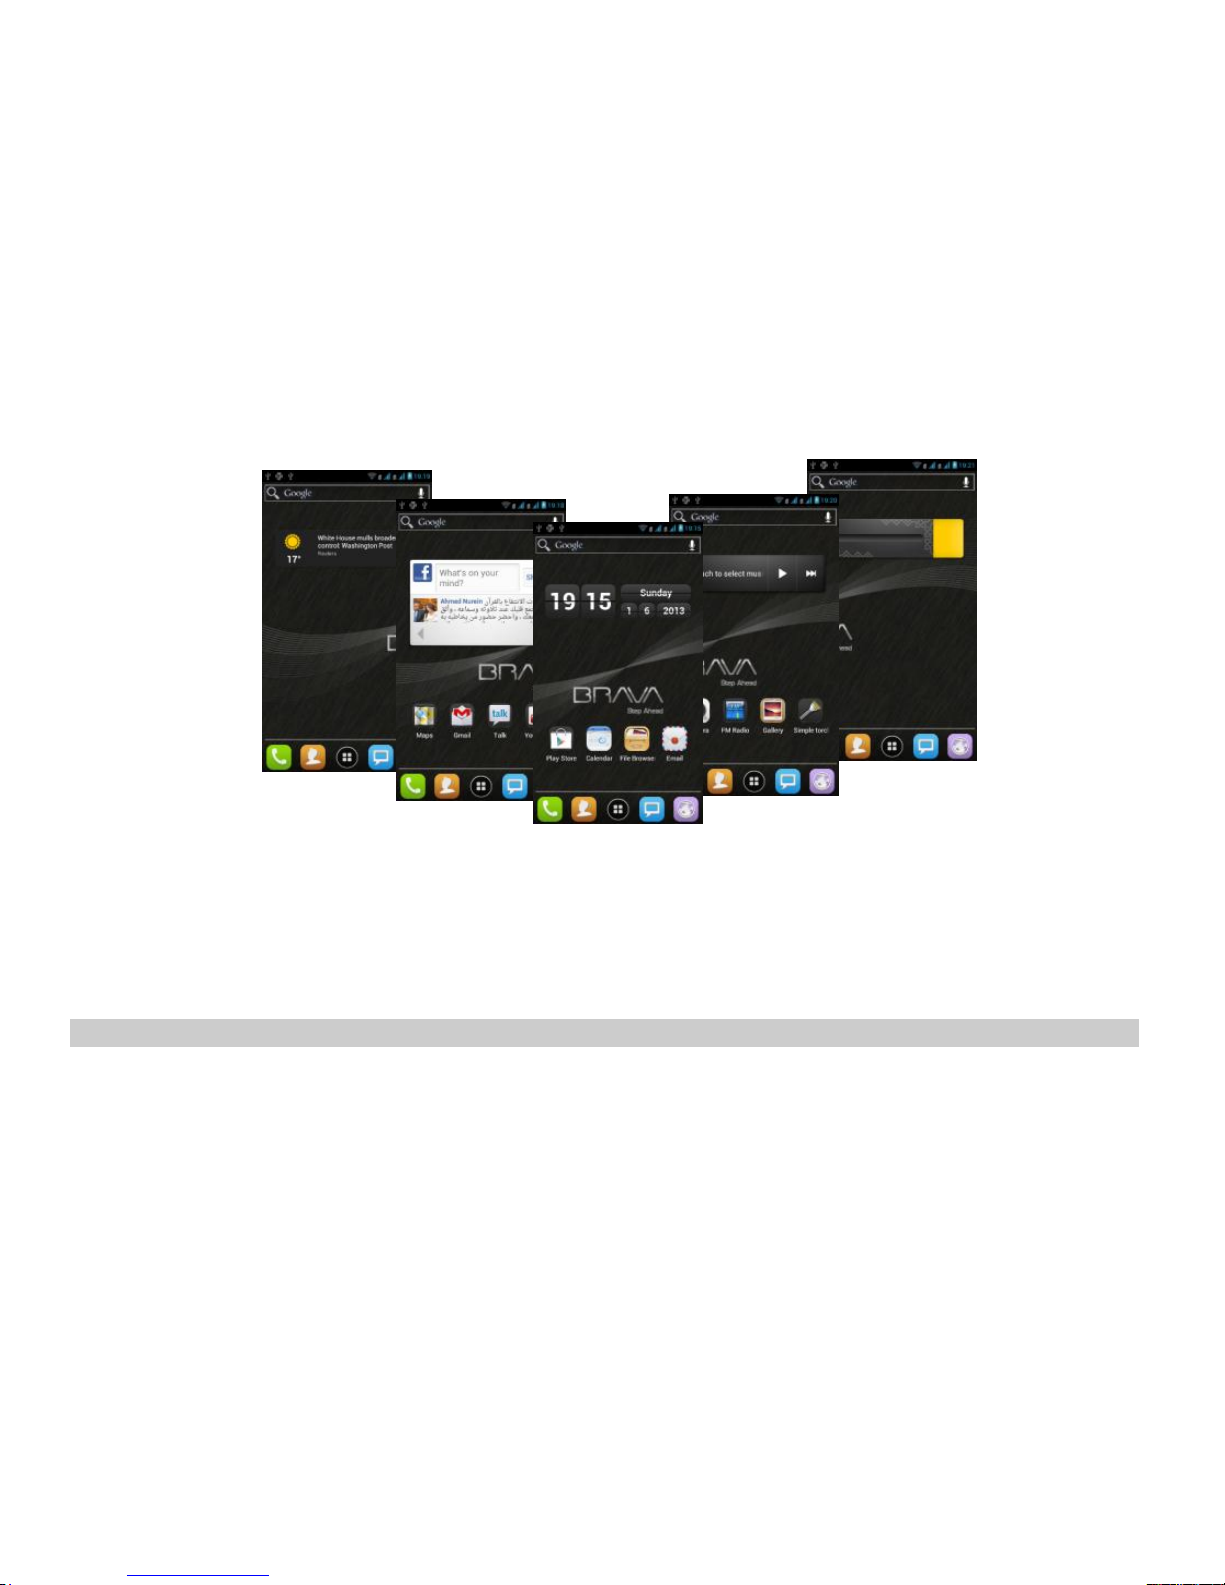
The Home screen extends beyond the screen width to provide more space for adding icons, widgets,
and more.
There are five Home screens. Tap a blank area on the screen and slide your finger left or right
horizontally to view the other Home screens.
Page 26
21
You can customize the five Home screens to meet your personal preferences. For example, you can
change the main Home screen, add or remove widgets or applications shortcuts, change the
wallpaper and so on.
Hint: The default home screens contents maybe changed from what is shown in the above photo.
Phone status and notifications
Phone status icons
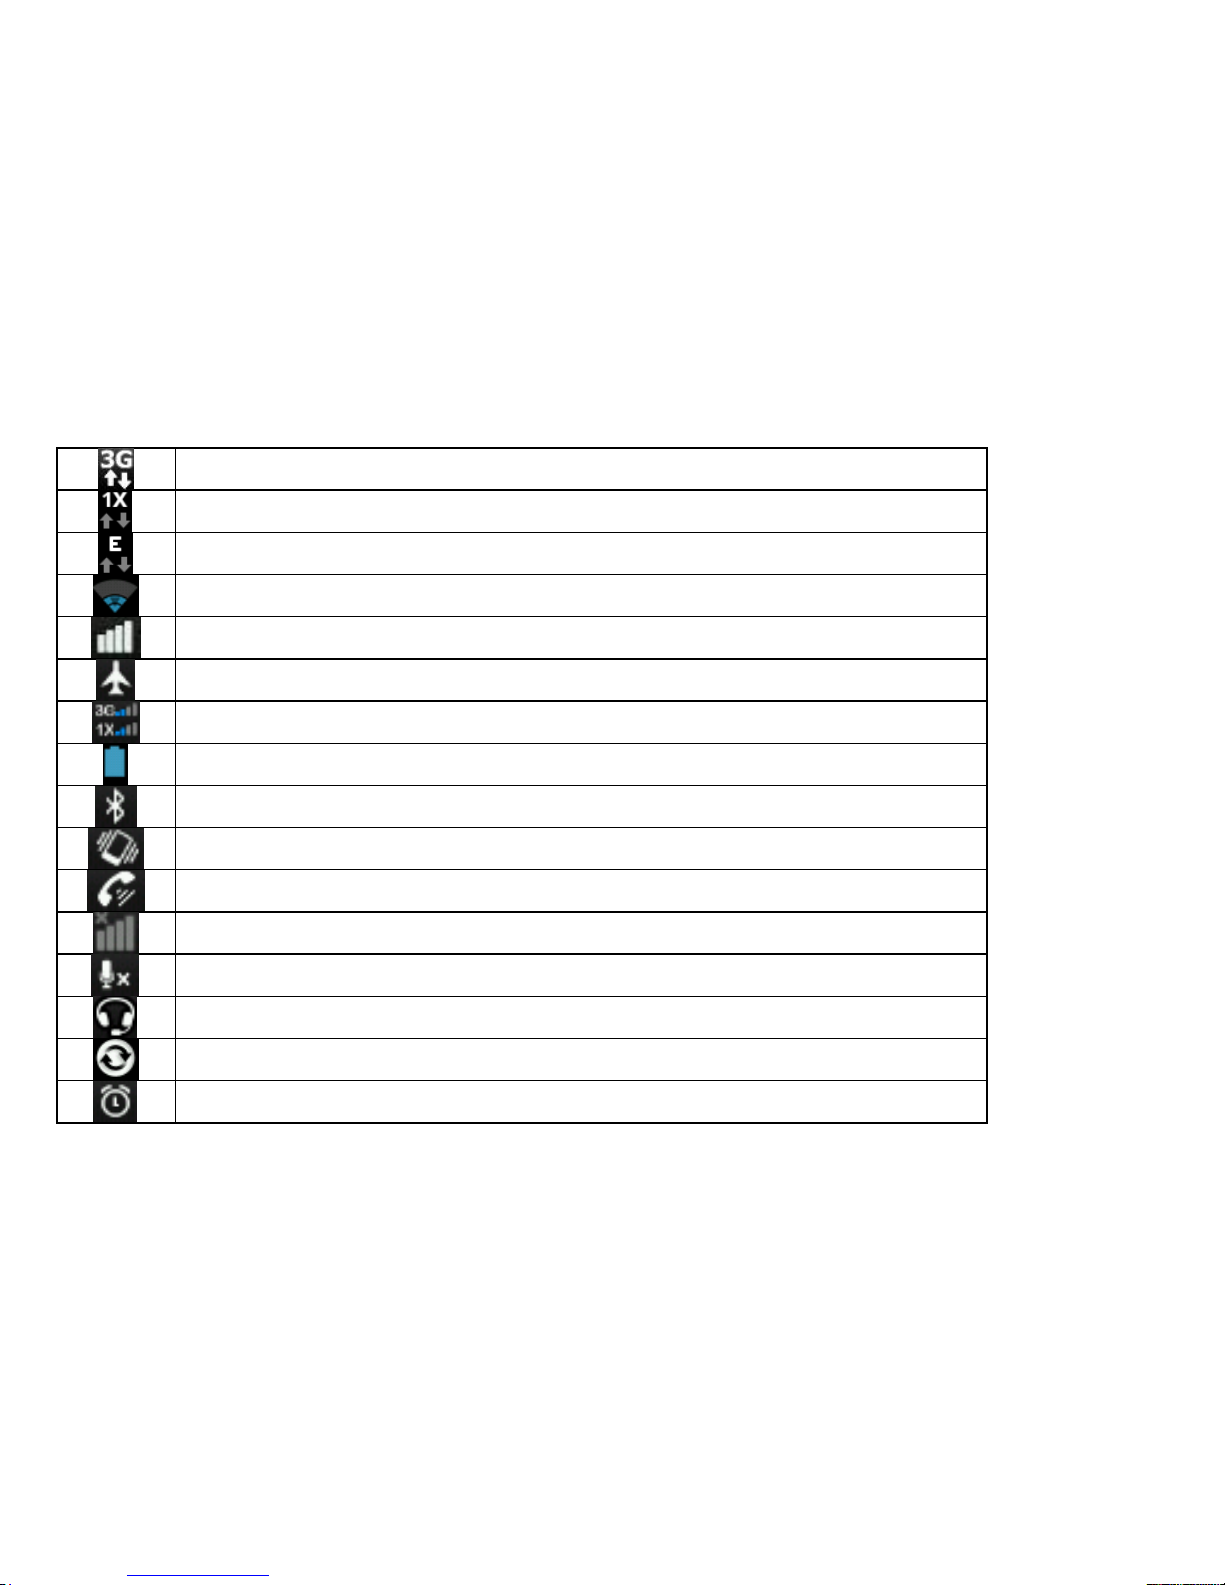
These are the icons that may appear on the phone status area of the status bar:
Page 27
22
3G data (EVDO) is connected and active
1x data is connected in idle status (no data transfer)
GSM EDGE data service is connected
Wireless connection Wi-Fi is on
GSM Signal strength
Flight mode
CDMA-1X/3G(EVDO) signal strength
Battery level
Bluetooth is on
Vibration mode is activated
Speaker is on
No signal
Microphone is muted
Cord headset is connected
Data synchronization is in progress
Alarm is set to on
Page 28
23
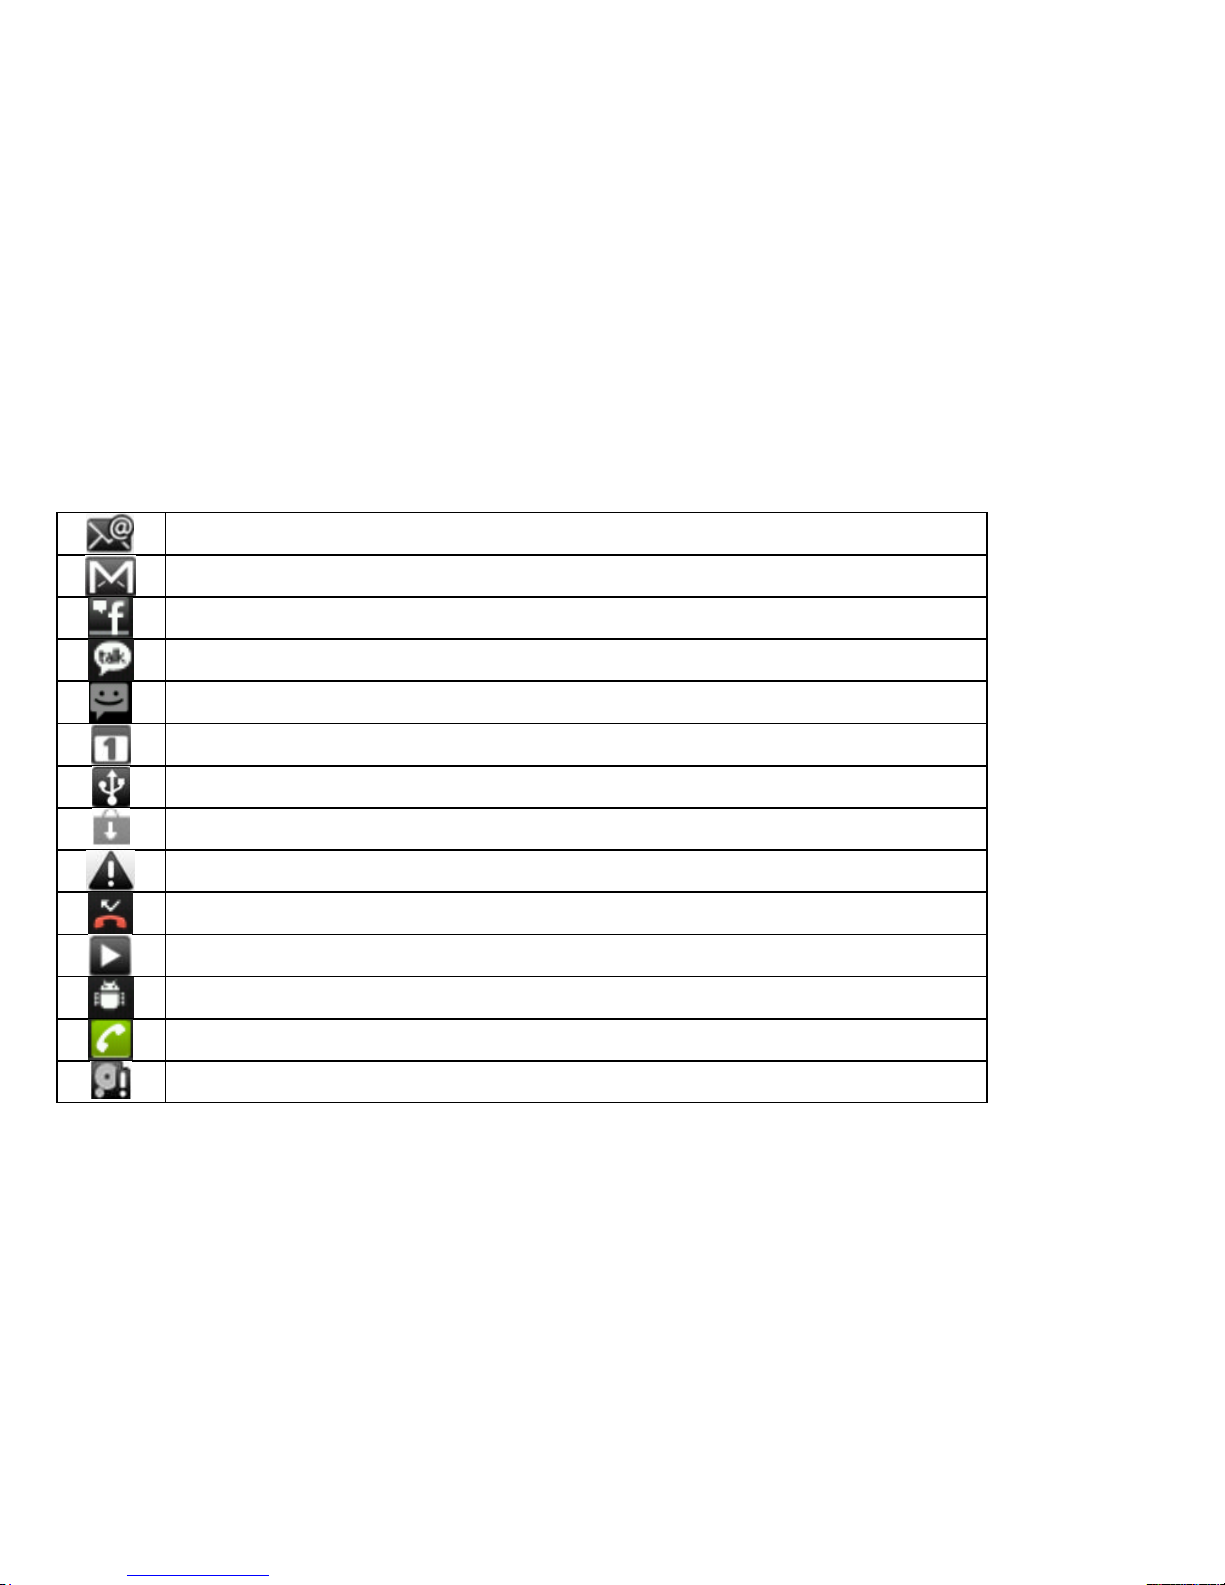
Notification icons
The icons that may appear on the notifications area of the status bar:
New Email message
New Gmail message
New Facebook message
New Gtalk message
New SMS
Calendar notification
USB mode is connected
New application update is available
General warning notification
Missed call
Music is playing
USB debugging mode is connected
Call in progress
Memory is full
Page 29
24
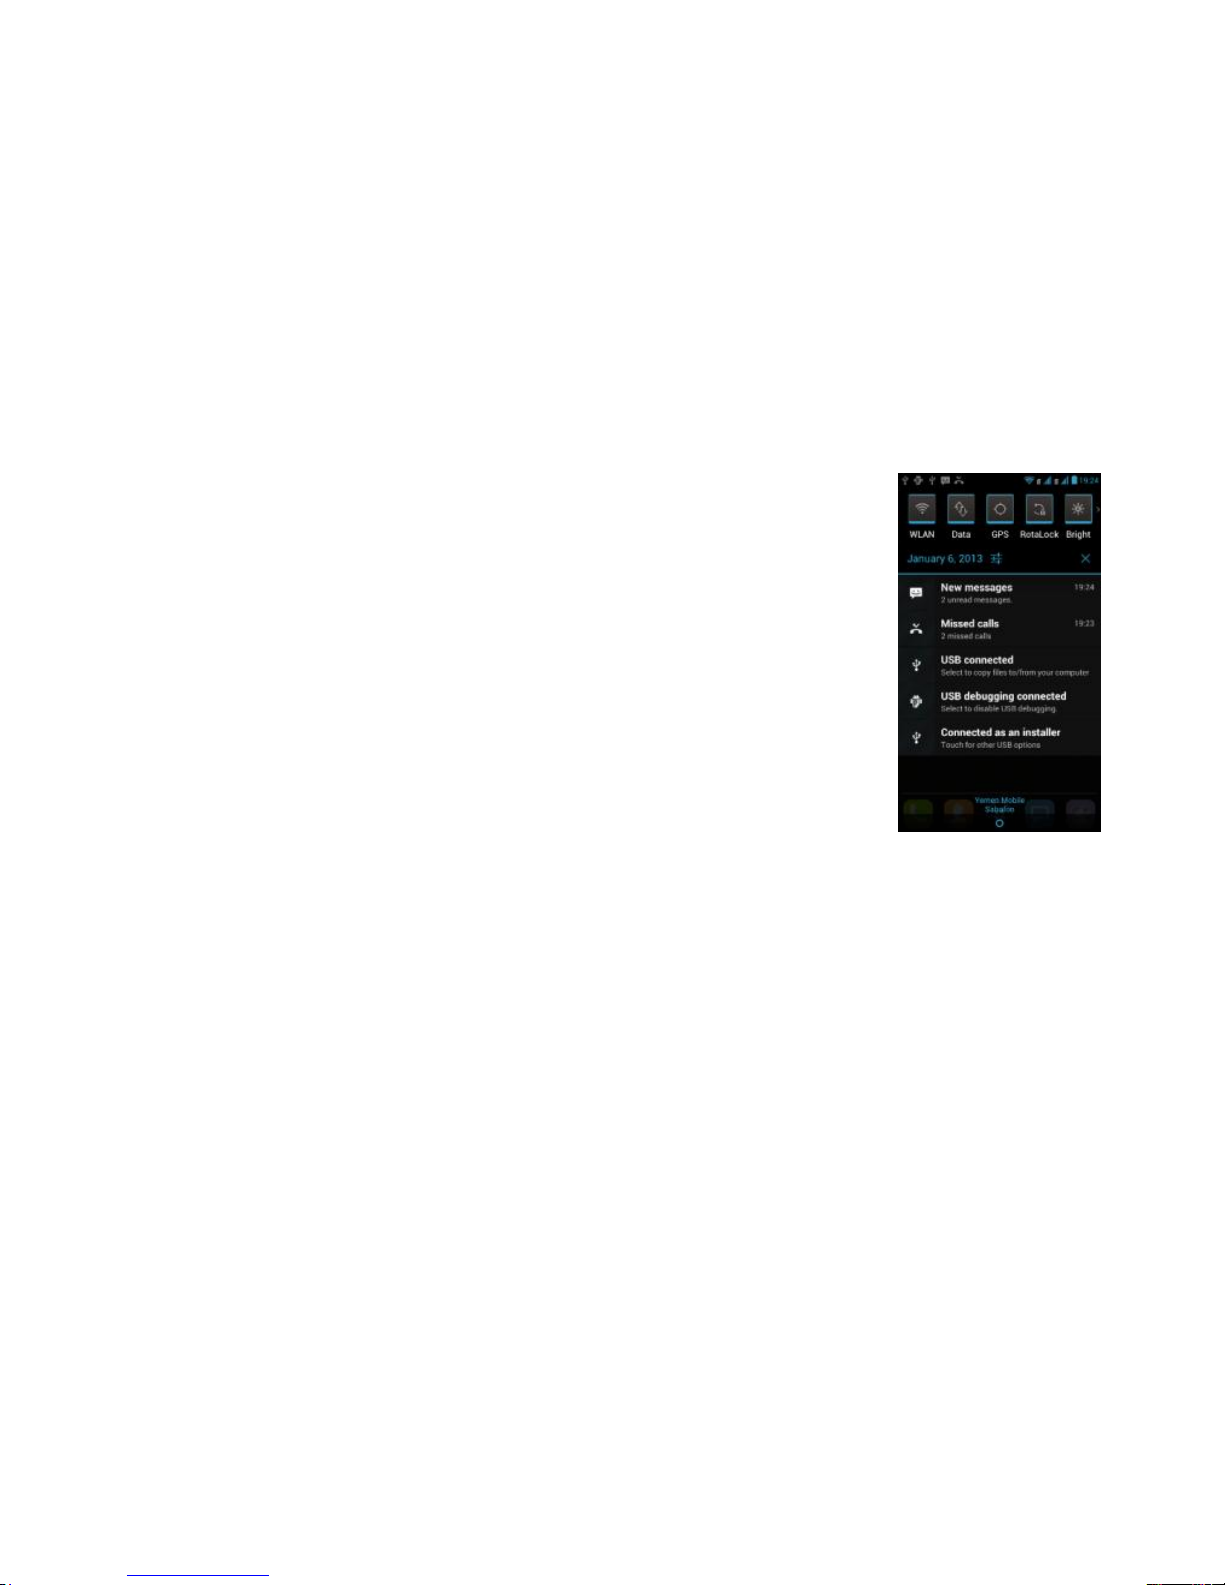
Checking notifications
Notification icons on the status bar report the arrival
of new messages, calendar events, alarms , missed call and so on.
You can also open the phone setting meny by tapping the Settings
icon next to the date displayed in the dropped panel.
You can also open widgets that allow you to quickly switch on or off
certain settings of your phone, such as WLAN, Data, GPS,
RotateLock, Brightnees , Bluetooth, Mute.
Opening the Notifications panel
When a new notification icon displays in the status bar,
press and hold the status bar, then slide your finger
downward to open the Notifications panel.
Closing the Notifications panel
Do one of the following:
1. Press and hold the bottom bar of the Notifications panel, then slide your finger up the
screen.
2. Press the Back button.
Page 30
25
Personalize your phone
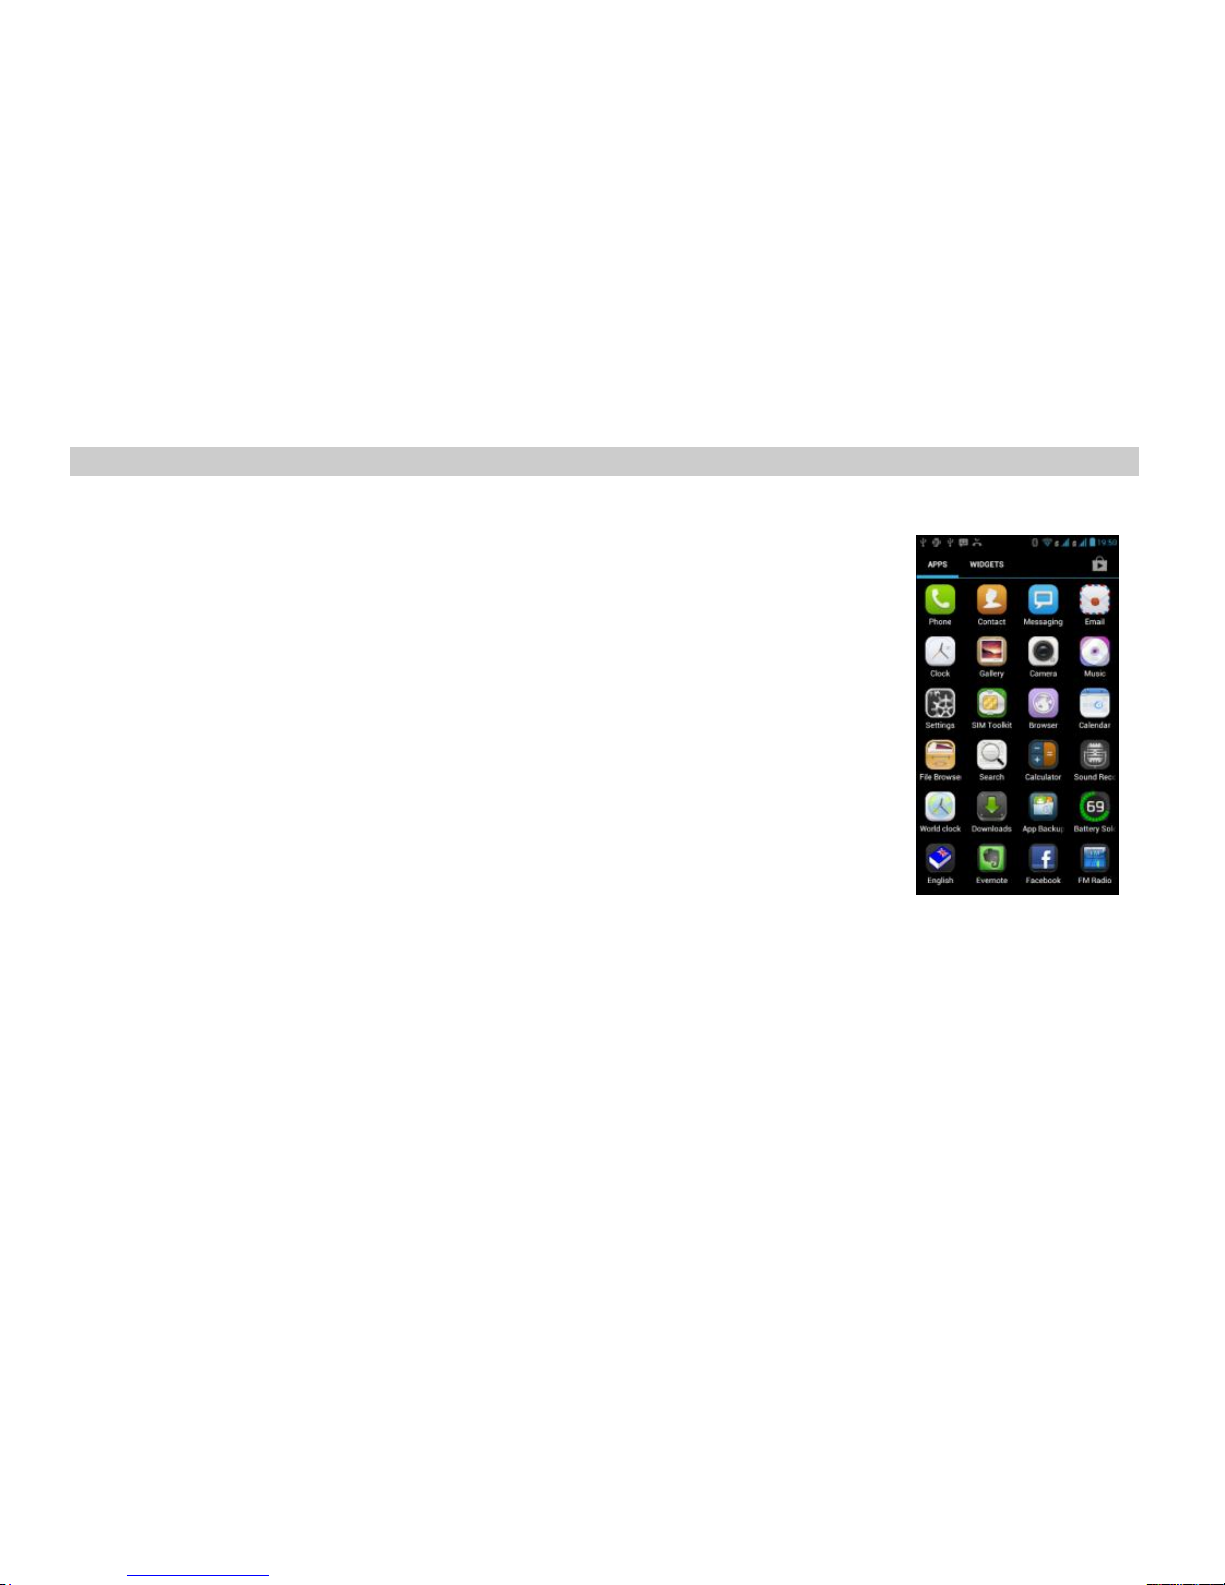
Adding application icons and other shortcuts on your Home screen
Place application icons on your Home screen to open applications quicker.
You can also add shortcuts for a music playlist and many other items to your
Home screen.
The shortcuts available depend on the applications that are installed on your
phone.
1. Touch the All Apps icon on your Home screen.
2. Touch Apps at the top of the screen.
From the main applications screen, you can
Move between screens: swipe left or right.
Drag a Apps to a Home screen: Touch and hold the application
icon, drag the App to an empty area on the Home screen where you
want to place it, and lift your finger.
Delete icons on the main interface
1. Long press the icon on the main interface until it’s enlarged.
2. Drag the icon into Remove Area on the top of he screen to delete it.
Page 31
26
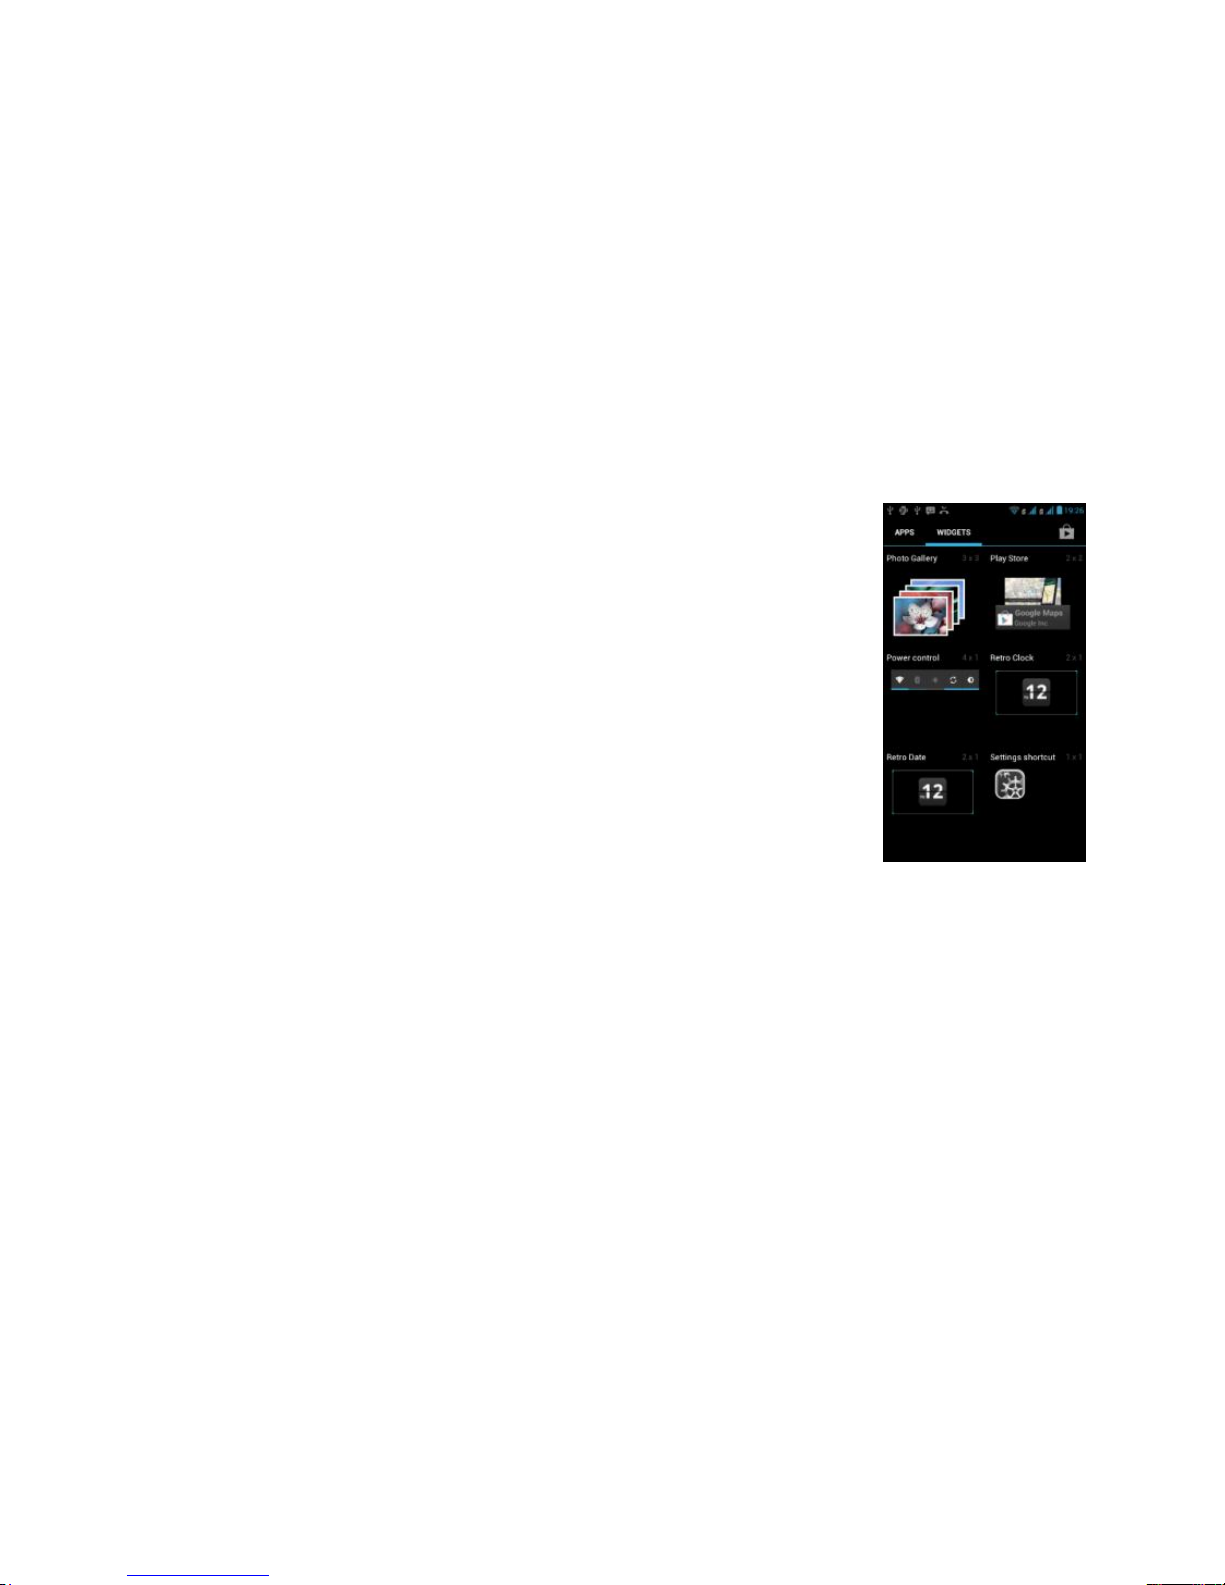
Adding a widget to your Home screen
A wide selection of widgets is available for you to choose from, such as
Calendar, Music, Photo Album, and more. You can also install new widget
for the different applications that you can download and install from
Google Play. To a dd a widget to one of your home screens:
1. Touch the All Apps icon on your Home screen.
2. Touch Widgets at the top of the screen.
From the main Widgets screen, you can
Move between screens: swipe left or right.
Drag a widget to a Home screen: Touch and hold the
widgets icon slide your finger where you want to place it, and lift
your finger.
Create folders on your Home screen
Use folders to group related applications and other shortcuts to keep your Home screen tidy and
organized.
To creat folders in the HOME screen follow the steps:
Press and hold an application icon ,move and drop it onto the top of another application icon then
a folder will be created.
You can add more apps into this folder with the same step.
Simply tap the folder to open it so you can access the applications and shortcuts inside the folder.
Page 32

27
Renaming a folder
1. Tap the folder to open it.
2. Press the folder bellow title bar.
3. Enter a new folder name and then tap OK.
Wallpaper
Personalizing your Home screen wallpaper with your favorite photo is a quick and easy way to
change the feel of your phone and give it a fresh look. Browse the collection of wallpapers included in
your phone or choose from photos that you have taken with the camera.
You can also change your Home screen to use an animated wallpaper.
You can change the wallpaper by one of the following:
1. Press HOME > MENU , and then tap Wallpapers.
2. Or Long press “Home screen” to open the menu “Choose wallpaper from”, then choose
Wallpapers
You can choose the wallpaper you want from:
Gallery
Live wallpapers
Wallpapers
and Select the wallpaper and press “Set wallpaper” to complete.
Page 33

28
Copying files to and from the Storage card
Connect the phone to your computer using the supplied USB cable.
When the Connect to PC notice appears in notification panel, press and hold the status bar, then
slide your finger downward to open the Notifications panel and press on the option Charging , then
tap USB mass storage. the connected phone is recognized as a removable disk. Navigate to this
removable disk and open it. Do one of the following:
Copy the files from the computer to the phone’s storage card’s root folder.
Copy the files from the phone’s storage card to a folder in your computer or computer
desktop.
Copy files from the computer to the internal storage.
Copy the files from internal storage to a folder in your computer or computer desktop.
After copying the files, unmount the removable disk (that is, the connected phone) as required by
your computer’s operating system to safely remove your phone.
Page 34
29
4
4
PPhhoonnee ccaallllss
Making Calls
VEGA IV DM-994 from Brava is a Dual Mode smart phone that enables you dialing either through the
CDMA or GSM network. You can tap to make call using CDMA UIM card or tap to
make call using the GSM SIM card.
You can call number using your phone either by dialing a number directly, or using the Smart Dial
feature to search and call a contact in your contacts list or a number from call history.
1. Press HOME , and then tap the phone icon .
2. when you enter digits or letters, the panel displays numbers and names that match the keys you
tapped.
If you enter a wrong digit, tap to erase that digit. to erase the entire number, press
and hold .
3. Tap “All Match Items” to close the phone keypad and to see the matching numbers or
contacts. To browse through the filtered list, slide your finger up or down the list slowly.
4. To make a call, do one of the following:
If there are no matching contacts in the list, after entering the number, tap Call icon of G or C
for making the call.
Page 35
30
If matched contact is there, tap the phone number or contact from the list.
To call a different phone number associated with the contact, tap the associated number that
appear in the filtered list.
Smart Dial
The phone dialer’s Smart Dial feature makes it quick and easy for you to place a call. Simply enter
the phone number or first few letters of the person you want to call. Smart Dial automatically
searches and filters your contacts list stored on your phone, and the phone numbers from the call
history.
Calling a phone number in a text message
1. Press HOME , tap Applications , then tap Messaging , and then tap the message
with the phone number.
2. Inside the message, tap the number you want to call.
3. new menu will appear with options “Make call”, “save as contact” and “copy” .
4. Tap “Make call” to call the number in the message.
Making a conference call
To make a conference call you can make a call to the first party. after establishing the connection,
make call to the second party then choose merge from the in-call options, to do follow the steps (this
service may differs from the GSM operator to the CDMA operator):
Page 36
31
1. Press HOME , and then tap . dial the first number you want to call.
2. Tap add call fom in-call options, then enter the second party number you want to add
to conference, then press dial icon,
3. When the second party answer tap “Merge calls” .
4. Now you can speak a conference call with all parties.
Making an emergency call
On the phone dialer screen, dial the Local Emergency number , then tap Call.
Your phone can only operate when in a CDMA or GSM service area.
Received Calls
When you receive a phone call from a contact, the incoming call screen appears and displays the
caller ID icon, name, and phone number of the calling party. When you receive a phone call from
someone who is not stored in Contacts, only the default caller ID icon and phone number appear on
the incoming call screen.
Answering an incoming call
The display will turn on showing the incoming call screen. Tap the green answer icon and slide
your finger horizontally to the right to answer the incoming call.
To mute the ringing sound without rejecting the call, Press any VOLUME button.
Page 37
32
Rejecting an incoming call
When you receive a phone call , the incoming call screen displays the caller ID.
Tap the red reject icon and slide your finger horizontally to the left to reject the incoming
call. You can also reject the call by sliding up to send a short message
During Call options
When making call there are many options you can choose from:
Add Call : you can invite many participants to a conference call, this feature deponds on the
Network operator support for the service.
Ending a call:Tap this icon to end the call.
Dial Pad : to input numbers during the calls.
Bluetooth/Speaker : to connect/disconnect bluetooth headset so you can speak without
holding the phone or to operate the loud speaker during the call.
Mute : to mute your voice to the other party.
Hold : to hold the call.
Page 38
33
Call Log (History)
When you miss a call, the missed call icon ( ) appears in the Status bar. check the Call log in the
dial pad screen to check who the caller was or view all your dialed, received and missed calls.
Press HOME , and then tap phone icon . press Call log.
The screen will be splitted into two sections
the left for all Calls: (All, missed , received, dialed).
the right for all Cards: (CDMA and GSM, CDMA, GSM).
You can check the dialed, received and missed calls by
filtering the calls from the All calls list.
In the call log list, each call are indicated by its
appropriate icon as missed call, answered call, or dialed call. Also, each call is identified by its
network icon iether CDMA call (C) or GSM call (G).
Favorites
The favorates tab contains the prefered contacts that are frequently used by you for quickly
calling or sending message. You can add any contact from your contacts list to favorates list by
taping the Star of the contact so it will appear in the favorates list.
Page 39
34
5
5
CCoonnttaaccttss
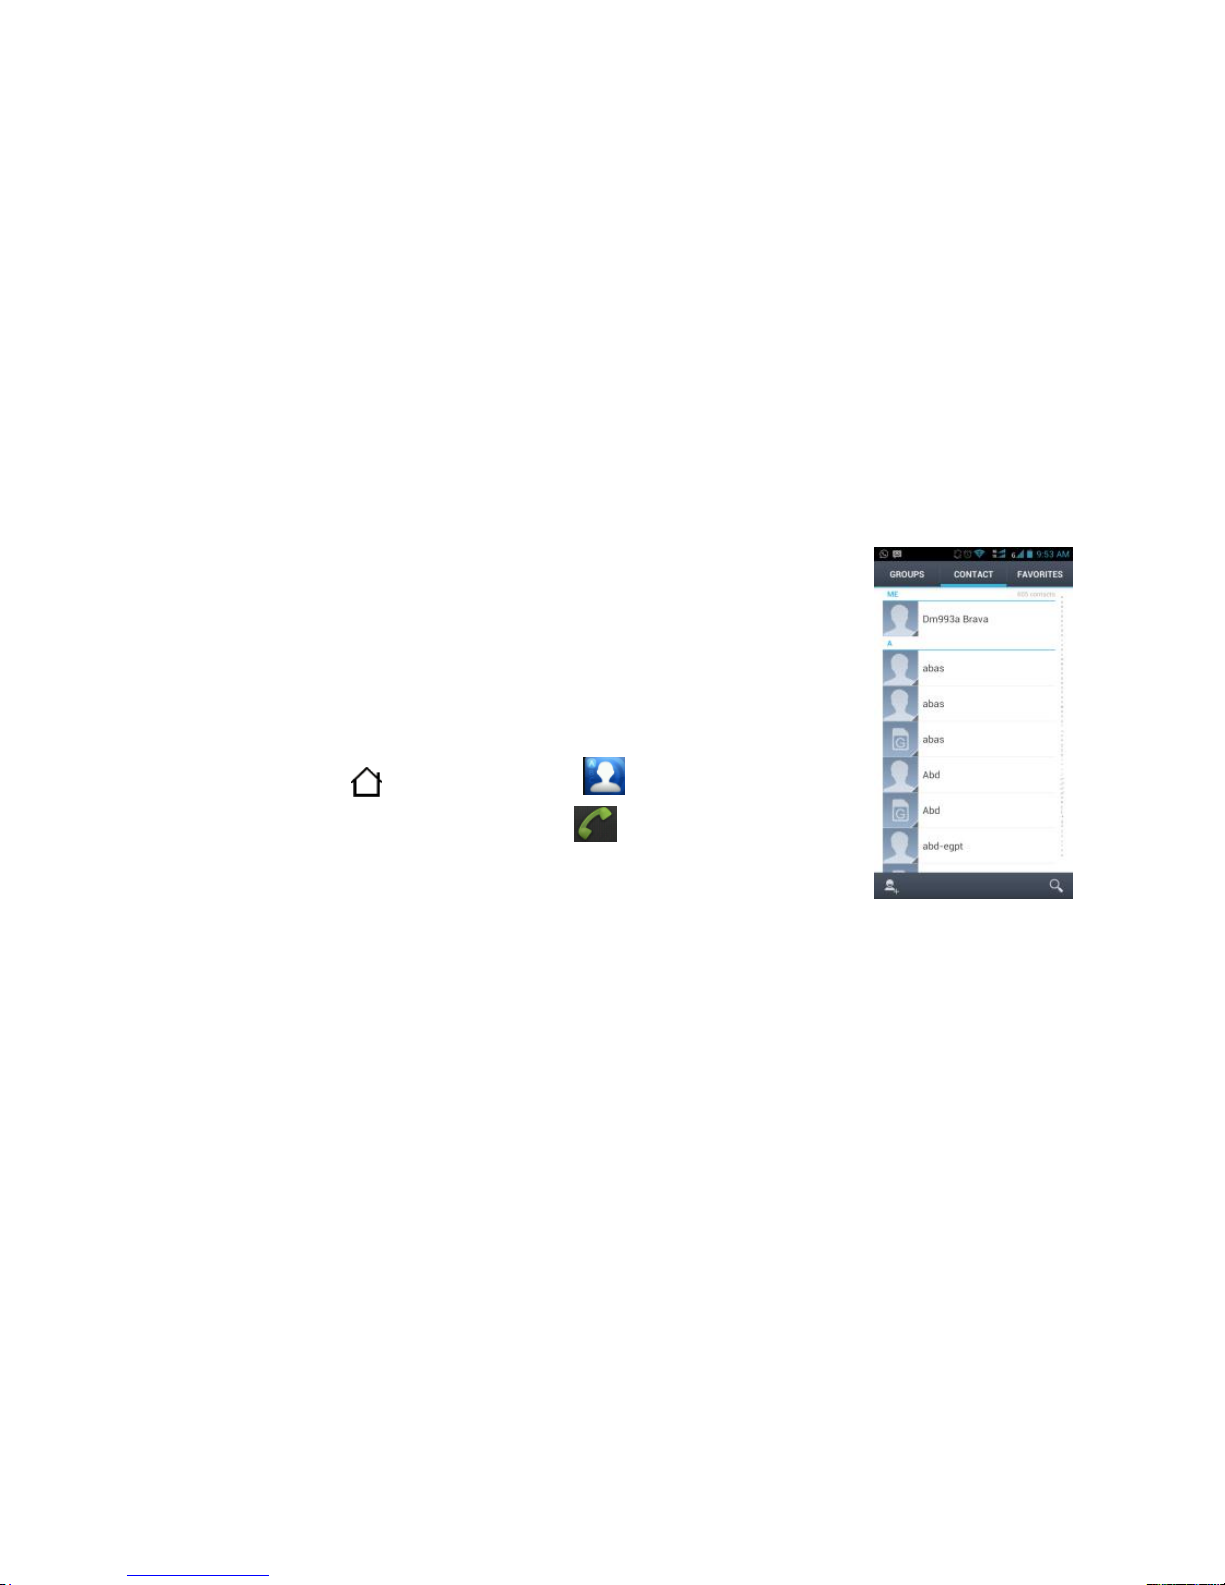
In Contacts, you can easily manage your communications with contacts via phone, messaging, and
email.
If you are synchronizing contacts with your Google account, with your
PC, and/or with an Exchange Server, any contacts stored in those
accounts are displayed in contacts.
The contacts on your phone are synced with your Google account
contacts stored on the Web.
To view the contacts on your phone do one of the following:
Press the HOME , and tap Contacts .
Press the Home key and tap send key , then choose
Contact tab in the top of the screen.
The contacts you select as favorites are listed in the Favorites tab.
If your contact is online and if you are signed in to Google Talk, their online status will appear.
Browse through your contacts by sliding your finger up and down on the screen. Tap the screen to
stop the scrolling.
TIP: To find a contact quickly from the Home screen, press the search botton then type the name
you want to search. Your contact list appears and resolves to the letters you have typed.
Page 40
35
Managing your Contacts
Add a new contacts
1. Press HOME , and then tap Contacts .
2. On the bottom of the contact screen, tap add new +.
3. Select where to save the Contact, for example CDMA, GSM, Phone or Gmail Account.
4. Tap the Name field, enter the first and last name of the contact.
5. Enter the contact information in the fields provided.
6. In the top of the screen tap Done to save the contact information. Or back button to cancel and
go back to contacts screen.
Display contacts
1. Press HOME , and then tap Contacts .
2. On the contact screen, You can select from the following:
Contacts: to display all the contacts you have created or that has been added automatically.
Favorites: to display the contacts you have added as favorites.
Groups: to display the contacts you have added in specific groups such as Family, Friend, Work
and so on.
Page 41
36
Editing/ Deleting contacts
1. Press HOME , and then tap Contacts .
2. To edit a contact, tap the contact name from the contact list, tap the Menu icon and then tap
Edit.
3. To delet e a contact, tap the contact from the contact list, tap the Menu icon , and then tap
Delete.
4. To join the same contacts, press MENU, and then tap Auto Join.When asked to confirm, tap OK.
Backing up your contacts to the Storage Card
1. Press HOME , and then tap Contacts .
2. Press MENU, and then tap Import/Export > Export to SD card.When asked to confirm, tap OK.
Importing contacts from the Storage Card
1. Press HOME , and then tap Contacts .
2. Press MENU, and then tap Import/Export > Import from SD card.
Contacts display options
1. Press HOME , and then tap Contacts .
2. Press MENU, and then tap Contacts to display.
Page 42

37
3. Change in the display options and select from the available contacts types that you want to
display in the contacts list.
6
6
TTeexxtt IInnppuutt aanndd kkeeyybbooaarrdd
Using the onscreen keyboard
When you start a program or select a field that requires text or numbers, the onscreen keyboard
becomes available.
Changing the onscreen keyboard layout
Your VEGA IV Phone from Brava comes with the default keyboard and differnet keyboards, You can
choose from layouts to suit your typing style. To change the keyboard type, do the following:
While you are opening a text box, such as writing message, press in the text field to show the
default keyboard , in the notification bar slide down to chose the “Select input method”. then
a list of available keyboard will appears.
Select the keyboard layout that you want to use. Choose from the following example:
Android Keyborad. This is the default keyboard layout.
Go Keyboard keyboard has many features supporting arabic and English.
Hint: You can install any other different keyboard from the Google Play market.
Page 43
38
7
7
MMeessssaaggiinngg
Messages lets you compose and send text (SMS) and multimedia messages
(MMS) to other mobile phones.
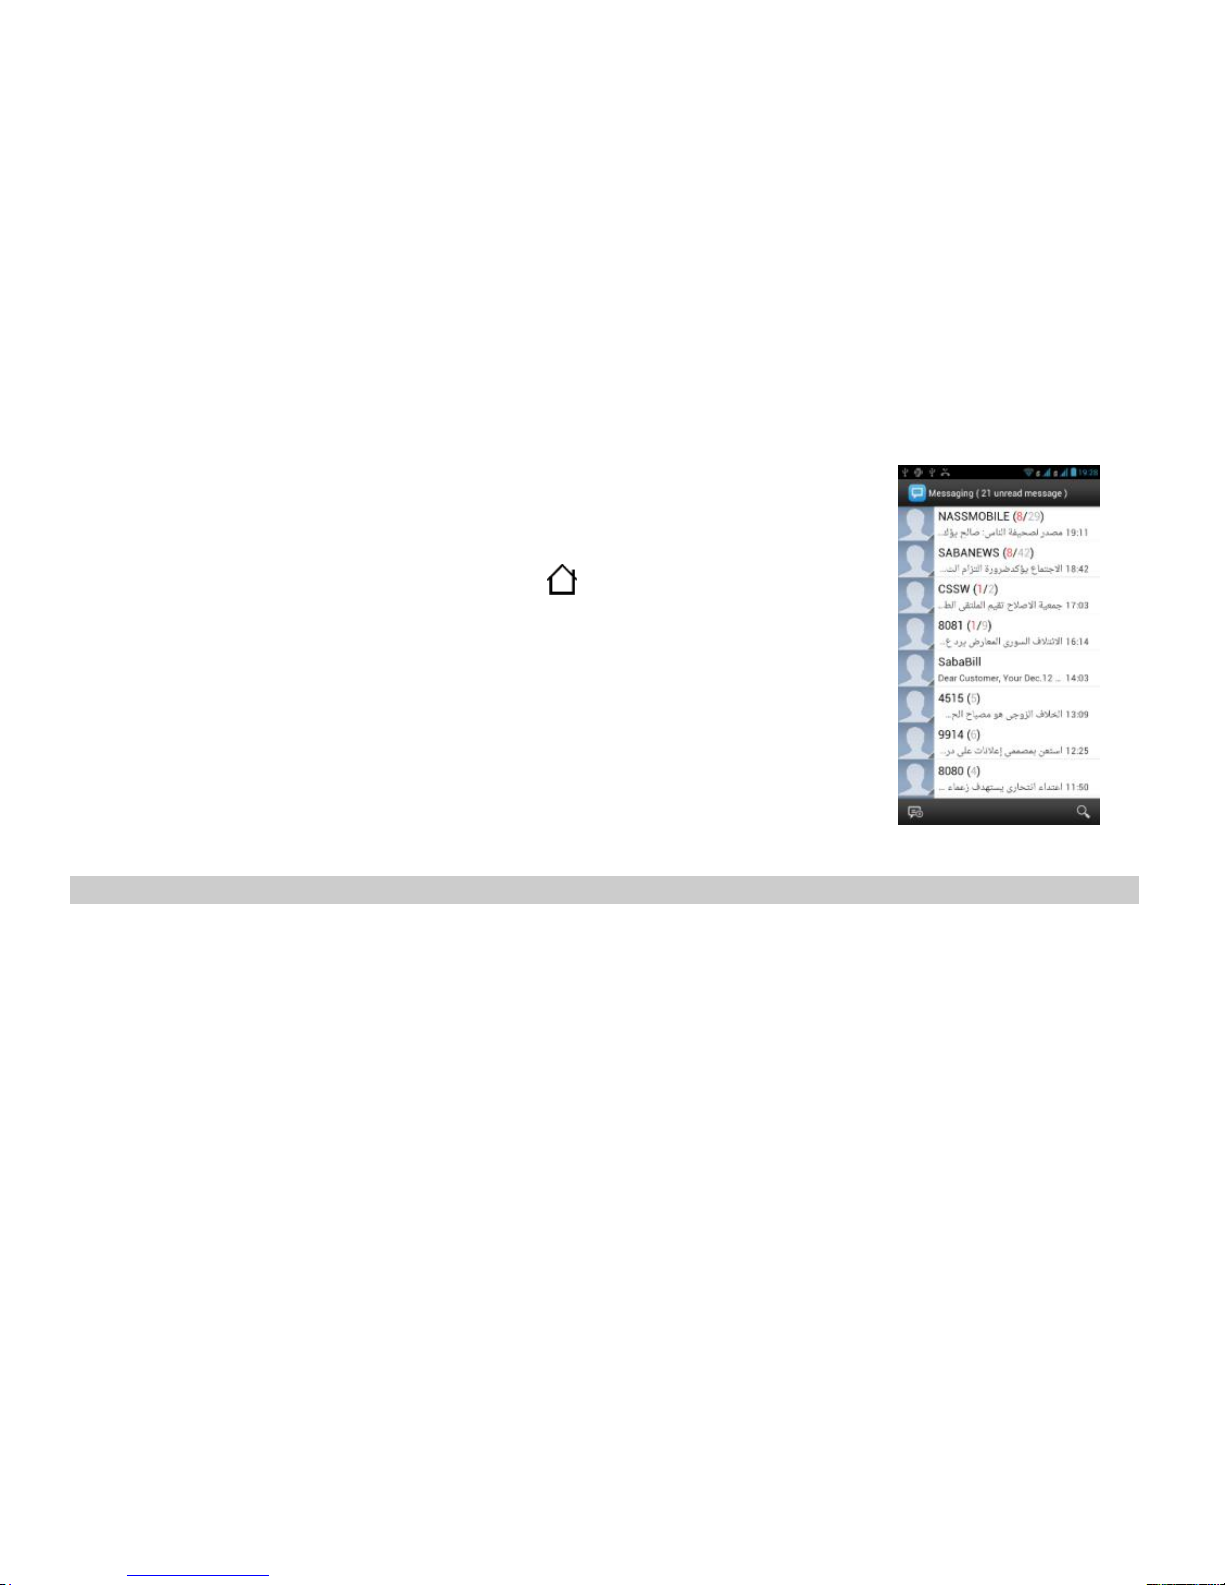
To open your message inbox, press HOME , and then tap Application
icon > Messaging.
You can scroll down to view more messages.
Red point indicates unread messages in the list.
Tap to open the message and read the content.
Messages are listed as threads, each thread shows the messages
history of each sender/receiver.
Sending text and multimedia messages
Send short text messages (SMS) and multimedia messages (MMS) to other mobile phones. If you
exceed the limit on the number of characters for a single text message, your text message will be
delivered as one but will be billed as more than one message. These are called concatenated
messages.
Multimedia messages can contain text and a picture, a recorded voice, an audio or video file, a
picture slideshow.
Page 44
39
The Messages application automatically converts a text message into a multimedia message when
you enter an email address in the “To” field, add a message subject, attach an item, or compose a
message.
Hint: The MMS downloading process depends on the default Data Connection which can be set form
the Setting->Wireless & network->Mobile Networks->Data connection.
Sending a text message
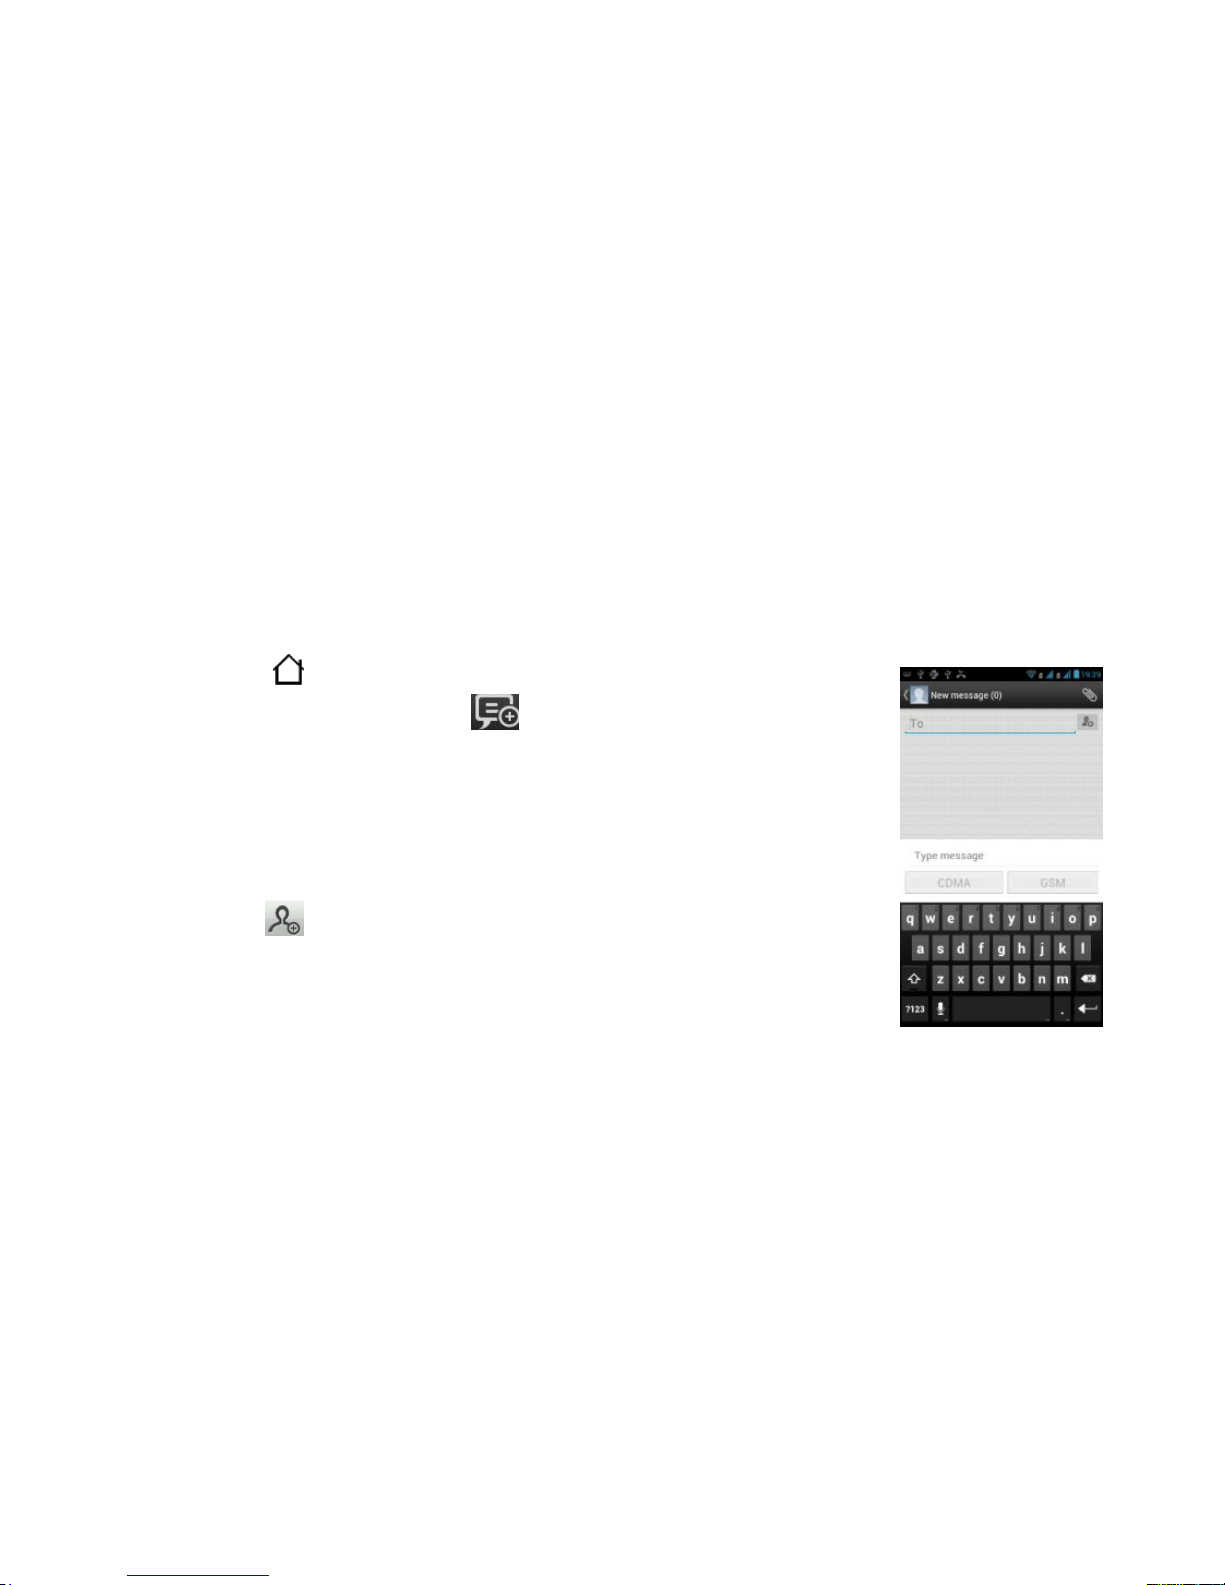
1. Press HOME , and then tap Messages.
2. On the All messages screen, tap on the left bottom of the screen
to write a new message.
3. Fill in one or more recipients. You can:
o Enter phone numbers directly in the “To” field. If you’re sending
the message to several phone numbers, separate the phone
numbers with a comma.
o Tap the icon, and then select the phone numbers of the
contacts to whom you want to send the message. You can also
select contact groups as recipients.
o When you have selected all the message recipients, tap Done.
o Tap the text box that contains the text “Tap to compose”, and then start writing your
message.
Page 45

40
o When done, tap Send to send the text message.
To receive delivery reports and know when a text message is received, in the All messages
screen, press MENU and then tap Settings. In the SMS settings section, select the Delivery
reports check box.
Sending a multimedia (MMS) message
1. Press HOME , and then tap Messaging.
2. On the All messages screen, tap new message. The Compose screen opens.
3. Fill in one or more recipients. You can:
o Enter phone numbers or email addresses directly in the “To” field. If you’re sending the
message to several recipients, separate the phone numbers or email addresses with a comma.
As you enter information, any matching phone numbers or addresses from your contacts list
are displayed. Tap a match to enter that number or address directly.
o Tap the icon, and then select the contacts to whom you want to send the message. You
can also select contact groups as recipients.
4. When you have selected all the message recipients, tap Done.
5. You can add a subject line by pressing MENU and then tapping Add subject.
6. Tap the text box that contains the text “Type message”, and then start writing your message.
7. In the right top of the screen tap icon Attach .
On the Attach window, select from the following file attachments:
Page 46

41
Picture: attach Pictures from your storage card.
Capture Picture: Select Camera to take a photo and attach it.
Videos: attach a video from your storage card.
Capture video: Select Camera to take a video and attach it.
Audio: to attach a music file or voice recording from your storage card.
Record audio: Select Voice Recorder to make a voice recording and attach it.
Slideshow: Opens the Edit slideshow screen. Tap Add slide to create a new slide. Tap the
created slide (for example, Slide 1), tap Insert picture, and then select the picture you want to
add to the slide. You can also navigate to the text box and enter a caption for the picture. When
finished, tap Done to attach the slideshow to your message.
VCard: Select to send a contacts in the message.
8. When you have finished composing the multimedia message, tap CDMA or GSM to Send.
Setting text and multimedia message options
Press HOME , and then tap Messaging. On the All messages screen, press MENU and then tap
Settings to set the text or multimedia message options. You can set the following:
Delete old messages: to delete old messages as limits are reached.
Storage Settings
Text message limit: set the number of SMS messages from the same sender before deleting old.
Page 47

42
Multimedia message limit: set the number of MMS messages from the same sender before
deleting old.
SMS settings
Delivery reports
Select this option to receive a report on the delivery status of your message.
CDMA card messages
manage messages stored on your CDMA UIM card.
GSM card messages
manage messages stored on your GSM SIM card.
MMS Settings
Delivery reports
Select this option to receive a report on the delivery status of your message.
Auto-retrieve
Select this option to automatically retrieve all your MMS messages completely.
When selected, the MMS message header plus the message body and attachments will
automatically download to your phone. If you clear this check box, only the MMS message header
will be retrieved and shown in your All messages screen.
Roaming auto-retrieve
Select this option to automatically retrieve your MMS messages while roaming on other networks.
Page 48

43
MMS READING MODE
Vertical mode
Select this option if you want to view the mms message in vertical sliding screen to read them.
Notification settings
Notifications
Select this option if you want to receive a notification in the status bar when a new text or
multimedia message arrives
Select CDMA ringtone
Select a ringtone that is specific to CDMA UIM recieved SMS and MMS messages.
Select GSM ringtone
Select a ringtone that is specific to GSM SIM recieved SMS and MMS messages.
Page 49
44
8
8
EEmmaaiillss aanndd AAccccoouunnttss
Your VEGA IV phone can receive messages from your POP3 and IMAP e-mail accounts at anytime
and anywhere wherever there is internet connection.
Email Setup
Add e-mail account
1. Press HOME , then tap the applications button.
2. Tap Email icon . The Email setup screen appears guiding you through the setup process. If
your Email has already an account, then after opening the email application press options then
accounts then add account.
3. Tap Next.
4. Slide open the display to reveal the keyboard.
5. Type your e-mail address and password to your e-mail account.
6. Tap Next.
The application will automatically configure the settings for many common e-mail services.
Before you go to your Inbox, you can name the account (if you don’t, your e-mail address will
be used). You are also asked to type your name as you want it to display on outgoing
messages. You must complete this field before you can tap Next and go to your Inbox.
Page 50
45
If your account is not automatically configured, follow the prompts to type the e-mail server,
protocol, and other account information yourself. After your account settings have been
verified, tap Next to go to your Inbox.
Delete Email Account
You can always remove a POP3 or IMAP e-mail account from your phone. To delete:
1. Press HOME , then tap the applications button.
2. Tap Email icon to display your inbox.
3. Go to your Inbox.
4. Press the Menu key.
5. Tap accounts.
6. Tap and hold the account you want to delete.
7. Tap Remove account.
8. Tap oK to remove.
Read Email messages
1. Press HOME , then tap the applications button.
2. Tap Email icon to display your inbox.
3. Tap the message to open.
Page 51
46
Send Email messages
1. Press HOME , then tap the applications button.
2. Tap Email icon to display your inbox.
3. Press the Menu key.
4. Tap Compose, the keyboard will be displayed.
5. Type a name or e-mail address in the To field. Matching contacts will appear. Select the
contact or continue typing. If you want to add CC or BCC addresses, tap +Cc/Bcc.
6. Type the subject and message.
7. To attach pictures, press the Menu key.
8. Tap the Add attachment.
9. Tap Send.
If you have more than one account and want to send an e-mail from a specific account, chose that
account name by taping the menu key then accounts. After that you can press the Menu key and tap
Compose.
Gmail Setup
Your phone can receive messages from your Gmail account by signing into your phone, you are
automatically set up by signing to your Gmail account to get the different services by Google, such as
syncing your account and contacts, Google play, Gtalk, ..etc. You will be able also to receive your email messages, and there are no additional steps needed to set up Gmail on your phone.
Page 52

47
9
9
IInntteerrnneett
Web Browsing
Connect
Your smartphone uses the mobile phone network (over the air) or a Wi-Fi connection to automatically
access the Web.
Note: Surfing the Web or downloading data over the mobile phone network uses your monthly data
subscription allowance.
If you want to use a Wi-Fi network for faster Internet access, tap the status bar at the top of the
home screen and drag it down.
Tap the Wi-Fi icon available notification to select a preferred network.
You can connect to the internet also through the data service provided by your network service
provider either CDMA-1x/EVDO or GSM GPRS/EDGE.
Note: If you can’t connect, contact your service provider to get the correct connection settings.
To open the browser do the following:
1. Press HOME , then tap the Browser button.
2. Wirte the URL address you want to browse.
Note: You can download and install different web browsers such as Google Chrome from Google
Play Store.
Page 53
48
Android Market™ (Play Store)
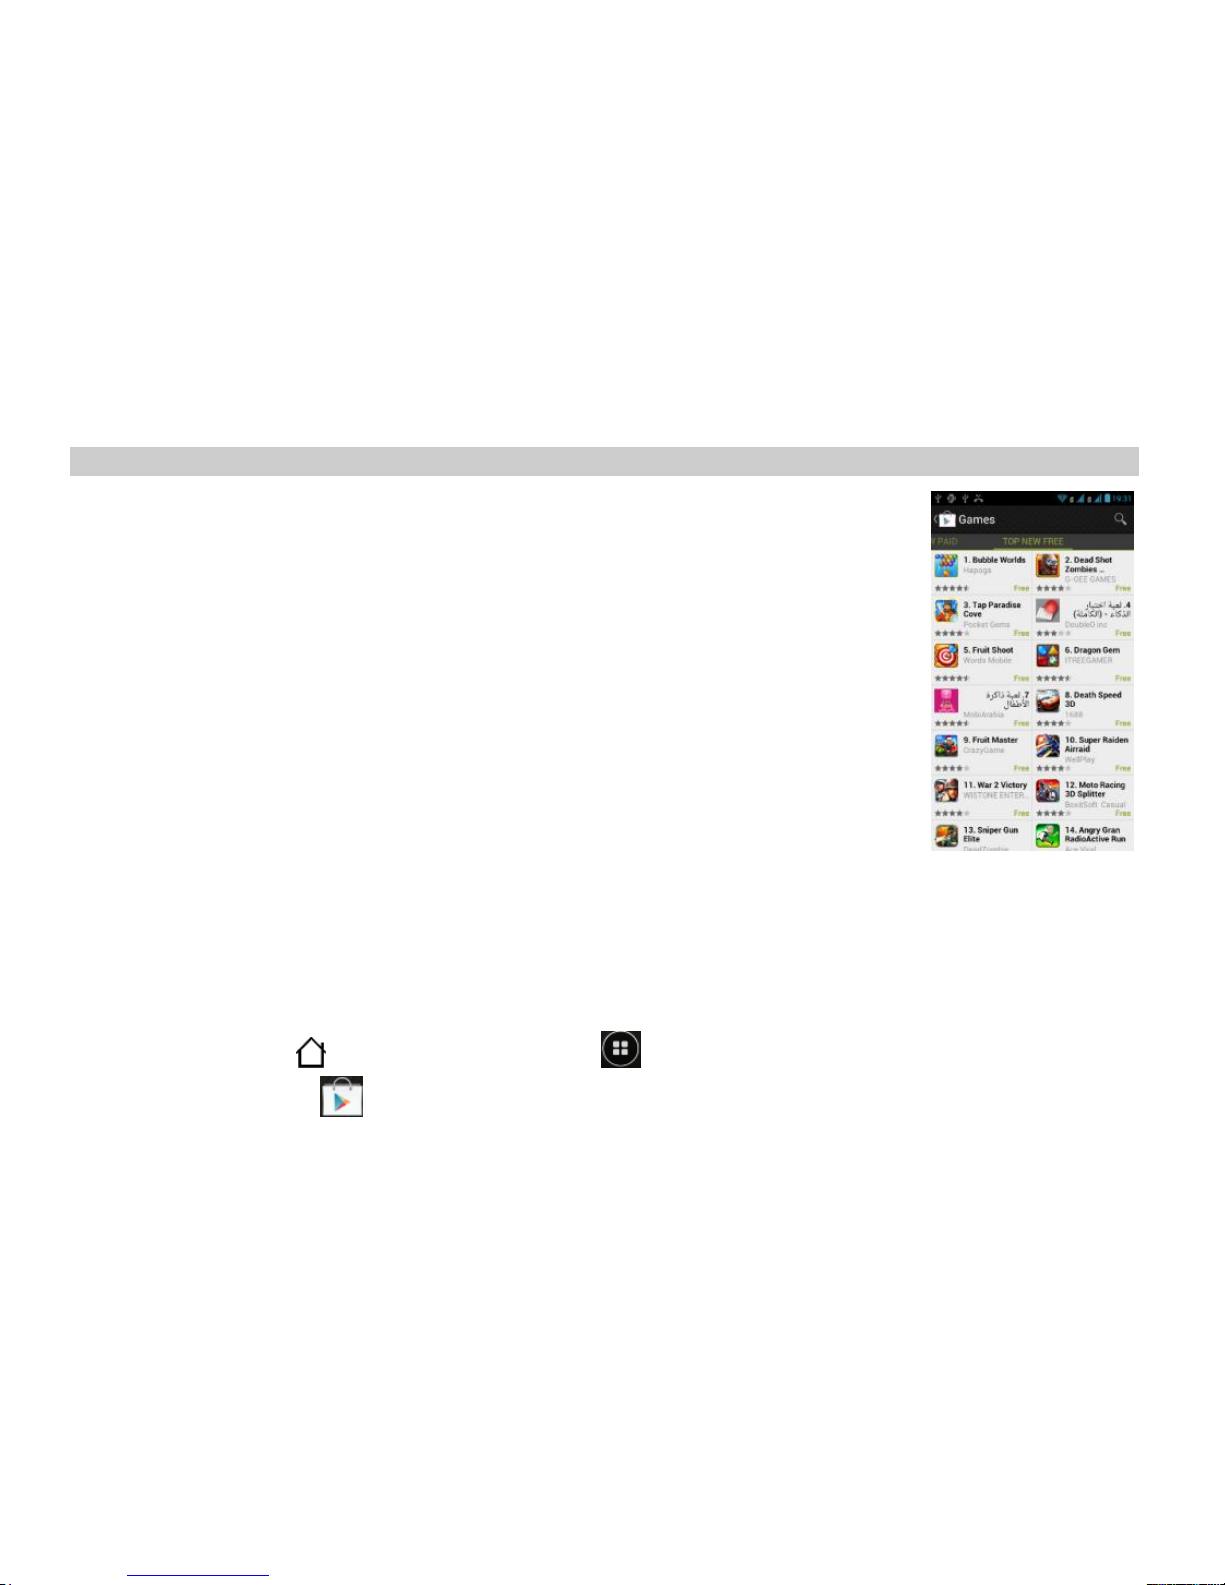
Android Market™ provides you with direct access to software developers
throughout the world. It is the place to go to find fun games and cool
applications.
Browse contents
When you first enter Android Market, you will see featured items, a list of item
categories, a link to search, and a link to My downloads.
Scroll through the featured items or select a category to browse its contents,
then select a subcategory. Within each subcategory you can select to view
items sorted By popularity or By date.
Note that all items in a subcategory are listed in each tab; those in the By
popularity tab are sorted most popular to least popular, and those in the By
date tab are sorted newest to oldest. You can also search for specific application by its name using
the search box on the top of the play store application.
To access:
1. Connect to the internet through network operator CDMA/EVDO or GSM GPRS/EDGE, or Wi-Fi
Connection.
2. Press HOME , then tap the applications button.
3. Tap Play Store .
Page 54
49
Social Networks
Facebook
Facebook for Android application
The Facebook application on your phone lets you keep up and stay close with your friends in
Facebook.... It offers most of the features that you are familiar with when using Facebook on your
computer, such as like, comment, share, …etc.
Press HOME , applications and then tap Facebook.
If this is your first time to use Facebook, follow the onscreen instructions to sign in to your Facebook
account.
YouTube
YouTube is a free online video streaming service that allows anyone to view and share videos that
have been uploaded by the YouTube members. You do not need a YouTube account to browse and
view videos.
Watch YouTube videos
1. Connect to the internet through network operator or Wi-Fi Connection.
2. Press HOME , then tap the applications button.
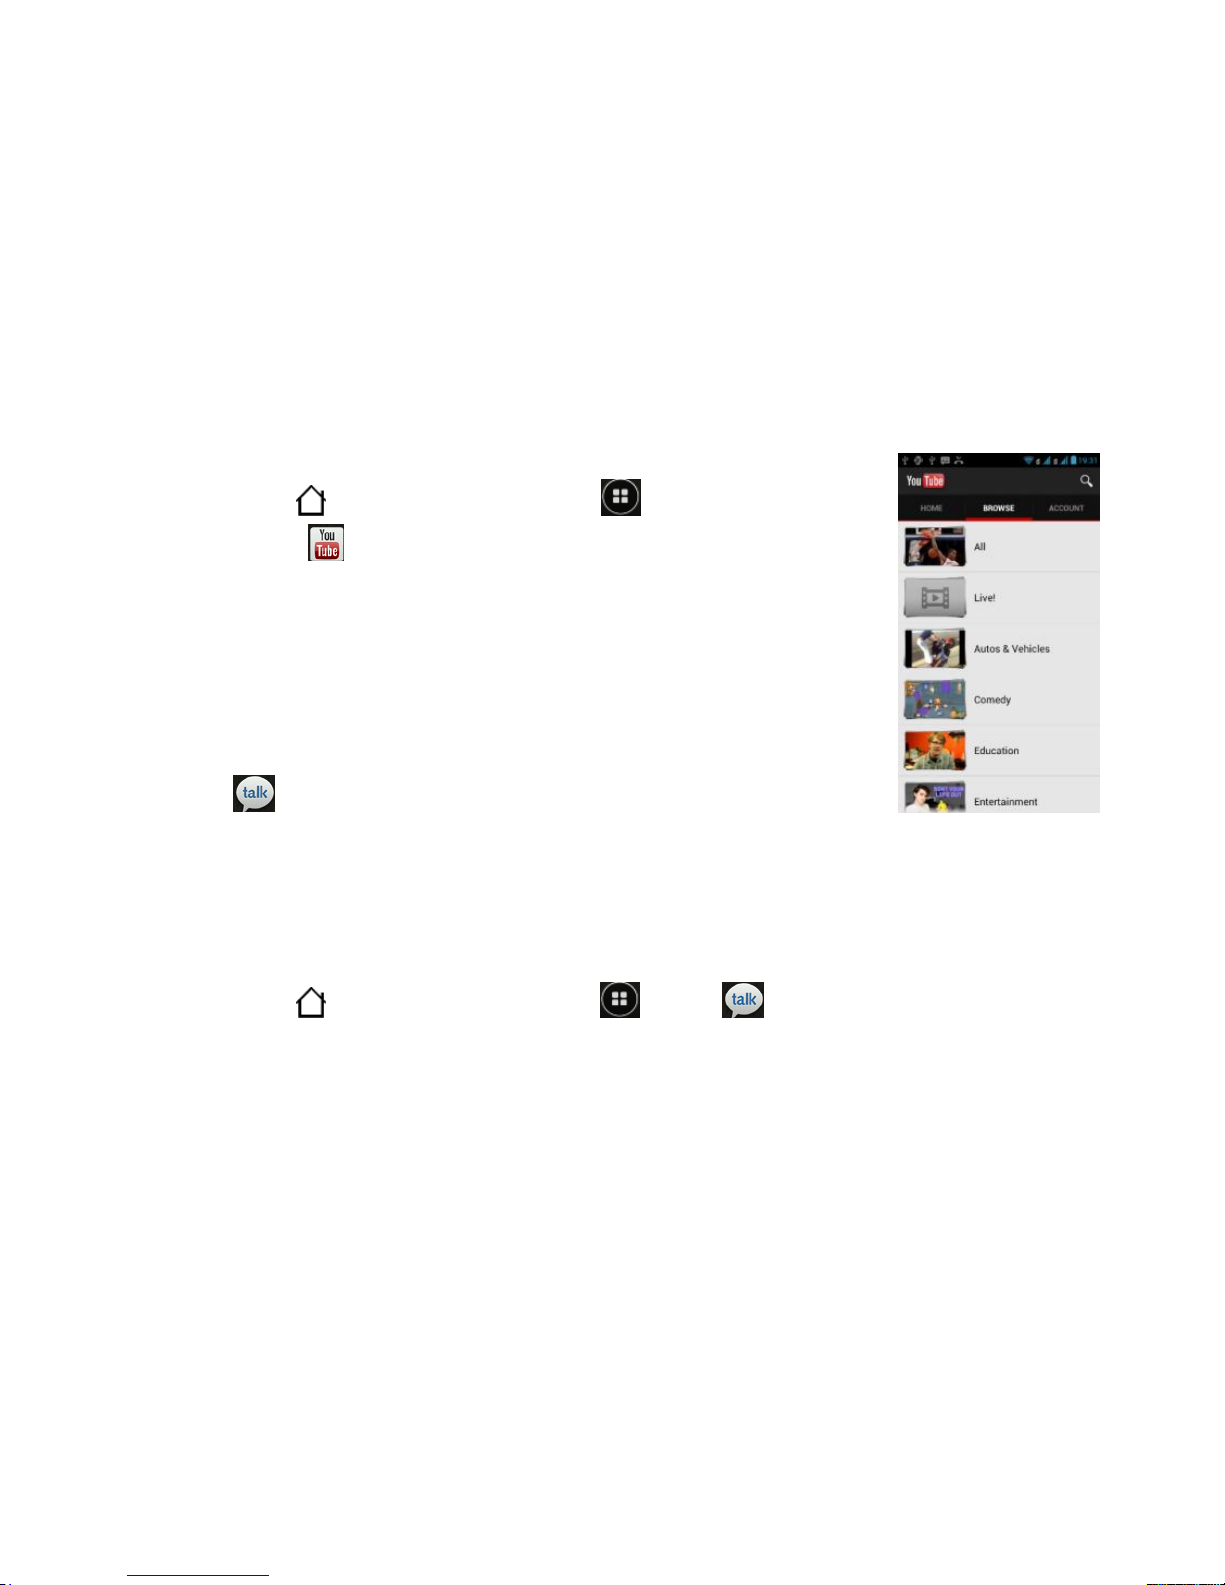
3. Tap YouTube . The main YouTube screen appears showing popular video categories.
4. Tap the category and the video in that category.
Page 55
50
Search for YouTube videos
1. Press HOME , then tap the applications button.
2. Tap YouTube . The main YouTube screen appears showing
popular video categories.
3. Press the Menu key.
4. Tap Search.
5. Open the display to reveal the keyboard.
6. Type your search.
7. Tap Search.
Google Talk
Google Talk is Google’s instant messaging program. It lets you communicate and make voice and
video chat with other people that also use Google Talk.
Signing in to Google Talk
If you signed in to your Google Account when you first set up the phone, you are already signed in to
Google Talk.
1. Press HOME , and tap the applications > Talk > Sign in.
2. Enter your Google Account username and password, and then tap Sign in.
When you are signed in to Google Talk, your online status in Google Talk will also appear in
other Google Apps such as Gmail/Google Mail and Google Maps.
Page 56

51
Signing out of Google Talk
If you are not going to use Google Talk for an extended period of time, we recommend that you sign
out of Google Talk to save battery power; in the Friends list, press MENU, and then tap More > Sign
out.
Page 57
52
110
0
TToooollss
VEGA IV DM-994 from Brava has several tools to help you organize your daily life such as Alarm
clock, Calendar, Calculator and you can install many other tools that may help you from Play Store.
Alarm clock
To add an alarm, press Home > Apps> Clock> Set alarm, then
Add Alarm, enter alarm details.
To turn on an alarm, tap the check box.
When an alarm sounds, select Dismiss to turn it off or tap the screen to
snooze for five minutes.
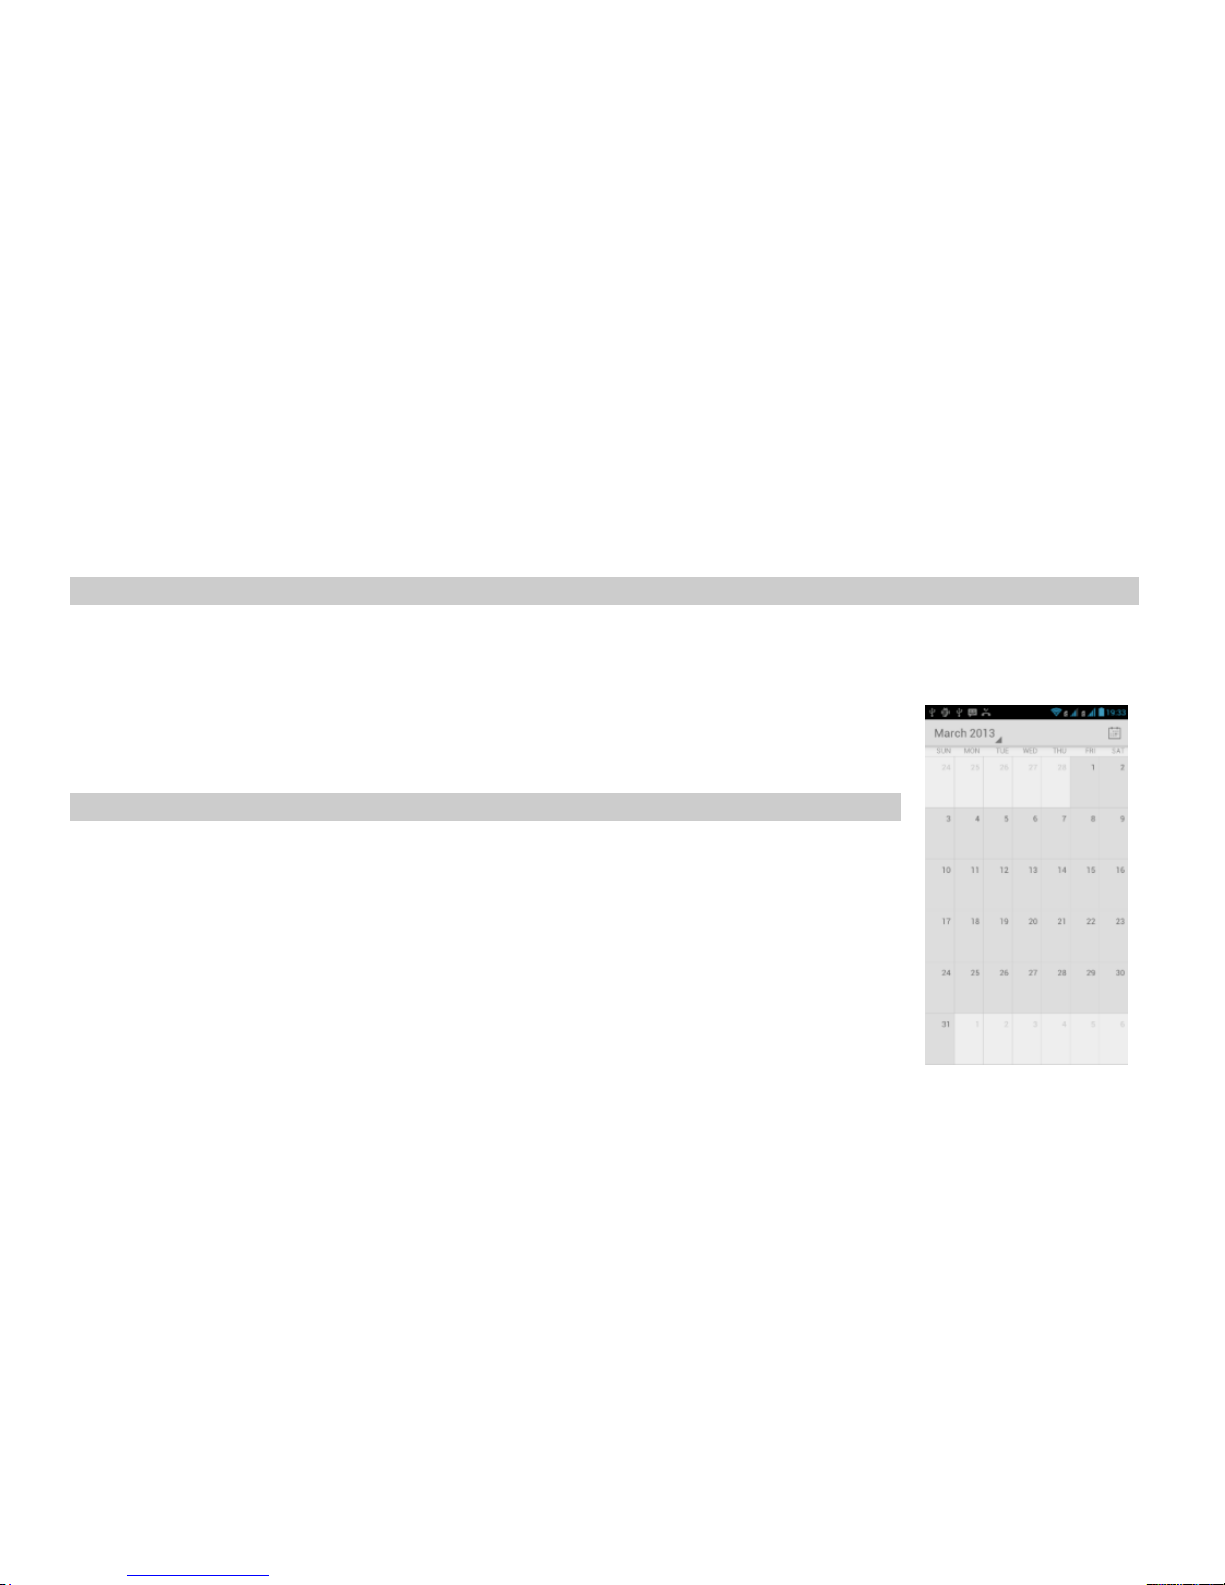
Calendar
Your calendar events can be viewed in different ways:
Tap > Agenda, Day, Week, or Month.
When you tap an event, more details appear.
Tip: Add a calendar widget to your home screen by taping and holding the
Calendar Widget and drag it into an empty space in the HOME screen.
Add calendar events
In the Calendar screen tap MENU, Chose New Event. Enter the event details like the name, start
time and other. set a reminder so you don’t forget the event.
Page 58

53
(When you set the reminder time to 1 minutes, it plays Alarm before 1 minute of the event start
time.)
Tip: Reminders will play only if you’ve selected a notification ringtone.
When you finish entering event details, tap DONE.
Calculator
Your calculator has basic and advanced views. To change views, press Menu > Advance
panel/Basic panel. To clear results, press clear button.
Simple torch
Your phone has simple torch application help you to light up the darkness condition using the dual
flash light.
Viewing documents
You can browse and edit your different documents such as word file, Excel, PDF, and power point by
using the different available applications for the Android operating system in the Google Play Store,
such as Kingsoft Office and Quick Office
Page 59
54
111
1
CCaammeerraa
Camera Basics
Whether traveling for business or fun, enjoy taking photos and videos of your trip and encounters
with your phone’s 5MP camera with the Auto Focus function.
Photos and videos captured with the camera will be stored onto internal SD card or external microSD
card, according to the selected default storage in the Storage settings.
To open the camera in photo mode and take photos, press HOME , applications and then
tap Camera icon .
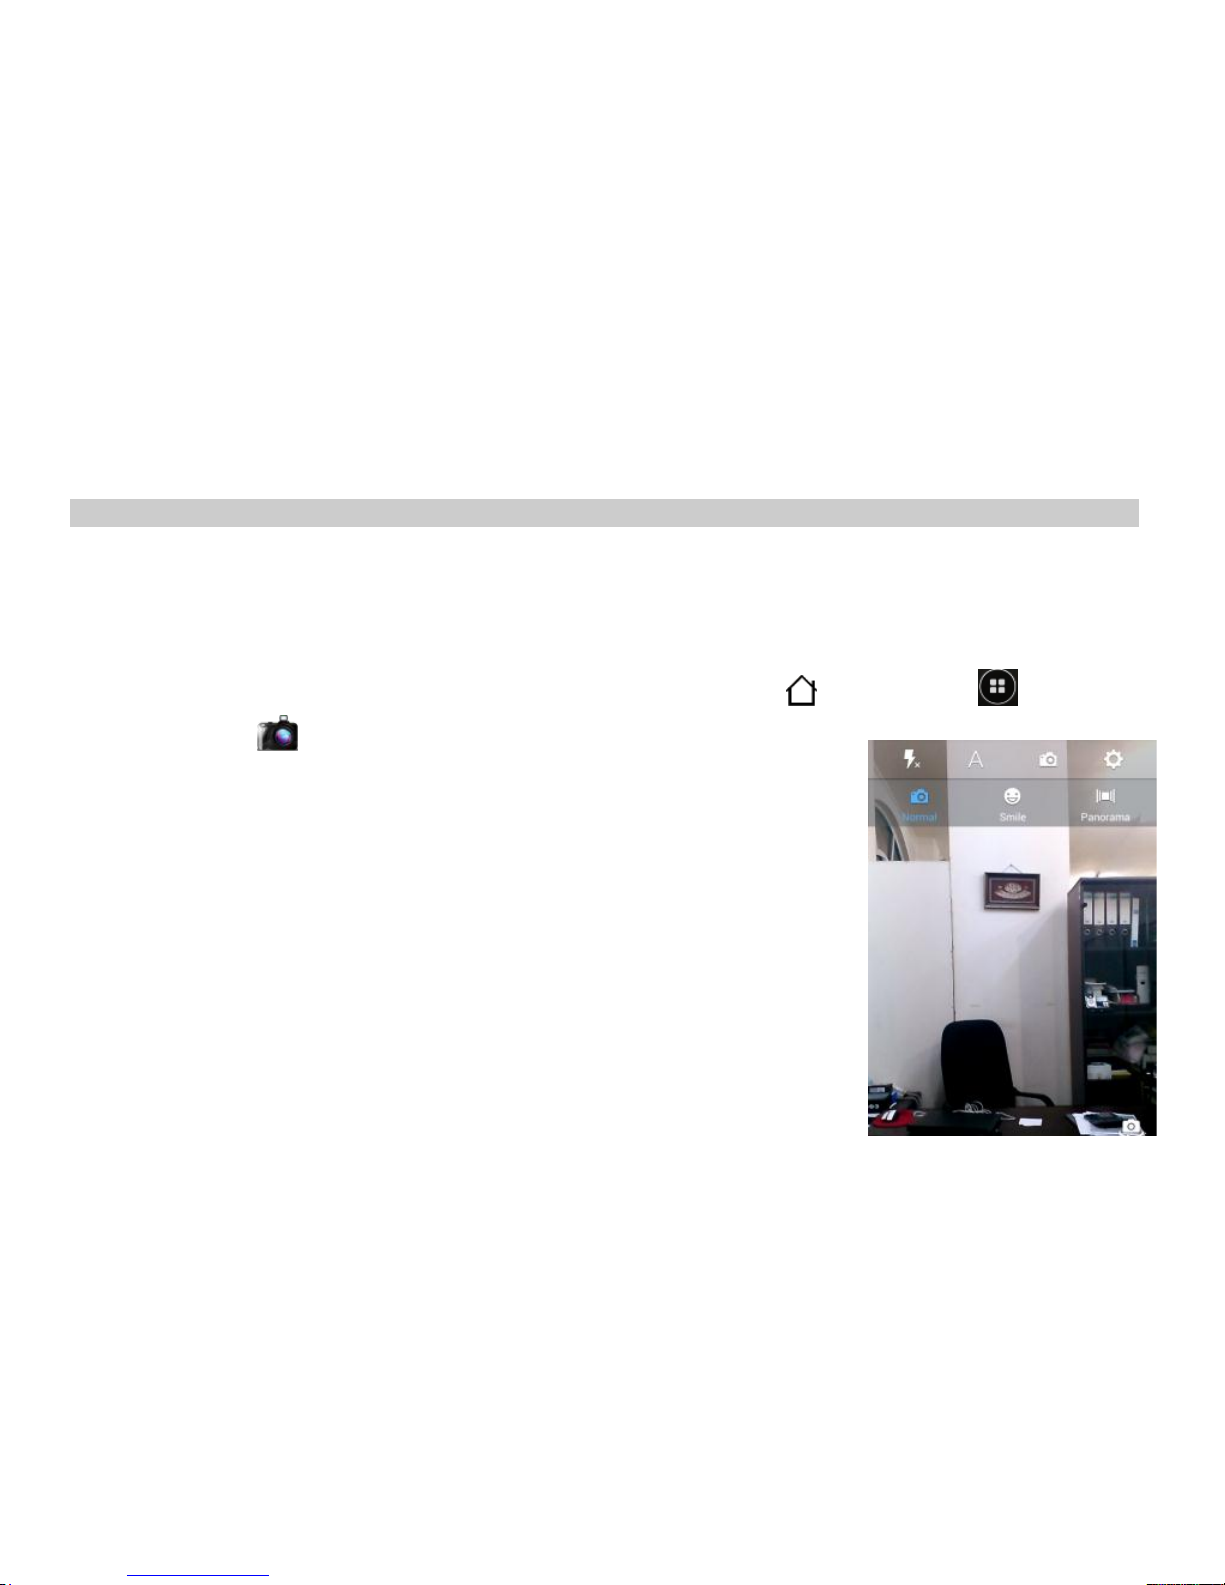
Viewfinder screen
When in photo mode, the Viewfinder automatically
rotates to match the direction you’re holding
your phone. This lets you easily capture photos
in portrait or landscape orientation.
Page 60
55
Taking a photo
press HOME , applications and then tap Camera icon .
On the Viewfinder screen, tap the options as follow:
Zoom: Before taking the photo, you can zoom in first on your subject.
Flash mode: set the flash light on , off or auto.
Exposure: Increase or decrease the amount of aperture time.
Captured Sound: Set the capture sound on or off.
Scene mode: Set the Scene mode to Action, night or Auto.
Settings: Set different settings for camera like Picture size, Focus mode, Face Detection, Colour
effect, anti Banding and Restore defaults.
Select the camera: to change between the front camera or back camera.
Capturing a video
press HOME , applications and then tap Camera icon ..
in the camera screen, you can switch to the camcorder mode by taping the camcoder
button.
If your subject is dimly lit, tap the Flash button
on the Viewfinder screen turn on the camcorder flash.
You can also set other options as follows:
Page 61

56
Zoom: you can zoom in/out during capturing the video.
Flash mode: to turn on the camcorder flash.
Record Sound: Set the capture sound on or off of starting and ending the recording.
480P: to set video quality SD(720x480), high, low and MMS low.
Settings: Set settings for camera like anti Banding and Restore defaults.
Select the camera: to change between the front camer or back camera.
Page 62
57
112
2
GGaalllleerryy
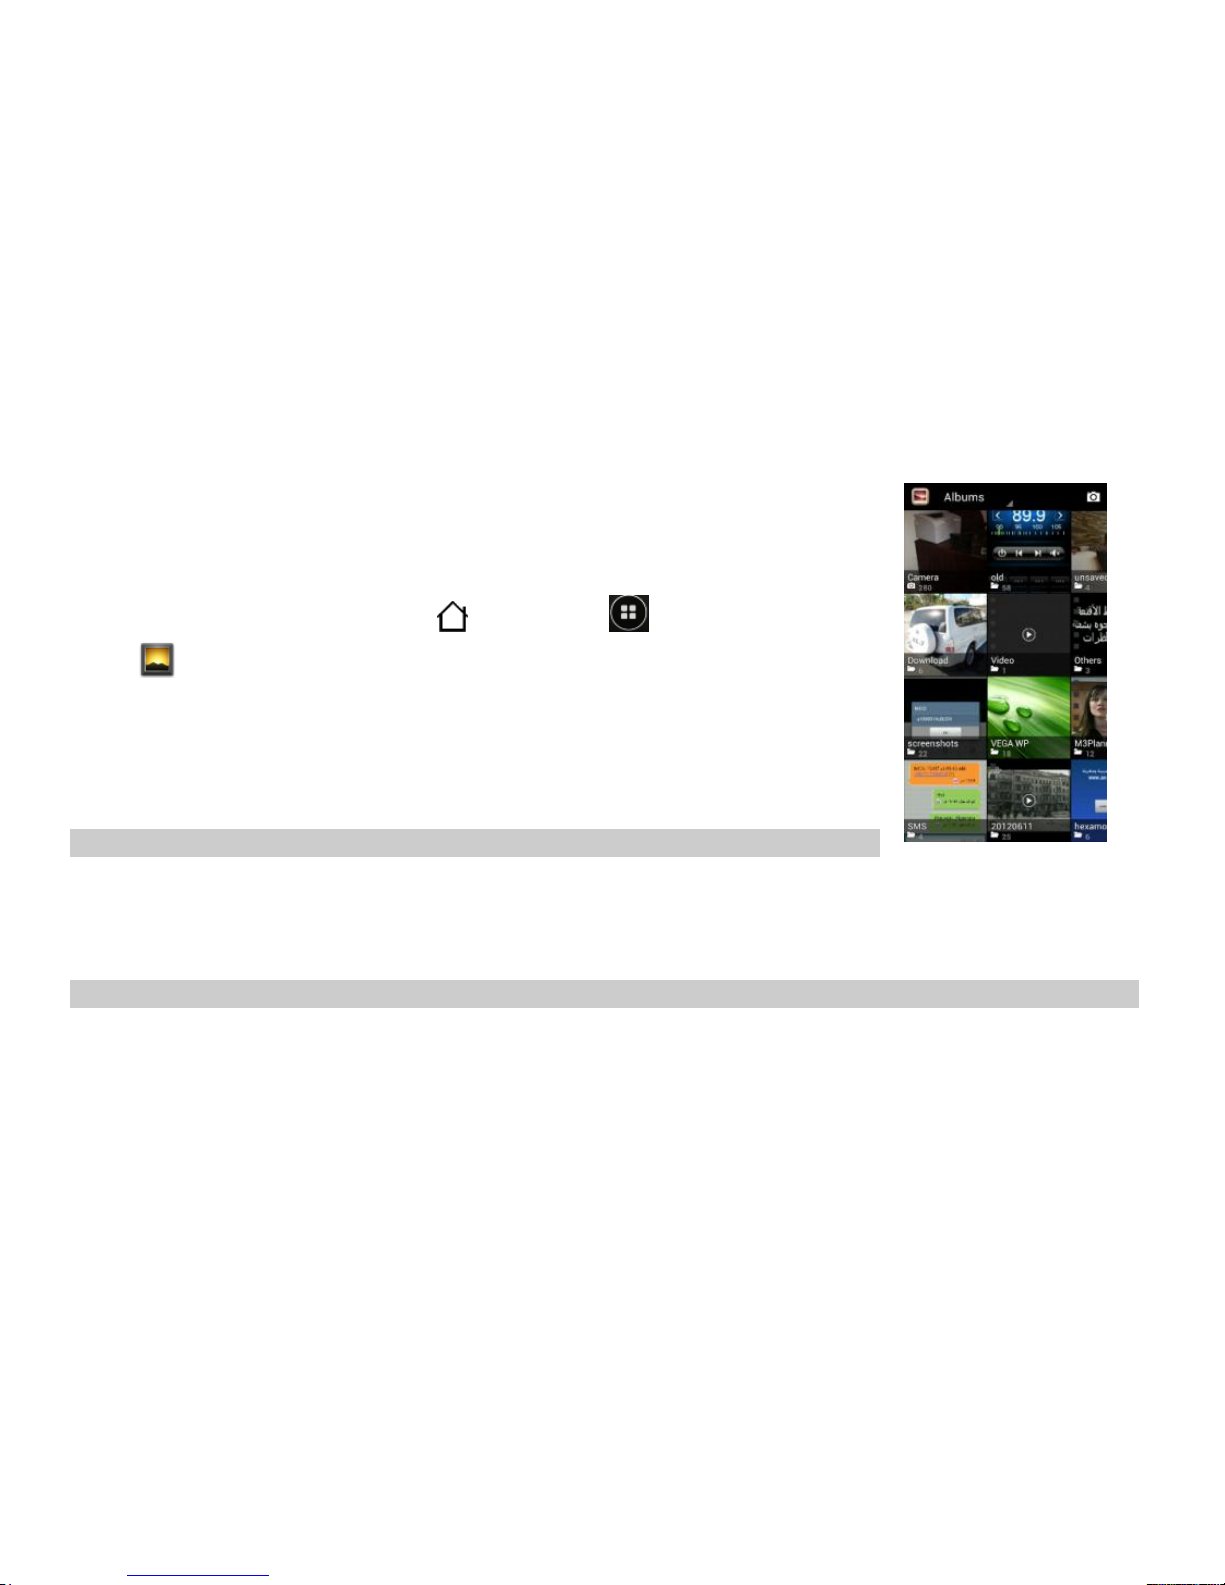
By using the Gallery application, you can view photos and watch videos that
you’ve taken with your phone’s camera, downloaded, or copied onto your
storage card.
To open the Gallery, press HOME , applications and then tap Gallery
icon .
For photos that are in your storage card, you can do basic editing such as
rotate and crop. You can also easily make a photo as your contact picture
or wallpaper and share photos with your friends.
Simply tap an album to view the photos and/or videos in that album.
Viewing photos and videos
After selecting an album from the Gallery application’s Albums screen, you can browse through the
photos and videos of that album either in filmstrip or grid view. Tap a photo or video to view it in full
screen.
Watching video
The screen automatically switches to landscape mode when you play a video. Use the onscreen
controls to play, pause, or stop the video. The video is displayed in full screen size.
Page 63
58
113
3
MMuussiicc
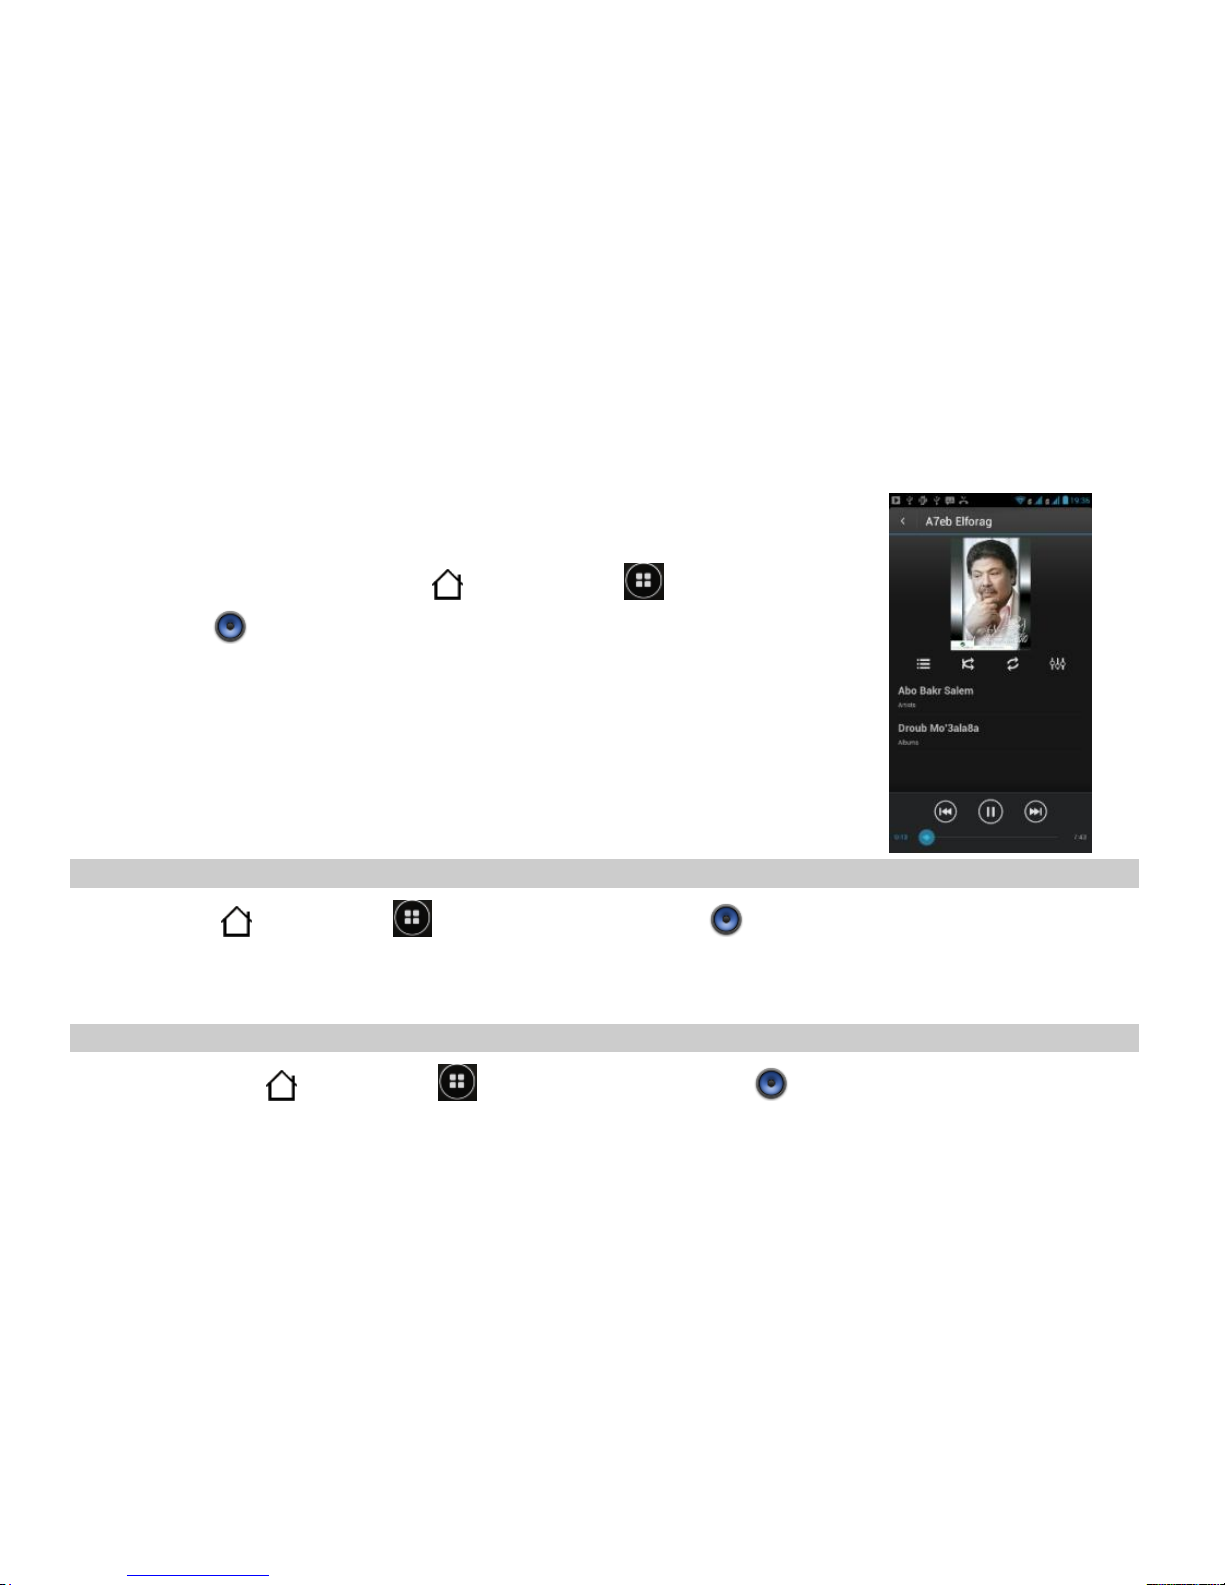
Enjoy listening to songs and music on your phone using the Music
application.
To open the Music, press HOME , applications and then tap
Music icon .
Your music is organized into four categories: Artists, Albums, Songs,
and Playlists. Select a category to view the lists within each.
Once in a category, keep selecting until you reach the music you want to
play. For example, if you select the Artists category, you will see a list of
artists in A–Z order. If you select an artist, the list opens to display that
artist’s albums. Select an album, and the album’s song list displays.
Access and play music
Press HOME , applications and then tap Music icon .
Tap Songs. You can also tap Artists, Albums, or Playlists.
Tap the song to play.
Add songs to new playlist
1. Press HOME , applications and then tap Music icon .
Page 64
59
2. Tap Songs.
3. Tap and hold the song that you want to add to the playlist, tap Add to playlist.
4. Tap New, slide open the display to reveal the keyboard.
5. Type the name for the playlist.
6. Tap Save.
You can easily add a song as your ringtone. Tap and hold the song and then select Use as phone
ringtone.
Delete playlists
1. Press HOME , applications and then tap Gallery icon .
2. Tap Playlist.
3. Tap and hold the playlist you want to delete, tap Delete.
Page 65
60
114
4
MMaappss aanndd llooccaattiioonn
Using Google Maps
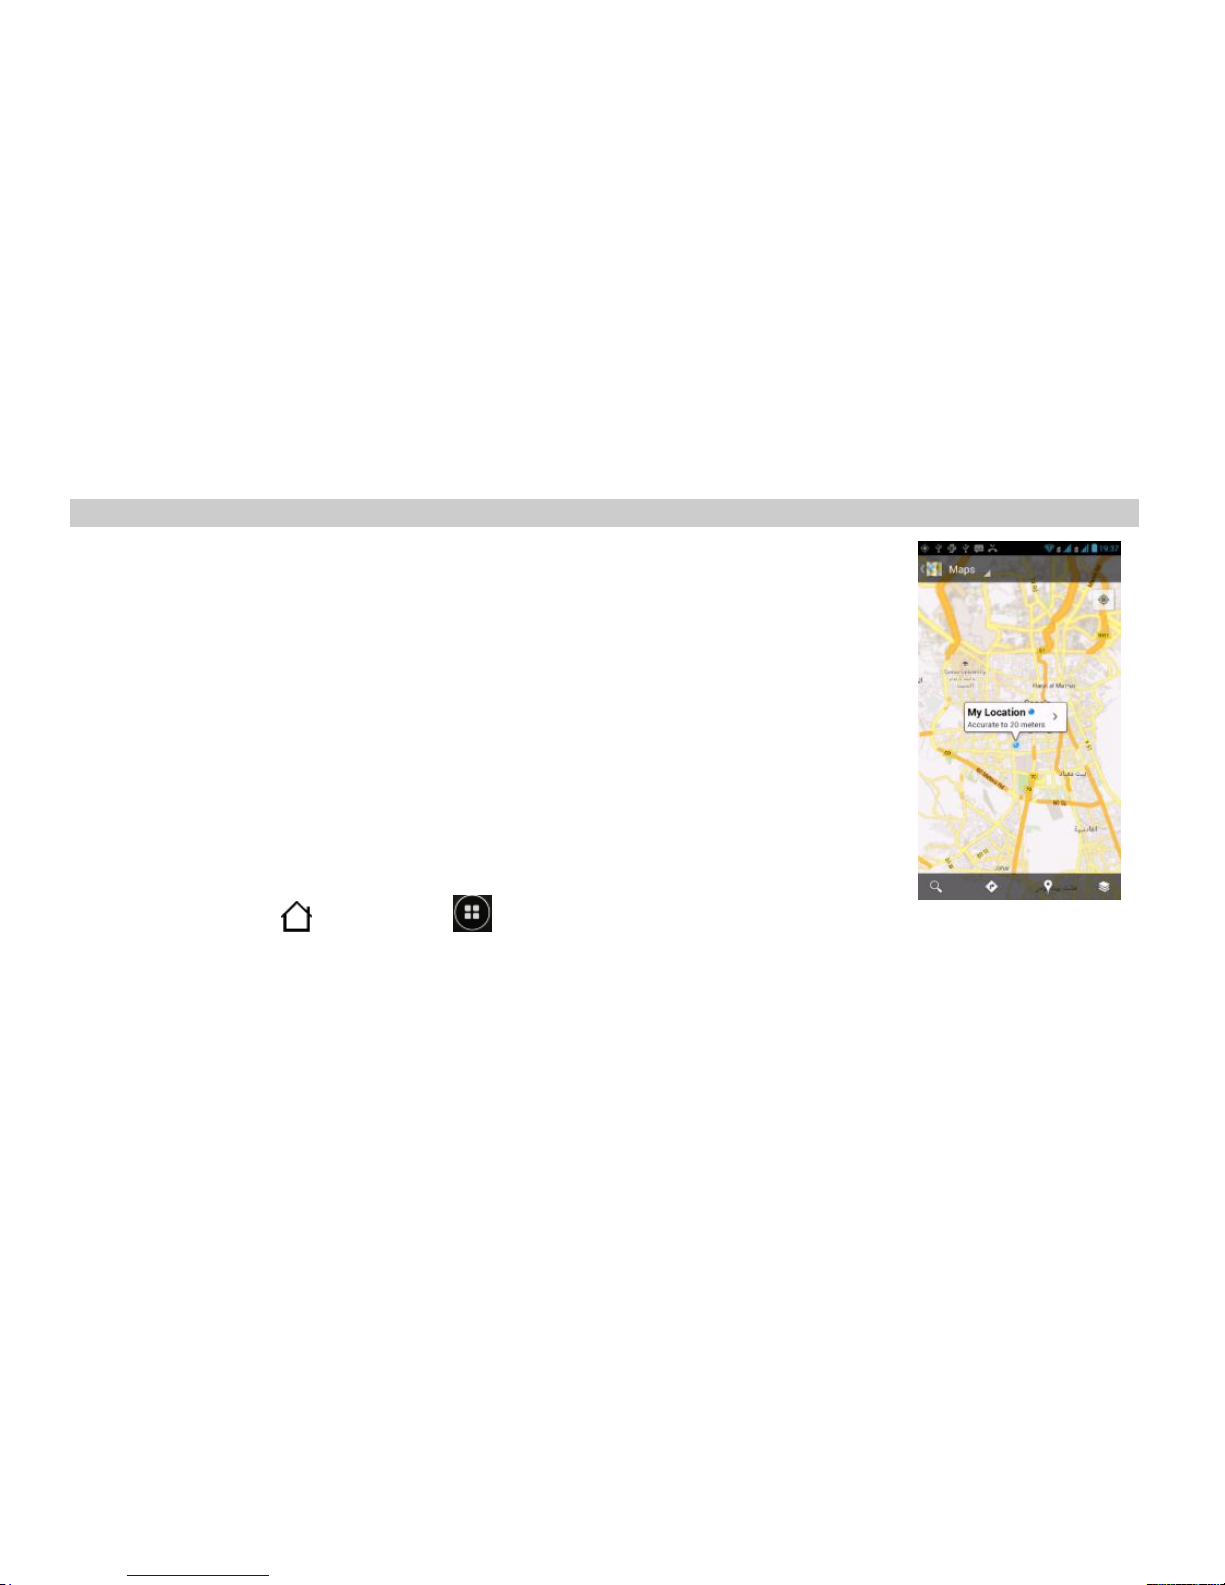
Google Maps lets you track your current location, view real-time traffic
situations (depends on the service availability), and receive detailed
directions to your destination. It also provides a search tool where you can
locate places of interest, or view locations in street level.
You need an active mobile data or Wi-Fi connection to use Google Maps.
The Google Maps application may not covering every country or city.
Viewing locations
Turning on location services
Before you open Google Maps and find your location or search for places of
interest, you must enable location sources.
1- Press HOME , applications and then tap Settings > Location services.
2- Select Use network, Use GPS satellites, or both.
Selecting Use GPS satellites lets you locate places of interest at street level. However, this
requires a clear view of the sky and more battery power.
Page 66

61
Finding your location
Press HOME , applications and then tap Maps .
On the Google Maps screen, tap My Location, then Your location will be shown on the
map as a blinking blue dot according to the results coming from the GPS Cordinates.
Page 67
62
115
5
WWiirreelleessss ccoommmmuunniiccaattiioonn
Wi-Fi Connection
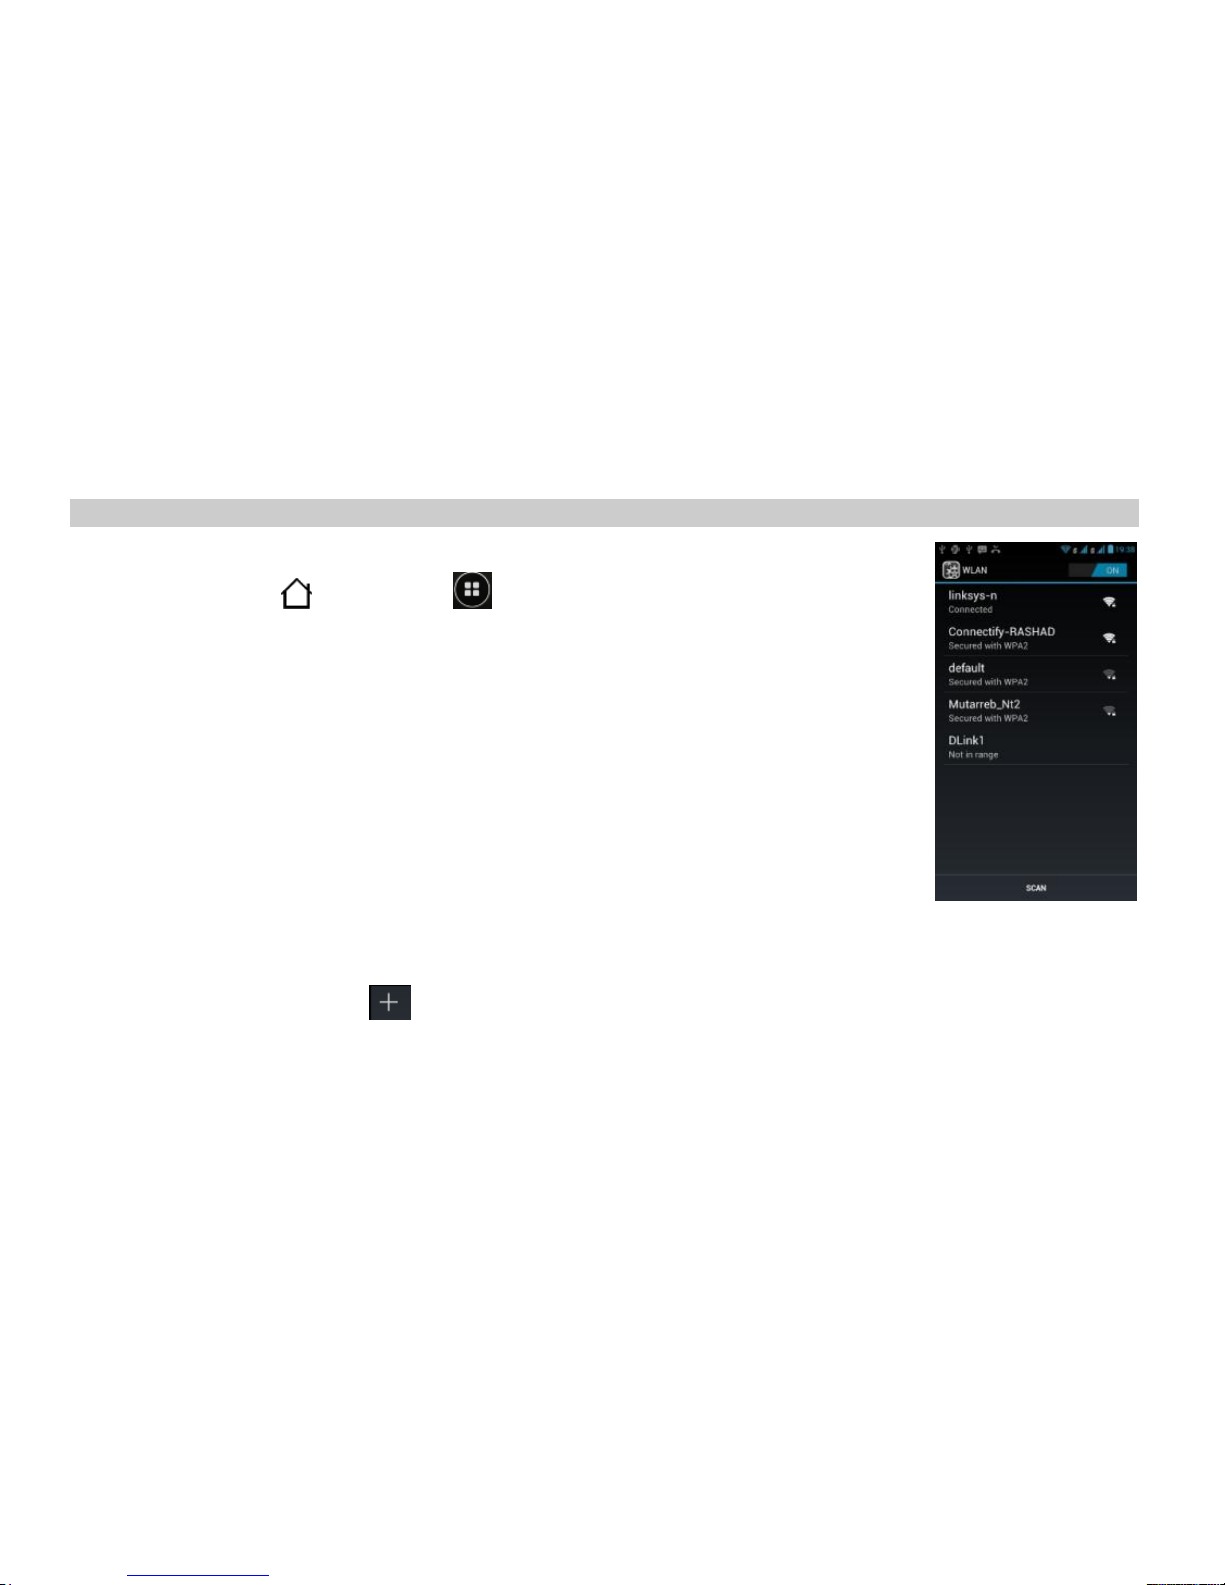
Your phone can connect to Wi-Fi ntworks. To connect:
1. Press HOME , applications .
2. Tap Settings.
3. In the Wireless & networks.Tap WLAN right button to turn it on. Tap the
WLAN to open WLAN settings
4. Your phone will scans for the available Wi-Fi networks.
5. Tap the Wi-Fi network that you want to connect to.
6. Tap Connect. If the network is secured, then you will be required to
enter the network lock key. If the network requires static IP address then
from the advance options.
Another way to turn on Wi-Fi
Tap the status bar at the top of the Home screen and drag it down. Tap the WLAN icon to turn it on.
Manually add your new network connection
1. Tap Add network
2. Enter the Network SSID. This is the name of your
Wireless Access Point.
3. Tap the Security field and select a security option. This
Page 68

63
must match the current security setting on your target
WAP.
4. If secured, you will also need to enter your WAP’s
Password.
5. Tap save to store the new information and connect to your target WAP.
Manually Scan for a Wi-Fi Network
1. From the Home screen, tap ➔ Settings ➔ Wi-Fi.
2. Tap Scan.
All available Wi-Fi networks are displayed.
Wi-Fi Advanced Settings
The Wi-Fi settings - Advanced menu allows you to set up
many of your device’s Wi-Fi service, including:
Network notification when an open network is available.
Setting your Wi-Fi sleep policy
Avoid poor connections
Viewing your device’s MAC and IP Address.
Page 69

64
Wi-Fi Direct
Wi-Fi Direct allows device-to-device connections so you can
transfer large amounts of data over a Wi-Fi connection.
1. From the Home screen, tap ➔ Settings ➔ Wi-Fi ➔ Options
2. Tap Wi-Fi Direct.
3. On your phone, tap Searching.
4. The device searching for other Wi-Fi Direct devices
5. Once the device you want to connect to is displayed, tap on it.
Page 70
65
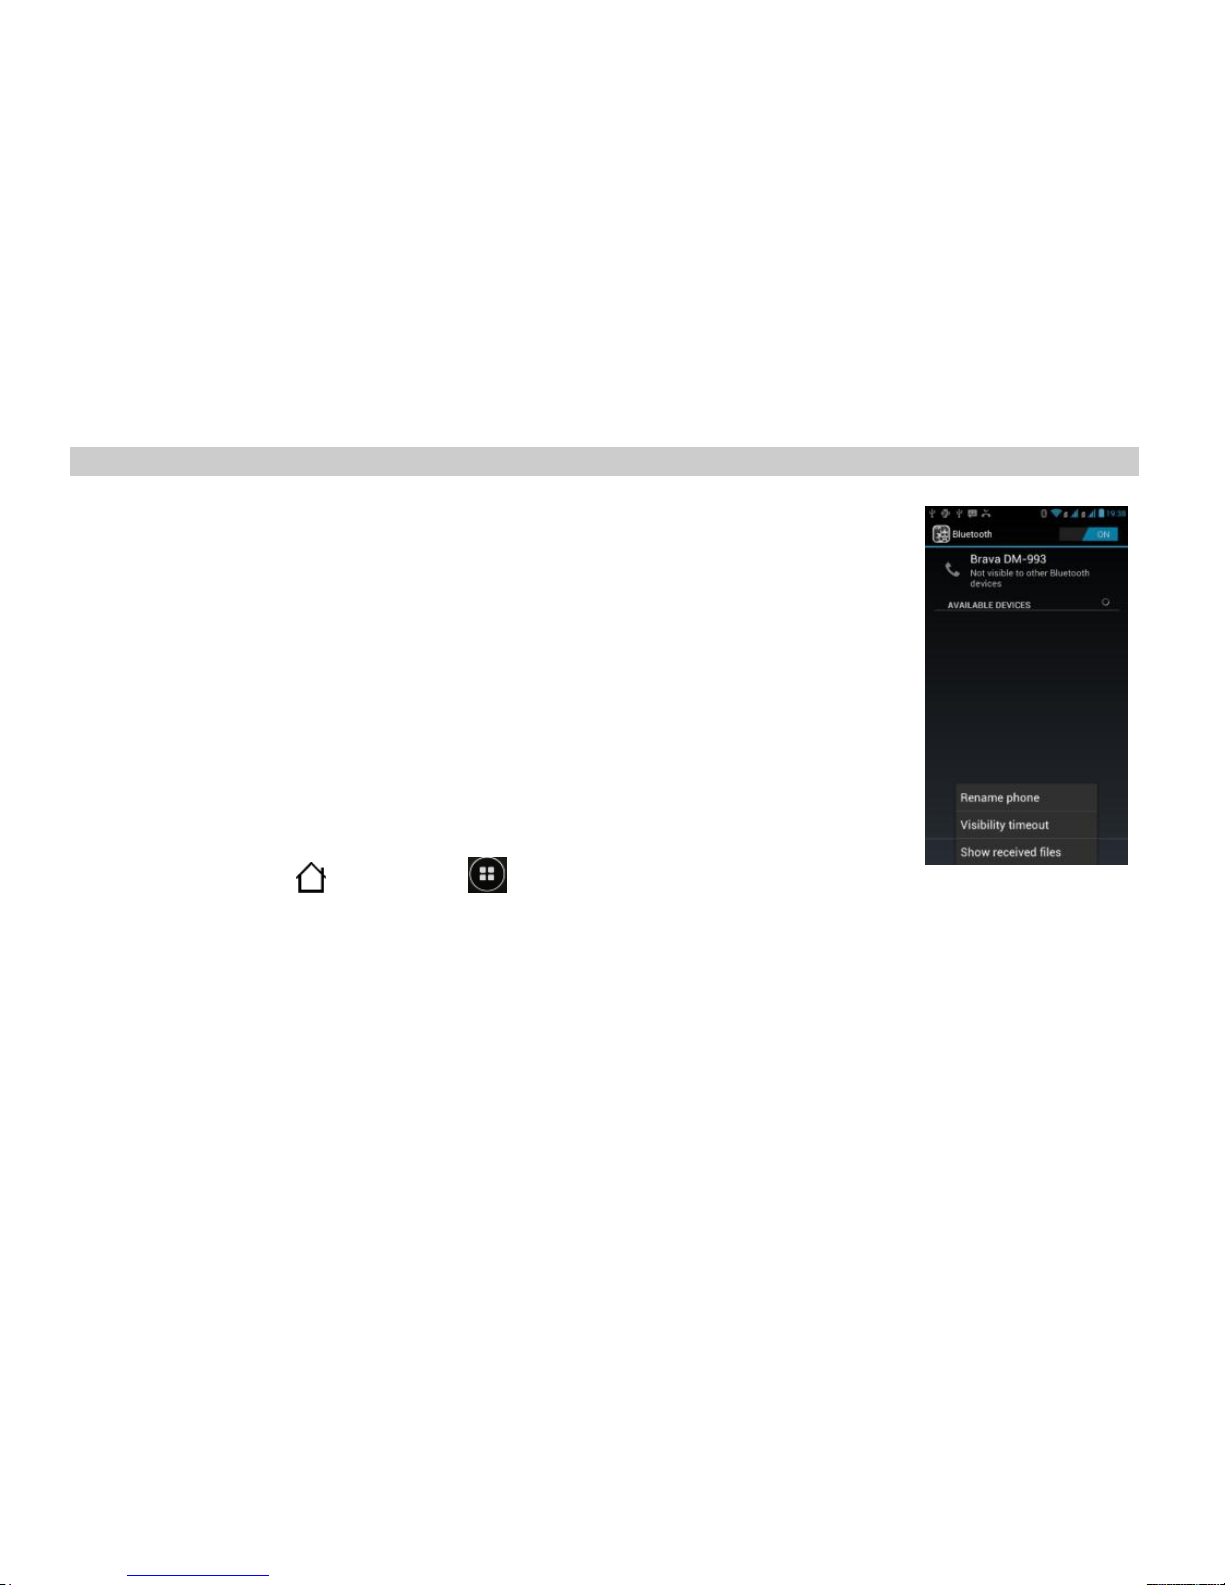
Bluetooth®
Your phone comes with Bluetooth wireless function version 4.0 with low
energy technology BLE, Bluetooth will enable a data connection between your
phone and other Bluetooth wireless devices such as phones, computers and
headsets.
Prepare a Bluetooth wireless headset to pair your phone with a Bluetooth
headset, make sure that your headset is fully charged and that you put the
headset into pairing mode. See your Bluetooth headset’s manual for more
information.
Turn on the Bluetooth feature and pair with a headset
Tap the status bar at the top of the home screen and drag it down. Tap the
Bluetooth icon to turn on the bluetooth function.
1. Press HOME , applications .
2. Tap Settings.
3. In the Wireless & networks,Tap Bluetooth right button to turn it on.
5. Tap Bluetooth. Your phone will scans for available Bluetooth devices.
6. Tap the headset to select it.
7. Slide open the display to reveal the keyboard and type the PIN if required.
8. Tap oK.
Page 71
66
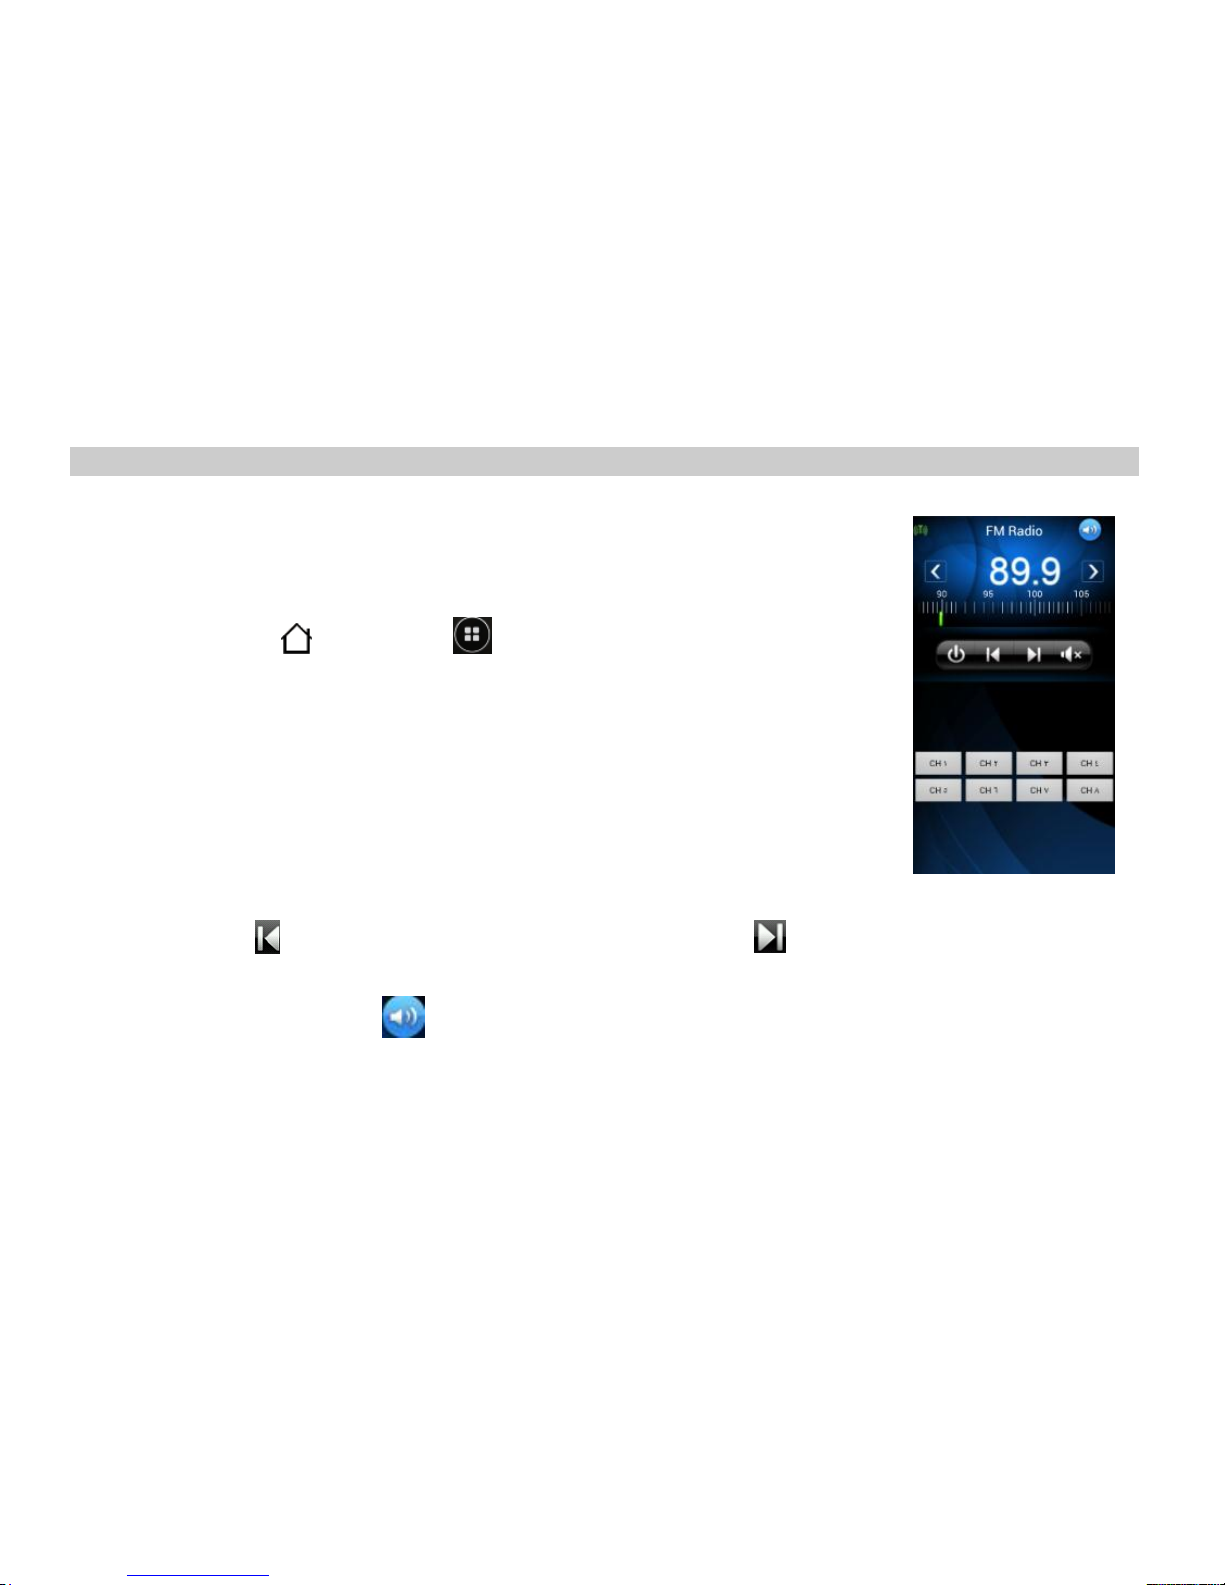
FM Radio
Listening to the radio
FM Radio lets you listen to FM radio stations on your phone.
You need to connect a headset first to the audio jack of your phone to use
FM Radio. FM Radio uses the stereo headset as the FM radio antenna.
1. Press HOME , applications then FM Radio.
2. The first time you open FM Radio, it automatically scans for the
available FM stations, saves them as presets, and play the first FM
station found.
To repeat scanning and saving of FM stations, press MENU, and then tap
Scan & Save.
3. Press BACK to stop the auto-scan.
On the FM Radio screen, you can:
1. Tap any of the down stored frequencies for the station you want to listen to.
2. Tap to go to the previous available FM station, or to the next available FM station.
3. Tap the VOLUME UP / DOWN buttons on the side of the phone to adjust the volume.
4. Tap the speaker icon to switch the speaker on/off.
Page 72
67
116
6
SSeettttiinnggss
The various settings available help you to personalize and optimize your phone.
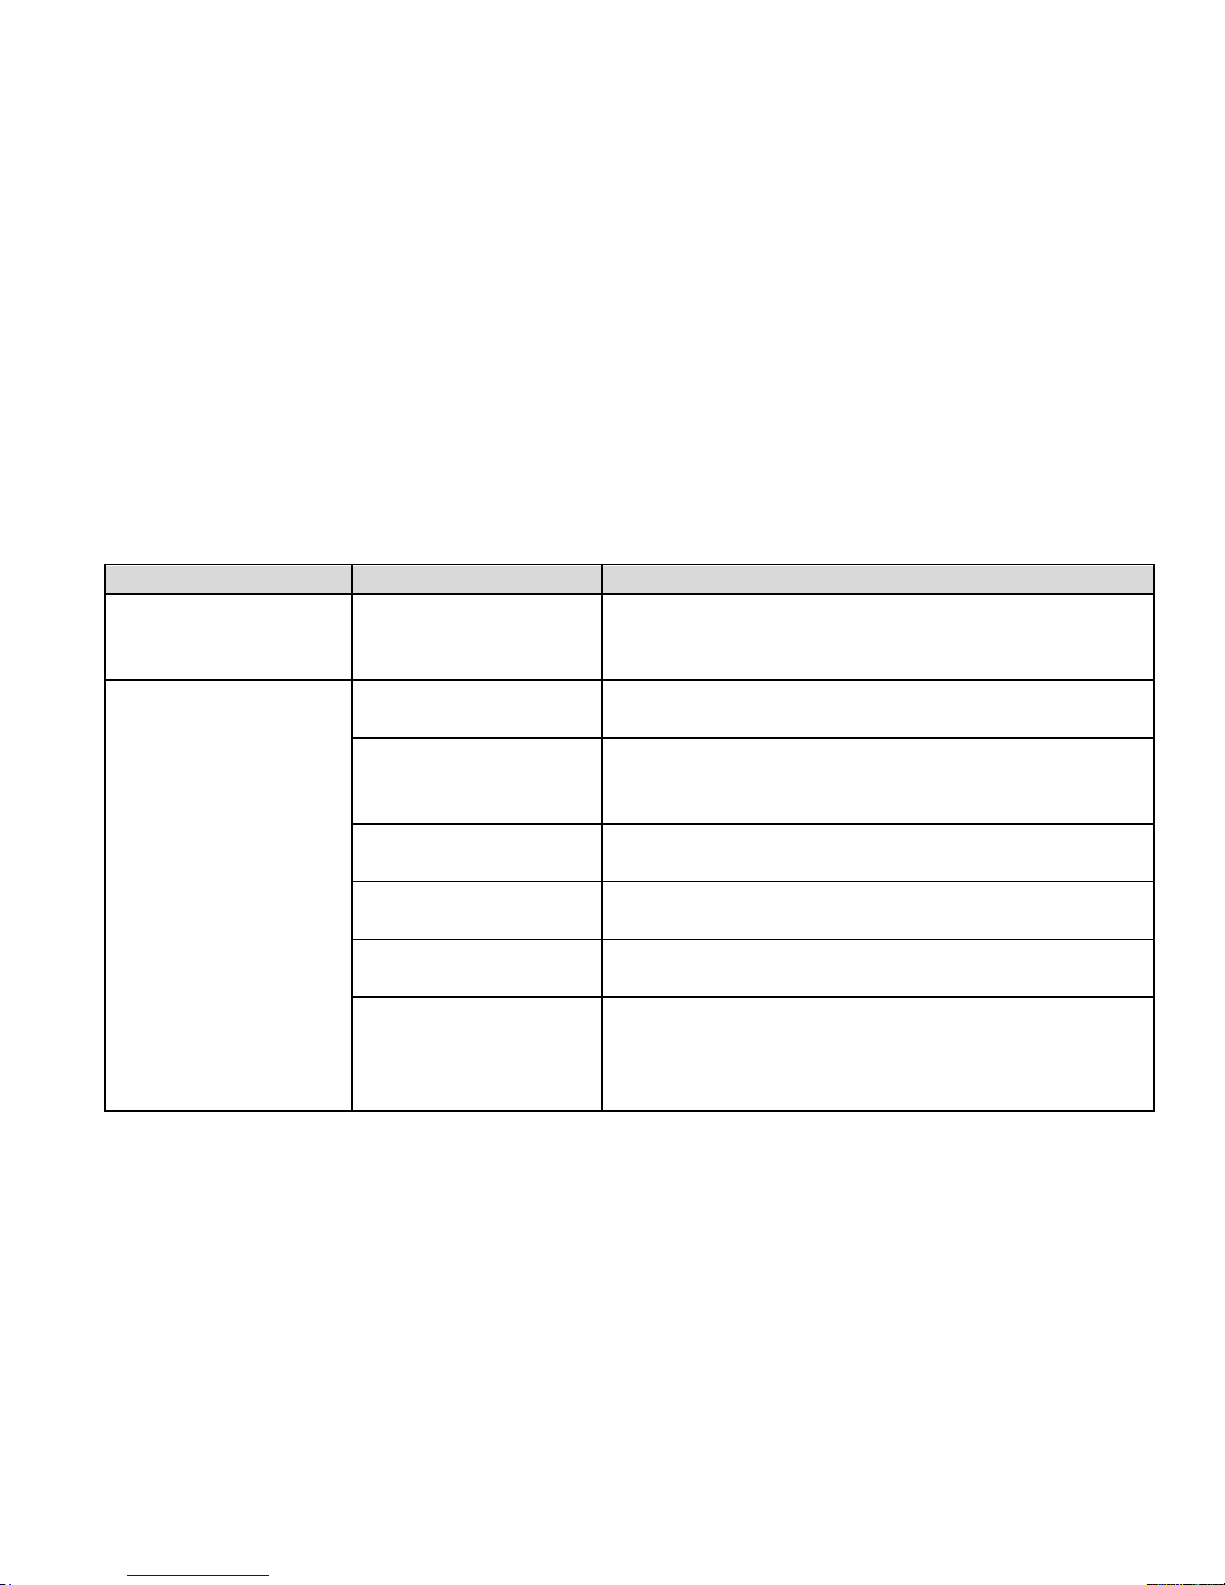
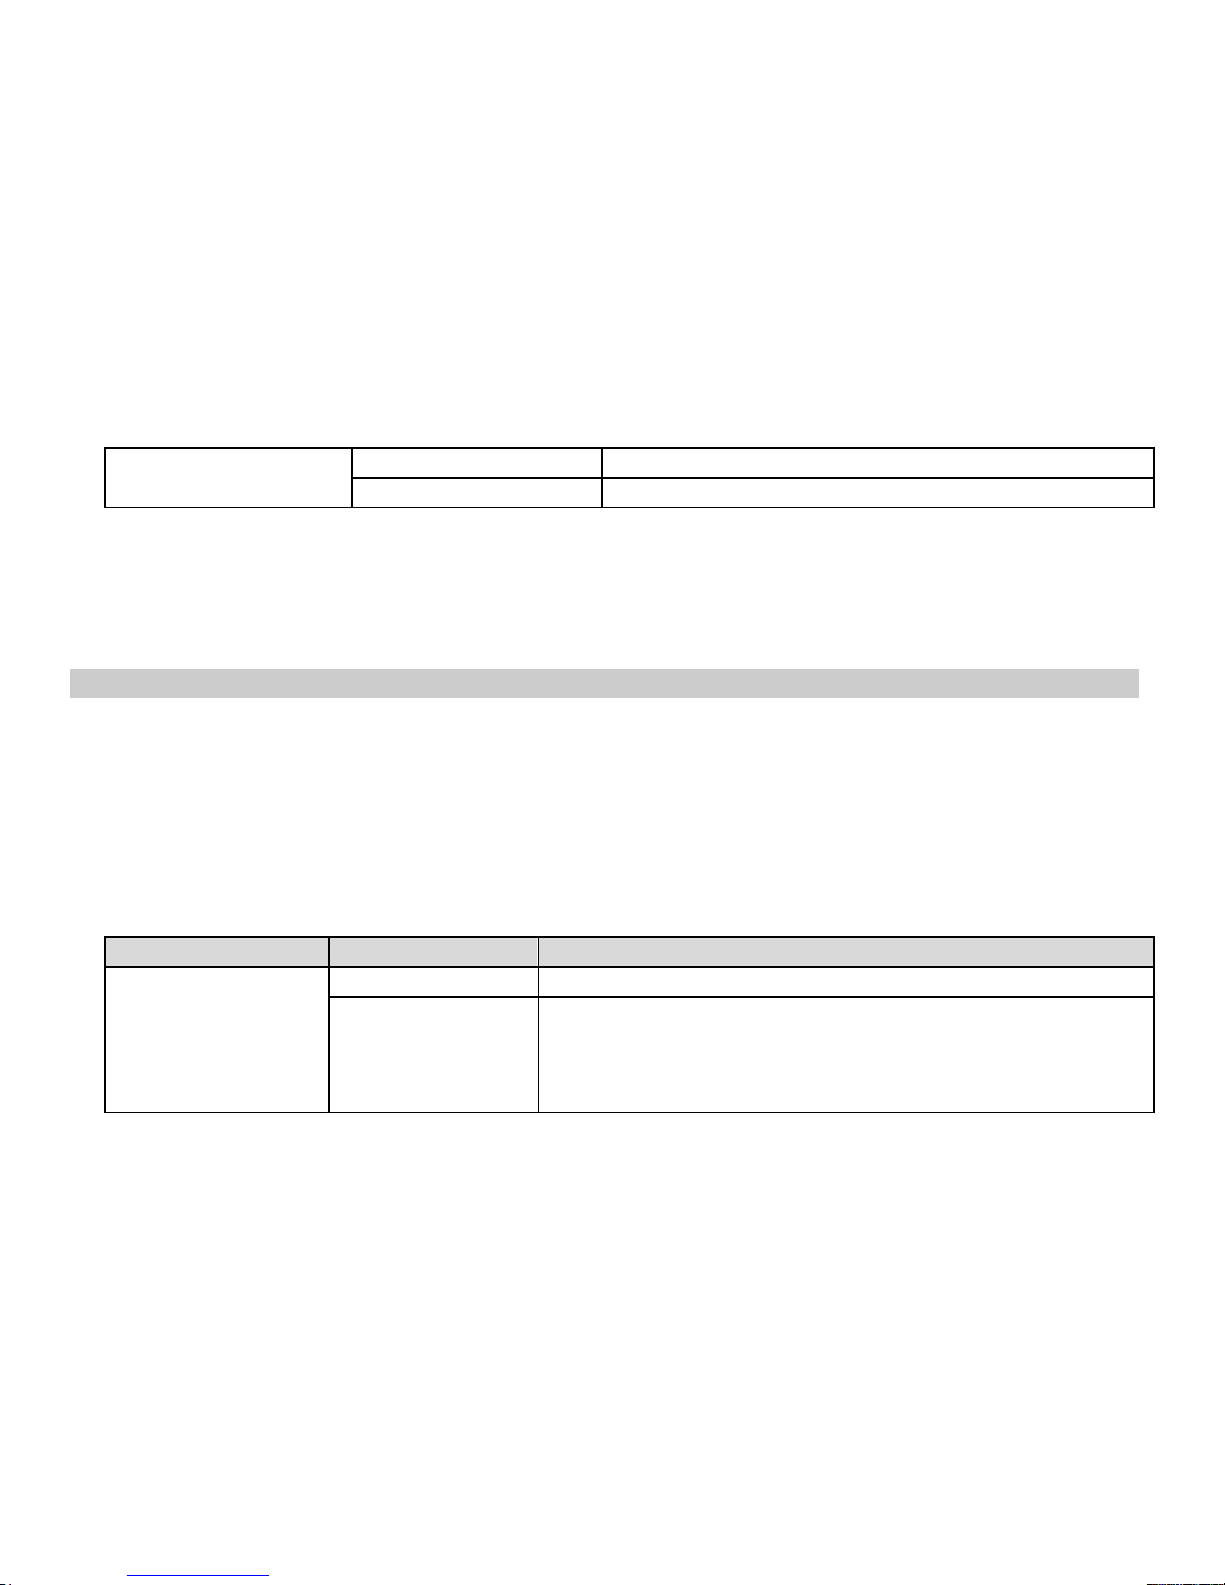
The following table lists the main menu items on the Android Settings screen.
item
Description
Wireless & networks
Wireless & networks
Configure and manage connections to networks
and devices through Wi-Fi, Bluetooth, and mobile
networks.
Device
Dual SIM Settings
Open/Close the connection with the SIM/UIM
Cards networks.
Call Settings
Configure the call settings in both CDMA and GSM
network such as voicemail, call forwarding and so
on.
Sound
Configure the volume level and type; configure
ringtones and alarms.
Display
Configure brightness, wallpapers, and other
screen settings.
Storage
Monitor the used and available space on your
phone internal storage.
Battery
View battery usage for applications and services
currently running. Touch an item for more
information, or to configure options for managing
power use.
Page 73
68
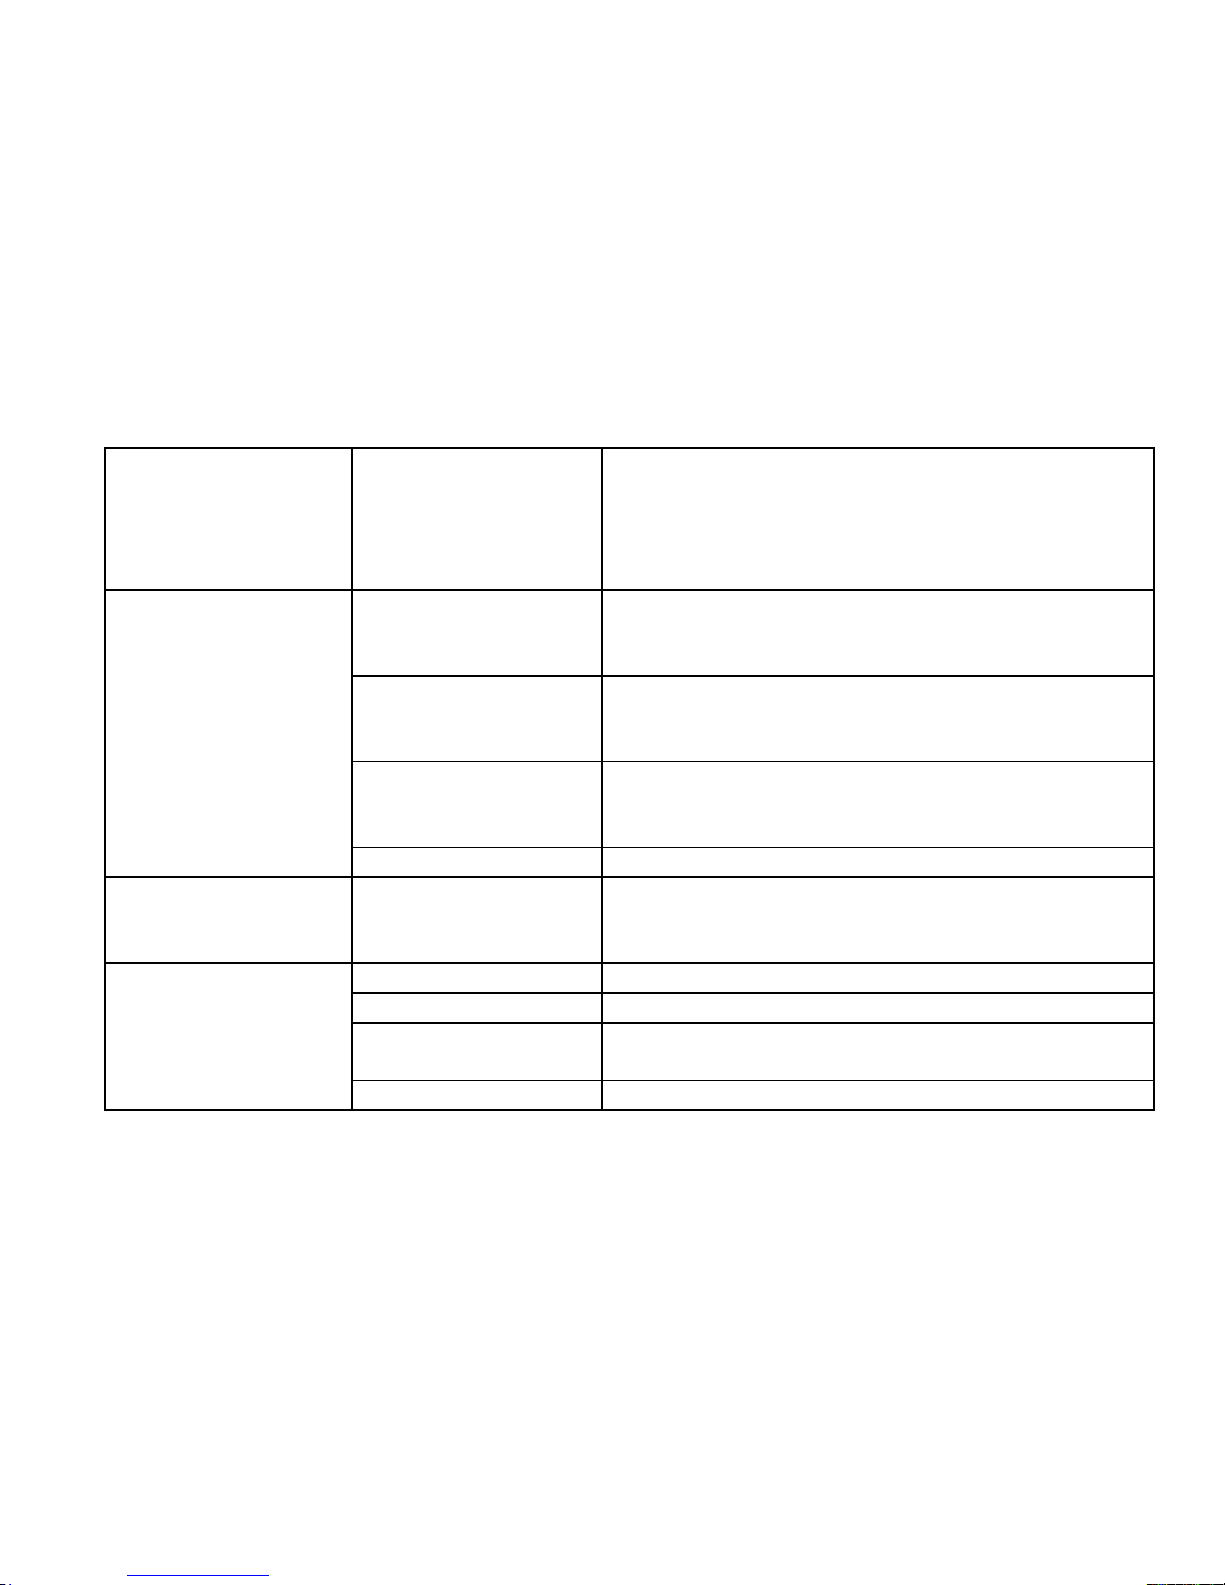
Apps
View details about the applications installed on
your phone, manage application data, close
applications, and set whether you want to permit
the installation of applications that you obtain
from Web sites and e-mail.
PERSONAL
Location services
Configure how you want the phone to determine
your location and how you want to share your
location with Google and others.
Security
Configure the different security settings for your
phone such as screen lock, owner info, SIM/UIM
lock, …etc.
Language & input
Select the language that you want to work with
on your phone and configure the input method.
With spelling correction and voice search.
Backup & reset
Back up data or reset your phone.
Accounts
Accounts
This menu allows you to set up, manage, and
synchronize accounts, including your Google and
email accounts.
System
Date & time
Set date and time.
Accessibility
Enable or disable accessibility technologies
System upgrades
Check and upgrade with new version of the
system.
Developer options
This section contains the different settings related
Page 74
69
to developers.
About phone
View information about your phone.
To access any item, do the following:
1. From the main Home screen, tap the Android Settings icon, or tap the applications icon and then
tap Settings . The Android Settings screen opens.
2. Tap an item from the main menu. The submenu for the item is displayed.
Wireless & networks
Use Wireless & networks settings to configure and manage connections to networks and devices
through Wi-Fi, Bluetooth, mobile networks, and a USB connection. You also can use Wireless &
networks settings to configure connections between your phone and virtual private networks (VPNs),
connect other devices to the Internet using your phone’s mobile data connection, and turn off all
radios by enabling the Airplane mode.
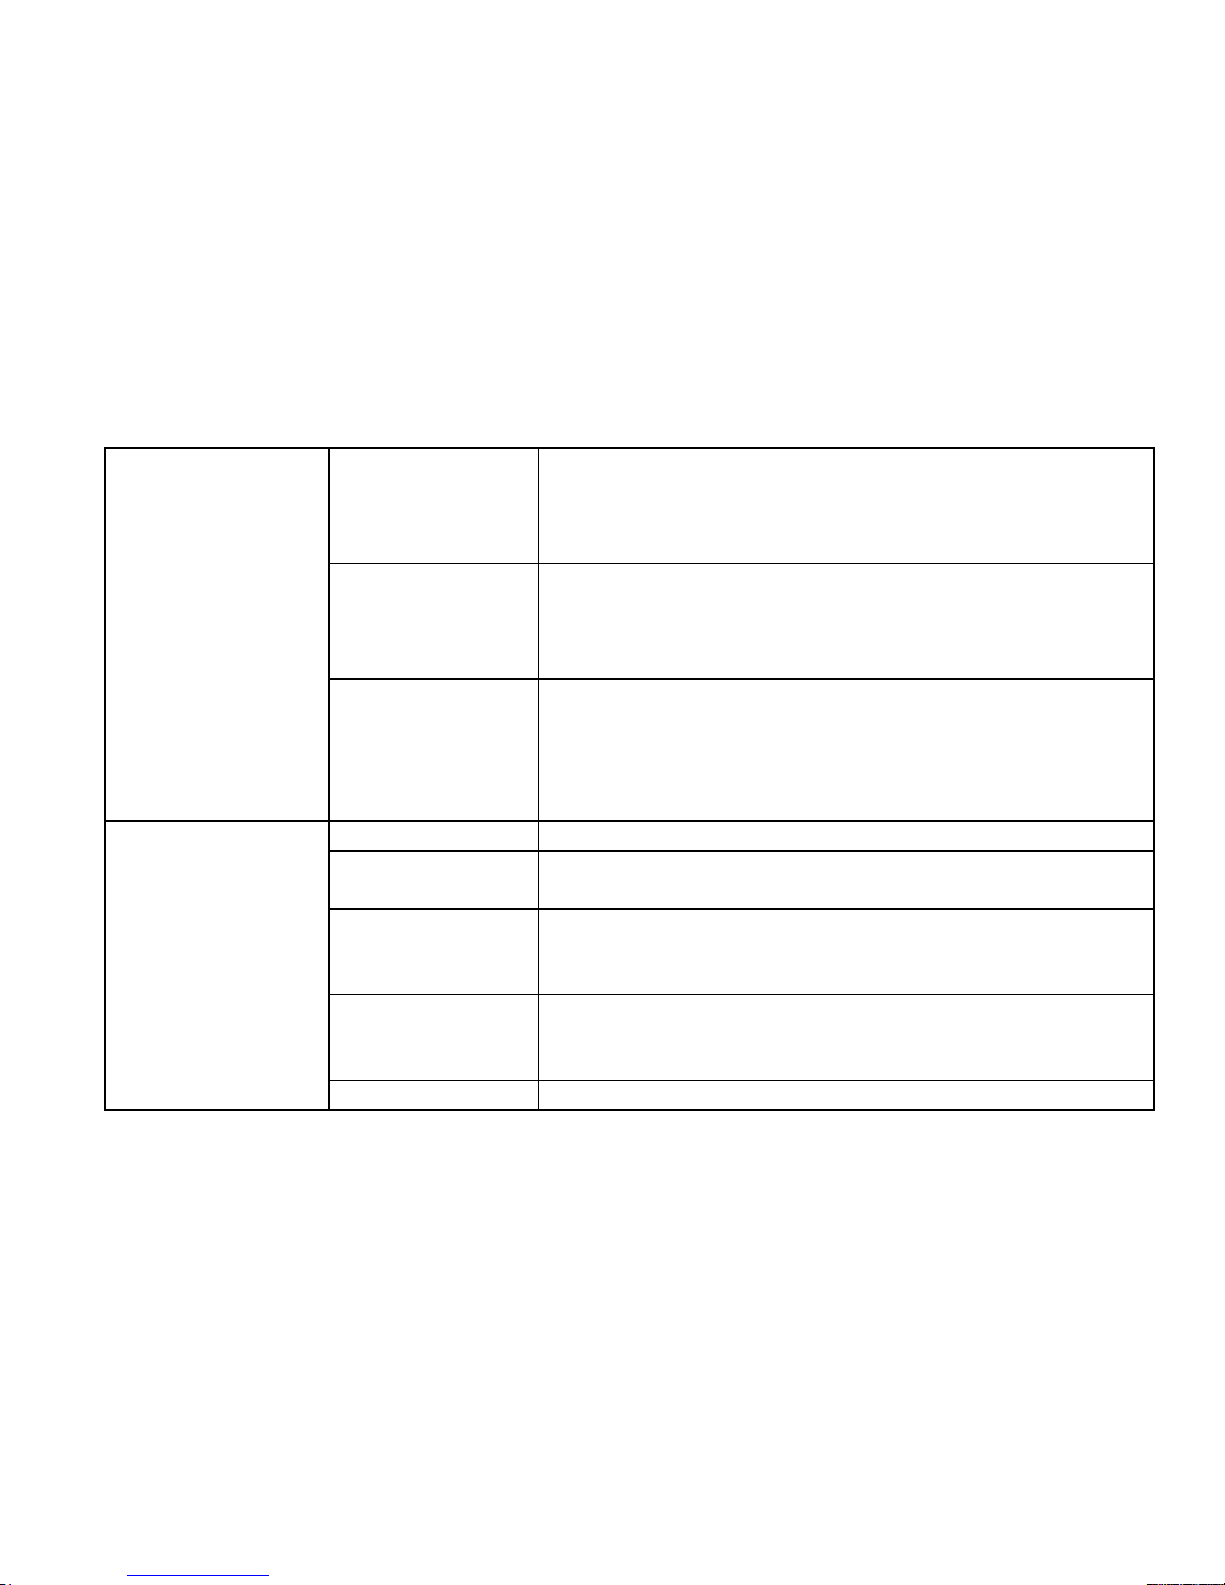
The following table lists the settings that you can configure through the Wireless & networks menu.
Menu
Submenu
Description
Wi-Fi
ON/OFF
Turn on or turn off Wi-Fi.
Options menu:
Scan
Tap scan and all available Wi-Fi networks are displayed
Page 75
70
Options menu:
WPS Pin Entry
WPS is a method for establishing a wireless network in
a secure and simple manner.
Options menu:
Wi-Fi Direct
Wi-Fi Direct allows device to device connections so you
can transfer larg amounts of data over a Wi-Fi
connection.
Options menu:
Advanced
Setting the different wireless options, such as:
Network notification: notify when a near network is
available.
WLAN sleep policy: Used to control the time of the
sleep.
Bluetooth
ON/OFF
Bluetooth Turn on or turn off the Bluetooth feature.
Options menu:
Rename phone
To change Bluetooth name.
Options menu:
Visibility timeout
Set the time of your phone to be visible to other
Bluetooth devices. This function is only available when
Bluetooth is on.
Options menu:
Show received
files
Display the files that have been received.
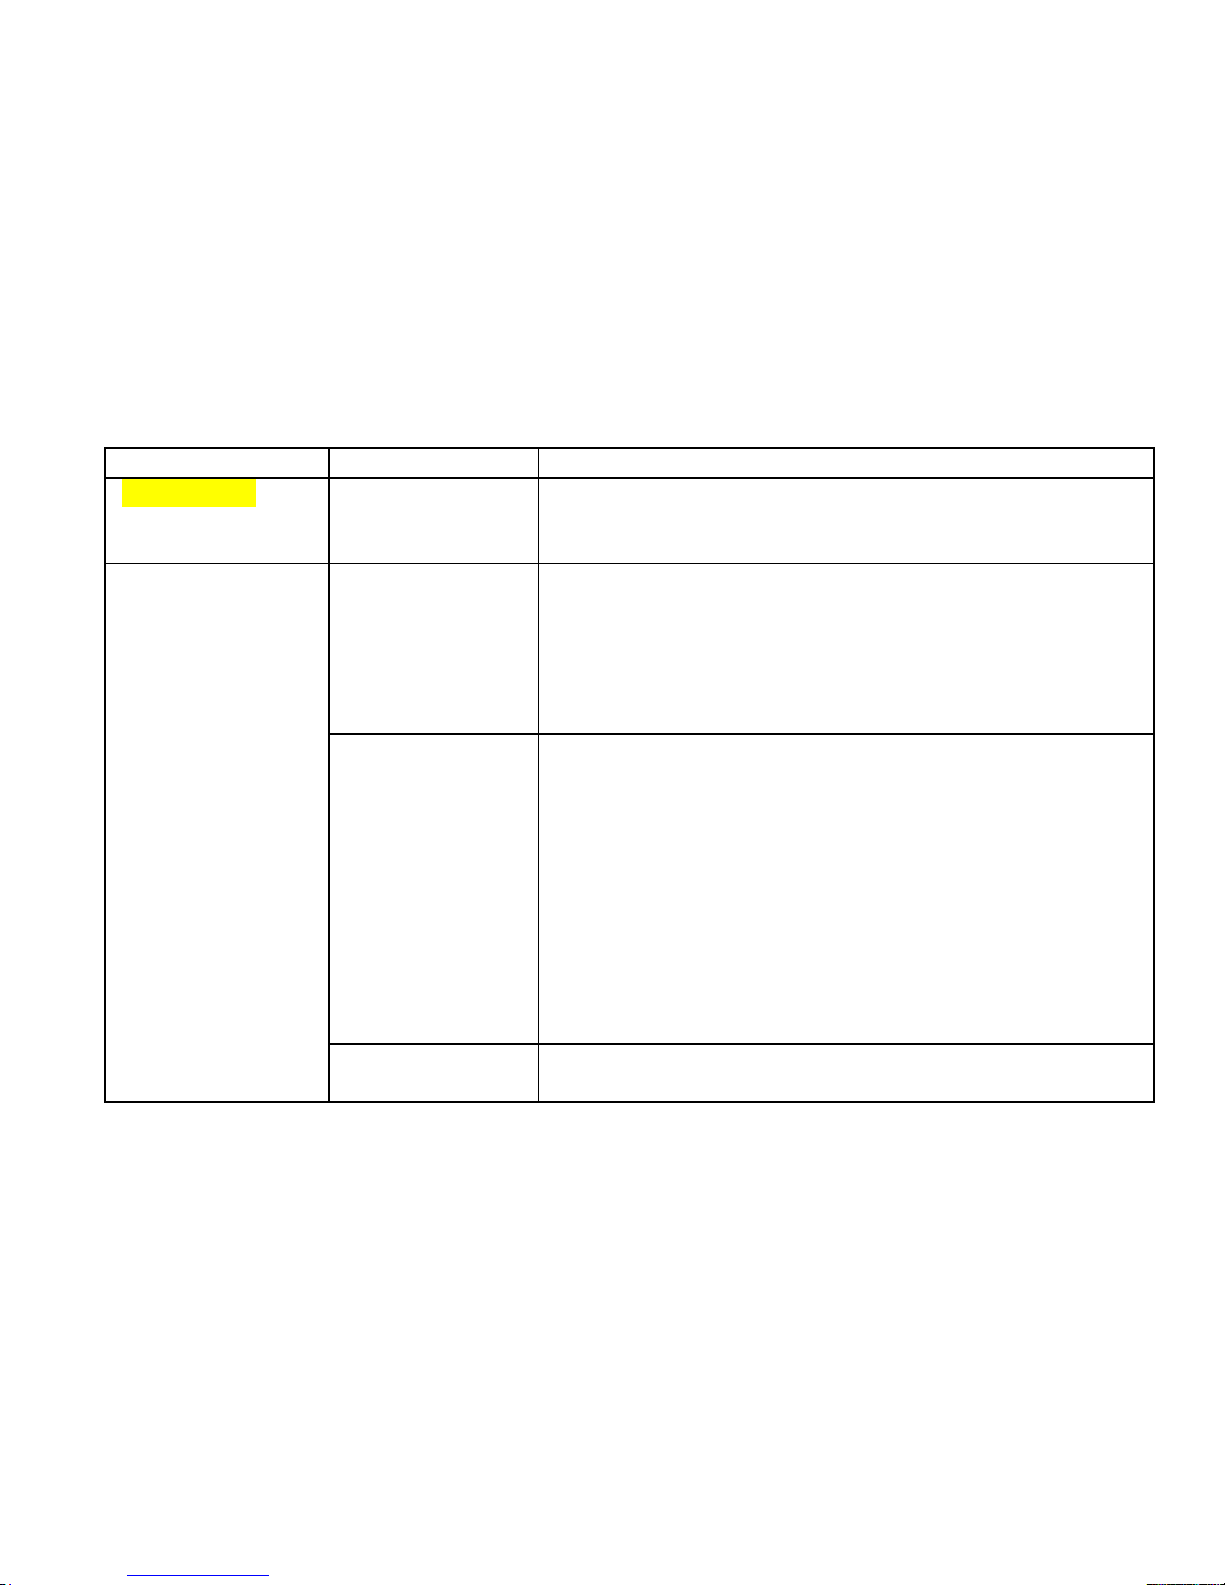
Scan for devices
Scan for nearby available Bluetooth devices. When the
Page 76
71
search results are displayed, tap a device to pair with it.
Data Usage
the best way to assess your data is to look at what
you’re actually using (either via your bills or via a data
usage monitor)
More
Airplane mode
When airplane mode is enabled, all wireless connections
are disabled, and you cannot connect to networks. If
allowed by the aircraft operator and applicable laws and
regulations, you can continue to use other features,
such as playing music,watching videos, checking your
calendar , viewing pictures, and so on.
VPN
Select the type of VPN to add.
• Add PPTP VPN: Set up a connection to a VPN with
Point-to-Point Tunneling Protocol (PPTP).
• Add L2TPVPN: Set up a connection to a VPN with
Layer 2 Tunneling Protocol (L2TP).
• Add L2TP/IPSec PSK VPN: Set up a connection to a
VPN with Preshared key-based L2TP/IP sec (Internet
Prot ocol Security).
• Add L2TP/IPSec CRT VPN: Set up a connection to a
VPN with certificate-based L2TP/IP sec.
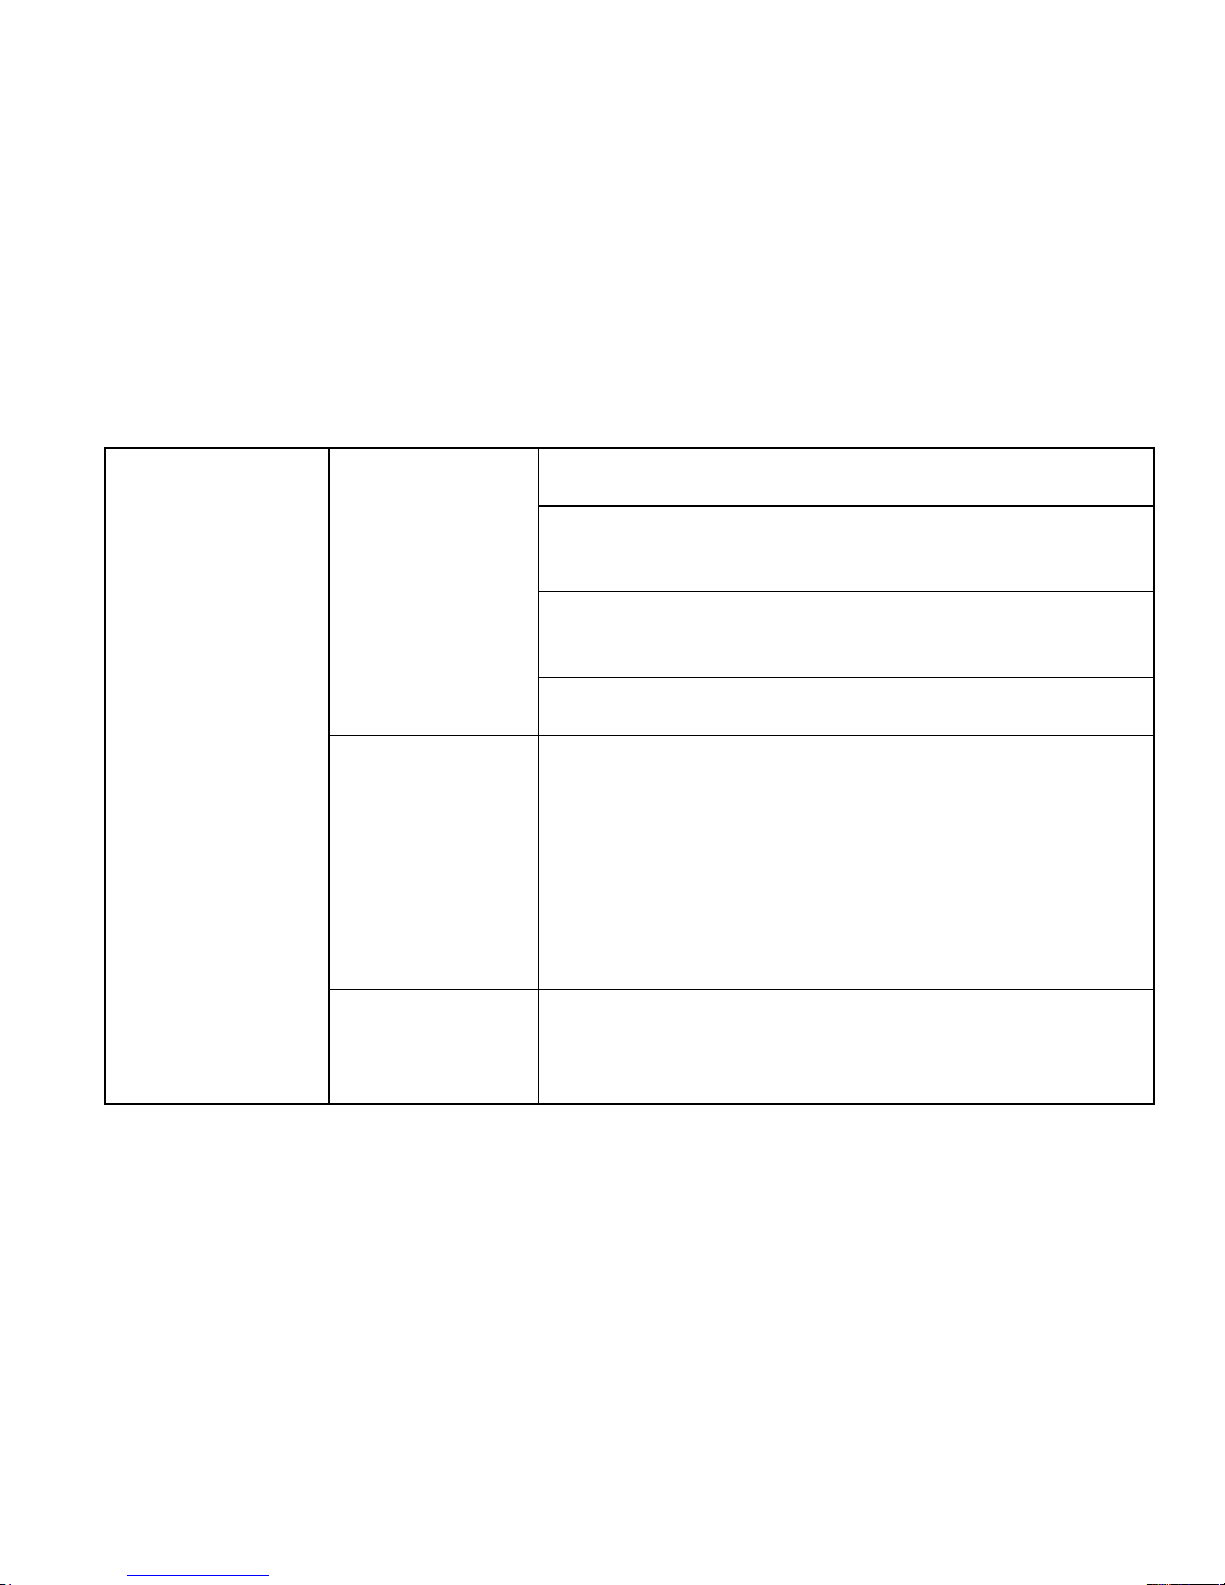
Tethering &
portable
USB tethering: Share your phone’s mobile network
data connection with your computer through a USB
Page 77
72
hotspot
connection.
.
Portable Wi-Fi hotspot: Share your phone’s mobile
network data connection as a portable Wi-Fi hotspot.
Setup Wi-Fi hotspot: Open a screen with settings to
turn on or turn off the hotspot and to set its SSID (its
broadcast name) and security features
Bluetooth tethering: Allow you to sharing internet
phone over bluetooth
Mobile
networks:
Network settings
Manage Network settings of each network.
CDMA: Change the network operating mode: CDMA /
Evdo (auto mode). Also change the cdma roaming
mode.
Also, manage the Access Point Names (APNs) available
for CDMA-1X/EVDO data connectivity.
GSM: Change the network operators seaching mode.
Also, manage the available Access Point Names for
GSM/GPRS data connectivity.
Mobile
networks:
Data enabled
Disable this setting to prevent your phone from
transmitting data on any mobile network. This is useful
if you are traveling in an area where you do not have a
mobile data plan and want to avoid charges for data
Page 78
73
use on local carriers’ mobile networks.
Note: Disabling this setting does not prevent your
phone from transmitting data on other wireless
networks, such as Wi-Fi or Bluetooth.
Mobile
networks:
Data connection
Select the default data connection type either GSM or
CDMA.
Dual SIM Settings
Use Dual sim settings to control which SIM/UIM cards want to enable or disable.
Call Settings
Use this menu for adjusting the CDMA and/or GSM call setting.
CDMA call settings include voicemail service settings, Voice privacy, call waiting and call forwarding
settings.
GSM call settings include fixed dialing numbers, voicemail settings, call forwarding, call waiting and
caller ID.
The common settings for both CDMA and GSM are:
Page 79
74
Outgoing call answer notification: Enable or Disable the vibration when outgoing call is
answered.
TTY Mode setting
DTMF tone Setting
Sound
Use the Sound settings to configure how , and at what volume, the phone plays music and audio
from other media, notification ringtones, and alarms. You also can use these settings to pick the
notification ringtone you prefer and set whether you hear audible feedback when touching, locking,
or unlocking the screen.
The following table lists the settings that you can configure through the Sound menu.
Menu
Submenu
Description
General
Volumes
Adjust the volume of music and audio from other
media, notification ringtones, and alarms.
Call ringtone
and vibrate
CDMA phone
ringtone
Select the ringtone to sound when you receive a call
through CDMA UIM.
GSM phone
ringtone
Select the ringtone to sound when you receive a call
through GSM S`IM.
Vibrate when
ringing
Page 80
75
System
Default Notification
Select the ringtone to sound when you receive a
notification, such as incoming e-mails.
Audible touch tones
Play sound when pressing dial pad to make call.
Dial pad touch
tones
Touch sounds
When enabled, sounds play when you touch icons and
other items on the screen.
Screen lock sounds
When enabled, tones play when you unlock and lock
the screen.
Vibrate on touch
Emergency tone
Display
Use the Screen settings to configure brightness, auto-rotate screen and other screen features.
The following table lists the settings that you can configure through the Display menu.
Menu
Description
Brightness
Adjust the brightness of the screen. Drag the brightness
slider horizontally or touch the desired portion on the
slider. The length of the highlighted bar on the slider
indicates the brightness of the screen.
Wallpaper
Enable you to change the wllpaper of the home screen
Page 81
76
Auto-rotate
screen
Enable or disable the screen auto-rotatation function.
When enabled, the screen switches the orientation to
landscape or portrait view as you
rotate the phone.
Timeout
Select a timeout value for how long the screen remains
on after the last operation. For the longest battery life
between charges, use the shortest
convenient timeout value.
Font size
Select the size of font
Proximity
Calibration
To adjust the sensor of the LCD light during call.
GSensor Adjust
To adjust the appropriate settings of accelerometer
within your phone
Storage
Use the Storage settings to monitor the used and available space on your phone internal storage and
the installed flash media card.
The following table lists the settings that you can configure through the Storage menu.
Menu
Submenu
description
System space
Total space
View the total space on an installed in the system
storage such as apps data and media.
Page 82
77
External SD card
Total space
View the total space on an installed flash media
card.
Available Space
View the available space on an installed flash media
card.
Erase SD card
Erase the data on the installed flash media card
and prepare it for use with your phone.
Internal storage
Total space
View the total space on the internal storage.
A vailable
View the available space on the phone internal
storage.
Erase phone
storage
Erases all data on the phone storage, such as music
and phones.
Battery
Us see how much battery power is used for device activites. The battery level displayes in percentage.
The amount of time battery was used also displays. Battery usage displays in percentage per
application
Apps
Use the Applications settings to view details about the applications installed on your phone, to
manage their data, to force them to stop if they do not function correctly, and to set whether you
want t o permit the installation of applications that you obtain from Websites and e-mail.
The following table lists the settings that you can configure through the Applications menu.
Page 83
78
Menu
description
Manage apps
Open a list of the applications installed on the phone to
check the application information or remove the
application.
Pereffered
install location
Change the preferred installation location.
Location Services
The Location services settings allow you to set up how the
phone will determine your location and the sensor settings
for your phone.
The following table lists the settings that you can configure through the location services menu.
Menu
description
Use network
allows applications to use data from mobile network and
wi-Fi to help determine your location
GPS satellites
allows applications to use GPS to pinpoint your location
Location &
Google search
allows Google to use your location data for improved
search results and other services
Page 84
79
Security
The Security settings allow you to determine the security
level for your phone.
The following table lists the settings that you can configure through the security menu.
Menu
Submenu
description
Screen Lock
Configure lock
screen
• None: Never lock the screen.
• Pattern : Set an unlock pattern to unlock the screen
by pattern drawing.
• Face Unlock: Look at your phone to unlock it.
• PIN : Set a PIN (numeric) to unlock the screen.
• Password : Set a password (alphanumeric) to unlock
the screen.
SIM/UIM card
lock
Setup SIM/UIM
card lock.
Note: This option is only available for the WANsupported models.
Configure the phone to require entering the SIM PIN to
use the phone
Passwords
Make password
Visible
Enable to show the password as you type.
Device
administration
Device
administrators
Activate an application to be a device administrator for
your phone.Then, your IT personnel are able to perform
some administrative tasks on your phone through the
application.
Page 85
80
Unknown sources
Allow installation of apps from unknown sources.
Credential
storage
Use secure
credentials
Enable to allow applications to access your phone’s
encrypted store of secure certificates and related
passwords and other credentials.
Install from SD
card
Install a secure certificate from the flash media card
installed on the phone.
Set password
Set or change the password for your secure credential
storage.
Clear credentials
Delete all secure certificates and related credentials and
erase the credential storage password.
Language & input
Use the Language & input settings to select the language you want to work with on your phone, and
to configure the settings of input method.
Menu
Submenu
description
Language settings
Select language
Select the language to use for the text on your
phone.
Spell checker
Spell checker uses entries from your contact list.
Personal dictionary
Allow you to add personal words for instant
recognition. This will make your typing experience
faster.
Default input
Default input
Choose the default keyboard when entering text.
Page 86
81
method settings
method settings
Go keyboard
Google voice typing
Speech
Voice search
Voice search to configure the voice language,
speech output and block offnsive words
Text-to-speech
output
Speech rate: set the speed at which the text
is spoken.
Listen to an example: Play a sample of
speech synthesis (available if voice data is
installed).
Pointer
Pointer speed
This option sets your pointer speed.
Backup & reset
Use By this option, The Google server will back up all of your settings and data. The following table
shows list of the menu settings.
Menu
description
Backup my
data
Back up app data, Wi-Fi passwords, and other settings
to Google servers
Automatic
restore
When reinstalling an app, restore backed up settings
and data
Page 87
82
Factory data
reset
From this menu you can reset your phone and sound
settings
to the factory default settings
Accounts
Use the Accounts to add, remove, and manage your Google Accounts and other accounts.
You also use these settings to control how and whether applications send, receive, and synchronize
data on their own schedules, and whether applications can synchronize user data automatically .
The following table lists the settings that you can configure through the Accounts and Sync menu.
Hint: Data traffic will not stop if you disable the Sync feature. If you want to save your data traffic
plan by wireless, please disable the Data link from notifiction bar (slid down the notification bar by
your finger from up to down, then disable the data icon).
Menu
Submenu
description
Manage accounts
All the Google Accounts and other accounts you
have added to the phone are displayed under
Manage accounts . Different options are
displayed when you touch an account depending on
the account type.
For each Google Account, the kinds of data that can
Page 88
83
be synchronized to the phone are listed. Touch the
option to start synchronizing that kind of data.
To add an account, touch Add account from the top
right corner of the screen.
To delet e an account, touch the account and then
touch Remove account from the top right corner of
the screen.
Note: Removing an account also deletes all of its
messages, contacts,and other data from the phone.
Date & time
Use Date & time settings to set your preferences for how dates are displayed. You also can use these
settings to set your own time and time zone, rather than obtaining the current time from the
network.
To enable a setting, tap the setting item to select the check box. To disable a setting, tap the setting
item to clear the check box.
The following table lists the settings that you can configure through the Date and Time menu.
Menu
Submenu
description
Date & time
settings
Automatic
Disable to manually set the date and time. Enable
to obtain the current time from the
wireless network.
Page 89
84
Set date
If Automatic date & time is unchecked, tap to
manually set the date.
Set time
If Automatic date & time is unchecked, tap to
manually set the time.
Select time zone
If Automatic time zone is unchecked, tap to
manually set the time zone.
Use 24-hour format
Enable to display the time using the 24-hour time
format.
Select date format
Set the format for displaying dates.
Accessibility
Accessibility services are special features to make using the phone easier for those with certain
physical disabilities. Use the Accessibility settings to configure any accessibility plug-ins you have
installed on your phone.
The following table lists the settings that you can configure through the Accessibility menu.
Note: If no accessibility-related applications are installed, after you touch Accessibility from the
settings panel, you are prompted to download accessibility software. Touch OK if you want t o
download. Otherwise, touch Cancel .
Menu
Submenu
description
Accessibility
Settings
Accessibility
Select this option to enable all installed accessibility
plug-ins.
Page 90
85
Power button
Power button ends
call
During call, pressing power ends call instead of
turning off screen.
Speak passwords
To reads out password information
Touch & hold delay
Lets users set the recognition time for tapping and
holding the screen
Enhance web
accessibility
System upgrade
Check new version: Scan for the latest update.
Notify me when have update: : To enable or disable the notification of the update.
Connect mode: To select connection mode (Wi-Fi only, Wi-Fi + Mobile data).
Page 91
86
Developer options
Use the developer options to set options for application development.
Menu
description
General
Desktop backup password
Protect the desktop with a backup password ID
Stay awake
Screen will never sleep while charging
Protect SD card
Apps must request permission to read SD card
Debugging
USB debugging
When enabled, allows debugging when the device
is
attached to a PC by a USB cable.
Note: This setting is used for development
purposes.
Allow mock locations
This setting is used by developers when
developing
location-based applications
Select debug app
To debugging an application.
Wait for debugger
Input
Show touches
Displays touch interactions on the screen
Pointer location
Highlights the data that was touched on the
screen.
Drawing
Show layout bounds
Page 92
87
Show GPU view updates
Areas of the screen flash when they update.
Show surace updates
Window animation scale
Configure the scale for animation(ranges from off
to 10x).
Transition animation scale
Configure the scale for transitioning when using
animation (ranges from off to 10x).
Animator duration scale
This is a new setting and this affects automatic
animations in Android, such as swipe speeds when
you swipe something away from Recent Apps (it
affects the speed of which the list gets reordered)
Disable HW overlays
Every application that is displaying things on the
screen will share video memory and will have to
constantly check for collision and clipping to
render a proper image, this can cost a lot of
processing power.
Force GPU rendering
Uses a 2D acceleration in applications
Monitoring
Strict mode enabled
Makes the screen flash when applications perform
long operations on the main thread.
Show CPU usage
Screen highlights the current CPU usage
App
Don't keep activities
To destroy every activity as soon as the
application is closed.
Background process limit
To set the number of processes that can run in
Page 93
88
the background. Options are: Standard limit, No
background processes, and 1 to 4 processes at
most
Show all ANRs
ANRs to display a prompt when applications
running in the background are not responding.
About phone
Use About phone settings to check for information about your phone, including the status, battery
use, legal information, hardware and software versions, and model number .
The following table lists the settings that you can configure through the About Phone menu.
Menu
Description
System updates
Open a screen that reports the latest availabile Android software updates
for your phone.
Status
View information about your batter y status, mobile network connection,
and other details.
Battery use
View a list of the applications and operating system components you have
used since you last charged the phone, sorted by the amount of power
they have used.
Legal information
Obtain legal information about the software included with your phone.
Model number
View your phone model number .
Android Version
View details about the versions of your phone’s hardware and operating
Page 94
89
system software.This information is useful if you need to work with your
carrier’s support team.
Build number
Shows the software version build number in your phone.
Brava Gate
Stay connected with Brava through the "Brava Gate" applications by which you will get several
services provided by Brava Techno to its valued clients, such as:
- Faster after sales support.
- Brava latest products detailes.
- Latest news and updates from Brava (Brava Inbox).
- Dailly contents and awards.
By running Brava Gate for first time and if you don't have a Brava
Gate account already have an account then just login with your
account.
Page 95
90
117
7
MMaaiinntteennaannccee GGuuiiddeelliinnee
If there is any problem while using your mobile phone, please check according to the following
table otherwise contact the nearest Brava customer service center to you.
FAQ
Item to be checked
The telephone does
not charge properly
Make sure that the charger is correctly connected to the phone and
the power socket.
Make sure you are using a charger specifically designed for this
phone.
The phone does
not switch on
Check the battery charge level.
Make sure the battery is properly installed.
Press and hold the ON key until the screen comes on.
SIM/UIM card is
Inserted, but
cannot read the
information in the
card.
Please check if the SIM/UIM card is inserted properly ;
Please check if your RUIM card is valid.
Page 96
91
The mobile phone
displays “Input
PUK”
Please communicate with the service provider to get the PUK code
and use it to unlock the RUIM.
Unable to dial a
number
Make sure you have dialed a valid phone number.
Check if your phone is connected to the network.
Weak talk quality
Please check if the phone signal is strong enough;
If you are in the building, please move the phone or move near to
the window.
The other party
cannot hear you
during a call
Please check if your mike has been blocked by fittings or other
blocks.
The receiver
volume is low
Check if the receiver volume is set to maximum.
The phone signal is
poor or switches
off frequently
Make sure the phone antenna is not damaged.
Check the phone signal strength.
If there is no signal, use your phone in a location where the signal is
strong.
Page 97
92
The phone displays
“out of network”
or "Emergency
calls" .
Check if you are in an area where the signal is weak (in a tunnel or
surrounded by building). Move to another location and try again.
Make sure you are not trying to use a service that you haven’t
subscribed to. If you require this service, contact the network for
details.
 Loading...