

BRAUN PHOTO TECHNIK B-Box T4 Instruction Manual [ml]
User Manual
Braun B-Box T4

User Manual
1-8
Bedienungsanleitung
Mode d’emploi
Manuale dell'utente
9-16
17-25
26-33

1
For getting the most out of your new c ar DVR, read all use instructions carefully before usin g this product.
Note:
1. Observe the relevant local laws strictl y.
2. Insert the memory card before taking a video. Obs erve the correct orientation to avoid damaging the card or the
device.
3. Transfer your files to computer to avoid loss of files.
4. After installation check that the suction cup works properly.
the battery capacity will decreas e. Charge the battery before use.
5. With time
6. Do not place the product in humid environs , it is not waterproof.
7. Do not take pictures directly into the sun; this c an damage the lens.
8. Do not use the camera in excessive dusty environs. Clean the lens regularly.
9. This is a precision electronic product; do not subject to strong impact, vibration and do not use it in strong
magnetic fields.
2
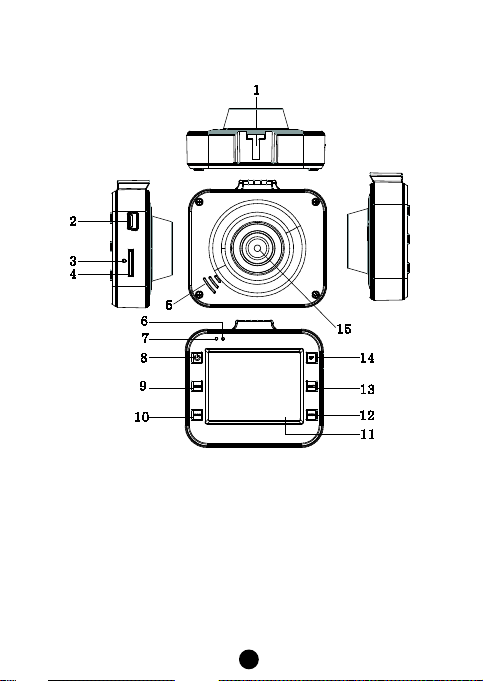
A. Controls and components
1. Stand connector
9. Mode button
2. USB port
3. Reset
4. TF card slot
5. Speaker
6. Status LED
7. Charge LED
8. On/Off button
10. Menu button
11. LCD
12. Down button
13. Record button
14. Up button
15. Lens

3
B. Product features
1. Supports 1080p, 720p, 480p and a variety of video formats, superior image effects
2. Built-in microphone/speaker
3. Quick recording
4. Quick screensaver
5. Supports high capacity TF card
6. Charge during video recording, video loop , seamless video
7. Idling engine starts automatic boot video func tion, time-lapse video automatic shut d own after 5 seconds
8. Motion detection
9. SOS and G_SENSOR file forced
preserving evidence, not to be delet ed
C. Operation
1. Switching on and off:
A) Press the ON/OFF button, the DVR automatically enters video mode and starts recording, the green LED flashes.
If connected to the car charger, the DVR automatically enters video m ode and starts recording, when the en gine
is started. It automatically switches off and saves th e video file 5 seconds after the engine is stopped.
inserted the LCD displays "no card". Ins ert a TF card after switching the device off.
If no TF card is
B) Press and hold the ON/OFF button t o turn the DVR off.
If the battery capacity is insufficient, th e DVR will automatically switch off and save the video file.
2. Charging th e battery
You can charge the battery in two ways:
1) Use the USB charger f or charging.
2) Use the car charger.
During charging the red LED lights u p; it extingui
3. Inserting a memory card
Insert a TF card according to the arrows until you hear a confirmation sound.
4. Rec ording a video
Press ON/OFF to immediately record videos, the green LED flashes. Press the REC button to stop recording and
save the file; the DVR enters s tandby mode. Press the REC button to start r ecording, press the button again to
stop recording. Press the MODE butt on
UP button to switch the LCD on/off to save power.
5. Taking pictures
Press the MODE button t o enter photo mode, press the REC button to take a photo. Press the UP button t o turn
night vision on/off.
6. Playback and delete
In standby mode, pr ess the MODE button to enter the playback mode. Press the UP/DOWN button to s elect
preview, press the REC butt
Delete menu, press the button again to select the option "Delete current" or "Delete all". Press the REC button t o
confirm and press the MENU button t o exit the Delete menu to return to playback mode.
7. SOS func tion
In video recording mode, press the MENU button to force save the file in order to prevent important information
shes as soon as the b attery is fully charged.
to mute the sound an d only record the pictures in video mode. Pr ess the
on to play or stop the file. Too delete the file, pr ess the MENU button to ent er the

4
being deleted. Mandatory saving method: during the first 10 s econds of the current video, press the MENU button to
force save t he current and the previous s egment; during 10 seconds back cou nted of the vi deo, press the MENU
button to force save the current and the next segment; in the current video between the first 10 seconds and the last
10 seconds, press the MENU button to f orce save the current file.
8. G_SENSOR function
n video recording mode, if the car brakes suddenly or there is an impact, th e accelerometer force saves the
I
current file in order to prevent important information from being delet ed. The sensitivity can b e set as h igh,
medium or low. The filing is similar to the SOS G_S ENSOR filing method.
9. Motion detection
In video standby mode, press th e DOWN button when moving objects are detected, th e video starts recording. I
within 5 seconds no moving object enters the motion detection area, the function d eactivates.
D. System settings
In standby mode, press t he MENU b utton to enter the Settings menu. Pr ess the UP/DOW N button to select and
press the REC button to conf irm. After setting up the parameters, press the REC button. Press the MENU button to
exit the Settings menu. The layout of th e Settings menu is as follows:
Mode Menu Select Settings Remark
1080FHD 1920x1080
Resolution
Video
Image Settings
Cycle Recording Off/30 seconds/1 min/2mins
Exposure
Compensation
Motion Detection Off/On
Video & Audio Off/On
Date Label Off/On
REC Mode
Photo
Resolution
1080p 1440x1080
720p 1280x720
WVGA 848x480
VGA 640x480
+2.0>, +5/3, +4/3, +1.0, +2/3, +1/3, +0.0 ,
-1/3, -2/3, -1.0, -4/3, -5/3, -2.0
Single shooting / 2 second timer / 5 second
timer / 10 seconds timer
12M 4032*3024 / 10M 3648*2 736
8M 3264*2448/ 5M 2592*1944
3M 2048*1536 / 2M 1920*1080
VGA 640*480 / 1.3M 1280*960
Resolution: 1080FHD is 25fps,
others are 30fps
Can set the time
The greater the number of
pixels, the larger the file
f

5
Sharpness Strong / standard / soft
Can change image effects
Anti-shake Off/On
Playback
Slide Show 2 seconds/5 seconds /8 s econds
язык/
System Settings
日本語/한국어
Can change image effects
Can change image brightness
and effects
Continuous
Shooting
Image Quality High quality / standard / economy
White Balance
Colour Colour / black & white / tan Can change image effects
ISO Auto/100/200/400 Can change image effects
Exposure
Compensation
Quick Preview Off/2 seconds/5 seconds/
Date Label Off, Date, Date/time
Cancel Delete current / Delete all
Protection
Date/Time MM/DD/YY,DD/MM/YY,YY/MM/DD
Automatic
Shutdown
Key Sound off/on
Fill Light off/on Use UP button to turn on/off
Language
TV Mode NTSC/PAL
Optical
Frequency
Off/On
Auto / Daylight / Cloudy / tungsten lamp /
fluorescent lamp
+0.0, -1/3, -2/3, -1.0 , -4/3, -5/3 , -2.0, +2.0,
+5/3, +4/3, +1.0, +2/3, +1/3
Lock current / Unlock current / Lock all /
Unlock all
off/1min/3mins
English/Français/Español/P ortuguês/Deut
sch/Italiano/简体中文/繁體中文/Русский
50Hz/60Hz

6
Format SD card
Off-Screen
Screen
2.0" TFT screen
Pixels
1.2M
Lens
120 degree HD wide-angle lens
Camera rotation
180 degree
Minimum illumination
1LUX
Video resolution
1080P/720P/480P
Video format
AVI /MJPG
Default Settings Restore Default Settings / Canc el / OK
Automatic
OFF/1 min/2mins/5mins Use UP button to turn on/off
G-Sensor Vision Off/low / medium / high
E. Connecting to PC
Downloading video and photo files
1. After connecting the USB cable to the c omputer, the camera's red status LED turns on, on screen appear th e
menu setting options: m emory card/ PICTBRIDGE / webcam.
2. After selecting memory card the scr een turns black and the c omputer will aut omatically identify t he camera as
"Removable Disk".
3. Use the c omputer to browse and manage the files.
4. W hen selecting PICTBRIDGE, you
5. W hen selecting webc am the camera can be used for i nstant video messaging. At the end, press the ON/OFF
button and unplug the USB cable to automatic ally switch the camera off.
6. W hen the data cable or car charger is connected, the status LED lights up red. It turns off after the battery is fully
charged.
Note: In case of malfunction, pr ess and hold the ON/OFF button for 5 sec
button and then switch the camera on again, it will return to normal function.
can print the files fr om the TF card.
onds to shut down. Press the RESET
F. Specifications

7
Frames
30fps
Image resolution
12M/10M/8M/5M/3M/2M/VGA/1.3M
Photo format
JPG
Motion detection
Supported
Cycle recording
Off/30s/1min/2mins
Memory card type
TF card
Capacity
Maximum supported 32G
USB port
USB2.0
Power port
USB5V/500mA
Current frequency
50Hz/60Hz
Battery capacity
350mAh
Microphone/speaker
Built-in
English/Deutsch/Français/Español/Italiano/
/Português/Русский язык/
Language
Note: Specifications subject to change without prior notice.
한국어
简体中文/繁體中文/日本語
8
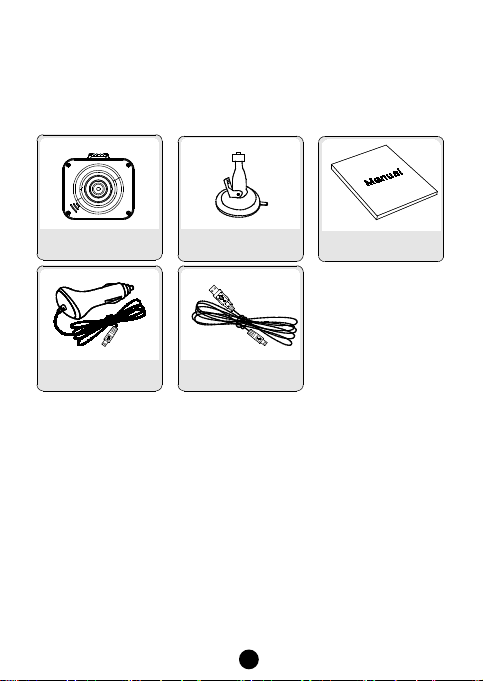
G. Accessories:
The following accessory list is for reference. We reserve the right to modify accessories.
BDK-611
Car charger USB cable
Suction cup Manual

Lesen Sie alle Anleitungen vor der Verwendung dieses Geräts aufmerksam durc h, um das Beste aus Ihrem neuen
Car DVR herauszuholen.
Hinweis:
1. Beachten Sie alle örtlichen G esetze.
2. Setzen Sie die Speicherkarte ein, b evor Sie ein Video aufnehmen. Achten Sie auf die korrekt e Ausrichtung, um
die Speicherkarte und das Gerät nich t zu beschädigen.
3. Übertragen Sie Ihre Aufnahmedateien auf Computer, um Datenverlust zu vermeiden.
4. Vergewissern Sie sich nach der Installation, dass der Saugnapf ordnungsgemäß funktioniert.
5. Über einen längeren Zeitraum lässt die Akkukapazität nach. Laden Sie den Akku vor Gebrauch.
6. Bewahren Sie das Gerät nicht in feuchter Umgebung auf, es ist nicht wasserdicht.
7. Richten Sie das Objektiv nicht direkt auf die Sonne aus; das kann zu Schäden führen.
8. Verwenden Sie die Kamera nicht in übermäßig staub iger Umgebung. Reinig
9. Das Gerät ist ein elektronisches Präzisionsprodukt; setzen Sie es keinen stark en Stößen oder Vibration aus und
verwenden Sie es nicht in starken Magnetfeldern.
en Sie das Objektiv regelmäßig.
9
 Loading...