

Braun VitalScan 1, VitalScan 3 User Manual

VitalScan® 1
®
VitalScan
3
BPW200LA
BPW220LA
English................................ 2
GB
ES
Español............................. 19
PT
Português........................ 36
This product is manufactured for
Kaz Europe Sàrl under a license to the ‘Braun’
trademark. ‘Braun’ is a registered trademark
of Braun GmbH, Kronberg , Germany.
Este producto es fabricado para Kaz Europe
Sàrl bajo licencia de la marca registrada ‘Braun’.
‘Braun’ es una marca registrada de Braun
GmbH, Kronberg, Alemania.
Este produto é fabricado para Kaz Europe Sàrl
baixo licença da marca “Braun”. “Braun” é
marca registrada da empresa Braun GmbH,
Kronberg, Alemanha.
Manufacturer:
Kaz Europe Sàrl
Place Chauderon 18
CH-1003 Lausanne
Switzerland
Made in China.
Hecho en China.
Fabricado na China.
© 2017, Kaz Europe Sàrl
Manufacturado en China por ONBO Electronic
(Shenzhen) Co., Ltd., No. 497, Ta Laneg Nan Road, Ta
Laneg Street, Baoan District , Shenzhen, China para
Kaz Europe Sàrl, Place Chauderon 18 CH-1003
Lausanne, Suiza.
Manufactured in China by ONBO Electronic
(Shenzhen) Co., Ltd., No. 497, Ta Laneg Nan Road, Ta
Laneg Street, Baoan District , Shenzhen, China for
Kaz Europe Sàrl, Place Chauderon 18 CH-1003
Lausanne, Switzerland.
BPW200LA
BPW220LA
31IM2XLA190R0 122816
COLOMBIA: Importado y distribuido por:
Distribuidora GLX S.A.S Calle: 21 No. 68D-60 Tel:
4263600 Bogota D.C. Colombia. Registro Sanitario
No. 2014DM-0011225.
VENEZUELA: Importado y Distribuido por:
Importadora de Alimentos Beka, C.A. RIF:
J-30642410-1. Dirección: Urbanización Filas de
Mariche – Sector Guaicoco. Carretera Petare-Sta
Lucia. Km 5. Galpón Industrial Metalaire. CaracasVenezuela. Teléfono: 0212-2388560.
Representante Legal: Dra. Betzabeth
Hernandez Tovar. Registrado en el MPPS bajo el
No.____________________.
PERU: Importado y distribuido por:
Helen Of Troy Limited Sucursal del Peru,
Calle Monterrey No. 341, Dpto. 901, Urb. Chacarilla
del Estanque - San Borja.
San Borja-Lima-Peru 41 Telf. 3727000
RUC: 20508237252 R.S. DB2968E D.T. Rocío García
Arana.
MEXICO: Importado y distribuido por:
Helen of Troy de México S. de R. L. de C. V.
Domicilio Almacén:
Vía Gustavo Baz Prada Km 12.5
Colonia San Pedro Barrientos, Tlalnepantla, Estado
de México, C.P 54010
Domicilio Fiscal: Pico de Verapaz No. 435
Piso 5-501, Col. Jardines en la Montaña,
Ciudad de México, Tlalpan, C.P. 14210
REG. SAN. No.: 1805E2016 SSA.
ATENCIÓN AL CONSUMIDOR: CIUDAD DE MÉXICO ÁREA
METROPOLITANA: 5511 5767.
DEL INTERIOR DE LA REPÚBLICA:
01800 2282022
REG. SAN. No.:1805E2016 SSA
CHILE: Importado por HBC Latina Ltda. Av.
SantaMaría 0824, Providencia, Chile. Teléfono
(56-2) 2341 0711
PANAMA: Importado y distribuido por Farmacias
Arrocha S.A. GUATEMALA, COSTA RICA, EL
SALVADOR: Importado y distribuido por
Coprodisa, S.A.
3 V
1.5 V
2 Baterías AAA de
c/u
VitalScan 3
A
B
C
D
VitalScan 1
E
F G
1
GB
English
Intended use of Braun VitalScan 1 and VitalScan 3
Braun VitalScan 1 / VitalScan 3 are blood pressure monitors that have been
developed for easy and accurate blood pressure measurements from the wrist. The
measuring accuracy of Braun VitalScan 1 and VitalScan 3 were tested at the time of
manufacture and were proven by clinical research in accordance with AAMI/ANSI-SP10,
and also passed ESH clinical validation.
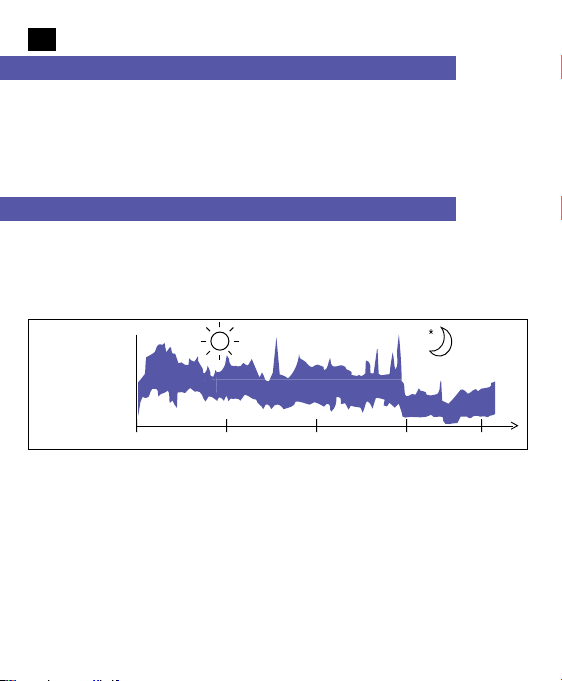
What you should know about blood pressure
Blood pressure constantly changes throughout the day. It rises sharply in the early
morning and declines during the late morning. Blood pressure rises again in the
afternoon and finally drops to a low level at night. Also, it may vary in a short period of
time. Therefore, readings from successive measurements can fluctuate.
SYS
mmHG
DIA
mmHG
Note: Blood pressure readings from a healthy 31-year old male, measured at 5-minute intervals
140
120
100
80
60
6 5 h12 18 0
Blood pressure measured in a doctor’s office only provides a momentary value.
Repeated measurements at home better reflect one’s actual blood pressure values
under everyday conditions.
Moreover, many people have a different blood pressure when they measure at home,
because they tend to be more relaxed than when in the doctor’s office.
Regular blood pressure measurements taken at home can provide your doctor with
valuable information on your normal blood pressure values under actual everyday
conditions.
2

The World Health Organization (WHO) has set up the following standard blood pressure
values when measured at resting pulse:
Blood
pressure (mmHg)
SYS = systole
= upper value
DIA = diastole
= lower value
Normal values Mild hypertension Severe
up to 140
up to 90
140 – 180
90 – 110
Safety information and important precautions
• To ensure accurate measuring results, carefully read the complete
use instructions.
• This product is intended for household use only. Keep product and
batteries away from children.
• People suffering from cardiac arrhythmia, vascular constriction,
arteriosclerosis in extremities, diabetes or users of cardiac pacemakers
should consult their doctor before measuring their blood pressure
themselves, since deviations in blood pressure values may occur
in such cases.
• If you are under medical treatment or taking any medication, please
consult your doctor first.
• The use of this blood pressure monitor is not intended as a substitute
for consultation with your doctor.
hypertension
over 180
over 110
3

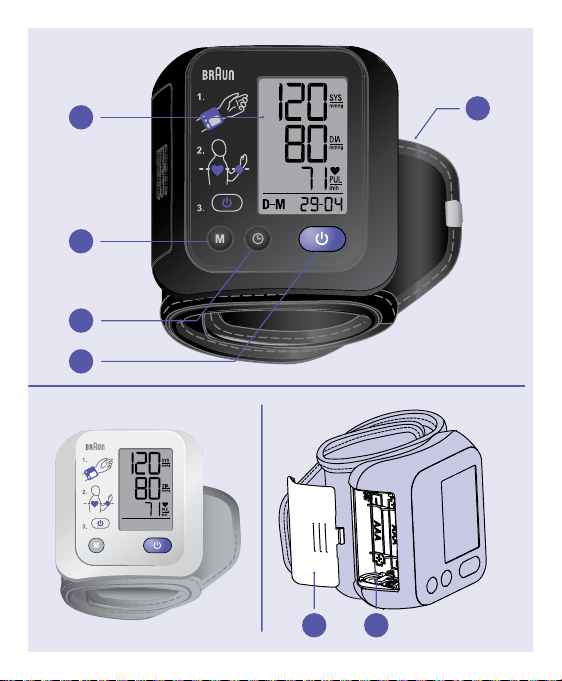
Product description
• Display
A
Memory button
B
Time/date button
C
Power (start/stop) button
D
Cu
E
Battery compar tment cover
F
Battery compartment
G
Inserting batteries
• Use alkaline batteries, type AAA 1.5V
as supplied with this product.
• Remove the battery compartment cover and insert
two batteries with correct polarity (see symbol in the
battery compartment).
• New batteries will provide approximately
200 measurements.
Only discard empty batteries. They should not be disposed of in the
•
household waste, but at appropriate collection sites or at your retailer.
(not available on the VitalScan1)
Time and date (only for VitalScan 3)
Setting time and date
1 2 3
1.
After new batteries have been installed, the year number flashes at bottom of
display. Advance the year by pressing
4
button. To set, press the button.
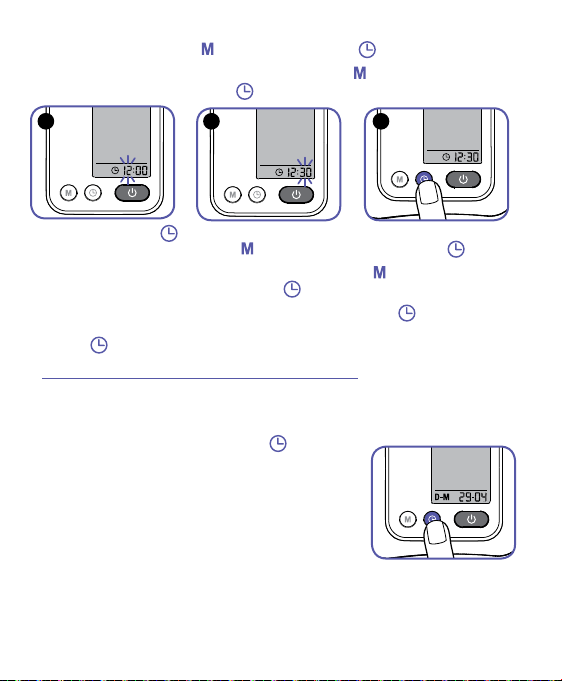
2. The display will then show D-M and the month number will flash. You can advance
the month by pressing the
3. Next, the day number will flash and you can press the
the days. To set the day press the
4 5 6
button. To set, press the button.
button to advance
button.
4. Then, the time icon
Advance the hour by pushing the
5. Last, the minute number will flash, and you can press the
the minutes. To set the minutes press the
6. To complete, exit the time/date setting mode by pushing the
want to change the time or date at anytime, press and hold the time/date
button
Note: Time and date will be lost when changing batteries.
Viewing time and date
The display will always display the time. To view
the date, just press the time / date button
The date will display for 3 seconds and then revert
back to displaying the time.
for 3 seconds and begin the process as described above.
will automatically appear and the hour number flashes.
button. To set the hour press the button.
button to advance
button.
button. If you
.
5

2 cm
1.
2.
3.
Key rules for accurate blood pressure measurement
• Always take readings at the same time of day, ideally in the morning, under the same
conditions.
• Do not measure within 30 minutes after smoking, coffee, tea consumption or any
form of exertion. These factors will influence the measurement results.
• Always measure on the same wrist (normally left).
• Take off wrist watch and jewelry before fitting the monitor on the measuring arm.
• Wait approximately 3 minutes before repeating a measurement.
Taking a measurement
1 2
1. While taking a measurement, sit down, relax, keep still, especially the
hand of the measuring arm (normally left), do not move or speak.
2. Fasten the monitor on the PALM side of your wrist, roughly 2 cm below
the palm line. DO NOT ATTACH LIKE A WRIST WATCH. Make sure that
the cuff fits tightly. See Cuff fitting on page 10.
3.
Hold the monitor AT THE HEART LEVEL, as on the examples below.
Do not let arm fall below heart level.
3
6
4 5 6
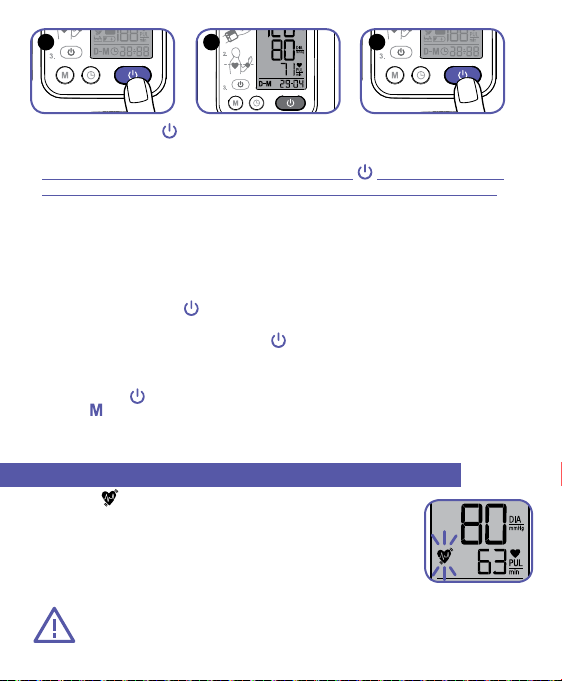
4. Press power button to begin. The measurement starts automatically. While
measurement is in progress, do not move or speak.
Note: If necessary to interrupt a measurement, press the
immediately cancels the measurement, lowers cuff pressure and enters sleep mode.
5. The cuff will first inflate and then deflate. At the end of the measurement a final
beep sounds and the reading is displayed:
Upper (systolic) value
Lower (diastolic) value
Pulse
6. Press the power button
turn off automatically after 1 minute. If at any time, you want to stop the
measurement, press the power button
7. Tests results will be saved into the memories automatically ( see Average &
memory functions below). If you don’t want store the data, press and hold the
power button
to confirm operation.
button
to turn the product off. Otherwise the product will
.
5 seconds until the M icon is flashing, then press the memory
at any time. The device
Irregular heartbeat detection (only for VitalScan 3)
This symbol indicates that certain pulse irregularities were
detected during the measurement. In this case, the result may
deviate from your normal basal blood pressure – repeat the
measurement. In most cases, this is no cause for concern. However,
if the symbol appears on a regular basis (e.g. several times a week
with measurements taken daily), we advise you to tell your doctor.
CAUTION: An irregular heartbeat can be a serious medical condition
requiring medical attention. We recommend contacting your physician
if you see this icon frequently.
7
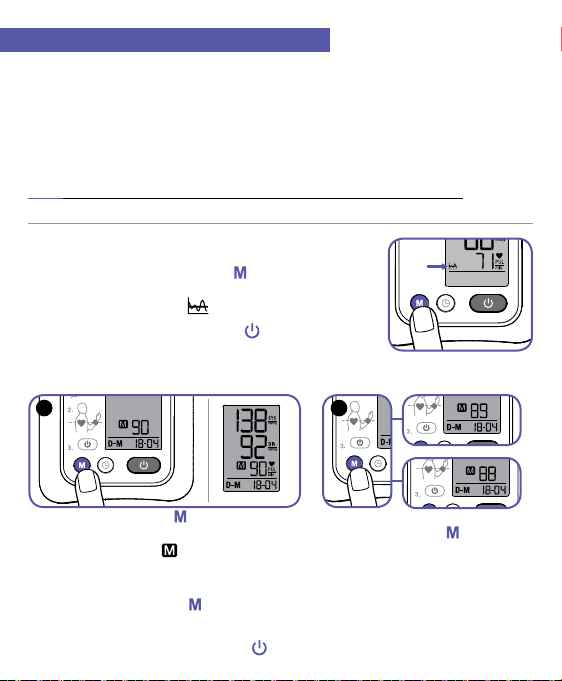
Average & memory functions
Your VitalScan 3 blood pressure monitor will automatically store 90 measurements
(VitalScan 1 model: 10 measurements). Storing is done automatically after each
completed measurement. The memory is nonvolatile. This means that you will not lose
stored data when changing batteries. However, the memory can be cleared manually.
See Deleting all measurements on page 9.
The VitalScan 3 model features an Average function to display the average
reading of the last three measurements.
Note: Average readings feature is NOT available in the VitalScan 1 model.
Recalling average readings (VitalScan 3 only)
1. To recall average readings, press button.
The average of the 3 last readings will display
along with average icon
2. To exit, turn device off by pressing
Recalling stored readings (VitalScan 1 and VitalScan 3)
1 2
.
button.
1.
Press memory button
VitalScan 3 only. See Recalling average readings above.) Then press
again. Memory icon
pulse field. This number indicates which memory is being recalled. Then, the
recalled measurement will display.
2. Repeatedly pressing the
The number of the memory will appear first, followed by the measurement.
3. To exit the memory mode, press the
8
once for average of existing memories (this step is for
will appear and a number will briefly appear in the
button will call up one by one all stored readings.
button.
button
3.
7 Sec.
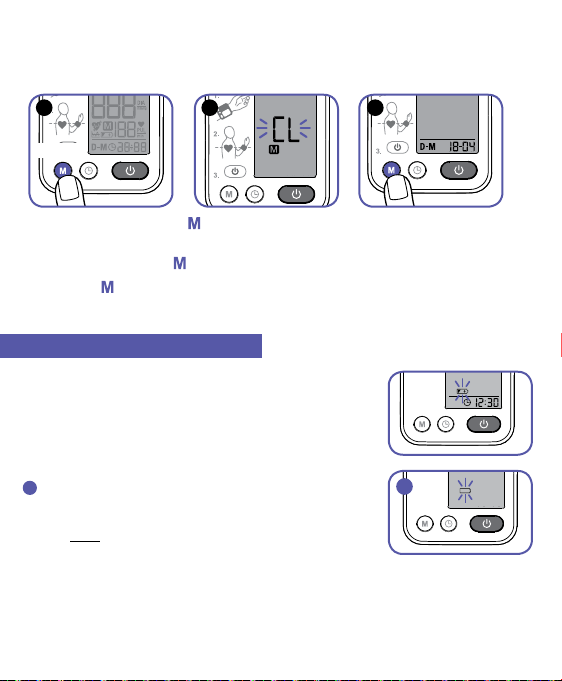
Deleting all measurements
IMPORTANT: Before proceeding to clear all the memory, make sure you don’t have
to make reference to the readings in the future.
1 2 3
1. In shut off mode, press
button for at least 7 seconds until CL appears
in display.
2. When you release the
3. Press the
disappear which indicates all stored readings have been deleted.
button one more time and 3 short beeps will sound, CL will
button, CL will flash.
Battery charge indicator
Batteries almost discharged
When the batteries are approximately 75% used the
battery symbol will flash. The monitor will continue to
measure reliably, but new batteries should be obtained.
Batteries discharged—replacements required
!
When the batteries are dead, the battery symbol
will flash empty, display will go blank and 3 beeps will
sound. You cannot take any further measurements
and must replace the batteries.
!
9
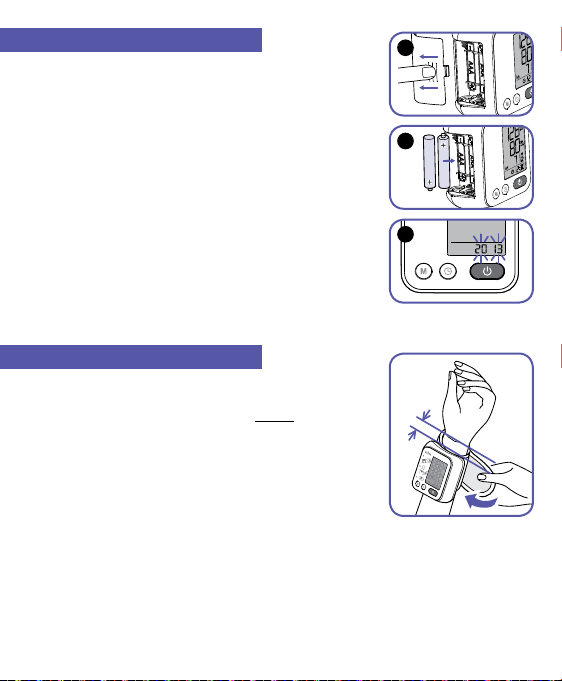
Replace batteries
2 cm
1. Open the battery compartment on the lef t side by
pulling battery door down.
2. Replace the batteries – ensure they are
correctly connected, as shown on the symbols
in the compartment.
3. All saved memories are retained although date and
time must be reset—the year number therefore flashes
automatically after the batteries are replaced.
To set time and date, follow the procedure described
in Time and date on page 4.
Cuff fitting
1. Remove all objects and jewelry from the wrist
(e.g. wristwatch, bracelet, etc.) Put the cuff over the
wrist in with the monitor face on the INSIDE of wrist.
2. The distance between the cuff and the hand
should be approximately 2 cm (1/2”).
3.
Secure the cuff with the Velcro fastener, so that it
lies comfortably and not too tight. No space should
remain between the cuff and the wrist.
1
2
3
10
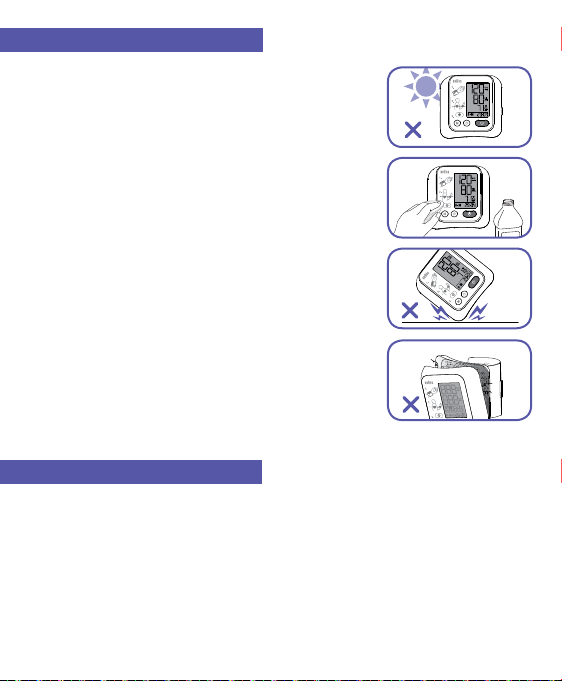
Storage and cleaning
3.
3.
3.
• Do not expose device to either extreme temperatures,
humidity, dust or direct sunlight.
• The cuff contains a sensitive air-tight bubble.
Handle this carefully and avoid all types of straining
through twisting or buckling.
• Clean the product with a soft, slightly damp cloth.
Stains on the cuff can be carefully removed with a
damp cloth. Do not use gasoline, thinners or similar
solvents. Do not wash or dry clean the cuff. Do not
store the product in a place exposed to direct sunlight
or high humidity.
• Do not drop the device or treat it roughly in any way.
Avoid strong vibrations.
• NEVER open the device! This will make the
manufacturers warranty invalid!
Calibration
This product has been calibrated at the time of manufacture. If used according to
the use instructions, periodic recalibration is not required. If at any time, you
question the measuring accuracy, please contact an authorized Service Centre .
11

What to do if ...
Error Description Potential cause and remedy
Batteries are low Insert new batteries
Batteries are dead Insert new batteries
«ERR 1» Signal too weak The pulse signals on the cuff are too weak.
«ERR 2» Error signal During the measurement, error signals were
«ERR 3» No pressure in the cuff An adequate pressure cannot be generated
«ERR 5» Abnormal result The measuring signals are inaccurate and
Re-position the cuff and repeat the
measurement.*
detected by the cuff, caused for instance by
movement or muscle tension. Repeat the
measurement, keeping the arm still.
in the cuff. A leak may have occurred. Check
that the cuff is correctly connected and is
not too loose. Replace the batterries
if necessary. Repeat the measurement.
no result can therefore be displayed. Read
through the checklist for performing
reliable measurements and then repeat the
measurement.*
12

Error Description Potential cause and remedy
«Hi» Pulse or cuff pressure
«LO» Pulse too low The pulse is too low (less than 40 beats
too high
The pressure in the cuff is too high (over
300 mmHg) OR the pulse is too high
(over 200 beats per minute). Relax for 5
minutes and repeat the measurement*.
per minute). Repeat the measurement*.
Readings from repeated
measurements differ
considerably.
Blood pressure is a
fluctuating value.
For healthy adults, deviations
of 10 to 20 mmHg are
possible.
Cuff is not
properly fitted.
Readings were not
consistently taken at heart
level.
Talking, coughing, laughing,
moving etc. when measuring
will influence the reading.
none
Ensure that the monitor is
fitted as follows:
- on the palm side of your wrist
- approx. 2 cm away from
palm line
For each measurement, hold the
monitor at heart level.
While measuring, relax, keep still, do not
move or speak.
* If this or any other problem occurs repeatedly, please consult your doctor.
13

Error Description Potential cause and remedy
Blood pressure values
measured at your doctors
office
differ from your
measurements.
Doctor visits can frequently
experience anxiety.
Record the daily development of the
measured values and consult your
doctor.
Display remains
blank, or is unusual, when
instrument is switched on.
Device frequently fails to
measure blood pressure
values, or values measured
are too low (too high).
Batteries are not installed
properly.
Cuff may not be properly
positioned.
Check batteries for
correct polarity.
Check the positioning of the
cuff. See Cuff fitting on
page 10 for proper fitting.
Further information
Blood pressure is subject to fluctuations even in healthy people. Comparable
measurements always require the same conditions (quiet conditions)!
In order to receive market clearance from governmental bodies, this device was
subjected to strict clinical tests. The computer program used to measure blood
pressure values was tested by experienced cardiac specialists in Germany.
14
Specifications
55
Models: BPW200LA, BPW200LAD1, BPW220LA, BPW220LAD1
Operation principle: Oscillometric method
Display: Liquid crystal display
Measuring range: 20–280 mmHg
Pulse: 40–199 / min
Blood pressure
measurement: 20 mmHg (minimum diastolic value)
280 mmHg (maximum systolic value)
Laboratory accuracy: ± 3 mmHg (cuff pressure)
± 5 % of reading (pulse rate)
Clinical accuracy: According to AAMI-SP10 with auscultatory reference:
< 5 mmHg systematic offset
< 8 mmHg standard deviation
Inflation: Automatic
Power supply: 2 batteries, type AAA 1.5V
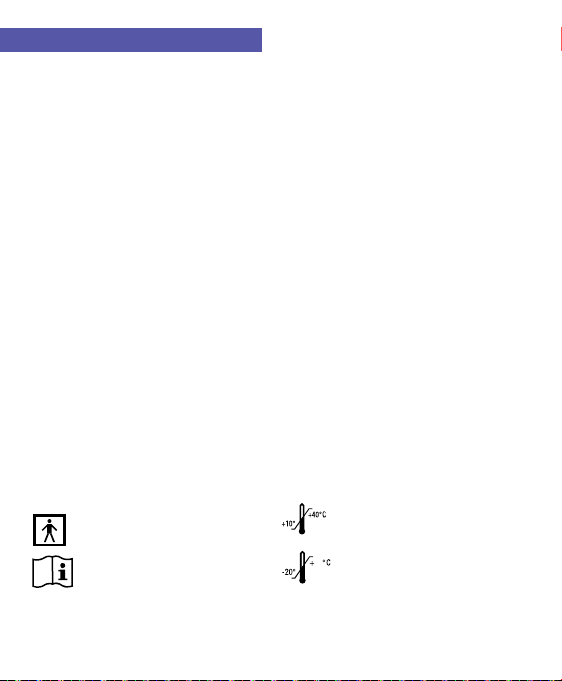
Operating temperature /
atmospheric pressure: +10 °C to +40 °C (50˚F – 104˚F),860-1060 hPa (0.849 - 1.046 atm)
Storage temperature: –20 °C to +55 °C (-4˚F to +131˚F)
Humidity: 15 to 90 % relative humidity maximum
Cuff: Suitable for wrist circumference of 13.5 to 21.5 cm
(5.25 - 8.5 inches).
Clinical validation: According to AAMI-SP10 with auscultatory reference.
(Please note that a validation against intra-arterial
measurements can lead to different results for devices
which are calibrated against auscultatory reference.)
Service Life: 5 years
If device is not used within specified temperature and humidity ranges the technical
accuracy can not be ensured.
Type BF applied parts
See instructions for use
Subject to change without notice.
Operating temperature
Storage temperature
15
 Loading...