

Page 1
It is recommended that all pumps at
your care unit are equipped with the
same software version.
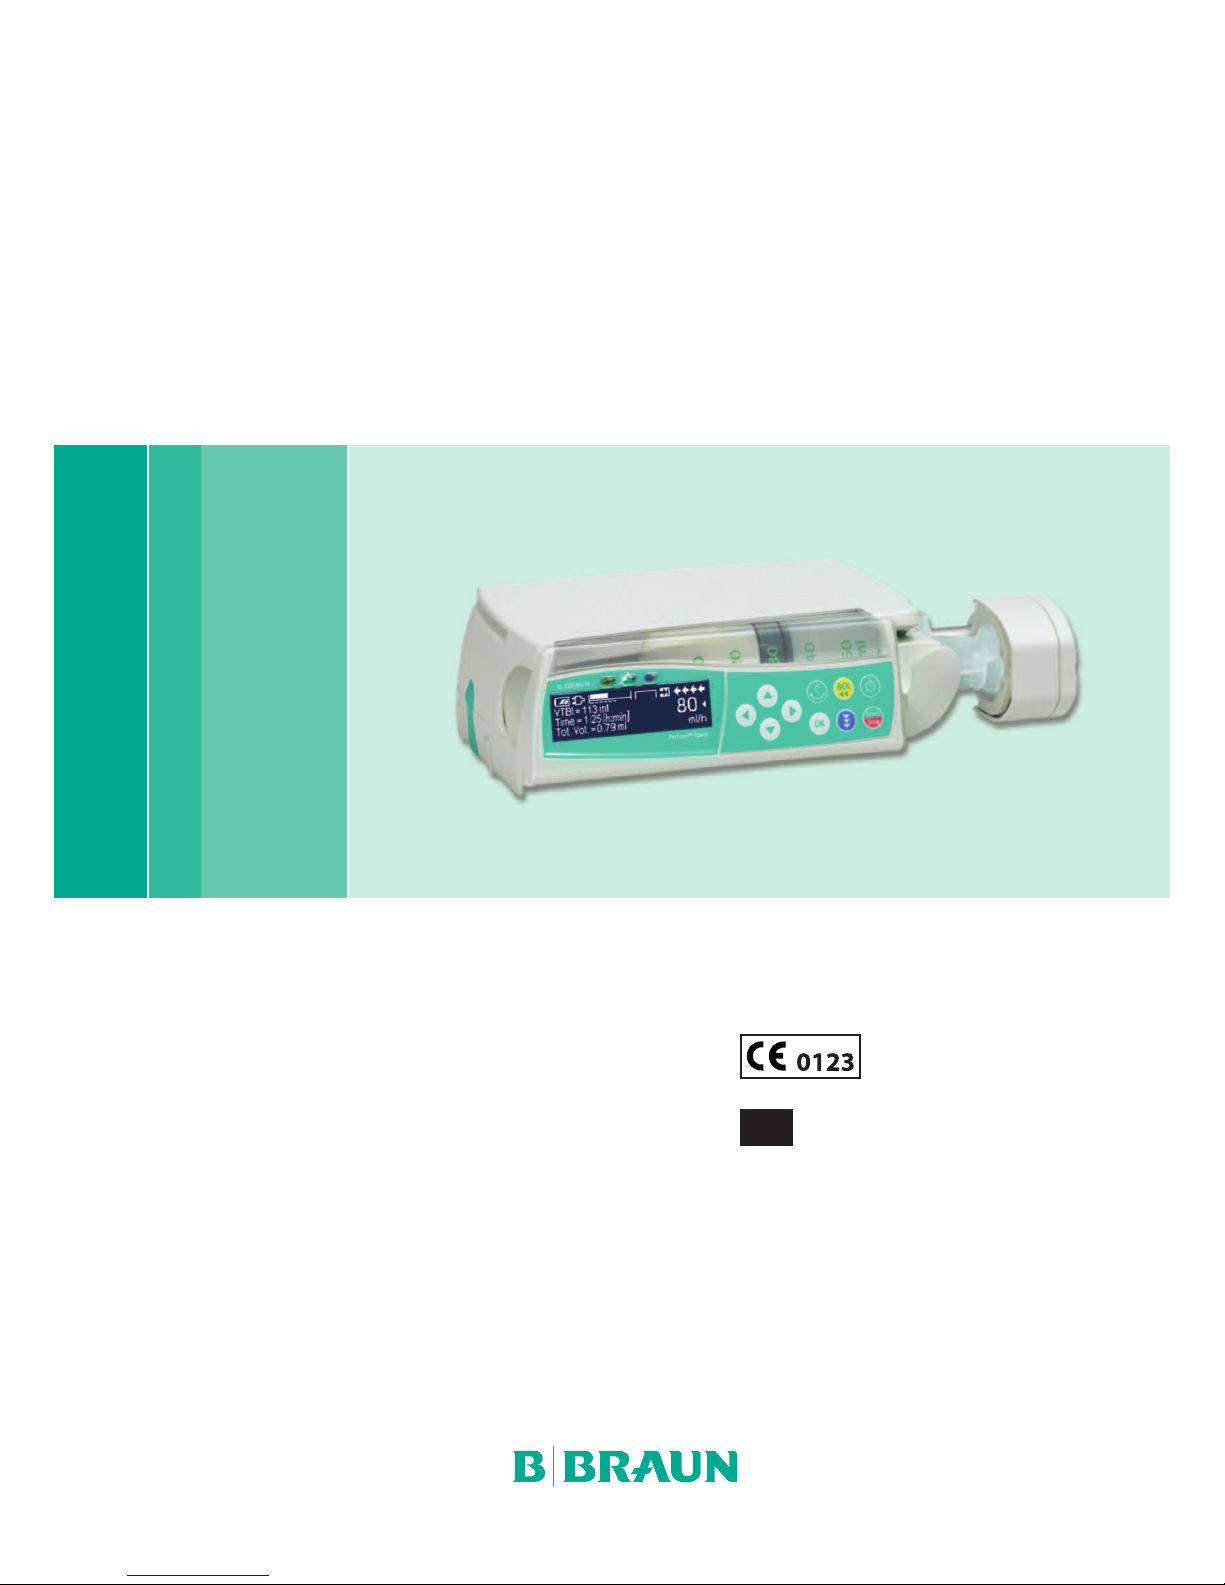
Perfusor® Space
and Accessories
Instructions for Use
GB
Valid for software 688M
Page 2

CONTENTS
Perfusor® Space Overview...........................................................................................................................3
Symbols on Product ......................................................................................................................................5
Patient Safety ........................................................................................................................................6
Menu Structure / Navigation...................................................................................................................11
Chapter 1 Operation..........................................................................................................................14
1.1 Start of Infusion .........................................................................................................................14
1.2 Entry With Different Combinations of Rate, VTBI (= Volume To Be Infused)
and Time........................................................................................................................................15
1.3 Bolus Application .......................................................................................................................16
1.4 Syringe Change and New Therapy Start .............................................................................17
1.5 End of Infusion............................................................................................................................18
1.6 Standby Mode .............................................................................................................................18
Chapter 2 Advanced Operations ....................................................................................................19
2.1 Status Request of Pump when Infusion is Running ........................................................19
2.2 Rate, VTBI and Time Change Without Infusion Interruption and Reset
of Status Menu Data.................................................................................................................19
Chapter 3 Special Functions*..........................................................................................................20
3.1 Dosing Units and Dose Rate Calculation (Overview).......................................................20
3.2 Dose Rate Calculation (Operation)........................................................................................21
3.3 Drug Library..................................................................................................................................21
3.4 Patient Controlled Analgesia (PCA) (optional) ..................................................................24
3.5 Target Controlled Infusion (TCI) (optional) .........................................................................26
3.6 Barcoding......................................................................................................................................32
3.7 Ramp and Taper Mode..............................................................................................................32
3.8 Program Mode.............................................................................................................................34
3.9 Intermittent Mode .....................................................................................................................36
3.10Dose Over Time ...........................................................................................................................39
3.11 Take Over Mode (TOM) (optional)..........................................................................................41
Chapter 4 Autoprogramming ..........................................................................................................46
Chapter 5 Options ..............................................................................................................................50
5.1 Occlusion Pressure .....................................................................................................................50
5.2 OccluGuard & Pressure Leap/Drop detection (optional).................................................50
5.3 Data Lock ......................................................................................................................................53
5.4 Bolus Rate.....................................................................................................................................54
5.5 KVO-Mode ....................................................................................................................................54
5.6 Contrast / Display Light / Keypad Light...............................................................................54
5.7 Alarm Volume..............................................................................................................................55
5.8 Date / Time ...................................................................................................................................55
5.9 Macro Mode.................................................................................................................................55
5.10Language.......................................................................................................................................55
Chapter6 Alarms................................................................................................................................56
6.1 Device Alarm................................................................................................................................56
6.2 Pre-Alarms and Operating Alarms ........................................................................................56
6.3 Reminder Alarms ........................................................................................................................60
6.4 Alarm Hints ..................................................................................................................................60
Chapter 7 Battery Operation and Maintenance........................................................................61
Chapter 8 Compatible Syringes......................................................................................................63
Chapter 9 Start Up Graphs and Trumpet Curves ......................................................................68
Chapter10 Technical Data.................................................................................................................69
Chapter 11 Warranty / TSC** / Service / Training / Cleaning / Disposal ..............................76
Chapter 12 Instructions for Use Accessory ...................................................................................79
Ordering .....................................................................................................................................84
*The availability of
the listed features
is depending on
the configuration
of the pump.
**Technical Safety
Check.
2
Page 3
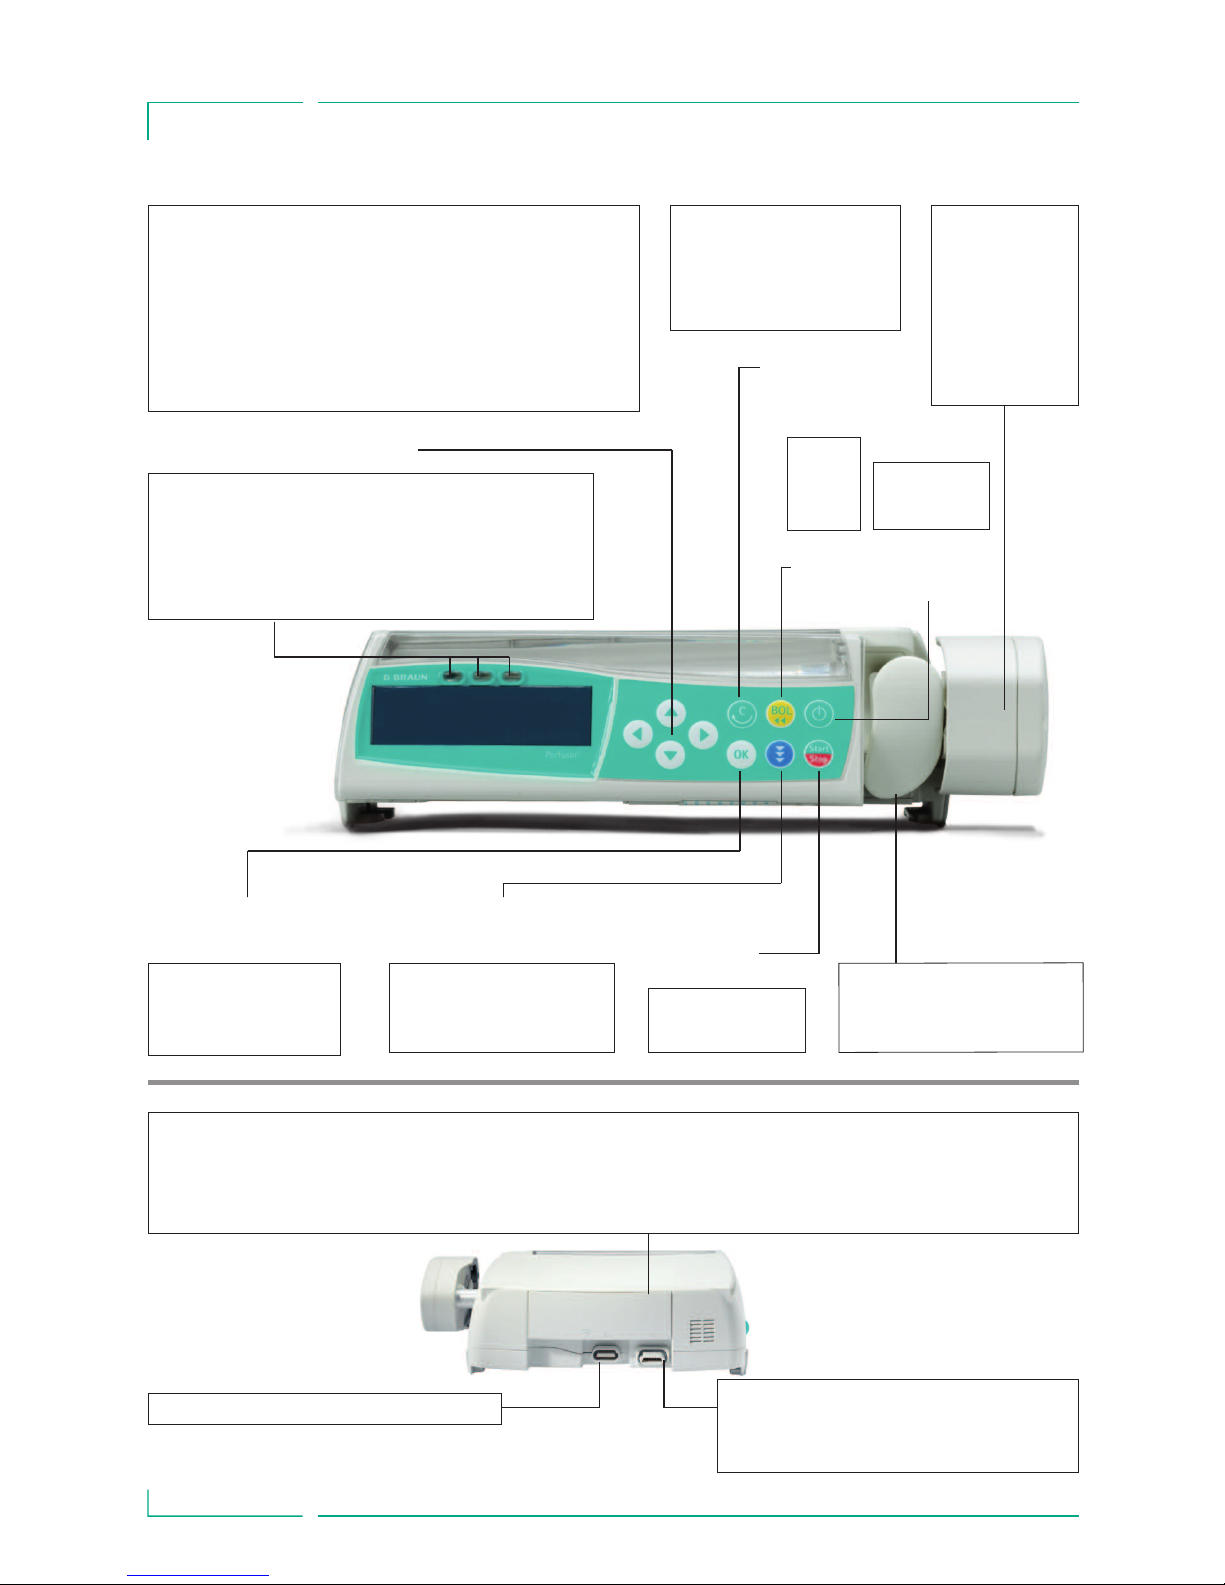
PERFUSOR SPACE® OVERVIEW
PER F U S OR® SPA C E O V E R VIEW
3
Arrow up and -down
Scroll through menus, change setting of numbers from 0-9,
answer Yes/No questions.
Arrow left and -right
Select data from a scale and switch between digits when
numbers are entered. Open a function while pump is running
or stopped with the left arrow key.
Press to reset single values
to zero and switch back to
the previous screen/menu
level.
Press to Start/Stop
infusion.
Press to initiate
auto-programming orders
when prompted.
Open certain functions
and press to confirm
values/settings/alarms.
Syringe holder locks syringe
in position. The drive will
automatically move back.
Yellow LED: Pre-alarm, reminder alarm
Green LED: Infusing
Red LED: Operating or device alarm
Blue LED: Initiating connection to wireless battery
or Space Station
q
c
k m
Port P2 for power supply, SpaceStation,
connection lead (12V), combi lead and
further accessory leads (staff call, service)
Port P3 for future options
Cover of Battery Compartment
Before changing the battery, always disconnect the pump from the patient and switch off the device.
To remove the battery cover push the button below the battery compartment with a pointed pen and pull the cover
away from device. Slide green locking mechanism on back of battery up and take out battery pack for exchange.
Press to
initiate
bolus.
Press to turn
pump on/off.
Drive head with
claws to hold the
syringe plunger
plate and
emergency
release button.
o
nB
Sf
Page 4
PERFUSOR® SPACE OVERVIEW
4
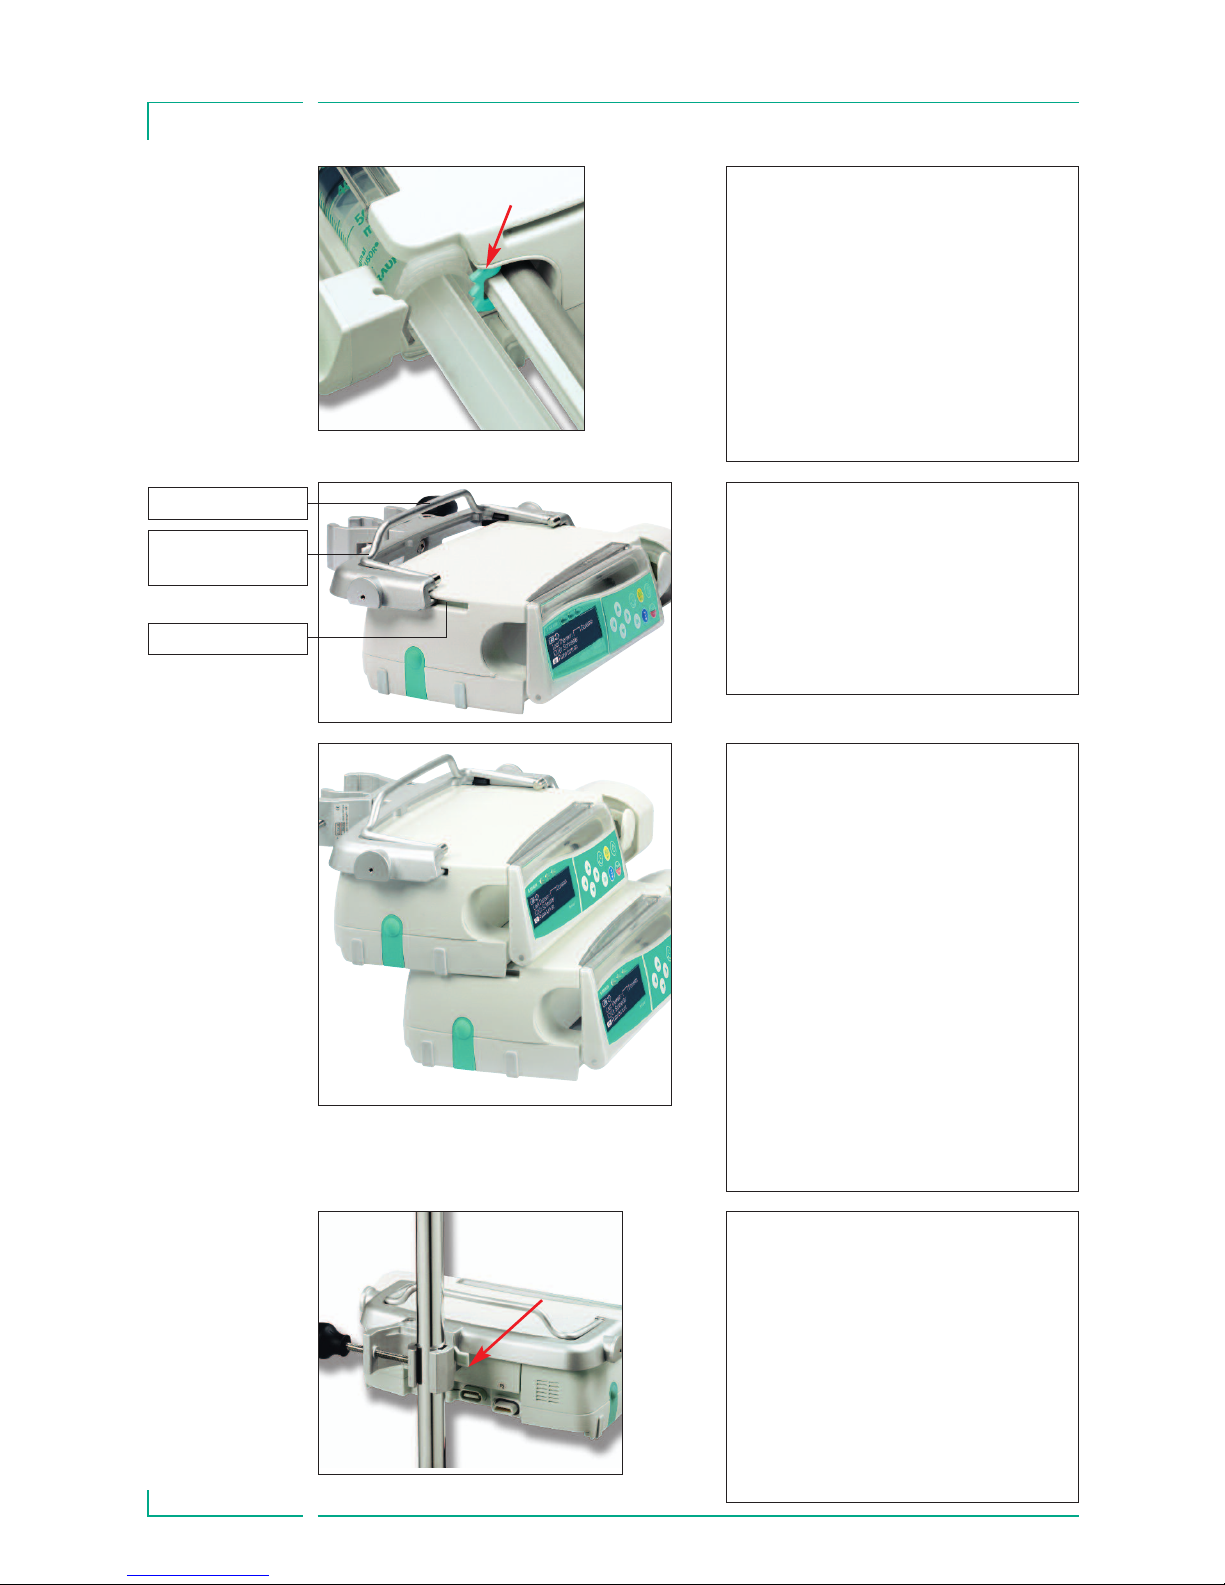
Syringe Fixation
Pull and turn the syringe holder to the right
to open the green axial fixation (see red
arrow). Syringe must be fixed with wings
upright in the slot (found to the left hand
side of the axial fixation) before closing
syringe holder. Make sure that syringe is
properly inserted.
Caution: Don't touch piston brake when
moving forward.
Transport
A maximum of three pumps (Perfusor®
Space or Infusomat® Space) plus one
SpaceControl may be stacked together (in
ambulance cars or helicopters only one
pump). Avoid external mechanical influence.
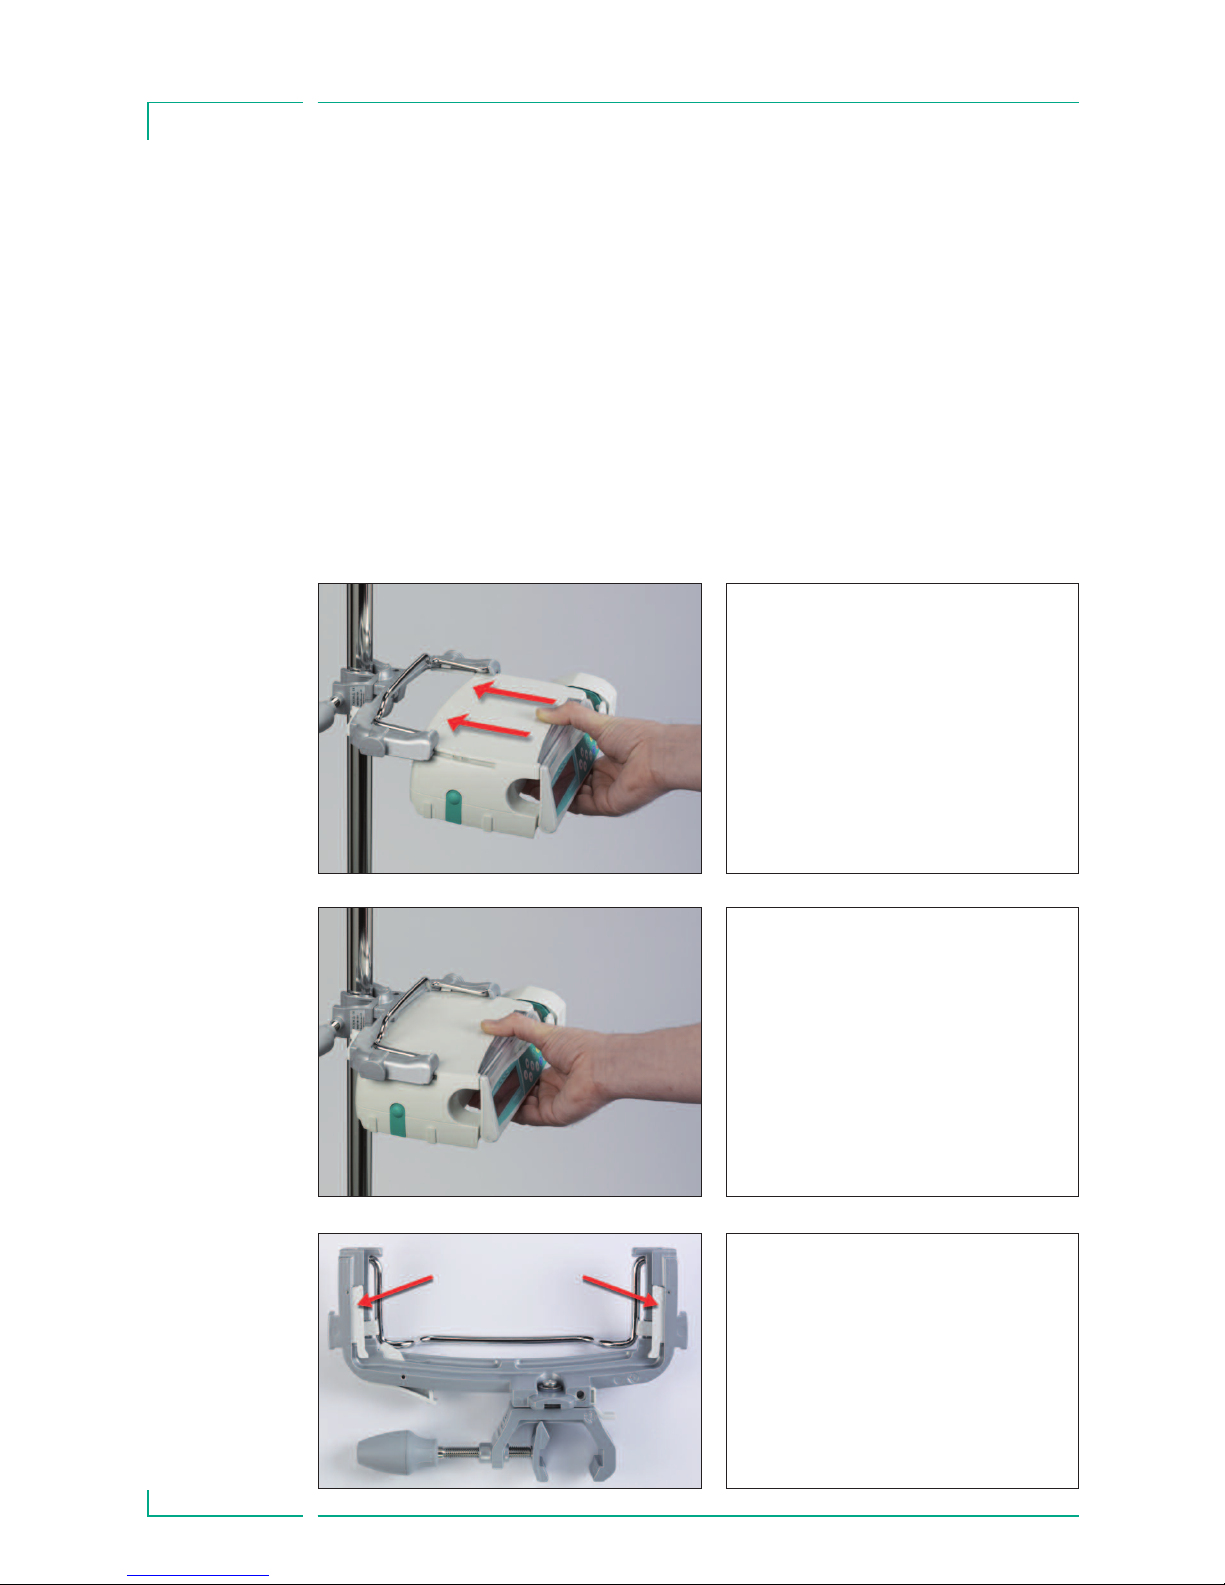
Locking Devices Together
Line up the bar of the lower pump with the
bar of the pump above and slide the lower
pump backwards until the lock clicks and
the green buttons are above each other.
To disconnect, push green locking buttons
of top pump device and slide bottom pump
forward.
Caution: Avoid external mechanical action.
Fixaton of PoleClamp (Universal Clamp)
Line up bar of pump with bar of PoleClamp
and slide PoleClamp forward until locking
mechanism clicks.
To remove, press release button on frame,
push handle down and pull PoleClamp
backwards.
Pole Fixation
Push the opening of PoleClamp against the
vertical pole and lock the screw tightly.
Unscrew to release.
For vertical fixation of PoleClamp push
lever down and rotate either way until lever
clicks into notch. Push lever for rotation.
Caution: A maximum of three B. Braun
Space pumps can be stacked together
when used with the PoleClamp SP.
Pole clamp handle
Pole clamp
release button
Pump slots
Page 5
5
SYMBOLS ON PRODUCT
SYM B O L S O N P R O D UCT
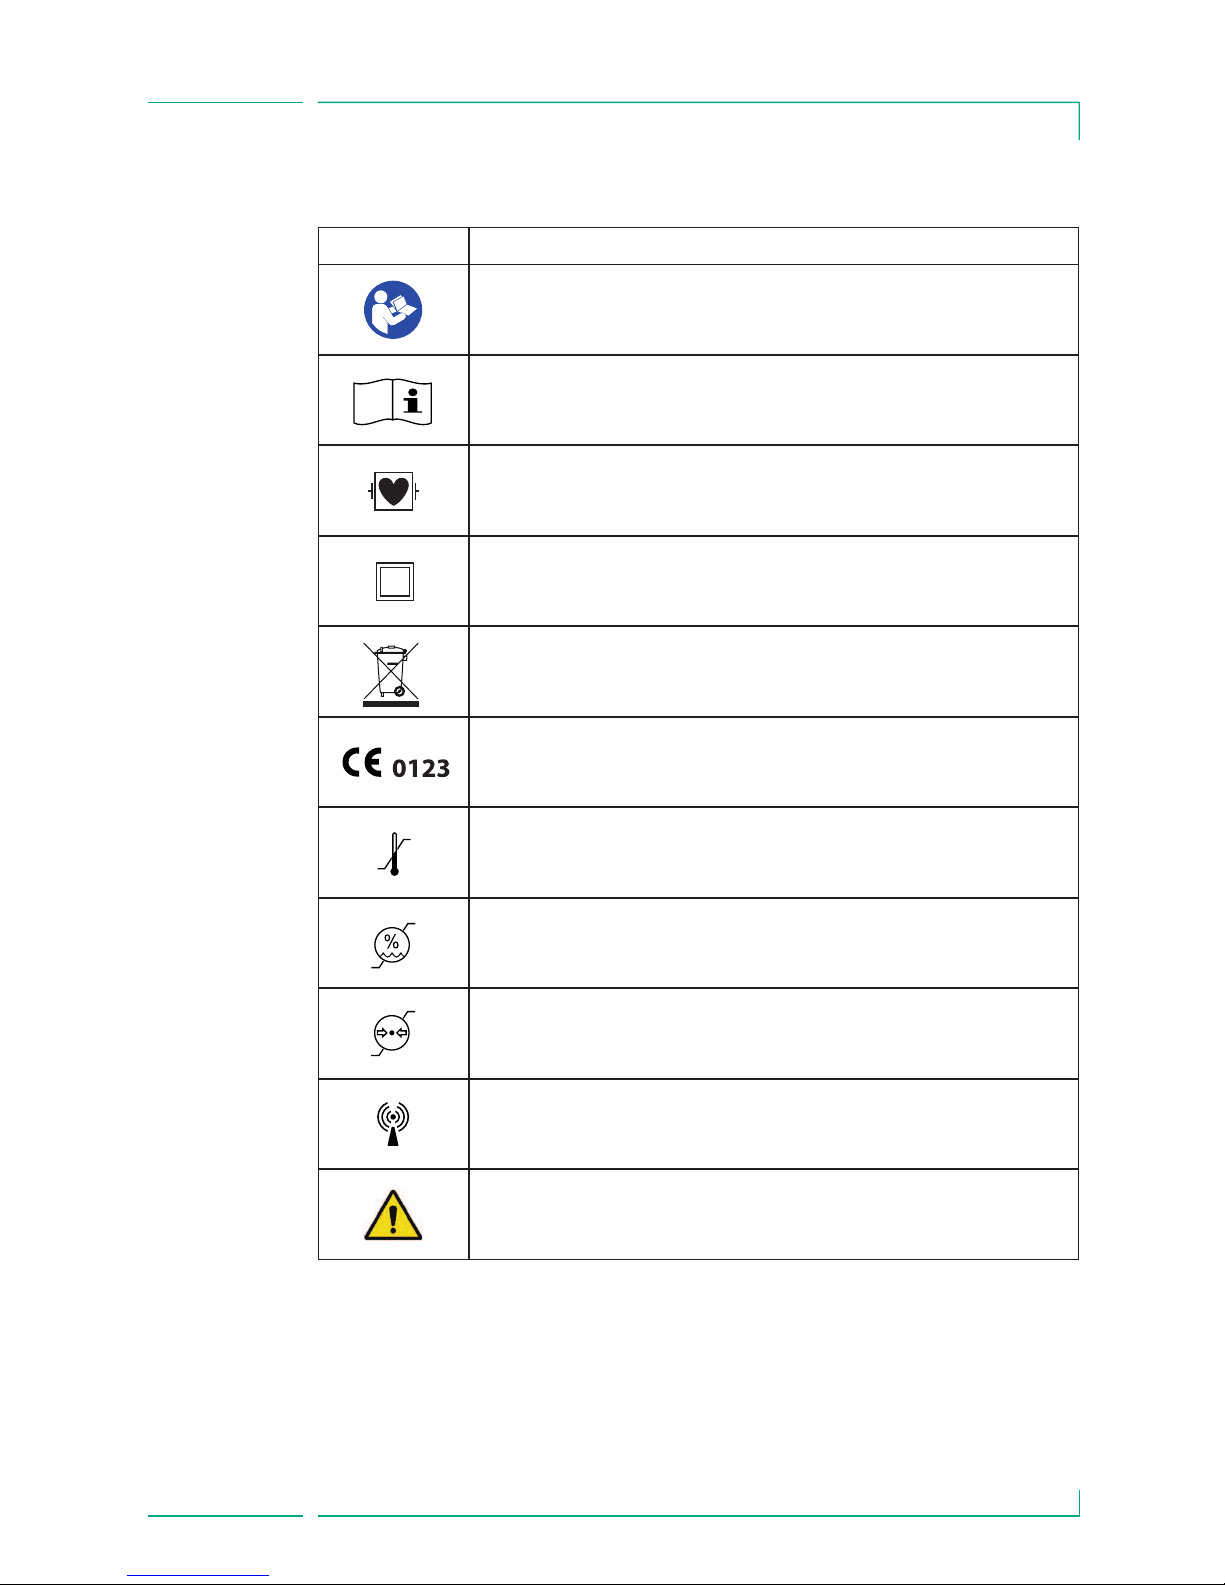
Symbol Explanation
See accompanying documents.
Type CF unit with defibrillation protection
Protection class II device
Symbol indicating separate collection for electrical and
electronic equipment (2002/96/EC)
CE mark compliant to Directive 93/42/EEC
Temperature Limit
Moisture Limit
Limitation of the atmospheric pressure
Mandatory action: see instruction for use.
Non-ionizing electromagnetic radiation
General warning sign (e.g. Caution)
Page 6

6
PATIEN T SAF E T Y
PATIENT S AFETY
Read Instructions
for Use prior to use.
The infusion device
should only be
used by specially
trained staff.
Intended use
The Perfusor® Space Infusion Syringe Pump System includes an external transportable electronic infusion syringe pump and pump accessories. The system is
intended for use on adults, pediatrics, and neonates for the intermittent or continuous delivery of parenteral and enteral fluids through clinically accepted
routes of administration. These routes include, but are not limited to intravenous, intra-arterial, subcutaneous, epidural, and enteral. The system is used
for the delivery of medications indicated for infusion therapy including but not
limited to drugs like anesthetics, sedatives, analgesics, catecholamines, anticoagulants etc.; blood and blood components; Total Parenteral Nutrition (TPN);
lipids, and enteral fluids. The Perfusor® Space Infusion Syringe Pump System is
intended to be used by trained healthcare professionals in healthcare facilities,
home care, outpatient, and medical transport environments.
Using TCI the scope of patients is:
Some parameter sets are using the Lean Body Mass (LBM) to individualize the
parameterization. The LBM calculation may furthermore restrict the scope of
patients as it will not allow TCI for obese patients.
Using TCI the scope of procedures is:
•
Propofol: Anaesthesia and Conscious Sedation
•
Remifentanil: Anaesthesia
The medical specialist must decide on suitability for application on the basis of
the warranted properties and the technical data.
Operation
• The initial training of the Perfusor® Space is to be performed by B. Braun
sales personnel or other authorized persons.
After each software update, the user is required to inform himself of the
changes to the device and accessories by referring to the Instructions for Use.
4w Caution: Ensure the unit is properly positioned and secured. Do not position
pump unit above patient or in a position where a patient could
come to harm, should the pump fall.
•
Prior to administration, visibly inspect the pump and the accessories
(especially the axial fixation) for damage, missing parts or contamination and
check audible and visible alarms during selftest.
•
Not be used adjacent and stacked with other equipment except B. Braun
Space devices.
w
Height [cm]
Weight [kg]
Age [Yrs]
30
Minimum Maximum
200
130 220
16 100
Page 7

7
PATIENT S AFETY
• Only connect to patient once the syringe has been inserted correctly and
there is proper fixation of the syringe pressure plate by the claws of the drive
head. Interrupt connection during syringe change to prevent incorrect dose
delivery.
•
Select syringe/catheter suitable for use with the intended medical application.
4w Caution: Position the infusion line free of kinks.
•
Recommended change of disposable each 24 h (or as per national hygiene
regulations).
•
Installation in medically used rooms must comply with the appropriate
regulations (e.g. VDE 0100, VDE 0107 or IEC-publications). Observe national
specifications and deviations.
4w Caution: Operate the pump at least 25 cm from flammable anaesthetics
to prevent explosion
•
Compare the displayed value with the entered value prior to starting
infusion.
•
If staff call is used we recommend checking the equipment once after
connecting the pump.
•
Protect the device and the power supply against moisture.
•
Do not carry the pump device by it's drive mechanism during transportation.
•
If the pump device falls or is exposed to force it needs to be examined by the
service department.
•
The displayed data must always be checked by the user prior to making
further medical decisions.
•
During mobile use (homecare, patient transport inside and outside the
hospital): Make sure the device is securely fixed and positioned. Positioning
changes and severe shock can lead to minor changes in the delivery accuracy
and/or unintentional bolus administration.
•
A supplemental patient monitoring must be carried out if life-saving
medication is performed.
•
Avoid applying external force on the drive mechanism during administration.
•
In case high potent drugs are given be sure to have a second infusion pump
for that drug at hand. The therapy documentation should be suitable to
continue the therapy at the second infusion pump.
•
Independant of the soft limits the selected values have to be the medically
correct ones for the given patient.
•
In case values relevant for the dose rate calculation (e.g. body weight) are
changing always the flow rate will be updated and the dose rate will be fix.
•
Consider startup characteristics before using low infusion rates (0.1ml/h)
with critical drugs.
Page 8

Enteral Nutrition
The Perfusor® Space may be used for enteral nutrition. Do not use enteral fluids
for intravenous infusion as this may harm your patient. For this reason only use
disposables dedicated and labeled for enteral nutrition.
Other components
•
Use only pressure proof and compatible disposable items (min. 2 bar/
1500 mm Hg) to avoid influencing performance data - which would result in
impairing patient safety.
•
Where several infusion lines are connected on one single vascular access, the
possibility of the lines exerting a mutual influence over each other cannot be
excluded.
•
Refer to the according manufacturer’s information for possible
incompatibilities of equipment with respect to drugs.
•
Use only compatible combinations of equipment, accessories, working parts
and disposables with luer lock connectors.
•
The use of incompatible disposables may influence the technical
specifications of the device.
•
Connected electrical equipment must comply with the relevant IEC/EN-
specifications (e.g. IEC/EN 60950 for data-processing equipment).
The user/operator is responsible for the system configuration if additional
equipment is connected. The international standard IEC/EN 60601-1-1 has to
be taken into account.
Safety Standards
Perfusor® Space satisfies all safety standards for medical electrical devices in
compliance with IEC/EN 60601-1 and IEC/EN 60601-2-24.
•
The EMC-limits (electro-magnetic compatibility) according to
IEC 60601-1-2:2007 and IEC 60601-2-24: 2012 are maintained. If the
equipment is operated in the vicinity of other equipment which may cause
high levels of interference (e.g. HF surgical equipment, nuclear spin
tomography units, mobile telephones etc.) may be disturbed. Maintain the
protective distancesrecommended by the manufacturers of these devices.
•
The Perfusor® Space fulfils the applicable requirements of EN 13718 to be
used in the air, on the water and in difficult terrain. During transport the
Perfusor® Space needs to be fixed on a suitable restraint system by means of
SpaceStation or Pole Clamp SP. When stored under temperature conditions
beyond the defined operating conditions the Perfusor® Space needs to
remain under room temperature at least one hour before usage.
Safety Instructions for using PCA
•
In case the demand button is used with SpaceStation the PCA pump has to
be placed in the lowest slot of the lowest SpaceStation.
PATIENT S AFETY
8
Page 9

9
PATIENT S AFETY
• Access to the pump settings can be prohibited by DataLock 3. The code for
DataLock level 3 should differ from the one for levels 1 and 2 in case the
pump is only allowed to be used by pain management professionals.
•
For additional safety the removal of the syringe can be prevented by the use
of the Syringe Anti Removal Cap (see accessories) and the locking of the
syringe holder. The Syringe Anti Removal Cap is usable for the following
syringes: B. Braun Original Perfusor Syringe 50 ml, B. Braun Omnifix 50 ml,
BD Plastipak 50/60 ml and Tyco Monoject 50 ml. The locking of the syringe
holder is under the pump and is locked by a clockwise turn of 90°. Make sure
the syringe holder is safely locked. Opening of the syringe holder may not be
possible after locking.
•
In case opioids are administered and the Syringe Anti Removal Cap is not in
use and the syringe holder is not locked the therapy only should be
performed under surveillance of medical staff. This especially is necessary in
case non-authorised access to the drug can be anticipated.
•
When ending PCA and starting it again the therapy data are set to default
values.
•
Using the demand button also the patient is a permitted user. With the
demand button only a PCA-bolus can be requested. This is limited to pre defined doses by drug list and pump settings.
•
Consider startup characteristics before using low infusion rates (0.1ml/h)
with critical drugs.
Safety instructions for using TCI
•
TCI should only be performed by experienced anaesthetists being familiar
with the principles of TCI and properly trained in using the present device.
•
The use of TCI with B. Braun Space does not limit the responsibility of the
anaesthetist for administration of drugs. They need to be fully aware of the
available literature for any parameter set used in association with a drug and
need to refer to the prescribed information for rate and dosing limits.
•
Pharmacokinetic and pharmacodynamic interactions among anaesthetic
drugs are known, but are not taken into account into the calculation of the
plasma and effect site concentrations. They have to be taken into account by
the user.
•
In particular, the user must be aware that starting the TCI will result in the
automatic infusion of a pre-calculated bolus dose followed by an infusion to
achieve the selected target concentration.
•
It is essential that the user verifies that the patient characteristics and the
selected target concentration as well as the resulting dosages conform to the
prescribing information of the relevant country.
•
B. Braun has verified the accuracy of the mathematical model
implementation, the usability as well as pump delivery accuracy.
Page 10
10
PATIENT S AFETY
• While using TCI an appropriate patient monitoring is mandatory.
•
Take care of using the right dilution/concentration of the drug and make sure
the right dilution is selected at the pump.
•
Never administer Propofol or Remifentanil by a second infusion as long as
you use TCI.
•
It is possible to completely switch off the TCI mode to avoid the use of TCI
accidentally.
Safety Instructions for using Pole Clamp
1. Line pump up with the Pole Clamp
guide rails.
2. Slide pump fully into place onto the
guide rails.
3. An audible “Click” should heard.
4. Test the pump is secure.
W
The pump ist now securely attached to
Pole Clamp.
• Do not lean on the pump when
attached to the Pole Clamp.
• Do not position the pump unit
above the patient.
W
• DO NOT use any Pole Clamp that
shows signs of damage.
• DO NOT use Pole Clamp with
missing clamp grids.
Underside view
Clamp grids
Page 11
11
MENU STRUCTURE / NAVIGATION
MENU STRUCTURE / NAVIGATION
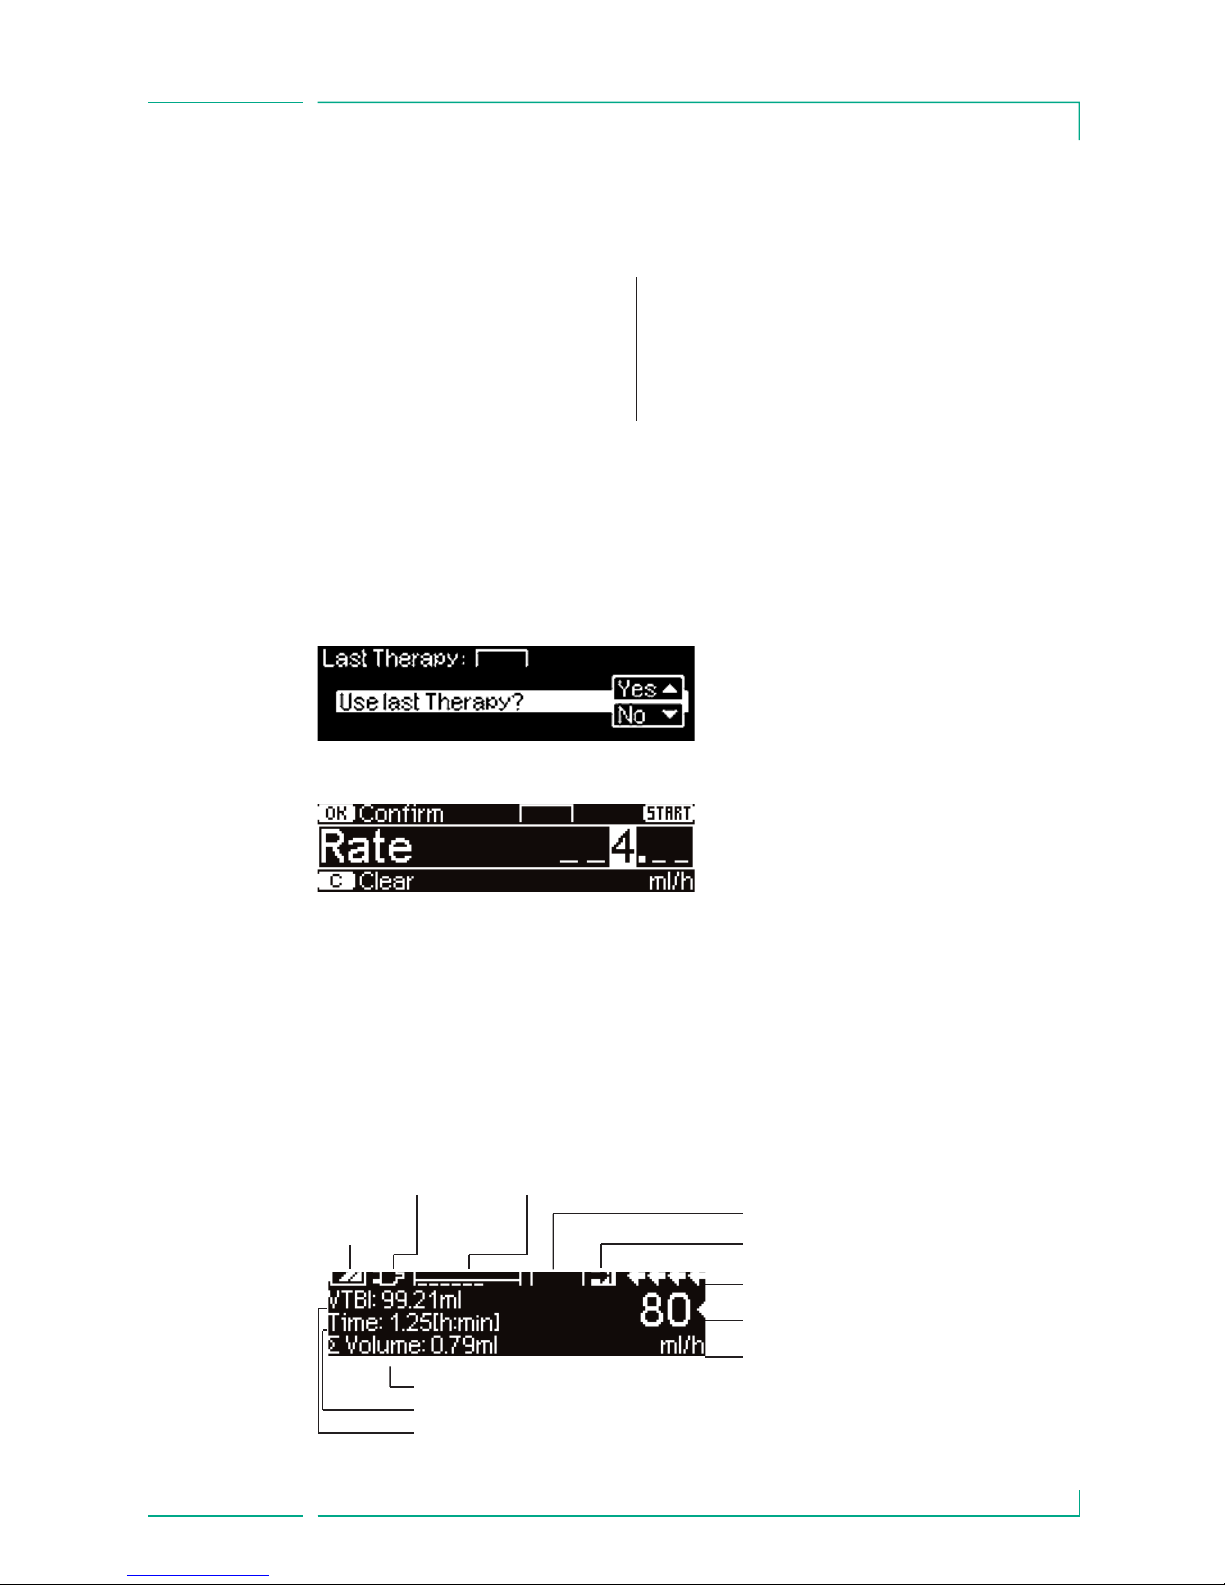
At the top of the screen the last therapy is
indicated. Yes/No question can be
answered by pressing ufor yes or d
for no.
Parameters which can be changed (e.g.
rate in ml/h) are opened with l or
k. When editing parameters, switch
digits/levels using l r. White
background indicates current
digit/level. Use u or d to change
current setting. Help text on the
bottom/top of the screen indicates
options how to proceed (e.g. confirm
rate with k, start infusion with sf
or clear rate by pressing c).
Display Meaning
Mains
connection
Battery
status
Unit of drug application
Active VTBI- or time preselection
Scrolling arrows indicate pump is infusing
Set rate can be opened with l
Set pressure limit and current pressure*
*See also OccluGuard
Therapy profile
Typical display during infusion:
Total volume infused. Alternatively the intermediate volume can be displayed.
Remaining time
Remaining VTBI
Cutline
o On/Off button
sf Start/Stop button
nb Bolus button
c Clear button
k OK button
q Keypad with arrow up, -down,
-left, -right button
m Connection button
All display screen shots are examples and may be different when related to an
individual patient and individualized therapy.
Page 12
12
MENU STRUCTURE / NAVIGATION
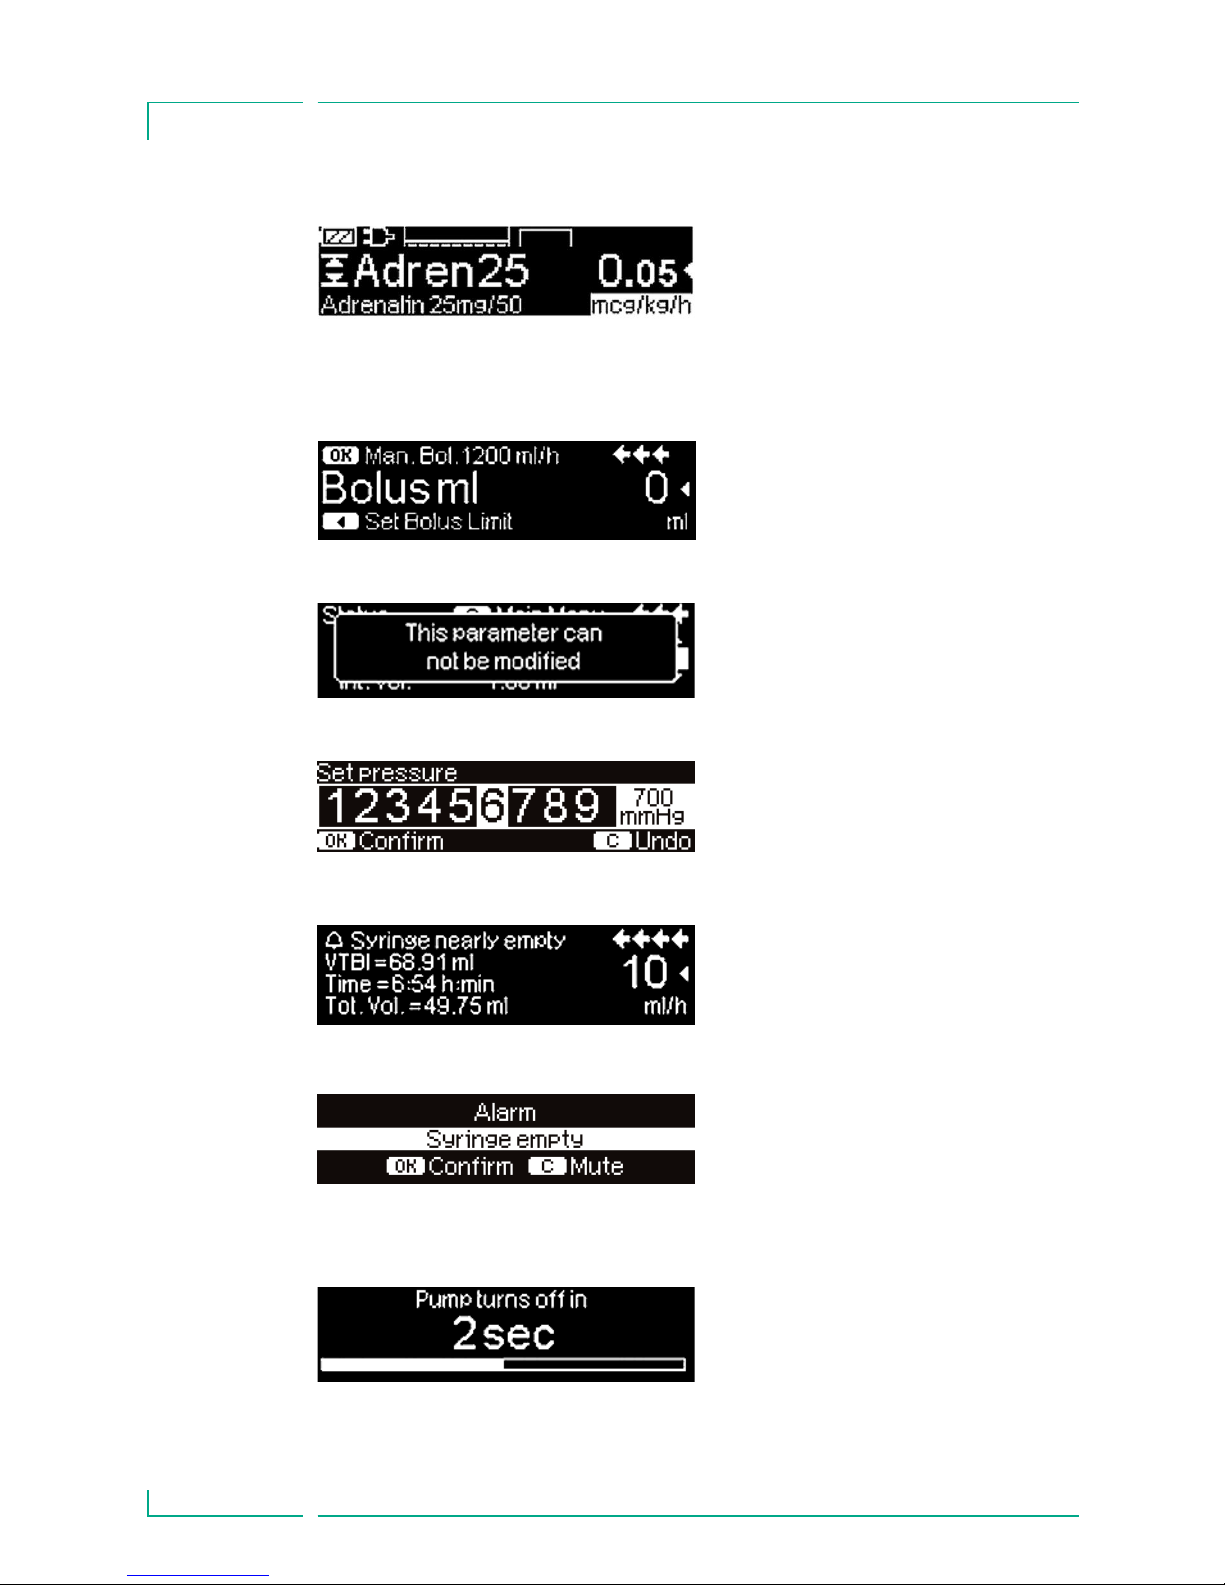
Set pressure level with l or r and con-
firm by pressing k.
Cancel to edit pressure by using c.
Pre-alarms are indicated by the message
on the display (e.g. “Syringe nearly
empty”), an audible tone and the yellow
LED is constantly on. To confirm a
pre-alarm press k.
In case of an operating alarm (e.g.
"Syringe empty") the infusion stops, an
audible tone sounds and the red LED is
flashing. Confirm alarm by using
k.
Confirming does not activate an acoustic
feedback
Press and hold o for 3 sec to turn pump
off. A white bar stretches from left to right
and counts down the 3 sec.
As long there is a syringe inserted the
pump will not turn off but will use standby.
Display Meaning
This hint pops up if a user tries to edit or
change a parameter by pressing l when
that parameter is unable to be changed.
nb has been pressed while the pump is
infusing. Start manual bolus at
1200 ml/h by pressing k (see top of
display) or proceed to set bolus limit
with l (see bottom of display).
All status information is available in the
bottom line of the dislplay. The desired
information can be selected by using
d
u and will be displayed permanently
thereafter (e. g. drug long name, time until
syringe empty, current system pressure
etc.).
Page 13
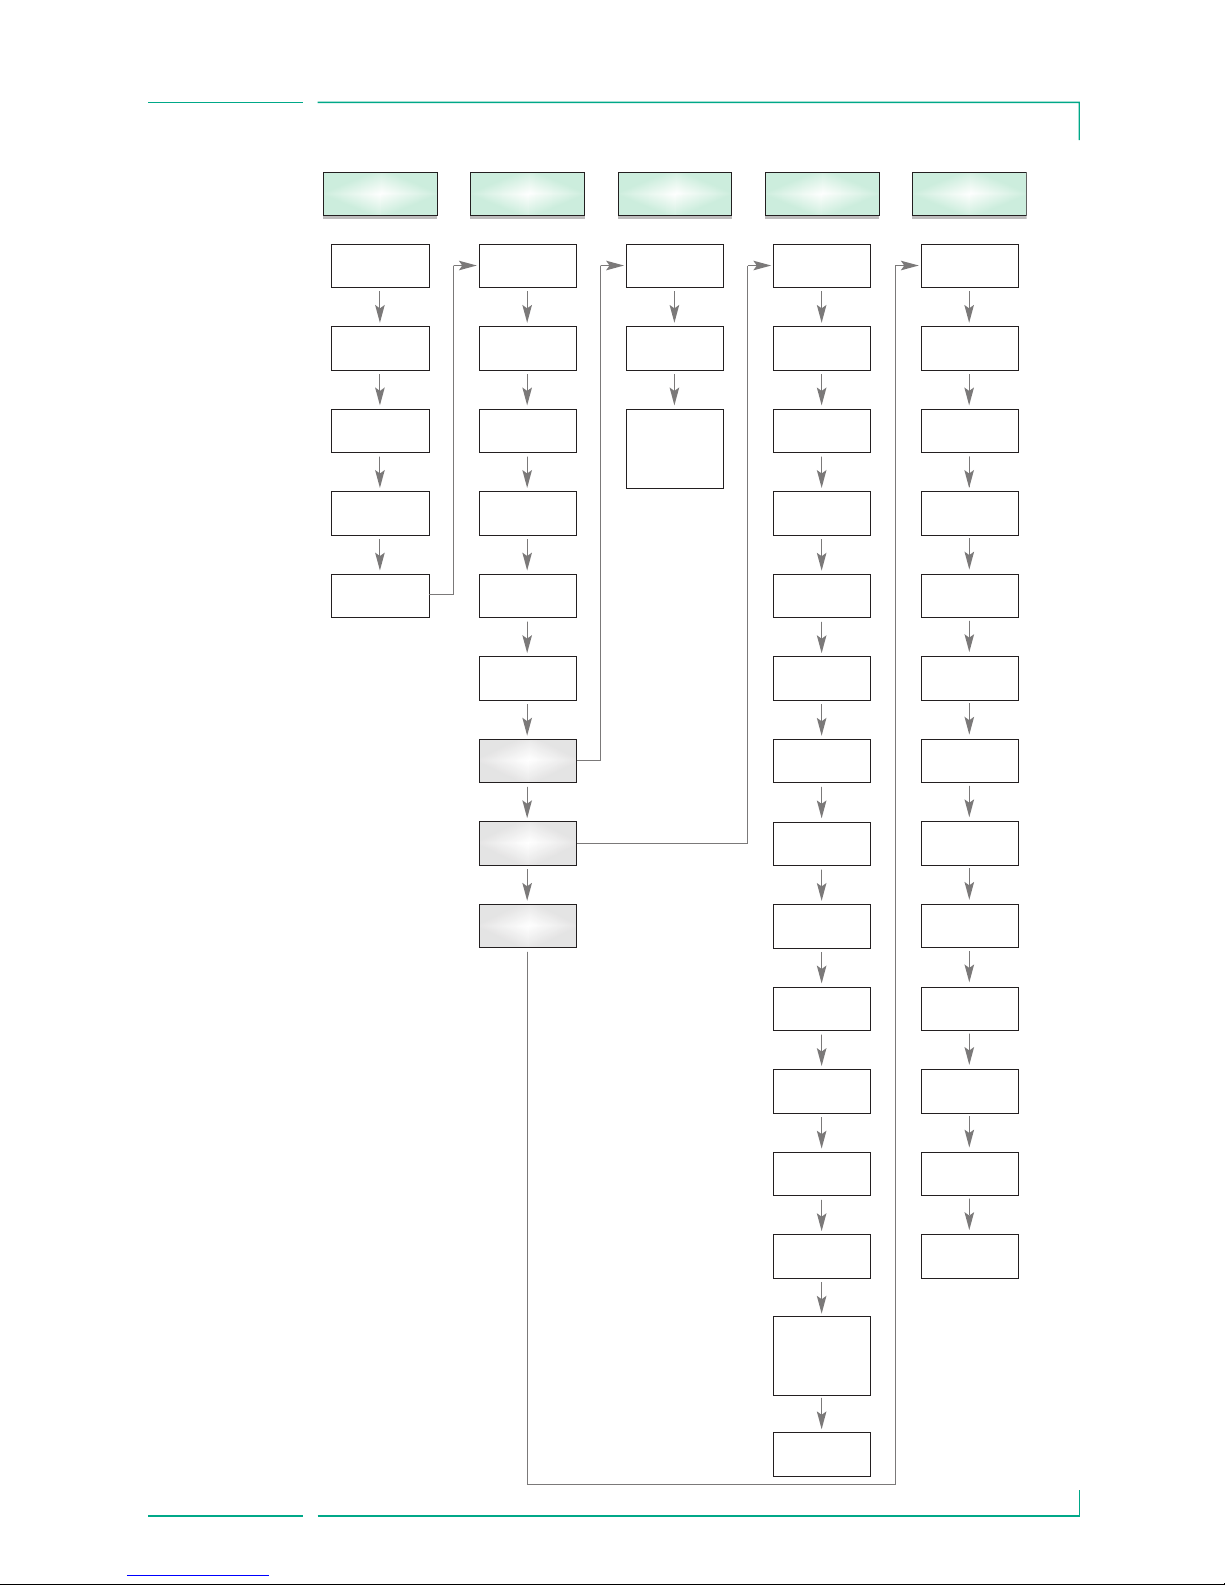
Prime ?
S
tart Up
Menu
M
ain
Menu
S
tatus
Menu
Syringe
s
election
R
ate
S
pecial
Functions
Dose Rate
C
alculation
VTBI
Time
U
se last
therapy ?
Use dose rate
calculation ?
Use drug
library ?
Weight
Concentration
D
ose
Drug Library
Change-over
from
c
ontinuous
mode to PCA
Intermediate
v
olume
I
ntermediate
amount
I
ntermediate
time
Total
volume
Special
Functions
Options
Status
O
ptions
Menu
Occlusion
P
ressure
Total
amount
Total
time
Pressure
OccluGuard
Status
Syringe
Battery
capacity
WLan
Version
Drug
info
Bolus
Rate
KVO-
Mode
Display
Light
Keypad
Light
Alarm
Volume
OccluGuard
P
ressure
Leap/Drop
Contrast
Date
Time
Macro
Mode
In Dose Mode:
Display of flow
rate in large
scale
D
ata
Lock
Language
13
MENU STRUCTURE / NAVIGATION
Page 14

14
Chapter 1
OPERATION
OPE RATION
1.1 Start of Infusion
• Ensure correct installation of the pump device. If the pump is connected to mains,
the display states information such as the battery status, the mains connection
symbol and the last therapy.
•
Press o to switch on unit. Note the automatic selfcheck: “Selftest active” and the
software version are displayed, two audible tones sound and all three LEDs (yellow,
green/red and blue) flash once. Information on power supply (battery or mains
connection), the set pressure level and the syringe (if syringe already inserted) are
displayed. Hence the drive moves backwards.
•
Press c to start with direct entry of therapy parameters or open pump cover and
syringe holder to start with syringe insertion.
•
Insert syringe with wings of the syringe upright in the slot to the right of the
housing. Close syringe holder and pump door. Piston brake moves forward.
Caution: Never leave the pump unattended during syringe loading.
•
Confirm syringe type with k. Type of syringe indicated must coincide with syringe
inserted.
•
Drive will advance and grip pressure plate of syringe.
Caution: Keep your hands away from advancing device.
Note: Make sure that the piston brake moves back into the syringe holder.
•
If the prime function is activated, press U to prime infusion set at 1200 ml/h
(pressing key once = 1 ml). Interrupt prime function with
k. Repeat procedure
until infusion line is fully primed. Then press
d to proceed.
•
Connect with patient.
•
Respectively answer questions in Start Up Menu with uand d, until the rate is
displayed in the Main Menu.
Enter infusion rate:
•
Press l and set rate using q.
The pump offers the possibility to load up to four languages into the pump
(depending on the number of the language specific characters), among which the
user can choose during the operation of the pump. During the first ever start-up of
the device, the user is requested to select the languages and to mark them with
l.
After that, the selection has to be confirmed by choosing the last menu item at the
bottom of the list and pressing
k. Then the desired language must be selected with
t and confirmed with k. Answer the following question with d in order to
activate the selected language.
Page 15

15
OPERATION
Chapter 1
• Press sf to commence infusion. Running arrows on display and green LED
above display indicate pump is infusing.
Note: Stop the infusion at any time by pressing sf. The pump can be turned off
at any time by pressing
o for 3 sec (Exception: Data lock level 2) and as long a
disposable is inserted.
1.2 Entry With Different Combinations of Rate, VTBI
(= Volume To Be Infused) and Time
The Perfusor® Space offers the possibility to enter a volume- and time limit in addition
to an infusion rate. When two of these parameters are entered, the third is calculated
by the pump. If a volume and/or time is preselected, an arrow symbol is placed in front
of one of these parameters in the Main Menu. It is called the “target”. During the
infusion of the pump, this target symbol is displayed next to the moving arrows in the
run display (this symbol is not visible in case TCI is used). This indicates that the pump
has been programmed, either with a volume- or time limit. The assignment of the target symbol, apparent in the Main Menu, shows the established parameter for the application (VTBI or time). When the rate is changed, the so-called target parameter is
principally not adjusted to the new rate but to the parameter which does not have the
target symbol in front. After the infusion has started, the remaining VTBI and time are
displayed in the status menu and the run display (values are counting down).
1.) Enter VTBI and time: The infusion rate will be calculated and displayed on the
bottom of the display.
Target: Volume
• Select VTBI with t and open with l.
• Enter VTBI with qand confirm with k.
• Select time with t and open with l.
• Enter time with qand confirm with k.
Check calculated rate on plausibility.
Proceed in the same way to calculate 2.) and 3.).
2.)Infusion with volume limit
Enter rate and VTBI: The infusion time will be calculated and displayed at the
bottom of the display.
Target: VTBI
3.)Infusion with time limit
Enter rate and time: The infusion volume will be calculated and displayed at the
bottom of the display.
Target: Time
Changing already entered values of VTBI and time (rate, VTBI and time already exist
at the point of change):
Page 16

16
a) Target symbol is placed in front of VTBI:
• Change of VTBI => Adjustment of time. Old and new target: VTBI
• Change of time => Adjustment of rate. Old and new target: VTBI
b) Target symbol is placed in front of time:
• Change of time => Adjustment of VTBI. Old and new target: Time
• Change of VTBI => Adjustment of time. New target: VTBI
Note: Changing VTBI/time is only possible while the pump has been stopped.
1.3 Bolus Application
After pressing the button nb the bolus unit can be selected by using d.
Note: The selected unit will not be stored. It is possible to administer a bolus in ml.
There are three ways to administer a bolus:
1.)Manual Bolus: Press
nb. Then press k and hold button. Fluid is
administered as long as button is held down. The infused bolus volume is
displayed.
The max. bolus volume is limited to 10 sec. Reaching this limit is indicated
by an acoustic signal.
2.)Bolus with volume preselection: Press
nb. Then press l and set bolus dose
limit by using
q. Press nb. to confirm and start bolus. Depending on the
service tool settings an acoustic signal will sound after finishing the bolus
volume.
3.)Bolus with rate calculation: Press
nb. Then press l and set bolus dose
by using
q. Press k to confirm bolus dose. Set time with q in which a
bolus is to be delivered. Calculated bolus rate is shown on top of the display.
Press
nb. to confirm and start bolus.
You can use the service program to enter a default and a maximum bolus rate.
Once a new therapy is started the device always returns to the default rate
- even if the bolus rate was manually changed beforehand.
Note: If the bolus limit is not entered after pressing nb, the pump switches
back into the run display automatically.
Note: The infused volume during bolus with volume preselection counts up.
In order to purge the line at any time while the pump is stopped press
nb.
Answer the following question by pressing
u in order to start the purge
process. Cancel by pressing
u or any other key.
Caution: Take care not to overdose! Given a bolus rate of 1200 ml/h, 1 ml will
be administered in just 3 sec. To cancel bolus infusion at any time press
k.
At low bolus volumes, under dosages due to the start up characteristic of the
pump and the tolerances in the infusion system cannot be excluded. Disconnect
patient while purging.
Chapter 1
OPERATION
Page 17

17
OPERATION
1.4 Syringe Change and New Therapy Start
Note: To avoid incorrect dosing, always disconnect the pump from the patient when
changing the syringe. Never leave the pump device unattended during syringe change.
Before inserting a new syringe check if the axial fixation is properly working.
•
Press sf to stop the infusion. The green LED will disappear.
Disconnect the pump from the patient.
•
Either the drive mechanism moves backwards into starting position when opening
syringe holder or the question "Perfom change?" must be first answered before the
drive moves backwards.
•
Open pump door, remove syringe and insert new syringe.
Note: In case the plunger head of the syringe is not released anymore by the claws
when performing a syringe change, the emergency release button needs to be pressed
to release the claws of the drive head. The emergency release button is placed on the
outside of the drive head. It can be released with a pointed pen. Then manually open
the claws and take out the syringe.
•
Close the syringe holder (Note: Piston brake must move forward!) and the pump
door and confirm the inserted syringe type with
k. Drive advances and grips
pressure plate of syringe.
Note: Do not block advancing drive unit with any objects. Piston brake must move
backwards into the syringe holder.
•
Prime pump if necessary with uthen press dto continue.
•
Connect the patient to the pump and check set parameters using t.
•
Press sf to start infusion.
To start a new therapy after a syringe change:
•
Press c when pump is in the Main Menu.
•
Press d and continue to set new therapy parameters with q.
• Press sf to start infusion.
Note: A new therapy can be started at any time during a stopped infusion. Press
c (repeatedly) when the pump is in the Main-, Status- or Options Menu and
proceed to follow instructions as described.
1.5 End of Infusion
• Press sf to stop the infusion. The green LED disappears. Disconnect the
pump from the patient.
•
Open the syringe holder. Answer the question whether a syringe change should be
performed with
u. The drive moves backwards into the starting position.
Chapter 1
Page 18

18
Chapter 1
OPERATION
• Open pump cover. Remove the syringe, move the syringe holder into an upright
position and close the front door.
•
Press o for 3 sec. to switch the pump off. The drive moves into parking
position.
Note: The settings will be permanently saved by the switched off device.
Note: Pump cannot be powered off with syringe inserted.
1.6 Standby Mode
In the case of extended interruption, the user has the option to maintain the set values.
•
Press sf to stop the infusion. Then press o for less than 3 sec.
•
Confirm that the pump is supposed to switch into standby by pressing u.
•
The pump is now in Standby.
While the pump is in the standby mode, it’s display shows the drug and the
remaining time for this mode. Change of remaining time by pressing
l. Exit
standby by pressing
c .
As long as a disposable is inserted in the pump will use standby also in case
o is
pressed for at least or more than 3 sec.
Page 19

ADVANCED OPERATIONS
2.1 Status Request of Pump when Infusion is Running
Press c to switch between run display and Main Menu while the device is infusing.
Navigate through the menu using
t to check parameters. In order to check the menu
parameters in the Status-/Options Menu, select "Status" respectively "Options" in the
Main Menu, open menu with
l and scroll through menu with t.
2.2 Rate, VTBI and Time Change Without Infusion
Interruption and Reset of Status Menu Data
• Press cwhen the pump is in the run display in order to switch to the Main Menu.
Select rate/VTBI/time with
t and press l in order to open the parameter.
•
Enter new value with q and confirm with k.
Reset Status Menu Data:
The parameters intermediate volume and -time can be reset when the pump is
infusing or when the pump is stopped.
•
Select “Status” in Main Menu with t and press l.
•
Highlight intermediate volume (in ml) or intermediate time (in h:min) with t and
open parameter with
l.
• Reset values by pressing u.
Both parameter total volume and -time, are displayed in the pump as "Total" with the
according unit and can be reset by starting a new therapy. A second way to reset the
parameters when the pump is in the Main Menu: Press
c, answer question if the last
therapy is to be used with
u and reset the values with u.
The type of the inserted syringe is displayed in menu item „Syringe“ and cannot be
changed once it has been confirmed at the beginning of the infusion. The drug info
states the drug name, the name of the drug list and its date of origin. The current
battery capacity in hours and minutes is displayed in the menu item “Battery Cap.” and
the current software version in menu item "Version". In-line pressure can also be read
in the Status menu in mmHg or Bar depending on the service settings.
19
Chapter 1
OPERATION
Page 20

20
Chapter 2
ADVANCED OPERATIONS
SPE CIAL FUNCTIONS
3.1 Dosing Units and Dose Rate Calculation (Overview)
The following list shows the units used in the pump:
Gram family: ng, mcg, mg, g
Unit family: mIU, IU, kIU, MIU
Equivalents family: mEq
Mole family: mmol
Kilocalorie family: kcal
Millitliter family: ml, ml/kg
In addition to these dosing units the user can choose:
• Feeding: kcal, mEq, mmol
• Surface related amount units: m
2
The pump is calculating the body surface area with the “Dubois” formula
(DuBois D, DuBois EF. A formula. Arch Intern Med 1916; 17: 863):
BSA(m2) = 0.007184 x weight(kg)0.425 x height(cm)0.725.
Check plausibility of calculated body surface area value and resulting delivery
rate before starting the infusion, also, if body surface area related dose rate is
set by Barcode. The dose rate calculation enables a calculation of the rate in
ml/h based on the entered dose parameters.
Setting parameters:
1. Concentration as the amount of the active ingredient per volume.
- Amount of the active ingredient
- Volume in ml
2. Where necessary: Patient weight or Patient height
Note: - Patient weight can be entered in kg, lbs or grams.
- Patient hight is entered in m (is used to calculate BSA)
3. Dose prescription:
- time related as the amount of the active ingredient per min, h or 24h.
- time and patient weight related as the amount of the active
ingredient per kg per min, h or 24h or BSA.
4. Where necessary: VTBI in ml.
Infusion rate [ml/h] =
x
Patient weight (optional)
Dose
Concentration
[]
Page 21

21
SPECIAL FUNCTIONS
3.2 Dose Rate Calculation (Operation)
a Select dose rate calculation with l.
a Select the unit of the active ingredient with
T and confirm it with l.
a Enter the concentration by entering the amount of the active ingredient
and the volume. In order to do so set the values with
q and confirm
with
k.
a If the patient weight shall not be entered press
d.
Press
t to choose “weight” or “surface” and confirm with k.
a Set the patient weight with
q and confirm with k.
a Select the dose prescription with
t and confirm it with l.
a Set the dose with
q and confirm with k. The rate will automatically
be calculated and displayed at the bottom of the display.
a Check the calculated rate and if necessary the adapted parameters with
t on plausibility before starting the infusion with sf.
Dose can later be changed in the Main Menu in the same way as the rate, VTBI
and time (compare 2.2). During TCI mode after a syringe change, the concentration can only be changed in Main Menu. The effect of dose modifications on
other parameters is shown at the bottom of the display. Additionally the total
and intermediate amount of the infused drug can be taken from the Status
Menu. These can be checked and resetted in the same way as the other total
and intermediate values.
A deactivation of the dose rate calculation is only possible when the pump is
stopped. Press
c from Main Menu and then press d.
Caution: A change of the patient weight or height will alter the flow rate.
3.3 Drug Library
Up to 1200 drug names including therapy data, information and up to 10
concentrations per drug can be stored in 30 categories. These drugs can be
subdivided in 50 care units and 16 Patient Profiles. The loading process into the
pump can be performed via a separate PC program (Space Upload Manager &
HiBaSeD).
Note: The drug library can be started over the Start Up and Special Functions
Menu. The user has to make sure prior to the therapy start that the drug library
in the pump complies with the patient target group. The name of the care unit
and creation date (see headline) should be checked in the pump.
There are different ways of assigning a drug to an infusion. This can be done
while the infusion is running or when the pump is stopped.
Chapter 3
Page 22
22
Chapter 3
SPECIAL FUNCTIONS
On the one hand, a drug name including the according therapy data can be
taken from the drug library. On the other hand, if a rate, VTBI and/or time were
already defined in the Main Menu, the drug name and the adjusted values of
the data set will be loaded. If a dose rate calculation has already been started a
belated assignment of the drug name nevertheless is possible.
Loading a drug (including the according parameters) from the Main Menu:
• Go to Special Functions Menu and press
l.
• Open the drug library by pressing
l.
• Navigate through the list with
t and select the care unit with l. If you
have already set the care unit once on your pump this step will be skipped for
the next time.
• Change the care unit by navigating through the list until "Change care unit"
will be displayed. Press
k to change the care unit.
• Navigate through the list with
t and select the patient profile with l.
If no profile is set, this step will be skipped.
• Navigate through the list with
t and select in alphabetical order (all drugs)
or within a category with
l.
• If different therapies are related to a drug, choose therapy type with
t and
confirm with
l.
• Confirm the displayed drug information with
l.
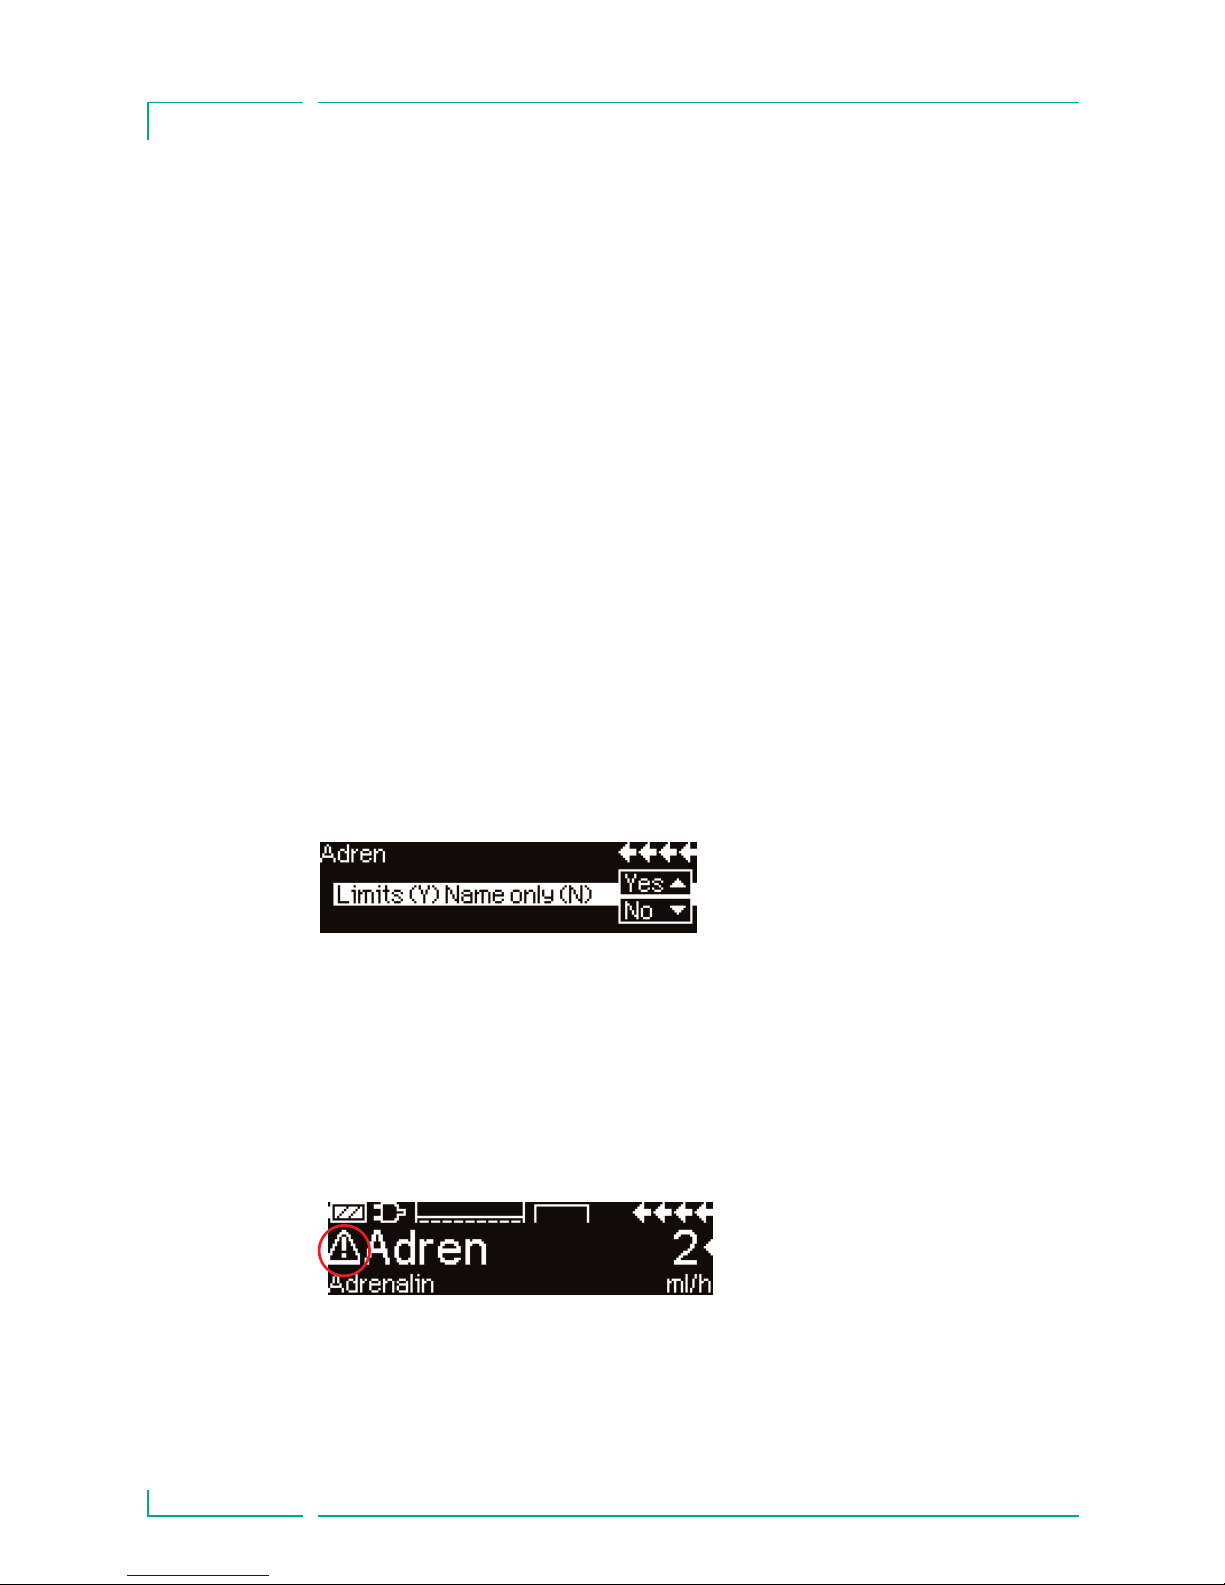
• Decide if the safety limits for the drug are to be applied u or if only the
drug name should be used
d.
• Check if the drug short name in the Run Menu is the same as the selected
drug. Check the parameter in the Main Menu with
t and start infusion with
sf.
Note: If a drug name has been assigned without safety limits, the following hint
is provided in the RUN screen:
Note: Care unit and Patient Profile can not be changed within a therapy.
Initial Bolus:
Initial Bolus has to be configured in the Drug List Manager.
• Use the drug library according to the instructions for use.
Page 23

23
Chapter 3
SPECIAL FUNCTIONS
• Select the desired drug with t and press l.
Before the initial bolus begins, the bolus menu is displayed to allow editing
the bolus with
q.
• Check the parameter and start infusion with
sf.
Hard Limits:
If the set rate/dose/bolus volume and bolus rate exceed the values stored in the
drug library (hard limits), the drug will be rejected, a hint will be displayed and
the pump will fall back into the drug selection. If this occurs while the pump is
infusing the pump will continue to administrate.
Soft Limits:
For the same parameters so called soft limits can be preset via the Drug List
Editor. These can be exceeded without any constraint. The following symbols
that describe the status with regard to the soft limits are being displayed:
The infusion is within the range of the minimum and maximum
soft limits =
The infusion is within the range of the maximum soft limit =
The infusion is within the range of the minimum soft limit =
Violation of the upper soft limit =
Violation of the lower soft limit =
No soft limit is defined =
Only a drug name is available =
(It is possible to select a drug name only from the drug library)
The limits of the drug library have to comply with the limits of the pump and
the disposable.
Note: An adequate monitoring when infusing highly potent drugs is
recommended.
Note: In case a drug from the drug library is selected and the pump is running
under dose rate calculation the initial values will be overwritten by the drug
library values if selected.
Remote Drug Library update from Upload Manager (Space Online Suite)
The file icon blinks every 2 s. An update is available.
Page 24
24
*Bolus volume is the volume of a single bolus the patient may demand. Max. Limit is the amount of
drug or volume a patient may demand within a certain time in total. Lockout is the time in between
two boli.
The Drug Library Upload starts as soon as the pump is in Passive mode.
Note: You can cancel the upload by pressing c.
Please contact your local sales represantative in case you like to use Remote
Drug Library update.
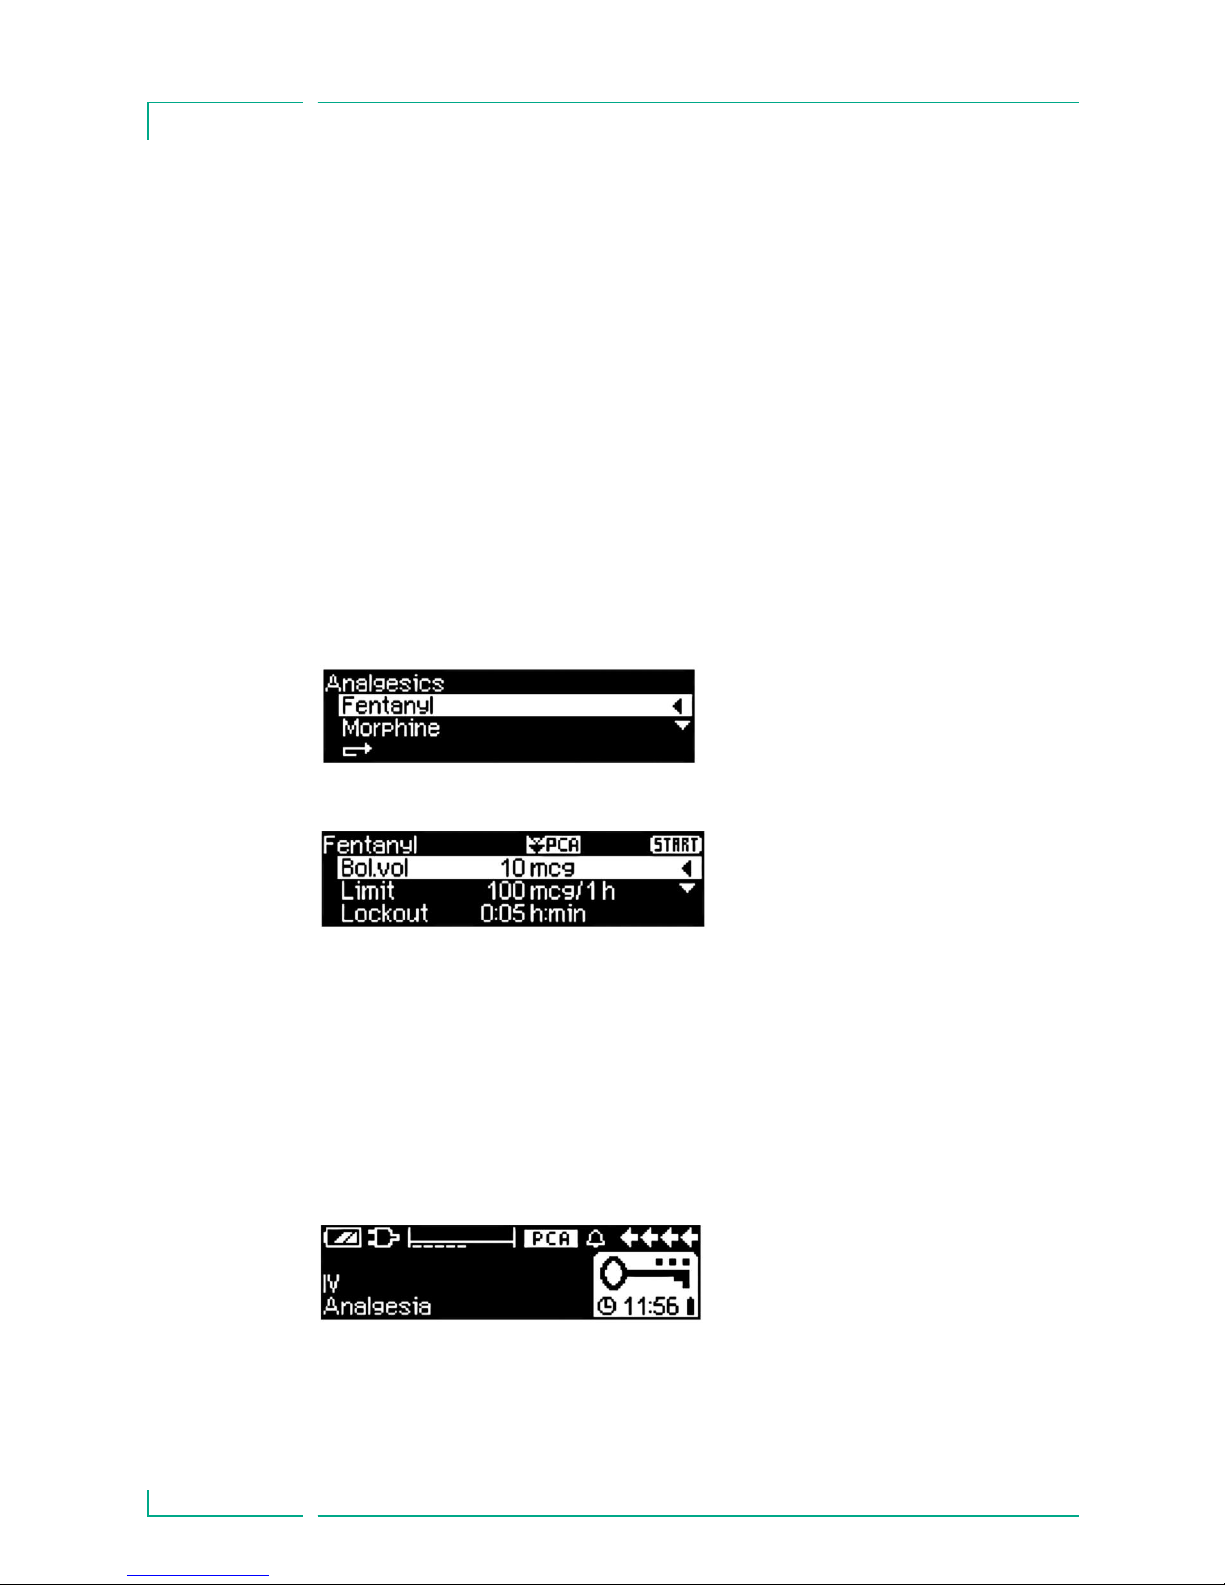
3.4 Patient Controlled Analgesia (PCA)
For PCA a drug list with at least one drug activating the profile PCA is necessary. By this the conditions for an effective and safe therapy are defined.
Switch on pump with
o and wait until self-check is finished. Depending on
the settings the choice of a drug is offered direcly or the pump is in “Main
Menu”.
Select “Special Functions” with
t from “Main Menu” and confirm with l.
Select drug list, category and desired drug by using
q.
The therapy can be started now with
sf in case all values are defined.
Depending on the pre-defined settings the therapy is started with an initial
bolus and a basal rate or not.
Before leaving the patient the pump should be put into DataLock level 3 with
q in Menu “Options”. This is necessary especially in case non-authorised access
to the settings can be anticipated.
The code is entered with
q and confirmed with k.
After the selection the pump
offers additional drug related
information which are confirmed
by
l.
Select profile PCA by using and
confirm with
t .The therapy set-
tings stored in the drug list are
displayed *.
The pump display now may look
like this.
Chapter 3
SPECIAL FUNCTIONS
Page 25
25
In this state the patient is allowed to demand boli. Depending on the status of
the therapy these are either administered or denied. Changing the syringe is also
possible by using the code for level 1 or level 2. Altering the settings for PCA or
other therapies however is only possible with the code for level 3.
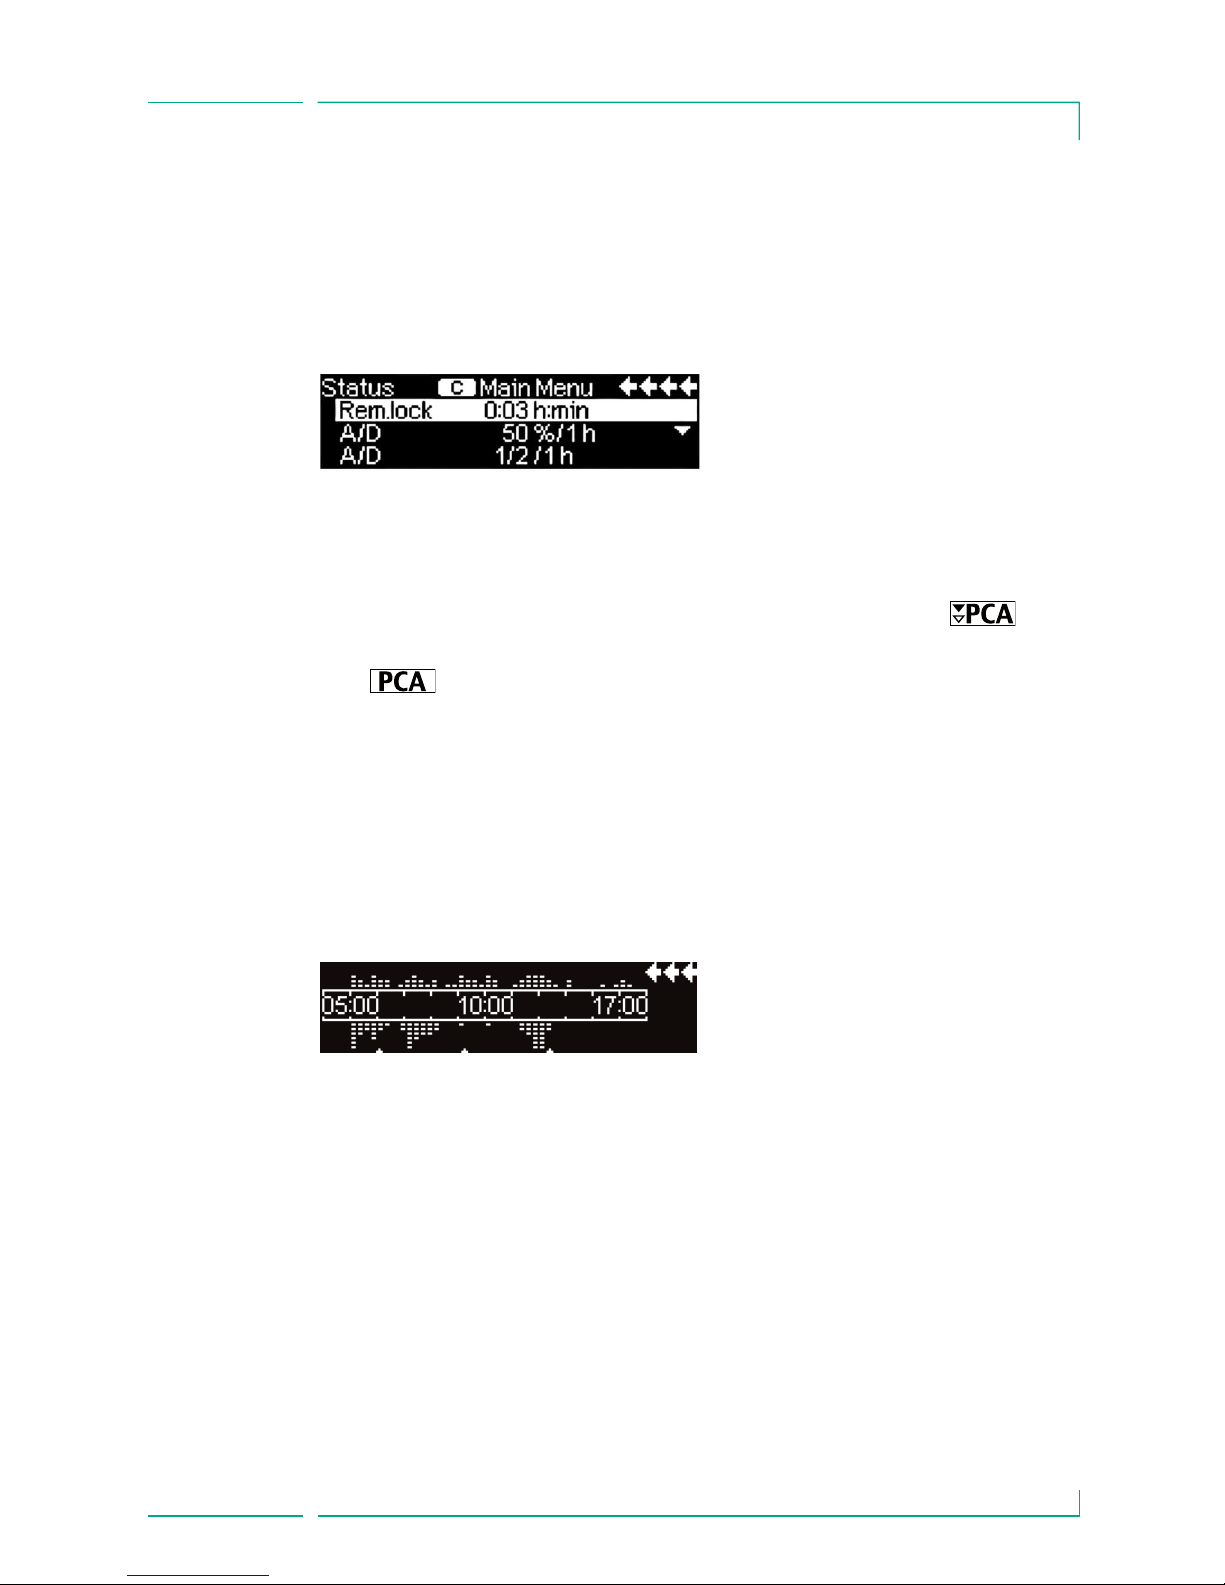
The status of the therapy can be checked in the menu „Status“ .
Enter the „Main Menu“ with c and select the “Status“ with q.
An acoustic confirmation of demanded boli can be activated and modulated by
t in Data Lock 3.
Is a demand button connected, the therapy symbol looks like this:
In case there is no demand button connected the therapy symbol looks like
this: .
The demand button is connected to the interface P2 at the rear side of the
pump.
Hint: It is possible to start a therapy in continuous mode and switch over to
PCA later on (in case the drug is dedicated for use with continuous and PCA
application).
SpacePCA-Chart
If
r is pressed on the RUN screen, the SpacePCA-Chart is displayed:
The bar represents a time axis, with the points above the axis representing the
number of boli administered and the points below the axis representing the
number of boli refused.
The chart has a 15 minute resolution and shows max of 5 points per 15 minutes. Should more then 5 boli be given or refused in this time, the last point will
be turn bold.
Changes to the PCA parameters are displayed as arrowheads at the bottom of
the chart.
The A/D-ratio indicates the
percentage of administered and
demanded boli thus giving an idea
about the effectivity of the therapy.
Chapter 3
SPECIAL FUNCTIONS
Page 26
26
3.5 Target Controlled Infusion (TCI)
Introduction
In TCI the user is defining a desired concentration of drug in the human body
(target) rather than an infusion rate. The rates necessary to reach and maintain
that said concentration are calculated by the pump using an algorithm based on
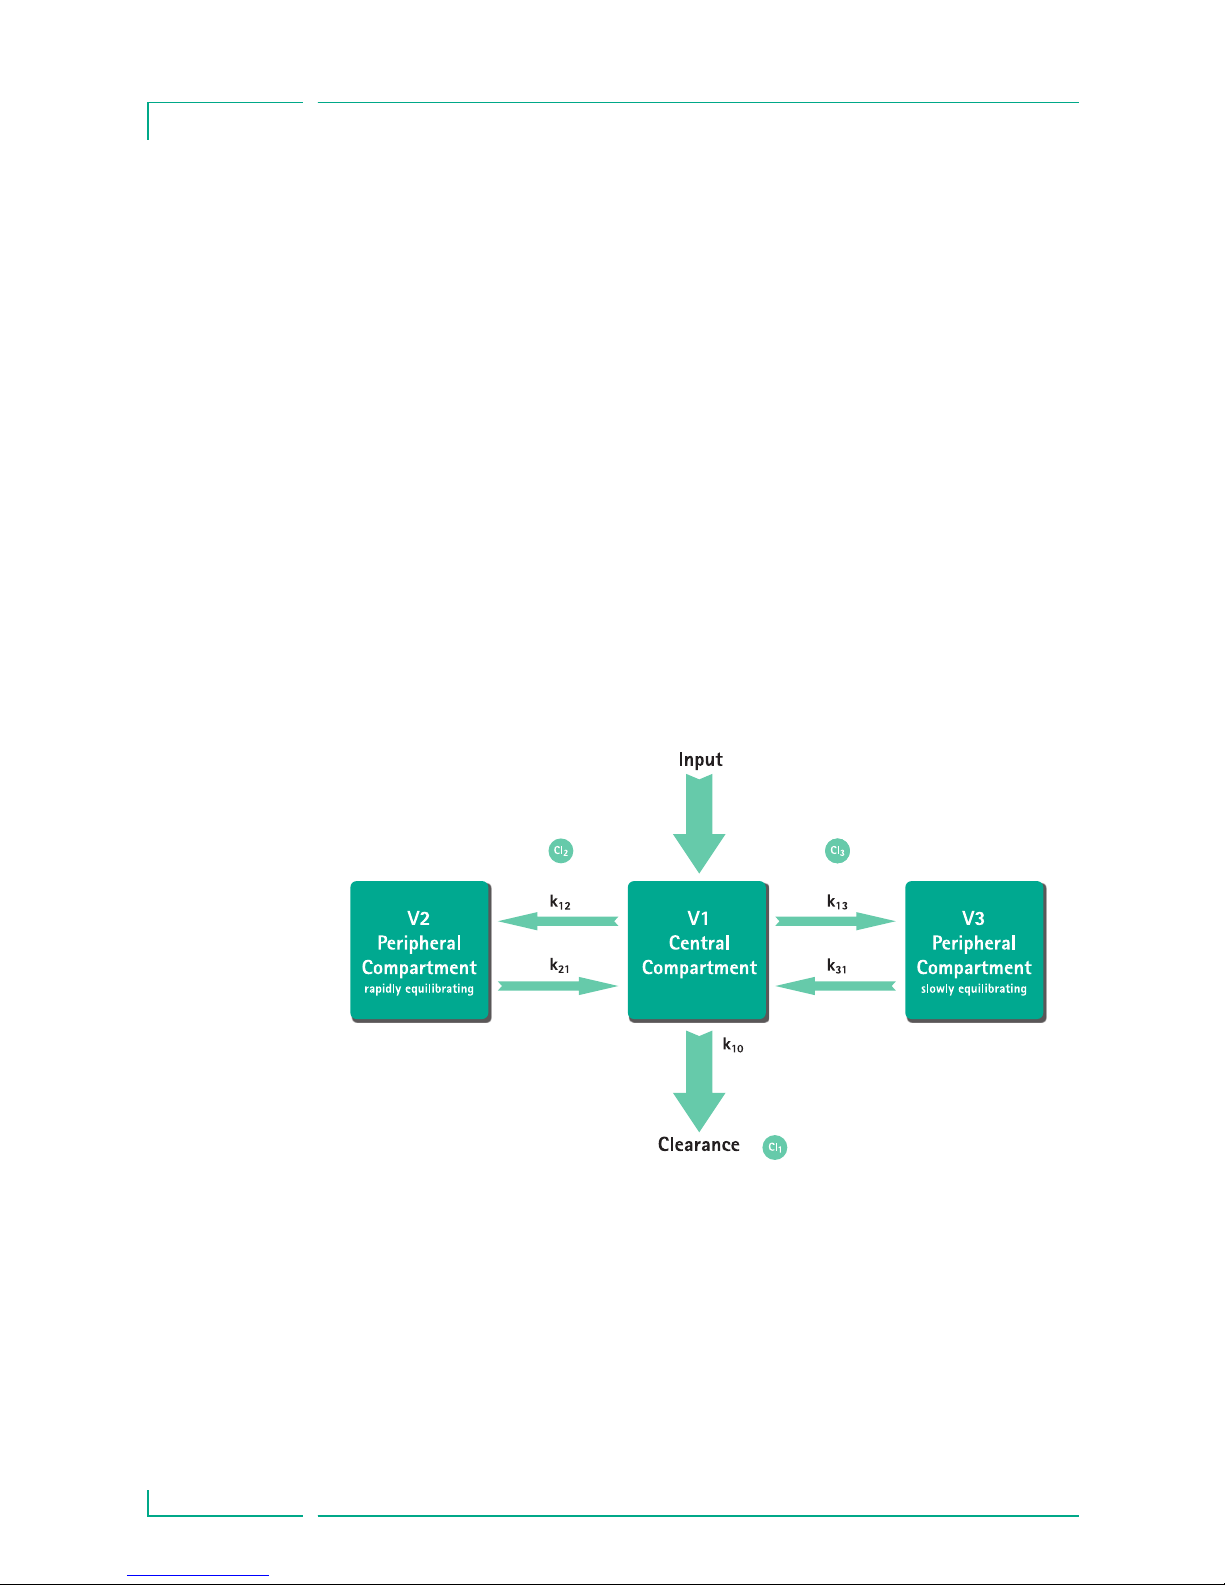
a three-compartment pharmacokinetic model.
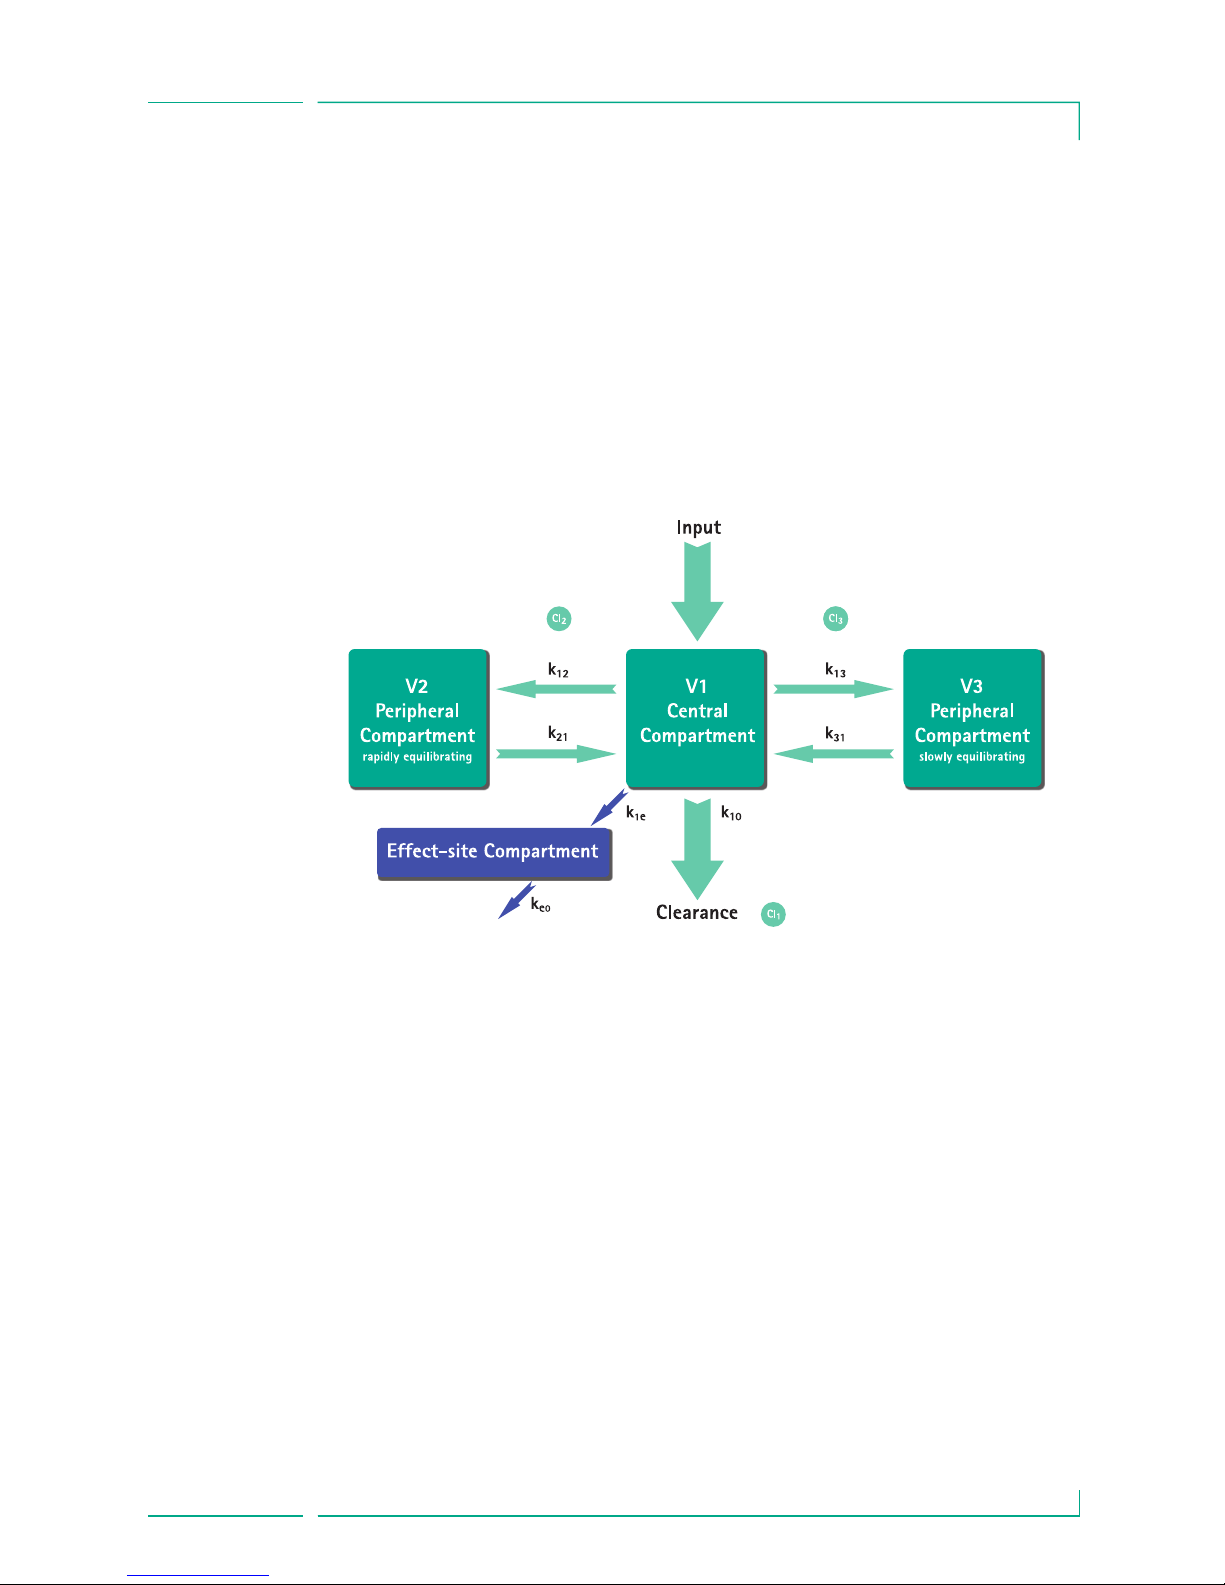
A pharmacokinetic model (PK model) is a mathematic model to predict the concentration of a drug in the human body (e.g. plasma level) after a bolus or a
continuous infusion of different duration. A PK model is developed by measurement of plasma level values of a population of patients or volunteers and the
respective statistical analysis. A PK model mostly is a 2- or 3- compartment
model indicating the volumes of the compartments, indicating rates for the
exchange amongst the compartments and indicating rates for elimination /
metabolism of the drug.
A PK model can be parameterized to use it for different drugs as long as it is
suitable for that said drug. The pharmacokinetic model and its parameters are
schematically depicted by the following illustration:
B. Braun Space is offering two modes for TCI:
•
TCI by targeting the plasma concentration
In this mode the user selects the desired concentration of a drug in the
blood plasma and the PK model is used to calculate the infusion rates
required to achieve that concentration as quick as possible (unless there is
no restriction defined by the user).
Chapter 3
SPECIAL FUNCTIONS
Page 27
27
• TCI by targeting the effect-site concentration
In this mode the user selects the desired concentration of a drug at the site
of action and the PK model is used to calculate the infusion rates required to
achieve that concentration as quick as possible (unless there is no restriction
defined by the user). A certain overshoot of the concentration in the plasma
is resulting from this mode.
For effect-site targeting there is a link between pharmacokinetics and pharmacodynamics necessary. As the effect-site compartment is considered to have no
volume and the rate constant k
1e
can be ignored the rate constant ke0is the
parameter necessary to perform effect-site TCI. A pharmacokinetic model modified in such way is schematically depicted by the illustration on the next page.
TCI with B. Braun Space is possible with two drugs: Propofol and Remifentanil.
For Propofol the user can choose between two parameter sets. The parameter
sets used for these drugs are (Not all parameter sets allow effect-site targeting):
Chapter 3
SPECIAL FUNCTIONS
Page 28

28
Drug List
The pre-installed drug list offers the following values:
Drug / Parameter
V1[Litre]
Propofol Remifentanil
k12[min
-
1
] 0,112
0,119
k13[min-1] 0,0419
k21[min
-
1
] 0,055
k31[min-1] 0,0033
ke0[min-1] 0,26
Reference Marsh et al., Br.
J. Anaesthesia,
Vol. 67, 1991,
41-48
Effect-site
targeting
No
k10[min-1]
0,228 *Weight
0,302 - 0,0056 *(Age - 53)
0,443 + 0,0107 *(Weight -
77) - 0,0159 *(LBM - 59) +
0,0062 *(Height - 177)
0,196
[1,29 - 0,024 *(Age - 53)] /
[18,9 - 0,391 *(Age - 53)
0,0035
0,456
Schnider et al., Anesthesio-
logy, Vol. 88, 1998, 11701182 Schnider et al.,
Anesthesiology, Vol. 90,
1999, 1502-1516
Yes
4,27
[2,05 - 0,0301 *(Age - 40)] /
[5.1 - 0.0201 *(Age - 40) +
0.072 * (LBM - 55)]
[2,6 - 0,0162 *(Age - 40) +
0,0191 *(LBM - 55)] / [5.1 -
0.0201 *(Age - 40) + 0.072 *
(LBM - 55)]
[0,076 - 0,00113 *(Age - 40)] /
[5.1 - 0.0201 *(Age - 40) +
0.072 *(LBM - 55)]
[2,05 - 0,0301 *(Age - 40)] /
[9,82 - 0,0811 *(Age - 40) +
0,108 *(LBM - 55)]
0.01402 - 0,0002085
*
(Age -40)
0,595 - 0,007 *(Age - 40)
Minto et al., Anesthesiology,
Vol. 86, 1997, 10-33
Yes
5,1 - 0,0201 *(Age - 40) +
0,072 * (LBM - 55)
Available Concentrations
Propofol Remifentanil
Default Max. Rate 1.200 ml/h
TCIProp
Hard Limit Rate Max of pump
Plasma Limit Default 400 %
Plasma Limit Hard Low 100 %
Plasma Limit Soft Max 450 %
Default Target 0.0 µg/ml
Target Soft Max 8.0 µg/ml
Short name
5 mg/ml
10 mg/ml
20 mg/ml
1.200 ml/h
TCIRemi
Max of pump
400 %
100 %
450 %
0.0 ng/ml
8.0 ng/ml
Target Hard Max 15.0 µg/ml 20.0 ng/ml
Decrement Concentration
Default
1.0 µg/ml 1.0 ng/ml
Default Parameter Set Marsh Minto
20 µg/ml
50 µg/ml
Chapter 3
SPECIAL FUNCTIONS
Page 29

29
Chapter 3
SPECIAL FUNCTIONS
Important note: Before installing an additional drug list please contact your local
B. Braun representative!
Setting up the pump
For TCI a drug list with at least one drug activating the profile TCI is necessary. The
drug list in this version is pre-defined. By this the conditions for an effective and safe
therapy are defined.
Switch on pump with
o and wait until self-check is finished. Insert disposable and
use the drug lib according to Instructions for Use.
Selecting a drug
Select drug list, category (the TCI drugs need to be selected from the category “TCI”)
and desired drug by using
q .
These steps are only necessary in case there are different options for that drug.
Input of patient data
Depending on the parameter set one or more of the following data are necessary:
•
Weight
•
Height
•
Gender
•
Age
The editing window appears with the initial setting “0” to make sure editing a value takes place (exemption: initial setting for gender is “male”).
Using effect-site targeting the weight may be limited due to the constraints of the
LBM calculation.
In this example: Propofol.
As a next step select the correct
dilution (concentration) of the drug
to be administered as well as the
parameter set (model) and the Mode
(Effect-Site Targeting or Plasma
Targeting)
Use q for editing the patient data.
Example.
Page 30

30
Important notes:
•
Be sure to enter the data corresponding to the respective patient.
•
Once the TCI is started patient data can not be altered!
Editing a target and starting TCI
The editor window for setting the target comes up with the default value from the
drug list.
Confirm target with
k. TCI can be started now with sf.
After TCI is started the screen looks the following:
In the top line there is an icon indicating the parameter set and the mode (Mode
Indicator) with following meaning:
•
“TCI Ma P”: TCI Marsh plasma targeting
•
“TCI Sc P”: TCI Schnider plasma targeting
•
“TCI Sc E”: TCI Schnider effect-site targeting
•
“TCI Mi P”: TCI Minto plasma targeting
•
“TCI Mi E”: TCI Minto effect-site targeting
In the bottom line the status parameters like flow rate, Cp/Ce, infused volume etc. can
be displayed. The desired parameter can be selected by using
t . It is recommended to
select Cp/Ce.
In case it is necessary to change the target press
l to edit the value.
Editing this parameter is guided by
the dose error reduction system
“DoseGuard™” according to the limits
defined in the drug list.
Drug short name
Target and unitCurrent plasma an effect-site concentration
Mode-Indicator
Chapter 3
SPECIAL FUNCTIONS
Page 31

31
Useful information while pump is running
The line describes the course of Cp over the time and the area describes the course of
Ce over the time. The time window is 20 min (15 min past, 5 min future).
Additional information is left with
C.
Finishing TCI
There are two possibilities to finish the TCI Therapy (reversion of anaesthesia or
sedation):
• Set Target= 0
•
Stop pump
It is recommended to simply stop the pump by pressing
sf.
Pressing
R the pump offers additional information – in this case the
information is modified the following way:
After the therapy is ended there are two possibilities:
a) The pump may be used for TCI with the same drug again but with a new patient.
In this case, cancel old therapy and use new disposables.
b) The pump may go with the patient but in continuous mode (without TCI).
By pressing r additional
information can be requested.
Pressing r a second time is offering
a graphical overview.
Pressing r again shows up the
graph.
In case a) press u in the menu - in
case b) press
d.
In both cases the “old” TCI needs to
be ended by c and selecting “Yes”
in this screen by pressing u.
Chapter 3
SPECIAL FUNCTIONS
Page 32

32
3.6 Barcoding
The barcoding functionality is included but initially not activated.
Please contact your local sales representative in case you like to use barcoding.
3.7 Ramp and Taper Mode
The Ramp and Taper Mode is designed to deliver infusions with gradual ramp up
and taper down rates. The pump automatically calculates the rate increase and
decrease required to match the total volume, time and ramp up/ramp down
time parameters. It consists of 3 phases.
•
Ramp phase: the pump rate is linearly increased until it reaches a
predefined rate (plateau rate) in a predefined time (Up-Time)
• Continuous phase: the plateau rate is used as a continuous infusion
•
Taper phase: the pump rate is decreased linearly after the continuous
phase until the KVO rate is reached or pump is stopped in a predefined
time (Down-Time)
Example:
Ramp and Taper should only be performed by an experienced user that is
familiar with the principles of the Ramp and Taper function and properly trained
in using the present device.
Note: The active Ramp and Taper function is always symbolised with an
characteristical symbol in the Display ( / / ).
Note: Bolus function is disabled for Ramp and Taper Mode.
Chapter 3
SPECIAL FUNCTIONS
Page 33

33
Set Profile Parameters: The therapy can be started directly via the drug library or via
the Main Menu/Special functions.
Starting Ramp and Taper via Drug Library:
Note: Ramp and Taper settings have been configured in the Drug List Manager
before and have been uploaded into the pump.
•
Switch on pump with o and wait until self-check is finished.
•
Insert disposable and use the drug library according to the Instructions for
Use.
•
Select the desired drug with t and press l.
The pump now lits the possible therapy profiles.
•
Select “Ramp and Taper Mode” with t and press l.
The therapy settings for “Ramp and Taper Mode” are shown on the display.
•
To change the values, press l to change and k to confirm.
The pump can be started now by pressing
sf.
Starting Ramp and Taper via Special Function Menu:
•
Switch on pump with o and wait until self-check is finished.
•
Insert disposable.
•
Go to Special Functions Menu and select Ramp and Taper.
•
Press l to enter parameters and k to confirm.
•
After entering all desired parameters the pump can be started by pressing sf.
The status of the therapy is shown in the upper part of the display of the pump
by the icon for “Ramp and Taper Mode”.
The screen shows the following:
Ramp phase
Continuous phase
The pump now linearly
increases the rate in the
predefined time until it
reaches the plateau rate and
then automatically switches
to continuous phase.
The pump continuously infuses
the same rate for a predefined
time and then automatically
switches to taper phase.
SPECIAL FUNCTIONS
Chapter 3
Page 34

34
Taper phase
Note: After starting infusion it is only possible to change rates, time and VTBI in
the continuous phase.
By editing (increasing/decreasing) the plateau rate, the therapy is recalculated. With
the increase/decrease of the plateau rate the volumes in the ramp phase, the continuous phase and the taper phase are increased/decreased. The continuous phase is
shortened/prolonged to infuse the VTBI still completely with the end of the taper
phase.
By editing the Ramp/Taper-Time, the therapy is recalculated. The Continuous Phase is
extended/shortened to infuse the VTBI still completely until the end of the Taper
phase.
By increasing/decreasing the VTBI, the continuous phase is prolonged/shortened to infuse the new entered VTBI completely with the end of the taper phase.
Note: The delivery of drugs can be stopped and started again in Ramp and Taper
Mode at any time by pressing
sf. Ramp and Taper is stopped immediately with-
out Taper phase and started without a new Ramp phase. This will not have any
effect on the settings of the therapy.
Immediate Taper Down
By chosing the Immediate Taper Down Function the therapy can be ended with a taper
phase before the originally defined VTBI is completely infused.
• Press
C during continuous phase.
• Use
t to select Special Functions and press l.
• Select Immediate Taper Down Function and confirm with
l.
• Edit taper time by using
t and press k to confirm.
The pump automatically changes to Taper phase and linearly decreases the
rate.
3.8 Program Mode
Program Mode is for infusion requiring a non-standard delivery pattern. The user
defines a series of intervals (max. 12 intervals) by certain parameters (rate, time,
volume) for each cycle.
The pump automatically gives each programmed period, one after the other.
The pump linearly decreases the
rate in the predefined time
until it reaches the KVO rate
SPECIAL FUNCTIONS
Chapter 3
Page 35

35
Example:
Program Mode should only be performed by an experienced user being familiar with
the principles of the Program Mode function and properly trained in using the present
device.
Note: The active Program Mode function always displays this icon in the Display
( ).
Note: Bolus function is disabled for Program Mode.
Set Profile Parameters: The therapy can be started directly via the drug library or via
the Main Menu/Special functions.
Starting Program Mode via Drug Library:
Note: Program Mode settings have been configured in the Drug List Manager
before and have been uploaded into the pump.
• Switch on pump with
o and wait until self-check is finished.
• Insert disposable and use the drug library according to Instructions for Use.
• Select the desired drug with
t and press l.
• Select Program Mode with
l.
In the following screen the user has to confirm the number of steps for the
therapy with
k.
The settings for the steps of the infusion are shown on the display. These
settings, configured in the Drug List Editor, need to be confirmed with
r.
• To change the values, press
l to change and k to confirm.
• Adjust VTBI with
q.
SPECIAL FUNCTIONS
Chapter 3
Page 36

36
The pump can be started now by pressing sf.
Starting Program Mode via Special Function Menu:
• Switch on pump with
o and wait until self-check is finished.
• Insert disposable.
• Go to Special Functions Menu and select Program Mode.
• Press
l to enter parameters and k to confirm.
• Adjust VTBI with
q.
After entering all desired parameters the pump can be started by pressing
sf.
In the upper part of the display the icon for “Program Mode” appears.
The screen shows the following:
Only the VTBI may be changed during an infusion that is running.
• Press
C to check upcoming Program Mode intervals in Main Menu.
It is possible to cancel one step of the running therapy. All following steps in
the programmed sequence persist.
• Go to Main Menu by pressing
C.
• Use
t to navigate through the Main Menu and select Current with l.
• For checking upcoming intervals press
C.
• Select "Program Parameters" with
l.
• Go through all interval steps with
r.
Note: The delivery of drugs can be stopped and started again in the Program
Mode at any time by pressing
sf. This will not have any effect on the settings
of the therapy.
Number of cycles is defined by VTBI. Take care to set the VTBI in the correct
relation to the volume of one Cycle. VTBI may needs to be adjusted after
changing the intervals.
The Main menu informs about the current interval. The configured parameters
can be checked by Program Parameter Menu in Main.
3.9 Intermittent Mode
The Intermittent Mode consists of 2 phases. This phases will be repeated.
•
Bolus phase: the configured bolus is active
•
Rate phase: time during the therapy in which the entered rate is active
The pump infuses the
predefined rate in the
predefined time for the current
step.
SPECIAL FUNCTIONS
Chapter 3
Page 37

37
Example:
Intermittent Mode should only be performed by an experienced user being familiar
with the principles of the Intermittent Mode and properly trained in using the present
device.
Note: The active Multi Dose Mode function always displays this icon in the Display
()
Note: Regular Bolus function is disabled for Intermittent Mode.
In Intemittent Bolus the bolus service settings are active. The pressure level is automatically set to max value.
Set Profile Parameters: The therapy can be started directly via the drug library or via
the Main Menu/Special functions.
Starting Intermittent Mode via Drug Library:
Note: Intermittent Mode settings have been configured in the Drug List
Manager before and have been uploaded into the pump.
• Switch on pump with
o and wait until self-check is finished.
• Insert disposable and use the drug library according to Instructions for Use.
• Select the desired drug with
t and press l.
The pump now offers the possible therapy profiles.
• Select “Intermittent Mode” with
t and press l. The therapy settings for
“Intermittent Mode” are shown on the display.
• For changing the parameters, press
l to change and k to confirm.
Note: Bolus rate is calculated by editable parameters. These parameters have to
be checked by the user before starting the infusion.
The pump can be started now by pressing
sf.
SPECIAL FUNCTIONS
Chapter 3
Page 38

38
Starting Intermittent Mode via Special Function Menu:
• Switch on pump with
sf and wait until self-check is finished.
• Insert disposable.
• Go to Special Functions Menu and select Intermittent Mode.
• Press
l to enter parameters and k to confirm.
After entering all desired parameters the pump can be started by pressing
sf
In the upper part of the display the icon for “Intermittent Mode” appears.
In bolus phase the screen shows the following:
After the bolus phase the pump switches to rate phase and the screen shows
the following:
Note: To cancel bolus infusion in the Intermittet Bolus therapy at any time it is
only possible with
sf.
Note: The delivery of drugs can be stopped and started again in the Intermittent
Mode at any time by pressing
sf. During infusion it is possible to change the
bolus volume, amount, VTBI as well as the time interval.
• Press
C.
• Use
t to navigate through the parameter list and select the parameter to
be changed with
l.
• Enter the new value and press
k.
The pump continues infusion.
Changing the bolus after start:
If the user edits the bolus the therapy progression changes.
• Press
C.
• Use
t to select Bolus and press l.
• Change Bolus by using
t and press k to confirm.
The pump automatically recalculates all other settings of the therapy.
The pump now delivers the
predefined bolus.
The pump now delivers the
predefined rate.
SPECIAL FUNCTIONS
Chapter 3
Page 39

39
Changing the time interval after start:
If the user edits the time interval the therapy progression changes.
• Press
C.
• Use
t to select Interval and press l.
• Change Interval by using
t and press k to confirm.
The pump automatically recalculates all other settings of the therapy.
3.10 Dose Over Time
Dose Over Time is used to administer a specific dose of antibiotics in a specific
time. Dose Over Time is an own therapy and cannot be used in combination
with another therapy. It can only be activated via the Drug List Manager. It can
be used for standard infusion.
The active Dose Over time function is always symbolised with a characteristical
symbol in the Display ( ).
Note: Dose Over Time should only be performed by experienced users being
familiar with the principles of the Dose Over Time function and properly trained
in using the present device.
The infusion rate in Dose Over Time can not be changed. This parameter is a
result of the total dose and the infusion time setting. Directly, after the Drug
selection, the infusion time and the total dose intended to be infused have to be
set. If the drug library contains default values for these parameters, the default
values are used as preset values.
If changes are necessary during infusion, the delivery can be controlled by
changing the time. The pump calculates the new rate by using the remaining
total dose and the remaining time. In the Main Menu total dose, time and VTBI
can be changed, also during RUN-Mode. Other parameters (dose rate, basal rate,
concentration, patient weight and patient height) cannot be changed.
Note: The KVO function and Bolus function are disabled during Dose Over Time.
Note: The feature Dose Over Time always requires the usage of dosing units (i.e.,
mg or mg/kg patient weight).
Before using Dose Over Time contact your local B. Braun representative!
Starting Dose Over Time via Drug Library:
Note: Dose Over Time settings have been configured in the Drug List Manager
before and have been uploaded into the pump.
• Switch on pump with
o and wait until self-check is finished.
SPECIAL FUNCTIONS
Chapter 3
Page 40

40
• Insert disposable and use the drug library according to the Instructions for
Use.
• Select a drug by using
t and press l.
The pump now offers the possible therapy profiles. Select “Dose over Time” with
t and
press
l.
The editor for Total Dose is shown if a drug with therapy Dose over Time is selected from drug library and no default value for Total Dose was entered in library. The editor is also shown if the Total Dose is edited in the Main menu.
The editor for Time is shown if a drug with therapy Dose over Time is selected
from drug library and no default value for Time was entered in library. The editor
is also shown if the Time is edited in Main Menu.
The VTBI is calculated automatically and the
following screen is displayed:
Note: It is always possible to press the key C in the Run Menu and edit or
check values in the Main Menu while the pump is delivering.
Enter the total dose, if necessary,
and confirm with
k.
Enter the time, if necessary,
and confirm with
k.
Check calculated rate by using t
for plausibility
Start Dose Over Time by
pressing
sf.
Run Menu: The time is used to
control the therapy. For this
reason the remaining time is
shown big digits in menu Run.
The parameter in the lower left
corner can be scrolled. Set to
Rate when leaving the pump.
SPECIAL FUNCTIONS
Chapter 3
Page 41

41
3.11 Take Over Mode (TOM)
Take Over Mode is a feature to support the user during syringe changes by automatically starting a second Perfusor® Space pump when the first has run empty.
The second pump automatically takes over the infusion rate from the first pump.
Activation:
•
Start an infusion of the desired medication from the drug library on a
Perfusor® Space pump (see Section 3.3).
•
Place a second a Perfusor® Space pump in an adjacent slot of the
SpaceStation (either above or below).
Note: Make sure that the pumps are correctly inserted in the SpaceStation.
•
Navigate to the Drug Library on the second pump (Note: The drug library can
be started over the Start Up or Special Functions Menu).
•
Navigate through the list with t and select the Care Unit with l. The Care
Unit of the second pump must be the same as the first.
Note: If you have already set the Care Unit once on your pump this step will
be skipped for the next time.
•
Navigate through the list with t and select the patient profile with l. The
patient profile of the second pump must be the same as the first.
Note: If no profile is set, this step will be skipped.
SPECIAL FUNCTIONS
Chapter 3
Page 42

42
• Navigate through the list with t and select in alphabetical order (all drugs)
or within a category with
l. The drug selected in the second pump must be
the same as the first.
•
Navigate through the list with t and select a concentration with l. The
concentration in the second pump must be the same as the first.
•
Confirm ‘Use Take Over Mode’ with u.
•
Check IV line of is connected to the patient and that stopcocks are
open.
Symbols:
first Perfusor® Space pump
second Perfusor® Space pump
Deactivation:
•
Press the c button on the pump.
Take Over Phase:
When the syringe is nearly empty, a pre-alarm will sound on the
pump.
When the syringe is empty, the pump will automatically start
infusing at the correct rate.
SPECIAL FUNCTIONS
Chapter 3
Page 43

43
Note: Start-up behaviour is not influenced by TOM. See Chapter Start Up Graphs
and Trumpet Curves.
Note: Please use a seperate patient connection for Take Over Mode infusion
(e.g. smallbore extension set) or use a back check valve for lines at the same
access which are not used for Take Over Mode.
Note: When both pumps are turned off (e.g. for changing the syringe), pumps
will be turned on again, both will start as a normal pumps and not in TOM
modus with the latest TOM setting.
When both pumps are put in Standby during infusion and both are turned on
again, both pumps will start with the latest druglibrary setting. TOM has to be
activated separately.
TOM Requirements:
TOM will only be offered if the following requirements are met:
•
Same drug selected on both pumps.
•
Same drug concentration selected on both pumps.
•
First Perfusor® Space pump must have a running infusion with a drug
from drug library.
TOM Hints:
The following TOM hints are to be observed:
Chapter 3
SPECIAL FUNCTIONS
Page 44

44
More information regarding alarm hints may be found in chapter 5.
T
O
M
H
in
t
Recommendation
Both pumps must have TOM activated –
contact your service department
Manual
l
y start second pump if appropriate
T
ake o
ver o
f infusion has failed
T
ake Over Mod
e not
possib
le,
T
OM no
t enabled
i
n o
ther
pum
p
Both pumps must have the same ‘Stop at syr.
end’ settings – contact your service
department
Take Over Mode not possible,
Invalid conf
ig
. ‘Stop
at
syr.
end
’
Both pumps must have the same modification
data – contact your service department
Tak
e O
v
e
r M
o
d
e
no
t
p
o
s
s
ib
le,
M
o
d
.d
at
a up
d
at
e req
uired
Both pumps must have the same software
version – contact your service department
Tak
e O
v
e
r M
o
d
e
no
t
p
o
s
s
ib
le,
S
o
ft
w
are up
d
at
e re
q
uire
d
Ensure same patient profile selected on both
pumps
Tak
e O
v
e
r M
o
d
e
no
t
p
o
s
s
ib
le,
Different
p
at
ient
p
ro
files
Ensure both pumps have the same Care Unit
selected
Tak
e O
v
e
r M
o
d
e
no
t
p
o
s
s
ib
le,
Different
c
are unit
s
s
elec
t
ed
Ensure both pumps must have a syringe of
the same size
Tak
e O
v
e
r M
o
d
e
no
t
p
o
s
s
ib
le,
Different
s
y
ring
e s
izes
Data connection must be active between
pumps – check the positioning of pumps in
the SpaceStation
T
a
ke
Ove
r
Mode
not
pos
s
i
bl
e
,
Da
ta
conne
cti
on
l
os
t
Deactivate Data Lock
Tak
e O
v
e
r M
o
d
e
no
t
p
o
s
s
ib
le,
Dat
aLo
c
k
ac
t
iv
e in o
t
her p
um
p
Ensure first Perfusor® Space pump must be
running in ‘continuous mode’ (i.e. ml/h or a
dose rate; not KVO, PCA etc.)
T
a
ke
Ove
r
Mode
not
pos
s
i
bl
e
,
Othe
r
pump
i
n
w
rong
the
ra
py
Ensure first Perfusor® Space pump is infusing
T
a
ke
Ove
r
Mode
not
pos
s
i
bl
e
,
Othe
r
pump
not
i
n
R
un
me
nu
Chapter 3
SPECIAL FUNCTIONS
Page 45

45
Changes in TOM system:
pump shows “connection lost – TOM
aborted” alarm. TOM may be reactivated by
pressing
k and then u when prompted
“Return to Take Over M.”
No user interaction necessary, will
start infusion at new rate when
syringe is empty.
Reaction
Rate changed in pump
Change
pump is stopped
pump is put in standby
VTBI ended in
Chapter 3
SPECIAL FUNCTIONS
Page 46

AUT OPROG R A M MING
Note: All normal pump functions remain in place when orders are received via
autoprogramming.
The pump can accept drug orders wirelessly from the EHR system or from
SpaceStation with SpaceCom. The workflow to accept an order wirelessly will
vary depending on your EHR vendor.
•
Using the hand held device or lap top, review the order and follow your hospital
protocol for scanning the bag/syringe, pump, patient and nurse (optional).
•
Once order is confirmed on the hand held or laptop, prompt EHR to send order
directly to pump. The order will arrive and appear on the pump within 10 seconds.
•
Ensure pump is in the Main Menu, passive mode or Standby.
•
New Order message will appear with drug name and mode.
•
Press k to accept or ckey to cancel order and respond to prompt.
•
Select Care Unit and Patient Profile as in Drug Library programming.
•
Pump will search for Drug Library match.
Note: If no drug library match, which may be due to no matching name,
concentration or dosing units, pump displays reason for no match and depending on
your hospitals configuration either allows manual programming outside the drug
library or rejects order completely. An order that is confirmed outside the drug library
will have a triangle with an exclamation point on display to indicate there are no drug
library settings.
•
Scroll to each value to confirm using q arrow keys.
46
Chapter 4
AUTOPROGRAMMING
Page 47

47
Note: Order may be cancelled prior to confirming order.
•
Once all values are confirmed, the Main Menu is displayed.
Note: Soft Limit alert will be issued if value exceeds any soft limits set in drug
library, soft limit may be overridden or value re-programmed per institutional
policy. Order will be rejected if hard limit is exceeded. (except in circumstance
where pump service program is not set to perform drug library match for autoprogramming).
For PRIMary Orders (Either 'Continuous' oder 'Dose over Time'):
Note: The first order sent send as 'Continuous' is always considered as the
PRIMary infusion, subsequent orders will be considered PIGGYback.
Note: Order sent as 'Dose over Time' is always considered the PRIMary infusion,
no subsequent order can be received. Additional, no updates can be received for
'Dose over Time'.
•
Press Start/Stop key sfto start infusion.
Updates to Current Primary Infusion
Updates may be received for PRIMary infusions while pump is running or stopped and
while in PRIMary or PIGGYback.
While in PRIMary:
•
Update icon will appear on display, follow on screen prompts to accept or cancel
the order. Confirmation screen will indicate both OLD and NEW value for
parameter(s) that changed.
While in PIGGYback:
•
Message will appear on top of display indicating update is available for PRIMary.
•
Press M key to view order.
Chapter 4
AUTOPROGRAMMING
Page 48

48
• Follow prompt, pressing sf to accept order or ckey to cancel and hold order for
later.
New Primary Infusion:
•
To accept a new PRIMary order, stop infusion and clear current PRIMary infusion by
pressing
c key and responding “yes” to clear current infusion.
PIGGYback Orders:
Orders received after PRIMary has been set will be for PIGGYback infusions,
follow prompts on screen to stop the PRIMary to accept the PIGGYback order.
•
Confirm order values as above for PRIMary orders.
•
Respond to prompts to check bag height and clamps prior to startingPIGGYback.
New PIGGYback order while PIGGYback is Infusing:
•
Follow display prompts to stop current infusion.
Note: A PIGGYback order may be held for later by pressing c key to cancel
order and answering yes to “hold for later”.
Chapter 4
AUTOPROGRAMMNG
Page 49

49
Note: Changing values on any incoming order may only be done after confir-
ming all values. Once all values are confirmed you may scroll to any value and
open editor with
l to change value. Alternately, order may be cancelled and
request made for revised order to be sent.
Note: If pump is placed in standby while order is pending new order will flash
on top of stand by display, press
M key to accept order (pump will come out of
standby).
Chapter 4
AUTOPROGRAMMING
Page 50

50
OPT IONS
The options functions may be selected and changed while the pump is infusing or
stopped. To edit a menu item, select “Options” in the Main Menu and press
l.
Then select desired function with
t and follow the Instructions for Use as described.
5.1 Occlusion Pressure
The higher the pressure level is set at, the higher the pressure level must rise before
triggering an occlusion pressure alarm.
Using the occlusion pressure, the alarm sounding period can be kept short in the event
of system occlusions. It generally applies that the set pressure should always be set
higher than the system pressure. If pressure alarms occur in a pressure level without a
system occlusion, the pressure level must be adjusted upward. In order to be able to
ensure short alarm times, a low pressure level should be started with and the pressure
level increased until the syringe starts up.
Depending on the different influences, such as friction fluctuations of the syringes,
tube length, tube diameter, viscosity of the liquid and the filter used in the system setup, adjustments may need to be made to the pressure level.
•
Enter pressure in Options Menu by pressing l.
•
Choose between nine pressure levels (1=lowest level; 9=highest level) by
pressing
l or r and confirm entry with k.
5.2 OccluGuard & Pressure Leap/Drop detection
OccluGuard
OccluGuard speeds up time to alarm when an occlusion is present. Occlusions
can be caused by problems in IV access (e.g. a blocked catheter), problems in the
infusion setup (e.g. closed stopcocks) or ‘syringe occlusions’ i.e. Due to varying
syringe tolerances of syringes from other manufacturers, an OccluGuard alarm
may occur because of high syringe friction forces. OccluGuard can be used with
all syringe sizes and drugs, but is ideally suited to infusions at low rates and/or
with drugs of short half life (e.g. Catecholamines).
The top line is the current
infusion pressure. The buttom
dashed line shows the pressure alarm setting, currently 5
out of 9 which is represented
by 5 dashed. The picture
shows a current presure of
~ 30% of the pressure level 5.
Chapter 5
OPTIONS
Page 51

51
Chapter 5
OPTIONS
OccluGuard activation / deactivation from the Main Menu
• Go to Options Menu and press
l.
• Navigate through the list with
t and select OccluGuard.
• OccluGuard can be activated with
u and deactivated with d.
Pressure Leap/Drop detection
The pressure leap/drop software detects sudden increases and decreases in infusion pressure respectively which can be caused by problems in IV access, or
changes in pump position in the SpaceStation.
Pressure Leap/Drop detection activation / deactivation from the Main Menu
• Go to Options Menu and press
l.
• Navigate through the list with
t and select “Pr. leap/drop”.
• Navigate to Off with
l r and press k to deactivate pressure leap/drop.
• Navigate to high (2mmHg), medium (8mmHg) or low (20mmHg) with
l
r
and press k to activate pressure leap/drop.
Note: after a restart of the pump, these settings remain at the levels set before
the restart.
Area of application
OccluGuard and pressure leap/drop are active below the following infusion
rates. Should the rates increase, the OccluGuard Inactive symbol ( ) is shown
in run screen.
Symbols
Syringe Size
50 ml
Maximum Rate (typical)
30 ml/h
20 ml
14 ml/h
10 ml 9.8 ml/h
OccluGuard symbol
Page 52

52
Note:
• The OccluGuard status can be checked in the status menu
• Perfusor® Space continues to infuse during OccluGuard and Pressure
leap/drop alarms.
• The existing occlusion alarm pressure levels are unaffected by OccluGuard.
OccluGuard
Symbol
Meaning
OccluGuard is active.
Infusion is running
stably
Recommendation
n/a
Pending – OccluGuard
has not enough data
n/a
OccluGuard Inactive
OccluGuard will automatically
reactivate as soon as infusion rate
drops below threshold levels – see
above.
Occlusion has been
detected
Confirm alarm and check IV access, IV
setup and syringe for cause of
occlusion. Should the cause of the
alarm be removed, the alarm will stop
automatically.
OccluGuard is
deactivated
Activate OccluGuard – see below(no symbol)
Pressure rise
detect
Pressure
leap/drop
Symbol
Meaning
Sudden pressure leap
detected
Recommendation
Check IV access and IV setup
Sudden pressure drop
detected
Check IV access and IV setup
Pressure leap
detect.
Pressure drop
detect.
Chapter 5
OPTIONS
Page 53

53
When a change is made to the infusion system (e.g. addition or removal of a
pump to a SpaceStation, a change of infusion rate, a bolus application) the
OccluGuard and pressure leap/drop are temporarily set to ‘pending’ ( ) to
allow the system to reach a hydrostatic balance, and so prevent false alarms.
5.3 Data Lock
The data lock function protects the device against unauthorized access. It is recommended to adapt the four digit code for level 1 and 2 from the default setting (9119), using the service program. There are three security
levels.
Level 1:
A modification of values as well as a bolus application are not possible but a
change of the disposable can be conducted. It is possible to navigate through all
menus and status data can be checked. Starting, interrupting and switching the
pump off is possible.
Level 2:
This level has the same performance characteristic as described under level 1
and additional will not allow the change of disposable. In order to prevent a
data lock alarm the correct code must be entered within 20 sec after the pump
was stopped. Changing the disposable and switching the pump off is only
possible after the code was entered.
Level 3:
This level will allow starting and stopping the pump as well as switching off.
The code for this level may be different for each drug and is defined in the drug
list. A change of the syringe, however, is possible by using the code defined for
the other levels. An overview about the differences between the levels 1, 2 and
3 is given by the following table.
Event
Change of disposable
Level 1 Level 2 Level 3
Change of parameters
O OO
O
Stop of infusion
%
Switching off pump / Standby
O O
PCA bolus with pump-based bolus button
O O
Customisable screen
O O
Acoustic feedback of demanded boli
O
O
Indicates denied PCA boli
O
Start of infusion
O with code for
level 1/2
= possible | O = not possible | %= followed by standby-alarm
Chapter 5
OPTIONS
Page 54

54
Activation of the function:
• Open data lock in Options Menu with
l.
• Select between level 1, 2 or 3 (if activated) with
l and r and confirm
with
k.
• Enter code with
q and press k in order to activate data lock.
Changes to the protected values and the bolus function which are marked
with
y are only possible after entering the code. After 20 sec in the Main
Menu, Status Menu, Special Functions Menu and Options Menu the lock will be
activated again. If the wrong code is entered twice the pump will switch into
the last menu. If the wrong code is entered twice again the pump will go into
an audible alarm, a nurse call will go off and the yellow LED blinks. If a target
value was reached while data lock is active a new start of the pump is only
possible after entering the code.
In order to deactivate the function, select “Off” in the data lock, press
k, enter
the code and press
k again.
5.4 Bolus Rate
• Open bolus rate in Options Menu with l.
•
Change bolus rate with q and confirm setting with k.
Note: Set bolus rate according to therapy requirements. Take care not to overdose!
Given a bolus rate of 1800 ml/h, e.g. 0,5 ml are reached within just one second.
5.5 KVO-Mode
After reaching a preselected VTBI/time, the pump can continue the infusion with a
predefined KVO-rate (see "Technical Data"). The duration of the KVO-infusion is set via
the service program.
•
Open KVO-Mode in Options Menu with l.
•
Answer Yes/No question with u, to activate KVO.
5.6 Contrast / Display Light / Keypad Light
Contrast as well as display- and keypad light can be adjusted individually according to
the lighting conditions.
•
Open contrast/display light/keypad light in Options Menu by pressing l.
•
Choose between 9 contrast- and display light levels with l or r and confirm
with
k. For use with light sensitive drugs the keypad- respectively syringe light
can be completely turned off.
Chapter 5
OPTIONS
Page 55

55
5.7 Alarm Volume
Chose between 9 different alarm volume levels.
•
Open alarm volume in Options Menu with l.
•
Set volume with l or r and confirm entry with k.
5.8 Date / Time
• Open date/time in Options Menu with l.
•
Change date/time with q and confirm with k.
5.9 Macro Mode
The infusion rate appears larger on the display when the macro mode is
activated and the pump is infusing.
•
Open macro mode in Options Menu with l.
•
Answer Yes/No question by pressing u to activate the macro mode.
For quick activation of macro mode: Press and hold
r while the pump is infusing
until the font size changes.
5.10Language
This function enables a change of the pump language.
• Open language in the Options Menu with
l.
• Select language with
t, then press l.
• Confirm Yes/No with
u.
Chapter 5
OPTIONS
Page 56

56
Chapter 5
ALARMS
ALARMS
The Perfusor® Space is equipped with a audible and optical alarm signal.
6.1 Device Alarms
When a device alarm occurs the infusion is immediately stopped. Press O to switch
off the device. Then switch the device on again. In case of a repeated device alarm you
must disconnect from the patient, open the front door of the pump and take out the
disposable. The device needs to be handed to the service department.
6.2 Pre-Alarms and Operating Alarms
Pre-alarms:
Pre-alarms occur a few minutes (dependable on service settings, excluding OccluGuard
and pressure leap/drop pre-alarms) prior to operating alarms. During pre-alarms an audible tone sounds, the yellow LED is constantly on and a staff call is activated (optional). The display message varies depending on the alarm reason. The signal tone and
the staff call are turned off with
c . Display and LED stay in pre-alarm until the ope-
rating alarm goes off. Pre-alarms don't lead to an interruption of the infusion.
Alarmtype
Device
Alarm
yes flashes off device
alarm and
alarm code
(see service
program)
yes Press Oand follow
the instruction on the
display.
Op
er
a
-
t
ing
A
-
lar
m
y
es
f
lashes
o
f
f
see alarm
d
esc
rip
t
io
n
yes
PreAlarm
yes off constantonsee alarm
description
(de-)activate
via service
program
Press c to mute
alarm and turn off
staff call. Visible
alarm remains until
end.
Reminder
Alarm
yes off constantonsee alarm
description
yes
Press kto mute
alarm, turn off staff
call and delete the
alarm text.
Alarm
Hint
no off
off
see alarm
description
no
Hint disappears
without confirmation.
Audible
signal
Red LED
Optical signal
Yellow LED Text
Staff call User confirmation
P
r
ess
k
t
o
ac
k
no
wled
g
e
t
he
aud
ib
le
alar
m,
alar
m
t
ext
and
st
af
f
c
all.
The
r
ed
LED
g
o
es
o
f
f
.
P
r
ess
c
t
o
mut
e
t
he
alar
m
f
o
r
2
minut
es.
Page 57

57
Display message Pre-alarm reason
“Syringe nearly empty“ Very little fluid is left in syringe.
“VTBI near end“ The preselected volume is nearly infused.
“Time near end“ The preselected time is almost over.
“Battery nearly empty“ The battery is almost discharged.
“KVO mode“ Volume/time are reached and the pump continues
the infusion at the KVO-rate.
“Communication error" The pump is located in a system in which at least
one device is incompatible or defective. The use
of this device in a system is not permitted. The
system is to be checked by a service technician.
“Pressure rise detect.” OccluGuard has detected an occlusion. Check IV
access, IV setup and syringe for cause of
occlusion. Should the cause of the alarm be
removed, the alarm will stop automatically.
Due to varying syringe tolerances of syringes from
other manufacturers, a pressure alarm may occur
because of high syringe friction forces.
“Pressure leap detect.” A sudden pressure leap has been detected – check
IV access.
“Pressure drop detect.” A sudden pressure drop has been detected –
check IV access.
”TOM pending” Very little fluid is left in syringe, infusion will be
handed over to second Perfusor® Space pump
when syringe is empty (Take Over Mode only).
TOM aborted” Take Over Mode has been aborted (Take Over
Mode only)
Except OccluGuard and pressure leap/drop pre-alarms, a stopwatch on the
display counts down the remaining time (depending on the service program,
between 0-30 min). After that, the pump changes to the operating alarm.
The pre-alarms “VTBI near end“ (volume preselection) and “Time near end“ (time
preselection) can be deactivated via the service program.
Operating alarms:
Operating alarms lead to an interruption of the infusion. An audible tone
sounds, the red LED flashes and a staff call is activated.
The display states "Alarm", the reason for the operating alarm and gives the
option to either confirm the alarm by pressing
k or mute the alarm by pres-
sing
c. If the alarm is muted, the alarm message will remain on the screen
until it is confirmed by pressing
k. After 2 minutes, if the alarm has not been
confirmed by pressing
k, the audible tone will sound again. The alarm tone,
Chapter 6
ALARMS
Page 58

58
ALARMS
the alarm message, and the staff call (optional) are all cleared by pressing k.
Corrections should be made in accordance with the alarm reason.
Display message Alarm reason
“Syringe empty“ There is no fluid left in the syringe.
Due to varying syringe tolerances of syringes
from other manufacturers, some fluid may be
left inside the syringe.
Restarting the infusion leads to a complete depletion
of the syringe and shut-off via the pressure sensor.
Perform syringe change as described in 1.4.
“VTBI infused “ The preselected volume was infused.
Continue therapy or select new therapy.
“Time expired“ The preselected time has ended.
Continue therapy or select new therapy.
“Battery empty“ The battery pack is discharged.
Connect device with mains and/or exchange
battery pack. The battery alarm will be on for 3 min.
Then the pump will automatically turn off.
“KVO finished” KVO is reached. Continue with old or set new therapy.
“Pressure high“ An occlusion occured in the system. The set
pressure level was exceeded. A bolus reduction is
automatically initiated by the pump.
Check if syringe is empty, kinks are in tubing and
tubing isn't damaged, IV patency and filter patency.
Increase occlusion pressure if necessary.
Due to varying syringe tolerances of syringes from
other manufacturers, a pressure alarm may occur
because of high syringe friction forces.
“Syringe not correctly inserted” The wings of the syringe are not properly inserted.
Insert syringe according to describtion in “Overview
Perfusor® Space“ as well as 1.1.
“Syringe holder“ The syringe holder was opened during a running
infusion. Close syringe holder.
“Battery cover removed“ The battery cover is not properly engaged on the
battery compartment.
When pushing on the battery cover listen for “click”.
“Drive blocked“ An external interference kept the drive unit from
advancing.
Basically prevent all external interferences.
Consider “Patient Safety“.
Chapter 6
Page 59

59
Chapter 6
ALARMS
“Calibrate device“ Pump calibration data have changed (e.g. after an
update).
Recalibrate device via the service program.
“Claw malfunction“ The emergency release button was pressed and the
claws manually opened.
Take out syringe and contact technical service department.
“Plunger plate not prop. fixed“ The syringe plunger plate does not attach to the
plunger plate sensor on the pump.
Check system for negative pressure and eliminate
cause. Consider “Patient Safety“.
“Standby Time expired“ The set standby time has ended.
Set new time or continue with previously set therapy.
“No battery inserted“ It is not possible to use the pump without a
battery pack.
Turn off pump and insert battery pack according
to describtion “Overview Perfusor® Space“.
“Data were reset” Therapy and pump settings could not be restored.
Enter therapy and pump settings anew.
"Therapy data were reset" Therapy data could not be restored.
Enter therapy anew.
“Data Lock" An attempt was made to stop or switch the pump off
without entering the code.
Enter the correct code in order to continue the
therapy or in order to turn the pump off.
“Connection lost – TOM aborted” Data connection between TOM pumps in the
SpaceStation has been lost and TOM has been aborted
(Take Over Mode only).
TOM may be reactivated by pressing
k and then u
when prompted “Return to Take Over M.”
“Infusion taken over by
other pump” Infusion been handed over to second Perfusor® Space
pump (Take Over Mode only)
The red LED extinguishes with the acknowledgement of the alarm.
Caution: If a wrench is displayed and/or a yellow, red and blue LED blink then the
pump is in the service mode and is not permitted to be used on a patient. The pump is
then to be checked by a service technician.
Page 60

60
6.3 Reminder Alarms
Reminder alarms only occur in two cases:
1. A syringe is inserted, the pump doesn’t administrate, no value is being edited and
the device is not operated for two minutes.
An acoustic tone sounds, the yellow LED is constantly on and a staff call is
activated.
a) The display states “Reminder alarm!”
b) The display states “Config. not finished!”
Confirm alarm with
K and continue to set therapy/Start Up configuration.
2. A value edition was started but not finished and confirmed. This is also possible
with a missing disposable.
An acoustic tone sounds, the display states “Value not accepted“, the yellow LED
is constantly on and a staff call is activated.
Confirm alarm with
K and continue to set therapy.
6.4 Alarm Hints
If inproper entries are made the display states corresponding hints (e.g. “Bol.rate out of
range”; “Download failed”; “The parameter can not be modified”). These hints
disappear after a few seconds and don't need to be confirmed.
Chapter 6
ALARMS
Page 61

61
BATTERY OPERATION AND MAINTENANCE
The battery has an operating lifetime of 8 hours at 25 ml/h when new. For optimal
treatment of the battery, the device is equipped with protection against overcharge
and deep depletion. The battery pack is charged by the pump during connection to
mains. When disconnected from mains or in case of power failure, the pump
automatically switches to battery power.
Note: Prior to a longer storage of the pump (5 months) the battery pack must be
completely charged and then removed from the pump. Before changing the battery,
always disconnect the pump from the patient and switch off the device.
The battery status indicator is a trend display (low, medium, high). For more detailed
information on the current battery capacity (operating time in hours and minutes)
please refer to menu item “Batt. Cap.” in the Status Menu of the Perfusor® Space.
Caution: The display of the battery operating time on the pump is an approximate
value based on the current delivery rate. Changes in the delivery rate may affect the
battery operating time.
Syringe change procedures require a high power consumption. A sudden break down
of the battery operating time can be possible with an aged battery. In this case the
battery has to be replaced by a new one.
If highly potent drugs are to be given over an extended time without mains power, it is
recommended to have a fully charged reserve pump at hand.
Note: In case of ESD, Pump may need plugged into wall outlet to re-start the battery.
Attention: If the battery module is stored for long periods of time outside the pump, it
is recommended to fully charge the battery and store it at room temperature.
Caution: Batteries may explode or leak if they are opened or incinerated. Consider dis-
posal directions!
Important information for battery self-check:
If the battery symbol is blinking during mains operation, the battery has less then 30
minutes remaining capacity. In this case, the pump should not be disconnected from
mains. If it is necessary to disconnect the pump from mains power for urgent reasons,
the user should check to ensure if the battery capacity is sufficient for the proposed
use. When the battery symbol blinks permanently (>1h), the battery must be checked
by a technician and replaced if necessary.
Directions for optimal battery use:
The actual battery life may vary due to
•
ambient temperature
•
varying load (e.g. frequent boluses).
The optimal life time of a battery pack will only be reached if it's completely discharged
from time to time. A maintenance mode which conducts this battery maintenance is
built in. This function should be activated once a month. Furthermore:
BATTERY OPERATION AND MAINTENANCE
Chapter 7
Page 62

62
• If a battery, which is not completely discharged, is charged several times, its
capacity can be reduced.
•
Under normal temperature conditions a battery can be charged and discharged
approx. 500 times before its lifetime decreases.
•
When the pump is not connected to mains power the battery discharges itself
slowly. This can occur even when the pump is not operating.
•
The battery operating time can only be realized if the pump operates
continuously with a fully charged battery at room temperature.
Battery maintenance:
To accurately balance the battery capacity a cyclical battery maintenance is necessary.
The frequency of battery maintenance may be set in the service tool. The battery maintenance mode detects a possible capacity loss (e.g. through ageing of the battery pack)
and then the capacity/running time will be calculated anew. After a longer storage
time or a longer operation without battery maintenance it can happen that the battery
pre-alarm time can no longer be maintained. In this case it is necessary to perform a
battery maintenance.
To initiate the discharge process the message „Battery maintenance“ and the
k-key
will be displayed after switching the pump off. By pressing
k and uthe discharge
process will start. The process is interrupted by switching the pump on again. If the
battery maintenance is to be continued a new activation is necessary. After completely
discharging the battery it will be completely charged again. The total duration of the
battery maintenance process takes approx. twelve hours.
Caution: Please take into account that, if the battery maintenance has not been
completed there is a possibility of a reduced battery operating time.
Replacing batteries:
The Battery Pack SP can be exchanged by any user. No special qualification is required.
All rechargeable batteries exhibit a reduction in capacity as they age. This aging is dependant on several factors including charging cycles, temperature and battery usage.
It is recommended to periodically check the function of the battery. A battery should
no longer be used if a change of syringe leads to a “Battery nearly empty“ or a “Battery
empty“ alarm when it is fully charged.
Caution: Batteries may explode or leak if they are opened or incinerated. Consider
disposal directions!
BATTERY OPERATION AND MAINTENANCE
Chapter 7
Page 63

63
COMPAT IBLE SYRINGES
Manufacturer:
B. Braun
Manufacturer:
B. Braun
Syringe Type
B. Braun
Mat. No.
1)
Time to Occl.
2)
P 1 [mm:ss]
P 9 [mm:ss]
Syringe Type
B. Braun
Mat. No.
1)
Time to Occl.
2)
P 1 [mm:ss]
P 9 [mm:ss]
Manufacturer:
B. Braun
Syringe Type
B. Braun
Mat. No.
1)
Time to Occl.
2)
P 1 [mm:ss]
P 9 [mm:ss]
Chapter 8
Omnifix
5 ml
461 7053V
typ.
0:58
1:32
Omnifix
20 ml
461 7207V
typ.
1:04
3:26
Omnifix
30 ml
461 7304F
typ.
1:13
6:07
Omnifix
50 ml
461 7509F
typ.
1:16
13:46
OPS
20 ml
872 8615
typ.
00:50
05:50
OPS
50 ml
872 8810F
typ.
1:34
15:27
Omnifix
3ml
3)
4617022V
A/P 4617022V-03
US 4610303V-02
typ.
0:25
1:43
Omnifix
10ml LL
4617100V
A/P 4617100V-03
US 4617100V-02
typ.
0:53
3:50
Manufacturer:
TYCO EU
Syringe Type
TYCO EU
Mat. No.
1)
Time to Occl.
2)
P 1 [mm:ss]
P 9 [mm:ss]
Monoject
3 ml
1100-
603495
typ.
0:51
1:16
Monoject
6 ml
1100-
606159
typ.
0:56
1:41
Monoject
12 ml
1100-
612173
typ.
1:04
3:27
Monoject
20 ml
1100-
620036
typ.
1:19
5:27
Monoject
35 ml
1100-
635430
typ.
1:32
12:05
Monoject
50/60 ml
1100-
650090
typ.
2:23
15:58
COMPATIBLE SYRINGES
The syringe types listed in the following tables can be used with the Perfusor® Space.
Please refer to the listed material number (Mat. No.
1)
) to ensure specific syringe brand
compatibility.
The Time to Occlusion
2
)
alarm has been measured at 5 ml/h. The measured data are
typical values which may vary because of possible syringe tolerances.
Omnifix
2 ml
461 7029V
typ.
0:39
1:05
Page 64

64
Chapter 8
COMPAT IBLE SYRINGES
Manufacturer:
TYCO USA
Syringe Type
TYCO USA
Mat. No.
1)
Time to Occl.
2)
P 1 [mm:ss]
P 9 [mm:ss]
Monoject
3 ml
8881513934
8881713005
typ.
0:41
1:17
Monoject
6 ml
8881516937
8881716008
typ.
0:50
2:07
Monoject
12 ml
8881512878
8881712023
typ.
1:07
3:45
Monoject
20 ml
8881520657
typ.
1:13
4:49
Monoject
35 ml
8881535762
typ.
1:27
11:50
Monoject
50/60 ml
8881560125
8881760089
typ.
1:35
15:46
Manufacturer:
Becton Dickinson
Syringe Type
B-D EU/USA
Mat. No.
1)
Time to Occl.
2)
P 1 [mm:ss]
P 9 [mm:ss]
Plastipak
3 ml
309585
300910
typ.
0:53
1:15
Plastipak
5 ml
309603
300911
typ.
0:55
1:34
Plastipak
10 ml
309604
300912
typ.
1:15
3:27
Plastipak
20 ml
309661
300913
300134
300629
typ.
2:05
6:30
Plastipak
30 ml
309662
300863
typ.
2:14
6:36
Plastipak
50/60 ml
309653
300865
300869
typ.
2:53
15:34
Manufacturer:
Becton Dickinson
Syringe Type
B-D EU/USA
Mat. No.
1)
Time to Occl.
2)
P 1 [mm:ss]
P 9 [mm:ss]
Plastipak
BD 30 ml
301229
1:25
8:50
BD
Luer Lock
3 ml A/P
3)
302113
0:24
1:04
BD
Luer Lock
5 ml A/P
3)
302135
0:28
1:22
BD
Luer Lock
10 ml A/P
3)
300149
0:50
2:36
BD
Luer Lock
20 ml A/P
3)
300141
1:11
5:03
BD
Luer Lock
50 ml A/P
3)
300144
3:17
16:36
Page 65

65
Chapter 8
COMPAT IBLE SYRINGES
Manufacturer:
TERUMO
Syringe Type
TERUMO
EU/USA/JAP
Mat. No.
1
)
Time to Occl.
2)
P 1 [mm:ss]
P 9 [mm:ss]
3 ml
3SS*03L
typ.
0:43
1:17
5 ml
3SS*05L
1SS*05LZ1
typ.
0:35
1:16
10 ml
3SS*10L
1SS*10LZ1
typ.
0:55
4:48
20 ml
3SS*20L
SS*20ES
typ.
2:12
7:53
30 ml
1SS*30LZ1
typ.
2:25
8:18
50 ml
2BS-50LG
typ.
3:01
16:55
60 ml
3SS*60L
typ.
3:34
17:03
Manufacturer:
Codan
Syringe Type
Codan
Mat. No.
1)
Time to Occl.
2)
P 1 [mm:ss]
P 9 [mm:ss]
Codan
2 ml
3)
62.2637
0:07
0:58
Codan
5 ml
3)
62.4717
0:09
1:18
Codan
10 ml
3)
62.6706
0:19
2:23
Codan
20 ml
3)
62.7704
0:36
4:14
Codan
30/35 ml
3)
62.9555
0:45
4:22
Codan
50/60 ml
3)
62.8426
1:48
11:41
Manufacturer:
Fresenius
Syringe Type
Fresenius
Mat. No.
1)
Time to Occl.
2)
P 1 [mm:ss]
P 9 [mm:ss]
Injectomat
50 ml
9000701
typ.
4:37
21:09
Page 66

66
Chapter 8
COMPAT IBLE SYRINGES
BD Precise
50 ml A/P
300144
03:17
16:36
BD Precise
20 ml A/P
300141
01:11
05:03
Syringe Type
B-D Precise
Mat. No.
1)
Time to Occl.
2)
P 1 [mm:ss]
P 9 [mm:ss]
Manufacturer:
Becton-Dickinson
Polfa
50 ml
n/a
01:54
16:58
Syringe Type
Mat. No.
1)
Time to Occl.
2)
P 1 [mm:ss]
P 9 [mm:ss]
Manufacturer:
Polfa
Sofjec
10 ml
n/a
00:13
03:10
Sofjec
20 ml
n/a
03:18
08:14
Sofjec
40 ml
n/a
04:09
12:45
Sofjec
50 ml
n/a
07:18
24:47
Syringe Type
Mat. No.
1)
Time to Occl.
2)
P 1 [mm:ss]
P 9 [mm:ss]
Manufacturer:
Hwajin Medical
Margomed
50 ml
3000950
01:27
20:01
Syringe Type
Mat. No.
1)
Time to Occl.
2)
P 1 [mm:ss]
P 9 [mm:ss]
Manufacturer:
Margomed
Page 67

67
Syringes not specified in IEC/EN 60601-2-24
Nutrition pumps, in contrast to infusion pumps, are not classified as Class IIa according
to the infusion pump norm IEC/EN 60601-2-24. There are therefore no direct guidelines concerning the technical characteristics (accuracy of infusion rate, alarm
parameters etc) of the relevant disposables.
The syringes types listed in the following tables can be used with the Perfusor® Space.
However, due to the relatively high tolerances allowed in the disposables, the accuracy
of infusion rate and the alarm parameters are not comparable with infusion syringes.
Precautions must be taken as follows:
• Consider the risks involved in the use of a non LuerLock connection prior to
the therapy
• Permanently observe the connection between the syringe and the infusion
set, in order to detect any break in the connection
• If syringe and tubing line are not fixed, a disconnection can occur possibly
leading to air infusion, reverse infusion, under- /over delivery and/or
nonsterility.
Complete list available on request.
Sizes (ml)
60, 20, 10, 5, 3
60, 35, 20, 12, 6, 3
Nutrisafe: 60, 35,
20, 10, 5
C-Gon: 60, 20, 5
Manufacturer
Baxa
NeoMed
Vygon
Chapter 8
COMPAT IBLE SYRINGES
Page 68

68
START UP GRAPHS AND TRUMPET CURVES
Chapter 9
The graphs show the accuracy/uniformity of flow in relation to time. They allow
for the following:
The delivery behaviour or delivery precision is essentially influenced by the type
of (disposable syringe) used. Deviations from the technical data of the pump
cannot be guaranteed as the manufacturer may change syringe specification
significant to system accuracy without prior notification.
System accuracy is ± 2% typical by volume as measured using the trumpet curve
test method defined in IEC 60601-2-24 at rates of 1ml/h (23°C) and when the
pump is used with recommended syringes.
START UP GRAPHS AND TRUMPE T CURVES
Trumpet Curves
Measured values for second hour in each case.
Measurement interval ∆t = 0.5 min
Observation interval p x ∆t [min]
Start Up Graphs
Measurement interval ∆t = 0.5 min
Measurement duration T = 120 min
Flow Q
i
(ml/h)
Start Up Curves Trumpet Curves
Page 69

69
TEC H N I CAL DAT A
Type of unit Infusion Syringe Pump
Classification (acc. to IEC/EN 60601-1) Defibrillator–proof; CF equipment
Protective Class II; Protective Class I in
combination with SpaceStation
Class (acc. to Directive 93/42 EEC) IIb
Moisture protection IP 22 (fluid protected for horizontal usage)
External power supply:
• Rated voltage Via B. Braun SpaceStation or optional
mains adaptor (rated voltage 100 … 240 V
AC~, 50/60 Hz) for stand alone operation
• External low voltage 11 … 16 V DC via Connection Lead SP
12 V or via SpaceStation
Staff call Max. 24 V / 0,5 A / 24 VA (VDE 0834)
EMC IEC/EN 60601-1-2 / 60601-2-24
Time of operation 100 % (continuous operation)
Operating conditions:
• Relative humidity 30 % … 90 % (without condensation)
• Temperature +5 … +40 °C
• Atmospheric pressure 500 … 1060 mbar
Storage conditions:
• Relative humidity 20 % … 90 % (without condensation)
• Temperature -20 … +55 °C
• Atmospheric pressure 500 … 1060 mbar
Type of battery pack (rechargeable) NiMH
Operating time of rechargeable battery Approx. 8 hours at 25 ml/h
Recharging time Approx. 6 hours
Weight Approx. 1.4 kg
Dimensions (W x H x D) 249 x 68 x 152 mm
Volume preselection 0.1 - 99.99 ml in increments of 0.01 ml
100.0 – 999.0 ml in increments 0.1 ml
1000 – 9999 ml in increments 1 ml
Time preselection 00:01 – 99:59 h
Accuracy of set delivery rate ± 2 % according to IEC/EN 60601-2-24
Occlusion alarm pressure 9 levels up to 1.2 bar
Max. Volume in case of single fault For incorrect dosages of 0.1 ml due to
condition malfunctions of the device the pump will
automatically shut off.
Technical inspection (safety check) Every 2 years
TECHNICAL DATA
Chapter 10
Page 70

70
Multiple lines connected to one Connecting multiple infusion lines with
patient port different flow rates may affect the rate
for all infusions past the point of
connection.
Selectable delivery rates Continuous infusion rate range / bolus
rates in dependence on syringe sizes:
Rate increments 0.01 - 99.99 ml/h in increments of
0.01 ml/h
100.0 - 999.9 ml/h in increments of
0.1 ml/h
Accuracy of bolus infusion typ. ± 2 %
Max. bolus after bolus reduction £ 0.2 ml
KVO-rate Delivery rate > 10 ml/h: KVO-rate 3 ml/h
Delivery rate < 10 ml/h: KVO-rate 1 ml/h
Delivery rate < 1 ml/h: KVO-rate =
set rate (default setting 0.1 ml/h)
Computer connection USB connection in combination with
B. Braun interface lead CAN SP
(8713230) including electrical
insulation. Please pay attention to
safety notices.
History protocol < 3000 last history entries.
100 events for system diagnose.
Refer to separate documents of the
History Viewer for closer information.
Alarm volume 9 levels from 1 (59dBA) to 9 (74dBA)
• Use only pressure proof and compatible disposable items (min. 2 bar/1500 mm Hg)
to avoid influencing performance data - which would result in impairing patient
safety.
Chapter 10
TECHNICAL DATA
Syringe sizes Cont. rates* Bolus rates
[ml] [ml/h] [ml/h]
50/60 0.01 - 200 1 -1800
optional
0.01 - 999.9
30/35 0.01 -100 1 -1200
20 0.01 -100 1 - 800
10/12 0.01 -50 1- 500
5/6 0.01 -50 1 - 300
2/3 0.01 -25 1 - 150
Page 71

71
• Only use combined with approved devices/accessories by the manufacturer,
otherwise this may lead to higher emission or reduced immunity.
• Use only compatible combinations of equipment, accessories, working parts
and disposables with luer lock connectors.
Essential Performance for Infusion pumps:
• Infusion of liquids without variation of infusion rate
• Pressure limitation as protection from the bursting of the infusion line
• Protection from air-infusion
• Protection against unintended bolus volumes and occlusion (added by IEC
60601-2-24)
• Alarm signal of high priority (added by IEC 60601-2-24)
Chapter 10
TECHNICAL DATA
Page 72

72
Chapter 10
TECHNICAL DATA
Guidanc
e
and
m
anuf
ac
t
urer’s
dec
larart
ion
on
elec
t
rom
agnet
ic
c
om
pat
ib
ilit
y
Em
i
ssi
on
s test
Gu
i
dan
c
e an
d man
u
f
ac
t
u
r
er
’
s
dec
l
arat
i
on
– el
ec
t
romagn
et
i
c
emi
s
s
i
on
T
he S
p
a
ce S
ystem
i
s i
ntend
ed
f
o
r
use i
n t
he el
ec
tr
o
m
a
g
neti
c
envi
r
o
nm
ent sp
eci
f
i
ed
b
el
o
w
. T
he
custo
m
er
o
r
the user
o
f
the S
p
a
c
e S
ystem
o
r
a
ny co
m
p
o
nent sho
ul
d
a
ssur
e tha
t i
t i
s used
i
n such
a
n envi
r
o
nm
ent.
RF
em
is
s
io
n
s
CI
S
P
R
1
1
C
om
pl
i
a
n
ce
Gr
o
u
p
1
E
l
e
ct
ro
m
a
g
ne
t
i
c
e
nv
i
ro
nm
e
nt
g
ui
d
a
nce
The Spa
c
e Sy
st
em uses RF
ener
gy
only
f
or
it
s int
er
na
l
f
unc
t
ion. Ther
ef
or
e, it
s RF
emissions a
r
e v
er
y
low a
nd
a
r
e not
lik
ely
t
o c
a
use a
ny
int
er
f
er
enc
e in nea
r
by
elec
t
r
onic
equipment
.
I
f
W
LA
N
-M
odule is inst
a
lled wit
hin Ba
t
t
er
y
module
(87
13
182A
) or
W
LA
N
U
SB St
ic
k
f
or
Spa
c
eCom
(87
13
185) is used RF
ener
gy
is t
r
a
nsmit
t
ed by
t
he
Spa
c
e Sy
st
em.
Ref
er
t
o t
ec
hnic
a
l da
t
a
of
Ba
t
t
er
y
-Pa
c
k
SP wit
h W
if
i
I
U
F
a
nd/
or
Spa
c
eSt
a
t
ion a
nd Spa
c
eCom f
or
det
a
ils.
RF
em
is
s
io
n
s
CI
S
P
R
1
1
Har
m
o
n
ic
em
is
s
io
n
s
I
EC
610
0
0
-3
-2
Clas
s
B
(
N
ot
e
2
)
ap
p
lic
ab
le
o
n
ly
f
o
r
S
p
ac
eS
tatio
n
Clas
s
A
Voltage f
luctuations /
f
licker em
is
s
ions
IEC 6
1
0
0
0-3-
3
Note 1:
Maximum
emiss
ions
are measured
with a complete system
(SpaceStation and com
ponents).
Note 2:
If Class
A
e
q
uipment is attached
to the
S
pace System, the Space System will become Class
A too. This equipment
/s
ys
t
e
m
m
ay caus
e radio int
erfer
ence or
may disr
upt the oper
ation of
near
by
eq
u
ipment. It
may be necessary
t
o take
mitigatio
n
me
asur
es, such as r
e-or
ienting or
r
elocating the
S
pace System or shield
in
g the
locat
ion
.
Complies
The Spa
c
e Sy
st
em or
a
ny
c
omponent
is suit
a
ble f
or
use in a
ll est
a
blishment
s, inc
luding domest
ic
est
a
blishment
s a
nd t
hose dir
ec
t
ly
c
onnec
t
ed t
o t
he
public
low-v
olt
a
ge power
supply
net
wor
k
t
ha
t
supplies buildings used f
or
domest
ic
pur
poses.
EMC (ELECTROMAGNETIC COMPATIBILITY)
Page 73

73
TECHNICAL DATA
Chapter 10
Note: Different test values of IEC 60601-2-24 are marked in the table. At the test values no
dangerous disturbances occurred at the lower test values of IEC 60601-1-2.
Im
m
unity
tes
t
Guid
a
nc
e
a
nd
m
a
nufa
c
tur
er
’
s
d
ec
la
r
a
tio
n
–
elec
tr
o
m
a
g
netic
im
m
unity
T
he
Spa
ce
Syst
e
m is int
e
nde
d for use
in t
he
e
le
ct
roma
gne
t
ic e
nvironme
nt
spe
cifie
d be
low
.
T
he
cust
ome
r or t
he
use
r of t
he
Spa
ce
Syst
e
m or a
ny compone
nt
should a
ssure
t
ha
t
it
is use
d in such
a
n e
nvironme
nt
.
El
ec
tros
tati
c
di
s
c
h
arge
(
ESD)
ac
c
ordi
n
g
I
EC
6
0
6
01
-
4
-
2
cont
a
ct
IE
C
6060
1-
1-
2:
±
6K
V
IE
C
6060
1-
2-
24:
±
8K
V
a
ir
IE
C
6060
1-
1-
2:
±
8K
V
IE
C
6060
1-
2-
24:
±
15K
V
±
6K
V
no dist
urba
nce
s
±
8K
V
st
op w
it
h a
la
rm
possible
±
8K
V
no dist
urba
nce
s
±
15K
V
st
op w
it
h a
la
rm
possible
Floors should be
w
ood,
concre
t
e
or ce
ra
mic t
ile
.
If floors a
re
cove
re
d w
it
h
synt
he
t
ic ma
t
e
ria
l,
t
he
re
la
t
ive
humidit
y should be
a
t
le
a
st
30 %.
El
ec
tros
tati
c
tran
s
i
en
t
/
bu
rs
t
ac
c
ordi
n
g
I
EC
610
0
0
-
4
-
4
±
2 kV
for pow
e
r
supply line
s
±
1 kV
for
input
/out
put
line
s
±
2K
V
±
1K
V
A/C
pow
e
r qua
lit
y should be
t
ha
t
of a
t
ypica
l comme
rcia
l or
hospit
a
l e
nvironme
nt
.
Su
rge
ac
c
ordi
n
g
I
EC
610
0
0
-
4
-
5
diffe
re
nt
ia
l mode
±
1K
V
common mode
±
2K
V
±
1K
V
±
2K
V
A/C
pow
e
r qua
lit
y should be
t
ha
t
of a
t
ypica
l comme
rcia
l or
hospit
a
l e
nvironme
nt
.
Power freq
uency
(50/60 Hz)
magnetic field
acco
rding
IEC
61000-4-8
3 A/m
40
0
A/m
Power frequency magnetic
fields should be at levels
characteristic of a typical
location in a typical
commercial or hospital
environment.
Volt
a
ge
dips,
short
interruptions and
voltage
variations
on power
s
upply
input
lines
according
IEC
61000-4-1
1
<
5 % U
T
(>95 % dip in UT
)
for
0,
5
cycle
40 % UT
(60 % dip
in
UT
)
for
5 cycles
70 %
UT
(30 % dip in UT
)
for 25
cycles
<
5 % UT
(>95 % dip
in
UT
)
for 5 sec
<5% UT
fo
r 5 s
(>95% dip
)
complie
s by use
of
internal battery
A/C
pow
e
r qua
lit
y should be
that of a typical commercial or
hospital environment. If the
user of the Space System
requires continued operation
during long time A/C pow
er
interruptions, it is
recommended that the Space
System or component be
pow
ered from an
uninterruptible pow
er supply or
a battery.
t
es
t
l
evel
I
E
C
6
0
6
0
1
-1
-2
I
E
C
6
0
6
0
1
-2
-2
4
C
o
mp
l
i
an
c
e
l
evel
E
l
ec
t
ro
mag
n
et
i
c
en
vi
ro
n
men
t
–
g
u
i
d
an
c
e
Page 74

74
TECHNICAL DATA
Chapter 10
radi
ated
el
ec
tromagn
eti
c
R
F
fi
el
ds
ac
c
ordi
n
g
I
EC
610
0
0
-
4
-
6
radi
ated
el
ec
tromagn
eti
c
R
F
fi
el
ds
ac
c
ording
IEC 6
1000-4
-3
IE
C
6060
1-
1-
2:
3 Ve
ff norma
l a
nd
1
0Ve
ff in ISM
fre
que
ncy ba
nd
I
E
C
6060
1-
2-
24:
1
0 Ve
ff
150K
Hz
t
o 80MHz
1
0 V
/m
80 MHz
t
o 2,
5 G
Hz
1
0Ve
ff
150K
Hz
t
o 80MHz
1
0 V
/m
80 MHz
t
o 3 G
Hz
P
ort
a
ble
a
nd mobile
R
F
communica
t
ions e
quipme
nt
should
be
use
d no close
r t
o a
ny pa
rt
of t
he
Spa
ce
Syst
e
m or it
’s compone
nt
s,
including ca
ble
s,
t
ha
n t
he
re
comme
nde
d se
pa
ra
t
ion dist
a
nce
ca
lcula
t
e
d from t
he
e
qua
t
ion
a
pplica
ble
t
o t
he
fre
que
ncy of t
he
t
ra
nsmit
t
e
r.
R
e
com
m
e
n
de
d
se
pa
r
a
t
i
on
dist
a
n
ce
d =
1,
2 √
P
Fie
ld st
re
ngt
hs should be
le
ss t
he
n
1
0V
/m
d =
1,
2 √
P
80 MHz
t
o 800 MHz
d =
2,
3 √
P
800 MHz
t
o 2,
5G
Hz
w
he
re
p is t
he
ma
x
imum out
put
pow
e
r rating of the
transmitter in
w
atts (W) according to the
transmit-
ter manufacture
r and d is
the rec-
ommended separation
distance in meters (m).
Field strengths from fixed RF
transmitters, as determined by an
electromagnetic site survey, should
be less than the compliance leve
l in
each fre
quency range.
I
nterference may occur in the
vicinity of equipment marked w
ith
the follow
ing symbol:
Im
m
unity
tes
t
Guid
a
nc
e
a
nd
m
a
nufa
c
tur
er
’
s
d
ec
la
r
a
tio
n
–
elec
tr
o
m
a
g
netic
im
m
unity
T
h
e
Spac
e
Sy
s
tem
i
s
i
n
ten
ded
for
u
s
e
i
n
th
e
el
ec
tromagn
eti
c
en
v
i
ron
men
t
s
pec
i
fi
ed
bel
ow.
T
h
e
c
u
s
tomer
or
th
e
u
s
er
of
th
e
Spac
e
Sy
s
tem
or
an
y
c
ompon
en
t
s
h
ou
l
d
as
s
u
re
th
at
i
t
i
s
u
s
ed
i
n
s
u
c
h
an
en
v
i
ron
men
t.
t
es
t
l
evel
I
E
C
6
0
6
0
1
-1
-2
I
E
C
6
0
6
0
1
-2
-2
4
C
o
mp
l
i
an
c
e
l
evel
E
l
ec
t
ro
mag
n
et
i
c
en
vi
ro
n
men
t
-
g
u
i
d
an
c
e
NOTE 1:
At 80 MHz and 800 MHz, the higher frequency range applies.
NOTE 2:
These guidelines may not apply in all situations. Electromagnetic propagation is affected by
absorption and reflection from structures, objects and people.
NOTE 3:
See next page.
Page 75

75
TECHNICAL DATA
Chapter 10
N
O
TE
3
:
D
i
f
f
e
r
e
n
t
t
e
s
t
v
al
u
e
s
o
f
IEC
6
0
6
01
-2
-2
4
ar
e
m
ar
k
e
d
i
n
t
h
e
t
ab
l
e
.
At
t
h
e
s
e
t
e
s
t
v
al
u
e
s
n
o
d
an
g
e
r
o
u
s
d
i
s
t
u
r
b
an
c
e
s
ar
e
al
l
o
w
e
d
w
h
i
l
e
at
t
h
e
l
o
w
e
r
t
e
s
t
v
al
u
e
s
o
f
IEC
6
0
6
01
-1
-2
.
F
i
e
l
d
s
t
r
e
n
g
t
h
s
f
r
om
f
i
x
e
d
tr
an
s
mi
tte
r
s
,
s
u
c
h
as
bas
e
s
tati
on
s
f
or
r
adi
o
(c
e
l
l
u
l
ar
/
c
or
dl
e
s
s
)
te
l
e
ph
on
e
s
an
d
l
an
d
mobi
l
e
r
adi
os
,
amate
u
r
r
adi
o,
AM
an
d
F
M
r
adi
o
br
oadc
as
t
an
d
TV
br
oadc
as
t
c
an
n
ot
be
pr
e
di
c
te
d
th
e
or
e
ti
c
al
l
y
wi
th
ac
c
u
r
ac
y
.
T
o
as
s
e
s
s
th
e
e
l
e
c
tr
omagn
e
ti
c
e
n
v
i
r
on
me
n
t
du
e
to
f
i
x
e
d
RF
tr
an
s
mi
tte
r
s
,
an
e
l
e
c
tr
o-
magn
e
ti
c
s
i
te
s
u
r
v
e
y
s
h
ou
l
d
be
c
on
s
i
de
r
e
d.
If
th
e
me
as
u
r
e
d
f
i
e
l
d
s
tr
e
n
gth
i
n
th
e
l
oc
ati
on
i
n
wh
i
c
h
th
e
Spac
e
Sy
s
te
m
i
s
u
s
e
d
e
x
c
e
e
ds
th
e
appl
i
c
abl
e
RF
c
ompl
i
an
c
e
l
e
v
e
l
abov
e
,
th
e
Spac
e
Sy
s
te
m
s
h
ou
l
d
be
obs
e
r
v
e
d
to
v
e
r
i
f
y
n
or
mal
ope
r
ati
on
.
If
abn
or
mal
pe
r
f
or
man
c
e
i
s
obs
e
r
v
e
d,
addi
ti
on
al
me
as
u
r
e
s
may
be
n
e
c
e
s
s
ar
y
,
s
u
c
h
as
r
e
-or
i
e
n
ti
n
g
or
r
e
l
oc
ati
n
g
th
e
Spac
e
Sy
s
te
m.
rat
ed
p
o
w
er
o
f
t
h
e
rat
i
o
t
ran
s
mi
t
t
er
W
S
ep
arat
i
o
n
d
i
s
t
an
c
e
ac
c
o
rd
i
n
g
t
o
f
req
u
en
c
y
o
f
t
ran
s
mi
t
t
er
m
T
he
Spa
ce
Syst
e
m is int
e
nde
d for use
in a
n e
le
ct
roma
gne
t
ic e
nvironme
nt
in w
hich ra
dia
t
e
d R
F
dist
urba
nce
s a
re
cont
rolle
d.
T
he
cust
ome
r or t
he
use
r of t
he
Spa
ce
Syst
e
m or compone
nt
ca
n he
lp
pre
ve
nt
e
le
ct
roma
gne
t
ic int
e
rfe
re
nce
by ma
int
a
ining a
minimum dist
a
nce
be
t
w
e
e
n port
a
ble
a
nd
mobile
R
F communica
t
ions e
quipme
nt
(
t
ra
nsmit
t
e
rs)
a
nd t
he
Spa
ce
Syst
e
m a
s re
comme
nde
d be
low
,
a
ccording t
o t
he
ma
x
i-
mum out
put
pow
e
r of t
he
communica
t
ions e
quipme
nt
1
5
0
kH
z
bi
s
8
0
M
H
z
1
,
2
√P
8
0
M
H
z
bi
s
8
0
0
M
H
z
1
,
2
√P
8
0
0
M
H
z
bi
s
2
,
5
GH
z
2
,
3
√P
NO
T
E
1:
For t
ra
nsmit
t
e
rs ra
t
e
d a
t
a
ma
x
imum pow
e
r out
put
not
list
e
d a
bove
,
t
he
re
comme
nde
d
se
pa
ra
t
ion dist
a
nce
(
d)
in me
t
e
rs (
m)
ca
n be
de
t
e
rmine
d using t
he
e
qua
t
ion a
pplica
ble
t
o t
he
fre
que
n
-
cy of the transmitter, w
here (P) is the maximum output pow
er rating of the
transmit-
ter in w
atts (W)
according
to the transmitter manufacturer
.
NO
TE
2:
An
add
itional
factor
of
10
/3
is
u
s
ed in calcu
lating the recommended se
paration distance for
trans
mitters
in
the
freque
ncy
range
0.1
5
MHz
to 2.5
GHz
to de
cre
ase
the like
lihood that mobile/
portable
communicatio
ns
e
qu
ipmen
t
could
caus
e
interference if it is inadvertently brought into
patient are
as.
NO
TE
3:
T
hes
e
guidelines
may
no
t
apply in all
s
ituations. Electromagne
tic propagation is affected by
abs
orption
and
reflection
fro
m
structures
,
ob
jects
and pe
ople.
0,
0
1
0,
12
0,
23
0,
1
0,
38
0,
73
1
1,
2
2,
3
1
0
3,
8
7,
27
1
00
12
0,
12
0,
38
1,
2
3,
8
12
23
Page 76

76
WARR ANTY / TSC* / SERVICE / TRAINING /
CLE ANING / DISPOSAL
Responsibility of the Manufacturer
The manufacturer, assembler, installer or importer is responsible for the effects
on safety, reliability and performance of the equipment only if:
• assembly operations, extensions, re-adjustments, modifications or repairs
are carried out by authorized personnel,
• the electrical installation of the relevant room complies with the
appropriate requirements (e.g. VDE 0100, 0107 and/or the IEC-publications
resp. national requirements),
• the equipment is used in accordance with the Instructions for Use and
• the Technical Safety Checks are carried out regularly.
Warranty
B. Braun provides 24 months warranty, as from the date of delivery, for every
Perfusor® Space (12 months for every Battery-Pack SP). This covers repair or
replacement of parts damaged as a result of design/manufacturing errors or
material defects. Modifications or repairs to the unit undertaken by the
user/operator or by third parties invalidate the warranty.
The warranty does not cover the following:
Elimination of faults attributable to incorrect/unauthorized handling, or to
normal wear and tear.
Defective rechargeable battery packs can be returned to B. Braun for further
disposal.
WARNING: Do not modify this equipment without authorization of the manu-
facturer.
Separate collection for electrical and electronic equipment
(currently applicable to EU community only).
Training
B. Braun offers a training. Please ask your local representative for further
details.
Technical Safety Check* / Service
The Technical Safety Check is recommended to be carried out every 2 years and
should be documented. Servicing work must be carried out exclusively by
trained personnel.
Chapter 11
WARRANTY / TSC* / SERVICE / TRAINING / DESINFECTING / DISPOSAL
The CE mark
confirms that this
medical product
complies with the
"Council Directive
on Medical
Devices
93/42/EEC” dated
14thJune 1993.
B. Braun
Melsungen AG
Page 77

77
Check regularly
Check for cleanliness, completeness and damage. Use only according to
Instructions for Use. During an exchange interval of the disposable the pump
has to perform a self-test. Check the following items each time the pump is
switched on: self-check, audible alarm, process- and alarm control indication.
Disinfecting
Caution: Before disinfecting the pump, always disconnect the pump
from the patient, switch off the device and disconnect from power and
other devices (e.g. staff call).
Clean all exposed surfaces using a clean, soft, lint-free cloth dampened with a
mild cleaning solution of warm, soapy water. Make sure to remove any visible
residue from all surfaces prior to disinfecting. Do not spray disinfectants directly
on the pump, use a soft, low lint cloth dampened but not saturated with product. After cleaning and disinfecting allow device to dry for at least 20 minutes
prior to use. Wipe magnifying- and displayglas on front of pump door only with
a soft cloth.
Note: Do not use Hexaquart® or other alkylamine containing disinfectants.
Recommended: disinfectant for wiping available from B. Braun: Meliseptol®
Foam pure, Melsitt 10% and Melsept SF 10%.
Note: Keep instrument upright and do not allow any part of instrument to
become saturated with or submersed in fluid during cleaning operation.
Do not allow moisture or detergents to come into contact with the electrical
connections of the device (P2 or P3 connectors) or any device openings. To
reduce the likelihood of moisture ingress into the electrical connectors, the P2
connector of a power supply or combi cable may be used to cover the
connections during cleaning operations. Ensure that any connectors used to
cover are not connected to a wall outlet or other electrical source. Once the
cleaning has been completed, remove the connector and inspect all connectors
for residual moisture and evidence of damage or breakdown to the plating on
the connectors. Allow any residual moisture to evaporate before plugging the
device into a wall outlet. Replace any connectors which exhibit damage or
evidence of plating breakdown prior to returning the device to service.
Utilize electrical contact cleaner that does not react with plastics to remove any
deposits of material which may be present inside the electrical connectors as
required.
WARRANTY / TSC* / SERVICE / TRAINING / DESINFECTING / DISPOSAL
Chapter 11
Page 78

78
Caution: Do not allow liquids to enter into or come into contact with
any openings or electrical connections on the pump or power supply.
Fluid exposure in these areas may result in the risk of short circuit,
corrosion or breakdown of sensitive electrical components, and/or
electrical shock. If fluid exposure occurs, the device should be swapped
out with another device in a manner that presents minimal interruption
to patient care. The device should remain unplugged until it can be
inspected by a trained technician for any evidence of damage and/or
residual moisture which may impair the function of the device.
Note: The use of unappoved cleaners and failure to follow the disinfection pro-
cedures and the manufacturer's recommended dilutions can result in an instrument malfunction or product damage and could void the warranty.
Disposal
The pumps as well as battery packs can be returned to B. Braun for further
disposal. When taking care of disposing of disposables as well as infusion solutions, please consider the applicable hygiene and disposal regulations.
Inspection on Delivery
Despite careful packaging, the risk of damage during transport cannot be
entirely prevented. Upon delivery, please check that all items are present. Do not
use a damaged device. Contact the service department.
Testing the proper funciton of the device should be performed before initial use.
This is even ruled by law in several countries. A respective form can be obtained
from B. Braun.
Included in Delivery
Perfusor® Space, Battery-Pack SP, Instructions for Use-Set.
Chapter 11
WARRANTY / TSC* / SERVICE / TRAINING / DESINFECTING / DISPOSAL
Page 79

79
Chapter 12
INSTRUCTIONS FOR USE ACCESSORY
INS T R U CTION S FOR USE ACCES S O R Y
SpaceStation (8713140)
Station for up to four pumps. For further information see Instructions for Use of
SpaceStation.
SpaceCover Standard (8713147)
SpaceCover Comfort (8713145)
Cover to be placed on upper SpaceStation incl. built-in handle. The SpaceCover
Comfort additionaly includes a central alarm management and alarm LEDs.
PoleClamp SP (8713130)
A maximum of three B. Braun Space pumps and one SpaceControl can be
stacked together when used with the PoleClamp SP. For detailed instructions on
secure fixation of the PoleClamp SP please refer to "Overview Perfusor® Space"
and "Patient Safety".
Power Supply SP III (8713110D - 8713123D)
The Power Supply SP is adequate to supply power for a single pump and one
SpaceControl.
1.) Connect plug of Power Supply SP with socket P2 on back of pump
(ensure that plug “clicks”).
2.) Push power plug into wall outlet.
Note: For disconnection from pump, press lever on plug down.
A maximum of three plugs can be stacked upon each other in socket P2.
Prior to use, visibly inspect the power supply and if reject if damaged.
Technical Data: 100 – 240V AC~, 50/60 Hz
Combi Lead SP 12 V (8713133)
The Combi Lead SP can connect up to three pumps. All pumps can then be
operated via the Connection Lead SP (12 V).
1.) Connect plug of the Combi Lead SP 12 V with the socket P2 on the
back of the pump.
2.) Connect plug of Connection Lead SP with Combi Lead SP.
Page 80

80
3.) Push plug of Connection Lead SP into 12 V connector.
Note: A maximum of three plugs can be stacked upon each other in socket P2.
Battery-Pack SP (NiMH) (8713180)
Battery-Pack SP (NiMH) incl. Pin (8713180A)
For further information on the Battery-Pack SP (NiMH) see “Battery Operation”.
Battery-Pack SP (LiIon) incl. Pin and WiFi (8713182A)
For further information see Instructions for Use of "Battery Pack SP with WiFi".
Interface Lead CAN SP (8713230)
Interface Lead CAN SP is needed in order to set up a connection between the
SpaceStation/pump and the computer outlet (for service requirements).
1.) Push plug into socket F3 on the SpaceStation or P2 on the pump and
connect with the CAN/USB converter.
2.) Connect CAN/USB converter to computer outlet as described in the
Instructions for Use manual.
Caution: The Interface Lead CAN SP is only to be used by the service
department; never use while patient is connected.
Note: A maximum of three plugs can be stacked upon each other in socket P2.
Interface Lead RS232 SP (8713234)
Interface Lead RS232 SP is needed in order to set up a connection between the
Space pump and the computer outlet (for service requirements).
1.)Push plug into socket P2 on the pump and connect with the Interface
Lead RS232 SP.
2.)Connect Interface Lead RS232 SP to computer outlet as described in the
Instructions for Use manual.
Caution: The Interface Lead RS232 SP is only to be used by the service
department; never use while patient is connected.
Note: A maximum of three plugs can be stacked upon each other in socket P2.
Chapter 12
INSTRUCTIONS FOR USE ACCESSORY
Page 81

81
Connection Lead SP (12 V) (8713231)
Install the Connection Lead SP (12 V) in the following way:
1.) Connect plug to socket P2 on back of pump or F3 on SpaceStation
respectively.
2.) Put the connection lead into the car socket.
3.) If necessary, remove red adaptor of motor vehicle connector by slightly
turning and simultanously pulling.
The green LED of the electronic box shows the operating voltage. The mains
connector can easily be replaced by another plug if required.
Caution: Do not connect the pump to a patient during external car battery
charging!
Note: A maximum of three plugs can be stacked upon each other in socket P2.
Connection Lead for Staff Call SP (8713232)
To connect the Perfusor® Space to staff call, use the Connection Lead for Staff
Call SP. The staff call needs to comply with the requirements of VDE 0834
(consider country specific regulations).
Note: Test staff call signalling before every use.
The Perfusor® Space offers three different staff call operating modes. They are
displayed in the signalling scheme. Consider the staff call of the hospital when
choosing an operating mode. Choose the operating mode via the service
program.
Chapter 12
INSTRUCTIONS FOR USE ACCESSORY
turned off
Alarm
Operation
Alarm
Operation
Alarm
Operation
turned on
1 sec
1 sec 1 sec
turned off
static
without
OffAlarm
*
)
dynamic
without
Off–Alarm
dynamic
with
Off-Alarm
Operating Alarm
*
)
in the mode static without Off-Alarm, the staff call can be surpressed with k
Page 82

Caution: The user should always closely observe the local pump alarms as well.
Note: A maximum of three plugs can be stacked upon each other in socket P2.
82
Technical Data
Polarity of connexion is arbitrary:
max. 24 V / 0.5 A / 12 VA
Chapter 12
INSTRUCTIONS FOR USE ACCESSORY
Alarm
Operation
white and green
Connecting Wire
white and brown
disconnected connected
connected disconnected
Page 83

83
Chapter 12
INSTRUCTIONS FOR USE ACCESSORY
PCA - A c cess o r i es
• Space PCA-Kit (REF 8713554) consisting of: :
- Demand button
- Hook and loop tape
f
or fixation of the demand button at
the patients arm
- Line fixation
connection between hook and loop tape
and demand button
- Metal clip
alternatively for fixation at the bed
sheet
- Cable strap
for wrapping the cable of the demand
button
- PCA-Key
for locking the syringe holder or the Syringe Anti Removal Cap
• Syringe Anti Removal Cap PSP (REF 8713556)
Fixation of the demand button:
at the wrist: or at the bed sheet:
Usage of the cable strap:
Usage of the Syringe Anti Removal
Cap PSP:
The Syringe Anti Removal Cap PSP is
slided over the drive head from the
front and is fixed with the PCA-key
(270° clockwise rotation). Mind the
markings – make sure it is securely locked. Dismantling: counter clockwise
rotation of 270°. Push to the left and disengage.
Caution: When Syringe Anti Removal Cap is used always change the syringe as
soon the „syringe empty“ alarm appears.
Page 84

84
ORDERING
Art. No.
B. Braun Perfusor® Space (100 – 240 V) .............................................871 3030
Recommended accessories for the B. Braun Perfusor® Space:
SpaceStation ....................................................................................................871 3140
SpaceCover Standard ....................................................................................871 3147
SpaceCover Comfort ......................................................................................871 3145
PoleClamp SP.....................................................................................................871 3130
Power Supply SP EU III ...................................................................................871 3110D
Power Supply SP EU III 3.0m.........................................................................871 3123D
Power Supply SP GB III ..................................................................................871 3111D
Power Supply SP US III...................................................................................871 3112D
Power Supply SP AU III ..................................................................................871 3113D
Power Supply SP-RSA plug III......................................................................871 3115D
Power supply SP CN III ..... ..........................................................................871 3117D
Power Supply SP DK III...................................................................................871 3118D
Power Supply SP BR III...................................................................................871 3119D
Power Supply SP KR III...................................................................................871 3120D
Combi Lead SP 12 V........................................................................................871 3133
Battery-Pack SP (NiMH).................................................................................871 3180
Battery-Pack SP (NiMH) incl. Pin .................. ............................................871 3180A
Battery-Pack SP (LiIon) incl. Pin and WiFi ...............................................871 3182A
Interface Lead CAN SP ...................................................................................871 3230
Connection Lead SP (12 V) ...........................................................................871 3231
Connection Lead for Staff Call SP ..............................................................871 3232
Interface Lead RS232 SP ...............................................................................871 3234
Space PCA Kit....................................................................................................871 3554
Syringe Anti Removal Cap PSP ....................................................................871 3556
Original Perfusor® Syringes:
20ml, without needle………………………………............................................872 8615
20ml, with aspiration needle .......................................................................872 8623
50ml, without needle .....................................................................................872 8844 F
50ml, with aspiration needle ......................................................................872 8810 F
50ml, with aspiration needle and 15 µm particle filter .....................872 8852F
50ml, light protection orange, aspiration
needle and 15 µm particle filter .................................................................872 8861 F-06
Page 85

85
ORDERING
50ml, yellow inked cylinder and aspiration needle...............................87 28801 F
50ml, yellow inked cylinder, aspiration needle
and 15 µm particle filter ...............................................................................872 8800 F
50ml, black, aspiration needle and particle filter ..................................872 8828 F
Omnifix® syringes
Omnifix® 50/60 ml Luer Lock.......................................................................461 7509F
Omnifix® 30 ml Luer Lock.............................................................................461 7304F
Omnifix® 20 ml Luer Lock.............................................................................461 7207V
Omnifix® 10 ml Luer Lock.............................................................................461 7100V
Omnifix® 5 ml Luer Lock ...............................................................................461 7053V
Omnifix® 3 ml Luer Lock ...............................................................................461 7022V
Omnifix® 2 ml Luer Lock ..............................................................................461 7029V
Original Perfusor lines made of PE (polyethylen). Tube diameter 0.9 mm
50 cm, Luer Lock..............................................................................................825 5059
100 cm, Luer Lock............................................................................................825 5067
150 cm, Luer Lock............................................................................................872 2935
200 cm, Luer Lock............................................................................................872 3060
250 cm, Luer Lock............................................................................................827 2565
300 cm, Luer Lock............................................................................................825 0146
Original Perfusor lines made of PVC. Tube diameter 1.5 mm
50 cm, Luer Lock..............................................................................................825 5172
150 cm, Luer Lock............................................................................................872 2960
200 cm, Luer Lock............................................................................................872 2862
250 cm, Luer Lock............................................................................................825 5490
300 cm, Luer Lock............................................................................................825 5253
Original Perfusor lines made of PVC. Tube diameter 0.9 mm
75 cm, Luer Lock..............................................................................................872 2870
150 cm, Luer Lock............................................................................................825 5504
specific Original Perfusor lines
Transparent UV - light protected, 150 cm,
PE - tube 0.9 mm, Luer Lock .......................................................................872 3017
Black PE tube 0.9 mm, 150 cm, Luer Lock...............................................872 3010
Black PVC tube 1,5 mm, 150 cm, Luer Lock............................................872 2919
Page 86

Type PCA, PVC tube 1,5 mm, 150 cm, Luer Lock ...................................872 6019
with 0.2 µm Sterifix filter, PVC tube 1,5 mm,
200cm, Luer Lock .............................................................................................872 3001
with SafeSite valve, PVC tube 1,5 mm,
150 cm, Luer Lock............................................................................................872 2820
ORDERING
86
Page 87

Page 88

Page 89

Page 90

38916517 • Drawing No. I0688700201
Printed on pulp bleached 100 % chlorine-free
0715
B. Braun Melsungen AG
Sparte Hospital Care
34209 Melsungen
Germany
Tel.: +49 (0) 56 61 71-0
Fax: +49 (0) 56 61 71-20 44
www.bbraun.com
Manufactured by:
B. Braun Melsungen AG
34209 Melsungen
Germany
Tel +49 (0) 56 61 71-0
 Loading...