

Page 1

Multipractic
MC 100
Type 4176
Multipractic 200
MC 200
Type 4177
plus
Food processor
English
Use Instructions
Guarantee
Service Centers
Page 2
3
English
Read all instructions carefully before using this
product.
Important
●
the blade 5 is very sharp!
Take hold of the blade
by the plastic knob only. After using the blade,
always take it out of the workig bowl
4
first, before
removing the processed food.
●
Your voltage must correspond to the voltage printed
on the bottom of the appliance. Connect to alternating current only.
●
Keep the appliance out of the reach of children.
●
This appliance was constructed for household use
only to process the listed quantities.
●
None of the parts (including the working bowl) are
microwave-proof. These parts should not be
washed in the dishwasher either.
●
Braun electric appliances meet applicable safety
standards. Repairs on electrical appliances must
only be done by authorized service personnel.
Faulty, unqualified repair work may cause accidents
or injury to the user.
●
The mains cable of this appliance can only be
changed by an official Service Dealer, since it
requires a special tool.
Specifications
●
Voltage/wattage: See typeplate on the bottom of the
appliance.
●
Opeating time and max. capacity: See processing
instructions.
This product conforms to the radio interference
supression requirements as laid down by the
Council Directive 82/499 EEC or 87/308 EEC.
Safety fuse
This unit is equipped with a self protecting system
which prevents damage to the motor in the case of
accidental overload and/or blockages. In those cases
the unit will automatically stop. Turn the appliance off
and leave for two minutes.
Afterwards, turn the appliance on again and continue
the operation. If the motor will not start, it has not
cooled off sufficiently. Turn the unit off again and wait
long enough for the motor to cool off thoroughly.
Store the appliance after use only after having turned
it off, or pull the plug out of the socket.
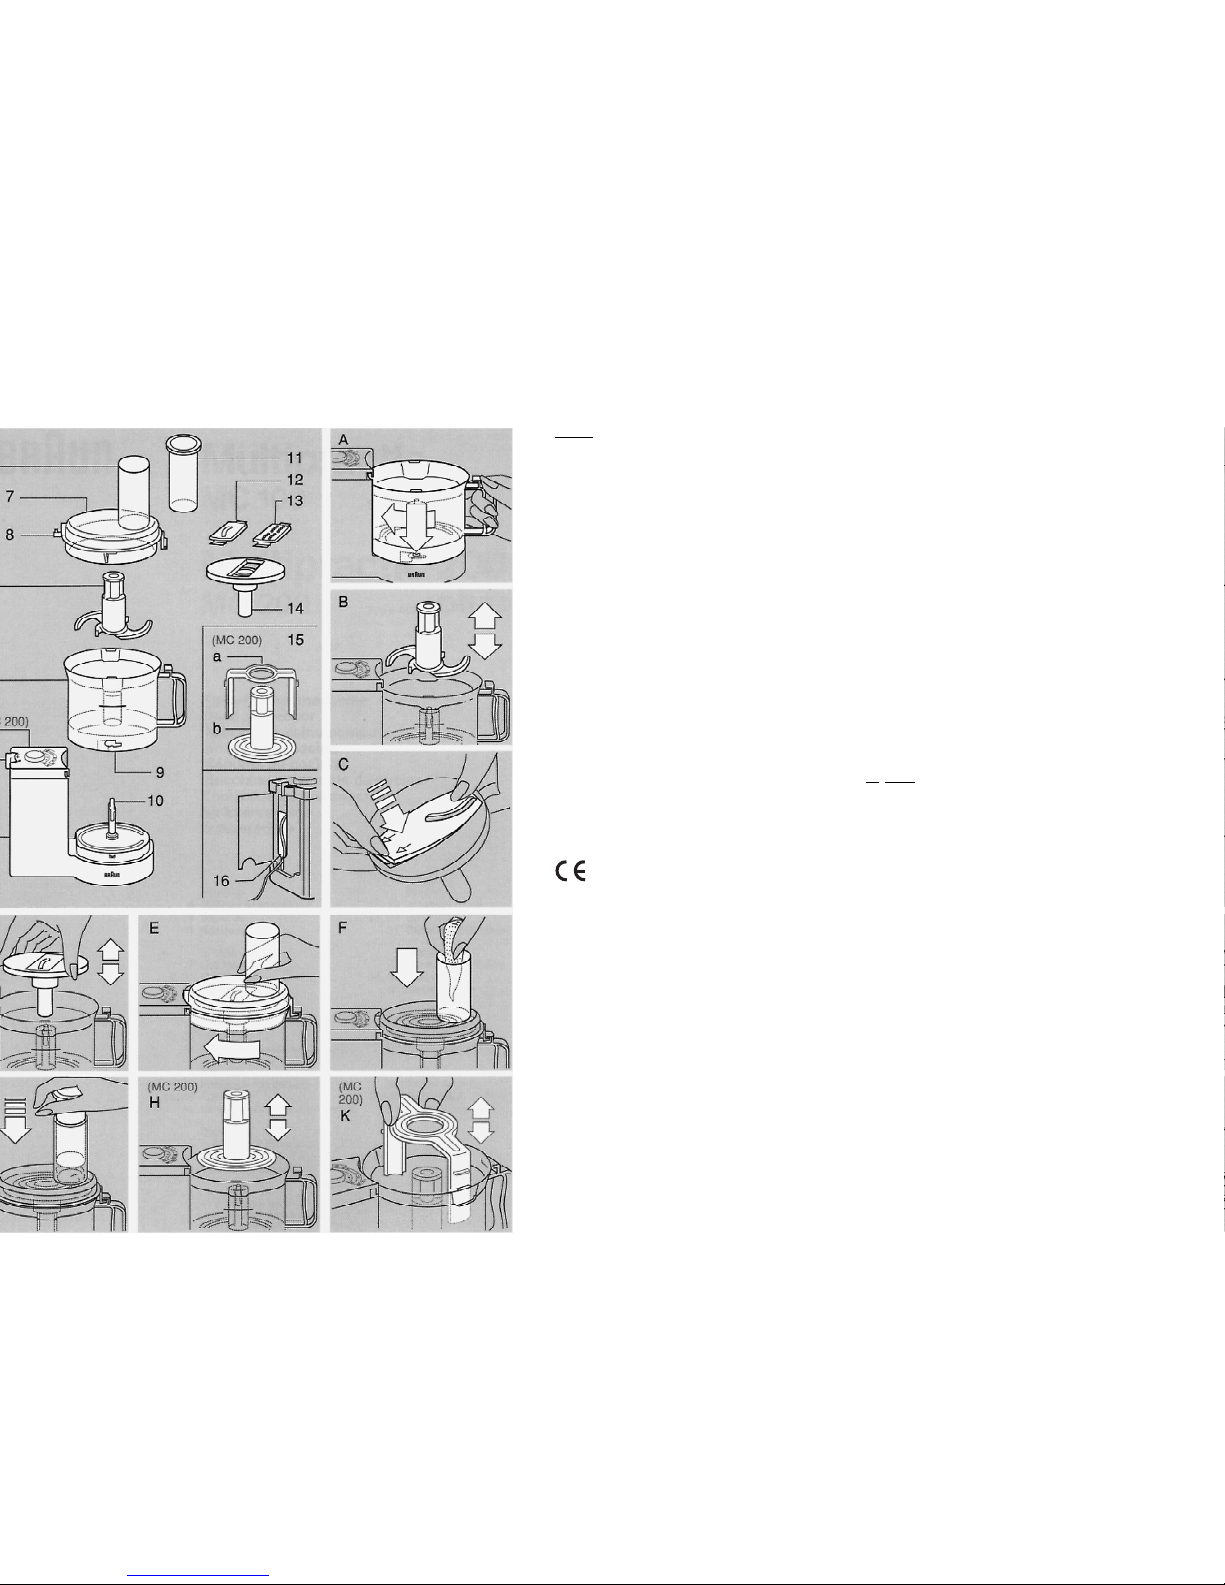
Description
1
Motor base
2
Switch
3
MC 200 only: Speed selector
4
Working bowl
5
Blade
6
Feed tube
7
Lid
8
Lid lock
9
Guide opening
j
Central shaft
k
Pusher
l
Slicing insert
m
Shredding insert
n
Carrier disc
o
a MC 200 only: Deflector
o
b MC 200 only: Beater disc
p
Cord storage compartment
Switch
2
0 = off
I = on
L = pulsator setting
For safety reasons, the motor turns on only if the lid
7
has been locked properly (see «Assembly»).
Assembly
Place the working bowl
4
on the central shaft
j
.
Ensure that the guide opening
9
on the working bowl
is aligned with the notches on the motor base. Turn the
working bowl slightly in the direction of the arrow until
it latches (A). (The lid lock
8
must slide into the
opening at the top of the motor base.)
●
When using the blade
5
: Simply place the blade
on the central shaft
j
and press until it rests in
place (B).
Im
portant: Always insert blade
5
before putting in
food.
●
When using the slicer/shredder: Insert the cutting
insert you want (
l
,
m
) into the carrier disc
n
.
Insert the sharp side first; then snap the side with
the arrows in place (C).
Then place the carrier disc
n
on the central
shaft
j
(D).
MC 200 only:
●
When using the beater disc
o
b and deflector
o
a:
Place the beater disc in the working bowl first (H)
and then push the deflector over the two notches of
the working bowl so that it fits exactly into the
grooves inside the bowl (K).
Place the lid
7
on the working bowl
4
, coupling the
lock
8
on the lid
7
with the guide rail on the motor
base
1
. Turn the lid clockwise until it engages onto
the motor base
1
with an audible click (E). For
safety reasons, the motor will only operate if the lid
7
has been locked properly.
Processing in the working bowl
●
Insert the food you want to process into the working
bowl only after you have inserted the blade
5
. ●
Do not exceed the maximum capacity indicated in
the tables.
Depending on what you want to process, the
ingredients can either be put directly into the working bowl
4
or through the feed tube
6
even while
the motor is running (F).
Page 3

5
. The following tables will give you an
For best results, do not fill the working bowl with
quantities over those listed. The processing times are
only references; they depend on the quality of the food,
the degree of fineness you want, etc.
5
. However, the
o
b
o
a that should be used for cream,
3
(line in the working bowl
4
). ●
When beating eggwhites with sugar, put the sugar
into the working bowl after inserting the attachment
required.
As a rule, add 2 level tablespoons of sugar to one
eggwhite.
●
When mixing drinks, use the blade
5
and the
deflector
o
a of the MC 200.
setting
MC 200 only:
Speed sel.
setting
Approx.
operations
or seconds
+ ingredients
I 5 30 sec.
1 thick slice in pieces L
I
5
5
6-10 times
40 sec.
setting
MC 200 only:
Speed sel.
setting
Approx.
operat.
time
MC 100
access.
MC 200
access.
2-4 Add 4 tablespoons
water per egg straight
into working bowl
I – 2 min. Blade –
2-4 Add 4 tablespoons
water per egg straight
into working bowl
I 4 1 min.
30 sec.
– Beater
disc +
deflector
1/4 l cream Chilled I 3 1 min. Blade Beater
disc +
deflector
700 cm
3
Blend fruit first
+ then add liquids
I 4- 5 1 - 3 min. Blade Blade +
deflector
Slicing, shredding
Use the carrier disc
n
with the cutting insert you want
(see «Assembly»). Insert the food to be processed into
the feed tube
6
while the motor is turned off.
Food can then be added through the feed tube even
while the motor is running (F).
●
Never reach into the feed tube
6
while the motor is
running. Always use the pusher
k
to push food
through the feed tube (G).
●
When using the MC 200, set the speed selector at
1-2 for slicing and at 3 for shredding.
Disassembly
Switch the unit off first (switch set at «0»). Slightly turn
the lid counter-clockwise and lift it off.
Then remove the blade or carrier disc – whichever you
may be using. Press the cutting insert out of the carrier
disc on the side marked with the arrow.
Turn the working bowl against the direction of the
arrow to unlock and lift off.
Cleaning
Always switch the unit off and pull the plug out of
the socket first.
Cean the housing with a damp cloth only. All other
parts may be washed in warm water and normal
dishwashing liquids. Dry all parts well before replacing.
Unit may discolour when processing food with high
degree of pigments (e. g. carrots); use vegetable oil to
clean.
Subject to change without notice.
Guarantee
We grant a 1 year guarantee on the product
commencing on the date of purchase.
Within the guarantee period we will eliminate, free of
charge, any defects in the appliance resulting from
faults in material or workmanship either by repairing,
or exchanging parts or exchanging the whole
appliance as we may choose.
Not covered by this guarantee: damage arising from
improper use or storage (operation with incorrect
current/voltage, plugging it into an unsuitabie power
point, breakage), normal wear and defects which
have a negligible effect on the value or operation of
the appliance.
The guarantee becomes void if repairs are undertaken by unauthorised persons and if original Braun
parts are not used.
The guarantee only comes into force if the date of
purchase is confirmed by the dealer's stamp and
signature on the guarantee card and registration
card, and if the registration card is sent to the Braun
guarantee office within 4 weeks of purchase.
This guarantee extends to every country where this
appliance is supplied by Braun or its appointed
distributor and where no import restrictions or other
legal regulations hinder or prevent service being
given under guarantee.
Service under the guarantee does not affect the
expiry date of the guarantee. The guarantee on parts
or entire appliances which are exchanged ends
when the guarantee on this appliance expires.
In the event of a claim under this guarantee, hand in
the complete appliance with the valid guarantee card
to your dealer, or send both to the nearest Braun
Customer Service Centre.
All other claims including for damages resulting from
this guarantee are excluded unless our liability is
legally mandatory.
Those claims arising out of the sales contract with
the vendor are not affected by this guarantee.
For UK only:
This guarantee in no way affects your rights under
statutory law.
5
 Loading...