

Page 1
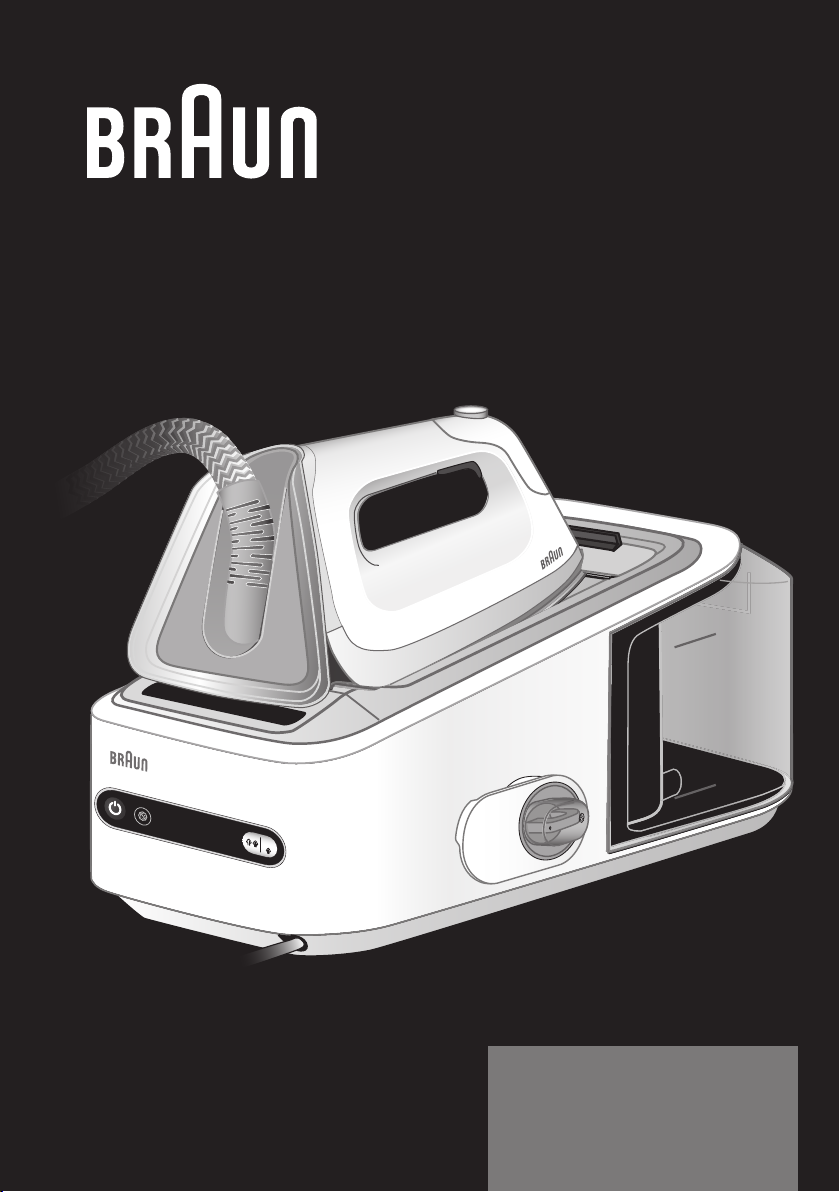
CareStyle 5
Print Spec J 92194885
Stapled booklet, 148 x 210 mm, 28 p, 1/1c = black
CareStyle 7
iCare technology
turbo
iCare
eco
CareStyle 7
Type: 12850001, 12870000
eco
Register your product
www.braunhousehold.com/register
CareStyle 7
max
min
Calc clean
IS50XX
IS70XX
Steam generator iron
Page 2
English 6
12
20
© Copyright 2018. All rights reserved
De’Longhi Braun Household GmbH
Carl-Ulrich-Straße 4
63263 Neu-Isenburg/Germany
5712812151/11.18 – IS50x x / IS70xx
UK/China/Korea
Page 3
o
iCare
max
max
turbo
CareStyle 7 Pro
CareStyle 5 / CareStyle 7
14
15
13
12
11
eco
CareStyle 7 Pro
10*
6
5
eco
23
4
CareStyle 5 Pro / CareStyle 7 Pro
23
A
CareStyle 7
CareStyle 5
turbo
flashing
iCare
4
eco
max
click!
permanent
1
14
turbo
CareStyle 7 Pro
max
min
max
min
iCare
eco
ean
Calc cl
click!
max
min
9
max
max
max
min
min
8
7
max
min
max
max
selected models only
*
CareStyle 7
max
min
max
m
in
~10´-15´
CareStyle 5
max
3
min
min
min
Page 4
B
l
Steam Button
CareStyle 5
CareStyle 7
eco
flashing
temp. ok
CareStyle 5 Pro
CareStyle 7 Pro
C
Precision Shot
D
Iron Auto-Off
10´
eco
iCare
turbo
on
flashing
auto-off
(flashing)
temp. ok
4
Page 5
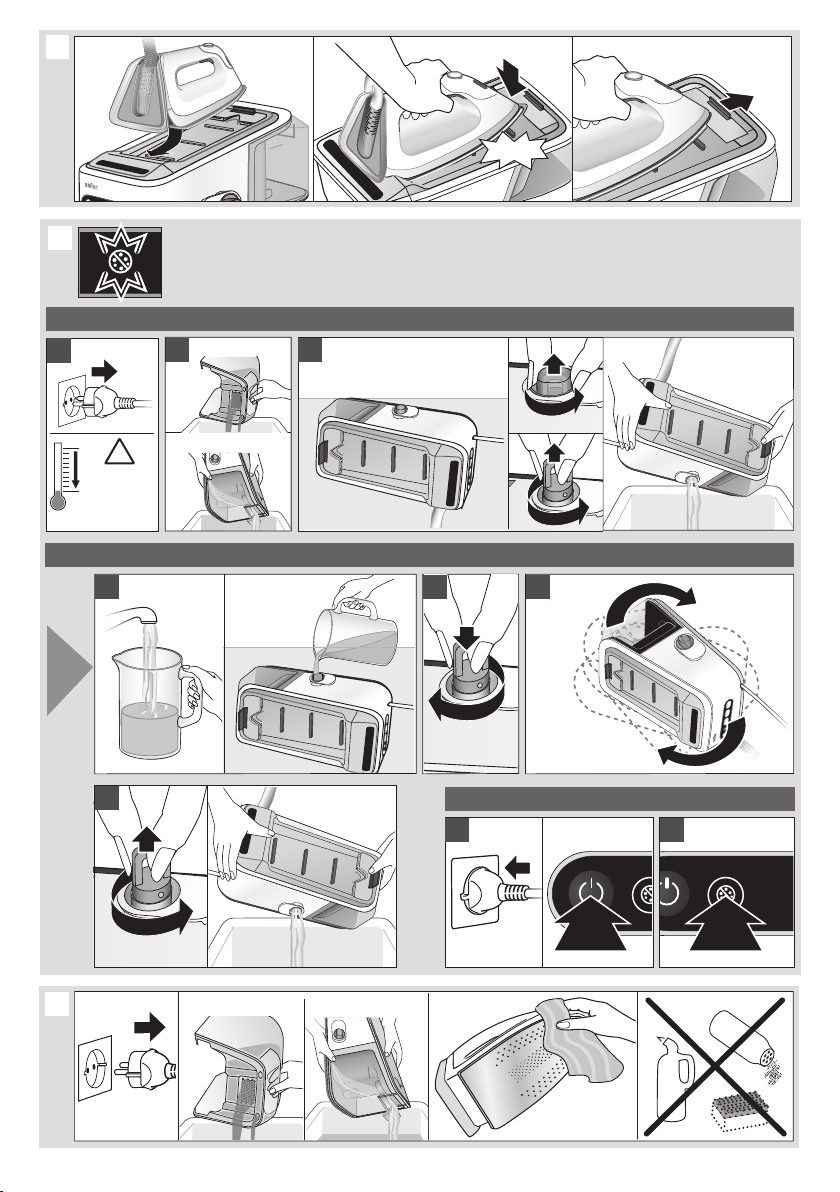
E
max
max
max
F
1. Preparation
a
CareStyle 7
b
click!
c
!
allow to
cool down
2.5 h
min.
2. Descaling
500 ml
d
2x
g
G
CareStyle 5
CareStyle 7 CareStyle 5
e
3. Reset
h
f
h
a
s
e
max
k
ean
Calc cl
yle 5
areSt
C
i
auto auto
2 sec
chemicals
5
Page 6

English
Our products are engineered to meet the highest
standards of quality, functionality and design.
We hope you thoroughly enjoy the new Braun
appliance.
Before use
Please read instructions carefully and
completely before using the appliance.
Caution
•
Caution: Hot surfaces! Electric
ironing stations combine high temperatures and hot steam that could
lead to burns.
•
This appliance can be used by children aged from 8 years and above
and persons with reduced physical,
sensory or mental capabilities or lack
of experience and knowledge if they
have been given supervision or
instruction concerning use of the
appliance in a safe way and understand the hazards involved.
•
Children shall not play with the appliance.
•
Cleaning and user maintenance shall
not be made by children without
supervision.
•
During operation and cool-down the
appliance and its mains cord shall be
kept out of reach of children under 8
years.
•
If the supply cord is damaged, it must
be replaced by the manufacturer, its
service agent or similarly qualified
persons in order to avoid a hazard.
•
Always unplug the station/iron before
filling with water.
•
The appliance must be used and
rested on a stable surface.
•
During ironing pauses, place the iron
upright on its heel rest or on the iron
rest. Ensure that the heel rest is
placed on a stable surface.
6
•
The iron must not be left unattended
while it is connected to the supply
mains.
•
Do not open the boiler during ironing.
•
During use, the pressurised apertures must not be opened for filling,
descaling, rinsing or inspection.
•
The appliance must not to be used if
it has dropped, if there are visible
signs of damage or if it is leaking.
Regularly check the cords for damages.
•
Never immerse the unit in water or
other liquids.
•
This appliance is designed for household use only and for processing normal household quantities.
•
Please clean all parts before first use
or as required, following the instructions in the Care and Cleaning section.
•
The cords should never come in contact with hot objects, the soleplate,
water and sharp edges.
•
Before plugging into a socket, check
whether your voltage corresponds
with the voltage printed on the bottom of the appliance and that you are
using an earthed socket.
•
When using an extension cord watch
out that it is in good condition, has a
plug with an earth connection and
corresponds with the power rating of
the appliance (16A).
•
The soleplate and the iron rest can
reach very high temperatures that
could lead to burns. Do not touch
them.
•
Choking hazard. The appliance might
contain small parts. Some of those
small parts might be required to get
disassembled during cleaning and
maintenance operations. Handle with
care and keep small parts out of
reach of children.
Page 7

•
Important:
Keep all packaging (plastic bags,
polystyrene foam) away from children.
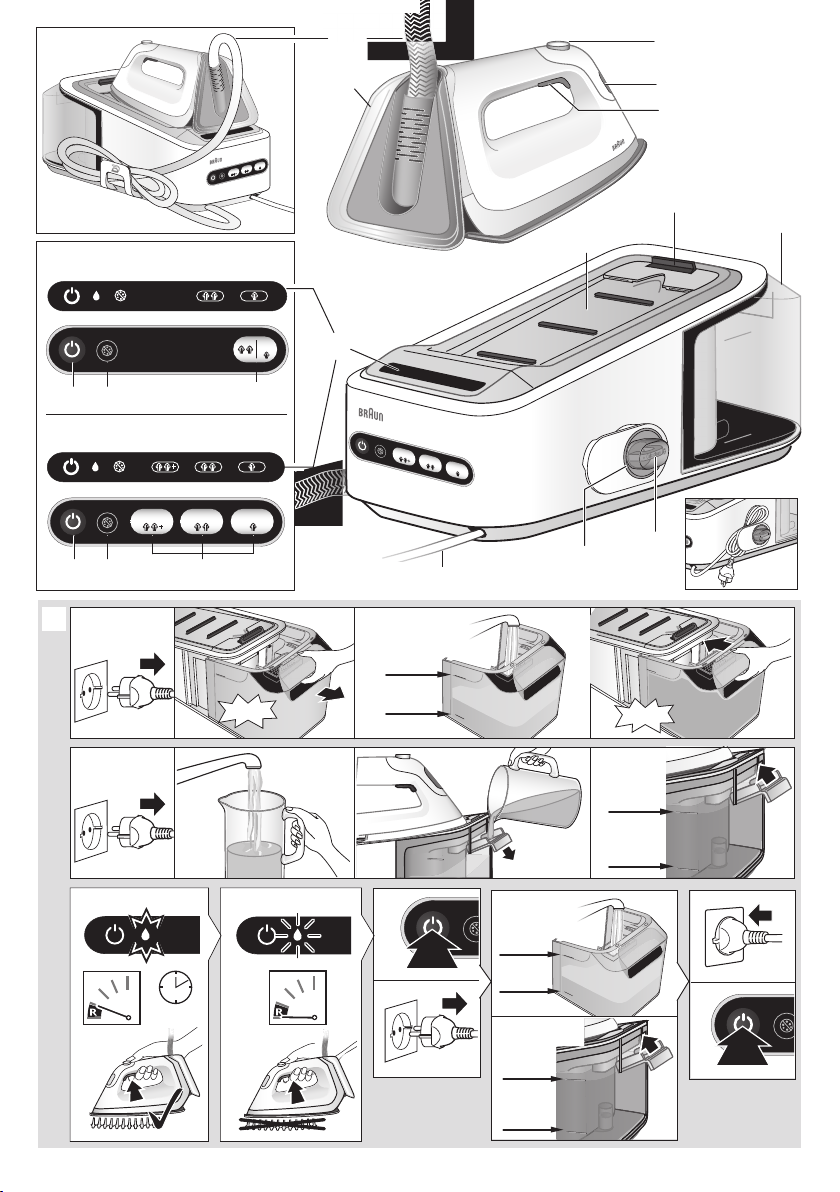
Description
Steam Generator Iron
1 Display
2 On/Off button
3 Calc clean system button
4 Settings (eco, iCare, turbo)
5 Iron rest
6 Water tank
7 Power cord
8 Closure
9 Transparent cover
10 Lock system
Iron
11 Steam button
12 Temperature control LED
13 Precision shot button
14 Double cord
15 Heel rest
Intended use
The appliance must be used only for ironing
garments which are suitable for ironing according
to the care label. Never iron or dampen garments
while wearing them.
Before first use
Take the unit out of the carton. Remove all pieces of
the packing. Remove any possibly extant labels on
the unit (do not remove the rating plate).
When steam is ready for the first time we
recommend to iron for a few minutes over a rag
to avoid manufacturing residues can dirty your
garments.
• Never use distilled water exclusively. Do not
add any additives (e.g. starch). Do not use
condensation water from a tumble dryer.
• Insert the water tank or close the water tank.
• Place the appliance on a stable, level surface.
Note: If you use filtering devices or in-house
permanent descaler, make absolutely sure the
water obtained is neutral ph.
Water reserve function
• When the water level is becoming low, the icon
starts flashing. At this stage it is possible to
continue steam ironing for about 10-15 minutes.
• When the icon turns permanently on, it
becomes necessary to refill the tank. At the same
time, the temperature control LED (12) is flashing
and the icon related to the selected setting (4)
turns off.
• To continue steam ironing, refill the water tank (A).
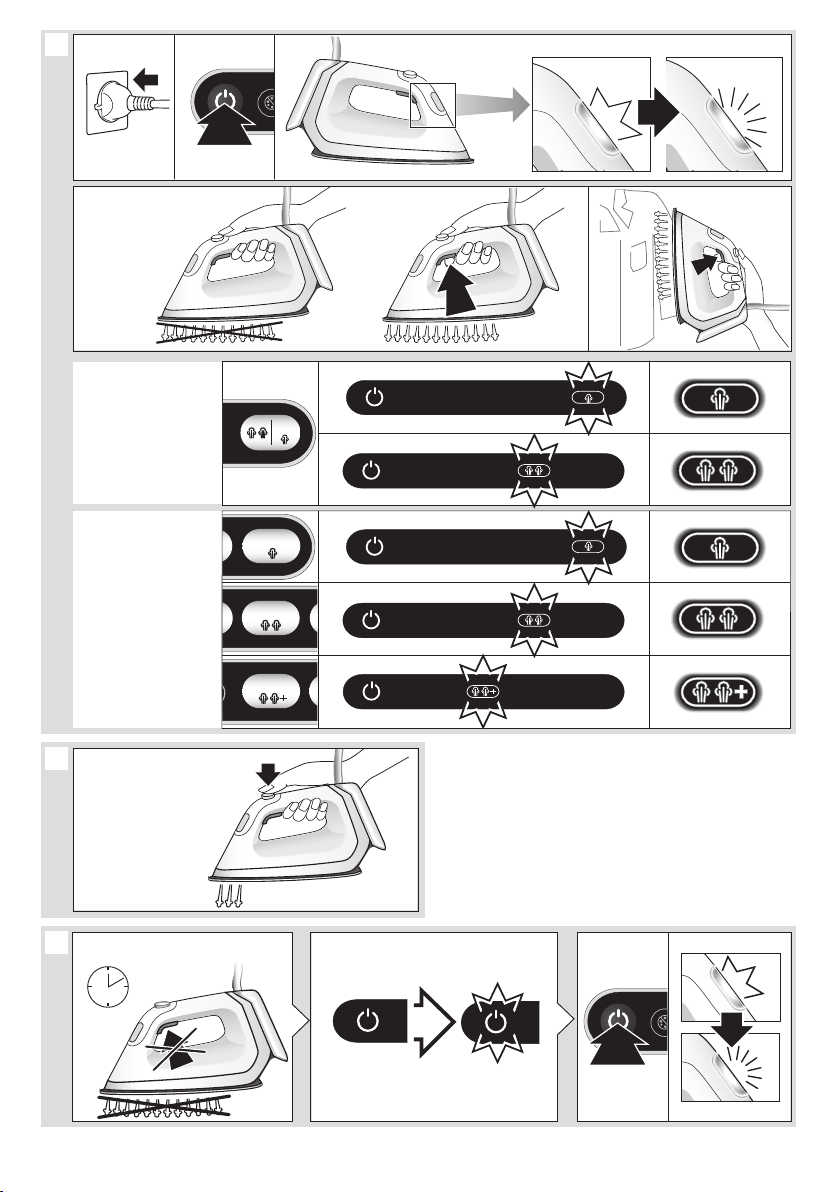
(B) Start into operation
Before start ironing follow the garment care label
instructions carefully. Fabrics with this symbol
are not ironable.
• Place the iron on the iron rest (5) or on its heel
rest (15), unwind completely the cord, plug in the
appliance and press the On/ Off button (2).
• Select the setting (4) most suitable for the
garments to be ironed.
• The requested setting can be chosen by pressing
the corresponding button (eco, iCare or turbo).
To switch from one setting to another press the
dedicated button.
• The iron will start to heat up and the temperature
control LED (12) on the iron will flash. Once the
temperature is reached, the temperature control
LED is permanently on.
• The related icon for the setting in the display (1)
will start to flash. When steam is ready the icon
turns permanently on.
(A) Filling the water tank
• Make sure that the appliance is switched off and
the system is unplugged.
• Remove the water tank (6) or open the water tank.
• Fill the water tank with tap water, taking care
not to exceed the “max” level but at least up
to the mark “min” otherwise the appliance will
not be ready to start steam ironing. If you have
extremely hard water, we recommend that
you use a mixture of 50 % tap water and 50 %
distilled water.
Steam ironing
Press the steam button (11) or the precision shot
button (13).
Double trigger
Press the steam button (11) or the precision shot
button (13) twice in quick succession within 1 second.
There will be a continuous steam emission for a few
seconds.
Press the steam button or the precision shot button
once again during steam emission to stop the
function.
7
Page 8
Dry ironing
Iron without pressing the steam button (11) or the
precision shot button (13). Please note that after
10 minutes of dry ironing, the iron switches to the
auto-off mode.
Vertical steam
The iron can also be used for steaming hanging
clothes (B). Hold the iron in a vertical position, tilted
slightly forwards. Press repeatedly the steam button
(11) or the precision shot button (13) while moving
the iron from top to the bottom.
Steam is very hot: never iron or dampen garment
while wearing them.
3D soleplate
The unique round shape of the 3D soleplate
ensures best gliding results on difficult parts (e. g.
buttons, pockets etc.)
Settings
CareStyle 5 & CareStyle 7
The iCare setting is automatically chosen
when the appliance is switched on for the first time.
From 2nd switch on, it will be set to the last setting
chosen.
The iCare setting is suggested for garments like
wool, polyester and cotton/linen.
The eco setting is suggested for most
delicate garments like synthetics, silk and blended
fabrics for which you need less steam. This setting
allows less power consumption.
CareStyle 5 Pro & CareStyle 7 Pro
eco
It is suggested for most delicate garments like
synthetics, silk and blended fabrics. This setting
allows less power consumption.
iCare
It is suggested for garments like wool, polyester
and cotton.
turbo
It is suggested for garments that need more
powerful steam, like thick cotton/linen and jeans.
Note: Due to higher temperature in the turbo mode,
do not leave unattended the iron on garments to
avoid any damage.
When the appliance is switched on, it will always be
set to the iCare setting, independently on the last
setting chosen.
8
For best results
Before start ironing follow the garment care label
instructions carefully.
• Always iron black and dark garments inside out
to avoid getting a sheen on the fabrics from the
iron.
• When ironing a shirt, start with the more difficult
parts like collar, cuff links and sleeves. Then iron
the bigger parts like front and back, so you can
prevent wrinkling the bigger parts when you are
ironing the other parts.
• When you iron a collar, start on its underside and
work from the outside (the pointy end) inwards.
Turn over and repeat. Fold down the collar and
press the edge for a more crisp finish.
• When ironing garments with imprints,
applications or even more sensitive fabric parts
(i.e. embroidery), turn them inside out and, if
necessary, lay a cotton cloth between the iron
and the fabric. This way you avoid damage and
get the volume of fabric designs that are not to
be ironed flat.
• When ironing woolen garments, we recommend
pressing sequentially the precision shot button
(13) without placing the iron on the garment. This
will avoid shiny effects on the fabric.
• In order to prevent new creases while ironing
with steam make sure that the garment shows no
residual moisture before going on ironing other
parts of it.
(C) Precision shot
• Press the precision shot button (13) completely
down.
• Steam will come out of the tip area of the
soleplate only.
• To stop this function release the button.
• If you do not press it down completely, some
steam may also come out from the rear steam
holes in the soleplate.
(D) Iron auto-off
This function is activated if after 10 minutes there
has been no steam emission.
• When the iron is in the auto-off mode, the icon
is flashing and the temperature control LED
(12) is off. The iron will turn off to reduce power
consumption.
• To turn the iron on again, the On/Off button (2)
has to be pressed. Before start ironing again
wait until the temperature control LED and the
related icon for the setting in the display (1) are
permanently on.
Page 9
After ironing / storage
• Press the On/Off button (2) to turn off the
appliance.
• Unplug and let the appliance cool down before
storing.
• Empty the water tank.
• Lock the iron.
(E) Lock system
The lock system can be used for a safe and easy
storage of the steam station and the iron. Do not lift
or carry the appliance on the handle of the locked
iron.
• Place the soleplate into the recess on the iron
mat.
• Press down the tip of the iron until you hear a
“click” and the iron will be locked automatically.
• To unlock the iron slide the locking system
forward. The iron will be released.
(F) Descaling
Never open or touch the closure (8) when the
appliance is hot and/or plugged in.
To maintain optimum performance, the system
needs to be decalcified after every 15 litres of water
consumption (about 8 complete refills).
Do not use any chemicals, additives or descaler to
rinse the boiler.
Note: Because of the different water composition
by using an installed in-house permanent descaler,
it is recommended to descale the system after
every 4 complete refills or at least once per month.
Please note that in this case the icon for descaling
will not automatically start flashing.
(G) Care and Cleaning
• Before cleaning, always make sure that the
appliance is switched off, unplugged and has
cooled down completely.
• To clean the soleplate it is suggested to use a
damp cloth.
• To clean the soft material on the handle and the
high glossy surface use a damp cloth only.
• Never use chemicals, vinegar or scouring pads
(eg. sponges with coarse nylon fabrics etc).
Please do not dispose of the product in the
household waste at the end of its useful life.
Disposal can take place at a Braun Service
Centre or at appropriate collection points
provided in your country.
The icon is flashing.
a. Switch off (2) and unplug the appliance. Unlock
the iron and remove it from the iron rest. Wait
until the appliance has cooled down (minimum
2.5 hours).
b. Empty the water tank.
c. Turn the closure (8) anticlockwise to open it.
Empty the boiler.
d. Pour in 500 ml tap water.
e. Screw the closure to close the boiler.
f. Shake the base unit to rinse.
g. Empty the boiler. Repeat this procedure one
more time.
h. After having finished the descaling procedure,
plug in and switch on.
i. Press the calc clean system button (3) for
2 seconds to reset.
If the appliance is switched off without descaling,
the icon will start to flash again when it is next
switched on.
9
Page 10
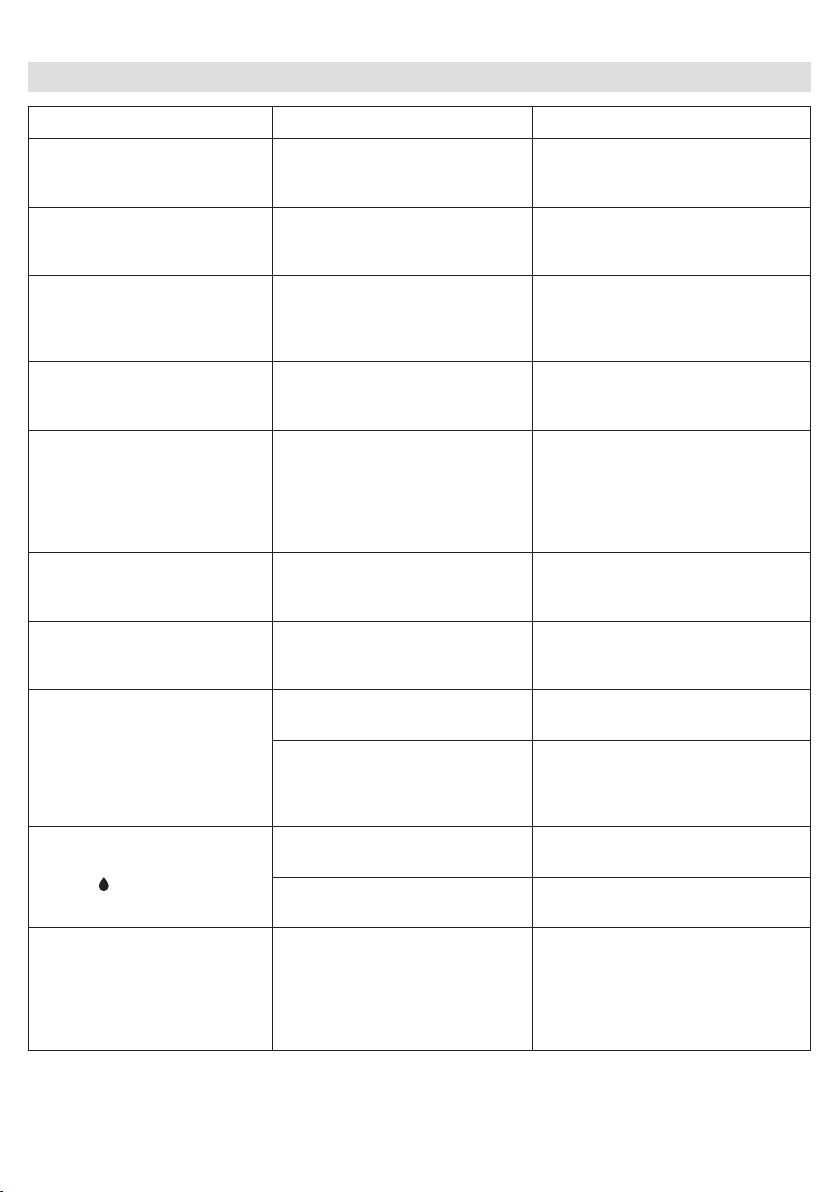
Troubleshooting guide
PROBLEM CAUSE REMEDY
The appliance does not switch
on.
Steam comes out under the
base unit.
There are some water drops
from the holes in the bottom of
the soleplate.
Brown coloured fluid leaks
from the soleplate.
The first time the appliance is
turned on, you notice smoke
or smell.
The appliance emits an
intermittent noise associated
with vibrations.
The appliance emits a
continuous noise associated
with vibrations.
The closure is difficult to
unscrew.
After refilling the water tank,
the light
All LEDs are flashing. System error.
does not reset.
The appliance is not plugged into
a mains socket.
The “max” pressure safety
system has opened.
Water has condensed inside the
tubes because steam is being
used for the first time, or has not
been used for some time.
Chemical water softeners or
additives have been poured into
the water tank.
Some parts have been treated
with sealer/lubricant which
evaporates the first time the iron
heats up.
Water is being pumped into the
boiler.
System error.
Lime scale has made the closure
difficult to open.
The boiler is still under pressure.
The water float does not work
appropriately.
The water tank is not positioned
correctly.
Make sure the appliance is correctly
connected and press the On/Off
button.
Turn the appliance off immediately
and contact an authorised Braun
Customer Service.
Press the steam button several
times away from the ironing board.
This will eliminate cold water from
the steam circuit.
Never pour products into the water
tank. Clean the soleplate with a
damp cloth and rinse the boiler.
This is normal and will stop when
you have used the iron a few times.
If the smoke/smell is still present
after turning off the appliance,
contact an authorised Braun
Customer Service.
This is normal and no action is
needed.
Unplug the appliance from the
mains and contact an authorised
Braun Customer Service.
Turn the cap forcefully. To avoid the
problem, rinse system frequently.
Never open the closure if the boiler
is still under pressure or hot. Wait at
least 2.5 hours before opening the
closure.
Empty the water tank, rinse out and
refill.
Position the water tank correctly.
Unplug the appliance, plug it in
again and press On/Off button. If
this problem is still present, turn the
appliance off immediately, unplug
and contact an authorised Braun
Customer Service.
10
Page 11

Steam icon is permanently on,
but there is no steam emission
from the soleplate.
Steam or water comes out
from the closure.
The double cord gets hot
during use.
Water tank float is locked or
the water tank is not correctly
inserted.
The closure is not tightened
properly.
This is normal. It is caused due
to the steam passing through the
cord during ironing.
Turn off and unplug the appliance.
Remove and empty the water tank,
rinse out and refill. Insert the water
tank.
Switch on the appliance and wait
until the device is ready to use.
Press the steam button and wait
until steam comes out.
Keep the steam button pressed for
10 seconds of steam emission then
release the steam button.
Switch off the appliance, unplug
and let it cool down (for at least
2,5 hours).
Unscrew the closure and screw it
back on the appliance properly.
Note: Some water can escape
when you unscrew the closure
Place the double cord on the
opposite side so that you cannot
touch the cord during ironing.
11
Page 12
121314151617181920
Page 13
Page 14
Page 15
Page 16
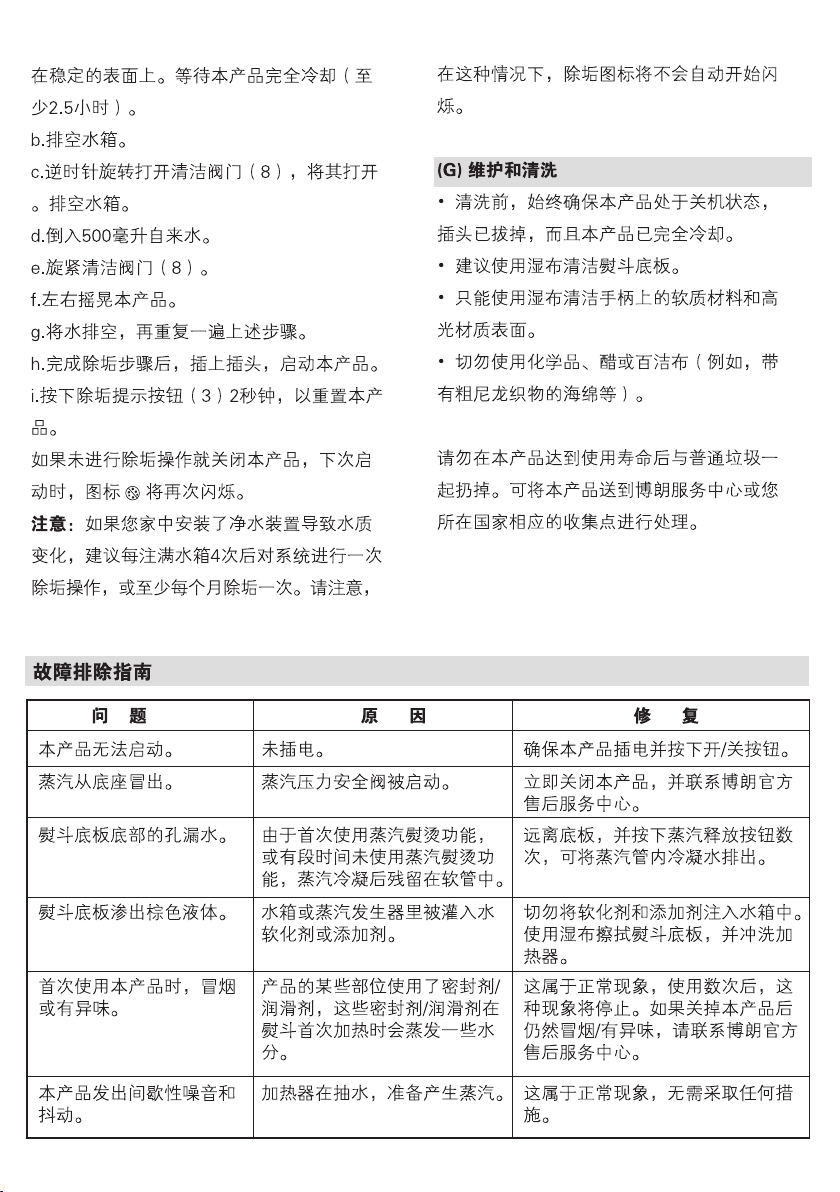
Page 17
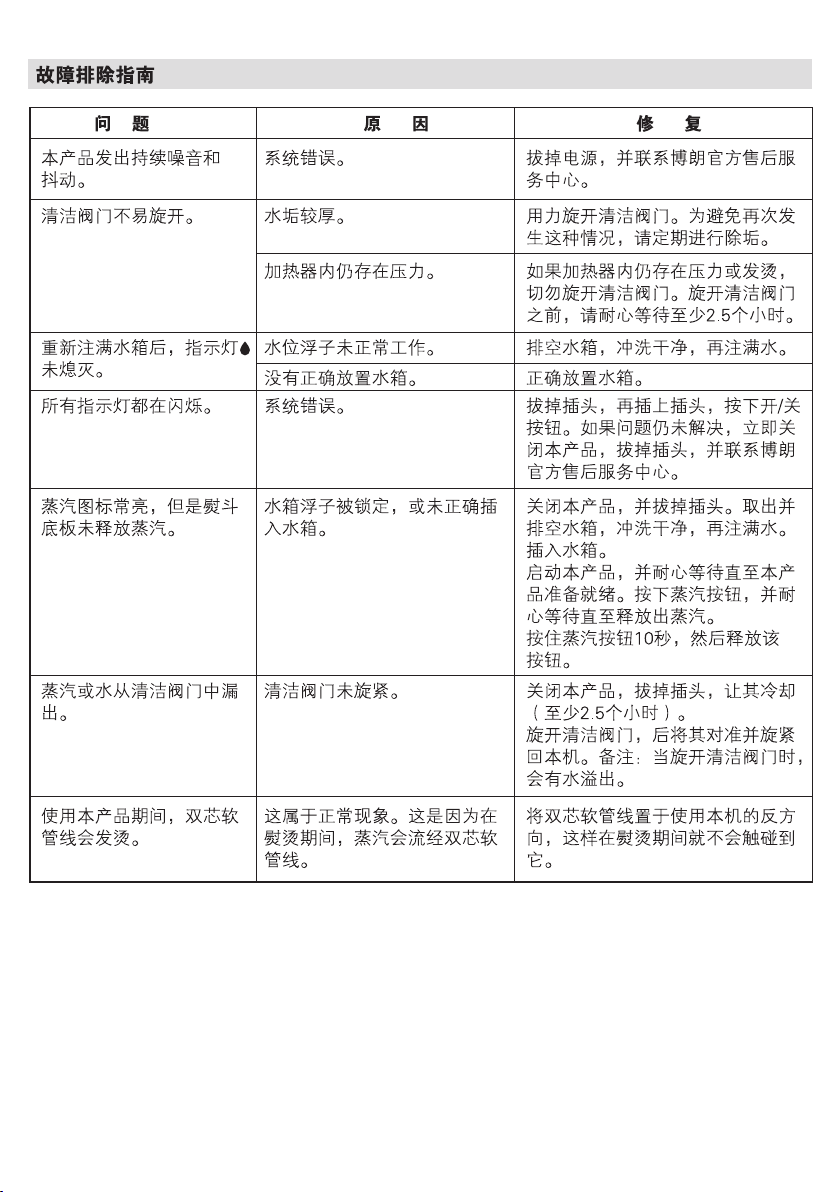
Page 18
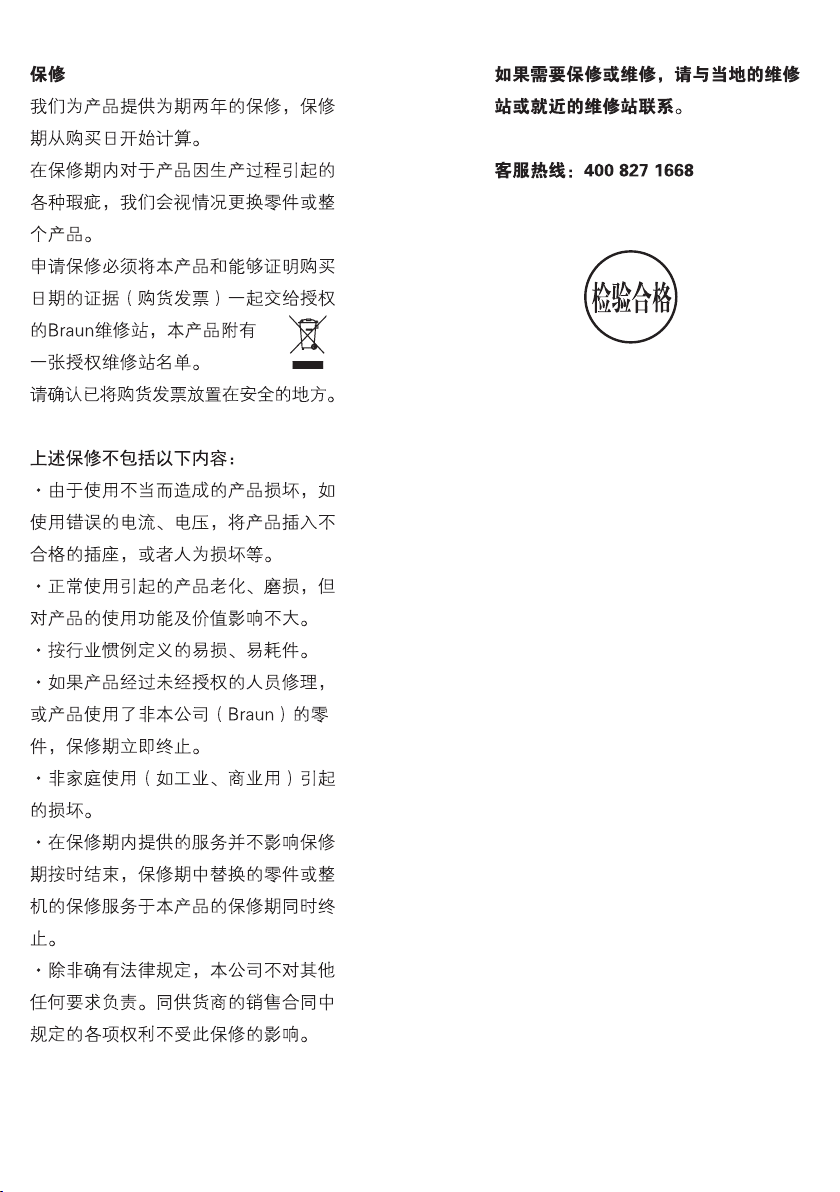
Page 19
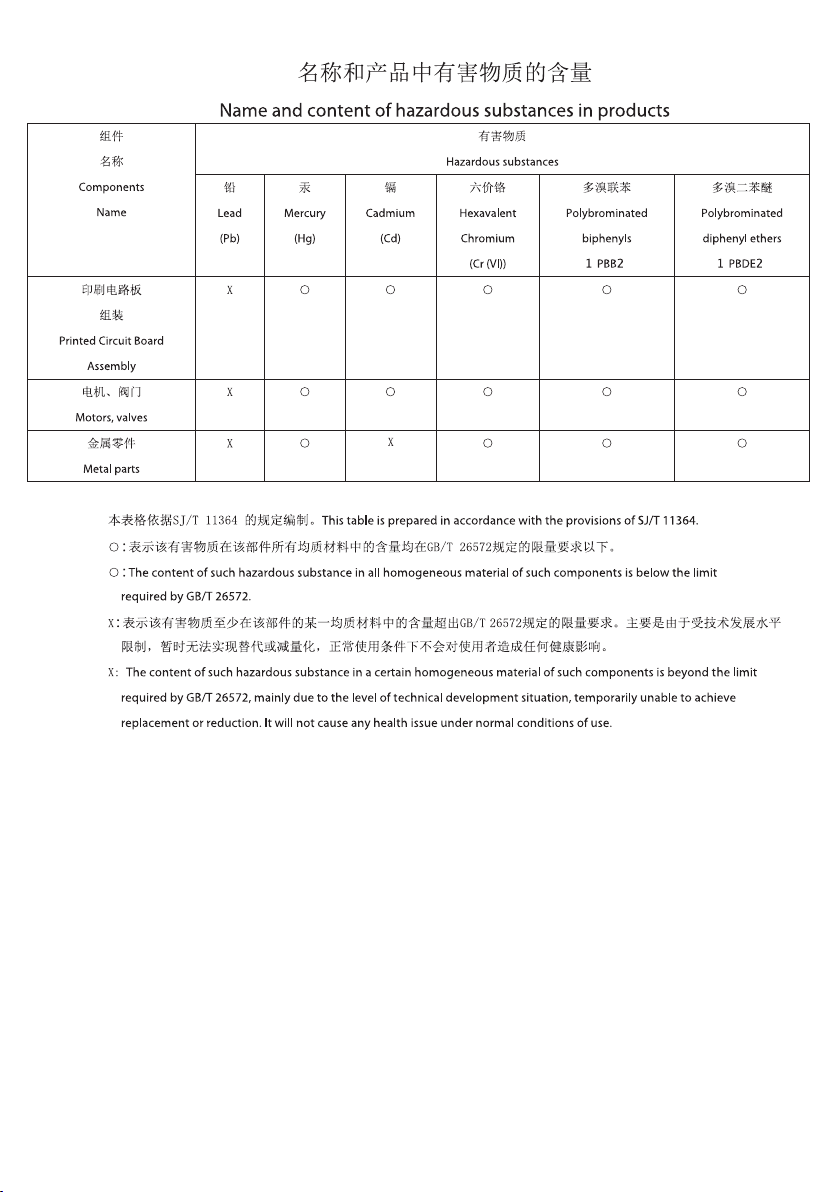
Page 20
,
. Braun
.
• : .
.
•8
, ,
,
.
•
.
•
•
8
•
,
.
•
.
•
.
•
•
.
•
.
.
•
, ,
.
• ,
,
.
.
•
.
•
.
•
.
•
.
, , ,
.
•
.
.
•
,
, (16A)
.
•
.
. .
.
.
. ,
.
.
Page 21
• :
( , )
1
2
3
4 (eco, iCare, turbo)
5
6
7
8
9
10
-ࠗݽ؛ীೠೣ
• . ( :
) .
.
•
.
•
:
• .
10~15
.
•
. LED(12)
, (4)
.
•
(A) .
.
.
.
11
12 LED
13
14
15
.
.
. .
.
(A)
•
•
•
(6) .
“min”( ) .
.
. “max”( )
50% 50%
(B)
.
.
• (5)
(15), , ,
.
.
.
.
•
•
•
LED(12
•
(2) .
(4) .
(eco, iCare turbo)
.
.
,
)
LED .
(1)
(11) (13) .
(11) (13) 1
.
.
.
.
.
.
21
Page 22
(11) (13)
. 10
.
(B) .
(13) .
.
, )
.
CareStyle 5 CareStyle 7
iCare
.
.
, , , iCare
.
.
•
.
.
(11)
.
( :
•
•
•
) ,
.
,
.
•
(13) .
•
, ,
.
.
.
.
.
.
.
( :
.
.
, ,
eco
.
CareStyle 5 Pro
eco
, , .
iCare
, , .
turbo
, ,
turbo(
:
iCare .
22
CareStyle 7 Pro
.
)
.
.
.
• (13) .
•
•
•
.
.
.
(D)
10 .
•
•
LED (1)
LED(12) .
.
(2) .
.
(C)
Page 23
/
• (2) .
•
•
•
(E)
• .
“ ”
•
•
.
.
-ⱦ≪ᾒᡢ⪺#㩆㩒
.
.
(F)
.
15 ( 8 )
.
, ,
.
:
4
.
.
.
(G)
• , ,
.
.
(8)
•
•
•
.
.
.
.
.
, ( :
) .
.
.
a. (2) .
.
(2 30 ).
b.
c.
(8) .
d.
e.
f.
g.
h.
i.
500mL .
.
.
.
.
.
. .
(3) 2
.
,
.
23
Page 24
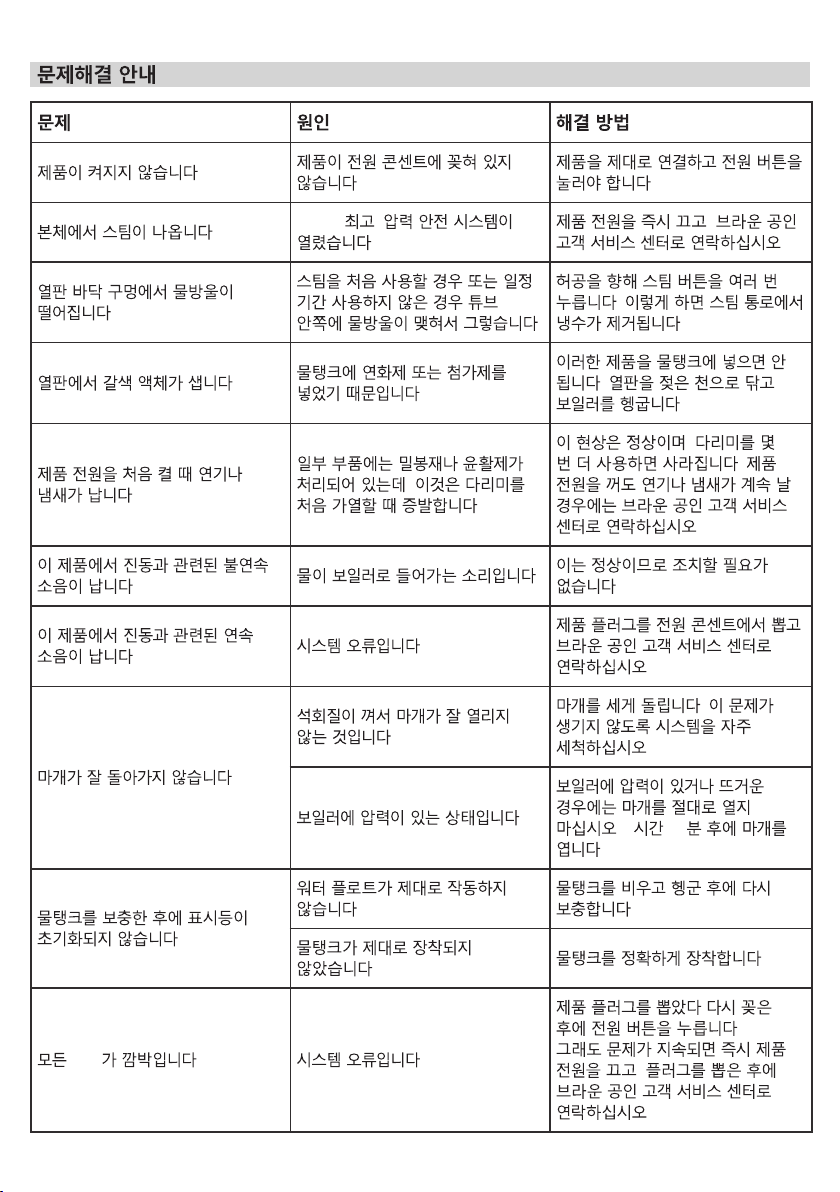
.
. .
“
.
.
.
.
.
.
.
max”(
)
.
.
.
.
,
.
.
.
.
.
.
,
.
.
.
,
.
.
,
.
.
.
.
LED . .
24
.
. .
.
. 2 30
.
.
.
, ,
.
Page 25
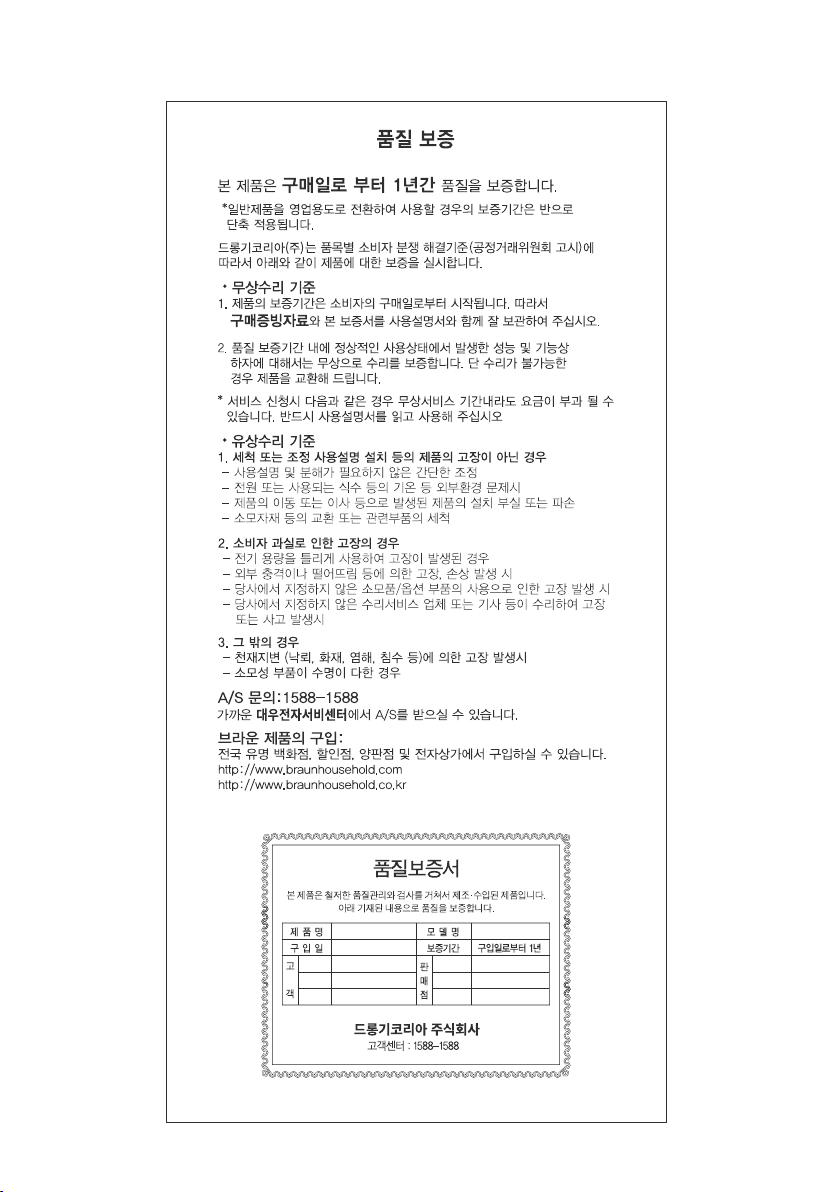
25
Page 26

Page 27

Page 28

 Loading...