

Page 1
Page 2
6
English 17
Internet:
www.oralb.com
www.braun.com
www.service.braun.com
www.oral-b.co.kr
KR
1577-8027
Braun GmbH
Frankfurter Str. 145
61476 Kronberg/Germany
Charger Type 3786
Handle Type 3758
Travel Case Type 3759
Smart Plug Type 492-XXXX
90260342/III-22
KR/EN
Page 3
1
2
3
4
5
6
Page 4
7
8
9
11
12 1310
17161514
18
222119 20
100%
23
1:30
2524
26
27
Page 5
a
b
dc
Page 6
e
fg
jk
hi
kȕ
kȖ
Page 7
678910111213141516
Page 8
Page 9
Page 10
Page 11
Page 12
Page 13
Page 14
Page 15
Page 16
Page 17
Page 18

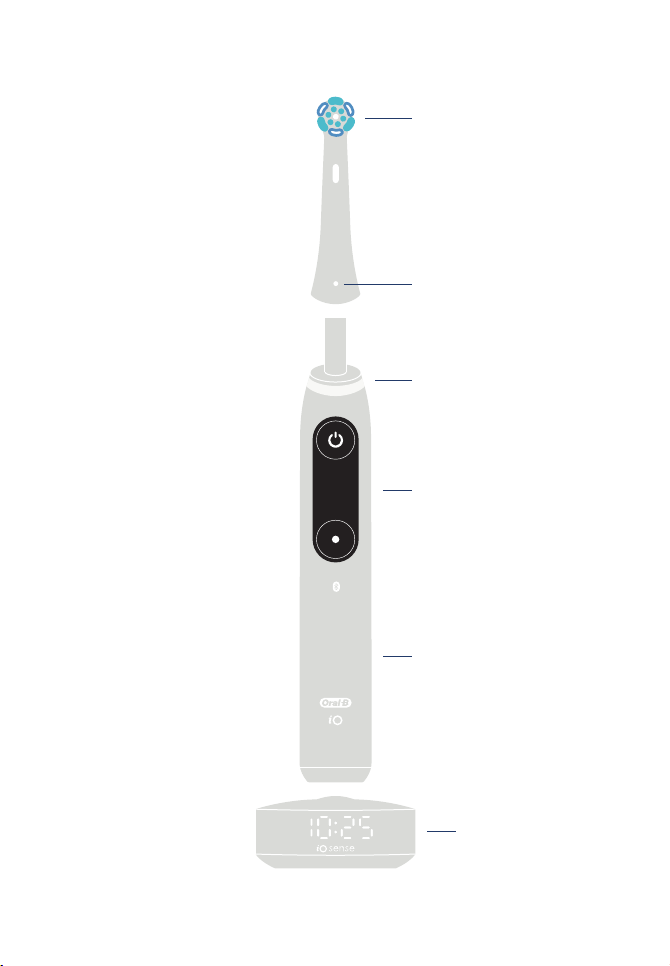
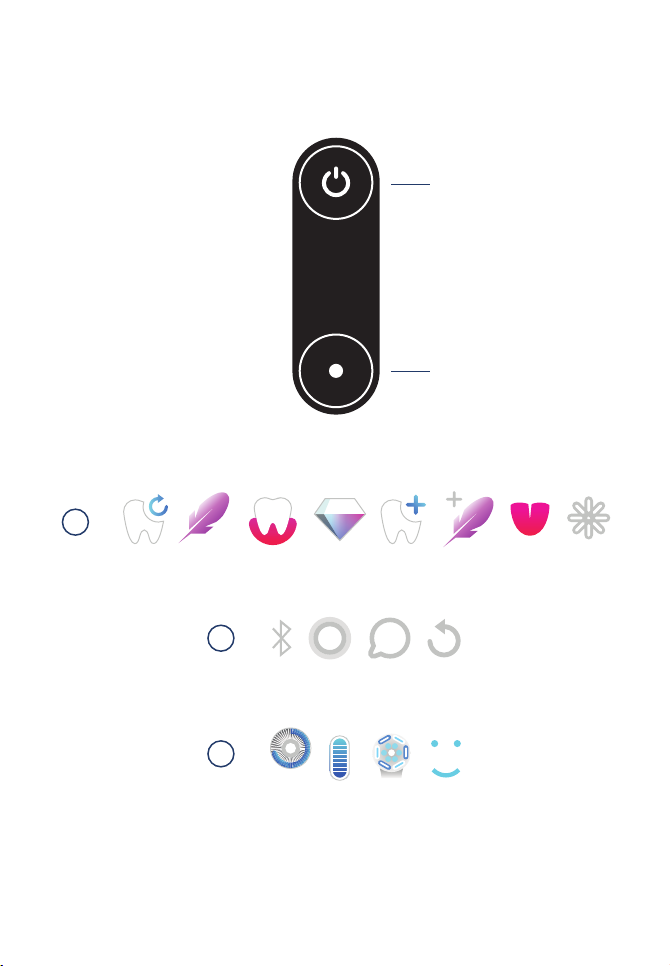
Description
1 Brush head
2 Brush head identification symbol
3 Smart Pressure Sensor / Light ring
4 Interactive display
5 Toothbrush handle
6 iOsense™ charger
7 On/off button
8 Mode button
9 Interactive display features
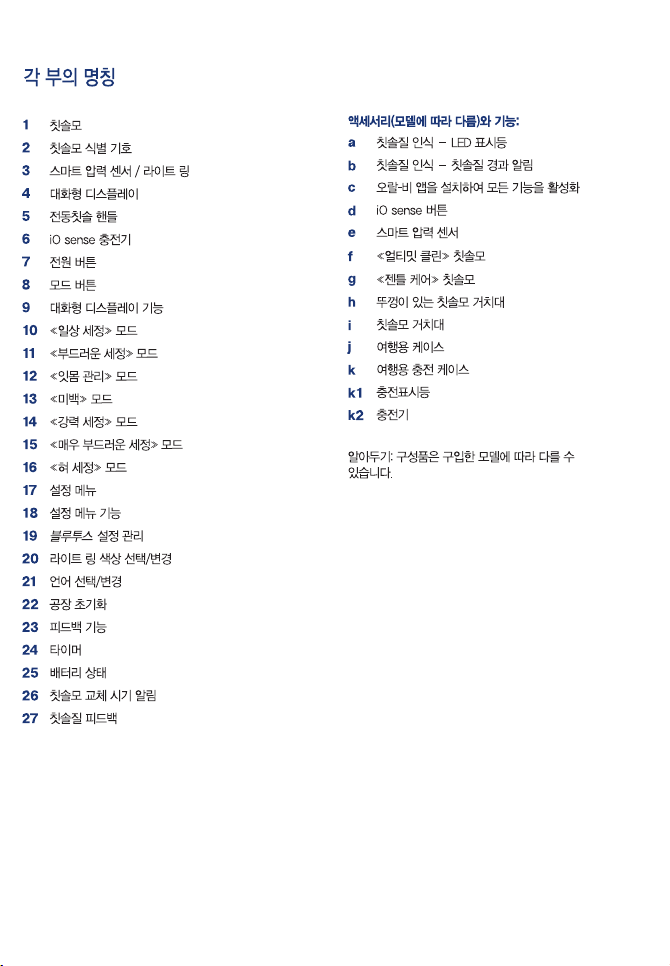
10 «Daily Clean» mode
11 «Sensitive» mode
12 «Gum Care» mode
13 «Whiten» mode
14 «Intense» mode
15 «Super Sensitive» mode
16 «Tongue Clean» mode
17 Settings menu
18 Settings menu features
19 Manage Bluetooth
20 Select / change colour of light ring
21 Select / change language
22 Perform factory reset
23 Feedback features
24 Timer
25 Battery status
26 Brush head replacement reminder
27 Brushing feedback
®
settings
Accessories (depending on model) and
features:
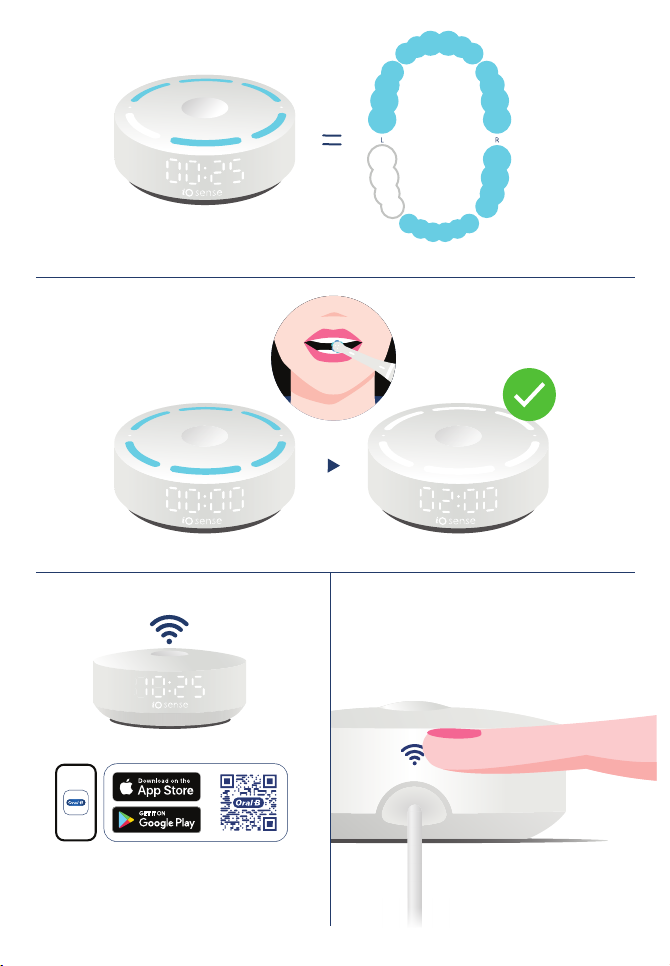
a Brushing recognition - Indicator LEDs
b Brushing recognition - Brushing progress
indication
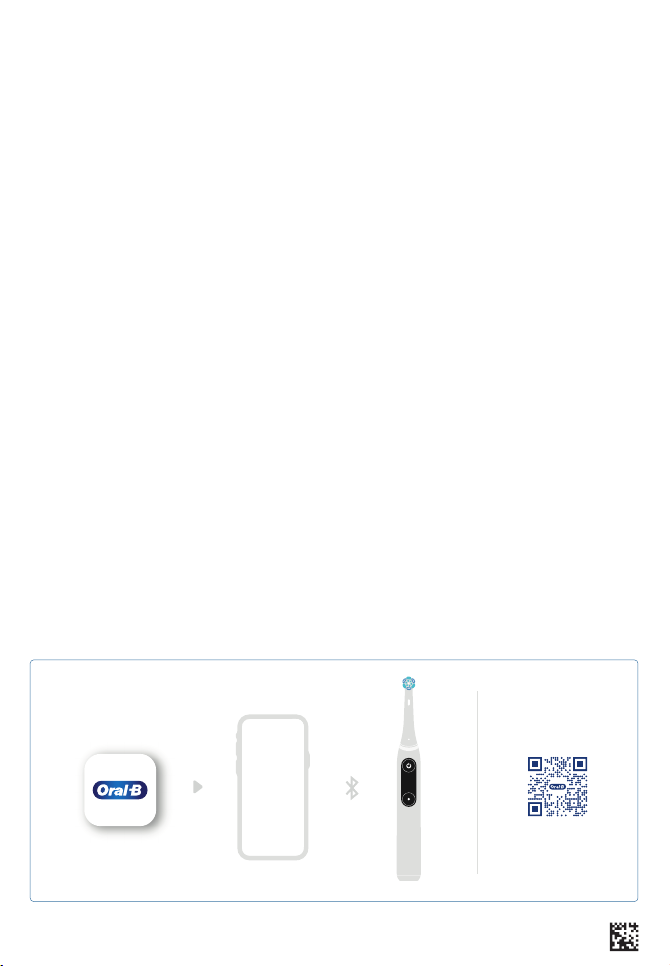
c Download and launch Oral-B App to enable
all features
d iOsense™ button
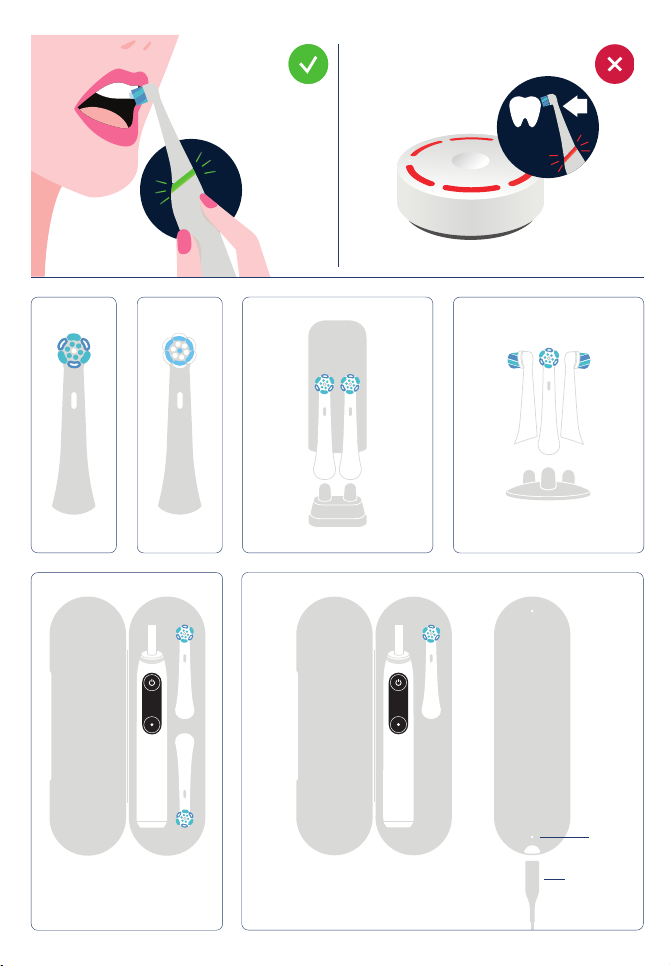
e Smart Pressure Sensor
f Brush head «Ultimate Clean»
g Brush head «Gentle Care»
h Brush head holder with cap
i Brush head holder stand
j Travel case
k Charging travel case
k1 Charging light
k2 Power supply
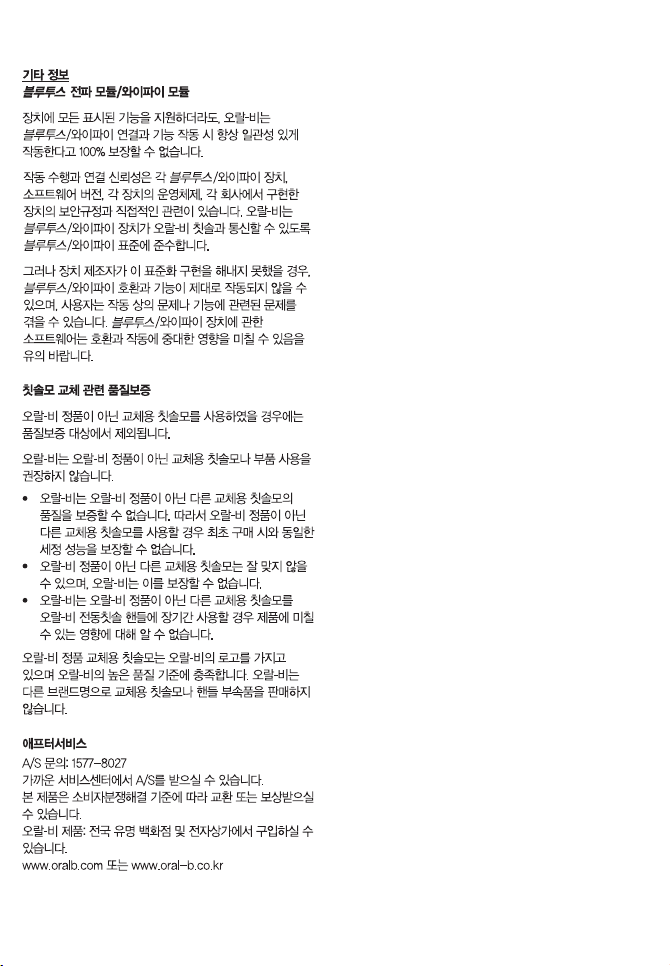
Note: Content may vary based on the model
purchased.
17
Page 19

English
Welcome to Oral-B!
Before operating your Oral-B iO toothbrush and
iOsense™ charger, please read these instructions
and save this manual for future reference.
IMPORTANT
•
Periodically check the entire
product/cord/accessories for
damage. A damaged or
non-functioning unit should
no longer be used. If the
product/accessories is damaged, take it to an Oral-B
Service Centre. Do not modify
or repair the product. This
may cause fire, electric shock
or injury.
•
Never insert any object into
any opening of the appliance.
•
Usage by children under age
3 is not recommended. Toothbrushes can be used by
children and persons with
reduced physical, sensory or
mental capabilities or lack of
experience and knowledge, if
they have been given supervision or instruction concerning
use of the appliance in a safe
way and understand the hazards involved.
•
Cleaning and maintenance
shall not be performed by
children.
•
Children shall not play with the
appliance.
•
For tooth brushing only. Do
not chew or bite on brush. Do
18
not use as a toy or without
adult supervision.
•
Use this product only for its
intended use as described in
this manual. Do not use
attachments which are not
recommended by the manufacturer.
•
Only use the charger provided
with your appliance.
•
Only use the charger and/or
special cord set with
integrated Safety Extra Low
Voltage power supply
provided with your appliance.
Do not exchange or tamper
with any part of it, otherwise
there is risk of an electric
shock. If charging stand/
charging travel case is
marked with 492-XXXX, only
use Braun/Oral-B special
cord set with this
identification.
WARNING
• Do not place the charger, power supply or
charging travel case in water or liquid or store
where it can fall or be pulled into a tub or sink.
Do not reach for it when fallen into water.
Unplug immediately.
• Avoid sharp bending, jamming or squeezing of
the cord.
• This appliance contains batteries that are
non-replaceable. Do not open and disassemble
device. For battery recycling please dispose
whole device according to local environmental
regulations. Opening the handle will destroy the
appliance and invalidate the warranty.
• When unplugging, always pull the power plug
instead of the cord. Do not touch the power
plug with wet hands. This can cause an electric
shock.
Page 20

• If you are undergoing treatment for any oral care
condition, consult your dental professional prior
to use.
• This toothbrush is a personal care device and
is not intended for use on multiple patients in a
dental practice or institution. For hygienic
reasons we recommend the use of individual
brush handles and brush heads for each family
member.
• Small parts may come off, keep out of reach of
children.
To avoid brush head breakage which may generate
a small parts choking hazard or damage teeth:
• Prior to each use, ensure the brush head fits
well. Discontinue use of the toothbrush, if brush
head no longer fits properly. Never use without
a brush head.
• If the toothbrush handle is dropped, the brush
head should be replaced before the next use
even if no damage is visible.
• Replace brush head every 3 months or sooner if
brush head becomes worn.
• Clean brush head properly after each use (see
«Cleaning recommendations» paragraph).
Proper cleaning ensures the safe use and
functional life of the toothbrush.
Important Information
• This toothbrush, charger and pouch
(accessory) contain NdFeB magnets and
generate magnetic fields. If you use a medical
device or have an implanted medical device,
consult with the medical device manufacturer or
a physician, if you have questions about safely
using your toothbrush.
• To avoid electromagnetic interference and/or
compatibility conflicts, disable Bluetooth on
your toothbrush handle (5) and Bluetooth/ Wi-Fi
on your iOsense™ charger before using it in
restricted surroundings, such as aircrafts or
specially marked areas in hospitals.
• Disable Bluetooth by entering the «Settings»
menu on the interactive display (4) -> Bluetooth
-> disable. Follow the same procedure to
enable Bluetooth again. Disable Bluetooth/
Wi-Fi on your iOsense™ charger by entering low
power mode by tapping the iOsense™ button
twice (d). Tap the botton once again to enable
Bluetooth/ Wi-Fi.
• Persons with pacemakers should always keep
the toothbrush more than 15 centimeters (six
inches) from the pacemaker while turned on.
Anytime you suspect interference is taking
place disable Bluetooth.
Specifications
For voltage specifications refer to the bottom of
the charging unit.
Noise level: 64 dB (A)
First use
Please wake up your iO toothbrush by pressing the
on/off button (7) and follow the instructions on the
interactive display (4) to get started for first time
setup.
If not further instructed on the display, you may
toggle with the mode button (8) and select with the
on/off button (7).
You may change the settings via the «Settings»
menu (17) at any time.
You may connect your iO toothbrush with your
iOsense™ charger by switch on the toothbrush in
close proximity to the plugged-in iOsense™ charger.
Charging and Operating
• To charge the toothbrush battery place the
toothbrush on the iOsense™ charger (6).
• The charge level is indicated on the interactive
display (4). The light ring (3) fades in and out
during charging. Once it is fully charged the
light ring turns off. A full charge typically takes
3 hours.
• If the battery is running low the light ring (3)
blinks quickly in red. Once the battery is empty,
the motor stops; it will need at least a 5-minute
charge for one usage.
Note: In case the battery is empty (display off),
charge for at least 30 minutes.
• You can always store the toothbrush on the
iOsense™ charger to maintain it at full charge; a
battery overcharge is prevented by the device.
Note: Store the toothbrush at room temperature
for optimal battery maintenance.
Caution: Do not expose the toothbrush to
temperatures higher than 50°C / 122°F.
Using your iO toothbrush
Start Brushing
Place the brush head on the toothbrush handle. A
small gap should remain between handle and
brush head. Activate the display by picking-up the
toothbrush, lifting it off the iOsense™ charger or
pressing the on/off button (7) (display turns on).
Wet brush head and apply toothpaste. To avoid
splashing, guide the brush head to your teeth
19
Page 21

before switching the toothbrush on by pressing the
on/off button.
Note: Display turns off after some time. You may
press the on/off button to activate display again.
Guide the brush head from tooth to tooth. Brush
the outsides, the insides and the chewing surfaces.
Brush all four quadrants of your mouth equally. You
may also consult your dentist or dental hygienist
about the right technique for you. After brushing,
the display gives you feedback based on your
brushing time.
In the first days of using any electric toothbrush,
your gums may bleed slightly. In general, bleeding
should stop after a few days. Should it persist after
2 weeks, please consult your dentist or dental
hygienist. If you have sensitive teeth and/or gums,
Oral-B recommends using the «Sensitive» or
«Super Sensitive» modes (optional in combination
with an Oral-B «Gentle Care» brush head (g)).
Availability of modes are depending on model
purchased.
Toothbrush Timer (Stutter Timer)
The iO toothbrush is equipped with timer features,
which help you to achieve the professionally
recommended 2-minute brushing time. The timer
signals with a short stuttering sound at 30-seconds
intervals to move to the next quadrant of your
mouth. A long stuttering sound indicates the end
of the professionally recommended 2-minute
brushing time.
The timer memorizes the reached brushing time,
even when the toothbrush is briefly switched off
during brushing. The timer resets if pausing longer
than 30 seconds or placing the toothbrush on the
plugged-in iOsense™ charger.
Note: During the use of the Oral-B App or
iOsense™ charger features the stutter timer is
deactivated in the toothbrush. You may also
customize the stutter timer settings via Oral-B App.
Toothbrush Light Ring (3)
Your iO toothbrush is equipped with a light ring (3)
that has various functions indicated via colours:
Smart Pressure Sensor (e)
White (default) = Operating indicator (choose
individual colour via Oral-B App)/ Low pressure
indicator
Green = recommended pressure indicator
Red = high pressure indicator
20
If the Smart Pressure Sensor illuminates in white
(or your pre-selected colour), we recommend
applying more pressure. The green light indicates
recommended brushing pressure. If too much
pressure is applied, it lights up in red reminding
you to reduce pressure.
During high pressure the brush head movement
will be reduced (in «Daily Clean», «Intense» and
«Sensitive» modes). Periodically check the
operation of the Smart Pressure Sensor by
pressing moderately on the brush head during use.
Note: During the use of the Oral-B App, the Smart
Pressure Sensor indication may be inactive for
some features.
Note: Smart Pressure Sensor is deactivated during
«Tongue Clean» mode.
Other functions
Red = Low battery indicator
Blue = Bluetooth pairing indicator
Orange = Error indicator (follow display messages)
Brushing modes (depending on model)
Your iO toothbrush offers different brushing modes
indicated on the display:
«Daily Clean» – Standard mode for daily cleaning
«Sensitive» – Gentle, yet thorough cleaning for
sensitive areas
«Gum Care» – Gentle massage of gums
«Whiten» – Polishing for occasional or everyday use
«Intense» – For an extraordinary clean feeling
(operated with a higher speed)
«Super Sensitive» – Super gentle cleaning for
extra sensitive areas
«Tongue Clean» – Tongue cleaning for occasional
or everyday use
Note: The sequence and availability of brushing
modes may vary depending on model purchased.
When operating the «Tongue Clean» mode, we
recommend using a «Gentle Care» brush head (g).
You can brush your tongue either with or without
toothpaste. Brush the whole area of your tongue
systematically in gentle movements.
The recommended brushing time is 30 seconds;
the motor stops after 30 seconds.
Mode setting:
You may first choose your default mode by
pressing the mode button (8) successively once
the toothbrush is awake (display turned on). Select
a mode by pressing the on/off button (7). Your
toothbrush starts in the selected default mode.
You may also change modes during brushing.
Page 22

Note: You may also customize mode settings via
Oral-B App.
Interactive Display
Activate the brushing mode display (4) by
picking-up the toothbrush, lifting it off the
charger or pressing the on/off button (7).
(10-16) «Mode selection» – toggle by pressing the
mode button and select default start mode with
on/off button.
(17) «Settings» – toggle through all modes until
you reach the option «Settings»; to enter press the
on/off button:
-> (19) manage Bluetooth settings (enable, disable)
-> (20) select/change colour of light ring
-> (21) select/change language
-> (22) perform factory reset
(24) «Timer» – displays brushing time.
(25) «Battery status» – shows battery status after
use, when charging or when battery is low.
(26) «Exchange reminder» – reminds you when to
replace your brush head.
(27) «Brush feedback» – brushing feedback is
indicated with a smiley face.
When the toothbrush is picked up, lifted off the
iOsense™ charger or when you press the on/off
button the toothbrush handle indicates its
readiness.
«Error messages» – «outside operating limits»:
you are operating or charging outside standard
temperature range.
Brush heads
Oral-B offers you a variety of different Oral-B iO
brush heads (f/g) that only fit your Oral-B iO toothbrush handle and can be used for tooth-by-tooth
precision cleaning.
Most iO Oral-B brush heads feature INDICATOR
bristles to help you monitor brush head replacement need. With thorough brushing, twice a day
for two minutes, the bristle colour will fade halfway
approximately within 3 months, indicating the need
to exchange your brush head. If the bristles splay
before the colour recedes, you may exert too much
pressure on teeth and gums. In general, we recommend replacing the brush head every 3 months.
Brush Replacement Reminder
The toothbrush is equipped with a «Brush Replacement Reminder» on the interactive display, indicating
the need to exchange the brush head approximately
after 3 months when used twice per day.
®
To reset the «Brush Replacement Reminder»
follow the instructions on the display.
Note: You may also customize the brush
replacement settings via the Oral-B App.
Connecting your iO
toothbrush to your
Smartphone/Oral-B App
The Oral-B App offers various features:
• Personalize your toothbrush settings (e.g.
choose your preferred light ring colour, adjust
stutter timer, brush mode sequence or brush
replacement reminder settings)
• Track your brushing behavior (e.g. brushing
time and applied pressure)
• Real-time brushing recognition to help you
brush every area for the right amount of time.
The Oral-B App is available for smartphones
running iOS or Android™ operating systems.
Check app.oralb.com for compatible smartphones
and country availability of the Oral-B App. It can be
downloaded for free from App Store
Play store™ or you may scan the QR code on the
cover page of this manual (c).
• Launch the Oral-B App. It will guide you through
the entire Bluetooth pairing procedure. You may
also pair new devices at any time in the Oral-B
App´s settings.
Note: Oral-B App functionality is limited if
Bluetooth is deactivated on your smartphone
(for directions please refer to your smartphone’s
user manual).
• You may change Bluetooth settings on your
toothbrush via the display -> Settings ->
Bluetooth enable/disable.
• Keep your smartphone in close proximity (within
5m distance) when using it with the toothbrush.
Make sure the smartphone is safely positioned
in a dry place.
Note: Your smartphone must support Bluetooth
4.2 (or higher) / Bluetooth Smart in order to pair
your toothbrush.
Caution: Follow your smartphone’s user manual to
ensure your phone/ charger is designed for use in
a bathroom environment.
(SM)
/ Google
Using your iOsense™ charger
Personalized live-coaching and
Smart Pressure Sensor features
The iOsense™ charger has a built-in real-time feedback on brushing coverage, brushing time and
21
Page 23
pressure. The LED lights on top of your iOsense™
charger illustrate your upper and lower jaw (a). You
may start your brushing session at any area of your
mouth. While the area is being brushed, the
respective light fades from blue to white, indicating
the brushing progress. Once one area is cleaned
(a), the respective LED turns into white.
If too much pressure is applied, LEDs light up in red
reminding you to reduce pressure (e).
Caution: During a brushing session with enabled
brushing recognition feature on your iOsense™
charger, please stay within 5m distance to your
iOsense™ charger to ensure a stable connection
and brushing recognition.
To enable the full feature set of iOsense™ charger,
the Oral-B App is required. Please follow the
instructions in the Oral-B App for connection setup.
Clock setup
Launch the Oral-B App and connect the iOsense™
charger with your Wi-Fi by following the instructions
in the Oral-B App.
Note: The clock doesn‘t work without the Wi-Fi
connection.
®
Bluetooth & Wi-Fi
The iOsense™ charger supports Bluetooth and
Wi-Fi.
• Bluetooth connects the iOsense™ charger with
the toothbrush and the Oral-B App.
• Wi-Fi connects the iOsense™ charger with the
internet.
iOsense™ button functions
You may find the capacitive touch button (d) on the
back of your iOsense™ charger. It has two functions:
• Low Power Mode: Device enters into low
power mode. All features beyond charging are
disabled. Tap the button (d) twice to enable low
power mode and once to disable. The
activation of low power mode is indicated by
the LEDs on the top of your iOsense charger.
Power consumption of networked standby
mode: 1,2 W.
• Factory reset: Touch and hold the button (d)
until orange light appears on the top of your
iOsense™ charger, then release the button. Tap
the button once again while orange light is on,
to trigger the factory reset. LEDs spin orange
clockwise to confirm the factory reset. All
credentials and settings are deleted from the
iOsense™ charger.
22
functions
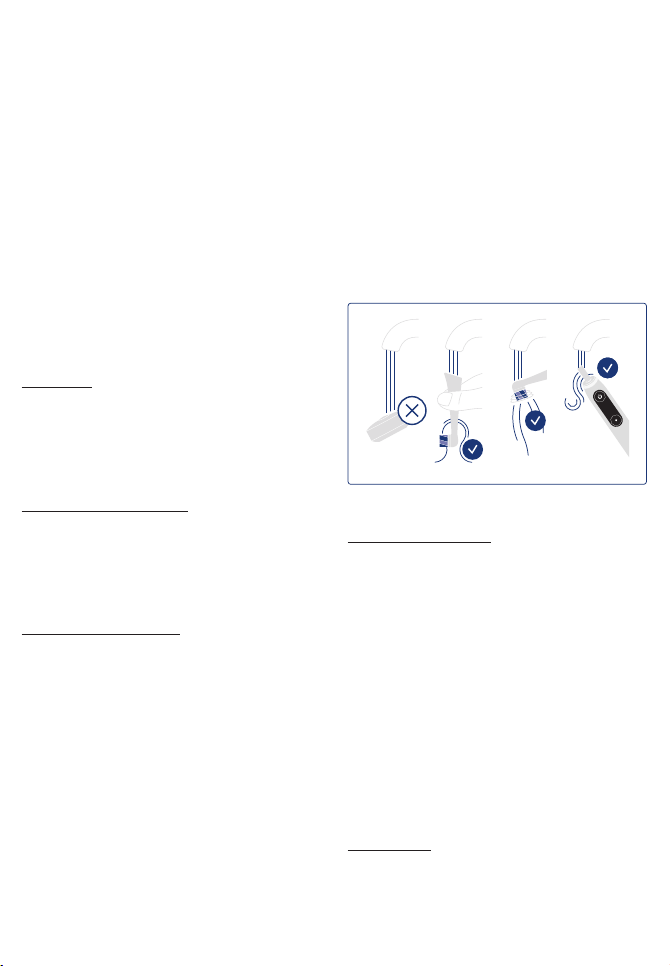
Cleaning recommendations
After brushing, rinse your brush head under running
water with the toothbrush switched on.
brush head and clean the toothbrush handle and
brush head separately. Make sure water runs
inside the top of the handle as well as inside the
brush head. Wipe all parts dry and let them air-dr y
before reassembling your iO toothbrush again.
Unplug the iOsense™ charger before cleaning.
Clean the charger regularly with a damp cloth only.
Please check individual cleaning instructions for
each accessory in its «Accessories» paragraph.
Accessories (depending on model)
Charging Travel Case (k)
• To charge your toothbrush (5) place it in the
charging travel case (k) and connect it to the
mains outlet, using the extra power supply (k2)
provided. The power supply may be used for all
global mains voltage ranges (100 – 240V).
• The flashing light (k1) of the charging travel
case indicates that the toothbrush is charging.
Once the toothbrush is fully charged the light
turns off. A full charge in the charging travel
case typically takes 6 hours.
• The outer and inner case should be cleaned
with a damp cloth only. Make sure that the
toothbrush and brush head are completely dry
before storing in the travel case.
Note: Clean stains on travel case surfaces immediately. Store travel case in a clean and dry place.
Travel Case (j)
Store the clean and dry iO toothbrush/brush heads
in the travel case (j). The outer and inner case
should be cleaned with a damp cloth only.
Note: Clean stains on travel case surfaces immediately. Store travel case in a clean and dry place.
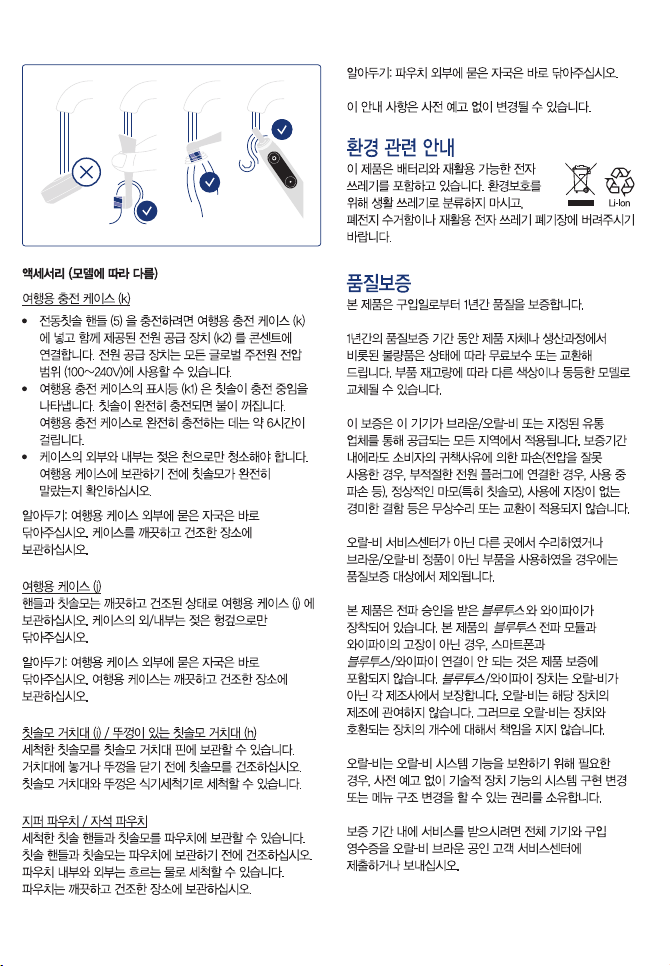
Remove the
Page 24
Brush head holder stand (i) / Brush head holder
with cap (h)
You may store your cleaned and dry brush heads
on the pins of the brush head holders. Make sure
your brush heads are dried before placing them in
the holder and/or closing the cap. Brush head
holders and cap are dishwasher-safe.
Zipper Pouch / Magnetic Pouch
You may store your cleaned brush heads and
toothbrush in the pouches. Make sure your brush
heads and toothbrush are dried before placing
them in the pouches. The outer and inner surfaces
can be cleaned under running water. Store
pouches in a clean and dry place.
Note: Clean stains on pouch surfaces immediately.
Subject to change without notice.
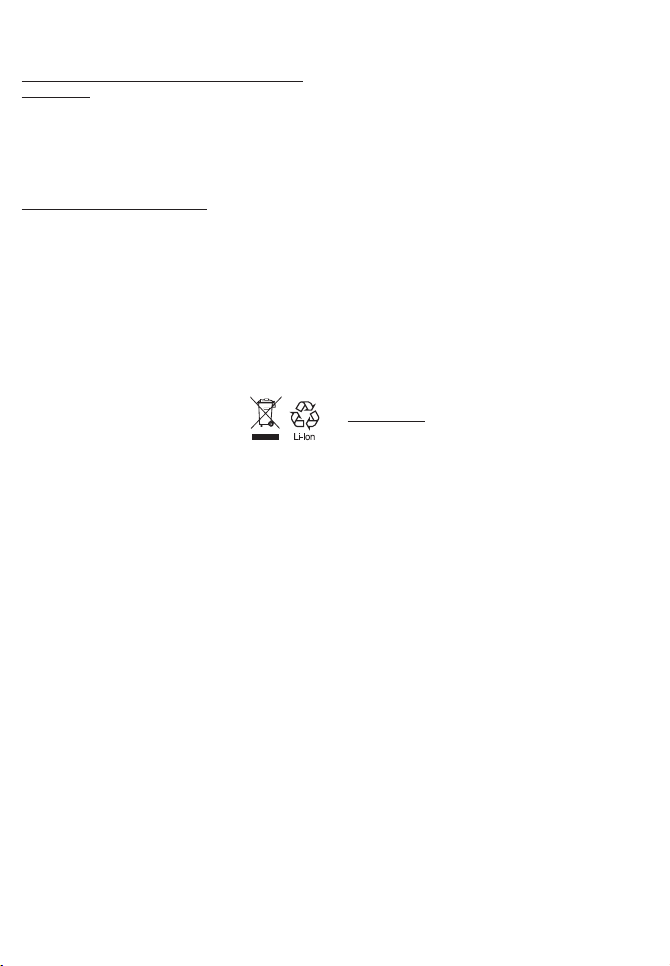
Environmental Notice
Product contains batteries and/or
recyclable electric waste. For environment protection do not dispose in
household waste, but for recycling take to electric
waste collection points provided in your country.
Guarantee
We grant 1 year guarantee on the product commencing on the date of purchase.
Within the guarantee period we will eliminate, free
of charge, any defects in the appliance resulting
from faults in materials or workmanship, either by
repairing or replacing the complete appliance as
we may choose. Depending on availability
replacement of a unit might result in a different
colour or an equivalent model.
This guarantee extends to every country where this
appliance is supplied by Braun / Oral-B or its
appointed distributor. This guarantee does not
cover: damage due to improper use, normal wear
or use, especially regarding the brush heads, as
well as defects that have a negligible effect on the
value or operation of the appliance.
The guarantee becomes void if repairs are undertaken by unauthorized persons and if original
Braun / Oral-B parts are not used.
These appliances are equipped with a Bluetooth
Smart approved radio/ Wi-Fi interfaces. Failure to
establish a Bluetooth Smart/ Wi-Fi connection to
specific smartphones is not covered under the
device guarantee, unless the malfunction of the
Bluetooth/ Wi-Fi interface is referable to Oral-B. The
Bluetooth/ Wi-Fi devices are warranted by their own
manufacturers and not by Oral-B. Oral-B does not
influence or make any recommendations to device
manufacturers, and therefore Oral-B does not
assume any responsibility for the number of compatible devices with our Bluetooth/ Wi-Fi interface.
Oral-B reserves the right, without any prior notice,
to make any technical modifications or changes to
system implementation of device features, interface, and menu structure changes that are
deemed necessary to ensure that Oral-B systems
function reliably.
To obtain service within the guarantee period,
hand in or send the complete appliance with your
sales receipt to an authorized Oral-B Braun Customer Service Centre.
Information
Bluetooth
Although all indicated functions on the Bluetooth/
Wi-Fi device are supported, Oral-B does not
ensure 100% reliability in connection, and feature
operation consistency.
Operation performance and connection reliability
are
Bluetooth/
as the operating system of those Bluetooth/ Wi-Fi
devices and company security regulations
implemented on the device.
Oral-B adheres to and strictly implements the
Bluetooth/ Wi-Fi standard by which Bluetooth/
Wi-Fi devices can communicate and function in
Oral-B iO toothbrushes.
However, if device manufacturers fail to implement
this standard, Bluetooth/ Wi-Fi compatibility and
features will be further compromised and the user
may experience functional and feature-related
issues. Please note that the software on the
Bluetooth/ Wi-Fi device can significantly affect
compatibility and operation.
Warranty replacement brush heads
Oral-B warranty will be voided if electric
rechargeable toothbrush handle damage is
found to be attributed to the use of non-Oral-B
replacement brush heads.
Oral-B does not recommend the use of non-Oral-B
replacement brush heads.
®
radio module/ Wi-Fi® module
direct consequences of each individual
Wi-Fi device, software version, as well
23
Page 25
• Oral-B has no control over the quality of
non-Oral-B replacement brush heads.
Therefore, we cannot ensure the cleaning
performance of non-Oral-B replacement brush
heads, as communicated with the electric
rechargeable handle at time of initial purchase.
• Oral-B cannot ensure a good fit of non-Oral-B
replacement brush heads.
• Oral-B cannot predict the long-term effect of
non-Oral-B replacement brush heads on handle
wear.
All Oral-B replacement brush heads carry the
Oral-B logo and meet Oral-B’s high quality standards. Oral-B does not sell replacement brush heads
or handle parts under any other brand name.
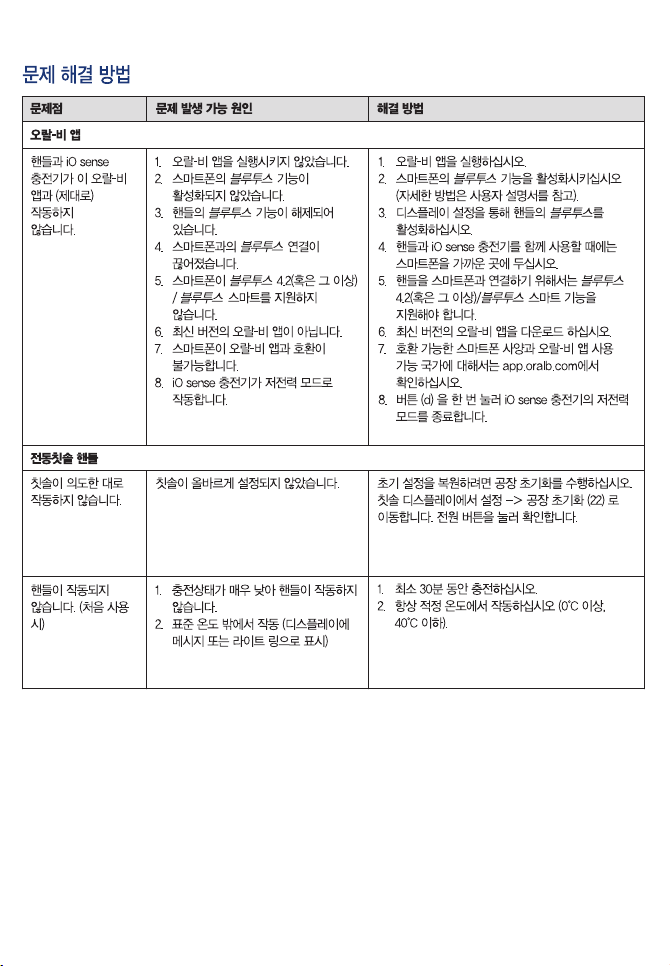
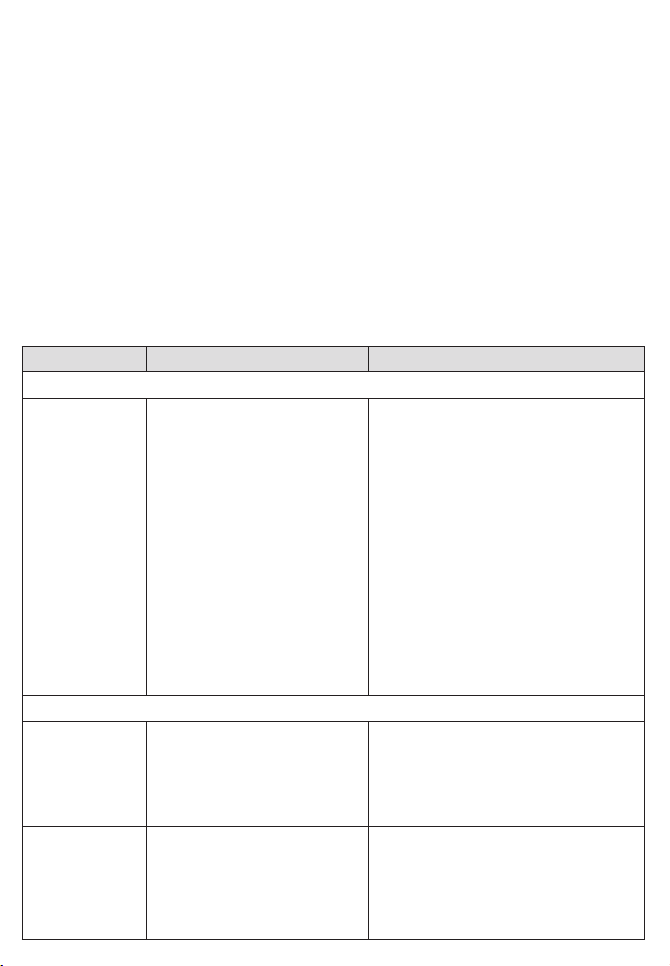
Troubleshooting
Problem Possible reason Remedy
Oral-B App
Toothbrush and
iOsense™
charger do not
operate
(properly) with
Oral-B App.
TOOTHBRUSH
Unwanted
toothbrush
behavior
1. Oral-B App is closed.
2. Bluetooth is not activated on
smartphone.
3. Bluetooth is disabled on
toothbrush
4. Bluetooth connection to
smartphone has been lost.
5. Your smartphone does not
support Bluetooth 4.2 (or
higher) /
Bluetooth Smart.
6. Outdated Oral-B App.
7. Your smartphone is not
compatible with the Oral-B App
8. iOsense™ charger is in Low
Power mode.
Toothbrush was misconfigured
1. Launch Oral-B App.
2. Activate Bluetooth on smartphone
(described in its user manual).
3. Enable Bluetooth via display settings on
your toothbrush
4. Keep your smartphone in close
proximity when using it with the
toothbrush and iOsense™ charger.
5. Your smartphone must support
Bluetooth 4.2 (or higher)/
Bluetooth Smart in order to pair
toothbrush.
6. Download latest Oral-B App.
7. Check app.oralb.com for compatible
smartphones and country availability
of the Oral-B App.
8. Quit Low Power mode on iOsense™
charger by tapping the button (d) once.
Perform a factory reset to restore initial
settings. Navigate on toothbrush display to
Settings -> Factory Reset (22). Press on/off
button to confirm.
Toothbrush is not
operating (during
first use).
24
1. Battery has a very low charge
level; handle does not operate.
2. Operating outside standard
temperature range (message
on display and/or alternating
lights of light ring)
1. Charge at least for 30 min.
2. Always operate in standard operating
temperature range (> 0°C and < 40°C).
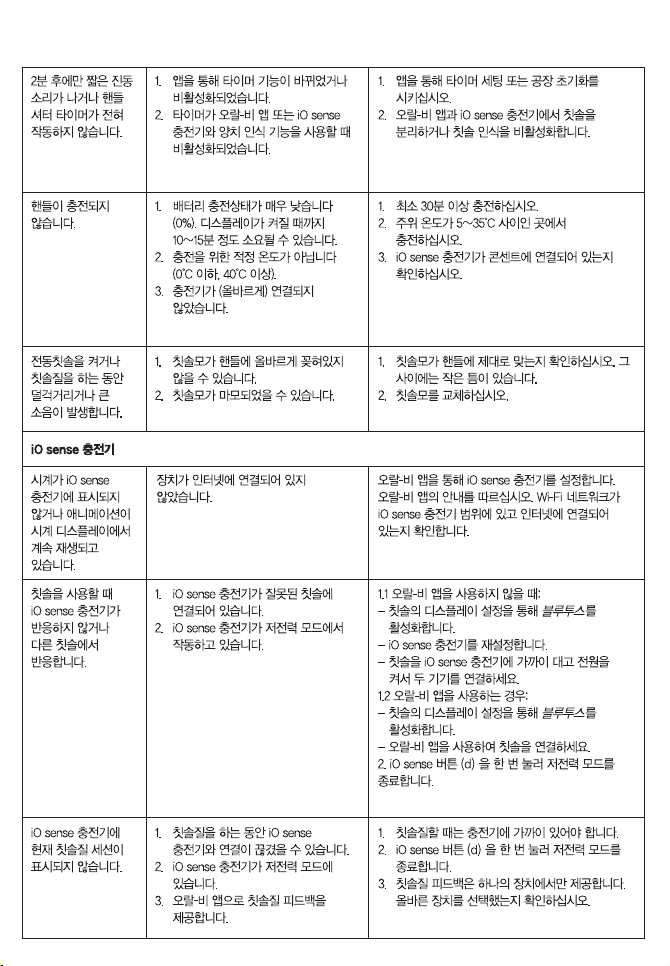
Page 26
Short stuttering
sounds after
2 minutes or
toothbrush does
not provide any
stutter timer.
Toothbrush does
not charge.
Rattling/loud
noise during
brushing or
turning on.
iOsense™ charger
Clock is not displayed on the
iOsense™ charger
or an animation is
playing ongoingly
on clock display
iOsense™ charger
is not reacting
when using my
toothbrush or
reacts on a different toothbrush
iOsense™ charger
is not showing my
current brushing
session
1. Timer has been modified/
deactivated via Oral-B App.
2. The toothbrush timer is
disabled during use of
brushing recognition with
Oral-B App or iOsense™
charger.
1. Battery is at a very low charger
level (0%); it may take up to
10-15min until display turns on.
2. Ambient temperature for
charging is out of valid
temperature range
(< 0°C and > 40°C).
3. Charger may not be (properly)
connected.
1. Brush head may not be placed
correctly onto the brush
handle.
2. Brush head may be worn out.
Device is not connected to the
internet.
1. iOsense™ charger is
connected to a wrong
toothbrush
2. iOsense™ charger is in
Low Power mode.
1. iOsense™ charger may got
disconnected from your
toothbrush while brushing
2. iOsense™ charger is in Low
Power mode.
3. Brushing feedback is already
provided in the Oral-B App
1. Use Oral-B App to change timer settings
or perform toothbrush factory reset
2. Disconnect toothbrush from Oral-B App
and iOsense™ charger or configure
iOsense™ charger with the App to
disable brushing recognition.
1. Charge at least for 30 min.
2. Recommended ambient temperature
range for charging is 5°C to 35°C.
3. Ensure iOsense™ charger is connected
to mains voltage.
1. Check proper fit of brush head on
handle. Small gap remains in between.
2. Replace brush head.
Use the Oral-B App to setup the iOsense™
charger. Please follow the instruction in the
Oral-B App. Make sure your Wi-Fi network is
in range of iOsense™ charger and connected to internet.
1.1 When you are not using the Oral-B App:
- Enable Bluetooth via display settings on
your toothbrush
- Reset iOsense™ charger.
- Hold your toothbrush close to iOsense™
charger and turn it on to connect both
devices.
1.2 When you are using the Oral-B App:
- Enable Bluetooth via display settings on
your toothbrush.
- Use the Oral-B App to connect your tooth-
brush.
2. Quit Low Power mode on iOsense™
charger by tapping the button (d) once.
1. Please ensure that you stay in close
proximity to your charger while brushing
2. Quit Low Power mode on iOsense™
charger by tapping the button (d) once.
3. Brushing feedback can only be provided
on one device. Make sure you have
selected the right device.
25
Page 27

The rechargeable iO toothbrush contains a radio module which operates in the 2.4 to 2.48 GHz
band with a maximum power of 1mW.
Hereby, Braun GmbH declares that the radio equipment types 3786, 3768, 3758, 3771, 3765,
3754, 3764, 3762 and 3767 are in compliance with Directive 2014/53/EU.
The full text of the EU declaration of conformity is available at the following internet address:
www.oralb.com/ce.
Manufacturing date code:
To determine the date of manufacture, refer to
the production code located on the type plate
on the bottom of the toothbrush handle and/or
iOsense™charger.
Toothbrush Handle:
The production code starts with two letters. The
first digit after the two letters of the production
code refers to the year of manufacture. Second
and third digits refer to the calendar week of
manufacture. Fourth digit refers to the calendar
day of manufacture.
Handle: Example: «XX1093…» – means the
product was manufactured on Wednesday in
week 09 of 2021.
iOsense™ charger:
The production code of the device consists of
5 digits. The first three digits represent the Julian
Date (Example: 035 = 4 February), the fourth digit
is year of production (Example: 1 = 2021), the fifth
digit is an internal code.
Charging travel case:
The production code of the device consists of
6 digits. The first two digits represent the Year
(Example: 21 = 2021), the next 2 digits are the
calendar week of production (Example: 01-52),
the last two digits are internal codes.
26
Page 28
c
Get
started
90260342
 Loading...