

Page 1
Aesculap Suhl GmbH
FAV5 CL/FORTIS
Instructions for use/Technical description
Battery-powered clipping machine FAV5 CL/FORTIS
Gebrauchsanweisung/Technische Beschreibung
Akku-Schermaschine FAV5 CL/FORTIS
Mode d’emploi/Description technique
Tondeuse à accu FAV5 CL/FORTIS
Instrucciones de manejo/Descripción técnica
Esquiladora a batería FAV5 CL/FORTIS
Istruzioni per l’uso/Descrizione tecnica
Tosatrice ad accumulatore FAV5 CL/FORTIS
Gebruiksaanwijzing/Technische beschrijving
Accu-scheermachine FAV5 CL/FORTIS
Инструкция по примению/Техническое
описание
Машинка для стрижки, с аккумулятором, FAV5 CL/
FORTIS
Instrukcja u¿ytkowania/Opis Techniczny
Akumulatorowa maszynka do strzy¿enia FAV5 CL/
FORTIS
Page 2
1
2
2
11
10
9
3
7
4
5
68
Page 3
12
Page 4
Aesculap Suhl GmbH
Battery-powered clipping machine FAV5 CL/FORTIS
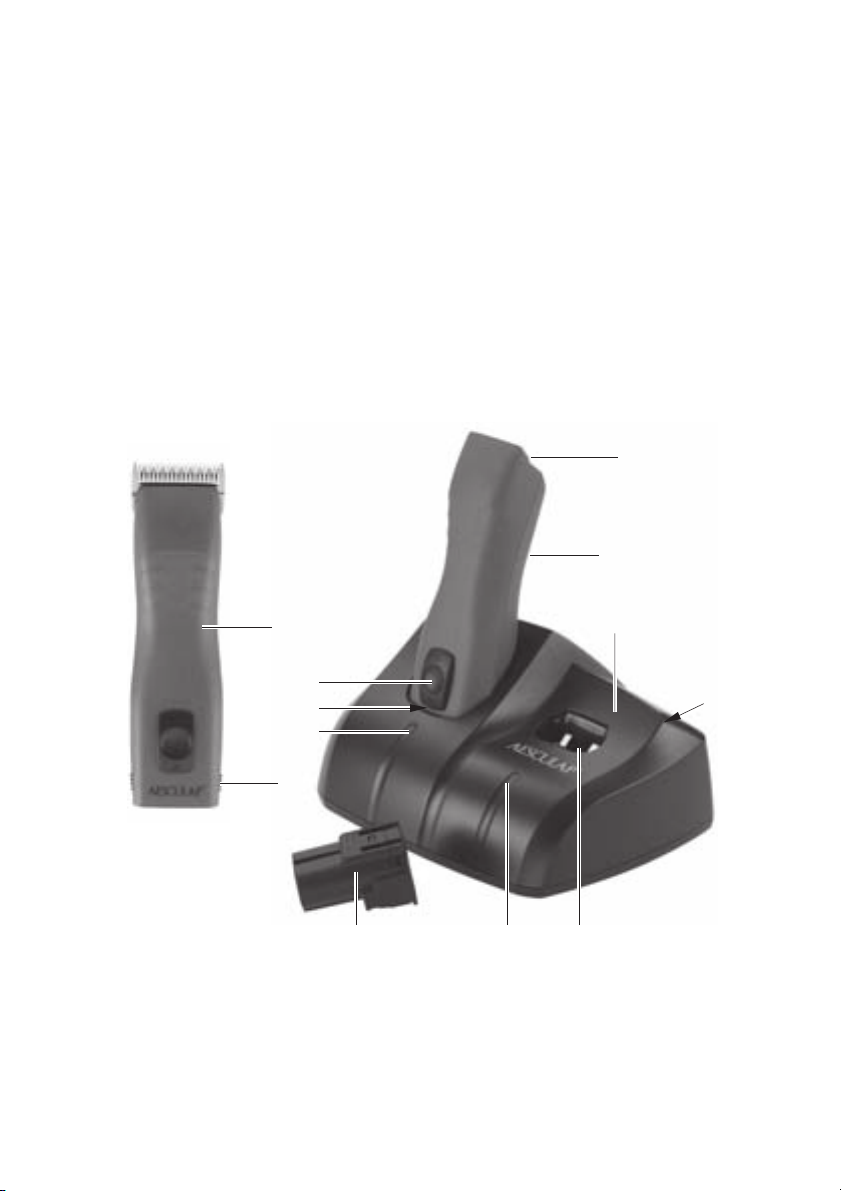
Legend
1 Blade adapter
2 Battery-powered clipping machine FAV5 CL/FORTIS
3 Battery release lock
4 Charger
5 Mains power cord (with device plug)
6 Charging bay (for Li-ion battery)
7 Charge state indicator (for Li-ion battery)
8 Li-ion battery
9 Charge state indicator (for battery-powered clip-
ping machine FAV5 CL/FORTIS)
10 Charging bay (for battery-powered clipping
machine FAV5 CL/FORTIS)
11 On/Off switch
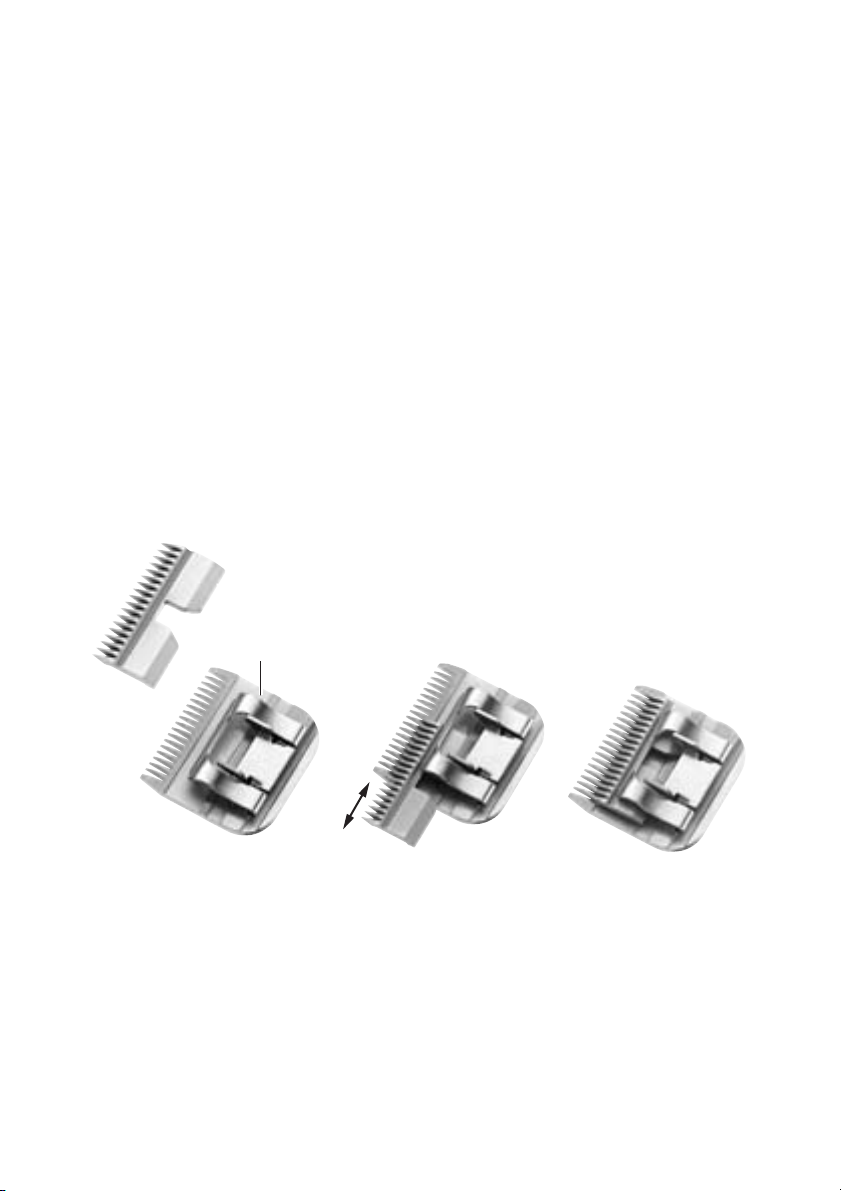
12 Blade
Symbols on product
Adhere to instructions for use
Marking of electric and electronic devices according to
directive 2012/19/EU (WEEE),
see Chapter Disposal
Contents
1. Safe handling ........................................................... 3
2. Product description ................................................ 3
2.1 Scope of delivery ..................................................... 3
2.2 Components required for operation .................. 4
2.3 Intended use of battery-powered
clipping machine FAV5 CL/FORTIS ..................... 4
2.4 Intended use of charger GT203/Li-ion
battery GT201 .......................................................... 4
2.5 Operating principle of the batterypowered clipping machine FAV5 CL/FORTIS ...4
2.6 Operating principle of charger GT203/
Li-ion battery GT201 .............................................. 4
2.6.1 Charging principle .................................................. 4
2.6.2 Charging time .......................................................... 4
3. Preparation and setup ........................................... 5
4. Working with the battery-powered
clipping machine FAV5 CL/FORTIS, and
the charger GT203/Li-ion battery GT201 ......... 5
4.1 System set-up ..........................................................5
4.1.1 Connecting the accessories.................................. 5
4.1.2 Attaching the blade................................................ 6
4.1.3 Connecting the charger/Charging the
Li-ion battery........................................................... 6
4.2 Functional check of the batterypowered clipping machine FAV5 CL/FORTIS ...7
4.3 Function checks of the charger ..........................8
4.4 Safe handling blade ............................................... 8
4.4.1 Sharpening the cutting plate.............................. 8
4.4.2 Changing the blade................................................ 8
4.4.3 Lubricating the blade............................................. 9
4.4.4 Changing the Li-ion battery................................ 9
5. Processing ...............................................................10
5.1 Cleaning/disinfection ...........................................10
5.2 Control, care and inspection .............................10
6. Maintenance ..........................................................11
7. Troubleshooting list .............................................12
7.1 Battery-powered clipping machine
FAV5 CL/FORTIS .....................................................12
7.2 Charger and Li-ion battery ................................12
8. Technical Service ..................................................14
9. Accessories/Spare parts ......................................15
10. Technical data ........................................................16
2
Page 5
10.1 Battery-powered clipping machine
FAV5 CL/FORTIS .....................................................16
10.2 Charger ....................................................................16
10.3 Li-ion battery .........................................................16
10.4 Declaration of conformity ..................................16
11. Disposal ....................................................................16
11.1 For EU countries only ...........................................16
11.2 Li-ion batteries ......................................................16
12. Two year guarantee ..............................................17
13. Distributor in the US/Contact in Canada
for product information and complaints .......17
1. Safe handling
CAUTION
Federal law restricts this device to sale by or on
order of a physician!
Risk of fatal injury from electric
shock!
¾ Do not open the product (except
DANGER
¾ Prior to use, check that the product is in good
working order.
¾ Store the charger and Li-ion batteries at room tem-
perature.
¾ Keep dry the charger and Li-ion batteries.
¾ Charge the Li-ion batteries prior to first use.
¾ Observe our “Notes on Electromagnetic Compati-
bility (EMC)“.
¾ To prevent damage caused by improper setup or
operation, and in order not to compromise warranty and manufacturer liability:
– Use the product only according to these instruc-
tions for use.
– Follow the safety and maintenance instructions.
for changing a charging bay).
¾ Connect the product only to a
grounded power supply.
– Ensure the manufacturer's approval before using
accessories that are not mentioned in the instructions for use.
¾ Ensure that the product and its accessories are
operated and used only by persons with the requisite training, knowledge, or experience.
¾ Keep the instructions for use accessible for the
user.
¾ Always adhere to applicable standards.
¾ Ensure that the electrical facilities in the room in
which the device is being used conform to IEC
norms.
¾ Unplug the device by pulling the plug, but never by
pulling the power cord.
¾ Do not operate the product in explosion-hazard
areas.
¾ Do not use the product if it is damaged or defec-
tive. Set aside the product if it is damaged.
2. Product description
2.1 Scope of delivery
Designation Art. no.
Battery-powered clipping
machine FAV5 CL/FORTIS
Li-ion battery GT201
Charger GT203
Mains power cord (with device
plug)
Instructions for Use TA013440
GT300/GT380
see Chapter
Accessories/
Spare parts
3
Page 6

Aesculap Suhl GmbH
Battery-powered clipping machine FAV5 CL/FORTIS
Note
The blade GT330 #10 (USA+UK) for battery-powered
clipping machine FAV5 CL/FORTIS is included in the
scope of delivery. Various blades are available for different applications!
2.2 Components required for operation
• Battery-powered clipping machine FAV5 CL/FORTIS
•Blade
•Charger
• Mains power cord (with device plug)
• Li-ion battery
2.3 Intended use of battery-powered
clipping machine FAV5 CL/FORTIS
The battery-powered clipping machine FAV5 CL/FORTIS is used for shearing small animals.
The battery powered clipping machine FAV5 CL/FORTIS
is used with a blade to be selected according to the
respective application.
2.4 Intended use of charger GT203/Li-
ion battery GT201
The charger GT203 is used for charging the batterypowered clipping machine FAV5 CL/FORTIS and the Liion battery. There is one charging bay each for the two
components.
2.5 Operating principle of the battery-
powered clipping machine FAV5 CL/
FORTIS
The battery-powered clipping machine FAV5 CL/FORTIS is switched on (off) by pushing the ON/OFF switch
up (down).
2.6 Operating principle of charger
GT203/Li-ion battery GT201
The charger GT203 is designed for the mains voltage/
frequency range 100 V to 240 V / 50 Hz to 60 Hz.
To make the charger GT203 ready for operation, connect it to mains power by plugging in the mains plug.
The charger GT203 is equipped with to charging bays.
The first charging bay is for charging the battery-powered clipping machine FAV5 CL/FORTIS, while in the
second charging bay the Li-ion battery is charged.
Each charging bay has an indicator field on the charger
front panel assigned to it.
Charging starts automatically, as soon as a Li-ion battery is inserted in the charging station.
The charging time in the charging bays depends on the
charge state and capacity of the Li-ion batteries.
2.6.1 Charging principle
The Li-ion batteries are charged by constant current
pulses.
The charge state of the Li-ion battery is monitored
during charging. Monitoring of the charging curve
ensures that the battery is fully charged without overcharging.
Additionally, the battery temperature and charging
time are monitored as well.
The charger monitors the battery status and indicates
the charge state via two LED indicators.
LED indicators:
• green = Battery fully charged
• red = Battery completely discharged
2.6.2 Charging time
Charging is stopped as soon as the maximum charging
time is reached.
The charging time is approx. 50 min.
4
Page 7
3. Preparation and setup
Non-compliance with the following instructions will
preclude all responsibility and liability in this respect
on the part of Aesculap.
¾ When setting up and operating the product, adhere
to
– national regulations for installation and opera-
tion,
– national regulations on fire and explosion protec-
tion.
– operating advisories according to IEC-/VDE regu-
lations.
Fire and explosion hazard!
¾ Do not operate the product in
explosion-hazard areas.
DANGER
Malfunction of, or damage to the
product caused by improper setup!
¾ Do not expose the product to
CAUTION
direct sunlight or moisture.
¾ Do not cover the ventilation
slots of the product.
¾ Connect the product to the
specified voltage of 100 V to
240 V/50 Hz to 60 Hz.
¾ Ensure that the mains power
socket used for supplying the
product is freely accessible.
4. Working with the batterypowered clipping machine
FAV5 CL/FORTIS, and the
charger GT203/Li-ion battery
GT201
4.1 System set-up
4.1.1 Connecting the accessories
Combinations of accessories that are not mentioned in
the present instructions for use may only be employed
if they are specifically intended for the respective
application, and if they do not compromise the performance and safety characteristics of the products.
¾ Please contact your B. Braun/Aesculap Partner or
Aesculap Technical Service with any inquiries in
this respect, see Chapter Technical Service.
5
Page 8
Aesculap Suhl GmbH
Battery-powered clipping machine FAV5 CL/FORTIS
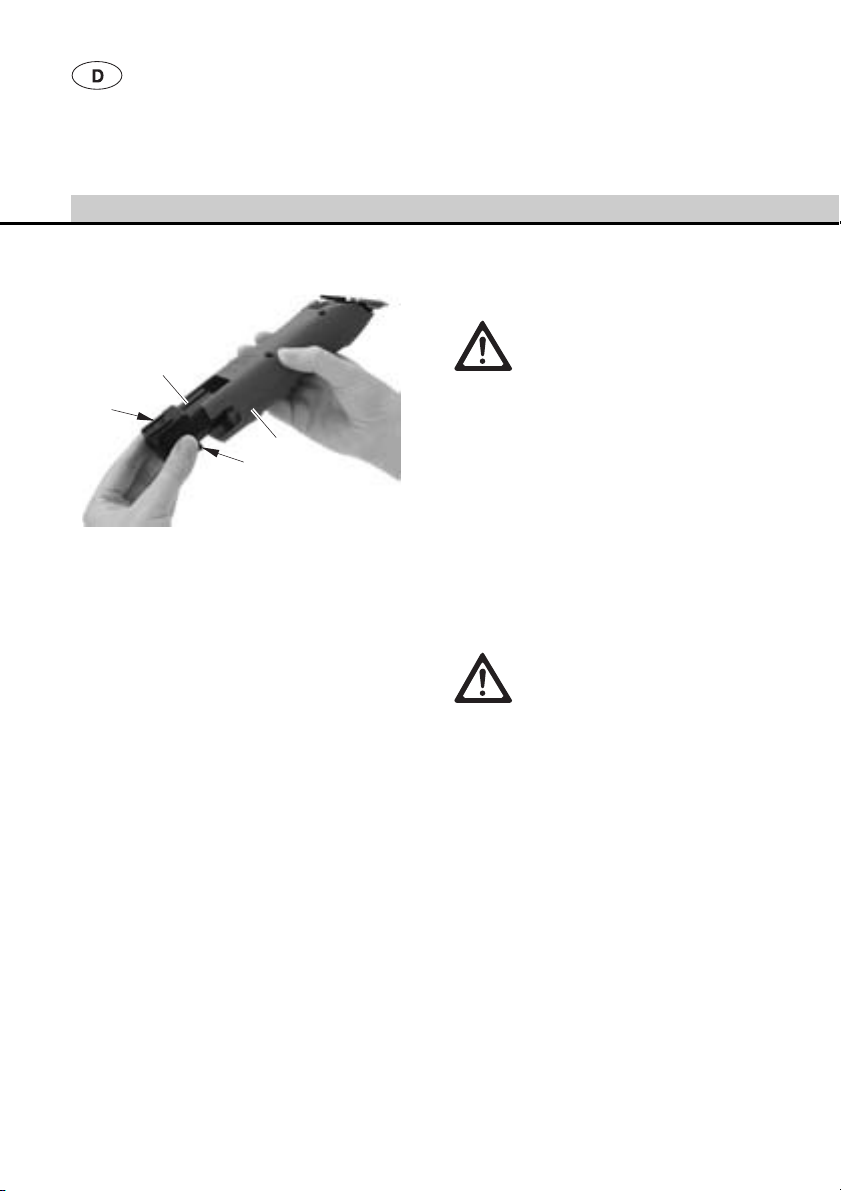
4.1.2 Attaching the blade
Risk of injury caused by sharp cutting plates!
¾ Handle the blade of clipping
WARNING
Note
The blade GT330 #10 (USA+UK) for battery-powered
clipping machine FAV5 CL/FORTIS is included in the
scope of delivery. Various blades are available for different applications!
machine FAV5 CL/FORTIS with
appropriate caution.
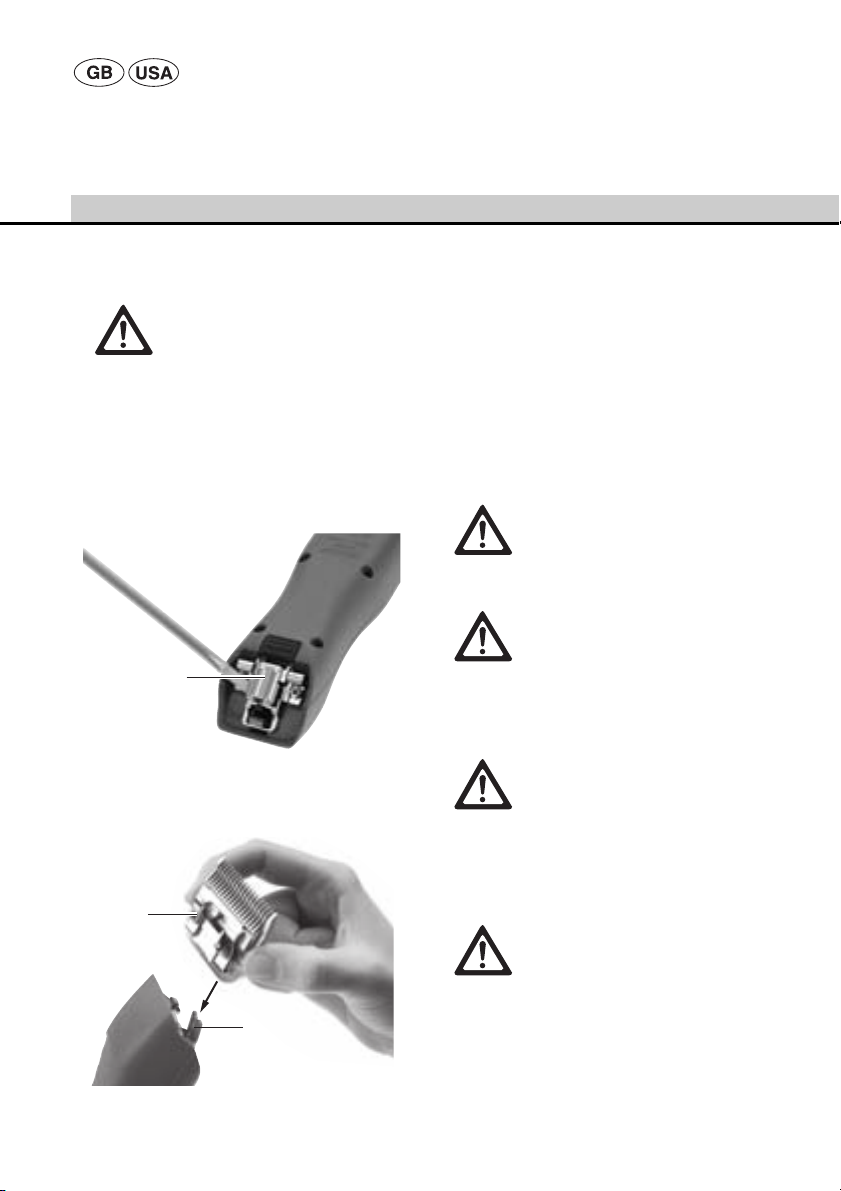
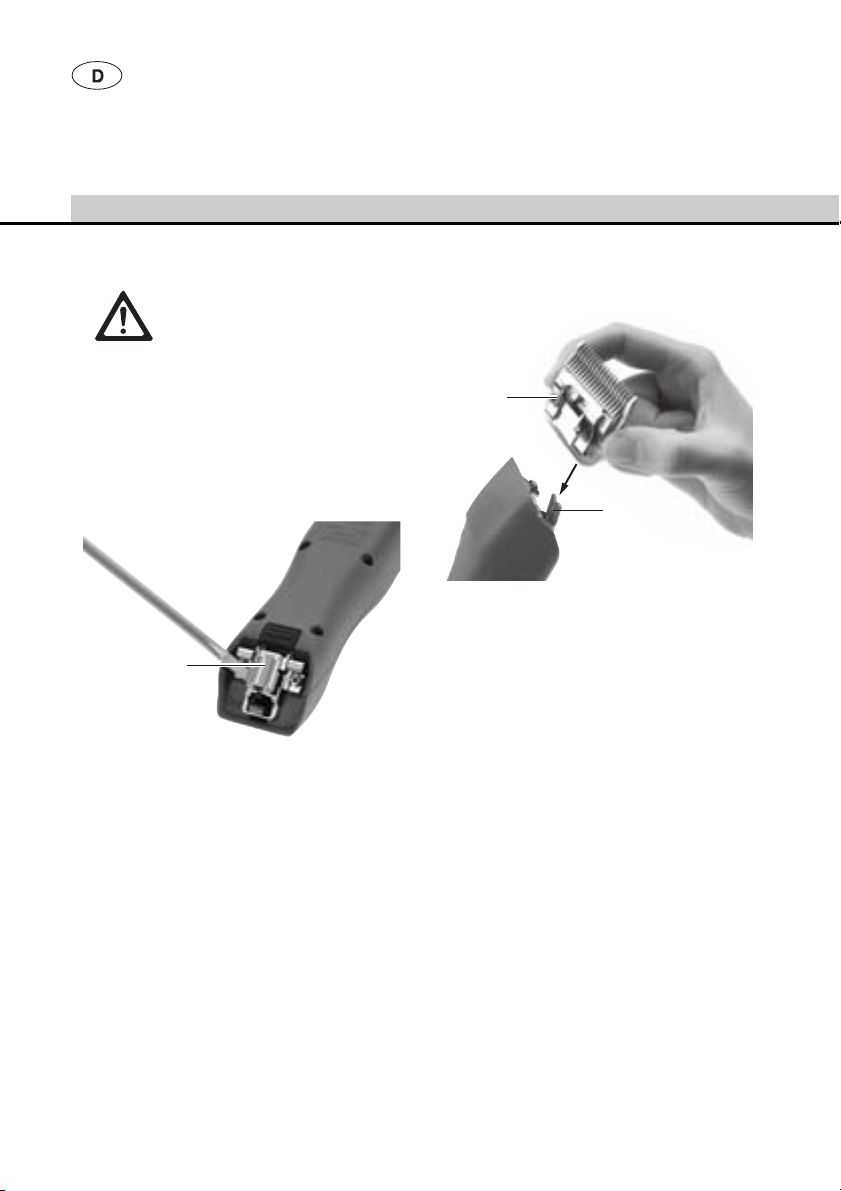
13
Fig. 1
¾ If the knife hinge is closed: Open knife hinge 13
with a screwdriver, see Fig. 1.
12
13
¾ Install blade 12 on open knife hinge 13, see Fig. 2.
¾ Press ON/OFF switch 11.
¾ Press blade 12 gently in the direction of the clip-
ping machine FAV5 CL/FORTIS, see Fig. 2.
The blade 12 engages with an audible click.
¾ Ensure that the blade 12 is fitted correctly on the
clipping machine FAV5 CL/FORTIS.
4.1.3 Connecting the charger/Charging the
Li-ion battery
Fire hazard due to battery poles
shorted by fluids or metal components!
WARNING
WARNING
CAUTION
CAUTION
¾ Do not short the Li-ion battery.
Risk of injury and material damage
due to damaged Li-ion batteries!
¾ Prior to charging, check the Li-
ion batteries for any damage.
¾ Do not use or charge damaged
Li-ion batteries.
Loss of capacity/performance due
to prolonged storage of discharged
Li-ion batteries!
¾ Store Li-ion batteries only in
fully charged condition and
recharge stored batteries once
every month.
Destruction of the product, charging bay or Li-ion battery when
inserting the wrong type of battery
in the charging bay!
¾ Insert Li-ion batteries only in
the appropriate charging bay.
¾ Insert the Li-ion battery in the
correct position.
Fig. 2
6
Page 9

Note
Switch off the battery-powered clipping machine
FAV5 CL/FORTIS before charging!
Note
Li-ion batteries heat up slightly during charging.
Note
Unplug the mains power cord at the mains socket when
the charger is not going to be used!
¾ To connect charger 4: Plug in the device plug of
mains power cord 5 in charger 4.
¾ Plug in the mains plug of mains power cord 5 at
the mains power socket.
¾ Place Li-ion battery 8 in charging bay 6 of the
charger 4 and charge.
- or -
¾ Place battery-powered clipping machine FAV5 CL/
FORTIS 2 in charging bay 10 of the charger 4 and
charge.
Charge state indicator 7 or 9 lights up red.
After charging, the charge state indicator 7/9
shines green and the battery-powered clipping
machine FAV5 CL/FORTIS 2/Li-ion battery 8 is
ready for operation.
4.2 Functional check of the batterypowered clipping machine FAV5 CL/
FORTIS
¾ Carry out a visual inspection.
¾ Check the switch position.
¾ Install the battery, see Chapter Changing the Li-ion
battery.
¾ Mount the blade correctly and lubricate it if neces-
sary, see Chapter Safe handling blade.
¾ Keep a charged Li-ion battery on hand, as reserve.
¾ Clean battery-powered clipping machine FAV5 CL/
FORTIS prior to use, see Chapter Cleaning/disinfection.
7
Page 10

Aesculap Suhl GmbH
Battery-powered clipping machine FAV5 CL/FORTIS
4.3 Function checks of the charger
¾ Carry out a visual inspection.
¾ Prior to connecting the product to mains power:
– Check mains power cord 5 for possible damage.
– Check the product for any damage (e.g. bent con-
tacts of the charging bays).
¾ Plug in mains power cord 5 at the device socket of
the charging station.
¾ Plug in the mains plug at the mains power socket.
¾ Place Li-ion battery 8 in charging bay 6 of the
charger 4 and charge.
- or -
¾ Place battery-powered clipping machine FAV5 CL/
FORTIS 2 in charging bay 10 of the charger 4 and
charge.
Charge state indicator 7 or 9 lights up red.
After charging, the charge state indicator 7/9
shines green and the battery-powered clipping
machine FAV5 CL/FORTIS 2/Li-ion battery 8 is
ready for operation.
The product is ready for operation.
4.4 Safe handling blade
4.4.1 Sharpening the cutting plate
Note
For sharpening the cutting plate, please contact Tech-
nical Service, see Chapter Technical Service.
4.4.2 Changing the blade
Risk of injury caused by sharp cutting plates!
¾ Handle the blade of clipping
WARNING
machine FAV5 CL/FORTIS with
appropriate caution.
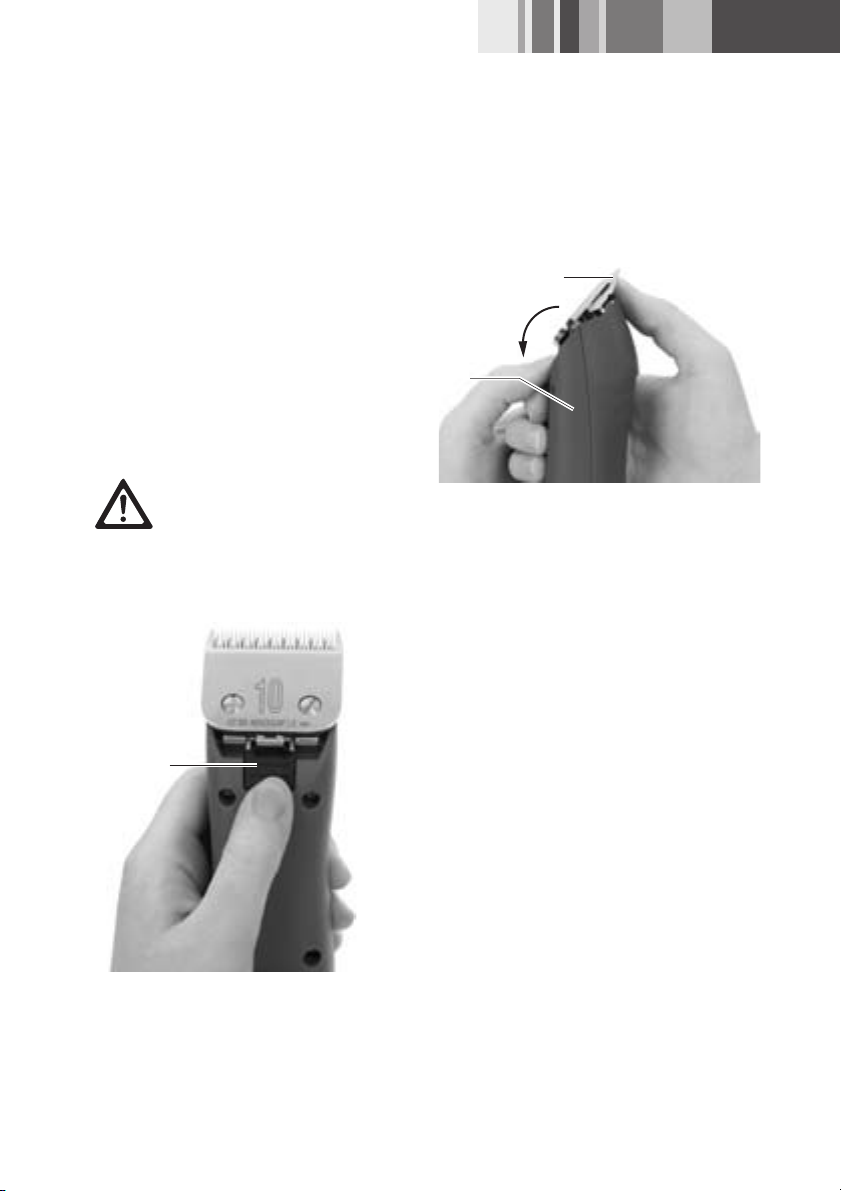
14
Fig. 3
¾ Press ON/OFF switch 11 to swi tch off bat ter y-p ow-
ered clipping machine FAV5 CL/FORTIS.
¾ Press blade lock 14, see Fig. 3.
8
Page 11
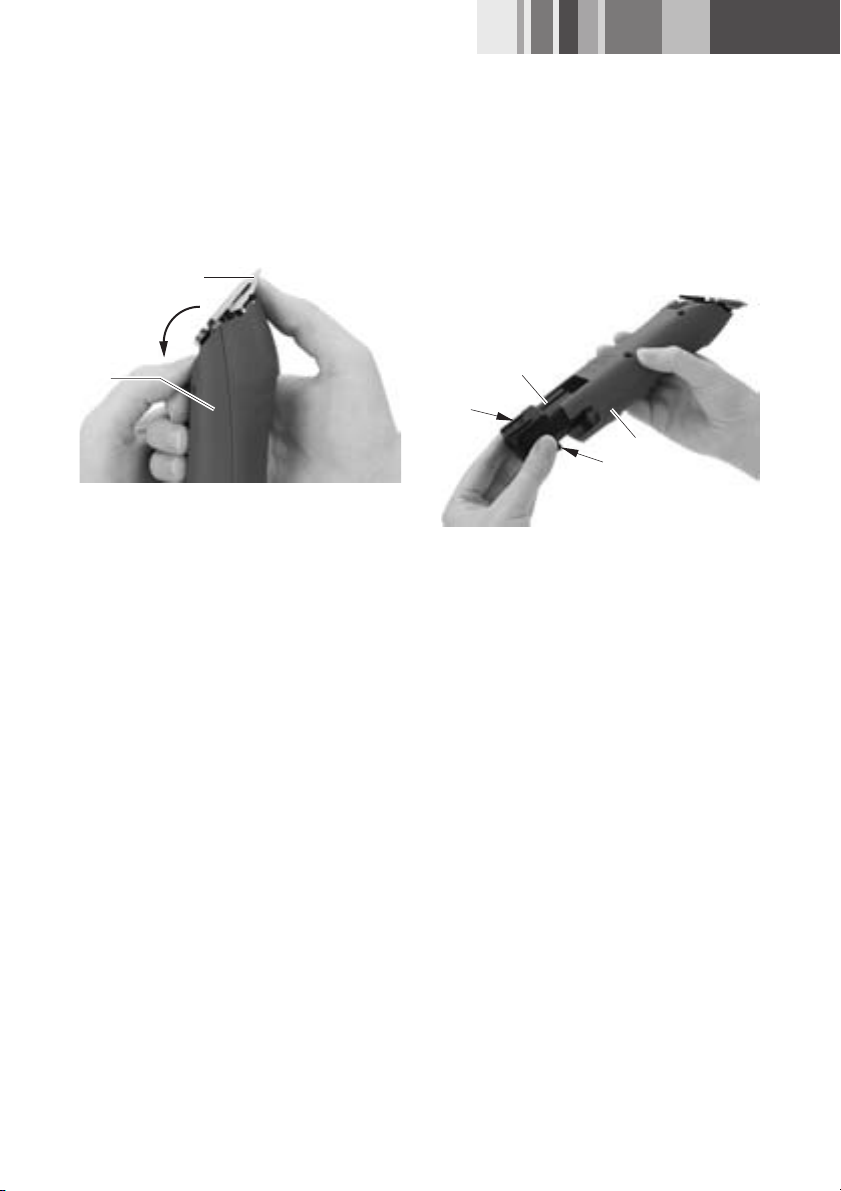
12
4.4.4 Changing the Li-ion battery
2
Fig. 4
¾ Fold forward blade 12, see Fig. 4.
¾ Detach blade 12.
¾ Clean open knife hinge with a brush.
¾ Install blade 12 on knife hinge.
¾ Plug in the power cord of battery-powered clipping
machine FAV5 CL/FORTIS.
¾ Press ON/OFF switch 11.
¾ Slightly push blade 12 towards battery-powered
clipping machine FAV5 CL/FORTIS.
Blade 12 will click into position.
¾ Check that blade 12 is correctly seated on battery-
powered clipping machine FAV5 CL/FORTIS.
4.4.3 Lubricating the blade
¾ Clean the upper and lower cutting plates with a
soft cloth or brush. Make certain that the gaps
between the cutting teeth are cleaned properly.
¾ Slightly lubricate the upper and lower cutting
plates with special lubricant for blades GT604.
8
3
2
3
Fig. 5
¾ Hold battery-powered clipping machine FAV5 CL/
FORTIS 2 and press battery release lock 3.
¾ Pull out Li-ion battery 8 from battery-powered
clipping machine FAV5 CL/FORTIS 2.
¾ Insert the charged Li-ion battery 8 in battery-pow-
ered clipping machine FAV5 CL/FORTIS 2 as far as
it will go.
The battery-powered clipping machine FAV5 CL/
FORTIS 2 is ready for operation.
9
Page 12
Aesculap Suhl GmbH
Battery-powered clipping machine FAV5 CL/FORTIS
5. Processing
Damage to, or destruction of the
product caused by mechanical
cleaning/disinfecting or steriliza-
CAUTION
5.1 Cleaning/disinfection
Note
Always follow disposal and hygiene instructions and
regulations!
Manual cleaning/disinfection
DANGER
tion!
¾ Only clean and disinfect the
product manually.
¾ Do not sterilize the product
under any circumstances.
Risk of electric shock and fire hazard!
¾ Unplug the device before clean-
ing.
¾ Ensure that no fluids will pene-
trate the product.
¾ Leave the product exposed to
air for at least 1 minute after
cleaning/disinfecting.
Damage to the product due to
incorrect cleaning or inappropriate
cleaning/disinfecting agents!
CAUTION
¾ Wipe the shell of the product with a lint-free cloth
moistened with a commercial disinfectant for wipe
disinfection.
¾ If necessary, after the appropriate exposure time,
wipe off any residues of the cleaning/disinfecting
agent with a lint-free cloth moistened with clean
water.
¾ Dry the product with a clean, lint-free cloth.
¾ Clean the contacts in the charging bay with isopro-
panol or ethyl alcohol and a cotton swab. Do not
use corrosive chemicals.
¾ If necessary, repeat the cleaning/disinfecting pro-
cess.
¾ Use any commercial detergent
for surface cleaning.
¾ Never immerse the product in
water or detergent.
¾ Do not introduce any fluid into
the charging bays.
¾ Clean the contacts in the charg-
ing bays, applying extreme care.
5.2 Control, care and inspection
¾ Allow the product to cool down to room tempera-
ture.
¾ Inspect the product after each cleaning and disin-
fecting cycle to be sure it is: clean, functional, and
undamaged.
¾ Lubricate blade if required, see Chapter Lubricating
the blade.
¾ Check the product for any damage, abnormal run-
ning noise, overheating or excessive vibration.
¾ Inspect the blade for broken, damaged or blunt
cutting edges.
¾ Set aside the product if it is damaged.
10
Page 13

6. Maintenance
To ensure reliable operation, Aesculap recommends
servicing the product at least once a year.
For the respective services, please contact your
national B. Braun/Aesculap agency, see Chapter Technical Service.
Service addresses
In the UK
KG PRODUCTS
243-251 City Road, Fenton
Stoke-on-Trent, Staffs
ST4 2PX
United Kingdom,
Phone (44) - 01782 844 866
DIAMOND EDGE
126 Gloucester Rd.
Brighton, BN1 4BU.
United Kingdom
Phone (44) - 01273 605 922
Or in the US
A & J Sales and Service
42 - A Frame Drive
West Burke, VT 05871
USA
Phone: (800) 447-1957
Or in Germany
Aesculap Suhl GmbH
Fröhliche-Mann-Straße 15
98528 Suhl / Germany
Phone: +49 (0) 3681 49820
Fax: +49 (0) 3681 498234
E-Mail: suhl@aesculap.de
www.aesculap-schermaschinen.de
Other service addresses can be obtained from the
address indicated above.
11
Page 14
Aesculap Suhl GmbH
Battery-powered clipping machine FAV5 CL/FORTIS
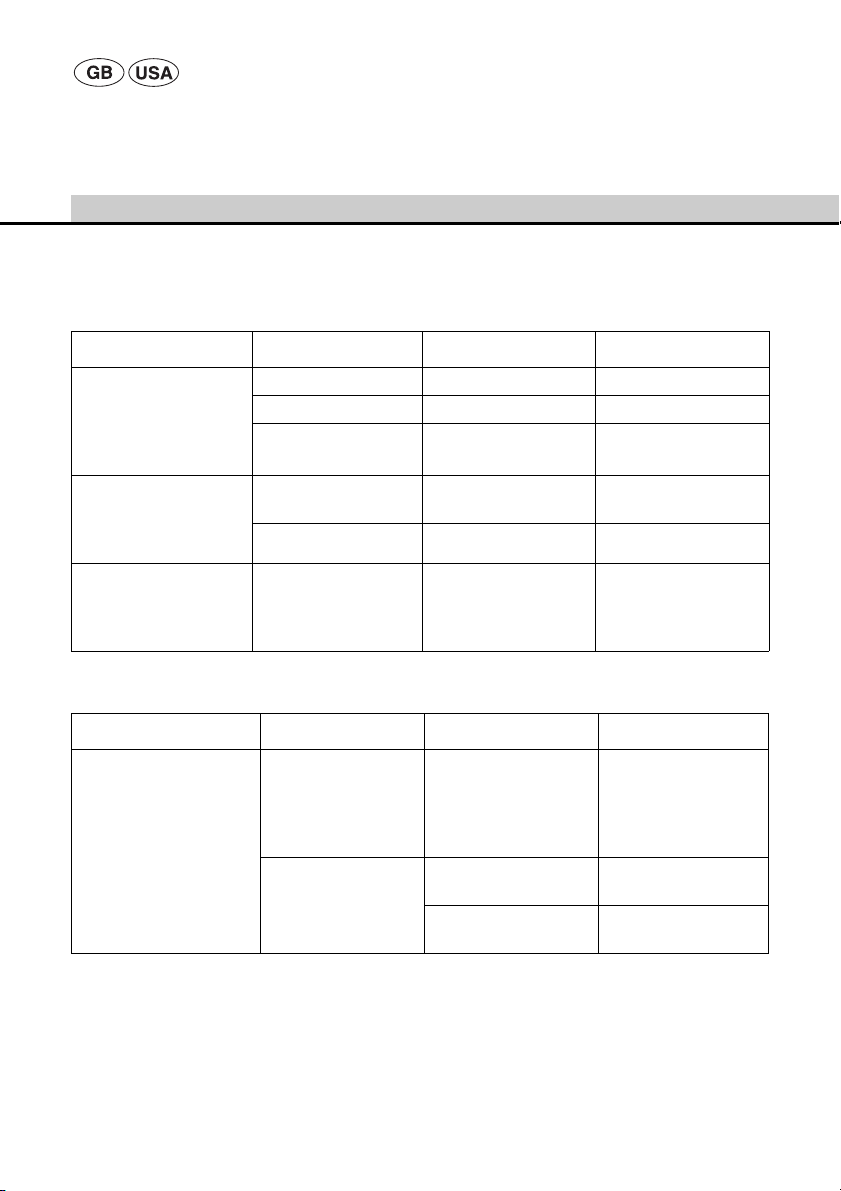
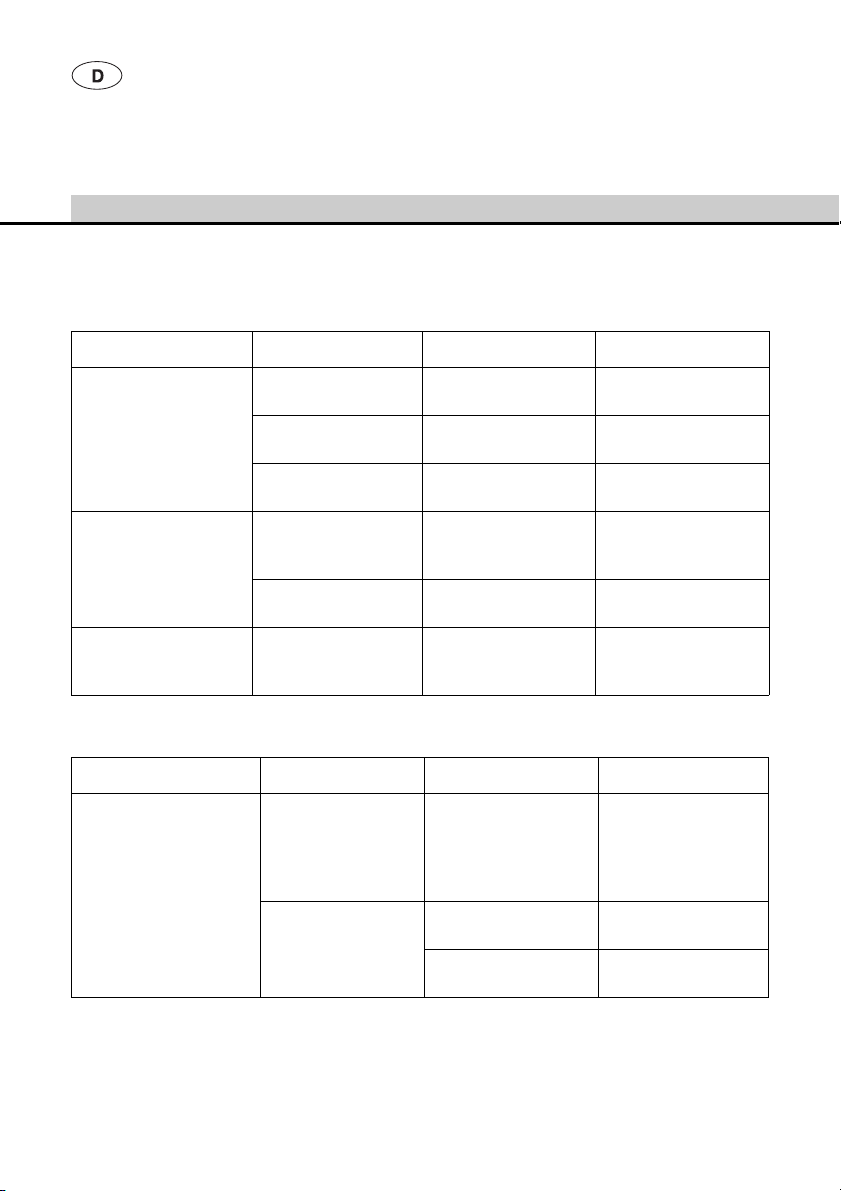
7. Troubleshooting list
7.1 Battery-powered clipping machine FAV5 CL/FORTIS
Malfunction Detection Cause Remedy
Battery-powered clipping
machine FAV5 CL/FORTIS
does not start
Battery-powered clipping
machine FAV5 CL/FORTIS
has come to a stop
Check switch position Li-ion battery not loaded Load Li-ion battery
– Li-ion battery defect Insert new Li-ion battery
– Li-ion battery not
inserted
– Li-ion battery deactivated
through protective circuit
– Li-ion battery is empty Insert new Li-ion battery
Insert new Li-ion battery
Deactivate and reactivate the control unit
Battery-powered clipping
machine FAV5 CL/FORTIS
does not load into the
charging station
LED indicators do not
light up
– see Chapter Charger and
Li-ion battery
7.2 Charger and Li-ion battery
Malfunction Detection Cause Remedy
Charger not working LED indicators do not
light up
Li-ion battery not
loaded
12
Mains power cord not
plugged in
Mains power cord defect Replace mains power
Charger defect Send product to manu-
Plug mains power cord
into the device socket on
the charger and into the
socket of the mains
power supply.
cord
facturer for repair
Page 15

Malfunction Detection Cause Remedy
Li-ion battery cannot be
loaded
Li-ion battery in place,
charge state indicator
does not light up
Charger contacts dirty or
damaged
Clean contacts in the
charging bay, see Chapter Cleaning/disinfection
or send to manufacturer
for repair
Li-ion battery defect Send Li-ion battery to
manufacturer for repair
Charger defect Send charger to manu-
facturer for repair
Excess temperature is
detected in the Li-ion
battery during charging
Remove Li-ion battery
from charging bay, leave
to cool and start the
charging process again.
If the problem occurs
again, send battery to
manufacturer for repair
Charging fault or
Li-ion battery defect
Remove Li-ion battery
from charging bay and
repeat charging process,
if necessary in another
charging bay.
If the problem occurs
again send Li-ion battery to manufacturer for
repair
13
Page 16

Aesculap Suhl GmbH
Battery-powered clipping machine FAV5 CL/FORTIS
8. Technical Service
¾ For service, maintenance and repairs, please con-
tact your national B. Braun/Aesculap agency.
Modifications carried out on medical technical equipment may result in loss of guarantee/warranty rights
and forfeiture of applicable licenses.
Service addresses
In the UK
KG PRODUCTS
243-251 City Road, Fenton
Stoke-on-Trent, Staffs
ST4 2PX
United Kingdom,
Phone (44) - 01782 844 866
DIAMOND EDGE
126 Gloucester Rd.
Brighton, BN1 4BU.
United Kingdom
Phone (44) - 01273 605 922
Or in the US
A & J Sales and Service
42 - A Frame Drive
West Burke, VT 05871
USA
Phone: (800) 447-1957
Or in Germany
Aesculap Suhl GmbH
Fröhliche-Mann-Straße 15
98528 Suhl / Germany
Phone: +49 (0) 3681 49820
Fax: +49 (0) 3681 498234
E-Mail: suhl@aesculap.de
www.aesculap-schermaschinen.de
Other service addresses can be obtained from the
address indicated above.
14
Page 17

9. Accessories/Spare parts
Art. no. Design Power cord Li-ion bat-
GT306/
GT380
GT306G/
GT380G
GT306J/
GT380J
GT306K/
GT380K
Europe
outside of
Great Britain
Great Britain TA012169
Japan, Mexico
110-125 V
USA TA012168
TA012170
Europe-flat
plug, black,
L=1.8 m
GB plug, black,
L=1.8 m
TA012168
2-pin connector
plug, black,
L=1.8 m
2-pin connector
plug, black,
L=1.8 m
tery
GT201 GT200880 GT300/GT380
GT201 GT200880 GT300/GT380
GT201 GT200880 GT300/GT380
GT201 GT200880 GT300/GT380
Charging
station
Batterypowered
clipping
machine
unpacked
unpacked
unpacked
unpacked
Accessories
GT604800
Hand oiler
GT604800
Hand oiler
GT604800
Hand oiler
GT604800
Hand oiler
15
Page 18
Aesculap Suhl GmbH
Battery-powered clipping machine FAV5 CL/FORTIS
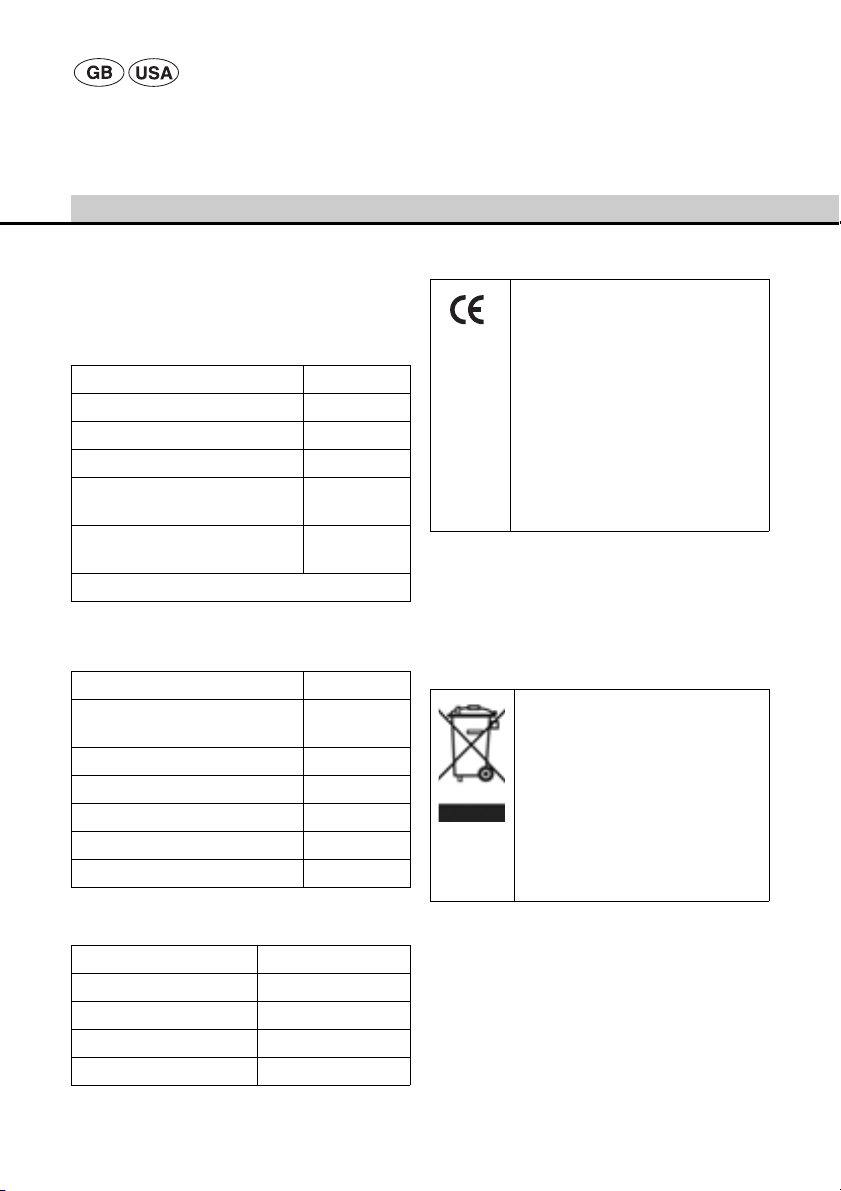
10. Technical data
10.1 Battery-powered clipping machine
FAV5 CL/FORTIS
Model GT300/GT380
Stroke frequency 2 300/min
Charging voltage/Output voltage max. 8.4 V
Charging current/Output current max. 1.2 A
Weight
(without blade and battery)
Weight
(with blade and battery)
EN 60335-1, EN 60335-2-29
10.2 Charger
Model GT203
Mains voltage ranges
(Current intake)
Frequency 50-60 Hz
Charging voltage/Output voltage max. 8.4 V
Charging current/Output current max. 1.2 A
Weight 495 g
Quality marks CE, UL
385 g
450 g
100-240 V
10.4 Declaration of conformity
We declare under our sole responsibility that this product complies with the
following standards and regulatory
documents:
2004/108/EC EMC guidelines:
DIN EN 60335-1
DIN EN 60335-2-8
Safety of household and similar
electrical appliances
- general requirements
- for hair clipping machines
Aesculap Suhl GmbH
11. Disposal
Electrical tools, accessories and packaging should be
sent for environmentally responsible recycling.
11.1 For EU countries only
Do not dispose of electrical tools in
domestic waste!
According to European Directive
2012/19/EU on old electrical and
electronic appliances and its implementation in national law, electrical
tools that are no longer suitable for
use must be separately collected and
sent for environmentally responsible
recycling.
10.3 Li-ion battery
Model GT201
Cell type Li
DC voltage 7.4 V
Capacity approx.1.2 Ah
Charging time 50 min ±5 min
16
11.2 Li-ion batteries
Do not dispose of batteries in domestic waste, fire or
water. Defective or used batteries must be collected,
recycled or disposed of in an environmentally-friendly
way according to Directive 2006/66/EG.
Page 19

12. Two year guarantee
Dear Customer,
Thank you for choosing a product from our company.
For decades, the name Aesculap has stood for proven
quality and first-class service. We are known to
provide innovative, high-performance products for our
customers. Aesculap manufactures high-quality
devices, using high-quality materials and careful
manufacturing processes. We would like to point out
to you that we are not liable for defects in our
products, if these are caused by improper use, normal
wear or are caused by the product being improperly
used or if inappropriate or not properly functioning
third-party products are used.
Parts that are typically subject to wear, and for which
we are therefore not liable, are the battery and clipper
head. Defects that do not affect or only negligibly
affect the value or function of the product are also
excluded from our warranty.
If we are liable under our warranty, we reserve the
right to repair or replace the product.
13. Distributor in the US/Contact
in Canada for product information and complaints
Aesculap Inc.
3773 Corporate Parkway
Center Valley, PA 18034
USA
Service addresses
A & J Sales and Service
42 - A Frame Drive
West Burke, VT 05871
USA
Phone: (800) 447-1957
Or in Germany
Aesculap Suhl GmbH
Fröhliche-Mann-Straße 15
98528 Suhl / Germany
Phone: +49 (0) 3681 49820
Fax: +49 (0) 3681 498234
E-Mail: suhl@aesculap.de
www.aesculap-schermaschinen.de
17
Page 20
Aesculap Suhl GmbH
Akku-Schermaschine FAV5 CL/FORTIS
Legende
1 Scherkopfhalter
2 Akku-Schermaschine FAV5 CL/FORTIS
3 Akku-Entriegelung
4 Ladegerät
5 Netzanschlussleitung (mit Gerätestecker)
6 Ladeschacht (für Li-Ionen-Akku)
7 Ladezustandsanzeige (für Li-Ionen-Akku)
8 Li-Ionen-Akku
9 Ladezustandsanzeige (für Akku-Schermaschine
FAV5 CL/FORTIS)
10 Ladeschacht (für Akku-Schermaschine FAV5 CL/
FORTIS)
11 Ein-/Ausschalter
12 Scherkopf
Symbole am Produkt
Gebrauchsanweisung einhalten
Kennzeichnung von Elektround Elektronikgeräten entsprechend Richtlinie 2012/19/EU
(WEEE), siehe Kapitel Entsorgung
Inhaltsverzeichnis
1. Sichere Handhabung ............................................19
2. Gerätebeschreibung .............................................19
2.1 Lieferumfang ..........................................................19
2.2 Zum Betrieb erforderliche Komponenten ......20
2.3 Verwendungszweck Akku-Schermaschine
FAV5 CL/FORTIS .....................................................20
2.4 Verwendungszweck Ladegerät GT203/
Li-Ionen-Akku GT201 ..........................................20
2.5 Funktionsweise Akku-Schermaschine
FAV5 CL/FORTIS .....................................................20
2.6 Funktionsweise Ladegerät GT203/Li-Ionen-
Akku GT201 ............................................................20
2.6.1 Ladeprinzip.............................................................. 20
2.6.2 Ladezeit.................................................................... 20
3. Vorbereiten und Aufstellen ................................21
4. Arbeiten mit der Akku-Schermaschine
FAV5 CL/FORTIS, dem Ladegerät GT203/
Li-Ionen-Akku GT201 ..........................................21
4.1 Bereitstellen ...........................................................21
4.1.1 Zubehör anschließen............................................ 21
4.1.2 Scherkopf aufstecken........................................... 22
4.1.3 Ladegerät anschließen/Li-Ionen-Akku laden... 22
4.2 Funktionsprüfung Akku-Schermaschine
FAV5 CL/FORTIS .....................................................23
4.3 Funktionsprüfung Ladegerät .............................24
4.4 Handhabung Scherkopf .......................................24
4.4.1 Schneidplatte schleifen....................................... 24
4.4.2 Scherkopf austauschen....................................... 24
4.4.3 Scherkopf ölen....................................................... 25
4.4.4 Li-Ionen-Akku austauschen............................... 25
5. Aufbereitung ..........................................................26
5.1 Reinigung/Desinfektion .......................................26
5.2 Kontrolle, Pflege und Prüfung ...........................27
6. Wartung ..................................................................27
7. Fehler erkennen und beheben ...........................28
7.1 Akku-Schermaschine FAV5 CL/FORTIS ...........28
7.2 Ladegerät und Li-Ionen-Akku ...........................28
8. Technischer Service ..............................................30
9. Zubehör/Ersatzteile ..............................................31
10. Technische Daten ..................................................32
10.1 Akku-Schermaschine FAV5 CL/FORTIS ...........32
10.2 Ladegerät ................................................................32
18
Page 21
10.3 Li-Ionen-Akku ........................................................32
10.4 Konformitätserklärung ........................................32
11. Entsorgung ..............................................................33
11.1 Nur für EU-Länder ................................................33
11.2 Li-Ionen-Akkus ......................................................33
12. 2 Jahre Gewährleistung ......................................33
1. Sichere Handhabung
Lebensgefahr durch elektrischen
Stromschlag!
¾ Produkt nicht öffnen (hiervon
GEFAHR
¾ Vor der Anwendung des Produkts Funktionsfähig-
keit und ordnungsgemäßen Zustand prüfen.
¾ Ladegerät und Li-Ionen-Akkus bei Raumtempera-
tur aufbewahren.
¾ Ladegerät und Li-Ionen-Akkus trocken halten.
¾ Vor dem ersten Einsatz Li-Ionen-Akkus aufladen.
¾ „Hinweise zur elektromagnetischen Verträglichkeit
(EMV)“ beachten.
¾ Um Schäden durch unsachgemäßen Aufbau oder
Betrieb zu vermeiden und die Gewährleistung und
Haftung nicht zu gefährden:
– Produkt nur gemäß dieser Gebrauchsanweisung
verwenden.
– Sicherheitsinformationen und Instandhaltungs-
hinweise einhalten.
– Zubehör, das nicht in der Gebrauchsanweisung
erwähnt wird, nur mit Zustimmung des Herstellers
verwenden.
¾ Produkt und Zubehör nur von Personen betreiben
und anwenden lassen, die die erforderliche Ausbildung, Kenntnis oder Erfahrung haben.
ausgenommen ist der AkkuWechsel).
¾ Produkt nur an ein Versorgungs-
netz mit Schutzleiter anschließen.
¾ Gebrauchsanweisung für den Anwender zugäng-
lich aufbewahren.
¾ Gültige Normen einhalten.
¾ Sicherstellen, dass die elektrische Installation des
Raums den IEC-Anforderungen entspricht.
¾ Netzverbindungen durch Ziehen am Gerätestecker
lösen, nie durch Ziehen am Kabel.
¾ Produkt nicht in explosionsgefährdeten Bereichen
einsetzen.
¾ Kein beschädigtes oder defektes Produkt verwen-
den. Beschädigtes Produkt sofort aussortieren.
2. Gerätebeschreibung
2.1 Lieferumfang
Bezeichnung Art.-Nr.
Akku-Schermaschine FAV5 CL/
FORTIS
Li-Ionen-Akku GT201
Ladegerät GT203
Netzanschlussleitung (mit Gerätestecker)
Gebrauchsanweisung TA013440
Hinweis
Der Scherkopf GT330 #10 (USA+GB) der Akku-Schermaschine FAV5 CL/FORTIS ist im Lieferumfang enthalten. Je nach Anwendung können verschiedene Scherköpfe eingesetzt werden!
GT300/GT380
siehe Kapitel
Zubehör/Ersatzteile
19
Page 22

Aesculap Suhl GmbH
Akku-Schermaschine FAV5 CL/FORTIS
2.2 Zum Betrieb erforderliche Komponenten
• Akku-Schermaschine FAV5 CL/FORTIS
• Scherkopf
• Ladegerät
• Netzanschlussleitung (mit Gerätestecker)
• Li-Ionen-Akku
2.3 Verwendungszweck Akku-Schermaschine FAV5 CL/FORTIS
Die Akku-Schermaschine FAV5 CL/FORTIS wird zum
Scheren von Kleintieren verwendet.
Die Akku-Schermaschine FAV5 CL/FORTIS muss je
nach Anwendung mit einem Scherkopf eingesetzt werden.
2.4 Verwendungszweck Ladegerät
GT203/Li-Ionen-Akku GT201
Das Ladegerät GT203 wird zum Laden der Akku-Schermaschine FAV5 CL/FORTIS und dem Li-Ionen-Akku eingesetzt. Für beide Komponenten gibt es je einen Ladeschacht.
2.5 Funktionsweise Akku-Schermaschine FAV5 CL/FORTIS
Die Akku-Schermaschine FAV5 CL/FORTIS wird mit dem
Ein-/Ausschalter nach oben eingeschaltet und nach
unten ausgeschaltet.
2.6 Funktionsweise Ladegerät GT203/
Li-Ionen-Akku GT201
Das Ladegerät GT203 ist für einen Netzspannungsbereich von 100 V bis 240 V und von 50 Hz bis 60 Hz
konzipiert.
Zur Herstellung der Betriebsbereitschaft wird das
Ladegerät GT203 mit dem Netzstecker an das Versorgungsnetz angeschlossen.
Das Ladegerät GT203 verfügt über zwei Ladeschächte.
Im ersten Ladeschacht wird die Akku-Schermaschine
FAV5 CL/FORTIS geladen und im zweiten der Li-IonenAkku.
Die Ladeschächte sind dem jeweiligen Anzeigefeld an
der Ladegerätefront zugeordnet.
Mit dem Einstecken eines Li-Ionen-Akkus in die
Ladestation startet der Ladevorgang automatisch.
Die Ladezeit in den Ladeschächten hängt vom Ladezustand und der Kapazität der Li-Ionen-Akkus ab.
2.6.1 Ladeprinzip
Die Li-Ionen-Akkus werden mit konstanten Stromimpulsen aufgeladen.
Der Ladezustand des Li-Ionen-Akkus wird während der
Aufladung überwacht. Durch die Überwachung der
Ladekurve wird eine 100-%-Ladung ohne Überladung
sichergestellt.
Zusätzlich werden die Akku-Temperatur und die Ladezeit überwacht.
Das Ladegerät überwacht den Akkuzustand mit zwei
Ladezustandsanzeigen.
LED-Anzeigen:
• grün = Akku voll
• rot = Akku leer
2.6.2 Ladezeit
Bei Erreichen der maximalen Ladezeit wird der Ladevorgang abgebrochen.
Die Ladezeit beträgt ca. 50 min.
20
Page 23

3. Vorbereiten und Aufstellen
Wenn die folgenden Vorschriften nicht beachtet werden, übernimmt Aesculap insoweit keinerlei Verantwortung.
¾ Beim Aufstellen und Betrieb des Produkts einhal-
ten:
– die nationalen Installations- und Betreiber-Vor-
schriften,
– die nationalen Vorschriften über Brand- und
Explosionsschutz.
– Anwendungshinweise gemäß IEC-/VDE-Bestim-
mungen.
Brand- und Explosionsgefahr!
¾ Produkt nicht in explosionsge-
fährdeten Bereichen einsetzen.
GEFAHR
Beeinträchtigung der Funktion oder
Beschädigung des Produkts durch
unsachgemäße Aufstellung!
VORSICHT
¾ Produkt keiner direkten Son-
neneinstrahlung oder Nässe
aussetzen.
¾ Lüftungsschlitze des Produkts
nicht abdecken.
¾ Nennspannung zwischen 100 V
bis 240 V und einem Netzfrequenzbereich von 50 Hz bis
60 Hz anschließen.
¾ Sicherstellen, dass die Netz-
steckdose des Versorgungsnetzes, die zur Spannungsversorgung des Produkts genutzt wird,
frei zugänglich ist.
4. Arbeiten mit der AkkuSchermaschine FAV5 CL/
FORTIS, dem Ladegerät
GT203/
Li-Ionen-Akku GT201
4.1 Bereitstellen
4.1.1 Zubehör anschließen
Zubehörkombinationen, die nicht in der Gebrauchsanweisung erwähnt sind, dürfen nur verwendet werden,
wenn sie ausdrücklich für die vorgesehene Anwendung
bestimmt sind. Leistungsmerkmale sowie Sicherheitsanforderungen dürfen nicht nachteilig beeinflusst
werden.
¾ Bei Fragen wenden Sie sich an Ihren B. Braun/
Aesculap-Partner oder den Aesculap Technischen
Service, Adresse siehe Kapitel Technischer Service.
21
Page 24
Aesculap Suhl GmbH
Akku-Schermaschine FAV5 CL/FORTIS
4.1.2 Scherkopf aufstecken
Verletzungsgefahr durch scharfe
Schneidplatten!
¾ Scherkopf der Schermaschine
WARNUNG
Hinweis
Der Scherkopf GT330 #10 (USA+GB) der Scherma-
schine FAV5 CL/FORTIS ist im Lieferumfang enthalten.
Je nach Anwendung können verschiedene Scherköpfe
eingesetzt werden!
FAV5 CL/FORTIS vorsichtig
behandeln.
13
Abb. 1
¾ Bei geschlossenem Messerscharnier: Messer-
scharnier 13 mit Schraubendreher aufklappen, siehe
Abb. 1.
12
13
Abb. 2
¾ Scherkopf 12 auf geöffnetes Messerscharnier 13
stecken, siehe Abb. 2.
¾ Ein-/Aus-Schalter 11 drücken.
¾ Scherkopf 12 leicht in Richtung Schermaschine
FAV5 CL/FORTIS drücken, siehe Abb. 2.
Scherkopf 12 rastet hörbar ein.
¾ Sicherstellen, dass der Scherkopf 12 korrekt auf der
Schermaschine FAV5 CL/FORTIS sitzt.
22
Page 25
4.1.3 Ladegerät anschließen/Li-Ionen-Akku
laden
Brandgefahr bei Kurzschluss der
Pole durch Flüssigkeiten oder
Metallteile!
WARNUNG
WARNUNG
VORSICHT
VORSICHT
¾ Li-Ionen-Akku nicht kurzschlie-
ßen.
Verletzungsgefahr und Sachschäden
durch beschädigte Li-Ionen-Akkus!
¾ Li-Ionen-Akkus vor dem Laden
auf Beschädigungen prüfen.
¾ Beschädigte Li-Ionen-Akkus
nicht verwenden oder aufladen.
Verlust der Kapazität/Leistungsfähigkeit der entladenen Li-IonenAkkus durch längere Lagerung!
¾ Li-Ionen-Akku bei längerer
Lagerung nur vollgeladen einlagern und einmal pro Monat
nachladen.
Zerstörung von Produkt, Ladeschacht oder Li-Ionen-Akku durch
Stecken eines falschen Akkutyps in
den Ladeschacht!
¾ Li-Ionen-Akkus nur in die dafür
vorgesehenen Ladeschächte stecken.
¾ Li-Ionen-Akkus lagerichtig ein-
stecken.
Hinweis
Wenn nicht mit dem Ladegerät gearbeitet wird, muss
die Netzanschlussleitung von der Steckdose ausgesteckt werden!
¾ Ladegerät 4 anschließen: Gerätestecker der Netz-
anschlussleitung 5 in Ladegerät 4 stecken.
¾ Netzstecker der Netzanschlussleitung 5 in Steck-
dose stecken.
¾ Li-Ionen-Akku 8 in Ladeschacht 6 des Ladegeräts 4
stellen und aufladen.
- oder -
¾ Akku-Schermaschine FAV5 CL/FORTIS 2 in
Ladeschacht 10 des Ladegeräts 4 stellen und aufladen.
Ladezustandsanzeige 7 oder 9 leuchtet rot auf.
Nach dem Ladevorgang leuchtet die Ladezustandsanzeige 7/9 grün auf und die Akku-Schermaschine
FAV5 CL/FORTIS 2/der Li-Ionen-Akku 8 ist
betriebsbereit.
Hinweis
Vor dem Ladevorgang die Akku-Schermaschine
FAV5 CL/FORTIS ausschalten!
Hinweis
Die Li-Ionen-Akku s erwärmen sich leicht beim Ladevor-
gang.
23
Page 26

Aesculap Suhl GmbH
Akku-Schermaschine FAV5 CL/FORTIS
4.2 Funktionsprüfung Akku-Scherma-
schine FAV5 CL/FORTIS
¾ Sichtprüfung durchführen.
¾ Schalterstellung prüfen.
¾ Akku aufstecken, siehe Kapitel Li-Ionen-Akku aus-
tauschen.
¾ Scherkopf korrekt aufstecken und ggf. ölen, siehe
Kapitel Handhabung Scherkopf.
¾ Geladenen Reserve-Li-Ionen-Akku bereithalten.
¾ Akku-Schermaschine FAV5 CL/FORTIS vor Gebrauch
reinigen, siehe Kapitel Reinigung/Desinfektion.
4.3 Funktionsprüfung Ladegerät
¾ Sichtprüfung durchführen.
¾ Vor dem Anschluss des Produkts an das Versor-
gungsnetz:
– Netzanschlussleitung 5 auf mögliche Beschädi-
gung prüfen.
– Produkt auf mögliche Beschädigungen prüfen
(z. B. Kontakte der Ladeschächte auf verbogene
Kontakte prüfen).
¾ Netzanschlussleitung 5 in Gerätestecker an der
Ladestation stecken.
¾ Netzstecker in Steckdose des Versorgungsnetzes
stecken.
¾ Li-Ionen-Akku 8 in Ladeschacht 6 des Ladegeräts 4
stellen und aufladen.
- oder -
¾ Akku-Schermaschine FAV5 CL/FORTIS 2 in
Ladeschacht 10 des Ladegeräts 4 stellen und aufladen.
Die Ladezustandsanzeige 7 oder 9 leuchtet rot auf.
Nach dem Ladevorgang leuchtet die Ladezustandsanzeige 7/9 grün auf und die Akku-Schermaschine
FAV5 CL/FORTIS 2/der Li-Ionen-Akku 8 ist
betriebsbereit.
Das Produkt ist betriebsbereit.
24
Page 27
4.4 Handhabung Scherkopf
4.4.1 Schneidplatte schleifen
Hinweis
Zum Schleifen der Schneidplatte an den Technischen
Service wenden, siehe Kapitel Technischer Service.
4.4.2 Scherkopf austauschen
Verletzungsgefahr durch scharfe
Schneidplatten!
¾ Scherkopf der Schermaschine
WARNUNG
FAV5 CL/FORTIS vorsichtig
behandeln.
14
12
2
Abb. 4
¾ Scherkopf 12 nach vorne aufklappen, siehe Abb. 4.
¾ Scherkopf 12 abnehmen.
¾ Aufgeklapptes Messerscharnier mit Pinsel reinigen.
¾ Scherkopf 12 auf Messerscharnier stecken.
¾ Netzanschlussleitung der Akku-Schermaschine
FAV5 CL/FORTIS einstecken.
¾ Ein-/Aus-Schalter 11 drücken.
¾ Scherkopf 12 leicht in Richtung Akku-Scherma-
schine FAV5 CL/FORTIS drücken.
Der Scherkopf 12 rastet hörbar ein.
¾ Sicherstellen, dass der Scherkopf 12 korrekt auf der
Akku-Schermaschine FAV5 CL/FORTIS sitzt.
4.4.3 Scherkopf ölen
¾ Mit weichem Lappen oder Pinsel obere und untere
Schneidplatte reinigen. Dabei sicherstellen, dass
die Lücken zwischen den Zähnen sauber sind.
¾ Obere und untere Schneidplatte leicht mit Spezialöl
für Schneidköpfe GT604 einölen.
Abb. 3
¾ Ein-/Aus-Schalter 11 drücken, um Akku-Scherma-
schine FAV5 CL/FORTIS auszuschalten.
¾ Scherkopf-Verriegelung 14 drücken, siehe Abb. 3.
25
Page 28
Aesculap Suhl GmbH
Akku-Schermaschine FAV5 CL/FORTIS
4.4.4 Li-Ionen-Akku austauschen
8
3
2
3
Abb. 5
¾ Akku-Schermaschine FAV5 CL/FORTIS 2 halten und
Akku-Entriegelungen 3 drücken.
¾ Li-Ionen-Akku 8 aus Akku-Schermaschine
FAV5 CL/FORTIS 2 herausziehen.
¾ Geladenen Li-Ionen-Akku 8 in Akku-Scherma-
schine FAV5 CL/FORTIS 2 bis zum Anschlag einschieben.
Die Akku-Schermaschine FAV5 CL/FORTIS 2 ist
betriebsbereit.
5. Aufbereitung
Beschädigung oder Zerstörung des
Produkts durch maschinelle Reinigung/Desinfektion oder Sterilisa-
VORSICHT
5.1 Reinigung/Desinfektion
Hinweis
Entsorgungs- und Hygienevorschriften einhalten!
Manuelle Reinigung/Desinfektion
GEFAHR
tion!
¾ Produkt nur manuell reinigen/
desinfizieren.
¾ Produkt niemals sterilisieren.
Stromschlag- und Brandgefahr!
¾ Vor der Reinigung Netzstecker
ziehen.
¾ Sicherstellen, dass keine Flüs-
sigkeit in das Produkt eindringt.
¾ Nach der Reinigung/Desinfek-
tion mindestens 1 Minute
ablüften lassen.
26
Page 29

Schäden am Produkt durch falsche
Reinigung oder falsches Reinigungs-/Desinfektionsmittel!
VORSICHT
¾ Gehäuse des Produkts mit einem flusenfreien Tuch,
das mit einem handelsüblichen Mittel zur Wischdesinfektion befeuchtet ist, abwischen.
¾ Bei Bedarf Rückstände des Reinigungs- und Desin-
fektionsmittels nach dessen Einwirkzeit mit einem
in sauberem Wasser angefeuchteten, flusenfreien
Tuch abwischen.
¾ Zum Trocknen sauberes, flusenfreies Tuch verwen-
den.
¾ Kontakte in den Ladeschächten mit Isopropanol
bzw. Äthylalkohol und einem Wattestäbchen reinigen. Keine korrosionsfördernden Chemikalien verwenden.
¾ Falls nötig, Reinigung/Desinfektion wiederholen.
¾ Für die Flächenreinigung han-
delsübliches Mittel verwenden.
¾ Produkt nie in Wasser oder Rei-
nigungsmittel legen.
¾ Keine Flüssigkeit in die Lade-
schächte einbringen.
¾ Kontakte in den Ladeschächten
mit größter Sorgfalt reinigen.
5.2 Kontrolle, Pflege und Prüfung
¾ Produkt auf Raumtemperatur abkühlen lassen.
¾ Produkt nach jeder Reinigung und Desinfektion
prüfen auf: Sauberkeit, Funktion und Beschädigung.
¾ Scherkopf bei Bedarf ölen, siehe Kapitel Scherkopf
ölen.
¾ Produkt auf Beschädigungen, unregelmäßige Lauf-
geräusche, übermäßige Erwärmung oder zu starke
Vibration prüfen.
¾ Scherkopf auf abgebrochene, beschädigte und
stumpfe Schneiden kontrollieren.
¾ Beschädigtes Produkt sofort aussortieren.
6. Wartung
Um einen zuverlässigen Betrieb zu gewährleisten,
empfiehlt Aesculap eine Wartung pro Jahr.
Für entsprechende Serviceleistungen wenden Sie sich
an Ihre nationale B. Braun/Aesculap-Vertretung, siehe
Kapitel Technischer Service.
Service-Adressen
Aesculap Suhl GmbH
Fröhliche-Mann-Straße 15
98528 Suhl / Germany
Phone: +49 (0) 3681 49820
Fax: +49 (0) 3681 498234
E-Mail: suhl@aesculap.de
www.aesculap-schermaschinen.de
Weitere Service-Adressen erfahren Sie über die oben
genannte Adresse.
27
Page 30
Aesculap Suhl GmbH
Akku-Schermaschine FAV5 CL/FORTIS
7. Fehler erkennen und beheben
7.1 Akku-Schermaschine FAV5 CL/FORTIS
Störung Erkennung Ursache Behebung
Akku-Schermaschine
FAV5 CL/FORTIS läuft nicht
an
Akku-Schermaschine
FAV5 CL/FORTIS bleibt stehen
Akku-Schermaschine
FAV5 CL/FORTIS lädt nicht
in der Ladestation
Schalter-Stellung prüfen Li-Ionen-Akku nicht gela-
den
– Li-Ionen-Akku defekt Neuen Li-Ionen-Akku
– Li-Ionen-Akku nicht ein-
gesetzt
– Li-Ionen-Akku durch
Schutzschaltung abgeschaltet
– Li-Ionen-Akku ist leer Neuen Li-Ionen-Akku
LED-Anzeigen leuchten
nicht
– siehe Kapitel Ladegerät
Li-Ionen-Akku laden
einsetzen
Neuen Li-Ionen-Akku
einsetzen
Schalter aus- und wieder
einschalten
einsetzen
und Li-Ionen-Akku
7.2 Ladegerät und Li-Ionen-Akku
Störung Erkennung Ursache Behebung
Ladegerät ohne Funktion LED-Anzeigen leuchten
nicht
Li-Ionen-Akku nicht
geladen
28
Netzanschlussleitung
nicht eingesteckt
Netzanschlussleitung
defekt
Ladegerät defekt Produkt beim Hersteller
Netzanschlussleitung in
Gerätestecker am Ladegerät und in die Steckdose des Versorgungsnetzes stecken
Netzanschlussleitung
austauschen
instand setzen lassen
Page 31

Störung Erkennung Ursache Behebung
Li-Ionen-Akku wird nicht
geladen
Li-Ionen-Akku gesteckt,
Ladezustandsanzeige
leuchtet nicht
Kontakte des Ladegeräts
verschmutzt oder beschädigt
Kontakte im Ladeschacht reinigen, siehe
Kapitel Reinigung/Desinfektion oder beim Hersteller instand setzen
lassen
Li-Ionen-Akku defekt Li-Ionen-Akku beim Her-
steller instand setzen
lassen
Ladegerät defekt Ladegerät beim Herstel-
ler instand setzen lassen
Während des Ladevorgangs wird im Li-IonenAkku eine Übertemperatur detektiert
Li-Ionen-Akku aus Ladeschacht entnehmen,
abkühlen lassen und
Ladevorgang neu starten.
Bei erneuter Störung
Akku beim Hersteller
instand setzen lassen
Ladestörung bzw.
Li-Ionen-Akku defekt
Li-Ionen-Akku aus Ladeschacht entnehmen und
Ladevorgang wiederholen, ggf. in einem anderen Ladeschacht.
Bei erneuter Störung
Li-Ionen-Akku beim Hersteller instand setzen
lassen
29
Page 32

Aesculap Suhl GmbH
Akku-Schermaschine FAV5 CL/FORTIS
8. Technischer Service
¾ Für Service, Wartung und Reparatur wenden Sie
sich an Ihre nationale B. Braun/Aesculap-Vertretung.
Modifikationen an medizintechnischer Ausrüstung
können zu einem Verlust der Garantie-/Gewährleistungsansprüche sowie eventueller Zulassungen führen.
Service-Adressen
Aesculap Suhl GmbH
Fröhliche-Mann-Straße 15
98528 Suhl / Germany
Phone: +49 (0) 3681 49820
Fax: +49 (0) 3681 498234
E-Mail: suhl@aesculap.de
www.aesculap-schermaschinen.de
Weitere Service-Adressen erfahren Sie über die oben
genannte Adresse.
30
Page 33

9. Zubehör/Ersatzteile
Art.-Nr. Ausführung Netzkabel Li-Ionen-
Akku
GT306/
GT380
GT306G/
GT380G
GT306J/
GT380J
GT306K/
GT380K
Europa
außer Großbritannien
Großbritannien
Japan,
Mexiko
110–125 V
USA TA012168
TA012170
Europa-Flachstecker, schwarz,
L=1,8 m
TA012169
GB-Stecker,
schwarz,
L=1,8 m
TA012168
2-poligerGerätestecker,
schwarz,
L=1,8 m
2-poligerGerätestecker,
schwarz,
L=1,8 m
GT201 GT200880 GT300/GT380
GT201
GT201
GT201 GT200880 GT300/GT380
Ladestation Akku-Scher-
maschine
unverpackt
GT200880
GT200880
GT300/GT380
unverpackt
GT300/GT380
unverpackt
unverpackt
Zubehör
GT604800
Ölflasche
GT604800
Ölflasche
GT604800
Ölflasche
GT604800
Ölflasche
31
Page 34

Aesculap Suhl GmbH
Akku-Schermaschine FAV5 CL/FORTIS
10. Technische Daten
10.1 Akku-Schermaschine FAV5 CL/
FORTIS
Gerätetyp GT300/GT380
Hubzahl 2 300 1/min
Lade-/Ausgangsspannung max. 8,4 V
Lade-/Ausgangsstrom max. 1,2 A
Gewicht
(ohne Scherkopf und Akku)
Gewicht
(mit Scherkopf und Akku)
EN 60335-1, EN 60335-2-29
10.2 Ladegerät
Gerätetyp GT203
Netzspannungsbereiche
(Stromaufnahme)
Frequenz 50–60 Hz
Lade-/Ausgangsspannung max. 8,4 V
Lade-/Ausgangsstrom max. 1,2 A
Gewicht 495 g
Prüfzeichen CE, UL
385 g
450 g
100–240 V
10.3 Li-Ionen-Akku
Gerätetyp GT201
Zellentyp Li
Gleichspannung 7,4 V
Kapazität ca. 1,2 Ah
Ladezeit 50 min ±5 min
10.4 Konformitätserklärung
Wir erklären in alleiniger Verantwortung, dass dieses Produkt mit den folgenden Normen oder normativen
Dokumenten übereinstimmt:
2004/108/EG EMV-Richtlinie:
DIN EN 60335-1
DIN EN 60335-2-8
Sicherheit elektrischer Geräte für den
Hausgebrauch und ähnliche Zwecke
- allgemeine Anforderungen
- für Haarschneidemaschinen
Aesculap Suhl GmbH
32
Page 35

11. Entsorgung
Elektrowerkzeuge, Zubehör und Verpackung sollen
einer umweltgerechten Wiederverwertung zugeführt
werden.
11.1 Nur für EU-Länder
Werfen Sie Elektrowerkzeuge nicht in
den Hausmüll!
Gemäß der Europäischen Richtlinie
2012/19/EU über Elektro- und Elektronik-Altgeräte und ihrer Umsetzung
in nationales Recht müssen nicht
mehr gebrauchsfähige Elektrowerkzeuge getrennt gesammelt und einer
umweltgerechten Wiederverwertung
zugeführt werden.
11.2 Li-Ionen-Akkus
Akkus nicht in den Hausmüll, ins Feuer oder Wasser
werfen. Defekte oder verbrauchte Akkus müssen
gemäß der Richtlinie 2006/66/EG gesammelt, recycelt
oder auf umweltfreundliche Weise entsorgt werden.
12. 2 Jahre Gewährleistung
Sehr geehrte Kundin, sehr geehrter Kunde,
herzlichen Dank, dass Sie sich für ein Produkt aus
unserem Hause entschieden haben.
Der Name Aesculap steht seit Jahrzehnten für geprüfte
Qualität und erstklassigen Service. Unseren Kunden
bieten wir innovative und leistungsfähige Produkte.
Aesculap stellt hochwertige Geräte her und sichert
Ihnen die Verwendung hochwertigen Materials und
sorgfältiger Herstellung zu. Gerne möchten wir Sie
darauf hinweisen, dass wir für Sachmängel unserer
Produkte nicht haften, wenn diese durch unsachgemäßen Gebrauch, normalen Verschleiß oder dadurch entstehen, dass das Produkt unsachgemäß verwendet
wird oder nicht passende oder nicht einwandfrei funktionierende Fremdprodukte eingesetzt werden.
Teile, die typischerweise dem Verschleiß unterliegen,
und für die wir deshalb nicht haften, sind der Akku und
der Scherkopf. Ebenfalls ausgenommen sind Sachmängel, die den Wert oder die Funktion nicht oder nur
unerheblich beeinflussen.
Sollten wir im Rahmen unserer Gewährleistung haften,
behalten wir uns vor, das Produkt zu reparieren oder
auszutauschen.
33
Page 36

Aesculap Suhl GmbH
Tondeuse à accu FAV5 CL/FORTIS
Légende
1 Support de tête de tonte
2 Tondeuse à accu FAV5 CL/FORTIS
3 Déverrouillage de l’accu
4 Chargeur
5 Câble d’alimentation électrique (avec fiche côté
appareil)
6 Compartiment de recharge (pour accu Li-ion)
7 Indicateur d’état de charge (pour accu Li-ion)
8 Accu Li-ion
9 Indicateur d’état de charge (pour tondeuse à accu
FAV5 CL/FORTIS)
10 Compartiment de recharge (pour tondeuse à accu
FAV5 CL/FORTIS)
11 Interrupteur Marche/Arrêt
12 Tête de tonte
Symboles sur le produit
Respecter le mode d’emploi
Marquage des appareils électriques et électroniques conformément à la directive 2012/19/
EU (DEEE), voir Chapitre Elimination
Sommaire
1. Manipulation sûre ................................................35
2. Description de l’appareil .....................................35
2.1 Etendue de la livraison ........................................35
2.2 Composants nécessaires à l’utilisation ...........36
2.3 Champ d’application de la tondeuse à accu
FAV5 CL/FORTIS .....................................................36
2.4 Champ d’application du chargeur GT203
et de l’accu Li-ion GT201 ...................................36
2.5 Mode de fonctionnement de la tondeuse à
accu FAV5 CL/FORTIS ...........................................36
2.6 Mode de fonctionnement du chargeur GT203
et de l’accu Li-ion GT201 ...................................36
2.6.1 Principe de chargement...................................... 36
2.6.2 Durée de recharge................................................. 36
3. Préparation et installation .................................37
4. Utilisation de la tondeuse à accu
FAV5 CL/FORTIS, du chargeur GT203 et de
l’accu Li-ion GT201 ..............................................37
4.1 Préparation .............................................................37
4.1.1 Raccordement des accessoires.......................... 37
4.1.2 Montage de la tête de tonte.............................. 38
4.1.3 Branchement du chargeur et recharge de
l’accu Li-ion............................................................ 38
4.2 Contrôle du fonctionnement de la tondeuse
à accu FAV5 CL/FORTIS .......................................39
4.3 Contrôle du fonctionnement du chargeur .....40
4.4 Manipulation de la tête de tonte .....................40
4.4.1 Affûtage de la plaque de coupe........................ 40
4.4.2 Remplacement de la tête de tonte.................. 40
4.4.3 Huilage de la tête de tonte................................ 41
4.4.4 Remplacement de l’accu Li-ion........................ 41
5. Traitement stérile ..................................................42
5.1 Nettoyage/décontamination .............................42
5.2 Vérification, entretien et contrôle ...................43
6. Maintenance ..........................................................43
7. Identification et élimination des pannes .......44
7.1 Tondeuse à accu FAV5 CL/FORTIS ....................44
7.2 Chargeur et accu Li-ion ......................................44
8. Service Technique .................................................46
9. Accessoires/pièces de rechange ........................47
10. Caractéristiques techniques ..............................48
10.1 Tondeuse à accu FAV5 CL/FORTIS ....................48
34
Page 37

10.2 Chargeur ..................................................................48
10.3 Accu Li-ion ..............................................................48
10.4 Déclaration de conformité .................................48
11. Elimination ..............................................................49
11.1 Uniquement pour les pays de l’UE ...................49
11.2 Accus Li-ion ............................................................49
12. 2 ans de garantie ..................................................49
1. Manipulation sûre
Danger de mort par électrocution!
¾ Ne pas ouvrir le produit (sauf
DANGER
¾ Vérifier le bon fonctionnement et le bon état du
produit avant de l’utiliser.
¾ Conserver le chargeur et les accus Li-ion à tempé-
rature ambiante.
¾ Maintenir le chargeur et les accus Li-ion au sec.
¾ Charger les accus Li-ion avant la première utilisa-
tion.
¾ Respecter les “Consignes relatives à la compatibi-
lité électromagnétique (CEM)”.
¾ Pour éviter les dommages provoqués par un mon-
tage ou une utilisation incorrects et ne pas remettre en cause les droits à prestations de garantie et
la responsabilité:
– N’utiliser ce produit que conformément au pré-
sent mode d’emploi.
– Respecter les informations sur la sécurité et les
consignes de maintenance.
– N’utiliser les accessoires non mentionnés dans le
mode d’emploi qu’avec l’accord du fabricant.
¾ Confier le fonctionnement et l’utilisation du pro-
duit et des accessoires uniquement à des personnes
disposant de la formation, des connaissances ou de
l’expérience requises.
pour le remplacement de l’accu).
¾ Ne raccorder le produit qu’à un
réseau d’alimentation avec fil de
protection.
¾ Le mode d’emploi doit être conservé en un lieu
accessible à l’utilisateur.
¾ Respecter les normes en vigueur.
¾ Veiller à ce que l’installation électrique du local
soit conforme aux prescriptions CEI.
¾ Toujours débrancher les connexions au réseau en
tirant sur la fiche côté appareil et jamais en tirant
sur le câble.
¾ Ne pas utiliser le produit dans des zones à risque
d’explosion.
¾ Ne jamais utiliser un produit endommagé ou
défectueux. Mettre immédiatement au rebut tout
produit endommagé.
2. Description de l’appareil
2.1 Etendue de la livraison
Désignation Art. n°
Tondeuse à accu FAV5 CL/FORTIS
Accu Li-ion GT201
Chargeur GT203
Câble d’alimentation électrique
(avec fiche côté appareil)
Mode d’emploi TA013440
Remarque
La tête de tonte GT330 #10 (USA+GB) de la tondeuse à
accu FAV5 CL/FORTIS fait partie des éléments livrés.
Selon l’application, différentes têtes de tonte peuvent
être utilisées!
GT300/GT380
voir Chapitre
Accessoires/pièces de rechange
35
Page 38

Aesculap Suhl GmbH
Tondeuse à accu FAV5 CL/FORTIS
2.2 Composants nécessaires à l’utilisation
• Tondeuse à accu FAV5 CL/FORTIS
•Tête de tonte
•Chargeur
• Câble d’alimentation électrique (avec fiche côté
appareil)
• Accu Li-ion
2.3 Champ d’application de la tondeuse
à accu FAV5 CL/FORTIS
La tondeuse à accu FAV5 CL/FORTIS s’utilise pour tondre de petits animaux.
La tondeuse à accu FAV5 CL/FORTIS doit être utilisée
avec une tête de tonte choisie en fonction de l’application.
2.4 Champ d’application du chargeur
GT203 et de l’accu Li-ion GT201
Le chargeur GT203 est utilisé pour charger la tondeuse
à accu FAV5 CL/FORTIS et l’accu Li-ion. Il possède un
compartiment de recharge pour chacun des composants.
2.5 Mode de fonctionnement de la tondeuse à accu FAV5 CL/FORTIS
La tondeuse à accu FAV5 CL/FORTIS se met en marche
en poussant l’interrupteur Marche/Arrêt vers le haut et
s’arrête en poussant l’interrupteur vers le bas.
2.6 Mode de fonctionnement du chargeur GT203 et de l’accu Li-ion
GT201
Le chargeur GT203 est conçu pour une plage de tension de réseau de 100 à 240 V et de 50 à 60 Hz.
Pour être prêt à fonctionner, le chargeur GT203 doit
être raccordé au réseau électrique par la fiche secteur.
Le chargeur GT203 possède deux compartiments de
recharge. Le premier compartiment sert à recharger la
tondeuse à accu FAV5 CL/FORTIS et le second l’accu Liion.
Les compartiments de recharge sont reliés à la zone
d’affichage correspondante sur la face avant de l’appareil.
Le processus de recharge démarre automatiquement
lorsqu’un accu Li-ion est placé dans la station de
recharge.
La durée de recharge dans les compartiments de
recharge dépend de l’état de charge et de la capacité
des accus Li-ion.
2.6.1 Principe de chargement
Les accus Li-ion sont rechargés par des impulsions
électriques constantes.
L’état de charge de l’accu Li-ion est surveillé pendant
la recharge. La surveillance de la courbe de recharge
garantit une recharge à 100 % sans surcharge.
La température de l’accu et la durée de recharge sont
également contrôlées.
Le chargeur permet de surveiller l’état de l’accu au
moyen de deux indicateurs d’état de charge.
Indicateurs à DEL:
•vert = accu plein
• rouge = accu vide
2.6.2 Durée de recharge
Le processus de recharge est interrompu une fois que
la durée de recharge maximale a été atteinte.
La durée de charge est d’environ 50 min.
36
Page 39

3. Préparation et installation
Aesculap n’assume aucune responsabilité lorsque les
obligations suivantes ne sont pas respectées.
¾ Pour installer et faire fonctionner le produit, obser-
ver:
– les directives nationales relatives à l’installation et
à l’exploitation,
– les réglementations nationales relatives à la pro-
tection contre les incendies et les explosions.
– Consignes d’utilisation conformément aux dispo-
sitions des normes CEI/VDE.
Risque d’incendie et d’explosion!
¾ Ne pas utiliser le produit dans
DANGER
ATTENTION
des zones à risque d’explosion.
Risque de perturbation du fonctionnement ou d’endommagement
du produit en cas d’installation
impropre!
¾ Ne pas soumettre le produit au
rayonnement direct du soleil ou
à l’humidité.
¾ Ne pas recouvrir les fentes
d’aération du produit.
¾ Brancher l’appareil sur une ten-
sion de réseau de 100 à 240 V
avec une plage de fréquence
réseau de 50 à 60 Hz.
¾ S’assurer que la prise secteur
utilisée pour l’alimentation
électrique du produit est librement accessible.
4. Utilisation de la tondeuse à
accu FAV5 CL/FORTIS, du
chargeur GT203 et de l’accu
Li-ion GT201
4.1 Préparation
4.1.1 Raccordement des accessoires
Les combinaisons d’accessoires non mentionnées dans
le mode d’emploi ne peuvent être utilisées que si elles
sont expressément prévues pour l’application projetée.
Ceci ne doit pas porter préjudice aux caractéristiques
de puissance ni aux exigences de sécurité.
¾ Pour toute question, adressez-vous à votre parte-
naire B. Braun/Aesculap ou au Service Technique
Aesculap, adresse voir Chapitre Service Technique.
37
Page 40

Aesculap Suhl GmbH
Tondeuse à accu FAV5 CL/FORTIS
4.1.2 Montage de la tête de tonte
Risque de blessure par des plaques
de coupe acérées!
AVERTISSEMENT
Remarque
La tête de tonte GT330 #10 (USA+GB) de la tondeuse
FAV5 CL/FORTIS fait partie des éléments livrés. Selon
l’application, différentes têtes de tonte peuvent être
utilisées!
¾ Manipuler avec précautions la
tête de tonte de la tondeuse
FAV5 CL/FORTIS.
13
Fig. 1
¾ La charnière de lame étant fermée: déployer la
charnière de lame 13 avec un tournevis, voir Fig. 1.
¾ Ficher la tête de tonte 12 sur la charnière de lame
ouverte 13, voir Fig. 2.
¾ Appuyer sur l’interrupteur Marche/Arrêt 11.
¾ Presser légèrement la tête de tonte 12 en direction
de la tondeuse FAV5 CL/FORTIS, voir Fig. 2.
La tête de tonte 12 s’encliquète de façon audible.
¾ Vérifier que la tête de tonte 12 est correctement
placée sur la tondeuse FAV5 CL/FORTIS.
4.1.3 Branchement du chargeur et recharge
de l’accu Li-ion
Risque d’incendie en cas de courtcircuit des pôles provoqué par un
liquide ou des pièces métalliques!
AVERTISSEMENT
AVERTISSEMENT
¾ Ne pas court-circuiter l’accu Li-
ion.
Risque de blessure et de dégâts
matériels avec des accus Li-ion
endommagés!
¾ Vérifier que les accus Li-ion
sont intacts avant de les recharger.
¾ Ne pas utiliser ni recharger des
accus Li-ion endommagés.
Fig. 2
38
12
13
ATTENTION
Risque de perte de capacité ou de
performance des accus Li-ion
déchargés du fait d’un stockage
prolongé!
¾ Ne stocker les accus Li-ion pen-
dant une période prolongée
qu’entièrement rechargés et les
recharger une fois par mois.
Page 41

Risque de détérioration irrémédiable du produit, du compartiment de
recharge ou de l’accu Li-ion en cas
ATTENTION
Remarque
Avant le processus de recharge, éteindre la tondeuse à
accu FAV5 CL/FORTIS!
Remarque
Les accus Li-ion chauffent légèrement pendant le processus de recharge.
Remarque
Lorsque le chargeur n’est pas utilisé, le câble d’alimentation électrique doit être débranché!
¾ Brancher le chargeur 4: enfoncer la fiche côté
appareil du câble d’alimentation électrique 5 dans
le chargeur 4.
¾ Enfoncer la fiche secteur du câble d’alimentation
électrique 5 dans la prise secteur.
¾ Placer l’accu Li-ion 8 dans le compartiment de
recharge 6 du chargeur 4 et le recharger.
- ou -
¾ Placer la tondeuse à accu FAV5 CL/FORTIS 2 dans
le compartiment de recharge 10 du chargeur 4 et
la recharger.
L’indicateur d’état de charge 7 ou 9 s’allume en
rouge.
Après le processus de charge, l’indicateur d’état de
charge 7/9 s’allume en vert et la tondeuse à accu
FAV5 CL/FORTIS 2 ou l’accu Li-ion 8 sont prêts à
fonctionner.
d’insertion d’un type d’accu inadapté dans le compartiment de
recharge!
¾ N’insérer les accus Li-ion que
dans les compartiments de
recharge prévus à cet effet.
¾ Insérer les accus Li-ion dans la
bonne position.
4.2 Contrôle du fonctionnement de la
tondeuse à accu FAV5 CL/FORTIS
¾ Effectuer un contrôle visuel.
¾ Contrôler la position de l’interrupteur.
¾ Mettre l’accu en place, voir Chapitre Remplace-
ment de l’accu Li-ion.
¾ Placer correctement la tête de tonte et la huiler si
nécessaire, voir Chapitre Manipulation de la tête de
tonte.
¾ Tenir en réserve un accu Li-ion chargé.
¾ Nettoyer la tondeuse à accu FAV5 CL/FORTIS avant
utilisation, voir Chapitre Nettoyage/décontamination.
39
Page 42

Aesculap Suhl GmbH
Tondeuse à accu FAV5 CL/FORTIS
4.3 Contrôle du fonctionnement du
chargeur
¾ Effectuer un contrôle visuel.
¾ Avant de brancher le produit au réseau d’alimenta-
tion électrique:
– Contrôler l’absence d’éventuelles détériorations
sur le câble d’alimentation électrique 5.
– Contrôler l’absence d’éventuelles détériorations
du produit (p. ex. contacts tordus dans les compartiments de recharge).
¾ Ficher le câble d’alimentation électrique 5 dans la
prise de la station de recharge.
¾ Brancher la fiche secteur dans la prise du réseau
d’alimentation électrique.
¾ Placer l’accu Li-ion 8 dans le compartiment de
recharge 6 du chargeur 4 et le recharger.
- ou -
¾ Placer la tondeuse à accu FAV5 CL/FORTIS 2 dans
le compartiment de recharge 10 du chargeur 4 et
la recharger.
L’indicateur d’état de charge 7 ou 9 s’allume en
rouge.
Après le processus de charge, l’indicateur d’état de
charge 7/9 s’allume en vert et la tondeuse à accu
FAV5 CL/FORTIS 2 ou l’accu Li-ion 8 sont prêts à
fonctionner.
Le produit est prêt à fonctionner.
4.4 Manipulation de la tête de tonte
4.4.1 Affûtage de la plaque de coupe
Remarque
Pour l’affûtage de la plaque de coupe, s’adresser au Ser-
vice Technique, voir Chapitre Service Technique.
4.4.2 Remplacement de la tête de tonte
Risque de blessure par des plaques
de coupe acérées!
AVERTISSEMENT
¾ Manipuler avec précautions la
tête de tonte de la tondeuse
FAV5 CL/FORTIS.
14
Fig. 3
¾ Appuyer sur l’interrupteur Marche/Arrêt 11 pour
éteindre la tondeuse FAV5 CL/FORTIS.
¾ Presser le verrouillage de tête de tonte 14, voir
Fig. 3.
40
Page 43

12
4.4.4 Remplacement de l’accu Li-ion
2
Fig. 4
¾ Déployer la tête de tonte 12 vers l’avant, voir Fig. 4.
¾ Retirer la tête de tonte 12.
¾ Nettoyer la charnière de lame ouverte avec un pin-
ceau.
¾ Ficher la tête de tonte 12 sur la charnière de lame.
¾ Raccorder le câble d’alimentation électrique de la
tondeuse à accu FAV5 CL/FORTIS.
¾ Appuyer sur l’interrupteur Marche/Arrêt 11.
¾ Presser légèrement la tête de tonte 12 en direction
de la tondeuse à accu FAV5 CL/FORTIS.
La tête de tonte 12 s’encliquète de façon audible.
¾ Vérifier que la tête de tonte 12 est correctement
placée sur la tondeuse FAV5 CL/FORTIS.
4.4.3 Huilage de la tête de tonte
¾ Nettoyer la plaque de coupe supérieure et infé-
rieure avec un chiffon doux ou un pinceau. Vérifier
ce faisant que les espaces entre les dents sont propres.
¾ Huiler légèrement la plaque de coupe supérieure et
inférieure avec l’huile spéciale pour têtes de tonte
GT604.
8
3
2
3
Fig. 5
¾ Tenir la tondeuse à accu FAV5 CL/FORTIS 2 et
appuyer sur le déverrouillage de l’accu 3.
¾ Retirer l’accu Li-ion 8 de la tondeuse à accu
FAV5 CL/FORTIS 2.
¾ Insérer l’accu Li-ion chargé 8 dans la tondeuse à
accu FAV5 CL/FORTIS 2 jusqu’à la butée.
La tondeuse à accu FAV5 CL/FORTIS 2 est prête à
l’emploi.
41
Page 44

Aesculap Suhl GmbH
Tondeuse à accu FAV5 CL/FORTIS
5. Traitement stérile
Risque d’endommagement ou de
détérioration irrémédiable du produit par un nettoyage/une déconta-
ATTENTION
5.1 Nettoyage/décontamination
Remarque
Respecter les consignes d’hygiène et d’élimination!
Nettoyage/décontamination manuels
DANGER
mination en machine ou par stérilisation!
¾ Ne nettoyer/décontaminer le
produit que manuellement.
¾ Ne jamais stériliser le produit.
Risque d’électrocution et d’incendie!
¾ Débrancher la fiche secteur
avant le nettoyage.
¾ Veiller à ce qu’aucun liquide ne
pénètre dans le produit.
¾ Laisser le produit s’aérer pen-
dant au moins 1 minute après le
nettoyage/la décontamination.
Risque de détériorations sur le produit en cas de nettoyage impropre
ou de produit de nettoyage/décon-
ATTENTION
¾ Essuyer le boîtier du produit avec un chiffon non
pelucheux imbibé d’un produit courant du commerce pour la décontamination par essuyage.
¾ Si nécessaire, éliminer les résidus du produit de
nettoyage et de décontamination à la fin de la
durée d’action de celui-ci avec un chiffon non
pelucheux humidifié à l’eau propre.
¾ Pour le séchage, utiliser un chiffon propre non
pelucheux.
¾ Nettoyer les contacts dans les compartiments de
recharge avec un coton-tige imbibé d’isopropanol
ou d’alcool éthylique. Ne pas utiliser de produits
chimiques favorisant la corrosion.
¾ Si nécessaire, répéter le nettoyage/la décontami-
nation.
tamination inadéquat!
¾ Utiliser un produit courant du
commerce pour le nettoyage des
surfaces.
¾ Ne jamais plonger le produit
dans de l’eau ou dans un produit
nettoyant.
¾ Ne pas faire pénétrer de liquide
dans les compartiments de
recharge.
¾ Nettoyer avec le plus grand soin
les contacts dans les compartiments de recharge.
42
Page 45

5.2 Vérification, entretien et contrôle
¾ Laisser refroidir le produit à la température
ambiante.
¾ Après chaque nettoyage et décontamination, véri-
fier sur le produit les éléments suivants: propreté,
bon fonctionnement et absence de détériorations.
¾ Huiler la tête de tonte si nécessaire, voir Chapitre
Huilage de la tête de tonte.
¾ Contrôler sur le produit l’absence de détériorations,
de bruits de fonctionnement irréguliers, d’échauffement excessif et de trop fortes vibrations.
¾ Vérifier que les tranchants de la tête de tonte ne
sont pas rompus, endommagés ou émoussés.
¾ Mettre immédiatement au rebut tout produit
endommagé.
6. Maintenance
Pour garantir un fonctionnement fiable, Aesculap
recommande une maintenance par an.
Pour des prestations de service en ce sens, adressezvous à votre distributeur national B. Braun/Aesculap,
voir Chapitre Service Technique.
Adresses de service
Aesculap Suhl GmbH
Fröhliche-Mann-Strasse 15
98528 Suhl / Germany
Phone: +49 (0) 3681 49820
Fax: +49 (0) 3681 498234
E-mail: suhl@aesculap.de
www.aesculap-schermaschinen.de
Pour obtenir d’autres adresses de service, contactez
l’adresse ci-dessus.
43
Page 46

Aesculap Suhl GmbH
Tondeuse à accu FAV5 CL/FORTIS
7. Identification et élimination des pannes
7.1 Tondeuse à accu FAV5 CL/FORTIS
Problème Identification Cause Elimination
La tondeuse à accu FAV5 CL/
FORTIS ne démarre pas.
La tondeuse à accu FAV5 CL/
FORTIS s’arrête.
La tondeuse à accu FAV5 CL/
FORTIS ne se recharge pas
dans la station de recharge.
Contrôler la position de
l’interrupteur.
– Accu Li-ion défectueux Insérer un nouvel accu
– L’accu Li-ion n’est pas
– Accu Li-ion mis en cou-
– L’accu Li-ion est vide. Insérer un nouvel accu
Les indicateurs à DEL ne
s’allument pas.
L’accu Li-ion n’est pas
chargé.
inséré.
pure par le disjoncteur de
protection
– voir Chapitre Chargeur
Charger l’accu Li-ion.
Li-ion.
Insérer un nouvel accu
Li-ion.
Mettre l’interrupteur en
position d’arrêt puis à
nouveau en position de
marche.
Li-ion.
et accu Li-ion
7.2 Chargeur et accu Li-ion
Problème Identification Cause Elimination
Le chargeur ne répond pas. Les indicateurs à DEL ne
s’allument pas.
L’accu Li-ion n’est pas
chargé.
44
Le câble d’alimentation
électrique n’est pas branché.
Câble d’alimentation
électrique défectueux
Chargeur défectueux Faire réparer le produit
Brancher le câble d’alimentation électrique
dans la prise du chargeur et le brancher dans
la prise du réseau d’alimentation électrique.
Remplacer le câble
d’alimentation électrique.
chez le fabricant.
Page 47

Problème Identification Cause Elimination
L’accu Li-ion n’est pas
rechargé.
Accu Li-ion inséré, indicateur d’état de charge
non allumé
Contacts du chargeur
encrassés ou endommagés
Nettoyer les contacts
dans le compartiment
de recharge, voir Chapitre Nettoyage/décontamination ou faire réparer chez le fabricant.
Accu Li-ion défectueux Faire réparer l’accu
Li-ion chez le fabricant.
Chargeur défectueux Faire réparer le chargeur
chez le fabricant.
Une température excessive est détectée dans
l’accu Li-ion pendant le
processus de recharge.
Retirer l’accu Li-ion du
compartiment de
recharge, le laisser
refroidir et relancer le
processus de recharge.
En cas de nouveau dysfonctionnement, faire
réparer l’accu chez le
fabricant.
Perturbation du rechargement ou
accu Li-ion défectueux
Retirer l’accu Li-ion du
compartiment de
recharge et répéter le
processus de recharge,
le cas échéant dans
autre compartiment de
recharge.
En cas de nouveau dysfonctionnement
Faire réparer l’accu Liion chez le fabricant.
45
Page 48

Aesculap Suhl GmbH
Tondeuse à accu FAV5 CL/FORTIS
8. Service Technique
¾ Pour le service, la maintenance et la réparation,
adressez-vous à votre distributeur national
B. Braun/Aesculap.
Les modifications effectuées sur les équipements techniques médicaux peuvent entraîner une perte des
droits à garantie de même que d’éventuelles autorisations.
Adresses de service
Aesculap Suhl GmbH
Fröhliche-Mann-Strasse 15
98528 Suhl / Germany
Phone: +49 (0) 3681 49820
Fax: +49 (0) 3681 498234
E-mail: suhl@aesculap.de
www.aesculap-schermaschinen.de
Pour obtenir d’autres adresses de service, contactez
l’adresse ci-dessus.
46
Page 49

9. Accessoires/pièces de rechange
Art. n° Variante Câble secteur Accu
GT306/
GT380
GT306G/
GT380G
GT306J/
GT380J
GT306K/
GT380K
Europe
sauf GrandeBretagne
GrandeBretagne
Japon,
Mexique
110-125 V
Etats-Unis TA012168
TA012170
Fiche plate
Europe, noir,
L=1,8 m
TA012169
Fiche GB, noir,
L=1,8 m
TA012168
Fiche côté appareil
2 broches, noir,
L=1,8 m
Fiche côté appareil
2 broches, noir,
L=1,8 m
Li-ion
GT201 GT200880 GT300/GT380
GT201 GT200880 GT300/GT380
GT201 GT200880 GT300/GT380
GT201 GT200880 GT300/GT380
Station de
recharge
Tondeuse à
accu
non emballé
non emballé
non emballé
non emballé
Accessoires
GT604800
Burette
d’huile
GT604800
Burette
d’huile
GT604800
Burette
d’huile
GT604800
Burette
d’huile
47
Page 50

Aesculap Suhl GmbH
Tondeuse à accu FAV5 CL/FORTIS
10. Caractéristiques techniques
10.1 Tondeuse à accu FAV5 CL/FORTIS
Type d’appareil GT300/GT380
Nombre de courses 2 300 1/min
Tension de chargement/de
sortie
Intensité de chargement/de
sortie
Poids
(sans tête de tonte ni accu)
Poids
(avec tête de tonte et accu)
EN 60335-1, EN 60335-2-29
10.2 Chargeur
Type d’appareil GT203
Plage de tension réseau
(courant absorbé)
Fréquence 50-60 Hz
Tension de chargement/de
sortie
Intensité de chargement/de
sortie
Poids 495 g
Label de contrôle CE, UL
8,4 V max.
1,2 A max.
385 g
450 g
100-240 V
8,4 V max.
1,2 A max.
10.3 Accu Li-ion
Type d’appareil GT201
Type de pile rechargeable Li
Tension continue 7,4 V
Capacité env. 1,2 Ah
Durée de recharge 50 min ±5 min
10.4 Déclaration de conformité
Nous déclarons sous notre propre responsabilité que le présent produit est
conforme aux normes et documents
normatifs suivants:
2004/108/CE Directive CEM:
DIN EN 60335-1
DIN EN 60335-2-8
Sécurité des appareils électriques pour
usage domestique et similaire
- prescriptions générales
- pour les tondeuses de cheveux/
pelage
Aesculap Suhl GmbH
48
Page 51

11. Elimination
Les appareils électriques, les accessoires et l’emballage
doivent être recyclés dans le respect de l’environnement.
11.1 Uniquement pour les pays de l’UE
Ne pas jeter les appareils électriques
avec les déchets ménagers!
Conformément à la Directive européenne 2012/19/EU sur les appareils
électriques et électroniques usagés et
sa transposition dans le droit national,
les appareils électriques inutilisables
doivent être collectés séparément et
recyclés dans le respect de l’environnement.
11.2 Accus Li-ion
Ne pas jeter les accus avec les déchets ménagers, dans
le feu ni dans l’eau. Les accus défectueux ou usés doivent être collectés, recyclés ou éliminés dans le respect
de l’environnement conformément à la Directive 2006/
66/CE.
12. 2 ans de garantie
Chère cliente, cher client,
Nous vous remercions d’avoir acheté l’un de nos
produits.
La marque Aesculap est synonyme depuis des
décennies de qualité contrôlée et de service
remarquable. Nous offrons à nos clients des produits
innovants et performants. Aesculap fabrique des
appareils de qualité supérieure et vous garantit
l’utilisation de matériaux de qualité supérieure ainsi
qu’une fabrication soignée. Nous tenons à souligner
que nous ne sommes pas responsables des défauts de
nos produits s’ils résultent d’une utilisation incorrecte,
d’une usure normale ou du fait que le produit est
utilisé de manière inappropriée ou que des produits
d’autres marques ne fonctionnant pas parfaitement ou
non adéquats sont utilisés.
Les pièces qui subissent généralement une usure et
pour lesquelles nous ne donnons donc pas de garantie
sont l’accu et la tête de tonte. Les défauts qui
n’influencent pas ou très peu la valeur ou le
fonctionnement de l’appareil sont également exclus.
Si notre responsabilité est engagée dans le cadre de
notre garantie, nous nous réservons le droit de réparer
ou de remplacer le produit.
49
Page 52

Aesculap Suhl GmbH
Esquiladora a batería FAV5 CL/FORTIS
Leyenda
1 Soporte del cabezal de corte
2 Esquiladora a batería FAV5 CL/FORTIS
3 Desbloqueo de la batería
4 Cargador de acumuladores
5 Cable de red (con conector para aparatos)
6 Compartimento de carga (batería de iones de litio)
7 Indicador del nivel de carga (batería de iones de
litio)
8 Batería de iones de litio
9 Indicador del nivel de carga (esquiladora a batería
FAV5 CL/FORTIS)
10 Compartimento de carga (esquiladora a batería
FAV5 CL/FORTIS)
11 Interruptor de encendido/apagado
12 Cabezal de corte
Símbolos en el producto
Respetar las instrucciones de
uso
Identificación de equipos eléctricos y electrónicos de acuerdo
con la directiva 2012/19/EU
(RAEE), ver Capítulo Eliminación de residuos
Índice
1. Manipulación correcta ........................................51
2. Descripción del aparato ......................................51
2.1 Volumen de suministro .......................................51
2.2 Componentes necesarios para el servicio ......52
2.3 Finalidad de uso de la esquiladora a
batería FAV5 CL/FORTIS ......................................52
2.4 Finalidad de uso del cargador GT203/
de la batería de iones de litio GT201 ..............52
2.5 Modo de funcionamiento de la esquiladora
a batería FAV5 CL/FORTIS ...................................52
2.6 Modo de funcionamiento del cargador GT203/
de la batería de iones de litio GT201 ..............52
2.6.1 Principio de carga................................................. 52
2.6.2 Tiempo de carga.................................................... 52
3. Preparación e instalación ...................................53
4. Utilización de la esquiladora a batería
FAV5 CL/FORTIS, del cargador GT203/
de la batería de iones de litio GT201 ..............53
4.1 Puesta a punto ......................................................53
4.1.1 Conexión de los accesorios................................ 53
4.1.2 Colocación del cabezal de corte....................... 54
4.1.3 Conexión del cargador/Carga de la batería
de iones de litio..................................................... 54
4.2 Comprobación del funcionamiento de
la esquiladora a batería FAV5 CL/FORTIS .......55
4.3 Prueba de funcionamiento del cargador ........56
4.4 Manipulación del cabezal de corte ..................56
4.4.1 Afilado de la hoja de corte................................. 56
4.4.2 Cambio del cabezal de corte.............................. 56
4.4.3 Lubricación del cabezal de corte...................... 57
4.4.4 Cambio de la batería de iones de litio ............ 57
5. Trato y cuidado ......................................................58
5.1 Limpieza/Desinfección .........................................58
5.2 Control, conservación e inspección .................59
6. Mantenimiento ...................................................... 59
7. Identificación y subsanación de fallos ...........60
7.1 Esquiladora a batería FAV5 CL/FORTIS ...........60
7.2 Cargador y batería de iones de litio ................60
8. Servicio de Asistencia Técnica ..........................62
9. Accesorios/piezas de recambio .........................63
10. Datos técnicos .......................................................64
10.1 Esquiladora a batería FAV5 CL/FORTIS ...........64
50
Page 53

10.2 Cargador de acumuladores ................................64
10.3 Batería de iones de litio ......................................64
10.4 Declaración de conformidad ..............................64
11. Eliminación de residuos ......................................65
11.1 Sólo para países de la UE ....................................65
11.2 Baterías de iones de litio ....................................65
12. 2 años de garantía ................................................65
1. Manipulación correcta
Peligro de muerte por descarga
eléctrica.
¾ No abrir el producto (el cambio
PELIGRO
¾ Antes de utilizar el producto comprobar que fun-
cione y que se encuentre en perfecto estado.
¾ Almacenar el cargador y la batería de iones de litio
a temperatura ambiente.
¾ Mantener secos el cargador y la batería de iones de
litio.
¾ Cargar las baterías de iones de litio antes de utili-
zarlas por primera vez.
¾ Respetar las "Instrucciones sobre compatibilidad
electromagnética (CEM)".
¾ Para evitar daños causados por un montaje o uso
inadecuados y conservar así los derechos de garantía y responsabilidad del fabricante:
– Utilizar el producto sólo conforme a las presentes
instrucciones de uso.
– Respetar la información sobre las medidas de
seguridad y las instrucciones de mantenimiento.
– Los accesorios que no se incluyan en las instruc-
ciones de manejo se utilizarán sólo con autorización expresa del fabricante.
de compartimento de carga
constituye una excepción).
¾ Conectar el producto única-
mente a redes de suministro con
puesta a tierra.
¾ Confiar la aplicación y el uso del producto y de los
accesorios exclusivamente a personal con la formación requerida para ello o que disponga de los
conocimientos o experiencia necesarios.
¾ Conservar las instrucciones en un lugar accesible
para el operario.
¾ Cumplir con las normas vigentes.
¾ Asegurarse de que la instalación eléctrica de la sala
cumpla con los requisitos IEC.
¾ Para desconectar el aparato de la red, tirar del
enchufe, nunca del cable.
¾ No utilizar el producto en lugares expuestos a peli-
gro de explosión.
¾ No utilizar ningún producto dañado o defectuoso.
Retirar inmediatamente el producto si está dañado.
2. Descripción del aparato
2.1 Volumen de suministro
Descripción N.º art.
Esquiladora a batería FAV5 CL/
FORTIS
Batería de iones de litio GT201
Cargador de acumuladores GT203
Cable de red (con conector para
aparatos)
Instrucciones de manejo TA013440
Nota
La esquiladora FAV5 CL/FORTIS se suministra con el
cabezal de corte GT330 #10 (EE.UU.+GB). Se pueden
utilizar distintos cabezales de corte en función de la
aplicación.
GT300/GT380
ver Capítulo
Accesorios/piezas de recambio
51
Page 54

Aesculap Suhl GmbH
Esquiladora a batería FAV5 CL/FORTIS
2.2 Componentes necesarios para el
servicio
• Esquiladora a batería FAV5 CL/FORTIS
• Cabezal de corte
• Cargador de acumuladores
• Cable de red (con conector para aparatos)
• Batería de iones de litio
2.3 Finalidad de uso de la esquiladora a
batería FAV5 CL/FORTIS
La esquiladora a batería FAV5 CL/FORTIS se utiliza para
esquilar animales pequeños.
La esquiladora a batería FAV5 CL/FORTIS se debe utilizar con un cabezal de corte adecuado en función de la
aplicación.
2.4 Finalidad de uso del cargador
GT203/de la batería de iones de
litio GT201
El cargador GT203 se utiliza para cargar la esquiladora
a batería FAV5 CL/FORTIS y la batería de iones de litio.
Existe un compartimento de carga específico para cada
componente.
2.5 Modo de funcionamiento de la
esquiladora a batería FAV5 CL/
FORTIS
La esquiladora a batería FAV5 CL/FORTIS se enciende
deslizando el interruptor de encendido/apagado hacia
arriba y se apaga deslizándolo hacia abajo.
2.6 Modo de funcionamiento del cargador GT203/de la batería de iones de
litio GT201
El cargador GT203 ha sido diseñado para un rango de
tensión de 100 V a 240 V y unas frecuencias de 50 Hz
a 60 Hz.
Para que el cargador GT203 funcione se debe conectar
a la red eléctrica con el enchufe de red.
El cargador GT203 dispone de dos compartimentos de
carga. En el primer compartimento se carga la esquiladora a batería FAV5 CL/FORTIS y en el segundo la batería de iones de litio.
Cada compartimento de carga tiene asignado su cuadro indicador en el frontal del cargador.
El proceso de carga se inicia automáticamente después
de introducir una batería de iones de litio en la estación de carga.
El tiempo que tardan en cargarse las baterías en los
compartimentos va en función del nivel de carga y de
la capacidad de las baterías.
2.6.1 Principio de carga
La carga de las baterías de iones de litio se produce por
impulsos eléctricos constantes.
El cargador controla el nivel de carga de la batería de
iones de litio mientras ésta se carga. Con la vigilancia
del nivel de carga se garantiza la carga completa sin
que se produzca una sobrecarga.
El equipo vigila asimismo la temperatura de la batería
y el tiempo de carga.
El cargador realiza la vigilancia del nivel de carga de la
batería por medio de dos indicadores.
Indicadores LED:
• verde = batería cargada
• rojo = batería vacía
2.6.2 Tiempo de carga
Una vez agotado el tiempo de carga, se interrumpe el
proceso de carga.
El tiempo de carga es de unos 50 minutos.
52
Page 55

3. Preparación e instalación
Si no se observan las siguientes normas, Aesculap
declina cualquier responsabilidad.
¾ Al instalar y poner en funcionamiento el producto,
deberán respetarse:
– los reglamentos de instalación y operación vigen-
tes a nivel nacional,
– y las directrices vigentes a nivel nacional para la
prevención de explosiones e incendios.
– Instrucciones de utilización según las normas IEC/
VDE.
Peligro de incendio y de explosión.
¾ No utilizar el producto en luga-
res expuestos a peligro de
PELIGRO
ATENCIÓN
explosión.
El producto no funcionará bien o se
dañará si no coloca en el lugar adecuado.
¾ No exponer el producto a la
radiación directa del sol ni a la
humedad.
¾ No cubrir las ranuras de ventila-
ción del producto.
¾ Conectar el producto a redes
con una tensión nominal de
100 V a 240 V y un rango de
frecuencias de 50 Hz a 60 Hz.
¾ Asegurarse de que la toma de
corriente de la red de suministro
de la tensión de alimentación
del producto se encuentre accesible.
4. Utilización de la esquiladora a
batería FAV5 CL/FORTIS, del
cargador GT203/de la batería
de iones de litio GT201
4.1 Puesta a punto
4.1.1 Conexión de los accesorios
Las combinaciones de accesorios no mencionadas en
las instrucciones de manejo sólo podrán utilizarse si se
indica expresamente que son adecuadas para la utilización prevista. No deben influir negativamente en las
características de rendimiento ni los requisitos de
seguridad.
¾ En caso de duda, consulte a la persona de contacto
correspondiente de B. Braun/Aesculap o al Servicio
de Atención al Cliente de Aesculap, dirección ver
Capítulo Servicio de Asistencia Técnica.
53
Page 56

Aesculap Suhl GmbH
Esquiladora a batería FAV5 CL/FORTIS
4.1.2 Colocación del cabezal de corte
Peligro de lesiones por el filo cortante de las hojas de corte.
¾ Manipular con cuidado el cabe-
ADVERTENCIA
Nota
La esquiladora FAV5 CL/FORTIS se suministra con el
cabezal de corte GT330 #10 (EE.UU.+GB). Se pueden
utilizar distintos cabezales de corte en función de la
aplicación.
zal de corte de la esquiladora
FAV5 CL/FORTIS.
13
Fig. 1
¾ Si la bisagra del cabezal está cerrada: abrir la bisa-
gra del cabezal 13 con un destornillador, ver Fig. 1.
¾ Conectar el cabezal de corte 12 a la bisagra del
cabezal 13 abierta, ver Fig. 2.
¾ Accionar el interruptor 11.
¾ Empujar suavemente el cabezal de corte 12 hacia
la esquiladora FAV5 CL/FORTIS, ver Fig. 2.
El cabezal de corte 12 se enclava de forma audible.
¾ Comprobar que el cabezal de corte 12 se asienta
correctamente en la esquiladora FAV5 CL/FORTIS.
4.1.3 Conexión del cargador/Carga de la
batería de iones de litio
Peligro de incendio por cortocircuito de los polos a causa de líquidos o piezas de metal.
ADVERTENCIA
ADVERTENCIA
¾ No cortocircuitar la batería de
iones de litio.
Peligro de lesiones y daños materiales si la batería de iones de litio
está en mal estado.
¾ Comprobar que la batería de
iones de litio no presenta daños
antes de iniciar la carga.
¾ No utilizar la batería de iones de
litio si presenta algún daño.
Fig. 2
54
12
13
ATENCIÓN
Pérdida de la capacidad/del rendimiento de la batería de iones de
litio si se almacena descargada
durante demasiado tiempo.
¾ Cargar siempre por completo la
batería de iones de litio antes de
almacenarla durante periodos
largos y recargarla una vez al
mes.
Page 57

Peligro de destrucción del producto,
del compartimento de carga o de la
batería de iones de litio si se intro-
ATENCIÓN
Nota
Apagar siempre la esquiladora a batería FAV5 CL/
FORTIS antes de la carga.
Nota
Las baterías de iones de litio se calientan ligeramente
durante la carga.
Nota
Cuando no se vaya a utilizar el cargador se desenchu-
fará siempre el cable de red de la toma de corriente.
¾ Conexión del cargador 4: Enchufar el conector para
aparatos del cable de red 5 en el cargador 4.
¾ Conectar el enchufe de red del cable de red 5 a la
toma de corriente.
¾ Colocar la batería de iones de litio 8 en el compar-
timento de carga 6 del cargador 4 y cargarla.
- o -
¾ Colocar la esquiladora a batería FAV5 CL/FORTIS 2
en el compartimento de carga 10del cargador 4 y
cargarla.
El indicador del nivel de carga 7 o el indicador del
nivel de carga 9 se ilumina en rojo.
Después de la carga, el indicador del nivel de
carga 7/9 se ilumina en verde y la esquiladora a
batería FAV5 CL/FORTIS 2/la batería de iones de
litio 8 se encuentra lista para funcionar.
duce una batería incorrecta en el
compartimento de carga.
¾ Introducir la batería de iones de
litio sólo en el compartimento
de carga que le corresponde.
¾ Introducir la batería de iones de
litio en la posición correcta.
4.2 Comprobación del funcionamiento
de la esquiladora a batería
FAV5 CL/FORTIS
¾ Realizar una inspección visual.
¾ Comprobar la posición del selector.
¾ Introducir la batería, ver Capítulo Cambio de la
batería de iones de litio.
¾ Conectar correctamente el cabezal de corte y, si es
necesario, lubricarlo, ver Capítulo Manipulación
del cabezal de corte.
¾ Tener preparada la batería de iones de litio car-
gada.
¾ Limpiar la esquiladora a batería FAV5 CL/FORTIS
antes de utilizarla, ver Capítulo Limpieza/Desinfección.
55
Page 58

Aesculap Suhl GmbH
Esquiladora a batería FAV5 CL/FORTIS
4.3 Prueba de funcionamiento del cargador
¾ Realizar una inspección visual.
¾ Antes de conectar el producto a la red:
– Comprobar que el cable de red 5 no está dañado.
– Comprobar que el producto no presenta daños
(p. ej. que los contactos de los compartimentos de
carga no están deformados).
¾ Enchufar el cable de red 5 en la estación de carga.
¾ Conectar el enchufe de red a la toma de corriente
de la red.
¾ Colocar la batería de iones de litio 8 en el compar-
timento de carga 6 del cargador 4 y cargarla.
- o -
¾ Colocar la esquiladora a batería FAV5 CL/FORTIS 2
en el compartimento de carga 10del cargador 4 y
cargarla.
El indicador del nivel de carga 7 o el indicador del
nivel de carga 9 se ilumina en rojo.
Después de la carga, el indicador del nivel de
carga 7/9 se ilumina en verde y la esquiladora a
batería FAV5 CL/FORTIS 2/la batería de iones de
litio 8 se encuentra lista para funcionar.
El producto está listo para el funcionamiento.
4.4 Manipulación del cabezal de corte
4.4.1 Afilado de la hoja de corte
Nota
En caso de que sea necesario afilar la hoja de corte, dirí-
jase al Servicio de Asistencia Técnica, ver Capítulo Servicio de Asistencia Técnica.
4.4.2 Cambio del cabezal de corte
Peligro de lesiones por el filo cortante de las hojas de corte.
¾ Manipular con cuidado el cabe-
ADVERTENCIA
zal de corte de la esquiladora
FAV5 CL/FORTIS.
14
Fig. 3
¾ Accionar el interruptor 11 para apagar la esquila-
dora FAV5 CL/FORTIS.
¾ Presionar el bloqueo del cabezal de corte 14, ver
Fig. 3.
56
Page 59

12
4.4.4 Cambio de la batería de iones de litio
2
Fig. 4
¾ Empujar el cabezal de corte 12 hacia delante, ver
Fig. 4.
¾ Retirar el cabezal de corte 12.
¾ Limpiar con un pincel la bisagra abierta del cabe-
zal.
¾ Conectar el cabezal de corte 12 a la bisagra del
cabezal.
¾ Enchufar el cable de red de la esquiladora a batería
FAV5 CL/FORTIS.
¾ Accionar el interruptor 11.
¾ Empujar suavemente el cabezal de corte 12 hacia
la esquiladora a batería FAV5 CL/FORTIS.
El cabezal de corte 12 se enclava de forma audible.
¾ Comprobar que el cabezal de corte 12 se asienta
correctamente en la esquiladora a batería FAV5 CL/
FORTIS.
4.4.3 Lubricación del cabezal de corte
¾ Limpiar las hojas de corte inferior y superior con un
trapo suave o con un pincel. Asegurarse de que los
espacios entre los dientes quedan bien limpios.
¾ Lubricar las placas superior e inferior ligeramente
con el aceite especial para cabezales GT604.
8
3
2
3
Fig. 5
¾ Sujetar la esquiladora a batería FAV5 CL/FORTIS 2
y apretar el desbloqueo de la batería 3.
¾ Extraer la batería de iones de litio 8 de la esquila-
dora a batería FAV5 CL/FORTIS 2.
¾ Introducir hasta el tope la batería de iones de litio8
cargada en la esquiladora a batería FAV5 CL/
FORTIS 2.
La esquiladora a batería FAV5 CL/FORTIS 2 está
lista para funcionar.
57
Page 60

Aesculap Suhl GmbH
Esquiladora a batería FAV5 CL/FORTIS
5. Trato y cuidado
El producto se dañará o se destruirá
si se somete a una limpieza/desinfección o esterilización automática.
ATENCIÓN
5.1 Limpieza/Desinfección
Nota
Respetar las normas higiénicas y de eliminación de residuos.
Limpieza/desinfección manuales
PELIGRO
¾ Limpiar/desinfectar el producto
sólo manualmente.
¾ No esterilizar nunca el producto.
Riesgo de descargas eléctricas e
incendios.
¾ Desconectar el aparato del
enchufe de red antes de limpiar.
¾ Asegurarse de que no penetra
ningún líquido en el producto.
¾ Tras la limpieza/desinfección,
dejar ventilar al menos durante
1 minuto.
Peligro de dañar el producto debido
una limpieza incorrecta o al uso de
desinfectantes/agentes de limpieza
ATENCIÓN
¾ Limpiar la carcasa del producto con un paño sin
pelusa humedecido con un desinfectante convencional.
¾ Eliminar los posibles restos del agente de limpieza
y desinfección una vez finalizado su tiempo de
actuación con un paño sin pelusa humedecido en
agua clara.
¾ Para el secado, utilizar un paño limpio y sin pelusa.
¾ Limpiar los contactos de los compartimentos de
carga con isopropanol o alcohol etílico y un bastoncillo de algodón. No utilizar productos químicos
que puedan provocar corrosión.
¾ Si es necesario, repetir la limpieza/desinfección.
no adecuados.
¾ Utilizar un producto de limpieza
convencional para la limpieza de
la superficie.
¾ No sumergir nunca el producto
en agua o en el agente de limpieza.
¾ No introducir líquidos en los
compartimentos de carga.
¾ Limpiar los contactos de los
compartimentos de carga con
sumo cuidado.
58
Page 61

5.2 Control, conservación e inspección
¾ Dejar que el producto se enfríe a temperatura
ambiente.
¾ Tras limpiar y desinfectar el producto, comprobar
que: esté limpio, funcione debidamente y no tenga
defectos.
¾ Si es necesario, lubricar el cabezal de corte, ver
Capítulo Lubricación del cabezal de corte.
¾ Comprobar que el producto no presenta daños, rui-
dos de funcionamiento anormales, sobrecalentamiento ni una vibración excesiva.
¾ Comprobar que las hojas de corte no están frag-
mentadas, dañadas ni desafiladas.
¾ Retirar inmediatamente el producto si está dañado.
6. Mantenimiento
Para garantizar un funcionamiento fiable, Aesculap
recomienda realizar un mantenimiento una vez al año.
Si el producto necesita alguna reparación debe dirigirse al representante de B. Braun/Aesculap de su país,
ver Capítulo Servicio de Asistencia Técnica.
Direcciones de la Asistencia Técnica
Aesculap Suhl GmbH
Fröhliche-Mann-Straße 15
98528 Suhl / Germany
Phone: +49 (0) 3681 49820
Fax: +49 (0) 3681 498234
E-Mail: suhl@aesculap.de
www.aesculap-schermaschinen.de
En la dirección especificada anteriormente se le facilitará información sobre otras direcciones de Asistencia
Técnica.
59
Page 62

Aesculap Suhl GmbH
Esquiladora a batería FAV5 CL/FORTIS
7. Identificación y subsanación de fallos
7.1 Esquiladora a batería FAV5 CL/FORTIS
Fallo Detección Causa Subsanación
La esquiladora a batería
FAV5 CL/FORTIS no funciona con
La esquiladora a batería
FAV5 CL/FORTIS se para
La esquiladora a batería
FAV5 CL/FORTIS no se
carga en la estación de
carga
Comprobar la posición
del interruptor
– Batería de iones de litio
– No se ha introducido la
– El circuito de protección
– La batería de iones de
Los indicadores LED no se
iluminan
No se ha cargado la batería de iones de litio
defectuosa
batería de iones de litio
ha desconectado la batería de iones de litio
litio está descargada
– ver Capítulo Cargador y
Cargar la batería de iones
de litio
Introducir una batería de
iones de litio nueva
Introducir una batería de
iones de litio nueva
Apagar y encender la
esquiladora
Introducir una batería de
iones de litio nueva
batería de iones de litio
7.2 Cargador y batería de iones de litio
Fallo Detección Causa Subsanación
El cargador no funciona Los indicadores LED no
se iluminan
No se ha cargado la
batería de iones de litio
60
No se ha conectado el
cable de red
Cable de red defectuoso Cambiar el cable de red
Cargador defectuoso Encargar al fabricante la
Enchufar el cable de red
en el cargador y en la
toma de la red
reparación del producto
Page 63

Fallo Detección Causa Subsanación
La batería de iones de litio
no se carga
Se ha encajado la batería de iones de litio pero
el indicador del nivel de
carga no se ilumina
Los contactos del cargador están sucios o dañados
Limpiar los contactos del
compartimento de carga,
ver Capítulo Limpieza/
Desinfección o encargar
la reparación al fabricante
Batería de iones de litio
defectuosa
Encargar al fabricante la
reparación de la batería
de iones de litio
Cargador defectuoso Encargar al fabricante la
reparación del cargador
Durante la carga se ha
detectado un sobrecalentamiento de la batería de
iones de litio
Retirar la batería de
iones de litio del compartimento de carga,
dejarla enfriar e iniciar
de nuevo la carga.
Se se produce otro fallo,
encargar al fabricante la
reparación del acumulador
Fallo de carga o
batería de iones de litio
defectuosa
Retirar la batería de
iones de litio del compartimento de carga y
repetir la carga, si es
necesario, en otro compartimento.
Si se produce otro fallo,
encargar al fabricante la
reparación de la batería
de iones de litio
61
Page 64

Aesculap Suhl GmbH
Esquiladora a batería FAV5 CL/FORTIS
8. Servicio de Asistencia Técnica
¾ Para asistencia técnica, mantenimiento y repara-
ciones, diríjase a su distribuidor nacional de
B. Braun/Aesculap.
Si se realizan modificaciones en el equipo médico técnico, se extinguirá la garantía y el derecho de garantía,
así como las posibles homologaciones.
Direcciones de la Asistencia Técnica
Aesculap Suhl GmbH
Fröhliche-Mann-Straße 15
98528 Suhl / Germany
Phone: +49 (0) 3681 49820
Fax: +49 (0) 3681 498234
E-Mail: suhl@aesculap.de
www.aesculap-schermaschinen.de
En la dirección especificada anteriormente se le facilitará información sobre otras direcciones de Asistencia
Técnica.
62
Page 65

9. Accesorios/piezas de recambio
N.º art. Versión Cable de red Batería de
GT306/
GT380
GT306G/
GT380G
GT306J/
GT380J
GT306K/
GT380K
Europa
excepto Gran
Bretaña
Gran Bretaña TA012169
Japón,
México
110-125 V
EE. UU. TA012168
TA012170
Euroconector
plano, negro,
L=1,8 m
Conector UK,
negro,
L=1,8 m
TA012168
Conector para
aparatos de
2polos, negro,
L=1,8 m
L=1,8 m
Conector para
aparatos de
2polos, negro,
L=1,8 m
L=1,8 m
iones de
litio
GT201 GT200880 GT300/GT380
GT201 GT200880 GT300/GT380
GT201 GT200880 GT300/GT380
GT201 GT200880 GT300/GT380
Estación de
carga
Esquiladora
a batería
Sin embalaje
Sin embalaje
Sin embalaje
Sin embalaje
Accesorios
GT604800
Aceitera
GT604800
Aceitera
GT604800
Aceitera
GT604800
Aceitera
63
Page 66

Aesculap Suhl GmbH
Esquiladora a batería FAV5 CL/FORTIS
10. Datos técnicos
10.1 Esquiladora a batería FAV5 CL/
FORTIS
Tipo de aparato GT300/GT380
Velocidad 2 300 1/min
Tensión de carga/salida máx. 8,4 V
Corriente de carga/salida máx. 1,2 A
Peso
(sin cabezal de corte ni batería)
Peso
(con cabezal de corte y batería)
EN 60335-1, EN 60335-2-29
10.2 Cargador de acumuladores
Tipo de aparato GT203
Rango de tensión
(potencia absorbida)
Frecuencia 50-60 Hz
Tensión de carga/salida máx. 8,4 V
Corriente de carga/salida máx. 1,2 A
Peso 495 g
Marca de verificación CE, UL
385 g
450 g
100-240 V
10.3 Batería de iones de litio
Tipo de aparato GT201
Elementos del acumulador Li
Tensión de corriente continua
Capacidad aprox. Ah
Tiempo de carga 50 min ±5 min
7,4 V
10.4 Declaración de conformidad
Declaramos, bajo responsabilidad propia, que este producto cumple las
siguientes normas o documentos normativos:
2004/108/EG Directriz de CEM:
DIN EN 60335-1
DIN EN 60335-2-8
Seguridad de los aparatos electrodomésticos y análogos
- Requisitos generales
- Requisitos particulares para
máquinas de cortar el pelo
Aesculap Suhl GmbH
64
Page 67

11. Eliminación de residuos
Reciclar de forma ecológica las herramientas eléctricas, sus accesorios y sus envases.
11.1 Sólo para países de la UE
No deseche las herramientas eléctricas con la basura doméstica.
En virtud de la Directiva europea
2012/19/EU sobre residuos de aparatos eléctricos y electrónicos, y su
transposición, las herramientas eléctricas que han dejado de ser aptas
para el uso deben eliminarse mediante
una recogida selectiva y reciclarse de
forma ecológica.
11.2 Baterías de iones de litio
No desechar las baterías con la basura doméstica ni
arrojándolas al fuego ni al agua. Las baterías defectuosas o usadas se deben recoger, reciclar o eliminar de
forma respetuosa con el medio ambiente según lo dispuesto en la Directiva 2006/66/EG.
12. 2 años de garantía
Apreciado cliente, apreciada clienta:
Le damos las gracias por haber elegido un producto de
nuestra casa.
Ya desde hace varias décadas, se asocia la marca
Aesculap con productos de acreditada calidad y con un
excelente servicio técnico. Ofrecemos a nuestros
clientes productos innovadores y con elevadas
prestaciones. Aesculap fabrica aparatos de primera
calidad y le garantiza el empleo de materiales de alta
calidad, así como un proceso de producción impecable.
Nos gustaría indicar asimismo que no respondemos de
los defectos materiales de nuestros productos cuando
se derivan de un uso inadecuado, del desgaste natural
del producto o de sus consecuencias, ni cuando no se
utilice el producto debidamente ni cuando se use con
productos de terceros que sean inapropiados o no
funcionen correctamente.
Las piezas que, por lo general, se desgastan son el
cabezal de corte y la batería y, por lo tanto, no
respondemos de ellas. Asimismo, quedan excluidos
aquellos defectos que no afectan o sólo afectan de
forma insignificante al valor o la función del producto.
En el caso de responder en el ámbito de nuestra
garantía, nos reservamos el derecho de reparar o
sustituir el producto.
65
Page 68

Aesculap Suhl GmbH
Tosatrice ad accumulatore FAV5 CL/FORTIS
Legenda
1 Supporto per testa di tosatura
2 Tosatrice ad accumulatore FAV5 CL/FORTIS
3 Sblocco accumulatore
4 Caricabatterie
5 Cavo di allacciamento alla rete (con spina apparec-
chio)
6 Pozzetto (per accumulatore a ioni di litio)
7 Indicatore della condizione di carica (per accumu-
latore a ioni di litio)
8 Accumulatore a ioni di litio
9 Indicatore della condizione di carica (per tosatrice
ad accumulatore FAV5 CL/FORTIS)
10 Pozzetto (per tosatrice ad accumulatore FAV5 CL/
FORTIS)
11 Interruttore di accensione/spegnimento
12 Testa di tosatura
Simboli del prodotto
Rispettare le istruzioni per l'uso
Marchio degli apparecchi elettrici ed elettronici conformi alla
direttiva 2012/19/EU (RAEE),
vedere Capitolo Smaltimento
Indice
1. Manipolazione sicura ..........................................67
2. Descrizione dell’apparecchio .............................67
2.1 Corredo di fornitura .............................................67
2.2 Componenti necessari alla messa in
funzione ...................................................................68
2.3 Destinazione d'uso della tosatrice
ad accumulatore FAV5 CL/FORTIS ...................68
2.4 Destinazione d'uso del caricabatterie
GT203/accumulatore a ioni di litio GT201 ....68
2.5 Funzionamento della tosatrice ad
accumulatore FAV5 CL/FORTIS .........................68
2.6 Funzionamento del caricabatterie
GT203/accumulatore a ioni di litio GT201 ....68
2.6.1 Principio di carica................................................. 68
2.6.2 Durata della carica............................................... 68
3. Preparazione ed installazione ...........................69
4. Lavorare con la tosatrice ad accumulatore
FAV5 CL/FORTIS, il caricabatterie
GT203/l'accumulatore a ioni di litio GT201 .. 69
4.1 Messa in funzione ................................................69
4.1.1 Collegamento degli accessori............................ 69
4.1.2 Inserimento della testa di tosatura.................. 70
4.1.3 Collegamento del caricabatterie/
ricarica dell'accumulatore a ioni di litio ........ 70
4.2 Controllo del funzionamento della tosatrice
ad accumulatore FAV5 CL/FORTIS ...................71
4.3 Controllo del funzionamento del
caricabatterie .........................................................72
4.4 Manipolazione della testa di tosatura ............72
4.4.1 Affilatura dei pettini............................................ 72
4.4.2 Sostituzione della testa di tosatura................. 72
4.4.3 Oliatura della testa di tosatura......................... 73
4.4.4 Sostituzione dell'accumulatore a ioni di litio 73
5. Preparazione sterile ..............................................74
5.1 Pulizia/Disinfezione ..............................................74
5.2 Controllo, cura e verifica ....................................75
6. Manutenzione ........................................................75
7. Identificazione ed eliminazione dei guasti .... 76
7.1 Tosatrice ad accumulatore FAV5 CL/FORTIS .76
7.2 Caricabatterie e accumulatore a ioni di litio 76
8. Assistenza tecnica ................................................78
9. Accessori/Ricambi .................................................79
66
Page 69

10. Specifiche tecniche ..............................................80
10.1 Tosatrice ad accumulatore FAV5 CL/FORTIS .80
10.2 Caricabatterie ........................................................80
10.3 Accumulatore a ioni di litio ...............................80
10.4 Dichiarazione di conformità ..............................80
11. Smaltimento ...........................................................81
11.1 Soltanto per i paesi CE ........................................81
11.2 Accumulatori a ioni di litio ................................81
12. 2 anni di garanzia .................................................81
1. Manipolazione sicura
Le scosse elettriche comportano
pericolo di morte!
¾ Non aprire il prodotto (eccetto
PERICOLO
per sostituire il pozzetto).
¾ Utilizzare il prodotto soltanto su
una rete elettrica con conduttore di protezione.
– Gli accessori non menzionati nelle istruzioni per
l'uso possono essere usati solo con il consenso del
produttore.
¾ Far usare il prodotto e gli accessori solo a personale
che disponga di adeguata formazione, conoscenze
ed esperienze.
¾ Conservare le istruzioni per l’uso in modo che siano
accessibili per l’utente.
¾ Rispettare le norme vigenti.
¾ Accertarsi che l'impianto elettrico dell'ambiente
sia conforme ai requisiti CEI.
¾ Staccare la spina dalla presa di rete afferrando
sempre la spina, mai tirando il cavo.
¾ Non utilizzare il prodotto in settori a rischio di
esplosione.
¾ Se il prodotto è guasto o danneggiato, non utiliz-
zarlo. Se il prodotto è danneggiato, scartarlo
immediatamente.
2. Descrizione dell’apparecchio
¾ Prima di utilizzare il prodotto verificarne l’idoneità
funzionale ed accertarsi che sia in perfette condizioni.
¾ Conservare il caricabatterie e gli accumulatori a
ioni di litio a temperatura ambiente.
¾ Mantenere asciutti il caricabatterie e gli accumu-
latori a ioni di litio.
¾ Prima del primo utilizzo caricare gli accumulatori a
ioni di litio.
¾ Rispettare le “Avvertenze sulla compatibilità elet-
tromagnetica (CEM)”.
¾ In questo modo è possibile evitare danni dovuti a
un montaggio o un esercizio non corretto e che,
come tali, pregiudicano la garanzia:
– Utilizzare il prodotto solo in conformità alle pre-
senti istruzioni per l’uso.
– Rispettare le informazioni sulla sicurezza e le
avvertenze per la manutenzione.
2.1 Corredo di fornitura
Descrizione Cod. art.
Tosatrice ad accumulatore FAV5
CL/FORTIS
Accumulatore a ioni di litio GT201
Caricabatterie GT203
Cavo di allacciamento alla rete
(con spina apparecchio)
Istruzioni per l'uso TA013440
Nota
La testa di tosatura GT330 #10 (USA+GB) della tosa-
trice FAV5 CL/FORTIS è compresa nel corredo di fornitura. Possono essere impiegate tes te di tosatura diverse
a seconda dell’applicazione!
GT300/GT380
vedere Capitolo
Accessori/
Ricambi
67
Page 70

Aesculap Suhl GmbH
Tosatrice ad accumulatore FAV5 CL/FORTIS
2.2 Componenti necessari alla messa in
funzione
• Tosatrice ad accumulatore FAV5 CL/FORTIS
• Testa di tosatura
• Caricabatterie
• Cavo di allacciamento alla rete (con spina apparec-
chio)
• Accumulatore a ioni di litio
2.3 Destinazione d'uso della tosatrice
ad accumulatore FAV5 CL/FORTIS
La tosatrice ad accumulatore FAV5 CL/FORTIS serve a
tosare piccoli animali.
La tosatrice ad accumulatore FAV5 CL/FORTIS deve
essere utilizzata con una testa di tosatura adatta
all'applicazione.
2.4 Destinazione d'uso del caricabatterie GT203/accumulatore a ioni di
litio GT201
Il caricabatterie GT203 serve a ricaricare la tosatrice ad
accumulatore FAV5 CL/FORTIS e l'accumulatore a ioni
di litio. Vi è un pozzetto per ciascuno dei due componenti.
2.5 Funzionamento della tosatrice ad
accumulatore FAV5 CL/FORTIS
La tosatrice ad accumulatore FAV5 CL/FORTIS si
accende portando l'interruttore di accensione/spegnimento nella posizione in alto e si spegne portando il
medesimo interruttore nella posizione in basso.
2.6 Funzionamento del caricabatterie
GT203/accumulatore a ioni di litio
GT201
Il caricabatterie GT203 è concepito per l'intervallo di
tensione di rete da 100 V a 240 V e da 50 Hz a 60 Hz.
Per renderlo idoneo a funzionare il caricabatterie
GT203 è collegato alla rete elettrica tramite la spina.
Il caricabatterie GT203 ha due pozzetti. Nel primo pozzetto è caricata la tosatrice ad accumulatore FAV5 CL/
FORTIS e nel secondo l'accumulatore a ioni di litio.
Ognuno dei pozzetti di carica corrisponde ad un proprio campo d'indicazione sul frontalino del caricabatterie.
Il procedimento di carica ha inizio automaticamente
quando nella stazione di carica è inserito un accumulatore a ioni di litio.
La durata della carica nei pozzetti dipende dalla condizione di carica e dalla capacità degli accumulatori a
ioni di litio.
2.6.1 Principio di carica
Gli accumulatori a ioni di litio sono caricati medianteimpulsi di corrente costanti.
La condizione di carica dell'accumulatore a ioni di litio
è sorvegliata durante la ricarica. Il monitoraggio della
curva di carico assicura una carica al 100 % senza
sovraccariche.
Inoltre vengono monitorate la temperatura e la durata
della carica degli accumulatori.
Il caricabatterie sorveglia la condizione di carica con
due indicatori della condizione di carica.
Indicatori LED:
• verde = accumulatore pieno
• rosso = accumulatore vuoto
2.6.2 Durata della carica
Al raggiungimento della durata massima della carica,
il procedimento di carica è interrotto.
La durata della carica è di circa 50 min.
68
Page 71

3. Preparazione ed installazione
Il mancato rispetto delle seguenti disposizioni fa sì che
Aesculap non si assuma alcuna garanzia in merito.
¾ Nell'installazione e l'esercizio del prodotto è neces-
sario rispettare:
– le norme nazionali sull'installazione ed i gestori,
– le norme nazionali antincendio ed antideflagra-
zione.
– Avvertenze per l'impiego come da disposizioni
CEI/VDE.
Pericolo di incendi ed esplosioni!
¾ Non utilizzare il prodotto in set-
tori a rischio di esplosione.
PERICOLO
Compromissioni del funzionamento
o danni al prodotto causati da
installazioni non idonee!
ATTENZIONE
¾ Non esporre il prodotto a radia-
zioni solari dirette o all'umidità.
¾ Non coprire la feritoia di venti-
lazione del prodotto.
¾ Collegare a tensione nominale
compresa tra 100 V e 240 V e a
un intervallo di frequenza di
rete di 50 Hz e 60 Hz.
¾ Accertarsi che la presa della rete
di alimentazione usata per il
prodotto sia liberamente accessibile.
4. Lavorare con la tosatrice ad
accumulatore FAV5 CL/FORTIS, il caricabatterie GT203/
l'accumulatore a ioni di litio
GT201
4.1 Messa in funzione
4.1.1 Collegamento degli accessori
Le combinazioni di accessori non menzionate nelle
istruzioni per l’uso possono essere utilizzate soltanto
se espressamente destinate all’applicazione prevista.
Caratteristiche e sicurezza non devono risultare pregiudicate.
¾ Per eventuali domande rivolgersi al partner B.
Braun/Aesculap o all’Assistenza Tecnica Aesculap,
indirizzo vedere Capitolo Assistenza tecnica.
69
Page 72

Aesculap Suhl GmbH
Tosatrice ad accumulatore FAV5 CL/FORTIS
4.1.2 Inserimento della testa di tosatura
Pericoli di lesioni causate dai pettini taglienti!
¾ Maneggiare la testa di tosatura
AVVERTENZA
Nota
La testa di tosatura GT330 #10 (USA+GB) della tosatrice FAV5 CL/FORTIS è compresa nel corredo di fornitura. Possono essere impiegate teste di tosatura diverse
a seconda dell’applicazione!
della tosatrice FAV5 CL/FORTIS
con estrema cautela.
13
Fig. 1
¾ Con la cerniera delle lame chiusa: Aprire la cerniera
delle lame 13 con il cacciavite, vedere Fig. 1.
¾ Inserire la testa di tosatura 12 sulla cerniera delle
lame 13 aperta, vedere Fig. 2.
¾ Premere l’interruttore di accensione/
spegnimento 11.
¾ Spingere leggermente la testa di tosatura 12 nella
direzione della tosatrice FAV5 CL/FORTIS, vedere
Fig. 2.
La testa di tosatura 12 scatta in posizione con un
rumore percettibile.
¾ Accertarsi che la testa di tosatura 12 sia corretta-
mente posizionata sulla tosatrice FAV5 CL/FORTIS.
4.1.3 Collegamento del caricabatterie/rica-
rica dell'accumulatore a ioni di litio
Pericolo di incendio in caso di cortocircuito dei poli causato da liquidi
o parti metalliche!
AVVERTENZA
AVVERTENZA
¾ Non cortocircuitare l'accumula-
tore a ioni di litio.
Pericolo di lesioni e danni materiali
da accumulatori a ioni di litio danneggiati!
¾ Prima di ricaricare gli accumu-
latori a ioni di litio controllare
che non siano danneggiati.
¾ Non usare o ricaricare accumu-
latori a ioni di litio danneggiati.
Fig. 2
70
12
13
ATTENZIONE
Perdite di capacità/degrado delle
prestazioni degli accumulatori a
ioni di litio scarichi da lunghe conservazioni!
¾ In caso di lunghe conservazioni,
conservare gli accumulatori a
ioni di litio soltanto a piena
carica e ricaricandoli una volta
al mese.
Page 73

Distruzioni del prodotto, del pozzetto di carica o dell'accumulatore
a ioni di litio causate dall'inseri-
ATTENZIONE
Nota
Prima della procedura di carica spegne re la tosatrice ad
accumulatore FAV5 CL/FORTIS!
Nota
Durante il procedimento di carica gli accumulatori a
ioni di litio si surriscaldano leggermente.
Nota
Quando non si lavora con il caricabatterie, il cavo di
allacciamento alla rete deve essere staccato dalla
presa!
¾ Collegare il caricabatterie 4: Inserire la spina appa-
recchio del cavo di allacciamento alla rete 5 nel
caricabatterie 4.
¾ Inserire la spina del cavo di allacciamento alla
rete 5 nella presa.
¾ Mettere l'accumulatore a ioni di litio 8 nel poz-
zetto 6 del caricabatterie 4 e ricaricarlo.
- oppure -
¾ Mettere la tosatrice ad accumulatore FAV5 CL/
FORTIS 2 nel pozzetto 10 del caricabatterie 4 ericaricarla.
L'indicatore della condizione di carica 7 o 9 si illuminano in colore rosso.
mento di modelli di accumulatore
errati nel pozzetto di carica!
¾ Inserire gli accumulatori a ioni
di litio soltanto negli appositi
pozzetti.
¾ Inserire gli accumulatori a ioni
di litio rispettando la posizione
corretta.
Dopo il procedimento di carica l'indicatore della
condizione di carica 7/9 si illuminano in colore
verde e la tosatrice ad accumulatore FAV5 CL/
FORTIS 2/l'accumulatore a ioni di litio 8 sono
pronti a funzionare.
4.2 Controllo del funzionamento della
tosatrice ad accumulatore FAV5 CL/
FORTIS
¾ Eseguire un controllo visivo.
¾ Verificare la posizione dell'interruttore.
¾ Inserire l'accumulatore, vedere Capitolo Sostitu-
zione dell'accumulatore a ioni di litio.
¾ Inserire correttamente ed eventualmente oliare la
testa di tosatura, vedere Capitolo Manipolazione
della testa di tosatura.
¾ Tenere a portata di mano l'accumulatore a ioni di
litio di riserva carico.
¾ Prima dell'uso pulire la tosatrice ad accumulatore
FAV5 CL/FORTIS, vedere Capitolo Pulizia/Disinfezione.
71
Page 74

Aesculap Suhl GmbH
Tosatrice ad accumulatore FAV5 CL/FORTIS
4.3 Controllo del funzionamento del
caricabatterie
¾ Eseguire un controllo visivo.
¾ Prima di collegare il prodotto alla rete di alimenta-
zione:
– Verificare che il cavo di allacciamento alla rete 5
non sia danneggiato.
– Controllare che il prodotto non presenti danni
(ad es. contatti dei pozzetti di carica deformati).
¾ Inserire il cavo di allacciamento alla rete 5 nella
spina apparecchio della stazione di carica.
¾ Inserire la spina di rete nella presa della rete di ali-
mentazione.
¾ Mettere l'accumulatore a ioni di litio 8 nel poz-
zetto 6 del caricabatterie 4 e ricaricarla.
- oppure -
¾ Mettere la tosatrice ad accumulatore FAV5 CL/
FORTIS 2 nel pozzetto 10 del caricabatterie 4 ericaricarla.
L'indicatore della condizione di carica 7 o 9 si illuminano in colore rosso.
Dopo il procedimento di carica l'indicatore della
condizione di carica 7/9 si illuminano in colore
verde e la tosatrice ad accumulatore FAV5 CL/
FORTIS 2/l'accumulatore a ioni di litio 8 sono
pronti a funzionare.
Il prodotto è pronto a funzionare.
4.4 Manipolazione della testa di tosatura
4.4.1 Affilatura dei pettini
Nota
Per affilare i pettini rivolgersi all'Assistenza Tecnica,
vedere Capitolo Assistenza tecnica.
4.4.2 Sostituzione della testa di tosatura
Pericoli di lesioni causate dai pettini taglienti!
¾ Maneggiare la testa di tosatura
AVVERTENZA
della tosatrice FAV5 CL/FORTIS
con estrema cautela.
14
Fig. 3
¾ Per disattivare la tosatrice FAV5 CL/FORTIS pre-
mere l’interruttore di accensione/spegnimento 11.
¾ Premere il bloccaggio della testa di tosatura 14,
vedere Fig. 3.
72
Page 75

12
4.4.4 Sostituzione dell'accumulatore a ioni
di litio
2
Fig. 4
¾ Aprire la testa di tosatura 12 tirandola in avanti,
vedere Fig. 4.
¾ Rimuovere la testa di tosatura 12.
¾ Pulire la cerniera delle lame spazzolandola con un
pennello.
¾ Inserire la testa di tosatura 12 sulla cerniera delle
lame.
¾ Collegare la linea di allacciamento alla rete della
tosatrice FAV5 CL/FORTIS.
¾ Premere l’interruttore di accensione/
spegnimento 11.
¾ Spingere leggermente la testa di tosatura 12 nella
direzione della tosatrice FAV5 CL/FORTIS.
La testa di tosatura 12 scatta in posizione con un
rumore percettibile.
¾ Accertarsi che la testa di tosatura 12 sia corretta-
mente posizionata sulla tosatrice ad accumulatore
FAV5 CL/FORTIS.
4.4.3 Oliatura della testa di tosatura
¾ Pulire pettine e contropettine con un panno o un
pennello morbido, assicurandosi che gli spazi
interdentali siano ben puliti.
¾ Oliare leggermente pettine e contropettine con olio
speciale per teste di tosatura GT604.
8
3
2
3
Fig. 5
¾ Tener ferma la tosatrice ad accumulatore FAV5 CL/
FORTIS 2 e premere gli sblocchi accumulatore 3.
¾ Estrarre l'accumulatore a ioni di litio 8 dalla tosa-
trice ad accumulatore FAV5 CL/FORTIS 2.
¾ Inserire l'accumulatore a ioni di litio 8 carico fino
all'arresto nella tosatrice ad accumulatore
FAV5 CL/FORTIS 2.
La tosatrice ad accumulatore FAV5 CL/FORTIS 2 è
pronta per l'uso.
73
Page 76

Aesculap Suhl GmbH
Tosatrice ad accumulatore FAV5 CL/FORTIS
5. Preparazione sterile
Danni o distruzioni del prodotto
causati dalla pulizia/disinfezione
automatica o la sterilizzazione!
ATTENZIONE
5.1 Pulizia/Disinfezione
Nota
Rispettare la normativa sullo smaltimento e l'igiene!
Pulizia/disinfezione manuale
PERICOLO
¾ Pulire/disinfettare il prodotto
solo manualmente.
¾ Non sterilizzare mai il prodotto.
Pericolo di scosse elettriche ed
incendi!
¾ Prima della pulizia staccare la
spina dalla presa di rete.
¾ Accertarsi che nel prodotto non
penetri alcun liquido.
¾ Dopo la pulizia/disinfezione
aerare per minimo 1 minuto.
Danni al prodotto causati da pulizie
errate o da detergenti/disinfettanti
non idonei!
ATTENZIONE
¾ Passare la scocca del prodotto con un telo non sfi-
lacciante inumidito con un normale prodotto idoneo per la disinfezione per strofinamento.
¾ Se necessario, dopo il relativo tempo d'azione eli-
minare i residui di detergenti e disinfettanti con un
telo non sfilacciante inumidito con acqua pulita.
¾ Per asciugare usare un telo non sfilacciante pulito.
¾ Pulire i contatti dei pozzetti con isopropanolo o
alcool etilico ed un bastoncino cotonato. Non usare
prodotti chimici che favoriscano la corrosione.
¾ Se necessario, ripetere la pulizia/disinfezione.
¾ Per pulire le superfici usare i
normali prodotti reperibili in
commercio.
¾ Non immergere mai il prodotto
in acqua o detergente.
¾ Non introdurre liquidi nei poz-
zetti di carica.
¾ Pulire i contatti dei pozzetti con
la massima cura.
74
Page 77

5.2 Controllo, cura e verifica
¾ Far raffreddare il prodotto a temperatura
ambiente.
¾ Dopo ogni pulizia e disinfezione, verificare che il
prodotto sia pulito, perfettamente funzionante e
non danneggiato.
¾ Se necessario oliare la testa di tosatura, vedere
Capitolo Oliatura della testa di tosatura.
¾ Controllare che il prodotto non presenti danni,
rumori da funzionamento anomali, surriscaldamenti eccessivi o vibrazioni troppo forti.
¾ Sottoporre la testa di taglio a un controllo mirante
ad escludere che i taglienti siano rotti, danneggiati
e smussi.
¾ Se il prodotto è danneggiato, scartarlo immediata-
mente.
6. Manutenzione
Per garantire un funzionamento affidabile, Aesculap
raccomanda una manutenzione annuale.
Per i corrispondenti interventi di assistenza rivolgersi
alla rappresentanza nazionale B. Braun/Aesculap competente, vedere Capitolo Assistenza tecnica.
Indirizzi dei centri assistenza
Aesculap Suhl GmbH
Fröhliche-Mann-Straße 15
98528 Suhl / Germany
Phone: +49 (0) 3681 49820
Fax: +49 (0) 3681 498234
E-Mail: suhl@aesculap.de
www.aesculap-schermaschinen.de
Gli altri indirizzi dell'assistenza possono essere richiesti all'indirizzo predetto.
75
Page 78

Aesculap Suhl GmbH
Tosatrice ad accumulatore FAV5 CL/FORTIS
7. Identificazione ed eliminazione dei guasti
7.1 Tosatrice ad accumulatore FAV5 CL/FORTIS
Anomalia Identificazione Causa Rimedio
La tosatrice ad accumulatore FAV5 CL/FORTIS non
si avvia
La tosatrice ad accumulatore FAV5 CL/FORTIS si
ferma
La tosatrice ad accumulatore FAV5 CL/FORTIS non
si ricarica nella stazione di
carica
Controllare la posizione
dell'interruttore
– Accumulatore a ioni di
– Accumulatore a ioni di
– Accumulatore a ioni di
– L'accumulatore a ioni di
Gli indicatori LED non si
illuminano
Accumulatore a ioni di
litio non caricato
litio guasto
litio non inserito
litio disattivato dal circuito di protezione
litio è vuoto
– vedere Capitolo Carica-
Caricare l'accumulatore a
ioni di litio
Inserire un nuovo accumulatore a ioni di litio
Inserire un nuovo accumulatore a ioni di litio
Spegnere e riaccendere
l'interruttore
Inserire un nuovo accumulatore a ioni di litio
batterie e accumulatore a
ioni di litio
7.2 Caricabatterie e accumulatore a ioni di litio
Anomalia Identificazione Causa Rimedio
Caricabatterie non funzionante
76
Gli indicatori LED non si
illuminano
Accumulatore a ioni di
litio non caricato
Cavo di allacciamento
alla rete non inserita
Cavo di allacciamento
alla rete guasto
Caricabatterie guasto Far riparare il prodotto
Inserire il cavo di allacciamento alla rete nella
spina apparecchio della
stazione di carica e nella
presa della rete di alimentazione
Sostituire il cavo di
allacciamento alla rete
dal produttore
Page 79

Anomalia Identificazione Causa Rimedio
L'accumulatore a ioni di
litio non è caricato
Accumulatore a ioni di
litio inserito, l'indicatore
della condizione di
carica non si illumina
Contatti del caricabatterie sporchi o danneggiati
Pulire i contatti nel pozzetto, vedere Capitolo
Pulizia/Disinfezione
oppure farli riparare dal
produttore
Accumulatore a ioni di
litio guasto
Far riparare l'accumulatore a ioni di litio dal
produttore
Caricabatterie guasto Far riparare il caricabat-
terie dal produttore
Durante il procedimento
di carica nell'accumulatore a ioni di litio è rilevata una temperatura
eccessiva
Togliere l'accumulatore a
ioni di litio dal pozzetto,
lasciarlo raffreddare e
ricominciare il procedimento di carica.
Se l'anomalia si ripresenta far riparare l'accumulatore presso il produttore
Anomalia nella ricarica
oppure
accumulatore a ioni di
litio guasto
Estrarre l'accumulatore a
ioni di litio dal pozzetto e
ripetere il procedimento
di carica, eventualmente
in un altro pozzetto.
Se l'anomalia si ripresenta
Far riparare l'accumulatore a ioni di litio dal
produttore
77
Page 80

Aesculap Suhl GmbH
Tosatrice ad accumulatore FAV5 CL/FORTIS
8. Assistenza tecnica
¾ Per qualsiasi intervento di assistenza, manuten-
zione e riparazione rivolgersi alla rappresentanza
B. Braun/Aesculap nazionale competente per territorio.
Eventuali modifiche delle attrezzature medico-chirurgiche possono comportare il decadere dei diritti di
garanzia e delle omologazioni.
Indirizzi dei centri assistenza
Aesculap Suhl GmbH
Fröhliche-Mann-Straße 15
98528 Suhl / Germany
Phone: +49 (0) 3681 49820
Fax: +49 (0) 3681 498234
E-Mail: suhl@aesculap.de
www.aesculap-schermaschinen.de
Gli altri indirizzi dell'assistenza possono essere richiesti all'indirizzo predetto.
78
Page 81

9. Accessori/Ricambi
Cod. art. Esecuzione Cavi di rete Accumula-
GT306/
GT380
GT306G/
GT380G
GT306J/
GT380J
GT306K/
GT380K
Europa
tranne Gran
Bretagna
Gran
Bretagna
Giappone,
Messico
110-125 V
USA TA012168
TA012170
Spina piatta
europea, nera,
L=1,8 m
TA012169
Spina GB, nera,
L=1,8 m
TA012168
Spina apparecchio a 2 pin,
nera,
L=1,8 m
Spina apparecchio a 2 pin,
nera,
L=1,8 m
tore a ioni
di litio
GT201 GT200880 GT300/GT380
GT201 GT200880 GT300/GT380
GT201 GT200880 GT300/GT380
GT201 GT200880 GT300/GT380
Stazione di
carica
Tosatrice ad
accumulatore
non
confezionata
non
confezionata
non
confezionata
non
confezionata
Accessori
GT604800
Oliatore
GT604800
Oliatore
GT604800
Oliatore
GT604800
Oliatore
79
Page 82

Aesculap Suhl GmbH
Tosatrice ad accumulatore FAV5 CL/FORTIS
10. Specifiche tecniche
10.1 Tosatrice ad accumulatore
FAV5 CL/FORTIS
Modello di apparecchio GT300/GT380
Cadenza 2 300 1/min
Tensione di carica/uscita max. 8,4 V
Corrente di carica/uscita max. 1,2 A
Peso
(senza testa di tosatura e
accumulatore)
Peso
(con testa di tosatura e
accumulatore)
EN 60335-1, EN 60335-2-29
10.2 Caricabatterie
Modello di apparecchio GT203
Intervalli di tensione di rete
(corrente assorbita)
Frequenza 50-60 Hz
Tensione di carica/uscita max. 8,4 V
Corrente di carica/uscita max. 1,2 A
Peso 495 g
Marchio di prova CE, UL
385 g
450 g
100-240 V
10.3 Accumulatore a ioni di litio
Modello di apparecchio GT201
Tipo di pila Li
Tensione continua 7.4 V
Capacità circa 1,2 Ah
Durata della carica 50 min ±5 min
10.4 Dichiarazione di conformità
Dichiariamo, sotto nostra esclusiva
responsabilità, che questo prodotto è
conforme alle seguenti norme o documenti normativi:
2004/108/CE Direttiva EMV:
DIN EN 60335-1
DIN EN 60335-2-8
Sicurezza degli apparecchi elettrici
d’uso domestico e similare
- Requisiti generali
- per gli apparecchi per la cura della
pelle e dei capelli
Aesculap Suhl GmbH
80
Page 83

11. Smaltimento
Gli elettroutensili, gli accessori e l'imballo devono
essere conferiti ad un impianto di riciclaggio ecocompatibile.
11.1 Soltanto per i paesi CE
Non gettare gli elettroutensili nei
rifiuti domestici!
In ottemperanza alla Direttiva Europea 2012/19/EU sui rifiuti da apparecchiature elettriche ed elettroniche e la
relativa attuazione nell'ambito della
legislazione nazionale, gli elettroutensili giunti a fine vite devono essere
raccolti separatamente e conferiti ad
un impianto di riciclaggio ecocompatibile.
11.2 Accumulatori a ioni di litio
Non gettare gli accumulatori nei rifiuti domestici, né in
fiamme o acqua. Gli accumulatori guasti o esausti
devono essere raccolti, riciclati o smaltiti in maniera
ecologicamente corretta ai sensi della direttiva 2006/
66/CE.
12. 2 anni di garanzia
Gentile cliente,
molte grazie per aver scelto un prodotto della nostra
azienda.
Il nome Aesculap è da decenni sinonimo di qualità
controllata e servizio di altissimo livello. Ai nostri
clienti offriamo prodotti innovativi e potenti. Aesculap
produce apparecchi di grande valore e le garantisce
l'utilizzo di materiali di alta qualità e una produzione
accurata. Desideriamo ricordarle che non ci
assumiamo responsabilità alcuna per i vizi materiali se
tali vizi derivano da utilizzo non conforme, usura
normale o dal fatto che il prodotto venga usato in
modo inadeguato o se vengono impiegati prodotti
esterni non adeguati o non perfettamente funzionanti.
I componenti normalmente sottoposti ad usura e per i
quali non ci assumiamo perciò alcuna responsabilità,
sono l'accumulatore e la testa di taglio. Allo stesso
modo fanno eccezione i vizi materiali che non
influiscono sul funzionamento o lo fanno in modo non
determinante.
Qualora fossimo responsabili in base alla garanzia, ci
riserviamo di riparare o sostituire il prodotto.
81
Page 84

Aesculap Suhl GmbH
Accuscheermachine FAV5 CL/FORTIS
Legende
1 Onderplaat
2 Accuscheermachine FAV5 CL/FORTIS
3 Accu-ontgrendeling
4 Lader
5 Netaansluitkabel (met apparaatstekker)
6 Laadschacht (voor Li-ion-accu)
7 Ladingsindicator (voor Li-ion-accu)
8 Li-ion-accu
9 Ladingsindicator (voor accuscheermachine
FAV5 CL/FORTIS)
10 Ladingsindicator (voor accu-scheermachine
FAV5 CL/FORTIS)
11 Aan/Uit-schakelaar
12 Scheerkop
Symbolen op het product
Volg de gebruiksaanwijzing
Aanduiding van elektrische en
elektronische apparaten volgens de richtlijn 2012/19/EU
(AEEA), zie Paragraaf Verwijdering
Inhoudsopgave
1. Veilig gebruik .........................................................83
2. Beschrijving van het apparaat ..........................83
2.1 Leveringsomvang ..................................................83
2.2 Benodigde componenten voor het gebruik ...84
2.3 Gebruiksdoel accuscheermachine
FAV5 CL/FORTIS .....................................................84
2.4 Gebruiksdoel lader GT203/Li-ion-accu
GT201 .......................................................................84
2.5 Werking accuscheermachine FAV5 CL/
FORTIS ......................................................................84
2.6 Werking lader GT203/Li-ion-accu GT201 ...... 84
2.6.1 Laadprincipe........................................................... 84
2.6.2 Laadduur.................................................................. 84
3. Voorbereiding en opstelling ...............................85
4. Werken met de accuscheermachine
FAV5 CL/FORTIS, de lader GT203/
Li-ion-accu GT201 ................................................85
4.1 Opstellen .................................................................85
4.1.1 Accessoires aansluiten......................................... 85
4.1.2 Scheerkop monteren............................................ 86
4.1.3 Lader aansluiten/Li-ion-accu laden................. 86
4.2 Functietest accuscheermachine FAV5 CL/
FORTIS ......................................................................87
4.3 Functietest lader ...................................................88
4.4 Omgang met de scheerkop ................................88
4.4.1 Snijplaat slijpen ..................................................... 88
4.4.2 Scheerkop verwisselen......................................... 88
4.4.3 Scheerkop smeren................................................. 89
4.4.4 Li-ion-accu vervangen......................................... 89
5. Reiniging en sterilisatie ......................................90
5.1 Reiniging/desinfectie ...........................................90
5.2 Controle, onderhoud en inspectie ....................91
6. Onderhoud ..............................................................91
7. Opsporen en verhelpen van fouten ..................92
7.1 Accuscheermachine FAV5 CL/FORTIS ..............92
7.2 Lader en Li-ion-accu ............................................92
8. Technische dienst .................................................94
9. Accessoires/Reserveonderdelen ........................95
10. Technische specificaties ......................................96
10.1 Accuscheermachine FAV5 CL/FORTIS ..............96
10.2 Lader .........................................................................96
10.3 Li-ion-accu .............................................................96
82
Page 85

10.4 Verklaring van conformiteit ...............................96
11. Verwijdering ...........................................................97
11.1 Alleen voor EU-landen .........................................97
11.2 Li-ion-accu's ..........................................................97
12. 2 Jaar garantie .......................................................97
1. Veilig gebruik
Levensgevaar door elektrische
schok!
GEVAAR
¾ Controleer de juiste werking en de goede staat van
het product voordat u het gebruikt.
¾ Bewaar de lader en de Li-ion-accu's bij kamertem-
peratuur.
¾ Houd de lader en de Li-ion-accu's droog.
¾ Laad de Li-ion-accu's voor het eerste gebruik.
¾ Volg de aanwijzingen met betrekking tot elektro-
magnetische compatibiliteit (EMC).
¾ Om beschadiging ten gevolge van een onoordeel-
kundige montage of foutief gebruik te vermijden
en de garantie en aansprakelijkheid niet in het
geding te brengen:
– Gebruik dit product enkel volgens deze gebruiks-
aanwijzing.
– Volg de veiligheidsinformatie en de onder-
houdsinstructies.
– Accessoires die niet in deze gebruiksaanwijzing
worden vermeld, mogen enkel met toestemming
van de fabrikant worden gebruikt.
¾ Dit product en de accessoires mogen uitsluitend
worden gebruikt door personen die over de daartoe
benodigde opleiding, kennis en ervaring beschikken.
¾ Open dit product niet (tenzij om
een accu te vervangen).
¾ Sluit dit product uitsluitend aan
op een voedingsnet met randaarde.
¾ Bewaar deze gebruiksaanwijzing op een plaats die
toegankelijk is voor de gebruiker.
¾ Leef de toepasselijke normen na.
¾ Zorg ervoor dat de elektrische installatie op de
plaats van gebruik aan de IEC-eisen voldoet.
¾ Trek de voedingskabel altijd aan de stekker uit het
stopcontact en nooit aan de kabel zelf.
¾ Gebruik dit product niet in een explosiegevaarlijke
ruimte.
¾ Gebruik geen beschadigde of defecte producten.
Houd beschadigde producten onmiddellijk apart.
2. Beschrijving van het apparaat
2.1 Leveringsomvang
Benaming Art.nr.
Accuscheermachine FAV5 CL/
FORTIS
Li-ion-accu GT201
Lader GT203
Netaansluitkabel (met apparaatstekker)
Gebruiksaanwijzing TA013440
Opmerking
De scheerkop GT330 #10 (VS+GB) van accuscheerma-
chine FAV5 CL/FORTIS wordt standaard meegeleverd.
Afhankelijk van de toepassing kunnen er verschillende
scheerkoppen worden gebruikt!
GT300/GT380
zie Paragraaf
Accessoires/
Reserveonderdelen
83
Page 86

Aesculap Suhl GmbH
Accuscheermachine FAV5 CL/FORTIS
2.2 Benodigde componenten voor het
gebruik
• Accuscheermachine FAV5 CL/FORTIS
•Scheerkop
•Lader
• Netaansluitkabel (met apparaatstekker)
• Li-ion-accu
2.3 Gebruiksdoel accuscheermachine
FAV5 CL/FORTIS
De accuscheermachine FAV5 CL/FORTIS wordt gebruikt
om kleine dieren te scheren.
De accuscheermachine FAV5 CL/FORTIS moet afhankelijk van het gebruik, worden voorzien van een
scheerkop.
2.4 Gebruiksdoel lader GT203/Li-ionaccu GT201
De lader GT203 wordt gebruikt om de accuscheermachine FAV5 CL/FORTIS en de Li-ion-accu te laden. Hij
beschikt over een laadschacht voor beide componenten.
2.5 Werking accuscheermachine FAV5
CL/FORTIS
De accuscheermachine FAV5 CL/FORTIS wordt ingeschakeld door de Aan/Uit-schakelaar omhoog te zetten
en uitgeschakeld door de Aan/Uit-schakelaar omlaag
te zetten.
2.6 Werking lader GT203/Li-ion-accu
GT201
De lader GT203 is voorzien voor een netspanningsbereik van 100 V tot 240 V en van 50 Hz tot 60 Hz.
Zodra de netstekker in het stopcontact wordt gestoken
is de lader GT203 klaar voor gebruik.
De lader GT203 beschikt over twee laadschachten. In
de eerste laadschacht wordt de accuscheermachine
FAV5 CL/FORTIS geladen en in de tweede de Li-ionaccu.
Bij iedere laadschacht hoort een afzonderlijk indicatieveld op het frontpaneel van de lader.
Zodra er een Li-ion-accu in het laadstation wordt
gestoken, start het laden automatisch.
De laadduur in de laadschachten is afhankelijk van de
ladingstoestand en de capaciteit van de Li-ion-accu.
2.6.1 Laadprincipe
De Li-ion-accu's worden opgeladen door middel van
constante stroomimpulsen.
De ladingstoestand van de Li-ion-accu wordt tijdens
het laden continu bewaakt. Door de bewaking van de
laadcurve wordt een lading van 100% zonder overlading gegarandeerd.
Voorts worden de accutemperatuur en de laadduur
bewaakt.
De lader bewaakt de toestand van de accu en duidt
deze aan door middel van twee ladingsindicatoren.
Led-lampjes:
• groen = accu vol
• rood = accu leeg
2.6.2 Laadduur
Wanneer de maximale laadduur is bereikt, wordt het
laadproces afgebroken.
De laadduur bedraagt ca. 50 min.
84
Page 87

3. Voorbereiding en opstelling
Wanneer de volgende voorschriften niet worden nageleefd, wijst Aesculap elke aansprakelijkheid van de
hand.
¾ Bij de opstelling en het gebruik van dit product
dient u de volgende voorschriften na te leven:
– de nationale installatie- en gebruikersvoorschrif-
ten,
– de nationale voorschriften voor brand- en explo-
siepreventie.
– Gebruiksinstructies conform de IEC-/VDE-bepa-
lingen.
Brand- en explosiegevaar!
¾ Gebruik dit product niet in een
GEVAAR
VOORZICHTIG
explosiegevaarlijke ruimte.
Slechte werking of beschadiging
van het product door onoordeelkundige opstelling!
¾ Stel het product niet bloot aan
direct zonlicht of vocht.
¾ Dek de beluchtingsgleuf van het
product niet af.
¾ De aangesloten netspanning
moet tussen 100 V en 240 V
liggen, bij een netfrequentie van
50 Hz tot 60 Hz.
¾ Zorg ervoor dat het stopcontact
van het voedingsnet waarop het
product wordt aangesloten goed
toegankelijk is.
4. Werken met de accuscheermachine FAV5 CL/FORTIS, de
lader GT203/Li-ion-accu
GT201
4.1 Opstellen
4.1.1 Accessoires aansluiten
Combinaties van accessoires die niet in deze gebruiksaanwijzing worden vermeld, mogen uitsluitend worden
gebruikt als ze uitdrukkelijk voor de beoogde toepassing bestemd zijn. De vermogenskenmerken en veiligheidseisen mogen daarbij niet nadelig worden beïnvloed.
¾ Als u nog vragen hebt, kunt u contact opnemen
met uw B. Braun/Aesculap-partner of de Technische Service van Aesculap, adres zie Paragraaf
Technische dienst.
85
Page 88

Aesculap Suhl GmbH
Accuscheermachine FAV5 CL/FORTIS
4.1.2 Scheerkop monteren
Gevaar voor verwonding door
scherpe snijplaten!
WAARSCHUWING
Opmerking
De scheerkop GT330 #10 (VS+GB) van scheermachine
FAV5 CL/FORTIS wordt standaard meegeleverd. Afhankelijk van de toepassing kunnen er verschillende
scheerkoppen worden gebruikt!
¾ Behandel de scheerkop van
scheermachine FAV5 CL/FORTIS
voorzichtig.
13
Afb. 1
¾ Bij gesloten messcharnier: Klap het messcharnier 13
open met de schroevendraaier, zie Afb. 1.
12
¾ Steek de scheerkop 12 op het geopende messchar-
nier 13, zie Afb. 2.
¾ Druk op de Aan/Uit-schakelaar 11.
¾ Druk de scheerkop 12 licht naar de scheermachine
FAV5 CL/FORTIS toe, zie Afb. 2.
De scheerkop 12 klikt hoorbaar vast.
¾ Controleer of de scheerkop 12 correct op de
scheermachine FAV5 CL/FORTIS zit.
4.1.3 Lader aansluiten/Li-ion-accu laden
Brandgevaar bij kortsluiting van de
polen door vloeistoffen of metalen
onderdelen!
WAARSCHUWING
WAARSCHUWING
VOORZICHTIG
¾ Voorkom kortsluiting van de Li-
ion-accu.
Gevaar voor verwondingen en
materiële schade door beschadigde
Li-ion-accu's!
¾ Controleer de Li-ionaccu's voor
gebruik op beschadigingen.
¾ Beschadigde Li-ionaccu's niet
gebruiken of laden.
Afname van vermogen/prestaties
van de ontladen Li-ion-accu door
langdurige bewaring!
¾ Berg de Li-ion-accu enkel volle-
dig geladen op voor langere tijd
en laad hem maandelijks bij.
Afb. 2
86
13
Page 89

Vernieling van het product, de
laadschacht of de Li-ion-accu door
een verkeerd accutype in de laad-
VOORZICHTIG
Opmerking
Schakel de accuscheermachine FAV5 CL/FORTIS uit,
alvorens deze te laden!
Opmerking
De Li-ion-accu's warmen licht op tijdens het laden.
Opmerking
Trek de stekker van de netaansluitkabel uit het stopcontact, wanneer u niet met de lader werkt!
¾ Lader 4 aansluiten: Steek de apparaatstekker van
de netaansluitkabel 5in de lader 4.
¾ Steek de netstekker van de netaansluitkabel 5 in
het stopcontact.
¾ Zet de Li-ion-accu 8 in de laadschacht 6 van de
lader 4 en laad hem op.
- of -
¾ Zet de accuscheermachine FAV5 CL/FORTIS 2 in de
laadschacht 10 van de lader 4 en laad hem op.
De ladingsindicator 7 of 9 licht rood op.
Na het laden brandt de ladingsindicator 7/9 groen
en is de accuscheermachine FAV5 CL/FORTIS 2/de
Li-ion-accu 8 klaar voor gebruik.
schacht te steken!
¾ Steek de Li-ion-accu's enkel in
de daarvoor voorziene laadschachten.
¾ Breng de Li-ion-accu's in de
juiste positie aan.
4.2 Functietest accuscheermachine
FAV5 CL/FORTIS
¾ Voer een visuele inspectie uit.
¾ Controleer de stand van de schakelaar.
¾ Steek de accu erop, zie Paragraaf Li-ion-accu ver-
vangen.
¾ Breng de scheerkop correct aan en smeer deze
indien nodig, zie Paragraaf Omgang met de scheerkop.
¾ Leg een geladen Li-ion-reserveaccu klaar.
¾ Reinig de accuscheermachine FAV5 CL/FORTIS voor
het gebruik, zie Paragraaf Reiniging/desinfectie.
87
Page 90

Aesculap Suhl GmbH
Accuscheermachine FAV5 CL/FORTIS
4.3 Functietest lader
¾ Voer een visuele inspectie uit.
¾ Alvorens het product op het voedingsnet aan te
sluiten:
– Controleer de netaansluitkabel 5 op eventuele
beschadigingen.
– Controleer het product op eventuele
beschadigingen (bijv. contacten van de laadschachten controleren op kromgebogen contacten).
¾ Steek de netaansluitkabel 5 in de apparaatstekker
van de lader.
¾ Steek de netstekker in het stopcontact van het voe-
dingsnet.
¾ Zet de Li-ion-accu 8 in de laadschacht 6 van de
lader 4 en laad hem op.
- of -
¾ Zet de accuscheermachine FAV5 CL/FORTIS 2 in de
laadschacht 10 van de lader 4 en laad hem op.
De ladingsindicator 7 of 9 licht rood op.
Na het laden brandt de ladingsindicator 7/9 groen
en is de accuscheermachine FAV5 CL/FORTIS 2/de
Li-ion-accu 8 klaar voor gebruik.
Het product is klaar voor gebruik.
4.4 Omgang met de scheerkop
4.4.1 Snijplaat slijpen
Opmerking
Laat de snijplaat slijpen door de Technische Service, zie
Paragraaf Technische dienst.
4.4.2 Scheerkop verwisselen
Gevaar voor verwonding door
scherpe snijplaten!
WAARSCHUWING
¾ Behandel de scheerkop van
scheermachine FAV5 CL/FORTIS
voorzichtig.
14
Afb. 3
¾ Druk op de Aan/Uit-schakelaar 11 om accuscheer-
machine FAV5 CL/FORTIS uit te schakelen.
¾ Druk op de scheerkop-vergrendeling 14, zie Afb. 3.
88
Page 91

12
4.4.4 Li-ion-accu vervangen
2
Afb. 4
¾ Klap de scheerkop 12 naar voren open, zie Afb. 4.
¾ Verwijder de scheerkop 12.
¾ Maak het opengeklapte messcharnier schoon met
een borsteltje.
¾ Steek de scheerkop 12 op het messcharnier.
¾ Steek de voedingskabel van de accuscheermachine
FAV5 CL/FORTIS in het stopcontact.
¾ Druk op de Aan/Uit-schakelaar 11.
¾ Druk de scheerkop 12 licht naar de accuscheerma-
chine FAV5 CL/FORTIS toe.
De scheerkop 12 klikt hoorbaar vast.
¾ Controleer of de scheerkop 12 correct op de accu-
scheermachine FAV5 CL/FORTIS zit.
4.4.3 Scheerkop smeren
¾ Maak de bovenste en onderste snijplaat schoon
met een zachte doek of borsteltje. Let erop dat de
spleten tussen de tanden goed schoon worden.
¾ Smeer de bovenste en onderste snijplaat met een
beetje speciale olie voor scheerkoppen GT604.
8
3
2
3
Afb. 5
¾ Houd de accuscheermachine FAV5 CL/FORTIS 2
vast en druk op de accu-ontgrendelingen 3.
¾ Trek de Li-ion-accu 8 uit de accu-scheermachine
FAV5 CL/FORTIS 2.
¾ Steek de geladen Li-ion-accu 8 tot de aanslag in de
accuscheermachine FAV5 CL/FORTIS 2.
De accuscheermachine FAV5 CL/FORTIS 2 is klaar
voor gebruik.
89
Page 92

Aesculap Suhl GmbH
Accuscheermachine FAV5 CL/FORTIS
5. Reiniging en sterilisatie
Beschadiging of vernieling van het
product door machinale reiniging/
desinfectie of sterilisatie!
VOORZICHTIG
5.1 Reiniging/desinfectie
Opmerking
Volg de voorschriften inzake verwijdering en hygiëne!
Handmatige reiniging/desinfectie
GEVAAR
¾ Reinig/desinfecteer het product
uitsluitend handmatig.
¾ Het product nooit steriliseren.
Gevaar voor elektrische schok en
brand!
¾ De netstekker voor het reinigen
uit het stopcontact verwijderen.
¾ Zorg ervoor dat er geen vloei-
stof in het product binnendringt.
¾ Laat het product na de reini-
ging/desinfectie minstens
1 minuut luchten.
Beschadiging van het product door
verkeerde reiniging of gebruik van
verkeerd reinigings-/desinfectie-
VOORZICHTIG
¾ Wis de behuizing van het product schoon met een
pluisvrije doek, bevochtigd met een in de handel
verkrijgbaar desinfectiemiddel.
¾ Wis de resten van het reinigings- en desinfectie-
middel na de inwerkingstijd af met een pluisvrije
doek, bevochtigd met schoon water.
¾ Droog het product af met een schone, pluisvrije
doek.
¾ Reinig de contacten in de laadschachten met isop-
ropanol of ethylalcohol en een wattenstaafje.
Gebruik geen chemicaliën die corrosie bevorderen.
¾ Herhaal de reiniging/desinfectie, indien nodig.
middel!
¾ Voer de oppervlaktereiniging uit
met in de handel verkrijgbare
reinigingsmiddelen.
¾ Leg het product nooit in water
of reinigingsmiddel.
¾ Laat geen vloeistof in de laad-
schacht lopen.
¾ Reinig de contacten in de laad-
schachten uiterst zorgvuldig.
90
Page 93

5.2 Controle, onderhoud en inspectie
¾ Laat het product afkoelen tot kamertemperatuur.
¾ Controleer het product na elke reiniging en desin-
fectie op: reinheid, goede werking en beschadiging.
¾ Smeer de scheerkop indien nodig, zie Paragraaf
Scheerkop smeren.
¾ Inspecteer het product op beschadigingen, abnor-
male geluiden, buitensporige verhitting of te sterke
trillingen.
¾ Inspecteer de scheerkop op afgebroken, bescha-
digde en botte sneden.
¾ Houd beschadigde producten onmiddellijk apart.
6. Onderhoud
Om een betrouwbare werking te garanderen, beveelt
Aesculap een jaarlijks onderhoud aan.
Voor alle servicewerkzaamheden dient u zich te richten
tot uw nationale B. Braun/Aesculap-vertegenwoordiger, zie Paragraaf Technische dienst.
Service-adressen
Aesculap Suhl GmbH
Fröhliche-Mann-Straße 15
98528 Suhl / Germany
Phone: +49 (0) 3681 49820
Fax: +49 (0) 3681 498234
E-mail: suhl@aesculap.de
www.aesculap-schermaschinen.de
Andere service-adressen zijn verkrijgbaar op het
bovengenoemde adres.
91
Page 94

Aesculap Suhl GmbH
Accuscheermachine FAV5 CL/FORTIS
7. Opsporen en verhelpen van fouten
7.1 Accuscheermachine FAV5 CL/FORTIS
Storing Opsporing Oorzaak Oplossing
Accuscheermachine
FAV5 CL/FORTIS loopt niet
aan
Accuscheermachine
FAV5 CL/FORTIS blijft stilstaan
Accuscheermachine
FAV5 CL/FORTIS wordt niet
opgeladen in het laadstation
Stand schakelaar controleren
– Li-ion-accu defect Nieuwe Li-ion-accu
– Li-ion-accu niet
– Li-ion-accu uitgeschakeld
– Li-ion-accu is leeg Nieuwe Li-ion-accu
Led-lampjes branden niet – zie Paragraaf Lader en Li-
Li-ion-accu niet geladen Li-ion-accu laden
plaatsen
Nieuwe Li-ion-accu
geplaatst
door beveiligingsschakeling
plaatsen
Schakelaar uit- en
opnieuw inschakelen
plaatsen
ion-accu
7.2 Lader en Li-ion-accu
Storing Opsporing Oorzaak Oplossing
Lader werkt niet Led-lampjes branden
niet
Li-ion-accu niet geladen
92
Netaansluitkabel niet
ingestoken
Netaansluitkabel defect Netaansluitkabel vervan-
Lader defect Product door de fabri-
Netaansluitkabel in de
apparaatstekker aan de
lader en in het stopcontact van het voedingsnet
steken
gen
kant laten repareren
Page 95

Storing Opsporing Oorzaak Oplossing
Li-ion-accu wordt niet
geladen
Li-ion-accu ingestoken,
ladingsindicator brandt
niet
Contacten van de lader
vuil of beschadigd
Contacten in de laadschacht reinigen, zie
Paragraaf Reiniging/desinfectie of laten repareren door de fabrikant
Li-ion-accu defect Li-ion-accu door de
fabrikant laten repareren
Lader defect Lader door de fabrikant
laten repareren
Tijdens het laden wordt
oververhitting van de Liion-accu gedetecteerd
Li-ion-accu uit de laadschacht halen, laten
afkoelen en laadproces
opnieuw starten.
Indien storing zich herhaalt, accu door de fabrikant laten repareren
Laadstoring of
Li-ion-accu defect
Li-ion-accu uit de laadschacht halen en laadproces herhalen, evt. in
een andere laadschacht.
Als de storing opnieuw
optreedt Li-ion-accu
door de fabrikant laten
repareren
93
Page 96

Aesculap Suhl GmbH
Accuscheermachine FAV5 CL/FORTIS
8. Technische dienst
¾ Doe voor alle service, onderhoud en reparaties een
beroep op uw nationale B. Braun/Aesculap-vestiging.
Wijzigingen aan medischtechnische hulpmiddelen
kunnen leiden tot het verlies van elke aanspraak op
garantie/vrijwaring en het intrekken van eventuele
goedkeuringen.
Service-adressen
Aesculap Suhl GmbH
Fröhliche-Mann-Straße 15
98528 Suhl / Germany
Phone: +49 (0) 3681 49820
Fax: +49 (0) 3681 498234
E-mail: suhl@aesculap.de
www.aesculap-schermaschinen.de
Andere service-adressen zijn verkrijgbaar op het
bovengenoemde adres.
94
Page 97

9. Accessoires/Reserveonderdelen
Art.nr. Uitvoering Voedingskabel Li-ion-
GT306/
GT380
GT306G/
GT380G
GT306J/
GT380J
GT306K/
GT380K
Europa
buiten GrootBrittannië
GrootBrittannië
Japan,
Mexico
110–125 V
VS TA012168
TA012170
Europa vlakkestekker, zwart,
L=1,8 m
TA012169
GB-stekker,
zwart,
L=1,8 m
TA012168
2-polige
apparaatstekker, zwart,
L=1,8 m
2-polige
apparaatstekker, zwart,
L=1,8 m
accu
GT201 GT200880 GT300/GT380
GT201 GT200880 GT300/GT380
GT201 GT200880 GT300/GT380
GT201 GT200880 GT300/GT380
Laadstation Accu-scheer-
machine
onverpakt
onverpakt
onverpakt
onverpakt
Accessoires
GT604800
Oliebusje
GT604800
Oliebusje
GT604800
Oliebusje
GT604800
Oliebusje
95
Page 98

Aesculap Suhl GmbH
Accuscheermachine FAV5 CL/FORTIS
10. Technische specificaties
10.1 Accuscheermachine FAV5 CL/
FORTIS
Toesteltype GT300/GT380
Aantal slagen 2.300 1/min
Laad-/uitgangsspanning max. 8,4 V
Laad-/uitgangsstroom max. 1,2 A
Gewicht
(zonder scheerkop en accu)
Gewicht
(met scheerkop en accu)
EN 60335-1, EN 60335-2-29
10.2 Lader
Toesteltype GT203
Netspanningsbereik
(stroomopname)
Frequentie 50–60 Hz
Laad-/uitgangsspanning max. 8,4 V
Laad-/uitgangsstroom max. 1,2 A
Gewicht 495 g
Keurmerken CE, UL
385 g
450 g
100–240 V
10.3 Li-ion-accu
Toesteltype GT201
Celtype Li
Gelijkspanning 7,4 V
Capaciteit ca. 1,2 Ah
Laadduur 50 min ±5 min
10.4 Verklaring van conformiteit
Wij verklaren, alleen de verantwoordelijkheid dragend, dat dit product in
overeenstemming is met de volgende
normen en normatieve documenten:
2004/108/EGEMC-richtlijn:
DIN EN 60335-1
DIN EN 60335-2-8
Veiligheid van huishoudelijke en soortgelijke elektrische toestellen
- algemene vereisten
- voor haarsnijmachines
Aesculap Suhl GmbH
96
Page 99

11. Verwijdering
Elektrisch gereedschap, accessoires en verpakking
moeten op een milieubewuste manier worden gerecycled.
11.1 Alleen voor EU-landen
Elektrisch gereedschap hoort niet bij
het huishoudelijk afval!
Volgens de Europese Richtlijn 2012/
19/EU inzake afgedankte elektrische
en elektronische apparaten en de
overeenkomstige nationale voorschriften moet afgedankt elektrisch
gereedschap gescheiden worden verzameld en op een milieuverantwoorde
wijze worden gerecycled.
11.2 Li-ion-accu's
Werp accu's niet bij het huishoudelijk afval, in vuur of
in het water. Defecte of verbruikte accu's moeten worden ingezameld, gerecycled of op milieuvriendelijke
wijze worden verwijderd volgens richtlijn 2006/66/EG.
12. 2 Jaar garantie
Beste klant,
Hartelijk dank dat u voor een product van Aesculap
hebt gekozen.
De naam Aesculap staat al decennialang borg voor
bewezen kwaliteit en voortreffelijke service. Wij
bieden onze klanten innovatieve producten die
topprestaties garanderen. Aesculap produceert
kwaliteitsapparaten, die met de grootste zorg worden
gefabriceerd uit hoogwaardige materialen. Wij willen
u er graag op wijzen dat wij niet aansprakelijk zijn voor
gebreken aan onze producten, wanneer het gebrek
wordt veroorzaakt door onoordeelkundig gebruik,
normale slijtage of doordat het product
onoordeelkundig wordt toegepast of niet-passende of
niet-perfect functionerende producten van vreemde
makelij worden ingezet.
Onderdelen die gevoelig zijn voor slijtage en waarvoor
wij om die reden niet aansprakelijk accepteren, zijn de
accu en de scheerkop. Eveneens uitgesloten zijn
gebreken die geen of nauwelijks invloed hebben op de
waarde of goede werking van het product.
Indien wij in het kader van onze kwaliteitsgarantie de
aansprakelijkheid aanvaarden, behouden wij ons voor
het product te repareren of te vervangen.
97
Page 100

Aesculap Suhl GmbH
Машинка для стрижки с аккумулятором FAV5 CL/FORTIS
Легенда
1 Держатель стригущей головки
2 Машинка для стрижки с аккумулятором
FAV5 CL/FORTIS
3 Деблокиратор аккумулятора
4 Зарядное устройство
5 Линия подключения к сети (с
штепсельным разъемом)
6 Зарядное гнездо (для литиевоионного
аккумулятора)
7 Индикатор зарядки (для литиево
ионного аккумулятора)
8 Литиевоионный аккумулятор
9 Индикатор зарядки (к машинке для
стрижки с аккумулятором FAV5 CL/
FORTIS)
10 Зарядное гнездо (к машинке для
стрижки с аккумулятором FAV5 CL/
FORTIS)
11 Переключатель "Вкл/Выкл"
12 Стригущая головка
Симбольи на продукт
Соблюдайте требования
руководства по
эксплуатации
Маркировка
электрических и
электронных приборов в
соответствии с
директивой 2012/19/EU
(WEEE), см. Раздел
Утилизация
Содержание
1. Правильное обращение с
прибором .......................................99
2. Описание прибора .......................100
2.1 Комплект поставки .......................100
2.2 Компоненты, необходимые
для эксплуатации прибора ...........100
2.3 Назначение машинки для стрижки
с аккумулятором FAV5 CL/FORTIS .100
2.4 Назначение зарядного
устройства GT203/литиево
ионный аккумулятор GT201 ..........100
2.5 Способ функционирования
машинки для стрижки с
аккумулятором FAV5 CL/FORTIS ...100
2.6 Функционирование зарядного
устройства GT203/литиево
ионный аккумулятор GT201 ..........101
2.6.1Принцип зарядки ......................... 101
2.6.2Время зарядки............................. 101
3. Подготовка и установка ................101
4. Работа с машинкой FAV5 CL/
FORTIS и зарядным устройством
GT203/литиевоионны
аккумулятором GT201 ..................102
4.1 Подготовка ..................................102
4.1.1Подсоединение принадлежностей 102
4.1.2Надеть стригущую головку........... 103
4.1.3 Подключение зарядного устройства/
зарядка литиевоионного
аккумулятора............................... 104
4.2 Проверка функционирования
машинки для стрижки с
аккумулятором FAV5 CL/FORTIS ...105
4.3 Проверка функционирования
зарядного устройства ..................105
4.4 Работа со стригущей головкой .....106
4.4.1Заточка ножа ............................... 106
4.4.2Замена стригущей головки .......... 106
4.4.3Смазка стригущей головки
маслом ........................................ 107
4.4.4 Замена литиевоионного
аккумулятора .............................. 107
98
 Loading...