

Braun ExactFit 5 Connect User Manual
ExactFit™ 5 Connect
BUA 6350
Product description
10
11
7
7
8
5
4
3
6
9
2
1
BUA6350
2
9 8
12
Fig. 1
3
English
GB
English
Intended use of Braun ExactFit™ 5 Connect
Braun upper arm blood pressure monitor has been developed for accurate and comfortable blood
pressure measurements. The measuring accuracy of Braun’s upper arm blood pressure monitor was
tested at the time of manufacture and was proven by clinical research in accordance with ESH.
What you should know about blood pressure
Blood pressure constantly changes throughout the day. It rises sharply in the early morning and
declines during the late morning. Blood pressure rises again in the afternoon and nally drops to
a low level at night. Also, it may vary in a short period of time. Therefore, readings from successive
measurements can uctuate.
This device will display your blood pressure reading referring to two values: systolic and diastolic.
The systolic blood pressure (the upper number) indicates how much pressure your blood is exerting
against your artery walls when the heart beats. The diastolic blood pressure (the lower number)
indicates how much pressure your blood is exerting against your artery walls while the heart is resting
between beats. The pulse value is also displayed after each measurement.
Blood pressure measured in a doctor’s oce only provides a momentary value. Repeated
measurements at home better reect one’s actual blood pressure values under everyday conditions.
Moreover, many people have a dierent blood pressure when they measure at home because they
tend to be more relaxed than when in the doctor’s oce. Regular blood pressure measurements taken
at home can provide your doctor with valuable information on your normal blood pressure values
under actual «everyday» conditions.
The ESH (European Society of Hypertension) and WHO (World Health Organisation) have set up the
following standard blood pressure values when measured with a resting pulse at home:
Blood pressure
(mmHg)
SYS = systole
(upper value)
DIA = diastole
(lower value)
Normal values
up to 134 135-159 160-179 ≥180
up to 84 85-99 100-109 ≥110
Grade 1
mild
hypertension
Grade 2
moderate
hypertension
Grade 3
severe
hypertension
Safety information and important precautions
To ensure accurate measuring results, read the complete instructions for use carefully.
People suering from cardiac arrhythmia, vascular constriction, arteriosclerosis in the extremities,
diabetes or users of cardiac pacemakers should consult their doctor before measuring their blood
pressure themselves. Deviations in blood pressure values may occur in such cases.
If your blood pressure reading is in the severe hypertension range with values of 180 mmHg systolic
and above, and/or 110 mmHg diastolic and above; and you nd you have one or two readings in this
range - please see your doctor straight away.
If you are under medical treatment or taking any medication, please consult your doctor rst.
The use of this blood pressure monitor is not intended as a substitute for a consultation with your
doctor.
Key rules for accurate blood pressure measurement
Always take readings at the same time of day, under the same conditions.
Do not take a measurement within 30 minutes of smoking, drinking coee or tea or any form of
exertion. These factors will inuence the measurement.
Ensure at least 5 minutes of quiet rest before measurements. If possible, it is recommended to rest
10 minutes before taking the measurement. Try to always use the same resting time before taking a
measurement.
Always measure on the same arm. The left arm is recommended. Do not move or speak. Keep your
legs uncrossed and feet at on the oor.
Place the cu in direct contact with the skin. Do not wrap the cu over a jacket, sweater or shirt.
If you want to take multiple measurements, wait approximately 3 minutes before repeating a
measurement.
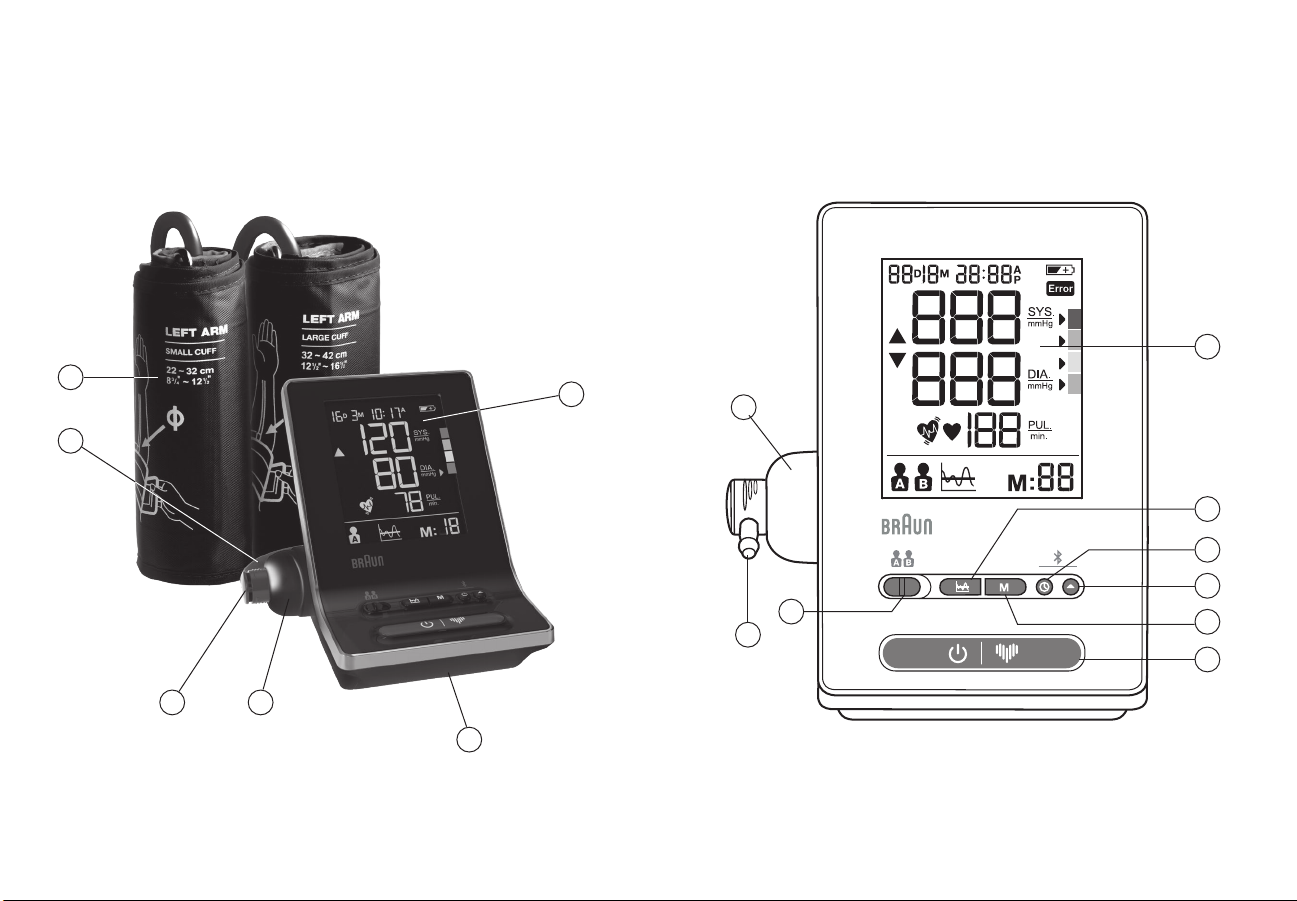
Product description (See page 2-3)
1. Start button
2. Memory button
3. Date / time adjust button
4. Set button
5. Average button
6. User A / B switch
7. LCD display
8. Hose port
9. Connector
10. Arm cu (supplied with 2 cus)
11. Air hose
12. Battery compartment cover (4 X 1.5V type AA (LR6) batteries)
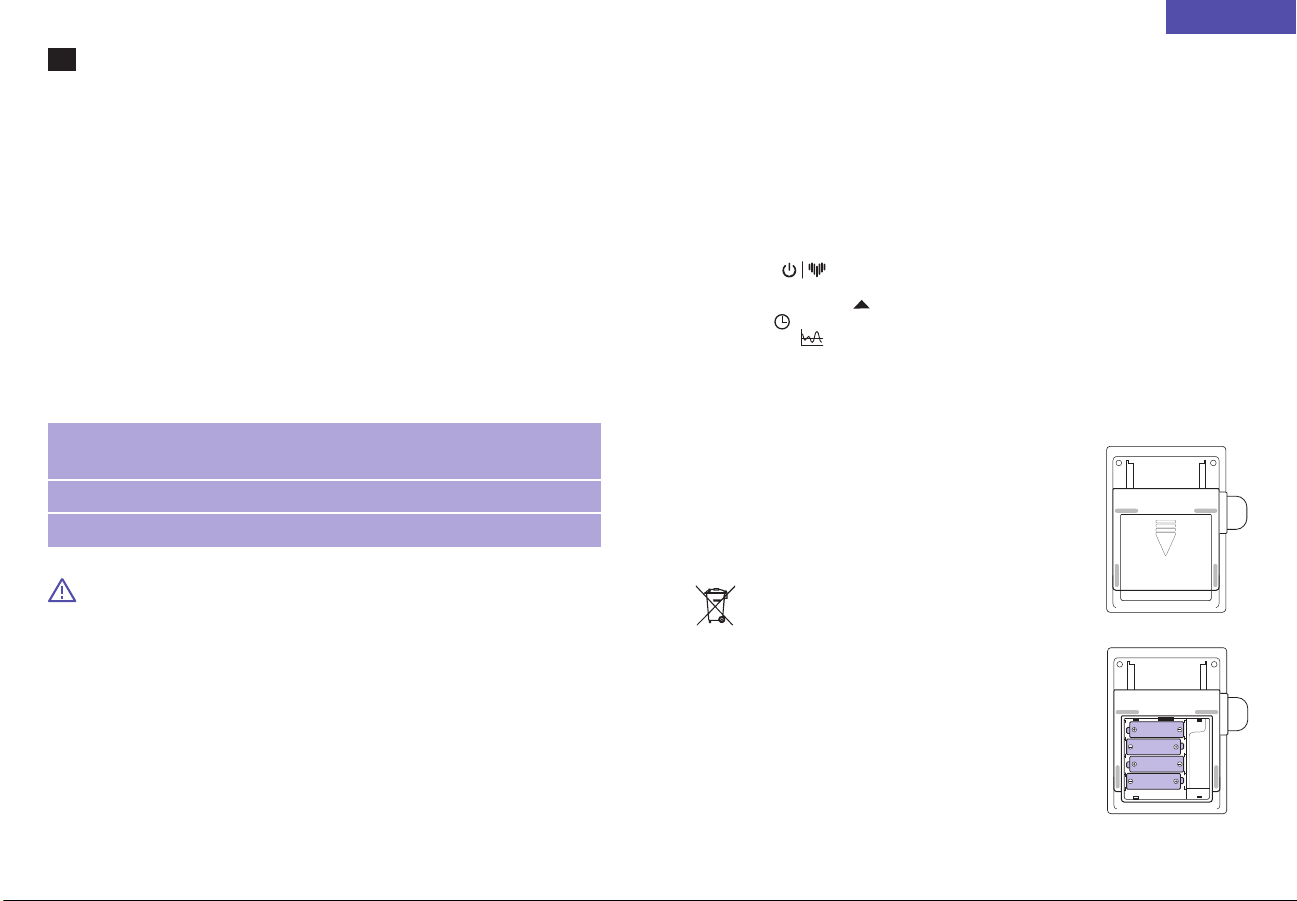
Inserting batteries (See Fig. 2-3)
• Remove the battery compartment cover at the bottom of the unit and
insert 4 AA LR6 alkaline batteries with correct polarity (see symbol in
the battery compartment).
• Note: always re-set date and time after replacing new batteries to
make sure the measurement results are stored with correct date and
time.
Only discard empty batteries.
They should not be disposed of in the household waste, but at
appropriate collection sites or at your retailer.
Fig. 2
Fig. 3
4
5
 Loading...