

Page 1
ExactFit™ 3
™
ExactFit
5
BP 4900PH-WE
BP5900PH-EMEA
Page 2
GB
English.............................. 3
ES
Español............................. 12
PT
Português........................ 21
Product
description
7
8
Fi g. 1
BP 4900PH-WE
BP5900PH-EMEA
P/N 31IM4959190
08APR15
This product is manufactured for
Kaz Europe Sàrl under a license to the
‘Braun’ trademark. ‘Braun’ is a registered
trademark of Braun GmbH, Kronberg ,
Germany.
Este producto es fabricado para Kaz
Europe Sàrl bajo licencia de la marca
registrada Braun. Braun es una marca
registrada de Braun GmbH, Kronberg,
Alemania.
Kaz Europe Sàrl
Place Chauderon 18
CH-1003 Lausanne
Switzerland
PERU: Importado por Helen Of Troy Limited
12
5
4
3
2
1
6
9
10
11
Sucursal del Peru. Av de La Floresta 497 Piso 5.
Urb. Chacarilla del Estanque, San Borja-LimaPeru. RUC 20508237252 R.S. E-29902-IMM . D.T.
Rocio Garcia Arana.
CHILE: Importado por HBC Latina Ltda.
Av. Santa María 0824, Providencia, Chile.
Teléfono (56-2) 2341 0711
COLOMBIA: Importado y distribuido por:
Distribuidora GLX S.A.S Calle: 21 No. 68D-60
Tel: 4263600 Bogota D.C. Colombia.
Registro Sanitario No.
INVIMA 2014DM-0011225
MEXICO: Importado y distribuido por:
Enviracaire de México, S. de R. L. de
C. V. Terranova 329 Int. 301, Colonia Leones,
C.P. 64600, Monterrey, Nuevo León, México
REG. SAN. No.:2385E2012 SSA
ATENCIÓN AL CONSUMIDOR: D.F. Y ÁREA
METROPOLITANA: 5511 5767. DEL INTERIOR DE
LA REPÚBLICA: 01800 2282022
Fabricado en China por Health & Life Co., Ltd.
No. 1428, Xiang Jian Road, Suzhou New District,
Suzhou City, 215129, People’s, Republic of China
para Kaz Europe Sàrl, Place Chauderon 18
CH-1003 - Lausanne -Suiza.
Características eléctricas: 6 V
3 W 4 X AA/LR6 de 1.5 V c/u
Page 3
GB
English
Intended use of Braun ExactFit
Braun upper arm blood pressure monitor has been developed for accurate and comfortable
blood pressure measurements. The measuring accuracy of Braun’s upper arm blood pressure
monitor was tested at the time of manufacture and was proven by clinical research in
accordance with AAMI/ANSI-SP10.
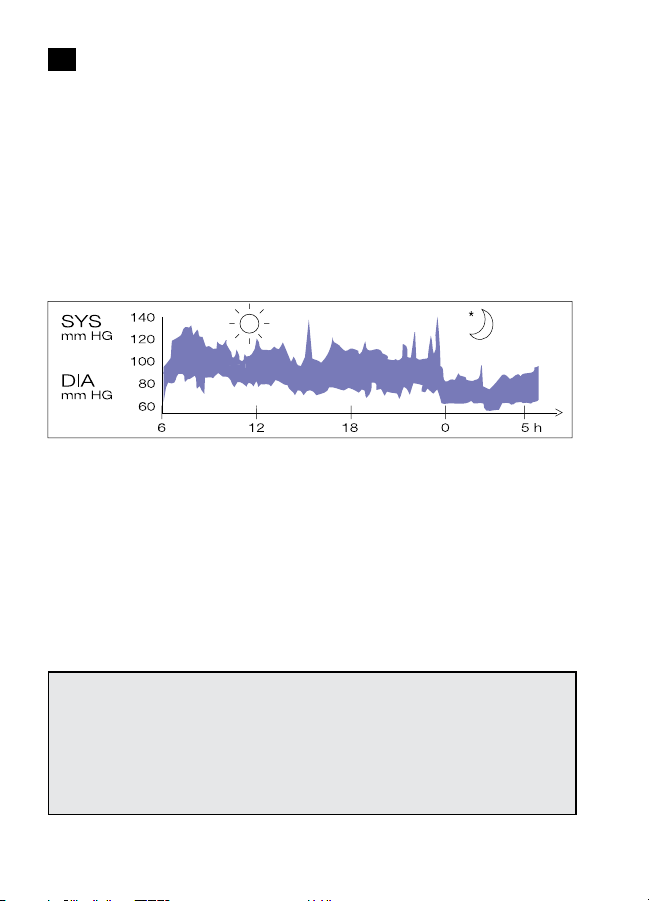
What you should know about blood pressure
Blood pressure constantly changes throughout the day. It rises sharply in the early morning
and declines during the late morning. Blood pressure rises again in the afternoon and nally
drops to a low level at night. Also, it may vary in a short period of time. Therefore, readings
from successive measurements can uctuate.
Blood pressure readings taken from a healthy 31-year -old male, measured at 5-minute intervals
Blood pressure measured in a doctor’s oce only provides a momentary value. Repeated
measurements at home better reect one’s actual blood pressure values under everyday
conditions.
Moreover, many people have a dierent blood pressure when they measure at home,
because they tend to be more relaxed than when in the doctor’s oce. Regular blood
pressure measurements taken at home can provide your doctor with valuable information
on your normal blood pressure values under actual «everyday» conditions.
The World Health Organisation (WHO) has set up the following standard blood pressure values
when measured at resting pulse.
Blood pressure Normal Mild Severe
(mmHg) values hypertension hypertension
SYS = systole (upper value) up to 140 140-180 over 180
DIA = diastole (lower value) up to 90 90-110 over 110
3
Page 4
Warnings and Precautions
• To ensure accurate measuring results, carefully read the complete use instructions.
• This product is intended for household use only. Keep product and batteries away
from children.
• People suering from cardiac arrhythmia, vascular constriction, arteriosclerosis in
extremities, diabetes or users of cardiac pacemakers should consult their doctor
before measuring their blood pressure themselves, since deviations in blood
pressure values may occur in such cases.
• If you are under medical treatment or taking any medication, please consult your
doctor rst.
• The use of this blood pressure monitor is not intended as a substitute for
consultation with your doctor.
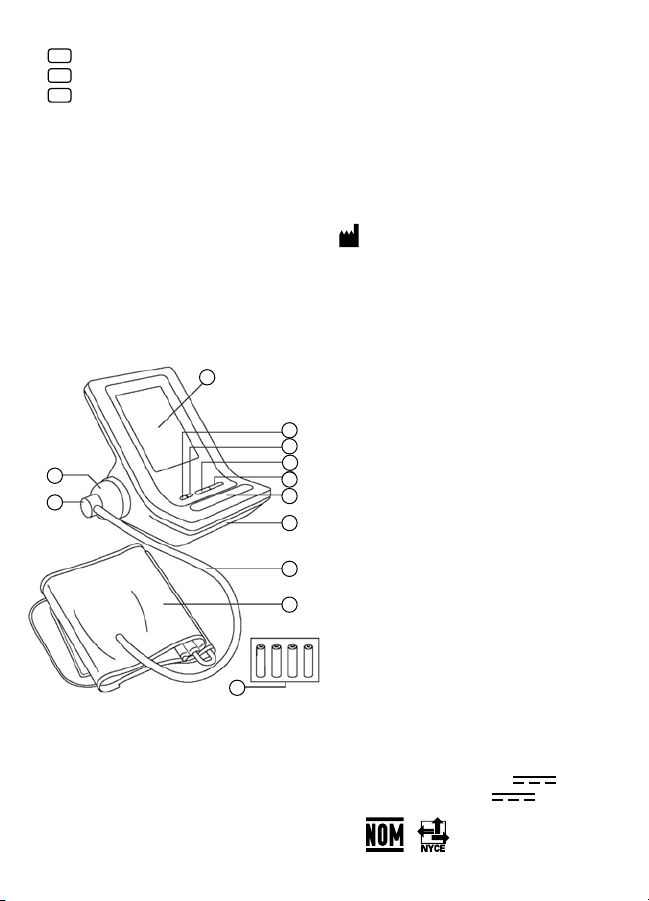
Product description
1. Start/stop button
2. Memory button
3. Average button
4. Set button
5. Mode button
6. Battery compartment cover
7. Hose port
8. Connector
9. Hose
10. Arm cu
11. 4X AA alkaline batteries (1,5v)
12. LCD display
Fig. 2
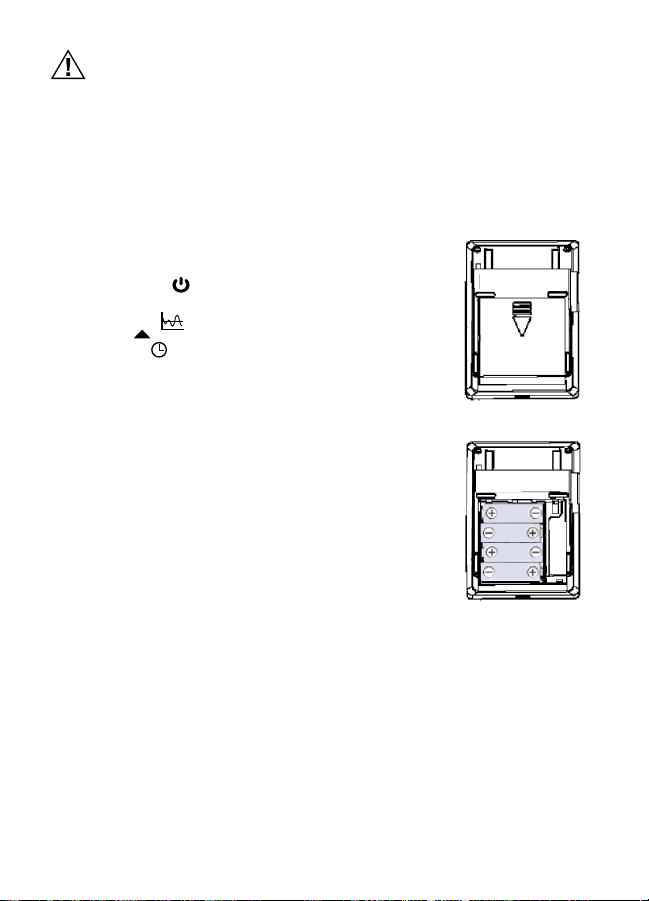
Inserting batteries
• Remove the battery compartment cover at the bottom of the unit
and insert 4 AA LR6 alkaline batteries with correct polarity (see
symbol in the battery compartment).
• Note: always re-set date and time after replacing new batteries to
make sure the measurement results are stored with correct date
and time.
• Only discard empty batteries. They should not be
disposed of in the household waste, but at appropriate
collection sites or at your retailer.
Key rules for accurate blood pressure measurement
• Always take readings at the same time of day, ideally in the morning and evening,
under the same conditions.
• Do not measure within 30 minutes after smoking or consuming coee or tea.
• Take o wrist watch and jewelry before tting the cu on the measuring arm.
• While taking a measurement, sit down, relax, keep still, and do not move or speak.
• Wrap the cu snugly around your arm. The cu must be at heart level.
• Do not vibrate the unit during measurement, or the proper measurement
will not be achieved.
• Perform measurement quietly in a relaxed position.
• Sit in a chair with your feet at on the oor.
Fig. 3
4
Page 5
• Do not wrap the cu over jacket or sweater sleeve or measurement cannot be done.
• Remove tight-tting clothing from your left arm.
• Do not in any way twist the arm cu.
• Do not inate the monitor’s cu when it is not wrapped around the arm.
• Do not attempt to disassemble or change any parts of the monitor including the cu.
• Do not drop the product or put it through strong impact.
• The device is not supposed to be used if your arm has any wound or injury.
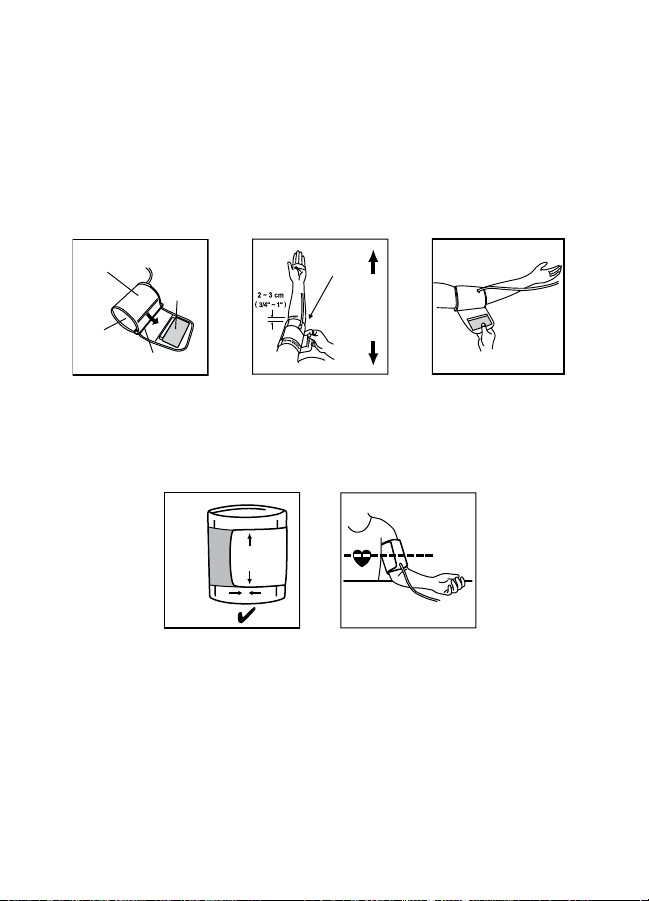
Applying the arm cu
1. Slide the end of arm cu furthest from the tube through the metal ring to a loop.
The smooth cloth should be on the inside of the cu.
Fig. 5
Left arm
Main
arteries
Index
Fig. 6
Pile side material
Velcro
Smooth
cloth
Metal ring
Fig. 4
2. If the cu is located correctly, the Velcro will be on the outside of the cu and the metal ring
will not touch the skin. (Fig. 4)
3. Put your left arm through the cu loop. The bottom of the cu should be approximately
(2~3 cm) above elbow. The tube should lie over the brachial artery on the inside of the arm.
(Fig. 5)
23 ~ 43 Cm
Adult cuff
Fig. 7
4. Pull the cu so that the top and bottom edges are tightened around your arm. (Fig. 6)
5. When the cu is positioned properly, press the Velcro rmly against the pile side of the cu.
6. This cu is suitable for use if the <<index>> mark falls within the <<ok range>> marked by
two arrows when the cu is tightened around your arm. (Fig. 7)
7. Sit on a chair and place your arm on the table so that the cu is at the same level as your
heart. (Fig. 8)
Index
OKOK
Fig. 8
5
Page 6
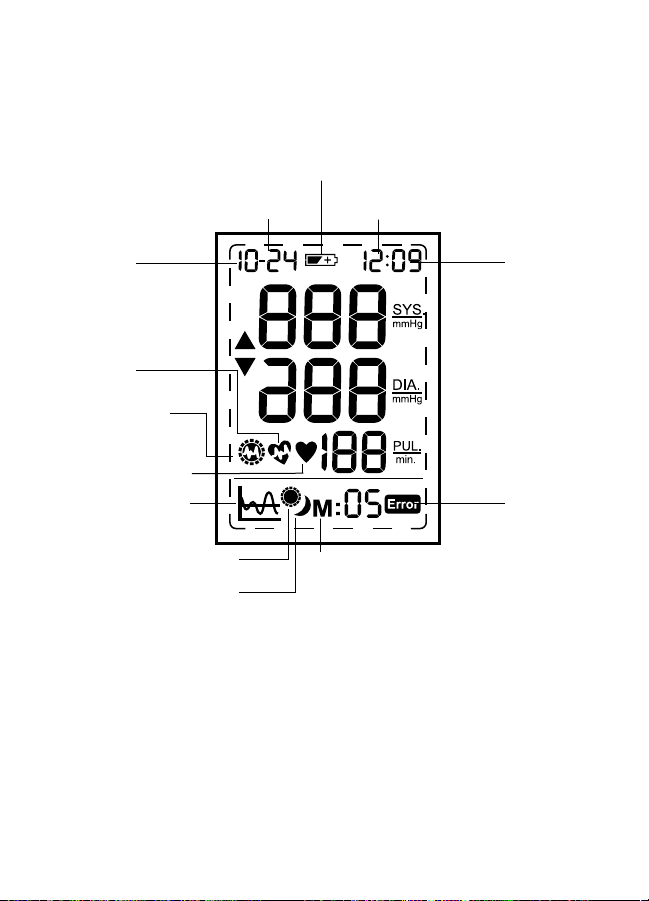
Display BP 4900PH-WE/BP5900PH-EMEA
Low battery indicator
Date
Month
Irregular heart beat
symbol*
Morning
hypertension
symbol*
Heart rate symbol
Average symbol
Morning average record*
Evening average record*
Hour
Minute
Measuring
error display
Memory record
Fig. 9
* For BP5900PH-EMEA only
Note: On BP5900PH-EMEA, the backlight goes on when the unit is turned on, buttons are
pressed, or when results are being displayed. It turns itself o after 10 seconds if no
buttons are pressed.
6
Page 7
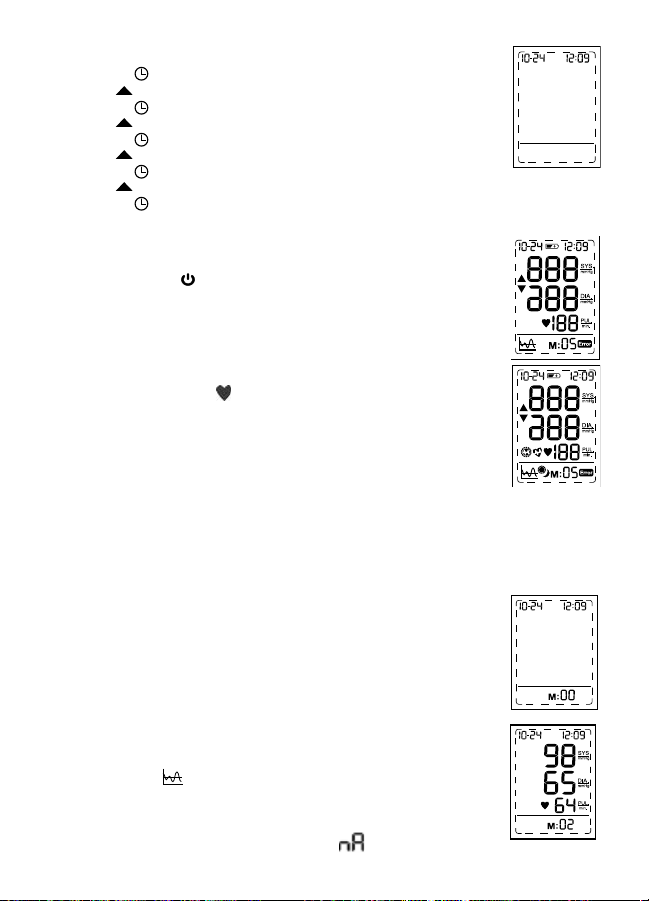
Setting month, date and time
a. Press mode (5) button (“month” starts ashing)
Press set
b. Press mode
Press set
c. Press mode
Press set
d. Press mode
Press set
e. Press mode
(4) button to set the correct month (1,2,3,…12)
(5) button (“date” start ashing)
(4) button to set the correct date (1,2,3,…31)
(5) button (“hour” starts ashing)
(4) button to set the correct hour (1,2,3,…12)
(5) button (“minute” starts ashing)
(4) button to set the correct minute (0,1,2,3,…59)
(5) button again to lock in time settings. Digits will stop ashing.
Taking a measurement
Wrap the cu around the arm (see “applying the arm cu” section above).
1. Sit upright on the chair to have a correct posture.
2. Press the “start/stop
“888” during the rst 3 seconds. The measuring blood pressure symbol will
then ash on the display and the air pressure will automatically pump up
to certain pressure level and start measurement.
(Fig.9 BP 4900PH-WE/BP5900PH-EMEA)
Do not move or talk in the midst of taking blood pressure measurement.
3. After the air pressure has increased, it will slowly decrease. When the pulse
is detected, the heart rate
After taking blood pressure measurement, the product will turn o
automatically after 1 minute.
” (1) button, all elements of the display indicate
symbol will start ashing.
Memory function
Your blood pressure monitor can store the latest readings of 48 measurements
for BP 4900PH-WE, or 99 measurements for BP5900PH-EMEA.
Storing measurement data
After each blood pressure measurement, the systolic pressure, diastolic pressure, pulse rate
and the time & date of specic day will be automatically stored. Memory #01 is always the
most recent one. Once the memory is full, the oldest values will be overwritten.
Recalling stored readings
• Press “memory
data stored in the memory. If there is data stored in the memory, the latest
recorded set of measurement which is the systolic pressure, diastolic
pressure, pulse rate, and the recording time and date and M:01 will appear
on the display for 1 minute.
• Press the “memory
The data called up on the display with 2-digit memory number (ex. M:02).
” (2) button, M:00 will appear on the display if there is no
” (2) button again to read the next line of stored data.
7-day average function
Full day average
• Press the “average ” (3) button once, “full day average” result will
show on LCD.
• Make sure the date / time is correct when taking measurement, so you
may get the correct 7-day average result.
• If there is no data in memory within past 7 days, “
” will show on LCD.
7
Page 8
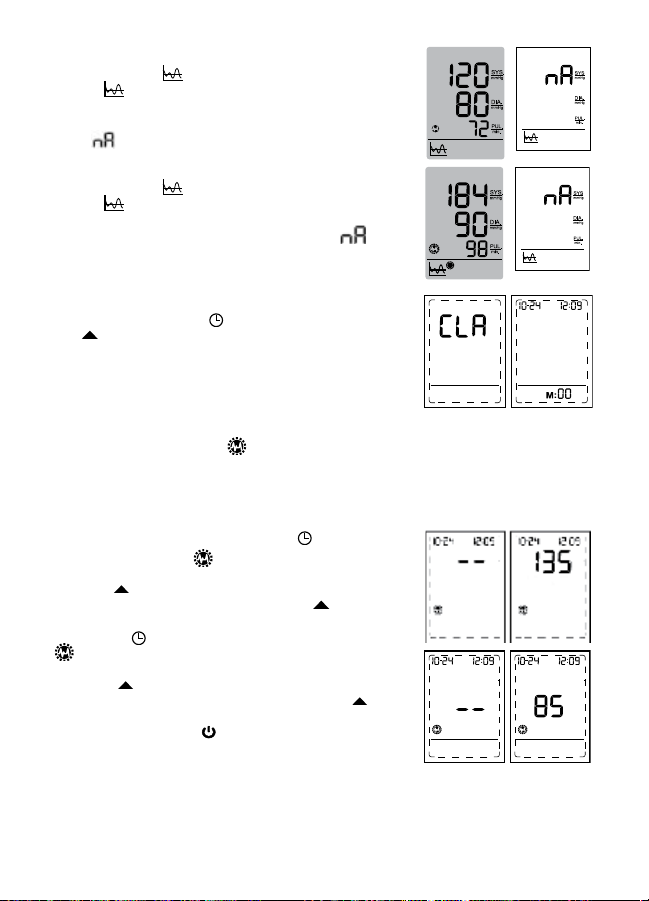
Morning average (for BP5900PH-EMEA only)
• Press the “average ” (3) button again into “morning
average
in memory within past 7 days will show on LCD.
• If there is no data in memory within past 7
days, “
” mode, the morning measurements
” will show on LCD.
Evening average (for BP5900PH-EMEA only)
• Press the “average ” (3) button once again into “evening
average
within past 7 days will show on LCD.
• If there is no data in memory within past 7 days, “
show on LCD.
” mode, the evening measurements in memory
” will
Erasing data
• Press the “memory
• Press and hold the “mode
” (4) button, all the stored data will be erased and
“set
CLR will show on screen.
• To check if the data was erased, press the “memory
button. No data should show up on screen, but date, time
and M:00.
” (2) button into memory mode.
” (5) button and then press the
” (2)
Morning hypertension setting (for BP5900PH-EMEA only)
Morning hypertension symbol will appear when morning average is above your
pre-congured systolic rate and/or pre-congured diastolic rate, and/or one or both of
these measurements is 20% or more above evening average.
** Your pre-congured systolic / diastolic should be decided between you and your
doctor or healthcare provider.
• After setting date and time, press “mode
“morning hypertension
position will ash for systolic setting.
• Press “set
as the internal pre-set value, then press “Set
repeatedly to set his own value (range from 70~250 mmHg)
• Press “mode
diastolic setting.
• Press “SET
as the internal pre-set value, then user presses “set
to set his own value (range for DIA is 40 ~ 115 mmHg).
• User can press start/stop
and go back to standby at any step.
” (4) button, LCD will appear 135 mmHg for SYS
” (5) button again into “morning hypertension
” setting mode “ - - ” on diastolic position will ash for
” (4) button, LCD will appear 85 mmHg for DIA
” setting mode “- - ” on systolic
(1) button to exit setting mode
” (5) button into
” button
” button
8
Page 9
Irregular heart beat detector (for BP5900PH-EMEA only)
The appearance of this symbol signies that a certain pulse irregularity was detected
during the measurement. Talking, moving, shaking or an irregular pulse during the
measurement can result in the appearance of this icon. Usually this is not a cause for concern,
however if the symbol appears often, we recommend you seek medical advice. The device does
not replace a cardiac examination, but service to detect pulse irregularities at an early stage.
Low battery indicator
When the low battery indicator ashes on the display, it means the battery is low and
the four batteries need to be replaced with alkaline LR6 (AA) batteries.
** After replacing batteries, BPM will go into time-setting mode automatically and show the
last measurement time on screen. Please set the current date / time before taking the next
measurement to get correct average result.
Storage and cleaning
• Always keep the unit in the carrying case after its use.
• Do not put the item directly under the sunlight, in high temperature or humid and dusty
places.
• Do not store in extremely low (less than -20°C) or high (more than 60°C) temperature.
temperature.
• Use a piece of cloth with water or mild cleansing agent to clean the case and then use a piece
of dry cloth to wipe it dry. Use a piece of dry cloth to wipe the cu when it is dirty.
• Do not use any strong cleansers to clean it.
• When the unit is not to be used for a long time, remove the batteries.
(Batteries may leak or cause harm).
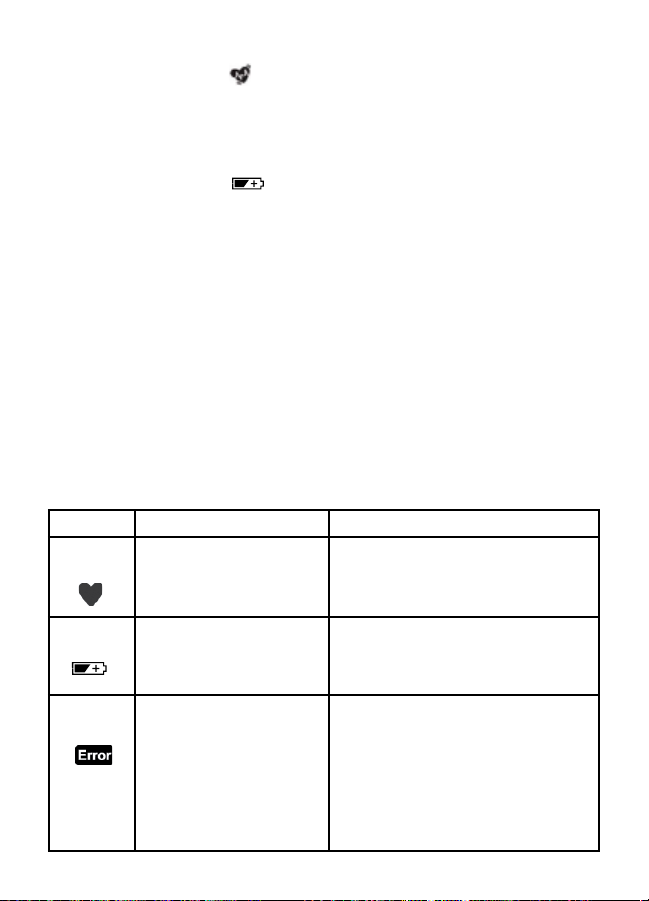
What to do if …..
Problem Reason Solution
Heart rate
symbol
Appears in the measurement
condition and ashes when
pulse is detected.
• Measurement in progress, remain quiet.
Low battery
indicator
Measuring
error
Appears when the battery
voltage is excessively low or
the positions of the batteries
are incorrect.
Appears when the accurate
blood pressure and pulse
could not be obtained.
• Replace all four batteries with new ones.
Insert the batteries in the correct
positions. Be aware of +/- positions.
• Press “start/stop” button again and
remeasure.
• Check if cu is wrapped
according to instructions.
• Check that there are no kinks in tube.
• Check palm if exerting eort.
• Check if talking or moving
during measurement.
• Check if posture is correct.
9
Page 10

Specications
Method of measurement Oscillometric
Model number BP 4900PH-WE, BP5900PH-EMEA
Range of measurement Pressure 0~300 mmHg
Pulse 40~199 beats/minute
Accuracy Pressure +/- 3 mmHg
Pulse +/- 5% max.
Ination Deluxe automatic
Exhaust Automatic exhaust valve
Display Liquid crystal display – systolic, diastolic, pulse rate
Sets of memory BP 4900PH-WE: 48 sets
BP5900PH-EMEA: 99 sets
Cu size Universal cu = 23~43 cm arm circumference
Operating temperature +10 °C ~ +40 °C, less than 85% R.H.
Storage temperature -20 °C ~ +60 °C, less than 85% R.H.
Unit weight Approximately 300g (without batteries)
Power supply Alkaline battery: 4 x AA (LR6)
Battery life Twice a day measurement:
BP 4900PH-WE: 300 times measurement
BP5900PH-EMEA: 250 times measurement
Auto power o Whenever not used for 1 minute
Accessories 4 batteries, arm cu with tube, instruction manual,
pouch, gift box
10
Page 11

IMPORTANT
Read the operating instructions.
Classication:
• Internally powered equipment
• Type BF equipment
• IPX0
• Not suitable for use in the presence of ammable anesthetic mixture with air,
• Continuous operation with short-time loading
Keep dry.
• EN 60601-1: 1990 + A1: 1993 + A2: 1995 + A13: 1996 General requirements for safety.
• EN 60601-1-2: 2001 - Electromagnetic compatibility requirements and tests.
• EN1060-1: 1995 + A1: 2002 - Non-invasive sphygmomanometers- General
• EN1060-3: 1997 + A1: 2005 - Non-invasive sphygmomanometers- supplementary
• EN1060-4: 2004 - Non-invasive sphygmomanometers- Test procedures to
MEDICAL ELECTRICAL EQUIPMENT needs special precautions regarding EMC.
For detailed description of EMC requirements please contact an authorized local Service
Centre (see package insert).
Portable and mobile RF communications equipment can aect medical electrical
equipment.
Please do not dispose of the product in the household waste at the end of its useful
Guarantee
See warranty statement that comes with the product.
oxygen or nitrous oxide
Operating temperature
Storage temperature
This device conforms to the following standards:
requirements .
requirements for electromechanical blood pressure measuring systems.
determine the overall system accuracy of automated non-invasive
sphygmomanometers.
life. Disposal can take place at your local retailer or at appropriate collection points
provided in your country.
11
Page 12

ES
Español FAVOR DE LEER INSTRUCTIVO ANTES DE USAR EL MONITOR DE TENSIÓN
Uso previsto de Braun ExactFit
El monitor de tensión arterial de la parte superior del brazo de Braun se ha desarrollado
para realizar mediciones de tensión arterial precisas y cómodas. La precisión de la medición
del monitor de tensión arterial de la parte superior del brazo de Braun se ha probado en el
momento de su fabricación y ha sido testeado mediante investigación clínica según AAMI/
ANSI-SP10.
Lo que debe saber sobre la tensión arterial
La tensión arterial cambia constantemente a lo largo del día. Aumenta notablemente a
principios de la mañana y desciende a nales de la mañana. La tensión arterial vuelve a
aumentar por la tarde y nalmente desciende a un nivel bajo por la noche. Asimismo,
puede variar en un breve periodo de tiempo. Por lo tanto, las lecturas de mediciones
sucesivas pueden uctuar.
Lecturas de la tensión arterial tomadas a un hombre sano de 31 años de edad, realizadas en
intervalos de 5 minutos
La tensión arterial medida en una consulta médica sólo ofrece un valor momentáneo. Las
mediciones repetidas en casa reejan mejor los valores de tensión arterial propios bajo
condiciones diarias.
Además, mucha gente presenta una tensión arterial diferente cuando la medición se realiza en
casa, ya que tienden a estar más relajados que cuando se encuentran en la consulta médica.
Las mediciones regulares de la tensión arterial realizadas en casa pueden ofrecer a su médico
información valiosa sobre sus valores de tensión arterial normal bajo condiciones diarias reales.
La organización mundial de la salud (OMS) ha establecido los siguientes valores estándar de
tensión arterial al realizar mediciones con pulso en descanso.
12
Tensión arterial Normal Media Grave
(mmHg) valores hipertensión hipertensión
SYS = sistólica hasta 140 140-180 más de 180
(valor máximo)
DIA = diastólica hasta 90 90-110 más de 110
(valor mínimo)
Page 13

• Para asegurar resultados precisos de medición, lea detenidamente las instrucciones
de uso completas.
• Esté producto está indicado únicamente para su uso doméstico. Mantenga el
producto y las baterias alejados de los niños.
• Aquellas personas que sufran arritmias cardiacas, constricción vascular,
arteriosclerosis en las extremidades, diabetes o usuarios de marcapasos deben
consultar con su médico antes de realizarse mediciones de tensión arterial ya que
se pueden producir en tales casos desviaciones en los valores de la tensión arterial.
• Si se encuentra bajo tratamiento médico o toma cualquier medicación,
rogamos consulte primero con su médico.
• El uso de este monitor de tensión arterial no está indicado como un sustituto
de la consulta con el médico.
Descripción del producto
1. Botón de inicio / parada
2. Botón de memoria
3. Botón de promedio
4. Botón de ajuste
5. Botón de modo
6. Cubierta del compartimento de las baterias
7. Puerto de la manguera
8. Conector
9. Manguera
10. Manguito del brazo
11. 4 baterias alcalinas AA de 1.5V
12. Pantalla LED
Fig. 2
Insertar las baterias
• Retire la cubierta del compartimento de las baterias situada en la
parte posterior de la unidad inserte 4 baterias alcalinas AA/LR6 con la
polaridad correcta (ver los símbolos del compartimento de las baterias).
• Nota: Reinicie siempre la fecha y la hora después de la sustitución de
baterias para asegurarse que las mediciones se realizan con la fecha y
hora correcta.
• Elimine únicamente las baterias usadas. No debe eliminarlas como si
fueran desechos domésticos, sino en lugares de recogida adecuados o en su distribuidor.
Fig. 3
Reglas básicas para una medición precisa de la tensión arterial
• Tome siempre las lecturas a la misma hora del día, de forma ideal por la mañana o noche y en
las mismas condiciones.
• No realice la medición antes de que trascurran 30 minutos después de haber fumado o
consumido café.
• Quítese el reloj de pulsera y las joyas antes de ajustar el manguito sobre el brazo en el que se
vaya a realizar la medición.
• Mientras realiza la medición, siéntese, relájese, mantenga la calma y no se mueva o hable.
• Apriete el manguito de forma cómoda alrededor del brazo. El manguito debe encontrarse al
mismo nivel que el corazón.
• No provoque vibraciones en la unidad durante la medición, o no se conseguirá una medición adecuada.
13
Page 14

• Realice la medición tranquilamente en una posición relajada.
• Siéntese en una silla con los pies apoyados sobre el suelo.
• No apriete el manguito sobre la manga de una chaqueta o jersey o no se podrá realizar la
medición.
• Retire la ropa ajustada de su brazo izquierdo.
• No retuerza de ninguna manera el manguito del brazo.
• No ine el manguito del monitor cuando no esté apretado alrededor del brazo.
• No intente desmontar ni cambiar cualquiera de los componentes del monitor incluyendo el
manguito.
• No deje caer el producto o lo someta a un impacto fuerte.
• Se supone que el dispositivo no debe usarse si el brazo presenta cualquier tipo de herida o lesión.
Aplicación del manguito al brazo
1. Deslice el extremo del manguito del brazo lo más alejado del tubo a través del anillo
metálico hasta un bucle. El paño más suave debe encontrarse en la parte interior del
manguito.
Brazo izquierdo
Fig. 7
Arterias
principales
Índice
Fig. 5
Fig. 6
Fig. 8
Material lateral
del soporte
Paño
suave
Velcro
Anillo de metal
Fig. 4
2. Si el manguito se encuentra localizado correctamente, el Velcro se encontrará en la parte
exterior del manguito y el anillo metálico no tocará su piel. (Fig. 4)
3. Inserte el brazo izquierdo a través del bucle del manguito. La parte inferior del manguito
debe encontrarse a aproximadamente 2~3 cm por encima del codo. El tubo debe
encontrarse sobre la arteria braquial en la parte interior del brazo. (Fig. 5)
Index
23 ~ 43 cm
OKOK
Manguito adulto
4. Empuje el manguito de tal forma que los bordes superior e inferior queden apretados
alrededor del brazo.
5. Cuando el manguito está colocado adecuadamente, presione rmemente el velcro contra el
lado del paño del manguito. (Fig. 6)
6. Este manguito está adecuado para su uso si la marca <<index (índice)>> forma parte del
<<ok range>> marcada por dos echas cuando el manguito se aprieta alrededor del brazo.
(Fig. 7)
7. Siéntese en una silla y coloque el brazo sobre la mesa de tal forma que el manguito se
encuentre al mismo nivel que su corazón. (Fig. 8)
14
Page 15

Pantalla BP 4900PH-WE/BP5900PH-EMEA
Indicador de bateria baja
Fecha
Mes
Símbolo de
ritmo cardiaco
irregular*
Símbolo de
hipertensión
matinal*
Símbolo de ritmo
cardiaco
Símbolo de
promedio
Registro de media matinal*
Registro de media nocturna*
Hora
Minutos
Pantalla de
error de medición
Registro de memoria
Fig. 9
* Sólo para BP5900PH-EMEA
Nota: En el modelo BP5900PH-EMEA, la luz posterior se enciende cuando se enciende la
unidad, se pulsan los botones o cuando se muestran los resultados. Se apaga automáticamente
a los 10 segundos si no se pulsa ningún botón.
15
Page 16

Establecer el mes, fecha y hora
a. Pulse el botón modo (empieza a parpadear “mes”)
b. Pulse el botón modo
Pulse el botón establecer
(1, 2, 3, ....31)
c. Pulse el botón modo
Pulse el botón establecer
d. Pulse el botón modo
Pulse el botón establecer
(0, 1, 2, 3, ....59)
e. Vuelva a pulsar el botón modo
temporal.
Los dígitos dejan de parpadear.
(5)Pulse el botón Establecer
(4) para establecer la fecha correcta
(5) (empieza a parpadear “hora”)
(4) para establecer la hora correcta (1, 2, 3, ....12)
(5) (empieza a parpadear “minutos”)
(4) para establecer los minutos correctos
(5) para bloquear la conguración
Realizar una medición
Apriete el manguito alrededor del brazo (véase la sección que aparece arriba
“aplicación del manguito al brazo”).
1. Siéntese recto en una silla para disponer de una postura correcta.
2. Pulse el botón “start / stop
indican “888” durante los primeros 3 segundos. El símbolo de medición
de la tensión arterial posteriormente se iluminará en pantalla y la presión
del aire aumentará hasta alcanzar cierto nivel de presión y se iniciará la
medición. (Figura 9 BP 4900PH-WE/BP5900PH-EMEA) No se mueva o hable
en medio de una medición de la tensión arterial.
3. Una vez que haya aumentado la presión del aire, lentamente disminuirá:
cuando se detecte pulso, el símbolo de ritmo cardiaco
parpadear. Al detectarse pulso empezará a parpadear el símbolo de
ritmo cardiaco.
Tras la realización de la medición de la tensión arterial, el producto de
apagará de forma automática después de 1 minuto.
“ (1); todos los elementos de la pantalla
empezará a
Función de memoria
Su monitor de tensión arterial puede almacenar las últimas 48 lecturas de mediciones para el
BP 4900PH-WE o de 99 mediciones para el BP5900PH-EMEA.
Almacenar datos de mediciones
Tras cada medición de la tensión arterial, se guardarán automáticamente
la tensión sistólica, la diastólica, el ritmo cardiaco y la fecha y hora del día
especíco. La memoria #01 es siempre la más reciente. Una vez que la memoria
se encuentre llena, se sobrescribirán sobre los valores más antiguos.
Recordar lecturas almacenadas
• Pulse el botón “memoria
datos almacenados en la memoria. Si existen datos almacenados en la
memoria, las mediciones registradas la última vez que son la tensión
sistólica, la diastólica, el ritmo cardiaco, la fecha, hora del registro y
M.01 aparecerán en pantalla durante 1 minuto.
• Vuelva a pulsar el botón “memoria
datos almacenados. Los datos aparecen en pantalla con el número de
memoria de dos dígitos (por ejemplo M:02).
16
“ (2); aparecerá en pantalla M:00 si no hay
“ (2) para leer la siguiente línea de
Page 17

Función promedio 7 días:
Promedio de día completo
• Pulse una vez el botón “promedio “ (3); aparecerán en la pantalla LCD el resultado de
”promedio de día completo”.
• Asegúrese que la fecha / hora son correctas cuando realice
la medición, y así podrá obtener el resultado correcto del
promedio de 7 días.
• Si no existen datos en la memoria de los últimos 7 días “
aparecerá en la pantalla LCD.
Promedio matinal (sólo para BP5900PH-EMEA))
• Vuelva a pulsar el botón “promedio
“promedio matinal “ ; aparecerán en la pantalla LCD las
mediciones matinales que se encuentren en la memoria
de los últimos 7 días.
• Si no existen datos en la memoria de los últimos
7 días “
” aparecerá en la pantalla LCD.
Promedio vespertino (sólo para BP5900PH-EMEA)
• Vuelva a pulsar el botón “promedio
“promedio vespertino
LCD las mediciones vespertinas que se encuentren en
la memoria de los últimos 7 días con fecha y hora.
• Si no existen datos en la memoria de los últimos
7 días “
“ aparecerá en la pantalla LCD.
“; aparecerán en la pantalla
“ (3) en modo
“ (3) en modo
Borrar datos
• Pulse el botón “memoria
• Pulse y mantenga pulsado el botón “modo
posteriormente pulse el botón “establecer
se borrarán todos los datos almacenados y aparecerá en pantalla CLR.
• Para comprobar si se han borrado los datos, pulse el botón “memoria
No debe aparecer ningún dato en pantalla salvo fecha, hora y M:00.
Conguración de hipertensión matinal (sólo para BP5900PH-EMEA)
Aparecerá el símbolo de hipertensión matinal
por encima de su tasa sistólica precongurada y/o la tasa diastólica precongurada , Y/O una o
ambas de estas mediciones supera en un 20% o más su promedio matinal.
** Se debe decidir la tasa Sistólica / diastólica precongurada entre usted y el médico.
“ (2) en modo memoria.
“(5) y
“ (4);
cuando el promedio matinal se encuentre
”
“ (2).
17
Page 18

• Una vez establecida la fecha y la hora, pulse el botón “modo
“ (5) en modo de conguración “hipertensión matinal” ”;
parpadeará “---” en la posición sistólica para la conguración
sistólica.
• Pulse el botón “establecer
aparecerá 135 mmHg para SIS como el valor interno
predeterminado; posteriormente pulse el botón
“establecer
su propio valor (gama desde 70~250 mmHg))
• Vuelva a pulsar el botón “modo
de conguración “hipertensión matinal
parpadeará “ - - ” en la posición diastólica para la
conguración diastólica.
• Pulse el botón “establecer
aparecerá 85 mmHg para DIA como el valor interno
predeterminado; posteriormente el usuario pulsa el botón
“establecer
• El usuario puede pulsar el botón start/stop
modo en espera en cualquier momento.
” de forma reiterada para establecer
” para establecer su propio valor (La gama para DIA es 40 ~ 115 mmHg).
” (4); en la pantalla LCD
(5) en el modo
”;
” (4); en la pantalla LCD
(1) para salir del modo conguración y volver al
Detector de ritmo cardiaco irregular (sólo para BP5900PH-EMEA)
La aparición de este símbolo indica que se ha detectado cierta irregularidad de pulso
durante la medición. Hablar, moverse, agitarse o un pulso irregular durante la medición puede
provocar la aparición de este icono. Normalmente esto no es preocupante; no obstante si este
símbolo aparece a menudo, le recomendamos que busque consejo médico. El dispositivo no es
un sustituto de un examen cardiológico, aunque sirva para detectar irregularidades del pulso
en un estadio precoz.
Indicador de bateria baja
Cuando el indicador de bateria baja parpadea en pantalla, indica que bateria está
gastada y que es necesario sustituir las cuatro baterias por baterias alcalina LR6 (AA).
** Tras la sustitución de las baterias, BMP entrará en modo configuración horaria de forma
automática y mostrará la última hora de medición en pantalla. rogamos establezca la fecha /
hora actual antes de realizar la siguiente medición para obtener el resultado de promedio
correcto.
Almacenamiento y limpieza
• Guarde siempre la unidad en su bolsa de transporte después de su uso.
• No exponga directamente la unidad a la luz directa del sol, a altas temperaturas o la coloque
en espacios húmedos o con polvo.
• No la guarde a temperaturas extremadamente altas (más de 60ºC) o bajas (inferiores a -20°C).
• Use un paño con agua o con un agente de limpieza suave para limpiar la bolsa y
posteriormente use un paño seco para secarla. Use un paño seco para limpiar el manguito
cuando esté sucio.
• No emplee combustibles o limpiadores abrasivos para limpiarlo.
• Cuando no se vaya a emplear la unidad durante un periodo prolongado de tiempo, quite las
baterias. (La ltración del líquido de las baterias puede ser nociva).
18
Page 19

Qué hacer si.....
Problema Motivo Solución
Símbolo
de ritmo
cardiaco
Aparece en la condición de
medición y parpadea cuando
se detecta pulso.
• Medición en progreso permanezca tranquilo.
Indicador de
bateria baja
Error de
medición
Aparece cuando el voltaje de
las baterias es excesivamente
bajo o la posición de las
baterias es incorrecta.
Aparece cuando no se puede
obtener una tensión arterial
o el pulso con precisión.
• Sustituya las cuatro baterias por otras nuevas. Inserte
las baterias en la posición correcta. Tenga en cuenta las
posiciones +/-.
• Vuelva a pulsar el botón “start / stop” y reinicie la medición.
• Compruebe si el manguito está apretado según las
instrucciones.
• Compruebe que no existan dobleces en el tubo.
• Compruebe si la palma de la mano ejerce algún esfuerzo.
• Compruebe si se ha hablado o se ha movido durante la
medición.
• Compruebe si la postura es la correcta.
Especicaciones
Método de medición Oscilométrico
Número de modelo BP 4900PH-WE, BP5900PH-EMEA
Gama de medición Presión 0~300 mmHg
Pulso 40~199 latidos/minuto
Precisión Presión +/- 3 mmHg
Pulso +/- 5% Max.
Inado Automático deluxe
Escape Válvula de escape automática
Pantalla Pantalla de cristal líquido - tasa de pulso, sistólico, diastólico
Juegos de memoria BP 4900PH-WE: 48 juegos
BP5900PH-EMEA: 99 juegos
Tamaño del manguito Manguito universal = 23~43 cm de circunferencia de brazo
Temperatura de funcionamiento +10 °C ~ +40 °C, inferior a 85% R.H.
Temperatura de almacenamiento 20 °C ~ +60 °C, inferior a 85% R.H.
Peso de la unidad Aproximadamente 300g (sin baterias)
Alimentación Baterias alcalinas: 4 x AA (LR6)
Vida útil de la batería Medición dos veces al día:
BP 4900PH-WE: medición de 300 veces
BP5900PH-EMEA: medición de 250 veces
Desconexión automática Siempre que no se use durante 1 minuto
Accesorios 4 baterias, manguito de brazo con tubo,
manual de instrucciones, bolsita, caja de cartón
Características eléctricas: 6 V
3 W 4 X AA/LR6 de 1.5 V c/u
19
Page 20

IMPORTANTE
Léase las instrucciones de funcionamiento.
Clasicación:
• Equipo de alimentación eléctrica
• Tipo de equipo BF
• IPX0
• No adecuado para su uso en presencia de mezclas anestésicas inamables con
aire, oxígeno u óxido nitroso
• Funcionamiento continuado con poco tiempo de carga
Temperatura de funcionamiento
Mantener en
lugar seco.
Temperatura de almacenamiento
Este dispositivo cumple con los siguientes estándares:
• EN 60601-1: 1990 + A1: 1993 + A2: 1995 + A13: 1996 Requisitos generales de
seguridad.
• EN 60601-1-2: 2001 – Pruebas y requerimientos de compatibilidad
electromagnética.
• EN1060-1: 1995 + A1: 2002 - esgmomanómetros no invasivos - Exigencias
generales.
• EN1060-3: 1997 + A1: 2005 - esgmomanómetros no invasivos - exigencias
suplementarias para sistemas de medición de tensión arterial electromecánica.
• EN1060-4: 2002 - esgmomanómetros no invasivos - procedimientos de
prueba para determinar la precisión general del sistema de esgmomanómetros
automáticos no invasivos.
LOS EQUIPOS MÉDICOS ELÉCTRICOS necesitan precauciones especiales según EMC.
Para una descripción detallada de las exigencias de EMC, rogamos se ponga en contacto
con Centro de Reparación autorizado (véase el prospecto en el embalaje).
Los aparatos de radiofrecuencia portátiles (RF) pueden afectar a los aparatos médicos
eléctricos.
Por favor no se deshaga del producto como un residuo doméstico al nal de su
vida útil. Su eliminación debe tener lugar en los distribuidores locales o en los
puntos de recogida adecuados de los que disponga su país.
Garantía
Ver garantía que se incluye con el producto.
20
Page 21

PT
Português
Utilização prevista do Braun ExactFit
O monitor de tensão arterial Braun de braço foi desenvolvido para a medição exacta e
confortável da tensão arterial. A exactidão da medição deste monitor Braun foi testada no
momento do fabrico e foi comprovada por investigação clínica realizada em conformidade
com a norma AAMI/ANSI-SP10.
O que deve saber sobre a tensão arterial
A tensão arterial muda constantemente durante o dia. Sobe bruscamente de manhã cedo
e diminui durante o m da manhã. A tensão arterial volta a subir durante a tarde e desce
novamente para um nível mais baixo à noite. Também pode variar num período de tempo
curto, e por conseguinte, as leituras de medições sucessivas podem utuar.
Leituras da tensão arterial de um indivíduo sadio, de 31 anos de idade e sexo masculino,
medidas com intervalos de 5 minutos
A medição da tensão arterial no consultório apenas fornece um valor momentâneo. As
mediçõesregulares feitas em casa reectem melhor os valores reais da tensão arterial nas
condições do dia-a-dia.
Mais ainda, muitas pessoas têm uma tensão arterial diferente quando a medem em casa,
pois têm tendência para se sentirem mais à vontade do que no consultório médico. As
medições regulares da tensão arterial feitas em casa, podem fornecer ao médico
informações valiosas sobre os seus valores de tensão arterial em condições do dia-a-dia.
A Organização Mundial da Saúde (OMS) deniu como normais os seguintes valores da tensão
arterial, medida em repouso.
Tensão arterial Valores Hipertensão Hipertensão
(mmHg) normais ligeire grave
SIS = sistólica até 140 140-180 superior a 180
(valor máximo)
DIA = diastólica até 90 90-110 superior a 110
(valor mínimo)
21
Page 22

• Para garantir resultados exactos na medição, leia cuidadosamente todas as
instruções de utilização.
• Este produto destina-se apenas a utilização doméstica. Mantenha o produto e
as pilhas fora do alcance das crianças.
• As pessoas que sofrem de arritmia cardíaca, constrição vascular, arterioesclerose
nas extremidades, diabetes, ou portadoras de pacemakers cardíacos , e porque em
tais casos podem ocorrer desvios dos valores da tensão arterial, devem consultar e
aconselhar-se com o médico antes de iniciarem as medições em casa.
• Se estiver em tratamento médico ou a tomar medicamentos, consulte
primeiro o médico.
• A utilização deste monitor da tensão arterial não substitui a consulta do seu médico.
Descrição do produto
1. Botão start/stop (iniciar)
2. Botão memory (memória)
3. Botão average (média)
4. Botão set (ajuste)
5. Botão mode (modo)
6. Tampa do compartimento da pilha
7. Porta da mangueira
8. Conector
9. Mangueira
10. Braçadeira
11. 4x AA pilhas alcalinas (1,5V)
12. Visor LED
Fig. 2
Introduzir as pilhas
• Abra a tampa do compartimento das pilhas, na parte de trás do aparelho,
e coloque as 4 pilhas alcalinas AA LR6 na posição correcta (ver símbolo
no compartimento das pilhas).
• Nota: Actualize a data e a hora sempre que colocar pilhas novas, para se
certicar de que os resultados das medições são memorizados com a
data e hora correctas.
• Desfaça-se apenas das pilhas gastas. Estas não devem ser eliminadas
juntamente com o lixo doméstico, mas sim colocadas nos pontos de
recolha adequados.
Regras fundamentais para a medição exacta da tensão arterial
• Faça as medições sempre à mesma hora do dia, de preferência de manhã e à noite,
nas mesmas condições.
• Evite fumar, comer, tomar café, consumir álcool ou fazer actividades sicas nos
30 minutos que antecedem a medição.
• Retire o relógio e as jóias antes de adaptar a braçadeira ao braço da medição.
• Durante a medição, mantenha-se sentado, relaxado, imóvel e sem falar.
• Enrole a braçadeira confortávelmente no braço. A braçadeira deve car
posicionada ao nível do coração.
• Não faça vibrar a unidade durante a medição, pois caso isso aconteça poderá
obter uma medição incorrecta.
• Faça a medição tranquilamente e numa posição cómoda.
• Sente-se numa cadeira com os pés apoiados no chão.
Fig. 3
22
Page 23

• Não enrole a braçadeira sobre a manga do casaco ou da camisola, pois a medição não é possível.
• Retire a roupa apertada do braço da medição.
• Nunca torça a braçadeira.
• Não insue a braçadeira se esta não estiver enrolada no braço.
• Não tente desmontar ou alterar as peças do monitor nem da braçadeira.
• Não deixe cair o produto, nem o sujeite a impactos fortes.
O dispositivo não deve ser utilizado se o braço tiver feridas ou lesões.
Aplicar a braçadeira
1. Coloque o a extremidade da braçadeira no anel metálico para formar um “manguito”.
O tecido macio deve car na parte interior da braçadeira.
Tira de xação
Velcro
Artérias
principais
Tecido
v suave
Aro metálico
Fig. 4
Braço esquerdo
Índice
Fig. 5
Fig. 6
2. Se a braçadeira estiver colocada correctamente, o Velcro ca no lado exterior da braçadeira
e o anel metálico não toca na pele. (Fig. 4)
3. Passe o braço através da abertura da braçadeira. A parte inferior da braçadeira deve estar
aproximadamente 2~3 cm acima do cotovelo. O tubo deve apontar para a palma da mão
e estar posicionado sobre a artéria braquial situada no interior do braço. (Fig. 5)
Index
23 ~ 43 cm
Braçadeira adulto
OKOK
Fig. 7
Fig. 8
4. Puxe a braçadeira de modo que as extremidades superiores e inferiores quem apertadas
em volta do braço.
5. Quando a braçadeira estiver devidamente colocada, prima o Velcro rmemente contra o
lado macio da braçadeira. (Fig. 6)
6. Após apertada no braço, a braçadeira está pronta a ser usada sempre que a marca “index” se
encontrar posicionada dentro do intervalo “ok” demarcado por 2 setas (Fig. 7)
7. Sente-se numa cadeira, e apoie o braço numa mesa de modo que a braçadeira que ao nível
do coração. (Fig. 8)
23
Page 24

Mostrador BP 4900PH-WE/BP5900PH-EMEA
Indicador de pilha fraca
Data
Mês
Símbolo de pulsação
irregular*
Símbolo de
hipertensão
matinal*
Símbolo de
frequência
cardíaca
Símbolo de
média
Registo da média matinal*
Registo da média vespertina*
Hora
Minuto
Indicação
de erro de
medição
Registo de memória
Fig. 9
* apenas no mod. BP5900PH-EMEA
NOTA: No mod. BP5900PH-EMEA, a “luz de fundo” do ecrã acende-se sempre que a unidade é
ligada, quando são premidos botões ou quando são apresentados os resultados. Se não forem
premidos botões, a unidade desliga-se automáticamente após 10 segundos.
24
Page 25

Acertar o mês, a data e a hora
a. Prima o botão (5) mode (“month” começa a piscar)
Prima o botão set (4) para acertar o mês (1,2,3,…12)
b. Prima o botão mode (5) (“date” começa a piscar)
Prima o botão set (4) para acertar a data (1,2,3,…31)
c. Prima o botão mode (5) (“hour” começa a piscar)
Prima o botão set (4) para acertar a hora (1,2,3,…12)
d. Prima o botão mode (5) (“minute” começa a piscar)
Prima o botão set (4) para acertar os minutos (0,1,2,3,…59)
e. Prima o botão modo (5) outra vez para guardar as congurações de tempo.
Os dígitos param de piscar.
Fazer uma medição
Enrole a braçadeira no braço (ver a secção “aplicar a braçadeira”).
1. Sente-se numa cadeira e mantenha uma postura correcta.
2. Prima o botão “start/stop
indicam “888” durante os primeiros 3 segundos. Em seguida pisca no
mostrador o símbolo de medição da tensão arterial e a braçadeira
começa automáticamente a insuar-se, iniciando-se assim a medição.
(Fig.9 BP 4900PH-WE/BP5900PH-EMEA) Não se mexa nem fale durante
uma medição da tensão arterial.
3. Depois da tensão da braçadeira aumentar até um certo nível, esta começa
a diminuir lentamente. Quando a pulsação for detectada, o símbolo da
frequência cardíaca
O monitor desliga-se automaticamente 1 minuto após os resultados da
medição da tensão arterial aparecerem no visor.
” (1), todos os elementos do mostrador
começa a piscar.
Função de memória
O seu monitor de tensão arterial pode guardar as últimas 48 leituras
(mod. BP 4900PH-WE) ou 99 leituras (mod. BP5900PH-EMEA).
Memorizar os resultados da medição
A tensão sistólica e diastólica, a frequência cardíaca, a hora e a data são memorizadas
automáticamente após cada medição. A memória nº 1 é sempre a mais recente. Uma vez a
memória cheia, os valores mais antigos são substituídos.
Ver as leituras memorizadas
• Prima o botão “memory ” (2), se não existirem dados guardados em
memória, “M:00” aparece no visor. Se houver dados memorizados, o
conjunto de medições mais recentes, tensões sistólica e diastólica,
frequência cardíaca, a hora e a data da medição e “M:01”, aparecem no
mostrador durante 1 minuto.
• Prima novamente o botão “memory ” (2) para ler a linha seguinte de
dados memorizados. Os dados são identicados no mostrador com
números de memória de 2 dígitos (ex: “M:02”)
25
Page 26

Função de média de 7 dias
Média dia
• Prima o botão “average ” (3) o resultado “full day average”
aparece no visor.
• Para obter um resultado correcto da média dos últimos 7 dias,
certique-se de que a data e a hora estão actualizadas antes de
fazer as medições.
• Se não existirem dados em memória para os últimos 7 dias,
o símbolo “
“ aparece no visor.
Média da manhã (mod. BP5900PH-EMEA)
• Prima novamente o botão “average ” (3) para obter
o modo “morning average
matinais dos últimos 7 dias aparecem no visor.
• Se não existirem dados em memória dos últimos 7 dias,
o símbolo “
“ aparece no visor.
” , a média das medições
Média da noite (mod. BP5900PH-EMEA)
• Prima novamente o botão “average ” (3) para obter o
modo “evening average”, a média das medições nocturnas
dos últimos 7 dias aparecem no visor.
• Se não existirem dados em memória dos últimos 7 dias,
o símbolo “
“ aparece no visor.
Eliminação de dados memorizados
• Prima o botão “memory
visor o modo “memory.
• Prima e mantenha premido o botão “mode
seguida prima simultâneamente o botão “set
que todos os dados memorizados sejam
apagados. As siglas CLR aparecem de imediato no visor.
• Para vericar se os dados foram eliminados, prima o
botão “memory
outros dados para alêm da data/hora e “M:00”.
” (2) até aparecer no
” (5) e em
” (4), para
” (2). No visor não devem aparecer
Congurar hipertensão matinal
(mod. BP5900PH-EMEA)
O símbolo de hipertensão matinal aparece quando a média da manhã estiver acima da
tensão sistólica e/ou da tensão diastólica pré-conguradas, e/ou quando uma ou
ambas as medições, tiverem valores iguais ou superiores a
20% da Média Nocturna.
** As tensões sistólica / diastólica pré-conguradas devem
ser decididas com o seu médico de familia.
• Depois de congurar a data e hora, prima o botão “mode
conguração da “hipertensão matinal
conguração da tensão sistólica.
”; “--” pisca na posição Systolic para
” (5) até ao modo de
26
Page 27

• Prima o botão “set ” (4), o valor por defeito de fábrica de
135 mmHg para SYS aparece no visor. Prima repetidamente
o botão “Set ” até obter o seu valor pessoal da tensão
sistólica (limites entre 70~250 mmHg).
• Prima novamente o botão “mode ” (5) até ao modo de
conguração da “hipertensão matinal ”; “--” piscar na
posição “diastolic” e assim poder congurar a tensão diastólica.
• Prima o botão “set ” (4), o valor por defeito de fábrica de 85
mmHg para DIA aparece no visor. Prima repetidamente o
botão “set ” até obter o seu valor pessoal da tensão
diastólica (limites entre 40~115 mmHg).
• A qualquer momento é possível premir o botão start/stop
(1) para sair do modo de conguração e regressar ao
modo de espera.
Detector de frequência cardíaca irregular (mod. BP5900PH-EMEA)
O aparecimento do símbolo signica que foi detectada uma certa irregularidade da
pulsação durante a medição. Se falar, se se mexer ou se tiver uma pulsação irregular durante
a medição, pode provocar o aparecimento deste símbolo. Normalmente não é razão para
preocupação, no entanto se o símbolo aparecer com frequência recomendamos que procure
aconselhamento médico. O dispositivo não substitui um exame cardiológico, mas serve para
detectar irregularidades da pulsação numa fase precoce.
Indicador de pilha fraca
Quando o simbolo “pilha piscar no mostrador, isso signica que as pilhas estão fracas e
que as quatro pilhas devem ser substituídas por pilhas alcalinas LR6 (AA) novas.
** Depois de substituir as pilhas, o monitor de tensão arterial passa automáticamente para modo
de configuração da hora e o mostrador indica a hora da última medição. Para obter um resultado
médio correcto, actualize a DATA / HORA antes de fazer a medição seguinte.
Conservação e limpeza
• Guarde sempre o monitor no estojo de transporte depois de cada utilização.
• Não deixe o monitor exposta à luz solar directa nem o guarde em locais
húmidos ou com poeira.
• Não o guarde sob temperaturas extremamente baixas (inferiores a -20 ºC) ou altas
(superiores a 60 ºC).
• Para limpar o estojo, use um pano humedecido com água ou um agente de limpeza
suave e em seguida seque-o com um pano. Use um pano seco para limpar a braçadeira.
• Não use gás nem agentes de limpeza agressivos.
• Quando o monitor não for utilizada por um período prolongado, remova as pilhas.
O derrame do uido da pilha pode danicar o monitor.
27
Page 28

Que fazer se…..
Problema Razão Solução
SÍMBOLO DE
FREQUÊNCIA
CARDÍACA
Aparece no estado de
medição e pisca quando
é detectada a pulsação.
• Medição em progresso, permaneça imóvel e aguarde
que a medição termine.
Símbolo de
pilha
Erro de
medição
Aparece quando as pilhas
estão fracas ou quando
a posição das mesmas é
incorrecta.
Aparece quando não foi
possível obter a tensão
arterial e a pulsação
correcta.
• Substitua as quatro pilhas por outras novas. Coloque as
pilhas na posição correcta.
Atenção às posições +/-.
• Prima outra vez o botão “start/stop” e volte a medir.
• Verique se a braçadeira está colocada segundo as
instruções.
• Certique-se de que o tubo não tem dobras..
• Verique se está a fazer esforço com a palma da mão.
• Verique se há conversa ou movimento durante a medição.
• Certique-se que adopta a postura corrrecta.
Especicações
Método de medição Oscilométrico
Número do modelo BP 4900PH-WE, BP5900PH-EMEA
Limites de medição Tensão 0~300 mmHg
Pulso 40~199 batimentos/minuto
Exactidão Tensão +/- 3 mmHg
Pulso +/- 5% Máx.
Insuação Deluxe automatic
Escape Válvula de escape automática
Mostrador Mostrador de cristais líquidos – sistólica, diastólica,
frequência
Conjuntos de memória BP 4900PH-WE: 48 conjuntos
BP5900PH-EMEA: 99 conjuntos
Tamanho da braçadeira Braçadeira universal = 23~43 cm perímetro do braço
Temperatura de funcionamento +10 °C ~ +40 °C, menos de 85% H.R.
Temperatura de conservação -20 °C ~ +60 °C, menos de 85% H.R.
Peso da unidade Aproximadamente 300 g (sem pilhas)
Alimentação Pilha alcalina: 4 x AA (LR6)
Vida útil da pilha Medições duas vezes por dia:
BP 4900PH-WE: 300 medições
BP5900PH-EMEA: 250 medições
Desliga-se automaticamente Quando inactivo mais de 1 minuto
Acessórios 4 pilhas, braçadeira com tubo, manual de instruções, bolsa,
caixa de oferta
28
Page 29

IMPORTANTE
Leia as instruções de funcionamento.
Classicação:
• Equipamento com fonte de alimentação interna
• Equipamento tipo BF
• IPX0
• Não adequado para utilização na presença de misturas anestésicas com ar,
• Funcionamento contínuo com curto tempo de carregamento
Mantenha-o
sempre seco.
Este produto está em conformidade com as seguintes normas:
• EN 60601-1-1: 1990 + A1: 1993 + A2: 1995 + A13: 1996 Requisitos gerais de
• EN 60601-1-2: 2001 - Requisitos e testes de compatibilidade electromagnética.
• EN1060-1: 1995 + A1: 2002 - Esgmomanómetros não invasivos - Requisitos
• EN1060-3: 1997 + A1: 2005 - Esgmomanómetros não invasivos - requisitos
• EN1060-4: 2004 - Esgmomanómetros não invasivos - Procedimentos de teste
O EQUIPAMENTO MÉDICO ELÉCTRICO carece de precauções especiais no que respeita à
CEM. Para uma descrição detalhada dos requisitos de CEM, contacte um Centro de Assistência
Técnica autorizado local (consulte o Folheto Informativo).
Equipamentos de comunicação portáteis de rádiofrequência (RF) podem afectar equipamento
médico eléctrico.
oxigénio ou óxido nitroso
Temperatura operacional
Temperatura de armazenamento
segurança.
gerais.
suplementares para sistemas electromecânicos de medição da tensão arterial.
para determinar a exactidão geral dos esgmomanómetros automatizados não
invasivos.
Quando o produto atingir o m da vida útil, não o elimine juntamente com o
Garantia
Consulte a garantia que vem com o produto.
lixo doméstico. A eliminação pode ser feita entregando o produto na loja ou em
pontos de recolha adequados disponíveis localmente.
29
Page 30

Just placed here for
CREATIVE DEPARTMENT
ARTWORK SPECIFICATIONS
Brand: Braun
Category: Blood Pressure
Model: BP4900PH-WE
Artwork Part #: 31IM4959190
Die Line Part #: N/A
Oracle Desc: OM, BP4900/BP5900 SERIES,
ENG/SPAN/PORT, 2015
Subject: Owner’s Manual
Region: LATIN AMERICA
Size: MM: W114.3 x H158.75
Scale: 1/1
Material: 50# gloss or matte text (inside pages)
Page Count: 32 - 2 blank
Revision: 6
Date:
Release Date: 13APR15
Re-release Date:
Colors:
Dielines (Do not print) Spot Colors
info - NOT PRINTING
70# gloss or matte text (cover)
13APR15
Cyan 0%Magenta 0%Yellow 0%Black
PMS Goe
100%
PMS
63-1-4
XXXX
Coating:
Overall Gloss
Special Instructions:
Quality Requirement of Artwork and
Quality Clarification Process of Artwork
Printing: Meet Eng-QS-06&02
Kaz USA, Inc.
Creative Services, 250 Turnpike Road
Southborough, MA 01772, USA
+1 508 490 7000
Varnish:
Spot UV
 Loading...