

Page 1
www.braun.com
Series 7
Type 5692
trimmer
trimmer
trimmer
Series 7
Series 7
790 cc-4
Stapled booklet, 110x200 mm, 34 p (incl. 6 p cover), 2/2 = HKS43N + black
Page 2

Braun Infolines
UK 0800 783 7010
IE 1 800 509 448
RU 8 800 200 20 20
UA 0 800 505 000
www.service.braun.com
English 4
Русский 12
Українська 22
Braun GmbH
Frankfurter Straße 145
61476 Kronberg/Germany
www.braun.com
92275905/VI-12
UK/RU/UA
Page 3
trimmer
trimmer
trimmer
on
off
on
off
trimmer
trimmer
trimmer
3 4
6
5
1
2
4a
9
8
10
11
12
15
14
17
18
19
7
20
Series 7
Series 7
16
trimmer
trimmer
trimmer
Series 7
Series 7
13
Page 4
4
Our products are designed to meet the highest
standards of quality, functionality and design.
We hope you enjoy your new Braun Shaver.
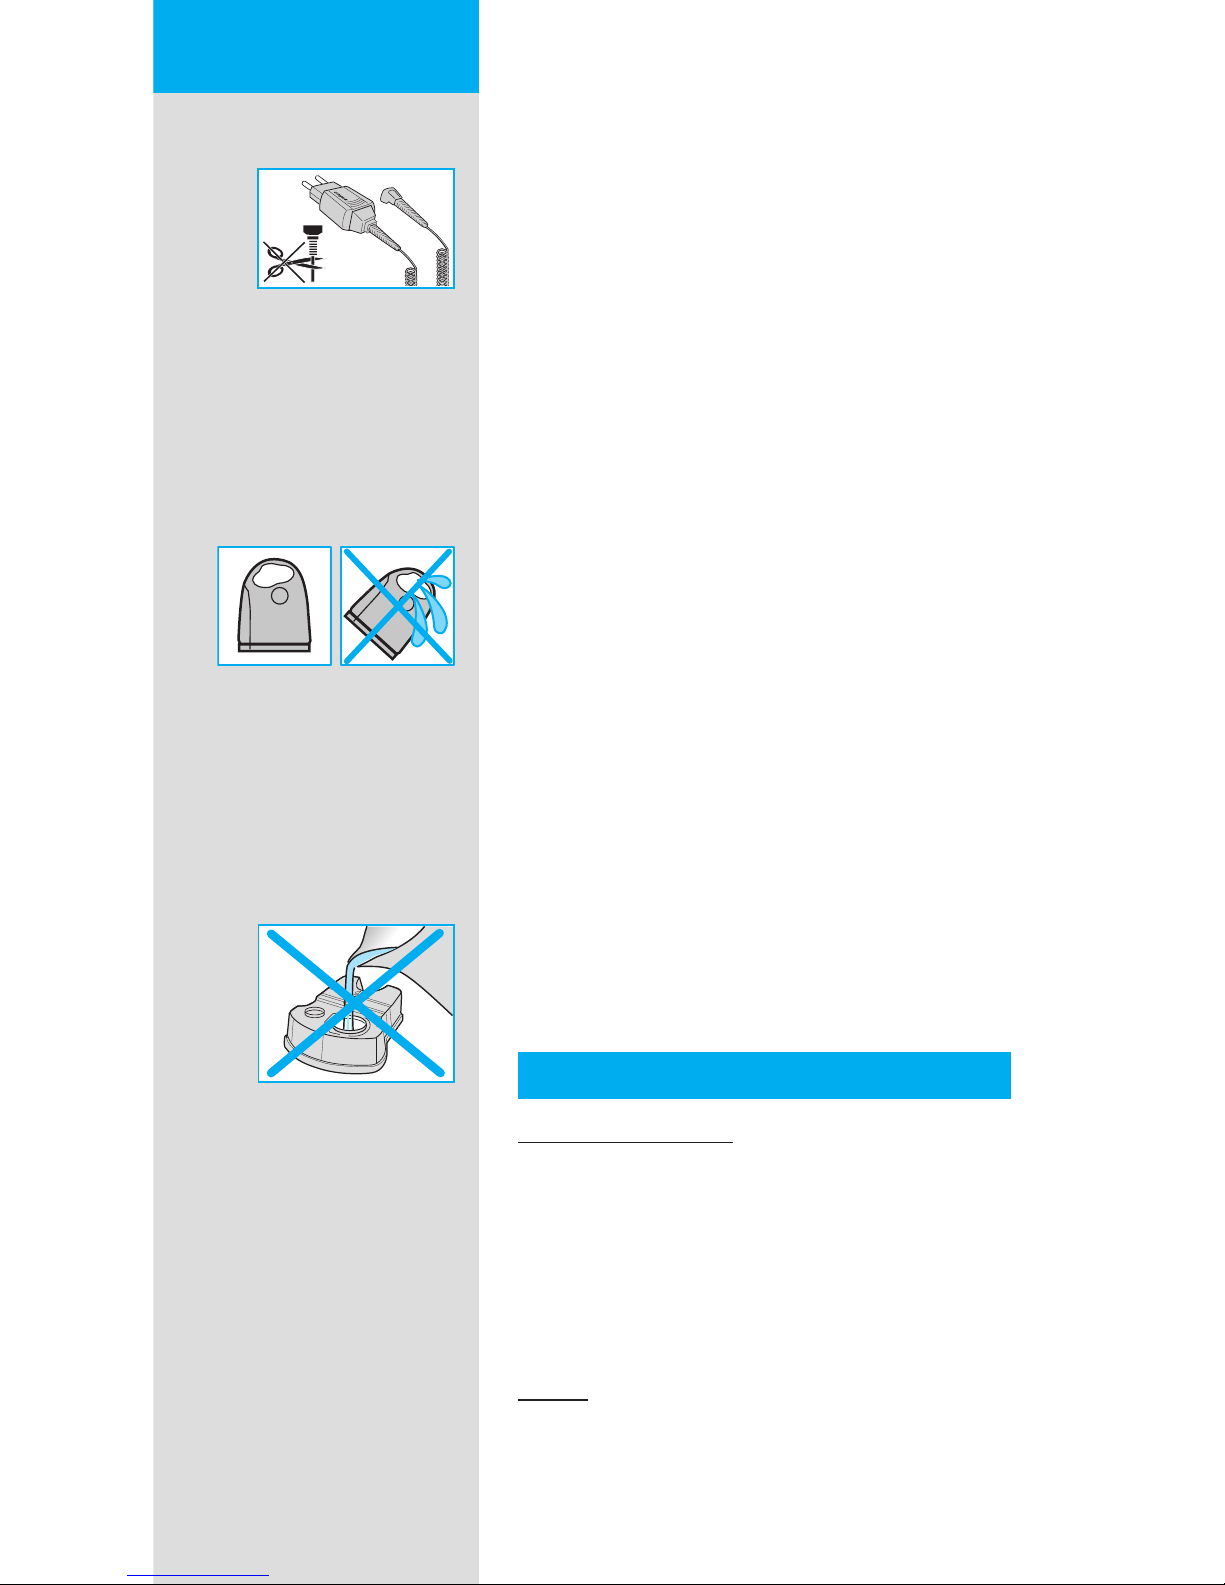
Warning
Your shaving system is provided with a special
cord set, which has an integrated Safety Extra
Low Voltage power supply. Do not exchange or
tamper with any part of it, otherwise there is risk
of an electric shock.
This appliance is not intended for use by children
or persons with reduced physical, sensory or
mental capabilities, unless they are supervised
by a person responsible for their safety. In
general, we recommend that you keep the
appliance out of reach of children. Children
should be supervised to ensure that they do not
play with the appliance.
To prevent the cleaning uid from leaking, ensure
that the Clean&Renew station is placed on a at
surface. When a cleaning cartridge is installed,
do not tip, move suddenly or transport the
station in any way as cleaning uid might spill
out of the cartridge. Do not place the station
inside a mirror cabinet, nor over a radiator, nor
place it on a polished or lacquered surface.
The cleaning cartridge contains a highly
ammable liquid so keep it away from sources of
ignition. Do not smoke near the station. Do not
expose to direct sunlight for long periods of time.
Do not rell the cartridge and use only original
Braun rell cartridges.
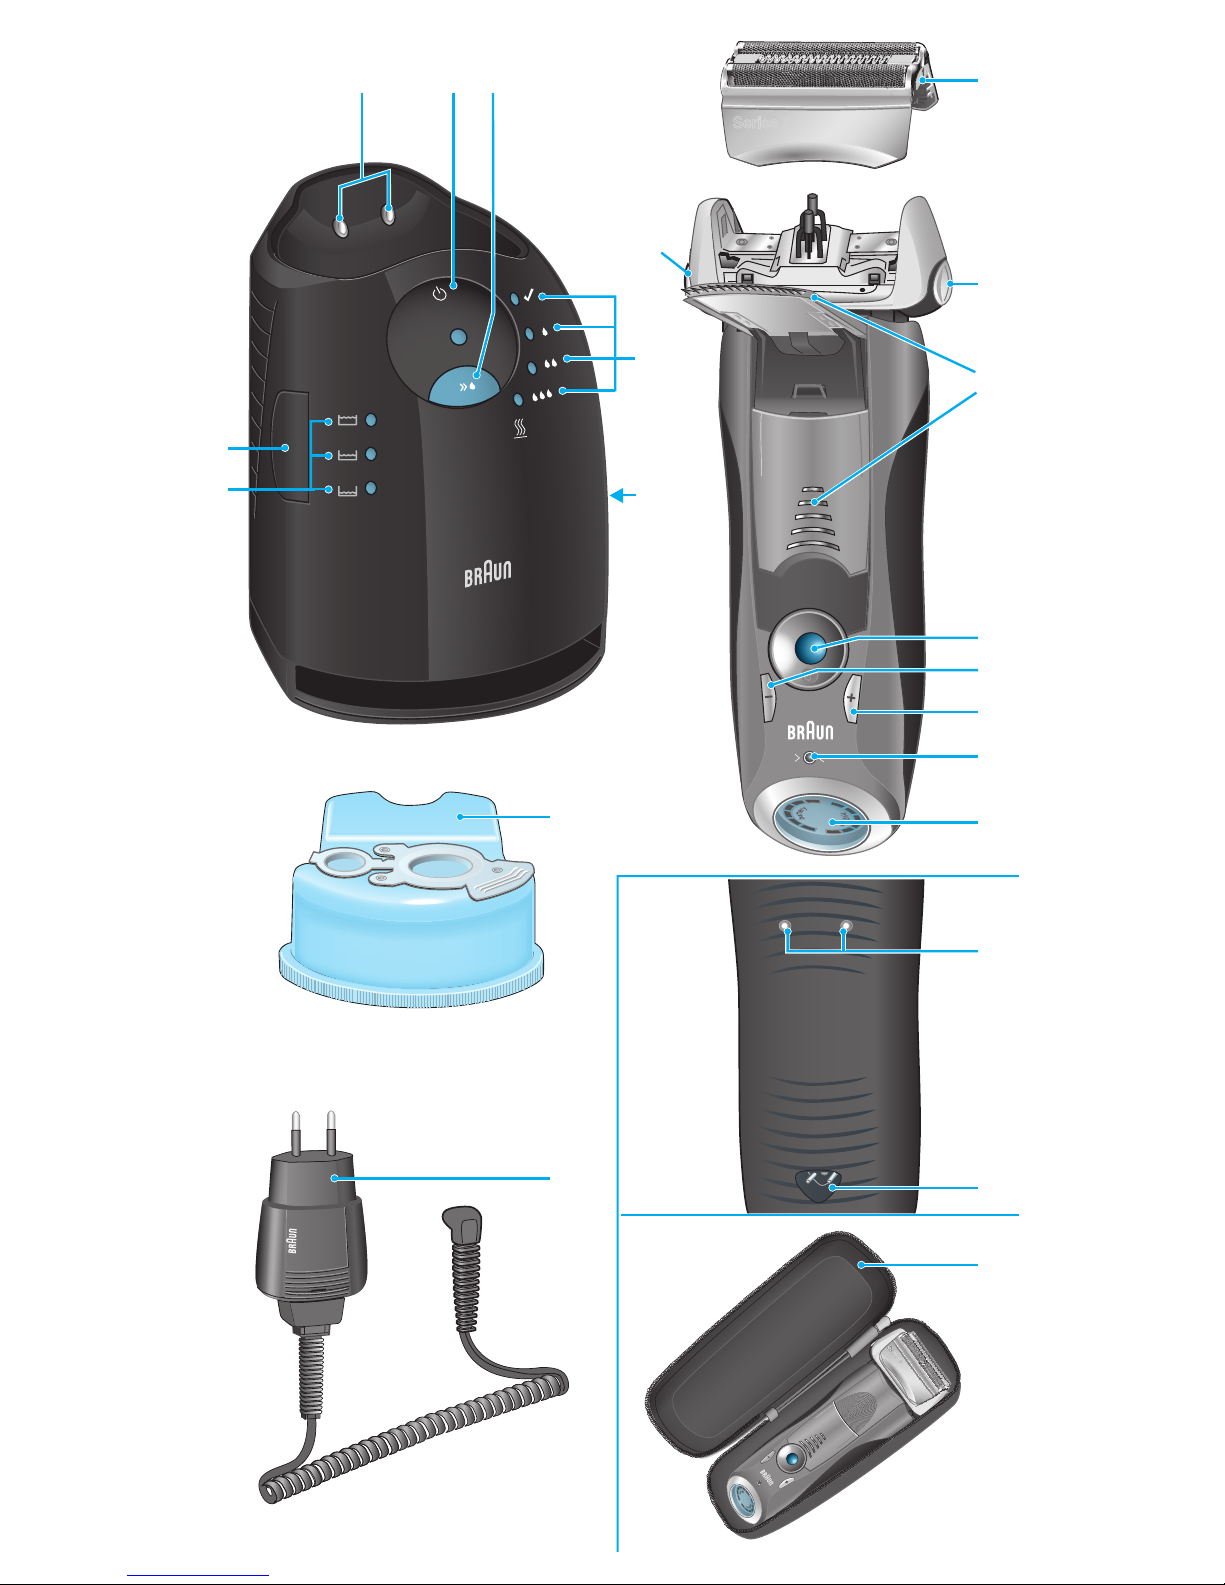
Description
Clean&Renew station
1 Cleaning uid display
2 Lift button for cartridge exchange
3 Station-to-shaver contacts
4 Start button
D Fast clean button
5 Cleaning program indicators
6 Station power socket
7 Cleaning cartridge
Shaver
8 Foil & Cutter cassette
9 Cassette «release» button
0 Shaver head «lock» switch
q Pop-out long hair trimmer
STOP
English
Page 5
5
w On/off switch
e (–) setting button (sensitive)
r (+) setting button (intensive)
t Reset button
z Shaver display
u Shaver-to-station contacts
i Shaver power socket
o Travel case
p Special cord set
Before shaving
Prior to rst use you must connect the shaver to
an electrical outlet using the special cord set p
or alternatively proceed as below.
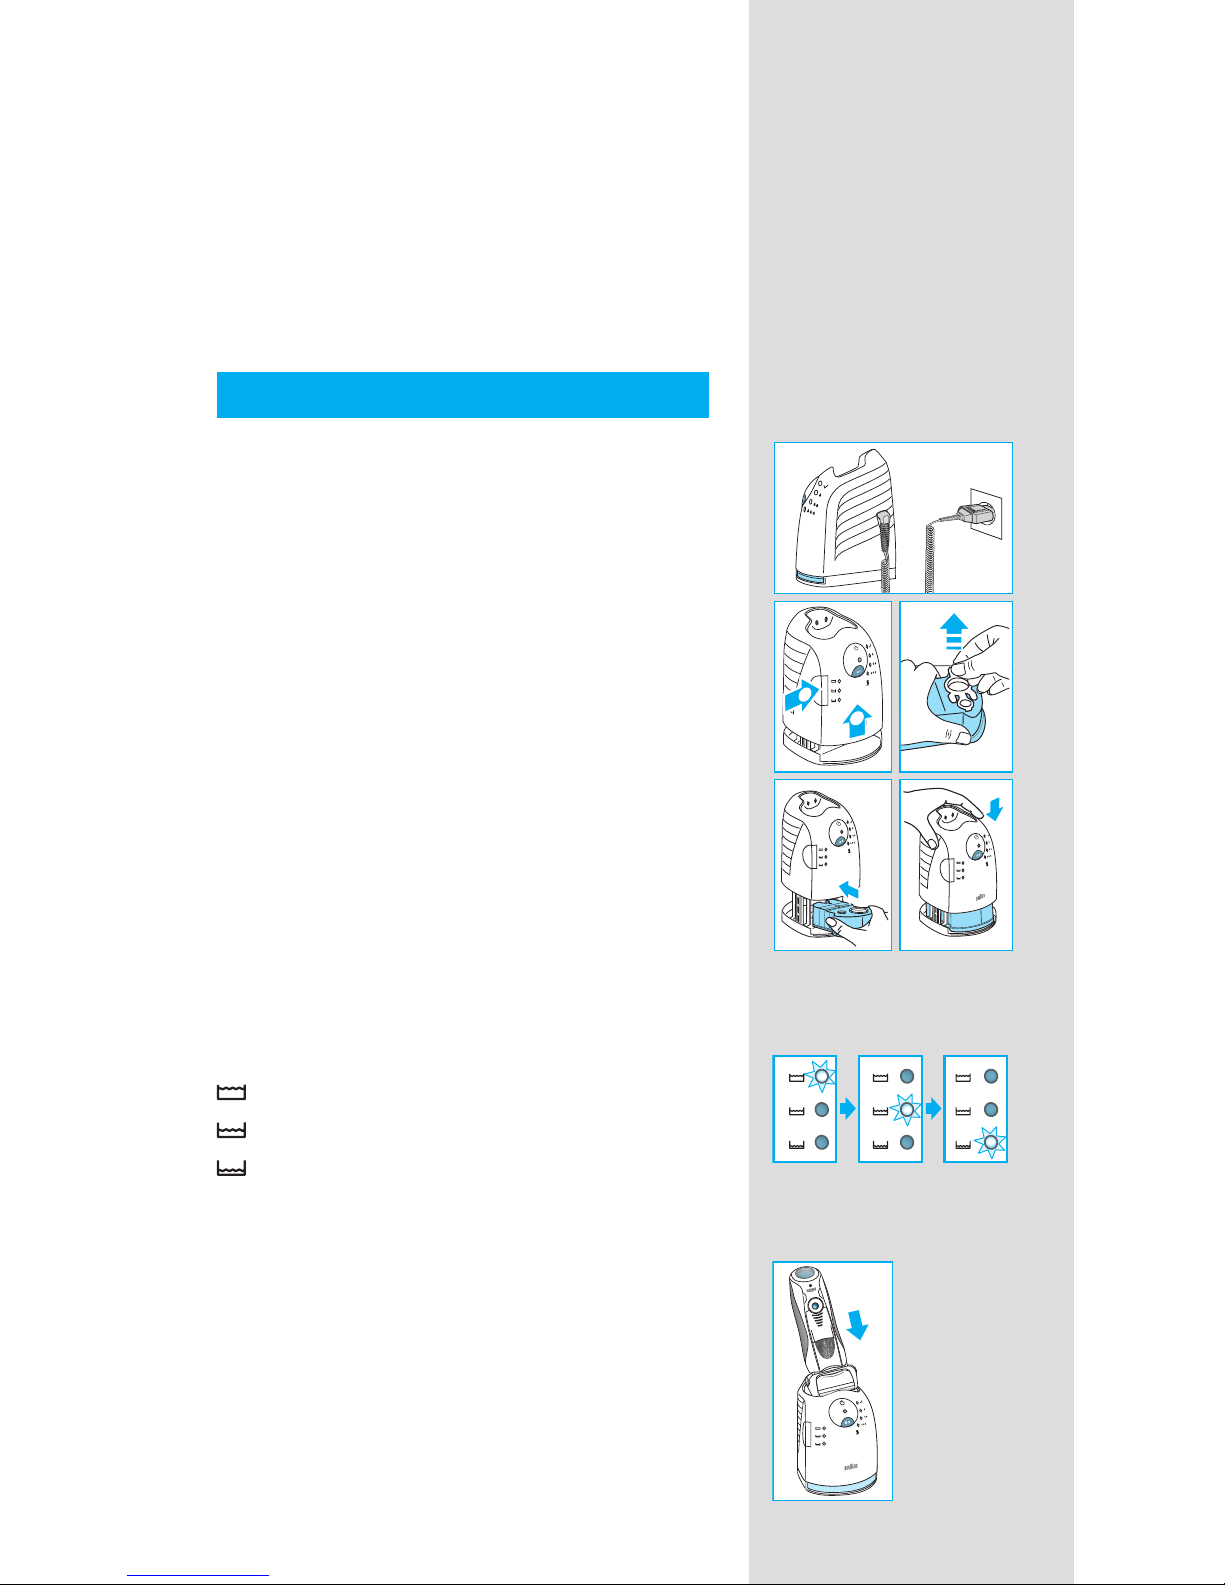
Installing the Clean&Renew station
• Using the special cord set p, connect the
station power socket 6 to an electrical outlet.
• Press the lift button 2 to open the housing.
• Hold the cleaning cartridge 7 down on a at,
stable surface (e.g. table).
• Carefully remove the lid from the cartridge.
• Slide the cartridge into the base of the station
as far as it will go.
• Slowly close the housing by pushing it down
until it locks.
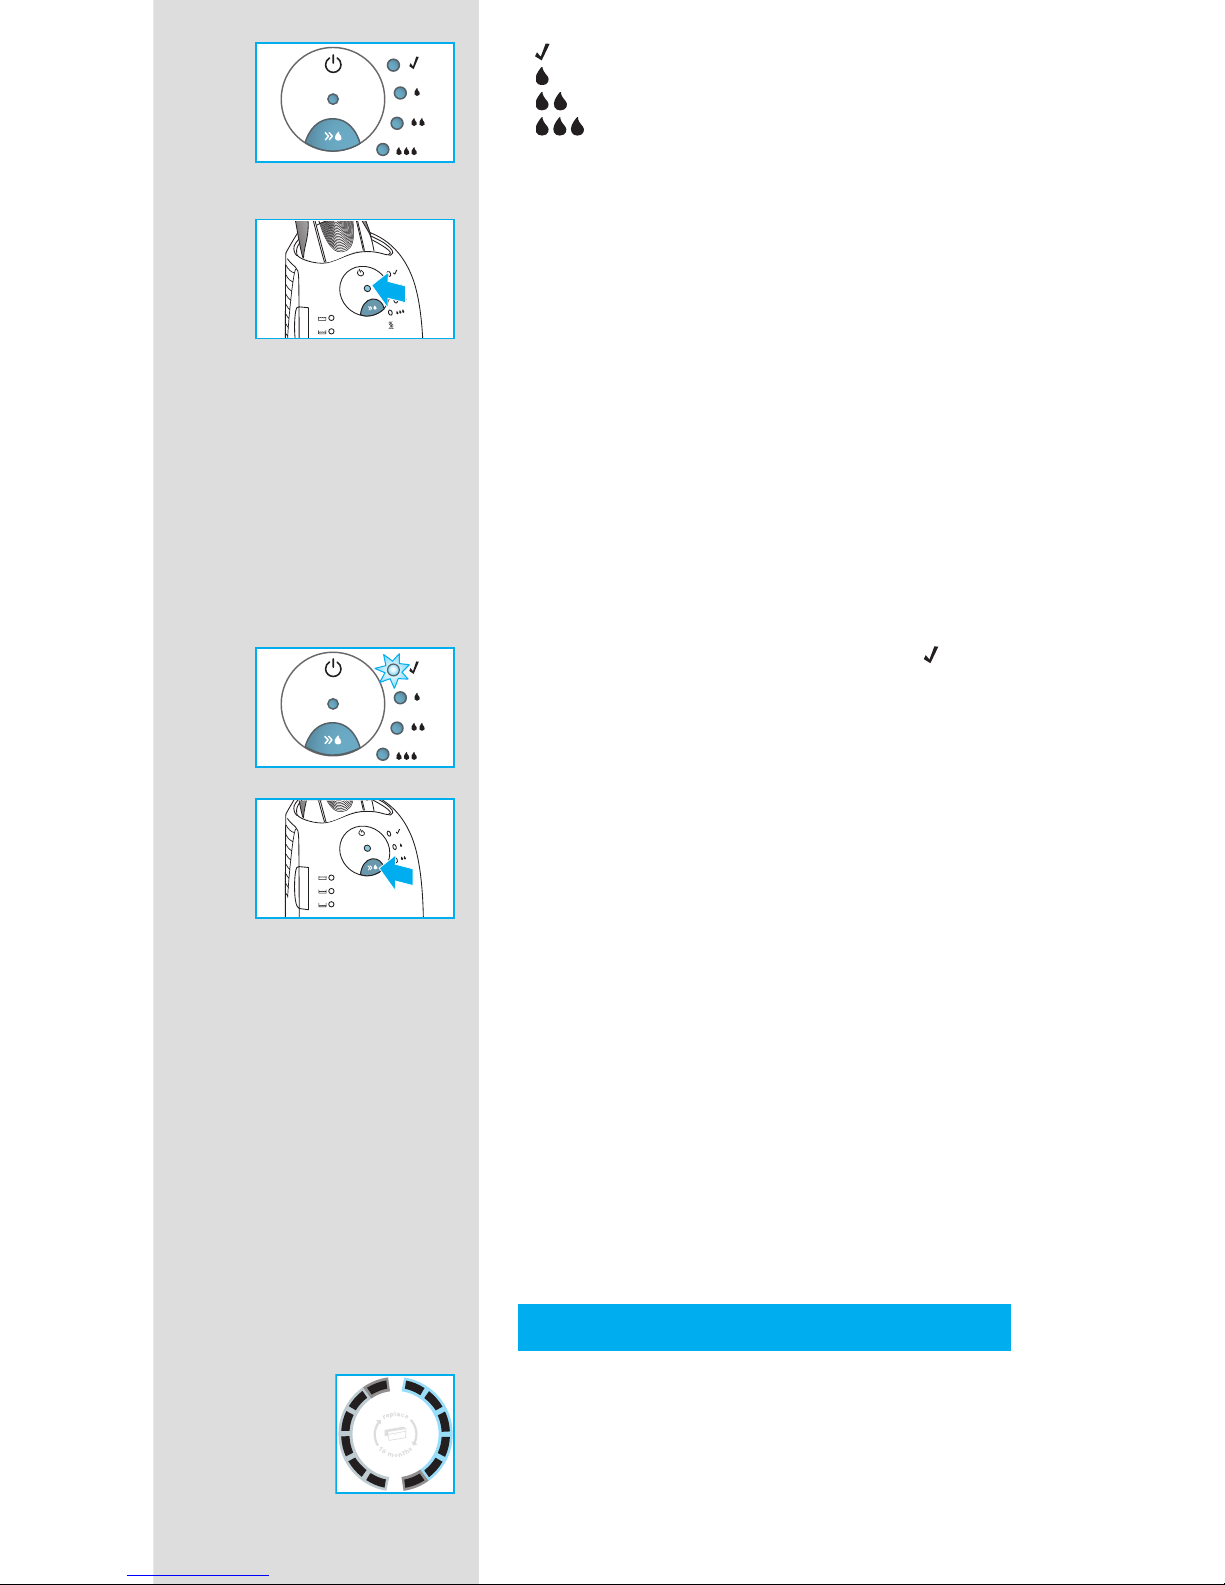
The cleaning uid display 1 will show how much
uid is in the cartridge:
up to 30 cleaning cycles available
up to 7 cleaning cycles remaining
new cartridge required
Charging and cleaning the shaver
Insert the shaver head down into the cleaning
station. (The contacts u on the back of the
shaver will align with the contacts 3 in the
cleaning station).
If required, the Clean&Renew station will automatically charge the shaver. The hygiene status
of the shaver will also be analyzed and one of
the following cleaning program indicators 5 will
light up:
new
f
a
s
t
c
l
e
a
n
f
a
s
t
c
l
e
a
n
f
a
s
t
c
l
e
a
n
2
1
trimmer
Series 7
Page 6
6
«
» shaver is clean
« » short economical cleaning required
« » normal level of cleaning required
« » high intensive cleaning required
If the station selects one of the required cleaning
programs, it will not start unless you press the
start button 4. For best shaving results, we
recommend cleaning after each shave.
Whilst cleaning is in progress, the respective
cleaning program indicator will blink. Each
cleaning program consists of several cycles,
where cleaning uid is ushed through the
shaver head and a heat drying process dries
the shaver. Depending on the program selected
the total cleaning time will range from 32 to 43
minutes.
The cleaning programs should not be interrupted. Please note that whilst the shaver is
drying, the shaving head may be hot and wet.
When the program is nished, the blue « »
indicator will light up. Your shaver is now clean
and ready for use.
Fast cleaning
Push the fast clean button D to activate
the fast clean program without drying. This
program takes about 25 seconds only and is
recommended when you do not have time to
wait for one of the automatic cleaning programs.
If you remove the shaver just after the program
has nished, wipe off the shaver head with a
tissue to avoid dripping.
Stand-by mode
10 minutes after completing the charging or
cleaning session, the Clean&Renew station
switches to the stand-by mode: The indicators
of the Clean&Renew station turn off.
Shaver display
The shaver display z shows the charge status of
the battery on the left, and the hygiene status on
the right. (6 dark segments are shown on each
side when the battery is fully charged and the
shaver is hygienically clean).
h
y
g
i
e
n
e
b
a
t
t
e
r
y
Page 7
7
Battery segments:
During charging or when using the shaver, the
respective battery segments will blink. When
fully charged all 6 segments are shown. With
decreasing charge the segments gradually
disappear.
Low charge indicator:
The low charge indicator provided with a red
frame blinks to indicate that the charge has
dropped below 20%. The remaining battery
capacity is sufcient for 2 to 3 shaves.
Hygiene segments:
All 6 hygiene segments will appear after the
shaver has been cleaned in the Clean&Renew
station. When the shaver is being used, the
hygiene segments will gradually disappear.
Once the shaver is returned to the station, the
system will automatically select the appropriate
cleaning program and restore the segments
to maximum hygiene. Given that rinsing the
shaver under tap water is not as hygienic as the
cleaning station, the hygiene segments will only
restore themselves when the shaver has been
cleaned in the Clean&Renew station.
Charging information
• A full charge provides up to 50 minutes
of cordless shaving time. This may vary
according to your beard growth.
• The best environmental temperature for
charging is between 5 °C to 35 °C. Do not
expose the shaver to temperatures higher than
50 °C for extended periods of time.
Personalizing your shaver
Personalizing your shaver
With the (–) e and (+) r buttons you can choose
the best setting for shaving different areas of
your face and as per your specic needs.
The different settings are indicated by the pilot
light incorporated in the on/off switch w:
• dark blue (powerful shave)
• light blue (normal)
• white (for a thorough comfortable shave in
sensitive areas of your face such as neck)
h
y
g
i
e
n
e
b
a
t
t
e
r
y
h
y
g
i
e
n
e
b
a
t
t
e
r
y
b
a
t
y
+
normal
Page 8
8
For a thorough and fast shave we recommend
the (+) setting.
When switching on next time, the last used
setting will be activated.
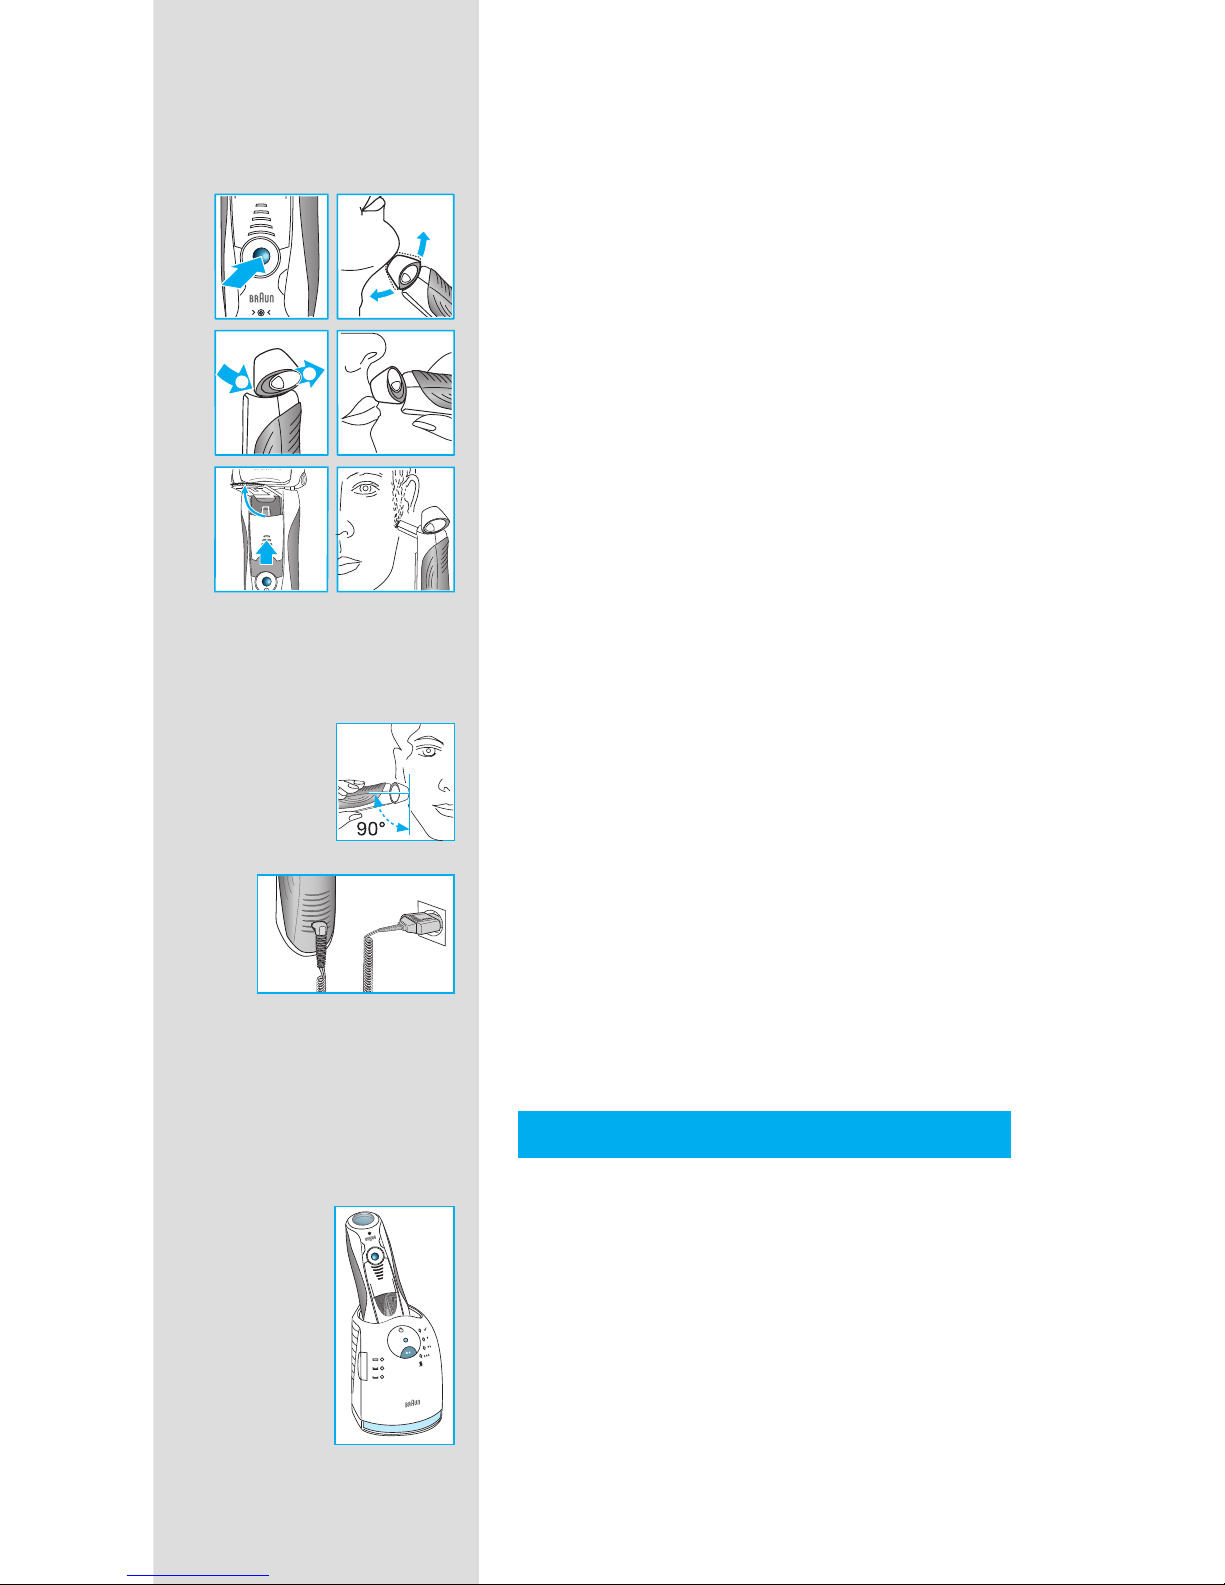
How to use
Press the on/off switch
w to operate the shaver:
• The pivoting shaver head and oating foils
automatically adjust to every contour of your
face.
• To shave hard to reach areas (e.g. under the
nose) slide the shaver head «lock» switch 0 to
the back position to lock the pivoting head at
an angle.
• To trim sideburns, moustache or beard, slide
the pop-out long hair trimmer upwards.
Tips for the perfect shave
For best shaving results, Braun recommends you
follow 3 simple steps:
1. Always shave before washing your face.
2. At all times, hold the shaver at right angles
(90°) to your skin.
3. Stretch your skin and shave against the
direction of your beard growth.
Shaving with the cord
If the shaver has run out of power (discharged),
and you do not have the time to recharge it in the
Clean&Renew station, you may also shave with
the shaver connected to an electrical outlet via
the special cord set.
Cleaning
Automatic cleaning
After each shave, return the shaver to the
Clean&Renew station and proceed as described
above in the section «Before shaving».
All charging and cleaning needs are then
automatically taken care of. With daily use, a
cleaning cartridge should be sufcient for about
30 cleaning cycles.
The hygienic cleaning cartridge contains
izopropanol, which once opened will naturally
evaporate slowly into the surrounding air. Each
cartridge, if not used daily, should be replaced
after approximately 8 weeks.
tr
lock
1
2
trimmer
lock
lock
lock
+
release
trimmer
Page 9
9
The cleaning cartridge also contains lubricants,
which may leave residual marks on the outer foil
frame after cleaning. However, these marks can
be removed easily by wiping gently with a cloth
or soft tissue paper.
Manual cleaning
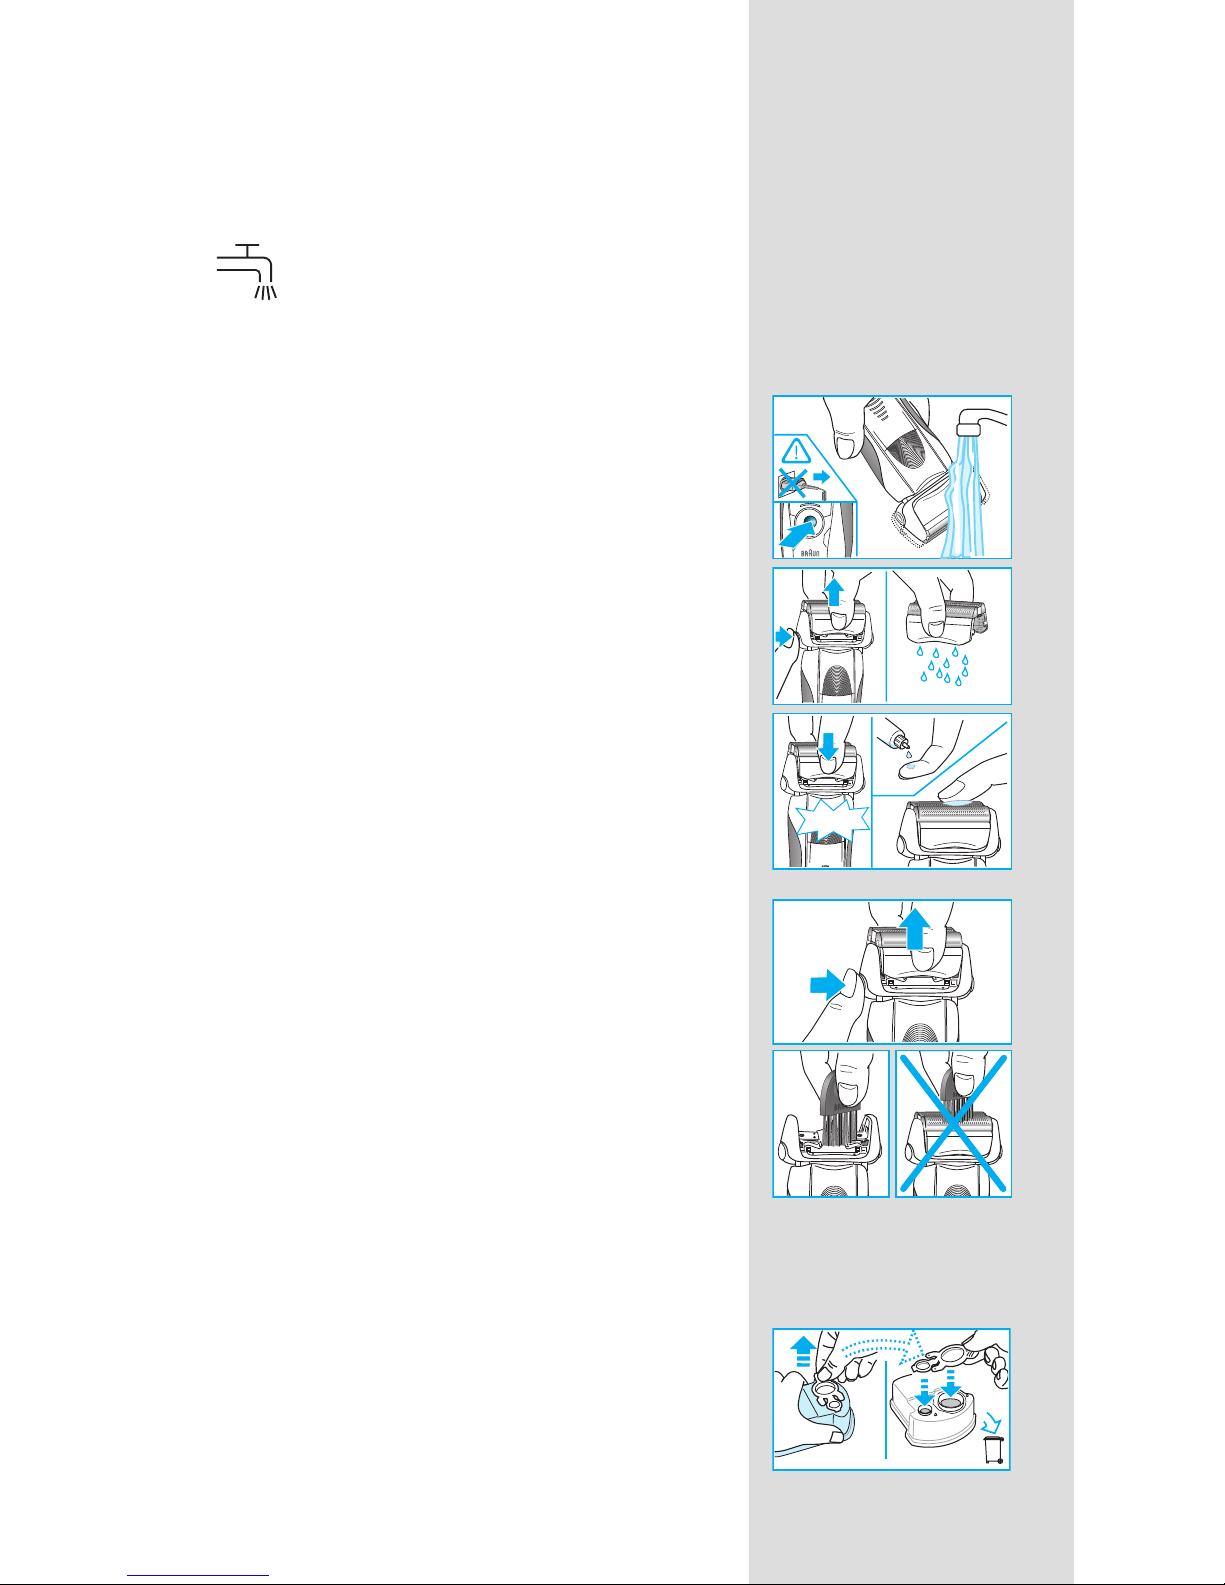
The shaver head is suitable for cleaning
under running tap water.
Warning: Detach the shaver from the
power supply before cleaning the shaver
head in water.
Rinsing the shaving head under running water
is an alternative way to keep the shaver clean,
especially when travelling:
• Switch the shaver on (cordless) and rinse
the shaving head under hot running water.
You may use liquid soap without abrasive
substances. Rinse off all foam and let the
shaver run for a few more seconds.
• Next, switch off the shaver, press the «release»
button
9 to remove the Foil & Cutter cassette
8 and let it dry.
• If you regularly clean the shaver under
water, then once a week apply a drop of
light machine oil on top of the Foil & Cutter
cassette.
Alternatively, you may clean the shaver using the
brush provided:
• Switch off the shaver. Remove the Foil & Cutter
cassette 8 and tap it out on a at surface.
Using the brush, clean the inner area of the
pivoting head. However, do not clean the
cassette with the brush as this may damage it.
Cleaning the housing
From time to time clean the housing of the
shaver and the Clean&Renew station with a
damp cloth, especially inside the cleaning
chamber where the shaver rests.
Replacing the cleaning cartridge
After having pressed the lift button 2 to open the
housing, wait for a few seconds before removing
the used cartridge to avoid any dripping.
Before discarding the used cartridge, make sure
to close the openings using the lid of the new
cartridge, since the used cartridge will contain
contaminated cleaning solution.
oil
trimmer
er
re
le
a
s
e
trimmer
re
le
a
s
e
re
le
a
s
e
click!
Series 7
Series 7
Series
Series
re
le
a
s
e
re
le
a
s
e
re
le
a
s
e
Series 7
Series 7
new
old
Page 10
10
Keeping your shaver in top shape
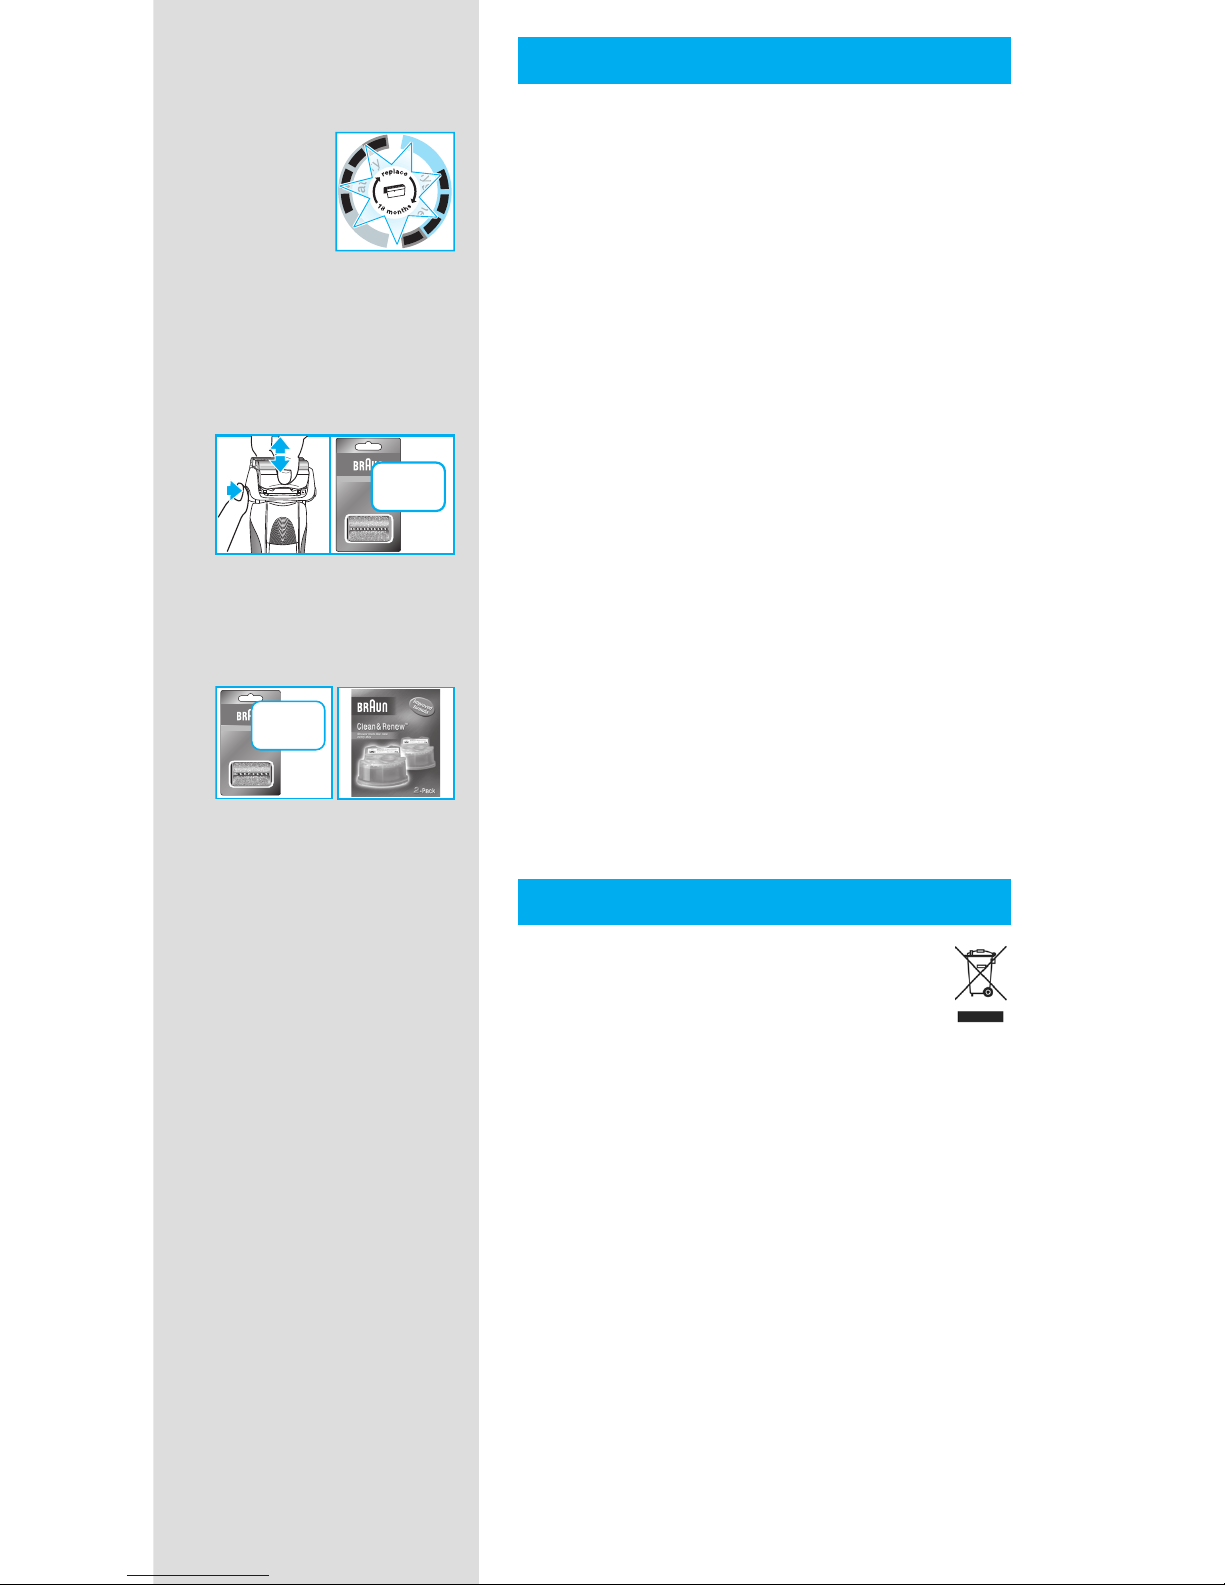
Replacing the Foil & Cutter cassette / reset
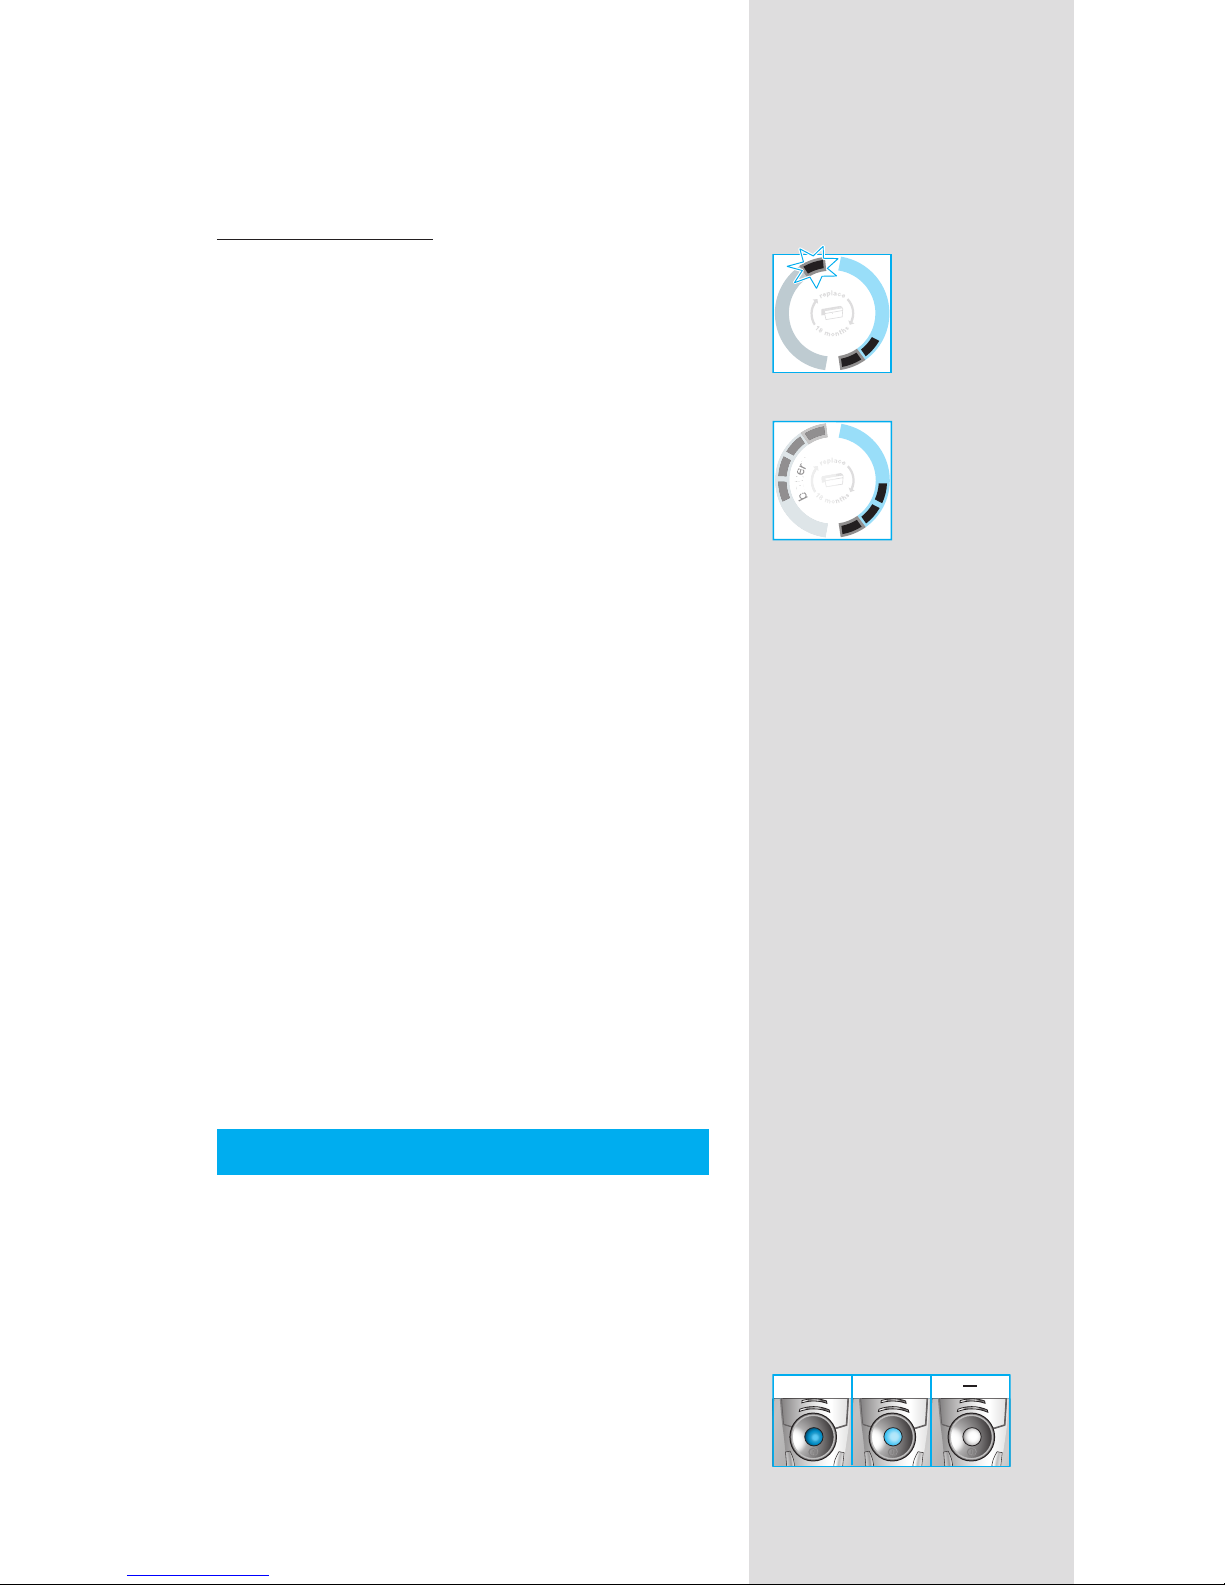
To maintain 100% shaving performance, replace the Foil & Cutter cassette 8, when the
replacement symbol lights up on the shaver
display z (after about 18 months) or when
cassette is worn.
The replacement symbol will remind you during
the next 7 shaves to replace the Foil & Cutter
cassette. Then the shaver will automatically reset
the display.
After you have replaced the Foil & Cutter
cassette, use a ball-pen to push the reset button
t for at least 3 seconds to reset the counter.
While doing so, the replacement light blinks and
goes off when the reset is complete. The manual
reset can be done at any time.
Accessories
Available at your dealer or Braun Service
Centres:
• Foil & Cutter cassette 70S
• Cleaning cartridge Clean&Renew CCR
Environmental notice
This product contains rechargeable
batteries. In the interest of protecting the
environment, please do not dispose of the
product in household waste at the end of
its useful life. Disposal can take place at a
Braun Service Centre or at appropriate
collection points provided in your country.
The cleaning cartridge can be disposed with
regular household waste.
Subject to change without notice.
For electric specications, see printing on the
special cord set.
h
y
g
i
e
n
e
b
a
t
t
e
r
y
er
re
le
a
s
e
70S
Series 7
70S
Page 11

11
Guarantee
We grant a 2 year guarantee on the product
commencing on the date of purchase. Within the
guarantee period we will eliminate any defects in
the appliance resulting from faults in materials or
workmanship, free of charge either by repairing
or replacing the complete appliance at our
discretion.
This guarantee extends to every country where
this appliance is supplied by Braun or its
appointed distributor.
This guarantee does not cover: damage due to
improper use, normal wear and tear (e.g. shaver
foil or cutter block) as well as defects that have
a negligible effect on the value or operation of
the appliance. The guarantee becomes void if
repairs are undertaken by unauthorised persons
and if original Braun parts are not used.
To obtain service within the guarantee period,
hand in or send the complete appliance with
your sales receipt to an authorised Braun
Customer Service Centre (address information
available online at www.service.braun.com).
For UK only:
This guarantee in no way affects your rights
under statutory law.
Page 12

12
Руководство по эксплуатации
Наши изделия разработаны в соответствии
с самыми высокими стандартами качества,
функциональности и дизайна. Мы уверены,
что Вы останетесь довольны новой бритвой
от фирмы Braun.
Предупреждение
Ваша бритвенная система комплектуется
шнуром с вмонтированным безопасным блоком питания сверхнизкого напряжения. Во
избежание поражения электрическим током
запрещается заменять или модифицировать
любые части бритвенной системы.
Прибор не предназначен для использования
лицами (включая детей) с пониженными
физическими, чувственными или умственными
способностями или при отсутствии у них
опыта или знаний, если они не находятся под
контролем или не проинструктированы об
использовании прибора лицом, ответсвенным
за их безопасность. Дети должны находиться
под контролем для недопущения игры с
прибором.
Во избежание утечки чистящей жидкости размещайте автоматическое устройство чистки
и подзарядки Clean&Renew™ на плоской
и устойчивой поверхности. Не допускайте
опрокидывания, резкого перемещения
или транспортировки устройства чистки и
подзарядки Clean&Renew при установленном чистящем картридже. Не ставить
устройство чистки и подзарядки Clean&Renew
в зеркальном шкафу, на батарею, на полированные или лакированные поверхности.
В картридже для устройства чистки и подзарядки Clean&Renew находится легковоспламеняющаяся чистящая жидкость. Держите
его вдали от источников возгорания. Курение
вблизи запрещено.
Не подвергать длительному воздействию
прямого солнечного света.
Не заправляйте картридж. Используйте
только оригинальный сменный картридж
Braun.
Описание и комплектность
Автоматическое устройство чистки и
подзарядки Clean&Renew
1 Дисплей уровня чистящей жидкости
2 Кнопка замены картриджа
3 Контакты соединения устройства чистки
и бритвы
4 Кнопка «начать чистку»
D Кнопка «быстрая чистка»
STOP
кЫТТНЛИ
Page 13

13
5 Дисплей программы чистки
6 Разъем подключения устройства чистки и
подзарядки к электросети
7 Чистящий картридж
Бритва
8 Кассета (бреющая сетка + режущий блок)
9 Кнопки съема кассеты
0 Кнопка «lock» (блокировки плавающей
бреющей головки)
q Откидной триммер для длинных волос
w Кнопка Включения / Выключения
e (–) Кнопка чувствительного режима
r (+) Кнопка интенсивного) режима
t Кнопка перезагрузки
z Дисплей бритвы
u Соединительные контакты бритвы и
устройства чистки и подзарядки
i Разъем подключения бритвы к
электросети
o Дорожный футляр
p Специальный шнур
Перед бритьем
Перед первым использованием подключите
бритву к электросети с помощью шнура питания p или следуйте инструкциям приведенным ниже.
Установка автоматического устройства
чистки и подзарядки Clean&Renew
• С помощью специального шнура p
подключите разъем устройства чистки
и подзарядки 6 к электросети.
• Нажмите на кнопку замены картриджа
2
для открытия корпуса.
• Поместите чистящий картридж
7 на плос-
кую, устойчивую поверхность (например,
на стол).
• Осторожно снимите заглушку картриджа.
• Плавно поместите картридж в основание
устройства чистки и подзарядки до упора.
• Медленно закройте корпус устройства
чистки и подзарядки, надавив на него до
щелчка.
Дисплей уровня чистящей жидкости
1
покажет уровень жидкости в картридже:
до 30 циклов чистки
осталось примерно на 7 чисток
необходим новый картридж
new
f
a
s
t
c
l
e
a
n
f
a
s
t
c
l
e
a
n
f
a
s
t
c
l
e
a
n
2
1
Page 14

14
Зарядка и чистка бритвы
Поместите бритву бреющей головкой вниз
в устройство чистки и подзарядки (соединительные контакты
u на тыльной стороне
бритвы будут соответствовать контактам на
устройстве 3.
Теперь при необходимости будет осуществляться зарядка бритвы. Устройство чистки и
подзарядки Clean&Renew производит анализ
на уровень загрязнения бритвы, результат
анализа отображается включением одного из
индикаторов дисплея программы чистки 5:
« » бритва чистая
« » требуется экономичная,
т.е. кратковременная чистка
« » требуется нормальная чистка
« » требуется интенсивная чистка
В случае выбора системой одной из программ
чистки, для ее запуска необходимо нажать
кнопку
4. Для наилучших результатов
рекомендуется проводить чистку после
каждого бритья.
В процессе чистки индикатор соответствующей программы чистки будет мигать. Каждая
программа чистки состоит из нескольких
циклов, при которых чистящая жидкость
пропускается через бреющую головку
бритвы и включается процесс горячей сушки.
Общее время чистки зависит от выбранной
программы и в среднем составляет от
32 до 43 минут.
Программа чистки не должна прерываться.
Во время сушки бреющая головка может
быть горячей и влажной.
После завершения программы загорается
голубой индикатор «« ». Теперь бритва
полностью очищена и подготовлена к последующему использованию.
Быстрая чистка
Нажмите кнопку «быстрая чистка» D для
включения программы быстрой чистки без
сушки. Это программа занимает около 25
секунд и рекомендуется в случае отсутствия
времени для одной из автоматических
программ чистки. При извлечении бритвы
из устройства чистки и подзарядки сразу
после программы «fast clean» (быстрая
чистка), оботрите бреющую головку бритвы
салфеткой.
trimmer
Series 7
Page 15

15
Режим ожидания
Через 10 минут после окончания процесса
зарядки и чистки устройство Clean&Renew
переключается в режим ожидания: Индикаторы устройства и бритвы выключаются.
Экран бритвы
Левая сторона дисплея бритвы z показывает
уровень зарядки аккумулятора, правая –
уровень гигиены бритвы. (Аккумулятор полностью заряжен и бритва абсолютно чистая,
когда с двух сторон дисплея появляются все
6 сегментов).
Сегменты аккумулятора:
Во время зарядки или во время использования бритвы, соответственные сегменты аккумулятора начинают мигать. При полной
зарядке аккумулятора появляются все
6 сегментов. При снижении уровня зарядки
аккумулятора сегменты постепенно исчезают.
Индикатор низкого уровня зарядки:
При снижении уровня зарядки аккумулятора
за 20%, окантовка сегмента низкого уровня
зарядки загорается красным светом. Заряда
аккумулятора хватит на 2 – 3 процесса
бритья.
Сегменты гигиены:
Все 6 сегментов появляются на дисплее по
завершении чистки бритвы в устройстве
чистки и подзарядки Clean&Renew. При
использовании бритвы во время бритья
сегменты гигиены постепенно исчезают. При
помещении бритвы в устройство чистки и
подзарядки, система автоматически выбирает подходящую программу чистки и
возвращает сегменты до уровня максимальной гигиены. Так как чистка бритвы под
струей воды не является аналогично гигиеничным способом чистки по сравнению с
чисткой устройством чистки и подзарядки,
сегменты гигиены восполняются на дисплее
только после чистки в устройстве чистки и
подзарядки Clean&Renew.
Информация по зарядке
• Полная зарядка аккумулятора обеспе-
чивает до 50 минут автономной работы
бритвы. Время автономной работы может
изменяться в зависимости от густоты
щетины.
h
y
g
i
e
n
e
b
a
t
t
e
r
y
h
y
g
i
e
n
e
b
a
t
t
e
r
y
h
y
g
i
e
n
e
b
a
t
t
e
r
y
b
a
t
y
Page 16

16
• Оптимальный диапазон температуры
воздуха для зарядки бритвы от 5 °С до
35 °С. Не подвергайте бритву воздействию
температуры свыше 50 °С в течение
длительного времени.
Персональная настройка бритвы
Кнопками (–) чувствительный e и
(+) интенсивный r вы можете выбрать
наилучшие для вас настройки бритья
отдельных частей лица. Индикация
различных настроек осуществляется
лампочкой встроенной в выключатель
питания w:
• темно-синий (мощное бритье)
• светло-синий (normal)
• белый (для приятного бритья чувстви-
тельных частей лица, таких как шея)
Для полного и быстрого бритья мы рекомендуем (+) интенсивный режим.
При следующем включении будут выбраны
последние настройки.
Как использовать
Нажмите кнопку Включения / Выключения
для управления бритвой:
• Плавающая бреющая головка и плавающие
бреющие сетки автоматически приспосабливаются к контурам Вашего лица.
• Для бритья труднодоступных участков
(например, под носом) передвиньте кнопку
блокировки плавающей бреющей головки
0 в дальнее положение для блокировки
головки под углом.
• Для подравнивания бакенбардов, усов
и бороды, движением вверх, включите
откидной триммер для длинных волос.
+
normal
tr
lock
1
2
trimmer
lock
lock
lock
+
Page 17

17
Рекомендации для чистого бритья
Для достижения лучших результатов во
время бритья Braun рекомендует следовать
3 простым шагам:
1. Всегда брейтесь до умывания.
2. Всегда держите бритву под прямым углом
(90°) к коже.
3. Слегка натягивайте кожу и перемещайте
бритву в направлении против роста волос.
Бритье при подключении к электросети
Если бритва полностью разряжена, и у вас
нет времени на зарядку с помощью устройства чистки и подзарядки Clean&Renew, вы
можете использовать бритву, подключив ее
к электросети с помощью шнура питания.
Чистка
Автоматическая чистка
После каждого бритья помещайте бритву в
устройство чистки и подзарядки Clean&Renew
и выполняйте действия, указанные в разделе
«До бритья». При этом осуществляется
необходимая зарядка и чистка.
При ежедневном использовании, чистящего
картриджа хватает примерно на 30 циклов
чистки.
Гигиеническая чистящая жидкость содержит
ЛБУФУФЛОУ‚˚И спирт, который после
вскрытия картриджа начинает медленно
испаряться в окружающую атмосферу. При
не ежедневном использовании картридж
следует заменять примерно через 8 недель.
Чистящая жидкость также содержит
смазывающие средства, которые могут
оставлять небольшие разводы на внешней
стороне рамки бреющей сетки. Эти разводы
очень легко убираются мягкой материей или
бумажной салфеткой.
Ручная чистка
Возможна чистка бреющей головки
под струей воды. Внимание:
Отсоедините бритву от источника
электроэнергии перед чисткой под
струей воды.
release
trimmer
Page 18

18
Чистка бритвы под струей воды – это альтернативный способ поддержания гигиены
бритвы, особенно во время путешествий:
• Включите бритву (без подключения к
электросети) и промойте бреющую головку
под струей горячей воды. Также можно
использовать жидкое мыло без абразивных
субстанций. Смойте остатки пены и на
несколько секунд включите бритву.
• Выключите бритву и нажмите кнопки съема
кассеты
9. Снимите кассету (бреющая
сетка + режущий блок) 8 и оставьте
просохнуть.
• При регулярной чистке бритвы под струей
воды, необходимо раз в неделю наносить
каплю машинного масла на верхнюю часть
кассеты (бреющая сетка + режущий блок).
В качестве альтернативы, Вы можете чистить
бритву щеточкой, входящей в комплект:
• Отключите бритву. Снимите кассету
(бреющая сетка + режущий блок) 8
и постучите ей по плоской поверхности.
С помощью щеточки очистите внутреннюю
поверхность плавающей головки бритвы.
При этом не очищайте кассету щеточкой,
поскольку это может ее повредить.
Чистка корпуса
Периодически очищайте корпус бритвы
и устройство чистки и подзарядки
Clean&Renew влажной тканью, особенно
внутреннюю поверхность устройства,
в которую помещается бритва.
Замена картриджа
После нажатия на кнопку замены картриджа
2 для открытия корпуса устройства чистки
и подзарядки Clean&Renew, подождите
несколько секунд перед удалением использованного картриджа во избежание расплескивания.
Прежде чем выкинуть использованный
картридж, закройте его отверстие с помощью
заглушки от нового картриджа, так как
использованный картридж содержит остатки
загрязненной чистящей жидкости.
oil
trimmer
er
re
le
a
s
e
trimmer
re
le
a
s
e
re
le
a
s
e
click!
Series 7
Series 7
Series
Series
re
le
a
s
e
re
le
a
s
e
re
le
a
s
e
Series 7
Series 7
new
old
Page 19

19
Поддержание эффективности
работы бритвы
Замена кассеты (бреющая сетка +
режущий блок) / Перезагрузка
Для поддержания 100% эффективности
работы бритвы производите замену кассеты
(бреющая сетка + режущий блок) 8. Замену
рекомендуется производить при включении
индикатора замены на дисплее бритвы z
(примерно каждые 18 месяцев) или по мере
износа.
Индикатор замены будет напоминать
вам в течение последующих 7 сеансов
бритья о необходимости замены кассеты
(бреющая сетка + режущий блок). После
этого показания дисплея бритвы будут
автоматически сброшены.
После замены кассеты (бреющая сетка
+ режущий блок), используя шариковую
ручку, нажмите на кнопку перезагрузки t и
удерживайте не менее 3 секунд для сброса
счетчика.
При этом индикатор замены мигает и выключается после окончания сброса. Ручной сброс
можно произвести в любое время.
Комплектность:
бритва - 1шт; шнур питания - 1 шт;
устройство чистки и подзарядки - 1 шт.;
щеточка для чистки - 1 шт.; футляр - 1 шт.
Аксессуары
Представлены в магазинах бытовой техники
или в Сервисных центрах Braun:
• Кассета (бреющая сетка + режущий
блок) 70S
• Чистящий картридж Clean&Renew CCR
лУ‰ВК‡МЛВ ПУКВЪ ·˚Ъ¸ ЛБПВМВМУ ·ВБ
ФВ‰‚‡ЛЪВО¸МУ„У Ы‚В‰УПОВМЛfl.
С‡ММУВ ЛБ‰ВОЛВ ТУУЪ‚ВЪТЪ‚ЫВЪ
‚ТВП ЪВ·ЫВП˚П В‚УФВИТНЛП
ТЪ‡М‰‡Ъ‡П ·ВБУФ‡ТМУТЪЛ Л
„Л„ЛВМ˚.
Аккумуляторная и сетевая бритва Серия 7
модель 790, тип 5692
Изготовлено ‚ ÉÂχÌËË, ŇÛÌ ÉÏ·ï, Braun
GmbH, Waldstr. 9, 74731 Walldürn, Germany
щОВНЪЛ˜ВТНЛВ ТФВˆЛЩЛН‡ˆЛЛ ТПУЪЛЪВ М‡
ТФВˆЛ‡О¸МУП ¯МЫВ.
h
y
g
i
e
n
e
b
a
t
t
e
r
y
mer
re
le
a
s
e
70S
Series 7
70S
Page 20

20
RU: Импортер/Служба потребителей: OOO
«Проктер энд Гэмбл Дистрибьюторская
Компания», Россия, 125171, Москва,
Ленинградское шоссе, 16А, стр.2.
Тел. 8-800-200-20-20.
BY: Импортер: ООО «Электросервис
и Ко», Беларусь, 220012, г. Минск, ул.
Чернышевского, 10А, к. 412А3. Сервисный
центр: ООО «Катрикс», Беларусь, 220012, г.
Минск, ул. Чернышевского, 10А, к.409.
Й‡‡МЪЛИМ˚В У·flБ‡ЪВО¸ТЪ‚‡ BRAUN
СОfl ‚ТВı ЛБ‰ВОЛИ П˚ ‰‡ВП „‡‡МЪЛ˛ М‡
‰‚‡ „У‰‡, М‡˜ЛМ‡fl Т ПУПВМЪ‡ ФЛУ·ВЪВМЛfl
ЛБ‰ВОЛfl.
З ЪВ˜ВМЛВ „‡‡МЪЛИМУ„У ФВЛУ‰‡ П˚
·ВТФО‡ЪМУ ЫТЪ‡МЛП ФЫЪВП ВПУМЪ‡,
Б‡ПВМ˚ ‰ВЪ‡ОВИ ЛОЛ Б‡ПВМ˚ ‚ТВ„У ЛБ‰ВОЛfl
О˛·˚В Б‡‚У‰ТНЛВ ‰ВЩВНЪ˚, ‚˚Б‚‡ММ˚В
МВ‰УТЪ‡ЪУ˜М˚П Н‡˜ВТЪ‚УП П‡ЪВЛ‡ОУ‚ ЛОЛ
Т·УНЛ.
З ТОЫ˜‡В МВ‚УБПУКМУТЪЛ ВПУМЪ‡ ‚
„‡‡МЪЛИМ˚И ФВЛУ‰ ЛБ‰ВОЛВ ПУКВЪ ·˚Ъ¸
Б‡ПВМВМУ М‡ МУ‚УВ ЛОЛ ‡М‡ОУ„Л˜МУВ ‚
ТУУЪ‚ВЪТЪ‚ЛЛ Т Б‡НУМУП «й Б‡˘ЛЪВ Ф‡‚
ФУЪВ·ЛЪВОВИ».
Й‡‡МЪЛfl У·ВЪ‡ВЪ ТЛОЫ, ЪУО¸НУ ВТОЛ ‰‡Ъ‡
ФУНЫФНЛ ФУ‰Ъ‚ВК‰‡ВЪТfl ФВ˜‡Ъ¸˛ Л ФУ‰ФЛТ¸˛
‰ЛОВ‡ (П‡„‡БЛМ‡) М‡ ФУТОВ‰МВИ ТЪ‡МЛˆВ
оригинального руководства ФУ ˝НТФОЫ‡Ъ‡ˆЛЛ
BRAUN, НУЪУ‡fl fl‚ОflВЪТfl „‡‡МЪЛИМ˚П
Ъ‡ОУМУП.
щЪ‡ „‡‡МЪЛfl ‰ВИТЪ‚ЛЪВО¸М‡ ‚ О˛·УИ ТЪ‡МВ,
‚ НУЪУЫ˛ ˝ЪУ ЛБ‰ВОЛВ ФУТЪ‡‚ОflВЪТfl ЩЛПУИ
BRAUN ЛОЛ М‡БМ‡˜ВММ˚П ‰ЛТЪЛ·¸˛ЪУУП,
Л „‰В МЛН‡НЛВ У„‡МЛ˜ВМЛfl ФУ ЛПФУЪЫ ЛОЛ
‰Ы„ЛВ Ф‡‚У‚˚В ФУОУКВМЛfl МВ ФВФflЪТЪ‚Ы˛Ъ
ФВ‰УТЪ‡‚ОВМЛ˛ „‡‡МЪЛИМУ„У У·ТОЫКЛ‚‡МЛfl.
Й‡‡МЪЛfl МВ ФУН˚‚‡ВЪ ФУ‚ВК‰ВМЛfl,
‚˚Б‚‡ММ˚В МВФ‡‚ЛО¸М˚П ЛТФУО¸БУ‚‡МЛВП
(ТП. Ъ‡НКВ ТФЛТУН МЛКВ) Л МУП‡О¸М˚И ЛБМУТ
‰ВЪ‡ОВИ (М‡ФЛПВ, ТВЪНЛ Л ВКЫ˘В„У ·ОУН‡)
‚ ФУˆВТТВ ˝НТФОЫ‡Ъ‡ˆЛЛ ЛБ‰ВОЛfl.
щЪ‡ „‡‡МЪЛfl ЪВflВЪ ТЛОЫ, ВТОЛ ВПУМЪ
ФУЛБ‚У‰ЛОТfl МВ ЫФУОМУПУ˜ВММ˚П М‡ ЪУ
ОЛˆУП, Л ВТОЛ ЛТФУО¸БУ‚‡М˚ МВ УЛ„ЛМ‡О¸М˚В
‰ВЪ‡ОЛ BRAUN.
З ТОЫ˜‡В ФВ‰˙fl‚ОВМЛfl ВНО‡П‡ˆЛЛ ФУ
ЫТОУ‚ЛflП ‰‡ММУИ „‡‡МЪЛЛ, ФВВ‰‡ИЪВ
ЛБ‰ВОЛВ ˆВОЛНУП ‚ПВТЪВ Т „‡‡МЪЛИМ˚П
Ъ‡ОУМУП ‚ О˛·УИ ЛБ ˆВМЪУ‚ ТВ‚ЛТМУ„У
У·ТОЫКЛ‚‡МЛfl BRAUN.
ЗТВ ‰Ы„ЛВ ЪВ·У‚‡МЛfl, ‚НО˛˜‡fl ЪВ·У‚‡МЛfl
‚УБПВ˘ВМЛfl Ы·˚ЪНУ‚, ЛТНО˛˜‡˛ЪТfl, ВТОЛ
М‡¯‡ УЪ‚ВЪТЪ‚ВММУТЪ¸ МВ ЫТЪ‡МУ‚ОВМ‡ ‚
Б‡НУММУП ФУfl‰НВ.
Page 21

21
кВНО‡П‡ˆЛЛ, Т‚flБ‡ММ˚В Т НУППВ˜ВТНЛП
НУМЪ‡НЪУП Т ФУ‰‡‚ˆУП МВ ФУФ‡‰‡˛Ъ ФУ‰ ˝ЪЫ
„‡‡МЪЛ˛.
З ТУУЪ‚ВЪТЪ‚ЛЛ Т Б‡НУМУП ко ‹ 2300-1 УЪ
7.02.1992 „. «й б‡˘ЛЪВ Ф‡‚ ФУЪВ·ЛЪВОВИ»
ЩЛП‡ BRAUN ЫТЪ‡М‡‚ОЛ‚‡ВЪ ТУН ТОЫК·˚ М‡
Т‚УЛ ЛБ‰ВОЛfl ‡‚М˚П ‰‚ЫП „У‰‡П Т ПУПВМЪ‡
ФЛУ·ВЪВМЛfl ЛОЛ Т ПУПВМЪ‡ ФУЛБ‚У‰ТЪ‚‡,
ВТОЛ ‰‡ЪЫ ФУ‰‡КЛ ЫТЪ‡МУ‚ЛЪ¸ МВ‚УБПУКМУ.
аБ‰ВОЛfl BRAUN ЛБ„УЪУ‚ОВМ˚ ‚ ТУУЪ‚ВЪТЪ‚ЛЛ
Т ‚˚ТУНЛПЛ ЪВ·У‚‡МЛflПЛ В‚УФВИТНУ„У
Н‡˜ВТЪ‚‡. иЛ ·ВВКМУП ЛТФУО¸БУ‚‡МЛЛ Л
ФЛ ТУ·О˛‰ВМЛЛ Ф‡‚ЛО ФУ ˝НТФОЫ‡Ъ‡ˆЛЛ,
ФЛУ·ВЪВММУВ З‡ПЛ ЛБ‰ВОЛВ BRAUN, ПУКВЪ
ЛПВЪ¸ БМ‡˜ЛЪВО¸МУ ·УО¸¯ЛИ ТУН ТОЫК·˚,
˜ВП ТУН ЫТЪ‡МУ‚ОВММ˚И ‚ ТУУЪ‚ВЪТЪ‚ЛЛ Т
кУТТЛИТНЛП Б‡НУМУП.
ëÎÛ˜‡Ë, ̇ ÍÓÚÓ˚ „‡‡ÌÚËfl ÌÂ
‡ÒÔÓÒÚ‡ÌflÂÚÒfl:
– ‰ВЩВНЪ˚, ‚˚Б‚‡ММ˚В ЩУТ-П‡КУМ˚ПЛ
Ó·ÒÚÓflÚÂθÒÚ‚‡ÏË;
– ЛТФУО¸БУ‚‡МЛВ ‚ ФУЩВТТЛУМ‡О¸М˚ı ˆВОflı;
– М‡Ы¯ВМЛВ ЪВ·У‚‡МЛИ руководства ÔÓ
˝НТФОЫ‡Ъ‡ˆЛЛ;
– ÌÂÔ‡‚Ëθ̇fl ÛÒÚ‡Ìӂ͇ ̇ÔflÊÂÌËfl
ФЛЪ‡˛˘ВИ ТВЪЛ (ВТОЛ ˝ЪУ ЪВ·ЫВЪТfl);
– ‚МВТВМЛВ ЪВıМЛ˜ВТНЛı ЛБПВМВМЛИ;
– ПВı‡МЛ˜ВТНЛВ ФУ‚ВК‰ВМЛfl;
– ФУ‚ВК‰ВМЛfl ФУ ‚ЛМВ КЛ‚УЪМ˚ı, „˚БЫМУ‚ Л
М‡ТВНУП˚ı (‚ ЪУП ˜ЛТОВ ТОЫ˜‡Л М‡ıУК‰ВМЛfl
„˚БЫМУ‚ Л М‡ТВНУП˚ı ‚МЫЪЛ ФЛ·УУ‚);
– ‰Оfl ФЛ·УУ‚, ‡·УЪ‡˛˘Лı УЪ ·‡Ъ‡ВВН,
– ‡·ÓÚ‡ Ò ÌÂÔÓ‰ıÓ‰fl˘ËÏË ËÎË
ËÒÚÓ˘ÂÌÌ˚ÏË ·‡Ú‡ÂÈ͇ÏË, β·˚Â
ÔÓ‚ÂʉÂÌËfl, ‚˚Á‚‡ÌÌ˚ ËÒÚÓ˘ÂÌÌ˚ÏË
ЛОЛ ЪВНЫ˘ЛПЛ ·‡Ъ‡ВИН‡ПЛ (ТУ‚ВЪЫВП
ÔÓθÁÓ‚‡Ú¸Òfl ÚÓθÍÓ Ô‰Óı‡ÌÂÌÌ˚ÏË ÓÚ
‚˚ÚÂ͇ÌËfl ·‡Ú‡ÂÈ͇ÏË);
– ‰Îfl ·ËÚ‚ – ÒÏflÚ‡fl ËÎË ÔÓ‚‡Ì̇fl ÒÂÚ͇.
ЗМЛП‡МЛВ! йЛ„ЛМ‡О¸М˚И Й‡‡МЪЛИМ˚И
н‡ОУМ ФУ‰ОВКЛЪ ЛБ˙flЪЛ˛ ФЛ У·‡˘ВМЛЛ
‚ ТВ‚ЛТМ˚И ˆВМЪ ‰Оfl „‡‡МЪЛИМУ„У
ВПУМЪ‡. иУТОВ ФУ‚В‰ВМЛfl ВПУМЪ‡
Й‡‡МЪЛИМ˚П н‡ОУМУП ·Ы‰ВЪ fl‚ОflЪ¸Тfl
Б‡ФУОМВММ˚И УЛ„ЛМ‡О гЛТЪ‡ ‚˚ФУОМВМЛfl
ВПУМЪ‡ ТУ ¯Ъ‡ПФУП ТВ‚ЛТМУ„У ˆВМЪ‡ Л
ФУ‰ФЛТ‡ММ˚И ФУЪВ·ЛЪВОВП ФУ ФУОЫ˜ВМЛЛ
ЛБ‰ВОЛfl ЛБ ВПУМЪ‡. нВ·ЫИЪВ ФУТЪ‡‚ОВМЛfl
‰‡Ъ˚ ‚УБ‚‡Ъ‡ ЛБ ВПУМЪ‡, ТУН „‡‡МЪЛЛ
ФУ‰ОВ‚‡ВЪТfl М‡ ‚ВПfl М‡ıУК‰ВМЛfl ЛБ‰ВОЛfl
‚ ТВ‚ЛТМУП ˆВМЪВ.
З ТОЫ˜‡В ‚УБМЛНМУ‚ВМЛfl ТОУКМУТЪВИ
Т ‚˚ФУОМВМЛВП „‡‡МЪЛИМУ„У ЛОЛ
ФУТОВ„‡‡МЪЛИМУ„У У·ТОЫКЛ‚‡МЛfl ФУТ¸·‡
ТУУ·˘‡Ъ¸ У· ˝ЪУП ‚ аМЩУП‡ˆЛУММЫ˛
лОЫК·Ы лВ‚ЛТ‡ BRAUN ФУ ЪВОВЩУМЫ
8 800 200 20 20 (Б‚УМУН ЛБ кУТТЛЛ ·ВТФО‡ЪМУ).
Page 22

22
ì͇ªÌҸ͇
Наші вироби розроблені відповідно до
найвищих стандартів якості, функціональності
та дизайну. Ми впевнені, що Ви залишитеся
задоволені новою бритвою від фірми Braun.
Попередження
Ваша бритвенна система комплектується
шнуром із вмонтованим безпечним блоком
живлення наднизької напруги. Щоб уникнути
ураження електричним струмом, забороняється замінювати або модифікувати будьякі частини бритвенної системи.
Прилад не призначений для використання
особами (включаючи дітей) зі зниженими
фізичними, чуттєвими або розумовими
можливостями або за відсутності у них
досвіду або знань, якщо вони не знаходяться
під контролем або не проінструктовані про
використання приладу особою, відповідальною
за їх безпеку. Діти повинні знаходитися під
контролем для недопущення гри з приладом.
Щоб уникнути витоку рідини для чищення,
розміщуйте автоматичний пристрій чищення
та підзарядки Clean&Renew на плоскій і стійкій
поверхні. Не допускайте перекидання, різкого
переміщення або транспортування пристрою
чищення та підзарядки Clean&Renew при
встановленому картриджі для чищення.
Не ставити пристрій чищення та підзарядки
Clean&Renew у дзеркальній шафі, на батарею,
на поліровані або лаковані поверхні.
У картриджі для пристрою чищення та
підзарядки Clean&Renew знаходиться
легкозаймиста рідина для чищення. Тримайте
його подалі від джерел займання. Паління
поблизу заборонено. Не піддавати тривалому
впливу прямого сонячного світла.
Не заправляйте картридж. Використовуйте
тільки оригінальний змінний картридж Braun.
Опис та комплектність
Автоматичний пристрій чищення та
підзарядки Clean&Renew
1 Дисплей рівня рідини для чищення
2 Кнопка заміни картриджа
3 Контакти з’єднання пристрою чищення та
бритви
4 Кнопка «почати чищення»
D Кнопка «швидке чищення»
5 Дисплей програми чищення
6 Рознім підключення пристрою чищення та
підзарядки до електромережі
7 Картридж для чищення
STOP
Page 23

23
Бритва
8 Касета (сіточка для гоління + ріжучий блок)
9 Кнопки знімання касети
0 Кнопка «lock» (блокування плаваючої
бриючої голівки)
q Відкидний тример для довгого волосся
w Кнопка Вмикання / Вимикання
e (–) Кнопка чутливого режиму
r
(+) Кнопка інтенсивного режиму
t Кнопка перезавантаження
z Дисплей бритви
u Сполучні контакти бритви та пристрою
чищення і підзарядки
i Рознім підключення бритви до електро-
мережі
o Дорожний футляр
p Набір спеціальних шнурів
Перед голінням
Перед першим використанням підключіть
бритву до електромережі за допомогою
шнура живлення p або дотримуйтеся
інструкцій, наведених нижче.
Встановлення автоматичного пристрою
чищення та підзарядки Clean&Renew
• За допомогою набору спеціальних шнурів
p підключіть рознім пристрою чищення та
підзарядки 6 до електромережі
• Натисніть на кнопку заміни картриджа 2
для відкриття корпуса.
• Помістіть картридж для чищення 7 на
плоску, стійку поверхню (наприклад, на
стіл).
• Обережно зніміть заглушку картриджа.
• Плавно помістіть картридж в основу
пристрою чищення та підзарядки до упору.
• Повільно закрийте корпус пристрою
чищення та підзарядки, надавивши на
нього до клацання.
Дисплей рівня рідини для чищення 1 покаже
рівень рідини в картриджі:
до 30 циклів чищення
залишилося приблизно на 7 чищень
необхідний новий картридж
new
f
a
s
t
c
l
e
a
n
f
a
s
t
c
l
e
a
n
f
a
s
t
c
l
e
a
n
2
1
Page 24

24
Зарядка і чищення бритви
Помістіть бритву бриючою голівкою вниз у
пристрій чищення та підзарядки (сполучні
контакти
u на тильній стороні бритви
відповідатимуть контактам на пристрої 3.
Тепер при необхідності буде здійснюватися
зарядка бритви. Пристрій чищення та
підзарядки Clean&Renew здійснює аналіз
на рівень забруднення бритви, результат
аналізу відображається ввімкненням одного
з індикаторів дисплея програми чищення 5:
« » бритва чиста
« » потрібне економічне, тобто
короткочасне чищення
« » потрібне нормальне чищення
« » потрібне інтенсивне чищення
У разі вибору системою однієї з програм
чищення для її запуску необхідно натиснути
кнопку «почати чищення» 4. Для найкращих
результатів рекомендується проводити
чищення після кожного гоління.
У процесі чищення індикатор відповідної
програми чищення мигатиме. Кожна
програма чищення складається з декількох
циклів, при яких рідина для чищення
пропускається через бриючу голівку бритви
і вмикається процес гарячого сушіння.
Загальний час чищення залежить від обраної
програми і в середньому становить від 32 до
43 хвилин.
Програма чищення не має перериватися.
Під час сушіння бриюча голівка може бути
гарячою і вологою.
Після завершення програми починає світитися
блакитний індикатор « ». Тепер бритву
повністю очищено і підготовлено до наступного використання.
Швидке чищення
Натисніть кнопку «швидке чищення» D для
ввімкнення програми швидкого чищення
без сушіння. Ця програма триває близько
25 секунд і рекомендується у разі відсутності
часу для однієї з автоматичних програм
чищення. При витягненні бритви із пристрою
чищення та підзарядки відразу після
програми «fast clean» (швидке чищення)
обітріть бриючу голівку бритви серветкою.
trimmer
Series 7
Page 25

25
Режим очікування
Через 10 хвилин після закінчення процесу
зарядки та чищення пристрій Clean&Renew
перемикається в режим очікування:
Індикатори пристрою і бритви вимикаються.
Екран бритви
Ліва сторона дисплея бритви z показує
рівень зарядки акумулятора, права – рівень
гігієни бритви. (Акумулятор повністю
заряджений і бритва абсолютно чиста,
коли із двох сторін дисплея з‘являються всі
6 сегментів).
Сегменти акумулятора:
Під час зарядки або під час використання
бритви відповідні сегменти акумулятора
починають мигати. При повній зарядці
акумулятора з‘являються всі 6 сегментів. При
зниженні рівня зарядки акумулятора сегменти
поступово зникають.
Індикатор низького рівня зарядки:
При зниженні рівня зарядки акумулятора
за 20%, окантовка сегмента низького рівня
зарядки починає світитися червоним світлом.
Заряду акумулятора вистачить на 2 – 3
процеси гоління.
Сегменти гігієни:
Всі 6 сегментів з‘являються на дисплеї після
завершення чищення бритви в пристрої
чищення та підзарядки Clean&Renew. При
використанні бритви під час гоління сегменти
гігієни поступово зникають. При поміщенні
бритви в пристрій чищення та підзарядки
система автоматично вибирає підходящу
програму чищення і повертає сегменти до
рівня максимальної гігієни. Оскільки чищення
бритви під струменем води не є аналогічно
гігієнічним способом чищення порівняно із
чищенням пристроєм чищення та підзарядки,
сегменти гігієни заповнюються на дисплеї
тільки після чищення в пристрої чищення та
підзарядки Clean&Renew.
Інформація щодо зарядки
• Повна зарядка акумулятора забезпечує
до 50 хвилин автономної роботи бритви.
Час автономної роботи може змінюватися
залежно від густоти щетини.
• Оптимальний діапазон температури повітря
для зарядки бритви від 5 до 35 °С. Не
піддавайте бритву впливу температури
понад 50 °С протягом тривалого часу.
h
y
g
i
e
n
e
b
a
t
t
e
r
y
h
y
g
i
e
n
e
b
a
t
t
e
r
y
h
y
g
i
e
n
e
b
a
t
t
e
r
y
b
a
t
y
Page 26

26
Персональне налаштування
бритви
Кнопками (–) чутливий e та (+) інтенсивний r
ви можете вибрати найкращі для вас
налаштування гоління окремих частин
обличчя. Індикація різних налаштувань
здійснюється лампочкою, вбудованою у
вимикач живлення w:
• темно-синій (потужне гоління)
• ясно-синій (normal/звичайне)
• білий (для приємного гоління чутливих
частин обличчя, таких як шия)
Для повного і швидкого гоління ми рекомендуємо (+) інтенсивний режим.
При наступному включенні будуть обрані
останні налаштування.
Як використовувати
Натисніть кнопку Вмикання / Вимикання
w
для керування бритвою:
• Плаваюча бриюча голівка і плаваючі сіточки
для гоління автоматично пристосовуються
до контурів Вашого обличчя.
• Для гоління важкодоступних ділянок
(наприклад, під носом) пересуньте кнопку
блокування плаваючої бриючої голівки 0 у
дальнє положення для блокування головки
під кутом.
• Для підрівнювання бакенбардів, вусів і
бороди, рухом нагору, увімкніть відкидний
тример для довгого волосся.
Рекомендації для чистого гоління
Для досягнення кращих результатів під час
гоління Braun рекомендує дотримуватися
3 простих кроків:
1. Завжди голіться до вмивання.
2. Завжди тримайте бритву під прямим
кутом (90)° до шкіри.
3. Злегка натягуйте шкіру і переміщуйте
бритву в напрямку проти росту волосся.
+
normal
tr
lock
1
2
trimmer
lock
lock
lock
+
release
Page 27

27
Гоління при підключенні до
електромережі
Якщо бритва повністю розряджена, і ви не
маєте часу на зарядку за допомогою пристрою
чищення та підзарядки Clean&Renew, ви
можете використовувати бритву, підключивши
її до електромережі за допомогою шнура
живлення.
Чищення
Автоматичне чищення
Після кожного гоління поміщайте бритву в
пристрій чищення та підзарядки Clean&Renew
і виконуйте дії, зазначені в розділі «До
гоління». При цьому здійснюється необхідна
зарядка і чищення. При щоденному
використанні картриджа для чищення
вистачає приблизно на 30 циклів чищення.
Гігієнічна рідина для чищення містить
ізопропанол, який після розкриття картриджа
починає повільно випаровуватися в
навколишню атмосферу. При не щоденному
використанні картридж потрібно замінювати
приблизно через 8 тижнів.
Рідина для чищення також містить засоби,
що змазують, які можуть залишати невеликі
розводи на зовнішній стороні рамки
сіточки для гоління. Ці розводи дуже легко
вбираються м‘якою матерією або паперовою
серветкою.
Ручне чищення
Можливе чищення бриючої голівки під
струменем води. Увага: Від’єднайте
бритву від джерела електроенергії
перед чищенням під струменем води.
Чищення бритви під струменем води – це
альтернативний спосіб підтримання гігієни
бритви, особливо під час подорожей:
• Увімкніть бритву (без підключення до
електромережі) і промийте бриючу голівку
під струменем гарячої води. Також можна
використовувати рідке мило без абразивних
субстанцій. Змийте залишки піни і на кілька
секунд увімкніть бритву.
• Вимкніть бритву і натисніть кнопки знімання
касети
9. Зніміть касету (сіточка для
гоління + ріжучий блок) 8 і залиште
просохнути.
• При регулярному чищенні бритви під стру-
менем води, необхідно раз на тиждень
наносити краплю машинної оливи на верхню
частину касети (сіточка для гоління +
ріжучий блок).
trimmer
oil
trimmer
er
re
le
a
s
e
trimmer
re
le
a
s
e
re
le
a
s
e
click!
Series 7
Series 7
Series
Series
Page 28

28
В якості альтернативи, Ви можете чистити
бритву щіточкою, що входить у комплект:
• Відключіть бритву. Зніміть касету (сіточка
для гоління + ріжучий блок)
8 і постукайте
нею по плоскій поверхні. За допомогою
щіточки очистіть внутрішню поверхню
плаваючої голівки бритви. При цьому не
очищуйте касету щіточкою, оскільки це
може її пошкодити.
Чищення корпусу
Періодично очищуйте корпус бритви і
пристрій чищення та підзарядки Clean&Renew
вологою тканиною, особливо внутрішню
поверхню пристрою, в яку поміщається
бритва.
Заміна картриджа
Після натискання на кнопку заміни картриджа
2 для відкриття корпуса пристрою чищення
та підзарядки Clean&Renew, почекайте кілька
секунд перед видаленням використаного
картриджа, щоб уникнути розхлюпування.
Перш ніж викинути використаний картридж,
закрийте його отвір за допомогою заглушки
від нового картриджа, оскільки використаний
картридж містить залишки забрудненої
рідини для чищення.
Підтримка ефективності роботи
бритви
Заміна касети (сіточка для гоління +
ріжучий блок) / Перезавантаження
Для підтримання 100% ефективності роботи
бритви здійснюйте заміну касети (сіточка
для гоління + ріжучий блок) 8. Заміну
рекомендується здійснювати при включенні
індикатора заміни на дисплеї бритви z
(приблизно кожні 18 місяців) або в міру
зношування.
Індикатор заміни буде нагадувати вам
протягом наступних 7 сеансів гоління про
необхідність заміни касети (сіточка для
гоління + ріжучий блок). Після цього показання
дисплея бритви будуть автоматично скинуті.
Після заміни касети (сіточка для гоління +
ріжучий блок), використовуючи кулькову
ручку, натисніть на кнопку перезавантаження
t і втримуйте не менше 3 секунд для
скидання лічильника.
re
le
a
s
e
re
le
a
s
e
re
le
a
s
e
Series 7
Series 7
new
old
h
y
g
i
e
n
e
b
a
t
t
e
r
y
mer
re
le
a
s
e
70S
Series 7
Page 29

29
При цьому індикатор заміни мигає і
вимикається після закінчення скидання.
Ручне скидання можна зробити в будь-який
час.
Аксесуари
Представлені в магазинах побутової техніки
або в Сервісних центрах Braun:
• Касета (сіточка для гоління + ріжучий
блок) 70S
• Картридж для чищення Clean&Renew
CCR
ЦНУОУ„¥˜МВ ФУФВВ‰КВММfl
сВИ ФЛТЪ¥И П¥ТЪЛЪ¸ ·‡Ъ‡ВИНЛ, ˘У
ФВВБ‡fl‰К‡˛Ъ¸Тfl. З ¥МЪВВТ‡ı
Б‡ıЛТЪЫ М‡‚НУОЛ¯М¸У„У ТВВ‰У‚Л˘‡,
ФУТЛПУ МВ НЛ‰‡ЪЛ ªı ‰У НУБЛМЛ Б
‰УП‡¯М¥ПЛ ‚¥‰ıУ‰‡ПЛ Ф¥ТОfl Б‡Н¥М˜ВММfl
ТЪУНЫ ‚ЛНУЛТЪ‡ММfl. ЗЛ ПУКВЪВ Б‰‡ЪЛ ªı ‰У
лВ‚¥ТМУ„У ˆВМЪЫ ‡·У ‰У ‚¥‰ФУ‚¥‰МУ„У ˆВМЪЫ
Б·УЫ, ˘У БМ‡ıУ‰ЛЪ¸Тfl Ы ‚‡¯¥И Н‡ªМ¥.
иУ‚¥‰УПОВММfl ˘У‰У Б‡ıЛТЪЫ ‰У‚Н¥ООfl
д‡ЪЛ‰К ‰Оfl ˜Л˘ВММfl ПУКВ ·ЫЪЛ
ЫЪЛО¥БУ‚‡МЛИ flН Б‚Л˜‡ИМ¥ ФУ·ЫЪУ‚¥ ‚¥‰ıУ‰Л.
бП¥МЛ ‰У ˆ¸У„У ‰УНЫПВМЪЫ ‚МУТflЪ¸Тfl ·ВБ
ФУФВВ‰М¸У„У ФУ‚¥‰УПОВММfl.
ЦОВНЪЛ˜М¥ ТФВˆЛЩ¥Н‡ˆ¥ª М‡‚В‰ВМУ М‡
ТФВˆ¥‡О¸МУПЫ НУПФОВНЪ¥ КЛ‚ОВММfl.
äÓÎË ÔËÒÚ¥È Òڇ̠ÌÂÔˉ‡ÚÌËÏ ‰Îfl
‚ËÍÓËÒÚ‡ÌÌfl, ·Û‰¸ ·Ò͇, ‚¥‰ÌÂÒ¥Ú¸ ÈÓ„Ó ‰Ó
ÒÔˆ¥‡Î¸ÌÓ ÔËÁ̇˜ÂÌËı ‰Îfl ˆ¸Ó„Ó Ï¥Òˆ¸, flÍ
‚ÒÚ‡ÌÓ‚ÎÂÌÓ Û Ç‡¯¥È ͇ªÌ¥.
Електробритва Braun Series 7, 790cc
䇪̇ ‚ËÓ·Ìˈڂ‡:
ÅêAìç ÉÏ·É,
LJθ‰¯Ú‡ÒÒ Ñ-74731 LJÎθ‰ÛÌ,
ç¥Ï˜˜Ë̇
ÇË¥· ‚¥‰ÔÓ‚¥‰‡π ‚ËÏÓ„‡Ï Ñëíì 3135.2-2000
(Ééëí 30345.2-2000, ßÖë 335-2-8-92),
Ééëí 23511-79 .1, ‡ Ú‡ÍÓÊ - ̥҇ڇÌËÏ
ÌÓÏ‡Ï ë‡Ìè¥ç 001-96, Ñëç 239-96
Дата виготовлення продукції Braun вказана
безпосередньо на виробі (в місці маркування)
і складається з трьох цифр: перша цифра є
останньою цифрою року виготовлення, інші
дві цифри є порядковим номером тижня у
році.
70S
Page 30

30
Гарантія – 2 роки. У разі необхідності
гарантійного чи постгарантійного
обслуговування, звертайтеся до головного
офісу сервісного центру Braun в Україні:
ПП «І.Б.С.», вул. Глибочицька 53, м. Київ.
Тел. (044) 4286505.
Обладнання відповідає вимогам Технічного
регламенту обмеження використання деяких
небезпечних речовин в електричному та
електронному обладнані.
ɇ‡ÌÚ¥ÈÌ¥ ÁÓ·Ó‚’flÁ‡ÌÌfl виробника
Для всіх виробів ми даємо гарантію на два
роки, починаючи з моменту придбання
виробу або з дати його виробництва, у разі
відсутності або неналежного оформлення
гарантійного талону на виріб.
èÓÚfl„ÓÏ „‡‡ÌÚ¥ÈÌÓ„Ó ÔÂ¥Ó‰Û ÏË
безкоштовно ЫТЫ‚‡πПУ ¯ОflıУП ВПУМЪЫ,
Б‡ПiМЛ ‰ВЪ‡ОВИ ‡·У Б‡П¥МЛ ‚Т¸У„У ‚ЛУ·Ы
·Ы‰¸-flН¥ Б‡‚У‰Т¸Н¥ ‰ВЩВНЪЛ, ‚ЛНОЛН‡М¥
МВ‰УТЪ‡ЪМ¸У˛ flН¥ТЪ˛ П‡ЪВ¥‡О¥‚ ‡·У
ТНО‡‰‡ММfl.
м ‚ЛФ‡‰НЫ МВПУКОЛ‚УТЪ¥ ВПУМЪЫ ‚
„‡‡МЪ¥ИМЛИ ФВ¥У‰ ‚Л¥· ПУКВ ·ЫЪЛ Б‡П¥МВМЛИ
М‡ МУ‚ЛИ ‡·У ‡М‡ОУ„¥˜МЛИ ‚¥‰ФУ‚¥‰МУ ‰У
б‡НУМЫ ФУ Б‡ıЛТЪ Ф‡‚ ТФУКЛ‚‡˜¥‚.
Й‡‡МЪ¥fl М‡·Ы‚‡π ТЛОЛ ОЛ¯В, flН˘У ‰‡Ъ‡
НЫФ¥‚О¥ Ф¥‰Ъ‚В‰КЫπЪ¸Тfl ФВ˜‡ЪНУ˛ Ъ‡
Фi‰ФЛТУП дилера (П‡„‡БЛМЫ) М‡ УЛ„¥М‡О¸МУПЫ
„‡‡МЪ¥ИМУПЫ Ъ‡ОУМ¥ З„aun ‡·У М‡ УТЪ‡ММ¥И
ТЪУ¥Мˆ¥ УЛ„¥М‡О¸МУª ¥МТЪЫНˆ¥ª Б ВНТФОЫ‡Ъ‡ˆ¥ª
Зr‡un, flН‡ Ъ‡НУК ПУКВ ·ЫЪЛ „‡‡МЪiИМЛП
Ъ‡ОУМУП.
сfl „‡‡МЪ¥fl ‰¥ИТМ‡ Ы ·Ы‰¸-flН¥И Н‡ªМ¥, ‚ flНЫ ˆВИ
‚Л¥· ФУТЪ‡‚ОflπЪ¸Тfl представником компанії
виробника ‡·Ó ÔËÁ̇˜ÂÌËÏ дистриб’ютором,
Ъ‡ ‰В КУ‰М¥ У·ПВКВММfl Б ¥ПФУЪЫ ‡·У ¥М¯¥
Ф‡‚У‚¥ ФУОУКВММfl МВ ФВВ¯НУ‰К‡˛Ъ¸
М‡‰‡ММ˛ „‡‡МЪ¥ИМУ„У У·ТОЫ„У‚Ы‚‡ММfl.
Й‡‡МЪ¥fl М‡ Б‡П¥МВМ¥ ˜‡ТЪЛМЛ Б‡Н¥М˜ЫπЪ¸Тfl ‚
ПУПВМЪ Б‡НiМ˜ВММfl „‡‡МЪ¥ª М‡ ‰‡МЛИ ‚Лi·.
Й‡‡МЪ¥fl МВ ФУНЛ‚‡π ФУ¯НУ‰КВММfl, ‚ЛНОЛН‡М¥
МВ‚iМЛП ‚ЛНУЛТЪ‡ММflП (‰Л‚. Ъ‡НУК ФВВОiН
МЛК˜В) нормальне зношування Т¥ЪУН Ъ‡
МУК¥‚ ‰Оfl „УОiММfl, ‰ВЩВНЪЛ, ˘У МВБМ‡˜МЛП
˜ЛМУП ‚ФОЛ‚‡˛Ъ¸ М‡ flН¥ТЪ¸ У·УЪЛ ФЛО‡‰Ы.
сfl „‡‡МЪ¥fl ‚Ъ‡˜‡π ТЛОЫ, flН˘У ВПУМЪ
Б‰iИТМ˛πЪ¸Тfl МВ ‚ФУ‚МУ‚‡КВМУ˛ ‰Оfl ˆ¸У„У
УТУ·У˛ Ъ‡, flН˘У ‚ЛНУЛТЪУ‚Ы˛Ъ¸Тfl МВ
УЛ„¥М‡О¸Мi запасні частини виробника.
Page 31

31
У випадку пред’явлення рекламації за
умовами даної гарантії, передайте виріб у
повному комплекті згідно опису в оригінальній
інструкції з експлуатації разом з гарантійним
талоном у будь-який сервісний центр, який
офіційно вповноважений представником
компанії виробника.
ЗТ¥ ¥М¯¥ ‚ЛПУ„Л, ‡БУП Б ‚ЛПУ„‡ПЛ
‚¥‰¯НУ‰Ы‚‡ММfl Б·ЛЪН¥‚, МВ ‰¥ИТМ¥, flН˘У М‡¯‡
‚¥‰ФУ‚i‰‡О¸М¥ТЪ¸ МВ ‚ТЪ‡МУ‚ОВМ‡ Б‡НУММЛП
˜ЛМУП.
ЗЛФ‡‰НЛ, М‡ flН¥ МВ УБФУ‚Т˛‰КЫπЪ¸Тfl
„‡‡МЪ¥fl:
– ‰ВЩВНЪЛ, ‚ЛНОЛН‡М¥ ЩУТ-П‡КУМЛПЛ
Ó·ÒÚ‡‚Ë̇ÏË;
– використання з професійною метою або з
метою отримання прибутку;
– ФУЫ¯ВММfl ‚ЛПУ„ ¥МТЪЫНˆ¥ª Б ВНТФОЫ‡Ъ‡ˆ¥ª;
– МВ‚iМВ ‚ТЪ‡МУ‚ОВММfl М‡ФЫ„Л ПВВКi
КЛ‚ОВММfl (flН˘У ˆВ ‚ЛП‡„‡πЪ¸Тfl);
– Б‰iИТМВММfl ЪВıМ¥˜МЛı БП¥М;
– ПВı‡М¥˜Мi ФУ¯НУ‰КВММfl;
– ‰Оfl ФЛО‡‰¥‚, ˘У Ф‡ˆ˛˛Ъ¸ М‡
·‡Ú‡ÂÈ͇ı – Ó·ÓÚ‡ Á Ì‚i‰ÔÓ‚¥‰ÌËÏË
‡·Ó ÒÔ‡ˆ¸Ó‚‡ÌËÏË ·‡Ú‡ÂÈ͇ÏË, ·Û‰¸flÍ¥
ФУ¯НУ‰КВММfl, ‚ЛНОЛН‡М¥ ТФ‡ˆ¸У‚‡МЛПЛ
‡·Ó Ô¥‰Ú¥Í‡˛˜ËÏË ·‡Ú‡ÂÈ͇ÏË;
– пошкодження з вини тварин, гризунів
та комах (в тому числі у випадках
знаходження гризунів та комах усередині
приладів)
– ‰Îfl ·ËÚ‚ – Á¥Ï’flÚ‡ ‡·Ó ÔÓ‚‡Ì‡ Ò¥Ú͇.
Увага! Гарантійний талон підлягає вилученню
в разі звернення до сервісного центру з
проханням про виконання гарантійного
ремонту. Після проведення ремонту
гарантійним талоном буде вважатися
заповнений оригінал листа виконаного
ремонту зі штампом сервісного центру та
підписаний споживачем про отримання
виробу з ремонту. Гарантійний термін
подовжується на період, який даний виріб
знаходився в сервісному центрі в ремонті.
В разі виникнення труднощів з виконанням
гарантійного та післягарантійного
обслуговування, прохання звертатися до
інформаційної служби сервісу представника
компанії виробника в Україні.
Телефон гарячої лінії 0800505 000. Дзвінки
по Україні зі стаціонарних телефонних
номерів є безкоштовними. Дзвінки з
мобільних телефонів оплачуються згідно
тарифів відповідного оператора.
Також можна отримати додаткову
інформацію на сервісному порталі виробника
в інтернеті www.service.braun.com
 Loading...