

Page 1

Bedienungsanleitung
User instructions
Mode d’emploi
Istruzioni per l’uso
Bedieningshandleiding
Instrucciones de empleo
Manual de operação
Bruksanvisning
DigiAlbum 7
BN, BA DigiAlbum 0410.qxd 16.04.2010 9:56 Uhr Seite 1
Page 2
Digitales Fotoalbum – Bedienungsanleitung..........................................3
Digital Photo Album – User instructions ...............................................8
Album photo numérique – Mode d'emploi ..........................................13
Album per foto digitale – Istruzioni per l'uso ......................................18
Digitaal fotoalbum – Bedieningshandleiding........................................23
Álbum digital de fotos – Instrucciones de empleo...............................28
Álbum de fotografias digitais – Manual de operação ...........................33
Digitalt fotoalbum – Bruksanvisning ...................................................38
..........................................................................................................43
DIGI ALBUM 7
2
BN, BA DigiAlbum 0410.qxd 16.04.2010 9:56 Uhr Seite 2
Page 3

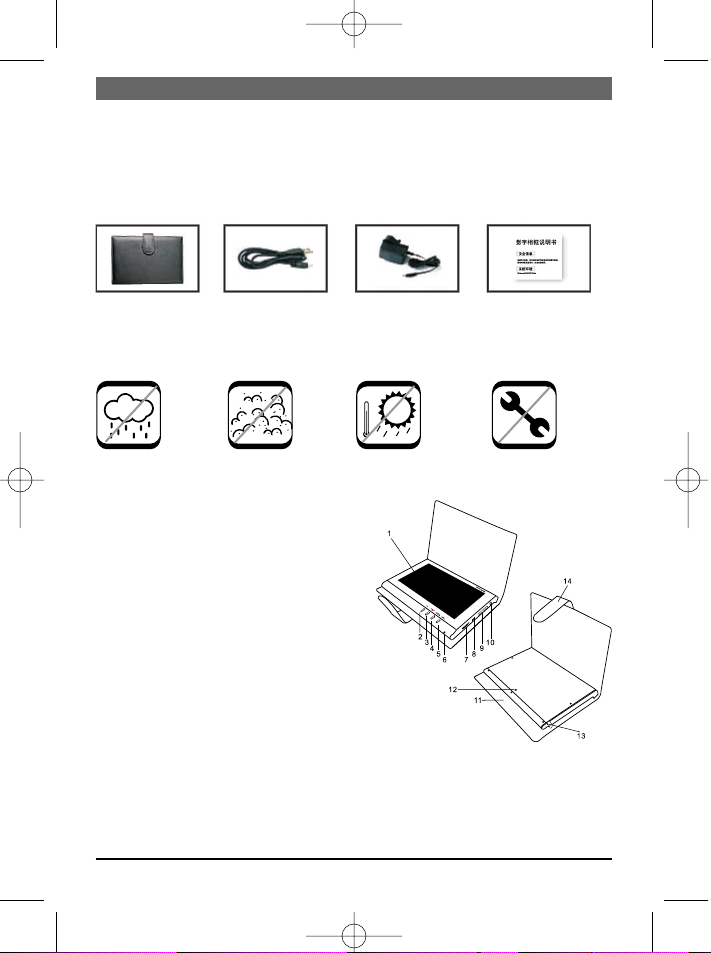
1.LCD-Bildschirm
2.EXIT: Aktuellen Modus verlassen
Menü zurückkehren.
3.Taste SLIDESHOW/ENTER:
ENTER: Foto anzeigen oder Auswahl bestätigen
SLIDESHOW: Diashow starten oder beenden, Diashowintervall auswählen.
4.Taste PREVIOUS/16:9/4:3:
1) Taste kurz drücken, um vorheriges
Foto anzuzeigen.
2) Taste gedrückt halten, um zwischen Anzeigeformat 16:9 und 4:3 umzuschalten.
5.Taste NEXT/AUTO ZOOM:
1) Taste kurz drücken, um nächstes Foto
anzuzeigen.
2) Taste gedrückt halten, um zwischen
dem Anzeigeformat Original und Auto Zoom
umzuschalten.
6. Ein/Aus LED
7.Album
ein-/ausschalten.
8.USB-Anschluss
9.Kartenschlitz SD/MMC/MS/xD
10. Stromeingang
11. Tasche
12. Loch für Ständer
13. Ständerstab
14. Verschlusslasche
Bitte lesen
Lesen Sie bitte alle Sicherheits- und Bedienungsanweisungen, bevor Sie das Album verwenden.
Beachten Sie die Warnhinweise auf dem Album und in der Anleitung und bewahren Sie diese auf.
Systemanforderungen: Windows 2000/XP/Vista
Inhalt:
Digitales USB-Kabel Netzadapter BedienungsFotoalbum anleitung
Wichtige Sicherheitshinweise
Achtung:
Keine hohe Kein Staub Keine hohen Nicht
Luftfeuchtigkeit Temperaturen zerlegen
Beschreibung des digitalen Fotoalbums
DEUTSCH
3
BN, BA DigiAlbum 0410.qxd 16.04.2010 9:56 Uhr Seite 3
Page 4
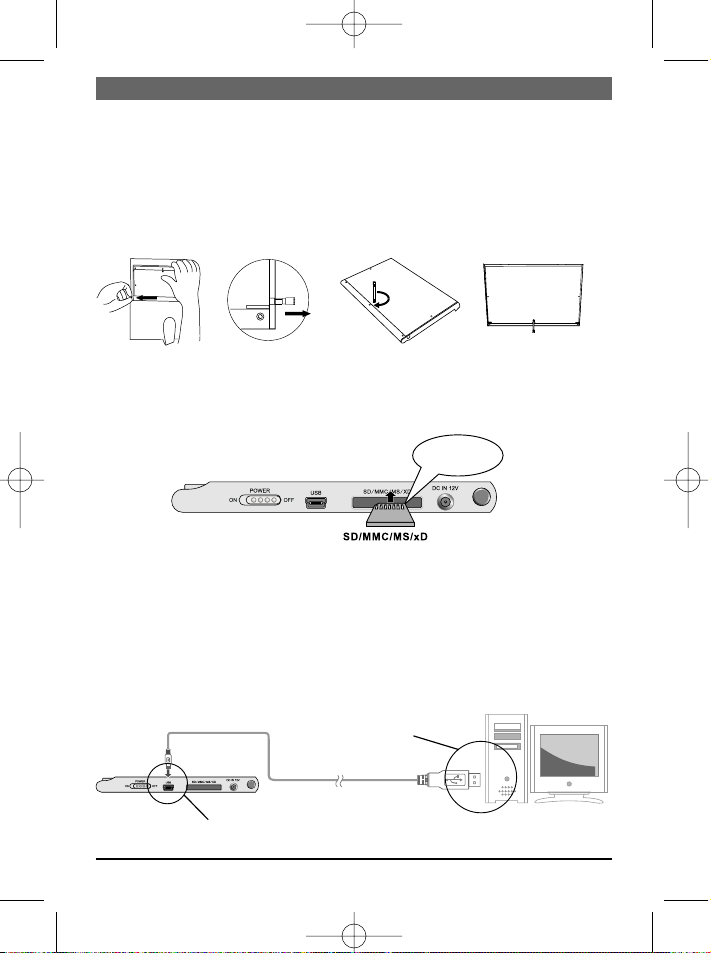
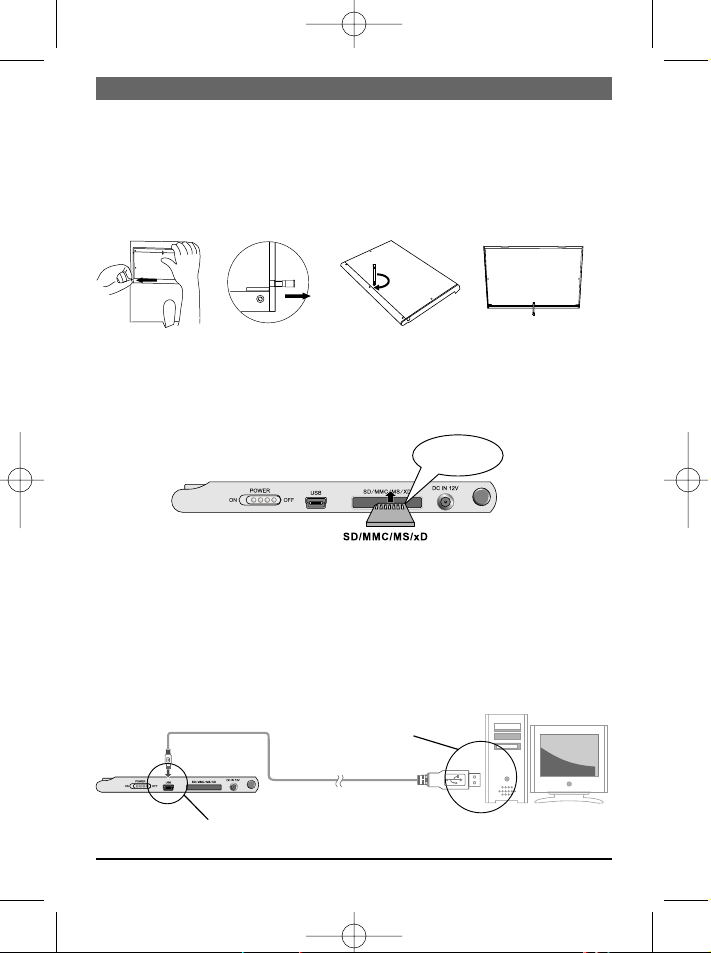
Fotoalbum aufstellen
Das Fotoalbum kann mit dem mitgelieferten Ständer auf dem Schreibtisch aufgestellt
werden.
1. Das Album aus der Tasche nehmen.
2. Den Ständerstab auf der Rückseite des Albums herausnehmen.
3. Den Stab in das entsprechende Loch schrauben.
4. Das Fotoalbum horizontal auf den Tisch stellen.
Kartenleser verwenden
1. Die Speicherkarte in den Schlitz im Album stecken. Darauf achten, dass die Metallkontakte der SD/MMC/MS/xD-Speicherkarte zur Vorderseite des Albums zeigen.
2. Zum Entfernen der Karte diese
einfach herausziehen.
Hinweis:
Mit einer Memory Stick Pro-Karte ist ein entsprechender Memory Stick-Adapter erforderlich. Andernfalls kann die Karte im Schlitz stecken bleiben.
An PC anschließen
Es ist ein Mini USB-USB-Adapterkabel erforderlich, um den Mini USB-Anschluss des
Albums mit dem Standard-USB-Anschluss des PCs zu verbinden.
Hinweis: Ist das Album angeschlossen, können Dateien zwischen PC, Speicherkarten und
internem Speicher übertragen werden.
DEUTSCH
4
Metallkontakte auf
der Speicherkarte
Adapterkabel für Mini USB - USB
USB
Mini-USB
BN, BA DigiAlbum 0410.qxd 16.04.2010 9:56 Uhr Seite 4
Page 5

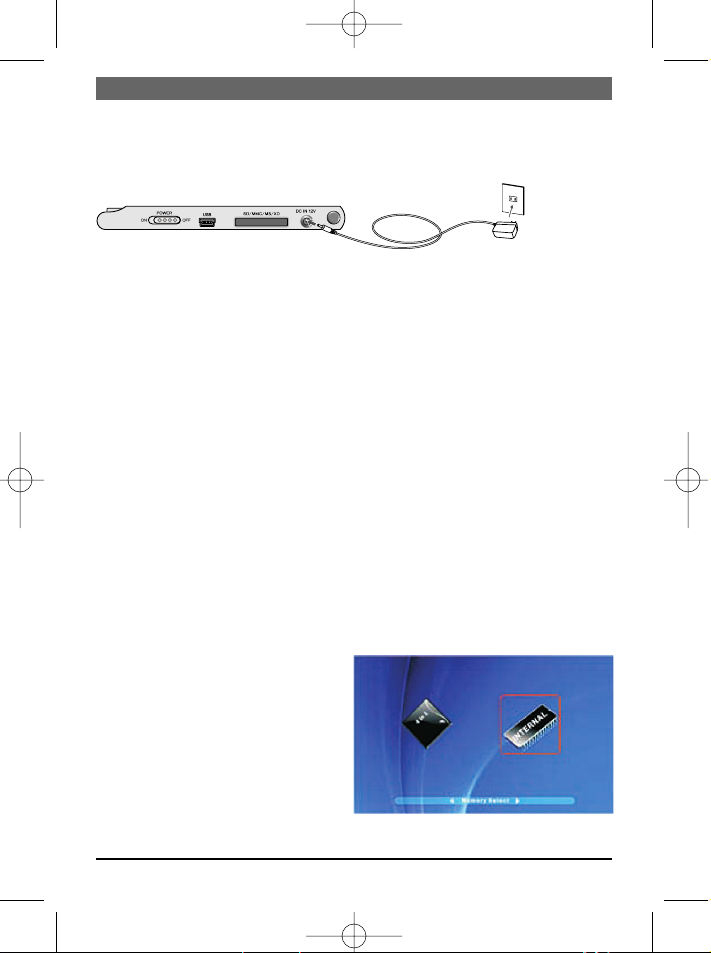
Netzadapter verwenden
Dieses Album kann mit dem mitgelieferten Netzadapter an die Steckdose angeschlossen
werden. Den Netzadapter wie unten gezeigt an das Album anschließen.
Hinweis:
• Vor dem Anschließen/Entfernen des Stromkabels immer das Album ausschalten.
• Nur den mitgelieferten Netzadapter mit diesem Album verwenden. Ein anderer Adapter kann zu Funktionsstörungen führen oder das Album beschädigen.
• Bei längerer Verwendung kann sich der Netzadapter erwärmen. Das ist normal und
kein Grund zur Sorge.
• Wird der Adapter nicht verwendet, das Kabel aus der Steckdose ziehen.
Akku laden
1. Zum Laden des Akku den Netzadapter verwenden. Den Netzadapter wie oben gezeigt
anschließen.
2. Schalter POWER auf OFF schieben (Album muss zum Laden des Akku ausgeschaltet sein).
3. Der Ladevorgang beginnt und wird automatisch beendet, sobald der Akku vollständig
geladen ist.
LED-Anzeige
1. Während des Ladevorgangs blinken die rote und grüne LED abwechselnd.
2. Ist der Akku voll geladen, leuchtet die grüne LED konstant.
3. Wird das Album mit dem Akku betrieben, leuchtet die grüne LED.
Bei sinkender Akkuleistung blinkt die grüne LED.
Fotos betrachten
1. Schalter POWER ON/OFF auf ON
schieben. Die Betriebsanzeige leuchtet
auf und das Album startet die Diashow automatisch.
2. Die Speicherkarte in den SD/MMC/MS/
xD-Schlitz schieben und EXIT drücken,
um die Speichermedien anzuzeigen.
3. Mit PREVIOUS oder NEXT den 4-in-1Kartenschlitz oder den internen Speicher auswählen.
DEUTSCH
5
An Steckdose
anschließen
BN, BA DigiAlbum 0410.qxd 16.04.2010 9:56 Uhr Seite 5
Page 6

Hinweis:
1. Das Album liest zuerst den 4-in-1-Kartenschlitz und dann den internen Speicher.
2. Befinden sich keine Dateien auf dem Speichermedium, zeigt das Album „Keine Datei
gefunden".
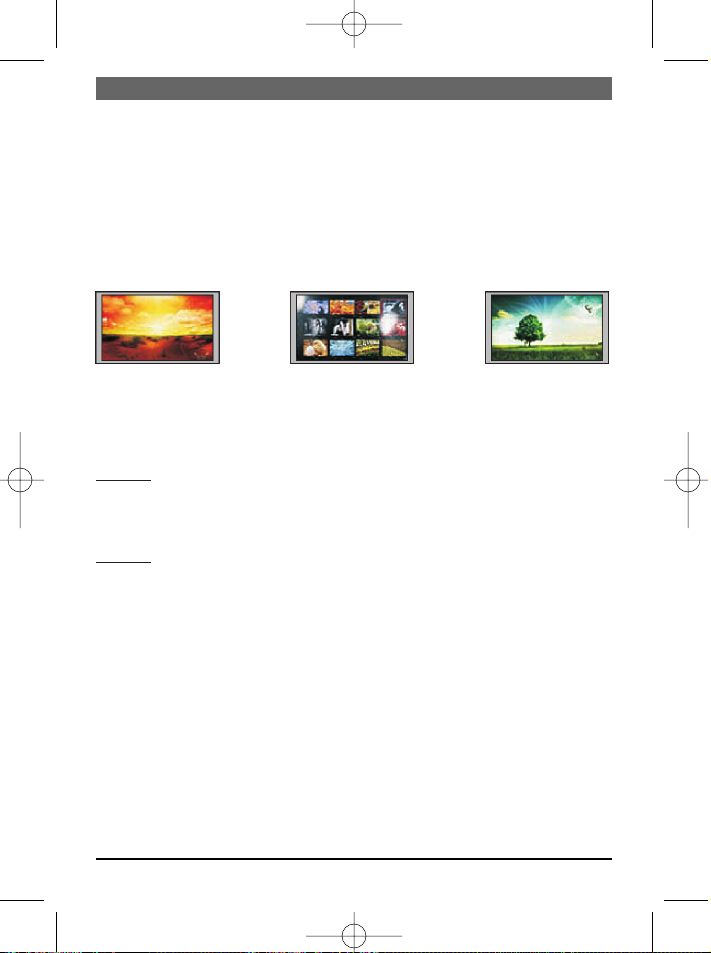
Drei Anzeigemodi
Es gibt drei Anzeigemöglichkeiten für die Fotos: Blättern (Browse), Vorschau (Thumbnail) und Diashow (Slideshow).
Anzeigemodi für Fotos
Browse: Manuelles Thumbnail: Eine Slideshow: AutoAnzeigen der einzelnen Vorschauliste der Fotos in matische Anzeige
Fotos nacheinander. verkleinerter Größe. der Fotos.
Fotos durchblättern
Methode 1: Im Diashow-Modus wiederholt SLIDESHOW drücken, um „Slideshow off"
auszuwählen. Zum Beenden der Diashow und Aufrufen des Blättern-Modus NEXT für
das nächste Foto und PREVIOUS für das vorherige Foto drücken.
Methode 2: Im Vorschau-Modus das Foto auswählen und ENTER drücken. Mit PREVIOUS und NEXT weitere Fotos auswählen.
Bildervorschau
Zeigt das Album Fotos im Blättern- oder Diashow-Modus an, einfach EXIT drücken, um
die Bildervorschau zu öffnen.
Diashow anzeigen
SLIDESHOW drücken, um die Diashow zu starten. Wiederholt SLIDESHOW drücken, um
die Anzeigedauer der einzelnen Fotos auszuwählen (3 sec, 5 sec, 10 sec, 15 sec, 30 sec,
1 min, 1 Stunde, 1 Tag). Um die Diashow zu beenden, wiederholt SLIDESHOW drücken,
um „Slideshow off" auszuwählen.
Anzeigeformat ändern
Taste PREVIOUS/16:9/4:3 gedrückt halten, um zwischen Anzeigeformat 16:9 und 4:3
umzuschalten.
Taste NEXT/AUTO ZOOM gedrückt halten, um zwischen dem Anzeigeformat Original und
Auto Zoom umzuschalten.
DEUTSCH
6
BN, BA DigiAlbum 0410.qxd 16.04.2010 9:56 Uhr Seite 6
Page 7
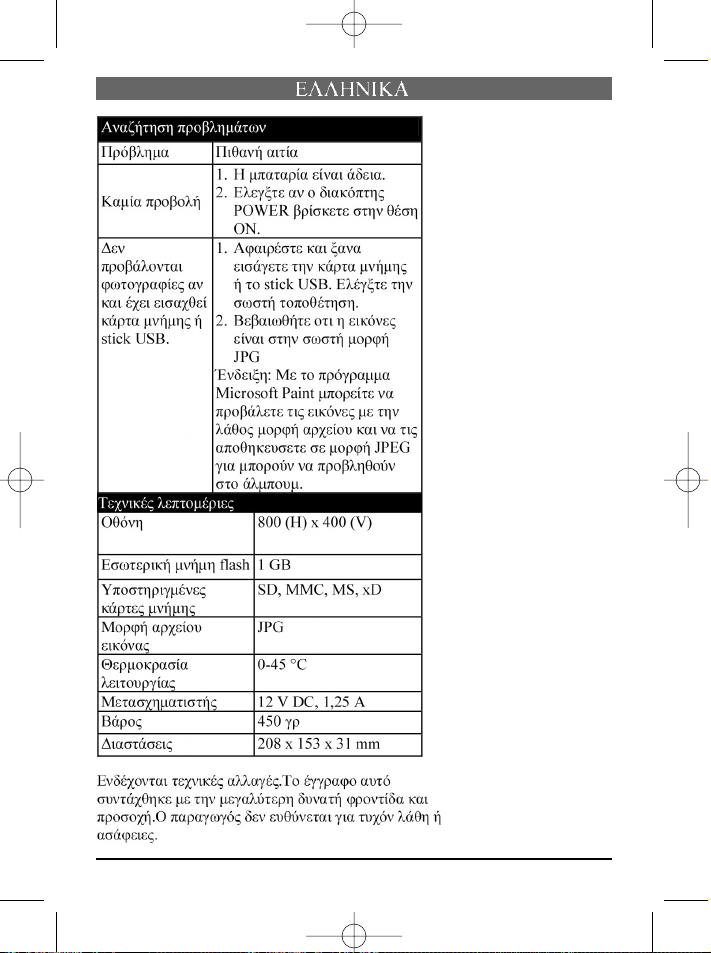
Fehlersuche
Fehler Mögliche Ursachen
Keine Anzeige 1.Akku leer.
2.Überprüfen, ob Schalter POWER auf ON steht.
Kein Foto angezeigt, 1. Speicherkarte oder USB-Stick entfernen und
obwohl Speicherkarte wieder einlegen. Auf korrekten Sitz prüfen.
oder USB-Stick ein- 2.Sicherstellen, dass die Bilddateien im korrekten
gelegt ist. JPG-Format sind.
Hinweis: Mit Microsoft Paint können Dateien mit falschem Format angezeigt und als
Standard-JPEG-Dateien gespeichert werden, so dass sie mit diesem Album betrachtet
werden können.
Technische Daten
Anzeige 800 (H) x 400 (V)
Interner Flash-Speicher 1 GB
Lesbare Speicherkarten SD, MMC, MS, xD
Lesbares Dateiformat JPG
Betriebstemperatur 0-45 °C
Netzadapter 12 V DC, 1,25 A
Gewicht 450 g
Maße (BxLxH) 208 x 153 x 31 mm
Technische Änderungen vorbehalten. Dieses Dokument wurde mit größter Sorgfalt
erstellt. Der Hersteller übernimmt keine Haftung für Ungenauigkeiten oder Fehler.
Dieses Symbol auf dem Produkt oder in der Gebrauchsanleitung bedeutet,
dass das Elektrogerät nicht im Hausmüll entsorgt werden darf, sondern EUweit an speziellen Sammelstellen abgegeben werden muss. Für nähere
Informationen wenden Sie sich an Ihre Stadt oder Gemeinde oder an den
Händler, wo Sie das Produkt erworben haben.
DEUTSCH
7
BN, BA DigiAlbum 0410.qxd 16.04.2010 9:56 Uhr Seite 7
Page 8
Please read First
Please read all the safety and operating instructions before operating the Album. Observe all warnings placed on the Album or in the instructions for future reference.
System Requirements: Windows 2000/XP/Vista
Package Includes:
Digitaal USB cable AC adapter User
Photo Album instructions
Important Safety Notes
Warning:
No high No dust No high Do not
humidity temperature disassemble
Description of the Digital Photo Album
ENGLISH
8
1.LCD screen
2.EXIT button: Exit current mode and
return to menu.
3. SLIDESHOW/ENTER button:
ENTER: Show photo or confirm selection
SLIDESHOW: Start or stop slideshow,
select slideshow interval.
4. PREVIOUS/16:9/4:3 button:
1) Press button shortly to view previous
photo.
2) Keep button pressed to toggle between
16:9 and 4:3 display format.
5. NEXT/AUTO ZOOM button:
1) Press button shortly to view next photo.
2) Keep button pressed to toggle between
Original and Auto Zoom display format.
6. Power on/off LED
7. Power on/off
8. USB port
9.SD/MMC/MS/xD
card slot
10. DC power input
11. Wallet
12. Hole for the stand
13. Rod stand
14. Flap closure
BN, BA DigiAlbum 0410.qxd 16.04.2010 9:56 Uhr Seite 8
Page 9
Placing the Photo Album
The Photo Album can be placed on the desktop using the included stand.
1. Take out the Album from the wallet.
2. Take out the rod stand located in the back of the Album.
3. Screw in the rod into the screw hole.
4. Place the Photo Album horizontally.
Using the card reader
1. Insert the memory card into the slot of the Album. Make sure that the metal contacts
of SD/MMC/MS/xD memory card is facing the front of the Album.
2. To remove the card, simply pull it out.
Note:
If you use a Memory Stick Pro card, a Memory Stick Pro to Memory Stick adapter must
be used. Otherwise, the card may become stuck inside the slot.
Connecting to a PC
You need a Mini USB to USB adapter cable to connect the Mini USB port of the Album
to the standard USB port of your PC.
Note: When connected you can transfer files among PC, memory cards and internal
memory.
ENGLISH
9
Metal contacts
on the memory
card
Mini USB to USB adapter cable
USB
Mini-USB
BN, BA DigiAlbum 0410.qxd 16.04.2010 9:56 Uhr Seite 9
Page 10
Using the AC adapter
This Album can be powered by AC through the supplied switching power AC adapter.
Connect the AC adapter to the Album as illustrated below.
Note:
• Always turn off the Album before connecting or disconnecting the AC cable.
• Only use the AC adapter supplied with this Album. Using a different type of adapter
may cause malfunction or damage the product.
• When the AC adapter is used for a prolonged period of time, the adapter may heat
up. This is normal and no reason for concern.
• When the adapter is not used, unplug it from the outlet.
Charging the battery
1. Use the AC adapter to charge the battery. Connect the AC adapter as illustrated
above.
2. Slide POWER to OFF (the Album must be turned off to charge the battery).
3. The charging starts and stops automatically when the Album is fully charged.
LED indicator
1. During charging, the red and green LEDs blink alternatively.
2. When the battery is fully charged, the green LED stays lit.
3. When the Album uses battery for power, steady green LED lights.
If the battery power is low, the green LED blinks.
Viewing photos
1. Slide POWER ON/OFF to ON. The
power indicator illuminates, and the
Album starts the slideshow automatically.
2. Insert your memory card into the
SD/MMC/MS/xD slot and press EXIT
to display the memory devices.
3. Use PREVIOUS or NEXT to select the
4-in-1 card slot or internal memory.
ENGLISH
10
To home
power outlet
BN, BA DigiAlbum 0410.qxd 16.04.2010 9:56 Uhr Seite 10
Page 11

Note:
1. The Album reads the 4-in-1 card slot first before reading the internal memory.
2. If no file stored in the device, the Album displays "No file found".
Three viewing modes
Er zijn drie weergavemogelijkheden voor de foto's: Bladeren (Browse), beeldoverzicht
(Thumbnail) en diapresentatie (Slideshow).
Photo Viewing Modes
Browse: Manual Thumbnail: A list Slideshow:
viewing of photos of photos in Automatic display
one-by-one. smaller size. of photos.
Browse Photos
Method 1: In Slideshow mode, repeatedly press SLIDESHOW to select "Slideshow off".
To stop the slideshow and enter browse mode, press NEXT to browse the next photo
and PREVIOUS to browse the previous photo.
Method 2: In Thumbnail mode, select the photo and press ENTER. Use PREVIOUS and
NEXT to browse photos.
View Thumbnail
If the Album is playing photos either in Browse or Slideshow mode, simply press EXIT
to enter the Thumbnail mode.
View Slideshow
Press SLIDESHOW to start the slideshow. Repeatedly press SLIDESHOW to select the
duration of the individual photo (3 sec, 5 sec, 10 sec, 15 sec, 30 sec, 1 min, 1 hour, 1
day). To stop the slideshow, repeatedly press SLIDESHOW to select "Slideshow off".
Change Display Format
Keep PREVIOUS/16:9/4:3 pressed to toggle between 16:9 and 4:3 display format.
Keep NEXT/AUTO ZOOM pressed to toggle between Original and Auto Zoom display format.
ENGLISH
11
BN, BA DigiAlbum 0410.qxd 16.04.2010 9:56 Uhr Seite 11
Page 12

Troubleshooting
Error Possible causes
No display 1.Depleted battery.
2.Check that POWER switch is at ON position.
No photos displayed 1.Remove memory card or USB stick and insert again.
although memory card Make sure the device is properly inserted in place.
or USB stick is inserted. 2. Make sure the image files are in correct JPG format.
Note: You may use Microsoft Paint program to display wrong-format files and save
them as standard JPEG so that they can be displayed on this Album.
Technical specifications
Display 800 (H) x 400 (V)
Internal flash memory 1 GB
Readable memory cards SD, MMC, MS, xD
Readable file format JPG
Operating temperature 0-45 °C
AC adapter 12 V DC, 1.25 A
Weight 450 g
Dimensions (WxLxH) 208 x 153 x 31 mm
Specifications are subject to change without notice. The document was compiled with
greatest diligence. The manufacturer will not be held liable for any inaccuracies or
errors.
This symbol on the product or in the instructions means that your electrical
and electronic equipment should be disposed at the end of its life separately from your household waste. There are separate collection systems for
recycling in the EU. For more information, please contact the local authority
or your retailer where you purchased the product.
ENGLISH
12
BN, BA DigiAlbum 0410.qxd 16.04.2010 9:56 Uhr Seite 12
Page 13

Lire s.v.p.
Lisez toutes les instructions de sécurité et d’emploi avant d’utiliser l’album. Observez
les avertissements sur l’album et dans le mode d’emploi. Conservez le mode d’emploi.
Systèmes compatibles : Windows 2000/XP/Vista
Contenu :
Album photo Câble USB Adaptateur secteur Mode d’emploi
numérique
Consignes de sécurité importantes
Attention :
Pas d’humidité Pas de poussière Pas de temp. élevées Ne pas démonter
Description de l’album photo numérique
1. Écran LCD
2. EXIT : Quitter le mode actuel et retourner au menu.
3. Touche SLIDESHOW/ENTER :
ENTER : Afficher la photo ou valider la
sélection
SLIDESHOW : Lancer ou arrêter le diaporama, sélectionner l'intervalle de diaporama.
4. Touche PREVIOUS/16:9/4:3 :
1) Appuyer brièvement sur la touche pour
afficher la photo précédente.
2) Tenir la touche pressée pour commuter
entre le format d'affichage 16:9 et 4:3.
5. Touche NEXT/AUTO ZOOM :
1) Appuyer brièvement sur la touche
pour afficher la prochaine photo.
2) Tenir la touche pressée pour
commuter entre le format d'affichage
Original et Auto Zoom.
6. DEL marche/arrêt
FRANÇAIS
13
7. Marche/arrêt
de l'album.
8. Port USB
9. Emplacement de carte SD/MMC/MS/xD
10. Entrée de courant
11. Trousse
12. Trou pour pied
13. Barre de pied
14. Languette de fermeture
BN, BA DigiAlbum 0410.qxd 16.04.2010 9:56 Uhr Seite 13
Page 14

Poser l’album photo
L’album photo peut être posé sur le bureau avec le pied fourni.
1. Retirer l’album de la trousse.
2. Retirer la barre de pied au dos de l’album.
3. Visser la barre dans le trou correspondant.
4. Poser l’album photo horizontalement sur le bureau.
Utiliser le lecteur pour cartes
1. Introduire la carte à mémoire dans la fente de l’album. Il faut que les contacts
métalliques de la carte à mémoire SD/MMC/MS/xD pointent vers la face de l’album.
2. Pour sortir la carte, la retirer simplement.
Remarque :
Un adaptateur Memory Stick correspondant est nécessaire avec une carte Memory Stick
Pro. Sinon, la carte pourrait rester coincée dans la fente.
Connexion à l’ordinateur
Un câble adaptateur Mini USB-USB est nécessaire pour connecter le port Mini USB de
l’album avec le port USB standard de l’ordinateur.
Remarque : Quand l’album est connecté, il est possible de transférer des fichiers entre
l’ordinateur, les cartes à mémoire et la mémoire interne.
FRANÇAIS
14
Contacts
métalliques sur la
carte à mémoire
Câble Mini-USB – USB
USB
Mini-USB
BN, BA DigiAlbum 0410.qxd 16.04.2010 9:56 Uhr Seite 14
Page 15

FRANÇAIS
15
Utiliser l’adaptateur secteur
Cet album peut être connecté à une prise de courant avec l’adaptateur secteur fourni.
Brancher l’adaptateur secteur sur l’album comme c’est montré ci-après.
Remarque :
• Avant de brancher/débrancher le câble de courant, toujours éteindre l’album.
• Utiliser uniquement l’adaptateur secteur fourni avec cet album. Tout autre adaptateur
pourrait provoquer des dysfonctionnements ou endommager l’album.
• Si l’adaptateur secteur est utilisé pendant longtemps, il peut se réchauffer. C’est normal et il n’y a pas de raison de s’inquiéter.
• Si l’adaptateur secteur n’est pas utilisé, débrancher le câble de la prise de courant.
Charger l’accu
1. Utiliser l’adaptateur secteur pour le chargement de l’accu. Brancher l’adaptateur secteur comme c’est montré ci-dessus.
2. Mettre l’interrupteur POWER sur OFF (album doit être arrêté pour charger l’accu).
3. Le chargement démarre et se termine automatiquement quand l’accu est plein.
Affichage DEL
1. Au cours du chargement, la DEL rouge et la DEL verte clignotent tour à tour.
2. Quand l’accu est complètement chargé, la DEL verte s’allume en permanence.
3. Quand l’album fonctionne avec l’accu, la DEL verte s’allume.
Quand la capacité de l’accu baisse, la DEL verte clignote.
Visionner photos
1. Mettre l’interrupteur POWER ON/OFF
sur ON. L’affichage de service s’allume et l’album démarre le diaporama
automatiquement.
2. Introduire la carte à mémoire dans la
fente SD/MMC/MS/xD et appuyer sur
EXIT pour afficher des supports de
mémoire.
3. Sélectionner l’emplacement 4-en-1 ou
la mémoire interne avec PREVIOUS ou NEXT.
Connecter à une
prise de courant
BN, BA DigiAlbum 0410.qxd 16.04.2010 9:56 Uhr Seite 15
Page 16

Remarque :
1. L’album lit d’abord l’emplacement 4-en-1 puis la mémoire interne.
2. Si le support de mémoire ne contient pas de fichiers, l’album affiche « Aucun fichier
trouvé ».
Trois modes d’affichage
Il y a trois options d’affichage pour les photos : Feuilleter (Browse), aperçu (Thumbnail)
et diaporama (Slideshow).
Modes d’affichage pour photos
Browse : Affichage manuel Thumbnail : Une liste de Slideshow : Affichage
des photos individuelles l’aperçu des photos en automatique des
une par une. format réduit. photos.
Feuilleter photos
Méthode 1 : Appuyer sur SLIDESHOW à répétition dans le mode diaporama pour sélectionner « Slideshow off ». Pour arrêter le diaporama et activer le mode Feuilleter appuyer sur NEXT pour la prochaine photo et sur PREVIOUS pour la photo précédente.
Méthode 2 : Sélectionner la photo en mode Aperçu et appuyer sur ENTER. Sélectionner
d’autres photos avec PREVIOUS et NEXT.
Aperçu de photos
Quand l’album affiche des photos en mode Feuilleter ou Diaporama, appuyer simplement sur EXIT pour ouvrir l’aperçu de photos.
Visionner un diaporama
Appuyer sur SLIDESHOW pour démarrer le diaporama. Appuyer sur SLIDESHOW à
répétition pour sélectionner la durée d’affichage de chaque photo (3 sec, 5 sec, 10 sec,
15 sec, 30 sec, 1 min, 1 heure, 1 jour). Pour arrêter le diaporama, appuyer sur SLIDESHOW à répétition pour sélectionner « Slideshow off ».
Changer le format d’affichage
Tenir la touche PREVIOUS/16:9/4:3 pressée pour commuter entre le format d’affichage
16:9 et 4:3.
Tenir la touche NEXT/AUTO ZOOM pressée pour commuter entre le format d’affichage
Original et Auto Zoom.
FRANÇAIS
16
BN, BA DigiAlbum 0410.qxd 16.04.2010 9:56 Uhr Seite 16
Page 17

Résolution des problèmes
Erreur Causes possibles
Pas d'affichage 1.Accu à plat.
2.Vérifier si l'interrupteur POWER se trouve sur ON.
Aucune photo affichée 1. Retirer la carte à mémoire ou la clé USB et introduire de
bien que la carte à nouveau. Verifier la position correcte.
mémoire ou la clé USB 2. Verifier que les fichiers de photos sont en
soit introduite. format JPG correct.
Remarque : Il est possible d'afficher des fichiers en format incompatible avec Microsoft
Paint et de les enregistrer comme fichiers standard JPEG pour pouvoir les afficher avec
cet album.
Caractéristiques techniques
Affichage 800 (H) x 400 (V)
Mémoire flash interne 1 Go
Cartes à mémoire
compatibles SD, MMC, MS, xD
Format de fichier
compatible JPG
Température de
fonctionnement 0 à 45 °C
Adaptateur secteur 12 V DC, 1,25 A
Poids 450 g
Dimensions (PxLxH) 208 x 153 x 31 mm
Sous réserve de modifications techniques. Ce document a été rédigé avec le plus grand
soin possible. Le constructeur n’assume cependant aucune responsabilité pour toute
imprécision ou erreur contenue.
Ce symbole apposé au produit ou dans le mode d'emploi indique que l'appareil électrique ne doit pas être éliminé avec les ordures ménagères, mais
retourné aux endroits de collecte spéciaux qui existent dans tous les pays
européens. Pour plus d'informations, veuillez vous renseigner auprès de
votre commune ou du commerçant qui vous a vendu le produit.
FRANÇAIS
17
BN, BA DigiAlbum 0410.qxd 16.04.2010 9:56 Uhr Seite 17
Page 18

ITALIANO
18
Si prega di leggere
Si prega di leggere tutte le precauzioni ed istruzioni per l'uso prima di utilizzare l'album.
Osservare le avvertenze sull'album e nelle istruzioni e conservarle.
Requisiti del sistema / Sistemi operativi: Windows 2000/XP/Vista
Contenuto:
Album per foto Cavo USB Adattatore Istruzioni
digitale di rete per l’uso
Precauzioni importanti
Attenzione:
Evitare elevata umidità... polvere... elevate temperature Non scomporre
Descrizione dell'album per foto digitale
1. Display LCD
2. EXIT: Uscire dal modo attuale e tornare al menu.
3. Tasto SLIDESHOW/ENTER:
ENTER: Visualizzare immagine o confermare selezione
SLIDESHOW: Avviare o terminare show di
diapositiva, selezionare tempo intervallo
show di diapositiva.
4. Tasto PREVIOUS/16:9/4:3:
1) Pigiare brevemente il tasto per visualizzare la foto precedente.
2) Tenere pigiato il tasto per commutare tra il formato della visualizzazione
16:9 e 4:3.
5. Tasto NEXT/AUTO ZOOM:
1) Pigiare brevemente il tasto per visualizzare la foto successiva.
2) Tenere pigiato il tasto per commutare tra il formato della visualizzazione
Original e Auto Zoom.
6. LED On/Off
7. Accendere/
spegnere l'album.
8. Connessione USB
9. Slot per scheda SD/MMC/MS/xD
10. Ingresso corrente
11. Borsa
12. Foro per supporto
13. Asta del supporto
14. Linguetta di chiusura
BN, BA DigiAlbum 0410.qxd 16.04.2010 9:56 Uhr Seite 18
Page 19

Montare l'album per foto
L'album può essere appoggiato sulla scrivania con il supporto fornito.
1. Togliere l'album dalla borsa.
2. Estrarre l'asta del supporto posta sul retro dell'album.
3. Avvitare l'asta nell'apposito foro.
4. Mettere l'album orizzontale sulla scrivania.
Uso del lettore schede
1. Inserire la scheda di memoria nello slot dell'album. Fare attenzione che i contatti
metallici della scheda di memoria SD/MMC/MS/xD siano rivolti verso la parte anteriore dell'album.
2. Per togliere la scheda basta estrarla.
Nota:
Con una scheda Memory Stick Pro è necessario un rispettivo adattatore Memory Stick.
Altrimenti può succedere che la scheda resti incastrata nello slot.
Collegamento al PC
È necessario un cavo adattatore USB del tipo Mini USB per collegare la connessione
Mini USB dell'album alla connessione USB standard del PC.
Nota: Ad album collegato è possibile trasferire file tra PC, schede di memoria e memoria
interna.
ITALIANO
19
Contatti metallici
sulla scheda di
memoria
Cavo adattatore Mini USB – USB
USB
Mini-USB
BN, BA DigiAlbum 0410.qxd 16.04.2010 9:56 Uhr Seite 19
Page 20

Uso dell'adattatore di rete
Questo album può essere collegato ad una presa di corrente con l'adattatore di rete fornito. Collegare l'adattatore di rete all'album come di seguito indicato.
Nota:
• Spegnere sempre l'album prima di collegare/staccare il cavo dalla presa di corrente.
• Utilizzare solo l'adattatore di rete fornito con l'album. Un altro adattatore può comportare disfunzioni o danneggiare l'album.
• In caso di utilizzo prolungato è possibile che l'adattatore si riscaldi. Ciò è normale e
non deve preoccupare.
• Staccare il cavo dalla presa di corrente quando non si utilizza l'adattatore.
Carica della batteria ricaricabile
1. Utilizzare l'adattatore di rete per caricare la batteria ricaricabile. Collegare l'adattatore
di rete come suindicato.
2. Mettere l'interruttore POWER su OFF (per caricare la batteria ricaricabile l'album
deve essere spento).
3. Il procedimento di carica inizia e viene terminato automaticamente non appena la
batteria si carica completamente.
LED
1. Durante la ricarica, il LED rosso e verde lampeggiano alternativamente.
2. Una volta carica la batteria ricaricabile, il LED verde resta costantemente acceso.
3. Se l'album viene fatto funzionare con la batteria ricaricabile, il LED verde si accende.
In caso di calo di potenza della batteria, il LED verde lampeggia.
Visualizzare le foto
1. Mettere l'interruttore POWER ON/OFF
su ON. Il LED di funzionamento si
accende e l'album avvia automaticamente lo show di diapositiva.
2. Inserire la scheda di memoria nello
slot SD/MMC/MS/xD e pigiare EXIT
per visualizzare i mezzi di memorizzazione.
3. Selezionare lo slot per schede 4 in 1 o la memoria interna con PREVIOUS o NEXT.
ITALIANO
20
Collegare
a presa
di corrente
BN, BA DigiAlbum 0410.qxd 16.04.2010 9:56 Uhr Seite 20
Page 21

Nota:
1. L'album legge prima lo slot per schede di memoria 4 in 1, quindi la memoria interna.
2. Se non ci sono file sul mezzo di memorizzazione, l'album visualizza "Nessun file trovato".
Tre modi di visualizzazione
Ci sono tre possibilità di visualizzazione per le foto: Sfogliare (Browse), anteprima
immagini (Thumbnail) e show di diapositiva (Slideshow).
Modes d’affichage pour photos
Browse: Visualizzazione Thumbnail: Lista dell’ Slideshow:
manuale delle foto una anteprima immagini nel Visualizzazione autoalla volta. formato ridotto. matica delle foto.
Sfogliare le foto
Metodo 1: Pigiare SLIDESHOW ripetutamente nel modo Show di diapositiva per selezionare "Slideshow off". Per terminare lo show di diapositiva ed attivare il modo Sfogliare
pigiare NEXT per la foto successiva e PREVIOUS per la foto precedente.
Metodo 2: Selezionare la foto nel modo Anteprima immagini e pigiare ENTER. Selezionare altre foto con PREVIOUS e NEXT.
Anteprima immagini
Se l'album mostra le foto nel modo Sfogliare o Show di diapositiva, basta pigiare EXIT
per aprire l'anteprima immagini.
Visualizzare show di diapositiva
Pigiare SLIDESHOW per avviare lo show di diapositiva. Pigiare SLIDESHOW ripetutamente per selezionare la durata di visualizzazione di ogni singola foto (3 sec, 5 sec, 10
sec, 15 sec, 30 sec, 1 min, 1 ora, 1 giorno). Per terminare lo show di diapositiva pigiare
SLIDESHOW ripetutamente, onde selezionare "Slideshow off".
Modificare il formato di visualizzazione
Tenere pigiato il tasto PREVIOUS/16:9/4:3 per commutare tra il formato di visualizzazione 16:9 e 4:3.
Tenere pigiato il tasto NEXT/AUTO ZOOM per commutare tra il formato della visualizzazione Original e Auto Zoom.
ITALIANO
21
BN, BA DigiAlbum 0410.qxd 16.04.2010 9:56 Uhr Seite 21
Page 22

Diagnostica errori
Errore Cause possibili
Nessuna visualizzazione 1. Batteria ricaricabile scarica.
2.Controllare se l'interruttore POWER si trova su ON.
Nessuna foto visua- 1.Estrarre scheda di memoria o stick USB e reinserire.
lizzata, anche se Controllare che siano inseriti correttamente.
scheda di memoria 2. Assicurarsi che i file di immagini siano nel
o stick USB inseriti. corretto formato JPG.
Nota: Con Microsoft Paint i file con formato sbagliato possono venire visualizzati e
memorizzati come file JPEG standard, così da poter essere ammirati con questo album.
Specifiche tecniche
Visualizza 800(H) x 480(V)
Memoria interna 1GB (Flash)
Schede memoria SD, MMC, MS, xD card
Formato file JPG
Temperatura di
funzionamento 0°–45°C
Addattore corrente DC12V, 1,25A
Peso 450g
Dimensioni 208 mm(W) x 153 rnm(D) x 31 mm(H)
Con riserva di modifiche tecniche. Questo documento è stato realizzato con grande
cura. Il produttore non si assume alcuna responsabilità per imprecisioni o errori d'uso.
Questo simbolo sul prodotto o nelle istruzioni per l'uso significa che l'apparecchio non deve essere buttato nell'immondizia domestica, ma che va consegnato, in tutto il territorio della UE, ad un apposito centro di raccolta. Per
ulteriori informazioni rivolgetevi al Vostro comune o alla Vostra città o al
rivenditore presso il quale avete acquistato l'apparecchio.
ITALIANO
22
BN, BA DigiAlbum 0410.qxd 16.04.2010 9:56 Uhr Seite 22
Page 23

A.u.b. lezen
Lees alle veiligheids- en bedieningsinstructies voor het gebruik van het album. Neem in elk
geval deze veiligheidsinstructies op het album en in de handleiding in acht en bewaar ze goed.
Systeemeisen: Windows 2000/XP/Vista
Inhoud:
Digitaal USB-kabel Netadapter Bedieningsfotoalbum handleiding
Belangrijke veiligheidsinstructies
Attentie:
Geen hoge Geen stof Geen hoge Niet
luchtvochtigheid temperatuur demonteren
Beschrijving van het digitale fotoalbum
NEDERLANDS
23
1.LCD-beeldscherm
2.EXIT: Actuele modus verlaten en naar menu
terugkeren.
3.Toets SLIDESHOW/ENTER:
ENTER: Foto weergeven of selectie bevestigen.
SLIDESHOW: Diapresentatie starten of beëindigen, weergaveduur van de afzonderlijke foto's selecteren.
4. Toets PREVIOUS/16:9/4:3:
1) Druk op de toets om de vorige foto
weer te geven.
2) Toets ingedrukt houden om tussen weergaveformaat 16:9 en 4:3 om te schakelen.
5. Toets NEXT/AUTO ZOOM:
1) Druk op de toets om de volgende foto
te weer te geven.
2) Toets ingedrukt houden om tussen weergaveformaat Original en Auto Zoom om te
schakelen.
6. LED In/Uit
7. Album aan-/
uitschakelen.
8. USB-aansluiting
9. Kaartensleuf SD/MMC/MS/xD
10. Stroomingang
11. Tas
12. Gat voor staander
13. Staaf staander
14. Sluitstrip
BN, BA DigiAlbum 0410.qxd 16.04.2010 9:56 Uhr Seite 23
Page 24

Fotoalbum opstellen
Het fotoalbum kan op een bureau worden neergezet met de meegeleverde staander.
1. Neem het album uit de tas.
2. Neem de staaf van de staander uit de achterzijde van het album.
3. Schroef de staaf in het desbetreffende gat.
4. Plaats het fotoalbum horizontaal op de tafel.
Kaartlezer gebruiken
1. De geheugenkaart in de sleuf van het album steken. Let erop dat de metalen contacten van de SD/MMC/MS/xD-geheugenkaart naar de voorkant van het album wijzen.
2. Voor het verwijderen van de kaart, trekt u
deze er gewoon uit.
Opmerking:
Met een Memory Stick Pro kaart is een overeenkomstige Memory Stick adapter nodig.
Anders kan de kaart in de sleuf blijven steken.
Aan PC aansluiten
Er is een Mini USB-USB adapterkabel nodig om de Mini USB aansluiting van het album
met de standard USB-aansluiting van de PC te verbinden.
Aanwijzing: Als het album is aangesloten, kunnen bestanden tussen PC, geheugenkaarten
en intern geheugen worden overdragen.
NEDERLANDS
24
Metalen con-
tacten van de ge-
heugenkart
Mini USB-USB adapterkabel
USB
Mini-USB
BN, BA DigiAlbum 0410.qxd 16.04.2010 9:56 Uhr Seite 24
Page 25

Netadapter gebruiken
Het album kan met de meegeleverde netadapter aan het stopcontact worden aangesloten. De netadapter aan het album aansluiten zoals hieronder weergegeven.
Aanwijzing:
• Voor het aansluiten/verwijderen van het netsnoer het album uitschakelen.
• Alleen de meegeleverde netadapter met dit album gebruiken. Een andere adapter kan
functiestoringen veroorzaken of het album beschadigen.
• Bij langdurig gebruik kan de netadapter warm worden. Dat is normaal en geen rede
tot bezorgdheid.
• Wanneer de adapter niet wordt gebruikt, het netsnoer uit het stopcontact trekken.
Accu laden
1. Voor het laden van de accu de netadapter gebruiken. De netadapter op de boven
getoonde manier aansluiten.
2. Schakelaar POWER op OFF zetten (voor het laden van de accu het album uitschakelen).
3. Het laadproces begint en word automatisch beëindigd zodra de accu volledig is geladen.
LED-indicator
1. Tijdens het laden, knipperen de rode en groene LED beurtelings.
2. Wanneer de accu volledig is geladen, brandt de groene LED permanent.
3. Wanneer het album op de accu werkt, brandt de groene LED.
Bij dalend accuvermogen knippert de groene LED.
Foto's bekijken
1. Schakelaar POWER ON/OFF op ON
zetten. De bedrijfsindicator brandt en
het album start de diapresentatie
automatisch.
2. De geheugenkaart in de SD/MMC/MS/
xD-sleuf schuiven en op EXIT drukken
om de geheugenmedia weer te geven.
3. De 4-in-1-kaartensleuf of het intern
geheugen met PREVIOUS of NEXT selecteren.
NEDERLANDS
25
Aan stopcontact
aansluiten
BN, BA DigiAlbum 0410.qxd 16.04.2010 9:56 Uhr Seite 25
Page 26

Aanwijzing:
1. Het album leest eerst de 4-in-1-kaartensleuf en vervolgens het interne geheugen.
2. Wanneer er geen gegevens op het geheugenmedium aanwezig zijn, geeft het album
„Geen bestand gevonden" aan.
Drie weergavemodi
Er zijn drie weergavemogelijkheden voor de foto's: Bladeren (Browse), beeldoverzicht
(Thumbnail) en diapresentatie (Slideshow).
Weergavemodi voor foto's
Browse: Foto's stuk Thumbnail: Beeldoverzicht Slideshow: Foto's
voor stuk hand- van de foto's in een automatisch
matig weergeven. kleiner formaat. weergeven.
Foto's bladeren
Methode 1: In de diapresentatie-modus herhaaldelijk op SLIDESHOW drukken om "Slideshow off" te selecteren. Om de diapresentatie te beëindigen en de bladeren-modus te
openen, NEXT voor de volgende foto en PREVIOUS voor de vorige foto indrukken.
Methode 2: In de beeldoverzicht-modus, de foto selecteren en op ENTER drukken. Verdere foto's met PREVIOUS en NEXT selecteren.
Beeldoverzicht
Geeft het album in de bladeren- of diapresentatie-modus weer, druk gewoon op EXIT
om het beeldoverzicht te openen.
Diapresentatie weergeven
Op SLIDESHOW drukken om de diapresentatie te starten. Herhaaldelijk op SLIDESHOW
drukken om de weergaveduur van de afzonderlijke foto's vast te leggen (3 sec, 5 sec, 10
sec, 15 sec, 30 sec, 1 min, 1 uur, 1 dag). Om de diapresentatie te beëindigen, herhaaldelijk op SLIDESHOW drukken om "Slideshow off" te selecteren.
Weergaveformaat wijzigen
Toets PREVIOUS/16:9/4:3 ingedrukt houden om tussen weergaveformaat 16:9 en 4:3
om te schakelen.
Toets NEXT/AUTO ZOOM ingedrukt houden om tussen weergaveformaat Original en
Auto Zoom om te schakelen.
NEDERLANDS
26
BN, BA DigiAlbum 0410.qxd 16.04.2010 9:56 Uhr Seite 26
Page 27

Probleemoplossing
Probleem Mogelijke oorzaken
Geen weergave 1. Accu leeg.
2.Controleer of schakelaar POWER op ON staat.
Geen foto weerge- 1. Geheugenkaart of USB-stick verwijderen en opnieuw
geven ofschoon ge- inleggen. Controleer of deze correct zit.
heugenkaart of USB- 2.Controleer of de beeldbestanden in het correcte
stick is ingelegd. JPG-formaat zijn.
Opmerking: Met Microsoft Paint kunnen bestanden met een verkeerd formaat worden
weergegeven en als standaard-JPEG-bestanden worden opgeslagen zodat ze met dit
album kunnen worden bekeken.
Technische gegevens
Weergave 800 (H) x 400 (V)
Intern Flash-geheugen 1 GB
Compatible geheugenkaarten SD, MMC, MS, xD
Compatibel bestandsformaat JPG
Bedrijfstemperatuur 0-45 °C
Netadapter 12 V DC, 1,25 A
Gewicht 450 g
Afmetingen (B x L x H) 208 x 153 x 31 mm
Technische wijzigingen voorbehouden. Dit document werd uiterst zorgvuldig opgesteld.
De fabrikant is niet aansprakelijk voor onnauwkeurigheden of fouten.
Dit symbool op het product of in de gebruiksaanwijzing betekent dat het
elektronische apparaat niet bij het huisvuil mag worden verwijderd maar in
de gehele EU bij speciale inzamelplaatsen moet worden afgegeven. Nadere
informatie krijgt u bij uw gemeente of bij de handelaar waar u het product
heeft gekocht.
NEDERLANDS
27
BN, BA DigiAlbum 0410.qxd 16.04.2010 9:56 Uhr Seite 27
Page 28

ESPAÑOL
28
1.Pantalla LCD
2.EXIT: Abandonar el modo actual y regresar
al menú.
3.Tecla SLIDESHOW/ENTER:
ENTER: Mostrar la foto o confirmar la
selección
SLIDESHOW: Empezar o terminar la presentación continua de fotos, seleccionar
el tiempo de presentación de las fotos.
4.Tecla PREVIOUS/16:9/4:3:
1) Pulsar la tecla brevemente para mostrar
la foto anterior.
2) Mantener pulsada la tecla para conmutar
entre el formato de visualización 16:9 y 4:3.
5.Tecla NEXT/AUTO ZOOM:
1) Pulsar la tecla brevemente para mostrar
la foto siguiente.
2) Mantener pulsada la tecla para conmutar
entre el formato de visualización Original y
Auto.
6. LED On/Off
7.Encender/apagar el álbum.
8.Puerto USB
9.Ranura de tarjeta SD/MMC/MS/xD
10. Entrada de corriente
11. Bolso
12. Orificio para la suspensión
13. Palo de suspensión
14. Lengüeta de cierre
Favor leer
Sírvase leer todas las instrucciones de seguridad y operación antes de usar el álbum. Sírvase
considerar las indicaciones de seguridad sobre el álbum y en las instrucciones y guardarlas.
Sistemas operativos: Windows 2000/XP/Vista
Contenido:
Álbum digital Cable USB Adaptador Instrucciones
de fotos del red de empleo
Indicaciones de seguridad importantes
Atención:
No alta humedad No polvos No temp. altas No desintegrar
Descripción del álbum digital de fotos
BN, BA DigiAlbum 0410.qxd 16.04.2010 9:56 Uhr Seite 28
Page 29

Colocar el álbum de fotos
El álbum de fotos puede ser colocado en el escritorio mediante la suspensión suministrado.
1. Sacar el álbum del bolso.
2. Retirar el palo de suspensión al lado posterior del álbum.
3. Atornillar el palo en el orificio correspondiente.
4. Poner el álbum de fotos horizontalmente sobre el escritorio.
Usar el lector de tarjetas
1. Ingresar la tarjeta de memoria en la ranura del álbum. Tener cuidado que los contactos metálicos de la tarjeta de memoria SD/MMC/MS/xD apunten hacia el anverso del
álbum.
2. Para retirar la tarjeta, sacarla simplemente.
Observación:
Con una tarjeta Memory Stick Pro, un adaptador Memory Stick correspondiente es
necesario. En otro caso se puede colocar la tarjeta en la ranura.
Conectar al PC
Un cable adaptador de Mini USB-USB es necesario para conectar el puerto Mini USB del
álbum al puerto USB estándar del PC.
Observación: Si el álbum está conectado, es posible de transferir archivos entre PC, tarjetas de memoria y memoria interna.
ESPAÑOL
29
Contactos metálli-
cos sobre la tarjeta
de memoria
Cable adaptator de Mini USB-USB
USB
Mini-USB
BN, BA DigiAlbum 0410.qxd 16.04.2010 9:56 Uhr Seite 29
Page 30

Usar adaptador de red
Este álbum puede ser conectada a una fuente de alimentación mediante el adaptador de
red suministrado. Conectar el adaptador de red al álbum, tal como se indica abajo.
Observación:
• Siempre apagar el álbum antes de conectar/retirar el cable de corriente.
• Sólo usar el adaptador de red suministrado con este álbum. Otro adaptador puede
implicar fallos funcionales o dañar el álbum.
• En caso de usarlo por mayor tiempo el adaptador de red puede calentarse. Eso es
normal y no necesita ser motivo de preocupación.
• Si no se usa el adaptador, sacar el cable de la fuente de alimentación.
Cargar acumulador
1. Usar el adaptador de red para cargar el acumulador. Conectar el adaptador de red tal
como se indica arriba.
2. Poner el interruptor POWER en OFF (álbum debe ser apagado para cargar el acumulador).
3. El proceso de carga empieza y se termina automáticamente cuando el acumulador
está cargado completamente.
Indicación LED
1. Durante el proceso de carga, la LED roja y verde parpadean turnando.
2. Cuando el acumulador está cargado completamente, la LED verde está encendida
permanentemente.
3. Si el álbum funciona con el acumulador, la LED verde está encendida.
Si el acumulador está vacío, la LED verde parpadeará.
Mirar fotos
1. Poner el interruptor POWER ON/OFF
en ON. La indicación de servicio se
ilumina y el álbum empieza la presentación continua de fotos automáticamente.
2. Poner la tarjeta de memoria en la
ranura SD/MMC/MS/xD y pulsar EXIT
para indicar los medios de almacenamiento.
3. Seleccionar la ranura de tarjeta 4-en-1 o la memoria interna con PREVIOUS ó NEXT.
ESPAÑOL
30
Conectar a la
fuente de
alimentación
BN, BA DigiAlbum 0410.qxd 16.04.2010 9:56 Uhr Seite 30
Page 31

Observación:
1. El álbum lee la ranura de tarjeta 4-en-1 primero y después la memoria interna.
2. Si no hay ningún archivo sobre el medio de almacenamiento, el álbum indica "Ningún
archivo encontrado".
Tres modos de visualización
Hay tres posibilidades de visualización para las fotos: Explorar (Browse), vista previa
(Thumbnail) y presentación continua de fotos (Slideshow).
Modos de visualización para las fotos
Browse: Visualización Thumbnail: Una lista Slideshow: Visualimanual de las fotos de vista previa en zación automática de
una tras otra. formato reducido. las fotos.
Explorar fotos
Método 1: En el modo de presentación continua, pulsar SLIDESHOW reiteradamente para
seleccionar "Slideshow off". Para terminar la presentación continua y activar el modo de
exploración, pulsar NEXT para la foto siguiente y PREVIOUS para la foto precedente.
Método 2: Seleccionar la foto en el modo de vista previa y pulsar ENTER. Seleccionar
otras fotos con PREVIOUS y NEXT.
Vista previa
Si el álbum muestra fotos en el modo de exploración o presentación continua, pulsar
simplemente EXIT para abrir la vista previa.
Mostrar presentación continua
Pulsar SLIDESHOW para empezar la presentación continua. Pulsar SLIDESHOW reiteradamente para seleccionar el tiempo de presentación de cada foto (3 seg., 5 seg., 10
seg., 15 seg., 30 seg., 1 min, 1 hora, 1 día). Para terminar la presentación continua
pulsar SLIDESHOW reiteradamente para seleccionar "Slideshow off".
Cambiar formato de visualización
Mantener pulsada la tecla PREVIOUS/16:9/4:3 para conmutar entre el formato de visualización 16:9 y 4:3.
Mantener pulsada la tecla NEXT/AUTO ZOOM para conmutar entre el formato de visualización Original y Auto.
ESPAÑOL
31
BN, BA DigiAlbum 0410.qxd 16.04.2010 9:56 Uhr Seite 31
Page 32

Diagnóstico de fallas
Falla Causas posibles
Ninguna visualización 1.Acumulador agotado.
2.Verificar si el interruptor POWER está en ON.
Ninguna foto mostrada 1.Retirar tarjeta de memoria o llave USB y ingresar de nuevo.
aunque tarjeta de me- Controlar la posición correcta.
moria o llave USB esté 2. Verificar que los archivos de imágenes son en
ingresado. formato JPG correcto.
Observación: Con Microsoft Paint se puede visualizar archivos con formato erróneo y
archivarlos en formato JPEG estándar, de manera que puedan ser visualizados con este
álbum.
Datos técnicos
Visualización 800 (H) x 400 (V)
Memoria Flash interna 1 GB
Tarjetas de memoria
compatibles SD, MMC, MS, xD
Formato de archivo
compatible JPG
Temperatura de
funcionamiento 0-45 °C
Adaptador de red 12 V DC, 1,25 A
Peso 450 g
Dimensiones (A x L x A) 208 x 153 x 31 mm
Nos reservamos el derecho de efectuar modificaciones técnicas. Este documento ha
sido generado con el mayor cuidado. El productor no garantiza por alguna imprecisión
o algún error.
Este símbolo en el producto o en el manual de empleo significa que el aparato eléctrico no debe ser botado a la basura doméstica sino que a nivel
europeo debe ser entregado a puntos de recogida especiales. Para informaciones más detalladas diríjase a su comunidad o municipio o al vendedor
donde adquirió el producto.
ESPAÑOL
32
BN, BA DigiAlbum 0410.qxd 16.04.2010 9:56 Uhr Seite 32
Page 33

PORTUGUÊS
33
1.Tela de LCD
2.EXIT: Abandonar o modo actual e retornar
ao menu.
3.Tecla SLIDESHOW/ENTER:
ENTER: Reproduzir as fotografias ou confirmar a selecção.
SLIDESHOW: Iniciar ou terminar o show
de diapositivos, seleccionar o tempo de
reprodução.
4.Tecla PREVIOUS/16:9/4:3:
1) Premir brevemente a tecla para fazer
indicar a fotografia anterior.
2) Manter a tecla premida para comutar entre os formatos de indicação 16:9 e 4:3.
5.Tecla NEXT/AUTO ZOOM:
1) Premir brevemente a tecla para fazer
indicar a fotografia seguinte.
2) Manter a tecla premida para comutar entre formato indicação Original e Auto Zoom.
6.LED Ligar/desligar
7.Ligar/
desligar
o álbum.
8.Conexão USB
9.Porto para recepção
dos cartões SD/MMC/MS/xD
10. Entrada de corrente
11. Estojo
12. Orifício para suporte
13. Haste para suporte
14. Lingueta de fecho
Leia por favor
Antes de utilizar o álbum, leia todas as instruções relativas à segurança e operação, por
favor. Observe todas as indicações de aviso sobre o álbum e o manual e guarde estes bem.
Requisitos do sistema: Windows 2000/XP/Vista
Conteúdo:
Álbum de foto- Cabo de Adaptador Manual de
grafias digitais USB de rede operação
Instruções importantes relativas à segurança
Atenção:
Não expôr a hum. Não expôr Não expôr a Não
alta do ar a poeiras temp. altas desmontar
Descrição del álbum de fotografias digitais
BN, BA DigiAlbum 0410.qxd 16.04.2010 9:56 Uhr Seite 33
Page 34

Colocar o álbum de fotografias
O álbum de fotografias pode ser colocado sobre a mesa com o suporte incluído.
1. Retirar o álbum do estojo.
2. Retirar o haste para suporte da parte posterior do álbum.
3. Enroscar o haste no respectivo orifício.
4. Colocar o álbum de fotografias horizontalmente sobre a mesa.
Utilizar o leitor de cartões
1. Inserir o cartão de memória no porto para recepção do álbum, tomando particular
atenção a que os contactos metálicos dos cartões de memória
2. Para retirar o cartão, basta puxá-lo para fora.
Indicação:
Quando aplicar um cartão de Memory Stick, torna- -se necessário um adaptador de
Memory Stick correspondente. Se não, o cartão poderá ficar entalado no porto para
recepção.
Conectar com o PC
Para poder conectar o porto de conexão USB mini do álbum com o porto de conexão
USB padrão do PC, é necessário utilizar um cabo adaptador de USB-USB mini.
Indicação: Uma vez conectado com o álbum, poderão então ser transmitidos ficheiros
entre PC, cartões de memória ou memória interna.
Cabo adaptador de USB-USB mini
USB
Mini-USB
PORTUGUÊS
34
Contactos metáli-
cos do cartão de
memória
BN, BA DigiAlbum 0410.qxd 16.04.2010 9:56 Uhr Seite 34
Page 35

Utilizar o adaptador de rede
Este álbum poderá ser ligado a uma tomada via o adaptador de rede incluído.Conectar o
adaptador de rede com o álbum, tal como indicado abaixo.
Indicação:
• Sempre desligar o álbum antes de conectar/retirar o cabo de alimentação.
• Só utilizar o adaptador de rede incluído com este álbum. Só utilizar o adaptador de
rede incluído com este álbum. Um outro adaptador poderá provocar defeitos funcionais ou danificar o álbum.
• Quando aplicar o aparelho duranto um período prolongado, o adaptador de rede
poderá aquecer-se, o que é normal.
• Retirar o cabo de alimentação da tomada, sempre que o adaptador estiver fora de serviço.
Carregar do acumulador
1. Utilizar o adaptador de rede para carregar o acumulador. Conectar o adaptador de
rede, tal como indicado em cima.
2. Empurrar o interruptor POWER para OFF (álbum deverá estar desligado durante o
carregamento).
3. O carregamento começa e é automaticamente terminado quando o acumulador estiver inteiramente carregado.
Indicação LED
1. Os LED vermelho e verde piscam alternadamente durante o processo de carregamento.
2. Quando o acumulador estiver inteiramente carregado, o LED verde permanece aceso.
3. No caso de o álbum funcionar com acumulador, acende-se o LED verde.
O LED verde pisca quando se reduzir a capacidade do acumulador.
Mirar as fotografias
1. Empurrar o interruptor POWER ON/OFF
para ON. Acende-se a indicação do
serviço e o álbum inicia automaticamente o show de diapositivos.
2. Inserir o cartão de memória no porto
para recepção dos cartões
SD/MMC/MS/xD e premir EXIT para
indicar o suportes de memória.
3. Seleccionar o porto para recepção 4-
em-1 ou a memória interna com PREVIOUS ou NEXT.
PORTUGUÊS
35
Conectar a uma
tomada
BN, BA DigiAlbum 0410.qxd 16.04.2010 9:56 Uhr Seite 35
Page 36
Indicação:
1. O álbum lê primeiro o porto para recepção 4-em-1, depois a memória interna.
2. Se não existirem nenhuns ficheiros no suporte de memória, o álbum indica „Não
encontrou ficheiros“.
Três modos de indicação
Há três opções de indicação para as fotografias: Folhear (Browse), Miniaturas (Thumbnail) e Show de diapositivos (Slideshow).
Modos de indicação para as fotografias
Browse: Visualização Thumbnail: Uma lista Slideshow: Visualimanual das fotografias das fotografias zação automática
uma atrás da outra. em miniaturas. das fotografias.
Folhear as fotografias
Método 1: No modo de show de diapositivos, premir repetidamente SLIDESHOW para
seleccionar "Slideshow off". Para terminar o show de diapositivos e activar o modo de
folhear, premir NEXT para fazer indicar a fotografia seguinte e PREVIOUS par a fotografia precedente.
Método 2: Seleccionar a fotografia no modo em miniaturas e premir ENTER. Seleccionar
mais fotografias com PREVIOUS e NEXT.
Fotografias em miniaturas
Zeigt das Album Fotos im Blättern- oder Diashow-Modus an, einfach EXIT drücken, um
die Bildervorschau zu öffnen.
Reproduzir show de diapositivos
Premir SLIDESHOW para iniciar o show de diapositivos. Premir repetidamente SLIDESHOW para seleccionar o tempo de reprodução de cada uma das fotografias (3 sec, 5
sec, 10 sec, 15 sec, 30 sec, 1 min, 1 hora, 1 dia). Para terminar o show de diapositivos,
premir repetidamente SLIDESHOW para seleccionar "Slideshow off".
Mudar de formato de indicação
Manter premida a tecla PREVIOUS/16:9/4:3 para comutar entre os formatos de indicação 16:9 e 4:3.
Manter premida a tecla NEXT/AUTO ZOOM para comutar entre os formatos de indicação
Original e Auto Zoom.
PORTUGUÊS
36
BN, BA DigiAlbum 0410.qxd 16.04.2010 9:56 Uhr Seite 36
Page 37
Detecção de erros
Erro Causas possíveis
Nenhuma indicação 1. Acumulador vazioa.
2.Verificar se o interruptor POWER está em ON.
Não é indicada nen- 1.Retirar cartão de memória ou stick USB e voltar a inserí-lo
huma fotografia, em- Verificar assento correcto.
bora inserido cartão 2.Certificar-se de que os ficheiros gráficos tenham
de memória ou stick o formato JPG correcto.
USB.
Indicação: Ficheiros com formato incorrecto poderão ser indicados com Microsoft Paint
e, a seguir, guardados como ficheiros padrão JPEG, para então poderem ser reproduzidos com este álbum.
Características técnicas
Visualização 800 (H) x 400 (V)
Memória Flash interna 1 GB
Cartões de memória
compatíveis SD, MMC, MS, xD
Formato do ficheiro
compatível JPG
Temperatura de serviço 0-45 °C
Adaptador de rede 12 V DC, 1,25 A
Peso 450 g
Dimensões 208 x 153 x 31 mm (larg. x comp. x alt.)
Alterações técnicas reservadas. Este documento foi elaborado com o maior cuidado. O
fabricante não responde por imprecisões ou erros.
Este símbolo sobre o produto ou no manual de operação quer dizer, que
este aparelho eléctrico não deverá em nenhum caso ser eliminado juntamente com o lixo doméstico, mas sim entregue em centros especiais de
recolha existentes em toda a UE. Para informações detalhadas, dirija-se à
câmara municipal da sua cidade ou freguesia ou então ao distribuidor onde
adquiriu o produto.
PORTUGUÊS
37
BN, BA DigiAlbum 0410.qxd 16.04.2010 9:56 Uhr Seite 37
Page 38

1.LCD-bildskärm
2.EXIT: Lämna det aktuella läget och återgå
till menyn.
3.Knapp SLIDESHOW/ENTER:
ENTER: Visa foto eller bekräfta urval
SLIDESHOW: Starta eller avsluta bildspel,
välj intervall för bildväxling.
4.Knapp PREVIOUS/16:9/4:3:
1) Tryck kort på knappen för att visa föregående foto.
2) Håll knappen nertryckt för att växla
mellan visningsformat 16:9 och 4:3.
5.Knapp NEXT/AUTO ZOOM:
1) Tryck kort på knappen för att visa nästa
foto.
2) Håll knappen nertryckt för att växla mellan visningsformat Original och Auto Zoom.
6.On/off lysdiod
7.Slå på/stäng av albumet.
8.USB-anslutning
9.Kortfack
SD/MMC/MS/xD
10. Ingång för strömadaptern
11. Väska
12. Hål för stativ
13. Stativ
14. Förslutning
SVENSKA
38
Läs anvisningarna
Läs alla säkerhets- och handhavandeanvisningar innan du använder albumet.
Beakta varningarna på albumet och i bruksanvisningen och förvara bruksanvisningen.
Systemkrav: Windows 2000/XP/Vista
Innehåll:
Digitalt USB-kabel Nätadapter Bruksanvisning
fotoalbum
Viktiga säkerhetsanvisningar
Viktigt:
Ingen hög Inget damm Inga höga Ta inte
luftfuktighet temp isär
Beskrivning
BN, BA DigiAlbum 0410.qxd 16.04.2010 9:56 Uhr Seite 38
Page 39

Ställa upp albumet
Albumet kan ställas upp på skrivbordet med hjälp av det medlevererade stativet.
1. Ta ut albumet ur väskan.
2. Ta fram stativet på albumets baksida.
3. Skruva in stativet i det härför avsedda hålet.
4. Ställ upp albumet horisontalt på bordet.
Använda kortläsare
1. Skjut in minneskortet i albumets kortfack. SD/MMC/MS/xD-minneskortets metallkontakter ska vara riktade mot albumets framsida.
2. Kortet kan enkelt tas ut genom
att dras ut ur kortfacket.
Hänvisning:
För kort av typ Memory Stick Pro krävs en lämplig minnesstiftadapter. Annars kan kortet fastna i kortfacket.
Ansluta till dator
För att förbinda albumets mini-USB-gränssnitt med datorns standard-USB-gränssnitt
krävs en adapterkabel mini-USB/USB.
Hänvisning: När albumet är anslutet kan filer överföras mellan datorn, minneskortet och
det interna minnet.
Adapterkabel mini USB - USB
USB
Mini-USB
SVENSKA
39
Metallkontakter
minneskortet
BN, BA DigiAlbum 0410.qxd 16.04.2010 9:56 Uhr Seite 39
Page 40

Använda nätadapter
Albumet kan anslutas till nätuttaget med den medlevererade nätadaptern. Anslut nätadaptern till albumet enligt bilden nedan.
Anvisning:
• Stäng alltid av albumet innan du ansluter/drar av elsladden.
• Använd endast den medlevererade nätadaptern tillsammans med detta fotoalbum.
Andra nätadaptrar ge upphov till funktionsstörningar eller skada albumet.
• Vid längre användning kan nätadaptern bli varm. Detta är normalt och du behöver
inte oroa dig.
• Om adaptern inte används ska sladden dras av från nätuttaget.
Ladda batteri
1. Batteriet laddas med hjälp av nätadaptern. Anslut nätadaptern enligt bilden ovan.
2. Ställ brytaren POWER på OFF (nät batteriet ska laddas måste albumet vara avstängt).
3. Laddningen startas och avslutas automatiskt när batteriet är full.
Lysdioder
1. Under laddningen blinkar omväxlande den röda och den gröna lysdioden.
2. När batteriet är fullt lyser den gröna lysdioden kontinuerligt.
3. När albumet går på batteri lyser den gröna lysdioden.
När batteriets effekt avtar börjar den gröna lysdioden att blinka.
Visa foton
1. Ställ brytaren POWER ON/OFF på ON. Driftsindikatorn tänds och bildspelet startas
automatiskt.
2. Skjut in minneskortet i
SD/MMC/MS/xD-facket och tryck p
EXIT för att visa lagringsmediuma.
3. Välj 4-in-1-kortfacket eller det interna
minnet med PREVIOUS eller NEXT.
SVENSKA
40
Ansluts till
nätuttaget
BN, BA DigiAlbum 0410.qxd 16.04.2010 9:56 Uhr Seite 40
Page 41

Hänvisning:
1. Albumet läser föst 4-in-1-kortfacket och därefter det interna minnet.
2. Om inga filer är i minnesmediet visar albumet "Hittar inga filer".
Tre visningslägen
Foton kan visas i tre olika visningslägen: Bläddra (Browse), Förhandsvisning (Thumbnail) och Bildspel (Slideshow).
Visningslägen
Browse: Manuell Thumbnail: Lista med Slideshow: Autovisning av bilderna förhandsvisning av foton matisk visning av
en och en. i förminskad storlek. foton efter varandra.
Bläddra genom foton
Metod 1: I bildspelsläget: Tryck flera gånger på SLIDESHOW för att stänga av bildspelsläget. Genom att trycka NEXT eller PREVIOUS stänger du bildspelet och bläddrar manuellt till nästa resp föregående foto.
Metod 2: I förhandsvisningsläget: Välj foto och tryck på ENTER. Tryck på PREVIOUS
eller NEXT för att visa föregående resp nästa foto.
Förhandsvisning
När albumet visar foton i lägena Bläddra eller Bildspel, kan du med enkel tryckning på
EXIT hoppa till läget Förhandsvisning.
Visa bildspel
Starta bildspelet genom att trycka på SLIDESHOW. Genom att trycka på SLIDESHOW
igen kan du välja hur långt den enskilda foton visas (3 sek, 5 sek, 10 sek, 15 sek, 30
sek, 1 min, 1 timme, 1 dygn). Tryck igen på SLIDESHOW för att välja „Slideshow off“.
Ändra bildformat
Genom att hålla knappen PREVIOUS/16:9/4:3 nertryck kan du hoppa mellan bildformaten 16:9 och 4:3.
Håll knappen NEXT/AUTO ZOOM nertryckt för att hoppa mellan visningsformaten Original och Auto Zoom.
SVENSKA
41
BN, BA DigiAlbum 0410.qxd 16.04.2010 9:56 Uhr Seite 41
Page 42

Felsökning
Fel Möjliga orsaker
Ingen displaybild 1. Batteriet är tömt.
2.Kontrollera om brytaren POWER är i ON-läge.
Inget foto visas fastän 1.Ta bort minneskortet resp USB-minnet och stick in det igen.
minneskort/usb-minne Kontrollera att minneskortet resp USB-minnet är korrekt
är inskjutet. inskjutet.
2.Kontrollera att bildfilerna är i korrekt jpg-format.
Hänvisning: I Microsoft Paint kan filer i fel format öppnas och sparas som standard jpegfiler så att bilderna kan visas med detta album.
Tekniska data
Display 800 (h) x 400 (v)
Internt flash-minne 1 GB
Läsbara minneskort SD, MMC, MS, xD
Läsbart filformat JPG
Arbeitstemperatur 0-45 °C
Strömadapter 12 V DC, 1,25 A
Vikt 450 g
Mått (b x l x h) 208 x 153 x 31 mm
Rätt till tekniska ändringar förbehålles. Detta dokument har skapats med stor omsorg.
Tillverkaren ansvarar inte för eventuella onogrannheter eller fel.
Denna symbol på produkten eller i instruktionerna innebär att din elektriska
och elektroniska produkter bör kasseras i slutet av sitt liv skilt från hushållsavfallet. Det finns separata insamlingssystem för återvinning inom EU. För
mer information, vänligen kontakta lokala myndigheter eller din återförsäljare där du köpte produkten.
SVENSKA
42
BN, BA DigiAlbum 0410.qxd 16.04.2010 9:56 Uhr Seite 42
Page 43

43
BN, BA DigiAlbum 0410.qxd 16.04.2010 9:56 Uhr Seite 43
Page 44

44
BN, BA DigiAlbum 0410.qxd 16.04.2010 9:56 Uhr Seite 44
Page 45

45
Mini USB to USB
adapter cable
USB
Mini-USB
Metal contacts
on the memory
card
BN, BA DigiAlbum 0410.qxd 16.04.2010 9:57 Uhr Seite 45
Page 46

46
BN, BA DigiAlbum 0410.qxd 16.04.2010 9:57 Uhr Seite 46
Page 47

47
BN, BA DigiAlbum 0410.qxd 16.04.2010 9:57 Uhr Seite 47
Page 48

48
BN, BA DigiAlbum 0410.qxd 16.04.2010 9:57 Uhr Seite 48
Page 49
49
BN, BA DigiAlbum 0410.qxd 16.04.2010 9:57 Uhr Seite 49
Page 50

50
BN, BA DigiAlbum 0410.qxd 16.04.2010 9:57 Uhr Seite 50
Page 51

51
BN, BA DigiAlbum 0410.qxd 16.04.2010 9:57 Uhr Seite 51
Page 52

Klingenhofstrasse 72
90411
Nürnberg / Germany
Phone
+49(0)911-3206-0
Fax +49(0)911-3206-190
www.braun-phototechnik.de
post@braun-phototechnik.de
BN, BA DigiAlbum 0410.qxd 16.04.2010 9:57 Uhr Seite 52
 Loading...