

Page 1
°CoolTec
Stapled booklet, 148 x 210 mm, 32 pages, 2/2c = cyan + black
90633644/IX-15
CT6cc
CT5cc
CT4cc
CT4s
CT3cc
CT2cc
CT2s
Type 5676
www.braun.com/jp
Page 2

23456
Page 3
Page 4
Page 5
Page 6
Page 7
CoolTec
l
CoolTec
CoolTec
CoolTec
CoolTec
CoolTec
7
Page 8
8
Page 9
CoolTec
2
2
CoolTec
1
1
9
Page 10

10
Page 11

90°
11
Page 12

12
Page 13

CoolTec
CoolTec
CoolTec
CoolTec
13
Page 14

CoolTec
CoolTec
CoolTec
2
1
new
14
Page 15

2
1
15
Page 16

16
Page 17

new
old
17
Page 18

18
Page 19

1
2
1
Li- Ion
2
19
Page 20

202122
Page 21

Page 22

CoolTec
CoolTec
CoolTec
1
2
CoolTec
10
6
7
8
3
4
5
11b
14
13
CT5cc
CT4cc
11c
CT6cc
CT4s
CT3cc
CT2cc
CT2s
CT6cc
12a
12b
12c
CT4s
CT2s
9
11a
12d
+
CT6cc
CT5cc
CT4cc
CT3cc
CT2cc
15
16a
16b
17
18
Page 23

A
90°
B
C
D
2
CoolTec
CoolTec
2
1
CoolTec
1
CoolTec
CoolTec
CoolTec
CoolTec
CoolTec
click!
CoolTec
23
Page 24

E
F
2
1
new
2
CoolTec
1
24
G
new
old
Page 25

English
Our products are designed to meet the highest
standards of quality, functionality and design.
Thank you for your trust in Braun’s quality and we
hope you enjoy your new Braun shaver.
This shaver cools the skin to give you a cooling
sensation for a pleasant shave.
Please read the use instructions carefully and
completely before using the appliance.
Warning
Your appliance is provided with a
special cord set, which has an integrated Safety Extra Low Voltage power
supply. Do not exchange or tamper
with any part of it, otherwise there is
risk of an electric shock. Only use the
special cord set provided with your
appliance.
If the appliance is marked
492, you can use it with any Braun
power supply coded 492-XXXX.
This appliance is suitable for use
in a bath or shower. For safety
reasons the appliance can only be
operated cordlessly.
tion concerning the safe use of the
appliance and understand the hazards
involved. Children shall not play with
the appliance. Cleaning and user maintenance shall not be made by children
unless they are older than 8 years and
supervised.
Clean&Charge Station (models
CT6cc/CT5cc/CT4cc/CT3cc/CT2cc
only)
To prevent the cleaning fluid from
leaking, ensure that the Clean&Charge
station is placed on a flat surface.
When a cleaning cartridge is installed,
do not tip, move suddenly or transport
the station in any way as cleaning fluid
might spill out of the cartridge. Do not
place the station inside a mirror cabinet, nor place it on a polished or
lacquered surface.
The cleaning cartridge contains a highly
flammable liquid so keep it away from
sources of ignition.
Do not expose to direct sunlight and
cigarette smoking nor store it over
a radiator. Keep away from children.
We recommend not to use the shaver
with any foam or gel to ensure that you
–
experience the optimal cooling effect.
– get the optimal cleaning perfor-
mance from the Clean&Charge
station (for cc models).
– avoid potential damage to the device.
Do not shave with a damaged foil or
cord.
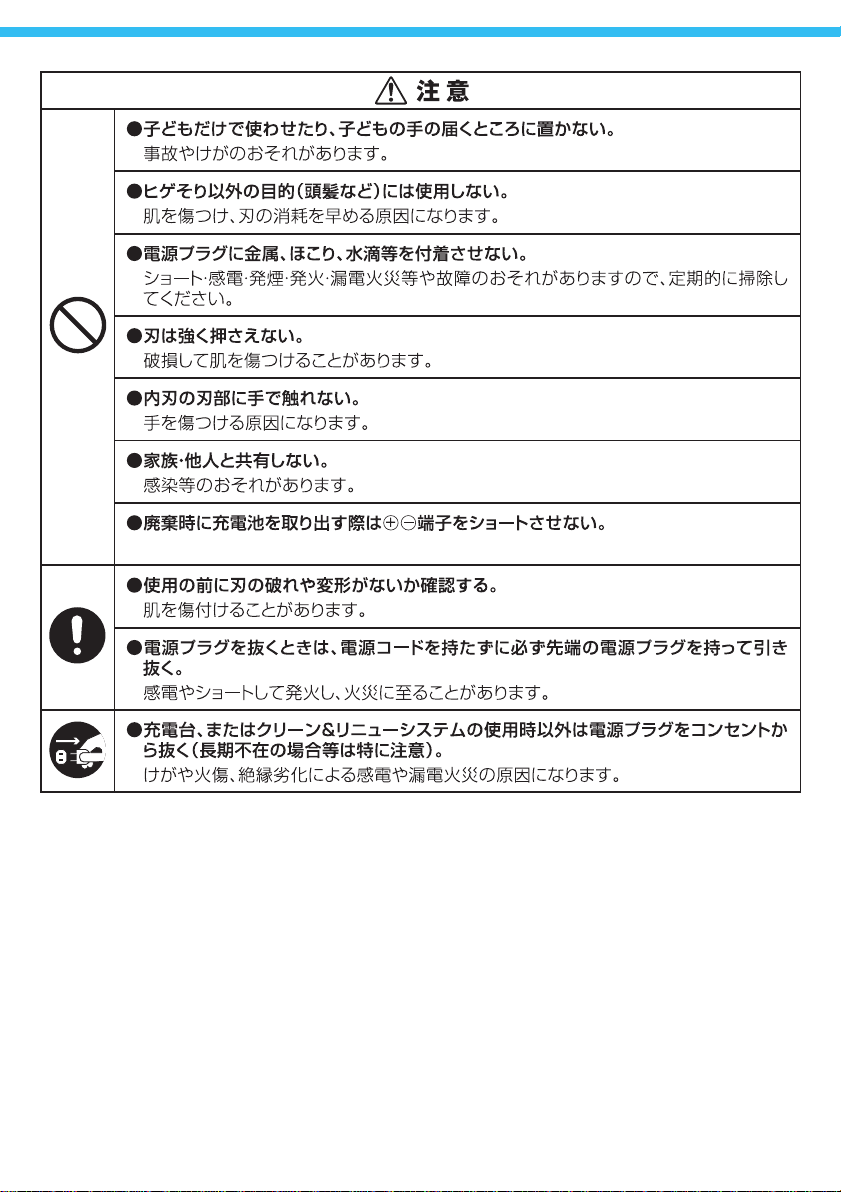
This appliance can be used by children
aged from 8 years and above and
persons with reduced physical, sensory or mental capabilities or lack of
experience and knowledge if they
have been given supervision or instruc-
Do not refill the cartridge and use
only original Braun refill cartridges.
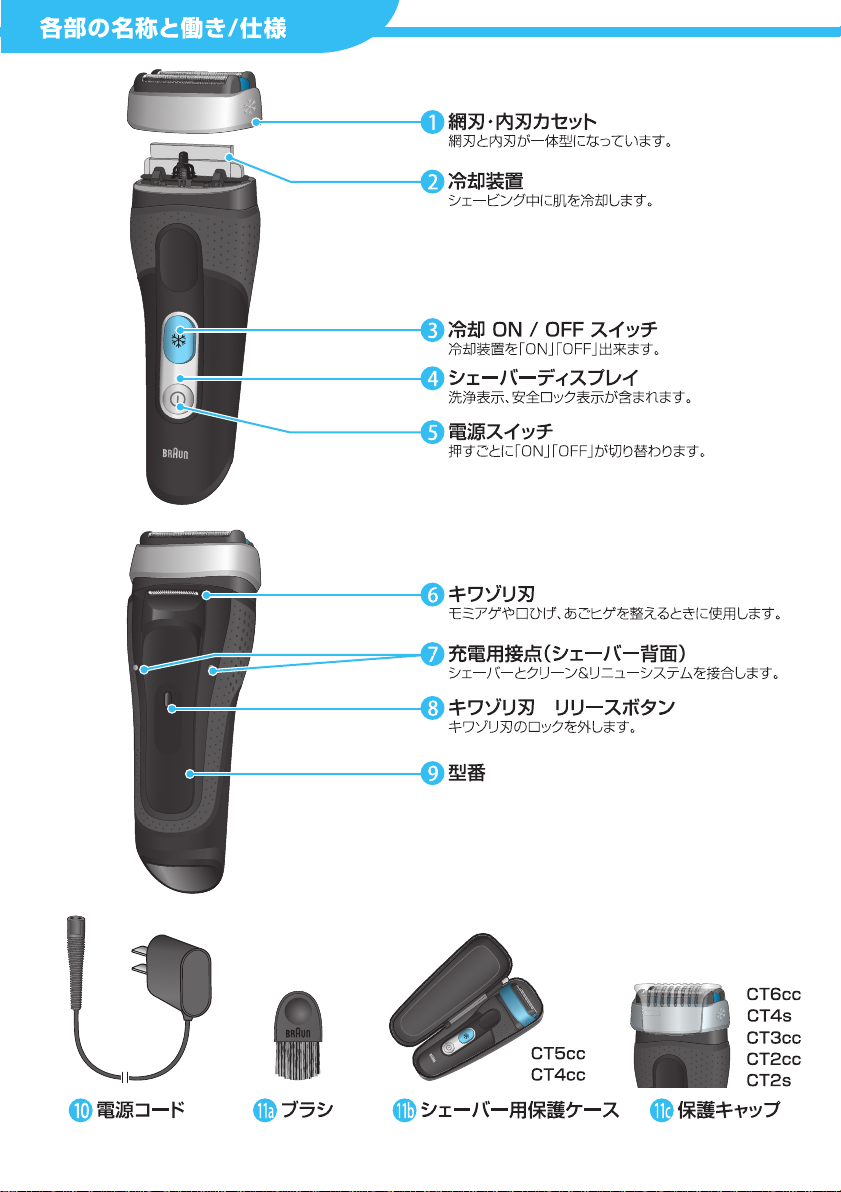
Shaver description
1 Foil & Cutter cassette
2 Cooling element
3 Cooling on/off switch
4 Shaver display
5 On/off switch
6 Long hair trimmer
7 Shaver-to-shell/station contacts
8 Release button for long hair trimmer
9 Model number
10 Special cord set
11a Brush
11b Pouch
11c Protection cap
12a Charging shell
12b Shell power socket
12c Stand for charging shell
12d Shell-to-shaver contacts
25
Page 26

First use and Charging
Prior to first use connect the shaver to an electrical
outlet using the charging shell as described below
or for models CT6cc/CT5cc/CT4cc/CT3cc/CT2cc
the Clean&Charge station (see Chapter «Automatic
Clean&Charge station description»).
Note: The shaver can only be charged via the
charging shell or the Clean&Charge station.
Models CT4s/CT2s must not be used with the
Clean&Charge station.
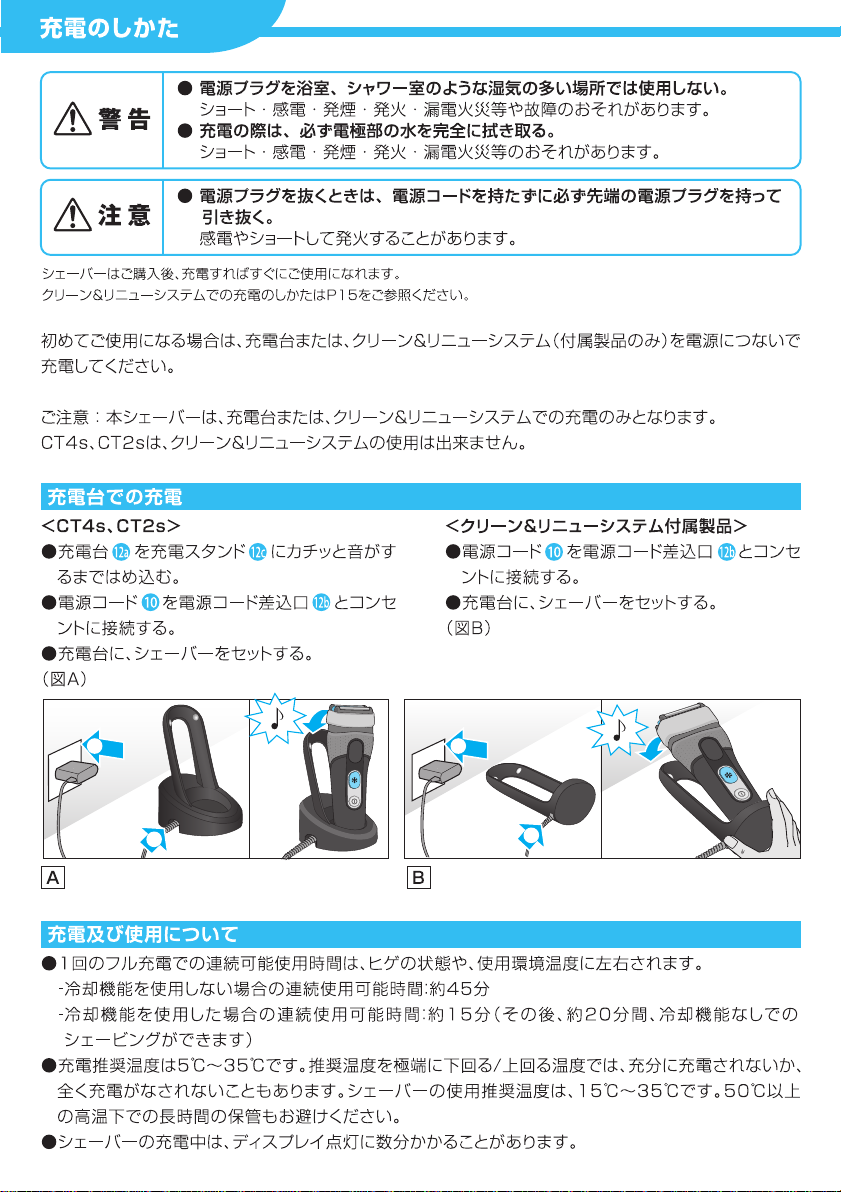
Charging shell (see fig. B)
• Click the charging shell (12a) onto the stand (12c
- models CT4s/CT2s only). Using the special cord
set (10), connect the shell power socket (12b) to
an electrical outlet.
• Place the shaver into the charging shell. The
contacts (7) on the back of the shaver need to
align with the contacts (12d) in the charging shell.
A beep sound confirms that the shaver sits
properly in the station.
• The shaver will be automatically charged.
Charging and basic operating information
• A full charge provides the following operating
times depending on your beard growth and
environmental temperatures:
– ca. 45 minutes without activated cooling function
– ca. 15 minutes with activated cooling function;
afterwards 20 minutes operation time without
cooling function.
• Recommended ambient temperature for charging
is 5 °C to 35 °C. The battery may not charge properly
or at all under extreme low or high temperatures.
Recommended ambient temperature for shaving
is 15 °C to 35 °C.
• Do not expose the appliance to temperatures
higher than 50 °C for extended periods of time.
• When the shaver is connected to an electrical outlet,
it may take some minutes until the display illuminates.
Shaver display
Charge status
During charging the symbol in the on/off switch (5)
blinks green. When fully charged, it will light up for a
few seconds, provided the shaver is connected to an
electrical outlet.
Low charge
The symbol in the on/off switch (5) shines red when
the battery is running low. You should be able to
finish your shave. When switching off the shaver a
beep sound reminds you of the low charge status.
26
Cooling status
The symbol
blue with activated cooling function. When the
battery is running low it starts blinking.
Cleaning status
CT4cc/CT3cc/CT2cc)
The cleaning indicator
needs to be cleaned in the Clean&Charge station.
Travel lock
The lock symbol
been locked to avoid unintended starting of the
motor (e.g. for storing it in a suitcase).
in the cooling on/off switch shines
(only models CT6cc/CT5cc/
lights up, when the shaver
lights up when the shaver has
Using the shaver (see fig. A)
Press the on/off switch (5) to operate the shaver.
Tips for a perfect dry shave
For best results, Braun recommends you to follow
3 simple steps:
1. Always shave before washing your face.
2. At all times, hold the shaver at right angles
(90°) to your skin.
3. Stretch your skin and shave against the
direction of your beard growth.
Cooling
Note: The cooling sensation experienced may differ
from person to person. It is influenced by personal
and environmental factors (e.g. skin, environmental
temperature).
To activate the cooling function, press the cooling
switch (3) during shaving. The symbol
cooling switch shines blue. For best cooling performance, we recommend to wait a few seconds
after the cooling function has been activated.
Then continue shaving as usual.
The symbol in the cooling switch (3) starts
blinking when the battery is running low and there is
not enough energy left for the cooling function.
You should be able to finish your shave with activated
cooling function. We recommend to charge the
appliance afterwards to have the cooling function
available for the next shave.
You can deactivate the cooling function by pressing
the cooling switch again.
Long hair trimmer
To trim sideburns, moustache or beard, press the
release button (8) and slide the long hair trimmer (6)
upwards.
in the
Page 27

Travel lock
• Activation: By pressing the on/off switch (5) for
3 seconds the shaver is locked. This is confirmed
by a beep sound and the lock symbol
display. Afterwards the display turns off.
• Deactivation: By pressing the on/off switch for
3 seconds the shaver is unlocked again.
in the
Manual cleaning of the shaver
(see fig. C/D)
The shaver is suitable for cleaning under running tap
. Detach the shaver ifr
water
e cleaning it in water
befor
• Switch the shaver on and rinse the shaver head
under hot running water until all residues have
been removed. You may use liquid soap without
abrasive substances. Rinse off all foam and let the
shaver run for a few more seconds.
• Next, switch off the shaver, remove the Foil &
Cutter cassette and let it dry.
• If you regularly clean the shaver under water, then
once a week apply a drop of light machine oil on
top of the Foil & Cutter cassette.
Alternatively, you may clean the shaver using a brush:
• Switch off the shaver. Remove the Foil & Cutter
cassette (1) and tap it out on a flat surface. Using
a brush, clean the inner area of the pivoting head.
Do not clean the cassette with the brush as this
may damage it!
om the power supply
.
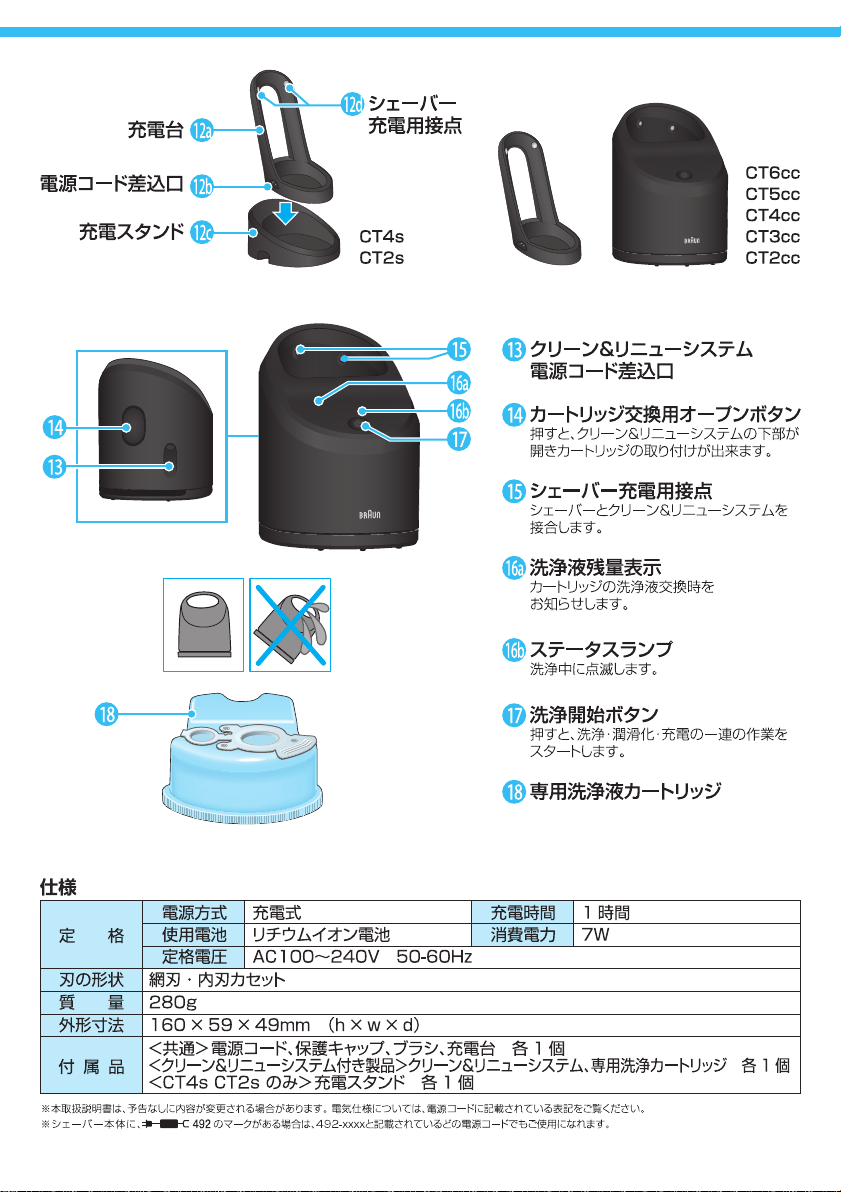
Clean&Charge station
(models CT6cc/CT5cc/CT4cc/CT3cc/CT2cc)
The Clean&Charge station has been developed for
cleaning, char
storing your Br
13
Station power socket
14 Lift button for cartridge exchange
15 Station-to-shaver contacts
16a Level indicator
16b Status light
17 Start button
18 Cleaning cartridge
Installing the Clean&Charge station (see fig. E)
• Remove the protection foil from the Clean&Charge
station display.
• Press the lift button (14) at the rear side of the
Clean&Charge station to lift up the housing.
• Hold the cleaning cartridge (18) down on a flat,
stable surface (e.g. table).
• Carefully remove the lid from the cartridge.
• Slide the cartridge from the rear side into the base
of the station until it snaps into place.
ging, lubricating, disinfecting and
aun shaver
.
• Slowly close the housing by pushing it down until it
locks.
• Using the special cord set (10), connect the
station power socket (13) to an electrical outlet.
Charging the shaver in the Clean&Charge station
Insert the shaver head down into the Clean&Charge
station.
Important: The shaver needs to be dry and free
from any foam or soap residue!
The contacts (7) on the back of the shaver need to
align with the contacts (15) in the Clean&Charge
station. Push the shaver in the correct position.
A beep sound confirms that the shaver sits properly
in the station. The Clean&Charge station will
automatically charge the shaver.
Cleaning the shaver
When the cleaning indicator
display, insert the shaver into the Clean&Charge
station, upside down and with the front showing.
Start automatic cleaning
Start the cleaning process by pressing the start
button (17). If the status light (16b) does not shine
(Clean&Charge station switches to stand-by after
about 10 minutes), press the start button twice.
Otherwise cleaning will not start.
For best shaving results, we recommend
cleaning after each shave.
The cleaning program consists of several cycles,
where cleaning fluid is flushed through the shaver
head. The cleaning time takes 3 minutes. During this
time the status light of the Clean&Charge station
blinks.
Leave the shaver in the station for drying. It takes
several hours until remaining moisture evaporates
depending on the climatic conditions. Afterwards
the shaver is ready for use.
After completing the cleaning and charging session,
the indicators of the Clean&Charge station turn off.
Removing the shaver from the Clean&Charge
station (see fig. F)
Hold the Clean&Charge station with one hand and
tilt the shaver slightly to the front to release it.
Cleaning Cartridge / Replacement (see fig. G)
When the level indicator
red, the remaining fluid in the cartridge is sufficient
for about 3 more cycles. When the level indicator
blinks red, the cartridge needs to be replaced
(about every 3–4 weeks when used daily).
After having pressed the lift button (14) to open the
housing, wait for a few seconds before removing the
used cartridge to avoid any dripping. Before
lights up in the shaver
lights up permanently
27
Page 28

discarding the used cartridge, make sure to close
the openings using the lid of the new cartridge,
since the used cartridge will contain contaminated
cleaning solution.
The hygienic cleaning cartridge contains ethanol or
izopropanol (dependent on country – specification
see cartridge), which once opened will naturally
evaporate slowly into the surrounding air.
Each cartridge, if not used daily, should be replaced
after approximately 8 weeks to ensure optimal
disinfection.
The cleaning cartridge also contains lubricants, for
the shaving system which may leave residual marks
on the outer foil frame and the cleaning chamber of
the Clean&Charge station after cleaning. These
marks can be removed easily by wiping gently with a
damp cloth.
Accessories
Braun recommends changing your shaver’s Foil &
Cutter cassette every 18 months to maintain your
shaver’s maximum performance.
Available at your dealer or Braun Service Centres:
• Foil & Cutter cassette: 40S/40B
• Cleaning cartridge Clean&Charge: CCR
Environmental notice
Product contains batteries and/or recyclable
electric waste. For environment protection
do not dispose of in household waste, but for
recycling take to electric waste collection
points provided in your country.
The cleaning cartridge can be disposed of with
regular household waste.
Subject to change without notice.
For electrical specifications, see printing on the
special cord set.
28
Page 29

Trouble-Shooting
Problem Possible reason Remedy
SHAVER
Unpleasant smell
from the shaver head.
Battery performance
dropped significantly.
Shaving performance
dropped significantly.
Cooling element is
warm.
Shaver head is
humid.
1. Shaver head is cleaned with
water.
2. Cleaning cartridge is in use
for more than 8 weeks.
1. Shaver head is regularly
cleaned with water but not
lubricated.
2. Foil and cutter are worn
which requires more power
for each shave.
1. Shaving system is clogged.
2. Foil and cutter are worn.
1. Shaver was used with
cooling function a couple of
minutes before.
2. Battery capacity is too low
for the cooling function.
1. Drying time after automatic
cleaning was not sufficient.
2. Drain of the Clean&Charge
station is clogged.
1. When cleaning the shaver head with water only
use hot water and from time to time some liquid
soap (without abrasive substances). Remove foil
& cutter cassette to let it dry.
2. Change cleaning cartridge at least every
8 weeks.
1. If the shaver is regularly cleaned with water, apply
a drop of light machine oil on top of the foil once
a week for lubrication.
2. Renew foil & cutter cassette.
1. Soak the foil & cutter cassette into hot water with
a drop of dish liquid. Afterwards rinse it properly
and tap it out. Once dry apply a drop of light
machine oil on the foil.
2. Renew foil & cutter cassette.
1. You can use the shaver like this or turn on the
cooling function and wait a few seconds until it is
activated again.
2. Charge the shaver after each shave to ensure
sufficient battery capacity for the cooling
function.
1. Clean directly after shaving to allow enough time
for drying.
2. Clean the drain with a wooden toothpick.
CLEAN&CHARGE STATION
Cleaning does not
start when pressing
the start button.
Increased
consumption of
cleaning fluid.
Guarantee
We grant a 2 year guarantee on the product commencing on the date of purchase. Within the guarantee
period we will eliminate any defects in the appliance resulting from faults in materials or workmanship,
free of charge either by repairing or replacing the complete appliance at our discretion.
This guarantee extends to every country where this appliance is supplied by Braun or its appointed
distributor.
This guarantee does not cover: damage due to improper use, normal wear or use as well as defects that
have a negligible effect on the value or operation of the appliance. The guarantee becomes void if repairs
are undertaken by unauthorised persons and if original Braun parts are not used.
To obtain service within the guarantee period, hand in or send the complete appliance with your sales
receipt to an authorised Braun Customer Service Centre (address information available online at
www.service.braun.com).
For UK only:
This guarantee in no way affects your rights under statutory law.
1. Shaver is not placed properly
in the Clean&Charge station.
2. Cleaning cartridge contains
not enough cleaning fluid
(display lights red).
3. Appliance is in stand-by
mode.
Drain of the Clean&Charge
station is clogged.
1. Insert shaver into the Clean&Charge station
(contacts of the shaver need to align with
contacts in the station).
2. Insert new cleaning cartridge.
3. Press start button twice.
– Clean the drain with a wooden toothpick.
– Regularly wipe the tub clean.
29
Page 30

30
 Loading...