

Page 1
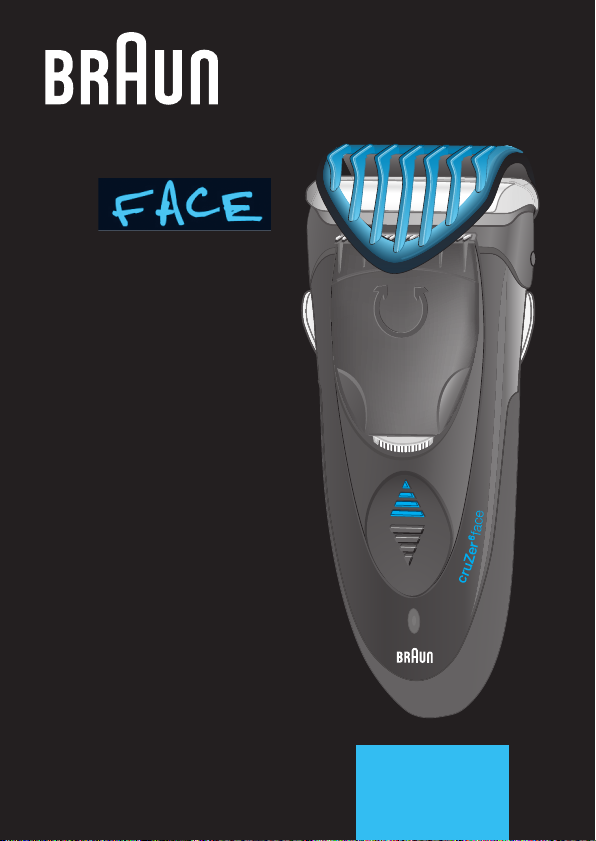
cruZer
Stapled booklet, 105x148mm, 80 pages (incl. 8 pages cover), 2/2c = black+cyan
Type 5730
www.braun.com
cruZer
6
face
Page 2
English 6
Français 11
Polski 17
âesk˘ 23
Slovensk˘ 28
Magyar 33
Hrvatski 38
Slovenski 43
Türkçe 48
Română (RO/MD) 53
кЫТТНЛИ 59
ì͇ªÌҸ͇ 66
79
Braun GmbH
Frankfurter Straße 145
61476 Kronberg/Germany
www.braun.com
Braun Infolines
UK 0800 783 7010
IE 1 800 509 448
FR 0 800 944 802
BE 0 800 14 592
PL 801 127 286
801 1 BRAUN
CZ 221 804 335
SK 02/5710 1135
HU (06-1) 451-1256
HR 091 66 01 777
SI 080 2822
TR 0 800 261 63 65
RO 021-224.00.47
RU 8 800 200 20 20
UA 0 800 505 000
HK 852-25249377
(Audio Supplies
Company Ltd.)
www.service.braun.com
92270132/IV-12
UK/FR/PL/CZ/SK/HU/HR/SL/TR/RO/
MD/RU/UA/Arab
Page 3
1
6
10
2
7
9
3
4a
7
11
4
4b
5
e
c
a
f
6
r
e
Z
u
r
c
8
6
a
1
1
2
2
1
3
Page 4
2
1
b
90°
90°
c
d
2
1
180°
e
4
Page 5
l
f
2
1
g
180°
h
i
oi
j
5
Page 6

English
Our products are designed to meet the highest standards of quality,
functionality and design. We hope you entirely enjoy your new Braun shaver.
Warning
Your shaver is provided with a special cord set with an integrated Safety
Extra Low Voltage power supply. Do not exchange or manipulate any part of
it. Otherwise there is risk of electric shock.
This appliance is not intended for use by children or persons with reduced
physical, sensory or mental capabilities, unless they are given supervision
by a person responsible for their safety. In general, we recommend that you
keep the appliance out of reach of children. Children should be supervised to
ensure that they do not play with the appliance.
For usage in other body areas, please make sure that the skin is stretched.
For hygienic reasons, do not share this appliance with other persons.
Oil bottle
Keep out of reach of children. Do not swallow. Dispose of properly when
empty.
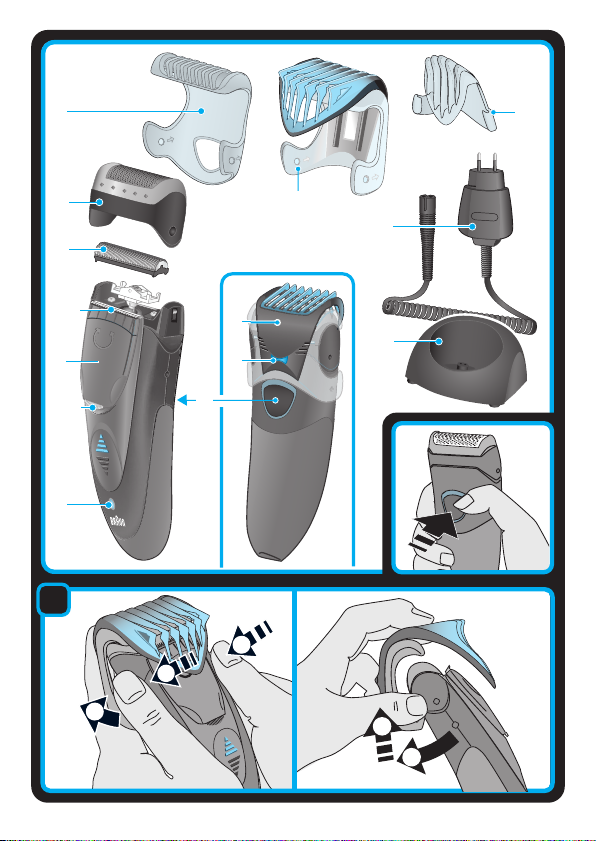
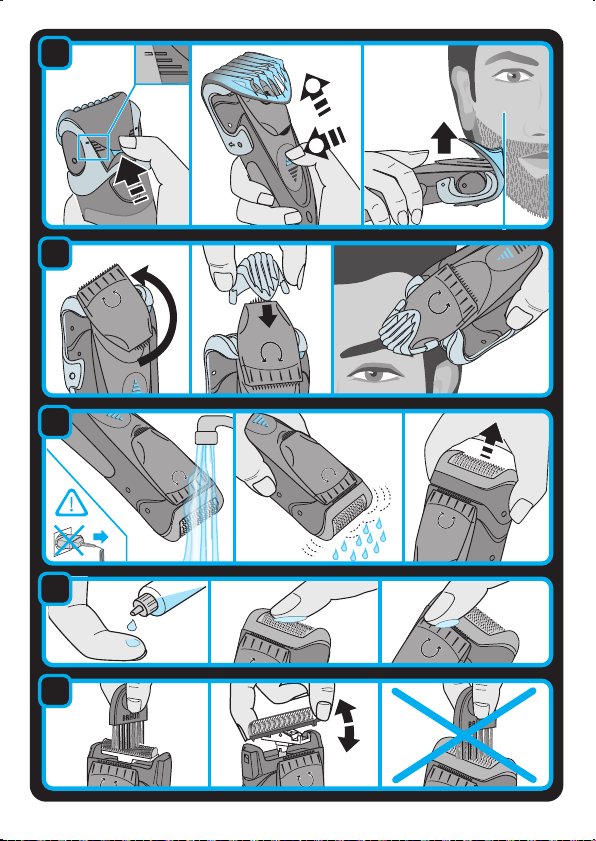
Description
1 3-day beard comb & protective cap
2 Shaver foil
3 Cutter block
4 Twistable trimmer
4a Wide trimmer (28 mm)
4b Narrow trimmer (14 mm)
5 Charging light
6 On/off switch
7 Adjustable comb
8 Beard length selector
9 Special cord set
10 Precision comb
11 Charging stand
Charging
The best environmental temperature for charging is between 15 °C and
35 °C. Do not expose the shaver to temperatures higher than 50 °C for
extended periods of time.
6
Page 7

• Using the special cord set, connect the shaver to an electrical outlet with
the motor switched off.
• When charging for the first time or when the shaver is not used for a few
months, leave the shaver to charge continuously for 4 hours.
• The charging light (5) shows that the appliance is being charged. When the
battery is fully charged, the charging light turns off. Intermittent blinking
after a while indicates that the battery maintains its full capacity. This can
also happen short term when charging after the battery was completely
discharged.
• A full charge provides 30 minutes of cordless shaving time depending on
your beard growth.
• Once the shaver is completely charged, discharge the shaver through
normal use. Then recharge to full capacity. Subsequent charges will take
about 1 hour.
• Maximum battery capacity will only be reached after several charging/
discharging cycles.
• 5-minute quick charge is sufficient for a shave.
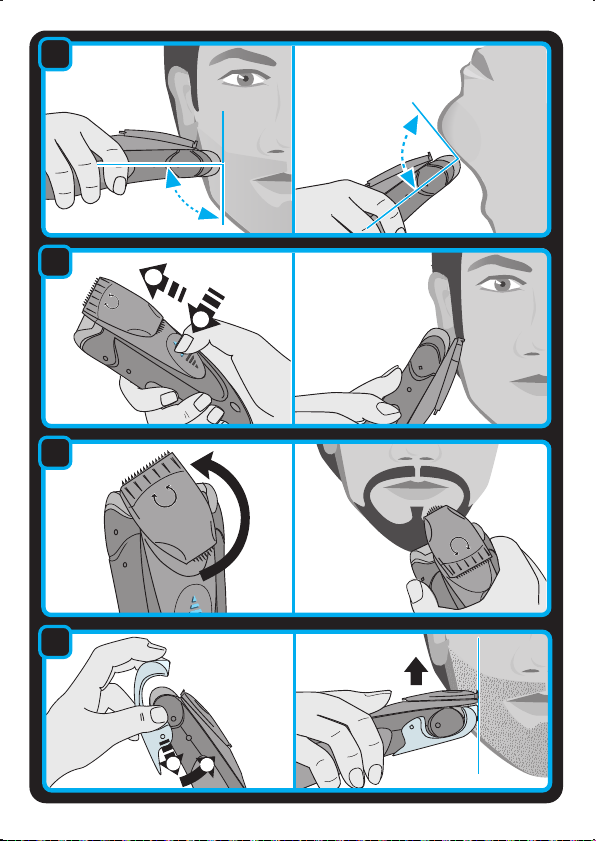
Shaving
First, remove the adjustable comb (7): Using your thumbs, press against the
side clips of the adjustable comb so that they swing off in the direction of the
arrows (a). Activate the on/off switch (6). The floating foil frame automatically
adapts to your skin surface for a close, smooth shave.
For best results:
• Always shave before washing your face.
• At all times, hold the shaver at right angles (90°) to the skin (b).
• Stretch the skin and shave against the direction of beard growth.
• For pre-shaving after a few days of not having shaved, use the wide
trimmer (4a) to pre-cut long hairs. For a close, smooth shave, finish with
the foil.
• To maintain 100% shaving performance, replace your foil and cutter block
at least every 18 months or when worn.
This appliance is suitable for use in a bath or shower.
7
Page 8

Style
Using the twistable trimmer
The wide trimmer (4a) evenly cuts and trims large areas (c). It is ideal for
shaping sideburns, moustaches and partial short beards. The wide trimmer
is provided with safety rips and a gliding strip for less irritation and easy
gliding. Press the blue stripes to push up the twistable trimmer (4). While
stretching the skin, guide the wide trimmer against the direction of hair
growth.
The narrow trimmer (4b) precisely defines lines and edges (d), being ideal for
precise contouring.
To use the narrow trimmer, push up the twistable trimmer and turn it 180°.
Frequent use of the twistable trimmer will reduce the battery capacity.
Trim
Using the trimming attachments (1), (7) and (10)
Place the respective trimming attachment onto the shaver foil (2) alternatively
on the twistable trimmer (4) and press it against the shaver housing until it
snaps into place with a click (e).
3-day beard comb & protective cap (1): This attachment is perfectly suited
for creating a stubble look and maintaining it.
• Place the attachment onto the foil (2) and push up the twistable trimmer (4).
Turn on the shaver and use the appliance as shown in the illustration (e).
The attachment ensures an optimum usage angle.
Adjustable comb (7): This attachment is ideal for beard trimming and keeping
it at a constant length.
• Place the attachment onto the shaver foil (2) and set desired beard length.
Press beard length selector (8) and slide it up (f) (possible length settings
from top to bottom: 1.2 mm / 2.8 mm / 4.4 mm / 6 mm). Push up the
twistable trimmer (4).
• Press the on/off switch and trim against hair growth by guiding the
transparent comb part over the skin (f).
Precision comb (10): This attachment is ideal for trimming eyebrows
(ca. 3 mm).
• It is recommended to place the 3-day beard comb & protection cap (1)
onto the shaving foil (2) (e) when using the precision comb.
• Place the attachment onto the extended narrow trimmer (4b) (g).
• Turn on the shaver and trim against hair growth (g).
8
Page 9

Cleaning
Regular cleaning ensures better shaving performance. Rinsing the shaving
head after each shave under running water is an easy and fast way to keep
it clean:
• Switch the shaver on (cordless) and rinse the shaving head under hot
running water (h). You may use liquid soap without abrasive substances.
Rinse off all foam and let the shaver run for a few more seconds.
• Next, switch off the shaver, remove the shaver foil and the cutter block.
Then leave the disassembled shaving parts to dry.
• If you regularly clean the shaver under water, then once a week apply a
drop of light machine oil onto the trimmers (4a, 4b) and shaver foil (i).
Alternatively, you may clean the shaver using the brush provided (j):
• Switch off the shaver. Remove the shaver foil.
• Using the brush, clean the cutter block and the inner area of the shaver
head. However, do not clean the shaver foil with the brush as this may
damage the foil.
Keeping your shaver in top shape
Replacing the shaving parts
To maintain 100% shaving performance, replace your foil and cutter block at
least every 18 months or when worn. Change both parts at the same time for
a closer shave with less skin irritation. (Shaver foil and cutter block: 10B)
Preserving the batteries
In order to maintain the optimum capacity of the rechargeable batteries, the
shaver has to be fully discharged (by shaving) every 6 months approximately.
Then recharge the shaver to full capacity.
Environmental notice
This product contains rechargeable batteries. In the interest of
protecting the environment, please do not dispose of the product in
the household waste at the end of its useful life. Disposal can take
place at a Braun Service Centre or at appropriate collection points
provided in your country.
Subject to change without notice.
For electric specifications, see printing on the special cord set.
9
Page 10

Guarantee
We grant a 2 year guarantee on the product commencing on the date of
purchase. Within the guarantee period we will eliminate any defects in the
appliance resulting from faults in materials or workmanship, free of charge
either by repairing or replacing the complete appliance at our discretion.
This guarantee extends to every country where this appliance is supplied by
Braun or its appointed distributor.
This guarantee does not cover: damage due to improper use, normal wear
and tear (e.g. shaver foil or cutter block) as well as defects that have a
negligible effect on the value or operation of the appliance. The guarantee
becomes void if repairs are undertaken by unauthorised persons and if
original Braun parts are not used.
To obtain service within the guarantee period, hand in or send the complete
appliance with your sales receipt to an authorised Braun Customer Service
Centre (address information available online at www.service.braun.com).
For UK only:
This guarantee in no way affects your rights under statutory law.
10
Page 11

Français
Nos produits sont conçus pour satisfaire aux plus hautes exigences en
matière de qualité, fonctionnalité et design. Nous espérons que vous serez
pleinement satisfait de votre nouveau rasoir Braun.
Attention
Votre rasoir est fourni avec un adaptateur basse tension.
Par conséquent, vous ne devez modifier ou manipuler aucun de ses composants afin d’éviter tout risque d’électrocution.
Cet appareil n’est pas destiné à des enfants ou à des personnes aux
capacités mentales, sensorielles et physiques réduites à moins qu’elles ne
soient sous la surveillance d’un adulte responsable de leur sécurité.
Il convient de surveiller les enfants pour s’assurer qu’ils ne jouent pas avec
l’appareil. Conserver hors de portée des enfants.
Pour une utilisation sur des autres parties du corps, assurez-vous que votre
peau soit tendue. Pour des raisons d’hygiène, ne pas partager ce produit
avec d’autre personne.
Bouteille d’huile
Conserver hors de la portée des enfants. Ne pas avaler. Eliminer comme il
convient après usage.
Description
1 Sabot pour barbe de « 3 jours & capot » de protection
2 Grille de rasage
3 Bloc-couteaux
4 Tondeuse rotative
4a Tondeuse large (28 mm)
4b Tondeuse étroite (14 mm)
5 Témoin lumineux de charge
6 Interrupteur marche/arrêt
7 Sabot réglable
8 Accessoire hauteur de coupe
9 Cordon d’alimentation
10 Sabot de précision
11 Chargeur sur pied
Mise en charge du rasoir
La température environnante idéale pour la mise en charge doit être
comprise entre 15 °C et 35 °C.
11
Page 12

Ne pas exposer le rasoir à une température supérieure à 50 °C pendant trop
longtemps.
• A l’aide du cordon d’alimentation, branchez le rasoir arrêté à une prise de
courant.
• Lors de la première mise en charge, ou si le rasoir n’a pas été utilisé pendant plusieurs mois, laissez l’appareil se charger de façon ininterrompue
pendant 4 heures.
• Le témoin lumineux de charge (5) s’allume, indiquant que le rasoir est en
train de se charger. Lorsque la batterie est complètement rechargée, le
témoin de charge s’éteint. Au bout d’un certain moment le témoin de
charge se rallume et clignote de temps en temps pour vérifier que la
batterie est complètement chargée. Le voyant peut également clignoter
rapidement pour indiquer que la batterie est entièrement déchargée.
• Une pleine charge procure environ 30 mn de rasage sans fil. Cette durée
varie toutefois selon votre type de barbe.
• Une fois le rasoir complètement rechargé, utilisez-le sans fil jusqu’à ce
qu’il soit complètement déchargé. Puis rechargez-le à nouveau complètement. Les mises en charge suivantes prendront environ 1 heure.
• La capacité maximum de la batterie ne sera atteinte qu’après plusieurs
cycles de charge/décharge.
• Recharge rapide en 5 minutes valable pour un rasage.
Rasage
Tout d’abord, retirez le sabot réglable (7) : À l’aide de vos deux pouces,
appuyez sur les clips latéraux du sabot dans la direction des flèches (a) pour
le détacher. Appuyez sur l’interrupteur marche/arrêt (6). La grille flexible
s’adapte automatiquement à votre peau pour un rasage précis et en
douceur.
Les astuces pour un rasage parfait:
• Nous vous recommandons de vous raser avant de vous laver le visage car
la peau a tendance à légèrement gonfler lorsqu’elle est humide.
• Tenez le rasoir perpendiculairement (90°) à la peau (b).
• Tendez votre peau et rasez-vous dans le sens contraire de la pousse du
poil.
• Pour un pré-rasage après quelques jours sans rasage, nous vous
conseillons d’utiliser la tondeuse large (4a) pour pré-couper les poils les
plus longs. Pour un rasage de plus près et plus en douceur, terminez avec
la grille.
• Pour conserver 100% de la performance de votre rasoir, remplacez la
grille et le bloc-couteaux tous les 18 mois.
12
Page 13

Cette appareil peut être utilisé dans le bain ou sous la douche.
Style
Utilisation de la tondeuse rotative
La tondeuse large (4a) permet d’égaliser et de tailler les poils sur les zones
les plus larges (c). Elle est idéale pour tailler les pattes, les moustaches et
les barbes courtes. La tondeuse large est fournie avec un accessoire anticoupure et une bande glissante pour réduire l’irritation et garantir une glisse
optimale. Appuyez sur les bandes bleues pour faire coulisser la tondeuse
rotative (4) vers le haut. Tout en tendant la peau, guidez la tondeuse large en
sens contraire de la pousse des poils.
La tondeuse étroite (4b) permet de définir de façon précise les lignes et les
contours (d) ce qui la rend idéale pour délimiter les contours de la barbe.
Pour utiliser la tondeuse étroite, faites coulisser la tondeuse rotative et
tournez-la de 180°.
L’utilisation fréquente de la tondeuse réduit l’autonomie de la batterie.
Sabots
Utilisation des sabots (1), (7) et (10)
Placez le sabot désiré sur la grille du rasoir (2) ou sur la tondeuse rotative (4)
et enclenchez-le sur le corps du rasoir jusqu’à ce qu’il émette un « clic » (e).
Sabot pour barbe de « 3 jours & capot » de protection (1) : Cet accessoire
est parfait pour entretenir une barbe avec l’aspect « barbe de 3 jours ».
• Positionner l’accessoire sur la grille (2) et faites coulisser la tondeuse
rotative (4) vers le haut. Allumez le rasoir et utilisez l’appareil comme
indiqué dans l’illustration (e). Cet accessoire vous garantit un angle de
rasage optimum.
Sabot réglable (7) : Cet accessoire est idéal pour tailler la barbe et pour
l’entretenir avec une longueur régulière.
• Positionner l’accessoire sur la grille (2) et sélectionnez la longueur de
barbe désirée. Appuyer sur le sélecteur de hauteur de coupe (8) et faites
le coulisser vers le haut (f) (différentes hauteurs de coupe, du haut vers le
bas : 1.2 mm / 2.8 mm / 4.4 mm / 6 mm). Puis faites coulisser la tondeuse
rotative vers le haut (4).
13
Page 14

• Mettez en marche et taillez la barbe dans le sens contraire de la pousse
des poils, en appliquant la partie transparente du sabot contre la peau (f).
Sabot de précision (10) : Cet accessoire est idéal pour tailler les sourcils
(env. 3 mm).
• Il est conseillé de mettre le sabot « barbe de 3 jours » & le capot de
protection (1) sur la grille de rasage (2) (e) lorsque vous utilisez le sabot de
précision.
• Placez l’accessoire sur la tondeuse étroite (4b) (g).
• Mettez le rasoir en marche et taillez les sourcils (g).
Nettoyage
Un nettoyage régulier assure de meilleures performances de rasage. Après
chaque utilisation, rincez la tête de rasage à l’eau – c’est un moyen rapide et
efficace pour la garder propre :
• Mettez en marche le rasoir (sans le fil) et rincez la tête du rasoir sous l’eau
chaude (h). Vous pouvez utiliser un savon liquide non abrasif. Rincez la
mousse et laissez le rasoir en marche pendant quelques instants.
• Puis, arrêtez le rasoir, retirez la grille du rasoir et le bloc couteau. Laissez
sécher séparément les différents éléments.
• Si vous nettoyez régulièrement votre rasoir à l’eau, appliquez une goutte
d’huile une fois par semaine sur les tondeuses (4a, 4b) et sur la grille du
rasoir (i).
Vous pouvez également nettoyer le rasoir à sec en utilisant la brosse fournie
(j) :
• Eteignez le rasoir. Retirez la grille.
• A l’aide de la brosse, nettoyez le bloc couteau et la partie intérieure de la
tête du rasoir. Cependant, ne nettoyez pas la grille de rasage avec la
brosse, cela risquerait de l’endommager.
Entretien du rasoir
Remplacement des pièces de rasage
Pour conserver 100% de la performance de votre rasoir, remplacez la grille
et le bloc-couteaux tous les 18 mois. Changez les 2 pièces en même temps
pour vous assurer d’un rasage de plus près avec moins d’irritations.
(Références Grille et bloc-couteau : 10B)
14
Page 15

Entretien de la batterie
Afin de conserver la capacité maximum de la batterie rechargeable, le rasoir
doit être complètement déchargé (en se rasant) environ tous les 6 mois. Puis
rechargez le rasoir à sa pleine capacité.
Respect de l’environnement
Ce produit contient des batteries rechargeables. Afin de protéger
l’environnement, ne jetez jamais l’appareil dans les ordures
ménagères à la fin de sa durée de vie. Remettez-le à votre centre
service agréé Braun ou déposez-le dans des sites de récupération
appropriés conformément aux réglementations locales ou nationales
en vigueur.
Sujet à toute modification sans préavis.
Voir les spécifications électriques mentionnées sur l’adaptateur basse
tension.
Garantie
Nous accordons une garantie de 2 ans sur ce produit, à partir de la date
d’achat.
Pendant la durée de la garantie, Braun prendra gratuitement à sa charge la
réparation des vices de fabrication ou de matière en se réservant le droit de
décider si certaines pièces doivent être réparées ou si l’appareil lui-même
doit être échangé.
Cette garantie s’étend à tous les pays où cet appareil est commercialisé par
Braun ou son distributeur exclusif.
Cette garantie ne couvre pas : les dommages occasionnés par une utilisation
inadéquate, l’usure normale (par exemple, grille et bloc-couteaux) ainsi que
les défauts d’usures qui ont un effet négligeable sur la valeur ou l’utilisation
de l’appareil. Cette garantie devient caduque si des réparations ont été
effectuées par des personnes non agréées par Braun et si des pièces de
rechange ne provenant pas de Braun ont été utilisées.
15
Page 16

Pour toute réclamation intervenant pendant la période de garantie, retournez
ou rapportez l’appareil ainsi que l’attestation de garantie à votre revendeur
ou à un Centre Service Agréé Braun.
Se référez à www.service.braun.com ou appelez 0 800 944 802 pour
connaitre le Centre Service Agrée Braun le plus proche de chez vous.
Clause spéciale pour la France
Outre la garantie contractuelle exposée ci-dessus, nos clients bénéficient de
la garantie légale des vices cachés prévue aux articles 1641 et suivants du
Code civil.
16
Page 17

Polski
Nasze wyroby spełniają najwyższe wymagania dotyczące jakości,
funkcjonalności i wzornictwa. Życzymy satysfakcji z użytkowania nowej
golarki marki Braun.
Ostrzeżenie
Golarka jest dostarczana wraz ze specjalnym kablem wyposażonym w
wbudowany zasilacz dostarczający bezpieczne, niskie napięcie. Elementów
kabla nie wolno wymieniać ani modyfikować, ponieważ grozi to porażeniem
prądem elektrycznym.
Urzàdzenie to nie mo˝e byç u˝ywane przez dzieci lub osoby fizycznie lub
umys∏owo upoÊledzone, jeÊli nie znajdujà si´ one pod nadzorem osoby
odpowiedzialnej za ich bezpieczeƒstwo. Zalecamy przechowywaç urzàdzenie w miejscu niedost´pnym dla dzieci. Dzieci powinny być nadzorowane
podczas używania urządzenia w celu zapewnienia odpowiedniego bezpieczeństwa.
Korzystając z golarki do golenia innych części ciała, należy pamiętać, aby
naciągnąć skórę. Ze względów higienicznych golarki powinna używać tylko
jedna osoba.
Pojemnik z olejem
Przechowywać poza zasięgiem dzieci. Nie połykać. Puste opakowanie
wyrzucić.
Opis
1 Nasadka do uzyskania efektu 3-dniowego zarostu i nasadka ochronna
2 Folia goląca
3 Blok ostrzy tnących
4 Regulowany trymer
4a Szerokie ustawienie trymera (28 mm)
4b Wąskie ustawienie trymera (14 mm)
5 Kontrolka ładowania
6 Włącznik/wyłącznik
7 Nasadka do przystrzygania zarostu
8 Przycisk do ustawiania długości zarostu
9 Specjalny kabel sieciowy
10 Nasadka do precyzyjnego przystrzygania zarostu
11 Baza do ∏adowania
17
Page 18

Ładowanie
Ładowanie akumulatorów powinno przebiegać w temperaturze otoczenia od
15 °C do 35 °C.
Golarki nie należy wystawiać na długotrwałe działanie temperatur powyżej
50 °C.
• Wyłączoną golarkę należy podłączyć do gniazdka sieciowego przy użyciu
specjalnego kabla.
• W przypadku pierwszego ładowania golarki lub nie używania jej przez kilka
miesięcy, należy podłączyć ją do ciągłego zasilania na 4 godziny.
• Zapalony wskaźnik ładowania (5) informuje, że golarka jest w trakcie
ładowania. Kiedy bateria jest w pełni naładowana, wskaźnik ładowania
gaśnie. Migający wskaźnik ładowania oznacza całkowite naładowanie
akumulatorów. Krótkotrwałe miganie wskaźnika może się również pojawić
w trakcie ładowania całkowicie rozładowanej baterii.
• W zależności od częstotliwości golenia, golarka z całkowicie naładowanymi
akumulatorami może pracować bez zasilania sieciowego do 30 minut.
• Po zakończeniu ładowania, akumulatory należy rozładować poprzez
normalne użytkowanie golarki. Następnie należy całkowicie naładować
akumulatory. Każde kolejne ładowanie trwa około 1 godziny.
• Pełną pojemność akumulatorów uzyskuje się dopiero po kilku cyklach
ładowania/rozładowania.
• 5-minutowe szybkie ładowanie wystarcza na jednorazowe golenie.
Golenie
W pierwszej kolejności, należy zdjąć nasadkę do przystrzygania zarostu (7):
Następnie, nacisnąć kciukami boczne przyciski nasadki do przystrzygania
zarostu, tak by były ustawione w kierunku wskazywanym przez strzałki (a).
Należy operować przyciskami włącznik/wyłącznik (6) Elastyczna folia golarki
automatycznie dopasowywuje się do Twojej skóry, by zapewnić gładkie i
dokładne golenie.
Aby osiągnąć najlepsze efekty:
• Należy zawsze golić się przed umyciem twarzy.
• Golarkę należy przez cały czas trzymać przy skórze pod odpowiednim
kątem (90°) (b).
• Skórę należy naciągnąć i golić pod włos.
• Należy użyć szerokiego ustawienia trymera (4a), by przyciąć długie włoski
kilkudniowego zarostu. Nasadka z folią zapewni dokładne i gładkie
wykończenie golenia.
18
Page 19
• Aby zapewnić 100 proc. skuteczność golenia, folię i głowicę golarki należy
wymieniać minimum co 18 miesięcy lub gdy części te zużyją się.
Urządzenie jest przystosowane do użytku podczas kąpieli lub pod
prysznicem.
Modelowanie
Użycie regulowanego trymera
Szerokie ustawienie trymera (4a) pozwala równomiernie przycinać i
wykańczać golenie dużych partii ciała. Jest idealne do wykańczania baków,
wąsów i krótkich bródek. Szerokie ustawienie o bezpiecznym kształcie,
wyposażone jest również w pasek zapobiegający podrażnieniom i ułatwiający
gładkie prowadzenie maszynki po skórze. Aby wysunąć regulowany trymer
należy przycisnąć niebieskie paski umieszczone z boku urządzenia. (4)
Podczas golenia należy napiąć skórę i delikatnie przesuwać trymer w kierunku odwrotnym do kierunku wzrostu włosów.
Wąskie ustawienie trymera (4b) precyzyjnie modeluje linie i krawędzie (d),
dzięki czemu jest idealne do wykańczania konturów zarostu. Aby korzystać z
wąskiego ustawienia trymera należy nacisnąć i przekręcić regulowany trymer
o 180°.
Częste używanie regulowanego trymera powoduje zmniejszenie pojemności
baterii.
Przystrzyganie
Użycie nasadek trymera (1), (7) i (10) należy nałożyć odpowiednią nasadkę
trymera na folię golarki (2) ewentualnie na regulowany trymer (4), a następnie
przycisnąć ją do obudowy urządzenia tak, aby umocować ją na właściwym
miejscu.
Nasadka do uzyskania efektu 3-dniowego zarostu i nasadka ochronna (1):
idealna nasadka do modelowania i wykańczania zarostu.
• Umocuj nasadkę na folii golącej (2), a następnie przesuń regulowany
trymer (4). Włącz urządzenie i korzystaj z niego tak jak pokazano na
ilustracji (e). Nasadka zapewnia odpowiedni kąt golenia.
Nasadka do przystrzygania zarostu (7): idealna nasadka do przystrzygania
brody pozwalającą utrzymać ją w odpowiedniej długości.
19
Page 20

• Umocuj nasadkę na folii golącej (2), a następnie ustaw pożądaną długość
zarostu. Naciśnij przycisk ustawiający długość brody (8) i przesuń go w
górę (f) (możliwe ustawienia długości od góry do dołu: 1,2 mm / 2,8 mm /
4,4 mm / 6 mm). Wysuń obrotową końcówkę (4).
• Naciśnij przycisk on/off, a następnie przesuwaj przeźroczysty grzebień po
skórze w kierunku odwrotnym do kierunku wzrostu włosów.
Nasadka do precyzyjnego przystrzygania zarostu (10): nasadka idealna do
przystrzygania brwi (ok. 3 mm).
• Podczas korzystania z nasadki do precyzyjnego przystrzygania, zaleca się
umieszczenie nasadki do uzyskania 3-dniowego zarostu i nasadki ochronnej (1) na folii golącej (2) (e).
• Umocuj nasadkę na przedłużonym wąskim ustawieniu trymera (4b) (g).
• Włącz urządzenie i przesuwaj delikatnie po skórze w kierunku odwrotnym
do kierunku wzrostu włosów (g).
Czyszczenie
Regularne czyszczenie urządzenia zapewnia jeszcze lepsze efekty golenia.
Płukanie głowicy golącej pod bieżącą wodą po każdorazowym korzystaniu
z urządzenia pozwala w łatwy i szybki sposób utrzymać ją w czystości.
• Włącz urządzenie (w trybie bezprzewodowym), a następnie opłucz głowicę
golącą pod ciepłą bieżącą wodą (h). Możesz użyć mydła w płynie, które
należy następnie dokładnie spłukać. Pozostaw urządzenie włączone przez
kilka sekund.
• Następnie wyłącz urządzenie, zdejmij folię goląca oraz blok ostrzy.
Pozostaw poszczególne części do wyschnięcia.
• Jeśli golarka jest regularnie czyszczona pod bieżącą wodą, należy raz
w tygodniu zaaplikować lekki olej maszynowy na ostrza (4a, 4b) oraz na
folię golącą (i).
Ewentualnie, można czyścić golarkę używając szczoteczki (j):
• Wyłącz golarkę i zdejmij folie golącą.
• Używając szczoteczki delikatnie wyczyść blok ostrzy oraz wnętrze głowicy
golarki. Nie należy czyścić szczoteczką folii golącej, gdyż jest ona bardzo
delikatna i może ulec uszkodzeniu.
Konserwacja
Wymiana części golących
Aby zapewnić 100 proc. skuteczność golenia, folię i głowicę golarki należy
wymieniać minimum co 18 miesięcy lub gdy części te zużyją się. Obie części
20
Page 21

należy wymienić jednocześnie, co zapewni dokładniejsze golenie i zmniejszy
ryzyko podrażnień skóry.
(Folia goląca i blok ostrzy tnących: 10B)
Użytkowanie akumulatorów
Aby utrzymać optymalną pojemność akumulatorów, należy je całkowicie
rozładować (poprzez golenie) w przybliżeniu raz na 6 miesięcy. Następnie,
akumulatory należy ponownie całkowicie naładować.
Uwagi dotyczàce ochrony Êrodowiska
Urzàdzenie to wyposa˝one jest w baterie przystoso
wane do wielokrotnego ∏adowania. Aby zapobiec zanieczyszczaniu
Êrodowiska, pod koniec okresu eksploatacji produktu nie wyrzucaj go
do kosza na Êmieci. Mo˝esz pozostawiç go w punkcie serwisowym
marki Braun lub jednym ze specjalnych punktów zajmujàcych si´ zbiórkà
zu˝ytych produktów w wybranych miejscach na terenie kraju.
Zastrzega si´ mo˝liwoÊç wprowadzania zmian.
Dane elektryczne mo˝na znale˝ç na tabliczce znamionowej specjalnego
zestawu sieciowego.
Warunki gwarancji
1. Procter & Gamble International Operations SA z siedzibą w Route de
St-Georges 47, 1213 Petit Lancy 1 w Szwajcarii, gwarantuje sprawne
działanie sprzętu w okresie 24 miesięcy od daty jego wydania
Kupującemu. Ujawnione w tym okresie wady będą usuwane bezpłatnie,
przez autoryzowany punkt serwisowy, w terminie 14 dni od daty
dostarczenia sprzętu do autoryzowanego punktu serwisowego.
2. Kupujący może wysłać sprzęt do naprawy do najbliżej znajdującego się
autoryzowanego punktu serwisowego lub skorzystać z pośrednictwa
sklepu, w którym dokonał zakupu sprzętu. W takim wypadku termin
naprawy ulegnie wydłużeniu o czas niezbędny do dostarczenia i odbioru
sprzętu.
3. Kupujący powinien dostarczyć sprzęt w opakowaniu należycie
zabezpieczonym przed uszkodzeniem. Uszkodzenia spowodowane
21
Page 22

niedostatecznym zabezpieczeniem sprzętu nie podlegają naprawom
gwarancyjnym. Naprawom gwarancyjnym nie podlegają także inne
uszkodzenia powstałe w następstwie okoliczności, za które Gwarant nie
ponosi odpowiedzialności, w szczególności zawinione przez Pocztę
Polską lub firmy kurierskie.
4. Niniejsza gwarancja jest ważna jedynie z dokumentem zakupu i
obowiązuje wyłącznie na terytorium Rzeczypospolitej Polskiej.
5. Okres gwarancji przedłuża się o czas od zgłoszenia wady lub
uszkodzenia do naprawy sprzętu i zwrotnego postawienia go do
dyspozycji Kupującego.
6. Naprawa gwarancyjna nie obejmuje czynności przewidzianych w
instrukcji, do wykonania, których Kupujący zobowiązany jest we
własnym zakresie i na własny koszt.
7. Ewentualne oczyszczenie sprzętu dokonywane jest na koszt Kupującego
według cennika danego autoryzowanego punktu serwisowego i nie
będzie traktowane jako naprawa gwarancyjna, chyba, że oczyszczenie
jest niezbędne do usunięcia wady w ramach świadczeń objętych
niniejszą gwarancją i nie stanowi czynności, o których mowa w p. 6.
8. Gwarancją nie są objęte:
a) mechaniczne uszkodzenia sprzętu spowodowane w czasie jego
użytkowania lub w czasie dostarczania sprzętu do naprawy;
b) uszkodzenia i wady wynikłe na skutek:
– używania sprzętu do celów innych niż osobisty użytek;
– niewłaściwego lub niezgodnego z instrukcją użytkowania,
konserwacji, przechowywania lub instalacji;
– używania niewłaściwych materiałów eksploatacyjnych;
– napraw dokonywanych przez nieuprawnione osoby; stwierdzenie
faktu takiej naprawy lub samowolnego otwarcia plomb lub innych
zabezpieczeń sprzętu powoduje utratę gwarancji;
– przeróbek, zmian konstrukcyjnych lub używania do napraw
nieoryginalnych części zamiennych;
c) części szklane, żarówki, oświetlenia;
d) ostrza i folie do golarek oraz materiały eksploatacyjne.
9. Bez nazwy, modelu sprzętu i daty jego zakupu potwierdzonej pieczątką
i podpisem sprzedawcy albo paragonu lub faktury zakupu z nazwą i
modelem sprzętu, karta gwarancyjna jest nieważna.
10. Niniejsza gwarancja na sprzedany towar konsumpcyjny nie wyłącza,
nie ogranicza ani nie zawiesza uprawnień Kupującego wynikających
z niezgodności towaru z umową.
22
Page 23

Ćeský
Naše výrobky jsou navrženy tak, aby splňovaly nejvyšší nároky na kvalitu,
funkčnost a design. Doufáme, že budete se svým novým holicím strojkem
Braun plně spokojeni.
Upozornění
Tento holicí strojek je vybaven speciálním přívodem s integrovaným
bezpečnostním síťovým adaptérem. Proto nesmíte žádnou jeho část měnit,
ani ji rozebírat. Jinak by mohlo dojít k úrazu elektrickým proudem.
Pfiístoj nesmí pouÏívat dûti ani osoby se sníÏen˘mi fyzick˘mi nebo
psychick˘mi schopnostmi bez dohledu osoby, která je zodpovûdná za jejich
bezpeãnost. Obecnû je doporuãeno uchovávat pfiístroj mimo dosah dûtí.
Děti by měly být pod dozorem, aby se zajistilo, že nebudou spotřebič
používat na hraní.
Při použití na různých partiích těla dbejte na to, abyste drželi pokožku
napjatou.
Z hygienických důvodů nepoužívejte tento strojek spolu s jinými osobami.
Lahvička s olejem
Uchovávejte mimo dosah dětí. Nepolykejte. Po vyprázdnění zlikvidujte
v rámci tříděného odpadu.
Popis
1 Zastřihovač třídenního strniště & ochranný kryt planžety
2 Holicí planžeta
3 Břitový blok
4 Otočný zastřihovač
4a Široký zastřihovač (28 mm)
4b Úzký zastřihovač (14 mm)
5 Kontrolky nabíjení
6 Spínač zapnutí/vypnutí
7 Nastavitelný zastřihovač
8 Volič délky vousu
9 Speciální síťový přívod
10 Přesný zastřihovač
11 Stav nabití
23
Page 24

Nabíjení
Optimální teplota prostředí pro nabíjení je 15 °C až 35 °C. Nevystavujte holicí
strojek teplotám vyšším než 50 °C po delší dobu.
• Pomocí speciálního síťového přívodu připojte holicí strojek k zásuvce
elektrické sítě, přičemž motor strojku musí být vypnutý.
• Pokud holicí strojek nabíjíte poprvé nebo jste ho několik měsíců nepouží-
val, nechte holicí strojek nabíjet nepřetržitě 4 hodiny.
• Kontrolka nabíjení (5) ukazuje, že se přístroj nabíjí. Když je baterie plně
nabitá, kontrolka nabíjení zhasne. Po chvíli začne kontrolka přerušovaně
blikat, což znamená, že je baterie nabitá na svou plnou kapacitu. Blikání se
může objevit i krátkodobě, pokud nabíjíte strojek poté, co se baterie zcela
vybila.
• Plné nabití umožňuje až 30 minut holení bez síťového přívodu, v závislosti
na vzrůstu vousů.
• Pokud je strojek plně nabitý, používejte jej, dokud se zcela nevybije.
Pak jej opět nabijte na plnou kapacitu. Následná nabíjení trvají přibližně
1 hodinu.
• Maximální kapacita baterie bude dosažena až po několika cyklech nabití/
vybití.
• 5-minutové rychlonabíjení je dostatečné pro oholení.
Holení
Nejprve sejměte nastavitelný zastřihovací nástavec (7): dvěma prsty stiskněte
klipsy po stranách nástavce tak, aby se uvolnily a nástavec sejměte ve směru
šipek (a). Zapněte strojek spínačem zapnutí/vypnutí (6). Plovoucí holicí
planžeta se automaticky přizpůsobuje povrchu vaší pokožky a zajišťuje tak
důkladné a hladké oholení.
Pro optimální výsledky:
• Holte se vždy před tím, než si budete mýt obličej.
• Vždy držte holicí strojek v pravém úhlu (90°) k pokožce (b).
• Pokožku napněte a holte se proti směru růstu vousů.
• Pokud jste se několik dnů neholil, použijte na zkrácení dlouhých vousů
nejprve široký zastřihovač (4a). Důkladné a hladké oholení dokončete
pomocí holicí planžety.
• Aby se udržel 100% holicí výkon, vyměňte holicí planžetu a břitový blok
nejpozději každých 18 měsíců, nebo jakmile se opotřebují.
Tento strojek je vhodný pro použití ve vaně nebo sprše.
24
Page 25

Tvarování
Použití otočného zastřihovače
Široký zastřihovač (4a) rovnoměrně zastřihuje rozsáhlejší partie (c) a je
ideální pro tvarování kotlet, knírku a krátké bradky. Široký zastřihovač je
vybaven bezpečnými zoubky a páskem pro zajištění menšího podráždění a
snadnějšího skluzu strojku. Stiskněte modré tlačítko a otočný zastřihovač (4)
se vysune. Širokým zastřihovačem posunujte proti směru růstu vousů a
přitom napínejte pokožku.
Úzký zastřihovač (4b) přesně zastřihuje linie a okraje vousů (d). Je ideální
pro přesné tvarování kontur.
Pokud chcete úzký zastřihovač použít, vysuňte zastřihovač a otočte ho o
180°.
Časté používání otočného zastřihovače může snížit kapacitu baterie.
Zastřihování
Použití zastřihovacích nástavců (1), (7) a (10)
Příslušný zastřihovací nástavec nasaďte na planžetu holicího strojku (2) nebo
na otočný zastřihovač (4) a tlačením ho nasaďte na holicí strojek, dokud
nezaklapne na svoje místo (e).
Zastřihovač třídenního strniště & ochranný kryt planžety (1): Tento nástavec
je ideální pro tvarování a udržování strniště.
• Nasaďte zastřihovací nástavec na planžetu (2) a vysuňte široký zastřiho-
vač (4). Zapněte holicí strojek a používejte ho, jak je znázorněno na
obrázku (e). Nástavec zajišťuje holení pod optimálním úhlem.
Nastavitelný zastřihovací nástavec (7): Tento nástavec je ideální pro zastřihování bradky a udržování požadované délky vousů.
• Nasaďte zastřihovací nástavec na holicí planžetu (2) a nastavte
požadovanou délku vousů bradky. Stiskněte volič délky vousů (8) a
posunutím směrem nahoru nastavte požadovanou délku vousů (f)
(možnosti volby: 1,2 mm / 2,8 mm / 4,4 mm / 6 mm). Vysuňte otočný
zastřihovač (4).
• Zapněte holicí strojek spínačem zapnutí/vypnutí a zastřihujte vousy proti
směru jejich růstu tak, že posunujete nástavec průhledným hřebenem po
pokožce (f).
Přesný zastřihovací nástavec (10): Tento nástavec je ideální pro úpravu
obočí (cca. 3 mm).
• Při použití přesného zastřihovače se doporučuje nasadit na holicí planžetu
(2) (e) zastřihovač třídenního strniště & ochranný kryt planžety (1).
25
Page 26

• Nástavec nasaďte na vysunutý úzký zastřihovač (4b) (g).
• Zapněte holicí strojek a zastřihujte vousy proti směru jejich růstu (g).
Čištěni
Pravidelné čištění holicího strojku zajišťuje lepší holicí výkon. Propláchněte
holicí hlavu po každém holení pod tekoucí vodou, protože je to velmi
jednoduchý a rychlý způsob, jak udržet holicí strojek v čistotě:
• Zapněte holicí strojek (bez síťového přívodu) a opláchněte holicí hlavu
pod teplou tekoucí vodou (h). Můžete také použít tekuté mýdlo, které
neobsahuje abrazivní látky. Opláchněte důkladně všechnu pěnu a strojek
nechte ještě několik sekund běžet.
• Pak holicí strojek vypněte, sejměte holicí planžetu a břitový blok. Nechte
rozebraný holicí strojek důkladně oschnout.
• Pokud budete holicí strojek pravidelně umývat pod tekoucí vodou, kápněte
jednou týdně na zastřihovače (4a, 4b) a holicí planžetu (i) kapku jemného
oleje na šicí stroje.
Alternativně můžete holicí strojek vyčistit pomocí přiloženého kartáčku (j):
• Holicí strojek vypněte. Sejměte holicí planžetu.
• Pomocí kartáčku vyčistěte břitový blok a vnitřní část holicí hlavy.
Kartáčkem však nečistěte holicí planžetu, protože by se mohla poškodit.
Udržování holicího strojku ve špičkové formě
Výměna holicích dílů
Aby se udržel 100% holicí výkon, vyměňte holicí planžetu a břitový blok
každých 18 měsíců, nebo jakmile se opotřebují. Oba tyto díly vyměňujte
současně, abyste dosáhli hladšího oholení a menšího podráždění pokožky.
(Holicí planžeta a břitový blok: 10B)
Péče o baterie
Aby se udržela optimální kapacita akumulátorových baterií, je třeba holicí
strojek plně vybít (holením) každých cca 6 měsíců. Pak strojek opět nabijte
na plnou kapacitu.
Poznámka k Ïivotnímu prostfiedí
Tento v˘robek obsahuje akumulátorové baterie. V zájmu ochrany
Ïivotního prostfiedí neodkládejte prosím tento v˘robek po skonãení
jeho Ïivotnosti do bûÏného domovního odpadu. Odevzdejte jej do
servisního stfiediska Braun nebo na pfiíslu‰né sbûrné místo zfiízené
dle pfiedpisÛ ve va‰í zemi.
26
Page 27

Deklarovaná hodnota emise hluku tohoto spotfiebiãe je 63 dB(A), coÏ
pfiedstavuje hladinu A akustického v˘konu vzhledem na referenãní
akustick˘ v˘kon 1 pW.
Zmûny jsou vyhrazeny.
Technické údaje viz potisk na speciálním napájecím pfiívodu se síÈov˘m
adaptérem.
Záruka
Poskytujeme dvojletou záruku na výrobek s platností od data jeho
zakoupení. V záruční lhůtě bezplatně odstraníme všechny vady přístroje
zapříčiněné chybou materiálu nebo výroby, a to buď formou opravy, nebo
výměnou celého přístroje (podle našeho vlastního uvážení). Uvedená záruka
je platná v každé zemi, ve které tento přístroj dodává společnost Braun
nebo její pověřený distributor.
Záruka se netýká následujících případů: poškození zapříčiněné nesprávným
použitím, běžné opotřebování (například plátků holicího strojku nebo
pouzdra zastřihávače), jakož i vady, které mají zanedbatelný dosah na
hodnotu nebo funkci přístroje. Pokud opravu uskuteční neautorizovaná
osoba a nebudou-li použity původní náhradní díly společnosti Braun,
platnost záruky bude ukončena.
Pokud v záruční lhůtě požadujete provedení servisní opravy, odevzdejte
celý přístroj s potvrzením o nákupu v autorizovaném servisním středisku
společnosti Braun nebo jej do střediska zašlete.
27
Page 28

Slovensk˘
Naše výrobky sú navrhnuté tak, aby spĺňali najvyššie nároky na kvalitu,
funkčnosť a dizajn. Veríme, že budete so svojím novým holiacim strojčekom
Braun maximálne spokojní.
Upozornenie
Tento holiaci strojček je vybavený špeciálnou sieťovou šnúrou s integrovaným bezpečnostným sieťovým adaptérom. Žiadna jej časť sa nesmie meniť
ani rozoberať. V opačnom prípade môže dôjsť k úrazu elektrickým prúdom.
Tento prístroj nie je urãen˘ pre deti a osoby so zníÏen˘mi fyzick˘mi a mentálnymi schopnosÈami, ak pri jeho pouÏívaní nie sú pod dozorom osoby,
ktorá je zodpovedná za ich bezpeãnosÈ. Vo v‰eobecnosti odporúãame, aby
ste prístroj uchovávali mimo dosahu detí. Dávajte pozor, aby deti prístroj
nepoužívali na hranie.
Pri používaní na rôznych partiách tela dbajte na to, aby ste držali pokožku
napnutú.
Z hygienických dôvodov nepoužívajte tento holiaci strojček spolu s inými
osobami.
Fľaštička s olejom
Uchovávajte mimo dosahu detí. Nekonzumujte. Po vyprázdnení obsahu
fľaštičku zahoďte.
Popis
1 Hrebienok na úpravu strniska aochranný kryt
2 Holiaca planžeta
3 Britový blok
4 Otočný zastrihávač
4a Široký zastrihávač (28 mm)
4b Úzky zastrihávač (14 mm)
5 Kontrolka nabíjania
6 Ovládač zapnutia/vypnutia
7 Nastaviteľný hrebienok
8 Nastavenie dĺžky chĺpkov
9 Špeciálna sieťová šnúra
10 Precízny hrebienok
11 Stav nabitia
28
Page 29

Nabíjanie
Optimálna teplota prostredia pre nabíjanie je 15 °C až 35 °C. Nevystavujte
holiaci strojček dlhšiu dobu teplotám vyšším ako 50 °C.
• Pomocou špeciálnej sieťovej šnúry pripojte vypnutý holiaci strojček do
zásuvky elektrickej siete.
• Ak holiaci strojček nabíjate po prvýkrát alebo ak ste ho niekoľko mesiacov
nepoužívali, nabíjajte honepretržite 4 hodiny.
• Indikátor nabíjania (5) signalizuje, že holiaci strojček sa nabíja. Keď je
batéria plne nabitá, indikátor nabíjania sa vypne. Prerušované blikanie po
krátkej chvíli znamená, že batéria je nabitá na plnú kapacitu. Indikátor
môže nakrátko zablikať aj počas nabíjania úplne vybitej batérie.
• Úplné nabitie umožňuje v závislosti od vzrastu chĺpkov až 30 minút holenia
bez sieťového pripojenia.
• Po úplnom nabití holiaci strojček bežným používaním postupne vybite.
Následne ho znova nabite na plnú kapacitu. Všetky ďalšie nabíjania trvajú
približne 1 hodinu.
• Maximálna kapacita batérie sa dosiahne až po niekoľkých cykloch nabitia/
vybitia.
• 5-minútové rýchlonabíjanie je dostatočné pre oholenie.
Holenie
Najskôr zložte nastaviteľný hrebienok (7): Palcami zatlačte úchyty po stranách nastaviteľného hrebienka ahrebienok uvoľnite vsmere, ktorý ukazuje
šípka (a). Holiaci strojček zapnite spínačom zapnutia/vypnutia (6). Pohyblivá
holiaca planžeta sa automaticky prispôsobí povrchu pokožky pre dôkladné
ahladké oholenie.
Tipy pre optimálne výsledky:
• Hoľte sa vždy pred umývaním tváre.
• Vždy držte holiaci strojček v pravom uhle (90°) voči pokožke (b).
• Napnite pokožku a hoľte sa v protismere rastu chĺpkov.
• Ak ste sa niekoľko dní neholili, pomocou širokého zastrihávača (4a) si
najskôr skráťte dlhé fúzy. Na dosiahnutie dôkladného, hladkého oholenia
sa nakoniec ohoľte pomocou holiacej planžety.
• Aby bol dodržaný 100% holiaci výkon, vymeňte holiacu planžetu a britový
blok každých 18 mesiacov alebo vtedy, keď sú tieto diely opotrebované.
Tento holiaci strojček je vhodný na použitie vo vani alebo v sprche.
29
Page 30

Tvarovanie
Používanie otočného zastrihávača
Široký zastrihávač (4a) rovnomerne upravuje azastriháva väčšie oblasti (c).
Je ideálny na tvarovanie bokombrád, fúzov akrátkych brád. Široký
zastrihávač sa vyznačuje systémom ochrany ahladkého sklzu pre menšie
podráždenie pokožky ahladké kĺzanie zastrihávača po pokožke. Otočný
zastrihávač (4) vysuňte stlačením modrých prúžkov vtvare šípky. Pokožku
udržujte napnutú aširokým zastrihávačom pohybujte proti smeru rastu fúzov.
Úzky zastrihávač (4b) precízne tvaruje línie akontúry (d) aje ideálny na
precíznu úpravu atvarovanie okrajov. Ak chcete použiť úzky zastrihávač,
najskôr vysuňte otočný zastrihávač aotočte ho o180 stupňov. Časté
používanie otočného zastrihávača znižuje kapacitu batérie.
Zastrihávanie
Používanie zastrihávacích nadstavcov (1), (7) a (10)
Požadovaný zastrihávací nadstavec nasaďte na holiacu planžetu strojčeka
(2), prípadne na otočný zastrihávač (4) azatláčajte ho na holiaci strojček, až
kým kliknutím nezapadne na miesto (e).
Hrebienok na úpravu strniska aochranný kryt (1): Tento nadstavec je vhodný
na vytvorenie vzhľadu trojdňového strniska ana jeho udržiavanie.
• Nadstavec nasaďte na holiacu planžetu (2) avysuňte otočný zastrihávač
(4). Zapnite holiaci strojček apohybujte ním tak, ako znázorňuje obrázok
(e). Pri použití nadstavec zaručuje optimálny uhol strojčeka kpokožke.
Nastaviteľný hrebienok (7): Tento nadstavec je vhodný na zastrihávanie
audržiavanie konštantnej dĺžky brady.
• Nadstavec nasaďte na holiacu planžetu (2) anastavte požadovanú dĺžku
fúzov. Stlačte nastavovač dĺžky fúzov (8) aposúvajte ho smerom nahor (f)
(možné nastavenie dĺžky zhora nadol: 1,2 mm / 2,8 mm / 4,4 mm/6 mm).
Vysuňte otočný zastrihávač (4).
• Stlačte spínač zapnutia/vypnutia azastrihávajte proti smeru rastu fúzov
pohybovaním priesvitného hrebienka po pokožke (f).
Precízny hrebienok (10): Tento nadstavec je ideálny na zastrihávanie obočia
(asi na 3 mm).
• Pri používaní precízneho hrebienka sa odporúča nasadiť na holiacu
planžetu (2) (e) hrebienok na úpravu strniska aochranný kryt (1).
• Nadstavec nasaďte na vysunutý úzky zastrihávač (4b) (g).
• Zapnite holiaci strojček aobočie si zastrihnite proti smeru rastu chĺpkov.
30
Page 31

Čisteni
Pravidelné čistenie zaručuje lepšie výsledky holenia. Opláchnutie holiacej
hlavy pod tečúcou vodou po každom holení je jednoduchý arýchly spôsob
ako udržať strojček čistý:
• Holiaci strojček zapnite (bez použitia sieťového kábla) aholiacu hlavu
opláchnite pod horúcou tečúcou vodou (h). Môžete použiť aj tekuté mydlo
bez abrazívnych látok. Penu dôkladne opláchnite astrojček nechajte
zapnutý ešte niekoľko sekúnd.
• Potom strojček vypnite a zložte holiacu planžetu aholiaci blok.
Rozmontované dielynechajte uschnúť.
• Ak holiaci strojček pravidelne čistíte pod tečúcou vodou, raz do týždňa
aplikujte naplanžetu azastrihávače (4a, 4b) kvapku jemného strojového
oleja.
Alternatívne môžete holiaci strojček vyčistiť pomocou priloženej kefky (j):
• Holiaci strojček vypnite a zložte holiacu planžetu.
• Kefkou vyčistite holiaci blok a vnútornú časť holiacej hlavy. Planžetu však
kefkou nečistite, pretože by sa mohla poškodiť.
Udržiavanie holiaceho strojčeka v špičkovej forme
Výmena holiacich dielov
Aby sa udržal 100% holiaci výkon, vymeňte holiacu planžetu a britový blok
každých 18 mesiacov alebo vtedy, keď sú tieto diely opotrebované. Obidva
tieto diely vymieňajte súčasne, aby sa dosahovalo hladšie oholenie a menšie
podráždenie pokožky.
(Holiaca planžeta a britový blok: 10B)
Starostlivosť o batérie
Aby sa udržala optimálna kapacita akumulátorových batérií je potrebné
holiaci strojček úplne vybiť (bežným holením) každých cca 6 mesiacov.
Potom holiaci strojček opäť nabite na plnú kapacitu.
Poznámka k Ïivotnému prostrediu
Tento v˘robok obsahuje akumulátorové batérie.
V záujme ochrany Ïivotného prostredia nevyhadzujte zariadenie po
skonãení jeho Ïivotnosti do beÏného domového odpadu. Odovzdajte
ho do servisného strediska Braun alebo do príslu‰ného zberného
strediska zriadeného v zmysle platn˘ch miestnych predpisov a noriem.
31
Page 32

Deklarovaná hodnota emisie hluku tohto spotrebiča je 63 dB(A), čo
predstavuje hladinu A akustického výkonu vzhľadom na frekvenčný akustický
výkon 1 pW.
Zmeny sú vyhradené.
Technické údaje viì potlaã na ‰peciálnej sieÈovej ‰núre so sieÈov˘m
adaptérom.
Záruka
Poskytujeme dvojročnú záruku na výrobok s platnosťou od dátumu jeho
zakúpenia. V záručnej lehote bezplatne odstránime všetky poruchy prístroja
zapríčinené chybou materiálu alebo výroby, a to buď formou opravy, alebo
výmenou celého prístroja (podľa nášho vlastného uváženia). Uvedená
záruka je platná v každom štáte, v ktorom tento prístroj dodáva spoločnosť
Braun alebo jej poverený distribútor.
Záruka sa netýka nasledujúcich prípadov: poškodenie zapríčinené
nesprávnym použitím, normálne opotrebovanie (napríklad plátkov holiaceho
strojčeka alebo puzdra zastrihávača), ako aj poruchy, ktoré majú
zanedbateľný účinok na hodnotu alebo funkciu prístroja. Ak opravu
uskutoční neautorizovaná osoba a ak sa nepoužijú pôvodné náhradné
súčiastky spoločnosti Braun, platnosť záruky bude ukončená.
Ak v záručnej lehote požadujete vykonanie servisnej opravy, odovzdajte
celý prístroj s potvrdením o nákupe v autorizovanom servisnom stredisku
spoločnosti Braun alebo ho do strediska zašlite.
32
Page 33

Magyar
Termékeinket a legmagasabb minőségi, funkcionalitás és design elvárások
kielégítésére tervezték. Reméljük, örömét leli új Braun borotvájában.
Figyelmeztetés
A készüléket alacsonyfeszültségű adapterrel láttuk el, ezért ne cserélje, és ne
szerelje egyik darabját sem! Ellenkező esetben áramütés veszélye áll fenn.
A készüléket mozgássérültek, szellemi vagy értelmi fogyatékosságban
szenvedŒ gyermekek vagy személyek, – kizárólag a biztonságukért felelŒs
felügyelet mellett használják! Javasoljuk, hogy a terméket gyermekektŒl
elzárva tartsa! Általában javasoljuk, hogy a készüléket tartsa gyermekek által
nem hozzáférhető helyen!
Amennyiben más testtájakon is használja a készüléket, győződjön meg arról,
hogy ott a bőrfelület kifeszíthető!
Higiéniai okokból a készüléket ne ossza meg másokkal!
Olajtartó flakon
Gyermekektől elzárva tartandó! Ne nyelje le! Javasoljuk, hogy a kiürült flakont
kimosás után helyezze el szelektív hulladékgyűjtőben!
Leírás
1 Fésű a 3-napos borosta megformázásához, védősapka
2 Szita
3 Kés
4 Elforgatható nyíró
4a Széles trimmelő (28 mm)
4b Keskeny trimmelő (14 mm)
5 Töltésjelző
6 Be és kikapcsoló
7 Állítható fésű
8 Szakáll hosszúság beállító
9 Speciális csatlakozókábel
10 Precíziós fésű
11 TöltŒállvány
A készülék feltöltése
A feltöltésre legalkalmasabb környezeti hőmérséklet 15 °C és 35 °C között
van. A készüléket ne tegye ki hosszabb ideig 50 °C-nál magasabb működési
hőmérsékletnek!
33
Page 34

• A csatlakozókábel segítségével csatlakoztassa a kikapcsolt készüléket a
hálózatra!
• Az első töltés alkalmával, - vagy amennyiben a borotvát több hónapja nem
használta, - hagyja a készüléket 4 órán át folyamatosan töltődni!
• A kigyulladt töltéskijelző fény (5) mutatja, hogy a borotva feltöltés alatt áll.
A töltéskijelző fény időszakos felvillanása azt jelzi, hogy a borotva még
teljes kapacitással rendelkezik. Az időszakos felvillanás akkor is jelentkezhet, ha az akkumulátor teljes lemerülést követően kerül újratöltésre.
• A teljesen feltöltött készülék kb. 30 perces vezeték nélküli borotválkozást
tesz lehetővé, a szakáll erősségétől függően.
• Ha a készülék teljesen feltöltődött, teljes lemerülésig használja azt.
Ezután ismét töltse fel teljesen, a teljes feltöltés kb. egy órát vesz igénybe.
• Az akkumulátor teljes kapacitását két, három feltöltés, és teljes lemerítés
után éri el.
• Egyetlen borotválkozáshoz 5 perces gyorsfeltöltés szükséges.
Borotválkozás
Először távolítsa el az állítható fésűt. (7) Hüvelykujjai segítségével nyomja be
az állítható fésű oldalán található csipeszeket úgy, hogy azok a nyilak
irányába álljanak (a). Kapcsolja be a borotvát a be/ki kapcsoló gombbal (6).
A lebegő szitakeret automatikusan igazodik az arc formájához, az alapos és
sima borotválkozás érdekében.
Tippek a tökéletes borotváltsághoz:
• A borotválkozást mindig arcmosás előtt végezze!
• Tartsa a készüléket megfelelő szögben (90°) az arcfelülethez képest! (b).
• Feszítse meg a bőrt, és a szakáll növekedési irányával ellentétes irányban
borotválkozzon!
• Amennyiben már néhány napja nem borotválkozott, a műveletvégzés
előtt használja a széles nyírót (4a) a hosszabb szőrszálak lerövidítéséhez.
Az alaposra borotvált, sima arcbőr eléréséhez fejezze be a borotválkozást
a szita használatával.
• A tökéletes eredmény érdekében azt javasoljuk, hogy készüléke nyíróalka-
trészeit (szita és kés) 18 havonta cserélje, illetve ha azok elkoptak.
34
A készülék alkalmas a fürdőkádban, vagy zuhany alatt történő
használatra.
Page 35

Formázás
Az elforgatható nyíró használata
A széles trimmelő (4a) egyenletes hosszúságúra vágja a szőrszálakat a
nagyobb bőrfelületeken. (c) Ideális a pajesz, a bajusz és a csak helyenként
rövid szakáll formázásához. A széles formázót biztonsági megszakítóval,
valamint a bőrirritáció megakadályozása és a borotva a bőrön történő
könnyed siklásának érdekében különleges felülettel láttuk el. Az elforgatható
nyíró kiemeléséhez nyomja meg a kék bordázatot. (4) A bőr kifeszítésével
egyidejűleg vezesse végig a borotvát a bőrfelületen, a szőrszálak növekedési
irányával ellentétesen.
A keskeny trimmelő (4b) a szabályos körvonalak és szélek (d) megformázására tervezett, így ideális a pontos kontúrvonalak kialakításához.
Használatához emelje ki a formázót és fordítsa el 180° fokkal.
Nyíró
A nyíró kiegészítő használata (1), (7) és (10)
Helyezze fel a szőrnyíró feltétet a borotvaszitára (2) vagy az elfordítható
formázóra (4) és nyomja a borotvaház felé mindaddig, amíg az a helyére
pattan (e).
A 3 napos borostát megformázó fésű és a védősapka (1): Ez a kiegészítő
ideális a borostás fazon elkészítéséhez és annak karbantartásához.
• Helyezze a nyíró kiegészítőt a szitára (2) és csúsztassa fel az elfordítható
formázót. (4). Kapcsolja be a készüléket és használja az ábrának megfelelően (e). A nyíró kiegészítő optimális szögben biztosítja a műveletvégzést.
Állítható fésű (7): ez a kiegészítő ideális a szakáll rövidebbre nyírásához és a
kívánt hosszúság karbantartásához.
• Helyezze a kiegészítőt a borotvaszitára és állítsa be a kívánt
szakállhosszúságot. Nyomja be a hosszúság-kiválsztót (8) és csúsztassa
felfelé (f) (a választható hosszúságok felülről-lefelé haladva: 1,2 mm /
2,8 mm / 4,4 mm / 6 mm). Csúsztassa fel az elforgatható nyírót (4).
• Indítsa el a készüléket a be- kikapcsoló gomb segítségével és a szőr
növekedésével ellentétes irányba, az átlátszó fésű vezetésével vágja le a
szőrszálakat a kívánt hosszúságra (f).
Precíziós fésű (10): ez a kiegészítő ideális a szemöldök nyírásához
(kb. 3 mm-re)
35
Page 36

• A precíziós fésű alkalmazásakor javasoljuk, hogy helyezze fel a 3-napos
borosta kialakítására szolgáló fésűt, valamint a védősapkát (1) a
borotvaszitára (2) (e).
• Helyezze fel a precíziós fésűt a meghosszabbított keskeny nyíróra (4b) (g).
• Kapcsolja be a készüléket és kezdje el a nyírást a szőrszálak
növekedésével ellentétes irányba (g).
A készülék tisztítása
A borotva rendszeres tisztítása fokozottabb teljesítményt biztosít a készülék
számára. A borotvafej tisztításának legkönnyebb és leggyorsabb módja, ha
minden borotválkozás után vízsugár alatt átöblíti azt.
• Kapcsolja be a borotvát (vezeték nélkül), és a borotvafejet forró vízsugár
alatt öblítse le (h). A tisztításhoz használhat sima, szemcséktől mentes
szappant. Öblítse le a habot, majd pár másodpercig még működtesse a
készüléket.
• Ezután kapcsolja ki a borotvát, emelje le a szitát és a nyíróegységet.
Hagyja a szétszedett alkatrészeket megszáradni.
• Amennyiben a borotva tisztítását rendszeresen vízsugár alatt végzi,
hetente egyszer ajánlatos a nyírókat (4a, 4b) és a szitát kevés műszerolajjal finoman átkenni (i).
Tisztíthatjuk a készüléket a készülékhez mellékelt tisztítókefével is (j).
• Kapcsolja ki a készüléket, és vegye le a szitát.
• A kefe segítségével tisztítsa meg a nyíróegységet, valamint a nyírófej
belső felületeit! A szita tisztításához azonban ne használjon kefét, mert az
kárt tehet benne.
A készülék ápolása, karbantartása
Nyíróalkatrészek cseréje
A tökéletes teljesítmény érdekében, cserélje le a szitát és a kést 18
havonként, vagy ezen alkatrészek elhasználódásakor! A még alaposabb
borotválkozás és a bőrirritáció megakadályozásának érdekében, mindkét
alkatrészt egyidejűleg cserélje! A Braun márkaszervizekben és az elektromos
üzletekben kapható szita-kés kombicsomag (típusszám: 10B).
Az akkumulátor megóvása
Az akkumulátor optimális kapacitásának megtartása érdekében, a borotvát
kb. 6 havonta teljesen le kell meríteni (borotválkozással). Ezután töltse fel
teljesen a borotvát ismét!
36
Page 37

Környezetvédelmi megjegyzés
Ez a készülék újra tölthetŒ akkumulátorral készült.
A környezetszennyezés elkerülése érdekében arra kérjük,
ha a készülék tönkrement ne dobja azt a háztartási szemétbe.
A mıködésképtelen készüléket leadhatja a Braun szervizközpontban, illetve az elhasznált elemek gyıjtésére kijelölt telepeken.
A változtatás jogát fenntartjuk.
Elektromos adattábla az adapteren található.
Garancia
A vásárlás napjától számított 2 évig tartó garanciát biztosítunk a termékre.
A garancia-időszakon belül minden anyag- és kivitelezési hibát díjmentesen
helyrehozunk, belátásunk szerint vagy javítva, vagy cserélve a készüléket.
Ez a garancia minden olyan országra kiterjed, ahol a készülék a Braun vagy
annak kijelölt viszonteladója forgalmazásában kapható.
A garancia nem fedi a következőket: nem rendeltetésszerű használat miatt
bekövetkező károsodás; kopás és elhasználódás (pl. a borotva szita- és
vágókazettája); illetve a készülék értéke és működése szempontjából
elhanyagolható jellegű hibák. A garancia érvényét veszti, ha a javítást erre
nem jogosult személy végzi, és ha nem Braun alkatrészeket használnak.
A garancia-időszakon belüli javításhoz adja le vagy küldje el a teljes
készüléket a vásárláskor kapott számlával együtt valamely hivatalos Braun
Ügyfélszolgálati Szervizközpontnak vagy a vásárlás helyén.
37
Page 38

Hrvatski
Naši su proizvodi dizajnirani tako da zadovoljavaju najviše standarde
kvalitete, funkcionalnosti i dizajna. Nadamo se da ćete i Vi uživati u brijanju
s novim Braun aparatom za brijanje.
Upozorenje
Vaš brijaći aparat ima specijalni priključni kabel s ugrađenim sigurnosnim
niskonaponskim sustavom. Nemojte mijenjati ili samostalno rukovati bilo
kojim dijelom kabela, jer se tako izlažete opasnosti od strujnog udara.
Nije predvi∂eno da ovaj ure∂aj koriste djeca ili osobe smanjenih fiziãkih
ili mentalnih sposobnosti, osim ako ih ne nadgleda osoba odgovorna za
njihovu sigurnost. Općenito, preporučujemo da ovaj uređaj držite van dosega
djece, a kada ga koriste pripazite da se ne igraju s njime.
Želite li koristiti aparat na drugim dijelovima tijela morate zategnuti kožu.
Iz higijenskih razloga ne dijelite ovaj aparat s drugim osobama.
Boca s uljem
Držati dalje od dosega djece. Ne gutati. Odložiti u skladu s propisima kada se
isprazni.
Opis
1 Češalj za trodnevnu bradu i zaštitni poklopac
2 Mrežica
3 Blok noža
4 Zakretni trimer
4a Široki trimer (28mm)
4b Uski trimer (14 mm)
5 Lampica-indikator
6 Prekidač za uključivanje/isključivanje aparata
7 Podesivi češalj
8 Prekidač za podešavanje dužine brade
9 Specijalni niskonaponski priključni kabel
10 Precizni češalj
11 Postolje za punjenje
38
Page 39

Punjenje
Najbolja temperatura okoliša u kojem punite svoj aparat je između 15 i 35 °C.
Ne izlažite aparat na duže vrijeme temperaturama višima od 50 °C.
• Uključite aparat u utičnicu preko niskonaponskog priključnog kabela.
Pazite da aparat bude isključen.
• Kod prvog punjenja ili ako uređaj niste koristili nekoliko mjeseci, pustite
aparat da se puni 4 sata bez prekida.
• Dok god se uređaj puni, istodobno svijetli i lampica indikatora punjenja (5).
Kad je baterija puna, lampica se gasi. Kratko nakon toga javlja se isprekidano svjetlo koje označava pun kapacitet baterije. Takvo se svjetlo može
javiti i kratko nakon što počnete puniti bateriju koja se u potpunosti ispraznila.
• Pun kapacitet baterija dostatan je za oko 30 minuta brijanja bez priključnog
kabela, što naravno ovisi i o jačini rasta Vaše brade.
• Kada je aparat u potpunosti napunjen, praznit će se normalnom upotre-
bom. Kada se isprazni ponovno ga napunite do punog kapaciteta. Daljnja
punjenja trajat će oko 1 sat.
• Baterije dostižu maksimum svojeg kapaciteta tek nakon nekoliko
uzastopnih ciklusa punjenja i pražnjenja.
• 5-minutno brzo punjenje dovoljno je za jedno brijanje.
Brijanje
Prvo skinite podesivi češalj (7): Držite aparat objema rukama i palčevima
stisnite bočne kvačice koje drže podesivi češalj, tako da se pomaknu
u smjeru strelica (a). Uključite aparat pritiskom na prekidač (6). Pomična
mrežica automatski se prilagođava obliku vašeg lica, pružajući vam temeljito
i nježno brijanje.
Savjeti za savršeno brijanje:
• Preporučujemo da se brijete prije umivanja.
• Aparat držite pod pravim kutem (90°) u odnosu na kožu (b).
• Zategnite kožu i pomičite aparat u pravcu suprotnom od smjera rasta
brade.
• Ako se nekoliko dana niste brijali, prvo skratite dlačice širokim trimerom
(4a), pa nastavite brijanje na uobičajen precizan i nježan način: mrežicom.
• Za što kvalitetnije brijanje, zamijenite mrežicu i blok noža svakih 18 mjeseci
ili kada se istroše.
Aparat se može koristiti u kadi ili pod tušem.
39
Page 40

Stiliziranje
Korištenje zakretnog trimera
Široki trimer (4a) ujednačeno podrezuje dlačice na širem području (c).
Zato je idealan za oblikovanje zalisaka, brkova i bradica. Široki trimer ima
sigurnosne utore i glatku plohu za manju iritaciju i lakše brijanje. Aktivira se
pritiskom na plavi rebrasti prekidač zakretnog trimera (4).
Dok zatežete kožu pomičite široki trimer u smjeru suprotnom od rasta dlačica.
Uski trimer (4b) precizno oblikuje linije i rubove (d), stoga je idealan za finalno
definiranje izgleda.
Za njegovo korištenje, aktivirajte zakretni trimer pritiskom na plavi prekidač pa
ga zakrenite za 180°.
Često korištenje zakretnog trimera zna smanjiti kapacitet baterija.
Podrezivanje
Korištenje nastavaka za podrezivanje (1), (7) i (10)
Postavite nastavak za podrezivanje na mrežicu (2) ili zakretni trimer (4)
i pritisnite prema dolje. Kada ga postavite na pravi način, čut ćete klik (e).
Češalj za trodnevnu bradu i zaštitni poklopac (1): Ovaj je nastavak idealan za
kreiranje i održavanje kratke brade.
• Postavite nastavak na mrežicu (2) i aktivirajte zakretni trimer (4). Uključite
uređaj kako je prikazano na ilustraciji (e). Ovaj nastavak jamči optimalan
kut korištenja.
Podesivi češalj (7): Ovaj je nastavak idealan za podrezivanje brade i stalno
održavanje željene dužine.
• Postavite nastavak na mrežicu (2) pa podesite željenu dužinu pritiskom na
prekidač za dužinu brade (8) i gurnite ga prema gore (f) (ponuđeni odabir
dužina je odozgo prema dolje: 1,2 mm, 2,8 mm, 4,4 mm, 6 mm). Uključite
zakretni trimer (4).
• Uključite aparat pritiskom na glavni prekidač. Pomičite aparat u smjeru
suprotnom od smjera rasta brade, vodeći računa o tome da plavi prozirni
dio aparata bude prislonjen uz kožu (f).
Precizni češalj (10): Ovaj je nastavak idealan za podrezivanje obrva
(cca. 3 mm).
• Kada koristite ovaj nastavak preporučujemo da na mrežicu (2) postavite
nastavak za 3-dnevnu bradu i zaštitni poklopac (1) (e).
• Postavite nastavak na uski trimmer (4b) (g).
• Uključite aparat i pomičite ga u smjeru suprotnom od rasta dlačica (g).
40
Page 41

Čišćenje
Redovito čišćenje omogućuje kvalitetniji i bolji rad aparata. Ispiranje glave
aparata tekućom vodom nakon svakog brijanja, jednostavan je i brz način
održavanja aparata čistim:
• Uključite aparat (bez priključnog kabela) i isperite glavu aparata vrućom
tekućom vodom (h). Za čišćenje možete koristiti i tekući sapun koji ne
sadrži nikakva jaka sredstva. Isperite pjenu i pustite da aparat radi još
nekoliko sekundi.
• Potom isključite aparat i pritisnite mehanizam za otpuštanje. Skinite
mrežicu i izvucite blok noža pa ih ostavite da se osuše.
• Čistite li redovito aparat tekućom vodom jednom tjedno nanesite kapljicu
laganog ulja za podmazivanje na trimere (4a i 4b) i mrežicu (i).
Aparat možete i čistiti četkicom koja dolazi s njim (j):
• Isključite uređaj i skinite mrežicu.
• Uz pomoć četkice očistite blok noža i unutrašnjost glave aparata. Nikada
nemojte četkicom čistiti mrežicu jer bi je to moglo oštetiti.
Održavanje aparata u vrhunskom stanju
Zamjenjivanje dijelova aparata
Kako biste zadržali 100-postotnu učinkovost aparata, zamijenite mrežicu i
blok noža svakih 18 mjeseci ili kada se istroše. Uvijek ih mijenjajte zajedno
jer tako osiguravate preciznije brijanje i manju iritaciju kože.
(Mrežica i blok noža: 10B)
Održavanje baterija
Kako biste održali optimalni kapacitet baterija, treba pustiti aparat da se do
kraja sam isprazni (upotrebom) otprilike svakih 6 mjeseci. Tada ga napunite
do punog kapaciteta.
Napomena o brizi za okoli‰
Ovaj ure∂aj dolazi s baterijama na punjenje. Kako biste za‰titili okoli‰,
kada se baterije u potpunosti istro‰e nemojte ih odlagati zajedno
s kuçnim otpadom. OdloÏiti ih moÏete u Braun servisnim centrima ili
mjestima predvi∂enima za odlaganje potro‰enih baterija.
ZadrÏano pravo na izmjene.
Detalji o elektriãnom napajanju otisnuti su na niskonaponskom prikljuãnom
kabelu.
41
Page 42

Jamstvo
Za ovaj proizvod jamčimo jamstveno razdoblje od 2 godine od dana kupnje.
U okviru tog razdoblja besplatno ćemo otkloniti bilo kakvu neispravnost
uređaja do koje je došlo zbog zamora materijala ili pogrešaka u radu ili
popravkom ili zamjenom uređaja ovisno o procjeni.
Ovo jamstvo vrijedi za svaku zemlju u kojoj ovaj uređaj distribuira Braun ili
njegov ovlašteni distributer.
Ovo jamstvo ne pokriva: štetu nastalu zbog nepravilne upotrebe, normalno
trošenje materijala (npr. u slučaju trošenja mrežice na uređaju za brijanje),
kao i oštećenja koja imaju neosporan utjecaj na vrijednost ili rad uređaja.
Jamstvo prestaje vrijediti ako popravke vrše neovlaštene osobe te ako se ne
koriste originalni Braunovi dijelovi.
Ako tijekom jamstvenog razdoblja zatrebate servis, donesite ili pošaljite cijeli
uređaj zajedno s računom na adresu Braunovog ovlaštenog servisnog
centra.
Servisna mjesta:
Poštovani, u koliko niste u mogućnosti riješiti Vaš problem putem priložene
servisne mreže, molimo Vas da nazovete broj 091 66 01 777 kako bi dobili
daljnje upute.
Singuli d.o.o., 10000, Zagreb, Primorska 3,
Elektromehaničarski obrt „Marković“, 42000, Varaždin, K.Filića 9,
042 21 05 88
)
Elektromehaničarski obrt „Marković“, 42240, Ivanec, Mirka Maleza 39,
042 78 42 99
)
ELMIN vl. Božidar Jakupanec, 48350, Đurđevac, Ruđera Boškovića 20,
048 81 33 65
)
Obrt za trgovinu i servis „Ježić color servis“ vl. Alen Jurić,
43000, Bjelovar, Petra Zrinskog 13, ) 043 24 35 00
TI-SAN d.o.o., 33000, Virovitica, Strossmayerova 9, ) 033 80 04 00
G-SERVIS d.o.o., 33520, Slatina, Grigora Viteza 2, ) 033 55 25 29
Kumex d.o.o., 31000, Osijek, Prolaz J.Leovića 5, ) 031 37 34 44
Konikom d.o.o., 31000, Osijek, Jablanova 43, ) 031 49 48 85
RTV servis vl. Mijo Kalaica, 34310, Pleternica, A.M.Relković 6,
034 25 20 00
)
Sorić elektronika, 44000, Sisak, A.Stračevića 35, ) 044 54 91 17
E.E.K.A., 51000, Rijeka, Baštijanova 36,
Čulig d.o.o., 47000, Karlovac, Banija 2, ) 047 41 59 55
Tehno - Jelčić, vl. Josip Jelčić, 22000, Šibenik,
8. DAL. UDAR. BRIGADE 71, ) 022 34 02 29
ALTA d.o.o., 23000, ZADAR, Vukovarska 3c, ) 023 32 76 66
Merc & Dujmović, 21000, SPLIT, Alojza Stepinca 6, ) 021 53 77 80
42
01 37 72 644, 01 66 01 777
)
051 22 84 01
)
Page 43

Slovenski
Vsi na‰i izdelki so zasnovani tako, da njihova kakovost, funkcionalnost in
oblika ustrezajo najvi‰jim standardom. Zato upamo, da bo va‰ novi Braunov
brivnik v celoti izpolnil va‰a priãakovanja in da ga boste z veseljem
uporabljali.
Opozorilo
Brivnik je opremljen s posebnim kablom z integriranim izjemno varnim
nizkonapetostnim napajalnikom in omreÏnim vtiãem.
Ta naprava ni namenjena, da bi jo uporabljali otroci ali osebe z zmanj‰ano
fiziãno in umsko sposobnostjo, razen pod nadzorom osebe odgovorne za
njihovo varnost. Priporočamo vam, da napravo hranite izven dosega otrok
oziroma zagotovite, da se otroci ne igrajo z njo.
Pred uporabo na drugih delih telesa kožo rahlo napnite. Iz higienskih razlogov
naj druge osebe brivnika ne uporabljajo.
Steklenička z oljem
Hranite izven dosega otrok. Ne zaužijte. Prazno embalažo odvrzite na
ustrezno mesto.
Opis
1 Nastavek za 3-dnevno brado in zaščitni pokrovček
2 MreÏica brivnika
3 Blok rezil
4 Vrtljivi prirezovalnik
4a Široki nastavek (28 mm)
4b Ozki nastavek (14 mm)
5 Indikator polnjenja
6 Stikalo za vklop/izklop
7 Nastavljivi glavniček
8 Drsnik za nastavitev dolžine brade
9 Posebni prikljuãni kabel
10 Nastavek za natančno prirezovanje
11 Podstavek za polnjenje
43
Page 44

Polnjenje
Najprimernej‰a temperatura okolice med polnjenjem brivnika je med 15 °C
in 35 °C. Brivnika ne izpostavljajte za daljši čas temperaturam nad 50 °C.
• S posebnim prikljuãnim kablom priklopite brivnik na omreÏno vtiãnico.
Motor mora biti pri tem izkljuãen.
• Pri prvem polnjenju ali kadar brivnika nekaj mesecev ne uporabljate,
pustite brivnik, da se neprekinjeno polni 4 ure.
• Indikator polnjenja (5) označuje, da poteka postopek polnjenja. Ko je
baterija v brivniku povsem napolnjena, se indikator polnjenja izklopi. Po
določenem času indikator s presledki utripa, kar označuje, da baterija
vzdržuje svojo polno kapaciteto. Indikator lahko za kratek čas utripa tudi
med polnjenjem, če je bila baterija povsem izpraznjena.
• Povsem napolnjena baterija brivnika zagotavlja – glede na rast va‰e
brade – 30 minut britja brez prikljuãnega kabla.
• Ko ste brivnik povsem napolnili, ga z normalno uporabo izpraznite.
Nato ga ponovno napolnite do polne kapacitete. Nadaljnja polnjenja
bodo trajala pribliÏno 1 uro.
• Baterija doseÏe svojo maksimalno kapaciteto ‰ele po nekajkratnem
polnjenju/praznjenju.
• Za britje zadošča že 5-minutno hitro polnjenje baterije.
Uporaba brivnika
Najprej odstranite nastavljivi glavniček (7): s palci hkrati pritisnite zaponi ob
straneh glavnička, tako da se premakneta v smeri puščic (a) in glavniček
sprostita. Pritisnite stikalo za vklop/izklop (6). Gibljivi okvir mrežice se
samodejno prilagodi površini vaše kože in jo gladko obrije.
Za najboljši učinek vam priporočamo:
• Brijte se pred umivanjem obraza.
• Brivnik vedno držite na kožo pod pravim kotom (90°) (b).
• Rahlo napnite kožo in se brijte v nasprotni smeri rasti dlak.
• Če se nekaj dni niste obrili, najprej uporabite široki nastavek (4a), da
najprej odrežete daljše dlake. Nato se gladko obrijte z mrežico.
• Za optimalne rezultate britja vam priporoãamo, da zamenjate mreÏico in
blok rezil vsakih 18 mesecev, oziroma ko opazite, da so deli obrabljeni.
44
Brivnik lahko uporabljate tako v kopalni kadi kot pod tušem.
Page 45

Oblikovanje
Uporaba vrtljivega prirezovalnika
S širokim nastavkom (4a) lahko enakomerno postrižete večje površine (c).
Idealen je za oblikovanje zalizcev, brkov in kratke brade. Široki nastavek je
opremljen z varnostnim zaklopom in drsnim trakom, kar zagotavlja gladko
drsenje in manjše draženje kože. Če želite uporabiti vrtljivi prirezovalnik,
pritisnite modro stikalo (4). Kožo rahlo napnite in široki nastavek pomikajte
proti rasti dlak.
Z ozkim nastavkom (4b) lahko oblikujete črte in robove (d), zato je idealen za
natančne linije.
Če želite uporabljati ozki nastavek, potisnite ven vrtljivi prirezovalnik in ga
obrnite za 180°.
Pogosta uporaba vrtljivega prirezovalnika lahko zmanjša kapaciteto baterije.
Prirezovanje
Uporaba nastavkov za prirezovanje (1), (7) in (10)
Izbrani prirezovalnik namestite na mrežico brivnika (2) ali na vrtljivi prirezovalnik (4) in ga pritisnite proti ohišju, da se zaskoči na svoje mesto (e).
Nastavek za 3-dnevno brado in zaščitni pokrovček (1): Ta nastavek je idealen
za oblikovanje in vzdrževanje nekajdnevne brade.
• Nastavek namestite na mrežico brivnika (2) in potisnite ven vrtljivi
prirezovalnik (4). Vklopite brivnik in ga uporabite tako, kot kaže sličica (e).
Nastavek omogoča britje pod optimalnim kotom.
Nastavljivi glavniček (7): Ta nastavek je idealen za prirezovanje brade in
vzdrževanje njene dolžine.
• Nastavek namestite na mrežico brivnika (2) in nastavite želeno dolžino
brade. Pritisnite drsnik za nastavitev dolžine brade (8) in ga potisnite
navzgor (f) (nastavitve dolžine z vrha proti dnu: 1,2 mm / 2,8 mm / 4,4 mm /
6 mm). Potisnite ven vrtljivi prirezovalnik (4).
• Pritisnite gumb za vklop/izklop in prirezujte proti rasti dlak, tako da prosojni
glavnik premikate po koži (f).
Nastavek za natančno prirezovanje (10): Ta nastavek je idealen za prirezovanje obrvi (ca. 3 mm).
• Priporočljivo je, da nastavek za 3-dnevno brado in zaščitni pokrovček (1)
namestite na mrežico brivnika (2) (e), kadar uporabljate nastavek za
natančno prirezovanje.
• Nastavek namestite na podaljšani ozki nastavek (4b) (g).
• Vklopite brivnik in prirezujte proti rasti dlak (g).
45
Page 46

Čišćenje
Redno čiščenje brivnika zagotavlja učinkovitejše britje. Splakovanje glave
brivnika pod tekočo vodo po vsakem britju je najhitrejši in najpreprostejši
način ohranjanja čistoče brivnika:
• Vklopite brivnik (brez priključne vrvice) in splaknite brivsko glavo pod
vročo tekočo vodo (h). Uporabite lahko tudi tekoče milo, če to ne vsebuje
abrazivnih snovi. Izperite vso peno in pustite brivnik delovati še nekaj
sekund.
• Nato izklopite brivnik, odstranite mrežico in blok rezil ter pustite, da se
razstavljeni deli brivnika posušijo.
• Priporočamo redno čiščenje brivnika pod tekočo vodo, enkrat tedensko pa
na prirezovalnike (4a, 4b) in na mrežico brivnika kanite še kapljico lahkega
strojnega olja (i).
Druga možnost je, da brivnik očistite s priloženo ščetko (j):
• Izklopite brivnik in odstranite mrežico.
• S ščetko očistite blok rezil in notranjost glave brivnika. Mrežice brivnika ne
smete čistiti s ščetko, ker jo lahko s tem poškodujete.
VzdrÏevanje brivnika v brezhibnem stanju
Zamenjava delov brivnika
Priporoãamo vam, da mreÏico in blok rezil zamenjate vsakih 18 mesecev
oziroma takrat, ko zaãneta kazati znake obrabe, saj boste le tako ohranjali
optimalne rezultate britja. Oba dela zamenjajte istoãasno, saj bo tako britje
bolj temeljito in bo manj draÏilo koÏo.
(MreÏica brivnika in blok rezil: ‰tevilka nadomestnega dela 10B)
Ohranjanje kapacitete baterij
PribliÏno vsakih ‰est mesecev morate brivnik (z britjem) popolnoma
izprazniti, saj boste le tako ohranili optimalno kapaciteto njegovih baterij.
Nato brivnik ponovno povsem napolnite.
Va‰ prispevek k varovanju okolja
Izdelek je opremljen z baterijami za ponovno polnjenje.
Prosimo vas, da izdelka ob koncu njegove Ïivljenjske dobe ne
odvrÏete skupaj z gospodinjskimi odpadki, ampak ga odnesete
na Braunov servisni center oz. na ustrezno zbirno mesto in tako
prispevate k varovanju okolja.
46
Page 47

Zmeny sú vyhradené.
Elektriãni podatki so odtisnjeni na posebnem prikljuãnem kablu.
Garancijski list
Za izdelek velja dveletna garancija, ki začne veljati z datumom izročitve blaga.
Proizvajalec jamči, da bo izdelek deloval v garancijskem roku ob pravilni
uporabi v skladu z njegovim namenom in priloženimi navodili. V garancijski
dobi bomo brezplačno odpravili vse okvare izdelka, ki so posledica napak v
materialu ali izdelavi, tako da vam bomo izdelek po naši presoji popravili ali
v celoti zamenjali.
Če pooblaščeni servis vašega izdelka ne popravi v 45 dneh, imate pravico
zahtevati nov izdelek. Za sprejem v reklamacijo se šteje dan, ko je izdelek
sprejet v pooblaščeni servis ali v trgovino, kjer ste izdelek kupili.
Čas zagotavljanja servisa, vzdrževanja, nadomestnih delov in priklopnih
aparatov je 3 leta po preteku garancijskega roka.
Popravila na domu zaradi zahtevnosti in neprenosljivosti sodobne servisne
opreme in razpoložljivosti rezervnih delov niso mogoča.
Garancija velja na območju Republike Slovenije, pa tudi v vseh državah,
kjer izdelek dobavlja podjetje Braun ali njegov pooblaščeni distributer.
Garancija ne izključuje pravic potrošnika, ki izhajajo iz odgovornosti
prodajalca za napake na blagu.
Garancija ne velja:
– Za okvare, ki so posledica nepravilne uporabe, normalne obrabe ali rabe
oziroma napake, ki imajo zanemarljiv učinek na vrednost in delovanje
izdelka.
– Ob vsakem posegu nepooblaščene osebe ali kakršnekoli druge
predelave izdelka in če pri popravilu niso uporabljeni originalni Braunovi
rezervni deli.
Za popravilo v garancijski dobi celotno napravo skupaj z računom in/ali
izpolnjenim garancijskim listom odnesite ali pošljite na pooblaščeni servisni
center Braun:
Jože Ježek
Cesta 24. junija 21
1231 Črnuče – Ljubljana
Tel. št.: +386 1 561 66 30
E-mail: jezektrg.servis@siol.net
Za dodatne informacije smo vam na voljo na brezplačni telefonski številki
080 2822.
47
Page 48

Türkçe
Ürünlerimiz yüksek kalite, fonksiyonellik ve şık dizayn ilkelerine bağlı
kalınarak tasarlanmıştır. Yeni Braun tıraş makinenizden memnun kalacağınızı
umarız.
Uyarı
Tıraş makinenizin ekstra düşük voltaj için güvenlik sağlayan adaptör içeren
özel kablo seti vardır. Bu setin hiçbir parçasını değiştirmeyin veya başka
amaçlar için kullanmayın aksi takdirde elektrik şoku meydana gelebilir.
Bu aygıt sorumlu bir kiμinin gözetiminde olmaksızın çocukların ve fiziksel
yada ruhsal engelli kiμilerin kullanmasına uygun de©ildir. Aygıtınızı çocukların
ulaμabilece©i yerlerden uzak tutmanızı öneririz. Çocukların cihazla oynama-
sını engellemek için gözetim altında tutunuz.
Vücudun yüz dışındaki bölgelerinde kullanırken cildinizin gergin olmasına
dikkat ediniz.
Hijyenik sebepler yüzünden makinenizi başkalarıyla paylaşmayınız.
Yağ Şişesi
Çocukların erişemeyeceği yerde saklayınız. Yutmayınız. Boşaldığında uygun
biçimde atınız.
Tanım
1 3 günlük kirli sakal tarağı & koruyucu başlık
2 Tıraş makinesi eleği
3 Kesici bıçaklar
4 Dönebilen şekillendirici bıçaklar
4a Geniş şekillendirici (28mm)
4b Dar şekillendirici (14mm)
5 Şarj ışığı
6 Açma/kapama düğmesi
7 Ayarlanabilir tarak
8 Sakal uzunluğu ayarı
9 Özel kablo seti
10 Hassas tarak
11 Ωarj stand∂
48
Page 49

Şarj etmek
Şarj etmek için en ideal sıcaklık 15 °C ve 35 °C arasıdır. Cihazı 50 °C nin
üstündeki sıcaklıklara uzun süre maruz bırakmayınız.
• Tıraş makineniz kapalıyken özel kablo setini kullanarak makinenizi prize
takın.
• lk kez şarj ederken veya tıraş makinesi birkaç aydır kulanılmadığında, tıraş
makinesini 4 saat süresince şarjda bırakın.
• Şarj ışığı (5) cihazın şarj edilmekte olduğunu gösterir. Pil tamamen şarj
olduğunda şarj ışığı söner. Bir süre sonra ışığın kesik kesik yanıp sönmesi
pilin tam kapasitesine ulaştığı anlamına gelir. Bu durum pil tamamen
boşken şarj edildiğinde de kısa süreli olarak görülür.
• Tam şarj olmuş bir makine sakal uzunluğunuza göre ortalama 30 dakikalık
kablosuz kullanım sağlar.
• Tıraş makinesi şarj olduktan sonra, şarjı bitene dek kullanın. Daha sonra,
tam dolana kadar yine şarj edin.
Şarj olması yaklaşık 1 saat sürecektir.
• Birkaç şarj döngüsünden sonra pil maksimum performansına ulaşacaktır.
• Tek bir tıraş için 5-dakika’lık hızlı şarj yeterlidir.
Tıraş Olurken
lk olarak, ayarlanabilir tarağı (7) çıkarın: Baş parmaklarınızı kullanarak
ayarlanabilir tarağın yanlardaki tutucu kısımlarına bastırıp ok yönünde (a)
çıkarın. Açma/kapama düğmesini (6) çalıştırın. Oynar folyo yapısı yakın ve
pürüzsüz bir tıraş için otomatik olarak cilt yüzeyine uyum sağlar.
En iyi sonuçlar için:
• Her zaman yüzünüzü yıkamadan önce tıraş olun.
• Tıraş olurken makinenizi cildinize 90 derece (90°) açı yapacak şekilde
kullanın.
• Cildinizi gerin ve tıraş makinenizi sakal uzama yönünün aksine doğru
hareket ettirin.
• Birkaç gün aradan sonra tıraş olunacağında, tıraş öncesinde geniş
şekillendiriciyi (4a) kullanarak uzun kılları düzeltin. Yakın, pürüzsüz bir tıraş
için elek ile işlemi tamamlayın.
• Tıraş performansını her zaman %100 korumak için elek ve kesicinizi en az
her 18 ayda bir değiştirin.
Bu makine, banyo ya da duşta kullanıma uygun tasarlanmıştır.
49
Page 50

Şekil verme
Dönebilen şekillendirici bıçakların kullanımı
Geniş şekillendirici bıçaklar (4a) büyük yüzeyleri (c) eşit şekilde keser ve
düzeltir. Favori, bıyık ve bölgesel kısa sakallara şekil verme için idealdir.
Daha az tahriş ve kolay bir şekilde kaymayı sağlamak için güvenlik ve
kayganlaştırıcı bantlar bulunmaktadır. Döner şekillendirici bıçakları (4) aktif
hale getirmek için mavi çizgilere basıp yukarıya doğru sürün. Cildinizi
gererken, geniş şekillendirici bıçakları sakal uzama yönünün tersine doğru
hareket ettirin.
Dar şekillendirici bıçaklar (4b) çizgileri ve köşeleri (d) hassas bir şekilde
belirlemek içindir.
Dar şekillendirici bıçağı kullanmak için şekillendiriciyi itip 180° çevirin.
Düzeltme
Düzeltici ataçmanların kullanımı (1), (7) ve (10)
Düzeltici ataçmanı tıraş makinesi eleğinin üzerine (2) veya dönebilen
düzelticinin üzerine yerleştirin ve bir klikle (e) yerine oturana kadar tıraş
makinesine doğru itin.
3 günlük kirli sakal tarağı & koruyucu başlık (1): Bu ataçman kirli sakal
görüntüsünü yaratmak ve korumak için mükemmel şekilde uygundur.
• Ataçmanı eleğin (2) üzerine yerleştirin ve dönebilen düzelticiyi (4) yukarı
doğru itin. Makineyi çalıştırın ve cihazı gösterildiği (e) gibi kullanın.
Ataçman en uygun kullanım açısını sağlar.
Ayarlanabilir tarak (7): Bu ataçman sakalı düzeltmek ve sabit boyda
tutmakiçin idealdir.
• Ataçmanı eleğin (2) üzerine yerleştirin ve istediğiniz sakal uzunluğunu
ayarlayın. Sakal uzunluğu seçicisine (8) basın ve yukarı doğru (f) kaydırın
(en kısadan en uzuna uzunluk seçimleri sırasıyla: 1,2 mm / 2,8 mm /
4,4 mm / 6 mm). Dönebilen şekillendiriciyi (4) yukarı itin.
Hassas tarak (10): Bu ataçman kaşları (3mm) düzeltmek için idealdir.
• Hassas tarağı kullanırken (e), 3 günlük kirli sakal tarağının & koruyucu
başlığın (1) eleğe (2) takılması önerilir.
• Ataçmanı dar şekillendiricinin (4b) üzerine yerleştirin (g).
• Tıraş makinesini çalıştırın ve kılların uzama yönünün tersine doğru tıraş
edin (g).
50
Page 51

Temizleme
Makineyi düzenli olarak temizlemek tıraş performansını arttıran bir unsurdur.
Makineyi her zaman temiz tutmanın en kolay ve hızlı yolu akan su altında
tıraş başlığını durulamak olacaktır:
• Kablosuzken tıraş makinesini çalıştırın ve tıraş başlığınısıcak suyun altına
tutun (h). Partiküller ve aşındırıcı maddeler bulundurmayan bir sabun da
kullanılabilir. Köpük temizlendikten sonra birkaç saniye daha suyun altında
tutup çalıştırabilirsiniz.
• Sonra,makineyi kapatın, tıraş makinesi eleğini ve kesici bölümü çıkarın.
Sonra bu parçaları kurumaya bırakın.
• Tıraş makinenizi düzenli olarak suyla temizliyorsanız, haftada bir elek (i) ve
düzeltici bıçaklar (4a, 4b) üzerine bir damla ince makine yağı damlatmanızı
öneririz.
Alternatif olarak makinenizi verilen temizleme fırçası (j) ile de temizleyebilirsiniz:
• Makineyi kapatın. Tıraş makinesi eleğini çıkarın.
• Fırçayı kullanarak kesici bıçakları ve iç bölmeyi temizleyin. Fakat zarar
verebileceği için, eleği kesinlikle fırça ile temizlemeyin.
Tıraş makineninizin ideal performansını her zaman
korumak için
Tıraş aksamını yenilemek
Tıraş performansını %100 korumak için tıraş makinesi eleğini ve kesiciyi her
18 ayda bir ya da eskidiğinde yenileyin.
Daha az cilt tahrişi ve yakın tıraş için iki parçayı aynı anda değiştirin.
(Tıraş makinesi eleği ve kesici: 10B)
Pillerin korunması
Şarj edilebilir pillerin maksimum kapasitede çalışabilmesi için, tıraş makinenizin şarjının yaklaşık her 6 ayda bir tamamen boşalması gerekir (tıraş olarak).
Sonra tıraş makinenizi tam dolana kadar şarj edin.
Bildirim yapılmadan deπiμtirilebilir.
Elektrikle ilgili direktifler özel kordon setinin üzerinde yazmaktadır.
51
Page 52

EEE STANDARTLARINA UYGUNDUR
Bakanlıkça tespit ve ilan edilen kullanım ömrü 7 yıldır.
Üretici firma ve CE işareti uygunluk değerlendirme
kuruluşu:
Braun GmbH
Frankfurter Straße 145
61476 Kronberg / Germany
“ (49) 6173 30 0
Fax (49) 6173 30 28 75
P & G Sat. ve Dağ. Ltd. Şti.
Serin Sok. No: 9 34752 çerenköy/stanbul
tarafından ithal edilmiştir.
Procter & Gamble Satış ve Dağıtım Ltd. Şti.
İçerenköy Mah. Serin Sok. Kosifler İş Merkezi
No:3 A 34752 Ataşehir, İstanbul
52
Page 53

Română (RO/MD)
Produsele noastre sunt concepute pentru a satisface cele mai înalte
standarde de calitate, funcţionalitate şi design.
Sperăm să vă bucuraţi pe deplin de noul dumneavoastră Aparat de Ras de
la Braun.
Avertizare
Sistemul de bărbierit este dotat cu un cablu special prevăzut cu un sistem
integrat de securitate pentru alimentarea de foarte joasă tensiune. Nu
schimbaţi sau nu acţionaţi nicio componentă a aparatului. În caz contrar,
există risc de electrocutare.
Acest aparat nu este destinat utilizării de către copii sau persoane cu
capacităţi fizice, senzoriale sau mentale reduse, cu excepţia cazului în care
sunt sub supravegherea unei persoane responsabile pentru siguranţa lor. În
general, vă recomandăm să nu lăsaţi aparatul la îndemâna copiilor. Copiii
trebuie supravegheaţi pentru a se asigura că nu se joacă cu aparatul.
Pentru utilizarea aparatului în alte zone ale corpului, asiguraţi-vă că pielea
este întinsă. Din motive de igienă, nu folosiţi aparatul în comun, cu alte
persoane.
Sticla de ulei
A nu se lăsa la îndemâna copiilor. A nu se înghiţi. A se arunca în mod
corespunzător după golire.
Descriere
1 pieptenele pentru barba de 3 zile şi capacul protector
2 Sita pentru bărbierit
3 Blocul de tăiere
4 Dispozitivul de tuns (trimmer) torsionabil
4a Dispozitivul de tuns (trimmer) lat (28 mm)
4b Dispozitivul de tuns (trimmer) îngust (14 mm)
5 Indicatorul de încărcare
6 Întrerupător on/off
7 Pieptenele reglabil
8 Selectorul de lungime pentru barbă
9 Cablul special
10 Pieptenele care asigură precizia
11 Suportul pentru încărcare
53
Page 54

Încărcarea
Temperatura ideală a mediului ambiant pentru încărcare este situată în
intervalul 15 °C – 35 °C. Nu expuneţi aparatul de ras la temperaturi mai mari
de 50 °C pentru perioade lungi de timp.
• Cu ajutorul cablului special, conectaţi aparatul de ras la o priză electrică
având motorul oprit.
• Când încărcaţi aparatul pentru prima dată, sau când aparatul nu a fost
folosit de câteva luni, lăsaţi-l la încărcat continuu, timp de 4 ore.
• Indicatorul de încărcare (5) arată faptul că aparatul se încarcă. Când
bateria este complet încărcată, indicatorul de încărcare se stinge. Clipitul
intermitent ce apare după o vreme, indică faptul că bateria se menţine la
capacitate maxima. Aceasta se poate întâmpla şi pe timpul încărcării,
pentru puţină vreme, după ce bateria se descărcase complet.
• O încărcare completă asigură până la 30 de minute de bărbierit fără fir, în
funcţie de ritmul de creştere a bărbii dumneavoastră.
• După ce aparatul de ras este complet încărcat, descărcarea acestuia se
va face prin utilizarea lui normală. Apoi reîncărcaţi aparatul de ras la
capacitate maximă. Încărcările ulterioare vor dura aproximativ 1 oră.
• Capacitatea maximă a bateriei poate fi atinsă numai după câteva cicluri
de încărcare/descărcare.
• O încărcare rapidă de 5 minute este suficientă pentru un bărbierit.
Bărbieritul
Mai întâi, înlăturaţi pieptenele reglabil (7): Utilizând degetele mari, apăsaţi
clemele laterale ale pieptenelui reglabil, astfel încât acestea să se
balanseze în direcţia săgeţilor (a). Acţionaţi întrerupătorul on/off (6). Cadrul
mobil al sitei se adaptează automat la suprafaţa pielii, pentru a conferi un
bărbierit precis şi neted.
Pentru rezultate optime:
• Bărbieriţi-vă întotdeauna înainte să vă spălaţi pe faţă.
• Pe tot parcursul bărbieritului ţineţi aparatul de ras în unghi drept (90°) faţă
de piele (b).
• Întindeţi pielea şi folosiţi aparatul de ras în sensul opus direcţiei de
creştere a bărbii dumneavoastră.
• Pentru un bărbierit preliminar după câteva zile în care nu v-aţi bărbierit,
folosiţi dispozitivul de tuns (trimmer) lat (4a) pentru a pre-tăia firele lungi
de păr. Pentru un ras precis, neted, încheiaţi operaţiunea folosind sita
pentru bărbierit.
54
Page 55

• Pentru a menţine performanţa bărbieritului la nivelul de 100%, înlocuiţi
sita de bărbierit şi blocul de tăiere la cel puţin 18 luni sau atunci când se
uzează.
Acest aparat este adaptat pentru utilizarea într-o baie sau duş.
Styling
Folosirea dispozitivului de tuns torsionabil
Dispozitvul de tuns lat (4a) taie uniform şi modelează părul pe suprafeţe
mari (c). Este ideal pentru a da formă perciunilor, mustăţii şi bărbii de
dimensiuni medii. Dispozitivul de tuns (trimmer) lat este prevăzut cu canale
de siguranţă şi o bandă de alunecare pentru o iritare redusă şi o alunecare
uşoară. Apăsaţi benzile albastre pentru a împinge dispozitivul de tuns
(trimmer) torsionabil (4). În timp ce întindeţi pielea, îndreptaţi dispozitivul
de tuns (trimmer) lat în sensul contrar direcţiei de creştere a părului.
Dispozitivul de tuns (trimmer) îngust (4b) defineşte cu acurateţe linii şi
margini (d) fiind ideal pentru obţinerea unui contur perfect.
Pentru a folosi dispozitivul de tuns (trimmer) îngust, împingeţi în sus
dispozitivul de tuns (trimmer) torsionabil şi răsuciţi-l la 180°. Utilizarea
frecventă a dispozitivului de tuns torsionabil poate diminua capacitatea
bateriei.
Tunsul
Folosirea accesoriilor pentru tuns (1), (7) şi (10)
Fixaţi respectivul accesoriu pentru tuns pe sita de bărbierit (2), alternativ pe
dispozitivul de tuns (trimmer) torsionabil (4) şi apăsaţi-l pe carcasa
aparatului de ras până ce se fixează cu un click (e).
Pieptenele pentru barba de 3 zile şi capacul protector (1): Acest accesoriu
este perfect potrivit pentru a crea şi menţine un aspect ţepos al bărbii.
• Fixaţi accesoriul pentru tuns pe sita de bărbierit (2) şi împingeţi în sus
dispozitivul de tuns (trimmer) torsionabil (4). Porniţi aparatul de ras şi
folosiţi dispozitivul aşa cum se arată în figura (e). Accesoriul asigură un
unghi optim de folosire.
Pieptenele reglabil (7): Acest accesoriu este ideal pentru aranjarea bărbii şi
menţinerea ei la o lungime constantă.
• Fixaţi accesoriul pentru tuns pe sita de bărbierit (2) şi setaţi lungimea dorită
pentru barbă. Apăsaţi selectorul de lungime a bărbii (8) şi glisaţi-l în sus (f)
55
Page 56

(posibile setări ale lungimii, de sus în jos: 1,2 mm/2,8 mm/4,4 mm/6 mm).
Împingeţi în sus dispozitivul de tuns (trimmer) torsionabil (4).
• Apăsaţi întrerupătorul on/off şi manevraţi partea transparentă a
pieptenului pe piele, în sensul contrar creşterii părului (f).
Pieptenele pentru precizie (10): Acest accesoriu este ideal pentru tunsul
sprâncenelor (circa 3 mm).
• Atunci când se foloseşte pieptenele pentru precizie, se recomandă
fixarea pieptenului pentru barba de 3 zile şi a capacului protector (1) pe
sita de bărbierit (2) (e).
• Fixaţi accesoriul pe dispozitivul de tuns (trimmer) îngust mărit (4b) (g).
• Porniţi aparatul de ras şi tundeţi în sensul contrar creşterii părului (g).
Curăţarea
Curăţarea regulată asigură o mai bună eficienţă a bărbieritului.Clătirea
capului aparatului de ras sub jet de apă după fiecare bărbierit reprezintă o
modalitate facilă şi rapidă de a-l păstra curat:
• Porniţi aparatul de ras (fără fir) şi clătiţi capul acestuia sub jet de apă
fierbinte (h). Puteţi folosi săpun lichid, fără substanţe abrazive. Clătiţi
toată spuma şi lăsaţi aparatul pornit pentru alte câteva secunde.
• Apoi opriţi aparatul de ras, îndepărtaţi sita de bărbierit şi blocul de tăiere.
După aceea, lăsaţi componentele dezasamblate la uscat.
• Dacă dumneavoastră curăţaţi în mod regulat aparatul de ras sub apă,
atunci aplicaţi, o dată pe săptămână, câte o picătură de ulei uşor de
maşină pe dispozitivele de tuns (4a, 4b) şi pe sita de bărbierit (i).
Alternativ, puteţi curăţa aparatul de ras folosind peria cu care este prevăzut
acesta (j):
• Opriţi aparatul de ras. Îndepărtaţi sita de bărbierit.
• Folosind peria, curăţaţi blocul de tăiere şi suprafaţa interioară a capului
aparatului de ras. Cu toate acestea, nu curăţaţi sita de bărbierit cu peria,
deoarece deteriorează sita.
Cum să vă păstraţi aparatul de ras în perfectă stare
Înlocuirea pieselor de bărbierit
Pentru a menţine performanţa bărbieritului la nivelul de 100%, înlocuiţi sita
de bărbierit şi blocul de tăiere la cel puţin 18 luni sau atunci când se uzează.
Schimbaţi ambele componente în acelaşi timp, pentru un bărbierit mai
precis şi mai puţine iritaţii ale pielii. (Sita de bărbierit şi blocul de tăiere: 10B)
56
Page 57

Conservarea bateriilor
Pentru a se menţine capacitatea optimă a bateriilor reîncărcabile, aparatul
de ras trebuie să fie în întregime descărcat (prin folosirea la bărbierit) la
fiecare aproximativ 6 luni. Apoi reîncărcaţi aparatul de ras la capacitate
maximă.
Conform Hotãrârii nr. 672 din 19 iulie 2001 privind stabilirea conditiilor de
introducere pe piatã a aparatelor electrocasnice în functie de nivelul
zgomotului transmis prin aer, valoarea de zgomot dB(A) pentru acest aparat
este de 63 dB(A).
Avertisment referitor la mediu
Acest produs conţine baterii reîncărcabile. În scopul protejării mediului, vă
rugăm să nu aruncaţi produsul în gunoiul menajer la sfârşitul duratei
sale de viaţă utilă. Debarasarea poate avea loc într-un Centru de
Service Braun sau în locaţii adecvate de colectare, existente în ţara
dumneavoastră.
Specificaţiile pot fi modificate fără avertizare prealabilă.
Pentru specificaţii electrice, a se vedea imprimarea de pe cablul special.
Garanţie
Acordăm o garanţie de 2 ani pentru acest produs, de la data achiziţionării.
Durata medie de utilizare: 5 ani, cu condiţia respectării instrucţiunilor de
utilizare si efectuării intervenţiilor tehnice numai de către personalul service
autorizat.
În perioada de garanţie vom remedia gratuit neconformităţile aparatului,
prin repararea sau înlocuirea produsului, după caz. Această garanţie este
valabilă în orice ţara în care acest aparat este furnizat de către compania
Braun sau de către distribuitorul desemnat al acesteia. Repararea sau
înlocuirea produselor se va efectua în cadrul unei perioade rezonabile de
timp (maxim 15 zile de la data aducerii la cunoştinţă a neconformităţii).
Prezenta garanţie nu acoperă: defectele datorate utilizării
necorespunzatoare, uzurii normale (de ex: ale sitei aparatului sau ale
blocului de taiere), precum si defectele care au un efect neglijabil asupra
valorii sau funcţionării aparatului. Garanţia devine nulă dacă se efectuează
57
Page 58

reparaţii de către persoane neautorizate şi dacă nu se utilizează
componente originale Braun.
Pentru a beneficia de service în perioada de garanţie, prezentaţi produsul
împreună cu factura (bonul/chitanţa de cumpărare) la una dintre unităţile
service agreate.
PUNCT CENTRAL DE SERVICE BRAUN
Şos. Viilor, Nr.14, Corp Clădire C2, Etaj 2, Biroul nr.3, Sector 5, Bucureti
(acces din Str. Năsăud)
Tel: 021–224.00.47
Mobil: 0722.541.548
E-mail: service.braun@interbrands.ro
58
Page 59

кЫТТНЛИ
Руководство по эксплуатации
з‡¯Л ЛБ‰ВОЛfl УЪ‚В˜‡˛Ъ Т‡П˚П ‚˚ТУНЛП ЪВ·У‚‡МЛflП Н‡˜ВТЪ‚‡,
ЩЫМНˆЛУМ‡О¸МУТЪЛ Л ‰ЛБ‡ИМ‡. 燉ВВПТfl, З‡П ФУМ‡‚ЛЪТfl З‡¯‡ МУ‚‡fl
˝ОВНЪУ·ЛЪ‚‡ Braun.
Важно
Бритва снабжена сетевым адаптером, подающим низкое напряжение.
Не пытайтесь заменить какие-либо детали этого устройства или
экспериментировать с ним, иначе Вы подвергаете себя опасности
поражения электрическим током.
Прибор не предназначен для использования лицами (включая детей)
с пониженными физическими, чувственными или умственными
способностями или при отсутствии у них опыта или знаний, если они не
находятся под контролем или не проинструктированы об использовании
прибора лицом, ответственным за их безопасность. Дети должны
находиться под контролем для недопущения игры с прибором.
При бритье любых участков тела, слегка натягивайте кожу для оптимизации бритья.
В целях гигиены не передавайте прибор другим лицам.
Маслёнка
Хранить вдали от детей. Не использовать в пищу. Утилизировать как
бытовой отход.
Описание и комплектность
1 Насадка для эффекта «трехдневной щетины» с защитной крышкой
2 Бреющая сетка
3 Режущий блок
4 Поворотный триммер
4a Широкая сторона триммера (28 мм)
4b Узкая сторона триммера (14 мм)
5 Индикатор зарядки
6 Кнопка ‚ключения/‚ыключения
7 Регулируемая насадка- триммер
8 Кнопка установки длины подравнивания
9 Cетевой адаптер
10 Точная насадка-триммер
11 èÓ‰ÒÚ‡‚͇ ‰Îfl Á‡fl‰ÍË ·ËÚ‚˚
59
Page 60

Зарядка аккумулятора
Зарядку лучше всего производить при температуре окружающей среды
от 15 °C до 35 °C. Не подвергайте бритву воздействию температуры
выше + 50 °C в течение длительного периода времени.
• С помощью сетевого адаптера подсоедините бритву к электросети;
бритва должна быть выключена.
• При первой зарядке аккумулятора или если бритва не использова-
лась в течение нескольких месяцев, заряжать бритву следует не
менее 4 часов.
• Индикатор зарядки аккумулятора (5) показывает, когда происходит
зарядка данного электроприбора. Когда аккумулятор полностью
зарядится, индикатор зарядки выключится. Через некоторое время
он начнет прерывисто мигать, что говорит о полной зарядке
аккумулятора. Индикатор может также мигать в течение короткого
периода времени в начале зарядки аккумулятора, если он был
полностью разряжен.
• Полный заряд обеспечивает работу бритвы без подключения
к электросети в течение примерно 30 минут в зависимости от типа
щетины.
• После полной зарядки аккумулятора его разрядка осуществляется
в процессе нормальной эксплуатации бритвы. Затем необходимо
произвести подзарядку до полного заряда аккумулятора.
В дальнейшем подзарядка аккумулятора занимает примерно 1 час.
• Максимальная емкость аккумулятора достигается только после
нескольких циклов зарядки/разрядки.
• Быстрой 5 минутной зарядки достаточно для одного сеанса бритья.
Процесс бритья
Прежде всего, снимите регулируемую насадку-триммер (7): Большими
пальцами нажмите на боковые фиксаторы регулируемой насадки-триммера, чтобы она сдвинулась в направлении, указанном стрелками (a).
Установите выключатель питания в положение вкл. (6). Плавающая
головка автоматически подстроится под поверхность Вашей кожи для
более качественного и мягкого бритья.
Рекомендации для чистого бритья
• Рекомендуем бриться до умывания.
• Держите бритву под прямым углом (90°) к поверхности кожи (b).
• В процессе бритья слегка натягивайте кожу и брейтесь в направлении
против роста волос.
60
Page 61

• Для предварительного бритья отросшей за несколько дней щетины
используйте широкую сторону насадки-триммера (4a). Для более
чистого и мягкого бритья заканчивайте бритье с помощью электробритвы.
• Для обеспечения 100%-ной эффективности бритья рекомендуется
заменять одновременно сетку и режущий блок бритвы каждые
18 месяцев или по мере их износа.
Бритву можно использовать в ванне и под душем.
Стайлинг
Использование поворотного триммера
Широкая сторона триммера (4a) позволяет равномерно подравнивать
большие участки щетины (c). Она идеально подходит для корректировки бакенбард, усов и щетины. Широкая сторона триммера поставляется в комплекте с защитными скребками и скользящей полоской для
уменьшения раздражения и легкого скольжения бритвы. Нажмите на
голубые полоски для снятия поворотного триммера (4). Растянув кожу,
проведите широкой стороной триммера против направления роста
волос.
Узкая сторона триммера (4b) позволяет сделать четкие линии и кромки
(d), являясь идеальным средством для очерчивания контуров.
Для использования узкой стороны триммера вытяните поворотный
триммер и поверните его на 180°.
При частом использовании поворотного триммера емкость аккумулятора может уменьшиться.
Использование триммеров
Бритье по контуру с использованием триммеров (1), (7) и (10)
Установите соответствующую насадку на головку бритвы (2) или на
поворотный триммер (4) и нажмите на него до того момента, пока
головка не защелкнется на корпусе бритвы (e).
Насадка для эффекта «трехдневной щетины» и защитная крышка (1):
Данная насадка идеально подходит для создания эффекта «трехдневной щетины» и его поддержания.
61
Page 62

• Установите насадку на головку бритвы (2) и вытяните поворотный
триммер (4). Включите бритву и начните бритье, как показано на
рисунке (e). Данная насадка обеспечивает оптимальный угол бритья.
Регулируемая насадка-триммер (7): Данная насадка идеальна для
корректировки щетины и поддержания ее постоянной длины.
• Установите насадку на головку бритвы (2) и установите необходимую
длину щетины. Нажмите на регулятор длины щетины (8) и сдвиньте
его вверх (f) (возможные варианты длины: 1,2 мм / 2,8 мм / 4,4 мм /
6 мм). Вытяните поворотный триммер (4).
• Включите бритву и начните бритье против направления роста волос,
прижимая прозрачную часть насадки к поверхности кожи (f).
Точная насадка-триммер (10): Данная насадка идеально подходит для
корректировки бровей (ок. 3 мм).
• При использовании точной насадки-триммера рекомендуется
установить насадку для эффекта «трехдневной щетины» с защитной
крышкой (1) на головку бритвы (2) (e).
• Установите насадку на вытянутую узкую сторону триммера (4b) (g).
• Включите бритву и начните бритье против направления роста волос
(g).
Чистка бритвы
Регулярная чистка прибора обеспечит более качественное бритье.
Головку бритвы следует промывать под проточной водой после
каждого применения:
• Включите бритву (без провода) и промойте головку теплой проточной
водой (h). Можно использовать жидкое мыло без абразивных
веществ. Смойте всю пену и дайте бритве поработать в течение
нескольких секунд.
• После этого выключите бритву, снимите сетку и режущий блок.
Положите снятые элементы до их полного высыхания.
• При регулярной чистке бритвы проточной водой необходимо один
раз в неделю наносить каплю машинного масла на широкую и узкую
стороны триммера (4a, 4b) и бреющую сетку (i).
В качестве альтернативы, бритву можно чистить при помощи щетки,
входящей в комплект поставки (j):
• Выключите бритву. Снимите сетку.
62
Page 63

• При помощи щетки очистите режущий блок и внутренние поверх-
ности головки бритвы. Саму бреющую сетку чистить щеткой не
следует, поскольку вы можете повредить ее.
Поддержание эффективной работы бритвы
Замена рабочих деталей
Для обеспечения 100% эффективности бритья рекомендуется заменять
одновременно сетку и режущий блок каждые 18 месяцев или по мере
их износа. Заменяйте обе детали одновременно, чтобы обеспечить
более гладкое бритье и снизить вероятность раздражения кожи.
(Бреющая сетка и режущий блок: 10B).
Обеспечение работоспособности аккумуляторов
Для поддержания оптимальной емкости аккумулятора бритвы, необходимо примерно раз в 6 месяцев полностью разряжать аккумулятор
путем эксплуатации бритвы. Затем полностью зарядите аккумулятор.
щОВНЪЛ˜ВТНЛВ ТФВˆЛЩЛН‡ˆЛЛ ТПУЪЛЪВ М‡ ТФВˆЛ‡О¸МУП ¯МЫВ.
Данный тип изделия может быть изменен без предварительного
уведомления
Внимание: Вскрытие корпуса приведет к повреждению прибора и
лишению гарантии.
Данное изделие соответствует всем требуемым европейским
стандартам безопасности и гигиены.
Изделие использовать по назначению в соответствии
с руководством по эксплуатации.
Бритва электрическая Braun cruZer 6 Face, тип 5730
Изготовлено в Китае для Braun GmbH,
Frankfurter Strasse 145, 61476 Kronberg, Germany.
RU: Импортер/Служба потребителей: OOO «Проктер энд Гэмбл
Дистрибьюторская Компания», Россия, 125171, Москва, Ленинградское
шоссе, 16А, стр.2. Тел. 8-800-200-20-20.
63
Page 64

BY: Импортер: ООО «Электросервис и Ко», Беларусь, 220012, г. Минск,
ул. Чернышевского, 10А, к. 412А3. Сервисный центр: ООО «Катрикс»,
Беларусь, 220012, г. Минск, ул. Чернышевского, 10А, к.409.
Й‡‡МЪЛИМ˚В У·flБ‡ЪВО¸ТЪ‚‡ BRAUN
СОfl ‚ТВı ЛБ‰ВОЛИ П˚ ‰‡ВП „‡‡МЪЛ˛ М‡ ‰‚‡ „У‰‡, М‡˜ЛМ‡fl Т ПУПВМЪ‡
ФЛУ·ВЪВМЛfl ЛБ‰ВОЛfl.
З ЪВ˜ВМЛВ „‡‡МЪЛИМУ„У ФВЛУ‰‡ П˚ ·ВТФО‡ЪМУ ЫТЪ‡МЛП ФЫЪВП
ВПУМЪ‡, Б‡ПВМ˚ ‰ВЪ‡ОВИ ЛОЛ Б‡ПВМ˚ ‚ТВ„У ЛБ‰ВОЛfl О˛·˚В Б‡‚У‰ТНЛВ
‰ВЩВНЪ˚, ‚˚Б‚‡ММ˚В МВ‰УТЪ‡ЪУ˜М˚П Н‡˜ВТЪ‚УП П‡ЪВЛ‡ОУ‚ ЛОЛ
Т·УНЛ.
З ТОЫ˜‡В МВ‚УБПУКМУТЪЛ ВПУМЪ‡ ‚ „‡‡МЪЛИМ˚И ФВЛУ‰ ЛБ‰ВОЛВ
ПУКВЪ ·˚Ъ¸ Б‡ПВМВМУ М‡ МУ‚УВ ЛОЛ ‡М‡ОУ„Л˜МУВ ‚ ТУУЪ‚ВЪТЪ‚ЛЛ
Т Б‡НУМУП «й Б‡˘ЛЪВ Ф‡‚ ФУЪВ·ЛЪВОВИ».
Й‡‡МЪЛfl У·ВЪ‡ВЪ ТЛОЫ, ЪУО¸НУ ВТОЛ ‰‡Ъ‡ ФУНЫФНЛ ФУ‰Ъ‚ВК‰‡ВЪТfl
ФВ˜‡Ъ¸˛ Л ФУ‰ФЛТ¸˛ ‰ЛОВ‡ (П‡„‡БЛМ‡) М‡ ФУТОВ‰МВИ ТЪ‡МЛˆВ
оригинального руководства ФУ ˝НТФОЫ‡Ъ‡ˆЛЛ BRAUN, НУЪУ‡fl fl‚ОflВЪТfl
„‡‡МЪЛИМ˚П Ъ‡ОУМУП.
щЪ‡ „‡‡МЪЛfl ‰ВИТЪ‚ЛЪВО¸М‡ ‚ О˛·УИ ТЪ‡МВ, ‚ НУЪУЫ˛ ˝ЪУ ЛБ‰ВОЛВ
ФУТЪ‡‚ОflВЪТfl ЩЛПУИ BRAUN ЛОЛ М‡БМ‡˜ВММ˚П ‰ЛТЪЛ·¸˛ЪУУП, Л „‰В
МЛН‡НЛВ У„‡МЛ˜ВМЛfl ФУ ЛПФУЪЫ ЛОЛ ‰Ы„ЛВ Ф‡‚У‚˚В ФУОУКВМЛfl МВ
ФВФflЪТЪ‚Ы˛Ъ ФВ‰УТЪ‡‚ОВМЛ˛ „‡‡МЪЛИМУ„У У·ТОЫКЛ‚‡МЛfl.
Й‡‡МЪЛfl МВ ФУН˚‚‡ВЪ ФУ‚ВК‰ВМЛfl, ‚˚Б‚‡ММ˚В МВФ‡‚ЛО¸М˚П
ЛТФУО¸БУ‚‡МЛВП (ТП. Ъ‡НКВ ТФЛТУН МЛКВ) Л МУП‡О¸М˚И ЛБМУТ ‰ВЪ‡ОВИ
(М‡ФЛПВ, ТВЪНЛ Л ВКЫ˘В„У ·ОУН‡) ‚ ФУˆВТТВ ˝НТФОЫ‡Ъ‡ˆЛЛ ЛБ‰ВОЛfl.
щЪ‡ „‡‡МЪЛfl ЪВflВЪ ТЛОЫ, ВТОЛ ВПУМЪ ФУЛБ‚У‰ЛОТfl МВ
ЫФУОМУПУ˜ВММ˚П М‡ ЪУ ОЛˆУП, Л ВТОЛ ЛТФУО¸БУ‚‡М˚ МВ УЛ„ЛМ‡О¸М˚В
‰ВЪ‡ОЛ BRAUN.
З ТОЫ˜‡В ФВ‰˙fl‚ОВМЛfl ВНО‡П‡ˆЛЛ ФУ ЫТОУ‚ЛflП ‰‡ММУИ „‡‡МЪЛЛ,
ФВВ‰‡ИЪВ ЛБ‰ВОЛВ ˆВОЛНУП ‚ПВТЪВ Т „‡‡МЪЛИМ˚П Ъ‡ОУМУП ‚ О˛·УИ
ЛБ ˆВМЪУ‚ ТВ‚ЛТМУ„У У·ТОЫКЛ‚‡МЛfl BRAUN.
ЗТВ ‰Ы„ЛВ ЪВ·У‚‡МЛfl, ‚НО˛˜‡fl ЪВ·У‚‡МЛfl ‚УБПВ˘ВМЛfl Ы·˚ЪНУ‚,
ЛТНО˛˜‡˛ЪТfl, ВТОЛ М‡¯‡ УЪ‚ВЪТЪ‚ВММУТЪ¸ МВ ЫТЪ‡МУ‚ОВМ‡ ‚ Б‡НУММУП
ФУfl‰НВ.
кВНО‡П‡ˆЛЛ, Т‚flБ‡ММ˚В Т НУППВ˜ВТНЛП НУМЪ‡НЪУП Т ФУ‰‡‚ˆУП МВ
ФУФ‡‰‡˛Ъ ФУ‰ ˝ЪЫ „‡‡МЪЛ˛.
З ТУУЪ‚ВЪТЪ‚ЛЛ Т Б‡НУМУП ко ‹ 2300-1 УЪ 7.02.1992 „. «й б‡˘ЛЪВ Ф‡‚
ФУЪВ·ЛЪВОВИ» ЩЛП‡ BRAUN ЫТЪ‡М‡‚ОЛ‚‡ВЪ ТУН ТОЫК·˚ М‡ Т‚УЛ
ЛБ‰ВОЛfl ‡‚М˚П ‰‚ЫП „У‰‡П Т ПУПВМЪ‡ ФЛУ·ВЪВМЛfl ЛОЛ Т ПУПВМЪ‡
ФУЛБ‚У‰ТЪ‚‡, ВТОЛ ‰‡ЪЫ ФУ‰‡КЛ ЫТЪ‡МУ‚ЛЪ¸ МВ‚УБПУКМУ.
64
Page 65

аБ‰ВОЛfl BRAUN ЛБ„УЪУ‚ОВМ˚ ‚ ТУУЪ‚ВЪТЪ‚ЛЛ Т ‚˚ТУНЛПЛ ЪВ·У‚‡МЛflПЛ
В‚УФВИТНУ„У Н‡˜ВТЪ‚‡. иЛ ·ВВКМУП ЛТФУО¸БУ‚‡МЛЛ Л ФЛ
ТУ·О˛‰ВМЛЛ Ф‡‚ЛО ФУ ˝НТФОЫ‡Ъ‡ˆЛЛ, ФЛУ·ВЪВММУВ З‡ПЛ ЛБ‰ВОЛВ
BRAUN, ПУКВЪ ЛПВЪ¸ БМ‡˜ЛЪВО¸МУ ·УО¸¯ЛИ ТУН ТОЫК·˚, ˜ВП ТУН
ЫТЪ‡МУ‚ОВММ˚И ‚ ТУУЪ‚ВЪТЪ‚ЛЛ Т кУТТЛИТНЛП Б‡НУМУП.
ëÎÛ˜‡Ë, ̇ ÍÓÚÓ˚ „‡‡ÌÚËfl Ì ‡ÒÔÓÒÚ‡ÌflÂÚÒfl:
– ‰ВЩВНЪ˚, ‚˚Б‚‡ММ˚В ЩУТ-П‡КУМ˚ПЛ У·ТЪУflЪВО¸ТЪ‚‡ПЛ;
– ЛТФУО¸БУ‚‡МЛВ ‚ ФУЩВТТЛУМ‡О¸М˚ı ˆВОflı;
– М‡Ы¯ВМЛВ ЪВ·У‚‡МЛИ руководства ФУ ˝НТФОЫ‡Ъ‡ˆЛЛ;
– ÌÂÔ‡‚Ëθ̇fl ÛÒÚ‡Ìӂ͇ ̇ÔflÊÂÌËfl ÔËÚ‡˛˘ÂÈ ÒÂÚË (ÂÒÎË ˝ÚÓ
ЪВ·ЫВЪТfl);
– ‚МВТВМЛВ ЪВıМЛ˜ВТНЛı ЛБПВМВМЛИ;
– ПВı‡МЛ˜ВТНЛВ ФУ‚ВК‰ВМЛfl;
– ФУ‚ВК‰ВМЛfl ФУ ‚ЛМВ КЛ‚УЪМ˚ı, „˚БЫМУ‚ Л М‡ТВНУП˚ı (‚ ЪУП ˜ЛТОВ
ТОЫ˜‡Л М‡ıУК‰ВМЛfl „˚БЫМУ‚ Л М‡ТВНУП˚ı ‚МЫЪЛ ФЛ·УУ‚);
– ‰Оfl ФЛ·УУ‚, ‡·УЪ‡˛˘Лı УЪ ·‡Ъ‡ВВН, – ‡·УЪ‡ Т МВФУ‰ıУ‰fl˘ЛПЛ
ËÎË ËÒÚÓ˘ÂÌÌ˚ÏË ·‡Ú‡ÂÈ͇ÏË, β·˚ ÔÓ‚ÂʉÂÌËfl, ‚˚Á‚‡ÌÌ˚Â
ЛТЪУ˘ВММ˚ПЛ ЛОЛ ЪВНЫ˘ЛПЛ ·‡Ъ‡ВИН‡ПЛ (ТУ‚ВЪЫВП ФУО¸БУ‚‡Ъ¸Тfl
ÚÓθÍÓ Ô‰Óı‡ÌÂÌÌ˚ÏË ÓÚ ‚˚ÚÂ͇ÌËfl ·‡Ú‡ÂÈ͇ÏË);
– ‰Îfl ·ËÚ‚ – ÒÏflÚ‡fl ËÎË ÔÓ‚‡Ì̇fl ÒÂÚ͇.
ЗМЛП‡МЛВ! йЛ„ЛМ‡О¸М˚И Й‡‡МЪЛИМ˚И н‡ОУМ ФУ‰ОВКЛЪ ЛБ˙flЪЛ˛ ФЛ
У·‡˘ВМЛЛ ‚ ТВ‚ЛТМ˚И ˆВМЪ ‰Оfl „‡‡МЪЛИМУ„У ВПУМЪ‡. иУТОВ
ФУ‚В‰ВМЛfl ВПУМЪ‡ Й‡‡МЪЛИМ˚П н‡ОУМУП ·Ы‰ВЪ fl‚ОflЪ¸Тfl
Б‡ФУОМВММ˚И УЛ„ЛМ‡О гЛТЪ‡ ‚˚ФУОМВМЛfl ВПУМЪ‡ ТУ ¯Ъ‡ПФУП
ТВ‚ЛТМУ„У ˆВМЪ‡ Л ФУ‰ФЛТ‡ММ˚И ФУЪВ·ЛЪВОВП ФУ ФУОЫ˜ВМЛЛ ЛБ‰ВОЛfl
ЛБ ВПУМЪ‡. нВ·ЫИЪВ ФУТЪ‡‚ОВМЛfl ‰‡Ъ˚ ‚УБ‚‡Ъ‡ ЛБ ВПУМЪ‡, ТУН
„‡‡МЪЛЛ ФУ‰ОВ‚‡ВЪТfl М‡ ‚ВПfl М‡ıУК‰ВМЛfl ЛБ‰ВОЛfl ‚ ТВ‚ЛТМУП
ˆВМЪВ.
З ТОЫ˜‡В ‚УБМЛНМУ‚ВМЛfl ТОУКМУТЪВИ Т ‚˚ФУОМВМЛВП „‡‡МЪЛИМУ„У ЛОЛ
ФУТОВ„‡‡МЪЛИМУ„У У·ТОЫКЛ‚‡МЛfl ФУТ¸·‡ ТУУ·˘‡Ъ¸ У· ˝ЪУП ‚
аМЩУП‡ˆЛУММЫ˛ лОЫК·Ы лВ‚ЛТ‡ BRAUN ФУ ЪВОВЩУМЫ 8 800 200 20 20
(Б‚УМУН ЛБ кУТТЛЛ ·ВТФО‡ЪМУ).
65
Page 66

ì͇ªÌҸ͇
Керівництво з експлуатації
Наші вироби відповідають найвищим стандартам якості, функціональним можливостям та дизайну.
Ми сподіваємось, що Ви отримаєте цілковиту насолоду, користуючись
своєю новою бритвою Braun.
Увага
Ваша бритва оснащена спеціальним мережевим адаптером з
вбудованим джерелом живлення та безпечною низькою вихідною
напругою.
Не замінюйте й не змінюйте яку-небудь частину комплекту. Це може
призвести до ураження електричним струмом.
Прилад не призначений для використання особами (включаючи дітей) зі
зниженими фізичними, чуттєвими або розумовими можливостями або
за відсутності у них досвіду або знань, якщо вони не знаходяться під
контролем або не проінструктовані про використання приладу особою,
відповідальною за їх безпеку. Діти повинні знаходитися під контролем
для недопущення гри з приладом.
При використанні для інших частин тіла шкіра повинна бути натягнутою.
З гігієнічних причин не давайте користуватися цим пристроєм іншим.
Баночка з олійкою
Зберігайте подалі від дітей. Не ковтати. Утилізувати як побутовий
відхід.
Опис та комплектність
1 Насадка для ефекту «триденної щетини» із захисною кришкою
2 Сітка бритви
3 Ріжуча голівка
4 Поворотний тример
4а Широка сторона тримера (28 мм)
4b Вузька сторона тримера (14 мм)
5 Світлова індикація зарядки
6 Перемикач увімкнення/вимкнення
7 Насадка-тример, що регулюється
8 Селектор довжини волосся
9 Мережевий адаптер
10 Точна насадка-тример
11 á‡fl‰ÌËÈ ÔËÒÚ¥È
66
Page 67

Зарядка
Оптимальна температура навколишнього середовища для зарядки
перебуває в діапазоні від 15 °C до 35 °C.
Не піддавайте бритву впливу температур вище 50 °C протягом
тривалого часу.
• Використовуючи спеціальний мережевий адаптер, живлення,
підключіть бритву до електромережі коли прилад вимкнений.
• При першій зарядці акумулятора або якщо бритва не використо-
вувалася протягом декількох місяців, заряджати бритву слід не
менше 4 годин.
• Індикатор зарядки акумулятора (5) показує, коли відбувається
зарядка даного електроприладу. Коли акумулятор буде повністю
зарядженим, індикатор зарядки вимкнеться. Через деякий час він
почне переривчасто блимати, що свідчитиме про повну зарядку
акумулятора. Індикатор може також блимати протягом короткого
періоду часу на початку зарядки акумулятора, якщо він був повністю
розряджений.
• Повністю заряджена батарея забезпечує роботу бритви без шнура
живлення протягом 30 хвилин залежно від вашої щетини.
• Після повної зарядки бритви розрядіть бритву, використовуючи її
в нормальному режимі роботи. Наступна зарядка займе приблизно
1 годину.
• Повна ємність батареї буде досягнута тільки після декількох циклів
зарядки / розрядки.
• 5-хвилинна швидка зарядка є достатньою для роботи бритви.
Гоління
Перш за все, зніміть насадку-тример, що регулюється (7): Великими
пальцями натискайте на бічні фіксатори насадки-тримера, що
регулюється, аби вона зрушилася в напрямі, вказаному стрілками (a).
Встановіть вимикач живлення в положення вкл. (6). Плаваюча голівка
автоматично підлаштується до поверхні Вашої шкіри для більш якісного
і м’якого гоління.
Кращі результати:
• Завжди голіться перед умиванням обличчя.
• Увесь час тримайте бритву під прямим кутом (90)° до поверхні
шкіри (b).
• Натягуйте шкіру й переміщуйте бритву проти напрямку росту волосся.
67
Page 68

• Для попереднього гоління щетини, що відросла за декілька днів,
використовуйте широку сторону насадки-тримеру (4a). Для більш
чистого та м’якого гоління закінчуйте гоління з використанням
електробритви.
• Для підтримки 100% ефективності гоління замінюйте сітку й ріжучу
голівку не рідше, ніж через 18 місяців, або при їхньому зношуванні.
Цей електроприлад можна використовувати у ванні або
душовій кабіні.
Стайлінг
Використання поворотного тримера
Широка сторона тримеру (4a) дозволяє рівномірно підрівнювати великі
ділянки (c). Вона ідеально підходить для коригування баків, вусів і
щетини. Широка сторона тримеру поставляється в комплекті із захисними скребками і ковзаючою смужкою для зменшення подразнення
і легкого руху бритви. Натискайте на блакитні смужки для зняття
поворотного тримера (4). Розтягнувши шкіру, проведіть широкою
стороною тримеру проти напряму росту волосся.
Вузька сторона тримера (4b) дозволяє зробити чіткі лінії і краї (d),
будучи ідеальною для окреслювання контурів.
Для використання вузької сторони тримеру витягніть поворотний
тример і поверніть його на 180°.
При частому використанні поворотного тримера ємність акумулятора
може зменшитися.
Використання тримерів
Гоління по контуру з використанням тримерів (1), (7) і (10)
Встановіть відповідну насадку на голівку бритви (2) або на поворотний
тример (4) і натискайте на нього до того моменту, поки голівка не
замкнеться на корпусі бритви (e).
Насадка для ефекту «триденної щетини» і захисна кришка (1): Дана
насадка ідеально підходить для створення ефекту «триденної щетини»
і його підтримки.
• Встановіть насадку на голівку бритви (2) і витягніть поворотний
тример (4). Увімкніть бритву і почніть гоління, як показано на
малюнку (e). Дана насадка забезпечує оптимальний кут гоління.
68
Page 69

Насадка-тример, що регулюється (7): Дана насадка ідеальна для
коригування щетини і підтримки її постійної довжини.
• Встановіть насадку на голівку бритви (2) і встановіть необхідну
довжину щетини. Натисніть на регулятор довжини щетини (8) і
зруште його вгору (f) (можливі варіанти довжини: 1,2 мм / 2,8 мм /
4,4 мм / 6 мм). Витягніть поворотний тример (4).
• Увімкніть бритву і почніть гоління проти напряму росту волосся,
притискаючи прозору частину насадки до поверхні шкіри (f).
Точна насадка-тример (10): Дана насадка ідеально підходить для
коригування брів (ок. 3 мм).
• При використанні точної насадки-тримера рекомендується
встановити насадку для ефекту «триденної щетини» із захисною
кришкою (1) на голівку бритви (2) (e).
• Встановіть насадку на витягнуту вузьку сторону тримеру (4b) (g).
• Увімкніть бритву і почніть гоління проти напряму росту волосся (g).
Чищення приладу
Регулярне чищення приладу забезпечить більш якісне гоління. Голівку
бритви слід промивати після кожного використання, під проточною
водою:
• Увімкніть бритву (без проводу) і промийте голівку теплою проточною
водою (h). Можна використовувати рідке мило без абразивних речовин.
Змийте всю піну і дайте бритві попрацювати протягом декількох секунд.
• Після цього вимкніть бритву, зніміть сітку і ріжучий блок. Залиште
зняті елементи до їх повного висихання.
• При регулярному чищенні бритви проточною водою необхідно один
раз в тиждень наносити краплю машинного масла на широку та
вузьку сторони тримеру (4a, 4b) і бриючу сітку (i).
Як альтернатива, бритву можна чистити за допомогою щітки, що
входить в комплект постачання (j):
• Вимкніть бритву. Зніміть сітку.
• За допомогою щітки очистіть ріжучий блок і внутрішні поверхні
голівки бритви. Саму бриючу сітку чистити щіткою не слід, оскільки
ви можете пошкодити її.
Підтримуйте відмінний стан своєї бритви
Заміни деталей бритви
Для підтримки 100% ефективності при голінні, робіть заміну сітки
й ріжучої голівки не рідше, ніж через 18 місяців, або при їхньому
69
Page 70

зношуванні. Робіть заміну обох деталей одночасно для забезпечення
чистого гоління з мінімальним подразненням шкіри.
(Сітка бритви й ріжуча голівка: 10B)
Збереження працездатності батарей
Для збереження максимальної ємності акумуляторних батарей вони
повинні бути повністю розряджені (в процесі гоління) приблизно кожні
6 місяців. Потім повністю зарядіть батареї бритви.
ЦНУОУ„¥˜МВ ФУФВВ‰КВММfl
сВИ ФЛТЪ¥И П¥ТЪЛЪ¸ ·‡Ъ‡ВИНЛ, ˘У ФВВБ‡fl‰К‡˛Ъ¸Тfl.
З ¥МЪВВТ‡ı Б‡ıЛТЪЫ М‡‚НУОЛ¯М¸У„У ТВВ‰У‚Л˘‡, ФУТЛПУ МВ
викидати ªı ‰Ó ÍÓÁËÌË Á ‰Óχ¯Ì¥ÏË ‚¥‰ıÓ‰‡ÏË Ô¥ÒÎfl Á‡Í¥Ì˜ÂÌÌfl
терміну ‚ЛНУЛТЪ‡ММfl. ЗЛ ПУКВЪВ Б‰‡ЪЛ ªı ‰У сервісного ˆÂÌÚÛ
‡·У ‰У ‚¥‰ФУ‚¥‰МУ„У ˆВМЪЫ Б·УЫ, ˘У БМ‡ıУ‰ЛЪ¸Тfl Ы ‚‡¯¥И Н‡ªМ¥.
дУПФ‡М¥fl Б‡ОЛ¯‡π Б‡ ТУ·У˛ Ф‡‚У ‚МУТЛЪЛ БП¥МЛ ‚ комплектацію
ÔËÒÚÓ˛ ·ÂÁ ÒÔˆ¥‡Î¸ÌÓ„Ó Ó„ÓÎÓ¯ÂÌÌfl.
ЦОВНЪЛ˜М¥ ı‡‡НЪВЛТЪЛНЛ М‡‰ЫНУ‚‡М¥ М‡ ˜‡ТЪЛМ‡ı НУПФОВНЪЫ
мережевого адаптера.
äÓÎË ÔËÒÚ¥È Òڇ̠ÌÂÔˉ‡ÚÌËÏ ‰Îfl ‚ËÍÓËÒÚ‡ÌÌfl, ·Û‰¸ ·Ò͇,
‚¥‰ÌÂÒ¥Ú¸ ÈÓ„Ó ‰Ó ÒÔˆ¥‡Î¸ÌÓ ÔËÁ̇˜ÂÌËı ‰Îfl ˆ¸Ó„Ó Ï¥Òˆ¸, flÍ
‚ÒÚ‡ÌÓ‚ÎÂÌÓ Û Ç‡¯¥È ͇ªÌ¥.
Бритва cruZer 6 Face, що працює від акумулятора, тип 5730
Виготовлено в Китаї для Браун ГмбХ: Braun Electric (Shanghaj) Co Ltd.,
Lu Chun Road 475-495, MInghang, Shanghaj 200245, P.R. of China.
Адреса в Україні: ТОВ «Проктер енд Гембл
Трейдінг Україна», Україна, 04070, м. Київ, вул.
Набережно-Хрещатицька, 5/13, корпус літ. А.
Тел. (0-800) 505-000. www.pg.com.ua
Товар використовувати за призначенням, відповідно до інструкції з
експлуатації.
Дата виготовлення продукції Braun вказана безпосередньо на виробі
(в місці маркування) і складається з трьох цифр: перша цифра є
останньою цифрою року виготовлення, інші дві цифри є порядковим
номером тижня у році.
Гарантія – 2 роки. У разі необхідності гарантійного чи постгарантійного
обслуговування, звертайтеся до головного офісу сервісного центру
70
Page 71

Braun в Україні: ПП «І.Б.С.», вул. Глибочицька 53, м. Київ.
Тел. (044) 4286505.
Даний пристрій відповідає усім європейським вимогам безпеки та гігієни.
Обладнання відповідає вимогам Технічного регламенту обмеження
використання деяких небезпечних речовин в електричному та
електронному обладнані.
ɇ‡ÌÚ¥ÈÌ¥ ÁÓ·Ó‚’flÁ‡ÌÌfl виробника
Для всіх виробів ми даємо гарантію на два роки, починаючи з моменту
придбання виробу або з дати його виробництва, у разі відсутності або
неналежного оформлення гарантійного талону на виріб.
èÓÚfl„ÓÏ „‡‡ÌÚ¥ÈÌÓ„Ó ÔÂ¥Ó‰Û ÏË безкоштовно ЫТЫ‚‡πПУ ¯ОflıУП
ВПУМЪЫ, Б‡ПiМЛ ‰ВЪ‡ОВИ ‡·У Б‡П¥МЛ ‚Т¸У„У ‚ЛУ·Ы ·Ы‰¸-flН¥ Б‡‚У‰Т¸Н¥
‰ВЩВНЪЛ, ‚ЛНОЛН‡М¥ МВ‰УТЪ‡ЪМ¸У˛ flН¥ТЪ˛ П‡ЪВ¥‡О¥‚ ‡·У ТНО‡‰‡ММfl.
м ‚ЛФ‡‰НЫ МВПУКОЛ‚УТЪ¥ ВПУМЪЫ ‚ „‡‡МЪ¥ИМЛИ ФВ¥У‰ ‚Л¥· ПУКВ ·ЫЪЛ
Б‡П¥МВМЛИ М‡ МУ‚ЛИ ‡·У ‡М‡ОУ„¥˜МЛИ ‚¥‰ФУ‚¥‰МУ ‰У б‡НУМЫ ФУ Б‡ıЛТЪ
Ф‡‚ ТФУКЛ‚‡˜¥‚.
Й‡‡МЪ¥fl М‡·Ы‚‡π ТЛОЛ ОЛ¯В, flН˘У ‰‡Ъ‡ НЫФ¥‚О¥ Ф¥‰Ъ‚В‰КЫπЪ¸Тfl
ФВ˜‡ЪНУ˛ Ъ‡ Фi‰ФЛТУП дилера (П‡„‡БЛМЫ) М‡ УЛ„¥М‡О¸МУПЫ „‡‡МЪ¥ИМУПЫ
Ъ‡ОУМ¥ З„aun ‡·У М‡ УТЪ‡ММ¥И ТЪУ¥Мˆ¥ УЛ„¥М‡О¸МУª ¥МТЪЫНˆ¥ª Б
ВНТФОЫ‡Ъ‡ˆ¥ª Зr‡un, flН‡ Ъ‡НУК ПУКВ ·ЫЪЛ „‡‡МЪiИМЛП Ъ‡ОУМУП.
сfl „‡‡МЪ¥fl ‰¥ИТМ‡ Ы ·Ы‰¸-flН¥И Н‡ªМ¥, ‚ flНЫ ˆВИ ‚Л¥· ФУТЪ‡‚ОflπЪ¸Тfl
представником компанії виробника ‡·Ó ÔËÁ̇˜ÂÌËÏ дистриб’ютором,
Ъ‡ ‰В КУ‰М¥ У·ПВКВММfl Б ¥ПФУЪЫ ‡·У ¥М¯¥ Ф‡‚У‚¥ ФУОУКВММfl МВ
ФВВ¯НУ‰К‡˛Ъ¸ М‡‰‡ММ˛ „‡‡МЪ¥ИМУ„У У·ТОЫ„У‚Ы‚‡ММfl.
Й‡‡МЪ¥fl М‡ Б‡П¥МВМ¥ ˜‡ТЪЛМЛ Б‡Н¥М˜ЫπЪ¸Тfl ‚ ПУПВМЪ Б‡НiМ˜ВММfl „‡‡МЪ¥ª
М‡ ‰‡МЛИ ‚Лi·.
Й‡‡МЪ¥fl МВ ФУНЛ‚‡π ФУ¯НУ‰КВММfl, ‚ЛНОЛН‡М¥ МВ‚iМЛП ‚ЛНУЛТЪ‡ММflП
(‰Л‚. Ъ‡НУК ФВВОiН МЛК˜В) нормальне зношування Т¥ЪУН Ъ‡ МУК¥‚ ‰Оfl
„УОiММfl, ‰ВЩВНЪЛ, ˘У МВБМ‡˜МЛП ˜ЛМУП ‚ФОЛ‚‡˛Ъ¸ М‡ flН¥ТЪ¸ У·УЪЛ
ФЛО‡‰Ы. сfl „‡‡МЪ¥fl ‚Ъ‡˜‡π ТЛОЫ, flН˘У ВПУМЪ Б‰iИТМ˛πЪ¸Тfl МВ
‚ФУ‚МУ‚‡КВМУ˛ ‰Оfl ˆ¸У„У УТУ·У˛ Ъ‡, flН˘У ‚ЛНУЛТЪУ‚Ы˛Ъ¸Тfl МВ
УЛ„¥М‡О¸Мi запасні частини виробника.
71
Page 72

У випадку пред’явлення рекламації за умовами даної гарантії,
передайте виріб у повному комплекті згідно опису в оригінальній
інструкції з експлуатації разом з гарантійним талоном у будь-який
сервісний центр, який офіційно вповноважений представником компанії
виробника.
ЗТ¥ ¥М¯¥ ‚ЛПУ„Л, ‡БУП Б ‚ЛПУ„‡ПЛ ‚¥‰¯НУ‰Ы‚‡ММfl Б·ЛЪН¥‚, МВ ‰¥ИТМ¥,
flН˘У М‡¯‡ ‚¥‰ФУ‚i‰‡О¸М¥ТЪ¸ МВ ‚ТЪ‡МУ‚ОВМ‡ Б‡НУММЛП ˜ЛМУП.
ÇËÔ‡‰ÍË, ̇ flÍ¥ Ì ÓÁÔÓ‚Ò˛‰ÊÛπÚ¸Òfl „‡‡ÌÚ¥fl:
– ‰ВЩВНЪЛ, ‚ЛНОЛН‡М¥ ЩУТ-П‡КУМЛПЛ У·ТЪ‡‚ЛМ‡ПЛ;
– використання з професійною метою або з метою отримання
прибутку;
– ФУЫ¯ВММfl ‚ЛПУ„ ¥МТЪЫНˆ¥ª Б ВНТФОЫ‡Ъ‡ˆ¥ª;
– МВ‚iМВ ‚ТЪ‡МУ‚ОВММfl М‡ФЫ„Л ПВВКi КЛ‚ОВММfl (flН˘У ˆВ
‚ЛП‡„‡πЪ¸Тfl);
– Б‰iИТМВММfl ЪВıМ¥˜МЛı БП¥М;
– ПВı‡М¥˜Мi ФУ¯НУ‰КВММfl;
– ‰Оfl ФЛО‡‰¥‚, ˘У Ф‡ˆ˛˛Ъ¸ М‡ ·‡Ъ‡ВИН‡ı – У·УЪ‡ Б
Ì‚i‰ÔÓ‚¥‰ÌËÏË ‡·Ó ÒÔ‡ˆ¸Ó‚‡ÌËÏË ·‡Ú‡ÂÈ͇ÏË, ·Û‰¸flÍ¥
ФУ¯НУ‰КВММfl, ‚ЛНОЛН‡М¥ ТФ‡ˆ¸У‚‡МЛПЛ ‡·У Ф¥‰Ъ¥Н‡˛˜ЛПЛ
·‡Ú‡ÂÈ͇ÏË;
– пошкодження з вини тварин, гризунів та комах (в тому числі у
випадках знаходження гризунів та комах усередині приладів)
– ‰Îfl ·ËÚ‚ – Á¥Ï’flÚ‡ ‡·Ó ÔÓ‚‡Ì‡ Ò¥Ú͇.
Увага! Гарантійний талон підлягає вилученню в разі звернення до
сервісного центру з проханням про виконання гарантійного ремонту.
Після проведення ремонту гарантійним талоном буде вважатися
заповнений оригінал листа виконаного ремонту зі штампом сервісного
центру та підписаний споживачем про отримання виробу з ремонту.
Гарантійний термін подовжується на період, який даний виріб
знаходився в сервісному центрі в ремонті.
В разі виникнення труднощів з виконанням гарантійного та
післягарантійного обслуговування, прохання звертатися до
інформаційної служби сервісу представника компанії виробника в
Україні.
Телефон гарячої лінії 0800505 000. Дзвінки по Україні зі стаціонарних
телефонних номерів є безкоштовними. Дзвінки з мобільних телефонів
оплачуються згідно тарифів відповідного оператора.
Також можна отримати додаткову інформацію на сервісному порталі
виробника в інтернеті www.service.braun.com
72
Page 73

73
Page 74

74
10B
Page 75

7576777879
Page 76

Page 77

Page 78

Page 79

 Loading...