

Page 1
cruZer
Stapled booklet, 105x148 mm, 68 p (incl. 8 p cover), 2/2c = black + cyan
Type 5417
Type 5418
www.braun.com
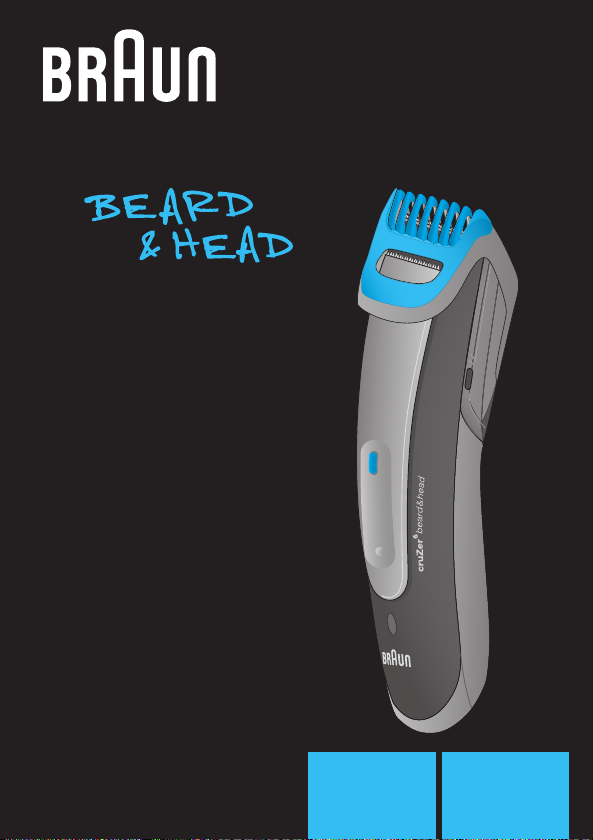
cruZer
beard&head
6
cruZer
5
beard
Page 2
English 6
Français 10
Polski 15
âesk˘ 20
Slovensk˘ 25
Magyar 30
Hrvatski 34
Slovenski 38
Türkçe 42
кЫТТНЛИ 46
ì͇ªÌҸ͇ 53
66
Braun GmbH
Frankfurter Straße 145
61476 Kronberg/Germany
www.braun.com
Braun Infolines
GB
0800 783 7010
IRL
1 800 509 448
F
0 800 944 802
PL
801 127 286
801 1 BRAUN
CZ
221 804 335
SK
02/5710 1135
H
(06-1) 451-1256
HR
01/6690 330
SLO
080 2822
TR
0 800 261 63 65
RUS
8 800 200 20 20
UA
+ 38 044 428 65 05
HK
852-25249377
(Audio Supplies Company Ltd.)
www.service.braun.com
99748834/III-11
GB/F/PL/CZ/SK/H/HR/SLO/TR/RUS/
UA/Arab
Page 3
1a
1c
model cruZer6 beard&head only
8
1b
STOP
1c
model cruZer6 beard&head only
2
3*
9
6
4*
5
*model cruZer6 beard&head only
a
click!
4
7
(model cruZer6
1h
(model cruZer5
8h
beard&head)
beard)
Page 4
b
c
e
f
h
5
d
click!
g
i
oil
l
oi
Page 5

English
Our products are designed to meet the highest standards of quality,
functionality and design. We hope you entirely enjoy your new Braun
product.
Warning
• The appliance is provided with a special cord set with an integrated Safety
Extra Low Voltage power supply. Do not exchange or manipulate any part
of it. Otherwise there is risk of electric shock.
• Never use the appliance with damaged trimmers or special cord set.
• This appliance is not intended for use by children or persons with reduced
physical, sensory or mental capabilities, unless they are given supervision by a person responsible for their safety. In general, we recommend
that you keep the appliance out of reach of children. Children should be
supervised to ensure that they do not play with the appliance.
Oil bottle
Keep out of reach of children. Do not swallow. Do not apply to eyes.
Dispose of properly when empty.
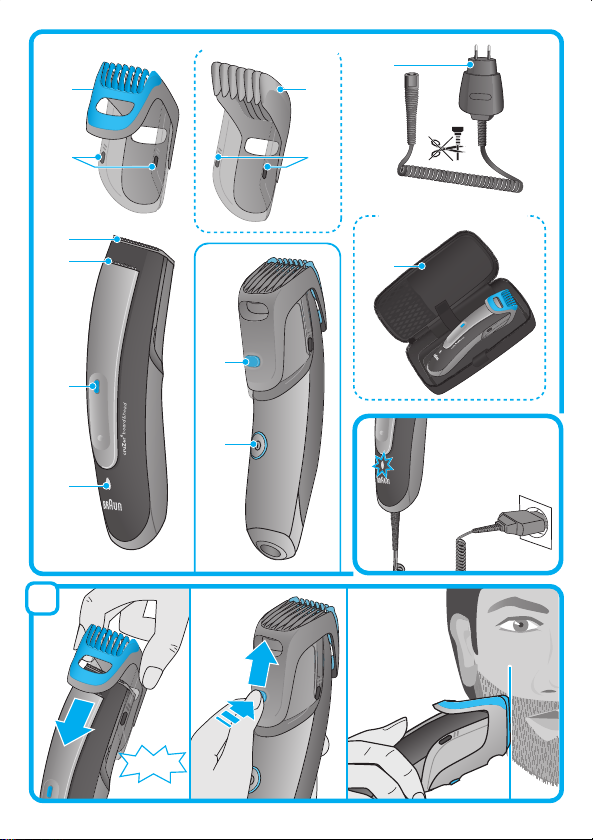
Description
1a Beard comb for trimming beard and short hair
1b Hair comb for cutting hair (model cruZer6 beard&head only)
1c Release buttons for comb
2 Wide trimmer (32 mm)
3 Precision trimmer (16 mm) (model cruZer6 beard&head only)
4 Release button precision trimmer
5 Charge Indicator
6 Length selector
7 On/off switch
8 Special cord set
9 Pouch (model cruZer6 beard&head only)
Charging
The best environmental temperature for charging is between 15 °C and
35 °C. Do not expose the appliance to temperatures higher than 50 °C for
extended periods of time.
• Using the special cord set (8), connect the appliance to an electrical
outlet with the motor switched off.
• When charging for the first time or when the appliance is not used for
a few months, leave the appliance to charge continuously for 4 hours
(model cruZer5 beard: about 8 hours).
6
Page 6

• Once the appliance is completely charged, discharge it through normal
use. Then recharge to full capacity. Subsequent charges will take about
1 hour (model cruZer5 beard: about 8 hours).
• A full charge provides up to 40 minutes of cordless operating time.
This may vary according to your beard growth.
• Maximum battery capacity will only be reached after several charging/
discharging cycles.
Charge Indicator (5)
Model cruZer6 beard&head:
• The charge indicator shows the status of the batteries.
• The charge indicator blinks green when the appliance is being charged.
When the battery is fully charged, the charge indicator shines permanently
green provided the appliance is connected to an electrical outlet.
• During cordless use the charge indicator blinks green.
• The charge indicator flashes red when the battery is running low. You
should be able to finish your current trimming sequence.
Model cruZer5 beard:
• The charge indicator shines permanently green provided the appliance is
connected to an electrical outlet.
Comb attachments (1a, 1b)
• The combs can be taken off by pressing the release buttons (1c) with
your thumb and forefinger.
Beard trimming
• Place the beard comb (1a) on the appliance with the appliance turned off
(a).
• Press length selector (6) and slide the beard comb up to your desired
beard length (possible length settings: 1, 3, 5, 7, 9, 11 mm).
• It is advisable to begin with the highest setting and then reduce the
setting until you reach the desired beard length.
• Press the on/off switch (7). Hold the beard comb with the angled edge
against your beard and guide the trimmer against the direction of the hair
growth (a).
• To avoid clogging the beard comb with hair, clean it from time to time with
the brush.
7
Page 7

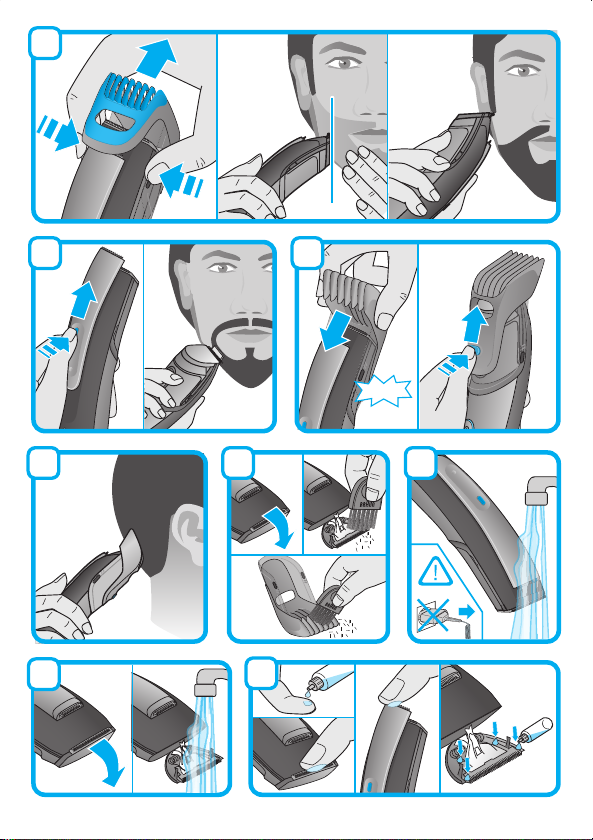
Contour Trimming / Styling
• The wide trimmer (2) evenly cuts and trims large areas. It is ideal for
shaping sideburns, moustaches and partial short beards. Take off the
comb. While stretching the skin, guide the wide trimmer against the
direction of hair growth (b).
• The precision trimmer (3) (model cruZer6 beard&head only) precisely
defines lines and edges and is ideal for precise contouring. To use the
precision trimmer, press the release button (4) and slide it up (c).
Hair cutting (model cruZer6 beard&head only)
The hair should be clean, well combed, tangle-free and dry.
• Place the hair comb (1b) on the appliance with the appliance turned off (d).
• Press the length selector (6) and slide the hair comb up to your desired
hair length (possible length settings: 10, 12, 14, 16, 18, 20 mm). If you are
not used to clipping hair, begin with a highest setting and then reduce the
setting to avoid cutting more hair than desired. If you want to cut your hair
shorter than 10 mm, we advise to first cut it with the hair comb (1b) down
to 10 mm and then use the beard comb for the desired length.
• Use a slow and controlled movement. Do not force the appliance through
the hair faster than it can be cut.
• In between, shake or blow off the hair. If too much hair is caught in the
comb, remove and clean it.
Cleaning
The appliance is suitable for cleaning under running tap water.
Warning: Detach the appliance from the power supply before
cleaning it with water.
Regular cleaning ensures better trimming performance.
Cleaning with the brush
• Switch off the appliance. Open the wide trimmer by pressing with the
thumb against the trimmer from the front side. It opens by ca. 45° and can
also be taken off (h).
• Using the brush clean the trimmers and the space behind the wide
trimmer (inside the housing).
Cleaning with water
• Switch off the appliance and rinse the head and trimmers under warm
running water. You can also rinse the opened wide trimmer.
• Leave the appliance with opened wide trimmer to dry.
8
Page 8

Keeping your appliance in top shape
To keep the cutting system working properly, oil it with light machine oil
after each use (i).
Preserving the batteries
In order to maintain the optimum capacity of the rechargeable batteries, the
appliance has to be fully discharged (by trimming/cutting) every 6 months
approximately. Then recharge the appliance to full capacity.
Environmental notice
This product contains rechargeable batteries. In the interest of
protecting the environment, please do not dispose of the product in
the household waste at the end of its useful life. Disposal can take
place at a Braun Service Centre or at appropriate collection points
provided in your country.
Subject to change without notice.
For electric specifications, see printing on the special cord set.
Guarantee
We grant a 2 year guarantee on the product commencing on the date of
purchase. Within the guarantee period we will eliminate any defects in the
appliance resulting from faults in materials or workmanship, free of charge
either by repairing or replacing the complete appliance at our discretion.
This guarantee extends to every country where this appliance is supplied by
Braun or its appointed distributor.
This guarantee does not cover: damage due to improper use, normal wear
or use as well as defects that have a negligible effect on the value or
operation of the appliance.
The guarantee becomes void if repairs are undertaken by unauthorised
persons and if original Braun parts are not used.
To obtain service within the guarantee period, hand in or send the complete
appliance with your sales receipt to an authorised Braun Customer Service
Centre (address information available online at www.service.braun.com).
For UK only:
This guarantee in no way affects your rights under statutory law.
9
Page 9

Français
Nos produits sont conçus pour satisfaire aux plus hautes exigences en
matière de qualité, fonctionnalité et design. Nous espérons que vous serez
pleinement satisfait de votre nouveau rasoir Braun.
Attention
• Cet appareil est équipé d’un cordon d’alimentation avec un adaptateur
basse tension intégré. Ne modifiez ni ne manipulez aucun de ses composants afin d’éviter tout risque d’électrocution.
• Ne jamais utiliser cet appareil si les tondeuses ou le cordon d’alimentation sont endommagés.
• Cet appareil ne doit pas être utilisé par des enfants ou des personnes aux
capacités physiques, sensorielles ou mentales réduites, sauf assistées
par une personne responsable de leur sécurité. Nous vous recommandons de maintenir cet appareil hors de portée des enfants. Les enfants
doivent être sous surveillance afin de s’assurer qu’ils ne jouent pas avec
l’appareil.
Bouteille d’huile
Conservez hors de portée des enfants. Ne pas avaler. Ne pas appliquer sur
les yeux. Jeter la bouteille correctement lorsqu’elle est vide.
Description
1a Sabot à barbe pour tailler la barbe et les poils courts
1b Sabot pour cheveux (modèle cruZer6 barbe & cheveux uniquement)
1c Boutons pour retirer le sabot
2 Bloc de coupe (32 mm)
3 Tondeuse de précision (16 mm)
(modèle cruZer6 barbe & cheveux uniquement)
4 Bouton pour retirer la tondeuse de précision
5 Témoin lumineux
6 Sélecteur de longueur de coupe
7 Bouton marche/arrêt
8 Cordon d’alimentation
9 Pochette (modèle cruZer6 barbe & cheveux uniquement)
Mise en charge de l’appareil
La température environnante optimale pour la mise en charge de l’appareil
se situe entre 15 et 35 °C. Ne pas exposer l’appareil à des températures
supérieures à 50 °C trop longtemps.
• À l’aide du cordon d’alimentation (8), branchez l’appareil en position arrêt
sur une prise de courant.
10
Page 10

• Lors de la première mise en charge ou lorsque l’appareil n’a pas été
utilisé pendant plusieurs mois, laissez l’appareil charger en continu
pendant 4 heures (modèle cruZer5 barbe : environ 8 heures).
• Une fois que l’appareil est complètement chargé, utilisez-le normalement
jusqu’à ce qu’il soit complètement déchargé. Puis, le recharger complètement. Les mises en charge effectuées par la suite prendront environ
une heure (modèle cruZer5 barbe : environ 8 heures).
• Après une charge complète, l’autonomie de l’appareil est de 40 minutes.
Cette autonomie varie toutefois selon votre type de barbe.
• La capacité maximum de la batterie ne sera atteinte qu’après plusieurs
cycles de charge/décharge.
Témoin lumineux (5)
Modèle cruZer6 barbe & cheveux :
• Le témoin lumineux indique l’état de la batterie.
• Le voyant vert clignote lorsque l’appareil est en charge. Lorsque la
batterie est complètement chargée, le voyant vert s’éclaire en permanence tant que l’appareil reste branché sur une prise de courant.
• Lors de l’utilisation sans fil, la voyant vert clignote.
• Lorsque la batterie est en fin d’autonomie un voyant rouge s’éclaire.
Vous devriez néanmoins pouvoir terminer la taille en cours.
Modèle cruZer5 barbe :
• Le voyant vert est allumé en permanence, tant que que l’appareil reste
branché sur une prise de courant.
Sabot et accessoires (1a, 1b)
• Pour retirer les sabots, appuyez sur les boutons (1c) à l’aide de vos
pouces et index.
Rasage
• Placez le sabot à barbe (1a) sur l’appareil lorsqu’il est arrêté (a).
• Poussez le bouton sélecteur (6) pour faire coulisser le sabot et choisir la
hauteur de coupe souhaitée (possibilité de réglage de la hauteur de
coupe : 1, 3, 5, 7, 9, 11 mm).
• Il est conseillé de commencer avec le réglage de la plus haute coupe,
puis de le réduire jusqu’à atteindre la longueur de barbe désirée.
• Mettre en marche en appuyant sur le bouton (7). Maintenir le sabot à
barbe contre la peau et déplacer la tondeuse dans le sens contraire de la
pousse du poil.
• Pour éviter que le sabot ne soit saturé par les poils, nettoyez-le régulière-
ment avec la brosse.
11
Page 11

Coupe / Rasage des contours
• Le bloc de coupe (2) coupe et taille les zones larges. Il est idéal pour la
coupe des pattes, des moustaches et des barbes courtes. Enlevez le
sabot. Puis tendre la peau et déplacez la tondeuse dans le sens contraire
à la pousse du poil.
• La tondeuse de précision (3) (modèle cruZer6 barbe & cheveux unique-
ment) délimite précisément les lignes et les bords et est idéale pour la
précision des contours. Pour utiliser la tondeuse de précision, appuyez
sur le bouton (4) et faites-la coulisser vers le haut (c).
Coupe de cheveux (modèle cruZer6 barbe & cheveux uniquement)
Les cheveux doivent être propres, bien peignés, démêlés et secs.
• Appareil arrêté, placer le sabot pour cheveux (1b).
• Poussez le bouton sélecteur (6) pour faire coulisser le sabot et choisir
la hauteur de coupe souhaitée (possibilité de réglage de la hauteur de
coupe : 10, 12, 14, 16, 18, 20 mm). Si vous n’êtes pas habitué à couper
vos cheveux, commencez par un réglage de la plus haute coupe, puis
diminuer le ensuite pour éviter de couper plus que ce que vous ne le
souhaiteriez. Si vous voulez couper vos cheveux plus courts que 10 mm,
nous vous conseillons de couper d’abord avec le sabot pour cheveux
(1b) réglage 10 mm, puis d’utiliser le sabot à barbe pour obtenir la
longueur désirée.
• Déplacez la tondeuse en la faisant glisser lentement tout en contrôlant
le geste. Ne pas forcer l’appareil à couper plus vite que ce qui lui est
possible de faire.
• De temps en temps, secouez ou soufflez sur le sabot pour évacuer les
cheveux. Si trop de cheveux s’accumulent dans le sabot, retirez-le et
videz-le.
Nettoyage
L’appareil peut être nettoyé à l’eau du robinet. Attention :
Débranchez l’appareil de la prise électrique avant de le nettoyer à
l’eau.
Un nettoyage régulier garantit une performance de rasage optimale.
Nettoyage à la brosse
• Arrêtez l’appareil. Repoussez avec votre pouce le bloc de coupe pour le
dégrafer. Il s’ouvre à 45° et peut être également retiré (h).
12
Page 12

• Utilisez la brosse pour nettoyer les tondeuses ainsi que l’arrière du bloc
de coupe (et l’espace entre le boîtier).
Nettoyage à l’eau
• Arrêtez l’appareil puis rincez la tête et les tondeuses à l’eau chaude
courante. Vous pouvez également rincer la tondeuse large lorsqu’elle
est sortie.
• Laissez sécher l’appareil avec le bloc de coupe ouvert pour un meilleur
séchage.
Gardez votre appareil en bon état
Pour assurer le bon fonctionnement du système de coupe, huilez-le après
chaque utilisation (i).
Entretien des batteries
Afin de conserver la capacité maximum des batteries rechargeables,
l’appareil doit être complètement déchargé en utilisation (rasage/taille)
tous les 6 mois environ. Puis, rechargez-le à sa pleine capacité.
Respect de l’environnement
Ce produit contient des batteries rechargeables. Afin de protéger
l’environnement, ne jamais jeter l’appareil dans les ordures
ménagères à la fin de sa durée de vie. Le remettre à un centre service
agréé Braun ou le déposer dans des sites de récupération appropriés
conformément aux réglementations locales ou nationales en vigueur.
Sujet à toute modification sans préavis.
Pour les spécifications électriques, veuillez vous reporter aux indications
situées sur le câble d’alimentation.
Garantie
Nous accordons une garantie de 2 ans sur ce produit, à partir de la date
d’achat.
Pendant la durée de la garantie, Braun prendra gratuitement à sa charge la
réparation des vices de fabrication ou de matière en se réservant le droit de
décider si certaines pièces doivent être réparées ou si l’appareil lui-même
doit être échangé.
13
Page 13

Cette garantie s’étend à tous les pays où cet appareil est commercialisé par
Braun ou son distributeur exclusif.
Cette garantie ne couvre pas : les dommages occasionnés par une utilisation
inadéquate, l’usure normale ainsi que les défauts d’usures qui ont un effet
négligeable sur la valeur ou l’utilisation de l’appareil. Cette garantie devient
caduque si des réparations ont été effectuées par des personnes non
agréées par Braun et si des pièces de rechange ne provenant pas de Braun
ont été utilisées.
Pour toute réclamation intervenant pendant la période de garantie, retournez
ou rapportez l’appareil ainsi que l’attestation de garantie à votre revendeur
ou à un Centre Service Agréé Braun.
Appelez au 0 800 944 802 (ou se référez à http://www.service.braun.com)
pour connaitre le Centre Service Agrée Braun le plus proche de chez vous.
Clause spéciale pour la France
Outre la garantie contractuelle exposée ci-dessus, nos clients bénéficient de
la garantie légale des vices cachés prévue aux articles 1641 et suivants du
Code civil.
14
Page 14

Polski
Nasze produkty zostały zaprojektowane po to, aby spełniać najwyższe
standardy jakości, funkcjonalności oraz designu. Mamy nadzieję, ze
użytkowanie naszego nowego produktu sprawi Ci wiele radości i satysfakcji.
Uwaga
• Twoja golarka jest wyposażona w specjalny przewód z wbudowanym
zasilaczem obniżającym napięcie. Nie próbuj wymieniać ani manipulować
przy jakiejkolwiek części golarki. W przeciwnym razie narażasz się na
ryzyko porażenia prądem.
• Nigdy nie używaj urządzenia, które jest uszkodzone lub ma zniszczony
kabel zasilający.
• Urządzenie nie jest przeznaczone do używania przez dzieci lub osoby
niepełnosprawne fizycznie lub umysłowo, jeżeli nie są one nadzorowane
przez osobę odpowiedzialną za ich bezpieczeństwo. Generalnie radzimy
trzymać urządzenie z dala od dzieci. Dzieci należy pilnować, aby nie
bawiły się urządzeniem.
Butelka oleju
Chronić przed dziećmi. Nie połykać. Zużyte opakowanie zutylizować
zgodnie z obowiązującymi przepisami.
Opis
1a Nasadka z grzebieniem do przycinania brody i krótkich włosków
1b Nasadka z grzebieniem do przycinania włosów
(tylko model cruZer6 beard&head )
1c Przycisk zwalniający nasadkę z grzebieniem
2 Szeroki trymer (32 mm)
3 Precyzyjny trymer (16 mm) (tylko model cruZer6 beard&head )
4 Przycisk zwalniający precyzyjny trymer
5 Wskaźnik ładowania
6 Regulator długości (pokrętło)
7 Włącznik/wyłącznik
8 Specjalny przewód zasilający
9 Etui (tylko model cruZer6 beard&head )
Ładowanie
Optymalna temperatura otoczenia, w której odbywa się ładowanie powinna
mieścić się między 15 °C i 35 °C. Nie należy pozostawiać urządzenia na
dłuższy okres czasu w temperaturze powyżej 50 °C.
• Korzystając ze specjalnego przewodu zasilającego (8) należy podłączyć
urządzenie do gniazdka elektrycznego.
15
Page 15

• Przed pierwszym goleniem lub gdy urządzenie nie było używane przez kilka
miesięcy, należy podłączyć golarkę do ciągłego ładowania na 4 godziny
(model cruZer5 beard: ok. 8 godzin).
• Gdy golarka jest całkowicie naładowana, należy rozładować baterię
poprzez normalne użytkowanie. Wówczas naładuje się ona ponownie do
pełna. Kolejne ładowanie zajmie ok. 1 godziny (model cruZer5 beard:
ok. 8 godzin).
• Urządzenie w pełni naładowane może pracować bezprzewodowo do
40 minut w zależności od rodzaju i długości zarostu.
• Maksymalna wydajność baterii może zostać osiągnięta po kilku cyklach
ładowania / rozładowania baterii.
Wskaźnik ładowania (5)
Modell cruZer6 beard&head:
• Wskaźnik pokazuje poziom naładowania baterii.
• Pulsujący na zielono wskaźnik ładowania informuje, że golarka jest
w trakcie ładowania. Kiedy bateria jest w pełni naładowana, wskaźnik
ładowania świeci ciągłym zielonym światłem, pod warunkiem, że
urządzenie jest podłączone do gniazdka.
• W czasie gdy urządzenie nie jest podłączone do prądu wskaźnik ładownia
miga na zielono.
• Migający czerwony wskaźnik oznacza, że bateria jest na wyczerpaniu
jednak powinna wystarczyć do momentu zakończenia golenia.
Model cruZer5 beard:
• Wskaźnik ładownia świeci ciągłym zielonym światłem, pod warunkiem, że
urządzenie jest podłączone do gniazdka.
Nasadki z grzebieniem (1a, 1b)
• Nasadka z grzebieniem może być zdjęta za pomocą naciśnięcia przycisku
zwalniającego (1c).
Przycinanie brody
• Umieść nasadkę z grzebieniem (1a) na urządzeniu, gdy jest ono
wyłączone (a).
• Naciśnij pokrętło (6) i wysuń nasadkę na odpowiednią dla siebie długość
brody (możliwość ustawienia długości 1, 3, 5, 7, 9, 11 mm).
• Wskazane jest, aby rozpocząć golenie od najwyższego ustawienia, a
następnie stopniowo je redukować aż do pożądanej długości brody.
• Naciśnij przycisk włącz/wyłącz (7). Trzymaj grzebień równolegle do
krawędzi brody i przesuwaj trymer w kierunku przeciwnym do wzrostu
włosów (a).
16
Page 16

• Aby uniknąć zatkania zarostem nasadki z grzebieniem, czyść ją od czasu
do czasu za pomocą szczoteczki.
Golenie konturów twarzy / Stylizacja
• Szeroki trymer (2) dokładnie przycina zarost dużych partii skóry.
Nadaje idealny kształt bakom, wąsom i krótkiemu zarostowi brody.
Zdejmij nasadkę, a następnie delikatnie naciągając skórę przesuwaj
trymer w kierunku przeciwnym do wzrostu włosów (b).
• Precyzyjny trymer (3) (tylko model cruZer6 beard&head) dokładnie i
precyzyjnie modeluje linie i krawędzie, nadając zarostowi idealny kontur.
Aby uruchomić precyzyjny trymer, naciśnij przycisk zwalniający (4) i
rozpocznij golenie (c).
Przycinanie włosków (tylko model cruZer6 beard&head)
Włosy powinny być czyste, przeczesane, niesplątane i suche.
• Umieść nasadkę z grzebieniem (1b) na urządzeniu, gdy jest ono
wyłączone (d).
• Naciśnij przycisk regulacji długości (6) i wysuń grzebień do pożądanej
długości włosów (możliwe ustawienia długości: 10, 12, 14, 16, 18,
20 mm). Jeżeli nie masz wprawy w przycinaniu włosków, rozpocznij od
wyższego ustawienia, a następnie stopniowe redukuj je, aby uniknąć
przycinania tych włosków, których nie chcesz usunąć. Jeżeli chcesz
skrócić włosy krócej niż 10 mmm, radzimy najpierw przyciąć je za pomocą
nasadki z grzebieniem do przycinania włosków (1b) do długości 10 mm, a
następnie użyć nasadki do cięcia brody, aby osiągnąć pożądaną długość.
• Przesuwaj urządzenie po skórze powolnymi i kontrolowanymi ruchami.
Nie przeciążaj urządzenia tnąc włosy szybciej niż jest to możliwe.
• Podczas golenia potrząsaj urządzeniem, co jakiś czas, aby usunąć pozo-
stałości włosów. Jeśli w nakładce znajduje się zbyt duża ilość zarostu,
zdejmij ją i dokładnie oczyść.
Czyszczenie
Urządzenie jest przystosowane do czyszczenia pod bieżącą wodą.
Uwaga: Przed umyciem należy wyjąć wtyczkę z gniazdka sieciowego.
Regularne czyszczenie zapewnia lepsze rezultaty golenia.
Czyszczenie za pomocą szczoteczki
• Wyłącz urządzenie. Otwórz szeroki trymer, naciskając kciukiem i
wysuwając go do przodu. Możesz otworzyć trymer pod kątem 45°, albo
całkowicie go zdjąć (h).
• Używając szczoteczki wyczyść dokładnie trymer oraz wewnętrzną stronę
głowicy.
17
Page 17

Czyszczenie pod wodą
• Wyłącz urządzenie i wypłucz głowicę i trymer pod ciepła bieżącą wodą.
Możesz także wypłukać otwarty trymer.
• Pozostaw urządzenie z otwartym szerokim trymerem do wyschnięcia.
Konserwacja urządzenia
Aby jakoÊç golenia by∏a utrzymywana na niezmiennie wysokim poziomie
system tnàcy nale˝y oliwiç olejem maszynowym (za∏àczonym w wybranych
modelach) po ka˝dym u˝yciu (i).
Konserwacja baterii
Aby zachować optymalna pojemność akumulatorów golarki, należy
rozładować je całkowicie (poprzez golenie) co około 6 miesięcy.
Następnie naładować urządzenie do pełna.
Uwagi dotyczące ochrony środowiska
Urządzenie zawiera baterię przystosowaną do wielokrotnego
ładowania. Ten symbol oznacza, że zużytego sprzętu nie można
wyrzucać łącznie z odpadami socjalnymi. Wyjąć baterie przed
wyrzuceniem. Zużyty produkt i baterie należy zostawić w jednym z
lokalnych punktów zbiórki zużytego sprzętu elektrycznego i elektronicznego
oraz zużytych baterii lub w autoryzowanym serwisie Braun. Odpowiednie
przetworzenie zużytego sprzętu zapobiega potencjalnym negatywnym
wpływom na środowisko lub zdrowie ludzi, wynikającym z obecności
składników niebezpiecznych w sprzęcie.
Powyższe informacje mogą ulec zmianie bez uprzedniego powiadomienia.
Specyfikacje elektryczne zostały wydrukowane na specjalnym kablu
sieciowym.
Warunki gwarancji
1. Procter and Gamble DS Polska sp. z.o.o. z siedzibą w Warszawie przy
ul. Zabranieckiej 20, gwarantuje sprawne działanie sprzętu w okresie
24 miesięcy od daty jego wydania Kupującemu. Ujawnione w tym okresie
wady będą usuwane bezpłatnie, przez wymieniony przez firmę Procter
and Gamble DS Polska sp. z.o.o. autoryzowany punkt serwisowy, w
terminie 14 dni od daty dostarczenia sprzętu do autoryzowanego punktu
serwisowego.
2. Kupujący może wysłać sprzęt do naprawy do najbliżej znajdującego się
autoryzowanego punktu serwisowego wymienionego przez firmę Procter
18
Page 18

and Gamble DS Polska sp. z.o.o. lub skorzystać z pośrednictwa sklepu,
w którym dokonał zakupu sprzętu. W takim wypadku termin naprawy
ulegnie wydłużeniu o czas niezbędny do dostarczenia i odbioru sprzętu.
3. Kupujący powinien dostarczyć sprzęt w opakowaniu należycie
zabezpieczonym przed uszkodzeniem. Uszkodzenia spowodowane
niedostatecznym zabezpieczeniem sprzętu nie podlegają naprawom
gwarancyjnym. Naprawom gwarancyjnym nie podlegają także inne
uszkodzenia powstałe w następstwie okoliczności, za które
Procter and Gamble DS Polska sp. z o.o. nie ponosi odpowiedzialności,
w szczególności zawinione przez Pocztę Polską lub firmy kurierskie.
4. Niniejsza gwarancja jest ważna jedynie z dokumentem zakupu i
obowiązuje wyłącznie na terytorium Rzeczypospolitej Polskiej.
5. Okres gwarancji przedłuża się o czas od zgłoszenia wady lub uszkodzenia
do naprawy sprzętu i zwrotnego postawienia go do dyspozycji
Kupującego.
6. Naprawa gwarancyjna nie obejmuje czynności przewidzianych w
instrukcji, do wykonania, których Kupujący zobowiązany jest we własnym
zakresie i na własny koszt.
7. Ewentualne oczyszczenie sprzętu dokonywane jest na koszt Kupującego
według cennika danego autoryzowanego punktu serwisowego i nie
będzie traktowane jako naprawa gwarancyjna, chyba, że oczyszczenie
jest niezbędne do usunięcia wady w ramach świadczeń objętych niniejszą
gwarancją i nie stanowi czynności, o których mowa w p. 6.
8. Gwarancją nie są objęte:
a) mechaniczne uszkodzenia sprzętu spowodowane w czasie jego
użytkowania lub w czasie dostarczania sprzętu do naprawy;
b) uszkodzenia i wady wynikłe na skutek:
– używania sprzętu do celów innych niż osobisty użytek;
– niewłaściwego lub niezgodnego z instrukcją użytkowania,
konserwacji, przechowywania lub instalacji;
– używania niewłaściwych materiałów eksploatacyjnych;
– napraw dokonywanych przez nieuprawnione osoby; stwierdzenie
faktu takiej naprawy lub samowolnego otwarcia plomb lub innych
zabezpieczeń sprzętu powoduje utratę gwarancji;
– przeróbek, zmian konstrukcyjnych lub używania do napraw
nieoryginalnych części zamiennych;
c) części szklane, żarówki oświetlenia;
d) ostrza i folie do golarek oraz materiały eksploatacyjne.
9. Bez nazwy i modelu sprzętu, daty jego zakupu potwierdzonej pieczątką i
podpisem sprzedawcy karta gwarancyjna jest nieważna.
10. Niniejsza gwarancja na sprzedany towar konsumpcyjny nie wyłącza, nie
ogranicza ani nie zawiesza uprawnień Kupującego wynikających z
niezgodności towaru z umową.
19
Page 19

Český
Naše výrobky jsou vyrobeny tak, aby splňovaly nejvyšší nároky na kvalitu,
funkčnost a design. Doufáme, že budete se svým novým holicím strojkem
Braun plně spokojeni.
Upozornění
• Tento přístroj je vybaven speciálním síťovým přívodem s integrovaným
bezpečnostním síťovým adaptérem. Žádná jeho část se nesmí měnit ani
rozebírat. Jinak by mohlo dojít k úrazu elektrickým proudem.
• Přístroj nikdy nepoužívejte, pokud má poškozené zastřihovače nebo
speciální síťový přívod.
• Tento přístroj není určen pro používání dětmi nebo osobami se sníženými
fyzickými, senzorickými či duševními schopnostmi, pokud nejsou pod
dohledem osoby zodpovědné za jejich bezpečnost. Doporučujeme
uchovávat přístroj mimo dosah dětí. Dávejte pozor, aby děti přístroj
nepoužívaly na hraní.
Lahvička s olejem
Uchovávejte mimo dosah dětí. Nepolykejte. Vyhněte se kontaktu s očima.
Po vyprázdnění zlikvidujte v rámci tříděného odpadu.
Popis
1a Hřeben tvarovače bradky pro úpravu bradky a krátkých vousů
1b Hřeben zastřihovače vlasů (pouze model cruZer6 beard&head)
1c Uvolňovací tlačítka zastřihovače
2 Široký zastřihovač (32 mm)
3 Přesný zastřihovač (16 mm) (pouze model cruZer6 beard&head)
4 Uvolňovací tlačítko přesného zastřihovače
5 Kontrolka
6 Volič délky
7 Spínač zapnutí/vypnutí
8 Speciální síťový přívod
9 Pouzdro (pouze model cruZer6 beard&head)
Nabíjení
Nejvhodnější okolní teplota pro nabíjení je 15 °C až 35 °C.
Nevystavujte holicí strojek po delší dobu teplotám vyšším než 50 °C.
• Pomocí speciálního síťového přívodu (8) připojte holicí strojek k zásuvce
elektrické sítě. Holicí strojek musí být přitom vypnutý.
• Při prvním nabíjení nebo pokud holicí strojek nebyl několik měsíců
používán, nechte holicí strojek nabíjet nepřetržitě 4 hodiny (u modelu
cruZer5 beard asi 8 hodin).
20
Page 20

• Jakmile je holicí strojek úplně nabitý, vybijte ho běžným používáním bez
použití síťového kabelu. Pak ho opět nabijte na plnou kapacitu.
Další nabíjení bude trvat přibližně 1 hodinu (u modelu cruZer5 beard asi
8 hodin).
• Plně nabitý holicí strojek zajistí až 40 minut provozu bez síťového přívodu
v závislosti na délce a typu vousů.
• Maximální kapacity baterie však lze dosáhnout pouze až po několika
cyklech nabití / vybití.
Kontrolka (5)
Model cruZer6 beard&head:
• Kontrolka ukazuje stav baterií.
• Při nabíjení holicího strojku bliká kontrolka zeleně. Jakmile je baterie plně
nabitá, svítí kontrolka nepřerušovaně zeleně, pokud je holicí strojek
připojen k zásuvce elektrické sítě.
• Při použití bez síťového přívodu bliká kontrolka zeleně.
• Kontrolka zabliká červeně, když kapacita baterie klesne. Zbývající kapa-
cita by však měla postačit na dokončení zastřihování.
Model cruZer5 beard:
• Kontrolka svítí nepřerušovaně zeleně, pokud je holicí strojek připojen
k zásuvce elektrické sítě.
Hřebenové nástavce (1a, 1b)
• Hřeben tvarovače bradky i zastřihovače vlasů lze sejmout, když dvěma
prsty stisknete uvolňovací tlačítka (1c).
Tvarovač bradky
• Na přístroj nasaďte hřeben tvarovače bradky (1a). Holicí strojek přitom
musí být vypnutý.
• Stiskněte volič délky vousů (6) a posunutím hřebene tvarovače bradky
směrem nahoru nastavte požadovanou délku (možnosti volby: 1 mm,
3 mm, 5 mm, 7 mm, 9 mm, 11 mm).
• Doporučujeme začít největší délkou a postupně ji snižovat, dokud nedo-
sáhnete požadované délky bradky.
• Stiskněte tlačítko vypnutí/zapnutí (7). Hřeben tvarovače bradky držte
zkoseným okrajem k bradce a postupujte proti směru růstu vousů (a).
• Aby se hřeben tvarovače bradky neucpával vousy, občas ho pomocí
kartáčku vyčistěte.
21
Page 21

Zastřihování / Úprava kontur
• Široký zastřihovač (2) rovnoměrně zastřihuje rozsáhlejší partie. Je ideální
pro tvarování kotlet, knírku a krátké bradky. Sejměte nástavec. Širokým
zastřihovačem postupujte proti směru růstu vousů a přitom si napínejte
pokožku (b).
• Přesný zastřihovač (3) (pouze model cruZer6 beard&head) přesně
zastřihne linie a okraje. Je ideální pro precizní tvarování kontur. Pokud
chcete použít přesný zastřihovač, stiskněte uvolňovací tlačítko (4) a
zastřihovač vysuňte (c).
Střihání vlasů (pouze model cruZer6 beard&head)
Vlasy by měly být čisté, dobře pročesané, nezacuchané a suché.
• Na přístroj nasaďte hřeben zastřihovače vlasů (1b). Holicí strojek přitom
musí být vypnutý (d).
• Stiskněte volič délky (6) a vysuňte zastřihovač vlasů do požadované
délky (možnosti volby: 10 mm, 12 mm, 14 mm, 16 mm, 18 mm, 20 mm).
Pokud nemáte se zkracováním vlasů zkušenosti, začněte nastavením na
větší délku, kterou postupně snižujte. Vyhnete se tak tomu, že vlasy
zkrátíte více, než chcete. Pokud si chcete vlasy ostřihat na délku menší
než 10 mm, doporučujeme je nejprve zkrátit hřebenem zastřihovače vlasů
(1b) na 10 mm a pak ke zkrácení na požadovanou délku použít hřeben
zastřihovač vousů.
• Používejte pomalý a kontrolovaný pohyb. Nepostupujte přístrojem
rychleji, aby stačil přístroj vlasy odstřihnout.
• V průběhu zkracování vlasy protřásejte a profukujte. Pokud je v hřebenu
zachyceno příliš mnoho vlasů, sejměte ho a vyčistěte.
Čištění
Holicí strojek lze čistit pod tekoucí vodou. Upozornění: Před mytím
holicí strojek odpojte z elektrické sítě.
Pravidelné čištění holicího strojku zajišťuje jeho lepší výkon.
Čištění pomocí kartáčku
• Holicí strojek vypněte. Široký zastřihovač otevřete tak, že palcem zatlačíte
na přední stranu zastřihovače. Otevře se asi na 45° a lze ho také sejmout.
• Pomocí kartáčku vyčistěte zastřihovač a prostor za širokým zastřihova-
čem (uvnitř krytu).
22
Page 22

Čištění vodou
• Holicí strojek vypněte, hlavu a zastřihovače opláchněte pod tekoucí
vodou. Můžete takto omýt i otevřený široký zastřihovač.
• Přístroj nechte s otevřeným zastřihovačem uschnout.
Udržování přístroje ve špičkovém stavu
Aby byl stfiihací systém udrÏen v provozuschopném stavu, naolejujte jej po
kaÏdém pouÏití jemn˘m olejem na ‰icí stroje (i).
Ochrana baterií
Aby byla udržována optimální kapacita akumulátorových baterií, měl by
být holicí strojek (zastřihováním / střiháním) plně vybit přibližně každých
6 měsíců. Pak přístroj nabijte na plnou kapacitu.
Deklarovaná hodnota emise hluku tohoto spotfiebiãe je 62 dB(A), coÏ
pfiedstavuje hladinu A akustického v˘konu vzhledem na referenãní
akustick˘ v˘kon 1 pW.
Poznámka k životnímu prostředí
Tento výrobek obsahuje akumulátorové baterie. V zájmu ochrany
životního prostředí nevyhazujte výrobek po skončení jeho životnosti
do běžného domácího odpadu. Můžete ho odevzdat v servisním
středisku Braun nebo na příslušných sběrných místech, zřízených ve
vaší zemi podle místních předpisů a norem.
Podléhá změnám bez předchozího upozornění.
Technické údaje o elektrickém napájení viz typový štítek na síťovém
adaptéru speciálního síťového přívodu.
23
Page 23

Záruka
Na tento v˘robek poskytujeme záruku po dobu 2 let od data prodeje
spotfiebiteli. Bûhem této záruãní doby bezplatnû odstraníme závady na
v˘robku, zpÛsobené vadami materiálu nebo chybou v˘roby. Tato záruka
platí pro v‰echny zemû, kam je tento v˘robek dodáván firmou Braun nebo
jejím autorizovan˘m distributorem.
Tato záruka se nevztahuje: na po‰kození, vzniklá nesprávn˘m pouÏíváním
a údrÏbou, na bûÏné opotfiebení, jakoÏ i na defekty, mající zanedbateln˘
vliv na hodnotu a pouÏitelnost pfiístroje. Záruka pozb˘vá platnosti, pokud
byl v˘robek mechanicky po‰kozen nebo pokud jsou opravy provedeny
neautorizovan˘mi osobami nebo pokud nejsou pouÏity originální díly Braun.
Pfiístroj je urãen v˘hradnû pro domácí pouÏití. Pfii pouÏití jin˘m zpÛsobem
nelze uplatnit záruku.Poskytnutím záruky nejsou dotãena práva
spotfiebitele, která se ke koupi vûci váÏí podle zvlá‰tních právních pfiedpisÛ.
Pro uplatnění záruky předložte řádně vyplněný záruční list anebo prodejní
doklad (dále jen doklady o koupi).
Chcete-li vyuÏít servisních sluÏeb v záruãní dobû, pfiedejte nebo po‰lete
kompletní pfiístroj spolu s doklady o koupi do autorizovaného servisního
stfiediska Braun. Aktualizovan˘ seznam servisních stfiedisek je k dispozici
v prodejnách v˘robkÛ Braun.
Volejte zákaznickou infolinku 221 804 335 pro informace o v˘robcích a
nejbliωím servisním stfiedisku Braun.
O pfiípadné v˘mûnû pfiístroje nebo zru‰ení kupní smlouvy platí pfiíslu‰ná
zákonná ustanovení. Záruãní doba se prodluÏuje o dobu, po kterou byl
v˘robek podle záznamu z opravny v záruãní opravû.
24
Page 24

Slovenský
Naše výrobky sú vyrobené tak, aby spíňali tie najvyššie nároky na kvalitu,
funkčnosť a dizajn. Dúfame, že so svojím novým výrobkom Braun budete
spokojní.
Upozornenie
• Tento prístroj je vybavený špeciálnym integrovaným sieťovým adaptérom
s káblom na nízke napätie. Žiadnu jeho časť nesmiete meniť ani ho
rozoberať, inak by mohlo dôjsť k úrazu elektrickým prúdom.
• Prístroj nikdy nepoužívajte, ak sa zastrihávače alebo sieťový kábel
poškodia.
• Tento prístroj nie je určený deťom ani osobám so zníženými fyzickými,
zmyslovými alebo mentálnymi schopnosťami, ak na ne nedohliada osoba
zodpovedná za ich bezpečnosť. Prístroj odporúčame uchovávať mimo
dosahu detí. Dávajte pozor, aby deti nepoužívali prístroj na hranie.
Fľaštička s olejom
Uchovávajte mimo dosahu detí. Nekonzumujte. Zabráňte kontaktu s očami.
Po vyprázdnení obsahu fľaštičku zahoďte.
Popis
1a Nadstavec na zastrihávanie fúzov a krátkych vlasov
1b Nadstavec na strihanie vlasov (iba model cruZer6 beard&head)
1c Tlačidlá na uvoľnenie nadstavca
2 Široký zastrihávač (32 mm)
3 Precízny zastrihávač (16 mm) (iba model cruZer6 beard&head)
4 Tlačidlo na uvoľnenie precízneho zastrihávača
5 Svetelný indikátor
6 Nastavenie dĺžky strihu
7 Spínač zapnutia/vypnutia
8 Špeciálny sieťový kábel
9 Puzdro (iba model cruZer6 beard&head)
Nabíjanie
Najvhodnejšia teplota prostredia pre nabíjanie je medzi 15 °C až 35 °C.
Prístroj nevystavujte dlhodobo teplotám nad 50 °C.
• Pomocou špeciálneho integrovaného sieťového kábla s adaptérom (8)
zapojte prístroj do elektrickej zásuvky a motorček nechajte vypnutý.
• Ak prístroj nabíjate po prvýkrát alebo ak ste ho niekoľko mesiacov
nepoužívali, nabíjajte ho nepretržite 4 hodiny (model cruZer5 beard: asi
8 hodín).
25
Page 25

• Po plnom nabití prístroj vybite normálnym používaním. Následne ho znova
nabite na plnú kapacitu. Každé ďalšie nabíjanie bude trvať asi 1 hodinu
(model cruZer5 beard: asi 8 hodín).
• Plne nabitý akumulátor zabezpečuje až 40 minút prevádzky bez použitia
sieťového kábla v závislosti od dĺžky vašich fúzov.
• Maximálnu kapacitu akumulátora však dosiahnete až po niekoľkých
cykloch nabitia/vybitia.
Svetelný indikátor (5)
Model cruZer6 beard&head:
• Svetelný indikátor znázorňuje stav batérií.
• Svetelný indikátor bliká počas nabíjania prístroja nazeleno. Keď je aku-
mulátor plne nabitý, indikátor začne nepretržite svietiť nazeleno, ak je
prístroj zapojený do elektrickej zásuvky.
• Počas používania prístroja bez sieťového kábla bliká indikátor nazeleno.
• Keď je akumulátor takmer vybitý, svetelný indikátor svieti načerveno.
Akumulátor by mal postačiť na dokončenie zastrihávania.
Model cruZer5 beard:
• Keď je prístroj zapojený do elektrickej zásuvky, svetelný indikátor svieti
nepretržite nazeleno.
Nadstavce (1a, 1b)
• Nadstavce môžete zložiť stlačením tlačidiel na uvoľnenie nadstavca (1c)
palcom a ukazovákom.
Zastrihávanie fúzov a brady
• Na vypnutý prístroj nasaďte nadstavec na zastrihávanie fúzov a krátkych
vlasov (1a).
• Stlačte tlačidlo nastavenia dĺžky strihu (6) a nadstavec posuňte smerom
hore na požadovanú dĺžku fúzov (možné nastavenia dĺžky: 1, 3, 5, 7, 9
a 11 mm).
• Odporúča sa začať s nastavením najväčšej dĺžky a postupne znižovať
úroveň nastavenia, až kým nedosiahnete požadovanú dĺžku fúzov.
• Stlačte spínač zapnutia/vypnutia (7). Nadstavec držte hranatou časťou
na zastrihávanej oblasti a zastrihávač veďte proti smeru rastu fúzov (a).
• Nadstavec občas vyčistite kefkou, aby ste zabránili jeho zaneseniu
zastrihnutými fúzmi.
26
Page 26

Zastrihávanie kontúr/úprava
• Široký zastrihávač (2) rovnomerne strihá a zastriháva veľké oblasti. Je
ideálny na úpravu bokombrád, fúzov a krátkych brád. Zložte nadstavec.
Pokožku držte napnutú a široký zastrihávač veďte proti smeru rastu fúzov.
• Precízny zastrihávač (3) (iba model cruZer6 beard&head) presne upra-
vuje línie a okraje a je vhodný na precíznu úpravu kontúr tváre. Ak chcete
použiť precízny zastrihávač, stlačte tlačidlo na jeho uvoľnenie (4) a
vysuňte ho nahor (c).
Strihanie vlasov (iba model cruZer6 beard&head)
Vlasy by mali byť čisté, dobre rozčesané, bez zauzlení a suché.
• Na vypnutý prístroj nasaďte nadstavec na strihanie vlasov (1b).
• Stlačte tlačidlo nastavenia dĺžky strihu (6) a nadstavec posuňte smerom
hore na požadovanú dĺžku vlasov (možné nastavenia dĺžky: 10, 12, 14, 16,
18 a 20 mm). Ak nie ste na domáce strihanie vlasov zvyknutí, začnite
s nastavením na väčšiu dĺžku a postupne úroveň nastavenia zmenšujte,
aby ste si vlasy neskrátili až príliš. Ak si chcete vlasy ostrihať na menej ako
10 mm, odporúčame ich najskôr pomocou nadstavca (1b) skrátiť na
dĺžku 10 mm a potom použiť nadstavec na zastrihávanie fúzov a krátkych
vlasov na dosiahnutie požadovanej dĺžky.
• Prístrojom pohybujte pomaly a opatrne. Cez vlasy ho neposúvajte
rýchlejšie, než je potrebné na to, aby stihol vlasy ostrihať.
• Vlasy z nadstavca priebežne vyklepávajte alebo vyfúkavajte. Ak je v hrebeni
zachytených príliš veľa vlasov, zložte ho a vyčistite.
Čistenie
Prístroj môžete opláchnuť pod tečúcou vodou.
Upozornenie: Pred čistením vo vode odpojte prístroj z elektrickej
siete.
Pravidelné čistenie zaručuje lepšie výsledky zastrihávania.
Čistenie kefkou
• Prístroj vypnite. Široký zastrihávač otvorte tak, že palcom zatlačíte proti
zastrihávaču z prednej strany. Otvorí sa v uhle približne 45 stupňov
a môžete ho aj zložiť (h).
• Pomocou kefky vyčistite zastrihávače a priestor za širokým zastrihávačom
(vo vnútri prístroja).
27
Page 27

Čistenie vodou
• Prístroj vypnite a hlavu prístroja a zastrihávače opláchnite pod teplou
tečúcou vodou. Opláchnuť môžete aj otvorený široký zastrihávač. Môžete
použiť aj tekuté mydlo bez abrazívnych látok. Penu dôkladne opláchnite.
• Prístroj s doširoka otvoreným širokým zastrihávačom nechajte uschnúť.
Udržiavanie prístroja v špičkovej forme
Aby bol strihací systém udrÏovan˘ v prevádzkyschopnom stave, naolejujte
ho po kaÏdom pouÏití jemn˘m olejom na ‰ijacie stroje (i).
Starostlivosť o akumulátor
Približne každých 6 mesiacov nechajte prístroj úplne vybiť (zastrihávaním/
strihaním), aby sa zachovala optimálna kapacita akumulátora. Potom
prístroj opäť nabite na plnú kapacitu.
Deklarovaná hodnota emisie hluku tohto spotrebiča je 62 dB(A), čo
predstavuje hladinu A akustického výkonu vzhľadom na frekvenčný akustický
výkon 1 pW.
Poznámka k životnému prostrediu
Tento výrobok obsahuje akumulátor. V záujme ochrany životného
prostredia nevyhadzujte výrobok po skončení jeho životnosti ako
súčasť bežného odpadu domácnosti. Odovzdať ho môžete
v servisných strediskách Braun alebo na príslušných zberných
miestach vo vašej krajine zriadených podľa miestnych predpisov a
noriem.
Právo na zmeny vyhradené.
Podrobné technické špecifikácie sa nachádzajú na špeciálnom sieťovom
kábli.
28
Page 28

Záruka
Na tento v˘robok poskytujeme záruku po dobu 2 rokov odo dÀa predaja
spotrebiteºovi. Poãas tejto záruãnej doby bezplatne odstránime závady
na v˘robku, spôsobené vadami materiálu alebo chybou v˘roby a to podºa
ná‰ho rozhodnutia buì opravou alebo v˘menou celého v˘robku. Táto
záruka platí pre v‰etky krajiny, kde tento v˘robok dodáva firma Braun alebo
jej autorizovan˘ distribútor.
Táto záruka sa nevzÈahuje: na po‰kodenia, ktoré vzniknú nesprávnym
pouÏívaním a údrÏbou, na beÏné opotrebenie ako aj na defekty, ktoré majú
zanedbateºn˘ vplyv na hodnotu a pouÏitie prístroja. Záruka stráca platnosÈ
v prípade, Ïe v˘robok bol mechanicky po‰koden˘, alebo sa uskutoãnili
opravy neautorizovan˘mi osobami, alebo sa nepouÏili originálne diely
Braun. Prístroj je v˘hradne urãen˘ na domáce pouÏitie. Pri pouÏití in˘m
spôsobom nie je moÏné záruku uplatniÈ.
Poskytnutím záruky nie sú ovlyvnené spotrebiteºské práva, ktoré sa ku kúpe
predmetu viaÏu podºa zvlá‰tnych predpisov.
Záruka platí iba vtedy, ak je záruãn˘ list riadne vyplnen˘ (dátum predaja,
peãiatka predajne a podpis predavaãa) a zároveÀ s ním predloÏen˘ doklad
o predaji (ìalej iba doklady o zakúpení).
Ak chcete vyuÏiÈ servisné sluÏby v záruãnej dobe, kompletn˘ prístroj
spolu s dokladmi o zakúpení odovzdajte alebo za‰lite do autorizovaného
servisného strediska Braun. Aktualizovan˘ zoznam servisn˘ch stredísk je
k dispozícii v predajniach v˘robkov Braun.
Vzhºadom na prípadnú v˘menu prístroja alebo na zru‰enie kúpnej zmluvy
platia príslu‰né zákonné ustanovenia. Záruãná doba sa predlÏuje o dobu,
poãas ktorej bol v˘robok podºa záznamu z opravovne v záruãnej oprave.
29
Page 29

Magyar
Termékeinket a legmagasabb minőségi, funkcionális és formatervezői
elvárások alapján terveztük. Reméljük, örömét leli majd új Braun
borotvájában!
Figyelmeztetés
• Az Ön borotváját egy különleges csatlakozókábellel láttuk el, integrált,
biztonságos kisfeszültségű rendszerrel. Semmilyen alkatrészét ne
cserélje, vagy alakítsa át, ellenkező esetben áramütés veszélye állhat
fenn!
• A készüléket soha ne használja, ha a nyíróegység vagy a különleges
csatlakozókábel megsérült!
• A készüléket gyermekek, mozgássérültek, szellemi vagy értelmi
fogyatékos személyek kizárólag a biztonságukért felelős felügyelet
mellett használják! Általában javasoljuk, hogy a készüléket gyermekektől
tartsa távol! Annak érdekében, hogy a készüléket játékra ne használják,
a gyermekek felügyeletet igényelnek.
Olajos fiola
Gyermekektől tartsa távol! Ne nyelje le.
Leírás
1a Szakáll fésű a szakáll és a rövid szőrszálak nyírásához
1b Hajnyíró fésű (csak a cruZer6 szakáll és hajnyíró készülék tartozéka)
1c Fésűkioldó gombok
2 Széles trimmelő (32 mm)
3 Precíziós trimmelő (16 mm)
(csak a cruZer6 szakáll és hajnyíró készülék tartozéka)
4 Precíziós trimmelő kioldó gomb
5 Üzemkijelző fény
6 Szakállhosszúság beállító
7 Be/kikapcsoló gomb
8 Különleges csatlakozókábel
9 Tartótok (csak a cruZer6 szakáll és hajnyíró készülékhez)
Töltés
A töltéshez legideálisabb környezeti hőmérséklet 15 °C és 35 °C között van.
Ne tegye ki a készüléket hosszabb ideig 50 °C-nál magasabb hőmérsékletnek.
• A különleges csatlakozókábel segítségével (8) a készüléket kikapcsolt
állapotban dugja be a konnektorba.
• Az első töltés alkalmával vagy ha a készüléket több hónapja nem
használta, töltse legalább 4 órán át (a cruZer5 beard modell esetében:
körülbelül 8 órát).
30
Page 30

• A teljes feltöltést követően normál használattal merítse le a készüléket,
majd töltse fel újra. Az első feltöltést követő töltések már csak 1 órát
vesznek igénybe (a cruZer5 beard modell esetében: körülbelül 8 órát).
• Egy teljes feltöltés – szakállhosszúságtól függően – akár 40 perc vezeték
nélküli használatot tesz lehetővé.
• A borotva a maximum kapacitását azonban csak többszöri feltöltési/
lemerítési ciklus után fogja elérni.
Üzemkijelző fény (5)
Az üzemkijelző fény az akkumulátor töltöttségi állapotát mutatja.
«cruZer6 beard&head» modell:
• A zöld színű üzemkijelző fény villogása azt jelzi, hogy a készülék feltöltés
alatt áll. A készülék teljes feltöltöttségi állapotánál a zöld színű üzemkijelző fény folyamatosan világít abban az esetben, ha a készülék be van
dugva a konnektorba.
• Vezeték nélküli használat során az üzemkijelző fény zölden villog.
• Amikor az akkumulátor közel van a lemerüléshez, az üzemkijelző fény
pirosan villog. Ilyenkor még elég idő áll rendelkezésre ahhoz, hogy az
elkezdett borotválkozást befejezze.
«cruZer5 beard» modell:
• A zöld színű üzemkijelző fény folyamatosan világít abban az esetben, ha a
készülék be van dugva a konnektorba.
Fésű kiegészítők (1a, 1b)
• A nyírófésűket a kioldógombok (1c) hüvelyk- és mutatóujjunkkal történő
megnyomásával távolíthatjuk el.
Szakáll nyíró
• Helyezze fel a szakállnyíró fésűt (1a) a kikapcsolt állapotban lévő
készülékre (a).
• Nyomja meg a szakállhosszúság kiválasztó gombot (6) és csúsztassa fel
a nyírófésűt a kívánt hosszúság jelzéséig (lehetséges beállítások: 1, 3, 5,
7, 9, 11 mm).
• Tanácsos a nyírást a legmagasabb hosszúsági-fokozat beállítással
indítani és fokozatosan csökkenteni azt mindaddig, amíg el nem éri a
kívánt szakállhosszúságot.
• Nyomja be a be/kikapcsoló gombot (7). Tartsa a nyírófésűt a megdöntött
élével a szakállához és kezdje el a nyírást a szőrszálak növekedési
irányával ellentétesen.
31
Page 31

• Annak érdekében, hogy a nyírófésű ne tömődjön el a szőrszálaktól,
időközönként seperje át a tisztítókefével.
Kontúrnyírás / Formázás
• A széles trimmelő (2) egyenletesen nyírja és trimmeli a nagyobb területe-
ket. Ideális a pajesz, a bajusz és a részben rövid szakáll megformázásához.
Vegye le a fésűt. Feszítse ki a nyírandó bőrfelületet és vezesse rajta végig
a széles trimmelőt a szőrszálak növekedésével ellentétes irányban (b).
• A precíziós trimmelő (3) (csak a «cruZer6 beard&head» szakáll és hajnyíró
készülék esetében) precíz és határozott vonalak és szélek megformázására
szolgál és ideális a pontos kontúrvonalak kialakításához. A precíziós
trimmelő használatához nyomja be a kioldó gombot (4) és csúsztassa fel
a trimmelőt (c).
Hajvágás (csak a «cruZer6 beard&head» szakáll és hajnyíró készülék
esetén)
A nyírandó haj legyen tiszta, alaposan átfésült, gubancmentes és száraz.
• Helyezze a nyírófésűt (1b) a kikapcsolt állapotban lévő készülékre (d).
• Nyomja meg a szakállhosszúság kiválasztó gombot (6) és csúsztassa a
távolabbi fésűt a kívánt hosszúság jelzéséig (lehetséges beállítások:
10, 12, 14, 16, 18, 20 mm). Amennyiben Ön nem jártas a hajvágásban,
célszerű a nyírást a legmagasabb hosszúsági-fokozat beállítással
indítani, így elkerülhető, hogy a kívántnál több hajat nyírjon le.
Amennyiben haját 10 mm-nél rövidebbre szeretné levágni, javasoljuk,
hogy először a hajnyíró fésűvel (1b) rövidítse meg 10 mm-re, majd a
szakállnyíró fésűvel érje el a kívánt hosszúságot.
• A nyírást lassú és határozott mozdulatokkal végezze. Ne erőltesse a
készülébb gyorsabb haladását, mint amennyivel az a nyírást el tudja
végezni.
• A hajvágás közben néha rázza le vagy fújja ki a hajat a készülékből.
Amennyiben túl sok haj szorult a fésűbe, szedje ki és tisztítsa meg azt.
Tisztítás
A készülék alkalmas a vízsugár alatt történő tisztításra.
Figyelmeztetés: A készülék vízzel történő tisztításának megkezdése
előtt húzza ki a borotvát a konnektorból!
A rendszeres tisztítás növeli a borotva hatékonyságát.
Tisztítás tisztítókefével
• Kapcsolja ki a készüléket. Nyissa ki a széles trimmelőt úgy, hogy
32
Page 32

hüvelykujjával megnyomja a készülék elejét. Ez kb. 45°-ban kinyitja a
trimmelőt, amely levehető is egyben (h).
• A tisztítókefe használatával tisztítsa meg a trimmelőket és a széles
trimmelő mögötti rést (a borítás belsejében).
Tisztítás vízzel
• Kapcsolja ki a készüléket és öblítse le a fejet és a trimmelőket meleg
vízsugár alatt. A nyitott széles trimmelőt szintén leöblítheti.
• A készüléket nyitott trimmelővel szárítsa.
Tartsa készülékét csúcsformában!
A tökéletes mıködés érdekében olajozza meg a nyírórendszert
mıszerolajjal minden használat után (i)!
Az akkumulátor karbantartása
A tölthető akkumulátor optimális kapacitásának megőrzése érdekében
a készüléket körülbelül félévente egyszer ajánlatos teljesen lemeríteni
(normál használattal), majd teljesen újratölteni.
Környezetvédelmi felhívás
A készülék tölthető akkumulátorral rendelkezik. A környezet megóvása
érdekében kérjük, hogy elhasználódott készülékét ne dobja a
háztartási hulladék közé, hanem kérjük, hogy juttassa el bármelyik
Braun szervízközpontba, illetve az Önhöz legközelebb eső
hulladékudvarba!
A változtatás joga fenntartva.
A műszaki adatok a különleges csatlakozókábelen kerültek feltüntetésre.
Garancia
A Braun – ismerve termékei megbízhatóságát, készülékeire két év garanciát
vállal, azzal a megkötéssel, hogy a jótállási igényt a készülék csomagolásában
található Jótállási Nyilatkozatban feltüntetett Braun márkaszervizekben lehet
érvényesíteni.
A garancia hatálya alól kivételt képeznek azok a meghibásodások, amelyek a
készülék szakszerűtlen, vagy nem rendeltetésszerű használatára vezethetők
vissza, valamint azok az apróbb hibák, amelyek a készülék értékét, vagy
használhatóságát nem befolyásolják.
A garancia nem vonatkozik a gyorsan kopó, rendszeresen cserélendő
tartozékokra (pl. Borotvaszita, kés, stb.)
A jótállási igény érvényesítésére vonatkozó részletes tájékoztató a készülék
csomagolásában található.
33
Page 33

Hrvatski
Naši su proizvodi dizajnirani tako da zadovoljavaju najviše standarde
kvalitete, funkcionalnosti i dizajna. Nadamo se da ćete i vi uživati u
korištenju novog Braunovog aparata za brijanje.
Upozorenje
• Ovaj uređaj ima ugrađen posebni sigurnosni niskonaponski adapter.
Nemojte mijenjati ili samostalno rukovati bilo kojim dijelom adaptera, jer
se tako izlažete opasnosti od strujnog udara.
• Nikada nemojte koristiti uređaj ako su oštećeni mrežica ili kabel.
• Ovaj uređaj nije namijenjen za upotrebu djeci ili osobama sa smanjenim
fizičkom i mentalnim sposobnostima, osim ako nisu pod nadzorom osobe
koja je zadužena za njihovu sigurnost. Općenito, preporučujemo da ovaj
uređaj držite van dosega djece kako se ne bi igrala s njime.
Boca s uljem
Držati dalje od dosega djece. Ne gutati. Odložiti u skladu s propisima kada
se isprazni.
Opis
1a Češalj za podrezivanje brade i kratke kose
1b Češalj za šišanje kose (samo s modelom cruZer6 beard&head)
1c Prekidač za otpuštanje češlja
2 Široki trimer (32 mm)
3 Precizni trimer (16 mm) (samo s modelom cruZer6 beard&head)
4 Prekidač za aktiviranje preciznog trimera
5 Kontrolna lampica
6 Odabir dužine
7 Prekidač za uključivanje/isključivanje
8 Priključni kabel s niskonaponskim adapterom
9 Torbica (samo s modelom cruZer6 beard&head)
Punjenje
Najbolja temperatura okoliša u kojem punite svoj aparat je između 15 °C
i 35 °C. Ne izlažite aparat duže vrijeme temperaturama višima od 50 °C.
• Uključite aparat u utičnicu preko niskonaponskog priključnog kabela (8).
Pazite da aparat pritom bude isključen.
• Kod prvog punjenja ili ako aparat za brijanje niste koristili nekoliko
mjeseci, pustite aparat da se puni 4 sata bez prekida (model cruZer5
za bradu: oko 8 sati).
34
Page 34

• Kad se baterija napuni, ispraznite je normalnom uporabom. Zatim je
napunite do kraja. Sljedeća punjenja trajat će oko 1 sat (model cruZer5 za
bradu: oko 8 sati).
• Pun kapacitet baterija dostatan je za do 40 minuta brijanja bez priključnog
kabela, što naravno ovisi i o jačini vaše brade.
• Baterije dostižu maksimum svojeg kapaciteta tek nakon nekoliko
uzastopnih ciklusa punjenja i pražnjenja.
Kontrolna lampica (5)
Model cruZer6 beard&head:
• Kontrolna lampica pokazuje status baterija.
• Kontrolna lampica tijekom punjenja treperi zeleno. Kada je baterija puna,
javlja se postojano zeleno svjetlo sve dok je aparat uključen u izvor
električne energije.
• Tijekom brijanja bez priključnog kabela lampica treperi zeleno.
• Kada je baterija pri kraju, kontrolna lampica bljeska crveno, no ima još
dostatno kapaciteta da završite s podrezivanjem odnosno šišanjem koje
ste započeli.
Model cruZer5 beard:
• Ako je uređaj uključen u izvor električne energije, kontrolna lampica
kontinuirano svijetli zeleno.
Nastavci u obliku češlja (1a, 1b)
• Češljevi se mogu skinuti tako da palcem i kažiprstom pritisnete prekidač
za njihovo otpuštanje (1c).
Podrezivanje brade
• Postavite češalj za podrezivanje brade (1a) na uređaj, pazeći da je uređaj
pri tom isključen (a).
• Pritisnite prekidač za odabir dužine (6) pa gurnite češalj do oznake za
željenu dužinu brade (moguće postavke dužine: 1, 3, 5, 7, 9, 11 mm).
• Preporučujemo vam da započnete s najvišom postavkom, pa ih lagano
smanjujete, sve dok ne dobijete željenu dužinu brade.
• Pritisnite prekidač za uključivanje/isključivanje (7). Držite češalj pod
kutem u odnosu na bradu i vodite uređaj u smjeru suprotnom od rasta
dlačica (a).
• Kako dlačice ne bi blokirale češalj, povremeno ga očistite četkicom.
35
Page 35

Nastavci za Stiliziranje
• Široki trimer (2) ujednačeno podrezuje dlačice na širem području pa je
idealan za oblikovanje zalisaka, brkova i bradica. Skinite češalj, zategnite
kožu i vodite trimer u smjeru suprotnom od rasta dlačica.
• Precizni trimer (3) (samo model cruZer6 beard&head) precizno oblikuje
linije i rubove, stoga je idealan za finalno definiranje izgleda. Samo pritisnite njegov prekidač (4) i gurnite ga prema gore.
Šišanje kose (samo model cruZer6 beard&head)
Kosa treba biti čista, počešljana i suha.
• Postavite češalj za šišanje kose (1b), pazeći da je uređaj pri tom isključen.
• Pritisnite prekidač za odabir dužine (6) pa gurnite češalj do oznake
za željenu dužinu kose (moguće postavke dužine: 10, 12, 14, 16, 18,
20 mm). Ako niste iskusni u samostalnom šišanju kose, počnite s najvišom postavkom i zatim ih smanjujte kako ne biste previše skratili kosu.
Želite li ošišati kosu na manje od 10 mm savjetujemo da je prvo ošišate
ovim češljem (1b) na dužinu od 10 mm, a zatim dođite do željene dužine
češljem za podrezivanje brade (1a).
• Neka vaši pokreti budu spori i kontrolirani. Ne provlačite uređaj kroz kosu
brže nego što on može šišati.
• U pauzama protresite ili otpušite dlačice. Ako se nakupi previše dlačica
skinite češalj i očistite ga.
Čišćenje
Ovaj uređaj možete čistiti pod mlazom tekuće vode.
Upozorenje: Prije ispiranja aparata vodom, prvo ga isključite iz izvora
napajanja električnom energijom.
Redovito čišćenje omogućuje kvalitetniji i bolji rad aparata.
Čišćenje četkicom
• Isključite aparat. Otklopite široki trimer pritiskom palca s prednje strane.
Otklopit će se pod kutem od 45°, a moći ćete ga i sklnuti (h).
• Uz pomoć četkice očistite trimere i prostor iza širokog trimera (unutar
kućišta uređaja).
Čišćenje vodom
• Isključite uređaj i isperite glavu aparata i trimere tekućom vrućom vodom.
Možete isprati i široki trimer, ali za to ga prvo trebate otklopiti.
• Ostavite uređaj s otklopljenim širokim trimerom da se osuši.
36
Page 36

Održavanje uređaja u vrhunskom stanju
Kako bi sustav za rezanje pravilno funkcionirao, podmaÏite ga laganim
ma‰inskim uljem nakon svake uporabe (i).
Očuvanje baterija
Kako biste održali optimalan kapacitet baterija, treba pustiti aparat da se do
kraja sam isprazni (uporabom) otprilike svakih 6 mjeseci. Tada ga napunite
do punog kapaciteta.
Napomena o brizi za okoliš
Ovaj uređaj ima punjive baterije. Kako biste zaštitili okoliš, kada se
baterije u potpunosti istroše, nemojte ih odlagati zajedno s kućnim
otpadom. Ostavite ih u Braunovom servisnom centru ili na za to
predviđenim odlagalištima.
Podložno promjenama bez prethodne najave.
Električne specifikacije su otisnute na posebnom niskonaponskom kabelu.
Jamstveni list
Jamstvo ne vrijedi za o‰teçenja nastala neispravnom uporabom, normalnu
istro‰enost (npr. mreÏice ili bloka noÏa) i nedostatke koji samo neznatno
utjeãu na vrijednost ili valjanost uporabe aparata.
Ovo jamstvo vrijedi u svakoj zemlji gdje su proizvodi distribuirani od strane
Brauna ili sluÏbenog distributera.
Jamstvo ne vrijedi za o‰teçenja nastala neispravnom uporabom, normalnu
istro‰enost i nedostatke koji samo neznatno utjeãu na vrijednost ili valjanost
uporabe aparata. Jamstvo prestaje kod popravka od strane neovla‰tene
osobe ili uporabe neoriginalnih dijelova umjesto Braun rezervnih dijelova.
Jamstvo vrijedi samo uz predoãenje raãuna i pravilno ispunjenog
jamstvenog lista.
Braunov servis moÏete kontaktirati na broj telefona 00 385 1 66 01 777.
37
Page 37

Slovenski
Naši izdelki so zasnovani tako, da ustrezajo najvišjim standardom kakovosti,
funkcionalnosti in dizajna. Upamo, da boste vaš novi Braunov aparat
z veseljem uporabljali.
Opozorilo
• Aparat je opremljen z vgrajenim varnostnim nizkonapetostnim napajanjem.
Delov priključne vrvice ne smete zamenjati ali jih kakorkoli spremeniti.
V nasprotnem primeru obstaja nevarnost električnega udara.
• Aparata ne uporabljajte, če so prirezovalniki ali posebna priključna vrvica
poškodovani.
• Otroci in ljudje z zmanjšano fizično, zaznavno ali duševno sposobnostjo
lahko uporabljajo aparat le pod nadzorstvom osebe, ki je odgovorna
za njihovo varnost. Priporočamo vam, da napravo hranite izven dosega
otrok. Otroci morajo biti pod nadzorom, da je zagotovljeno, da se
z napravo ne igrajo.
Steklenička z oljem
Hranite izven dosega otrok. Ne zaužijte. Ne nanašajte v oči. Prazno embalažo
odvrzite na ustrezno mesto.
Opis
1a Nastavek za prirezovanje brade in kratkih las
1b Nastavek za striženje las (samo model cruZer6 beard&head)
1c Tipki za sprostitev nastavka
2 Široki prirezovalnik (32 mm)
3 Natančni prirezovalnik (16 mm) (samo model cruZer6 beard&head)
4 Tipka za sprostitev natančnega prirezovalnika
5 Kontrolna lučka
6 Drsnik za nastavitev dolžine
7 Stikalo za vklop/izklop
8 Posebna priključna vrvica
9 Torbica (samo model cruZer6 beard&head)
Polnjenje
Najprimernejša temperatura okolice za polnjenje brivnika je med 15 in 35 °C.
Aparata ne smete dalj časa izpostavljati temperaturam, višjim od 50 °C.
• S posebno priključno vrvico (8) priključite aparat na električno omrežje.
Motor aparata mora biti pri tem izključen.
• Pri prvem polnjenju ali kadar aparat ni bil v uporabi nekaj mesecev, ga
polnite neprekinjeno vsaj 4 ure (model cruZer5 beard: približno 8 ur).
38
Page 38

• Ko je baterija aparata povsem napolnjena, jo izpraznite z normalno upo-
rabo. Nato jo ponovno napolnite do polne kapacitete. Nadaljnja polnjenja
bodo trajala približno 1 uro (model cruZer5 beard: približno 8 ur).
• Povsem napolnjena baterija omogoča do 40 minut uporabe aparata brez
priključne vrvice, odvisno od rasti vaše brade.
• Baterija bo dosegla svojo maksimalno kapaciteto šele po nekajkratnem
polnjenju/praznjenju.
Kontrolna lučka (5)
Model cruZer6 beard&head:
• Kontrolna lučka kaže napolnjenost baterije.
• Kontrolna lučka utripa zeleno, ko se aparat polni. Ko je baterija povsem
napolnjena, kontrolna lučka neprekinjeno sveti zeleno, pod pogojem,
da je aparat priključen na električno omrežje.
• Med uporabo brez priključne vrvice kontrolna lučka utripa zeleno.
• Kontrolna lučka utripa rdeče, če je baterija že skoraj prazna. Svoje
trenutno prirezovanje pa lahko še dokončate.
Model cruZer5 beard:
• Kontrolna lučka neprekinjeno sveti zeleno, pod pogojem, da je aparat
priključen na električno omrežje.
Nastavka (1a, 1b)
• Nastavka lahko odstranite z aparata, tako da s palcem in kazalcem
pritisnete tipki za sprostitev (1c).
Prirezovanje brade
• Nastavek za prirezovanje brade (1a) namestite na aparat, pri čemer mora
biti le-ta izključen (a).
• Pritisnite drsnik za nastavitev dolžine (6) in potisnite nastavek do želene
dolžine brade (možne nastavitve dolžine: 1, 3, 5, 7, 9, 11 mm).
• Priporočamo vam, da začnete z najvišjo nastavitvijo, nato pa jo manjšate,
dokler ne dosežete želene dolžine brade.
• Pritisnite stikalo za vklop/izklop (7). Nastavek držite z nagnjenim robom
proti vaši bradi in pomikajte prirezovalnik v nasprotni smeri rasti dlak (a).
• Da se nastavek ne bo zamašil z odrezanimi dlakami, ga občasno očistite
s ščetko.
Oblikovanje
• S širokim prirezovalnikom (2) lahko enakomerno postrižete in prirežete
večje površine. Idealen je za oblikovanje zalizcev, brkov in kratke brade.
39
Page 39

Snemite nastavek. Kožo rahlo napnite in široki prirezovalnik pomikajte
proti rasti dlak (b).
• Z natančnim prirezovalnikom (3) (samo pri modelu cruZer6 beard&head)
lahko oblikujete črte in robove, zato je idealen za natančne linije. Če želite
uporabiti natančni prirezovalnik, pritisnite gumb za sprostitev (4) in ga
potisnite navzgor (c).
Striženje las (samo model cruZer6 beard&head)
Lasje morajo biti umiti, razčesani, brez vozlov in suhi.
• Nastavek za striženje las (1b) namestite na aparat, pri čemer mora biti
le-ta izključen (d).
• Pritisnite drsnik za nastavitev dolžine (6) in potisnite nastavek do želene
dolžine las (možne nastavitve dolžine: 10, 12, 14, 16, 18, 20 mm).
Če niste vajeni striženja las, začnite z višjo nastavitvijo dolžine in jo nato
zmanjšajte, da ne boste las postrigli več, kot bi si želeli. Če želite lase
ostriči na dolžino, krajšo od 10 mm, vam svetujemo, da jih najprej
ostrižete z nastavkom (1b) na 10 mm, nato pa uporabite nastavek za
prirezovanje brade, da dosežete želeno dolžino.
• Strižite s počasnimi, nadzorovanimi gibi. Aparata ne potiskajte skozi lase
hitreje, kot jih lahko striže.
• Med delom večkrat otresite ali odpihnite lase z aparata. Če se v nastavek
ujame preveč las, jih odstranite in očistite nastavek.
Čiščenje
Aparat lahko čistite pod tekočo vodo. Opozorilo: Pred čiščenjem
z vodo morate aparat izključiti iz električnega omrežja.
Redno čiščenje aparata vam zagotavlja boljše rezultate prirezovanja.
Čiščenje s ščetko
• Izklopite aparat. Odprite široki prirezovalnik, tako da pritisnete s palcem
proti prirezovalniku s sprednje strani. Odpre se za pribl. 45° in ga lahko
tudi snamete (h).
• S ščetko očistite prirezovalnika in prostor za širokim prirezovalnikom
(znotraj ohišja).
Čiščenje z vodo
• Izklopite aparat in sperite njegovo glavo in prirezovalnika pod toplo tekočo
vodo. Sperete lahko tudi odprt široki prirezovalnik.
• Pustite, da se aparat posuši z odprtim širokim prirezovalnikom.
40
Page 40

Vzdrževanje brivnika
Aby holiaci systém správne fungoval, po každom použití ho namažte
jemným strojovým olejom (i).
Ohranjanje kapacitete baterij
Da bodo baterije za ponovno polnjenje ohranile optimalno kapaciteto, jih
morate približno vsakih 6 mesecev povsem izprazniti (s prirezovanjem).
Nato aparat ponovno napolnite do polne kapacitete.
Vaš prispevek k varovanju okolja
Izdelek je opremljen z baterijami za ponovno polnjenje. Prosimo,
da odslužene naprave ne odvržete med gospodinjske odpadke.
Odnesete jo lahko na ustrezno zbirno mesto, določeno v skladu
z veljavnimi predpisi v Republiki Sloveniji.
Pridržujemo si pravico do sprememb brez predhodnega opozorila.
Električne karakteristike so odtisnjene na priključni vrvici.
Garancija
Za izdelek valja dvoletna garancija, ki zaãne veljati z datumom nakupa.
V ãasu trajanja garancije bomo brezplaãno odpravili vse napake, ki so
posledica slabega materiala ali izdelave, bodisi s popravilom bodisi z
zamenjavo celega izdelka.
Ta garancija velja v vsaki drÏavi, kjer je izdelek dobavljen od BRAUN ali
njegovega poobla‰ãenega distributerja.
Garancija ne pokriva po‰kodb, ki so posledica nepravilne uporabe,
normalne obrabe ali uporabe in tudi ne napak, ki v zanemarljivi meri vplivajo
na vrednost ali delovanje aparata. Garancija preneha veljati, ãe popravilo
izvr‰i nepoobla‰ãena oseba oziroma, ãe pri popravilu niso uporabljeni
originalni Braunovi nadomestni deli.
Za popravilo v garancijskem roku izroãite ali po‰ljite kompleten izdelek z
raãunom poobla‰ãenemu Braunovemu servisu.
Za informacije pokliãite poobla‰ãeni servis ISKRA PRINS
tel. + 386 1 476 98 00.
41
Page 41

Türkçe
Ürünlerimiz yüksek kalite, fonksiyonellik ve şık dizayn ilkelerine bağlı
kalınarak tasarlanmıştır. Yeni Braun tıraş makinenizden memnun kalacağınızı
umarız.
Uyarı
• Tıraş makinenizin ekstra düşük voltaj için güvenlik sağlayan adaptör
içeren özel kablo seti vardır. Bu setin hiçbir parçasını değiştirmeyin veya
başka amaçlar için kullanmayın. Aksi takdirde elektrik şoku meydana
gelebilir.
• Cihazı kesinlikle hasar görmüş bıçaklar veya özel kablo seti ile kullanmayın.
• Bu aygıt sorumlu bir kişinin gözetiminde olmaksızın çocukların ve fiziksel,
ruhsal veya zihinsel engelli kişilerin kullanmasına uygun değildir. Aygıtınızı
çocukların ulaşabileceği yerlerden uzak tutmanızı öneririz. Çocukların
cihazla oynamamaları yönünde belgilendirilmesini öneririz.
Yağ şişesi
Çocukların erişebileceği yerlerden uzak tutunuz. Yutmayınız. Gözle temastan
kaçınınız. Boşaldığında uygun şekilde atınız.
Tanım
1a Sakal ve kısa saçların kesilmesi için sakal tarağı
1b Saç kesimi için saç tarağı (sadece cruZer6 Sakal&Saç modelinde)
1c Tarak için çıkartma düğmesi
2 Geniş şekillendirici (32 mm)
3 Hassas şekillendirici (16 mm) (sadece cruZer6 Sakal&Saç modelinde)
4 Hassas şekillendirici için çıkartma düğmesi
5 Pilot ışığı
6 Uzunluk seçimi
7 Açma/kapama düğmesi
8 Özel kablo seti
9 Kılıf (sadece cruZer6 Sakal&Saç modelinde)
Şarj Etme
Şarj etmek için en ideal sıcaklık 15 °C ve 35 °C arasıdır. Cihazı 50 °C nin
üzerindeki sıcaklıklara uzun süre maruz bırakmayınız.
• Tıraş makineniz kapalıyken özel kablo setini (8) kullanarak makinenizi
prize takın.
• Makinenizi ilk defa şarj ederken veya cihaz uzun süre kullanılmadığında,
4 saat boyunca şarj edin (cruZer5 Sakal modeli: yaklaşık 8 saat).
42
Page 42

• Makine tamamen sarj olduğunda, ürünü normal şekilde kullanarak şarjını
bitirin. Daha sonra tamamen şarj edin. Sonraki şarj etme işlemleri yaklaşık
1 saat kadar sürecektir (cruZer5 Sakal modeli: yaklaşık 8 saat).
• Tam şarj olmuş bir makine 40 dakikaya kadar kablosuz kullanım sağlar.
Sakal uzunluğunuza göre bu süre değişebilir.
• Birkaç şarj döngüsünden sonra pil maksimum performansına ulaşacaktır.
Pilot Işığı (5)
cruZer 6 Sakal&Saç modeli:
• Pilot ışığı pillerin durumunu gösterir.
• Cihaz şarj olurken pilot ışığı yeşil renkte yanıp söner. Pil tamamen
dolduğunda, cihaz prize takılı olduğu süre boyunca pilot ışığı sürekli
olarak yeşil renkte yanar.
• Kablosuz kullanım sırasında pilot ışığı yeşil renkte yanıp söner.
• Pil seviyesi düşük olduğunda pilot ışığı kırmızı renkte yanıp söner. Tıraş
işleminizi bitirebilirsiniz.
cruZer5 Sakal modeli:
• Cihaz prize takılı olduğu sürece pilot ışığı sürekli olarak yeşil renkte yanar.
Tarak ataçmanları (1a, 1b)
• Taraklar baş parmak ve işaret parmağı ile çıkarma düğmesine (1c)
basılarak çıkarılabilir.
Sakal şekillendirme
• Cihaz kapalı iken sakal tarağını (1a) cihazın üzerine yerleştirin (a).
• Uzunluk seçimine (6) basın ve sakal tarağını istediğiniz sakal uzunluğuna
göre kaydırın. (uzunluk seçenekleri: 1, 3, 5, 7, 9, 11 mm).
• En yüksek uzunluk ayarı ile başlayıp istediğiniz boyda sakala ulaşana
kadar seviyeyi düşürerek ilerlemeniz önerilir.
• Açma/kapama düğmesine basın (7). Sakal tarağını açılı ucu ile sakalınıza
yerleştirin ve kılların uzama yönünün tersine doğru hareket ettirin (a).
• Sakal tarağının kıllar ile tıkanmasını önlemek için ara sıra fırça ile
temizleyin.
Hatların şekillendirilmesi
• Geniş şekillendirici (2) büyük bölgeleri eşit şekilde keser ve düzeltir.
Favori, bıyık ve bölgesel kısa sakalların şekillendirilmesi için idealdir.
Cildinizi gererken, geniş şekillendiriciyi kılların uzama yönünün tersine
doğru hareket ettirin (b).
43
Page 43

• Hassas şekillendirici (3) (sadece cruZer6 Sakal&Saç modelinde), ince
hatların şekillendirilmesi için idealdir ve hassas bir şekilde hatları ve
kenarları belirler (c). Hassas şekillendiriciyi kullanmak için çıkartma
düğmesine (4) basın ve yukarı doğru kaydırın.
Saç Kesme (Sadece cruZer6 Sakal&Saç modelinde)
Saç temiz, iyice taranmış, karışıklıkları açılmış ve kuru durumda olmalıdır.
• Cihaz kapalı iken saç tarağını (1b) cihazın üzerine yerleştirin (d).
• Uzunluk seçimine (6) basın ve tarağı istediğiniz saç uzunluğuna göre
kaydırın. (uzunluk seçenekleri: 10, 12, 14, 16, 18, 20 mm). Saç kesmeye
alışık değilseniz, istenenden daha fazla saç kesilmesini önlemek için daha
yüksek bir uzunluk ayarı ile başlayıp sonrasında seviyeyi düşürün.
Saçınızı 10 mm’den daha kısa kesmek istiyorsanız, önce saç tarağı (1b)
ile 10 mm’ye kadar kısaltıp sonrasında sakal tarağı ile istediğiniz uzunluğa
getirmenizi öneririz.
• Yavaş ve kontrollü şekilde hareket ettirin. Cihazı saçta kesebileceğinden
daha hızlı şekilde zorlamayın.
• Ara sıra cihazı sallayarak veya üfleyerek kılların dökülmesini sağlayın.
Tarağa çok fazla kıl takıldığında, tarağı çıkarıp temizleyin.
Temizleme
Bu cihaz akan musluk suyu altında temizlenmeye uygundur.
Uyarı: Cihazı suyla temizlemeden önce prizden çıkarın.
Düzenli temizlik daha iyi kesme performansı sağlar.
Fırça ile temizleme
• Cihazı kapalı konuma getirin. Geniş şekillendiriciyi baş parmağınızla
şekillendiricinin tersi yönünde bastırarak açın. 45 dereceye kadar açılabilir
ve çıkarılabilir (h).
• Fırçayı kullanarak şekillendiricileri ve geniş şekillendiricinin arkasındaki
alanı (çerçevenin içi) temizleyin.
Su ile temizleme
• Cihazı kapatın ve başlık ile şekillendiricleri akan ılık su altında durulayın.
Ayrıca açılmış durumdaki geniş şekillendiriciyi de durulayabilirsiniz.
• Cihazı, geniş şekillendirici açık kalacak şekilde kurumaya bırakın.
Cihazınızın ideal performansını her zaman korumak için
Kesici sistemi düzenli çalıμır kılmak için her kullanımdan sonra hafif makine
yaπı ile yaπlayınız (i).
44
Page 44

Pillerin korunması
Şarj edilebilir pillerin maksimum kapasitede çalışabilmesi için, cihazınızın
şarjının yaklaşık her 6 ayda bir tamamen boşalması gerekir (kullanım
yoluyla). Sonra tıraş makinenizi tam dolana kadar şarj edin.
Çevresel Uyarı
Bu ürün şarj edilebilirpiller içermektedir. Doğal çevreyi korumak
adına, lütfen ürünü kullanım ömrü sonunda ev atıkları ile beraber
atmayınız. Ürünü atmak istediğinizde Braun servis merkezlerine
götürebilirsiniz ya da bulunduğunuz ülkenin katı atık kuralları
çerçevesinde yok ediniz.
Bildirim yapılmadan değiştirilebilir.
Elektrikle ilgili direktifler özel kordon setinin üzerinde yazmaktadır.
EEE STANDARTLARINA UYGUNDUR
Bakanlıkça tespit ve ilan edilen kullanım ömrü 7 yıldır.
Üretici firma ve CE işareti uygunluk değerlendirme
kuruluşu:
Braun GmbH
Frankfurter Straße 145
61476 Kronberg / Germany
“ (49) 6173 30 0
Fax (49) 6173 30 28 75
P & G Sat. ve Dağ. Ltd. Şti.
Serin Sok. No: 9 34752 çerenköy/stanbul
tarafından ithal edilmiştir.
P & G Tüketici Hizmetleri
0 800 261 63 65,
trconsumers@custhelp.com
45
Page 45

Русский
Руководство по эксплуатации
Наша продукция отвечает самым высоким стандартам качества,
функциональности и дизайна. Надеемся, Вы высоко оцените наше
новое изделие под маркой Braun.
Внимание
• Данный прибор оборудован специальным шнуром со встроенным
источником электропитания, подающим низкое напряжение.
Не меняйте и не ремонтируйте самостоятельно какие-либо его
части. В противном случае вы подвергаете себя риску поражения
электрическим током.
• Никогда не используйте прибор с поврежденными триммерами или
шнуром питания.
• Прибор не предназначен для использования лицами (включая детей)
с пониженными физическими, чувственными или умственными
способностями или при отсутствии у них опыта или знаний, если
они не находятся под контролем или не проинструктированы об
использовании прибора лицом, ответственным за их безопасность.
Дети должны находиться под контролем для недопущения игры
с прибором.
Масленка
Храните масленку в недоступном для детей месте. Не допускайте
попадания масла внутрь и в глаза. Не использовать в пищу. Пустую
масленку следует утилизировать в соответствии с требованиями
законодательства.
Описание и Комплектность
1a Насадка для подравнивания бороды и коротких волос
1b Насадка для стрижки волос (только для модели cruZer6 beard&head)
1c Фиксаторы для насадок
2 Широкий триммер (32 мм)
3 Узкий триммер (16 мм) (только для модели cruZer6 beard&head)
4 Фиксатор узкого триммера
5 Световой индикатор
6 Регулятор длины стрижки
7 Выключатель питания
8 Комплект проводов
9 Чехол (только для модели cruZer6 beard&head)
46
Page 46

Зарядка
Оптимальная окружающая температура для зарядки прибора от 15 °C
до 35 °C. Не подвергайте прибор воздействию температур выше 50 °C
в течение длительных периодов времени.
• При помощи специального комплекта проводов (8) присоедините
прибор к электрической розетке, при этом прибор должен быть
выключен.
• При первой зарядке или при зарядке прибора после длительного
периода хранения зарядку следует осуществлять непрерывно
в течение 4 часов (для модели cruZer5 beard: не более 8 часов).
• После полной зарядки прибора разрядите его в процессе обычной
эксплуатации. После этого снова полностью зарядите его.
Последующие зарядки будут занимать не более 1 часа (для модели
cruZer5 beard: не более 8 часов).
• При полной зарядке аккумулятора прибор сможет работать до
40 минут. Данный показатель может варьироваться в зависимости
от характеристик постригаемого волосяного покрова.
• Максимальная емкость аккумулятора будет достигнута только после
нескольких циклов зарядки/разрядки.
Световой индикатор (5)
Модель cruZer6 beard&head:
• Световой индикатор показывает состояние аккумулятора.
• В процессе зарядки аккумулятора индикатор будет мигать зеленым
светом. При полной зарядке аккумулятора индикатор будет непрерывно гореть зеленым светом, но при условии, что прибор будет
присоединен к электрической розетке.
• При использовании прибора в беспроводном режиме световой
индикатор будет мигать зеленым светом.
• При низком заряде аккумулятора световой индикатор будет мигать
красным светом. В этом случае вам будет необходимо закончить
процедуру стрижки как можно быстрее.
Модель cruZer5 beard:
• Если прибор присоединен к электрической розетке, данный
световой индикатор будет непрерывно гореть зеленым светом.
Насадки (1a, 1b)
• Насадки можно снять, нажав большим и указательным пальцами на
соответствующие фиксаторы (1c).
47
Page 47

Корректировка бороды
• Установите насадку для стрижки бороды (1a) на прибор, при этом
сам прибор должен быть выключен (a).
• Нажмите на регулятор длины (6) и установите насадку на длину
бороды (варианты установки длины: 1, 3, 5, 7, 9, 11 мм).
• Рекомендуется начинать с максимальной длины, затем уменьшать
ее до тех пор, пока не будет достигнута желаемая длина волос.
• Включите прибор (7). Удерживая насадку угловой кромкой к бороде,
проведите триммер против роста волос.
• Во избежание забивания насадки состриженными волосами
регулярно очищайте ее при помощи специальной щетки.
Корректировка контуров / Стайлинг
• Широкий триммер (2) ровно срезает и подравнивает большие
участки роста волос. Идеально подходит для придания необходимой
формы бакенбардам, усам и коротким бородкам. Снимите насадку.
Натянув кожу, направляйте широкий триммер против роста волос (b).
• Узкий триммер (3) (только для модели cruZer6 beard&head)
позволяет делать четкие линии. Является идеальным средством для
формирования контуров волосяного покрова. Для использования
узкого триммера нажмите на фиксатор (4) и сдвиньте его вверх (c).
Стрижка волос (только для модели cruZer6 beard&head)
Волосы должны быть чистыми, расчесанными и сухими.
• Установите насадку для стрижки волос (1b), при этом прибор должен
быть выключен.
• Установите регулятор длины волос (6) и выдвиньте насадку на
необходимую вам длину (возможные варианты длины волос: 10, 12,
14, 16, 18, 20 мм). Если вы не привыкли к стрижке волос с помощью
триммера, начинайте стрижку с максимальной длины, затем
уменьшайте ее во избежание нежелательного срезания большей
длины волос. Если вам необходимо состричь волосы короче 10 мм,
мы рекомендуем сначала состричь их при помощи насадки для
стрижки волос (1b) до длины 10 мм, а затем сменить ее на насадку
для стрижки бороды и состричь волосы на необходимую длину.
• Для оптимального результата стрижки движения должны быть
мягкими и плавными.
• В промежутках между проходками стряхивайте или сдувайте
состриженные волосы. При большом скоплении волос в насадке
снимите и очистите ее.
48
Page 48

Чистка и уход
Данный прибор можно чистить под проточной водой. Внимание:
Перед чисткой прибора в проточной воде отсоедините его от
электросети.
Регулярная чистка прибора продлит срок его службы и позволит
достигнуть максимальной эффективности в процессе его эксплуатации.
Чистка щеткой
• Выключите прибор. Откройте широкий триммер, нажав на него
большим пальцем с лицевой стороны. Он открывается примерно
на 45°, и также может быть полностью отсоединен от прибора (h).
• Очистите щеткой триммеры и пространство позади широкого
триммера (внутри корпуса).
Промывка водой
• Выключите прибор и промойте головку и триммеры теплой проточ-
ной водой. Прибор можно также промывать с открытым широким
триммером.
• Дайте прибору просохнуть, открыв при этом широкий триммер.
Продлите срок службы прибора
СОfl ФУ‰‰ВК‡МЛfl ВКЫ˘ВИ ТЛТЪВП˚ ‚ ıУУ¯ВП ТУТЪУflМЛЛ ТП‡Б˚‚‡ИЪВ
ВВ ОВ„НЛП П‡¯ЛММ˚П П‡ТОУП ФУТОВ Н‡К‰У„У ЛТФУО¸БУ‚‡МЛfl (i).
Сохранение емкости аккумуляторов
Для поддержания максимальной емкости аккумуляторов прибор
необходимо полностью разряжать (в процессе стрижки/корректировки) примерно через каждые 6 месяцев. После таких разрядок
прибор следует полностью заряжать.
Предупреждение относительно охраны
окружающей среды
Данное изделие имеет в своем составе перезаряжаемые
аккумуляторы. В интересах охраны окружающей среды просим
вас не утилизировать данное изделие как обычные бытовые
отходы. Утилизация может быть организована в Техническом
центре Braun или в соответствующем месте сбора подобных отходов
в вашей стране.
49
Page 49

Содержание может быть изменено без предварительного
уведомления.
Электротехнические характеристики указаны на комплекте проводов.
Внимание: Вскрытие корпуса приведет к повреждению прибора и
лишению гарантии.
Данное изделие соответствует всем требуемым
европейским стандартам безопасности и гигиены.
Бритва электрическая Braun cruZer6 beard&head, тип 5417;
Braun cruZer5 beard, тип 5418
Изготовлено в Китае для Braun GmbH,
Frankfurter Strasse 145, 61476 Kronberg, Germany.
RU: Импортер/Служба потребителей: OOO «Проктер энд Гэмбл
Дистрибьюторская Компания», Россия, 125171, Москва, Ленинградское
шоссе, 16А, стр.2. Тел. 8-800-200-20-20.
BY: Импортер: ООО «Электросервис и Ко», Беларусь, 220012, г. Минск,
ул. Чернышевского, 10А, к. 412А3. Сервисный центр: ООО «Катрикс»,
Беларусь, 220012, г. Минск, ул. Чернышевского, 10А, к.409.
Й‡‡МЪЛИМ˚В У·flБ‡ЪВО¸ТЪ‚‡ BRAUN
СОfl ‚ТВı ЛБ‰ВОЛИ П˚ ‰‡ВП „‡‡МЪЛ˛ М‡ ‰‚‡ „У‰‡, М‡˜ЛМ‡fl Т ПУПВМЪ‡
ФЛУ·ВЪВМЛfl ЛБ‰ВОЛfl.
З ЪВ˜ВМЛВ „‡‡МЪЛИМУ„У ФВЛУ‰‡ П˚ ·ВТФО‡ЪМУ ЫТЪ‡МЛП ФЫЪВП
ВПУМЪ‡, Б‡ПВМ˚ ‰ВЪ‡ОВИ ЛОЛ Б‡ПВМ˚ ‚ТВ„У ЛБ‰ВОЛfl О˛·˚В Б‡‚У‰ТНЛВ
‰ВЩВНЪ˚, ‚˚Б‚‡ММ˚В МВ‰УТЪ‡ЪУ˜М˚П Н‡˜ВТЪ‚УП П‡ЪВЛ‡ОУ‚ ЛОЛ
Т·УНЛ.
З ТОЫ˜‡В МВ‚УБПУКМУТЪЛ ВПУМЪ‡ ‚ „‡‡МЪЛИМ˚И ФВЛУ‰ ЛБ‰ВОЛВ
ПУКВЪ ·˚Ъ¸ Б‡ПВМВМУ М‡ МУ‚УВ ЛОЛ ‡М‡ОУ„Л˜МУВ ‚ ТУУЪ‚ВЪТЪ‚ЛЛ Т
Б‡НУМУП “й Б‡˘ЛЪВ Ф‡‚ ФУЪВ·ЛЪВОВИ”.
Й‡‡МЪЛfl У·ВЪ‡ВЪ ТЛОЫ, ЪУО¸НУ ВТОЛ ‰‡Ъ‡ ФУНЫФНЛ ФУ‰Ъ‚ВК‰‡ВЪТfl
ФВ˜‡Ъ¸˛ Л ФУ‰ФЛТ¸˛ ‰ЛОВ‡ (П‡„‡БЛМ‡) М‡ ФУТОВ‰МВИ ТЪ‡МЛˆВ
оригинального руководства ФУ ˝НТФОЫ‡Ъ‡ˆЛЛ BRAUN, НУЪУ‡fl fl‚ОflВЪТfl
„‡‡МЪЛИМ˚П Ъ‡ОУМУП.
50
Page 50

щЪ‡ „‡‡МЪЛfl ‰ВИТЪ‚ЛЪВО¸М‡ ‚ О˛·УИ ТЪ‡МВ, ‚ НУЪУЫ˛ ˝ЪУ ЛБ‰ВОЛВ
ФУТЪ‡‚ОflВЪТfl ЩЛПУИ BRAUN ЛОЛ М‡БМ‡˜ВММ˚П ‰ЛТЪЛ·¸˛ЪУУП, Л „‰В
МЛН‡НЛВ У„‡МЛ˜ВМЛfl ФУ ЛПФУЪЫ ЛОЛ ‰Ы„ЛВ Ф‡‚У‚˚В ФУОУКВМЛfl МВ
ФВФflЪТЪ‚Ы˛Ъ ФВ‰УТЪ‡‚ОВМЛ˛ „‡‡МЪЛИМУ„У У·ТОЫКЛ‚‡МЛfl.
Й‡‡МЪЛfl МВ ФУН˚‚‡ВЪ ФУ‚ВК‰ВМЛfl, ‚˚Б‚‡ММ˚В МВФ‡‚ЛО¸М˚П
ЛТФУО¸БУ‚‡МЛВП (ТП. Ъ‡НКВ ТФЛТУН МЛКВ) Л МУП‡О¸М˚И ЛБМУТ ‰ВЪ‡ОВИ
(М‡ФЛПВ, ТВЪНЛ Л ВКЫ˘В„У ·ОУН‡) ‚ ФУˆВТТВ ˝НТФОЫ‡Ъ‡ˆЛЛ ЛБ‰ВОЛfl.
щЪ‡ „‡‡МЪЛfl ЪВflВЪ ТЛОЫ, ВТОЛ ВПУМЪ ФУЛБ‚У‰ЛОТfl МВ
ЫФУОМУПУ˜ВММ˚П М‡ ЪУ ОЛˆУП, Л ВТОЛ ЛТФУО¸БУ‚‡М˚ МВ УЛ„ЛМ‡О¸М˚В
‰ВЪ‡ОЛ BRAUN.
З ТОЫ˜‡В ФВ‰˙fl‚ОВМЛfl ВНО‡П‡ˆЛЛ ФУ ЫТОУ‚ЛflП ‰‡ММУИ „‡‡МЪЛЛ,
ФВВ‰‡ИЪВ ЛБ‰ВОЛВ ˆВОЛНУП ‚ПВТЪВ Т „‡‡МЪЛИМ˚П Ъ‡ОУМУП ‚ О˛·УИ ЛБ
ˆВМЪУ‚ ТВ‚ЛТМУ„У У·ТОЫКЛ‚‡МЛfl BRAUN.
ЗТВ ‰Ы„ЛВ ЪВ·У‚‡МЛfl, ‚НО˛˜‡fl ЪВ·У‚‡МЛfl ‚УБПВ˘ВМЛfl Ы·˚ЪНУ‚,
ЛТНО˛˜‡˛ЪТfl, ВТОЛ М‡¯‡ УЪ‚ВЪТЪ‚ВММУТЪ¸ МВ ЫТЪ‡МУ‚ОВМ‡ ‚ Б‡НУММУП
ФУfl‰НВ.
кВНО‡П‡ˆЛЛ, Т‚flБ‡ММ˚В Т НУППВ˜ВТНЛП НУМЪ‡НЪУП Т ФУ‰‡‚ˆУП МВ
ФУФ‡‰‡˛Ъ ФУ‰ ˝ЪЫ „‡‡МЪЛ˛.
З ТУУЪ‚ВЪТЪ‚ЛЛ Т Б‡НУМУП ко ‹ 2300-1 УЪ 7.02.1992 „. «й б‡˘ЛЪВ Ф‡‚
ФУЪВ·ЛЪВОВИ» ЩЛП‡ BRAUN ЫТЪ‡М‡‚ОЛ‚‡ВЪ ТУН ТОЫК·˚ М‡ Т‚УЛ
ЛБ‰ВОЛfl ‡‚М˚П ‰‚ЫП „У‰‡П Т ПУПВМЪ‡ ФЛУ·ВЪВМЛfl ЛОЛ Т ПУПВМЪ‡
ФУЛБ‚У‰ТЪ‚‡, ВТОЛ ‰‡ЪЫ ФУ‰‡КЛ ЫТЪ‡МУ‚ЛЪ¸ МВ‚УБПУКМУ.
аБ‰ВОЛfl BRAUN ЛБ„УЪУ‚ОВМ˚ ‚ ТУУЪ‚ВЪТЪ‚ЛЛ Т ‚˚ТУНЛПЛ ЪВ·У‚‡МЛflПЛ
В‚УФВИТНУ„У Н‡˜ВТЪ‚‡. иЛ ·ВВКМУП ЛТФУО¸БУ‚‡МЛЛ Л ФЛ
ТУ·О˛‰ВМЛЛ Ф‡‚ЛО ФУ ˝НТФОЫ‡Ъ‡ˆЛЛ, ФЛУ·ВЪВММУВ З‡ПЛ ЛБ‰ВОЛВ
BRAUN, ПУКВЪ ЛПВЪ¸ БМ‡˜ЛЪВО¸МУ ·УО¸¯ЛИ ТУН ТОЫК·˚, ˜ВП ТУН
ЫТЪ‡МУ‚ОВММ˚И ‚ ТУУЪ‚ВЪТЪ‚ЛЛ Т кУТТЛИТНЛП Б‡НУМУП.
ëÎÛ˜‡Ë, ̇ ÍÓÚÓ˚ „‡‡ÌÚËfl Ì ‡ÒÔÓÒÚ‡ÌflÂÚÒfl:
– ‰ВЩВНЪ˚, ‚˚Б‚‡ММ˚В ЩУТ-П‡КУМ˚ПЛ У·ТЪУflЪВО¸ТЪ‚‡ПЛ;
– ЛТФУО¸БУ‚‡МЛВ ‚ ФУЩВТТЛУМ‡О¸М˚ı ˆВОflı;
– М‡Ы¯ВМЛВ ЪВ·У‚‡МЛИ руководства ФУ ˝НТФОЫ‡Ъ‡ˆЛЛ;
– ÌÂÔ‡‚Ëθ̇fl ÛÒÚ‡Ìӂ͇ ̇ÔflÊÂÌËfl ÔËÚ‡˛˘ÂÈ ÒÂÚË (ÂÒÎË ˝ÚÓ
ЪВ·ЫВЪТfl);
– ‚МВТВМЛВ ЪВıМЛ˜ВТНЛı ЛБПВМВМЛИ;
– ПВı‡МЛ˜ВТНЛВ ФУ‚ВК‰ВМЛfl;
– ФУ‚ВК‰ВМЛfl ФУ ‚ЛМВ КЛ‚УЪМ˚ı, „˚БЫМУ‚ Л М‡ТВНУП˚ı (‚ ЪУП ˜ЛТОВ
ТОЫ˜‡Л М‡ıУК‰ВМЛfl „˚БЫМУ‚ Л М‡ТВНУП˚ı ‚МЫЪЛ ФЛ·УУ‚);
– ‰Оfl ФЛ·УУ‚, ‡·УЪ‡˛˘Лı УЪ ·‡Ъ‡ВВН, – ‡·УЪ‡ Т МВФУ‰ıУ‰fl˘ЛПЛ
ËÎË ËÒÚÓ˘ÂÌÌ˚ÏË ·‡Ú‡ÂÈ͇ÏË, β·˚ ÔÓ‚ÂʉÂÌËfl, ‚˚Á‚‡ÌÌ˚Â
ЛТЪУ˘ВММ˚ПЛ ЛОЛ ЪВНЫ˘ЛПЛ ·‡Ъ‡ВИН‡ПЛ (ТУ‚ВЪЫВП ФУО¸БУ‚‡Ъ¸Тfl
ÚÓθÍÓ Ô‰Óı‡ÌÂÌÌ˚ÏË ÓÚ ‚˚ÚÂ͇ÌËfl ·‡Ú‡ÂÈ͇ÏË);
– ‰Îfl ·ËÚ‚ – ÒÏflÚ‡fl ËÎË ÔÓ‚‡Ì̇fl ÒÂÚ͇.
51
Page 51

ЗМЛП‡МЛВ! йЛ„ЛМ‡О¸М˚И Й‡‡МЪЛИМ˚И н‡ОУМ ФУ‰ОВКЛЪ ЛБ˙flЪЛ˛
ФЛ У·‡˘ВМЛЛ ‚ ТВ‚ЛТМ˚И ˆВМЪ ‰Оfl „‡‡МЪЛИМУ„У ВПУМЪ‡.
иУТОВ ФУ‚В‰ВМЛfl ВПУМЪ‡ Й‡‡МЪЛИМ˚П н‡ОУМУП ·Ы‰ВЪ fl‚ОflЪ¸Тfl
Б‡ФУОМВММ˚И УЛ„ЛМ‡О гЛТЪ‡ ‚˚ФУОМВМЛfl ВПУМЪ‡ ТУ ¯Ъ‡ПФУП
ТВ‚ЛТМУ„У ˆВМЪ‡ Л ФУ‰ФЛТ‡ММ˚И ФУЪВ·ЛЪВОВП ФУ ФУОЫ˜ВМЛЛ ЛБ‰ВОЛfl
ЛБ ВПУМЪ‡. нВ·ЫИЪВ ФУТЪ‡‚ОВМЛfl ‰‡Ъ˚ ‚УБ‚‡Ъ‡ ЛБ ВПУМЪ‡, ТУН
„‡‡МЪЛЛ ФУ‰ОВ‚‡ВЪТfl М‡ ‚ВПfl М‡ıУК‰ВМЛfl ЛБ‰ВОЛfl ‚ ТВ‚ЛТМУП
ˆВМЪВ.
З ТОЫ˜‡В ‚УБМЛНМУ‚ВМЛfl ТОУКМУТЪВИ Т ‚˚ФУОМВМЛВП „‡‡МЪЛИМУ„У
ЛОЛ ФУТОВ„‡‡МЪЛИМУ„У У·ТОЫКЛ‚‡МЛfl ФУТ¸·‡ ТУУ·˘‡Ъ¸ У· ˝ЪУП ‚
аМЩУП‡ˆЛУММЫ˛ лОЫК·Ы лВ‚ЛТ‡ BRAUN ФУ ЪВОВЩУМЫ 8 800 200 20 20
(Б‚УМУН ЛБ кУТТЛЛ ·ВТФО‡ЪМУ).
52
Page 52

Українська
Керівництво з експлуатації
Наша продукцiя вiдповiдає найвищим стандартам якостi, функцiональностi та дизайну. Сподiваємося у Вашiй високiй оцiнцi нашого
нового виробу від Braun.
Увага
• Даний прилад обладнаний спецiальним шнуром iз вбудованим
безпечним блоком живлення малої напруги. Не змiнюйте i не
ремонтуйте самостійно будь-якi його частини, оскільки це може
призвести до ураження електричним струмом.
• Нiколи не використовуйте прилад з пошкодженими тримером або
шнуром живлення.
• Прилад не призначений для використання особами (включаючи
дітей) зі зниженими фізичними, чуттєвими або розумовими
можливостями або за відсутності у них досвіду або знань, якщо
вони не знаходяться під контролем або не проінструктовані про
використання приладу особою, відповідальною за їх безпеку.
Діти повинні знаходитися під контролем для недопущення гри з
приладом.
Баночка з олійкою
Зберiгайте у недоступному для дiтей мiсцi. Не вживайте в їжу та не
допускайте потрапляння олійки в очi. Пусту баночку потрiбно
утилiзувати вiдповiдно до вимог законодавства.
Опис та комплектність
1а Насадка для пiдрiвнювання бороди i короткого волосся
1b Насадка для стрижки волосся
(тiльки для моделi cruZer6 beard&head)
1c Фiксатори для насадок
2 Широкий тример (32 мм)
3 Вузький тример (16 мм) (тiльки для моделi cruZer6 beard&head)
4 Фiксатор вузького тримера
5 Свiтловий iндикатор
6 Регулятор довжини стрижки
7 Вимикач живлення
8 Комплект проводiв
9 Чохол (тiльки для моделi cruZer6 beard&head)
53
Page 53

Зарядка
Оптимальна температура навколишнього середовища для зарядки
приладу знаходиться в дiапазонi вiд 15 °C до 35 °C. Не пiддавайте
прилад дiї температур вище 50 °C протягом тривалого часу.
• За допомогою спецiального комплекту проводiв (8) приєднайте
прилад до електричної розетки, при цьому прилад повинен бути
вимкнений.
• При першiй зарядцi чи при зарядцi приладу пiсля тривалого перiоду
зберiгання, прилад потрiбно заряджати безперервно протягом
4-х годин (для моделi cruZer5 beard: не бiльше 8 годин).
• Пiсля повної зарядки приладу розрядiть його у процесi звичайної
експлуатацiї. Пiсля цього знову повнiстю зарядiть його. Наступнi
зарядки будуть займати не бiльше 1 години (для моделi cruZer5
beard: не бiльше 8 годин).
• При повнiй зарядцi акумулятора прилад може працювати до
40 хвилин. Цей показник може змінюватися в залежностi вiд характеристик волосся, яке пiдстригають.
• Максимальна ємнicть акумулятора буде досягнута тiльки пiсля
декiлькох циклiв заряджання/розряджання.
Свiтловий iндикатор (5)
Модель cruZer6 beard&head:
• Свiтловий iндикатор показує стан акумулятора.
• В процесi заряджання акумулятора iндикатор буде блимати зеленим.
При повнiй зарядцi акумулятора iндикатор буде безперервно
світитися зеленим, але при умовi, що прилад буде під’єднаний до
електромережі.
• При використаннi приладу у безпровiдному режимi свiтловий iндика-
тор буде блимати зеленим.
• При низькому зарядi акумулятора свiтловий iндикатор буде блимати
червоним. У цьому разi вам необхiдно буде закiнчити процедуру
стрижки якнайшвидше.
Модель cruZer5 beard&head:
• Якщо прилад підєднаний до електромережі, даний свiтловий iндика-
тор буде безперервно світитися зеленим.
Насадки (1a, 1b)
• Насадки можна зняти, натиснувши великим та вказiвним пальцями
на вiдповiднi фiксатори (1с).
54
Page 54

Коригування бороди
• Встановiть насадку для стрижки бороди (1a) на прилад, при цьому
сам прилад повинен бути вимкнений (a).
• Натиснiть на регулятор довжини (6) i витягніть насадку на необхiдну
довжину бороди (варiанти установки довжини волосся: 1, 3, 5, 7, 9,
11 мм).
• Рекомендується починати з максимальної довжини, потiм зменшу-
вати її до тих пiр, поки не буде досягнута бажана довжина волосся.
• Увiмкнiть вимикач живлення (7), утримуючи насадку кутовим краєм
до бороди, проведiть тримером проти росту волосся (a).
• Щоб уникнути забивання насадки зрізаним волоссям, регулярно
очищуйте її за допомогою спецiальної щiтки.
Коригування контурiв / Стайлінг
• Широкий тример (2) рiвно зрiзає i пiдрiвнює значнi дiлянки росту
волосся. Вiн iдеально пiдходить для надання бакенбардам, вусам i
коротким борiдкам необхiдної форми. Знiмiть насадку. Розтягнувши
шкiру, направляйте широкий тример проти росту волосся (b).
• Вузький тример (3) (тiльки для моделi СruZer6 beard&head) дозволяє
робити чiткi лiнiї та краї, будучи iдеальним засобом для коригування
контурiв росту волосся. Для використання вузького тримеру
натиснiть на фiксатор (4) i зруште його вгору (c).
Стрижка волосся (тiльки для моделi СruZer6 beard&head)
Волосся повинне бути чистим, добре розчiсаним i сухим.
• Встановiть насадку для стрижки волосся (1b), при цьому прилад
повинен бути вимкнений (d).
• Натиснiть на регулятор довжини волосся (6) i витягніть насадку на
необхiдну вам довжину (можливi варiанти довжини волосся: 10, 12,
14, 16, 18, 20 мм). Якщо ви не звикли до підстригання волосся
з допомогою тримеру, починайте стрижку з максимальної довжини,
потiм зменшуйте її для запобiгання зрiзання бiльшої довжини
волосся, ніж необхідно. Якщо вам потрібно зрізати волосся коротше
10 мм, ми рекомендуємо спочатку зрізати його за допомогою
насадки для стрижки волосся (1b) до довжини 10 мм, а потiм змiнити
її на насадку для стрижки бороди i зрізати волосся на необхiдну
довжину.
• Рухи повиннi бути м’якими та плавними. Не проводьте приладом iз
зусиллям чи надто швидко, аби вiн встиг зрізати волосся.
55
Page 55

• У промiжках мiж рухами приладом струшуйте або здувайте зрізане
волосся. При скупченнi волосся у насадцi знiмiть та очистiть її.
Чищення та догляд
Цей прилад можна чистити пiд проточною водою. Увага: перед
чищенням приладу під проточною водою вiд’єднайте його вiд
електромережi.
Регулярне чищення приладу продовжить термiн його дiї i дозволить
досягти максимальної ефективностi в процесi його експлуатацiї.
Чищення щiткою
• Вимкнiть прилад. Вiдкрийте широкий тример, натиснувши на нього
великим пальцем з лицевої сторони. Вiн вiдкриється приблизно на
45°, або ж його можна повнiстю вiд’єднати вiд приладу (h).
• Очистiть щiткою всi ножi та простiр позаду широкого тримеру
(всерединi корпусу).
Промивання водою
• Вимкнiть прилад i промийте голiвку i тримери теплою проточною
водою. Прилад можна також промивати з вiдкритим широким
тримером.
• Дайте приладу просохнути, вiдкривши при цьому широкий тример.
Як підтримувати ваш прилад в ідеальній формі
фУ· ¥КЫ˜ЛИ ¥МТЪЫПВМЪ ‰У·В Ф‡ˆ˛‚‡‚, ВНУПВМ‰ЫπЪ¸Тfl БП‡˘Ы‚‡ЪЛ
ИУ„У ОВ„НЛП П‡¯ЛММЛП П‡ТОУП (i).
Збереження ємностi акумуляторiв
Для пiдтримки максимальної ємностi акумуляторiв прилад необхiдно
повнiстю розряджати (у процесi стрижки/коригування) приблизно
через кожнi 6 мiсяцiв. Пiсля такого розряджання прилад потрiбно
повнiстю зарядити.
Екологічне попередження
Даний пристрiй містить акумуляторні батареї. Задля охорони
навколишнього середовища просимо вас не утилiзувати даний
вирiб як звичайнi побутовi вiдходи. Утилiзацію можна провести
в Технiчному центрi Braun або у вiдповiдному мiсцi збору
подiбних вiдходiв у вашiй країнi.
56
Page 56

Вміст може бути змiнений виробником без попереднього
повiдомлення.
Електричні специфікації вказанi на комплектi проводiв.
äÓÎË ÔËÒÚ¥È Òڇ̠ÌÂÔˉ‡ÚÌËÏ ‰Îfl ‚ËÍÓËÒÚ‡ÌÌfl, ·Û‰¸ ·Ò͇,
‚¥‰ÌÂÒ¥Ú¸ ÈÓ„Ó ‰Ó ÒÔˆ¥‡Î¸ÌÓ ÔËÁ̇˜ÂÌËı ‰Îfl ˆ¸Ó„Ó Ï¥Òˆ¸, flÍ
‚ÒÚ‡ÌÓ‚ÎÂÌÓ Û Ç‡¯¥È ͇ªÌ¥.
Бритва Braun cruZer6 beard&head, тип 5417;
Braun cruZer5 beard, тип 5418
Виготовлено в Китаї для Браун ГмбХ: Braun Electric (Shanghaj) Co Ltd.,
Lu Chun Road 475-495, MInghang, Shanghaj 200245, P.R. of China.
Адреса в Україні: ТОВ “Проктер енд Гембл
Трейдінг Україна”, Україна, 04070,
м. Київ, вул.
Набережно-Хрещатицька, 5/13, корпус літ. А.
Тел. (0-800) 505-000. www.pg.com.ua
Товар використовувати за призначенням, відповідно до інструкції
з експлуатації.
Дата виготовлення продукції Braun вказана безпосередньо на виробі
(в місці маркування) і складається з трьох цифр: перша цифра є
останньою цифрою року виготовлення, інші дві цифри є порядковим
номером тижня у році.
Гарантія – 2 роки. У разі необхідності гарантійного чи постгарантійного
обслуговування, звертайтеся до головного офісу сервісного центру
Braun в Україні: ПП “І.Б.С.”, вул. Глибочицька 53, м. Київ.
Тел. (044) 4286505.
Даний пристрій відповідає усім європейським вимогам безпеки та
гігієни.
íÓ‚‡ ëÂÚËÙ¥ÍÓ‚‡ÌÓ
57
Page 57

ɇ‡ÌÚ¥ÈÌ¥ ÁÓ·Ó‚’flÁ‡ÌÌfl виробника
Для всіх виробів ми даємо гарантію на два роки, починаючи з моменту
придбання виробу або з дати його виробництва, у разі відсутності або
неналежного оформлення гарантійного талону на виріб.
èÓÚfl„ÓÏ „‡‡ÌÚ¥ÈÌÓ„Ó ÔÂ¥Ó‰Û ÏË безкоштовно ЫТЫ‚‡πПУ ¯ОflıУП
ВПУМЪЫ, Б‡ПiМЛ ‰ВЪ‡ОВИ ‡·У Б‡П¥МЛ ‚Т¸У„У ‚ЛУ·Ы ·Ы‰¸-flН¥ Б‡‚У‰Т¸Н¥
‰ВЩВНЪЛ, ‚ЛНОЛН‡М¥ МВ‰УТЪ‡ЪМ¸У˛ flН¥ТЪ˛ П‡ЪВ¥‡О¥‚ ‡·У ТНО‡‰‡ММfl.
м ‚ЛФ‡‰НЫ МВПУКОЛ‚УТЪ¥ ВПУМЪЫ ‚ „‡‡МЪ¥ИМЛИ ФВ¥У‰ ‚Л¥· ПУКВ ·ЫЪЛ
Б‡П¥МВМЛИ М‡ МУ‚ЛИ ‡·У ‡М‡ОУ„¥˜МЛИ ‚¥‰ФУ‚¥‰МУ ‰У б‡НУМЫ ФУ Б‡ıЛТЪ
Ф‡‚ ТФУКЛ‚‡˜¥‚.
Й‡‡МЪ¥fl М‡·Ы‚‡π ТЛОЛ ОЛ¯В, flН˘У ‰‡Ъ‡ НЫФ¥‚О¥ Ф¥‰Ъ‚В‰КЫπЪ¸Тfl
ФВ˜‡ЪНУ˛ Ъ‡ Фi‰ФЛТУП дилера (П‡„‡БЛМЫ) М‡ УЛ„¥М‡О¸МУПЫ
„‡‡МЪ¥ИМУПЫ Ъ‡ОУМ¥ З„aun ‡·У М‡ УТЪ‡ММ¥И ТЪУ¥Мˆ¥ УЛ„¥М‡О¸МУª
¥МТЪЫНˆ¥ª Б ВНТФОЫ‡Ъ‡ˆ¥ª Зr‡un, flН‡ Ъ‡НУК ПУКВ ·ЫЪЛ „‡‡МЪiИМЛП
Ъ‡ОУМУП.
сfl „‡‡МЪ¥fl ‰¥ИТМ‡ Ы ·Ы‰¸-flН¥И Н‡ªМ¥, ‚ flНЫ ˆВИ ‚Л¥· ФУТЪ‡‚ОflπЪ¸Тfl
представником компанії виробника ‡·Ó ÔËÁ̇˜ÂÌËÏ дистриб‘ютором,
Ъ‡ ‰В КУ‰М¥ У·ПВКВММfl Б ¥ПФУЪЫ ‡·У ¥М¯¥ Ф‡‚У‚¥ ФУОУКВММfl МВ
ФВВ¯НУ‰К‡˛Ъ¸ М‡‰‡ММ˛ „‡‡МЪ¥ИМУ„У У·ТОЫ„У‚Ы‚‡ММfl.
Й‡‡МЪ¥fl М‡ Б‡П¥МВМ¥ ˜‡ТЪЛМЛ Б‡Н¥М˜ЫπЪ¸Тfl ‚ ПУПВМЪ Б‡НiМ˜ВММfl „‡‡МЪ¥ª
М‡ ‰‡МЛИ ‚Лi·.
Й‡‡МЪ¥fl МВ ФУНЛ‚‡π ФУ¯НУ‰КВММfl, ‚ЛНОЛН‡М¥ МВ‚iМЛП ‚ЛНУЛТЪ‡ММflП
(‰Л‚. Ъ‡НУК ФВВОiН МЛК˜В) нормальне зношування Т¥ЪУН Ъ‡ МУК¥‚ ‰Оfl
„УОiММfl, ‰ВЩВНЪЛ, ˘У МВБМ‡˜МЛП ˜ЛМУП ‚ФОЛ‚‡˛Ъ¸ М‡ flН¥ТЪ¸ У·УЪЛ
ФЛО‡‰Ы. сfl „‡‡МЪ¥fl ‚Ъ‡˜‡π ТЛОЫ, flН˘У ВПУМЪ Б‰iИТМ˛πЪ¸Тfl МВ
‚ФУ‚МУ‚‡КВМУ˛ ‰Оfl ˆ¸У„У УТУ·У˛ Ъ‡, flН˘У ‚ЛНУЛТЪУ‚Ы˛Ъ¸Тfl МВ
УЛ„¥М‡О¸Мi запасні частини виробника.
У випадку пред‘явлення рекламації за умовами даної гарантії,
передайте виріб у повному комплекті згідно опису в оригінальній
інструкції з експлуатації разом з гарантійним талоном у будь-який
сервісний центр, який офіційно вповноважений представником компанії
виробника.
ЗТ¥ ¥М¯¥ ‚ЛПУ„Л, ‡БУП Б ‚ЛПУ„‡ПЛ ‚¥‰¯НУ‰Ы‚‡ММfl Б·ЛЪН¥‚, МВ ‰¥ИТМ¥,
flН˘У М‡¯‡ ‚¥‰ФУ‚i‰‡О¸М¥ТЪ¸ МВ ‚ТЪ‡МУ‚ОВМ‡ Б‡НУММЛП ˜ЛМУП.
ÇËÔ‡‰ÍË, ̇ flÍ¥ Ì ÓÁÔÓ‚Ò˛‰ÊÛπÚ¸Òfl „‡‡ÌÚ¥fl:
– ‰ВЩВНЪЛ, ‚ЛНОЛН‡М¥ ЩУТ-П‡КУМЛПЛ У·ТЪ‡‚ЛМ‡ПЛ;
– використання з професійною метою або з метою отримання
прибутку;
– ФУЫ¯ВММfl ‚ЛПУ„ ¥МТЪЫНˆ¥ª Б ВНТФОЫ‡Ъ‡ˆ¥ª;
58
Page 58

– Ì‚iÌ ‚ÒÚ‡ÌÓ‚ÎÂÌÌfl ̇ÔÛ„Ë ÏÂÂÊi ÊË‚ÎÂÌÌfl (flÍ˘Ó ˆÂ
‚ЛП‡„‡πЪ¸Тfl);
– Б‰iИТМВММfl ЪВıМ¥˜МЛı БП¥М;
– ПВı‡М¥˜Мi ФУ¯НУ‰КВММfl;
– ‰Оfl ФЛО‡‰¥‚, ˘У Ф‡ˆ˛˛Ъ¸ М‡ ·‡Ъ‡ВИН‡ı – У·УЪ‡ Б
Ì‚i‰ÔÓ‚¥‰ÌËÏË ‡·Ó ÒÔ‡ˆ¸Ó‚‡ÌËÏË ·‡Ú‡ÂÈ͇ÏË, будь-які
ФУ¯НУ‰КВММfl, ‚ЛНОЛН‡М¥ ТФ‡ˆ¸У‚‡МЛПЛ ‡·У Ф¥‰Ъ¥Н‡˛˜ЛПЛ
·‡Ú‡ÂÈ͇ÏË;
– пошкодження з вини тварин, гризунів та комах (в тому числі у
випадках знаходження гризунів та комах усередині приладів);
– ‰Îfl ·ËÚ‚ – Á¥Ï’flÚ‡ ‡·Ó ÔÓ‚‡Ì‡ Ò¥Ú͇.
Увага! Гарантійний талон підлягає вилученню в разі звернення до
сервісного центру з проханням про виконання гарантійного ремонту.
Після проведення ремонту гарантійним талоном буде вважатися
заповнений оригінал листа виконаного ремонту зі штампом сервісного
центру та підписаний споживачем про отримання виробу з ремонту.
Гарантійний термін подовжується на період, який даний виріб
знаходився в сервісному центрі в ремонті.
В разі виникнення труднощів з виконанням гарантійного та
післягарантійного обслуговування, прохання звертатися до
інформаційної служби сервісу представника компанії виробника
в Україні.
Телефон гарячої лінії 0800505 000. Дзвінки по Україні зі стаціонарних
телефонних номерів є безкоштовними. Дзвінки з мобільних телефонів
оплачуються згідно тарифів відповідного оператора.
Також можна отримати додаткову інформацію на сервісному порталі
виробника в інтернеті www.service.braun.com
59
Page 59

60616263646566
Page 60

Page 61

Page 62

Page 63

Page 64

Page 65

 Loading...