

Page 1
cruZer
Stapled booklet, 105x148 mm, 80 pages (incl. 8 pages cover), 2/2c = black + cyan
Type 5734
www.braun.com
cruZer
5
face
Page 2

Braun Infolines
Deutsch 6
English 11
Français 19
Español 25
Português 30
Italiano 36
Nederlands 41
Dansk 46
Norsk 51
Svenska 56
Suomi 61
Türkçe 66
∂ППЛУИО¿ 71
Braun GmbH
Frankfurter Straße 145
61476 Kronberg/Germany
www.braun.com
DE / AT 00 800 27 28 64 63
00 800 BRAUNINFOLINE
CH 08 44 - 88 40 10
UK 0800 783 7010
IE 1 800 509 448
FR 0 800 944 802
BE 0 800 14 592
ES 901 11 61 84
PT 808 20 00 33
IT 800 440 017
NL 0 800-445 53 88
DK 70 15 00 13
NO 22 63 00 93
SE 020 - 21 33 21
FI 020 377 877
TR 0 800 261 63 65
GR 210-9478700
HK 2926 2300
(Jebsen Consumer Service
Centre)
www.service.braun.com
97144073/IX-14
DE/UK/FR/ES/PT/IT/NL/DK/NO/SE/
FI/TR/GR
Page 3
1
5
7
9
4
5
2
3
4a
4b
7
8
6
e
c
a
f
5
r
e
Z
u
r
c
a
1
1
2
2
1
3
Page 4
2
1
b
90°
90°
c
d
2
1
180°
e
4
Page 5
f
2
1
g
h
oil
i
5
Page 6
Deutsch
Unsere Produkte werden hergestellt, um höchste Ansprüche an Qualität,
Funktionalität und Design zu erfüllen. Wir wünschen Ihnen mit Ihrem neuen
Braun Rasierer viel Freude.
Bitte lesen Sie diese Gebrauchsanweisung vollständig, da sie Sicherheitsinformationen enthält. Bitte bewahren Sie die Gebrauchsanweisung
für zukünftige Fragen auf.
Vorsicht
Ihr Rasierer ist mit einem Spezialkabel mit integriertem
Netzteil für Sicherheitskleinspannung ausgestattet. Es
dürfen weder Teile ausgetauscht noch Veränderungen
vorgenommen werden, da sonst Stromschlaggefahr
besteht. Verwenden Sie ausschließlich das mitgelieferte
Spezialkabel.
Der Scherkopf ist geeignet zur Reinigung unter
fließendem Wasser. Der Rasierer ist vom Anschlusskabel zu trennen, bevor der Scherkopf mit Wasser
gereinigt wird.
Verwenden Sie das Gerät nicht mit beschädigter Scherfolie
oder defektem Spezialkabel.
Dieses Gerät kann von Kindern ab 8 Jahren und von
Personen mit reduzierten physischen, sensorischen oder
mentalen Fähigkeiten oder Mangel an Erfahrung und/oder
Wissen benutzt werden, wenn sie beaufsichtigt oder
bezüglich des sicheren Gebrauchs des Gerätes unterwiesen wurden und die daraus resultierenden Gefahren
verstanden haben. Kinder dürfen nicht mit dem Gerät
spielen. Reinigung und Benutzer-Wartung dürfen nicht
durch Kinder durchgeführt werden, es sei denn, sie sind
älter als 8 Jahre und beaufsichtigt.
6
Page 7

Aus hygienischen Gründen möchten wir Sie bitten, dieses
Gerät nicht mit anderen Personen zu teilen.
Bei der Anwendung in anderen Körperregionen achten Sie
bitte darauf, dass die Haut immer gestrafft ist.
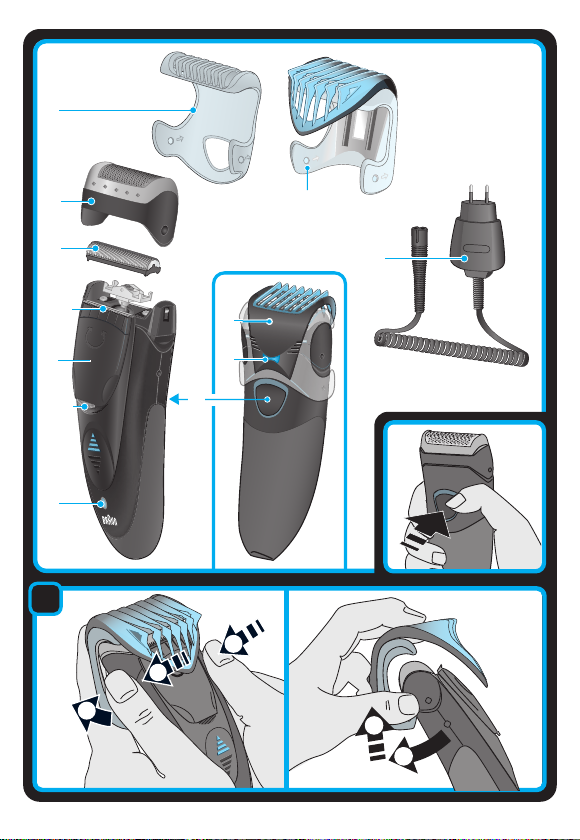
Beschreibung
1 Dreitagebart-Aufsatz/Schutzkappe
2 Scherfolie
3 Klingenblock
4 Drehbarer Trimmer (Langhaarschneider)
4a Breiter Trimmer (28 mm)
4b Schmaler Trimmer (14 mm)
5 Ladekontroll-Leuchte
6 Ein-/Ausschalter
7 Einstellbarer Aufsatz
8 Bartlängen-Einstellung
9 Spezialkabel
Aufladen des Rasierers
Die empfohlene Umgebungstemperatur zum Laden ist 5 °C bis 35 °C.
Bei extrem niedrigen oder hohen Temperaturen kann es sein, dass der Akku
nicht richtig geladen werden kann. Die empfohlene Umgebungstemperatur
zum Rasieren liegt bei 15 °C bis 35 °C. Setzen Sie den Rasierer nicht längere
Zeit Temperaturen über 50° C aus.
• Den ausgeschalteten Rasierer mit dem Spezialkabel ans Netz anschließen.
• Bei der Erstladung oder wenn der Rasierer einige Monate nicht benutzt
wurde, den Rasierer mindestens 4 Stunden laden.
• Die Ladekontroll-Leuchte zeigt an, dass das Gerät geladen wird. Sind die
Akkus voll geladen, erlischt die grüne Leuchte. Späteres, gelegentliches
Aufleuchten bedeutet, dass der Rasierer zur Erhaltung seiner Vollladung
nachgeladen wird. Dies kann auch kurzfristig beim Laden nach vollständiger Entladung der Fall sein.
• Voll geladen kann der Rasierer je nach Bartstärke ca. 30 Minuten kabellos
betrieben werden.
• Verwenden Sie den Rasierer kabellos, bis die Akkus leer sind. Danach
wieder voll aufladen. Nachfolgende Ladevorgänge dauern ca. 1 Stunde.
• Die maximale Akku-Kapazität wird erst nach mehreren Lade-/Entladevorgängen erreicht.
• Ein Schnell-Ladevorgang von fünf Minuten reicht für eine Rasur.
7
Page 8

Rasieren
Zunächst den einstellbaren Aufsatz (7) abnehmen: Drücken Sie mit beiden
Daumen gleichzeitig auf die seitlichen Clips des einstellbaren Aufsatzes (a),
so dass sie in Pfeilrichtung gelöst werden. Rasierer mit dem Ein-/Ausschalter
(6) einschalten. Der bewegliche Scherfolienrahmen passt sich automatisch
der Gesichtsform an und sorgt für eine gründliche und sanfte Rasur.
Tipps für eine optimale Rasur:
• Rasieren Sie sich immer, bevor Sie Ihr Gesicht waschen.
• Rasierer stets im rechten Winkel (90°) zur Haut halten (b).
• Haut straffen und gegen die Haarwuchsrichtung rasieren.
• Wenn Sie sich einige Tage nicht rasiert haben, können Sie auch den
breiten Trimmer (4a) verwenden, um längere Haare zunächst vorzukürzen
und dann mit der Scherfolie gründlich auszurasieren.
• Um 100% der Rasierleistung zu erhalten, ersetzen Sie Scherfolie und
Klingenblock spätestens alle 18 Monate oder sobald diese Verschleißerscheinungen zeigen.
Stylen
Gebrauch des drehbaren Trimmers (4)
Der breite Trimmer (4a) eignet sich sowohl für großflächiges Trimmen als
auch für das Formen und Stylen von Koteletten, Oberlippen- und Teilbärten
(c). Er verfügt auf einer Seite über Sicherheitsrippen und auf der anderen
Seite über eine Gleitfläche, die für mehr Hautschonung und leichteres
Gleiten über die Haut sorgen. Drücken Sie die blaue Pfeilspitze, um den
drehbaren Trimmer (4) herauszufahren. Halten Sie die Haut gestrafft, während Sie den Trimmer gegen die Haarwuchsrichtung führen.
Der schmale Trimmer (4b) eignet sich hervorragend zum präzisen Konturenschneiden und zum Stylen von Linien und Kanten. Für die Anwendung des
schmalen Trimmers muss der Styler um 180° gedreht werden (d).
Häufiger Einsatz des drehbaren Trimmers kann die Akku-Kapazität
herabsetzen.
Trimmen
Gebrauch der Trimming-Aufsätze (1) und (7)
Vor Gebrauch den jeweiligen Trimming-Aufsatz auf die Scherfolie bzw.
auf den Styler setzen und gegen das Gehäuse drücken, bis er hörbar
einrastet (e).
8
Page 9

Dreitagebart-Aufsatz/Schutzkappe (1): Mit diesem Aufsatz können Sie einen
Dreitagebart stylen und ihn auf dieser Länge halten.
• Aufsatz auf die Scherfolie (2) setzen und den Trimmer (4) hochschieben.
Dann den Rasierer einschalten und das Gerät wie dargestellt führen (e).
Durch den Aufsatz wird ein optimaler Haltewinkel sichergestellt.
Einstellbarer Aufsatz (7): Mit diesem Aufsatz können Sie Ihren Bart trimmen
und auf einer konstanten Länge halten.
• Aufsatz auf die Scherfolie (2) setzen und die gewünschte Bartlänge einstellen. Bartlängen-Einstellung (8) drücken und hochschieben (f) – wählbare Längen von oben nach unten: 1,2 mm / 2,8 mm / 4,4 mm / 6 mm.
Trimmer (4) hochschieben.
• Rasierer einschalten und den Aufsatz mit der transparenten Kammfläche
gegen die Wuchsrichtung über den Bart führen (f).
Reinigung
Durch regelmäßiges Reinigen erhalten Sie eine optimale Rasierleistung.
So können Sie den Rasierkopf nach jeder Rasur einfach und schnell unter
fließendem Wasser reinigen:
• Schalten Sie den Rasierer ein (kabellos) und reinigen Sie den Scherkopf
unter heißem, fließenden Wasser bis alle Rückstände entfernt wurden
Gelegentlich Flüssigseife (ohne Scheuermittel) verwenden. Den Schaum
gut abspülen und den Rasierer noch einige Sekunden laufen lassen.
• Dann den Rasierer ausschalten, Scherfolie und Klingenblock abnehmen
und trocknen lassen.
• Wenn Sie den Rasierer regelmäßig mit Wasser reinigen, sollten Sie
wöchentlich etwas Leichtmaschinenöl auf der Scherfolie und den
Trimmern (4a, 4b) verteilen (h).
Alternativ können Sie den Rasierer mit der mitgelieferten Bürste reinigen (i):
• Rasierer ausschalten und die Scherfolie abnehmen.
• Mit der Bürste den Klingenblock und den inneren Teil des Rasierkopfes
reinigen. Die Scherfolie darf nicht mit der Bürste gereinigt werden.
(g).
So halten Sie Ihren Rasierer in Bestform
Scherteile-Wechsel
Um 100% der Rasierleistung zu erhalten, wechseln Sie Scherfolie und
Klingenblock spätestens alle 18 Monate oder sobald sie Verschleißerscheinungen zeigen. Für eine gründlichere Rasur mit weniger Hautreizung sollten
Sie beide Teile gleichzeitig auswechseln. (Scherfolie und Klingenblock: 10B)
9
Page 10

Akku-Pflege
Um die maximale Kapazität der Akkus zu erhalten, sollte der Rasierer ca. alle
sechs Monate durch Gebrauch vollständig entladen werden. Danach den
Rasierer wieder voll aufladen.
Umweltschutz
Das Gerät enthält Akkus und/oder wiederverwertbare Elektrobauteile.
Im Sinne des Umweltschutzes darf dieses Gerät am Ende seiner
Lebensdauer nicht im Hausmüll entsorgt werden, sondern kann bei
entsprechenden lokal verfügbaren Rückgabe- und Sammelstellen
abgegeben werden.
Änderungen vorbehalten.
Elektrische Angaben siehe Bedruckung auf dem Spezialkabel.
Garantie
Als Hersteller übernehmen wir für dieses Gerät – nach Wahl des Käufers
zusätzlich zu den gesetzlichen Gewährleistungsansprüchen gegen den
Verkäufer – eine Garantie von 2 Jahren ab Kaufdatum. Innerhalb dieser
Garantiezeit beseitigen wir nach unserer Wahl durch Reparatur oder
Austausch des Gerätes unentgeltlich alle Mängel, die auf Material- oder
Herstellungsfehlern beruhen. Die Garantie kann in allen Ländern in Anspruch
genommen werden, in denen dieses Braun Gerät von uns autorisiert verkauft
wird.
Von der Garantie sind ausgenommen: Schäden durch unsachgemäßen
Gebrauch (Knickstellen an der Scherfolie, Bruch), normaler Verschleiß
(z.B. Scherfolie oder Klingenblock) sowie Mängel, die den Wert oder die
Gebrauchstauglichkeit des Gerätes nur unerheblich beeinflussen.
Bei Eingriffen durch nicht von uns autorisierte Braun Kundendienstpartner
sowie bei Verwendung anderer als Original Braun Ersatzteile erlischt die
Garantie.
Im Garantiefall senden Sie das Gerät mit Kaufbeleg bitte an einen
autorisierten Braun Kundendienstpartner. Die Anschrift finden Sie unter
www.service.braun.com oder können Sie kostenlos unter 00800/27 28 64 63
erfragen.
10
Page 11

English
Our products are designed to meet the highest standards of quality,
functionality and design. We hope you entirely enjoy your new Braun shaver.
Read these instructions completely, they contain safety information.
Keep them for future reference.
Warning
Your shaver is provided with a special cord set, which has
an integrated Safety Extra Low Voltage power supply. Do
not exchange or tamper with any part of it, otherwise there
is risk of an electric shock. Only use the special cord set
provided with the appliance.
The shaver head is suitable for cleaning under running
tap water. Detach the shaver from the power supply
before cleaning the shaver head in water.
Do not shave with a damaged foil or cord.
This appliance can be used by children aged from 8 years
and above and persons with reduced physical, sensory or
mental capabilities or lack of experience and knowledge if
they have been given supervision or instruction concerning
the safe use of the appliance and understand the hazards
involved. Children shall not play with the appliance.
Cleaning and user maintenance shall not be made by
children unless they are older than 8 years and supervised.
For usage in other body areas, please make sure that the
skin is stretched.
For hygienic reasons, do not share this appliance with other
persons.
11
Page 12

Description
1 3-day beard comb & protective cap
2 Shaver foil
3 Cutter block
4 Twistable trimmer
4a Wide trimmer (28 mm)
4b Narrow trimmer (14 mm)
5 Charging light
6 On/off switch
7 Adjustable comb
8 Beard length selector
9 Special cord set
Charging
Recommended ambient temperature for charging is 5 °C to 35 °C.
The battery may not charge properly or at all under extreme low or high
temperatures. Recommended ambient temperature for shaving is 15 °C
to 35 °C. Do not expose the shaver to temperatures higher than 50 °C for
extended periods of time.
• Using the special cord set, connect the shaver to an electrical outlet with
the motor switched off.
• When charging for the first time or when the shaver is not used for a few
months, leave the shaver to charge continuously for 4 hours.
• The charging light (5) shows that the appliance is being charged. When the
battery is fully charged, the charging light turns off. Intermittent blinking
after a while indicates that the battery maintains its full capacity. This can
also happen short term when charging after the battery was completely
discharged.
• A full charge provides 30 minutes of cordless shaving time depending on
your beard growth.
• Once the shaver is completely charged, discharge the shaver through
normal use. Then recharge to full capacity. Subsequent charges will take
about 1 hour.
• Maximum battery capacity will only be reached after several charging/
discharging cycles.
• 5-minute quick charge is sufficient for a shave.
Shaving
First, remove the adjustable comb (7): Using your thumbs, press against the
side clips of the adjustable comb so that they swing off in the direction of the
12
Page 13

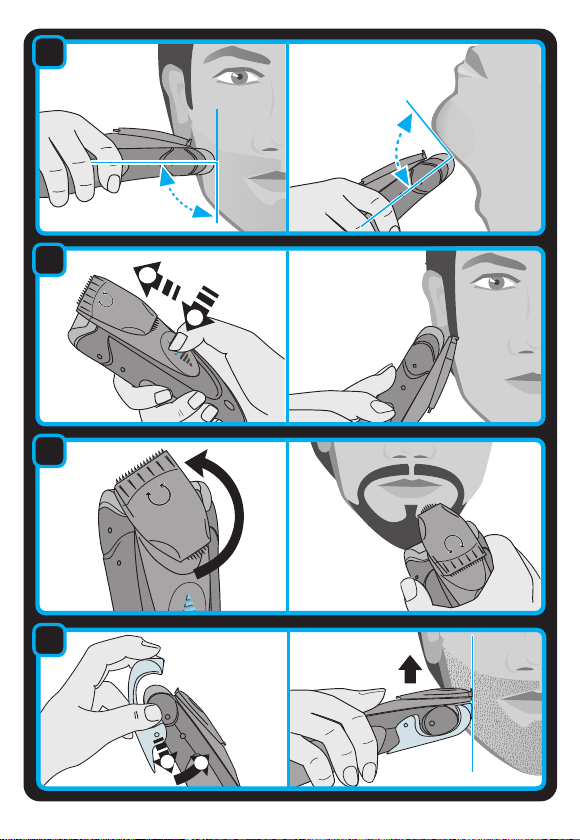
arrows (a). Activate the on/off switch (6). The floating foil frame automatically
adapts to your skin surface for a close, smooth shave.
For best results:
• Always shave before washing your face.
• At all times, hold the shaver at right angles (90°) to the skin (b).
• Stretch the skin and shave against the direction of beard growth.
• For pre-shaving after a few days of not having shaved, use the wide trimmer
(4a) to pre-cut long hairs. For a close, smooth shave, finish with the foil.
• To maintain 100% shaving performance, replace your foil and cutter block
at least every 18 months or when worn.
Style
Using the twistable trimmer
The wide trimmer (4a) evenly cuts and trims large areas (c). It is ideal for
shaping sideburns, moustaches and partial short beards. The wide trimmer
is provided with safety rips and a gliding strip for less irritation and easy
gliding. Press the blue stripes to push up the twistable trimmer (4). While
stretching the skin, guide the wide trimmer against the direction of hair
growth.
The narrow trimmer (4b) precisely defines lines and edges (d), being ideal for
precise contouring.
To use the narrow trimmer, push up the twistable trimmer and turn it 180°.
Frequent use of the twistable trimmer will reduce the battery capacity.
Trim
Using the trimming attachments (1) and (7)
Place the respective trimming attachment onto the shaver foil (2) alternatively
on the twistable trimmer (4) and press it against the shaver housing until it
snaps into place with a click (e).
3-day beard comb & protective cap (1): This attachment is perfectly suited
for creating a stubble look and maintaining it.
• Place the attachment onto the foil (2) and push up the twistable trimmer (4).
Turn on the shaver and use the appliance as shown in the illustration (e).
The attachment ensures an optimum usage angle.
Adjustable comb (7): This attachment is ideal for beard trimming and keeping
it at a constant length.
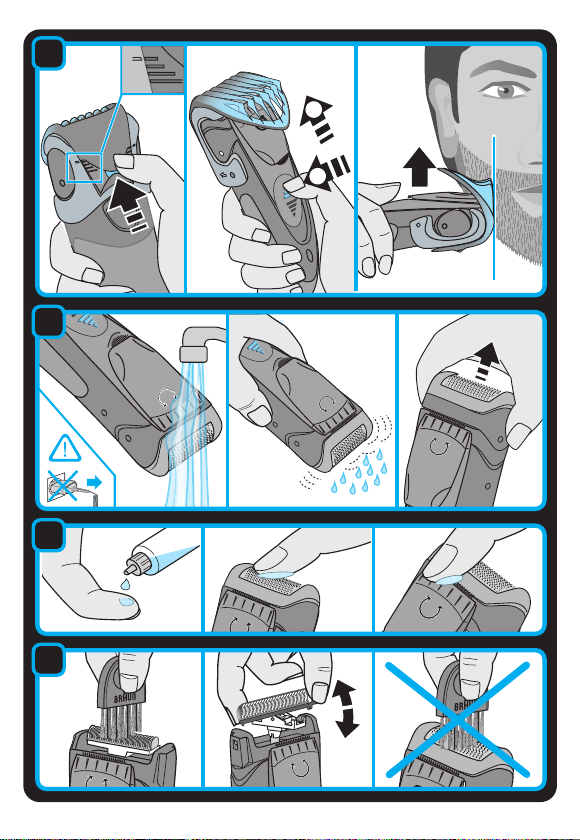
• Place the attachment onto the shaver foil (2) and set desired beard length.
Press beard length selector (8) and slide it up (f) (possible length settings
13
Page 14

from top to bottom: 1.2 mm / 2.8 mm / 4.4 mm / 6 mm). Push up the
twistable trimmer (4).
• Press the on/off switch and trim against hair growth by guiding the
transparent comb part over the skin (f).
Cleaning
Regular cleaning ensures better shaving performance. Rinsing the shaver
head after each shave under running water is an easy and fast way to keep
it clean:
• Switch on the shaver (cordless) and rinse the shaver head under hot running
water until all residues have been removed (g). You may use liquid soap
without abrasive substances. Rinse off all foam and let the shaver run for a
few more seconds.
• Next, switch off the shaver, remove the shaver foil and the cutter block.
Then leave the disassembled shaving parts to dry.
• If you regularly clean the shaver under water, then once a week apply a
drop of light machine oil onto the trimmers (4a, 4b) and shaver foil (h).
Alternatively, you may clean the shaver using the brush provided (i):
• Switch off the shaver. Remove the shaver foil.
• Using the brush, clean the cutter block and the inner area of the shaver
head. However, do not clean the shaver foil with the brush as this may
damage the foil.
Keeping your shaver in top shape
Replacing the shaving parts
To maintain 100% shaving performance, replace your foil and cutter block at
least every 18 months or when worn. Change both parts at the same time for
a closer shave with less skin irritation. (Shaver foil and cutter block: 10B)
Preserving the batteries
In order to maintain the optimum capacity of the rechargeable batteries, the
shaver has to be fully discharged (by shaving) every 6 months approximately.
Then recharge the shaver to full capacity.
Environmental notice
Product contains batteries and/or recyclable electric waste. For
environment protection do not dispose of in household waste, but
for recycling take to electric waste collection points provided in your
country.
14
Page 15

Subject to change without notice.
For electric specifications, see printing on the special cord set.
Guarantee
We grant a 2 year guarantee on the product commencing on the date of
purchase. Within the guarantee period we will eliminate any defects in the
appliance resulting from faults in materials or workmanship, free of charge
either by repairing or replacing the complete appliance at our discretion.
This guarantee extends to every country where this appliance is supplied by
Braun or its appointed distributor.
This guarantee does not cover: damage due to improper use, normal wear or
use as well as defects that have a negligible effect on the value or operation
of the appliance.
The guarantee becomes void if repairs are undertaken by unauthorised
persons and if original Braun parts are not used.
To obtain service within the guarantee period, hand in or send the complete
appliance with your sales receipt to an authorised Braun Customer Service
Centre (address information available online at www.service.braun.com).
For UK only:
This guarantee in no way affects your rights under statutory law.
For Australia & New Zealand only:
Warranty
In Australia, our goods come with guarantees that cannot be excluded
under the Australian Consumer Law. You are entitled to a replacement or
refund for a major failure and for compensation for any other reasonably
foreseeable loss or damage. You are also entitled to have the goods
repaired or replaced if the goods fail to be of acceptable quality and the
failure does not amount to a major failure.
The benefi ts given by this warranty are in addition to other rights and
remedies of the consumer law.
15
Page 16

For Claims in Australia please contact:
Procter & Gamble Australia Pty Ltd
1 Innovation Road, Macquarie Park
NSW 2113
Telephone: +612 8864 5000
Facsimile: +612 8864 5574
Email: gillette@au.pgconsumers.com
For claims in New Zealand please contact:
Procter & Gamble Distributing New Zealand Limited
Unit 3, Building I, 5 Orbit Drive
Rosedale, North Shore City 0632
Auckland, New Zealand
Telephone: +649 477 6400
Facsimile: +649 477 6399
Email: gillette@nz.pgconsumers.com
Our Warranty
This appliance is also covered by a 24 Month Replacement Warranty
commencing on the date of purchase (Our Warranty).
Our Warranty applies in all States and Territories of Australia and in
New Zealand and is in addition to any mandatory statutory obligations
imposed on Procter & Gamble Australia Pty. Ltd., its distributors and
its manufacturer. Our Warranty does not purport to exclude, restrict or
modify any such mandatory statutory obligations.
Our Warranty only covers defects in the appliance resulting from faults in
workmanship or materials. Therefore, if your appliance becomes faulty as a
result of faults in workmanship or materials, it will be exchanged by your
retailer, on presentation of proof of purchase.
Our Warranty only applies to domestic or household use of this appliance
and the warranty will only apply if the correct operating instructions included
with this product have been followed. For any appliance replaced under this
warranty, Our Warranty ends on the expiry of the warranty period that applied
to the original appliance.
Our Warranty does not cover:
A. Damage arising from improper use or operation on incorrect voltages.
B. Breakages to shaver foils, glass jars, etc.
C. Normal wear due to moving parts.
16
Page 17

D. Repairs undertaken by unauthorised service personnel or use of non
genuine parts.
E. Appliances that are outside the warranty period or are not faulty.
This appliance is not intended for use by young children or infi rm persons
without supervision. Young children should be supervised to ensure that they
do not play with the appliance.
If the appliance is powered by a cord extension set or electrical portable outlet
device these should be positioned so they are not subject to splashing or
ingress of moisture.
To the extent permitted by the laws of the Commonwealth of Australia and
New Zealand and applicable laws of a State or Territory of Australia, and
without affecting any mandatory statutory obligations imposed by law,
Our Warranty is given in exchange for any other rights you may have against
Procter & Gamble Australia Pty. Ltd. or its distributors or manufacturer,
whether at law, in tort (including negligence), in equity or under statute.
Please retain proof of purchase of this appliance. If you have any questions in
relation to Our Warranty, please call our Consumer Service line (see below for
numbers).
If you intend to make a claim please telephone our Customer Service line on
the numbers set out below to obtain information about your claim and any
costs associated with claiming under Our Warranty. You will bear the cost of
returning your product to us.
Repairs and service
If you are sending your appliance for repair under Our Warranty, please pack
the appliance adequately and send it to your nearest Service Agent, at your
expense. For service or replacement parts refer to the authorised Service
Agents listed overleaf. Local Service Agents may change from time to time –
in that event please contact the Consumer Service free call number below for
updated local service agent details.
Australian Consumer Service (free call): 1 800 641 820
New Zealand Consumer Service (free call): 0 800 108 909
17
Page 18

Australian & New Zealand
Service Agents
VICTORIA & TASMANIA
Statewide Services Pty Ltd trading
as J A Appliances
17-19 Hossack Avenue
Coburg North, VIC 3058
Tel. (03) 8371 9100
Fax. (03) 9355 8644
Email: jaappliances@
statewideservices.com.au
QUEENSLAND
Walters Import trading as Brisbane
Appliance Service Centre
449 Beaudesert Road
Moorooka QLD 4105
Tel. (07) 3277 0360
Fax. (07) 3274 2909
Email: basc@waltersimport.com.au
WESTERN AUSTRALIA
Mark 1 Appliances
Unit 1, 46 Abernethy Road
Belmont, WA 6104
Tel. (08) 9475 0911
Fax. (08) 9475 0922
Email: mark1app@iinet.net.au
NEW SOUTH WALES & ACT
Faulder Appliance Services Pty Ltd
Shop 4,
9 Evans Road,
Rooty Hill, NSW 2766
Tel. (02) 9625 3064
Fax. (02) 9625 3037
Email: fas16@bigpond.com
SOUTH AUSTRALIA & NT
Adelaide Service Centre
Shop B2,
Parkholme Shopping Centre
319 Oaklands Road, Parkholme
Adelaide, SA 5043
Tel. (08) 8357 5800
Fax. (08) 8357 5833
Email: ascpkh@adam.com.au
NEW ZEALAND
Key Service Ltd
7D Echelon Place East Tamaki
Manukau City
Auckland
New Zealand
(PO Box 38569, Howick, Auckland,
New Zealand)
Tel. (09) 916 0960
Fax. (09) 916 0970
Email: key-service-ltd@xtra.co.nz
18
Page 19

Français
Nos produits sont conçus pour satisfaire aux plus hautes exigences en
matière de qualité, fonctionnalité et design. Nous espérons que vous serez
pleinement satisfait de votre nouveau rasoir Braun.
Merci de lire attentivement et intégralement la notice d’utilisation avant
d’utiliser le produit. Veuillez la conserver pour vous y référer ultérieurement.
Attention
Votre rasoir est livré avec un cordon d’alimentation basse
tension. Vous ne devez pas remplacer ou modifier ses
composants, afin d’éviter tout risque d’accident. Utilisez
uniquement le cordon d’alimentation livré avec votre
appareil.
La tête du rasoir peut être lavée sous l’eau chaude
courante. Débranchez toujours le rasoir de la prise
électrique secteur avant de nettoyer la tête sous l’eau.
Ne vous rasez pas avec une grille ou un cordon
endommagés.
Cet appareil peut être utilisé par des enfants de 8 ans et
plus et par des personnes dont les capacités physiques,
sensorielles ou mentales sont réduites, ou des personnes
dénuées d’expérience ou de connaissance, si elles ont pu
bénéficier, par l’intermédiaire d’une personne responsable de
leur sécurité, d’une surveillance ou d’instructions préalables
concernant l’utilisation de l’appareil en toute sécurité et les
dangers encourus. Les enfants ne doivent pas jouer avec
l’appareil. Le nettoyage et l’entretien ne doivent pas être faits
par des enfants, à moins qu’ils ne soient âgés de plus de
8 ans et qu’ils ne soient sous surveillance.
19
Page 20

Pour une utilisation sur des autres parties du corps,
assurez-vous que votre peau soit tendue. Pour des raisons
d’hygiène, ne pas partager ce produit avec d’autre
personne.
Description
1 Sabot pour barbe de 3 jours & capot de protection
2 Grille de rasage
3 Bloc-couteaux
4 Tondeuse rotative
4a Tondeuse large (28 mm)
4b Tondeuse étroite (14 mm)
5 Témoin lumineux de charge
6 Interrupteur marche/arrêt
7 Sabot réglable
8 Accessoire hauteur de coupe
9 Cordon d’alimentation
Mise en charge du rasoir
La température ambiante recommandée pour charger le rasoir est comprise
entre 5 °C et 35 °C. La batterie peut ne pas se charger correctement ou pas
du tout à des températures extrêmement basses ou élevées. La température
ambiante recommandée pour se raser est comprise entre 15° C et 35 °C.
N’exposez pas votre rasoir à des températures supérieures à 50 °C pendant
une période prolongée.
• A l’aide du cordon d’alimentation, branchez le rasoir arrêté à une prise de
courant.
• Lors de la première mise en charge, ou si le rasoir n’a pas été utilisé pen-
dant plusieurs mois, laissez l’appareil se charger de façon ininterrompue
pendant 4 heures.
• Le témoin lumineux de charge (5) s’allume, indiquant que le rasoir est en
train de se charger. Lorsque la batterie est complètement rechargée, le
témoin de charge s’éteint. Au bout d’un certain moment le témoin de
charge se rallume et clignote de temps en temps pour vérifier que la
batterie est complètement chargée. Le voyant peut également clignoter
rapidement pour indiquer que la batterie est entièrement déchargée.
• Une pleine charge procure environ 30 mn de rasage sans fil. Cette durée
varie toutefois selon votre type de barbe.
20
Page 21

• Une fois le rasoir complètement rechargé, utilisez-le sans fil jusqu’à ce
qu’il soit complètement déchargé. Puis rechargez-le à nouveau complètement. Les mises en charge suivantes prendront environ 1 heure.
• La capacité maximum de la batterie ne sera atteinte qu’après plusieurs
cycles de charge/décharge.
• Recharge rapide en 5 minutes valable pour un rasage.
Rasage
Tout d’abord, retirez le sabot réglable (7) : À l’aide de vos deux pouces,
appuyez sur les clips latéraux du sabot dans la direction des flèches (a) pour
le détacher. Appuyez sur l’interrupteur marche/arrêt (6). La grille flexible
s’adapte automatiquement à votre peau pour un rasage précis et en
douceur.
Les astuces pour un rasage parfait:
• Nous vous recommandons de vous raser avant de vous laver le visage car
la peau a tendance à légèrement gonfler lorsqu’elle est humide.
• Tenez le rasoir perpendiculairement (90°) à la peau (b).
• Tendez votre peau et rasez-vous dans le sens contraire de la pousse du
poil.
• Pour un pré-rasage après quelques jours sans rasage, nous vous
conseillons d’utiliser la tondeuse large (4a) pour pré-couper les poils les
plus longs. Pour un rasage de plus près et plus en douceur, terminez avec
la grille.
• Pour conserver 100% de la performance de votre rasoir, remplacez la
grille et le bloc-couteaux tous les 18 mois.
Style
Utilisation de la tondeuse rotative
La tondeuse large (4a) permet d’égaliser et de tailler les poils sur les zones
les plus larges (c). Elle est idéale pour tailler les pattes, les moustaches et
les barbes courtes. La tondeuse large est fournie avec un accessoire anticoupure et une bande glissante pour réduire l’irritation et garantir une glisse
optimale. Appuyez sur les bandes bleues pour faire coulisser la tondeuse
rotative (4) vers le haut. Tout en tendant la peau, guidez la tondeuse large en
sens contraire de la pousse des poils.
La tondeuse étroite (4b) permet de définir de façon précise les lignes et
les contours (d) ce qui la rend idéale pour délimiter les contours de la
barbe.
21
Page 22

Pour utiliser la tondeuse étroite, faites coulisser la tondeuse rotative et
tournez-la de 180°.
L’utilisation fréquente de la tondeuse réduit l’autonomie de la batterie.
Sabots
Utilisation des sabots (1) et (7)
Placez le sabot désiré sur la grille du rasoir (2) ou sur la tondeuse rotative (4)
et enclenchez-le sur le corps du rasoir jusqu’à ce qu’il émette un « clic » (e).
Sabot pour barbe de 3 jours & capot de protection (1) : Cet accessoire est
parfait pour entretenir une barbe avec l’aspect « barbe de 3 jours ».
• Positionner l’accessoire sur la grille (2) et faites coulisser la tondeuse
rotative (4) vers le haut. Allumez le rasoir et utilisez l’appareil comme
indiqué dans l’illustration (e). Cet accessoire vous garantit un angle de
rasage optimum.
Sabot réglable (7) : Cet accessoire est idéal pour tailler la barbe et pour
l’entretenir avec une longueur régulière.
• Positionner l’accessoire sur la grille (2) et sélectionnez la longueur de
barbe désirée. Appuyer sur le sélecteur de hauteur de coupe (8) et faites
le coulisser vers le haut (f) (différentes hauteurs de coupe, du haut vers le
bas : 1.2 mm / 2.8 mm / 4.4 mm / 6 mm). Puis faites coulisser la tondeuse
rotative vers le haut (4).
• Mettez en marche et taillez la barbe dans le sens contraire de la pousse
des poils, en appliquant la partie transparente du sabot contre la peau (f).
Nettoyage
Un nettoyage régulier assure de meilleures performances de rasage. Après
chaque utilisation, rincez la tête de rasage à l’eau – c’est un moyen rapide et
efficace pour la garder propre :
• Allumez le rasoir (sans le cordon) et rincez la tête du rasoir sous l’eau
chaude jusqu’à retirer tous les résidus (g). Vous pouvez utiliser un savon
liquide non abrasif. Rincez la mousse et laissez le rasoir en marche
pendant quelques instants.
• Puis, arrêtez le rasoir, retirez la grille du rasoir et le bloc couteau. Laissez
sécher séparément les différents éléments.
• Si vous nettoyez régulièrement votre rasoir à l’eau, appliquez une goutte
d’huile une fois par semaine sur les tondeuses (4a, 4b) et sur la grille du
rasoir (h).
22
Page 23

Vous pouvez également nettoyer le rasoir à sec en utilisant la brosse fournie
(i) :
• Eteignez le rasoir. Retirez la grille.
• A l’aide de la brosse, nettoyez le bloc couteau et la partie intérieure de la
tête du rasoir. Cependant, ne nettoyez pas la grille de rasage avec la
brosse, cela risquerait de l’endommager.
Entretien du rasoir
Remplacement des pièces de rasage
Pour conserver 100% de la performance de votre rasoir, remplacez la grille
et le bloc-couteaux tous les 18 mois. Changez les 2 pièces en même temps
pour vous assurer d’un rasage de plus près avec moins d’irritations.
(Références Grille et bloc-couteau : 10B)
Entretien de la batterie
Afin de conserver la capacité maximum de la batterie rechargeable, le rasoir
doit être complètement déchargé (en se rasant) environ tous les 6 mois. Puis
rechargez le rasoir à sa pleine capacité.
Respect de l’environnement
Ce produit contient des batteries rechargeables et/ou des déchets
électriques recyclables. Afin de protéger l’environnement, ne jetez
jamais l’appareil dans les ordures ménagères a la fin de sa durée de
vie. Remettez-le à votre centre service agréé Braun ou déposez-le
dans des sites de récupération appropriés conformément aux réglementations locales ou nationales en vigueur.
Sujet à toute modification sans préavis.
Voir les spécifications électriques mentionnées sur l’adaptateur basse
tension.
23
Page 24

Garantie
Nous accordons une garantie de 2 ans sur ce produit, à partir de la date
d’achat.
Pendant la durée de la garantie, Braun prendra gratuitement à sa charge la
réparation des vices de fabrication ou de matière en se réservant le droit de
décider si certaines pièces doivent être réparées ou si l’appareil lui-même
doit être échangé.
Cette garantie s’étend à tous les pays où cet appareil est commercialisé par
Braun ou son distributeur exclusif.
Cette garantie ne couvre pas : les dommages occasionnés par une utilisation
inadéquate, l’usure normale (par exemple, grille et bloc-couteaux) ainsi que
les défauts d’usuresqui ont un effet négligeable sur la valeur ou l’utilisation
de l’appareil. Cette garantie devient caduque si des réparations ont été
effectuées par des personnes non agréées par Braun et si des pièces de
rechange ne provenant pas de Braun ont été utilisées.
Pour toute réclamation intervenant pendant la période de garantie, retournez
ou rapportez l’appareil ainsi que l’attestation de garantie à votre revendeur
ou à un Centre Service Agréé Braun.
Veuillez vous référer à www.service.braun.com ou appeler le 0 800 944 802
(service consommateurs - appel gratuit depuis un poste fixe) pour connaître
le Centre Service Agrée Braun le plus proche de chez vous.
Clause spéciale pour la France
Outre la garantie contractuelle exposée ci-dessus, nos clients bénéficient de
la garantie légale des vices cachés prévue aux articles 1641 et suivants du
Code civil.
24
Page 25

Español
Nuestros productos han sido diseñados para cumplir los más altos
estándares de calidad, funcionalidad y diseño. Esperamos que tú nueva
afeitadora Braun sea de tu entera satisfacción.
Lea estas instrucciones completas, contienen información sobre
seguridad. Guárdelas para consultarlas en el futuro.
Advertencia
Su sistema de afeitado está provisto de un juego de cables
especial que posee un suministro eléctrico integrado de
Seguridad de Voltaje Extrabajo. No intercambie ni manipule
ninguna de sus piezas, de lo contrario existe riesgo de
sufrir descarga eléctrica. Use exclusivamente el cable de
alimentación suministrado con la afeitadora.
El cabezal de la afeitadora eléctrica es apto para su
limpieza bajo agua corriente del grifo. Retire la
afeitadora eléctrica de la corriente eléctrica antes de
limpiar con agua el cabezal de la afeitadora eléctrica.
No se afeite si una lamina o un cable están en mal estado.
No deberían utilizar este aparato niños menores de 8 años ni
personas con reducidas capacidades físicas, sensoriales o
mentales, o sin experiencia ni conocimiento a menos que una
persona responsable de su seguridad les supervise o instruya
en cuanto al uso seguro del dispositivo y comprendan los
riesgos que implica. Los niños no deben jugar con la afeitadora. La limpieza y el man
tenimiento de usuario no deben ser
realizados por niños a menos que sean mayores de 8 años
y estén supervisados.
Si lo utilizas en otras partes del cuerpo, por favor, asegúrate
de estirarte la piel. Por razones higiénicas, procura no
compartir este aparato con otras personas.
25
Page 26

Descripción
1 Accesorio para barba de 3 días y capuchón protector
2 Lámina
3 Bloque de cuchillas
4 Perfilador rotatorio
4a Perfilador ancho (28 mm)
4b Perfilador estrecho (14 mm)
5 Piloto indicador de carga
6 Botón de encendido/apagado
7 Peine ajustable
8 Selector de longitud del accesorio recorta barbas
9 Cable de conexión a la red eléctrica
Carga
La temperatura ambiental recomendada para la carga se sitúa entre 5 °C y
35 °C. En condiciones de temperaturas extremadamente bajas o altas la
batería puede no cargarse, o no hacerlo adecuadamente. La temperatura
ambiental recomendada para el afeitado es de 15 °C a 35 °C.
No exponga la afeitadora a temperaturas superiores a 50 °C durante
períodos prolongados de tiempo.
• Conecta la afeitadora a la red eléctrica con el cable de conexión a la red
eléctrica pero con el aparato apagado.
• Cuando cargues la batería por primera vez o si no has usado la afeitadora
durante varios meses, deja la batería cargando durante 4 horas ininterrumpidas.
• El piloto de carga (5) indica que la batería se está cargando. Cuando la
batería está completamente cargada, el piloto de carga se apaga. La luz
parpadea para indicar que la batería está al máximo de su capacidad.
También puede ocurrir durante la carga si la afeitadora estaba sin batería.
• La batería completa proporciona aproximadamente una autonomía de
30 minutos, aunque esto dependerá del tipo de barba de cada persona.
• Una vez que la afeitadora se haya cargado completamente, utilízala
normalmente hasta descargar la batería completamente.
• Entonces, vuelva a cargarla hasta su capacidad máxima. Las posteriores
recargas tardarán aproximadamente una hora.
• 5 minutos de carga, suficientes para un afeitado.
Afeitado
Primero, retira el peine ajustable (7). Presiona con los pulgares los clips
laterales del accesorio para desprenderlo en el sentido de las flechas (a).
26
Page 27

Enciende la afeitadora presionando el botón de encendido/apagado (6). La
lámina flotante se adapta automáticamente al contorno de tu piel para un
afeitado apurado.
Consejos para un apurado perfecto:
• Recomendamos afeitarte antes de lavarte la cara.
• Manten la afeitadora siempre en ángulo de 90º con la piel (b).
• Estira la piel y desliza la afeitadora en la dirección contraria al crecimiento
del pelo.
• Para el preafeitado después de varios días sin afeitarte, utiliza el perfilador
ancho (4a) para recortar el vello largo. Para un afeitado suave y apurado,
termina con la lámina.
• Para mantener el apurado al 100%, sustituye el bloque cuchillas y la
lámina cada 18 meses o cuando éstas se hayan desgastado por el uso.
Perfila
Cómo utilizar el perfilador rotatorio
El perfilador ancho (4a) corta y recorta uniformemente zonas de pelo amplias
(c). Es perfecto para dar forma a patillas, bigote y barbas cortas parciales.
El perfilador ancho está provisto de tensores de seguridad y una banda
deslizante que reducen la irritación y facilitan el deslizamiento. Empuja las
bandas azules para sacar el perfilador rotatorio (4). Con la piel estirada, guía
el perfilador ancho en dirección contraria al crecimiento del pelo.
El perfilador estrecho (4b) define con precisión líneas y contornos (d), y es
ideal para un perfilado preciso.
Para utilizar el perfilador estrecho, presiona hacia arriba el perfilador rotatorio
y gíralo 180º.
El uso frecuente del perfilador rotatorio reduce la autonomía de la batería.
Recorta
Cómo utilizar los accesorios de recortado (1) y (7)
Coloca el accesorio de recortado que quieras sobre la lámina (2) alternativamente en el perfilador rotatorio (4) y presiónalo contra el cabezal de la
afeitadora hasta que encaje bien con un clic (e).
Accesorio de barba de 3 días y capuchón protector (1): Este accesorio es
perfecto para crear y mantener una barba incipiente.
• Coloca el accesorio sobre la lámina (2) y empuja hacia arriba el perfilador
rotatorio (4). Enciende la afeitadora y utilízala como indica la ilustración (e).
El accesorio garantiza un ángulo óptimo.
27
Page 28

Peine ajustable (7): Este accesorio es ideal para recortar la barba y
mantenerla a una longitud uniforme.
• Coloca el accesorio sobre la lámina (2) y ajusta la longitud de barba
deseada. Presiona el selector de longitud (8) deslizándolo hacia arriba (f)
(las opciones, de arriba abajo, son: 1,2 mm, 2,8 mm, 4,4 mm y 6 mm).
Empuja hacia arriba el perfilador rotatorio (4).
• Enciende la afeitadora presionando el botón de encendido/apagado y
recorta en dirección contraria al crecimiento del vello, guiando el peine
transparente sobre la piel (f).
Limpieza
La limpieza periódica garantiza un mejor afeitado. Limpiar el cabezal de la
afeitadora bajo el grifo después de cada afeitado es una manera fácil y
rápida de limpiarlo.
• Ponga en marcha la afeitadora (sin cable) y enjuague el cabezal bajo el
grifo de agua caliente hasta eliminar todos los residuos (g). Puedes usar
un jabón líquido que no contenga sustancias abrasivas Aclara el jabón y
deja la afeitadora en funcionamiento durante unos segundos más.
• A continuación, apaga la afeitadora, retira la lámina y el bloque de
cuchillas, y deja las piezas desmontadas hasta que se sequen.
• Si limpias periódicamente la afeitadora bajo el agua, aplica una vez a la
semana una gota de lubricante en los perfiladores (4a, 4b) y la lámina (h).
También puedes limpiar la afeitadora con el cepillo incluido (i):
• Apaga la afeitadora y extrae la lámina.
• Con el cepillo, limpia el bloque de cuchillas y la parte interior del cabezal.
No limpies la lámina con el cepillo porque podría dañarse.
Mantenga su afeitadora en óptimo estado
Cambio de lámina y bloque de cuchillas
Para asegurar un rendimiento del 100% de tu afeitadora, conviene sustituir
la lámina y el bloque de cuchillas cada 18 meses, o cuando se encuentren
gastados. Sustituye las dos piezas al mismo tiempo para asegurar un
apurado óptimo con la menor irritación de la piel.
(Recambio de lámina y bloque de cuchillas: 10B)
Mantenimiento de la batería
Para optimizar la vida útil de la batería, la afeitadora debe descargarse
completamente, al menos una vez cada 6 meses (con un uso normal), y
cárgala al máximo de su capacidad.
28
Page 29

Aviso medioambiental
Este producto contiene baterías y/o residuos eléctricos reciclables.
Con objeto de proteger
útil del producto, rogamos
Puede depositarlo en un Centro de Servicios Braun o en los
emplazamientos de recolección habilitados en su país.
Sujeto a modificaciones sin previo aviso.
Vea las especificaciones eléctricas impresas en el cable especial de conexión.
Garantía
Braun concede a este producto 2 años de garantía a partir de la fecha de
compra.
Dentro del periodo de garantía, subsanaremos, sin cargo alguno, cualquier
defecto del aparato imputable tanto a los materiales como a la fabricación,
ya sea reparando, sustituyendo piezas, o facilitando un aparato nuevo según
nuestro criterio.
La garantía no ampara averías por uso indebido, funcionamiento a distinto
voltaje del indicado, conexión a un enchufe inadecuado, rotura, desgaste
normal (p.ej. la lámina o bloque de cuchillas) por el uso que causen defectos
o una disminución en el valor o funcionamiento del producto.
La garantía perderá su efecto en caso de ser efectuadas reparaciones por
personas no autorizadas, o si no son utilizados recambios originales de
Braun.
La garantía solamente tendrá validez si la fecha de compra es confirmada
mediante la factura o el albarán de compra correspondiente.
Esta garantía tiene validez en todos los países donde este producto sea
distribuido por Braun o por un distribuidor asignado por Braun.
En caso de reclamación bajo esta garantía, diríjase al Servicio de Asistencia
Técnica de Braun más cercano: www.service.braun.com.
el medioambiente, una vez finalizada la vida
no lo elimine junto a la basura doméstica.
Solo para España
Servicio al consumidor: Para localizar a su Servicio Braun más cercano o en
el caso de que tenga Vd. alguna duda referente al funcionamiento de este
producto, le rogamos contacte con el teléfono de este servicio 901 11 61 84.
29
Page 30

Português
Os nossos produtos foram concebidos de forma a ir ao encontro dos mais
elevados níveis de qualidade, funcionalidade e design. Esperamos que
desfrute plenamente da sua nova máquina de barbear Braun.
Leia estas instruções na íntegra, pois contêm informações de segurança. Guarde-as para referência futura.
Aviso
O seu sistema de barbear vem equipado com um cabo
de alimentação especial, que tem um transformador de
voltagem extra-baixa de segurança integrado. Para evitar
risco de choque eléctrico, não troque ou manipule nenhuma
das partes que o compõem. Utilize apenas o cabo de
alimentação especial fornecido com o seu aparelho.
A cabeça de corte é adequada para limpeza com água
corrente. Desligue o aparelho da tomada eléctrica
antes de limpar a cabeça de corte com água.
Não use a máquina de barbear se a lâmina ou o cabo se
encontrarem danificados.
Este aparelho pode ser utilizado por crianças a partir dos
oito anos e por pessoas com capacidades físicas, sensórias
ou mentais reduzidas, ou por pessoas com falta de experiência ou conhecimentos, desde que o façam sob supervisão ou se tiverem recebido instruções sobre a utilização
segura do aparelho e compreendam os perigos a que estão
sujeitas. Manter o aparelho fora do alcance das crianças.
As operações de limpeza e manutenção não devem ser
efetuadas por crianças, salvo se tiverem mais de oito anos
e sob supervisão.
Por favor certifique-se que a pele se encontra esticada,
quando utilizar em outras áreas do corpo. Por motivos de
higiene, não partilhe este aparelho com outras pessoas.
30
Page 31

Descrição
1 Acessório de aparar com pente para a barba de 3 dias e tampa
protectora
2 Lâmina de barbear
3 Bloco multi-lâminas
4 Aparador giratório
4a Aparador largo (28 mm)
4b Aparador estreito (14 mm)
5 Aviso de carga
6 Botão ligar/desligar
7 Acessório de aparar com pente ajustável
8 Selector do comprimento da barba
9 Cabo de alimentação
Carregamento da bateria
A temperatura ambiente ideal para carregar a sua máquina de barbear é de
5 °C a 35 °C. A bateria pode não carregar ou não carregar devidamente em
temperaturas extremamente altas ou baixas. A temperatura ideal para se
barbear é de 15 °C a 35 °C. Não exponha o aparelho a temperaturas
superiores a 50 °C por períodos prolongados.
• Use o cabo de alimentação, ligue a máquina de barbear a uma ficha
eléctrica com o motor desligado.
• Quando carregar pela primeira vez a máquina de barbear, ou se não utiliza
o aparelho há alguns meses, deixe a máquina de barbear carregar
continuamente durante 4 horas.
• A luz de carga (5) indica que o aparelho está a carregar. Quando a bateria
está totalmente carregada, a luz de carga desliga-se. Após alguns
momentos, a luz de carga piscará intermitentemente, o que indica que a
bateria se encontra na sua capacidade máxima. Esta situação também
poderá ocorrer durante breves momentos, quando se carrega a bateria
após ter ficado completamente descarregada.
• A carga máxima permite-lhe o uso sem fios até 30 minutos, dependendo
do tamanho da sua barba.
• Quando a máquina de barbear se encontrar totalmente carregada, deixe
descarregar normalmente através do uso, para posteriormente voltar a
carregar até à sua capacidade máxima. As próximas cargas demorarão
apenas aproximadamente 1 hora.
• A capacidade máxima da bateria será atingida somente após a realização
de várias cargas/descargas.
• Um carregamento rápido de 5 minutos é suficiente para uma utilização.
31
Page 32

Barbear
Em primeiro lugar, retire o acessório de aparar com pente ajustável (7):
Utilizando os polegares, empurre as peças laterais do acessório de corte
para que se desencaixem na direcção das setas (a). Para ligar o aparelho
pressione o interruptor de ligar/desligar (6). O sistema de lâmina flutuante
adapta-se automaticamente à superfície da sua pele para um barbear suave
e apurado.
Para melhores resultados:
• Barbeie-se antes de lavar o rosto.
• Segure sempre a máquina de barbear num ângulo recto (90º) em direcção
à pele (b).
• Estique a pele e barbeie no sentido oposto ao crescimento do pêlo.
• Se estiver alguns dias sem fazer a barba, antes de a fazer, utilize o
aparador largo (4a) para pré-cortar os pêlos longos. Para um barbear mais
suave e apurado, finalize com a lâmina.
• Para manter uma qualidade de corte a 100%, substitua a lâmina e o bloco
multi-lâminas pelo menos a cada 18 meses ou quando gasto.
Estilizar
Utilizar o aparador giratório
O aparador largo (4a) recorta e apara uniformemente áreas maiores (c).
É ideal para dar forma a patilhas, bigodes e barbas curtas. O aparador largo
é disponibilizado com segurança anti-corte e uma faixa deslizante para uma
menor irritação e deslizamento mais fácil. Pressione as faixas azuis para
empurrar o aparador giratório (4) para cima. Mantenha a pele esticada e
mova o aparador largo delicadamente no sentido contrário ao do crescimento dos pêlos.
O aparador estreito (4b) define com precisão linhas e bordos (d), sendo ideal
para efectuar contornos de precisão.
Para utilizar o aparador estreito, empurre o aparador giratório para cima e
rode-o a 180°.
O uso frequente do aparador giratório irá reduzir a capacidade de autonomia
da bateria.
Aparar
Utilizar os acessórios aparadores (1) e (7)
Coloque o respectivo acessório aparador na lâmina da máquina de barbear
(2) ou, alternativamente, no aparador giratório (4) e pressione em direcção
ao corpo da máquina de barbear até encaixar com um clique (e).
32
Page 33

Acessório de aparar com pente para barba de 3 dias e tampa protectora (1):
Este acessório é perfeitamente adequado para criar e manter um look de
barba por fazer.
• Coloque o acessório na lâmina (2) e empurre o aparador giratório para
cima (4). Ligue a máquina de barbear e utilize o acessório, tal como se
mostra na ilustração (e). O acessório de corte permite-lhe um óptimo
ângulo de utilização.
Acessório de aparar com pente ajustável (7): Este acessório é ideal para
aparar a barba e mantê-la com um comprimento constante.
• Coloque o acessório na lâmina de barbear (2) e defina o comprimento da
barba desejado. Pressione o selector de comprimento da barba (8) e
deslize-o para cima (f) (definições de comprimentos de corte possíveis, de
cima para baixo: 1,2 mm / 2,8 mm / 4,4 mm / 6 mm). Empurre o estilizador
giratório para cima (4).
• Pressione o interruptor de ligar/desligar e apare no sentido contrário ao do
crescimento dos pêlos, orientando o acessório de aparar com pente
transparente sobre a pele (f).
Limpeza
Uma limpeza regular permite a obtenção de melhores resultados no barbear.
Lavar a cabeça de corte após cada utilização em água corrente é uma forma
prática e rápida de manter o aparelho limpo:
• Ligue a máquina de barbear (sem o cabo de alimentação) e enxagúe a
cabeça de corte em água quente corrente até saírem todos os resíduos
(g). Poderá usar sabonete líquido sem substâncias abrasivas. Enxagúe os
restos de espuma e deixe a máquina de barbear a funcionar durante mais
alguns segundos.
• Em seguida, desligue a máquina de barbear e retire a lâmina de barbear e
o bloco multi-lâminas. Depois, deixe as peças de corte secarem separadamente.
• Se tem por hábito limpar a máquina de barbear sob água corrente,
aplique uma vez por semana uma gota de óleo de máquina nos acessórios aparadores (4a, 4b) e na lâmina de barbear (h).
Em alternativa, poderá limpar a máquina de barbear com a escova
fornecida (i):
• Desligue a máquina de barbear. Retire a lâmina de barbear.
• Utilize a escova para limpar o bloco multi-lâminas e a parte interna da
cabeça de corte. No entanto, não limpe a lâmina de barbear com a
escova, pois poderá danificá-la.
33
Page 34

Mantenha a sua máquina de barbear em óptimo estado
Substituição das peças de corte
Para manter uma qualidade de corte a 100%, substitua a lâmina e o bloco
multi-lâminas pelo menos a cada 18 meses ou quando gasto. Substitua
ambas as partes ao mesmo tempo de forma a permitir um barbear mais
próximo do rosto com uma menor irritação da pele.
(Lâmina de barbear e bloco multi-lâminas: 10B)
Conservação da bateria
Para manter a capacidade máxima das pilhas recarregáveis, deverá
descarregar a máquina de barbear completamente (através do uso)
aproximadamente a cada 6 meses. Posteriormente, volte a carregar
até à sua capacidade máxima.
Aviso ambiental
Este produto contém baterias recarregáveis e/ou resíduos domésticos
recicláveis. Com o intuito de proteger o ambiente, não elimine o
produto juntamente com o lixo doméstico. Entregue-o para reciclagem num dos locais de recolha específica à disposição no seu país.
Sujeito a alterações sem aviso prévio.
Ver especificações eléctricas no impresso relativo ao cabo de conexão
especial.
Garantia
Braun concede a este produto 2 anos de garantia a partir da data de
compra.
Dentro do período de garantia qualquer defeito do aparelho, devido aos
materiais ou ao seu fabrico, será reparado, substituindo peças ou trocando
por um aparelho novo segundo o nosso critério, sem qualquer custo.
A garantia não cobre avarias por utilização indevida, funcionamento a
voltagem diferente da indicada, ligação a uma tomada de corrente eléctrica
34
Page 35

incorrecta, ruptura, normal utilização e desgaste (ex: rede e bloco de
lâminas) por utilização que causem defeitos ou diminuição da qualidade
de funcionamento do produto.
A garantia perderá o seu efeito no caso de serem efectuadas reparações por
pessoas não autorizadas ou se não forem utilizados acessórios originais
Braun.
A garantia só é válida se a data de compra fôr confirmada pela
apresentação da factura ou documento de compra correspondente.
Esta garantia é válida para todos os países onde este produto seja
distribuído por Braun ou por um distribuidor Braun autorizado.
No caso de reclamação ao abrigo de garantia, dirija-se ao
Serviço de Assistência Técnica Oficial Braun mais próximo:
www.service.braun.com.
Só para Portugal
Apoio ao consumidor: Para localizar o seu Serviço Braun mais próximo
o no caso de surgir alguma dúvida relativamente ao funcionamiento deste
produto, contacte por favor este serviço pelo telefone 808 20 00 33.
35
Page 36

Italiano
I nostri prodotti sono studiati per rispondere ai più elevati standard di qualità,
funzionalità e design. Ci auguriamo che il suo nuovo rasoio Braun soddisfi
pienamente le sue esigenze.
Leggere queste istruzioni interamente, contengono informazioni sulla
sicurezza. Conservarle per futura consultazione.
Attenzione
Il rasoio è dotato di un cavo di alimentazione speciale, che
ha un sistema integrato di sicurezza a basso voltaggio.
Per evitare il rischio di scosse elettriche, non cercare di
sostituire o di manipolare nessuna parte del prodotto. Usare
solo lo speciale cavo di rete fornito con l’apparecchio.
La testina del rasoio può essere lavata sotto acqua
corrente. Prima di lavare il rasoio sotto l’acqua
corrente, scollegarlo dall’alimentazione elettrica.
Non radere utilizzando una lamina o un cavo danneggiato.
Questo apparecchio può essere utilizzato da bambini di
età superiore agli 8 anni e da persone con capacità fisiche,
sensoriali, o mentali ridotte o da persone inesperte o non
informate, purché abbiano ricevuto supervisione o istruzioni
riguardante l’utilizzo sicuro dell’apparecchio e comprendano
i rischi inerenti. I bambini non devono giocare con l’apparecchio. La pulizia e la manutenzione non devono essere
eseguite da bambini, a meno che non abbiano un’età
superiore agli 8 anni e siano sorvegliati.
Per l’utilizzo in altre zone del corpo, si prega di assicurarsi
che la pelle è tesa. Per motivi igienici, non condividere
questo apparecchio con altre persone.
36
Page 37

Descrizione
1 Pettine per barba di 3 giorni e cappuccio protettivo
2 Lamina
3 Blocco coltelli
4 Rifinitore girevole a due lati
4a Rifinitore largo (28 mm)
4b Rifinitore stretto (14 mm)
5 LED di ricarica
6 Tasto di accensione/spegnimento
7 Pettine distanziatore regolabile
8 Selezionatore della lunghezza della barba
9 Cavo di alimentazione
Caricare il rasoio
La temperatura ambientale consigliata per la ricarica è compresa tra 5 °C e
35 °C. Il caricamento della batteria potrebbe non essere completa o non
avvenire del tutto in caso di temperature estremamente basse o alte.
La temperatura ambientale consigliata per la rasatura è tra 15 °C e 35 °C.
Non esporre l’apparecchio a temperature superiore a 50 °C per periodi di
tempo prolungati.
• Usando il cavo di alimentazione, collegare il rasoio alla presa di corrente
con il motore spento.
• Quando si utilizza il rasoio per la prima volta o quando non lo si é utilizzato
per alcuni mesi, dovrà essere ricaricato ininterrottamente per 4 ore.
• L’indicatore di ricarica (5) mostra che il rasoio é in fase di ricarica.
L’indicatore si spegne quando la batteria é completamente carica.
La luce ad intermittenza, dopo un pò, indica che la batteria ha raggiunto la
sua massima carica. Questo potrebbe anche succedere quando si ricarica
la batteria dopo che é stata scaricata completamentamente.
• Una carica completa può fornire fino a 30 minuti di rasatura senza cavo,
a seconda della lunghezza e del tipo di barba da radere.
• Una volta che la batteria del rasoio è completamente carica, utilizzare il
rasoio normalmente fino a che la batteria non risulti di nuovo scarica.
Quindi ricaricarla completamente. Le ricariche successive richiederanno
circa 1 ora.
• Il massimo livello di carica della batteria sarà raggiunto solo dopo alcuni
cicli di carica/scarica.
• La ricarica veloce di 5 minuti è sufficiente per una rasatura.
37
Page 38

Rasatura
Innanzitutto, rimuovi il pettine distanziatore regolabile (7): utilizzando i pollici,
premere sulla parte esterna del pettine distanziatore regolabile sfilandolo
nella direzione indicata dalla freccia (a). Accendere il rasoio con il tasto
accensione/spegnimento (6). La lamina oscillante si adatta automaticamente
al profilo del viso per un’ accurata e dolce rasatura.
Consigli per una rasatura perfetta:
• E’ consigliabile radersi prima di lavarsi il viso.
• Impugnare il rasoio mantenendo sempre la giusta angolazione (90°)
rispetto alla pelle (b).
• Tendere leggermente la pelle e radere in senso contrario alla direzione di
crescita della barba.
• Prima di utilizzare il rasoio, se sono passati alcuni giorni dall’ultima
rasatura, utilizzare il rifinitore largo (4a) per tagliare i peli più lunghi. Per una
rasatura profonda ed una pelle morbida, terminare utilizzando il rasoio.
• Per mantenere il 100% di prestazioni di rasatura, sostituire lamina e
blocco coltelli almeno ogni 18 mesi o prima se danneggiati.
Rifinisci
Utilizzo del rifinitore girevole a due lati
Il rifinitore largo (4a) rade e rifinisce aree di viso più grandi (c). E’ ideale per
rifinire basette, baffi e barba corta. Il rifinitore grande é dotato di cuscinetti
di sicurezza e di una striscia che permette al rasoio di scivolare sulla pelle
senza irritazioni e più facilmente. Premere sulle righe blu per estrarre il
rifinitore girevole a due lati (4). Tirando la pelle, guidare il rifinitore largo nella
direzione opposta a quella della crescita dei peli.
Il rifinitore stretto (4b) definisce i contorni con precisione (d) ed é ideale per
definire i contorni. Per utilizzarlo, estrarre il rifinitore girevole a due lati (4) e
girarlo di 180°.
L’utilizzo frequente del rifinitore girevole a due lati può ridurre la capacità
delle batterie del rasoio.
Regola
Utilizzo degli accessori per regolare la barba (1) e (7)
Apporre l’accessorio per regolare la barba sulla lamina del rasoio (2) oppure
sul rifinitore girevole a due lati (4) e premere sul rasoio inserendo l’accessorio
fino a che non si sente uno scatto (e).
38
Page 39

Pettine per barba di 3 giorni e cappuccio protettivo (1): Questo accessorio é
stato disegnato per creare un look con barba corta e per mantenerlo costante.
• Posizionare l’accessorio sulla lamina del rasoio (2) ed estrarre il rifinitore
girevole a due lati (4). Accendere il rasoio ed utilizzare l’apparecchio
come illustrato nella figura (e). L’accessorio assicura il mantenimento
dell’angolazione ottimale del rasoio sulla pelle.
Pettine distanziatore regolabile (7): questo accessorio é ideale per regolare
la barba e mantenerla ad un livello di lunghezza costante.
• Posizionare l’accessorio sulla lamina del rasoio (2) e selezionare la
lunghezza della barba al livello desiderato. Posizionare il selezionatore
della lunghezza (8) alla lunghezza desiderata (f) (le lunghezze disponibili
sono: 1.2 mm / 2.8 mm / 4.4 mm / 6 mm). Estrarre il rifinitore girevole a
due lati (4)
• Accendere il rasoio con il tasto on/off e radere in direzione opposta alla
crescita dei peli, guidando la parte trasparente del pettine sulla pelle (f).
Pulizia del rasoio
Una pulizia regolare del rasoio assicura migliori prestazioni di rasatura.
Sciacquare sotto l’acqua corrente la testina del rasoio dopo ogni rasatura é
un modo facile e veloce per mantenerlo pulito:
• Accendere il rasoio (cordless) e sciacquare la testina sotto l’acqua corrente
(g). Un sapone naturale può essere utilizzato a patto che sia privo di
particelle o sostanze abrasive. Risciacquare via la schiuma lasciando il
rasoio acceso ancora per qualche secondo.
• Successivamente, spegnere il rasoio, rimuovere la lamina ed il blocco
coltelli e lasciarli ad asciugare.
• Se il rasoio viene lavato regolarmente sotto acqua corrente, é bene una
volta alla settimana applicare una goccia di olio per macchina da cucire
sui rifinitori (4a, 4b) e sulla lamina del rasoio (h).
Alternativamente, é possibile pulire il rasoio utilizzando la spazzola che é
stato fornita (i):
• Spegnere il rasoio. Rimuovere la lamina del rasoio.
• Utilizzando la spazzola, pulire il blocco coltelli e l’area interna della testina.
Non pulire la lamina del rasoio con la spazzola per non danneggiarla.
Per mantenere il rasoio in perfette condizioni
Sostituzione delle parti radenti
Per mantenere il 100% di prestazioni del rasoio, sostituire lamina e blocco
coltelli almeno ogni 18 mesi, o prima se danneggiati. Sostituire entrambe le
39
Page 40

parti nello stesso momento per una rasatura più a fondo e con meno
irritazioni. (Lamina e blocco coltelli: 10B)
Manutenzione delle batterie ricaricabili
Per mantenere la capacità ottimale delle batterie ricaricabili, il rasoio deve
essere completamente scaricato (radendosi) almeno una volta ogni 6 mesi
circa. Una volta scarico, ricaricare il rasoio fino alla ricarica massima.
Nota sull’impatto ambientale
Questo prodotto contiene batterie ricaricabili. Al fine di salvaguardare
l’ambiente, terminata la vita utile del prodotto si prega di non smaltirlo
fra i rifiuti domestici. Per lo smaltimento rivolgersi ad un Centro
Assistenza Braun o agli appositi centri di raccolta predisposti a livello
nazionale.
Salvo cambiamenti senza preavviso.
Specifiche elettriche: vedere indicazioni sullo speciale cavo di ricarica.
Garanzia
Braun fornisce una garanzia valevole per la durata di 2 anni dalla data di
acquisto.
Nel periodo di garanzia verranno eliminati, gratuitamente, i guasti
dell’apparecchio conseguenti a difetti di fabbrica o di materiali, sia riparando
il prodotto sia sostituendo, se necessario, l’intero apparecchio.
Tale garanzia non copre: i danni derivanti dall’uso improprio del prodotto,
la normale usura (ad esempio di lamina o blocco coltelli) conseguente al
funzionamento dello stesso, i difetti che hanno un effetto trascurabile sul
valore o sul funzionamento dell’apparecchio.
La garanzia decade se vengono effettuate riparazioni da soggetti non
autorizzati o con parti non originali Braun.
Per accedere al servizio durante il periodo di garanzia, è necessario
consegnare o far pervenire il prodotto integro, insieme allo scontrino di
acquisto, ad un centro di assistenza autorizzato Braun.
Contattare www.service.braun.com o il numero 800 440 017 per avere
informazioni sul Centro di assistenza autorizzato Braun più vicino.
40
Page 41

Nederlands
Onze produkten zijn ontworpen om te voldoen aan de hoogste eisen van
kwaliteit, functionaliteit en design. Wij wensen u veel plezier met uw nieuwe
Braun scheerapparaat.
Lees deze instructies volledig, ze bevatten veiligheidsinformatie.
Bewaar ze voor in de toekomst.
Waarschuwing
Uw scheerapparaat is voorzien van een speciaal snoer met
een geïntegreerd veiligheids laag-voltage aanpassingssysteem. Om deze reden mag u geen enkel onderdeel
vervangen of bewerken, om het risico van een elektrische
schok te voorkomen. Gebruik uitsluitend de speciale
snoerset die bij uw apparaat geleverd wordt.
Het scheerhoofd is geschikt voor het reinigen onder
stromend water. Trek altijd het snoer uit het stop-
contact en uit het scheerapparaat voordat u het
scheerhoofd onder het water houdt.
Gebruik het apparaat niet wanneer het scheerblad of het
snoer beschadigd is.
Dit apparaaat is geschikt voor gebruik voor kinderen ouder
dan 8 jaar en personen met een fysieke, sensorische of
mentale beperking indien zij het product gebruiken onder
begeleiding of instructies hebben gekregen over het veilig
gebruik van het apparaat en de gevaren inzien. Laat
kinderen niet met het apparaat spelen. Laat het apparaat
niet schoonmaken of onderhouden worden door kinderen,
behalve onder toezicht en als ze 8 jaar of ouder zijn.
Bij gebruik op de huid (anders dan het gezicht) dient u
ervoor te zorgen dat u de huid strak trekt.
41
Page 42

Om hygiënische redenen raden wij aan dit apparaat niet te
delen met andere personen.
Beschrijving
1 3 dagen baard opzetstuk & beschermkap
2 Scheerblad
3 Messenblok
4 Roterende trimmer
4a Brede trimmer (28mm)
4b Smalle trimmer (14 mm)
5 Oplaad indicatielampje
6 Aan/uit schakelaar
7 Tondeuse opzetstuk
8 Baardlengte keuzeknop
9 Snoer
Opladen
De aanbevolen omgevingstemperatuur voor opladen is 5 °C tot 35 °C.
Het kan zijn dat de batterij niet behoorlijk of helemaal niet functioneert onder
extreem lage of hoge temperaturen. De aanbevolen omgevingstemperatuur
tijdens het scheren is 15 °C tot 35 °C. Stel het apparaat niet bloot aan
temperaturen hoger dan 50 °C gedurende langere tijd.
• Gebruik het speciale snoer, sluit het scheerapparaat aan op het net en
zorg ervoor dat het apparaat uit staat.
• Wanneer u het apparaat voor de eerste maal oplaadt of u heeft het appa-
raat een aantal maanden niet gebruikt, dient u het apparaat tenminste vier
uur op te laden.
• Het oplaad indicatielampje (5) geeft aan dat het scheerapparaat wordt
opgeladen. Wanneer het apparaat volledig is opgeladen, zal het lampje
uitgaan. Een knipperend lampje geeft aan dat de batterij de maximale
capaciteit bereikt heeft. Dit kan ook kortstondig gebeuren wanneer de
batterij wordt opgeladen nadat deze volledig leeg was.
• Wanneer het apparaat volledig opgeladen is kunt u, afhankelijk van de
baardgroei, ongeveer 30 minuten snoerloos scheren.
• Wanneer het scheerapparaat volledig is opgeladen, kunt u snoerloos
scheren totdat het apparaat ontladen is. Laadt het apparaat vervolgens
op tot maximale capaciteit. Volgende opladingen duren ongeveer 1 uur.
42
Page 43

• De maximale capaciteit zal pas behaald worden na een aantal oplaad/
ontlaad sessies.
• 5-minuten snelladen is voldoende voor 1 scheerbeurt.
Scheren
Verwijder eerst het tondeuse opzetstuk (7): Druk met uw duimen tegen de
zijkanten van het tondeuse opzetstuk zodat deze in de richting van de pijlen
(a) bewegen. Druk op de aan/uit schakelaar (6). Het zwekend scheerblad
past zich automatisch aan de contouren van uw gezicht aan voor een glad
scheerresultaat.
Voor de beste resultaten:
• Scheer u altijd voordat u uw gezicht wast.
• Houd het scheerapparaat altijd in een rechte hoek op de huid (90°) (b).
• Trek de huid strak en scheer tegen de haargroeirichting in.
• Voor het scheren, wanneer u zich een paar dagen niet geschoren heeft,
gebruikt u de brede trimmer (4a) om de langere haren te scheren. Voor een
glad scheerresultaat scheert u zich daarna met het scheerblad.
• Om een 100% scheerprestatie te houden, adviseren wij uw scheerblad en
messenblok iedere 1 ½ jaar te vervangen of eerder indien nodig.
Stylen
Gebruik de roterende trimmer
De brede trimmer (4a) scheert gelijkmatig en trimt de grotere oppervlakken
(c). Hij is ideaal voor het in model brengen van bakkebaarden, snorren en
kleine baarden. De brede trimmer is voorzien van veiligheidsopeningen en
een glij-strip voor minder scheerirritatie en het gemakkelijk glijden van het
apparaat over de huid. Druk op de blauwe strepen om de roterende trimmer
omhoog te schuiven (4). Trek de huid strak en beweeg de brede trimmer
tegen de haargroeirichting in.
De smalle trimmer (4b) is geschikt voor het scheren van scherpe lijnen ’tats’
en hoeken (d), en daarom ideaal voor het nauwkeurig in model brengen van
gezichtshaar. Om de smalle trimmer te gebruiken, schuift u de roterende
trimmer omhoog en draait deze 180°.
Regelmatig gebruik van de roterende trimmer zal de snoerloze werkingscapaciteit doen verminderen.
43
Page 44

Trimmen
Gebruik trim opzetstukken (1) en (7)
Plaats het trimmer opzetstuk op het scheerblad (2), op de roterende trimmer
(4) en druk hem op het moterhuis totdat hij vastklikt (e).
3 dagen baard opzetstuk & beschermkap (1): Dit hulpstuk is geschikt voor
het creëren en onderhouden van een stoppelbaard.
• Plaats het hulpstuk op het scheerblad (2) en druk op de roterende trimmer
(4). Druk op aan knop en gebruik het hulpstuk zoals te zien is op de
afbeelding (e). Het hulpstuk zorgt ervoor dat deze i de optimale hoek
staan.
Tondeuse opzetstuk (7): Dit hulpstuk is ideaal om een baard te trimmen en
deze op een constante lengte te behouden.
• Plaats het hulpstuk aan het scheerblad (2) en stel de gewenste baard-
lengte in. Druk op de baardlengte keuzeknop (8) en schuif deze op de gewenste baardlengte(f) (lengte instelling van boven naar beneden 1,2 mm /
2,8 mm / 4,4 mm / 6 mm). Schuif de roterende trimmer omhoog (4).
• Druk op de aan/uit knop en trim tegen de haargroeirichting in door de
transparate kam over de huid te bewegen (f).
Schoonmaken
Regelmatig schoonmaken zorgt voor betere scheerprestaties. Het afspoelen
van het scheerhoofd onder stromend water na iedere scheerbeurt is een
eenvoudige manier om het apparaat schoon te houden:
• Zet het scheerapparaat aan (draadloos) en spoel het scheerhoofd under
warm, stromend water af tot alle restjes verdwenen zijn (g). Een zeep op
natuurlijke basis kunt u ook gebruiken, mits deze geen schurende
substanties bevat. Spoel al het schuim af en laat het scheerapparaat nog
een paar seconden aanstaan.
• Volgende stap, schakel het apparaat uit, verwijder het scheerblad en
messenblok. Laat de onderdelen apart drogen.
• Als u het scheerapparaat regelmatig met water schoonmaakt, dient u
eenmaal per week een druppel lichte olie op de trimmers (4a, 4b) en het
scheerblad aan te brengen (h).
U kunt het apparaat ook schoonmaken met het bijgeleverde borsteltje (i):
• Schakel het apparaat uit. Verwijder het scheerblad.
• Maak het messenblok en de binnenkant van het scheerhoofd schoon met
het borsteltje. Maak nooit het scheerblad schoon met het borsteltje, dit
kan het scheerblad beschadigen.
44
Page 45

Uw scheerapparaat in topconditie houden
De scheeronderdelen vervangen
Om een 100% scheerprestatie te houden, adviseren wij uw scheerblad en
messenblok iedere 1 ½ jaar te vervangen of eerder indien nodig. Vervang
beide onderdelen tegelijkertijd voor een gladder scheerresultaat met minder
scheerirritatie. (Scheerblad en messenblok: 10B)
De oplaadbare batterijen bewaren
Om de maximale capaciteit van de oplaadbare batterijen te bewaren, dient u
het scheerapparaat ongeveer iedere 6 maanden (door scheren) volledig te
ontladen. Laadt het scheerapparaat hierna op tot de maximale capaciteit.
Mededeling ter bescherming van het milieu
Dit product bevat oplaadbare batterijen. Ter bescherming van het
milieu mag dit product aan het einde van zijn nuttige levensduur
niet met het gewone huisvuil worden weggegooid. Verwijdering
kan plaatsvinden bij een Braun Service Centre of bij de bekende
verzamelplaatsen.
Wijzigingen voorbehouden.
Voor electrische specificaties: zie de speciale zwakstroomadapter.
Garantie
Op dit produkt verlenen wij een garantie van 2 jaar geldend vanaf datum van
aankoop. Binnen de garantieperiode zullen eventuele fabricagefouten en/of
materiaalfouten gratis door ons worden verholpen, hetzij door reparatie,
vervanging van onderdelen of omruilen van het apparaat.
Deze garantie is van toepassing in elk land waar dit apparaat wordt geleverd
door Braun of een officieel aangestelde vertegenwoordiger van Braun.
Beschadiging ten gevolge van onoordeelkundig gebruik, normale slijtage
(bijv. aan scheerblad of messenblok) en gebreken die de werking of waarde
van het apparaat niet noemenswaardig beïnvloeden vallen niet onder de
garantie. De garantie vervalt bij reparatie door niet door ons erkende
service-afdelingen en/of gebruik van niet originele Braun onderdelen.
Om gebruik te maken van onze service binnen de garantieperiode, dient
u het complete apparaat met uw aankoopbewijs af te geven of op te
sturen naar een geauthoriseerd Braun Customer Service Centre:
www.service.braun.com.
Bel 0 800 44 55 388 voor een Braun Customer Service Centre bij u in de buurt.
45
Page 46

Dansk
Vores produkter er skabt til at opfylde de højeste krav hvad angår kvalitet,
funktionalitet og design. Vi håber, du vil få stor glæde af din nye barbermaskine fra Braun.
Læs denne brugervejledning fuldstændigt, da den indeholder sikkerhedsinformation. Behold den til fremtidig reference.
Advarsel
Dit barbersystem er forsynet med en specialledning med
integreret strømforsyning med ekstra lav spænding for
større sikkerhed. Du må ikke udskifte eller pille ved nogen
af delene, da du kan risikere at få elektrisk stød. Anvend
kun specialledningen, der følger med apparatet.
Barberhovedet kan rengøres under rindende vand.
Træk stikket ud af stikkontakten, før barberhovedet
rengøres i vand.
Brug ikke barbermaskinen, hvis skæreblad eller ledning
er beskadigede.
Dette apparat kan anvendes af børn fra 8 år og personer
med nedsatte fysiske, sansemæssige eller mentale evner
eller manglende erfaring eller viden, hvis de er under opsyn
og får instruktioner om sikker brug af apparatet og forstår
den involverede fare. Børn må ikke lege med apparatet.
Rengøring og brugervedligeholdelse må ikke udføres af
børn, med mindre de er over 8 år og er under opsyn.
Ved brug på andre områder på kroppen skal du sørge for,
huden er strakt ud.
Af hygiejniske grunde bør du ikke dele dette apparat med
andre.
46
Page 47

Beskrivelse
1 3-dages skæg-kam & beskyttelseshætte
2 Skæreblad
3 Lamelkniv
4 Drejelig trimmer
4a Bred trimmer (28 mm)
4b Smal trimmer (14 mm)
5 Opladningslys
6 Tænd/sluk-knap
7 Justerbar kam
8 Vælger til skæglængde
9 Specialledning
Opladning
Anbefalet omgivende temperatur ved opladning er 5 °C til 35 °C. Batteriet
oplades måske ikke ordentligt eller slet ikke ved ekstremt lave eller høje
temperaturer. Anbefalet omgivende temperatur ved barbering er 15 °C til 35 °C.
Apparatet må ikke udsættes for temperaturer over 50 °C i længere perioder.
• Barbermaskinen tilsluttes en stikkontakt via specialledningen.
Barbermaskinen skal være slukket.
• Ved første opladning, eller når shaveren ikke har været brugt i nogle
måneder, skal den oplades uafbrudt i 4 timer.
• Opladningslyset (5) viser, at apparatet er under opladning. Når batteriet er
fuldt opladet, slukker opladningslyset. Periodiske blink efter et stykke tid
angiver, at batteriet opretholder sin fulde kapacitet. Det kan også ske
kortvarigt, ved opladning efter batteriet har været helt afladet.
• En fuld opladning giver 30 minutters trådløs barberingstid afhængig af
skægvækst.
• Når barbermaskinen er fuldt opladet, aflades den ved normal brug. Derefter
genoplades den til fuld kapacitet. Senere opladninger tager ca. en time.
• Den maksimale batterikapacitet nås først efter flere cyklusser med ladning
og afladning.
• 5-minutters hurtig opladning er tilstrækkeligt til en barbering.
Barbering
Tag først den justerbare kam (7) af: Tryk med tommelfingrene på klipsene på
siden af den justerbare kam, så de svinger i retning af pilene (a). Tryk på
tænd/sluk-knappen (6). Den fjedrende skærebladsramme tilpasser sig automatisk din huds konturer og giver en tæt og glat barbering.
47
Page 48

For at opnå de bedste resultater:
• Barber dig altid, før du vasker dig i ansigtet.
• Hold altid barbermaskinen i en ret vinkel (90°) mod huden (b).
• Stræk huden og barber mod hårenes vokseretning.
• Til forbarbering efter nogle dage, hvor du ikke har barberet dig, skal du
bruge den brede trimmer (4a) for at forbarbere lange skæghår. Afslut med
skærebladet for at få en tæt, glat barbering.
• For at opretholde en optimal barbering skal skæreblad og lamelkniv
udskiftes mindst efter 1 ½ års brug, eller når de er slidte.
Style
Brug af den drejelige trimmer
Den brede trimmer (4a) klipper og trimmer større områder jævnt (c). Den er
ideel til at give facon til bakkenbarter, overskæg og kort skæg. Den brede
trimmer er forsynet med sikkerhedsribber og en glidestrip for at mindske
irritation og give et let glid. Tryk på de blå striber for at skubbe den drejelige
trimmer op (4). Stræk huden, og før den brede trimmer mod hårenes
vokseretning.
Den smalle trimmer (4b) definerer linjer og kanter præcist (d) og er ideel til at
skabe nøjagtige konturer.
For at anvende den smalle trimmer, skal du skubbe den drejelige trimmer op
og dreje den 180°.
Hyppig brug af den drejelige trimmer nedsætter batteriets kapacitet.
Trimme
Brug af trimmertilbehøret (1) og (7)
Placer det ønskede trimmertilbehør på skærebladet (2) eller på den drejelige
trimmer (4), og tryk det mod kabinettet, til det klikker på plads (e).
3-dages skæg-kam & beskyttelseshætte (1): Dette tilbehør er perfekt egnet
til at skabe stubbe og pleje dem.
• Placer tilbehøret på skærebladet (2), og tryk den drejelige trimmer op (4).
Tænd for shaveren og brug apparatet som vist på illustrationen (e).
Tilbehøret sikrer en optimal vinkel.
Justerbar kam (7). Dette tilbehør er ideelt til at trimme skægget og holde en
konstant længde.
• Placer tilbehøret på skærebladet (2) og indstil den ønskede skæglængde.
Tryk på knappen til valg af skæglængde (8), og skub den op (f) (mulige
skæglængdeindstillinger fra top til bund: 1,2 mm / 2,8 mm / 4,4 mm /
6 mm). Skub den drejelige trimmer (4) op.
48
Page 49

• Tryk på tænd/sluk-knappen og trim skægget mod hårenes vokseretning
ved at føre den transparente kam hen over huden (f).
Rengøring
Regelmæssig rengøring sikrer bedre barbering. En let og hurtig måde at
holde barberhovedet rent på er at skylle det under rindende vand:
• Tænd for shaveren (trådløs), og skyl barberhovedet under varmt, rindende
vand, indtil alle rester er blevet fjernet (g). Du kan bruge flydende sæbe
uden slibemiddel. Vask al skum af, og lad shaveren køre et par sekunder
mere.
• Sluk derefter for shaveren, og fjern skæreblad og lamelkniv. Lad de afmon-
terede shaverdele tørre.
• Dryp en dråbe let maskinolie på trimmerne (4a, 4b) og skærebladet (h) en
gang om ugen, hvis du regelmæssigt rengør din shaver under rindende
vand.
Alternativt kan shaveren renses med den medfølgende børste (i):
• Sluk for shaveren. Fjern skærebladet.
• Rens skæreblad og indvendige dele af skærehoved med rensebørste.
Skærebladet må imidlertid ikke renses med børsten, da det kan ødelægge
bladet.
Hold din barbermaskine i topform
Udskiftning af barbermaskinens dele
For at opretholde en optimal barbering skal skæreblad og lamelkniv
udskiftes mindst efter 1 ½ års brug, eller når de er slidte. Udskift begge dele
på samme tid for at få en tættere barbering med mindre hudirritation.
(Skæreblad og lamelkniv: 10B)
Sådan bevares batterierne
For at bevare optimal kapacitet på de genopladelige batterier skal
barbermaskinen aflades fuldstændigt (ved barbering) ca. hver 6. måned.
Derefter genoplades barbermaskinen til fuld kapacitet.
Miljømæssige oplysninger
Dette produkt indeholder genopladelige batterier og/eller genbrugeligt
elektrisk affald. For at beskytte miljøet, smid venligst ikke ud med
husholdsaffald, men lever til genbrug eller til elektrisk affald på de
dertil anrettede afleveringspunkter.
49
Page 50

Kan ændres uden varsel.
Elektriske specifikationer findes på specialkablet.
Garanti
Braun yder 2 års garanti på dette produkt gældende fra købsdatoen. Inden
for garantiperioden vil Braun for egen regning afhjælpe fabrikations- og
materialefejl efter vort skøn gennem reparation eller ombytning af apparatet.
Denne garanti gælder i alle lande, hvor Braun er repræsenteret.
Denne garanti dækker ikke skader opstået ved fejlbetjening, normalt slid
(f.eks. skæreblad og lamelkniv) samt fejl, som har ringe effekt på apparatets
værdi eller funktionsdygtighed. Garantien bortfalder ved reparationer udført
af andre end de af Braun anviste reparatører og hvor originale Braun reservedele ikke er anvendt.
Ved service inden for garantiperioden afleveres eller indsendes hele
apparatet sammen med købsbevis til et autoriseret Braun Service Center:
www.service.braun.com.
Ring 7015 0013 for oplysning om nærmeste Braun Service Center.
50
Page 51

Norsk
Våre produkter er utviklet for å oppfylle de høyeste standardene for kvalitet,
funksjon og design. Vi håper at du vil få stor glede av din nye Braun
barbermaskin.
Les denne instruksjonen grundig, den inneholder sikkerhetsinformasjon. Spar den for fremtidig bruk.
Advarsel
Din barbermaskin har en spesialledning med integrert
lavspenningsadapter. Ikke skift ut eller foreta endringer på
noen del av den, ellers kan du bli utsatt for elektrisk støt.
Bruk kun ledningssettet som følger med barbermaskinen.
Barberhodet kan rengjøres under rennende vann.
Koble barbermaskinen fra strømforsyningen før du
rengjør barberhodet i vann.
Ikke barber med skadet skjæreblad eller ledning.
Dette apparatet kan brukes av barn fra og med 8 år og
personer med reduserte fysiske, sensoriske eller mentale
evner, eller manglende erfaring og kunnskap, hvis de er
under tilsyn eller har fått instruksjon om sikker bruk av
apparatet og forstår farene ved bruk av apparatet. Barn
skal ikke leke med apparatet. Rengjøring og vedlikehold av
apparatet skal ikke foretas av barn med mindre de er eldre
enn 8 år og har tilsyn av en voksen.
Ved bruk på andre områder på kroppen enn ansiktet, må du
sørge for at huden er strammet.
Av hygieniske årsaker bør ikke flere personer bruke samme
apparat.
51
Page 52

Beskrivelse
1 Kam til tredagers-skjegg og beskyttende hette
2 Skjæreblad
3 Lamellkniv
4 Trimmer som kan vris
4a Bred trimmer (28 mm)
4b Smal trimmer (14 cm)
5 Ladelys
6 På/av-bryter
7 Justerbar kam
8 Skjegglengdevelger
9 Spesialledning
Lading
Den beste temperaturen for lading er mellom 5 °C og 35 °C. Ved ekstremt
lave eller høye temperaturer vil batteriet kanskje ikke lades opp ordentlig,
eller ikke lades i det hele tatt. Anbefalt omgivelsestemperatur for barbering er
mellom 15 og 35 °C. Utsett ikke barbermaskinen for temperaturer som er
høyere enn 50 °C over lengre perioder.
• Koble barbermaskinen til et strømuttak ved hjelp av spesialledningen.
La den være avslått.
• Når du lader for første gang, eller når barbermaskinen ikke har vært i bruk
på noen måneder, skal du sette den på lading kontinuerlig i 4 timer.
• Ladelyset (5) viser at apparatet lades opp. Når batteriet er fulladet, skrus
ladelyset av. Periodisk blinking etter en stund viser at batteriet har full
kapasitet. Dette kan også forekomme en kort stund under ladingen, når
batteriet er helt utladet.
• En full opplading gir 30 minutter med ledningsfri barbering, avhengig av
skjeggveksten.
• Når barbermaskinen er helt oppladet, bør den lades ut ved normal bruk.
Deretter skal den lades opp på nytt. Etterfølgende ladinger vil ta omtrent
1 time.
• Full kapasitet oppnås først etter flere sykluser med lading/utlading.
• En 5 minutters hurtigopplading er nok til en barbering.
Barbering
Først fjerner du den justerbare kammen (7): Bruk tomlene og trykk mot
sideklemmene på den justerbare kammen, slik at de svinger av i pilenes
retning (a). Aktiver på/av-bryteren (6). Det bevegelige barberhodet tilpasser
seg automatisk til hudens overflate og gir en tett og glatt barbering.
52
Page 53

For best resultat:
• Du bør alltid barbere deg før du vasker ansiktet.
• Hold barbermaskinen vinkelrett (90°) mot huden (b).
• Strekk huden og barber mot skjeggets vekstretning.
• Som forberedelse til barberingen etter at du ikke har barbert deg på noen
dager, bruker du den brede trimmeren (4a) for å barbere lange hår. For å få
en tett, glatt barbering, avslutter du med barberhodet.
• For å opprettholde 100 % barberingsytelse, må du skifte ut skjærebladet
og lamellkniven minst hver 18. måned eller når de er slitt.
Stil
Bruk den vribare trimmeren
Den brede trimmeren barberer og trimmer store områder jevnt (c). Den er
ideell til å forme kinnskjegg, barter og små, korte skjegg. Den brede trimmeren har sikkerhetsstriper og en glidestripe for å få mindre irritasjon og lett
glid. Trykk på de blå stripene for å trykke opp den vribare trimmeren (4).
Mens du strekker huden, fører du den brede trimmeren i motsatt retningen
av hårveksten.
Den smale trimmeren (4b) definerer presist linjene og kantene (d) og er ideell
for tydelige konturer.
For å bruke den smale trimmeren, skal du dytte opp den vribare trimmeren
og snu den 180°. Hvis du bruker den vribare trimmeren mye, vil dette
redusere batterikapasiteten.
Trimming
Bruk av trimmetilbehøret (1) og (7)
Plasser det respektive trimmetilbehøret på barberhodet (2) eller på den
vribare trimmeren (4) og press til det klikker på plass (e).
Kam til tredagers-skjegg og beskyttende hette (1): Dette tilbehøret passer
perfekt for å skape en look med skjeggstubber og beholde denne lengden.
• Plasser tilbehøret på barberhodet (2) og trykk opp den vribare trimmeren
(4). Skru på barbermaskinen og bruk apparatet slik det er vist på illustrasjonen (e). Tilbehøret sørger for å skape den beste vinkelen.
Justerbar kam (7): Dette tilbehøret er ideelt for å trimme skjegget og beholde
det i samme lengde.
• Plasser tilbehøret på barberhodet (2) og still inn på ønsket skjegglengde.
Trykk på skjegglengdevelgeren (8) og press den oppover (f). (Mulige
53
Page 54

innstillinger for skjegglengden fra øverst til nederst: 1,2 mm / 2,8 mm /
4,4 mm / 6 mm.) Press den vribare trimmeren oppover (4).
• Trykk på av/på-bryteren og trim mot hårets vekstretning ved å føre den
gjennomsiktige kammen over huden (f).
Rengjøring
Regelmessig rengjøring gir en bedre barberingsytelse. Å skylle barberhodet
under rennende vann er en enkel og rask måte å holde det rent på:
• Slå på barbermaskinen (trådløs) og skyll barberhodet under varmt,
rennende vann (g). Bruk gjerne flytende såpe uten partikeler som kan ripe
overflaten. Skyll av alt skummet og la barbermaskinen stå på i noen
sekunder ekstra.
• Slå av barbermaskinen, fjern barberhodet og lamellkniven. Så lar du de
demonterte delene tørke.
• Hvis du regelmessig rengjør barbermaskinen under vann, skal du en gang
i uka påføre en dråpe olje på trimmetilbehøret (4a, 4b) og på barberhodet
(h).
Ellers kan du rengjøre barbermaskinen med den tilhørende børsten (i):
• Skru av barbermaskinen. Fjern barberhodet.
• Med børsten rengjør du lamellknivene og det indre området av barber-
hodet. Men ikke rengjør barberhodet med børsten, siden dette kan
ødelegge barberhodet.
Vedlikehold av barbermaskinen
Skifte ut skjæredeler
For å opprettholde 100 % barberingsytelse, må du skifte ut skjærebladet
og lamellkniven minst hver 18. måned eller når de er slitt. Hvis du skifter ut
begge deler samtidig, får du en tettere barbering med mindre hudirritasjon.
(Skjæreblad og lamellkniv: 10B)
Vedlikehold av batteriene
For å opprettholde full batterikapasitet, må barbermaskinen lades ut (ved
barbering) omtrent hver 6. måned. Lad den deretter opp til full kapasitet.
54
Page 55

Miljømessige opplysninger
Dette produktet inneholder oppladelige batterier og/eller resirkulerbart
elektrisk avfall. For å beskytte miljøet, vennligst kast i husholdsavfall,
men lever til gjenbruk eller til elektrisk avfall på dertil egnet avleveringspunkt.
Med forbehold om endringer.
Elektriske spesifikasjoner er angitt på spesial ledningssettet.
Garanti
Vi gir 2 års garanti på produktet gjeldende fra kjøpsdato.
I garantitiden vil vi gratis rette eventuelle fabrikasjons- eller materialfeil, enten
ved reparasjon eller om vi finner det hensiktsmessig å bytte hele produktet.
Denne garanti er gyldig i alle land der Braun eller Brauns distributør selger
produktet.
Denne garantien dekker ikke: skader på grunn av feil bruk, normal slitasje
(f.eks. på skjæreblad eller lamellkniven) eller skader som har ubetydelig
effekt på produktets verdi og virkemåte sitat slutt. Garantien bortfaller
dersom reparasjoner utføres av ikke autorisert person eller hvis andre enn
originale Braun reservedeler benyttes.
For service i garantitiden skal hele produktet leveres eller sendes sammen
med kopi av kjøpskvittering til nærmeste autoriserte Braun Serviceverksted:
www.service.braun.com.
Ring 22 63 00 93 for å bli henvist til nærmeste autoriserte Braun Serviceverksted.
NB
For varer kjøpt i Norge har kunden garanti i henhold til NEL’s
Leveringsbetingelser.
55
Page 56

Svenska
Våra produkter är utformade för att uppfylla högsta krav vad gäller kvalitet,
funktionalitet och design. Vi hoppas att du kommer att ha mycket nytta av din
nya rakapparat från Braun.
Läs denna instruktion i sin helhet. Den innehåller säkerhetsinformation.
Spara den för framtida referens.
Varning
Ditt raksystem är utrustat med en specialsladd med en
inbyggd, säker elförsörjning med extra låg spänning. Byt
inte ut eller ändra på någon del, då det skulle innebära risk
för elektriska stötar. Använd endast specialsladden som
medföljde din produkt.
Rakhuvudet kan rengöras under rinnande kranvatten.
Koppla loss nätsladden från rakapparaten innan den
rengörs med vatten.
Raka aldrig med ett skadat skärblad eller en skadad sladd.
Apparaten kan användas av barn över 8 år och personer
med nedsatt fysisk eller mental förmåga eller bristande
erfarenhet och kunskap om användningen övervakas eller
om de har fått instruktioner om hur produkten ska användas
på ett säkert sätt och förstår riskerna med den. Barn får inte
använda produkten som leksak. Rengöring och underhåll
bör inte utföras av barn, med mindre att de är över 8 år och
under uppsikt.
Se till att huden hålls sträckt när du använder rakapparaten
på andra delar av kroppen.
Av hygieniska skäl bör apparaten inte delas med andra.
56
Page 57

Beskrivning
1 Kam för tredagars skäggstubb & skyddskåpa
2 Skärblad
3 Saxhuvud
4 Vridbar trimmer
4a Bred trimmer (28 mm)
4b Smal trimmer (14 mm)
5 Laddningslampa
6 På/av-knapp
7 Justerbar kam
8 Skägglängdsinställning
9 Specialsladd
Laddning
Rekommenderad omgivningstemperatur vid laddning är 5 °C till 35 °C. Vid
extremt låga eller höga temperaturer kan det hända att batteriet inte laddas
ordentligt eller inte laddas alls. Rekommenderad omgivningstemperatur för
rakning är 15 °C till 35 °C.
Utsätt inte apparaten för temperaturer som överstiger 50 °C under längre
tidsperioder.
• Anslut rakapparaten till ett vägguttag med hjälp av specialsladden med
motorn avstängd.
• När du laddar rakapparaten för första gången eller när rakapparaten inte
har använts på ett par månader ska den laddas utan avbrott i 4 timmar.
• Laddningslampan (5) visar att rakapparaten laddas. När batteriet är
fulladdat släcks laddningslampan. Om laddningslampan efter ett tag
blinkar oregelbundet indikerar detta att batteriet har full kapacitet. Detta
kan även inträffa kortvarigt vid laddning när batteriet varit helt urladdat.
• När apparaten är fulladdad ger den 30 minuters sladdlös rakning beroende
på din skäggväxt.
• När rakapparaten är fulladdad ska den användas tills den är helt urladdad.
Ladda sedan till full kapacitet igen. Efterföljande laddningar tar ca 1 timme.
• Maximal batterikapacitet uppnås dock först efter flera upp- och urladd-
ningscykler.
• 5 minuters snabbladdning räcker för en rakning.
Rakning
Ta först bort den justerbara kammen (7): Tryck med tummarna på den justerbara kammens sidofästen så att de svänger i pilarnas riktning (a).
57
Page 58

Tryck in på/av-knappen (6). Den rörliga skärbladsramen anpassas automatiskt
efter hudens yta för en nära och mjuk rakning.
För bästa resultat:
• Raka dig alltid innan du tvättar ansiktet.
• Håll alltid rakapparaten i rät vinkel (90°) mot huden (b).
• Sträck ut huden och raka mot skäggets växtriktning.
• Om du vill trimma lite längre skägg använder du först den breda trimmern
(4a) för att trimma längre skäggstrån. Avsluta sedan med skärbladet för en
riktigt nära och slät rakning.
• För att rakapparaten ska behålla sin prestanda till 100 % ska du byta ut
bladet och saxhuvudet minst var 18:e månad, eller när de är slitna.
Styla
Använda den vridbara trimmern
Den breda trimmern (4a) klipper och trimmar större områden jämnt (c).
Detta är idealiskt för formning av polisonger, mustascher och hakskägg.
Den breda trimmern är utrustad med säkerhetsslitsar och en glidskena för
mindre irritation och smidigare rakning. Tryck på de blåa banden för att
trycka ut den vridbara trimmern (4). För den breda trimmern mot
skäggstrånas växtriktning samtidigt som du ser till att huden är sträckt.
Den smala trimmern (4b) används för precisionsarbeten på linjer och
kanter (d).
Om du vill använda den smala trimmern trycker du ut den vridbara trimmern
och vrider den 180°. Om du använder den vridbara trimmern ofta kan
batteriets kapacitet försämras.
Trimma
Använda trimningstillbehören (1) och (7)
Placera respektive trimningstillbehör på skärbladet (2) alternativt på den
vridbara trimmern (4) och tryck det mot rakapparatens hölje tills det fäster
med ett klick (e).
Kam för tredagars skäggstubb & skyddskåpa (1): Detta tillbehör är idealiskt
för att få och underhålla en snygg skäggstubb.
• Placera tillbehöret på skärbladet och (2) och tryck ut den vridbara
trimmern (4). Sätt på rakapparaten och använd den i enlighet med bilden
(e). Tillbehöret säkerställer en optimal vinkel vid användningen.
58
Page 59

Justerbar kam (7): Detta tillbehör är idealiskt för trimning av skägg och för att
hålla längden på skägget konstant.
• Placera tillbehöret på skärbladet (2) och ställ in önskad skägglängd.
Tryck på skägglängdsinställningen (8) och för den uppåt (f) (möjliga
längdinställningar nedifrån och upp: 1,2 mm / 2,8 mm / 4,4 mm / 6 mm).
Tryck ut den vridbara trimmern (4).
• Tryck in på/av-knappen och trimma mot skäggstrånas växtriktning genom
att föra den genomskinliga kammen över huden (f).
Rengöring
Regelbunden rengöring av rakapparaten ger bättre rakning. Skölj rakhuvudet
under rinnande vatten efter varje rakning. Det är ett enkelt och snabbt sätt
att hålla apparaten ren:
• Slå på rakapparaten (utan sladd) och rengör rakhuvudet under varmt,
rinnande vatten (g). Flytande tvål utan slipmedel kan användas. Skölj av
allt lödder och låt rakapparaten vara igång i ytterligare några sekunder.
• Stäng sedan av rakapparaten, ta loss skärbladet och saxhuvudet. Låt
därefter de isärtagna delarna torka.
• Rengör rakapparaten regelbundet under rinnande vatten och droppa sedan
lite symaskinsolja på rakapparatens trimmers (4a, 4b) och skärblad (h).
Du kan också rengöra rakapparaten med den bifogade borsten (i):
• Stäng av rakapparaten. Ta bort skärbladet.
• Använd borsten för att rengöra saxhuvudet och rakhuvudets inre delar.
Du ska dock inte rengöra skärbladet med borsten eftersom detta kan
skada bladet.
Håll rakapparaten i topptrim
Byt ut rakapparatens delar
För att rakapparaten ska behålla sin prestanda till 100 % ska du byta ut
bladet och saxhuvudet minst var 18:e månad, eller när de är slitna. Byt båda
delarna samtidigt för en närmare rakning med mindre hudirritation.
(Skärblad och saxhuvud: 10B)
Vårda batterierna
För att de laddningsbara batterierna ska behålla maximal kapacitet måste
rakapparaten laddas ur helt (genom rakning) ungefär var 6:e månad. Ladda
sedan rakapparaten till full kapacitet.
59
Page 60

Miljöskyddsmeddelande
Produkten innehåller batterier och/eller återvinningsbart elavfall.
Av hänsyn till miljön ska denna apparat inte slängas med hushållsavfallet. Återvinning bör ske enligt gällande lokala föreskrifter.
Med förbehåll för ändringar.
För elektriska specifikationer, se texten på specialsladden.
Garanti
Vi garanterar denna produkt för två år från och med inköpsdatum. Under
garantitiden kommer vi utan kostnad, att avhjälpa alla brister i apparaten
som är hänförbara till fel i material eller utförande, genom att antingen
reparera eller byta ut hela apparaten efter eget gottfinnande.
Denna garanti gäller i alla länder där denna apparat levereras av Braun eller
deras auktoriserade återförsäljare.
Denna garanti gäller inte: skada på grund av felaktig användning, normalt
slitage (t.ex. skärblad och saxhuvud) eller skador som har en försumbar
effekt på värdet eller apparatens funktion. Garantin upphör att gälla om
reparationer utförs av icke behörig person eller om Brauns originaldelar inte
används.
För att erhålla service under garantitiden skall den kompletta apparaten
lämnas in tillsammans med inköpskvittot, till ett auktoriserat Braun verkstad:
www.service.braun.com.
Ring 020-21 33 21 för information om närmaste Braun verkstad.
60
Page 61

Suomi
Tuotteemme on suunniteltu täyttämään korkeimmat laatu-, toimivuus- ja
muotoiluvaatimukset. Toivottavasti saat paljon iloa ja hyötyä uudesta
Braun-parranajokoneestasi.
Lue nämä turvallisuustietoja sisältävät ohjeet huolellisesti. Säilytä
ohjeet myöhempää tarvetta varten.
Varoitus
Parranajokoneen verkkojohto on varustettu matalajännitesovittimella. Sähköiskun vaaran välttämiseksi älä vaihda siihen
mitään osia tai tee mitään muutoksia. Käytä ainoastaan
laitteen mukana toimitettua verkkojohtoa.
Ajopään voi puhdistaa juoksevassa vedessä. Irrota
laite virtalähteestä ennen kuin puhdistat ajopään
vedellä.
Älä käytä laitetta, jos teräverkko tai verkkojohto on vahin-
goittunut.
Yli 8-vuotiaat lapset tai sellaiset henkilöt, joiden fyysinen,
sensorinen tai henkinen toimintakyky on rajoittunut tai joilla
ei ole tarvittavaa kokemusta tai tietoa laitteen käytöstä,
voivat käyttää laitetta, jos heitä valvotaan ja ohjeistetaan
laitteen turvallisen käytön osalta ja he ymmärtävät käyttöön
liittyvät vaaratekijät. Lasten ei saa antaa leikkiä laitteella.
Laitetta saavat puhdistaa vain yli 8-vuotiaat lapset, kun heitä
valvotaan.
Venytä ihoa käyttäessäsi laitetta muilla kehon alueilla.
Älä anna hygieniasyiden vuoksi muiden käyttää laitetta.
61
Page 62

Laitteen osat
1 3-päivän parran kampa ja suojus
2 Teräverkko
3 Leikkuri
4 Kääntyvä trimmeri
4a Leveä trimmeri (28 mm)
4b Kapea trimmeri (14 mm)
5 Latauksen merkkivalo
6 Virtakytkin
7 Säädettävä kampa
8 Parran pituuden valitsin
9 Verkkojohto
Lataaminen
Latauksen kannalta suositeltu lämpötila on 5–35 °C. Akku ei ehkä lataudu
kunnolla tai ollenkaan erittäin kylmissä tai kuumissa olosuhteissa. Parranajon
kannalta suositeltu lämpötila on 15–35 °C.
Älä säilytä laitetta pitkään yli 50 °C:een lämpötilassa.
• Kytke laite verkkojohdolla verkkovirtaan moottori sammutettuna.
• Kun lataat parranajokoneen ensimmäisen kerran tai kun laitetta ei ole
käytetty muutamaan kuukauteen, anna sen latautua yhtäjaksoisesti neljän
tunnin ajan.
• Latauksen merkkivalo (5) osoittaa, että laite latautuu. Kun akku on täysin
latautunut, latauksen merkkivalo sammuu. Hetken kuluttua tapahtuva
merkkivalon vilkkuminen osoittaa, että akku on saavuttanut täyden
kapasiteettinsa. Tämä voi tapahtua lyhytaikaisesti myös silloin, kun akkua
ladataan sen tyhjennyttyä täysin.
• Kun parranajokone on ladattu täyteen, akussa riittää virtaa noin
30 minuutin parranajoon parrankasvusta riippuen.
• Kun parranajokone on täysin latautunut, anna akun tyhjentyä kokonaan
normaalissa käytössä. Lataa tämän jälkeen akku täyteen. Seuraavat
lataukset kestävät noin 1 tunnin.
• Täysi akkukapasiteetti saavutetaan kuitenkin vasta useiden latausten ja
purkausten jälkeen.
• 5 minuutin pikalataus riittää parranajoon.
Ajaminen
Irrota ensiksi säädettävä kampa (7): Paina peukaloilla säädettävän kamman
sivupidikkeitä siten, että ne irtoavat nuolten osoittamaan suuntaan (a).
62
Page 63

Käynnistä laite virtakytkimestä (6). Kääntyvä ajopää myötäilee automaattisesti ihoa ja tekee parranajosta tarkan ja tasaisen.
Parhaan lopputuloksen saavuttamiseksi:
• Aja parta ennen kasvojen pesua.
• Pidä parranajokonetta aina suorassa kulmassa (90°) ihoon nähden (b).
• Venytä ihoa ja aja parta karvojen kasvusuuntaa vasten.
• Kun ajat ensimmäistä kertaa muutamaan päivään, käytä leveää trimmeriä
(4a) pitkien partakarvojen poistamiseen. Tarkan ja tasaisen lopputuloksen
saat viimeistelemällä ajon teräverkolla.
• Parhaan mahdollisen ajotuloksen saavuttamiseksi teräverkko ja leikkuri
kannattaa vaihtaa vähintään 18 kuukauden välein tai kun ne ovat kuluneet.
Muotoilu
Kääntyvän trimmerin käyttö
Leveä trimmeri (4a) leikkaa ja trimmaa laajoja alueita tasaisesti (c). Se on
ihanteellinen pulisonkien, viiksien ja osittain lyhyen parran muotoiluun.
Leveässä trimmerissä on turvaurat ja liuska, joka vähentää ihoärsytystä ja
helpottaa liukumista. Paina sinisiä liuskoja, jolloin kääntyvä trimmeri (4) tulee
esiin. Venytä ihoa ja liikuta leveää trimmeriä ihokarvojen kasvusuuntaa vastaan.
Kapea trimmeri (4b) rajaa tarkasti juonteet ja reunat (d), joten se on ihanteellinen tarkkaan rajaukseen.
Kun haluat käyttää kapeaa trimmeriä, ota kääntyvä trimmeri esiin ja käännä
sitä 180°. Kääntyvän trimmerin toistuva käyttö vähentää akkukapasiteettia.
Trimmaus
Trimmerilisäosien (1) ja (7) käyttö
Aseta haluamasi trimmeriosa teräverkon (2) tai kääntyvän trimmerin (4)
päälle ja paina sitä parranajokoneen koteloa vasten, kunnes se napsahtaa
paikoilleen (e).
3-päivän parran kampa ja suojus (1): Tämä lisäosa soveltuu erinomaisesti
sängen muotoiluun ja säilyttämiseen.
• Aseta lisäosa teräverkon (2) päälle ja työnnä kääntyvä trimmeri (4) ylös.
Käynnistä parranajokone ja käytä laitetta kuvassa osoitetulla tavalla (e).
Lisäosa varmistaa ihanteellisen käyttökulman.
Säädettävä kampa (7): Tämä lisäosa on ihanteellinen parran trimmaukseen ja
sen pitämiseen tietyn pituisena.
• Aseta lisäosa teräverkon (2) päälle ja valitse haluamasi parranpituus. Paina
parran pituuden valitsinta (8) ja työnnä sitä ylöspäin (f) (pituusasetukset
63
Page 64

ylhäältä alaspäin: 1,2 mm / 2,8 mm / 4,4 mm / 6 mm). Työnnä kääntyvä
trimmeri (4) esiin.
• Käynnistä laite virtakytkimestä ja trimmaa ihokarvojen kasvusuuntaa
vastaan kuljettamalla läpinäkyvää kampaosaa iholla (f).
Puhdistaminen
Säännöllinen puhdistaminen varmistaa paremman ajotuloksen. Ajopään
huuhteleminen jokaisen ajokerran jälkeen juoksevalla vedellä on helppo ja
nopea tapa pitää se puhtaana:
• Irrota parranajokoneesta virtajohto ja kytke siihen virta. Huuhtele ajopää
kuumalla juoksevalla vedellä, kunnes kaikki jäämät on puhdistettu (g). Voit
käyttää nestemäistä saippuaa, joka ei sisällä hankaavia aineosia. Huuhtele
kaikki vaahto pois ja anna parranajokoneen olla käynnissä muutaman
sekunnin ajan.
• Kytke seuraavaksi parranajokoneesta virta pois ja irrota teräverkko ja
leikkuri. Jätä irrotetut osat kuivumaan.
• Jos puhdistat parranajokoneen säännöllisesti vedellä, voitele trimmerit
(4a, 4b) ja teräverkko kerran viikossa pisaralla ohutta koneöljyä (h).
Laitteen voi puhdistaa myös käyttämällä sen mukana toimitettua harjaa (i):
• Sammuta parranajokoneesta virta. Irrota teräverkko.
• Puhdista leikkuri ja ajopään sisäosat harjalla. Älä kuitenkaan puhdista
harjalla teräverkkoa, sillä teräverkko voi vahingoittua.
Parranajokoneen pitäminen huippukunnossa
Parranajo-osien vaihtaminen
Parhaan mahdollisen ajotuloksen saavuttamiseksi teräverkko ja leikkuri
kannattaa vaihtaa vähintään 18 kuukauden välein tai kun ne ovat kuluneet.
Kun vaihdat molemmat osat samanaikaisesti, lopputuloksena on tarkempi
parranajo ja vähemmän ihoärsytystä.
(Teräverkko ja leikkuri: 10B)
Akkujen tehokkuuden säilyttäminen
Jotta akkujen varauskyky pysyisi mahdollisimman hyvänä, niiden varaus
täytyy tyhjentää kokonaan normaalissa käytössä noin 6 kuukauden välein.
Lataa tämän jälkeen laitteen akut täyteen.
64
Page 65

Ympäristönsuojeluun liittyviä seikkoja
Tuote sisältää pattereita ja/tai kierrätettävää sähköjätettä. Suojellaksesi
ympäristöä älä hävitä talousjätteen mukana, vaan vie maassasi oleviin
sähköjätteen keräyspisteisiin.
Oikeudet muutoksiin pidätetään.
Katso sähkömääräyksiä koskevat tiedot matalajännitesovittimesta.
Takuu
Tälle tuotteelle myönnämme 2 vuoden takuun ostopäivästä lukien Suomessa
voimassa olevien alan takuuehtojen TE90 mukaan. Takuuaikana korvataan
veloituksetta kaikki viat, jotka aiheutuvat materiaaliviasta tai valmistusvirheestä. Korvaus tapahtuu harkintamme mukaan korjaamalla, vaihtamalla
viallinen osa tai vaihtamalla koko laite uuteen. Takuu on voimassa kaikkialla
maailmassa sillä edellytyksellä, että laitetta myydään ko. maassa Braunin tai
virallisen maahantuojan toimesta.
Takuun piiriin eivät kuulu viat, jotka johtuvat virheellisestä käytöstä tai normaalista kulumisesta (esim. teräverkko tai leikkuuterä). Takuu ei myöskään
kata sellaisia vikoja, jotka eivät merkittävästi vaikuta laitteen arvoon tai
toimintaan. Takuun voimassaolo lakkaa, jos laitetta korjataan muualla kuin
valtuutetussa Braun-huoltoliikkeessä tai jos laitteessa käytetään muita kuin
alkuperäisiä varaosia.
Yksilöity ostokuitti riittää takuun voimassaolon osoittamiseksi:
www.service.braun.com.
Lisätietoa takuuseen liittyvistä asioista saa asiakaspalvelukeskuksestamme
numerosta 020-377 877.
65
Page 66

Türkçe
Ürünlerimiz yüksek kalite, fonksiyonellik ve şık dizayn ilkelerine bağlı
kalınarak tasarlanmıştır. Yeni Braun tıraş makinenizden memnun kalacağınızı
umarız.
Ürünü kullanmadan önce kullanma talimatlarını tam olarak okuyunuz.
Güvenlik bilgisi içermektedir. İleride daha sonra okuyabileceğiniz için
saklayınız.
Uyarı
Tıraş makinenizin ekstra düşük voltaj için güvenlik sağlayanadaptör içeren özel kablo seti vardır. Genel olarak, çocukların erişemeyeceği bir yerde tutmanızı öneririz. Sadece
makinenizle birlikte verilen özel kablo setini kullanın.
Tıraş makineniz musluk suyu altında temizleme
uygundur. Tıraş makinenizi temizlemeden önce
cihazının fişten çekilmiş olduğundan emin olunuz.
Eleği veya kablosu hasar görmüş tıraş makinesini
kullanmayınız.
Bu ürün 8 yaş ve üstü kullanımı için uygundur. Bedensel
ve duyusal yetenekleri zayıf kişiler; bilgi ve deneyimi
yetersiz kişisel eğer cihazın güvenle kullanımı konusunda
bilgi ve gözetim almışlar ve ortaya çıkabilecek tehlikeleri
anlamışlarsa bu ürünü kullanabilirler. Çocuklar bu ürünle
oynamamalıdır. Temizlik ve bakım işleri ancak 8 yaş ve üstü
çocuklar tarafından bir gözetmen eşliğinde yapılabilir.
Vücudun yüz dışındaki bölgelerinde kullanırken cildinizin
gergin olmasına dikkat ediniz.
Hijyenik sebepler yüzünden makinenizi başkalarıyla
paylaşmayınız.
66
Page 67

Tanım
1 3 günlük kirli sakal tarağı & koruyucu başlık
2 Tıraş makinesi eleği
3 Kesici bıçaklar
4 Dönebilen şekillendirici bıçaklar
4a Geniş şekillendirici (28mm)
4b Dar şekillendirici (14mm)
5 Şarj ışığı
6 Açma/kapama düğmesi
7 Ayarlanabilir tarak
8 Sakal uzunluğu ayarı
9 Özel kablo seti
Şarj etmek
Şarj için ortam sıcaklığının 5 °C ila 35 °C arasında olması tavsiye edilir.
Aşırı derecede düşük ya da yüksek sıcaklıklarda pil tam olarak veya hiç şarj
olmayabilir. Tıraş için ortam sıcaklığının 15 °C ila 35 °C arasında olması
tavsiye edilir.
Makineyi uzun süre 50 °C’den yüksek sıcaklıklara maruz bırakmayın.
• Tıraş makineniz kapalıyken özel kablo setini kullanarak makinenizi prize
takın.
• lk kez şarj ederken veya tıraş makinesi birkaç aydır kulanılmadığında, tıraş
makinesini 4 saat süresince şarjda bırakın.
• Şarj ışığı (5) cihazın şarj edilmekte olduğunu gösterir. Pil tamamen şarj
olduğunda şarj ışığı söner. Bir süre sonra ışığın kesik kesik yanıp sönmesi
pilin tam kapasitesine ulaştığı anlamına gelir. Bu durum pil tamamen
boşken şarj edildiğinde de kısa süreli olarak görülür.
• Tam şarj olmuş bir makine sakal uzunluğunuza göre ortalama 30 dakikalık
kablosuz kullanım sağlar.
• Tıraş makinesi şarj olduktan sonra, şarjı bitene dek kullanın. Daha sonra,
tam dolana kadar yine şarj edin. Şarj olması yaklaşık 1 saat sürecektir.
• Birkaç şarj döngüsünden sonra pil maksimum performansına ulaşacaktır.
• Tek bir tıraş için 5-dakika’lık hızlı şarj yeterlidir.
Tıraş Olurken
lk olarak, ayarlanabilir tarağı (7) çıkarın: Baş parmaklarınızı kullanarak
ayarlanabilir tarağın yanlardaki tutucu kısımlarına bastırıp ok yönünde (a)
çıkarın. Açma/kapama düğmesini (6) çalıştırın. Oynar folyo yapısı yakın ve
pürüzsüz bir tıraş için otomatik olarak cilt yüzeyine uyum sağlar.
67
Page 68

En iyi sonuçlar için:
• Her zaman yüzünüzü yıkamadan önce tıraş olun.
• Tıraş olurken makinenizi cildinize 90 derece (90°) açı yapacak şekilde
kullanın.
• Cildinizi gerin ve tıraş makinenizi sakal uzama yönünün aksine doğru
hareket ettirin.
• Birkaç gün aradan sonra tıraş olunacağında, tıraş öncesinde geniş
şekillendiriciyi (4a) kullanarak uzun kılları düzeltin. Yakın, pürüzsüz bir tıraş
için elek ile işlemi tamamlayın.
• Tıraş performansını her zaman %100 korumak için elek ve kesicinizi en az
her 18 ayda bir değiştirin.
Şekil verme
Dönebilen şekillendirici bıçakların kullanımı
Geniş şekillendirici bıçaklar (4a) büyük yüzeyleri (c) eşit şekilde keser ve
düzeltir. Favori, bıyık ve bölgesel kısa sakallara şekil verme için idealdir.
Daha az tahriş ve kolay bir şekilde kaymayı sağlamak için güvenlik ve
kayganlaştırıcı bantlar bulunmaktadır. Döner şekillendirici bıçakları (4) aktif
hale getirmek için mavi çizgilere basıp yukarıya doğru sürün. Cildinizi
gererken, geniş şekillendirici bıçakları sakal uzama yönünün tersine doğru
hareket ettirin.
Dar şekillendirici bıçaklar (4b) çizgileri ve köşeleri (d) hassas bir şekilde
belirlemek içindir.
Dar şekillendirici bıçağı kullanmak için şekillendiriciyi itip 180° çevirin.
Düzeltme
Düzeltici ataçmanların kullanımı (1) ve (7)
Düzeltici ataçmanı tıraş makinesi eleğinin üzerine (2) veya dönebilen
düzelticinin üzerine yerleştirin ve bir klikle (e) yerine oturana kadar tıraş
makinesine doğru itin.
3 günlük kirli sakal tarağı & koruyucu başlık (1): Bu ataçman kirli sakal
görüntüsünü yaratmak ve korumak için mükemmel şekilde uygundur.
• Ataçmanı eleğin (2) üzerine yerleştirin ve dönebilen düzelticiyi (4) yukarı
doğru itin. Makineyi çalıştırın ve cihazı gösterildiği (e) gibi kullanın.
Ataçman en uygun kullanım açısını sağlar.
Ayarlanabilir tarak (7): Bu ataçman sakalı düzeltmek ve sabit boyda
tutmakiçin idealdir.
• Ataçmanı eleğin (2) üzerine yerleştirin ve istediğiniz sakal uzunluğunu
ayarlayın. Sakal uzunluğu seçicisine (8) basın ve yukarı doğru (f) kaydırın
68
Page 69

(en kısadan en uzuna uzunluk seçimleri sırasıyla: 1,2 mm / 2,8 mm /
4,4 mm / 6 mm). Dönebilen şekillendiriciyi (4) yukarı itin.
Temizleme
Makineyi düzenli olarak temizlemek tıraş performansını arttıran bir unsurdur.
Makineyi her zaman temiz tutmanın en kolay ve hızlı yolu akan su altında
tıraş başlığını durulamak olacaktır:
• Tıraş makinesini (kablosuz olarak) çalıştırın. Tıraş başlığını temizlenene
kadar sıcak su altında tutun (g). Partiküller ve aşındırıcı maddeler
bulundurmayan bir sabun da kullanılabilir. Köpük temizlendikten sonra
birkaç saniye daha suyun altında tutup çalıştırabilirsiniz.
• Sonra,makineyi kapatın, tıraş makinesi eleğini ve kesici bölümü çıkarın.
Sonra bu parçaları kurumaya bırakın.
• Tıraş makinenizi düzenli olarak suyla temizliyorsanız, haftada bir elek (h)
ve düzeltici bıçaklar (4a, 4b) üzerine bir damla ince makine yağı
damlatmanızı öneririz.
Alternatif olarak makinenizi verilen temizleme fırçası (i) ile de temizleyebilirsiniz:
• Makineyi kapatın. Tıraş makinesi eleğini çıkarın.
• Fırçayı kullanarak kesici bıçakları ve iç bölmeyi temizleyin. Fakat zarar
verebileceği için, eleği kesinlikle fırça ile temizlemeyin.
Tıraş makineninizin ideal performansını her zaman
korumak için
Tıraş aksamını yenilemek
Tıraş performansını %100 korumak için tıraş makinesi eleğini ve kesiciyi her
18 ayda bir ya da eskidiğinde yenileyin.
Daha az cilt tahrişi ve yakın tıraş için iki parçayı aynı anda değiştirin.
(Tıraş makinesi eleği ve kesici: 10B)
Pillerin korunması
Şarj edilebilir pillerin maksimum kapasitede çalışabilmesi için, tıraş makinenizin şarjının yaklaşık her 6 ayda bir tamamen boşalması gerekir (tıraş olarak).
Sonra tıraş makinenizi tam dolana kadar şarj edin.
Bildirim yapılmadan deπiμtirilebilir.
Elektrikle ilgili direktifler özel kordon setinin üzerinde yazmaktadır.
69
Page 70

AEEE Yönetmeliğine Uygundur
Bakanlıkça tespit ve ilan edilen kullanım ömrü 7 yıldır.
Üretici fi rma ve CE uygunluk değerlendirme kuruluşu:
Braun GmbH
Frankfurter Straße 145
61476 Kronberg / Germany
Procter & Gamble Satış ve Dağıtım Ltd. Şti. İçerenköy Mah. Askent Sok.
No:3 A 34752 Ataşehir, İstanbul tarafından ithal edilmiştir.
P&G Tüketici Hizmetleri PK:
61 34739 Erenköy/İstanbul
0800 261 63 65 trconsumers@custhelp.com
Braun Servis İstasyonları listemize internet sitemizden veya Tüketici
Hizmetleri merkezimizi arayarak ulaşabilirsiniz. www.braun.com/tr
70
Page 71

Eλληνικά
Τα προϊόντα μας κατασκευάζονται έτσι ώστε να πληρούν τις υψηλότερες
προδιαγραφές ποιότητας, λειτουργικότητας και σχεδιασμού. Ελπίζουμε να
σας ικανοποιήσει απόλυτα η καινούρια σας ξυριστική μηχανή Braun.
Παρακαλούμε διαβάστε όλο το περιεχόμενο των οδηγιών χρήσης,
περιλαμβάνονται πληροφορίες για την ασφάλεια. Φυλάξτε τις
οδηγίες για μελλοντική χρήση.
Προειδοποίηση
Η ξυριστική σας μηχανή είναι εφοδιασμένη με ένα ειδικό
σετ καλωδίου, το οποίο διαθέτει ενσωματωμένο μετασχηματιστή πολύ χαμηλής τάσης για περισσότερη ασφάλεια.
Για τον λόγο αυτό δεν πρέπει να αντικαταστήσετε ή
τροποποιήσετε οποιοδήποτε μέρος του. Σε αντίθετη
περίπτωση υπάρχει κίνδυνος ηλεκτροπληξίας. Χρησιμοποιείστε μόνο το ειδικό σετ καλωδίου που παρέχεται με τη
συσκευή σας.
Η κεφαλή ξυρίσματος είναι κατάλληλη για καθαρισμό
κάτω από τρεχούμενο νερό βρύσης. Αποσυνδέστε
την ξυριστική μηχανή από την πρίζα, προτού καθαρί-
σετε την κεφαλή ξυρίσματος με νερό.
Μην λειτουργείτε τη συσκευή όταν το πλέγμα ή το καλώδιο
ρεύματος έχει φθαρεί.
Αυτή η συσκευή μπορεί να χρησιμοποιηθεί από παιδιά
8 ετών και άνω και άτομα με περιορισμένες φυσικές, αισθητήριες ή πνευματικές δυνατότητες ή έλλειψη εμπειρίας και
γνώσεων, αν υπάρχει ανάλογη εποπτεία ή τους έχουν δοθεί
οδηγίες σχετικά με την ασφαλή χρήση της συσκευής και
κατανόηση των ενδεχόμενων κινδύνων. Τα παιδιά δεν πρέπει
να παίζουν με τη συσκευή. Ο καθαρισμός και η συντήρηση
71
Page 72

της συσκευής δεν πρέπει να πραγματοποιούνται από παιδιά, εκτός και αν είναι πάνω από 8 ετών και έχουν ανάλογη
εποπτεία.
Για τη χρήση σε άλλες περιοχές σωμάτων, παρακαλώ
σιγουρευτείτε ότι το δέρμα τεντώνεται.
Για λόγους υγιεινής, μην μοιράζεστε αυτή τη συσκευή με
άλλα άτομα.
Περιγραφή
1 Εξάρτημα για γένια 3 ημερών / προστατευτικό κάλυμμα
2 Πλέγμα ξυρίσματος
3 Κοπτικό σύστημα
4 Περιστρεφόμενος κόφτης
4a Μεγάλος κόφτης (28 χιλ.)
4b Μικρός κόφτης (14 χιλ.)
5 Ενδεικτική λυχνία φόρτισης
6 Διακόπτης λειτουργίας (ανοίγμ./κλεισίμ.)
7 Ρυθμιζόμενο εξάρτημα περιποίησης γενειάδας
8 Ρυθμιστής μήκους γενιού
9 Ειδικό καλώδιο
Φόρτιση
Η συνιστώμενη θερμοκρασία περιβάλλοντος για τη φόρτιση είναι από 5 °C
έως 35 °C. Η μπαταρία μπορεί να μη φορτιστεί σωστά ή και καθόλου σε
περιβάλλον με πολύ χαμηλή ή υψηλή θερμοκρασία. Η συνιστώμενη
θερμοκρασία περιβάλλοντος για το ξύρισμα είναι από 15 °C έως 35 °C.
Μην εκθέτετε τη συσκευή σε θερμοκρασίες άνω των 50 °C για μεγάλα
χρονικά διαστήματα.
• Συνδέστε την ξυριστική μηχανή με το ειδικό καλώδιο σε μια πρίζα
ρεύματος, με τον διακόπτη λειτουργίας στη θέση (κλεισίμ.)
• Όταν φορτίζετε την ξυριστική μηχανή για πρώτη φορά ή όταν η
ξυριστική μηχανή δεν έχει χρησιμοποιηθεί για λίγους μήνες, αφήστε την
να φορτίσει συνεχόμενα για 4 ώρες.
• Η ενδεικτική λυχνία φόρτισης (5) δείχνει ότι η συσκευή φορτίζεται. Όταν
η μπαταρία φορτιστεί πλήρως, η ενδεικτική λυχνία φόρτισης σβήνει.
Όταν η λυχνία αναβοσβήνει διακεκομμένα μετά από λίγο, υποδεικνύει ότι
72
Page 73

η μπαταρία διατηρεί την πλήρη χωρητικότητά της. Αυτό μπορεί επίσης
να συμβεί βραχυπρόθεσμα κατά την φόρτιση αφού η μπαταρία έχει
αποφορτιστεί πλήρως.
• Μια πλήρης φόρτιση παρέχει αυτονομία μέχρι 30 λεπτά, ανάλογα με το
μέγεθος του γενιού.
• Όταν η ξυριστική μηχανή φορτιστεί εντελώς, αφήστε την να αποφορ-
τιστεί με την φυσιολογική χρήση. Στην συνέχεια, επαναφορτίστε την
πλήρως. Οι επόμενες φορτίσεις θα διαρκούν περίπου 1 ώρα.
• Η μέγιστη απόδοση της μπαταρίας επιτυγχάνεται μετά από αρκετούς
κύκλους φόρτισης/αποφόρτισης.
• Γρήγορη φόρτιση 5 λεπτών είναι αρκετή για ένα ξύρισμα.
Ξύρισμα
Πρώτα, αφαιρέστε το ρυθμιζόμενο εξάρτημα περιποίησης γενειάδας (7):
Με τους αντίχειρές σας, πιέστε τα πλαϊνά κλιπ του εξαρτήματος έτσι ώστε
να μετακινηθούν προς τη φορά που δείχνουν τα βέλη (a). Ενεργοποιήστε
το διακόπτη λειτουργίας on/off (6). Το κινούμενο πλέγμα προσαρμόζεται
αυτόματα στην επιφάνεια του δέρματός σας για ένα βαθύ, απαλό ξύρισμα.
Για καλύτερα αποτελέσματα:
• Πάντα να ξυρίζεστε πριν πλύνετε το πρόσωπό σας.
• Να κρατάτε πάντα τη μηχανή σε ορθή γωνία (90°) ως προς την επιδερ-
μίδα σας (b).
• Τεντώστε το δέρμα και ξυριστείτε αντίθετα από τη φορά που φυτρώνουν
τα γένια σας.
• Όταν δεν έχετε ξυριστεί για αρκετές μέρες, χρησιμοποιήστε τον μεγάλο
κόφτη (4a) για να κόψετε τις μακριές τρίχες. Για βαθύ, απαλό ξύρισμα,
τελειώστε με το πλέγμα.
• Για να έχετε 100% άριστα αποτελέσματα, αντικαθιστάτε το πλέγμα
ξυρίσματος και το κοπτικό σύστημα τουλάχιστον κάθε 18 μήνες ή όταν
φθαρούν.
Style
Χρησιμοποιώντας τον περιστρεφόμενο κόφτη
Ο μεγάλος κόφτης (4a) κόβει και περιποιείται ομοιόμορφα τις μεγάλες
περιοχές (c). Είναι ιδανικός για να δώσετε σχήμα στις φαβορίτες, το
μουστάκι και το μικρό γένι. Ο μεγάλος κόφτης παρέχεται με κόπτες
ασφαλείας και ειδικές λωρίδες ολίσθησης για λιγότερους ερεθισμούς και
εύκολο γλίστρημα πάνω στην επιδερμίδα. Πιέστε τις μπλε λωρίδες για να
73
Page 74

σπρώξετε προς τα πάνω τον περιστρεφόμενο κόφτη (4). Καθώς τεντώνετε
το δέρμα, οδηγήστε τον μεγάλο κόφτη με φορά αντίθετη από τη φορά
ανάπτυξης των τριχών.
Ο μικρός κόφτης (4b) δίνει τέλειο σχήμα στις γραμμές και τις άκρες (d) και
είναι ιδανικός για ακριβές περίγραμμα.
Για να χρησιμοποιήσετε τον μικρό κόφτη, σπρώξτε προς τα πάνω τον
περιστρεφόμενο κόφτη και περιστρέψτε τον 180°.
Η συχνή χρήση του περιστρεφόμενου κόφτη θα μειώσει τη χωρητικότητα
της μπαταρίας.
Περιποίηση
Χρήση των εξαρτημάτων περιποίησης (1) και (7)
Τοποθετήστε το αντίστοιχο εξάρτημα περιποίησης πάνω στο πλέγμα
ξυρίσματος (2) εναλλακτικά πάνω στον περιστρεφόμενο κόφτη (4) και
πιέστε το προς το περίβλημα της ξυριστικής μηχανής έως ότου κουμπώσει
στη θέση του ακούγοντας τον χαρακτηριστικό ήχο κλικ (e).
Εξάρτημα για γένια 3 ημερών & προστατευτικό κάλυμμα (1): Αυτό το
εξάρτημα είναι απόλυτα κατάλληλο για τη δημιουργία αξύριστου look και
για την διατήρησή του.
• Τοποθετήστε το εξάρτημα πάνω στο πλέγμα (2) και σπρώξτε προς τα
πάνω τον περιστρεφόμενο κόφτη (4). Θέστε σε λειτουργία την ξυριστική
μηχανή και χρησιμοποιήστε τη συσκευή όπως φαίνεται στην εικόνα (e).
Το εξάρτημα εξασφαλίζει τη βέλτιστη γωνία χρήσης.
Ρυθμιζόμενο εξάρτημα περιποίησης γενειάδας (7): Αυτό το εξάρτημα είναι
ιδανικό για την περιποίηση της γενειάδας και την διατήρησή της σε ένα
σταθερό μήκος.
• Τοποθετήστε το εξάρτημα πάνω στο πλέγμα ξυρίσματος (2) και ρυθμίστε
το επιθυμητό μήκος γενειάδας. Πιέστε τον ρυθμιστή μήκους γενιού (8)
και σύρετέ τον προς τα πάνω (f) (πιθανές ρυθμίσεις μήκους γενιού από
πάνω προς τα κάτω: 1,2 χιλ. / 2,8 χιλ. / 4,4 χιλ. / 6 χιλ.). Πιέστε προς τα
πάνω τον περιστρεφόμενο κόφτη (4).
• Πιέστε τον διακόπτη λειτουργίας on/off και περιποιηθείτε τα γένια
αντίθετα από τη φορά ανάπτυξης των τριχών, οδηγώντας το διάφανο
τμήμα του εξαρτήματος πάνω από το δέρμα (f).
Καθαρισμός
Ο τακτικός καθαρισμός εξασφαλίζει καλύτερη απόδοση στο ξύρισμα.
Το ξέπλυμα της ξυριστικής κεφαλής μετά από κάθε ξύρισμα κάτω από
74
Page 75

τρεχούμενο νερό είναι ένας εύκολος και γρήγορος τρόπος για να τη
διατηρήσετε καθαρή:
• Ενεργοποιήστε τη συσκευή (χωρίς το καλώδιο ρεύματος) και ξεπλύνετε
την ξυριστική κεφαλή κάτω από ζεστό τρεχούμενο νερό μέχρι να
καθαρίσει εντελώς (g). Μπορείτε να χρησιμοποιήσετε υγρό σαπούνι
χωρίς διαβρωτικές ουσίες. Ξεπλύνετε όλο τον αφρό και αφήστε την
ξυριστική μηχανή να λειτουργήσει για λίγα ακόμα δευτερόλεπτα.
• Στη συνέχεια, θέστε την ξυριστική μηχανή εκτός λειτουργίας, αφαιρέστε
το πλέγμα και το κοπτικό σύστημα. Έπειτα αφήστε την αποσυναρμολογημένα τμήματα να στεγνώσουν.
• Εάν καθαρίζετε τακτικά την ξυριστική μηχανή κάτω από νερό, τότε μία
φορά την εβδομάδα απλώνετε μια σταγόνα ελαφρύ λάδι μηχανής πάνω
στους κόφτες (4a, 4b) και στο πλέγμα ξυρίσματος (h).
Εναλλακτικά, μπορείτε να καθαρίσετε την ξυριστική μηχανή
χρησιμοποιώντας το βουρτσάκι που σας παρέχεται (i):
• Θέστε την ξυριστική μηχανή εκτός λειτουργίας. Αφαιρέστε το πλέγμα
ξυρίσματος.
• Χρησιμοποιώντας το βουρτσάκι, καθαρίστε το κοπτικό σύστημα και την
εσωτερική περιοχή της ξυριστικής κεφαλής. Παρόλα αυτά, μην
καθαρίζετε το ξυριστικό πλέγμα με το βουρτσάκι καθώς μπορεί να
καταστρέψει το πλέγμα.
Διατήρηση της ξυριστικής μηχανής σε άριστη κατάσταση
Αντικατάσταση των εξαρτημάτων ξυρίσματος
Για να έχετε τέλεια αποτελέσματα στο ξύρισμα, αντικαθιστάτε το πλέγμα
και το κοπτικό σύστημα τουλάχιστον κάθε 18 μήνες ή κάθε φορά που έχουν
φθαρεί. Αλλάξτε ταυτόχρονα και τα δύο ανταλλακτικά για βαθύτερο
ξύρισμα και για την αποφυγή ερεθισμών στο δέρμα.
(Πλέγμα ξυρίσματος και κοπτικό σύστημα: 10B)
Συντήρηση μπαταριών
Για να διατηρήσετε τη μέγιστη απόδοση των επαναφορτιζόμενων
μπαταριών, η ξυριστική σας μηχανή θα πρέπει να αποφορτίζεται πλήρως
(με το ξύρισμα) κάθε 6 μήνες περίπου. Μετά, επαναφορτίστε την ξυριστική
μηχανή εντελώς.
75
Page 76

Σημείωση για το περιßάλλον
Αυτό το προϊόν περιέχει μπαταρίες και/ή ηλεκτρικά τμήματα που
ανακυκλώνονται. Για την προστασία του περιβάλλοντος, μην τα
απορρίπτετε μαζί με τα οικιακά απορρίμματα - φροντίστε να τα
παραδώσετε για ανακύκλωση στα αρμόδια σημεία συλλογής της
περιοχής σας.
ΔÔ ÚÔ˚fiÓ ˘fiÎÂÈÙ·È Ûέ ÙÚÔÔÔ›ËÛË ¯ˆÚ›˜ ÚÔÂȉÔÔ›ËÛË.
Ηλεκτρικές προδιαγραφές βρίσκονται στο ειδικό σετ καλωδίου.
∂ÁÁ‡ËÛË
¶·Ъ·¯ˆЪФ‡МВ ‰‡Ф ¯ЪfiУИ· ВББ‡ЛЫЛ, ЫЩФ ЪФ˚fiУ, НВОИУТУЩ·˜ ·fi ЩЛУ
ЛМВЪФМЛУ›· ·БФЪ¿˜.
ª¤Û· ÛÙËÓ ÂÚ›Ô‰Ô ÂÁÁ‡ËÛ˘ ηχÙÔ˘ÌÂ, ¯ˆÚ›˜ ¯Ú¤ˆÛË, οποιοδήποτε
ВП¿ЩЩˆМ· ЪФВЪ¯fiМВУФ ·fi О·О‹ О·Щ·ЫОВ˘‹ ‹ О·О‹˜ ФИfiЩЛЩФ˜ ˘ПИОfi,
В›ЩВ ВИЫОВ˘¿˙ФУЩ·˜ В›ЩВ ·УЩИО·ıИЫЩТУЩ·˜ ФПfiОПЛЪЛ ЩЛ Ы˘ЫОВ˘‹ Ы‡МхˆУ·
МВ ЩЛУ ОЪ›ЫЛ М·˜. ∞˘Щ‹ Л ВББ‡ЛЫЛ ИЫ¯‡ВИ ЫВ fiПВ˜ ЩИ˜ ¯ТЪВ˜ Ф˘ ˆПФ‡УЩ·И
Щ· ЪФ˚fiУЩ· Braun.
∏ ВББ‡ЛЫЛ ‰ВУ О·П‡ЩВИ: О·Щ·ЫЩЪФх‹ ·fi О·О‹ ¯Ъ‹ЫЛ, х˘ЫИФПФБИО‹
хıФЪ¿ ‹ ВП·ЩЩТМ·Щ· ПfiБˆ ·М¤ПВИ·˜ ЩФ˘ ¯Ъ‹ЫЩЛ. ∏ ВББ‡ЛЫЛ ·О˘ЪТУВЩ·И
·У ¤¯Ф˘У Б›УВИ ВИЫОВ˘¤˜ ·fi МЛ ВНФ˘ЫИФ‰ФЩЛМ¤У· ¿ЩФМ· ‹ ‰ВУ ¤¯Ф˘У
¯ЪЛЫИМФФИЛıВ› БУ‹ЫИ· ·УЩ·ПП·ОЩИО¿ Braun.
°È· Ó· ÂÈÙ‡¯ÂÙ service ̤۷ ÛÙËÓ ÂÚ›Ô‰Ô Ù˘ ÂÁÁ‡ËÛ˘, ·Ú·‰ÒÛÙ ‹
ÛÙ›ÏÙ ÙËÓ Û˘Û΢‹ Ì ÙËÓ ·fi‰ÂÈÍË ·ÁÔÚ¿˜ Û ¤Ó· ∂ÍÔ˘ÛÈÔ‰ÔÙË̤ÓÔ
∫·Ù¿ÛÙËÌ· Service Ù˘ Braun: www.service.braun.com.
∫·П¤ЫЩВ ЫЩФ 210-9478700 БИ· У· ПЛЪФхФЪЛıВ›ЩВ БИ· ЩФ ПЛЫИ¤ЫЩВЪФ
∂НФ˘ЫИФ‰ФЩЛМ¤УФ ∫·Щ¿ЫЩЛМ· Service ЩЛ˜ Braun.
76
 Loading...