

Page 1
Prosonic
washable
washable
trimmer
trimmer
trimmer
on
TM
9591 , 9585
e
a
l
n
c
t
r
a
t
s
high
low
empty
9581
i
n
g
TM
clean
eco
normal
intensive
auto select
offonoff
reset
BS 9591 BS 9585 BS 9581
www.braun.co.jp
www.braun.co.jp
9585
Page 2
2
Page 3
STOP
3
Page 4
45678
Page 5
Page 6
Page 7
Page 8
TM
9591, 9585, 9581
9000
Series
2
1
34
e
l
a
c
n
i
t
n
r
g
a
t
s
high
low
empty
7
18
clean
auto select
8
9
10
11
trimmer
trimmer
eco
normal
intensive
trimmer
5
on
6
12
offonoff
13
reset
14
15
16
17
ashable
ashable
w
w
trimmer
trimmer
trimmer
et
res
Page 9
91011
Page 10

Page 11

9591
9585
9581
Page 12

t
r
release
w
a
s
h
a
b
le
trim
m
e
r
res
et
on
off
2
lock
1
lock
lock
trimmer
on
off
lock
e
l
a
c
n
t
i
n
r
g
a
t
s
clean
eco
normal
intensive
high
t
c
le
e
s
to
u
a
low
empty
12
Page 13

empty
w
a
s
h
a
b
le
trim
m
e
r
r
e
s
e
t
c
le
an
e
c
o
n
o
r
mal
in
te
n
s
ive
a
u
to
s
el
e
c
t
n
a
i
n
e
g
l
c
n
t
a
r
le
c
a
t
s
eco
al
rm
no
e
iv
s
n
te
in
t
c
e
l
se
h
ig
to
h
u
a
w
lo
1
ty
p
m
e
2
n
a
f
e
l
a
c
s
t
new
n
a
i
n
e
g
l
c
t
an
r
cle
a
t
s
eco
normal
tensive
in
t
c
le
e
s
h
o
ig
t
h
u
a
w
lo
y
t
p
m
e
n
a
f
e
l
a
c
s
t
high
low
empty
e
l
a
c
n
t
i
n
r
g
a
t
s
clean
eco
normal
intensive
high
auto select
low
empty
n
a
i
n
e
g
l
c
n
t
r
lea
c
a
t
s
co
e
al
rm
no
ive
intens
igh
h
auto select
low
pty
em
n
a
f
e
l
a
c
s
t
high
high
low
low
empty
e
l
a
c
n
t
i
r
n
g
a
t
s
clean
eco
normal
intensive
auto select
13
Page 14

e
washable
l
a
c
n
t
i
n
r
g
a
t
s
clean
eco
normal
nsive
te
in
high
auto select
low
e
l
a
c
n
t
i
r
n
g
a
t
s
clean
eco
normal
intensive
auto select
14
Page 15

trimmer
on
re
le
a
s
e
washable
re
le
a
s
e
washable
er
oil
re
le
a
s
e
washable
click!
trimmer
re
le
a
s
e
washable
re
le
a
s
e
15
washable
re
le
a
s
e
washable
Page 16

161718
Page 17

Page 18

9000
9000
Series
re
le
a
s
e
washable
er
Series
360°Complete
Page 19

9000
Series
360°Complete
9000
Series
19
Page 20

202122
Page 21

Page 22

STOPSTOP
Our products are designed to meet the highest
standards of quality, functionality and design.
We hope you enjoy your new Braun Shaver.
Warning
Your Prosonic shaving system is provided with
a special cord set, which has an integrated
Safety Extra Low Voltage power supply. Do not
exchange or tamper with any part of it, otherwise
there is risk of an electric shock.
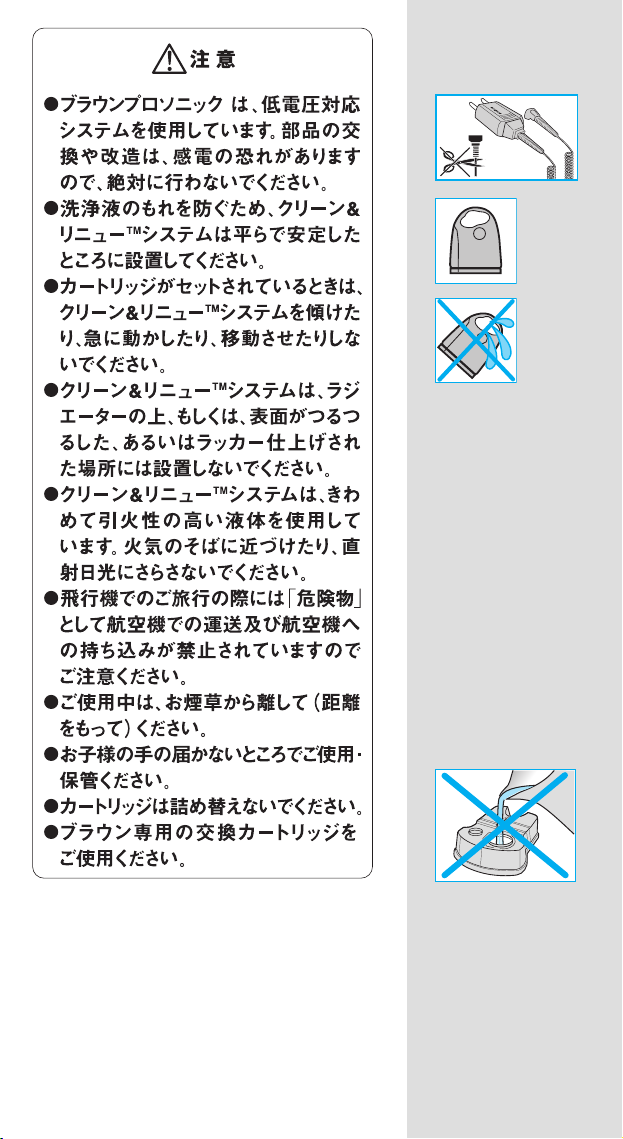
To prevent the cleaning fl uid from leaking, ensure
that the Clean&Renew station is placed on a fl at
surface. When a cleaning cartridge is installed,
do not tip, move suddenly or transport the
station in any way as cleaning fl uid might spill
out of the cartridge. Do not place the station
inside a mirror cabinet, nor place it on a polished
or lacquered surface.
The cleaning cartridge contains a highly
fl ammable liquid so keep it away from
of ignition. Do not expose to direct sunlight and
cigarette smoking nor store it over a radiator.
Keep it out of reach of children.
Do not refi ll the cartridge and use only original
Braun refi ll cartridges.
sources
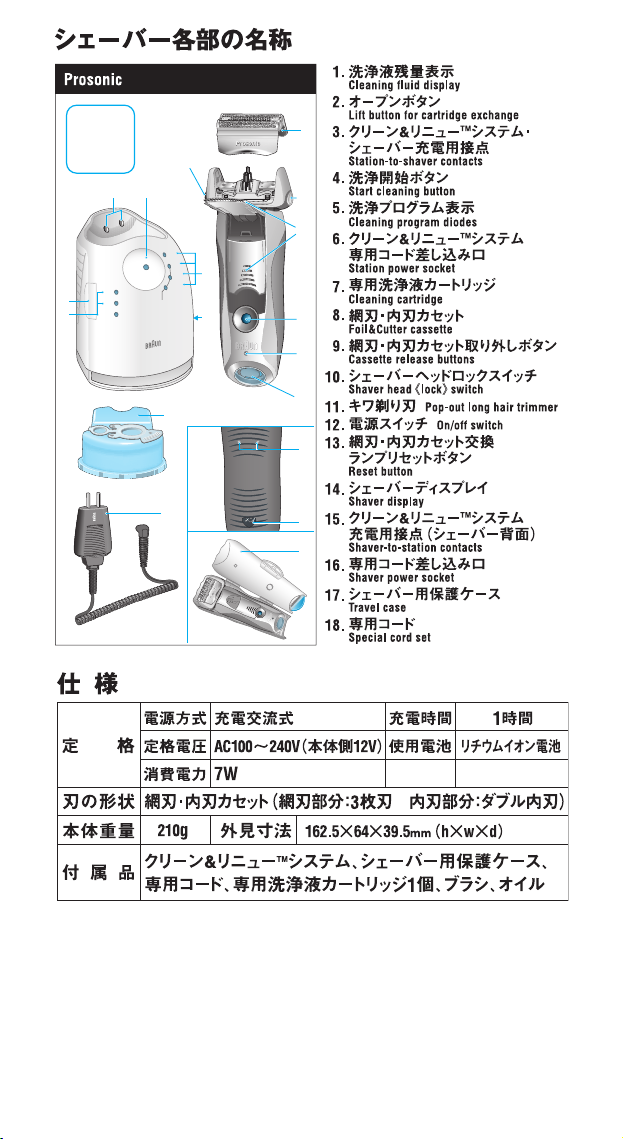
Description
Clean&Renew station
1 Cleaning fl uid display
2 Lift button for cartridge exchange
3 Station-to-shaver contacts
4 «start cleaning» button
5 Cleaning program diodes
6 Station power socket
7 Cleaning cartridge
Shaver
8 Foil & cutter cassette
9 Cassette release button
0 Shaver head «lock» switch
q Pop-out long hair trimmer
w On/off switch
e Reset button
r Shaver display
t Shaver-to-station contacts
z Shaver power socket
u Travel case
i Special cord set
Page 23

Before shaving
washable
trimmer
rese
t
washable
trimmer
rese
t
Prior to fi rst use you must connect the shaver to
an electrical outlet using the special cord set i
or alternatively proceed as below.
Installing the Clean&Renew station
• Using the special cord set i, connect the
station power socket
• Press the lift button 2 to open the housing.
• Hold the cleaning cartridge
stable surface (e.g. table).
• Carefully remove the lid from the cartridge.
• Slide the cartridge into the base of the station
as far as it will go.
• Slowly close the housing by pushing it down
until it locks.
The The cleaning fl uid display 1 will show how
much fl uid is in the cartridge:
«high» up to 30 cleaning cycles available
«low» up to 7 cleaning cycles remaining
«empty» new cartridge required
6 to an electrical outlet.
7 down on a fl at,
empty
empty
cle
cle
an
an
e
e
co
co
nor
nor
mal
mal
in
in
te
te
n
n
s
s
ive
ive
a
a
u
u
to
to
sel
sel
e
e
c
c
t
t
n
n
a
a
i
i
n
n
e
e
g
g
l
l
c
c
t
t
r
r
clean
clean
a
a
t
t
s
s
eco
eco
l
l
orma
orma
n
n
intensive
intensive
t
t
c
c
le
le
e
e
s
s
h
h
ig
ig
to
to
h
h
u
u
a
a
w
w
lo
lo
1
1
ty
ty
p
p
m
m
e
e
2
2
n
n
a
a
f
f
e
e
l
l
a
a
c
c
s
t
s
t
n
n
a
a
i
i
n
n
e
e
g
g
l
l
c
c
t
t
r
r
clean
clean
a
a
t
t
s
s
inte
inte
se
se
to
to
high
high
au
au
low
low
empty
empty
n
n
a
a
f
f
e
e
l
l
a
a
c
c
s
t
s
t
high
high
low
low
empty
empty
new
new
eco
eco
normal
normal
ive
ive
ns
ns
ct
ct
le
le
high
high
low
low
empty
empty
n
n
a
a
i
i
n
n
e
e
g
g
l
l
c
c
n
n
t
t
r
r
clea
clea
a
a
t
t
s
s
o
o
c
c
e
e
normal
normal
sive
sive
n
n
te
te
in
in
t
t
c
c
le
le
e
e
s
s
to
to
high
high
u
u
a
a
low
low
empty
empty
n
n
a
a
f
f
e
e
l
l
a
a
c
c
s
s
t
t
high
high
low
low
Charging and cleaning the shaver
Insert the shaver head down into the cleaning
station. (The contacts t on the back of the
shaver will align with the contacts 3 in the
cleaning station).
If required, the Clean&Renew station will now
charge the shaver. The hygiene status of the
shaver will also be analyzed and one of the
following cleaning program diodes 5 will light
up:
«clean» shaver is clean
«eco» short economical cleaning required
«normal» normal level of cleaning required
«intensive» high intensive cleaning required
23
e
e
l
l
a
a
c
c
n
n
t
t
i
i
n
n
r
r
g
g
a
a
t
t
s
s
clean
clean
eco
eco
al
al
norm
norm
intensive
intensive
high
high
t
t
c
c
le
le
e
e
s
s
to
to
u
u
a
a
low
low
empty
empty
e
e
l
l
a
a
c
c
n
n
t
t
i
i
r
r
n
n
g
g
a
a
t
t
s
s
clean
clean
eco
eco
normal
normal
intensive
intensive
auto select
auto select
Page 24

If the station selects one of the required cleaning
washable
washable
e
e
l
l
a
a
c
c
n
n
t
t
i
i
n
n
r
r
g
g
a
a
t
t
s
s
clean
clean
eco
eco
rmal
rmal
no
no
intensive
intensive
high
high
auto select
auto select
low
low
programs, it will not start unless you press the
«start cleaning» button
4. For best shaving
results, we recommend cleaning after each
shave.
Whilst cleaning is in progress, the respective
cleaning program diode will blink. Each cleaning
program consists of several cycles, where
cleaning fl uid is fl ushed through the shaver head
and a heat drying process dries the shaver.
Depending on the program selected the total
cleaning time will range from 32 to 43 minutes.
The cleaning programs should not be
interrupted. Please note that whilst the shaver is
e
e
l
l
a
a
c
c
n
n
t
t
i
i
r
r
n
n
g
g
a
a
t
t
s
s
clean
clean
eco
eco
normal
normal
intensive
intensive
auto select
auto select
drying, the shaving head may be hot and wet.
When the program is fi nished, the blue «clean»
diode will light up. Your shaver is now clean and
ready for use.
Stand-by mode
10 minutes after completing the charging or
cleaning session, the Clean&Renew station
switches to the stand-by mode: The diodes of
the Clean&Renew station and the
shaver display
turn off.
Shaver display
9591
9591
9585
9585
9581
9581
The shaver display r shows the charge status
of the battery. During charging or when using
the shaver, the respective green charge segment
will blink. When fully charged the green charge
segment(s) will light up continuously, provided
the shaver is switched on or connected to an
electrical outlet.
The red low charge segment fl ashes when
the battery capacity has dropped below 20%,
provided the shaver is switched on. The
remaining capacity will then be suffi cient for
2 to 3 shaves.
Charging information
• A full charge provides up to 50 minutes
of cordless shaving time. This may vary
according to your beard growth.
• The best environmental temperature for
charging is between 5 °C to 35 °C. Do not
expose the shaver to temperatures higher
than 50 °C for extended periods of time.
24
Page 25

Shaving
r
r
releaserelea
se
washable
trimmer
re
s
e
t
washable
trimmer
re
s
e
t
Press the on/off switch w to operate the shaver:
• The pivoting shaver head and fl oating foils
automatically adjust to every contour of your
face.
t
t
on
on
off
off
lock
lock
• To shave hard to reach areas (e.g. under the
nose) slide the shaver head «lock» switch to
the back position to lock the pivoting head at
an angle.
• To trim sideburns, moustache or beard, slide
the pop-out long hair trimmer upwards.
Tips for the perfect shave
For best shaving results, Braun recommends you
follow 3 simple steps:
1. Always shave before washing your face.
2. At all times, hold the shaver at right angles
(90°) to your skin.
3. Stretch your skin and shave against the
direction of your beard growth.
Shaving with the cord
If the shaver has run out of power (di
scharged),
and you do not have the time to recharge it in the
Clean&Renew station, you may also shave with
the shaver connected to an electrical outlet via
the special cord set.
Cleaning
Automatic cleaning
After each shave, return the shaver to the
Clean&Renew station and proceed as described
above in the section «Before shaving».
All charging and cleaning needs are then
automatically taken care of. With daily use, a
cleaning cartridge should be suffi cient for about
30 cleaning cycles.
The hygienic cleaning cartridge contains alcohol,
which once opened will naturally evaporate
slowly into the surrounding air. Each cartridge,
if not used daily, should be replaced after
approximately 8 weeks.
The cleaning cartridge also contains lubricates,
which may leave residual marks on the outer foil
frame after cleaning. However, these marks can
be removed easily by wiping gently with a cloth
or soft tissue paper.
25
2
2
lock
lock
1
1
trimmer
trimmer
on
on
off
off
e
e
l
l
a
a
c
c
n
n
t
t
i
i
n
n
r
r
g
g
a
a
t
t
s
s
clean
clean
eco
eco
normal
normal
intensive
intensive
high
high
auto select
auto select
low
low
empty
empty
lock
lock
lock
lock
Page 26

Manual cleaning
on
re
le
a
s
e
on
re
le
a
s
e
The shaver head is suitable for cleaning
under running tap water.
Warning: Detach the shaver from the
power supply before cleaning the shaver
head in water.
re
re
le
le
a
a
s
s
e
e
re
re
le
le
a
a
s
s
e
e
re
re
le
le
a
a
s
s
e
e
click!
click!
trimm
trimm
er
er
washable
washable
Rinsing the shaving head under running water
is an alternative way to keep the shaver clean,
especially when travelling.
• Switch the shaver on (cordless)
w and rinse
the shaver head under hot running water.
You may use liquid soap without abrasive
substances. Rinse off all foam and let the
shaver run for a few more seconds.
washable
washable
er
er
oil
oil
• Next, switch off the shaver, press the release
9 to remove the foil and cutter cassette
button
8 and let it dry.
• If you regularly clean the shaver under
washable
washable
water, then once a week apply a drop of
light machine oil on top of the foil and cutter
cassette.
trimmer
trimmer
Alternatively, you may clean the shaver using the
brush provided:
re
re
le
le
a
a
s
s
e
e
washable
washable
• Switch off the shaver. Remove the foil and
cutter cassette 8 and tap it out on a fl at
surface. Using the brush, clean the inner area
of the pivoting head. However, do not clean the
cassette with the brush as this may damage it.
re
re
le
le
a
a
s
s
e
washable
washable
e
washable
washable
Cleaning the housing
From time to time clean the housing of the
shaver and the Clean&Renew station with a
damp cloth, especially inside the cleaning
chamber where the shaver rests.
Replacing the cleaning cartridge
After having pressed the lift button
2 to open the
housing, wait for a few seconds before removing
the used cartridge to avoid any dripping.
new
new
old
old
Before discarding the used cartridge, make sure
to close the openings using the lid of the new
cartridge, since the used cartridge will contain
contaminated cleaning solution.
26
Page 27

Keeping your shaver in top shape
Replacing the foil and cutter cassette/reset
To maintain 100% shaving performance,
replace the foil and cutter cassette 8, when
the replacement symbol lights up on the shaver
display r (after about 18 months) or when
cassette is worn.
The replacement symbol will remind you during
the next 7 shaves to replace the foil and cutter
cassette. Then the shaver will automatically reset
the display.
After you have replaced the foil and cutter
cassette, use a ball-pen to push the reset button
e for at least 3 seconds to reset the counter.
While doing so, the replacement light blinks and
goes off when the reset is complete. The manual
reset can be done at any time.
Accessories
Available at your dealer or Braun Service
Centres:
• Foil & cutter cassette No. 9000
• Cleaning cartridge Clean&Renew CCR
Environmental notice
9000
9000
Series
Series
360°Complete
360°Complete
re
re
le
le
a
a
s
s
e
e
washable
washable
er
er
9000
9000
Series
Series
9000
9000
Series
Series
360°Complete
360°Complete
9000
9000
Series
Series
This product contains rechargeable
batteries. In the interest of protecting the
environment, please do not dispose of the
product in household waste at the end of
its useful life. Disposal can take place at a
Braun Repair Centre or at appropriate
collection points provided in your country.
The cleaning cartridge can be disposed with
regular household waste.
Subject to change without notice.
This product conforms to the European
Directives EMC 89/336/EEC and Low
Voltage 73/23/EEC.
For electric specifi cations, see printing on the
special cord set.
27
Page 28

Guarantee
We grant 1 year guarantee on the product
commencing on the date of purchase. Within
the guarantee period we will eliminate, free of
charge, any defects in the appliance resulting
from faults in materials or workmanship, either
by repairing or replacing the complete appliance
as we may choose.
This guarantee extends to every country where
this appliance is supplied by Braun or its
appointed distributor.
This guarantee does not cover: damage due
to improper use, normal wear and tear (e.g. foil
& cutter cassette) as well as defects that have
a negligible effect on the value or operation of
the appliance. The guarantee becomes void if
repairs are undertaken by unauthorised persons
and if original Braun parts are not used.
To obtain service within the guarantee period,
hand in or send the complete appliance with
your sales receipt to an authorised Braun
Customer Service Centre.
For UK only:
This guarantee in no way affects your rights
under statutory law.
28
Page 29

31
Page 30

5-673-458/00/IV-07
 Loading...