

Page 1
Aesculap Sterile Technology
Sterile container system
Edition 07/2009
Instructions for use/Technical description
Sterile container system
Gebrauchsanweisung/Technische Beschreibung
Sterilcontainer-System
Mode d’emploi/Description technique
Système de containers de stérilisation
Instrucciones de manejo/Descripción técnica
Sistema de contenedores estériles
Istruzioni per l’uso/Descrizione tecnica
Sterile container system
Gebruiksaanwijzing/Technische beschrijving
Steriele container-systeem
Brugsanvisning/Teknisk beskrivelse
Sterilcontainer-system
Bruksanvisning/Teknisk beskrivning
Sterilcontainersystem
Page 2
1
2
3
4
5
6
7
8
10
11
12
9
9
13
Page 3
19
14
15
20
21
18
21
17 16
Page 4

Aesculap Sterile Technology
Sterile container system
Legend
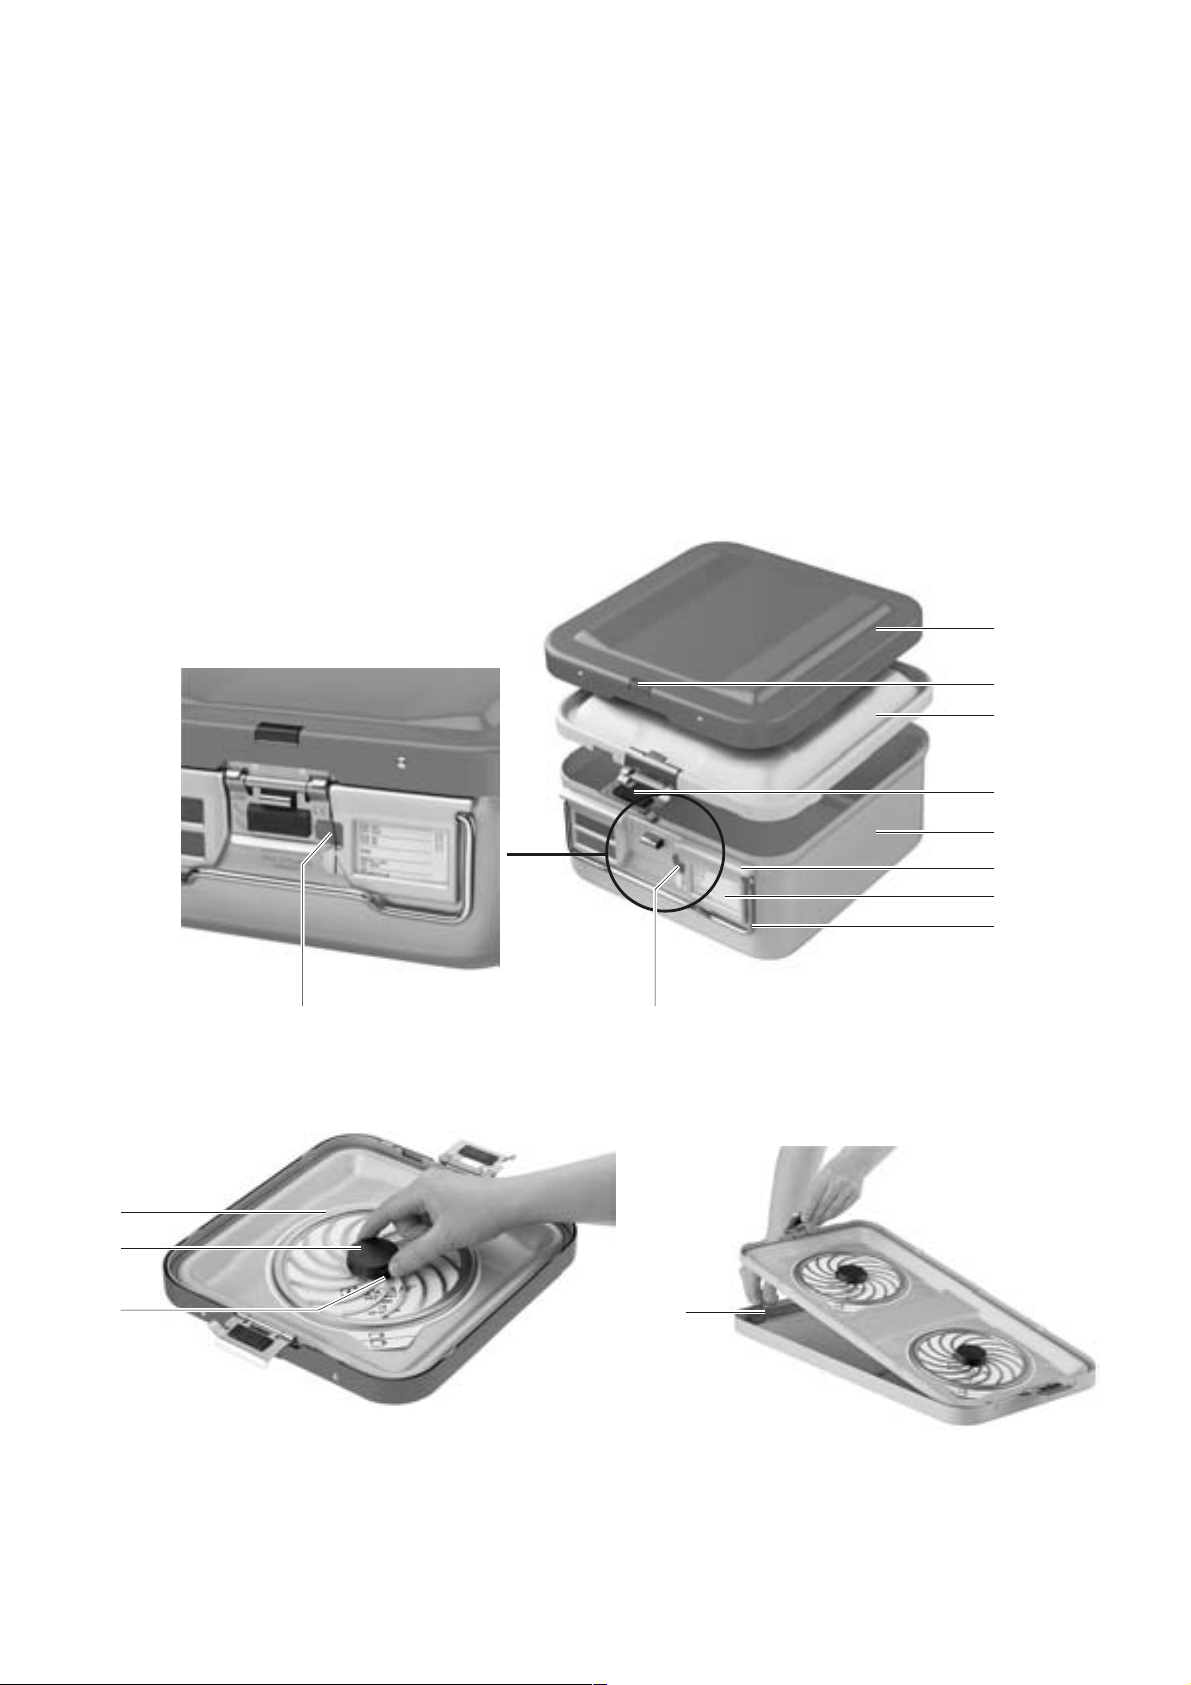
1 Outer lid
2 Outer lid lock
3 Inner lid
4 Inner lid lock
5 Bottom
6 Indicator seal retainer
7 Indicator seal
8 Handle
9 Slot (for the indicator seal on the inner lid lock)
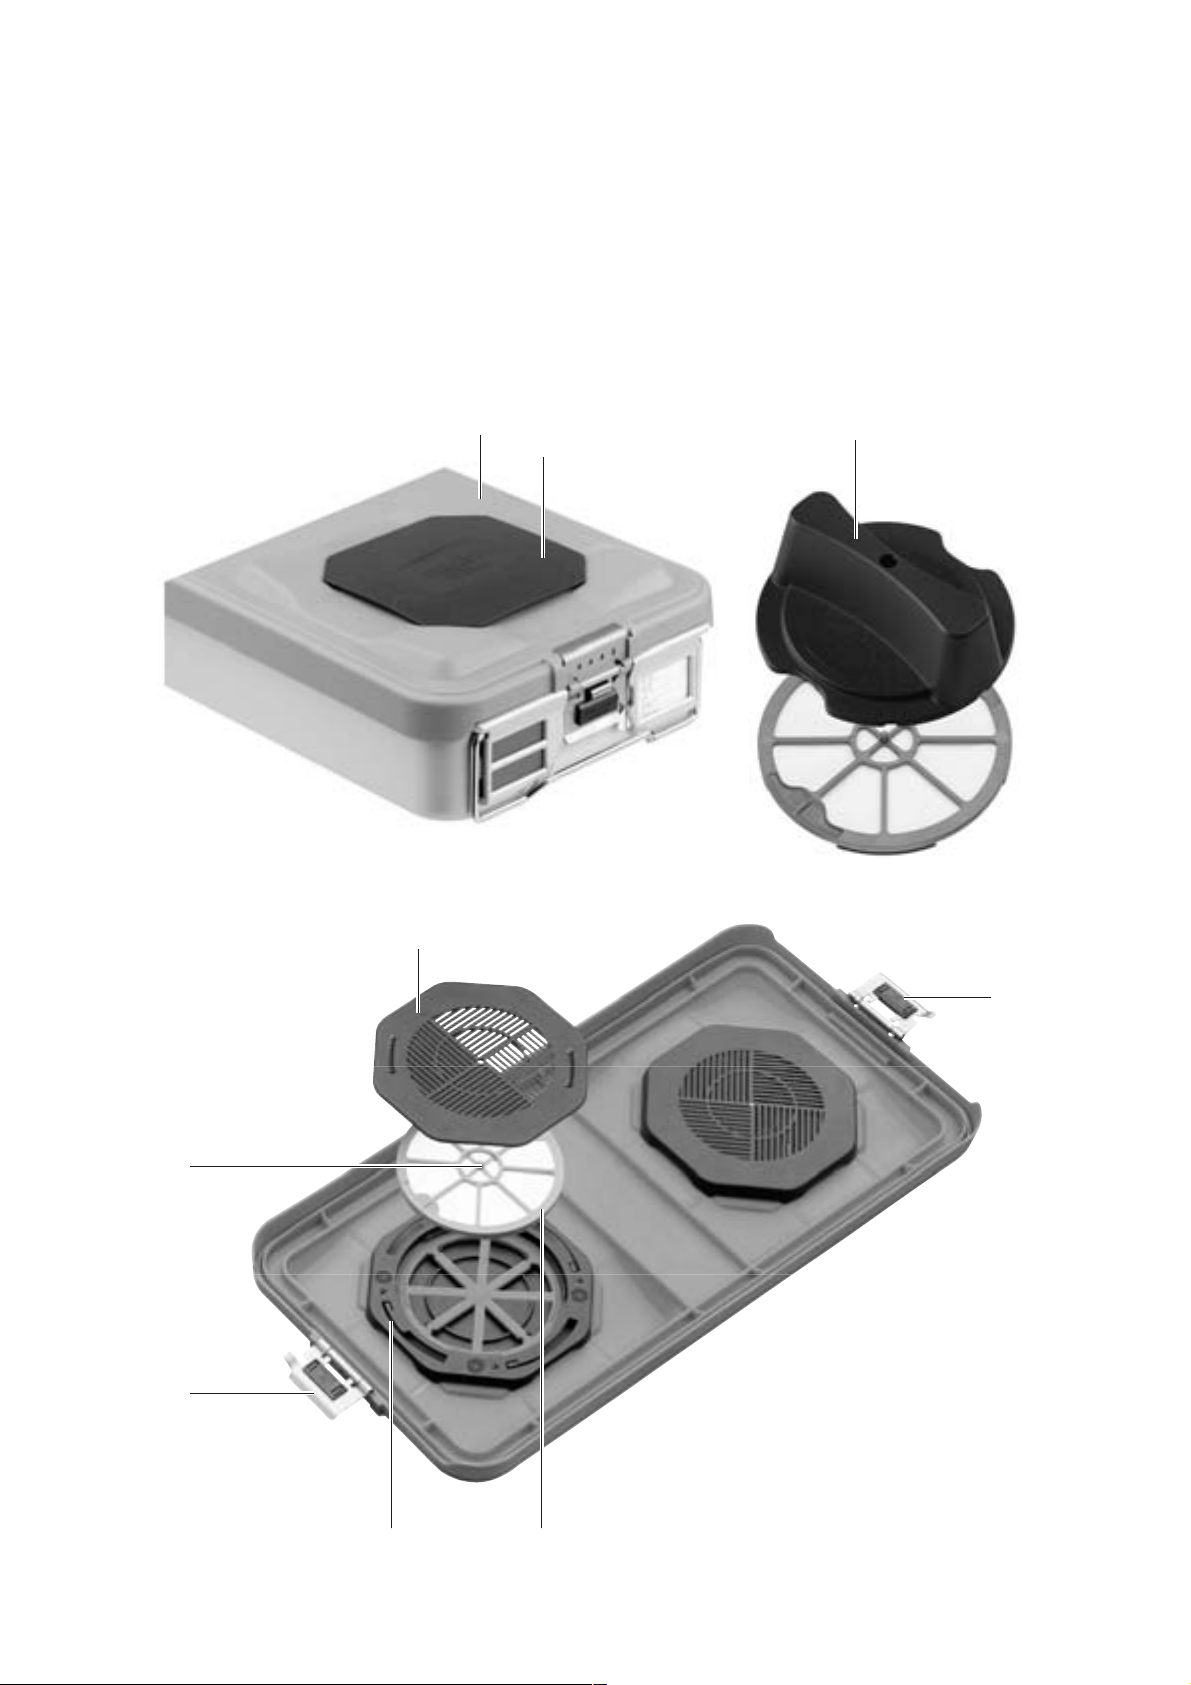
10 Universal filter retainer
11 Cap
12 Push buttons
13 Lid latch (for optional outer lid of BASIS container)
14 Plastic cover
15 Perforation field cover
16 Germ barrier system (permanent filter)
17 Adapter frame
18 Handling pin
19 Ribbed cover grid
20 Mounting handle
21 Plastic cover lock
Symbols on product and packages
Symbol Explanation
Caution: See documentation supplied with the
product
Follow the instructions for use
Contents
1. Safe handling .................................................................................................. 3
2. Product description ....................................................................................... 3
2.1 Intended use .................................................................................................... 3
2.2 Operating principle ........................................................................................ 3
3. Preparation and setup .................................................................................. 4
3.1 First use ............................................................................................................ 4
4. Working with the sterile container .......................................................... 4
4.1 System set-up ................................................................................................. 4
Removing the outer lid/inner lid/plastic cover...................................... 4
Filter change.................................................................................................... 4
4.2 Function checks ............................................................................................. 4
4.3 Safe operation ................................................................................................ 4
Loading the sterile containers.................................................................... 5
Inserting the indicator seal ......................................................................... 5
Loading the sterilizer .................................................................................... 5
Sterilization method and parameters ...................................................... 5
Unloading the sterilizer................................................................................ 6
Transporting the sterile container............................................................. 6
Storing the sterile containers..................................................................... 6
Checking and commissioning the sterile materials ............................. 6
5. Validated processing procedure ................................................................ 6
5.1 General notes .................................................................................................. 6
5.2 Cleaning/Disinfecting ................................................................................... 7
5.3 Manual cleaning/disinfecting .................................................................... 8
Manual cleaning and wipe disinfection.................................................. 8
5.4 Mechanical neutral or mild-alkaline cleaning and thermal
disinfection ...................................................................................................... 9
5.5 Inspection, maintenance and checks ....................................................... 9
6. Troubleshooting list ....................................................................................10
7. Technical Service .........................................................................................11
8. Accessories and replacement parts ........................................................11
9. Technical specifications .............................................................................11
10. Extracts from relevant standards ............................................................11
10.1 Standards cited ............................................................................................11
2
Page 5

1. Safe handling
2. Product description
Risk of contamination of sterile materials due to
sealing failure of sterile container!
WARNING
¾ Prior to use, check for proper condition and functioning of the product.
¾ To avoid damaging the product through improper setup or operation
and mitigating the warranty and liability on the part of the product’s
manufacturer:
–Use the product only according to these instructions for use.
–Follow the safety instructions and maintenance advisories.
–Never use damaged or faulty sterile containers. Replace any damaged
components immediately with original spare parts.
–If sterile container components are repaired in a way that could affect
the container’s germproof qualities: Inspect the sterile container
thoroughly before use.
¾ Ensure that only persons with the requisite training, expertise or
experience will handle the product and its accessories.
¾ Keep the instructions accessible for personnel.
¾ Follow general guidelines and aseptic principles when handling
contaminated items that have undergone or are to undergo
sterilization.
The sealing of the sterile container and its germ
barrier function will be compromised if the sterile
container is combined with components from
other manufacturers.
¾ Only combine Aesculap sterile container
products with each other.
2.1 Intended use
The Aesculap sterile container system is a reusable sterile barrier system
that preserves the sterility of medical products until they are used or reach
their use-by date. Medical products can be sterilized, stored and
transported in the Aesculap optics container. The container can also be
used for transporting medical products back to sterile processing after use.
The Aesculap sterile container System is suitable for steam sterilization.
Note
Please contact your Aesculap representative if your Aesculap sterile
containers are to be used in any other steam sterilization process.
2.2 Operating principle
The Aesculap sterile container system meets the requirements of
DIN 58953-9 and EN ISO 11607.
Sterile containers with a perforated lid and a closed bottom have been
validated for steam sterilization in a sterilizer acc. to EN 285 through the:
• fractionated vacuum process.
Sterile containers with a perforated lid and a perforated bottom are also
suitable for steam sterilization in a sterilizer acc. to EN 285 through:
• gravitational procedures
Note
The suitability of any specific process must be validated at the site of
application.
3
Page 6
Aesculap Sterile Technology
Sterile container system
3. Preparation and setup
3.1 First use
¾ Thoroughly clean the new sterile container prior to first use.
¾ After cleaning, use a suitable filter, see Filter change.
Sterile container system PrimeLine:
The germ barrier system 16 (permanent filter) is integrated in the system.
4. Working with the sterile container
4.1 System set-up
Removing the outer lid/inner lid/plastic cover
If an outer lid is used, it can be removed to clean the sterile container and,
if it is soiled, it can be separated from the inner lid.
VARIO container (by default with outer and inner lid):
¾ Push down the outer lid lock 2 and remove the outer lid 1 and the inner
lid 3.
BASIS container (with retrofitted outer lid):
¾ Dismount the combined outer lid 1 and inner lid 3 from the bottom 5.
¾ Loosen the lid latch 13 and remove the outer lid 1.
Sterile container system PrimeLine:
¾ Remove the plastic cover 14 from the bottom 5.
Filter change
Replace the filter at the following intervals, depending upon the filter
type:
• Disposable filter: prior to each sterilization cycle
• PTFE permanent filter: after max. 1 000 processing cycles
• PrimeLine germ barrier system: after max. 5 000 processing cycles
VARIO container and BASIS container:
¾ Press simultaneously both push buttons 12 on the universal filter
retainer 10.
¾ Remove the universal filter retainer 10.
¾ Insert a new filter and remount the universal filter retainer 10.
¾ Push down the cap 11 on the universal filter retainer 10 until you hear
it click into place.
Sterile container system PrimeLine:
¾ Turn the ribbed cover grid 19 anticlockwise until it is unlocked.
¾ Remove the ribbed cover grid 19 of the germ barrier system 16.
¾ Turn the germ barrier anticlockwise system 16 with the mounting
handle 20 until it is unlocked from the adapter frame 17.
¾ Lift the germ barrier system 16, gripping it at the handling pin 18, and
remove it.
¾ Install the germ barrier system 16 by the reverse sequence of steps.
4.2 Function checks
Note
With the PrimeLine sterile container system, the ribbed cover grid 19 must
be removed prior to checks!
¾ Visually inspect all components of the sterile containers for damage
and correct functioning prior to each use. Check that:
–metal parts are not deformed
–aluminum lids are not warped
–the edges of the universal filter retainer 10 are seated in full-surface
contact
–the seals are intact (no cracks, ...)
–plastic parts are not cracked
–the permanent filter/PrimeLine sterile barrier system is undamaged
(no kinks, holes, cracks or gaps)
–the lock functions properly (engages)
¾ Use sterile containers only if they are in mint condition. Replace any
damaged components immediately with original spare parts or have
the parts repaired.
4.3 Safe operation
Risk of contamination of sterile materials due to
sealing failure of sterile container!
WARNING
CAUTION
The sealing of any sterile container and its function as
a germ barrier will be compromised if the sterile
container is combined with components from other
manufacturers.
¾ Only combine Aesculap sterile container products
with each other.
Risk of non-sterility of container contents!
¾ Always carry the sterile containers by their handles.
¾ Never carry or lift the sterile container at the lid.
¾ Transport the sterile container in such a way that
mechanical damage will not occur.
4
Page 7
Loading the sterile containers
Instruments
According to DIN EN 868-8 and DIN 58953-9 we recommend the
following maximum load for the containers:
• Standard container: 10 kg
• Half container: 5 kg
• 3/4-container: 7 kg
¾ Store instruments in appropriate storage devices in a tray,
with hollow components, bowls, dishes, etc. with their openings at a
downward angle.
VARIO container and BASIS container:
¾ Load the sterile containers in such a way that their universal filter
retainers 10 remain unobstructed. Max. loading height: Up to about
2 cm below the edge of the container bottom.
¾ Use the inner lid lock 4 to fasten the inner lid 3 to the container
bottom 5.
The inner lid lock 4 has to engage perceptibly. If this is not the case:
Have the sterile container repaired, see Technical Service.
Sterile container system PrimeLine:
¾ Load the sterile container in such a way that the ribbed cover grid 19
in the plastic cover 14 remains unobstructed. Max. loading height: up
to approx. 2 cm below the rim of the container base.
¾ Lock the plastic lid 14 with the plastic lid lock 21 on the bottom 5.
The plastic lid lock 21 must engage perceptibly. If this is not the case:
Have the sterile container repaired, see Technical Service.
Inserting the indicator seal
¾ After loading of the sterile container, enter the following data on the
indicator seal 7: Date of sterilization, sterilization number, expiry date,
name and signature.
¾ Slide the indicator seal 7 from outside into the indicator seal retainer 6
so that the indicator segment engages in the slot on the lid lock and
seals the lock.
- or -
¾ Insert a plastic seal (e.g. JG739) at the lock of the closed container.
Loading the sterilizer
Risk of vacuum damage to the sterile container due to
inadequate pressure equalization!
WARNING
Note
VARIO containers and BASIS containers can be sterilized with the outer lid
in place!
¾ Do not use outer packaging for the sterile
containers.
¾ Do not obstruct the air flow through the
perforation fields in the bottom and in the inner lid
under any circumstances (applicable to all
container versions).
¾ Do not put foil packaging directly on the sterile
container.
Textiles
¾ Pack folded textiles in such a way that they fit vertically in the sterile
container.
¾ Make certain that when the sterile container is fully loaded, it is still
possible to insert a flat hand between the individual items without
difficulty.
¾ Load sterile containers in such a way that their universal filter
retainers 10 remain unobstructed.
¾ Use the inner lid lock 4 to fasten the inner lid 3 to the container
bottom 5.
The inner lid lock 4 has to engage perceptibly. If this is not the case:
Have the sterile container repaired, see Technical Service.
Sterile container system PrimeLine:
¾ Load the sterile container in such a way that the ribbed cover grid 19
in the plastic cover 14 remains unobstructed.
¾ Lock the plastic lid 14 with the plastic lid lock 21 on the bottom 5.
The plastic lid lock 21 must engage perceptibly. If this is not the case:
Have the sterile container repaired, see Technical Service.
¾ Follow the sterilizer manufacturer’s recommendations.
¾ Always place heavy sterile containers at the bottom of the sterilizer.
¾ Always carry the sterile containers by their handles.
Note
Sterile containers can be stacked in the sterilizer.
¾ Transport stacks of sterile containers in such a way that the stacks do
not topple over.
Sterilization method and parameters
Risk of sterilization failure!
¾ Sterilize the containers only by approved and
CAUTION
¾ Sterilize with steam, taking note of the following:
Sterilization must be carried out through a validated steam sterilizing
process (e.g. in a steam sterilizer according to DIN EN 285, validated
according to DIN EN ISO 17665).
validated sterilizing processes.
5
Page 8
Aesculap Sterile Technology
Sterile container system
Unloading the sterilizer
Risk of burns due to a hot sterile container after
sterilization!
WARNING
Transporting the sterile container
CAUTION
Storing the sterile containers
Note
The sterile containers may be stored in stacks.
¾ Store sterile containers in a dry, clean and protected place.
¾ Observe storage periods and storage conditions acc. to DIN 58953-9.
Checking and commissioning the sterile materials
The contents of a sterile container can be commissioned as sterile only if
the container has been properly sterilized, stored and transported.
If this is not the case, the sterile materials must be processed again.
DANGER
¾ Make certain that the color of the indicator point has changed.
¾ Make certain that all container components, particularly the lid locks,
are intact.
¾ Ensure the container seal is intact.
¾ Always wear protective gloves when unloading the
sterilizer.
Risk of non-sterility of container contents!
¾ Always carry the sterile containers by their handles.
¾ Never carry or lift the sterile container at the lid.
¾ Transport the sterile container in such a way that
mechanical damage will not occur.
Risk of contamination from improperly sterilized
materials!
¾ Prior to commissioning the sterile materials, check
to ensure that the sterilization was successful.
5. Validated processing procedure
Note
Adhere to national statutory regulations, national and international
standards and directives, and local, clinical hygiene instructions for sterile
processing.
Note
For patients with Creutzfeldt-Jakob disease (CJD), suspected CJD or
possible variants of CJD, observe the relevant national regulations
concerning the reprocessing of the products.
Note
Up-to-date information on processing can be found on the Aesculap
Extranet at www.aesculap-extra.net
Note
Successful processing of this medical product can only be ensured if
processing is performed through a validated processing procedure. The
user/processor is responsible for the validation.
Due to process tolerances, the manufacturer’s specifications can only serve
as an approximate guide for assessing the processing procedures appli ed by
the individual operator/processors.
5.1 General notes
Encrusted or fixated residues from surgery can make the cleaning process
more difficult or ineffective, and can cause corrosion of stainless steels. To
avoid this, the time interval between application and processing should
not exceed 6 h, and neither fixating pre-cleaning temperatures >45 °C nor
any fixating disinfecting agents (active ingredients: aldehyde, alcohol) be
used.
Excessive doses of neutralizers or basic detergents can cause chemical
degradation and/or fading and obliteration of laser inscriptions on
stainless steel surfaces, regarding visual reading and machine-readability
of the inscriptions.
Residues containing chlorine or chlorides e.g. in surgical residues,
medicines, saline solutions and in the service water used for cleaning,
disinfection and sterilization will cause corrosion damage (pitting, stress
corrosion) and result in the destruction of stainless steel products. To
remove such residues, the products must be rinsed sufficiently with fully
desalinated water and dried thoroughly.
6
Page 9
Only process chemicals that have been tested and approved (e.g. VAH/
DGHM or FDA approval or CE mark) and which are compatible with the
product’s materials according to the chemical manufacturers’
recommendations may be used for processing the product. All process
parameters specified by the chemical’s manufacturer, such as
temperatures, concentrations and exposure times, must be strictly
observed. Failure to do so can result in the following problems:
• optical changes of materials, e.g. fading or discoloration of aluminum.
For aluminum, pH >8 in the application/process solution is sufficient
to cause visible surface changes.
• material damage such as corrosion, cracks, fracturing, premature aging
or swelling.
¾ Do not use process chemicals that cause stress cracking of plastics
such as PPSU, or attack softeners e.g. in silicone and cause brittleness
of the material.
5.2 Cleaning/Disinfecting
Damage to the product due to inappropriate
cleaning/disinfecting agents and/or excessive
CAUTION
temperatures!
¾ Use cleaning and disinfecting agents according
to the manufacturer’s instructions. The cleaning
and disinfecting agent must
- be approved for plastics and high-grade
steel
- not attack softeners (e.g. in silicone).
¾ Observe specifications regarding concentration,
temperature and exposure time.
7
Page 10

Aesculap Sterile Technology
Sterile container system
5.3 Manual cleaning/disinfecting
¾ Inspect visible surfaces for residual contamination after manual
cleaning/disinfecting.
¾ Repeat the cleaning process if necessary.
Manual cleaning and wipe disinfection
Stage Step T
[°C/°F]t[min]
I Cleaning RT
(cold)
II Drying RT - - - -
III Wipe disinfection -
IV Final rinse RT
(cold)
V Drying RT - - - - -
D–W: Drinking water
FD–W: Fully desalinated water (demineralized)
RT: Room Temperature
Stage I
¾ Wipe off gross debris prior to cleaning.
Stage II
¾ Dry the product with lint-free tissue or medical-quality filtered
compressed air.
Conc.
[%]
--D–W-
>1- -I
- - FD–W not required Rinse off cleaning
Water
quality
Alcohol Denat. 70 %
(ethanol B|BRAUN)
Chemical
II
Aldehyde-free surface
disinfectant (Stabimed)
chemicals; do not leave
residues
Stage III
¾ Carry out wipe disinfection.
Stage IV
¾ When using aldehyde-free disinfectants:
After the specified exposure time (at least 1 minute), rinse the
disinfected surfaces under running FD water.
¾ Allow water to drip off for a sufficient length of time.
Stage V
¾ Dry the product with lint-free tissue or in a heating cabinet.
8
Page 11

5.4 Mechanical neutral or mild-alkaline cleaning and thermal disinfection
Machine type: Single-chamber washer/disinfector without ultrasound
Stage Step T
[°C/°F]
I Prerinse <25/77 3 D–W -
II Cleaning 55/131 10 FD–W Neutral:
III Intermediate rinse >10/50 1 FD–W Especially for PrimeLine it must be ensured that the
t
[min]
Water
quality
Chemical
BBRAUN HELIMATIC CLEANER
neutral, pH-neutral,
process solution 0.5 %
Mild-alkaline:
- Concentrate:
pH = 9.5
< 5 % anionic tensides
- 0.5 % solution
Alkaline:
Processing possible at pH up to 10.5, provided the cleaning
agent is manufacturer-approved for container cleaning.
Note
Application of mild-alkaline or alkaline cleaning agents
may cause discoloration of colored anodized aluminum,
which however will not affect the functionality of the
product.
surface is rinsed without leaving any residues.
IV Thermal disinfecting 90/194 5 FD–W Other process parameters may be feasible with agreement
by the hospital hygienist.
V Drying - - - According to mechanical cleaning program
D–W: Drinking water
FD–W: Fully desalinated (demineralized) water
¾ Check visible surfaces for residues after mechanical cleaning/
disinfecting.
¾ Repeat the cleaning process if necessary.
Note
Ultrasonic treatment can be applied in manual processing as well as in
mechanical processing. Temperatures of up to 120 °C are permissible for
mechanical drying with hot air.
5.5 Inspection, maintenance and checks
Note
The sterile containers may be tested and repaired only by persons with the
appropriate training, expertise or experience.
The seals in the container lids were tested according to DIN EN 868-8,
Annex G, for a minimum service life of 5 000 sterilization cycles.
¾ In case of visible damage, change the seal immediately.
¾ Have the lid sent to Aesculap, see Technical Service.
¾ If necessary, lightly lubricate moving metal parts, e.g. latch hinges,
with sterilizable and steam-permeable maintenance oil (e.g. STERILIT®
oil spray JG600 or STERILIT® I drip feed oiler JG598).
9
Page 12
Aesculap Sterile Technology
Sterile container system
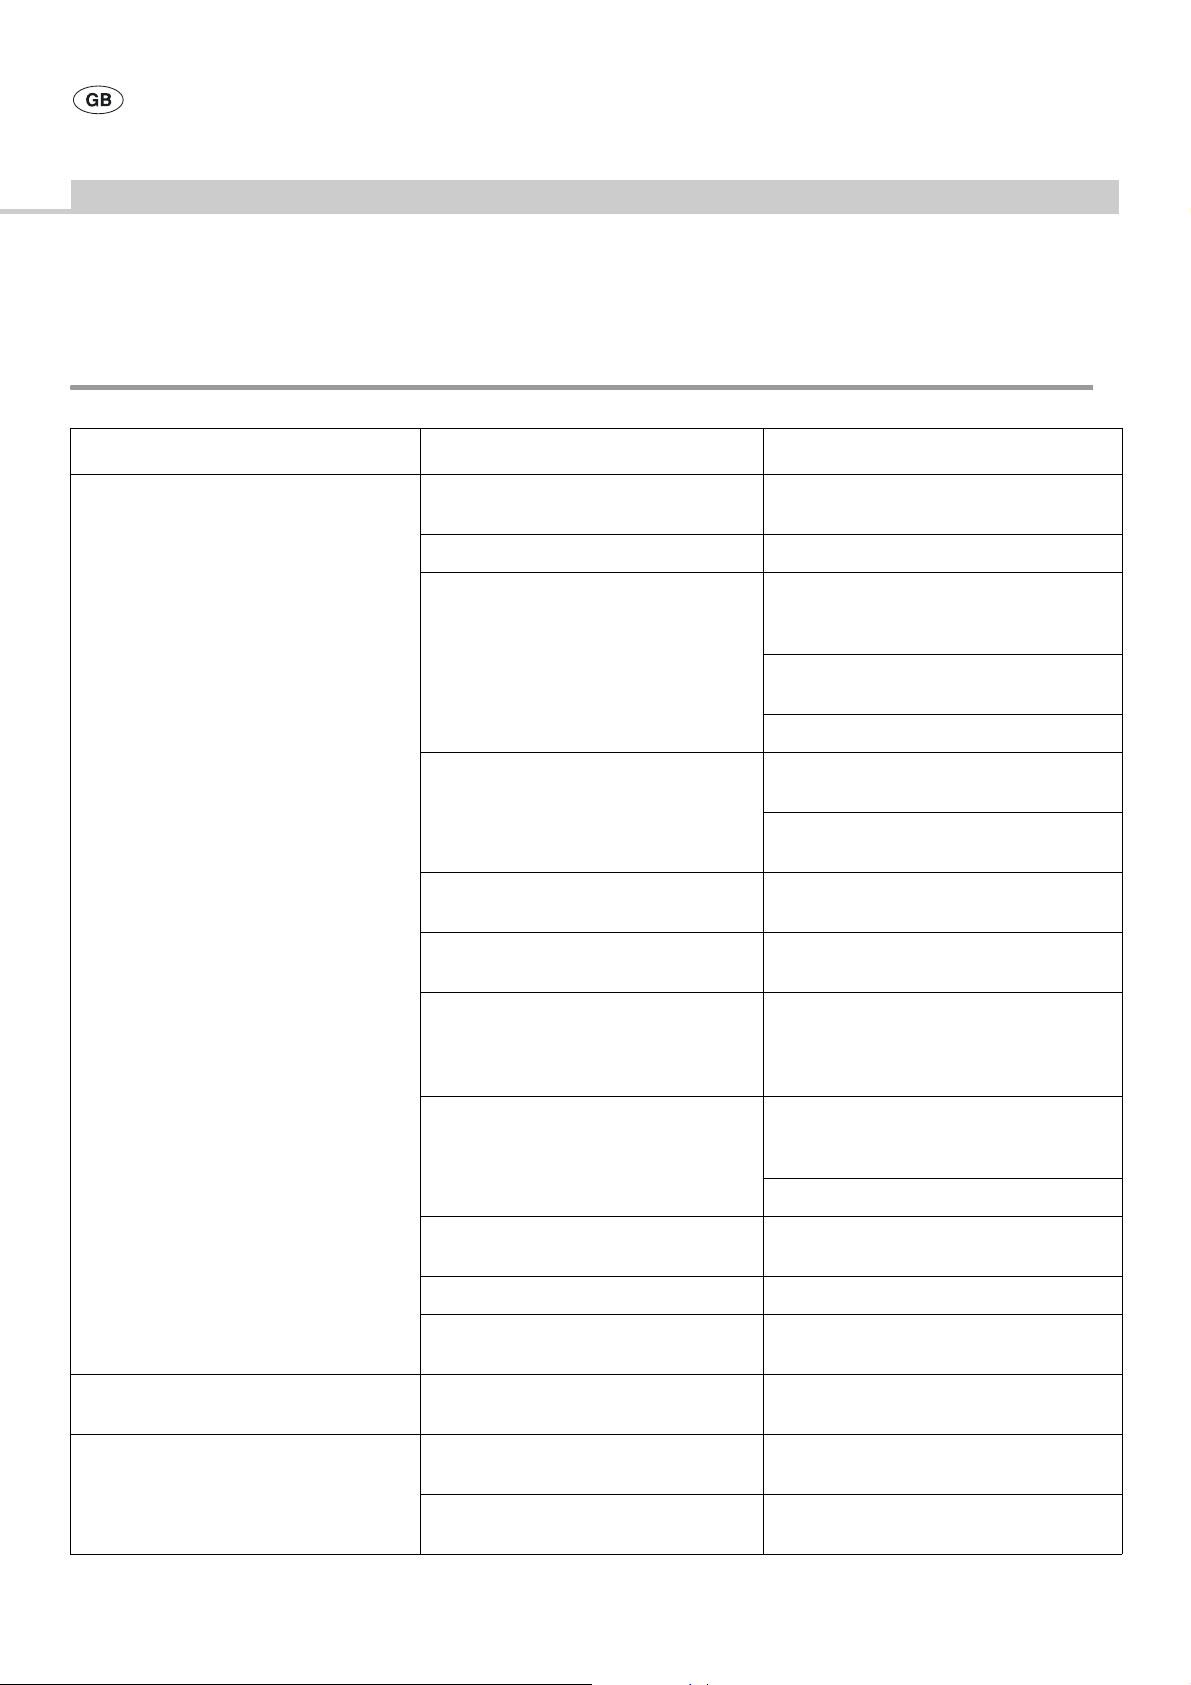
6. Troubleshooting list
Malfunction Cause Remedy
Excessive amounts of condensate inside the
sterile container
Temperature of sterile materials too low prior
to sterilization
Textiles too damp Sterilize dry textiles only
Sterile container too heavy Normal container
Sterile materials improperly positioned Lay hollow components, bowls, plates etc. face
Sterile container incorrectly positioned in
sterilizer
Sterile containers processed immediately
after sterilization
Sterile containers improperly positioned
during cooling phase
Allow sterile materials to come to room
temperature (appr. 20 °C) before sterilization
with instruments: max. load 10 kg
with textiles: max. load 8 kg
Half container with instruments:
max. load 5 kg
3/4-container with instruments: max. load 7 kg
down and on a slant
Arrange textiles in loose vertical piles, do not
press them together
Always place heavy sterile containers at the
bottom
Allow sterile containers to cool down to room
temperature prior to processing
Do not store sterile containers on a floor or in a
drafty place
Store sterile containers in air-conditioned areas
according to DIN 58953-9
Sterilizer properties do not meet DIN EN 285
standards
Empty-cycle and vacuum test not run daily
before sterilization begins
Unsuitable sterilizer cycle selected Select a program according to the load
Sterilizer door left open too long, sterilizer
cooled down
Condensate in groove of (inner) lid Multiple sterile containers or heavy sterile
materials stacked
Sterilization performed incorrectly
Indicator seal color unchanged
10
Sterilizer defective
Indicator seals stored improperly Observe storage conditions as specified on the
Have sterilizer serviced regularly
Check drying vacuum
Check drying time
Check steam quality and upgrade if necessary
Run empty-cycle and vacuum test daily before
beginning sterilization
Load and unload sterilizer quickly
Subdivide sterilizer with shelving
Use outer lid
Have sterilizer repaired by manufacturer
packaging of the indicator seals
Page 13
Malfunction Cause Remedy
Basis/Vario sterile container or PrimeLine
sterile container system deformed
Inner or outer lid cannot be positioned or
locked on the bottom component
Perforations covered during sterilization Never cover perforations
Container lid or bottom deformed or
damaged due to improper handling
(e.g. carrying by the lid)
7. Technical Service
Risk of injury and/or malfunction!
¾ Do not modify the product.
WARNING
¾ For service and repairs, please contact your national B. Braun/Aesculap
agency.
Modifications carried out on medical technical equipment may result in
loss of guarantee/warranty rights and forfeiture of applicable licenses.
Service addresses
Aesculap Technischer Service
Am Aesculap-Platz
78532 Tuttlingen / Germany
Phone: +49 7461 95-1602
Fax: +49 7461 16-5621
E-mail: ats@aesculap.de
Other service addresses can be obtained from the address indicated above.
Replace container lid or bottom, or have
components repaired by the manufacturer
9. Technical specifications
The variants and sizes of sterile containers are listed in brochure no.
C40401.
10. Extracts from relevant standards
10.1 Standards cited
The following standards are cited in connection with the sterile
containers:
• DIN 58953-9
•EN285
• EN 868-8
• EN 285 in combination with EN ISO 17665
• EN ISO 11607
8. Accessories and replacement parts
Accessories and supplies are listed in brochure no. C40401.
11
Page 14
Aesculap Sterile Technology
Sterilcontainer-System
Legende
1 Oberdeckel
2 Oberdeckel-Verschluss
3 Unterdeckel
4 Unterdeckel-Verschluss
5 Wanne
6 Indikatorplombenhalter
7 Indikatorplombe
8 Griff
9 Schlitz (für Indikatorplombe am Unterdeckel-Verschluss)
10 Universal-Filterhalter
11 Kappe
12 Druckknöpfe
13 Rastkralle (bei optionalem Oberdeckel an BASIS-Container)
14 Kunststoffdeckel
15 Perforationsfeld-Abdeckung
16 Keimrückhaltesystem (Dauerfilter)
17 Aufnahmerahmen
18 Griffbolzen
19 Abdecklamellengitter
20 Montagegriff
21 Kunststoffdeckel-Verschluss
Symbole an Produkt und Verpackung
Symbol Erklärung
Achtung, Begleitdokumente beachten
Gebrauchsanweisung befolgen
Inhaltsverzeichnis
1. Sichere Handhabung ...................................................................................13
2. Produktbeschreibung ..................................................................................13
2.1 Verwendungszweck .....................................................................................13
2.2 Funktionsweise .............................................................................................13
3. Vorbereiten und Aufstellen .......................................................................14
3.1 Erstinbetriebnahme .....................................................................................14
4. Arbeiten mit dem Sterilcontainer ...........................................................14
4.1 Bereitstellen ..................................................................................................14
Oberdeckel/Unterdeckel/Kunststoffdeckel abnehmen...................... 14
Filter wechseln............................................................................................. 14
4.2 Funktionsprüfung ........................................................................................14
4.3 Bedienung ......................................................................................................14
Sterilcontainer beladen............................................................................. 15
Indikatorplombe einsetzen....................................................................... 15
Sterilisator beladen .................................................................................... 15
Sterilisation .................................................................................................. 15
Sterilisator entladen................................................................................... 16
Sterilcontainer transportieren................................................................. 16
Sterilcontainer lagern................................................................................ 16
Sterilgut prüfen und bereitstellen.......................................................... 16
5. Validiertes Aufbereitungsverfahren ........................................................16
5.1 Allgemeine Hinweise ..................................................................................16
5.2 Reinigung/Desinfektion ..............................................................................17
5.3 Manuelle Reinigung/Desinfektion ...........................................................18
Manuelle Reinigung und Wischdesinfektion ...................................... 18
5.4 Maschinelle neutrale oder mildalkalische Reinigung und
thermische Desinfektion ............................................................................19
5.5 Kontrolle, Wartung und Prüfung .............................................................19
6. Fehler erkennen und beheben ..................................................................20
7. Technischer Service .....................................................................................21
8. Zubehör/Ersatzteile .....................................................................................21
9. Technische Daten .........................................................................................21
10. Normenauszüge ...........................................................................................21
10.1 Zitierte Normen ............................................................................................21
12
Page 15

1. Sichere Handhabung
2. Produktbeschreibung
Gefahr der Kontamination von Sterilgut durch
undichten Sterilcontainer!
WARNUNG
¾ Vor der Anwendung des Produkts Funktionsfähigkeit und ordnungsge-
mäßen Zustand prüfen.
¾ Um Schäden durch unsachgemäßen Aufbau oder Betrieb zu vermeiden
und die Garantie und Haftung nicht zu gefährden:
–Produkt nur gemäß dieser Gebrauchsanweisung verwenden.
–Sicherheitsinformationen und Instandhaltungshinweise beachten.
– Keine beschädigten oder defekten Sterilcontainer verwenden. Beschä-
digte Einzelteile sofort durch Originalersatzteile ersetzen.
–Wenn der Sterilcontainer an Teilen repariert wurde, die die Keimdich-
tigkeit beeinflussen: Vor dem Gebrauch Sterilcontainer visuell genau
prüfen.
¾ Sicherstellen, dass nur Personen mit entsprechender Ausbildung,
Kenntnis oder Erfahrung Produkt und Zubehör handhaben.
¾ Gebrauchsanweisung für das Personal zugänglich aufbewahren.
¾ Allgemeine Richtlinien und Hygienegrundsätze im Umgang mit konta-
miniertem, zu sterilisierendem und sterilisiertem Gut beachten.
Bei Kombination des Sterilcontainers mit Bauteilen anderer Hersteller ist die Dichtigkeit des Sterilcontainers und seine Funktion als Keimbarriere
nicht mehr gewährleistet.
¾ Nur Aesculap-Sterilcontainer-Produkte mitein-
ander kombinieren.
2.1 Verwendungszweck
Das Aesculap-Sterilcontainer-System ist ein mehrfach verwendbares Sterilbarrieresystem, das die Sterilität der Medizinprodukte bis zu deren Verwendung bzw. dem Verfallsdatum erhält. In ihm können Medizinprodukte
sterilisiert, gelagert und transportiert werden. Außerdem ist der Rücktransport von Medizinprodukten nach deren Gebrauch möglich. Das
Aesculap-Sterilcontainer-System ist geeignet für die Sterilisation in
Dampf.
Hinweis
Wenden Sie sich bitte an Ihre Aesculap-Vertretung, falls die Aesculap-Ste-
rilcontainer in anderen Sterilisationsverfahren verwendet werden sollen.
2.2 Funktionsweise
Das Aesculap-Sterilcontainer-System entspricht den Anforderungen der
DIN 58953-9 und EN ISO 11607.
Sterilcontainer mit perforiertem Deckel und geschlossener Wanne sind
validiert für die Dampfsterilisation in einem Sterilisator gemäß EN 285 im:
• Fraktionierten Vakuumverfahren
Sterilcontainer mit perforiertem Deckel und perforierter Wanne sind
zusätzlich geeignet für die Dampfsterilisation in einem Sterilisator gemäß
EN 285 im:
• Gravitationsverfahren
Hinweis
Die Eignung des spezifischen Verfahrens muss durch eine Validierung vor
Ort nachgewiesen werden.
13
Page 16
Aesculap Sterile Technology
Sterilcontainer-System
3. Vorbereiten und Aufstellen
3.1 Erstinbetriebnahme
¾ Fabrikneuen Sterilcontainer vor der ersten Anwendung gründlich reini-
gen.
¾ Nach der Reinigung passenden Filter einsetzen, siehe Filter wechseln.
Sterilcontainer-System PrimeLine:
Das Keimrückhaltesystem 16 (Dauerfilter) ist integriert.
4. Arbeiten mit dem Sterilcontainer
4.1 Bereitstellen
Oberdeckel/Unterdeckel/Kunststoffdeckel abnehmen
Wenn ein Oberdeckel verwendet wird, kann dieser zum Reinigen des Sterilcontainers und bei Verschmutzung vom Unterdeckel abgenommen werden.
VARIO-Container (standardmäßig mit Unter- und Oberdeckel):
¾ Oberdeckel-Verschluss 2 drücken, Oberdeckel 1 und Unterdeckel 3
abnehmen.
BASIS-Container (mit nachgerüstetem Oberdeckel):
¾ Kombination Oberdeckel 1 und Unterdeckel 3 von der Wanne 5
abnehmen.
¾ Rastkralle 13 lösen und Oberdeckel 1 abnehmen.
Sterilcontainer-System PrimeLine:
¾ Kunststoffdeckel 14 von der Wanne 5 abnehmen.
Filter wechseln
Je nach Filtertyp Filter in folgenden Intervallen wechseln:
• Einmalfilter: vor jeder Sterilisation
• Dauerfilter aus PTFE: nach max. 1 000 Aufbereitungszyklen
• PrimeLine-Keimrückhaltesystem: nach max. 5 000 Aufbereitungszyklen
VARIO-Container und BASIS-Container:
¾ Druckknöpfe 12 am Universal-Filterhalter 10 gleichzeitig drücken.
¾ Universal-Filterhalter 10 abnehmen.
¾ Neuen Filter einlegen und Universal-Filterhalter 10 wieder aufsetzen.
¾ Kappe 11 am Universal-Filterhalter 10 drücken, bis sie hörbar einras-
tet.
Sterilcontainer-System PrimeLine:
¾ Abdecklamellengitter 19 nach links drehen, bis es entriegelt ist.
¾ Abdecklamellengitter 19 des Keimrückhaltesystems 16 abnehmen.
¾ Keimrückhaltesystem 16 mit Montagegriff 20 nach links drehen, bis
es vom Aufnahmerahmen 17 entriegelt ist.
¾ Keimrückhaltesystem 16 am Griffbolzen 18 anheben und entnehmen.
¾ Keimrückhaltesystem 16 in umgekehrter Reihenfolge einbauen.
4.2 Funktionsprüfung
Hinweis
Beim Sterilcontainer-System PrimeLine muss zur Prüfung das Abdeckla-
mellengitter
¾ Alle Bestandteile des Sterilcontainers vor jedem Einsatz visuell auf
Beschädigung und korrekte Funktion prüfen:
–Metallteile nicht verformt
–Aluminiumdeckel nicht verzogen
–Universal-Filterhalter 10 liegt am Rand vollflächig auf
–Dichtungen unversehrt (keine Risse, ...)
–Kunststoffteile ohne Risse
–Dauerfilter/PrimeLine-Keimrückhaltesystem unbeschädigt (keine Kni-
cke, Löcher, Risse oder Spalten)
–Verschluss funktionstüchtig (rastet ein)
¾ Nur einwandfreie Sterilcontainer verwenden. Beschädigte Teile sofort
durch Originalersatzteile ersetzen oder reparieren.
19
abgenommen werden!
4.3 Bedienung
Gefahr der Kontamination von Sterilgut durch undichten Sterilcontainer!
WARNUNG
VORSICHT
Bei Kombination des Sterilcontainers mit Bauteilen
anderer Hersteller sind die Dichtigkeit des Sterilcontainers und seine Wirkung als Keimbarriere nicht mehr
gewährleistet.
¾ Nur Aesculap-Sterilcontainer-Produkte miteinan-
der kombinieren.
Gefahr der Unsterilität des Sterilguts!
¾ Sterilcontainer immer an den Griffen transportie-
ren.
¾ Sterilcontainer niemals am Deckel tragen oder
anheben.
¾ Sterilcontainer so transportieren, dass mechanische
Beschädigungen ausgeschlossen sind.
14
Page 17
Sterilcontainer beladen
Instrumente
Nach DIN EN 868-8 und DIN 58953-9 empfehlen wir folgende maximale
Beladung des Containers:
• Normalcontainer: 10 kg
• Halbcontainer: 5 kg
• 3/4-Container: 7 kg
¾ Instrumente mit geeigneten Lagerungshilfen in Siebkorb lagern.
Dabei Hohlkörper, Schalen, Teller u. Ä. mit der Öffnung nach schräg
unten lagern.
VARIO-Container und BASIS-Container:
¾ Sterilcontainer so beladen, dass die Universal-Filterhalter 10 frei blei-
ben. Max. Beladungshöhe: Bis ca. 2 cm unterhalb des Containerwannenrands.
¾ Unterdeckel 3 mit Unterdeckel-Verschluss 4 auf der Wanne 5 verrie-
geln.
Der Unterdeckel-Verschluss 4 muss spürbar einrasten. Falls nicht: Ste-
rilcontainer instand setzen lassen, siehe Technischer Service.
Sterilcontainer-System PrimeLine:
¾ Sterilcontainer so beladen, dass das Abdecklamellengitter 19 im
Kunststoffdeckel 14 frei bleibt. Max. Beladungshöhe: Bis ca. 2 cm
unterhalb des Containerwannenrands.
¾ Kunststoffdeckel 14 mit Kunststoffdeckel-Verschluss 21 auf der
Wanne 5 verriegeln.
Der Kunststoffdeckel-Verschluss 21 muss spürbar einrasten. Falls
nicht: Sterilcontainer instand setzen lassen, siehe Technischer Service.
Textilien
¾ Zusammengelegte Wäschestücke so packen, dass sie senkrecht in den
Sterilcontainer passen.
¾ Sicherstellen, dass bei voll beladenem Sterilcontainer noch eine
gestreckte Hand zwischen die einzelnen Wäschestücke passt.
¾ Sterilcontainer so beladen, dass die Universal-Filterhalter 10 frei blei-
ben (bei VARIO-Container und BASIS-Container).
¾ Unterdeckel 3 mit Unterdeckel-Verschluss 4 auf der Wanne 5 verrie-
geln.
Der Unterdeckel-Verschluss 4 muss spürbar einrasten. Falls nicht: Ste-
rilcontainer instand setzen lassen, siehe Technischer Service.
Sterilcontainer-System PrimeLine:
¾ Sterilcontainer so beladen, dass das Abdecklamellengitter 19 im
Kunststoffdeckel 14 frei bleibt.
¾ Kunststoffdeckel 14 mit Kunststoffdeckel-Verschluss 21 auf der
Wanne 5 verriegeln.
Der Kunststoffdeckel-Verschluss 21 muss spürbar einrasten. Falls
nicht: Sterilcontainer instand setzen lassen, siehe Technischer Service.
Indikatorplombe einsetzen
¾ Nach dem Beladen des Sterilcontainers auf der Indikatorplombe 7
Folgendes eintragen: Sterilisierdatum, Sterilisiernummer, Verfallsda-
tum sowie Namen und Unterschrift.
¾ Indikatorplombe 7 von der Außenseite in den
Indikatorplombenhalter 6 schieben, so dass das Indikatorteil in den
Schlitz am Deckelverschluss greift und den Verschluss versiegelt.
- oder -
¾ Nach dem Verschließen des Sterilcontainers Kunststoffplombe (z. B.
JG739) am Verschluss einsetzen.
Sterilisator beladen
Gefahr von Vakuumschäden am Sterilcontainer durch
unzureichenden Druckausgleich!
WARNUNG
Hinweis
Sowohl VARIO-Container als auch BASIS-Container können mit aufgesetz-
tem Oberdeckel sterilisiert werden!
¾ Anweisungen des Sterilisator-Herstellers beachten.
¾ Schwere Sterilcontainer immer unten in den Sterilisator stellen.
¾ Sterilcontainer immer an den Griffen transportieren.
Hinweis
Sterilcontainer können im Sterilisator gestapelt werden.
¾ Sterilcontainer-Stapel so transportieren, dass die Stapel nicht kippen.
Sterilisation
VORSICHT
¾ Sterilisieren mit Dampf, dabei Folgendes beachten:
Die Sterilisation hat nach einem validierten Dampfsterilisationsverfah-
ren (z. B. in einem Dampfsterilisator gemäß DIN EN 285 und validiert
gemäß DIN EN ISO 17665 zu erfolgen.
¾ Keine Außenverpackungen für Sterilcontainer ver-
wenden.
¾ Perforationsfelder in Wanne und Unterdeckel kei-
nesfalls luftdicht verschließen (bei allen ContainerVersionen).
¾ Keine Folienverpackungen direkt auf den Sterilcon-
tainer legen.
Gefahr der Unsterilität!
¾ Sterilcontainer nur in den dafür zugelassenen
und validierten Sterilisationsverfahren sterilisieren.
15
Page 18
Aesculap Sterile Technology
Sterilcontainer-System
Sterilisator entladen
Verbrennungsgefahr durch heiße Sterilcontainer nach
dem Sterilisieren!
WARNUNG
Sterilcontainer transportieren
VORSICHT
Sterilcontainer lagern
Hinweis
Sterilcontainer können gestapelt gelagert werden.
¾ Sterilcontainer an einem trockenen, sauberen und geschützten Platz
aufbewahren.
¾ Lagerdauer und Lagerbedingungen gemäß DIN 58953-9 einhalten.
Sterilgut prüfen und bereitstellen
Der Inhalt eines Sterilcontainers ist nur dann als steril zu betrachten,
wenn der Container ordnungsgemäß sterilisiert, gelagert und transportiert
wurde.
Wenn dies nicht der Fall ist, muss das Sterilgut neu aufbereitet werden.
GEFAHR
¾ Sicherstellen, dass die Farbe des Indikatorpunkts umgeschlagen ist.
¾ Sicherstellen, dass alle Containerbestandteile, insbesondere die
Deckelverschlüsse, unversehrt sind.
¾ Sicherstellen, dass die Containerverplombung unversehrt ist.
¾ Immer mit Schutzhandschuhen arbeiten.
Gefahr der Unsterilität des Sterilguts!
¾ Sterilcontainer immer an den Griffen transportie-
ren.
¾ Sterilcontainer niemals am Deckel tragen oder
anheben.
¾ Sterilcontainer so transportieren, dass mechanische
Beschädigungen ausgeschlossen sind.
Gefahr von Kontaminationen durch nicht korrekt sterilisiertes Sterilgut!
¾ Vor Bereitstellen des Sterilguts prüfen, ob die Steri-
lisation erfolgreich war.
5. Validiertes Aufbereitungsverfahren
Hinweis
Nationale gesetzliche Vorschriften, nationale und internationale Normen
und Richtlinien und die eigenen Hygienevorschriften zur Aufbereitung einhalten.
Hinweis
Bei Patienten mit Creutzfeldt-Jakob-Krankheit (CJK), CJK-Verdacht oder
möglichen Varianten bezüglich der Aufbereitung der Produkte die jeweils
gültigen nationalen Verordnungen einhalten.
Hinweis
Aktuelle Informationen zur Aufbereitung siehe auch Aesculap Extranet
unter www.aesculap-extra.net
Hinweis
Es ist zu beachten, dass die erfolgreiche Aufbereitung dieses Medizinpro-
duktes nur nach vorheriger Validierung des Aufbereitungsprozesses sichergestellt werden kann. Die Verantwortung hierfür trägt der Betreiber/Aufbereiter.
Durch Prozesstoleranzen bedingt, dienen die Angaben des Herstellers nur
als Richtwert für die Beurteilung der beim Betreiber/Aufbereiter vorhandenen Aufbereitungsprozesse.
5.1 Allgemeine Hinweise
Angetrocknete bzw. fixierte OP-Rückstände können die Reinigung
erschweren bzw. unwirksam machen und bei nicht rostendem Stahl zu
Korrosion führen. Demzufolge sollten ein Zeitraum zwischen Anwendung
und Aufbereitung von 6 h nicht überschritten, keine fixierenden Vorreinigungstemperaturen >45 °C angewandt und keine fixierenden Desinfektionsmittel (Wirkstoffbasis: Aldehyd, Alkohol) verwendet werden.
Überdosierte Neutralisationsmittel oder Grundreiniger können zu einem
chemischen Angriff und/oder zur Verblassung und visuellen oder maschinellen Unlesbarkeit der Laserbeschriftung bei nicht rostendem Stahl führen.
Bei nicht rostendem Stahl führen Chlor- bzw. chloridhaltige Rückstände,
z. B. in OP-Rückständen, Arzneimitteln, Kochsalzlösungen, im Wasser zur
Reinigung, Desinfektion und Sterilisation zu Korrosionsschäden (Lochkorrosion, Spannungskorrosion) und somit zur Zerstörung der Produkte. Zur
Entfernung muss eine ausreichende Spülung mit vollentsalztem Wasser
mit anschließender Trocknung erfolgen.
16
Page 19

Es dürfen nur Prozess-Chemikalien eingesetzt werden, die geprüft und
freigegeben sind (z. B. VAH/DGHM- oder FDA-Zulassung bzw. CE-Kennzeichnung) und vom Chemikalienhersteller hinsichtlich Materialverträglichkeit empfohlen wurden. Sämtliche Anwendungsvorgaben des Chemikalienherstellers über Temperatur, Konzentration und Einwirkzeit sind
strikt einzuhalten. Im anderen Fall kann dies zu nachfolgenden Problemen
führen:
• optische Materialveränderungen wie z. B. Verblassen oder Farbveränderungen bei Aluminium. Bei Aluminium können sichtbare Oberflächenveränderungen bereits bei einem pHWert von >8 in der Anwendungs-/Gebrauchslösung auftreten.
• Materialschäden, wie z. B. Korrosion, Risse, Brüche, vorzeitige Alterung
oder Quellung.
¾ Keine Prozess-Chemikalien verwenden, die bei Kunststoffen, z. B. PPSU,
Spannungsrissen auslösen oder, wie z. B. bei Silikon, Weichmacher
angreifen und zur Versprödung führen.
5.2 Reinigung/Desinfektion
Schäden am Produkt durch ungeeignete Reinigungs-/Desinfektionsmittel und/oder zu hohe Tem-
VORSICHT
peraturen!
¾ Reinigungs- und Desinfektionsmittel nach
Anweisungen des Herstellers verwenden,
- die für Kunststoffe und Edelstahl zugelassen
sind,
- die keine Weichmacher (z. B. Silikon) angrei fen.
¾ Angaben zu Konzentration, Temperatur und
Einwirkzeit beachten.
17
Page 20

Aesculap Sterile Technology
Sterilcontainer-System
5.3 Manuelle Reinigung/Desinfektion
¾ Nach der manuellen Reinigung/Desinfektion einsehbare Oberflächen
visuell auf Rückstände prüfen.
¾ Falls nötig, den Reinigungsprozess wiederholen.
Manuelle Reinigung und Wischdesinfektion
Phase Schritt T
[°C/°F]t[min]
I Reinigung RT
(kalt)
II Trocknung RT - - - -
III Wischdesinfektion -
IV Schlussspülung RT
(kalt)
V Trocknung RT - - - - -
T–W: Trinkwasser
VE–W: Vollentsalztes Wasser (demineralisiert)
RT: Raumtemperatur
Phase I
¾ Vor der Reinigung grobe Verschmutzungen durch Wischen entfernen.
Phase II
¾ Produkt mit flusenfreiem Tuch oder medizinischer Druckluft trocknen.
Phase III
¾ Wischdesinfektion durchführen.
Konz.
[%]
--T–W-
>1- -I
- - VE–W nicht notwendig Reinigungschemie rück-
WasserQualität
Alkohol denat. 70 % (Ethanol B|BRAUN)
Chemie
II
Aldehydfreies Flächendesinfektionsmittel (Stabimed)
standsfrei abspülen
Phase IV
¾ Bei Verwendung aldehydfreier Desinfektionsmittel:
Desinfizierte Oberflächen nach Ablauf der vorgeschriebenen Einwirkzeit (mindestens 1 Minute) unter fließendem VE-Wasser spülen.
¾ Restwasser ausreichend abtropfen lassen.
Phase V
¾ Produkt mit flusenfreiem Tuch oder im Wärmeschrank trocknen.
18
Page 21

5.4 Maschinelle neutrale oder mildalkalische Reinigung und thermische Desinfektion
Gerätetyp: Einkammer-Reinigungs-/Desinfektionsgerät ohne Ultraschall
Phase Schritt T
[°C/°F]
I Vorspülen <25/77 3 T–W -
II Reinigung 55/131 10 VE–W Neutral:
III Zwischenspülung >10/50 1 VE–W Insbesondere bei PrimeLine muss gewährleistet sein, dass
t
[min]
WasserQualität
Chemie
BBRAUN HELIMATIC CLEANER
neutral, pH-neutral,
Gebrauchslösung 0,5 %
Mildalkalisch:
- Konzentrat:
pH = 9,5
< 5 % anionische Tenside
- 0,5 %-ige Lösung
Alkalisch:
Aufbereitung bis pH = 10,5 möglich, wenn der Reiniger
vom Hersteller für die Containerreinigung freigegeben ist.
Hinweis
Bei Verwendung von mildalkalischen bzw. alkalischen Reinigern kann es bei farbig eloxiertem Aluminium zu Verfärbungen kommen, die aber keinen Einfluss auf die
Gebrauchstauglichkeit haben.
die Oberfläche rückstandsfrei abgespült wird.
IV Thermodesinfektion 90/194 5 VE–W Andere Prozessparameter für die Thermo-Desinfektion sind
in Absprache mit dem Klinikhygieniker möglich.
V Trocknung - - - Entsprechend zeitgemäßem Maschinenprogramm.
T–W: Trinkwasser
VE–W: Vollentsalztes Wasser (demineralisiert)
¾ Nach der maschinellen Reinigung/Desinfektion einsehbare Oberflä-
chen auf Rückstände prüfen.
¾ Falls nötig, den Reinigungsprozess wiederholen.
Hinweis
Sowohl in der manuellen als auch in der maschinellen Aufbereitung ist die
Behandlung mit Ultraschall möglich. Bei der maschinellen Trocknung mit
Heißluft sind Temperaturen bis 120 °C erlaubt.
5.5 Kontrolle, Wartung und Prüfung
Hinweis
Nur Personen mit entsprechender Ausbildung, fachlicher Kenntnis oder
Erfahrung dürfen Sterilcontainer prüfen und reparieren.
Die Dichtungen in den Containerdeckeln wurden nach DIN EN 868-8,
Anhang G auf eine Mindestlebensdauer von 5 000 Sterilisationszyklen
getestet.
¾ Bei visuell erkennbarer Beschädigung Dichtung sofort austauschen.
¾ Deckel einschicken an Aesculap, Adresse siehe Technischer Service.
¾ Bewegliche Metallteile (z. B. Verschlussscharniere) im Bedarfsfall mit
sterilisierbarem, dampfdurchlässigem Pflegeöl leicht ölen (z. B.
STERILIT® I-Ölspray JG600 oder STERILIT® I-Tropföler JG598).
19
Page 22
Aesculap Sterile Technology
Sterilcontainer-System
6. Fehler erkennen und beheben
Störung Ursache Behebung
Zu viel Kondensat im Sterilcontainer-Innenraum
Temperatur des Sterilisierguts vor dem Sterilisieren zu niedrig
Textilien zu feucht Nur trockene Textilien sterilisieren
Sterilcontainer zu schwer Normalcontainer
Sterilisiergut falsch gelagert Hohlkörper, Schalen, Teller u. Ä. mit der Öff-
Sterilcontainer im Sterilisator falsch positioniert
Sterilcontainer sofort nach dem Sterilisieren
zum Gebrauch bereitgestellt
Sterilcontainer beim Abkühlen schlecht gelagert
Sterilisiergut auf Raumtemperatur (ca. 20 °C)
vorwärmen
mit Instrumenten: max. 10 kg beladen
mit Textilien: max. 8 kg beladen
Halbcontainer mit Instrumenten:
max. 5 kg beladen
3/4-Container mit Instrumenten: max. 7 kg
beladen
nung nach schräg unten lagern
Textilien senkrecht schichten, nicht pressen
Schwere Sterilcontainer immer unten positionieren
Sterilcontainer vor dem Bereitstellen auf
Raumtemperatur abkühlen lassen
Sterilcontainer nicht auf dem Boden oder in
Zugluft lagern
Sterilcontainer in klimatisierten Räumen
gemäß DIN 58953-9 lagern
Sterilisator-Eigenschaften entsprechen nicht
DINEN285
Leersterilisation und Vakuumtest nicht täglich vor Sterilisierbeginn durchgeführt
Falsches Programm am Sterilisator gewählt Programm entsprechend der Beladung wählen
Sterilisatortür zu lange geöffnet, Sterilisator
kühlt aus
Kondensat in der Rinne des (Unter-)Deckels Mehrere Sterilcontainer oder schweres Sterili-
siergut gestapelt
Sterilisation nicht korrekt ausgeführt
Kein Farbwechsel an der Indikatorplombe
20
Sterilisator defekt
Indikatorplomben falsch gelagert Lagerbedingungen auf der Verpackung der
Sterilisator regelmäßig warten lassen
Trocknungsvakuum prüfen
Trocknungszeit prüfen
Dampfqualität prüfen, falls nötig verbessern
Täglich vor dem Sterilisieren Leersterilisation
und Vakuumtest durchführen
Sterilisator schnell be- und entladen
Sterilisator mit Einlegeböden unterteilen
Oberdeckel verwenden
Sterilisator vom Hersteller instand setzen lassen
Indikatorplomben beachten
Page 23

Störung Ursache Behebung
Basis-/Vario-Sterilcontainer oder PrimeLineSterilcontainer-System deformiert
Unter- bzw. Oberdeckel lässt sich nicht auf
der Wanne aufsetzen bzw. verriegeln
Perforationsfeld während der Sterilisation
abgedeckt
Containerdeckel bzw. -Wanne durch unsachgemäße Handhabung (z. B. Tragen am Deckel)
deformiert/beschädigt
7. Technischer Service
Verletzungsgefahr und/oder Fehlfunktion!
¾ Produkt nicht modifizieren.
WARNUNG
¾ Für Service und Instandsetzung wenden Sie sich an Ihre nationale
B. Braun/Aesculap-Vertretung.
Modifikationen an medizintechnischer Ausrüstung können zu einem Verlust der Garantie-/Gewährleistungsansprüche sowie eventueller Zulassungen führen.
Service-Adressen
Aesculap Technischer Service
Am Aesculap-Platz
78532 Tuttlingen / Germany
Phone: +49 7461 95-1602
Fax: +49 7461 16-5621
E-mail: ats@aesculap.de
Weitere Service-Adressen erfahren Sie über die oben genannte Adresse.
Perforationsfeld nie abdecken
Containerdeckel bzw. -Wanne austauschen
oder vom Hersteller instand setzen lassen
9. Technische Daten
Die Varianten und Abmessungen der Sterilcontainer finden Sie im Prospekt Nr. C40401.
10. Normenauszüge
10.1 Zitierte Normen
Folgende Normen werden in Bezug auf die Sterilcontainer zitiert:
• DIN 58953-9
•EN285
• EN 868-8
• EN 285 mit geltend EN ISO 17665
• EN ISO 11607
8. Zubehör/Ersatzteile
Zubehör und Verbrauchsmaterial finden Sie im Prospekt Nr. C40401.
21
Page 24
Aesculap Sterile Technology
Système de containers de stérilisation
Légende
1 Sur-couvercle
2 Fermeture du sur-couvercle
3 Couvercle perforé
4 Fermeture du couvercle perforé
5 Cuve
6 Support de plomb indicateur
7 Plomb indicateur
8 Poignée
9 Fente (pour plomb indicateur sur la fermeture du couvercle perforé)
10 Porte-filtre universel
11 Capuchon
12 Boutons pressoirs
13 Griffe à encoche (pour sur-couvercle en option sur les containers
BASIS)
14 Couvercle en plastique
15 Recouvrement pour zone de perforation
16 Système de rétention des germes (filtre permanent)
17 Cadre d’accueil
18 Goupille de préhension
19 Grille de recouvrement à lamelles
20 Poignée de montage
21 Fermeture du couvercle en plastique
Symboles sur le produit et emballage
Symbole Déclaration
Attention, tenir compte des documents
d’accompagnement
Respecter le mode d’emploi
Sommaire
1. Manipulation sûre .......................................................................................23
2. Description du produit ...............................................................................23
2.1 Champ d’application ...................................................................................23
2.2 Mode de fonctionnement ..........................................................................23
3. Préparation et installation ........................................................................23
3.1 Première mise en service ...........................................................................23
4. Utilisation du container de stérilisation ...............................................24
4.1 Mise à disposition ........................................................................................24
Retrait du sur-couvercle/couvercle perforé/couvercle en
plastique........................................................................................................ 24
Remplacer le filtre ...................................................................................... 24
4.2 Vérification du fonctionnement ..............................................................24
4.3 Manipulation ................................................................................................24
Chargement du container de stérilisation ........................................... 25
Mise en place du plomb indicateur ....................................................... 25
Chargement du stérilisateur.................................................................... 25
Stérilisation .................................................................................................. 25
Déchargement du stérilisateur................................................................ 26
Transport des containers de stérilisation ............................................. 26
Stockage des containers de stérilisation.............................................. 26
Contrôle et mise à disposition du matériel stérile ............................ 26
5. Procédé de traitement stérile validé ......................................................26
5.1 Remarques générales ..................................................................................26
5.2 Nettoyage/Décontamination ....................................................................27
5.3 Nettoyage/Décontamination manuels ...................................................28
Nettoyage manuel et décontamination par essuyage...................... 28
5.4 Nettoyage neutre ou alcalin doux en machine et désinfection
thermique .......................................................................................................29
5.5 Vérification, maintenance et contrôle ...................................................29
6. Identification et élimination des pannes ..............................................30
7. Service technique ........................................................................................31
8. Accessoires/Pièces de rechange ...............................................................31
9. Caractéristiques techniques .....................................................................31
10. Extraits de normes .......................................................................................31
10.1 Normes citées ...............................................................................................31
22
Page 25
1. Manipulation sûre
2. Description du produit
Risque de contamination de matériel stérile en cas
de containers de stérilisation non étanches!
AVERTISSEMENT
¾ Vérifier le bon fonctionnement et le bon état du produit avant de
l’utiliser.
¾ Pour éviter les dommages provoqués par un montage ou une utilisation
incorrects et ne pas remettre en cause les droits à garantie et les
prestations de responsabilité:
–N’utiliser ce produit que conformément au présent mode d’emploi.
–Respecter les informations et les consignes de sécurité et de
maintenance.
–Ne pas utiliser de containers de stérilisation endommagés ni
défectueux. Remplacer immédiatement les pièces défectueuses par
des pièces de rechange d'origine.
–Si des réparations ont été effectuées sur les containers de stérilisation
au niveau de pièces influant sur l’étanchéité aux germes: faire un
examen visuel attentif du container de stérilisation avant l’utilisation.
¾ S’assurer que seules des personnes possédant la formation, les
connaissances ou l’expérience requises manipulent le produit et les
accessoires.
¾ Conserver le mode d'emploi en un lieu accessible pour le personnel.
¾ Observer les directives générales et les principes d’hygiène relatifs à la
manipulation du matériel contaminé, devant être stérilisé et ayant été
stérilisé.
En cas de combinaison du container de
stérilisation avec des pièces provenant d’autres
fabricants, l’étanchéité du container de
stérilisation et sa fonction de barrière anti-germes
ne sont plus garanties.
¾ Ne combiner entre eux que des produits pour
containers de stérilisation Aesculap.
2.1 Champ d’application
Le système de containers stériles Aesculap est un système de barrière
stérile utilisable à plusieurs reprises, qui conserve la stérilité des produits
médicaux jusqu’à leur utilisation ou jusqu'à leur date de péremption. Il
permet de stériliser, de stocker et de transporter les produits médicaux. Il
rend également possible le réacheminement de produits médicaux après
leur utilisation. Le système Aesculap de containers de stérilisation est
conçu pour la stérilisation à la vapeur.
Remarque
Veuillez consulter votre représentation Aesculap si les containers de
stérilisation Aesculap doivent être utilisés avec d’autres procédés de
stérilisation.
2.2 Mode de fonctionnement
Le système Aesculap de containers de stérilisation est conforme aux
exigences des normes DIN 58953-9 et EN ISO 11607.
Les containers de stérilisation avec couvercle perforé et cuve fermée sont
validés pour la stérilisation à la vapeur dans un stérilisateur conforme à
EN 285 selon le:
• procédé de vide fractionné.
Les containers de stérilisation avec couvercle perforé et cuve perforée sont
en outre agréés pour la stérilisation à la vapeur dans un stérilisateur
conforme à EN 285 selon le:
• procédé de gravitation
Remarque
L’adéquation du procédé spécifique doit être attestée par une validation
sur place.
3. Préparation et installation
3.1 Première mise en service
¾ Nettoyer minutieusement avant la première utilisation les containers
de stérilisation neufs sortant d’usine.
¾ Après le nettoyage, introduire le filtre adéquat, voir Remplacer le filtre.
Système de containers de stérilisation PrimeLine:
Le système de rétention des germes 16 (filtre permanent) est intégré.
23
Page 26
Aesculap Sterile Technology
Système de containers de stérilisation
4. Utilisation du container de stérilisation
4.1 Mise à disposition
Retrait du sur-couvercle/couvercle perforé/couvercle en plastique
En présence d’un sur-couvercle, celui-ci peut être retiré du couvercle
perforé pour le nettoyage du container de stérilisation et en cas
d'encrassement.
Container VARIO (avec couvercle perforé et sur-couvercle en version
standard):
¾ Appuyer sur la fermeture du sur-couvercle 2, retirer le sur-couvercle 1
et le couvercle perforé 3.
Container BASIS (équipement ultérieur avec un sur-couvercle):
¾ Retirer la combinaison sur-couvercle 1 et couvercle perforé 3 de la
cuve 5.
¾ Desserrer la griffe à encoche 13 et retirer le sur-couvercle 1.
Système de containers de stérilisation PrimeLine:
¾ Retirer le couvercle en plastique 14 de la cuve 5.
Remplacer le filtre
Remplacer le filtre selon les intervalles prescrits en fonction du type de
filtre:
• Filtre à usage unique: avant chaque stérilisation
• Filtre permanent en PTFE: au plus tard après 1 000 cycles de traitement
• Système de rétention des germes PrimeLine: au plus tard après 5 000
cycles de traitement
Container VARIO et container BASIS:
¾ Presser simultanément les boutons pressoirs 12 du porte-filtre
universel 10.
¾ Retirer le porte-filtre universel 10.
¾ Insérer le nouveau filtre et remettre en place le porte-filtre universel
10.
¾ Appuyer sur le capuchon 11 du porte-filtre universel 10 jusqu’à ce
qu’il prenne l’encoche de façon audible.
Système de containers de stérilisation PrimeLine:
¾ Tourner la grille de recouvrement à lamelles 19 sur la gauche jusqu’à
ce qu’elle soit déverrouillée.
¾ Retirer la grille de recouvrement à lamelles 19 du système de rétention
des germes 16.
¾ Tourner vers la gauche le système de rétention des germes 16 avec la
poignée de montage 20 jusqu’à ce qu’il soit détaché du cadre
d’accueil 17.
¾ Soulever et retirer le système de rétention des germes 16 par la
goupille de préhension 18.
¾ Monter le système de rétention des germes 16 en suivant l’ordre
inverse.
4.2 Vérification du fonctionnement
Remarque
Pour le système de containers de stérilisation PrimeLine, la grille de
19
recouvrement à lamelles
fonctionnement!
¾ Procéder avant chaque utilisation à un examen visuel de toutes les
pièces du container de stérilisation pour en vérifier l’absence de
détérioration et le bon fonctionnement:
–Pièces métalliques non déformées
–Couvercle en aluminium non voilé
–Le porte-filtre universel 10 repose avec toute la surface sur le bord
–Les garnitures d’étanchéité sont en parfait état (pas de fissures, ...)
–Pièces en plastique sans fissures
–Le filtre permanent/le système de rétention des germes PrimeLine est
intact (pas de pliures, de perforations, de fissures ni d’interstices)
–Fermeture en bon état (s’encliquette)
¾ Utiliser uniquement des containers de stérilisation en parfait état.
Remplacer immédiatement les pièces endommagées par des pièces
d’origine ou les réparer.
doit être retirée pour la vérification du
4.3 Manipulation
Risque de contamination de matériel stérile en cas de
containers de stérilisation non étanches!
AVERTISSEMENT
ATTENTION
En cas de combinaison du container de stérilisation
avec des pièces provenant d’autres fabricants,
l’étanchéité du container de stérilisation et son effet
de barrière anti-germes ne sont plus garantis.
¾ Ne combiner entre eux que des produits pour
containers de stérilisation Aesculap.
Risque d’absence de stérilité du matériel à stériliser!
¾ Toujours transporter les containers de stérilisation
par les poignées.
¾ Ne jamais porter ni soulever les containers de
stérilisation par le couvercle.
¾ Transporter les containers de stérilisation de
manière à exclure toute détérioration mécanique.
24
Page 27

Chargement du container de stérilisation
Instruments
Conformément aux normes DIN EN 868-8 et DIN 58953-9, nous
recommandons le chargement maximal suivant pour le container:
• Container normal: 10 kg
• Demi-container: 5 kg
• Container 3/4: 7 kg
¾ Ranger les instruments dans des paniers perforés et des auxiliaires de
rangement adéquats.
Placer les corps creux, les coupes, les disques,etc., avec leur ouverture
inclinée vers le bas.
Container VARIO et container BASIS:
¾ Charger les containers de stérilisation de telle sorte que les porte-filtre
universels 10 demeurent dégagés. Hauteur max. de chargement:
jusqu’à env. 2 cm au-dessous du bord de la cuve du container.
¾ Verrouiller le couvercle perforé 3 par la fermeture 4 sur la cuve 5.
La fermeture 4 du couvercle perforé doit s’enclencher de façon audible.
Si ce n'est pas le cas: faire réparer le container de stérilisation, voir
Service technique.
Système de containers de stérilisation PrimeLine:
¾ Charger les containers de stérilisation de telle sorte que la grille de
recouvrement à lamelles 19 dans le couvercle en plastique 14 demeure
dégagée. Hauteur max. de chargement: jusqu’à env. 2 cm au-dessous
du bord de la cuve du container.
¾ Verrouiller le couvercle en plastique 14 avec la fermeture de couvercle
en plastique 21 sur la cuve 5.
La fermeture du couvercle en plastique 21 doit s’enclencher de façon
audible. Si ce n'est pas le cas: faire réparer le container de stérilisation,
voir Service technique.
Textiles
¾ Plier les pièces de linge de telle sorte qu’elles puissent être placées à la
verticale dans le container de stérilisation.
¾ Vérifier une fois le container de stérilisation entièrement chargé qu’il
est encore possible de passer la main tendue entre chaque pièce de
linge.
¾ Charger les containers de stérilisation de telle sorte que les porte-filtre
universels 10 demeurent dégagés (pour les containers VARIO et BASIS).
¾ Verrouiller le couvercle perforé 3 par la fermeture 4 sur la cuve 5.
La fermeture 4 du couvercle perforé doit s’enclencher de façon audible.
Si ce n'est pas le cas: faire réparer le container de stérilisation, voir
Service technique.
Système de containers de stérilisation PrimeLine:
¾ Charger les containers de stérilisation de telle sorte que la grille de
recouvrement à lamelles 19 dans le couvercle en plastique 14 demeure
dégagée.
¾ Verrouiller le couvercle en plastique 14 avec la fermeture de couvercle
en plastique 21 sur la cuve 5.
La fermeture du couvercle en plastique 21 doit s’enclencher de façon
audible. Si ce n'est pas le cas: faire réparer le container de stérilisation,
voir Service technique.
Mise en place du plomb indicateur
¾ Après le chargement du container de stérilisation, inscrire les données
suivantes sur le plomb indicateur 7: date de stérilisation, numéro de
stérilisation, date de péremption ainsi que nom et signature.
¾ Pousser le plomb indicateur 7 par le côté extérieur dans le support de
plomb indicateur 6, de sorte que la partie indicatrice s’engage dans la
fente de la fermeture du couvercle et verrouille la fermeture.
- ou -
¾ Après la fermeture du container de stérilisation, mettre en place le
plomb en plastique (p. ex. JG739) dans la fermeture.
Chargement du stérilisateur
Risque d’endommagement du container de stérilisation
par le vide en cas de compensation de pression
insuffisante!
AVERTISSEMENT
¾ Ne pas utiliser d'emballage extérieur pour les
containers de stérilisation.
¾ Ne jamais obturer hermétiquement les zones
perforées de la cuve et du couvercle perforé (pour
toutes les variantes de containers).
¾ Ne pas poser d’enveloppements en film plastique
directement sur le container de stérilisation.
Remarque
Tant les containers VARIO que les containers BASIS peuvent être stérilisés
avec le sur-couvercle en place!
¾ Respecter les indications du fabricant du stérilisateur.
¾ Toujours placer les containers de stérilisation lourds dans le bas du
stérilisateur.
¾ Toujours transporter les containers de stérilisation par les poignées.
Remarque
Les containers de stérilisation peuvent être empilés dans le stérilisateur.
¾ Transporter la pile de containers de stérilisation de manière à ce qu’elle
ne bascule pas.
Stérilisation
Risque de non stérilité!
¾ Ne stériliser les containers de stérilisation que
ATTENTION
suivant les procédés de stérilisation agréés et
validés à cet effet.
¾ Stérilisation à la vapeur, en tenant compte de ce qui suit:
La stérilisation doit être effectuée selon un procédé agréé de
stérilisation à la vapeur (p. ex. dans un stérilisateur à la vapeur
conforme à DIN EN 285 et agréé selon DIN EN ISO 17665).
25
Page 28

Aesculap Sterile Technology
Système de containers de stérilisation
Déchargement du stérilisateur
Risque de brûlure avec les containers brûlants après la
stérilisation!
AVERTISSEMENT
Transport des containers de stérilisation
ATTENTION
Stockage des containers de stérilisation
Remarque
Les containers de stérilisation peuvent être empilés pour le stockage.
¾ Conserver les containers de stérilisation en un lieu sec, propre et
protégé.
¾ Respecter la durée de stockage et les conditions de stockage de la
norme DIN 58953-9.
¾ Toujours travailler avec des gants de protection.
Risque d’absence de stérilité du matériel à stériliser!
¾ Toujours transporter les containers de stérilisation
par les poignées.
¾ Ne jamais porter ni soulever les containers de
stérilisation par le couvercle.
¾ Transporter les containers de stérilisation de
manière à exclure toute détérioration mécanique.
5. Procédé de traitement stérile validé
Remarque
En matière de traitement stérile, respecter les prescriptions légales
nationales, les normes et directives nationales et internationales ainsi que
les propres dispositions relatives à l’hygiène.
Remarque
Pour les patients atteints de la maladie de Creutzfeldt-Jakob (CJ),
soupçonnés d’être atteints de CJ ou d’éventuelles variantes, respecter les
réglementations nationales en vigueur pour la préparation stérile des
produits.
Remarque
Pour des informations actuelles sur le traitement stérile, voir également
l’Extranet Aesculap à l’adresse www.aesculap-extra.net
Remarque
On notera que la réussite du traitement stérile de ce produit médical ne
peut être garantie qu’après validation préalable du procédé de traitement
stérile. La responsabilité en incombe à l’exploitant/au responsable du
traitement stérile.
Du fait des tolérances des processus, les indications du fabricant ont
uniquement valeur indicative pour l’évaluation des processus de
traitement effectués par l’opérateur/en vigueur chez l’exploitant.
Contrôle et mise à disposition du matériel stérile
Le contenu d’un container de stérilisation n’est considéré comme stérile
que lorsque le container a été stérilisé, stocké et transporté dans les règles.
Si ce n'est pas le cas, le matériel doit faire l’objet d’un nouveau traitement
stérile.
Risque de contamination par du matériel stérilisé de
façon incorrecte!
DANGER
¾ Vérifier que la couleur du point indicateur a changé.
¾ Contrôler que tous les éléments du container, en particulier les
fermetures de couvercle, sont intactes.
¾ Vérifier que le plombage du container est intact.
¾ Avant la mise à disposition du matériel stérile,
contrôler que la stérilisation a été effectuée avec
succès.
5.1 Remarques générales
Les résidus opératoires incrustés ou fixés peuvent mettre obstacle au
nettoyage ou le rendre inefficace et entraîner une corrosion sur l’acier
inoxydable. Un intervalle de 6 heures entre utilisation et traitement ne
devrait par conséquent pas être dépassé, de même qu’il ne faut pas
appliquer de températures de prélavage fixantes >45 °C ni utiliser de
produits désinfectants fixants (substance active: aldéhyde, alcool).
Un surdosage du produit de neutralisation ou du détergent de base peut
entraîner une agression chimique et/ou le palissement et l’illisibilité
visuelle ou mécanique de l’inscription laser sur l’acier inoxydable.
Sur l’acier inoxydable, les résidus contenant du chlore ou du chlorure, tels
qu’ils sont contenus dans les résidus d’OP, médicaments, sérum
physiologique, eau de nettoyage, produits de décontamination et de
stérilisation, entraînent des dégâts dus à la corrosion (corrosion
perforatrice, sous contrainte) et donc la dégradation des produits. Les
résidus sont éliminés par rinçage suffisamment abondant à l’eau
déminéralisée et séchage consécutif.
26
Page 29

Seuls doivent être utilisés pour le processus des produits chimiques
contrôlés et validés (p. ex. agrément VAH/DGHM ou FDA ou label CE) et
recommandés par le fabricant des produits chimiques en termes de
compatibilité avec les matériaux. Toutes les prescriptions d’application du
fabricant des produits chimiques relatives à la température, la
concentration et la durée d’action doivent être strictement respectées.
Dans le cas contraire, les problèmes suivants peuvent survenir:
• modification d’aspect du matériau, p. ex. palissement ou altérations de
couleur de l’aluminium. Sur l’aluminium, des altérations de surface
visibles peuvent se produire dès une valeur de pH de >8 dans la
solution utilisée.
• des détériorations de matériau telles que corrosion, fissures, cassures,
vieillissement prématuré ou dilatations.
¾ Ne pas utiliser pour le processus de produits chimiques qui déclenchent
des fissures par contrainte sur les matières synthétiques, p. ex. le PPSU,
ou qui les attaquent, comme les plastifiants pour le silicone, et qui
entraînent une fragilisation.
5.2 Nettoyage/Décontamination
Risque de détérioration du produit avec un produit
de nettoyage/décontamination inadéquat et/ou des
ATTENTION
températures trop élevées!
¾ Utiliser en respectant les instructions du fabri-
cant des produits de nettoyage et de décontamination,
- agréés pour les plastiques et l’acier inoxydable,
- n’attaquant pas les plastifiants (p. ex. silicone).
¾ Respecter les indications sur la concentration, la
température et le temps d’action.
27
Page 30

Aesculap Sterile Technology
Système de containers de stérilisation
5.3 Nettoyage/Décontamination manuels
¾ Après le nettoyage/la décontamination manuels, vérifier par contrôle
visuel la présence éventuelle de résidus sur les surfaces visibles.
¾ Si nécessaire, répéter le processus de nettoyage.
Nettoyage manuel et décontamination par essuyage
Phase Etape T
[°C/°F]t[min]
I Nettoyage TA
(froid)
II Séchage TA - - - -
III Décontamination par
essuyage
IV Rinçage final TA
V Séchage TA - - - - -
EP: Eau potable
EDém: Eau déminéralisée
TA: Température ambiante
Phase I
¾ Avant le nettoyage, éliminer les impuretés grossières par essuyage.
Phase II
¾ Sécher le produit avec un chiffon non pelucheux ou de l’air comprimé
médical.
-
(froid)
Conc.
-- EP-
>1- -I
- - EDém non nécessaire Rincer les produits
[%]
Qualité de
l’eau
Alcool dénaturé 70 %
(éthanol B|BRAUN)
Chimie
II
Produit sans aldéhyde pour
désinfection des surfaces
(Stabimed)
chimiques de nettoyage
pour en éliminer
intégralement les résidus
Phase III
¾ Procéder à une décontamination par essuyage.
Phase IV
¾ Èn cas d’utilisation de produits de décontamination sans aldéhyde:
rincer les surfaces décontaminées sous eau déminéralisée courante
après le temps d’action prescrit (au moins 1 minute).
¾ Laisser s’égoutter suffisamment l’eau résiduelle.
Phase V
¾ Sécher le produit avec un chiffon non pelucheux ou en étuve.
28
Page 31

5.4 Nettoyage neutre ou alcalin doux en machine et désinfection thermique
Type d’appareil: appareil de nettoyage/décontamination à une chambre sans ultrasons
Phase Etape T
[°C/°F]
I Rinçage préalable <25/77 3 EP -
II Nettoyage 55/131 10 EDém Neutre:
III Rinçage intermédiaire >10/50 1 EDém Pour PrimeLine en particulier, il faut s’assurer que le rinçage de la
IV Thermodésinfection 90/194 5 EDém D’autres paramètres de processus pour la thermodésinfection sont
V Séchage - - - Conformément à un programme de machine adapté et moderne.
t
[min]
Qualité de
l’eau
Chimie
BBRAUN HELIMATIC CLEANER
neutre, pH neutre,
solution d’usage 0,5 %
Alcalin doux:
- Concentré:
pH = 9,5
< 5 % de dérivés tensioactifs anioniques
- solution à 0,5 %
Alcalin:
Traitement possible jusqu’à un pH = 10,5, si le produit nettoyant
est agréé par le fabricant pour le nettoyage des containers.
Remarque
En cas d’utilisation de produits nettoyants alcalins doux ou
alcalins, des décolorations peuvent se produire sur l’aluminium
anodisé coloré, qui n’ont toutefois aucune influence sur les
qualités fonctionnelles.
surface élimine tous les résidus.
possibles en concertation avec le responsable de l’hygiène de
l’hôpital.
EP: Eau potable
EDém: Eau déminéralisée
¾ Après le nettoyage/la décontamination en machine, vérifier la présence
éventuelle de résidus sur les surfaces visibles.
¾ Si nécessaire, répéter le processus de nettoyage.
Remarque
Un traitement aux ultrasons est possible tant avec le traitement stérile
manuel qu’en machine. Pour le séchage manuel à l’air chaud, des
températures atteignant 120 °C sont autorisées.
5.5 Vérification, maintenance et contrôle
Remarque
Seules des personnes possédant la formation, les connaissances techniques
ou l’expérience requises sont habilitées à contrôler et réparer les containers
de stérilisation.
Les joints d’étanchéité dans les couvercles de container ont été testés
selon la norme DIN EN 868-8, Appendice G, pour une durée de vie
minimale de 5 000 cycles de stérilisation.
¾ En présence d’une détérioration visible, remplacer le joint
immédiatement.
¾ Envoyer le couvercle à Aesculap, adresse voir Service technique.
¾ Huiler légèrement si nécessaire les pièces mobiles métalliques (p. ex.
les charnières de fermeture) avec une huile d’entretien stérilisable
perméable à la vapeur (p. ex. spray d’huile STERILIT I JG600 ou comptegouttes d’huile STERILIT I JG598).
29
Page 32

Aesculap Sterile Technology
Système de containers de stérilisation
6. Identification et élimination des pannes
Problème Cause Elimination
Trop de produit de condensation à l’intérieur
du container de stérilisation
Température du matériel à stériliser trop basse
avant la stérilisation
Textiles trop humides Stériliser uniquement des textiles secs
Container de stérilisation trop lourd Container normal
Matériel de stérilisation mal mis en place Placer les corps creux, les coupes, les
Le container de stérilisation est mal positionné Toujours placer les containers de stérilisation
Après la stérilisation, préparer immédiatement
le container de stérilisation pour l’emploi
Container de stérilisation mal stocké pendant
le refroidissement
Préchauffer le matériel à stériliser à
température ambiante (env. 20 °C)
avec instruments: chargement de 10 kg max.
avec textiles: chargement de 8 kg max.
Demi-container avec instruments:
chargement de 5 kg max.
Container 3/4 avec instruments: chargement
de 7 kg max.
disques, etc., avec leur ouverture inclinée vers
le bas
Placer les textiles à la verticale, ne pas serrer
lourds en bas
Avant la préparation, faire refroidir le
container de stérilisation à la température
ambiante
Ne pas déposer le container de stérilisation sur
le sol ni dans un courant d’air
Stocker le container de stérilisation dans des
pièces climatisées selon DIN 58953-9
30
Les caractéristiques du stérilisateur ne sont
pas conformes à la norme DIN EN 285
Une stérilisation à vide et un test du vide n’ont
pas été effectués quotidiennement avant le
début des stérilisations
Sélection du mauvais programme sur le
stérilisateur
Porte du stérilisateur ouverte trop longtemps,
le stérilisateur refroidit
Faire procéder régulièrement à la maintenance
du stérilisateur
Contrôler le vide de séchage
Contrôler la durée de séchage
Contrôler la qualité de la vapeur, si nécessaire
l’améliorer
Effectuer quotidiennement avant la
stérilisation une stérilisation à vide et un test
du vide
Sélectionner un programme conforme au
chargement
Charger et décharger rapidement le
stérilisateur
Page 33

Problème Cause Elimination
Produit de condensation dans la rainure du
couvercle (perforé)
Pas de changement de couleur sur le plomb
indicateur
Déformation du container de stérilisation
Basis/Vario ou du système de container de
stérilisation PrimeLine
Impossible de placer ou de verrouiller le
couvercle perforé ou le sur-couvercle sur la
cuve
7. Service technique
Risque de blessure et/ou de dysfonctionnements!
¾ Ne pas modifier le produit.
Empilage de plusieurs containers de
stérilisation ou de matériel de stérilisation
lourd
Stérilisation non effectuée correctement
Stérilisateur défectueux
Plomb indicateur mal stocké Respecter les conditions de stockage indiquées
Zone de perforations recouverte pendant la
stérilisation
Couvercles du container ou cuve déformés/
détériorés par une manipulation impropre
(p. ex. container ayant été porté par le
couvercle)
Subdiviser le stérilisateur avec des tablettes
amovibles
Utiliser un sur-couvercle
Faire réparer le stérilisateur par le fabricant
sur l'emballage du plomb indicateur
Ne jamais recouvrir la zone de perforations
Remplacer les couvercles de container ou la
cuve ou les faire réparer par fabricant
9. Caractéristiques techniques
Les variantes et les dimensions des containers de stérilisation sont fournis
dans le prospectus n° C40401.
AVERTISSEMENT
¾ Pour le service et la réparation, veuillez vous adresser à votre
représentation nationale B. Braun/Aesculap.
Les modifications effectuées sur les équipements techniques médicaux
peuvent entraîner une perte des droits à garantie de même que
d’éventuelles autorisations.
Adresses de service
Aesculap Technischer Service
Am Aesculap-Platz
78532 Tuttlingen / Germany
Phone: +49 7461 95-1602
Fax: +49 7461 16-5621
E-mail: ats@aesculap.de
Pour obtenir d’autres adresses de service, contactez l’adresse ci-dessus.
8. Accessoires/Pièces de rechange
Vous trouverez les accessoires et les consommables dans le prospectus
n° C40401.
10. Extraits de normes
10.1 Normes citées
Les normes suivantes ont été citées en relation avec les containers de
stérilisation:
• DIN 58953-9
•EN285
• EN 868-8
• EN 285 avec validité conjointe de la norme EN ISO 17665
• EN ISO 11607
31
Page 34

Aesculap Sterile Technology
Sistema de contenedores estériles
Leyenda
1 Tapa superior
2 Cierre de la tapa superior
3 Tapa inferior
4 Cierre de la tapa inferior
5 Cubeta
6 Soporte precinto de identificación
7 Precinto de identificación
8 Mango
9 Ranura (en el cierre de la tapa inferior para precinto de identificación)
10 Soporte para filtros universal
11 Caperuza
12 Botones
13 Garra de enclavamiento (en tapa superior opcional del modelo BASIS)
14 Tapa de plástico
15 Tapa para la zona perforada
16 Sistema antibacterias (filtro reutilizable)
17 Marco de alojamiento
18 Perno de sujeción
19 Tapa de rejilla de lamelas
20 Mango de montaje
21 Cierre de la tapa de plástico
Símbolos en el producto y envase
Símbolo Explicación
Atención, observar la documentación adjunta
Observar las instrucciones de manejo
Índice
1. Manejo correcto ...........................................................................................33
2. Descripción de producto ............................................................................33
2.1 Finalidad de uso ...........................................................................................33
2.2 Modo de funcionamiento ..........................................................................33
3. Preparación e instalación ..........................................................................34
3.1 Primera puesta en servicio ........................................................................34
4. Utilización del contenedor estéril ...........................................................34
4.1 Puesta a punto .............................................................................................34
Extracción de tapa superior/tapa inferior/tapa de plástico............ 34
Cambio del filtro ......................................................................................... 34
4.2 Comprobación del funcionamiento ........................................................34
4.3 Manejo ............................................................................................................34
Carga del contenedor estéril.................................................................... 35
Uso del precinto de identificación ......................................................... 35
Carga del esterilizador............................................................................... 35
Esterilización ................................................................................................ 35
Descarga del esterilizador ........................................................................ 36
Transporte de los contenedores estériles............................................. 36
Almacenamiento de los contenedores estériles ................................. 36
Comprobación y puesta a punto del material estéril ....................... 36
5. Procedimiento de trato y cuidado validado .........................................36
5.1 Advertencias generales ..............................................................................36
5.2 Limpieza/Desinfección ................................................................................37
5.3 Limpieza/Desinfección manuales ............................................................38
Limpieza manual y desinfección con un paño.................................... 38
5.4 Limpieza automática neutra o ligeramente alcalina y
desinfección térmica ...................................................................................39
5.5 Control, mantenimiento e inspección ....................................................39
6. Identificación y subsanación de fallos ..................................................40
7. Servicio de Asistencia Técnica .................................................................41
8. Accesorios/Piezas de recambio ................................................................41
9. Datos técnicos ..............................................................................................41
10. Extractos de normas ...................................................................................41
10.1 Normas citadas .............................................................................................41
32
Page 35

1. Manejo correcto
2. Descripción de producto
Peligro de contaminación de material estéril por
falta de estanqueidad del contenedor estéril.
ADVERTENCIA
¾ Antes de utilizar el producto comprobar que funcione y que se
encuentre en perfecto estado.
¾ Para evitar daños causados por un montaje o uso inadecuados, y
conservar así los derechos de garantía y de responsabilidad del
fabricante:
–Utilizar el producto sólo conforme a estas instrucciones de manejo.
–Tener en cuenta la información sobre las medidas de seguridad y las
instrucciones de mantenimiento.
–No utilizar contenedores estériles dañados o defectuosos. Sustituir
inmediatamente cualquier componente dañado por una pieza de
recambio original.
–Seguir los siguientes pasos en caso de que se hayan reparado
componentes cuyo estado pueda afectar a la eficacia del contenedor
para repeler los gérmenes: Efectuar una inspección visual minuciosa
del contenedor antes de su utilización.
¾ Asegurarse de que el producto y los accesorios sólo son manipulados
por personas con la formación adecuada o la experiencia o
conocimientos técnicos necesarios.
¾ Debe garantizarse que el personal tenga acceso a estas instrucciones.
¾ Observar las directrices generales y fundamentos de higiene
relacionados con la manipulación de objetos esterilizados y a
esterilizar.
Si el contenedor estéril se combina con
componentes de otros fabricantes, no se podrá
garantizar la estanqueidad del contenedor estéril
ni su función como barrera antibacteriana.
¾ Combinar entre sí únicamente productos de la
gama de contenedores estériles Aesculap.
2.1 Finalidad de uso
El sistema de contenedores estériles Aesculap es un sistema con barrera
estéril reutilizable que mantiene la esterilidad de los productos sanitarios
hasta el momento de su utilización o de su fecha de caducidad. En él los
productos sanitarios se pueden esterilizar, almacenar y transportar.
También posibilitan la retirada de los productos sanitarios después de
haber sido utilizados. El sistema de contenedores estériles Aesculap es
adecuado para la esterilización a vapor.
Observación
En caso de que tenga previsto utilizar los contenedores estériles de
Aesculap con otro método de esterilización, consulte con su distribuidor
habitual de Aesculap.
2.2 Modo de funcionamiento
El sistema de contenedores estériles Aesculap cumple con las
disposiciones de las normas DIN 58953-9 y EN ISO 11607.
Los contenedores estériles con tapa perforada y cubeta cerrada están
homologados para la esterilización a vapor con un esterilizador según
EN 285 en:
• la esterilización por vacío fraccionado
Los contenedores estériles con tapa perforada y cubeta perforada son
indicados además para la esterilización a vapor en un esterilizador según
EN 285 en:
• la esterilización por desplazamiento gravitacional
Observación
La idoneidad del método específico debe demostrarse por medio de una
validación in situ.
33
Page 36

Aesculap Sterile Technology
Sistema de contenedores estériles
3. Preparación e instalación
3.1 Primera puesta en servicio
¾ Limpiar a fondo los contenedores estériles nuevos de fábrica antes de
su primera aplicación.
¾ Tras la limpieza deberá colocarse el filtro indicado, ver Cambio del
filtro.
Sistema de contenedores estériles PrimeLine:
Lleva incorporado un sistema antibacterias 16 (filtro reutilizable).
4. Utilización del contenedor estéril
4.1 Puesta a punto
Extracción de tapa superior/tapa inferior/tapa de plástico
Si se utiliza una tapa superior, ésta puede retirarse para la limpieza del
contenedor estéril, o bien cuando la tapa inferior se ensucia.
Modelo VARIO (se suministra con tapa inferior y superior de forma
estándar):
¾ Presionar el cierre de la tapa superior 2, retirar la tapa superior 1 y la
tapa inferior 3.
Modelo BASIS (con tapa superior incorporada posteriormente):
¾ Retirar la tapa superior 1 y la tapa inferior 3 juntas de la cubeta 5.
¾ Soltar la garra de enclavamiento 13 y retirar la tapa superior 1.
Sistema de contenedores estériles PrimeLine:
¾ Retirar la tapa de plástico 14 de la cubeta 5.
Cambio del filtro
En función del tipo de filtro, éste deberá cambiarse según lo siguiente:
• Filtro de un solo uso: antes de cada esterilización
• Filtro reutilizable de PTFE: tras 1 000 ciclos de limpieza como máximo
• Sistema antibacterias de PrimeLine: tras 5 000 ciclos de limpieza como
máximo
Contenedores VARIO y BASIS:
¾ Presionar a la vez los botones 12 del soporte para filtros universal 10.
¾ Retirar el soporte para filtros universal 10.
¾ Insertar el nuevo filtro y volver a colocar el soporte para filtros
universal10.
¾ Presionar la caperuza 11 del soporte para filtros universal 10 hasta oír
que queda enclavada.
Sistema de contenedores estériles PrimeLine:
¾ Girar la tapa de rejilla con lamelas 19 hacia la izquierda hasta que se
desenclave.
¾ Retirar la tapa de rejilla con lamelas 19 separándola del sistema
antibacterias 16.
¾ Girar hacia la izquierda el sistema antibacterias 16 utilizando el
mango de montaje 20 hasta que se separe del marco alojamiento 17.
¾ Levantar el sistema antibacterias 16 por el perno de sujeción 18 y
retirarlo.
¾ Montar el sistema antibacterias 16 siguiendo los mismos pasos en
orden inverso.
4.2 Comprobación del funcionamiento
Observación
Para comprobar el sistema de contendores estériles PrimeLine debe
19
retirarse la tapa de rejilla con lamelas
¾ Antes de cada uso, comprobar con un examen visual que los
componentes del contenedor estéril no presenten daños y comprobar
su funcionalidad:
–Las partes metálicas no están deformadas
–La tapa de aluminio no está combada
– El soporte para filtros universal 10 toca el borde con toda su superficie
–Las juntas están intactas (sin grietas, etc.)
–Las partes de plástico no están agrietadas
–El filtro reutilizable/sistema antibacterias PrimeLine no presenta
daños (pliegues, agujeros, grietas)
–El cierre funciona correctamente (encaja bien)
¾ Utilizar únicamente contenedores estériles en perfecto estado.
Cambiar o reparar de inmediato los componentes dañados con
recambios originales.
.
4.3 Manejo
Peligro de contaminación de material estéril por falta
de estanqueidad del contenedor estéril.
ADVERTENCIA
ATENCIÓN
Si el contenedor estéril se combina con componentes
de otros fabricantes, no se podrá garantizar la
estanqueidad del contenedor estéril ni su función
como barrera antibacteriana.
¾ Combinar entre sí únicamente productos de la gama
de contenedores estériles Aesculap.
Peligro de no esterilidad del material estéril.
¾ Para transportar el contenedor estéril sujetarlo
siempre por sus asas.
¾ No sujetar ni levantar nunca los contenedores
estériles por la tapa.
¾ Transportar los contenedores estériles de manera
que no pueda producirse ningún daño mecánico.
34
Page 37

Carga del contenedor estéril
Instrumental
Recomendamos limitar la carga de los contenedores según DIN EN 868-8
y DIN 58953-9 como sigue:
• Contenedor normal: 10 kg
• Semicontenedor: 5 kg
• Contenedor 3/4: 7 kg
¾ Almacenar los instrumentos en la cesta utilizando los soportes
adecuados.
Los cuerpos huecos, las bandejas, los platos y los instrumentos
similares deberán colocarse con cierta inclinación y con la abertura
hacia abajo.
Contenedores VARIO y BASIS:
¾ Cargar el contenedor estéril dejando libres los soportes para filtro
universales 10. Altura máxima de carga: hasta 2 cm por debajo del
borde de la cubeta del contenedor.
¾ Bloquear la tapa inferior 3 en la cubeta 5 con el cierre de la tapa
inferior 4.
El cierre de la tapa inferior 4 debe encajar de forma audible. Si no es
así deberá hacerse que el fabricante repare el contenedor estéril, ver
Servicio de Asistencia Técnica.
Sistema de contenedores estériles PrimeLine:
¾ Cargar el contenedor estéril de tal forma que la tapa de rejilla con
lamelas 19 de la tapa de plástico 14 quede descubierta. Altura máxima
de carga: hasta 2 cm por debajo del borde de la cubeta del contenedor.
¾ Bloquear la tapa de plástico 14 en la cubeta 5 con el cierre de la tapa
de plástico 21.
El cierre de la tapa de plástico 21 debe encajar de forma audible. Si no
es así deberá hacerse que el fabricante repare el contenedor estéril, ver
Servicio de Asistencia Técnica.
Material textil
¾ Doblar el material textil y colocarlo en posición vertical en el
contenedor estéril.
¾ Una vez se han colocado en el contenedor todos los artículos textiles,
asegurarse de que entre cada uno de ellos queda suficiente espacio
como para introducir la mano extendida.
¾ Cargar el contenedor estéril dejando libres los soportes para filtro
universales 10 (contenedores VARIO y BASIS).
¾ Bloquear la tapa inferior 3 en la cubeta 5 con el cierre de la tapa
inferior 4.
El cierre de la tapa inferior 4 debe encajar de forma audible. Si no es
así deberá hacerse que el fabricante repare el contenedor estéril, ver
Servicio de Asistencia Técnica.
Sistema de contenedores estériles PrimeLine:
¾ Cargar el contenedor estéril de tal forma que la tapa de rejilla con
lamelas 19 de la tapa de plástico 14 quede descubierta.
¾ Bloquear la tapa de plástico 14 en la cubeta 5 con el cierre de la tapa
de plástico 21.
El cierre de la tapa de plástico 21 debe encajar de forma audible. Si no
es así deberá hacerse que el fabricante repare el contenedor estéril, ver
Servicio de Asistencia Técnica.
Uso del precinto de identificación
¾ Tras cargar el contenedor estéril, en el precinto de identificación 7
deberá escribirse lo siguiente: Fecha y número de esterilización,
período de validez, nombre y firma.
¾ Colocar el precinto de identificación 7 de la parte exterior en su
soporte 6 introduciendo la parte donde se encuentra la identificación
en la ranura del cierre de la tapa y sellando el cierre.
- o -
¾ Una vez cerrado el contenedor estéril, colocar el precinto de plástico
(p. ej. JG739) en el cierre.
Carga del esterilizador
Peligro de provocar daños por vacío en el contenedor si
no se produce una compensación de presión suficiente.
ADVERTENCIA
Observación
Tanto los contenedores VARIO como los contenedores BASIS pueden
esterilizarse con la tapa superior puesta.
¾ Observar las instrucciones del fabricante del esterilizador.
¾ Colocar los contenedores estériles más pesados en el fondo del
esterilizador.
¾ Para transportar el contenedor estéril sujetarlo siempre por sus asas.
Observación
Los contenedores estériles pueden apilarse en el esterilizador.
¾ Transportar la pila de contenedores estériles con cuidado para que no
se vuelque.
Esterilización
ATENCIÓN
¾ Esterilizar a vapor y, al esterilizar, tener en cuenta lo siguiente:
La esterilización debe realizarse mediante un método homologado de
esterilización a vapor (p. ej., en un esterilizador a vapor según DIN
EN 285 y validado según DIN EN ISO 17665).
¾ No utilizar embalajes exteriores con el contenedor
estéril.
¾ No obturar la zona perforada de la cubeta ni de la
tapa inferior bajo ningún concepto (en ninguno de
los modelos del contenedor).
¾ No colocar envases de film en contacto directo con
el contenedor estéril.
Peligro de no esterilidad.
¾ Esterilizar el contenedor estéril sólo con el
método de esterilización homologado y
autorizado al efecto.
35
Page 38

Aesculap Sterile Technology
Sistema de contenedores estériles
Descarga del esterilizador
Peligro de quemaduras por la alta temperatura del
contenedor después de la esterilización.
ADVERTENCIA
Transporte de los contenedores estériles
ATENCIÓN
Almacenamiento de los contenedores estériles
Observación
Los contenedores estériles pueden almacenarse apilados.
¾ Conservar los contenedores estériles en un lugar seco, limpio y seguro.
¾ Observar las disposiciones de la norma DIN 58953-9 relativas al
período y a las condiciones de almacenamiento.
Comprobación y puesta a punto del material estéril
Sólo se puede considerar que el material del interior del contenedor está
esterilizado si el contenedor ha sido esterilizado, almacenado y
transportado como es debido.
Si no es así, deberá esterilizarse de nuevo el material.
PELIGRO
¾ Asegurarse de que ha cambiado el color del punto de identificación.
¾ Asegurarse de que todos los componentes del contenedor están
intactos, en especial los cierres de las tapas.
¾ Asegurarse de que el precinto del contenedor está intacto.
¾ Utilizar guantes de protección en todo momento.
Peligro de no esterilidad del material estéril.
¾ Para transportar el contenedor estéril sujetarlo
siempre por sus asas.
¾ No sujetar ni levantar nunca los contenedores
estériles por la tapa.
¾ Transportar los contenedores estériles de manera
que no pueda producirse ningún daño mecánico.
Si el material no se ha esterilizado correctamente,
podría causar infecciones.
¾ Antes de la puesta a punto del material estéril
deberá comprobarse si la esterilización se ha
efectuado de forma efectiva.
5. Procedimiento de trato y cuidado
validado
Observación
Cumplir las disposiciones legales y las normas y directrices nacionales e
internacionales, además de las normas higiénicas del centro para el trato y
cuidado de los productos.
Observación
En el caso de pacientes que padezcan la enfermedad de Creutzfeldt-Jakob,
o con sospecha de padecer dicha enfermedad o sus variantes, deberá
cumplirse la normativa vigente del país en cada caso con respecto al trato
y cuidado de los productos.
Observación
Puede consultar información actualizada sobre el trato y cuidado en
Aesculap Extranet: www.aesculap-extra.net
Observación
Hay que tener en cuenta que la correcta limpieza de este producto sanitario
sólo puede garantizarse mediante una validación previa del proceso de
trato y cuidado. En este caso, la responsabilidad recae en el usuario/
responsable del trato y cuidado.
Debido a las tolerancias de proceso, las indicaciones del fabricante sólo
sirven como valor orientativo para la valoración de los procesos de trato y
cuidado de que disponga el usuario/la persona encargada del trato y
cuidado.
5.1 Advertencias generales
Los residuos resecos o incrustados de intervenciones quirúrgicas pueden
dificultar la limpieza o hacerla ineficaz y provocar daños por corrosión en
los componentes de acero inoxidable. Por esa razón, no deberían
transcurrir más de 6 horas entre la aplicación y el trato y cuidado, ni
deberían emplearse elevadas temperaturas de prelavado >45 °C, ni
desinfectantes (principios activos base: aldehído y alcohol) que puedan
favorecer la incrustación.
Una dosis excesiva de agentes neutralizantes o de limpieza puede
provocar agresiones químicas y/o la ilegibilidad manual o automática de
las inscripciones láser en acero inoxidable.
En el caso de productos de acero inoxidable, los restos de cloro y
sustancias cloradas — p. ej., los contenidos en residuos de intervenciones
quirúrgicas, fármacos, soluciones salinas, agua para limpieza, desinfección
y esterilización — pueden provocar daños irreversibles por corrosión
(corrosión por picaduras, corrosión interna) en dichos productos. Para
eliminar los restos, los productos se deben aclarar a fondo con agua
completamente desmineralizada y secarse a continuación.
36
Page 39

Se deben utilizar únicamente productos químicos de proceso
comprobados y autorizados (p. ej., autorizados por VAH/DGHM o la FDA, o
con marcado CE), y recomendados por el fabricante en cuanto a su
compatibilidad con el material. Deben cumplirse estrictamente todas las
indicaciones de uso del fabricante del producto químico, como p. ej., las
referentes a temperaturas, concentraciones o tiempos de actuación. De lo
contrario, pueden surgir los siguientes problemas:
• Alteraciones ópticas del material, como decoloración o cambio de color
en el caso del aluminio. Aparición de alteraciones visibles en las
superficies de aluminio a partir de valores pH >8 en la solución de
trabajo.
• Daños en el material como corrosión, grietas, roturas, envejecimiento
prematuro o hinchamiento.
¾ No utilizar ningún producto químico de proceso que pueda provocar
fisuras por tensión en plásticos, p. ej. PPSU, o que pueda atacar a
plastificantes, p. ej. silicona, y provocar fragilización.
5.2 Limpieza/Desinfección
Peligro de dañar el producto debido al uso de
desinfectantes/agentes de limpieza no adecuados
ATENCIÓN
y/o a temperaturas demasiado elevadas.
¾ Utilizar únicamente desinfectantes/agentes de
limpieza según las instrucciones del fabricante
que:
- sean aptos para su utilización en plásticos y
acero inoxidable.
- no ataquen a plastificantes (p. ej., silicona).
¾ Respetar los valores de concentración,
temperatura y tiempo de actuación.
37
Page 40

Aesculap Sterile Technology
Sistema de contenedores estériles
5.3 Limpieza/Desinfección manuales
¾ Después de la limpieza/desinfección manuales, comprobar visualmente
que no han quedado restos en las superficies visibles.
¾ Si es necesario, repetir el proceso de limpieza.
Limpieza manual y desinfección con un paño
Fase Paso T
[°C/°F]t[min]
I Limpieza TA
(frío)
II Secado TA - - - -
III Desinfección con paño -
IV Aclarado final TA
(frío)
V Secado TA - - - - -
AP: Agua potable
ACD: Agua completamente desmineralizada
TA: Temperatura ambiente
Fase I
¾ Antes de la limpieza, eliminar la suciedad más incrustada con un paño
húmedo.
Fase II
¾ Secar el producto con un paño sin pelusa o con aire comprimido de uso
médico.
Conc.
Calidad del
[%]
-- AP-
>1- -I
- - ACD no necesario Aclarar por completo
agua
Alcohol desnaturalizado
70 % (Etanol B|BRAUN)
Sust. químicas
II
Desinfectante de superficies
sin aldehídos (Stabimed)
cualquier resto de limpiador
Fase III
¾ Realizar una desinfección con paño.
Fase IV
¾ Si se utilizan desinfectantes sin aldehídos:
una vez finalizado el tiempo de actuación estipulado (al menos
1 minuto), aclarar las superficies desinfectadas con agua corriente
completamente desmineralizada.
¾ Dejar escurrir suficientemente los restos de agua.
Fase V
¾ Secar el producto con un paño sin pelusa o en un armario de secado.
38
Page 41

5.4 Limpieza automática neutra o ligeramente alcalina y desinfección térmica
Tipo de aparato: Aparato de limpieza/desinfección de una cámara sin ultrasonido
Fase Paso T
[°C/°F]
I Prelavado <25/77 3 AP -
II Limpieza 55/131 10 ACD Neutra [Sollte "Neutro" heissen, Maskulinum]:
III Aclarado intermedio >10/50 1 ACD En el caso de PrimeLine en particular, debe comprobarse
IV Termodesinfección 90/194 5 ACD Es posible configurar otros parámetros de proceso para la
V Secado - - - Según programa de la máquina.
t
[min]
Calidad del
agua
Sust. químicas
BBRAUN HELIMATIC CLEANER
neutro, pH neutro,
solución al 0,5%
Ligeramente alcalino:
- concentrado:
pH = 9,5
< 5% de agentes tensioactivos aniónicos
- solución al 0,5%
Alcalino:
Se puede utilizar un producto con un pH de hasta 10,5
siempre y cuando el fabricante haya autorizado su uso en
contenedores.
Observación
Si se utilizan productos de limpieza alcalinos o
ligeramente alcalinos es posible que, en el caso del
aluminio anodizado de color, se produzcan ligeras
alteraciones en el color; ello no afecta a la aptitud para el
uso.
exhaustivamente que no quedan restos en la superficie
después del aclarado.
termodesinfección previo acuerdo con el higienista
hospitalario.
AP: Agua potable
ACD: Agua completamente desmineralizada
¾ Después de la limpieza/desinfección automáticas, comprobar que no
han quedado restos en las superficies visibles.
¾ Si es necesario, repetir el proceso de limpieza.
Observación
El producto se puede tratar con ultrasonidos tanto si la limpieza es manual
como si es automática. En el secado automático con aire caliente se
permiten temperaturas de hasta 120 °C.
5.5 Control, mantenimiento e inspección
Observación
La inspección y reparación de los contenedores estériles sólo puede llevarse
a cabo por personas con la formación adecuada o la experiencia o
conocimientos técnicos necesarios.
Según los ensayos efectuados de acuerdo con la norma DIN EN 868-8,
apartado G, la vida útil mínima de las juntas de las tapas de los
contenedores es de 5 000 ciclos de esterilización.
¾ Si se constata que las juntas no están en buen estado deberán
cambiarse de inmediato.
¾ Enviar la tapa a Aesculap a la dirección: ver Servicio de Asistencia
Técnica.
¾ En caso necesario, lubricar ligeramente las piezas metálicas móviles
(p. ej., charnelas) con aceite de conservación permeable al vapor y
esterilizable (p. ej., aceite en espray STERILIT® I JG600 o lubricador por
goteo STERILIT® I JG598).
39
Page 42

Aesculap Sterile Technology
Sistema de contenedores estériles
6. Identificación y subsanación de fallos
Fallo Causa Subsanación
Gran cantidad de condensado en el interior del
contenedor estéril
Temperatura demasiado baja del material
antes de la esterilización
Material textil muy húmedo Esterilizar sólo material textil seco
El contenedor estéril pesa demasiado Carga máxima de contenedores
El material a esterilizar no se ha colocado
correctamente
Colocación incorrecta del contenedor estéril
en el esterilizador
Se han utilizado los contenedores
inmediatamente después de su esterilización
En primer lugar dejar que el material a
esterilizar adquiera la temperatura ambiente
(aprox. 20 °C)
normales con instrumentos: 10 kg
Con tejidos: 8 kg
Carga máxima de semicontenedores con
instrumentos:
5 kg
Contenedor ¾ con instrumentos: 7 kg
Los cuerpos huecos, las bandejas, los platos
y los instrumentos similares deberán colocarse
con cierta inclinación y con la abertura hacia
abajo
Colocar los tejidos en dirección vertical y sin
presión
Colocar siempre abajo los contenedores
pesados
Dejar que los contenedores se enfríen hasta
alcanzar la temperatura ambiente antes de su
utilización
40
El contenedor no se ha dejado enfriar en un
lugar adecuado
Las características técnicas del esterilizador
no se corresponden con las especificaciones
de la norma DIN EN 285
La prueba de vacío y la esterilización sin
material que deben realizarse diariamente no
han tenido lugar
Se ha seleccionado un programa incorrecto en
el esterilizador
La puerta del esterilizador ha estado abierta
demasiado tiempo; el esterilizador se enfría
No almacenar el contenedor estéril en el suelo
o en zonas con corriente de aire
Almacenar el contenedor estéril en espacios
climatizados según DIN 58953-9
Debe efectuarse un mantenimiento periódico
del esterilizador
Comprobar el vacío de secado
Comprobar el tiempo de secado
Comprobar la calidad del vapor y, si es
necesario, mejorarla
Efectuar diariamente antes de la esterilización
una esterilización sin material y una prueba de
vacío
Seleccionar el programa adecuado en función
del tipo de carga
Cargar y descargar el esterilizador con rapidez
Page 43

Fallo Causa Subsanación
La ranura de la tapa (inferior) tiene
condensado
El color del precinto de identificación no ha
cambiado
Los contenedores estériles Basis/Vario o
PrimeLine están deformados
La tapa superior/inferior no puede colocarse/
bloquearse en la cubeta
Se han apilado varios contenedores estériles o
contenedores con material a esterilizar muy
pesado
La esterilización no se ha realizado de forma
correcta
Esterilizador defectuoso
Los precintos de identificación no se han
almacenado correctamente
Se ha cubierto la zona perforada durante la
esterilización
Tapa y/o cubeta del contenedor deformada/
dañada debido a un manejo indebido (p. j.
porque se ha sujetado por la tapa)
7. Servicio de Asistencia Técnica
Peligro de lesiones y/o disfunción.
¾ No modificar el producto.
Dividir el espacio del esterilizador con bases
para alojar los contenedores
Utilizar la tapa superior
Hacer que el fabricante repare el esterilizador
Observar las instrucciones de almacenamiento
en el envase del precinto
No cubrir la zona perforada bajo ningún
concepto
Cambiar la tapa/cubeta del contenedor o
hacer que el fabricante la repare
9. Datos técnicos
En el prospecto nº C40401 se pueden consultar las variantes y las
dimensiones de los distintos contenedores estériles.
ADVERTENCIA
¾ Para asistencia técnica y reparaciones, diríjase a su distribuidor
nacional de B. Braun/Aesculap.
Si se realizan modificaciones en el equipo médico técnico, se extinguirá la
garantía y el derecho de garantía, así como las posibles homologaciones.
Direcciones de la Asistencia Técnica
Aesculap Technischer Service
Am Aesculap-Platz
78532 Tuttlingen / Germany
Phone: +49 7461 95-1602
Fax: +49 7461 16-5621
E-mail: ats@aesculap.de
En la dirección especificada anteriormente se le facilitará información
sobre otras direcciones de Asistencia Técnica.
8. Accesorios/Piezas de recambio
En el prospecto nº C40401 se pueden consultar los accesorios y el material
consumible.
10. Extractos de normas
10.1 Normas citadas
En relación con los contenedores estériles se citan las siguientes normas:
• DIN 58953-9
•EN285
• EN 868-8
• EN 285 y EN ISO 17665 vigente
• EN ISO 11607
41
Page 44

Aesculap Sterile Technology
Sterile container system
Legenda
1 Protezione modulare
2 Serratura della protezione modulare
3 Coperchio
4 Serratura del coperchio
5 Fondo
6 Supporto per la scheda tecnica multifunzione
7 Scheda tecnica multifunzione
8 Impugnatura
9 Intaglio (per la scheda tecnica multifunzione sulla serratura del
coperchio)
10 Spingifiltro universale
11 Cappuccio
12 Pulsanti
13 Bloccaggio a scatto (per i container BASIS con protezione modulare
opzionale)
14 Coperchio in plastica
15 Copertura del campo perforato
16 Sistema di trattenimento dei batteri (filtro permanente)
17 Telaio di alloggiamento
18 Pernino d’impugnatura
19 Griglia lamellare di copertura
20 Impugnatura di montaggio
21 Serratura del coperchio in plastica
Simboli del prodotto e imballo
Icona Spiegazione
Attenzione, rispettare i documenti allegati
Osservare le istruzioni per l'uso
Indice
1. Manipolazione sicura .................................................................................43
2. Descrizione del prodotto ............................................................................43
2.1 Destinazione d’uso ......................................................................................43
2.2 Funzionamento .............................................................................................43
3. Preparazione ed installazione ..................................................................44
3.1 Prima messa in servizio ..............................................................................44
4. Operatività con lo Sterilcontainer ..........................................................44
4.1 Preparazione .................................................................................................44
Rimozione della protezione modulare/del coperchio/del
coperchio in plastica.................................................................................. 44
Sostituire il filtro......................................................................................... 44
4.2 Controllo del funzionamento ...................................................................44
4.3 Comando ........................................................................................................44
Caricamento dello Sterilcontainer ......................................................... 45
Inserimento della scheda tecnica multifunzione............................... 45
Caricamento della sterilizzatrice............................................................ 45
Sterilizzazione.............................................................................................. 46
Scarico della sterilizzatrice ...................................................................... 46
Trasporto dello Sterilcontainer................................................................ 46
Magazzinaggio degli Sterilcontainer .................................................... 46
Controllo ed approntamento del materiale sterile............................ 46
5. Procedimento di preparazione sterile validato ....................................46
5.1 Avvertenze generali .....................................................................................46
5.2 Pulizia/Disinfezione .....................................................................................47
5.3 Pulizia/disinfezione manuali .....................................................................48
Pulizia manuale e disinfezione per strofinamento............................ 48
5.4 Pulizia automatica neutra o moderatamente alcalina e
disinfezione termica ....................................................................................49
5.5 Controllo, manutenzione e verifica ........................................................49
6. Identificazione ed eliminazione dei guasti ...........................................50
7. Assistenza tecnica .......................................................................................51
8. Accessori/Ricambi ........................................................................................51
9. Specifiche tecniche .....................................................................................51
10. Estratti dalla normativa .............................................................................51
10.1 Norme citate .................................................................................................51
42
Page 45

1. Manipolazione sicura
2. Descrizione del prodotto
Pericolo di contaminazioni dei materiali sterili da
Sterilcontainer non ermetici!
AVVERTENZA
¾ Prima di utilizzare il prodotto verificarne l’idoneità funzionale ed
accertarsi che sia in perfette condizioni.
¾ Per evitare danni dovuti ad un montaggio o un esercizio non corretto
e per non compromettere la garanzia:
–Utilizzare il prodotto solo in conformità alle presenti istruzioni per
l’uso.
–Rispettare le istruzioni sulla sicurezza e le indicazioni sulla
manutenzione.
–Non utilizzare alcuno Sterilcontainer danneggiato o difettato.
Sostituire immediatamente i singoli componenti danneggiati
mediante ricambi originali.
–Se sono stati riparati dei componenti dello Sterilcontainer che
possono influenzare la resistenza ai batteri: Prima dell’utilizzo
sottoporre lo Sterilcontainer ad un’accurata ispezione visiva.
¾ Assicurarsi che il prodotto e gli accessori vengano maneggiati soltanto
da personale che disponga della necessaria formazione, conoscenze ed
esperienza.
¾ Conservare le istruzioni per l’uso in modo che siano accessibili per il
personale.
¾ Rispettare le linee guida ed i principi igienici generali relativi alla
movimentazione dei materiali contaminati, da sterilizzare e sterilizzati.
Se lo Sterilcontainer è combinato con componenti
di altri produttori non è più possibile garantirne
l’ermeticità e la funzione di barriera antibatterica.
¾ Combinare solo prodotti dello Sterilcontainer
System Aesculap.
2.1 Destinazione d’uso
Lo sterile container system Aesculap è un sistema barriera sterile
riutilizzabile in grado di preservare la sterilità dei presidi medico-chirurgici
fino al loro impiego o alla data di scadenza. In esso è possibile sterilizzare,
immagazzinare e trasportare i presidi medico-chirurgici. Inoltre in esso è
possibile eseguire il riporto dei presidi medico-chirurgici dopo il loro
utilizzo. Lo sterile container system Aesculap è idoneo per la
sterilizzazione a vapore.
Nota
Se i container dello sterile container system Aesculap devono essere
utilizzati con un procedimento di sterilizzazione diverso, si raccomanda di
rivolgersi alla rappresentanza Aesculap competente.
2.2 Funzionamento
Lo sterile container system Aesculap è conforme ai requisiti delle norme
DIN 58953-9 e EN ISO 11607.
Gli Sterilcontainer con coperchio perforato e fondo chiuso sono validati
per la sterilizzazione a vapore in sterilizzatrici a norma EN 285:
• Procedimento a vuoto frazionato
Gli Sterilcontainer con coperchio perforato e fondo perforato sono inoltre
idonei per la sterilizzazione a vapore in sterilizzatrici a norma EN 285
mediante procedimento:
• a gravitazione
Nota
L’idoneità del procedimento specifico deve essere dimostrata mediante
validazione in loco.
43
Page 46

Aesculap Sterile Technology
Sterile container system
3. Preparazione ed installazione
3.1 Prima messa in servizio
¾ Prima del primo utilizzo pulire accuratamente gli Sterilcontainer nuovi
di fabbrica.
¾ Dopo la pulizia inserire un filtro idoneo, vedere Sostituire il filtro.
Sterile container system PrimeLine:
Il sistema di trattenimento dei batteri 16 (filtro permanente) è integrato.
4. Operatività con lo Sterilcontainer
4.1 Preparazione
Rimozione della protezione modulare/del coperchio/del coperchio in
plastica
Se si utilizza la protezione modulare, questa può comunque essere rimossa
per pulire il container oppure quando il coperchio è sporco.
Container VARIO (fornito di serie con coperchio e protezione modulare):
¾ Premere la serratura della protezione modulare 2 e togliere sia la
protezione modulare 1 che il coperchio 3.
Container BASIS (con protezione modulare aggiunta successivamente):
¾ Rimuovere la combinazione di protezione modulare 1 e coperchio 3
dal fondo 5.
¾ Allentare il bloccaggio a scatto 13 e togliere la protezione modulare 1.
Sterile container system PrimeLine:
¾ Togliere il coperchio in plastica 14 dal fondo 5.
Sostituire il filtro
I filtri devono essere sostituiti con i seguenti intervalli dipendenti dalla
tipologia:
• Filtri monouso: prima di ogni sterilizzazione
• Filtro permanente in PTFE: dopo max. 1 000 cicli di preparazione
• Sistema di trattenimento dei batteri PrimeLine: dopo max. 5 000 cicli
di preparazione
Container VARIO e BASIS:
¾ Premere contemporaneamente i pulsanti 12 dello spingifiltro
universale 10.
¾ Togliere lo spingifiltro universale 10.
¾ Inserire il nuovo filtro e riapplicare lo spingifiltro universale10.
¾ Premere il blocco centrale 11 dello spingifiltro universale 10 finché
quest’ultimo si blocca in posizione con un rumore percettibile.
Sterile container system PrimeLine:
¾ Girare la griglia lamellare di copertura 19 verso sinistra fino a
sbloccarla.
¾ Rimuovere la griglia lamellare di copertura 19 del sistema di
trattenimento dei batteri 16.
¾ Girare verso sinistra il sistema di trattenimento dei batteri 16 con
l’impugnatura di montaggio 20 fino a sbloccarlo dal telaio di
alloggiamento 17.
¾ Sollevare e rimuovere il sistema di trattenimento dei batteri 16 per il
pernino d’impugnatura 18.
¾ Montare il sistema di trattenimento dei batteri 16 seguendo la
sequenza inversa.
4.2 Controllo del funzionamento
Nota
Per lo sterile container system PrimeLine per eseguire la prova è necessario
19
asportare la griglia lamellare di copertura
¾ Prima di ogni utilizzo sottoporre tutti i componenti dello
Sterilcontainer ad un controllo visivo mirante ad escludere la presenza
di danni, nonché ad accertarne il corretto funzionamento:
–Parti metalliche non deformate
–Coperchio in alluminio non deformato
–Lo spingifiltro universale 10 poggia lungo il bordo con l’intera
superficie
–Guarnizioni integre (niente crepe, ...)
–Parti in plastica non crepate
–Filtro permanente/sistema di trattenimento dei batteri PrimeLine
integro (assenza di pieghe, fori, crepe o fessure)
–Serratura idonea a funzionare (scatta in posizione)
¾ Utilizzare soltanto Sterilcontainer in perfette condizioni. Riparare o
sostituire immediatamente i componenti danneggiati con ricambi
originali.
!
4.3 Comando
Pericolo di contaminazioni dei materiali sterili da
Sterilcontainer non ermetici!
AVVERTENZA
Se lo Sterilcontainer è combinato con componenti di
altri produttori non è più possibile garantirne
l’ermeticità e l’azione di barriera antibatterica.
¾ Combinare solo prodotti dello sterile container
system Aesculap.
44
Page 47

Pericolo di non sterilità del materiale sterile!
¾ Trasportare i container afferrandoli sempre per le
ATTENZIONE
Caricamento dello Sterilcontainer
Strumenti
A norma DIN EN 868-8 e DIN 58953-9 raccomandiamo il seguente carico
massimo del container:
• Container formato normale: 10 kg
• Container mezzo formato: 5 kg
• Container formato 3/4: 7 kg
¾ Conservare gli strumenti in un cestello con supporti di magazzinaggio
idonei,
appoggiando corpi cavi, bacinelle, piatti e quant’altro con l’apertura
rivolta trasversalmente verso il basso.
Container VARIO e BASIS:
¾ Caricare gli Sterilcontainer in modo che gli spingifiltro universali 10
rimangano liberi. Altezza di carico max.: Fino a 2 cm circa sotto al
bordo del fondo del container.
¾ Bloccare il coperchio 3 con la rispettiva serratura 4 sul fondo 5.
La serratura del coperchio 4 deve bloccarsi in posizione con un rumore
percettibile. Altrimenti: Far riparare il container, vedere Assistenza
tecnica.
Sterile container system PrimeLine:
¾ Caricare lo Sterilcontainer in modo che la griglia lamellare di copertura
19 del coperchio in plastica rimanga libera 14. Altezza di carico max.:
Fino a circa 2 cm sotto al bordo del fondo del container.
¾ Bloccare il coperchio in plastica 14 con la relativa serratura 21 sul
fondo 5.
La serratura del coperchio in plastica 21 deve scattare con un rumore
percettibile. Altrimenti: Far riparare il container, vedere Assistenza
tecnica.
Biancheria
¾ Imballare la biancheria piegata in modo da poterla inserire nel
container verticalmente.
¾ Accertarsi che a container totalmente carico tra i singoli capi sia
comunque possibile inserire una mano tesa.
¾ Caricare i container in modo che gli spingifiltro universali 10
rimangano liberi (per i container VARIO e BASIS).
¾ Bloccare il coperchio 3 con la rispettiva serratura 4 sul fondo 5.
La serratura del coperchio 4 deve bloccarsi in posizione con un rumore
percettibile. Altrimenti: Far riparare il container, vedere Assistenza
tecnica.
apposite impugnature.
¾ Non trasportare o sollevare mai gli Sterilcontainer
per il coperchio.
¾ Trasportare gli Sterilcontainer in modo da escludere
danni meccanici.
Sterile container system PrimeLine:
¾ Caricare il container per sterilizzazione in modo che la griglia lamellare
di copertura 19 del coperchio in plastica 14 rimanga libera.
¾ Bloccare il coperchio in plastica 14 con la relativa serratura 21 sul
fondo 5.
La serratura del coperchio in plastica 21 deve scattare con un rumore
percettibile. Altrimenti: Far riparare il container, vedere Assistenza
tecnica.
Inserimento della scheda tecnica multifunzione
¾ Dopo aver caricato lo Sterilcontainer riportare sulla scheda tecnica
multifunzione 7 i seguenti dati: data e codice della sterilizzazione, data
di scadenza nonché nome e firma.
¾ Inserire la scheda tecnica multifunzione 7 nell’apposito supporto 6
dall’esterno, in modo che lo spazio riservato alle indicazioni entri nella
fessura della serratura del coperchio bloccandola.
- oppure -
¾ Dopo la chiusura dello Sterilcontainer inserire il sigillo in plastica
(ad es. JG739) della serratura.
Caricamento della sterilizzatrice
Pericolo di compromissioni del vuoto nello
Sterilcontainer da insufficiente compensazione della
AVVERTENZA
Nota
Sia i container VARIO che quelli BASIS possono essere sterilizzati con la
protezione modulare applicata!
¾ Rispettare le istruzioni del produttore della sterilizzatrice.
¾ Inserire gli Sterilcontainer pesanti sempre nella parte bassa della
sterilizzatrice.
¾ Trasportare i container afferrandoli sempre per le apposite
impugnature.
Nota
Gli Sterilcontainer possono essere impilati nella sterilizzatrice.
¾ Trasportare sempre le pile di Sterilcontainer in modo che non si
ribaltino.
pressione!
¾ Per gli Sterilcontainer non usare imballi esterni.
¾ Non chiudere mai ermeticamente gli spazi perforati
del fondo e del sottocoperchio (per tutte le versioni
di container).
¾ Non appoggiare alcun imballo in pellicola
direttamente sullo Sterilcontainer.
45
Page 48

Aesculap Sterile Technology
Sterile container system
Sterilizzazione
Pericolo di non sterilità!
¾ Sterilizzare gli Sterilcontainer soltanto
ATTENZIONE
¾ Sterilizzare a vapore, attendendosi a quanto segue:
La sterilizzazione deve essere effettuata secondo un procedimento di
sterilizzazione a vapore validato (ad es. in una sterilizzatrice a vapore
a norma DIN EN 285 e validata a norma DIN EN ISO 17665).
Scarico della sterilizzatrice
AVVERTENZA
Trasporto dello Sterilcontainer
ATTENZIONE
Magazzinaggio degli Sterilcontainer
Nota
Gli Sterilcontainer possono essere conservati impilati.
¾ Conservare gli Sterilcontainer in un luogo asciutto, pulito e protetto.
¾ Attenersi alla permanenza in magazzino ed alle condizioni di
magazzinaggio indicate dalla norma DIN 58953-9.
Controllo ed approntamento del materiale sterile
Il contenuto di uno Sterilcontainer può essere considerato sterile soltanto
se questo è stato correttamente sterilizzato, conservato e trasportato.
In caso contrario il materiale deve essere sottoposto ad un nuovo ciclo di
preparazione sterile.
PERICOLO
mediante il procedimento di sterilizzazione
appositamente ammesso e validato.
Rischio di ustioni dovute agli Sterilcontainer caldi
dopo la sterilizzazione!
¾ Lavorare sempre indossando guanti protettivi.
Pericolo di non sterilità del materiale sterile!
¾ Trasportare i container afferrandoli sempre per le
apposite impugnature.
¾ Non trasportare o sollevare mai gli Sterilcontainer
per il coperchio.
¾ Trasportare gli Sterilcontainer in modo da escludere
danni meccanici.
Materiali non correttamente sterilizzati comportano
rischi di contaminazioni!
¾ Prima di approntare il materiale sterile controllare
che la sterilizzazione sia stata correttamente
eseguita.
¾ Sincerarsi che tutti i componenti del container ed in particolare le
serrature del coperchio siano perfettamente integri.
¾ Accertarsi che il sigillo del container sia integro.
5. Procedimento di preparazione sterile
validato
Nota
Osservare la legislazione nazionale, le norme e linee guida nazionali e
internazionali nonché le norme igieniche interne vigenti in materia di
preparazione sterile.
Nota
Per i pazienti con morbo di Creutzfeldt-Jakob (CJ), sospetto CJ o possibili
varianti del medesimo rispettare le normative nazionali vigenti in relazione
alla preparazione sterile dei prodotti.
Nota
Per informazioni aggiornate sulla preparazione sterile si rimanda anche
alla Extranet Aesculap, all’indirizzo www.aesculap-extra.net
Nota
E’ necessario tener presente che una preparazione sterile riuscita di questo
presidio medico-chirurgico può essere assicurata soltanto previa
validazione del processo di preparazione. La responsabilità di ciò ricade sul
gestore/preparatore.
A fronte delle tolleranze di processo, le presenti indicazioni del produttore
fungono soltanto da valori orientativi per i processi di preparazione sterile
implementati presso il gestore/preparatore.
5.1 Avvertenze generali
I residui operatori essiccati o fissati possono rendere la pulizia più difficile
o inefficace e per l’acciaio inossidabile possono causare corrosione.
Pertanto tra l’uso e la preparazione non devono trascorrere più di 6 ore,
nella pulizia preliminare non si devono usare temperature fissanti >45 °C
e non si devono impiegare disinfettanti fissanti (principi attivi di base:
aldeidi, alcool).
Neutralizzatori o detergenti profondi sovradosati possono causare
aggressioni chimiche e/o per l’acciaio inossidabile far sbiadire e rendere le
incisioni al laser illeggibili visivamente o meccanicamente.
Per l’acciaio inossidabile i residui contenenti cloro e cloruri, come ad es.
quelli operatori, di farmaci, soluzioni saline, dell'acqua usata per la pulizia,
disinfezione e sterilizzazione possono causare danni da corrosione
(corrosione perforante, tensocorrosione), con conseguente distruzione dei
prodotti. Per la rimozione è necessario eseguire un sufficiente risciacquo
con acqua completamente desalinizzata e successiva asciugatura.
¾ Verificare che il colore del puntino indicatore si sia modificato.
46
Page 49

Possono essere usate soltanto sostanze chimiche di processo testate e
omologate (ad es. omologazione VAH/DGHM o FDA oppure marchio CE) e
raccomandate dal produttore in relazione alla compatibilità con i
materiali. Tutte le indicazioni per l'uso del produttore delle sostanze
chimiche relative a temperatura, concentrazione e tempo d’azione devono
essere strettamente osservate. Altrimenti ciò può causare i seguenti
problemi:
• Alterazioni ottiche dei materiali, come ad es. scoloriture o alterazioni
cromatiche per l’alluminio. Per l’alluminio alterazioni superficiali
visibili possono verificarsi già a partire da un valore pH >8 della
soluzione d’uso.
• Danni materiali, come ad es. corrosione, crepe, rotture, invecchiamento
precoce o rigonfiamenti.
¾ Non usare sostanze chimiche di processo che sulle plastiche, quali ad
es. il PPSU, provochino tensocorrosione o che, ad es. per il silicone,
aggrediscano i rammollitori causando infragilimenti.
5.2 Pulizia/Disinfezione
Danni al prodotto causati da detergenti/
disinfettanti inidonei e/o temperature troppo
ATTENZIONE
elevate!
¾ Utilizzare detergenti e disinfettanti che secondo
le istruzioni del produttore sono
- ammessi per le plastiche e l’acciaio legato,
- che non aggrediscano i rammollitori (ad es.
silicone).
¾ Rispettare le indicazioni relative a
concentrazione, temperatura e tempo d’azione.
47
Page 50

Aesculap Sterile Technology
Sterile container system
5.3 Pulizia/disinfezione manuali
¾ Dopo la pulizia/disinfezione manuali sottoporre le superfici visibili a un
controllo ottico finalizzato a escludere la presenza di residui.
¾ Se necessario, ripetere il processo di pulizia.
Pulizia manuale e disinfezione per strofinamento
Fase Punto T
[°C/°F]t[min]
I Pulizia TA
(fredda)
II Asciugatura TA - - - -
III Disinfezione per
strofinamento
IV Risciacquo finale TA
V Asciugatura TA - - - - -
A-P: Acqua potabile
A-CD: Acqua completamente desalinizzata (demineralizzata)
TA: Temperatura ambientale
Fase I
¾ Prima della pulizia rimuovere lo sporco ostinato mediante
strofinamento.
Fase II
¾ Asciugare il prodotto con un telo non sfilacciante o aria compressa di
tipo medicale.
-
(fredda)
Conc.
[%]
--A-P-
>1- -I
- - A-CD non necessario Sciacquare le sostanze
Qualità
dell’acqua
Alcol denat. al 70 %
(etanolo B|BRAUN)
Chimica
II
Disinfettante per superfici
privo di aldeidi (Stabimed)
chimiche usate per la pulizia
fino a eliminare tutti i
residui
Fase III
¾ Eseguire la disinfezione per strofinamento.
Fase IV
¾ Se si usa un disinfettante senza aldeidi:
Una volta trascorso il tempo d’azione prescritto (almeno 1 minuto)
sciacquare le superfici disinfettate sotto acqua corrente CD.
¾ Far sgocciolare sufficientemente l’acqua residua.
Fase V
¾ Asciugare il prodotto con un telo non sfilacciante o in armadio termico.
48
Page 51

5.4 Pulizia automatica neutra o moderatamente alcalina e disinfezione termica
Modello di apparecchio: Lavatrice/disinfettore monocamera senza ultrasuoni
Fase Punto T
[°C/°F]
I Prerisciacquo <25/77 3 A-P -
II Pulizia 55/131 10 A-CD Neutra:
III Risciacquo intermedio >10/50 1 A-CD In particolare per PrimeLine deve essere garantito che la
IV Disinfezione termica 90/194 5 A-CD Parametri di processo diversi per la disinfezione termica
V Asciugatura - - - In conformità all’attuale programma della macchina.
t
[min]
Qualità
dell’acqua
Chimica
BBRAUN HELIMATIC CLEANER
neutro, a pH neutro,
soluzione pronta all’uso allo 0,5 %
Moderatamente alcalina:
- Concentrato:
pH = 9,5
< 5 % tensioattivi anionici
- soluzione allo 0,5 %
Alcalina:
Preparazione possibile fino a pH = 10,5 se il detergente è
approvato dal produttore per la pulizia dei container.
Nota
Se si usano detergenti moderatamente alcalini o alcalini,
per l’alluminio anodizzato colorato possono verificarsi
alterazioni cromatiche che tuttavia non ne
compromettono in alcun modo l’idoneità all’impiego.
superficie sia sciacquata sino a eliminare ogni residuo.
sono possibili previo accordo con il responsabile dell’igiene
della clinica.
A–P: Acqua potabile
A–CD: Acqua completamente desalinizzata (demineralizzata)
¾ Dopo la pulizia/disinfezione automatiche verificare che le superfici
visibili non presentino residui.
¾ Se necessario, ripetere il processo di pulizia.
Nota
Sia nella preparazione manuale che in quella automatica è possibile il
trattamento ad ultrasuoni. Nell’asciugatura automatica ad aria calda sono
ammesse temperature fino a 120 °C.
5.5 Controllo, manutenzione e verifica
Nota
Gli Sterilcontainer possono essere controllati e riparati soltanto da persone
che dispongano di idonea formazione, conoscenze ed esperienze.
Le guarnizioni dei coperchi dei container sono state testate a norma DIN
EN 868-8, Allegato G per una vita di servizio minima di 5 000 cicli di
sterilizzazione.
¾ Se sono presenti delle imperfezioni visibili ad occhio nudo, sostituire
immediatamente la guarnizione.
¾ Spedire il coperchio ad Aesculap, all’indirizzo vedere Assistenza
tecnica.
¾ Se necessario oliare leggermente le parti metalliche mobili (ad es.
cerniere di chiusura) con un olio per la cura sterilizzabile, permeabile
al vapore (ad es. olio spray STERILIT® I JG600 oppure oliatore a goccia
STERILIT® I- JG598).
49
Page 52

Aesculap Sterile Technology
Sterile container system
6. Identificazione ed eliminazione dei guasti
Anomalia Causa Rimedio
Troppa condensa all’interno dello
Sterilcontainer
Temperatura del materiale da sterilizzare
troppo bassa prima della sterilizzazione
Biancheria troppo umida Sterilizzare solo tessuti asciutti
Container troppo pesante Container formato normale
Materiale da sterilizzare conservato in
maniera errata
Sterilcontainer erroneamente posizionato
nella sterilizzatrice
Predisporre gli Sterilcontainer per l’uso subito
dopo la sterilizzazione
Sterilcontainer non ben conservati durante la
fase di raffreddamento
Preriscaldare il materiale da sterilizzare a
temperatura ambiente (circa 20 °C)
con strumenti: max. 10 kg di biancheria
con biancheria: max. 8 kg di biancheria
Container mezzo formato con strumenti:
caricare max. 5 kg
Container formato 3/4 con strumenti: max.
7 kg di biancheria
Conservare corpi cavi, bacinelle, piatti e simili
con l’apertura rivolta trasversalmente verso il
basso
Formare degli strati di tessuti verticali. Non
pressarli
Posizionare gli Sterilcontainer pesanti sempre
nella parte bassa della sterilizzatrice
Prima dell’approntamento far raffreddare gli
Sterilcontainer a temperatura ambiente
Non conservare gli Sterilcontainer sul
pavimento o in correnti d’aria
Conservare i container in ambienti
climatizzati a norma DIN 58953-9
50
Caratteristiche della sterilizzatrice non
rispondenti alla norma DIN EN 285
Sterililzzazione a vuoto e test del vuoto non
eseguiti quotidianamente prima dell’inizio
della sterilizzazione
Sulla sterilizzatrice è stato scelto un
programma errato
Sportello della sterilizzatrice aperto troppo a
lungo, la sterilizzatrice si raffredda
Sottoporre regolarmente la sterilizzatrice a
manutenzione
Controllare il vuoto presente durante
l’asciugatura
Controllare la durata dell’asciugatura
Controllare ed eventualmente correggere la
qualità del vapore
Eseguire ogni giorno la sterilizzazione a vuoto
ed il test del vuoto prima della sterilizzazione
Scegliere un programma conforme al carico
Caricare e scaricare la sterilizzatrice
rapidamente
Page 53

Anomalia Causa Rimedio
Nella scanalatura del coperchio è presente
della condensa
La scheda tecnica multifunzione non ha
cambiato colore
Container per sterilizzazione Basis/Vario o
PrimeLine deformato
Non si riesce a inserire sul fondo il coperchio o
la protezione modulare
7. Assistenza tecnica
Pericolo di lesioni e/o malfunzionamenti!
¾ Non modificare il prodotto.
Sono stati impilati diversi Sterilcontainer
oppure del materiale da sterilizzare pesante
Sterilizzazione non correttamente eseguita
Sterilizzatrice guasta
Schede tecniche multifunzione non
correttamente inserite
Lo spazio perforato è rimasto coperto durante
la sterilizzazione
Coperchio o fondo del container deformato/
danneggiato da manipolazioni non idonee
(ad es. trasporto per il coperchio)
9. Specifiche tecniche
Varianti e formati degli Sterilcontainer sono riportati nel prospetto
N° C40401.
Suddividere la sterilizzatrice con gli appositi
divisori
Usare la protezione modulare
Far riparare la sterilizzatrice dal produttore
Osservare le condizioni di magazzinaggio
indicate sulla confezione delle schede
tecniche multifunzione
Non coprire mai lo spazio perforato
Sostituire il coperchio o il fondo del container
o farlo riparare dal produttore
AVVERTENZA
¾ Per qualsiasi intervento di assistenza e riparazione rivolgersi alla
rappresentanza B. Braun/Aesculap nazionale competente.
Eventuali modifiche delle attrezzature medico-chirurgiche possono
comportare il decadere dei diritti di garanzia e delle omologazioni.
Indirizzi dei centri assistenza
Aesculap Technischer Service
Am Aesculap-Platz
78532 Tuttlingen / Germany
Phone: +49 7461 95-1602
Fax: +49 7461 16-5621
E-mail: ats@aesculap.de
Gli altri indirizzi dell'assistenza possono essere richiesti all'indirizzo
predetto.
8. Accessori/Ricambi
Accessori e materiali di consumo sono riportati nel prospetto N° C40401.
10. Estratti dalla normativa
10.1 Norme citate
In riferimento agli Sterilcontainer sono citate le seguenti norme:
• DIN 58953-9
•EN285
• EN 868-8
• EN 285 co-vigente EN ISO 17665
• EN ISO 11607
51
Page 54

Aesculap Sterile Technology
Sterilisatie container-systeem
Legende
1 Bovendeksel
2 Bovendeksel-sluiting
3 Onderdeksel
4 Onderdeksel-sluiting
5 Kuip
6 Indicatorplombehouder
7 Indicatorplombe
8 Greep
9 Gleuf (voor indicatorplombe in onderdeksel-sluiting)
10 Universele filterhouder
11 Kapje
12 Drukknoppen
13 Borgklauw (bij optioneel bovendeksel aan BASIS-container)
14 Kunststofdeksel
15 Perforatieveld-afdekking
16 Kiemweringssysteem (duurzaam filter)
17 Opnameframe
18 Greepbout
19 Afdekrooster
20 Montagegreep
21 Kunststofdeksel-sluiting
Symbolen op het product en verpakking
Symbool Verklaring
Let op: volg de bijgevoegde documentatie
Volg de gebruiksaanwijzing
Inhoudsopgave
1. Veilig gebruik ................................................................................................53
2. Productbeschrijving .....................................................................................53
2.1 Gebruiksdoel ..................................................................................................53
2.2 Werking ..........................................................................................................53
3. Voorbereiding en opstelling ......................................................................54
3.1 Eerste inwerkingstelling .............................................................................54
4. Gebruik van de steriele container ...........................................................54
4.1 Klaarmaken ....................................................................................................54
Bovendeksel/onderdeksel/kunststofdeksel verwijderen ................... 54
Filter vervangen........................................................................................... 54
4.2 Functietest .....................................................................................................54
4.3 Bediening .......................................................................................................54
Steriele container laden............................................................................ 55
Indicatorplombe aanbrengen .................................................................. 55
Sterilisator laden......................................................................................... 55
Sterilisatie ..................................................................................................... 55
Sterilisator uitladen.................................................................................... 56
Steriele containers transporteren........................................................... 56
Steriele containers bewaren .................................................................... 56
Steriele goederen controleren en klaarleggen.................................... 56
5. Gevalideerd reinigings- en desinfectieprocédé ...................................56
5.1 Algemene aanwijzingen .............................................................................56
5.2 Reiniging/Desinfectie ..................................................................................57
5.3 Handmatige reiniging/desinfectie ..........................................................58
Handmatige reiniging en wisdesinfectie.............................................. 58
5.4 Machinale neutrale of licht-alkalische reiniging en thermische
desinfectie .....................................................................................................59
5.5 Controle, onderhoud en inspectie ...........................................................59
6. Opsporen en verhelpen van fouten ........................................................60
7. Technische service .......................................................................................61
8. Accessoires/Reserveonderdelen ...............................................................61
9. Technische specificaties .............................................................................61
10. Uittreksels uit normen ................................................................................61
10.1 Geciteerde normen ......................................................................................61
52
Page 55

1. Veilig gebruik
2. Productbeschrijving
Gevaar voor contaminatie van steriele goederen
door ondichte steriele container!
WAARSCHUWING
¾ Controleer voor u dit product gebruikt of het correct werkt en in goede
staat is.
¾ Om beschadiging ten gevolge van een onoordeelkundige montage of
foutief gebruik te vermijden en de garantie en aansprakelijkheid niet in
het gedrang te brengen:
–Gebruik dit product enkel volgens deze gebruiksaanwijzing.
–Volg de veiligheidsinformatie en de onderhoudsinstructies.
–Gebruik geen beschadigde of defecte steriele containers. Vervang
beschadigde onderdelen onmiddellijk door originele onderdelen.
–Wanneer er reparaties werden uitgevoerd aan delen van de steriele
container die de kiemdichtheid beïnvloeden: Inspecteer de steriele
container grondig voor het gebruik.
¾ Zorg ervoor dat het onderhoud en de hantering van het product en de
accessoires alleen gebeuren door personen die daartoe over de nodige
opleiding, kennis en ervaring beschikken.
¾ Bewaar de gebruiksaanwijzing op een plaats die toegankelijk is voor
het personeel.
¾ Volg de algemene richtlijnen en hygiënische principes voor het omgaan
met gecontamineerde, te steriliseren en gesteriliseerde voorwerpen.
Wanneer de steriele container wordt
gecombineerd met onderdelen van andere
fabrikanten, is de dichtheid van de steriele
container en zijn efficiëntie als kiembarrière niet
meer gegarandeerd.
¾ Combineer alleen steriele container-producten
van Aesculap met elkaar.
2.1 Gebruiksdoel
Het steriele container-systeem van Aesculap is een herbruikbaar steriele
barrière-systeem, dat de steriliteit van medische producten tot hun
gebruik of tot hun vervaldatum bewaart. Hierin kunnen medische
producten worden gesteriliseerd, bewaard en getransporteerd. Bovendien
is het bruikbaar voor het retourtransport van medische producten na hun
gebruik. Het steriele container-systeem van Aesculap is geschikt voor
stoomsterilisatie.
Opmerking
Vraag raad aan uw Aesculap-vertegenwoordiger als u de Aesculap steriele
containers voor andere sterilisatieprocédés wilt gebruiken.
2.2 Werking
Het Aesculap steriele container-systeem voldoet aan de vereisten van
DIN 58953-9 en EN ISO 11607.
Steriele containers met geperforeerd deksel en gesloten kuip zijn
gevalideerd voor sterilisatie in een sterilisator conform EN 285 met een:
• gefractioneerd vacuümprocédé
Steriele containers met geperforeerd deksel en geperforeerde kuip zijn ook
geschikt voor stoomsterilisatie in een sterilisator conform EN 285 met
een:
• gravitatieprocédé
Opmerking
De geschiktheid van het specifieke procédé moet door een validering ter
plaatse worden aangetoond.
53
Page 56

Aesculap Sterile Technology
Sterilisatie container-systeem
3. Voorbereiding en opstelling
3.1 Eerste inwerkingstelling
¾ Reinig de nieuwe steriele container grondig voor het eerste gebruik.
¾ Breng na de reiniging een passend filter aan, zie Filter vervangen.
Steriele container-systeem PrimeLine:
Het kiemweringssysteem 16 (duurzaam filter) is ingebouwd.
4. Gebruik van de steriele container
4.1 Klaarmaken
Bovendeksel/onderdeksel/kunststofdeksel verwijderen
Wanneer er een bovendeksel wordt gebruikt, kan dit van het onderdeksel
worden verwijderd om de steriele container te reinigen en bij
verontreiniging.
VARIO-container (standaard met onder- en bovendeksel):
¾ Druk op de bovendeksel-sluiting 2 en verwijder het bovendeksel 1 en
onderdeksel 3.
BASIS-container (met later toegevoegd bovendeksel):
¾ Verwijder de combinatie van bovendeksel 1 en onderdeksel 3 van de
kuip 5.
¾ Maak de borgklauw 13 los en neem het bovendeksel 1 eraf.
Steriele container-systeem PrimeLine:
¾ Verwijder het kunststofdeksel 14 van de kuip 5.
Filter vervangen
Afhankelijk van het gebruikte type gelden de volgende intervallen voor de
vervanging van het filter:
• Wegwerpfilter: voor iedere sterilisatie
• Duurzaam filter uit PTFE: na max. 1 000 reinigings- en sterilisatiecycli
• PrimeLine-kiemweringssysteem: na max. 5 000 reinigings- en
sterilisatiecycli
VARIO-container en BASIS-container:
¾ Druk de drukknoppen 12 aan de universele filterhouder 10 tegelijk in.
¾ Verwijder de universele filterhouder 10.
¾ Breng een nieuw filter aan en plaats de universele filterhouder 10
terug.
¾ Druk het kapje 11 op de universele filterhouder 10 aan tot het
hoorbaar vastklikt.
Steriele container-systeem PrimeLine:
¾ Draai het afdekrooster 19 naar links om het te ontgrendelen.
¾ Verwijder het afdekrooster 19 van het kiemweringssysteem 16.
¾ Draai het kiemweringssysteem 16 aan de montagegreep 20 naar links,
tot het loskomt van het opnameframe 17.
¾ Hef het kiemweringssysteem 16 aan de greepbout 18 op en verwijder
het.
¾ Bouw het kiemweringssysteem 16 in omgekeerde volgorde in.
4.2 Functietest
Opmerking
Bij het steriele container-systeem PrimeLine moet het afdekrooster
worden verwijderd voor deze controle!
¾ Controleer alle onderdelen van de steriele container voor ieder gebruik
visueel op beschadigingen en goede werking:
–Metalen onderdelen niet vervormd
–Aluminium deksels niet verwrongen
–Universele filterhouder 10 sluit overal aan tegen de rand
–Afdichtingen intact (geen scheurtjes, ...)
–Kunststof onderdelen vrij van scheurtjes of barsten
–Duurzaam filter/PrimeLine-kiemweringssysteem intact (niet geknikt,
geen perforaties, scheurtjes of spleten)
–Sluiting werkt goed (klikt vast)
¾ Gebruik alleen steriele containers in perfecte staat. Repareer
beschadigde onderdelen onmiddellijk of vervang ze door originele
onderdelen.
19
4.3 Bediening
Gevaar voor contaminatie van steriele goederen door
ondichte steriele container!
WAARSCHUWING
VOORZICHTIG
Wanneer de steriele container wordt gecombineerd
met onderdelen van andere fabrikanten, is de
dichtheid van de steriele container en zijn efficiëntie
als kiembarrière niet meer gegarandeerd.
¾ Combineer alleen steriele container-producten van
Aesculap met elkaar.
Gevaar voor onsteriliteit van de steriele goederen!
¾ Transporteer steriele containers altijd aan de
grepen.
¾ Hef of draag steriele containers nooit aan het
deksel.
¾ Transporteer steriele containers zodanig dat
mechanische beschadiging wordt uitgesloten.
54
Page 57

Steriele container laden
Instrumenten
In overeenstemming met DIN EN 868-8 en DIN 58953-9 bevelen bij de
volgende maximale lading van de container aan:
• Normale container: 10 kg
• Halfcontainer: 5 kg
• 3/4-container: 7 kg
¾ Plaats de instrumenten met behulp van geschikte houders in de
zeefkorf.
Let erop dat holle voorwerpen, bekkens, borden e. d. met de opening
schuin naar onder worden geplaatst.
VARIO-container en BASIS-container:
¾ Laad de steriele container zodanig dat de universele filterhouders 10
vrij blijven. Max. laadhoogte: tot ca. 2 cm onder de rand van de
containerkuip.
¾ Vergrendel het onderdeksel 3 met de onderdeksel-sluiting 4 op de
kuip 5.
De onderdeksel-sluiting 4 moet merkbaar vastklikken. Als dit niet het
geval is: laat de steriele container repareren, zie Technische service.
Steriele container-systeem PrimeLine:
¾ Laad de steriele container zodanig dat het afdekrooster 19 in het
kunststofdeksel 14 vrij blijft. Max. laadhoogte: tot ca. 2 cm onder de
rand van de containerkuip.
¾ Vergrendel het kunststofdeksel 14 met de kunststofdeksel-sluiting 21
op de kuip 5.
De kunststofdeksel-sluiting 21 moet merkbaar vastklikken. Als dit niet
het geval is: laat de steriele container repareren, zie Technische service.
Textiel
¾ Pak de verzamelde stukken wasgoed zodanig in dat ze loodrecht in de
steriele container passen.
¾ Zorg ervoor dat u bij een volledig geladen container nog een gestrekte
hand tussen de individuele stukken wasgoed krijgt.
¾ Laad de steriele container zodanig dat de universele filterhouders 10
vrij blijven (bij VARIO-containers en BASIS-containers).
¾ Vergrendel het onderdeksel 3 met de onderdeksel-sluiting 4 op de
kuip 5.
De onderdeksel-sluiting 4 moet merkbaar vastklikken. Als dit niet het
geval is: laat de steriele container repareren, zie Technische service.
Steriele container-systeem PrimeLine:
¾ Laad de steriele container zodanig dat het afdekrooster 19 in het
kunststofdeksel 14 vrij blijft.
¾ Vergrendel het kunststofdeksel 14 met de kunststofdeksel-sluiting 21
op de kuip 5.
De kunststofdeksel-sluiting 21 moet merkbaar vastklikken. Als dit niet
het geval is: laat de steriele container repareren, zie Technische service.
Indicatorplombe aanbrengen
¾ Noteer na het laden van de steriele container de volgende gegevens op
de indicatorplombe 7: sterilisatiedatum, sterilisatienummer,
vervaldatum, naam en handtekening.
¾ Schuif de indicatorplombe 7 langs de buitenzijde in de
indicatorplombehouder 6, zodat het indicatordeel in de gleuf van de
dekselsluiting grijpt en de sluiting verzegelt.
– of -
¾ Breng na het sluiten van de steriele container een kunststof plombe
(bijv. JG739) op de sluiting aan.
Sterilisator laden
Gevaar voor vacuümschade aan de steriele container
door onvoldoende drukcompensatie!
WAARSCHUWING
¾ Gebruik geen buitenverpakkingen voor steriele
containers.
¾ Sluit de perforatievelden in de kuip en het
onderdeksel nooit luchtdicht af (bij alle
containerversies).
¾ Leg geen folieverpakkingen direct op de steriele
container.
Opmerking
Zowel VARIO-containers als BASIS-containers kunnen met aangebracht
bovendeksel worden gesteriliseerd!
¾ Volg de instructies van de fabrikant van de sterilisator.
¾ Plaats zware steriele containers altijd onderaan in de sterilisator.
¾ Transporteer steriele containers altijd aan de grepen.
Opmerking
Steriele containers mogen in de sterilisator worden gestapeld.
¾ Transporteer gestapelde steriele containers zodanig dat de stapel niet
kan omvallen.
Sterilisatie
Gevaar voor onsteriliteit!
¾ Steriliseer steriele containers alleen volgens de
VOORZICHTIG
daarvoor toegelaten en gevalideerde
sterilisatieprocédés.
¾ Voer een stoomsterilisatie uit en let daarbij op het volgende:
De sterilisatie moet volgens een erkend stoomsterilisatieprocédé
gebeuren (bijv. in een stoomsterilisator conform DIN EN 285 en
gevalideerd conform DIN EN ISO 17665).
55
Page 58

Aesculap Sterile Technology
Sterilisatie container-systeem
Sterilisator uitladen
Gevaar voor verbranding door hete steriele containers
na de sterilisatie!
WAARSCHUWING
Steriele containers transporteren
VOORZICHTIG
Steriele containers bewaren
Opmerking
Steriele containers kunnen gestapeld worden bewaard.
¾ Bewaar steriele containers op een droge, schone en beschermde plaats.
¾ Respecteer de bewaarduur en bewaaromstandigheden van DIN 58953-9.
Steriele goederen controleren en klaarleggen
De inhoud van een steriele container mag alleen als steriel worden
beschouwd, als de container correct werd gesteriliseerd, bewaard en
getransporteerd.
Als dit niet het geval is, moeten de goederen opnieuw worden gereinigd
en gesteriliseerd.
GEVAAR
¾ Kijk goed na of de indicatorstip van kleur is veranderd.
¾ Controleer of alle onderdelen van de container, in het bijzonder de
dekselsluitingen, intact zijn.
¾ Controleer of de containerplombe intact is.
¾ Werk altijd met veiligheidshandschoenen.
Gevaar voor onsteriliteit van de steriele goederen!
¾ Transporteer steriele containers altijd aan de
grepen.
¾ Hef of draag steriele containers nooit aan het
deksel.
¾ Transporteer steriele containers zodanig dat
mechanische beschadiging wordt uitgesloten.
Gevaar voor contaminatie door niet correct
gesteriliseerde goederen!
¾ Controleer voor het klaarleggen van de steriele
goederen of de sterilisatie is geslaagd.
5. Gevalideerd reinigings- en
desinfectieprocédé
Opmerking
Voer de reiniging en sterilisatie uit in overeenstemming met de nationale
wettelijke voorschriften, nationale en internationale normen en richtlijnen
en de eigen hygiënische voorschriften.
Opmerking
Bij patiënten die zeker of vermoedelijk aan de ziekte van Creutzfeldt-Jakob
(CJ) of mogelijke varianten van deze aandoening lijden, moeten de
nationale voorschriften voor de reiniging en sterilisatie van de producten
worden nageleefd.
Opmerking
Actuele informatie over reiniging en desinfectie vindt u op het Aesculap
extranet onder www.aesculap-extra.net
Opmerking
Houd er rekening mee dat een geslaagde reiniging en desinfectie van dit
medisch product enkel kan worden gegarandeerd na een voorafgaande
validering van het reinigings- en desinfectieprocédé. Hiervoor is de
gebruiker/persoon die reinigt en desinfecteert verantwoordelijk.
Wegens procestoleranties gelden de aanwijzingen van de fabrikant
uitsluitend als richtwaarde voor de beoordeling van het ter plaatse
toegepaste reinigings- en desinfectieprocédé.
5.1 Algemene aanwijzingen
Aangekoekte of gefixeerde operatieresten kunnen de reiniging
bemoeilijken of ineffectief maken en tot corrosie van roestvrij staal leiden.
Daarom mag de tijdspanne tussen het gebruik en de reiniging niet langer
dan 6 uur zijn en mogen er geen fixerende voorreinigingstemperaturen
>45 °C worden toegepast noch fixerende desinfectiemiddelen (op basis
van: aldehyde, alcohol) worden gebruikt.
Overdosering van neutralisatoren of basisreinigers kan chemische
aantasting en/of verbleking van de laseropschriften veroorzaken bij
roestvrij staal, waardoor deze visueel of machinaal onleesbaar worden.
Chloor- en chloridehoudende residuen, bijv. in operatieresten, medicijnen,
zoutoplossingen, het water voor de reiniging, desinfectie en sterilisatie,
leiden tot corrosie (putcorrosie, spanningscorrosie) en zodoende tot
vernieling van de producten. Om deze te verwijderen is een grondige
spoeling met gedemineraliseerd water en een zorgvuldige droging
noodzakelijk.
56
Page 59

Gebruik alleen proceschemicaliën die zijn getest en toegelaten (bijv. VAH/
DGHM- of FDA-toelating resp. CE-markering) en die door de fabrikant van
de chemicaliën worden aanbevolen voor het betreffende materiaal. Alle
gebruiksinstructies van de fabrikant van de chemicaliën, bijv. met
betrekking tot temperatuur, concentratie en inwerkingsduur, moeten
strikt worden gevolgd. Gebeurt dit niet, dan kunnen de volgende
problemen optreden:
• Optische verandering van het materiaal, bijv. afbleken of
kleurverandering van aluminium. Bij aluminium kunnen reeds
zichtbare oppervlakkige veranderingen optreden vanaf een pH-waarde
van >8 in de gebruikte oplossing.
• Materiële schade zoals corrosie, scheurtjes, barsten, vroegtijdige
veroudering of opzetten.
¾ Gebruik geen proceschemicaliën die spanningsscheurtjes veroorzaken
bij kunststoffen, bijv. PPSU, of die weekmakers aantasten, bijv. silicone,
en het materiaal broos maken.
5.2 Reiniging/Desinfectie
Beschadiging van het product door toepassing van
ongeschikte reinigings-/desinfectiemiddelen en/of
VOORZICHTIG
te hoge temperaturen!
¾ Gebruik reinigings- en desinfectiemiddelen
volgens de aanwijzingen van de fabrikant,
- die toegelaten zijn voor kunststoffen en
edelstaal,
- die geen weekmakers (bijv. silicone)
aantasten.
¾ Volg de aanwijzingen met betrekking tot de
concentratie, temperatuur en inwerkingsduur.
57
Page 60

Aesculap Sterile Technology
Sterilisatie container-systeem
5.3 Handmatige reiniging/desinfectie
¾ Inspecteer de zichtbare oppervlakken na de handmatige reiniging/
desinfectie op residuen.
¾ Herhaal het reinigingsproces, indien nodig.
Handmatige reiniging en wisdesinfectie
Fase Stap T
[°C/°F]t[min]
I Reiniging KT
(koud)
II Droging KT - - - -
III Wisdesinfectie -
IV Laatste spoeling KT
(koud)
V Droging KT - - - - -
D–W: Drinkwater
DM–W: Gedemineraliseerd water
KT: Kamertemperatuur
Fase I
¾ Verwijder grove verontreinigingen voor de reiniging met een doek.
Fase II
¾ Droog het product met een pluisvrije doek of met medische perslucht.
Conc.
[%]
--D–W-
>1- -I
- - DM–W niet nodig Spoel alle resten van
Water-
kwaliteit
Gedenat. alcohol 70 %
(ethanol B|BRAUN)
Chemie
II
Aldehydevrij
oppervlaktedesinfectiemidde
l (Stabimed)
reinigingsproducten
zorgvuldig af
Fase III
¾ Voer een wisdesinfectie uit.
Fase IV
¾ Bij gebruik van een aldehydevrij desinfectiemiddel:
spoel de gedesinfecteerde oppervlakken na de voorgeschreven
inwerkingsduur (minstens 1 minuut) onder stromend,
gedemineraliseerd water.
¾ Laat het restwater voldoende afdruipen.
Fase V
¾ Droog het product met een pluisvrije doek of in de warmtekast.
58
Page 61

5.4 Machinale neutrale of licht-alkalische reiniging en thermische desinfectie
Toesteltype: eenkamer-reinigings-/desinfectieapparaat zonder ultrasoonbehandeling
Fase Stap T
[°C/°F]
I Voorspoelen <25/77 3 D–W -
II Reiniging 55/131 10 DM–W Neutraal:
III Tussentijdse spoeling >10/50 1 DM–W Vooral bij de PrimeLine-producten moet het oppervlak zeer
t
[min]
Water-
kwaliteit
Chemie
BBRAUN HELIMATIC CLEANER
neutraal, pH-neutraal,
gebruikte oplossing 0,5 %
Licht alkalisch:
- concentraat:
pH = 9,5
< 5 % anionische tensiden
- oplossing 0,5 %
Alkalisch:
bereiding tot pH = 10,5 mogelijk, op voorwaarde dat de
reiniger door de fabrikant is goedgekeurd voor
containerreiniging.
Opmerking
Bij gebruik van licht-alkalische of alkalische
reinigingsmiddelen kan er verkleuring van gekleurd
geanodiseerd aluminium optreden. Deze heeft echter geen
enkele invloed op de goede werking van het product.
grondig worden gespoeld, zodat er absoluut geen resten
achterblijven.
IV Thermische desinfectie 90/194 5 DM–W Andere procesparameters voor de thermische desinfectie
moeten in samenspraak met de ziekenhuishygiënist
worden onderzocht.
V Droging - - - Volgens het actuele machinale programma.
D–W: Drinkwater
DM–W: Gedemineraliseerd water
¾ Inspecteer de zichtbare oppervlakken na de machinale reiniging/
desinfectie op residuen.
¾ Herhaal het reinigingsproces, indien nodig.
Opmerking
Zowel bij de handmatige als bij de machinale reiniging is een
ultrasoonbehandeling mogelijk. De machinale droging met hete lucht mag
plaatsvinden bij temperaturen tot 120 °C.
5.5 Controle, onderhoud en inspectie
Opmerking
De controle en reparatie van steriele containers mag uitsluitend gebeuren
door personen die daartoe over de nodige opleiding, kennis en ervaring
beschikken.
De afdichtingen in de containerdeksels werden getest op een minimale
levensduur van 5 000 sterilisatiecycli volgens DIN EN 868-8, bijlage G.
¾ Vervang de afdichtingen onmiddellijk wanneer u zichtbare
beschadigingen opmerkt.
¾ Stuur het deksel terug naar Aesculap, adres zie Technische service.
¾ Smeer de bewegende metalen delen (bijv. scharnieren van sluitingen)
indien nodig met een beetje steriliseerbare, dampdoorlatende
verzorgingsolie (bijv. STERILIT® I-oliespray JG600 of STERILIT®
I-oliedruppelfles JG598).
59
Page 62

Aesculap Sterile Technology
Sterilisatie container-systeem
6. Opsporen en verhelpen van fouten
Storing Oorzaak Remedie
Teveel condensaat binnen in de steriele
container
Temperatuur van te steriliseren goederen voor
de sterilisatie te laag
Textiel te vochtig Alleen droog textiel steriliseren
Steriele container te zwaar Normale container
Te steriliseren goederen verkeerd geplaatst Holle voorwerpen, bekkens, borden e. d. met
Steriele container slecht geplaatst in de
sterilisator
Steriele container onmiddellijk na de
sterilisatie klaargezet voor gebruik
Steriele container slecht geplaatst tijdens het
afkoelen
Te steriliseren goederen voorverwarmen tot
kamertemperatuur (ca. 20 °C)
met instrumenten: max. 10 kg laden
met textiel: max. 8 kg laden
Halfcontainer met instrumenten:
max. 5 kg laden
3/4-container met instrumenten: max. 7 kg
laden
de opening schuin naar onder plaatsen
Textiel loodrecht schikken, niet aandrukken
Zware steriele containers altijd onderaan
zetten
Steriele containers laten afkoelen tot
kamertemperatuur, alvorens deze klaar te
zetten voor gebruik
Steriele containers niet op de grond of in de
tocht plaatsen
Steriele containers bewaren in
geklimatiseerde ruimten volgens DIN 58953-9
Sterilisator-eigenschappen voldoen niet aan
DINEN285
Lege sterilisatie en vacuümtest niet dagelijks
voor het begin van de sterilisatie uitgevoerd
Verkeerd sterilisator-programma gekozen Geschikt programma voor de lading kiezen
Sterilisatordeur te lang geopend, sterilisator
koelt af
Condensaat in de groef van het (onder-)deksel Meerdere steriele containers of zware
goederen gestapeld
60
Sterilisator regelmatig laten onderhouden
Droogvacuüm controleren
Droogtijd controleren
Stoomkwaliteit controleren en eventueel
verbeteren
Dagelijks een lege sterilisatie en vacuümtest
uitvoeren alvorens te steriliseren
Sterilisator snel laden en uitladen
Sterilisator onderverdelen met leggers
Bovendeksel gebruiken
Page 63

Storing Oorzaak Remedie
Sterilisatie niet correct uitgevoerd
Indicatorplombe niet verkleurd
Basis/Vario steriele container of PrimeLine
steriele container-systeem vervormd
Onder- of bovendeksel kan niet op de kuip
worden aangebracht of vergrendeld
Sterilisator defect
Indikatorplomben verkeerd bewaard Bewaar indicatorplomben volgens de
Perforatieveld afgedekt tijdens de sterilisatie Perforatieveld nooit afdekken
Containerdeksel of –kuip vervormd/
beschadigd door onoordeelkundige hantering
(bijv. dragen aan het deksel)
7. Technische service
Gevaar voor verwonding en/of slechte werking!
¾ Voer geen wijzigingen aan dit product uit.
WAARSCHUWING
¾ Doe voor alle service en reparaties een beroep op uw nationale
B. Braun/Aesculap-vestiging.
Wijzigingen aan medisch-technische uitrusting kunnen leiden tot het
verlies van elke aanspraak op garantie en de nietigheid van eventuele
goedkeuringen.
Service-adressen
Aesculap Technischer Service
Am Aesculap-Platz
78532 Tuttlingen / Germany
Phone: +49 7461 95-1602
Fax: +49 7461 16-5621
E-mail: ats@aesculap.de
Andere service-adressen zijn verkrijgbaar op het bovengenoemde adres.
Sterilisator door de fabrikant laten repareren
bewaarvoorschriften op de verpakking
Containerdeksel of –kuip vervangen of door de
fabrikant laten repareren
9. Technische specificaties
De varianten en afmetingen van de steriele containers vindt u in de
catalogus nr. C40401.
10. Uittreksels uit normen
10.1 Geciteerde normen
De volgende normen worden aangehaald met betrekking tot steriele
containers:
• DIN 58953-9
•EN285
• EN 868-8
• EN 285 met toepasselijke bepalingen EN ISO 17665
• EN ISO 11607
8. Accessoires/Reserveonderdelen
De beschikbare accessoires en verbruiksmaterialen vindt u in de catalogus
nr. C40401.
61
Page 64

Aesculap Sterile Technology
Sterilcontainer-system
Billedforklaring
1 Overdæksel
2 Overdæksellås
3 Underdæksel
4 Underdæksellås
5 Kar
6 Indikatorplombeholder
7 Indikatorplombe
8 Greb
9 Slids (til indikatorplombe på underdæksellås)
10 Universal-filterholder
11 Kappe
12 Trykknapper
13 Indgrebsklo (ved optionalt overdæksel på BASIS-container)
14 Plastdæksel
15 Afdækning til perforationsfelt
16 Beskyttelsessystem mod mikroorganismer (permanent filter)
17 Modtageramme
18 Gribebolt
19 Afdækningsgitter
20 Montagegreb
21 Plastdæksellås
Symboler på produktet og æsken
Symbol Forklaring
OBS! Vær opmærksom på de vedlagte dokumenter
Følg brugsanvisningen
Indholdsfortegnelse
1. Sikker håndtering .........................................................................................63
2. Produktbeskrivelse .......................................................................................63
2.1 Anvendelsesformål ......................................................................................63
2.2 Funktionsmåde .............................................................................................63
3. Forberedelse og opstilling .........................................................................64
3.1 Første idrifttagning .....................................................................................64
4. Arbejder med den sterile container ........................................................64
4.1 Klargør ............................................................................................................64
Overdæksel/underdæksel/plastdæksel tages af.................................. 64
Filterskift ....................................................................................................... 64
4.2 Funktionstest ................................................................................................64
4.3 Betjening ........................................................................................................64
Læsning af sterilcontainere...................................................................... 65
Isætning af indikatorplombe ................................................................... 65
Læsning af sterilisator ............................................................................... 65
Sterilisation .................................................................................................. 65
Losning af sterilisator ................................................................................ 66
Transport af sterilcontainere ................................................................... 66
Lagring af sterilcontainere ....................................................................... 66
Sterilgods kontrolleres og gøres klart ................................................... 66
5. Valideret rensemetode ...............................................................................66
5.1 Almene bemærkninger ...............................................................................66
5.2 Rengøring/Desinfektion .............................................................................67
5.3 Manuel rengøring/desinfektion ...............................................................68
Manuel rengøring og vaskedesinfektion .............................................. 68
5.4 Maskinel neutral eller mildt alkalisk rengøring og termisk
desinfektion ...................................................................................................69
5.5 Kontrol, vedligeholdelse og afprøvning .................................................69
6. Fejlfinding og afhjælpning af fejl ...........................................................70
7. Teknisk service ..............................................................................................71
8. Tilbehør/reservedele ....................................................................................71
9. Tekniske specifikationer .............................................................................71
10. Uddrag af standarder ..................................................................................71
10.1 Citerede standarder .....................................................................................71
62
Page 65

1. Sikker håndtering
2. Produktbeskrivelse
Fare for kontaminering af sterilgods som følge af
utæt sterilcontainer!
ADVARSEL
¾ Inden produktet tages i anvendelse skal det kontrolleres for korrekt
funktionsduelighed og stand.
¾ For at undgå skader på grund af fejlagtig montering eller drift og for
ikke at bringe garantien og ansvaret i fare:
–Produktet må udelukkende anvendes i overensstemmelse med
nærværende brugsanvisning.
–Overhold sikkerhedsinformationer og vedligeholdelsesanvisninger.
–Den sterile container må ikke anvendes, hvis den er beskadiget eller
defekt. Skift beskadigede enkeltdele omgående ud med originale
reservedele.
–Hvis den sterile container er blevet repareret på dele, der påvirker
tætheden overfor mikroorganismer: Inden den bruges, skal den sterile
container underkastes en grundig visuel kontrol.
¾ Det skal sikres, at det kun er personer med tilsvarende uddannelse,
viden eller erfaring, der håndterer produktet samt tilbehør.
¾ Brugsanvisningen skal opbevares tilgængeligt for personalet.
¾ De almindelige standarder og principper for hygiejne omkring
håndtering af kontamineret gods, der skal steriliseres og er steriliseret,
skal overholdes.
Ved kombination af sterilcontainere med
komponenter fra andre fabrikanter kan der ikke
længere garanteres for sterilcontainerens tæthed
samt for dens funktion som barriere mod
mikroorganismer.
¾ Det er kun tilladt at kombinere Aesculap
sterilcontainer-produkter med hinanden.
2.1 Anvendelsesformål
Aesculaps sterilcontainer-system er et sterilt barrieresystem med flere
anvendelsesmuligheder, som opretholder medicinprodukternes sterilitet,
indtil deres anvendelse hvv. indtil forfaldsdato. Det kan bruges til
sterilisation, lagring og transport af medicinprodukter. Desuden er der
mulighed for tilbagetransport af medicinprodukter efter at de er blevet
brugt. Aesculaps sterilcontainer-system er egnet til sterilisation i damp.
Bemærk
De bedes rette henvendelse til Deres Aesculap-agentur, såfremt de enkelte
Aesculap-sterilcontainere skal anvendes i forbindelse med andre
steriliseringsmetoder.
2.2 Funktionsmåde
Dette Aesculap-sterilcontainer-system er i overenstemmelse med kravene
fastsat i DIN 58953-9 og EN ISO 11607.
Sterilcontainere med perforeret dæksel og lukket kar er valideret til
dampsterilisation i en sterilisator i henhold til EN 285 inden for den:
• fraktionerede vakuummetode
Sterilcontainere med perforeret dæksel og perforeret kar er yderligere
egnet til dampsterilisation i en sterilisator i henhold til EN 285 inden for
den:
• gravitationsmetode
Bemærk
Om den specifike metode er egnet, skal påvises ved at foretage en
validering på stedet.
63
Page 66

Aesculap Sterile Technology
Sterilcontainer-system
3. Forberedelse og opstilling
3.1 Første idrifttagning
¾ Den fabriksnye sterilcontainer skal rengøres grundigt inden den første
anvendelse.
¾ Efter rengøring skal det passende filter sættes i, se Filterskift.
Sterilcontainer-system PrimeLine:
Beskyttelsessystemet 16 (permanent filter) er integreret.
4. Arbejder med den sterile container
4.1 Klargør
Overdæksel/underdæksel/plastdæksel tages af
Hvis der anvendes et overdæksel, kan dette tages af underdækslet til
rengøring og i tilfælde af tilsmudsning.
VARIO-container (som standard med under- og overdæksel):
¾ Overdæksellåsen 2 trykkes ned, overdækslet 1 og underdækslet 3 tages
af.
BASIS-container (med senere påmonteret overdæksel):
¾ Kombinationen mellem overdæksel 1 og underdæksel 3 tages af
karret 5.
¾ Indgrebskloen 13 løsnes og overdækslet 1 tages af.
Sterilcontainer-system PrimeLine:
¾ Plastdæksel 14 tages af karret 5.
Filterskift
Alt efter filtertype skal filtre udskiftes med følgende intervaller:
• Engangs filter: før hver sterilisering
• Permanent filter af PTFE: efter maks. 1 000 rensecyklusser
• PrimeLine-beskyttelsessystem mod mikroorganismer: efter maks.
5 000 rensecyklusser
VARIO-container og BASIS-container:
¾ Der trykkes samtidigt på trykknapperne 12 på universal-
filterholderen 10.
¾ Universal-filterholder 10 tages af.
¾ Det nye filter lægges i og universal-filterholder 10 sættes på igen.
¾ Kappe 11 på universal-filterholder 10 trykkes ned, til den kommer
hørbart i indgreb.
Sterilcontainer-system PrimeLine:
¾ Afdækningsgitteret 19 drejes til venstre, til det er udløst.
¾ Afdækningsgitteret 19 på beskyttelsessystemet mod
mikroorganismer 16 tages af.
¾ Beskyttelsessystemet 16 drejes mod venstre ved hjælp af
montagegrebet 20, indtil det er blevet udløst af modtagerammen 17.
¾ Beskyttelsessystemet mod mikroorganismer 16 løftes i gribebolten 18
og tages ud.
¾ Beskyttelsessystemet 16 indbygges i omvendt rækkefølge.
4.2 Funktionstest
Bemærk
Ved sterilcontainer-systemet PrimeLine skal afdækningsgitteret 19 tages
af i tilfælde af kontrol!
¾ Alle bestanddele af den sterile container underkastes en visuel kontrol
for beskadigelser og korrekt funktion før hver anvendelse:
–Metaldele ikke deformeret
–Aluminiumsdæksel er ikke skæft
–Universal-filterholderen 10 skal ligge op mod kanten over hele fladen.
–Pakninger er fri for skader (ingen revner, ...)
–Plastdele uden revner
–Permanent filter/PrimeLine-beskyttelsessystemet uden beskadigelser
(ingen skarpe bøjninger, huller, revner eller sprækker)
–Lås er funktionsdygtig (kommer i indgreb)
¾ Der må kun anvendes intakte sterilcontainere. Beskadigede dele skal
omgående skiftes ud med originale reservedele eller repareres.
4.3 Betjening
Fare for kontaminering af sterilgods som følge af utæt
sterilcontainer!
ADVARSEL
FORSIGTIG
Ved kombination af den sterile container med
komponenter fra andre fabrikanter kan der ikke
længere garanteres for sterilcontainerens tæthed samt
for dens funktion som barriere mod mikroorganismer.
¾ Det er kun tilladt at kombinere Aesculap
sterilcontainer-produkter med hinanden.
Fare for manglende sterilitet af sterilgods!
¾ Sterilcontainere skal altid transporteres i grebene.
¾ Sterilcontainere må aldrig bæres eller løftes i
dækslet.
¾ Sterilcontainere skal transporteres, således at
mekaniske beskadigelser er udelukkede.
64
Page 67

Læsning af sterilcontainere
Instrumenter
Efter DIN EN 868-8 og DIN 58953-9 anbefales følgende maksimale
læsning af en container:
• Almindelig container: 10 kg
• Halvcontainer: 5 kg
• 3/4-container: 7 kg
¾ Instrumenterne lagres med egnede lagringsanordninger i en trådkurv.
Herved skal hule legemer, skåle, tallerkener el. lign. lagres med
åbningen skråt nedad.
VARIO-container og BASIS-container:
¾ Sterilcontainere skal læsses, således at universal-filterholderne 10 ikke
tildækkes. Maks. læssehøjde: Op til ca. 2 cm neden for kanten af
containerkarret.
¾ Underdækslet 3 låses med underdæksellåsen 4 på karret 5.
Underdæksellåsen 4 skal komme i indgreb, så det er til at mærke. Hvis
ikke: Sterilcontainer skal istandsættes, se Teknisk service.
Sterilcontainer-system PrimeLine:
¾ Sterilcontainer skal læsses, således at afdækningsgitteret 19 i
plastdækslet 14 ikke tildækkes. Maks. læssehøjde: Op til ca. 2 cm
nedenfor kanten af containerkarret.
¾ Plastdækslet 14 låses med plastdæksellåsen 21 på karret 5.
Plastdæksellåsen 21 skal komme i indgreb, så det kan mærkes. Hvis
ikke: Sterilcontainer skal istandsættes, se Teknisk service.
Tekstiler
¾ Sammenlagte vaskestykker skal pakkes ned, således at de passer lodret
ind i sterilcontaineren.
¾ Det skal sikres, at der passer en udstrakt hånd mellem de enkelte
vaskestykker, når sterilcontaineren er helt læsset.
¾ Sterilcontainere skal læsses, således at universal-filterholderne 10 ikke
tildækkes. (ved VARIO-containere og BASIS-containere).
¾ Underdækslet 3 låses med underdæksellåsen 4 på karret 5.
Underdæksellåsen 4 skal komme i indgreb, så det er til at mærke. Hvis
ikke: Sterilcontainer skal istandsættes, se Teknisk service.
Sterilcontainer-system PrimeLine:
¾ Sterilcontainere skal læsses, således at afdækningsgitteret 19 i
plastdækslet 14 ikke tildækkes.
¾ Plastdækslet 14 låses med plastdæksellåsen 21 på karret 5.
Plastdæksellåsen 21 skal komme i indgreb, så det kan mærkes. Hvis
ikke: Sterilcontainer skal istandsættes, se Teknisk service.
Isætning af indikatorplombe
¾ Efter læsning af sterilcontaineren på indikatorplomben 7 skal der
skrives følgende: Dato for sterilisering, nummer på sterilisering,
holdbarhedsdato samt navn og underskrift.
¾ Indikatorplomben 7 skubbes ind i indikatorplombeholderen 6 ud fra
den udvendige side, således at indikatordelen kommer i indgreb i
slidsen på dæksellåsen og forsegler låsen.
- eller -
¾ Efter lukning af sterilcontainer sættes plastplomben (f. eks. JG739) i
ved låsen.
Læsning af sterilisator
Fare for vakuumskader på sterilcontainere som følge
af utilstrækkelig trykudligning!
ADVARSEL
Bemærk
Både VARIO-containere og BASIS-containere kan steriliseres med påsat
overdæksel!
¾ Vær opmærksom på anvisningerne fra fabrikanten af sterilisatoren.
¾ Tunge sterilcontainere skal altid stilles helt ned i sterilisatoren.
¾ Sterilcontainere skal altid transporteres i grebene.
Bemærk
Sterilcontainere kan stables op i sterilisator.
¾ Sterilcontainer-stabler skal transporteres, således at stablerne ikke kan
vælte.
Sterilisation
FORSIGTIG
¾ Der må ikke anvendes udvendig emballage til
sterilcontainere.
¾ Perforationsfelter i kar og underdæksel må under
ingen omstændigheder lukkes lufttæt (ved alle
container-versioner).
¾ Folieemballager må ikke lægges direkte på en
sterilcontainer.
Fare for manglende sterilitet!
¾ Sterilcontainere må kun sterileres i de dertil
godkendte og validerede steriliseringsmetoder.
¾ Sterilisation med damp, her skal man være opmærksom på følgende:
Sterilisation skal ske efter en valideret dampsterilisationsmetode
(f. eks. i en dampsterilisator i henhold til DIN EN 285 og valideret i
henhold til DIN EN ISO 17665.
65
Page 68

Aesculap Sterile Technology
Sterilcontainer-system
Losning af sterilisator
Fare for forbrændinger som følge af varme
sterilcontainere efter sterilisering!
ADVARSEL
Transport af sterilcontainere
FORSIGTIG
Lagring af sterilcontainere
Bemærk
Sterilcontainere kan lagres i stablet tilstand.
¾ Sterilcontainere skal opbevares på et tørt, rent og beskyttet sted.
¾ Lagertid og lagerbetingelser i henhold til DIN 58953-9 skal overholdes.
Sterilgods kontrolleres og gøres klart
Indholdet i en sterilcontainer kan kun anses for sterilt, hvis containeren er
blevet steriliseret, lagret og transporteret på en forsvarlig korrekt måde.
Hvis dette ikke er tilfældet, skal det sterile gods renses på ny.
FARE
¾ Det skal sikres, at farven på indikatorpunktet er skiftet.
¾ Det skal sikres, at alle bestanddele af containere, specielt dæksellåse,
er fri for skader.
¾ Det skal sikres, at containerens plombering er fri for skader.
¾ Man skal altid arbejde med beskyttelseshandsker.
Fare for manglende sterilitet af sterilgods!
¾ Sterilcontainere skal altid transporteres i grebene.
¾ Sterilcontainere må aldrig bæres eller løftes i
dækslet.
¾ Sterilcontainere skal transporteres, således at
mekaniske beskadigelser er udelukkede.
Fare for kontaminering som følge af, at det sterile
gods ikke er korrekt steriliseret!
¾ Før det sterile gods gøres klart, skal det
kontrolleres, om steriliseringen har været
succesfuld.
5. Valideret rensemetode
Bemærk
De nationale lovbestemmelser, nationale og internationale standarder og
direktiver samt egne hygiejnebestemmelser i forbindelse med klargøring
skal følges.
Bemærk
Ved patienter med Creutzfeldt-Jakob-sygdommen (CJS), ved mistanke om
CJS eller mulige varianter skal man under hensyntagen til produkternes
rensning overholde de til enhver tid gældende nationale bestemmelser.
Bemærk
Aktuelle informationer om rensning kan også hentes på Aesculap Extranet
under www.aesculap-extra.net
Bemærk
Man skal være opmærksom på, at en succesfuld klargøring af dette
medicinprodukt kun kan sikres efter forudgående validering af
klargøringsprocessen. Ejeren/den ansvarlige for rensningen er ansvarlig
herfor.
Som følge af visse procestolerancer er producentens oplysninger kun
beregnet som orienteringsværdi til vurdering af de klargøringsprocesser,
der afvikles hos driftsherren/den ansvarlige for klargøring.
5.1 Almene bemærkninger
Indtørrede hhv. fikserede OP-restprodukter kan vanskeliggøre rengøringen
hhv. gøre den uvirksom og medføre korrosion på rustfri stål. Følgelig burde
man ikke overskride et tidsrum på 6 timer mellem anvendelse og rensning,
ikke anvende fikserende temperaturer til forrengøring på >45 °C og ikke
anvende fikserende desinfektionsmidler (aktivstofbasis: Aldehyd, alkohol).
Overdoserede neutraliseringsmidler eller grundrengøringsmidler kan føre
til et kemisk angreb og/eller til blegning og til visuel eller maskinel
ulæselighed af laserpåskriften ved rustfri stål.
Ved rustfri stål vil klor- hhv. kloridholdige restprodukter, som f. eks. er
indeholdt i OP-restprodukter, lægemidler, kogesaltsopløsninger eller i
vandet til rengøring, desinfektion og sterilisation medføre
korrosionsskader (gravrust, spændingskorrosion) og dermed en
ødelæggelse af produkterne. Til fjernelse skal der udføres tilstrækkelig
skylning med helt afsaltet vand samt efterfølgende tørring.
66
Page 69

Der må udelukkende anvendes proceskemikalier, der er blevet prøvet og
frigivet (f. eks. VAH/DGHM- eller FDA-godkendelse hhv. CE-mærkning) og
anbefalet af kemikalieproducenten under hensyntagen til materialernes
forenelighed. Samtlige anvendelsesbestemmelser fastsat af
kemikalieproducenten med henblik på temperatur, koncentration og
indvirkningstid skal absolut følges. I modsat fald kan der opstå følgende
problemer:
• optiske materialeforandringer, som f. eks. udblegning eller
farvemæssige ændringer på aluminium. Ved aluminium er der allerede
mulighed for synlige overfladeændringer ved en pH-værdi på >8 i
anvendelses-/brugsopløsningen.
• Materialeskader, som f. eks. korrosion, revner, brud, førtidig ældning
eller opsvulmning.
¾ Der må ikke anvendes proceskemikalier, der kan udløse
spændingsrevner på plast, f. eks. PPSU, eller kan angribe
blødgøringsmidler (f. eks. ved silikone) og medføre sprødhed.
5.2 Rengøring/Desinfektion
Skader på produktet som følge af uegnede rengørings/desinfektionsmidler og/eller for høje temperaturer!
FORSIGTIG
¾ Rengørings- og desinfektionsmidler skal anvendes i
henhold til producentens anvisninger,
- som er godkendte til kunststof og specialstål,
- som ikke kan angribe blødgøringsmidler (f. eks.
silikone).
¾ Vær opmærksom på oplysningerne vedrørende
koncentrationer, temperaturer samt
indvirkningstid.
67
Page 70

Aesculap Sterile Technology
Sterilcontainer-system
5.3 Manuel rengøring/desinfektion
¾ Efter manuel rengøring/desinfektion skal alle synlige overflader
underkastes en visuel kontrol for restprodukter.
¾ Hvis nødvendigt, skal rengøringsprocessen gentages.
Manuel rengøring og vaskedesinfektion
Fase Skridt T
[°C/°F]t[min]
I Rengøring RT
(koldt)
II Tørring RT - - - -
III Vaskedesinfektion -
IV Slutskylning RT
(koldt)
V Tørring RT - - - - -
D–V: Drikkevand
HA–V: Helt afsaltet vand (demineraliseret)
RT: Stuetemperatur
Fase I
¾ Før rengøring skal grov tilsmudsning fjernes ved vaske dem af.
Fase II
¾ Produktet tørres med en fnugfri klud eller med medicinisk trykluft.
Konc.
[%]
--D–V-
>1- -I
- - HA–V ikke nødvendig Rengøringskemi skal skylles
Vand-
kvalitet
Alkohol denat. 70 %
(ætanol B|BRAUN)
Kemi
II
Aldehydfrit
desinfektionsmiddel til
overflader (Stabimed)
af uden restprodukter
Fase III
¾ Vaskedesinfektion gennemføres.
Fase IV
¾ Ved anvendelse af aldehydfrit desinfektionsmiddel:
Desinficerede overflader skylles under rindende HA-vand efter udløb af
den foreskrevne indvirkningstid (på min. 1 minut).
¾ Lad det resterende vand dryppe godt af.
Fase V
¾ Produktet skal tørres med en fnugfri klud eller i varmeskabet.
68
Page 71

5.4 Maskinel neutral eller mildt alkalisk rengøring og termisk desinfektion
Udstyrstype: Etkammers rengørings-/desinfektionsudstyr uden ultralyd
Fase Skridt T
[°C/°F]
I Forskylning <25/77 3 D–V -
II Rengøring 55/131 10 HA–V Neutral:
III Mellemskylning >10/50 1 HA–V Specielt i forbindelse med PrimeLine skal det være sikret,
t
[min]
Vand-
kvalitet
Kemi
BBRAUN HELIMATIC CLEANER
neutral, pH-neutral,
Brugsopløsning 0,5 %
Mildt alkalisk:
- Koncentrat:
pH = 9,5
< 5 % anioniske tensider
- 0,5 %-ig opløsning
Alkalisk:
Rensning mulig op til pH = 10,5, hvis producenten har
frigivet rengøringsmidlet til containerrengøring.
Bemærk
Anvendelse af mildt alkaliske hhv. alkaliske
rengøringsmidler kan medføre misfarvninger på farvet
elokseret aluminium, som dog ikke vil have nogen negativ
indvirkning på brugsevnen.
at overfladen skylles af uden restprodukter.
IV Termodesinfektion 90/194 5 HA–V Andre procesparametre til termisk desinfektion er mulige
efter samråd med den hygiejne-ansvarlige på hospitalet.
V Tørring - - - I overensstemmeles med et tidssvarende maskinprogram.
T–W: Drikkevand
VE–W: Helt afsaltet vand (demineraliseret)
¾ Efter maskinel rengøring/desinfektion skal synlige overflader
kontrolleres for restprodukter.
¾ Hvis nødvendigt, skal rengøringsprocessen gentages.
Bemærk
Både i forbindelse med manuel og med maskinel rensning er der mulighed
for ultralydsbehandling. Maskinel tørring med varmluft er tilladt ved
temperaturer på op til 120 °C.
5.5 Kontrol, vedligeholdelse og afprøvning
Bemærk
Kun personer med passende uddannelse, fagviden eller erfaring må
kontrollere og reparere sterilcontainere.
De enkelte pakninger i containernes dæksler er blevet afprøvet efter DIN
EN 868-8, tillæg G med henblik på en minimums levetid på
5 000 sterilisationscyklusser.
¾ Ved synlige beskadigelser, skal pakningerne straks skiftes ud.
¾ Dæksler skal indsendes til Aesculap, adresse se Teknisk service.
¾ Bevægelige metaldele (f. eks. låsehængsler) kan, alt efter behov,
smøres lidt med einen steriliserbar og dampgennemtrængelig plejeolie
(f. eks. STERILIT® I-oliespray JG600 eller STERILIT® I-drypkop JG598).
69
Page 72

Aesculap Sterile Technology
Sterilcontainer-system
6. Fejlfinding og afhjælpning af fejl
Fejl Årsag Afhjælpning
For meget kondensat i sterilcontainerens
indvendige rum
For lav temperatur af steriliseringsgods før
sterilisering
Tekstilerne er for fugtige Kun tørre tekstiler må steriliseres
Sterilcontainer for tung Almindelig container
Forkert lagret steriliseringsgods Hule legemer, skåle, tallerkener el. lign. skal
Sterilcontainer forkert positioneret i
sterilisator
Sterilcontainer klargjort til brug straks efter
sterilisering
Dårlig lagring af sterilcontainer under
afkølingen
Steriliseringsgods skal forvarmes op til
rumtemperatur (ca. 20 °C)
med instrumenter: maks. 10 kg læsning
med tekstiler: maks. 8 kg læsning
Halvcontainer med instrumenter:
maks. 5 kg læsning
3/4-Container med instrumenter: maks. 7 kg
læsning
lagres med åbningen skråt nedad
Tekstiler skal lægges i lodrette lag, de må ikke
presses sammen
Tunge sterilcontainere skal altid positioneres
helt nede i bunden
Før klargøring skal sterilcontainere afkøles til
rumtemperatur
Sterilcontainere må ikke lagres på gulvet eller
i trækvind
Sterilcontainere skal lagres i klimatiserede
lokaler i henhold til DIN 58953-9
Sterilisator-egenskaber er ikke i
overensstemmelse med DIN EN 285
Tomsterilisering og vakuumtest ikke udført
hver dag, inden steriliseringen påbegyndes
Forkert program valgt på sterilisator Program skal vælges i overensstemmelse med
Sterilisatordør åbnet for længe, sterilisator
bliver for kølig
Kondensat i renden af (under-)dækslet Flere sterilcontainere eller tungt
steriliseringsgods stablet op
70
Sterilisator skal vedligeholdes med jævne
mellemrum
Tørringsvakuum kontrolleres
Tørringstid kontrolleres
Dampkvalitet kontrolleres; forbedres, om
nødvendigt
Hver dag før sterilisering skal der foretages
tomsterilisering samt vakuumtest
læsning
Sterilisator læsses og losses hurtigt
Sterilisator inddeles med flytbare hylder
Overdæksel skal anvendes
Page 73

Fejl Årsag Afhjælpning
Sterilisation ikke udført korrekt
Ingen farveskift på indikatorplombe
Basis-/vario-sterilcontainer eller PrimeLinesterilcontainer-system deformeret
Under- hhv. overdækslet kan ikke sættes på
karret hhv. aflåses
Sterilisator defekt
Forkert lagring af indikatorplomber Vær opmærksom på lagerbetingelserne på
Perforationsfelt tildækket under sterilisering Perforationsfeltet må aldrig tildækkes
Containerdækslet hhv. –karret er deformeret/
beskadiget som følge af uhensigtsmæssig
håndtering (f. eks. blevet båret i dækslet)
7. Teknisk service
Fare for personskader og/eller fejlfunktioner!
¾ Produktet må ikke modificeres.
ADVARSEL
¾ Til service og reparation bedes henvendelse rettet til det nationale
B. Braun/Aesculap-agentur.
Modifikationer på medicinteknisk udstyr kan medføre, at garanti-/
reklamationskrav samt eventuelle godkendelser bortfalder.
Serviceadresser
Aesculap Technischer Service
Am Aesculap-Platz
78532 Tuttlingen / Germany
Phone: +49 7461 95-1602
Fax: +49 7461 16-5621
E-Mail: ats@aesculap.de
Yderligere serviceadresser kan fås via den ovenfor anførte adresse.
Sterilisator skal istandsættes af fabrikant
emballagen til indikatorplomberne
Containerdækslet hhv. –karret skal udskiftes
eller istandsættes af fabrikant
9. Tekniske specifikationer
Forskellige udførelser og dimensioner af sterilcontainere findes i
brochuren nr. C40401.
10. Uddrag af standarder
10.1 Citerede standarder
Følgende standarder citeres under hensyntagen til sterilcontainere:
• DIN 58953-9
•EN285
• EN 868-8
• EN 285 med gældende EN ISO 17665
• EN ISO 11607
8. Tilbehør/reservedele
Tilbehør samt forbrugsmateriale findes i brochuren nr. C40401.
71
Page 74

Aesculap Sterile Technology
Sterilcontainersystem
Legend
1 Övre lock
2 Lås övre lock
3 Undre lock
4 Lås undre lock
5 Tråg
6 Indikatorplombhållare
7 Indikatorplomb
8 Handtag
9 Spår (för indikatorplomb på lås på undre lock)
10 Universalfilterhållare
11 Kåpa
12 Tryckknappar
13 Låshake (på alternativt övre lock på BASIS-container)
14 Plastlock
15 Skydd för perforationsområde
16 Bakteriespärr system (permanent filter)
17 Fästram
18 Grepptapp
19 Täcklamellgaller
20 Monteringshandtag
21 Lås plastlock
Symboler på produktet och förpackning
Symbol Förklaring
OBS! Följ anvisningarna i medföljande dokument
Följ bruksanvisningen
Innehållsförteckning
1. Säker hantering ............................................................................................73
2. Produktbeskrivning ......................................................................................73
2.1 Användningsändamål .................................................................................73
2.2 Funktionssätt ................................................................................................73
3. Förberedelse och uppställning .................................................................74
3.1 Start första gången .....................................................................................74
4. Arbeta med sterilcontainern .....................................................................74
4.1 Iordningställande .........................................................................................74
Avtagning av övre lock/undre lock/plastlock...................................... 74
Byte av filter................................................................................................. 74
4.2 Funktionskontroll .........................................................................................74
4.3 Användning ...................................................................................................74
Fyllning av sterilcontainern ..................................................................... 75
Isättning av indikatorplomb..................................................................... 75
Fyllning av sterilisatorn............................................................................. 75
Sterilisering................................................................................................... 75
Tömning av sterilisatorn ........................................................................... 76
Transport av sterilcontainern .................................................................. 76
Förvaring av sterilcontainern................................................................... 76
Kontroll och iordningställande av sterilgods ...................................... 76
5. Validerad beredningsmetod ......................................................................76
5.1 Allmänna anvisningar .................................................................................76
5.2 Rengöring/desinfektion ..............................................................................77
5.3 Manuell rengöring/desinficering .............................................................78
Manuell rengöring och avtorkningsdesinfektion ............................... 78
5.4 Maskinell neutral eller milt alkalisk rengöring och termisk
desinficering ..................................................................................................79
5.5 Kontroll, underhåll och provning ............................................................79
6. Identifiering och avhjälpande av fel ......................................................80
7. Teknisk service ..............................................................................................81
8. Tillbehör/reservdelar ...................................................................................81
9. Tekniska data ................................................................................................81
10. Utdrag ur standarder ..................................................................................81
10.1 Citerade standarder .....................................................................................81
72
Page 75

1. Säker hantering
2. Produktbeskrivning
Risk för kontamination av sterilgods genom otät
sterilcontainer!
VARNING
¾ Kontrollera att produkten är funktionsduglig och i föreskrivet skick
innan den används.
¾ För att undvika skador till följd av felaktig hopsättning eller drift och
inte riskera garantin och ansvarsförbindelsen:
–Använd endast produkten enligt denna bruksanvisning.
–Följ anvisningarna om säkerhet och underhåll.
–Använd aldrig sterilcontainrar som är skadade eller defekta. Byt
omgående ut enstaka skadade delar mot originalreservdelar.
–Om delar av sterilcontainern som påverkar bakterietätheten har
reparerats: Kontrollera sterilcontainern noga visuellt före
användningen.
¾ Se till att bara personer med motsvarande utbildning, kunskap eller
erfarenhet handhar produkten och tillbehören.
¾ Förvara bruksanvisningen så att den är tillgänglig för personalen.
¾ Följ de allmänna riktlinjerna och principerna för hygien vid hantering
av gods som är kontaminerat, som ska steriliseras och som är
steriliserat.
Om sterilcontainern kombineras med komponenter
från andra tillverkare garanteras inte längre att
sterilcontainern är tät och fungerar som
bakteriebarriär.
¾ Kombinera endast Aesculap sterilcontainer-
produkter med varandra.
2.1 Användningsändamål
Aesculap sterilcontainersystem är ett återanvändningsbart
sterilbarriärsystem som håller de medicinska produkterna sterila tills de
används eller till utgångsdatum. I denna kan medicinska produkter
steriliseras, förvaras och transporteras. Det är dessutom möjligt att
transportera tillbaka medicinska produkter efter det att de har använts.
Aesculap sterilcontainersystem är lämpligt för sterilisering i ånga.
Tips
Kontakta representanten för Aesculap, om Aesculap sterilcontainrar ska
användas med andra steriliseringsmetoder.
2.2 Funktionssätt
Aesculap sterilcontainersystem uppfyller kraven i DIN 58953-9 och EN
ISO 11607.
Sterilcontainrar med perforerat lock och slutet tråg är validerade för
ångsterilisering i sterilisator enligt EN 285 med:
• den fraktionerade vakuummetoden
Sterilcontainrar med perforerat lock och perforerat tråg är dessutom
lämpliga för ångsterilisering i sterilisator enligt EN 285 med:
• gravitationsmetoden
Tips
En specifik metods lämplighet måste påvisas genom validering på platsen.
73
Page 76

Aesculap Sterile Technology
Sterilcontainersystem
3. Förberedelse och uppställning
3.1 Start första gången
¾ Rengör den fabriksnya sterilcontainern grundligt innan den används
första gången.
¾ Sätt i ett passande filter efter rengöringen, se Byte av filter.
Sterilcontainersystem PrimeLine:
Bakteriespärrsystemet 16 (permanent filter) är integrerat.
4. Arbeta med sterilcontainern
4.1 Iordningställande
Avtagning av övre lock/undre lock/plastlock
Om ett övre lock används kan det tas av från det undre locket för
rengöring av sterilcontainern och vid nedsmutsning.
VARIO-container (med undre och övre lock som standard):
¾ Tryck på låset på det övre locket 2, ta av det övre locket 1 och det undre
locket 3.
BASIS-container (med kompletterat övre lock):
¾ Ta av kombinationen av övre lock 1 och undre lock 3 från tråget 5.
¾ Lossa låshaken 13 och ta av det övre locket 1.
Sterilcontainersystem PrimeLine:
¾ Ta av plastlocket 14 från tråget 5.
Byte av filter
Byt filter med följande intervall beroende på filtertyp:
• Engångsfilter: före varje sterilisering
• Permanent filter av PTFE: efter max. 1 000 beredningscykler
• PrimeLine bakteriespärrsystem: efter max. 5 000 beredningscykler
VARIO-container och BASIS-container:
¾ Tryck samtidigt på tryckknapparna 12 på universalfilterhållaren 10.
¾ Ta av universalfilterhållaren 10.
¾ Sätt i ett nytt filter och sätt på universalfilterhållaren 10 igen.
¾ Tryck på kåpan 11 på universalfilterhållaren 10 tills det hörs att den
hakar i.
Sterilcontainersystem PrimeLine:
¾ Vrid täcklamellgallret 19 åt vänster tills det är uppreglat.
¾ Ta av bakteriespärrsystemets 16 täcklamellgaller 19.
¾ Vrid bakteriespärrsystemet 16 åt vänster med hjälp av
monteringshandtaget 20 tills systemet är uppreglat från
fästramen 17.
¾ Håll i grepptappen 18 och lyft bakteriespärrsystemet 16 och ta ur det.
¾ Montera bakteriespärrsystemet 16 i omvänd ordningsföljd.
4.2 Funktionskontroll
Tips
På sterilcontainersystemet PrimeLine måste täcklamellgallret
kontroll!
¾ Kontrollera alltid visuellt före användningen att inga komponenter i
sterilcontainern är skadade, att de fungerar korrekt och att
–metalldelarna inte är deformerade
–lock av aluminium inte är böjda
–universalfilterhållarens 10 hela yta ligger an mot kanten
–tätningarna är oskadda (inga sprickor, ...)
–plastdelarna inte har sprickor
–permanent filter/PrimeLine bakteriespärrsystem inte är skadat (inga
veck, hål, sprickor eller spalter)
–låset är funktionsdugligt (hakar i)
¾ Använd endast felfria sterilcontainrar. Byt omgående ut skadade delar
mot originalreservdelar eller reparera dem.
19
tas av för
4.3 Användning
Risk för kontamination av sterilgods genom otät
sterilcontainer!
VARNING
OBSERVERA
Om sterilcontainern kombineras med komponenter
från andra tillverkare garanteras inte längre att
sterilcontainern är tät och fungerar som
bakteriebarriär.
¾ Kombinera endast Aesculap sterilcontainer-
produkter med varandra.
Risk för ej sterilt sterilgods!
¾ Transportera alltid sterilcontainern med hjälp av
handtagen.
¾ Bär eller lyft aldrig sterilcontainern genom att hålla
i locket.
¾ Transportera sterilcontainern så att mekaniska
skador inte kan inträffa.
74
Page 77

Fyllning av sterilcontainern
Instrument
I enlighet med DIN EN 868-8 och DIN 58953-9 rekommenderar vi följande
maximala fyllning av containern:
• Normalcontainer: 10 kg
• Halvcontainer: 5 kg
• 3/4-container: 7 kg
¾ Förvara instrumenten med lämpliga förvaringshjälpmedel i trådkorg.
Placera ihåliga kroppar, skålar, brickor o.d. med öppningen vänd snett
nedåt.
VARIO-container och BASIS-container:
¾ Fyll sterilcontainrarna så att universalfilterhållarna 10 förblir fria. Max.
fyllningshöjd: till ca 2 cm nedanför containertrågets kant.
¾ Lås fast det undre locket 3 på tråget 5 med låset på det undre locket 4.
Det måste kännas att låset på det undre locket 4 hakar i. Om inte: Låt
reparera sterilcontainern, se Teknisk service.
Sterilcontainersystem PrimeLine:
¾ Fyll sterilcontainern så att täcklamellgallret 19 förblir fritt i
plastlocket 14. Max. fyllningshöjd: till ca 2 cm nedanför
containertrågets kant.
¾ Lås fast plastlocket 14 på tråget 5 med låset på plastlocket 21.
Det måste kännas att låset på plastlocket 21 hakar i. Om inte: Låt
reparera sterilcontainern, se Teknisk service.
Textilier
¾ Packa den hopvikta tvätten så att den passar in lodrätt i
sterilcontainern.
¾ Se till att det går att sticka in en sträckt hand mellan de olika delarna
av tvätten när sterilcontainern är helt fylld.
¾ Fyll sterilcontainern så att universalfilterhållarna 10 förblir fria (gäller
VARIO-container och BASIS-container).
¾ Lås fast det undre locket 3 på tråget 5 med låset på det undre locket 4.
Det måste kännas att låset på det undre locket 4 hakar i. Om inte: Låt
reparera sterilcontainern, se Teknisk service.
Sterilcontainersystem PrimeLine:
¾ Fyll sterilcontainern så att täcklamellgallret 19 förblir fritt i
plastlocket 14.
¾ Lås fast plastlocket 14 på tråget 5 med låset på plastlocket 21.
Det måste kännas att låset på plastlocket 21 hakar i. Om inte: Låt
reparera sterilcontainern, se Teknisk service.
Isättning av indikatorplomb
¾ Ange följande på indikatorplomben 7 när sterilcontainern har fyllts:
steriliseringsdatum, steriliseringsnummer, sista användningsdag samt
namn och underskrift.
¾ Skjut in indikatorplomben 7 från utsidan i indikatorplombhållaren 6 så
att indikatordelen griper tag i spåret på lockets lås och förseglar
förslutningen.
- eller -
¾ Sätt i plastplomben (t.ex. JG739) i låset när sterilcontainern har
stängts.
Fyllning av sterilisatorn
Risk för vakuumskador på sterilcontainern genom
otillräcklig tryckutjämning!
VARNING
Tips
Både VARIO-containern och BASIS-containern kan steriliseras med påsatt
övre lock!
¾ Följ sterilisatortillverkarens anvisningar.
¾ Placera alltid tunga sterilcontainrar nedtill i sterilisatorn.
¾ Transportera alltid sterilcontainern med hjälp av handtagen.
Tips
Sterilcontainrar kan staplas i sterilisatorn.
¾ Transportera staplarna med sterilcontainrar så att staplarna inte
tippar.
Sterilisering
OBSERVERA
¾ Använd aldrig ytterförpackningar för
sterilcontainern.
¾ Förslut aldrig perforationsområdena i tråget och
det undre locket lufttätt (gäller alla
containerversioner).
¾ Lägg inte folieförpackningar direkt på
sterilcontainern.
Risk för bristande sterilitet!
¾ Sterilisera bara sterilcontainern med de
steriliseringsmetoder som är godkända och
validerade för denna.
¾ Sterilisera med ånga och tänk då på följande:
Steriliseringen ska utföras med hjälp av validerad
ångsteriliseringsmetod (t.ex. i ångsterilisator enligt DIN EN 285 och
validerad enligt DIN EN ISO 17665).
75
Page 78

Aesculap Sterile Technology
Sterilcontainersystem
Tömning av sterilisatorn
Risk för brännskador genom heta sterilcontainrar efter
steriliseringen!
VARNING
Transport av sterilcontainern
OBSERVERA
Förvaring av sterilcontainern
Tips
Sterilcontainrarna kan förvaras staplade.
¾ Förvara sterilcontainern på en torr, ren och skyddad plats.
¾ Observera lagringstiden och lagringsvillkoren enligt DIN 58953-9.
Kontroll och iordningställande av sterilgods
Innehållet i en sterilcontainer kan bara anses vara sterilt om containern
har steriliserats, förvarats och transporterats på föreskrivet sätt.
Om så inte är fallet måste sterilgodset beredas på nytt.
FARA
¾ Kontrollera att indikatorpunkten har skiftat färg.
¾ Kontrollera att containerns alla komponenter, särskilt låsen på locken,
är oskadda.
¾ Kontrollera att containerplomberingen är oskadd.
¾ Arbeta alltid med skyddshandskar.
Risk för ej sterilt sterilgods!
¾ Transportera alltid sterilcontainern med hjälp av
handtagen.
¾ Bär eller lyft aldrig sterilcontainern genom att hålla
i locket.
¾ Transportera sterilcontainern så att mekaniska
skador inte kan inträffa.
Risk för kontamination genom att sterilgodset inte har
steriliserats på rätt sätt!
¾ Kontrollera att steriliseringen har lyckats innan
sterilgodset ställs i ordning.
5. Validerad beredningsmetod
Tips
Följ nationella lagbestämmelser, nationella och internationella standarder
och direktiv och de egna hygienreglerna för beredningen.
Tips
Följ gällande nationella föreskrifter om beredning av produkterna, om
patienten har Creutzfeldt-Jakobs sjukdom (CJD), vid misstanke om CJD
eller vid eventuella varianter.
Tips
För aktuell information om beredning se även Aesculap Extranet på
www.aesculap-extra.net
Tips
Observera att en lyckad beredning av denna medicinska produkt bara kan
säkerställas efter föregående validering av beredningsprocessen.
Användaren/den som utför beredningen har ansvaret för detta.
På grund av processtoleranser kan tillverkarens uppgifter bara användas
som riktvärde för bedömning av beredningsprocesserna hos användaren.
5.1 Allmänna anvisningar
Fasttorkade eller fixerade OP-rester kan försvåra rengöringen eller göra
den ineffektiv och leda till korrosion på rostfritt stål. Det får därför inte
gå längre tid än 6 timmar mellan användningen och beredningen, och inga
fixerande förrengöringstemperaturer på >45 °C och inga fixerande
desinfektionsmedel (med aktiv substans: aldehyd, alkohol) får användas.
Överdoserade neutralisationsmedel eller grundrengöringsmedel kan leda
till kemiskt angrepp och/eller till att laserskriften bleknar och inte går att
läsa visuellt eller maskinellt på rostfritt stål.
På rostfritt stål leder klor- eller kloridhaltiga rester, t.ex. i OP-rester,
läkemedel och koksaltlösningar, som finns i vattnet för rengöring,
desinfektion och sterilisering till korrosionsskador (gropfrätning,
spänningskorrosion) och därmed till att produkterna förstörs. För att
avlägsna resterna måste tillräcklig sköljning med totalt avsaltat vatten
och åtföljande torkning utföras.
76
Page 79

Endast sådana processkemikalier får användas som är kontrollerade och
godkända (t.ex. VAH/DGHM- eller FDA-godkännande eller CE-märkning)
och har rekommenderats av kemikalietillverkaren när det gäller
materialkompabilitet. Alla användningsanvisningar från
kemikalietillverkaren om temperatur, koncentration och verkningstid
måste följas noga. I annat fall kan följande problem uppstå:
• optiska förändringar av materialet som t.ex. blekning eller
färgförändringar på aluminium. På aluminium kan synliga
ytförändringar uppträda redan vid pH-värde >8 i användnings-/
brukslösningen.
• Skador på materialet, som t.ex. korrosion, sprickor, brott, åldring i
förtid eller svällning.
¾ Använd inga processkemikalier som utlöser spänningssprickor i plaster,
t.ex. PPSU, eller, som t.ex. på silikon, angriper mjukmedel och leder till
försprödning.
5.2 Rengöring/desinfektion
Risk för skador på produkten genom olämpliga
rengörings-/desinfektionsmedel och/eller för höga
OBSERVERA
temperaturer!
¾ Använd rengörings- och desinfektionsmedel
enligt tillverkarens anvisningar
– som är godkända för plast och rostfritt stål,
- och som inte angriper mjukmedel (t.ex.
silikon).
¾ Observera uppgifterna om koncentration,
temperatur och verkningstid.
77
Page 80

Aesculap Sterile Technology
Sterilcontainersystem
5.3 Manuell rengöring/desinficering
¾ Kontrollera visuellt efter den manuella/desinficeringen att det inte
finns rester på ytor som går att se.
¾ Upprepa rengöringsproceduren, om det behövs.
Manuell rengöring och avtorkningsdesinfektion
Fas Åtgärd T
[°C/°F]t[min]
I Rengöring RT
(kallt)
II Torkning RT - - - -
III Avtorkningsdesinfektion -
IV Avslutande sköljning RT
(kallt)
V Torkning RT - - - - -
DV: Dricksvatten
TAV: Totalt avsaltat vatten (demineraliserat)
RT: Rumstemperatur
Fas I
¾ Avlägsna grov smuts genom avtorkning före rengöringen.
Fas II
¾ Torka produkten torr med en luddfri duk eller medicinsk tryckluft.
Konc.
[%]
-- DV-
>1- -I
- - TAV Ej nödvändig Skölj av kemiska
Vattenkvalitet
Denat. alkohol 70 % (etanol
B|BRAUN)
Kemikalier
II
Aldehydfritt
ytdesinfektionsmedel
(Stabimed)
rengöringsmedel så att det
inte finns några rester kvar
Fas III
¾ Utför avtorkningsdesinfektion.
Fas IV
¾ Vid användning av aldehydfria desinfektionsmedel:
Skölj de desinficerade ytorna efter den föreskrivna verkningstiden
(minst 1 minut) i rinnande totalt avsaltat vatten.
¾ Låt återstående vatten rinna av tillräckligt.
Fas V
¾ Torka produkten torr med en luddfri duk eller i värmeskåp.
78
Page 81

5.4 Maskinell neutral eller milt alkalisk rengöring och termisk desinficering
Apparattyp: Rengörings-/desinfektionsapparat med en kammare utan ultraljud
Fas Åtgärd T
[°C/°F]
I Försköljning <25/77 3 DV -
II Rengöring 55/131 10 TAV Neutral:
III Mellansköljning >10/50 1 TAV Särskilt när det gäller PrimeLine måste det vara garanterat
IV Termodesinficering 90/194 5 TAV Andra processparametrar för den termiska desinficeringen
t
[min]
Vatten-
kvalitet
Kemikalier
BBRAUN HELIMATIC CLEANER
neutral, pH-neutral,
brukslösning 0,5 %
Milt alkalisk:
- koncentrat:
pH = 9,5
< 5 % anjonaktiva tensider
- 0,5-procentig lösning
Alkalisk:
Beredning till pH = 10,5 möjlig om tillverkaren har
godkänt rengöringsmedlet för rengöring av containrar.
Tips
Vid användning av milt alkaliska eller alkaliska
rengöringsmedel kan missfärgningar uppträda på
färgeloxerat aluminium, men missfärgningen påverkar inte
användbarheten.
att ytan sköljs av så att det inte finns några rester kvar.
är möjliga efter samråd med sjukhushygienikern.
V Torkning - - - Enligt modernt maskinprogram.
DV: Dricksvatten
TAV: Totalt avsaltat vatten (demineraliserat)
¾ Kontrollera efter den maskinella rengöringen/desinficeringen att det
inte finns rester på ytor som går att se.
¾ Upprepa rengöringsproceduren, om det behövs.
Tips
Behandling med ultraljud är möjlig både vid manuell och maskinell
beredning. Vid maskinell torkning med varmluft är temperaturer upp till
120 °C tillåtna.
5.5 Kontroll, underhåll och provning
Tips
Endast personer med motsvarande utbildning, specialkunskap eller
erfarenhet får kontrollera och reparera sterilcontainern.
Packningarna i containerlocken har testats enligt DIN EN 868-8, bilaga G
med avseende på en minsta livslängd på 5 000 steriliseringscykler.
¾ Byt genast ut packningen om det syns att den är skadad.
¾ Skicka in locket till Aesculap, adress se Teknisk service.
¾ Smörj vid behov rörliga metalldelar (t.ex. låsens gångjärn) en aning
med steriliserbar, ånggenomsläpplig underhållsolja (t.ex. STERILIT® I
oljespray JG600 eller STERILIT® I droppsmörjare JG598).
79
Page 82

Aesculap Sterile Technology
Sterilcontainersystem
6. Identifiering och avhjälpande av fel
Störning Orsak Åtgärd
För mycket kondensat invändigt i
sterilcontainern
För låg temperatur före steriliseringen hos
godset som ska steriliseras
Textilier för fuktiga Sterilisera bara torra textilier
Sterilcontainer för tung Normalcontainer
Godset som ska steriliseras är felplacerat Placera ihåliga kroppar, skålar, brickor o.d.
Sterilcontainern felplacerad i sterilisatorn Placera alltid tunga sterilcontainrar nedtill
Sterilcontainern har gjorts i ordning för
användning direkt efter steriliseringen
Sterilcontainern illa placerad medan den
svalnade
Förvärm godset som ska steriliseras till
rumstemperatur (ca 20 °C)
med instrument: fyll med max. 10 kg
med textilier: fyll med max. 8 kg
Halvcontainer med instrument:
fyll med max. 5 kg
3/4-container med instrument: fyll med max.
7 kg
med öppningen vänd snett nedåt.
Lägg textilier i lodräta skikt, tryck inte
Låt sterilcontainern svalna till rumstemperatur
innan den görs i ordning
Förvara inte sterilcontainern på golvet eller i
drag
Förvara sterilcontainern i luftkonditionerade
utrymmen enligt DIN 58953-9
Sterilisatorns egenskaper uppfyller inte
DINEN285
Sterilisering med tom sterilisator och
vakuumtest har inte utförts dagligen före
steriliseringens början
Fel program valt på sterilisatorn Välj program i enlighet med lastningen
Sterilisatorluckan öppen för länge, sterilsatorn
kyls ut
Kondensat i rännan i (det undre) locket Flera sterilcontainrar eller tungt gods har
staplats
Steriliseringen har inte utförts korrekt
Indikatorplomben har inte skiftat färg
80
Sterilisatorn defekt
Indikatorplomben felaktigt lagrad Observera lagringsvillkoren på
Låt utföra regelbunden service på sterilisatorn
Kontrollera torkningsvakuum
Kontrollera torkningstiden
Kontrollera ångkvaliteten, förbättra den om
det behövs
Utför varje dag sterilisering med tom
sterilisator och vakuumtest före steriliseringen
Fyll och töm sterilisatorn snabbt
Dela in sterilisatorn med hyllor
Använd övre lock
Låt tillverkaren reparera sterilisatorn
indikatorplombernas förpackning
Page 83

Störning Orsak Åtgärd
Basis-/Vario-sterilcontainer eller PrimeLine
sterilcontainersystem deformerat
Det går inte att sätta på eller låsa det undre
eller övre locket på tråget
Perforationsområdet täckt under
steriliseringen
Containerlocket eller -tråget deformerat/
skadat på grund av felaktigt handhavande
(t.ex. genom att man burit containern genom
att hålla i locket)
7. Teknisk service
Risk för personskador och/eller felaktig funktion!
¾ Ändra inte produkten.
VARNING
¾ För service och reparationer kontakta den nationella representanten
för B. Braun/Aesculap.
Om medicinteknisk utrustning ändras kan detta medföra att garantin och
eventuella godkännanden upphör att gälla.
Service-adresser
Aesculap Technischer Service
Am Aesculap-Platz
78532 Tuttlingen / Germany
Phone: +49 7461 95-1602
Fax: +49 7461 16-5621
E-mail: ats@aesculap.de
Ytterligare service-adresser kan fås via ovan nämnda adress.
Täck aldrig över perforationsområdet
Byt ut containerlocket resp. tråget eller låt
tillverkaren reparera det
9. Tekniska data
Varianterna av sterilcontainrar och deras dimensioner finner ni i broschyr
nr C40401.
10. Utdrag ur standarder
10.1 Citerade standarder
Följande standarder citeras beträffande sterilcontainrarna:
• DIN 58953-9
•EN285
• EN 868-8
• EN 285 med gällande EN ISO 17665
• EN ISO 11607
8. Tillbehör/reservdelar
Tillbehör och förbrukningsmaterial finner ni i broschyr nr C40401.
81
Page 84

CE marking according to directive 93/42/EEC
CE-Kennzeichnung gemäß Richtlinie 93/42/EWG
Marquage CE conforme à la directive 93/42/CEE
Identificación CE en conformidad con la directriz 93/42/CEE
Marchio CE conforme alla direttiva 93/42/CEE
CE-certificering conform richtlijn 93/42/EEG
CE-markering iht. retningslinie 93/42/EEC
CE-märkning i enlighet med direktiv 93/42/EEG
Technical alterations reserved
Technische Änderungen vorbehalten
Sous réserve de modifications techniques
Sujeto a modificaciones técnicas
Con riserva di modifiche tecniche
Technische wijzigingen voorbehouden
Retten til tekniske ændringer forbeholdes
Med reservation för eventuella tekniska ändringar
TA-Nr. C48381 09/09 V3 Änd.-Nr. 40843
Aesculap AG
Am Aesculap-Platz
78532 Tuttlingen
Germany
Phone +49 7461 95-0
Fax +49 7461 95-2600
www.aesculap.de
 Loading...