

Page 1
Aesculap®
Aesculap Neurosurgery
Instructions for use/Technical description
Suction cannulas
Gebrauchsanweisung/Technische Beschreibung
Saugkanülen
Mode d’emploi/Description technique
Canules d’aspiration
Instrucciones de manejo/Descripción técnica
Cánulas de aspiración
Istruzioni per l’uso/Descrizione tecnica
Cannule di aspirazione
Instruções de utilização/Descrição técnica
Cânulas de sucção
Gebruiksaanwijzing/Technische beschrijving
Zuigcanules
Bruksanvisning/Teknisk beskrivning
Sugkanyler
Инструкция по примению/Техническое описание
Канюли для аспирации
Návod k použití/Technický popis
Odsávací kanyly
Instrukcja użytkowania/Opis techniczny
Kaniule ssące
Návod na použivanie/Technický opis
Odsávacie kanyly
Kullanım Kılavuzu/Teknik açiklama
Emme kanülleri
Aesculap AG | Am Aesculap-Platz | 78532 Tuttlingen | Germany
Phone +49 (0) 7461 95-0 | Fax +49 (0) 7461 95-26 00 | www.aesculap.com
Aesculap – a B. Braun company
TA-Nr. 011626 11/12 V6 Änd.-Nr. 44936
- DIR 93/42/EEC
Technical alterations reserved
31 542
6
Page 2
Aesculap®
Suction cannulas
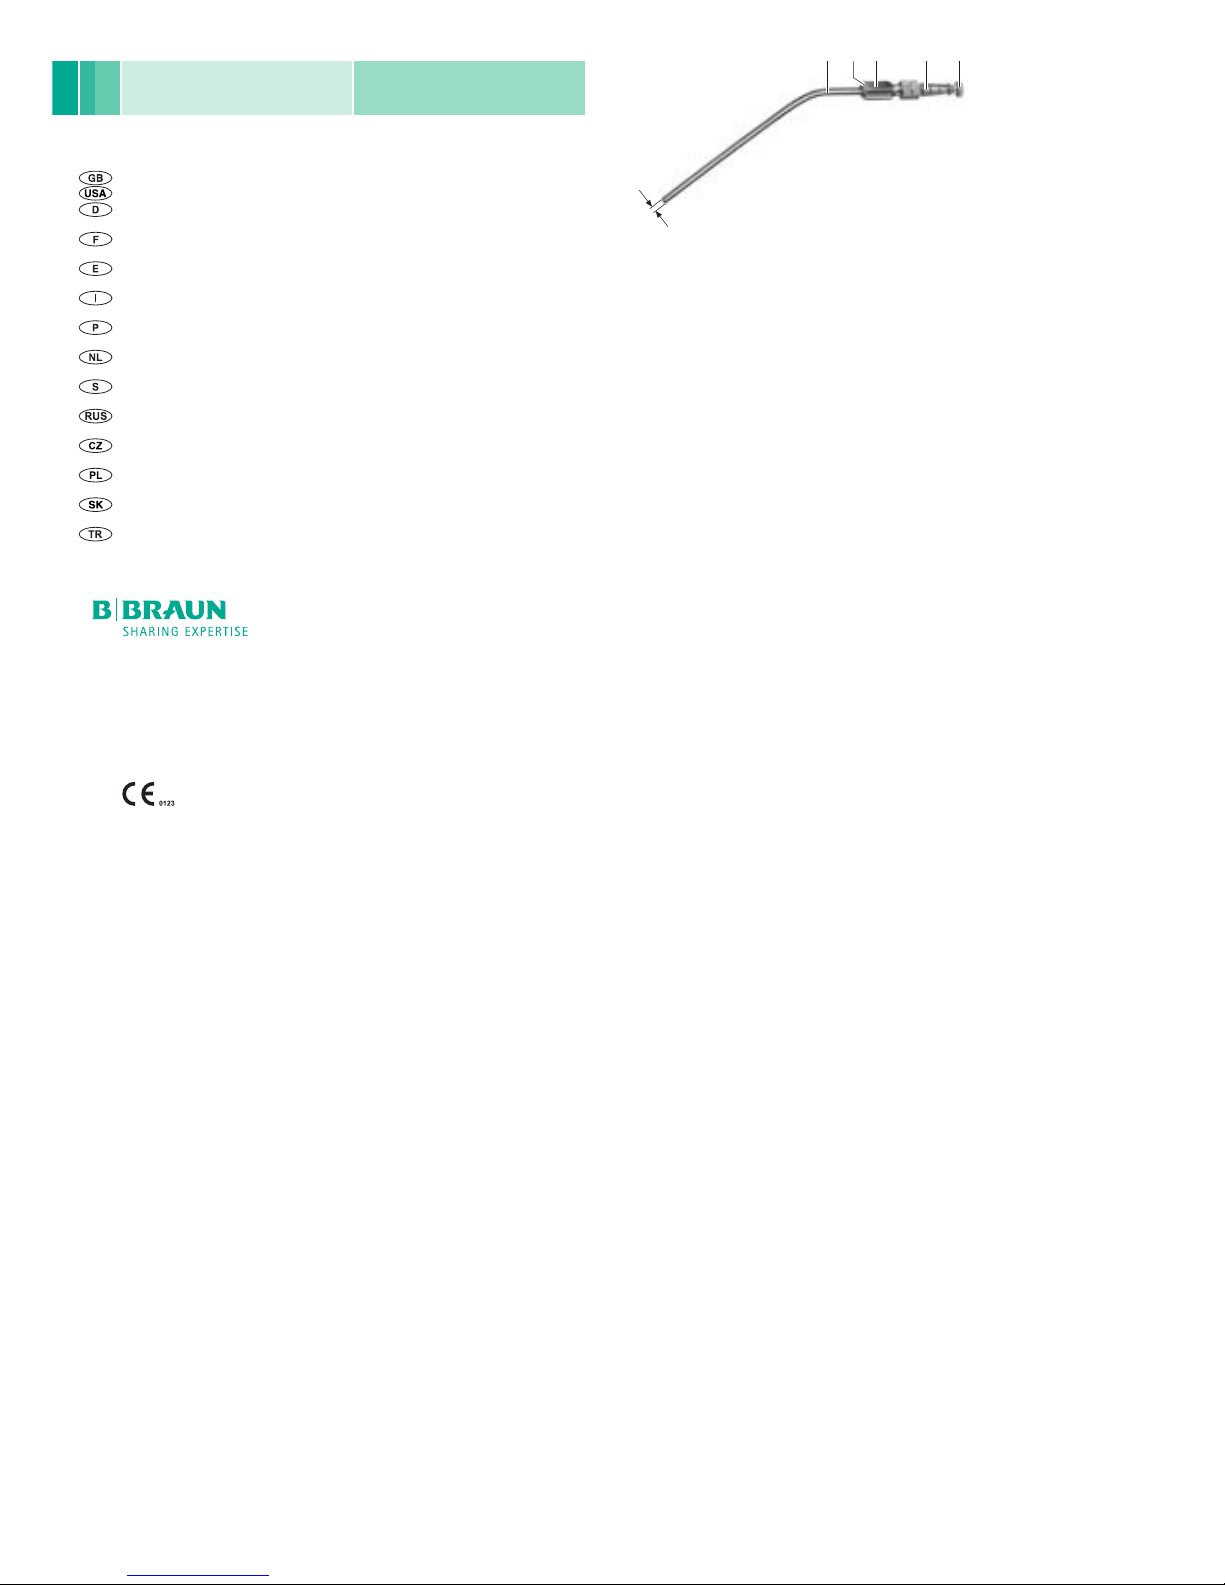
Legend
1 Suction tube, cylindrical/conical
2 Holding area
3 Suction control, round/tear-drop shaped
4 Tube connection
5 Stylet
6 Suction tube external diameter
Symbols on product and packages
Intended use
The suction cannulas are specially suited for microsurgical interventions in neurosurgery and ENT surgery. It can also
be used in many other disciplines such as oral and maxillofacial surgery, spine surgery or cardiothoracic surgery.
Available sizes
The suction cannulas are available with various:
■ suction tube diameters
■ working lengths
■ total lengths
■ holding area options
■ suction controllers
Detailed information about the available sizes/variants can be found in our brochures.
Safe handling and preparation
CAUTION
Federal law restricts this device to sale by, or on order of a physician!
► Ensure that the product and its accessories are operated and used only by persons with the requisite training,
knowledge, or experience.
► Read, follow, and keep the instructions for use.
► Use the product only in accordance with its intended use, see Intended use.
► Remove the transport packaging and clean the new product, either manually or mechanically, prior to its initial
sterilization.
► Store any new or unused products in a dry, clean, and safe place.
► Prior to each use, inspect the product for loose, bent, broken, cracked, worn, or fractured components.
► Do not use the product if it is damaged or defective. Set aside the product if it is damaged.
► Replace any damaged components immediately with original spare parts.
Safe operation
Connect the aspiration cannula
► Insert the appropriate tube into tube connection 4 of the aspiration cannula.
► Connect the tube with a suitable surgical aspirator.
Regulate the suction power during the procedure
The operating surgeon can control the suction power via the suction cannula, e.g. to prevent suction on sensitive
structures.
► Suction: Cover suction control 3 on holding area 2 with thumb.
► Do not aspirate: Remove thumb from suction control 3 on holding area 2.
► Adjusting the suction power (for suction cannulas with tear-drop shaped suction control): Partly cover suction
control 3 on holding area 2 according to the required suction power.
Validated reprocessing procedure
General safety instructions
Note
Adhere to national statutory regulations, national and international standards and directives, and local, clinical
hygiene instructions for sterile processing.
Note
For patients with Creutzfeldt-Jakob disease (CJD), suspected CJD or possible variants of CJD, observe the relevant
national regulations concerning the reprocessing of products.
Note
Mechanical reprocessing should be favored over manual cleaning as it gives better and more reliable results.
Note
Successful processing of this medical device can only be ensured if the processing method is first validated. The operator/sterile processing technician is responsible for this.
The recommended chemistry was used for validation.
Note
If there is no final sterilization, then a virucidal disinfectant must be used.
Note
For the latest information on reprocessing and material compatibility see also the Aesculap extranet at
www.extranet.bbraun.com
The validated steam sterilization procedure was carrie d out in the Aesculap sterile container system.
General information
Dried or affixed surgical residues can make cleaning more difficult or ineffective and lead to corrosion. Therefore the
time interval between application and processing should not exceed 6 h; also, neither fixating pre-cleaning temperatures >45 °C nor fixating disinfecting agents (active ingredient: aldehydes/alcohols) should be used.
Excessive measures of neutralizing agents or basic cleaners may result in a chemical attack and/or to fading and the
laser marking becoming unreadable visually or by machine for stainless steel.
Residues containing chlorine or chlorides e.g. in surgical residues, medicines, saline s olutions and in the service water
used for cleaning, disinfection and sterilization will cause corrosion damage (pitting, stress corrosion) and result in
the destruction of stainless steel products. These must be removed by rinsing thoroughly with demineralized water
and then drying.
Additional drying, if necessary.
Only process chemicals that have been tested and approved (e.g. VAH or FDA approval or CE mark) and which are
compatible with the product’s materials according to the chemical manufacturers’ recommendations may be used
for processing the product. All the chemical manufact urer's application specifications must be strictly observed. Failure to do so can result in the following problems:
■ Optical changes of materials, e.g. fading or discoloration of titanium or aluminum. For aluminum, the applica-
tion/process solution only needs to be of pH >8 to cause visible surface changes.
■ Material damage such as corrosion, cracks, fracturing, premature aging or swelling.
► Do not use metal cleaning brushes or other abrasives that would damage the product surfaces and could cause
corrosion.
► Further detailed advice on hygienically safe and material-/value-preserving reprocessing can be found at www.a-
k-i.org, link to Publications, Red Brochure – Proper maintenance of instruments.
Preparations at the place of use
► If applicable, rinse non-visible surfaces preferably with deionized water, with a disposable syringe for example.
► Remove any visible surgical residues to the extent possible with a damp, lint-free cloth.
► Transport the dry product in a sealed waste container for cleaning and disinfection within 6 hours.
Cleaning/disinfection
Product-specific safety notes on the reprocessing procedure
► Use suitable cleaning/disinfecting agents if the product is put away in a wet condition. To prevent foam forma-
tion and reduced effectiveness of the process chemicals: Prior to mechanical cleaning and disinfection, rinse the
product thoroughly with running water.
► Carry out ultrasound cleaning:
– as an effective mechanical supplement to manual cleaning/disinfecting.
– as a pre-cleaning procedure for products with encrusted residues, in preparation for mechanical cleaning/
disinfecting.
– as an integrated mechanical support measure for mechanical cleaning/disinfecting.
– for additional cleaning of products with residues left after mechanical cleaning/disinfecting.
Validated cleaning and disinfection procedure
Manual cleaning/disinfection
► Prior to manual disinfecting, allow water to drip off for a sufficient length of time to prevent dilution of the dis-
infecting solution.
► After manual cleaning/disinfection, check visible surfaces visually for residues.
► Repeat the cleaning /disinfection process if necessary.
Manual cleaning with ultrasound and immersion disinfection
D–W: Drinking water
FD–W: Fully desalinated water (demineralized, low microbiol ogical contamination: drinking water quality
at least)
RT: Room temperature
*Recommended: BBraun Stabimed
► Note the information on appropriate cleaning brushes and disposable syringes, see Validated cleaning and dis-
infection procedure.
Phase I
► Clean the product in an ultrasonic cleaning bath (frequency 35 kHz) for at least 15 min. Ensure that all ac cessible
surfaces are immersed and acoustic shadows are avoided.
► Clean the product with a suitable cleaning brush in the solution until a ll discernible residues have been removed
from the surface.
► If applicable, brush through non-visible surfaces with an appropriate cleaning brush for at least 1 min.
Caution, general warning symbol
Caution, see documentation supplied with the product
CAUTION
Damage to the product due to inappropriate cleaning/disinfecting agents and/or
excessive temperatures!
► Use cleaning and disinfecting agents according to the manufacturer’s instruc-
tions which
– are approved for (e.g. aluminum, plastics, high-grade steel).
► Observe specifications regarding concentration, temperature and exposure
time.
► Do not exceed the maximum permitted cleaning temperature of 60 °C.
Validated procedure Specific requirements Reference
Manual cleaning with ultrasound
and immersion disinfection
■ Use appropriate cleaning
brushes for the length and
diameter of the suction tubes
■ 20 ml disposable syringe
■ Drying phase: Use a lint-free
cloth or medical compressed air
Chapter Manual cleaning/disinfection and sub-chapter:
■ Chapter Manual cleaning with
ultrasound and immersion disinfection
Manual pre-cleaning with brush
and subsequent mechanical alkaline cleaning and thermal disinfection
■ Place the product in a tray that
is suitable for cleaning (avoiding rinsing blind spots).
■ Connect components with
lumens and channels directly to
the rinsing port of the injector
carriage.
Chapter Mechanical cleaning/disinfection with manual pre-cleaning and sub-chapter:
■ Chapter Manual pre-cleaning
with a brush
■ Chapter Mechanical alkaline
cleaning and thermal disinfecting
Phase Step T
[°C/°F]t[min]
Conc.
[%]
Water
quality
Chemical
I Ultrasonic
cleaning
RT (cold) >15 2 D–W Aldehyde-free, phenol-free,
and QUAT-free concentrate,
pH ~ 9*
II Intermediate
rinse
RT (cold) 1 - D–W -
III Disinfection RT (cold) 15 2 D–W Aldehyde-free, phenol-free,
and QUAT-free concentrate,
pH ~ 9*
IV Final rinse RT (cold) 1 - FD-W -
V Drying RT - - - -
Page 3

► Mobilize non-rigid components, such as set screws, links, etc. during cleaning.
► Thoroughly rinse through these components with the cleaning disinfectant solution (at least five times), using a
disposable syringe.
Phase II
► Rinse/flush the product thoroughly (all accessible surfaces) under running water.
► Mobilize non-rigid components, such as set screws, joints, etc. during rinsing.
► Drain any remaining water fully.
Phase III
► Fully immerse the product in the disinfectant solution.
► Mobilize non-rigid components, such as set screws, joints, etc. during rinsing.
► Rinse lumens at least five times at the beginning of the exposure time with an appropriate disposable syringe.
Ensure that all accessible surfaces are moistened.
Phase IV
► Rinse/flush the product thoroughly (all accessible surfaces) under running water.
► Mobilize non-rigid components, such as set screws, joints, etc. during final rinse.
► Rinse lumens with an appropriate disposable syringe at least five times.
► Drain any remaining water fully.
Phase V
► Dry the product in the drying phase with suitable equipment (e.g. cloth, compressed air), see Validated cleaning
and disinfection procedure.
Mechanical cleaning/disinfection with manual pre-cleaning
Note
The cleaning and disinfecting machine must be of tested and approved effectiveness (e.g. FDA approval or CE mark
according to DIN EN ISO 15883).
Note
The cleaning and disinfection device used for processing must be serviced and checked at regular intervals.
Manual pre-cleaning with a brush
D–W: Drinking water
RT: Room temperature
*Recommended: BBraun Stabimed
► Note the information on appropriate cleaning brushes and disposable syringes, see Validated cleaning and dis-
infection procedure.
Phase I
► Fully immerse the product in the cleaning/disinfectant for at least 15 min. Ensure that a ll accessible surfaces are
moistened.
► Clean the product with a suitable cleaning brush in the solution until all discernible residues have been removed
from the surface.
► If applicable, brush through non-visible surfaces with an appropriate cleaning brush for at least 1 min.
► Mobilize non-rigid components, such as set screws, links, etc. during cleaning.
► Thoroughly rinse through these components with the cleaning disinfectant solution (at least five times), using a
disposable syringe.
Phase II
► Rinse/flush the product thoroughly (all accessible surfaces) under running water.
► Mobilize non-rigid components, such as set screws, joints, etc. during rinsing.
Mechanical alkaline cleaning and thermal disinfecting
Machine type: single-chamber cleaning/disinfection device without ultrasound
D–W: Drinking water
FD–W: Fully desalinated water (demineralized, low microbiological contamination: drinking water quality
at least)
*Recommended: BBraun Helimatic Cleaner alkaline
► Check visible surfaces for residues after mechanical cleaning/disinfecting.
Inspection, maintenance and checks
► Allow the product to cool down to room temperature.
► After each complete cleaning, disinfecting and drying cycle, check that the product is dry, c lean, operational, and
free of damage (e.g. broken insulation or corroded, loose, bent, broken, cracked, worn, or fractured components).
► Dry the product if it is wet or damp.
► Repeat cleaning and disinfection of products that still show impurities or contamination.
► Check that the product functions correctly.
► Immediately put aside damaged or inoperative products and send them to Aesculap Technical Ser vice, see Tech-
nical Service.
Packaging
► Place the product in its holder or on a suitable tray. Ensure that all cutting edges are protected.
► Pack trays appropriately for the intended sterilization process (e.g. in Aesculap sterile containers).
► Ensure that the packaging provides sufficient protection against recontamination of the product during storage.
Steam sterilization
► Check to ensure that the sterilizing agent will come into contact with all external and internal surfaces (e.g. by
opening any valves and faucets).
► Validated sterilization process
– Steam sterilization using fractional vacuum process
– Steam sterilizer according to DIN EN 285 and validated according to DIN EN ISO 17665
– Sterilization using fractional vacuum process at 134 °C/holding time 5 min
► When sterilizing several products at the same time in a steam sterilizer, ensure that the maximum load capacity
of the steam sterilizer specified by the manufacturer is not exceeded.
Sterilization for the US market
■
Aesculap advises against sterilizing the device by flash sterilization or chemical sterilization.
■ Sterilization may be accomplished by a standard prevacuum cycle in a steam autoclave.
To achieve a sterility assurance level of 10-6, Aesculap recommends the following parameters:
*Aesculap has validated the above ster ilization cycle and has the data on file. The validation was accomplished in an
Aesculap sterile container cleared by FDA for the sterilization and storage of these products. Other sterilization cycles
may also be suitable, however individuals or hospitals not using the recommended method are advised to validate
any alternative method using appropriate laboratory techniques. Use an FDA cleared accessory to maintain sterility
after processing, such as a wrap, pouch, etc.
WARNING for the US market
If this device is/was used in a patient with, or suspected of having Creutzfeldt-Jakob Disease (CJD), the device
cannot be reused and must be destroyed due to the inability to reprocess or sterilize to eliminate the risk of
crosscontamination.
Storage
► Store sterile products in germ-proof packaging, protected from dust, in a dry, dark, temperature-controlled area.
Technical Service
► For service and repairs, please contact your national B. Braun/Aesculap agency.
Modifications carried out on medical technical equipment may result in loss of guarantee/warranty rights and forfeiture of applicable licenses.
Service addresses
Aesculap Technischer Service
Am Aesculap-Platz
78532 Tuttlingen / Germany
Phone: +49 (7461) 95-1602
Fax: +49 (7461) 16-5621
E-Mail: ats@aesculap.de
Or in the US:
Attn. Aesculap Technical Services
615 Lambert Pointe Drive
Hazelwood
MO, 63042
Aesculap Repair Hotline
Phone: +1 (800) 214-3392
Fax: +1 (314) 895-4420
Other service addresses can be obtained from the address indicated above.
Disposal
► Adhere to national regulations when disposing of or recycling the product, its components and its packaging!
Distributor in the US/Contact in Canada for product information and
complaints
3773 Corporate Parkway
Center Valley, PA, 18034,
USA
TA-Nr. 011626 11/12 V6 Änd.-Nr. 44936
Phase Step T
[°C/°F]t[min]
Conc.
[%]
Water
quality
Chemical
I Disinfec-
tant
cleaning
RT (cold) >15 2 D–W Aldehyde-free, phenol-free,
and QUAT-free concentrate,
pH ~ 9*
II Rinsing RT (cold) 1 - D–W -
Phase Step T
[°C/°F]t[min]
Water
quality
Chemical
I Prerinse <25/77 3 D–W -
II Cleaning 55/131 10 FD-W
■ Concentrate, alkaline:
–pH = 13
– <5 % anionic surfactant
■ 0.5 % working solution
– pH = 11*
III Intermediate
rinse
>10/50 1 FD-W -
IV Thermal disin-
fecting
90/194 5 FD-W -
V Drying - - - According to the program for cleaning
and disinfection device
Aesculap Orga Tray/Sterile container (perforated bottom)
Minimum cycle parameters*
Sterilization method Temp. Time Minimum drying time
Prevacuum 270 °F/275 °F 4 min 20 min
WARNING
Risk of injury and/or malfunction!
► Do not modify the product.
 Loading...