

Braun 5692 limited design edition, 5692 black premium selection limited design edition Quick Manual [es, en]
Page 1
www.braun.com
Series 7
trimmer
trimmer
trimmer
Series 7
Series 7
Series 7
black premium selection
limited design edition
Type 5692
Modèle 5692
Modelo 5692
790cc-4
Stapled booklet, 110x200 mm, 30 p (incl. 6 p cover), 2/2c = black + HKS43N
Page 2

Thank you for purchasing a Braun product.
We hope you are completely satisfied with
your new Braun shaver.
If you have any questions, please call:
US residents 1-800-BRAUN-11
1-800-272-8611
Gracias por haber comprado un producto
Braun.
Esperamos que quede completamente
satisfecho con su nueva afeitadora Braun.
Si tiene alguna duda, por favor llame al:
01(800) 508-5800
English 4
Español 16
99503050/III-10
USA / MEX
Page 3
trimmer
trimmer
trimmer
on
off
on
o
ff
trimmer
trimmer
trimmer
3 4
6
5
1
2
4a
9
8
10
11
12
15
14
17
18
19
7
20
Series 7
Series 7
Series 7
16
13
Series 7
Series 7
Series 7
tr
i
m
mer
t
r
i
m
m
e
r
t
r
i
m
m
e
r
S
eri
e
s 7
S
er
ie
s
7
S
eri
es 7
Page 4

4
English
IMPORTANT SAFETY
INSTRUCTIONS
When using an electrical appliance, basic precautions should
always be followed, including the following:
Read all instructions before using this appliance.
When disconnected, the hand-held part of this shaving
appliance may be cleaned under water.
DANGER
To reduce the risk of electric shock:
1. Use only in dry conditions.
2. Do not submerge in water.
3. Do not reach for an appliance that has fallen into water. Unplug
immediately.
4. Do not use while bathing or in a shower.
5. Do not place, store or charge the appliance where it can fall or
be pulled into a tub or sink. Do not place in or drop into water or
other liquid.
6. Except when charging, always unplug this appliance from the
electrical outlet immediately after using.
7. Unplug this appliance before cleaning.
8. This appliance is provided with a special cord set with
integrated Safety Extra Low Voltage power supply. Do not
exchange or manipulate any part of it.
9. Do not use an extension cord with this appliance.
FOR HOUSEHOLD USE ONLY
Page 5

5
WARNING
To reduce the risk of burns, fire, electric shock, or injury to
persons:
1. Close supervision is necessary when this appliance is used by,
on, or near children or invalids.
2. Use this appliance only for its intended use as described in
this manual. Do not use attachments not recommended by the
manufacturer.
3. Never operate this appliance if it has a damaged cord or plug,
if it is not working properly, if it has been dropped or damaged,
or if the power supply has been dropped into water. Return the
appliance to a service center for examination and repair.
4. Keep the cord away from heated surfaces.
5. Never drop or insert any object into any opening.
6. Do not use outdoors or operate where aerosol (spray)
products are being used or where oxygen is being
administered.
7. Do not use this appliance with a damaged or broken foil, as
serious skin injuries may occur.
8. Always attach plug to appliance first, then to outlet.
To disconnect, turn all controls to «off», then remove plug from
outlet.
9. When plugging to an electrical outlet outside the USA, use a
plug adapter to match the outlet’s pin configuration.
10. Caution: The battery used in this device may present a fire or
chemical burn hazard if mistreated. Do not disassemble heat
above 100 °C (212 °F) or incinerate.
SAVE THESE INSTRUCTIONS
Page 6
6
Warning
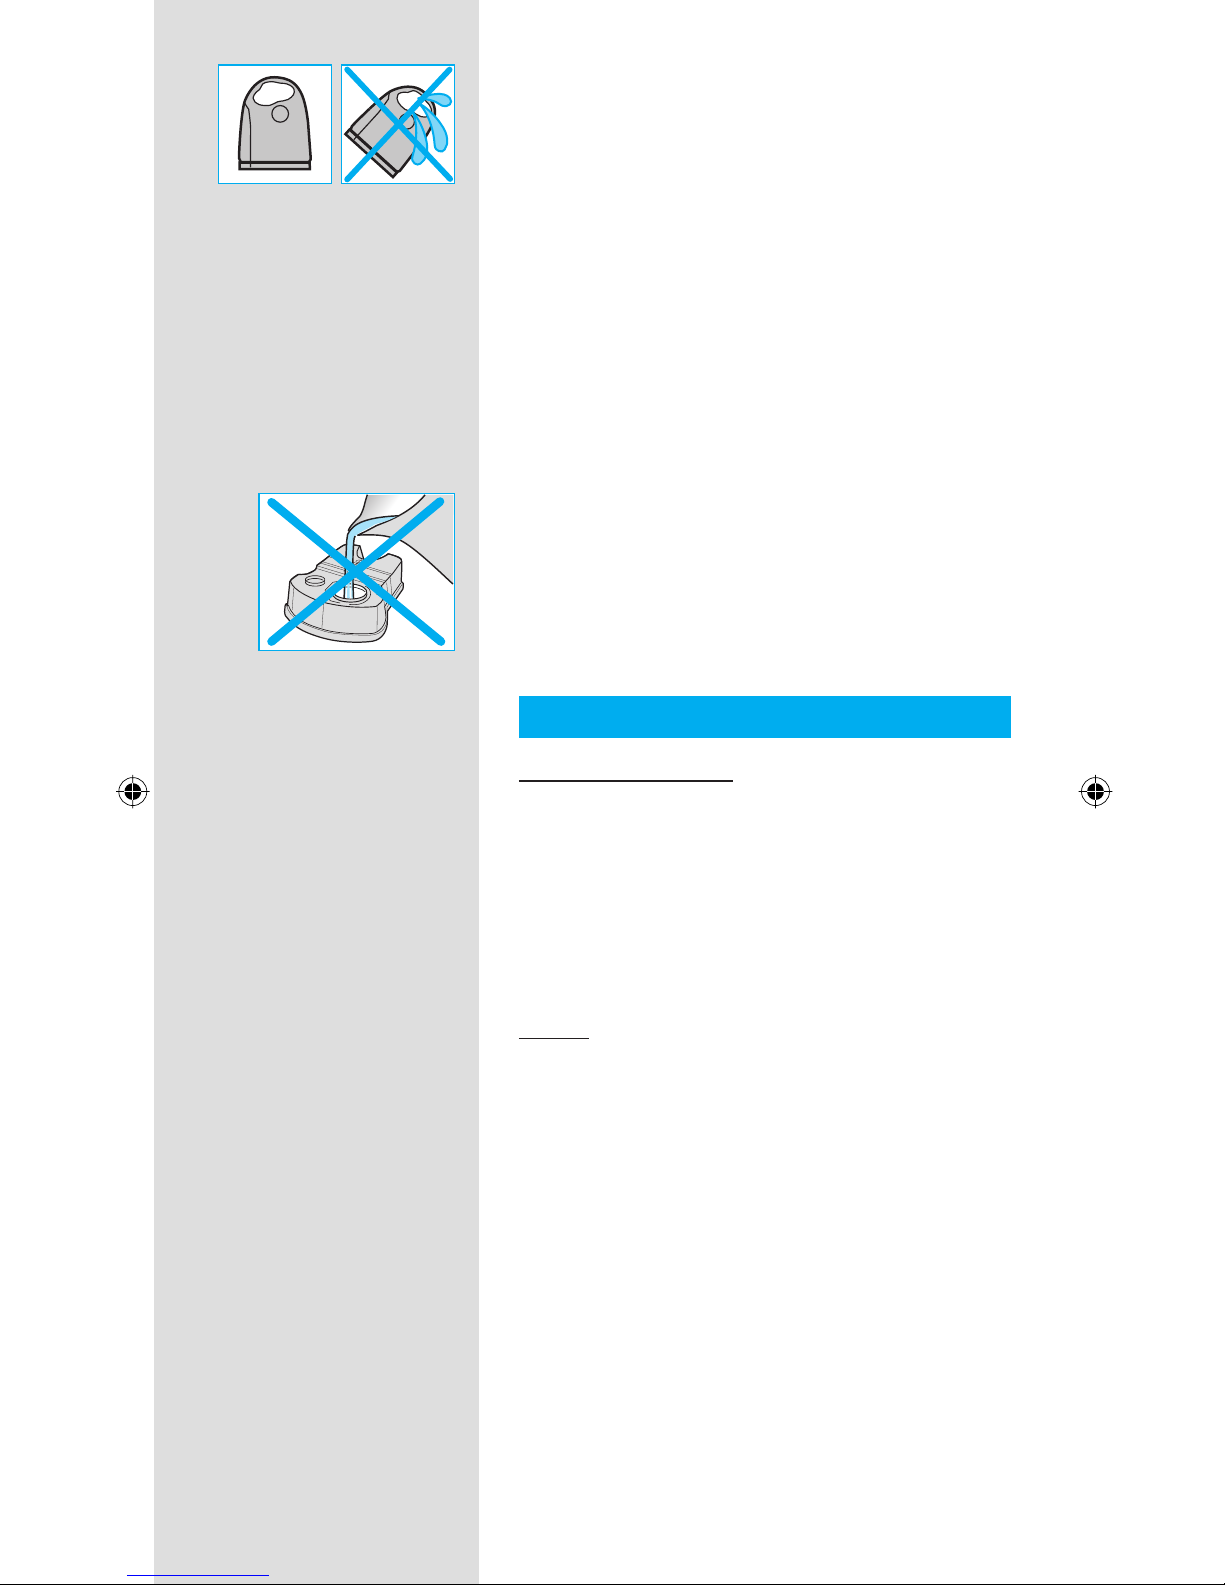
To prevent the cleaning fl uid from leaking, ensure
that the Clean&Renew station is placed on a fl at
surface. When a cleaning cartridge is installed,
do not tip, move suddenly or transport the
station in any way as cleaning fl uid might spill
out of the cartridge. Do not place the station
inside a mirror cabinet, nor over a radiator, nor
place it on a polished or lacquered surface.
The cleaning cartridge contains a highly
fl ammable liquid so keep it away from sources
of ignition. Do not expose to direct sunlight and
cigarette smoking nor store it over a radiator.
Keep it out of reach of children.
Do not refi ll the cartridge and use only original
Braun refi ll cartridges.
Description
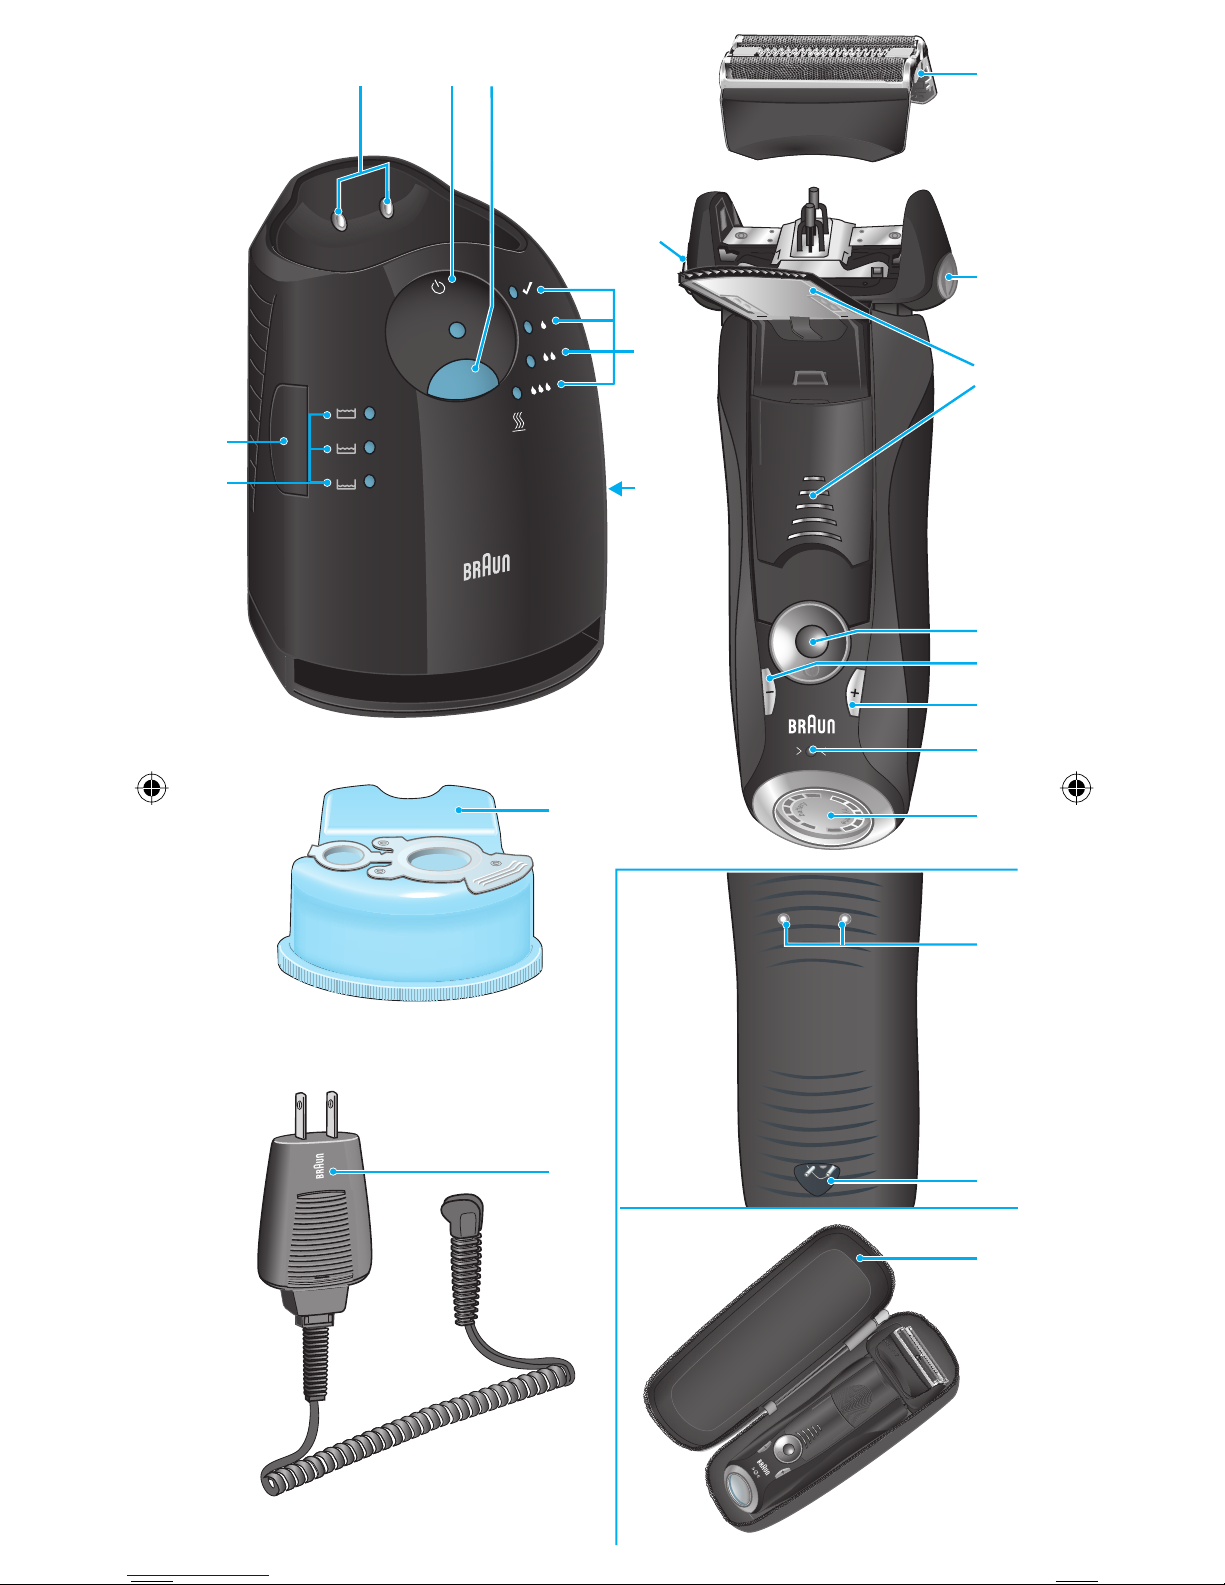
Clean&Renew station
1 Cleaning fl uid display
2 Lift button for cartridge exchange
3 Station-to-shaver contacts
4 Start button
D Fast clean button
5 Cleaning program indicators
6 Station power socket
7 Cleaning cartridge
Shaver
8 Foil & Cutter cassette
9 Cassette release button
0 Shaver head «lock» switch
q Pop-out long hair trimmer
w On/off switch
e (–) setting button (sensitive)
r (+) setting button (intensive)
t Reset button
z Shaver display
u Shaver-to-station contacts
i Shaver power socket
o Travel case
p Special cord set
Page 7
7
Before shaving
Prior to fi rst use you must connect the shaver to
an electrical outlet using the special cord set p
or alternatively proceed as below.
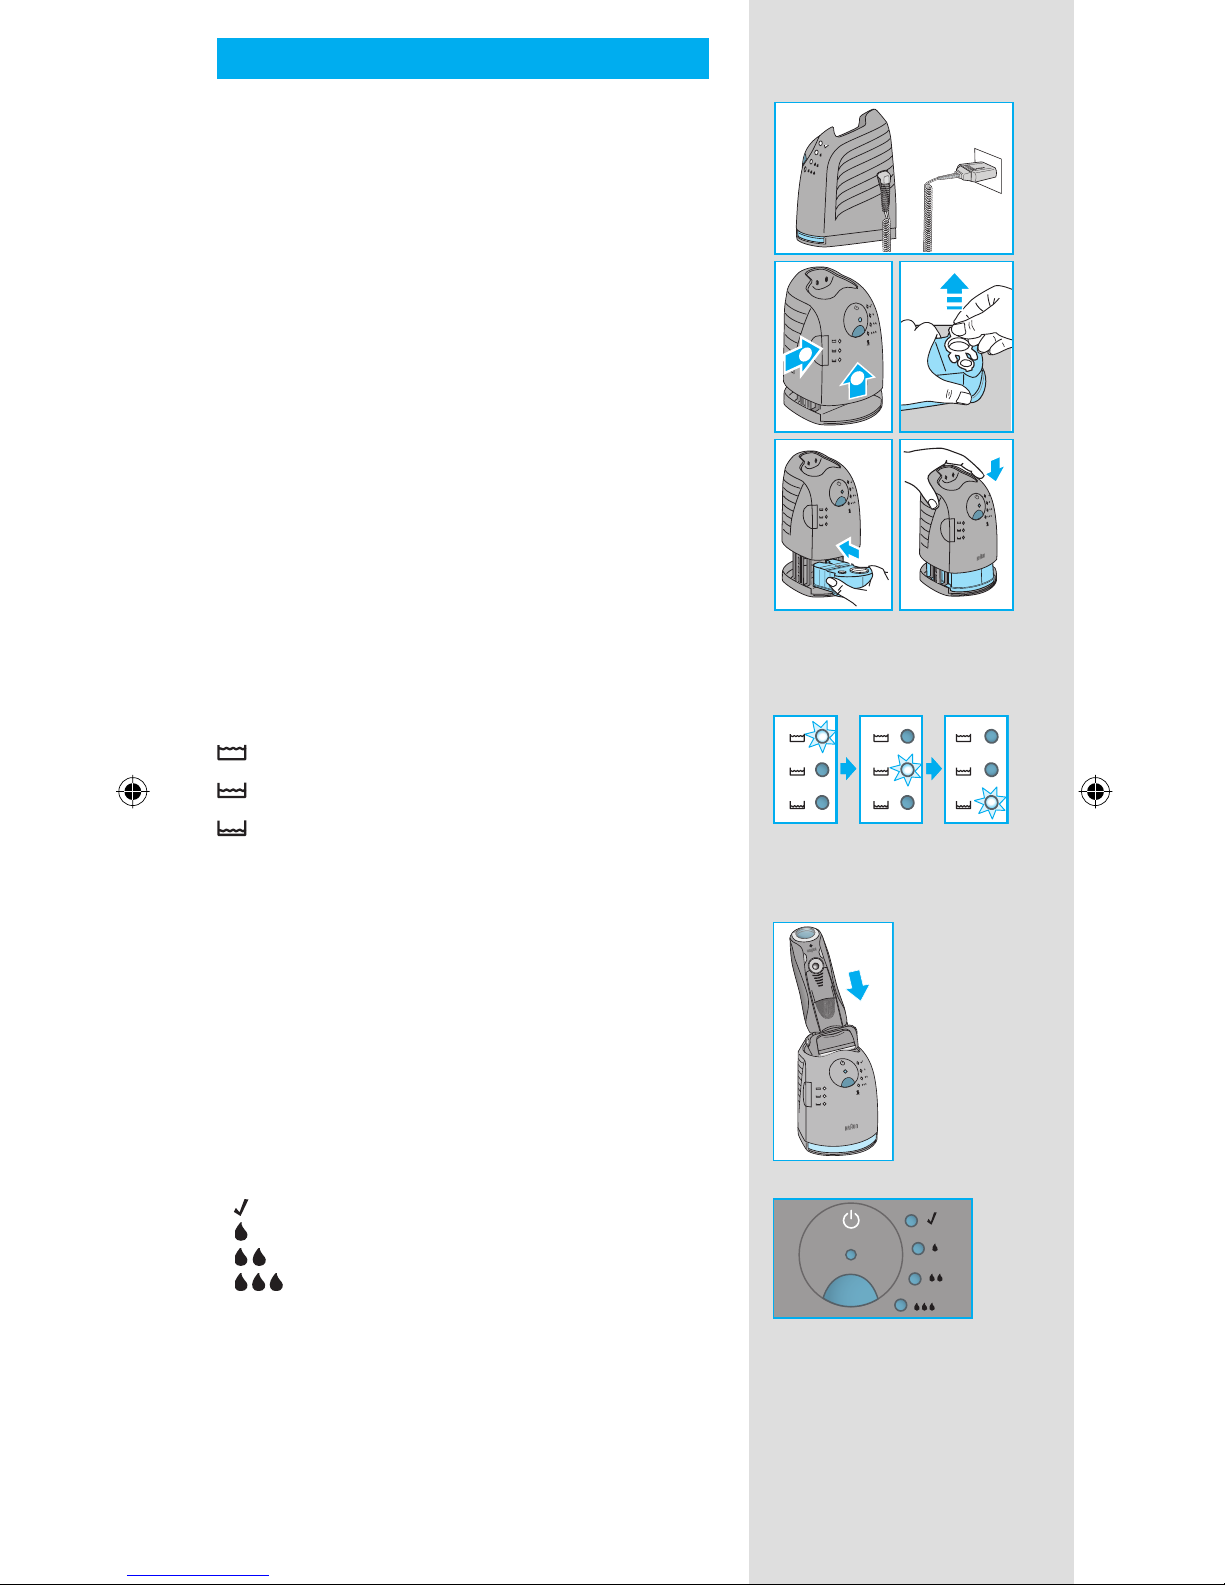
Installing the Clean&Renew station
• Using the special cord set p, connect the
station power socket
6 to an electrical outlet.
• Press the lift button 2 to open the housing.
• Hold the cleaning cartridge 7 down on a fl at,
stable surface (e.g. table).
• Carefully remove the lid from the cartridge.
• Slide the cartridge into the base of the station
as far as it will go.
• Slowly close the housing by pushing it down
until it locks.
The cleaning fl uid display 1 will show how much
fl uid is in the cartridge:
up to 30 cleaning cycles available
up to 7 cleaning cycles remaining
new cartridge required
Charging and cleaning the shaver
Insert the shaver head down into the cleaning
station. (The contacts u on the back of the
shaver will align with the contacts 3 in the
cleaning station).
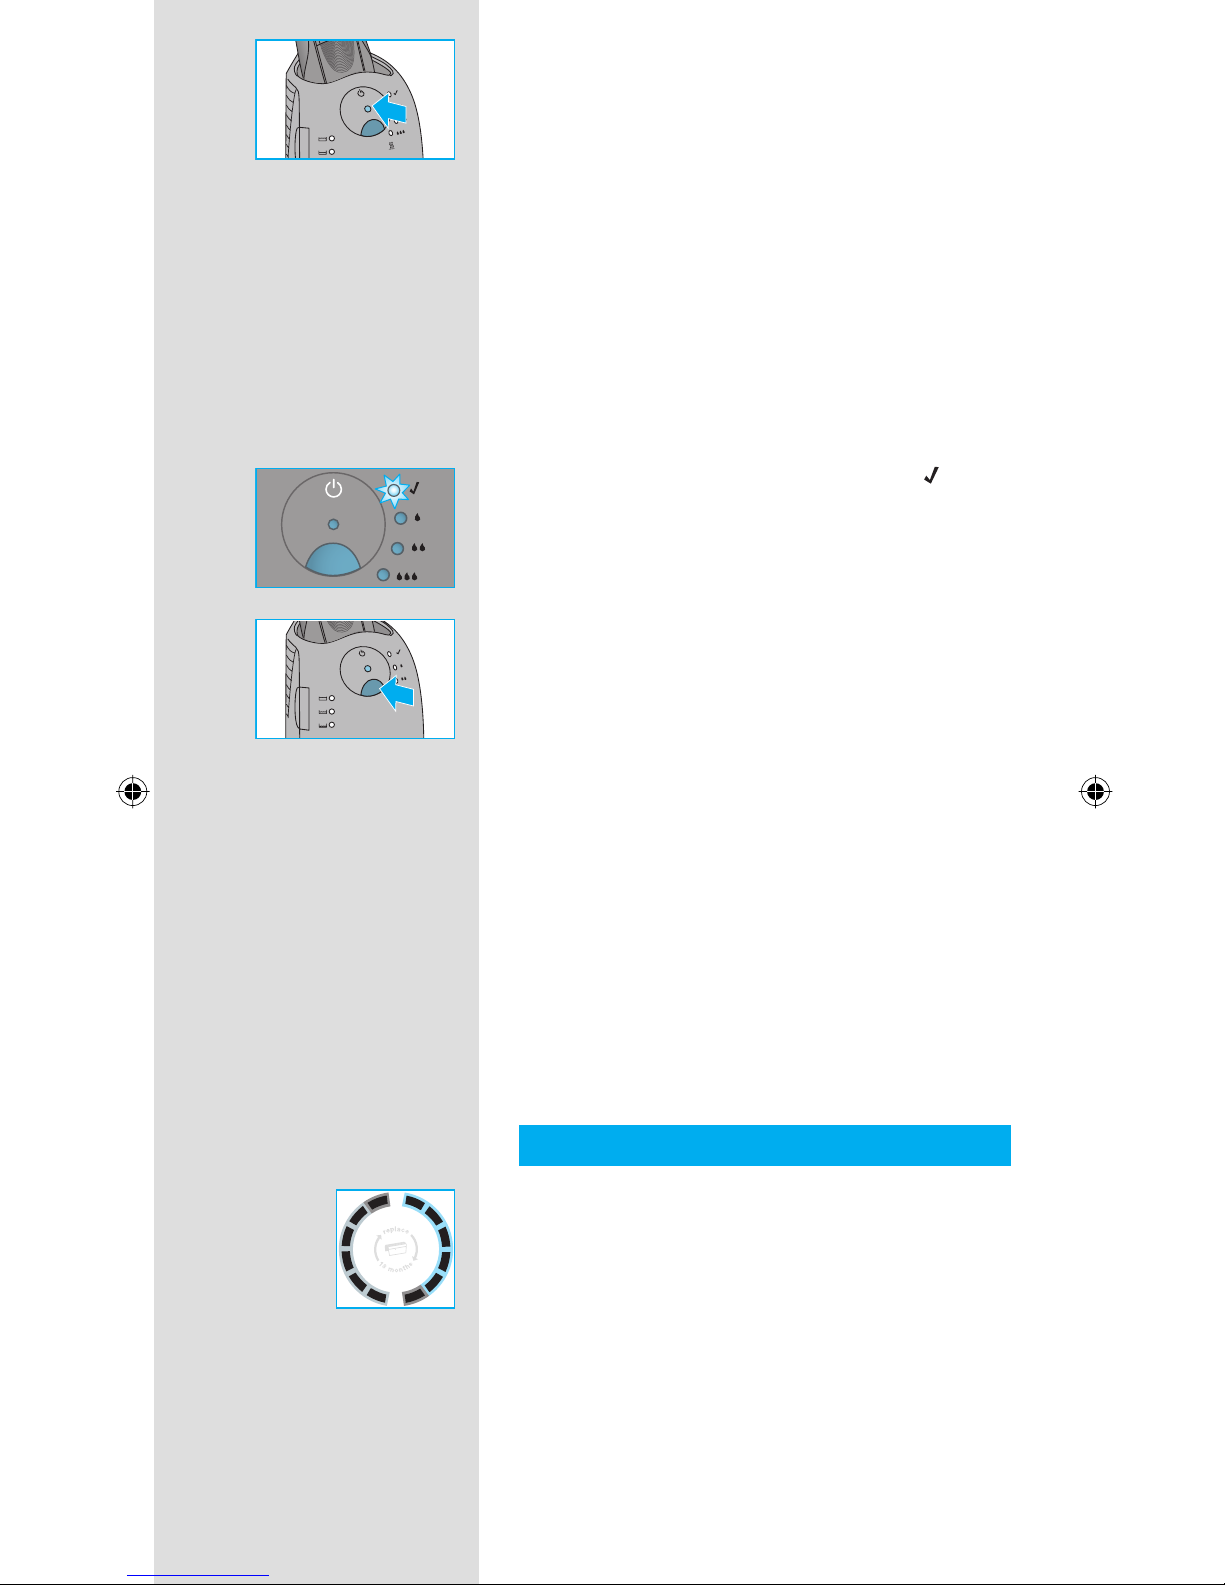
If required, the Clean&Renew station will automatically charge the shaver. The hygiene status
of the shaver will also be analyzed and one of
the following cleaning program indicators 5 will
light up:
« » shaver is clean
« » short economical cleaning required
« » normal level of cleaning required
« » high intensive cleaning required
new
f
a
s
t
c
l
e
a
n
f
a
s
t
c
l
e
a
n
f
a
s
t
c
l
e
a
n
2
1
new
f
a
s
t
c
l
e
a
n
f
a
s
t
c
l
e
a
n
f
a
s
t
c
l
e
a
n
2
1
trim
mer
Series 7
trim
mer
Series 7
Page 8
8
If the station selects one of the required cleaning
programs, it will not start unless you press the
start button
4. For best shaving results, we
recommend cleaning after each shave.
While cleaning is in progress, the respective
cleaning program indicator will blink. Each
cleaning program consists of several cycles,
where cleaning fl uid is fl ushed through the
shaver head and a heat drying process dries
the shaver. Depending on the program selected
the total cleaning time will range from 32 to 43
minutes.
The cleaning programs should not be interrupted. Please note that while the shaver is
drying, the shaving head may be hot and wet.
When the program is fi nished, the blue «
»
indicator will light up. Your shaver is now clean
and ready for use.
Fast cleaning
Push the fast clean button D to activate
the fast clean program without drying. This
program takes about 25 seconds only and is
recommended when you do not have time to
wait for one of the automatic cleaning programs.
If you remove the shaver just after the program
has fi nished, wipe off the shaver head with a
tissue to avoid dripping.
Stand-by mode
10 minutes after completing the charging or
cleaning session, the Clean&Renew station
switches to the stand-by mode: The indicators
of the Clean&Renew station turn off.
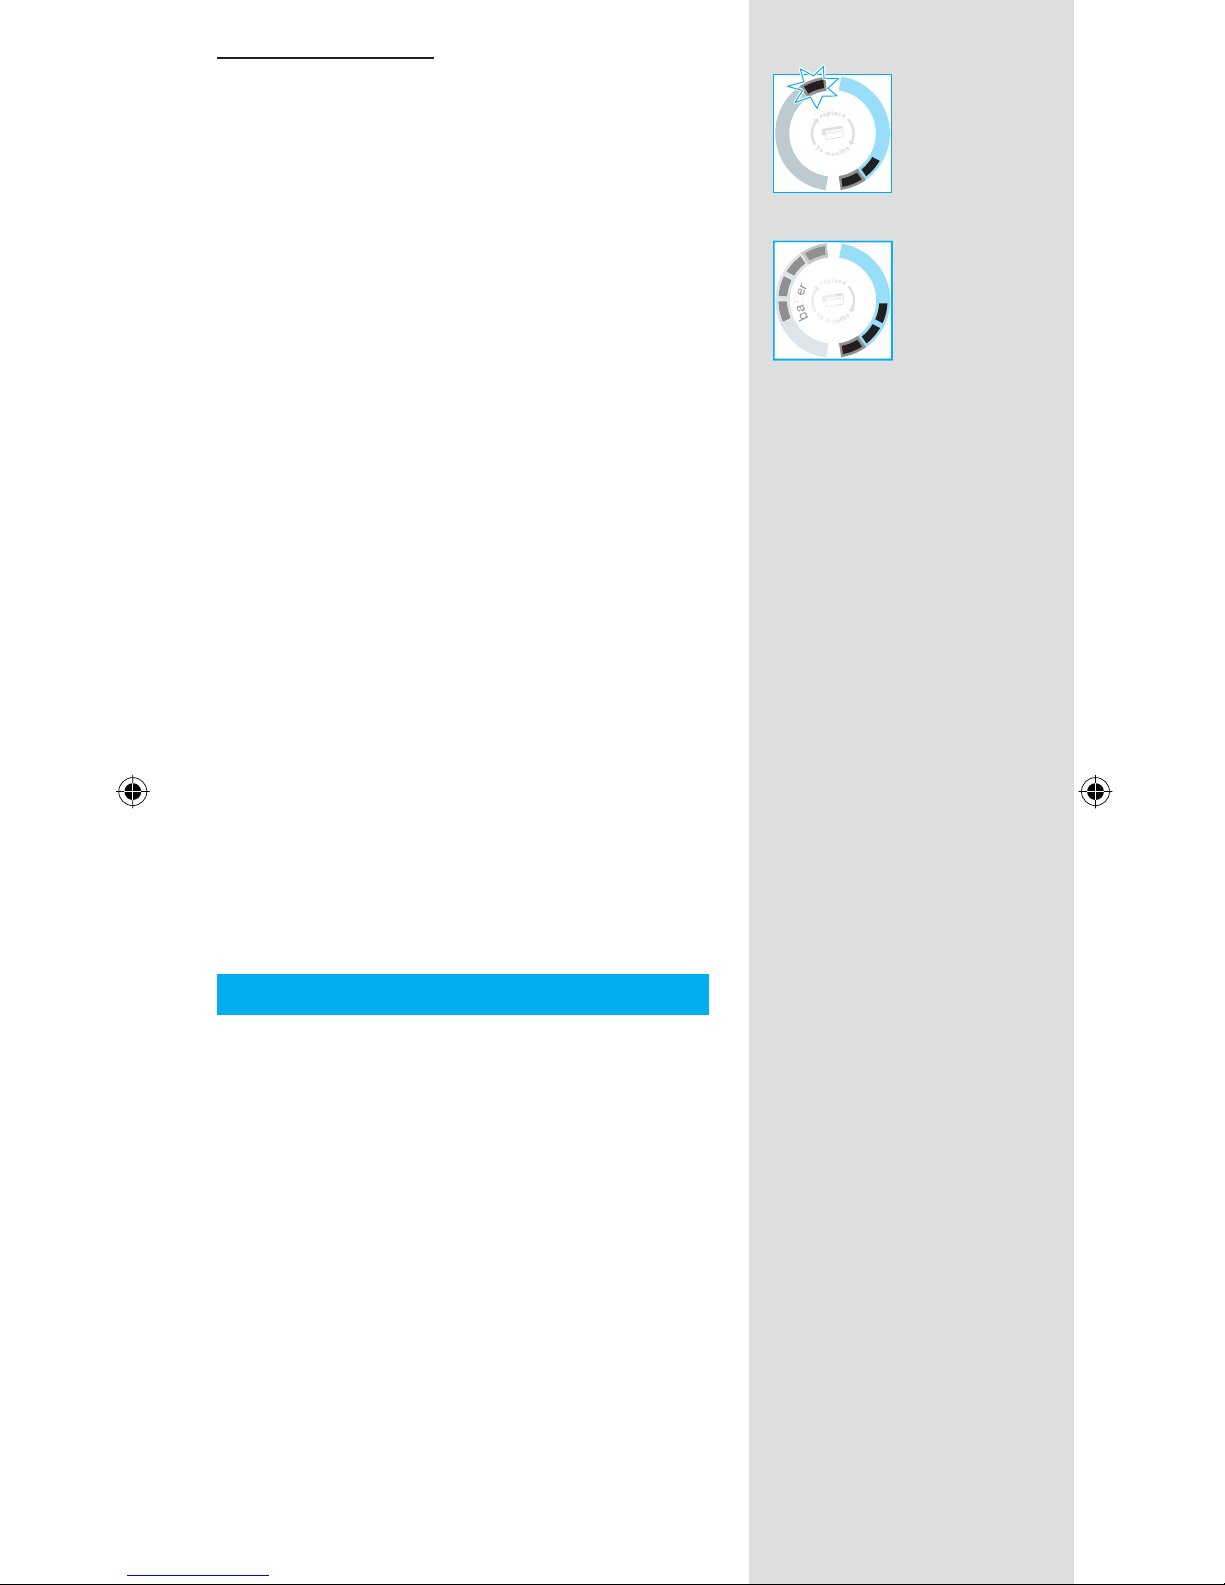
Shaver display
The shaver display z shows the charge status of
the battery on the left, and the hygiene status on
the right. (6 dark segments are shown on each
side when the battery is fully charged and the
shaver is hygienically clean).
Battery segments:
During charging or when using the shaver, the
respective battery segments will blink. When
fully charged all 6 segments are shown. With
decreasing charge the segments gradually
disappear.
h
y
g
i
e
n
e
b
a
t
t
e
r
y
h
y
g
i
e
n
e
b
a
t
t
e
r
y
Page 9
9
Low charge indicator:
The «low» charge indicator provided with a red
frame blinks to indicate that the charge has
dropped below 20%. The remaining battery
capacity is suffi cient for 2 to 3 shaves.
Hygiene segments:
All 6 hygiene segments will appear after the
shaver has been cleaned in the Clean&Renew
station. When the shaver is being used, the
hygiene segments will gradually disappear.
Once the shaver is returned to the station, the
system will automatically select the appropriate
cleaning program and restore the segments
to maximum hygiene. Given that rinsing the
shaver under tap water is not as hygienic as the
cleaning station, the hygiene segments will only
restore themselves when the shaver has been
cleaned in the Clean&Renew station.
Charging information
• A full charge provides up to 50 minutes
of cordless shaving time. This may vary
according to your beard growth.
• The best environmental temperature for
charging is between 41 °F to 95 °F / 5 °C to
35 °C. Do not expose the shaver to
temperatures higher than 122 °F / 50 °C for
extended periods of time.
Personalizing your shaver
Personalizing your shaver
With the (–) e and (+) r buttons you can choose
the best setting for shaving different areas of
your face and as per your specifi c needs.
For a thorough and fast shave we recommend
the (+) setting.
When switching on next time, the last used
setting will be activated.
h
y
g
i
e
n
e
b
a
t
t
e
r
y
h
y
g
i
e
n
e
b
a
t
t
e
r
y
h
y
g
i
e
n
e
b
a
t
t
e
r
y
b
a
t
y
h
y
g
i
e
n
e
b
a
t
t
e
r
y
b
a
t
y
Page 10
10
How to use
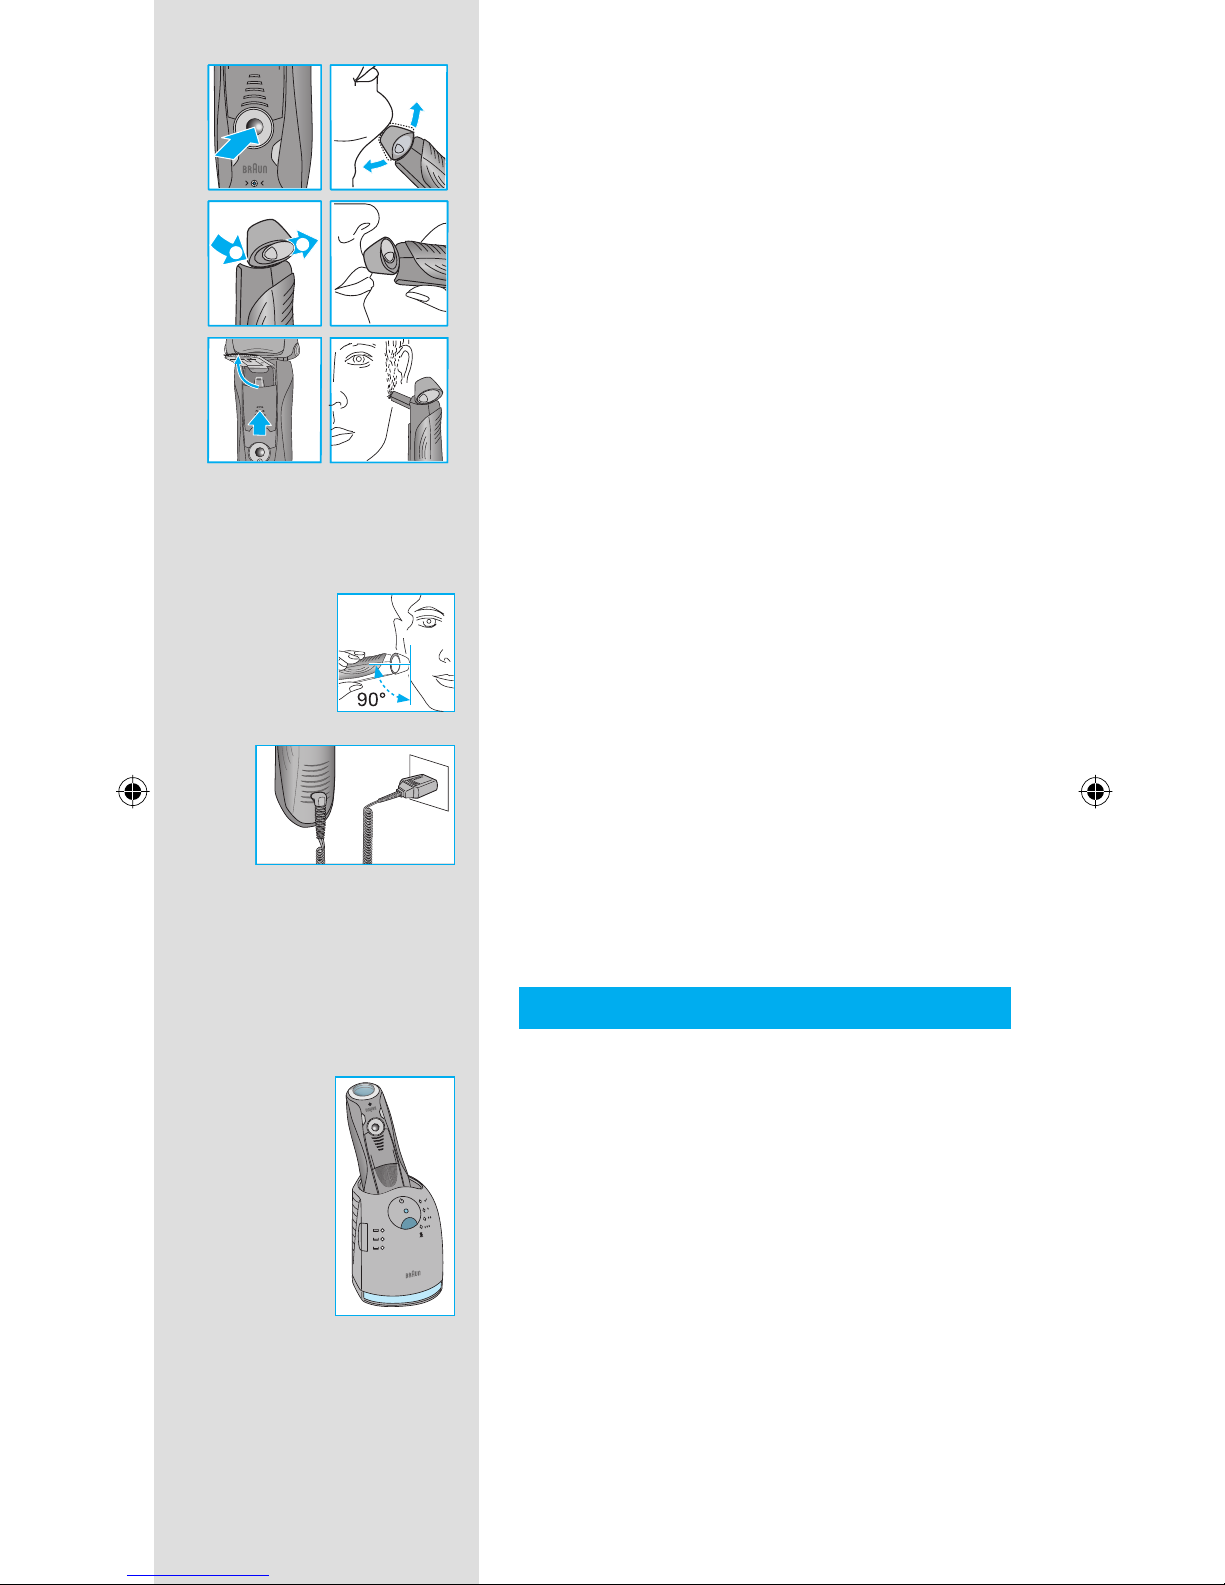
Press the on/off switch
w to operate the shaver:
• The pivoting shaver head and fl oating foils
automatically adjust to every contour of your
face.
• To shave hard to reach areas (e.g. under the
nose) slide the shaver head «lock» switch 0 to
the back position to lock the pivoting head at
an angle.
• To trim sideburns, mustache or beard, slide the
pop-out long hair trimmer
q upwards.
Tips for the perfect shave
For best shaving results, Braun recommends you
follow 3 simple steps:
1. Always shave before washing your face.
2. At all times, hold the shaver at right angles
(90°) to your skin.
3. Stretch your skin and shave against the
direction of your beard growth.
Shaving with the cord
If the shaver has run out of power (discharged),
and you do not have the time to recharge it in the
Clean&Renew station, you may also shave with
the shaver connected to an electrical outlet via
the special cord set p.
Cleaning
Automatic cleaning
After each shave, return the shaver to the
Clean&Renew station and proceed as described
above in the section «Before shaving».
All charging and cleaning needs are then
automatically taken care of. With daily use, a
cleaning cartridge should be suffi cient for about
30 cleaning cycles.
The hygienic cleaning cartridge contains alcohol,
which once opened will naturally evaporate
slowly into the surrounding air. Each cartridge,
if not used daily, should be replaced after
approximately 8 weeks.
The cleaning cartridge also contains lubricants,
which may leave residual marks on the outer foil
frame after cleaning. However, these marks can
be removed easily by wiping gently with a cloth
or soft tissue paper.
t
r
lock
1
2
trimmer
lock
lock
lock
+
t
r
lock
1
2
trimmer
lock
lock
lock
+
releaserelease
trimmertrimmer
Page 11
11
Manual cleaning
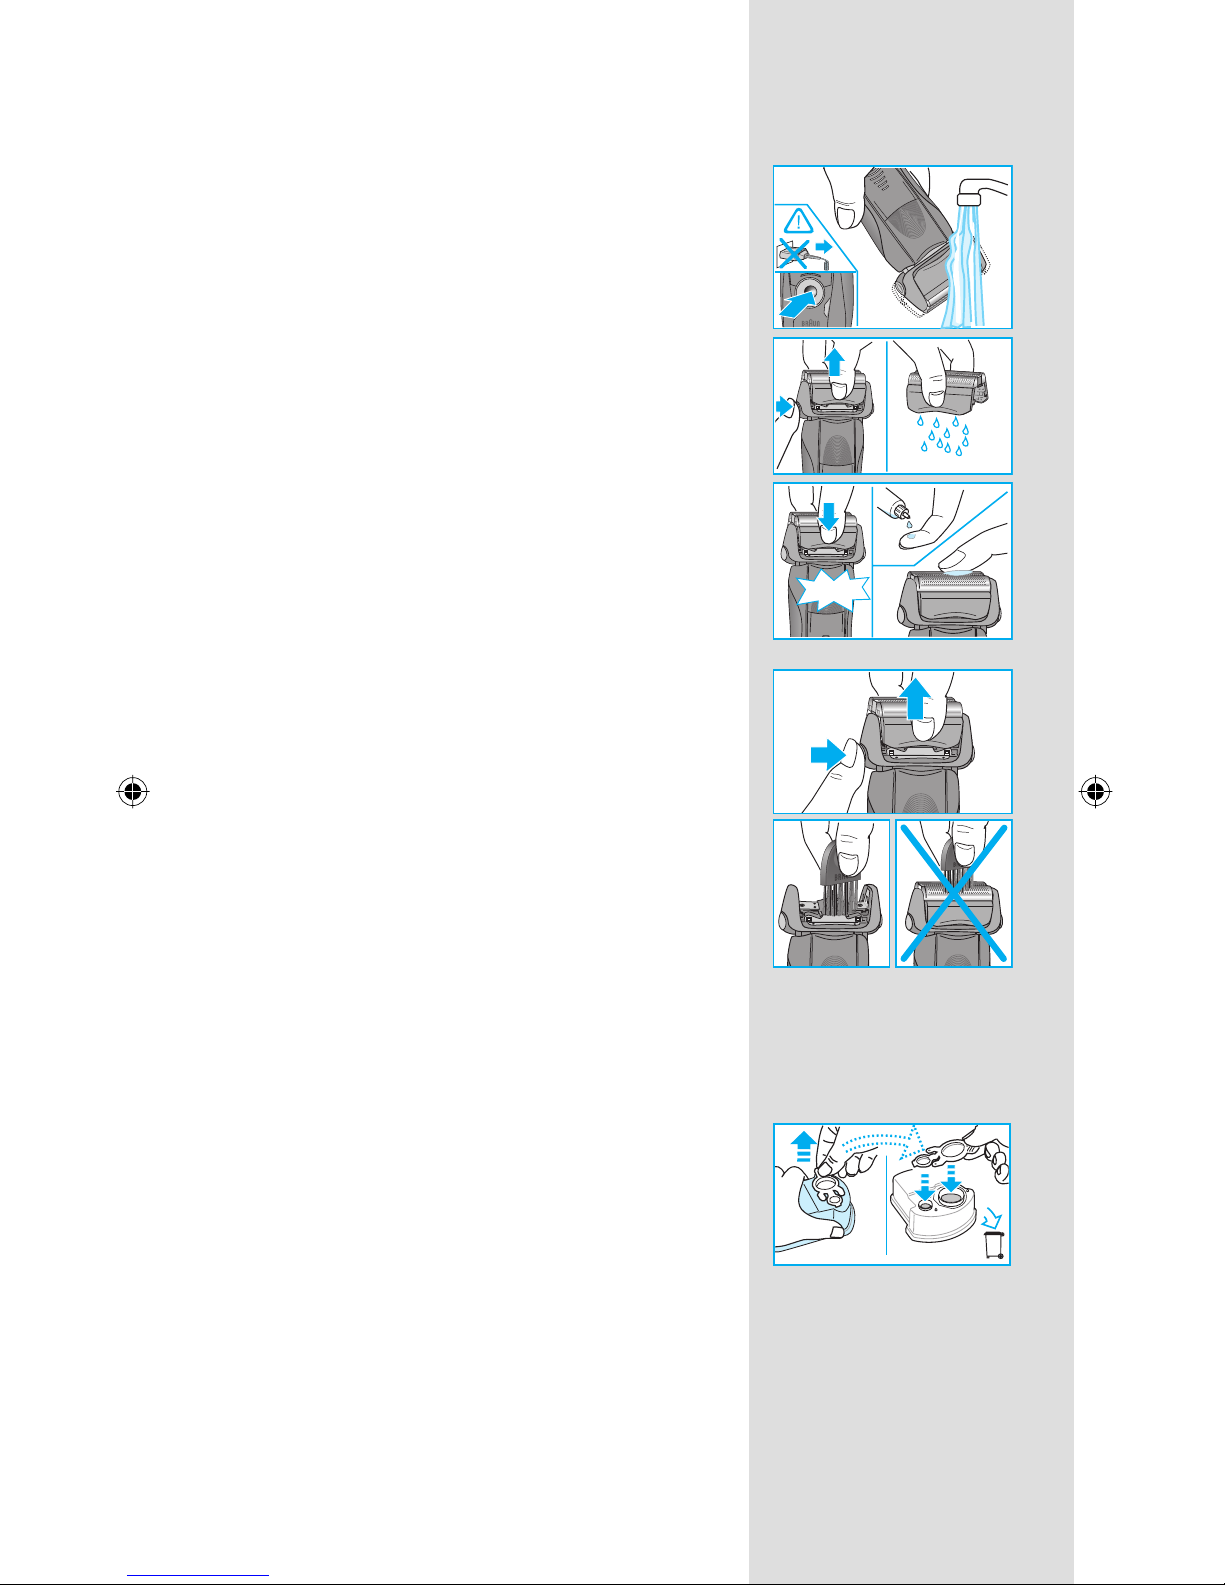
The hand-held unit shall be detached from the
power supply cord before cleaning. The shaver
shall not be used until it has dried.
Rinsing the shaving head under running water
is an alternative way to keep the shaver clean,
especially when travelling:
• Switch the shaver on (cordless) w and rinse
the shaving head under hot running water.
You may use liquid soap without abrasive
substances. Rinse off all foam and let the
shaver run for a few more seconds.
• Next, switch off the shaver, press the release
button 9 to remove the Foil & Cutter cassette
8 and let it dry.
• If you regularly clean the shaver under
water, then once a week apply a drop of
light machine oil on top of the Foil & Cutter
cassette.
Alternatively, you may clean the shaver using the
brush provided:
• Switch off the shaver. Remove the Foil & Cutter
cassette 8 and tap it out on a fl at surface.
Using the brush, clean the inner area of the
pivoting head. However, do not clean the
cassette with the brush as this may damage it.
Cleaning the housing
From time to time clean the housing of the
shaver and the Clean&Renew station with a
damp cloth, especially inside the cleaning
chamber where the shaver rests.
Replacing the cleaning cartridge
After having pressed the lift button 2 to open the
housing, wait for a few seconds before removing
the used cartridge to avoid any dripping.
Before discarding the used cartridge, make sure
to close the openings using the lid of the new
cartridge, since the used cartridge will contain
contaminated cleaning solution.
oil
trim
mer
er
re
le
a
s
e
trimmer
re
le
a
s
e
re
le
a
s
e
click!
Series 7
Series 7
Series
Series
oil
trim
mer
er
re
le
a
s
e
trimmer
re
le
a
s
e
re
le
a
s
e
click!
Series 7
Series 7
Series
Series
re
le
a
s
e
re
le
a
s
e
re
le
a
s
e
Series 7
Series 7
re
le
a
s
e
re
le
a
s
e
re
le
a
s
e
Series 7
Series 7
new
old
new
old
Page 12
12
Keeping your shaver in top shape
Replacing the Foil & Cutter cassette / reset
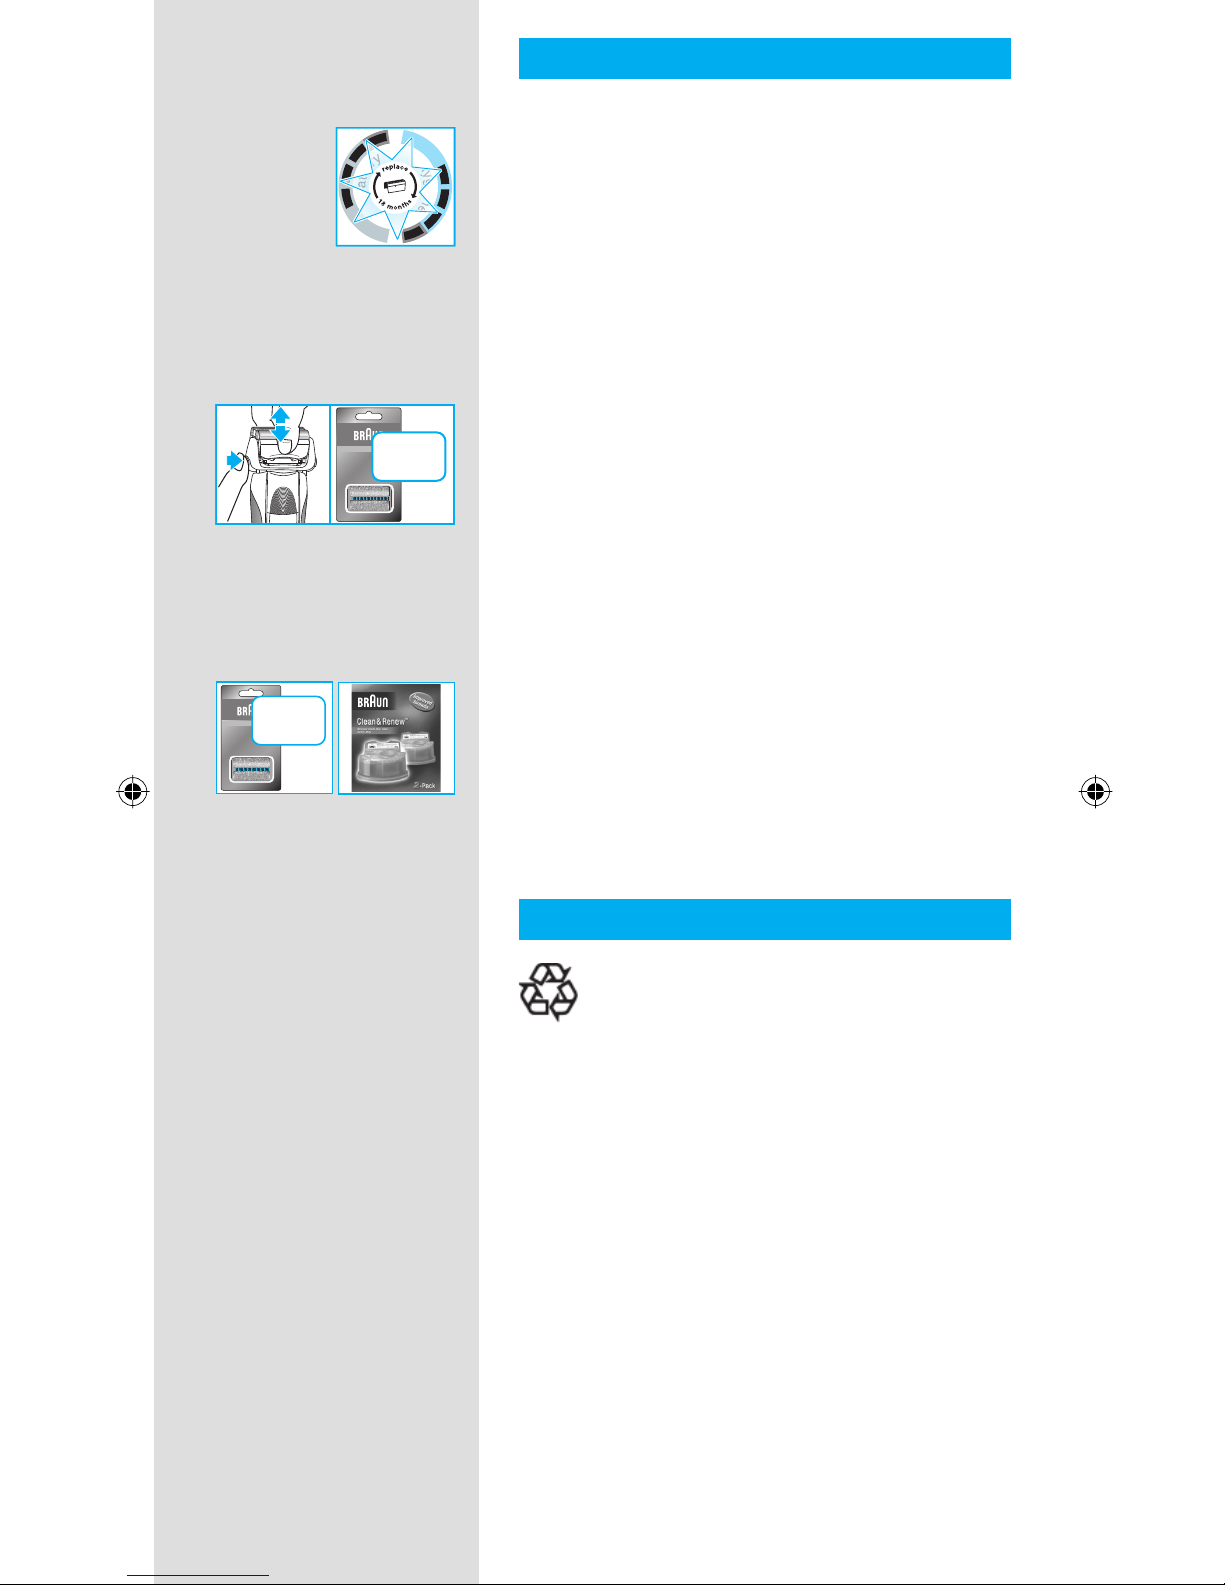
To maintain 100% shaving performance, replace the Foil & Cutter cassette 8, when the
replacement symbol lights up on the shaver
display z (after about 18 months) or when
cassette is worn.
The replacement symbol will remind you during
the next 7 shaves to replace the Foil & Cutter
cassette. Then the shaver will automatically reset
the display.
After you have replaced the Foil & Cutter
cassette, use a ball-point pen to push the reset
button
t for at least 3 seconds to reset the
counter.
While doing so, the replacement light blinks and
goes off when the reset is complete. The manual
reset can be done at any time.
Accessories
Available at your dealer or Braun Service
Centers:
• Foil & Cutter cassette 70S
(70-black = www.braun.service.com)
• Cleaning cartridge Clean&Renew CCR
Environmental notice
This appliance contains rechargeable
batteries. To protect the environment,
do not dispose of the appliance in the
household waste at the end of its useful life.
Disposal can take place at a Braun Service
Center or appropriate collection sites.
The cleaning cartridge can be disposed with
regular household waste.
Subject to change without notice.
For electric specifi cations, see printing on the
special cord set.
h
y
g
i
e
n
e
b
a
t
t
e
r
y
h
y
g
i
e
n
e
b
a
t
t
e
r
y
er
re
le
a
s
e
70S
Series 7
er
re
le
a
s
e
70S
Series 7
70S70S
Page 13

13
How to obtain service in the USA
60 day money back satisfaction guarantee
Should your Braun product require service,
please call 1-800-BRAUN 11 (272-8611) to be referred to
the Authorized Braun Service Center closest to you.
To obtain service:
A. Carry the product in to the Authorized Braun Service Center
of your choice or,
B. Ship the product to the Authorized Braun Service Center
of your choice.
Pack the product well.
Ship the product prepaid and insured (recommended).
Include a copy of your proof of purchase to verify warranty
coverage, if applicable.
To obtain original Braun replacement parts and accessories:
Contact a Braun Authorized Service Center.
Please call 1-800-BRAUN 11 (272-8611) to be referred to the
Authorized Braun Service Center closest to you.
To speak to a Braun Consumer Service Representative:
Please call 1-800-BRAUN 11 (272-8611).
Page 14

14
60 day money back satisfaction guarantee
for men’s grooming products
Braun Shavers
Braun Beard Trimmers
Once you have tried your new Braun shaver or beard trimmer, we
are confident you will appreciate its performance. We suggest
using the product regularly for 2 to 3 weeks. If you are not
satisfied with the product, please call 1-800-211-6661 within
60 days of purchase. Retain original cash receipt, product and all
product parts, including the box. Do not return to the retailer for
guarantee fulfillment.
Please note: No refunds will be made for any product damaged by
accident, neglect or unreasonable use.
Your product must be shipped in its original packaging, with your
original sales slip indicating the date of purchase.
Please include the following information when you return your
product:
Name
Street
City
State Zip code
Telephone number
Please allow 6-8 weeks for handling.
Page 15

15
FOR USA ONLY
2 year limited warranty
(foil and cutter cassette excluded)
Braun warrants this Braun shaver (except foil and cutter cassette)
to be free of defects in material and workmanship for a period of
two years from the date of original purchase.
If the shaver exhibits such a defect, Braun will, at its option, either
repair or replace it for the consumer without charge.
Please call 1-800-Braun 11 (800-272-8611) to be referred to the
authorized Braun Service Center closest to you.
This warranty does not cover foil and cutter cassette or damage
resulting from accident, misuse, abuse, dirt, water, tampering,
unreasonable use, normal wear, servicing performed or attempted
by unauthorized service agencies or failure to provide reasonable
and necessary maintenance, including recharging.
ALL IMPLIED WARRANTIES, INCLUDING ANY IMPLIED
WARRANTY OF MERCHANTABILITY OR FITNESS FOR ANY
PARTICULAR PURPOSE, ARE LIMITED IN DURATION TO
2 YEARS FROM DATE OF ORIGINAL PURCHASE. IN NO EVENT
WILL BRAUN BE RESPONSIBLE FOR CONSEQUENTIAL
DAMAGES RESULTING FROM THE USE OF THIS PRODUCT.
Some states do not allow the exclusion or limitation of incidental
or consequential damages, so the above limitation or exclusion
may not apply to you.
This warranty gives you specific legal rights, and you may also
have other legal rights which vary from state to state.
Page 16

16
Español
MEDIDAS DE SEGURIDAD
IMPORTANTES
Cuando use un aparato eléctrico, siempre tome las medidas de
seguridad básicas, entre las que se incluyen las siguientes:
Lea todas las instrucciones antes de usar este aparato.
Una vez desconectada, la afeitadora se puede lavar con
agua.
PELIGRO
Para disminuir el riesgo de descarga eléctrica:
1. Use en seco únicamente.
2. No sumerja en agua.
3. Si el aparato cae al agua, no trate de sacarlo. Desenchúfelo de
inmediato.
4. No use el aparato mientras se baña o se ducha.
5. No coloque, almacene ni ponga a recargar el aparato en lugares
donde pudiera caerse a la bañera o al lavamanos. No coloque o
deje caer al agua ni en otros líquidos.
6. Desconecte siempre el aparato del enchufe excepto cuando se
está cargando.
7. Desenchufe el aparato antes de limpiarlo.
8. Este aparato está equipado con un cable de alimentación
especial que tiene integrado un transformador de seguridad de
voltaje extra bajo. No cambie ni manipule ninguna de sus
piezas.
9. No use extensiones eléctricas con este aparato.
SOLAMENTE PARA USO
DOMÉSTICO
Page 17

17
ADVERTENCIA
Para disminuir el riesgo de quemaduras, incendio, descarga
eléctrica o lesiones:
1. Se debe supervisar detenidamente el uso de este aparato
cuando se emplee por o cerca de niños o personas
discapacitadas.
2. Use este producto solamente para el propósito indicado tal
como se describe en este manual. No utilice accesorios que
no estén recomendados por el fabricante.
3. No use este producto si el cable o el enchufe están dañados,
si no funciona debidamente, si se ha caído o dañado o si el
cargador se ha caído al agua. Envíe el aparato a un centro de
servicio técnico para su revisión y reparación.
4. Mantenga el cable alejado de las superficies calientes.
5. Nunca lo deje caer ni introduzca ningún objeto en las
aberturas.
6. No lo use al aire libre o en lugares donde se estén usando
productos en aerosol (spray) o donde se esté administrando
oxígeno.
7. No use este aparato si las láminas afeitadoras están dañadas
o rotas, ya que podría causar lesiones graves en la piel.
8. Siempre conecte primero el enchufe al aparato y luego al
tomacorriente. Para desconectar, apague todos los controles
con «off», y luego desenchufe del tomacorriente.
9. Si enchufa el aparato a un tomacorriente fuera de los Estados
Unidos, use un adaptador que se acople a la configuración de
pines del tomacorriente.
10. Precaución: Este aparato usa una batería que puede
ocasionar incendios o quemaduras químicas si se somete a
maltratos. No la desarme ni la caliente a temperaturas
superiores a 100 °C (212 °F) ni la incinere.
GUARDE ESTAS
INSTRUCCIONES
Page 18
18
Advertencia
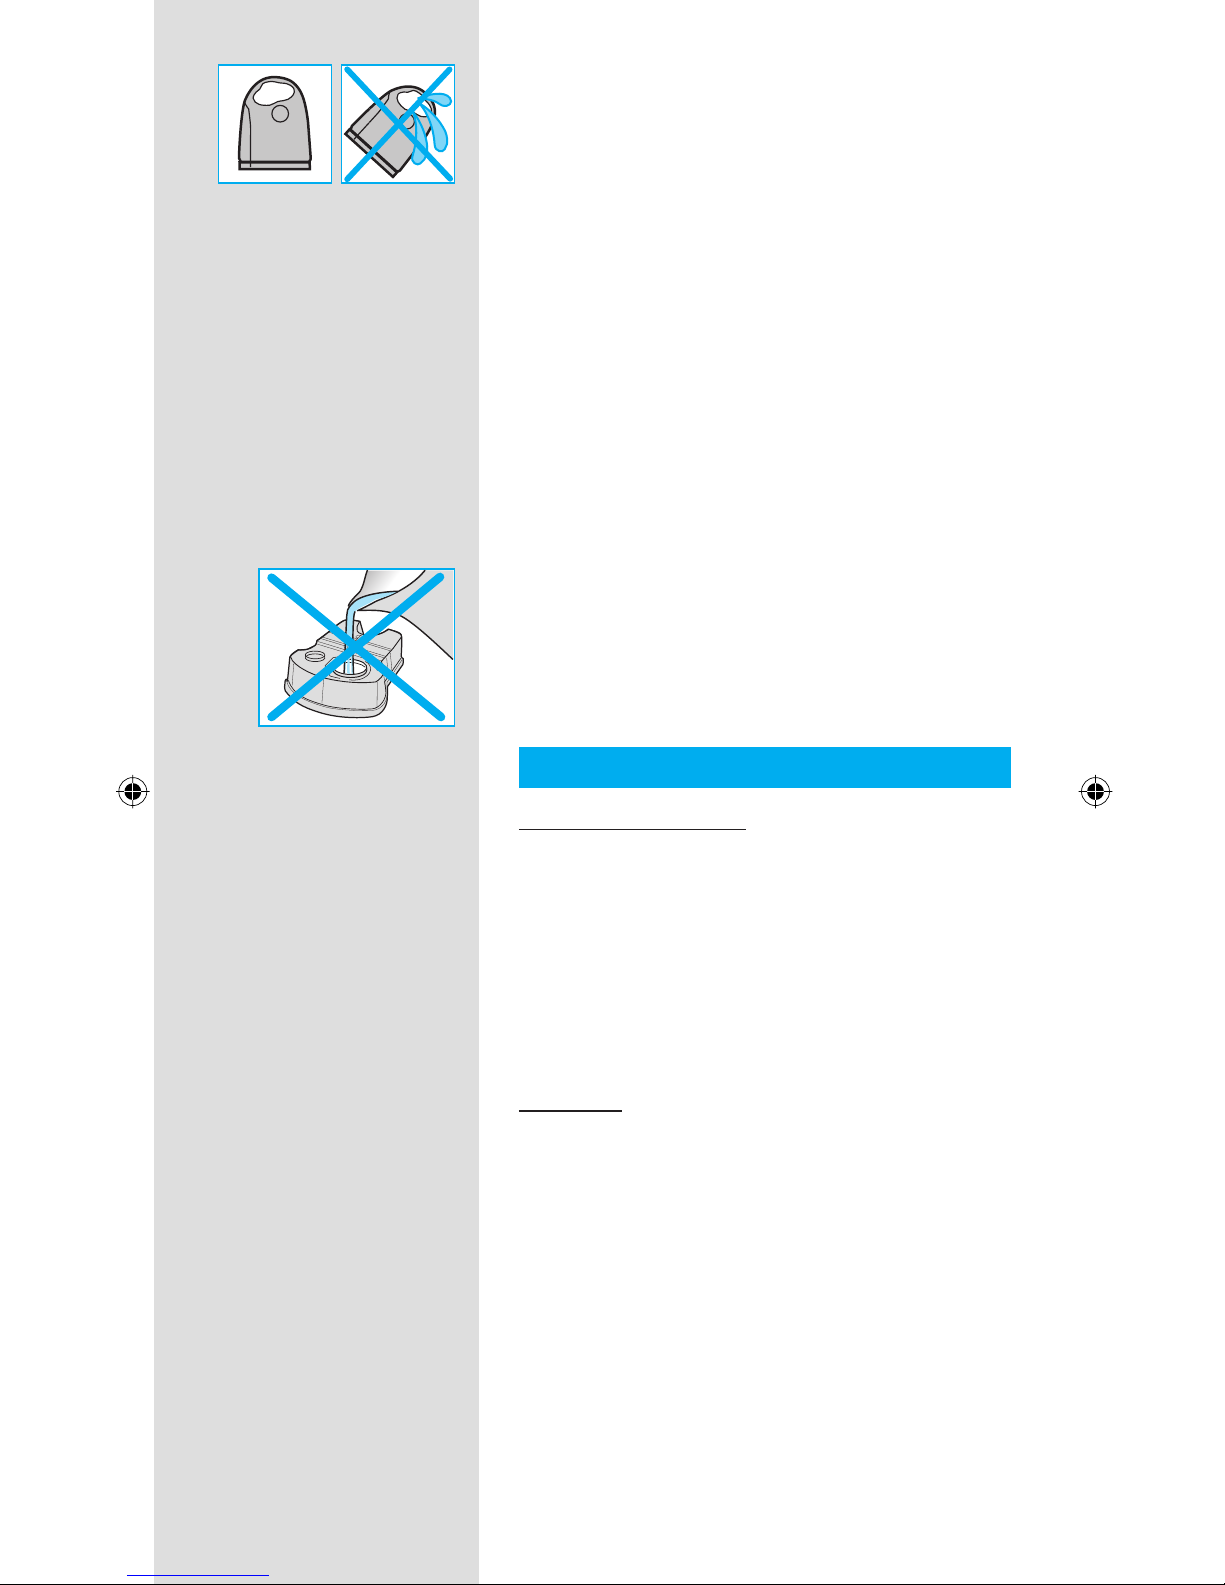
Para evitar fugas de la solución limpiadora,
asegúrese de que el soporte Clean&Renew se
encuentre sobre una superfi cie plana. Si hay
un cartucho limpiador instalado, no vuelque el
soporte ni lo mueva bruscamente ni lo transporte
de manera que la solución limpiadora se pueda
salir del cartucho. No coloque el soporte dentro
del botiquín de pared, ni encima de un radiador
ni lo coloque sobre superfi cies pulidas o
laqueadas.
El cartucho limpiador contiene un líquido
altamente infl amable, por lo que debe
mantenerlo alejado de fuentes de ignición.
No fume cerca del soporte. No lo exponga a la
luz solar directa durante períodos prolongados ni
lo almacene encima de un radiador. Manténgalo
fuera del alcance de los niños.
No rellene el cartucho. Use solamente cartuchos
de repuesto Braun originales.
Descripción
Soporte Clean&Renew
1 Indicador del nivel de solución limpiadora
2 Botón de apertura para recambio de
cartuchos
3 Contactos del soporte a la afeitadora
4 Botón de inicio de limpieza
D Botón de limpieza rápida
5 Indicadores del ciclo de limpieza
6 Entrada del enchufe del soporte
7 Cartucho limpiador
Afeitadora
8 Cartucho de láminas y cuchillas
9 Botón para liberar el cartucho de láminas y
cuchillas
0 Botón para bloquear el cabezal rasurador
«lock»
q Recortador de vellos largos extensible
w Interruptor de encendido y apagado
e Selector de nivel (–) (sensible)
r Selector de nivel (+) (intensivo)
t Botón de reinicio (reset)
z Pantalla de la afeitadora
u Contactos de la afeitadora al soporte
i Entrada del enchufe a la afeitadora
o Estuche de viaje
p Cable de alimentación especial
Page 19
19
Antes de afeitarse
Antes de usar la afeitadora por primera vez,
debe conectar la afeitadora al tomacorriente
usando el cable de alimentación especial p o
seguir los pasos que se indican más adelante.
Instalación del soporte Clean&Renew
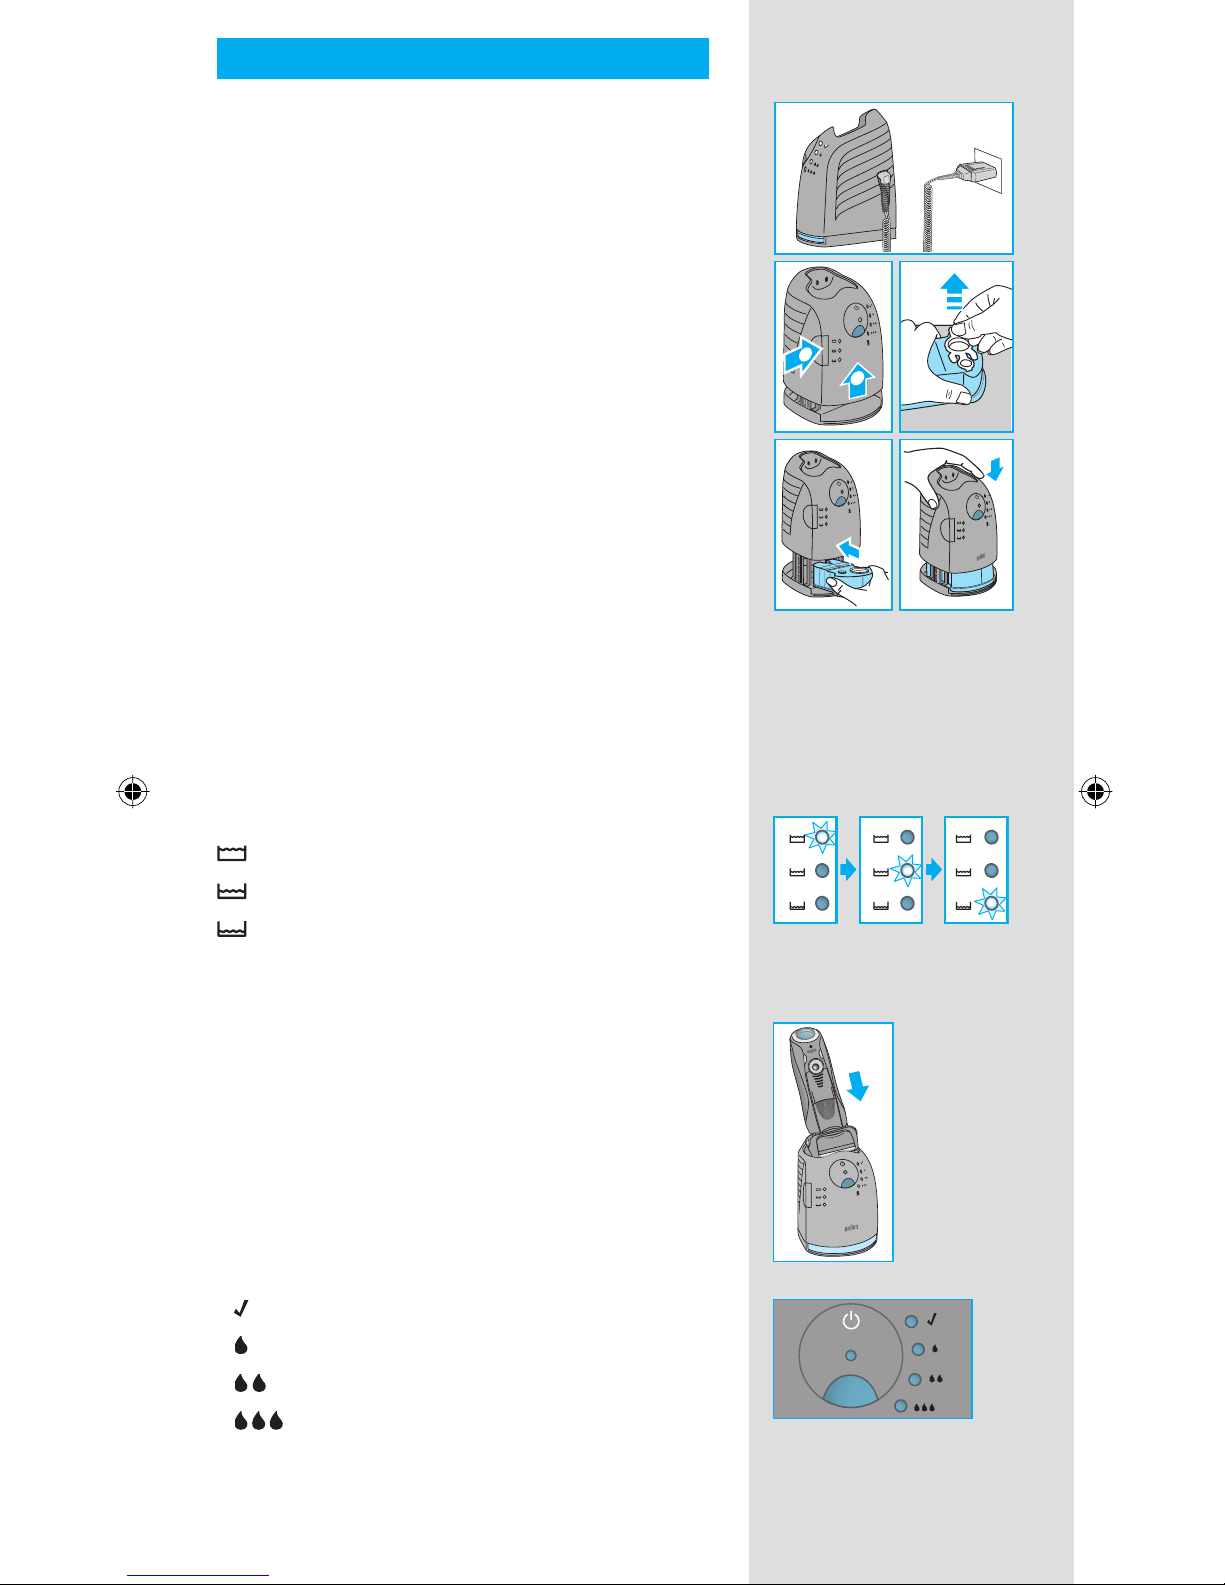
• Con el cable de alimentación especial
p,
conecte la entrada del enchufe del soporte 6
a un tomacorriente.
• Oprima el botón de apertura 2 para abrir la
cubierta.
• Coloque el cartucho limpiador 7 sobre una
superfi cie plana y estable (por ejemplo, una
mesa).
• Quite cuidadosamente la tapa del cartucho.
• Deslice el cartucho en la base del soporte
hasta que llegue al fondo del compartimiento.
• Cierre la cubierta lentamente hasta que vuelva
a quedar fi ja.
El indicador del nivel de solución limpiadora 1
mostrará cuánta solución hay en el cartucho:
hasta 30 ciclos de limpieza disponibles
hasta 7 ciclos de limpieza restantes
se requiere un nuevo cartucho
Cómo recargar y limpiar la afeitadora
Introduzca el cabezal de la afeitadora en el
soporte de limpieza. (Los contactos u ubicados
en la parte trasera de la afeitadora se alinearán
con los contactos 3 del soporte de limpieza).
Si fuese necesario, el soporte Clean&Renew
recargará automáticamente la afeitadora.
Además, el estado de limpieza de la afeitadora
se analizará y uno de los siguientes indicadores
del ciclo de limpieza 5 se encenderá:
« » La afeitadora está limpia
« » Se requiere limpieza rápida
« » Se requiere limpieza normal
« » Se requiere limpieza intensiva
new
f
a
s
t
c
l
e
a
n
f
a
s
t
c
l
e
a
n
f
a
s
t
c
l
e
a
n
2
1
new
f
a
s
t
c
l
e
a
n
f
a
s
t
c
l
e
a
n
f
a
s
t
c
l
e
a
n
2
1
trim
mer
Series 7
trim
mer
Series 7
Page 20
20
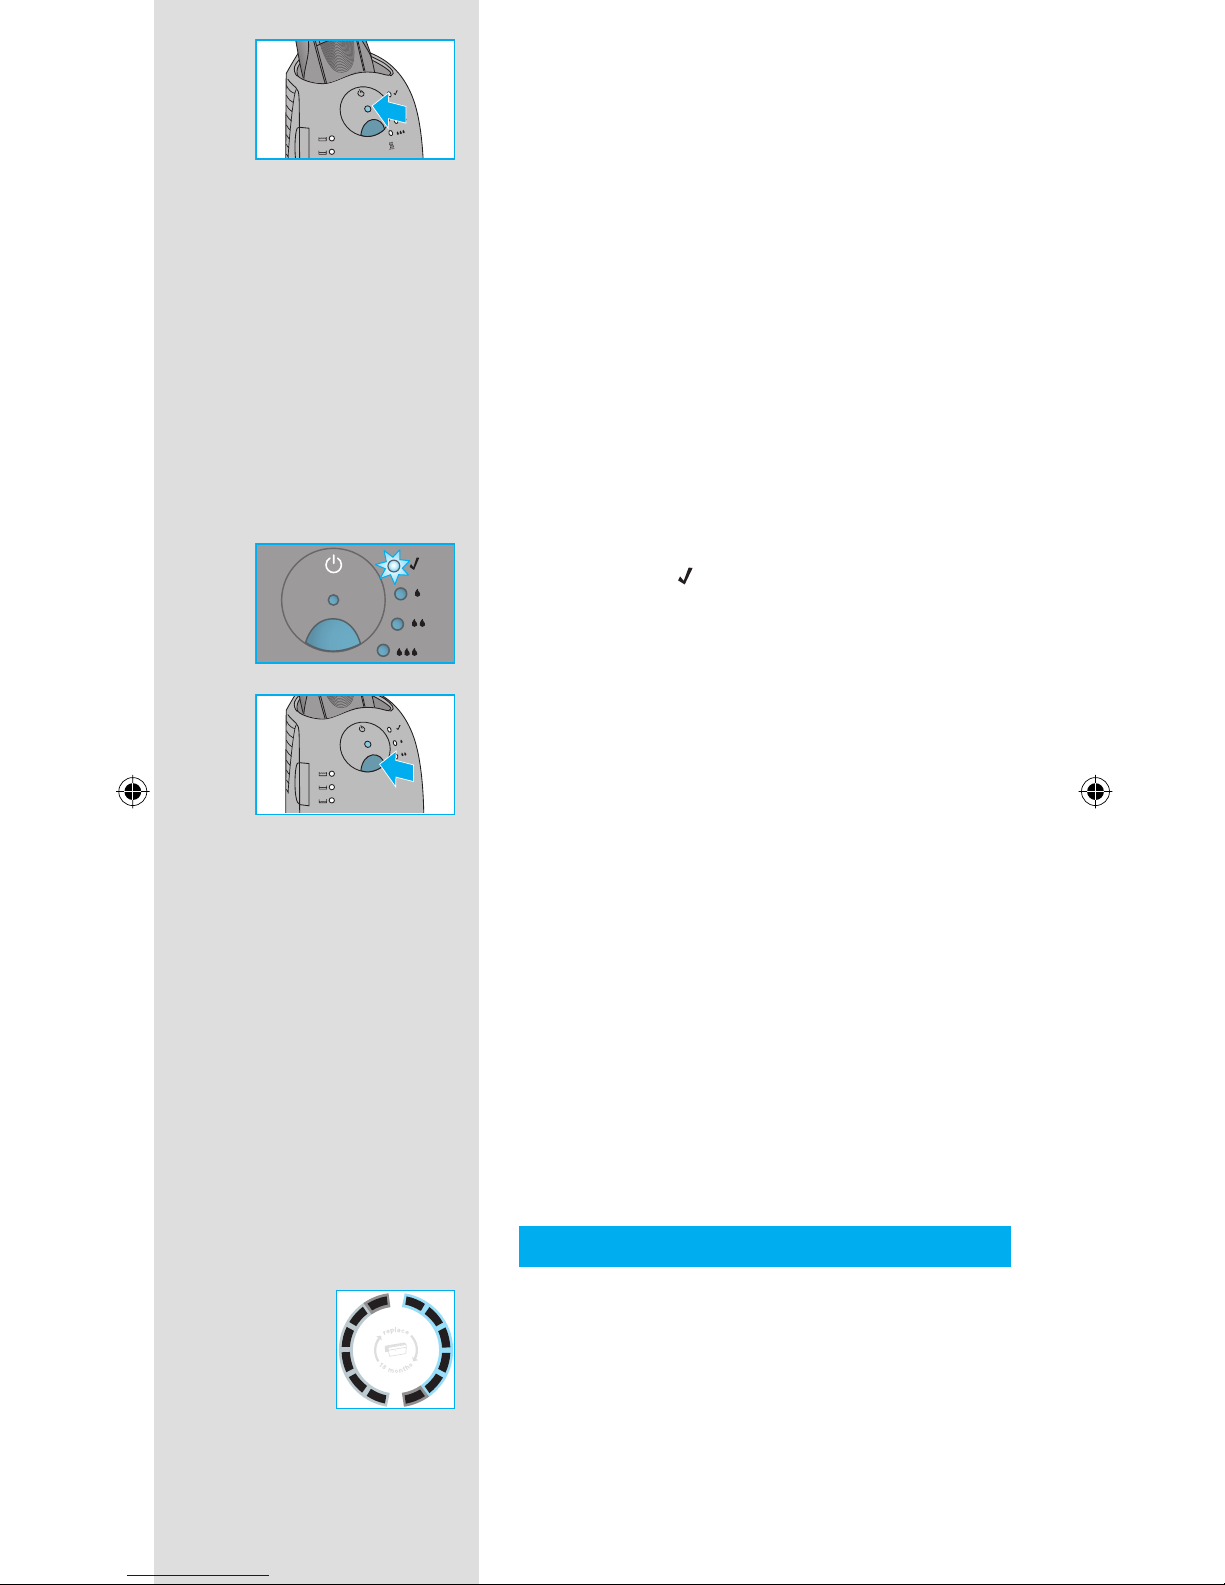
Si el soporte selecciona uno de los ciclos de
limpieza requeridos, no lo iniciará sino hasta que
se oprima el botón de inicio de limpieza 4.
Para obtener resultados óptimos durante
la afeitada, recomendamos que limpie la
afeitadora después de cada uso.
Mientras se realiza la limpieza, el indicador de
ciclo de limpieza correspondiente parpadeará.
Cada ciclo de limpieza consta de varias etapas
durante las que la solución limpiadora pasa por
el cabezal de la afeitadora, y de una fase de
secado con calor que seca la afeitadora. Según
el ciclo elegido, el tiempo total de limpieza
puede variar de 32 a 43 minutos.
Los ciclos de limpieza no deben interrumpirse.
Tenga en cuenta que cuando la afeitadora se
está secando, el cabezal puede estar caliente y
húmedo.
Cuando el ciclo de limpieza haya concluido, el
indicador azul « » se encenderá. La afeitadora
está limpia y lista para usarse.
Limpieza rápida
Oprima el botón de limpieza rápida D para
activar dicho ciclo y omitir el proceso de secado.
Este ciclo dura aproximadamente 25 segundos
solamente y se recomienda cuando no hay
tiempo sufi ciente para realizar uno de los ciclos
de limpieza automática.
Si retira la afeitadora del soporte de limpieza
justo al terminar el ciclo, seque el cabezal de la
afeitadora con un pañuelo de papel para evitar
goteos.
Modo de espera
10 minutos después de completada la recarga
o la limpieza, el soporte Clean&Renew cambia
a modo de espera: Los indicadores del soporte
Clean&Renew se apagarán.
Pantalla de la afeitadora
El indicador de carga de la afeitadora z muestra
el nivel de carga de la batería del lado izquierdo
y el estado de limpieza del lado derecho. (Se
muestran 6 segmentos oscuros de cada lado
cuando la batería está totalmente cargada y la
afeitadora está completamente limpia).
h
y
g
i
e
n
e
b
a
t
t
e
r
y
h
y
g
i
e
n
e
b
a
t
t
e
r
y
Page 21
21
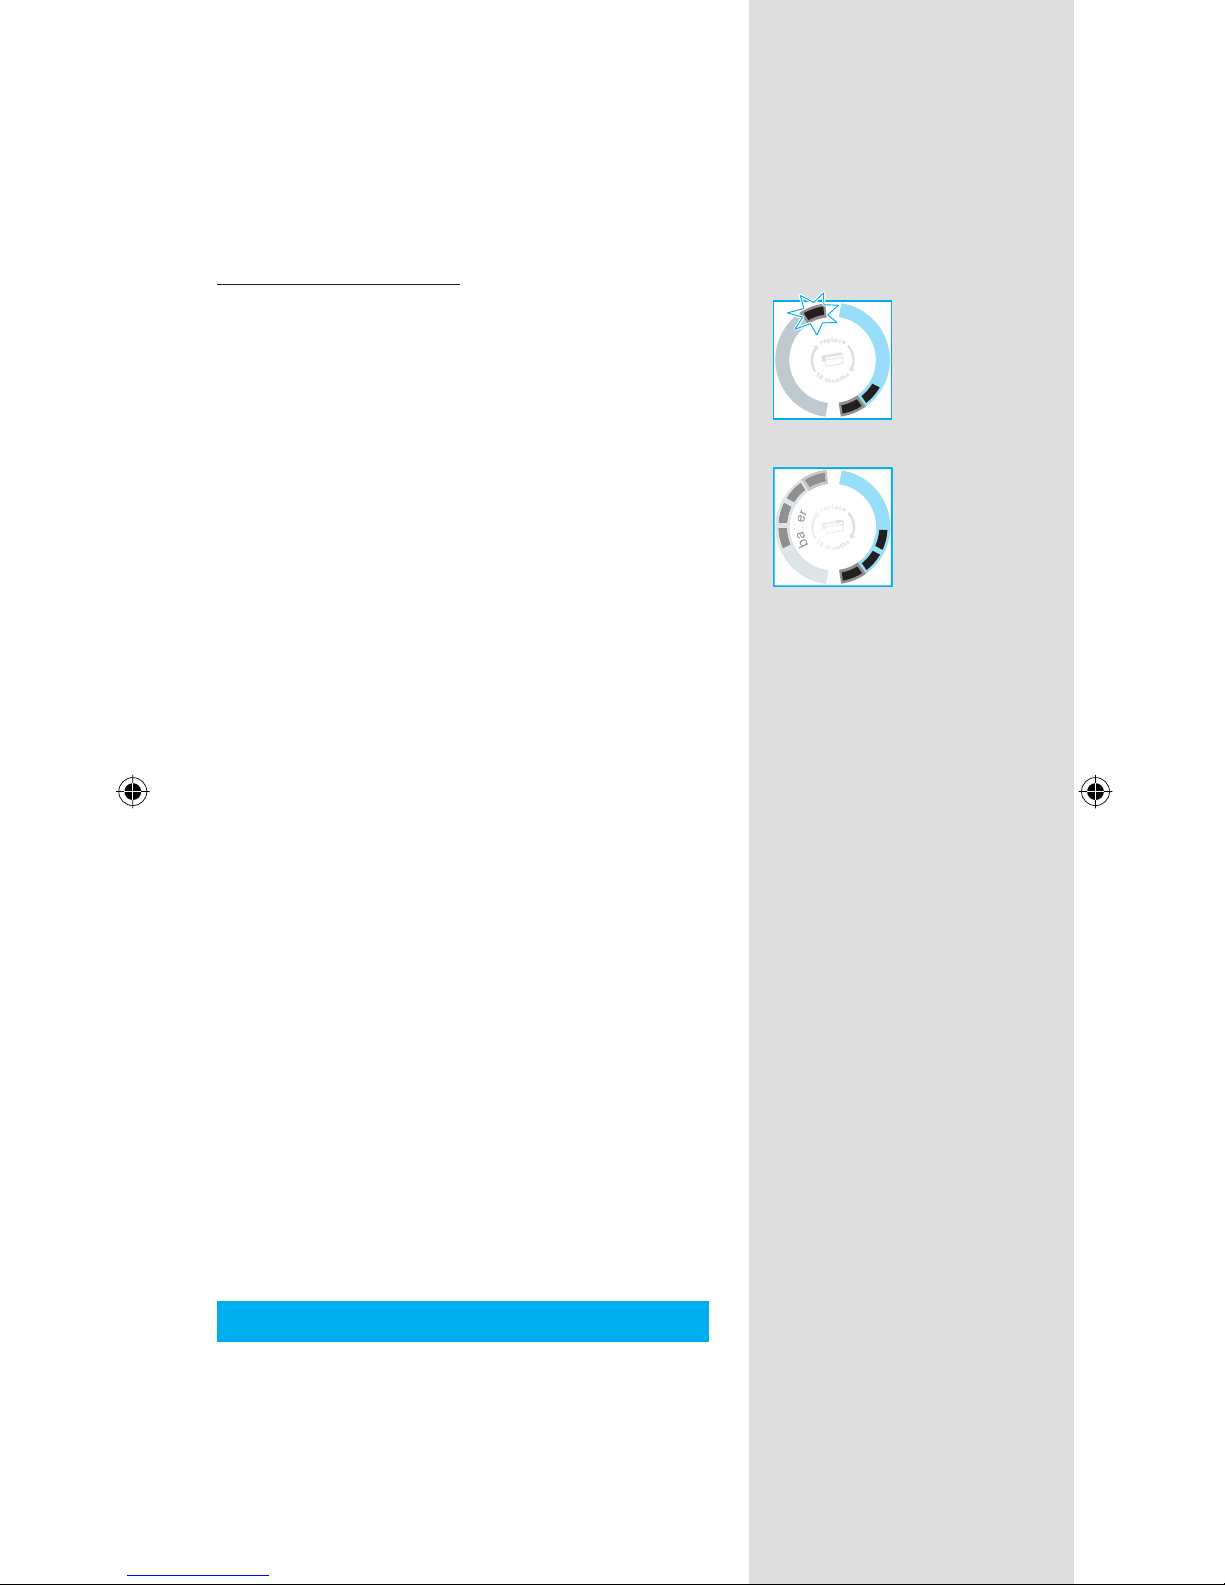
Segmentos de la batería:
Durante la recarga o cuando la afeitadora se
esté usando, los segmentos correspondientes
de la batería parpadearán. Cuando la afeitadora
esté completamente recargada, aparecerán
los 6 segmentos. A medida que la carga vaya
disminuyendo, los segmentos desaparecerán
gradualmente.
Indicador de carga baja:
El indicador de carga baja «low» proporcionado
con una luz roja parpadea para indicar que la
carga es inferior al 20%. La capacidad restante
de la batería será sufi ciente para 2 ó 3 afeitadas.
Segmentos indicadores de limpieza:
Los seis segmentos indicadores del estado
de limpieza aparecerán después de que la
afeitadora se haya limpiado en el soporte
Clean&Renew. Cuando la afeitadora se esté
usando, los segmentos irán desapareciendo
gradualmente. Al colocar la afeitadora
nuevamente en el soporte de limpieza, el
sistema seleccionará automáticamente el
ciclo de limpieza adecuado y restaurará los
segmentos al nivel de máxima higiene. Dado
que enjuagar la afeitadora bajo el agua corriente
no brinda una limpieza tan higiénica como
la del soporte de limpieza, los segmentos
indicadores de limpieza se restaurarán después
de haber limpiado la afeitadora en el soporte
Clean&Renew.
Información sobre la carga
• Con la batería completamente cargada se
pueden obtener hasta 50 minutos de afeitado
sin usar el cable de alimentación. Esto puede
variar dependiendo del crecimiento de la
barba.
• La temperatura ambiente ideal para la recarga
es de 41 °F a 95 °F / de 5 °C a 35 °C.
No exponga la afeitadora a temperaturas
superiores a 122 °F / 50 °C durante períodos
prolongados.
Cómo personalizar su afeitadora
Cómo personalizar su afeitadora
Con los botones (–) e y (+) r, usted puede
elegir la mejor confi guración para afeitar las
áreas difíciles de su rostro de acuerdo a sus
necesidades específi cas.
h
y
g
i
e
n
e
b
a
t
t
e
r
y
h
y
g
i
e
n
e
b
a
t
t
e
r
y
h
y
g
i
e
n
e
b
a
t
t
e
r
y
b
a
t
y
h
y
g
i
e
n
e
b
a
t
t
e
r
y
b
a
t
y
Page 22
22
Para una afeitada rápida y precisa,
recomendamos el nivel (+).
La próxima vez que encienda la afeitadora, se
activará el último ajuste que utilizó.
Instrucciones
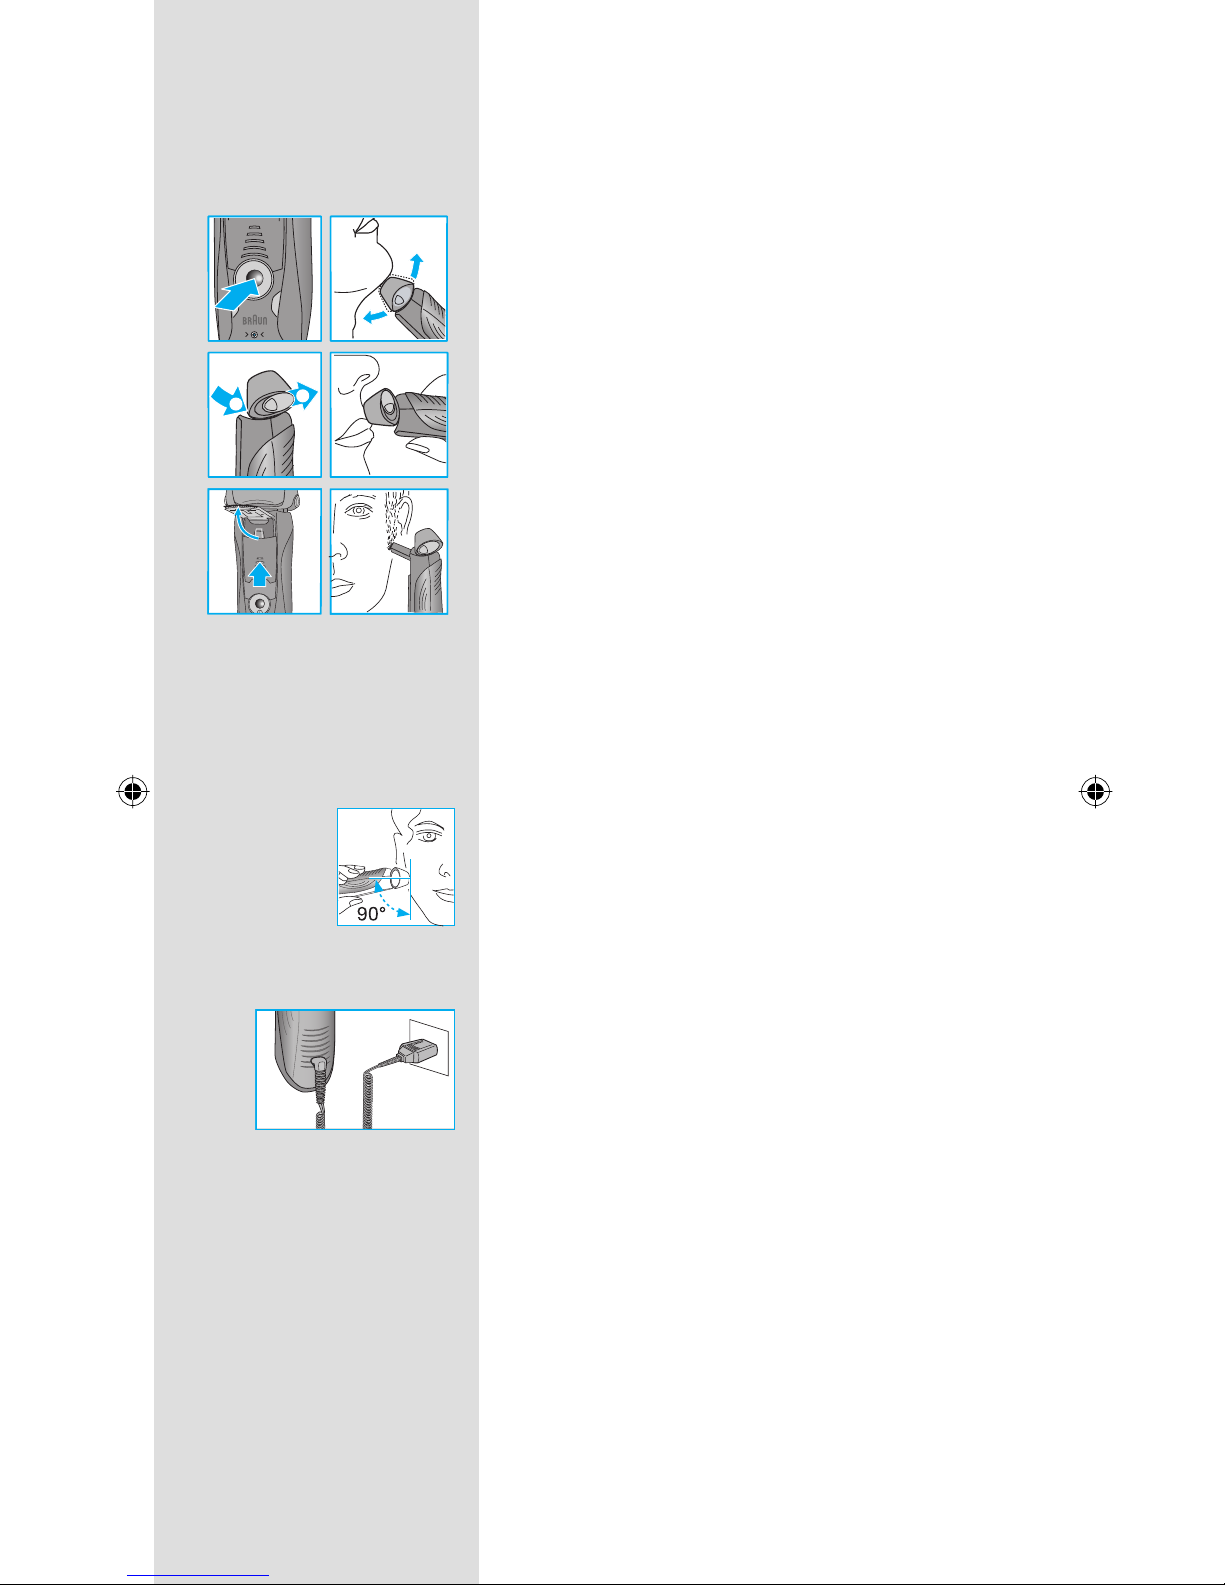
Oprima el interruptor de encendido y apagado
w
para encender la afeitadora:
• El cabezal basculante y las láminas fl otantes
se amoldan automáticamente a todos los
contornos del rostro.
• Para afeitar las zonas difíciles de alcanzar (por
ejemplo, debajo de la nariz), deslice hacia
atrás el botón de bloqueo «lock»
0 para
bloquear el cabezal basculante en el ángulo
deseado.
• Para recortar las patillas, el bigote o la
barba, deslice el recortador de vellos largos
extensible q hacia arriba.
Consejos para la afeitada perfecta
Para obtener resultados óptimos durante la
afeitada, Braun le recomienda seguir 3 sencillos
pasos:
1. Siempre aféitese antes de lavarse la cara.
2. Siempre sostenga la afeitadora perpendicular
a su rostro; es decir, en un ángulo de 90
grados.
3. Estire la piel y afeite en dirección contraria al
crecimiento de la barba.
Afeitado con cable de alimentación
Si la afeitadora no tiene más potencia (está
descargada), y no hay tiempo de recargarla en el
soporte Clean&Renew, también puede afeitarse
al enchufarlo a un tomacorriente con el cable de
alimentación especial p.
t
r
lock
1
2
trimmer
lock
lock
lock
+
t
r
lock
1
2
trimmer
lock
lock
lock
+
releaserelease
Page 23
23
Recomendaciones de limpieza
Limpieza automática
Después de cada afeitada, vuelva a colocar la
afeitadora en el soporte Clean&Renew y siga las
instrucciones que se describen anteriormente en
la sección «Antes de afeitarse».
De esta manera, todas las necesidades de
recarga y limpieza quedarán automáticamente
cubiertas. Con el uso diario, un cartucho
limpiador debería rendir aproximadamente
30 ciclos de limpieza.
El cartucho limpiador higiénico contiene
alcohol. Una vez que el cartucho se abre, el
alcohol se evapora naturalmente poco a poco.
Por eso, si no se usa a diario, el cartucho debe
reemplazarse aproximadamente cada
8 semanas.
El cartucho limpiador también contiene
lubricantes que podrían dejar marcas residuales
alrededor de las láminas afeitadoras después
de la limpieza. No obstante, es posible quitar
estas marcas fácilmente frotando suavemente
con un trapo o pañuelo de papel.
Limpieza manual
Antes de limpiarla, la afeitadora debe
desconectarse del enchufe. La afeitadora no
debe usarse hasta que esté seca.
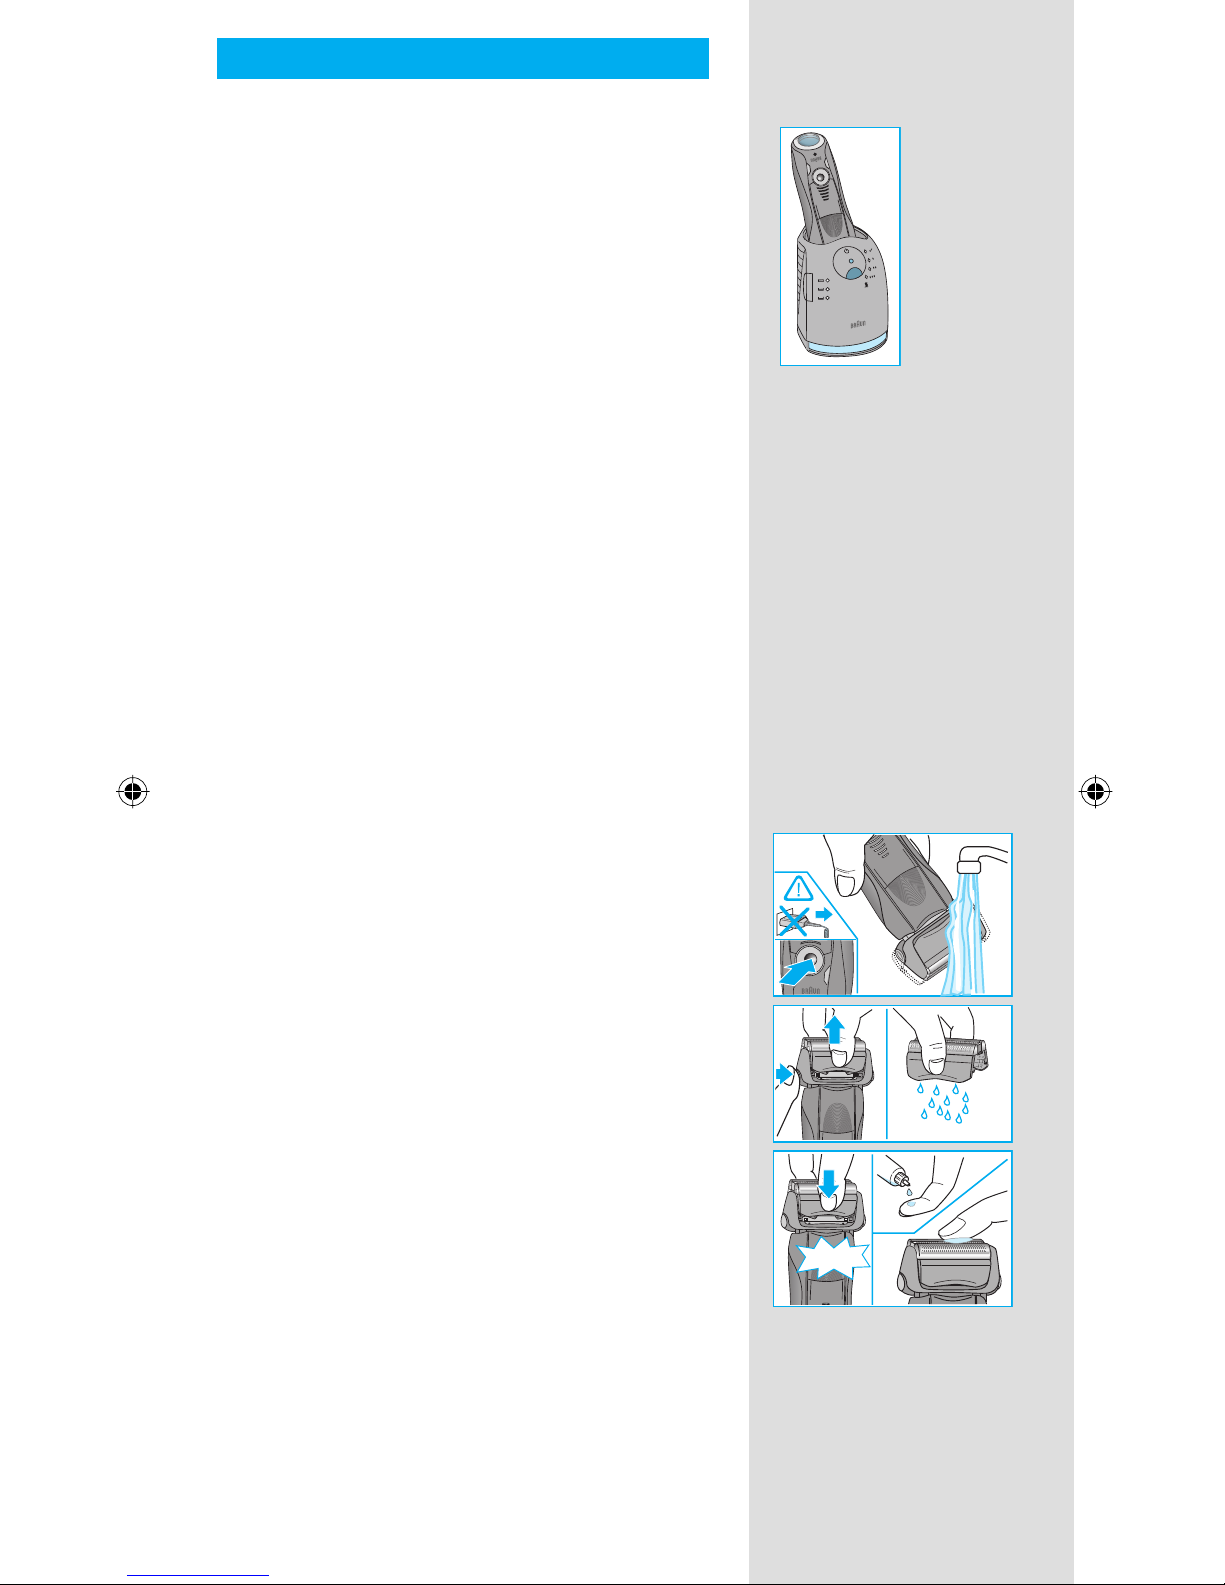
El cabezal de la afeitadora se puede enjuagar
bajo el agua corriente para mantenerlo limpio,
especialmente durante viajes:
• Encienda la afeitadora (sin el cable de
alimentación)
w y enjuague el cabezal bajo
el chorro de agua caliente del grifo. Puede
usar jabón líquido que no contenga abrasivos.
Enjuague toda la espuma y deje la afeitadora
encendida unos cuantos segundos más.
• Luego, apague la afeitadora, oprima el botón
liberador 9 para retirar el cartucho de láminas
y cuchillas 8 y deje secar.
• Si acostumbra lavar la afeitadora bajo el
agua corriente, una vez por semana aplique
una gota de aceite liviano para máquinas en
la parte superior del cartucho de láminas y
cuchillas.
trimmertrimmer
oil
trim
mer
er
re
le
a
s
e
trimmer
re
le
a
s
e
re
le
a
s
e
click!
Series 7
Series 7
Series
Series
oil
trim
mer
er
re
le
a
s
e
trimmer
re
le
a
s
e
re
le
a
s
e
click!
Series 7
Series 7
Series
Series
Page 24
24
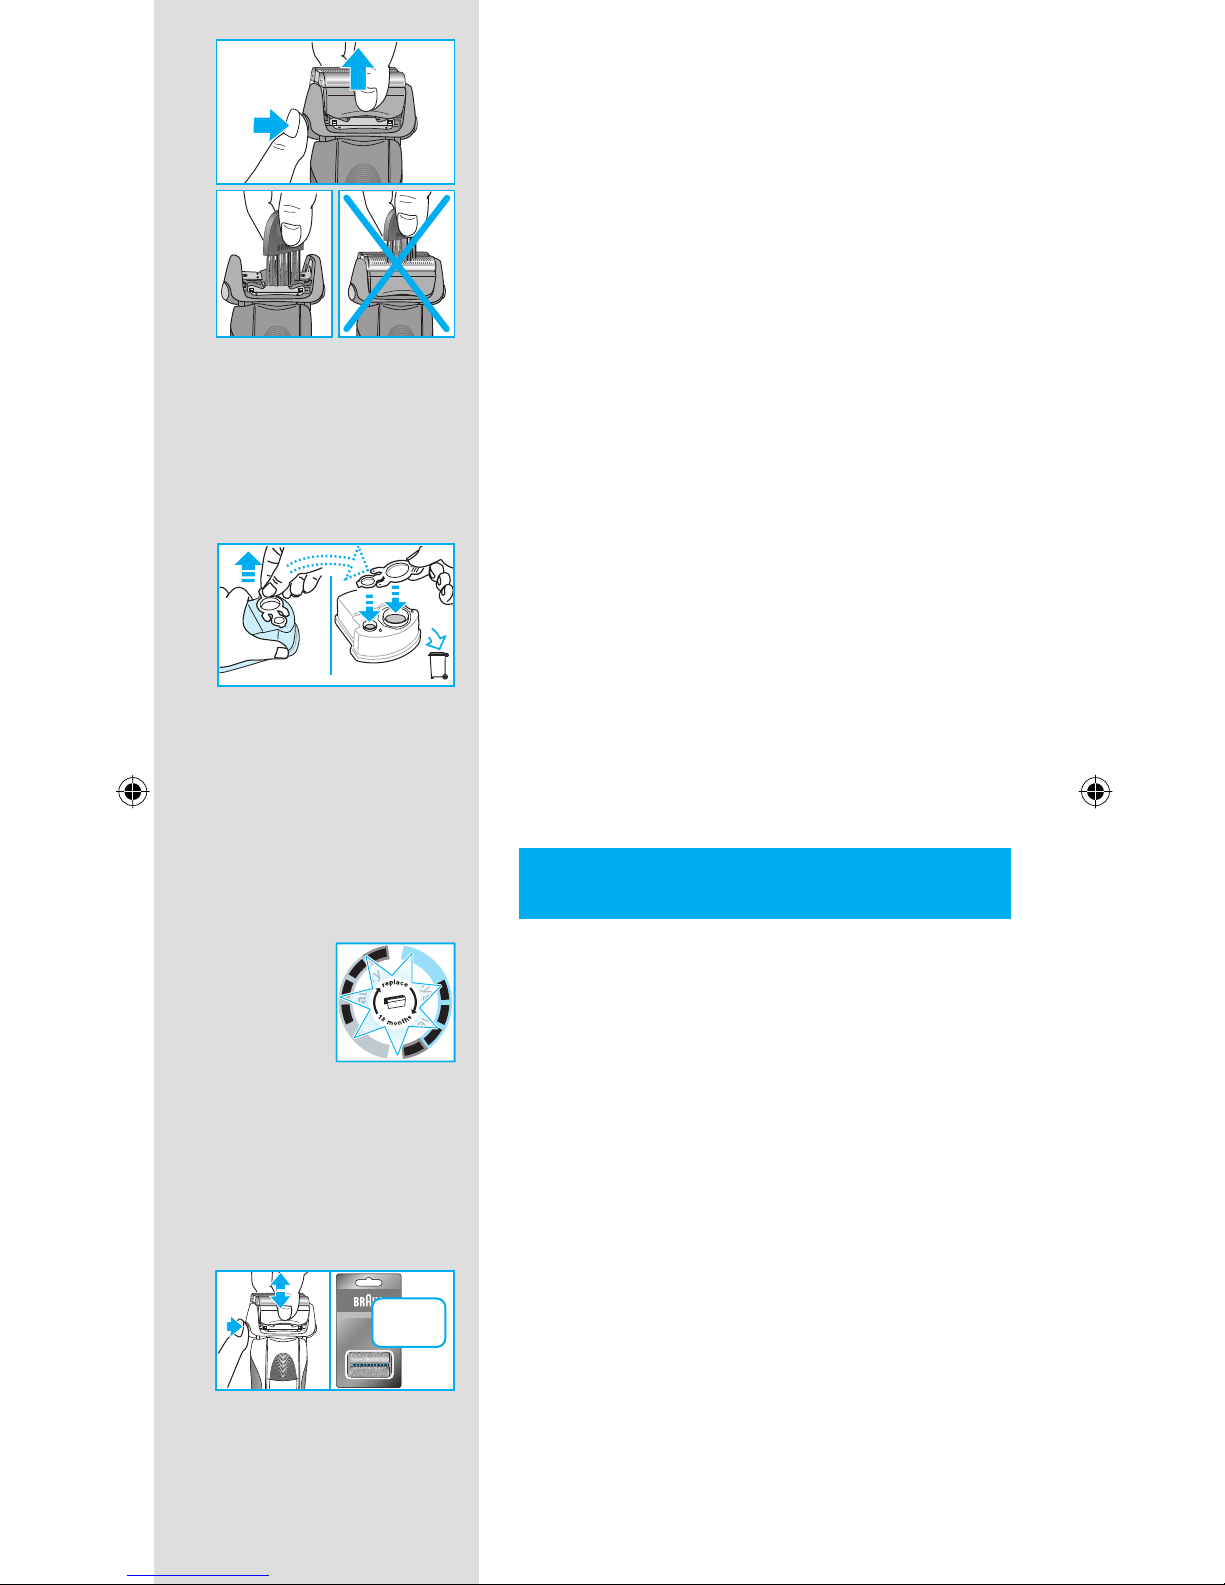
También puede limpiar la afeitadora usando el
cepillo provisto:
• Apague la afeitadora. Retire el cartucho de
láminas y cuchillas
8 y sacúdalo suavemente
sobre una superfi cie plana. Con el cepillo,
limpie la parte interna del cabezal basculante.
No obstante, no limpie el cartucho con el
cepillo ya que podría dañarlo.
Limpieza de la cubierta
Ocasionalmente limpie la cubierta de la
afeitadora y el soporte Clean&Renew con
un trapo húmedo, especialmente dentro del
compartimiento de limpieza donde se coloca la
afeitadora.
Cambio del cartucho limpiador
Después de oprimir el botón de apertura
2
para abrir la cubierta, espere algunos segundos
antes de retirar el cartucho usado a fi n de evitar
goteos.
Antes de desechar el cartucho usado, asegúrese
de tapar las aberturas con la tapa del cartucho
nuevo, ya que el cartucho usado contiene
solución limpiadora contaminada.
Cambio del cartucho de láminas y
cuchillas y reinicio
Para mantener un desempeño óptimo durante
la afeitada, reemplace el cartucho de láminas y
cuchillas 8, cuando el símbolo de repuesto se
encienda en el indicador de carga z (después
de aproximadamente 18 meses) o cuando el
cartucho se haya gastado.
El símbolo de repuesto le recordará durante
las siguientes 7 afeitadas que debe reemplazar
el cartucho de láminas y cuchillas. Luego, la
afeitadora reajustará el indicador de carga
automáticamente.
Una vez que haya reemplazado el cartucho
de láminas y cuchillas, oprima con ayuda de
un bolígrafo el botón de reinicio 15 durante al
menos 3 segundos para reiniciar el contador.
Mientras lo hace, la luz indicadora de repuesto
parpadeará y cuando el proceso haya concluido,
se apagará. Este proceso de reinicio manual se
puede realizar en cualquier momento.
re
le
a
s
e
re
le
a
s
e
re
le
a
s
e
Series 7
Series 7
re
le
a
s
e
re
le
a
s
e
re
le
a
s
e
Series 7
Series 7
new
old
new
old
h
y
g
i
e
n
e
b
a
t
t
e
r
y
h
y
g
i
e
n
e
b
a
t
t
e
r
y
er
re
le
a
s
e
70S
Series 7
er
re
le
a
s
e
70S
Series 7
Page 25
25
Accesorios
A la venta en su tienda detallista o en los
Centros de Servicio Braun:
• Cartucho de láminas y cuchillas 70S
(70-negro = www.braun.service.com)
• Cartucho limpiador Clean&Renew CCR
Aviso acerca del medio ambiente
Este aparato contiene baterías
recargables. Con el fi n de proteger el
medio ambiente, no deseche este
aparato junto con la basura doméstica al fi nal de
su vida útil. El producto puede desecharse en
un Centro de Servicio Braun o en los centros de
recolección de residuos correspondientes.
El cartucho limpiador se puede desechar con la
basura doméstica.
Sujeto a cambios sin previo aviso.
Para ver las especifi caciones eléctricas, refi érase
al texto impreso en el cable de alimentación
especial.
Características eléctricas
Potencia nominal: 7 W
Tensión de alimentación:
100 – 240 V ~ / 50 – 60 Hz
(se adapta automáticamente)
Voltaje de salida del adaptador: 12 V
Voltaje de la afeitadora: 4,5 V
70S70S
Page 26

26
Cómo obtener servicio técnico en los EE. UU.
Garantía de satisfacción con reembolso de
60 días
Si su producto Braun requiere servicio técnico, sírvase llamar al
1-800-BRAUN 11 (272-8611) para que lo remitan al Centro de
Servicio Braun autorizado de su localidad.
Para obtener servicio de reparación:
A. Lleve el producto al Centro de Servicio Braun autorizado de su
elección, o
B. Envíe el producto al Centro de Servicio Braun autorizado de su
elección.
Empaque bien el producto.
Envíelo por correo prepagado y asegurado (opción
recomendada).
Incluya una copia del comprobante de compra para
corroborar la cobertura de la garantía, si corresponde.
Para obtener accesorios y repuestos originales Braun:
Comuníquese con un Centro de Servicio Braun autorizado.
Sírvase llamar al 1-800-BRAUN 11 (272-8611) para que lo remitan
al Centro de Servicio Braun autorizado de su localidad.
Si desea hablar con un representante de atención al consumidor
de Braun:
Sírvase llamar al 1-800-BRAUN 11 (272-8611).
Page 27

27
Garantía de satisfacción con reembolso de
60 días para los productos de cuidado personal
para hombres
Afeitadoras Braun
Recortadores de barba Braun
Cuando haya probado la nueva afeitadora o el nuevo recortador
de barba Braun, estamos seguros que estará satisfecho con su
desempeño. Le sugerimos usar el producto regularmente durante
2 ó 3 semanas. Si no está satisfecho con el producto, sírvase
llamar al 1-800-211-6661 dentro de los 60 días posteriores a la
compra. Conserve el recibo de compra original, el producto y
todas sus piezas, incluida la caja. No devuelva el producto a la
tienda detallista para el cumplimiento de la garantía.
Nota: No se realizarán reembolsos para los productos dañados
por accidentes, uso negligente o irracional.
El producto deberá enviarse en su empaque original, con el recibo
de venta original que indica la fecha de compra.
Le rogamos incluya la siguiente información al momento de
devolver el producto:
Nombre
Calle
Ciudad
Estado Código postal
Número de teléfono
Espere de 6 a 8 semanas para recibir su reembolso.
Page 28

28
SÓLO PARA MEXICO
2 años de garantía limitada
La compañía Procter & Gamble Manufactura, S. de R.L. de C.V.
consciente de lo que significa para el usuario un servicio postventa, brinda a este aparato una garantía por 2 años, a partir
de la fecha señalada en el comprobante de compra original,
entendiéndose por ésta, la misma en que el consumidor recibió
el producto. Dentro del plazo de garantía subsanaremos cualquier
defecto de fabricación o mano de obra, bien sea reparando,
cambiando algunas piezas o sustituyendo el aparato, según sea
el desperfecto de éste. Las piezas o aparatos que hayan sido
sustituidos serán de nuestra propiedad.
La garantía perderá validez en los siguientes casos:
a) Cuando el producto no hubiese sido operado de acuerdo
al instructivo anexo.
b) Cuando el producto se hubiese utilizado en condiciones
distintas a las normales.
c) Cuando el producto hubiese sido alterado o reparado por
personas no autorizadas.
Para poder hacer efectiva esta garantía así como para obtener
partes consumibles, accesorios y refacciones, o bien acudir a los
centros de servicio autorizados, le sugerimos comunicarse sin
costo al 01-800-508-58-00.
Importado y/o distribuido por:
Procter & Gamble International Operations, SA
Loma Florida #32, Col. Lomas de Vista Hermosa,
Del. Cuajimalpa,
05100 México, D.F.
 Loading...