

Page 1
Series3
Stapled booklet, 105x148mm, 68pages (incl. 8pages cover), 2/2c = black+HKS43N
r
i
e
e
s
r
i
e
e
S
s
S
3
3
+
–
360s-4
Type 5415, 5413
www.braun.com
360s-4
330s-4
320s-4
Page 2

Deutsch 6
English 10
Français 17
Español 22
Português 27
Italiano 32
Nederlands 37
Dansk 42
Norsk 46
Svenska 50
Suomi 54
Türkçe 58
∂ППЛУИО¿ 62
Braun Infolines
A
D
00 800 27 28 64 63
00 800 BRAUNINFOLINE
CH
08 44 - 88 40 10
GB
0800 783 7010
IRL
1 800 509 448
F
0 800 944 802
B
0 800 14 592
E
901 11 61 84
P
808 20 00 33
I
(02) 6 67 86 23
NL
0 800-445 53 88
DK
70 15 00 13
N
22 63 00 93
S
020 - 21 33 21
FIN
020 377 877
TR
0 800 261 63 65
Braun GmbH
Frankfurter Straße 145
61476 Kronberg/Germany
www.braun.com
99919909/IV-11
D/GB/F/E/P/I/NL/DK/N/S/FIN/TR/GR
HK
852-25249377
(Audio Supplies Company Ltd.)
www.service.braun.com
Page 3
1
S
e
r
e
s
3
S
S
S
e
e
e
r
e
e
s
s
s
3
3
333
+
–
3
8
0
s
4
S
e
r
i
e
s
3
S
e
r
i
e
s
3
2
3
r
i
e
e
s
r
i
e
e
S
s
S
3
3
4
+
+
5
6
7
–
360
3
60s-
4
–
330
320
10
360
320
8
9
11
STOP
r
i
e
e
r
i
e
e
S
S
4
330
s
s
3
3
Page 4
oil
+
90°
f
ul
l
l
o
c
k
fu
l
l
click!
5
Page 5
Deutsch
Unsere Produkte werden hergestellt, um höchste Ansprüche an Qualität,
Funktionalität und Design zu erfüllen. Wir wünschen Ihnen mit Ihrem Braun
Rasierer viel Freude.
Achtung
Ihr Rasierer ist mit einem Spezialkabel mit integriertem Netzteil für Sicherheitskleinspannung ausgestattet. Es dürfen weder Teile ausgetauscht noch
Veränderungen vorgenommen werden, da sonst Stromschlaggefahr besteht.
Verwenden Sie das Gerät nicht mit beschädigter Scherfolie oder defektem
Spezialkabel.
Kinder oder Personen mit eingeschränkten physischen, sensorischen oder
geistigen Fähigkeiten dürfen dieses Gerät nicht benutzen, es sei denn, sie
werden durch eine für ihre Sicherheit zuständige Person beaufsichtigt.
Wir empfehlen außerdem, das Gerät außer Reichweite von Kindern aufzubewahren sowie sicherzustellen, dass Kinder nicht mit dem Gerät spielen.
Ölfläschchen
Außer Reichweite von Kindern aufbewahren. Nicht verschlucken.
Restentleert entsorgen.
Beschreibung
1 Schersystem
2 Langhaarschneider
3 Präzisionseinstellung (« ») (nur bei Modell 360s)
4 Ein-/Ausschalter
5 Ladekontroll-Leuchten (grün)
6 Restkapazitäts-Leuchte (rot)
7 Wechselanzeige für Scherteile
8 Rasierer-Buchse
9 Spezialkabel
10 Etui (nur bei Modell 360s/320s)
11 Schutzkappe (nur bei Modell 330s)
Rasierer aufladen
Die ideale Umgebungstemperatur für das Laden liegt zwischen 15 °C
und 35 °C.
Setzen Sie den Rasierer nicht längere Zeit Temperaturen über 50° C aus.
• Erstladung: Über das Spezialkabel (9) den ausgeschalteten oder einige
Monate nicht benutzten Rasierer mindestens 4 Stunden am Netz aufladen.
6
Page 6
• Ist der Rasierer voll geladen, kabellos rasieren, bis die Akkus leer sind.
Danach wieder voll aufladen (1 Stunde).
• Voll geladen kann der Rasierer je nach Bartstärke ca. 45 Minuten ohne
Netzanschluss betrieben werden. Die maximale Akku-Kapazität wird
jedoch erst nach mehreren Lade- und Entladevorgängen erreicht.
• Wenn die Akkus leer sind, können Sie das Gerät auch direkt über das
Spezialkabel vom Netz betreiben.
• Ein Schnell-Ladevorgang von 5 Minuten reicht für eine Rasur.
Ladekontroll-Leuchten (5)
Die grünen Ladekontroll-Leuchten zeigen den Ladezustand an (330s/320s:
1 Ladekontroll-Leuchte). Beim Laden oder während der Benutzung blinkt die
entsprechende grüne Leuchte. Wenn der Rasierer voll geladen ist, leuchten
alle grünen Leuchten (330s/320s: 1 Ladekontroll-Leuchte) konstant, vorausgesetzt der Rasierer ist am Netz angeschlossen.
Restkapazitäts-Leuchte (6)
Wenn die rote Restkapazitäts-Leuchte blinkt, geht die Akku-Ladung zur
Neige. In der Regel können Sie die Rasur noch beenden.
Rasieren
Drücken Sie den Ein-/Ausschalter (4), um den Rasierer einzuschalten (Abb.).
Das bewegliche Schersystem sorgt automatisch für eine optimale Anpassung an die Gesichtsform (Abb.).
Langhaarschneider (2)
Zum kontrollierten Trimmen von Schnurrbart und Haaransatz schieben Sie
den ausfahrbaren Langhaarschneider nach oben (Abb.).
Präzisionseinstellung (« ») (nur bei Modell 360s)
Für die präzise Rasur (z. B. unter der Nase) schieben Sie den Schalter (3)
nach rechts auf Stellung « ». Der Mittelschneider und eine Scherfolie
werden abgesenkt.
Tipps für eine optimale Rasur
Für optimale Rasier-Ergebnisse empfehlen wir drei einfache Schritte:
1. Rasieren Sie sich immer, bevor Sie Ihr Gesicht waschen.
2. Rasierer stets im rechten Winkel (90°) zur Haut halten.
3. Haut straffen und gegen die Haarwuchsrichtung rasieren.
7
Page 7

Reinigen
Der Scherkopf ist geeignet zur Reinigung unter fließendem Wasser.
Achtung: Der Rasierer ist vom Anschlusskabel zu trennen, bevor der
Scherkopf mit Wasser gereinigt wird.
Durch regelmäßiges Reinigen verbessern Sie die Rasierleistung Ihres Rasierers. So können Sie den Scherkopf nach jeder Rasur einfach und schnell
unter fließendem Wasser reinigen:
• Rasierer einschalten (schnurlos) und den Scherkopf unter heißes,
fließendes Wasser halten. Gelegentlich Flüssigseife (ohne Scheuermittel)
benutzen. Schaum vollständig abspülen und den Rasierer noch einige
Sekunden laufen lassen (Abb.).
• Dann den Rasierer ausschalten und das Schersystem (1) abnehmen (Abb.)
und trocknen lassen.
• Bei regelmäßiger Nassreinigung sollten Sie wöchentlich einen Tropfen
Leichtmaschinenöl auf der Oberfläche des Schersystems (1) und dem
Langhaarschneider (2) verteilen (Abb.).
Alternativ können Sie den Rasierer mit einer Bürste reinigen:
• Rasierer ausschalten. Das Schersystem abnehmen und ausklopfen (Abb.).
• Mit der Bürste die Scherkopf-Innenseite reinigen (Abb.). Das Schersystem
darf nicht mit der Bürste gereinigt werden (Abb.).
So halten Sie Ihren Rasierer in Bestform
Scherteile-Wechsel / Reset der Wechselanzeige
Um 100% der Rasierleistung zu erhalten, wechseln Sie das Schersystem (1),
wenn die Wechselanzeige (7) aufleuchtet (nach ca. 18 Monaten) oder sobald
es Verschleißerscheinungen zeigt.
Schersystem: 32S/32B
Die Wechselanzeige leuchtet noch während der nächsten sieben Rasuren,
um Sie an den Schersystemwechsel zu erinnern. Danach erfolgt ein automatisches Reset der Anzeige.
Wenn Sie das Schersystem (1) gewechselt haben, drücken Sie den Ein-/
Ausschalter (4) mindestens 5 Sekunden lang, um die Wechselanzeige
manuell zurückzustellen. Dabei blinkt die Wechselanzeige zunächst noch
und erlischt, sobald das Reset abgeschlossen ist. Die Wechselanzeige kann
zu jeder Zeit manuell zurückgesetzt werden.
8
Page 8

Akku-Pflege
Um die maximale Kapazität der Akkus zu erhalten, sollte das Gerät ca. alle
6 Monate vollständig durch Rasieren entladen werden. Danach den Rasierer
wieder voll aufladen.
Umweltschutz
Dieses Gerät enthält Akkus. Im Sinne des Umweltschutzes darf
dieses Gerät am Ende seiner Lebensdauer nicht mit dem
Hausmüll entsorgt werden. Die Entsorgung kann über eine Braun
Kundendienststelle oder über lokal verfügbare Rückgabe- und
Sammelsysteme erfolgen.
Änderungen vorbehalten.
Elektrische Angaben siehe Bedruckung auf dem Spezialkabel.
Garantie
Als Hersteller übernehmen wir für dieses Gerät – nach Wahl des Käufers
zusätzlich zu den gesetzlichen Gewährleistungsansprüchen gegen den
Verkäufer – eine Garantie von 2 Jahren ab Kaufdatum. Innerhalb dieser
Garantiezeit beseitigen wir nach unserer Wahl durch Reparatur oder
Austausch des Gerätes unentgeltlich alle Mängel, die auf Material- oder
Herstellungsfehlern beruhen. Die Garantie kann in allen Ländern in
Anspruch genommen werden, in denen dieses Braun Gerät von uns
autorisiert verkauft wird.
Von der Garantie sind ausgenommen: Schäden durch unsachgemäßen
Gebrauch (Knickstellen an der Scherfolie, Bruch), normaler Verschleiß (z.B.
Schersystem) sowie Mängel, die den Wert oder die Gebrauchstauglichkeit
des Gerätes nur unerheblich beeinflussen. Bei Eingriffen durch nicht von uns
autorisierte Braun Kundendienstpartner sowie bei Verwendung anderer als
Original Braun Ersatzteile erlischt die Garantie.
Im Garantiefall senden Sie das Gerät mit Kaufbeleg bitte an einen
autorisierten Braun Kundendienstpartner. Die Anschrift finden Sie unter
www.service.braun.com oder können Sie kostenlos unter 00800/27 28 64 63
erfragen.
9
Page 9

English
Our products are designed to meet the highest standards of quality,
functionality and design. We hope you enjoy your new Braun Shaver.
Warning
Your shaving system is provided with a special cord set, which has an
integrated Safety Extra Low Voltage power supply. Do not exchange or
tamper with any part of it, otherwise there is risk of an electric shock.
Do not shave with a damaged foil or cord.
This appliance is not intended for use by children or persons with reduced
physical, sensory or mental capabilities, unless they are given supervision
by a person responsible for their safety. In general, we recommend that you
keep the appliance out of reach of children. Children should be supervised
to ensure that they do not play with the appliance.
Oil bottle
Keep out of reach of children. Do not swallow. Dispose of properly when
empty.
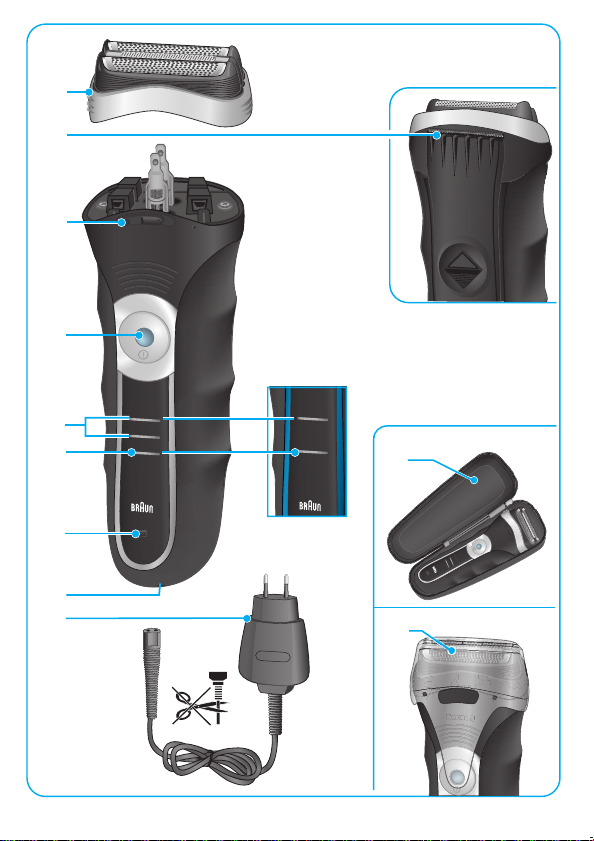
Description
1 Foil & Cutter cassette
2 Long hair trimmer
3 Precision setting switch (« ») (360s only)
4 On/off switch
5 Charging lights (green)
6 Low-charge light (red)
7 Replacement light for shaving parts
8 Shaver power socket
9 Special cord set
10 Etui (360s/320s only)
11 Protection cap (330s only)
Charging
The best environmental temperature for charging is between 15 °C to 35 °C.
Do not expose the shaver to temperatures higher than 50 °C for extended
periods of time.
• Using the special cord set (9), connect the shaver to an electrical outlet with
the motor switched off. When charging for the first time
is not used for a few months
4 hours.
10
, leave the shaver to charge continuously for
or when the shaver
Page 10
• Once the shaver is completely charged, discharge the shaver through
normal use. Then recharge to full capacity. Subsequent charges will take
about 1 hour.
• A full charge provides up to 45 minutes of cordless shaving time depending
on your beard growth. However, the maximum battery capacity will only be
reached after several charging/discharging cycles.
• If the rechargeable batteries are discharged, you may also shave by connecting the shaver to an electrical outlet via the special cord set.
• 5-minute quick charge is sufficient for a shave.
Charging lights (5)
The green charging lights show the charge status of the batteries
(330s/320s: 1 charging light). The green charging light blinks when the
shaver is being charged or switched on. When the battery is fully charged,
all green charging lights (330s/320s: 1 charging light) shine permanently,
provided the shaver is connected to an electrical outlet.
Low-charge light (6)
The red low-charge light flashes when the battery is running low.
You should be able to finish your shave.
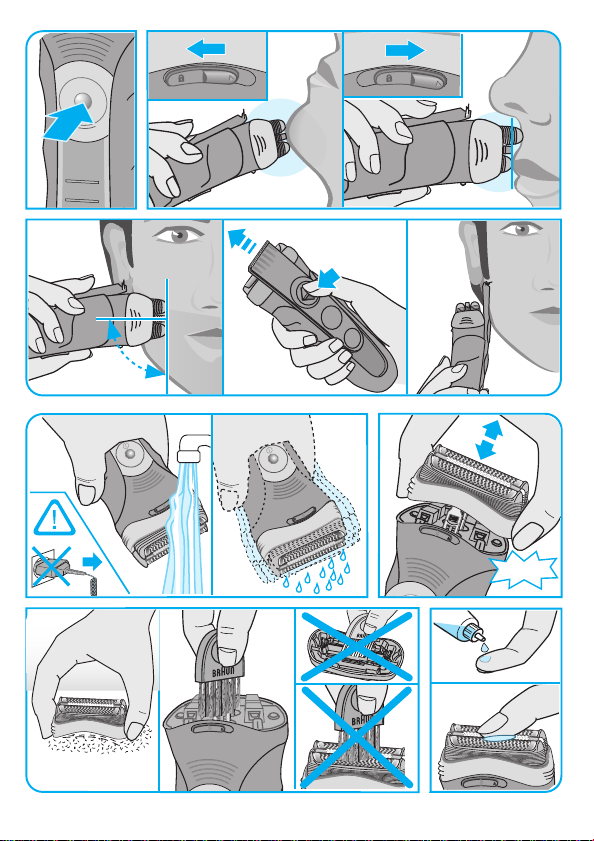
Shaving
Press the on/off switch (4) to operate the shaver (picture).
The flexible shaving foils automatically adjust to every contour of your face
(picture).
Long hair trimmer (2)
To trim sideburns, moustache or beard, slide the long hair trimmer upwards.
Precision setting switch (« ») (360s only)
For precise handling in hard to shave areas (e.g. under the nose) slide the
switch (3) to the right to position « ». The centre trimmer and one foil will be
lowered.
Tips for the perfect shave
For best results, Braun recommends you follow 3 simple steps:
1. Always shave before washing your face.
2. At all times, hold the shaver at right angles (90°) to your skin.
3. Stretch your skin and shave against the direction of your beard growth.
11
Page 11

Cleaning
The shaver head is suitable for cleaning under running tap water.
Warning: Detach the shaver from the power supply before cleaning
the shaver head in water.
Regular cleaning ensures better shaving performance. Rinsing the shaver
head under running water after each shave is an easy and fast way to keep
it clean:
• Switch the shaver on (cordless) and rinse the shaver head under hot
running water. You may use liquid soap without abrasive substances.
Rinse off all foam and let the shaver run for a few more seconds.
• Next, switch off the shaver, remove the shaver Foil & Cutter cassette (1)
and let it dry.
• If you regularly clean the shaver under water, then once a week apply a
drop of light machine oil onto the long hair trimmer (2) and shaver
Foil & Cutter cassette (1) (picture).
Alternatively, you may clean the shaver using a brush:
• Switch off the shaver. Remove the shaver Foil & Cutter cassette and tap it
out on a flat surface (picture).
• Using a brush, clean the inner area of the shaver head. However, do not
clean the shaver Foil & Cutter cassette with a brush as this may damage it
(picture).
Keeping your shaver in top shape
Replacement light for shaving parts / Reset
To maintain 100% shaving performance, replace the shaver Foil & Cutter
cassette (1), when the replacement light for shaving parts (7) comes on (after
about 18 months) or when worn.
Foil & Cutter cassette: 32S/32B
The replacement light will remind you during the next 7 shaves to replace the
Foil & Cutter cassette. Then the shaver will automatically reset the display.
After you have replaced the Foil & Cutter cassette (1), press the on/off switch
(4) for at least 5 seconds to reset the counter.
While doing so, the replacement light blinks and goes off when the reset is
complete. The manual reset can be done at any time.
12
Page 12
Preserving the batteries
In order to maintain the optimum capacity of the rechargeable batteries, the
shaver has to be fully discharged (by shaving) every six months approximately. Then recharge the shaver to full capacity.
Environmental notice
This product contains rechargeable batteries. In the interest of
protecting the environment, please do not dispose of the product in
the household waste at the end of its useful life. Disposal can take
place at a Braun Service Centre or at appropriate collection sites
provided in your country.
Subject to change without notice.
For electric specifications, see printing on the special cord set.
13
Page 13

Guarantee
We grant a 2 year guarantee on the product commencing on the date of
purchase. Within the guarantee period we will eliminate any defects in the
appliance resulting from faults in materials or workmanship, free of charge
either by repairing or replacing the complete appliance at our discretion.
This guarantee extends to every country where this appliance is supplied by
Braun or its appointed distributor.
This guarantee does not cover: damage due to improper use, normal wear or
use as well as defects that have a negligible effect on the value or operation
of the appliance.
The guarantee becomes void if repairs are undertaken by unauthorised
persons and if original Braun parts are not used.
To obtain service within the guarantee period, hand in or send the complete
appliance with your sales receipt to an authorised Braun Customer Service
Centre (address information available online at www.service.braun.com).
For UK only:
This guarantee in no way affects your rights under statutory law.
For Australia & New Zealand only:
Warranty
We grant a 24 Month Replacement Warranty on this appliance commencing
on the date of purchase.
This warranty applies in all States and Territories of Australia and in
New Zealand and is in addition to any mandatory statutory obligations
imposed on Procter & Gamble Australia Pty. Ltd., its distributors and its
manuacturer. This express warranty does not purport to exclude,
restrict or modify any such mandatory statutory obligations.
This warranty only covers defects in the appliance resulting from faults in
workmanship or materials. Therefore, if your appliance becomes faulty as a
result of faults in workmanship or materials, it will be exchanged by your
retailer, on presentation of proof of purchase.
This warranty only applies to domestic or household use of this appliance
and the warranty will only apply if the correct operating instructions included
14
Page 14

with this product have been followed. The warranty on any appliance
replaced under this warranty ends on the expiry of the warranty period that
applied to the original appliance.
This warranty does not cover:
A. Damage arising from improper use or operation on incorrect voltages.
B. Breakages to shaver foils, glass jars, etc.
C. Normal wear due to moving parts.
D. Repairs undertaken by unauthorised service personnel or use of non
genuine parts.
E. Appliances that are outside the warranty period or are not faulty.
This appliance is not intended for use by young children or infirm persons
without supervision. Young children should be supervised to ensure that they
do not play with the appliance.
If the appliance is powered by a cord extension set or electrical portable
outlet device these should be positioned so they are not subject to splashing
or ingress of moisture.
To the extent permitted by the laws of the Commonwealth of Australia and
New Zealand and applicable laws of a State or Territory of Australia, and
subject to the second paragraph of this warranty above, this warranty is
given in exchange for any other rights you may have against Procter &
Gamble Australia Pty. Ltd. or its distributors or manufacturer, whether at law,
in tort (including negligence), in equity or under statute.
Please retain proof of purchase of this appliance. If you have any questions
in relation to this warranty, please call our Consumer Service line (see below
for numbers).
Repairs and service
If you are sending your appliance for repair, please pack the appliance
adequately and send it to your nearest Service Agent.
For service or replacement parts refer to the authorised Service Agents listed
overleaf. Local Service Agents may change from time to time – in that event
please contact the Consumer Service free call number below for updated
local service agent details.
Australian Consumer Service (free call): 1 800 641 820
New Zealand Consumer Service (free call): 0 800 108 909
N2820
15
Page 15

Australian & New Zealand
Service Agents
VICTORIA & TASMANIA
Statewide Services Pty Ltd
trading as J A Appliances
17-19 Hossack Avenue
Coburg North, VIC 3058
Tel. (03) 8371 9100
Fax. (03) 9355 8644
Email: jaappliances@
statewideservices.com.au
QUEENSLAND
Walters Import trading as
Brisbane Appliance Service Centre
449 Beaudesert Road
Moorooka
QLD 4105
Tel. (07) 3277 0360
Fax. (07) 3274 2909
Email: basc@waltersimport.com.au
WESTERN AUSTRALIA
Mark 1 Appliances
Unit 1, 46 Abernethy Road
Belmont, WA 6104
Tel. (08) 9475 0911
Fax. (08) 9475 0922
Email: mark1app@iinet.net.au
SOUTH AUSTRALIA & NT
Adelaide Service Centre
Shop B2,
Parkholme Shopping Centre
319 Oaklands Road, Parkholme
Adelaide, SA 5043
Tel. (08) 8357 5800
Fax. (08) 8357 5833
Email: ascpkh@adam.com.au
NEW ZEALAND
Key Service Ltd
7D Echelon Place
East Tamaki
Manukau City
Auckland
New Zealand
(PO Box 38569, Howick, Auckland,
New Zealand)
Tel. (09) 916 0960
Fax. (09) 916 0970
Email: key-service-ltd@xtra.co.nz
NEW SOUTH WALES & ACT
Faulder Appliance Services Pty Ltd
Shop 4, 9 Evans Road,
Rooty Hill, NSW 2766
Tel. (02) 9625 3064
Fax. (02) 9625 3037
Email: fas16@bigpond.com
16
Page 16

Français
Nos produits sont conçus pour répondre aux normes les plus élevées en
matière de qualité, fonctionnalité et design. Nous espérons que vous
apprécierez votre nouveau rasoir Braun.
Attention
Votre rasoir est livré avec un cordon d’alimentation basse tension. Vous ne
devez pas remplacer ou modifier ses composants, afin d’éviter tout risque
d’accident.
Ne vous rasez pas avec une grille ou un cordon endommagés.
Cet appareil n’est pas destiné à des enfants ou à des personnes aux
capacités mentales, sensorielles et physiques réduites à moins qu’elles ne
soient sous la surveillance d’un adulte responsable de leur sécurité.
Il convient de surveiller les enfants pour s’assurer qu’ils ne jouent pas avec
l’appareil. Conserver hors de portée des enfants.
Bouteille d’huile
Conserver hors de la portée des enfants. Ne pas avaler. Eliminer comme il
convient après usage.
Description
1 Cassette de rasage (grille et bloc-couteaux)
2 Tondeuse rétractable pour poils longs
3 Loquet de réglage de précision («
4 Bouton marche/arrêt
5 Témoins lumineux de charge (vert)
6 Témoin lumineux de décharge (rouge)
7 Indicateur lumineux de remplacement de la cassette de rasage
8 Prise d’alimentation du rasoir
9 Cordon d’alimentation
10 Etui (360s/320s uniquement)
11 Capot de protection (330s uniquement)
») (360s uniquement)
Mise en charge du rasoir
La température ambiante idéale pour charger le rasoir est comprise entre
15 °C et 35°C. N’exposez pas votre rasoir à des températures supérieures
à 50 °C pendant une période prolongée.
• En utilisant le cordon d’alimentation (9), branchez le rasoir à une prise
électrique moteur arrêté. Lors de la première charge, ou si le rasoir n’a
17
Page 17
pas été utilisé pendant plusieurs mois, laissez le rasoir se charger pendant
4 d’heures.
• Lorsque le rasoir est complètement chargé, utilisez le normalement
jusqu’à complète décharge de la batterie. Rechargez le ensuite jusqu’à
pleine capacité. Les charges suivantes prendront environ une heure.
• Une pleine charge procure jusqu’à 45 minutes d’autonomie de rasage en
fonction de l’épaisseur et de la dureté de votre barbe. Cependant, la
capacité maximale de la batterie ne sera atteinte qu’après plusieurs cycles
de charge/décharge.
• Si les batteries sont déchargées, vous pouvez aussi vous raser en
branchant le rasoir à une prise électrique via le cordon d’alimentation.
• Une charge rapide de 5 minutes est suffisante pour un rasage.
Témoins lumineux de charge (5)
Les témoins lumineux de charge indiquent le niveau de charge des batteries
(330s/320s : 1 témoin lumineux). Le témoin lumineux vert de charge clignote
lorsque le rasoir est en cours de charge ou en marche. Quand la batterie
est complètement chargée, tous les témoins lumineux verts (330s/320s :
1 témoin lumineux) de charge sont allumés, que le rasoir soit branché sur
une prise électrique.
Témoin lumineux de décharge (6)
Le voyant lumineux rouge de faible charge clignote lorsque la batterie doit
être rechargée. La charge restante est normalement suffisante pour que vous
puissiez terminer votre rasage.
Rasage
Appuyez sur le bouton marche/arrêt (4) pour mettre en marche le rasoir
(cf. schéma). Les grilles de rasage souples s’adaptent automatiquement aux
contours de votre visage (cf. schéma).
Tondeuse rétractable pour poils longs (2)
Pour tailler les pattes, la moustache ou la barbe, faites glisser la tondeuse
rétractable vers le haut.
Loquet de réglage de précision (« »)
Pour une utilisation précise dans les zones difficiles à atteindre (par exemple,
sous le nez), poussez le loquet (3) vers la droite pour que « » se retrouve
en position centrale. La mini tondeuse de la cassette de rasage et une de
ses grilles seront alors abaissées.
18
(360s uniquement)
Page 18
Conseils pour un rasage parfait
Pour un résultat de rasage optimal, Braun vous recommande de suivre
3 étapes simples :
1. Rasez-vous toujours avant de vous laver le visage.
2. Tenez toujours le rasoir à angle droit (90°) par rapport à la peau.
3. Tendez votre peau et rasez-vous dans le sens opposé à la pousse du
poil.
Nettoyage
La tête du rasoir peut être lavée sous l’eau chaude courante.
Attention : débranchez toujours le rasoir de la prise électrique secteur
avant de nettoyer la tête sous l’eau.
Un nettoyage régulier assure une meilleure performance de rasage. Nettoyer
la tête du rasoir sous l’eau après chaque rasage permet de garder le rasoir
propre simplement et rapidement :
• Mettez en marche le rasoir (sans cordon) et rincez la tête de rasage sous
l’eau chaude. Vous pouvez utiliser du savon liquide ne contenant pas
de substances abrasives. Rincez toute la mousse et laissez le rasoir en
marche pendant quelques secondes supplémentaires.
• Ensuite, arrêtez le rasoir, retirez la cassette de rasage (1) et laissez la
sécher.
• Si vous nettoyez régulièrement votre rasoir sous l’eau, appliquez une fois
par semaine une goutte d’huile de machine à coudre sur la tondeuse
rétractable (2) et sur la cassette de rasage (1) (cf. schéma).
Vous pouvez également nettoyer le rasoir en utilisant une brossette :
• Arrêtez le rasoir. Enlevez la cassette de rasage et tapotez-la légèrement
sur une surface plane.
• A l’aide de la brossette, nettoyez l’intérieur de la tête du rasoir. Cependant,
ne nettoyez pas la cassette de rasage avec la brossette car cela risquerait
de l’endommager (cf. schéma).
Entretien du rasoir
Témoin lumineux de remplacement de la cassette de rasage /
réinitialisation
Pour conserver 100% de la performance de votre rasoir, remplacez la
cassette de rasage (1) quand le témoin lumineux de remplacement des
19
Page 19
pièces de rasage (7) s’allume (après environ 18 mois) ou quand elle est
usée.
Cassette de rasage « Foil & Cutter »: 32S/32B
Le témoin lumineux de remplacement vous rappellera lors des 7 rasages
suivants qu’il faut remplacer la cassette de rasage. Ensuite, le rasoir
réinitialisera automatiquement l’affichage.
Après avoir remplacé la cassette de rasage (1), appuyez sur le bouton
marche/arrêt (4) pendant au moins 5 secondes afin de remettre manuellement le compteur à zéro.
Pendant ce temps là, le témoin lumineux de remplacement clignote et
s’éteint quand la réinitalisation est faite. La réinitialisation manuelle peut être
faite à n’importe quel moment.
Conservation des batteries
Pour maintenir la capacité optimale des batteries rechargeables, tous les
6 mois environ déchargez complètement, le rasoir en l’utilisant sans le
remettre en charge entre chaque rasage ; ensuite recharger le rasoir au
maximum.
Respect de l’environnement
Ce produit contient des batteries rechargeables. Dans un souci de
protection de l’environnement, veuillez ne pas jeter le produit avec
les ordures ménagères au terme de son cycle de vie. Vous pouvez
remettre ce produit aux centres service agréés Braun ou aux points
de collecte dans votre pays.
Sujet à toute modification sans préavis.
Voir les spécifications électriques mentionnées sur l’adaptateur basse
tension.
20
Page 20

Garantie
Nous accordons une garantie de 2 ans sur ce produit, à partir de la date
d’achat.
Pendant la durée de la garantie, Braun prendra gratuitement à sa charge la
réparation des vices de fabrication ou de matière en se réservant le droit de
décider si certaines pièces doivent être réparées ou si l‘appareil lui-même
doit être échangé.
Cette garantie s’étend à tous les pays où cet appareil est commercialisé par
Braun ou son distributeur exclusif.
Cette garantie ne couvre pas : les dommages occasionnés par une utilisation
inadéquate, l’usure normale (par exemple, grille et bloc-couteaux) ainsi que
les défauts d’usuresqui ont un effet négligeable sur la valeur ou l’utilisation
de l’appareil. Cette garantie devient caduque si des réparations ont été
effectuées par des personnes non agréées par Braun et si des pièces de
rechange ne provenant pas de Braun ont été utilisées.
Pour toute réclamation intervenant pendant la période de garantie, retournez
ou rapportez l’appareil ainsi que l‘attestation de garantie à votre revendeur
ou à un Centre Service Agréé Braun.
Se référez à www.service.braun.com ou appelez 0 800 944 802 pour
connaitre le Centre Service Agrée Braun le plus proche de chez vous.
Clause spéciale pour la France
Outre la garantie contractuelle exposée ci-dessus, nos clients bénéficient de
la garantie légale des vices cachés prévue aux articles 1641 et suivants du
Code civil.
21
Page 21

Español
Nuestros productos están diseñados para cumplir los más altos niveles
de calidad, funcionalidad y diseño. Esperamos que disfrute de su nueva
afeitadora eléctrica Braun.
Advertencia
Su sistema de afeitado está provisto de un juego de cables especial que
posee un suministro eléctrico integrado de Seguridad de Voltaje Extrabajo.
No intercambie ni manipule ninguna de sus piezas, de lo contrario existe
riesgo de sufrir descarga eléctrica.
No se depile si una lamina o un cable están en mal estado.
Este aparato no es para uso de niños ni personas con minusvalías físicas,
sensorias o mentales, salvo que se utilicen bajo la supervisión de una
persona responsable de su seguridad. En general, recomendamos mantener
este aparato fuera del alcance de los niños. Los niños deben ser supervisados para asegurarse de que no juegan con el aparato.
Botella de aceite
Mantener fuera del alcance de los niños. No ingerir. Tirar adecuadamente a
la basura una vez vacío.
Descripción
1 Dispositivo de Láminas y Cuchillas
2 Recortadora de pelo largo
3 Interruptor de ajuste de precisión (« ») (sólo para 360s)
4 Botón de encendido/apagado
5 Luces de carga (verde)
6 Luz de carga baja (roja)
7 Luz de sustitución para las piezas de afeitado
8 Enchufe de la afeitadora eléctrica
9 Juego de cables especial
10 Estuche (sólo para 360s/320s)
11 Tapa de protección (sólo para 330s)
Carga
La mejor temperatura medioambiental para la carga es entre 15 °C y 35 °C.
No exponga la afeitadora eléctrica a temperaturas superiores a 50 °C
durante períodos de tiempo prolongados.
• Utilizando el juego de cables especial (9), conecte la afeitadora eléctrica
a una toma de corriente eléctrica con el motor apagado. Al cargarla por
22
Page 22

primera vez, o si no se ha usado en un par de meses, carge la máquina de
forma ininterrumpida durante 4 horas.
• Cuando la afeitadora eléctrica esté cargada por completo, descárguela
utilizándola normalmente. Luego recárguela hasta su capacidad máxima.
Las siguientes cargas tendrán una duración de, aprox., 1 hora.
• Una carga completa proporciona hasta 45 minutos de afeitado
inalámbrico, dependiendo del crecimiento de su barba. Sin embargo, la
capacidad máxima de la batería se alcanzará tras varios ciclos de carga/
descarga.
• Si las baterías recargables están descargadas, también puede afeitarse
conectando la afeitadora a una toma de corriente eléctrica utilizando el
juego de cables especial.
• Una carga rápida de 5 minutos es suficiente para un afeitado.
Luces de carga (5)
Las luces de carga verdes indican el estado de carga de las baterías
(330s/320s: 1 luz de carga). La luz de carga verde parpadea cuando la
afeitadora se está cargando o está encendida. Cuando la batería está
cargada por completo, todas las luces de carga (330s/320s: 1 luz de carga)
verdes se iluminan permanentemente, siempre que la afeitadora eléctrica
esté conectada a una toma de corriente eléctrica.
Luz de carga baja (6)
La luz roja que indica carga baja, parpadea cuando la batería se está
agotando. Aun así es posible finalizar el afeitado.
Afeitado
Presione el interruptor de encendido/apagado (4) para utilizar la afeitadora
eléctrica (imagen).
Las láminas de afeitado flexibles se ajustan automáticamente al contorno de
su cara (imagen).
Recortadora de pelo largo (2)
Para recortar patillas, bigote o barba, deslice hacia arriba la recortadora de
pelo largo.
Interruptor de ajuste de precisión (« ») (sólo para 360s)
Para un uso preciso en zonas de difícil afeitado (p.ej. bajo la nariz) deslice el
interruptor (3) hacia la derecha a la posición « ». Descenderán la recortadora central y una de las láminas.
23
Page 23

Trucos para un afeitado perfecto
Para obtener mejores resultados, Braun le recomienda que siga estos
3 sencillos pasos:
1. Aféitese siempre antes de lavarse la cara.
2. Mantenga en todo momento la afeitadora eléctrica en ángulos rectos
(90°) con su piel.
3. Estírese la piel y aféitese en sentido contrario a la dirección del crecimiento de su barba.
Limpieza
El cabezal de la afeitadora eléctrica es apto para su limpieza bajo
agua corriente del grifo.
Advertencia: Retire la afeitadora eléctrica de la corriente eléctrica
antes de limpiar con agua el cabezal de la afeitadora eléctrica.
La limpieza regular asegura un mejor rendimiento del afeitado. Aclarar el
cabezal de la afeitadora eléctrica bajo agua corriente tras cada afeitado es
una forma fácil y rápida de mantenerla limpia:
• Encienda la afeitadora eléctrica (inalámbrica) y aclare el cabezal de la
afeitadora eléctrica bajo agua corriente caliente. Puede utilizar jabón
líquido sin sustancias abrasivas. Aclare toda la espuma y deje la afeitadora
eléctrica en funcionamiento durante unos segundos más.
• A continuación, apague la afeitadora eléctrica, retire el dispositivo de
Láminas y Cuchillas de la afeitadora eléctrica (1) y déjelo secar.
• Si limpia regularmente con agua la afeitadora eléctrica, aplique una vez a
la semana una gota de aceite de máquina ligero en la recortadora de pelo
largo (2) y en el dispositivo de Láminas y Cuchillas (1) (imagen).
Alternativamente, puede limpiar la afeitadora eléctrica utilizando un cepillo:
• Apague la afeitadora eléctrica. Retire el dispositivo de Láminas y Cuchillas
de la afeitadora eléctrica y déle golpecitos sobre una superficie plana.
• Utilizando el cepillo, limpie la zona interior del cabezal de la afeitadora
eléctrica. Sin embargo, no limpie el dispositivo de Láminas y Cuchillas con
el cepillo ya que podría dañarlo (imagen).
24
Page 24

Mantenga su afeitadora en óptimo estado
Luz de sustitución para las piezas de afeitado / Reinicio
Para asegurar un rendimiento de afeitado del 100%, sustituya el dispositivo
de Láminas y Cuchillas de la afeitadora eléctrica (1) cuando la luz de
sustitución de piezas de afeitado (7) aparezca (cada, aprox., 18 meses) o
cuando esté desgastado.
Dispositivo de Láminas y Cuchillas: 32S/32B
La luz de sustitución le recordará durante los siguientes 7 afeitados que ha
de sustituir el dispositivo de láminas y cuchillas. Luego, automáticamente,
la afeitadora eléctrica reiniciará el mecanismo.
Una vez reemplazada la Lámina y bloque de Cuchillas (1), presionar el botón
de encendido/apagado (4) durante al menos 5 segundos para reestablecer
los valores del contador.
Mientras hace esto, la luz de sustitución parpadeará y se apagará cuando
el reinicio esté completado. El reinicio manual puede hacerse en cualquier
momento.
Conservación de las baterías
Para mantener la capacidad óptima de las baterías recargables, la afeitadora
eléctrica tiene que ser totalmente descargada (mediante afeitados)
aproximadamente cada 6 meses. Luego, recárguela hasta su capacidad
máxima.
Aviso medioambiental
Este producto contiene baterías
recargables. Con objeto de proteger el medioambiente, una vez
finalizada la vida útil del producto, rogamos no lo elimine junto a la
basura doméstica. Puede depositarlo en un Centro de Servicios
Braun o en los emplazamientos de recolección habilitados en su país.
Sujeto a modificaciones sin previo aviso.
Vea las especificaciones eléctricas impresas en el cable especial de
conexión.
25
Page 25

Garantía
Braun concede a este producto 2 años de garantía a partir de la fecha de
compra.
Dentro del periodo de garantía, subsanaremos, sin cargo alguno, cualquier
defecto del aparato imputable tanto a los materiales como a la fabricación,
ya sea reparando, sustituyendo piezas, o facilitando un aparato nuevo según
nuestro criterio.
La garantía no ampara averías por uso indebido, funcionamiento a distinto
voltaje del indicado, conexión a un enchufe inadecuado, rotura, desgaste
normal (p.ej. la lámina o bloque de cuchillas) por el uso que causen defectos
o una disminución en el valor o funcionamiento del producto.
La garantía perderá su efecto en caso de ser efectuadas reparaciones por
personas no autorizadas, o si no son utilizados recambios originales de
Braun.
La garantía solamente tendrá validez si la fecha de compra es confirmada
mediante la factura o el albarán de compra correspondiente.
Esta garantía tiene validez en todos los países donde este producto sea
distribuido por Braun o por un distribuidor asignado por Braun.
En caso de reclamación bajo esta garantía, diríjase al Servicio de Asistencia
Técnica de Braun más cercano: www.service.braun.com.
Solo para España
Servicio al consumidor: Para localizar a su Servicio Braun más cercano o en
el caso de que tenga Vd. alguna duda referente al funcionamiento de este
producto, le rogamos contacte con el teléfono de este servicio 901 11 61 84.
26
Page 26

Português
Os nossos produtos são concebidos para ir ao encontro dos mais altos
padrões de qualidade, funcionalidade e design. Esperamos que desfrute da
sua nova máquina de barbear Braun.
Aviso
O seu sistema de barbear vem equipado com um cabo de alimentação
especial, que tem um transformador de voltagem extra-baixa de segurança
integrado. Para evitar risco de choque eléctrico, não troque ou manipule
nenhuma das partes que o compõem.
Não use a depiladora se a lâmina ou o cabo se encontrarem danificados.
Este aparelho não deve ser usado por crianças ou pessoas com capaci-
dades físicas ou mentais reduzidas, excepto quando estejam sob a supervisão de alguém responsável pela sua segurança. Em geral, recomendamos
que mantenha o aparelho fora do alcance de crianças. As crianças dever
ser supervisionadas para garantir que não brincam com o aparelho.
Garrafa de oleo
Manter fora do alcance das crianças. Não engolir. Eliminar correctamente de
modo responsável quando vazio.
Descrição
1 Rede e bloco de lâminas
2 Acessório aparador de pelo longo
3 Botão de configuração de precisão («
4 Botão ligar/desligar
5 Luzes de Carregamento (verde)
6 Luz de bateria fraca (encarnada)
7 Luz de substituição da rede e bloco de lâminas
8 Ficha de alimentação da máquina de barbear
9 Cabo de alimentação especial
10 Bolsa (apenas para 360s/320s)
11 Acessório de protecção (apenas para 330s)
») (apenas para 360s)
Carregamento
A melhor temperatura ambiente para carregamento é entre os 15 °C e os
35 °C. Não exponha a máquina de barbear a temperaturas superiores a
50 °C por períodos prolongados.
• Usando o cabo de alimentação especial (9), ligue a máquina de barbear a
uma ficha eléctrica com o motor desligado. Quando carregar pela primeira
27
Page 27

vez ou quando o aparelho não foi utilizado durante alguns meses, por
favor deixe o aparelho a carregar continuamente durante 4 horas.
• Depois de a máquina de barbear estar completamente carregada, descarregue a máquina através do uso normal. Depois recarregue-a para a
sua capacidade máxima. As cargas seguintes demorarão cerca de 1 hora.
• Uma carga completa permite a utilização sem fios até 45 minutos de
tempo de barbear dependendo do comprimento da sua barba.
No entanto, a capacidade máxima de bateria só será atingida após vários
ciclos de carregamento/descarregamento.
• Se as baterias recarregáveis estiverem descarregadas, também se pode
barbear ligando a máquina a uma ficha eléctrica através do cabo de
alimentação especial.
• Um carregamento rápido de 5 minutos é suficiente para um barbear.
Luzes de carregamento (5)
As luzes de carregamento verdes mostram o estado de carga das baterias
(330s/320s: 1 luz de carregamento). A luz de carregamento verde pisca
quando a máquina de barbear está a ser carregada ou está ligada. Quando
a bateria está completamente carregada, todas as luzes de carregamento
verdes (330s/320s: 1 luz de carregamento) brilham permanentemente, desde
que a máquina esteja na ficha eléctrica.
Luz de bateria fraca (6)
A luz vermelha acende quando a bateria está com carga reduzida.
Tem ainda tempo para acabar de se barbear.
Barbear
Prima o botão ligar/desligar (4) para pôr a máquina de barbear a funcionar
(imagem).
As lâminas de barbear flexíveis ajustam-se automaticamente a todos os
contornos do seu rosto (imagem).
Acessório aparador de pelo longo (2)
Para aparar patilhas, bigode ou barba, deslize o acessório aparador de pelo
longo para cima.
Botão de configuração de precisão (« ») (apenas para 360s)
Para um manuseamento preciso nas áreas difíceis de barbear (por exemplo,
em baixo do nariz) deslize o botão (3) para a direita para posicionar o « ».
O aparador central e uma lâmina baixarão de posição.
28
Page 28

Dicas para um barbear perfeito
Para optimizar os resultados, a Braun recomenda que siga estes 3 passos
simples:
1. Barbeie-se sempre antes de lavar o rosto.
2. Segure sempre a máquina de barbear em ângulos rectos (90º) em
direcção à pele.
3. Estique a pele e barbeie-a no sentido contrário ao crescimento do pêlo.
Limpeza
A cabeça de corte é adequada para limpeza com água corrente.
Aviso: Desligue o aparelho da tomada eléctrica antes de limpar a
cabeça de corte com água.
A limpeza regular assegura um melhor desempenho no barbear. Enxaguar a
cabeça de corte com água corrente depois de cada utilização é uma forma
fácil e rápida de a manter limpa:
• Ligue a máquina de barbear (sem o cabo de alimentação) e enxagúe a
cabeça de corte em água quente. Poderá utilizar um sabonete líquido que
não contenha substâncias abrasivas. Enxagúe os restos de sabão e ponha
a máquina de barbear a funcionar por mais alguns segundos.
• Posteriormente, desligue a máquina de barbear, retire a rede e bloco de
lâminas (1) e deixe secar.
• Se tem por hábito limpar a máquina de barbear com água, aplique uma
vez por semana uma gota de óleo de máquina no cimo da rede e bloco de
lâminas.
A seguinte limpeza rápida é outro método alternativo de limpeza:
• Desligue a máquina de barbear. Retire a rede e bloco de laminas e bata
ligeiramente numa superfície plana.
• Utilizando uma escova, limpe a área interna da cabeça de corte. No
entanto, não limpe a lâmina da máquina de barbear nem o desbastador
com uma escova pois isto danificá-los-á.
Mantenha a sua máquina de barbear em óptimo
estado
Luz de substituição da rede e bloco de lâminas / Restaurar
Para que a máquina de barbear mantenha um desempenho perfeito,
substitua a rede e bloco de lâminas (1) quando se acender a luz de
29
Page 29

substituição para a rede e bloco de lâminas (após cerca de 18 meses)
ou quando a rede ou o bloco de lâminas estiverem gastos.
Rede e bloco de lâminas: 32S/32B
A luz de substituição lembrá-lo-á durante as próximas 7 utilizações que
deverá substituir a rede e bloco de lâminas. Posteriormente, a máquina de
barbear restaurará automaticamente o visor.
Quando substituir a rede e bloco de lâminas, pressione o botão ligar/desligar
(4) pelo menos durante 5 segundos para restaurar o contador.
Durante este procedimento, a luz de substituição piscará alternadamente
até desligar quando estiver totalmente restaurado. É possível restaurar
manualmente a qualquer momento.
Preservar as baterias
Para manter a melhor capacidade das baterias recarregáveis, a máquina
de barbear tem que ser descarregada por completo (ao barbear) a cada
6 meses aproximadamente. Em seguida, deve recarregar-se a máquina
para a sua capacidade total.
Aviso ambiental
Este produto contém baterias recarregáveis. No interesse da
protecção do ambiente, por favor não descarte este produto
com o lixo doméstico no fim da sua vida útil. Pode depositá-lo
num Centro de Assistência Técnica Braun ou nos pontos de
recolha apropriados e disponibilizados no seu país.
Sujeito a alterações sem aviso prévio.
Ver especificações eléctricas no impresso relativo ao cabo de conexão
especial.
30
Page 30

Garantia
Braun concede a este produto 2 anos de garantia a partir da data de
compra.
Dentro do período de garantia qualquer defeito do aparelho, devido aos
materiais ou ao seu fabrico, será reparado, substituindo peças ou trocando
por um aparelho novo segundo o nosso critério, sem qualquer custo.
A garantia não cobre avarias por utilização indevida, funcionamento a
voltagem diferente da indicada, ligação a uma tomada de corrente eléctrica
incorrecta, ruptura, normal utilização e desgaste (ex: rede e bloco de
lâminas) por utilização que causem defeitos ou diminuição da qualidade
de funcionamento do produto.
A garantia perderá o seu efeito no caso de serem efectuadas reparações por
pessoas não autorizadas ou se não forem utilizados acessórios originais
Braun.
A garantia só é válida se a data de compra fôr confirmada pela
apresentação da factura ou documento de compra correspondente.
Esta garantia é válida para todos os países onde este produto seja
distribuído por Braun ou por um distribuidor Braun autorizado.
No caso de reclamação ao abrigo de garantia, dirija-se ao
Serviço de Assistência Técnica Oficial Braun mais próximo:
www.service.braun.com.
Só para Portugal
Apoio ao consumidor: Para localizar o seu Serviço Braun mais próximo
o no caso de surgir alguma dúvida relativamente ao funcionamiento deste
produto, contacte por favor este serviço pelo telefone 808 20 00 33.
31
Page 31

Italiano
I nostri prodotti sono progettati per rispondere ai più elevati standard di
qualità, funzionalità e design. Ci auguriamo che il suo nuovo Braun soddisfi
pienamente le sue esigenze.
Attenzione
Il rasoio è dotato di un cavo di alimentazione speciale, che ha un sistema
integrato di sicurezza a basso voltaggio. Per evitare il rischio di scosse
elettriche, non cercare di sostituire o di manipolare nessuna parte del
prodotto.
Non radere utilizzando una lamina o un cavo danneggiato.
Questo elettrodomestico non è progettato per essere utilizzato da bambini o
da persone con capacità fisiche o mentali ridotte, senza la supervisione di
una persona responsabile della loro sicurezza. In generale, noi raccomandiamo di tenerlo fuori dalla portata dei bambini. I bambini dovrebbero essere
controllati per accertarsi che non giochino con il dispositivo.
Flacone olio lubrificante
Tenere fuori dalla portata dei bambini. Non ingoiare. Smaltire correttamente
quando è vuoto.
Descrizione
1 Lamina e Blocco coltelli
2 Tagliabasette
3 Tasto settaggio di precisione (« ») (solo 360s)
4 Tasto accensione/spegnimento
5 LED di ricarica (verde)
6 Indicatore di scarsa carica (rosso)
7 Indicatore di sostituzione parti di ricambio
8 Presa per il cavo di rete
9 Speciale cavo di rete
10 Custodia (solo 360s/320s)
11 Cappuccio di protezione (solo 330s)
Carica del rasoio
La migliore temperatura ambiente per la ricarica oscilla tra 15 °C e 35 °C.
Non esporre il rasoio a temperature superiori ai 50 °C per periodi di tempo
prolungati.
• Quando si utilizza il set cavo speciale (9), collegare il rasoio spento ad una
presa di corrente. Quando lo si carica per la prima volta, o quando non è
32
Page 32

stato usato per alcuni mesi, lasciare l’apparecchio in carica per 4 ore
continue.
• Quando il rasoio è caricato completamente, lasciar scaricare il rasoio
attraverso un normale uso. Poi ricaricare nuovamente. Le cariche
successive dureranno circa 1 ora.
• Una carica completa permette fino a 45 minuti di rasatura senza cavo.
La durata dipende in ogni caso dal livello di crescita dela barba.
• La capacità massima della batteria si raggiungerà solo dopo diversi cicli
di carica/scarica.
• Se la batteria ricaricabile si è scaricata, è possibile radersi anche collegando il rasoio a una presa elettrica con il set cavo speciale.
• Per una rasatura è sufficiente una carica veloce di 5 minuti.
LED di carica (5)
I LED di carica verdi mostrano il livello di carica delle batterie (330s/320s:
1 LED di carica). I LED di carica verdi lampeggiano quando il rasoio è in
carica o acceso. Quando la batteria è completamente carica, tutti i LED di
carica verdi (330s/320s: 1 LED di carica) restano permanentemente accesi,
purchè il rasoio sia connesso ad una presa di corrente.
Indicatore di scarsa carica (6)
Il LED rosso di basso livello carica lampeggia quando la batteria sia sta
scaricando. La capacità di carica rimasta dovrebbe essere sufficiente per
terminare la rasatura.
Rasatura
Per utilizzare il rasoio (immagine) premere l’interruttore di accensione/
spegnimento (4). Le lamine oscillanti del rasoio seguono automaticamente
ogni curva del viso (immagine).
Tagliabasette (2)
Per regolare basette, baffi e barba far scorrere verso l’alto il tagliabasette.
Tasto settaggio di precisione (« ») (solo 360s)
Per radere zone difficili (es. sotto al naso) far scorrere a destra l’interruttore
di blocco (3) nella posizione « ». Il regolatore centrale e una lamina si
abbasseranno.
33
Page 33

Consigli per una rasatura perfetta
Per risultati di rasatura ottimali Braun consiglia di seguire 3 semplici
passaggi:
1. Radersi sempre prima di lavarsi il viso.
2. Tenere sempre il rasoio ad angolo retto (90°) rispetto alla pelle.
3. Distendere la pelle e radersi in senso contrario a quello di crescita della
barba.
Pulizia del rasoio
La testina del rasoio può essere lavata sotto acqua corrente.
Attenzione: prima di lavare il rasoio sotto l’acqua corrente,
scollegarlo dall’alimentazione elettrica.
Una pulizia regolare garantisce una rasatura migliore. Risciacquare la testina
sotto l’acqua corrente dopo ogni rasatura è un modo semplice e veloce per
mantenerla pulita:
• Accendere il rasoio (scollegato dal cavo) e risciacquare la testina sotto
acqua calda corrente. È possibile utilizzare sapone liquido esente da
sostanze abrasive. Rimuovere tutta la schiuma e lasciare il rasoio in
funzione ancora per alcuni secondi.
• Successivamente spegnere il rasoio, rimuovere il sistema di rasatura (1) e
lasciarlo asciugare.
• Se si pulisce regolarmente il rasoio sotto l’acqua, una volta alla settimana
applicare al sistema di rasatura (1) e al tagliabasette (2) una goccia di olio
lubrificante leggero (immagine).
In alternativa, pulire il rasoio con un spazzolino:
• Spegnere il rasoio. Rimuovere il sistema di rasatura e batterlo leggermente
su una superficie piana.
• Pulire la zona interna della testina radente con lo spazzolino. Non utilizzare
lo spazzolino sul sistema di rasatura perché potrebbe danneggiarlo.
Per mantenere il rasoio in perfette condizioni
Sostituzione del sistema di rasatura / reset
Per mantenere le prestazioni al 100%, sostituire il sistema di rasatura (1)
quando l’indicatore di sostituzione di parti di ricambio (7) si accende (dopo
circa 18 mesi) oppure quando il sistema è usurato.
34
Page 34

Sistema di rasatura: 32S/32B
Nel corso delle 7 rasature successive l’indicatore di sostituzione ricorderà di
sostituire il sistema di rasatura. Successivamente il rasoio effettuerà il reset
automatico.
Una volta sostituito il sistema di rasatura (1), tenere premuto il tasto accensione/spegnimento (4) per almeno 5 secondi e azzerare il contatore.
La spia di sostituzione lampeggia nel corso di questa operazione e si spegne
una volta completato il reset. Il reset manuale può essere effettuato in
qualsiasi momento.
Preservare le batterie
Per mantenere la capacità ottimale delle batterie ricaricabili, il rasoio deve
essere scaricato completamente (attraverso la rasatura) ogni 6 mesi circa.
Poi procedere nuovamente con una completa carica.
Nota sull’impatto ambientale
Questo prodotto contiene batterie ricaricabili. Al fine di salvaguardare
l’ambiente, terminata la vita utile del prodotto si prega di non smaltirlo
fra i rifiuti domestici. Per lo smaltimento rivolgersi ad un Centro
Assistenza Braun o agli appositi centri di raccolta predisposti a livello
nazionale.
Salvo cambiamenti senza preavviso.
Specifiche elettriche: vedere indicazioni sullo speciale cavo di ricarica.
35
Page 35

Garanzia
Braun fornisce una garanzia valevole per la durata di 2 anni dalla data di
acquisto.
Nel periodo di garanzia verranno eliminati, gratuitamente, i guasti
dell’apparecchio conseguenti a difetti di fabbrica o di materiali, sia riparando
il prodotto sia sostituendo, se necessario, l’intero apparecchio.
Tale garanzia non copre: i danni derivanti dall‘uso improprio del prodotto,
la normale usura (ad esempio di lamina o blocco coltelli) conseguente al
funzionamento dello stesso, i difetti che hanno un effetto trascurabile sul
valore o sul funzionamento dell‘apparecchio.
La garanzia decade se vengono effettuate riparazioni da soggetti non
autorizzati o con parti non originali Braun.
Per accedere al servizio durante il periodo di garanzia, è necessario
consegnare o far pervenire il prodotto integro, insieme allo scontrino di
acquisto, ad un centro di assistenza autorizzato Braun.
Contattare www.service.braun.com o il numero 02/6678623 per avere
informazioni sul Centro di assistenza autorizzato Braun più vicino.
36
Page 36

Nederlands
Onze producten zijn ontworpen om te voldoen aan de hoogste eisen van
kwaliteit, functionaliteit en design. Wij wensen u veel plezier met uw nieuwe
Braun scheerapparaat.
Waarschuwing
Uw scheerapparaat is voorzien van een speciaal snoer met een geïntegreerd
veiligheids laag-voltage aanpassingssysteem. Om deze reden mag u geen
enkel onderdeel vervangen of bewerken, om het risico van een elektrische
schok te voorkomen.
Gebruik het apparaat niet wanneer het scheerblad of het snoer beschadigd is.
Dit apparaat is niet bedoeld voor gebruik door kinderen of personen met
verminderde fysieke of mentale capaciteiten, tenzij zij het apparaat gebruiken
onder toezicht van een persoon verantwoordelijk voor hun veiligheid. Houd
toezicht op kinderen om te voorkomen dat ze met het apparaat gaan spelen.
Buiten bereik van kinderen bewaren.
Olie-flesje
Hou buiten bereik van kinderen. Slik niet door. Gooi netjes weg wanneer
leeg.
Beschrijving
1 Scheerblad & Messenblok cassette
2 Tondeuse
3 Scheerhoofd schakelaar (« ») (alleen 360s)
4 Aan/uit schakelaar
5 Oplaad lampjes (groen)
6 Lage capaciteit indicatielampje (rood)
7 Indicatielampje voor vervangen scheeronderdelen
8 Scheerapparaat snoeringang
9 Speciaal snoer
10 Etui (alleen 360s/320s)
11 Beschermkapje (alleen 330s)
Opladen
De beste omgeving temperatuur voor het opladen van het scheerapparaat is
tussen de 15 °C tot 35 °C. Stel het scheerapparaat niet voor langere tijd
bloot aan temperaturen hoger dan 50 °C.
• Gebruik het speciale snoer (9), sluit het scheerapparaat aan op het lichtnet
met de motor uitgeschakeld. Als u het apparaat voor het eerst oplaadt of
37
Page 37

als u het apparaat enkele maanden niet heeft gebruikt, laat het apparaat
dan 4 uur lang onafgebroken opladen. Hierna zal het opladen ongeveer
1 uur duren
• Wanneer het scheerapparaat volledig is opgeladen, ontlaad het apparaat
dan door middel van normaal gebruik. Hierna zal het opladen ongeveer
1 uur duren.
• Een volledig opgeladen accu is voldoende voor ca. 45 minuten snoerloos
scheren. Dit is afhankelijk van uw baardgroei. Maximale capaciteit zal
worden bereikt na verschillende oplaad/ontlaad sessies.
• Als het scheerapparaat leeg is (ontladen) en u geen tijd heeft deze opnieuw
op te laden, kunt u zich tevens scheren met het scheerapparaat aangesloten op het lichtnet (gebruik hiervoor het speciale bijgeleverde snoer).
• 5-minuten snel laden is voldoende voor één scheerbeurt.
Oplaad lampjes (5)
De groene oplaadlampjes laten de status van de accu zien (330s/320s:
1 oplaadlampje). Tijdens het opladen en bij het gebruik van het scheerapparaat zullen alle oplaadlampjes blijven branden. Wanneer het scheerapparaat
aanstaat of aangesloten is op het lichtnet wanneer de accu volledig is
opgeladen, zullen alle oplaadlampjes (330s/320s: 1 oplaadlampje) continu
branden.
Lage capaciteit indicatielampje (6)
Het rode lampje knippert wanneer de batterij leeg begint te raken.
Doorgaans kunt u dan wel de scheerbeurt af maken.
Scheren
Druk op de aan/uit schakelaar (4) om het scheerapparaat aan te zetten
(afbeelding).
De flexibele scheerkoppen passen zich automatisch aan aan de contouren
van uw gezicht (afbeelding).
Trimmer voor lang haar (2)
Om uw bakkebaarden, snor of baard te scheren, schuift u de uitschuifbare
tondeuse naar boven.
Scheerhoofd schakelaar (« ») (alleen 360s)
Om lastige plekken te scheren (bijv. onder de neus) schuift u de scheerhoofdschakelaar (3) naar de goede positie « » om het zwenkende scheerhoofd in een hoek te vergrendelen.
38
Page 38

Tips voor een perfect scheerresultaat
Voor de beste resultaten, adviseert Braun de volgende 3 eenvoudige
stappen:
1. Scheer u altijd voordat u uw gezicht wast.
2. Houd het scheerapparaat altijd in een recht hoek van 90° op uw huid.
3. Strek uw huid strak en scheer tegen de haargroeirichting in.
Schoonmaken
Handmatig reinigen
Het scheerhoofd is geschikt voor het reinigen onder stromend water.
Waarschuwing: Trek altijd het snoer uit het stopcontact en uit het
scheerapparaat voordat u het scheerhoofd onder het water houdt.
Regelmatig reinigen zorgt voor betere scheerprestatie. Het afspoelen van
het scheerhoofd onder stromend water na iedere scheerbeurt is een snelle
en eenvoudige manier om uw scheerapparaat schoon te houden:
• Zet het scheerapparaat aan (snoerloos) en spoel het scheerhoofd af onder
heet stromend water. U mag hierbij vloeibare zeep zonder schurende
deeltjes gebruiken. Spoel al het schuim af en laat het scheerapparaat nog
een paar seconden aan staan.
• Schakel vervolgens het scheerapparaat uit, verwijder het scheerblad en de
messenblok cassette (1) en laat deze drogen.
• Indien u het scheerapparaat regelmatig schoonmaakt met water, dient u
eenmaal per week een druppel naaimachine olie op de scheerblad (2) en
messenblok (1) cassette en op de tondeuse (2) te druppelen (afbeelding).
U kunt het scheerapparaat tevens schoonmaken met een borsteltje:
• Zet het apparaat uit. Verwijder het scheerblad en de messenblok cassette
en klop deze uit op een vlakke ondergrond.
• Gebruik het borsteltje om de binnenkant van het scheerhoofd schoon te
maken. Gebruik het borsteltje nooit op het scheerblad en de messenblok
cassette aangezien dit het scheerblad kan beschadigen (afbeelding).
Uw scheerapparaat in topconditie houden
Indicatielampje voor vervangen scheeronderdelen / reset
Om een 100% scheerprestatie te houden, dient u het scheerblad en de
messenblok cassette (1) te vervangen wanneer het vervangingssymbool
oplicht (7) (na 1 ½ jaar) of wanneer de cassette versleten is.
39
Page 39

Scheerblad & Messenblok cassette: 32S/32B
Het vervangingssymbool zal u gedurende de volgende 7 scheerbeurten
herinneren uw scheerblad en messenblok cassette te vervangen. Hierna zal
het scheerapparaat automatisch resetten.
Nadat u de messenblok-scheerbladcassette heeft vervangen (1), drukt u op
de aan/uit knop (4) voor minimaal 5 seconden om de vervangingsindicator te
resetten.
Terwijl u dit doet, zal het vervangingslampje knipperen en doven wanneer de
reset is voltooid. Een handmatige reset kunt u op elk moment uitvoeren.
Behoud van de accu
Om maximale capaciteit van de accu te houden moet het scheerapparaat
ongeveer iedere 6 maanden volledig ontladen worden (door scheren). Hierna
het scheerapparaat volledig laten opladen.
Mededeling ter bescherming van het milieu
Dit product bevat oplaadbare batterijen. Ter bescherming van het
milieu mag dit product aan het einde van zijn levensduur niet met het
gewone huivuil worden weggegooid. Verwijdering kan plaatsvinden
bij een Braun Service Center of bij de bekende verzamelplaatsen.
Wijzigingen voorbehouden.
Voor electrische specificaties: zie de speciale zwakstroomadapter.
40
Page 40

Garantie
Op dit produkt verlenen wij een garantie van 2 jaar geldend vanaf datum van
aankoop. Binnen de garantieperiode zullen eventuele fabricagefouten en/of
materiaalfouten gratis door ons worden verholpen, hetzij door reparatie,
vervanging van onderdelen of omruilen van het apparaat.
Deze garantie is van toepassing in elk land waar dit apparaat wordt geleverd
door Braun of een officieel aangestelde vertegenwoordiger van Braun.
Beschadiging ten gevolge van onoordeelkundig gebruik, normale slijtage
(bijv. aan scheerblad of messenblok) en gebreken die de werking of waarde
van het apparaat niet noemenswaardig beïnvloeden vallen niet onder de
garantie. De garantie vervalt bij reparatie door niet door ons erkende
service-afdelingen en/of gebruik van niet originele Braun onderdelen.
Om gebruik te maken van onze service binnen de garantieperiode, dient
u het complete apparaat met uw aankoopbewijs af te geven of op te
sturen naar een geauthoriseerd Braun Customer Service Centre:
www.service.braun.com.
Bel 0 800 44 55 388 voor een Braun Customer Service Centre bij u in de
buurt.
41
Page 41

Dansk
Vores produkter er skabt til at opfylde de højeste krav med hensyn til kvalitet,
funktionalitet og design. Vi håber, du vil få glæde af din nye barbermaskine
fra Braun.
Advarsel
Dit barbersystem er forsynet med en specialledning med integreret strømforsyning med ekstra lav spænding for større sikkerhed. Du må ikke udskifte
eller pille ved nogen af delene, da du kan risikere at få elektrisk stød.
Brug ikke barbermaskinen, hvis skæreblad eller ledning er beskadigede.
Dette produkt er ikke beregnet til at bruges af børn eller svagelige personer
uden overvågning af en person der er ansvarlig for deres sikkerhed. Generelt
anbefaler vi at produktet opbevares utilgængeligt for børn. Børn bør overvåges for at sikre at de ikke leger med apparatet.
Olieflaske
Forvares utilgængeligt for børn. Må ikke indtages. Tom flaske bortskaffes på
korrekt vis.
Beskrivelse
1 Kassette med skæreblade og lamelknive
2 Trimmer til langt hår
3 Præcisionsindstillingskontakt (« ») (kun 360s)
4 Tænd/sluk-knap
5 Opladningslys (grønt)
6 Lys til indikation af lavt batteri (rødt)
7 Udskiftningslys for barberdele
8 Stik til barbermaskine
9 Specialledning
10 Etui (kun 360s/320s)
11 Beskyttelseshætte (kun 330s)
Opladning
Opladning foregår bedst ved en temperatur på mellem 15 °C og 35 °C.
Barbermaskinen må ikke udsættes for temperaturer over 50 °C i længere
perioder.
• Barbermaskinen tilsluttes en stikkontakt med specialledningen (9).
Barbermaskinen skal være slukket. Når der oplades for første gang, eller
når apparatet ikke har været i brug et par måneder, skal apparatet oplades
uafbrudt i 4 timer.
42
Page 42

• Når barbermaskinen er fuldt opladet, aflades den ved normal brug.
Derefter genoplades den til fuld kapacitet. Senere opladninger tager ca.
1 time.
• En fuld opladning giver op til 45 minutters trådløs barbering afhængig af
skægvækst. Den maksimale batterikapacitet nås imidlertid først efter flere
cyklusser med ladning og afladning.
• Hvis de genopladelige batterier aflades, kan du også barbere dig ved at
sætte barbermaskinen til en stikkontakt med specialledningen.
• 5 minutters hurtig opladning er tilstrækkeligt til en barbering.
Opladningslys (5)
De grønne lys viser batteriernes opladningsstatus (330s/320s: 1 opladningslys). Det grønne lys blinker, når barbermaskinen er under opladning eller
tændt. Når batteriet er fuldt opladet, lyser alle de grønne lys (330s/320s:
1 opladningslys) konstant, forudsat at barbermaskinen er tilsluttet lysnettet.
Lys til indikation af lavt batteri (6)
Når den røde advarselslampe blinker, betyder det at batteriniveauet er lavt.
Som regel vil der være strøm nok til, at du kan gøre barberingen færdig.
Barbering
Tryk på tænd/sluk-knappen (4) for at tænde for barbermaskinen (billedet).
De fleksible skæreblade tilpasser sig automatisk alle ansigtets konturer
(billedet).
Trimmer til langt hår (2)
For at trimme bakkenbarter, overskæg eller skæg skal trimmeren til langt hår
skydes opad.
Præcisionsindstillingskontakt («
Til præcis barbering de steder, hvor det er mere vanskeligt (f.eks. under
næsen), skubbes kontakten (3) mod højre til « ». Den midterste trimmer og
et skæreblad vil blive sænket.
Tips til den perfekte barbering
For at opnå de bedste resultater anbefaler Braun tre enkle trin:
1. Barber dig altid, før du vasker dig i ansigtet.
2. Hold altid barbermaskinen i en ret vinkel (90°) mod huden.
3. Stræk huden og barber mod skæggets vokseretning.
») (kun 360s)
43
Page 43

Rengøring
Barberhovedet kan rengøres under rindende vand.
Advarsel: Træk stikket ud af stikkontakten, før barberhovedet
rengøres i vand.
Regelmæssig rengøring sikrer en bedre barbering. Barberhovedet holdes let
og hurtigt rent, hvis du skyller det under rindende vand efter hver barbering:
• Tænd for barbermaskinen (trådløs), og skyl barberhovedet under varmt,
rindende vand. Der kan anvendes flydende sæbe uden slibemidler. Skyl al
skummet væk, og lad barbermaskinen køre i et par sekunder mere.
• Sluk derefter for barbermaskinen, og fjern kassetten med skæreblade og
lamelknive (1) og lad den tørre.
• Dryp en dråbe let maskinolie på trimmeren til langt hår (2) og i kassetten
med skæreblade og lamelknive (1) en gang om ugen, hvis du regelmæssigt
rengør din barbermaskine under rindende vand (billedet).
Alternativt kan barbermaskinen renses med en børste:
• Sluk for barbermaskinen. Tag kassetten med skæreblade og lamelknive ud
af og bank den mod en flad overflade.
• Rens derefter indersiden af barberhovedet med børsten. Kassetten med
skæreblade og lamelknive må ikke renses med børsten, da det kan beskadige den (billedet).
Hold din barbermaskine i topform
Udskiftningslys for barberdele / Nulstil
For at opnå optimal barbering bør kassetten med skæreblade og lamelknive
(1) udskiftes, når udskiftningslyset for barberdele (7) lyser (efter ca. 18 måneder), eller når barberdelene er slidt.
Kassette med skæreblade og lamelknive: 32S/32B
Udskiftningslyset minder dig under de næste syv barberinger om at udskifte
kassetten med skæreblade og lamelknive. Derefter nulstiller barbermaskinen
automatisk.
Efter at kassetten med skæreblade og lamelknive er sat tilbage (1), trykkes
på start/stop-knappen (4) i mindst 5 sekunder for at nulstille tælleren.
Imens blinker udskiftningslyset, som slukker, når nulstillingen er afsluttet.
Manuel nulstilling kan foretages til enhver tid.
44
Page 44

Sådan bevares batterierne
For at bevare optimal kapacitet på de genopladelige batterier skal
barbermaskinen aflades fuldstændigt (ved barbering) ca. hver 6. måned.
Derefter genoplades barbermaskinen til fuld kapacitet.
Miljømæssige oplysninger
Dette produkt indeholder genopladelige batterier. For at beskytte
miljøet bør apparatet efter endt levetid ikke kasseres sammen med
husholdningsaffaldet. Bortskaffelse kan ske på et Braun Servicecenter
eller passende, lokale opsamlingssteder.
Kan ændres uden varsel.
Elektriske specifikationer findes på specialkablet.
Garanti
Braun yder 2 års garanti på dette produkt gældende fra købsdatoen. Inden
for garantiperioden vil Braun for egen regning afhjælpe fabrikations- og
materialefejl efter vort skøn gennem reparation eller ombytning af apparatet.
Denne garanti gælder i alle lande, hvor Braun er repræsenteret.
Denne garanti dækker ikke skader opstået ved fejlbetjening, normalt slid
(f.eks. skæreblad og lamelkniv) samt fejl, som har ringe effekt på apparatets
værdi eller funktionsdygtighed. Garantien bortfalder ved reparationer udført
af andre end de af Braun anviste reparatører og hvor originale Braun reservedele ikke er anvendt.
Ved service inden for garantiperioden afleveres eller indsendes hele
apparatet sammen med købsbevis til et autoriseret Braun Service Center:
www.service.braun.com.
Ring 7015 0013 for oplysning om nærmeste Braun Service Center.
45
Page 45

Norsk
Våre produkter er utviklet for å oppfylle de høyeste standardene for kvalitet,
funksjonalitet og design. Vi håper at du vil få stor glede av din nye Braun
barbermaskin.
Advarsel
Din barbermaskin har en spesialledning med integrert lavspenningsadapter.
Ikke skift ut eller foreta endringer på noen del av den, ellers kan du bli utsatt
for elektrisk støt.
Ikke barber med skadet skjæreblad eller ledning.
Dette produktet er ikke ment å brukes av barn eller personer med redusert
fysisk eller mental kapasitet, med mindre en person ansvarlig for barnets
eller den andre personens sikkerhet har kontroll over situasjonen. Generelt
anbefaler vi at produktet oppbevares utilgjengelig for barn. Barn bør få
instruksjon slik at de ikke leker med apparatet.
Oljeflaske
Oppbevares utilgjengelig for barn. Må ikke svelges. Flasken skal kildesorteres som spesialavfall når den er tom.
Beskrivelse
1 Kassett med skjæreblad og lamellkniv
2 Langhårtrimmer
3 Bryter for presisjonsinnstilling («
4 På/av-bryter
5 Ladelys (grønne)
6 Varsellys for lavt batterinivå (rød)
7 Indikatorlys for bytte av skjæredeler
8 Barbermaskinens strømtilkobling
9 Spesialledning
10 Etui (kun 360s/320s)
11 Beskyttelseshette (kun 330s)
») (kun 3860s)
Oppladning
Den beste omgivelsestemperaturen for oppladning er mellom 15 °C og
35 °C. Utsett ikke barbermaskinen for temperaturer høyere enn 50 °C over
lengre tid.
• Koble barbermaskinen til et strømuttak ved hjelp av spesialledningen (9).
Når det lades opp for første gang eller når apparatet ikke har vært i bruk
på et par måneder, skal apparatet lades opp uavbrutt i 4 timer.
46
Page 46

• Når barbermaskinen er helt oppladet, bør den lades ut ved normal bruk.
Deretter skal apparatet lades helt opp på nytt. Etterfølgende oppladninger
vil ta omtrent 1 time.
• En full oppladning gir opptil 45 minutter med ledningsfri barbering,
avhengig av din skjeggvekst. Men full batterikapasitet oppnås først etter
gjentatte oppladninger og utladinger.
• Hvis de oppladbare batteriene er utladet, kan du barbere deg ved å koble
barbermaskinen til en stikkontakt med spesialledningen.
• 5-minutters hurtiglading er tilstrekkelig for en barbering.
Ladelys (5)
De grønne ladelysene angir ladestatusen til batteriene (330s/320s: 1 ladelys).
Den grønne ladelampen blinker mens barbermaskinen lades opp eller når
den slås på. Når batteriet er fullt oppladet, vil alle de grønne ladelysene
(330s/320s: 1 ladelys) lyse konstant så lenge barbermaskinen er koblet til et
strømuttak.
Varsellys for lavt batterinivå (6)
Den røde varsellampen for lavt batterinivå blinker når batteriet snart er tomt.
Vanligvis er det nok strøm igjen til at du kan avslutte barberingen.
Barbering
Trykk på på/av-knappen (4) for å slå på barbermaskinen (se ill.). De fleksible skjærebladene tilpasser seg automatisk til ansiktets konturer (se ill.).
Langhårtrimmer (2)
For å trimme kinnskjegg, bart eller skjegg skyver du langhårtrimmeren
oppover.
Bryter for presisjonsinnstilling (« ») (kun 360s)
For en mer nøyaktig håndtering av barbermaskinen på steder som er
vanskelige å barbere (f.eks. under nesen), skyv bryteren (3) mot høyre til
posisjonen « ». Midttrimmeren og ett skjæreblad vil da senkes.
Råd for perfekt barbering
For et best mulig resultat anbefaler Braun at du følger 3 enkle trinn:
1. Du bør alltid barbere deg før du vasker ansiktet.
2. Hold barbermaskinen vinkelrett (90°) mot huden.
3. Strekk huden og barber mot skjeggets vekstretning.
47
Page 47

Rengjøring
Barberhodet kan rengjøres under rennende vann.
Advarsel: Koble barbermaskinen fra strømforsyningen før du rengjør
barberhodet i vann.
Jevnlig rengjøring sikrer en bedre barberingsytelse. Rengjøring av skjærehodet under rennende vann etter bruk er en enkel og rask måte for å holde
det rent:
• Slå på barbermaskinen (ledningsfri drift), og rengjør barberhodet under
rennende, varmt vann. Du kan bruke flytende såpe uten skuremidler. Skyll
bort alt skummet, og la barbermaskinen gå i noen sekunder.
• Deretter slår du av barbermaskinen, tar av kassetten med skjæreblad og
lamellkniv (1) og lar den tørke.
• Hvis du rengjør barbermaskinen regelmessig under rennende vann, bør du
påføre en dråpe lett maskinolje på langhårtrimmeren (2) og kassetten med
skjæreblad og lamellkniv (1) (se ill.).
Alternativt kan du rengjøre barbermaskinen med en børsten:
• Slå av barbermaskinen. Ta av kassetten med skjæreblad og lamellkniv og
bank den lett mot en plan overflate.
• Bruk børsten og rengjør den indre delen av barberhodet. Du må imidlertid
ikke bruke børsten til å rengjøre kassetten med skjæreblad og lamellkniv
da det kan skade den (se ill.).
Vedlikehold av barbermaskinen
Indikatorlys for bytte av skjæredeler / tilbakestilling
For å opprettholde 100 % barberingsytelse må du skifte ut kassetten med
skjæreblad og lamellkniv (1) når indikatorlyset for bytte av skjærdeler (7)
tennes (etter omtrent 18 måneder), eller når delene er slitt.
Kassett med skjæreblad og lamellkniv: 32S/32B
Indikatorlyset for bytte av skjæredeler vil i løpet av de neste sju barberingene
påminne deg om å bytte ut kassetten med skjæreblad og lamellkniv. Deretter
tilbakestilles automatisk.
Etter at du har satt inn kassetten med skjæreblad og lamellkniv (1), holder du
inne på/av-knappen (4) i minst 5 sekunder for å tilbakestille telleren.
Indikatorlyset blinker mens du gjør dette, og det slukker når tilbakestillingen
er fullført. Manuell tilbakestilling kan foretas når som helst.
48
Page 48

Vedlikehold av batteriene
For å opprettholde full batterikapasitet, må barbermaskinen lades ut (ved
barbering) omtrent hver 6. måned. Lad den deretter opp til full kapasitet.
Miljømessige hensyn
Dette produktet inneholder oppladbare batterier. Av miljøhensyn
bør ikke dette produktet kastes sammen med husholdningsavfall når
det skal kasseres. Det kan leveres til et Braun servicesenter eller på
en kommunal miljøstasjon.
Med forbehold om endringer.
Elektriske spesifikasjoner er angitt på spesial ledningssettet.
Garanti
Vi gir 2 års garanti på produktet gjeldende fra kjøpsdato.
I garantitiden vil vi gratis rette eventuelle fabrikasjons- eller materialfeil, enten
ved reparasjon eller om vi finner det hensiktsmessig å bytte hele produktet.
Denne garanti er gyldig i alle land der Braun eller Brauns distributør selger
produktet.
Denne garantien dekker ikke: skader på grunn av feil bruk, normal slitasje
(f.eks. på skjæreblad eller lamellkniven) eller skader som har ubetydelig
effekt på produktets verdi og virkemåte sitat slutt. Garantien bortfaller
dersom reparasjoner utføres av ikke autorisert person eller hvis andre enn
originale Braun reservedeler benyttes.
For service i garantitiden skal hele produktet leveres eller sendes sammen
med kopi av kjøpskvittering til nærmeste autoriserte Braun Serviceverksted:
www.service.braun.com.
Ring 22 63 00 93 for å bli henvist til nærmeste autoriserte Braun Serviceverksted.
NB
For varer kjøpt i Norge har kunden garanti i henhold til NEL’s
Leveringsbetingelser.
49
Page 49

Svenska
Våra produkter har utformats för att uppfylla de högsta standarder för
kvalitet, funktionalitet och design. Vi hoppas att du blir nöjd med din nya
Braun Shaver.
Varning
Ditt raksystem är utrustat med en specialsladd med en inbyggd, säker
elförsörjning med extra låg spänning. Byt inte ut eller ändra på någon del,
då det skulle innebära risk för elektriska stötar.
Raka aldrig med ett skadat skärblad eller en skadad sladd.
Denna produkt är inte menad att användas av barn eller personer med
reducerad fyskisk eller mental kapacitet utan övervakning av en person som
är ansvarig för deras säkerhet. Generellt rekommenderar vi att produkten
förvaras utom räckhåll för barn. Barn bör hållas under uppsikt för att säkerställa att de inte leker med apparaten.
Oljeflaska
Förvaras oåtkomligt för barn. Sväljes ej. Återvinn tom flaska på rätt sätt.
Beskrivning
1 Skärblads- & saxkassett
2 Trimmer för långa hårstrån
3 Låsknapp för precisionsinställning (« ») (endast 360s)
4 På-/av-knapp
5 Laddningslampa (grön)
6 Laddningsvarnare (röd)
7 Utbyteslampa för rakdelar
8 Rakapparatens eluttag
9 Specialsladd
10 Etui (endast 360s/320s)
11 Skyddskåpa (endast 330s)
Laddning
Bästa omgivande temperatur vid laddning är mellan 15 °C och 35 °C.
Rakapparaten får inte utsättas för temperaturer överstigande 50 °C under
längre tid.
• Anslut rakapparaten till ett vägguttag med hjälp av specialsladden (9)
med motorn avstängd. När du laddar apparaten första gången eller om
apparaten inte varit i bruk på ett par månader, bör apparaten laddas
avbrutet i 4 timmar.
50
Page 50

• När rakapparaten är fulladdad ska den användas tills den är helt urladdad.
Ladda sedan till full kapacitet igen. Efterföljande laddningar tar ca 1 timme.
• När apparaten är fulladdad ger den upp till 45 minuters sladdlös rakning
beroende på din skäggväxt. Maximal batterikapacitet uppnås dock först
efter flera upp- och urladdningscykler.
• Om de laddningsbara batterierna är urladdade kan du också använda
rakapparaten ansluten till eluttaget via specialsladden.
• 5 minuters snabbladdning räcker för en rakning.
Laddningslampor (5):
De gröna laddningslamporna visar batteriernas laddningsstatus (330s/320s:
1 laddningslampa). Den gröna uppladdningslampan blinkar när rakapparaten
laddas och slås på. När batteriet är fulladdat lyser alla laddningslampor
(330s/320s: 1 laddningslampa) kontinuerligt under förutsättning att rakapparaten är ansluten till ett eluttag.
Laddningsvarnare (6)
Den röda lampan blinkar när batterinivån är låg. Du borde kunna avsluta din
rakning.
Rakning
Tryck in på-/av-kontakten (4) för att sätta igång rakapparaten (bild).
De flexibla skärbladen anpassas automatiskt till ansiktets konturer (bild).
Trimmer för långa hårstrån (2)
För den utfällbara trimmern för långt hår uppåt för att klippa polisonger,
mustascher eller skägg.
Låsknapp för precisionsinställning (« ») (endast 360s)
För noggrann rakning på svårtillgängliga ställen (t.ex. under näsan) kan man
ställa knappen (3) till höger i läge « ». Den mittersta trimmern och ett
skärblad sänks då.
Tips för den perfekta rakningen
För den perfekta rakningen rekommenderar Braun följande tre enkla steg:
1. Raka dig alltid innan du tvättar ansiktet.
2. Håll alltid rakapparaten i rät vinkel (90°) mot huden.
3. Sträck ut huden och raka mot skäggets växtriktning.
51
Page 51

Rengöring
Rakhuvudet kan rengöras under rinnande kranvatten.
Varning: Koppla loss nätsladden från rakapparaten innan den rengörs
med vatten.
Regelbunden rengöring ger bättre rakning. Skölj rakhuvudet under rinnande
vatten efter varje rakning. Det är ett enkelt och snabbt sätt att hålla apparaten ren.
• Slå på rakapparaten (utan sladd) och rengör rakhuvudet under varmt,
rinnande vatten. Flytande tvål utan slipmedel kan användas. Skölj av allt
lödder och låt rakapparaten vara igång i ytterligare några sekunder.
• Stäng sedan av rakapparaten, ta loss skärblads- och saxkassetten (1) och
låt torka.
• Rengör rakapparaten regelbundet under rinnande vatten och droppa
sedan lite symaskinsolja på trimmern för långa hårstrån (2) och skärbladsoch saxkassetten (1) (bild).
Du kan också rengöra rakapparaten med en borsten:
• Stäng av rakapparaten. Ta bort skärblads- och saxkassetten och knacka
den försiktigt mot en plan yta.
• Rengör rakhuvudets inre delar med borsten. Använd dock inte borsten för
att rengöra skärblads- och saxkassetten eftersom den kan skadas (bild).
Håll rakapparaten i topptrim
Utbyteslampa för rakdelar / Återställning
För att bibehålla fullgod funktion bör du byta ut skärblads- och saxkassetten
(1) när utbyteslampan för rakapparatens delar (7) börjar lysa (efter ca
18 månaders användning) eller när kassetten är utsliten.
Skärblad- & saxkassett: 32S/32B
Utbyteslampan påminner dig om att du under de kommande 7 rakningarna
bör byta ut skärblads- och saxkassetten. Rakapparaten återställer därpå
visningsskärmen automatiskt.
Efter att du har satt in skärblad- & saxkassetten (1), tryck in på-/av-knappen
(4) under minst 5 sekunder för att återställa räknaren.
Återställningslampan blinkar under tiden och släcks när återställningsproceduren är klar. Du kan när som helst återställa rakapparaten manuellt.
52
Page 52

Vårda batterierna
För att de laddningsbara batterierna ska behålla maximal kapacitet måste
rakappa-raten laddas ur helt (genom rakning) ungefär var 6:e månad. Ladda
sedan rakapparaten till full kapacitet.
Skydda miljön
Denna produkt innehåller laddningsbara batterier. Av miljöhänsyn
får produkten inte slängas bland det vanliga hushållsavfallet när den
är uttjänt. Du kan lämna in den uttjänta produkten hos ett Braunservicecenter eller till en återvinningsstation.
Med förbehåll för ändringar.
För elektriska specifikationer, se texten på specialsladden.
Garanti
Vi garanterar denna produkt för två år från och med inköpsdatum. Under
garantitiden kommer vi utan kostnad, att avhjälpa alla brister i apparaten
som är hänförbara till fel i material eller utförande, genom att antingen
reparera eller byta ut hela apparaten efter eget gottfinnande.
Denna garanti gäller i alla länder där denna apparat levereras av Braun eller
deras auktoriserade återförsäljare.
Denna garanti gäller inte: skada på grund av felaktig användning, normalt
slitage (t.ex. skärblad och saxhuvud) eller skador som har en försumbar
effekt på värdet eller apparatens funktion. Garantin upphör att gälla om
reparationer utförs av icke behörig person eller om Brauns originaldelar inte
används.
För att erhålla service under garantitiden skall den kompletta apparaten
lämnas in tillsammans med inköpskvittot, till ett auktoriserat Braun verkstad:
www.service.braun.com.
Ring 020-21 33 21 för information om närmaste Braun verkstad.
53
Page 53

Suomi
Tuotteemme on suunniteltu täyttämään korkeimmat laatu-, toimivuus- ja
muotoiluvaatimukset. Toivomme sinun saavan iloa ja hyötyä uudesta
Braun-parranajokoneestasi.
Varoitus
Parranajokoneen verkkojohto on varustettu matalajännitesovittimella.
Sähköiskun vaaran välttämiseksi älä vaihda siihen mitään osia tai tee mitään
muutoksia.
Älä käytä laitetta, jos teräverkko tai verkkojohto on vahingoittunut.
Tätä laitetta ei ole tarkoitettu lasten käyttöön. Tätä laitetta ei ole myöskään
tarkoitettu henkilöiden, joilla on alentunut fyysinen tai psyykkinen tila,
käytettäväksi. Poikkeuksena, jos lapsi tai henkilö on hänen turvallisuudestaan
vastaavan henkilön valvonnan alaisena. Suosittelemme, että laitteen tulee
olla lasten ulottumattomissa. Lapsia pitää valvoa eikä heidän saa antaa
leikkiä laitteella.
Öljypullo
Pidä poissa lasten ulottuvilta. Ei saa nielaista. Hävitä tyhjä pullo
asianmukaisesti.
Laitteen osat
1 Teräverkon ja leikkurin kasetti
2 Pitkien ihokarvojen viimeistelijä
3 Tarkkuusasetuksen kytkin («
4 Virtakytkin
5 Latauksen merkkivalot (vihreä)
6 Latauksen tyhjenemisen merkkivalo (punainen)
7 Parranajo-osien vaihdon merkkivalo
8 Parranajokoneen verkkolaitteen liitin
9 Verkkojohto
10 Säilytyskotelo (vain 360s/320s)
11 Suojakorkki (vain 330s)
») (vain 360s)
Lataaminen
Lataamisen kannalta ympäristön paras lämpötila on 15–35 °C. Älä säilytä
laitetta pitkään yli 50 °C:een lämpötilassa.
• Kytke laite verkkojohdolla (9) verkkovirtaan moottori sammutettuna.
Ensimmäisellä latauskerralla, tai jos laitetta ei ole käytetty muutamaan
kuukauteen, anna laitteen latautua yhtäjaksoisesti 4 tunnin ajan.
54
Page 54

• Kun parranajokone on täysin latautunut, anna akun tyhjentyä kokonaan
normaalissa käytössä. Lataa tämän jälkeen akku täyteen. Seuraavat
lataukset kestävät noin tunnin.
• Kun parranajokone on ladattu täyteen, akussa riittää virtaa jopa 45
minuutin parranajoon parrankasvusta riippuen. Täysi akkukapasiteetti
saavutetaan kuitenkin vasta useiden latausten ja purkausten jälkeen.
• Jos akut ovat tyhjentyneet, voit käyttää parranajokonetta kytkemällä
verkkojohdon verkkovirtaan.
• Viiden minuutin pikalataus riittää parranajoon.
Latauksen merkkivalot (5)
Latauksen vihreät merkkivalot osoittavat akkujen latauksen tilan (330s/320s:
1 latauksen merkkivalot). Vihreä latausmerkkivalo vilkkuu parranajokonetta
ladattaessa tai kun kone on päällä. Kun akut ovat täysin latautuneet, kaikki
vihreät merkkivalot (330s/320s: 1 latauksen merkkivalot) palavat jatkuvasti,
jos parranajokone se on kytketty verkkovirtaan.
Latauksen tyhjenemisen merkkivalo (6)
Punainen merkkivalo vilkkuu, kun pariston lataus on vähissä. Virran pitäisi
riittää parranajon loppuun asti.
Ajaminen
Käynnistä laite painamalla virtakytkintä (4) (kuva).
Joustavat teräverkot myötäilevät automaattisesti kasvojen muotoja (kuva).
Pitkien ihokarvojen viimeistelijä (2)
Trimmaa pulisongit, viikset ja parta työntämällä pitkien partakarvojen
viimeistelijä ylöspäin (kuva).
Tarkkuusasetuksen kytkin (« ») (vain 360s)
Hankalien kohtien (esimerkiksi nenän aluksen) tarkkaa ajoa varten työnnä
kytkin (3) oikealle lukitus-asentoon. Keskiosan trimmeri ja yksi teräverkoista
työntyy alaspäin.
Vinkkejä täydelliseen parranajoon
Parhaan lopputuloksen saavuttamiseksi Braun suosittelee seuraavien
kolmen vaiheen noudattamista:
1. Aja parta ennen kasvojen pesua.
2. Pidä parranajokonetta aina suorassa kulmassa (90°) ihoon nähden.
3. Venytä ihoa ja aja parta karvojen kasvusuuntaa vasten.
55
Page 55

Puhdistaminen
Ajopään voi puhdistaa juoksevassa vedessä.
Varoitus: Irrota laite virtalähteestä ennen kuin puhdistat ajopään
vedellä.
Säännöllinen puhdistaminen varmistaa paremman ajotuloksen. Ajopään
huuhteleminen jokaisen ajokerran jälkeen juoksevalla vedellä on helppo ja
nopea tapa pitää se puhtaana.
• Irrota virtajohto parranajokoneesta ja laita se päälle. Huuhtele ajopää
kuumalla juoksevalla vedellä. Voit käyttää nestemäistä saippuaa, joka ei
sisällä hankaavia aineosia. Huuhtele kaikki vaahto pois ja anna parranajokoneen olla käynnissä muutaman sekunnin ajan.
• Kytke seuraavaksi parranajokoneesta virta pois, irrota teräverkon ja leikkurin kasetti (1) ja anna sen kuivua.
• Jos puhdistat parranajokoneen säännöllisesti vedellä, voitele pitkien
partakarvojen viimeistelijä (2) ja teräverkon ja leikkurin kasetti (1) kerran
viikossa pisaralla ohutta koneöljyä (kuva).
Vaihtoehtoisesti voit puhdistaa parranajokoneen harjalla:
• Sammuta parranajokoneesta virta. Poista teräverkon ja leikkurin kasetti ja
kopauta sitä kevyesti tasaista pintaa vasten.
• Puhdista ajopään sisäosat harjalla. Älä kuitenkaan puhdista teräverkon ja
leikkurin kasettia harjalla, koska se voi vaurioitua (kuva).
Parranajokoneen pitäminen huippukunnossa
Parranajo-osien vaihdon merkkivalo / Reset
Parhaan mahdollisen ajotuloksen saavuttamiseksi teräverkon ja leikkurin
kasetti (1) kannattaa vaihtaa parranajo-osien vaihdon merkkivalon (7)
syttyessä (noin 18 kuukauden kuluttua) tai kun ne ovat kuluneet.
Teräverkon ja leikkurin kasetti: 32S/32B
Vaihdon valo muistuttaa teräverkon ja leikkurin kasetin vaihdosta seuraavien
7 parranajon aikana. Tämän jälkeen parranajokone nollaa asetuksen automaattisesti.
Kun olet vaihtanut teräverkon ja leikkurin kotelon (1), paina virtakytkintä (4)
vähintään 5 sekunnin ajan nollataksesi laskimen.
Parranajo-osien vaihdon merkkivalo vilkkuu ja sammuu, kun nollaus on
suoritettu. Manuaalinen nollaus voidaan tehdä milloin tahansa.
56
Page 56

Akkujen tehokkuuden säilyttäminen
Jotta akkujen varauskyky pysyisi mahdollisimman hyvänä, niiden varaus
täytyy tyhjentää kokonaan normaalissa käytössä noin 6 kuukauden välein.
Lataa tämän jälkeen laitteen akut täyteen.
Ympäristöseikkoihin liittyviä tietoja
Tässä laitteessa on ladattavat akut. Ympäristönsuojelullisista syistä
tuotetta ei saa hävittää kotitalousjätteen mukana käyttöiän päättyessä.
Hävitä tuote viemällä se Braun-huoltoliikkeeseen tai asianmukaiseen
keräyspisteeseen.
Oikeudet muutoksiin pidätetään.
Katso sähkömääräyksiä koskevat tiedot matalajännitesovittimesta.
Takuu
Tälle tuotteelle myönnämme 2 vuoden takuun ostopäivästä lukien Suomessa
voimassa olevien alan takuuehtojen TE90 mukaan. Takuuaikana korvataan
veloituksetta kaikki viat, jotka aiheutuvat materiaaliviasta tai valmistusvirheestä. Korvaus tapahtuu harkintamme mukaan korjaamalla, vaihtamalla
viallinen osa tai vaihtamalla koko laite uuteen. Takuu on voimassa kaikkialla
maailmassa sillä edellytyksellä, että laitetta myydään ko. maassa Braunin tai
virallisen maahantuojan toimesta.
Takuun piiriin eivät kuulu viat, jotka johtuvat virheellisestä käytöstä tai normaalista kulumisesta (esim. teräverkko tai leikkuuterä). Takuu ei myöskään
kata sellaisia vikoja, jotka eivät merkittävästi vaikuta laitteen arvoon tai
toimintaan. Takuun voimassaolo lakkaa, jos laitetta korjataan muualla kuin
valtuutetussa Braun-huoltoliikkeessä tai jos laitteessa käytetään muita kuin
alkuperäisiä varaosia.
Yksilöity ostokuitti riittää takuun voimassaolon osoittamiseksi:
www.service.braun.com.
Lisätietoa takuuseen liittyvistä asioista saa asiakaspalvelukeskuksestamme
numerosta 020-377 877.
57
Page 57

Türkçe
Ürünlerimiz kalite, kullanım ve tasarımda en yüksek standartlara ulaşabilmek
için üretilmiştir. Yeni Braun tıraş makinenizden memnun kalacağınızı umarız.
Uyarı
Tıraş makinenizin ekstra düşük voltaj için güvenlik sağlayanadaptör içeren
özel kablo seti vardır. Genel olarak, çocukların erişemeyeceği bir yerde
tutmanızı öneririz.
Eleği veya kablosu hasar görmüş tıraş makinesini kullanmayınız.
Bu aygıt sorumlu bir kiμinin gözetiminde olmaksızın çocukların ve fiziksel
yada ruhsal engelli kiμilerin kullanmasına uygun de©ildir. Aygıtınızı çocukların
ulaμabilece©i yerlerden uzak tutmanızı öneririz. Çocukların cihazla oynama-
sını engellemek için gözetim altında tutunuz.
Yağ Şişesi
Çocukların erişemeyeceği yerde saklayınız. Yutmayınız. Boşaldığında uygun
biçimde atınız.
Tanımlamalar
1 Elek koruyucu kapak
2 Uzun tüy düzeltici
3 Hassas ayar düğmesi (« ») (sadece 360s modelleri için)
4 Açma/kapama düğmesi
5 Şarj ışıkları (yeşil)
6 Şarj ikaz ışığı (kırmızı)
7 Tıraş başlıkları için değiştirme ışığı
8 Tıraş güç soketi
9 Özel kablo seti
10 Etui (sadece 360s/320s modelleri için)
11 Koruma Ataçmanı (sadece 330s modelleri için)
Tıraş Makinesini Şarj Etme
Şarj etmek için ideal çevre sıcaklığı 15 °C ile 35 °C arasındadır.
Tıraş makinenizi 50 °C den daha yüksek sıcaklığı maruz bırakmayınız.
• Cihazınız çalışmıyor iken özel kablo setini kullanarak tıraş makinenizi ya da
şarj etme standını prize takınız. Cihaz ilk kez şarj edilirken veya birkaç ay
boyunca kullanılmadığında, cihazı 4 saat kesintisiz olarak şarjda bırakınız.
• Cihazınız tamamen şarj olduğunda, normal kullanımla cihazı deşarj ediniz.
Ve cihazı tekrar tam olarak şarj ediniz. Şarj etme süreleri ortalama 1 saat
sürecektir.
58
Page 58

• Tam olarak şarj edilmiş cihaz – sakalınızın sertliğine ve uzama süresine
bağlı olarak – 45 dakikaya kadar kablosuz kullanım sağlar.
• Eğer sarj edilebilir bataryanız bitmiş ise, özel kablo seti ile cihazınız fişe
takılıyken tıraş olabilirsiniz.
• 5 dakikalık hızlı şarj etme özelliği tek seferlik tıraş işlemi için yeterlidir.
Şarj Işıkları (5)
Yeşil şarj ışığı cihazınızın şarj durumunu göstermektedir (330s/320s: 1 şarj
ışıkları). Yeşil şarj ışığı yanıp söndüğü zaman cihazınızın şarj (330s/320s:
1 şarj ışıkları) edilmekte olduğunu gösterir. Cihazınız tamamen şarj
olduğunda yeşil şarj ışığı sürekli yanmaya başlar.
Şarj kaz Işığı (6)
Kırmızı renkli düşük şarj göstergesi, pilin şarjı azaldığında yanar. Bu durumda
pildeki güç, tıraşınızı bitirmenize yeterli olacaktır.
Tıraş Olma
Tıraş makinesini çalıştırmak için açma/kapama düğmesine (4) basınız.
(resim)
Esnek kesici sistem yüz kıvrımlarınıza otomatik olarak uyum sağlar. (resim)
Uzun Tüy Düzeltici (2)
Favori, bıyık ve sakalınızı düzeltmek için uzun tüy düzelticiyi yukarı doğru
oynatınız.
Hassas Ayar Düğmesi (« ») (sadece 360s modelleri için)
Burun altı gibi tıraş edilmesi zor bölgelerde rahat tıraşı sağlamak için hassas
ayar düğmesini (3) sağa doğru (« ») pozisyonuna getiriniz.
Mükemmel tıraş için ipuçları
En iyi sonuçlar için, Braun size 3 basit you tavsiye ediyor:
1. Cildinizi yıkamadan once tıraş olmanızı öneririz.
2. Tıraş makinenizi cildinize 90° açı ile tutunuz.
3. Cildinizi geriniz ve sakallarınızı çıktıktan yönün tersine doğru tıraş
ediniz.
Temizleme
Tıraş makineniz musluk suyu altında temizleme uygundur.
Uyarı: Tıraş makinenizi temizlemeden önce cihazının fişten çekilmiş
olduğundan emin olunuz.
59
Page 59

Düzenli temizleme tıraş makineninizden en iyi performansı almanızı
sağlayacaktır. Tıraş başlığını akan su altında temizlemek kolay ve hızlı bir
temizleme yöntemidir:
• Cihazı çalıştırınız (kablosuz olarak) ve tıraş başlığını sıcak suyun altına
tutunuz. Dilerseniz aşındırıcı madde içermeyen sabunlu su kullanabilirsiniz.
Bütün köpükten arındığından emin olunuz ve tıraş makinenizi bir kaç saniye
daha çalışır durumda suyun altında tutunuz.
• Daha sonra, tıraş makinenizi kapatınız, tıraş eleğini ve elek koruyucu
başlığını (1) çıkartınız ve kurumaya bırakınız.
• Eğer cihazınızı düzenli olarak su altında temizliyorsanız, haftada bir kere
uzun tüy düzeltici (2) ve elek koruyucu başlığına (1) bir damla hafif makine
yağı uygulayınız. (resim)
Alternatif olarak, bir fırça yardımı ile tıraş makinenizi temizleyebilirsiniz:
• Cihazınızı kapatınız, Elek koruyucu başlığını (1) çıkartınız ve düz bir
yüzeye hafifçe vurunuz.
• Fırçayı kullanarak, tıraş başlığının iç bölgesini temizleyiniz. Buna rağmen,
elek ve kesiciyi zarar verebileceğinden fırça ile temizlemeyiniz. (resim)
Tıraş makineninizin ideal performansını her zaman
korumak için
Tıraş Başlığı Parçaları için Değiştirme Işığı / Resetleme
%100 tıraş performansı sağlamak için tıraş makinesi eleğini ve kesiciyi (1)
tıraş başlığı parçaları değiştirme ışığı (7) yandığında (ortalama 18 ayda bir)
ya da eskidiğinde değiştiriniz.
Elek ve kesici bıçaklar: 32S/32B
kaz ışığı yanmaya başladıktan sonra 7 tıraş süresince yanmaya devam
edecektir. Daha sonra ekran kendini resetleyecektir.
Bıçak & Elek kasetini değiştirdikten sonra, tıraş makinesinin sayacını
resetlemek için açma/kapama düğmesine en az 5 saniye kadar basınız.
Bunu yaparken, değiştirme ikaz ışığı yaıp sönecektir, resetleme işlemi
tamamlandığında ışık sönecektir. Manual resetleme istenildiği zaman
yapılabilir.
Daha uzun pil ömrü için
Şarj edilebilir pilin optimum kapasitesini korumak için, tıraş makineniz
ortalama her 6 ayda bir deşarj edilmelidir. Daha sonra cihaz tam olarak şarj
edilmelidir.
60
Page 60

Bildirim yapılmadan deπiμtirilebilir.
Elektrikle ilgili direktifler özel kordon setinin üzerinde yazmaktadır.
EEE STANDARTLARINA UYGUNDUR
Bakanlıkça tespit ve ilan edilen kullanım ömrü 7 yıldır.
Üretici firma ve CE işareti uygunluk değerlendirme kuruluşu:
Braun GmbH
Frankfurter Straße 145
61476 Kronberg / Germany
“ (49) 6173 30 0
Fax (49) 6173 30 28 75
P & G Sat. ve Dağ. Ltd. Şti.
Serin Sok. No: 9 34752 çerenköy/stanbul
tarafından ithal edilmiştir.
P & G Tüketici Hizmetleri
0 800 261 63 65,
trconsumers@custhelp.com
61
Page 61

∂ППЛУИО¿
Τα προϊόντα μας κατασκευάζονται έτσι ώστε να πληρούν τα υψηλότερα
πρότυπα ποιότητας, λειτουργικότητας και σχεδιασμού. Ελπίζουμε να
ικανοποιηθείτε απόλυτα από την καινούργια σας ξυριστική μηχανή Braun.
Προειδοποίηση
Η ξυριστική σας μηχανή είναι εφοδιασμένη με ένα ειδικό σετ καλωδίου, το
οποίο διαθέτει ενσωματωμένο μετασχηματιστή πολύ χαμηλής τάσης για
περισσότερη ασφάλεια. Για τον λόγο αυτό δεν πρέπει να αντικαταστήσετε
ή τροποποιήσετε οποιοδήποτε μέρος του. Σε αντίθετη περίπτωση υπάρχει
κίνδυνος ηλεκτροπληξίας.
Μην λειτουργείτε τη συσκευή όταν το καλώδιο ρεύματος έχει φθαρεί.
Αυτή η συσκευή δεν προορίζεται για χρήση από παιδιά ή άτομα με μειωμένες σωματικές ή διανοητικές ικανότητες, εκτός αν επιβλέπονται από
άτομο υπεύθυνο για την ασφάλειά τους. Γενικά, συνιστούμε να κρατάτε την
συσκευή μακριά από παιδιά. Τα παιδιά πρέπει να εποπτεύονται για να
εξασφαλίζεται ότι δεν παίζουν με τη συσκευή.
Λάδι
Κρατήστε το μακριά από παιδιά. Μην το καταπίνετε. Απορρίψτε το σωστά
όταν αδειάσει.
Περιγραφή
1 Κασέτα Πλέγματος & Μαχαιριού
2 Φαβοριτοκόπτης
3 Διακόπτης θέσης ακριβείας (« ») (μόνο για 360s)
4 Διακόπτης λειτουργίας
5 Ενδεικτικές λυχνίες φόρτισης (πράσινες)
6 Ενδεικτική λυχνία χαμηλής φόρτισης (κόκκινη)
7 Ενδεικτική λυχνία αντικατάστασης κασέτας πλέγματος και μαχαιριού
8 Υποδοχή καλωδίου ξυριστικής μηχανής
9 Σετ καλωδίου και μετασχηματιστή
10 Θήκη (μόνο για 360s/320s)
11 Προστατευτικό κάλυμμα (μόνο για 330s)
Φόρτιση
Η καλύτερη θερμοκρασία περιβάλλοντος για τη φόρτιση είναι 15 °C με
35 °C. Μην εκθέτετε την ξυριστική μηχανή σε θερμοκρασίες υψηλότερες
από 50 °C για παρατεταμένα χρονικά διαστήματα.
62
Page 62

• Χρησιμοποιώντας το σετ καλωδίου & μετασχηματιστή (9), συνδέστε
την ξυριστική μηχανή σε μια ηλεκτρική πρίζα ενώ βρίσκεται εκτός
λειτουργίας. Κατά την πρώτη φόρτιση ή όταν η συσκευή δεν έχει
χρησιμοποιηθεί για λίγους μήνες, αφήστε την να φορτίσει συνεχόμενα
για 4 ώρες.
• Μόλις η ξυριστική μηχανή φορτιστεί πλήρως, αποφορτίστε την με
φυσιολογική χρήση. Στην συνέχεια επαναφορτίστε την πλήρως.
Οι επόμενες φορτίσεις θα διαρκέσουν περίπου 1 ώρα.
• Μία πλήρης φόρτιση παρέχει 45 λεπτά λειτουργίας χωρίς καλώδιο,
ανάλογα με το μέγεθος της τρίχας. Παρόλα αυτά, η μέγιστη χωρητικότητα της μπαταρίας θα επιτευχθεί μόνο μετά από μερικούς κύκλους
φόρτισης / αποφόρτισης.
• Εάν οι επαναφορτιζόμενες μπαταρίες αποφορτιστούν, μπορείτε επίσης
να ξυριστείτε συνδέοντας την ξυριστική μηχανή σε μια πρίζα με το σετ
καλωδίου και μετασχηματιστή.
• Γρήγορη φόρτιση 5 λεπτών είναι αρκετή για ένα ξύρισμα.
Ενδεικτικές λυχνίες φόρτισης (5)
Οι πράσινες ενδεικτικές λυχνίες φόρτισης δείχνουν την κατάσταση
φόρτισης των μπαταριών (330s/320s: 1 ενδεικτικές λυχνίες φόρτισης).
Η πράσινη ενδεικτική λυχνία αναβοσβήνει όταν η ξυριστική μηχανή φορτίζεται ή βρίσκεται σε λειτουργία. Όταν η μπαταρία φορτιστεί πλήρως, όλες
οι πράσινες ενδεικτικές λυχνίες (330s/320s: 1 ενδεικτικές λυχνίες φόρτισης) παραμένουν αναμμένες, με την προϋπόθεση ότι η ξυριστική μηχανή
βρίσκεται σε λειτουργία ή είναι συνδεδεμένη στην πρίζα.
Ενδεικτική λυχνία χαμηλής φόρτισης (6)
Η κόκκινη ένδειξη χαμηλής φόρτισης αναβοσβήνει όταν στην μπαταρία έχει
απομείνει ελάχιστη φόρτιση. Θα μπορείτε να τελειώσετε το ξύρισμά σας.
Ξύρισμα
Πιέστε τον διακόπτη λειτουργίας (4) για να θέσετε την ξυριστική μηχανή
σε λειτουργία (εικόνα).
Τα βυθιζόμενα πλέγματα προσαρμόζονται αυτόματα σε κάθε καμπύλη του
προσώπου σας (εικόνα).
Φαβοριτοκόπτης (2)
Για να περιποιηθείτε τις φαβορίτες, το μουστάκι ή το μούσι, σύρετε προς
τα πάνω τον φαβοριτοκόπτη.
63
Page 63

Διακόπτης θέσης ακριβείας («
Για ακριβή χειρισμό των περιοχών που ξυρίζονται δύσκολα (π.χ. κάτω
από την μύτη) σύρετε τον διακόπτη (3) προς τα δεξιά στην θέση « ».
Ο κεντρικός κόπτης και το ένα πλέγμα θα χαμηλώσουν.
Συμβουλές για τέλειο ξύρισμα
Για καλύτερα αποτελέσματα, η Braun προτείνει να ακολουθείτε 3 απλά
βήματα:
1. Να ξυρίζεστε πάντα προτού πλύνετε το πρόσωπό σας.
2. Σε κάθε περίπτωση, να κρατάτε την ξυριστική μηχανή σε ορθή γωνία
(90°) προς το δέρμα σας.
3. Τεντώστε το δέρμα σας και ξυριστείτε με κινήσεις αντίθετες προς την
φορά των τριχών.
») (μόνο για 360s)
Καθαρισμός
Η κεφαλή ξυρίσματος είναι κατάλληλη για καθαρισμό κάτω από
τρεχούμενο νερό βρύσης.
Προειδοποίηση: Αποσυνδέστε την ξυριστική μηχανή από την πρίζα,
προτού καθαρίσετε την κεφαλή ξυρίσματος με νερό.
Ο τακτικός καθαρισμός εξασφαλίζει καλύτερη απόδοση στο ξύρισμα. Το
πλύσιμο της κεφαλής ξυρίσματος κάτω από τρεχούμενο νερό μετά από
κάθε ξύρισμα είναι ένας εύκολος και γρήγορος τρόπος να κρατήσετε την
ξυριστική μηχανή καθαρή:
• Θέστε την ξυριστική μηχανή σε λειτουργία (χωρίς το καλώδιο ρεύματος)
και ξεπλύνετε την κεφαλή ξυρίσματος κάτω από ζεστό τρεχούμενο νερό.
Μπορείτε να χρησιμοποιήσετε υγρό σαπούνι χωρίς λειαντικές ουσίες.
Ξεπλύνετε τον αφρό και αφήστε τη μηχανή να λειτουργεί για λίγα ακόμα
λεπτά.
• Στη συνέχεια, θέστε τη μηχανή εκτός λειτουργίας, αφαιρέστε την κασέτα
Πλέγματος & Μαχαιριού (1) και αφήστε την να στεγνώσει.
• Εάν καθαρίζετε τακτικά την ξυριστική μηχανή κάτω από νερό, τότε μία
φορά την εβδομάδα απλώστε μια σταγόνα λάδι μηχανής πάνω στον
φαβοριτοκόπτη (2) και στην κασέτα Πλέγματος & Μαχαιριού (1) (εικόνα).
∂У·ПП·ОЩИО¿, МФЪВ›ЩВ У· О·ı·Ъ›ЫВЩВ ЩЛУ Н˘ЪИЫЩИО‹ МЛ¯·У‹ ¯ЪЛЫИМФФИТУЩ·˜ ¤У· ‚Ф˘ЪЩЫ¿ОИ:
• Θέστε την ξυριστική μηχανή εκτός λειτουργίας. Αφαιρέστε την κασέτα
Πλέγματος & Μαχαιριού και τινάξτε την πάνω σε μια επίπεδη επιφάνεια.
64
Page 64

• Χρησιμοποιώντας το βουρτσάκι, καθαρίστε το εσωτερικό τμήμα της
κεφαλής ξυρίσματος. Παρόλα αυτά, μην καθαρίζετε την κασέτα
Πλέγματος & Μαχαιριού με το βουρτσάκι καθώς κάτι τέτοιο μπορεί να
την καταστρέψει (εικόνα).
Διατήρηση της ξυριστικής μηχανής σε άριστη
κατάσταση
Ενδεικτική λυχνία αντικατάστασης κασέτας πλέγματος & μαχαιριού /
Επαναφορά
Για να διατηρήσετε το 100% της απόδοσης της ξυριστικής σας μηχανής,
θα πρέπει να αντικαθιστάτε την κασέτα Πλέγματος & Μαχαιριού (1), όταν
η ενδεικτική λυχνία αντικατάστασης της κασέτας πλέγματος και μαχαιριού
(7) ανάψει (μετά από περίπου 18 μήνες) ή όταν η κασέτα έχει φθαρεί από
τη χρήση.
Κασέτα Πλέγματος & Μαχαιριού: 32S/32B
Η ενδεικτική λυχνία αντικατάστασης θα σας υπενθυμίζει κατά τα επόμενα
7 ξυρίσματα ότι πρέπει να αντικαταστήσετε την κασέτα πλέγματος και
μαχαιριού. Στη συνέχεια η ξυριστική μηχανή θα επαναφέρει αυτόματα την
ένδειξη στην οθόνη.
Αφού έχετε αντικαταστήσει την κασέτα Πλέγματος & Μαχαιριού (1) πιέστε
τον διακόπτη λειτουργίας on/off (4) για τουλάχιστον 5 δευτερόλεπτα για να
επαναφέρετε το μετρητή.
Ενώ κάνετε αυτή τη διαδικασία, η ενδεικτική λυχνία αντικατάστασης θα
αναβοσβήνει και θα σβήσει όταν η επαναφορά έχει ολοκληρωθεί.
Η επαναφορά με το χέρι μπορεί να γίνει οποιαδήποτε στιγμή.
Διατήρηση των μπαταριών
Για να διατηρήσετε την άριστη χωρητικότητα των επαναφορτιζόμενων
μπαταριών, η ξυριστική μηχανή πρέπει να αποφορτίζεται πλήρως (με το
ξύρισμα) περίπου κάθε 6 μήνες. Στην συνέχεια, επαναφορτίστε πλήρως
την ξυριστική μηχανή.
Σημείωση για το περιßάλλον
Αυτό το προϊόν περιέχει επαναφορτιζόμενες μπαταρίες. Για την
προστασία του περιβάλλοντος, παρακαλούμε μην πετάξετε το
προϊόν σε οικιακά απορρίμματα στο τέλος της χρήσιμης ζωής του.
Η απόρριψη του προϊόντος μπορεί να γίνει σε κάποιο
Εξουσιοδοτημένο Κέντρο Service της Braun ή σε κατάλληλα σημεία
περισυλλογής που υπάρχουν στη χώρα σας.
65
Page 65

ΔÔ ÚÔ˚fiÓ ˘fiÎÂÈÙ·È Ûέ ÙÚÔÔÔ›ËÛË ¯ˆÚ›˜ ÚÔÂȉÔÔ›ËÛË.
Ηλεκτρικές προδιαγραφές βρίσκονται στο ειδικό σετ καλωδίου.
∂ÁÁ‡ËÛË
¶·Ъ·¯ˆЪФ‡МВ ‰‡Ф ¯ЪfiУИ· ВББ‡ЛЫЛ, ЫЩФ ЪФ˚fiУ, НВОИУТУЩ·˜ ·fi ЩЛУ
ЛМВЪФМЛУ›· ·БФЪ¿˜.
ª¤Ы· ЫЩЛУ ВЪ›Ф‰Ф ВББ‡ЛЫЛ˜ О·П‡ЩФ˘МВ, ¯ˆЪ›˜ ¯Ъ¤ˆЫЛ, ФФИ·‰‹ФЩВ
ВП¿ЩЩˆМ· ЪФВЪ¯fiМВУФ ·fi О·О‹ О·Щ·ЫОВ˘‹ ‹ О·О‹˜ ФИfiЩЛЩФ˜ ˘ПИОfi,
В›ЩВ ВИЫОВ˘¿˙ФУЩ·˜ В›ЩВ ·УЩИО·ıИЫЩТУЩ·˜ ФПfiОПЛЪЛ ЩЛ Ы˘ЫОВ˘‹ Ы‡МхˆУ·
МВ ЩЛУ ОЪ›ЫЛ М·˜.
∞˘Ù‹ Ë ÂÁÁ‡ËÛË ÈÛ¯‡ÂÈ Û fiϘ ÙȘ ¯ÒÚ˜ Ô˘ ˆÏÔ‡ÓÙ·È Ù· ÚÔ˚fiÓÙ·
Braun.
∞˘Щ‹ Л ВББ‡ЛЫЛ ‰ВУ О·П‡ЩВИ: ˙ЛМИ¿ Ф˘ У· ФхВ›ПВЩ·И ЫВ П·Уı·ЫМ¤УЛ
¯Ъ‹ЫЛ, ЫВ хıФЪ¿ ·fi х˘ЫИФПФБИО‹ ¯Ъ‹ЫЛ (.¯. П¤БМ· ‹ М·¯·›ЪИ) fiˆ˜
О·И ˙ЛМИ¤˜ Ф˘ ¤¯Ф˘У ·МВПЛЩ¤· В›‰Ъ·ЫЛ ЫЩЛУ ·Н›· ‹ ЫЩЛ ¯Ъ‹ЫЛ ЩЛ˜
Ы˘ЫОВ˘‹˜.
∏ ВББ‡ЛЫЛ ·О˘ЪТУВЩ·И ·У ¤¯Ф˘У Б›УВИ ВИЫОВ˘¤˜ ·fi МЛ ВНФ˘ЫИФ‰ФЩЛМ¤У·
¿ЩФМ· ‹ ‰ВУ ¤¯Ф˘У ¯ЪЛЫИМФФИЛıВ› БУ‹ЫИ· ·УЩ·ПП·ОЩИО¿ Braun.
°È· Ó· ÂÈÙ‡¯ÂÙ ۤÚßȘ ̤۷ ÛÙËÓ ÂÚ›Ô‰Ô Ù˘ ÂÁÁ‡ËÛ˘, ·Ú·‰ÒÛÙ ‹
ÛÙ›ÏÙ ÙËÓ Û˘Û΢‹ Ì ÙËÓ ·fi‰ÂÈÍË ·ÁÔÚ¿˜ Û ¤Ó· ∂ÍÔ˘ÛÈÔ‰ÔÙË̤ÓÔ
∫·Ù¿ÛÙËÌ· ™¤ÚßȘ Ù˘ Braun: www.service.braun.com.
∫·П¤ЫЩВ ЫЩФ 01–9478700 БИ· У· ПЛЪФхФЪЛıВ›ЩВ БИ· ЩФ ПЛЫИ¤ЫЩВЪФ
∂НФ˘ЫИФ‰ФЩЛМ¤УФ ∫·Щ¿ЫЩЛМ· ™¤ЪЯИ˜ ЩЛ˜ Braun.
66
 Loading...