

Page 1

user guide
PHONE
FPP 010004
Version 1.0
Page 2

Page 3

user guide
PHONE
KIT FLIP
FLIP PHONE SPECIFICATION
SETTING UP THE TERMINAL
TERMINAL FUNCTIONS
ADDENDUM I
ADDENDUM II
ADDENDUM III
INDEX
5
5
6
9
12
16
17
Page 4

Page 5
user guide
5
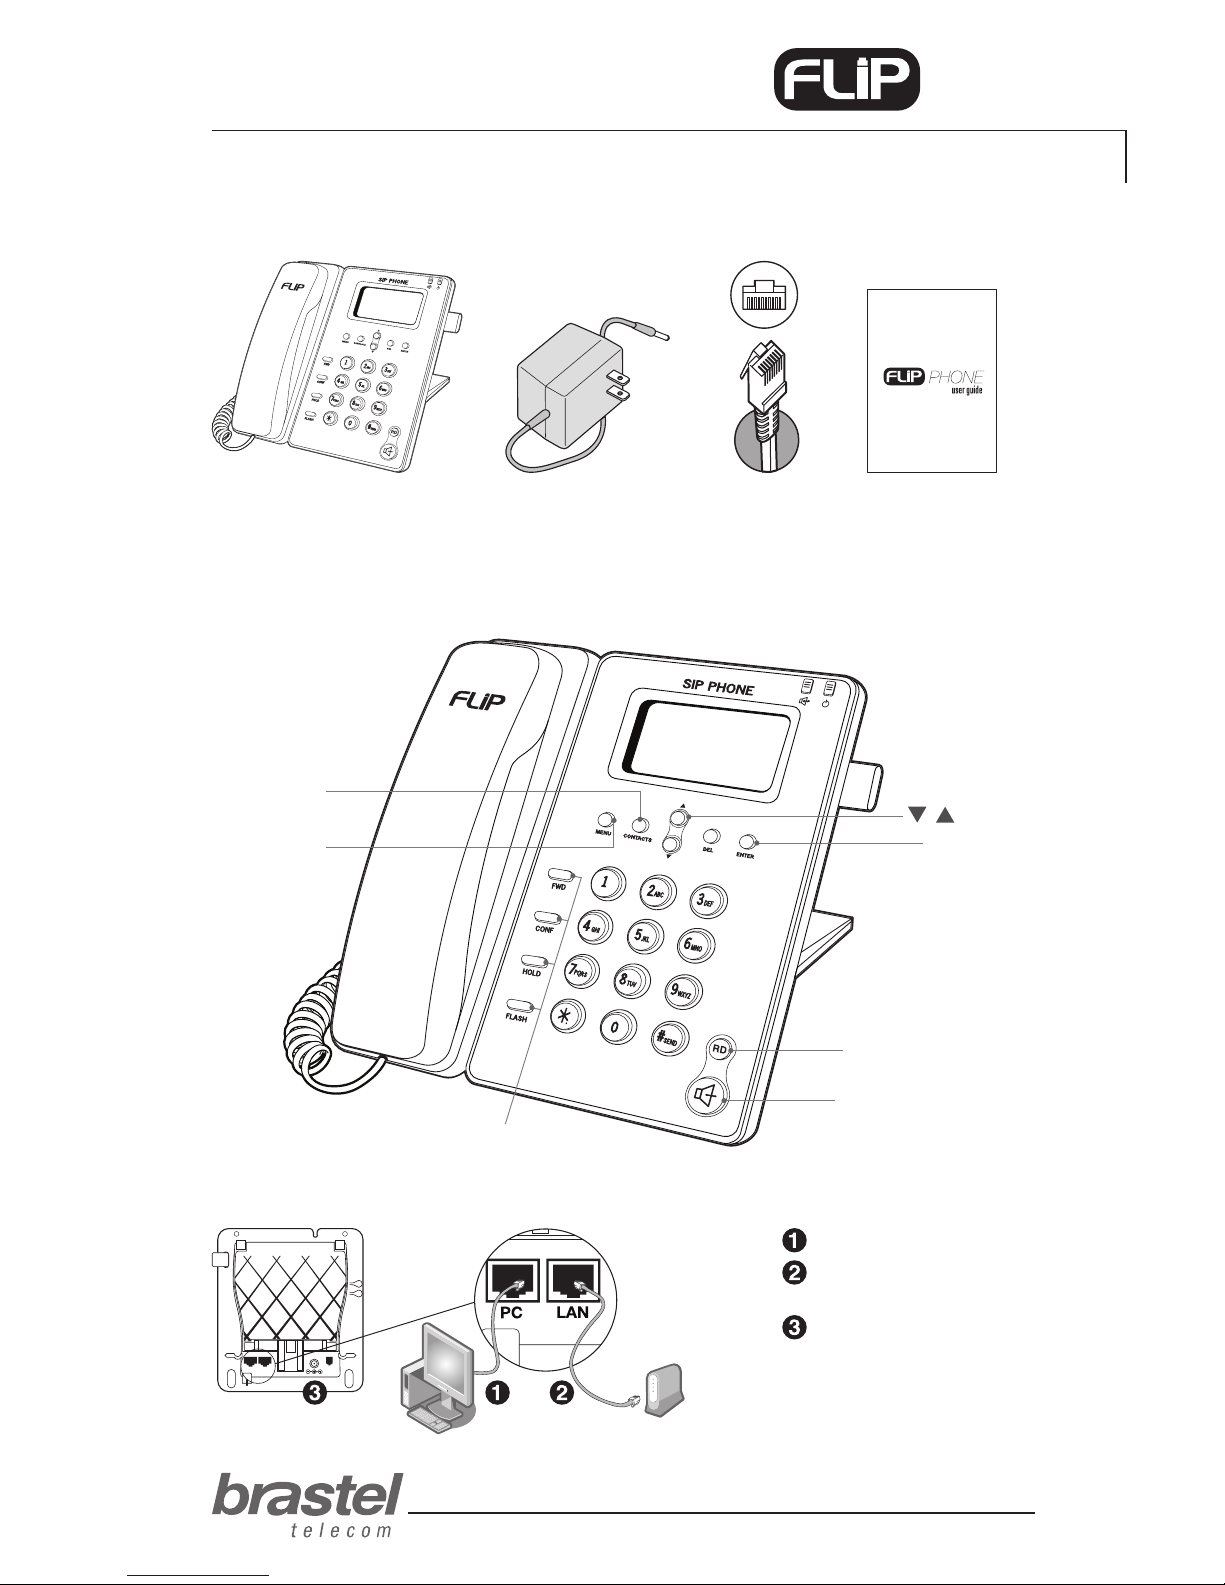
KIT FLIP
FLIP PHONE SPECIFICATION
PHONE
FLIP Phone Terminal AC/DC Power Supply LAN Cable
User’s Guide
PC: Connect to the PC.
LAN: Connect to the modem
or router.
5V DC: Connect to AC/DC
power supply.
PC LAN
5V DC
functions/buttons
not available
buttons
Enter button
RD (redial) button
Hand Free button
Menu
Contacts
(Phonebook)
Page 6
user guide
6
PHONE
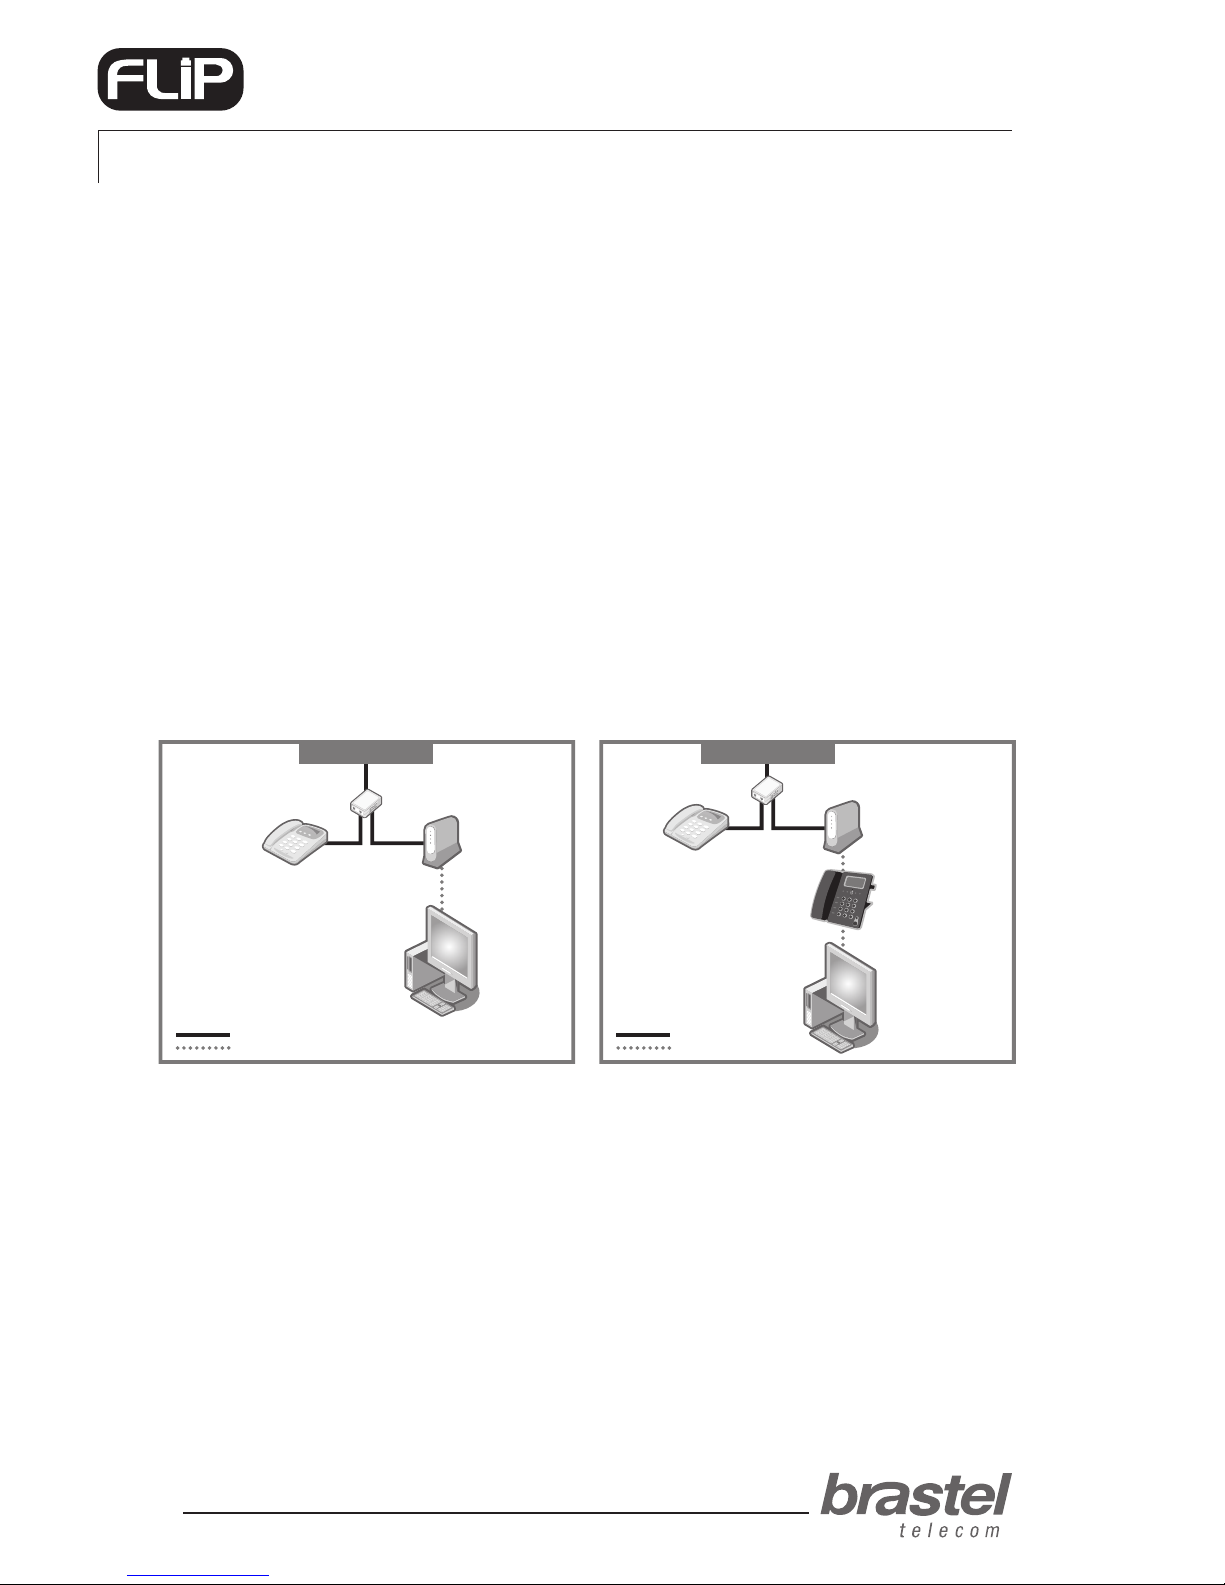
Case A: ADSL modem with built-in router
BEFORE and AFTER setting up the FLIP Phone.
AFTER
PC
Modem
Phone
Splitter
Phone Line
Phone Cable
LAN Cable
PC
Modem
Phone
Splitter
Phone Line
Phone Cable
LAN Cable
FLIP Phone
BEFORE
SETTING UP THE TERMINAL
The setup will depend on the other devices already installed for the internet connection, as well as
where the provider information (PPPoE) is registered.
The PPPoE (user authentication for the internet connection) must be registered in the router or modem
(with built-in router). For the setup you need the information from the internet provider (user name and
password). If you do not have a modem/router, setup the PPPoE in the FLIP Phone (see page 12).
IMPORTANT: To setup the PPPoE in the FLIP Phone terminal, the maximum number of characters for entering the user name
and password is 32. If that quantity is exceeded, the setup must be performed through the internet browser (see ADDENDUM I,
page 13).
After setting up the FLIP Phone terminal, wait a few minutes for system to stabilize.
If the modem/router was properly setup and installed, when you plug in the FLIP Phone terminal, the
display will show <Brastel-FLIP>.
If the modem/router was properly installed but the setup was not completed, when you plug in the FLIP
Phone terminal, the display will show <No service>.
Check in what case do you t in and setup the FLIP Phone as showing in the images.
Page 7
user guide
7
PHONE
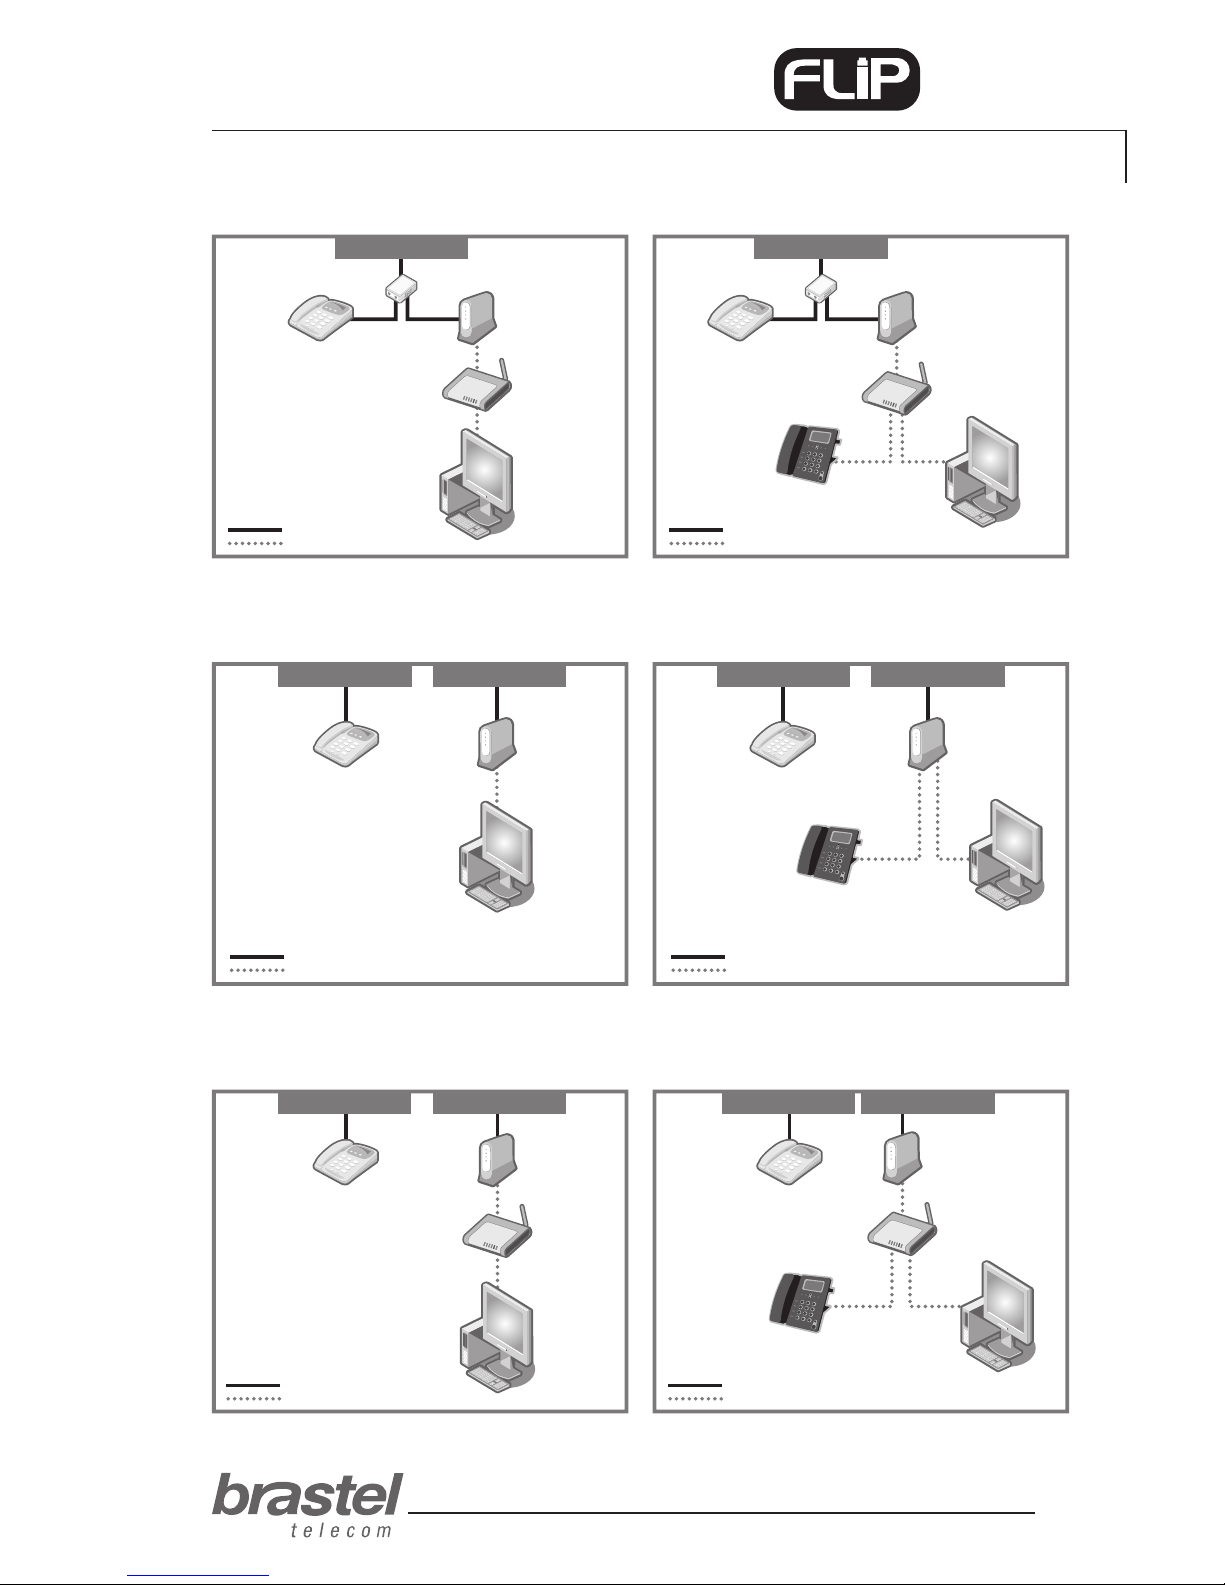
Case D: Optical ber/hikari connection with modem and router separately
BEFORE and AFTER setting up the FLIP Phone.
Case B: ADSL modem and router separately
BEFORE and AFTER setting up the FLIP Phone.
PC
Router
Modem
FLIP Phone
Phone
Splitter
Phone Line
Phone Cable
LAN Cable
Phone Cable
LAN Cable
PC
Router
Modem
Phone
Splitter
Phone Line
Case C: Optical ber/hikari connection and modem (with built-in router)
BEFORE and AFTER setting up the FLIP Phone.
Phone
PC
Modem
Phone Line Conector Modular
Phone Cable
LAN Cable
Phone Cable
LAN Cable
Phone
PC
Modem
Phone Line Conector Modular
FLIP Phone
Phone
PC
Router
Modem
FLIP Phone
Phone Line Conector Modular Phone Line Conector Modular
Phone Cable
LAN Cable
Phone Cable
LAN Cable
Phone
PC
Router
Modem
AFTERBEFORE
AFTERBEFORE
AFTERBEFORE
Page 8
user guide
8
PHONE
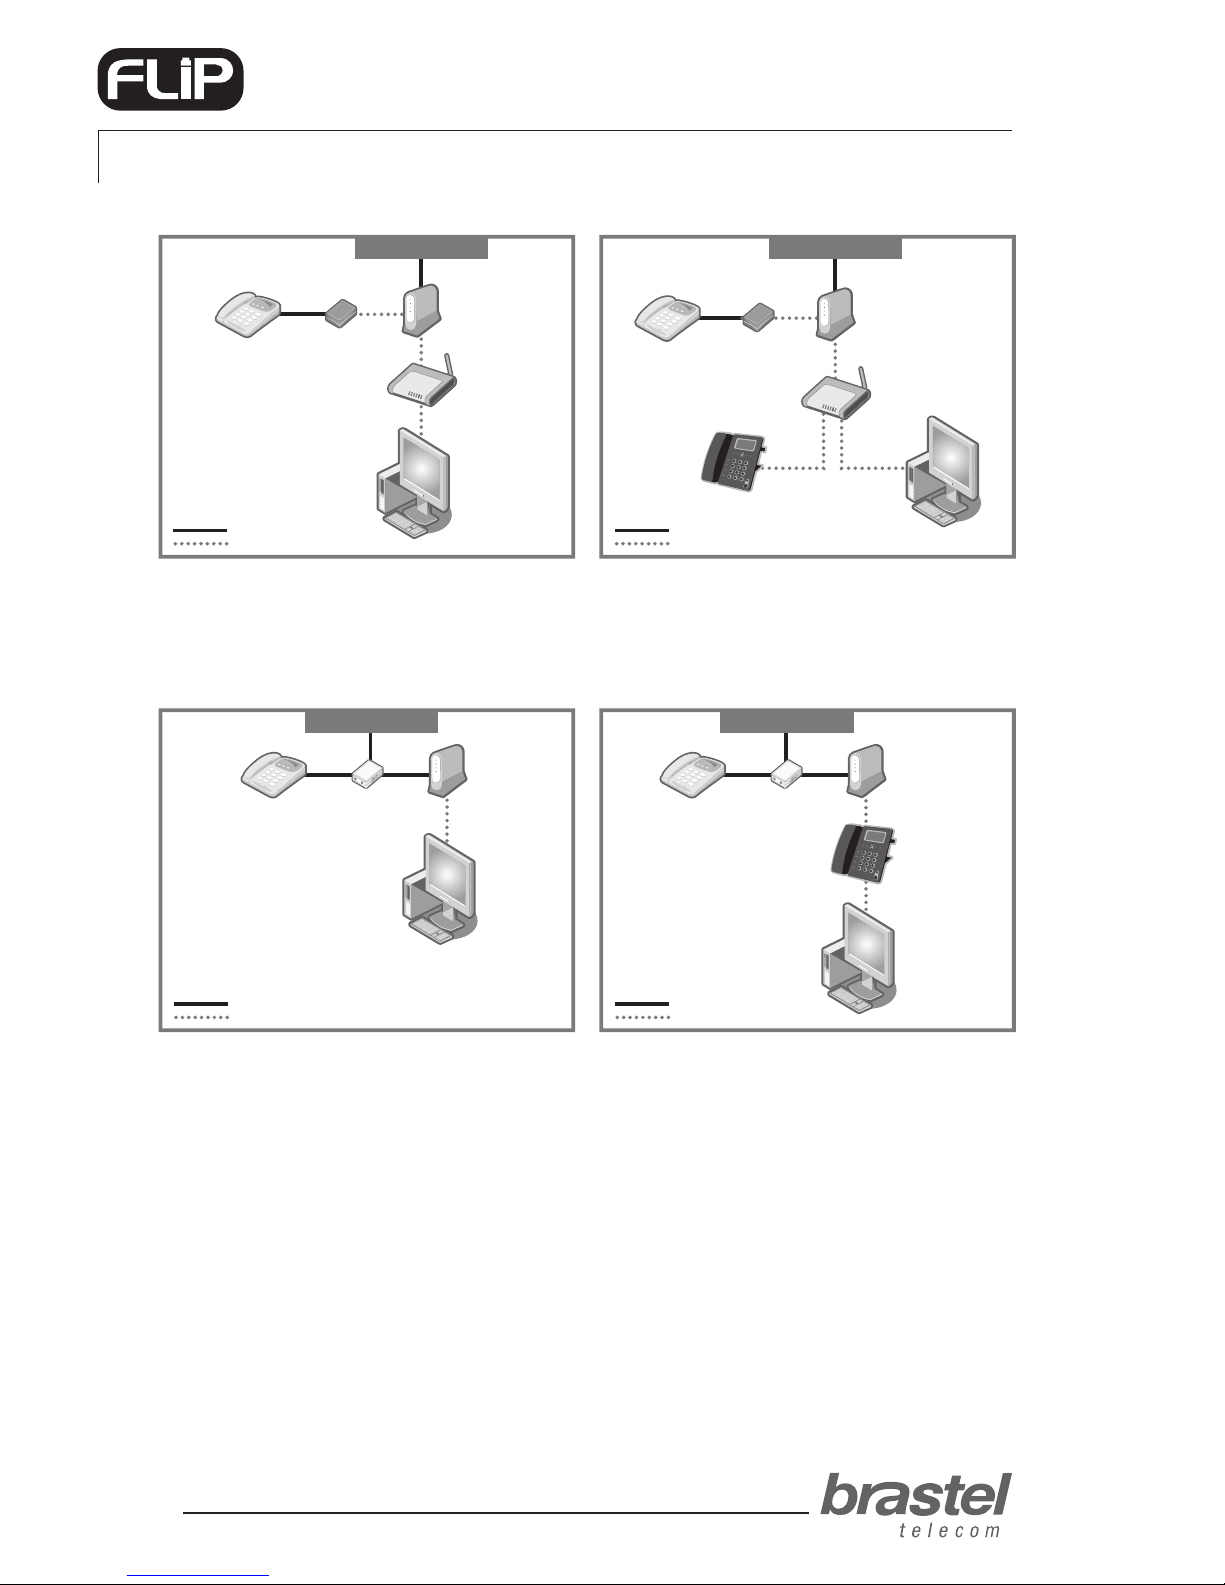
Case F: ADSL modem (without router)
Necessary to congure the PPPoE in the FLIP terminal (see Addendum I, page 12).
BEFORE and AFTER setting up the FLIP Phone.
Case E: Optical ber/hikari connection, IP phone with modem and router separately
BEFORE and AFTER setting up the FLIP Phone.
Phone Cable
LAN Cable
Phone Line
Phone
PC
Router
Modem
PC
Router
Modem
FLIP Phone
IP Adapter
Phone
IP Adapter
Phone Line
Phone Cable
LAN Cable
AFTERBEFORE
Phone Cable
LAN Cable
Phone Line
Phone
PC
ADSL
modem
Splitter
Phone Cable
LAN Cable
Phone Line
Phone
PC
ADSL
modem
Splitter
FLIP Phone
AFTERBEFORE
Page 9
user guide
9
PHONE
TERMINAL FUNCTIONS
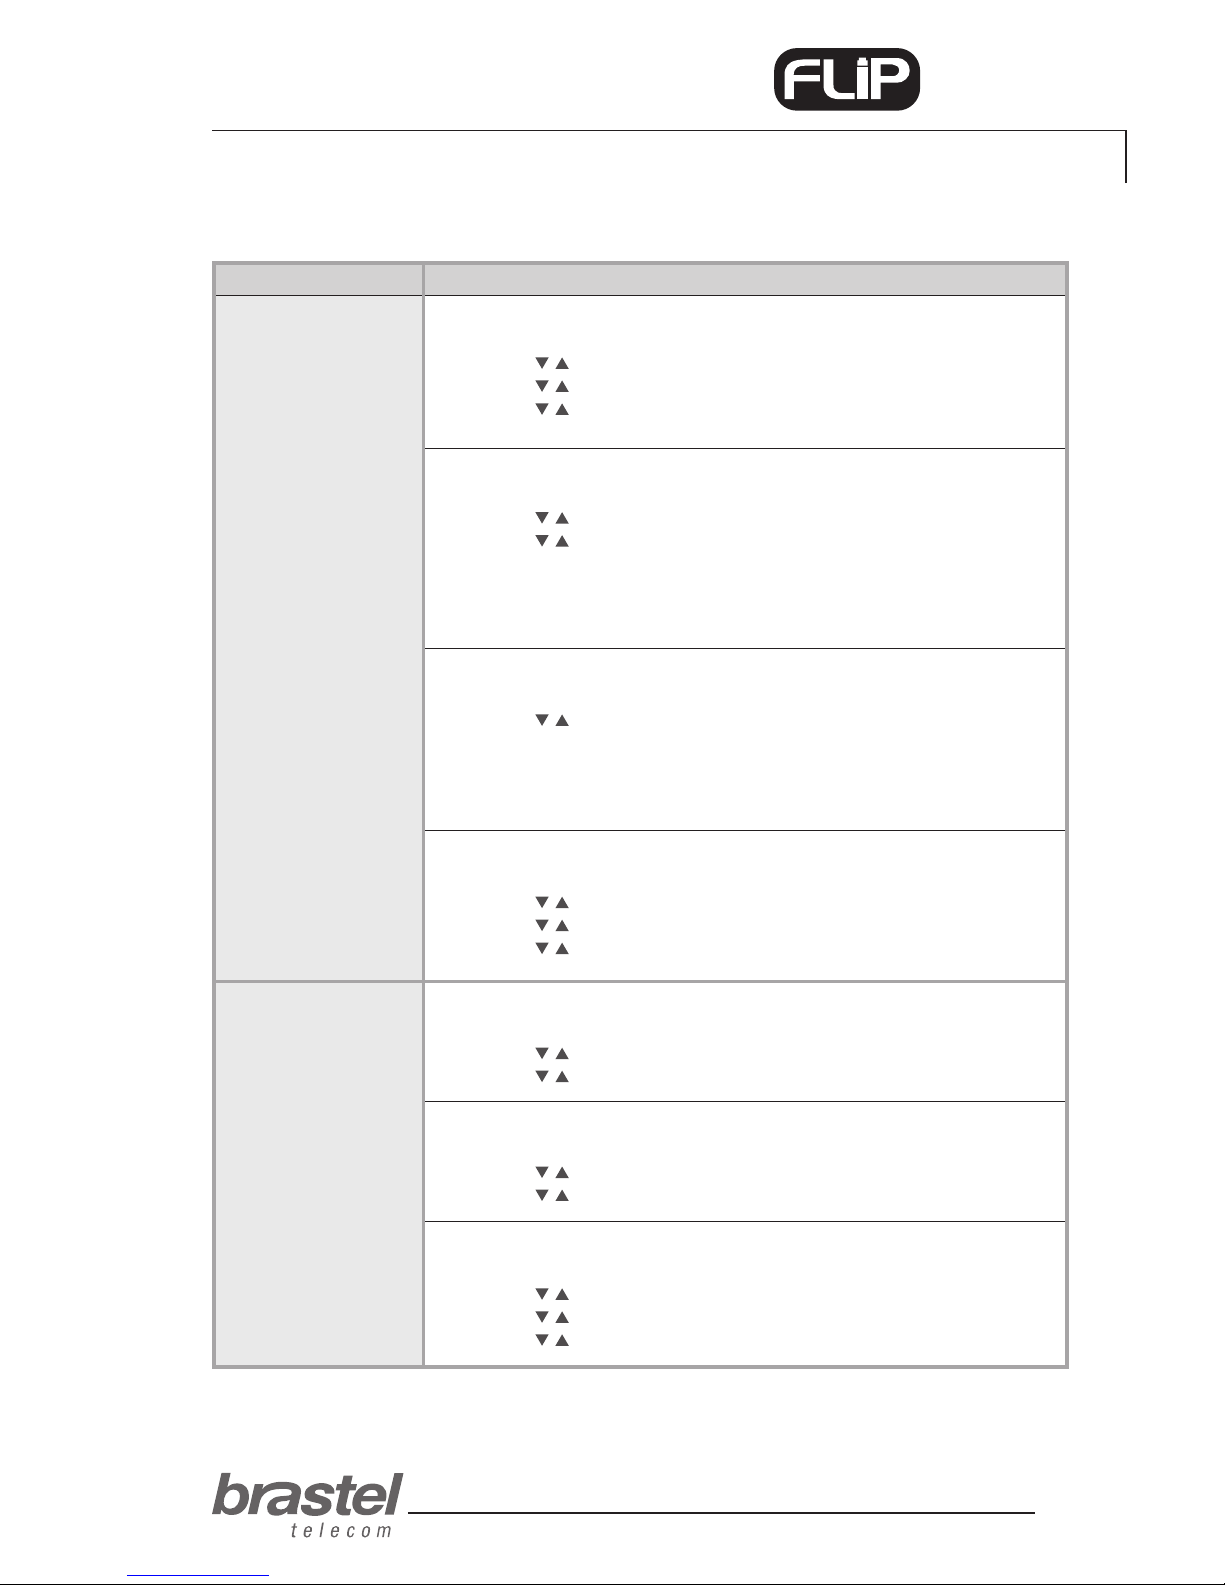
SEARCH
1. Press the Menu button.
2. Use the
buttons to select Phone book and press Enter.
3. Use the
buttons to select Search and press Enter.
4. Use the
buttons to select the number you are searching for.
Press # if you wish to call that number.
PHONEBOOK
ADD ENTRY
1. Press the Menu button.
2. Use the
buttons to select Phone book and press Enter.
3. Use the
buttons to select Add entry and press Enter.
4. Enter the name and press Enter.
4. Enter the phone number from Brastel’s prex 0091-20 followed by country
code, area code, phone number and press Enter.
For numbers in Japan, enter the entire number starting from area code.
CALL HISTORY
PROCEDUREFUNCTIONS
SPEED DIAL
1. Press the Menu button.
2. Use the
buttons to select Speed Dial and press Enter.
3. Enter the phone number you wish the register and press Enter.
4. Enter the memory number (between 1 and 10) you wish to register the
phone number and press Enter.
To place a call using the Speed Dial, enter the memory number and press #.
ERASE ALL (ENTRIES)
1. Press the Menu button.
2. Use the
buttons to select Phone book and press Enter.
3. Use the
buttons to select Erase all and press Enter.
4. Use the
buttons to select Yes or No and press Enter.
INCOMING CALLS
1. Press the Menu button.
2. Use the
buttons to select Call history and press Enter.
3. Use the
buttons to select Incoming calls and press Enter.
DIALED NUMBERS
1. Press the Menu button.
2. Use the
buttons to select Call history and press Enter.
3. Use the
buttons to select Dialed Numbers and press Enter.
ERASE RECORD
1. Press the Menu button.
2. Use the
buttons to select Call history and press Enter.
3. Use the
buttons to select Erase record and press Enter.
4. Use the
buttons to select All, Incoming or Dialed and press Enter.
Page 10
user guide
10
PHONE
TERMINAL FUNCTIONS
PHONE SETTING
PROCEDUREFUNCTIONS
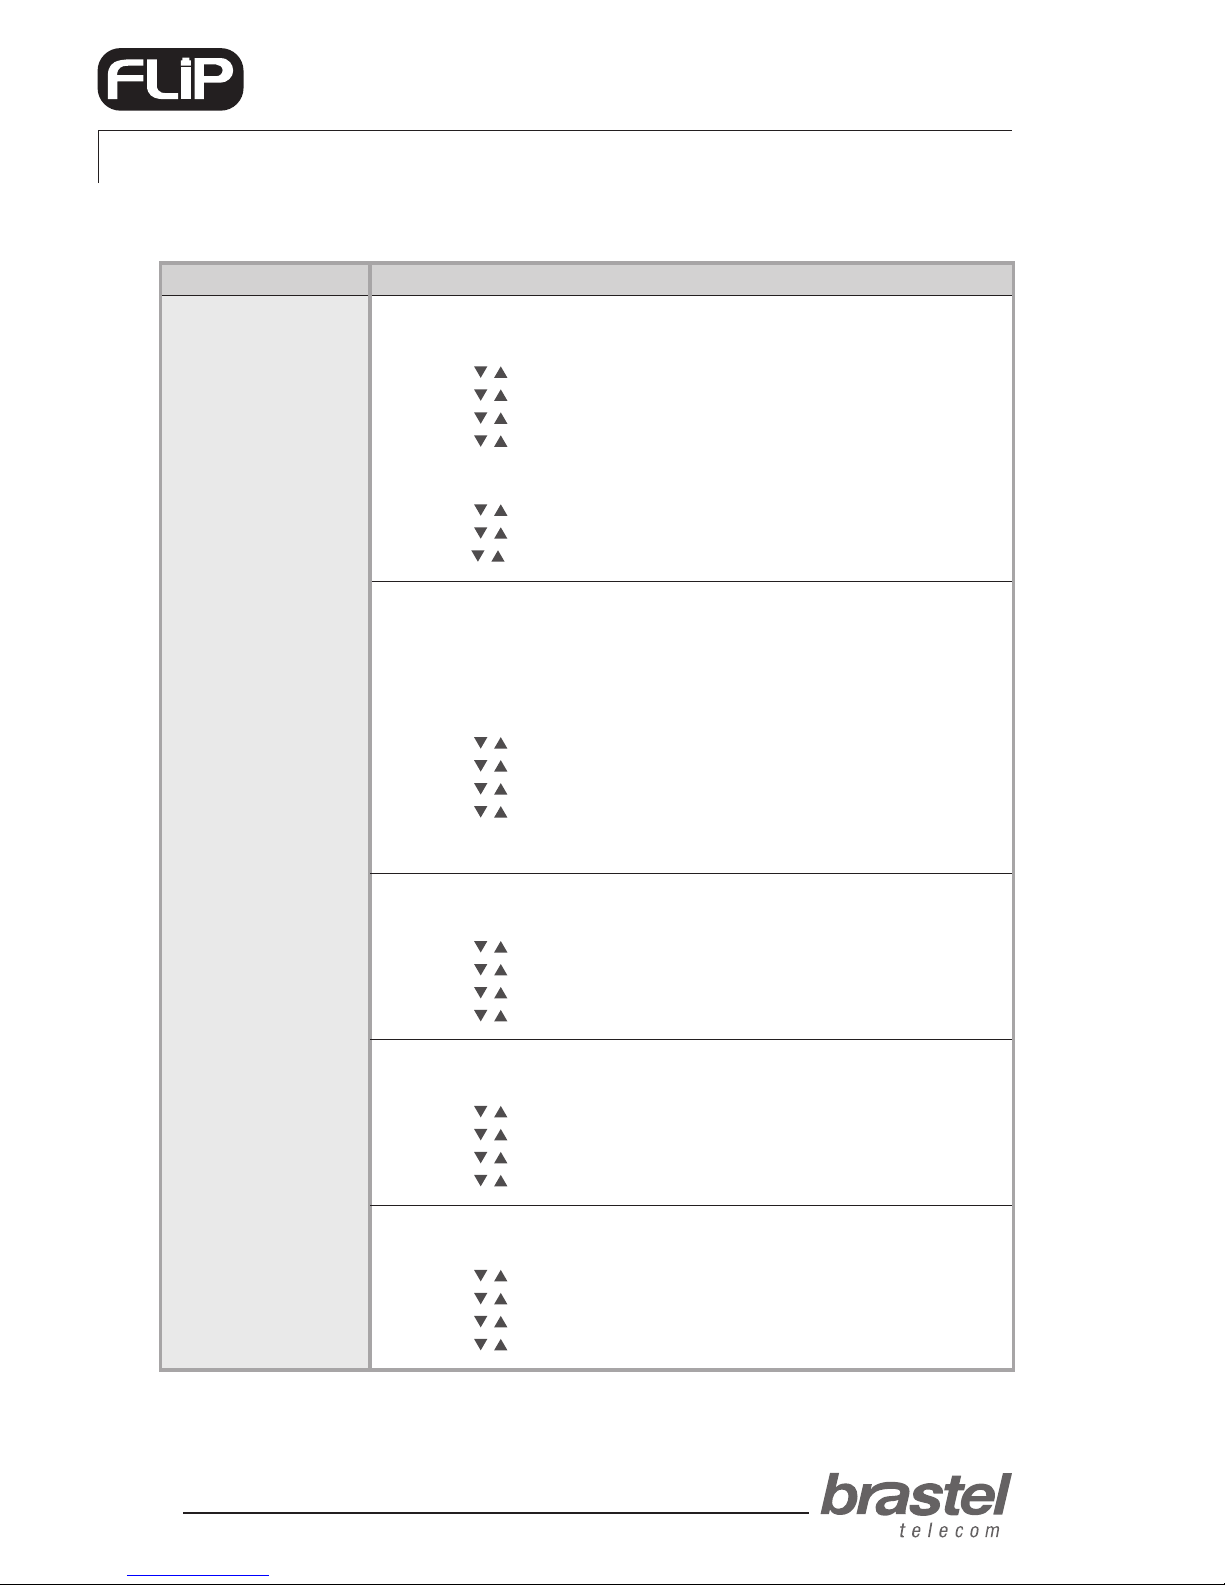
ALARM CLOCK
1. Press the Menu button.
2. Use the
buttons to select Phone setting and press Enter.
3. Use the
buttons to select Alarm setting and press Enter.
4. Use the
buttons to select Activation and press Enter.
5. Use the
buttons to select Enabled or Disable and press Enter.
ALARM CLOCK (TIME ADJUST)
1. Press the Menu button.
2. Use the
buttons to select Phone setting and press Enter.
3. Use the
buttons to select Alarm setting and press Enter.
4. Use the
buttons to select Alarm Time, enter the desired time and press Enter.
DATE/TIME
When the FLIP Phone is plugged in and it connects to Brastel’s server, Japan’s
date/time will be set automatically in the terminal.
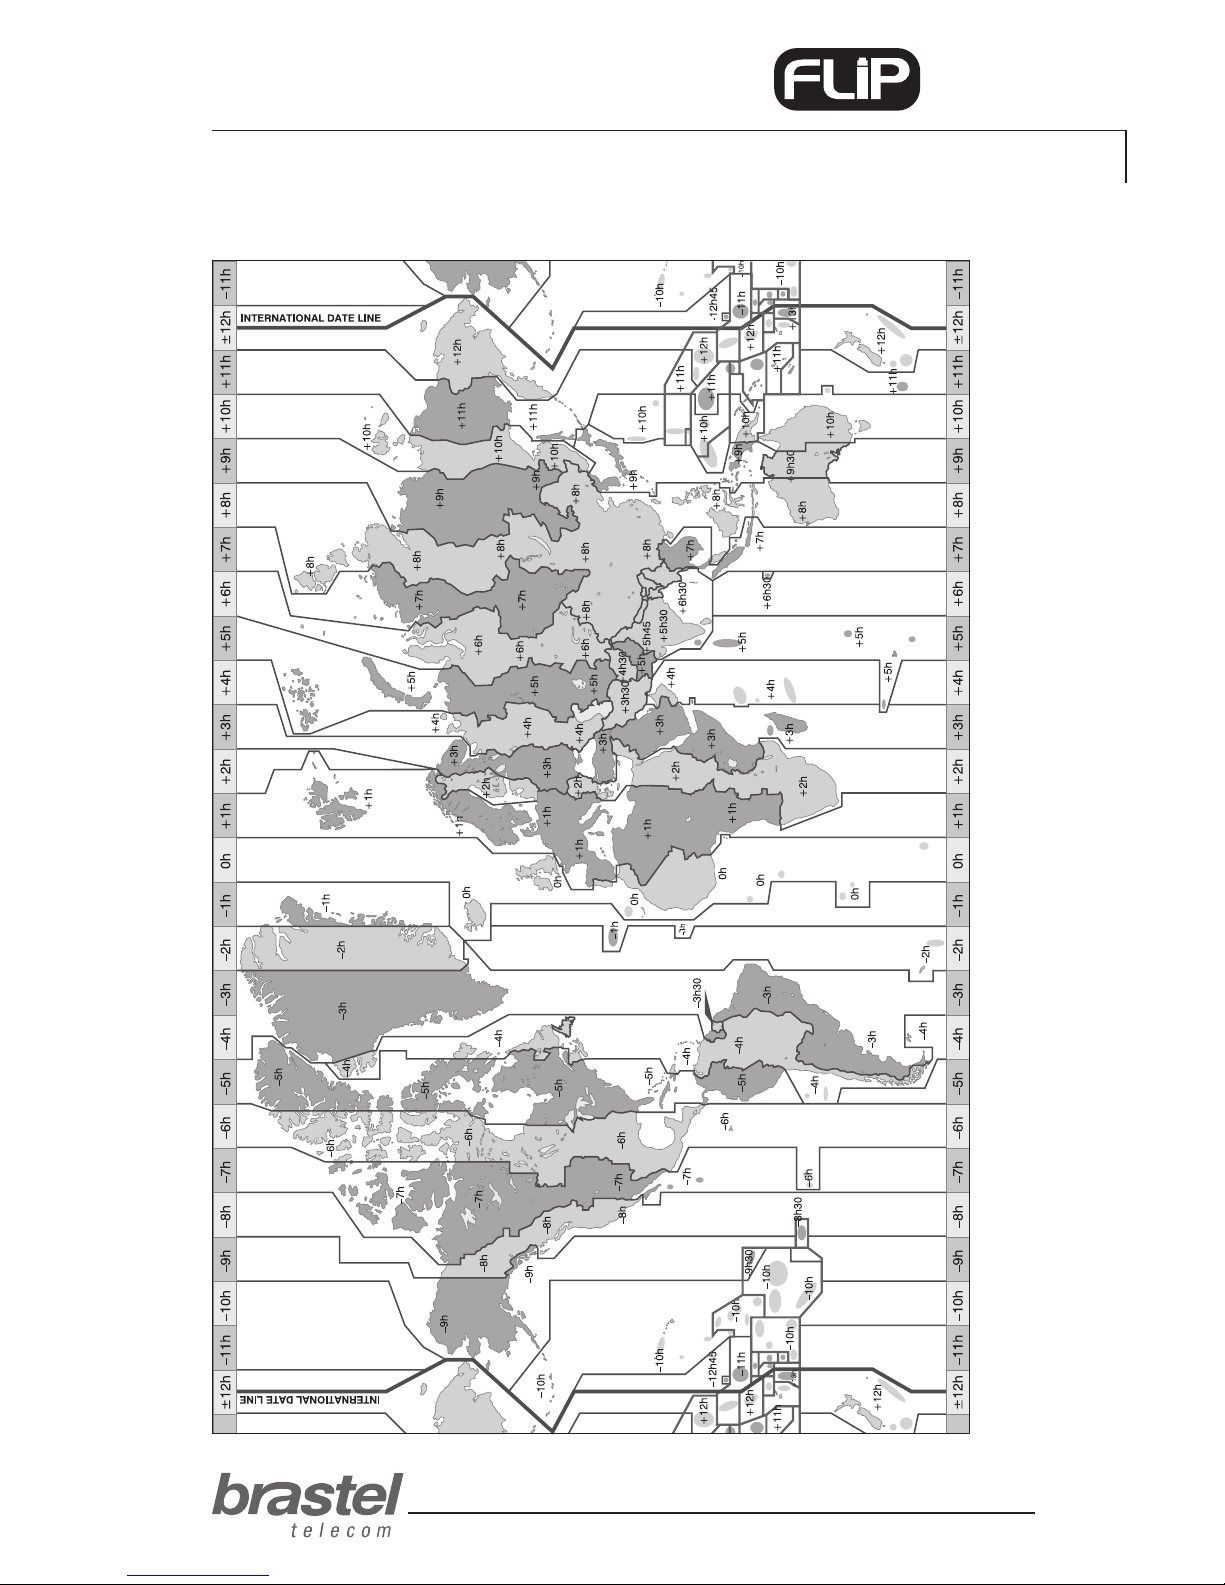
If you wish to change the date/time of another country, follow the procedure
below to adjust the new time zone (see Addendum III, page 17).
1. Press the Menu button.
2. Use the
buttons to select Phone setting and press Enter.
3. Use the
buttons to select Date/Time setting and press Enter.
4. Use the
buttons to select SNTP setting and press Enter.
5. Use the
buttons to select Time zone and press Enter.
6. Enter the country’s time zone and press Enter.
SPEAKER VOLUME
1. Press the Menu button.
2. Use the
buttons to select Phone setting and press Enter.
3. Use the
buttons to select Volume and Gain and press Enter.
4. Use the
buttons to select Speaker volume and press Enter.
5. Use the
buttons to select the desired volume and press Enter.
HANDSET VOLUME
1. Press the Menu button.
2. Use the
buttons to select Phone setting and press Enter.
3. Use the
buttons to select Volume and Gain and press Enter.
4. Use the
buttons to select Handset volume and press Enter.
5. Use the
buttons to select the desired volume and press Enter.
RING TONE VOLUME
1. Press the Menu button.
2. Use the
buttons to select Phone setting and press Enter.
3. Use the
buttons to select Ringer and press Enter.
4. Use the
buttons to select Ringer volume and press Enter.
5. Use the
buttons to select the desired volume and press Enter.
Page 11
user guide
11
PHONE
TERMINAL FUNCTIONS
NETWORK
ADMISTRATOR
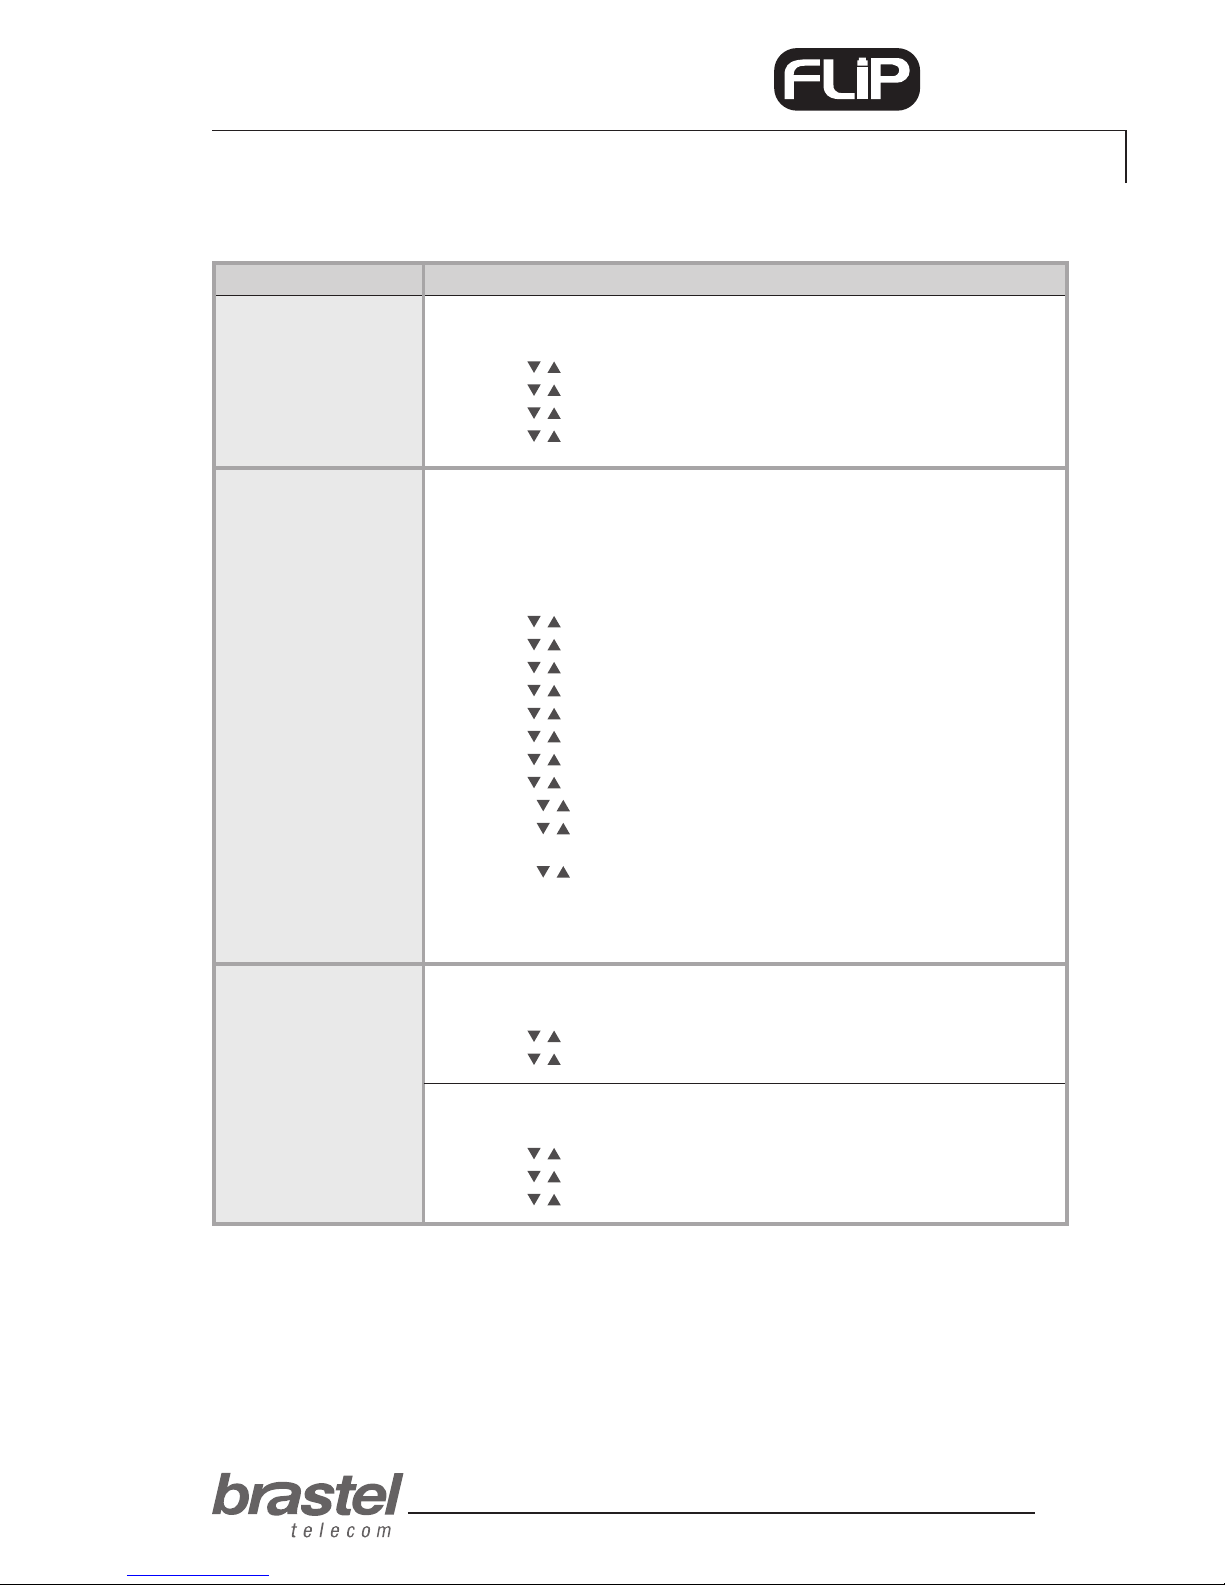
RING TYPE
1. Press the Menu button.
2. Use the
buttons to select Phone setting and press Enter.
3. Use the
buttons to select Ringer and press Enter.
4. Use the
buttons to select Ringer type and press Enter.
5. Use the
buttons to select the desired type and press Enter.
PHONE SETTING
PROCEDUREFUNCTIONS
REVERT THE TERMINAL TO DEFAULT SETTING (RESET)
1. Press the Menu button.
2. Use the
buttons to select Administrator and press Enter.
3. Use the
buttons to select Default setting and press Enter.
3. Use the
buttons to select Load default and press Enter.
RESTART THE FLIP PHONE TERMINAL
1. Press the Menu button.
2. Use the
buttons to select Administrator and press Enter.
3. Use the
buttons to select Restart and press Enter.
PPPoE SETUP
IMPORTANT: To setup the PPPoE in the FLIP Phone terminal, the maximum
number of characters for entering the user name and password is 32. If that
quantity is exceeded, the setup must be performed through the internet browser
(see ADDENDUM I, page 13).
1. Press the Menu button.
2. Use the
buttons to select Network and press Enter.
3. Use the
buttons to select PC setup and press Enter.
4. Use the
buttons to select NAT and press Enter.
5. Use the
buttons to select LAN Setup and press Enter.
6. Use the
buttons to select IP type and press Enter.
7. Use the
buttons to select PPPoE client and press Enter.
8. Use the
buttons to select Network and press Enter.
9. Use the
buttons to select LAN Setup and press Enter.
10. Use the
buttons to select PPPoE setting and press Enter.
11. Use the
buttons to select User name, enter the user name and press
Enter.
12. Use the
buttons to select Password, enter the password and press
Enter.
After completing the PPPoE setup, restart the terminal (see the procedure
bellow).
Page 12
user guide
12
PHONE
ADDENDUM I - ONLY FOR ADSL MODEMS WITHOUT A (BUILT-IN)
ROUTER, AS IN CASE F (page 8)
Setting up the PPPoE in the FLIP Phone
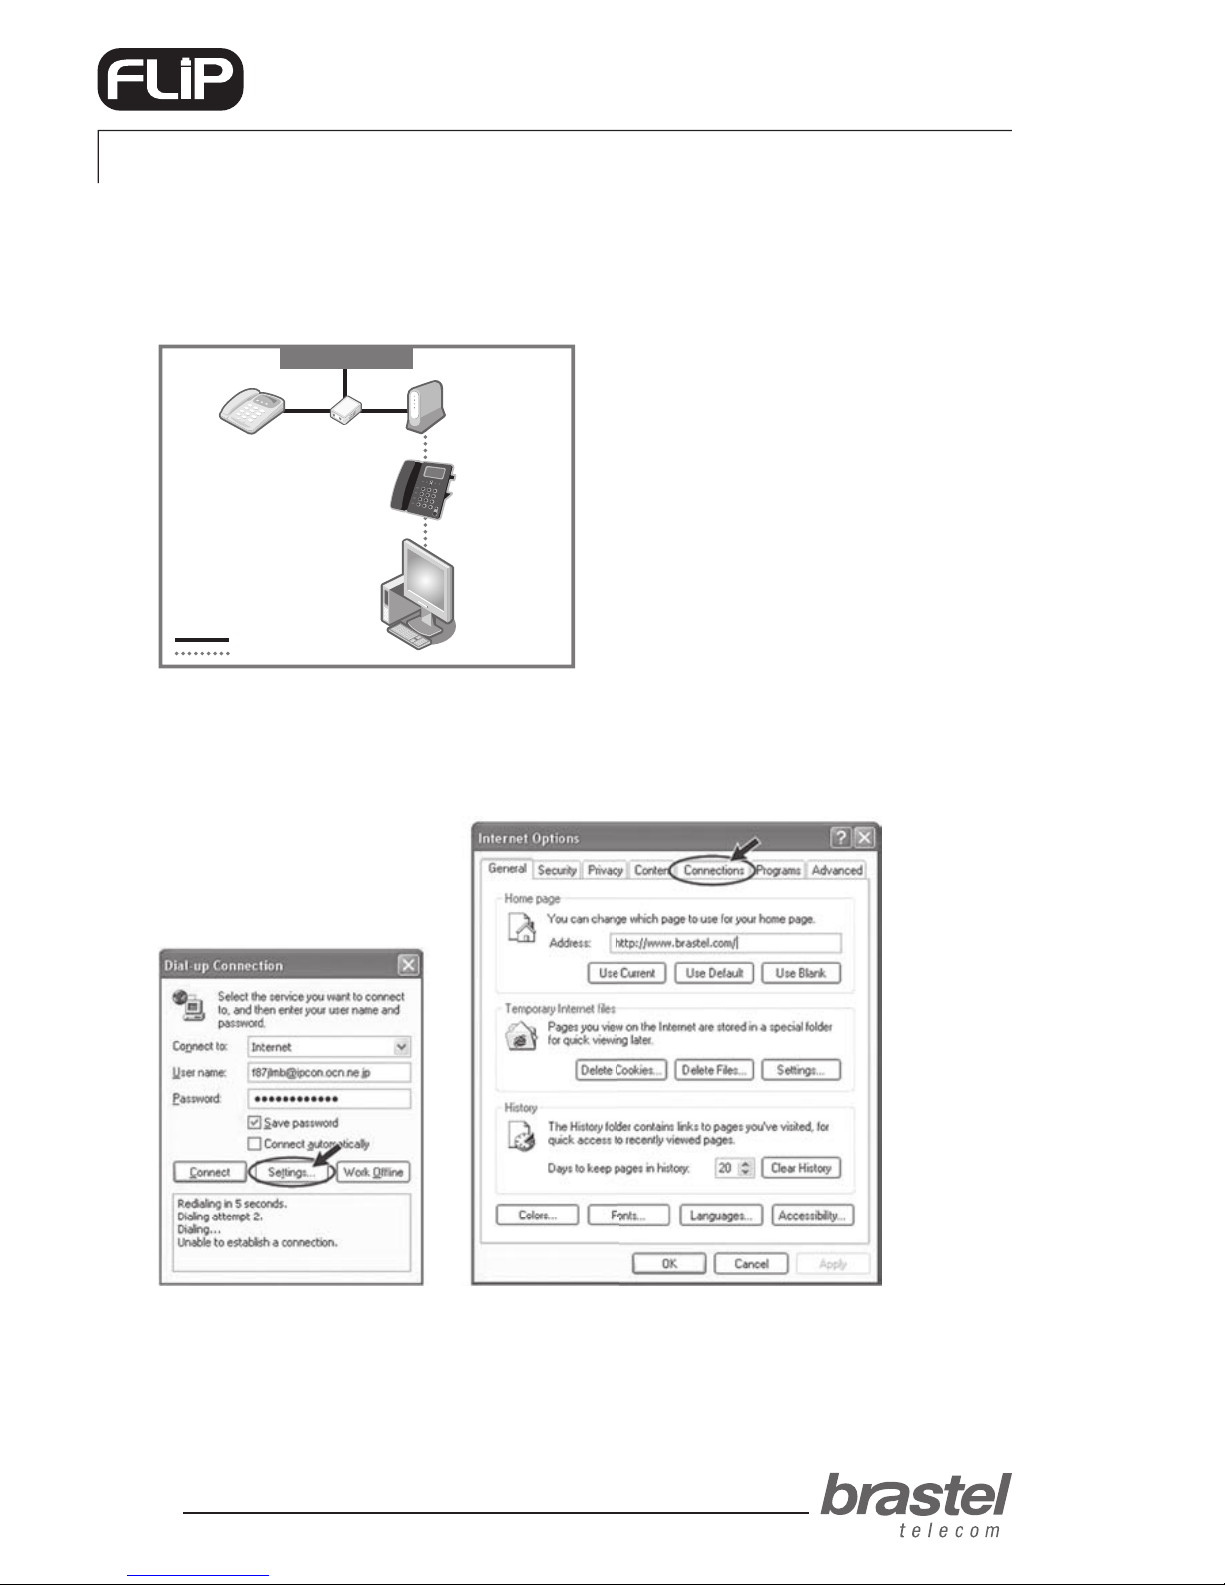
Make sure that all cables are properly connected (see the image below for reference).
Step 1) Disable the computer’s PPPoE
1. The setup can be done through the (A) dial-up connection window, or the (B) Internet Explorer
window.
Figure A Figure B
Open an Internet Explorer window and click on
Tools > Internet Options > Connections
Click on
Settings > Connection
Phone Cable
LAN Cable
Phone Line
Phone
PC
ADSL
modem
Splitter
FLIP Phone
Page 13
user guide
13
PHONE
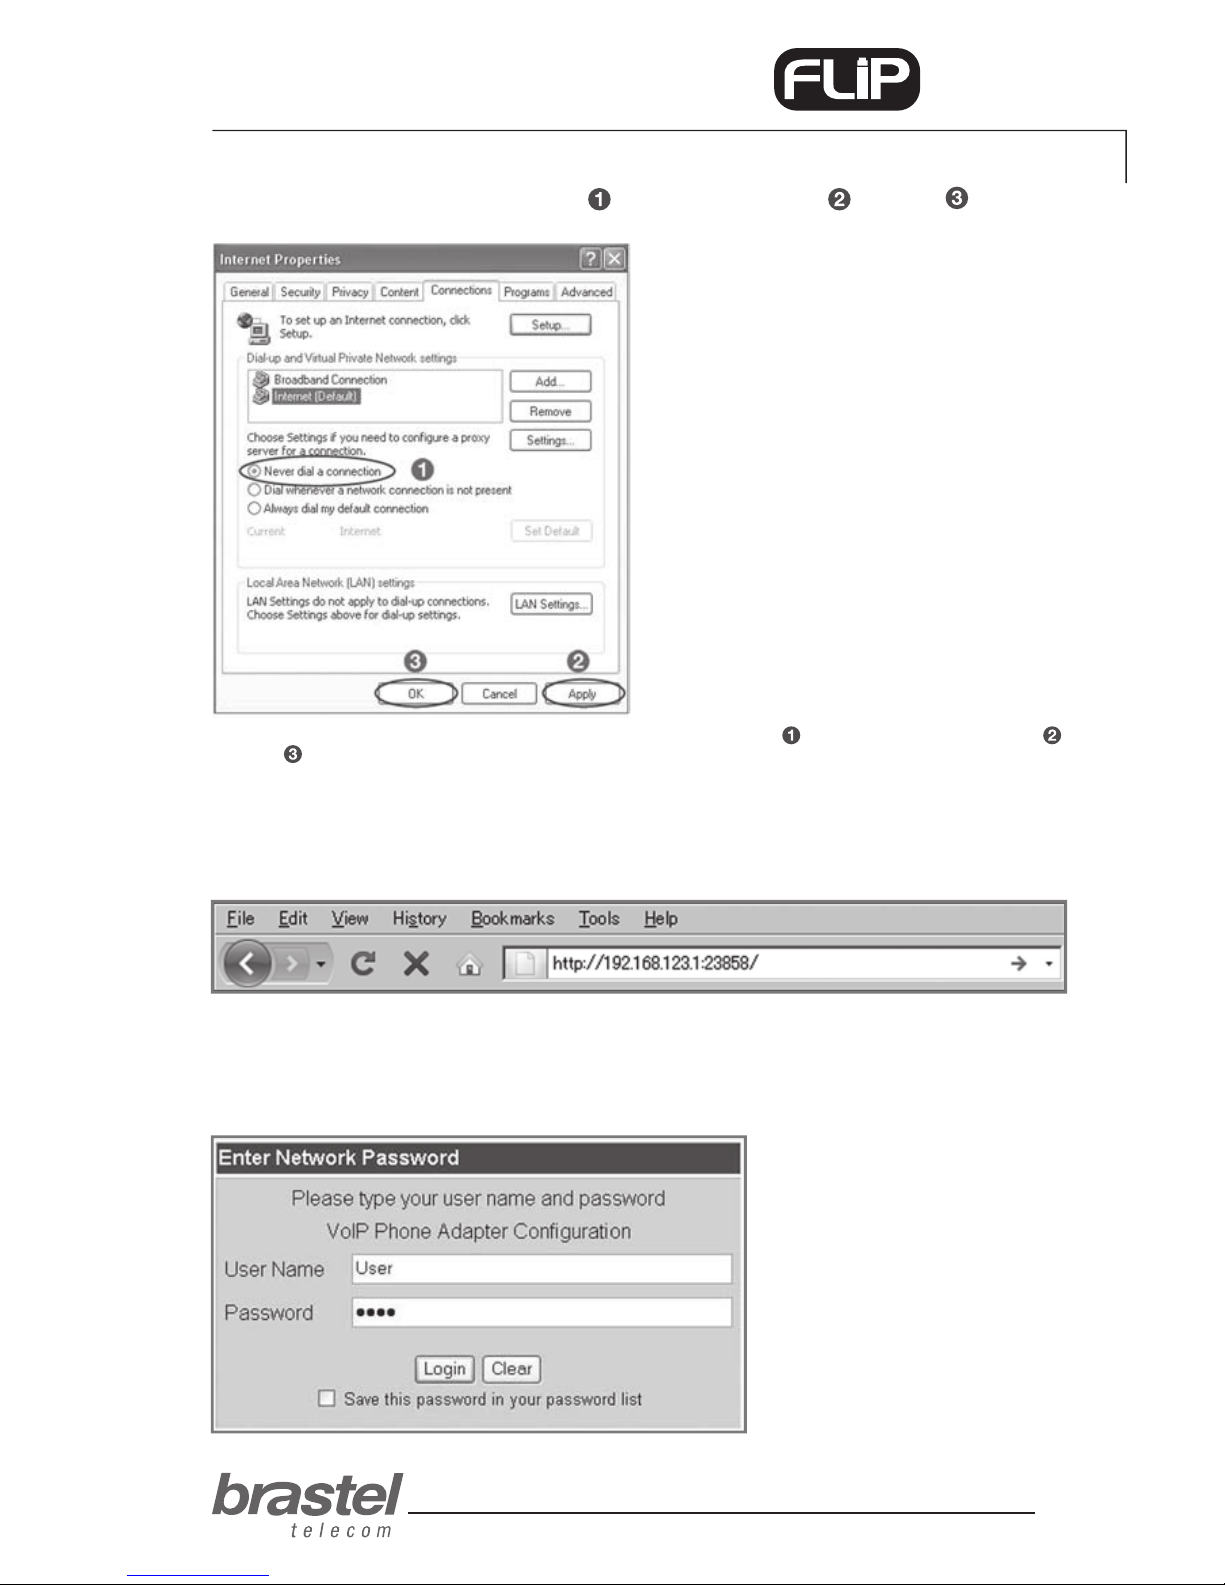
2. In the Internet Properties window, click on: Never dial a connection, Apply and OK, close
all windows and restart the PC.
NOTE: If you would like to use the internet without using the FLIP Phone, just click on Always dial my default connection,
Apply and OK.
Step 2) Setup the PPPoE in the FLIP Phone
1. Open a web browser (Internet Explorer, Firefox etc.), type the address:
http://192.168.123.1:23858/ and press Enter to open the setup window.
If you cannot open this address the DHCP of the computer may be deactivated. Please check ADDENDUM II (page 16) for
further instructions.
2. In both the User Name and Password elds, type User and click on Login.
NOTE: Fields are case sensitive. Please make sure to type with capital “U”.
Page 14
user guide
14
PHONE
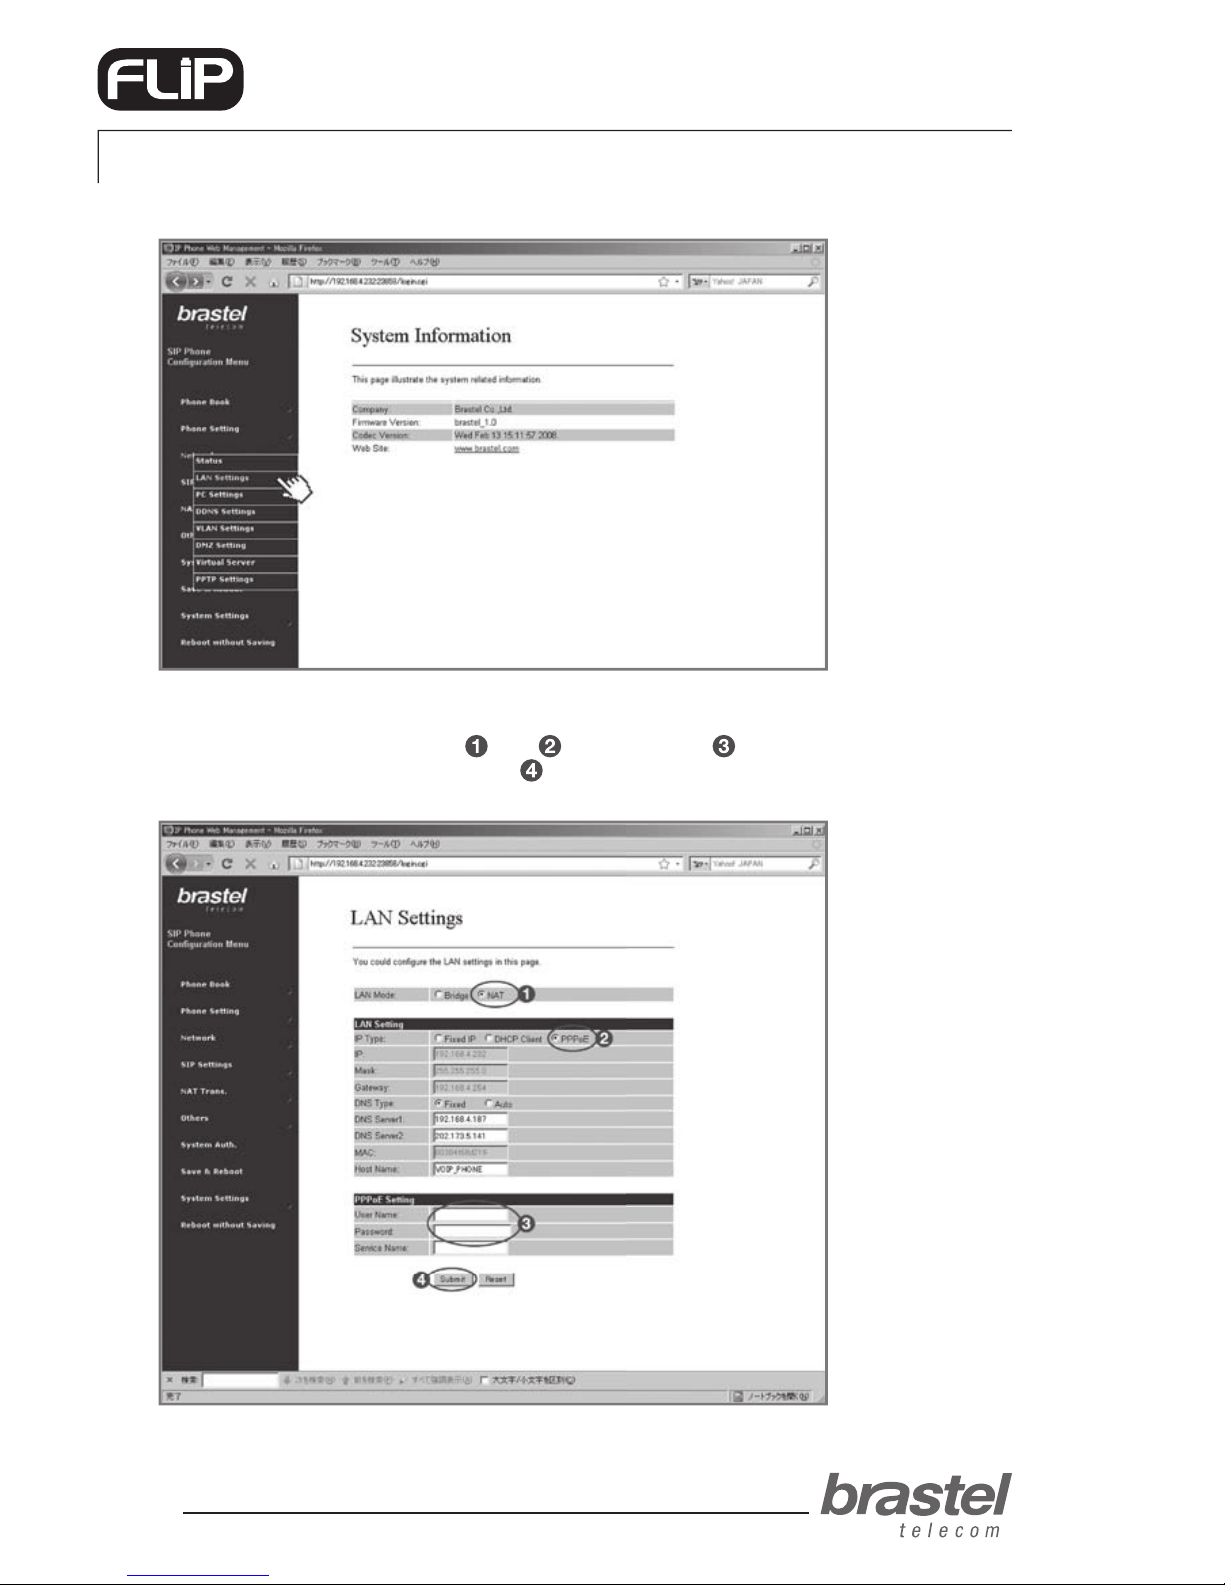
3. From the menu, click on Network and from the submenu select LAN Settings.
4. In the LAN Settings screen, select
NAT, PPPoE, enter the User Name and Password
given by your internet provider and click on Submit.
Page 15
user guide
15
PHONE
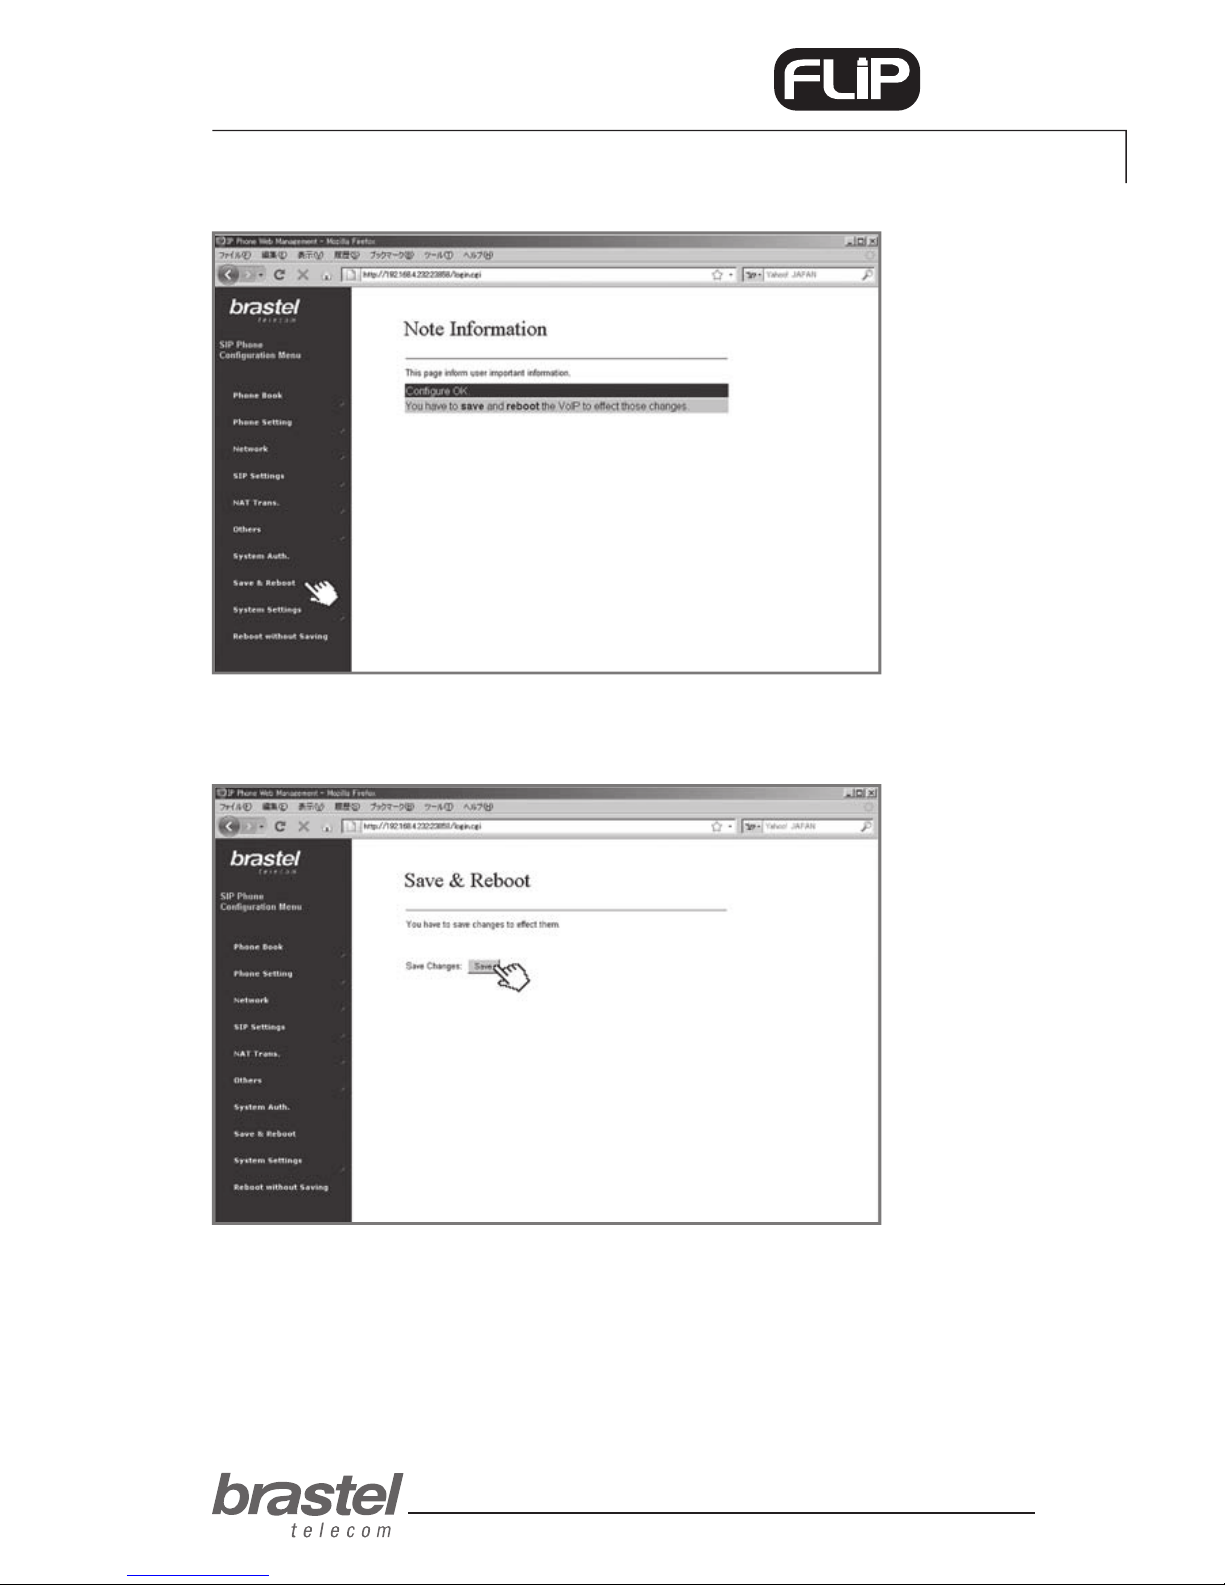
5. Click on Save & Reboot.
6. On the Save & Reboot screen, click on Save.
7. Please wait between 5 to 10 minutes and verify if there is an internet connection.
If so, the con guration is nished.
Page 16

user guide
16
PHONE
ADDENDUM II - CONFIGURING DHCP FOR WINDOWS
DHCP (Dynamic Host Conguration Protocol) is a client/server protocol that automatically provides an
Internet Protocol (IP) host with its IP address and other related conguration information such as the
subnet mask and default gateway.
In the case of FLIP, it will help the FLIP terminal to provide the necessary information to your computer
so you may use the internet normally connecting your computer to the FLIP terminal’s PC port.
Windows XP
1. Click on the Start button > Control Panel > Network Connections icon.
2. Right click on the Local Area Connection icon.
3. Select Properties from the menu.
4. Double click on the Internet Protocol (TCP/IP) entry.
5. Click on Obtain an IP address automatically.
6. Click on Obtain DNS server address automatically.
7. Click OK and restart the computer.
Windows Vista
1. Click on the Start Orb > Control Panel > Network and Internet.
2. Click on Network and Sharing Center.
3. In the Network and Sharing Center look along the left pane and click Manage Network
Connections.
4. Right click on the Local Area Connection icon.
5. Select Properties from the menu.
6. Click on Obtain an IP address automatically.
7. Click on Obtain DNS server address automatically.
8. Click OK and restart the computer.
For further information on DHCP settings, please refer to the operation system’s Help.
Page 17
user guide
17
PHONE
ADDENDUM III - TIME ZONE
 Loading...