

Page 1
QUARK
MANUALE D’ISTRUZIONI
OPERATOR’S MANUAL
CARNET D’INSTRUCTIONS
GEBRAUCHSANWEISUNG
MANUAL DE INSTRUCCIONES
Page 2
11
1 ELECTRICAL SAFETY INSTRUCTIONS
1
Before connecting the dispenser to the mains, check that
the voltage shown on the rating plate matches your electricity
su pply. C onnec t the dispense r to a sing le-phase supply
through an earthed socket as required by current regulations. If
the dispenser is to be disconnected from the power supply
using a single pole switch, the gap between the contacts on this
switch must be sufficiently wide to guarantee full disconnection
under category III overload conditions.?
2 Do not use extension cables to connect the appliance.
3 To avoid any risks, if the power cable is damaged, it must
be replaced by the manufacturer, by an authorised technician
or by a similarly qualified person.
4 The dispenser is not suitable for outdoor use.
5 The dispenser must be installed in the upright position.
6 Before cleaning, always disconnect the dispenser by
removing the plug from the socket.
7 Always disconnect the dispenser before removing any of
the panels for cleaning or maintenance work.
8 Do not use a water jet to clean the dispenser.
9 This appliance must not be operated by children.
10 Do not let children play with the appliance.
11 This appliance must not be used by persons with reduced
physi cal , sen sory or me nta l cap abilities or with a lack of
experience and knowledge unless they have supervision or
have been trained regarding the safe use of the appliance and
understand the risks involved.
12 Only persons who know and have practical experience of
the appliance are permitted access to the inner components of
the dispenser, especially when dealing with issues regarding
safety and hygiene.
2 HYGIENIC SAFETY INSTRUCTIONS
1
This appliance is intended exclusively for domestic and
similar use.
2 For the appliance to operate correctly, room temperature
must be between +5° and +32°C.
3 Use the appliance to cool the indicated liquids only.
4 Do not introduce dangerous or toxic liquids to the appliance.
3 TECHNICAL CHARACTERISTICS
The electric diagram of the dispenser is located in the inner
part of the dispensing side panel.
Specifications are subject to change without notice.
4 INTRODUCTION
It is necessary to read all sections of this manual thoroughly to
familiarize yourself with all aspects of the unit.
Like all mechanical products, this machine will require cleaning
an d maintenance. Be si de s, di sp en se r working can be
compromised by operator’s mistakes during disassembly and
cleaning. It is strongly recommended that personnel in charge to
the equipment’s daily operations, disasse mbly, cleaning,
sanitizing and assembly, go through these procedures in order
t o be p r oper l y trai n e d and t o make s u re th a t no
misunderstandings exist.
5 INSTALLATION
1
Remove the corrugate container and packing materials and
keep them for possible future use.
Transparent removable bowls n 1 2 3
Capacity of each bowl, approx. l 6 6 6
Dimensions:
width cm 18 36 54
depth cm 47 47 47
height cm 65 65 65
Net weight, approx. kg 22 36 48
Gross weight, approx. kg 24 39 51
Adjustable thermostats n 1 2 3
Hermetic compressor
Air-cooled condenser
Overload protector
Noise level lower than 70 dB (A)
IMPORTANT
Read electrical ratings written on the data plate of the
individual units; the data plate is adhered on the dispensing side panel of the unit, just behind the drip tray (the
right side drip tray in multiple bowl models). The serial
number of the unit (preceded by the symbol #) is adhered
inside the left switch box. In the ETC model the serial
numbers are located underneath the machine or on the
evaporator holder level when the side panels are removed. Data plate specifications will always supersede the
information in this manual.
IMPORTANT
When handling the machine never grasp it by the bowls
or by the evaporator cylinders. The manufacturer refuses
all responsibilities for possible damages which may
occur through incorrect handling.
QUARK 2
QUARK 1
QUARK 3
Page 3
Q U A R K
E NG LI S H
12
2 Inspect the uncrated unit for any possible damage. If
damage is found, call the delivering carrier immediately to file a
claim.
3 Install the unit on a counter top that will support the
combined weight of dispenser and product bearing in mind
wh at i s st at ed i n th e pr ec eding point 1 IMPORTA NT
warning.
4 A minimum of 15 cm (6”) of free air space all around the unit
should be allowed to guarantee adequate ventilation.
5 Ensure that the legs are screwed tightly into the base of the
machine.
Replace the standard legs originally installed with the 100 mm
(4”) legs whenever they are provided with the unit.
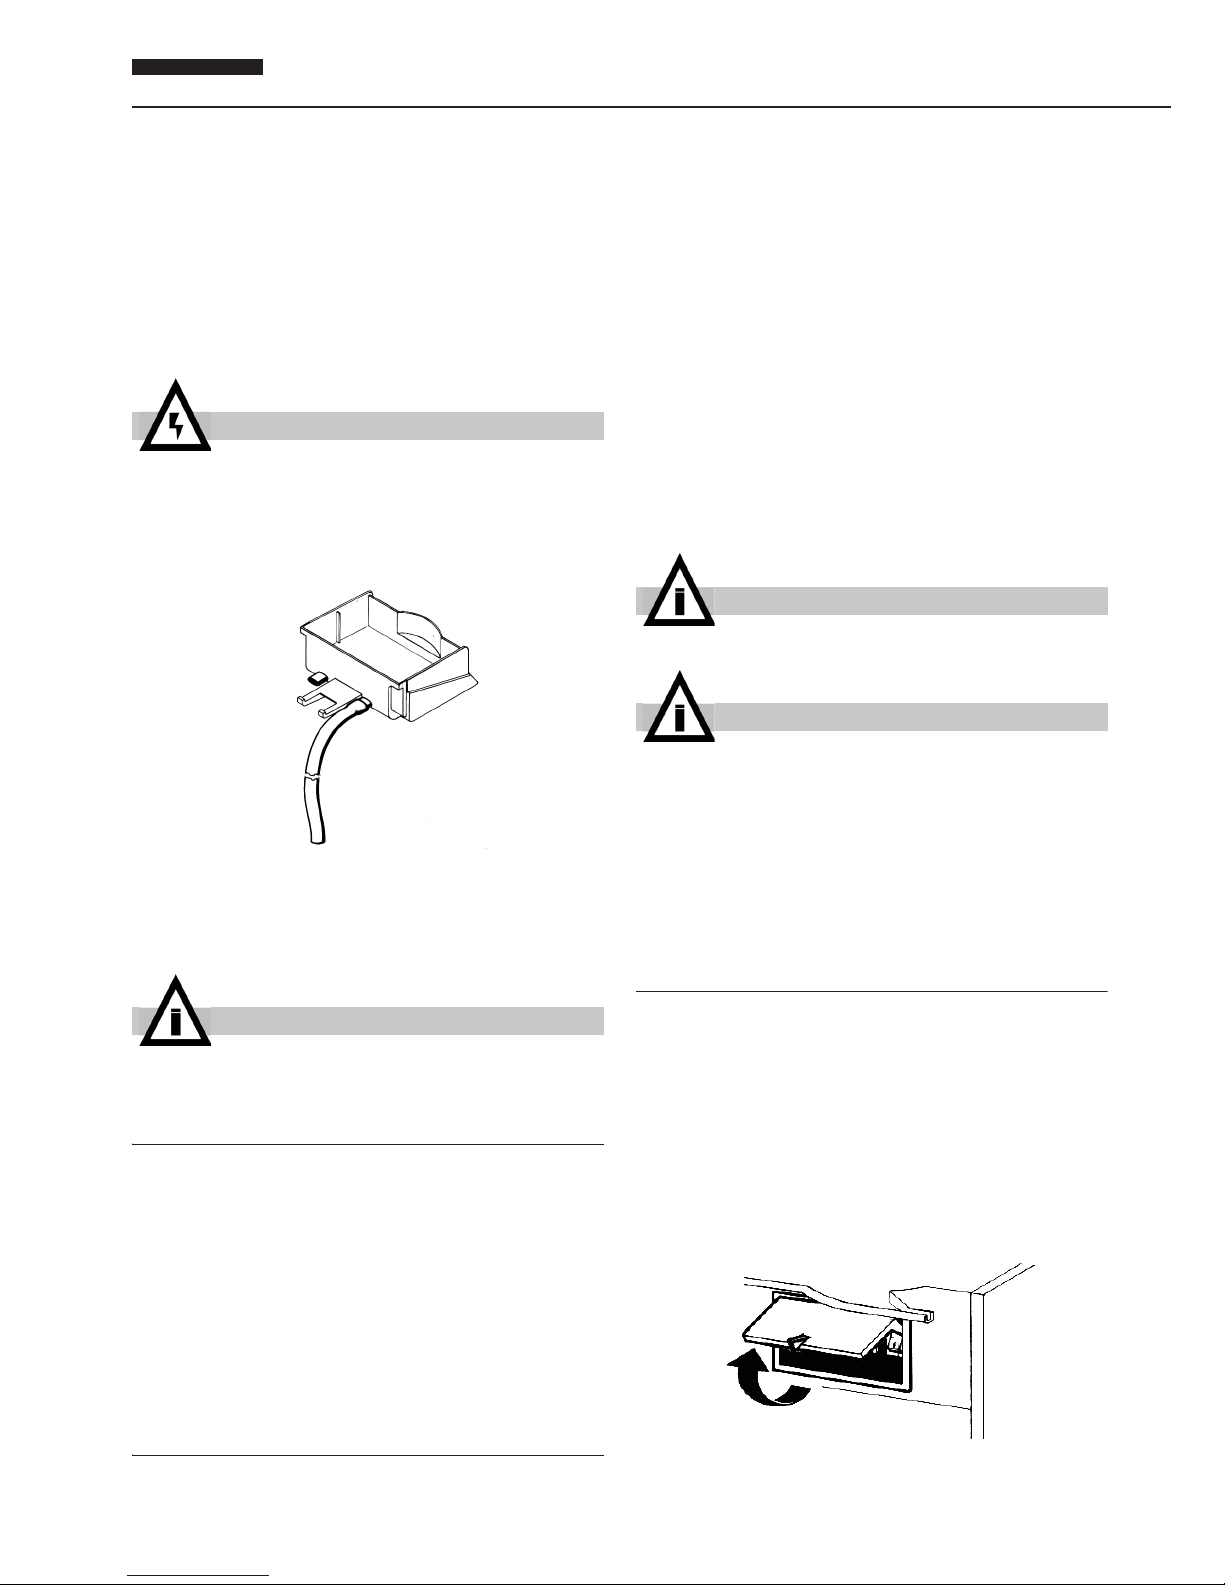
6 Each drip tray has two diaphragm plugs: if a continuous
drain is needed, perforate one of the drain plugs and connect it
to a flexible drain line (see figure 1).
figure 1
7 The unit doesn’t come presanitized from the factory. Before
se rving pro ducts, th e dispens er m ust be disa ssemble d,
cleaned and sanitized according to this handbook instructions
(chapter 5.3 CLEANING AND SANITAZING PROCEDURES).
6 TO OPERATE PROPERLY AND SAFELY
1
Do not operate the dispenser without reading this
operator’s manual.
2 Do not operate the dispenser unless it is properly
grounded.
3 Do not operate the dispenser unless all panels are
restrained with screws.
4 Do not put objects or fingers in panels louvers and faucet
outlet.
5 Do not remove bowls, augers and panels for cleaning or
routine maintenance unless the dispenser is disconnected from
its power source.
6 The cover must be always closed.
7 OPERATING PROCEDURES
1 Clean and sanitize the unit according to the instructions in
this manual. See chapter 5.3 CLEANING AND SANITIZING
PROCEDURES.
2 Fill the bowls with product to the maximum level mark. Do
not overfill.
The exact quantity of product (expressed as liters and gallons)
is shown by marks on the bowl.
3 In case of products to be diluted with water, pour water into
bowl first, then add correct quantity of product . In case of
natural squashes, it is advisable to strain them, in order to
prevent pulps from obstructing the faucet outlet.
4 To obtain the best performance and result, use bases
designed to be run in Granita freezers. Such bases have a
sugar content of 34 degrees B aum é correspondin g to 64
degrees Brix .
For soft drinks the bases are to be diluted with more water, on a
1 plus 5/5.5 basis.
In any case follow the syrup manufacturer’s instructions for
both Granita and soft drink recipes.
If natural juices (e.g. lemon, o range) as well as s ugarless
products (e.g. coffee) are used, dissolve 150 - 200 grams of
sugar per liter.
5 Set the control switches as shown in chapter
5.1 DESCRIPTION OF CONTROLS.
6 Always leave the dispenser on, as the refrigeration stops
automatically when Granita reaches the proper thickness. The
mixers will continue to turn.
7. 1 DESCRIPTION OF CONTROLS
The dispenser is equipped with a power switch. In addition each
bowl is individually operated by a mixer/refrigeration switch. In
fact it is possible to dispense both soft drinks and Granita.
When a bowl is in Soft Drink mode the beverage temperature is
controlled by the corresponding thermostat.
When a bowl is in Granita mode the mix viscosity is controlled
by the corresponding adjustment screw located in the rear wall
of each container (for temperature and viscosity setting make
reference to chapter 5.2 OPERATION HELPFUL HINTS).
All the switches are located on the faucet side of the dispenser
in switch panels protected by switch covers (see figure 2).
figure 2
With reference to figure 3 dispenser controls functions are as
ATTENTION
Failure to provide proper electrical ground according to
applicable electrical codes could result in serious shock
hazard.
IMPORTANT
Install the dispenser so that the plug is easily accessible.
IMPORTANT
Operate the dispenser with food products only.
IMPORTANT
However Granita mix may be done, its Brix (sugar percent content) must be at least 13.
Page 4

13
follows:
figure 3
Power switch (A)
Mixer/refrigeration switch (B)
Thermostat (D)
To operate the unit:
1 Set the power switch to I position.
2 Set the mixer/refrigeration switches as follows:
- to the I position to get soft drink.
- to the II position to get Granita.
ETC VERSION:
Dispenser controls functions are as follows (see figure 2).
figure 4
Power switch (A)
Mixer/Refrigeration switches ( C) and (D)
In machines with several tanks, pressing the key relating to the
activated operating mode will then make it possible to switch off
both mixing and freezing of the corresponding tank. As a result,
the mixer will stop and the two indicator lights (E) and (F) will
switch off. Pressing one of the two keys (C) or (D) makes it
possible to reactivate the corresponding function.
Thermostat (B)
It displays the temperature of product inside the bowl.
Temperature alarm : if the temperature on display flashes, it
me ans th at pro duct remain ed for a ce rtain period at a
temperature high er than the ma x. admitted conservation
temperature , and therefore it is necessary to check the product
conditions.
Press for three seconds the button (D) to reset the display .
Cleaning mode: hold down key (C) for three seconds to enable
CLEANING mode, during which the display shows " --.-- ". In
this mode, the mixer turns but the cooling is not enabled. This
function is useful during machine rinsing, washing and sanitising
to prevent the contents of the unit from being cooled. It is
nonetheless always possible to quit cleaning mode simply by
pressing any key.
Temperatur e ad justment in DRINK mode: the optim al
temperature of drinks (when the dispenser works as a drinks
cooler rather than as an ice crusher) is factory set to 4°C. If you
want to adjust the temperature, hold down keys (C) and (D)
simultaneously for two seconds. The indicator light (E) and the
temperature set will flash and you can adjust it using keys (C)
and (D). The display will go blank for a few seconds and then the
current temperature will be displayed.
Minimum temperature adjustment in GRANITA mode: you
can also adjust the minimum temperature of the product when
the dispenser is operating in granita mode. This minimum
temperature is factory set to -10°C. If you want to adjust it, hold
down keys (C) and (D) simultaneously for two seconds to go into
drink temperature adjustment mode and the indicator light (E)
will flash. Press keys (C) and (D) for two seconds to go into
grani ta m inimum tempe ratur e adjustment mod e an d th e
indicator light (F) and temperature set will flash. You can adjust
the temperature using keys (C) and (D). The display will go
blank for a few seconds and then the current temperature will be
displayed.
To operate the unit :
Set the power switch to I position
For each container select :
-Button (C) to get cold drink ( without freezing it)
-Button (D) to get slush
Cleaning function: during sanitizing operations, it may be useful
to have the mixers turning , without cooling. To get this, press for
three seconds the button (C ) : the display of thermostat will
show "--.-- "
By pressing any button, the dispenser will get out from cleaning
function and will operate normally.
7. 2 OPERATION HELPFUL HINTS
1 Granita viscosity adjustment: proper Granita viscosity is
0 position : power is turned OFF to all functions.
I position : power is turned ON to all functions and the
other switches are enabled. The fan motor
runs.
I position : mixer and refrigeration ON.
SOFT DRINK mode.
0 position : OFF.
II position : mixer and refrigeration ON.
GRANITA mode.
Turn clockwise : to decrease temperature
Turn counterclockwise : to increase temperature
0 position : power is turned OFF to all functions.
I position : power is turned ON to all functions . The
fan motor runs. On single bowl machines
mixers run too.
Switch C : if pressed it activates the function 'DRINK'.
In this case the (E) led lights up.
Switch D : if pressed it activates the function 'SLUSH'.
In this case the (F) led lights up.
IMPORTANT
If the dispenser is switched on when bowls contain products at a temperature higher than conservation temperature, the display will flash. To have a fixed display , it
is necessary to press for three seconds the button (D).
IMPORTANT
Conservation temperature is set at the factory at 4°C.
Page 5

Q U A R K
E NG LI S H
14
factory preset. To ch ang e the viscosity, if n eeded, u se a
standard screwdriver to turn the adjustment screw located in
the rear wall of each container as follows (see figure 5):
- towards right (clockwise) to obtain a thicker product (the indicator F will go down in opening G).
- towards left (counterclockwise) to obtain a thinner product
(the indicator F will go up in opening G).
figure 5
2 Temperature adjustment: the optimal temperature of
drinks (when the dispenser works as a drinks cooler rather than
as an ice crusher) is factory set. If you want to adjust this
temperature, turn the knob in each switch box:
- to the right (clockwise) for a cooler drink.
- to the right (anticlockwise) for a less cool drink.
Not e : be ver a ge t emp e rat u re i s co ntr o lle d by t he
thermostat only when the mixer/refrigeration switch(es)
are in I position, Soft Drink mode.
3 The length of time for freeze down of Granita is governed by
many variables, suc h as ambient tem perature, m ix initial
temperature, sugar content (Brix level) and viscosity setting.
4 To shorten Granita recovery time and increase productivity,
it is ad visable to pre- chill the pro duct to be used in the
dispenser.
5 To shorten Granita recovery time and increase productivity,
the bowl should be refilled after the product level drops lower
than half of the evaporator cylinder and at the start of each day.
6 For good product conservation the dispenser must run
overnight, at least in Soft Drink mode.
If this is not possible and product is left in the bowls overnight,
the mixer/refrigeration switches must be set to the I position at
least one hour before the unit is switched off. This eliminates
any block of iced product forming overnight, which could result
in damage to mixers or to their motor when the unit is switched
back on. In any case, before the unit is restarted, make sure
that no blocks of ice have been formed; if so, they are to be
removed before the unit is switched on. Overnight operation in
drink mode also eliminates possible ice accumulation from
condensation all around the bowls.
7 Mixers must not be turned off when frozen product is in the
bowl: if not agitated, the product may freeze to a solid block of
ice. If the mixers are turned back on in this situation, damage to
the mixers and their motor may result. Therefore, mixers may
be restarted only after product is melted.
8 The dispenser is equipped with a magnetic coupling by
which the gear motor (located outside the bowl) drives the
mixers (inside the bowl).
The magnetic drive operates as an “intelligent clutch” able
to automatically disconnect the mixers in case they are seized
by ice or other causes.
This inconvenience can be soon noticed since an intermittent
dull noise warns that mixers are still.
In th is case it i s nec es sa ry to unpl ug imme di at el y t he
dispenser, empty the bowl and eliminate the cause of seizing.
9 The dispenser must be able to emit heat.
In case it seems excessive, check that no heating source is
close to the unit and air flow through the slotted panels is not
obstructed by wall or boxes. Allow at least 15 cm (6”) of free
clearance all around the dispenser.
In any case if the pr oduct in the bowl s is fr ozen and the
pr essur e switc h warni ng light is OFF the un it is run ning
properly.
10 The product is for use with confectionery only.
7. 3 CLEANING AND SANITIZING
PROCEDURES
1
Cleaning and sanitizing of the dispenser are recommended
to guarantee the conservation of the best product taste and the
highest unit efficiency. This section is a procedural guideline
only and is subject to the requirements of the local Health
Authorities.
2 Prior to the disassembly and cleaning, the machine must be
emptied of product. To do this proceed as follows:
- set the power switch to I position
- set mixer/refrigeration switch(es) to I position (Soft Drink
mode)
- place a pail under each faucet and drain all product from
bowls
- set all control switches to the 0 position
7. 3. 1 DISASSEMBLY
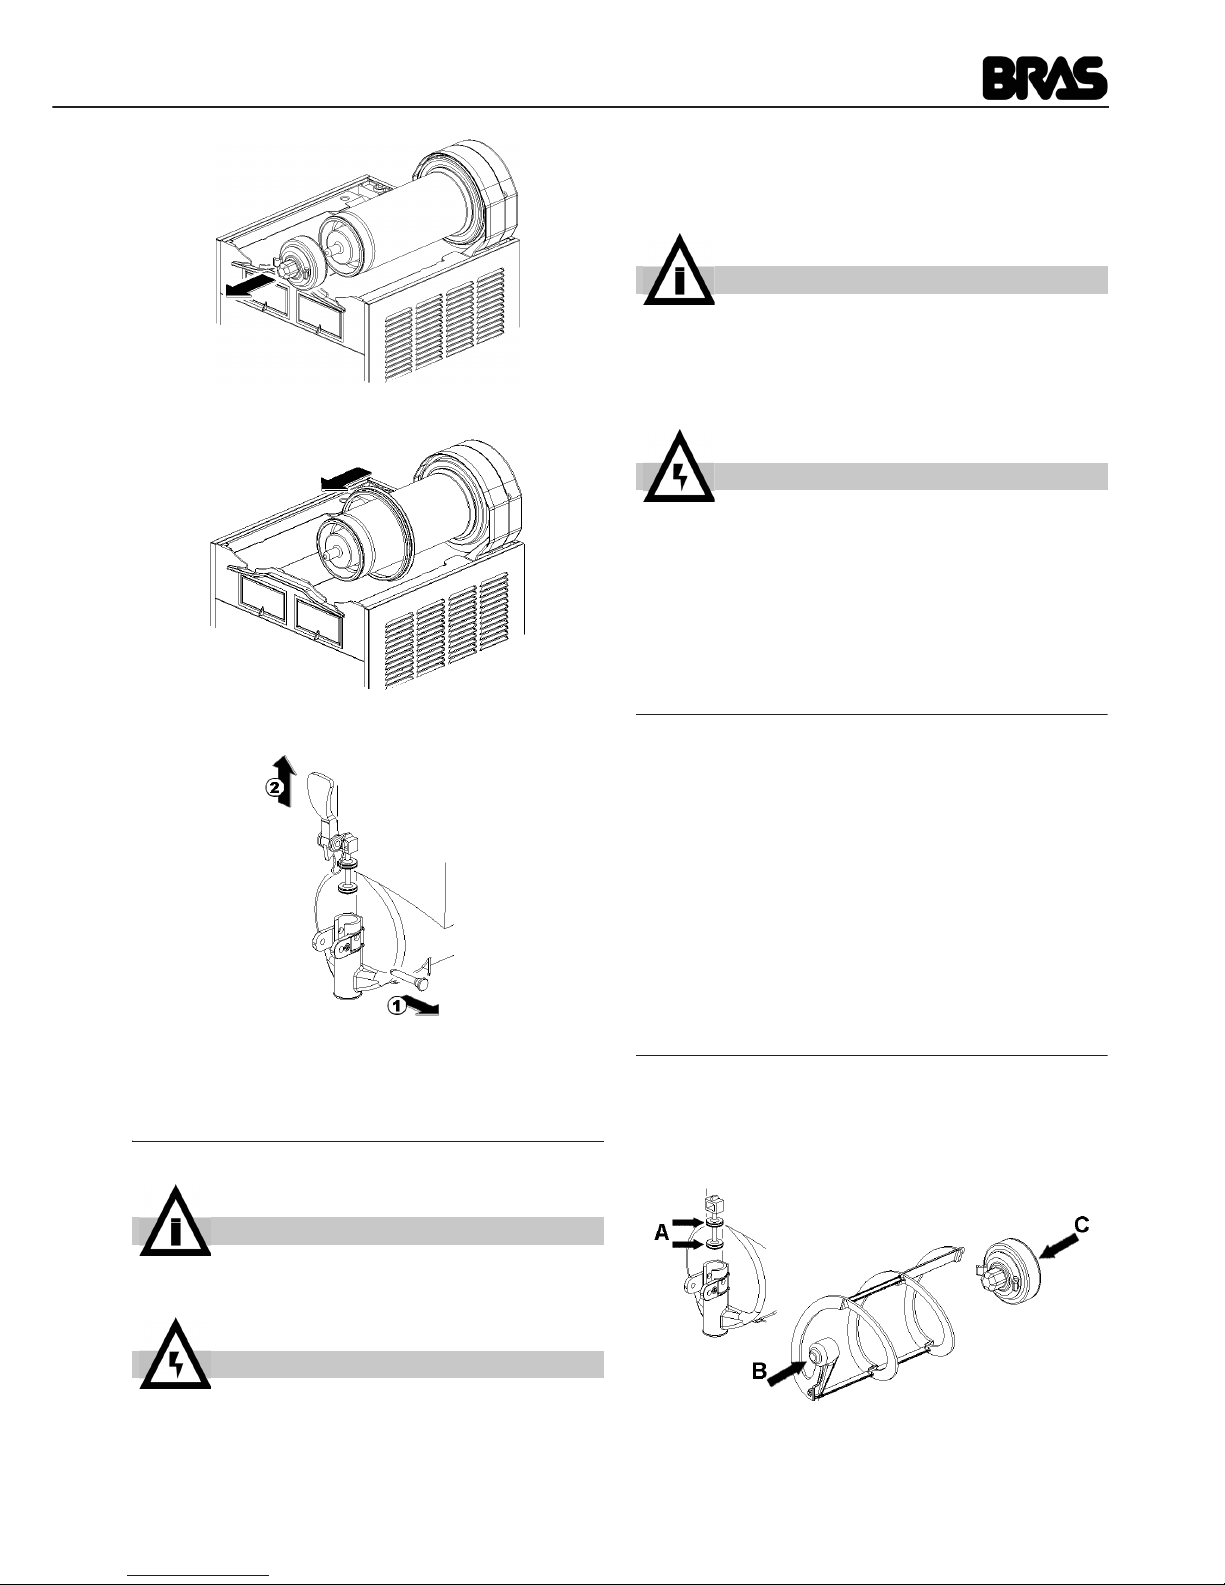
1 Remove cover from the bowl.
2 Remove the bowl by lifting its faucet side up and off the
fastening hooks (see figure 6) and slide it out (see figure 7).
figure 6
figure 7
3 Slide the outer spiral out (see 3) and then Outside magnetic
rotor assembly (see figure 9).
figure 8
ATTENTION
Before any disassembly and/or cleaning procedure make
sure that the dispenser is disconnected from its power
source by unplugging it.
Page 6
15
figure 9
4 Remove the bowl gasket from its seat (see figure 10).
figure 10
5 Dismantle the faucet assembly (see figure 11).
figure 11
6 Slide the drip tray out and empty it.
7. 3. 2 CLEANING
1
Prepare at least two gallons of a mild cleaning solution of
warm (45-60 °C 120-140 °F) potable water and dishwashing
detergent. Do not use abrasive detergent.
Important: if present, follow label directions, as too strong a
solution can cause parts damage, while too mild a solution will
not provide adequate cleaning.
2 Using a brush, suitable for the purpose, thoroughly clean all
disassembled parts in the cleaning solution.
3 In the same manner clean the evaporator cylinder(s) using
a soft bristle brush.
4 Rinse all cleaned parts with cool clean water.
7. 3. 3 SANITIZING
Sanit izing s hou ld be performe d immed iately prior t o
starting the mach ine . Do n ot allow the uni t to s it for
extended periods of time after sanitization.
1 Wash hands with a suitable antibacterial soap.
2 Prepare at least two gallons of a warm (45-60 °C 120-
14 0 ° F) saniti zi ng s olution (10 0 PP M av ailable chl or ine
concentration or 1 spoon of sodium hypoclorite diluted with two
litres of water) according to your loc al Health Code s and
manufacturer’s specifications.
3 Place the parts in the sanitizing solution for five minutes.
4 Place the sanitized parts on a clean dry surface to air dry.
5 Wipe clean all exterior surfaces of the unit. Do not use
abrasive cleaner.
7. 3. 4 ASSEMBLY
1
Slide the drip tray into place.
2 Lubricate faucet piston, outer spiral and outside magnetic
rotor (see points A, B and C of figure 12) only with the grease
supplied by the manufacturer or other food grade approved
lubricant.
figure 12
3 Assemble the faucet by reversing the disassembly steps
(see figure 11)
4 Fit bowl gasket around its seat.
Note: the largest brim of gasket must face against the rear wall
IMPORTANT
Do not attempt to wash any machine components in a
dishwasher.
ATTENTION
Before any disassembly and/or cleaning procedure make
sure that the dispenser is disconnected from its power
source.
IMPORTANT
In order to prevent any damages to the dispenser use
only a detergent suitable with plastics parts.
ATTENTION
When cleaning the machine, dump it, do not allow excessive amounts of water around the electrically operated
components of the unit. Electrical shock or damage to
the machine may result.
Page 7

Q U A R K
E NG LI S H
16
(see figure 13).
figure 13
5 Insert the magnetic outside rotor in the evaporator taking
care to accompany it to the end (see figure 14).
figure 14
6 Install the outer spiral. Slide it over the evaporator until its
hexagonal front notch engages with the hexagonal exposed
end of the magnetic outside rotor
(see figure 15).
figure 15
7 Push the bowl towards the rear wall of the unit until it fits
snugly around the gasket and its front fastening hooks are
properly engaged (see figure 16).
figure 16
8 Use fresh product to chase any remaining sanitizer from the
bottom of the bowl(s). Drain this solution. Do not rinse out the
machine.
7. 4 IN-PLACE SANITIZATION
The In-Place Sanitization prior to starting the machine may
be performed, if needed, only as further precaution, in
addition to the Disassembled Parts Sanitization described
before, but never in lieu of it.
1 Prepare two gallons of a warm (45-60°C, 120-140 °F)
sanitizing solution (100 PPM chlorine residual) according to
your local Health Codes and manufacturer’s specifications.
2 Pour the solution into the bowl(s).
3 Using a brush suitable for the purpose, wipe the solution on
all surfaces protruding above the solution-level and on the
underside of the top cover(s).
4 Install the top cover(s) and operate the unit. Allow the
solution to agitate for about two minutes. Drain the solution out
of the bowl(s).
5 Use fresh product to chase any remaining sanitizer from the
bottom of the bowl(s). Drain this solution. Do not rinse out the
machine.
8 ROUTINE MAINTENANCE
1
Daily: inspect the machine for signs of product leaks past
seals and gaskets. If proper assembly does not stop leaks
around seals or gaskets, check for improper lubrication, worn
or damaged parts. Replace parts as needed.
2 In case of noise it needs to unplug the cooler and call for
service.
3 In case of failure unplug the machine, because unexpected
start again would be possible.
4 It needs to fix everything back in the initial position after any
repairmen, like screws and covers.
8. 1 MAINTENANCE (TO BE CARRIED
OUT BY QUALIFIED SERVICE
PERSONNEL ONLY)
1
Annually: remove the panels and clean the inside of the
machine including the base, side panels, condenser, etc.
2 Annually: Check if the auger bushings are worn out or
ovalized. If they are, replace them with new ones.
3 Never remove the insulating jacket from around the suction
tubing of the evaporator (the copper tubing located on the right
side of gear motor). In case the insulating jacket is missing
replace the entire parts with origin al spa re par ts fro m the
supplier.
4 In order to prevent any damages to the dispenser, all
plastics parts must be lubricated only with grease supplied by
the manufacturer or with another lubricating product suitable for
polycarbonate
.
ATTENTION
In case of damages, the power cord must be replaced by
qualified personnel only in order to prevent any shock
hazard.
ATTENTION
Before any disassembly and/or cleaning procedure make
sure that the dispenser is disconnected from its power
source by unplugging it.
ATTENTION
Condenser fins are very sharp. Use extreme caution
when cleaning.
 Loading...