

Page 1
Fé vr ie r 20 09
Page 2
1
FR
pas dépasser la limite de puissance
mentionnée sur l’adaptateur.
• Après avoir enlevé l’emballage, vérifier
que l’appareil est en parfait état, en
cas de doute, s’adresser au Service
d’Assistance Technique le plus proche.
• Les éléments de l’emballage (sacs en
plastique, polystyrène, etc.) ne doivent
pas être laissés à la portée des enfants,
car ils peuvent représenter un danger.
• Cet appareil est destiné uniquement
à un usage domestique. Toute autre
utilisation est considérée inappropriée
et dangereuse.
• Le fabricant ne saurait être tenu
pour responsable des dommages
pouvant survenir à la suite de l’usage
inapproprié, erroné, peu correct ou des
réparations effectuées par du personnel
non- qualifié.
• Ne pas toucher l’appareil avec les
mains ou les pieds mouillés ou
humides.
• Éloigner l’appareil de l’eau ou de tout
autre liquide, afin d’éviter tout risque de
décharge électrique. Ne pas brancher
l’appareil ci ce dernier se trouve sur une
surface humide.
• Déposer l’appareil sur une surface
sèche, lisse et stable.
• Ne jamais laisser l’appareil sans
surveillance à la portée d’enfants ou de
personnes handicapées.
• Cet appareil n’a pas été conçu pour
son usage par des personnes (enfants
y compris) aux capacités physiques,
sensorielles ou mentales réduites, ou
sans expérience ou connaissance ; à
moins de l’utiliser sous surveillance ou
après avoir été dûment instruites sur
son mode d’emploi par une personne
responsable de leur sécurité.
• Veillez à ne pas laisser les enfants jouer
avec l’appareil.
• Pour une plus grande protection, il est
recommandé d’installer un dispositif
de courant résiduel (RCD) à courant
résiduel opérationnel ne dépassant pas
les 30 mA. Consultez votre installateur.
• Ne pas abandonner l’appareil allumé,
car il peut représenter une source de
danger.
• Avant d’utiliser cet appareil pour la
première fois, lire attentivement ce
Mode d’Emploi et le garder pour de
postérieures consultations.
• Vérifier que la tension du secteur
correspond bien à celle indiquée sur la
plaque signalétique de l’appareil.
• En cas d’incompatibilité entre la prise
de courant et la fiche de l’appareil,
remplacer la prise par une autre
qui convient en s’adressant à un
professionnel qualifié.
• La sécurité électrique de l’appareil est
garantie seulement s’il est raccordé à
une installation de terre efficace, tout
comme le prévoient les normes de
sécurité électrique en vigueur. En cas
de doute, s’adresser à du personnel
professionnellement qualifié.
• L’utilisation d’adaptateurs et/ou de
rallonges est déconseillée. Si ces
éléments s’avéraient indispensables,
utiliser seulement des adaptateurs et
des rallonges qui respectent les normes
de sécurité en vigueur. Veiller à ne
3. PRESCRIPTIONS DE SÉCURITÉ
Fig. A
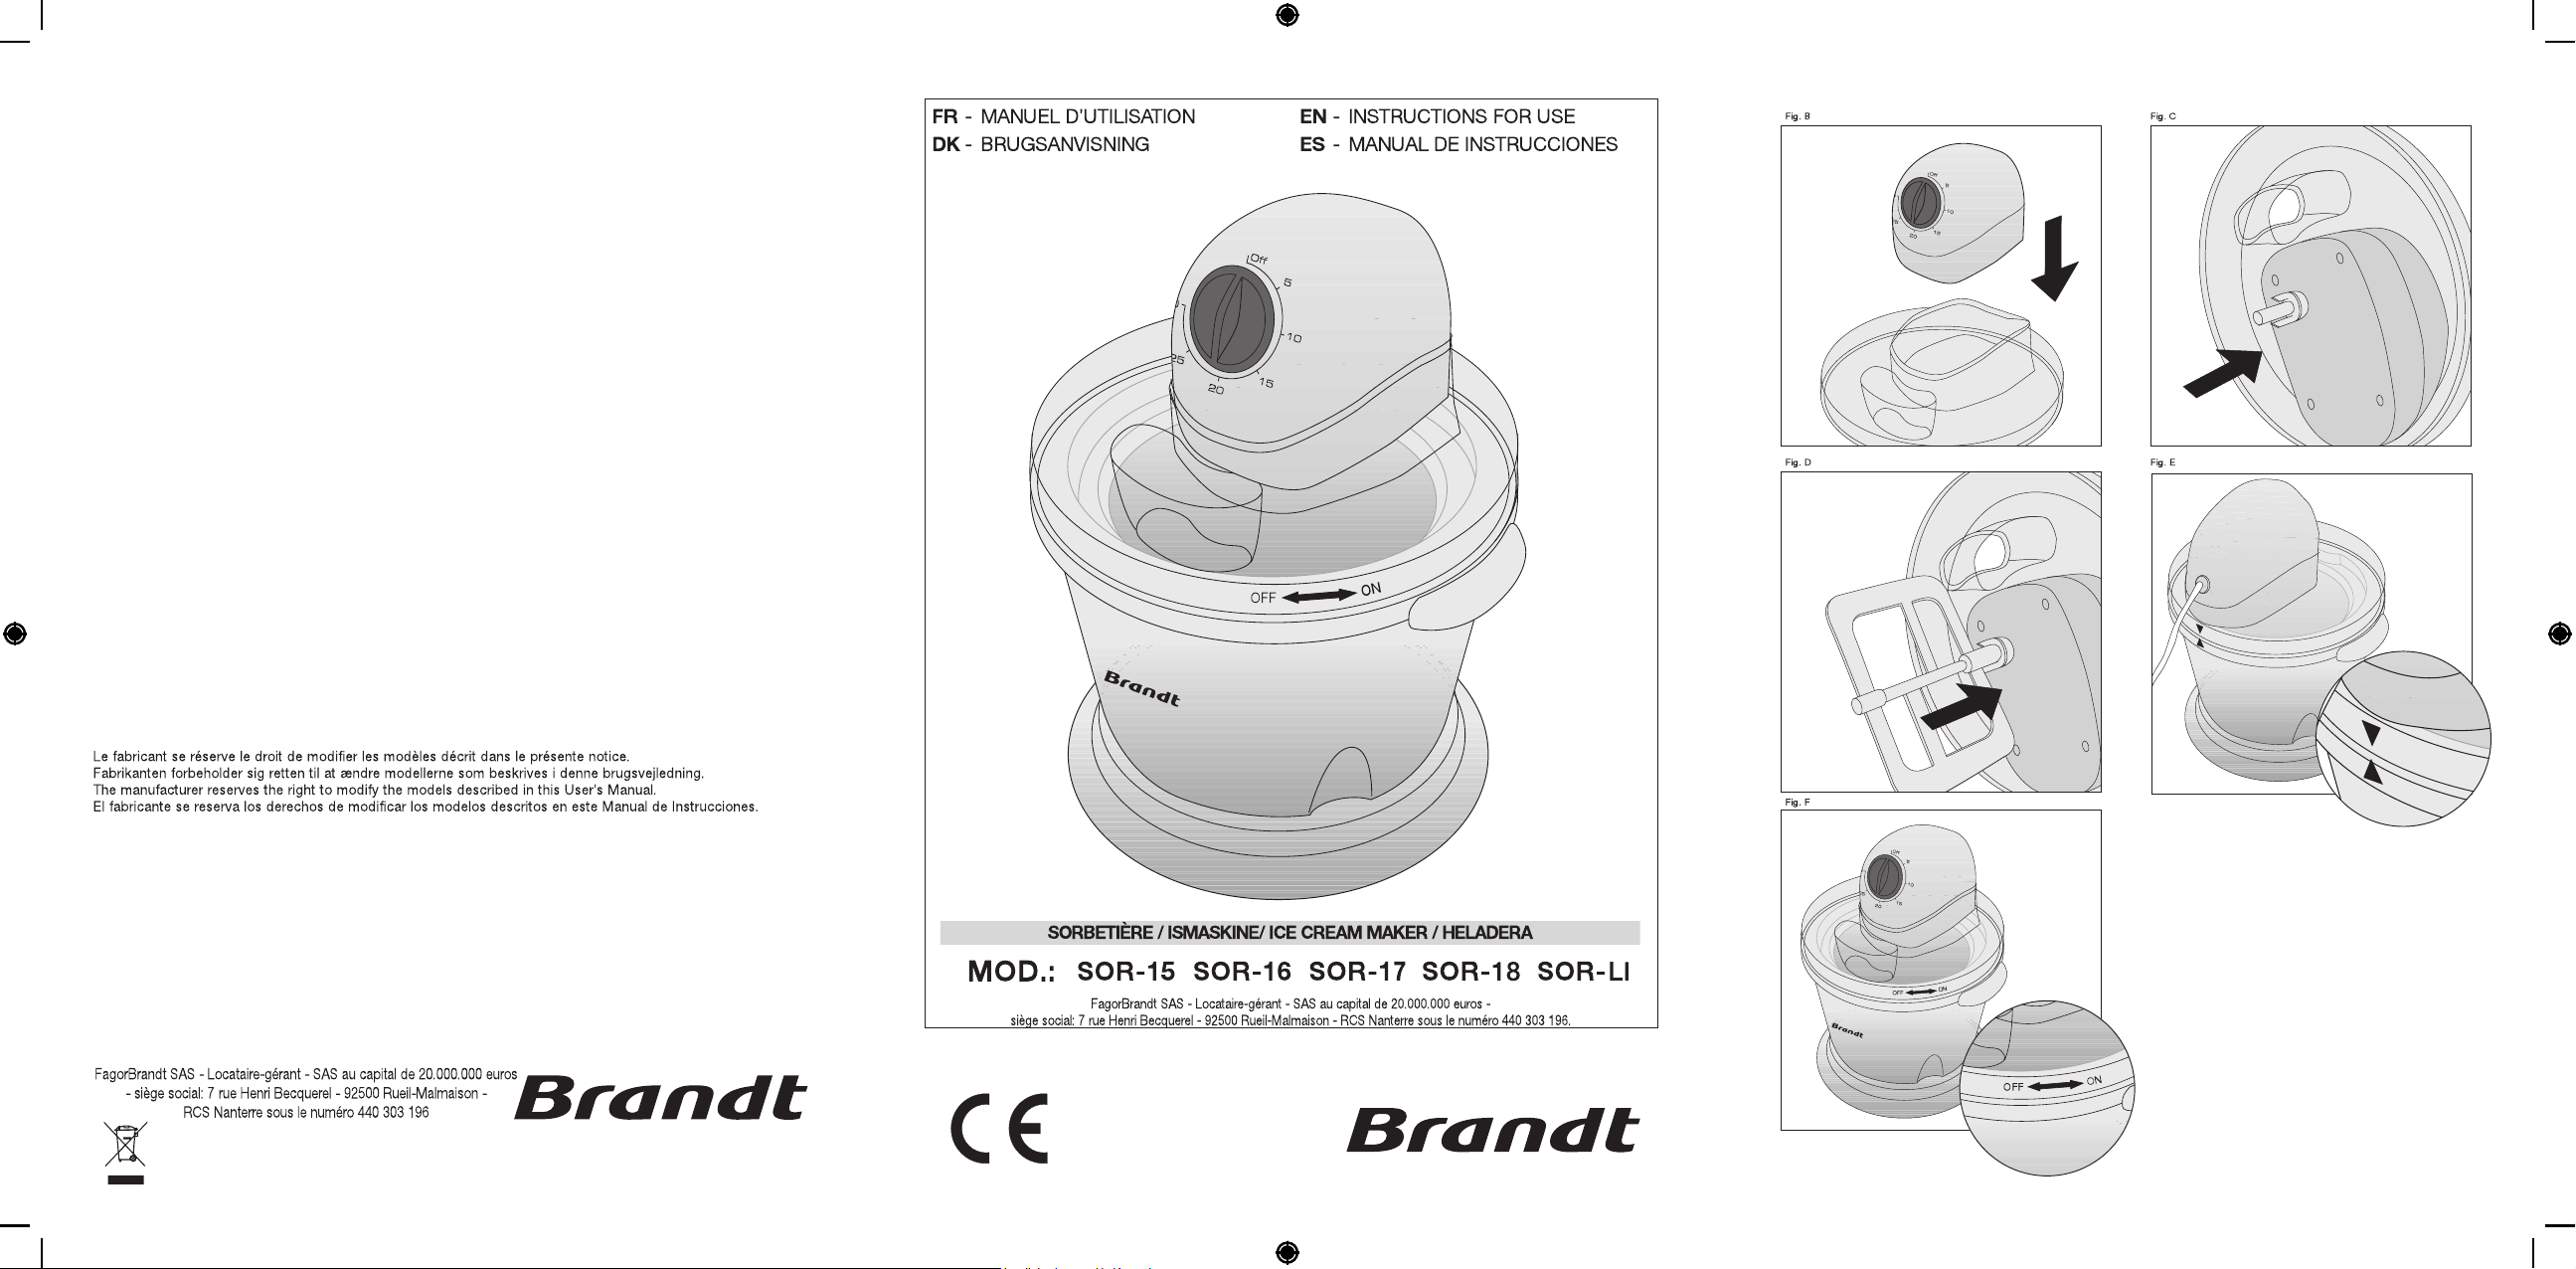
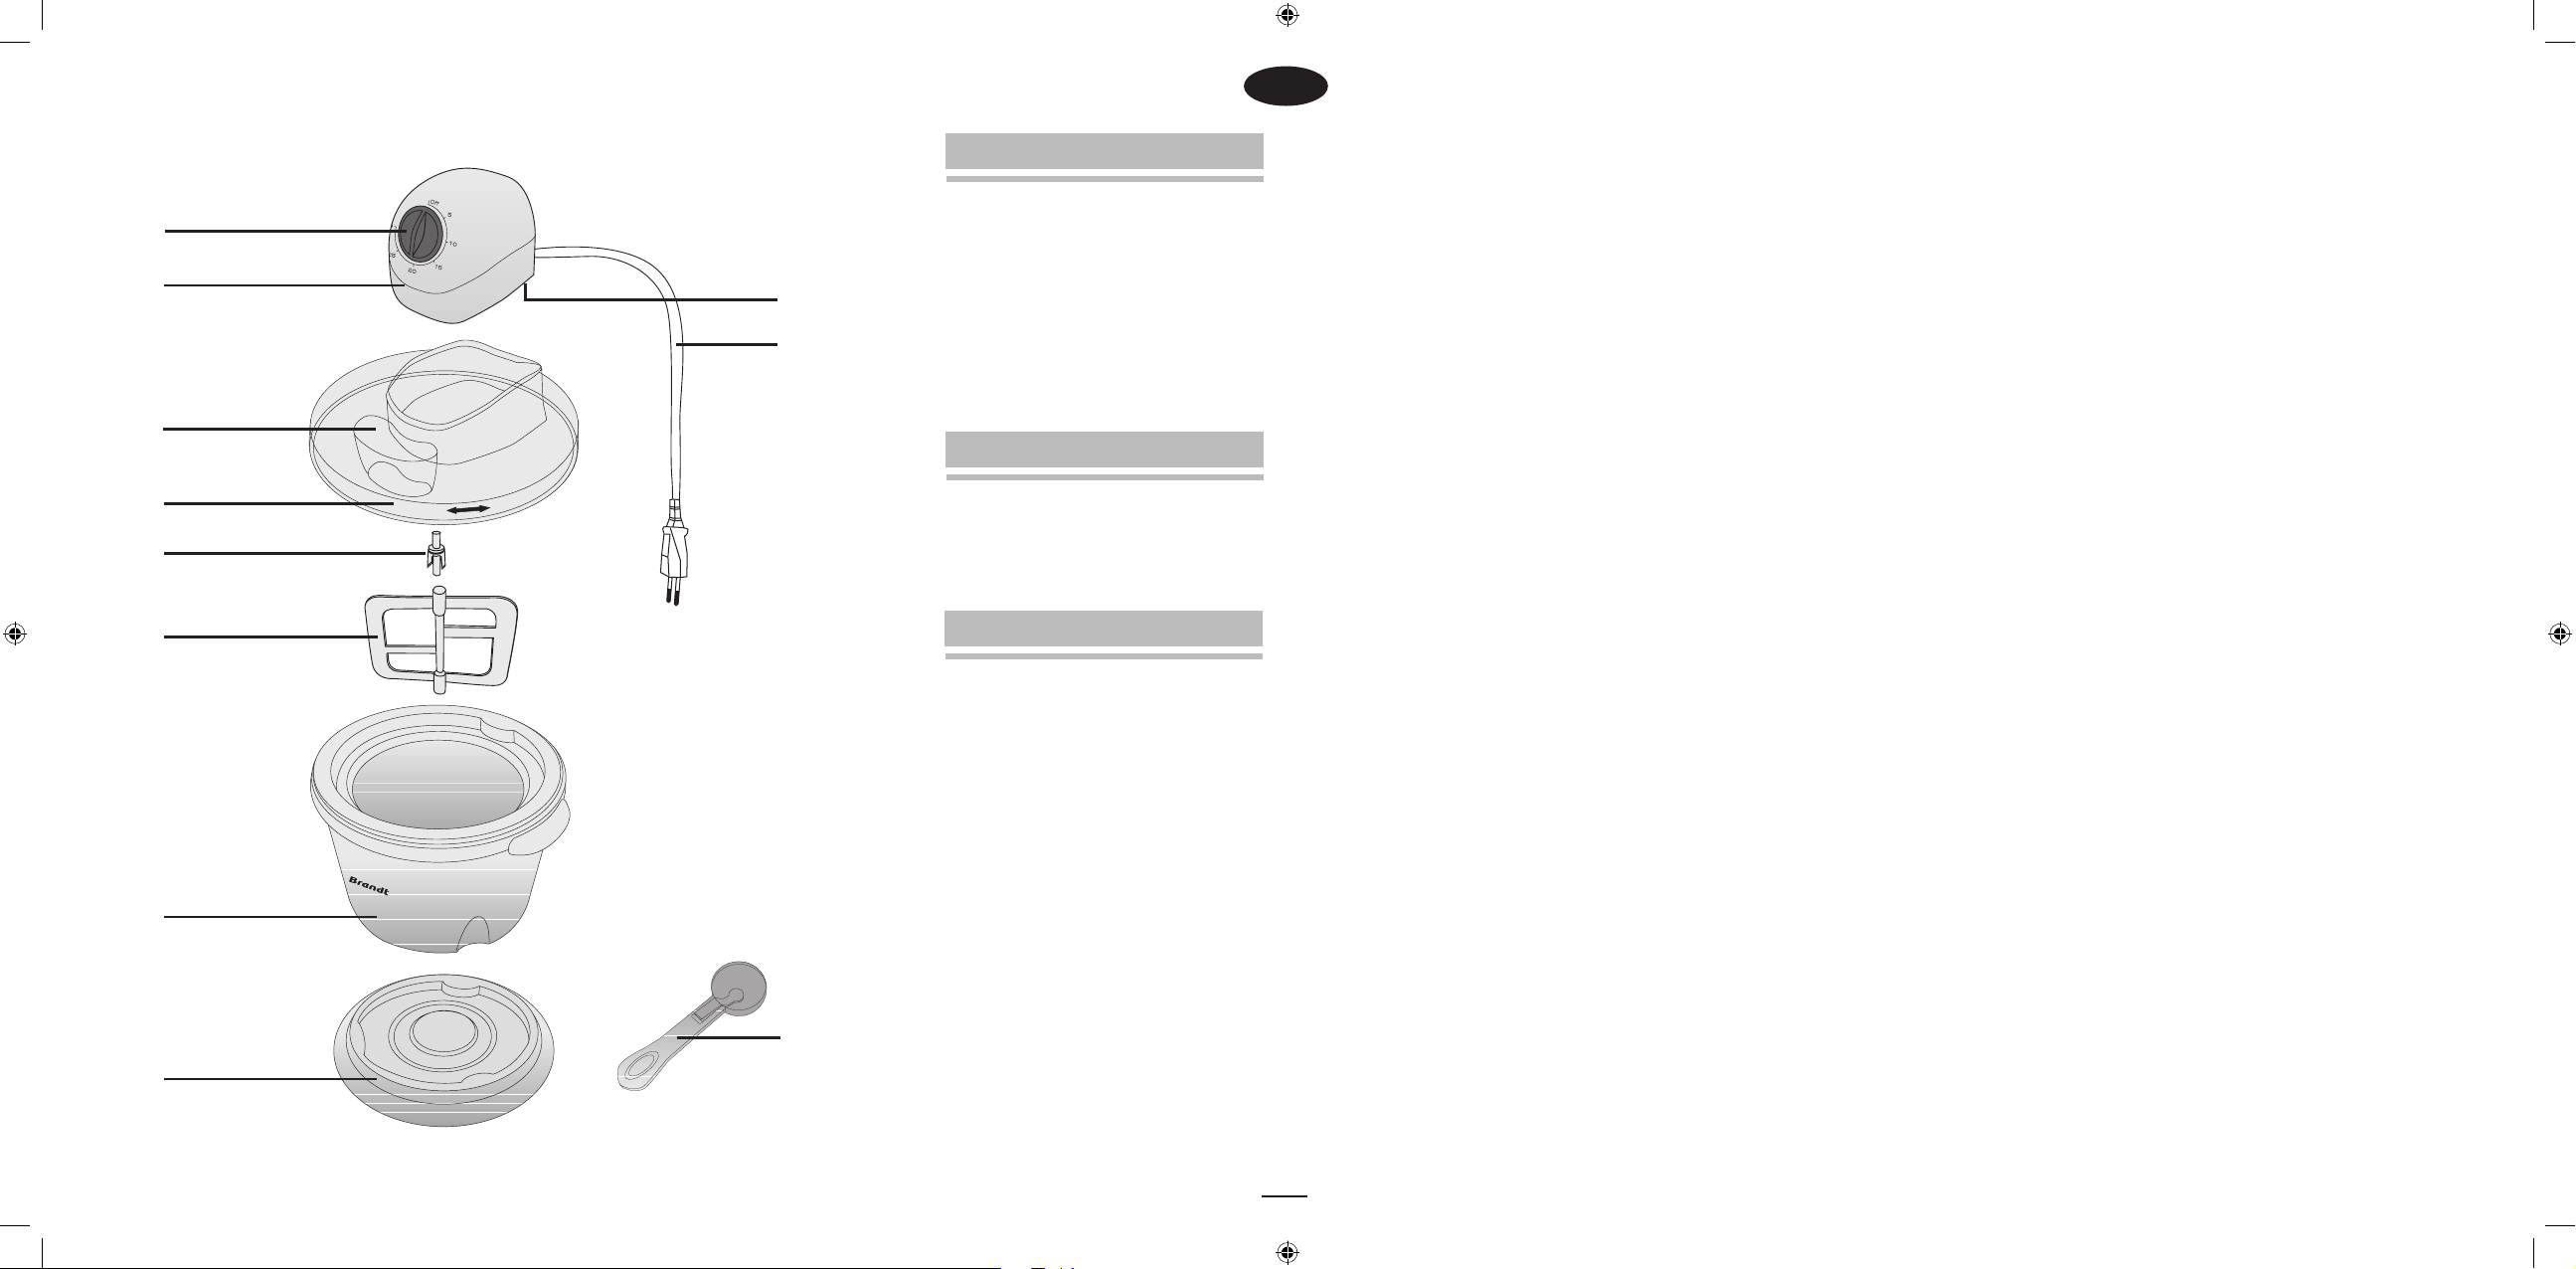
1. Minuterie
2. Moteur
3. Entrée des ingrédients
4. Couvercle
5. Axe
6. Mélangeur
7. Bol
8. Base
9. Micro-interrupteur
10. Cordon d’alimentation
11. Cuillère à boules
1. DESCRIPTION
Voir plaque signalétique.
Cet appareil est conforme aux
Directives Européennes de Compatibilité
Électromagnétique et de Basse Tension.
2. CARACTÉRISTIQUES TECHNIQUES
1
2
3
4
5
6
7
8
11
10
OFF
ON
9
Page 3

2
• Pour débrancher la fiche, ne jamais tirer
sur le cordon.
• Débrancher l’appareil avant d’effectuer
toute opération de nettoyage ou de
maintenance.
• En cas de panne et/ou de mauvais
fonctionnement de l’appareil, éteindre
ce dernier et ne pas essayer de le
réparer. S’il requiert une réparation,
s’adresser uniquement à un Service
d’Assistance Technique agréé par le
fabricant et demander à utiliser des
pièces de rechange originales.
• Si le cordon de l’appareil est
endommagé, s’adresser à un Service
d’Assistance Technique agréé par le
fabricant pour le faire remplacer.
• Ne pas le laisser cet appareil exposé
aux intempéries (pluie, soleil, givre,
etc.).
• Ne pas utiliser l’appareil et ne placer
aucune de ses parties sur des surfaces
chaudes ou près de celles-ci (plaques
de cuisson à gaz ou électriques ou
fours).
• Ne pas utiliser de produits abrasifs pour
nettoyer l’appareil.
• Ne pas toucher les parties chaudes de
l’appareil. Saisir toujours l’appareil par
la poignée.
• Éviter que le cordon ne touche les
parties chaudes de l’appareil.
• Ne versez pas d’eau ni d’ingrédients
chauds dans le bol.
• Placez la glacière sur une surface
propre, ferme et stable, loin de l’eau et
de l’humidité.
• Ne plongez pas le moteur dans l’eau ni
dans aucun autre liquide.
• Ne recongelez pas une glace qui a été
décongelée.
• Avant d’utiliser l’appareil congelez
toujours le bol vide durant au moins 12
heures.
• Ne remplissez pas le bol à plus de la
moitié de sa contenance.
• Une fois le bol congelé, tenez-le
avec un linge sec. Ne touchez pas
l’intérieur du bol congelé avec les
mains mouillées ou humides, vos doigts
peuvent coller au métal.
1. Avant d’utiliser l’appareil pour la
première fois, lavez la base
(8), le
couvercle
(4), le mélangeur (6) et le
bol
(7), à l’eau tiède et avec du savon
liquide. N’utilisez pas de produits
abrasifs ni d’éponges métalliques.
Ne
plongez pas le moteur dans l’eau ni
dans aucun autre liquide.
2. Le liquide intérieur du bol doit être
congelé avant de commencer à faire
de la glace. Mettez le bol
(7) dans le
congélateur durant au moins 12 heures
pour congeler le liquide intérieur du
récipient et monter la sorbetière.
• Avertissement: Une fois le bol congelé
(7), Ne touchez pas l’intérieur du bol
congelé avec les mains mouillées ou
humides, vos doigts peuvent coller au
métal. Il est important de prendre le bol
avec un linge sec.
3. Placez la base (8) sur une surface plane
et stable et placez le bol
(7) sur la base
(8).
4. Insérez le moteur (2) dans la cavité du
couvercle
(4) en appuyant fermement
pour qu’il s’encastre bien
(fig. B).
5. Introduisez l’axe (5) dans le trou du
moteur (2) et enclenchez le mélangeur
(6) dans l’axe (fig. C & D).
6. Placez le couvercle (4) sur le bol (7).
Sur le couvercle, vous verrez la flèche
▼ située sous le cordon d’alimentation
(10) qui devra être alignée avec la
flèche
▲, située sur le bol (fig. E). Les
quatre pôles du couvercle se situeront
face aux quatre trous de la partie
supérieure du bol. Pour bloquer le
couvercle, vous devrez le tourner vers
la position ON
(fig. F).
Important: Si le couvercle n’est pas
monté correctement, la sorbetière ne
fonctionnera pas puisque le microinterrupteur de sécurité
(9) n’est pas
actionné.
4. MISE AU POINT
Page 4

3
6. NETTOYAGE ET ENTRETIEN
Avant de procéder au nettoyage de la
sorbetière, assurez-vous que l’appareil est
débranché et démontez la sorbetière.
Lavez la base
(8), le bol (7), le couvercle
(4), l’axe (5) et le mélangeur (6) à l’eau
savonneuse tiède, nettoyez et séchez bien
toutes les pièces avant de les assembler à
nouveau. Ces pièces ne sont pas adaptées
pour le lave-vaisselle.
Nettoyez le moteur
(2) de la sorbetière avec
un linge humide. N’utilisez pas de lessives
7. CONSEILS POUR UNE GLACE
CONSISTANTE:
• Assurez-vous que le sucre est dissout
dans le mélange et que tous les
ingrédients sont bien mélangés.
• Utilisez des fruits frais. Lavez-les,
retirez-en la peau, les pépins, les
cœurs, etc., et coupez-les en très petits
morceaux.
• Utilisez des jus 100% naturels pour
avoir le maximum de saveur
• Il est recommandé que les ingrédients à
mélanger, soient à moins de 10ºC.
5. FONCTIONNEMENT
• Une fois que vous aurez congelé le
bol
(7) et monté la sorbetière, versez
les ingrédients froids par l’entrée des
ingrédients (3), comme il est indiqué
dans les recettes. Ne remplissez
pas le bol à plus de la moitié de
sa contenance, car la sorbetière,
ne mélangera pas les ingrédients
correctement.
• Tournez la minuterie (1) pour
sélectionner le temps de fonctionnement
souhaité. 30 minutes environ sont
nécessaires pour faire la glace.
• Branchez la sorbetière sur la prise de
courant. Le mélangeur
(6) commencera
à tourner pour faire la glace.
• Lorsque le minuteur (1) arrivera à 0, la
sorbetière s’éteindra automatiquement
et la glace sera prête.
• Débranchez la sorbetière de la prise de
courant.
• Ouvrez le couvercle (4) en le faisant
tourner sur la position OFF
(fig. F) et
retirez la glace dans un récipient en
plastique.
La glace doit avoir une consistance douce.
Si vous voulez que la glace ait plus de
consistance, gardez-la dans le congélateur
durant ½ - 1 heure jusqu’à ce qu’elle soit
bien congelée.
Conservez la glace dans un récipient en
plastique bien fermé pour que les odeurs
du congélateur ne nuisent pas à sa saveur.
ni de produits abrasifs pour son nettoyage.
Ne plongez pas le moteur dans l’eau ni
dans aucun autre liquide.
8. RECETTES
Sorbet au citron
Ingrédients:
Jus de 6 citrons
290 gr de sucre
435 ml d’eau
Préparation:
Râpez la peau de 5 citrons et pressez les
six citrons. Laissez le sucre se dissoudre
dans l’eau chaude durant 10 minutes et
ajoutez les zestes de la peau de citron.
Ajoutez le jus des citrons et laissez refroidir.
Versez le mélange dans la sorbetière et
faites-la fonctionner durant 30 minutes.
Lorsque la glace est prête, conservez-la
dans le congélateur durant une demi-heure.
Sorbet à la fraise
Ingrédients:
435gr de fraises
90g de sucre
145ml d’eau
½ cuillère de jus de citron
Préparation:
Lavez les fraises et enlevez les queues.
Mélangez tous les ingrédients. Mettez
l’eau à bouillir et ajoutez-y le sucre. Faites
bouillir l’eau jusqu’à dissoudre tout le
sucre. Laissez refroidir un peu le sirop.
Page 5

Versez le jus de citron et le sirop sur la
purée de fraises. Mettez le mélange dans
la sorbetière et faites-la fonctionner durant
30 minutes. Ensuite, placez le mélange final
dans le congélateur durant une demi-heure.
Glace à la vanille
Ingrédients:
180ml de lait
180ml de crème à fouetter
1,5 gousse de vanille ouverte
4 jaunes d’œufs
65 grammes de sucre
Préparation:
Faites bouillir le lait avec la crème à fouetter
et les gousses de vanille et laissez refroidir.
Battez les jaunes avec le sucre jusqu’à ce
que cela change de couleur et double de
volume. Grattez l’intérieur de la gousse de
vanille et ajoutez-la au lait. Chauffez jusqu’à
ébullition et ajoutez aux jaunes. Versez
le mélange dans la sorbetière et faitesla fonctionner pendant 30 minutes. Puis
placez la préparation dans le congélateur
durant une demi-heure.
Glace à la pistache
Ingrédients:
180ml de lait entier
73g de sucre
1 œuf
110g de pistaches décortiquées
325g de crème à fouetter
1,5 petite cuillère d’essence de vanille
Préparation:
Chauffez le lait et battez l’œuf avec le
sucre. Versez lentement le lait chaud
dans le mélange d’œuf et de sucre tout
en continuant à battre. Versez cette pâte
dans une marmite et chauffez-la tout en
continuant à remuer fermement, jusqu’à
ce que qu’elle commence à épaissir.
Mais ne la laissez pas bouillir ! Laissez
refroidir à température ambiante. Versez
la crème à fouetter et l’essence de vanille
et laissez-la dans le réfrigérateur jusqu’à
ce qu’elle refroidisse. Versez-la dans la
sorbetière et laissez-la en marche durant
30 minutes. Lorsque la glace est prête,
ajoutez les pistaches broyées par l’entrée
des ingrédients (3) du couvercle. Après la
préparation dans la sorbetière, mettez le
mélange final dans le congélateur durant
une demi-heure.
Glace au citron
Ingrédients:
180ml de crème à fouetter
180ml de lait entier
3 jaunes d’œufs
150g de sucre
1,5 petite cuillère de zeste de citron
Préparation:
Faites bouillir la crème à fouetter avec le
lait, ajoutez le sucre. Battez les jaunes
d’œufs et ajoutez un peu du mélange de
crème réchauffée. Battez ce mélange et
ajoutez-le au reste du lait avec la crème
dans la casserole et cuisez le tout au bain
Marie tout en continuant à remuer, chauffez
jusqu’à ce qu’il ait pris la consistance
d’une bouillie. À présent ajoutez le zeste de
citron. Laissez refroidir dans le réfrigérateur.
Ensuite, versez le mélange dans la
sorbetière et faites-la fonctionner durant
30 minutes. Après la préparation dans le
réfrigérateur, mettez le mélange dans le
congélateur durant une demi-heure.
Glace à la fraise
Ingrédients:
220g de fraises fraîches
90g de sucre semoule
1 jaune d’œuf
¾ cuillerées de jus de citron
220ml de lait entier
1dl de crème à fouetter
Préparation:
Lavez les fraises et ôtez les queues. Faites
une purée avec le jus de citron et le lait.
Battez le jaune d’œuf avec le sucre jusqu’à
ce que le mélange soit mousseux. Battez
la crème jusqu’à ce qu’elle soit ferme.
Mélanger les fraises avec la crème à fouetter
et le jaune d’œuf. Assurez-vous que cette
pâte soit bien mélangée. Mettez le mélange
dans la sorbetière durant 30 minutes. Après
la préparation dans la sorbetière, mettez
le mélange dans le congélateur durant une
demi-heure.
4
Page 6
Glace à la banane
Ingrédients:
220g de bananes mûres
95g de sucre semoule
1 jus de citron
1 jaune d’œuf
3/4dl de crème à fouetter
220ml de lait entier
Préparation:
Faites une purée avec les bananes et le
jaune d’œuf, le sucre et le jus de citron.
Battez la purée de bananes avec la crème à
fouetter et le lait, (ne montez pas la crème).
Mettez le mélange dans la sorbetière durant
30 minutes. Après la préparation dans
la sorbetière, mettez le mélange dans le
congélateur durant une demi-heure.
Glace à la myrtille
Ingrédients:
510g de myrtilles
580ml d’eau minérale gazeuse
75g de sucre glace
Préparation:
Mélangez les myrtilles, l’eau gazeuse et
le sucre glace jusqu’à obtenir une douce
purée. Vous pouvez passer le mélange au
batteur si vous le souhaitez. Mettez dans
la sorbetière durant 30 minutes. Ensuite
mettez le mélange dans le congélateur
durant une demi-heure.
Glace au soja et à la fraise
Ingrédients:
220g de fraises
110g de sucre
6 jaunes d’œufs
3 cuillerées de miel
0,75 l de lait de soja
Préparation:
Faites bouillir le lait de soja avec le miel.
Réduisez les fraises en purée et ajoutez ce
mélange au lait de soja et au miel. Battez les
jaunes d’œufs jusqu’à ce qu’ils soient bien
mousseux. Versez le lait bouillant sur les jaunes
d’œufs et remuez bien. Laissez refroidir et
mettez-le dans la sorbetière durant 30 minutes.
Ensuite, mettez le mélange dans le congélateur
durant une demi-heure. Décorez avec des
morceaux de fraises avant de servir.
Glace au yaourt
Ingrédients:
510g de yaourt entier (turc)
75g de lait entier
130g de sucre fin
22g de dextrose
22g de lait écrémé en poudre
Préparation:
Dissoudre le sucre, le dextrose et le lait
écrémé en poudre dans le lait chaud.
Laissez refroidir. Remuez bien le yaourt
avec le lait. Placez dans la sorbetière
en marche pendant 30 minutes. (Si
vous désirez un résultat plus doux, vous
pouvez ajouter 100g de crème à moitié
battue avant de congeler). Mettez dans le
congélateur durant une demi-heure.
9. INFORMATION POUR LA
CORRECTE GESTION DES RÉSIDUS
D'APPAREILS ÉLECTRIQUES ET
ÉLECTRONIQUES
A la fin de la vie utile de
l’appareil, ce dernier ne doit
pas être éliminé mélangé
aux ordures ménagères
brutes.
Il peut être porté aux centres
spécifiques de collecte,
agréés par les administrations locales, ou
aux prestataires qui facilitent ce service.
L’élimination séparée d’un déchet
d’électroménager permet d’éviter
d’éventuelles conséquences négatives pour
l’environnement et la santé, dérivées d’une
élimination inadéquate, tout en facilitant le
traitement et le recyclage des matériaux
qu’il contient, avec la considérable
économie d’énergie et de ressources que
cela implique.
Afin de souligner l’obligation de collaborer à
la collecte sélective, le marquage ci-dessus
apposé sur le produit vise à rappeler la
non-utilisation des conteneurs traditionnels
pour son élimination.
Pour davantage d’information, contacter les
autorités locales ou votre revendeur.
5
Page 7
DK
1. PRODUKTBESKRIVELSE
1. Tidsindstilling
2. Motor
3. Ingrediensindgang
4. Låg
5. Låseskrue for rørevinge
6. Rørevinge
7. Skål
8. Sokkel
9. Mikro-afbryder
10. Ledning
11. Isske
2. TEKNISK DATA
Se teknisk data på typepladen
Dette produkt overholder EU direktiverne
angående elektromagnetisk kompatibilitet
og lavspænding.
Hvis du er i tvivl bør du kontakte en
autoriseret service forhandler.
• Emballagen (plastik poser, polystyren
skum, osv.), bør ikke efterlades inden
for børns rækkevidde da dette kan
medføre fare.
• Apparatet må kun anvendes til
husholdningsbrug. Enhver anden
anvendelse må ikke foretages og kan
eventuelt medføre fare.
• Producenten kan ikke gøres ansvarlig
for skader, der matte opstå på grund af
fejlbetjening, eller reparationer udført af
ikke autoriseret personale.
• Apparatet bør aldrig berøres med
fugtige / våde hænder eller fødder
• For at undgå elektrisk stød bør
apparatet ikke komme I kontakt med
vand eller andre væsker; tilslut ikke
apparatet hvis det står på fugtige
overflader.
• Stil apparatet på en tør, fast og stabil
overflade.
• Børn og handicappede må ikke betjene
apparatet uden opsyn.
• Dette apparat må ikke betjenes af
fysisk, sensorisk, psykisk handicappede
personer (inklusive børn) eller
personer uden erfaring eller kendskab,
medmindre man har opsyn med
dem eller de kan vejledes i brugen af
apparatet af en person som er ansvarlig
for deres sikkerhed.
• Man må holde øje med børn og sørge
for at apparatet stilles uden for deres
rækkevidde.
• Af sikkerhedsmæssige grunde,
anbefales det at installere en
reststrøms- mekanisme (RCD) som
ikke overstiger 30 mA. Spørg Deres
installatør.
• Apparatet må ikke efterlades uden
opsyn når det er tændt da det kan være
farligt.
• Træk ikke ledningen ud af stikkontakten
ved at hive i ledningen
• Træk stikket ud af stikkontakten inden
apparatet rengøres.
• Prøv ikke selv at reparere apparatet
hvis det er beskadiget og afbryd
straks maskinen. Er det nødvendigt at
reparare apparatet, bør du indlevere det
• Inden dette apparat tages i brug
for første gang bør du læse denne
brugsvejledning grundigt og opbevare
den omhyggeligt.
• Inden apparatet tages i brug bør du
kontrollere at netspændingen svarer til
det der står på maskinens typeplade.
• Hvis stikkontakten og apparatets stik
ikke stemmer overens, bør udskiftning
af stikkontakten udføres af en
autoriseret elinstallatør .
• Apparatets el-sikkerhed er kun
garanteret hvis det er tilsluttet en
instalation med effektiv jordforbindelse.
Er du i tvivl bør du kontakte en
autoriseret service forhandler.
• Adaptere, multistikkontakter og/
eller forlængerledninger bør ikke
anvendes. Hvis dette ikke er muligt,
bør du kun anvende adaptere eller
forlængerledninger som overholder
sikkerhedsbestemmelserne og sikre dig at
den anførte netspænding ikke overskrides.
• Når emballagen er fjernet, bør du sikre
dig at apparatet ikke har synlige skader.
3. SIKKERHED
6
Page 8

til en autoriseret service forhandler og
bede om reservedele.
• Hvis ledningen er besakadiget bør
du kontakte en autoriseret service
forhandler og anmode at få den skiftet
ud.
• Apparatet må ikke bruges udendørs og
udsættes for regn, sol, is, osv.
• Apparatet må ikke efterlades på eller
være I nærheden af varmekilder (gas
eller el-kogeplade eller en ovn).
• Brug ikke “svære” eller slibende
rengøringsmidler når apparatet skal
renses.
• Varme overflader må ikke berøres.
Anvend håndtagene.
• Undgå at ledningen kommer I kontakt
med varme overflader.
• Hæld aldrig varmt vand eller
ingredienser i skålen.
• Anbring ismaskinen på et hårdt og
jævnt underlag som ikke er vådt eller
fugtigt.
• Apparatet må aldrig sænkes ned i vand
eller andre væsker.
• Is som er blevet optøet må ikke
nedfryses igen.
• Inden apparatet tages i brug, bør skålen
altid nedfryses i mindst 12 timer.
• Fyld ikke skålen mere end halvdelen af
dens kapacitet.
• Når skålen er kølet af bør man holde
om den med en tør klud. Undgå at
røre skålen indvendigt med våde eller
fugtige hænder. Fingrene kan klæbe sig
fast på skålens metal overflader.
1. Inden maskinen bruges for første gang,
bør man rengøre sokkelen
(8), låget (4),
rørevingen (6) og skålen (7), med lunkent
sæbevand. Brug aldrig agressive eller
slibende vaskemidler. Apparatet må aldrig
sænkes ned i vand eller andre væsker.
2. Skålens frysevæske bør være frossen
inden du begynder at lave is. Sæt
skålen
(7) i fryseren i mindst 12 timer.
Skålens frysevæske skal være nedkølet
inden ismaskinen opstilles.
4. FØRSTE GANG MAN BRUGER
MASKINEN
• Vigtigt: Når skålen (7) er kølet af, bør
man undgå at røre skålen indvendigt
med våde eller fugtige hænder da
Fingrene kan klæbe sig fast på skålens
metal overflader. Hold skålen med en
tør klud.
3. Anbring soklen (8) på et hårdt og jævnt
underlag og sæt skålen
(7) på soklen
(8).
4. Sæt motoren (2) i lågets hulrum (4) og
tryk den ned indtil den sidder rigtigt
(fig. B).
5. Sæt låseskruen (5) i motorens hulrum
(2) og anbring rørevingen (6) på
låseskruen
(fig. C & D).
6. Sæt låget (4) på skålen (7). På låget vil
du kunne se pil
▼ under ledningen (10).
Denne pil skal stilles på linie med pil
▲, på skålen (fig. E). Skålens fire poler
skal sættes på linie med skålens fire
huller placeret øverst på beholderen.
For at låse låget, bør man dreje det
mod ON
(fig. F).
Vigtigt: Hvis låget ikke sidder rigtigt,
kan ismaskinen ikke igangsættes
da mikro sikkerhedsafbryderen ikke
tilkobles
(9).
5. BETJENING AF ISMASKINEN
• Når skålen (7) er nedkølet og maskinen
er opstillet, hælder man ingredienserne
ned i ingrediensindgangen
(3), ved
at følge den valgte opskrift. Fyld
ikke skålen mere end halvdelen af
dens kapacitet. Overfyldes skålen,
vil ismaskinen ikke kunne blande
ingredienserne ordentligt.
• Drej tidsindstillingen (1) for at vælge den
ønskede funktionstid. Det tager ca. 30
minutter at lave is.
• Stik stikket i stikkontakten. Rørevingen
(6) drejer til fremstilling af is.
• Når kontroluret (1) når 0, slukker
ismaskinen automatisk og isen er klar.
• Træk stikket ud af stikkontakten.
• Åbn låget (4) ved at dreje den mod OFF
(fig. F) og hæld isen i en plastik beholder.
Isen bør have lidt konsistens. Ønsker man
is med mere konsistens, bør den opbevares
7
Page 9

8
7. GODE RÅD:
Inden ismaskinen rengøres, bør man trække
stikket ud af stikkontakten og afmontere
apparatet.
Rengør sokkelen
(8), skålen (7), låget (4),
låseskruen
(5) og rørevingen (6), med
lunkent sæbevand. Skyl elementerne
ordentligt og tør dem grundigt inden de
genmonteres. Disse elementer kan ikke
vaskes i opvaskemaskinen.
Rengør ismaskinens motor
(2) med en
fugtig klud. Brug aldrig agressive eller
slibende rengøringsmidler.
Apparatet må aldrig sænkes ned i vand
eller andre væsker.
6. RENGØRING OG
VEDLIGEHOLDELSE
• Sørg for at sukker opløses i isblandingen
og at alle ingredienser er blevet
ordentligt blandet sammen.
• Brug frisk frugt. Skyl frugten og fjern
skal og kerner. Skær frugten i små
terninger.
• Brug 100% naturlig frugtsaft for at opnå
den bedste smag.
• Det anbefales at ingrediensernes
temperatur ligger på under10ºC.
8.- OPSKRIFTER
Citron sorbet
Ingredienser:
Citrosaft. 6 citroner.
290 gr sukker
435 ml vand
Tilberedning:
Riv skallerne på 5 citroner og pres
saften af de seks citroner. Lad sukkeret
opløse i varmt vand i 10 minutter og
tilføj citron raspen. Hæld citronsaften
og las blandingen køle af. Hæld derefter
i køleskabet i en ½ til 1 time indtil isen er
kølet ned. Opbevar isen i en lukket plastik
beholder så man undgår at fryserens lugt
blander sig med isens smag.
blandingen i ismaskinen og las den fungere
i 30 minutter. Når isen er færdig, bør man
lade den stå i fryseren i en halv time.
Jordbær sorbet
Ingredienser:
435gr jordbær
90g sukker
145ml vand
½ skefuld citronsaft
Tilberedning:
Skyl jordbærrene og fjern stilkene. Bland
alle ingredienserne sammen. Kog vandet
og tilføj sukker. Lad sukkeret opløse i det
kogende vand. Lad sukkersaften afkøle
lidt. Hæld derefter citronsaften og siruppen
på jordbær pureen. Hæld blandingen
i ismaskinen og lad den fungere i 30
minutter. Derefter stilles isblandingen i
køleskabet i en halv time.
Vanilleis
Ingredienser:
180ml mælk
180ml piskefløde
1,5 åbne vanille stænger
4 æggeblommer
65 sukker
Tilberedning:
Kog mælken sammen med piskefløden
og vanillestængerne og lad derefter
isblandingen stå og afkøle lidt. Pisk
æggeblommerne sammen med sukkeret
indtil de ændrer farve og hæver. Vanille
stængerne rives og hældes i mælken.
Opvarm mælken til det koger og tilføj
derefter æggeblommerne. Hæld blandingen
i ismaskinen og lad apparatet fungere i
30 minutter. Derefter stilles isblandingen i
køleskabet i en halv time.
Pistacie is
Ingredienser:
180ml sødmælk
73g sukker
1 æg
110g pillede pistacier
325g piskefløde
1,5 teskefuld vanille udtræk
Page 10

9
Tilberedning:
Varm mælken op og pisk æggene sammen
med sukkeret. Hæld langsomt den varme
mælk i blandingen mens man fortsætter
med at piske. Hæld dejen i en gryde
og varm den op samtidigt med at man
pisker blandingen grundigt indtil den
begynder at jævne. Blandingen må ikke
koge!. Lad isblandingen stå og køle af i
stuetemperatur. Hæld piskefløden og vanille
udtrækket i isblandingen og lad den stå i
køleskabet indtil blandingen er nedkølet.
Hæld derefter isblandingen i ismaskinen og
lad apparatet fungere i 30 minutter. Når isen
er færdig, tilføjer man de pillede pistacier
gennem ingrediensindgangen (3) som
sidder på låget. Køl isen af i køleskabet en
halv time.
Citronis
Ingredienser:
180ml piskefløde
180ml sødmælk
3 æggeblommer
150g sukker
1,5 teskefuld citronskind i reven stand
Tilberedning:
Kog piskefløden med mælken og tilføj sukker.
Pisk æggeblommerne og hæld lidt varm
piske fløde i. Pisk blandingen og hæld resten
af mælken sammen med piskefløden i en
gryde. Blandingen vandbadkoges samtidigt
med at man rører rundt. Varm isblandingen
op indtil den bliver som en vælling. Tilføj
citron raspen. Lad isblandingen stå i
køleskabet indtil den er nedkølet. Derefter
hælder man blandingen i ismaskinen og lader
apparatet fungere i 30 minutter. Køl isen af i
køleskabet en halv time.
Jordbæris
Ingredienser:
220g friske jordbær
90g melis
1 æggeblomme
¾ skefuld citronsaft
220ml sødmælk
1dl piskefløde
Tilberedning:
Skyl jordbærerne af og fjern stilkene. Lav en
puré sammen med citronsaften og mælken.
Pisk æggeblommen sammen med sukker
indtil den skummer. Pisk piskefløden indtil
den er fast. Bland jordbærrene sammen med
piskefløden og æggeblommen. Sørg for at
ingredienserne er godt blandet sammen. Hæld
isblandingen i ismaskinen og lad apparatet
fungere i 30 minutter. Når isen er færdig, så lad
den køle af i køleskabet i en halv time.
Bananis
Ingredienser:
220g modne bananer
95g melis
Citronsaft
1 æggeblomme
3/4dl piskefløde
220ml sødmælk
Tilberedning:
Bland bananerne, æggeblommen, melis og
citronsaften sammen og lav en puré. Rør
banan pureen med piskefløden og mælken.
Blandingen må ikke piskes. Bata el puré de
plátano con la nata para montar y la leche,
(no monte la nata). Hæld isblandingen i
ismaskinen og lad apparatet fungere i 30
minutter. Når isen er færdig, så lad den køle
af i køleskabet i en halv time.
Tyttebæris
Ingredienser:
510g tyttebær
580ml danskvand
75g strøsukker
Tilberedning:
Bland tyttebær, danskvand og strøsukker
sammen til en tynd puré. En blender kan
anvendes. Hæld isblandingen i ismaskinen
og lad apparatet fungere i 30 minutter.
Når isen er færdig, så lad den køle af i
køleskabet i en halv time.
Soja- og jordbæris
Ingredienser:
220g jordbær
110g sukker
6 æggeblommer
3 skefulde honning
0,75 l sojamælk
Page 11

10
9. INFORMATION ANGÅENDE
BORTSKAFFELSE AF ELEKTRISKE
OG ELEKTRONISKE APPARATER
Gamle elektriske eller
elektroniske apparater
må ikke bortskaffes med
husholdningsaffaldet.
Aflever I stedet for det
gamle produkt på nærmeste
opsamlingssted eller
den lokale genbrugsstation. Når man
bortskaffer restprodukter separat, undgår
man at skade den menneskelige sundhed
samt miljøet og muliggør at apparatets
affaldsmaterialer kan behandles og
genudnyttes for derved at opnå vigtige
energi- og ressource besparelser.
For at understrege det vigtige i at
forpligte sig til at være med i et
kildesorteringsprogram er apparatet
markeret med denne mærkning som
betyder at maskinen ikke må smides i en
almindelig container.
Kontakt den lokale genbrugsstation
eller forhandleren hvis De ønsker mere
information.
Tilberedning:
Kog sojamælken sammen med honningen.
Lav en puré med jordbærrene og bland
pureen med sojamælken og honningen. Pisk
æggeblommerne indtil de bliver gule. Hæld
kogende mælk i æggeblommerne og rør
grundigt. Lad blandingen stå og køle lidt af.
Hæld derefter isblandingen i ismaskinen og
lad apparatet fungere i 30 minutter. Når isen er
færdig, så lad den køle af i køleskabet i en halv
time. Pynt jordbærrene inden isen serveres.
Yoghurtis
Ingredienser:
510g tykmælk
75g sødmælk
130g melis
22g druesukker
22g skummemælkspulver
Tilberedning:
Opløs melis, druesukker og
skummemælkspulver i varm mælk.
Lad blandingen køle af. Rør tykmælk
og sødmælk grundigt. Hæld derefter
isblandingen i ismaskinen og lad apparatet
fungere i 30 minutter. (Ønsker man en
lettere isblanding kan man tilføje 100g
let pisket fløde inden blandingen stilles i
køleskabet). Lad isen køle af i køleskabet i
en halv time.
Page 12

11
EN
• After removing the packaging, check
that the appliance is in perfect
condition, if in doubt, contact the
nearest Technical Support Service.
• Packaging elements (plastic bags,
polystyrene foam, etc.), should not be
left within the reach of children because
they can be dangerous.
• The appliance is for domestic use only.
Any other use is considered unsuitable
or dangerous.
• The manufacturer shall not be
responsible for any damages that may
arise from improper or inadequate
use, or for repairs conducted by nonqualified personnel.
• Do not touch the appliance with wet or
damp hands or feet.
• Keep the appliance separate from water
or other liquids, to avoid electric shock;
do not connect the appliance to the
mains if it is on a damp surface.
• Place the appliance on a dry, firm and
stable surface.
• Do not allow children or the disabled to
handle the appliance unsupervised.
• This appliance should not be used
by physically, sensorially or mentally
handicapped people or people without
experience or knowledge of it (including
children), unless they are supervised or
instructed in the use of the appliance
by a person responsible for their safety.
• Children should be watched to ensure
they do not play with the appliance.
• For greater protection, we recommend
installing a residual current device
(RCD) with an operational residual
current not exceeding 30 mA. Ask your
installer for advice.
• Do not leave the appliance unattended
when it is turned on because it can be
dangerous.
• When removing the plug never pull on
the cable.
• Unplug the appliance before cleaning or
maintenance.
• In the event of fault or malfunction
where the appliance is not to be used,
turn off the appliance and do not
attempt to repair. If a repair is required,
contact a Technical Assistance Service
• Before using this appliance for the first
time, read the following instructions
carefully and keep them for future
reference.
• Make sure that the mains voltage
in your home corresponds to that
indicated on the appliance.
• In the event of incompatibility between
the mains socket and the appliance
plug, replace the socket with a suitable
one, using a qualified professional.
• The electrical safety of the appliance
is only guaranteed if it is connected
to an efficient earth installation, as
foreseen in applicable electrical safety
regulations. If in doubt, contact a
qualified professional.
• The use of adaptors, multiple sockets
and or extension cables is not
recommended. Where it is not possible
to avoid their use, only adaptors or
extensions that comply with applicable
safety regulations should be used, and
ensuring that the indicated voltage limit
is not exceeded.
3. SAFETY PRECAUTIONS
2. TECHNICAL CHARACTERISTICS
See characteristics plate.
This product complies with the European
Directives on Electromagnetic Compatibility
and Low Voltage.
1. Timer
2. Motor
3. Ingredient feed tube
4. Lid
5. Shaft
6. Mixing blade
7. Bowl
8. Base
9. Micro-switch
10. Power cable
11. Scoop
1. DESCRIPTION
Page 13

12
authorised by the manufacturer and
request the use of original spare parts.
• If the cable for this appliance is
damaged, contact an authorised
Technical Assistance Service for it to be
replaced.
• Do not leave the appliance exposed to
the elements (rain, sun, ice, etc.).
• Do not use or let any part of the
appliance come into contact or near hot
surfaces (kitchen gas or electric hobs or
ovens).
• Do not use detergents or abrasive
sponges to clean the appliance.
• Do not touch the hot surfaces. Use the
handles.
• Do not let the cable come into contact
with the hot parts of the appliance.
• Do not pour hot water or ingredients
into the bowl.
• Place the ice cream maker onto a
clean, firm and stable surface, well
away from water and humidity.
• Do not immerse the motor in water or in
any other liquid.
• Do not refreeze ice cream that has
melted.
• Before using the appliance, always freeze
the empty bowl for at least 12 hours.
• Do not fill the bowl to more than half its
capacity.
• Once the bowl is frozen, hold it with a
dry cloth. Do not touch the inside of the
frozen bowl with wet or damp hands,
as your fingers may stick to the metal.
1. Before using the appliance for the first
time, clean the base
(8), the lid (4), the
mixing blade
(6) and the bowl (7) in
warm water and liquid soap. Do not use
abrasive detergents or metal scourers.
Do not immerse the motor in water or
in any other liquid.
2. The liquid inside the bowl must be
frozen before you can make ice cream.
Put the bowl
(7) in the freezer for at
least 12 hours to freeze the liquid inside
the container and before assembling
the ice cream maker.
4. PREPARING THE APPLIANCE
• Warning: Once the bowl (7) is frozen,
do not touch the inside with wet or
damp hands, as they may stick to the
metal. It is important to hold the bowl
with a dry cloth.
3. Place the base (8) onto a flat, stable
surface and place the bowl
(7) onto the
base
(8).
4. Insert the motor (2) into the cavity in
the lid
(4), pressing firmly so that it is
properly secure
(fig. B).
5. Insert the shaft (5) into the hole in the
motor
(2) and fit the mixing blade (6)
onto the shaft
(fig. C & D).
6. Place the lid (4) onto the bowl (7). On
the lid you will see the
▼ arrow situated
below the power cable
(10) which must
align with the
▲ arrow, situated on the
bowl (fig. E). The four tabs on the lid
should face the four holes on the upper
part of the bowl. To lock the lid, it must
be turned to the ON position
(fig. F).
Important: If the lid is not fitted
properly, the ice cream maker will not
operate as the safety micro-switch
(9)
cannot be pressed.
5. OPERATING INSTRUCTIONS
• Once the bowl (7) is frozen and the ice
cream maker has been assembled, pour
the cold ingredients into the ingredient
feed tube
(3), according to the recipe
instructions. Do not fill the bowl to
more than half its capacity, as the ice
cream maker will not mix the ingredients
properly.
• Turn the timer (1) to select the desired
operating time. Approximately 30
minutes are required to make ice cream.
• Plug the ice cream maker into the power
socket. The mixing blade
(6) will begin to
rotate to make the ice cream.
• When the timer (1) reaches 0, the ice
cream maker will turn off automatically
and the ice cream will be ready.
• Unplug the ice cream maker from the
power socket.
• Open the lid (4) by turning it to the OFF
position (fig. F) and transfer the ice
cream into a plastic container.
Page 14

13
6. CLEANING AND MAINTENANCE
Before cleaning the ice cream maker, make
sure that the appliance is unplugged and
dismantle it.
Clean the base
(8), the bowl (7), the lid
(4), the shaft (5) and the mixing blade (6)
in warm soapy water, rinse and dry all the
pieces thoroughly before reassembling
them. These pieces are not suitable for
dishwashers.
Clean the motor
(2) of the ice cream maker
with a damp cloth. Do not use detergents
or abrasive products to clean it.
Do not immerse the motor in water or in
any other liquid.
• Make sure that the sugar has dissolved
into the mixture and that all the
ingredients have been mixed together
properly.
• Use fresh fruit. Wash it, remove the peel,
pips, cores, etc, and chop it into very
small pieces.
• Use 100% natural fruit juice to ensure
maximum flavour.
• It is advisable for the ingredients which
are going to be mixed to be at less than
10ºC.
8. RECIPES
Lemon sorbet
Ingredients:
Juice of 6 lemons
290g sugar
435ml water
The ice cream should have a smooth
consistency. If you would like the ice cream
to have a firmer consistency, put it in the
freezer for ½ to 1 hour until it is thoroughly
frozen.
Store the ice cream in a well-sealed plastic
container so that the smells from the
freezer do not affect its flavour.
7. TIPS FOR FIRM ICE CREAM
Preparation:
Grate the rind of 5 lemons and squeeze
the six lemons. Leave the sugar to dissolve
in hot water for 10 minutes and add the
grated lemon rind. Add the juice from the
lemons and leave to cool. Pour the mixture
into the ice cream maker and turn it on for
30 minutes. Once the ice cream has been
made, put it in the freezer for half an hour.
Strawberry sorbet
Ingredients:
435g strawberries
90g sugar
145ml water
½ spoonful of lemon juice
Preparation:
Wash the strawberries and remove the
stalks. Mix all the ingredients together.
Bring the water to the boil and add the
sugar. Boil the water until all of the sugar
has dissolved. Leave the syrup to cool a
little. Pour the lemon juice and the syrup
onto the strawberry puree. Put the mixture
into the ice cream maker and turn it on for
30 minutes. Then put the final mixture into
the freezer for half an hour.
Vanilla ice cream
Ingredients:
180ml milk
180ml whipping cream
1.5 opened vanilla pods
4 egg yolks
65g sugar
Preparation:
Bring the milk to the boil with the whipping
cream and the vanilla pods and leave to
cool. Beat the egg yolks with the sugar
until it changes colour and doubles in size.
Scrape out the inside of the vanilla pod and
add it to the milk. Bring to the boil and add
the egg yolks. Pour the mixture into the ice
cream maker and turn it on for 30 minutes.
Once the ice cream has been prepared in
the ice cream maker, put the mixture into
the freezer for half an hour.
Page 15

Pistachio ice cream
Ingredients:
180ml whole milk
73g sugar
1 egg
110g peeled pistachios
325g whipping cream
1.5 teaspoonfuls of vanilla essence
Preparation:
Heat the milk and beat the egg with the
sugar. Slowly pour the hot milk into the egg
and sugar mixture whilst continuing to beat.
Pour this mixture into a saucepan and heat
it whilst continuing to stir vigorously until
it starts to thicken. But do not let it boil!
Leave it to cool down to room temperature.
Pour in the whipping cream and the vanilla
essence and leave it in the fridge until
chilled. Pour it into the ice cream maker
and turn it on for 30 minutes. Once the ice
cream has been made, add the chopped
pistachios through the ingredient feed tube
(3) in the lid. Once the ice cream has been
prepared in the ice cream maker, put the
final mixture into the freezer for half an
hour.
Lemon ice cream
Ingredients:
180ml whipping cream
180ml whole milk
3 egg yolks
150g sugar
1.5 teaspoonfuls of grated lemon rind
Preparation:
Boil the whipping cream with the milk, add
the sugar. Beat the egg yolks and add a
little of the heated cream mixture. Beat
this mixture and add it to the rest of the
milk with the cream in the pan and cook
the whole of the mixture in a bain-marie
whilst continuing to stir, heat until it has the
consistency of a pulp. Now add the grated
lemon rind. Leave to cool in the fridge.
Then pour the mixture into the ice cream
maker and turn it on for 30 minutes. Once
the ice cream has been prepared in the
ice cream maker, put the mixture into the
freezer for half an hour.
Strawberry ice cream
Ingredients:
220g fresh strawberries
90g caster sugar
1 egg yolk
¾ spoonful of lemon juice
220ml whole milk
100ml whipping cream
Preparation:
Wash the strawberries and remove the
stalks. Make a puree together with the
lemon juice and the milk. Beat the egg yolk
with the sugar until frothy. Beat the cream
until firm. Mix the strawberries with the
whipped cream and the egg yolk. Make
sure that this mixture is well mixed. Put
the mixture into the ice cream maker for
30 minutes. Once the ice cream has been
prepared in the ice cream maker, put the
mixture into the freezer for half an hour.
Banana ice cream
Ingredients:
220g ripe bananas
95g caster sugar
Juice of 1 lemon
1 egg yolk
75ml whipping cream
220ml whole milk
Preparation:
Make a puree with the bananas and the
egg yolk, sugar and lemon juice. Beat the
banana puree with the whipping cream
and the milk (do not whip the cream). Put
the mixture into the ice cream maker for
30 minutes. Once the ice cream has been
prepared in the ice cream maker, put the
mixture into the freezer for half an hour.
Blueberry ice cream
Ingredients:
510g blueberries
580ml sparkling mineral water
75g icing sugar
Preparation:
Mix the blueberries, the sparkling water and
the icing sugar into a smooth puree. You can
put it in the blender if you wish. Put into the
ice cream maker for 30 minutes. Then put
the mixture into the freezer for half an hour.
14
Page 16

Soya and strawberry ice cream
Ingredients:
220g strawberries
110g sugar
6 egg yolks
3 spoonfuls of honey
750ml soya milk
Preparation:
Boil the soya milk with the honey. Make a
puree with the strawberries and add this
mixture to the soya milk and honey. Beat the
egg yolks until yellow. Pour the boiling milk
over the egg yolks and stir well. Leave to
cool and put into the ice cream maker for 30
minutes. Then put the mixture into the freezer
for half an hour. Decorate with pieces of
strawberry before serving.
Yoghurt ice cream
Ingredients:
510g whole yoghurt (Turkish)
75g whole milk
130g caster sugar
22g dextrose
22g skimmed milk powder
Preparation:
Dissoudre le sucre, le dextrose et le lait
Dissolve the sugar, the dextrose and the
skimmed milk powder into hot milk. Leave
to cool. Stir the yoghurt well into the milk.
Put the mixture into the ice cream maker
for 30 minutes. (For a smoother ice cream,
you can add 100g semi-whipped cream
before freezing.) Put in the freezer for half
an hour.
9. INFORMATION FOR THE CORRECT
DISPOSAL OF ELECTRICAL AND
ELECTRONIC APPLIANCES
At the end of its working
life, the product must not be
disposed of as urban waste.
It must be taken to a special
local authority differentiated
waste collection centre or
to a dealer providing this service. Disposing
of a household appliance separately avoids
possible negative consequences for the
environment and health deriving from
inappropriate disposal and enables the
constituent materials to be recovered to
obtain significant savings in energy and
resources.
To remind you that you must collaborate with
a selective collection scheme, the symbol
shown appears on the product warning
you not to dispose of it in traditional refuse
containers.
For further information, contact your local
authority or the shop where you bought the
product.
15
Page 17

ES
1. Temporizador
2. Motor
3. Entrada de ingredientes
4. Tapa
5. Eje
6. Mezclador
7. Cubeta
8. Base
9. Micro-interruptor
10. Cable alimentación
11.
Sacabolas
1. DESCRIPCIÓN
• Antes de utilizar este aparato por primera
vez, lea detenidamente este manual de
instrucciones y guárdelo para posteriores
consultas.
• Verifique que la tensión de la red doméstica
y la potencia de la toma correspondan con
las indicadas en el aparato.
• En caso de incompatibilidad entre la toma
de corriente y el enchufe del aparato,
sustituya la toma por otra adecuada
sirviéndose de personal profesionalmente
cualificado.
• La seguridad eléctrica del aparato se
garantiza solamente en caso de que esté
conectado a una toma de tierra eficaz
tal como prevén las vigentes normas de
seguridad eléctrica. En caso de dudas
diríjase a personal profesionalmente
cualificado.
• Se desaconseja el uso de adaptadores,
tomas múltiples y/o cables de extensión.
En caso de que fuera indispensable
usarlos, hay que utilizar únicamente
adaptadores y prolongaciones que sean
conformes a las normas de seguridad
3. ADVERTENCIAS DE SEGURIDAD
Vea placa de características.
Este producto cumple con las
Directivas Europeas de Compatibilidad
Electromagnética y Baja Tensión.
2. CARACTERÍSTICAS TÉCNICAS
vigentes, prestando atención a no superar
el límite de potencia indicado en el
adaptador.
• Después de quitar el embalaje, verifique
que el aparato esté en perfectas
condiciones, en caso de duda, diríjase
al Servicio de Asistencia Técnica más
cercano.
• Los elementos del embalaje (bolsas de
plástico, espuma de poliestireno, etc.),
no deben dejarse al alcance de los niños
porque son fuentes de peligro.
• Este aparato debe utilizarse solo para
uso doméstico. Cualquier otro uso se
considerará inadecuado o peligroso.
• El fabricante no será responsable de los
daños que puedan derivarse del uso
inapropiado equivocado o poco adecuado
o bien de reparaciones efectuadas por
personal no cualificado.
• No toque el aparato con manos o pies
mojados o húmedos.
• Mantenga el aparato lejos del agua u otros
líquidos para evitar una descarga eléctrica;
No enchufe el producto si está sobre una
superficie húmeda.
• Coloque el aparato sobre una superficie
seca, firme y estable.
• No deje que los niños o discapacitados
manipulen el aparato sin vigilancia.
• Este aparato no está destinado para el
uso por personas (incluidos niños) con
capacidades físicas, sensoriales o mentales
disminuidas, o faltas de experiencia o
conocimiento; a menos de que dispongan
de supervisión o instrucción relativa al
uso del aparato por parte de una persona
responsable de su seguridad.
• Debe vigilarse a los niños para asegurar
que no juegan con el aparato.
• Para mayor protección, se recomienda la
instalación de un dispositivo de corriente
residual (RCD) con una corriente residual
operativa que no supere los 30 mA. Pida
consejo a su instalador.
• No abandonar el aparato encendido
porque puede ser una fuente de peligro.
• Al desenchufar la clavija nunca tire del
cable.
• No deje el aparato expuesto a los
agentes atmosféricos (lluvia, sol, hielo
etc.).
16
Page 18

• No utilice o coloque ninguna parte
de este aparato sobre o cerca de
superficies calientes (placas de cocina
de gas o eléctrica u hornos).
• No utilice detergentes o bayetas
abrasivas para limpiar la unidad.
• No toque las superficies calientes.
Utilice los mangos o asideros.
• Evite que el cable toque las partes
calientes del aparato.
• No vierta agua ni ingredientes calientes a la
cubeta.
• Coloque la heladera en una superficie
limpia, firme y estable, lejos del agua y de la
humedad.
• No sumerja el motor en agua ni en ningún
otro líquido.
• No vuelva a congelar un helado que ha sido
descongelado.
• Antes de utilizar el aparato congele siempre
la cubeta vacía durante al menos 12 horas.
• No llene la cubeta más de la mitad de su
capacidad.
• Una vez congelada la cubeta, sujétela con
un paño seco. No toque el interior de la
cubeta congelada con las manos mojadas
o húmedas, se le pueden pegar los dedos
al metal.
1. Antes de usar el aparato por primera
vez, limpie la base
(8), la tapa (4), el
mezclador
(6) y la cubeta (7), en agua
templada y jabón líquido. No utilice
detergentes abrasivos ni estropajos
metálicos. No sumerja el motor en agua
ni en ningún otro líquido.
2. El líquido interior de la cubeta debe
estar congelado antes de proceder a
hacer helado. Tenga la cubeta
(7) en el
congelador durante al menos 12 horas
para congelar el líquido interior del
recipiente y de montar la heladera.
• Advertencia: Una vez congelada la
cubeta (7), no toque su interior con
las manos mojadas o húmedas, se le
pueden pegar las manos al metal. Es
importante que coja la cubeta con un
paño seco.
3. Coloque la base (8) en una superficie
4. PUESTA A PUNTO
plana y estable y coloque la cubeta (7)
en la base
(8).
4. Inserte el motor (2) en la cavidad de la
tapa (4) presionando firmemente para
que encaje bien
(fig. B).
5. Introduzca el eje (5) en el agujero del
motor (2) y enganche el mezclador (6)
en el eje
(fig. C & D).
6. Coloque la tapa (4) sobre la cubeta
(7). En la tapa verá la flecha ▼ situada
debajo del cable de alimentación (10)
que deberá alinearla con la flecha
▲,
situada en la cubeta
(fig. E). Los cuatro
polos de la tapa se situarán frente a los
cuatro agujeros de la parte superior de
la cubeta. Para bloquear la tapa, deberá
girarla hacia la posición ON
(fig. F).
Importante: Si la tapa no está
correctamente montada, la heladera no
funcionará ya que no se pulsa el microinterruptor de seguridad
(9).
5. FUNCIONAMIENTO
• Una vez que tenga la cubeta (7)
congelada y la heladera montada, vierta
los ingredientes fríos por la entrada de
los ingredientes
(3), según se indica
en las recetas. No llene la cubeta más
de la mitad de su capacidad, pues la
heladera, no mezclara correctamente los
ingredientes.
• Gire el temporizador (1) para seleccionar
el tiempo de funcionamiento deseado.
Se necesitan aproximadamente 30
minutos para hacer el helado.
• Enchufe la heladera a la toma de
corriente. El mezclador
(6) comenzará a
girar para hacer el helado.
• Cuando el temporizador (1) llegue a 0, la
heladera se apagará automáticamente y
el helado estará listo.
• Desenchufe la heladera de la toma de
corriente.
• Abra la tapa (4) girándola hacia la
posición OFF
(fig. F) y retire el helado a
un envase de plástico.
El helado debe tener una consistencia
suave. Si quiere que el helado tenga
una mayor consistencia, guárdelo en el
17
Page 19

18
6. LIMPIEZA Y MANTENIMIENTO
Antes de proceder a la limpieza de la
heladera, asegúrese de que el aparato esté
desenchufado y desmonte la heladera
Limpie la base
(8), la cubeta (7), la tapa
(4), el eje (5) y el mezclador (6) en agua
jabonosa templada, aclare y seque bien
todas las piezas antes de volverlas a
montar. Estas piezas no son aptas para
lavavajillas.
Limpie el motor
(2) de la heladera con un
paño húmedo. No utilice detergentes ni
productos abrasivos para su limpieza.
No sumerja el motor en agua ni en
ningún otro líquido.
7. CONSEJOS PARA UN HELADO
CONSISTENTE:
• Asegúrese de que el azúcar se haya
disuelto en la mezcla y de que todos los
ingredientes estén bien mezclados.
• Utilice frutas frescas. Lávelas, retíreles
la piel, las pepitas, los corazones, etc, y
córtelos en trocitos muy pequeños.
• Utilice zumos 100% naturales para
asegurar el máximo sabor.
• Se recomienda que los ingredientes a
mezclar, estén a menos de 10ºC.
8. RECETAS
Sorbete de limón
Ingredientes:
Zumo de 6 limones
290 gr de azúcar
435 ml de agua
Preparación:
Ralle la piel de 5 limones y exprima los seis
limones. Deje que el azúcar se disuelva en
agua caliente durante 10 minutos y añada
las ralladuras de la piel de limón. Añada el
congelador durante ½ - 1 hora hasta que
se congele bien.
Almacene el helado en un envase de
plástico bien cerrado a fin de que los olores
del congelador no perjudiquen a su sabor.
zumo de los limones y déjelo enfriar. Vierta
la mezcla en la heladera y hágala funcionar
durante 30 minutos. Cuando se haga
el helado, manténgalo en el congelador
durante media hora.
Sorbete de fresa
Ingredientes:
435gr de fresas
90g de azúcar
145ml de agua
½ cucharada de zumo de limón
Preparación:
Limpie las fresas y quite los tallos. Mezcle
todos los ingredientes. Ponga el agua a
hervir y añádele el azúcar. Hierva el agua
hasta disolver todo el azúcar. Deje que
el almíbar se enfríe un poco. Vierta el
zumo de limón y el almíbar sobre el puré
de fresas. Ponga la mezcla en la heladera
y hágala funcionar durante 30 minutos.
Después, ponga la mezcla final en el
congelador durante media hora.
Helado de vainilla
Ingredientes:
180ml de leche
180ml de nata para montar
1,5 varas de vainilla abiertas
4 yemas de huevo
65 gramos de azúcar
Preparación:
Hierva la leche con la nata para montar y
las ramas de vainilla y deje que se enfríe.
Bata las yemas con el azúcar hasta que
cambie de color y doble su tamaño. Raspe
el interior de la vara de vainilla y añádalo a
la leche. Caliente hasta que hierva y añada
a las yemas. Vierta la mezcla a la heladera
y hágala funcionar durante 30 minutos.
Tras la preparación en la heladera en el
congelador durante media hora.
Helado de pistacho
Ingredientes:
180ml de leche entera
73g de azúcar
1 huevo
110g de pistachos pelados
Page 20

19
325g de nata para montar
1,5 cucharadita de esencia de vainilla
Preparación:
Caliente la leche y bata el huevo con el
azúcar. Vierta lentamente la leche caliente
en la mezcla de huevo y azúcar mientras
sigue batiendo. Vierta esta masa en una
olla y caliéntela mientras sigue removiendo
firmemente, hasta que empiece a espesar.
¡Pero no deje que hierva! Deje que se enfríe
a temperatura ambiente. Vierta la nata para
montar y la esencia de vainilla y déjela en
el frigorífico hasta que se enfríe. Viértalo
a la heladera y déjela en funcionamiento
durante 30 minutos. Cuando se haya hecho
el helado, añada los pistachos picados a
través de la entrada de ingredientes (3) de
la tapa. Tras la preparación en la heladera,
ponga la mezcla final en el congelador
durante media hora.
Helado de limón
Ingredientes:
180ml de nata para montar
180ml de leche entera
3 yemas de huevo
150g de azúcar
1,5 cucharaditas de piel de limón rallada
Preparación:
Hierva la nata para montar con la leche,
añada el azúcar. Bata las yemas de huevo
y añada un poco de la mezcla de nata
calentada. Bata esta mezcla y añádala al
resto de la leche con la nata en la cacerola
y cueza el total al baño María mientras lo
sigue removiendo, caliente hasta que haya
tomado la consistencia de una papilla.
Ahora añada la ralladura de limón. Deje que
se enfríe en el frigorífico. Después, vierta la
mezcla en la heladera y hágala funcionar
durante 30 minutos. Tras la preparación
en la heladera, ponga la mezcla en el
congelador durante media hora.
Helado de fresas
Ingredientes:
220g de fresas frescas
90g de azúcar de grano fino
1 yema de huevo
¾ cucharadas de zumo de limón
220ml de leche entera
1dl de nata para montar
Preparación:
Lave las fresas y quite los tallos. Haga
un puré junto con el zumo de limón y la
leche. Bata la yema de huevo con el azúcar
hasta que quede espumosa. Bata la nata
hasta que quede firme. Mezcle las fresas
con la nata montada y la yema de huevo.
Asegúrese de que esta masa está bien
mezclada. Ponga la mezcla en la heladera
durante 30 minutos. Tras la preparación
en la heladera, ponga la mezcla en el
congelador durante media hora.
Helado de plátano
Ingredientes:
220g de plátanos maduros
95g de azúcar de grano fino
Zumo de un limón
1 yema de huevo
3/4dl de nata para montar
220ml de leche entera
Preparación:
Haga un puré con los plátanos y la yema
de huevo, el azúcar y el zumo de limón.
Bata el puré de plátano con la nata para
montar y la leche, (no monte la nata).
Ponga la mezcla en la heladera durante 30
minutos. Tras la preparación en la heladera,
ponga la mezcla en el congelador durante
media hora.
Helado de arándanos
Ingredientes:
510g de arádanos
580ml de agua mineral carbonatada
75g de azúcar glasé
Preparación:
Mezcle los arándanos, el agua carbonatada
y el azúcar glasé hasta hacer un puré
suave. Puede pasarlo por la batidora si lo
desea. Ponga en la heladera durante 30
minutos. Después ponga la mezcla en el
congelador durante media hora.
Helado de soja y fresas
Ingredientes:
220g de fresas
110g de azúcar
Page 21

9. INFORMACIÓN PARA LA
CORRECTA GESTIÓN DE LOS
RESIDUOS DE APARATOS
ELÉCTRICOS Y ELECTRÓNICOS
Al final de la vida útil del
aparato, éste no debe
eliminarse mezclado con
los residuos domésticos
generales.
Puede entregarse, sin
coste alguno, en centros
específicos de recogida, diferenciados
por las administraciones locales, o
distribuidores que faciliten este servicio.
Eliminar por separado un residuo de
electrodoméstico, significa evitar posibles
consecuencias negativas para el medio
ambiente y la salud, derivadas de una
eliminación inadecuada, y permite un
tratamiento, y reciclado de los materiales
que lo componen, obteniendo ahorros
importantes de energía y recursos.
Para subrayar la obligación de colaborar
con una recogida selectiva, en el producto
aparece el marcado que se muestra
como advertencia de la no utilización
de contenedores tradicionales para su
eliminación.
Para mas información, ponerse en contacto
con la autoridad local o con la tienda
donde adquirió el producto.
20
6 yemas de huevo
3 cucharadas de miel
0,75 l de leche de soja
Preparación:
Hierva la leche de soja con la miel. Haga un
puré con las fresas y añada esta mezcla a
la leche de soja y la miel. Bata las yemas
de huevo hasta que sean amarillas. Vierta la
leche hirviendo sobre las yemas de huevo y
remueva bien. Deje que se enfríe y póngalo
en la heladera durante 30 minutos. Después,
ponga la mezcla en el congelador durante
media hora. Decore con trozos de fresas antes
de servir.
Helado de yogur
Ingredientes:
510g de yogur entero (turco)
75g de leche entera
130g de azúcar fina
22g de dextrosa
22g de leche desnatada en polvo
Preparación:
Disuelva el azúcar, la dextrosa y la leche
desnatada en polvo en leche caliente. Deje
enfriar. Remueva bien el yogur con la leche.
Ponga en la heladera en marcha durante 30
minutos. (Si desea un resultado más suave,
puede añadir 100g de nata medio batida
antes de congelar). Ponga en el congelador
durante media hora.
Page 22

 Loading...