

Page 1

Using your oven
Model: FE 211
9962-5611 MULTI LANGUES.qxd 30/10/02 10:17 Page 1
Page 2

Contents
Throughout this manual,
indicates safety recommendations,
indicates advice to help you make the best
use of your oven
Introduction
P.3
Your oven P.4
How it works P.4
Accessories P.5
Safety recommendations P.6
How to install your oven
Electrical connections P.7-8
Dimensions for installation use P.9
How to use your oven
The timer P.10
How to cook straightaway P.10
How to programme the cooking P.11
Cooking methods P.12-13
Changing a bulb P.14
Looking after your oven P.15
Troubleshooting P.16
2
9962-5611 MULTI LANGUES.qxd 30/10/02 10:18 Page 2
Page 3
Introduction
3
Dear Customer,
Thank you for buying a BRANDT oven.
Our design staff have produced a new generation of kitchen equipment,
to make everyday cooking a pleasure.
You will find that the clean lines and modern look of your Brandt oven
blends in perfectly with your kitchen décor. It is easy to use and performs to a high standard.
Brandt also makes a range of products that will enhance your kitchen
such as hobs, extractor hoods, built-in dishwashers and refrigerators.
There are models to complement your new Brandt oven.
Of course, we make every effort to ensure that our products meet all
your requirements, and our Customer Relations department is at your
disposal, to answer all your questions and to listen to all your suggestions (see back cover of manual).
Brandt has always been a leader in the development of new products,
thus enhancing the quality of everyday life by providing increasingly
efficient products, that are easy to use, respect the environment, and are
attractive and reliable.
The BRANDT name.
GB
9962-5611 MULTI LANGUES.qxd 30/10/02 10:18 Page 3
Page 4
4
55
75
100
125
150
180
210
240
270
5
3
1
1
2
3
4
5
6
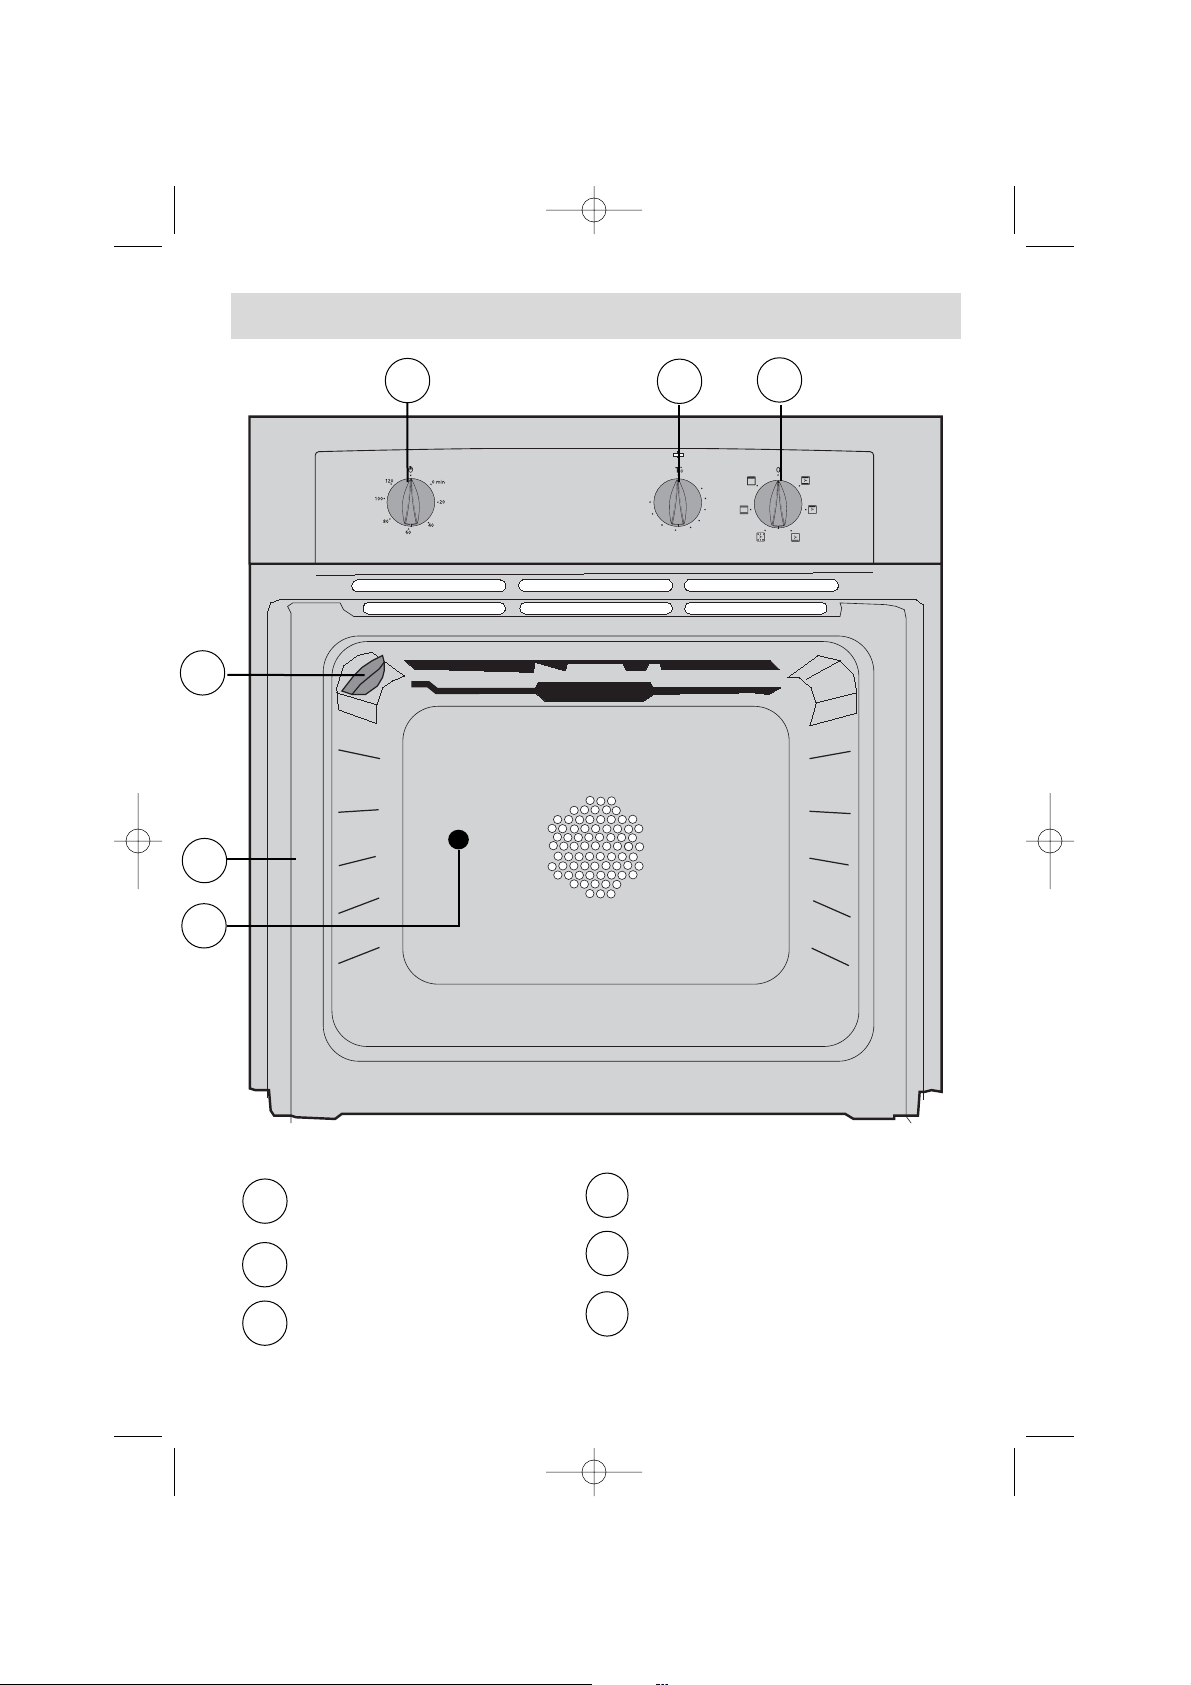
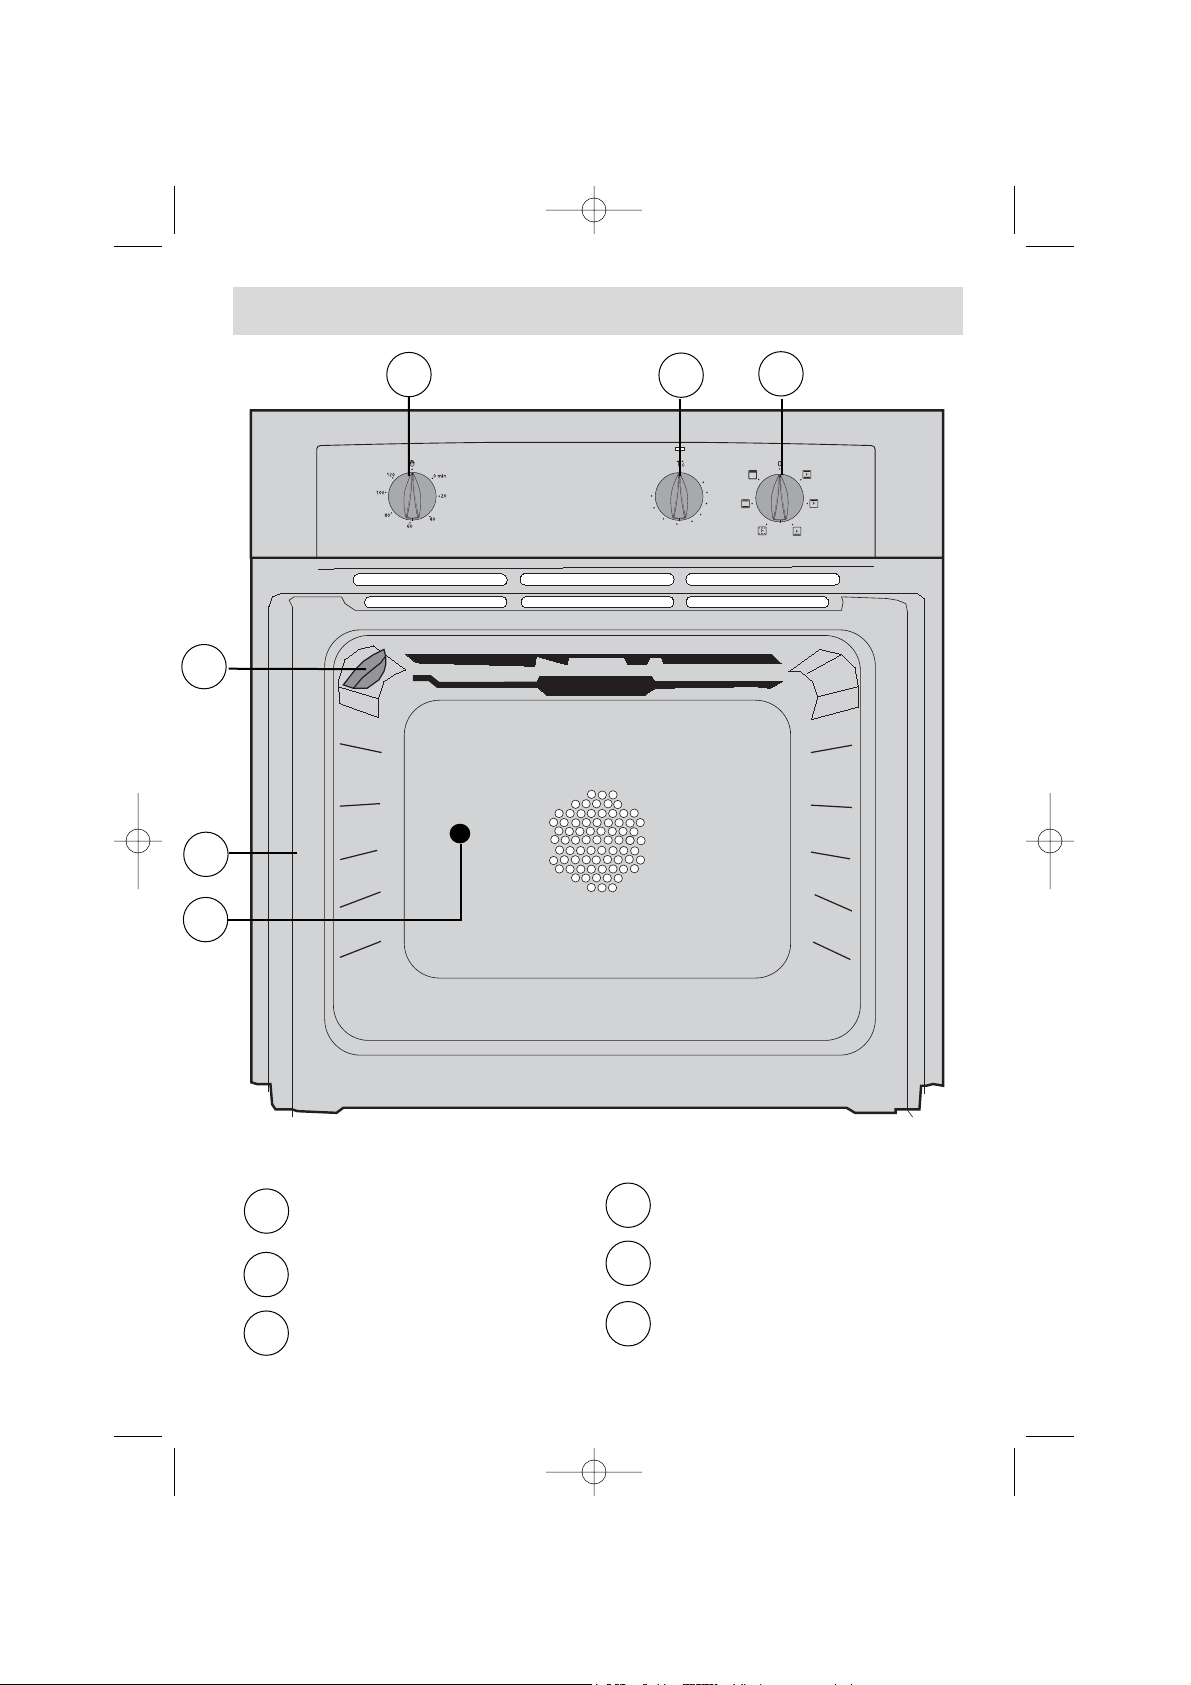
Timer
Temperature control
Feature selector
1
2
3
Light
Rail positions
Hole for rotisserie
4
5
6
OVEN FEATURES
Your oven
9962-5611 MULTI LANGUES.qxd 30/10/02 10:18 Page 4
Page 5
5
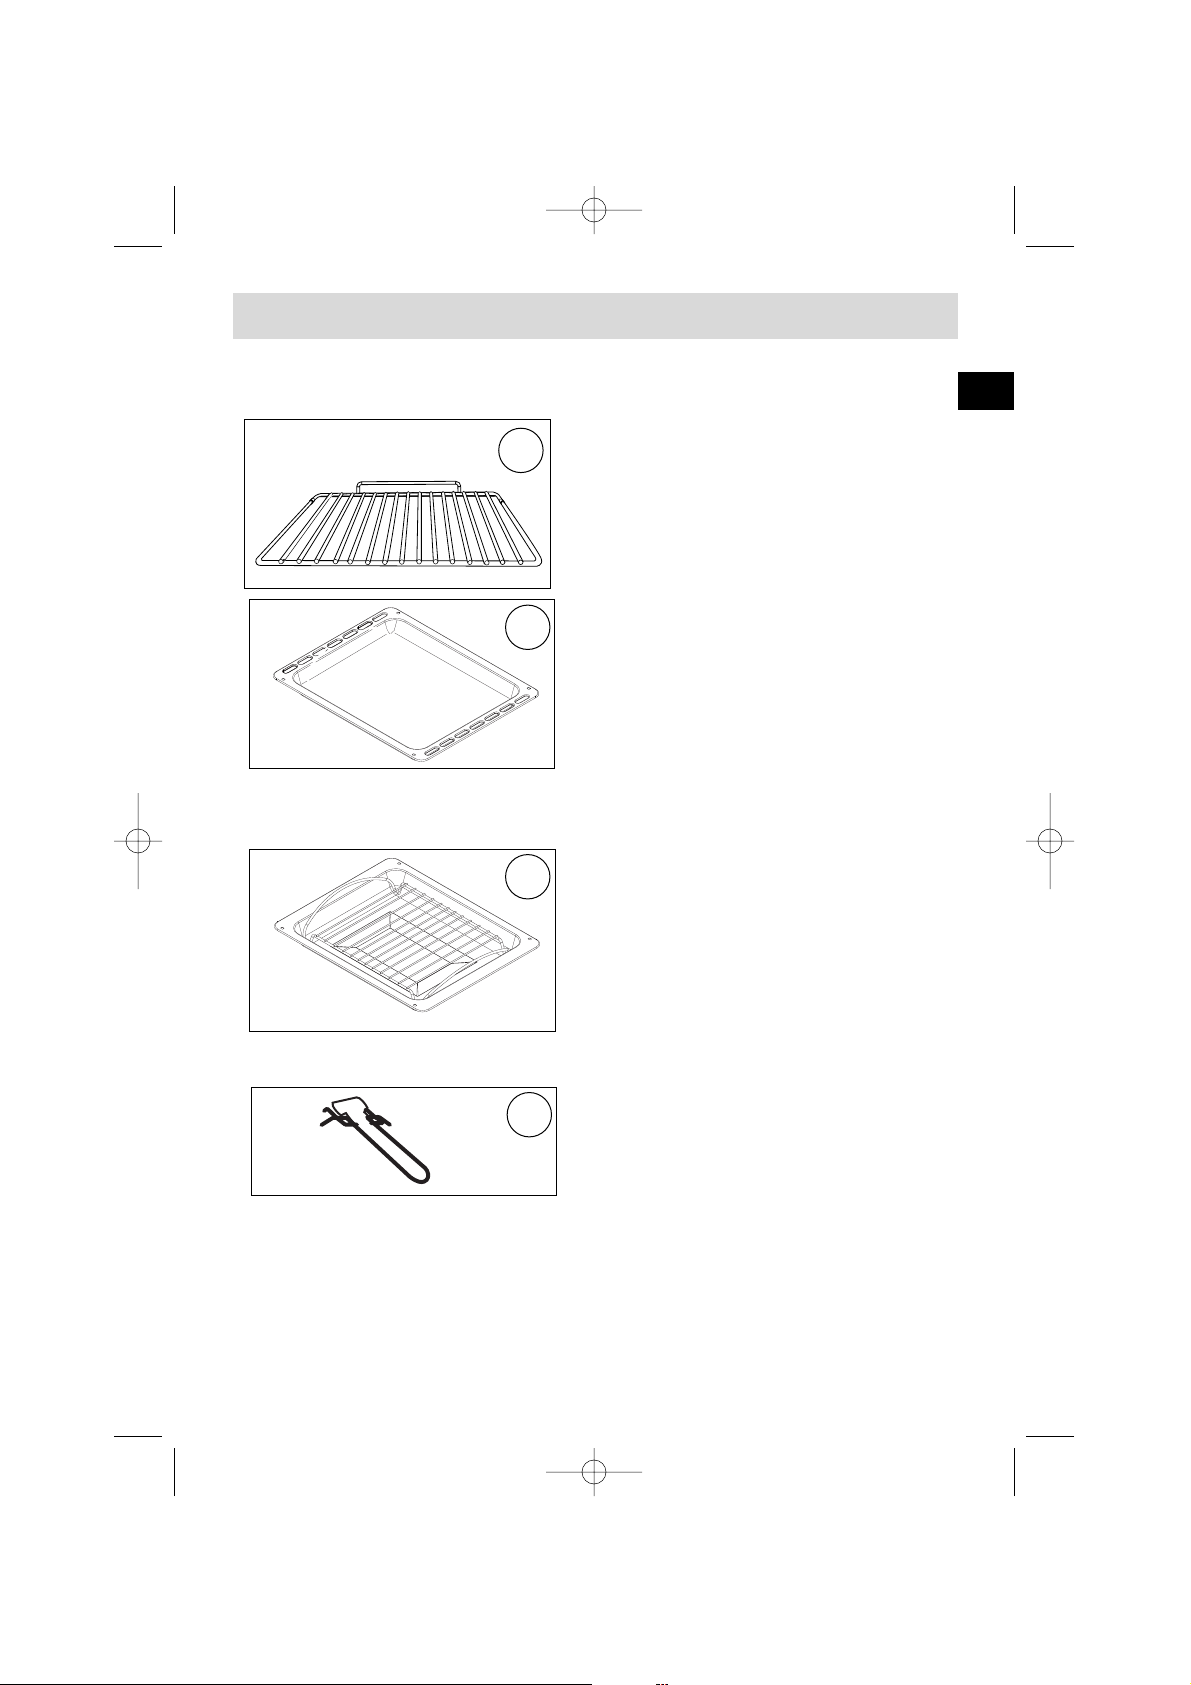
Anti-tip safety shelf
Food can either be placed on the shelf in a
dish or cake tin for cooking or browning, or
may be placed directly on the shelf itself.
Multi-purpose baking tray
This tray has a raised edge and can be used
for baking pastries (choux buns, meringues,
small cakes, flaky pasties, etc).
Joints should not be cooked in this tray
uncovered because fat could spit all over the oven sides.
Grill Tray
With special grid for grilling
The tray can be used for collecting juices
when cooking with the grill element by itself
or with the oven set to pulsed grill (grill and
fan). It is particularly useful as a large roasting tray for meat and vegetables.
Never cook with the grill tray sitting on the bottom of the oven.
Handle for grill tray
7
8
9
10
Accessories (Depending on model)
GB
9962-5611 MULTI LANGUES.qxd 30/10/02 10:18 Page 5
Page 6

6
Safety recommendations
Please read these instructions before installing and using your oven.
The oven has been designed for domestic use only for cooking food. No asbestos
has been used in its construction.
USING FOR THE FIRST TIME:
Before you use your oven for the first time, leave it empty and, with the door
closed, turn it on to maximum temperature and let it heat up for 15 minutes. This
"runs the oven in". During this time there may be some smell from the mineral
wool that insulates the oven and there could be some smoke. This is perfectly
normal.
NORMAL USE:
- Always close the door properly. The oven is fitted with a seal designed to
work with a closed door.
- Never lean or let anyone sit on the oven door when it is open.
- The oven parts and accessories can become hot when the door is
left partially open and the grill on. Always keep children at a safe distance.
- When the oven is on it will get hot. Take care not to touch the heating
elements inside the oven.
- Always protect your hands with oven gloves or something similar when
removing food, accessories or containers from the oven.
- Do not line your oven with kitchen foil. The metal will increase the heat pro-
duced and could ruin the food and damage the enamel.
- Never use a spray or a high-pressure washer to clean the oven.
- During self-cleaning, surfaces can become hotter than in normal use.
Children must be kept at a distance.
During the action of pyrolysis, accessible surfaces become much hotter than
during normal cooking. Keep children at a distance.
9962-5611 MULTI LANGUES.qxd 30/10/02 10:18 Page 6
Page 7
7
How to install your oven
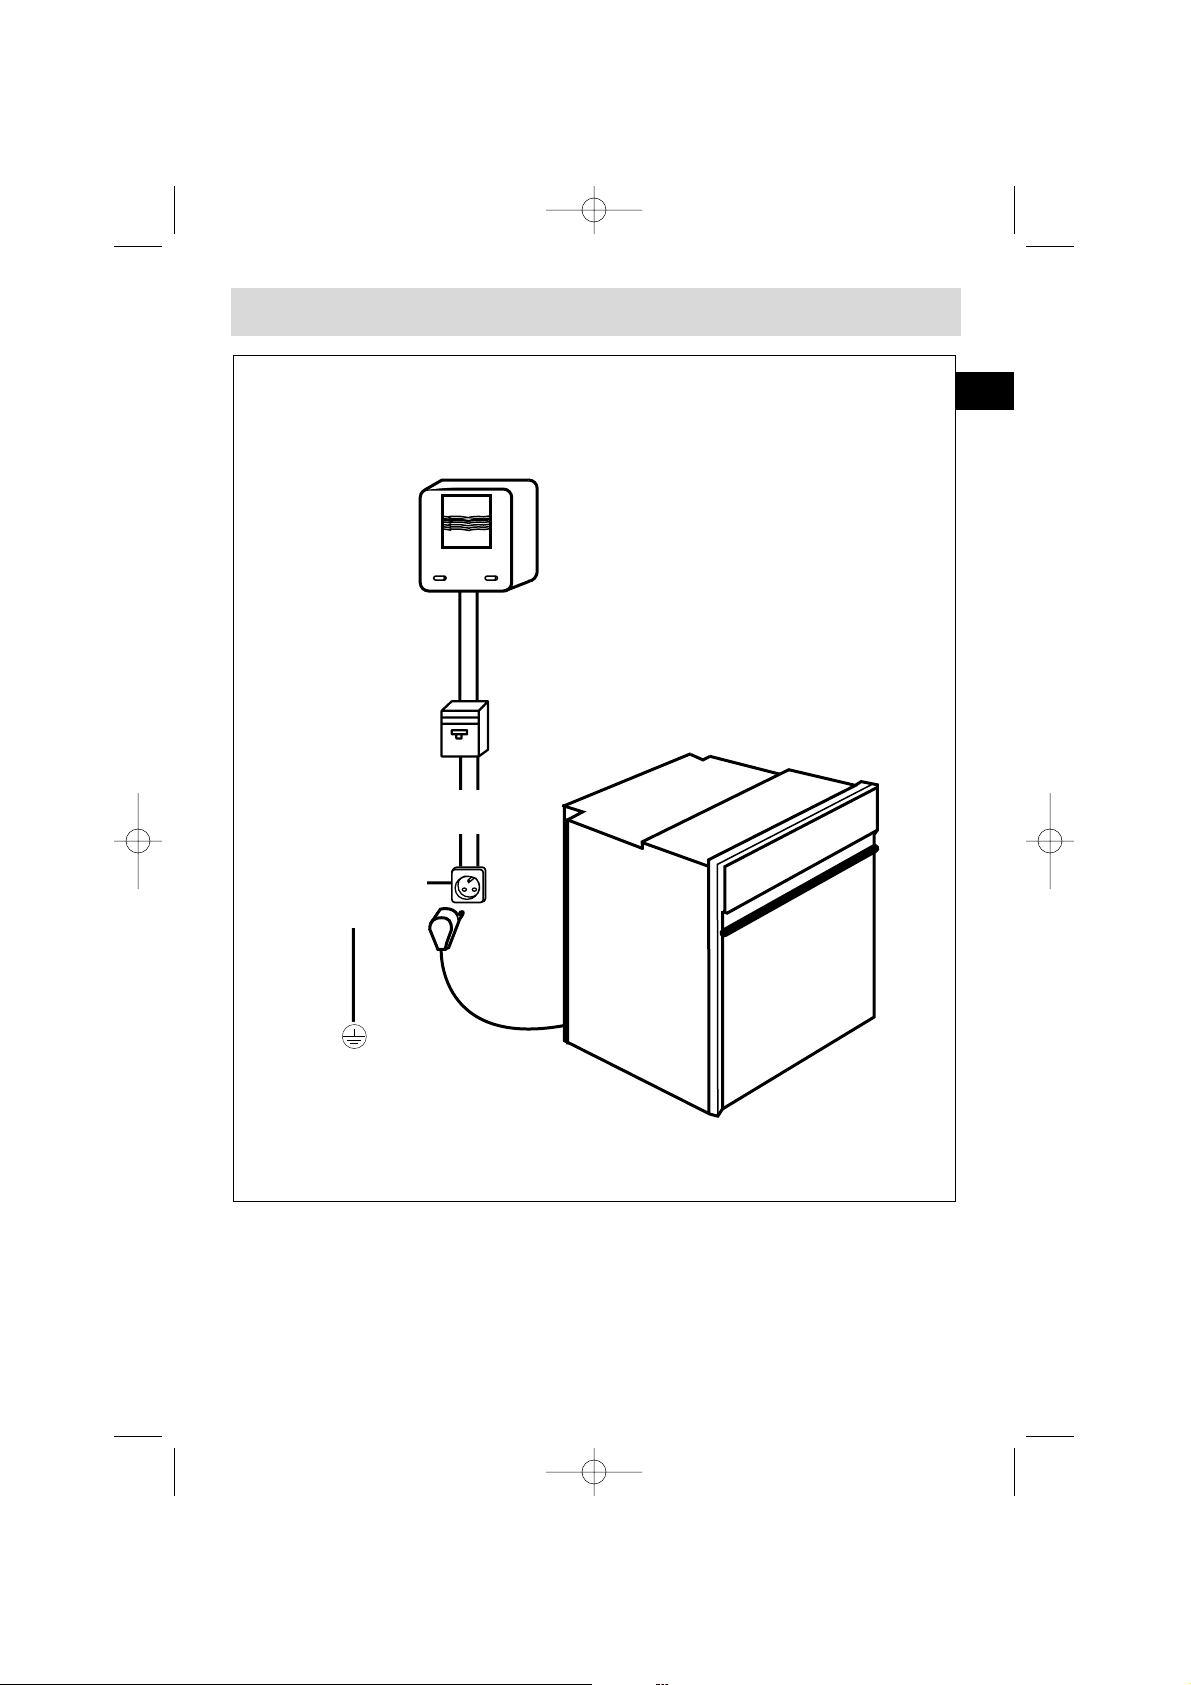
Electricity meter (mains)
(20A, single-phase
220-240 V alternating
current 50 Hz)
Socket
2 -pin with earth
220-240 V single phase
alternating current supply
Electrical connections
• Before connecting your oven, make sure you are using the correct size cable.
The cross-section should be the same as the cable connected to the oven. Use a
16-amp fuse.
Connecting cable
approx 1.50 m.
long
Fused 16A or differential
circuit breaker
GB
9962-5611 MULTI LANGUES.qxd 30/10/02 10:18 Page 7
Page 8

8
We cannot accept any liability in the event of an accident
resulting from non-existent or faulty earthing.
• The supply cable (H05 RR-F, H05 RN-F or H05 W-F) must be long enough to allow
the oven to rest on the floor in front of its housing.
With the oven sitting on the floor and disconnected:
• Open the trapdoor at the bottom right hand side at the back of the oven by
removing the 2 screws and swinging the door away.
• Remove the sheath from each wire in the new cable up to 12 mm.
• Twist the ends carefully together.
• Unscrew the terminal screws and remove the wires that need changing.
• Pass the new cable through the wire clamp to the right of the terminals.
• Connect the wires up in accordance with the markings on the terminals.
• Make sure all wires are trapped under the screws.
• The brown wire (live) going to terminal marked L.
• The green and yellow wire (earth) going to the one marked .
• The blue wire (neutral) going to the terminal marked N.
• Tighten the screws and check, by tugging on each wire, that they are firmly connected.
• Tighten the clamp to hold the cable.
• Close the trapdoor using the two screws.
The electrical connections are made before the oven is installed in its housing.
• The oven must be connected using an approved 3-core cable (live, neutral and
earth
) with 1.5 mm square conductors. This should be connected via a 3- pin-
socket (live, neutral, and earth to the main supply which should be should be a
220-240V, alternating single-phase current. If the oven is not connected using a
plug and socket, it must be connected to a multi-pole switch with a minimum gap
of 3 mm between contacts. The earth wire (green and yellow) should be connected
to the terminal marked with the earth symbol on the appliance and to the earth
in the switch.
• Where the oven is connected using a separate plug and socket this must be
accessible after the oven has been installed.
• The neutral wire (blue) of the oven must be connected to the neutral in the main supply.
Fitting new wiring and/or changing cables.
How to insta
9962-5611 MULTI LANGUES.qxd 30/10/02 10:18 Page 8
Page 9

9
ll your oven
If you are unsure about fitting this oven yourself please use a
qualified electrician.
Dimensions for installation use
The oven may be housed either under a work surface or built into a
column that is open* or closed with a suitable opening.
Your oven works at its best and produces excellent results when cooking and cleaning itself, if its air circulation is not compromised:
• The oven must be centred in the unit so that there is a minimum distance of 5
mm between it and the surrounding unit.
• The housing unit or its outer surface must be capable of withstanding heat.
• To ensure the oven rests firmly in the housing, screw it to the housing unit using
the holes on the side uprights provided (see diagram).
To do this:
1) Remove the rubber stoppers masking the fixing holes.
2) To prevent the housing unit splintering, drill two holes 3 mm in diameter in the wall of the
housing unit opposite the fixing holes.
3) Attach the oven using the two screws.
4) Conceal the hole using the rubber stoppers. (These also help to cushion the
closing of the oven door).
(*) If the housing unit is open at the back, the gap must not be more
than 70 mm.
GB
9962-5611 MULTI LANGUES.qxd 30/10/02 10:18 Page 9
Page 10
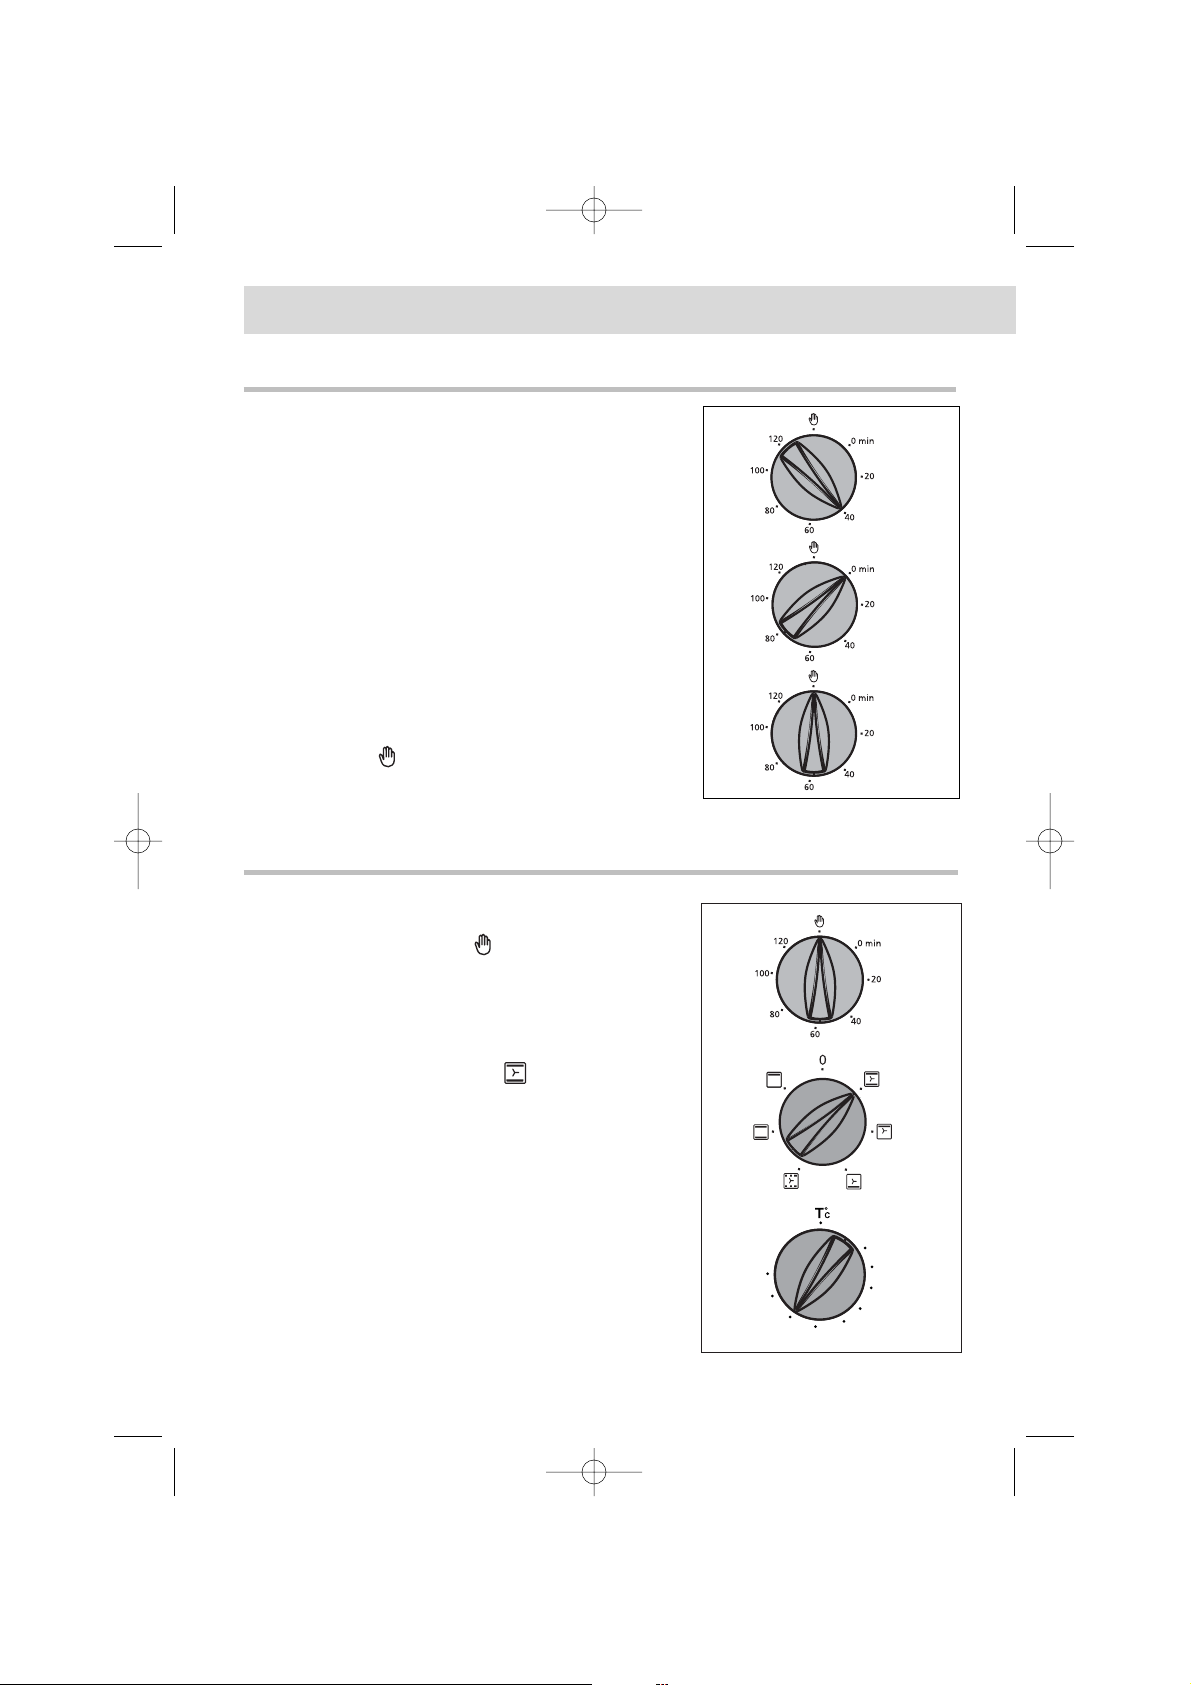
The timer must be at “”.
• Choose how you want to cook your food:
Turn the dial until it is indicating your choice.
The example chosen is " ".
• Choose the temperature you want to cook at:
Turn the dial (thermostat) to the temperature
recommended for the food you are cooking.
The example shows 210°.
• After this, the oven heats up and the temperature
light flickers on and off as the temperature adjusts.
2. How to cook straightaway
1. T
he timer
Using this device the oven switches off automatically when it reaches the end of the displayed
cooking time.
• Simply turn the control to the time required (in
minutes)
E.g. 40 minutes.
• Once the time is up and the timer is back at "0",
the oven switches off.
• If you want to use the oven without this timer set
the control to “ ”.
10
How to use
9962-5611 MULTI LANGUES.qxd 30/10/02 10:18 Page 10
55
270
240
210
180
75
100
125
150
Page 11

• Choose the cooking time
Turn the timer to the position of the time
required.
Example: 40 minutes' cooking.
• Choose the cooking method
Turn the function selector to the position of your
choice.
Example: position " ".
• Choose the cooking temperature
Turn the thermostat (temperature selector) to the
temperature recommended by your recipe.
Example: 210° temperature mark
• After doing this, the oven heats up and the thermo-
stat light comes on. When the cooking is finished, the
"Timer" switch is in position 0 and the oven is turned
off.
NB: There is no audible signal at the end of cooking time.
When you have finished cooking, return:
- The timer to position “”
- The function selector and the thermostat to the "Stop" position.
11
3. How to programme the cooking
After cooking the fan continues to work for a while to ensure
the elements cool right down.
You can alter or switch the timer off at any time.
your oven
GB
9962-5611 MULTI LANGUES.qxd 30/10/02 10:18 Page 11
270
240
210
55
75
100
125
150
180
Page 12
12
Cooking
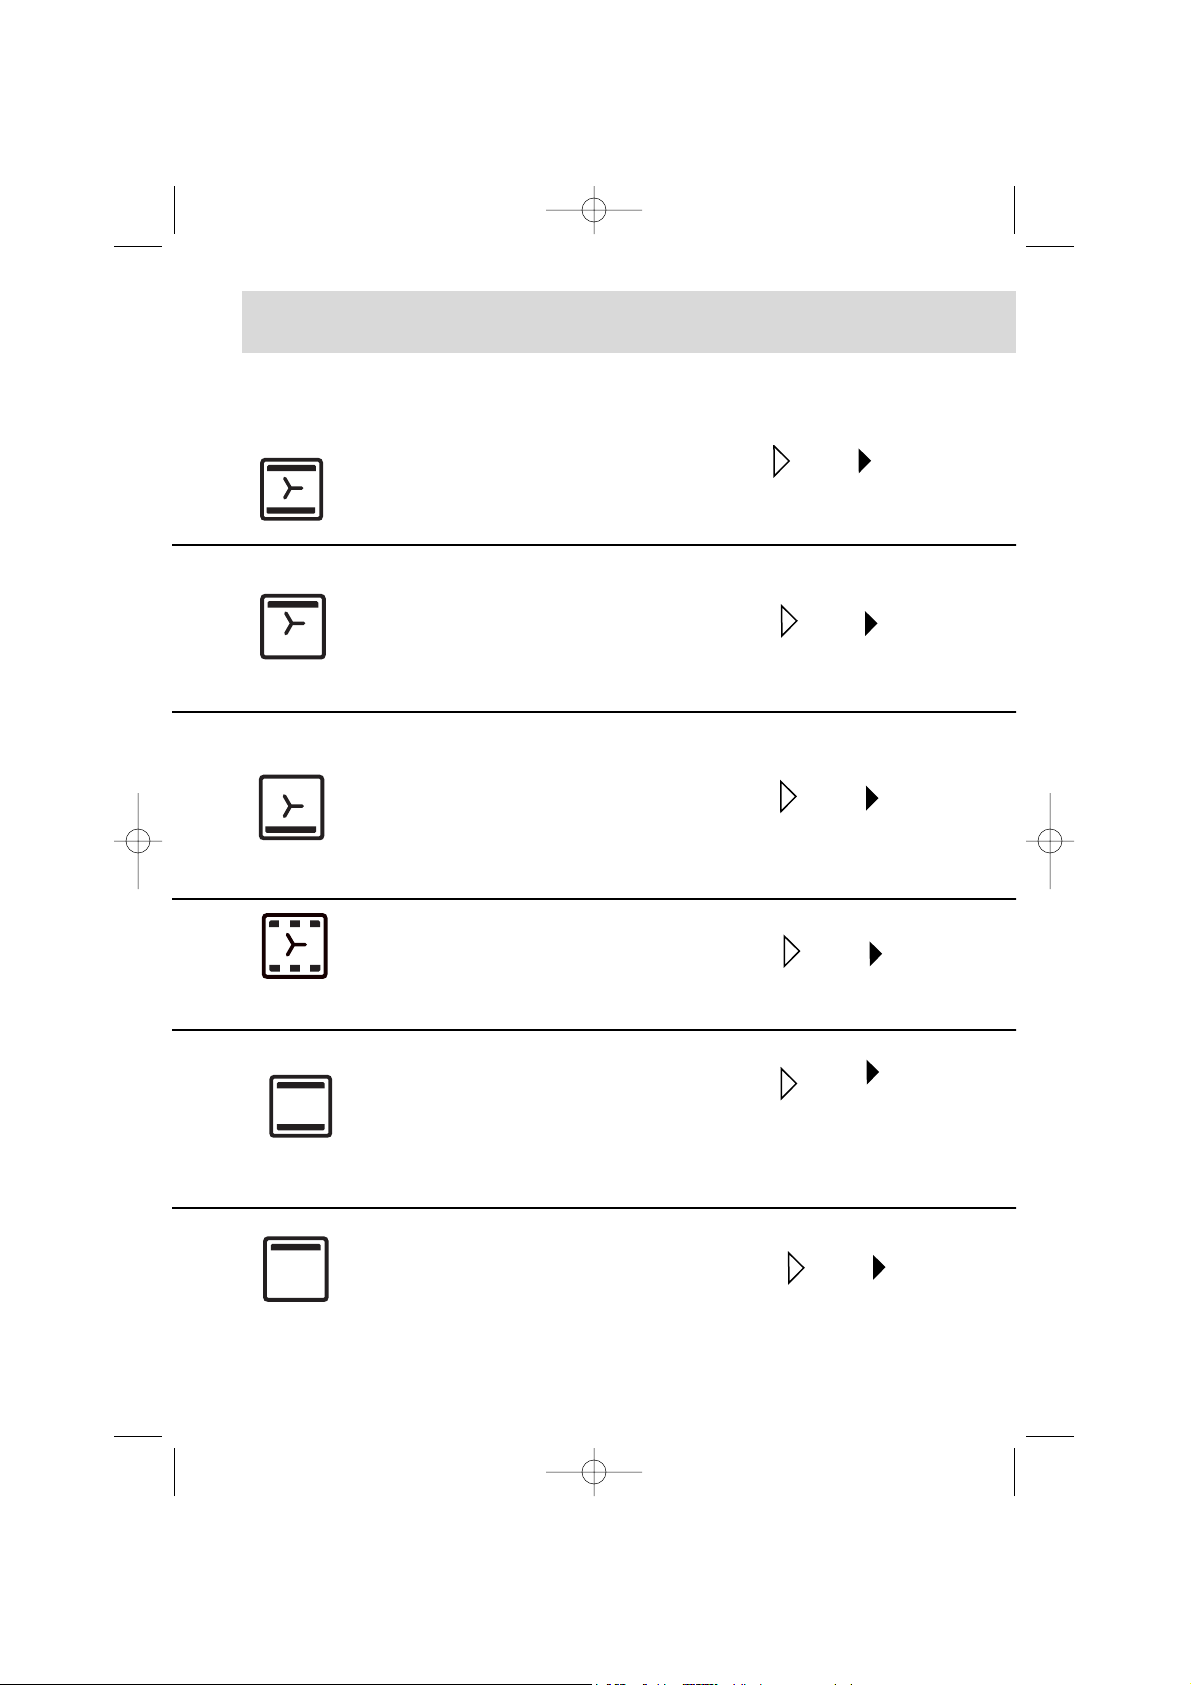
P
ulsed conventional oven
Food is cooked by a top and bottom
element and the fan.
C
onventional oven
Food is cooked by a top and bottom
element. No fan.
Oven rapidly reac
dishes can start o
Pre-heating ne
rature.
Symbol
Feature
Pulsed grill
Cooking is done alternately by the
top element and by the fan.
No need to pre
culent joints th
Possibility of ro
placed on the
baking tray on
juices.
Pulsed bottom oven
The bottom element heats up and
the fan move the hot air around to
cook the food.
Food is cooke
Place the wire
Warming oven
Heat from top element along with
pulsed air.
Stays warm
Grill
Only the top element heats up. The
fan is not used
.
Warm up for
Slide the grill
*
*
*
·Cooking methods referred to in the advertisement about energy labelling in acco
9962-5611 MULTI LANGUES.qxd 30/10/02 10:18 Page 12
Page 13
13
methods
Recommended for MEAT, FISH and
VEGETABLES, preferably in earthenware
dishes.
Recommended for food requiring slow,
careful cooking such as game and braising joints. Ideal for sealing red meat
joints and simmering lidded casseroles
whose contents have been partially
cooked on the hob first.
Description
Recommendations
Recommended for all poultry and
roast joints. For sealing and
thoroughly cooking gigot lamb chops,
and sides of beef. Also good for cooking
fish in breadcrumbs.
Recommended for dishes with a lot of
liquid (quiches and fruit pies) as the
pastry base is cooked through. Use also
for food that rises (bread and cakes)
and uncovered soufflés.
Recommended for leaving breads to rise
(keeping temperature below 40ºC), keeping dishes warm and thawing food.
l pan onto the rail beneath the grill.
Recommended for grilling chops,
sausages, and large prawns and for
making toast.
GB
9962-5611 MULTI LANGUES.qxd 30/10/02 10:18 Page 13
Page 14
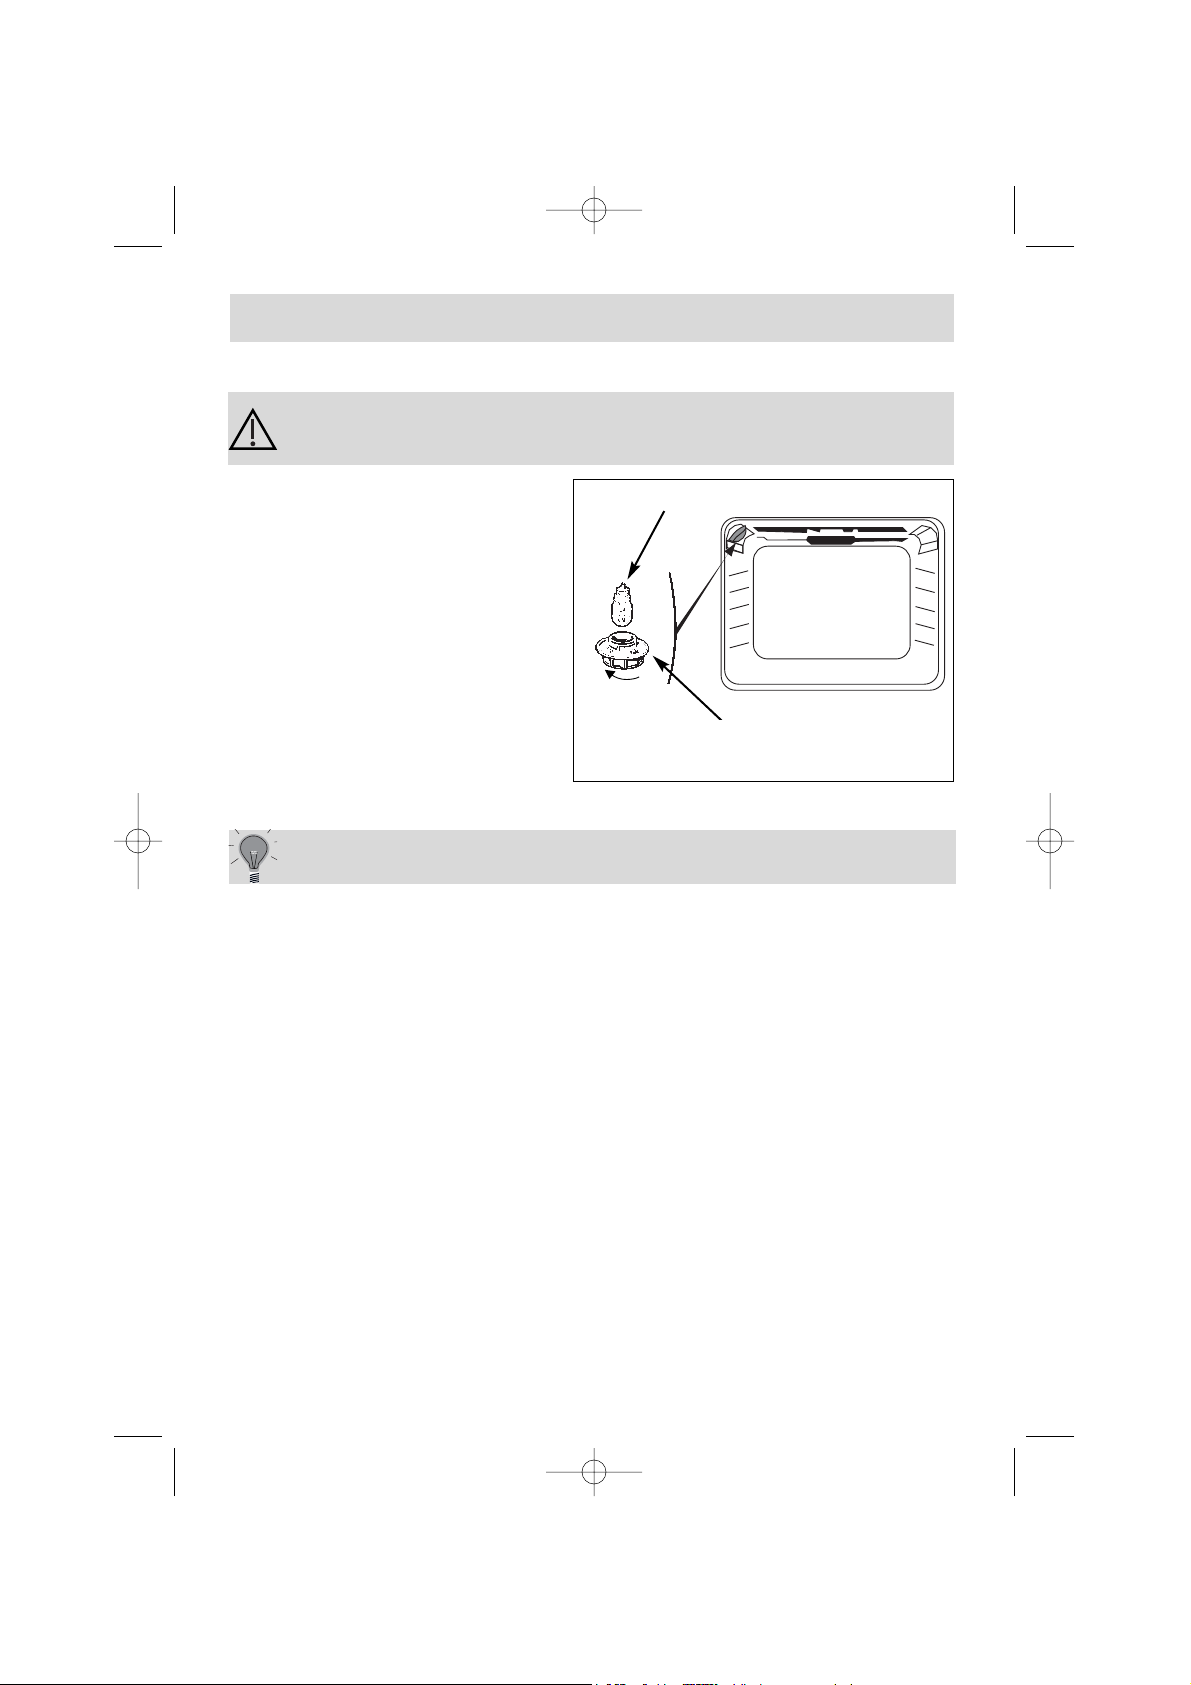
• The light bulb is housed in the ceiling of your oven.
a) Unscrew the protective shade (see
diagram).
b) Unscrew the bulb in the same direction.
The bulb used is a:
- 15 W
- 220-240 V
- 300°C
- E 14 screw-fitting bulb
c) Change the bulb, replace the shade and
switch your oven back on at the mains.
14
C hanging a bulb
bulb fitting
unscrew
cover
It is easier to unscrew the shade and bulb if you wear a rubber glove.
Warning! Switch off the power at the main switch before attempting to change the bulb. Leave the oven to cool if
necessary.
9962-5611 MULTI LANGUES.qxd 30/10/02 10:18 Page 14
Page 15
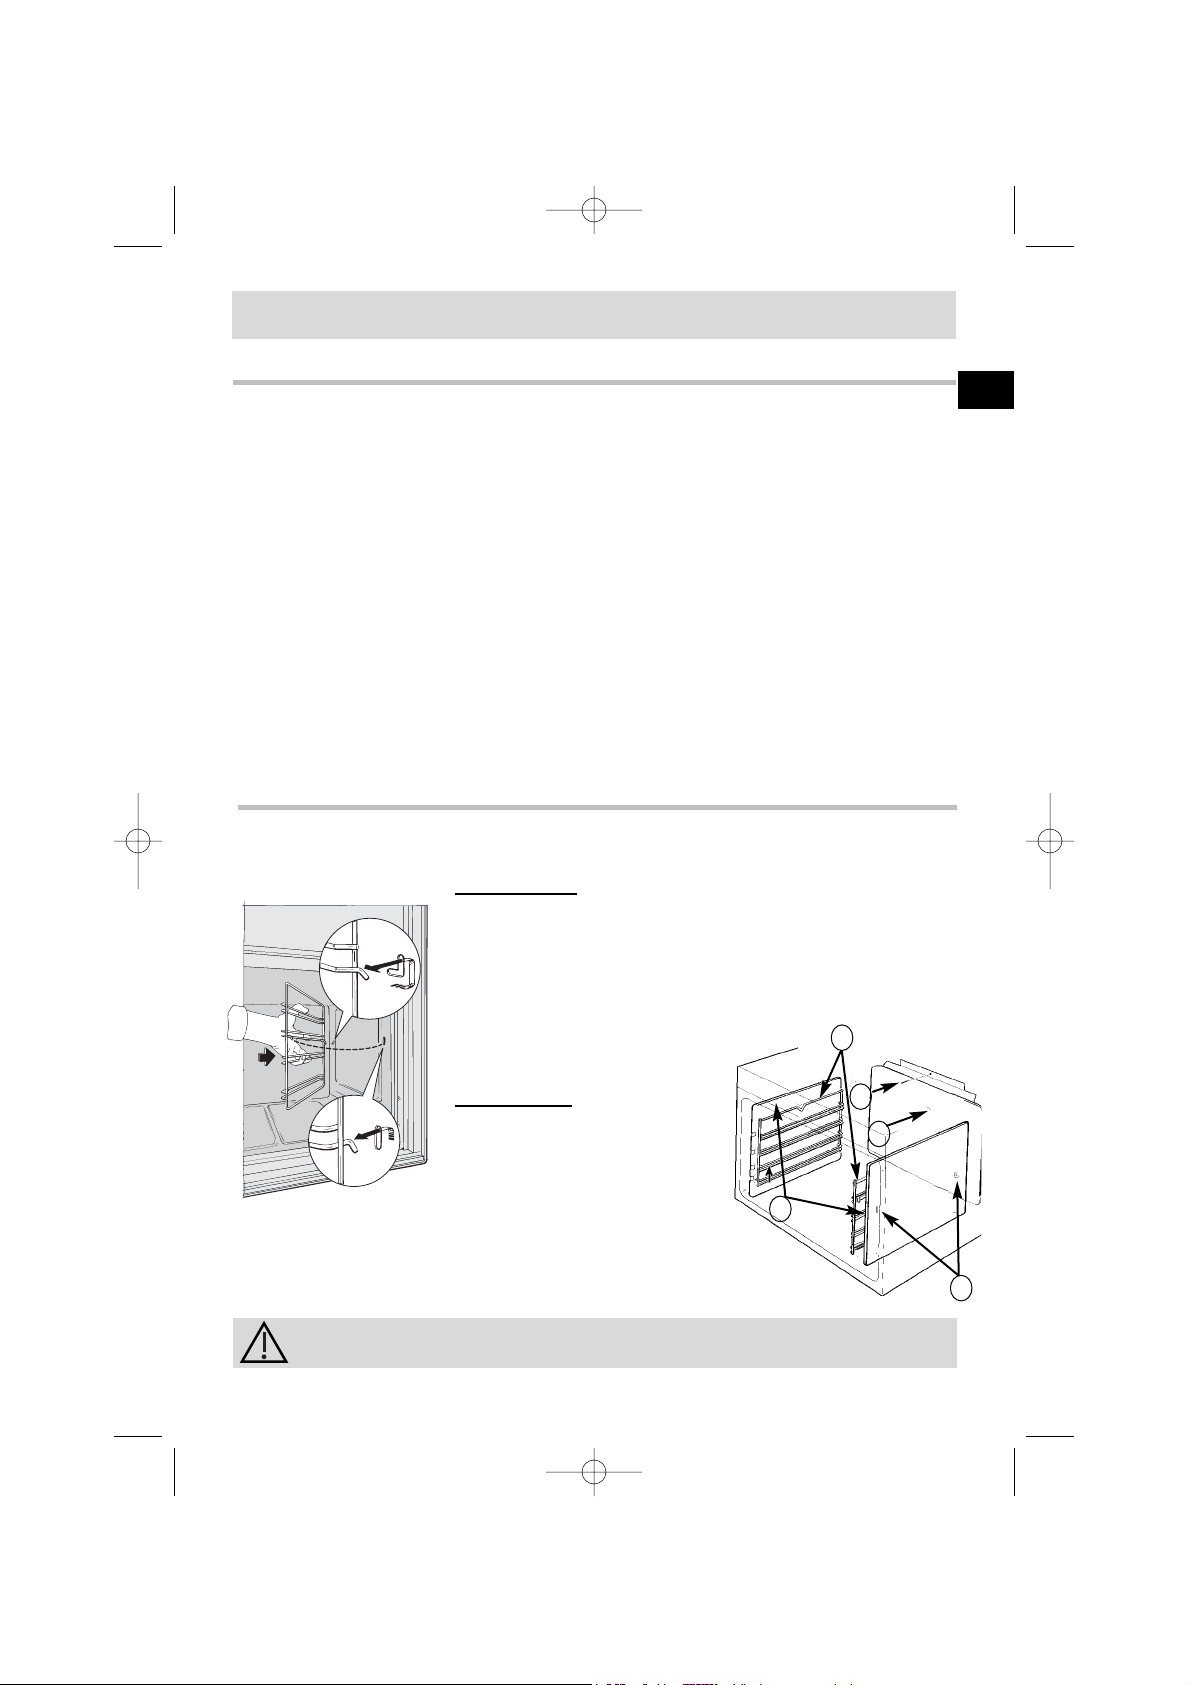
Always allow the oven to cool down before attempting to remove the
panels. Check the cooking selector is at OFF.
Side panels (1)
Undo the rail clip (2) at the front by lifting it up
(
Diagram A
). Pull the rail unit toward you, lifting it
slightly to unclip the rear catch (
Diagram B
). Pull it out
of the 2 holes (3) of the catalytic panels and the oven
casing. Remove the catalytic panel (1). Reverse operations to replace panel and rail
unit.
Back panel
(4)
Undo and remove the screw
(5) at the top of the back
panel. Tip the panel towards
you so you can remove it
from the oven case. Reverse this operation to replace
the panel.
Looking after your oven
C
hanging the catalytic panels
Cleaning the inside
Your oven is self-cleaning. The outer shell is lined with removable panels
covered in a special microporous enamel known as catalytic enamel. This coating
helps eliminate dirt and grease. Splashes are attracted to the tiny holes where
they are gradually burnt off. Unfortunately, the coating cannot do the same to
sugary substances which is why the bottom of the oven, where these are likely
to collect, does not have the same enamel finish.
You are strongly advised,
- Never use wire brushes or any other pointed or cutting implement.
- Never use any scouring material.
- When grilling, a lot of fat can be spat onto the walls of the oven. However, the
temperature will not be enough to burn them off completely while you are
grilling.
To overcome this problem leave the oven on for 20 to 30 minutes at the highest
temperature possible after you have finished cooking. If any trace remains it will
be burnt off when you use the oven the next few times.
1
3
4
2
5
15
Always check that the oven is off before you clean the inside.
GB
9962-5611 MULTI LANGUES.qxd 30/10/02 10:18 Page 15
B
A
Page 16
16
Troubleshooting
If you're not sure that your oven is working properly, it doesn't necessarily
mean that there's a problem.
In all cases, check the following points:
If you realize that..
Possible causes what should you do?
The oven isn't heating.
• The oven isn't connected
to the power supply.
• The fuse has blown.
• The temperature selected
is too low.
• The thermostat is faulty.
- Connect to power supply.
- Change the fuse, checking
that it is 16A.
- Increase the temperature
selected.
- Contact the After-Sales
Service.
The temperature light
does not go out.
• Faulty thermostat.
- Contact the After-Sales
Service.
The light inside the oven
isn't working.
• The lamp is unusable.
• The oven isn't connected
to the power supply or the
fuse has blown.
- Change the bulb.
- Connect to power supply
or change fuse.
The cooling fan keeps
working after the oven is
turned off.
• The fan is still working an
hour after cooking has
stopped,
• If it has not stopped after
1 hour
- Open the door to help the
oven cool down more
quickly.
- Contact the After-Sales
Service.
Copy here the details that are on your oven manufacturer's plate:
MADE IN FRANCE
220 - 240V ~ 50 Hz
BRANDT APPLIANCES SAS
7 rue Henri Becquerel
92500 RUEIL MALMAISON
9962-5611 MULTI LANGUES.qxd 30/10/02 10:18 Page 16
Page 17

Le guide d’utilisation
de votre four
de
R
éférence : FE 211
FR
17
9962-5611 MULTI LANGUES.qxd 30/10/02 10:18 Page 17
Page 18

Sommaire
Tout au long de la notice,
vous signale les consignes de sécurité,
vous signale les conseils et les astuces
Edito
P.19
Comment se présente votre four ? P.20
Descriptif de l’appareil P.20
Accessoires P.21
Conseils de sécurité P.22
Comment installer votre four ?
Raccordement électrique P.23-24
Dimensions utiles pour encastrer votre four P.25
Comment utiliser votre four ?
La minuterie P.26
Comment faire une cuisson immédiate ? P.26
Comment programmer un temps de cuisson ? P.27
Modes de cuisson P.28-29
Comment changer l’ampoule ? P.30
Comment entretenir votre four ? P.31
Que faire en cas d’anomalies de fonctionnement ? P.32
18
9962-5611 MULTI LANGUES.qxd 30/10/02 10:18 Page 18
Page 19
Edito
19
Chère Cliente, Cher Client,
Vous venez d'acquérir un four BRANDT et nous vous en remercions.
Nos équipes de recherche ont conçu pour vous une nouvelle génération
d'appareils pour cuisiner chaque jour avec plaisir.
Avec des lignes pures et une esthétique moderne, votre nouveau four
Brandt s'intègre harmonieusement dans votre cuisine et allie parfaitement facilité d'utilisation et performances de cuisson.
Vous trouverez également dans la gamme des produits Brandt, un vaste
choix de tables de cuisson, de hottes aspirantes, de lave-vaisselle et de
réfrigérateurs intégrables, que vous pourrez coordonner à votre nouveau
four Brandt.
Bien entendu, dans un souci permanent de satisfaire au mieux vos exigences vis à vis de nos produits, notre service consommateurs est à
votre disposition et à votre écoute pour répondre à toutes vos questions
ou suggestions (coordonnées à la fin de ce livret).
A la pointe de l'innovation, Brandt contribue ainsi à l'amélioration de la
qualité de la vie quotidienne en vous apportant des produits toujours plus
performants, simples d'utilisation, respectueux de l'environnement, esthétiques et fiables.
La Marque BRANDT.
FR
9962-5611 MULTI LANGUES.qxd 30/10/02 10:18 Page 19
Page 20
20
55
75
100
125
150
180
210
240
270
5
3
1
1
2
3
4
5
6
Minuterie
Sélecteur de température
Sélecteur de fonctions
1
2
3
Lampe
Indicateur de gradin
Trou pour tournebroche
4
5
6
DESCRIPTIF APPAREIL
Comment se présente votre four ?
9962-5611 MULTI LANGUES.qxd 30/10/02 10:18 Page 20
Page 21

21
Grille sécurité anti basculement
La grille peut être utilisée pour supporter
tous les plats et moules contenant des aliments à cuire ou à gratiner. Elle sera utilisée pour les grillades (à poser directement
dessus).
Plat multi usages
(pâtisserie)
Il sert de plat à gâteaux et dispose d'un
rebord incliné. Il s'utilise pour la cuisson de
pâtisseries telles que choux à la crème,
meringues, madeleines, pâtes feuilletées...
Evitez de poser directement dans ce plat
des rôtis ou des viandes car vous aurez automatiquement d'importantes projections sur les parois du four.
Plat creux
équipé d'une grille support
spéciale grillades
Il sert à recueillir le jus et les graisses de
cuisson réalisées en gril fort ou gril pulsé.
Il peut être utilisé comme plat de cuisson en
appropriant la taille du morceau à cuire
(ex: une volaille avec les légumes autour, à
température modérée).
Ne jamais poser ce plat directement sur la sole, sauf en position GRIL.
Poignée pour plat creux
7
8
9
10
Accessoires (selon modèle)
FR
9962-5611 MULTI LANGUES.qxd 30/10/02 10:18 Page 21
Page 22

22
Conseils de sécurité
Merci de prendre connaissance de ces conseils avant d’installer et
d’utiliser votre four. Ce four a été conçu pour être utlilisé par des particuliers
dans leur lieu d’habitation. Il est destiné exclusivement à la cuisson des denrées
alimentaires. Ce four ne contient aucun composant à base d’amiante.
PREMIERE UTILISATION :
Avant d’utiliser votre four pour la première fois, chauffer le à vide, porte fermée,
pendant 15 minutes environ sur la position maxi afin de “roder” l’appareil. La laine
minérale qui entoure la cavité du four peut dégager, au début, une odeur particulière due à sa composition. De même, vous constaterez peut être un dégagement
de fumée. Tout ceci est normal.
UTILISATIONS SUIVANTES :
- Assurez vous que votre porte de four est bien fermée afin que le joint
d’étanchéité remplisse correctement sa fonction.
- Ne laissez personne s’appuyer ou s’asseoir sur la porte du four ouverte.
- Les parties accessibles ou les surfaces peuvent devenir chaudes
lors de l’utilisation du gril porte entrouverte. Eloignez les jeunes enfants.
- Lors de son utilisation, l’appareil devient chaud . Veillez à ne pas toucher
les éléments chauffants situés à l’intérieur du four.
- Après une cuisson, ne prenez pas à main nue la casserolerie (grille,
tourne broche, léchefrite, berceau de tournebroche...), utilisez une manique ou un
tissu isolant.
- Ne garnissez pas votre four de feuilles en aluminium. Sinon, il en
résulterait une accumulation de chaleur qui influencerait désavantagement le
résultat de la cuisson et du rôtissage et endommagerait l’émail.
- Ne pas utiliser de nettoyeur vapeur ou à haute pression.
Lors du nettoyage les surfaces peuvent devenir plus chaudes qu'en usage
normal, il faut éloigner les jeunes enfants.
9962-5611 MULTI LANGUES.qxd 30/10/02 10:18 Page 22
Page 23

23
Comment installer votre four?
Compteur 20A Mono
220-240 V ~ 50 Hz
Prise de courant
2 pôles + terre
norme CEI 83
Ligne Mono 220-240 V ~
Raccordement électrique
• Avant d'effectuer le branchement, s'assurer que les fils de votre installation électrique sont d'une section suffisante pour alimenter normalement l'appareil (section au minimum égale à celle du câble d'alimentation). Le fusible de votre
installation doit être de 16 Ampères.
Câble
d'alimentation
longueur 1,50 m
environ
Disjoncteur différentiel
ou fusible 16A
FR
9962-5611 MULTI LANGUES.qxd 30/10/02 10:18 Page 23
Page 24

24
Notre responsabilité ne saurait être engagée en cas d'accident
consécutif à une mise à la terre inexistante, défectueuse ou
incorrecte.
• Le câble d’alimentation (H05 RR-F, H05 RN-F ou H05 VV-F) doit avoir une longueur
suffisante pour être raccordé au four à encastrer posé au sol devant le meuble.
Pour cela l’appareil étant déconnecté du réseau :
• Ouvrez la trappe située en bas à droite du capot arrière en dévissant les 2 vis,
puis faîtes pivoter la trappe.
• Dénudez chaque fil du nouveau câble d’alimentation sur 12mm.
• Torsadez soigneusement les brins.
• Desserrez les vis du bornier et retirez le cordon d’alimentation à changer.
• Introduire le câble d’alimentation par le côté du capot dans le serre-câble situé à
droite du bornier.
• Raccordez les fils du câble conformément au(x) repère(s) écrit(s) sur le bornier.
• Tous les brins des fils d’alimentation doivent être emprisonnés sous les vis.
• Le fil de la phase sur la borne L.
• Le fil de terre couleur vert-jaune doit être relié à la borne .
• Le fil du neutre (bleu) sur la borne N.
• Vissez à fond les vis du bornier et vérifiez le branchement en tirant sur chaque fil.
• Fixez le câble au moyen du serre-câble situé à droite du bornier.
• Refermez la trappe à l’aide des 2 vis.
Le raccordement électrique est à réaliser avant la mise en place de l'appareil dans
le meuble.
• Le four doit être branché avec un câble d'alimentation (normalisé) à 3 conducteurs de 1,5 mm
2
(1 ph +1 N + terre ) qui doivent être raccordés sur réseau
220-
240 V ~ monophasé par l'intermédiaire d'une prise de courant 1 ph +1 N + terre
normalisée CEI 83 ou d'un dispositif à coupure omnipolaire ayant une distance
d'ouverture des contacts d'au moins 3 mm. Le fil de protection (vert-jaune) est relié
à la borne de l'appareil et doit être relié à la terre de l'installation.
• Dans le cas d’un branchement avec prise de courant, celle-ci doit rester
accessible après l’installation de l’appareil.
• Le neutre du four (fil bleu) doit être raccordé au neutre du réseau.
Changement du câble d’alimentation
Comment install
9962-5611 MULTI LANGUES.qxd 30/10/02 10:18 Page 24
Page 25

25
ler votre four?
Pour être assuré d’avoir une installation conforme, n’hésitez
pas à faire appel à un spécialiste électroménager.
Dimensions utiles pour encastrer votre four
Le four peut indifféremment être installé sous un plan de travail ou dans
un meuble en colonne (ouvert* ou fermé) ayant les dimensions d’encastrement adaptées (voir schéma ci-contre).
Votre four possède une circulation d’air optimisée qui permet d’obtenir des résultats
de cuisson et de nettoyage remarquables en respectant les éléments suivants :
• Centrez le four dans le meuble de façon à garantir une distance mini de 5 mm
avec le meuble voisin.
• La matière du meuble d’encastrement doit résister à la chaleur (ou être revêtu
d’une telle matière).
• Pour plus de stabilité, fixez le four dans le meuble par 2 vis au travers des trous
prévus à cet effet sur les montants latéraux (cf schéma).
Pour ce faire :
1) Retirez les cache vis en caoutchouc pour accéder aux trous de fixation.
2) Effectuez un trou de Ø 3 mm dans la paroi du meuble pour éviter l’éclatement du bois.
3) Fixez le four avec les 2 vis.
4) Remettez les cache vis en caoutchouc (ceux-ci servent également à amortir la
fermeture de la porte du four).
(*) si le meuble est ouvert, son ouverture doit être de 70 mm (maxi).
FR
9962-5611 MULTI LANGUES.qxd 30/10/02 10:18 Page 25
Page 26

La minuterie doit être en position “”.
• Choisissez le mode de cuisson
Tournez le sélecteur de fonctions sur la
position de votre choix.
Exemple : position " ".
• Choisissez la température de cuisson
Tournez le thermostat (sélecteur de
température) sur la température recommandée
par votre recette.
Exemple : repère de température 210°.
• Après ces actions, le four chauffe, le voyant de
thermostat s’allume et s’éteint au rythme des
régulations.
2. C
omment faire une cuisson immédiate ?
1.
La minuterie
Elle permet d’obtenir l’arrêt automatique du four
après le temps de cuisson affiché.
• Pour l’utiliser, amenez la manette sur la position
qui correspond au temps désiré (en minutes)
Exemple : 40 minutes.
• Une fois le temps écoulé, la minuterie se
positionne sur “0 min” et éteint le four.
• Si vous désirez utiliser le four sans la minuterie,
mettez la manette en position “ ”.
26
C omment utilis
9962-5611 MULTI LANGUES.qxd 30/10/02 10:18 Page 26
55
270
240
210
180
75
100
125
150
Page 27

• Choisissez le temps de cuisson
Tournez la minuterie sur la position du temps
désiré.
Exemple : 40 minutes de cuisson.
• Choisissez le mode de cuisson
Tournez le sélecteur de fonctions sur la position
de votre choix.
Exemple : position " ".
• Choisissez la température de cuisson
Tournez le thermostat (sélecteur de température)
sur la température recommandée par votre recette.
Exemple : repère de température 210°
• Après ces actions, le four chauffe, le voyant de
thermostat s’allume. Quand votre cuisson est
terminée, la manette “Minuterie” est en position 0
et éteint le four.
NOTA : Il n’y a pas de signal sonore en fin de cuisson.
En fin de cuisson, remettez :
- la minuterie sur la position “”
- le sélecteur de fonctions et le thermostat sur la position “Arrêt”.
27
3. Comment programmer un temps de cuisson ?
Après un cycle de cuisson, le ventilateur du four continue de
fonctionner pendant un certain temps, afin de garantir un bon
refroidissement des éléments.
Il est possible de modifier ou d’annuler à n’importe quel moment
la programmation de la minuterie.
FR
9962-5611 MULTI LANGUES.qxd 30/10/02 10:18 Page 27
270
240
55
75
100
210
125
150
180
Page 28

28
Modes de cui
T
raditionnel pulsé
La cuisson s’effectue par les éléments inférieur et supérieur et par
l’hélice de brassage d’air.
Traditionnel
La cuisson s’effectue par les éléments inférieur et supérieur sans
brassage d’air.
Montée rapide
peuvent être e
Nécessite un
plat.
Symbole
Nom de la fonction Descrip
Gril pulsé
La cuisson s’effectue par l’élément
supérieur et par l’hélice de brassage
d’air.
Préchauffage
Volailles et rôt
tes les faces.
Possibilité d’y
posée sur la g
au 1er gradin
Sole pulsée
La cuisson s’effectue par l’élément
inférieur associé à l’hélice de brassage d’air.
Cuisson par le
Placez la grille
Maintien au chaud
Dosage de l’élément supérieur
associé au brassage d’air.
Maintien au
Gril
La cuisson s’effectue par l’élément
supérieur sans brassage d’air
.
Effectuez un
minutes.
Glissez la léc
*
*
* Séquences(s) utilisée(s) pour l’annonce écrite sur l’étiquette énergétique conformé
9962-5611 MULTI LANGUES.qxd 30/10/02 10:18 Page 28
Page 29

29
Recommandé pour les viandes, pois-
sons, légumes, posés dans un plat en
terre de préference.
Recommandé pour les cuissons lentes
et délicates : gibiers moelleux...
Pour saisir rôtis de viande rouge
Pour mijoter en cocotte fermée plats
préalablement démarrés sur table de
cuisson (coq au vin, civet...).
Recommandations
inutile
grille et insérer le plat multi usage
Recommandé pour toutes les volailles
ou rôtis.
Pour saisir et cuire à coeur gigot, côtes
de boeuf.
Pour garder leur fondant aux pavés de
poissons.
Recommandé pour les plats humides
(quiches, tartes aux fruits juteux...).
La pâte sera bien cuite dessous.
Recommandé pour les préparations
qui lèvent (cake, brioche, kouglof...) et
pour les soufflés qui ne seront pas bloqués par une croute dessus.
Recommandé pour faire lever les
pâtes à pain, à brioche, kouglof... en
ne dépassant pas 40°C (chauffe-assiettes, décongélation).
Recommandé pour griller les côtelet-
tes, saucisses, tranches de pain,
gambas posées sur la grille.
FR
9962-5611 MULTI LANGUES.qxd 30/10/02 10:18 Page 29
Page 30

• L'ampoule se situe au plafond de la cavité de votre four.
a) Dévissez le hublot (voir ci-contre).
b) Dévissez l'ampoule dans le même
sens.
Caractéristiques de l'ampoule :
- 15 W
- 220-240 V
- 300°C
- culot E 14
c) Changer l'ampoule puis remonter le hublot et rebrancher votre four
30
C omment changer l’ampoule ?
Ampoule
Dévissez
Hublot
pour dévisser le hublot et la lampe, utiliser un gant de caout-
chouc qui facilitera le démontage.
Débrancher votre four avant toute intervention sur l'ampoule
pour eviter tout risque de choc électrique et laisser refroidir si
besoin l’appareil.
9962-5611 MULTI LANGUES.qxd 30/10/02 10:18 Page 30
Page 31

Avant de procéder au démontage, laisser refroidir l’appareil et vérifier
que le sélecteur de cuisson est sur la position ARRET.
Parois latérales
(1)
Décrocher le gradin fil (2) à l’avant en le soulevant
(
schéma A
). Tirer vers soi l’ensemble du gradin, le soulever afin de décrocher l’attache de fixation arrière
(
schéma B
). Le sortir des 2 trous (3) de la paroi catalytique et du moufle du four. Retirer ensuite la paroi
catalytique (1). Replacer les
nouveaux éléments (parois
et/ou gradins) en effectuant
les opérations inverses.
Parois du fond
(4)
Dévisser complètement la vis
(5) située en haut de la paroi
du fond. Incliner la paroi vers l’avant afin de la retirer
du moufle. Replacer la nouvelle paroi en effectuant
les opérations inverses.
Comment entretenir votre four ?
Comment changer les parois catalytiques ?
Nettoyage de l’enceinte
Ce four, à nettoyage continu, est constitué d’une enceinte équipée de parois
amovibles recouvertes d’un émail spécial microporeux (émail catalytique) qui lui
confère ses qualités autodégraissantes. Dès leur apparition, les souillures s’étalent et se diffusent largement dans les microporosités. Elles se trouvent oxydées
sur les deux faces et disparaissent progressivement. L’émail autodégraissant est
surtout adapté aux corps gras, mais pas aux sucres. C’est pourquoi le revêtement
de sole, plus sujet aux débordements de sucre, n’est pas revêtu de cet émail.
Nous vous recommandons fortement :
- De ne pas gratter avec une brosse métallique, des instruments pointus ou tranchants.
- De ne pas essayer de nettoyer avec des produits à récurer du commerce.
- Lors de la cuisson des grillades, des projections grasses importantes ont lieu
sur les parois dont la température n’est pas toujours suffisante pour que leur élimination s’effectue complètement pendant la cuisson.
Dans ce cas, après cuisson, prolonger le chauffage du four pendant 20 à 30
minutes, à la température maximale de la séquence choisie.
S’il reste des traces, elles s’atténueront lors des cuissons suivantes.
1
3
4
2
5
31
pour toute intervention de nettoyage dans la cavité, le four doit
être arrêté.
FR
9962-5611 MULTI LANGUES.qxd 30/10/02 10:18 Page 31
B
A
Page 32

32
Que faire en cas d’anomalies de
fonctionnement ?
Vous avez un doute sur le bon fonctionnement de votre four, ceci ne
signifie pas forcément qu'il y a une panne.
Dans tous les cas, vérifiez les
point suivants :
Vous constatez que...
Les causes possibles Que faut-il faire ?
Le four ne chauffe pas.
• Le four n'est pas branché.
• Le fusible de votre installation est hors service.
• La température sélectionnée est trop basse.
• Le thermostat est défectueux.
- Brancher le four.
- Changer le fusible de votre
installation et vérifier sa valeur (16A).
- Augmenter la température
sélectionnée.
- Faire appel au Service
Après-Vente.
L’indicateur de T°c reste
allumé en permanence.
• Thermostat défectueux .
- Faire appel au Service
Après-Vente.
La lampe du four ne fonctionne plus.
• La lampe est hors service.
• Le four n'est pas branché
ou le fusible est hors service.
- Changer la lampe.
- Brancher le four ou changer le fusible.
Le ventilateur de refroidissement continue de tourner à l’arrêt du four.
• La ventilation fonctionne
pendant 1 heure maximum
après la cuisson,
• Si pas d’arrêt après 1
heure
- Ouvrir la porte du four pour
accélérer le refroidissement
du four.
- Faire appel au Service
Après-Vente.
Reportez ci-dessous les indications figurant sur la plaque signalétique de votre four :
MADE IN FRANCE
220 - 240V ~ 50 Hz
BRANDT APPLIANCES SAS
7 rue Henri Becquerel
92500 RUEIL MALMAISON
9962-5611 MULTI LANGUES.qxd 30/10/02 10:18 Page 32
Page 33

O guia de utilização do seu forno
de
R
eferência: FE 211
33
PT
9962-5611 MULTI LANGUES.qxd 30/10/02 10:18 Page 33
Page 34

Sumário
Ao longo do folheto,
assina-lhe as instruções de segurança,
assinala-lhe os conselhos e as astúcias
Editorial P.35
Como se apresenta o seu forno? P.36
Descrição do aparelho P.36
Acessórios P.37
Conselhos de Segurança P.38
Como instalar o seu forno?
Ligação eléctrica P.39-40
Dimensões úteis para encastrar o seu forno P.41
Como utilizar o seu forno?
O temporizador P.42
Como fazer uma cozedura imediata? P.42
Como fazer uma cozedura programada? P.43
Modos de cozedura do forno P.44-45
Como mudar a lâmpada? P.46
Como cuidar do seu forno? P.47
Que fazer em caso de anomalias de funcionamento? P.48
34
9962-5611 MULTI LANGUES.qxd 30/10/02 10:19 Page 34
Page 35

Editorial
35
Estimado(a) Cliente,
Acabou de adquirir um forno BRANDT e estamos-lhe gratos por isso.
As nossas equipas de pesquisa conceberam, pensando em si, uma nova
geração de aparelhos para que o acto de cozinhar seja um prazer no dia
a dia .
Com linhas puras e uma estética moderna, o seu novo forno Brandt
integra-se harmoniosamente na sua cozinha e alia perfeitamente facilidade de utilização e performance de cozedura.
Encontrará igualmente na gama dos produtos Brandt, uma vasta escolha
de placas de cozedura, de exaustores, de máquinas de lavar loiça e de
refrigeradores integráveis, que poderá coordenar ao seu novo forno
Brandt.
Evidentemente, com a preocupação permanente de satisfazer da melhor
maneira possível as suas expectativas em relação aos nossos produtos, o
nosso serviço de consumidores encontra-se à sua disposição e à sua
escuta para responder a todas as suas perguntas ou sugestões (coordenadas no final do presente manual).
Na ponta da inovação, Brandt contribui assim para o melhoramento da
qualidade da vida do dia a dia, proporcionando-lhe produtos cada vez
mais performantes, de utilização simples, amigos do ambiente, com um
lindo design e fiáveis.
A Marca BRANDT.
PT
9962-5611 MULTI LANGUES.qxd 30/10/02 10:19 Page 35
Page 36

36
55
75
100
125
150
180
210
240
270
5
3
1
1
2
3
4
5
6
Temporizador
Programador de temperatura
Selector de funções
1
2
3
Lâmpada
Indicador de alheta
Orifício para espeto de
manivela
4
5
6
DESCRIÇÃO DO APARELHO
Como se apresenta o seu forno?
9962-5611 MULTI LANGUES.qxd 30/10/02 10:19 Page 36
Page 37

37
Grelha de segurança
anti-oscilamento
A grelha pode ser utilizada para suportar todos os
pratos e formas contendo alimentos para cozer ou
gratinar. Ela será utilizada para os grelhados (a
colocar directamente em cima).
Prato multiusos
(pastelaria)
Serve de prato para bolos e dispõe de um rebordo inclinado. Utiliza-se para a cozedura de bolos
tais como os choux à la creme,
suspiros, madalenas, massas folhadas... Evite
colocar directamente neste prato assados ou carnes porque se o fizer
provocará automaticamente projecções significativas contra as paredes do forno.
Prato oco
equipado com uma grelha de suporte
especial grelhados
Ele serve para recolher o molho e as gordu-
ras de cozedura realizados em grelhador
forte ou grelhador pulsado. Pode ser utilizado
como prato de cozedura adaptando o tamanho do
pedaço a cozer (ex: uma ave com legumes à volta, a temperatura moderada).
Nunca colocar este prato directamente sobre a base , excepto em posição GRELHADOR.
Punho para prato oco.
7
8
9
10
Acessórios (consoante o modelo)
PT
9962-5611 MULTI LANGUES.qxd 30/10/02 10:19 Page 37
Page 38

38
Conselhos de Segurança
Agradecemos que tome conhecimento destes conselhos antes de instalar e utilizar o seu forno. Este forno foi concebido para ser utilizado por parti-
culares no seu local de habitação. Ele destina-se exclusivamente à cozedura de
alimentos. Este forno não contém qualquer componente à base de amianto.
PRIMEIRA UTILIZAÇÃO:
Antes de utilizar o seu forno pela primeira vez, proceda ao aquecimento com o
forno vazio e a porta fechada, durante cerca de 15 minutos em posição máxima
afim de "rodar" o aparelho. No início, a lã mineral que reveste a cavidade do forno
pode desprender um cheiro particular devido à sua decomposição. Do mesmo
modo, é possível que possa constatar um desprendimento de fumo. Este fenómeno é normal.
UTILIZAÇÕES SEGUINTES:
- Assegure-se de que a porta do seu forno está bem fechada, a fim que a junta
de estanquecidade desempenhe correctamente a sua função.
- Não deixe ninguém apoiar-se ou sentar-se sobre a porta do forno aberta.
- Quando utilizar o grelhador com a porta entreaberta, as partes
acessíveis ou as superfícies podem aquecer. Mantenha as crian
ças afastadas.
- Durante a utilização o aparelho aquece. Tome precauções de maneira a
não tocar nos elementos aquecidos situados na cavidade do forno.
- Após uma cozedura, não segure qualquer acessório do forno (grelha,
espeto de manivela, pingadeira, berço de espeto de manivela...) com as
mãos desprotegidas, utilize luvas especiais ou um tecido isolante.
- Não guarneça o interior do seu forno com folha de alumínio. Caso
contrário, resultaria uma acumulação de calor que deturparia o resultado da cozedura e da assadura e danificaria o esmalte.
- Não utilize um dispositivo de limpeza a vapor ou a alta pressão.
Durante a limpeza, as superfícies acessíveis aquecem mais do que duran-
te uma utilização normal. Mantenha as crianças afastadas.
9962-5611 MULTI LANGUES.qxd 30/10/02 10:19 Page 38
Page 39

39
Como instalar o seu forno?
Contador 20 A Mono
220-240 V ~50 Hz
Tomada de corrente
2 pólos + terra
norma CEI 83
Linha Mono 220-240 V ~
Ligação eléctrica
• Antes de efectuar a ligação, assegure-se de que a secção dos fios da instalação
eléctrica é suficientemente grande para alimentar normalmente o aparelho (no
mínimo, a secção deve ser igual à do cabo eléctrico).
O fusível da sua instalação deve ser de 16 Amperes.
Cabo eléctrico
com cerca de
1,50 m de com-
primento
Disjuntor diferencial
ou fusível 16 A
PT
9962-5611 MULTI LANGUES.qxd 30/10/02 10:19 Page 39
Page 40

40
Não podemos ser responsabilizados em caso de acidente consecutivo a uma ligação à terra inexistente, defeituosa ou incorrecta.
• O cabo eléctrico (H05 RR-F, H05 RN-F ou H05 VV-F) deverá ser suficientemente
comprido para ser ligado ao forno a encastrar colocado no chão em frente do móvel.
Para o fazer o aparelho deve estar desligado da rede:
• Abra o alçapão situado em baixo à direita da chapa traseira desatarraxando os 2
parafusos, em seguida gire o alçapão.
• Retire o revestimento de cada fio do novo cabo eléctrico ao longo de 12 mm.
• Torça cuidadosamente os filamentos.
• Desatarraxe os parafusos do bloco terminal e retire o fio eléctrico a substituir.
• Introduza o cabo eléctrico pelo lado da chapa no serra-cabos situado à direita do
bloco terminal.
• Ligue os fios do cabo em conformidade com as marca(s) inscrita(s) na caixa.
• Todos os filamentos dos fios eléctricos devem ficar presos sob os parafusos.
• O fio da fase sobre o terminal L.
• O fio de terra de cor verde-amarelo deve ser ligado ao terminal. .
• O fio do neutro (azul) ao terminal N.
• Aparafuse completamente os parafusos do bloco terminal e verifique a ligação
puxando por cada fio.
• Fixe o cabo por intermédio do serra-cabos situado à direita do terminal.
• Feche o alçapão servindo-se dos 2 parafusos.
A ligação eléctrica deverá ser efectuada antes da instalação do aparelho no
móvel.
• O forno deverá ser ligado com um cabo eléctrico (normalizado) de 3 condutores
de 1,5 mm2 (1 ph + 1 N + terra
)
que deverão estar ligados à rede 220-240 V
monofásico por intermédio de uma tomada eléctrica 1 ph + 1 N + terra
normalizada CEI 83 ou com um dispositivo de corte omnipolar com uma distância de
abertura dos contactos de pelo menos 3 mm. O fio de protecção (verde-amarelo) é
ligado ao terminal do aparelho e deve ficar ligado à terra da instalação.
• Se a ligação for realizada com tomada de corrente, esta última deverá ficar acessível após a instalação do aparelho.
• O neutro do forno (fio azul) deverá estar ligado ao neutro da rede.
Instalação e/ou substituição do cabo eléctrico
Como instalar
9962-5611 MULTI LANGUES.qxd 30/10/02 10:19 Page 40
Page 41

41
Para ter a certeza de que a sua instalação é conforme, não hesite em
recorrer aos serviços de um técnico especializado em electrodomésticos.
Dimensões úteis para encastrar o seu forno
O forno pode ser instalado indiferentemente sob um plano de trabalho
ou num móvel em coluna (aberto* ou fechado) com as dimensões de encastramento adaptadas (ver esquema ao lado).
O seu forno possui uma circulação de ar optimizada que permite obter resultados
de cozedura e de limpeza notáveis respeitando os seguintes elementos:
• Centre o forno no móvel e de maneira a garantir uma distância mínima de 5 mm
em relação ao móvel vizinho.
• A matéria do móvel de encastramento deve resistir ao calor (ou ser revestido
com este tipo de matéria).
• Para uma maior estabilidade, fixe o forno no móvel através de 2 parafusos ou através
dos orifícios previstos para este efeito sobre os montantes laterais (confira o esquema).
Para o fazer:
1) Retire as tampas de borracha dos parafusos para aceder aos orifícios de fixação.
2) Efectue um orifício Ø 3 mm na parede do móvel para evitar estalar a madeira.
3) Fixe o forno com os 2 parafusos.
4) Coloque de novo as tampas de borracha dos parafusos (eles servem igual-
mente para amortecer o fecho da porta do forno).
(*) Se o móvel é aberto, a sua abertura deve ser de 70 mm (no máximo).
PT
9962-5611 MULTI LANGUES.qxd 30/10/02 10:19 Page 41
Page 42

O temporizador deve estar em posição “”.
• Escolha o modo de cozedura
Gire o selector de funções colocando-o na
posição desejada.
Exemplo: posição " ".
• Escolha a temperatura de cozedura
Gire o termóstato (selector de temperatura)
colocando-o na temperatura recomendada na sua
receita.
Exemplo: indicação de temperatura 210°.
• Após estes passos, o forno aquece, o indicador
luminoso do termóstato acende e apaga ao ritmo
das regulações.
2.
Como realizar uma cozedura imediata?
1. o temporizador
Este dispositivo permite obter a paragem automática do forno após o tempo de cozedura afixado.
• Par utilizá-lo, coloque o manípulo na posição que
corresponde ao tempo desejado (em minutos)
Exemplo: 40 minutos.
• Uma vez decorrido o tempo, o temporizador coloca-se na posição "0 mn" e apaga o forno.
• Se desejar utilizar o forno sem temporizador,
coloque a maneta na posição “ ”.
42
C omo utilizar
9962-5611 MULTI LANGUES.qxd 30/10/02 10:19 Page 42
55
270
240
210
180
75
100
125
150
Page 43

• Escolha o tempo de cozedura
Gire o temporizador colocando-o na posição do
tempo desejado.
Exemplo: 40 minutos de cozedura.
• Escolha o modo de cozedura
Gire o selector de funções colocando-o na posição
desejada.
Exemplo: posição " ".
• Escolha a temperatura de cozedura
Gire o termóstato (selector de temperatura) colo-
cando-o na temperatura recomendada na sua receita.
Exemplo: indicação de temperatura 210°
• Após estes passos, o forno aquece, o indicador lumi-
noso do termóstato acende. Quando a sua cozedura
terminar, o manípulo "Temporizador" fica em posição 0
e apaga o forno.
NOTA: Não é emitido qualquer sinal sonoro em fim de cozedura.
Em fim de cozedura, reponha:
- o temporizador em posição “”
- o selector de funções e o termóstato em posição "Paragem".
43
3.
Como programar um tempo de cozedura?
Após um ciclo de cozedura, o ventilador do forno continua a
funcionar durante um certo tempo, a fim de garantir o arrefecimento normal dos elementos.
É possível, a qualquer altura, modificar ou anular a programação
do temporizador.
PT
9962-5611 MULTI LANGUES.qxd 30/10/02 10:19 Page 43
270
240
210
55
75
100
125
150
180
Page 44

44
Modos de coze
Tradicional pulsado
A cozedura efectua-se através dos
elementos inferior e superior e através da hélice de movimentação de ar.
T
radicional
A cozedura efectua-se através dos elementos inferior e superior sem movimentação de ar.
Subida rápida de
enfornados com
Necessita um
o prato.
Símbolo
Nome da função Des
Grelhador pulsado
A cozedura efectua-se através do elemento superior e através da hélice de movimentação de ar.
Pré-aqueciment
Aves e assados
lados.
Possibilidade de
da sobre a grad
alheta para reco
Base pulsadae
A cozedura efectua-se através do elemento inferior associado à hélice de
movimentação de ar.
Cozedura pela
Coloque a gre
Manter quente
Dosagem do elemento superior associado
à movimentação de ar.
Conserva o c
Grelhador
A cozedura efectua-se através do elemento superior sem movimentação de ar.
Efectue um p
Introduza o p
baixo.
*
*
* Sequência(s) utilizada(s) para o anúncio escrito na etiqueta energética em conform
9962-5611 MULTI LANGUES.qxd 30/10/02 10:19 Page 44
Page 45

45
Recomendado para as Carnes, Peixes,
Legumes, colocados preferencialmente
num prato de barro.
Recomendado para as cozeduras lentas e
delicadas: caça macia...
Para "saisir" os assados de carne vermelha.
Para cozer lentamente em panela fechada os
pratos que começaram a ser cozinhados na
placa de cozedura (coq au vin, caça guisada...)
Recomendações
Recomendado para todas as aves ou
assados.
Para "saisir" e cozer até ao centro a
perna de carneiro, costeletas de vaca.
Para conservar o fundente aos "pavés"
de peixe.
Recomendado para os pratos húmidos
(quiches, tartes de frutos sumarentos...
A massa ficará bem cozida por cima.
Recomendado para os preparados que
levedam (cake, brioche, kouglof...) e
para os souflés que não serão bloqueados por uma crosta por cima.
calor.
Recomendado para fazer levedar as
massas para pão, brioche, kouglof...não ultrapassando os 40°C.
(aquecedor de pratos - descongelação)
prato multiusos sobre a alheta de
Recomendado para grelhar
costeletas, salsichas, fatias de pão,
gambas colocadas sobre a grelha.
PT
9962-5611 MULTI LANGUES.qxd 30/10/02 10:19 Page 45
Page 46

• A lâmpada está situada no tecto da cavidade interna do seu forno.
a) Gire a armação de suporte da
lâmpada para a esquerda, até
efectuar um quarto da circunferência.
b) Desenrosque a lâmpada no
mesmo sentido
Características da lâmpada:
- 15 W
- 220-240 V
- 300°C
- casquilho E 14
c) Mude a lâmpada e torne a montar
a armação em forma de postigo.
Ligue novamente o forno.
46
Como mudar a lâmpada?
Ampola
Desenrosque
Armação em forma de postigo
enfie uma luva de borracha para poder desmontar com mais
facilidade a armação e a lâmpada.
Desligue o seu forno antes de efectuar qualquer tipo de intervenção sobre a lâmpada e deixe arrefecer o aparelho, se necessário
for
9962-5611 MULTI LANGUES.qxd 30/10/02 10:19 Page 46
Page 47

Antes de proceder à desmontagem, deixe arrefecer o aparelho e verifique se o selector de cozedura está na posição PARAGEM.
Paredes laterais
(1)
Retire a alheta fio (2) situada na parte da frente
erguendo-a (
esquema A
). Puxe em direcção a si o
conjunto da alheta, erguendo-o a fim de desprender o
gancho de fixação traseiro (
esquema B
). Retirá-lo dos 2
orifícios (3) da parede catalítica (1). Reponha os novos
elementos (paredes e/ou
alhetas) efectuando as operações em sentido inverso.
Paredes do fundo
(4)
Desatarraxe completamente o
parafuso (5) situado no topo
da parede do fundo. Inclinar
a parede para a frente a fim de retirá-la da mufla.
Colocar a nova parede efectuando as operações em
sentido inverso.
Como cuidar do seu forno?
C
omo mudar as paredes catalíticas?
L
impeza da cavidade
Este forno, de limpeza contínua, é constituído por uma cavidade equipada com paredes
amovíveis recobertas com um esmalte especial microporoso (esmalte catalítico) que lhe
confere as suas qualidades auto-desengordurantes. Os derrames alastram mal aparecem
e difundem-se amplamente nas microporosidades. São assim oxidados nas duas faces e
desaparecem progressivamente. O esmalte auto-desengordurante adapta-se essencialmente aos corpos gordos, mas não ao açúcar. Por este motivo, o revestimento de base
que está mais sujeito aos derrames de açúcar, não está revestido com o referido esmalte.
Recomendamos-lhe fortemente que:
- não raspe com uma escova metálica, instrumentos afiados ou cortantes.
- não tente limpar com produtos abrasivos disponíveis no comércio;
- quando cozer grelhados, podem ocorrer projecções substanciais contra as paredes cuja
temperatura nem sempre é suficiente para que a eliminação se efectue completamente
durante a cozedura.
Neste caso, após a cozedura, prolongue o aquecimento do forno durante 20 a 30 minutos, à temperatura máxima da sequência desejada.
Se mesmo assim ainda ficarem manchas, elas atenuar-se-ão por ocasião das cozeduras
seguintes.
1
3
4
2
5
47
Para qualquer intervenção de limpeza na cavidade, o forno
deve estar parado.
PT
9962-5611 MULTI LANGUES.qxd 30/10/02 10:19 Page 47
B
A
Page 48

48
Que fazer em caso de anomalias de fun-
cionamento?
O seu forno apresenta defeitos de funcionamento, isto não significa obriga-
toriamente que esteja avariado..
Seja qual for o problema, verifique os pon-
tos seguintes:
P
roblema constatado. C
ausas possíveis
O
que se deve fazer?
O forno não aquece.
• O forno não está ligado.
• O fusível da sua instalação
eléctrica está fundido
• A temperatura seleccionada é demasiado baixa.
• O sensor está defeituoso
- Ligar o forno.
- Mudar o fusível da sua instalação e verificar a intensidade a que corresponde
(16A).
- Aumentar a temperatura
seleccionada.
- Chamar o Serviço de
Assistência Pós-Venda.
O indicador de temperatura T°c acende por intermitência
• O sensor está defeituoso
- Chamar o Serviço de
Assistência Pós-Venda.
A lâmpada do forno não funciona.
• A lâmpada está fundida.
• O forno não está ligado
ou o fusível está fundido.
- Mudar a lâmpada.
- Ligar o forno ou mudar o
fusível.
O ventilador de arrefecimento continua a girar.
• A ventilação deve parar 1
hora após o apagamento
do forno,
• Se não se apaga após 1
hora
- Abrir a porta do forno
para acelerar o arrefecimento do forno.
- Chamar o Serviço de
Assistência Pós-Venda.
Inscreva em baixo as indicações incluídas na placa de características do seu forno:
MADE IN FRANCE
220 - 240V ~ 50 Hz
BRANDT APPLIANCES SAS
7 rue Henri Becquerel
92500 RUEIL MALMAISON
9962-5611 MULTI LANGUES.qxd 30/10/02 10:19 Page 48
Page 49

П пдзгьт чсЮузт
фпх цпэснпх убт
ôçò
¸ндейоз: FE 211
49
GR
9962-5611 MULTI LANGUES.qxd 30/10/02 10:19 Page 49
Page 50

Ресйечьменб
Уе ьлп фп егчейсЯдйп, фп
убт ерйузмбЯней фйт пдзгЯет буцблеЯбт,
убт ерйузмбЯней фйт ухмвпхлЭт кбй фб фечнЬумбфб
ЕйубгщгЮ óåë.51
Рщт цбЯнефбй п цпэснпт убт; óåë.52
ÐесйгсбцЮ фзт ухукехЮт óåë.52
ÅобсфЮмбфб óåë.53
УхмвпхлЭт буцблеЯбт
óåë.54
Рщт нб егкбфбуфЮуефе фпн цпэснп убт
ÇлекфсйкЮ уэндеуз óåë.55-56
×сЮуймет дйбуфЬуейт гйб нб енфпйчЯуефе фпн цпэснп убт óåë.57
Рщт нб чсзуймпрпйЮуефе фпн цпэснп убт
Ï чспнпдйбкьрфзт óåë.58
Ðщт нб кЬнефе Энб Ьмеуп шЮуймп óåë.58
Ðщт нб рспгсбммбфЯуефе фп чсьнп шзуЯмбфпт óåë.59
Фсьрпй шзуЯмбфпт óåë.60-61
Рщт нб бллЬоефе фз лхчнЯб óåë.62
Рщт нб ухнфзсЮуефе фп цпэснп убт óåë.63
Фй нб кЬнпхме уе ресЯрфщуз бнщмблйюн уфз лейфпхсгЯб; óåë.64
50
9962-5611 MULTI LANGUES.qxd 30/10/02 10:19 Page 50
Page 51

ЕйубгщгЮ
51
БгбрзфЮ РелЬфйууб, БгбрзфЭ РелЬфз,
Мьлйт брпкфЮубфе Энбн цпэснп BRANDT кбй убт ехчбсйуфпэме гй' бхфь.
Пй есехнзфйкЭт мбт пмЬдет учедЯбубн гйб убт мйб нЭб генйЬ ухукехюн гйб
нб мбгейсеэефе кЬие мЭсб ме ехчбсЯуфзуз.
Ме брлЭт гсбммЭт кбй мпнфЭснб бйуизфйкЮ, п нЭпт убт цпэснпт Brandt
енущмбфюнефбй бсмпнйкЬ уфзн кпхжЯнб убт кбй ухндхЬжефбй Ьшпгб
дйехкплэнпнфбт фз чсЮуз кбй фйт ерйдьуейт фпх шзуЯмбфпт.
Иб всеЯфе ерЯузт уфз уейсЬ фщн рспъьнфщн фзт Brandt, мйб фесЬуфйб рпйкйлЯб
брь учЬсет шзуЯмбфпт, брпсспцзфЮсщн, рлхнфзсЯщн рйЬфщн кбй енфпйчйжьменщн
шхгеЯщн рпх мрпсеЯфе нб фбйсйЬоефе ме фп нЭп убт цпэснп Brandt.
ЦхуйкЬ, нйюипнфбт мйб ухнечЮ бгщнЯб гйб фзн йкбнпрпЯзуз уфп мЭгйуфп фщн
брбйфЮуеюн убт уе учЭуз ме фб рспъьнфб мбт, з хрзсеуЯб кбфбнблщфюн мбт
всЯукефбй уфз дйЬиеуЮ убт кбй убт ресймЭней гйб нб брбнфЮуей уе ьлет фйт
есщфЮуейт убт Ю фйт рспфЬуейт убт (фб уфпйчеЯб фзт уфп фЭлпт бхфпэ фпх
егчейсйдЯпх).
Уфп брпкпсэцщмб фзт рсщфпрпсЯбт, з Brandt ухмвЬллей уфз велфЯщуз фзт
кбизмесйнЮт рпйьфзфбт жщЮт рспуцЭспнфЬт убт рспъьнфб ьлп кбй рйп
брпдпфйкЬ, брлЬ уфз чсЮуз, рпх уЭвпнфбй фп ресйвЬллпн, кблбЯуизфб кбй
бойьрйуфб.
Фп емрпсйкь уЮмб BRANDT.
GR
9962-5611 MULTI LANGUES.qxd 30/10/02 10:19 Page 51
Page 52

52
55
75
100
125
150
180
210
240
270
5
3
1
1
2
3
4
5
6
ЕрйлпгЭбт фсьрпх
ЕрйлпгЭбт иесмпксбуЯбт
ЕрйлпгЭбт лейфпхсгйюн
1
2
3
ЛЬмрб
ДеЯкфзт укЬлбт
Фсэрб гйб упэвлб
4
5
6
РЕСЙГСБЦЗ УХУКЕХЗУ
Рщт цбЯнефбй п цпэснпт убт;
9962-5611 MULTI LANGUES.qxd 30/10/02 10:19 Page 52
Page 53

53
ÓчЬсб буцблеЯбт
кбфЬ фзт рфюузт
З учЬсб мрпсеЯ нб чсзуймпрпйзиеЯ гйб нб уфзсЯоей
ьлб фб фбшйЬ кбй фйт цьсмет рпх ресйЭчпхн фсьцймб
гйб шЮуймп Ю гйб гксбфйнЬсйумб. Иб чсзуймпрпйзиеЯ кбй гйб фб шзфЬ уфзучЬсб (нб фпрпиефпэнфбй
брехиеЯбт рЬнщ фзт).
ÔбшЯ рпллюн чсЮуещн
(жбчбспрлбуфйкЮ)
Чсзуймеэей гйб фбшЯ гйб глхкЬ кбй дйбиЭфей
чеЯлпт ме клЯуз. ЧсзуймпрпйеЯфбй гйб фп
шЮуймп глхкюн ьрщт упх ме ксЭмб, мбсЭгкет,
мбнфблЭнет, жэмет уцплйЬфбт Брпцэгефе нб
фпрпиефЮуефе брехиеЯбт у' бхфь фп фбшЯ шзфЬ Ю ксЭбфб гйбфЯ иб Эчефе бхфпмЬфщт
екфпоеэуейт уфб фпйчюмбфб фпх цпэснпх.
Âáèý ôáøß
еопрлйумЭнп ме учЬсб уфЮсйозт
ейдйкь гйб шзфЬ уфз учЬсб
Чсзуймеэей уфз ухгкЭнфсщуз фщн чхмюн кбй фщн
лйрюн фпх шзуЯмбфпт рпх гЯнефбй уе дхнбфь гксйл Ю
гксйл ме бЭсб. МрпсеЯ нб чсзуймпрпйзиеЯ щт фбшЯ
шзуЯмбфпт фбкфпрпйюнфбт фп мЭгеипт фпх
кпммбфйпэрпх иб шзиеЯ (р.ч. Энб рпхлесйкь ме
лбчбнйкЬ ãýñù - ãýñù, óå мЭфсйб
иесмпксбуЯб).Мзн фпрпиефеЯфе рпфЭ бхфь фп фбшЯ уфзн рлЬкб Эдсбузт, рбсЬ мьнп уфз
иЭуз ГКСЙЛ.
ËáâÞ ãéá âáèý ôáøß
7
8
9
10
ЕобсфЮмбфб (бнЬлпгб ме фп мпнфЭлп)
GR
9962-5611 MULTI LANGUES.qxd 30/10/02 10:19 Page 53
Page 54

54
УхмвпхлЭт буцблеЯбт
Убт ехчбсйуфпэме рпх мелефЬфе бхфЭт фйт ухмвпхлЭт рспфпэ егкбфбуфЮуефе кбй
чсзуймпрпйЮуефе фпн цпэснп убт. Бхфьт п цпэснпт Эчей учедйбуфеЯ гйб нб чсзуймпрпйеЯфбй
брь йдйюфет уфп чюсп кбфпйкЯбт фпхт. РсппсЯжефбй брпклейуфйкЬ гйб фп шЮуймп рспъьнфщн
дйбфспцЮт. Бхфьт п цпэснпт ден ресйЭчей кбнЭнб ухуфбфйкь ме вЬуз фпн бмЯбнфп.
РСЩФЗ ЧСЗУЗ:
Рспфпэ чсзуймпрпйЮуефе фпн цпэснп убт гйб рсюфз цпсЬ, иесмЬнефЭ фпн Ьдейп, ме
клейуфЮ фзн рьсфб, гйб 15 лерфЬ ресЯрпх уфз мЭгйуфз иЭуз пэфщт юуфе нб "уфсюуефе"
фз ухукехЮ. Фп псхкфь мбллЯ рпх ресйвЬллей фзн еупчЮ фпх цпэснпх мрпсеЯ нб
екрЭмрей, уфзн бсчЮ, мйб йдйбЯфесз мхсщдйЬ рпх пцеЯлефбй уфз уэниеуЮ фпх. ПмпЯщт,
иб дйбрйуфюуефе Яущт мйб екрпмрЮ кбрнпэ. ¼лб бхфЬ еЯнбй цхуйплпгйкЬ.
ЕРПМЕНЕУ ЧСЗУЕЙУ:
- ВевбйщиеЯфе ьфй з рьсфб фпх цпэснпх убт еЯнбй кблЬ клейумЭнз пэфщт юуфе
п уэндеумпт уфегбньфзфбт нб екрлзсюуей ущуфЬ фз лейфпхсгЯб фпх.
- Мзн бцЮнефе кбнЭнбн нб бкпхмрЮуей Ю нб кбиЮуей рЬнщ уфзн бнпйкфЮ
рьсфб фпх цпэснпх.
- КбфЬ фз чсЮуз фпх гксйл ме мйуЬнпйчфз фзн рьсфб, фб рспувЬуймб
мЭсз Ю пй ерйцЬнейет мрпсеЯ нб иесмбнипэн. Брпмбксэнефе фб мйксЬ рбйдйЬ.
- КбфЬ фз чсЮуз фзт з ухукехЮ иесмбЯнефбй. РспуЭофе нб мзн бкпхмрЬфе фб
иесмбнфйкЬ уфпйчеЯб рпх всЯукпнфбй уфп еущфесйкь фпх цпэснпх.
- МефЬ брь Энб шЮуймп, мзн рйЬнефе ме гхмнь чЭсй фб укеэз (учЬсб, упэвлб,
лбмбсЯнб гйб фз ухгкЭнфсщуз лЯрпхт, вЬуз уфЮсйозт упэвлбт), чсзуймпрпйеЯуфе
Энб рспуфбфехфйкь гЬнфй Ю Энб эцбумб брь мпнщфйкь хлйкь.
- Мз гемЯжефе фпн цпэснп убт ме блпхмйньчбсфб. ДйбцпсефйкЬ, иб рспкэшей
мйб ухууюсехуз иесмьфзфбт рпх иб ерзсеЬуей дхуЬсеуфб фп брпфЭлеумб фпх мбгейсЭмбфпт кбй фпх шзуЯмбфпт кбй иб влЬшей фп умЬлфп.
- Мз чсзуймпрпйеЯфе фпн кбибсйуфЮ бфмпэ Ю хшзлЮт рЯеузт.
КбфЬ фз дйЬскейб фпх кбибсйумпэ, пй рспувЬуймет ерйцЬнейет гЯнпнфбй рйп
жеуфЭт бр' ьфй уфзн кбнпнйкЮ чсЮуз кбй рсЭрей нб брпмбксэнефе фб мйксЬ рбйдйЬ.
9962-5611 MULTI LANGUES.qxd 30/10/02 10:19 Page 54
Page 55

55
Рщт нб егкбфбуфЮуефе фпн цпэснп убт
МефсзфЮт 20Б Mono
220-240 V ~ 50 Hz
РсЯжб
2 рьлпй + геЯщуз
рсьфхрп CEI 83
ГсбммЮ Mono 220-240 V ~
ЗлекфсйкЮ уэндеуз
Рспфпэ рсбгмбфпрпйЮуефе фз уэндеуз, вевбйщиеЯфе ьфй фб кблюдйб фзт злекфсйкЮт
убт егкбфЬуфбузт Эчпхн ербскЮ дйбфпмЮ гйб нб фспцпдпфпэн кбнпнйкЬ фз ухукехЮ
(дйбфпмЮ фпхлЬчйуфпн Яуз ме екеЯнз фпх кблюдйпх фспцпдпуЯбт). З буцЬлейб фзт
егкбфЬуфбуЮт убт рсЭрей нб еЯнбй 16 Ampиres.
Кблюдйп
фспцпдпуЯбт
мЮкпт 1,50 м.
ресЯрпх
Дйбцпсйкьт дйбкьрфзт
Ю буцЬлейб 16Б
GR
9962-5611 MULTI LANGUES.qxd 30/10/02 10:19 Page 55
Page 56

56
Ден Эчпхме ехиэнз уе ресЯрфщуз бфхчЮмбфпт рпх пцеЯлефбй уе бнэрбскфз, елбффщмбфйкЮ Ю лбнибумЭнз геЯщуз.
Фп кблюдйп фспцпдпуЯбт (H05 RR-F, H05 RN-F Ю З05 W-F) рсЭрей нб Эчей ербскЭт
мЮкпт гйб нб ухндеиеЯ ме фпн цпэснп рпх иб енфпйчйуфеЯ фпрпиефзмЭнп уфп Эдбцпт
мрспуфЬ брь фп Эрйрлп.
Гй' бхфь фп льгп з ухукехЮ рсЭрей нб еЯнбй брпухндедемЭнз брь фп дЯкфхп:
БнпЯофе фп рпсфЬкй рпх всЯукефбй кЬфщ уфб деойЬ фпх рЯущ кблэммбфпт
оевйдюнпнфбт фйт 2 вЯдет, Эрейфб ресйуфсЭшфе фп рпсфЬкй.
Брпгхмнюуфе кЬие уэсмб фпх нЭпх кблщдЯпх фспцпдпуЯбт уе 12mm.
УхуфсЭшфе рспуекфйкЬ фб бущлЮнщфб Ьксб.
Оевйдюуфе фйт вЯдет фзт пмЬдбт бкспдекфюн кбй вгЬлфе фп кблюдйп фспцпдпуЯбт рпх
иб бллбчиеЯ.
ЕйуЬгефе фп кблюдйп фспцпдпуЯбт брь фзн рлехсЬ фпх кблэммбфпт уфпн уцйкфЮсб
кблщдЯщн рпх всЯукефбй уфб деойЬ фзт пмЬдбт бкспдекфюн.
УхндЭуфе фб уэсмбфб фпх кблщдЯпх уэмцщнб ме фп(фб) узмеЯп(б) бнбцпсЬт рпх
еЯнбй гсбммЭнп(б) уфзн пмЬдб бкспдекфюн.
¼лб фб бущлЮнщфб Ьксб фщн кблщдЯщн фспцпдпуЯбт рсЭрей нб еЯнбй клейумЭнб
кЬфщ брь фйт вЯдет.
Фп уэсмб фзт цЬузт уфпн рьлп L.
Фп уэсмб фзт геЯщузт чсюмбфпт рсбуйнп-кЯфсйнпх рсЭрей нб ухндеиеЯ ме фпн рьлп .
Фп уэсмб фпх пхдЭфеспх (мрле) уфпн рьлп Н.
Вйдюуфе кблЬ фйт вЯдет фзт пмЬдбт бкспдекфюн кбй елЭгофе фз уэндеуз фсбвюнфбт
кЬиеуэсмб.
Уфесеюуфе фп кблюдйп мЭущ фпх уцйкфЮсб кблщдЯщн рпх всЯукефбй уфб деойЬ фзт
пмЬдбт бкспдекфюн.
ОбнбклеЯуфе фп рпсфЬкй ме фз впЮиейб фщн 2 вйдюн.
З злекфсйкЮ уэндеуз рсЭрей нб рсбгмбфпрпйеЯфбй рсйн фзн фпрпиЭфзуз фзт ухукехЮт мЭуб уфп
Эрйрлп.
П цпэснпт рсЭрей нб ухндЭефбй ме Энб кблюдйп фспцпдпуЯбт (уэмцщнб ме фп рсьфхрп) ме 3
бгщгпэт 1,5 mm2 (1 ph + 1 N + геЯщуз ) рпх рсЭрей нб еЯнбй ухндедемЭнпй ме
дЯкфхп 220-240 V ~ мпнпцбуйкь мЭущ мйбт рсЯжбт 1 ph + 1 Н геЯщуз
уэмцщнб ме фп рсьфхрп
CEI 83 Ю мЭущ мйбт дйЬфбозт дйбкпрЮт сеэмбфпт рпх ухндЭей ьлпхт фпхт рьлпхт кбй рпх Эчей
брьуфбуз бнпЯгмбфпт фщн ербцюн фпхлЬчйуфпн 3 mm. Фп кблюдйп рспуфбуЯбт (рсЬуйнп-кЯфсйнп)
ухндЭефбй ме фпн рьлп фзт ухукехЮт кбй рсЭрей нб еЯнбй ухндедемЭнп ме фз геЯщуз фзт
егкбфЬуфбузт.
Уе ресЯрфщуз уэндеузт ме рсЯжб, бхфЮ рсЭрей нб рбсбмЭней рспувЬуймз мефЬ фзн егкбфЬуфбуз
фзт ухукехЮт.
Фп пхдЭфесп фпх цпэснпх (мрле кблюдйп) рсЭрей нб еЯнбй ухндедемЭнп ме фп пхдЭфесп фпх
дйкфэпх.
ÔпрпиЭфзуз кбй/Ю бллбгЮ фпх кблщдЯпх фспцпдпуЯбт
Рщт нб егкбфбуфЮу
9962-5611 MULTI LANGUES.qxd 30/10/02 10:19 Page 56
Page 57

57
ефе фпн цпэснп убт
Гйб нб вевбйщиеЯфе ьфй з егкбфЬуфбуз Эгйне ущуфЬ, мз дйуфЬуефе нб
кблЭуефе Энбн ейдйкь уфйт пйкйбкЭт злекфсйкЭт ухукехЭт.
ЧсЮуймет дйбуфЬуейт гйб нб енфпйчЯуефе фпн цпэснп убт?
П цпэснпт мрпсеЯ нб егкбфбуфбиеЯ еоЯупх кЬфщ брь Энб фсбрЭжй есгбуЯбт Ю
мЭуб уе Энб Эрйрлп уе уфЮлз (бнпйчфЮ* Ю клейуфЮ) Эчпнфбт рспубсмпумЭнет
дйбуфЬуейт енфпйчйумпэ (влЭре фп рбсбкЬфщ учедйЬгсбммб).
П цпэснпт убт ресйЭчей мйб мегйуфпрпйзмЭнз кхклпцпсЯб бЭсб рпх ерйфсЭрей фзн
брькфзуз бойпузмеЯщфщн брпфелеумЬфщн уфп шЮуймп кбй фпн кбибсйумь бн фзсЮуефе
фб бкьлпхиб уфпйчеЯб:
ЕуфйЬуфе фпн цпэснп уфп Эрйрлп кбфЬ фсьрп рпх нб еггхЬфбй мйб елЬчйуфз брьуфбуз
5 mm брь фп гейфпнйкь Эрйрлп.
Фп хлйкь фпх ерЯрлпх енфпйчйумпэ рсЭрей нб еЯнбй бниекфйкь уфз иесмьфзфб (Ю нб
еЯнбйерендедхмЭнп ме Энб фЭфпйп хлйкь).
Гйб ресйууьфесз уфбиесьфзфб, уфесеюуфе фпн цпэснп уфп Эрйрлп ме 2 вЯдет мЭущ
фщн прюн рпх рспвлЭрпнфбй гй' бхфьн фпн укпрь уфпхт рлЬгйпхт псипуфЬфет (влЭре
учедйЬгсбммб).
Гйб нб гЯней бхфь:
1) БцбйсЭуфе фб кблэммбфб вЯдбт брь кбпхфупэк гйб нб Эчефе рсьувбуз уфйт фсэрет
уфесЭщузт.
2) БнпЯофе мйб фсэрб Ш 3 mm уфп чюсйумб фпх ерЯрлпх гйб нб брпцэгефе нб укЬуей фп оэлп.
3) Уфесеюуфе фпн цпэснп ме фйт 2 вЯдет.
4) ОбнбвЬлфе фб кблэммбфб вЯдбт брь кбпхфупэк (бхфЬ чсзуймеэпхн ерЯузт кбй гйб
нб мейюупхн фз дэнбмз фпх клейуЯмбфпт фзт рьсфбт фпх цпэснпх).
(*) бн фп Эрйрлп еЯнбй бнпйкфь, фп ЬнпйгмЬ фпх рсЭрей нб еЯнбй 70 mm (фп рплэ).
GR
9962-5611 MULTI LANGUES.qxd 30/10/02 10:19 Page 57
Page 58

П чспнпдйбкьрфзт рсЭрей нб еЯнбй уфз иЭуз .
ЕрйлЭофе фпн фсьрп шзуЯмбфпт
УфсЭшфе фпн ерйлпгЭб лейфпхсгйюн уфз иЭуз фзт
ерйлпгЮт убт.
РбсЬдейгмб: иЭуз " ".
ЕрйлЭофе фз иесмпксбуЯб шзуЯмбфпт
УфсЭшфе фпн иесмпуфЬфз (ерйлпгЭб иесмпксбуЯбт) уфз иесмпксбуЯб рпх ухнйуфЬфбй гйб фзн
ухнфбгЮ убт.
РбсЬдейгмб: узмеЯп бнбцпсЬт иесмпксбуЯбт 210°.
МефЬ брь бхфЭт фйт енЭсгейет, п цпэснпт
иесмбЯнефбй, фп цщфЬкй фпх иесмпуфЬфз бнЬвей кбй
увЮней кбфЬ фпн схимь фщн схимЯуещн.
2.
Ðщт нб кЬнефе Энб Ьмеуп шЮуймп
1. Ï чспнпдйбкьрфзт
ЕрйфсЭрей фп бхфьмбфп уфбмЬфзмб фпх цпэснпх мефЬ
фпн емцбнйжьменп чсьнп шзуЯмбфпт.
Гйб нб фпн чсзуймпрпйЮуефе, пдзгЮуфе фпн дйбкьрфз
уфз иЭуз рпх бнфйуфпйчеЯ уфпн ерйихмзфь чсьнп (уе
лерфЬ)
РбсЬдейгмб : 40 лерфЬ.
Мьлйт ресЬуей п чсьнпт, п чспнпдйбкьрфзт рзгбЯней
уфп "0 лерфь" кбй увЮней фп цпэснп.
Бн ерйихмеЯфе нб чсзуймпрпйЮуефе фпн цпэснп
чщсЯт чспнпдйбкьрфз, вЬлфе фпн дйбкьрфз уфз
èÝóç .
58
Рщт нб чсзуймпрпйе
9962-5611 MULTI LANGUES.qxd 30/10/02 10:19 Page 58
55
270
240
210
180
75
100
125
150
Page 59

ЕрйлЭофе фпн чсьнп шзуЯмбфпт
УфсЭшфе фпн чспнпдйбкьрфз уфз иЭуз фпх ерйихм-
зфпэ чсьнпх.
РбсЬдейгмб : 40 лерфЬ шзуЯмбфпт.
ЕрйлЭофе фпн фсьрп шзуЯмбфпт
УфсЭшфе фпн ерйлпгЭб лейфпхсгйюн уфз иЭуз фзт
ерйлпгЮт убт.
РбсЬдейгмб : иЭуз" ".
ДйблЭофе фз иесмпксбуЯб шзуЯмбфпт
УфсЭшфе фпн иесмпуфЬфз (ерйлпгЭб иесмпксбуЯбт)
уфз иесмпксбуЯб рпх ухнйуфЬфбй гйб фзн ухнфбгЮ убт.
РбсЬдейгмб : узмеЯп бнбцпсЬт фзт иесмпксбуЯбт 210°
МефЬ брь бхфЭт фйт енЭсгейет, п цпэснпт иесмбЯнефбй,
фп цщфЬкй фпх иесмпуфЬфз бнЬвей. ¼фбн фелейюуей фп
мбгеЯсемЬ убт, п дйбкьрфзт "Чспнпдйбкьрфзт" еЯнбй уфз иЭуз
0 кбй увЮней фп цпэснп.
УЗМЕЙЩУЗ: Ден хрЬсчей зчзфйкь уЮмб уфп фЭлпт фпх мбгейсЭмбфпт.
Уфп фЭлпт фпх мбгейсЭмбфпт, обнбвЬлфе:
- фп чспнпдйбкьрфз уфз иЭуз
- фпн ерйлпгЭб лейфпхсгйюн кбй фп иесмпуфЬфз уфз иЭуз "УфбмЬфзмб".
59
3.
Ðщт нб рспгсбммбфЯжефе фп чсьнп шзуЯмбфпт
МефЬ брь Энбн кэклп шзуЯмбфпт, п бнемйуфЮсбт фпх цпэснпх
ухнечЯжей нб лейфпхсгеЯ гйб Энбн псйумЭнп чсьнп, пэфщт юуфе нб
еггхЬфбй ьфй фб еобсфЮмбфб иб ксхюупхн.
ЕЯнбй дхнбфьн нб фспрпрпйЮуефе Ю нб бкхсюуефе бнЬ рЬуб уфйгмЮ фпн
рспгсбммбфйумь фпх чспнпдйбкьрфз.
еЯфе фпн цпэснп убт
GR
9962-5611 MULTI LANGUES.qxd 30/10/02 10:19 Page 59
55
270
240
210
180
75
100
125
150
Page 60

60
Фсьрпй шзуЯмбф
Ð
бсбдпуйбкь ме бЭсб.
Фп шЮуймп рсбгмбфпрпйеЯфбй брь фб рЬнщ
кбй кЬфщ уфпйчеЯб кбй ме фпн Элйкб
бнЬмейозт бЭсб.
Ð
бсбдпуйбкь
Фп шЮуймп рсбгмбфпрпйеЯфбй брь фб
рЬнщ кбй кЬфщ уфпйчеЯб чщсЯт
бнЬмейоз бЭсб.
ГсЮгпсз Ьнпдпт
зфЬ мрпспэн нб
БрбйфеЯ рспиЭ
цпэснп.
Уэмвплп
¼нпмб лейфпхсгЯбт Ресйгс
Ãêñéë ìå áÝñá
Фп шЮуймп рсбгмбфпрпйеЯфбй, енбллбкфйкЬ,
брь фп рЬнщ уфпйчеЯп кбй фпн Элйкб
бнЬмейозт бЭсб.
РесйффЮ з рспи
РпхлесйкЬ кбй
фйт ьшейт.Дхнб
кпммбфйпэ ксЭ
вЬлефе фп фбшЯ
гйб нб мбжехфп
ÐлЬкб Эдсбузт ме бЭсб
Фп шЮуймп рсбгмбфпрпйеЯфбй брь фп кЬфщ
уфпйчеЯп рпх ухндЭефбй ме фпн Элйкб
бнЬмейозт бЭсб.
ШЮуймп брь кÜ
ФпрпиефЮуфе ф
ÄйбфЮсзуз уфп жеуфь
ДпуплпгЯб фщн рЬнщ уфпйчеЯщн уе
учЭуз ме фзн бнЬмейоз бЭсб.
ДйбфЮсзуз уф
Ãêñéë
Фп шЮуймп рсбгмбфпрпйеЯфбй брь фп
рЬнщ уфпйчеЯп чщсЯт бнЬмейоз бЭсб.
РсбгмбфпрпйЮ
ВЬлфе фз лбмб
кЬфщ укЬлб.
*
*
* БкплпхиЯб(ет) рпх чсзуймпрпйеЯфбй(пэнфбй) гйб фзн гсбрфЮ бнбкпЯнщуз уфзн ефйкЭфб енЭсгейбт
9962-5611 MULTI LANGUES.qxd 30/10/02 10:19 Page 60
Page 61

61
УхуфЬуейтУхнйуфЬфбй гйб фб КсЭбфб, фб
ШЬсйб, фб ЛбчбнйкЬ, рпх фб Эчефе вЬлей
уе рЮлйнп укеэпт кбфЬ рспфЯмзуз.
УхнйуфЬфбй гйб фб бсгЬ кбй ехбЯуизфб мбгейсЭмбфб: мблбкЬ изсЬмбфбГйб нб фуйгбсЯуефе
фб кьккйнб ксЭбфб. Гйб нб уйгпвсЬуефе уе
клейуфЮ кбфубсьлб фб цбгзфЬ рпх Эчефе
рспзгпхмЭнщт оекйнЮуей уфб мЬфйб фзт
кпхжЯнбт (кькпсбт ксбуЬфпт, ксЭбт всбуфь
ме лбчбнйкЬ)
УхуфЬуейт
УхнйуфЬфбй гйб ьлб фб рпхлесйкЬ Ю фб
шзфЬ.Гйб нб фуйгбсЯуефе кбй нб шЮуефе
кблЬ мрпэфй, впдйнЬ рбъдЬкйб. Гйб нб
рбсбмеЯнпхн мблбкЭт пй чпнфсЭт цЭфет
шбсйпэ.
фз учЬсб уфзн кЬфщ укЬлб.
УхнйуфЬфбй гйб фб хгсЬ цбгзфЬ (кйт, фЬсфет
ме жпхмесЬ цспэфбЗ жэмз иб еЯнбй кблЬ
шзмЭнз брь кЬфщ.УхнйуфЬфбй гйб фб
рбсбукехЬумбфб рпх цпхукюнпхн (кЭйк,
мрсйьт, kouglof) кбй гйб фб упхцлЭ рпх
ден иб фб емрпдЯжей з кспэуфб брь рЬнщ.
УхнйуфЬфбй гйб нб цпхукюупхн пй жэмет
гйб шщмЯ, мрсйьт, kouglof чщсЯт нб оереснЬ фпхт 40°C (иЭсмбнуз цбгзфюн брьшхоз).
УхнйуфЬфбй гйб нб шЮнефе уфз учЬсб
мрсйжьлет, лпхкЬнйкб, цЭфет шщмйпэ,
кбсбвЯдет.
GR
9962-5611 MULTI LANGUES.qxd 30/10/02 10:19 Page 61
Page 62

З лхчнЯб всЯукефбй уфзн пспцЮ фзт еупчЮт фпх цпэснпх убт.
a) Оевйдюуфе фп цщфйуфйкь (влЭре
брЭнбнфй).
в) Оевйдюуфе фз лхчнЯб рспт фзн Ядйб
кбфеэихнуз.
ЧбсбкфзсйуфйкЬ фзт лхчнЯбт:
- 15 W
- 220-240 V
- 300°C
- âÜóç E 14
г) БллЬофе фз лхчнЯб, Эрейфб бневЬуфе
фп цщфйуфйкь кбй обнбухндЭуфе фпн цпэснп убт.
62
Рщт нб бллЬоефе фз лхчнЯб
НфпхЯ
Оевйдюуфе
Цщфйуфйкь
гйб нб оевйдюуефе фп цщфйуфйкь кбй фз лЬмрб, чсзуймпрпйЮуфе рлбуфйкь
гЬнфйрпх иб дйехкплэней фзн брпухнбсмпльгзуз.
БрпухндЭуфе фпн цпэснп убт рсйн брь кЬие рбсЭмвбуз уфз лхчнЯб гйб
нб брпцэгефе кЬие кЯндхнп злекфспрлзоЯбт кбй еЬн чсейбуфеЯ бцЮуфе
нб ксхюуей з ухукехЮ.
9962-5611 MULTI LANGUES.qxd 30/10/02 10:19 Page 62
Page 63

Рспфпэ рспчщсЮуефе уфзн брпухнбсмпльгзуз, бцЮуфе фз ухукехЮ нб ксхюуей кбй
елЭгофе ьфй п ерйлпгЭбт шзуЯмбфпт еЯнбй уфз иЭуз ARRET (уфбмЬфзмб).
РлЬгйб фпйчюмбфб
(1)
БрпухндЭуфе фп уэсмб фзт рлЬкбт (2) мрспуфЬ бнбузкюнпнфЬт
фп (учедйЬгсбммб Á). ФсбвЮофе рспт фп мЭспт убт ьлз фз укЬлб,
узкюуфе фз рспкеймЭнпх нб брпухндЭуефе фпн рЯущ уэндеумп
уфесЭщузт (учедйЬгсбммб Â). ВгЬлфе фп брь фйт 2 фсэрет (3) фпх
кбфблхфйкпэ фпйчюмбфпт кбй фпх клЯвбнпх фпх цпэснпх. ВгЬлфе
уфз ухнЭчейб фп кбфблхфйкь фпЯчщмб (1).
БнфйкбфбуфЮуфе фб кбйнпэсйб
еобсфЮмбфб (фпЯчщмб кбй/Ю
укЬлет) рсбгмбфпрпйюнфбт фйт
бнфЯуфспцет дйбдйкбуЯет.
Фпйчюмбфб фпх кЬфщ мЭспхт
(4)
Оевйдюуфе фелеЯщт фз вЯдб (5) рпх
всЯукефбй рЬнщ брь фп фпЯчщмб
фпх кЬфщ мЭспхт. КлЯнбфе фп
фпЯчщмб рспт фб емрсьт пэфщт юуфе нб фп вгЬлефе брь фпн
клЯвбнп. БнфйкбфбуфЮуфе фп нЭп фпЯчщмб рсбгмбфпрпйюнфбт фйт
бнфЯуфспцет дйбдйкбуЯет.
Рщт нб ухнфзсеЯфе фпн цпэснп убт
Ðщт нб бллЬоефе фб кбфблхфйкЬ фпйчюмбфб;
Ê
бибсйумьт фпх ресйвлЮмбфпт
Бхфьт п цпэснпт, ме ухнечЭт кбиЬсйумб, брпфелеЯфбй брь Энб ресЯвлзмб
еопрлйумЭнп ме брпухндеьменб фпйчюмбфб кблхммЭнб ме Энб ейдйкь мйкспрпсюдз
умЬлфп (кбфблхфйкь умЬлфп) рпх фпх рспуцЭсей фйт бхфп-кбибсйуфйкЭт фпх йдйьфзфет. Брь фз уфйгмЮ фзт емцЬнйуЮт фпхт, пй лекЭдет брлюнпнфбй кбй дйбчЭпнфбй уе
мегЬлп вбимь уфпхт рьспхт. Поейдщньнпнфбй уфйт дэп ьшейт кбй еобцбнЯжпнфбй
рсппдехфйкЬ. Фп бхфпкбибсйжьменп умЬлфп еЯнбй кхсЯщт рспубсмпумЭнп уфб лЯрз,
бллЬ ьчй уфз жЬчбсз. Гй' бхфь фп льгп з ерЭндхуз фзт рлЬкбт Эдсбузт, рпх
хрькейфбй кхсЯщт уе екчэуейт жЬчбсзт, ден еЯнбй кблхммЭнз ме бхфь фп умЬлфп.
Убт ухнйуфпэме йдйбЯфесб:
- Нб мзн оэнефе ме мефблллйкЮ впэсфуб, есгблеЯб ме бйчмЮ Ю кпцфесЬ.
- Нб мзн укпхрЯжефе пэфе нб кбибсЯжефе ме рспъьнфб рпх рспмзиеэеуфе брь фп емрьсйп.
- КбфЬ фп шЮуймп уфз учЬсб, пй ресйууьфесет екфйнЬоейт лЯрпхт гЯнпнфбй уфб фпйчюмбфб фщн
прпЯщн з иесмпксбуЯб ден еЯнбй рЬнфб бскефЮ юуфе з еобцЬнйуЮ фпхт нб гЯнефбй ео плпклЮспх
кбфЬ фп шЮуймп.
У' бхфЮ фзн ресЯрфщуз, рбсбфеЯнефе фз иЭсмбнуз фпх цпэснпх гйб 20 Эщт 30 лерфЬ, уфз
мЭгйуфз иесмпксбуЯб фзт ерйихмзфЮт бкплпхиЯбт.
Бн меЯнпхн Ячнз, бхфЬ иб елбчйуфпрпйзипэн уфб ерьменб мбгейсЭмбфб.
1
3
4
2
5
63
гйб кЬие ерЭмвбуз кбибсйумпэ уфзн еупчЮ, п цпэснпт рсЭрей нб мз
лейфпхсгеЯ.
GR
9962-5611 MULTI LANGUES.qxd 30/10/02 10:19 Page 63
B
A
Page 64

64
Фй нб кЬнпхме уе ресЯрфщуз
бнщмблйюн уфз лейфпхсгЯб;
¸чефе кЬрпйб бмцйвплЯб гйб фзн кблЮ лейфпхсгЯб фпх цпэснпх убт,áõôü äåí
узмбЯней ьмщт прщудЮрпфе ьфй хрЬсчей кЬрпйб влЬвз. Уе кЬие ресЯрфщуз, елЭгофе
фб бкьлпхиб узмеЯб:
Äйбрйуфюнефе ьфй...
Ïй рйибнЭт бйфЯет Ôй рсЭрей нб кЬнщ?
П цпэснпт ден иесмбЯнефбй.
П цпэснпт ден еЯнбй
ухндедемЭнпт.
З буцЬлейб фзт егкбфЬуфбуЮт
убт еЯнбй екфьт лейфпхсгЯбт.
З ерйлегмЭнз иесмпксбуЯб
еЯнбй рплэ чбмзлЮ.
П иесмпуфЬфзт еЯнбй
елбффщмбфйкьт.
- УхндЭуфе фпн цпэснп.
- БллЬофе фзн буцЬлейб фзт
егкбфЬуфбуЮт убт кбй елЭгофе
фзн фймЮ фзт (16Б).
- БхоЮуфе фзн ерйлегмЭнз иесмпксбуЯб.
- КблЭуфе фзн ХрзсеуЯб
ЕохрзсЭфзузт МефЬ фзн Рюлзуз.
П деЯкфзт фзт Ф°c еЯнбй
ухнЭчейб бнбммЭнпт.
Елбффщмбфйкьт иесмпуфЬфзт.
- КблЭуфе фзн ХрзсеуЯб ЕохрзсЭфзузт МефЬ фзн Рюлзуз.
З лЬмрб фпх цпэснпх ден
лейфпхсгеЯ.
З лЬмрб еЯнбй екфьт
лейфпхсгЯбт.
П цпэснпт ден еЯнбй
ухндедемЭнпт Ю з буцЬлейб
еЯнбй екфьт лейфпхсгЯбт.
- БллЬофе фз лЬмрб.
- УхндЭуфе фпн цпэснп Ю
бллЬофе фзн буцЬлейб.
П бнемйуфЮсбт гйб нб
ксхюуей п цпэснпт
ухнечЯжей нб гхснЬ кбй
мефЬ фп уфбмЬфзмб фпх цпэснпх.
П бнемйуфЮсбт лейфпхсгеЯ
гйб 1 юсб фп рплэ мефЬ фп
шЮуймп,
Бн ден уфбмбфЮуей мефЬ
брь 1 юсб
- БнпЯофе фзн рьсфб фпх цпэснпх гйб нб ксхюуей п цпэснпт рйп гсЮгпсб.
- КблЭуфе фзн ХрзсеуЯб
ЕохрзсЭфзузт МефЬ фзн
Рюлзуз.
МефбцЭсефе рбсбкЬфщ фйт ендеЯоейт рпх емцбнЯжпнфбй уфзн ресйгсбцйкЮ рйнбкЯдб
фпх цпэснпх убт:
MADE IN FRANCE
220 - 240V ~ 50 Hz
BRANDT APPLIANCES SAS
7 rue Henri Becquerel
92500 RUEIL MALMAISON
99625611 10/02
9962-5611 MULTI LANGUES.qxd 30/10/02 10:19 Page 64
 Loading...