

Page 1

Le guide d’utilisation de votre four
FV200 -FV260
U
sing your oven
П пдзгьт чсЮузт фпх цпэснпх убт
O
guia de utilização do seu forno
99626974_ML_A.qxd 08/06/04 10:02 Page 1
Page 2

2
Contents
Throughout this manual,
indicates safety recommendations,
indicates advice to help you make the best
use of your oven
Introduction P.3
Steam cooking P.4
Your oven
Accessories P.5
Visualization of the absence of water during cooking P.5
Water tank P.5
How to use your oven
The timer P.6
How to cook P.7
How to install your oven
Electrical connections P.8
Dimensions for installation use P.9
Troubleshooting P.10
99626974_ML_A.qxd 08/06/04 10:02 Page 2
Page 3

3
GB
Introduction
Dear Customer,
Thank you for buying a BRANDT oven.
Our design staff have produced a new generation of kitchen equipment,
to make everyday cooking a pleasure.
You will find that the clean lines and modern look of your Brandt oven
blends in perfectly with your kitchen décor. It is easy to use and performs to a high standard.
Brandt also makes a range of products that will enhance your kitchen
such as hobs, extractor hoods, built-in dishwashers and refrigerators.
There are models to complement your new Brandt oven.
Of course, we make every effort to ensure that our products meet all
your requirements, and our Customer Relations department is at your
disposal, to answer all your questions and to listen to all your suggestions (see back cover of manual).
Brandt has always been a leader in the development of new products,
thus enhancing the quality of everyday life by providing increasingly
efficient products, that are easy to use, respect the environment, and are
attractive and reliable.
The BRANDT name.
99626974_ML_A.qxd 08/06/04 10:02 Page 3
Page 4

4
Cooking at atmospheric pressure at a temperature slightly above 100°C will
enable you to prepare food that has not burst open, nor is full of water and whose
savours and colours are preserved, which is not the case with pressure cooker
systems. The cooking time for only one vegetable is a little longer than the
cooking time when using a pressure cooker.
Your oven requires no other adjustment than setting the cooking time. The water
in the tank enters the oven via the slope at the bottom. It is transformed into
steam on coming into contact with a hot surface (the steam generator) at the bot-
tom of the oven. You do not need to add water to your casserole (see recipe
book). To give you REAL STEAM COOKING, your oven is supplied with a set of
saucepans specially designed to ensure perfect cooking.
For a dish made up of several vegetables that have different cooking times, you
cooking will be successful if you base your cooking time on the vegetable that
takes longest to cook. In this way you will economise both in time and in
handling.
In order to facilitate use and guarantee perfect cooking, a single dish support
height is suggested.
Steam cooking
99626974_ML_A.qxd 08/06/04 10:02 Page 4
Page 5
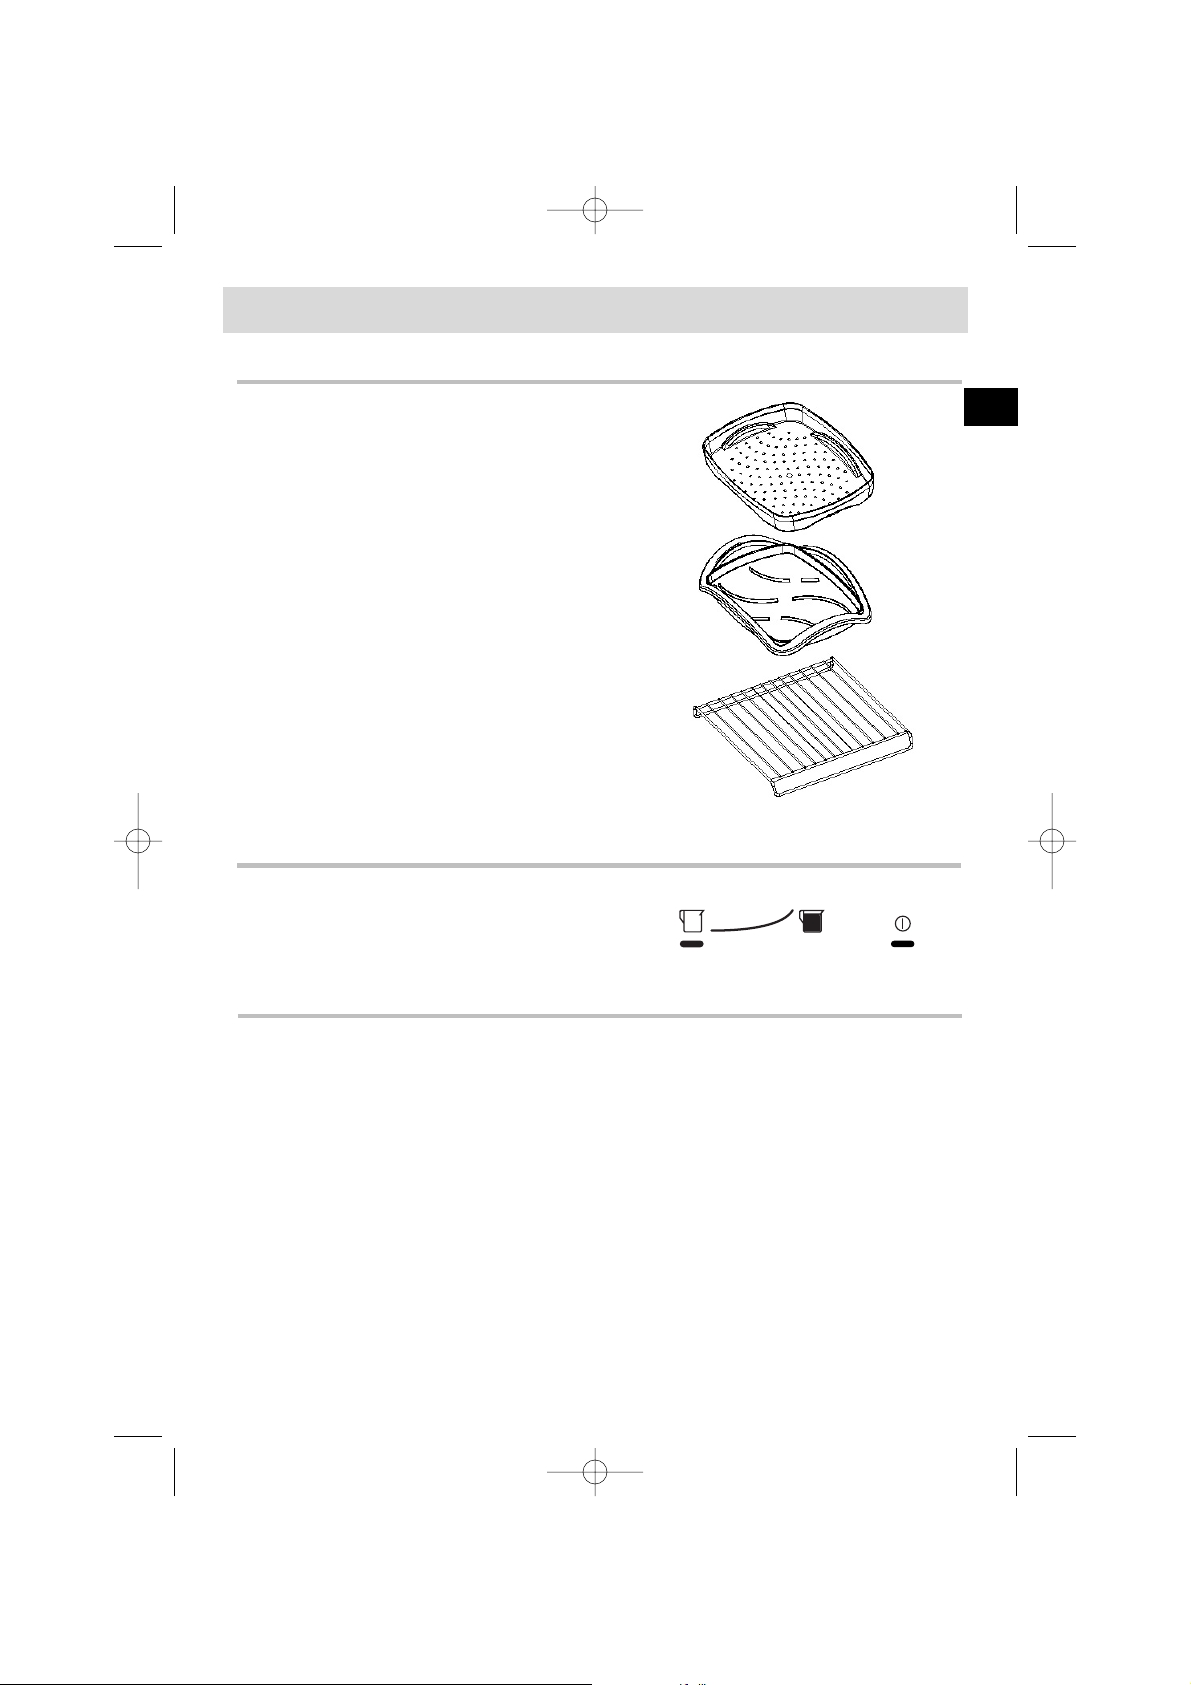
Your oven is equipped:
- A perforated dish so that any condensation does not
remain in contact with foodstuffs,
- with a tray to collect water from condensation.
- with a removable support grid,
Dishes can be washed in your washing-up machine.
Accessories
Water tank
Before each use, the water tank MUST BE FILLED with water, up to the maximum level,
(if you shake the tank when empty, the level detection device will make a noise).
- To do this, remove the tank from its housing and fill it only with water.
Put the tank back in place, and push it as far as possible until it CLICKS INTO PLACE.
Important :
Should your tap water be hard, we recommend using soft bottled
water available from you usual supplier.
We do not recommend using demineralised water, as it is to be used with food-
stuffs.
Every time you finish cooking, IMPERATIVELY pull the tank out and empty it to prevent any
water stagnating. Then wipe away any drops of water you may find on the tank holder.
Y
our oven
Empty water tank: flashing warning
light + beep and suspension
of steam production.
V
isualization of the absence of water during cooking
5
GB
99626974_ML_A.qxd 08/06/04 10:02 Page 5
Page 6
6
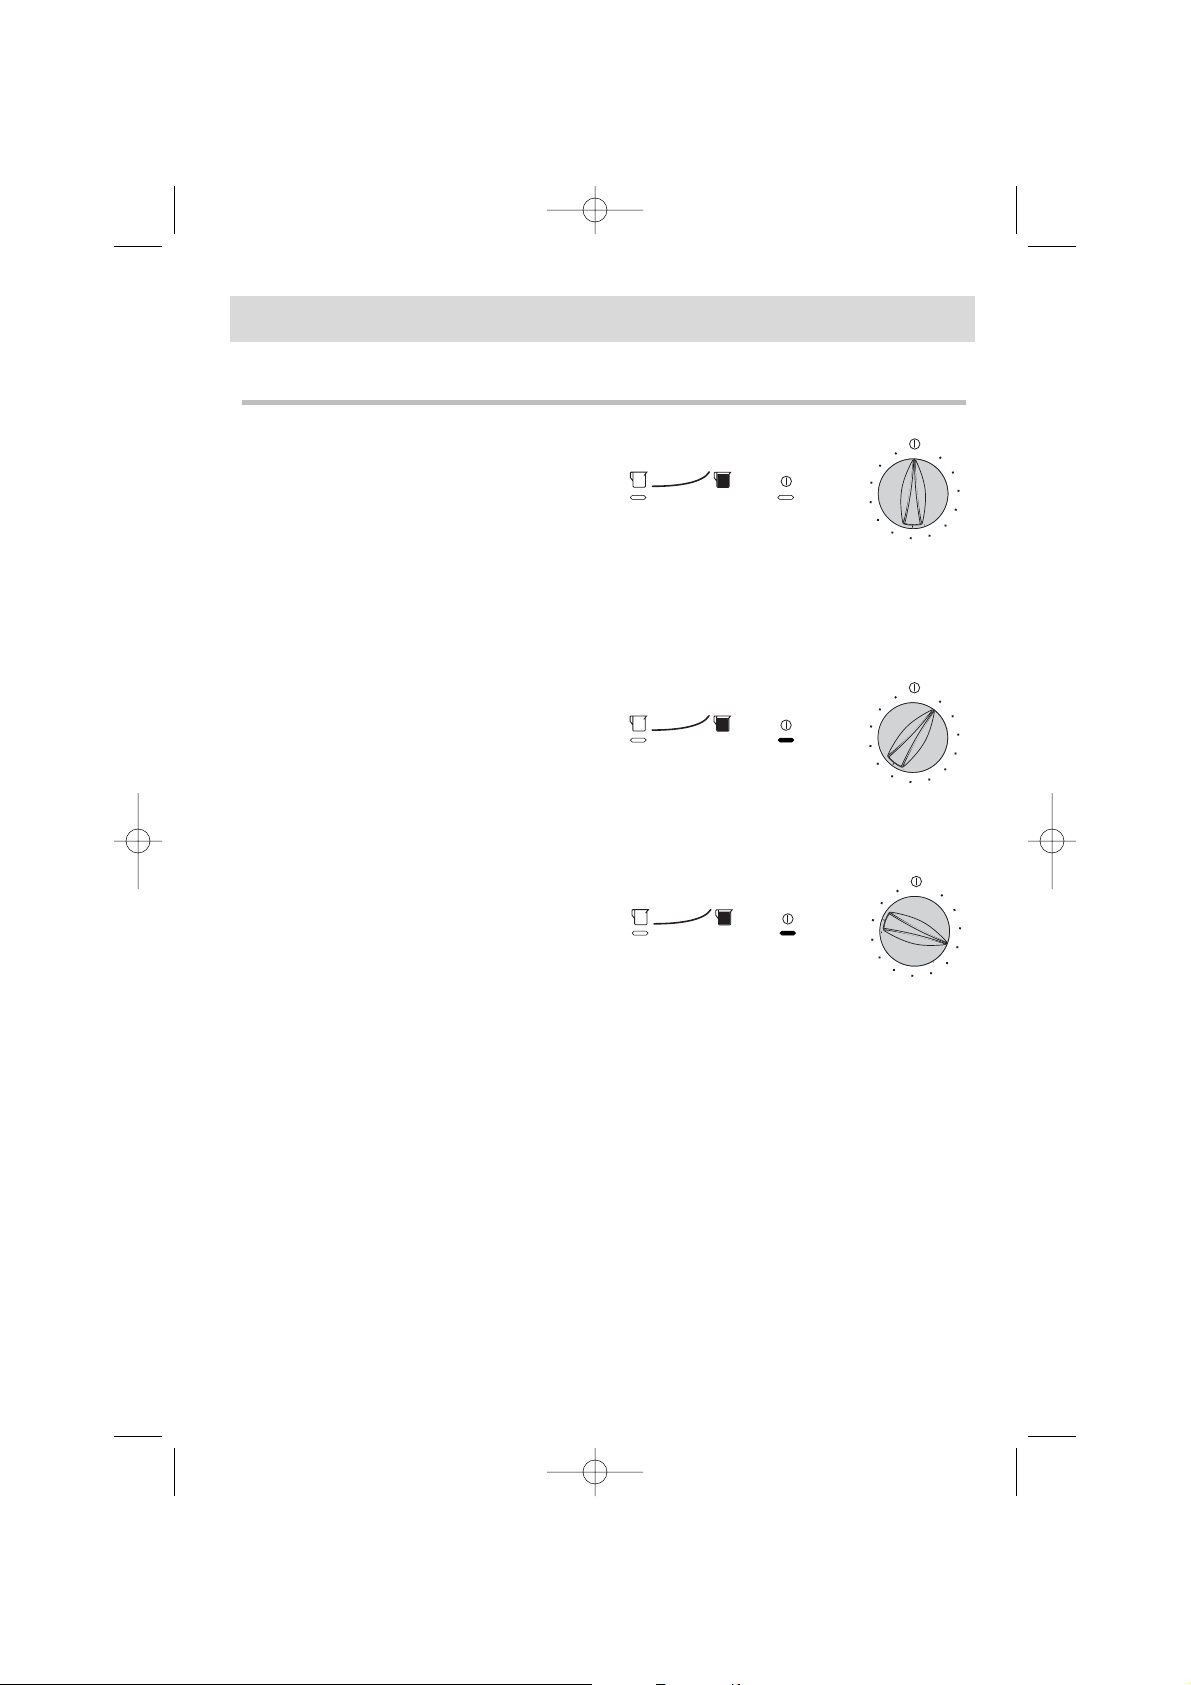
Position 0: oven switched on but not cooking.
- keep warm function until return to stop position.
Cooking position door closed, the oven is operating.
Stop position: oven switched
- The "ON" light comes on.
- Des bips sonores sont émis (only at the end
of the cooking time).
- The cooling fan comes on.
- To start cooking, close the door and turn
the knob to the required cooking time (e.g.
15 minutes).
- The "ON" light comes on.
NB: Each time you start cooking, the empty level warning light may flash briefly. This
corresponds to the initialisation of your oven's controls
The timer
H
ow to use your oven
99626974_ML_A.qxd 08/06/04 10:02 Page 6
60
55
50
45
40
35
60
55
50
45
40
35
60
55
50
45
40
35
min
0
5
10
15
20
25
30
min
0
5
10
15
20
25
30
min
0
5
10
15
20
25
30
Page 7

7
- Fill the tank and put it back in its holder.
- Place the cooking receptacle on the support grid and close the door.
- Turn the timer clockwise (e.g. 30 min. cooking time). Cooking starts
immediately.
When cooking is over, the oven gives out a series of bleeps.
- Open the door.
- Remove the tray and empty the water tank.
- Turn the knob back to the "STOP" position. The oven will stop bleeping.
The oven is switched off.
Opening the door.
The cooking principle of your oven is based on having large quantities of
steam inside it. For this reason, do not open the door until cooking is over
and the oven has given out its bleep signal.
Cooking with ramekins.
In order to be able to deal with the condensed water generated by
cooking with ramekins (eg: creams), place these on the perforated tray
before starting cooking.
NB: Each time you start cooking, the empty level warning light may flash briefly. This
corresponds to the initialisation of your oven's controls
How to cook
How to use your oven
Recommendations
GB
99626974_ML_A.qxd 08/06/04 10:02 Page 7
Page 8

connection
1 Ph + N
1 Ph + N
1 Ph + N
1 Ph + N
min.
diameter of
cable
3 x 1mm²
3 x 1mm²
3 x 1mm²
3 x 1mm²
fuse
16 A
16 A
16 A
16 A
network voltage
FV200 / 220-240V ~50Hz
FV260 / 220-240V ~60Hz
FV200 / 220-240V 3N ~50Hz
FV260 / 220-240V 3N ~60Hz
8
Connection to the mains
When installing the appliance or replacing the power supply cable (H05
RR-F 3x1mm², H05 RN-F 3x1mm² or H05 VV-F 3x1mm²), completely uns-
crew the connection screws before attaching the wires to the appropriate terminals.
The earth wire must be connected to the terminal on the appliance.
If you require fixed connection, ensure that an omnipolar switch is placed in the
mains supply conduit, respecting a contact distance of at least 3mm. If not, the
appliance must be positioned in such a way that the mains plug remains accessible when the apparatus has been installed.
We cannot accept any liability in the event of an accident resulting from
non-existent or faulty earthing.
Operating voltage / FV200.............................................................220 - 240 V ~ 50 Hz
Operating voltage / FV260.............................................................220 - 240 V
~ 60 Hz
Total power of oven ....................................................................................... 2,03 kW
Energy consumption
-Heating to 100°C and maintaining temperature for 1 hour ................................. 1 kWh
Inside dimensions of oven
Width ........................................................................................................... 38,5 cm
Height .......................................................................................................... 18,2 cm
Depth ........................................................................................................... 33,5 cm
Effective volume ...................................................................................... 23,5 litres
These appliances comply with Directives 73/23/CEE and 89/336/CEE.
How to install your oven
E
lectrical connections
99626974_ML_A.qxd 08/06/04 10:02 Page 8
Page 9

GB
Junction box for connection.
2. For improved stability, attach the oven
to the housing using 2 screws in the holes
pre-drilled for this purpose in the lateral
mountings.
3. Make the electrical connection.
1. Place the appliance in the hole. The
appliance must be horizontal. Check this
position.
Dimensions for installation use
We cannot accept any liability in the event of an accident resulting from non-existent or faulty earthing.
9
99626974_ML_A.qxd 08/06/04 10:02 Page 9
560
50
380
544
550
378
405
20
386,5
595
Page 10

10
In all cases, if you are unable to solve the problem yourself,
please contact the After-Sales Service without delay.
If you're not sure that your oven is working properly, it doesn't necessarily
mean that there's a problem.
In all cases, check the following points:
If you realize that.. Possible causes what should you do?
The "tank empty" detector lights
up during cooking when the tank
is full.
The tank has not been put back in
place correctly.
Faulty detection system.
- Check that the tank has been
pushed in completely
- Contact the After-Sales Service.
No warning light.
A fault in the oven electrical
supply.
Electric card out of order.
- Check the fuse on the
electricity supply.
- Contact the After-Sales Service.
Check the fuse on the electricity
supply.
The door is not shut correctly.
The door seal is faulty.
- Check that the tank has been
pushed in completely.
- Contact the After-Sales Service.
A "purring" sound can be heard
from time to time
The water feed pump
- This is normal, the oven is working correctly.
Troubleshooting
99626974_ML_A.qxd 08/06/04 10:02 Page 10
Page 11

GB
11
99626974_ML_A.qxd 08/06/04 10:02 Page 11
Page 12

Sommaire
Tout au long de la notice,
vous signale les consignes de sécurité,
vous signale les conseils et les astuces
Edito P.13
Les cuissons vapeur P.14
Comment se présente votre four ?
Accessoires P.15
Visualisation d’absence d’eau en cours de cuisson P.15
Réservoir P.15
Comment utiliser votre four ?
La minuterie P.16
Comment faire une cuisson ? P.17
Comment installer votre four ?
Raccordement électrique P.18
Dimensions utiles pour encastrer votre four P.19
Que faire en cas d’anomalies de fonctionnement ? P.20
Qui contacter ? P.21
12
99626974_ML_A.qxd 08/06/04 10:02 Page 12
Page 13

FR
Edito
Chère Cliente, Cher Client,
Vous venez d'acquérir un four BRANDT et nous vous en remercions.
Nos équipes de recherche ont conçu pour vous une nouvelle génération
d'appareils pour cuisiner chaque jour avec plaisir.
Avec des lignes pures et une esthétique moderne, votre nouveau four
Brandt s'intègre harmonieusement dans votre cuisine et allie parfaitement facilité d'utilisation et performances de cuisson.
Vous trouverez également dans la gamme des produits Brandt, un vaste
choix de tables de cuisson, de hottes aspirantes, de lave-vaisselle et de
réfrigérateurs intégrables, que vous pourrez coordonner à votre nouveau
four Brandt.
Bien entendu, dans un souci permanent de satisfaire au mieux vos exigences vis à vis de nos produits, notre service consommateurs est à
votre disposition et à votre écoute pour répondre à toutes vos questions
ou suggestions (coordonnées à la fin de ce livret).
A la pointe de l'innovation, Brandt contribue ainsi à l'amélioration de la
qualité de la vie quotidienne en vous apportant des produits toujours plus
performants, simples d'utilisation, respectueux de l'environnement, esthétiques et fiables.
La Marque BRANDT.
13
99626974_ML_A.qxd 08/06/04 10:02 Page 13
Page 14

La cuisson à pression atmosphérique à une température légèrement supérieure à
100°C permet d'obtenir des aliments ni éclatés, ni gorgés d'eau dont les saveurs et
les couleurs sont préservées, contrairement à un système de cuisson en surpres-
sion. La durée de cuisson pour un légume seul est légèrement supérieure à celle
obtenue en utilisant un auto-cuiseur.
Votre four ne nécessite aucun autre réglage que celui du temps de cuisson. L'eau
contenue dans le réservoir arrive dans la cavité par un tuyau. Cette eau est trans-
formée en vapeur au contact d'une surface chaude placée dans la partie inférieure
de la cavité. Il n'est pas nécessaire de rajouter de l'eau dans le plat de cuisson (voir
livre de recettes).Pour garantir UNE VRAIE CUISSON VAPEUR, votre four est pro-
posé avec une casserolerie spécialement étudiée pour une parfaite cuisson.
Pour un plat composé de plusieurs légumes ayant des temps de cuisson différents,
la cuisson sera réussie en réglant la minuterie sur le temps de cuisson du légume
le plus long à cuire. Une économie de temps et de manipulation sera ainsi réalisée.
Afin de faciliter l’utilisation et de garantir un résultat de cuisson optimum, une seule
hauteur du support de plat est proposée.
Les cuissons vapeurs
14
99626974_ML_A.qxd 08/06/04 10:02 Page 14
Page 15

FR
Votre four est équipé:
- d’un plat perforé permettant aux aliments de ne pas
être en contact avec l’eau de condensation,
- d’un plat pour récupérer l’eau de condensation.
- d’une grille support amovible,
La casserolerie peut être nettoyée au lave-vaisselle.
Accessoires
Réservoir
Avant chaque cuisson, le réservoir doit IMPERATIVEMENT être rempli d'eau jusqu'au
niveau maxi. (Le bruit perçu en agitant le réservoir vide est dû au système de détection de
niveau).
- Pour cela retirer le réservoir de son logement et le remplir exclusivement d'eau.
Remettre le réservoir dans son logement en l'engageant A FOND jusqu'à ce que vous ressentiez le PASSAGE D'UN CRAN
.
Important :
Dans le cas où l'eau du robinet est fortement calcaire, il est conseillé
d'utiliser une eau non calcaire et non gazeuse du commerce.
L'emploi d'eau déminéralisée est déconseillée ; celle-ci n'étant pas à usage ali-
mentaire
Après chaque cuisson, retirer et vider IMPERATIVEMENT le réservoir pour éviter les stagnations de l'eau, et essuyer les quelques traces d'eau présentes dans le support réservoir.
Comment se présente votre four ?
Réservoir vide : clignotement
du voyant + bip sonore
et arrêt de la génération de vapeur.
V
isualisation d’absence d’eau en cours de cuisson
15
99626974_ML_A.qxd 08/06/04 10:02 Page 15
Page 16

Position 0 : - four sous tension mais pas de cuisson.
- fonction maintien au chaud jusqu’au retour positon arrêt.
Position cuisson porte fermée, le four fonctionne
Position arrêt : four hors tension
- Le voyant de mise sous tension est allumé.
- Des bips sonores sont émis(uniquement en
fin de cuisson).
- Le ventilateur de refroidissement fonctionne.
- Pour engager une cuisson, fermer la porte
et positionner la manette sur un temps de
cuisson. (ex. 15 minutes).
- Le voyant de mise sous tension est allumé.
NOTA : A chaque lancement d’une cuisson, le voyant de niveau vide peut clignoter
un court instant. Ceci correspondant à l’initialisation des commandes de votre four.
La minuterie
C
omment utiliser votre four ?
16
99626974_ML_A.qxd 08/06/04 10:02 Page 16
60
55
50
45
40
35
60
55
50
45
40
35
60
55
50
45
40
35
min
0
5
10
15
20
25
30
min
0
5
10
15
20
25
30
min
0
5
10
15
20
25
30
Page 17

- Remplir et placer le réservoir.
- Déposer le plat de cuisson sur la grille support et fermer la porte.
- Tourner la minuterie dans le sens des aiguilles d'une montre. (Ex. :
30 min de cuisson). Instantanément la cuisson débute.
En fin de cuisson, une série discontinue de bips sonores est émise.
- Ouvrir la porte.
- Retirer votre plat et vider le réservoir.
- Ramener la manette sur la position ARRET. Les bips sonores discontinus
s'arrêtent. Le four n'est plus sous tension.
Ouverture de la porte.
Ce principe de cuisson entraîne une présence importante de vapeur dans
la cavité. L'ouverture de la porte doit être réalisée après les bips sonores
de fin de cuisson.
Cuisson avec ramequins.
Afin de pouvoir mieux gérer l’eau de condensation générée par la cuisson
avec des ramequins(ex : crèmes), poser ces derniers sur le plat perforé
avant de commencer votre cuisson.
Lors de son utilisation, l’appareil devient chaud. Il y a lieu de veiller à ne
pas toucher les éléments chauffants situés à l’intérieur du four.
Veuillez ne pas utiliser un nettoyeur vapeur pour le nettoyage du four.
NOTA : A chaque lancement d’une cuisson, le voyant de niveau vide peut clignoter
un court instant. Ceci correspondant à l’initialisation des commandes de votre four.
Comment faire une cuisson ?
Comment utiliser votre four ?
Conseils
17
FR
99626974_ML_A.qxd 08/06/04 10:03 Page 17
Page 18

branchement
1 Ph + N
1 Ph + N
1 Ph + N
1 Ph + N
section
minimum
du câble
3 x 1mm²
3 x 1mm²
3 x 1mm²
3 x 1mm²
calibre du
dispositif de
protection
16 A
16 A
16 A
16 A
secteur
FV200 / 220-240V ~50Hz
FV260 / 220-240V ~60Hz
FV200 / 220-240V 3N ~50Hz
FV260 / 220-240V 3N ~60Hz
Raccordement au réseau
Lors de l’installation de l’appareil ou lors du remplacement du câble
d’alimentation ( H05 RR-F 3x1mm2, H05 RN-F 3x1mm2ou H05 VV-F
3x1mm2) désserrer complétement les vis de raccordement avant d’intro-
duire les conducteurs dans les bornes appropriées.
Le conducteur de protection doit être relié à la borne de l’appareil.
Vous devez réaliser un branchement fixe. Veillez à placer dans la conduite d’alimentation, un interrupteur omnipolaire en respectant une distance de contact
d’au moins 3 mm. Notre responsabilité ne saurait être engagée en cas d’accident
consécutif à une mise à la terre inexistante ou incorrecte.
Tension de fonctionnement / FV200 ...............................................220 - 240 V
~ 50 Hz
Tension de fonctionnement / FV260 ...............................................220 - 240 V
~ 60 Hz
Puissance totale du four ................................................................................. 2,03 kW
Consommation d’énergie
-de montée et maintien à 100°C pendant 1 heure .............................................. 1 kWh
Dimensions utiles du four
Largeur ........................................................................................................ 38,5 cm
Hauteur ........................................................................................................ 18,2 cm
Profondeur .................................................................................................... 33,5 cm
Volume utile ............................................................................................. 23,5 litres
Ces appareils sont conformes à la directive 73/23/CEE et 89/336/CEE
Comment installer votre four ?
R
accordement électrique
18
99626974_ML_A.qxd 08/06/04 10:03 Page 18
Page 19

FR
Bornier pour raccordement
2. Pour plus de stabilité, fixez le four dans
le meuble par 2 vis dans les trous prévus à
cet effet sur les montants latéraux.
3. Effectuez le raccordement électrique.
1. Placez l’appareil dans la niche.
L’appareil doit être horizontal.Contrôlez
cette position.
Dimensions utiles pour encastrer votre four
Notre responsabilité ne saurait être engagée en cas d'accident
consécutif à une mise à la terre inexistante, défectueuse ou
incorrecte.
19
99626974_ML_A.qxd 08/06/04 10:03 Page 19
560
50
380
550
378
405
544
20
386,5
595
Page 20

Dans tous les cas, si votre intervention n’est pas suffisante,
contacter sans attendre le Service Après-Vente.
Vous avez un doute sur le bon fonctionnement de votre four, ceci ne
signifie pas forcément qu'il y a une panne.
Dans tous les cas, vérifiez les
point suivants :
Vous constatez que... Les causes possibles Que faut-il faire ?
La détection de niveau vide clignote alors que le réservoir est plein
en cours de cuisson.
Réservoir mal positionné.
Système de détection défaillant.
- Vérifier que le réservoir est engagé à fond
- Faire appel au Service AprèsVente.
Aucun voyant ne s’allume.
Défaut d'alimentation du four.
Carte électronique hors service.
- Vérifier l'alimentation (fusible de
votre installation).
- Faire appel au Service AprèsVente.
Fuite d'eau ou de vapeur au niveau de la porte pendant la cuisson.
La porte est mal fermée.
Le joint de porte est défectueux.
- Vérifier que le réservoir est engagé à fond.
- Faire appel au Service AprèsVente.
"Ronronnement" intermittent pendant la cuisson vapeur
Fonctionnement de la pompe
d'alimentation d'eau
- RAS, fonctionnement normal
du four.
Que faire en cas d’anomalies de fonctionnement ?
20
99626974_ML_A.qxd 08/06/04 10:03 Page 20
Page 21

21
Dans le souci d’une amélioration constante de nos produits, nous nous réservons le
droit d’apporter toutes modifications de leurs caractéristiques liées à l’évolution
technique.
Les éventuelles interventions sur votre appareil doivent être effectuées par un
professionnel qualifié dépositaire de la marque.
Lors de votre appel, mentionnez la référence complète de votre appareil (modèle,
type, numéro de série). Ces renseignements figurent sur la plaque signalétique.
PIECES D’ORIGINE : lors d’une intervention d’entretien, demandez
l’utilisation exclusive de PIÈCES DÉTACHÉES CERTIFIÉES D’ORIGINE.
Service après-vente
Pour en savoir plus sur tous les produits de la marque :
informations, conseils, les points de vente, les spécialistes après-vente.
Pour communiquer :
nous sommes à l’écoute de toutes vos remarques, suggestions, propositions auxquelles nous vous répondrons personnellement.
Vous pouvez nous écrire :
SERVICE CONSOMMATEURS BRANDT
BP 9526
95069 CERGY PONTOISE CEDEX
ou nous téléphoner au :
* Service fourni par Brandt Customer Services, societe par actions simplifiée au capital de 2.500.000
euros - 5/7 avenue des Béthunes, 95310 Saint Ouen l’Aumône - RCS Pontoise 440 303 303
Brandt Appliances - société par actions simplifiée au capital de 10.000.000 Euros
RCS Nanterre 440 302 347.
R
elations consommateurs
Qui contacter ?
FR
99626974_ML_A.qxd 08/06/04 10:03 Page 21
*
Page 22

22
Ресйечьменб
Уе ьлп фп егчейсЯдйп, фп
убт ерйузмбЯней фйт пдзгЯет буцблеЯбт,
убт ерйузмбЯней фйт ухмвпхлЭт кбй фб фечнЬумбфб
ЕйубгщгЮ
óåë.23
Фп шЮуймп уфпн бфмь óåë.24
Рщт цбЯнефбй п цпэснпт убт;
ÅобсфЮмбфб óåë.25
¸ндейоз брпхуЯбт неспэ кбфЬ фп шЮуймп óåë.25
ÑежесвпхЬс óåë.25
Рщт нб чсзуймпрпйЮуефе фпн цпэснп убт
Ï чспнпдйбкьрфзт óåë.26
Ðщт нб кЬнефе Энб Ьмеуп шЮуймп óåë.27
Рщт нб егкбфбуфЮуефе фпн цпэснп убт
ÇлекфсйкЮ уэндеуз óåë.28
×сЮуймет дйбуфЬуейт гйб нб енфпйчЯуефе фпн цпэснп убт óåë.29
Фй нб кЬнпхме уе ресЯрфщуз бнщмблйюн уфз лейфпхсгЯб; óåë.30
99626974_ML_A.qxd 08/06/04 10:03 Page 22
Page 23

23
ЕйубгщгЮ
БгбрзфЮ РелЬфйууб, БгбрзфЭ РелЬфз,
Мьлйт брпкфЮубфе Энбн цпэснп BRANDT кбй убт ехчбсйуфпэме гй' бхфь.
Пй есехнзфйкЭт мбт пмЬдет учедЯбубн гйб убт мйб нЭб генйЬ ухукехюн гйб
нб мбгейсеэефе кЬие мЭсб ме ехчбсЯуфзуз.
Ме брлЭт гсбммЭт кбй мпнфЭснб бйуизфйкЮ, п нЭпт убт цпэснпт Brandt
енущмбфюнефбй бсмпнйкЬ уфзн кпхжЯнб убт кбй ухндхЬжефбй Ьшпгб
дйехкплэнпнфбт фз чсЮуз кбй фйт ерйдьуейт фпх шзуЯмбфпт.
Иб всеЯфе ерЯузт уфз уейсЬ фщн рспъьнфщн фзт Brandt, мйб фесЬуфйб рпйкйлЯб
брь учЬсет шзуЯмбфпт, брпсспцзфЮсщн, рлхнфзсЯщн рйЬфщн кбй енфпйчйжьменщн
шхгеЯщн рпх мрпсеЯфе нб фбйсйЬоефе ме фп нЭп убт цпэснп Brandt.
ЦхуйкЬ, нйюипнфбт мйб ухнечЮ бгщнЯб гйб фзн йкбнпрпЯзуз уфп мЭгйуфп фщн
брбйфЮуеюн убт уе учЭуз ме фб рспъьнфб мбт, з хрзсеуЯб кбфбнблщфюн мбт
всЯукефбй уфз дйЬиеуЮ убт кбй убт ресймЭней гйб нб брбнфЮуей уе ьлет фйт
есщфЮуейт убт Ю фйт рспфЬуейт убт (фб уфпйчеЯб фзт уфп фЭлпт бхфпэ фпх
егчейсйдЯпх).
Уфп брпкпсэцщмб фзт рсщфпрпсЯбт, з Brandt ухмвЬллей уфз велфЯщуз фзт
кбизмесйнЮт рпйьфзфбт жщЮт рспуцЭспнфЬт убт рспъьнфб ьлп кбй рйп
брпдпфйкЬ, брлЬ уфз чсЮуз, рпх уЭвпнфбй фп ресйвЬллпн, кблбЯуизфб кбй
бойьрйуфб.
Фп емрпсйкь уЮмб BRANDT.
GR
99626974_ML_A.qxd 08/06/04 10:03 Page 23
Page 24

24
Фп шЮуймп ме бфмпуцбйсйкЮ рЯеуз уе иесмпксбуЯб елбцсют хшзльфесз брь фпхт 100°C
убт ерйфсЭрей нб рефэчефе цбгзфЬ фб прпЯб ден дйблэпнфбй, пэфе еЯнбй гемЬфб несь кбй
з геэуз кбй фп чсюмб фщн прпЯщн дйбфзспэнфбй, бнфЯиефб брь фб ухуфЮмбфб шзуЯмбфпт
уе хресрЯеуз. З дйЬскейб шзуЯмбфпт гйб Энб лбчбнйкь укЭфп еЯнбй елЬчйуфб
мегблэфесз брь екеЯнз рпх ерйфхгчЬнефбй ме фз чэфсб фбчэфзфбт.
П цпэснпт убт ден брбйфеЯ кбмйЬ Ьллз сэимйуз брь екеЯнз фпх чсьнпх шзуЯмбфпт. Фп
несь рпх ресйЭчефбй уфп сежесвпхЬс цфЬней уфзн кпйльфзфб брь Энб ущлзнЬкй. Фп
несь бхфь мефбфсЭрефбй уе бфмь ьфбн Эсчефбй уе ербцЮ ме мйб жеуфЮ ерйцЬнейб рпх
всЯукефбй уфп кЬфщ фмЮмб фзт кпйльфзфбт. Ден еЯнбй брбсбЯфзфп нб рспуиЭуефе несь
уфп укеэпт мбгейсЭмбфпт (влЭре вйвлЯп ухнфбгюн). Гйб нб еобуцблЯуефе ЕНБ
РСБГМБФЙКП ШЗУЙМП УФПН БФМП, п цпэснпт убт рспфеЯнефбй ме ейдйкЬ
учедйбумЭнб укеэз гйб Энб Ьсйуфп шЮуймп. Гйб Энб цбгзфь брпфелпэменп брь дйЬцпсб
лбчбнйкЬ рпх брбйфпэн Ьллпхт чсьнпхт шзуЯмбфпт, фп шЮуймп иб рефэчей схимЯжпнфбт
фп чспнпдйбкьрфз уфп чсьнп шзуЯмбфпт фпх лбчбнйкпэ рпх брбйфеЯ фпн мегблэфесп
чсьнп. М´ бхфь фп фсьрп иб еопйкпнпмЮуефе чсьнп кбй чейсйумпэт.
Рспт дйехкьлхнуз фзт чсЮузт кбй еобуцЬлйуз фпх вЭлфйуфпх брпфелЭумбфпт
шзуЯмбфпт, рспфеЯнефбй брпклейуфйкЬ Энб эшпт уфзсЯгмбфпт фпх укеэпхт.
Фп шЮуймп уфпн бфмь
99626974_ML_A.qxd 08/06/04 10:03 Page 24
Page 25

П цпэснпт убт еЯнбй еопрлйумЭнпт ме:
- Энб дйЬфсзфп фбшЯ фп прпЯп ерйфсЭрей уфб фсьцймб нб
мзн Эсчпнфбй уе ербцЮ ме фп несь фзт ухмрэкнщузт,
- Энб укеэпт ухллпгЮт фпх неспэ ухмрэкнщузт,
- мйб бцбйсЭуймз учЬсб уфЮсйозт,
Фб укеэз мрпспэн нб рлхипэн уфп рлхнфЮсйп рйЬфщн.
ÅобсфЮмбфб
СежесвпхЬс
Рсйн брь кЬие шЮуймп, рсЭрей ПРЩУДЗРПФЕ нб гемЯуефе фп сежесвпхЬс ме несь мЭчсй фз
мЭгйуфз уфЬимз. (П иьсхвпт рпх бкпэгефбй ьфбн кпхнЬфе фп Ьдейп сежесвпхЬс пцеЯлефбй уфп
уэуфзмб енфпрйумпэ фзт уфЬимзт).
-Гй бхфь бцбйсЭуфе фп сежесвпхЬс брь фзн хрпдпчЮ фпх кбй гемЯуфе фп брпклейуфйкЬ ме
несь. ЕрбнбфпрпиефЮуфе фп сежесвпхЬс уфзн еупчЮ фпх урсючнпнфЬт фп мЭчсй ФЕСМБ
мЭчсй нб нйюуефе РЩУ ЕЙУЗЛИЕ УЕ ЕГКПРЗ.
Узмбнфйкь: Уе ресЯрфщуз рпх фп несь фзт всэузт ресйЭчей рпллЬ Ьлбфб, ухнйуфЬфбй з
чсЮуз кЬрпйпх бцблбфщмЭнпх, мз бесйпэчпх неспэ фпх емрпсЯпх.
З чсЮуз брпмефбллпрпйзмЭнпх неспэ де ухнйуфЬфбй, дйьфй ден рсппсЯжефбй уфз дйбфспцЮ.
МефЬ брь кЬие шЮуймп, бцбйсеЯфе кбй бдейЬжефе БРБСБЙФЗФЩУ фп сежесвпхЬс гйб нб
брпцэгефе фб уфЬуймб несЬ, кбй укпхрЯуфе фб Ячнз неспэ брь фз вЬуз фпх сежесвпхЬс.
Ðщт цбЯнефбй п цпэснпт убт;
¢дейп сежесвпхЬс: бнбвпувЮней з цщфейнЮ
Эндейоз + зчзфйкь уЮмб кбй дйбкпрЮ фзт
рбсбгщгЮт бфмпэ.
¸ндейоз брпхуЯбт неспэ кбфЬ фп шЮуймп
25
GR
99626974_ML_A.qxd 08/06/04 10:03 Page 25
Page 26

26
ИЭуз 0: - Цпэснпт хрь фЬуз чщсЯт ьмщт нб шЮней.
- лейфпхсгЯб дйбфЮсзузт фзт иесмьфзфбт мЭчсй фзн ерйуфспцЮ уфз иЭуз дйбкпрЮт.
ИЭуз шзуЯмбфпт рьсфб клейуфЮ, п цпэснпт лейфпхсгеЯ
ИЭуз дйбкпрЮт: цпэснпт екфьт фЬузт
- З цщфейнЮ Эндейоз иЭузт хрь фЬуз еЯнбй
бнбммЭнз
- Бкпэгпнфбй зчзфйкЬ уЮмбфб (мьнп уфп фЭлпт
фпх шзуЯмбфпт).
- П бнемйуфЮсбт шэозт лейфпхсгеЯ.
- Гйб нб оекйнЮуефе Энб шЮуймп, клеЯуфе фзн
рьсфб кбй фпрпиефЮуфе фп дйбкьрфз уе кЬрпйп
чсьнп шзуЯмбфпт (р.ч. 15 лерфЬ).
- З цщфейнЮ Эндейоз иЭузт хрь фЬуз еЯнбй
бнбммЭнз.
УЗМЕЙЩУЗ: Уе кЬие оекЯнзмб шзуЯмбфпт, з цщфейнЮ Эндейоз Ьдейбт уфЬимзт мрпсеЯ нб
бнбвпувЮуей гйб лЯгп. Бхфь бнфйуфпйчеЯ уфзн енесгпрпЯзуз фщн елЭгчщн фпх цпэснпх убт.
Ï чспнпдйбкьрфзт
Ðщт нб чсзуймпрпйЮуефе фпн цпэснп убт
99626974_ML_A.qxd 08/06/04 10:03 Page 26
60
55
50
45
40
35
60
55
50
45
40
35
60
55
50
45
40
35
min
0
5
10
15
20
25
30
min
0
5
10
15
20
25
30
min
0
5
10
15
20
25
30
Page 27

GR
27
- ГемЯуфе кбй фпрпиефЮуфе фп сежесвпхЬс.
- БкпхмрЮуфе фп укеэпт шзуЯмбфпт уфз учЬсб уфЮсйозт кбй клеЯуфе фзн рьсфб.
- ГхсЯуфе фп чспнпдйбкьрфз рспт фб деойЬ (р.ч.: 30 лерфЬ шЮуймп). ¢меуб
оекйнЬ фп шЮуймп.
Уфп фЭлпт фпх шзуЯмбфпт, бкпэгефбй мйб уейсЬ дйбкекпммЭнщн зчзфйкюн узмЬфщн.
- БнпЯофе фзн рьсфб.
- ВгЬлфе фп цбгзфь убт кбй бдейЬуфе фп сежесвпхЬс.
- ЕрбнбцЭсефе фп дйбкьрфз уфз иЭуз ДЙБКПРЗ. Фб дйбкекпммЭнб зчзфйкЬ
уЮмбфб уфбмбфЬне. П цпэснпт ден еЯнбй рйб хрь фЬуз.
¢нпйгмб фзт рьсфбт.
Бхфьт п фсьрпт шзуЯмбфпт ерйцЭсей мйб узмбнфйкЮ рпуьфзфб бфмпэ мЭуб уфзн
кпйльфзфб. Фп Ьнпйгмб фзт рьсфбт рсЭрей нб рсбгмбфпрпйзиеЯ мефЬ фб зчзфйкЬ
уЮмбфб фЭлпхт шзуЯмбфпт.
ШЮуймп уе цпсмЬкйб.
Гйб нб мрпсЭуефе нб дйбчейсйуфеЯфе кблэфесб фп несь фзт ухмрэкнщузт рпх
дзмйпхсгеЯфбй кбфЬ фп шЮуймп уе цпсмЬкйб (р.ч.: ксЭмет), фпрпиефЮуфе фб уфп
дйЬфсзфп фбшЯ рсйн бсчЯуефе фп шЮуймп.
УЗМЕЙЩУЗ: Уе кЬие оекЯнзмб шзуЯмбфпт, з цщфейнЮ Эндейоз Ьдейбт уфЬимзт мрпсеЯ нб
бнбвпувЮуей гйб лЯгп. Бхфь бнфйуфпйчеЯ уфзн енесгпрпЯзуз фщн елЭгчщн фпх цпэснпх убт.
Ðщт нб кЬнефе Энб Ьмеуп шЮуймп
Ðщт нб чсзуймпрпйЮуефе фпн цпэснп убт
УхмвпхлЭт
99626974_ML_A.qxd 08/06/04 10:03 Page 27
Page 28

уэндеуз
1 Ph + N
1 Ph + N
1 Ph + N
1 Ph + N
елЬчйуфздйб
ôïìÞ
кблщдЯпх
3 x 1mm²
3 x 1mm²
3 x 1mm²
3 x 1mm²
дйбмЭфсзмбдй
Ьфбозт
рспуфбуЯбт
16 A
16 A
16 A
16 A
Сеэмб
FV200 / 220-240V ~50Hz
FV260 / 220-240V ~60Hz
FV200 / 220-240V 3N ~50Hz
FV260 / 220-240V 3N ~60Hz
28
Уэндеуз уфп дЯкфхп
КбфЬ фзн егкбфЬуфбуз фзт ухукехЮт Ю кбфЬ фзн бнфйкбфЬуфбуз фпх кблщдЯпх
рбспчЮт сеэмбфпт (H05 RR-F 3X1mm², H05 RN-F 3X1mm² Þ H05 VV-F 3X1mm²)
оеуцЯофе енфелют фйт вЯдет уэндеузт рсйн фпрпиефЮуефе фпхт бгщгпэт уфпхт
кбфЬллзлпхт бкспдЭкфет.
П рспуфбфехфйкьт бгщгьт рсЭрей нб ухндеиеЯ уфпн бкспдЭкфз фзт ухукехЮт.
Бн ерйихмеЯфе уфбиесЮ уэндеуз, цспнфЯуфе нб фпрпиефЮуефе уфпн бгщгь фспцпдпуЯбт
Энбн дйбкьрфз кбиплйкЮт дйбкпрЮт фзсюнфбт мйб елЬчйуфз брьуфбуз ербцЮт 3 mm.
ЕйдЬллщт з ухукехЮ рсЭрей нб фпрпиефзиеЯ Эфуй юуфе фп цйт фзт злекфсйкЮт рсЯжбт
нб еЯнбй рспувЬуймп ьфбн Эчей енфпйчйуфеЯ.
Ден Эчпхме ехиэнз уе ресЯрфщуз бфхчЮмбфпт рпх пцеЯлефбй уе бнэрбскфз,
елбффщмбфйкЮ Ю лбнибумЭнз геЯщуз.
ФЬуз лейфпхсгЯбт / FV200................................................................................220 - 240 V
~ 50 Hz
ФЬуз лейфпхсгЯбт / FV260................................................................................220 - 240 V
~ 60 Hz
УхнплйкЮ йучэт фпх цпэснпх .............................................................................................. 2,03 kW
КбфбнЬлщуз енЭсгейбт
-бньдпх кбй дйбфЮсзузт уфпхт 100°C гйб 1 юсб ................................................................. 1 kWh
ЩцЭлймет дйбуфЬуейт фпх цпэснпх
РлЬфпт .................................................................................................................................. 38,5 cm
¾øïò ..................................................................................................................................... 18,2 cm
ВЬипт .................................................................................................................................... 33,5 cm
Чщсзфйкьфзфб ................................................................................................................. 23,5 лЯфсб
ПЙ ухукехЭт бхфЭт еЯнбй уэмцщнет рспт фзн пдзгЯб 73/23/CEE кбй 89/336/CEE.
Рщт нб егкбфбуфЮуефе фпн цпэснп убт
ÇлекфсйкЮ уэндеуз
99626974_ML_A.qxd 08/06/04 10:03 Page 28
Page 29

GR
Мрлпк бкспдекфюн уэндеузт
2. Гйб мегблэфесз уфбиесьфзфб, уфесеюуфе
фп цпэснп уфп Эрйрлп ме 2 вЯдет уфйт прЭт
рпх рспвлЭрпнфбй гй бхфь уфб рлбънЬ.
3. РспвеЯфе уфзн злекфсйкЮ уэндеуз.
1. ФпрпиефЮуфе фз ухукехЮ уфз иЭуз фзт.
З ухукехЮ рсЭрей нб еЯнбй псйжьнфйб.
ЕлЭгофе фз иЭуз бхфЮ.
×сЮуймет дйбуфЬуейт гйб нб енфпйчЯуефе фпн цпэснп убт
Ден Эчпхме ехиэнз уе ресЯрфщуз бфхчЮмбфпт рпх пцеЯлефбй уе
бнэрбскфз, елбффщмбфйкЮ Ю лбнибумЭнз геЯщуз.
29
99626974_ML_A.qxd 08/06/04 10:03 Page 29
560
50
380
550
378
405
544
20
386,5
595
Page 30

30
Уе кЬие ресЯрфщуз, бн з ерЭмвбуЮ убт ден ербскеЯ
,
ерйкпйнщнЮуфе чщсЯт кбихуфЭсзуз ме фзн ХрзсеуЯб
ФечнйкЮт ЕохрзсЭфзузт.
¸чефе кЬрпйб бмцйвплЯб гйб фзн кблЮ лейфпхсгЯб фпх цпэснпх убт,áõôü äåí
узмбЯней ьмщт прщудЮрпфе ьфй хрЬсчей кЬрпйб влЬвз. Уе кЬие ресЯрфщуз, елЭгофе
фб бкьлпхиб узмеЯб:
Äйбрйуфюнефе ьфй... Ïй рйибнЭт бйфЯет Ôй рсЭрей нб кЬнщ?
З Эндейоз Ьдейпх сежесвпхЬс
бнбвпувЮней еню фп сежесвпхЬс
еЯнбй гемЬфп кбфЬ фп шЮуймп.
ЛЬипт фпрпиефзмЭнп сежесвпхЬс.
Елбффщмбфйкь уэуфзмб бнЯчнехузт.
- ВевбйщиеЯфе рщт фп сежесвпхЬс
Эчей фпрпиефзиеЯ кблЬ
- КблЭуфе фзн ХрзсеуЯб ФечнйкЮт
ЕохрзсЭфзузт.
Ден бнбвпувЮней кбмЯб цщфейнЮ
Эндейоз.
ЕлЬффщмб уфзн фспцпдпуЯб фпх
цпэснпх.
ЗлекфспнйкЮ кЬсфб екфьт
лейфпхсгЯбт.
- ЕлЭгофе фзн рбспчЮ сеэмбфпт
(буцЬлейб фзт егкбфЬуфбуЮт убт).
- КблЭуфе фзн ХрзсеуЯб ФечнйкЮт
ЕохрзсЭфзузт.
ДйбсспЮ неспэ Ю бфмпэ уфп ерЯредп
фзт рьсфбт кбфЬ фп шЮуймп.
З рьсфб ден Эчей клеЯуей кблЬ.
Фп рбсЭмвхумб фзт рьсфбт еЯнбй
елбффщмбфйкь.
- ВевбйщиеЯфе рщт фп сежесвпхЬс
Эчей фпрпиефзиеЯ кблЬ.
- КблЭуфе фзн ХрзсеуЯб ФечнйкЮт
ЕохрзсЭфзузт.
ДйбкекпммЭнп "гпхсгпэсйумб"
кбфЬ фп шЮуймп уфпн бфмь.
ЛейфпхсгЯб ôçò бнфлЯбт
фспцпдпуЯбт неспэ.
- КбнпнйкЮ лейфпхсгЯб фпх
цпэснпх.
Ô
й нб кЬнпхме уе ресЯрфщуз бнщмблйюн уфз лейфпхсгЯб;
99626974_ML_A.qxd 08/06/04 10:03 Page 30
Page 31

GR
31
99626974_ML_A.qxd 08/06/04 10:03 Page 31
Page 32

32
Sumário
Ao longo do folheto,
assina-lhe as instruções de segurança,
assinala-lhe os conselhos e as astúcias
Editorial P.33
As cozeduras vapor P.34
Como se apresenta o seu forno?
Acessórios P.35
Visualização de ausência de água durante a cozedura P.35
Depósito P.35
Como utilizar o seu forno?
O temporizador P.36
Como fazer uma cozedura? P.37
Como instalar o seu forno?
Ligação eléctrica P.38
Dimensões úteis para encastrar o seu forno P.39
Que fazer em caso de anomalias de funcionamento? P.40
99626974_ML_A.qxd 08/06/04 10:03 Page 32
Page 33

33
Editorial
Estimado(a) Cliente,
Acabou de adquirir um forno BRANDT e estamos-lhe gratos por isso.
As nossas equipas de pesquisa conceberam, pensando em si, uma nova
geração de aparelhos para que o acto de cozinhar seja um prazer no dia
a dia .
Com linhas puras e uma estética moderna, o seu novo forno Brandt
integra-se harmoniosamente na sua cozinha e alia perfeitamente facilidade de utilização e performance de cozedura.
Encontrará igualmente na gama dos produtos Brandt, uma vasta escolha
de placas de cozedura, de exaustores, de máquinas de lavar loiça e de
refrigeradores integráveis, que poderá coordenar ao seu novo forno
Brandt.
Evidentemente, com a preocupação permanente de satisfazer da melhor
maneira possível as suas expectativas em relação aos nossos produtos, o
nosso serviço de consumidores encontra-se à sua disposição e à sua
escuta para responder a todas as suas perguntas ou sugestões (coordenadas no final do presente manual).
Na ponta da inovação, Brandt contribui assim para o melhoramento da
qualidade da vida do dia a dia, proporcionando-lhe produtos cada vez
mais performantes, de utilização simples, amigos do ambiente, com um
lindo design e fiáveis.
A Marca BRANDT.
PT
99626974_ML_A.qxd 08/06/04 10:03 Page 33
Page 34

34
A cozedura por pressão atmosférica, a uma temperatura ligeiramente superior a
100°C, permite evitar que os alimentos rebentem ou fiquem inchados de água, pre-
servando assim os sabores e as cores, ao contrário de um sistema de cozedura em
sobrepressão. A duração de cozedura para um único legume é ligeiramente super-
ior àquela que se obtém numa panela de pressão.
O seu forno não necessita de qualquer outra regulação a não ser a do tempo de
cozedura. A água contida no depósito chega à cavidade por intermédio de um tubo.
Esta água é transformada em vapor ao contacto com uma superfície quente colo-
cada na parte inferior da cavidade. Não é necessário acrescentar água no prato de
cozedura (ver livro de receitas). Para garantir UMA VERDADEIRA COZEDURA
VAPOR, o seu forno é proposto com acessórios especialmente estudados para uma
cozedura perfeita.
Para um prato composto por diferentes legumes, com um tempo de cozedura dife-
rente para cada um deles, a cozedura será conseguida se regular o temporizador
sobre o tempo de cozedura do legume que leva mais tempo a cozer. Realizará
assim uma economia de tempo e de manipulação.
A fim de facilitar a utilização e garantir um resultado de cozedura óptimo, é pro-
posta uma única altura do suporte.
As cozeduras vapor
99626974_ML_A.qxd 08/06/04 10:03 Page 34
Page 35

PT
O seu forno está equipado:
- com um prato que permite que os alimentos não
estejam em contacto com a água de condensação,
- com um prato para recuperar a água de condensação,
- com uma grelha de suporte amovível,
Os acessórios podem ser limpos na máquina de lavar loiça.
Acessórios
Depósito
Antes de cada cozedura, o depósito deve, IMPERATIVAMENTE, estar cheio de água até
ao nível máximo. ( O ruído que se ouve quando se agita o depósito vazio é devido ao sistema de detecção de nível).
- Para encher o depósito, deve retirá-lo do seu habitáculo e enchê-lo exclusivamente com água.
Colocar de novo o depósito no seu habitáculo empurrando-o até ao FUNDO até ouvir o
CLIQUE.
Importante: Se a água da torneira for demasiado calcária, aconselha-se a
utilização de uma água não calcária e não gasosa vendida no comércio.
A utilização de água desmineralizada é desaconselhada; esta não é destinada ao
uso alimentar.
Após cada cozedura, retirar e esvaziar IMPERATIVAMENTE o depósito para evitar que a
água estagne e limpar as marcas de água presentes no suporte do depósito.
Como se apresenta o seu forno?
Depósito vazio: o indicador luminoso
acende por intermitência + emissão
sonora e paragem da geração de vapor.
Visualização de ausência de água durante a cozedura
35
99626974_ML_A.qxd 08/06/04 10:03 Page 35
Page 36

36
Posição 0: forno sob tensão mas não se realiza qualquer cozedura.
- função "manter quente" até voltar à posição de paragem.
Posição cozedura porta fechada, o forno funciona
Posição paragem: forno fora de tensão
- O indicador luminoso de colocação sob
tensão está aceso.
- Um som é emitido (final de cozedura unicamente).
- O ventilador de arrefecimento funciona.
- Para iniciar uma cozedura, fechar a porta e
posicionar o manípulo sobre um tempo de
cozedura (ex. 15 minutos).
- O indicador luminoso de colocação sob
tensão está aceso.
NOTA: sempre que se lançar uma cozedura, o indicador de nível vazio pode acender por
intermitência durante um curto instante. Tal facto corresponde à inicialização dos
comandos do forno.
o temporizador
C
omo utilizar o seu forno?
99626974_ML_A.qxd 08/06/04 10:03 Page 36
60
55
50
45
40
35
60
55
50
45
40
35
55
50
45
40
35
min
0
5
10
15
20
25
30
min
0
5
10
15
20
25
30
60
min
0
5
10
15
20
25
30
Page 37

37
- Encher e colocar o depósito.
- Colocar o prato de cozedura sobre a grelha de suporte e fechar a porta.
- Girar o temporizador no sentido dos ponteiros de um relógio (Ex.: 30
mn de cozedura). A cozedura começa instantaneamente.
Em fim de cozedura, é emitida uma série contínua de sons.
- Abrir a porta.
- Retirar o seu prato e esvaziar o depósito.
- Colocar de novo o manípulo na posição PARAGEM. Os sinais sonoros
descontínuos cessam. O forno deixa de estar sob tensão.
Abertura da porta.
Este princípio de cozedura produz uma presença significativa de vapor na
cavidade. A abertura da porta deve ser efectuada após os sinais sonoros
de fim de cozedura.
Cozedura em tigelas.
Para gerir melhor a água de condensação gerada pela cozedura com
tigelas (ex.: cremes), colocá-las sobre o prato perfurado antes de
começar a cozedura.
NOTA: sempre que se lançar uma cozedura, o indicador de nível vazio pode acender por
intermitência durante um curto instante. Tal facto corresponde à inicialização dos
comandos do forno.
Como fazer uma cozedura?
Como utilizar o seu forno?
Conselhos
PT
99626974_ML_A.qxd 08/06/04 10:03 Page 37
Page 38

Ligação
1 Ph + N
1 Ph + N
1 Ph + N
1 Ph + N
Secção
mínima
do cabo
3 x 1mm²
3 x 1mm²
3 x 1mm²
3 x 1mm²
Calibre
do dispositivo
de protecção
16 A
16 A
16 A
16 A
Sector
FV200 / 220-240V ~50Hz
FV260 / 220-240V ~60Hz
FV200 / 220-240V 3N ~50Hz
FV260 / 220-240V 3N ~60Hz
38
Ligação à rede
Quando da instalação do aprelho ou quando da substituição do cabo
eléctrico (H05 RR-F 3x1 mm², H05 RN-F 3x1mm² ou H05 VV-Ff 3x1mm²)
desaparafusar completamente os parafusos de ligação antes de introduzir os condutores nos terminais adequados.
O condutor de protecção deve estar ligado ao terminal do aparelho.
Se desejar uma ligação fixa, deve proceder de modo a colocar na conduta de alimentação
um interruptor omnipolar respeitando a distância de contacto de pelo menos 3 mm. Caso
contrário, o aparelho deve ser colocado de maneira a que a ficha de tomada eléctrica fique
acessível quando o referido aparelho estiver encastrado.
Não podemos ser responsabilizados em caso de acidente consecutivo a uma
ligação à terra inexistente, defeituosa ou incorrecta.
Tensão de funcionamento / FV200 .................................................220 - 240 V
~
50 Hz
Tensão de funcionamento / FV260 .................................................220 - 240 V
~ 60 Hz
Potência total do forno ................................................................................... 2,03 kW
Consumo de energia
-de subida e manutenção a 100°C durante 1 hora ............................................... 1 kWh
Dimensões úteis do forno
Largura ........................................................................................................ 38,5 cm
Altura ........................................................................................................... 18,2 cm
Profundidade ................................................................................................ 33,5 cm
Volume útil ............................................................................................... 23,5 litros
Estes aparelhos estão em conformidade com a directiva 73/23/CEE e 89/336/CEE
Como instalar o seu forno?
Ligação eléctrica
99626974_ML_A.qxd 08/06/04 10:03 Page 38
Page 39

PT
Terminal de ligação
2. Para uma maior estabilidade, fixe o
forno no móvel por intermédio de 2 parafusos nos orifícios previstos para tal efeito,
sobre os montantes laterais.
3. Terminal para ligação.
1. Coloque o aparelho no nicho.
O aparelho deve ficar horizontal. Controle
esta posição.
Dimensões úteis para encastrar o seu forno
Não podemos ser responsabilizados em caso de acidente
consecutivo a uma ligação à terra inexistente, defeituosa ou
incorrecta.
39
99626974_ML_A.qxd 08/06/04 10:03 Page 39
560
50
380
550
378
405
544
20
386,5
595
Page 40

40
Em todos os casos, se a sua intervenção não for suficiente,
contactar sem demora o Serviço Pós-Venda.
O seu forno apresenta defeitos de funcionamento, isto não significa obriga-
toriamente que esteja avariado..
Seja qual for o problema, verifique os pon-
tos seguintes:
Problema constatado. Causas possíveis O que se deve fazer?
A detecção de nível vazio acende
por intermitência quando o depósito está cheio durante a cozedura.
Depósito mal colocado
Sistema de detecção defeituoso.
- Verificar se o depósito foi encaixado até ao fundo.
- Telefonar para o serviço
Pós-venda.
Nenhum indicador luminoso
acende
Defeito de alimentação do forno.
Cartão electrónico fora de
serviço
- Verificar a alimentação (fusível
da sua instalação).
- Telefonar para o serviço
Pós-venda.
Fuga de água ou de vapor ao nível
da porta durante a cozedura.
A porta está mal fechada.
A junta de porta apresenta um
defeito.
- Verificar se o depósito foi
encaixado até ao fundo.
-Telefonar para o serviço
Pós-venda.
"Ronrom" intermitente durante a
cozedura vapor.
Funcionamento da bomba de alimentação de água.
- RAS, funcionamento normal
do forno.
Que fazer em caso de anomalias de funcionamento?
99626974 06/04
99626974_ML_A.qxd 08/06/04 10:03 Page 40
 Loading...