

Page 1

NOTICE D’UTILISATION
OPERATINGINSTRUCTIONS
MICRO-ONDES
MICROWAVEOVEN
Réf. 99617322 - 02/02
Page 2

2
FRANÇAIS
Notice d’utilisation .......................................................... page 3
ENGLISH
Operating instructions..................................................... page 27
Page 3

3
3
Sommaire
Installation . . . . . . . . . . . . . . . . . . . . . . . . . . . . . .4
Principes de fonctionnement . . . . . . . . . . . . . . . . . . .5
Conseils importants . . . . . . . . . . . . . . . . . . . . . . . . .6
Présentation . . . . . . . . . . . . . . . . . . . . . . . . . . . . . .8
Bandeau de Commande . . . . . . . . . . . . . . . . . . . . . . .9
Mise à l’heure / Equivalence des puissances micro-ondes . . . . 10
L’afficheur & le sélecteur . . . . . . . . . . . . . . . . . . . . .11
Programmation . . . . . . . . . . . . . . . . . . . . . . . . . . .12
Programmation / Programmation AUTO . . . . . . . . . . . .13
"Speed DEFROST" . . . . . . . . . . . . . . . . . . . . . . . . .14
La fonction gril / La fonction micro-ondes + gril . . . . .15
Programmation du gril et du tournebroche . . . . . . . . .16
Les fonctions chaleur tournante . . . . . . . . . . . . . . . .17
Programmation chaleur tournante . . . . . . . . . . . . . . .18
Programmation chaleur tournante + micro-ondes . . . . .19
Utilisation du tournebroche . . . . . . . . . . . . . . . . . . .20
Programmation du tournebroche . . . . . . . . . . . . . . . .21
Recommandations . . . . . . . . . . . . . . . . . . . . . . . . . .23
Entretien / Nettoyage . . . . . . . . . . . . . . . . . . . . . . .24
Un petit problème ! Que faire ? . . . . . . . . . . . . . . . . .25
Service Après-Vente . . . . . . . . . . . . . . . . . . . . . . . .26
Veuillez lire attentivement ce guide d’utilisation.
Vous y trouverez des conseils importants concernant la sécurité,
l’installation et l’utilisation de votre appareil.
Chère Madame, Cher Monsieur,
Vous venez d’acquérir un Four à Micro-ondes Brandt et nous vous
remercions de nous avoir choisis.
Tous nos fours à micro-ondes sont conçus pour vivre avec vous de
nombreuses années. Tous bénéficient de la même exigence et de la même
qualité qui ont fait la réputation de Brandt, première Marque française
d’électroménager.
Nous vous remercions de votre confiance.
Notre récompense sera votre satisfaction.
La Marque Brandt
Page 4

4
•
Vérifiez que votre appareil n’a subi aucune avarie lors du transport (porte ou joint
déformé, etc...). Si vous constatez un dommage quelconque, avant toute utilisation, contactez votre revendeur.
•
Vérifiez la tension du secteur. Dans le cas d’une sous-tension PERMANENTE (200-210 volts),
consultez votre installateur électricien.
Pour les appareils posés sur un plan
de travail, choisissez un emplacement
qui laisse un espace libre minimum de :
- 5 cm entre les faces latérales de
l’appareil et les murs
- 14 cm au-dessus de votre appareil
- 10 cm pour la face arrière.
EMPLACEMENT
AVANT BRANCHEMENT
Installation
•
Cet appareil est destiné à être posé (ou encastré selon les cas) sur un plan
de travail situé à au moins 85 cm du sol.
•
Posez l’appareil sur une surface plane et horizontale, éloigné de toute source
de chaleur ou de vapeur. Pour assurer la bonne stabilité de l’appareil,
le pied avant gauche est réglable (5 positions). Tournez-le pour rehausser
ou descendre le four.
•
Assurez-vous de la libre circulation de l’air en dessous et autour du four.
•
Veillez à ne pas obstruer les orifices de ventilation situés en dessous et à l’arrière du four.
•
Certains appareils sont encastrables : pour obtenir le kit d’encastrement correspondant,
veuillez consulter votre revendeur.
•
Veillez à ce que la fiche de prise de courant soit accessible après installation.
•
Votre installation doit être équipée d’une protection thermique de 16 Ampères.
•
Utilisez impérativement une prise de courant comportant une borne de mise à la terre et
raccordée conformément aux normes de sécurité en vigueur.
•
Prévoyez dans votre installation électrique un dispositif accessible par l’utilisateur qui doit être
en mesure de séparer l’appareil du secteur et
dont l’ouverture de contact est d’au moins 3 mm
au niveau de tous les pôles.
•
Ne faites pas fonctionner le four si le cordon d’alimentation ou sa fiche sont abîmés. Dans ce cas,
faites appel au distributeur ou à un technicien
spécialisé formé par le fabricant.
230 V
Borne
de terre
RACCORDEMENT ELECTRIQUE
5 cm
14 cm
10 cm
5 cm
Page 5
5
55
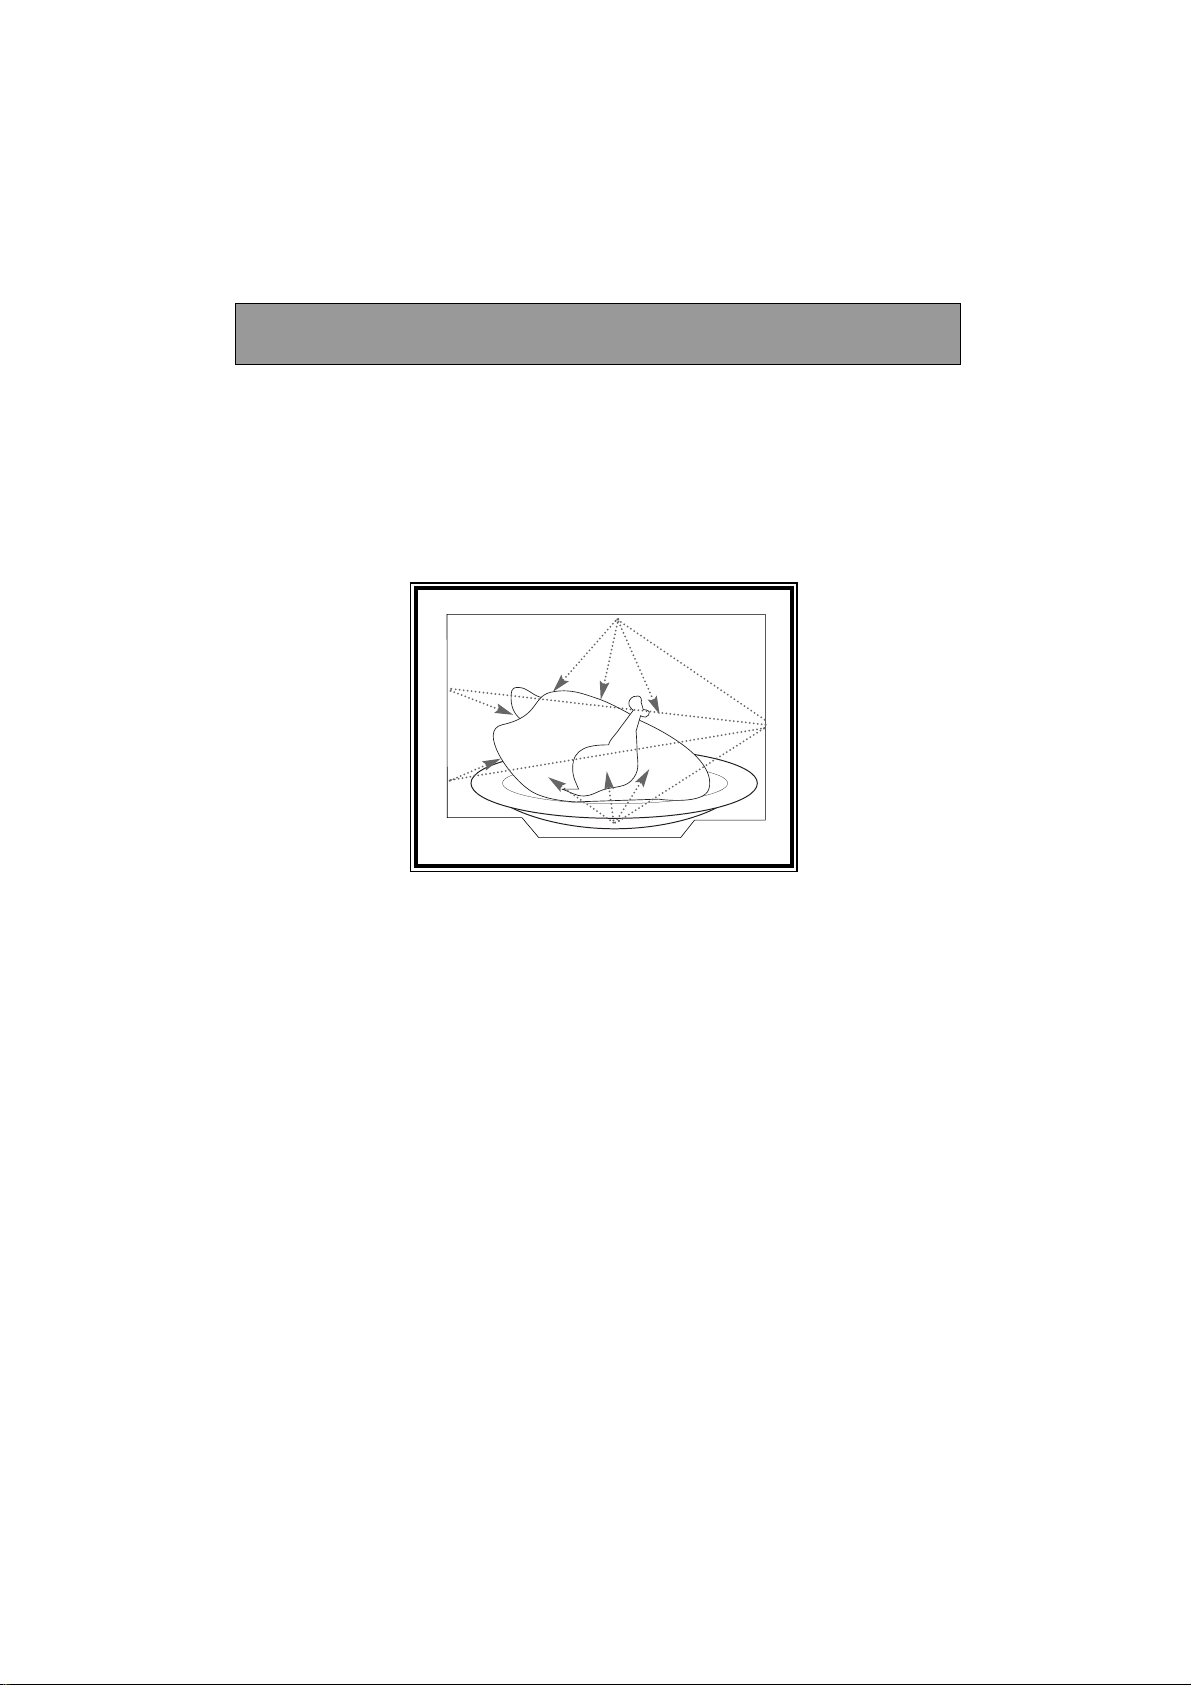
Les micro-ondes utilisées pour la cuisson sont des ondes électro-magnétiques.
Elles existent couramment dans notre environnement comme les ondes radioélectriques, la lumière, ou bien les rayonnements infrarouges.
Leur fréquence se situe dans la bande des 2 450 MHz.
Leur comportement :
➜ Elles sont réfléchies par les métaux.
➜ Elles traversent tous les autres matériaux.
➜ Elles sont absorbées par les molécules d’eau, de graisse et de sucre.
Lorsqu’un aliment est exposé aux micro-ondes il s’ensuit une agitation rapide des molécules,
ce qui provoque un échauffement.
La profondeur de pénétration des ondes dans l’aliment est d’environ 2,5 cm, si l’aliment
est plus épais, la cuisson à cœur se fera par conduction comme en cuisson traditionnelle.
Il est bon de savoir que les micro-ondes provoquent à l’intérieur de l’aliment un simple
phénomène de thermie et qu’elles ne sont pas nocives pour la santé.
Principes de fonctionnement
Page 6

6
• Votre appareil est exclusivement destiné à un usage domestique pour la cuisson,
le réchauffage ou la décongélation des aliments. Le fabricant se dégage de toute
responsabilité en cas d’utilisations non conformes.
• Avant toute utilisation, assurez-vous que les récipients et accessoires soient appro-
priés à l’usage de votre four à micro-ondes (par exemple : verre à feu, porcelaine...).
• Pour éviter de détériorer votre appareil, ne jamais le faire fonctionner à vide ou sans
plateau.
• N’intervenez pas dans les orifices de la serrure en face avant; vous pourriez créer
des dommages sur votre appareil qui nécessiteraient une intervention.
• Surveillez fréquemment le four lorsque les aliments sont chauffés ou cuits dans des
récipients jetables en matière plastique, papier ou autre matériau combustible.
• Il est déconseillé d’utiliser des récipients métalliques, des fourchettes, des cuillères,
des couteaux ainsi que des liens et agrafes en métal pour sachets de congélation.
Cependant, occasionnellement, vous pouvez procéder à la remise à température
d’aliments conditionnés en barquette d’aluminium de faible hauteur (maximum 4
cm) sans le couvercle. Toutefois, le temps de réchauffage sera légèrement plus long.
Dans ce cas veillez à ce que la barquette soit bien positionnée au centre du plateau
en verre et qu’en aucun cas elle ne soit à moins de 1 cm des parois métalliques ou
de la porte de l’appareil.
• Pour les enfants, il est impératif :
- de réchauffer les biberons sans la tétine, d’agiter le liquide et de tester sa température sur le dos de la main avant absorption par l’enfant.
- de mélanger et de vérifier la température des aliments pour enfants avant consommation, afin d’éviter des brûlures internes graves.
Conseils importants
Page 7

7
7
Conseils importants
• Il est recommandé de couvrir les aliments dans la plupart des cas; ils seront plus
savoureux et votre appareil restera propre. Cependant, avant de cuire des aliments
ou de réchauffer des liquides dans une bouteille ou un récipient hermétique
, vous
devez retirer le bouchon ou le couvercle.
• Le réchauffage ou la cuisson au micro-ondes des œufs dans leur coquille, en cocotte
ou au plat, est à proscrire. Ceux-ci peuvent éclater et risquent de provoquer des brûlures graves ou la dégradation irrémédiable de votre four.
• Dans le cas de liquides en ébullition, afin d’éviter un débordement, attendez 20
secondes avant d’y introduire un élément quelconque et de le sortir de l’appareil.
• Dans le cas de petites quantités (une saucisse, un croissant, etc...) posez un verre
d’eau à côté de l’aliment.
• Des temps trop longs peuvent dessécher l’aliment et le carboniser. Pour éviter de
tels incidents, n’utilisez jamais les mêmes temps préconisés pour une cuisson au
four traditionnel.
• Si l'on constate l'apparition de fumée, gardez la porte de l’appareil fermée, mettez
hors tension ou déconnectez le four de l'alimentation électrique.
•
MISE EN GARDE : Ne laissez les enfants utiliser l’appareil sans surveillance que si des
instructions appropriées ont été données afin que l’enfant puisse utiliser le four de
façon sure et comprenne les dangers d’une utilisation incorrecte.
Page 8
8
Présentation
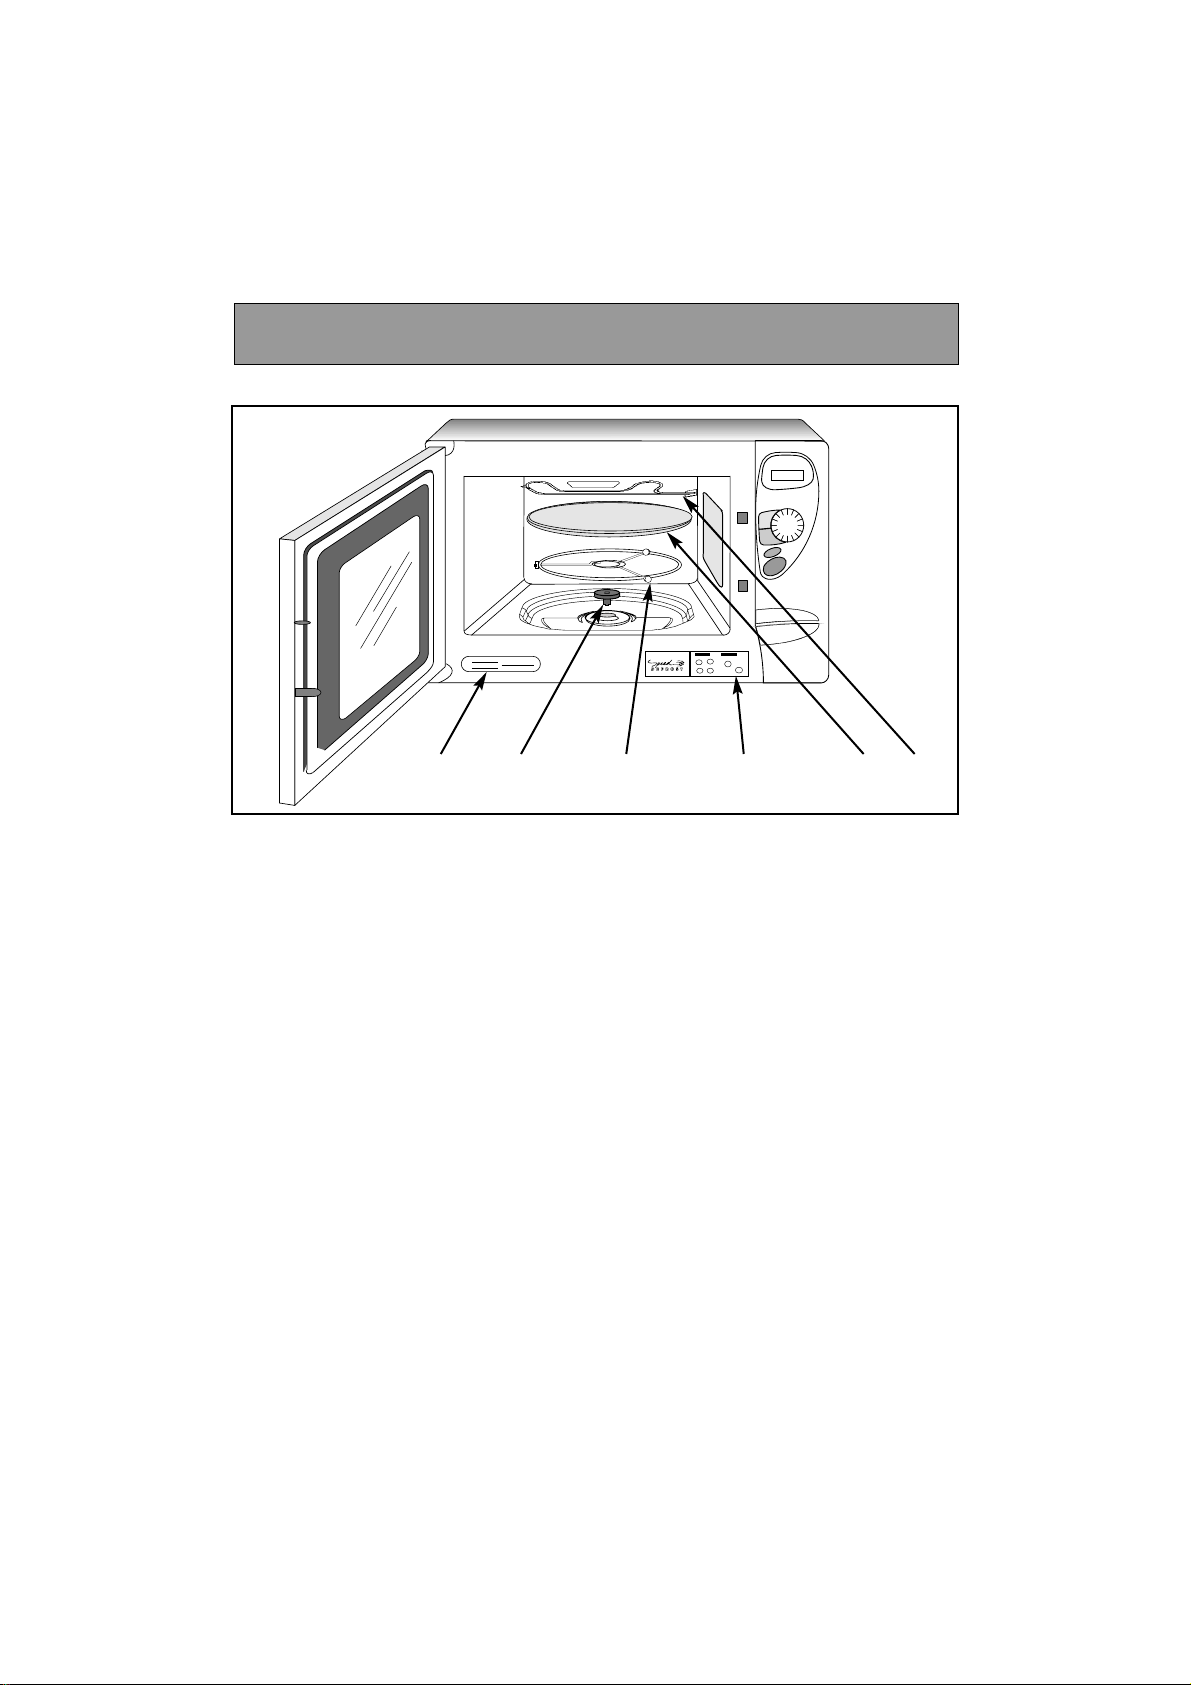
•
Le PLATEAU TOURNANT :
permet une cuisson homogène de l’aliment sans manipulation.
- Il est guidé dans sa rotation par l’entraîneur et le support à roulettes.
- Il tourne indifféremment dans les 2 sens.
- S’il ne tourne pas, vérifiez que tous les éléments soient bien positionnés.
- Il peut être utilisé comme plat de cuisson.
- Pour le retirer, prenez-le en utilisant les zones d’accès prévues à cet effet.
•
Le PLATEAU EN POSITION ARRÊT :
permet l’utilisation de grands plats sur toute la surface du four. Dans ce cas, il est nécessaire de tourner le récipient ou de mélanger son contenu à mi-programme.
•
Le SUPPORT A ROULETTES :
Ne cherchez pas à faire tourner manuellement le support à roulettes, vous risqueriez
de détériorer le système d’entraînement. En cas de mauvaise rotation, assurez-vous
de l’absence de corps étrangers sous le plateau.
•
L’ÉTIQUETTE Speed DEFROST: collez-l'étiquette autocollante en bas du four à
l’endroit indiqué ci-dessus.
Plateau
tournant
Entraîneur Support
à roulettes
Etiquette
d’identification
GrilEtiquette
Speed DEFROST
Page 9
9
9
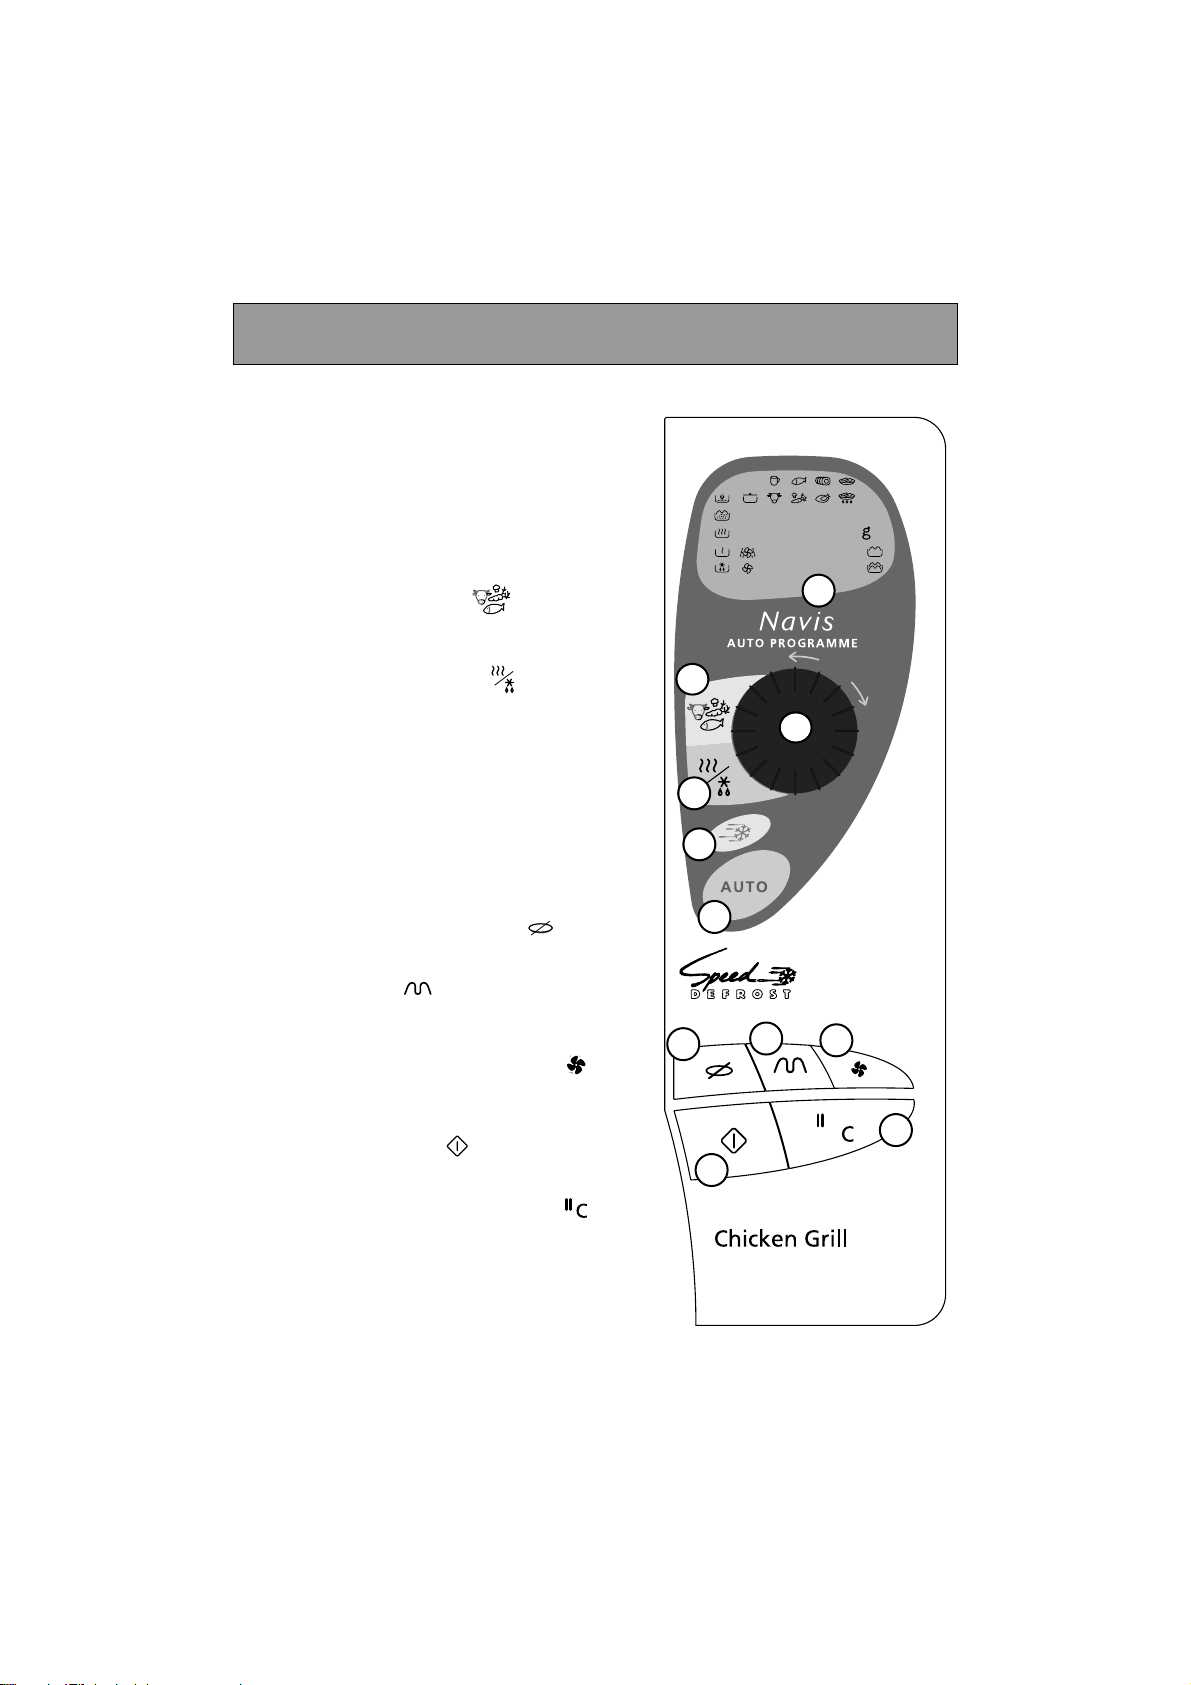
Bandeau de Commande
A
L'afficheur :
vous facilite la programmation en affichant :
les catégories d’aliments et de fonctions,
le temps ou le poids programmé, et l’heure.
B
Le sélecteur :
permet de choisir l’aliment, la fonction, le
temps ou le poids.
C
La touche ALIMENTS :
permet de choisir la catégorie d’aliment,
à l’aide du sélecteur.
D
La touche FONCTIONS :
permet de choisir la fonction appropriée,
à l’aide du sélecteur.
E
La touche "Speed DEFROST" :
permet une décongélation rapide des aliments.
F La touche AUTO :
permet une programmation automatique
en fonction du poids de l'aliment.
G La touche ARRÊT PLATEAU :
permet l’arrêt du plateau tournant.
H La touche GRIL :
permet de sélectionner l’un des 2 niveaux
de puissances du gril.
I La touche CHALEUR TOURNANTE :
permet de cuire les aliments comme dans
un four traditionnel.
J La touche DÉPART :
permet de débuter votre programme.
K La touche PAUSE/ANNULATION :
permet d’interrompre ou d’effacer un programme en cours (un appui pour PAUSE,
deux appuis pour ANNULATION).
Elle permet également de mettre l’horloge
à l’heure.
C
B
G
F
A
K
D
E
C
H
J
I
4 0 : 0 0
2 2 0 ° C
Page 10

10
Equivalence des puissances micro-ondes
Lorsque vous sélectionnez un aliment, la puissance
nécessaire est programmée automatiquement.
Après le branchement de votre appareil ou une coupure de courant,
l’horloge indique 00:00, les deux points : clignotent.
Pour mettre l’horloge à l’heure :
- Appuyez pendant 5 secondes sur la touche PAUSE / ANNULATION .
Les 4 chiffres clignotent
, et un bip sonore vous invite à régler l’heure.
- Programmez l’horloge en tournant le sélecteur.
- Validez d’une simple pression sur la touche PAUSE / ANNULATION
.
Votre horloge est à l’heure.
0 0 : 0 0
1 2 : 0 0
0 0 : 0 0
Mise à l’heure
DÉCONGÉLATION
150W
Pour décongeler tous les aliments. Pour terminer
des cuissons délicates ou pour cuire très lentement.
MIJOTAGE
500W
Pour cuire les poissons et volailles.
Pour terminer les préparations commencées en
CUISSON, telles que haricots, lentilles, laitages.
Cette fonction est disponible lorsqu’on commence la
programmation en sélectionnant la fonction).
RÉCHAUFFAGE
700W
Pour réchauffer tous les aliments liquides ou solides,
ainsi que les plats préparés frais ou surgelés.
CUISSON FORTE
900W
Pour cuire les légumes et potages.
Puissance restituée : 900 W
FONCTION UTILISATION
Page 11

11
11
L’afficheur et le sélecteur vous guident pour choisir :
les aliments
les fonctions
DÉCONGÉL. MIJOTAGE RÉCHAUFFAGE CUISSON
MICRO
-ONDES TOURNE- CHALEUR CHALEUR TOURNANTE
+ GRIL BROCHE TOURNANTE + MICRO-ONDES
le gril 2 niveaux
GRIL DOUX GRIL FORT
le poids pour une programmation AUTO
le temps de programmation (ou l’horloge)
L’aliment ou la fonction en cours de sélection clignote.
12:00
liquides
bœuf,
agneau
légumes
volaille
plats
préparés
surgelés
plats
préparés
frais
porc,
veau
poissons
dindonneau
L’afficheur & le sélecteur
12:30
200°C
C
H
O
I
X
Page 12
12
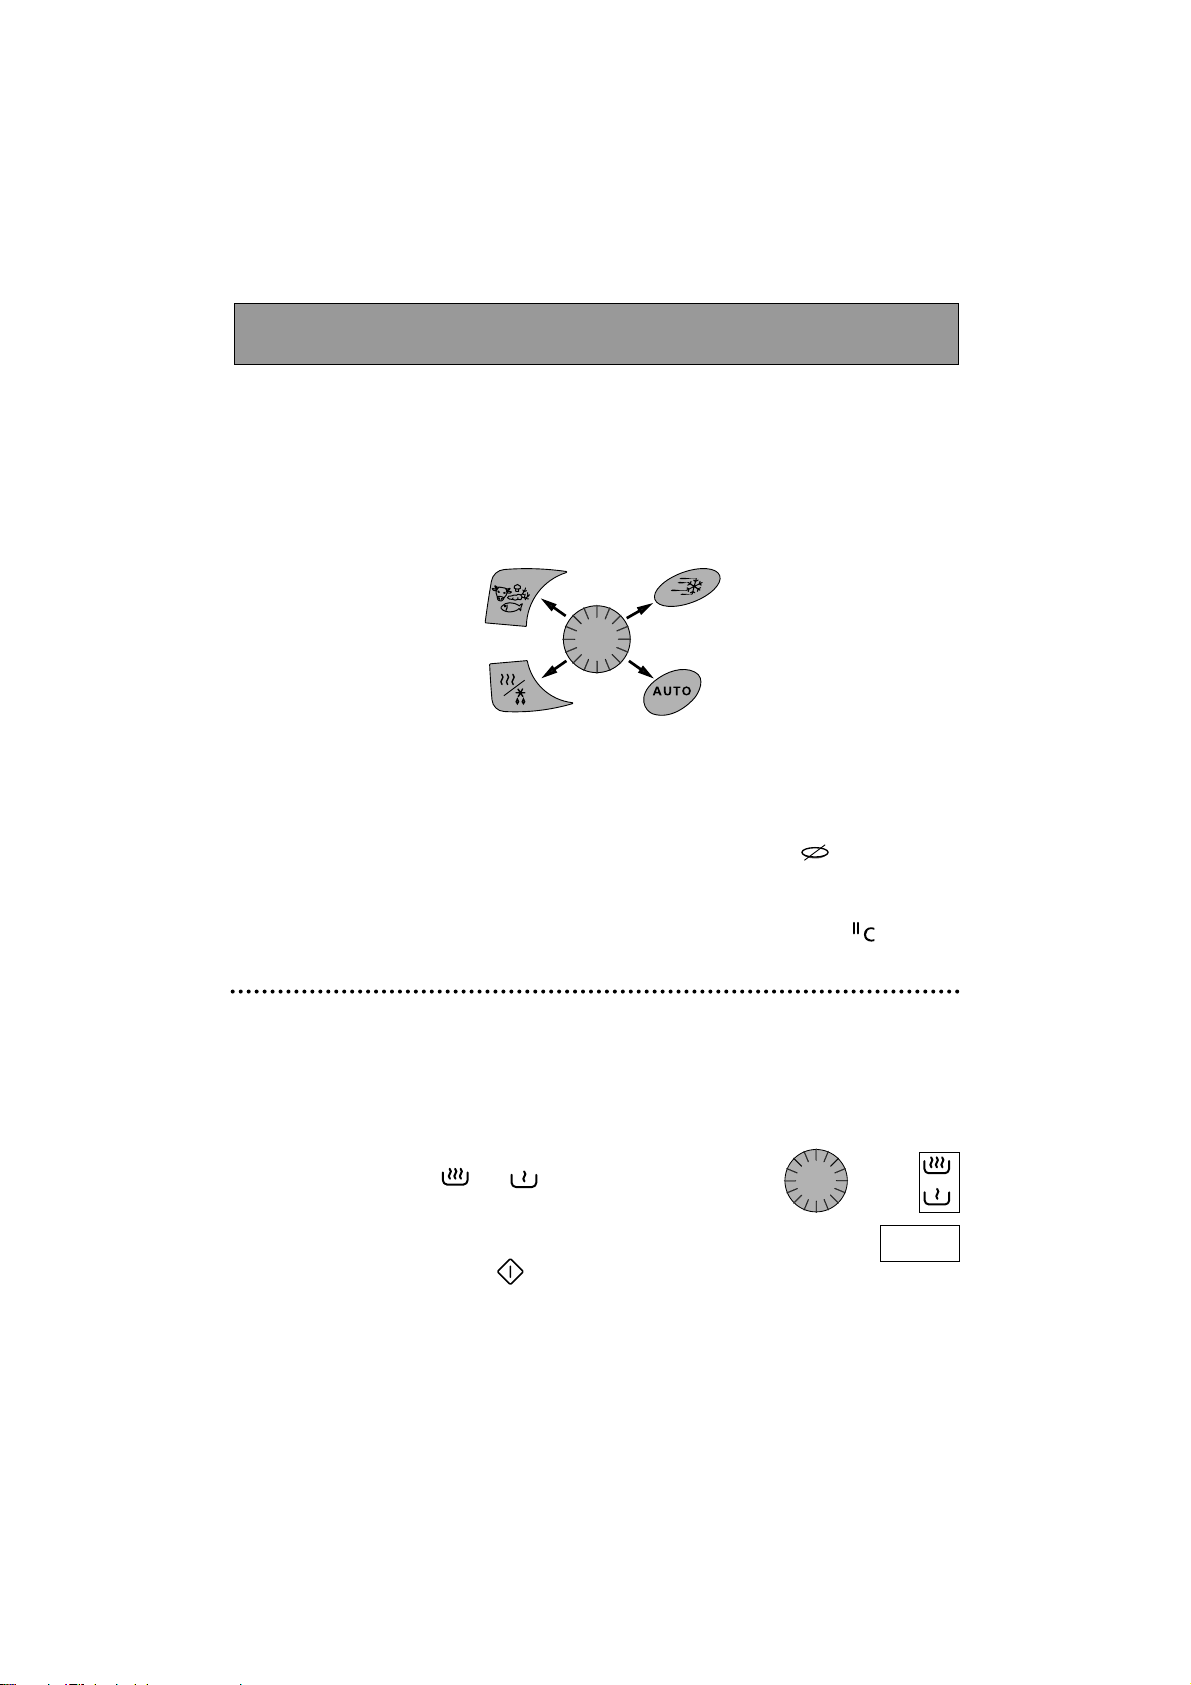
Les programmations à votre disposition :
Programmation express
▼▼
programmez le temps désiré (ex. 2 minutes) à l’aide du
sélecteur. Les fonctions et clignotent alternativement pour indiquer la puissance express 900 W.
▼▼
Appuyez sur la touche DÉPART .
Programmation
2 : 0 0
Votre appareil est maintenant branché et à l’heure.
Ouvrez la porte à l'aide de la poignée. Placez l’aliment dans l’appareil, fermez la porte.
Si la porte n’est pas bien fermée, l’appareil ne fonctionnera pas.
Faites votre programmation avec les touches :
•
Lorsque l’appareil s’arrête, un triple signal sonore indique la fin du programme. Ce signal est
répété toutes les minutes pendant dix minutes jusqu’à ouverture de la porte.
•
Si vous estimez que le plat ne peut pas tourner, utilisez la touche
ARRÊT PLATEAU
avant ou en cours
de p r ogramme.
•
En cas d’erreur de programmation, appuyez deux fois sur la touche
ANNULATION
.
SPEED DEFROST
AUTOMATIQUE
FONCTIONS
ALIMENTS
Page 13

13
Programmation automatique
Avec la touche
AUTO, le temps
est calculé automatiquement
en fonction du poids de l’aliment.
▼▼
Appuyez sur la touche ALIMENTS, faites votre choix.
▼▼
Appuyez sur la touche FONCTIONS, faites votre choix.
▼▼
Appuyez sur la touche AUTO
, clignote,
vous demandant d’indiquer le poids à l’aide du sélecteur.
▼▼
Appuyez sur la touche DÉPART .
Le temps adéquat s’affiche
automatiquement.
5 0
Programmation
Programmation par la fonction
▼▼
Appuyez sur la touche FONCTIONS, faites votre choix.
Dans ce mode, la fonction
MIJOTAGE
est disponible.
▼▼
Attendez que “00:00” clignote,
programmez le temps désiré à l’aide du sélecteur.
▼▼
Appuyez sur la touche DÉPART .
Programmation par l’aliment
▼▼
Appuyez sur la touche ALIMENTS, faites votre choix.
▼▼
Appuyez sur la touche FONCTIONS, faites votre choix;
la puissance micro-ondes sera adaptée à l’aliment choisi.
▼▼
Attendez que “00:00” clignote,
programmez le temps désiré à l’aide du sélecteur.
▼▼
Appuyez sur la touche DÉPART .
5 : 0 0
7 : 0 0
Programmation Auto
5 0 0
9 : 0 0
Page 14

14
Speed DEFROST
La touche Speed DEFROST permet une décongélation rapide des aliments
d'un poids maximum de 500 grammes, ceci afin de garantir de bons résultats. Au delà de ce poids, utilisez la touche FONCTIONS pour les décongeler
(voir page précédente).
▼▼
Pour la décongélation rapide des viandes, volailles, poissons, légumes et liquides,
appuyez une fois sur la touche Speed DEFROST :
s'affiche.
▼▼
Pour la décongélation rapide des pains, brioches et viennoiseries
appuyez deux fois sur la touche Speed DEFROST :
s'affiche.
▼▼
Attendez que s'affiche.
▼▼
Rentrez le poids de votre aliment avec le sélecteur (dans la limite de 500 grammes).
▼▼
Appuyez sur la touche
DÉPART
.
Le temps de décongélation est calculé automatiquement en fonction du poids de l'aliment.
Ce temps peut varier selon la température initiale de l'aliment. (Les temps indiqués correspondent à des produits surgelés à -18°C).
Le temps s'affiche et le four démarre.
En fonctions Speed DEFROST et décongélation une sonnerie à mi-programme vous rappelle
qu’il faut retourner l’aliment pour un meilleur résultat. Refermez la porte et appuyez sur la
touche
DÉPART pour redémarrer le four.
1 0 0
S 2
S 1
j
-
j
-
Page 15
15
Cette fonction donne la possibilité d’utiliser simultanément les micro-ondes et le
gril, ce qui permet une cuisson rapide.
La CLAYETTE
en fonction GRIL, permet de dorer
les aliments de faible hauteur.
Lors de son utilisation en fonction micro-ondes + gril,
elle doit obligatoirement être bien centrée sur le
plateau tournant. L’utilisation de la clayette avec des récipients métalliques est
exclusivement réservée à la fonction GRIL seul. Toutefois, vous pouvez réchauffer un aliment dans une barquette en aluminium en l’isolant de la clayette à l’aide d’une assiette.
La Clayette
La fonction micro-ondes + gril
Cette fonction permet de dorer les aliments tels que gratins et viandes.
Elle peut être utilisée avant ou après la cuisson, selon les recettes.
•
Le gril est rabattable; afin de faciliter le nettoyage :
1. horizontal pour les gratins, grillades à plat
2. vertical pour l’entretien de la voûte et en fonction tournebroche
Laisser refroidir le gril 25 minutes après utilisation avant de le toucher.
•
Lors de l’utilisation du gril, il est nécessaire de se protéger les mains pour sortir les plats et d’utiliser des récipients qui supportent des températures élevées, tels que le verre à feu ou la céramique.
•
Vous avez à votre disposition 2 niveaux de gril :
GRIL
FORT
(un appui sur la touche GRIL)
et GRIL
DOUX
(deux appuis).
En règle générale, utilisez le niveau GRIL
FORT
pour griller viandes et poissons, et utilisez le niveau
GRIL
DOUX
en fonction micro-ondes + gril pour gratiner, ainsi que pour dorer les aliments les plus
délicats.
La fonction gril
Positions du gril
1
2
Page 16
16
Utilisation du gril 2 niveaux de puissance
•
Appuyez une fois sur la touche GRIL pour sélectionner GRIL FORT , 2 fois pour sélectionner
GRIL DOUX . Programmez le temps voulu et appuyez sur DÉPART .
Un troisième appui sur la touche GRIL arrête le gril.
Utilisation de la fonction micro-ondes + gril simultané
ou de la fonction tournebroche
:
•
Sélectionnez votre
ALIMENT
parmi les catégories proposées. Sélectionnez ensuite la
FONCTION
micro-ondes + gril ou tournebroche . La puissance micro-ondes
ainsi que le niveau de gril seront automatiquement adaptés à votre plat. Attendez que
00:00
clignote. Programmez le temps désiré à l’aide du sélecteur. Appuyez sur la touche DÉPART .
•
Si votre aliment ne correspond à aucune catégorie proposée, sélectionnez la
FONCTION
micro-ondes + gril ou tournebroche . Dans ce cas, une puissance micro-ondes
moyenne et le gril fort sont préprogrammés. Programmez le temps désiré à l’aide du sélecteur.
Appuyez sur la touche DÉPART .
Programmation du gril et du tournebroche
Page 17

17
Les fonctions chaleur tournante
•
La température de cuisson est réglable de
50°- 250° C
par pas de 5°.
•
Le temps de cuisson est réglable de
0- 90
par pas de 1minute.
•
Vous pouvez modifier le temps de cuisson à tout moment.
•
Il est préférable de programmer un temps minimal et
d’en rajouter si nécessaire; surveiller la coloration des
aliments.
•
N’oubliez pas de toujours poser vos plats sur la clayette
en position basse avec les fonctions chaleur tour-
nante et chaleur tournante + micro-ondes .
Vous obtiendrez ainsi une meilleure répartition de
chaleur et des résultats de cuisson optimaux.
N.b. Lors de cuissons en fonction chaleur tournante +
micro-ondes, n’utilisez pas de plat de cuisson métallique.
•
Utilisez des récipients résistant aux températures
élevées.
•
Le plat à tarte en verre : il peut être utilisée pour les
pâtisseries, quiches, pizzas, ou bien comme plat de
cuisson pour les rôtis. Il peut également servir de lèchefrites en le positionnant sous la clayette.
•
Bien se protéger les mains pour sortir le plat car celui-ci atteint des températures élevées.
•
Si vous désirez réaliser une décongélation suite à une cuisson avec une des fonctions
chaleur tournante, nous vous recommandons de respecter un temps de refroidissement
d’environ dix minutes afin d’obtenir de meilleurs résultats.
Conseils
La clayette basse
Le plat à tarte
Vous avez à votre disposition :
la fonction chaleur tournante
• qui permet de cuire et dorer les aliments comme dans un four traditionnel
la fonction chaleur tournante + micro-ondes
• qui permet d’utiliser en combiné les micro-ondes et la chaleur tournante,
pour un gain de temps important.
Page 18

18
Programmation chaleur tournante
C
Préparez la tarte selon votre recette preférée et
placez-la directement dans le plat à tarte en verre.
Mettez le plat sur la clayette en position basse et
posez l’ensemble sur le plateau tournant.
Programmation avec la touche
CHALEUR TOURNANTE
11
Appuyez sur CHALEUR TOURNANTE
s’affiche;
clignote, vous invitant
à sélectionner la température de cuisson.
22
Programmez 220 ° à l’aide du sélecteur.
s’affiche
33
Attendez jusqu’à ce que
s’affiche et clignote,
demandant la durée de
cuisson.
Programmez 40 min à l’aide du sélecteur.
s’affiche
44
Appuyez sur la touche DÉPART , le
plateau tourne, l’éclairage intérieur s’allume.
1
Exemple : pour cuire
une tarte aux pommes
4
175°
40:00
220°
00:00
➤ En fin de cuisson, sortez le plat
à l’aide d’un gant de protection.
3
2
4 0 : 0 0
2 2 0 ° C
Page 19

Programmation chaleur tournante + micro-ondes
Placez le rôti dans un plat de cuisson non-métallique, accommodez-le à votre guise. Mettez le plat
sur la clayette en position basse et placez l’ensemble au centre du plateau tournant.
3 façons de programmer cette fonction sont à votre disposition :
avec la touche Auto
: vous ne rentrez que le poids de l’aliment
et la programmation se fait automatiquement.
▼▼
Appuyez sur la touche ALIMENTS, sélectionnez parmi les aliments proposés
le rôti de bœuf.
▼▼
Appuyez sur la touche FONCTIONS , sélectionnez la fonction
chaleur tournante + micro-ondes.
▼▼
Appuyez sur la touche
Auto
: la température est adaptée automatiquement au rôti de bœuf.
50 clignote, vous invitant à programmer le poids : pour le rôti d’un kilo entrez 1000.
▼▼
Appuyez sur la touche DÉPART, le temps et la température nécessaires à la
cuisson de votre rôti s’affichent, (ex. 30 min, 200°) le programme démarre.
Vous choisissez votre temps de cuisson et donc le degré de cuisson du plat.
▼▼
Appuyez sur la touche ALIMENTS , sélectionnez parmi les aliments proposés
le rôti de bœuf.
▼▼
Appuyez sur la touche FONCTIONS , sélectionnez la fonction
chaleur tournante + micro-ondes.
▼▼
La température est adaptée automatiquement au rôti de bœuf et s’affiche.
clignote, vous invitant à programmer le temps; ex. 30 minutes
▼▼
Appuyez sur la touche DÉPART, le programme démarre.
avec la touche FONCTIONS
: vous personnalisez toute la programmation
en sélectionnant la fonction, la température et le temps de cuisson.
▼▼
Appuyez sur la touche FONCTIONS , sélectionnez la fonction
chaleur tournante + micro-ondes.
▼▼
clignote vous invitant
à programmer la température voulue, ex. 200°.
▼▼
Attendez jusqu’à ce que clignote, vous invitant à programmer
le temps, ex. 30 minutes.
▼▼
Appuyez sur la touche DÉPART , le programme démarre.
Exemple : pour cuire un rôti de bœuf de 1 kg
175°
00:00
200°
00:00
30:00
200°
30:00
200°
30:00
19
Page 20

20
Préparation
• Mettez le gril en position verticale.
• Prenez un poulet ficelé, veillez à ce que les ailes et
les cuisses soient bien collées le long du corps.
• Salez et poivrez l’intérieur du poulet.
• N’ajoutez ni matière grasse, ni eau dans le jus de
cuisson ou sur le poulet, avant ou en cours de cuisson,
ceci afin d’éviter les projections de graisse.
• Enlevez la ou les bagues métalliques qui se trouvent
sur les ailes du poulet, s’il y a lieu.
• Insérez la broche sur le plot céramique situé au
centre du plat en verre.
• Positionnez le poulet ficelé tête en bas sur la broche,
centrez le bien en enfonçant les piques dans les
blancs, tassez-le sur la broche en rabattant le croupion à l'intérieur.
• Posez le plat bien au centre du plateau tournant.
Plot
céramique
Pique
Broche
Exemple : pour cuire 1 poulet d’un kg
Utilisation du tournebroche
Plat en
verre
Page 21

21
1
2
3
4
Programmation
11
Appuyez sur la touche ALIMENTS :
sélectionner volaille
22
Appuyez sur la touche FONCTIONS :
sélectionnez la fonction
tournebroche
33
Appuyez sur la touche AUTO :
programmez
1000
44
Appuyez sur la touche DÉPART ,
s’affiche, le plateau tourne,
l’éclairage intérieur s’allume.
➤ A la fin de la cuisson, sortez le plat
à l’aide d’un gant de protection.
25:54
Exemple : pour cuire un poulet d’un kg
Programmation du tournebroche
25:54
1000
C
Page 22

22
Vous avez la possibilité de sélectionner l’aliment et
la fonction tournebroche puis de programmer le temps.
Le tableau suivant vous préconise les temps de cuisson.
Aliment
Poulet 1 kg à 1,5 kg 25/35 min
Rôti d’agneau
800 g à 1 kg 28/35 min
et de bœuf
Rôti de dindonneau,
800 g à 1 kg 35/45 min
de porc et de veau
Sélection Poids Temps
• Utiliser de préférence la touche AUTO avec le tournebroche.
• Le temps peut varier selon l’épaisseur et le poids de l’aliment, sa température initiale
et selon le goût de chacun. Il est préférable de programmer un temps minimal et
d’en rajouter si nécessaire.
• Prenez des rôtis non bardés afin d’éviter des projections de graisse trop importantes.
La cuisson du rôti de porc au tournebroche peut salir rapidement l’appareil.
• Huilez la broche et ses piques pour faciliter le débrochage de l’aliment après cuisson.
• Positionnez les aliments de manière à ce qu’ils soient bien centrés sur la broche.
• Il est impératif de nettoyer l’appareil après chaque utilisation.
Conseils
Programmation du tournebroche
Page 23

23
Recommandations
EN COURS DE CUISSON :
• Si vous avez fait une programmation par le
TEMPS
ou avec la touche AUTO :
➢ vous pouvez modifier la durée à tout moment.
• Vous pouvez arrêter ou démarrer le plateau tournant en cours de cuisson en
appuyant sur la touche
ARRÊT PLATEAU
.
• Pour modifier le choix de la
FONCTION
ou de l’
ALIMENT
, il faut appuyer deux fois sur la
touche
PAUSE/ANNULATION
et recommencer la programmation.
• Si vous ouvrez la porte avant la fin du programme, refermez la porte et appuyez sur la
touche
DÉPART
pour remettre votre appareil en fonctionnement.
• Si vous retirez l’aliment avant la fin de la programmation, annulez les données qui restent affichées en appuyant deux fois sur la touche
ANNULATION
.
REMARQUES :
•
Si, après avoir commencé une programmation, vous n’appuyez pas sur la touche
DÉPART
au bout de trois minutes, le programme sera annulé (l’heure s’affichera de nouveau).
Page 24

24
• L'entretien régulier de votre appareil vous permettra de le garder en bon état
de marche. Pour éviter les salissures trop importantes, il est nécessaire de couvrir
les récipients dans la plupart des cas.
• Veillez à ce que le plan de travail sur lequel repose votre four reste toujours
propre; l’aspiration de saletés autour de votre four pourrait endommager l’appareil.
• Le nettoyage des appareils possédant uniquement la fonction
micro-ondes se fait au moyen d'une éponge humide et savonneuse,
tant pourl'intérieur que pour l'extérieur.
• En cas d'odeur ou de four encrassé, faites bouillir de l'eau additionnée de jus de
citron ou de vinaigre dans une tasse pendant 2 min et nettoyez les parois avec un
peu de liquide vaisselle.
• Pour les appareils munis d’une fonction gril ou chaleur pulsée, le dessus et les sorties d'air arrières sont très chauds. Veillez à ne pas toucher ces parties après utilisation. Procédez au nettoyage de l’intérieur du four lorsque celui-ci est tiède. Utilisez
un tampon au savon en fine laine d'acier.
• Le plateau peut être retiré pour faciliter le nettoyage.
Pour ce faire, prenez-le par les zones d’accès prévues
à cet effet.
Si vous enlevez l'entraîneur, évitez de faire pénétrer
de l'eau dans le trou de l'axe moteur.
N'oubliez pas de remettre l’entraîneur, le support à roulettes et le plateau
tournant.
• Les pourtours de la porte et de l'enceinte doivent toujours être propres. Si, par excès
de salissures, ces surfaces se trouvent endommagées, faites appel à un technicien
spécialisé avant d'utiliser votre appareil.
• L'emploi de produits abrasifs, d'alcool ou de diluant
est déconseillé; ils sont susceptibles de détériorer
l'appareil.
Entretien / Nettoyage
EAU
+
SAVON
Page 25

25
Un petit problème ! Que faire ?
Problèmes
▼ Le temps se décompte mais l’appareil ne
fonctionne pas (le plateau ne tourne pas,
l’éclairage ne s’allume pas et l’aliment
n’est pas chauffé)
▼ Le four est bruyant
▼ Vous constatez de la buée sur la vitre
▼ La fumée se dégage du gril en début
de programme
▼ Le plateau ne tourne pas correctement
▼ L’aliment n’est pas chauffé en programme
micro-ondes
▼ L’appareil produit des étincelles
Conseils
▲ Appuyer sur la touche
ARRÊT PLATEAU
pendant 5 secondes.
▲ Ajuster le pied réglable.
Nettoyer les roulettes et la zone de
roulement sous le plateau tournant.
▲ Nettoyer la grille d’aspiration sous
l’appareil.
▲ Enlever tous dépôts de résidus de
cuisson sur l’élément chauffant.
▲ Nettoyer les roulettes et la zone de
roulement sous le plateau tournant.
▲ Nettoyer la grille d’aspiration sous
l’appareil.
Vérifier que les ustensiles conviennent
aux fours à micro-ondes.
▲ Vérifier que l'entraîneur et le support
à roulettes soient bien positionnés.
Bien nettoyer l‘appareil : retirer
graisses, particules de cuisson ...
Eloigner tout élément métallique
des parois du four.
Ne jamais utiliser d’éléments métalliques avec la clayette.
Page 26

26
• Si l’appareil a subi une avarie quelconque :
- Vérifiez que la porte n’est pas déformée.
• Si l’appareil ne fonctionne pas,
avant
d’appeler le réparateur :
- Vérifiez l’alimentation électrique.
- Vérifiez la bonne fermeture de la porte.
- Vérifiez votre programmation.
ATTENTION : ne cherchez jamais à intervenir vous-même.
MISE EN GARDE : il est dangereux pour quiconque autre qu’une personne formée,
d’effectuer une opération de maintenance ou une réparation qui nécessite le retrait
d’un couvercle protégeant contre l’exposition à l’énergie des micro-ondes.
Les éventuelles interventions sur votre appareil doivent être
effectuées par un professionnel qualifié dépositaire de la marque.
Service Après-Vente
BRANDT c’est aussi le minitel...
... pour en savoir plus sur tous les produits de la marque :
- informations, conseils,
- les points de vente,
- les spécialistes après-vente.
... pour communiquer :
nous sommes à l’écoute de toutes vos remarques, suggestions, propositions
auxquelles nous vous répondrons personnellement.
Vous pouvez aussi nous écrire : Service Consommateurs BRANDT
BP 9526
95069 CERGY-PONTOISE CEDEX
nous téléphoner au :
ou nous contacter par e-mail :
service.consommateurs@brandt.fr
Page 27

27
ENGLISH
Operating instructions..................................................... page 28
Page 28

28
Table of contents
Installation . . . . . . . . . . . . . . . . . . . . . . . . . . . . . .29
How microwaves work . . . . . . . . . . . . . . . . . . . . . . .30
Important instructions . . . . . . . . . . . . . . . . . . . . . . .31
General description . . . . . . . . . . . . . . . . . . . . . . . . .33
The control panel . . . . . . . . . . . . . . . . . . . . . . . . . .34
Setting the clock / Microwave power settings . . . . . . . . . . .3 5
The display & the selector knob . . . . . . . . . . . . . . . . .36
Programming . . . . . . . . . . . . . . . . . . . . . . . . . . . . .37
Programming / AUTO programming . . . . . . . . . . . . . .38
“Speed DEFROST” . . . . . . . . . . . . . . . . . . . . . . . . . .39
The grill function / The microwave + grill function . . . .40
Programming the grill & rotisserie . . . . . . . . . . . . . . .41
The hot air functions . . . . . . . . . . . . . . . . . . . . . . . .42
Programming the hot air function . . . . . . . . . . . . . . .43
Programming the hot air + microwave function . . . . . .44
Using the rotisserie . . . . . . . . . . . . . . . . . . . . . . . . .45
Programming the rotisserie . . . . . . . . . . . . . . . . . . . .46
Recommendations . . . . . . . . . . . . . . . . . . . . . . . . . .48
Care & cleaning . . . . . . . . . . . . . . . . . . . . . . . . . . .49
Troubleshooting guide . . . . . . . . . . . . . . . . . . . . . . .50
After-sales service . . . . . . . . . . . . . . . . . . . . . . . . . .51
Please read this user manual carefully. It contains important
instructions concerning installation, use and security measures.
Page 29

29
Leave sufficient space around the oven :
- 5 cm between the sides of the oven
and any walls or objects
- 14 cm above the oven
- 10 cm behind the oven.
LOCATION
BEFORE CONNECTION
Installation
•
The oven is meant to be set on a work surface at least 85 cm above floor level.
•
Place the oven on a flat and horizontal surface, away from any source of heat or
steam. To ensure the stability of the microwave oven, the front left foot
is adjustable (5 positions). Turn it to raise or lower the appliance.
•
Make sure that air may circulate freely around the oven.
•
Make sure that nothing obstructs the ventilation
louvers at the back of the appliance.
•
Make sure the electrical plug will be accessible after installation.
•
Make sure that your oven has not suffered any damage during transport (deformed door
or door seal, etc.). If you see any signs of damage, contact your dealer before use.
•
Check the power voltage. If there is a PERMANENT undervoltage (200-210 volts), consult your
electrical installer.
•
Your installation must be protected by a 16 Amp thermal fuse.
•
It is mandatory to use a power point with a ground terminal, connected in accordance with
current safety regulations.
•
In your electrical installation, provide a device
that is accessible to the installer, capable of
separating the appliance from the mains power
and whose contact opening is at least 3 mm at
all of the poles.
•
Never operate the oven if the supply cord and/
or its plug are damaged. In case of damage, call
in a specialised technician trained by the
manufacturer.
230 V
Ground
terminal
ELECTRICAL CONNECTION
5 cm
14 cm
10 cm
5 cm
Page 30

30
The microwaves used for cooking are electro-magnetic waves. They exist in our
environment as do radioelectric waves, light, and infrared rays.
Their frequency is 2,450 MHz.
Their characteristics :
➜ They are reflected by metals.
➜ They pass through all other materials.
➜ They are absorbed by water, sugar and fat molecules.
When food is exposed to microwaves there follows a vibration of the molecules at a speed
of 2 billion 450 million times a second, which in turn produces heat.
The depth of penetration of the waves into food is about 2.5 cm. If the food is thicker the
centre is cooked by normal conduction of heat. It is worth noting that the microwaves produce a simple heat reaction inside food and are not at all harmful to your health.
How microwaves work
Page 31

31
Important instructions
• Your appliance is designed exclusively for the domestic purposes of defrosting, heating or
cooking foods. The manufacturer bears no responsibility in the case of improper
usage.
• To avoid deterioration of your microwave oven, never operate it empty or without the
turntable.
• Never tamper with the lock mechanism of your microwave oven; this could cause
damage requiring repair by an authorised technician.
• Before use, make sure that the containers are appropriate for microwave usage (e.g.:
heat resistant glass, porcelain, etc.).
• It is not advisable to use metal recipients, forks, spoons, knives, metal ties or staples for
deep-freeze bags.
• For baby food and children’s food, it is essential :
- to remove the teat before heating up baby bottles, shake the contents and test
the temperature on the back of your hand before feeding.
- to stir and verify the temperature of children’s foods before serving to avoid causing
serious internal burns.
• WARNING : Do not allow children to use the microwave oven without supervision
unless they have been thoroughly instructed in the proper use and the dangers of
improper operation.
Page 32

32
Important instructions
• It is advisable to cover food in most cases. It will be tastier and your oven will stay cleaner.
However, be sure to remove the cap or lid before cooking foods or heating liquids in
a sealed bottle or container, which could otherwise explode.
• The heating or cooking of boiled, coddled eggs or fried eggs by microwave is pro-
hibited. They can burst and cause serious burns or irreparable damage to your oven.
• When heating liquids, the boiling point may be reached without the typical bubbles
appearing on the surface. To prevent liquids from boiling over and possible burns, wait
20 seconds before removing the containers from the appliance or adding anything
to the liquids, to avoid sudden spurting of the liquid.
• For small amounts (one sausage, a single croissant, etc.), place a glass of water
alongside the food item.
• Time settings that are too long may dry out and burn the food. To avoid such inci-
dents, never use the same cooking times as those recommended for traditional
ovens.
• Be sure to watch closely when heating or cooking foods in disposable plastic or paper
containers or any other combustible material, due to fire hazard.
• If smoke appears, keep the oven door closed and disconnect the oven or turn it off.
Page 33

33
General description
•
THE TURNTABLE :
ensures equal cooking of food throughout with no need to intervene.
- It may be used as a cooking dish.
- Rotation is controlled by the drive shaft and the wheel support.
- The turntable rotates in both directions.
- If it does not turn, verify that all components are properly positioned.
- For easy removal, wells are provided on either side.
•
TURNTABLE OFF :
stops the turntable from revolving in order to use platters which require the entire oven
space. When off, remember to turn the recipient or stir the contents.
•
THE WHEEL SUPPORT :
Do not try to rotate the roller ring manually, as you could damage the drive system. I f it
does not turn smoothly, make sure that there is nothing in the well beneath the turntable.
•
Speed DEFROST STICKER: position the sticker as shown above.
TurntableDrive shaft Wheel
support
Identification
label
GrillSpeed DEFROST
sticker
Page 34

34
The control panel
A
Display window :
to simplify programming, the display
indicates : the time of day, the types of
food and functions, the minutes /
seconds or weight programmed.
B
The selector knob :
to choose the food type, function, program time or weight.
C
FOOD TYPE key :
to choose the food type, with the selector knob.
D
FUNCTION key :
to choose the appropriate function, with
the selector knob.
E ”Speed DEFROST” key :
to quickly defrost all types of frozen food.
F
“AUTO” key :
automatically sets the correct program
time according to a specified food type
and weight.
G STOP-TURNTABLE key :
to stop the turntable from revolving.
H GRILL key :
to select low or high grill.
I
HOT AIR key
:
to cook as if with a traditional oven.
J START key :
to start all programs.
K PAUSE/CANCEL key :
to interrupt (press once) or cancel a program (press twice). Also used to set the
clock.
C
B
G
F
A
K
D
E
C
H
J
I
4 0 : 0 0
2 2 0 ° C
Page 35

35
Microwave power settings
When you select the type of food, the appropriate
power setting is automatically programmed.
After first plugging in your microwave oven or after a power outage,
the clock reads 00:00 and the two dots flash.
To set the clock :
- Press the PAUSE / CANCEL key for 5 seconds.
The 4 numbers flash
, and a tone sounds indicating the hour must be set.
- Turn the selector knob to display the correct time.
- Validate by pressing the PAUSE / CANCEL key .
Your clock is set.
0 0 : 0 0
1 2 : 0 0
0 0 : 0 0
Setting the clock
POWER SETTING APPLICATION
DEFROST 150W
To defrost all frozen food or to top off
cooking of delicate dishes or cook very slowly.
SIMMER 500W
HEAT 700W
To heat up all liquids and all fresh or frozen
pre-cooked dishes.
HIGH COOK 900W
To cook vegetables and soup.
Microwave output power : 900 W
To cook fish and poultry.
To finish programs begun with the HIGH COOK
power setting, for instance beans, lentils, or
dairy products.
(This power setting is available
when you program with the function key.)
Page 36

36
The display and the selector knob guide you in your choice of :
food types
DEFROST SIMMER HEAT COOK
MICROWAVE ROTISSERIE HOT AIR HOT AIR
+
+ GRILL MICROWAVE
the 2-position grill
LOW GRILL HIGH GRILL
the weight for Automatic programming
the program time (or clock)
The food type or function being selected will blink in the display.
12:00
beverages
beef,
lamb
vegetables
poultry
frozen
ready-
made
dishes
fresh
ready-
made
dishes
pork,
veal
fish
turkey
The display & the selector knob
12:30
200°C
C
H
O
I
X
Page 37

37
You may choose amongst the following programs :
Express program
▼▼
set the program time (ex. 2 minutes) with the selector knob.
The functions & blink alternatively to indicate
that the express program (900 W) is set.
▼▼
Press START .
Programming
2 : 0 0
Your microwave oven is now plugged in and the clock is set.
Open the door with the handle. Set the dish inside, close the door.
If the door is nor properly shut, the appliance will not operate.
The following keys are used for the various programs :
•
3 beeps announce the end of a program. The beeps are repeated every minute for 10 minutes
until you open the door.
.
•
If you think there is insufficient space for the dish to turn freely inside the oven, press the STOP
TURNTABLE key before or during the program.
•
If there is an error in the programming, press the CANCEL key twice.
SPEED DEFROST
AUTOMATIC
FUNCTION
FOOD TYPE
Page 38

Programming with the function key
▼▼
Press the FUNCTION key, make your selection.
With this key,the
SIMMER
setting is available.
▼▼
Wait until
00:00
flashes, set the program time with the selector knob.
▼▼
Press START .
Programming with the food type key
▼▼
Press the FOOD TYPE key, make your selection.
▼▼
Press the FUNCTION key, make your selection;
the correct microwave power setting will be programmed
according to the food type selected.
▼▼
Wait until
00:00
flashes, set the program time with the selector knob.
▼▼
Press START .
Automatic programming
With the
AUTO key, the program time is set
automatically
according to the weight of your food item.
▼▼
Press the FOOD TYPE key, make your selection.
▼▼
Press the FUNCTION key, make your selection.
▼▼
Press the AUTO key ; flashes,
use the selector knob to indicate the weight of your food item.
▼▼
Press START .
The appropriate time is programmed
automatically.
38
5 0
Programming
5 : 0 0
7 : 0 0
Auto Programming
5 0
9 : 0 0
Page 39

39
Speed DEFROST
With the Speed DEFROST key you can quickly defrost all types of frozen
food. To guarantee quality results, use Speed DEFROST for dishes weighing
up to 500g. To defrost food items over 500g, use the FUNCTION key (as
described on the preceding page).
▼▼
For quick defrosting of meat, poultry, fish, vegetables and beverages, press the Speed
DEFROST key once :
is displayed.
▼▼
For quick defrosting of bread, rolls and pastry, press the Speed DEFROST key twice :
is displayed.
▼▼
Wait until flashes.
▼▼
Use the selector knob to enter the weight of your food item (up to 500g).
▼▼
Press START .
The defrost time corresponding to the given weight is automatically calculated.
Necessary time may vary according to the initial temperature of the food (the defrost
times were calculated for food frozen at -18°C).
The defrost time is displayed and the programme begins.
When using Speed DEFROST or the defrost function a beep indicates the midpoint of the program (the oven continues to operate). To obtain the best results, turn
the food at this time, close the door and press the
START key to continue the
second half of the program.
1 0 0
S 2
S 1
j
-
j
-
Page 40

40
This function enables you to use the microwaves and grill simultaneously, for rapid
cooking.
The Rack
for use with the GRILL function, to brown shallow
dishes.
When used with the simple or combined microwave
functions, it must be positioned on the center of the
turntable.
Metal dishes may be used on the
rack
only with the simple GRILL function. However, you
can heat a dish in an aluminum tray if it is isolated from
the rack atop a plate.
the Rack
The microwave + grill function
This function enables you to brown dishes such as gratins or meat. It may be used
before or after cooking, as called for in the recipe.
•
The grill folds down for easy cleaning :
1-Horizontal position: for cooking au gratin, grilled food laid flat.
2-Vertical position : for cleaning the oven and for the rotisserie function.
Always allow the grill to cool off 25 minutes before touching it.
•
After grilling make sure to use an oven mitt to handle dishes, and remember to use
only oven proof cookware such as ceramic dishes or heat resistant glass.
•
The dual level grill offers you a choice between :
HIGH GRILL (press the GRILL
key once) and LOW GRILL (press twice).
As a rule, use the HIGH GRILL level to grill meat and fish and the LOW GRILL level
with the simultaneous microwave+ grill function for gratins and to brown delicate
dishes.
The grill function
Grill
Positions
1
2
Page 41

41
Using the dual-level grill
•
Press the GRILL key once to select HIGH GRILL , press twice to select LOW GRILL .
Set the program time and press START .
Press the GRILL key a third time to stop the grill functioning.
Using the microwave + grill functions simultaneously
or the rotisserie function :
•
Select the
FOOD TYPE
with the selector knob. Select the
FUNCTION ,
microwave
+ grill or rotisserie . The appropriate microwave power setting and the grill level will
be automatically adjusted according to your food type. Wait until
00:00
flashes. Set the program
time and press START .
•
In the event the food item you wish to cook does not correspond to any of the proposed food
categories, select the microwave + grill or rotisserie function. A medium microwave
power setting and high grill level will be programmed. Set the program time and press START .
Programming the grill & rotisserie
Page 42

42
The hot air functions
2 convection cooking functions are available :
the hot air function
• to cook and brown food just as in a traditional convection oven
the hot air + microwave function
• to combine microwave power with hot air cooking, for considerable time
savings.
•
The cooking temperature may be set from
50°- 250° C
by 5°steps.
•
Cooking time may be set from
0- 90
by 1minute steps.
•
You may modify the cooktime at any point during the program.
•
It is always preferable to set a minimal cooktime and extend if necessary; check the
browning of your dishes to avoid overcooking.
•
Remember to always place your dishes on the rack in
the low position when using the hot air function
or hot air + microwave function . This will ensure
even heat distribution thereby providing optimal
cooking results. Never use metal dishes when cooking
with the hot air + microwave function.
•
Use only heat-resistant ovenware.
•
The glass pie dish : it may be used for all pastries,
quiches, pizzas, or as a roasting pan. You may also
place it under the rack when grilling in order to catch
drippings.
•
When cooking with the hot air + microwave function , do not use any metallic
dishes.
•
Always use an oven mitt to remove your dish as it may become quite hot.
•
If you wish to defrost frozen food after using one of the hot air functions, for better
results, first let the microwave oven cool down for about ten minutes.
Pointers
the low rack
the glass pie dish
Page 43

43
Programming the hot air function
Example : to bake an apple pie
Using your favorite recipe, prepare the pie in the
glass pie dish. Set the dish on the rack in the low
position and place together on the turntable.
Programming with the hot air key
11
Press the hot air key
is displayed;
flashes, requesting that
you select the cook temperature.
22
Programme 220 ° with the selector
is displayed
33
Wait until
flashes in the display
window, requesting the
cooktime.
Programme
40 min with the selector.
is displayed
44
Press START , the turntable revolves,
the oven light comes on.
175°
40:00
220°
00:00
➤ At the end of the cooktime, remember to use an oven mitt to remove the dish.
C
1
4
3
2
4 0 : 0 0
2 2 0 ° C
Page 44

44
Programming the hot air + microwave function
Set the roast in a non-metallic roasting pan, dress and season to taste. Put the pan on the
rack in the low position and place together on the center of the turntable.
You may program the hot air function 3 different ways :
with the
Auto
key
: all you need to enter is the weight of the food
and the appropriate program is set automatically.
▼▼
Press the FOOD ITEM key, select BEEF from amongst the choices.
▼▼
Press the FUNCTION key, select the hot air + microwave function.
▼▼
Press the Auto key, the appropriate temperature for the roast is set
automatically. 50 flashes, requesting you enter the weight :
for the 1-kilo roast beef, enter 1000.
▼▼
Press START, the cooking time and temperature necessary for the roast
are displayed, (ex. 30 min, 200°), the programme starts.
You choose the cooktime yourself according to personal preference.
▼▼
Press the FOOD ITEM key, select BEEF from amongst the choices.
▼▼
Press the FUNCTION key, select the hot air + microwave function.
▼▼
The appropriate temperature for the roast is set automatically and is displayed, flashes, requesting you program the time, ex. 30 minutes.
▼▼
Press START, the programme starts.
with the FUNCTION key
: enter a tailor-made program by selecting
the function, temperature and cooking time you wish.
▼▼
Press the FUNCTION key, select the hot air + microwave function.
▼▼
flashes, requesting you set the temperature, ex. 200°.
▼▼
When flashes, enter the program time, ex. 30 minutes.
▼▼
Press START , the programme starts.
Example : to cook a 1 kg roast beef
175
°
00:00
200
°
00:00
30:00
200
°
30:00
30:00
200
°
Page 45

45
Preparation
• Set the grill to the vertical position.
• Tie the legs of the chicken and make sure that the
wings and legs are pressed against the body.
• Salt and pepper the inside of the chicken.
• Do not add shortening or water to the juices or to
the chicken, either before or during the process, to
avoid splattering of grease.
• Remove any metal ring or rings on the wings of the
chicken.
• Insert the spit into the ceramic holder in the center
of the glass dish.
• Place the bound chicken head down on the spit,
centering it while pushing the two forks into the
breasts, press down firmly over the spit, folding the
croup into the body cavity.
• Set the glass dish on the middle of the turntable.
Ceramic
holder
Tines
Spit
Glass
dish
Example : to roast a chicken (1 kg)
Using the rotisserie
Page 46

46
Programming
11
Press the FOOD TYPE key :
select poultry
22
Press the FUNCTION key :
select the rotisserie
function
33
Press the AUTO key:
program
1000
44
Press START ,
is displayed, the turntable
revolves, the oven light comes on.
➤ Be sure to use an oven mitt to remove the dish.
25:54
Example : to cook a 1 kg chicken
Programming the rotisserie
1
2
3
4
25:54
1000
C
Page 47

47
You may also select your food type, select the rotisserie function ,
then set your program time
.
The table below lists recommended roasting times.
Food item
Chicken 1 kg - 1,5 kg 25/35 min
Lamb or
800 g - 1 kg 28/35 min
beef roast
Turkey, pork
800 g - 1 kg 35/45 min
or veal roast
Display Weight Time
Tips
• Programing with the AUTO key is recommended when using the rotisserie function.
• The time may vary according to the thickness and weight of the meat, the initial temperature and individual preference. It is preferable to program a minimal time and
extend cooktime at the end if necessary.
• Cook roasts without an outer layer of fat to avoid splattering. The spit is not recommended for cooking pork roasts as they are liable to heavily soil the cook area.
• Grease the spit and tines before positioning the chicken to ensure easy removal after
roasting.
• Make sure the food is properly centered on the spit.
• Be sure to clean the microwave oven after each use.
Programming the rotisserie
Page 48

48
Recommendations
WHILE THE OVEN IS OPERATING :
• If you used the time or AUTO key,
➢ you may change the program length at any time.
• You may stop or start the turntable revolving during a program by pressing the
TURN-
TABLE STOP key .
• To change the food type or FUNCTION selection, press the CANCEL key twice
and program again.
• If you open the door before the end of the program, shut the door and press the START
key to continue the program.
• If you remove a dish before the end of the program, press the CANCEL key twice
to erase the program.
REMARKS :
• If you wait longer than 3 minutes to press the START key after having entered a
program, it will be cancelled (the clocktime will be displayed).
Page 49

49
• Regular maintenance of your oven will keep it in sound operating condition.
To prevent heavy soiling, it is preferable to cover recipients whenever possible.
• Make sure the work surface on which the microwave oven sits is always kept clean as
surrounding dirt/dust could enter and damage your appliance.
• Clean with a damp, soapy sponge both on the inside and outside, with special
attention to the door seal and front of the cavity which must be kept
clean at all times. If these surfaces are damaged because they become
excessively dirty, call in a specialised technician before using your oven.
• In the event of bad odors or caked-on dirt, boil water containing lemon juice or
vinegar in a cup for 2 minutes and clean the walls with a little dishwashing liquid.
• For those ovens with grill or convection heat functions, the top and rear air vents
become very hot. Do not touch these parts after use; wait till the appliance has cooled
down in order to clean it. Use a fine steel wool pad on the metal parts.
• The turntable can be removed for cleaning. Wells are
provided on both sides for easy access.
If you remove the drive shaft, do not allow water
to enter the motor shaft hole.
Be sure to put the turntable, the drive shaft and the
wheel support back in their proper place.
• Do not use abrasives, alcohol or solvents a s they are
liable to damage the oven.
Care & cleaning
SOAP
+
WATER
Page 50

50
Troubleshooting guide
Problem
▼ The time counts down, but the appliance
does not function
the turntable does not
rotate, the light does not come on and
the food is not heated)
▼ The microwave oven is noisy when
operating.
▼ Condensation forms on the door glass
▼ The grill element smokes when it heats
up.
▼ The turntable does not revolve correctly
▼ The microwave programs do not produce
the desired results.
▼ The appliance produces sparks.
Suggestion
▲ Press the
TURNTABLE OFF
key for
5 seconds.
▲ Adjust the front left foot.
Clean the wheels and the well area
beneath the turntable.
▲ Clean the vents under the appliance.
▲ Clean all cooking residue from the
grill element.
▲ Clean the wheels and the well beneath
the turntable.
▲ Clean the vents under the appliance.
Make sure that you use only containers
which are suitable for microwave cooking.
▲ Check whether the wheel support is
correctly positioned.
Thoroughly clean the appliance :
remove any greasy deposits, cooking
residue, etc...
Move any metal objects away from
the oven walls.
Never use metallic containers with the
rack.
Page 51

51
After-sales service
•If the equipment has sustained any damage :
- Check that the door is not deformed.
•If the oven does not operate, before calling the repairman :
- Check the electrical supply.
- Check that the door is properly closed.
- Check your programming.
CAUTION : never attempt to repair
your oven yourself.
WARNING : it is dangerous for anyone other than qualified personnel to make
any repairs requiring removal of the cover providing protection from exposure to
microwave energy.
Only a specially trained technician is qualified
to repair your microwave oven
 Loading...