

Brandt BT653MA, BT650MA, BT653HQA Instruction Manual
INSTRUCTION MANUAL EN
Washing machine
BT650MA
BT653MA
BT653HQA
2
EN
This appliance has been designed exclusively for
domestic use for washing linen.
Very important : Read this user guide before installing and using
this appliance.
SAFETY
EN
RECOMMENLED LOADS :
— The maximum capacity of the appliance is 6,5 kg.
The following instructions must be respected :
INSTALLATION :
— The pressure of the water supply must be between 0.1 and 1 MPa
(1 and 10 bars).
— Do not use an extension, adapter, multi-socket or a timer plug.
— The electrical installation must be able to withstand the maximum
power indicated on the rating plate and the plug must be properly
grounded.
— Once your appliance has been installed, the plug must remain
accessible.
— Only use the hose and the new seals supplied with the
appliance.
— If the power cord is damaged, have it changed by the After Sales
Service or a qualified professional to avoid any risks.
— We recommend that the appliance is not placed onto a mat or carpet to avoid hampering the circulation of air at its base.
— If a problem occurs that you cannot solve (see page 11), do not
attempt to repair the machine yourself. Call the customer service.
USE :
— This appliance may be used by children of 8 years or older and by
persons with limited physical, sensorial or mental capacities or
without experience or knowledge of it, provided that they are correctly supervised or if they are given instructions on the use of the
appliance in complete safety if the risks incurred are understood.
Children should be supervised to ensure that they do not play with
the appliance and prevent children of less than 3 years old from
playing with it, unless they are constantly supervised.
G

3
1 -
SAFETY
(continued)
EN
USE
(continued)
:
—
The device should not be cleaned or maintained by unsupervised children.
— Do not load linen that has been treated with stain removers, solvents or inflammable products –straight after they have been treated
(risk of explosion)
— This washing machine is fitted with a safety device to prevent any
spillage of water.
— At the end of the cycle, ensure the water tap is switched off and
the appliance unplugged.
ENVIRONMENT
This washing machine has been designed to respect the environment.
PROTECTING THE ENVIRONMENT
The dose of washing product depends on how dirty
the laundry is and the hardness of the water. Do not
exceed the dose recommended by the manufacturer of the washing product.
This appliance’s packaging material is recyclable.
Help protect the environment by placing the packa-
ging into the municipal containers provided for this
purpose.
Your washing machine also contains many
recyclable materials, it features this logo to
remind you that used appliances must not
be mixed with other waste.
The appliance must therefore be recycled in compliance with the European directive 2012/19/EU on
used electrical and electronic equipment.
Contact your town hall or your retailer for the used
appliance collection points closest to your home.
ENERGY SAVING
Only programme a prewash when it is absolutely
necessary. For linen that is not very or normally dirty,
a low temperature programme is sufficient.

4
1 -
EN
1 - INSTALLATION
1.4 - LEVELLING THE MACHINE
(Diagram 1.4)
The appliance must be installed on a horizontal
floor. If required, and if it is equipped with adjustable feet at the front of the appliance, stabilise your
washing machine so that it is level. If it is fitted with
retractable castors, it may be moved by pulling the
lever underneath the appliance completely to the
left.
1.5 - E
LECTRICAL CONNECTION
(Diagram 1.1.1)
Ensure that the indications on the data plate of the
Appliance are respected.
1.6 - CLEANING BEFORE USE
Once installed, your washing machine must be cleaned by programming a cotton cycle at 90°C with
nothing inside and with half a dose of washing powder.
1.2 - CONNECTION TO THE WATER SUPPLY
(Diagram 1.2 )
Connect the feed pipe with its new washers to the
coupling on the rear of the washing machine and to
a tap with a threaded Ø 20x27 endpiece.
1.3 - DRAINING
(Diagram 1.3)
Position the drain hose, fitted with the curved part,
ensuring that the instructions shown on the diagram are respected and especially that the connection is not air-tight: air must pass freely between the
drain hose and the drain to avoid used water from
flowing back up the hose into the machine and bad
smells being caused.
H
— Remove the 3 hose support clips, and place
E
1.1 - UNPACKING
(Diagram 1.1.2 to 1.1.4)
The following instructions must be respected :
— Remove the chocks from the lid and flaps of the
drum and open and close the drum carefully.
— Lift the washing machine and remove the
motor chock and base
(Diagram 1.1.2)
.
B
A
holes
(Diagram 1.1.3)
.
D
— Remove the strip and place the stoppers in the
C
the stoppers in the 3 holes (very important)
(Diagram 1.1.4).
F
2 - USE
RECOMMENDATIONS :
— Before inserting the linen, sort it by colour, how
dirty it is and the type of textile. Empty all pockets,
close zips, removes hooks from curtains, place
Small items of underwear in a mesh bag.
— Remove any loose buttons, pins and clips.
— Knot belts, and ties for aprons, etc.
2.1 - LOADING YOUR WASHING
(Diagram 2.1)
Operate the handle of the lid and open the drum
by pushing the button .
Once the linen has been put in, ensure that
the drum has been closed properly. Ensure
that the edge of the button is visible.
A
2.2 - WASHING PRODUCTS AND ADDITIVES
(Diagram 2.2)
The product drawer has 3 compartments :
pre-wash
(powder), wash (powder or liquid),
softener.
— Use detergents that are certified for domestic
washing machines.
— Do not use liquid detergents with the pre-wash
cycle and/or delayed start.
— Do not exceed the MAX level.
5
1 -EN1 -
3 - PROGRAMMING
4
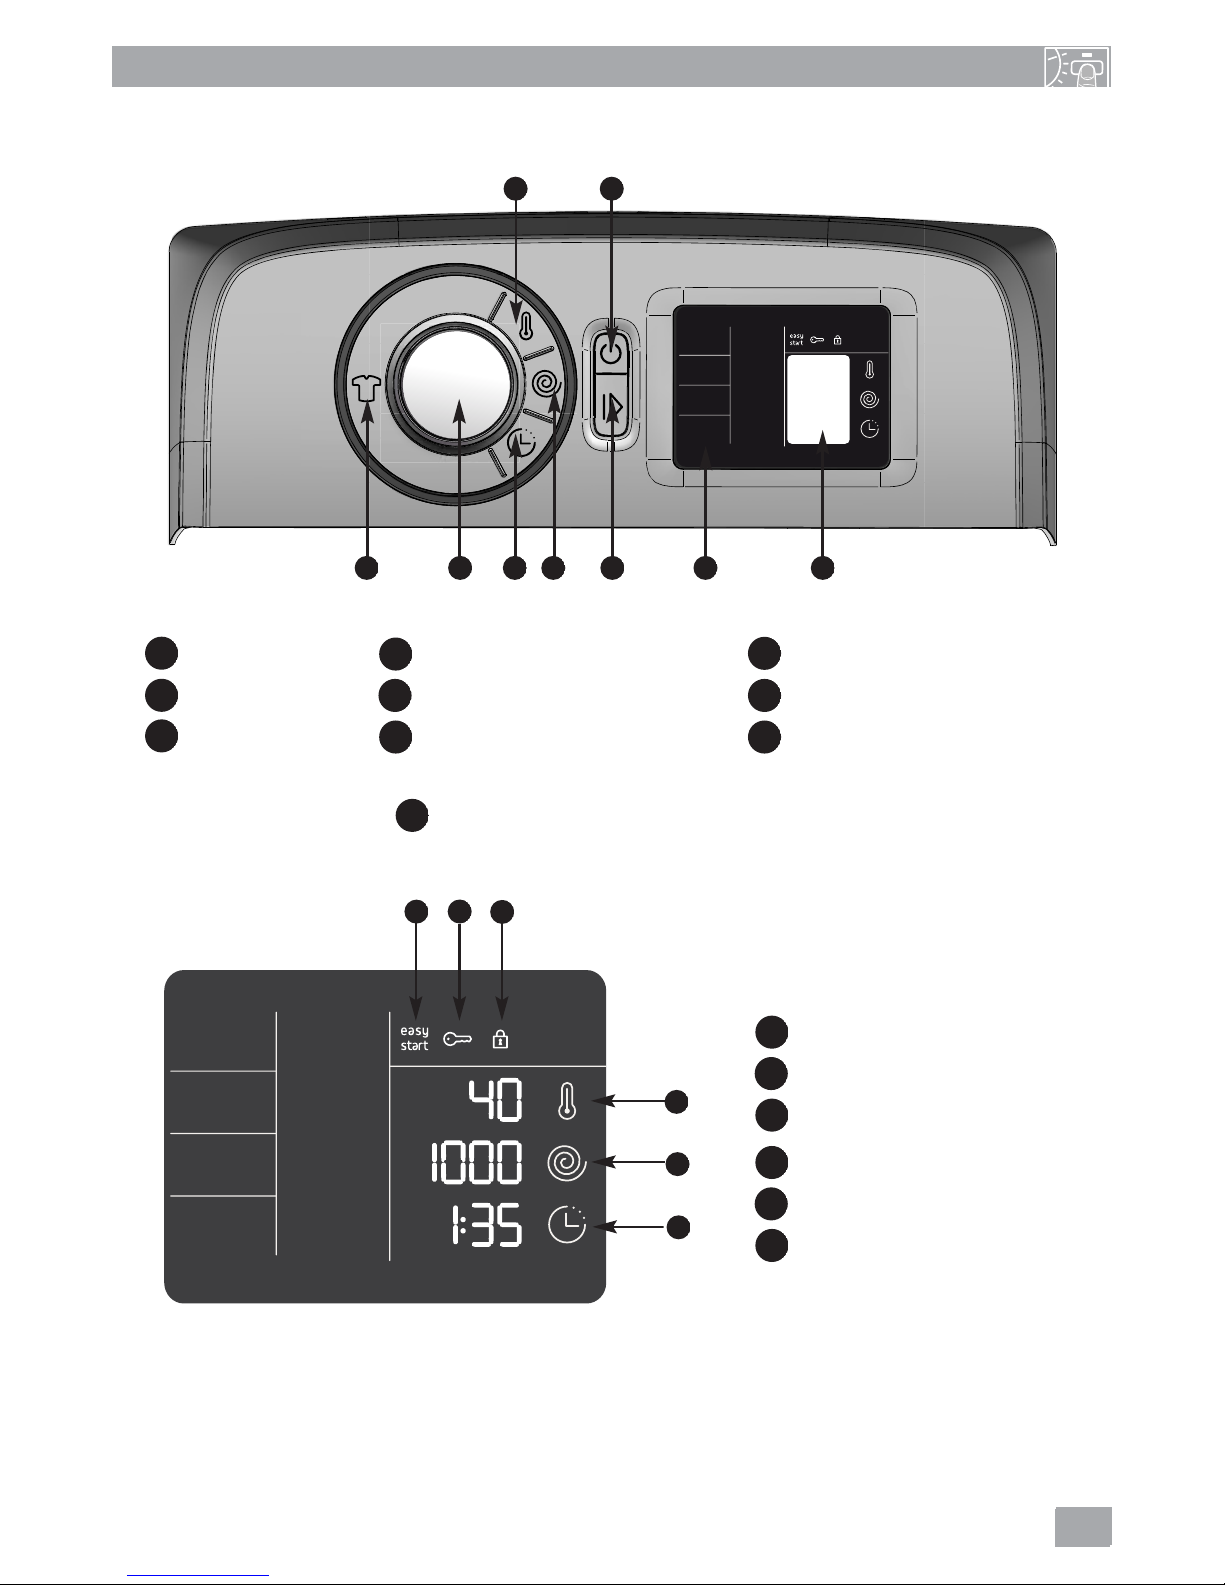
3.1 - THE CONTROL PANEL
1
2
On / Off
Start/Pause
547
Selecting the Programme
Selecting the temperature
8
6
Selector
Selecting the spin speed
3
Programming a delayed start
Options
Display
9
1
2
3
768
9
5
11
10
12
141315
11
10
"Easy start" function
Child safety lock
12
Door lock
14
13
Temperature
Spin speed
15
Delayed start / Time remaining
CLOSE-UP OF THE DISPLAY
9
 Loading...