

Page 1
!
INSTALLATION!INSTR UCTIONS!
!
7607 Chevrolet Express-GMC Savana Instructions 2-20-13.doc Page 1 of 2
Chevrolet Express/GMC Savana Camera Installation Instructions, 2008 – current
(Kit # 9002-7607)
Please read thoroughly before starting installation and check that kit contents are complete.
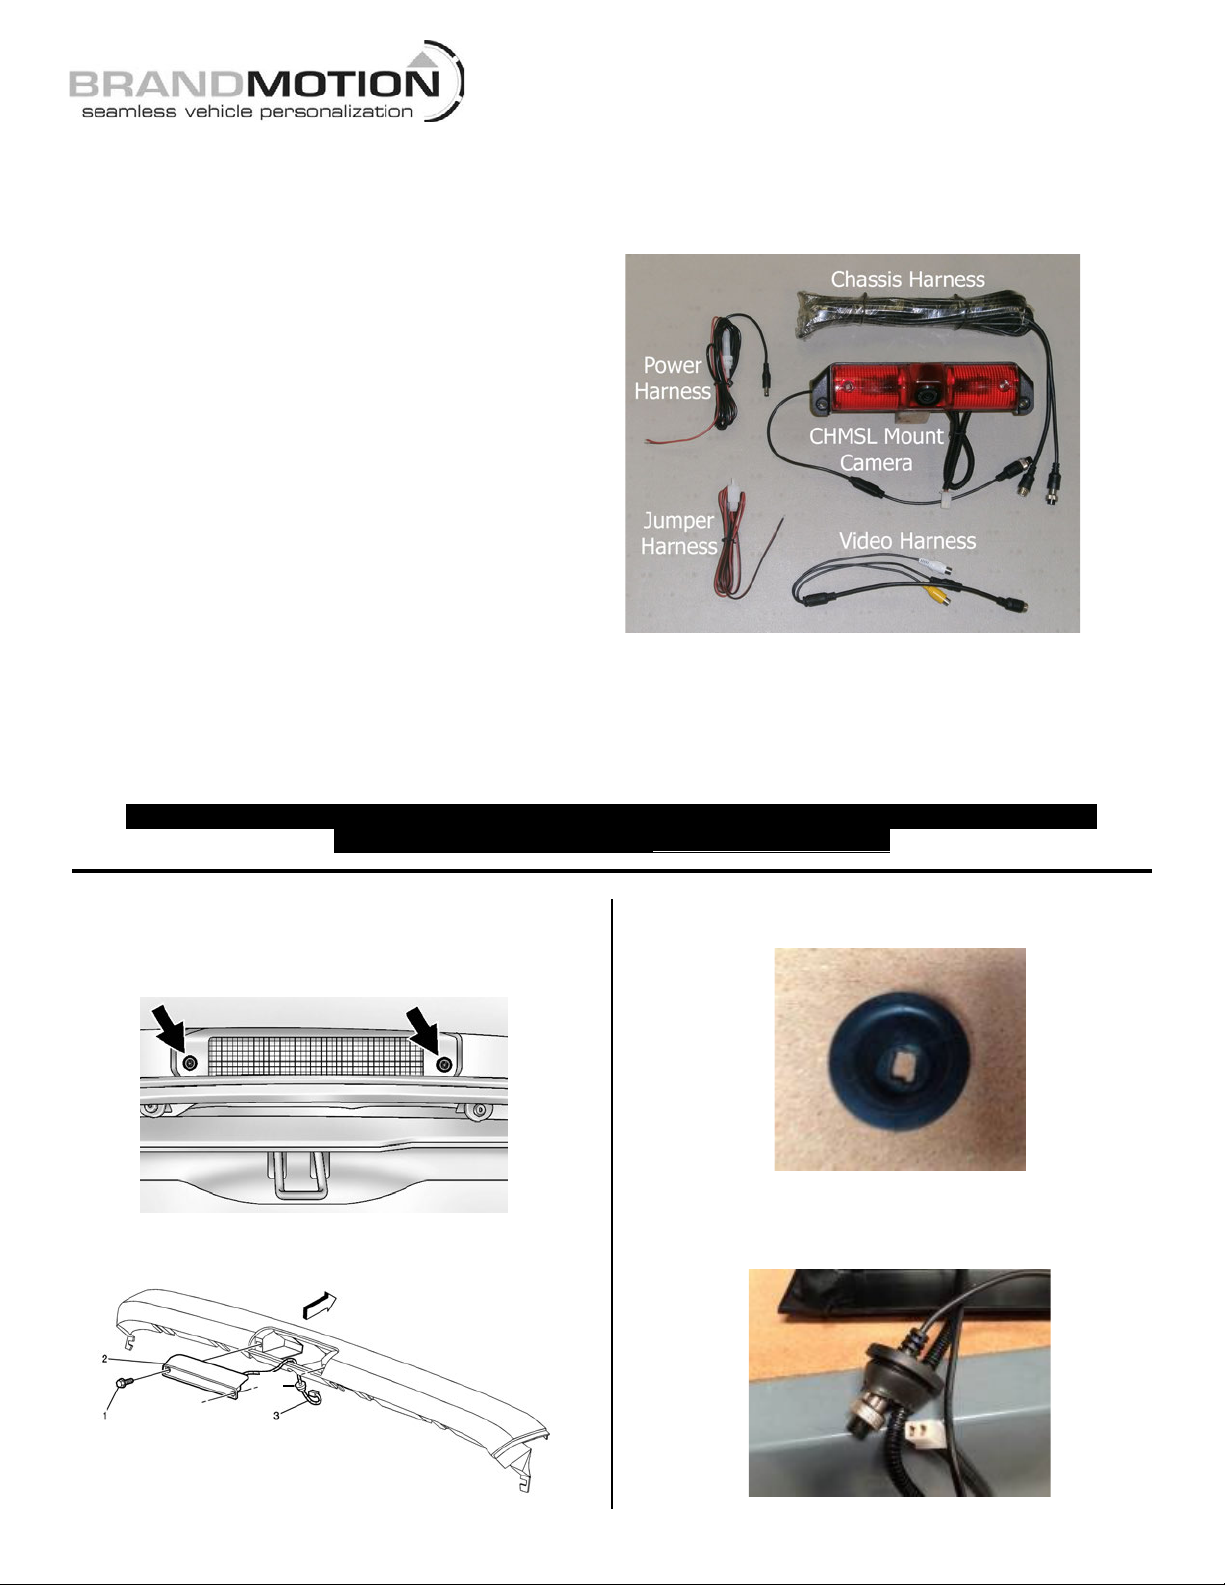
Items Included in Kit:
CHMSL Mount Camera and Harness
Video Harness
Chassis Harness
Power Harness
Jumper Harness
Female to Male RCA Adaptor (not shown at right)
These Instructions
Tools & Supplies Needed:
Multi-meter or computer-safe test light
Plastic Trim Removal Tool
Electrical Tape or Heat Shrink Tubing
Soldering Iron (recommended)
Solder (recommended) or T-Taps
Wire Ties (recommended)
Ground Eyelet (recommended)
Safety Precautions:
• Work in a well ventilated area that is clear of obstructions.
• Secure vehicle with tire chucks in both front and rear of tires.
• Turn vehicle accessories OFF and ensure ignition key is in OFF position.
• Wear safety goggles and snug fitting clothes.
• Use tools only for their intended purpose and which are in good repair.
• Only perform this task if confidence, skill, and physical ability permit.
NOTE: We strive to provide accurate and up-to-date installation instructions. The latest full color
instructions can be accessed at www.brandmotion.com
Step 1: Use a Phillips screwdriver to remove two
screws retaining the Center High-Mount Stop Lamp or
CHMSL (commonly known as the Third Brake Light.) Save
screws to attach Camera.
Step 2: Disconnect the brake lamp socket from the
CHMSL and remove the CHMSL.
Step 3: Cut the rubber CHMSL harness grommet (shown
as part #4 at Step 2) at its base and remove.
Step 4: Thread Camera Harness video and jumper
connector ends through the grommet and through the
CHMSL opening. Recommended: Apply a dab of silicone to
retain grommet in place and maintain a water tight seal.
4
4
Page 2
!
INSTALLATION!INSTR UCTIONS!
!
7607 Chevrolet Express-GMC Savana Instructions 2-20-13.doc Page 2 of 2
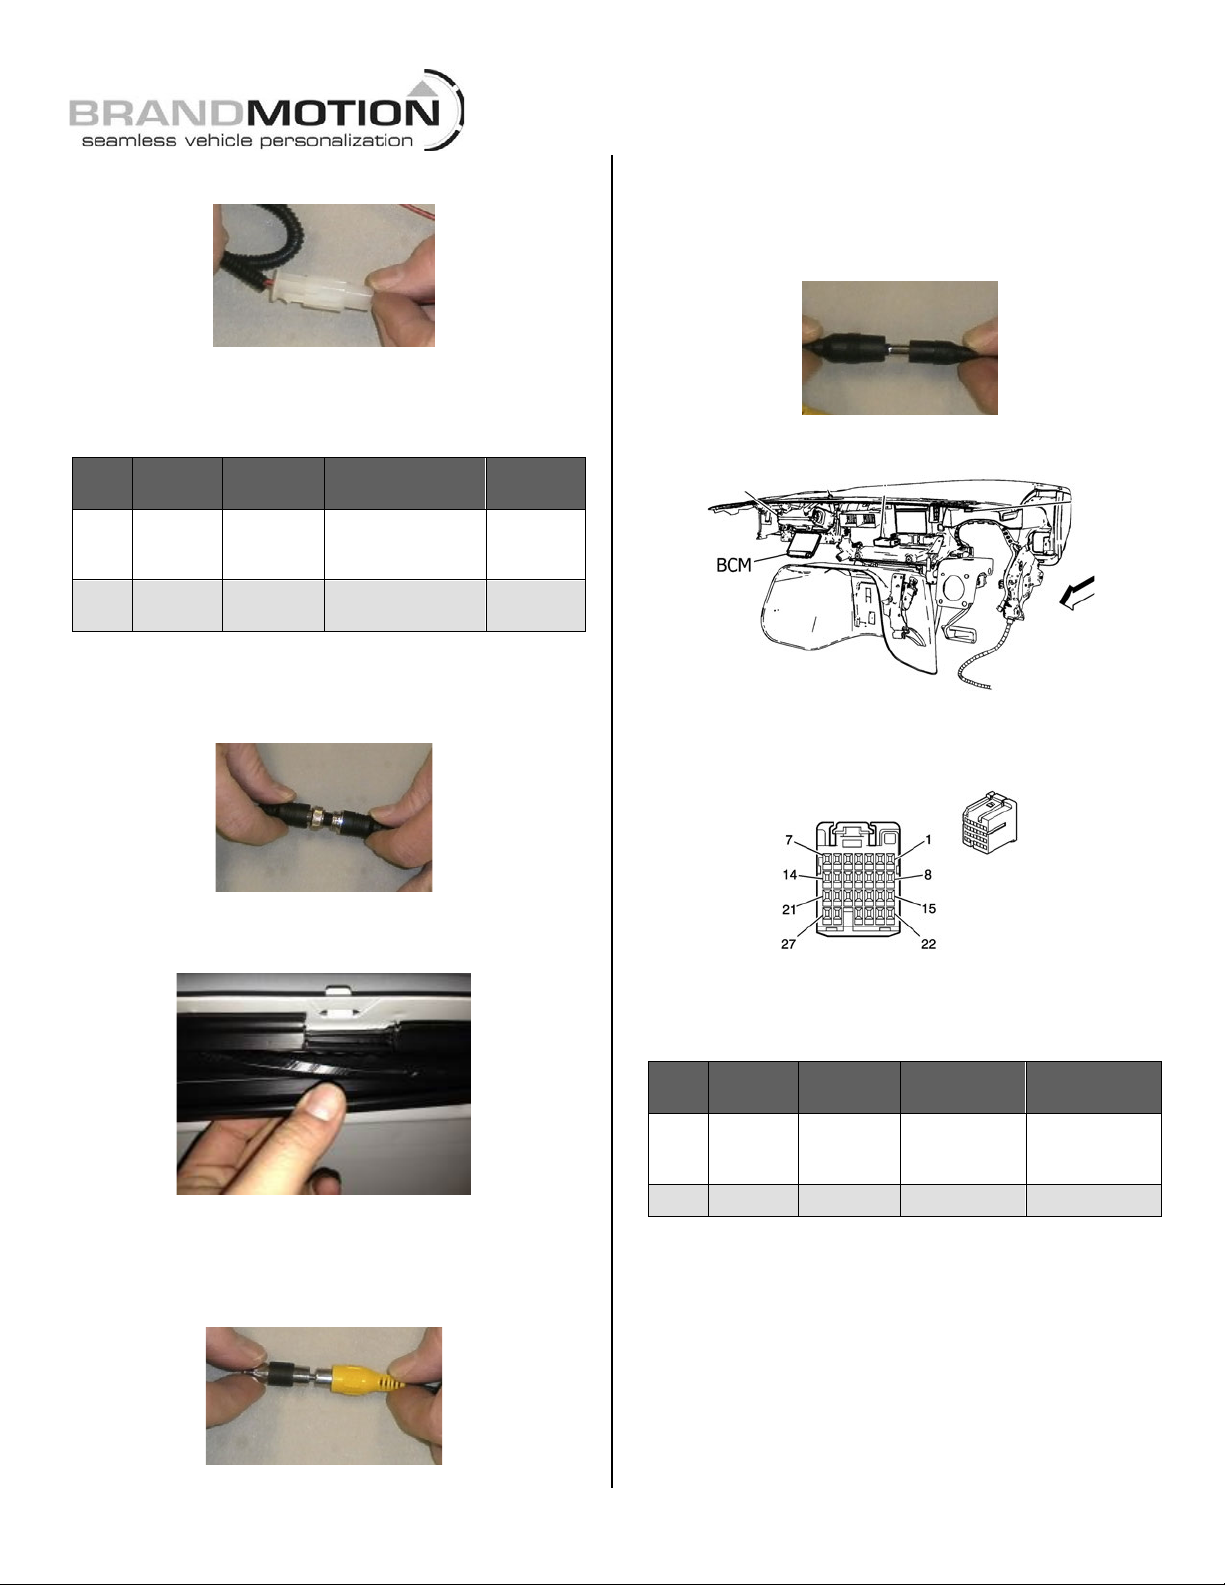
Step 5: Connect Camera Harness jumper connector to
supplied Jumper Harness.
Step 6: Connect red wire of Jumper Harness to light
blue wire of CHMSL brake lamp (12+ brake lamp
power) and black wire to chassis ground (solder
recommended or T-Taps).
Wire
Color
Polarity
Function
Description
Location
Red
12v +
CHMSL
illumination
Displays 12 volts +
with brakes applied
CHMSL
light blue
wire
Black
(–)
Ground
Brake light ground
CHMSL
black wire
Step 7: Attach supplied Camera using existing screws.
CAUTION: Do not over tighten.
Step 8: Connect Camera Harness video connector to
supplied Chassis Harness.
Step 9: Route Chassis Harness forward along the
drivers side wire channel at the base of the roof and
toward your video display / Navigation display.
Step 10: Connect Chassis Harness to supplied Video
Harness and route beneath headliner and down drivers
side A-pillar. (Note: connection is same as shown in Step 8.)
Step 11: (If necessary) Connect supplied Female to Male
RCA Adaptor to yellow RCA Video Harness plug.
Step 12: Connect yellow RCA plug of Video Harness to
“Camera IN” on the video / Navigation display. (NOTE:
The white RCA plug is not used in this application.)
Step 13: Connect Camera Harness power connector to
the supplied Power Harness.
Step 14: Locate the Body Control Module (BCM) under
the passenger side of the dash.
Step 15: Splice the red wire from the Power Harness to
pink 12v+ Ignition power wire in cavity 2 of Body
Control Module (BCM) connector X1.
Step 16: Add a Ground Eyelet (recommended) to the
black wire from the Power Harness and use a screw or
nut to attach it to chassis ground (solder recommended or
T-Taps).
Wire
Color
Polarity
Function
Description
Location
Red
12v +
Camera
power
Displays 12
volts + with
Ignition ON
BCM Connector
cavity 2 - Pink
wire
Black
(–)
Ground
Ground
Chassis
Step 17: Test the system. Inspect that all connections are
proper and secure. Clear all loose items removed from area
around the vehicle. Turn ignition key ON and shift into Reverse
to test system. The video image from the Camera should
appear in your display / Navigation display.
Step 18: Secure Chassis, Video, and Power Harnesses
to existing vehicle wiring and reassemble vehicle by
following your disassembly steps in reverse. Avoid
binding or otherwise damaging the harnesses.
(Recommended: Wire Ties or Electrical Tape.
 Loading...