

Page 1

INSTALLATION INSTRUCTIONS
2000-3801 Instructions 10-10-12.doc Page 1 of 24
Bongiovi Acoustics DPS – GM 44-Pin Harness
(Kit part number 2000-3801)
Applications Covered:
2010 – Current Buick LaCrosse (7 speaker)
2011 – Current Buick Regal (7 speaker)
2012 – Current Buick Verano (6 speaker)
2010 – Current Chevy Camaro (6 speaker)
2011 – Current Chevy Cruze (6 speaker)
2013 Chevy Malibu (6 speaker)
2012 – Current Chevy Sonic (4 and 6 speaker)
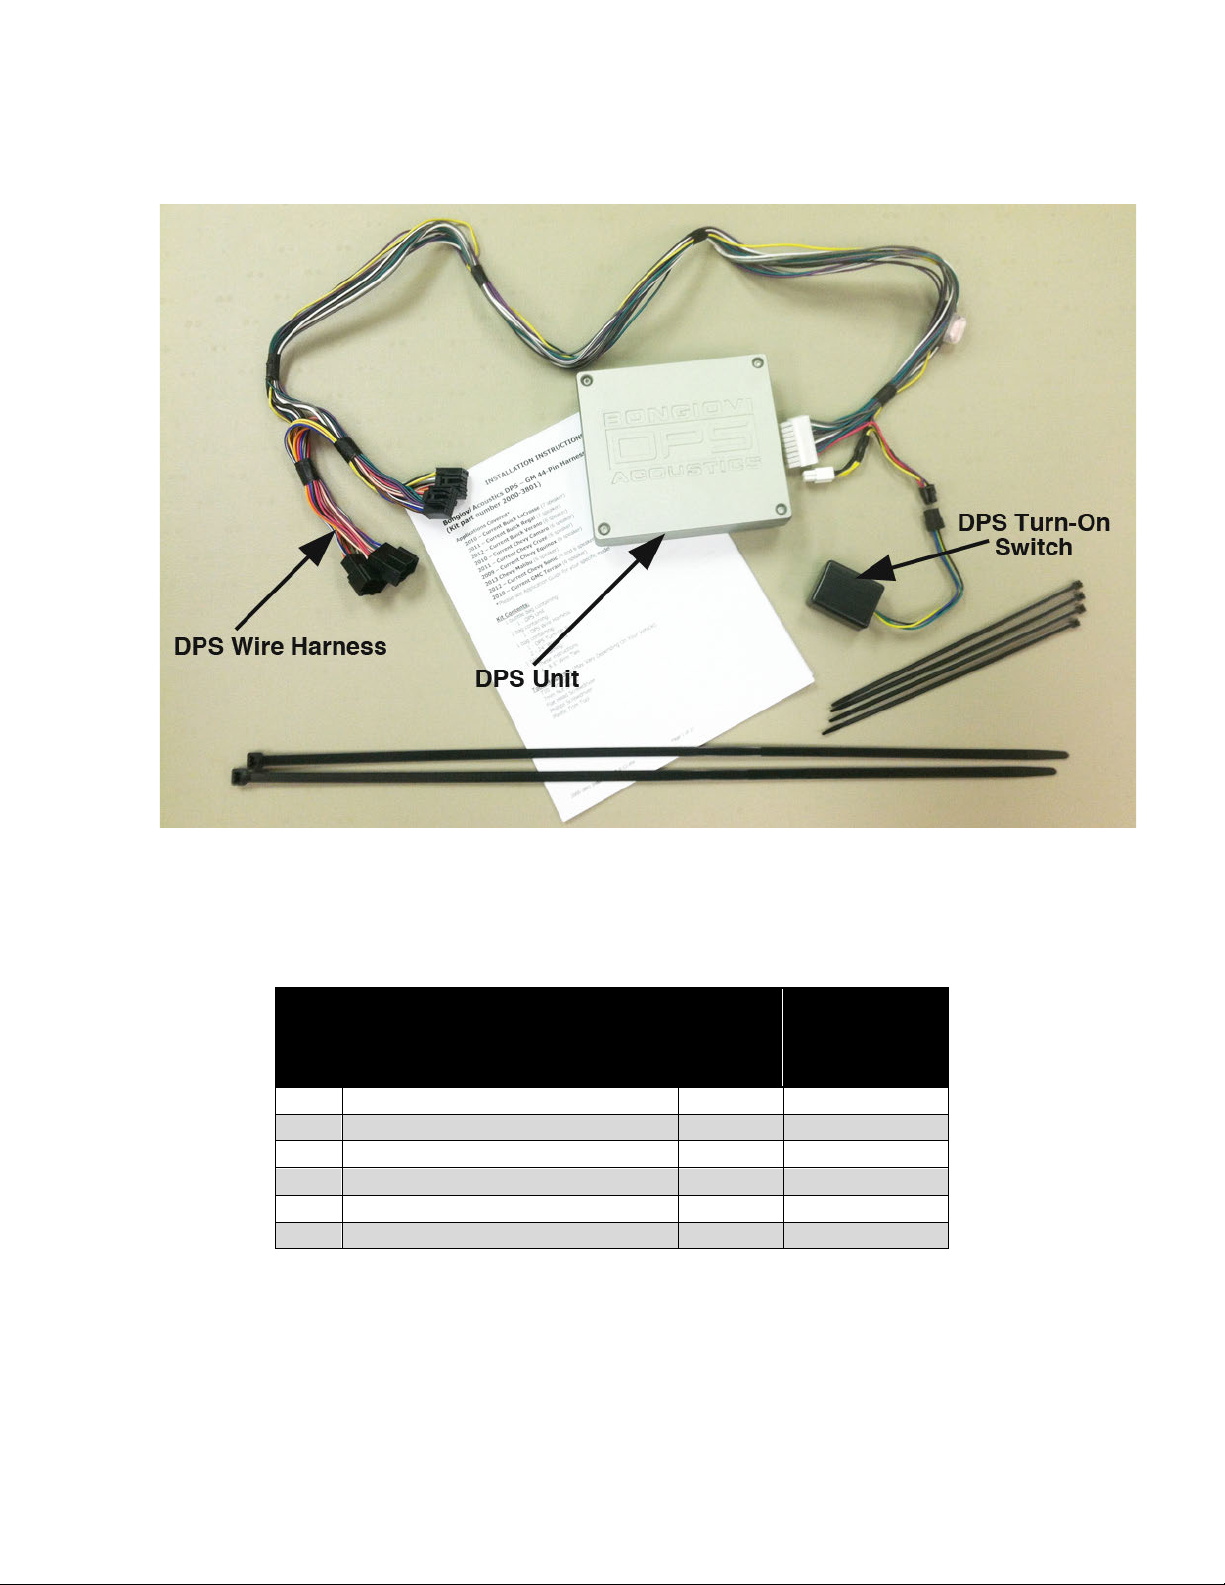
Kit Contents:
1 bubble bag containing:
1 - DPS Unit
1 bag containing:
1 - DPS Wire Harness
1 bag containing:
1 - DPS Turn-On Switch
2 - 24” Wire Ties
1 bag containing:
These instructions
4 - 8.5” Wire Ties
Tools Required: (May Vary Depending On Your Vehicle)
T20 Torx Driver
7mm Nut Driver
Flat Head Screwdriver
Phillips Screwdriver
Plastic Trim Tool
Page 2

INSTALLATION INSTRUCTIONS
2000-3801 Instructions 10-10-12.doc Page 2 of 24
TABLE OF CONTENTS
Pages
Kit Components
3
Reference Pin Out for DPS Wiring Harness to DPS Turn On Switch
3
Section 1: Buick LaCrosse Instructions
4 - 5
Section 2: Buick Regal Instructions
6 - 8
Section 3: Buick Verano Instructions
9 - 11
Section 4: Chevy Camaro Instructions
12 - 14
Section 5: Chevy Cruze Instructions
15 - 18
Section 6: 2013 Chevy Malibu Instructions
19 - 21
Section 7: Chevy Sonic Instructions
22 - 24
General Preparation:
1. Park vehicle on level ground and secure with tire chucks.
2. Ensure all radio functions are working properly before disassembly.
3. Record any pre-set radio stations if desired since these may be lost when power is
disconnected.
4. Remove any CDs to avoid possible jam.
5. Return all Treble, Bass, Fade, and Balance to neutral setting. The DPS is designed to provide
the best audio experience at the neutral settings. You can, however, adjust them to meet your
desired experience.
6. For vehicles equipped with automatic transmissions, place shifter in the N (neutral) position
and set parking brake.
7. Loosen the negative battery cable bolt. Remove negative battery cable from terminal and
position away from battery.
Page 3
INSTALLATION INSTRUCTIONS
2000-3801 Instructions 10-10-12.doc Page 3 of 24
KIT COMPONENTS
Reference Pin Out for DPS Wiring Harness to DPS Turn On Switch
(Small Black Connectors)
PIN
#
FUNCTION
DPS
TURN
ON
SWITCH
DPS
WRING
HARNESS
1
12V Ignition
Blue
Red
2
12V +
Yellow
Yellow
3
Ground
Black
Black
4
Low Voltage Trigger / Speaker
Green
Purple
5
N/A
N/A
N/A
6
N/A
N/A
N/A
Page 4
Section 1: Buick LaCrosse Instructions, 2010 – Current
2000-3801 Instructions 10-10-12.doc Page 4 of 24
1. Ensure all radio functions are working properly,
return all Treble, Bass, Fade, and Balance to neutral
settings, and remove any CDs to avoid possible jam
before disassembly.
2. For vehicles equipped with automatic transmissions,
place shifter in the N (neutral) position and set
parking brake.
3. Loosen the negative battery cable bolt. Remove
negative battery cable from terminal and position
away from battery.
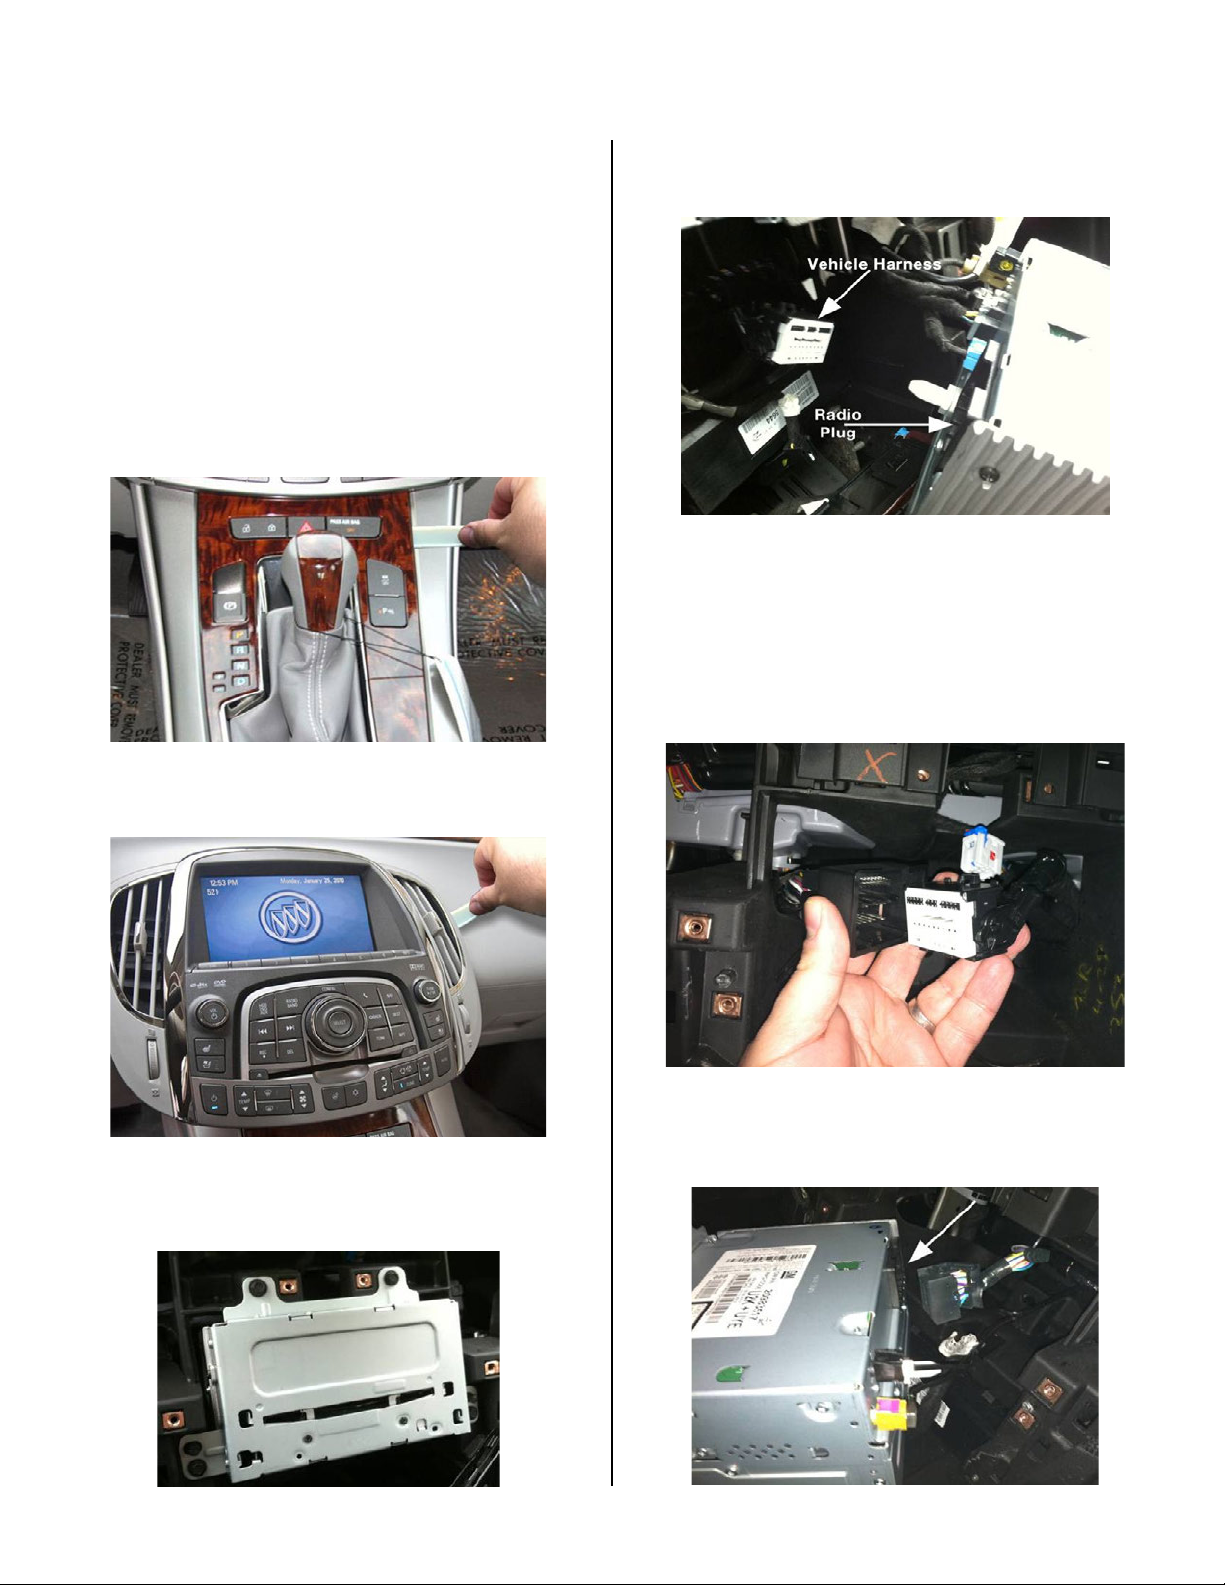
4. Carefully loosen and pull back from IP lower console
trim panel using a plastic trim tool. (Figure 1)
Figure 1
5. Using a plastic trim tool, gently remove IP center
trim. (Figure 2)
Figure 2
6. Using a 7mm socket driver, remove 4 bolts attaching
radio head unit. (Figure 3)
Figure 3
7. Pull out radio head and disconnect 44-pin connector
from back of radio. (Figure 4)
Figure 4
8. With the radio head unit pulled out of the way, drop
the white connectors of the DPS harness though the
opening behind radio cavity. Remove console side
panel, and pull through from underneath dash on
passenger side.
9. Connect male 44-pin connector from the DPS harness
to the vehicle radio harness. (Figure 5)
Figure 5
10. Connect the female end of the 44-pin connector from
the DPS harness to the back of the radio head unit.
(Figure 6)
Figure 6
Page 5
Section 1: Buick LaCrosse Instructions, 2010 – Current
2000-3801 Instructions 10-10-12.doc Page 5 of 24
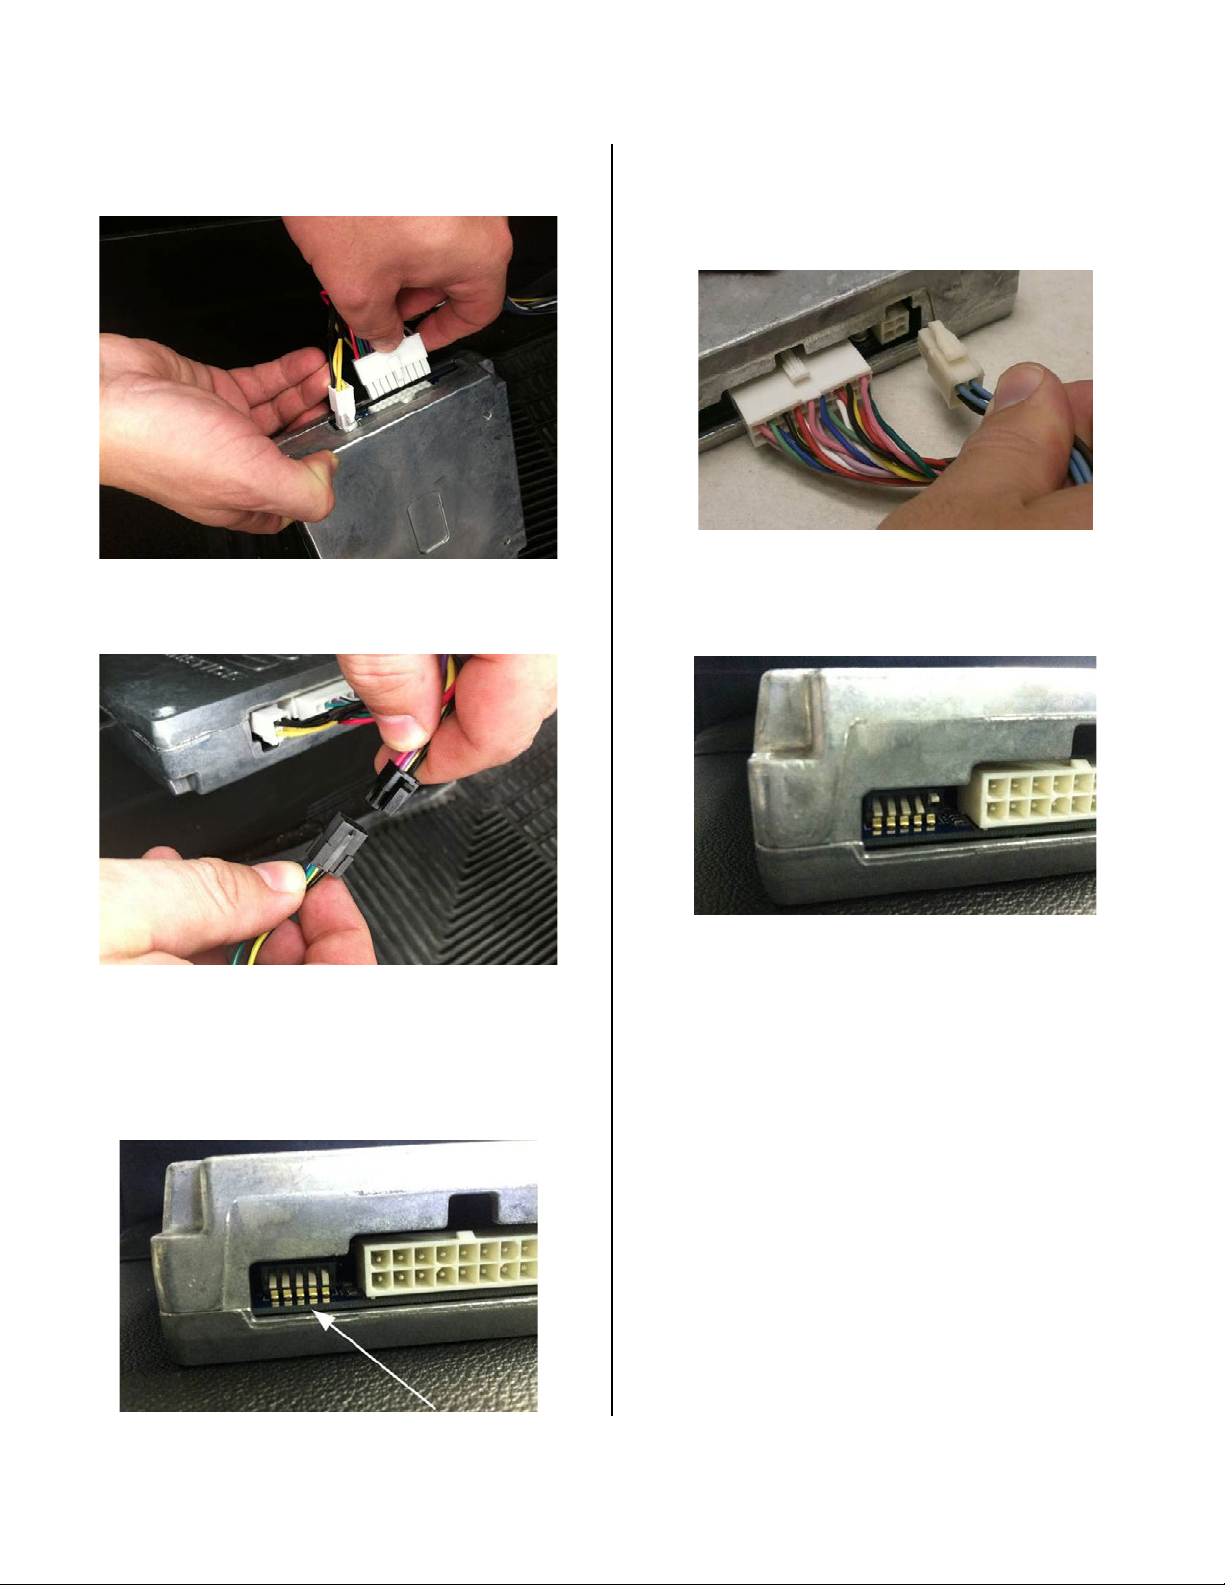
11. Connect the two white connectors of the DPS harness
to the DPS module. (Figure 7)
Figure 7
12. Connect the DPS turn-on switch to the remaining
connector on the DPS harness. (Figure 8)
Figure 8
13. Reconnect battery of vehicle.
14. Place DPS module with the Bongiovi DPS Acoustics
side face down. Then confirm the DPS unit’s dip
switches are all set to the “down” position –
“DDDDD”. (Figure 9)
Figure 9
15. Turn vehicle ignition key to “ON” position. Turn on
radio head unit for 10 seconds. (Note: There should
be no sound from the speakers). Disconnect white 4pin connector from back of DPS module. (Figure 10)
Figure 10
16. Set the DPS dip switches for Buick LaCrosse: The fifth
switch should be flipped to the “up” position –
“DDDDU”. (Figure 11)
Figure 11
17. Plug white 4-pin connector into DPS module and wait
10 seconds. (Note: There should be no sound from
the speakers). Disconnect white 4-pin connector from
back of DPS module.
18. Plug white 4-pin connector back into DPS module.
After a few seconds you should hear sound from the
radio. Ensure radio head unit is working properly
including all speaker channels.
If you do not hear any sounds, recheck connections
and repeat Steps 14 through 18.
19. Disconnect negative battery cable.
20. Remove passenger hush panel by using 7mm socket
driver remove the bolts.
21. Using supplied 24” wire ties, secure DPS module
under front of console or behind carpet on passenger
side upper foot well.
22. Reassemble vehicle and reconnect negative battery
cable.
23. Place Bongiovi DPS Badge on left side of IP center
trim.
Page 6
Section 2: Buick Regal Instructions, 2011 – Current
2000-3801 Instructions 10-10-12.doc Page 6 of 24
1. Ensure all radio functions are working properly, return all
Treble, Bass, Fade, and Balance to neutral settings and
remove any CDs to avoid possible jam before
disassembly.
2. For vehicles equipped with automatic transmissions, place
shifter in the N (neutral) position and set parking brake.
3. Loosen the negative battery cable bolt. Remove negative
battery cable from terminal and position away from
battery.
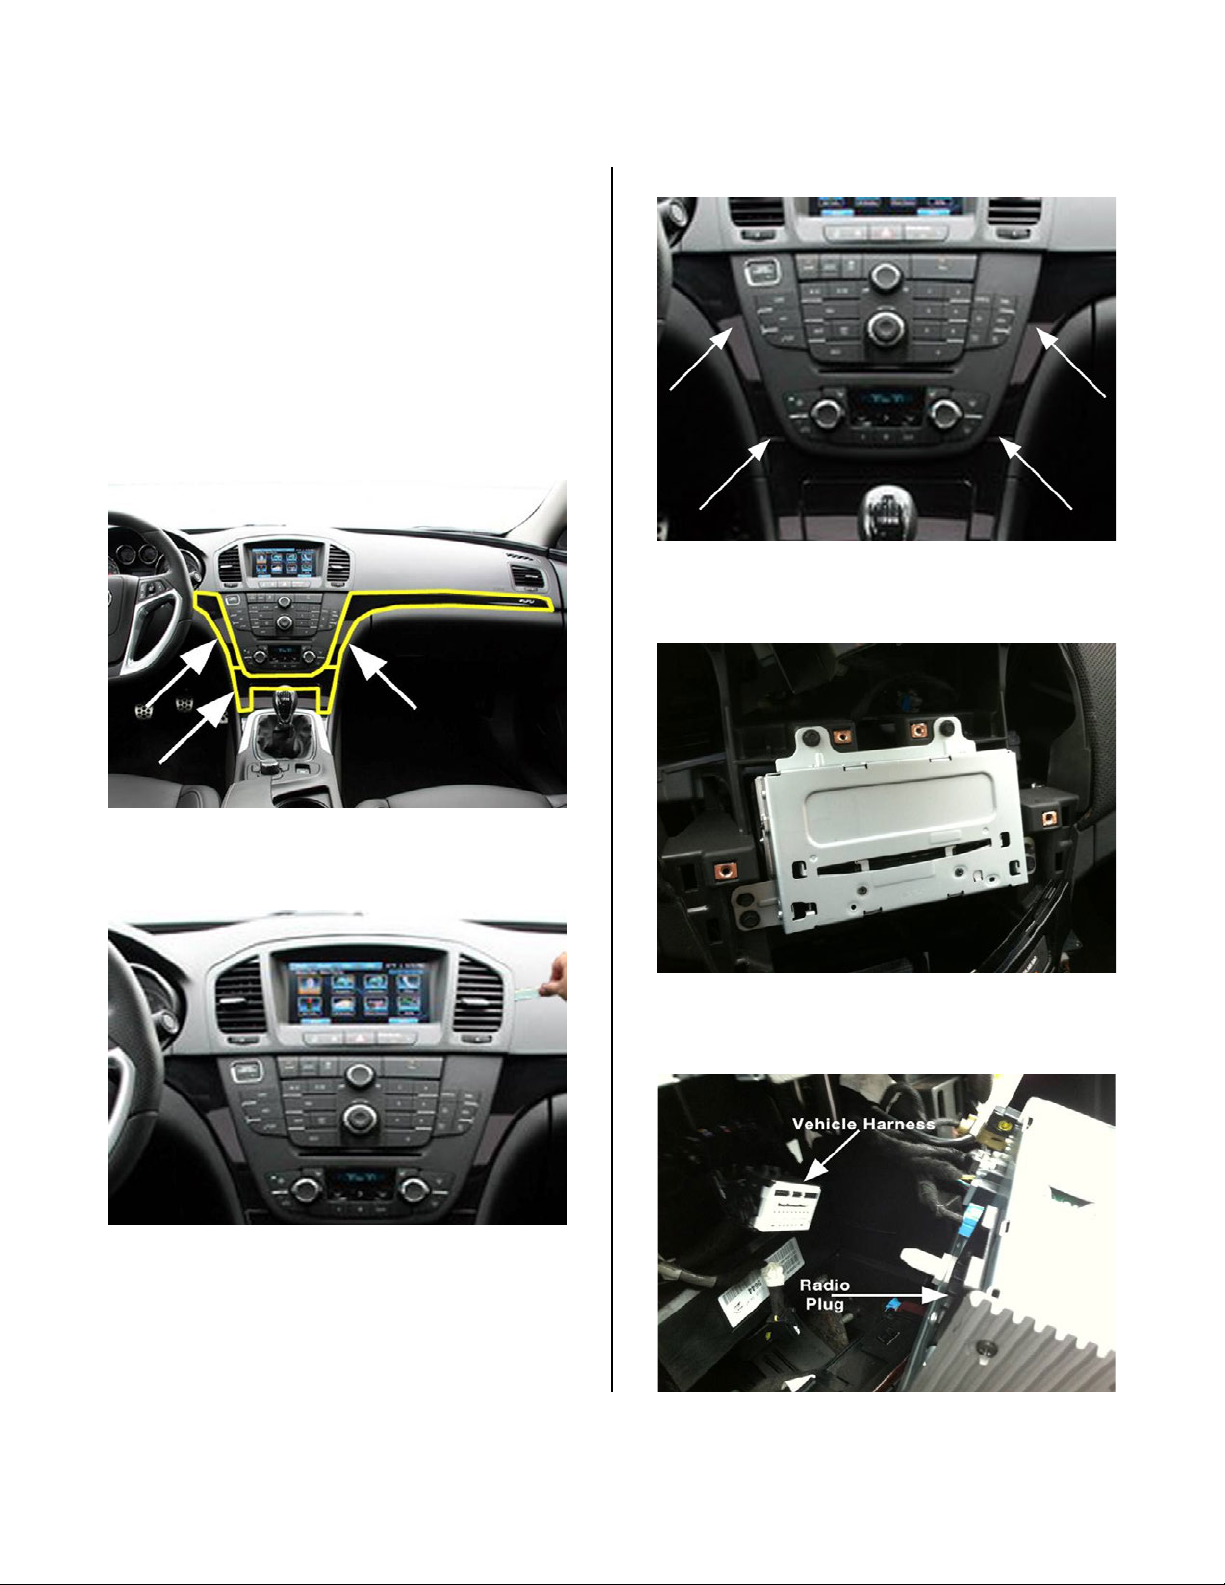
4. Carefully remove highlighted trim using a plastic trim
tool. (Figure 1)
Figure 1
5. Using a plastic trim tool, gently remove upper IP display
surround. (Figure 2)
Figure 2
6. Using a 7mm socket, remove 4 bolts attaching radio
faceplate unit and remove. (Figure 3)
Figure 3
7. Using a 7mm socket, remove 4 bolts attaching radio head
unit. (Figure 4)
Figure 4
8. Pull radio head away and disconnect 44-pin connector
from the back of radio. (Figure 5)
Figure 5
Page 7
Section 2: Buick Regal Instructions, 2011 – Current
2000-3801 Instructions 10-10-12.doc Page 7 of 24
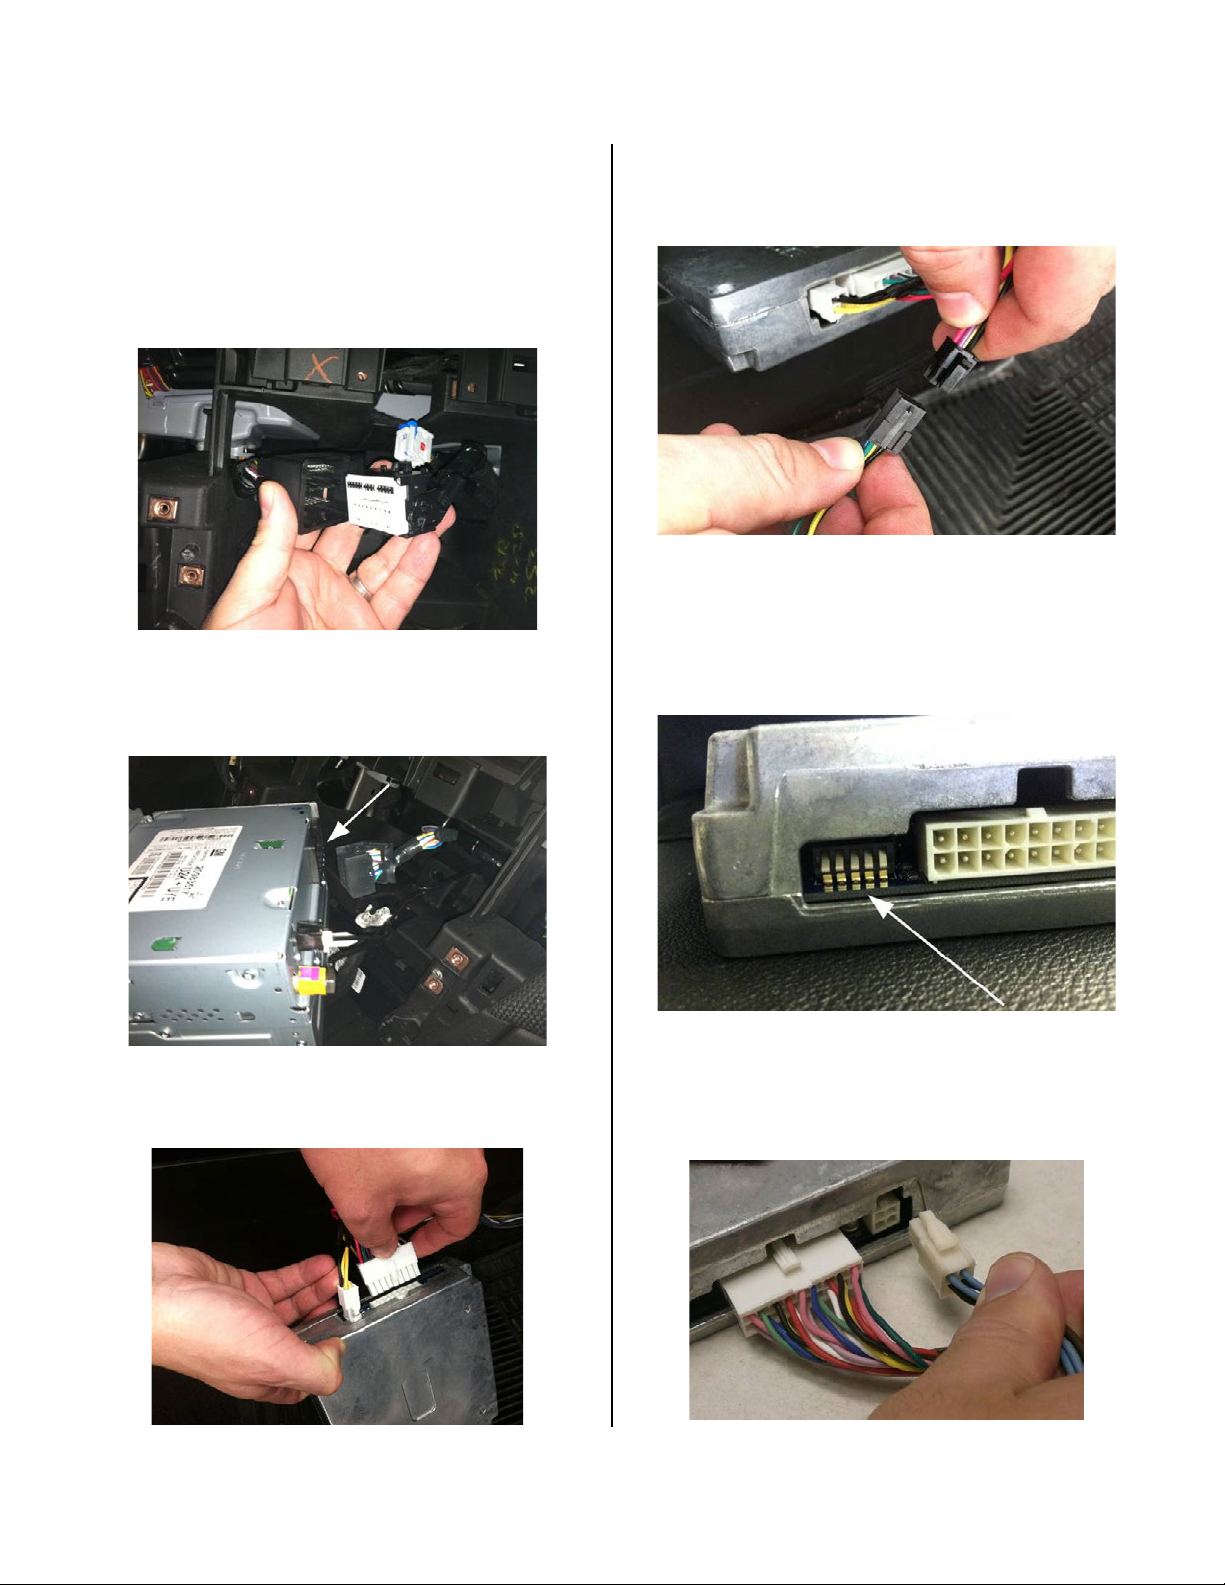
9. With the radio head unit pulled out of the way, drop the
white connectors of the DPS harness though the opening
behind radio cavity. Remove the console side panel, and
pull DPS harness through from underneath the dash.
10. Connect the male 44-pin connector from the DPS
harness to the vehicle’s harness. (Figure 6)
Figure 6
11. Connect the female end of the 44-pin connector from
the DPS harness to the back of the radio head unit.
(Figure 7)
Figure 7
12. Connect the two white connectors of the DPS harness
to the DPS module. (Figure 8)
Figure 8
13. Connect the DPS turn-on switch to the remaining
connector on the DPS harness. (Figure 9)
Figure 9
14. Reconnect negative battery cable of vehicle.
15. Place DPS module with the Bongiovi DPS Acoustics
side face down. Confirm the DPS unit’s dip switches
are all set to the “down” position – “DDDDD”. (Figure
10)
Figure 10
16. Turn vehicle ignition key to “ON” position. Turn on
radio head unit for 10 seconds. (Note: There should
be no sound from the speakers). Disconnect white 4pin connector from back of DPS module. (Figure 11)
Figure 11
Page 8
Section 2: Buick Regal Instructions, 2011 – Current
2000-3801 Instructions 10-10-12.doc Page 8 of 24
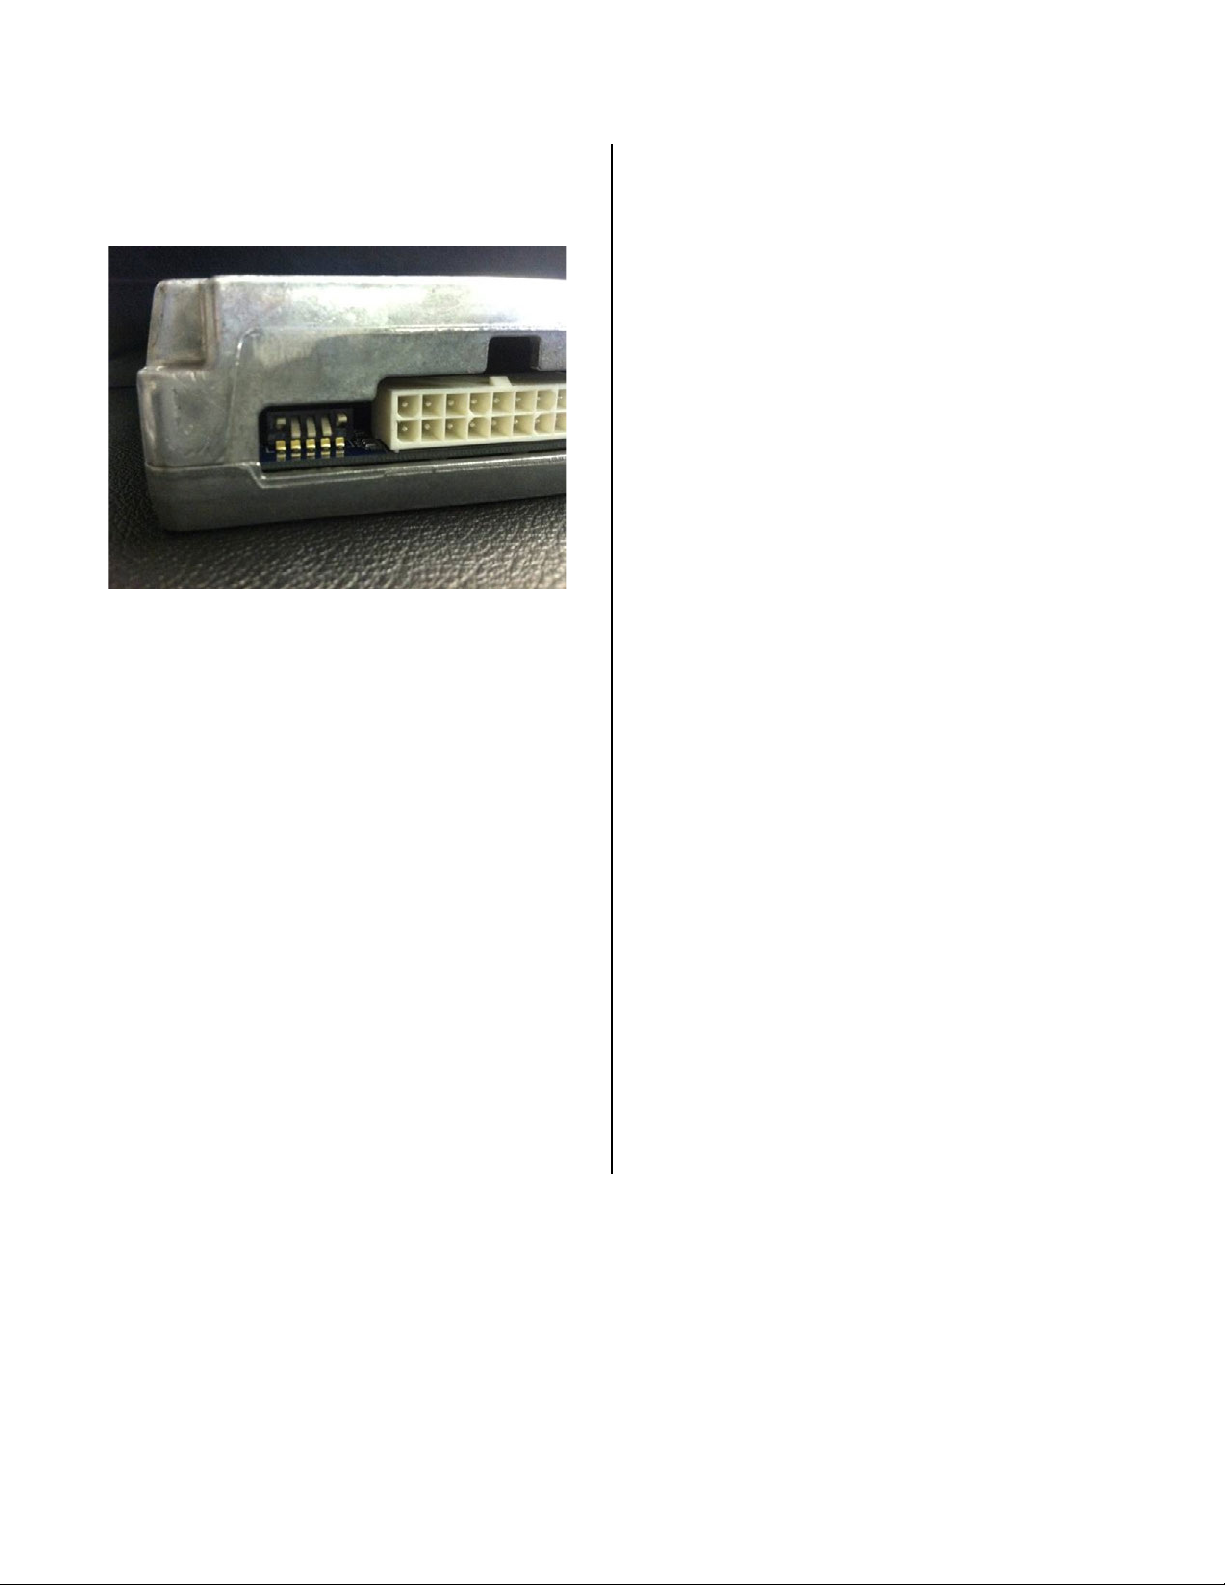
17. Set the DPS dip switches for Buick Regal. Flip the first
and fifth switches to the “up” position – “UDDDU”.
(Figure 12)
Figure 12
18. Plug white 4-pin connector into DPS module and wait
10 seconds. (Note: There should be no sound from the
speakers). Disconnect white 4-pin connector from back
of DPS module.
19. Plug white 4-pin connector back into DPS module.
After a few seconds you should hear sound from the
radio. Ensure radio head unit is working properly
including all speaker channels.
If you do not hear any sounds, recheck connections
and repeat Steps 15 through 19.
20. Disconnect vehicle negative battery cable.
21. Remove passenger hush panel by using 7mm socket
driver remove the bolts.
22. Using the supplied 24” wire ties, secure DPS module
under front of console or behind carpet on passenger
side upper foot well.
23. Reassemble vehicle.
24. Reconnect negative battery cable of vehicle.
25. Place Bongiovi DPS Badge on left side of IP center
trim.
Page 9
Section 3: Buick Verano Instructions, 2012 – Current
1. Ensure all radio functions are working properly, return
all Treble, Bass, Fade, and Balance to neutral settings,
and remove any CDs to avoid possible jam before
disassembly.
2. For vehicles equipped with automatic transmissions,
place shifter in the N (neutral) position and set parking
brake.
3. Loosen the negative battery cable bolt. Remove
negative battery cable from terminal and position
away from battery.
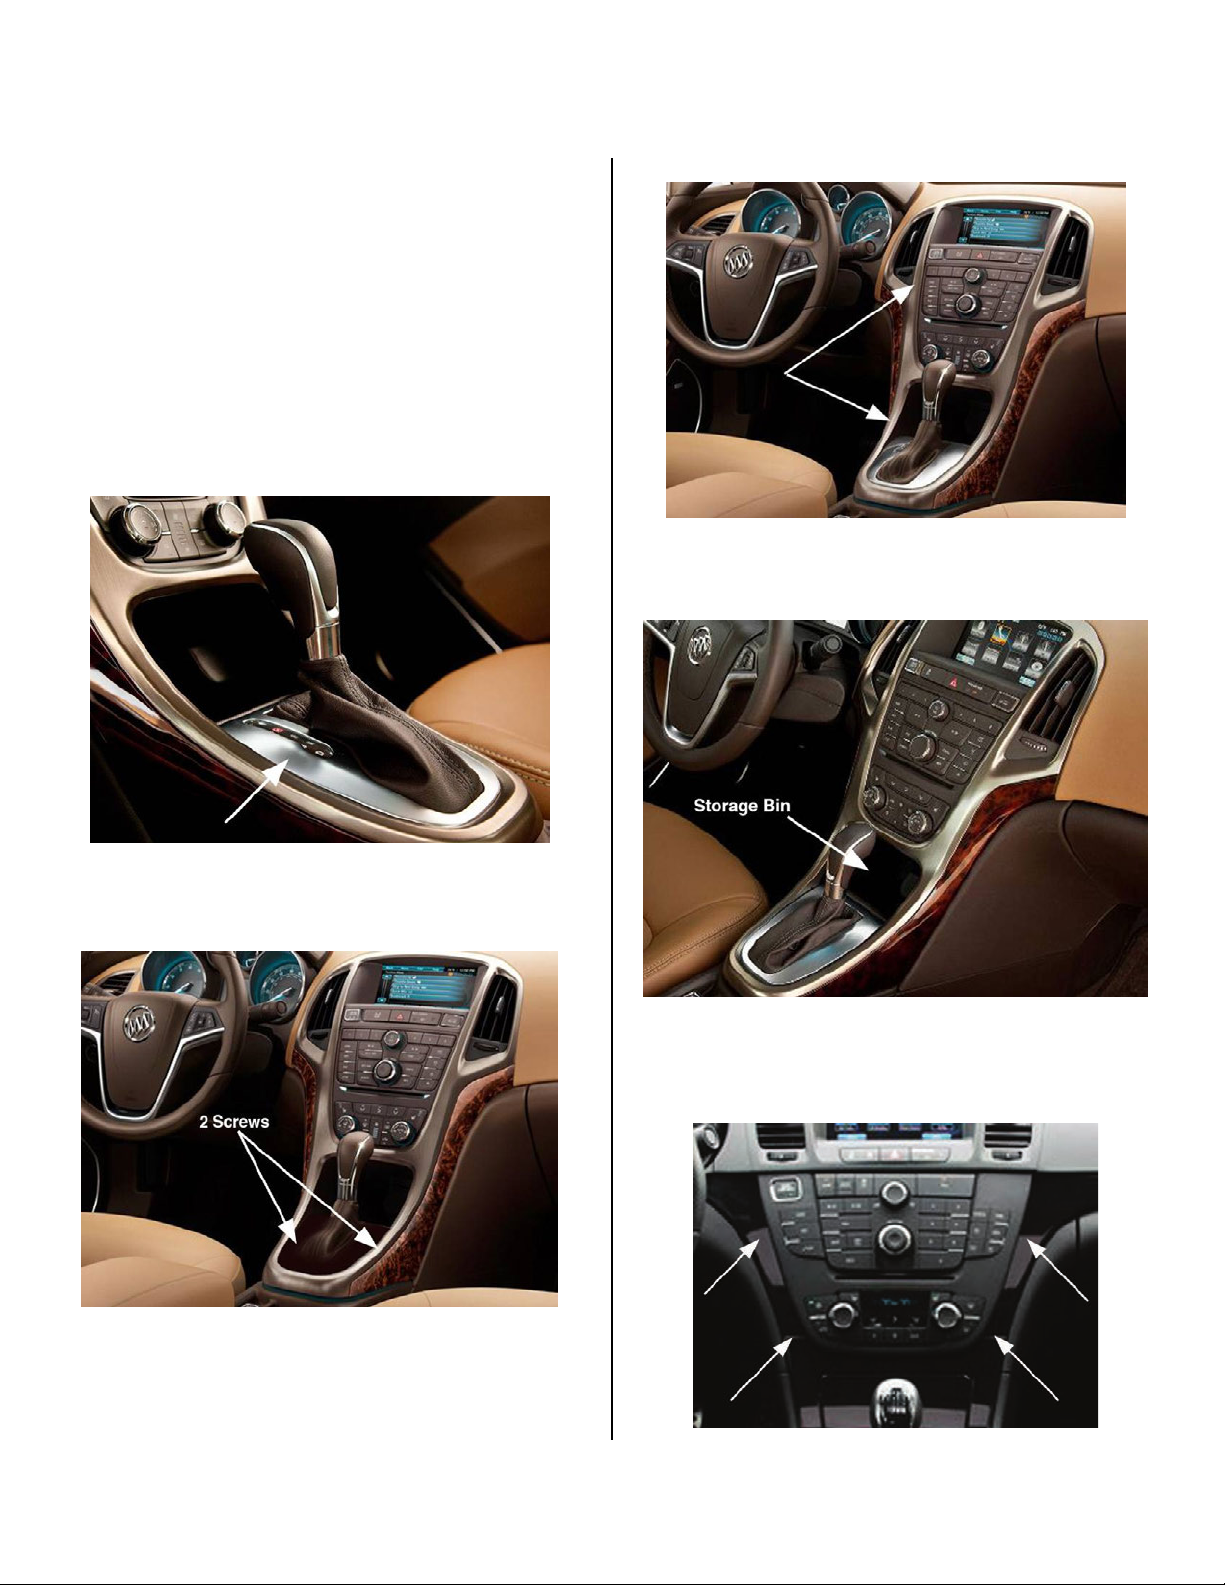
4. Using a plastic trim tool, gently remove the shifter
surround. (Figure 1)
Figure 1
Figure 3
7. Remove lower storage bin from below the HVAC
controls. (Figure 4)
Figure 4
5. Remove the 2 screws now visible from under the
shifter surround. (Figure 2)
Figure 2
6. Using the plastic trim tool, gently remove the IP and
console trim surround. (Figure 3)
8. Using a 7mm socket driver, remove the 4 bolts
attaching the center radio faceplate unit and remove
it. (Figure 5)
Figure 5
2000-3801 Instructions 10-10-12.doc Page 9 of 24
Page 10
Section 3: Buick Verano Instructions, 2012 – Current
2000-3801 Instructions 10-10-12.doc Page 10 of 24
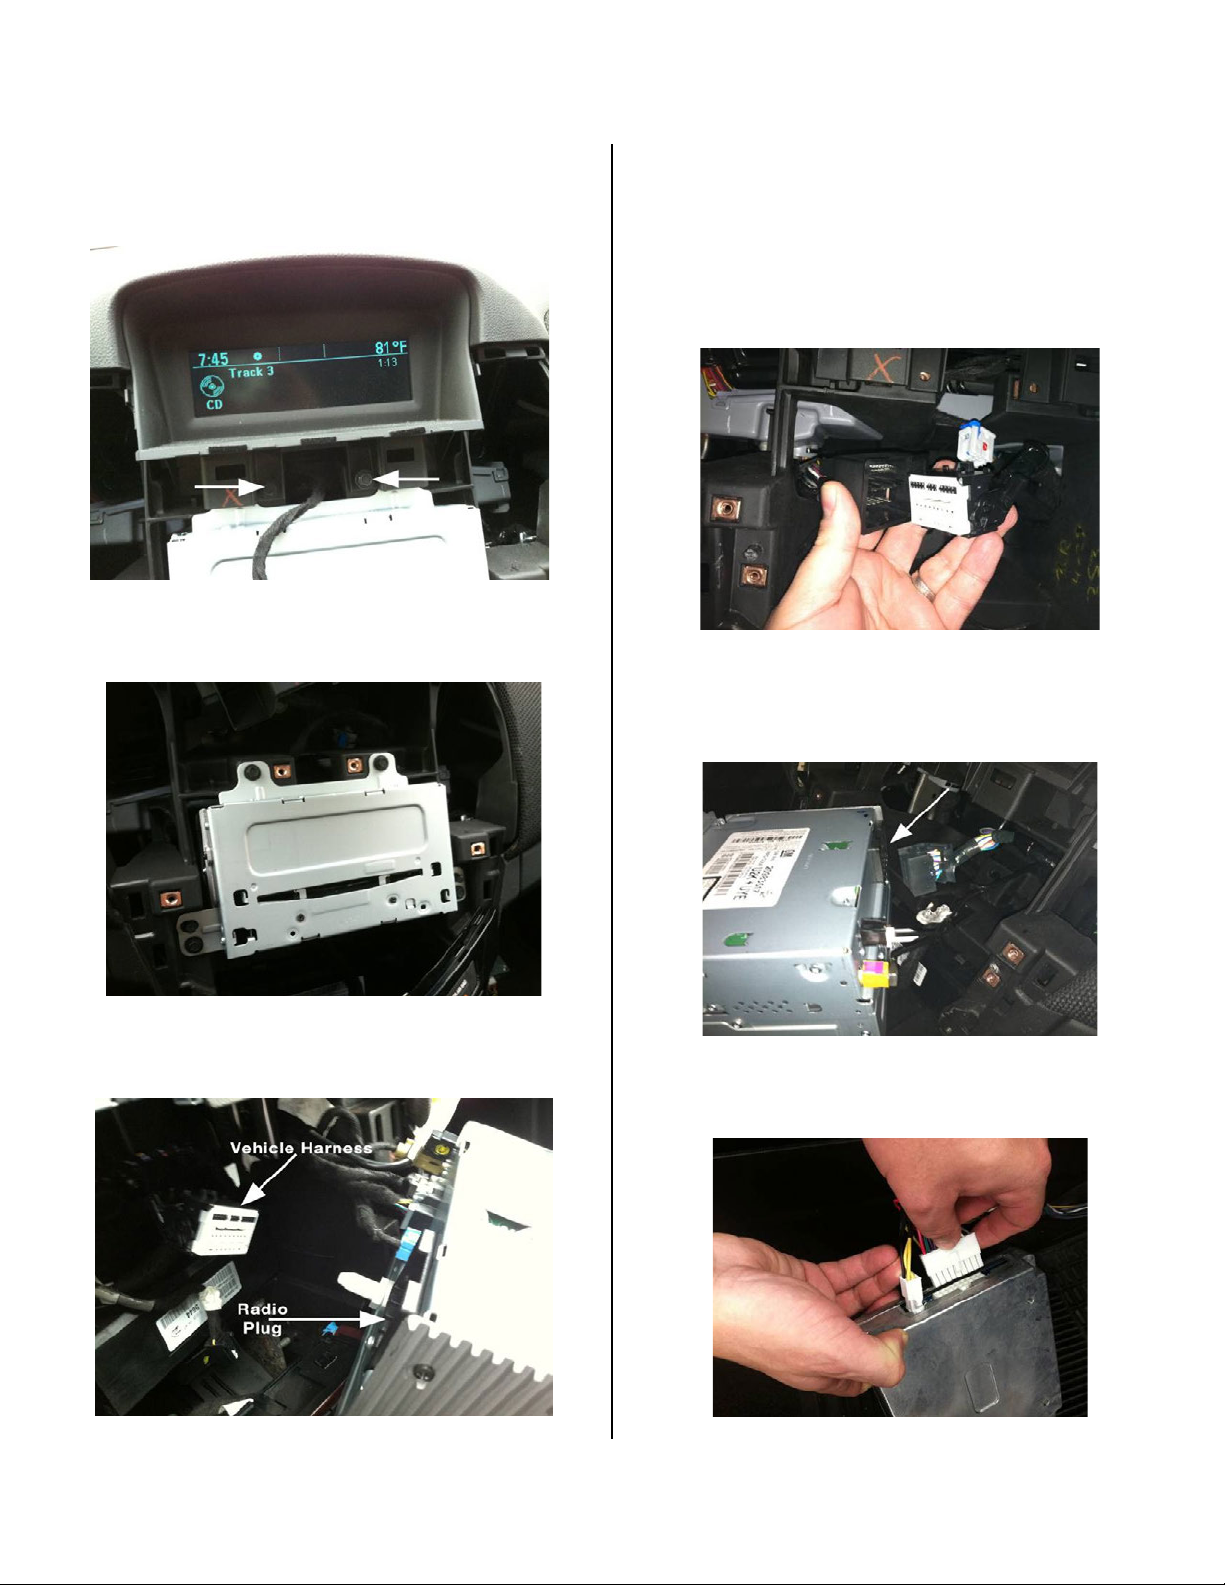
9. Using a 7mm socket driver, remove 2 bolts attaching
upper display screen, and remove display to gain
access to radio head unit. (Figure 6)
Figure 6
10. Using a 7mm socket driver, remove 4 bolts attaching
radio head unit. (Figure 7)
Figure 7
11. Pull out the radio head and disconnect the 44-pin
connector from the back of the radio. (Figure 8)
Figure 8
12. With the radio head unit pulled out of the way,
drop the white connectors of the DPS harness
though the opening behind radio cavity. Remove
the console side panel, and pull harness through
from underneath the dash on passenger side.
13. Connect the male 44-pin connector from the DPS
harness to the vehicles harness. (Figure 9)
Figure 9
14. Connect the female end of the 44-pin connector
from the DPS harness to the back of the radio head
unit. (Figure 10)
Figure 10
15. Connect the two white connectors of the DPS
harness to the DPS module. (Figure 11)
Figure 11
Page 11
Section 3: Buick Verano Instructions, 2012 – Current
2000-3801 Instructions 10-10-12.doc Page 11 of 24
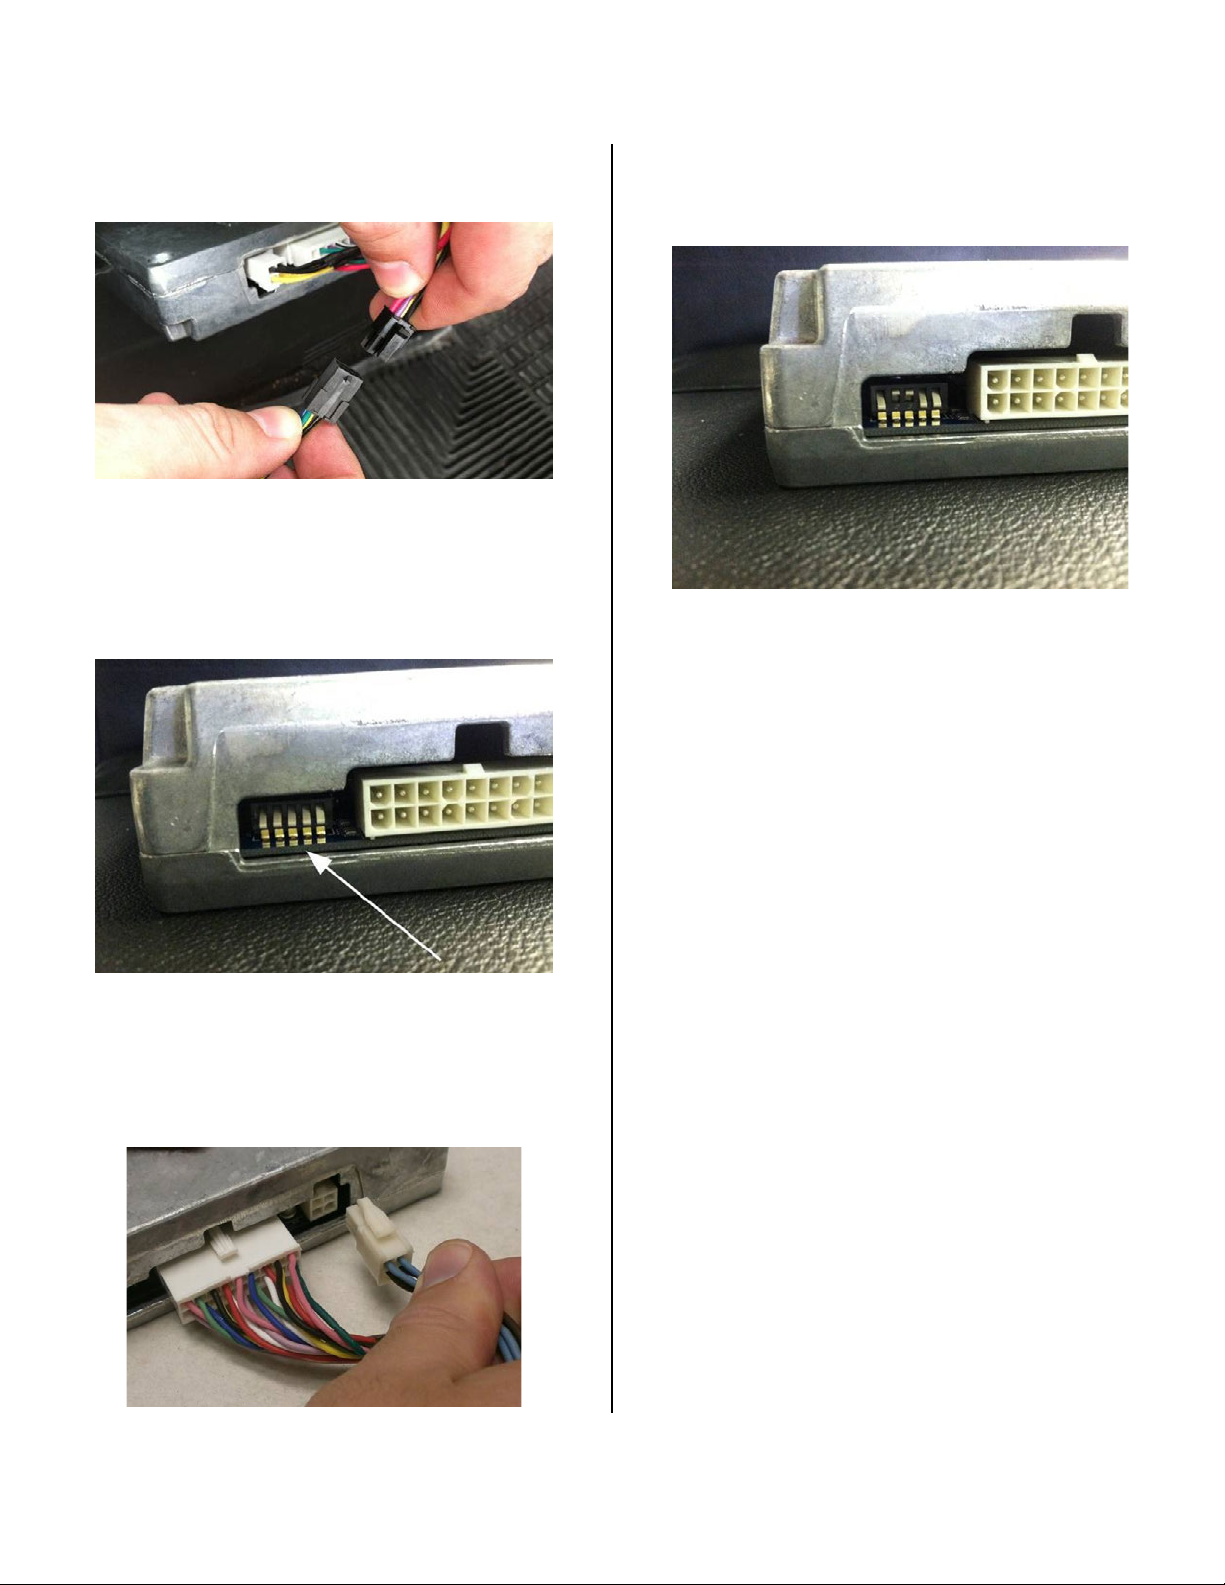
16. Connect the DPS turn-on switch to the remaining
connector on the DPS harness. (Figure 12)
Figure 12
17. Reconnect negative battery cable of vehicle.
18. Place DPS module with the Bongiovi DPS Acoustics
side face down. Then confirm the DPS unit’s dip
switches are all set to the “down” position –
“DDDDD”. (Figure 13)
Figure 13
19. Turn vehicle ignition key to “ON” position. Turn on
radio head unit for 10 seconds. (Note: There
should be no sound from the speakers).
Disconnect white 4-pin connector from back of
DPS module. (Figure 14)
Figure 14
20. Set the DPS dip switches for Buick Verano. The
second and third switches should be flipped to the
“up” position – “DUUDD”. (Figure 15)
Figure 15
21. Plug white 4-pin connector into DPS module and
wait 10 seconds. (Note: There should be no sound
from the speakers). Disconnect white 4-pin
connector from back of DPS module.
22. Plug white 4-pin connector back into DPS module.
After a few seconds you should hear sound from
the radio. Ensure radio head unit is working
properly including all speaker channels.
If you do not hear any sounds, recheck connections
and repeat Steps 18 through 22.
23. Disconnect negative battery cable.
24. Remove passenger hush panel by using a 7mm
socket driver to remove the bolts.
25. Using supplied 24” wire ties, secure DPS module
under front of console or behind carpet on
passenger side upper foot well.
26. Reassemble vehicle.
27. Reconnect negative battery cable.
28. Place Bongiovi DPS Badge on left side of IP center
trim.
Page 12
Section 4: Chevy Camaro Instructions, 2010 - Current
2000-3801 Instructions 10-10-12.doc Page 12 of 24
1. Ensure all radio functions are working properly, return
all Treble, Bass, Fade, and Balance to neutral settings,
and remove any CDs to avoid possible jam before
disassembly.
2. For vehicles equipped with automatic transmissions,
place shifter in the N (neutral) position and set parking
brake.
3. Loosen the negative battery cable bolt. Remove
negative battery cable from terminal and position
away from battery.
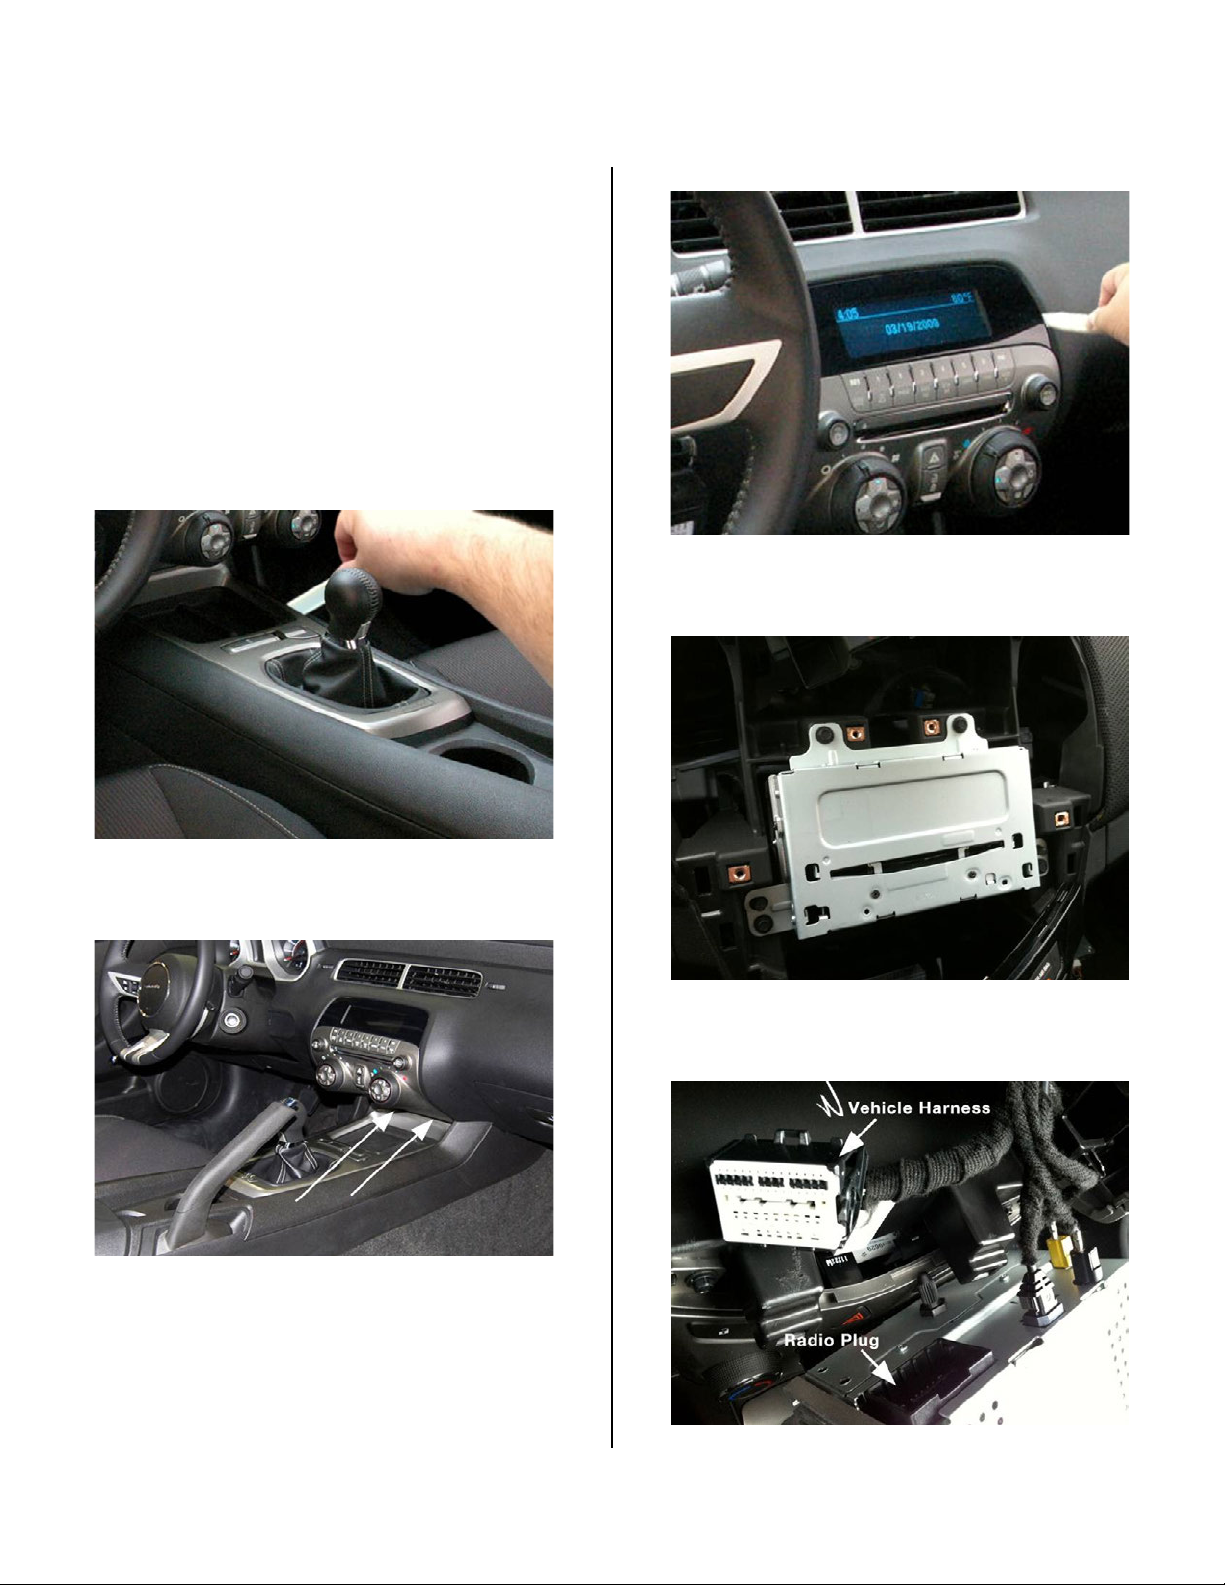
4. Using a plastic trim tool, gently remove the lower
console trim. (Figure 1)
Figure 1
5. Using a 7mm socket driver remove the 2 bolts under
the HVAC controls. (Figure 2)
Figure 2
6. Using the plastic trim tool, gently remove the IP face
plate controls (Figure 3)
Figure 3
7. Using a 7mm socket driver, remove the 4 bolts
attaching the radio head unit. (Figure 4)
Figure 4
8. Pull out the radio head and disconnect the 44-pin
connector from the back of the radio. (Figure 5)
Figure 5
Page 13
Section 4: Chevy Camaro Instructions, 2010 - Current
2000-3801 Instructions 10-10-12.doc Page 13 of 24
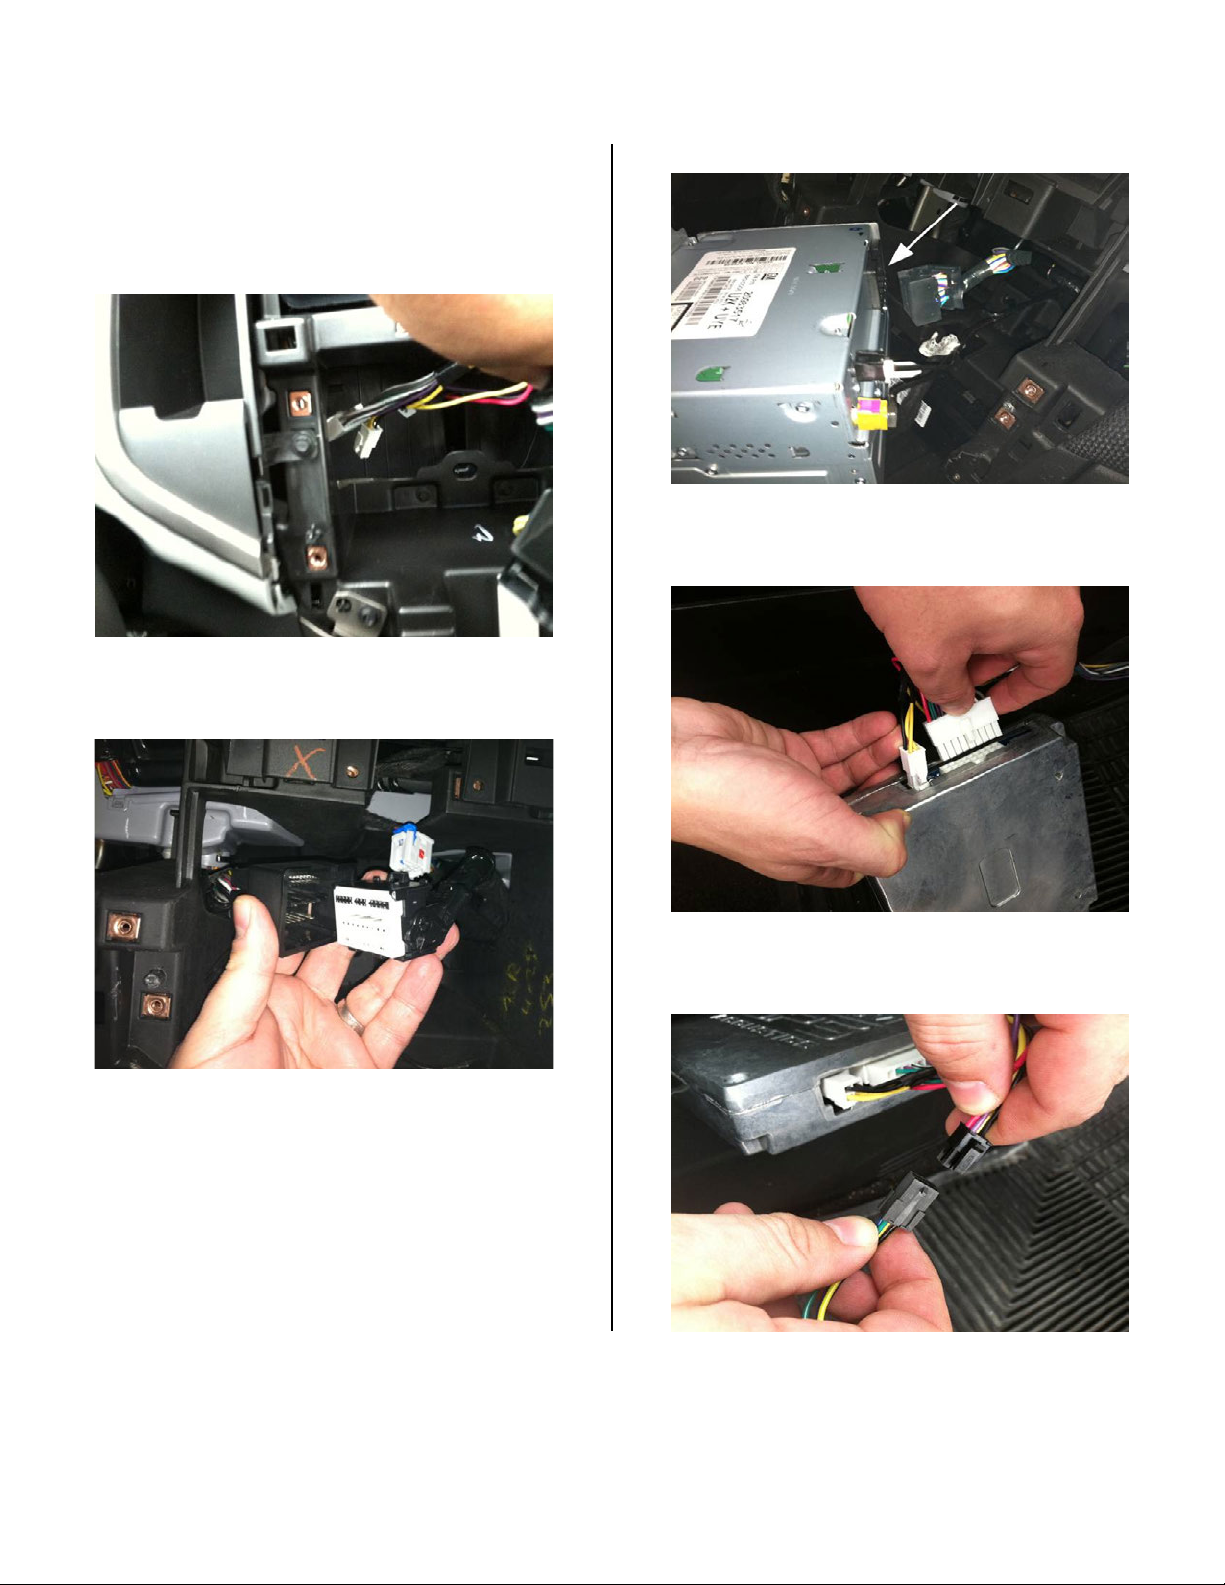
9. With the radio head unit pulled out of the way,
drop the white connectors of the DPS harness
though the opening behind radio cavity on the left
side. Pull harness through from underneath the
dash. (Figure 6)
Figure 6
10. Connect the male 44-pin connector from the DPS
harness to the vehicle’s harness. (Figure 7)
Figure 7
11. Connect the female end of the 44-pin connector
from the DPS harness to the back of the radio head
unit. (Figure 8)
Figure 8
12. Connect the two white connectors of the DPS
harness to the DPS module. (Figure 9)
Figure 9
13. Connect the DPS turn-on switch to the remaining
connector on the DPS harness. (Figure 10)
Figure 10
Page 14
Section 4: Chevy Camaro Instructions, 2010 - Current
2000-3801 Instructions 10-10-12.doc Page 14 of 24
14. Reconnect negative battery cable.
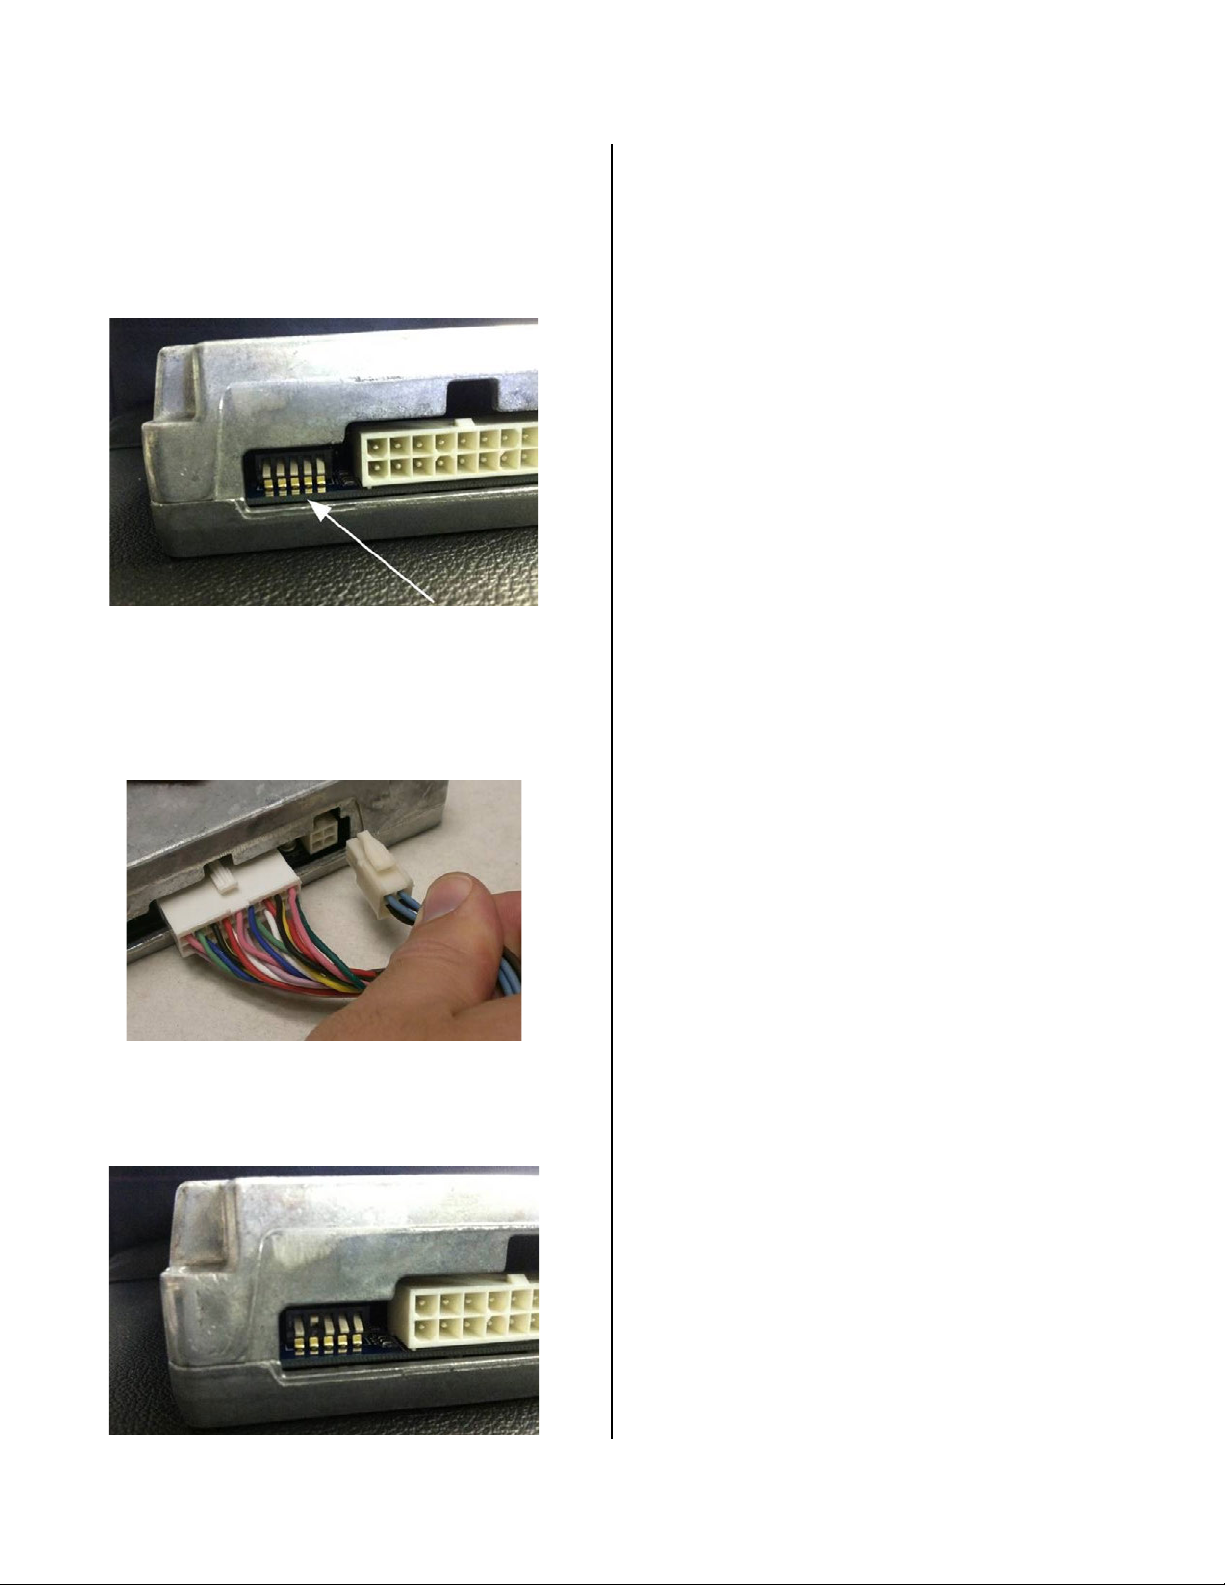
15. Place DPS module with the Bongiovi DPS Acoustics
side face down. Confirm the DPS unit’s dip
switches are all set to the “down” position –
“DDDDD”. (Figure 11)
Figure 11
16. Turn vehicle ignition key to “ON” position. Turn on
radio head unit for 10 seconds. (Note: There
should be no sound from the speakers).
Disconnect white 4-pin connector from back of
DPS module. (Figure 12)
Figure 12
17. Set the DPS dip switches for Chevy Camaro. The
second switch should be flipped to the “up” position
– “DUDDD”. (Figure 13)
Figure 13
18. Plug white 4-pin connector into DPS module and
wait 10 seconds. (Note: There should be no sound
from the speakers). Disconnect white 4-pin
connector from back of DPS module.
19. Plug white 4-pin connector back into DPS module.
After a few seconds you should hear sound from
the radio. Ensure radio head unit is working
properly including all speaker channels.
If you do not hear any sounds, recheck connections
and repeat Steps 15 through 19.
20. Disconnect negative battery cable.
21. Using supplied 24” wire ties, secure DPS module
under front of console bracket or behind upper foot
well carpet.
22. Reassemble vehicle.
23. Reconnect negative battery cable.
24. Place Bongiovi DPS Badge on left side of IP center
trim.
Page 15
Section 5: Chevy Cruze Instructions, 2011 – Current
2000-3801 Instructions 10-10-12.doc Page 15 of 24
1. Ensure all radio functions are working properly, return
all Treble, Bass, Fade, and Balance to neutral settings,
and remove any CDs to avoid possible jam before
disassembly.
2. For vehicles equipped with automatic transmissions,
place shifter in the N (neutral) position and set parking
brake.
3. Loosen the negative battery cable bolt. Remove
negative battery cable from terminal and position away
from battery.
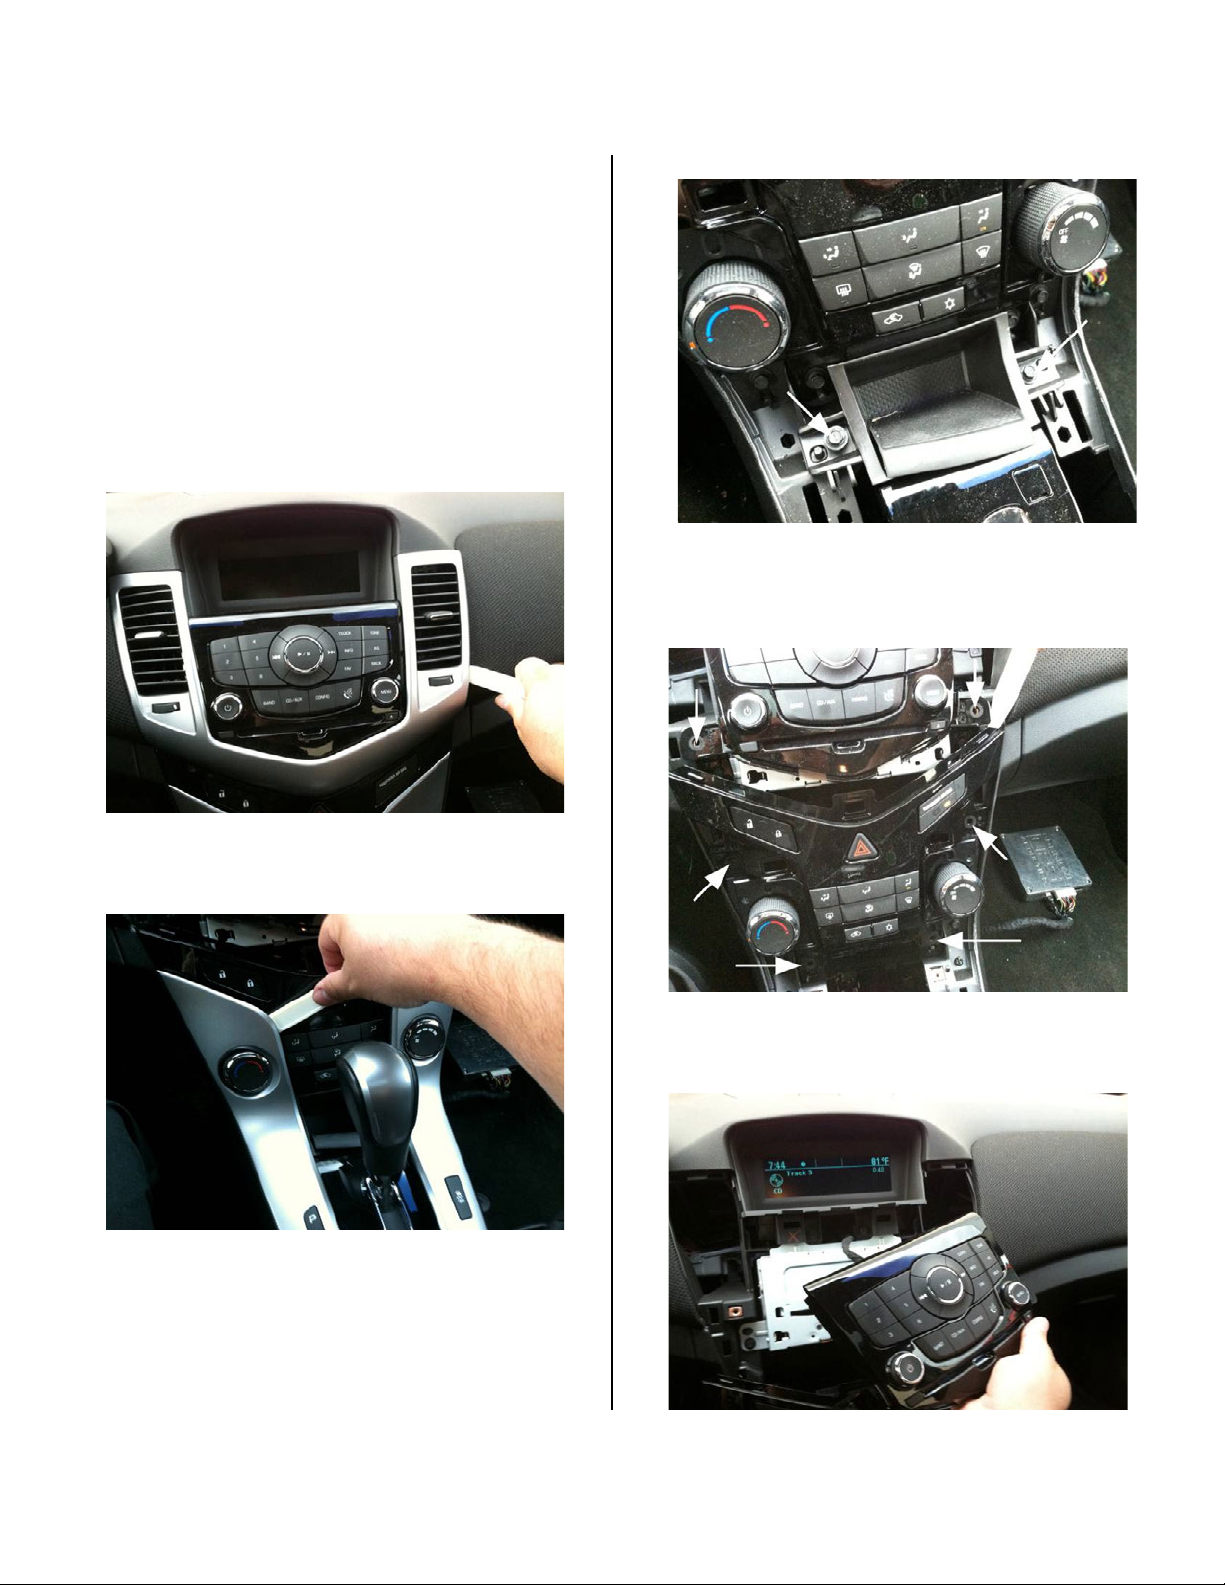
4. Using a plastic trim tool, gently remove the IP center
trim. (Figure 1)
Figure 1
5. Carefully remove the lower console trim panel using
the plastic trim tool. (Figure 2)
Figure 2
6. Using a 7mm socket driver remove the 2 bolts
attaching the small lower bin under the faceplate
controls. (Figure 3)
Figure 3
7. Using a 7mm socket driver, remove the 6 bolts
attaching the upper and lower faceplate controls.
(Figure 4)
Figure 4
8. Remove and set the upper and lower faceplate controls
aside. (Figure 5)
Figure 5
Page 16
Section 5: Chevy Cruze Instructions, 2011 – Current
2000-3801 Instructions 10-10-12.doc Page 16 of 24
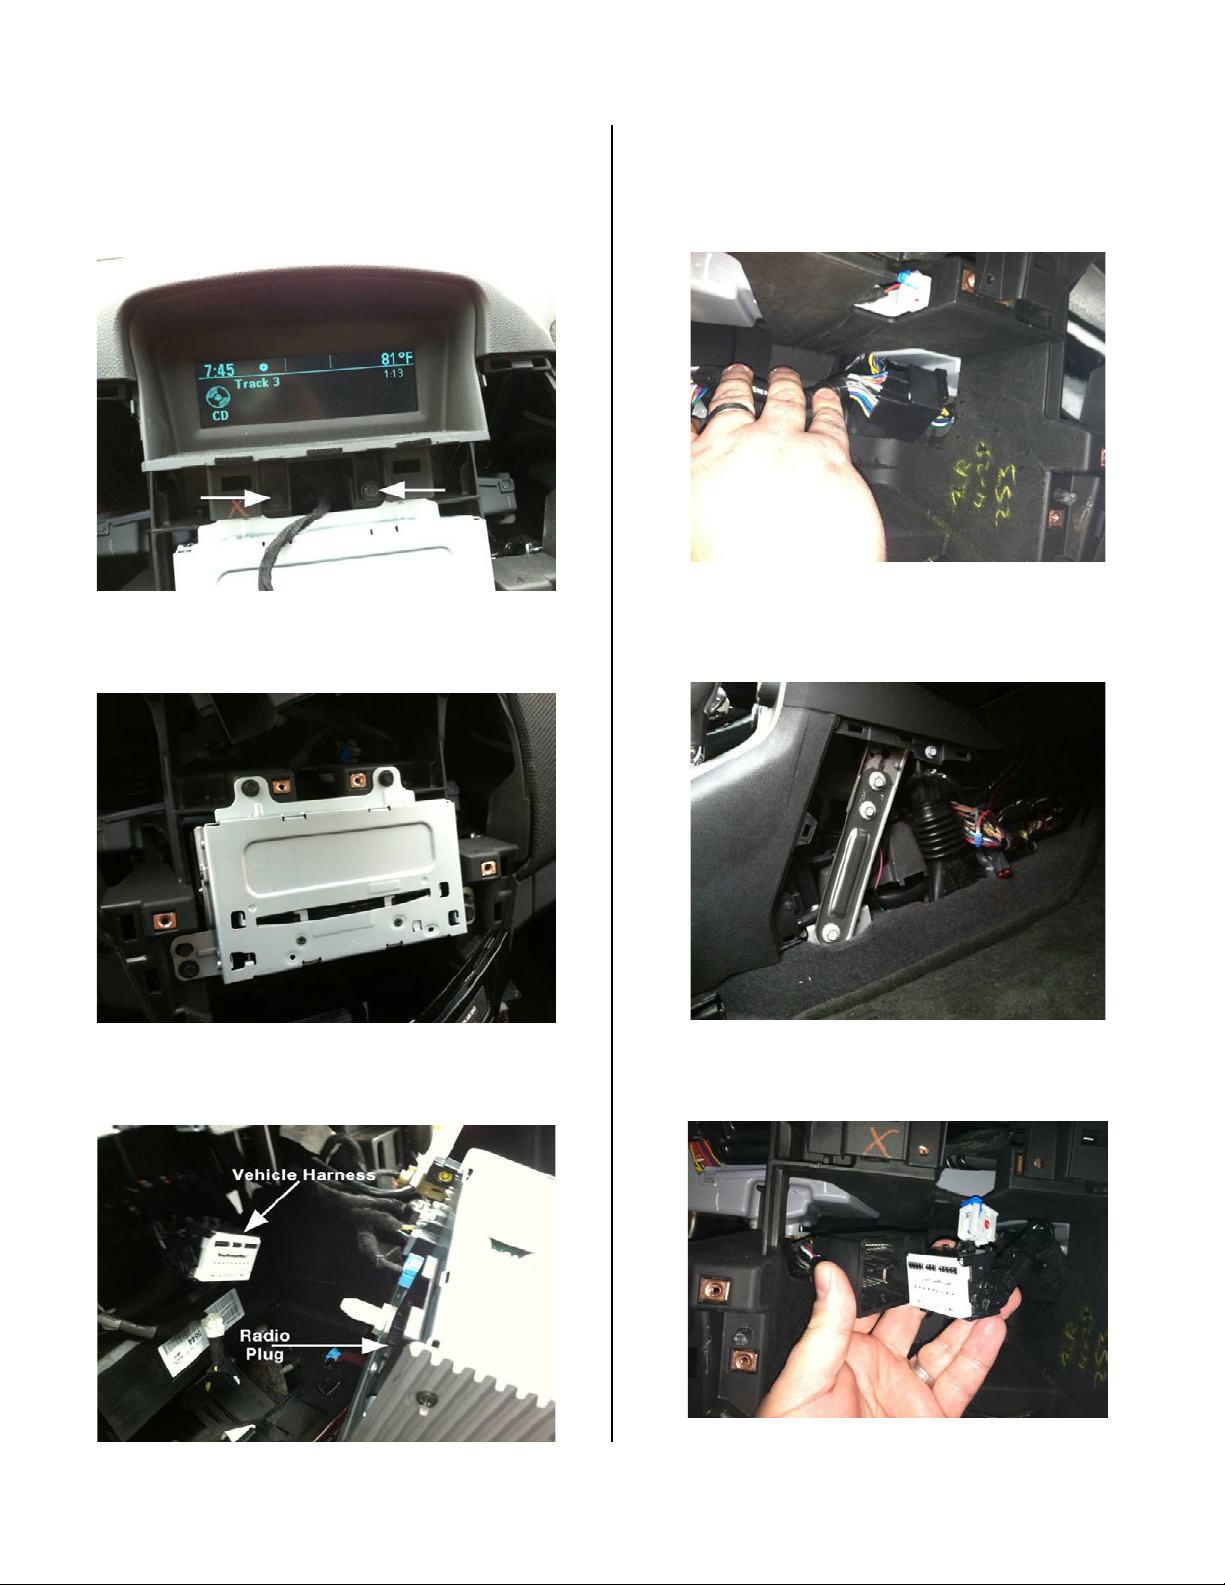
9. Using a 7mm socket driver, remove the 2 bolts
attaching the upper display screen and remove it to
gain access to the radio head unit. (Figure 6)
Figure 6
10. Using a 7mm socket driver, remove the 4 bolts
attaching the radio head unit. (Figure 7)
Figure 7
11. Pull out the radio head and disconnect the 44-pin
connector from the back of the radio. (Figure 8)
Figure 8
12. With the radio head unit pulled out of the way, drop
the white connectors of the DPS harness though the
opening behind radio cavity on the right side (Figure
9).
Figure 9
13. Remove console side panel and pull DPS Harness
through from underneath the dash on passenger side.
(Figure 10)
Figure 10
19. Connect the male 44-pin connector of the DPS
harness to the vehicle’s harness. (Figure 11)
Figure 11
Page 17
Section 5: Chevy Cruze Instructions, 2011 – Current
2000-3801 Instructions 10-10-12.doc Page 17 of 24
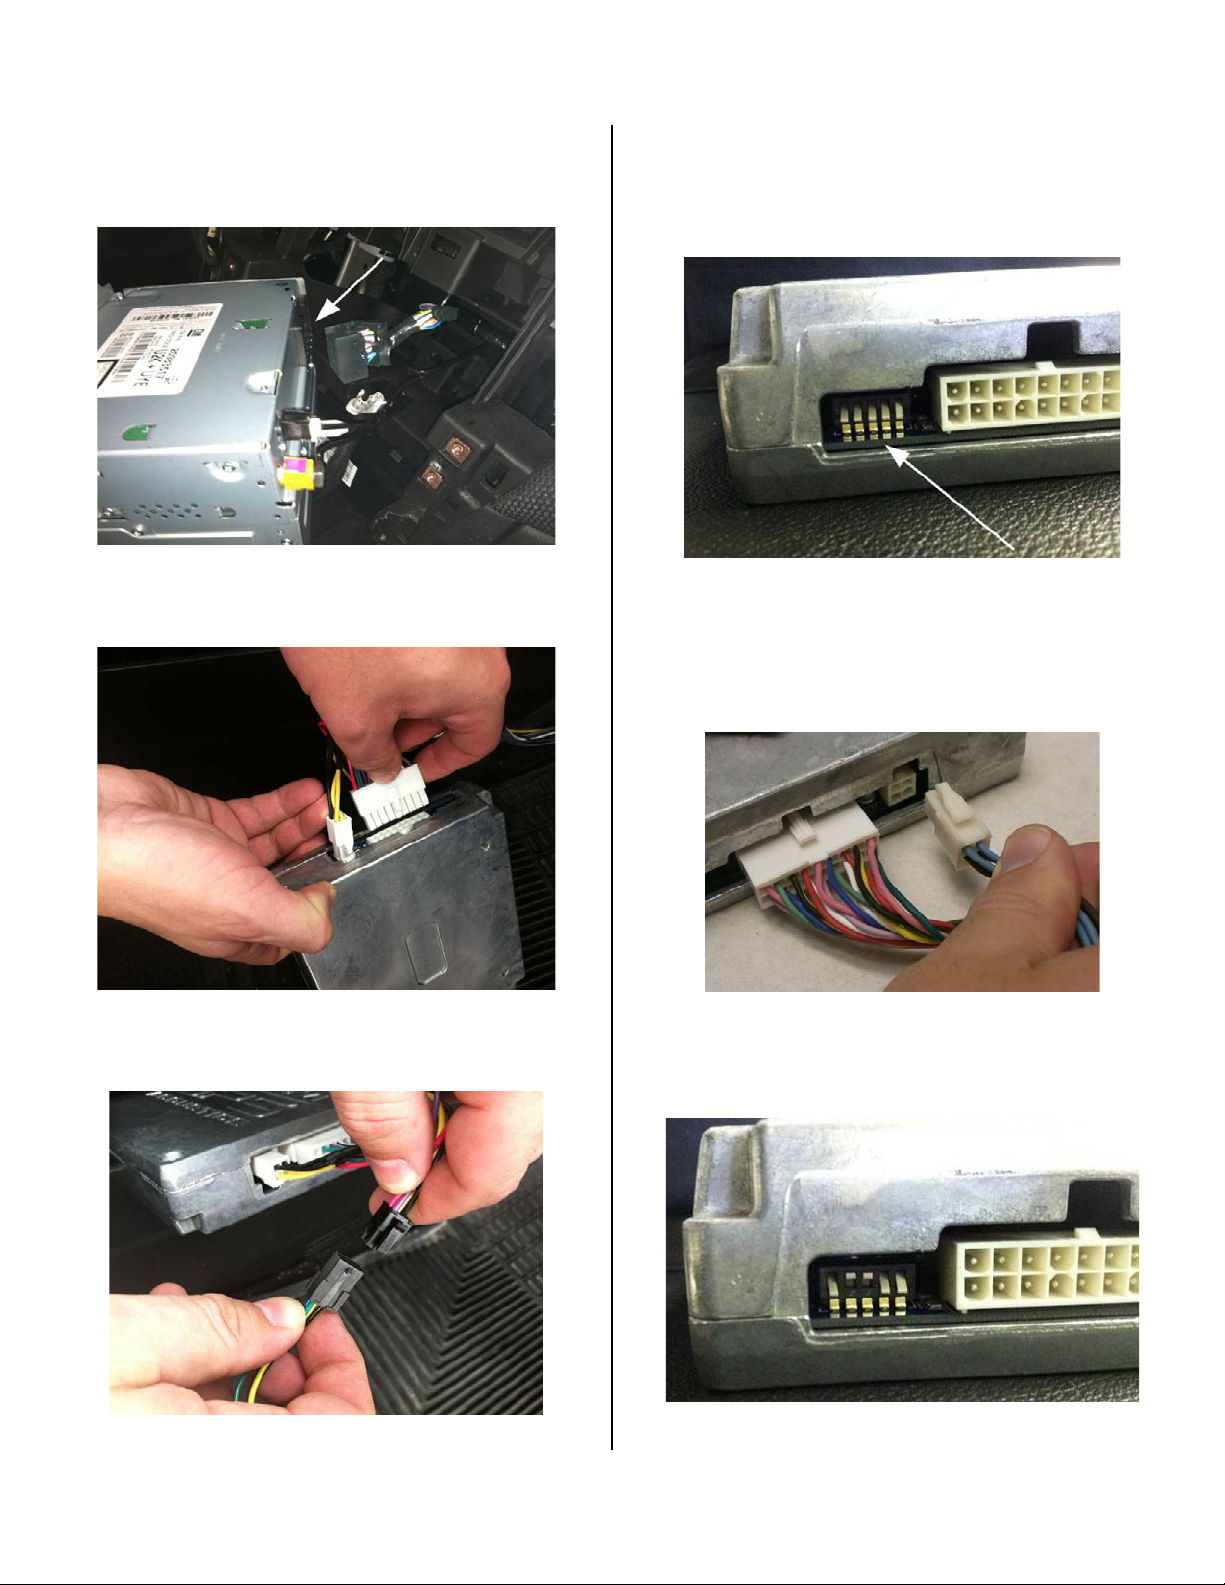
20. Connect the female end of the 44-pin connector
from the DPS harness to the back of the radio head
unit. (Figure 12)
Figure 12
21. Connect the two white connectors of the DPS
harness to the DPS module. (Figure 13)
Figure 13
22. Connect the DPS turn-on switch to the remaining
connector on the DPS harness. (Figure 14)
Figure 14
23. Reconnect negative vehicle battery cable.
24. Place DPS module with Bongiovi DPS Acoustics side
face down. Confirm the DPS unit’s dip switches are
set to the “down” position – “DDDDD”. (Figure 15)
Figure 15
25. Turn vehicle ignition key to “ON” position. Turn on
radio head unit for 10 seconds. (Note: There should
be no sound from the speakers). Disconnect white
4-pin connector from back of DPS module. (Figure
16)
Figure 16
26. Set the DPS dip switches for Chevy Cruze. The
second and third switches should be flipped to the
“up” position – “DUUDD”. (Figure 17)
Figure 17
Page 18
Section 5: Chevy Cruze Instructions, 2011 – Current
2000-3801 Instructions 10-10-12.doc Page 18 of 24
27. Plug white 4-pin connector into DPS module and
wait 10 seconds. (Note: There should be no sound
from the speakers). Disconnect white 4-pin
connector from back of DPS module.
28. Plug white 4-pin connector back into DPS module.
After a few seconds you should hear sound from
the radio. Ensure radio head unit is working
properly including all speaker channels.
29. If you do not hear any sounds, recheck connections
and repeat Steps 24 through 29.
30. Disconnect vehicle negative battery cable.
31. Using a 7mm socket driver, remove the bolts from
the passenger hush panel and remove the panel.
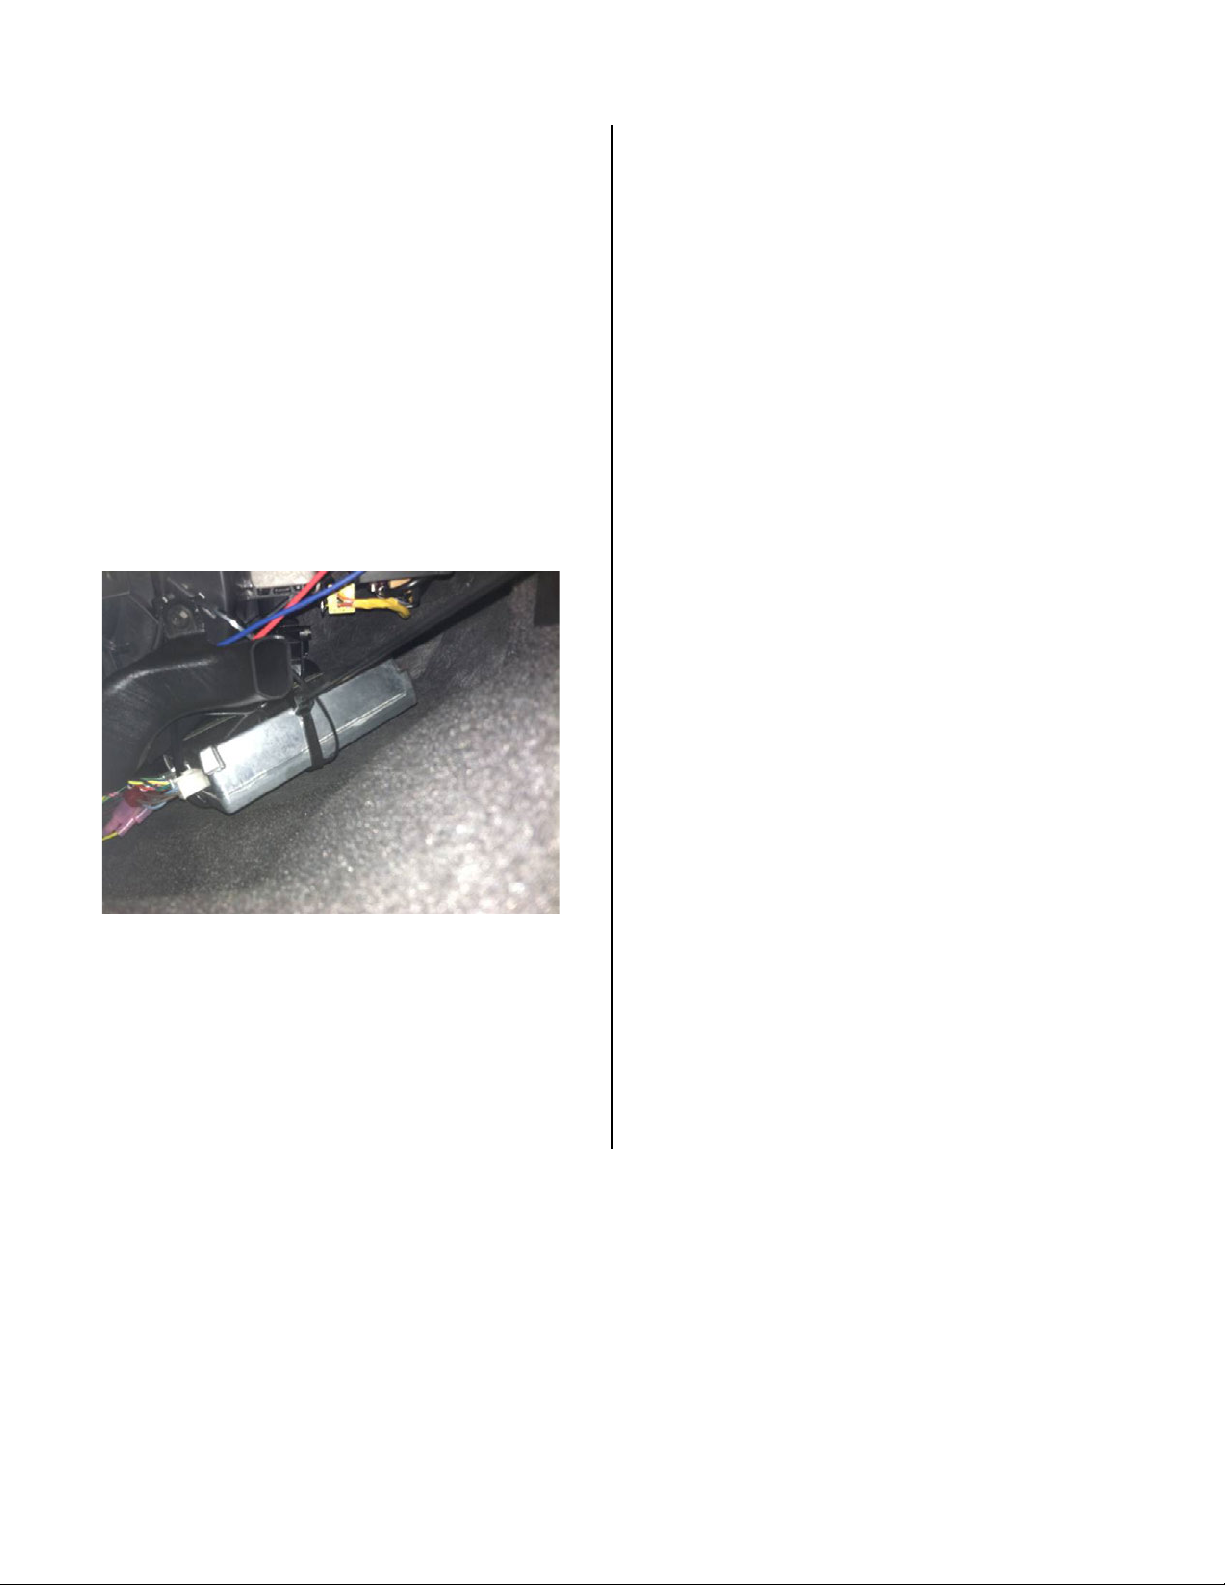
32. Using the supplied 24” wire ties secure the DPS
module under passenger foot well behind HVAC
duct. (Figure 18)
Figure 18
33. Reassemble vehicle.
34. Reconnect negative battery cable.
35. Place Bongiovi DPS Badge on left side of IP center
trim.
Page 19
Section 6: 2013 Chevy Malibu Instructions
2000-3801 Instructions 10-10-12.doc Page 19 of 24
1. Ensure all radio functions are working properly,
return all Treble, Bass, Fade, and Balance to neutral
settings and, remove any CDs to avoid possible jam
before disassembly.
2. For vehicles equipped with automatic transmissions,
place shifter in the N (neutral) position and set parking
brake.
3. Loosen the negative battery cable bolt. Remove
negative battery cable from terminal and position away
from battery.
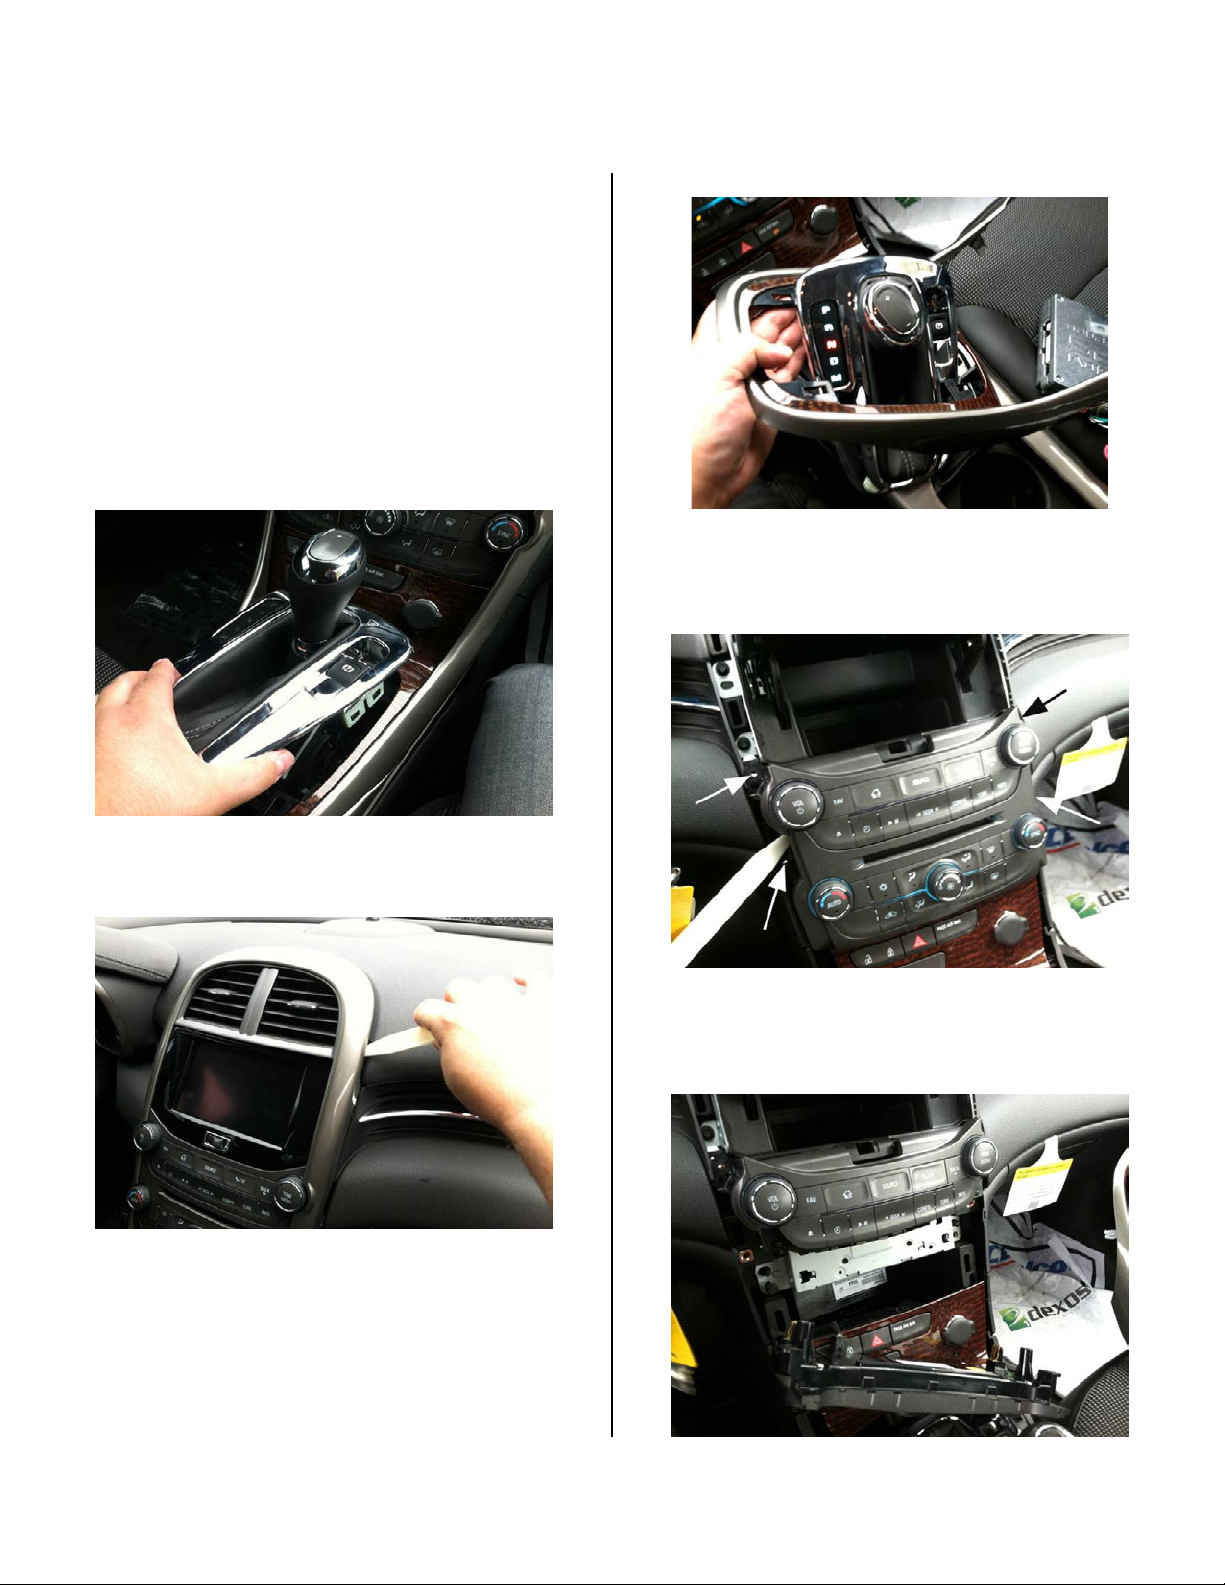
4. Using a plastic trim tool, gently separate the chrome
shifter bezel from the surrounding bezel. (Figure 1)
Figure 1
5. Using the plastic trim tool gently remove the IP
center trim. (Figure 2)
Figure 2
6. Carefully remove the IP center trim panel by slide
the shifter bezel through the trim opening. (Figure 3)
Figure 3
7. Using a 7mm socket driver, remove the 4 bolts
attaching the HVAC and radio control faceplates. (Figure
4)
Figure 4
8. Flip up the display screen and remove both the
HVAC and radio faceplates starting with the HVAC.
(Figure 5)
Figure 5
Page 20
Section 6: 2013 Chevy Malibu Instructions
2000-3801 Instructions 10-10-12.doc Page 20 of 24
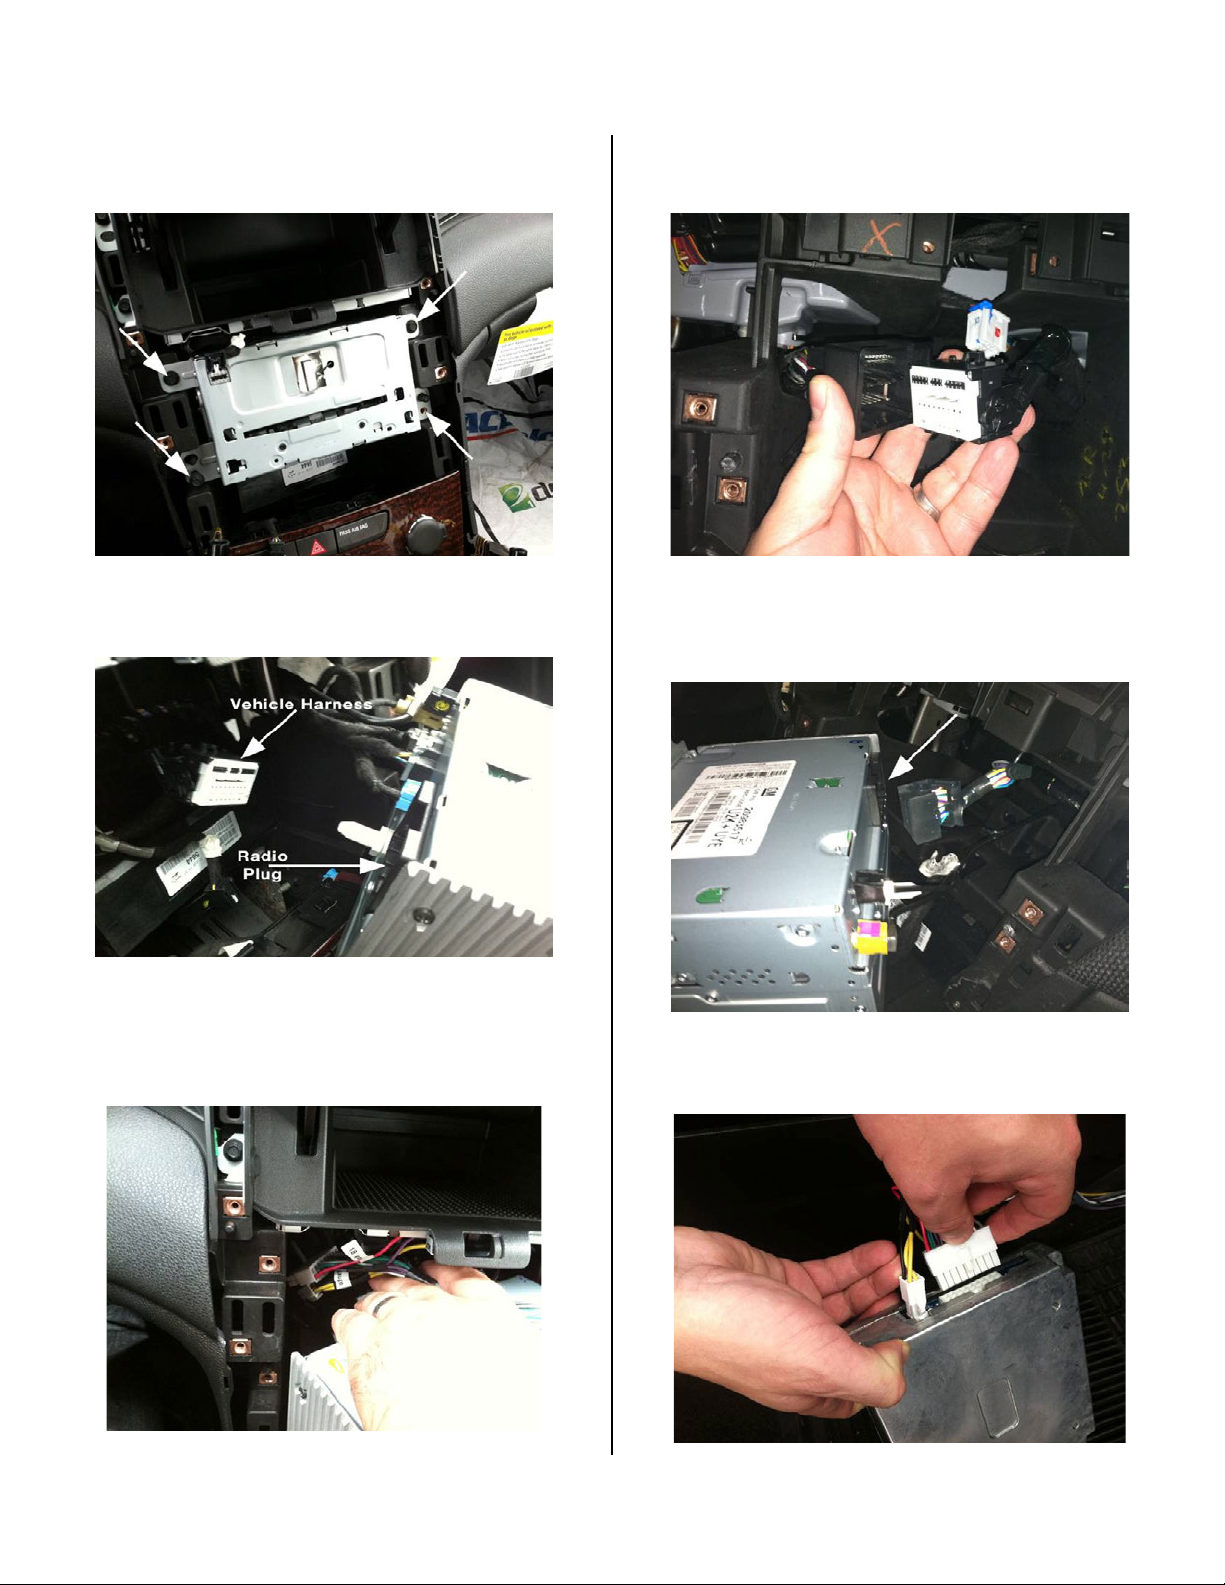
9. Using a 7mm socket driver remove the 4 bolts
attaching the radio head unit. (Figure 6)
Figure 6
10. Pull out the radio head and disconnect the 44-pin
connector from the back of the radio. (Figure 7)
Figure 7
11. With the radio head unit pulled out of the way, drop
the white connectors of the DPS harness though the
opening behind radio cavity on the left side and pull
through from underneath the dash. (Figure 8)
Figure 8
12. Connect the male 44-pin connector from the DPS
harness to the vehicles harness. (Figure 9)
Figure 9
13. Connect the female end of the 44-pin connector
from the DPS harness to the back of the radio head unit.
(Figure 10)
Figure 10
14. Connect the two white connectors of the DPS
harness to the DPS module. (Figure 11)
Figure 11
Page 21
Section 6: 2013 Chevy Malibu Instructions
2000-3801 Instructions 10-10-12.doc Page 21 of 24
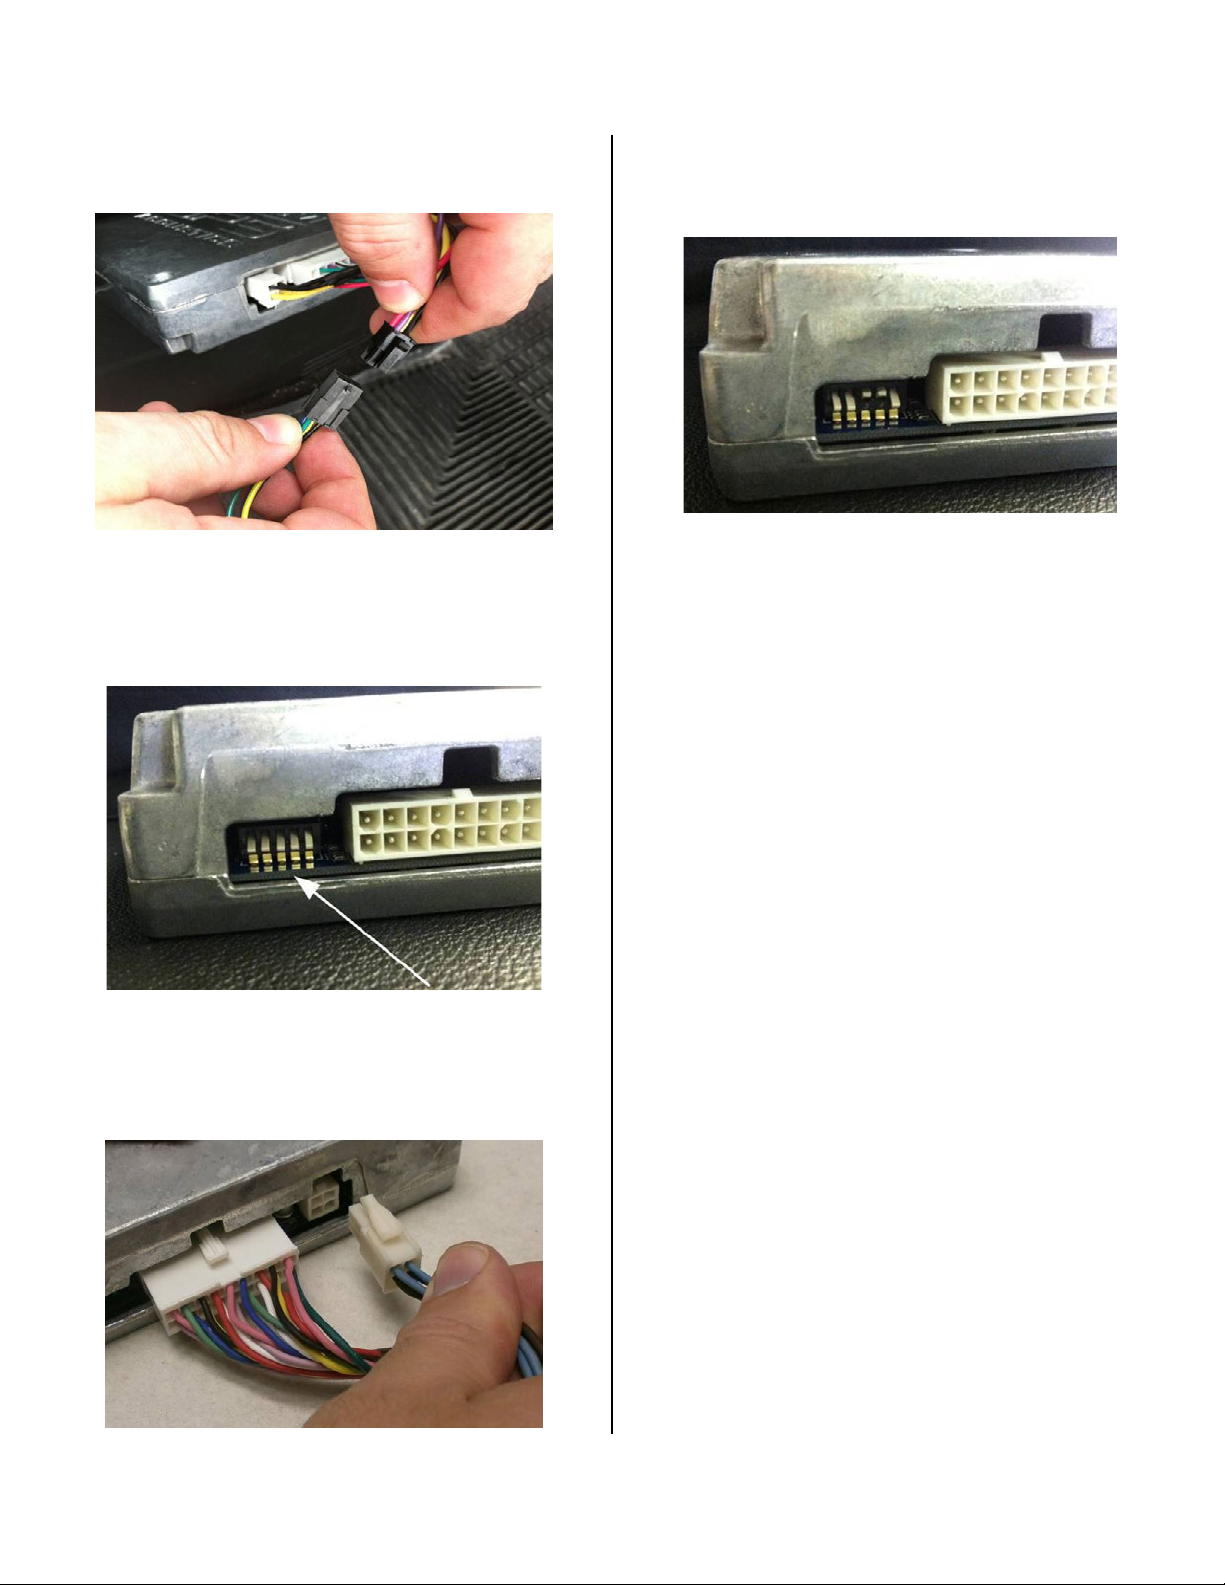
15. Connect the DPS turn-on switch to the remaining
connector on the DPS harness. (Figure 12)
Figure 12
16. Reconnect negative battery cable.
17. Place DPS module with Bongiovi DPS Acoustics side
face down. Confirm the DPS unit’s dip switches are set
in the “down” position – “DDDDD”. (Figure 13)
Figure 13
18. Turn vehicle ignition key to “ON” position. Turn on
radio head unit for 10 seconds. (Note: There should be
no sound from the speakers). Disconnect white 4-pin
connector from back of DPS module. (Figure 14)
Figure 14
19. Set the DPS dip switches for 2013 Chevy Malibu:
The third and fourth switches should be flipped to the
“up” position – “DDUUD”. (Figure 15)
Figure 15
20. Plug white 4-pin connector into DPS module and
wait 10 seconds. (Note: There should be no sound from
the speakers). Disconnect white 4-pin connector from
back of DPS module.
21. Plug white 4-pin connector back into DPS module.
After a few seconds you should hear sound from the
radio. Ensure radio head unit is working properly
including all speaker channels.
If you do not hear any sounds, recheck connections
and repeat Steps 17 through 21.
22. Disconnect vehicle battery
23. Secure DPS module under front of console bracket
using supplied zip ties or behind upper foot well carpet.
24. Reassemble vehicle
25. Reconnect negative battery cable of vehicle.
26. Place Bongiovi DPS Badge on the faceplate controls
to the left side of CD slot.
Page 22
Section 7: Chevy Sonic Instructions, 2012 - Current
2000-3801 Instructions 10-10-12.doc Page 22 of 24
1. Ensure all radio functions are working properly, return
all Treble, Bass, Fade, and Balance to neutral settings,
and remove any CDs to avoid possible jam before
disassembly.
2. For vehicles equipped with automatic transmissions,
place shifter in N (neutral) position and set parking
brake.
3. Loosen the negative battery cable bolt. Remove
negative battery cable from terminal and position
away from battery.
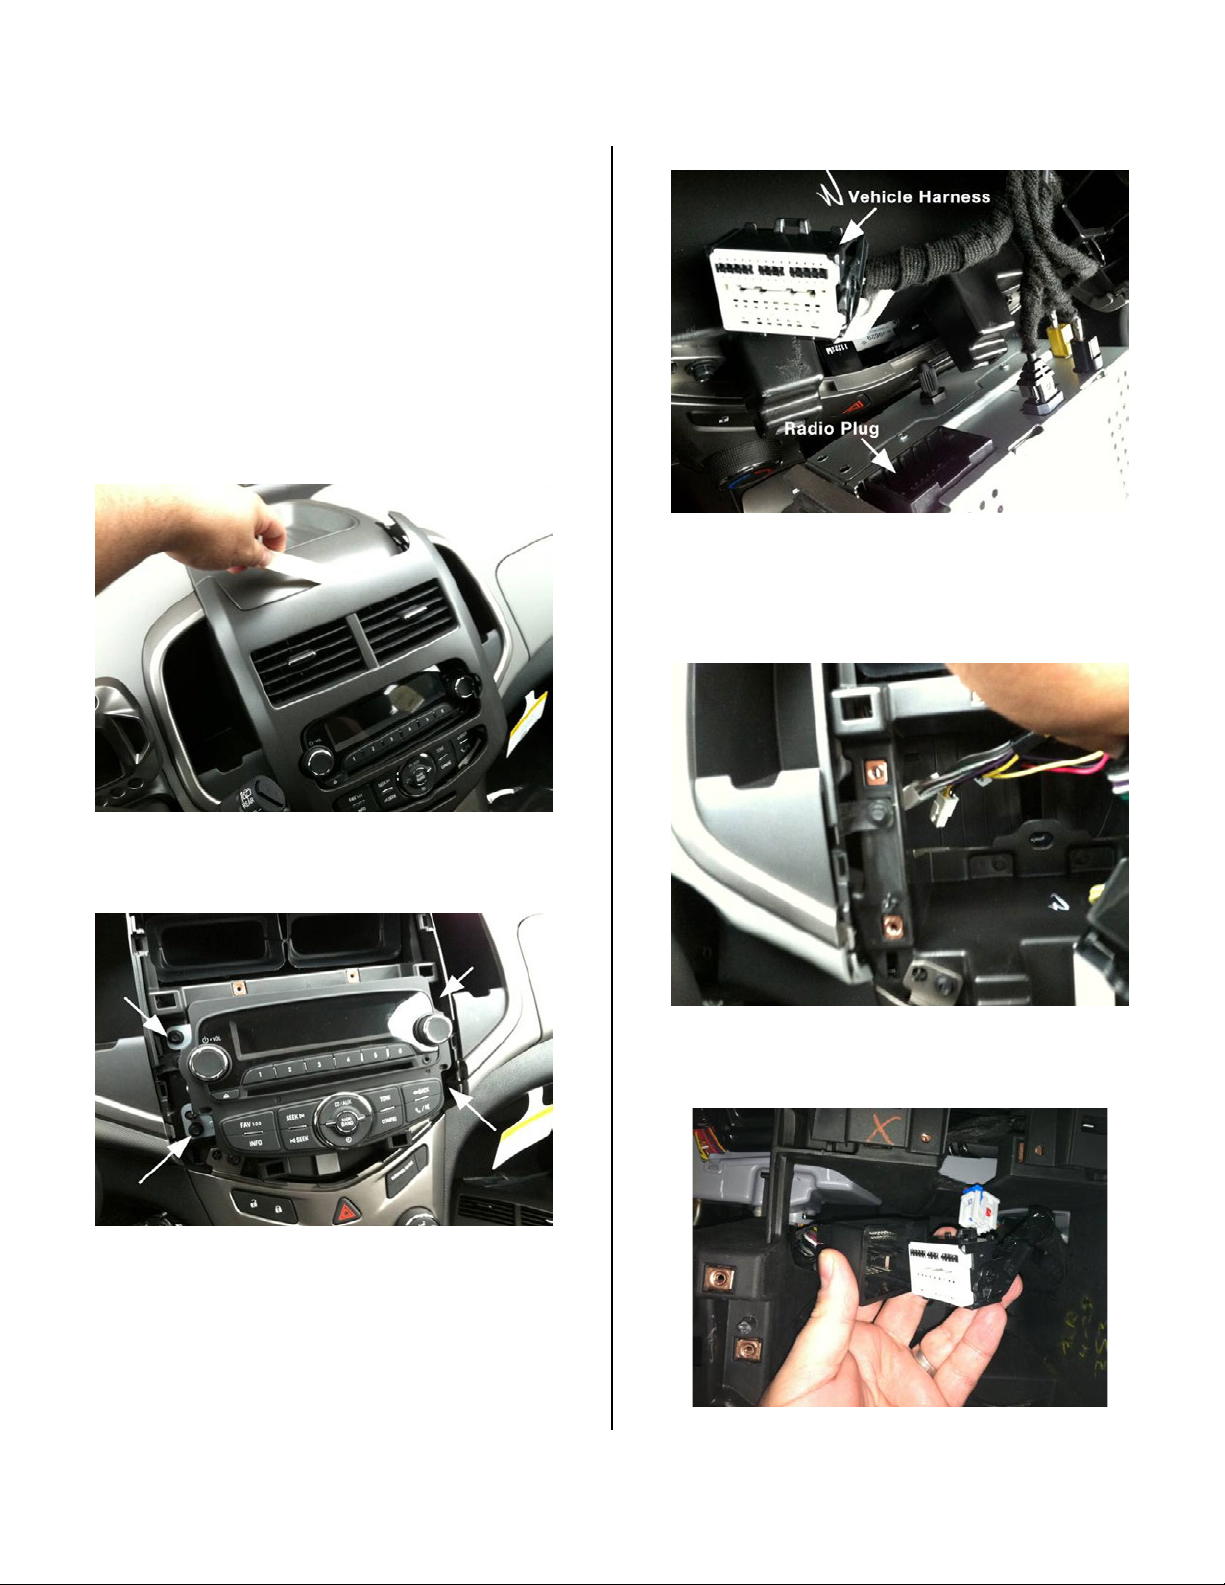
4. Using the plastic trim tool gently remove IP center
trim. (Figure 1)
Figure 1
5. Using a 7mm socket driver, remove 4 bolts attaching
the radio head unit. (Figure 2)
Figure 2
6. Pull out the radio head and disconnect the 44-pin
connector from the back of the radio. (Figure 3)
Figure 3
7. With the radio head unit pulled out of the way, drop
the white connectors of DPS harness though the
opening behind radio cavity on the left side and pull
through from underneath the dash. (Figure 4)
Figure 4
8. Connect the male 44-pin connector from the DPS
harness to the vehicles harness. (Figure 5)
Figure 5
Page 23
Section 7: Chevy Sonic Instructions, 2012 - Current
2000-3801 Instructions 10-10-12.doc Page 23 of 24
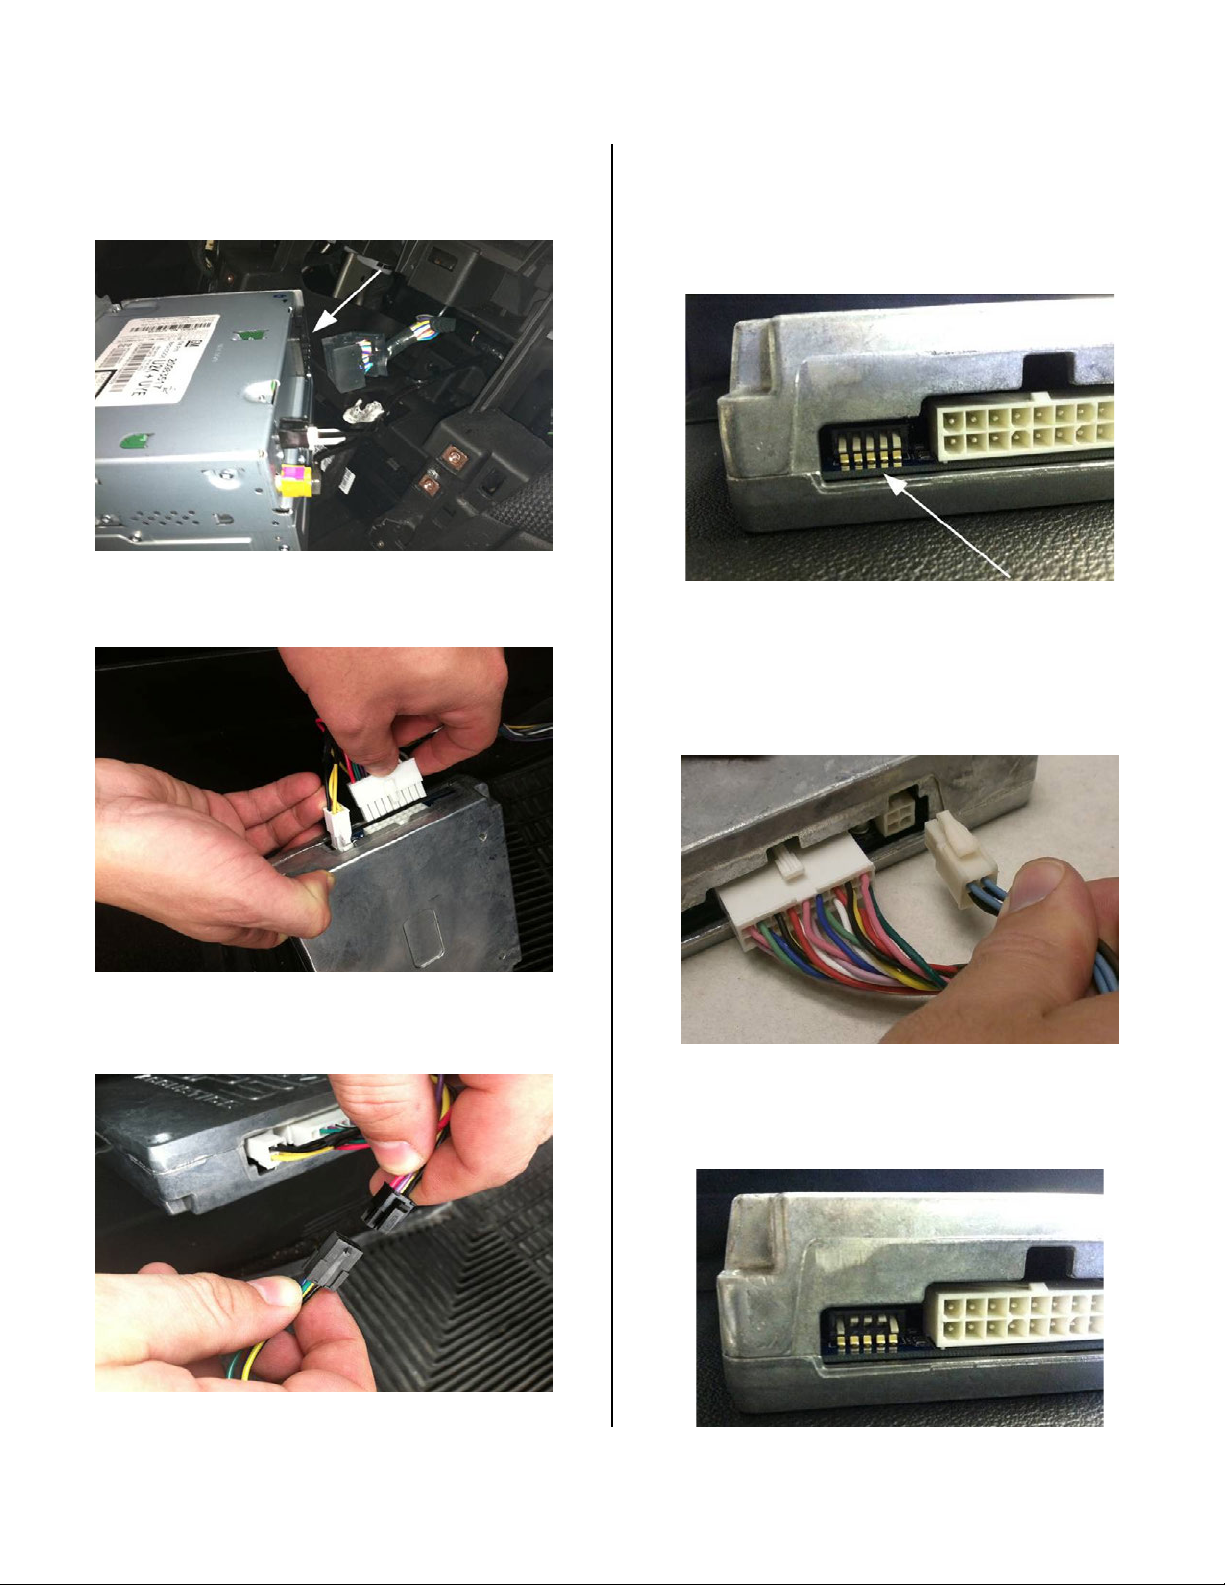
9. Connect the female end of the 44-pin connector from
the DPS harness to the back of the radio head unit.
(Figure 6)
Figure 6
10. Connect the two white connectors of the DPS
harness to the DPS module. (Figure 7)
Figure 7
11. Connect the DPS turn-on switch to the remaining
connector on the DPS harness. (Figure 8)
Figure 8
12. Reconnect negative battery cable of vehicle.
13. Place DPS module with the Bongiovi DPS Acoustics
side face down. Confirm that all of the DPS unit’s
dip switches are set to “down” position – “DDDDD”.
(Figure 9)
Figure 9
14. Turn vehicle ignition key to “ON” position. Turn on
radio head unit for 10 seconds. (Note: There should
be no sound from the speakers). Disconnect white
4-pin connector from back of DPS module. (Figure
10)
Figure 10
15. Set the DPS dip switches for Chevy Sonic. The
second, third, and fourth switches should be flipped
to the “up” position – “DUUUD”. (Figure 11)
Figure 11
Page 24
Section 7: Chevy Sonic Instructions, 2012 - Current
2000-3801 Instructions 10-10-12.doc Page 24 of 24
17. Plug white 4-pin connector into DPS module and
wait 10 seconds. (Note: There should be no sound
from the speakers). Disconnect white 4-pin
connector from back of DPS module.
18. Plug white 4-pin connector back into DPS module.
After a few seconds you should hear sound from the
radio. Ensure radio head unit is working properly
including all speaker channels.
19. If you do not hear any sounds, recheck connections
and repeat Steps 13 through 22.
20. Disconnect negative vehicle battery cable.
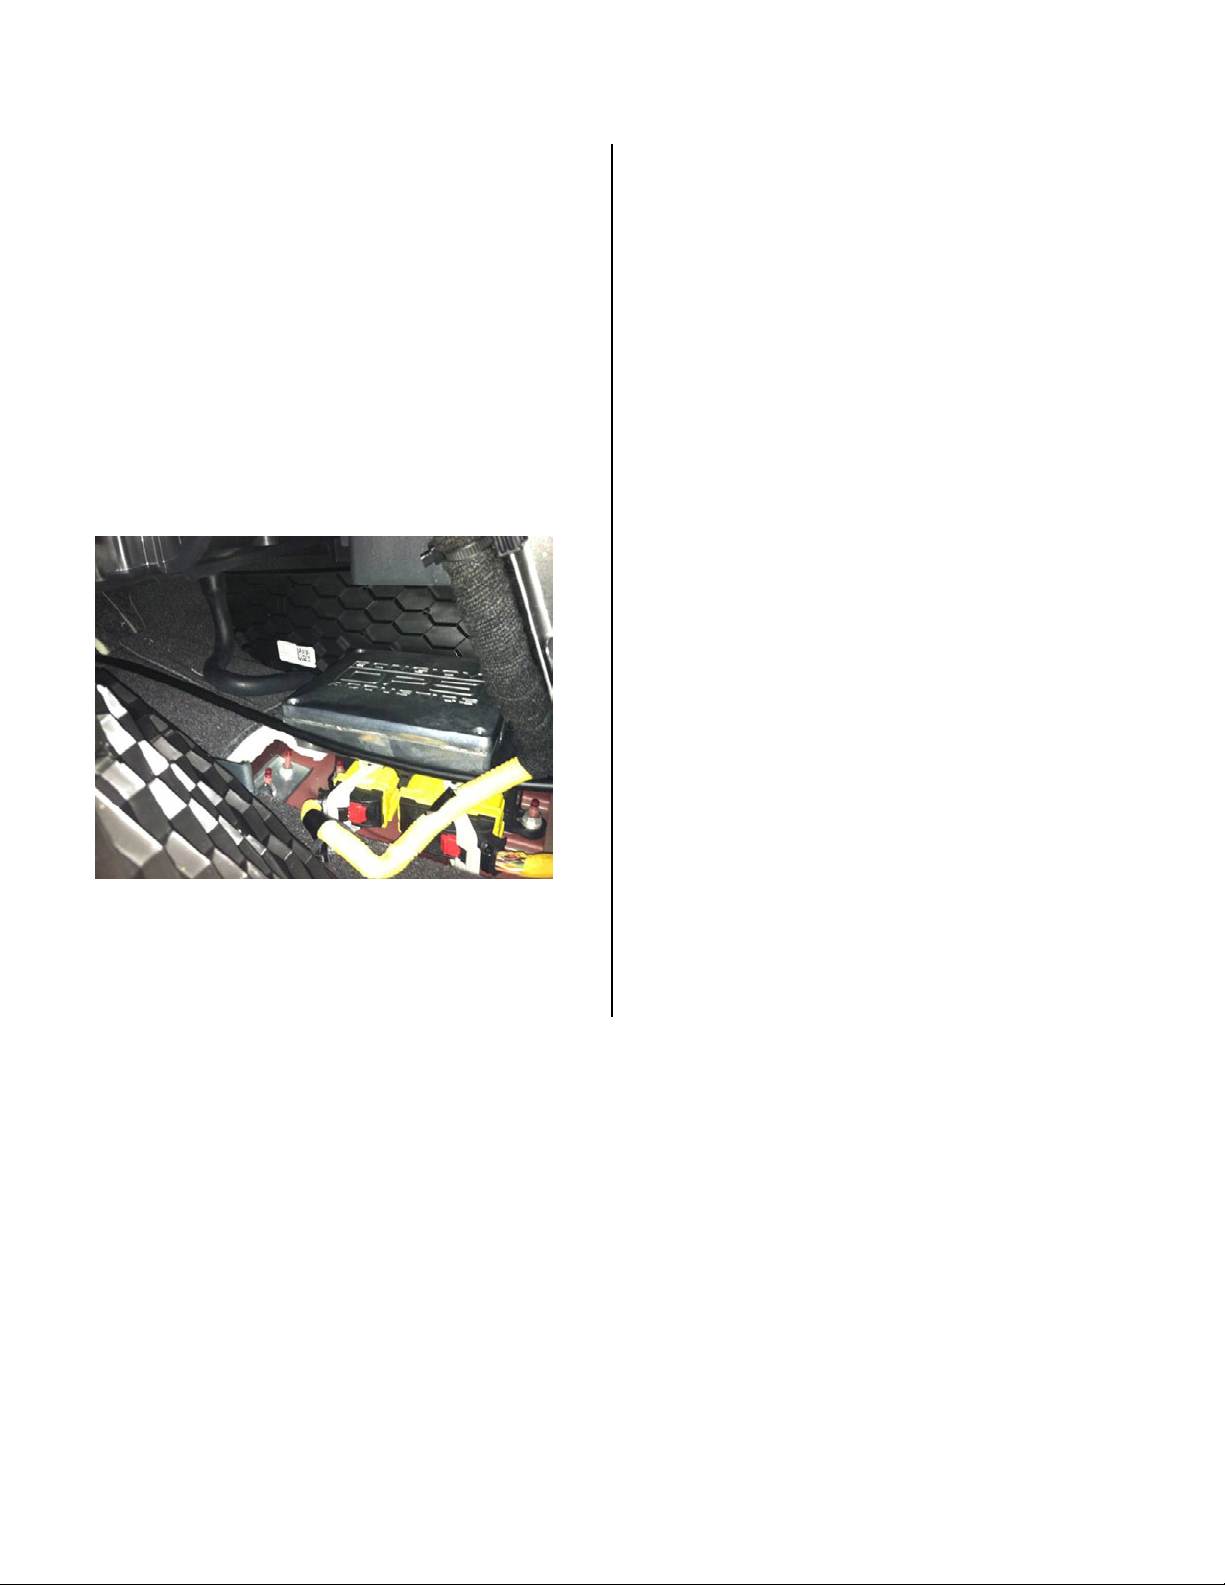
21. Secure DPS module under front of console bracket
using supplied 24” wire ties. CAUTION: DO NOT
mount to or interfere with shift linkage. (Figure 12)
Figure 12
22. Reassemble vehicle
23. Reconnect battery of vehicle
24. Place Bongiovi DPS Badge on left side of IP center
trim.
 Loading...