

Page 1
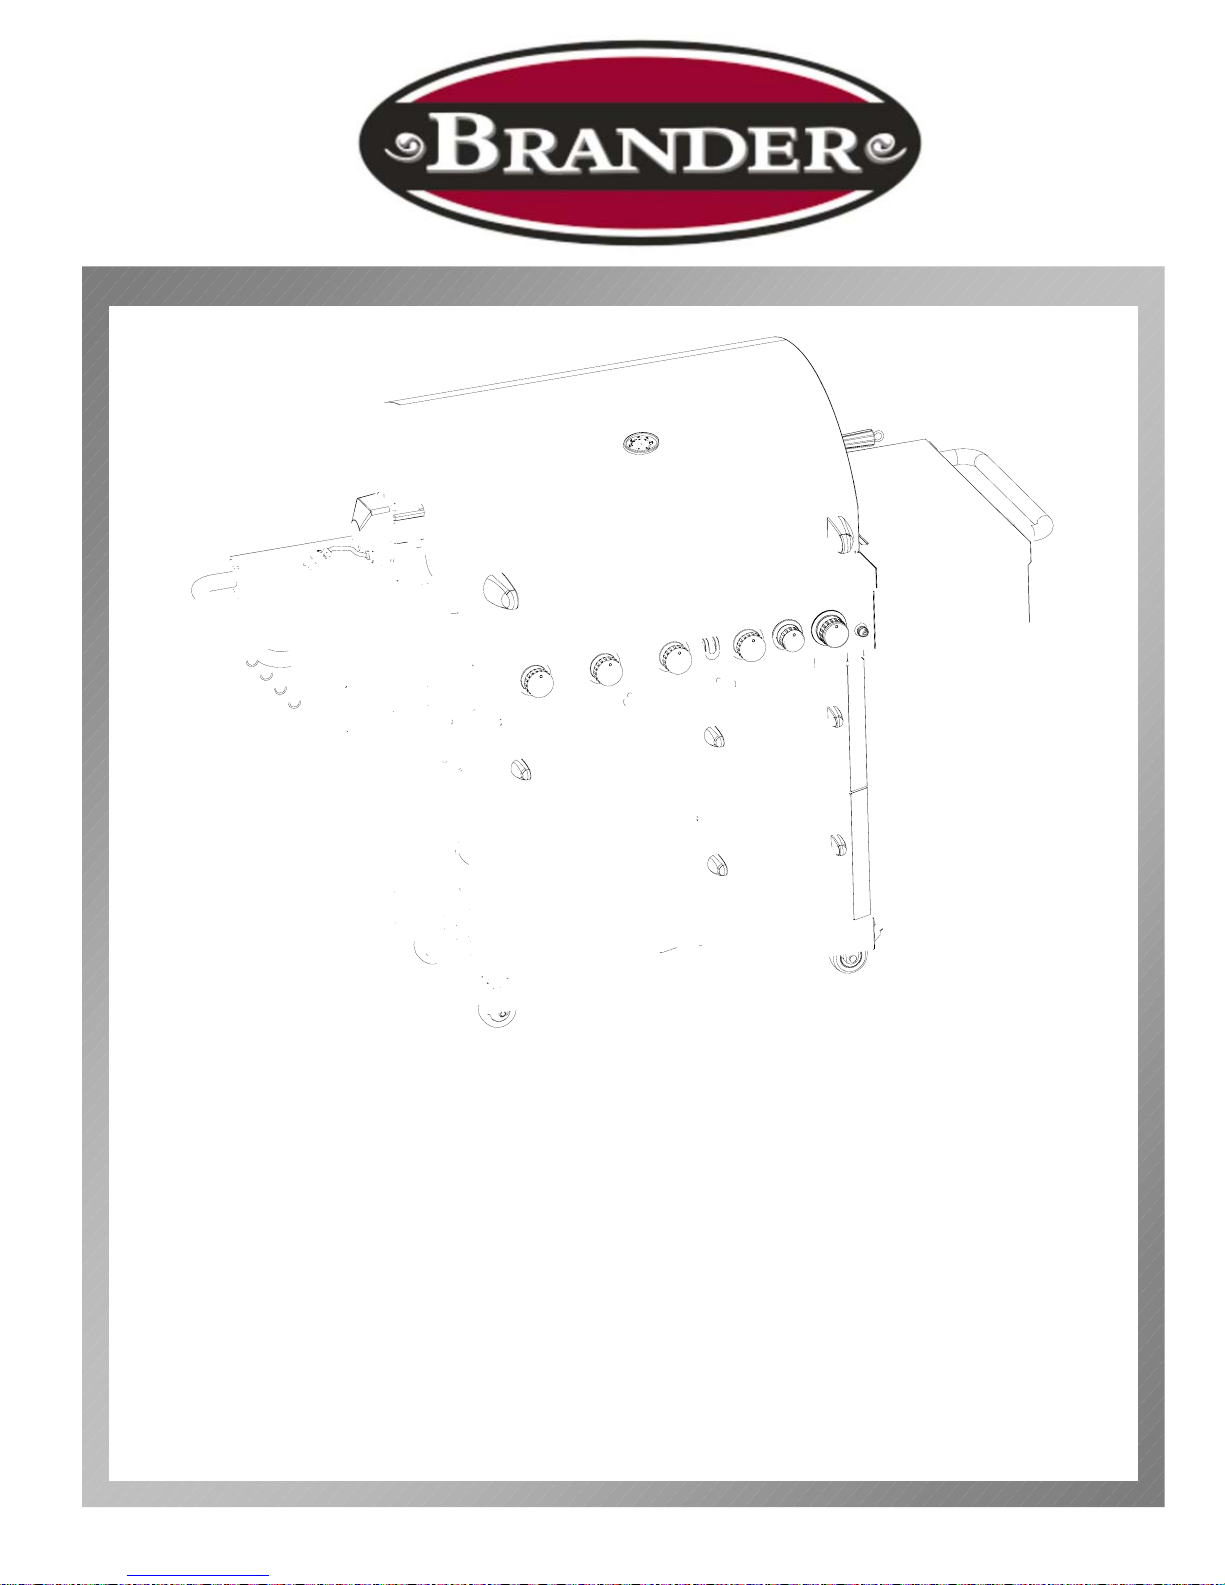
All STAINLESS STEEL GAS BBQ GRILL
MODEL NUMBER: PG-50506SRL
CUSTOMER SERVICE: (888)-287-0735
FOR OUTDOOR USE ONLY
USER’S MANUAL
TM
Page 2

LIMITED WARRANTY
Model Number: PG-50506SRL
PermaSteel All Stainless Steel BBQ Grill
We warrant to the original consumer purc haser (“Purchaser”) of the PermaSteel All Stainless Steel
BBQ Grill (“Product”) that each Product shall be free from defects in workmanship and materials
for a period of the years listed below from the date of original purchase. Our obligation under this
warranty shall be limited to repair or replacement of, or adequate compensation for, the Product, at
the option of us, during the warranty period. Our liability shall not extend beyond repair or
replacement, or the cost equivalent thereto.
This warranty excludes normal wear and tear of the Product and its parts or components, and any
damage arising from any of the following: negligent use or misuse of the Product, use contrary to
this User’s Manual, or alteration by any one other than us. The warranty period of the years listed
below shall not be extended or renewed by the repair or replacement of, or compensation for, the
Product.
If your Product is defective or otherwise requires service or parts, please first call PermaSteel
Customer Service toll-free at (888)-287-0735, between 8:00 a.m. and 5:00 p.m., PST. Please tell
us which model you purchased, the date of purchase, and the problem with your Product. We will
use our very best efforts to honor this warranty, and repair, replace or compensate you for your
Product through your original place of purchase. A copy of your original purchase receipt must
accompany your service request.
Component Warranty Period:
Burners: 1 Year
Stainless Steel Flame Tamer: 1 Year
Stainless Steel Cooking Grids: 1 Year
Valves: 1 Year
Frame, Housing, Cart, Control Panel,
Igniter, and Related Parts: 1 Year
All Stainless Steel Parts: 1 Year
LIMITATION OF REMEDIES AND LIABILITY
We shall not be liable for any incidental or consequential damages for breach of any express or
implied warranty on its Product. Except to the extent prohibited by applicable law, any implied
warranty or merchantability or fitness for a particular purpose on this Product shall be limited to the
duration of the above warranty. Neither us nor anyone else who has been involved in the creation,
production, or delivery of the Product shall be liable for damages of any type, including but not
limited to any lost profits, lost savings, loss of anticipated benefits, or other incidental or
consequential damages which may arise out of the purchase, use, or inability to use the Product,
whether arising out of contract, negligence, strict tort, or under any warranty, or otherwise, even if
you have been advised of the possibility of such damage or any other claim by any other party.
Our liability for any breach of warranty shall be limited to repair or replacement of the defective part
or parts as described above. Some states do not allow the exclusion or limitation of incidental or
consequential damages, so the above limitation or exclusion may not apply to you. The above
warranty gives you specific legal rights, and you may have other rights which vary from state to
state.
Notice:PermaSteel provides the PVC cover for your convenience only. We do not provide
warranty for PVC cover.
TM
Page 3

TABLE OF CONTENTS
BEFORE YOU BEGIN
MESSAGE TO OUR USERS PAGE 1
SAFETY SYMBOLS PAGE 1
INSTALLATION & SAFETY PRECAUTIONS PAGE 2
PROPANE & GAS WARNING PAGE 2
ASSEMBLY
PARTS PAGE 3
STEP I PAGE 5
STEP II PAGE 6
STEP III PAGE 7
STEP IV PAGE 8
STEP V PAGE 9
STEP VI PAGE 10
POST ASSEMBLY
GAS CONNECTION PAGE 12
LEAK TESTING PAGE 17
FINAL INSTALLATION CHECK LIST PAGE 19
GRILL LIGHTING INSTRUCTION PAGE 20
OPERATING INSTRUCTION PAGE 22
CARE & MAINTENANCE PAGE 23
TROUBLE SHOOTING PAGE 24
FOOD SAFETY PAGE 26
GRILL STORAGE PAGE 26
TM
Page 4

MESSAGE TO OUR USERS
Thank you for your purchase of our All Stainless Steel BBQ Gas Grill. We sincerely
wish you will enjoy using our fine products.
Please read this User’s Manual in its entirety before using the grill.
Please contact our customer service at (888)-287-0735 if you have any questions.
Please read this User’s Manual carefully. Failure to follow the provided instruction
can result in seriously bodily injury and/or property damage.
Some parts of this grill may have sharp edges. Please wear suitable protective gloves.
IMPORTANT: This grill is intended for outdoor use only and is not intended to be
installed in or on recreational vehicles or boats.
NOTE TO INSTALLER: Leave this User’s Manual with the customer after delivery
and/or installation.
NOTE TO CONSUMER: Leave this User’s Manual in a convenient place for future
reference.
SAFETY SYMBOLS
The symbols listed here are being used through out this User’s Manual. Please pay
special attention to them. The meaning of each of the symbols is listed here:
DANGER– this symbol indicates an imminently hazardous situation which
will result in death or serious bodily injury if not properly followed.
WARNING– this symbol indicates a warning of potential serious bodily
injury if the instructions are not strictly followed. Please be sure to read and follow
all these messages carefully.
CAUTION – t his symbol indicates a potentially hazardous situation which
may result in minor or moderate bodily injury if the instructions are not properly
followed.
1
Page 5
INSTALLATION
WARNING
READ THIS SECTION FIRST BEFORE INSTALLING THE GRILL
Your grill has been designed to operate using only the gas specified on the rating
plate. Do not attempt to operate your grill with other gases.Failure to follow this
warning may result in a fire hazard and bodily harm, and PermaSteel will void your
warranty.
The installation of this appliance must conform with local codes or, in the absence
of local codes, with either the National Fuel Gas Code, ANSI Z223. 1/NFPA 54,
or CAN/CGA- B149.1; Natural Gas and Propane.
All electric accessories (such as rotisserie) must be electrically grounded in
accordance with local codes, or National Electrical Code, ANSI/NFPA 70, or
Canadian Electrical Code, CSA C22.1. Keep any electrical cords and/or fuel
supply hoses away from any hot surfaces.
This grill is safety certified for use in the United States and Canada only. Never
modify to use in other places. Modification may cause serious bodily injury or
property damage. PermaSteel is not responsible for any modifications, and all
warranties will be void.
GAS WARNING
FOR YOUR SAFETY, PLEASE READ THIS SECTION FIRST
If you smell gas:
Shut off gas to the grill.
Extinguish any open flames immediately.
Open the grill lid.
If the odor persists, please call your gas supplier or your fire department
immediately.
Do not store or use gasoline or other flammable items in the vicinity of this grill.
Any LP cylinder that is not connected for use should not be stored in the vicinity
of this grill.
WARNING
2
Page 6
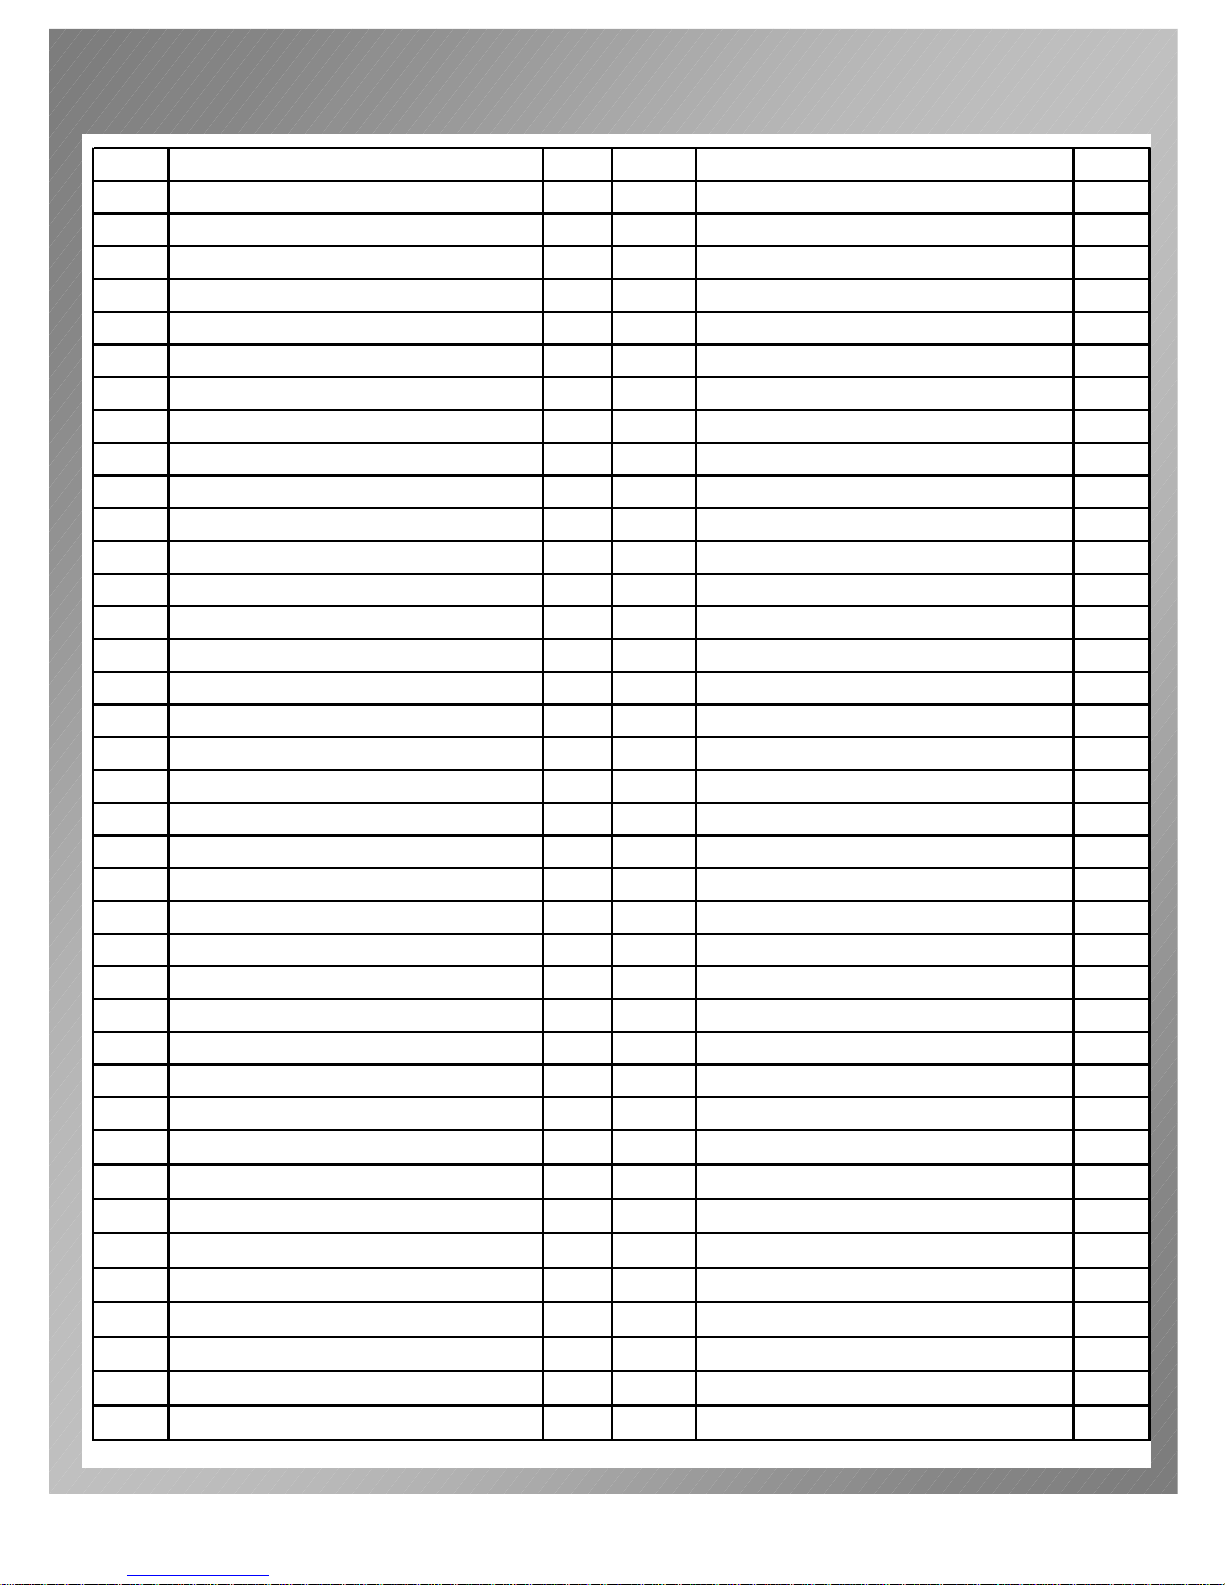
GRILL PARTS LIST
REF# DESCRIPTION Q’TY REF# DESCRIPTION Q’TY
1 Double-layer Lid 1 39 Hole Bushing 1
2 Temp.Gauge Seat 1 40 Rear Burner Cover 1
3 Temp.Gauge 1 41 Thermocouple Cover 1
4 Clip Rings 2 42 Thermocouple Bracket 1
5 Name Plate 1 43 Smoker 1
6 Lid Handle Seats 2 44 Smoker Cover 1
7 Lid Handle 1 45 Firebox 1
8 Rotisserie Kit 1 46 Corrugated Pipe B 1
9 Right Shelf Bracket 1 47 Thermocouple 1
10 Push Bars 2 48 Rear Panel 1
11 Right Side Shelf 1 49 Rear Burner 1
12 Grease Tray 1 50 I gnition Electrode, Rear Burner 1
13 Rear Burner Knob 1 51 Warming rack 1
14 Knobs 5 52 Cooking Grids 3
15 Control Panel 1 53 Flame tamers 3
16 Manifold, Main Burner 1 54 Main Burner Brackets 5
17 Rear Burner Valve 1 55 Main Burners 4
18 Safety Va l ve & Buttom 1 56 Le ft main Burner 1
19 Corrugated Pipe A 1 57 Left Side Shelf Bracket 1
20 Valves 5 58 Motor 1
21 Valve Bracket 1 59 Motor Bracket 1
22 Door Bracket 1 60 S-Style Hooks 4
23 Front Transom 1 61 Left Side Shelf 1
24 Door Handles 2 62 Left Side Drawer 1
25 Handle Seats 4 63 Snap Close 1
26 Drawer Front Panels 2 64 Right Panel 1
27 Drawers 2 65 Left Heat Shield 1
28 Sliding Bars 6 66 Tank Holder Brackets 2
29 Casters With Brake 2
30 Bottom Panel 1 68
31 Right Drawer Transoms 2 69
32 Right Panel 1 70
33 PVC Washers 2 71
34 Right Heat Shield 1 72
35 Clapboard 1 73
36 Acorn Nut 1 74
37 Rotary Pin 1 75
38 Back Panel 1
67 Tank Holder 4
Tank Holder Rubber Strap 1
Lower Door Hinge Bracket 1
Casters without Brakes 2
Magets 4
I gnitor Rod 1
Left Side Door 1
Upper Door Hinge Bracket 1
Regulator 1
3
Page 7
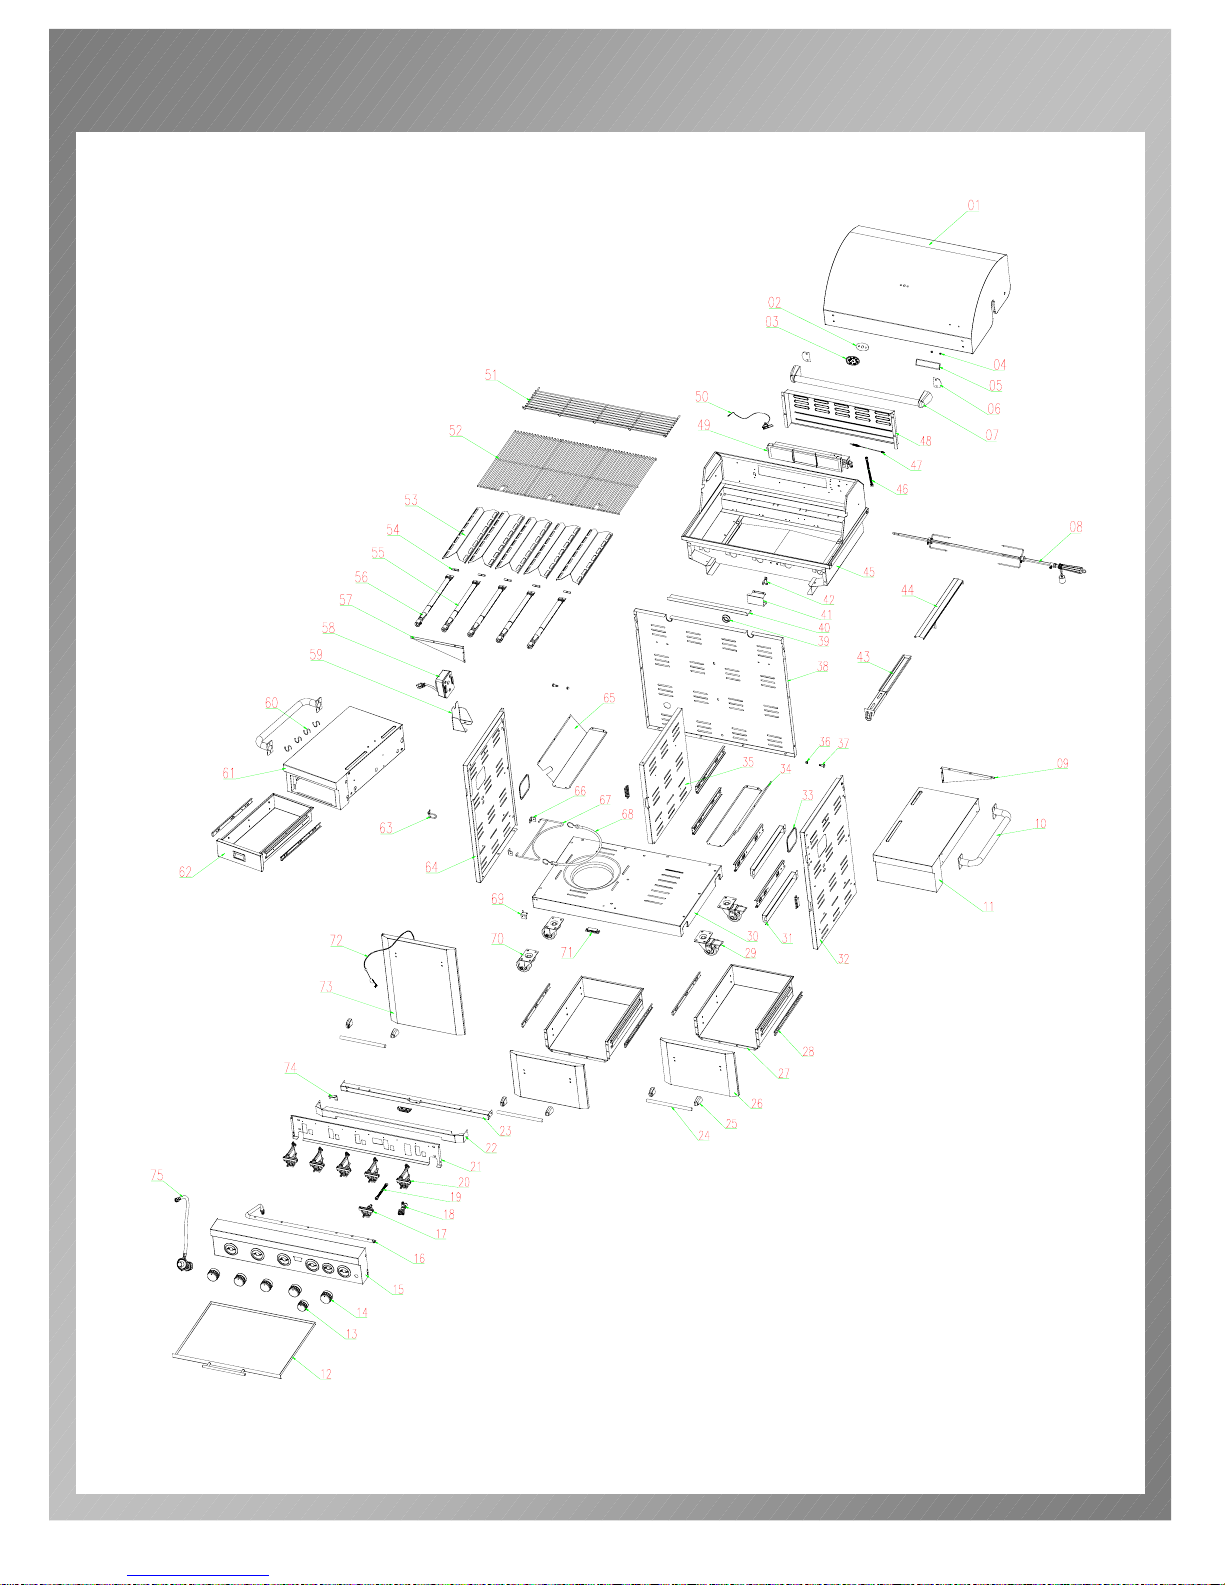
GRILL PARTS DIAGRAM
4
Page 8
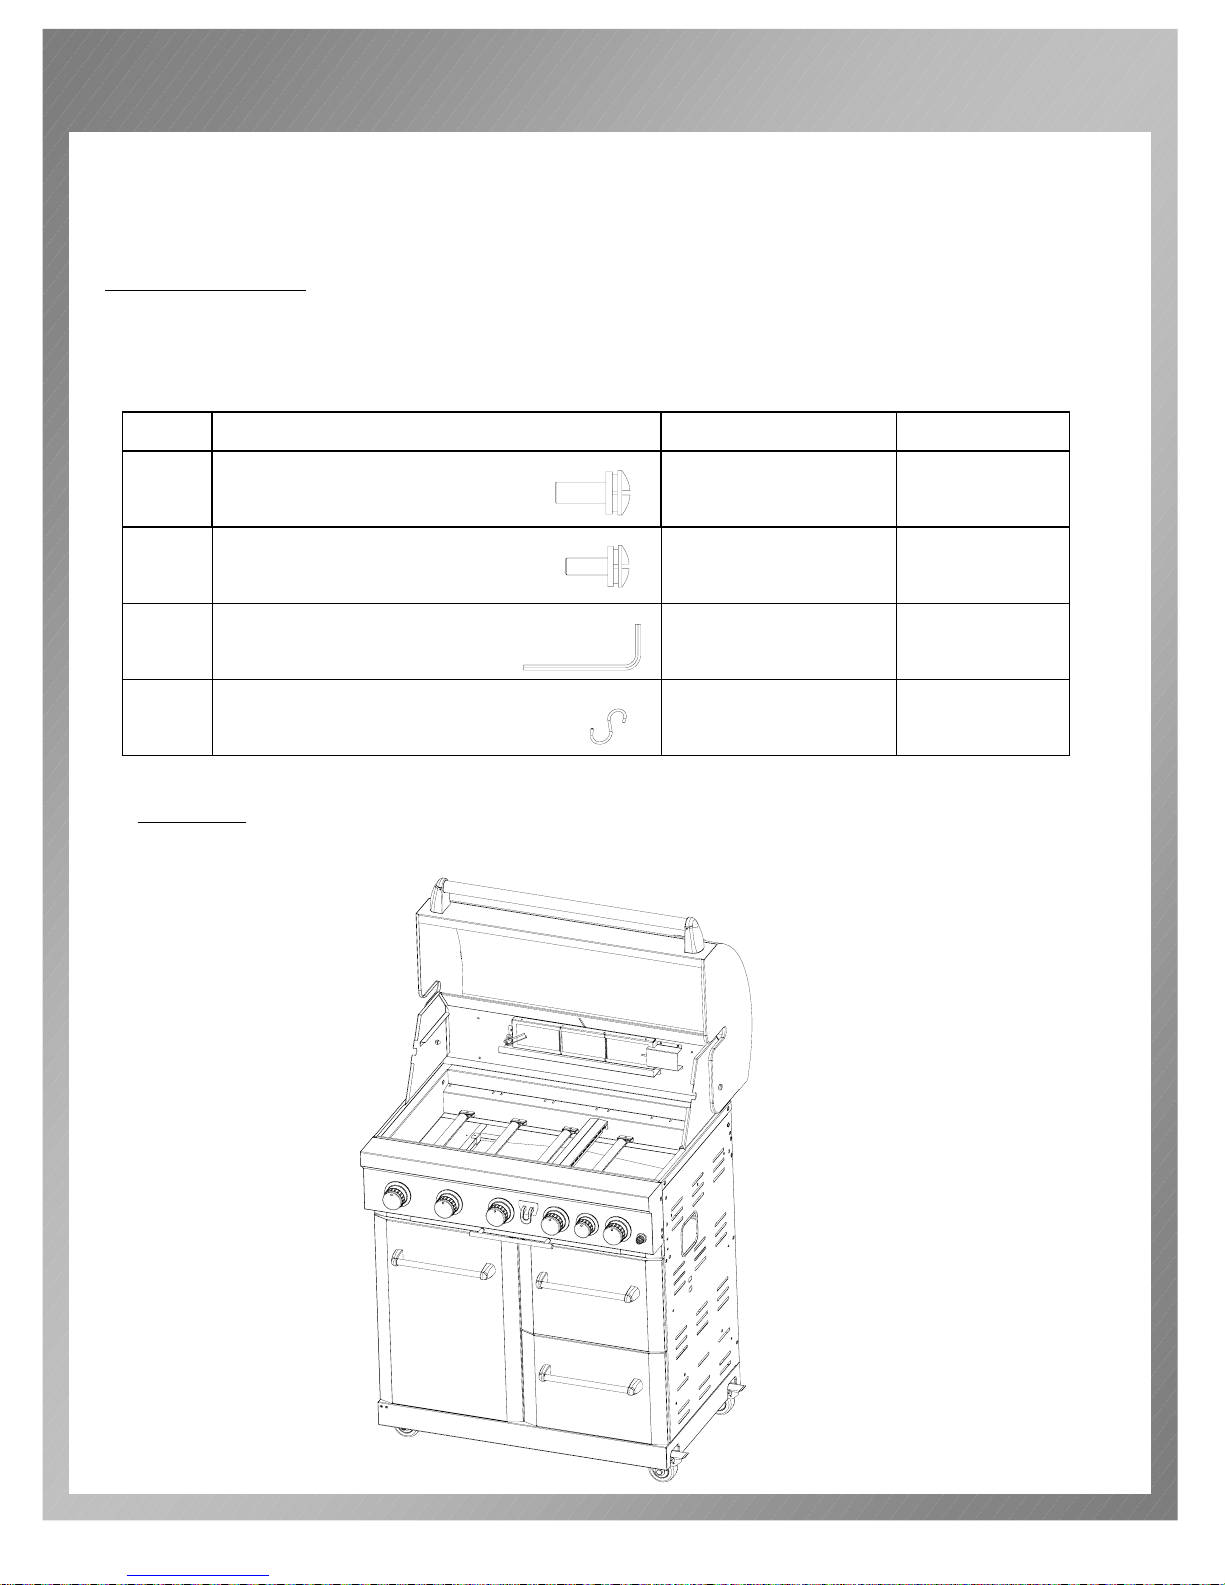
ASSEMBLY INSTRUCTIONS
PLEASE READ AND FOLLOW THE INSTRUCTIONS CAREFULLY
STEP BY STEP
Tools Required:
#2 Philips head screwdriver (not provided)
Hexagon/Allen wrench (provided).
The following hardware kit is provided and packed in rotisserie motor carton:
Item Description Specification Quantity
1
2
3 Hexagon wrench 1pc
4 BBQ hooks 4pcs
Truss head screw
(With Split lock And Gasket)
Truss head screw
(With Split lock An d Gasket)
1/4-20x1/2” 20pcs
5/32-32x3/8” 5pcs
STEP I:
Take out main body of grill from carton. Remove all the packing materials.
5
Page 9
ASSEMBLY INSTRUCTIONS
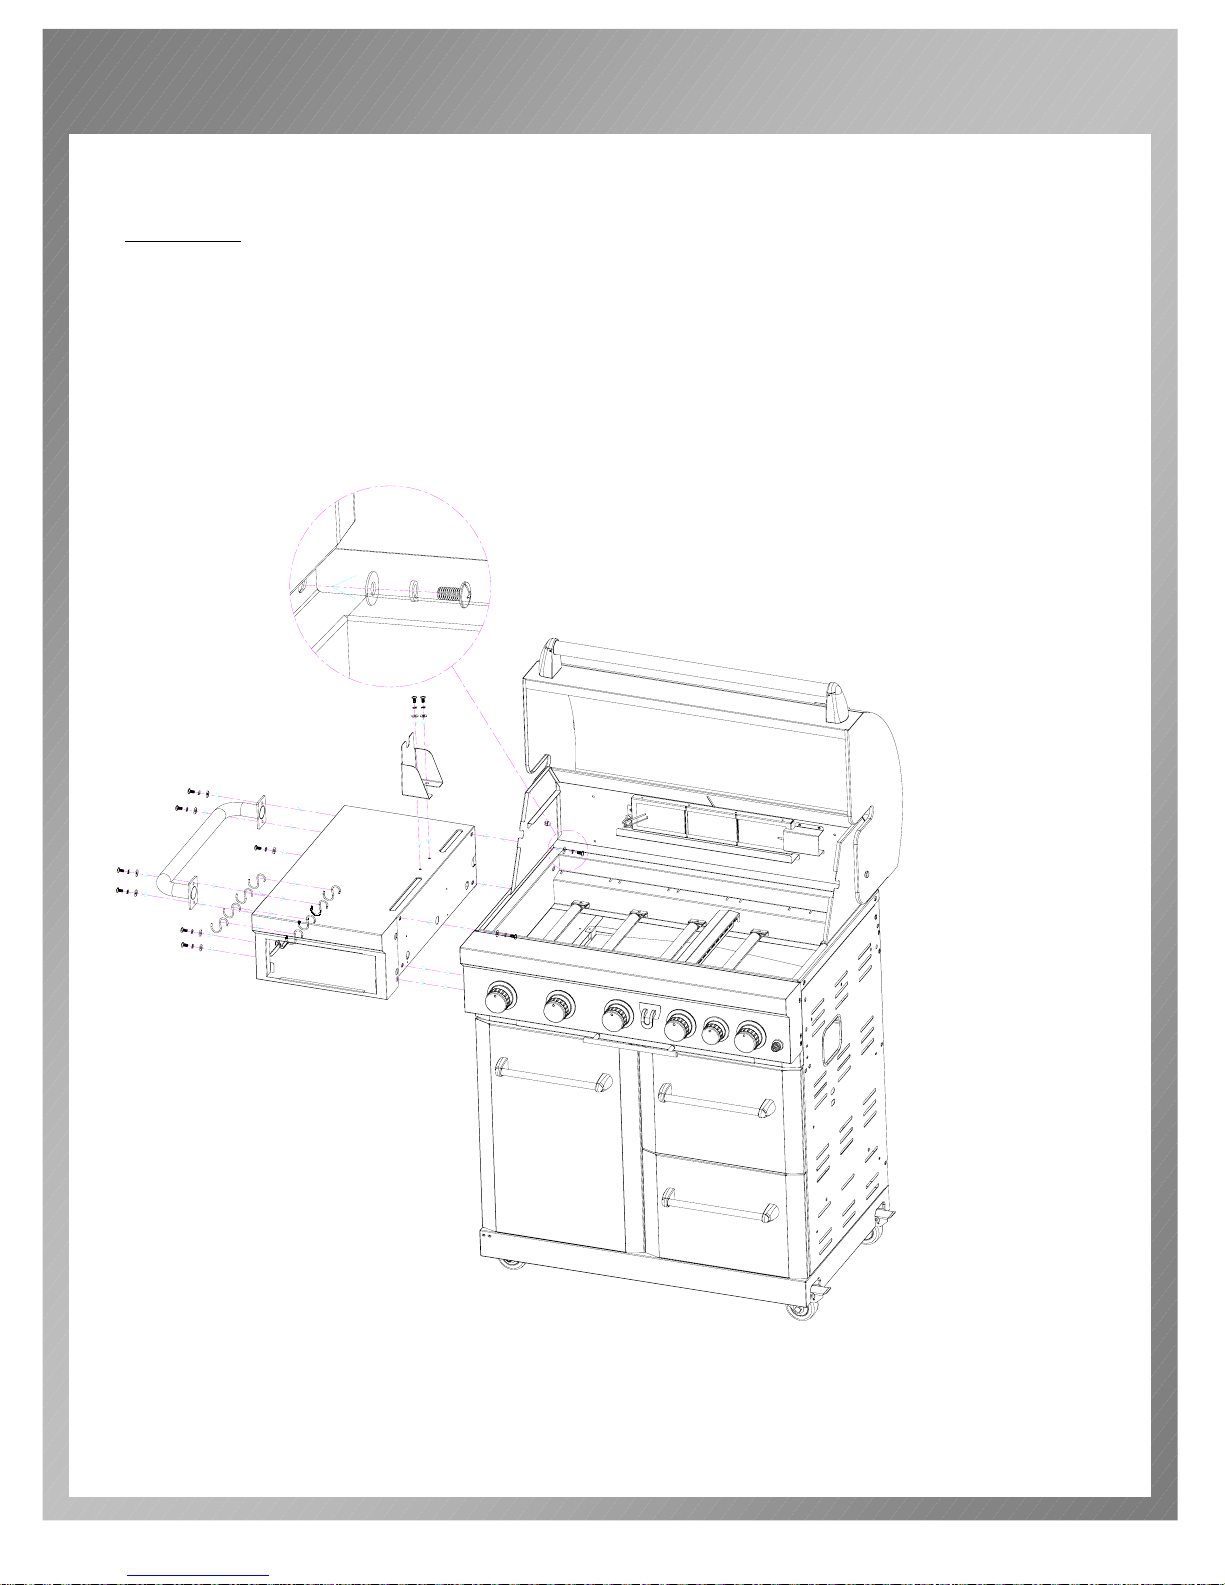
STEP II:
Take out left side shelf from carton.
Use two 1/4-20x1/2” screws to attach left side shelf from inside of the firebox,
and use three same screws to attach it from outside of firebox.
Use four 1/4-20x1/2” screws to attach push bar on left side shelf.
Use two 1/4-20x1/2” screws to install motor bracket on left side shelf.
Take out four S-style BBQ tool hooks from the hardware bag, then hang on
the edge of the left side shelf.
6
Page 10
ASSEMBLY INSTRUCTIONS
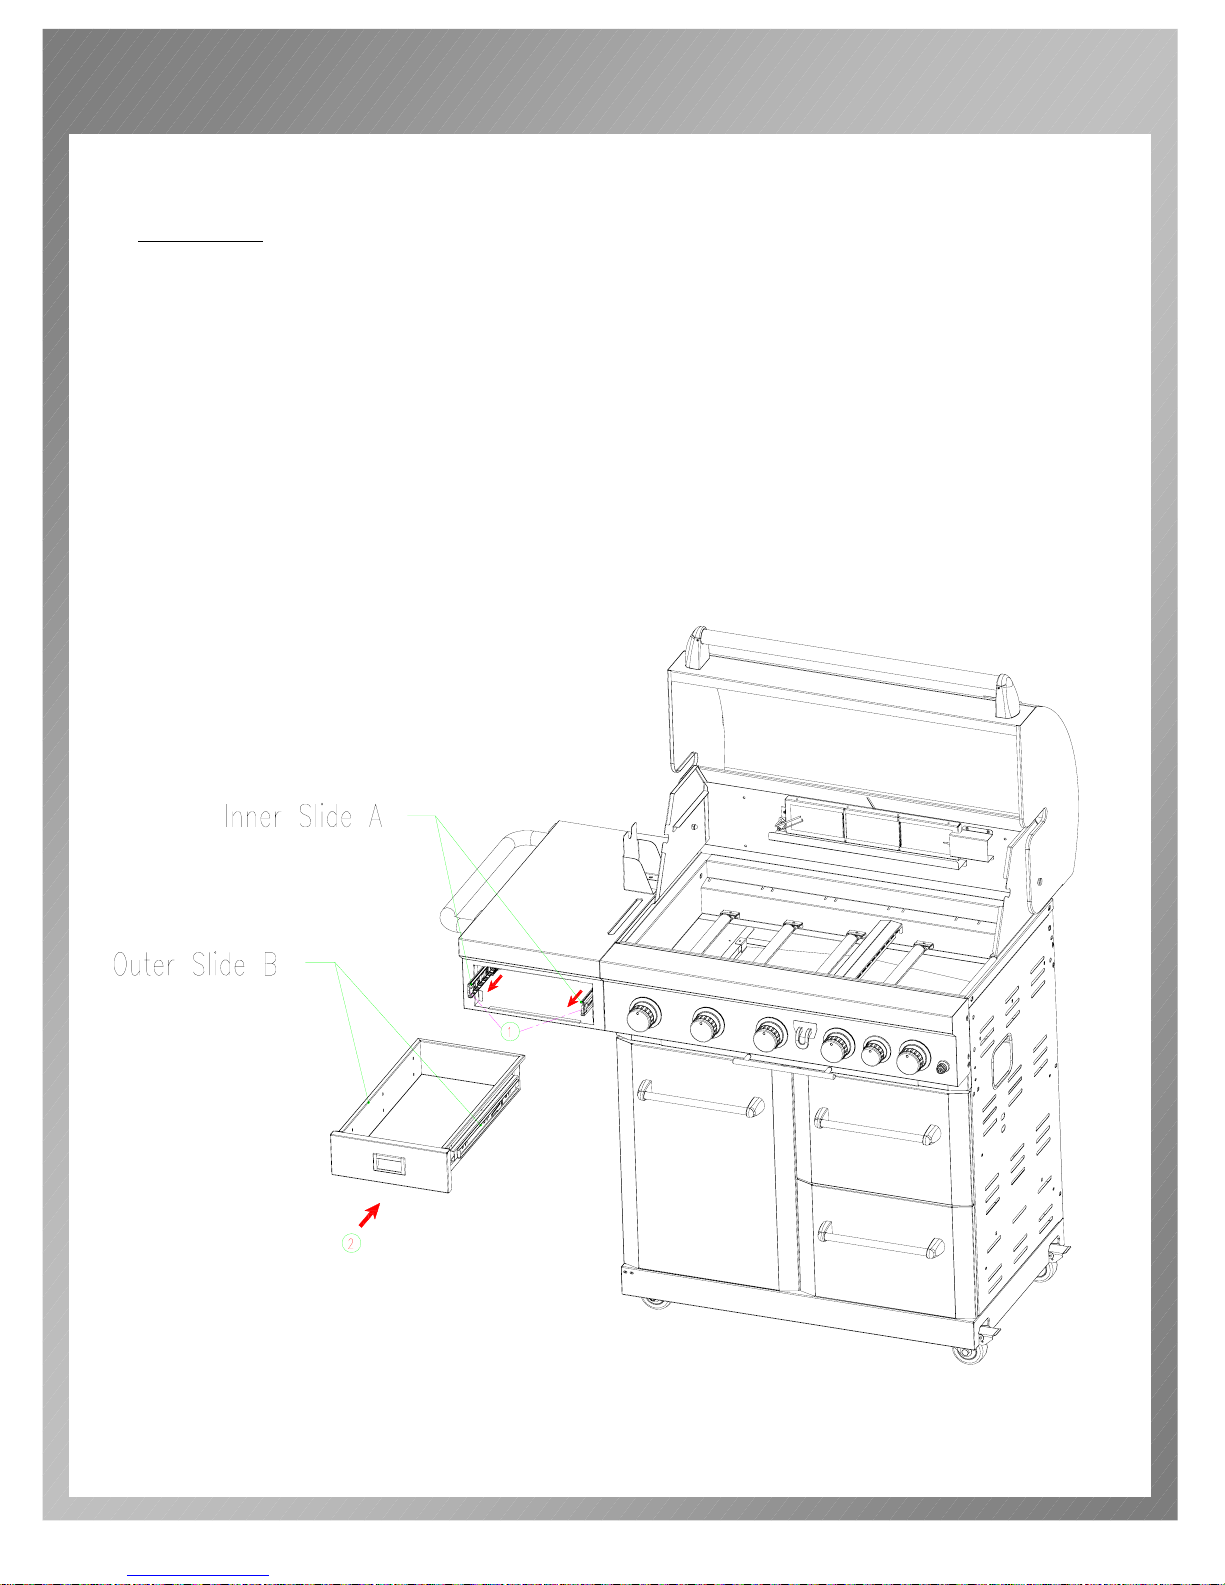
STEP III:
Remove the left side shelf drawer from inside grill cabinet.
Pull out the two drawers inner slides (A) attached to left side shelf, all the
way out.
Insert the drawer into left shelf , make sure the outer slides (B) insert into the
inner slides (A) push drawer in evenly and slowly on both sides.
Notice:push drawer in and out until it goes in smoothly and will not fall of slides
when pulled out ,if not please re-insert outer slides (B) into inner slides (A)
and repeat the steps.
7
Page 11
ASSEMBLY INSTRUCTIONS
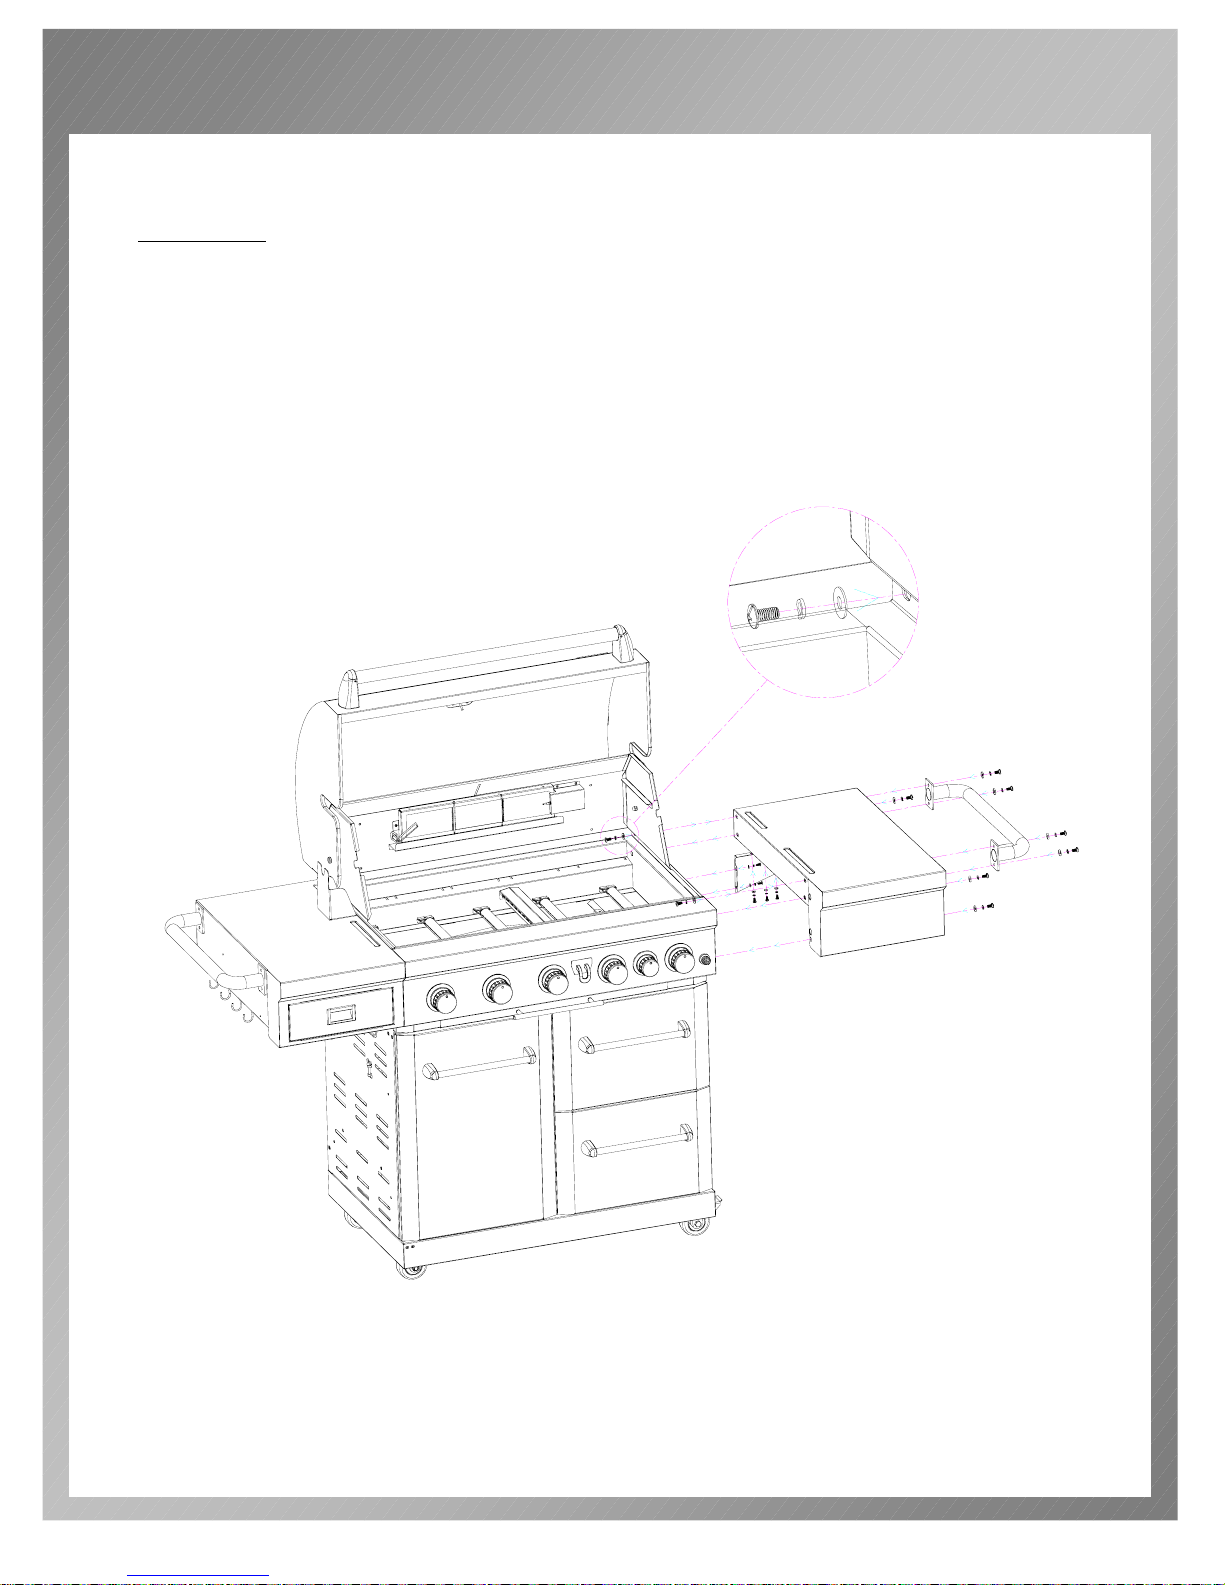
STEP IV:
Take out right side shelf from carton.
Use two 1/4-20x1/2” screws to attach right side shelf from inside of the
firebox, and use three same screws to attach it from outside of firebox.
Use three 5/32-32x1/2” screws to attach right side angle iron to side shelf,
and also use two same screws to attach it to firebox from outside.
Use four 1/4-20x1/2” screws to attach push bar to right side shelf.
8
Page 12
ASSEMBLY INSTRUCTIONS
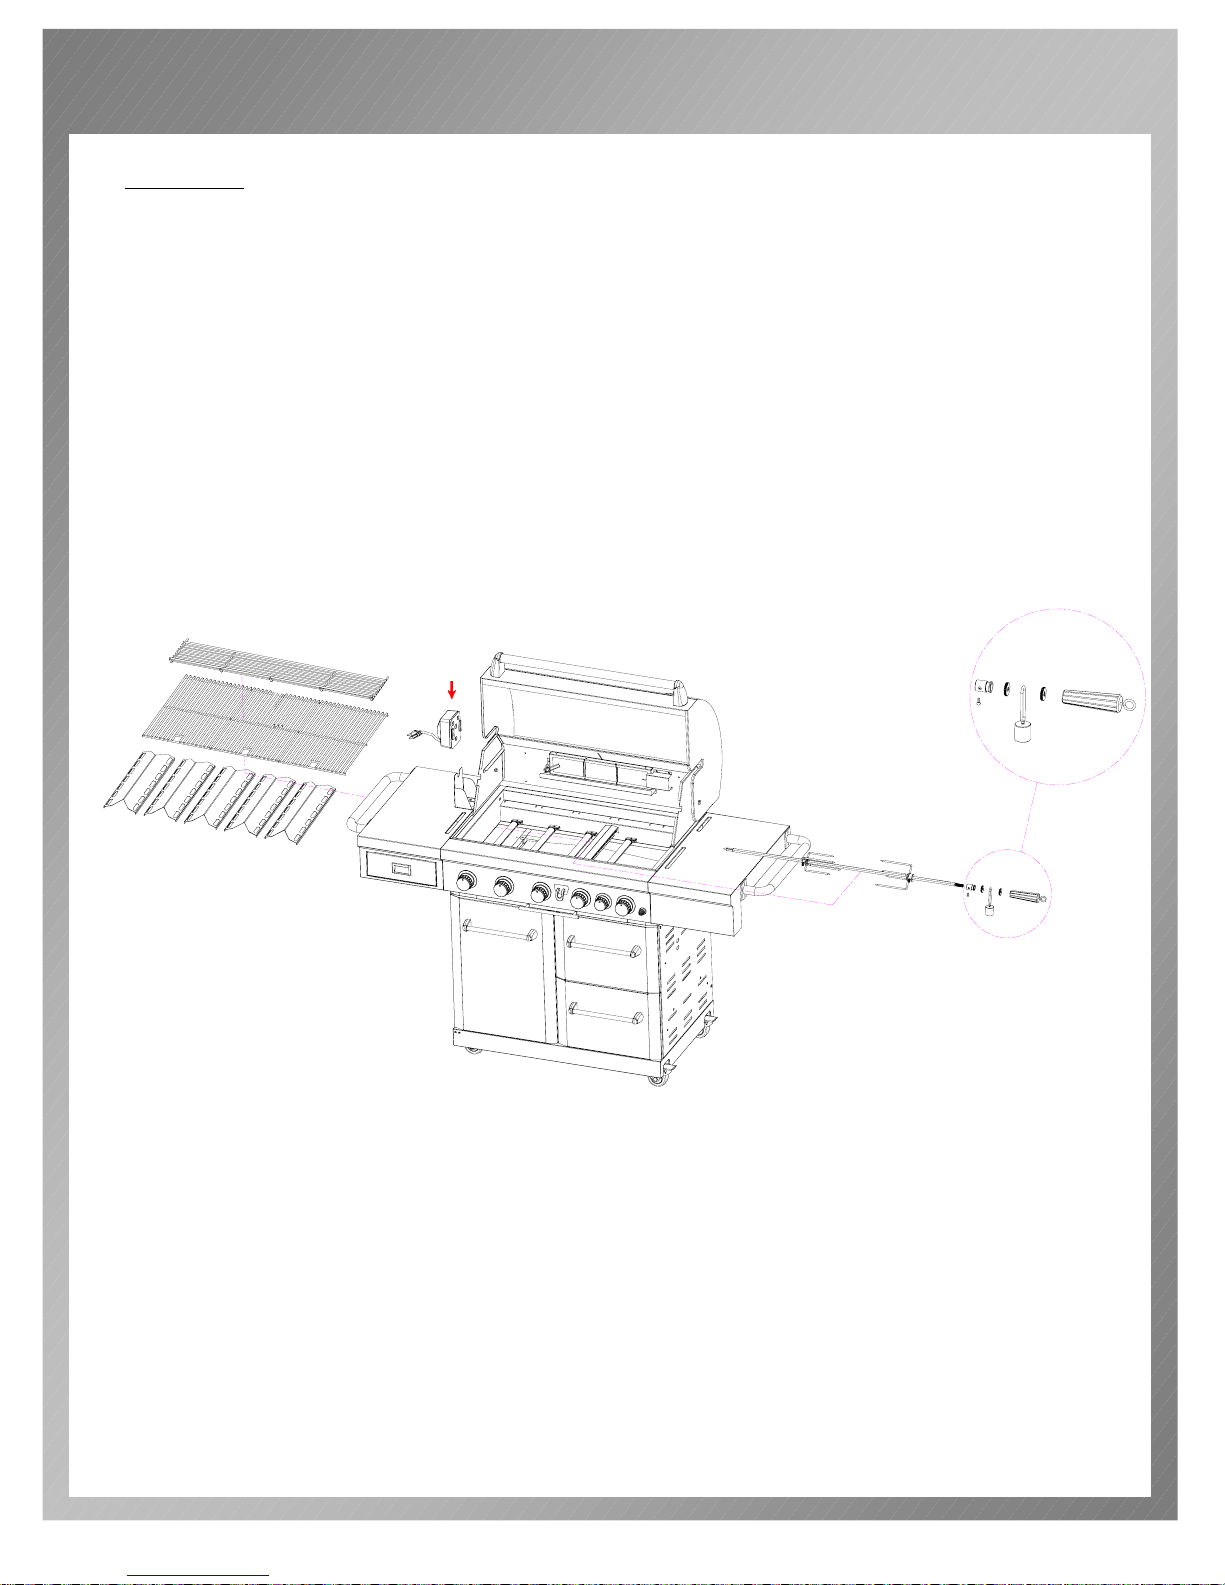
STEP V:
Remove rotisserie rod from back panel packing foam, take out handle,
prongs, counter balance and shaft collar from rotisserie carton.
Tread key washers and counter balance onto treaded end of rotisserie rod,
next tread handle and tighten, slide shaft collar through other side of rod
followed by the two prongs, (forks should be pointing towards each other)
tighten thumb screws on shaft collar and prongs.
Remove packing material from flame tamers, cooking grids and warming
rack, then place them in the proper positions shown below.
9
Page 13
ASSEMBLY INSTRUCTIONS
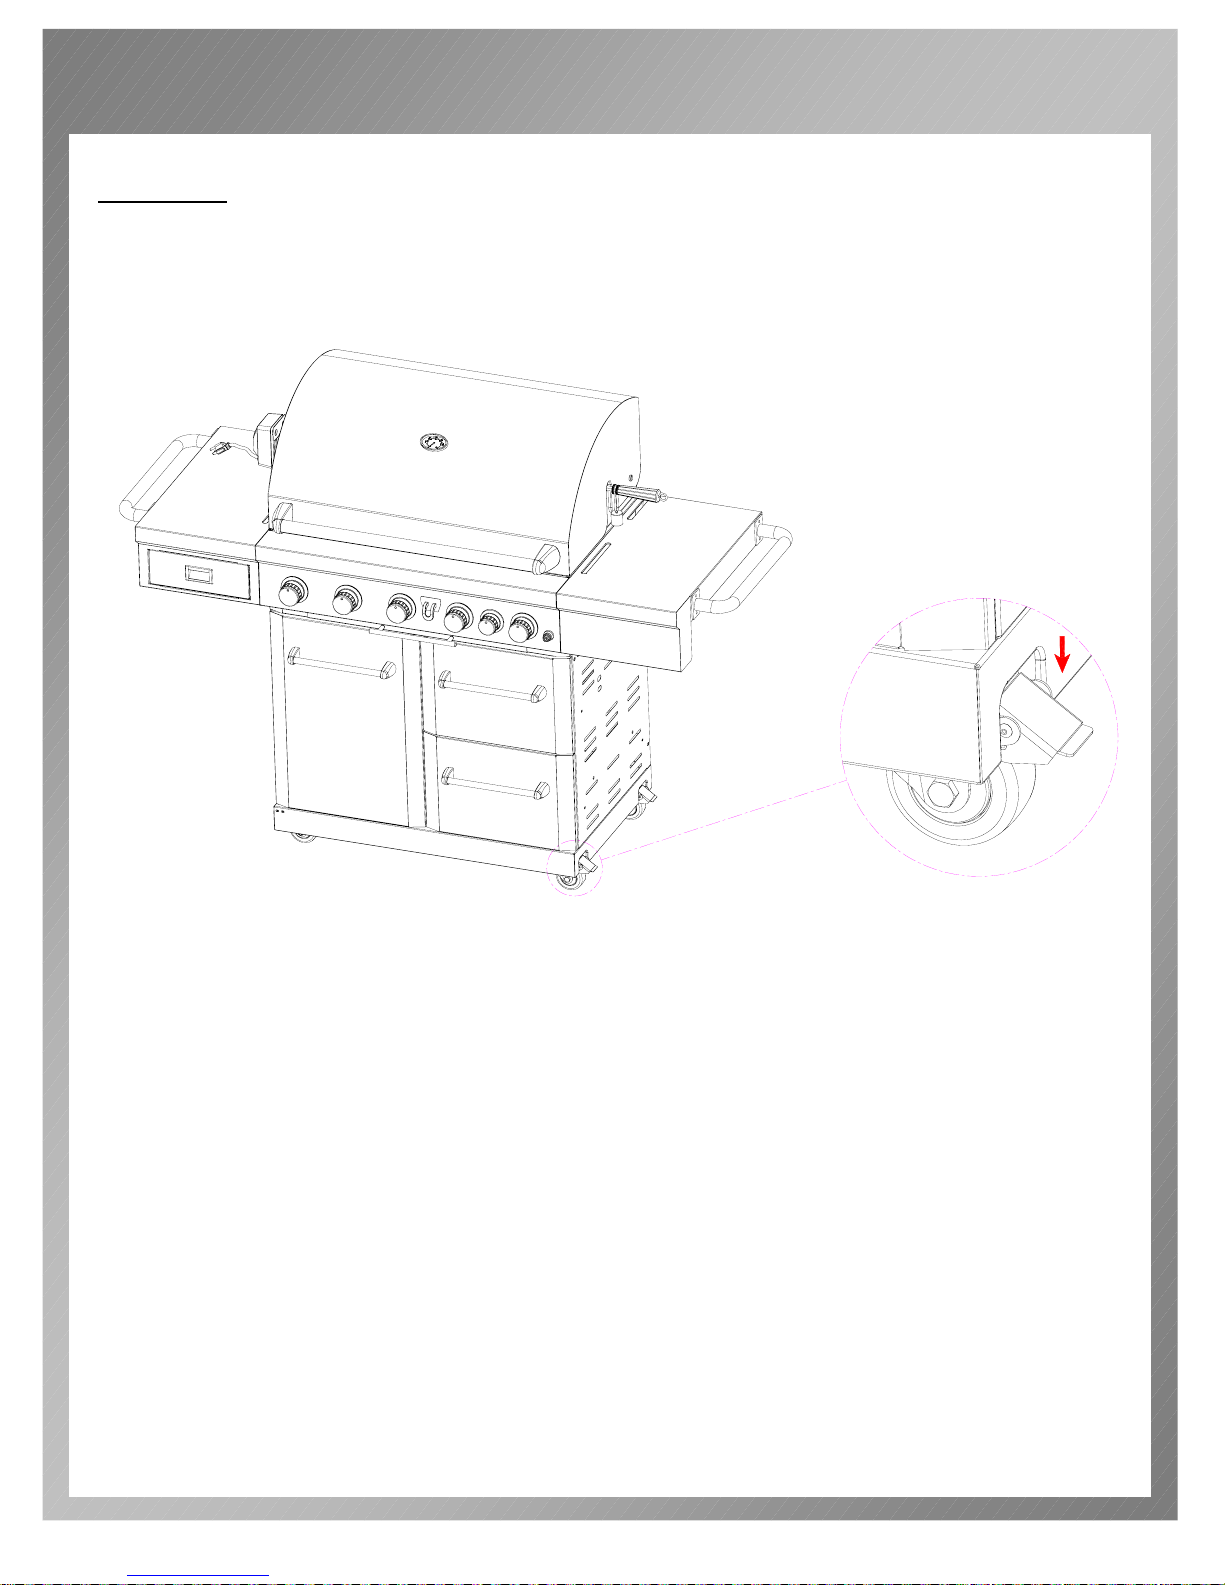
STEP VI:
When the grill is in the desired location, lock the caster brakes, this will keep
the grill unit in place for safe operation.
10
Page 14
ASSEMBLY INSTRUCTIONS
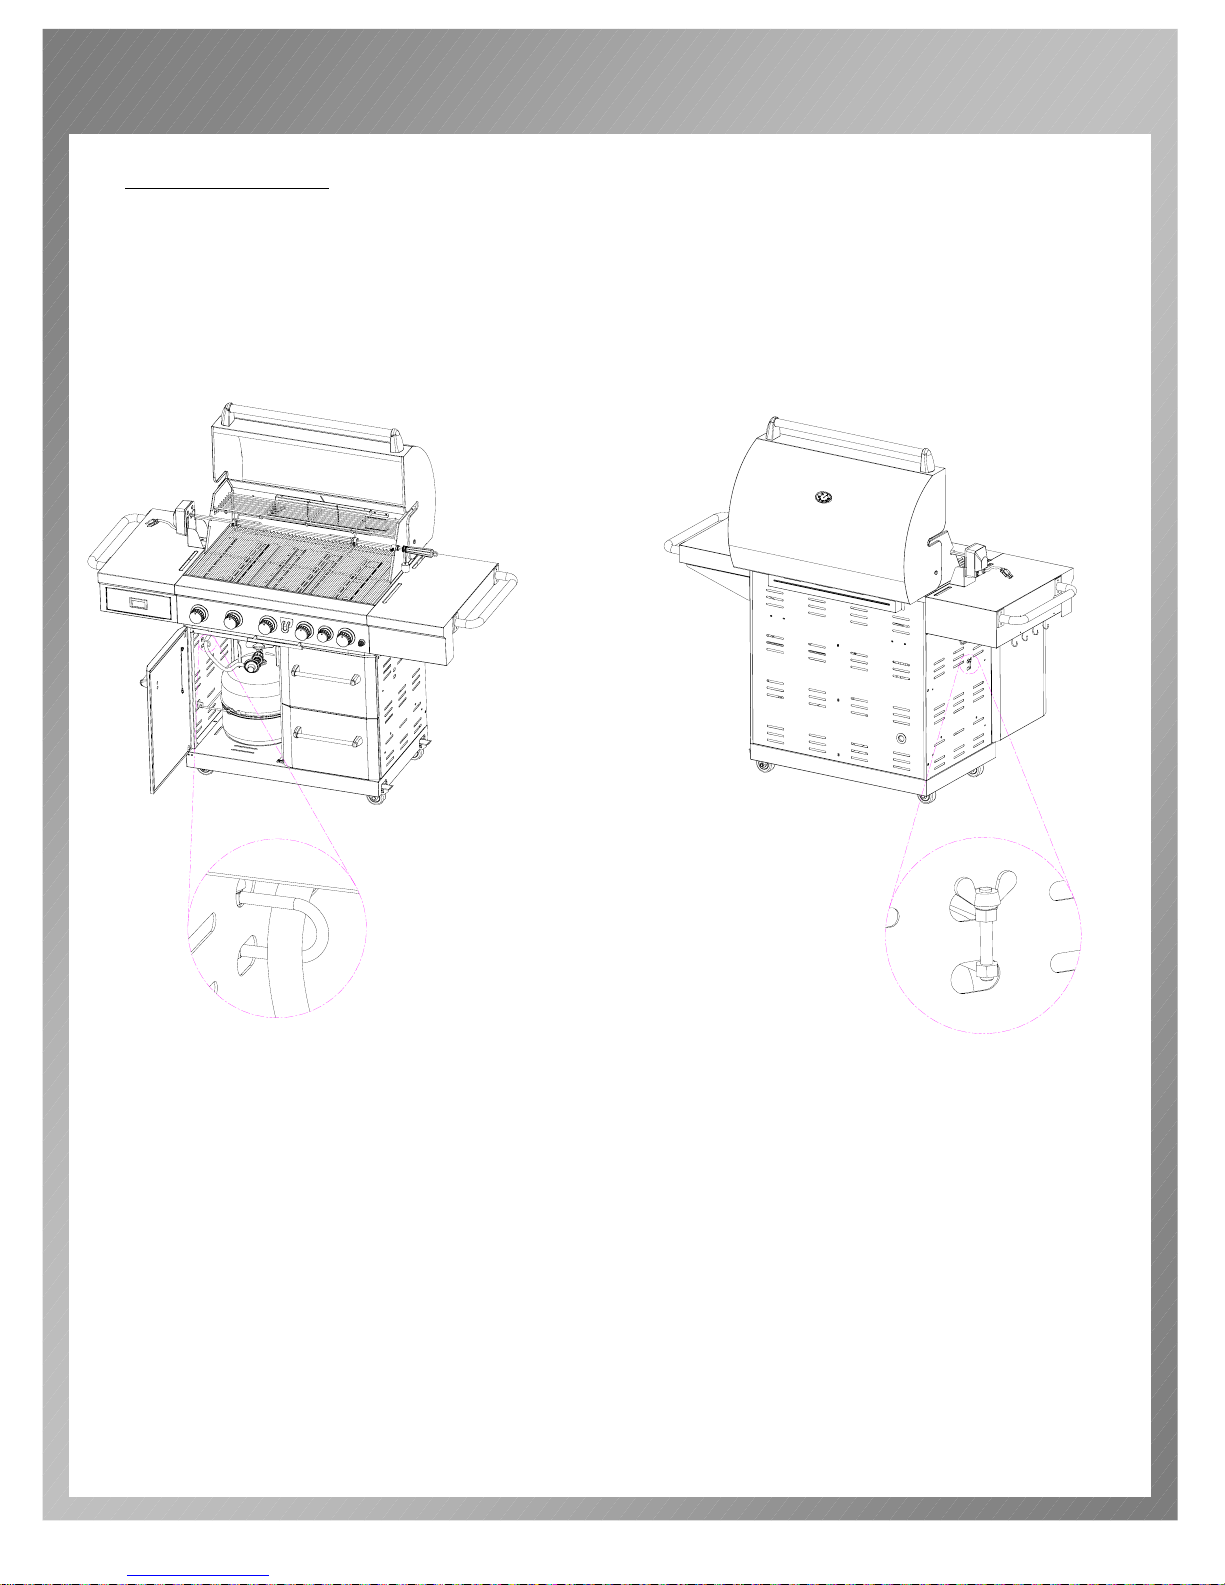
Safety Notice:
The regulator hose(natural gas hose) should go through the U shaped bracket,
in order to prevent the hose from lifting up and touching the hot firebox.
Note: if replacing regulator (natural gas hose) please make sure to put regulator
hose (natural gas hose) through U shape bracket.
11
Page 15

GAS CONNECTION
WARNING
IMPORTANT: Your grill has been designed to operate using only the
gas specified on the rating plate. Do not attempt to operate your grill
with other gases. Failure to follow this warning may result in a fire
hazard and bodily harm.
CONNECTION FOR LIQUID PROPANE GAS(LPG) GRILLS:
CONNECTION FOR LIQUID PROPANE GAS(LPG) GRILLS:
Your LP gas grill is factory built to operate using liquid propane gas only. Never
attempt to operate your grill on gases other than the type specified on the grill
rating plates.
Your regulator supplied with your liquid propane gas grill is set for 11inch water
column pressure and is for use with propane gas only.T he regulator and factory
supplied hose assembly must be used when operating your grill with a 20lbs LP
gas cylinder. If replacement of the hose and/or regulator becomes necessary,
factory specified parts are required.
LP TANK USED WITH YOUR GRILL MUST MEET THE FOL LOWING
1) Measurement: 12’’(30.5cm) (Diameter) X 18’’ (45.7cm) (Tall) .
2) Maximum Capacity: 20lbs(9Kg).
3) Constructed and marked in accordance with the specification for LP gas
cylinders of the U.S. Department of Transportation (DOT) or the National
Standard of Canada, CAN/CSA-B339, Cylinders, Spheres and Tubes for the
Transportation of Dangerous Goods..
4) Is arranged for vapor withdrawal.
5) Includes a collar to protect the tank valve.
6) Provides a shut-ff valve terminating in an LP gas tank valve outlet.
LP TANK VALVE USED MUST MEET THE FOLLOWING
1) Have type I connection complying with the latest edition of ANSI Z21.58.
2) Have safety relief valve.
3) UL listed Overfill Protection Device (OPD), This OPD safety feature is
identified by a unique triangular hand wheel.
FOR YOUR SAFETY
Ensure that the black plastic grommets of the regulator provided are in place and
that the hose does not come into contact with the heat shield or the grill head.
12
Page 16
GAS CONNECTION
OPD HAND WHEEL
C
L
O
S
E
g
EN
OP
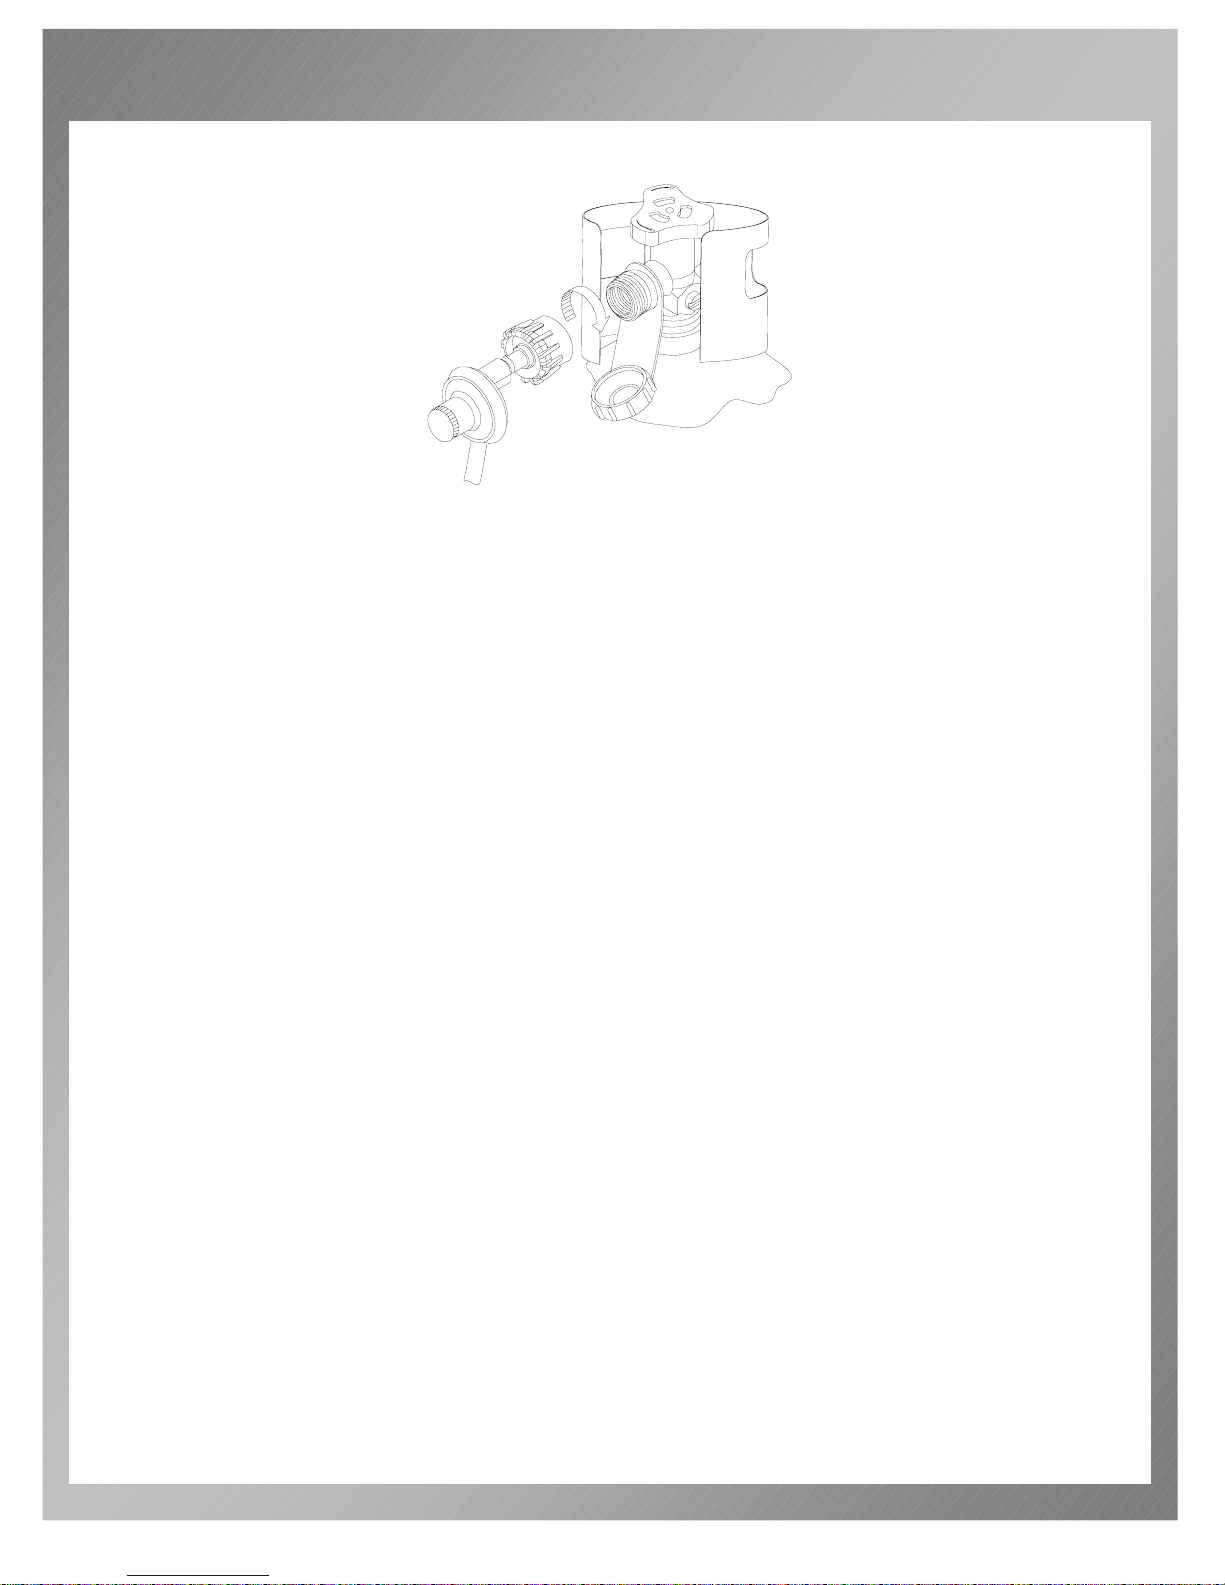
CONNECT THE REGULATOR TO THE LP TANK
VERY IMPORTANT:
- THE REGULATOR SHALL NOT BE IN A LOCATION THAT WILL ATTAIN A
TEMPERATURE ABOVE 140℉(60℃).
- THE REGULATOR SHALL INCORPORATE A PRESSURE RELIEF VALVE
OR OVERPRESSURE DEVICE.
- THE INLET OF THE PRESSURE REGULATOR SHALL BE FITTED TO
CONNECT THE TYPE I CONNECTION OF THE TANK VALVE PER ANSIZ21.81.
1) Make sure tank valve is in its full OFF position (turn clockwise to stop).
2) Check tank valve to assure it has proper external male threads (type I
connection per ANSIZ21.81).
3) Make sure all burner knobs are in their OFF position.
4) Remove the protective cap from LP tank valve. Always use cap and strap
supplied with valve.
5) Inspect valve connection port and regulator assembly. Look for any damage or
debris. Remove any debris. Inspect hose for damage. Never attempt to use
damaged or plugged equipment. Contact your local LP gas dealer for repair.
6) When connecting regulator assembly to the valve, hand tighten nut clockwise
to a positive stop. Do not use a wrench to tighten. Use of a wrench may
damage quick coupling nut and result in a hazardous condition.
7) Open tank valve fully (counterclockwise). Use a soapy water solution to check
all connections for leaks before attempting to light grill. If a leak is found, turn
tank valve off and do not use grill until a local L.P gas dealer can make repairs.
DISCONNECT THE TANK WHEN THIS GRILL IS NOT IN USE
1) Turn all the knobs off.
2) Turn the tank valve off fully (turn clockwise to stop).
3) Detach the regulator assembly from tank valve by turning the quick coupling
nut counterclockwise.
4) Install the protective cap back onto the LP tank valve.
13
Page 17
GAS CONNECTION
WARNING
Never insert any foreign objects into the valve outlet. It may damage the valve and
cause leak, leaking gas may result in fire, explosion, heavy body injury, or even death.
Do not use this grill until leak tested.
If you cannot stop a gas leak, close the LP tank valve IMMEDIATELY, call LP gas
supplier or the fire department.
DANGER
NEVER store a spare LP tank under or near grill or in an enclosed area.
NEVER fill the tank beyond 80% full. An overfilled spare LP tank is dangerous
because surplus gas may leak from safety relief valve. The safety relief valve on a LP
tank could activate to release gas and cause a fire.
The spare LP tank must have safety caps installed on the LP tank outlet.
If any gas leaks are found on the spare LP tank, immediately step away from the grill,
and call the fire department.
CONNECTION FOR NATURAL GAS(NG) GRILLS:
CONNECTION FOR NATURAL GAS(NG) GRILLS:
Your natural gas grill is factory built to operate using natural gas only. Never
attempt to operate your grill on gases other than the type specified on the grill
rating plates.
Your grill operates at 7 inch water column pressure.Verify supply pressure with
your local gas company. If supply pressure is different than 7 inch, contact a
certified plumber for assistance. Not for use with LP gas.
BEFORE CONNECTION:
The natural gas hose and assemble are not supplied with this grill. Please
purchase a CSA approved Hose and assemble in local reputable dealer.
Hose and assembly are CSA listed for natural gas, manufacturer gas, mixed gas and
for liquefied petroleum and for LP Gas-Air mixtures on basis of 0.64 specific gravity
for 1000 BTU’s per cubic foot of gas at 0.3 inch water column pressure drop. Only
ANSI Z21.54 approved hoses should be used with this grill.
The appliance and its individual shut off valve must be disconnected from the gas
supply piping system during any pressure testing on that system at test pressures in
excess of 1/2 psi (3.5Kpa).
14
Page 18
GAS CONNECTION
The appliance must be isolated from the gas supply piping system by closing its
individual manual shut off valve during any pressure testing of the gas supply piping
system at test pressure equal to or less than 1/2 psi (3.5Kpa).
WARNING
Do not use hard metal piping of any kind to connect this type of grill to natural
gas source. Use only hose specified by reputable dealer. Using hard metal
piping or convoluted metal tubing is an unsafe practice. Movement of the grill
can cause breakage of metal pipe.
DANGER
Connection should be made by a certified plumber. Supply the plumber with a
copy of these instructions. Incorrect connection can result in a gas leak with
possibility of fire.
CONNECT YOUR GRILL TO NATURAL GAS SOURCE
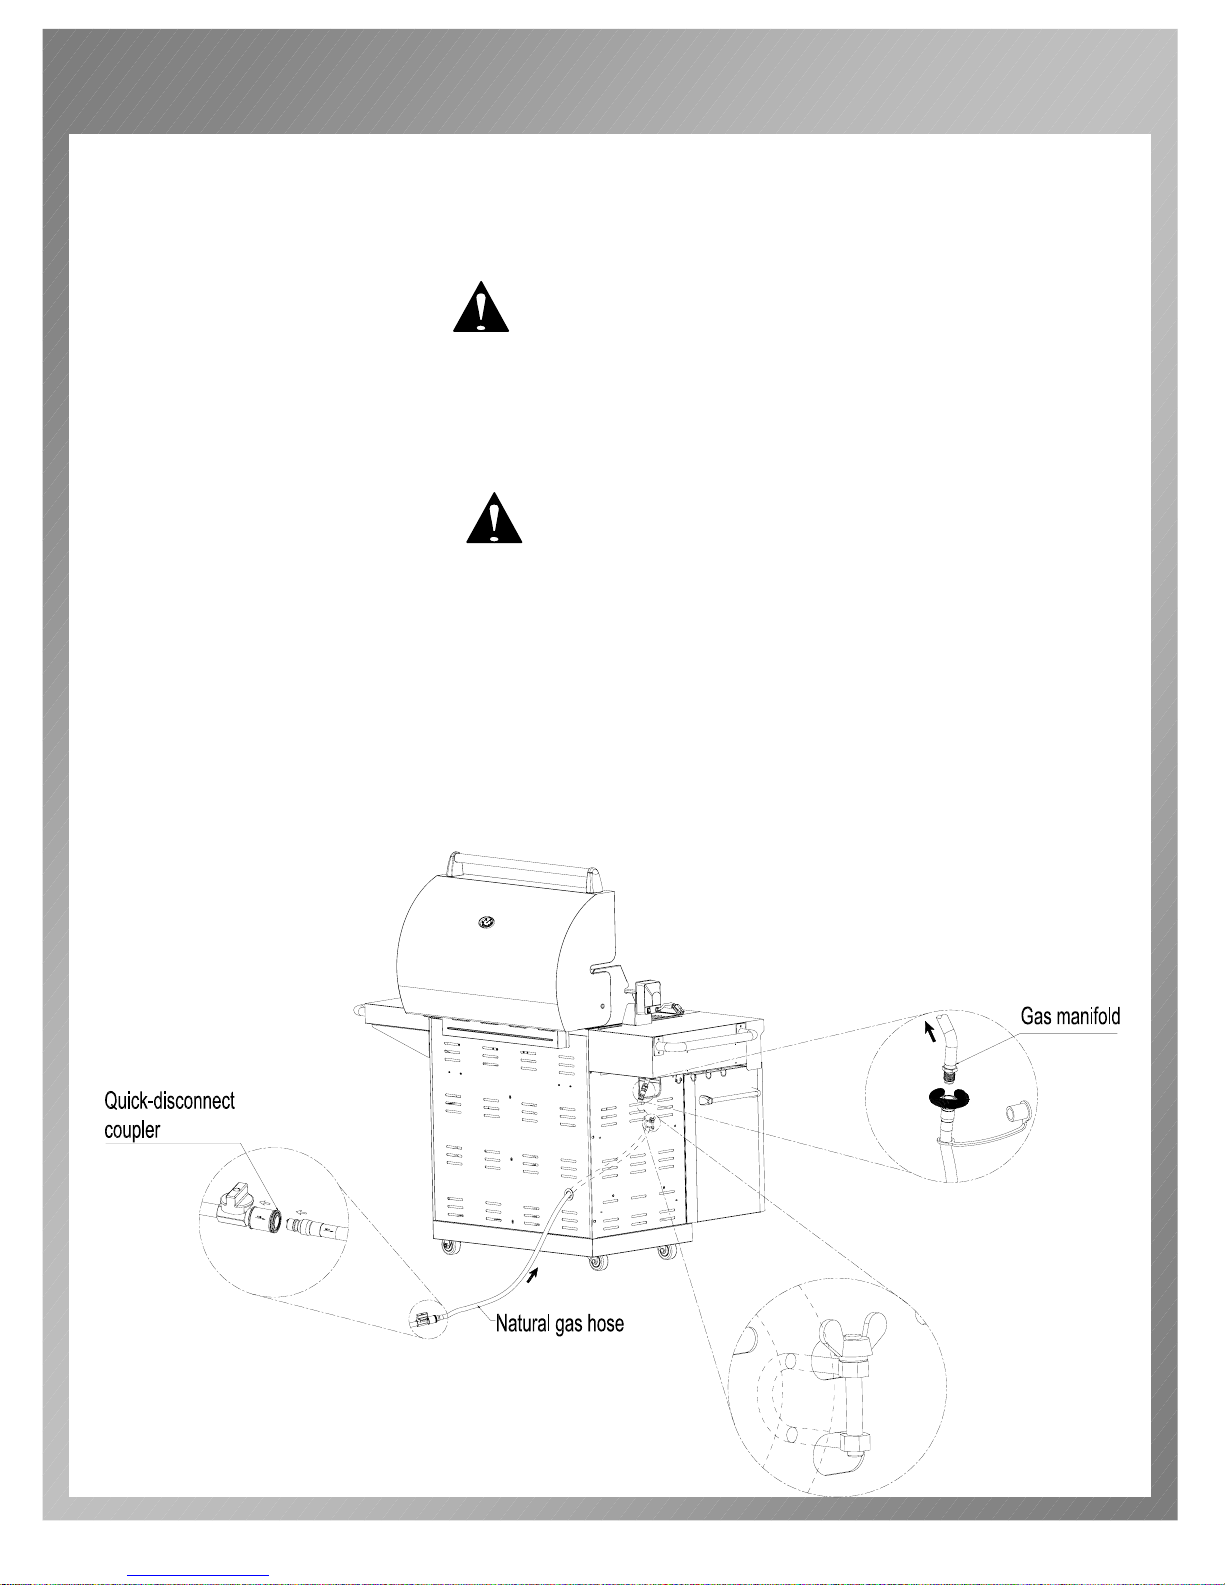
1. Insert the inlet connection to grill cabinet from back of grill. Tighten it to gas
manifold with wrench. Make sure to put natural gas hose through U shape bracket.
Notice: The natural gas hose and assemble are not supplied with this grill.
15
Page 19
GAS CONNECTION
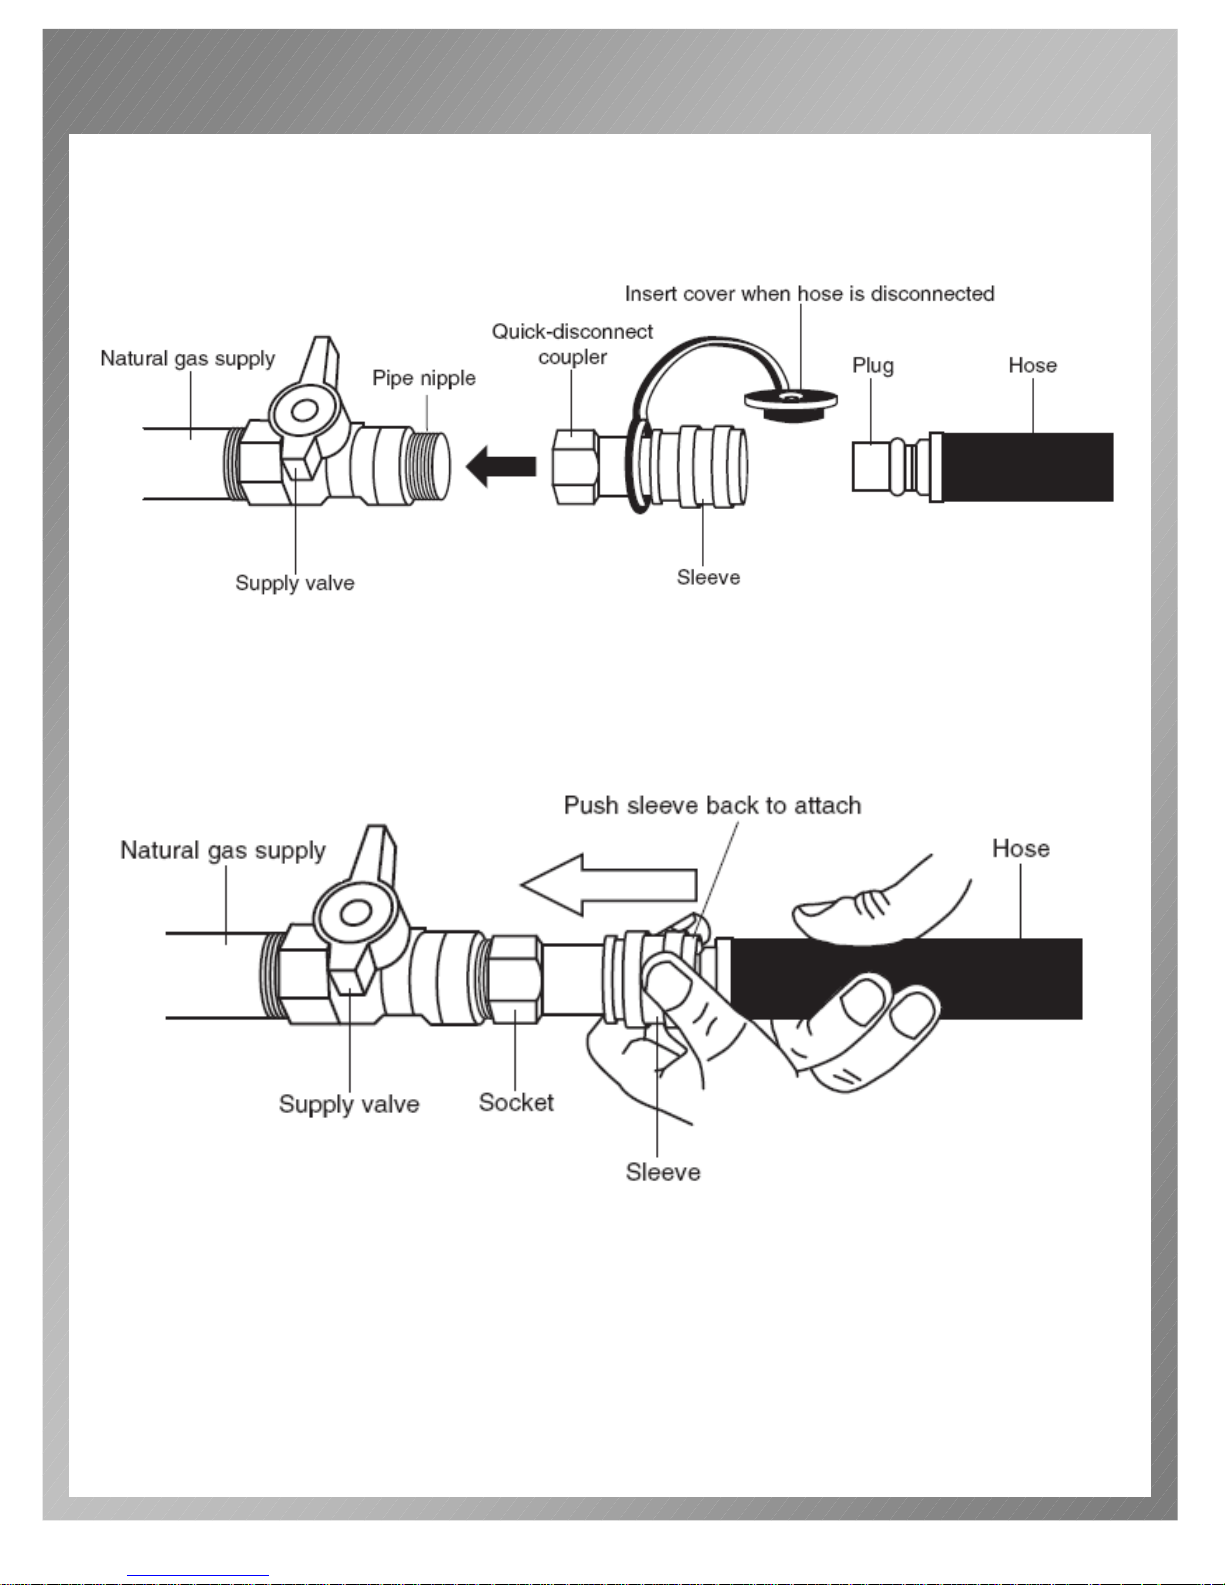
2. Coat pipe nipple with gas resistant teflon tape or pipe dope. Tighten quickdisconnect coupler onto pipe nipple that leads to natural gas supply.
3. After grill is completely assembled, make sure natural gas supply valve is “OFF” and
then connect natural gas hose to socket. Push sleeve back on socket and insert plug
until sleeve snaps forward, locking plug into socket. Be sure to leak test these
connections prior to use.
Notice: Please also follow the instructions which attached on the natural gas hose
assemble you purchase for connection steps.
DISCONNECT YOUR GRILL FROM THE NATURAL GAS SOURCE
1) Turn natural gas supply valve to “ OFF ”position.
2) Push sleeve back and pull plug out of sleeve.
16
Page 20

LEAK TESTING
GENERAL
Although all gas connections on the grill are leak tested at the factory prior to
shipment, a complete gas tightness check must be performed at the installation site
due to possible mishandling in shipment, or excessive pressure unknowingly being
applied to the unit. Periodically check the whole system for leaks, or immediately
check if the smell of gas is detected.
BEFORE TESTING
1) Make sure that all packing material is removed from the grill including the burner
tie-down straps.
2) Do not smoke while leak testing.
3) Never leak test with an open flame.
4) Make a soap solution with one part liquid detergent and another part water.
Prepare a spray bottle, brush, or rag to apply the solution to the connections. For
the initial leak test, make sure the cylinder is full.
5) Grill must be leak tested outdoors in a well-ventilated area, away from ignition
sources such as gas fired or electrical appliances, and flammable materials.
6) Keep grill away from open flames and/or sparks while testing.
TO TEST GAS LEAK ON LP GAS GRILLS
1) Make sure all control knobs are in the “ ” position.
2) Make sure the regulator is connected to the tank tightly.
3) Completely open tank valve by turning counter clockwise. If you hear a “POP”
sound, turn gas off IMMEDIATELY, as it indicates a heavy leak at the connection.
Call your gas dealer or fire department.
4) Check every connection from the tank up to and including the connection to
the manifold pipe assembly (the pipe that goes to the burner) by brushing or
spraying the soapy solution on the connections.
5) If soap bubbles appear, there is a leak. Turn off tank valve IMMEDIATELY
and retighten connections, open tank valve again, and recheck.
6) If leaks cannot be stopped, DO NOT ATTEMPT TO REPAIR. Call our service
center for help.
7) Always close the tank valve after leak testing by turning clockwise.
Only those parts recommended by the manufacturer should be used on the grill.
Substitution will void the warranty. Do not use the grill until all connections have
been checked and do not leak.
17
Page 21
LEAK TESTING
SAFETY TIPS:
1) Always check for leaks after every gas tank change.
2) Always check for leaks before each use.
3) Check all gas supply fittings for leaks before each use. It is handy to keep a
spray bottle of soapy water near the shut-off valve of the gas supply line. Spray
all the fittings. Bubbles indicate leaks.
4) Disconnected gas cylinders must have threaded valve plugs tightly installed, and
must not be stored in a building, garage, or any other enclosed areas.
5) Turn off all control knobs and gas tank valve when the grill is not in use.
6) If the appliance is stored indoors, the gas tank must be disconnected and
removed from the grill.
7) Gas tanks must store outdoors in a well-ventilated area. Disconnected gas tanks
in storage or being transported must have a safety cap.
8) Never leave a gas tank in a recreational vehicle or boat which may become
overheated by the sun.
9) Do not store gas tank in or near an area where children play.
TO TEST GAS LEAK ON NATURAL GAS GRILL
1) Make sure all control knobs are in the “ ” position.
2) Turn on the natural gas supply. If you hear a hissing or rushing sound, turn gas
off immediately. There is a major leak at the connection. Correct before
proceeding.
3) Create a mixture of half water and half liquid dishwashing soap. Brush soapy
solution onto the following:
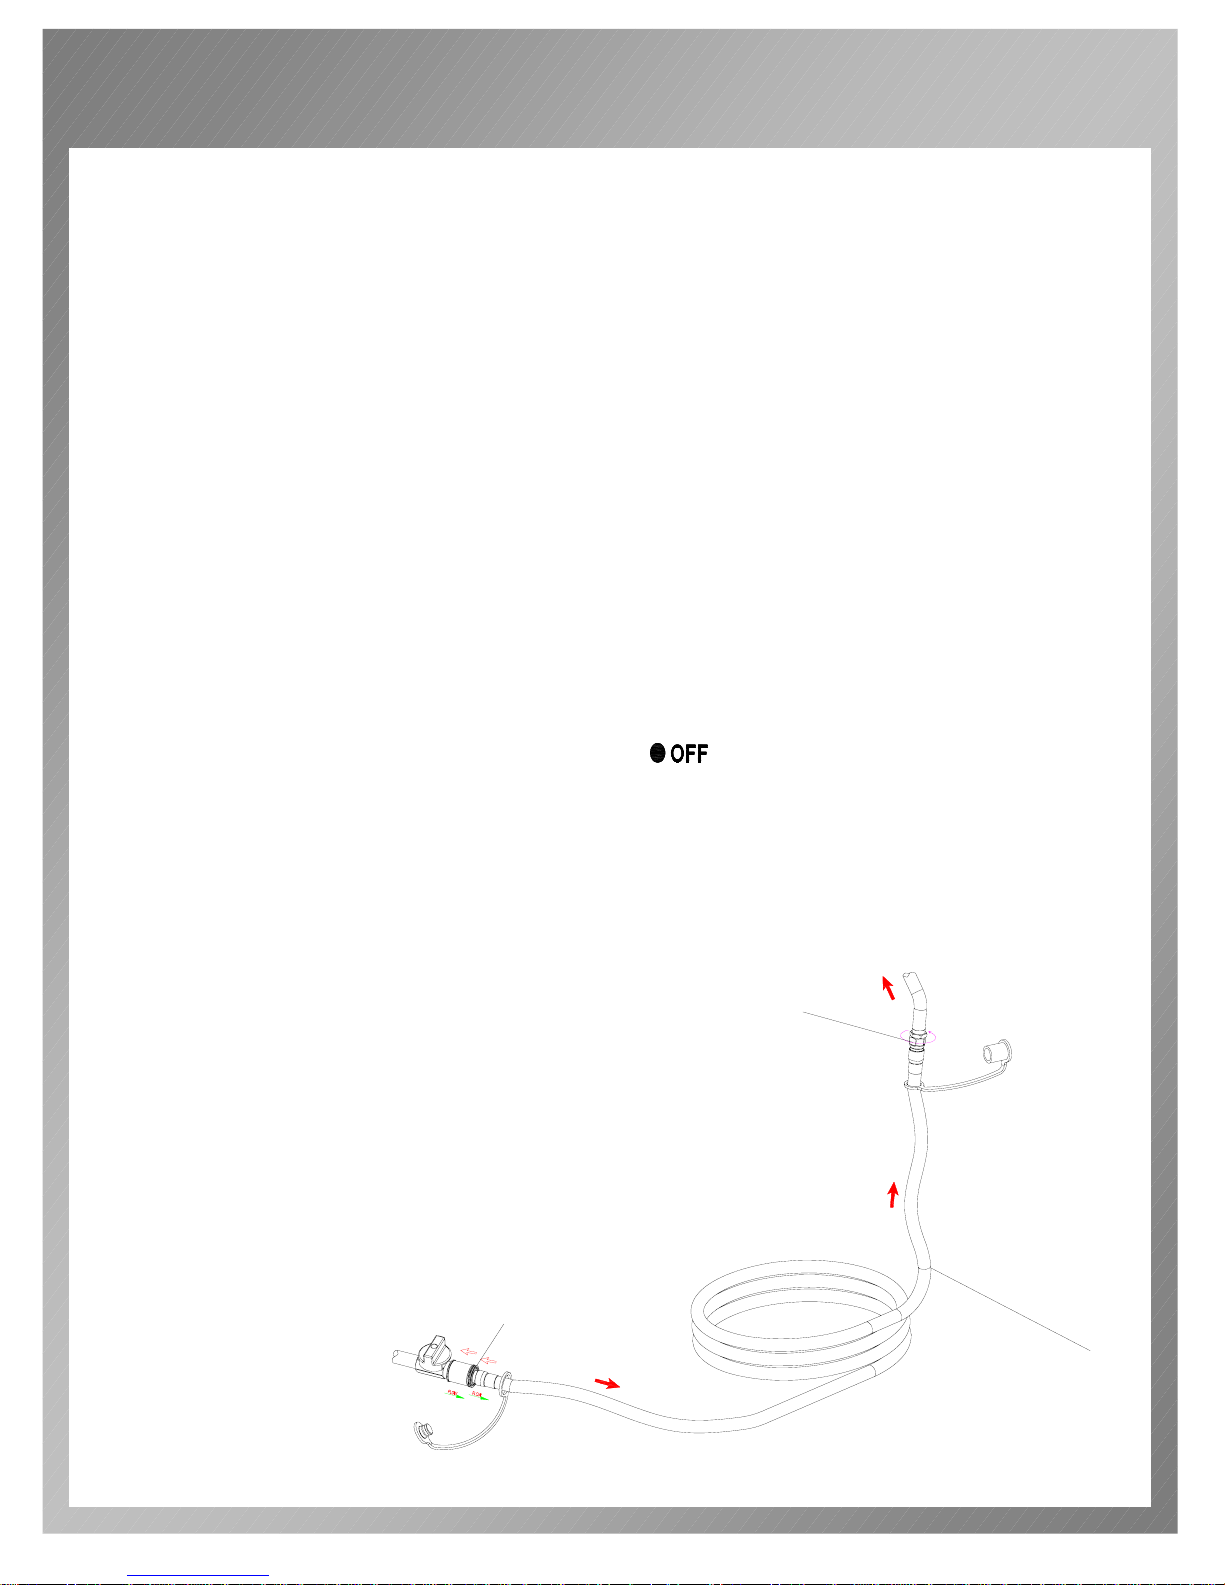
A. Quick-disconnect coupler
B. The full length of gas supply hose
C. Gas supply connection to gas manifold.
C
A
B
18
Page 22

FINAL INSTALLATION CHECKLIST
WARNING
PRE-START CHECKLIST:
Property damage, bodily harm, severe burns, and death could result from
failure to follow these safety steps. These steps should be performed after
the grill has been assembled, stored, moved, cleaned, or repaired, DO NOT
operate this grill until you have read and understand ALL of the warning
and instructions in this manual.
Ensure that the grill is properly assembled.
The LP regulator & hose connected to grill are provided by the manufacturer.
Inspect the natural gas supply hose for burns, chaffing, kinks, and proper routing
before each use. If it is evident there is excessive abrasion or wear, or the hose is
cut, it must be replaced prior the grill being used.
Leak check all gas connections and hose.
All internal packaging removed.
Burners are sitting properly on orifices.
Knobs turn freely.
Properly place the empty grease tray onto grease tray brackets to catch grease
during use.
User informed of gas supply shut off valve location.
Position your grill on lever ground in a well ventilated location, at least 36”
clearance maintained from combustible materials, buildings and overhangs.
Ensure that all electrical supply cords are properly grounded. Keep any electrical
supply cord and the fuel supply hose away from any heated surfaces. Hose
should be at least 3 inches from hot surfaces.
There is no unprotected combustible construction material over the grill.
Do not obstruct the flow of combustion and ventilation air.
19
Page 23
GRILL LIGHTING INSTRUCTION
VERY IMPORTANT: ALWAYS INSPECT THE HOSE PRIOR TO EACH USE.
BEFORE LIGHTING:
Inspect the gas supply hose before turning the gas “ ”. If there is evidence of
cuts, wear, or abrasion, it must be replaced before use. The replacement hose
assembly must be that specified by the manufacturer.
VERY IMPORTANT: TO LIGHT MAIN BURNERS OF THE GRILL:
1) Read instructions before lighting.
2) Turn all knobs to “ ” then open the tank valve. Always keep your face
and body as far from the grill as possible when lighting.
3) Open lid during lighting.
4) Push and turn any control knob slowly to “ ” position. The built-in igniter
will click and spark simultaneously to light the pilot and burner in
sequence. Turn the control knob to “ ”IMMEDIATELY if the burner does
not light within 5 seconds. Wait 5 minutes for gas to dispel, then repeat the
lighting procedure.
5) Follow match lighting instructions if burner can’t be lit after repeating 3-4 times.
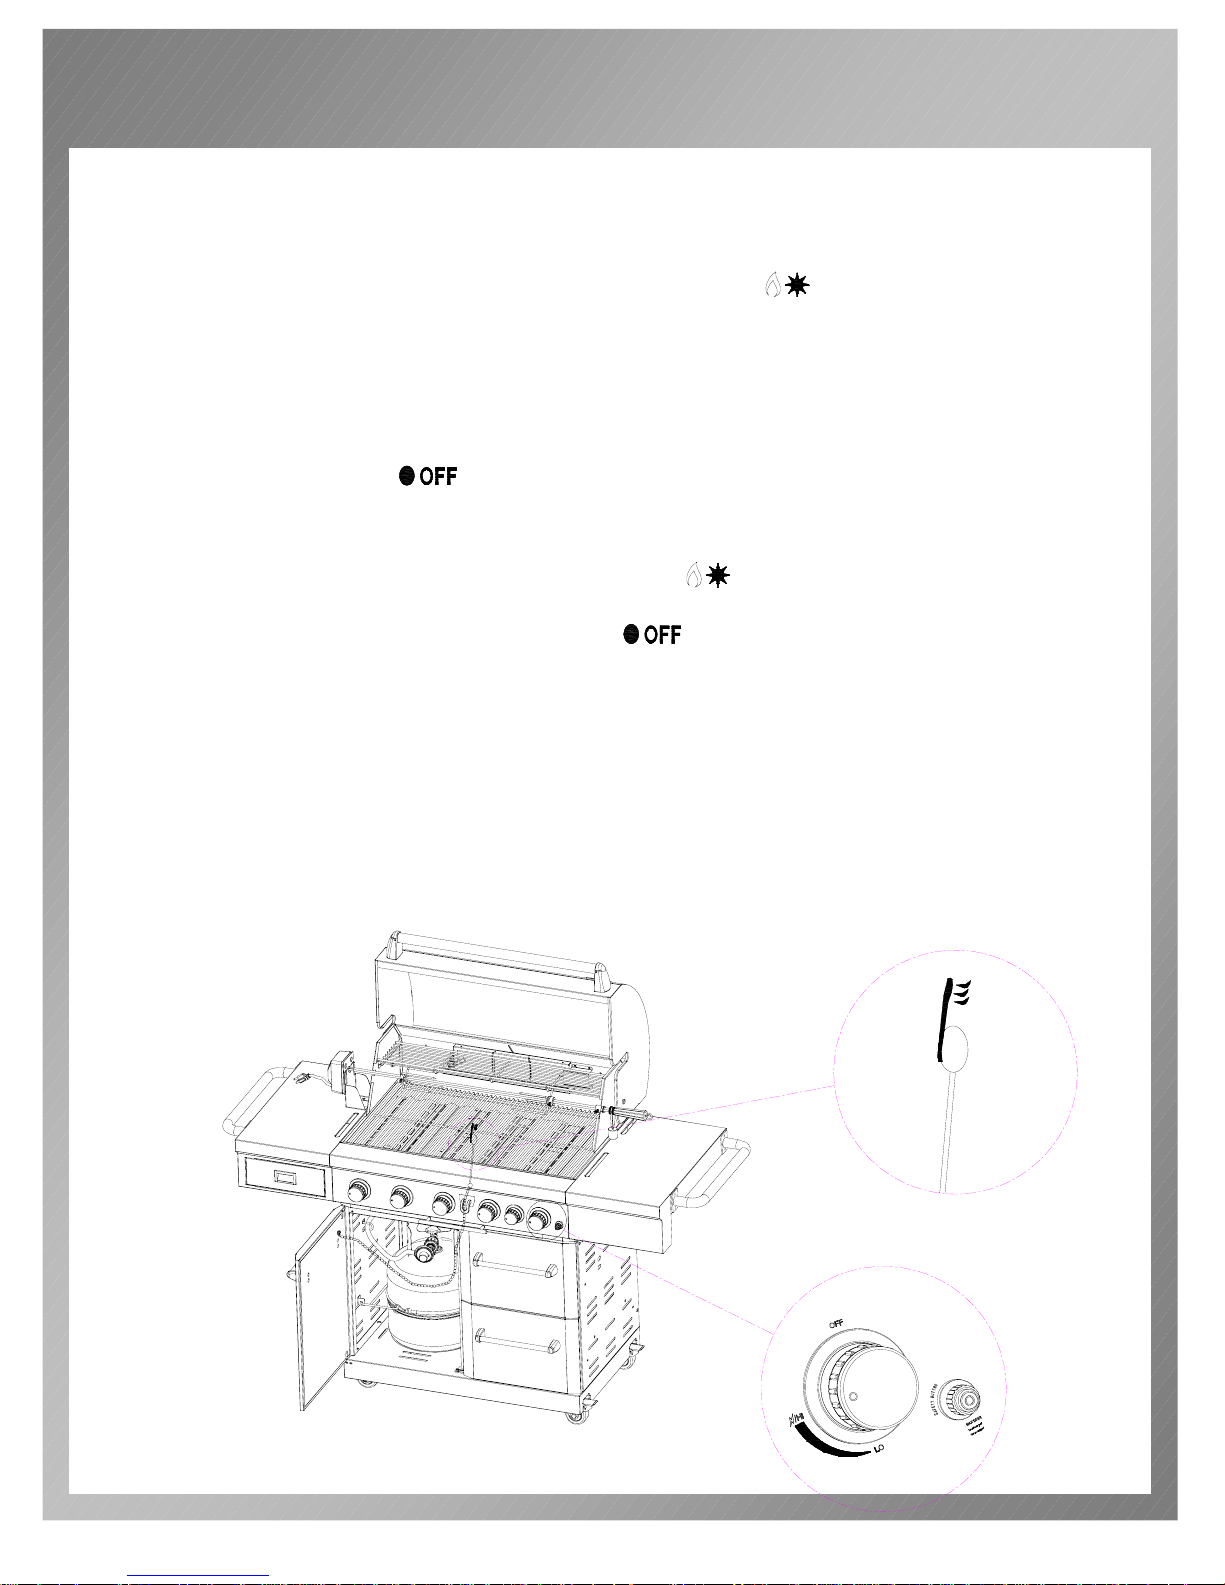
TO LIGHT MAIN BURNERS BY MATCH: (AS THE FOLLOWING FIGURE
SHOWS)
If the burner will not light after several attempts then the burner can be match lit.
Tools: Lighting rod (hanging behind the right door)
20
Page 24

GRILL LIGHTING INSTRUCTION
Usage:
1) Read instructions before lighting.
2) Open the lid during lighting.
3) Simply place a lighted match between the coils on the end of the lighting
rod and hold next to the burner to ignite.
4) Push and turn the knob to “ ” position, make sure the burner lights
and stays lighted.
5) Repeat 3.4 to light other burners.
6) Keep a spray bottle of soapy water near the gas supply valve and check
the connections before each use. Do not light the grill if odor of gas is
present, call out service center.
TO LIGHT THE REAR BURNER OF THE GRILL:
1) Read instructions before lighting.
2) Turn all knobs to “ ” then open the tank valve. Always keep your face and
body as far from the grill as possible when lighting.
3) Open lid during lighting.
4) Push down the safety valve switch button and hold on with right hand, allowing
the gas to reach the burner.
5) Push and turn rear burner knob slowly to “ ” position with left hand 2
seconds later than push down the button. The built-in igniter will click and spark
simultaneously to light the burner once burner lights. Keep pressing safety valve
button for 15 seconds to allow the safety valve to open. Turn the control knob to
“ ”and release the button IMMEDIATELY if the burner does not light within
5 seconds. Wait 5 minutes for gas to dispel, then repeat the lighting procedure.
6) Follow match lighting instruction if burner can’t be lit after repeating 3-4 times.
TO LIGHT THE REAR BURNER BY MATCH:
1) Open the lid during lighting.
2) Push and turn the rear burner knobs slowly to “ ” position, then release.
3) Push down the safety valve switch button with right hand and hold on, light by
match with left hand. Make sure the burner lights and stays lighted.
FLAME CHARACTERISTICS:
1) Check for proper burner flame characteristics. Each burner is adjusted prior to
shipment; however, variations in the local gas supply may take subtle necessary
adjustments.
2) Burner flames should be blue and stable with small yellow tips, no excessive
noise, or lifting. If any of these conditions exist call our customer service line. If
the flame is yellow, it indicates insufficient air. If the flame is noisy and tends to
lift away from the burner, it indicates too much air.
3) Small yellow tips are ok.
21
Page 25

OPERATING INSTRUCTION
TOTAL GAS CONSUMPTION:
Total gas consumption (per hour) of PG-50506SRL grill with all burners on “HI”:
Main burners 60,000 Btu/hr
Rear burner 14,000 Btu/hr
Total 74,000 Btu/hr
USING THE GRILL:
Grilling requires high heat for searing and proper browning. Most foods are cooked at
the “ ” heat setting for the entire cooking time. However, when grilling large
pieces of meat or poultry, it may be necessary to turn the heat to a lower setting after
the initial browning. This cooks the food through without burning the outside. Foods
cooked for a long time or basted with a sugary marinade may need a lower heat
setting near the end of the cooking time.
1) Make sure the grill has been leak tested and is properly located.
2) Remove any packing material.
3) Light the grill burners using the instructions in this manual.
4) Turn the control knob to “ ” and preheat the grill for 15 minutes.
5) The grill lid is to be closed during the appliance preheat period.
6) Place the food on the grill and cook to the desired doneness. Adjust heat
setting, if necessary. The control knob may be set to any position between
“ ” and “ ”.
7) The grill is designed to grill efficiently without the use of lava rocks or
briquettes of any kind. Heat is radiated by the stainless steel flame tamers
under the cooking grids.
8) The hot grill sears the food, sealing in the juices. The longer the preheat, the
faster the meat browns.
USING ROTISSERIE KIT:
1) Take off the rotisserie kit from the grill.
2) Slide off the left fork, and load the meat or poultry onto the rod.
3) Restore the left fork, put two forks into the meat or poultry as far as possible.
Make sure the meat or poultry is located in the middle of the rod. Screw the
wing nuts of the fork as tight as possible.
4) Wrap the food with butchers string (never use nylon or plastic string) to
secure any loose portions, if necessary.
5) Restore the rotisserie kit into the motor.
22
Page 26
CARE & MAINTENANCE
MAINTENANCE
1) Keep the grill area clear and free from combustible materials, gasoline and
other flammable vapors and liquids.
2) Keep the holes in the three sides of the cart clear and free from debris, thus
ensure the flow of combustion and ventilation air is unobstructed.
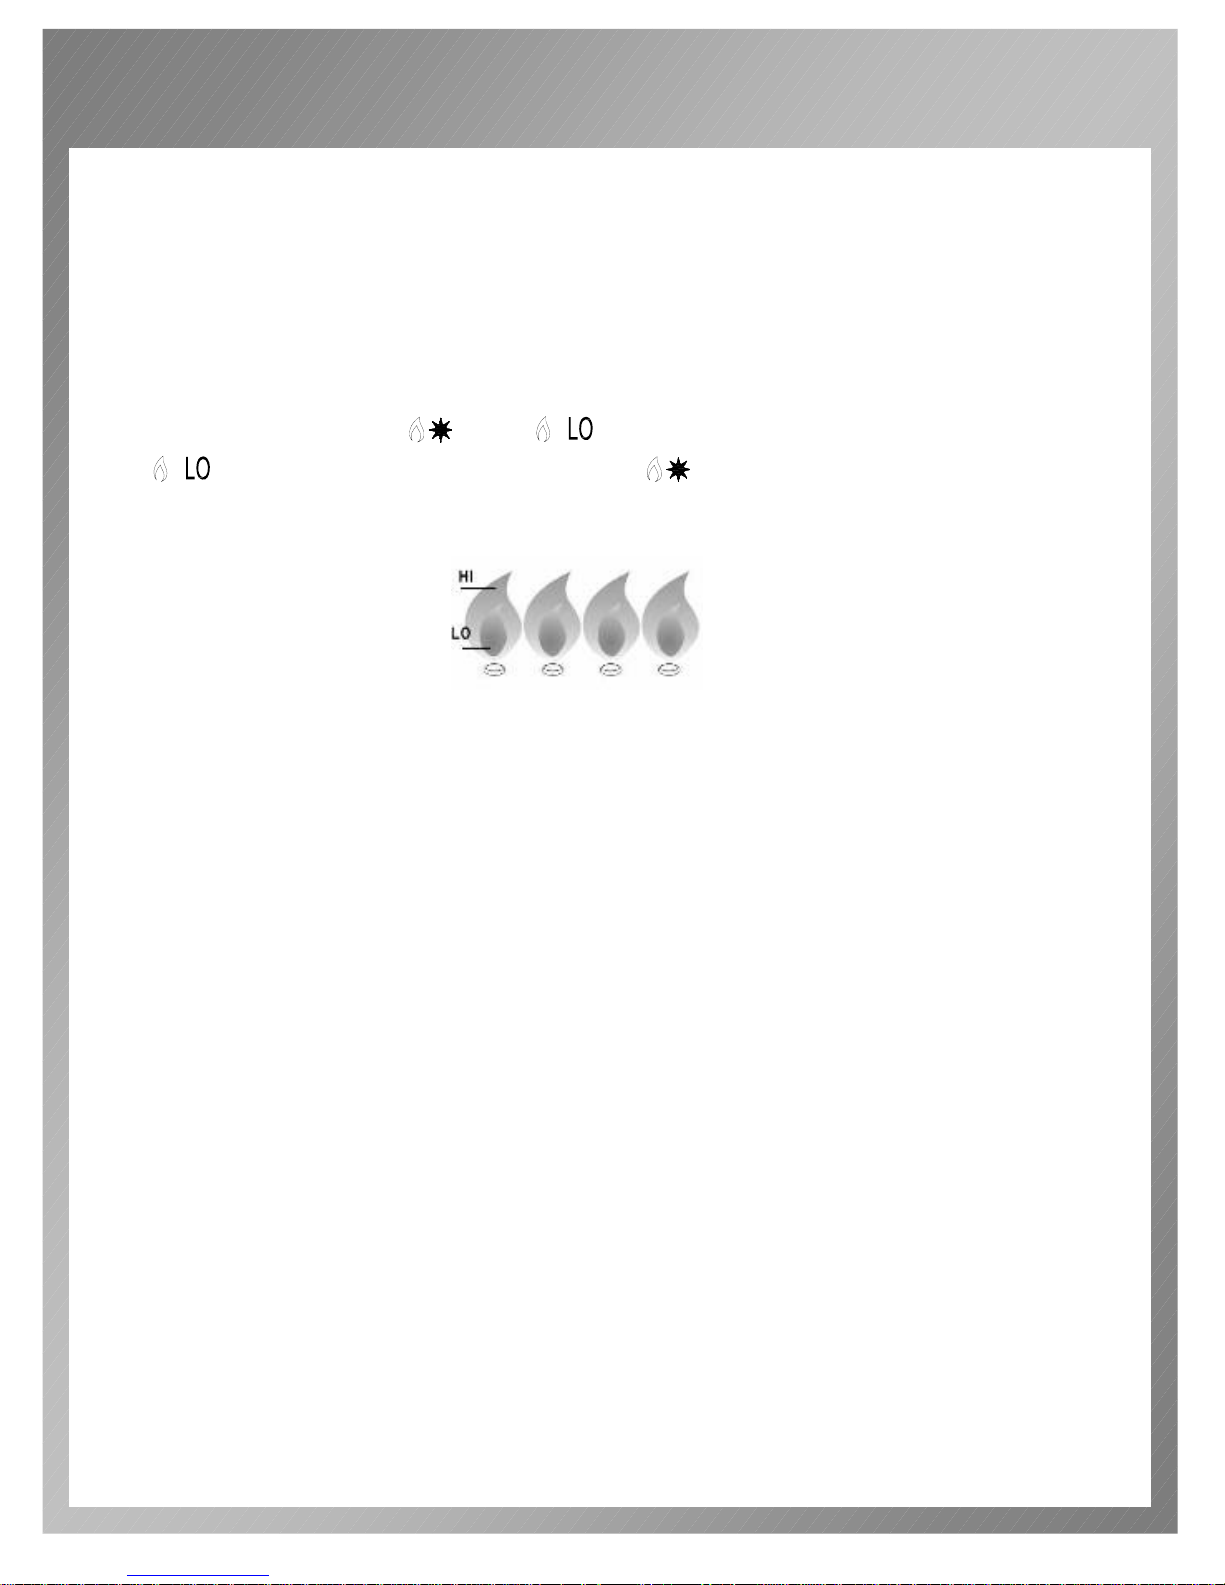
3) Visually check burner flames as following:
- Remove cooking grids and flame tamers.
- Light burners.
- Turn knobs from “ ” to “ ”, check the flame status, the flame in
“ ” position should be smaller than in “ ” position, as figure shown below.
- Always check flame before each use, see TROUBLESHOOTING if any
abnormal status found.
CLEANING
Stainless steel surfaces: To maintain your grill’s high quality appearance, wash
with mild detergent and warm soapy water and wipe dry with a soft cloth after each
use, Baked-on grease deposits may require the use of an abrasive plastic cleaning
pad.
Porcelain surfaces: Because of glass-like composition, most residue can be
wiped away with baking soda/water solution or specially formulated cleaner. Use
nonabrasive scouring powder for stubborn stains.
Painted surfaces: Wash with mild detergent or nonabrasive cleaner and warm
soapy water. Wipe dry with a soft nonabrasive cloth.
Granite surfaces: If the appliance is equipped with a granite countertop, to protect
granite countertops against stains and discoloration, use a high quality penetrating
sealant made specifically for granite. The sealant should be applied periodically
throughout the year.
For standard maintenance on granite countertops, wipe with warm water or mild
soapy water. Cleaners made specifically for cleaning granite may be used as
necessary. Do not use vinegar, cleaners that contain acid, abrasive cleaners, or
furniture polish.We suggest the following routine care:
• Clean up spills immediately;
• Dust with an untreated cloth;
• Use coasters;
• Keep planters off the surface;
• Always keep covered when not in use.
23
Page 27
TROUBLE SHOOTING
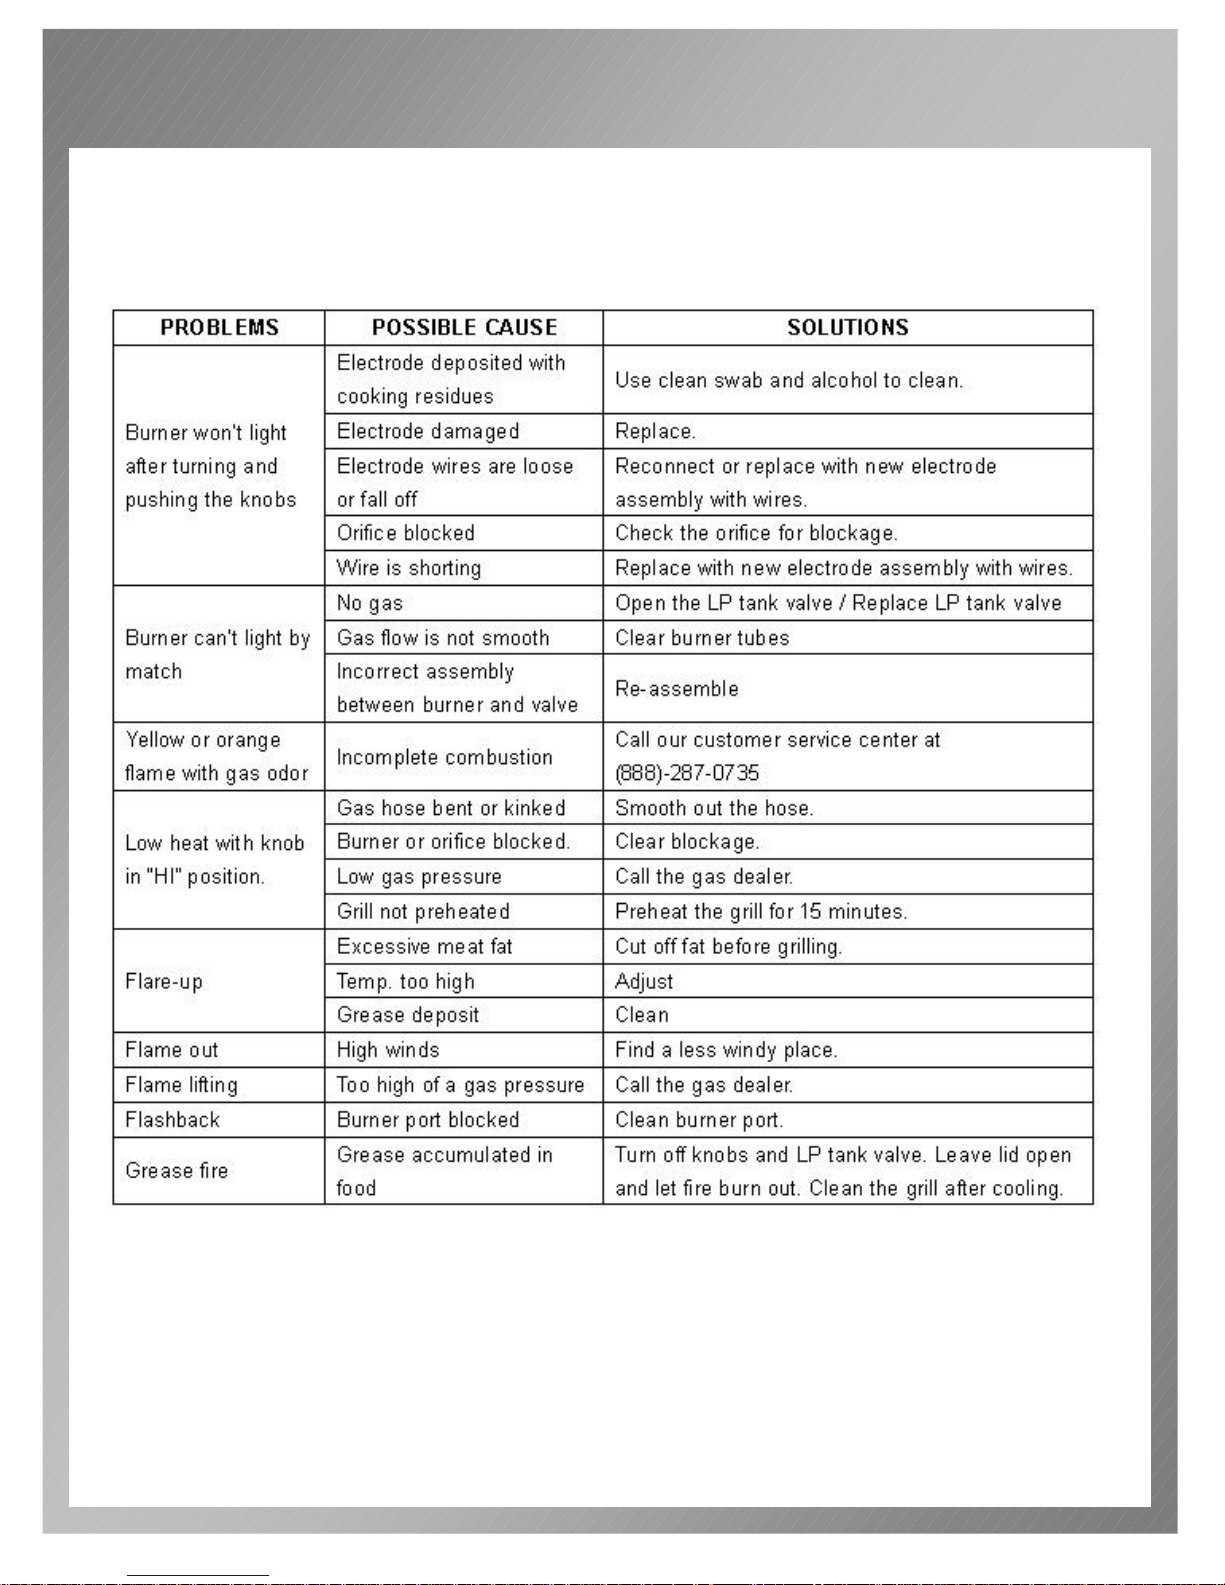
BEFORE CALLING FOR SERVICE
Please check the following problems/solutions before contact our service center.
24
Page 28

FOOD SAFETY
FOOD SAFETY:
1) Always follow the following tips to enjoy safe and healthy outdoor grilling.
2) Always use hot soapy water to wash hands, surfaces & utensils after
processing raw meat.
3) Always separate raw meat from cooked foods to avoid cross-contamination.
4) Always use clean utensils to handle the food.
5) Always cook the meat thoroughly to kill germs. Use a thermometer to
inspect the inner temp. of the meat, if necessary.
6) Place the cooked foods and leftovers promptly into the refrigerator when
done eating.
VERY IMPORTANT: DO NOT LEAVE THE GRILL UNATTENDED
WHILE COOKING.
GRILL STORAGE
SPIDER AND INSECT WARNING
Spiders and insects can nest in the burners after storing. These nests can cause fires
inside the tube or beneath the grill. This is a very dangerous condition. So always
clean the burners before use.
WHEN TO LOOK FOR SPIDERS
Inspect the burners at least once a year or immediately if any of the following
conditions occur:
1) Yellow flame with burning smell.
2) Temperature wont rise.
3) Heats unevenly.
4) Burners make popping noises.
GRILL STORAGE
1) Clean the grill.
2) Store the grill in a well-ventilated, dry outdoor area. Keep out of the reach of
children when tank is connected to the grill.
3) Store the grill in dry indoors ONLY aft e r the tank is turned off and removed, or
disconnect from the natural gas source.The tank must be stored outdoors, out of
the reach of children. NEVER store the tank in a building, garage or any other
enclosed area.
4) Put on the supplied vinyl cover.
25
Page 29

PRODUCT REGISTRATION
Thank you for purchasing the PermaSteel Grill. In order to register your product to
receive streamlined customer service, please fill out the following Product Registration
form and (1) fax the form and a copy of your receipt to FAX # 909-287-0733, or (2)
mail the form and a copy of your receipt to PermaSteel Inc, 14231 Fern Avenue,
Building 10, Chino, CA 91710.
PRODUCT REGISTRATION
First Name:______________ Last Name:__________________________
Address:_____________________________________________________
City:____________ State:___ Zip Code:_________
Email Address:_____________________ Phon e:____-____-_______
Product Model #:______________ Date of Purchase:____/____/____
Retail Store Location of Purchase:________________________________
Please rate the importance of each feature ( 1=least important; 10= m ost
important)
Quality____ Price____ Size/Capacity__ __ Cooking Area____ Appearance____
Other____
What other brands did you seriously consider before making this purchase?
DCS_ CharBroil_ Brinkman_ Members Mark_ Lynx_ Other_
Did not consider other brands_
How did you hear about our product?
Magazine Ad_ Catalog_ Salesperson_ Word of Mouth_ Internet_
Store Display_ Other_
Marital Status Single_ Married_
Household Income Below $50,000_ $50,000-$150,000_ $150,000+_
Education High School_ College_ Graduate School_
Primary Residence Own_ Rent_
Comments/Suggestions:_____________________________________________
__________________________________________________________________
26
Page 30

PERMASTEEL, INC.
14231 FERN AVENUE, BUILDING 10,
CHINO, CA 91710
TEL: (888)-287-0735
FAX: (909)-287-0733
EMAIL: [email protected]
 Loading...