

Page 1
Print Date: 03/03/15
Product Manual
BL-819, BL-830, BL-875
RS-232 Bluetooth Adapters
Version: 6.1
Brainboxes Limited, 18 Hurricane Drive, Liverpool International Business Park, Liverpool, Speke, L24 8RL
Tel: +44 (0)151 220 2500 Fax: +44 (0)151 252 0446 Web: www.brainboxes.com Email: [email protected]
Page 2

INTRODUCTION ............................................................................................................................................................................... 4
1.1. PREAMBLE ............................................................................................................................................................................... 4
1.2. PRODUCTS AND FIRMWARE ......................................................................................................................................................... 4
PHYSICAL PRODUCT FEATURES ...................................................................................................................................................... 5
1.3. BL-819 / 830 .......................................................................................................................................................................... 5
1.4. COMPARISON OF BL-819 AND BL-830 FEATURES ........................................................................................................................... 5
1.5. BL- 819 / 830 POWER OPTIONS ................................................................................................................................................. 5
PRODUCT CONFIGURATION ........................................................................................................................................................... 6
1.6. CONFIGURATION FEATURES AT A GLANCE ........................................................................................................................................ 6
1.7. USING THE CONFIGURATION UTILITY ............................................................................................................................................. 6
1.7.1. Device Info ..................................................................................................................................................................... 7
1.7.2. Support/Links ................................................................................................................................................................. 7
1.8. CURRENT SETTINGS .................................................................................................................................................................... 8
1.8.1. Baud Rate ...................................................................................................................................................................... 8
1.8.2. Parity ............................................................................................................................................................................. 8
1.8.3. Stop Bits ......................................................................................................................................................................... 8
1.8.4. Data bits ........................................................................................................................................................................ 8
1.8.5. PIN Code ....................................................................................................................................................................... 9
1.8.6. Client/Server .................................................................................................................................................................. 9
1.8.7. Partner Device .............................................................................................................................................................. 9
1.8.8. Connect Using ............................................................................................................................................................... 9
1.9. ADVANCED SETTINGS ............................................................................................................................................................... 11
1.9.1. Device Address ............................................................................................................................................................ 11
1.9.2. Device Name................................................................................................................................................................ 11
1.9.3. Discoverability ............................................................................................................................................................ 11
1.9.4. Security Mode .............................................................................................................................................................. 12
1.9.5. Encryption ................................................................................................................................................................... 12
1.9.6. Switch Role .................................................................................................................................................................. 13
1.9.7. Class of Device ............................................................................................................................................................ 13
1.9.8. Handshaking ................................................................................................................................................................ 13
1.9.9. Connect Scheme .......................................................................................................................................................... 13
1.9.10. Interactive Menu ........................................................................................................................................................ 14
1.10. DEFAULT SETTINGS ................................................................................................................................................................. 15
1.11. UPGRADE DEVICE .................................................................................................................................................................. 15
ALTERNATIVE PRODUCT CONFIGURATION .................................................................................................................................. 16
1.12. ACCESSING THE CONFIGURATION MENUS AND COMMANDS. ........................................................................................................... 16
1.13. CONFIGURATION MENU. ......................................................................................................................................................... 17
1.13.1. Navigation ................................................................................................................................................................. 17
1.13.2. Main Menu ................................................................................................................................................................ 18
1.13.3. Communications Parameters .................................................................................................................................... 18
1.13.4. Handshaking .............................................................................................................................................................. 19
1.13.5. Bluetooth Parameters ............................................................................................................................................... 20
1.13.6. Display, Restore and Update Current and Factory Settings ...................................................................................... 21
1.13.7. Disabling Interactive Menu ....................................................................................................................................... 22
1.13.8. Upgrading Firmware ................................................................................................................................................. 23
1.14. COMMAND INTERFACE ........................................................................................................................................................... 25
REMOTE CONFIGURATION ........................................................................................................................................................... 26
RESETTING THE PRODUCT ............................................................................................................................................................ 26
UPGRADING YOUR DEVICE ........................................................................................................................................................... 27
PHYSICALLY CONNECTING TO YOUR RS-232 DEVICE ................................................................................................................... 30
1.15. CONFIGURING THE COMMUNICATIONS PARAMETERS. ................................................................................................................... 30
1.16. PHYSICALLY CONNECTING YOUR DEVICE TO ADAPTER VIA THE RS-232 CONNECTOR ............................................................................. 30
Manual for BL-819, BL-830, BL-875
V6.1
© Copyright Brainboxes Ltd Page 2 of 40
Page 3

CONNECTING ADAPTERS OVER BLUETOOTH ............................................................................................................................... 31
1.17. CLIENT/SERVER PAIR: “CABLE REPLACEMENT” ............................................................................................................................ 31
1.17.1. Configuration by Windows Application ..................................................................................................................... 31
1.17.2. Configuration by Menu .............................................................................................................................................. 32
1.17.3. Configuration by Commands ..................................................................................................................................... 33
1.18. CLIENT: ADAPTER IS THE BLUETOOTH DEVICE WHICH INITIATES THE CONNECTION ................................................................................ 33
1.19. SERVER: CONNECTING TO ADAPTER FROM A REMOTE BLUETOOTH DEVICE ......................................................................................... 34
1.19.1. Configure and connect the adapter ........................................................................................................................... 34
1.19.2. Bluetooth Enable your PC .......................................................................................................................................... 34
1.19.3. Discover the device .................................................................................................................................................... 34
1.19.4. Secure the relationship .............................................................................................................................................. 34
1.19.5. Connect to the Serial Port profile............................................................................................................................... 35
1.19.6. Connect your application to the new COM port ........................................................................................................ 35
11. CUSTOM FACTORY CONFIGURATION ..................................................................................................................................... 36
12. TROUBLESHOOTING ............................................................................................................................................................... 37
13. TECHNICAL SPECIFICATIONS ................................................................................................................................................... 38
13.1. STORAGE AND OPERATING ENVIRONMENT ................................................................................................................................. 38
13.1.1. Storage ...................................................................................................................................................................... 38
13.1.2. Operational ................................................................................................................................................................ 38
13.2. POWER REQUIREMENTS .......................................................................................................................................................... 38
13.2.1. Input Voltage Requirements ...................................................................................................................................... 38
13.3. CHIPSET ............................................................................................................................................................................... 38
14. REGULATORY APPROVALS / COMPLIANCE ............................................................................................................................ 39
14.1. COMPANY ACCREDITATION ...................................................................................................................................................... 39
14.2. EUROPE – EU DECLARATION OF CONFORMITY ............................................................................................................................ 39
14.3. WEEE DIRECTIVE (WASTE ELECTRICAL AND ELECTRONIC EQUIPMENT) ............................................................................................ 39
14.4. ROHS COMPLIANCE ............................................................................................................................................................... 40
Manual for BL-819, BL-830, BL-875
V6.1
© Copyright Brainboxes Ltd Page 3 of 40
Page 4

Introduction
1.1. Preamble
Brainboxes’ RS-232 Bluetooth adapters are fully embedded, stand-alone Bluetooth solutions, which will Bluetooth enable any
device with an RS-232 port. These adapters do not require any additional Bluetooth software.
For many applications, a Bluetooth Adapter used in combination with another Bluetooth product (e.g. Brainboxes’ USB to
Serial adapter connected to a PC with Brainboxes’ Bluetooth Software Suite, or a second adapter) essentially replaces the
serial cable. This means freeing the device from the limits imposed by the cable specification and in many applications
removes the need for expensive cable installation and maintenance. The devices are designed to appear transparent to a
user’s applications that would otherwise be communicating via a COM port and over a cable, therefore no specific Bluetooth
programming is required. The connection uses Bluetooth security to ensure that sensitive data is not “sniffed” by any
unauthorised source, although this feature can be turned off.
The products described by this document are designed as cable replacement products. Their primary function is to offer
“point to point” Bluetooth capabilities to devices which otherwise do not have the capacity for such behaviour. This capability
is configured by a “set and forget” interface, which is not designed to cater for multiple device connection scenarios. At the
time of publication, the adapters are only capable of connecting to one other Bluetooth device at a time.
The Adapter is user configurable to baud rates between 1200 and 921,600 baud with none, odd, or even parity, and with 1 or
2 stop bits. The default factory settings are 115,200 baud, no parity, 8 data bits and 1 stop bit.
A convenient reset button can be used to restore various functions of the device including a restore of factory settings.
We trust that if you adhere to the following procedures you will enjoy many years of useful service from your Brainboxes
Bluetooth Adapter.
1.2. Products and Firmware
This document covers Brainboxes part numbers BL-819, BL-830 and BL-875 (pre-paired BL-819 and BL-830). Any features that
apply to a specific part code will be clearly identified.
New versions of firmware will become available in the future, along with an updated Product Manual. Both of these items will
be available for download from our website, http://www.brainboxes.com/
Manual for BL-819, BL-830, BL-875
V6.1
© Copyright Brainboxes Ltd Page 4 of 40
Page 5
Physical Product Features
1.3. BL-819 / 830
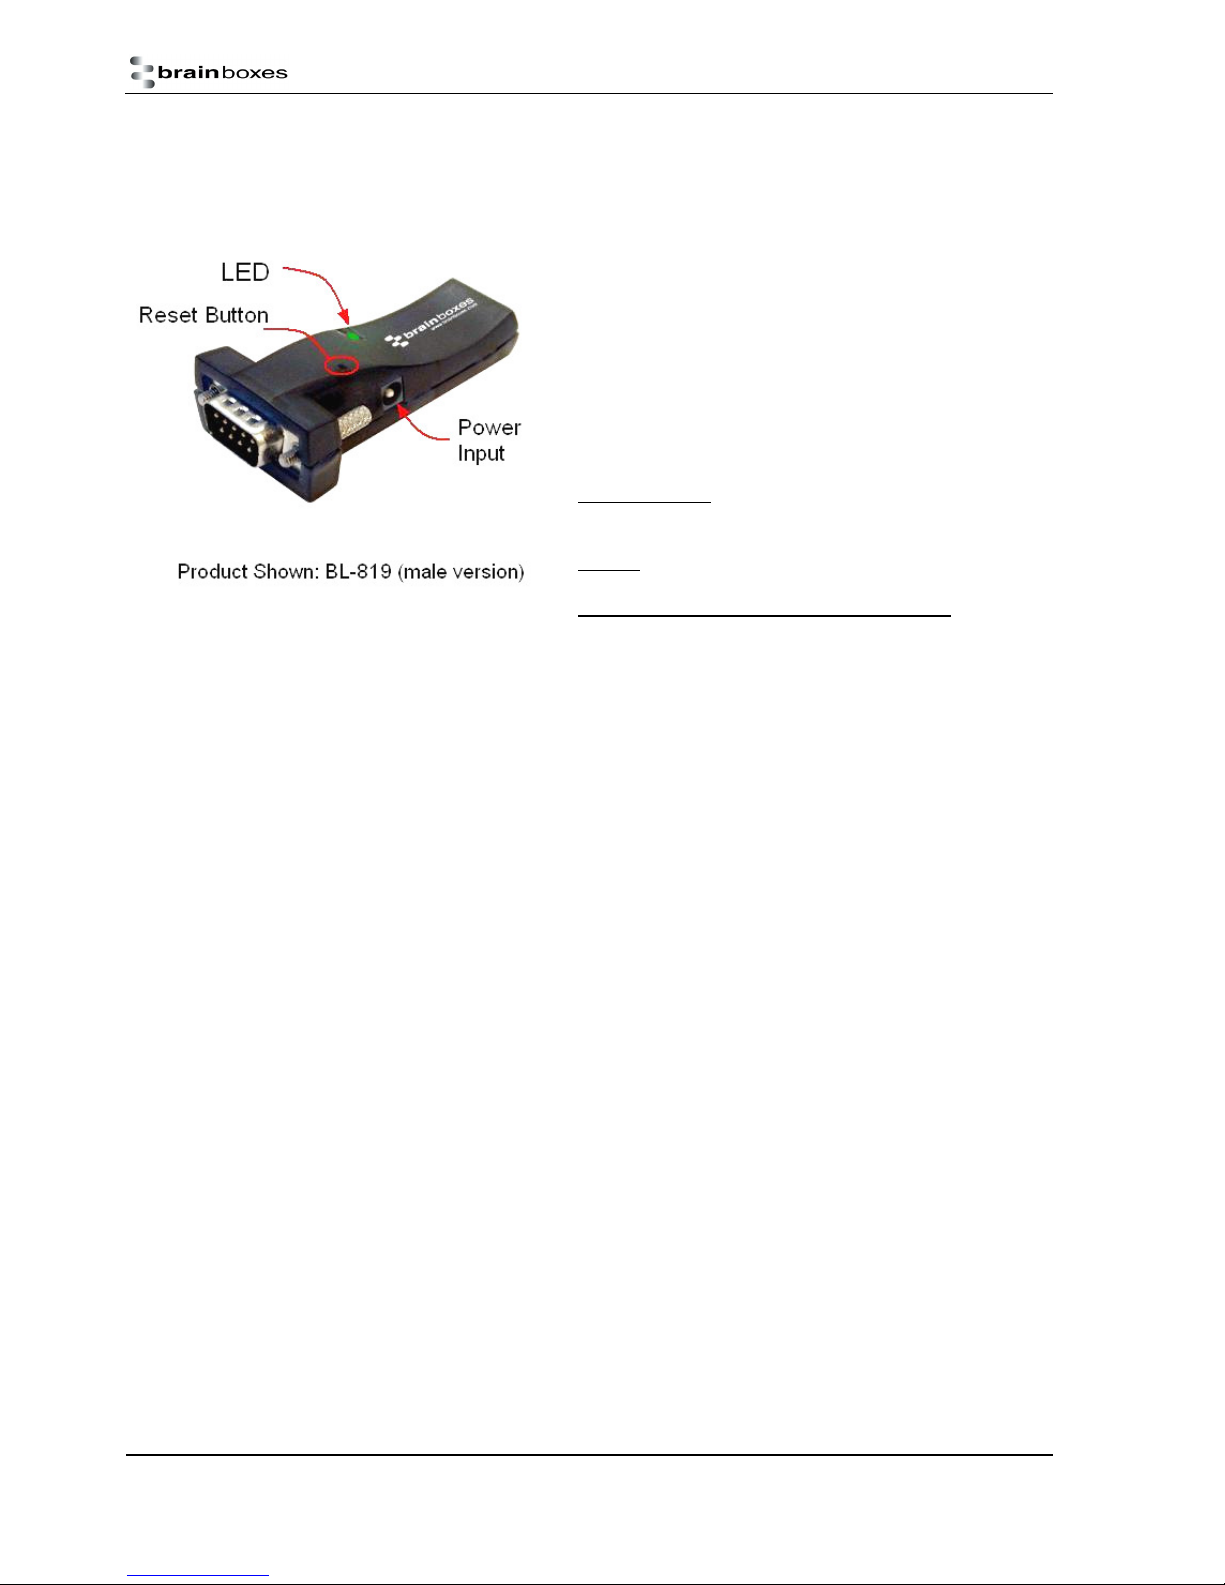
Reset button
See section 6 for more details on how to use the reset button.
LED
The Green LED on the top of the device indicates the current device
status. There are 2 states that the light will indicate;
Permanently On – The device has power but no Bluetooth
Connection
Flashing – The device has power and has a Bluetooth Connection
On when power is applied, then permanently off – This occurs when
the device is in Upgrade mode.
1.4. Comparison of BL-819 and BL-830 Features
The BL-819 and BL-830 adapters share almost identical features, with the only difference being the gender of the adapter. The
BL-819 is 9-pin male (DTE) with the BL-830 being female (DCE).
The main anticipated use of BL-819 is to be connected to a DCE device that would normally plug into the back of a PC. If you
wish to use BL-819 as a DCE device (e.g. to plug into the back of a PC or similar for configuration) you will need to use the
provided gender changer.
The BL-830 is supplied with a DCE connector (female). This device will plug into any serial port on a PC or Laptop.
1.5. BL- 819 / 830 Power Options
The BL-819 & BL-830 also carry the ability to be powered through Pin 9 by a suitable serial port. This negates the need for an
external power source. Brainboxes offer two serial cards, which can perform this function for the BL-830, UP-189 and UP-200.
For information of the power requirements of your RS-232 Bluetooth Adapter, please see the Input Voltage Requirements in
the Technical Specification Section.
Manual for BL-819, BL-830, BL-875
V6.1
© Copyright Brainboxes Ltd Page 5 of 40
Page 6
Product Configuration
This device contains a comprehensive set of Bluetooth and COM port features which can be changed from an easy to use
Windows Configuration Application. This section gives full details about the changes that can be made, how to make them,
and the implications the changes will have on the manner in which your Adapter behaves.
1.6. Configuration features at a glance
Below is a quick list of the configuration options that are available from the configuration application. They will be covered in
more detail later in this section.
• View/Set local COM port settings (baud rate, parity, stop bits)
• View/Set Discoverability, Security mode and PIN number
• View/Set Pairing options (including pairing to another adapter)
• View/Set Client/Server configuration (Client connects to Server – important if “pairing” 2 adapters)
• View/Set Local Device Name and Device Class
• View all “factory” and modified settings plus local Bluetooth Address
• Disable command interface and configuration menu
• Permanently update “factory” settings
• Upgrade Device Firmware
1.7. Using the Configuration Utility
The Configuration Utility will display allowing selection of the appropriate COM port settings for the Adapter device you have
attached to the port:
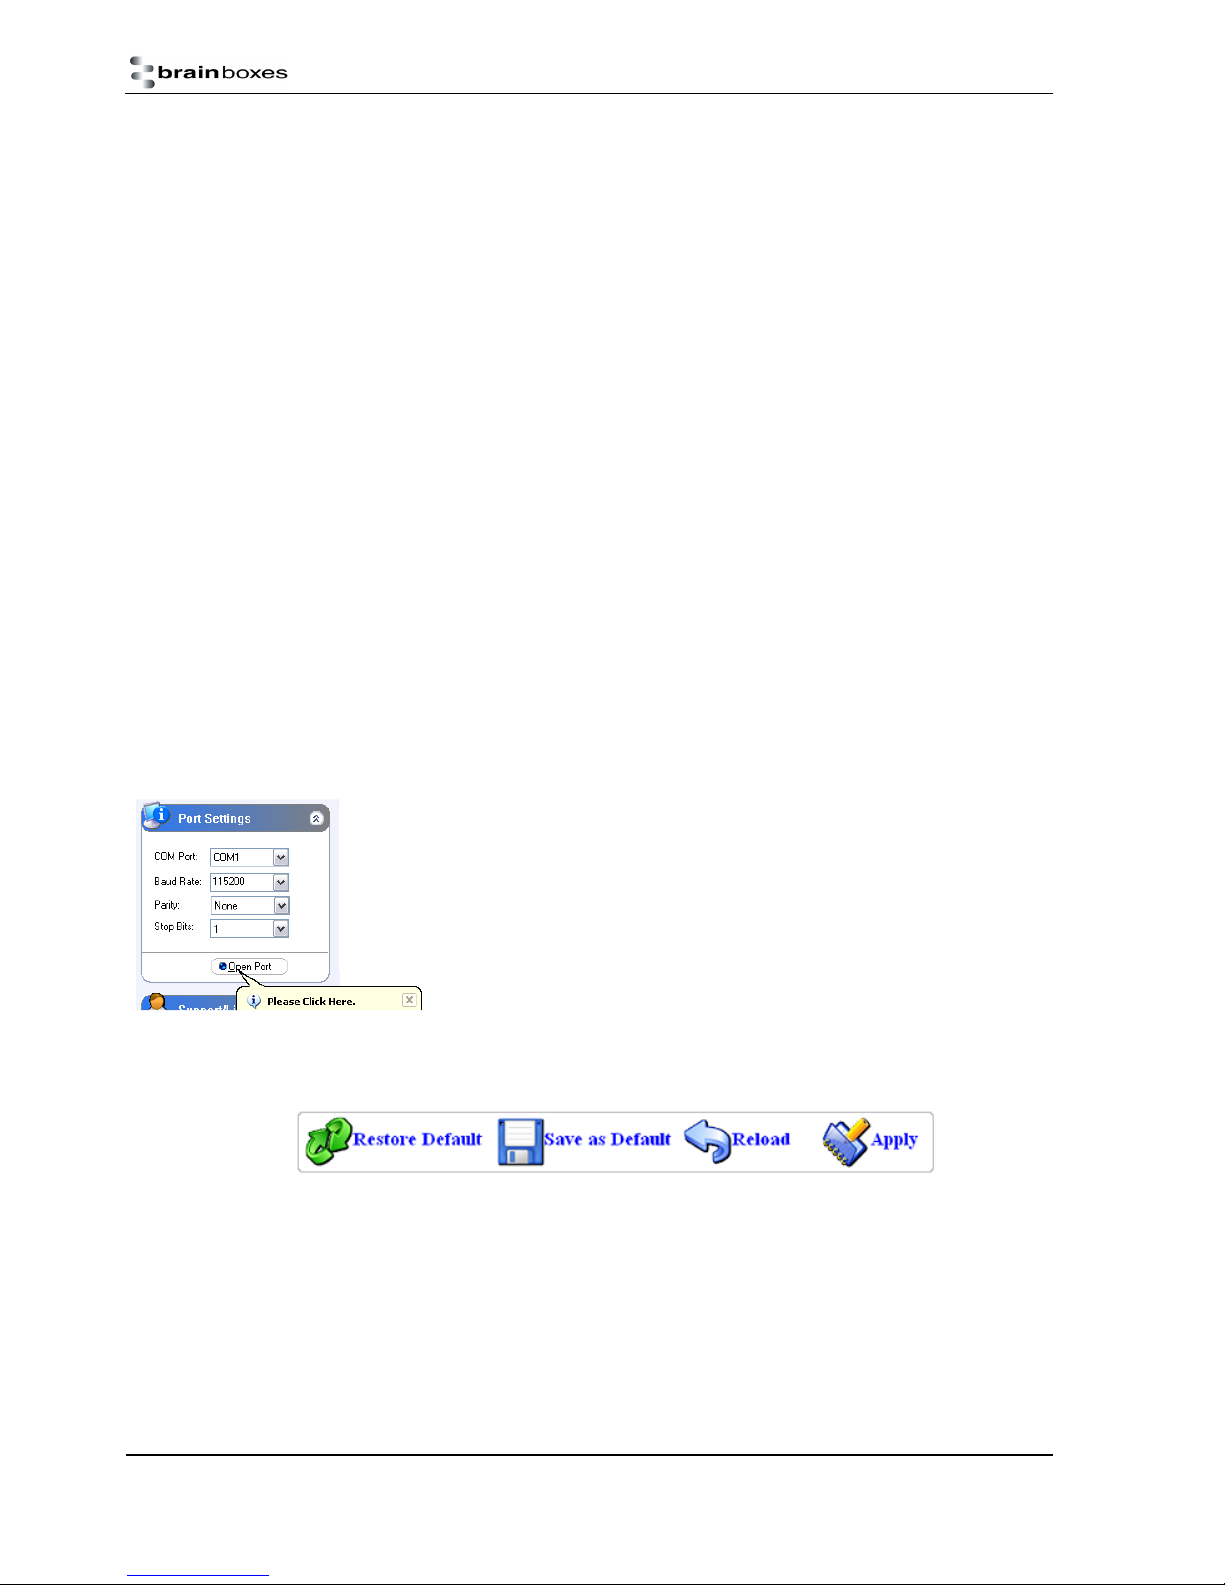
COM Port: Select the port number of the COM port to which you have attached your
adapter. Select “Auto” if you don’t know the number and the utility will attempt to
find the device for you.
Other Settings: Select the other parameters to match those that have been set on the
adapter. If you don’t know them, select “auto” and the utility will attempt to find the
device for you. The default parameters for the adapters are 115200 baud, No Parity
and 1 Stop bit.
When the device has been opened in the Configuration Utility, at the bottom of the application there will be four ‘action’
icons. These can be used to restore the local RS-232 Bluetooth Adapter to its default settings, save the current settings as
default settings, reload the current settings and apply the current settings:
The feature that allows a user to change the default configuration settings on their Adapter would be useful in cases where
the Adapter was in use in an application where the physical security of the Adapter couldn’t be guaranteed. If the application
required that the settings were very different from the original factory settings then if a long reset were performed (restoring
default settings) the application would no longer work until the Adapter was reconfigured. Updating the default settings to
the required ones means that should a long reset be performed the device will power up with the settings required by the
application.
Manual for BL-819, BL-830, BL-875
V6.1
© Copyright Brainboxes Ltd Page 6 of 40
Page 7
purposes, but also allows you to check for available or suitable update
s.
1.7.1. Device Info
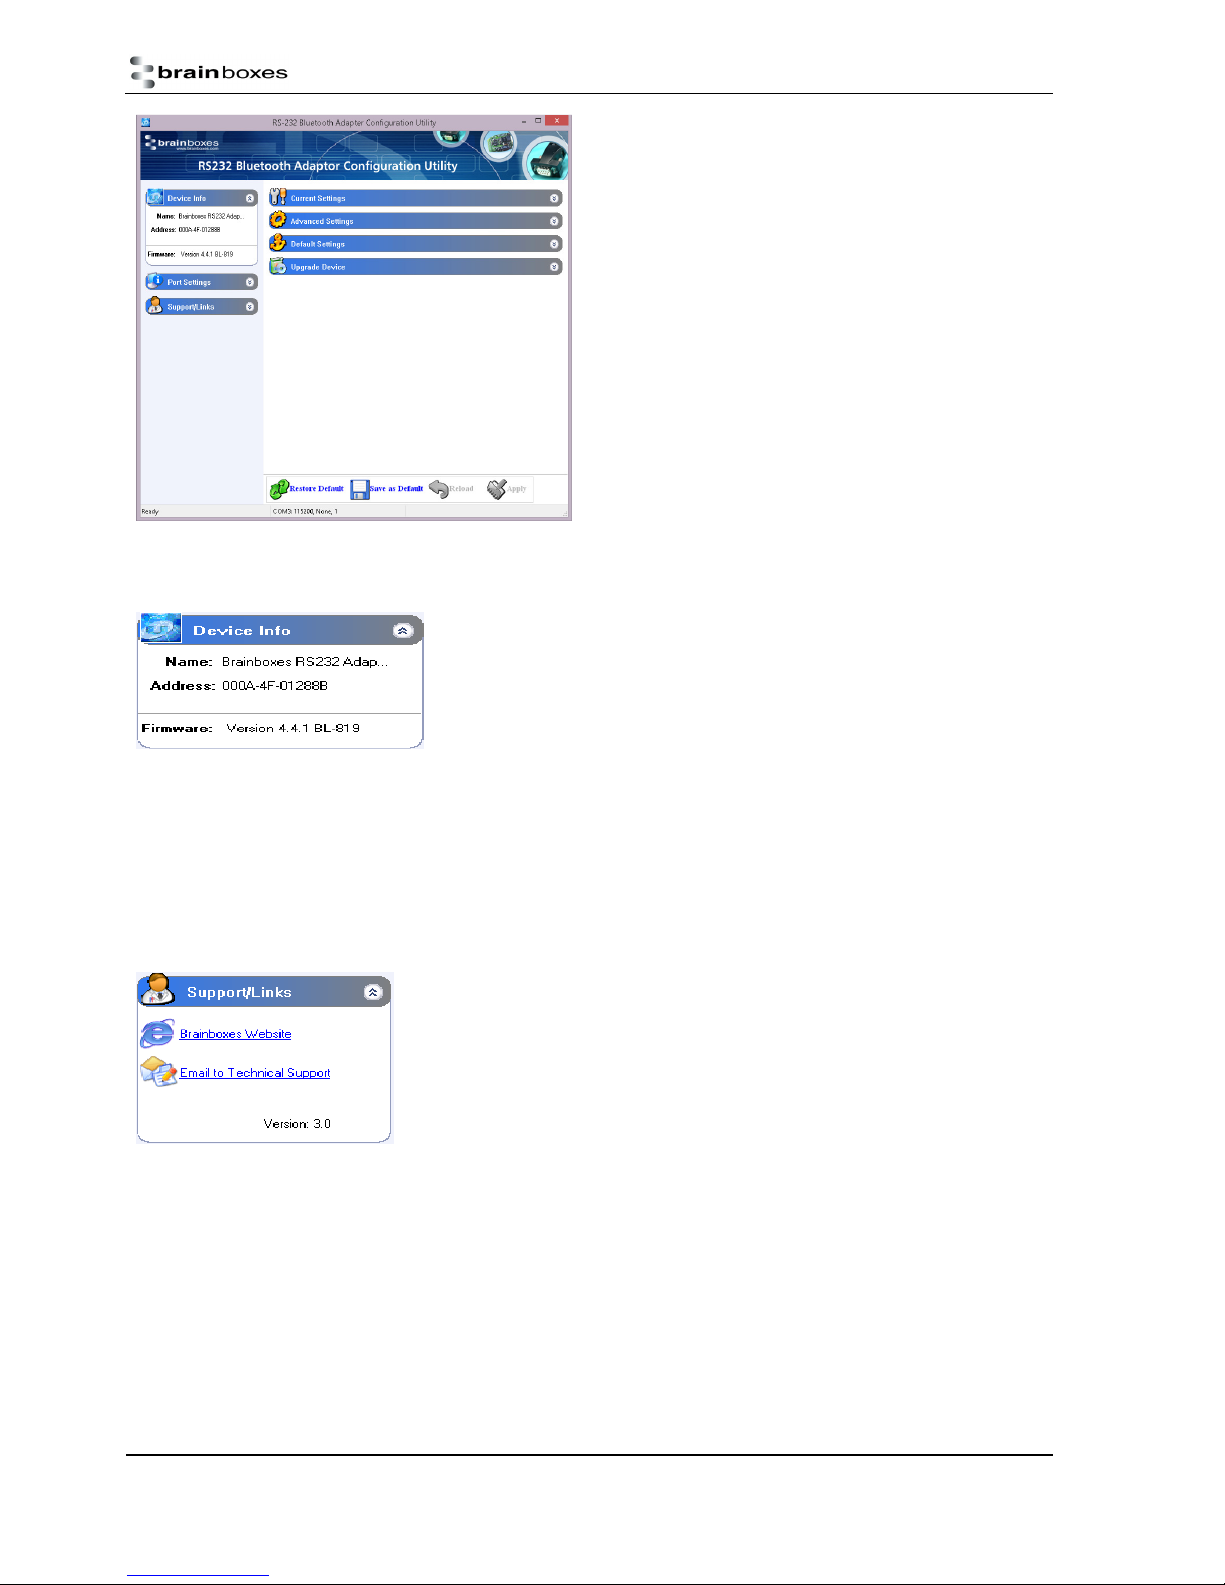
The application will now load. There may be a short delay whilst
the device is detected and its current configuration is queried and
the appropriate fields are populated.
As a rule, sections on the left-hand side of the application display
information about your device. Settings cannot be changed here.
Sections on the right-hand side are where settings can be changed
as well as viewed.
Useful “tips” are displayed if the cursor is “hovered” over various
fields to help explain those options.
Each section can be expanded to see or change the relevant
settings for your RS-232 Bluetooth Adapter
All the settings are described in full detail below.
The Device Info section displays the Bluetooth address, name and firmware of the
product currently attached.
The local device name field displays the “friendly” name of the device that is
connected. This can be changed to any name as required as detailed further below.
Each Bluetooth device in the world must have a unique address. Some Bluetooth devices need to know the address of the
device they are connecting to. This address is also identified on the label attached to your product.
The firmware loaded onto your connected device is also displayed here. This is provided mainly for technical support
1.7.2. Support/Links
The Support/Links section can be used to get more help from Brainboxes should you
be experiencing any difficulties.
The Brainboxes Bluetooth Support website and support email address are available
in this section.
Manual for BL-819, BL-830, BL-875
V6.1
© Copyright Brainboxes Ltd Page 7 of 40
Page 8
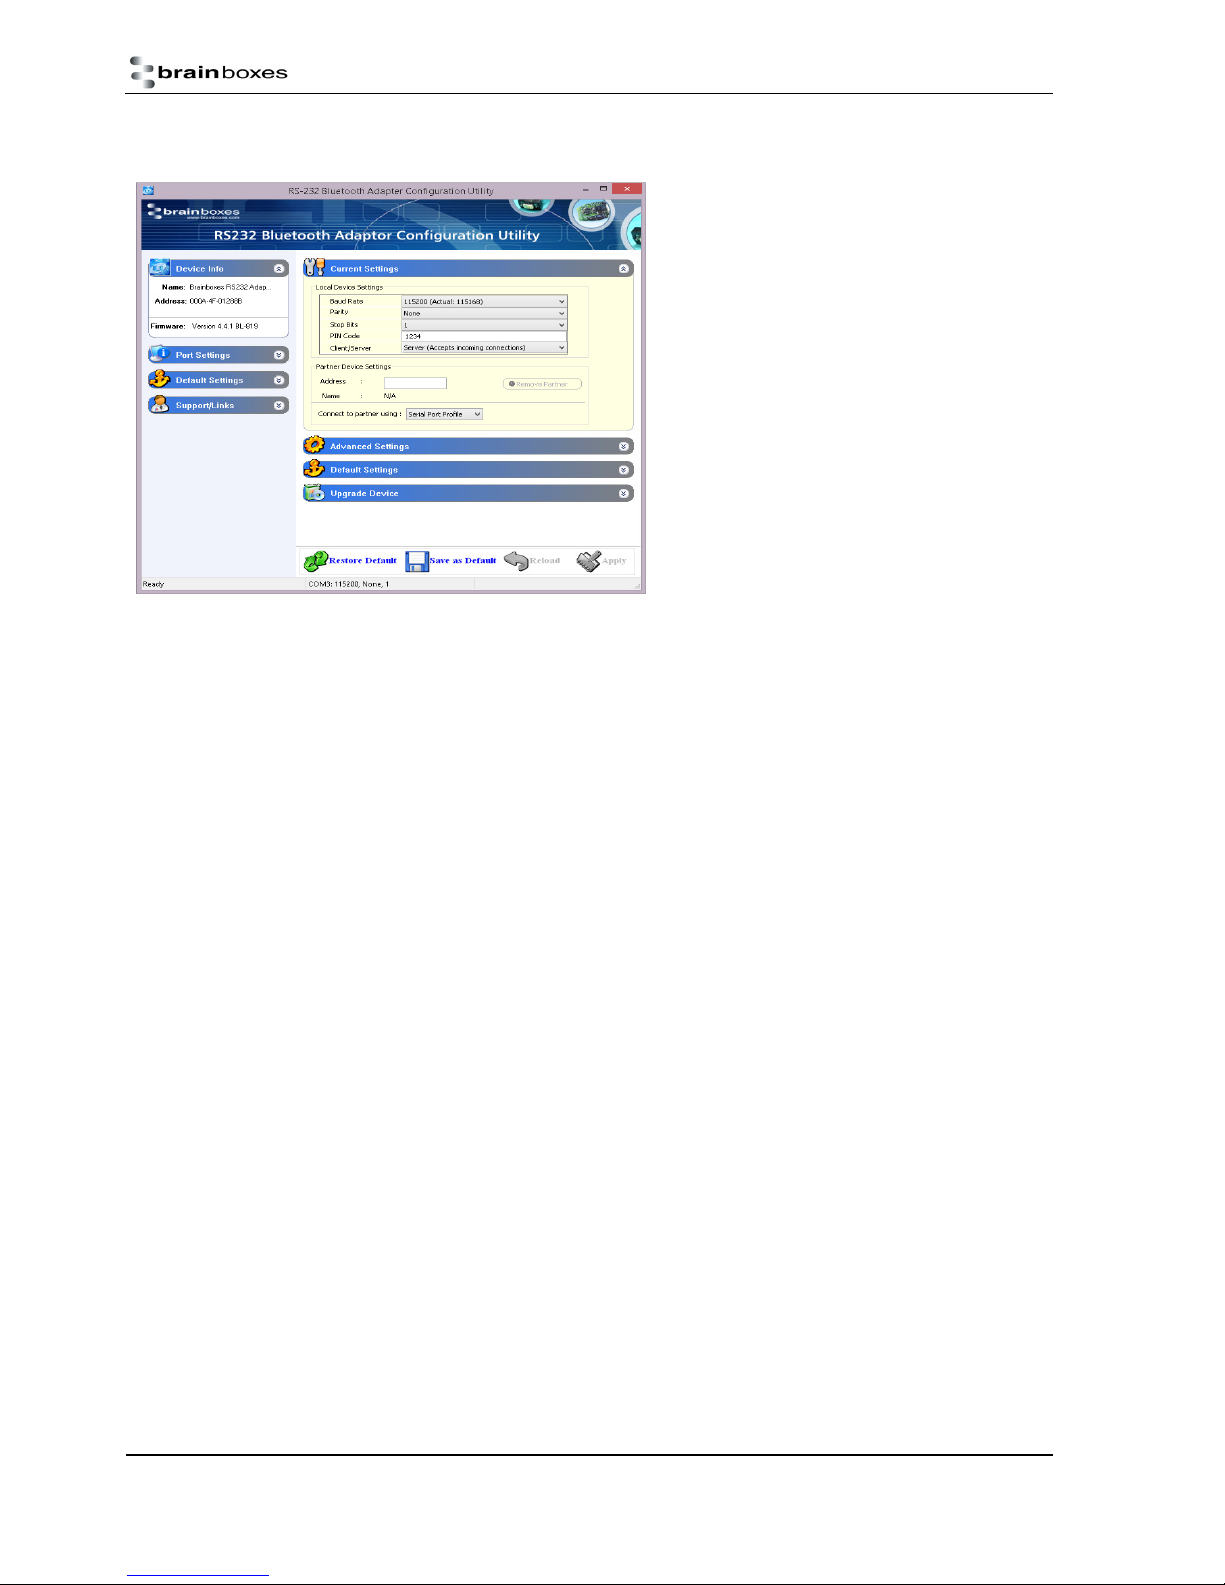
1.8. Current Settings
The Current Settings section is broken down into two
sections; Local Device Settings and Partner Device
Settings. Each field will be discussed further below.
When the Current Settings has been selected, an
additional section appears in the left-hand section called
Default Settings. Both sections can be expanded at the
same time to enable the user to view the current
settings and the default settings at the same time.
As each section is opened, the previously opened
section will close to prevent information moving off the
bottom of the screen and thus requiring the user to
scroll down.
Whenever a setting is changed, the field changes colour
to indicate that a change has been made but not
applied.
1.8.1. Baud Rate
Click the drop down arrow at the far right of this field to display a list of popular baud rates. Due to some technical limitations,
it is not possible for the product to achieve all of these baud rates exactly, although most of them are available to within 1%.
Normal RS-232 operation is not affected by such small differences in data rates unless very long streams of continuous data
are being used. The Actual baud rate achieved is displayed next to your selection.
This option is only applied when the “Apply” icon is clicked. Along with updating the device, the application will immediately
change its own communications parameters to match those new settings so it can continue to interact with the device.
Multiple changes to communications settings are ALL applied when the “apply” icon is selected.
NOTE: It is possible for the adapters to be configured to baud rates that are not supported by a PC’s COM port. If your
application requires such a “non-standard” baud rate, you may no longer be able to communicate to the Adapter from your
PC. If you “apply” the setting inadvertently, you can restore the default settings of the Adapter by performing a reset as
documented below.
The adapter’s normal factory set baud rate (and default baud rate) is 115200 baud.
1.8.2. Parity
Click the drop down arrow at the far right of this field to display the available options for Parity.
This option is only applied when the “Apply” icon is clicked. Along with updating the device, the application will immediately
change its own communications parameters to match those new settings so it can continue to interact with the device.
Multiple changes to communications settings are ALL applied when the “apply” icon is selected.
1.8.3. Stop Bits
Click the drop down arrow at the far right of this field to display the available options for Stop Bits.
This option is only applied when the “Apply” icon is clicked. Along with updating the device the application will immediately
change its own communications parameters to match those new settings so it can continue to interact with the device.
Multiple changes to communications settings are ALL applied when the “apply” icon is selected.
1.8.4. Data bits
Unfortunately this setting cannot be changed. Your RS-232 Adapter only supports the 8 data bit format. Thus there is not a
configuration menu option for this setting.
Manual for BL-819, BL-830, BL-875
V6.1
© Copyright Brainboxes Ltd Page 8 of 40
Page 9

1.8.5. PIN Code
The PIN (Personal Identification Number) is used to create a secure and trusted connection between 2 Bluetooth devices
during a process called pairing or bonding. The PIN can be any combination of printable characters. The PIN is only used
when the adapter is configured to be in security mode 2 or 3 (High or Medium security).
The factory set PIN is “1234”. This can be changed and you may enter your own combination up to a maximum of 16
characters. If you try to create a PIN code that is larger than this, an error message is generated and you will be given another
opportunity to enter your own PIN.
To change your device’s PIN number, click in this field and simply type the new code you want applied. This can be any
printable alphanumeric character or symbol, but you should take care to choose a PIN appropriately remembering that some
Bluetooth devices (e.g. cell phones) only have limited input mechanisms and may not have a full range of characters available.
Press the “Apply” icon to apply the new PIN code.
If your RS-232 Bluetooth Adapter is to be configured into Client mode, this is the PIN that will be used by your Adapter to
initiate pairing with the remote device before any connection is made. If your remote device is another Brainboxes RS-232
Adapter in Server mode, you will need to ensure that “both” devices are configured to use the same PIN number.
1.8.6. Client/Server
The option Client/Server changes the default behaviour of your product. This is important if you want a remote device to
connect to the product or whether you want the product to connect to a remote device. Click on the drop down arrow on the
far right of this field to see the 2 selectable options. The default configuration of your product is set to “Server” operation.
This means that the product will wait for devices to connect to it (just like a network or web server). Changing this setting to
“Client” will put the product into a state where it will attempt to connect to remote devices contained in its internal database.
The “remote” or “partner” device feature is explained below. It is this option that requires attention if you wish to configure
2x Brainboxes RS-232 Adapters to communicate to each other to create a “true” cable replacement scenario.
Due to the nature of this feature (it connects to a remote device and therefore renders the configuration utility unavailable)
we recommend that this setting is changed after all other configuration changes have been made and applied.
1.8.7. Partner Device
This feature serves 2 purposes:
In Server mode it shows the address of the last device to successfully bond and connect.
In Client mode, it shows the device to which the product will attempt to pair/connect.
A remote device address must first be entered into the “partner device” field before the product, configured in Client mode,
will be able to initiate any connections to that remote device. Adding a partner device using this feature will stop remote
devices bonding with the device in Server Mode if one of those remote devices is not the partner device.
Click on the field to enter the Bluetooth Address (BD_ADDR) of the remote device you wish to connect to. This should be in
the same format as indicated on the products label (NAP-UAP-LAP, for those of you who know). The option to remove this
newly entered device exists at this point should you have made a mistake. You should be sure to check that the PIN number
entered above exactly matches the PIN code requirement of the remote device to which you are trying to connect.
Once the RS-232 Bluetooth Adapter has successfully added a partner device the menu will update to give the user the option
to remove the partner. All settings must be applied using the “Apply” icon before they are set.
1.8.8. Connect Using
Clicking the arrow on the far right of this field shows a drop down list of the available service options. It should be noted that
this feature does not actually query the remote device for its supported services, so you must be sure that your remote device
actually supports your selection.
This feature can be used to connect to remote devices that support DUN, LAN or FAX services i.e. some Bluetooth phones will
only let devices that are Dial-Up Networking clients to connect to them. Although Brainboxes Bluetooth Adapters do not
Manual for BL-819, BL-830, BL-875
V6.1
© Copyright Brainboxes Ltd Page 9 of 40
Page 10

actually include all the software necessary for it to support DUN, LAN and FAX fully, these are all based on SPP, which the
Brainboxes devices do support. The additional software can come from the Operating System such as XP.
For example, a Bluetooth phone can be used by an RS-232 Bluetooth Adapter to dial out to the internet on a PC if the Connect
Using feature is set to DUN, partner address is the phone’s Bluetooth address and the Adapter is in Client mode. When the
phone confirms that a Bluetooth connection is present, a modem can be installed on the PC, which would use the COM port
that the Adapter is connected to. Some Bluetooth phone’s such as Nokia and Sony Ericsson have a special Bluetooth modem
driver that you can download from their website. Once installed you can then use the Create a New Connection wizard from
Control Panel/Network Connections to dial out using the new modem. You will require an ISP with username and password
for this.
Manual for BL-819, BL-830, BL-875
V6.1
© Copyright Brainboxes Ltd Page 10 of 40
Page 11
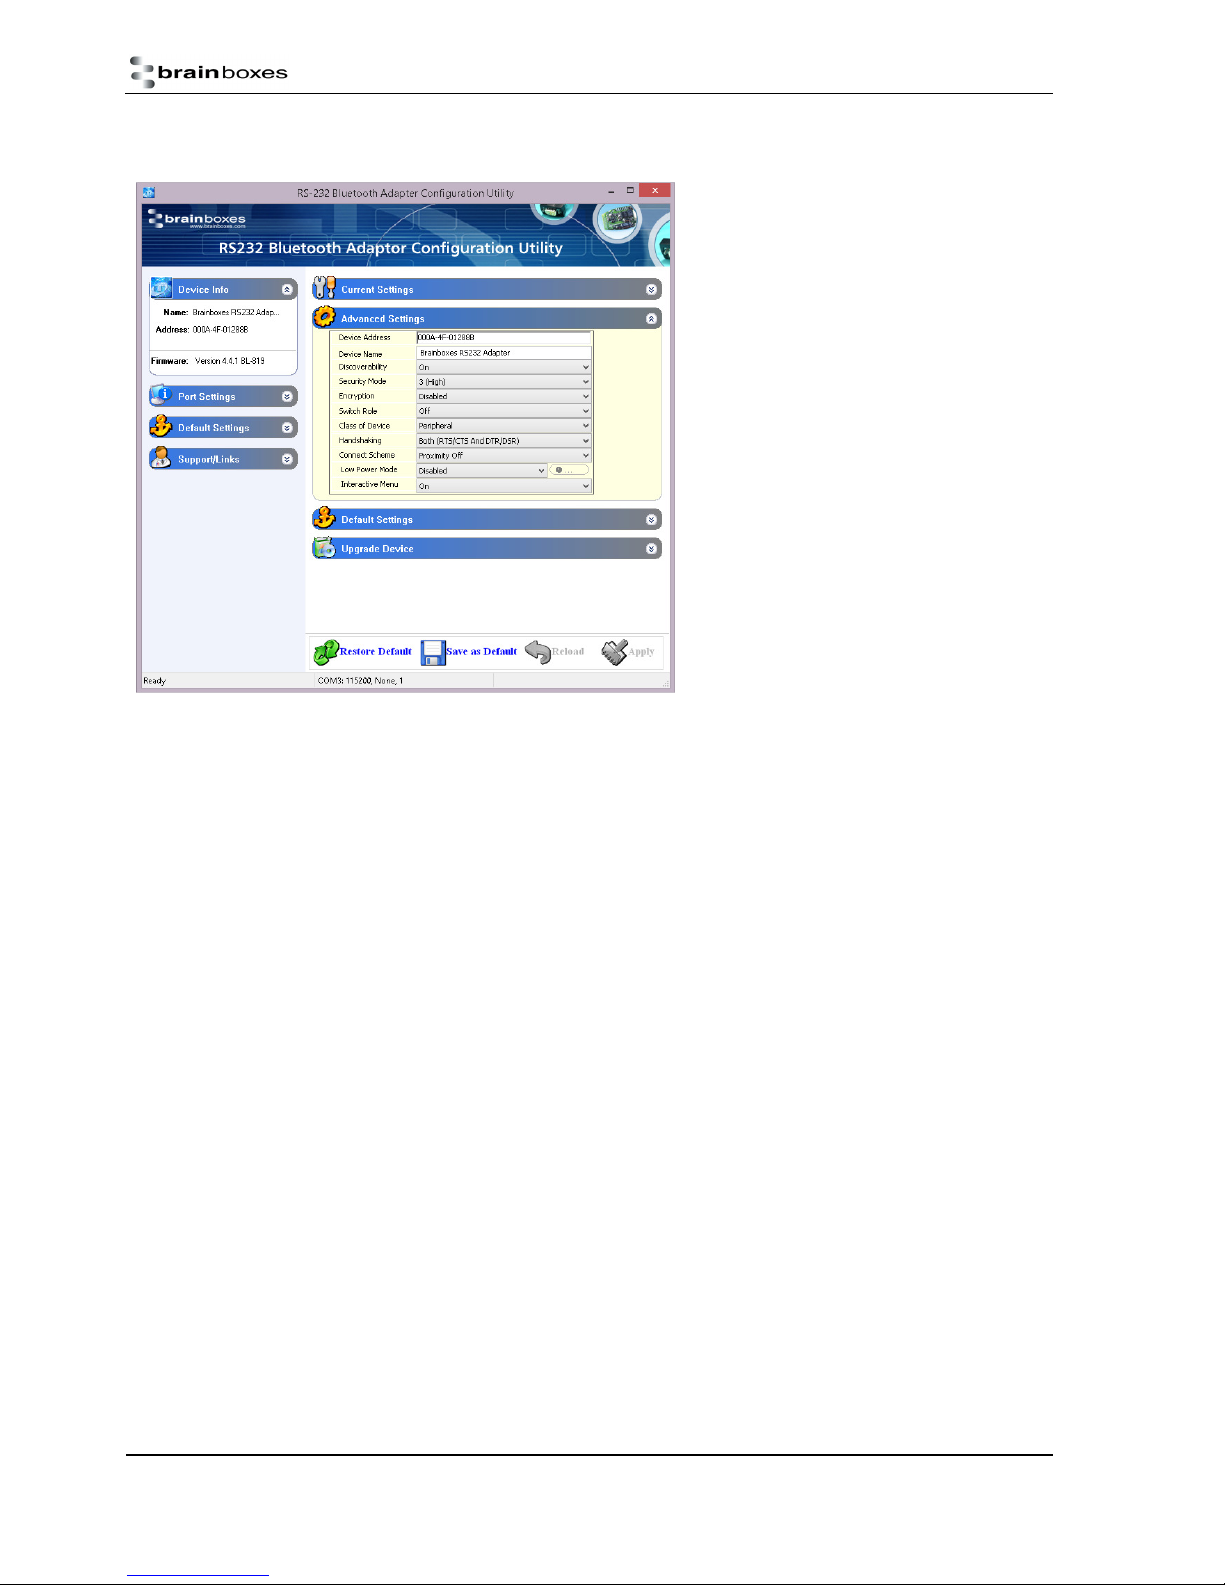
1.9. Advanced Settings
The Advanced Settings section contains a more
detailed range of settings that are least likely to
require modification for any particular scenario to
work. Each field will be discussed further below.
When the Advanced Settings has been selected, an
additional section appears in the left-hand section
called Default Settings. Both sections can be
expanded at the same time to enable the user to
view the current settings and the default settings at
the same time.
As each section is opened, the previously opened
section will close to prevent information moving off
the bottom of the screen and thus requiring the user
to scroll down.
Whenever a setting is changed, the field changes
colour to indicate that a change has been made but
not applied. After making a selection select the
“Apply” icon to apply the setting.
1.9.1. Device Address
This field shows the Bluetooth Address (BD_ADDR) of the local device. As each Bluetooth device must have its own unique
address, this field cannot be edited or modified in any way.
1.9.2. Device Name
In scenario’s where more than 1 Adapter is to be used in the same geographical location (i.e. they are all in range of each
other/the controlling device), it may be wise to change the name of each device so that human users can more easily identify
each individual.
This field does not have a drop down list of options. You must select the field and edit the name to your requirements.
Memory constraints on the Adapter mean that you must ensure that your desired name is less than 30 characters. The
Factory setting for the local device name is “Brainboxes RS-232 Adapter”.
1.9.3. Discoverability
Discoverability is a feature that allows any other Bluetooth device to find (or not find) your Bluetooth device. Just because a
Bluetooth device is non-discoverable it doesn’t mean it’s not also connectable. Because a Bluetooth connection is made using
only the device’s address, if an application already knows the address of a non-discoverable remote device, and it has already
bonded (if appropriate) or knows the correct PIN number, then it can connect to that device. You may wish to set this option
to help avoid confusion when many RS-232 Bluetooth Adapters exist in close proximity to each other.
This field has 2 options selected from the drop down list.
1) “On” is the default setting for the adapters. This setting will make the Adapter “viewable” by any other Bluetooth device.
2) Selecting “Off” immediately renders the adapter “non-discoverable”. No other Bluetooth devices will be able to see the
Adapter when they perform a device discovery. However, in this mode, your adapter is still “connectable”.
Manual for BL-819, BL-830, BL-875
V6.1
© Copyright Brainboxes Ltd Page 11 of 40
Page 12
connect unless paired)
1.9.4. Security Mode
The factory set security mode is 3 (Highest). This field has 3 available settings from the drop down list:
1) Selecting option “1” will immediately place your adapter into security mode 1. This is the lowest security mode that the
Adapter can be configured to. Connections, including service discovery, can take place without the need for “pairing” or
“bonding”. In mode 1, the Adapter automatically accepts all access requests without initiating authentication, encryption, or
authorization procedures. Any attempt by a remote application to perform authentication or encryption procedures will be
rejected.
2) Selecting option “2” will immediately place your Adapter into security mode 2. This mode allows remote Bluetooth devices
to search for and retrieve the services on your Adapter without pairing, but will not allow them to connect unless the 2
devices are paired.
3) Selecting option “3” will immediately place your Adapter into security mode 3 (default). This is the highest security mode
available. Connections of any kind (other than a device discovery) from a remote Bluetooth device are only allowed after a
successful “pairing” has been performed. No services will be shown to other Bluetooth devices unless the 2 devices are
successfully paired.
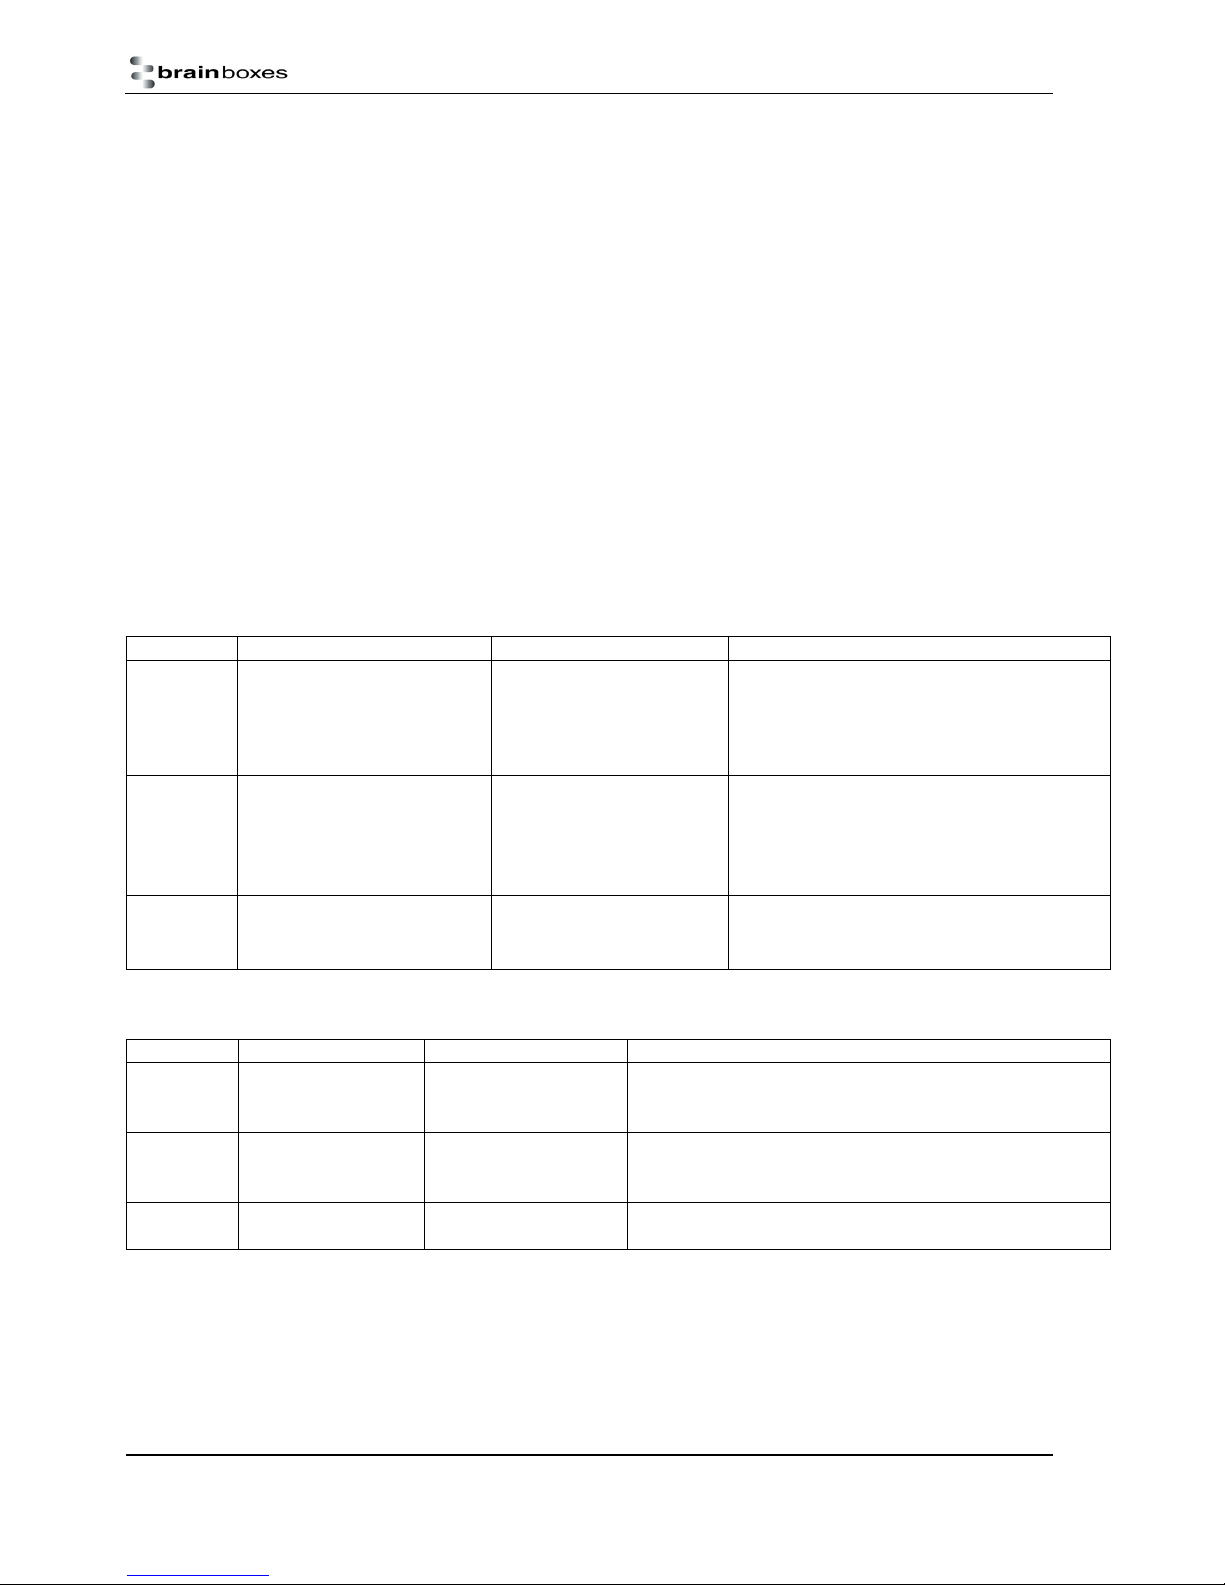
The tables below show some more information with regards to the application of the security settings…
Security modes for Adapter as Client (initiates Connections):
Security: Who can Pair? Who can it connect to? Possible use:
High
(Mode 3)
BL-819 / 830 will only pair
with device entered in the
‘Set Partner’ menu. Other
device must have identical
Only device entered in the
‘Set Partner’ Menu, after
pairing.
Secure connection between the BL-819 / 830
and a pre-set device (Link level enforced
security – can see device but not services
unless paired)
PIN number
Medium
(Mode 2)
BL-819 / 830 will only pair
with device entered in the
‘Set Partner’ menu. Other
Only device entered in the
‘Set Partner’ Menu, after
pairing.
Secure connection between the BL-819 / 830
and a pre-set device (Service level security –
can see services but not connect unless paired)
device must have correct link
key
Low
(Mode 1)
N/A Only device entered in the
‘Set Partner’ Menu.
When users who do not want to spend time
pairing and do not require a secure connection
Security mode for Adapter as Server (receives connections):
Security: Who can Pair? Who can Connect? Possible Use:
High
(Mode 3)
Any Device with
correct PIN.
Any device Secure connection between the BL-819 / 830 and a pre-set
device (Link level enforced security – can see device but not
services unless paired)
Medium
(Mode 2)
Low
(Mode 1)
Any Device with
correct PIN.
Any device Secure connection between the BL-819 / 830 and a pre-set
device (Service level security – can see services but not
N/A Any device When users who do not want to spend time pairing and do
not require a secure connection
1.9.5. Encryption
Encryption is a method of ensuring that the communications between 2 devices cannot be “bugged” or “listened” to by any
unauthorised source. This encryption is performed in lower layers of the protocol stack as defined by the Bluetooth
Specification.
The factory set Encryption mode is “Disabled”. This field has a drop down list from which the configuration can be changed
to enable “Point to Point” or “Point to Point & Broadcast”.
Manual for BL-819, BL-830, BL-875
V6.1
© Copyright Brainboxes Ltd Page 12 of 40
Page 13

1.9.6. Switch Role
This Function will allow an RS-232 Bluetooth Adapter to connect to another device as a Client, then when the connection has
been made, to switch the role to Server. This option is required if you wish to connect two or more adaptors to a control
device, with the adaptors initiating the connection. NB, the adaptors are only capable of being connected to one other device
at time.
1.9.7. Class of Device
Some remote device applications will only communicate to devices of a certain type. This option allows you to reconfigure
your RS-232 Bluetooth Adapter to appear as a number of different device types. The Factory setting for the Class of device is
“Peripheral”. The available options are: Peripheral, Desktop, Laptop, Imaging, Phone/Modem and LAN.
IMPORTANT NOTE: Changing this Class of Device setting does not alter the published functionality of the product. It will
continue to offer ONLY One Serial port profile connection.
1.9.8. Handshaking
This setting allows the user to select the handshaking scheme used for the device. By default the setting is no handshaking.
Handshaking options are RTS/CTS, DTR/DSR, RTS/CTS & DTR/DSR or none. When changing between handshaking options, a
power cycle is required before the configuration utility can be re-accessed.
RTS/CTS handshaking is used between the Adapter and the port to which it is connected (hardware handshaking). DTR/DSR
handshaking is used over the Bluetooth connection between the adapter and the device to which it is connected via
Bluetooth (over-the-air handshaking).
As shipped from the factory, this product is configured NOT to require the use of RTS/CTS handshaking. Its implementation is
such that these control signals are NOT transferred over the Bluetooth link, but instead are used to control the passage of
data between the adapter and the physically connected RS-232 device (PC, modem etc.). It is therefore not possible to use
this product in an application that uses the RTS and/or CTS handshake lines for purposes other than simply to control the flow
of data.
Whilst the Adapter is configured NOT to require RTS/CTS handshaking, some devices to which it may be connected will
require this flow control. If this is the case, unless the following procedures are undertaken the Adapter will not send any data
and the communications between the 2 devices will appear corrupt or broken.
Whilst the product ships without handshaking to make initial configuration easier, Brainboxes do not recommend that you
leave RTS/CTS handshaking disabled unless you are connecting the Adapter to a device that specifically does not use any
itself. This handshaking exists to ensure that no data is lost between the 2 devices. In applications where there is a significant
amount of data flowing between devices, there is an increased risk of data being lost. Disabling handshaking unnecessarily
may cause your application to fail intermittently due to this lost data.
No provision has been made in the current design for the implementation of the DCD and RI lines.
1.9.9. Connect Scheme
This allows the selection of a connection scheme called Proximity. This connection scheme tells the adapter to go out, find
the first Bluetooth device in range and connect to that device. If there are any problems connecting or pairing, then the
adapter will give up and go out to search again.
There are two different proximity schemes, 1 and 2. Scheme 1 finds a device to connect to and then saves that device’s
address as its partner device, so that the next time the adapter is powered up, it will always connect to that partner device.
Scheme 2 finds a device to connect to and doesn’t save that device’s address, so that next time the adapter is powered up, it
will go out and find a new device to connect to again. It may be the same device as last time (if it is still in range) or it may be
a new device.
The closest device to the adapter is not necessarily going to be the device that responds to the inquiry first. The adapter
needs to be in Client mode for Proximity to work and as soon as a partner address is populated in the partner address field,
the adapter behaves just as though it is in Client mode with a partner device to connect to.
Manual for BL-819, BL-830, BL-875
V6.1
© Copyright Brainboxes Ltd Page 13 of 40
Page 14

1.9.10. Interactive Menu
Some RS-232 devices (GPS devices for example) emit a continuous stream of data regardless of whether a cable is connected.
When there is no Bluetooth connection, this data (from the RS-232 device) will be interpreted by the Adapter as commands to
(or interaction with) the menu and ultimately change settings (such as baud rate) that render the Adapter inoperable.
Selecting “off” for this setting will stop the Adapter being unwontedly re-configured in this manner. Unfortunately, this will
also disable all the functionality required for this configuration application to interact with this product.
If you inadvertently select “off” for this setting, the menu/command interface (and thus the operation of the configuration
application on this device) will only be re-enabled by a long reset as documented below.
WARNING: Use with care: Selecting the “off” option of this feature will render further configuration impossible if set as a
default setting.
Manual for BL-819, BL-830, BL-875
V6.1
© Copyright Brainboxes Ltd Page 14 of 40
Page 15
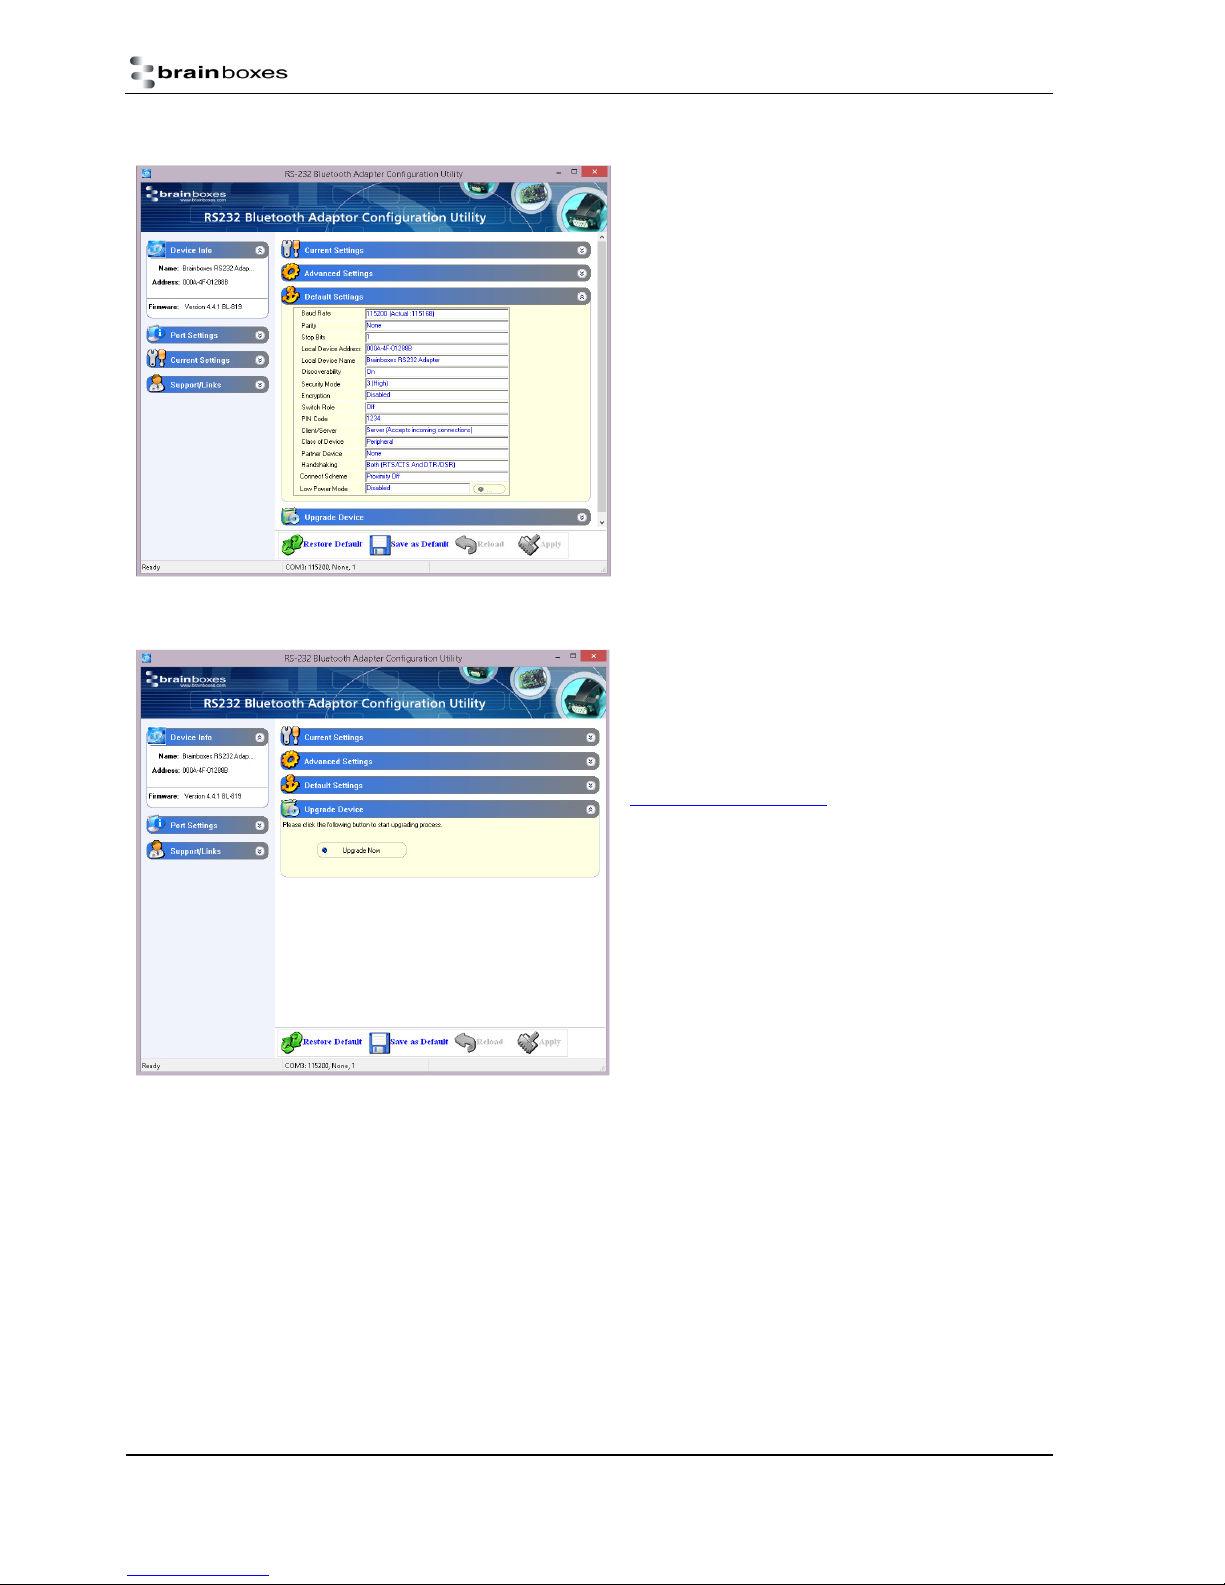
1.10. Default settings
1.11. Upgrade Device
The “Default Settings” section is simply a display page
showing all the configuration options either as they were set
in the factory (default or custom) or as the user has chosen
to update them from this application or menu.
These are the settings that will be restored if the “Restore
Default” icon is selected at the bottom of the page.
When the Default Settings section is opened (on the righthand side of the application), a new section appears in the
left-hand side called Current Settings, which can also be
expanded so that the current and default settings can be
viewed at the same time.
The “Upgrade” section allows the user to upgrade the
adapter firmware using a simple upgrade wizard.
Updated firmware will be available from the Brainboxes
support website so please check the site regularly:
http://www.brainboxes.com
Manual for BL-819, BL-830, BL-875
V6.1
© Copyright Brainboxes Ltd Page 15 of 40
Page 16
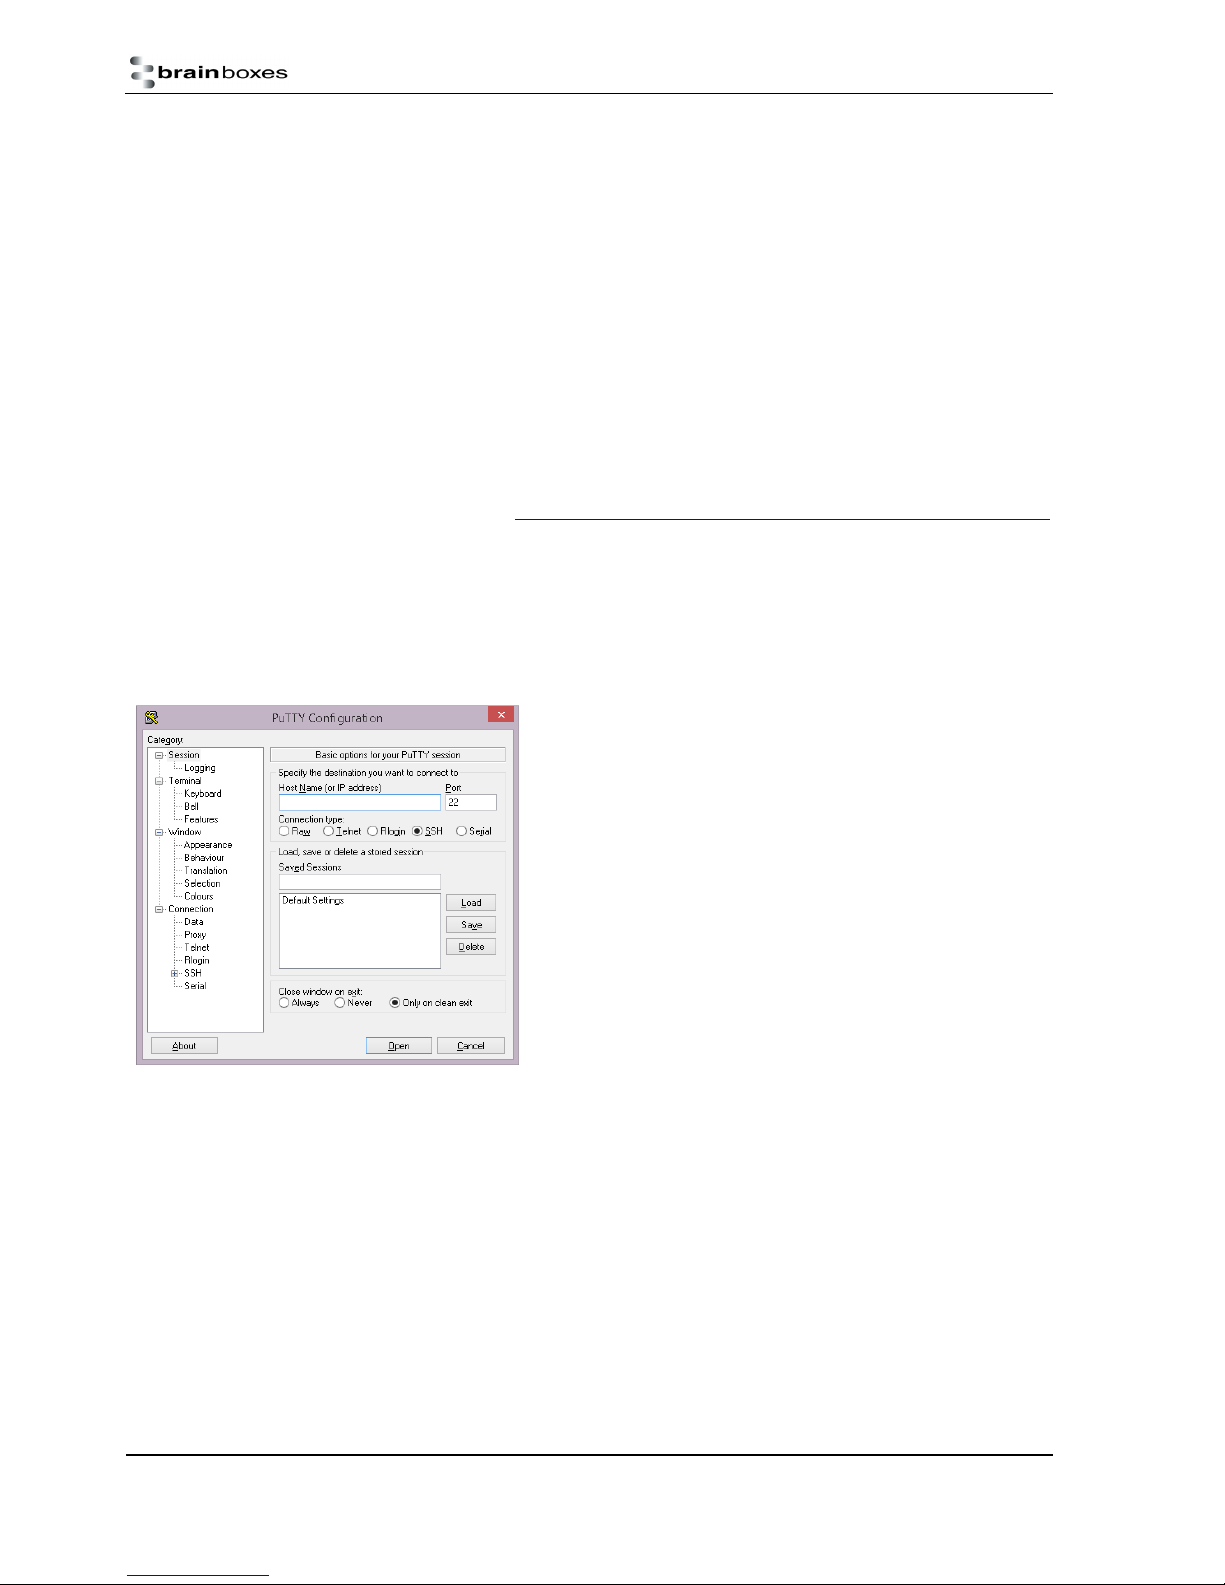
Alternative Product Configuration
1.12. Accessing the configuration menus and commands.
The adapter’s configuration menu is available at any time that there is no Bluetooth radio connection established with
another device (unless of course you have selected the option to disable the menu). As soon as a Bluetooth connection is
made, the data sent to the Adapter will be sent over the radio link to the remote device. A short time after the Bluetooth
connection is broken, the configuration menu’s become available again.
Sending a single “Carriage Return” (Enter) character to the Adapter whilst no Bluetooth connection exists will activate the
initial main menu, or typing the command required will initiate the appropriate response. Both the menu and command list
are documented further below.
The example given below to connect to the configuration menus is performed in Windows 8.1 using PuTTY, a terminal
application which can be downloaded from here: http://www.chiark.greenend.org.uk/~sgtatham/putty/download.html. If
you are using a different version of Windows the specific steps to invoke and use the PuTTY application may be slightly
different.
First, connect the adapter to an available serial port on your computer. In this example, the COM3 port on the PC has been
used.
Ensure the power adapter is connected and switched on (the leftmost green LED on the Adapter should light.
When PuTTY is first opened, you will be presented with the
window shown here. You now need to input the COM port and
choose the port settings which you want to open the COM port
with. To do this, select the ‘Serial’ option on the left side of the
window (at the bottom of the list).
Manual for BL-819, BL-830, BL-875
V6.1
© Copyright Brainboxes Ltd Page 16 of 40
Page 17
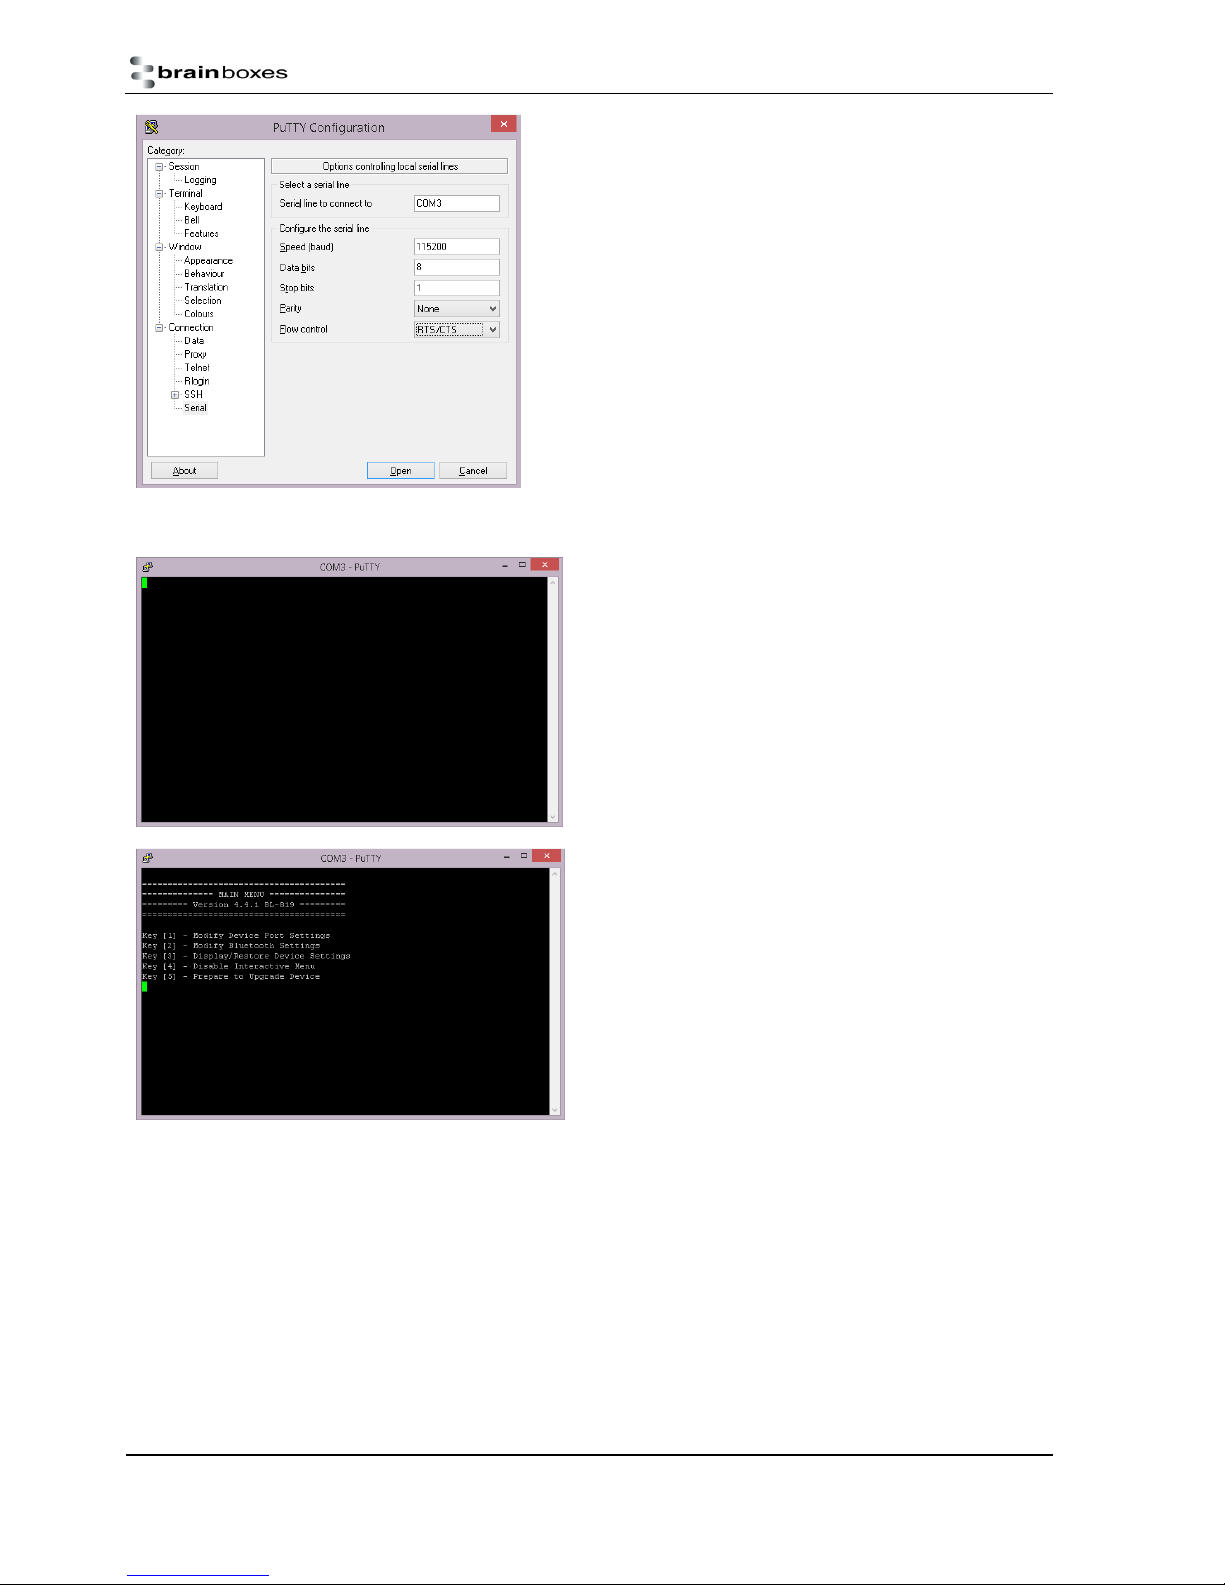
This is the Serial connections section. Here you are able to select
the COM port which you want to open and the speed (baud rate),
data bits (always 8), stop bits, parity and flow control. Once you
have entered the settings for the BL-819/830, press Open.
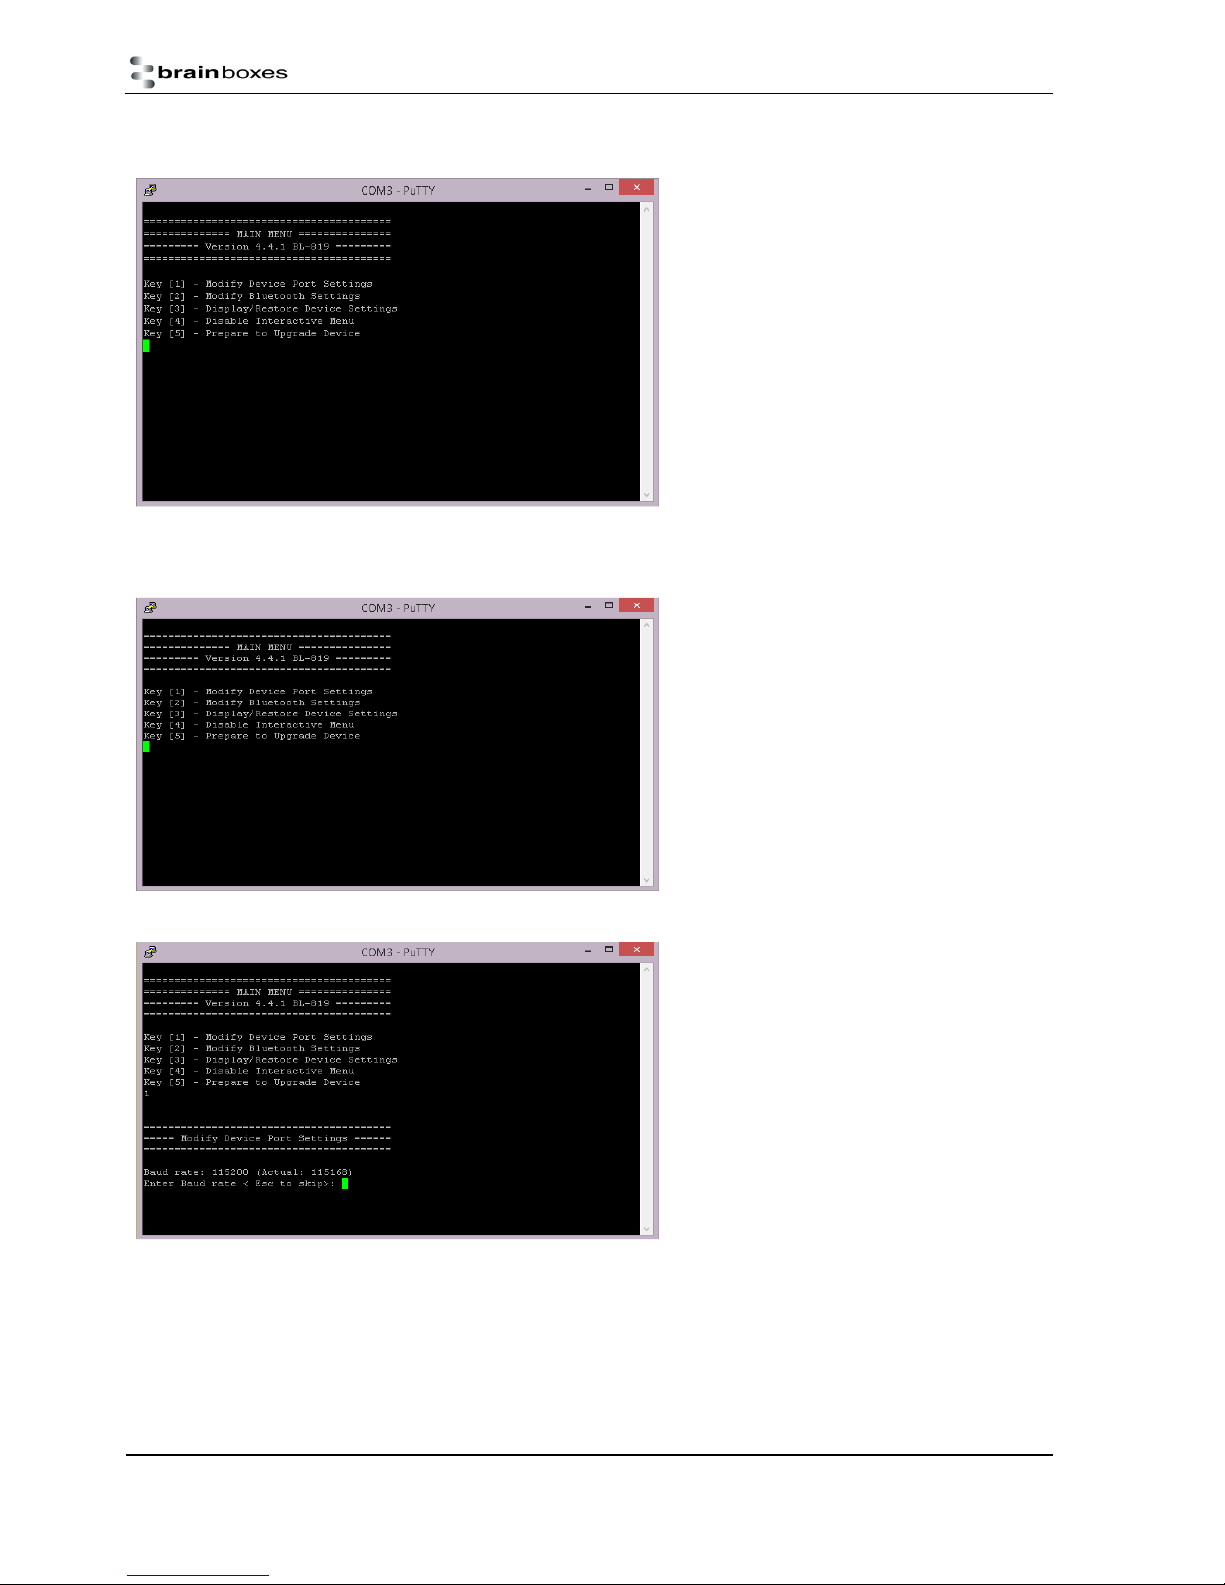
This is how the PuTTY terminal will appear when the COM port is
first opened. If you now press Enter (Carriage Return), you will
then see the Interactive Menu appear, like below.
This is the Interactive Menu. Here you can configure the BL819/830’s port settings.
1.13. Configuration Menu.
1.13.1. Navigation
As a general principle, from any menu screen hitting the “Enter” key refreshes the current menu and hitting the “Esc” or
“Escape” key returns the user to the previous menu or skips a particular option.
Menu selection is performed by pressing the number on your keyboard that corresponds to the number listed on the menu
item you wish to view/configure.
Reminder: The configuration menu is not available whilst a radio (Bluetooth) connection is established.
Manual for BL-819, BL-830, BL-875
V6.1
© Copyright Brainboxes Ltd Page 17 of 40
Page 18
1.13.2. Main Menu
1.13.3. Communications Parameters
Sending the “Enter” character to the adapter accesses
its main menu. This is also sometimes referred to as
“Carriage Return”.
All basic configuration options for adapter are
accessed via this menu. Advanced features are not
available from the menu interface.
Users wishing to alter “advanced” settings can do so
by either using the Windows Configuration application
documented above, or by using the commands
documented below.
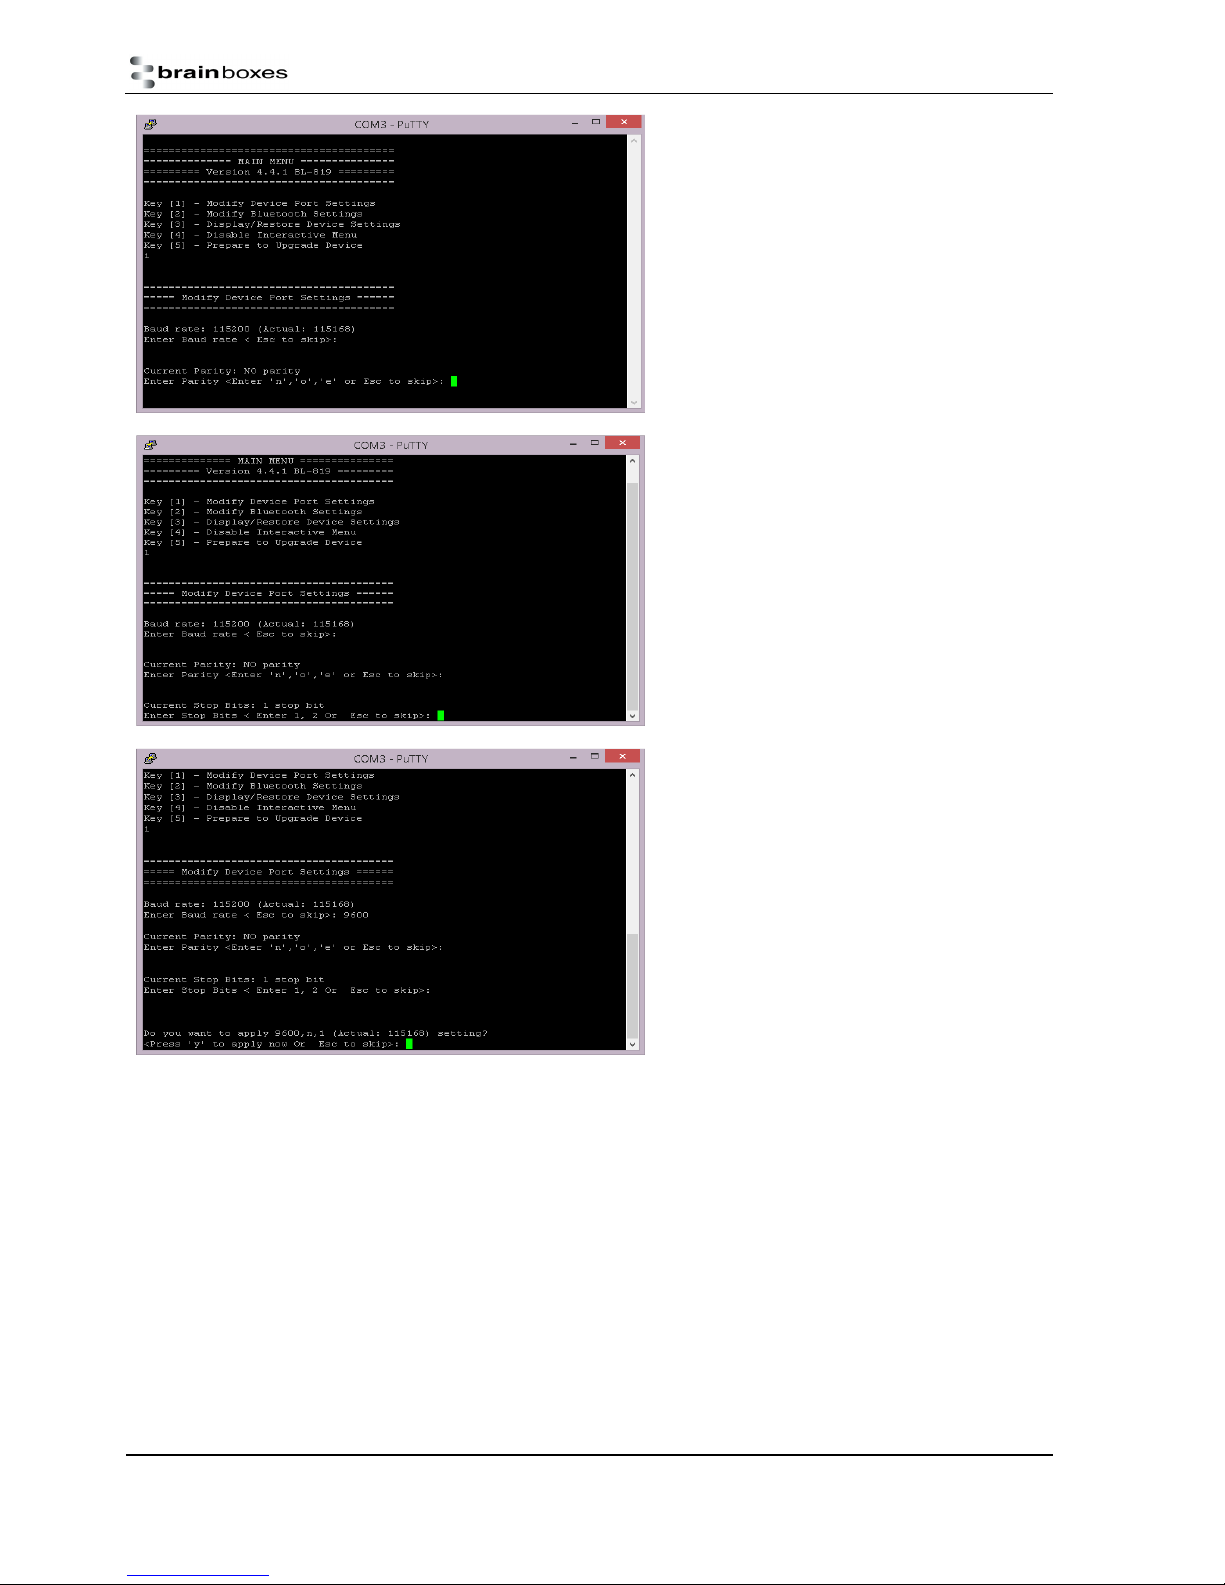
Selecting option 1 from the “Main Menu” menu
displays the Communications settings menu.
It is from this menu that all available serial port
settings can be changed. The available options are
detailed below.
The factory set communications parameters for your
adapter are as follows…
Baud Rate: 115,200
Data Bits: 8 (non-configurable)
Parity: None
Stop Bits: 1
You are first prompted to change the Baud Rate. The
current setting is shown. To change the baud rate, just
type the rate you want to use and press <enter>. The
Adapter will accept any number you type, but will set
the baud rate to the one that’s closest to what it can
actually achieve.
Press “Esc” to skip this setting – the current setting will
remain unchanged
Manual for BL-819, BL-830, BL-875
V6.1
© Copyright Brainboxes Ltd Page 18 of 40
Page 19
Next you’ll be prompted to set the adapter’s Parity.
Options here are None, Odd or Even.
“Esc” skips this selection leaving the current setting
unchanged.
You are then prompted to change Stop bits. Options
here are 1 or 2.
Pressing “Esc” skips this selection leaving the current
setting unchanged.
You are then asked if you wish to Apply the new
settings immediately. If settings are not immediately
applied, the changes will only take effect after the
Adapter has had its power cycled.
This is to minimise the disruption to the device
configuration by having to reconfigure the terminal
application after changing each setting.
If you have changed any communications parameters,
and wish to continue to access the configuration
menu, you will need to update your terminal
applications settings. The easiest method of
performing this in PuTTY is to close and re-start the
application, setting the new parameters during the
initial application configuration.
1.13.4. Handshaking
Handshaking is discussed in more detail in the section below, as it is not an option directly available from the menu.
Manual for BL-819, BL-830, BL-875
V6.1
© Copyright Brainboxes Ltd Page 19 of 40
Page 20
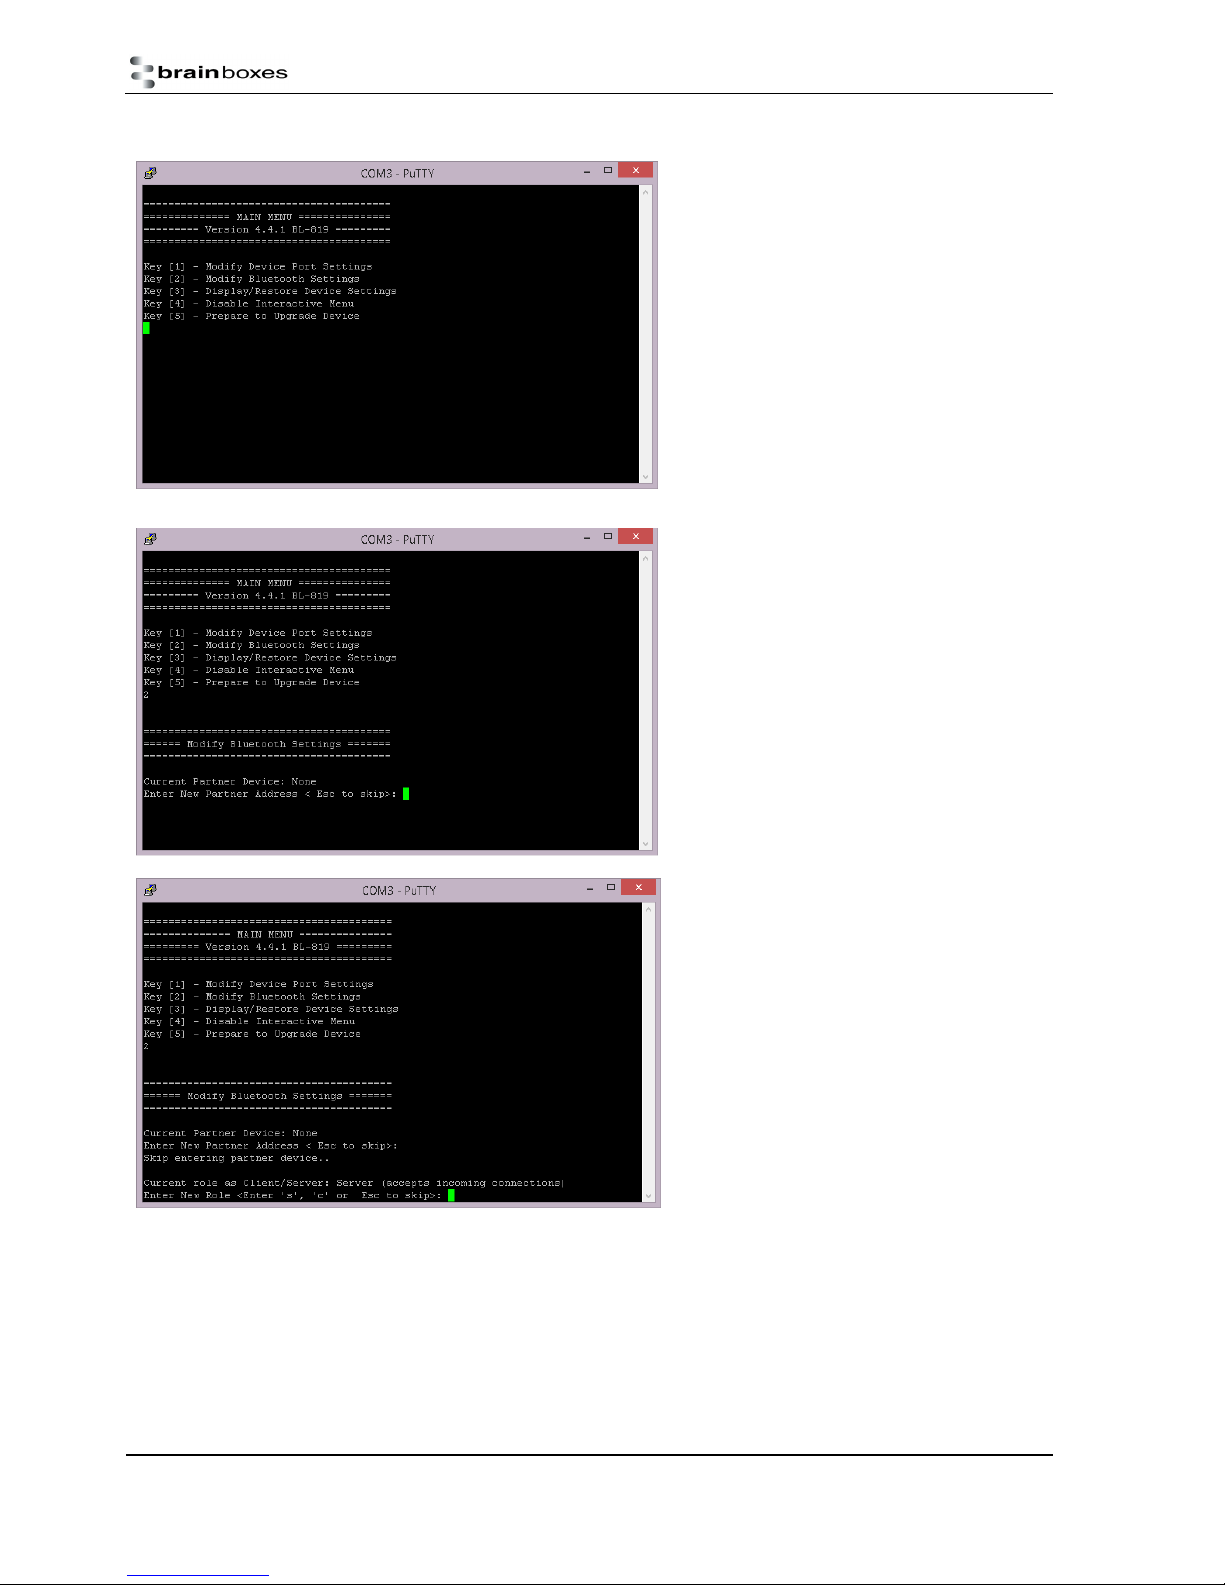
1.13.5. Bluetooth Parameters
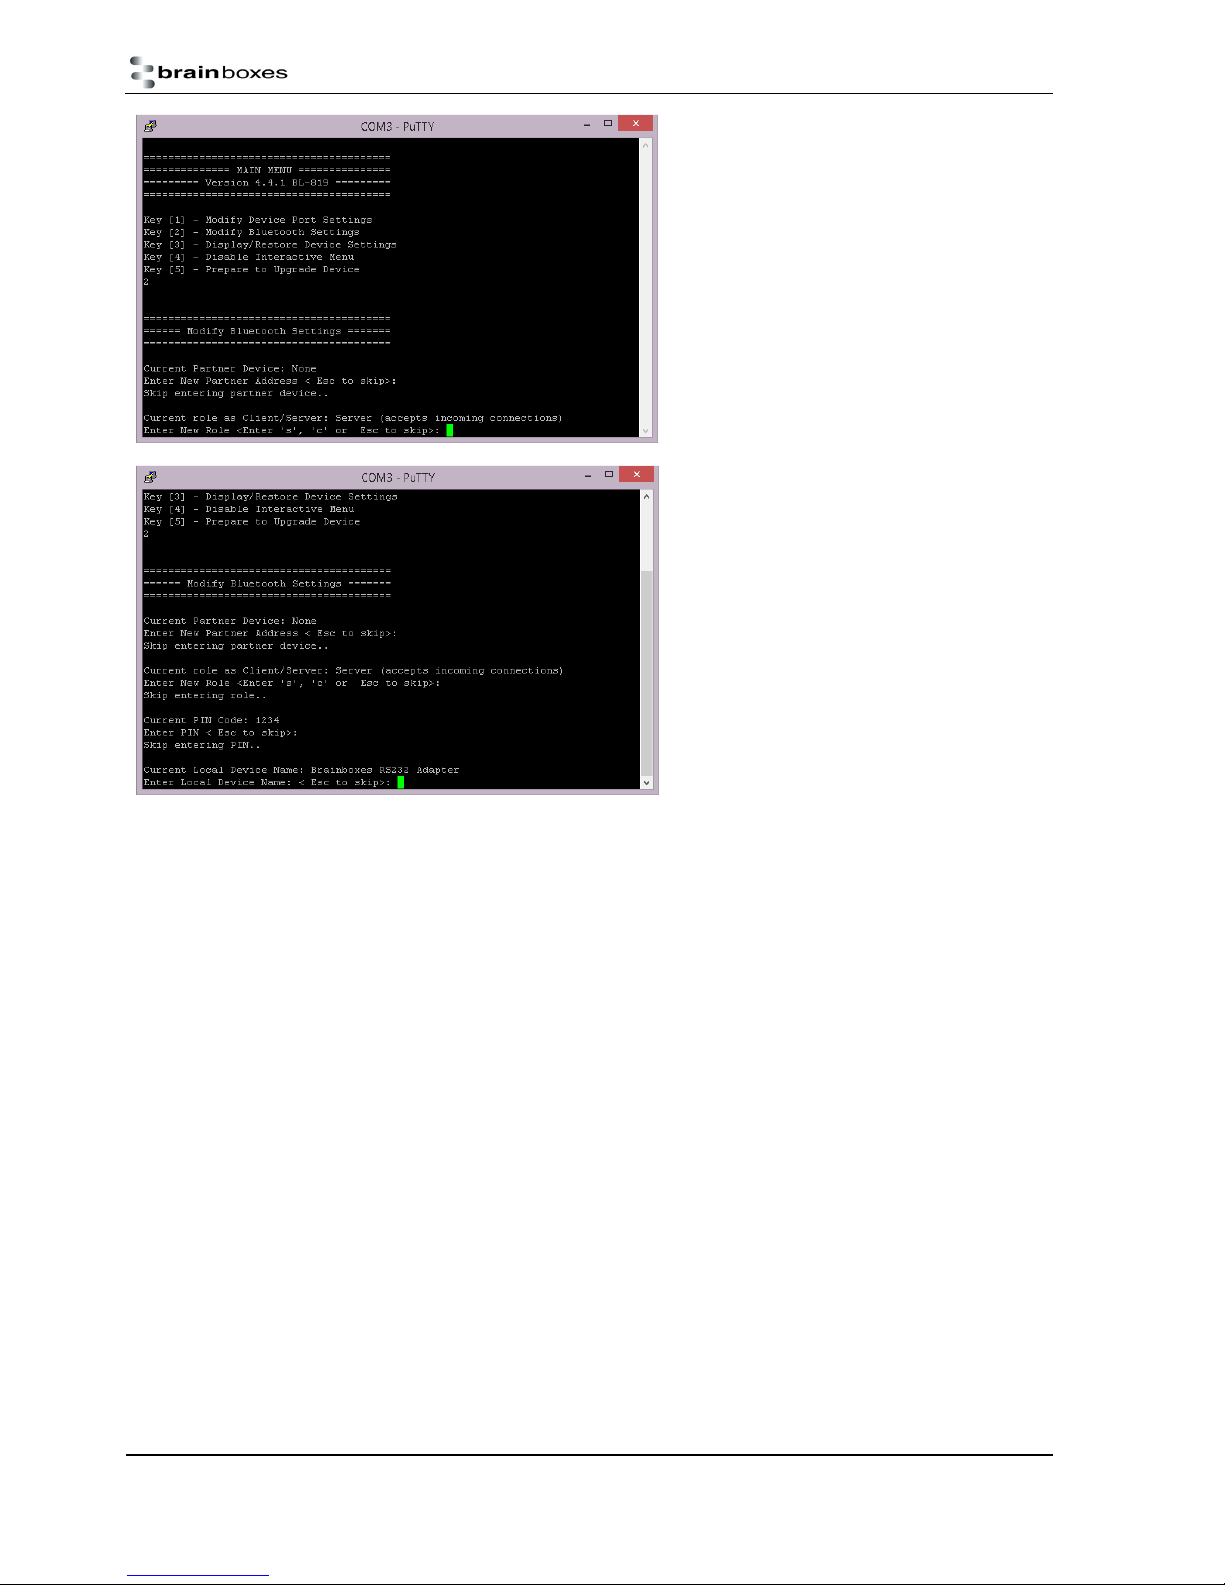
Selecting option 2 from the “Main Menu” menu
displays the Bluetooth settings menu shown below
left.
The factory set Bluetooth Parameters are:
Partner device: None
Role (Client/Server): Server
PIN: 1234
Local device name: Brainboxes RS-232 Adapter
It is from this menu that all available Bluetooth
settings can be changed. The available options are
detailed below.
The Currently configured partner device is shown (if
any). The user is then prompted to enter a new
partner device address.
To keep the same partner, or skip this option, press
the “Esc” key
Next the user is prompted to choose a role for the
device (the current one is identified). “s” chooses
Server, “c” chooses Client or “Esc” skips this section
leaving the current setting unchanged.
Manual for BL-819, BL-830, BL-875
V6.1
© Copyright Brainboxes Ltd Page 20 of 40
Page 21
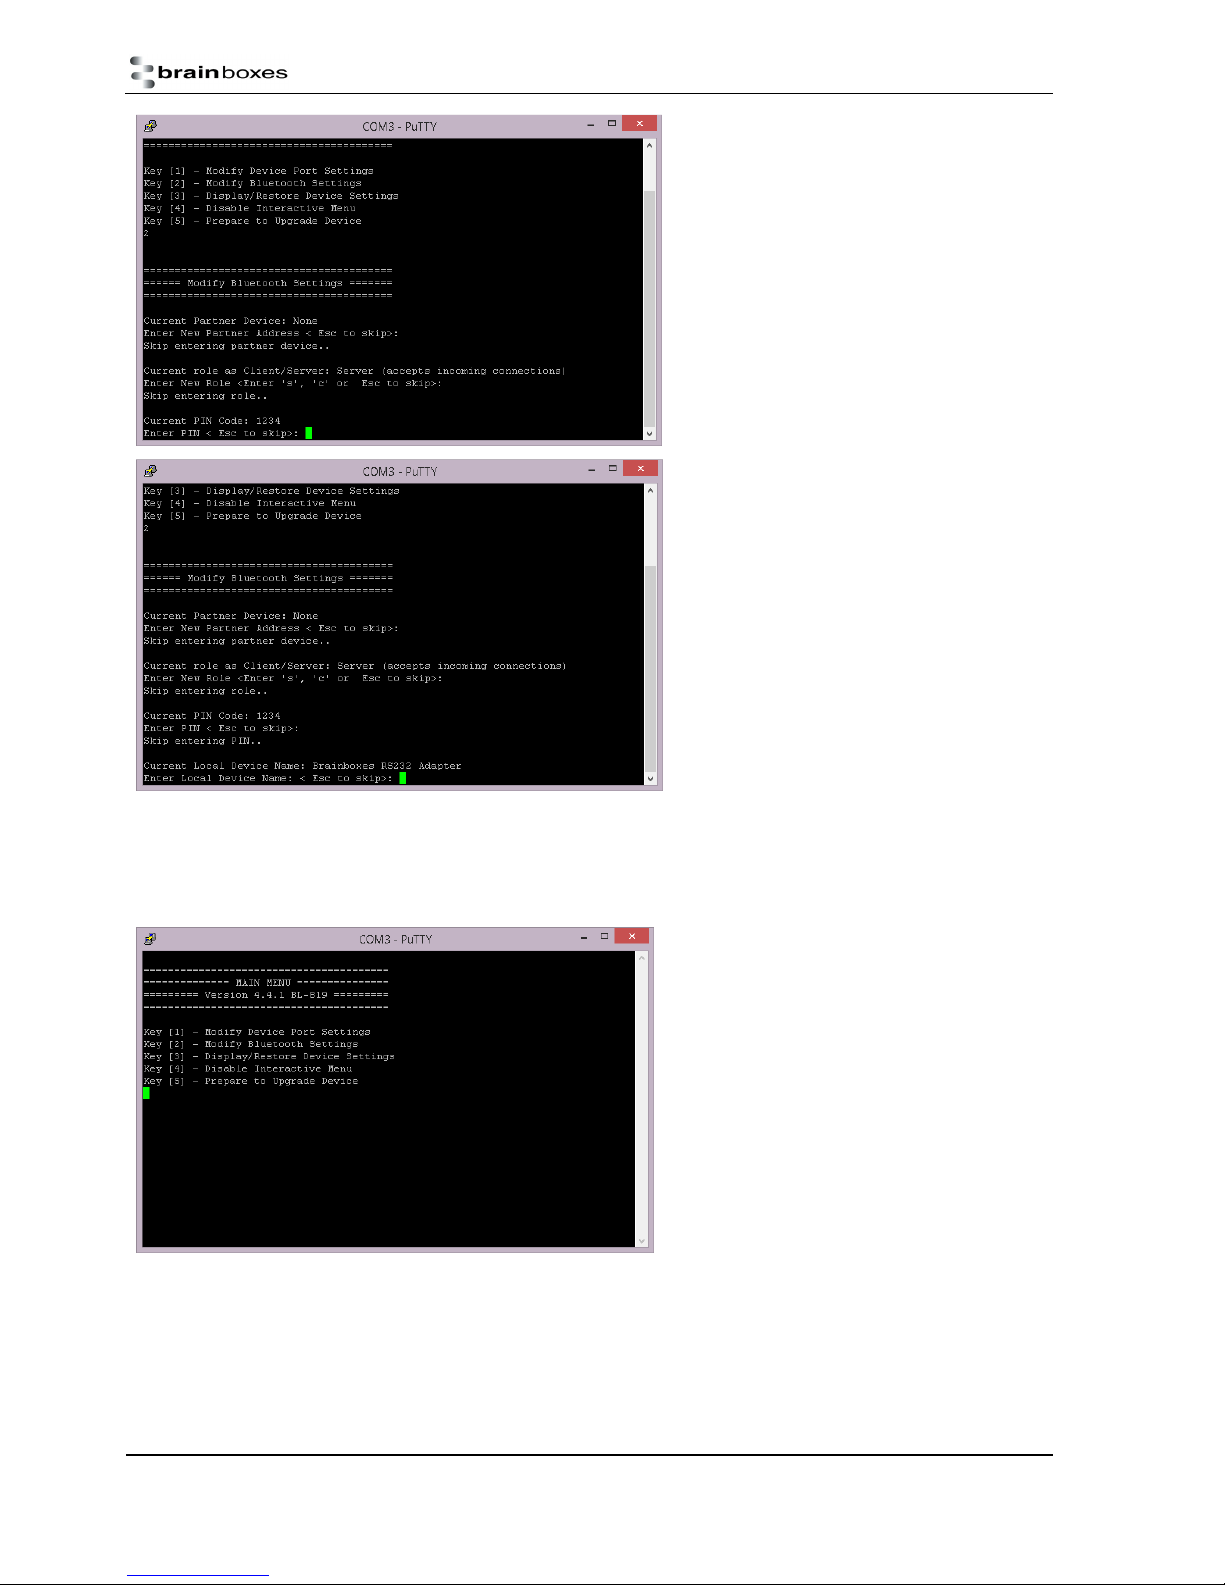
The user is then prompted for a new PIN to be
entered. You can enter any characters you wish here
up to a maximum of 16 characters. You should bear in
mind that some devices have limited input
mechanisms and may not be able to use a full
character set.
Lastly, the user is offered to change the adapter’s
friendly name. Typing your chosen name followed by
“enter” will immediately alter the published name,
hitting the “Esc” key will skip this setting leaving the
current name unchanged.
1.13.6. Display, Restore and Update Current and Factory Settings
Selecting option 3 from the “Main Menu” menu
displays the Current Settings menu and allows the user
to display, change or restore the default settings.
Manual for BL-819, BL-830, BL-875
V6.1
© Copyright Brainboxes Ltd Page 21 of 40
Page 22
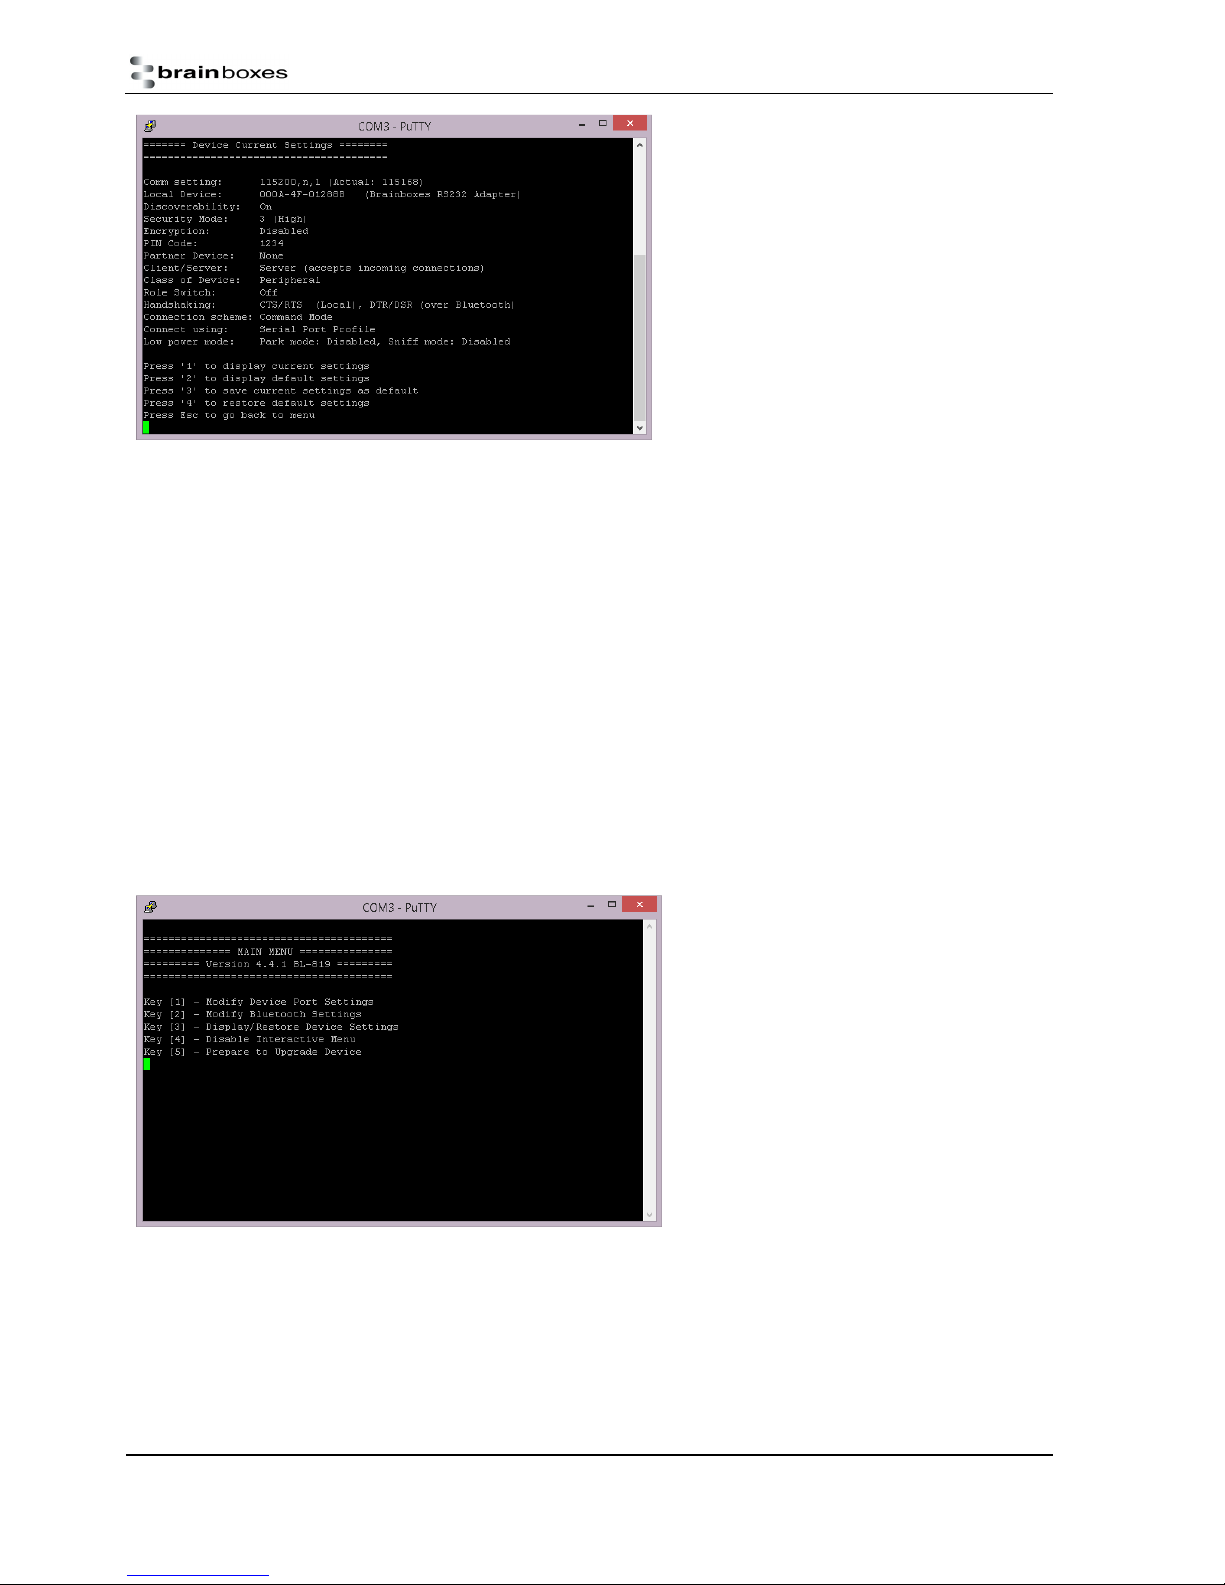
The first screen that displays shows the current state of
the adapter’s settings.
If any settings have been modified by the user following
the instructions above, then this list will differ from the
default (factory) settings
Selecting option 2 from this menu shows the original
factory settings for the product (if viewing for the first
time). The one item that will be different for each
individual product will be the local device setting. This
setting is unique for each individual Bluetooth device in
existence and cannot be changed.
Selecting option 3 from this “Settings” menu allows the
current user settings to be used to update the “factory”
settings, providing some level of protection from losing
application configuration settings during a device reset
when the reset button is activated.
A warning message will appear to ask the user to be
sure that the default settings should be changed. This
is not something you really want to do unless you’re
sure you have the settings as you want them and are
sure you can remember them, as there is no way back
from here…
Selecting option 4 from the “Settings” menu above allows the user to restore the device to its default settings. Be sure to
take a note of, or print these settings, as you will need to ensure that the next time you attempt to communicate with your
Adapter you use these new settings. Remember that the original factory settings may have been updated using the previous
menu.
1.13.7. Disabling Interactive Menu
Some RS-232 devices (GPS devices for example) emit a
continuous stream of data regardless of whether a
cable is connected. When no Bluetooth connection
exists, this data can actually appear as commands to
the menu and change settings that render the Adapter
inoperable. Disabling the menu, stops the Adapter
being unwontedly re-configured in this manner.
Selecting option 5 from the main menu displays the
following Disable Interactive menu.
Manual for BL-819, BL-830, BL-875
V6.1
© Copyright Brainboxes Ltd Page 22 of 40
Page 23
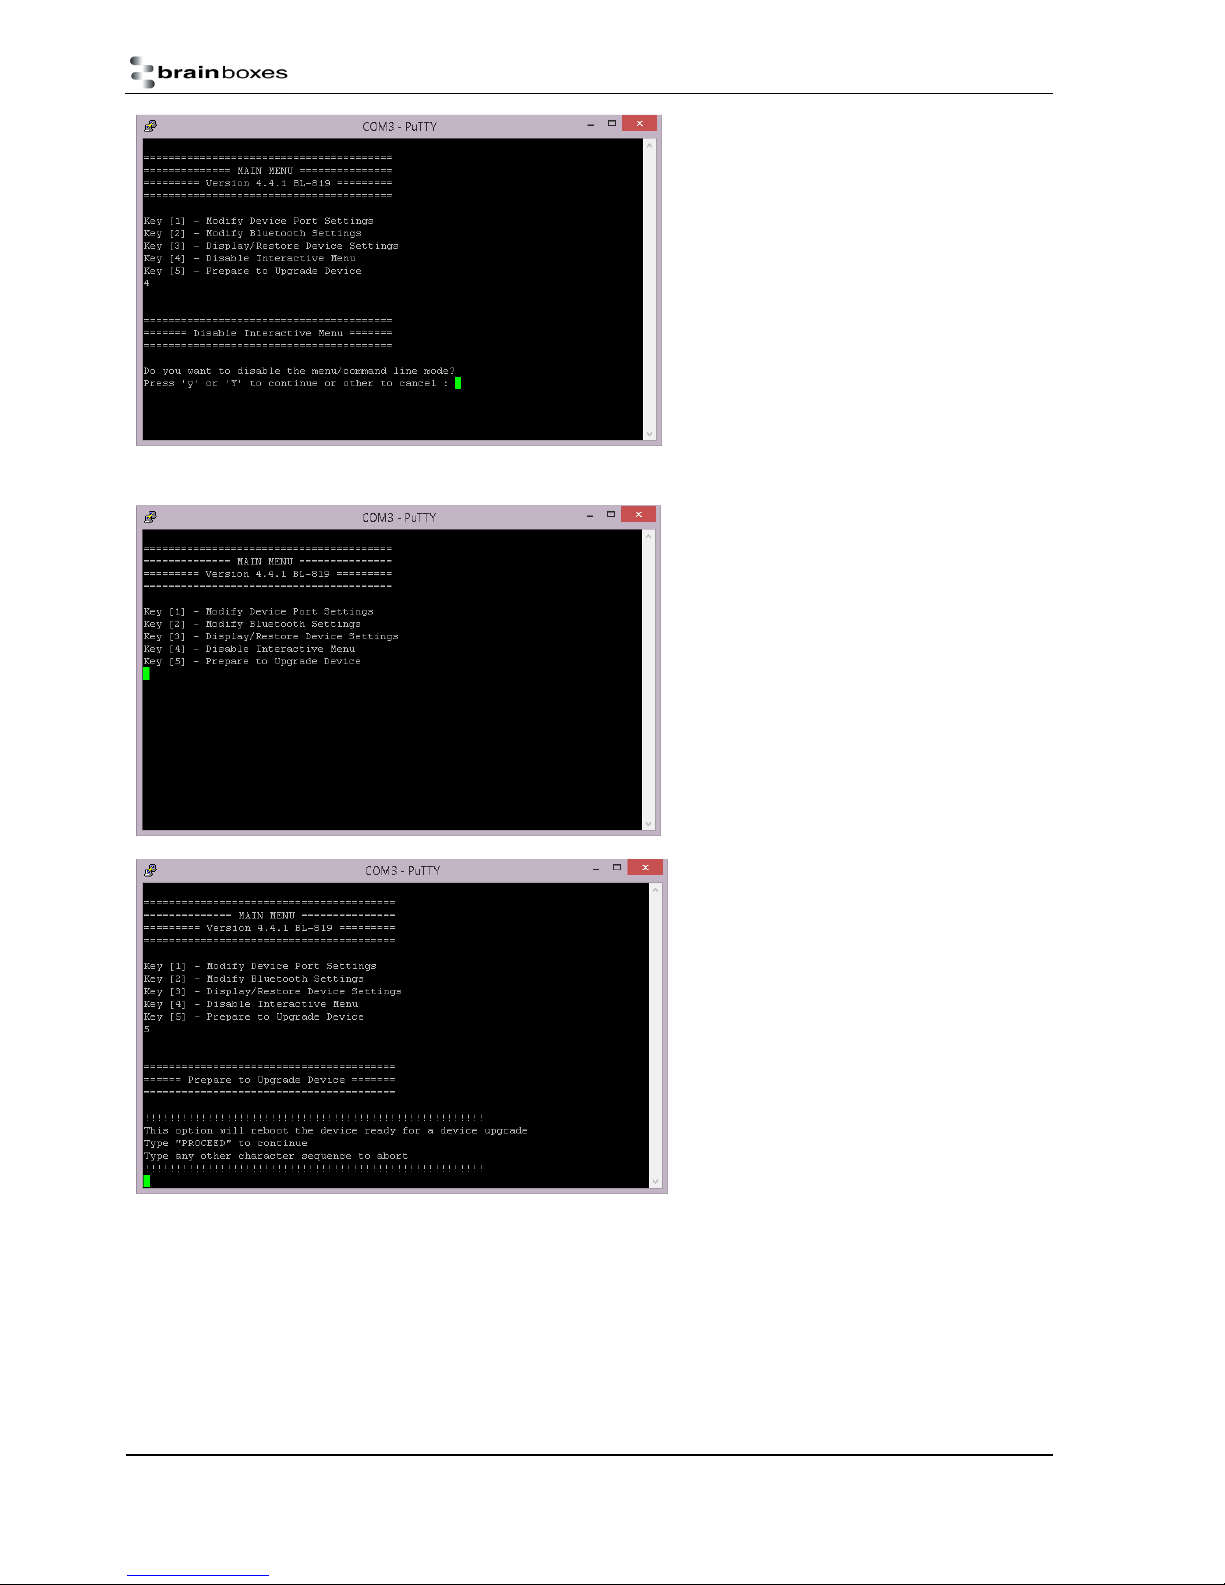
1.13.8. Upgrading Firmware
Selecting ‘y’ or ‘Y’ from this menu means that no
further interaction with the menu will be possible until
the device has been completely reset to its factory
defaults by performing a “long” reset from the reset
button.
Upgrade DFU (Device Firmware Upgrade) is an option
to be taken seriously as it has the potential to leave
your product in an unusable state.
The upgrade is a 2 stage process, the menu option
must be used in conjunction with the upgrade
software supplied on the accompanying CD ROM
which requires a Microsoft Windows 95 or later
operating system
Selecting option 5 from the main menu displays the
following Firmware Upgrade menu.
To activate this feature, you must type the word
“PROCEED” exactly. This command is case sensitive.
Typing “PROCEED” correctly will cause the product to
enter its firmware upgrade mode with immediate
effect.
Manual for BL-819, BL-830, BL-875
V6.1
© Copyright Brainboxes Ltd Page 23 of 40
Page 24
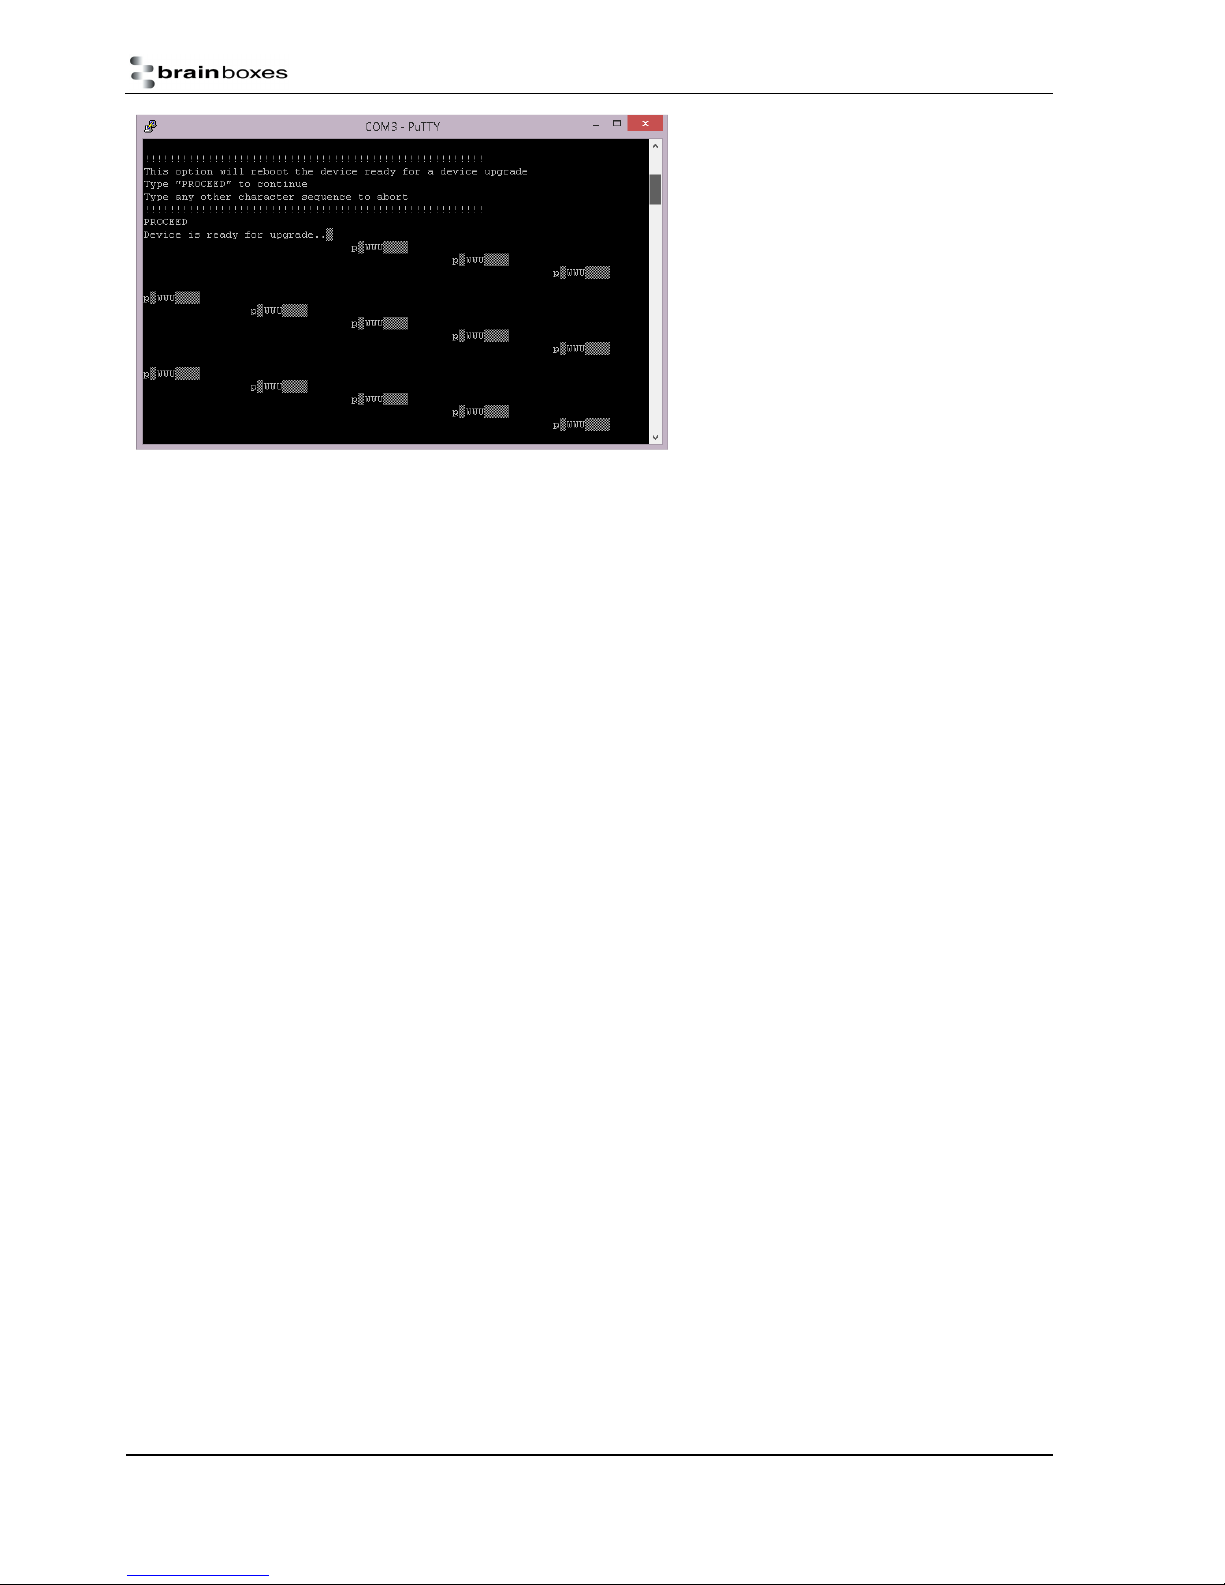
Failure to enter “PROCEED” correctly will cause the
menu option to abort and you will be able to
continue navigating the menu in the normal fashion.
In some (but not all) instances you will see some
“odd” characters displayed as shown above. This is
normal behaviour and indicates the product is ready
to receive its firmware upgrade commands from the
supporting software.
At this point, you will no longer be able to interact with the menu, nor will you be able to use the product as advertised. ONLY
the supporting software can restore this setting. Neither a power reset nor any combination of presses of the reset button
will restore normal operation to the product. It is now permanently in a state to upgrade the firmware.
IMPORTANT, in order for the upgrade application to connect to your product and perform the upgrade, you must ensure you
disconnect your terminal application from the COM port. In PuTTY, this is done by closing the application down.
Now run the “upgrade” application documented in section 7 (page 27) below for upgrading.
Manual for BL-819, BL-830, BL-875
V6.1
© Copyright Brainboxes Ltd Page 24 of 40
Page 25

1.14. Command Interface
This interface has been developed primarily to support programming access to the configuration settings by an application
such as our own configuration application, but can also offer a powerful human operated (e.g. via PuTTY) command driven
interface in its own right. Additionally, the commands can be placed in a Text/script file and sent (e.g. by PuTTY) in one go to
the adapter. The “scr” command is strongly recommended for use in this scenario.
The command interface protocol is quite straightforward. Each command (see table and descriptions below) must be sent
over the COM port, followed by a Carriage return <CR>. This can be done in PuTTY just by typing each command and hitting
the Enter key.
There are up to 3 ways each command can be used.
1. On its own. This acts as a “query” command.
E.g. cod<CR>
Returns the current device class
2. With an “=” and parameter(s). This acts as a “set” command
E.g. cset=9600,n,1<CR>
Sets the current settings to 9600 baud, No Parity and 1 Stop Bit
Not all commands support this function as they are query commands only
3. With a “?” which acts as a “help” command
E.g. svc?<CR>
Returns a description of the command syntax and allowable parameters
The command list summary is given below.
Command
Name
aset Get all settings padd Partner Address
btset
cnx Manually connect to a found device parkset
cod Class Of Device part
cset
delpair Delete the current pair pnam Partner Name
delpart Delete the current Partner prox Set the proximity mode
dflt
disc
enc Encryption sec Security
find Manually perform an inquiry sniffset
help or ? Help switchrole
hsk Handshaking svc
ladd Local device address svr
list List the manually-found devices upg Prepare for upgrading
lowpwr Low Power Mode ver F/W app version
lnam Local device name verb Verbose
menu
This information can be found using the help or ‘?’ command in PuTTY when your Adapter is attached to an available COM
port.
Description Command
Name
Get current Bluetooth settings
Communication Settings
Default settings
Discoverability
Display Menu
pair Pair
pin PIN code
remcfg Remote Configuration
scr Script Mode
Description
Park Settings
Partner
Sniff Settings
Switch Role On / Off
Connect Using profile other than SPP
Server or Client
Manual for BL-819, BL-830, BL-875
V6.1
© Copyright Brainboxes Ltd Page 25 of 40
Page 26
Remote Configuration
One of the great features of Brainboxes RS-232 Bluetooth Adapters is the ability to be remotely configured. For example, a
Bluetooth connection can be created from a second device and that second device can change the baud rate, local name or
any of the settings of the adapter over the Bluetooth link.
This is achieved by the adapter presenting two services to connect to; one is the standard serial port service and the other is a
remote configuration service. The latter is connected to, to enable the second device to access the adapter’s configuration
menu using PuTTY and thus make any changes. Changes to port settings such as baud rate, parity or stop bits do not affect
the port settings of the second devices’ PuTTY settings, so the adapter can be set to 115200, n, 1 and the PuTTY settings for
the second device that is accessing the adapter’s menu remotely can be set to any settings i.e. 9600, e, 2.
Currently the remote configuration feature is not accessible from the main configuration utility application and PuTTY or
some other suitable terminal application should be used.
Also, upgrading of the adapter cannot be achieved using remote configuration because as soon as the adapter starts to
upgrade, the Bluetooth connection is lost and there is no longer a way of communicating to the adapter remotely.
To use remote configuration from adapter to adapter use the command line “remcfg=xxxx-xx-xxxxxx” where the x’s stand for
the remote device’s Bluetooth address.
Resetting the Product
The adapter has a “reset button” located on the top of the case as shown in section 2.1 above. This button performs 2
different functions.
A short press (less than 3 seconds) of the reset button causes any paired device information to be deleted. When the device is
in low security mode, this will not have any effect on the devices operation, but whilst in high security mode, this will mean
that another device can pair with adapter, or that the original device must expire its bond in order to reconnect.
A long press (more than 3 seconds) of the reset button causes all factory defaults to be restored. Care should be taken here to
remember that these “factory” settings can actually be updated via the interactive menu and thus may not be the same as the
Manual for BL-819, BL-830, BL-875
V6.1
© Copyright Brainboxes Ltd Page 26 of 40
Page 27
device was shipped with. The user should also remember that adapter is likely to need its parameters re-configuring to ensure
communications can be re-established with either the local serial device, or remote Bluetooth device.
Long press
• Hold down the reset button for about 20 seconds with the power on
• Power cycle the device
• Access the device using baud 9600,n,1
Double tap
• Hold the button for about 3-5 seconds
• Repeat
• Access the device using baud 9600,n,1
Upgrading your device
If you have installed the Configuration Utility already, the Upgrade application will also have installed and a shortcut will be
placed onto your desktop. Otherwise browse the CD, navigate to the: 83CDBLUETOOTH3\Bluetooth Solutions
3.3\Software\BL-819\Configuration Utility directory, and run the “Setup.exe” application. Follow the onscreen instructions
to install the application. This will create an entry in your start menu as well as a desktop shortcut.
Run the application by selecting it from the “Start” menu or by running it from the shortcut on your desktop.
This is the first window which appears. The version of
the application is displayed in the lower right corner
of the screen.
Click “Next”
Manual for BL-819, BL-830, BL-875
V6.1
© Copyright Brainboxes Ltd Page 27 of 40
Page 28
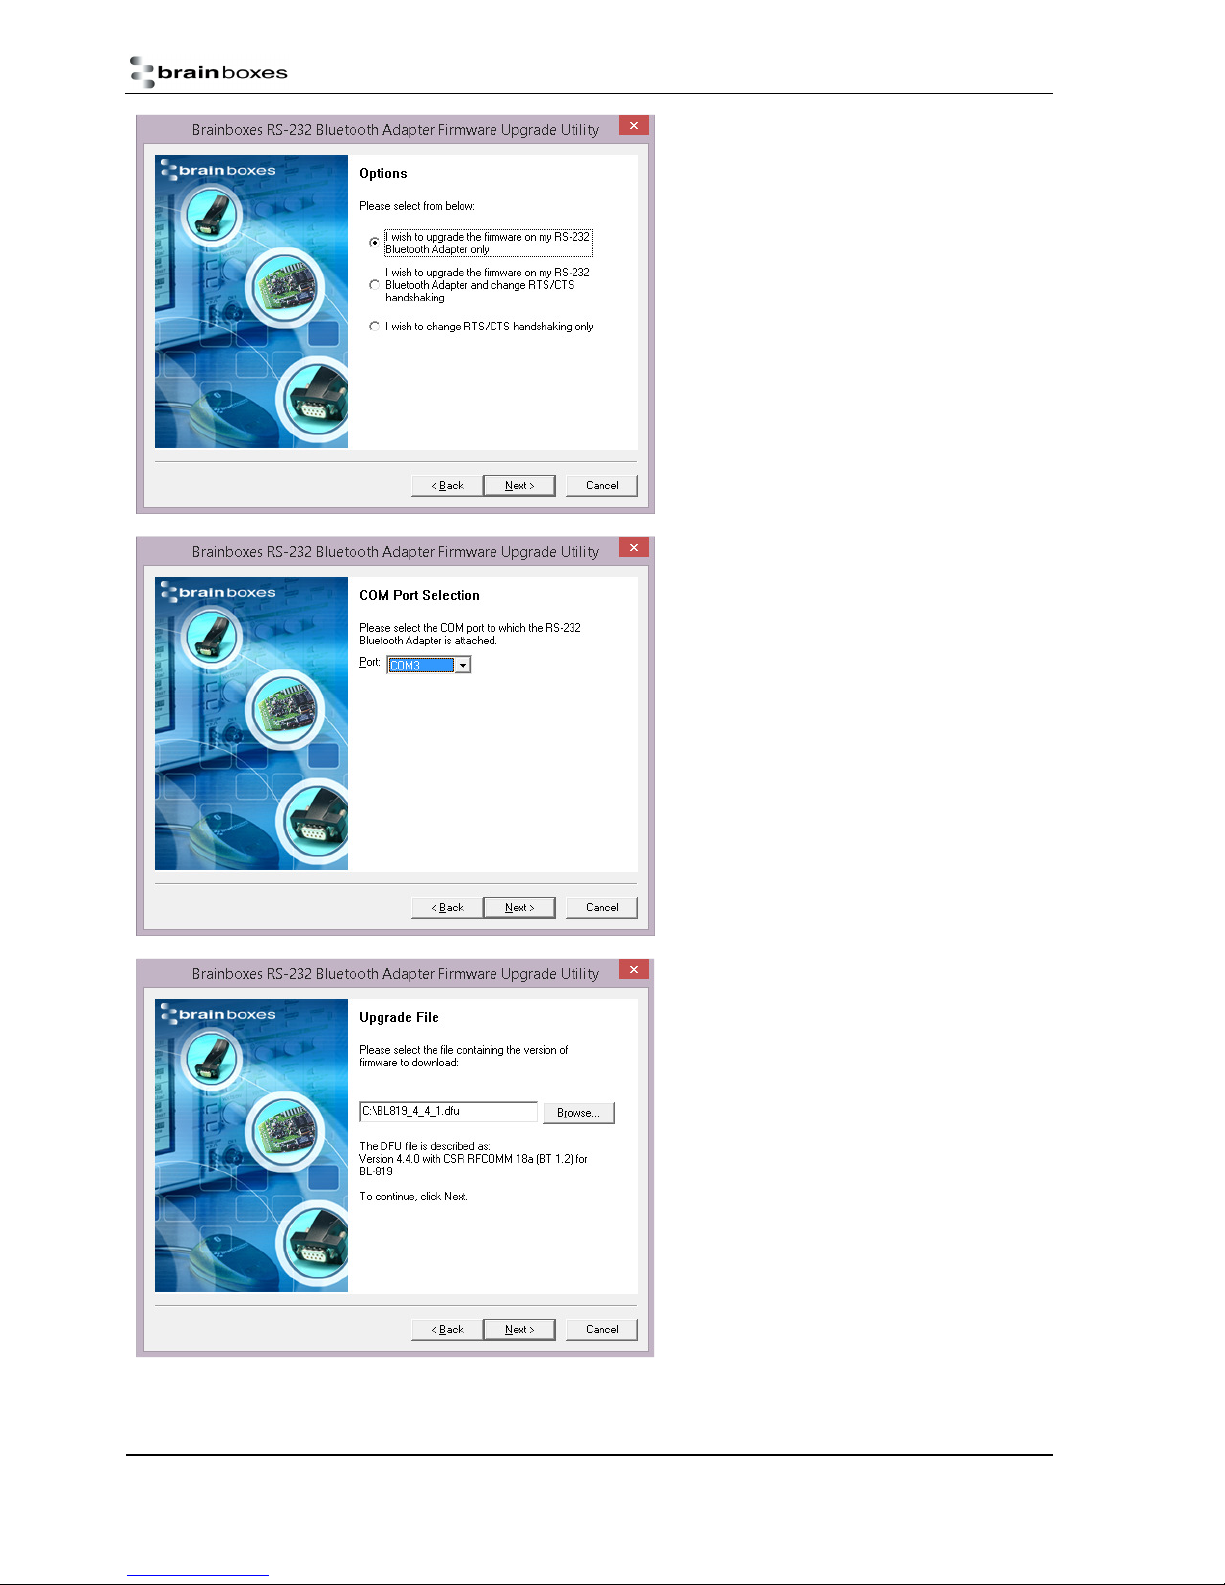
Three options are presented to the user with the
choice or either just upgrading the firmware,
upgrading the firmware and changing the RTS/CTS
handshaking setting or just changing the RTS/CTS
handshaking setting.
To simply upgrade the firmware, select the first
option.
Select the COM port to which you have connected
your product. (Remember to close the Configuration
Utility or Hyper Terminal application if you still have
either open)
Then Click “Next”.
Point the upgrade wizard to the upgrade file you wish
to use.
These upgrade files all have the extension .dfu and the
latest version is available from the Brainboxes
website.
NB The BL-819 and the BL-830 have their own
distinctive version of firmware. Make sure that you
are choosing the correct firmware for your device
Manual for BL-819, BL-830, BL-875
V6.1
© Copyright Brainboxes Ltd Page 28 of 40
Page 29
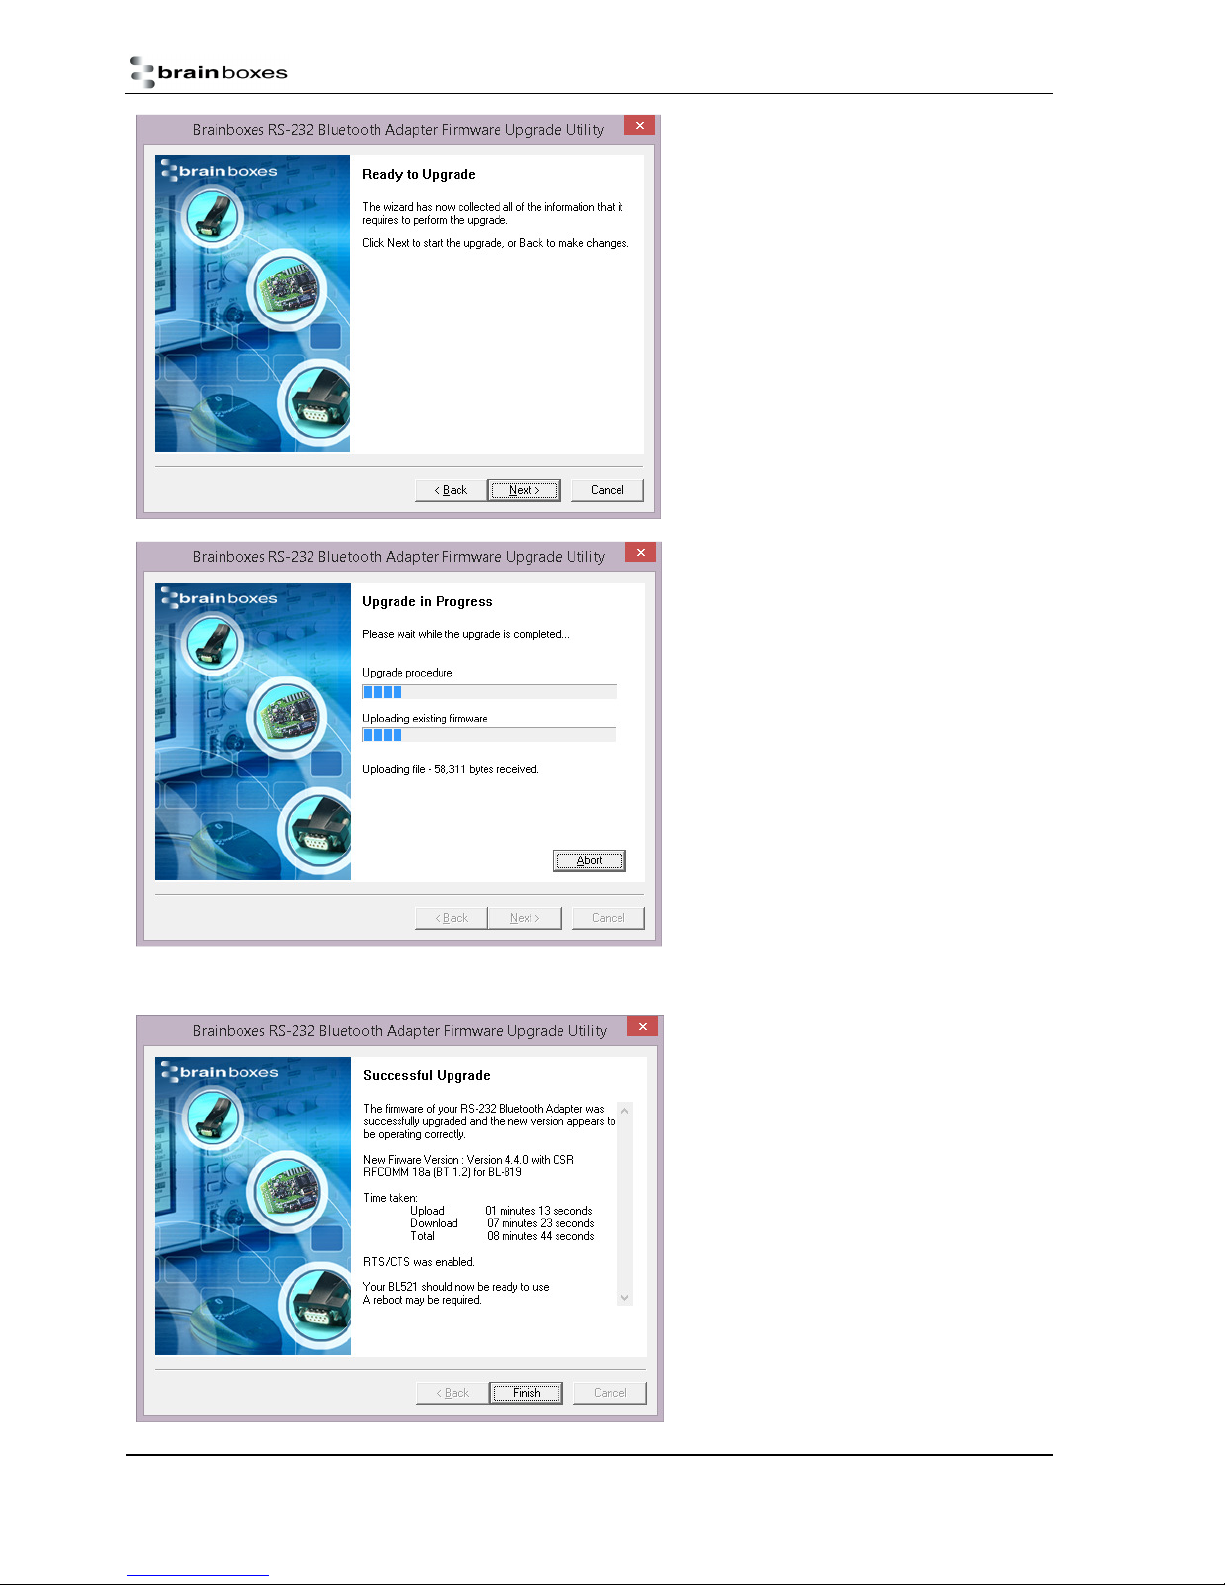
Confirm you have made the correct selections by
clicking “Next” to start the upgrade procedure.
Assuming you have selected the correct options, the
wizard will detect the product connected to the
selected port and begin the upgrade.
This may take a few minutes, as the wizard will
automatically make a copy of the firmware currently
on the device before uploading the new version.
A progress bar indicates how the procedure is going.
If everything went well the final screen should show
indicating any further action that may be required.
Typically a power cycle of the device will be necessary
before the upgrade completes.
Manual for BL-819, BL-830, BL-875
V6.1
© Copyright Brainboxes Ltd Page 29 of 40
Page 30
1 N/C 4 DSR –
N/C 7 CTS
Physically connecting to your RS-232 device
1.15. Configuring the communications parameters.
The adapters do not have the ability to auto-detect the communications parameters (e.g. baud rate) so they must be
configured to match the data rate used in the application to which they are connected.
Please refer to section 4.2.3 above, for details on how to do this.
It is possible, if a little confusing, to “pair” two adapters and have them physically connected to RS-232 devices which use
totally different communications parameters.
1.16. Physically connecting your device to adapter via the RS-232 connector
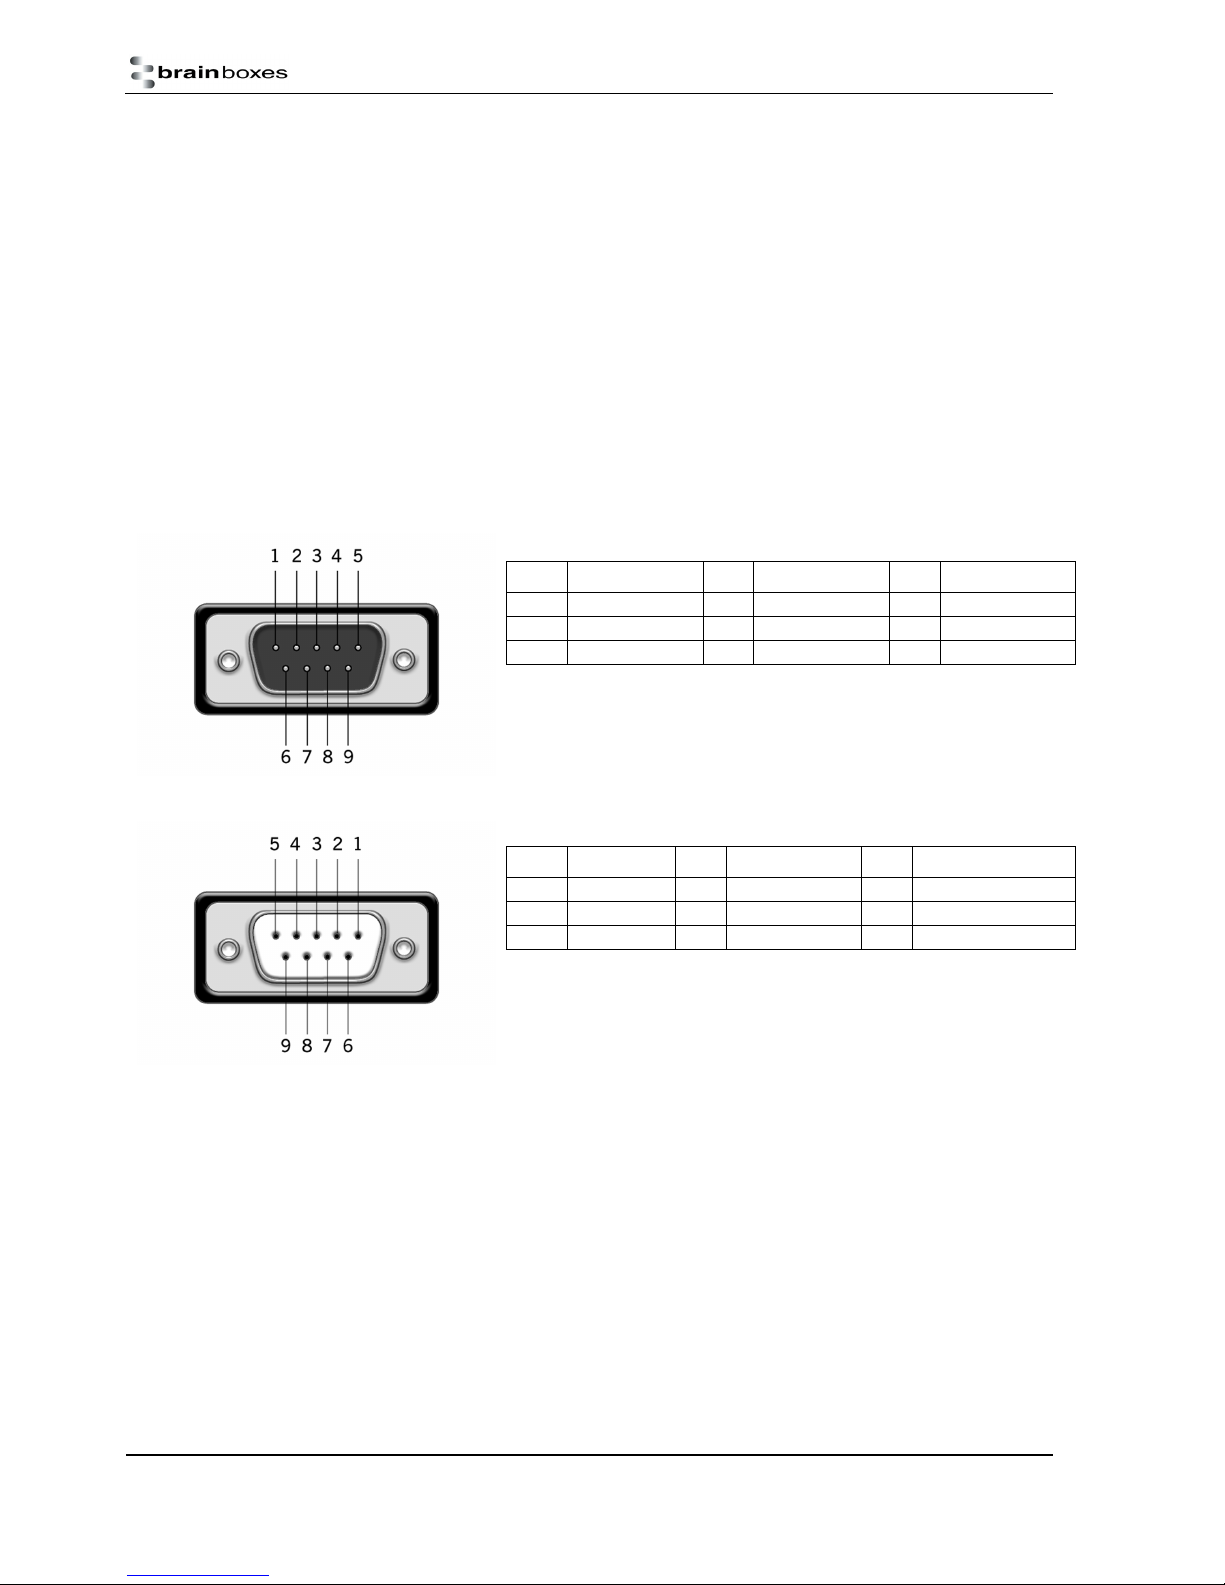
The adapter is supplied with a 9-pin D type connector, Male (DTE) for the BL-819 and Female (DCE) for the BL-830. The DTE
(Data Terminal Equipment) configuration of the BL-819 has been chosen to allow for easy connection to DCE (Data
Communication Equipment) RS-232 devices that would normally connect directly to the RS-232 port on a computer.
Connector Pin-Outs for the BL-819 DTE are as follows:
Pin Signal Pin Signal Pin Signal
1 N/C 4 DTR – N/C 7 RTS
2 RxD 5 Ground 8 CTS
3 TxD 6 DSR – N/C 9 N/C
As the RS-232 standard allows for many different cable configurations, your
device may need an additional cable to work with the adapter, such as a
“cross-over” or “null-modem” cable. Please refer to your device’s
For the BL-830 and the BL-819 fitted with the provided gender changer the Pin-Outs are:
documentation for specific details.
Pin Signal Pin Signal Pin Signal
2 TxD 5 Ground 8 RTS
3 RxD 6 DTR – N/C 9 Power on Pin 9*
The female connector is designed so that it can be plugged directly into a PC’s
motherboard COM port. If you are connecting it directly to a different device
you may need an additional cable, such as a “cross-over” or “null-modem”
cable. Please refer to your device’s documentation for further details.
Manual for BL-819, BL-830, BL-875
V6.1
© Copyright Brainboxes Ltd Page 30 of 40
Page 31
Connecting adapters over Bluetooth
There are 3 scenarios in which adapter can be connected via Bluetooth. This section details all 3 methods.
a) Client/Server Pair: 2 adapters, configured to perform a “true” cable replacement.
b) Client: adapter is the Bluetooth device which initiates the connection
c) Server: Connecting TO adapter from a remote Bluetooth device (Factory Default)
Each of these 3 different scenarios can be configured in each of the 3 configuration methods previously described and are also
documented herein.
1.17. Client/Server Pair: “Cable Replacement”
One of the strongest features of the adapter is that 2 of them can be configured to connect to each other and thus behave
almost exactly as a cable. This configuration is very straightforward, does not require any Bluetooth software and is detailed
below.
For adapter’s to connect as a pair, one of the devices needs to be configured as a client device, and one as a server. As the
factory settings for adapter are “Server” it follows then that only 1 of the pair needs any alternate configuration from that
supplied.
It is advisable that you first configure the communications settings (baud rate etc.) for each adapter so that they are suitable
for the devices into which you are plugging them. When configuring a pair of adapter’s the Communications parameters of
each Adapter do not have to match each other’s, only that of the devices into which they are connected.
Each adapter has a unique Bluetooth Address (BD_ADDR). This is printed on a label on the base of every product, but is also
accessible from the “View Current Settings” menu detailed above. For our example here, we will use an adapter with a
BD_ADDR of 000A-4F-00082D, which we’ll call the Server, and a second, with a BD_ADDR of 000A-4F-0013BB, which we’ll call
the Client. We’ll leave all other settings for this example as factory defaults. As explained above we only need to change the
settings of the Client device…
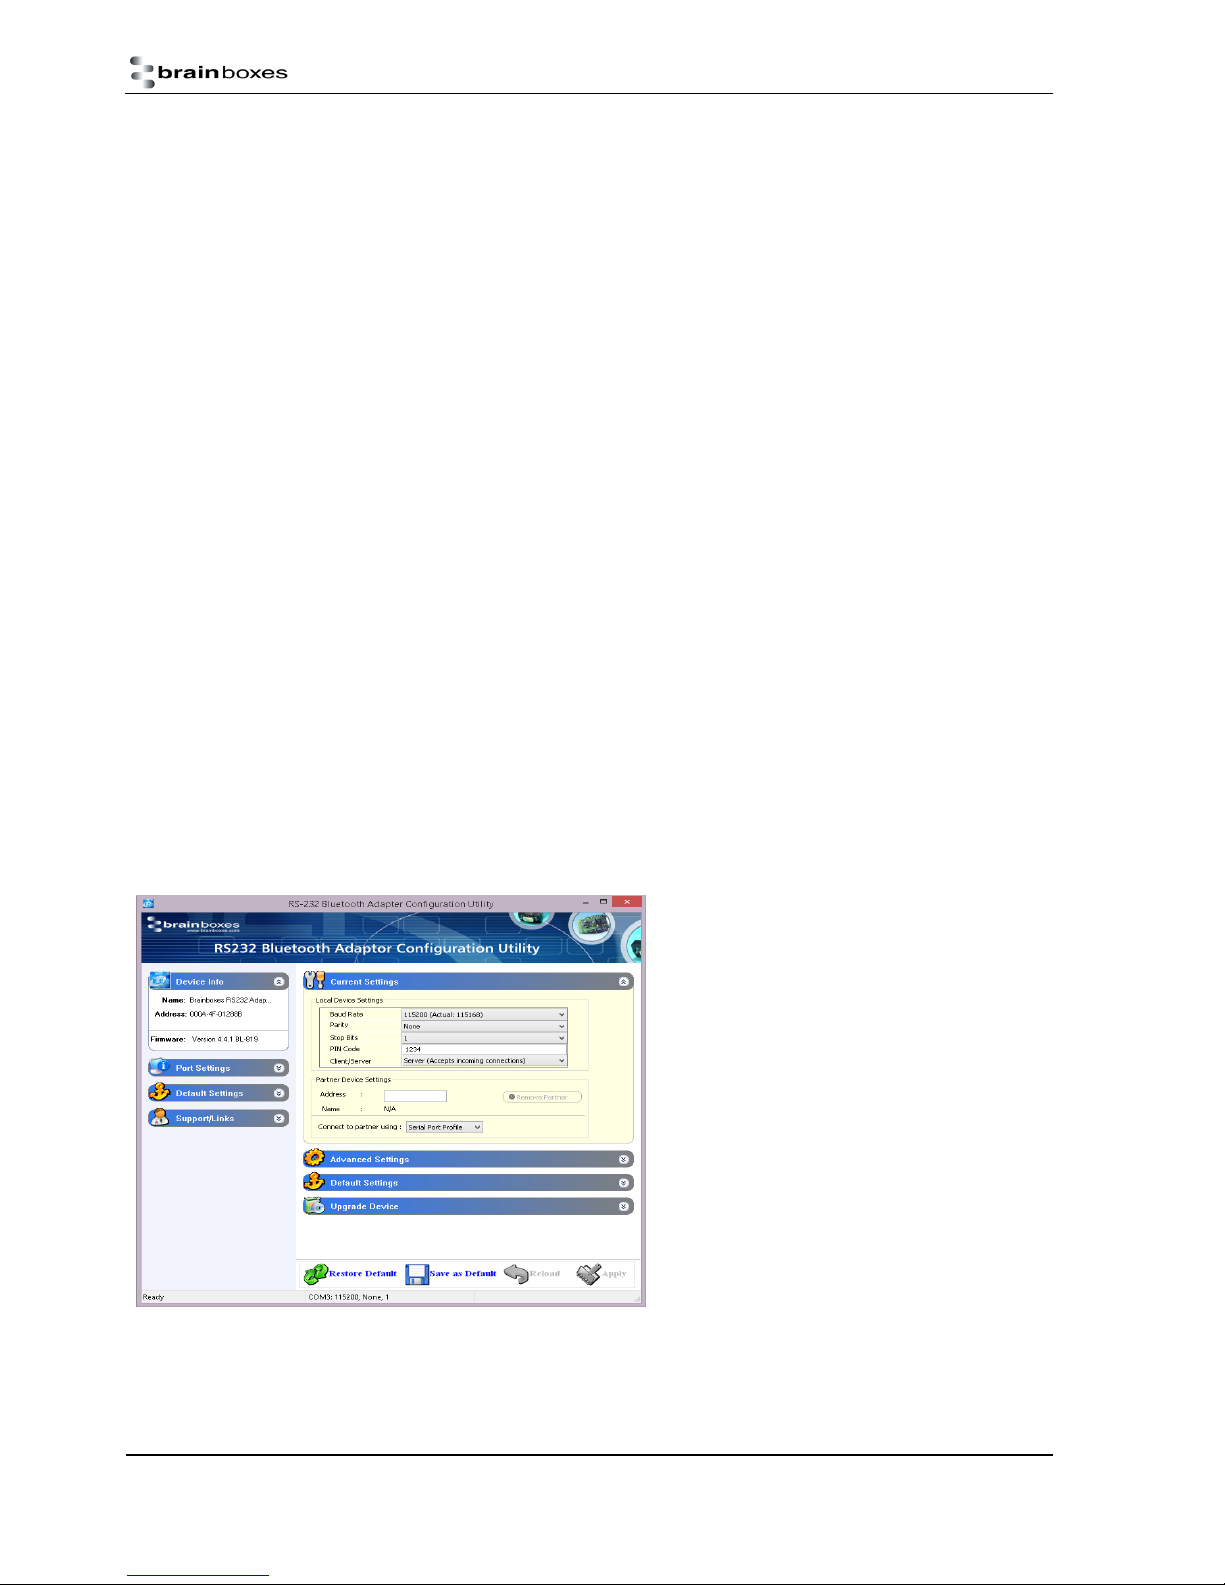
1.17.1. Configuration by Windows Application
Add the address of your remote device into the
“Partner Device Settings” Section in the “Address” field.
Next Click the drop down arrow at the right of the
“Client/Server” field in the “Local Device Settings”
section and select the “Client” Option
Click “Apply”
Manual for BL-819, BL-830, BL-875
V6.1
© Copyright Brainboxes Ltd Page 31 of 40
Page 32
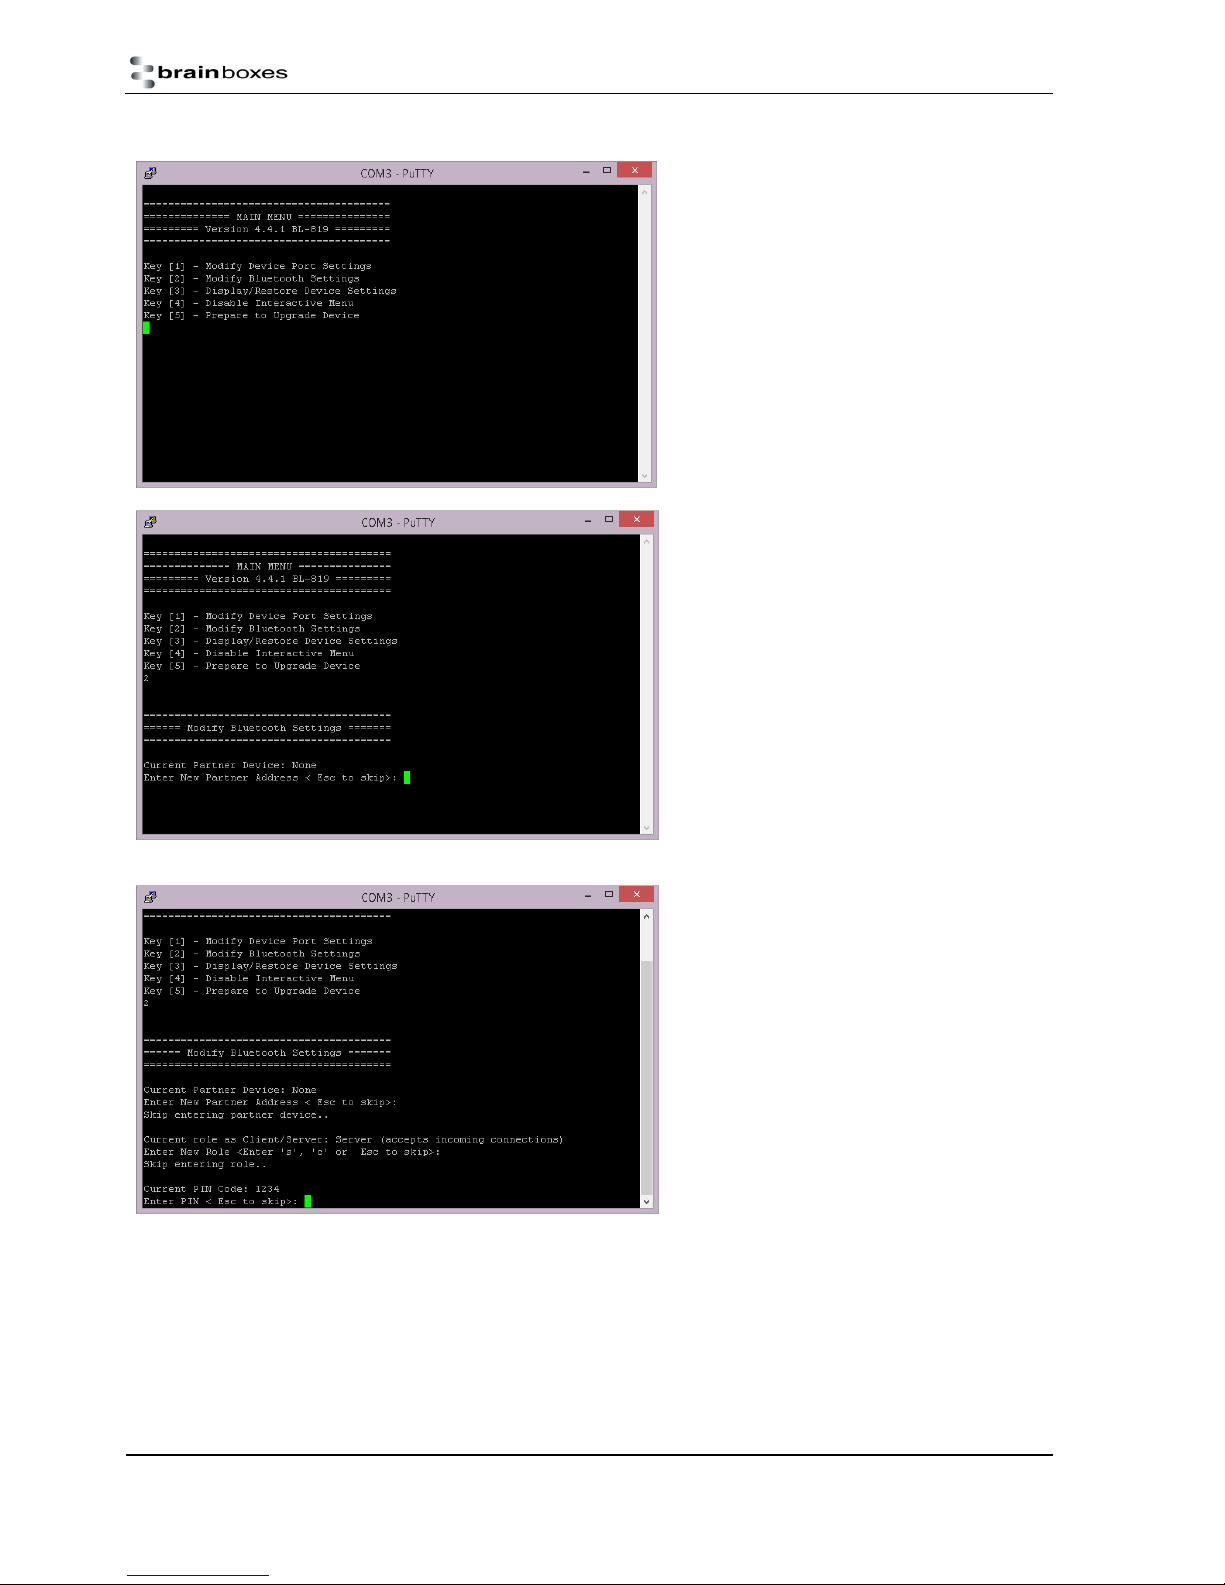
1.17.2. Configuration by Menu
Select option 2 from the “Main Menu” menu to display
the Bluetooth settings menu shown below left.
You should enter here the Bluetooth Address
(BD_ADDR) of the remote (server) device you wish to
pair (in our case this is 000A-4F-00082D) followed by
ENTER.
This should be in the same format as indicated on the
products label (NAP-UAP-LAP, for those of you who
know)
Press “Esc” to skip this section
Manual for BL-819, BL-830, BL-875
V6.1
© Copyright Brainboxes Ltd Page 32 of 40
Page 33
Press C to select the client option. This setting is stored
immediately and is not discarded upon a reboot. In
fact it requires a re-boot in order to activate it.
Press “Esc” to skip this option
Re-boot (power cycle) your adapter. When the Client adapter is switched on, it will connect to the Server device you have
entered in the menu above, assuming of course that the server device is also powered up. Remember of course that the
factory shipped configuration of the adapters is “server” so only 1 device needs any modification in this respect
1.17.3. Configuration by Commands
Access the Adapter you wish to change to “Client” for command mode as documented above and send the following
commands:
padd = 000A-4F-00082D<CR>
svr = 0<CR>
Now power cycle you’re Adapter and it will attempt to connect to the server device.
1.18. Client: adapter is the Bluetooth device which initiates the connection
The instructions in the above section for creating a “cable replacement” connection should be followed to place the adapter
into Client Mode in order to initiate a connection to a remote device substituting the address for that of the other device
which you are trying to connect to.
Some remote devices do not allow connection to a Serial Port Profile, but may allow connection to DUN, LAN or FAX profiles.
If this is the case, only the Windows Configuration UI or command mode can be used to change the behaviour of your
Adapter in this respect. This option is documented above in the Adapter configuration section.
Manual for BL-819, BL-830, BL-875
V6.1
© Copyright Brainboxes Ltd Page 33 of 40
Page 34
1.19. Server: Connecting to adapter from a remote Bluetooth device
Connecting to your adapter will vary depending on your application, but will usually consist of 3 Steps:
1 – Configuring the adapter’s communications parameters.
2 – Physically connecting adapter to your device.
3 – Connecting to adapter from a remote device via Bluetooth and transferring data.
There are many different scenarios whereby a connection can be made to an adapter and consequently its attached device.
The application scenarios will also depend on what sort of device you have attached to the adapter.
1.19.1. Configure and connect the adapter
Configure the communications and Bluetooth parameters of the Adapter as described in the above sections and physically
connect it to your RS-232 device.
1.19.2. Bluetooth Enable your PC
Any PC based Bluetooth device could be used, but for this example we have used a Brainboxes USB adapter and Bluetooth
software for Windows 8.1.
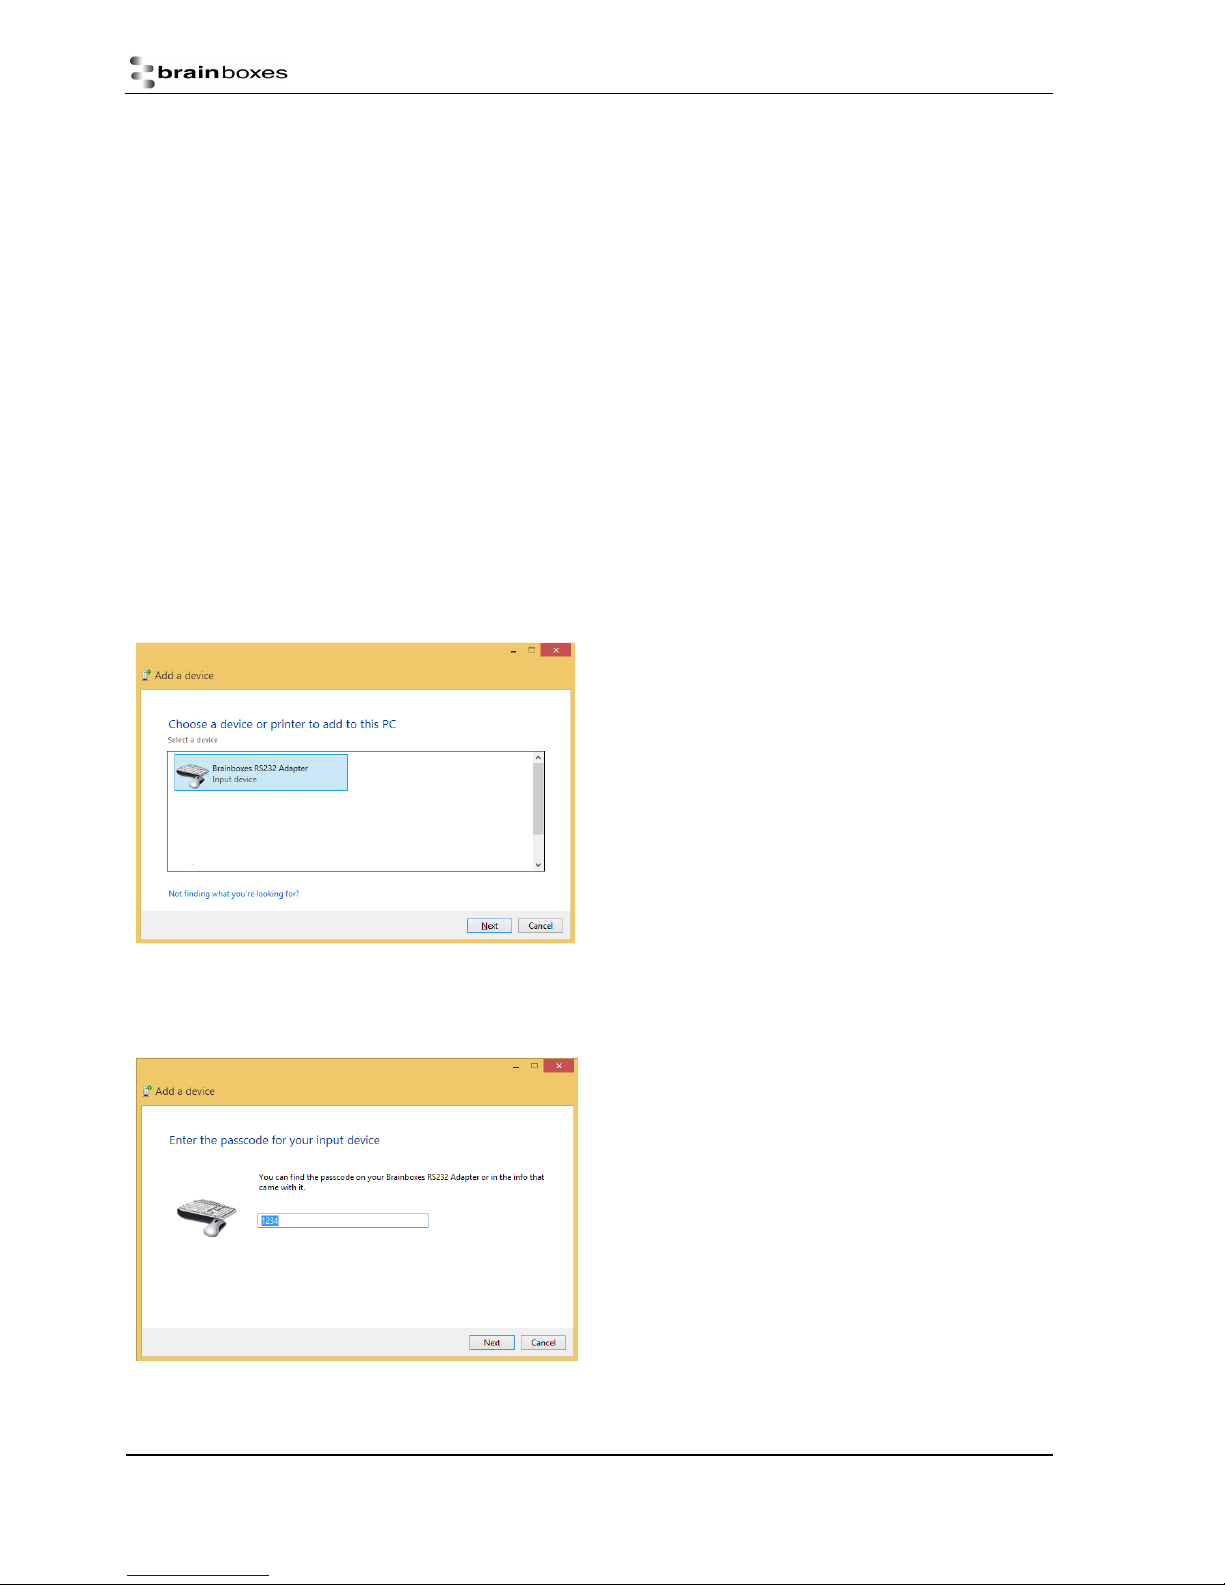
1.19.3. Discover the device
Open Control Panel and go to the Devices and Printers section.
Select ‘Add a device’ and a window will appear which will
automatically search for local Bluetooth devices.
Assuming that your adapter is switched on, in radio range and set
to discoverable you should see it displayed (perhaps alongside
other Bluetooth devices in range) in this window.
Double click on the Brainboxes adapter to begin the pairing
process.
1.19.4. Secure the relationship
Once the adapter has been selected you will be asked to enter
the pin code. The default pin code for the BL-819 and BL-830
adapters is: 1234
When you have entered the pin in the text field, press next.
Manual for BL-819, BL-830, BL-875
V6.1
© Copyright Brainboxes Ltd Page 34 of 40
Page 35
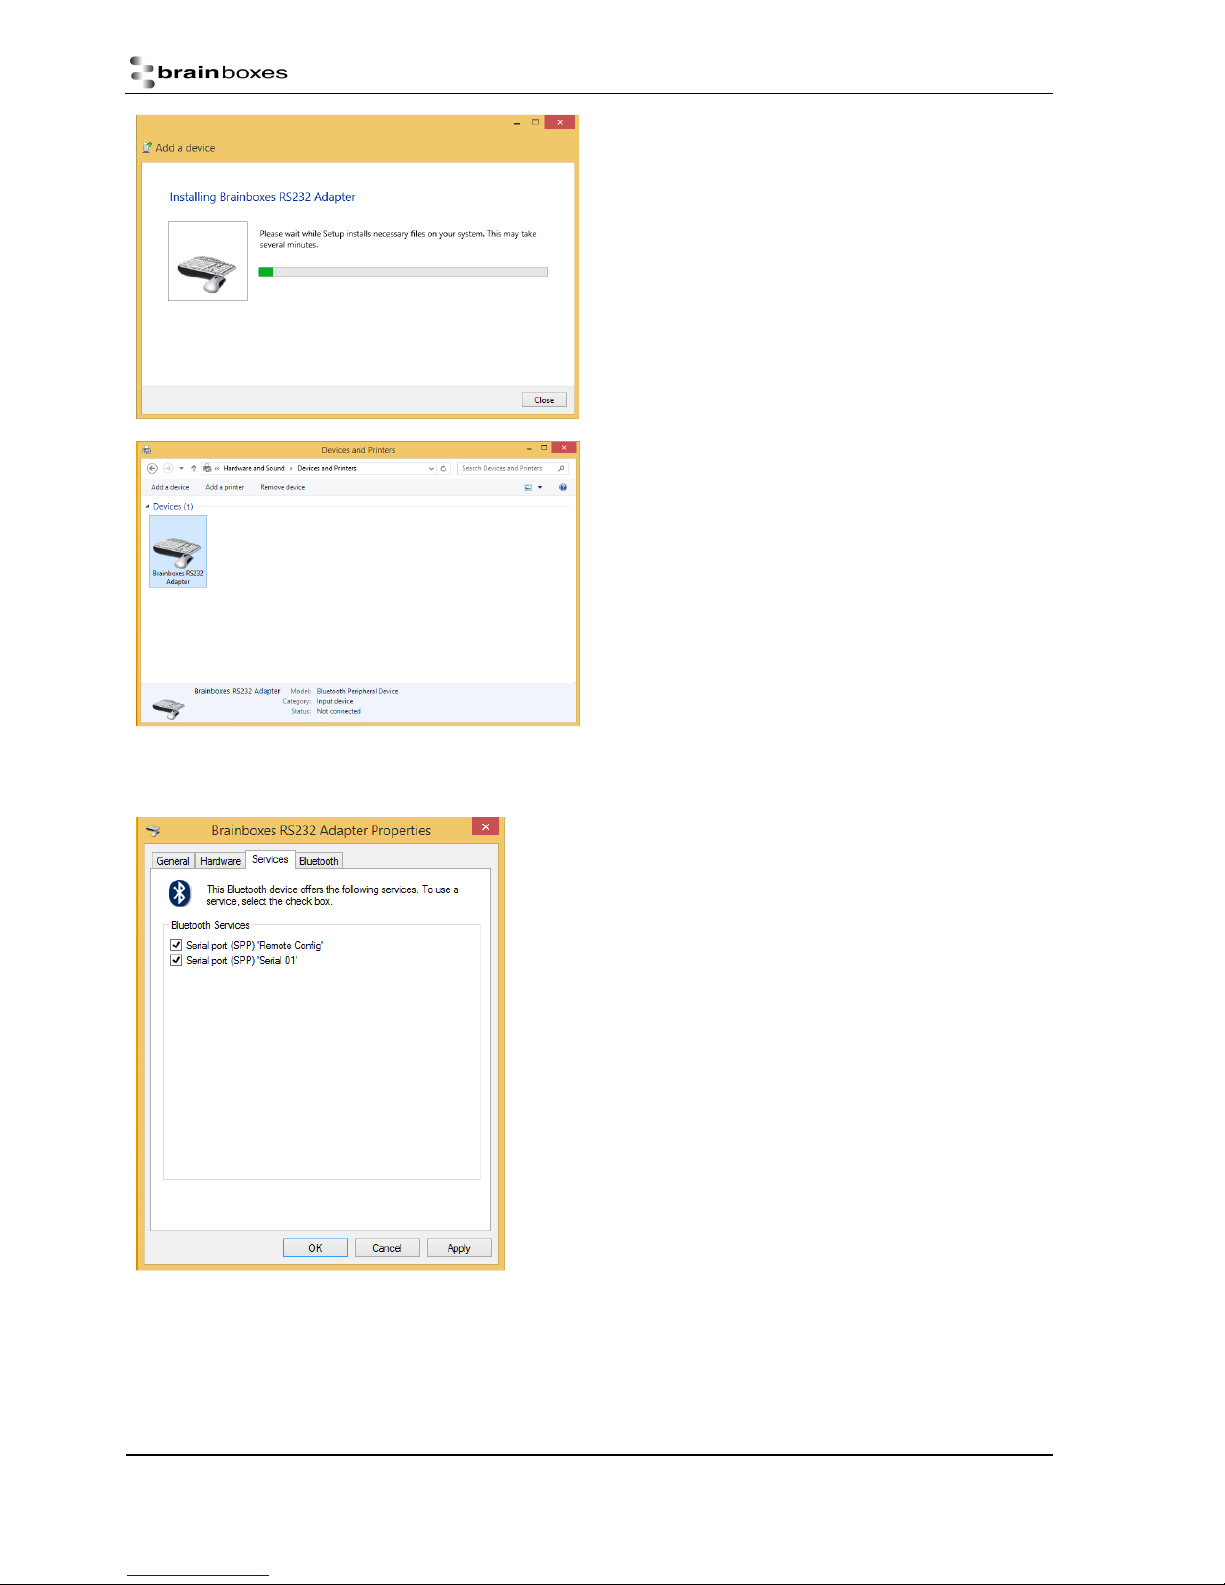
After the pin has been entered the computer and device will then
begin to pair.
1.19.5. Connect to the Serial Port profile
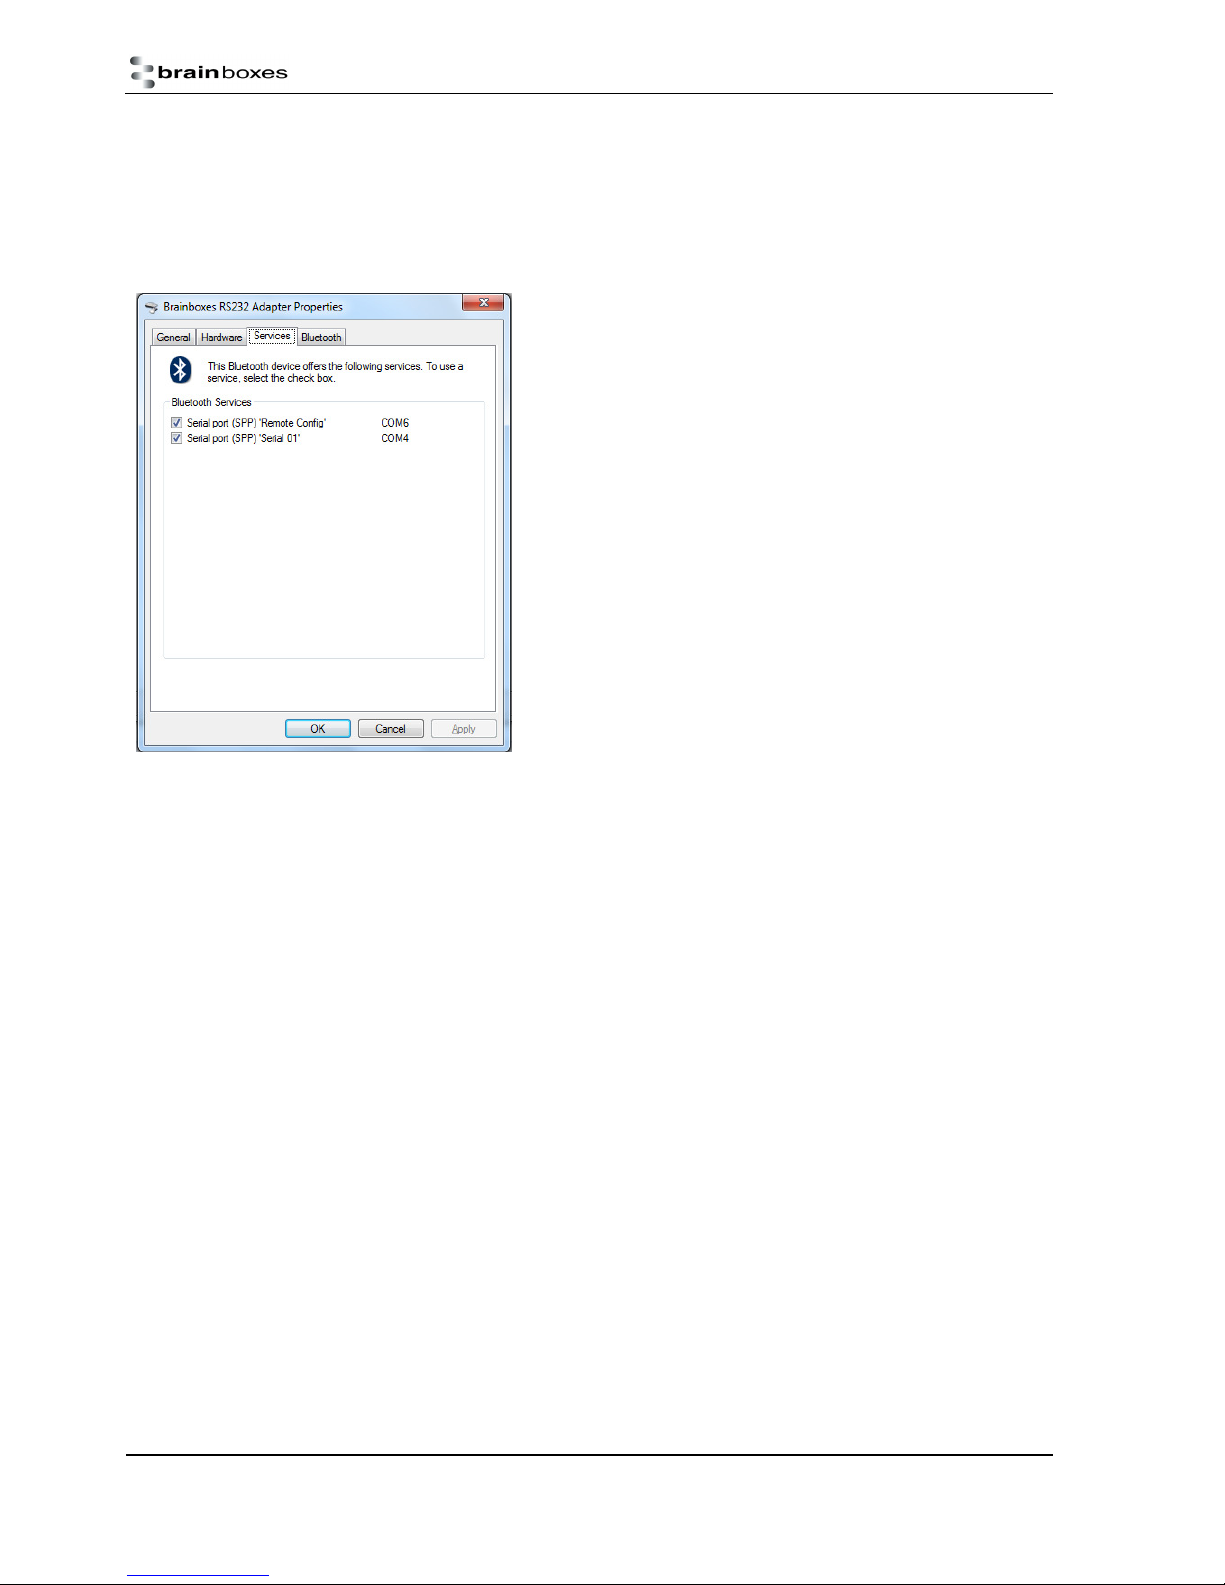
Right-click the adapter, select properties and then go to the
Services tab to view the Serial 01 and Remote Configuration ports
for the BL-819/830.
Once the adapter has been paired, it will be displayed here.
1.19.6. Connect your application to the new COM port
In our initial testing at our labs, we use the PuTTY application included in Windows to open the new COM port. See
documentation above for details of using the PuTTY application
Manual for BL-819, BL-830, BL-875
V6.1
© Copyright Brainboxes Ltd Page 35 of 40
Page 36

11. Custom Factory Configuration
To help ease larger application rollouts by removing the need for customer re-configuration of each individual unit supplied,
all the settings documented in this manual can be pre-configured to your specification at the factory. Please speak to your
account manager/distributor for more details about this service.
Manual for BL-819, BL-830, BL-875
V6.1
© Copyright Brainboxes Ltd Page 36 of 40
Page 37
12. Troubleshooting
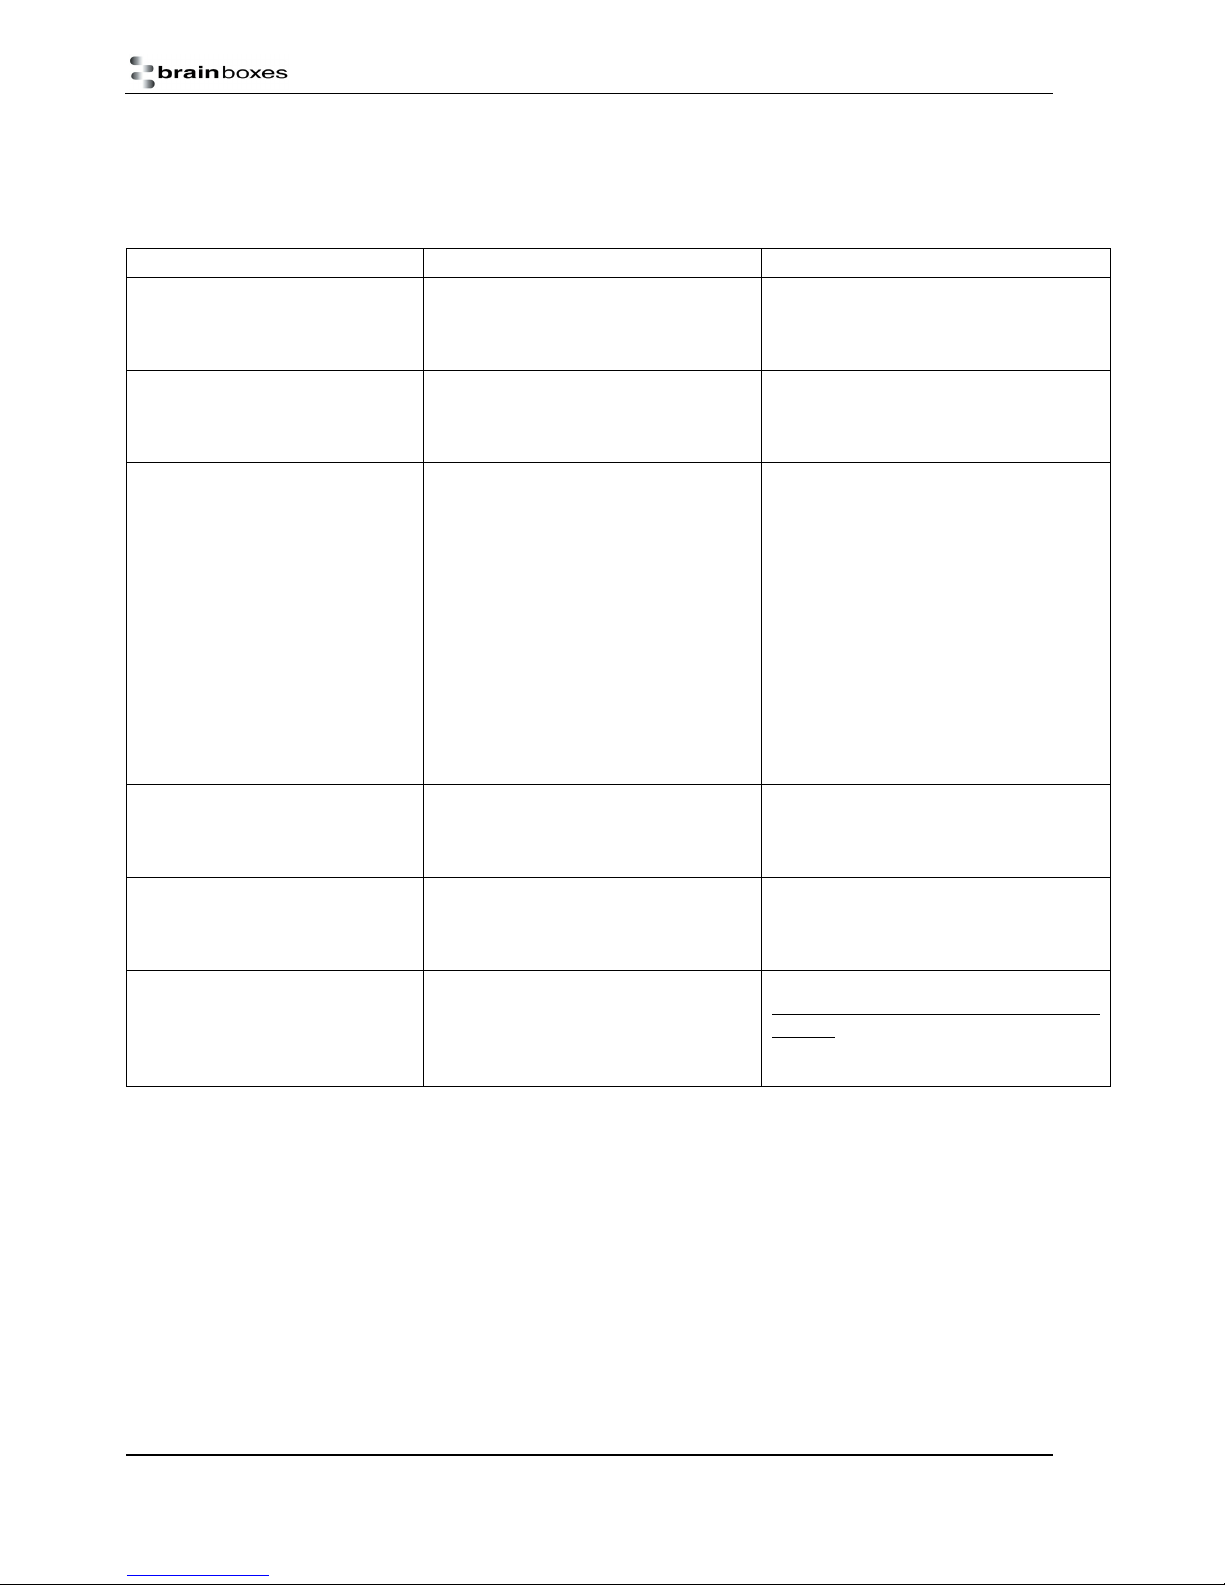
In the rare occasion that you experience difficulties using this product, please read the following suggestions from the table
below before contacting our support team.
Problem Description Solution
Data doesn’t seem to be received
by the product, but seems to be
sent by it (e.g. data only travelling
in one direction)
Interaction with the menu appears
slow and unresponsive, but data
does show eventually.
Cannot interact with the menu There are a number of scenarios where
Firmware upgrade (DFU Wizard)
fails
Can’t connect to iPhone, iPad, iPod Cannot establish a connection to an
I do not know what pins to connect
my hardware to
This is normally the result of the product
being configured as requiring RTS/CTS
handshaking, but being plugged into a
device which does not support it.
This is normal operation when the
product is in Client mode. The product is
using most of its processor cycles to try
and find and connect to a remote device.
this might happen…
1. A Bluetooth connection is made
2. The Product has failed to initialise
correctly (perhaps if the power adapter
has been attached whilst switched on).
3. Incorrect communication parameters
selection.
4. Incorrect Wiring configuration
1. Product not connected
2. Product not configured for upgrade
Apple product
Many users are unsure which pins of the
BL device they are using are used to
connect to their hardware
Switch off the RTS/CTS handshaking by
putting the device into upgrade mode and
using the Upgrade Wizard
Reconfigure the product to Server mode
whilst attempting to configure other
options
1. No interaction with the menu is possible
when a Bluetooth connection is present.
Break the connection to restore access to
the menu.
2. Switch the power off then on again.
3. Change the communication settings in
your terminal application to match those
of the devices settings. If you have
forgotten or lost these settings, then the
device can be restored to its factory
settings by performing a long reset.
4. Check your devices wiring and
handshake configuration requirements
1. Connect your Adapter to a suitable port
on your PC and connect the power.
2. Follow instructions in above sections for
preparing for upgrade
Brainboxes Bluetooth products do not
work with Apple products as Apple’s
products do not support the Serial Port
Profile (SPP) needed for communication
A picture of the BL pinouts is located here:
http://www.brainboxes.com/product/item
s/bl-819 and in section 8 of this manual.
The pins are the same for the BL819/830/875.
Manual for BL-819, BL-830, BL-875
V6.1
© Copyright Brainboxes Ltd Page 37 of 40
Page 38

13. Technical Specifications
Qualified Output Power: > 0 dBm < +4.0 dBm @ 25 oC Receive sensitivity Single Slot = -83 dBm with 0.1% BER
13.1. Storage and Operating Environment
13.1.1. Storage
Temperature: -10oC to +60oC
Humidity: 8% to 95% non-condensing
13.1.2. Operational
Temperature : 0oC to +40oC
Humidity : 20% to 75% non-condensing
13.2. Power requirements
13.2.1. Input Voltage Requirements
The product was qualified using a fully rectified AC/DC power supply supplying 550mA @ 5V. To ensure your product
performs within the regulatory requirements, it is recommended that you use the AC/DC adapter supplied... For your
information only, the voltage range is given below. Minimum 5.0 V – Maximum 13.6 VDC NOTE: Power supplied through Pin 9
of the RS 232 connector does go through the regulator and has the same input requirements as the DC jack, +5.0 to 13.6 VDC.
13.3. Chipset
The chipset used in the BL-819/830 is the Bluecore BC02 BC212015B.
BlueCore2-External is a single chip radio and baseband IC for Bluetooth 2.4GHz systems. It is implemented in 0.18μm CMOS
technology. When used with external flash containing the CSR Bluetooth software stack, it provides a fully compliant
Bluetooth system for data and voice communications.
The Bluecore BC02 BC212015B chip has these features:
• Low power 1.8V operation
• Small footprint in 96-ball VFBGA and LGA packages (6x6mm 8x8mm and 10x10mm)
• Fully qualified Bluetooth component
• 0.18μm CMOS technology
• Full speed Bluetooth operation with full piconet support
• Support for 8Mbit external flash
• Minimum external components
Manual for BL-819, BL-830, BL-875
V6.1
© Copyright Brainboxes Ltd Page 38 of 40
Page 39

14. Regulatory Approvals / Compliance
For up to date details of global certifications, please check the product datasheet on the Brainboxes website:
www.brainboxes.com
14.1. Company Accreditation
Brainboxes is accredited to internationally recognised standards for our Quality and Environmental Management
Systems. Our ISO9001 Quality System was first accredited in 1994, followed by our ISO14001 Environmental
System in 2008. These standards help ensure we can demonstrate effective management of all our quality systems
and our environmental impacts, together with a process of continuous improvement.
All our Quality systems are subject to internal and external assessment on a regular basis. Copies of Certificates
are available for download from our website: www.brainboxes.com
Linked with our Lean and Six Sigma techniques, we believe we have the most reliable products on the market, and
to back this up we are offering a Lifetime Warranty* on all our Serial Products.
14.2. Europe – EU Declaration of Conformity
Brainboxes products are designed to conform to the protection requirements of European Council Directive
2004/108/EC and its subsequent revisions.
A Declaration of Conformity and supporting Technical Construction File is available by request from Brainboxes,
and will identify any updated legislation that may have been introduced since the publication of this Manual.
Warning: This is a Class A Product. In a domestic environment this product may cause interference in which case
the user may be required to take adequate measures to address this.
14.3. WEEE Directive (Waste Electrical and Electronic Equipment)
The Waste Electric and Electronic Equipment (WEEE) Regulations 2013 became law in the UK on the 1st of
January 2014 and replaced the 2006 Regulations. Brainboxes is fully compliant with this legislation.
Customer Responsibilities
You are encouraged to dispose of WEEE in an environment friendly way.
This can be done through your local civic amenities site, an approved treatment facility or alternatively through a
relevant compliance scheme.
Brainboxes’ Responsibilities
Brainboxes has a legal responsibility, as producer, to provide a free of charge collection service to our customers
for our obligated WEEE.
Brainboxes is defined as a producer under the WEEE regulations because we sell own brand Electrical & Electronic
Equipment (EEE) in the UK. Our WEEE Producer Registration Number is WEE/AH0004XR.
For details of our WEEE recovery service options, please see our Website, or email us at:
Manual for BL-819, BL-830, BL-875
V6.1
© Copyright Brainboxes Ltd Page 39 of 40
Page 40

14.4. RoHS Compliance
All Brainboxes Serial and Bluetooth products are fully RoHS compliant.
Brainboxes identified at an early stage the importance of rapid compliance to RoHS guidelines and established a
project team to actively manage the transition. The initial step in the process was to use our close relationships with
suppliers to ensure early access to RoHS compliant components for all of our Bluetooth and Serial Products. In
addition, the project team worked to ensure that our manufacturing processes meet all RoHS requirements well in
advance of the deadline.
To verify supplier declarations on RoHS compliancy, we have also sent fully built products to an external test house
for X-Ray system XDAL. This technique is capable of determining percentages of different elements and is
accurate to 0.1% Wt.
RoHS Compliant Brainboxes products have been available since January 2005.
What is the RoHS Directive?
The Restriction of the Use of Certain Hazardous Substances (RoHS) in Electrical and Electronic Equipment (EEE)
Directive (2011/65/EU) was transposed into UK law on 2 January 2013.
This legislation bans the placing on the EU market of new EEE containing more than the agreed levels of:
• lead (Pb)
• cadmium (Cd)
• mercury (Hg)
• hexavalent chromium (Cr6+)
• polybrominated biphenyls (PBB)
• polybrominated diphenyl ethers (PBDE)
Any future revisions to this legislation will be complied with, and identified in a Declaration of Conformity, available
on request.
Copyright
Copyright © Brainboxes Ltd
All rights reserved. No part of this hardware, software, circuitry or manual may be duplicated, copied, transmitted or
reproduced in any way without the prior consent of the Manufacturer.
Manual for BL-819, BL-830, BL-875
V6.1
© Copyright Brainboxes Ltd Page 40 of 40
 Loading...