

Page 1

S19-270C eyewash
douche oculaire
lavador de ojos
Installation
S19-270C, S19-270E,
S19274C, S19274E
Swing-Activated Eyewash and Eye/Face
Wash
Douche oculaire et oculaire/faciale
activée par bras mobile
Lavador de ojos y de ojos/rostro
activado por brazo oscilante
S19-270E eye/face wash
douche oculaire/faciale
lavador de ojos/rostro
S19274C Halo™ eyewash
douche oculaire
lavador de ojos
S19274E Halo™ eye/face wash
douche oculaire/faciale
lavador de ojos/rostro
215-1326 Rev. V; ECN 15-05-042
© 2017 Bradley
Page 1 of 35 10/5/2017
Menomonee Falls, WI 53052 USA
P.O. Box 309
800 BRADLEY (800 272 3539)
+1 262 251 6000
bradleycorp.com
Page 2

S19-270C, S19-270E, S19274C, S19274E Installation
Table of Contents
Pre-Installation Information .................................................................. 3
S19-270C, S19274C Dimensions .............................................................4
S19-270E, S19274E Dimensions .............................................................5
Installation .............................................................................6–7
Installation Left-Hand Units ................................................................8–9
S19-270C Assembly of Components and Parts List .............................................. 10
S19274C Assembly of Components and Parts List .............................................. 11
S19-270E Assembly of Components and Parts List .............................................. 12
S19274E Assembly of Components and Parts List............................................... 13
Table des matières
Avant l’installation ........................................................................ 14
S19-270C, S19274C Dimensions ............................................................15
S19-270E, S19274E Dimensions ............................................................16
Installation ........................................................................... 17–18
Installation Gaucher.................................................................... 19–20
S19-270C Assemblage des composantes et liste des pièces....................................... 21
S19274C Assemblage des composantes et liste des pièces ....................................... 22
S19-270E Assemblage des composantes et liste des pièces....................................... 23
S19274E Assemblage des composantes et liste des pièces ....................................... 24
Contenido
Información previa a la instalación ........................................................... 25
S19-270C, S19274C Dimensiones ...........................................................26
S19-270E, S19274E Dimensiones ...........................................................27
Instalación ........................................................................... 28–29
Instalación de Mano Izquierda............................................................ 30–31
S19-270C Armado de los componentes y lista de piezas ......................................... 32
S19274C Armado de los componentes y lista de piezas .......................................... 33
S19-270E Armado de los componentes y lista de piezas.......................................... 34
S19274E Armado de los componentes y lista de piezas .......................................... 35
2
10/5/2017 Bradley • 215-1326 Rev. V; ECN 15-05-042
Page 3

Installation S19-270C, S19-270E, S19274C, S19274E
WARNING
The installation and location of all Safety drench showers, eye and eye/face washes must comply
with the requirements of ANSI Z358.1.
Emergency equipment must be supplied with tepid water (60-100°F/ 15.6-37.8°C). Any prolonged
exposure to near freezing water affects the body’s ability to maintain body temperature, increasing
the risk of hypothermia.
Flush the water supply lines before beginning installation and after installation is complete. Test
the unit for leaks and adequate water flow. Main water supply to the eyewash should be “ON” at all
times. Provisions shall be made to prevent unauthorized shutoff.
The ANSI Z358.1 standard requires an uninterrupted supply of flushing fluid. Bradley plumbed
emergency fixtures require a minimum of 30 PSI (0.21 MPa) flowing pressure. Flushing fluid should
be tepid per ANSI Z358.1.
Weekly activation must be conducted on all plumbed emergency equipment to ensure a suitable
flushing fluid supply is present and any sediment build-up in the supply line is cleared. Emergency
Equipment should be inspected monthly to address any maintenance issues ensuring the
equipment is in good operating condition and that there are no signs of wear.
Workers who may come in contact with potentially hazardous materials should be trained regarding
the placement and proper operation of emergency equipment per ANSI Z358.1.
NOTICE
Before installing this product ensure that there are adequate clearances around the product and
activation of the product does not interfere with other products or obstructions
For classic eye/face wash units, avoid cleaners containing organic solvents, alcohols, and
hydrocarbons. Rinse with water after cleaning.
IMPORTANT
Read this installation manual completely to ensure proper installation, then file it with the owner
or maintenance department. Compliance and conformity to drain requirements and other local
codes/ordinances is the responsibility of the installer.
Separate parts from packaging and make sure all parts are accounted for before discarding
any packaging material. If any parts are missing, do not begin installation until you obtain the
missing parts.
For questions regarding the operation or installation of this product, visit bradleycorp.com or
call 800.BRADLEY (800.272.3539).
Product warranties may also be found under ”Products” on our web site at bradleycorp.com.
Supplies Required:
• Piping to ½" NPT water supply inlet on unit
• Pipe sealant
• Inlet strainer (recommended)
• Sign-mounting hardware
Bradley • 215-1326 Rev. V; ECN 15-05-042 10/5/2017
Local codes may require the installation of a backflow prevention
valve to complete proper installation. Compliance with local codes
is the responsibility of the installer. Valve must be tested annually
to verify that it is functioning properly. Backflow prevention valves
are not included with the fixture and may be supplied by the
contractor or purchased from Bradley Corporation.
3
Page 4
S19-270C, S19-270E, S19274C, S19274E Installation
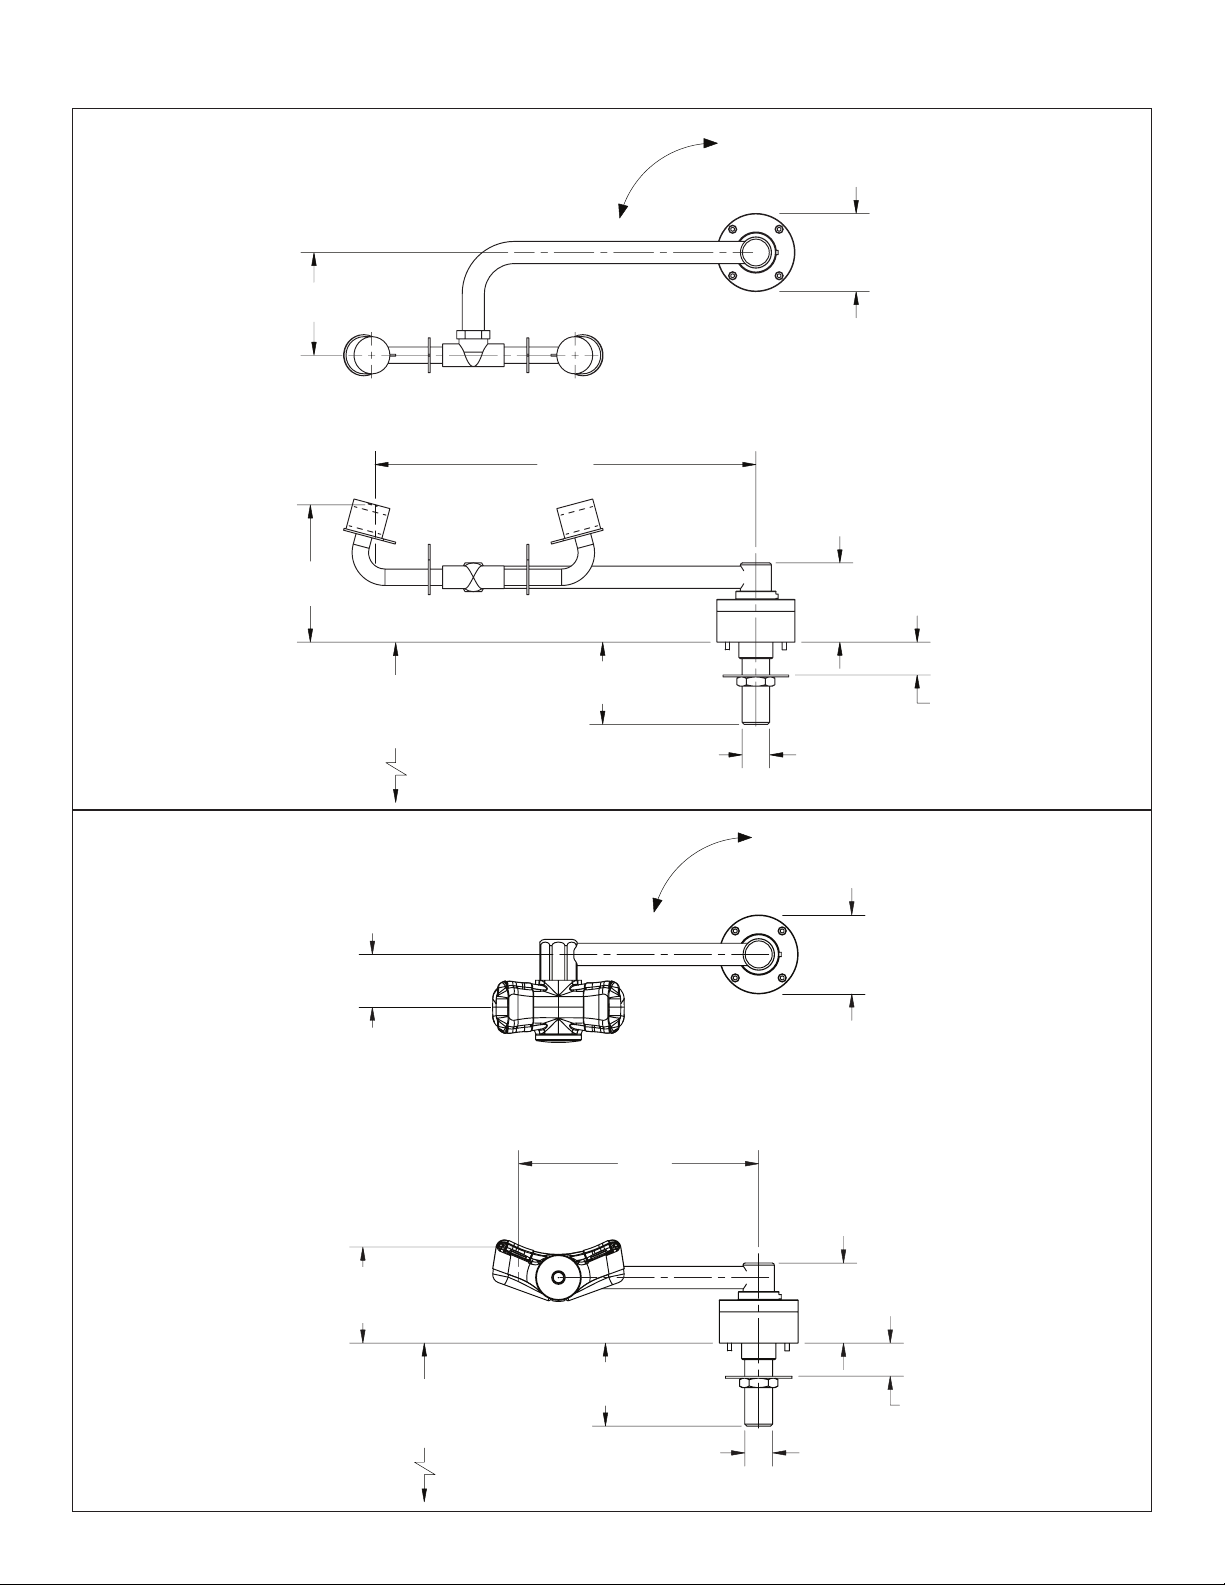
Dimensions — S19-270C
3¹⁄₈"
(79mm)
4¹⁄₈"
(105mm)
28-7/8" to 40-7/8"
(733 mm to 1038 mm)
to finished floor
11⁵⁄₈"
(295mm)
On
2½"
(64mm)
Off
Ø 2³⁄₈"
(60mm)
2³⁄₈"
(60mm)
1³⁄₈"
(35mm)
Max.
Ø ⁷⁄₈"
Dimensions — S19274C
1⁵⁄₈"
(41mm)
2⁷⁄₈"
(73mm)
30-1/8" to 42-1/8"
(765 mm to 1070 mm)
to finished floor
(181mm)
2½"
(64mm)
7¼"
On
Off
Ø 2³⁄₈"
(60mm)
2³⁄₈"
(60mm)
Ø ⁷⁄₈"
Ø 1¹⁄₈"
1³⁄₈"
(35mm)
Max.
4
10/5/2017 Bradley • 215-1326 Rev. V; ECN 15-05-042
Page 5
Installation S19-270C, S19-270E, S19274C, S19274E
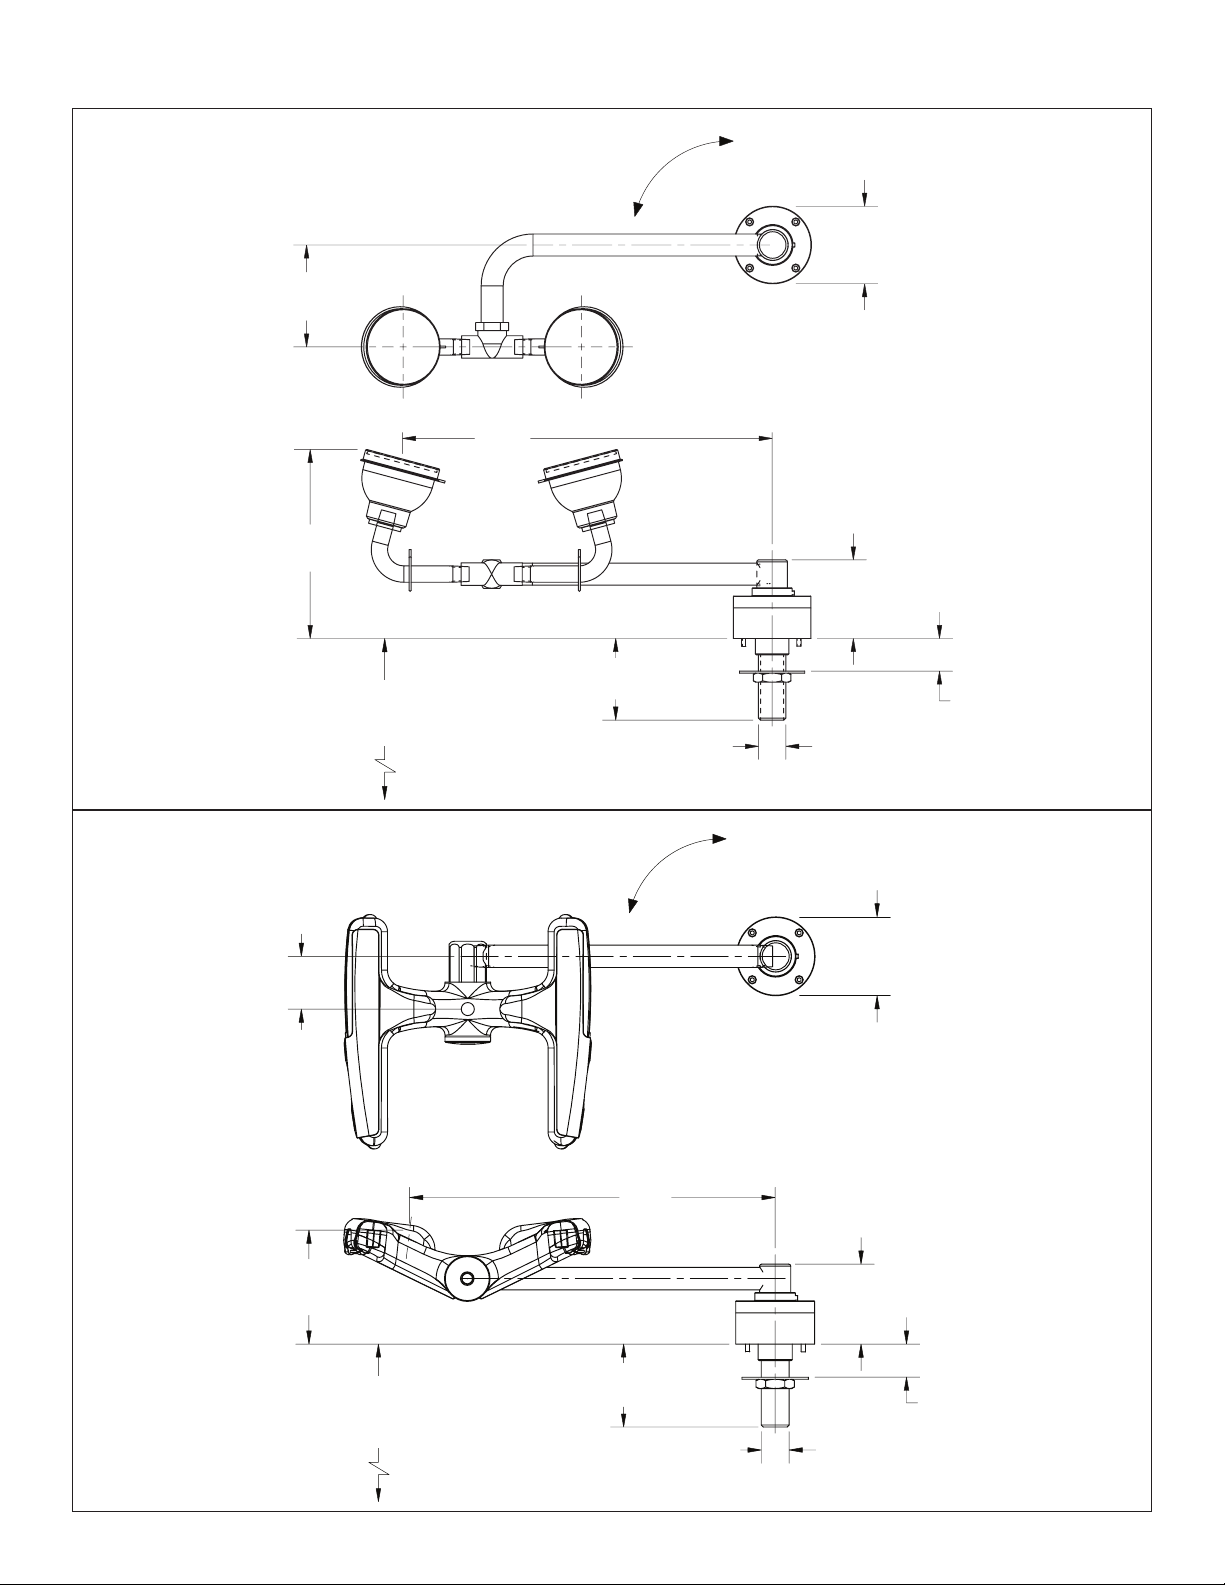
Dimensions — S19-270E
3¹⁄₈"
(79mm)
5¾"
(146mm)
27-1/4" to 39-1/4"
(692 mm to 997 mm)
to finished floor
11³⁄₈"
(289mm)
On
2½"
(64mm)
Off
(60mm)
Ø ⁷⁄₈"
Ø 2³⁄₈"
(60mm)
2³⁄₈"
1³⁄₈"
(35mm)
Max.
Dimensions — S19274E
1⁵⁄₈"
(41mm)
3³⁄₈"
(86mm)
29-5/8" to 41-5/8"
(752 mm to 1057 mm)
to finished floor
On
11"
(279mm)
2½"
(64mm)
Off
(60mm)
Ø ⁷⁄₈"
Ø 2³⁄₈"
(60mm)
2³⁄₈"
1³⁄₈"
(35mm)
Max.
Bradley • 215-1326 Rev. V; ECN 15-05-042 10/5/2017
5
Page 6
S19-270C, S19-270E, S19274C, S19274E Installation
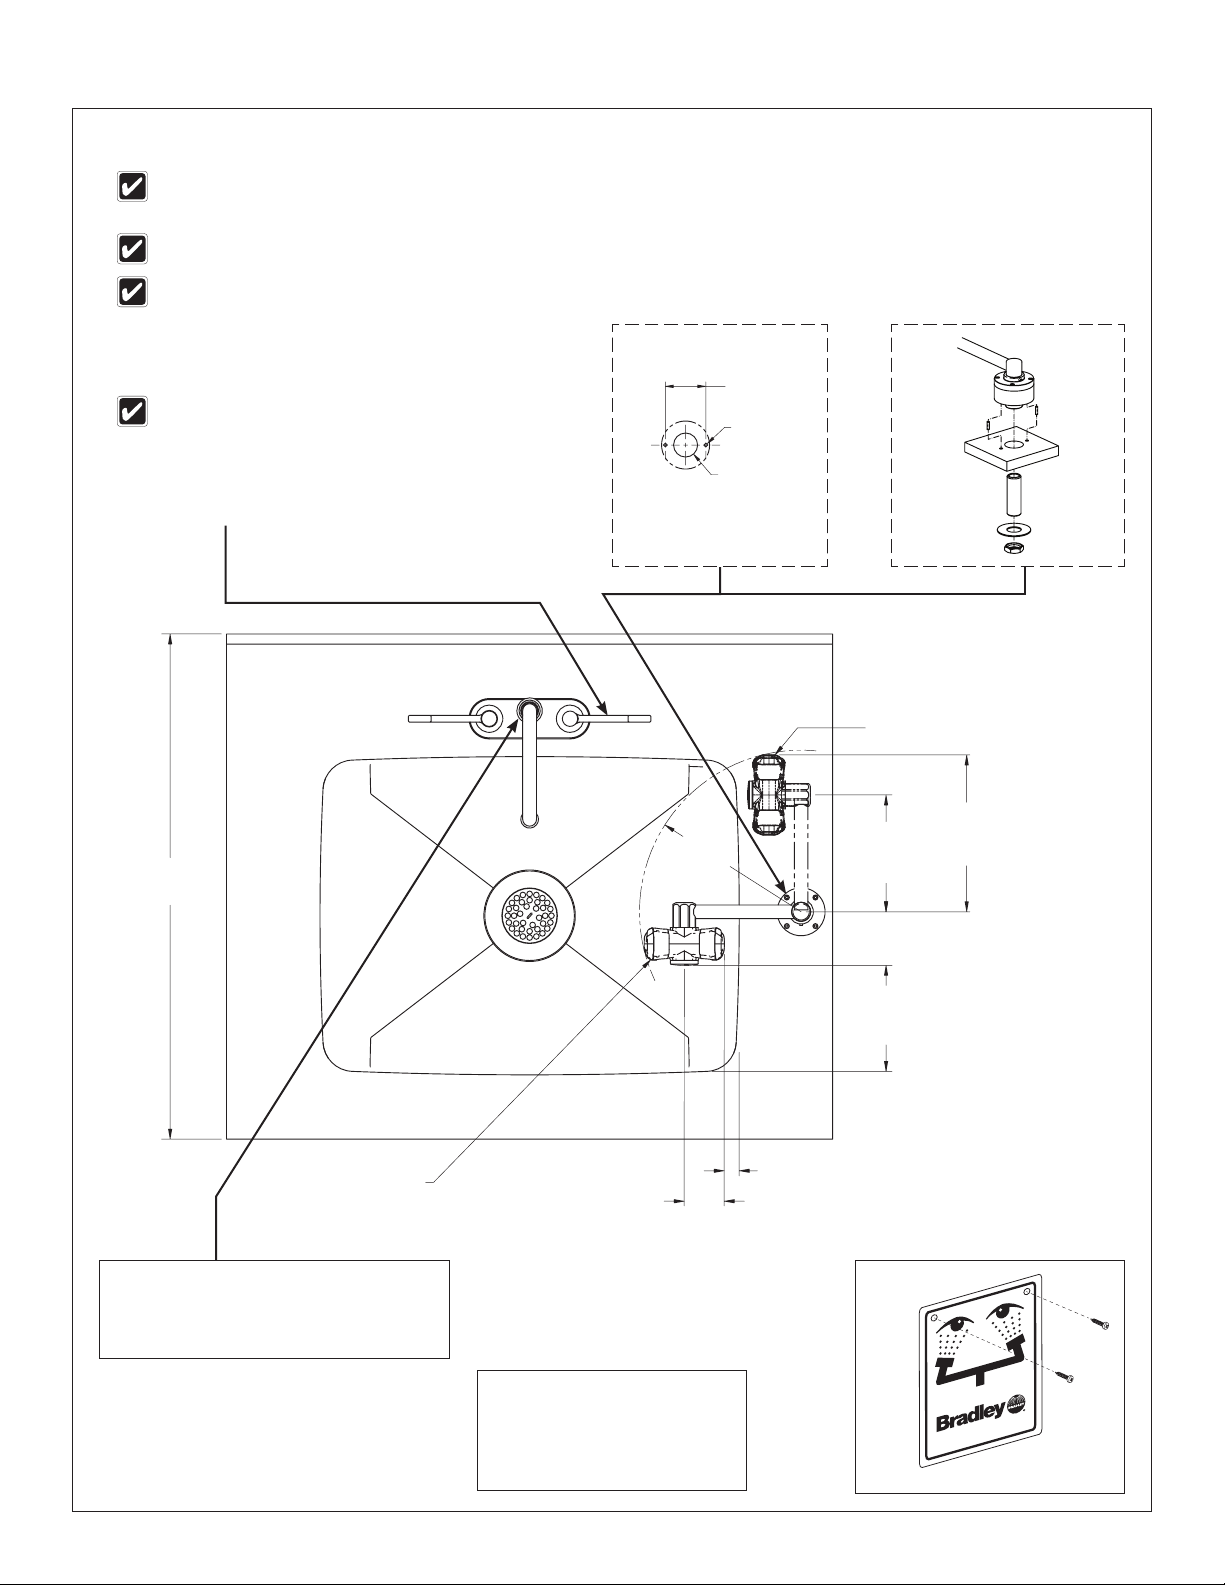
Installation — Eyewash
Halo eyewash right-hand unit is shown on a sample 25" deck. Other units are similar. For classic eyewash installation,
refer to the dimensions on page 4 to determine optimal mounting position. Refer to page 8 for left-hand units.
Minimum dimensions necessary to contain splashing from Halo units are shown.
Apply pipe sealant (supplied by installer) to all male-threaded pipe joints. The top of the eyewash heads should be
positioned a minimum of 33" and a maximum of 45" from the floor and 6" from the nearest obstruction.
Proper faucet shank/handle
clearance and recommended
minimum splash containment
dimensions must be considered
when selecting the desired
location for mounting.
25"
(635mm)
A
2"
(51mm)
Ø ³⁄₁₆"
Ø 1¹⁄₈"
Deck Mounting Pattern
(drill (3) holes as shown)
8"
(203mm)
Radius
B
"OFF" Position
5¾"
(146mm)
Ref.
2⁵⁄₈" (67mm)
Ref.
Deck
7¾"
(197mm)
Ref.
5¼"
(133mm)
Min.
"ON" Position
Connect the water supply using
piping (supplied by installer) with
C
½" NPT female threaded end.
(51mm)
Slowly open the water
supply lines to relieve air
and pressurize the valve.
E
Test the unit for leaks
2"
Ref.
¾" (19mm)
Min.
D
To
Wall
114-051
P.O. BOX 309, MENOMONEE FALLS, WI 53052-0309 USA
TEL: 1-800-BRADLEY FAX: (262-251-5817)
http://www.bradleycorp.com
and adequate flow.
6
10/5/2017 Bradley • 215-1326 Rev. V; ECN 15-05-042
Page 7
Installation S19-270C, S19-270E, S19274C, S19274E
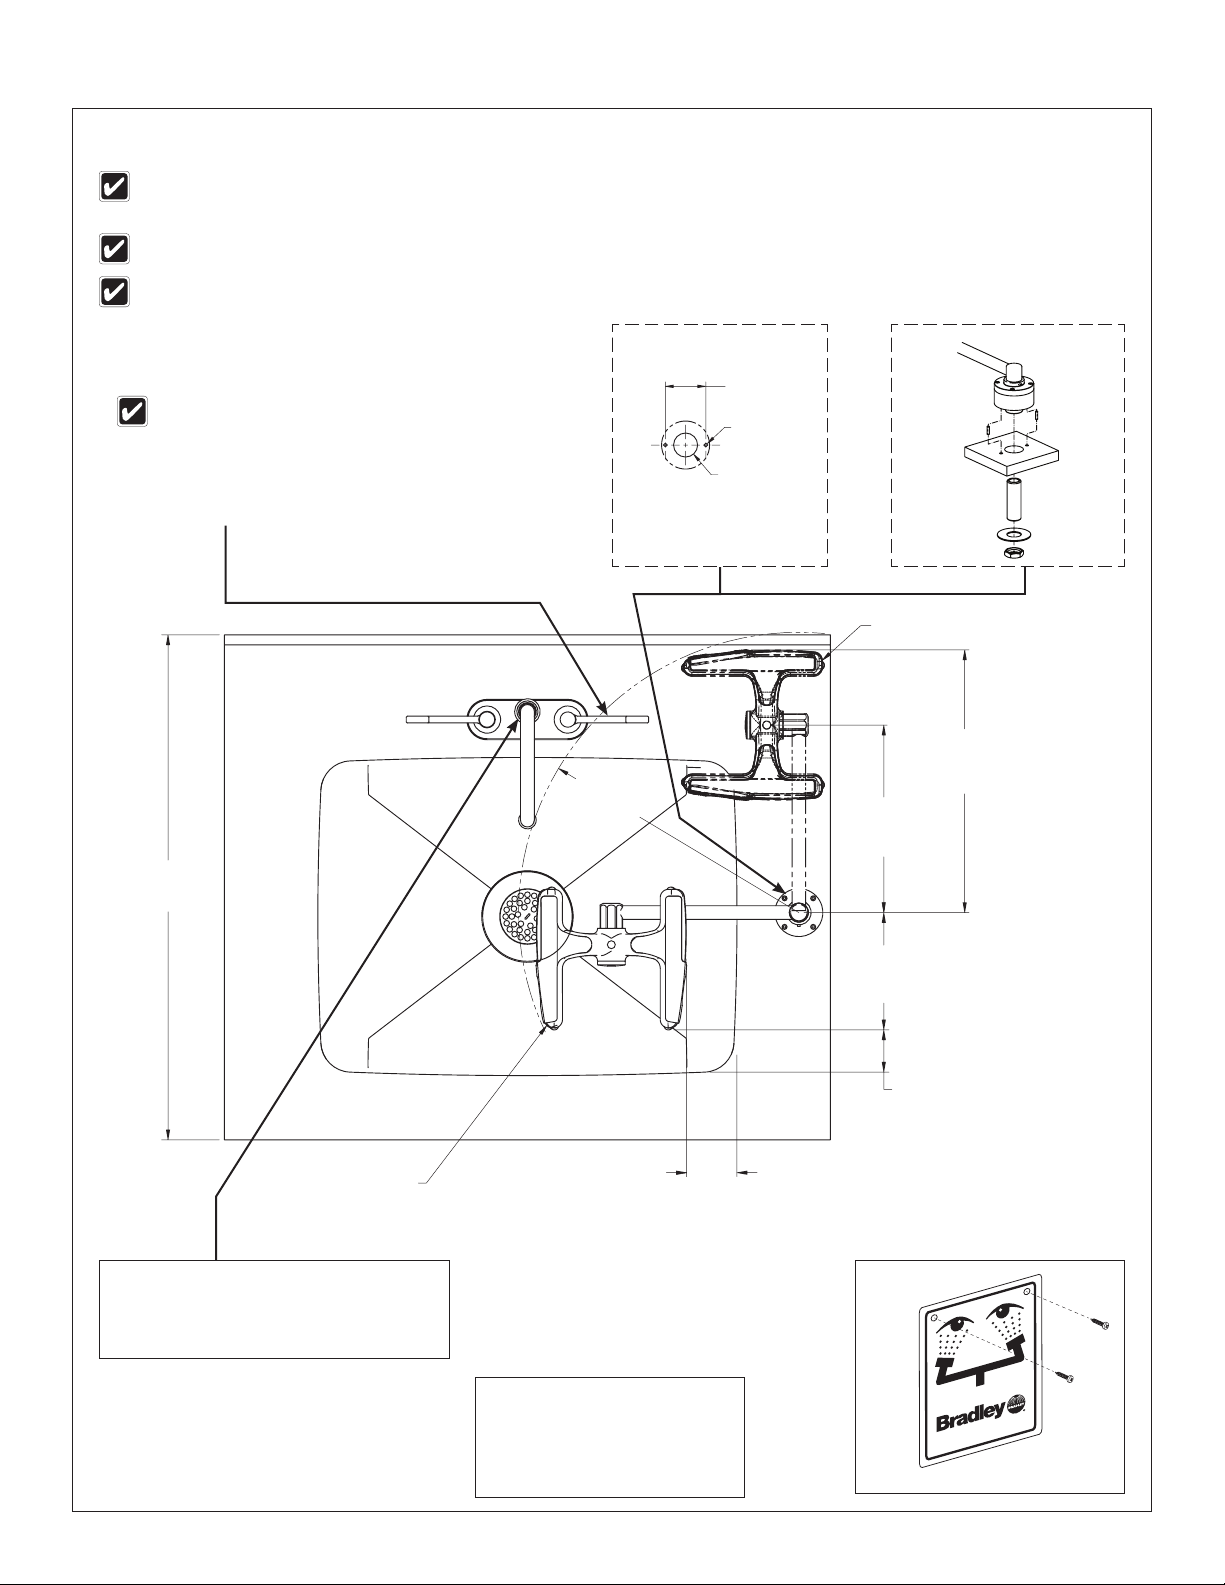
Installation — Eye/Face Wash
Halo eye/face wash right-hand unit is shown on a sample 25" deck. Other units are similar. For classic eye/face wash
installation, refer to the dimensions on page 5 to determine optimal mounting position. Refer to page 8 for left-hand units.
Minimum dimensions necessary to contain splashing from Halo units are shown.
Apply pipe sealant (supplied by installer) to all male-threaded pipe joints. The top of the eyewash heads should be positioned
a minimum of 33" (838mm) and a maximum of 45" (1143mm) from the floor and 6" (152mm) from the nearest obstruction.
Proper faucet shank/handle
clearance and recommended
minimum splash containment
dimensions must be considered
when selecting the desired
location for mounting.
25"
(635mm)
13⁷⁄₈"
(352mm)
Radius
A
2"
(51mm)
Ø ³⁄₁₆"
Ø 1¹⁄₈"
Deck Mounting Pattern
Drill (3) holes as shown.
B
Deck
"OFF" Position
13"
(330mm)
Ref.
9¼"
(235mm)
Ref.
"ON" Position
2½"
(64mm)
Min.
Connect the water supply using
piping (supplied by installer) with
C
½" NPT female threaded end.
Slowly open the water
supply lines to relieve air
and pressurize the valve.
E
Test the unit for leaks
and adequate flow.
Bradley • 215-1326 Rev. V; ECN 15-05-042 10/5/2017
5¾"
(146mm)
Ref.
2¹⁄₈"
(54mm)
Min.
D
To
Wall
114-051
P.O. BOX 309, MENOMONEE FALLS, WI 53052-0309 USA
TEL: 1-800-BRADLEY FAX: (262-251-5817)
http://www.bradleycorp.com
7
Page 8
S19-270C, S19-270E, S19274C, S19274E Installation
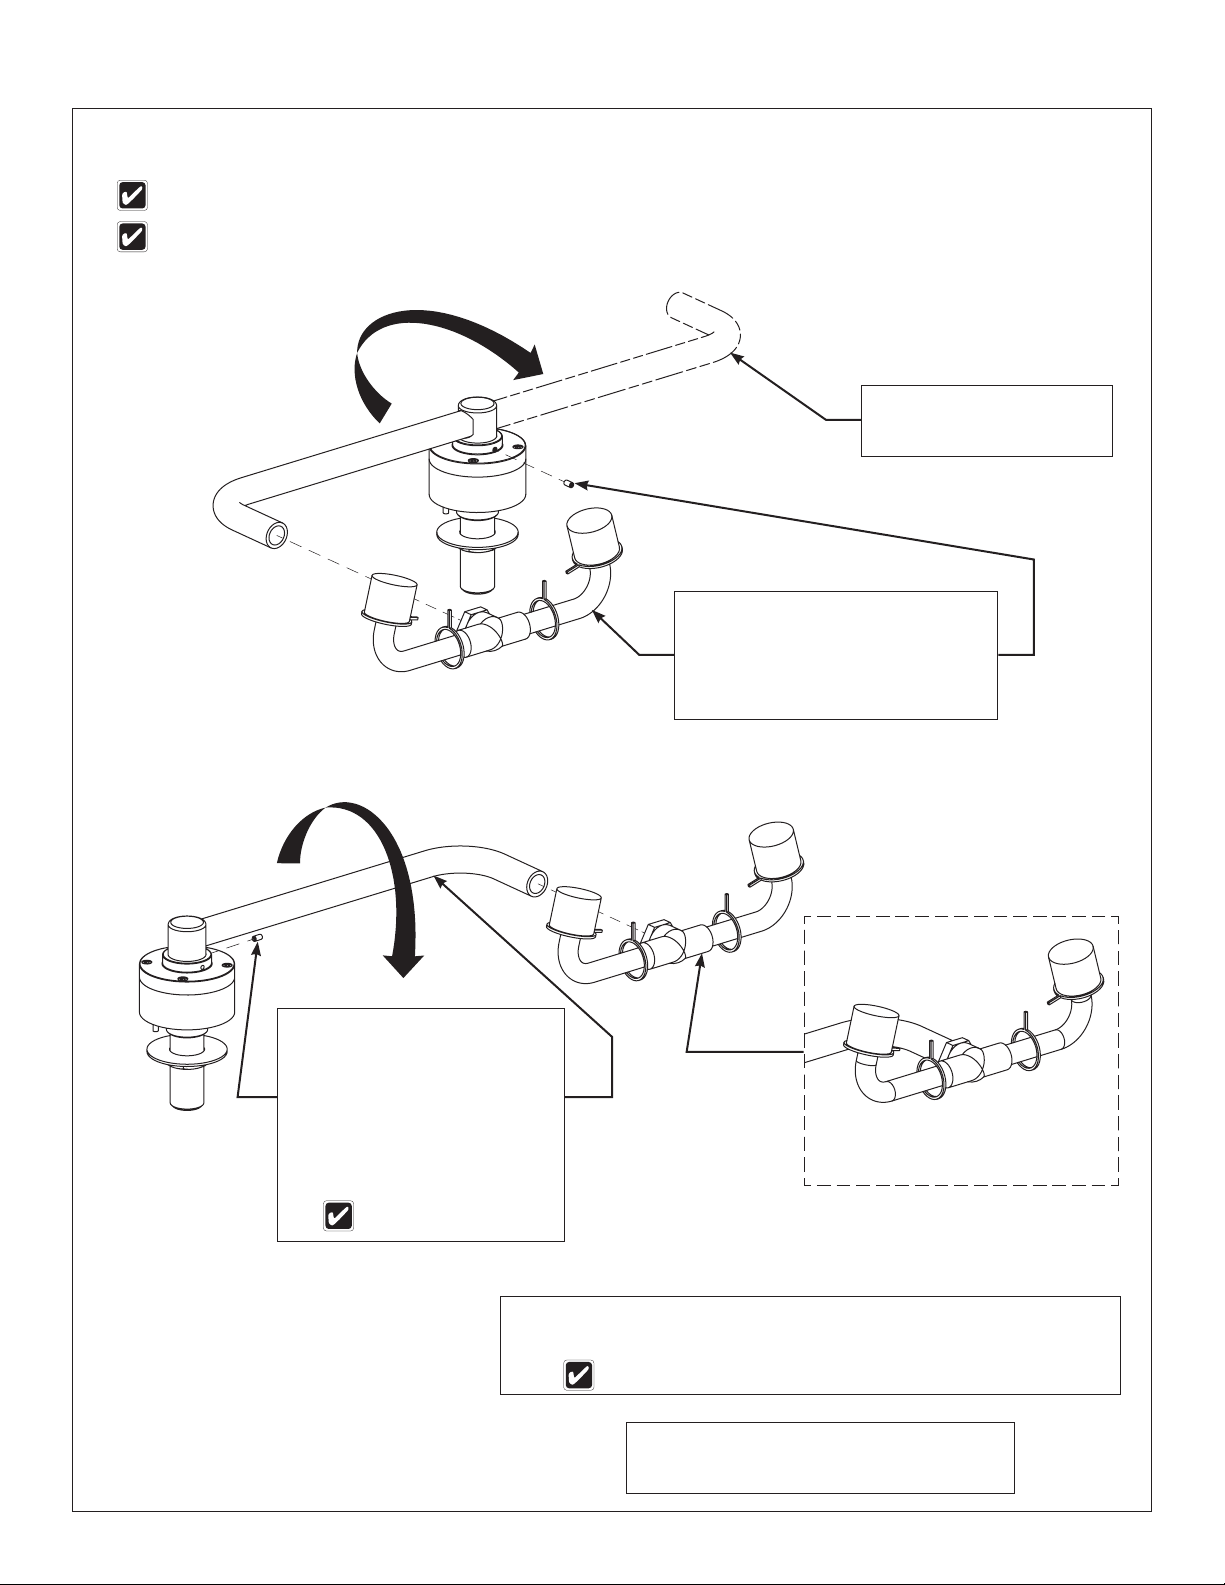
Installation — Left-Hand Units (Classic)
Classic eyewash unit is shown. Classic eye/face wash unit is similar.
Apply pipe sealant (supplied by installer) to all male-threaded pipe joints.
Rotate the bent arm
B
180° around the valve.
Remove the sprayhead from the
bent arm. Remove the set screw
from the valve assembly with an
A
Allen key (1/16"(1.5mm)). Set
the two items aside.
Rotate the bent arm 180°
around the valve. Using
low strength thread locker,
reinstall the set screw
C
into the valve in the new
location shown until it
bottoms out, then back off
½ turn.
Arm must swing freely.
D
Reattach the sprayhead to the
bent arm, resealing as necessary.
Mount the unit onto the deck. Refer to the instructions on page 6 for
eyewash units or page 7 for eye/face wash units.
E
The left-hand unit must be installed on the left side of the deck.
Slowly open the water supply lines to
relieve air and pressurize the valve. Test
F
the unit for leaks and adequate flow.
8
10/5/2017 Bradley • 215-1326 Rev. V; ECN 15-05-042
Page 9
Installation S19-270C, S19-270E, S19274C, S19274E
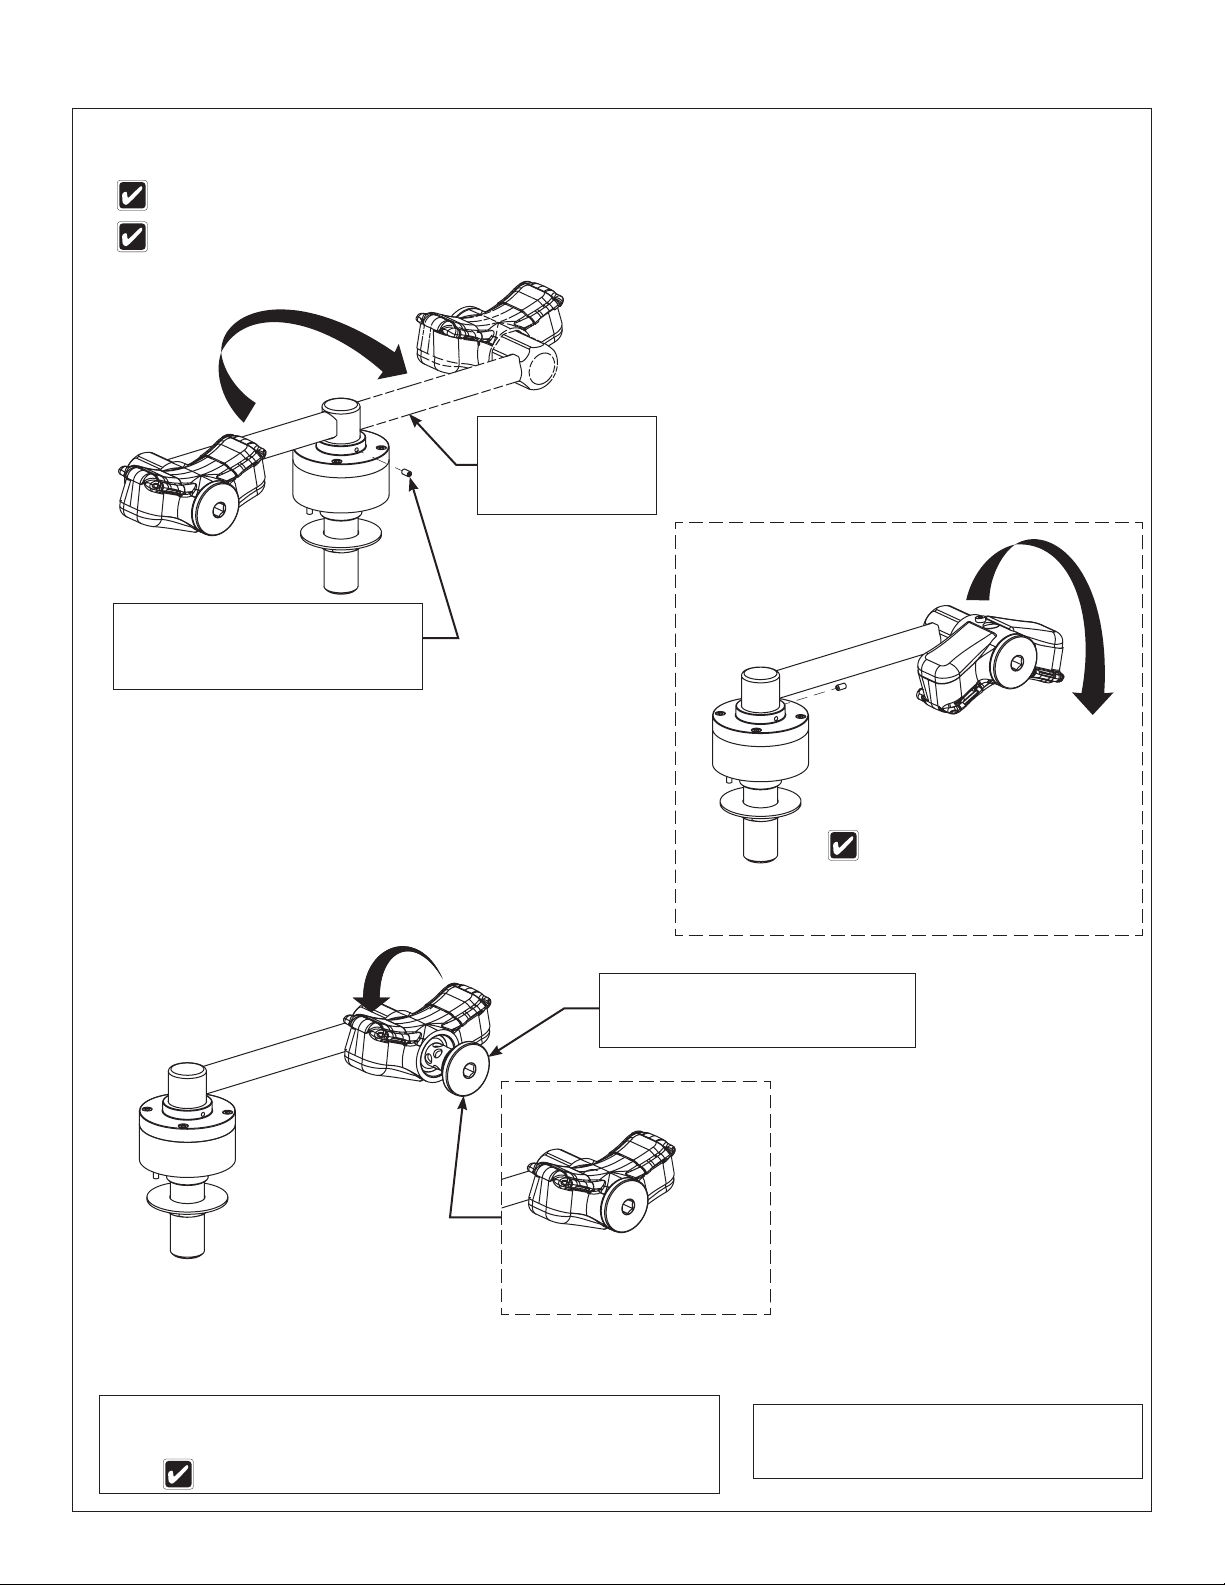
Installation — Left-Hand Units (Halo)
Halo eyewash unit is shown. Halo eye/face wash unit is similar.
Apply pipe sealant (supplied by installer) to all male-threaded pipe joints.
Rotate the
arm 180°
B
around the
valve.
C
Remove the set screw from
the valve assembly with an
A
Allen key (1/16"(1.5mm)) and
set aside.
D
E
Tighten cap assembly,
ensuring head is level.
Using low strength thread locker,
reinstall the set screw into the valve
in the new location shown until it
bottoms out, then back off ½ turn.
Arm must swing freely.
Rotate the head and body 180°
around the arm.
Loosen the cap assembly with
an Allen key (5/16"(8mm)) and
rotate the sprayhead 180°.
Mount the unit onto the deck. Refer to the instructions on page 6 for
eyewash units or page 7 for eye/face wash units.
F
The left-hand unit must be installed on the left side of the deck.
Bradley • 215-1326 Rev. V; ECN 15-05-042 10/5/2017
G
Slowly open the water supply lines to
relieve air and pressurize the valve. Test
the unit for leaks and adequate flow.
9
Page 10

S19-270C, S19-270E, S19274C, S19274E Installation
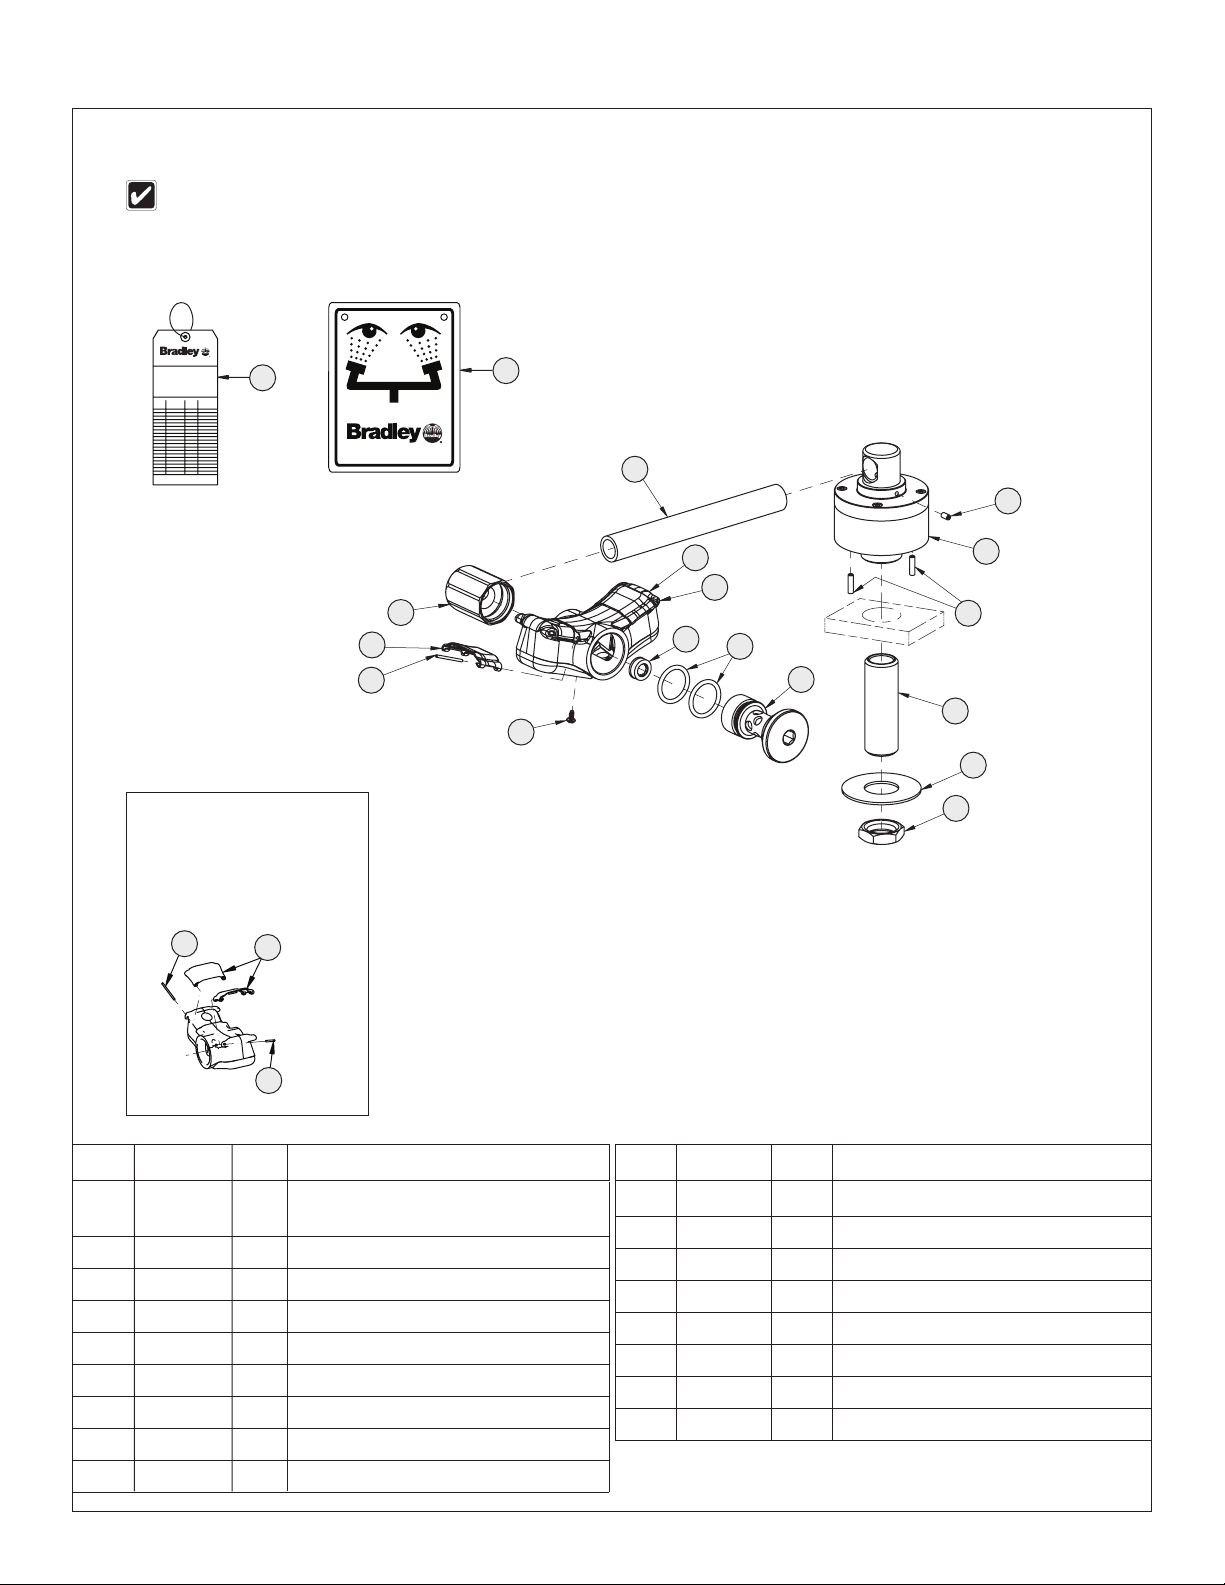
Assembly of Components and Parts List — S19-270C
Right-hand swivel version is shown in the "ON" position.
R
P.O. Box 309, Menomonee Falls, WI 53051
TEST THIS UNIT EACH WEEK
DIESES GERÄT 1ST WÖCHENTLICH ZU PRÜFEN.
ESSAI HEBDOMADAIRE
Test-operate valve(s) each week and sign below.
Report any malfunctions immediately.
Ventil(e) wöchentlich im Testbetrieb prüfen, bestätigt
durch Unterschrift. Jegliche Störung sofort melden.
Test le fonctionnement des valves chaque semaine et
signe en bas. S'il y à quelque chose qui ne va pas fait
un rapport immédiatement.
Date
Signed
Date Signed
Datum
Unterschrift
Date
Date
Signe
Date
31
Signed
Signed
bradleycorp.com
114-051
30
23
2
19
Deck
21
1
13
14
15
16
Item Part No. Qty Description
1 N/A 1 Valve not available for service; must
replace complete fixture.
2 160-473 2 Screw, Set
13 160-474 2 Screw, Set
14 113-514 1 Shank, ½" x 2½"
15 142-002CB 1 Washer, Flat ⁷⁄₈" x 2"
10
10/5/2017 Bradley • 215-1326 Rev. V; ECN 15-05-042
Item Part No. Qty Description
16 110-115 1 Nut, Brass ½"-14 NPSM
19 113-1032 1 Pipe, Bent Plated
21 S05-092 1 Eyewash Yoke 90°
23 107-371 2 Tethered Dust Cover
30 114-051 1 Safety Sign
31 204-421 1 Emergency Inspection Tag
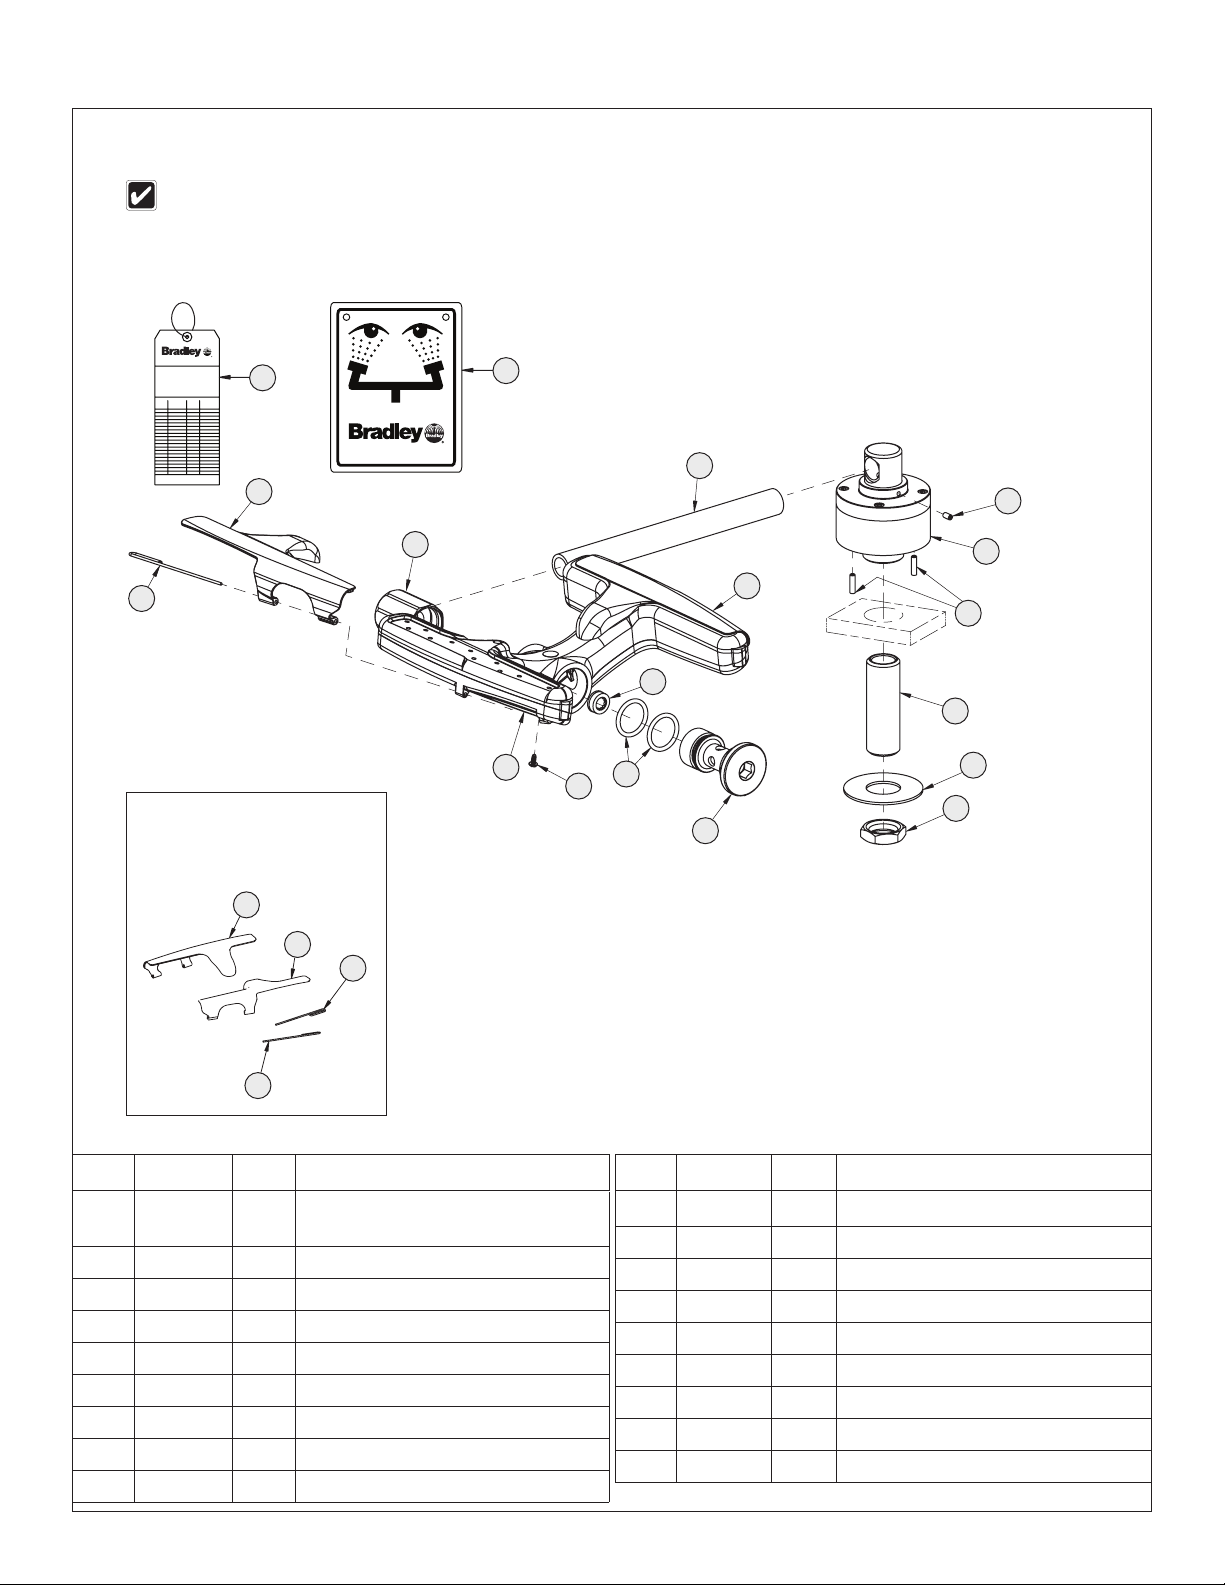
Page 11
Installation S19-270C, S19-270E, S19274C, S19274E
Assembly of Components and Parts List — S19274C
Right-hand swivel version is shown in the "ON" position.
R
P.O. Box 309, Menomonee Falls, WI 53051
TEST THIS UNIT EACH WEEK
DIESES GERÄT 1ST WÖCHENTLICH ZU PRÜFEN.
ESSAI HEBDOMADAIRE
Test-operate valve(s) each week and sign below.
Report any malfunctions immediately.
Ventil(e) wöchentlich im Testbetrieb prüfen, bestätigt
durch Unterschrift. Jegliche Störung sofort melden.
Test le fonctionnement des valves chaque semaine et
signe en bas. S'il y à quelque chose qui ne va pas fait
un rapport immédiatement.
Date
Signed
Date Signed
Datum
Unterschrift
Date
Date
Signe
Date
31
Signed
Signed
bradleycorp.com
114-051
30
19
2
Eyewash Cover Prepack
S45-2675 includes items
22 and 23
22
23
22
23
1
21
20
23
27
22
Deck
26
25
13
14
29
15
16
Item Part No. Qty Description
1 N/A 1 Valve not available for service; must
replace complete fixture.
2 160-473 2 Screw, Set
13 160-474 2 Screw, Set
14 113-514 1 Shank, ½" x 2½"
15 142-002CB 1 Washer, Flat ⁷⁄₈" x 2"
16 110-115 1 Nut, Brass ½"-14 NPSM
19 113-1236 1 Pipe, ³⁄₈" x 5½" Chrome Red Brass
Item Part No. Qty Description
22 in service kit 2 Pivot Pin
23 in service kit 2 Flip Cover, Eyewash
25 115-169 1 Cap, Short
26 125-157 2 O-Ring
27 125-175 1 Flow Control
29 160-500 1 Screw, Weep
30 114-051 1 Safety Sign
31 204-421 1 Emergency Inspection Tag
20 171-005 1 Body, Mount, Short ³⁄₈" NPT
21 S05-190 1 Sprayhead Ass'y Eyewash (includes)
Bradley • 215-1326 Rev. V; ECN 15-05-042 10/5/2017
11
Page 12
S19-270C, S19-270E, S19274C, S19274E Installation
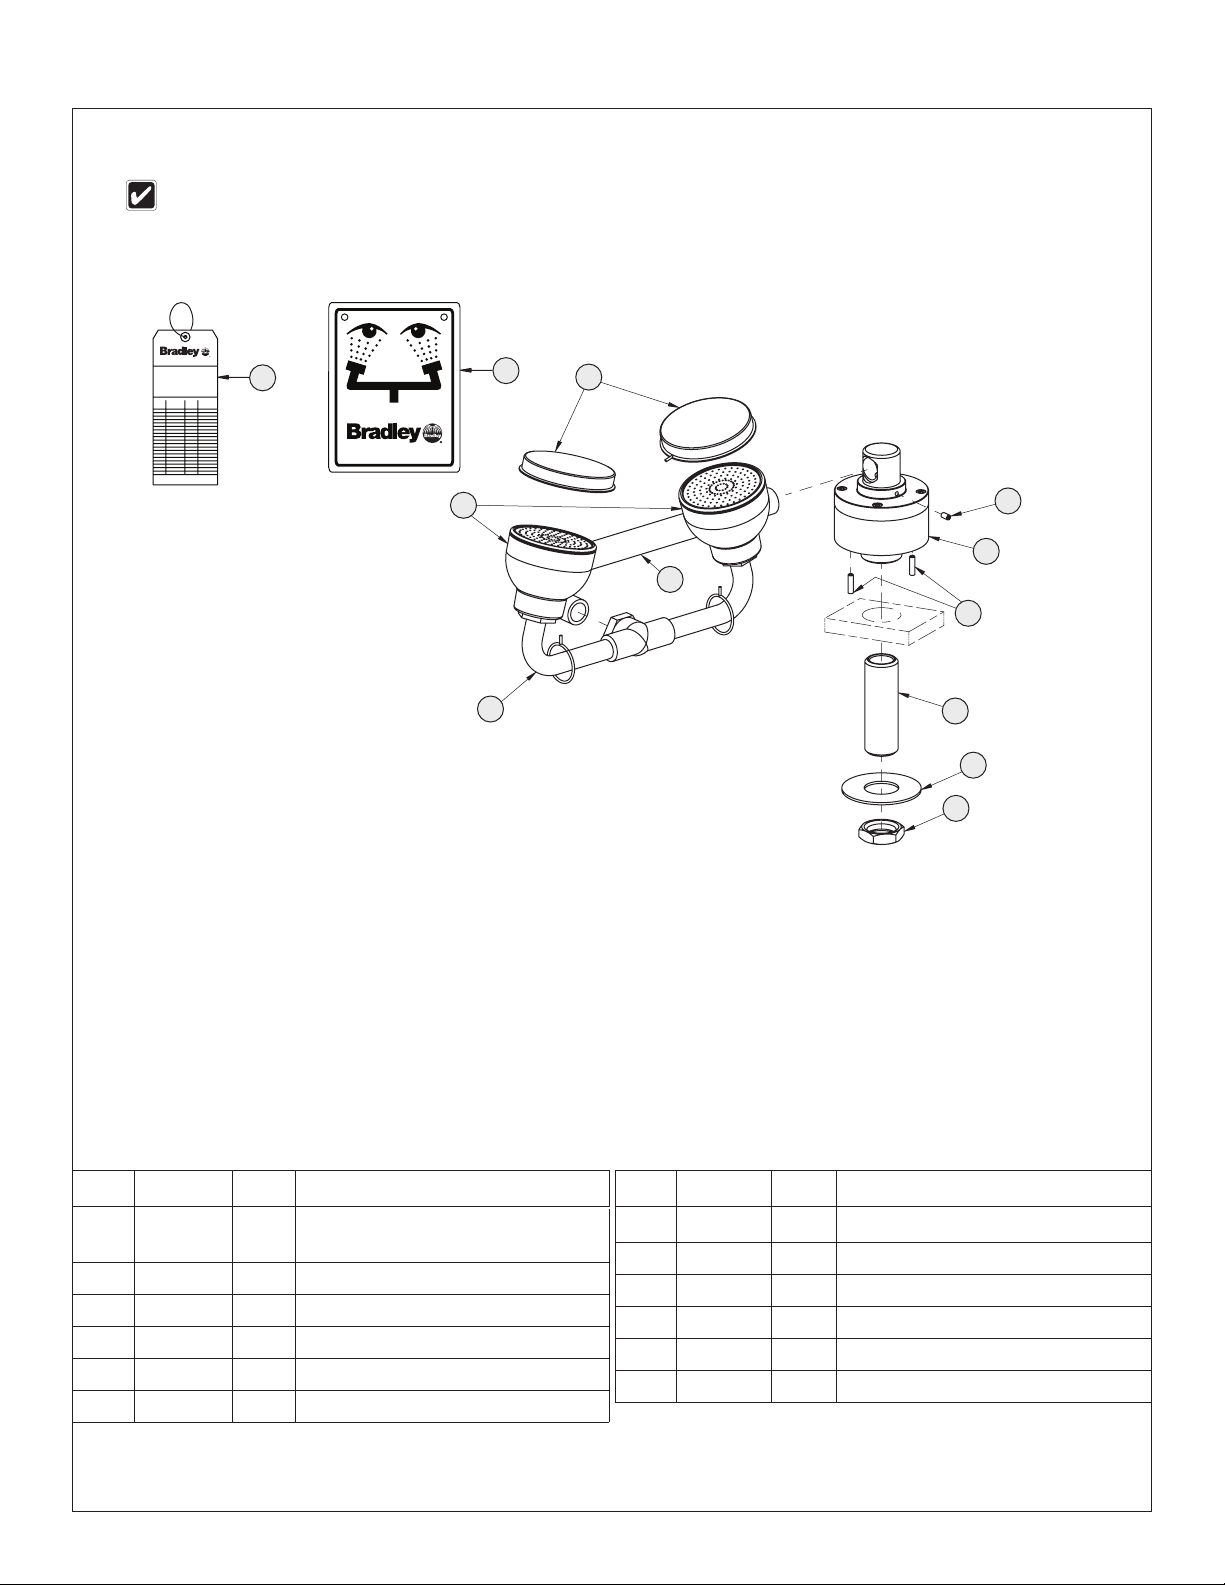
Assembly of Components and Parts List — S19-270E
Right-hand swivel version is shown in the "ON" position.
R
P.O. Box 309, Menomonee Falls, WI 53051
TEST THIS UNIT EACH WEEK
DIESES GERÄT 1ST WÖCHENTLICH ZU PRÜFEN.
ESSAI HEBDOMADAIRE
Test-operate valve(s) each week and sign below.
Report any malfunctions immediately.
Ventil(e) wöchentlich im Testbetrieb prüfen, bestätigt
durch Unterschrift. Jegliche Störung sofort melden.
Test le fonctionnement des valves chaque semaine et
signe en bas. S'il y à quelque chose qui ne va pas fait
un rapport immédiatement.
Date Signed
Signed
Date
Unterschrift
Date
Datum
Signe
Date
Date
31
Signed
Signed
bradleycorp.com
114-051
30
23
21a
2
1
19
Deck
21
13
14
15
16
Item Part No. Qty Description
1 N/A 1 Valve not available for service; must
replace complete fixture.
2 160-473 2 Screw, Set
13 160-474 2 Screw, Set
14 113-514 1 Shank, ½" x 2½"
15 142-002CB 1 Washer, Flat ⁷⁄₈" x 2"
16 110-115 1 Nut, Brass ½"-14 NPSM
12
10/5/2017 Bradley • 215-1326 Rev. V; ECN 15-05-042
Item Part No. Qty Description
19 113-1032 1 Pipe, Bent Plated
21 S05-206 1 Eye/Face Wash Assembly
21A S45-2453 1 Service Kit EFW - Black Sprayheads
23 S53-063 2 Tethered Dust Cover
30 114-051 1 Safety Sign
31 204-421 1 Emergency Inspection Tag
Page 13
Installation S19-270C, S19-270E, S19274C, S19274E
Assembly of Components and Parts List — S19274E
Right-hand swivel version is shown in the "ON" position.
R
P.O. Box 309, Menomonee Falls, WI 53051
TEST THIS UNIT EACH WEEK
DIESES GERÄT 1ST WÖCHENTLICH ZU PRÜFEN.
ESSAI HEBDOMADAIRE
Test-operate valve(s) each week and sign below.
Report any malfunctions immediately.
Ventil(e) wöchentlich im Testbetrieb prüfen, bestätigt
durch Unterschrift. Jegliche Störung sofort melden.
Test le fonctionnement des valves chaque semaine et
signe en bas. S'il y à quelque chose qui ne va pas fait
un rapport immédiatement.
Date
Signed
Date Signed
Datum
Unterschrift
Date
Date
Signe
Date
31
Signed
Signed
bradleycorp.com
114-051
24a
30
19
2
22
Eye/Face Wash Cover
Prepack S45-2676 includes
items 22, 24a and 24b
24b
24a
22
20
1
24b
Deck
13
27
14
21
26
29
15
16
25
22
Item Part No. Qty Description
1 N/A 1 Valve not available for service; must
replace complete fixture.
2 160-473 2 Screw, Set
13 160-474 2 Screw, Set
14 113-514 1 Shank, ½" x 2½"
15 142-002CB 1 Washer, Flat ⁷⁄₈" x 2"
16 110-115 1 Nut, Brass ½"-14 NPSM
19 113-1075 1 Pipe, ³⁄₈" x 9" Chrome Red Brass
20 171-005 1 Body, Mount, Short ³⁄₈" NPT
Item Part No. Qty Description
22 in service kit 2 Pivot Pin
24a in service kit 1 Flip Cover, Right
24b in service kit 1 Flip Cover, Left
25 115-169 1 Cap, Short
26 125-157 2 O-Ring
27 125-175 1 Flow Control
29 160-500 1 Screw, Weep
30 114-051 1 Safety Sign
31 204-421 1 Emergency Inspection Tag
21 S05-192 1 Sprayhead Ass'y Eye/Face Wash (incl.)
Bradley • 215-1326 Rev. V; ECN 15-05-042 10/5/2017
13
Page 14

S19-270C, S19-270E, S19274C, S19274E Installation
AVERTISSEMENT
L’installation et l’emplacement de toutes les douches d’urgence, oculaires et oculaires-faciales
doivent être conformes aux exigences d’ANSI Z358.1.
Le matériel d’urgence doit être alimenté en eau tiède (15,6 °C à 37,8 °C/60 °F à 100 °F). Toute
exposition prolongée à de l’eau proche de la température de congélation peut altérer la capacité
de l’organisme à maintenir la température corporelle, ce qui accroît le risque d’hypothermie.
Rincez la conduite d’alimentation avant et apres l’installation. Assurez-vous que le débit d’eau est
adéquat et qu’il n’y a pas de fuites. L’alimentation principale en eau doit être toujours OUVERTE.
On devra prévoir des dispositions pour empêcher tout arrêt non autorisé.
La norme ANSI Z358.1 prévoit une alimentation ininterrompue du liquide de rinçage. Les appareils
d’urgence Bradley raccordés au réseau nécessitent une pression d’écoulement d’au moins 30 PSI
(0,21 MPa). Selon ANSI Z358.1, le liquide de rinçage doit être tiède.
Une activation hebdomadaire doit être effectuée sur tout le matériel d’urgence à tuyauterie
d’alimentation pour vérifier que l’arrivée de liquide de rinçage est suffisante et éliminer tout dépôt
de sédiment de la conduite d’alimentation. Le matériel d’urgence doit être contrôlé chaque mois
pour régler tout problème d’entretien éventuel et s’assurer que le matériel est en bon état de
marche et ne présente aucun signe d’usure.
Les ouvriers susceptibles d’entrer en contact avec des matières potentiellement dangereuses
doivent recevoir une formation sur la mise en place et le bon fonctionnement du matériel
d’urgence conformément à la norme ANSI Z358.1.
AVIS
Avant d’installer ce produit, vérifier qu’il y a des dégagements suffisants autour du produit et que
l’activation du produit n’est pas entravée par d’autres produits ou obstructions.
Pour les classiques unités de douche oculaire/faciale, eviter les nettoyants qui contiennent des
solvants organiques, de l’alcool et de l’hydrocarbure. Rincer avec de l’eau après le nettoyage.
IMPORTANT
Lire ce manuel d’installation dans son intégralité pour garantir une installation appropriée.
Une fois celle-ci terminée, classer ce manuel auprès du service à la clientèle ou d’entretien.
L’installateur est responsable de la conformité de l’installation aux codes pour des drain et
codes et règlements en vigueur.
Assurez-vous que toutes les pièces sont incluses dans l’emballage et qu’il n’en manque aucune
avant de jeter l’emballage. Ne commencez pas l’assemblage avant de recevoir les pièces
manquantes.
Pour toute question concernant le fonctionnement ou l’installation de ce produit, consulter le
site www.bradleycorp.com ou appeler le 800-BRADLEY (800-272-3539).
Les garanties de produits figurent sous la rubrique « Produits » sur notre site Internet à www.
bradleycorp.com.
Equipements nécessaires :
• Amener la tuyauterie à l'entrée ½" NPT
d'approvisionnement en eau de la douche oculaire
• Produit d’étanchéité pour tuyau
• Filtre d'entrée (recommandé)
• Quincaillerie pour l'installation de l'enseigne
14
10/5/2017 Bradley • 215-1326 Rev. V; ECN 15-05-042
Les codes locaux peuvent exiger l’ installation d’une soupape de
prévention d’écoulement de retour pour réaliser une installation
appropriée. L’installateur est responsable de la conformité
aux codes locaux. La soupape doit être testée une fois par an
pour vérifier qu’elle fonctionne correctement. Les soupapes de
prévention d’écoulement de retour ne sont pas fournies avec
l’appareil et peuvent être fournies par l’entrepreneur ou achetées
auprès de Bradley Corporation.
Page 15

Installation S19-270C, S19-270E, S19274C, S19274E
Dimensions — S19-270C
3¹⁄₈"
(79mm)
4¹⁄₈"
(105mm)
28-7/8" to 40-7/8"
(733 mm to 1038 mm)
au plancher fini
11⁵⁄₈"
(295mm)
(64mm)
Off
On
Ø 2³⁄₈"
(60mm)
2³⁄₈"
(60mm)
2½"
1³⁄₈"
(35mm)
Max.
Ø ⁷⁄₈"
Dimensions — S19274C
1⁵⁄₈"
(41mm)
2⁷⁄₈"
(73mm)
30-1/8" to 42-1/8"
(765 mm to 1070 mm)
au plancher fini
(181mm)
2½"
(64mm)
On
7¼"
Off
Ø 2³⁄₈"
(60mm)
2³⁄₈"
(60mm)
1³⁄₈"
(35mm)
Max.
Ø ⁷⁄₈"
Bradley • 215-1326 Rev. V; ECN 15-05-042 10/5/2017
15
Page 16

S19-270C, S19-270E, S19274C, S19274E Installation
Dimensions — S19-270E
3¹⁄₈"
(79mm)
5¾"
(146mm)
27-1/4" to 39-1/4"
(692 mm to 997 mm)
au plancher fini
11³⁄₈"
(289mm)
On
2½"
(64mm)
Off
Ø 2³⁄₈"
(60mm)
2³⁄₈"
(60mm)
Ø ⁷⁄₈"
1³⁄₈"
(35mm)
Max.
Dimensions — S19274E
1⁵⁄₈"
(41mm)
3³⁄₈"
(86mm)
29-5/8" to 41-5/8"
(752 mm to 1057 mm)
au plancher fini
On
11"
(279mm)
2½"
(64mm)
Off
(60mm)
Ø ⁷⁄₈"
Ø 2³⁄₈"
(60mm)
2³⁄₈"
1³⁄₈"
(35mm)
Max.
16
10/5/2017 Bradley • 215-1326 Rev. V; ECN 15-05-042
Page 17

Installation S19-270C, S19-270E, S19274C, S19274E
Installation — Douche Oculaire
La douche oculaire Halo droite est montrée sur un exemple de comptoir de 25" (635 mm). Les autres unités sont similaires. Pour l’installation
d’une douche oculaire classique, voir les dimensions à la page 15 pour déterminer la position optimale de montage. Consulter les
pages19–20 pour un montage gaucher.
Les dimensions minimales nécessaires pour contenir les éclaboussures des unités Halo sont indiquées.
Mettez du produit d’étanchéité (non fourni) sur tous les filetages mâles. Le dessus des érogateurs de la douche oculaire doit être situé à une
taille minimum de 83cm (33 po) et à une hauteur maximum de 115 cm (45 po) du plancher et de 15 cm (6 po) de l'obstruction la plus proche.
Le dégagement pour les poignées et le tube
montant du robinet et les dimensions
minimales pour contenir les éclaboussures
doivent être pris en compte lors du choix de
l’emplacement de pose.
25"
(635mm)
A
2"
(51mm)
Ø ³⁄₁₆"
Ø 1¹⁄₈"
Dessin de montage (comptoir)
Percez (3) trous
8"
(203mm)
Rayon
B
Comptoir
Montré dans la position de "ÉTEINT"
7¾"
5¾"
(146mm)
Ref.
2⁵⁄₈" (67mm)
Ref.
(197mm)
Ref.
Montré dans la position
de "Ouverte"
2"
(51mm)
Ref.
¾" (19mm)
Min.
Un boyau flexible fileté femelle ½"
NPT (fourni par l'installateur) peut
C
également être utilisé.
Ouvrir les arrivées d’eau lentement
pour libérer l’air et mettre le robinet
E
sous pression. Vérifier s'il y a des
fuites et si le débit d'eau est adéquat.
Bradley • 215-1326 Rev. V; ECN 15-05-042 10/5/2017
5¼"
(133mm)
Min.
D
sur le
mur
114-051
P.O. BOX 309, MENOMONEE FALLS, WI 53052-0309 USA
TEL: 1-800-BRADLEY FAX: (262-251-5817)
http://www.bradleycorp.com
17
Page 18

S19-270C, S19-270E, S19274C, S19274E Installation
Installation — Douche Oculaire/Faciale
La douche oculaire/faciale Halo droite est montrée sur un exemple de comptoir de 25". Les autres unités sont similaires. Pour l’installation
d’une douche oculaire/faciale classique, voir les dimensions à la page 15 pour déterminer la position optimale de montage. Consulter les
pages 19–20 pour un montage gaucher.
Les dimensions minimales nécessaires pour contenir les éclaboussures des unités Halo sont indiquées.
Mettez du produit d’étanchéité (non fourni) sur tous les filetages mâles. Le dessus des érogateurs de la douche oculaire doit être situé à une
taille minimum de 83cm (33 po) et à une hauteur maximum de 115 cm (45 po) du plancher et de 15 cm (6 po) de l'obstruction la plus proche.
Le dégagement pour les poignées et le tube
montant du robinet et les dimensions
minimales pour contenir les éclaboussures
doivent être pris en compte lors du choix de
l’emplacement de pose.
25"
(635mm)
A
2"
(51mm)
Ø 1¹⁄₈"
Dessin de montage (comptoir)
Percez (3) trous
13⁷⁄₈"
(352mm)
Rayon
B
Ø ³⁄₁₆"
Comptoir
Montré dans la position de "ÉTEINT"
13"
(330mm)
Ref.
9¼"
(235mm)
Ref.
18
Montré dans la position
de "Ouverte"
Un boyau flexible fileté femelle ½"
NPT (fourni par l'installateur) peut
C
également être utilisé.
5¾"
(146mm)
Ref.
2¹⁄₈"
(54mm)
Min.
2½"
(64mm)
Min.
D
sur le
Ouvrir les arrivées d’eau lentement
pour libérer l’air et mettre le robinet
E
sous pression. Vérifier s'il y a des
fuites et si le débit d'eau est adéquat.
10/5/2017 Bradley • 215-1326 Rev. V; ECN 15-05-042
mur
114-051
P.O. BOX 309, MENOMONEE FALLS, WI 53052-0309 USA
TEL: 1-800-BRADLEY FAX: (262-251-5817)
http://www.bradleycorp.com
Page 19

Installation S19-270C, S19-270E, S19274C, S19274E
Installation — Unités Gaucher (classique)
Douche oculaire classique illustrée. L'unité douche oculaire/faciale classique est similair.
Mettez du produit d’étanchéité (non fourni) sur tous les filetages mâles.
Faire pivoter le bras
coudé de 180° autour
B
du robinet.
Retirer la tête de douche du
bras coudé. Retirer la vis
calante du l’aide d’une clé
A
Allen (1/16"(1.5mm)). Mettre
ces deux articles de côté.
Faire pivoter le bras
coudé de 180° autour du
robinet. En utilisant un
enduit-frein pour filet de
faible résistance, visser
C
la vis calante à fond dans
le robinet puis revenir en
arrière d’un demi-tour.
Le bras doit pivoter
librement.
D
Rattacher la tête de douche
au bras coudé, en refaisant
l’étanchéité au besoin.
Monter l'unité sur le comptoir. Consulter la page 17 pour douche
oculaire ou la page 18 pour douche oculaire/faciale.
E
Le modèle gauche doit être posé sur le côté gauche du comptoir.
Ouvrir les arrivées d’eau lentement
pour libérer l’air et mettre le robinet
F
sous pression. Vérifier s'il y a des
fuites et si le débit d'eau est adéquat.
Bradley • 215-1326 Rev. V; ECN 15-05-042 10/5/2017
19
Page 20

S19-270C, S19-270E, S19274C, S19274E Installation
Installation — Unités Gaucher (Halo)
Douche oculaire Halo illustrée. L'unité douche oculaire/faciale Halo est similaire.
Mettez du produit d’étanchéité (non fourni) sur tous les filetages mâles.
Faire pivoter
le bras de
B
180° autour
du robinet.
C
Retirer la vis calante du
robinet à l’aide d’une clé
A
Allen (1/16"(1.5mm)) et la
mettre de côté.
Desserrer le capuchon à l’aide d’une
clé Allen (5/16"(8mm)) et faire pivoter
D
le tête de douche de 180°.
E
Serrer le capuchon en
s’assurant que la tête est
de niveau.
En utilisant un enduit-frein pour filet
de faible résistance, visser la vis
calante à fond dans le robinet au
nouvel emplacement représenté puis
revenir en arrière d’un demi-tour.
Le bras doit pivoter librement.
Faire pivoter le bec et le corps de
180° autour du bras.
20
Monter l'unité sur le comptoir. Consulter la page 17 pour douche
oculaire ou la page 18 pour douche oculaire/faciale.
F
Le modèle gauche doit être posé sur le côté gauche du comptoir.
10/5/2017 Bradley • 215-1326 Rev. V; ECN 15-05-042
Ouvrir les arrivées d’eau lentement
pour libérer l’air et mettre le robinet
G
sous pression. Vérifier s'il y a des
fuites et si le débit d'eau est adéquat.
Page 21

Installation S19-270C, S19-270E, S19274C, S19274E
Assemblage des composantes et liste des pièces — S19-270C
La version pivotante à droite est montrée en position « Ouverte ».
R
P.O. Box 309, Menomonee Falls, WI 53051
TEST THIS UNIT EACH WEEK
DIESES GERÄT 1ST WÖCHENTLICH ZU PRÜFEN.
ESSAI HEBDOMADAIRE
Test-operate valve(s) each week and sign below.
Report any malfunctions immediately.
Ventil(e) wöchentlich im Testbetrieb prüfen, bestätigt
durch Unterschrift. Jegliche Störung sofort melden.
Test le fonctionnement des valves chaque semaine et
signe en bas. S'il y à quelque chose qui ne va pas fait
un rapport immédiatement.
Date
Signed
Date Signed
Datum
Unterschrift
Date
Date
Signe
Date
31
Signed
Signed
bradleycorp.com
114-051
30
23
2
19
Comptoir
21
1
13
14
15
16
Piéce Réf. Qté Description
1 N/A 1 Le robinet n’est pas disponible en tant que
pièce de rechange; l’appareil complet doit
être changé.
2 160-473 2 Vis de reglage
13 160-474 2 Vis de reglage
14 113-514 1 Tige ½" x 2½"
15 142-002CB 1 Rondelle ⁷⁄₈" x 2"
Piéce Réf. Qté Description
16 110-115 1 Écrou ½"-14 NPSM
19 113-1032 1 Tuyau Courbe (Plaque)
21 S05-092 1 Douche oculaire 90°
23 107-371 2 Cache-poussière ancré
30 114-051 1 Enseigne de sécurité
31 204-421 1 Etiquette d’inspection
Bradley • 215-1326 Rev. V; ECN 15-05-042 10/5/2017
21
Page 22

S19-270C, S19-270E, S19274C, S19274E Installation
Assemblage des composantes et liste des pièces — S19274C
La version pivotante à droite est montrée en position « Ouverte ».
R
P.O. Box 309, Menomonee Falls, WI 53051
TEST THIS UNIT EACH WEEK
DIESES GERÄT 1ST WÖCHENTLICH ZU PRÜFEN.
ESSAI HEBDOMADAIRE
Test-operate valve(s) each week and sign below.
Report any malfunctions immediately.
Ventil(e) wöchentlich im Testbetrieb prüfen, bestätigt
durch Unterschrift. Jegliche Störung sofort melden.
Test le fonctionnement des valves chaque semaine et
signe en bas. S'il y à quelque chose qui ne va pas fait
un rapport immédiatement.
Date
Signed
Date Signed
Datum
Unterschrift
Date
Date
Signe
Date
31
Signed
Signed
bradleycorp.com
114-051
30
19
2
Paquet couvertures à
bascule (douche oculaire)
S45-2675 comprend les
éléments 22 et 23
22
23
22
23
1
21
20
23
27
22
Comptoir
26
25
13
14
29
15
16
Piéce Réf. Qté Description
1 N/A 1 Le robinet n’est pas disponible
en tant que pièce de rechange;
l’appareil complet doit être changé.
2 160-473 2 Vis de reglage
13 160-474 2 Vis de reglage
14 113-514 1 Tige ½" x 2½"
15 142-002CB 1
16 110-115 1 Écrou ½"-14 NPSM
19 113-1236 1
20 171-005 1
21 S05-190 1 Douche oculaire (comprend)
22
Rondelle ⁷⁄₈" x 2"
Tuyau ³⁄₈" x 5½" laiton chromé rouge
Corps ³⁄₈" NPT court
10/5/2017 Bradley • 215-1326 Rev. V; ECN 15-05-042
Piéce Réf. Qté Description
22 dans la trousse
d’entretien
23 dans la trousse
d’entretien
25 115-169 1 Bouchon corto
26 125-157 2 Bague
27 125-175 1 Contrôle du débit
29 160-500 1 Vis, purge
30 114-051 1 Enseigne de sécurité
31 204-421 1 Etiquette d’inspection
2 Axe de pivotement (kit de
remplacement)
2 Couverture à bascule (kit de
remplacement)
Page 23

Installation S19-270C, S19-270E, S19274C, S19274E
Assemblage des composantes et liste des pièces — S19-270E
La version pivotante à droite est montrée en position « Ouverte ».
R
P.O. Box 309, Menomonee Falls, WI 53051
TEST THIS UNIT EACH WEEK
DIESES GERÄT 1ST WÖCHENTLICH ZU PRÜFEN.
ESSAI HEBDOMADAIRE
Test-operate valve(s) each week and sign below.
Report any malfunctions immediately.
Ventil(e) wöchentlich im Testbetrieb prüfen, bestätigt
durch Unterschrift. Jegliche Störung sofort melden.
Test le fonctionnement des valves chaque semaine et
signe en bas. S'il y à quelque chose qui ne va pas fait
un rapport immédiatement.
Date Signed
Signed
Date
Unterschrift
Date
Datum
Signe
Date
Date
31
Signed
Signed
bradleycorp.com
114-051
30
23
21a
2
1
19
Comptoir
21
13
14
15
16
Piéce Réf. Qté Description
1 N/A 1 Le robinet n’est pas disponible en tant que
pièce de rechange; l’appareil complet doit
être changé.
2 160-473 2 Vis de reglage
13 160-474 2 Vis de reglage
14 113-514 1 Tige ½" x 2½"
15 142-002CB 1 Rondelle ⁷⁄₈" x 2"
Piéce Réf. Qté Description
19 113-1032 1 Tuyau Courbe (Plaque)
21 S05-206 1 Douche oculaire/faciale
21A S45-2453 1 Trousse d’entretien EFW - Diffuseurs noirs
23 S53-063 2 Cache-poussière ancré
30 114-051 1 Enseigne de sécurité
31 204-421 1 Etiquette d’inspection
16 110-115 1 Écrou ½"-14 NPSM
Bradley • 215-1326 Rev. V; ECN 15-05-042 10/5/2017
23
Page 24

S19-270C, S19-270E, S19274C, S19274E Installation
Assemblage des composantes et liste des pièces — S19274E
La version pivotante à droite est montrée en position « Ouverte ».
R
P.O. Box 309, Menomonee Falls, WI 53051
TEST THIS UNIT EACH WEEK
DIESES GERÄT 1ST WÖCHENTLICH ZU PRÜFEN.
ESSAI HEBDOMADAIRE
Test-operate valve(s) each week and sign below.
Report any malfunctions immediately.
Ventil(e) wöchentlich im Testbetrieb prüfen, bestätigt
durch Unterschrift. Jegliche Störung sofort melden.
Test le fonctionnement des valves chaque semaine et
signe en bas. S'il y à quelque chose qui ne va pas fait
un rapport immédiatement.
Date
Signed
Date Signed
Datum
Unterschrift
Date
Date
Signe
Date
31
Signed
Signed
bradleycorp.com
114-051
24a
30
19
2
22
Paquet couvertures à
bascule (douche oculaire/
faciale) S45-2676 comprend
les éléments 22, 24a et 24b
24b
24a
22
20
1
24b
Comptoir
13
27
14
21
26
29
15
16
25
22
Piéce Réf. Qté Description
1 N/A 1 Le robinet n’est pas disponible
en tant que pièce de rechange;
l’appareil complet doit être changé.
2 160-473 2 Vis de reglage
13 160-474 2 Vis de reglage
14 113-514 1 Tige ½" x 2½"
15 142-002CB 1
16 110-115 1 Écrou ½"-14 NPSM
19 113-1075 1
20 171-005 1
21 S05-192 1 Douche oculaire/faciale (comprend)
24
Rondelle ⁷⁄₈" x 2"
Tuyau ³⁄₈" x 9" laiton chromé rouge
Corps ³⁄₈" NPT court
10/5/2017 Bradley • 215-1326 Rev. V; ECN 15-05-042
Piéce Réf. Qté Description
22 dans la trousse
d’entretien
24a dans la trousse
d’entretien
24b dans la trousse
d’entretien
25 115-169 1 Bouchon corto
26 125-157 2 Bague
27 125-175 1 Contrôle du débit
29 160-500 1 Vis, purge
30 114-051 1 Enseigne de sécurité
31 204-421 1 Etiquette d’inspection
2 Axe de pivotement (kit de
remplacement)
1 Couverture à bascule (kit de
remplacement)
1 Couverture à bascule (kit de
remplacement)
Page 25

Installation S19-270C, S19-270E, S19274C, S19274E
ADVERTENCIA
La instalación y ubicación de todas las duchas, lavaojos y lavaojos/lavacara de seguridad deben
cumplir con los requisitos de ANSI Z358.1.
Los equipos de emergencia deben contar con agua tibia (entre 15,6 °C y 37,8 °C). Cualquier
exposición prolongada a aguas bajo cero afecta la capacidad del cuerpo para mantener su
temperatura, lo que incrementa el riesgo de hipotermia.
Aclarar el conducto del suministro de agua antes y después de la instalación. Verificar que no haya
fugas y que el flujo de agua sea adecuado. El suministro principal de agua a la unidad debe estar
siempre en posición “ON” (abierto). Se deben tomar medidas a fin de evitar el corte no autorizado
del suministro.
La norma ANSI Z358.1 exige un suministro ininterrumpido de líquido de limpieza. Los equipos de
emergencia con tuberías de Bradley requieren una presión de flujo mínima de 0,21 MPa (30 PSI). El
líquido de limpieza debe estar tibio en conformidad con la norma ANSI Z358.1.
Se deben llevar a cabo activaciones semanales de todos los equipos de emergencia conectados
a la plomería para garantizar que hay un suministro de líquido de limpieza adecuado presente
y liberar la tubería de suministro de cualquier acumulación de sedimento. Los equipos de
emergencia se deben inspeccionar mensualmente para solucionar cualquier problema de
mantenimiento; esto garantizará que los equipos están en buenas condiciones de funcionamiento
y que no hay señales de desgaste.
Los trabajadores que puedan tener contacto con materiales potencialmente peligrosos deben
recibir capacitación sobre la ubicación y operación adecuada de los equipos de emergencia en
conformidad con la norma ANSI Z358.1.
AVISO
Antes de instalar este producto, asegúrese de que haya espacio adecuado alrededor del producto y
de que su activación no interfiera con otros productos u obstrucciones.
Para unidades clásicas de lavado de ojos/rostro, evite los limpiadores que contengan solventes
orgánicos, alcoholes e hidrocarburos. Enjuague con agua después de limpiar.
IMPORTANTE
Lea en su totalidad este manual de instalación para garantizar una instalación adecuada.
Una vez que termine la instalación, entregue este manual al propietario o al Departamento de
Mantenimiento. Es responsabilidad de quien instale el equipo cumplir con los códigos para
desagüe y otra códigos y ordenanzas locales.
Separar todas las piezas del material de embalaje y asegurarse que todas las piezas estén
incluídas antes de desechar cualquier material de embalaje. Si faltase alguna pieza, no intentar
instalar la unidad combinada Bradley hasta obtener las piezas faltantes.
Para consultas sobre la operación o instalación de este producto, visite www.bradleycorp.com o
llame al 800.BRADLEY (800.272.3539).
Las garantías del producto se pueden encontrar e n “Productos” o en nuestro sitio Web, www.
bradleycorp.com.
Materiales necesarios:
• Proporcione la tubería a la toma de ½" NPT del
suministro de agua del lavador de ojos
• Sellador de tubería
• Filtro de la entrada (recomendado)
• Tornillería para montar el aviso de seguridad
Bradley • 215-1326 Rev. V; ECN 15-05-042 10/5/2017
Los códigos locales pueden exigir la instalación de una válvula de
prevención de contraflujo para completar la instalación correcta.
La conformidad con los códigos locales es de responsabilidad del
instalador. La válvula se debe probar anualmente para verificar que
funcione de manera correcta. Las válvulas de prevención de contraflujo
no se incluyen con el accesorio y las puede proporcionar el contratista
o las puede comprar en Bradley Corporation.
25
Page 26

S19-270C, S19-270E, S19274C, S19274E Installation
Dimensiones — S19-270C
3¹⁄₈"
(79mm)
4¹⁄₈"
(105mm)
28-7/8" to 40-7/8"
(733 mm to 1038 mm)
al suelo terminado
11⁵⁄₈"
(295mm)
(64mm)
2½"
On
Off
Ø 2³⁄₈"
(60mm)
2³⁄₈"
(60mm)
1³⁄₈"
(35mm)
Max.
Ø ⁷⁄₈"
Dimensiones — S19274C
1⁵⁄₈"
(41mm)
2⁷⁄₈"
(73mm)
30-1/8" to 42-1/8"
(765 mm to 1070 mm)
al suelo terminado
(181mm)
2½"
(64mm)
7¼"
On
Off
Ø 2³⁄₈"
(60mm)
2³⁄₈"
(60mm)
Ø ⁷⁄₈"
1³⁄₈"
(35mm)
Max.
26
10/5/2017 Bradley • 215-1326 Rev. V; ECN 15-05-042
Page 27

Installation S19-270C, S19-270E, S19274C, S19274E
Dimensiones — S19-270E
3¹⁄₈"
(79mm)
5¾"
(146mm)
27-1/4" to 39-1/4"
(692 mm to 997 mm)
al suelo terminado
11³⁄₈"
(289mm)
On
2½"
(64mm)
Off
Ø ⁷⁄₈"
Ø 2³⁄₈"
(60mm)
2³⁄₈"
(60mm)
1³⁄₈"
(35mm)
Max.
Dimensiones — S19274E
1⁵⁄₈"
(41mm)
3³⁄₈"
(86mm)
29-5/8" to 41-5/8"
(752 mm to 1057 mm)
al suelo terminado
On
11"
(279mm)
2½"
(64mm)
Off
(60mm)
Ø ⁷⁄₈"
Ø 2³⁄₈"
(60mm)
2³⁄₈"
1³⁄₈"
(35mm)
Max.
Bradley • 215-1326 Rev. V; ECN 15-05-042 10/5/2017
27
Page 28

S19-270C, S19-270E, S19274C, S19274E Installation
Instalación — Lavador de ojos
Se observa la unidad de lavado ocular Halo del lado derecho en una cubierta de muestra de 25" . Las otras unidades son similares. Para la
instalación del lavaojos clásico, consulte las dimensiones en la página 26 para determinar la posición óptima de montaje Consulte la páginas
30–31 para el montaje de la izquierda.
Se muestran las dimensiones mínimas necesarias para contener las salpicaduras de las unidades Halo.
Aplicar sellador de tubería o cinta (suministrados por el instalador) a las juntas de tubería de rosca macho. La parte superior de los rociadores
del lavador de ojos debe colocarse a una altura máxima de 33 pulgadas (83 cm) y a una altura mínimo de 45 pulg. (115 cm) del piso y 6 pulg.
(15 cm) de la obstrucción más cercana.
Se debe considerar el espacio
adecuado entre la caña y la manilla
de la llave y las dimensiones mínimas
para la contención de salpicaduras
cuando se seleccione la ubicación
deseada para el montaje.
25"
(635mm)
A
2"
(51mm)
Ø ³⁄₁₆"
Ø 1¹⁄₈"
Patrón de montaje (mostrador)
Perforar (3) orificios
8"
(203mm)
Radio
B
Pared
Mostrado en la posición
de "APAGADA"
7¾"
5¾"
(146mm)
Ref.
2⁵⁄₈" (67mm)
Ref.
(197mm)
Ref.
28
Mostrado en la posición
de "CONECTADO"
Se puede usar también una manguera flexible
(provista por el instalador) con terminación de
C
rosca hembra de ½" (12,8 mm) NPT.
10/5/2017 Bradley • 215-1326 Rev. V; ECN 15-05-042
2"
(51mm)
Ref.
Abra lentamente las tuberías de
suministro de agua para liberar el
aire y presurizar la válvula. Revise si
E
existen fugas y verifique si el flujo de
agua es adecuado.
¾" (19mm)
Min.
5¼"
(133mm)
Min.
D
a la
pared
114-051
P.O. BOX 309, MENOMONEE FALLS, WI 53052-0309 USA
TEL: 1-800-BRADLEY FAX: (262-251-5817)
http://www.bradleycorp.com
Page 29

Installation S19-270C, S19-270E, S19274C, S19274E
Instalación — Lavador de ojos y rostro
Se observa la unidad de lavado ocular y facial Halo del lado derecho en una cubierta de muestra de 25". Las otras unidades son similares.
Para la instalación de lavado ocular y facial clásico, consulte las dimensiones en la página 27 para determinar la posición óptima de montaje.
Consulte la páginas 30–31 para el montaje de la izquierda.
Se muestran las dimensiones mínimas necesarias para contener las salpicaduras de las unidades Halo.
Aplicar sellador de tubería o cinta (suministrados por el instalador) a las juntas de tubería de rosca macho. La parte superior de los rociadores
del lavador de ojos debe colocarse a una altura máxima de 33 pulgadas (83 cm) y a una altura mínimo de 45 pulg. (115 cm) del piso y 6 pulg.
(15 cm) de la obstrucción más cercana.
Se debe considerar el espacio
adecuado entre la caña y la manilla
de la llave y las dimensiones mínimas
para la contención de salpicaduras
cuando se seleccione la ubicación
deseada para el montaje.
25"
(635mm)
A
2"
(51mm)
Ø ³⁄₁₆"
Ø 1¹⁄₈"
Patrón de montaje (mostrador)
Perforar (3) orificios
13⁷⁄₈"
(352mm)
Radio
B
Pared
Mostrado en la posición
de "APAGADA"
13"
(330mm)
Ref.
9¼"
(235mm)
Ref.
Mostrado en la posición
de "CONECTADO"
2½"
(64mm)
Min.
Se puede usar también una manguera flexible
(provista por el instalador) con terminación de
C
rosca hembra de ½" (12,8 mm) NPT.
Abra lentamente las tuberías de
suministro de agua para liberar el
aire y presurizar la válvula. Revise si
E
existen fugas y verifique si el flujo de
agua es adecuado.
Bradley • 215-1326 Rev. V; ECN 15-05-042 10/5/2017
5¾"
(146mm)
Ref.
2¹⁄₈"
(54mm)
Min.
D
a la
pared
114-051
P.O. BOX 309, MENOMONEE FALLS, WI 53052-0309 USA
TEL: 1-800-BRADLEY FAX: (262-251-5817)
http://www.bradleycorp.com
29
Page 30

S19-270C, S19-270E, S19274C, S19274E Installation
Instalación — Unidades izquierda (clásico)
Se muestra una unidad lavador de ojos clásico. La unidad lavador de ojos/rostro clásico son similares.
Aplicar sellador de tubería a todas las juntas de tubería de rosca macho.
Gire el brazo doblado
en 180º alrededor de
B
la válvula.
Retire la boquilla rociadora
del brazo doblado. Retire el
tornillo de ajuste del conjunto
A
de válvula con la llave Allen
(1/16"(1.5mm)). Deje ambos
elementos a un lado.
Gire el brazo doblado
en 180º alrededor de la
válvula. Con un cierre de
roscas de baja resistencia,
C
enrosque el tornillo de
fijación en la nueva
ubicación en la válvula
hasta que salga el extremo
inferior, luego devuélvalo ½
vuelta.
El brazo debe oscilar
libremente.
D
Vuelva a conectar la boquilla
rociadora en el brazo doblado; selle
nuevamente si es necesario.
Monte la unidad sobre el mostrador. Consulte la página 28 para el
lavador de ojos o la página 29 para el lavador de ojos/rostro.
E
La unidad de lado izquierdo se debe instalar en el lado
izquierdo de la cubierta.
Abra lentamente las tuberías de suministro de agua para
liberar el aire y presurizar la válvula. Revise si existen
F
fugas y verifique si el flujo de agua es adecuado.
30
10/5/2017 Bradley • 215-1326 Rev. V; ECN 15-05-042
Page 31

Installation S19-270C, S19-270E, S19274C, S19274E
Instalación — Unidades izquierda (Halo)
Se muestra una unidad lavador de ojos Halo. La unidad lavador de ojos/rostro Halo son similares.
Aplicar sellador de tubería a todas las juntas de tubería de rosca macho.
Gire el brazo
en 180º
B
alrededor de
la válvula.
C
Retire el tornillo de ajuste del
conjunto de válvula con la llave
A
Allen (1/16"(1.5mm)) y déjelo a
un lado.
Suelte el conjunto de de la tapa
con la llave Allen (5/16"(8mm)) y
D
gire la boquilla rociadora en 180º.
E
Apriete el conjunto de la
tapa y asegúrese de que el
cabezal esté nivelado.
Con un cierre de roscas de baja
resistencia, enrosque el tornillo de
fijación en la nueva ubicación en la
válvula hasta que salga el extremo
inferior, luego devuélvalo ½ vuelta.
El brazo debe oscilar
libremente.
Gire el cabezal y el cuerpo en 180º
alrededor del brazo.
Monte la unidad sobre el mostrador. Consulte la página 28 para el
lavador de ojos o la página 29 para el lavador de ojos/rostro.
F
Bradley • 215-1326 Rev. V; ECN 15-05-042 10/5/2017
La unidad de lado izquierdo se debe instalar en el lado
izquierdo de la cubierta.
G
Abra lentamente las tuberías de
suministro de agua para liberar el aire y
presurizar la válvula. Revise si existen
fugas y verifique si el flujo de agua es
adecuado.
31
Page 32

S19-270C, S19-270E, S19274C, S19274E Installation
Armado de los componentes y lista de piezas — S19-270C
La versión que oscila hacia la derecha se muestra en la posición abierta.
R
P.O. Box 309, Menomonee Falls, WI 53051
TEST THIS UNIT EACH WEEK
DIESES GERÄT 1ST WÖCHENTLICH ZU PRÜFEN.
ESSAI HEBDOMADAIRE
Test-operate valve(s) each week and sign below.
Report any malfunctions immediately.
Ventil(e) wöchentlich im Testbetrieb prüfen, bestätigt
durch Unterschrift. Jegliche Störung sofort melden.
Test le fonctionnement des valves chaque semaine et
signe en bas. S'il y à quelque chose qui ne va pas fait
un rapport immédiatement.
Date
Signed
Date Signed
Datum
Unterschrift
Date
Date
Signe
Date
31
Signed
Signed
bradleycorp.com
114-051
30
23
2
19
Mostrador
21
1
13
14
15
16
Art. Pieza N° Ctd. Descripción
1 N/A 1 Válvula no disponible para servicio;
se debe reemplazar el accesorio por
completo.
2 160-473 2 Tornillo prisionero
13 160-474 2 Tornillo prisionero
14 113-514 1 Varilla tornillante ½" x 2½"
15 142-002CB 1 Arandela ⁷⁄₈" x 2"
32
10/5/2017 Bradley • 215-1326 Rev. V; ECN 15-05-042
Art. Pieza N° Ctd. Descripción
16 110-115 1 Tuerca ½"-14 NPSM
19 113-1032 1 Tubo Acodado (Niquelado)
21 S05-092 1 Lavador de ojos 90°
23 107-371 2 Cubierta contrapolvo
30 114-051 1 Aviso de seguridad
31 204-421 1 Etiqueta de inspección
Page 33

Installation S19-270C, S19-270E, S19274C, S19274E
Armado de los componentes y lista de piezas — S19274C
La versión que oscila hacia la derecha se muestra en la posición abierta.
R
P.O. Box 309, Menomonee Falls, WI 53051
TEST THIS UNIT EACH WEEK
DIESES GERÄT 1ST WÖCHENTLICH ZU PRÜFEN.
ESSAI HEBDOMADAIRE
Test-operate valve(s) each week and sign below.
Report any malfunctions immediately.
Ventil(e) wöchentlich im Testbetrieb prüfen, bestätigt
durch Unterschrift. Jegliche Störung sofort melden.
Test le fonctionnement des valves chaque semaine et
signe en bas. S'il y à quelque chose qui ne va pas fait
un rapport immédiatement.
Date
Signed
Date Signed
Datum
Unterschrift
Date
Date
Signe
Date
31
Signed
Signed
bradleycorp.com
114-051
30
19
2
Paquete tapa protectora
lavaojos S45-2675 incluye
art. 22 and 23
22
23
22
23
1
21
20
23
27
22
Mostrador
26
25
13
14
29
15
16
Art. Pieza N° Ctd. Descripción
1 N/A 1 Válvula no disponible para servicio;
se debe reemplazar el accesorio
por completo.ccesorio por completo.
2 160-473 2 Tornillo prisionero
13 160-474 2 Tornillo prisionero
14 113-514 1 Varilla tornillante ½" x 2½"
15 142-002CB 1
16 110-115 1 Tuerca ½"-14 NPSM
19 113-1236 1
20 171-005 1
Arandela ⁷⁄₈" x 2"
Tubo ³⁄₈" x 5½" cromado latón rojo
Cuerpo ³⁄₈" NPT corto
Art. Pieza N° Ctd. Descripción
22 En el kit de
mantenimiento
23 En el kit de
mantenimiento
25 115-169 1 Tapa corto
26 125-157 2 Arosello
27 125-175 1 Control del flujo
29 160-500 1 Tornillo, Drenaje
30 114-051 1 Aviso de seguridad
31 204-421 1 Etiqueta de inspección
21 S05-190 1 Lavador de ojos (incluye)
Bradley • 215-1326 Rev. V; ECN 15-05-042 10/5/2017
2 Pasador de pivote (juego de
repuesto)
2 Tapa protectora (juego de repuesto)
33
Page 34

S19-270C, S19-270E, S19274C, S19274E Installation
Armado de los componentes y lista de piezas — S19-270E
La versión que oscila hacia la derecha se muestra en la posición abierta.
R
P.O. Box 309, Menomonee Falls, WI 53051
TEST THIS UNIT EACH WEEK
DIESES GERÄT 1ST WÖCHENTLICH ZU PRÜFEN.
ESSAI HEBDOMADAIRE
Test-operate valve(s) each week and sign below.
Report any malfunctions immediately.
Ventil(e) wöchentlich im Testbetrieb prüfen, bestätigt
durch Unterschrift. Jegliche Störung sofort melden.
Test le fonctionnement des valves chaque semaine et
signe en bas. S'il y à quelque chose qui ne va pas fait
un rapport immédiatement.
Date Signed
Signed
Date
Unterschrift
Date
Datum
Signe
Date
Date
31
Signed
Signed
bradleycorp.com
114-051
30
23
21a
2
1
19
Mostrador
21
13
14
15
16
Art. Pieza N° Ctd. Descripción
1 N/A 1 Válvula no disponible para servicio;
se debe reemplazar el accesorio por
completo.
2 160-473 2 Tornillo prisionero
13 160-474 2 Tornillo prisionero
14 113-514 1 Varilla tornillante ½" x 2½"
15 142-002CB 1 Arandela ⁷⁄₈" x 2"
16 110-115 1 Tuerca ½"-14 NPSM
34
10/5/2017 Bradley • 215-1326 Rev. V; ECN 15-05-042
Art. Pieza N° Ctd. Descripción
19 113-1032 1 Tubo Acodado (Niquelado)
21 S05-206 1 Lavado de ojos y rostro
21A S45-2453 1 Kit de mantenimiento para lavado de ojos y
rostro: Boquillas rociadoras negras
23 S53-063 2 Cubierta contrapolvo con ligaduras
30 114-051 1 Aviso de seguridad
31 204-421 1 Etiqueta de inspección
Page 35

Installation S19-270C, S19-270E, S19274C, S19274E
Armado de los componentes y lista de piezas — S19274E
La versión que oscila hacia la derecha se muestra en la posición abierta.
R
P.O. Box 309, Menomonee Falls, WI 53051
TEST THIS UNIT EACH WEEK
DIESES GERÄT 1ST WÖCHENTLICH ZU PRÜFEN.
ESSAI HEBDOMADAIRE
Test-operate valve(s) each week and sign below.
Report any malfunctions immediately.
Ventil(e) wöchentlich im Testbetrieb prüfen, bestätigt
durch Unterschrift. Jegliche Störung sofort melden.
Test le fonctionnement des valves chaque semaine et
signe en bas. S'il y à quelque chose qui ne va pas fait
un rapport immédiatement.
Date
Signed
Date Signed
Datum
Unterschrift
Date
Date
Signe
Date
31
Signed
Signed
bradleycorp.com
114-051
24a
30
19
2
22
Paquete tapa protectora
lavaojos/rostro S45-2676
incluye art. 22, 24a y 24b
24b
24a
22
20
1
24b
Mostrador
13
27
14
21
26
29
15
16
25
22
Art. Pieza N° Ctd. Descripción
1 N/A 1 Válvula no disponible para servicio;
se debe reemplazar el accesorio
por completo.
2 160-473 2 Tornillo prisionero
13 160-474 2 Tornillo prisionero
14 113-514 1 Varilla tornillante ½" x 2½"
15 142-002CB 1
16 110-115 1 Tuerca ½"-14 NPSM
19 113-1075 1
20 171-005 1
21 S05-192 1 Lavador de ojos y rostro (incluye)
Arandela ⁷⁄₈" x 2"
Tubo ³⁄₈" x 9" cromado latón rojo
Cuerpo ³⁄₈" NPT corto
Art. Pieza N° Ctd. Descripción
22 En el kit de
mantenimiento
24a En el kit de
mantenimiento
24b En el kit de
mantenimient
25 115-169 1 Tapa corto
26 125-157 2 Arosello
27 125-175 1 Control del flujo
29 160-500 1 Tornillo, Drenaje
30 114-051 1 Aviso de seguridad
31 204-421 1 Etiqueta de inspección
Bradley • 215-1326 Rev. V; ECN 15-05-042 10/5/2017
2 Pasador de pivote (juego de
repuesto)
1 Tapa protectora (juego de repuesto)
1 Tapa protectora (juego de repuesto)
35
 Loading...