

Page 1

arrestor. If not equipped, call your dealer for ordering information.
WARNING
READ and UNDERSTAND this manual completely before using log splitter.
All operators of this equipment must read and completely understand all safety information, operating instructions, maintenance
and storage instructions. Failure to properly operate and maintain the log splitter could result in serious injury to the operator and
bystanders from moving parts that can crush or cut, flying objects, burns, fire or explosion, escaping high pressure hydraulic fluid,
or carbon monoxide poisoning in particular, be aware of the following hazards.
Crush and Cut Hazards
Moving parts can crush and cut hands and fingers. Keep hands clear of endplate, wedge, logs, and log strippers while
splitting.
High Pressure Hydraulic Fluid Hazards
High fluid pressures and temperatures are developed in hydraulic log splitters. Hydraulic fluid escaping through even a pinsize hole opening can puncture skin and cause severe blood poisoning. Inspect hydraulic system regularly for possible leaks.
Never check for leaks with your hand while the system is pressurized. Seek medical attention immediately if injured by
escaping fluid.
Fire Hazards
If your log splitter is intended for use near an ignitable forest, brush, or grassy covered land, the engine exhaust should be
equipped with a spark arrestor. See the "Specifications" section of this manual to determine if your splitter already has a spark
Keep a fire extinguisher with you that is rated for ordinary combustibles and flammable liquids.
STOP!
ADD OIL TO ENGINE BEFORE USING: Engine is shipped without oil. DO NOT start log splitter without first adding oil.
ADD HYDRAULIC OIL: Your log splitter was shipped without hydraulic oil. Refer to Periodic Maintenance section of this manual
for instructions on filling the hydraulic reservoir
INSPECT COMPONENTS: Closely inspect to make sure no components are missing or damaged.
See Initial Unpacking & Set-up for instructions and for whom to contact to report missing or damaged parts.
Owner's Manual
Instructions for Assembly, Testing, Operation,
Servicing, & Storage
1
Page 2

Table of Contents
About Your Log Splitter ...........................................................................................................
Machine Components Identification ........................................................................................
Initial Set-up .............................................................................................................................
Moving & Towing to the Job Site ............................................................................................
Before Each Use:
Step One: Inspection/Maintenance .................................................................................
Step Two: Refueling .......................................................................................................
Step Three: Work site Selection & Set-up ....................................................................
Splitting Operation ...................................................................................................................
Storage ......................................................................................................................................
Periodic Maintenance ...............................................................................................................
Troubleshooting ........................................................................................................................
Specifications ...........................................................................................................................
................................
Exploded View ..........................................................................................
Part List
................................................................
.......................................................
Assembly Instructions ..............................................................................................................
3
4
5
6
9
11
12
13
19
20
21
22
23
24
25
2
Page 3

About Your Log Splitter
WARNING
This log splitter uses a high-pressure hydraulic system to generate a very strong splitting
force.
Read the manual completely before using the machine to understand how to safely operate
and maintain it.
About Your Log Splitter:
This log splitter is a machine designed to split wood logs using a hydraulically powered moving wedge.
The log splitter's gasoline engine is used to pressurize the hydraulic system.
This log splitter is designed to split logs lengthwise with the grain only.
Your splitter can be used in either a vertical or horizontal splitting position:
When the splitter is set up to operate in the horizontal splitting position, a log is placed on the
horizontal beam and the wedge moves horizontally into the end of the log to split it.
When the splitter is set up to operate in the vertical splitting position, the log is placed on the
endplate, upright on its end, and the wedge moves down into the top of the log to split it.
The horizontal splitting position is used for lighter logs that can be easily loaded onto the beam. The
vertical splitting position is used for heavier logs that are difficult to load onto the beam.
The technical specifications for your log splitter are provided in the Specifications section of this
manual.
Follow all safety precautions presented throughout this manual. A summary of important safety
information can be found at the end of this manual.
3
Page 4
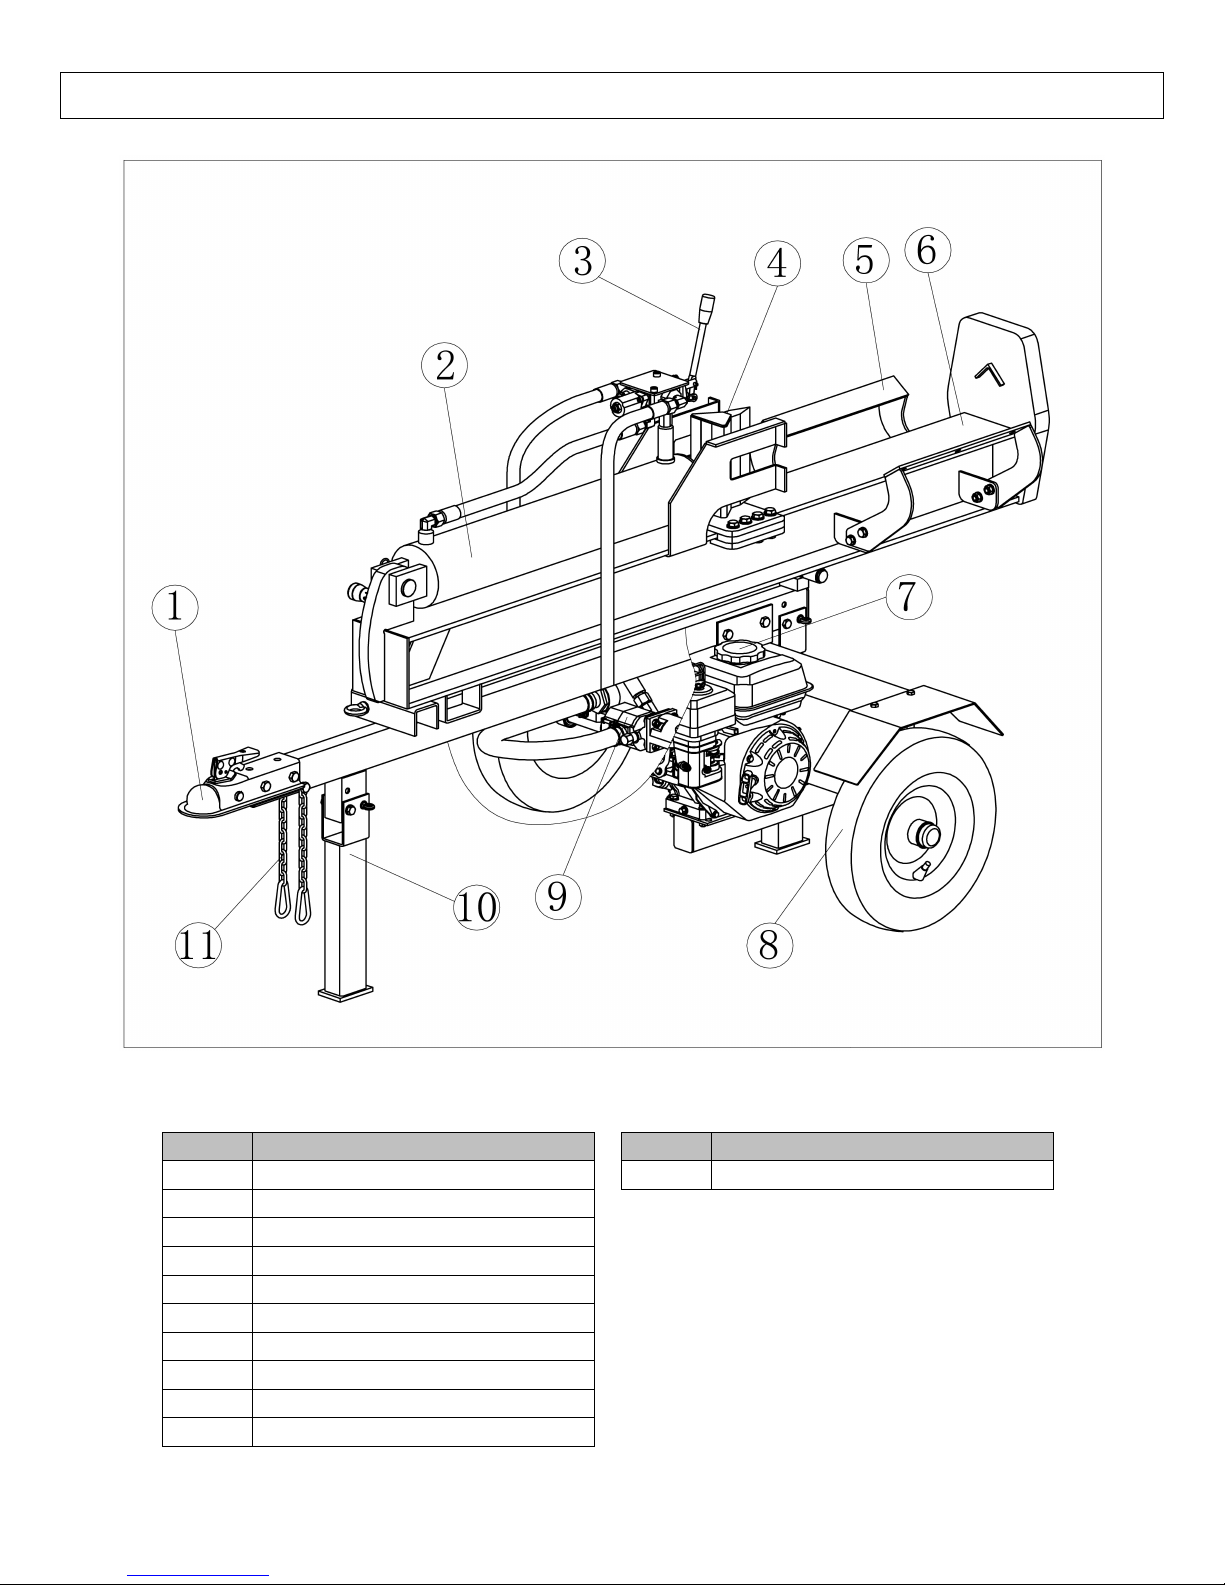
Safety Chain
Outrigger Leg
Gear Pump
Wheel
Engine
Beam
Log Cradle
Wedge
Control Valve Handle
Hydraulic Cylinder
2"/50mm
Machine Component Identification
Ref #
Description
Ref #
Description
1
Ball Coupler
11
2
3
4
5
6
7
8
9
10
4
Page 5
If you have missing components, contact your local dealer
IMPORTANT!
Engine is shipped without oil. DO NOT start the engine before adding oil.
See Assembly Instructions section of this manual to assemble the log splitter before
set-up.
Step One:
Inspect Log
Splitter
Components.
Closely inspect all log splitter components.
(See Machine Components section of this manual for diagram of components.)
If you have damaged components, contact the Freight Company that delivered the unit
and file a claim.
Step Two:
Add Oil to Engine
Add oil to the engine.
Step Three:
Add Hydraulic Oil
to Reservoir
Initial Set-Up
See engine Owner's Manual for oil capacity and location of fill cap.
WARNING: High fluid pressures and temperatures are developed in hydraulic log
splitters. Hydraulic fluid escaping through a pin hole sized opening can burn or
puncture skin, resulting in wounds that could cause blood poisoning, infection,
disability, gangrene, amputation, or death. Therefore, the following instructions
should be heeded at all times when inspecting or servicing the hydraulic components
of the log splitter.
NEVER check for leaks with your hand. Leaks can be located by holding a piece of
cardboard or wood (at least two feet long) with your hand at one end and passing the
other end over the suspected area (wear eye protection). Look for discoloration of the
cardboard or wood.
NEVER adjust the pressure of the pump or valve.
If injured by escaping fluid, no matter how small the wound is, see a doctor at once. A
typical injection injury may be a small wound that does not look serious. However,
severe infection or reaction can result if proper medical treatment is not administered
immediately by a doctor who is familiar with injection injuries.
Remove hydraulic oil tank cover.
1.
2. Refer to the Specifications section for approximate hydraulic oil capacity.
3. Fill reservoir with 10 wt AW32, ASLE H-150, or ISO 32 oil. Use a funnel
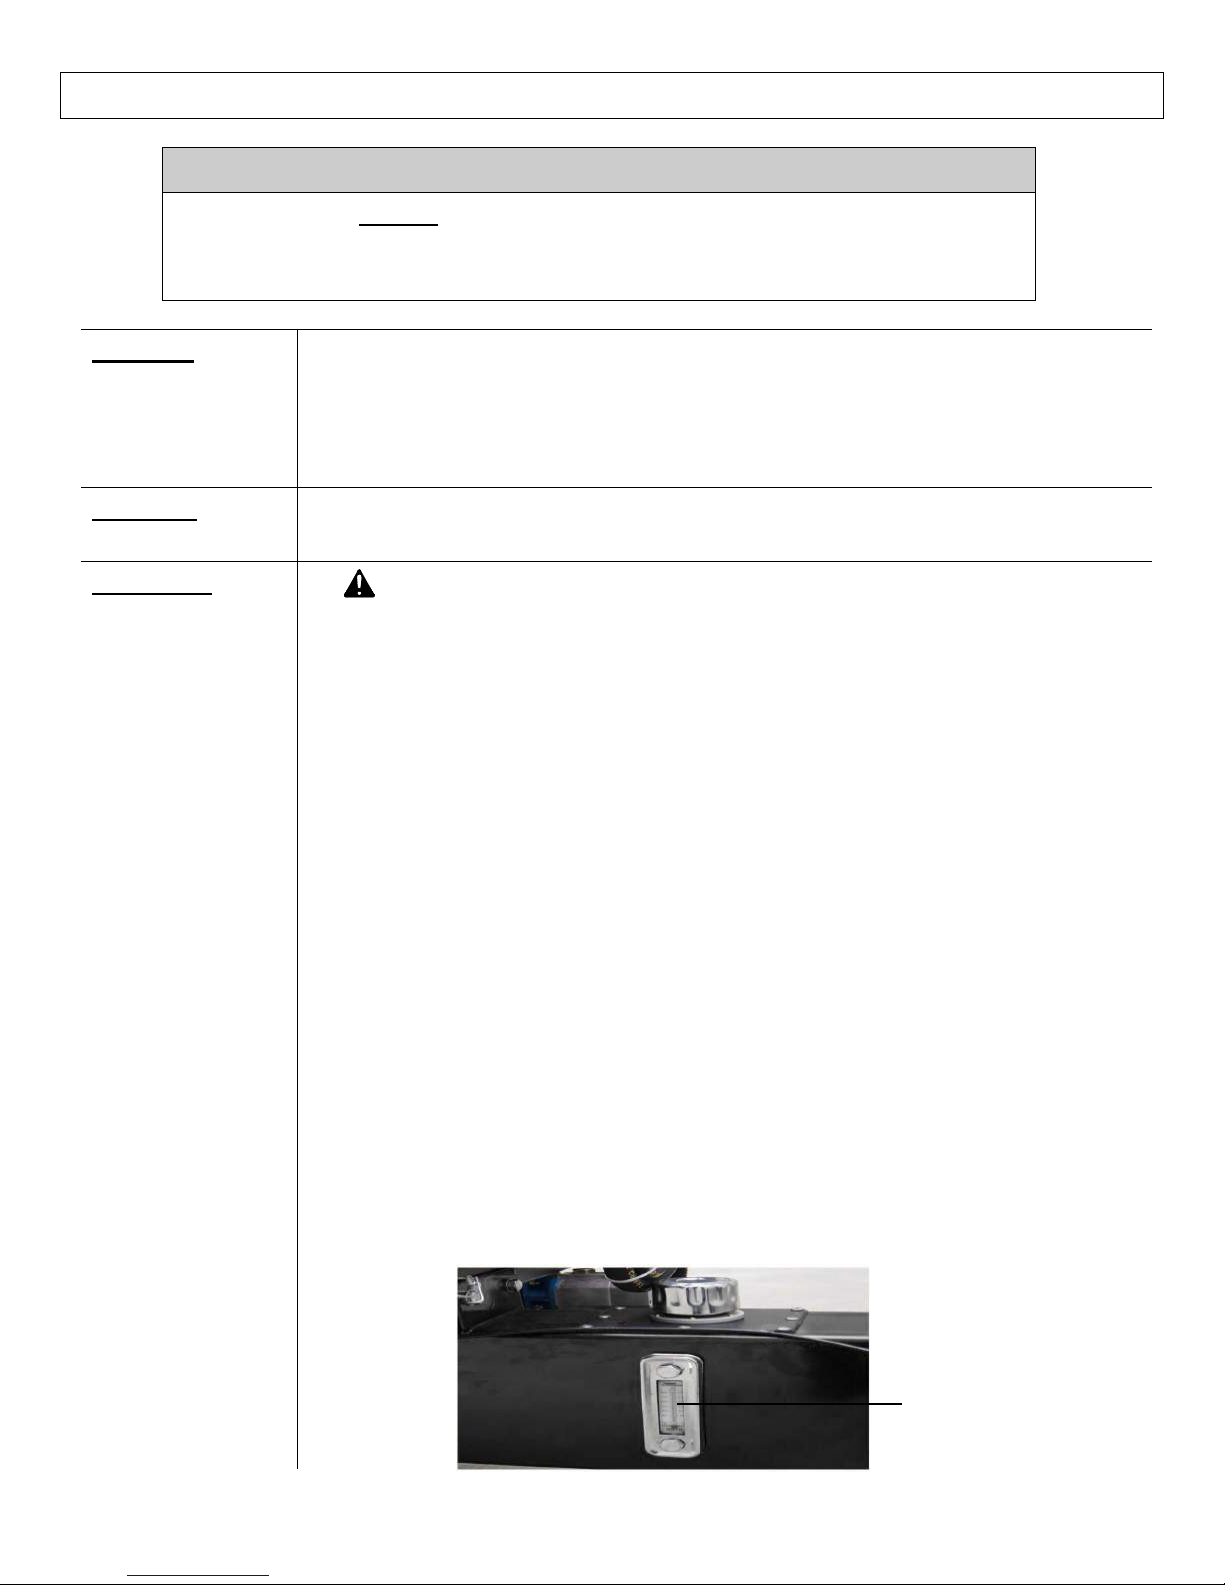
Make sure the oil is at least up to the middle lever of oil monitor.Replace hydraulic oil tank.
4.
5. Start engine and use control valve handle to extend and retract wedge 5 (five) times
to remove air from the high pressure lines.
6. With wedge retracted, check oil level again.
Make sure the oil at least at the middle level of the monitor
5
Hydraulic oil monitor
Page 6

WARNING
The log splitter is heavy. It can crush and cause serious injury if it rolls out of control or
tips over.
Follow the instructions below for safely moving and towing the log splitter.
1. Place in
Horizontal
position
Make sure the log splitter is locked in the horizontal position with hitch pin
before moving.
NEVER move log splitter when it is in vertical configuration because it will be
unstable and could tip.
2. Engine off.
IMPORTANT: Make sure log splitter engine is off.
Never move the log splitter with its engine running.
3. Fuel valve off
(if equipped)
Turn fuel valve off to prevent carburetor flooding and reduce the chance of fuel
leakage. Refer to Engine owner's manual for fuel valve location.
4. Lock:
Front
outrigger leg
DOWN
Rear
outrigger leg
UP
Lock the front outrigger leg in the "DOWN" position and the rear support leg
in the "UP" position before you move the log splitter.
5. Move log splitter
to work site or
tow hitch
Move log splitter by hand either directly to chosen work site or to vehicle
hitch for towing.
(See Before Each Use: Step Three: instructions on selecting a work site)
Important Safety Instructions:
Hills. Do not move the log splitter up or down hills by hand—use a towing
vehicle.
No riding. Never allow anyone to sit or ride on the log splitter.
No cargo. Never transport cargo or wood on the log splitter.
Lock front
outrigger leg in the
down position
Lock rear
outrigger leg in
the up position
Moving the log splitter:
Moving and Towing to the Job Site
6
Page 7
s coupler to a
hitch with 2" or 50mm ball
or 50mm ball)(2
1. Read instructions
Review towing safety instructions in your vehicle manual.
2. Check tires
3. Attach to hitch
"
Attach log splitter to vehicle hitch
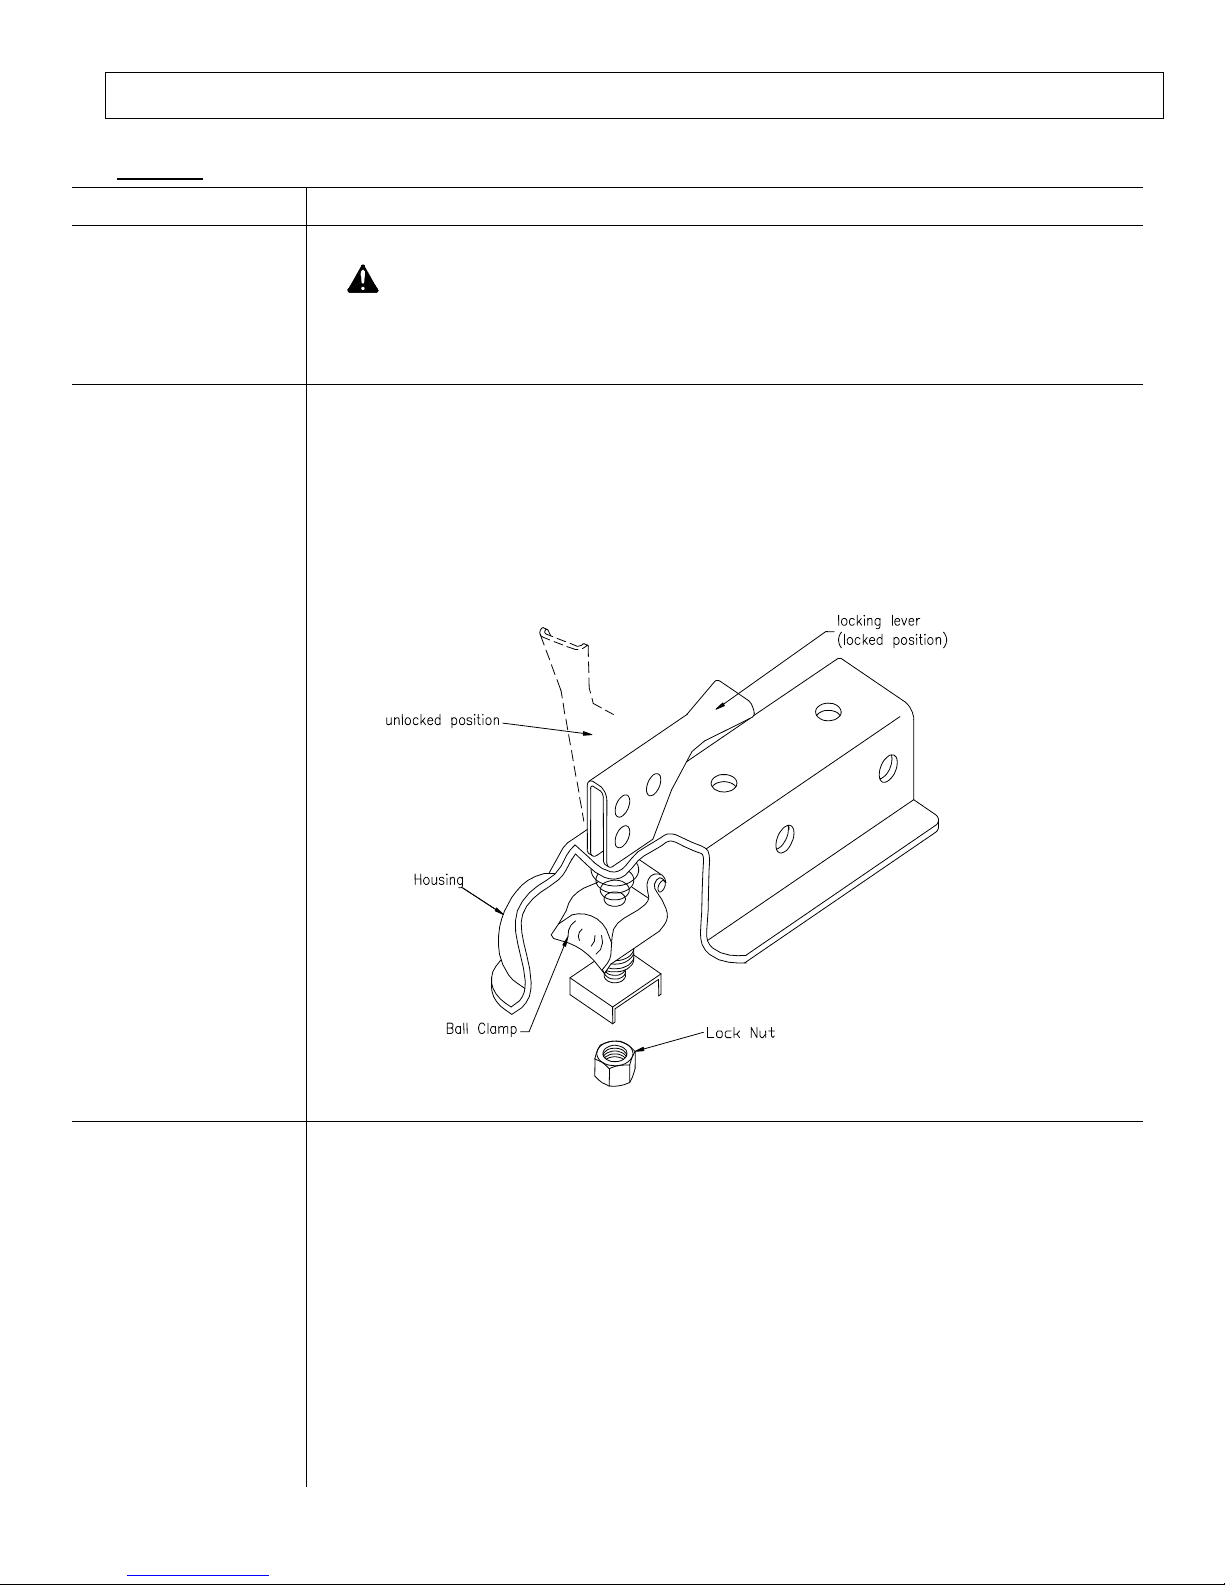
1. Attach log splitter'
2. Adjust coupler to ball by raising locking lever and turning lock nut with fingers.
3. Proper adjustment is obtained when coupler is as tight as possible on ball and
locking lever can still be opened and closed.
4. Lock lever closed to secure the attachment. An optional locking pin or padlock
may be inserted in the locking lever hole for extra security.
4. Attach safety
chains
Attach safety chains.
1. Two safety chains must be used while towing.
2. Cross safety chains under the coupler allowing only enough slack for vehicle
turns.
Towing:
Moving and Towing to the Job Site
Make sure tires are fully inflated and in good repair.
WARNING:
Do not over-inflate tires. Serious injury can occur if tire explodes.
When seating a bead after repair, do not exceed 30 PSI. Pressures higher
than 30 PSI can cause the tire and wheel to rupture and explode.
7
Page 8

Moving and Towing to the Job Site
5. Put front
outrigger leg UP
Move the front outrigger leg to the "UP" position and lock. (Both outrigger legs
must remain in the up position during towing.)
6. Tow to desired
location
Tow log splitter carefully to desired work site.
(See Before Each Use section on selecting an appropriate work site)
Important safety instructions:
Added length. Be aware of the added length of the splitter.
Speed limit. Never tow this log splitter over 45 mph. Faster speeds may
result in loss of control.
Rough terrain. Drive slowly and take extra caution when traveling over
rough terrain.
On public roads. If towing on a public road, make sure to comply with all
local, state, and federal towing requirements. It is the sole responsibility of
the purchaser to obtain licensing, trailer lights, safety chains or signage, as
needed to comply.
Unattended. Turn off the towing vehicle before leaving the splitter
unattended.
Under the influence. Never tow or operate this splitter while under the
influence of alcohol, drugs, or medication.
7. Lock front
outrigger leg down
& unhitch
Lock front outrigger leg in the DOWN position and disconnect from vehicle.
NEVER operate log splitter while it is attached to the vehicle.
Lock front
outrigger leg in the
up position
Lock rear
outrigger leg in the
up position
Attach coupler to 2“"
or 50mm ball.
Latch Securely.
Hook both safety
chains to the towing
vehicle
8
Page 9

Before Each Use-Inspection / Maintenance
WARNING
ALWAYS shut off the engine, disconnect the spark plug, and relieve system pressure before
inspecting, cleaning, adjusting, or repairing the splitter. Relieve system pressure by moving Split
Control Lever back and forth several times.
1. Engine off /
relieve pressure
Perform all inspections/repairs with the engine off and hydraulic system pressure relieved.
1. Make sure engine is off and cool.
2. Disconnect the spark plug
3. Relieve all hydraulic system pressure by moving the Split Control Lever back and forth
several times.
2. Remove debris
Remove debris from engine, muffler, and moving parts.
1. Engine debris. Debris on a hot engine can be a fire hazard. Clean debris and chaff from
engine cylinder head, cylinder head fins, blower housing rotating screen, and muffler
areas. Avoid contact with hot muffler.
2. Other debris. Debris on moving parts can cause excess wear. Clear debris from the slide
beam, wedge, and endplate.
3. Fuel tank / lines
Check fuel tank and fuel lines for leaks.
Any fuel leak is a fire hazard. Fix any fuel leaks before starting engine.
4. Mechanical parts
Check to be sure that all nuts and bolts are tight to make sure the log splitter is in safe
working condition.
Step One: Inspect and maintain log splitter before each use
If the log splitter has been used previously, it must be inspected and maintained BEFORE EACH SUBSEQUENT USE.
IMPORTANT:
If a part needs replacement, only use parts that meet the manufacturer's specifications. Replacement parts that do not meet
specifications may result in a safety hazard or poor operation of the log splitter.
9
Page 10

Before Each Use-Inspection / Maintenance
5. Hydraulic system
6. Hydraulic oil level
7. Engine
Inspect and perform engine maintenance as directed in the engine manual.
8. Spark arrestor
muffler
If the engine is equipped with a spark arrestor muffler, clean and inspect it regularly
(follow spark arrestor manufacturer's service instructions).
Replace if damaged.
9. Tires
10. Shields / guards
Replace all guards and shields after servicing the log splitter.
Check the hydraulic system carefully:
1. Visually inspect all hoses, tubing, clamps/fittings, pump, and cylinder for cracks, fraying,
kinks, or other damage.
2. Check all components for oily residue, which may indicate a leak.
Do NOT operate the log splitter if there is any indication of damage or oily residue. Small leaks
in hydraulic lines can cause severe injuries and can also be an indication of catastrophic failure
in the near future. The life of hydraulic hoses may be from a few months to a few years,
depending on use and storage patterns.
WARNING: High fluid pressures and temperatures are developed in hydraulic log
splitters. Hydraulic fluid escaping through a pin hole sized opening can burn or
puncture skin, resulting in wounds that could cause blood poisoning, infection,
disability, gangrene, amputation, or death. Therefore, the following instructions should
be heeded at all times when inspecting or servicing the hydraulic components of the log
splitter:
Stop the engine, disconnect the spark plug, and move all control valve handles back
and forth to relieve pressure before changing or adjusting hydraulic system
components such as hoses, tubing, fittings or other components.
NEVER check for leaks with your hand. Leaks can be located by holding a piece of
cardboard or wood (at least two feet long) with your hand at one end and passing the
other end over the suspected area (wear eye protection). Look for discoloration of the
cardboard or wood.
NEVER adjust the pressure setting of the pump or valve.
If injured by escaping fluid, no matter how small the wound is, see a doctor at once.
A typical injection injury may be a small puncture wound that does not look serious.
However, severe infection or reaction can result if proper medical treatment is not
administered immediately by a doctor who is familiar with injection injuries.
Check the hydraulic oil level by the oil monitor.
Fill if the oil is level is under the middle of the monitor.
Make sure tires are fully inflated and in good repair if you will be towing the splitter.
See tire sidewall for recommended tire pressure.
WARNING:
Do not over-inflate tires. Serious injury can occur if tire explodes.
When seating a bead after repair, do not exceed 30 PSI. Pressures higher than 30 PSI can
cause the tire and wheel to rupture and explode.
10
Page 11

4. Add gasoline/
WARNING
Gasoline is highly flammable and explosive. You can be burned or seriously injured when handling
fuel. Use extreme care when handling gasoline.
1. Engine off / cool
2. Outdoor location
3. Remove gas cap
Remove engine gas cap.
5. Spills / splashes
Clean up fuel spills /splashes immediately.
1. Move the log splitter away from spilled fuel on the ground.
2. Wipe fuel off engine and wait 5 minutes for excess fuel to evaporate before starting engine.
3. Gas soaked rags are flammable and should be disposed of properly.
4. If gasoline is spilled on your skin or clothes, change clothes and wash skin immediately.
6. Replace gas cap
Replace gas cap securely before starting engine.
Step Two: Fueling
The engine must be off and allowed to cool at least two minutes before adding fuel.
Fill fuel tank outdoors – never indoors.
Before Each Use - Fueling
WARNING: A running engine is hot enough to ignite fuel. Never add fuel or remove gas
cap if engine is running or still hot.
WARNING: Gasoline vapors can ignite if they collect inside an enclosure. Explosion can
result.
Add gasoline/diesel according to the engine user's manual requirements.
Diesel
11
Page 12

spark arrestor. Contact your dealer for information
Before Each Use – Work Site Selection and Set-up
WARNING
It is important to select an appropriate work site and properly set up the log splitter in order to
minimize the risk of slips and falls, equipment rolling or tipping over, carbon monoxide poisoning,
and accidental fires.
1. Select location
2. Fire precautions
Take the following precautions against fire:
1. IMPORTANT: If your splitter will be used near any unimproved forest, brush, or
grassy covered land, then engine must be equipped with a spark arrestor.
(See the "Specifications" section of this manual to determine if your splitter already has a
obtaining a spark arrestor for your log splitter if it is unequipped.)
2. Make sure you comply with applicable local, state and federal codes.
3. Keep a fire extinguisher available (classified for both ordinary combustibles & flammable
liquids) as a precautionary measure when operating the log splitter in dry areas.
3. Position splitter 7'
from any
combustibles or
flammable liquids
Position muffler at least 7 ft. from combustible objects during operation.
Hot exhaust fumes from engine could cause fire. Also, hydraulic oil leaking or spraying on hot
engine can ignite.
4. Lock both
outrigger legs
DOWN
Lock both the outrigger legs in the "DOWN" position.
5. Block wheels
Block the wheels to prevent unintended movement of the log splitter.
Lock front
outrigger leg in
the down
position
Lock rear
outrigger leg in
the down
position
Step Three: Work site selection and log splitter set-up
Select an appropriate location for operating the log splitter.
Requirements:
1. Dry-level surface with good footing. Stay clear of areas with mud, ice, tall grass, weeds,
brush, or snow.
2. Outdoors, away from air intakes.
WARNING: The running engine gives off carbon monoxide, a poisonous gas that can
kill you. You CANNOT smell it, see it, or taste it.
ONLY run log splitter OUTDOORS and away from air intakes. NEVER run log splitter
inside homes, garages, sheds, or other buildings or semi-enclosed spaces. These spaces can
trap poisonous gases, EVEN if you run a fan or open windows.
If you start to feel sick, dizzy, or weak while using the log splitter, shut off the engine and
get to fresh air RIGHT AWAY. See a doctor. You may have carbon monoxide poisoning.
12
Page 13

Splitting Operation
WARNING
Before starting this log splitter, review the following instructions and safety information for safe
operation of the log splitter.
Failure to follow these rules may result in serious injury to the operator or bystanders from moving
parts that crush, cut, or entangle from flying objects, burns, fire, falling or tripping, or from carbon
monoxide poisoning.
General safety information:
Read manual. Do not allow anyone to operate the log splitter who has not read the Owner's Manual or has not
been instructed on the safe use of the splitter. The log splitter owner should instruct all operators in safe log
splitter operation.
Age restrictions. Never allow anyone under 16 years old to operate the log splitter. Anyone 16 years and older
must be trained and supervised by a trained adult.
Intended use. Log splitters should only be used for splitting wood logs, lengthwise with the grain. Do not use for
other purposes as unforeseen hazards may result.
Modifications. Never modify or alter the log splitter in any way. Modifications can create serious safety
hazards and will void the warranty:
Attachments. Never add attachments to the splitter, except for authorized accessories supplied by the
manufacturer with instructions for safe installation and use.
Engine speed. The maximum engine speed is preset at a safe limit. Never attempt to modify the engine speed
setting to run at a higher speed.
Fuel/exhaust system. NEVER modify or add to the exhaust system, fuel tanks, or fuel lines. Fire can result.
Remote control. NEVER attach a rope, cable, or other remote device to the splitting control.
Splitting wedge. NEVER attempt to change the height or speed of the splitting wedge.
Pressure setting. NEVER increase the pressure setting of the pump or control valve.
Safety equipment / controls. Always operate the log splitter with all safety equipment in place and in good
working order, and all controls properly adjusted for safe operation.
Know how to stop. Be thoroughly familiar with all controls and with the proper use of the equipment. Know
how to stop the log splitter and relieve system pressures quickly if needed.
Operating speed. Always operate the log splitter at the manufacturer's recommended speed. The maximum
speed of the engine pump and wedge are preset within safe limits.
Daylight only. Only use the log splitter in daylight so you can see what you are doing.
Smoking / sparks. Never smoke while operating the log splitter, and never operate near sources of sparks or
flames.
Under the influence. Never operate, or let anyone else operate, the log splitter while under the influence of
alcohol, drugs, or medication.
Unattended. Never leave the machine unattended while the engine is running.
Refueling. Never refuel the engine until it has cooled at least two minutes.
Adjusting / repairing. Always make sure the engine is off before cleaning, repairing or adjusting the splitter,
except as recommended by the manufacturer. In addition, disconnect the spark plug and move all control handles
back and forth to relieve system pressure such as
hoses, tubing, fittings or other components.
before changing or adjusting hydraulic system components
13
Page 14

Splitting Operation
1. Put on
protective
clothing /
gear
Wear the following protective clothing and safety gear:
1) Eye protection. Always wear safety glasses or goggles when operating the machine. Pieces
of log may fly out and serious eye injury can occur.
2) Boots. Falling logs can crush feet. Always wear safety shoes or heavy boots when operating
or helping to load logs.
3) Gloves. Wear snug fitting gloves without drawstrings or loose cuffs.
4) Hearing protection. The use of earplugs or other hearing protection device is recommended.
5) No Loose / dangling. Loose or dangling apparel can become entangled in moving parts.
Never wear jewelry or loose-fitting clothing.
2. Lock & block
Block the wheels to prevent unintended movement of the log splitter. Check that:
1) The outrigger legs are both locked in the DOWN position.
2) The wheels are blocked.
3. Set to
horizontal
or vertical:
a) Set to
Horizontal
position
Horizontal Splitting Position
Horizontal
Lock
et log splitter into either the horizontal or vertical splitting position
S
The HORIZONTAL splitting position is used for lighter logs that can be easily loaded onto the beam.
The VERTICAL splitting position is used for light logs as well as heavy logs that are difficult to load
onto the beam.
Note:
Musculoskeletal injury can result from lifting logs onto the log splitter if proper lifting techniques
are not used or the logs are too heavy for a person's size, weight, or strength. In some cases, logs
as small as 8" in diameter and 14" in length may be heavier than what some persons should be
repeatedly lifting onto the splitter.
The use of the vertical splitting position can greatly reduce the need to lift logs onto the splitter.
Employers are advised to consider NIOSH lifting guidelines when assigning employees to log
splitting tasks for an extended period of time.
WARNING: NEVER change splitting positions with the engine running. You may
contact the muffler and receive serious burns.
Make sure beam is locked securely in the horizontal position by checking the horizontal lock.
Rear outrigger leg must be locked in horizontal splitting position.
14
Page 15

b) Set to
Vertical
position
4. Start engine
Lifting handle
Vertical Splitting Position
Splitting Operation
1) Lock rear outrigger leg in down position.
2) Pull out horizontal lock catch pin, grasp lifting handle and lift beam until it rotates into
vertical position.
WARNING: Crush hazard. The beam is heavy – do not let it just drop. It could crush
fingers or cause damage to the splitter.
3) Lock in vertical position using catch pin through the vertical lock.
4) To return to horizontal position, unlock vertical position, grasp lifting handle and lower
beam carefully in a controlled manner until it rests on the tow bar, lock beam in the
horizontal position with catch pin.
Vertical lock
Start the engine.
See the engine owner's manual for engine starting instructions
NOTE:
a) Make sure the hydraulic oil is above 10F before starting the engine. Cold hydraulic oil
can damage the hydraulic pump.
b) If outdoor air temperature is below 32F, allow log splitter to warm up by extending and
returning the wedge several times before splitting wood.
WARNING:
Burns. To avoid burns, stay clear of hot muffler if you are starting a warm engine.
Carbon monoxide. The running engine gives off carbon monoxide, a poisonous gas
that can kill you. You CANNOT smell it, see it, or taste it. If you start to feel sick,
dizzy, or weak while using the log splitter, shut off the engine and get to fresh air
RIGHT AWAY. See a doctor. You may have carbon monoxide poisoning.
15
Page 16

5. Load log
Splitting Operation
Load log onto beam with a cut end against the endplate – positioned for a lengthwise cut.
Notes:
a) The log splitter is designed only for cutting lengthwise with the grain, NOT for cutting
across the grain.
Correct Log Orientation Incorrect Log Orientation
WARNING: ALWAYS keep hands and feet away from the endplate, wedge, and partially
split logs while loading, operating and unloading the log splitter.
Important safety instructions:
Hold bark side. Hold the bark side of logs when loading or positioning, never the ends.
Never place your hands or any part of your body between a log and any part of the log
splitter.
NOTE for vertical position loading: Place the log on the endplate and turn it until it leans
against the beam and is stable. If the log is too big or oddly shaped, stabilize the log with
wooden shims between the log and endplate or ground. DO NOT use your leg or knee to
stabilize the log. NEVER stabilize the log by placing your hand on top of the log.
Wedge moving. NEVER load or unload logs while the wedge is moving.
Straddling / reaching across. Never straddle, reach across, or step over the beam while the
engine is running and the log splitter is in the horizontal position. You could trip, actuate
the controls, and get seriously injured.
Unsplit log pile. Do not pile logs to be split in a place that will make you reach across the
log splitter in order to load them.
Square log ends. Logs that are not cut square can slide out while splitting and become a
safety hazard or cause excessive force to log splitter components. Use a chainsaw to cut
logs square on each end before attempting to split them.
Single log. Never attempt to split more than one log at a time. Pieces of log can
unexpectedly be thrown from the machine causing serious injury.
Split along grain. Do not use the log splitter to split logs across the grain. Doing so will
damage the log splitter and could also cause pieces of log to be thrown, injuring the operator
or bystanders.
Forked logs. Splitting forked logs can cause damage the log splitter. Trim the forked log
with a chain saw prior to splitting the log.
Changing splitting position. Do not change splitting positions (horizontal/vertical) with
the engine running. You may contact the muffler and receive serious burns. Be careful to
avoid contact with hot muffler even after the engine is turned off.
16
Page 17

operate the log splitter from the manufacturer
person is assisting in loading logs, the operator must NEVER actuate the Split
. Remove both hands from log before activating Split Control Lever.
. Many accidents occur when there is more than one person involved in
Splitting Operation
6. Extend
wedge
Move Split Control Lever toward endplate to extend wedge and split log.
Important safety instructions:
Operator position. ALWAYS 's indicated
OPERATOR POSITION. (See diagram above.) Other positions are unsafe because they
can increase the risk of injury from crushing, cutting, flying objects, or burns.
Remove hands
Hand activate. Use only your hand to operate the Split Control Lever. Never use any
other body part, or a rope, cable, or other remote device to actuate the control.
Second person
loading and operating the log splitter. Only one person should operate the controls. If a
second
Control Lever until the assistant and all bystanders are at least 10 feet away. NEVER
allow an assistant to hold the log in place while the operator actuates the Split Control
Lever.
7. Stop wedge
8. Important
STUCK LOG
procedure
If a log does not split completely and becomes stuck on the wedge, follow the instructions
below to remove the log.
A log can become stuck to the wedge if the wedge becomes embedded in the log and the log
doesn't split and separate. This can happen if the log is too stringy or tough to split completely.
A stuck log will move back with the wedge on the initial attempt to retract the wedge. If this
happens, retract the wedge completely to allow the splitter to strip the log from the wedge.
Keep hands clear of log and wedge while wedge is retracting.
SPLIT CONTROL LEVER OPERATION
Release Split Control Lever to stop wedge movement when log is split.
WARNING: Cracks in logs can close quickly and pinch fingers. Keep fingers away from
any cracks that open in partially split logs.
SPLIT CONTROL LEVER OPERATION
17
Page 18

Splitting Operation
9. Return
wedge
10. Remove split
wood
Remove split wood from area.
Move each log away from log splitter after it is split. Split logs left near the log splitter are a trip
hazard.
11. After use
WARNING: NEVER attempt to remove a stuck log by:
Modifying the splitter.
Adding attachments to the splitter.
Personal injury could result from log or metal pieces flying out at high speed toward the
operator or bystanders, or the splitter could become damaged.
Move Split Control Lever away from end plate to return wedge.
Once the control valve is actuated in the return direction, the wedge is designed to keep returning
by itself completely and then stop automatically.
WARNING:
Stay clear while the wedge is returning. It is still powerful enough on the return stroke to cause
serious injury.
SPLIT CONTROL LEVER OPERATION
1. Turn off engine.
2. Remove engine debris.
Debris on a hot engine can be a fire hazard. After the engine is off, clean debris and chaff from
engine cylinder head, cylinder head fins, blower housing rotating screen, and muffler areas.
WARNING: Avoid contact with hot muffler.
3. Return to horizontal position.
If in the vertical position, return log splitter to the horizontal position for greater stability and to
prepare for transportation. Avoid contact with hot muffler.
18
Page 19

Storage
WARNING
Gasoline vapors can ignite and cause a fire. Select a well-ventilated storage away from
sources of heat, flame, or sparks.
1. Retract wedge
Retract the wedge completely to keep the rod protected from corrosion.
2. Cool
Allow the machine to cool 5 minutes before storing.
3. Wipe with oily rag
Wipe the beam and wedge with an oily rag to prevent corrosion.
4. Engine manual
Refer to the engine manual for proper engine storage instructions.
CAUTION: Gasoline will oxidize and deteriorate in storage. Old gasoline in
the engine will cause hard starting and leave gum deposits that can clog the
fuel systems. Deterioration problems may occur within a few months, or even
less if gasoline was not fresh when you filled the tank.
Short-Term Storage:
1. Consider adding a fuel stabilizer to extend fuel storage life.
2. Leave the fuel valve lever in the OFF position to reduce the possibility of
fuel leakage.
Long-Term Storage: (between infrequent uses and at end of season)
Drain the fuel tank and carburetor as instructed in the engine owner's manual.
Important Safety Instructions
Always drain fuel from tank in outdoor, well-ventilated area.
Stay away from sources of heat, flame, or sparks while handling fuel.
Clean up fuel spills/splashes immediately.
5. Splitter storage location
Follow the instructions below for storing your log splitter between uses.
WARNING: A hot engine can be a fire hazard.
Store the log splitter in a location away from corrosive material, sources
of heat, open flames, sparks or pilot lights.
WARNING: Never store log splitter inside where there is a source of
heat or an open flame, spark or pilot light – such as water heaters, space
heaters,
furnaces, clothes dryers, or other gas appliances – EVEN IF the log
splitter's gas tank is empty, residual gasoline vapors could ignite.
NOTE: Do not store the log splitter near fertilizer or any other corrosive
material.
19
Page 20

3. Nuts and Bolts
Remove hydraulic oil tank cover.
Periodic Maintenance
WARNING
ALWAYS shut off the engine, disconnect the spark plug, and relieve system pressure before
cleaning, adjusting, or repairing the splitter. Relieve system pressure by moving Split Control
Lever back and forth several times.
1. Engine
maintenance
Perform engine maintenance as specified in engine owner's manual.
2. Hydraulic Oil
Change
Change Hydraulic Oil Annually or Every 100 Hours.
1. Use 10wt AW32, ASLE H-150, or ISO32 oil.
2. Relieve hydraulic system pressure by moving Split Control Lever back and forth
several times.
3.
4. Remove the drain plug from the hydraulic tank to drain the hydraulic oil into a 10
gallon pan.
5. Remove suction strainer and wipe off debris with a dry cloth.
6. Fill the hydraulic tank with wedge retracted.
7. Dispose of used oil at an oil-recycling center. Used hydraulic oil is hazardous waste.
8. Extend and retract wedge 5 (five) times to purge air from the system.
9. Check hydraulic oil level and fill if necessary. Note: Do not thread in the oil dipstick
when checking the hydraulic oil level.
In addition to the maintenance performed with each use, periodic maintenance should also be performed
according to the following schedule.
IMPORTANT:
If a part needs replacement only use parts that meets the manufacturer's specifications. Replacement parts that do
not meet specifications may result in a safety hazard or poor operation of the log splitter.
WARNING: High fluid pressures and temperatures are developed in hydraulic log
splitters. Hydraulic fluid escaping through a pin hole sized opening can burn or puncture
skin, resulting in wounds that could cause blood poisoning, infection, disability, gangrene,
amputation, or death. Therefore, the following instructions should be heeded at all times
when inspecting or servicing the hydraulic components of the log splitter.
NEVER check for leaks with your hand. Leaks can be located by holding a piece of
cardboard or wood (at least two feet long) with your hand at one end and passing the
other end over the suspected area (wear eye protection). Look for discoloration of the
cardboard or wood.
NEVER adjust the pressure of the pump or valve.
If injured by escaping fluid, no matter how small the wound is, see a doctor at once. A
typical injection injury may be a small wound that does not look serious. However,
severe infection or reaction can result if proper medical treatment is not administered
immediately by a doctor who is familiar with injection injuries.
Make sure all nuts and bolts are tightend
20
Page 21

Troubleshooting
WARNING
Before troubleshooting or attempting to service, read the following safety instructions to avoid serious injury
to the operator or bystanders from moving parts that can crush or cut, burns, fire or explosion, or escaping
high pressure hydraulic fluid.
Problem
Wedge will not move
Solution: A,D,E,H,J
Slow wedge speed when extending or retracting
Solution: A,B,C,H,I,K
Wood will not split or splits extremely slow
Solution: A,B,C,F,I,K
Engine bogs down during splitting
Solution: G
Engine stalls under low load condition
Solution: D,E
Cause
Solution
A- Insufficient oil to pump
Check oil level in reservoir
B- Air in oil
Check oil level in reservoir, check for leaks in the suction
line
C- Excessive pump inlet vacuum
Check pump inlet hose for blockage or kinks
D- Blocked hydraulic lines
Flush and clean the splitter hydraulic system
E- Blocked control valve
Flush and clean the splitter hydraulic system
F- Low control valve setting
Adjust control valve with a pressure gauge
G- High control valve setting
Adjust control valve with a pressure gauge
H- Damaged control valve
Return control valve for authorized repair
I- Internal control valve leak
Return control valve for authorized repair
J- Damaged cylinder piston
Return cylinder for authorized repair
K- Internally damaged cylinder
Return cylinder for authorized repair
Important Safety Instructions:
1. Engine off. Always make sure the engine is off before cleaning, repairing or adjusting the splitter, except as
recommended by the manufacturer.
2. Hydraulic safety. High fluid pressures and temperatures are developed in the hydraulic log splitters.
Hydraulic fluid escaping through a pin hole sized opening can burn or
puncture skin, resulting in wounds that could cause blood poisoning, infection, disability, gangrene,
amputation, or death. Therefore, the following instructions should be heeded at all times when inspecting or
servicing the hydraulic components of the log splitter:
Stop the engine, disconnect the spark plug, and move all control valve handles back and forth to relieve
pressure before changing or adjusting hydraulic components such as hoses, tubing, fittings, or other
components.
Do not remove the hydraulic oil fill cap when the engine is running. Hot oil can escape causing severe
burns. Allow the log splitter to cool completely before removing the hydraulic oil fill cap.
Do not adjust the pressure setting to the pump or valve.
Do not check for leaks with your hands. Leaks can be located by holding a piece of cardboard or wood (at
least 2 feet long) with your hand at one end and passing the other end suspected area (wear eye
protection). Look for discoloration of the cardboard or wood.
If injured by escaping fluid, no matter how small the wound is, see a doctor at once. A typical injection
injury may be a small puncture that does not look serious. However, severe infection or reaction can
result if proper medical treatment is not administered immediately by a doctor who is familiar will
injection injuries.
21
Page 22

5"354" /22T, 4.5"/30
/ 35
/ 30T
/ 22
/16gpm/ 18gpm
Maximum Pressure……………….
Maximum Flow ………………….
Hydraulic Fluid Capacity ………..
Hydraulic Fluid Type …………….
Coupler Size ……………………...
Maximum Towing Speed…………
Maximum Log Length …………...
Hydraulic Cylinder Bore …………
Hydraulic Cylinder Stroke ……….
Maximum Log Diameter ………...
3500 psi
11gpm
3.5 gallons T
4 gallons
5 gallons T
5 gallons/ 40T
5 gallons/ 45T
10wt AW32, ASLE
H-150, or ISO32
2” Ball / 50mm Ball
55MPH
25 ”
T, T,
5”/40T, 5.5”/45T
23.6 ”
18 ”/19”/20”/25”/25”
Specifications
The manufacturer reserves the right to make improvements in design
and/or changes in specifications at any time without incurring any
obligation to install them on units previously sold.
22
Page 23

Exploded View
23
Page 24

Part List
Part
No.
Description Qty
PartN
o.
Description Qty
1 I Beam 1 43 Bolt M8x30 8
2 Wedge 1 44 Hydraucli Gear Pump 1
3 Bolt M12x50 8 45 Woodruff Key 1
4 Washer φ12 18 46 Hexagon Socket Set Screws M6x10 1
5 Bolt M12x75 1 47 Gear Pump Coupling 1
6 Liner plate 2 48 Ordinary Flat Key 1
7 Track Slab 2 49 Engine Coupling 1
8 Lock Nut M12 14 50 Engine Bushing 1
9 1/2”-22x1.5 Corner Connector 1 51 Hinge Pin 1
10 Hydraulic pipe B 1 52 Coupling Block 1
11 Pipe Connector 1 53 Coupling Cover 1
12 Control Valve 1 54 Hydraulic Oil Tank Cover 1
13 1/2”-1/2” Corner Connector 4 55 Phillips Pan Head Screws M5x8 4
14 Hydraulic pipe C 1 56 Bolt M8x40 4
15 Hydraulic pipe A 1 57 Engine 1
16 Hydraulic Cylinder 1 58 Hydraulic Oil Monitor 1
17 R Pin 4 59 Bolt M8x16 4
18 Handle Grip 1 60 Wheel Guard 2
19 Handle 1 61 Hydraulic Oil Tank 1
20 Cylinder Lock Pin 1 62 Wheel 16” 2
21 Hitch Coupler 2inch/50mm 1 63 Thin Slotted Nut M24x2 2
22 Safety Chain 2 64 Cotter Pin φ4x36 2
23 Lock Nut M10 14 65 Dust Cover 2
24 Washer φ10 28 66 Spring Washer φ10 4
25 I Beam Lock Pin (Rear) 1 67 Bolt M10x30 4
26 Return Spring 1 68 Engine Block 1
27 Washer φ20 1 69 Oil Drain Plug M16x1.5 1
28 Shaft Circlip φ19 1 70 Groupware Washer φ16 1
29 Tow Bar 1 71 Log Cradle 2
30 Bolt M12x80 5 72 Bolt M10x25 8
31 Catch Pin 2 73 Control Valve Operating instruction Plate 1
32 Bolt M10x75 2 74 Hexagon Socket Head Cap Screws M8x40 2
33 Outrigger Leg (Rear) 1 75 Control Valve Handle Grip 1
34 Outrigger Leg (Front) 1 76 Control Valve Handle 1
35 Net Type Oil Filter 40x180-J 1 77 Pin Axis 5x25B 1
36 Oil Filter Core ZG1 1/2 1 78 Cotter Pin φ1.6x10 1
37 Inlet Pipe Fitting G1 1 79 Roller Chain 1
38 Hoop 2 80 Chain Plate 1
39 Suction Pipe 1 81 Lock 1
40 Lock Nut M8 14 82
41 Spring Washer φ8 12 83
42 Washer φ8 24 84
24
Page 25

Assembly Instructions
Closely inspect all log splitter components.
If you have missing components, please contact your local dealer
If you have damaged components, contact the Freight Company that delivered the unit and file a claim.
CAUTION! Heavy lifting required. Some of the components in these assembly instructions are heavy and cannot
be lifted by one person safely. Please plan on assembling this product when another person can be available to help out.
Tools needed: Adjustable wrenches Torque Wrench, Soft Faced Mallet, Flat Blade Screw Driver
25
Page 26

Assembly Instructions
26
Page 27

Step 1:
·Take all the components from the shipping box.
·Slide the wheel onto the axle.
·Slide the thin slotted onto the axle and fix with cotter pin
·Put the dust cap on the the wheel
·Mount the engine block onto the hydraulic oil tank
·Put the bolt with washer through the engine block holes, fix by lock nut with washer and spring washer
Step 2:
·Mount the front outrigger leg onto tow bar
·Put the bolt and catch pin through the leg hole and fix by lock nut with washer and R pin
Assembly Instructions
27
Page 28

Step 3:
·Mount the tow bar onto hydraulic oil tank,
·Put the bolt with washer through the hole, and fix by lock nut with washer
Step 4:
·Mount the rear outrigger leg onto the tow bar
·Put the bolt and catch pin through the leg hole and fix by lock nut with washer and R pin
Assembly Instructions
28
Page 29

Step 5:
·Put the tow bar end into the middle hole on the beam
·Put the hinge pin through the hole and fix by R pin
Step 6:
·Mount the control valve onto the hydrualic cylinder
Assembly Instructions
29
Page 30

Step 7:
·Put the engine onto the engine block
·Put the bolt with washer throught the hole and fix by lock nut with washer and spring washer
Please note the Bolt M8x40,Washer 8, Spring Washer 8 and Lock Nut 8 for 6.5HP engine
And Bolt M10x45,Washer 10, Spring Washer 10 and Lock Nut 10 for 9HP,13HP and 15HP engine
Step 8:
·Mount the hydraulic pipe A one side on pump and another side on control valve,make sure tightened
·Mount the hydraulic pipe B one side on control valve and another side on hydraulic oil tank, make sure tightened
·Mount the hydraulic pipe C one side on control valve and another size on hydraulic cylinder, make sure tightened
·Mount the suction pipe one side on pump and another side on hydraulic cylinder, tighten with hoop
Assembly Instructions
30
Page 31

Step 9:
·Mount the log cradle onto both side of beam, Put bolt with washer through the hole and fix by log nut with washer
·Mount the wheel guard onto both side of hydraulic oil tank, and tighten with bolt and lock nut.
Assembly Instructions
31
 Loading...