

Bradley BTDS76P, BS611 Series, BS815XLT Series, BS916, BTDS76CE-EU Owner's Manual
...
Owner’s Manual
Manuel du Propriétaire
Manual del Propietario
Bedienungsanleitung
Bradley Tec
hnologies Canada Inc.
1-866-508-7514
info@bradleysmoker.com
www.bradleysmoker.com
Printed in China/ Imprimé en Chine/ Impreso en China/ Gedruckt in China
March 2016/Mars 2016/ Marzo de 2016/ März 2016
Model Name 120V Models
240V Models
Bradley 4 Rack Digital Smoker
Bradley 6 Rack Digital Smoker
The Original Bradley Smoker
The Original XLT Bradley Smoker
The Bradley Smart Smoker
BTDS76P
BTDS108P
BS611
*(A-Z)
BS815XLT
*(A-Z)
BS916
BTDS76CE-EU
BTDS108CE-EU
BS611*(A-Z)
BS815XLTCE*(A-Z)
BS916CE

1
Dear Sir or Madam,
Revolut
ionary Smoking Technology for Household Chefs
Welcome to the wonderful experience of backyard smoking and slow
roast cooking. The Bradley Smoker is an insulated smoker oven designed to
automatically generate a continuous flow of clean smoke. It is an outdoor
electrical appliance that enables one to cook, roast, hot smoke, as well as cold
smoke food with consistently superior results using minimal effort.
The Bradley Smoker is unique in that it produces smoke which is four
times cleaner than traditional burn-box chips*. Because it automatically
extinguishes the spent bisquette, it prevents the formation of high temperature
gases and acids. In addition, the Bradley Smoker meets both North American and
European appliance standards.
There are eleven different woods of the Bradley Flavor Bisquettes that are
made especially for your smoker: Alder, Apple, Cherry, Hickory, Maple,
Mesquite, Oak, Pecan, Pacific Blend, Special Blend and Whisky Oak. For recipes
ideas, please have a look on the enclosed recipes booklet and on our website:
www.bradleysmoker.com.
We also suggest you try our Bradley Recipe Collection, Flavor Cures,
Bradley Jerky Racks, Bradley Original Racks, Sausage Hooks, Weather Guard
Covers, Caps, Aprons, and the Bradley Digital Thermometer with meat probe
that takes all the guesswork out of roasting and smoking meat.
I wish you great cooking and smoking for the years to come.
Sincerel
y,
Wade Bradley
*Based on studies and tests performed at The British Columbia Institute of Technology.

2
Important Safety Warnings
Please Save These Instructions
Read All Instructions Before Use
Basic Safety Precautions
• Carefully read through assembly
instructions to prepare smoker for use.
• Do not touch hot surfaces. Use handles or
knobs.
• To protect against electric shock, do not
immerse cord or plugs in water or other
liquids.
• Close supervision is necessary when any
appliance is used by or near children.
• Unplug from outlet when not in use and
before cleaning. Allow to cool before putting
on or taking off parts.
• Do not operate any appliance with a
damaged cord or plug or after the appliance
malfunctions or has been damaged in any
manner.
• The use of accessory attachments is not
recommended by the appliance manufacturer.
May cause injuries.
• Do not modify your smoker from its
original state.
• Do not let cord hang over edge of table or
counter, or touch hot surfaces.
• Do not place on or near a hot gas or electric
burner or in a heated oven.
• Extreme caution must be used when moving
an appliance containing hot oil or other hot
liquids.
• Always attach plug to appliance first, then
plug into the wall outlet. To disconnect, turn
all controls to “off”, then remove plug from
wall outlet.
• Do not use appliance for other than
intended use.
• Do not use any other type of wood other
than Bradley Flavor Bisquettes®.
• Lift and move smoker with care to prevent
strains and back injuries.
• Use caution when reaching into or around
smoker.
• It is recommended that a fire extinguisher
be placed near the smoker. Refer to your local
authority to determine proper size and type of
fire extinguisher.
• Longer detachable power supply cords or
extension cords are available and may be used
if care is exercised in their use.
• If a longer detachable power supply cord or
extension cord is used, the marked electrical
rating of the cord set or extension cord should
be at least as great as the electrical rating of
the appliance.
• The cord should be arranged so that it will
not drape over the counter-top or tabletop
where it can be pulled on by children or
tripped over unintentionally.
• If an extension cord is required, the cord
must be an approved heavy duty cord not
over 1.85 m (6 feet) long.
• Outdoor extension cords should be used
with outdoor use products and are surface
marked with the suffix letter “W” and with a
tag stating “Suitable for use with outdoor
appliances”.
• CAUTION: risk of electric shock. Keep
extension cord connection dry and off the
ground.
• Properly dispose of all packaging.
• Use caution when assembling, operating,
handling or cleaning your smoker as some
edges on the metal parts may be sharp.
Carefully read through Assembly Instructions to prepare smoker for use

3
USE OUTDOORS ONL Y
Carbon Monoxide
Hazard Warning
• Burning wood gives off carbon
monoxide, which may cause death.
• DO NOT burn wood chips inside
homes, vehicles, tents, garages or any
enclosed areas.
• Use only outdoors where it is well
ventilated.
• This appliance is not intended for use by
persons (including children) with reduced
physical, sensory or mental capabilit ies,
or lack of experience and knowledge,
unless they have been given supervision
or instruction concerning use of the
appliance by a person responsible for
their safety.
• Children should be supervised to ensure
that they do not play with the appliance.
• During use the appliance becomes hot.
Care should be taken to avoid touching
heating elements inside the oven.
•WARNING: The appliance and its
accessible parts may become hot during
use.
• This appliance can be used by children
aged from 8 years and above and persons
with reduced physical, sensory or mental
capabilities or lack of experience and
knowledge if they have been given
supervision or instruction concerning use
of the appliance in a safe way and
understand the hazards involved.
Cleaning and user maintenance shall not
be made by children without supervision.
• St eam cleaner is not to be used.
• Do not plug in the smoker until it is
fully assembled.
When in Use
• Do not leave unattended.
• Do not cover or seal the racks or drip
tray with aluminum foil. This can cause
severe damage to your smoker.
• Do not move smoker when in use.
• Do not exceed a temperature of 140 °C
(280 °F).
• Always wear oven mitts or gloves to
protect hands from burns. Do not wear
loose clothing or allow hair to hang
freely.
• Do not use packaging box to cover the
smoker.
• Use only approved grounded electrical
outlet.
• Do not allow
rainwater to come
in contact with
smoker at any time.
Place unit under
center of 3 x 3 x
2.5 m (118 x 118 x
100 inches) shelter.
• To avoid smoke and carbon monoxide,
do not use product indoors, use in a wellventilated area. ,
• To avoid electric shock hazard, please
use under a shelter or gazebo. Do not use
during an electrical storm or in windy
conditions. Do no t use when raining.
• Do not use near gasoline or other
flammable liquids, gases, or where
flammable vapors may be present.
• Do not immerse in water.
Empt
y drip bowl every 2 to 3 hours of
burnt wood bisquettes and refill with
fresh water

4
After Each Use
• Unplug smoker when it is not in use.
See “Maintenance Procedures” section.
• Place extinguished Bradley Flavor
Bisquettes® at a safe distance from all
structures and combustible materials.
• Store the smoker in a dry covered place
out of reach of children.
• Clean out any grease. Grease build up
may cause fire.
• Do not steam clean this appliance.
Save these Instructions
General Maintenance
Refer to the External Components List & Internal Components List Diagrams
Important Safety Precautions
• The Bradley Smoker must be
maintained and cleaned after each use.
• Unplug the Long Power Cord prior to
commencement of any maintenance or
cleaning.
• Do not immerse smoker in water.
• Do not spray inside of smoker with
any kind of appliance cleaner.
• Do not cover or seal the Racks or Drip
Tray with aluminum foil. This can cause
severe damage to your smoker.
• Do not leave unattended when in use.
• Do not spray or clean the smoker with
excessive amounts of water. Instead use a
damp cloth.
Maintenance Procedures
• Use caution when handling and
cleaning your smoker as some metal
edges may be sharp.
• Clean out the Drip Bowl. Dispose of
all burnt Bisquettes carefully as they may
still be hot.
• Wash the Drip Tray, Racks, Bottom
Rectangular Tray and Drip Bowl with
hot water and dish detergent or put
them in the dishwasher.
• Remove food particles and grease
residue from the smoker. If the inside
needs cleaning, wipe it with a damp
cloth.
• Note: T
he tower should have smoke or
black residue on the inside. The more
residues, the better the product will taste.
• The Smok
e Generator should be kept
clean and free of wood chips and grease
at all times. If loose wood chips have
collected in the Smoke Generator,
simply blow or vacuum these particles
away.
• Unplug the Long Power Cord before
removing the Smoke Generator from the
Smoke Tower. Refer to “To remove
Smoke Generator” in “Assembly
instructions”.
• The Bisquettes Burner should be
lightly scraped using a wire brush or
scraper to remove any residue that has
been left by the burning process.

5
• Clean the Damper (at the top of the
Smoker) to ensure it is not stuck.
• Wipe the Door Seal with warm water
and dish detergent to remove any
leftover residues and food particles.
After Cleaning
• Replace Racks, Drip Tray, Bottom
Rectangular Tray and Drip Bowl into
the smoker, making sure all parts are
clean and dry.
• Insert the Smoke Generator back into
the Smoke Tower.
• Make sure the Long Power Cord is
unplugged.
Trouble Shooting
No Power To Smoker
Check that all plugs are correctly and
firmly inserted into sockets. Check fuse
(located on smoke generator). Check to
make sure the outlet, Ground Fault
Circuit Interrupter (GFCI), has not
been tripped.
Bisquettes Will Not Advance
Check the drive guide and clear all loose
wood chips. By cleaning the smoke
generator, Bisquette jamming and
undue wear and tear can be avoided.
Bisquettes Will Not Burn
Completely
Check to see if other electrical
equipment is plugged into the circuit.
The smoker should be plugged into its
own dedicated wall circuit. Check to
make sure the Bisquettes burner is free
of residue build up.
Smoker Oven Not Reaching
Temperatures
Allow smoker oven time to preheat.
Remember, once food is put in the
oven, the temperature will drop, and
slowly rise again. Try closing the
Damper slightly and keeping the
smoker out of the wind. Next, try using
a separate thermometer inside the
smoker oven to ensure the temperature
is reading correctly.
Note: Normal
cooking temperature is
between 95-120 °C (200–250 °F). Keep
in mind that the temperature shown on
the display is for reference only and is not
intended to give exact internal
temperatures of the food. The internal
temperature will be higher closer to the
Heat Element.
If you need further advice, please call our Customer Service (1-866-508-7514).

6
Assembly Instructions
For the 4 and 6-Rack Digital Smokers, please refer to the corresponding sections.
Refer to Part Numbers in External Components List, Internal Components List and Electrical
Connection Set Up
Original Bradley Smoker®
1. Remove smoker from box.
2. Take all packaged parts out of
smoker.
3. Remove all protective packaging
materials from parts.
Install Smoke Dial Generator:
• Attach Smoke Dial Generator (1)
to the Smoker Tower (2).
• Aim the Bisquettes Burner (F)
toward the tower opening.
• Align Smoke Dial Generator key
holes to smoker tower locating
supports (3).
• Secure the Smoke Dial Generator
• Insert the feeder tube (4) on top
of the smoke dial generator and
the desired number of Bradley
Flavor Bisquettes®.
• Plug the Short Power Cord (E -
not shown) from the Smoke Dial
Generator into the Smoker Tower.
Set Up Smoker Tower:
• Place Racks (C) onto side
supports.
• Place Drip Tray (B) “V” facing
down beneath the Racks on the
brass side pins.
• Place the Rectangular Tray (J) on
the bottom of the Smoker.
• Fill the Drip Bowl (D) half full
of water and place in the center
of the Rectangular Tray to catch
burnt Bisquettes. During a long
smoking period, the Drip Bowl
will require changing the water
every 2-3 hours.
• Plug the Long Power Cord (A)
for the smoke generator into an
approved grounded electrical
outlet.
To Remove Smoke Dial Generator:
• Unplug Short Jumper Cord (E).
• Detach smoke dial generator
from the smoker tower by raising
the Smoke Dial Generator gently
upward and pull it outward.
Handling of Packaging
All packaging should be discarded
as per the regulations in your area.
should not be used as a cover when
smoker is in use.
4-Rack Digital Smoker (BTDS76P & BTDS76CE-EU)
6-Rack Digital Smokers (BTDS108P & BTDS108CE-EU)
7
(BS611, BS611EU, BS815XLT & BS815XLTCE)
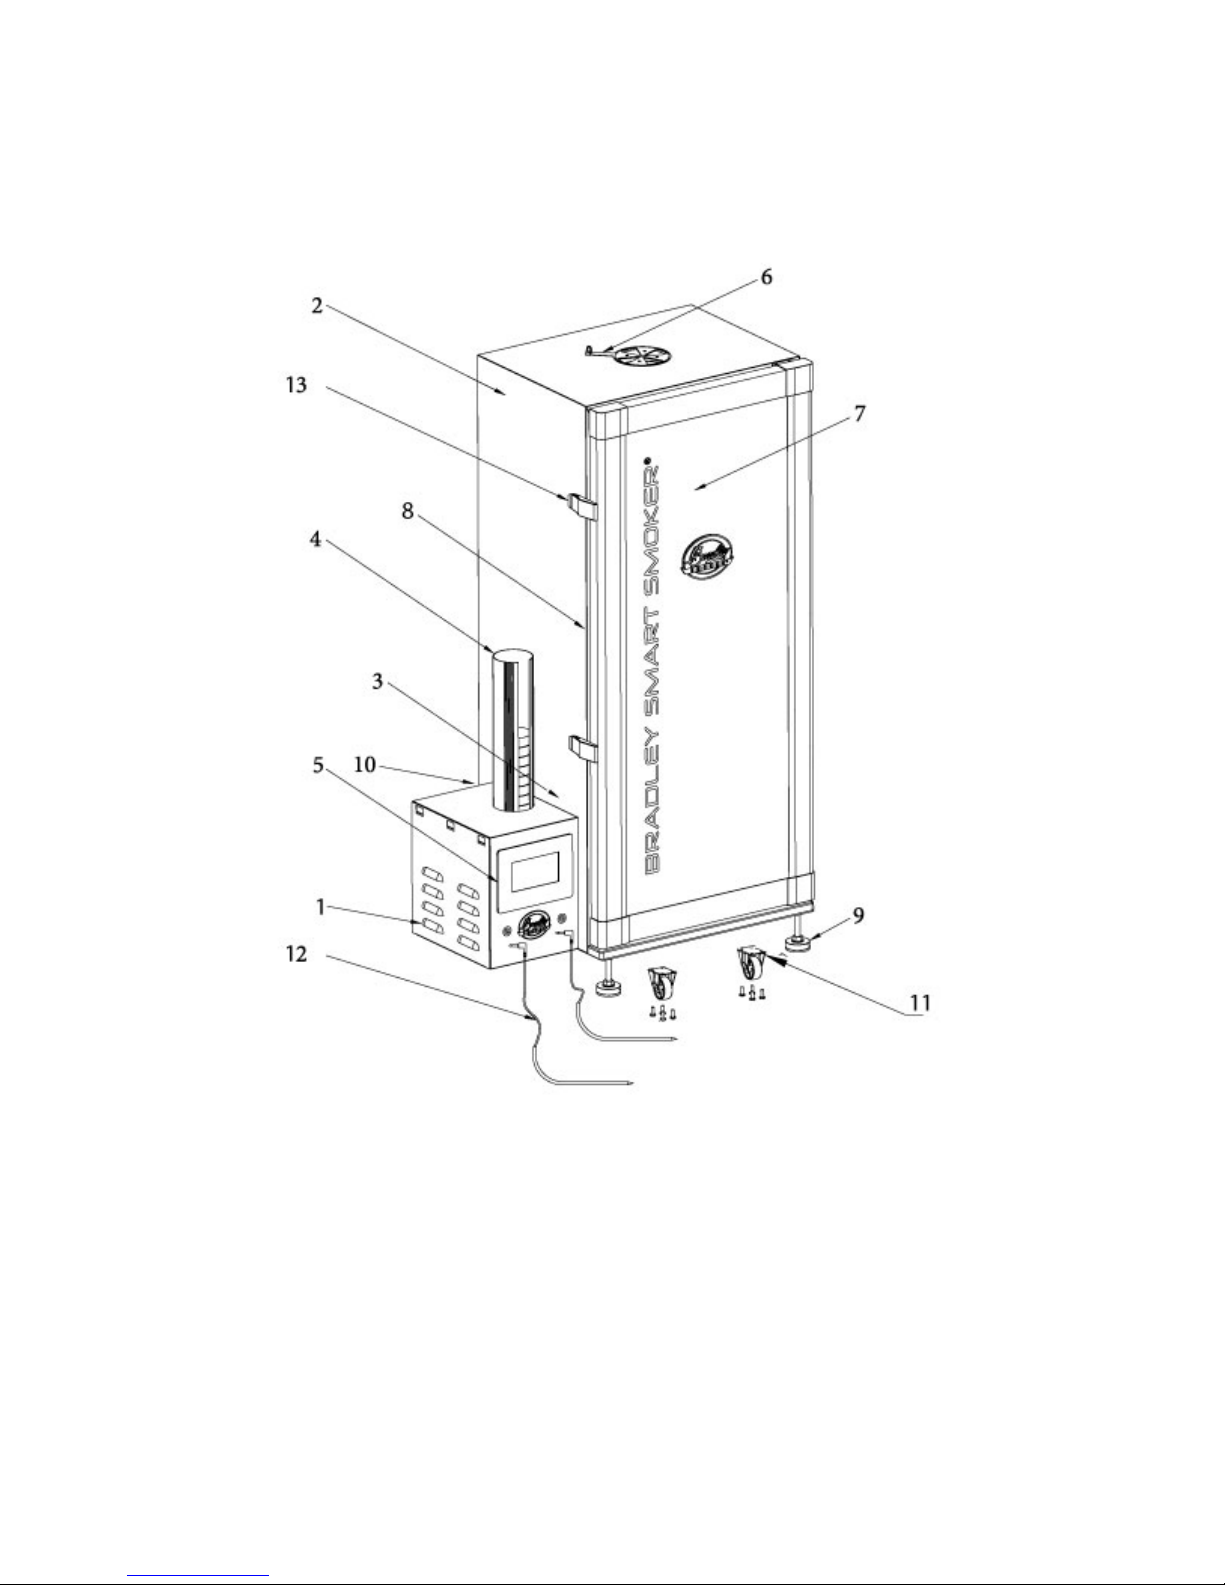
External Components List
External Parts List
1. Smoke Dial Generator
2. Smoker Tower
3. Generator Supports
4. Feeder Tube
5. Smoke Generator Indicator Light
6. Bisquette Advance Button
7. Damper with handle (not shown)
8. Door
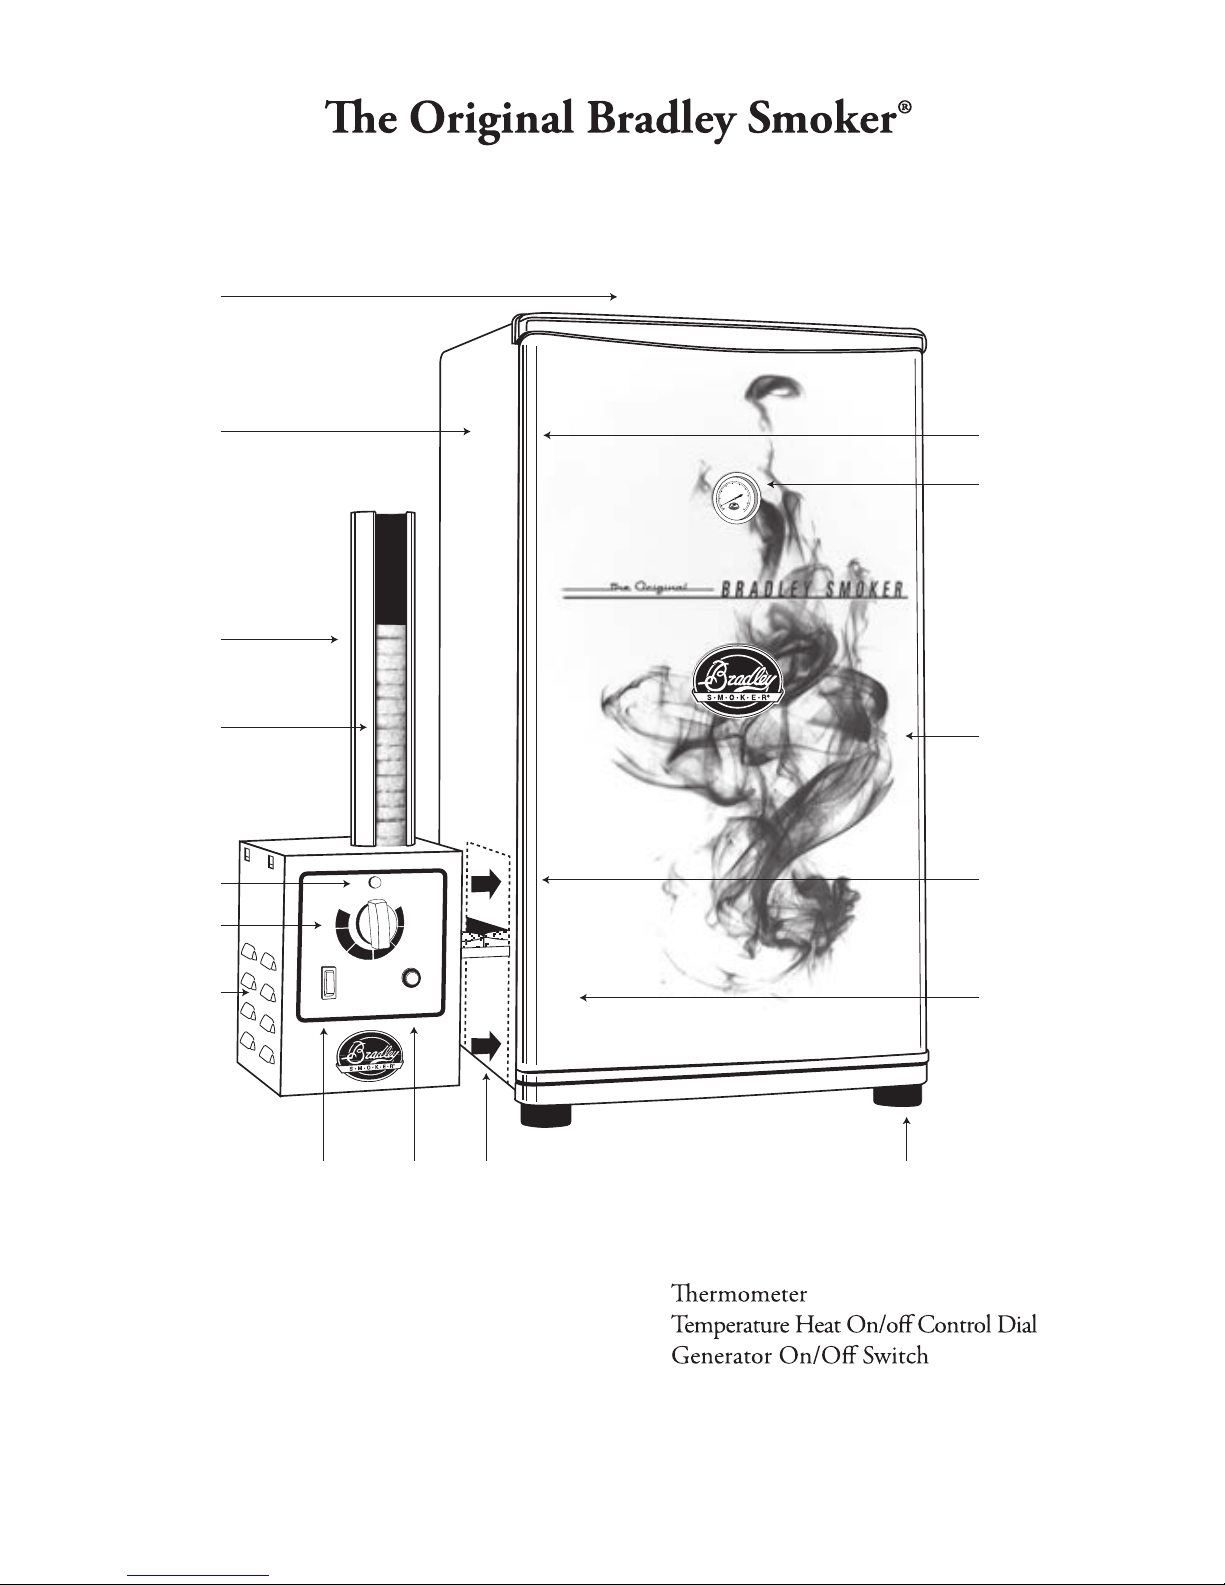
9.
10.
11.
12. Door Seal
13. Rubber Feet
14. Bisquette (not included with smoker)
OFF
BISQUETTE
ADVANCE
MEDIUM
TEMPERATURE
OFF
HIGH
LOW
7
2
4
10
1
5
12
9
8
3
14
14
13311 6
80
100
120
140
160
180
200
40
60
0
20
200
250
300
350
400
0
°F
°C
ON
8
C
H
E
I
A
B
L
G
D
KJF
OFF
BISQUETTE
ADVANCE
ON
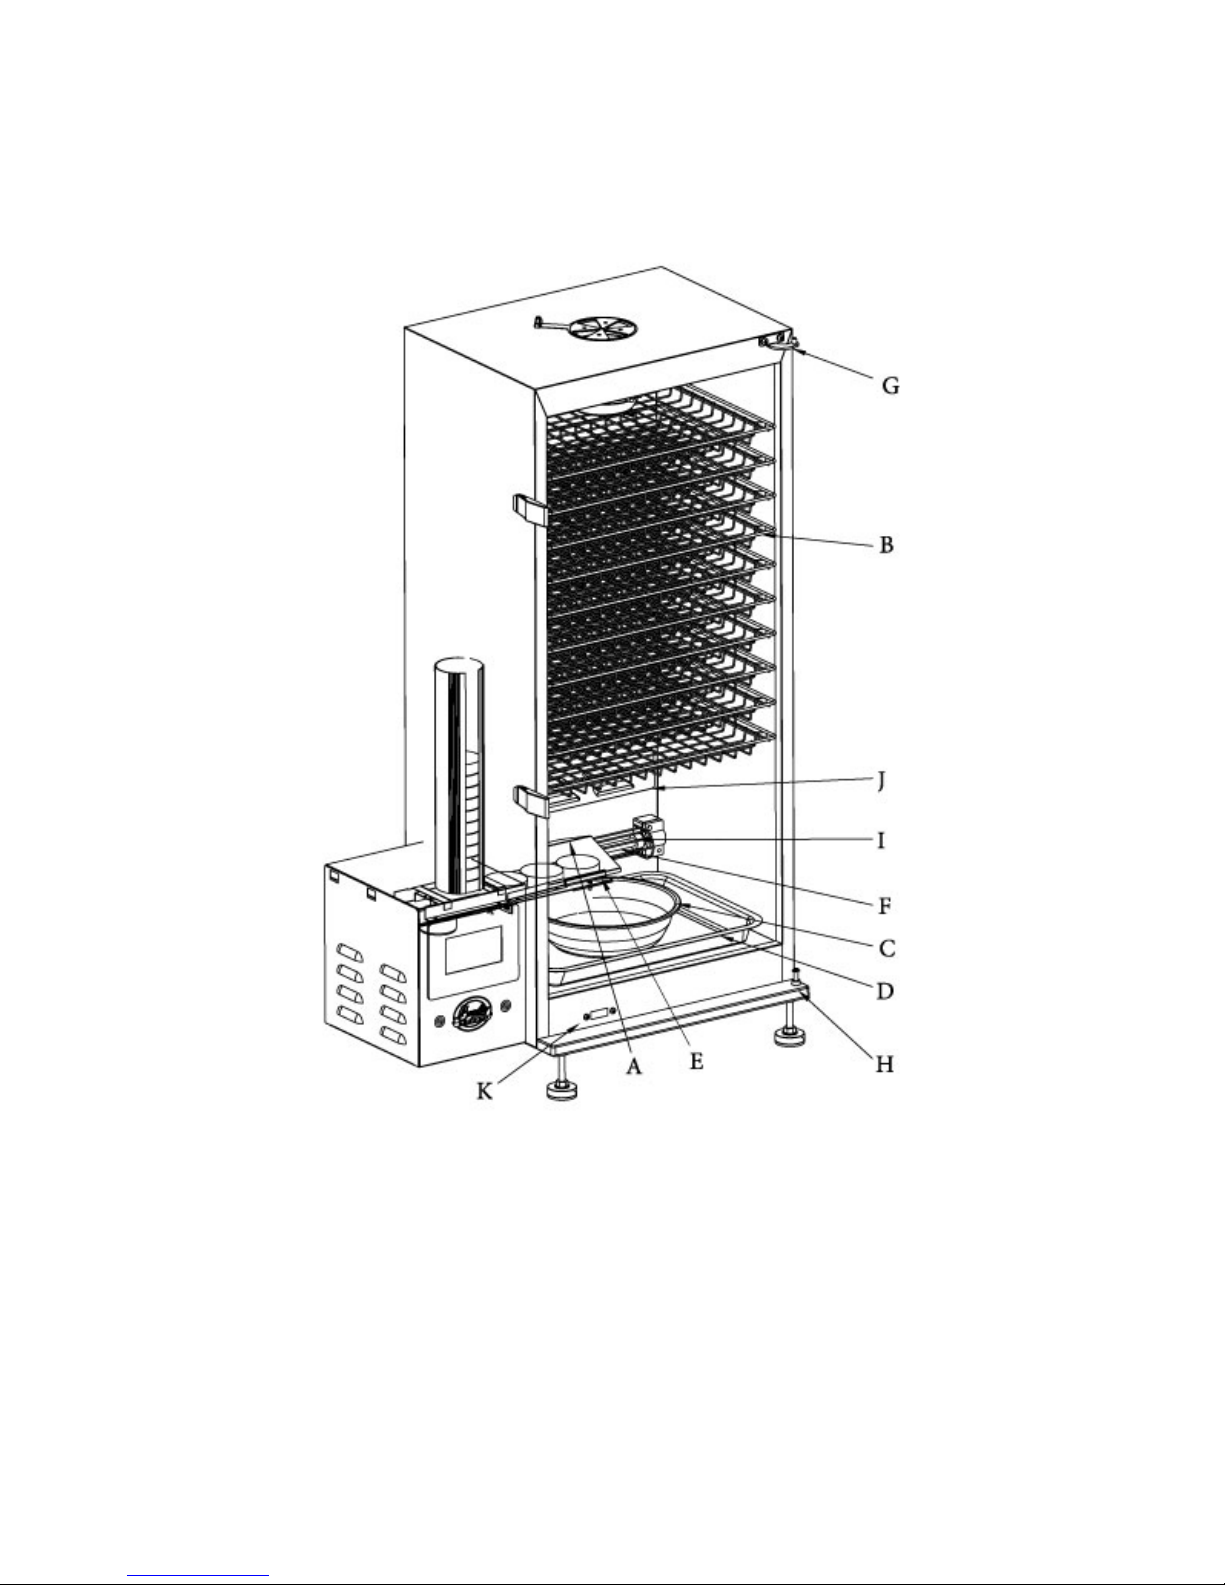
(BS611, BS611EU, BS815XLT & BS815XLTCE)
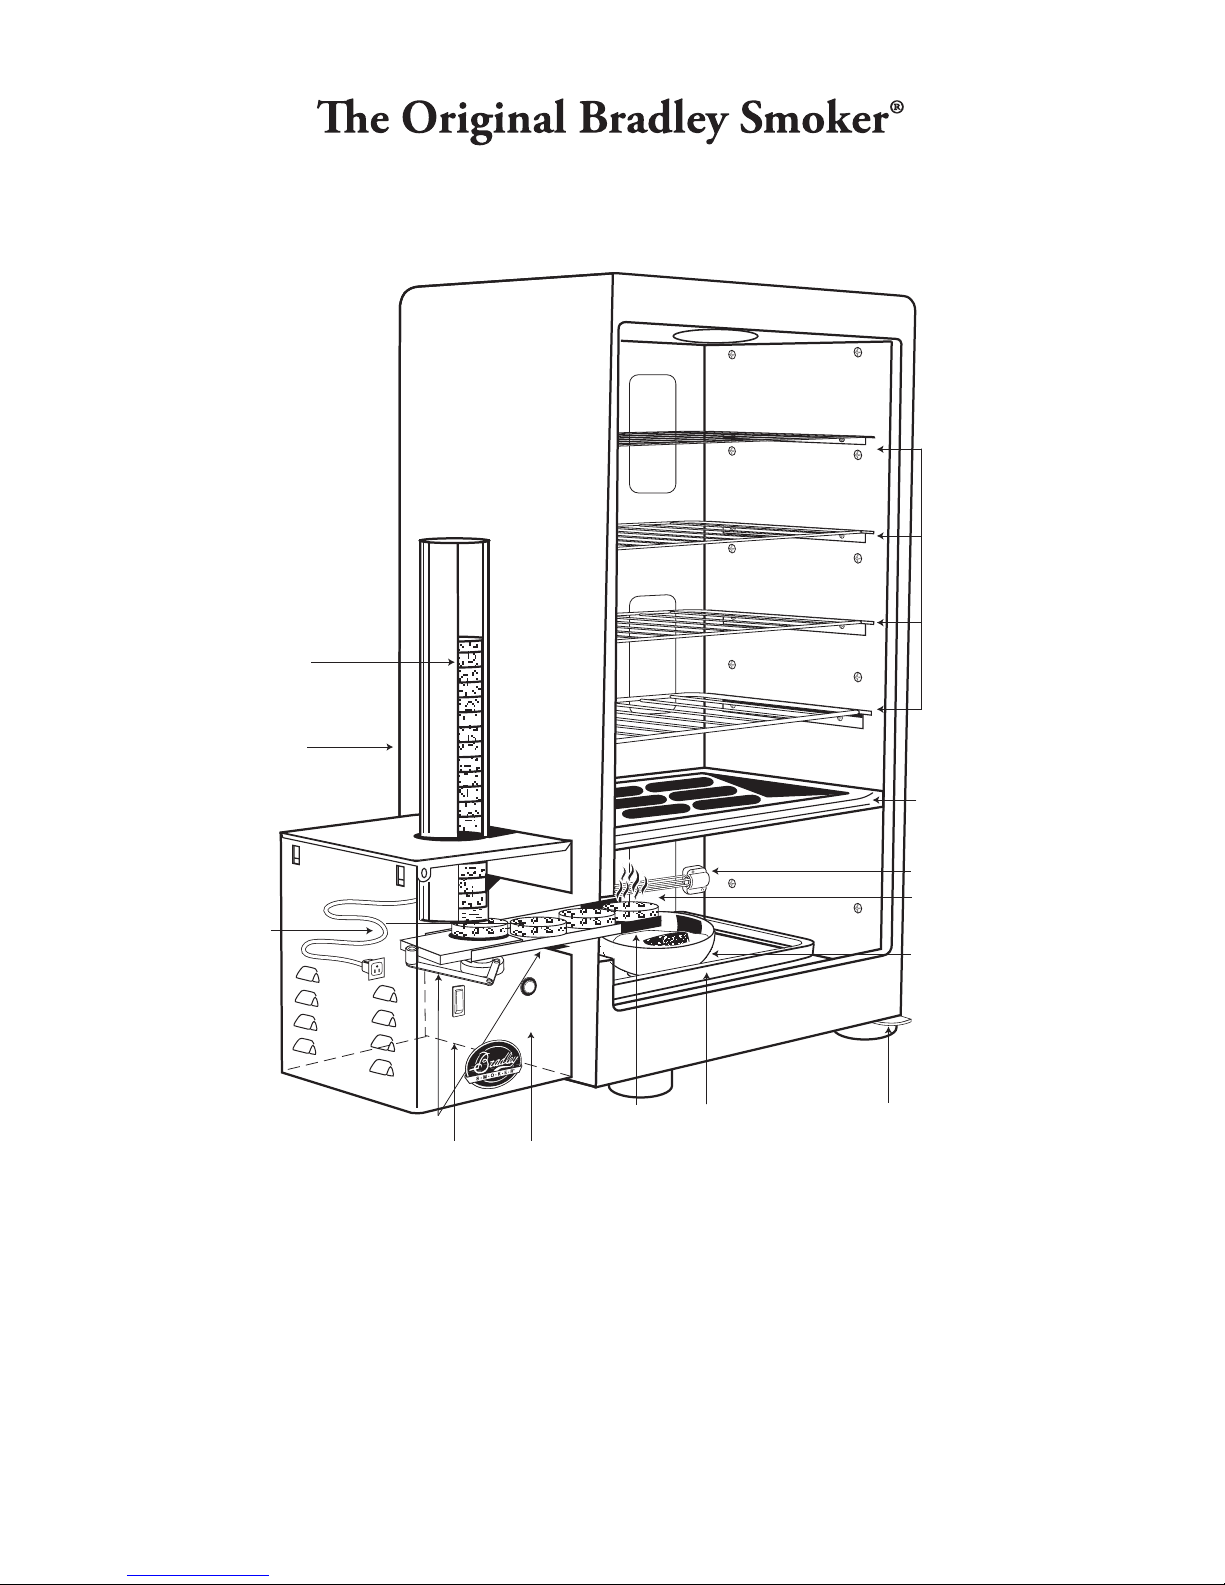
Internal Components List
Internal Parts List
A) Long Power Cord
B) Drip Tray
C) Cooking Racks
D) Drip Bowl
E) Short Power Cord (not shown)
Connects Generator
F) Bisquette Burner
G) 500 Watt Heating Element
H) Flavor Bisquettes® (not included)
I) Drive Guide
J) Bottom Rectangular Tray
K) Door Hinge
L) Porcelain Holder
9
Operating Guidelines
(BS611, BS611EU, BS815XLT & BS815XLTCE)
Refer to the External Components List Diagram
Seasoning & Preparation
For Use
Seasoning the Bradley Smoker® is an ongoing
process, the more you use it, the better tasting
your foods will be.
Seasoning is mainly to remove the impartial
new Bradley Smoker® is not necessarily how
you want your food to taste.
Seasoning Method:
• Clean Racks, Drip Tray, Drip Bowl and
Rectangular Tray and place in smoker.
• Fill the Drip Bowl half full of water.
• Load the Feeder Tube with 5 Bisquettes.
Bisquettes will not advance onto the Burner.
• Note: each Bisquette burns for 20 minutes.
• Open the Damper at the top of the
Smoker Tower.
• Plug smoker into its own designated outlet.
• Turn on the Smoke Generator by pressing
• Pre-heat Bisquette Burner for 20 minutes.
• Press Bisquette Advance Button (6) until
a Bisquette is on the Bisquette Burner (F).
• Turn on the smoker by rotating the
medium (about the 6 o’clock position). Wait
should read 66°C (150°F). If it is higher,
bring down the temperature by rotating the
3 o’clock position and vice versa until the
temperature reads 66°C (150°F).
• Smoke the tower continuously at 66°C
(150°F) for 1 hour, or until Bisquettes are out.
• Your Smoker will be seasoned having
reached 66°C (150°F) and smoked in for 1
hour.
Getting Started
•
Bowl half full of water.
• Turn on the Smoke Generator by pressing
heats the Bisquette burner.
• When the Smoker Generator Indicator
Light (5) is on, this means the Generator has
power.
• Press the Bisquette Advance Button (6)
to push a Bisquette onto the Bisquette
burner (F).
Note: After the advance button has been
pressed, a new cycle will start, (or) in
approximately 20 minutes the next Bisquette
will advance.
• Pre-heat oven to the desired temperature
you want to cook at.
• Place your food onto the cooking racks
and load them into the smoker.
• Set the damper at the desired opening.
Do not close the damper all the way when
the smoke is running.
• You may need to adjust the Heat On/
temperature as per the door thermometer.
Cold Smoke: use the smoke generator only.
Unplug the Short Power Cord.
Hot Smoke: the smoke generator and
on.
Note:
thermometer will only read the air
temperature inside the tower. To get a more
accurate temperature of the food being smoked,
use a meat thermometer. Keep in mind that
the ambient temperature will
the cooking
temperature of the smoker.
“ Remember to clean your smoker after
each use.”

10
Assembly Instructions
4-Rack Digital Smoker (BTDS76P & BTDS76CE-EU)
6-Rack Digital Smokers (BTDS108P & BTDS108CE-EU)
Refer to Part Numbers in External Components List, Internal Components List and Electrical
page 6
Connection Set Up
How to Assemble the
Bradley Digital Smoker®
1. Remove smoker from box.
2. Take all packaged parts out of
smoker.
3. Remove all protective packaging.
Install Digital Smoke Generator:
• Attach Digital Smoke Generator (1)
to the Smoker Tower (2) by placing
the Bisquette Burner (E) through the
left side opening of the tower. Align
the generator keyholes to the two
supports (3) on the side and push
down to secure in position.
• Insert the feeder tube (4) into
the top of the smoke generator.
desired number of Bradley Flavor
Bisquettes®.
Electrical Connection Set Up(see page 13)
• Plug the Sensor Cable (1) into
the back of the Smoke Generator
Sensor
• Receptacle (A) and Smoker
Tower Sensor Receptacle (B).
• Plug the Short Power Cord
(2) into the back of the Smoke
Generator Female Receptacle (D)
and then into the back of the
Smoker Tower Male Receptacle
• Plug the Long Power Cord (3)
into the power receptacle (E).
Set Up Smoker Tower:
• Place Racks, either four or six (B)
onto side supports.
• Place Drip Tray (A) “V” facing
down beneath the Racks on the
brass side pins and under pin (I).
• Place the Rectangular Tray (D)
on the bottom of the Smoker.
• Fill the Drip Bowl (C) half full
with water and place in the center
of Rectangular Tray (D) to catch
burnt Bisquettes. During a long
smoking period, the Drip Bowl
will require changing the water.
• Plug the Long Power Cord (3)
from the Smoke Generator into
an approved grounded electrical
outlet (4).
To Remove Smoke Generator(see page
13) Make sure the Smoke Generator
has had time to cool down. Unplug
Long Power Cord (3) from the wall
outlet (4) and from
the Smoke Generator (E). Detach
Sensor Cable (1) and Short Power
Cord (2) and then remove Smoke
Generator from the Smoker Tower
by raising it gently upward and
pulling it outward.

11
(BTDS76P, BTDS76CE-EU,
BTDS108P & BTDS108CE-EU)
External Components List
Exterior Parts List
1. Digital Smoke Generator
2. Smoke Tower
3. Generator Supports (not shown)
4. Feeder Tube
5. Digital Display Panel
6. Damper
7. Door
8. Door Seal
9. Rubber Feet
10. Sensor Cable, Short Power Cord &
Long Power Cord (not shown)

12
(BTDS76P, BTDS76CE-EU,
BTDS108P & BTDS108CE-EU)
Internal Components List
Internal Parts List
A) Drip Tray
B) Cooking Racks (4 or 6)
C) Drip Bowl
D) Bottom Rectangular Tray
E) Bisquette Burner
(Bisquettes not included)
F) Heating Element
G) Top Door Hinge
H) Lower Door Hinge
I) Brass Pin
J) Porcelain Insulator
13

14
Display Function Guideline
Digital Smoke Generator
• Smoke Generator operated by left side control buttons.
• Press to turn Smoke Generator on.
• Press “>>> Wood” to advance Bisquettes onto Burner. Each press advances
Bisquette one spot.
• Press “Smoker Timer Set” and then “v ^” to desired length of smoking time.
• Press “Smoker Timer Set” again to start 20 minute automatic advance.
• Press
Smoker Oven
• Smoker Oven operated by right side control buttons.
• Press to turn Smoker Oven on.
• Press “Oven Temp Set” and then use “v ^” buttons to set desired temperature.
• Press “Oven Temp Set” again to set the temperature.
• Press “Oven Timer Set” and then use “v ^” to reach desired length of cooking
time.
• Press “Oven Timer Set” again to set cooking time.
• Press
Display Function
Once the button has been pressed to turn the smoke generator
on, the “Smoker Timer”
“Oven Temp” will start to read the internal temperature right away. Once the “On/
button has been pressed to turn the oven on, the “Oven Timer” display
“Temp Setting” will also
Press the C/F Button to change the setting from Celsius to Fahrenheit.

15
Operating Guidelines
for the
BTDS76P, BTDS76CEEU, BTDS108P & BTDS108CEEU)
Refer to part numbers in the External Components List Diagram
Seasoning & Preparation For Use
• Seasoning the Bradley Digital Smoker is an ongoing process, the more you use it, the
better tasting the foods will be.
•
your food to taste.
Seasoning Method
• Clean Racks, Drip Tray, Drip Bowl and Rectangular Tray and place in smoker.
• Fill the Drip Bowl half full of water.
• Load the Feeder Tube with 5 Bisquettes. Note - Each Bisquette burns for 20 minutes.
Bisquettes will not advance onto the Burner.
• Open the Damper slightly at the top of smoker tower.
• Press
to turn on.
• Pre-heat the Bisquette Burner for 20 minutes.
• Press “>>>Wood” to advance a Bisquette onto the burner.
• Set the “Smoker Timer Set” for 1 hour.
• Press
to turn on.
• Set “Oven Temp Set” to 66° C (150° F).
• Set the “Oven Timer Set” to 1 hour.
Note: Your smoker will be seasoned having reached 66° C (150° F) and smoked in for 1 hour.
Getting Started (see “Display Function Guideline”)
•
• Load desired amount of Bisquettes into the Feeder Tube.
• Press the
to turn the smoke generator on.
• Pre-heat the Bisquette Burner for 20 minutes.
• Press “>>>Wood”. Allow time for Bisquette to advance. Repeat this step twice to
move a Bisquette onto the burner.
• Press “Smoker Timer Set” for length of smoking time.
• Set the Damper to the desired opening. Do not close damper all the way when smoke
is running.
• Press the
to turn smoker oven on.
• Pre-heat the Smoker Oven to the desired temperature you want to cook at.
• Press “Oven Temp Set” to set the heat.
• Press “Oven Timer Set” to set length of cooking time.
• Place your food onto the Racks and load them into the smoker.
•
• Cold Smoke - Use the generator only. Unplug the Short Power Cord (2).
• Hot Smoke - Use the generator and the oven together.
Note:
temperature of the food being smoked, use a meat thermometer. Keep in mind that the ambient
“ Remember to clean your smoker after each use.”

16
Assembly Instructions
For The Bradley Smart Smoker® with iSmoke Technology®
Model BS 916 and BS 916 CE
Refer to Part Numbers in External Components List Page 17, Internal Components List Page
18 and Electrical Connection Set Up Page 19
How to Assemble the
Bradley Smart Smoker®
1. Remove smoker from box.
2. Take all packaged parts out of smoker.
3. Remove all protective packaging.
Install Bluetooth® Smoke Generator:
• Attach Smoke Gene
rator (1) to the
Smoker Tower (2) by placing the
Bisquette Burner (E) through the left side
opening of the tower. Align the generator
keyholes to the two supports (3) on the
side and push down to secure in position.
• Insert the feeder tube (4) into the top of
the smoke generator. Push down firmly.
Load with desired number of Bradley
Flavor Bisquettes®.
Electrical Connection Set Up (see page
19)
• Plug the Sensor Cable (1) into the back
of the Smoke Generator Sensor •
Receptacle (A) and Smoker Tower Sensor
Receptacle (B).
• Plug the Short Power Cord (2) into the
back of the Smoke Generator Female
Receptacle (D) and then into the back of
the Smoker Tower Male Receptacle (C) –
push firmly.
• Plug the Long Powe
r Cord (3) into the
power receptacle (E).
Set Up Smoker Tower:
• Place Racks,(B) onto side supports.
• Place Bisquette cover (A) above the
Bisquette Burner (E). Align the cover
keyholes to the three support pins on the
side and push down to secure in position.
• Place the Rectangular Tray (D) on the
bottom of the Smoker.
• Fill the Drip Bowl (C) 3/4 full with
water and place in the center of
Rectangular Tray (D) to catch burnt
Bisquettes. During smoking period, the
Drip Bowl will require changing the water
every 2-3 hours
• Plug the Long Power Cord (3) from the
Smoke Generator into an approved
grounded electrical outlet (4).
To Remove Smoke Generator (see page
19)
Make sure the Smoke Generator has had
time to cool down. Unplug Long Power
Cord (3) from the wall outlet (4) and from
the Smoke Generator (E). Detach Sensor
Cable (1) and Short Power Cord (2) and
then remove Smoke Generator from the
Smoker Tower by raising it gently upward
and pulling it outward.

16 a
Warning: Changes or modifications to this unit not expressly approved by the
party responsible for compliance could void the user’s authority to operate the
equipment.
NOTE: This equipment has been tested and found to comply with the limits for a
Class B digital device, pursuant to Part 15 of the FCC Rules. These limits are
designed to provide reasonable protection against harmful interference in a
residential installation. This equipment generates uses and can radiate radio
frequency energy and, if not installed and used in accordance with the instructions,
may cause harmful interference to radio communications.
However, there is no guarantee that interference will not occur in a particular
installation. If this equipment does cause harmful interference to radio or television
reception, which can be determined by turning the equipment off and on, the user is
encouraged to try to correct the interference by one or more of the following
measures:
Reorient or relocate the receiving antenna.
Increase the separation between the equipment and receiver.
Connect the equipment into an outlet on a circuit different from that to which the
receiver is connected.
Consult the dealer or an experienced radio/TV technician for help.
•
•
•
•
This device complies with Industry Canada's licence-exempt RSSs.
Operation is subject to the following two conditions:
(1) This device may not cause interference; and
(2) This device must accept any interference, including interference that may cause
undesired operation of the device
17
The Bradley Smart Smoker® with iSmoke Technology®
BS 916 and BS 916 CE
External Component List
Exterior Parts List
1. Bluetooth® Smoke Generator
2. Smoke Tower
3. Generator Supports (not shown)
4. Feeder Tube
5. Bluetooth® Digital Display panel
6. Damper
7. Door
8. Door Seal (not shown)
9. Adjustable Feet
10. Sensor Cable and 2 Power Cord
(not shown)
11. Wheels (optional)
12. Meat probes
13. Door Latches
18
The Bradley Smart Smoker® with iSmoke Technology®
BS916 and BS916CE
Internal Components List
Internal Parts List
A) Bisquette Cover
B) Cooking Racks (6 racks included)
C) Drip Bowl
D) Bottom Rectangular Tray
E) Bisquette Burner (bisquettes not
included)
F) Heating Element
G) Top Door Hinge
H) Lower Door Hinge
I ) Porcelain Insulator
J ) Heater Element Cover
K) Door Safety Switch
19
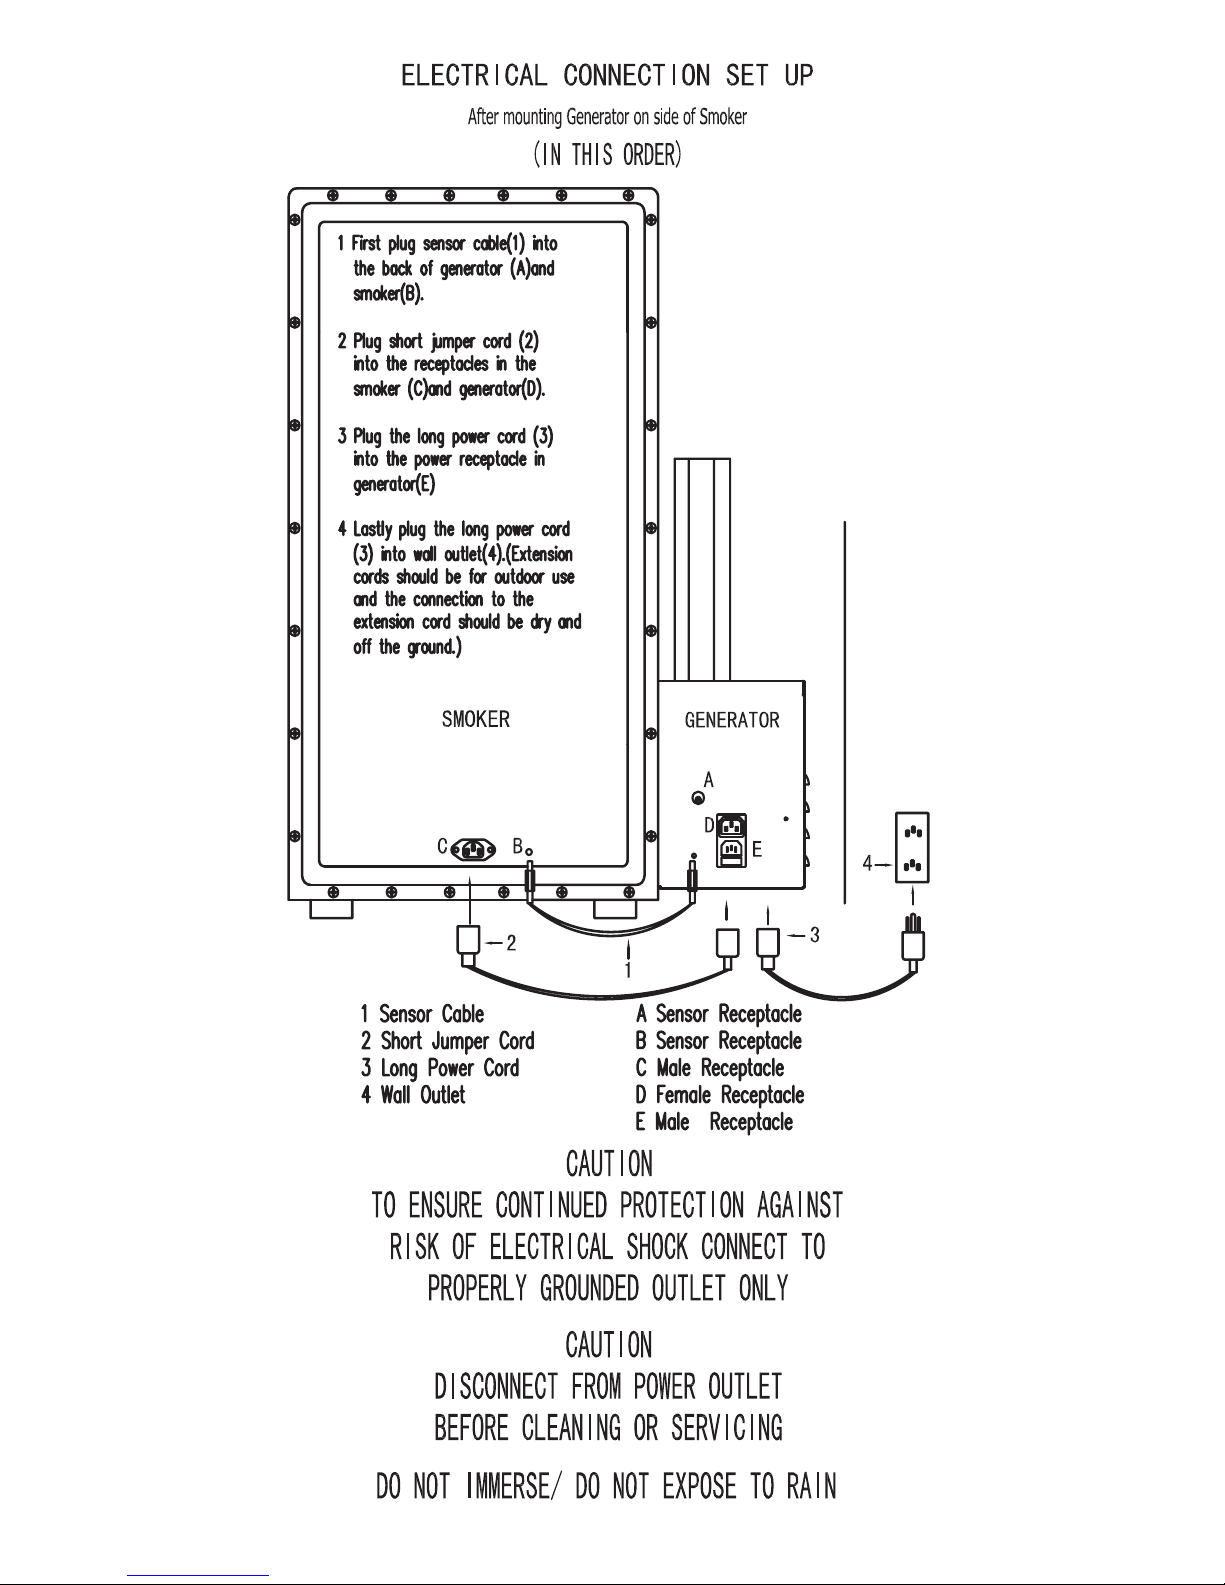
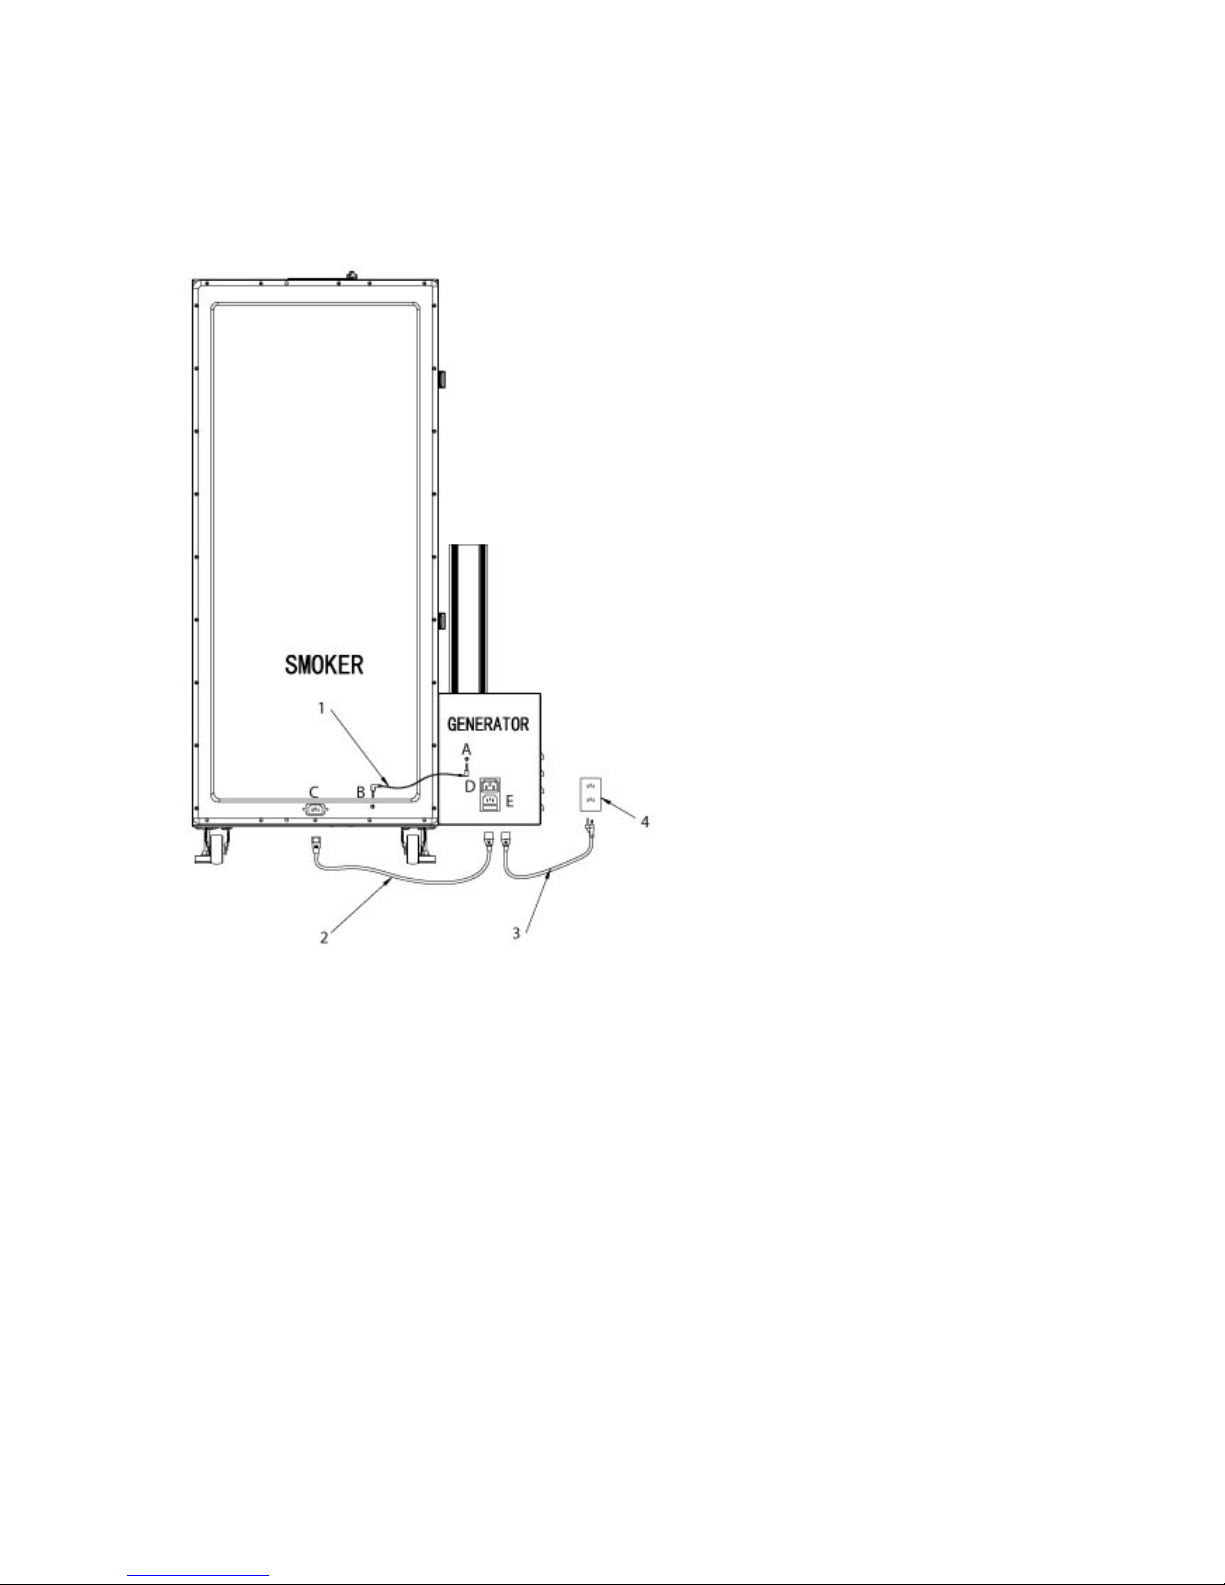
ELECTRICAL CONNECTION SET UP
(After mounting Generator on Side of Smoker)
IN THIS ORDER
1. First plug sensor cable (1) into the
back of the generator (A) and smoker
(B).
2. Plug short jumper cord (2) into the
receptacles in the smoker (C) and
generator (D).
3. Plug the lo
ng power cord (3) into
the power receptacle in generator (E).
4. Lastly plug the long cord (3) into a
wall outlet (4). (Extension cords
should be for outdoor use and the
connection to the extension cord
should be dry and off the ground).
CAUTION
TO ENSURE CONTINUED PROTECTION AGAINST RISK OF ELECTRICAL
SHOCK CONNECT TO PROPERLY GROUNDED OUTLET ONLY
CAUTION
DISCONNECT FROM POWER OUTLET BEFORE CLEANING OR SERVICING
DO NOT IMMERSE / DO NOT EXPOSE TO RAIN
This device c
omplies with Industry Canada licence-exempt RRS standard(s). Operation is
subject to the following two conditions: (1) this device may not cause interference, and (2) this
device must accept any interference, including interference that may cause undesired operation
of the device.

20
Optimum use of your Bradley Smoker
1. Bradley Sm
okers are made to cook low and slow. Take your time and plan ahead as
your smoker was designed to smoke slowly at a low temperature. By using this method,
you will end up with a better taste and aroma.
2. Do not overf
ill your racks – always leave space to allow for constant airflow, otherwise
your smoke will be trapped and won’t circulate through the entirety of your unit.
3. To evenly c
ook or smoke food it is recommended to rotate racks up and down and
front to back.
4. Smoking times and temperature will vary based on the following conditions:
a) Ambient air temperature
b) Amount of product in the smoker
c) Internal temperature of whatever you’re smoking
d) Displayed temperature readings are for reference only
5. NEVER fully close your smoker vent.
6. Refill your
water bowl every 2 hours.
7. When cook
ing or smoking foods that are heavy with grease and fat, please place the pie
plate or bowl directly under the food to catch as much of the rendering as possible. This
will help to keep your Bradley Smoker clean and will extend the life of your smoker. It
will also help to prevent the possibility of a grease fire.
8. Always ke
ep your smoker clean to increase the longevity of your unit.
Note: Meat probes cables are not dishwasher safe. Do not submerge the cables or
connecting ends into water or liquid of any sort, this will permanently damage them.
21
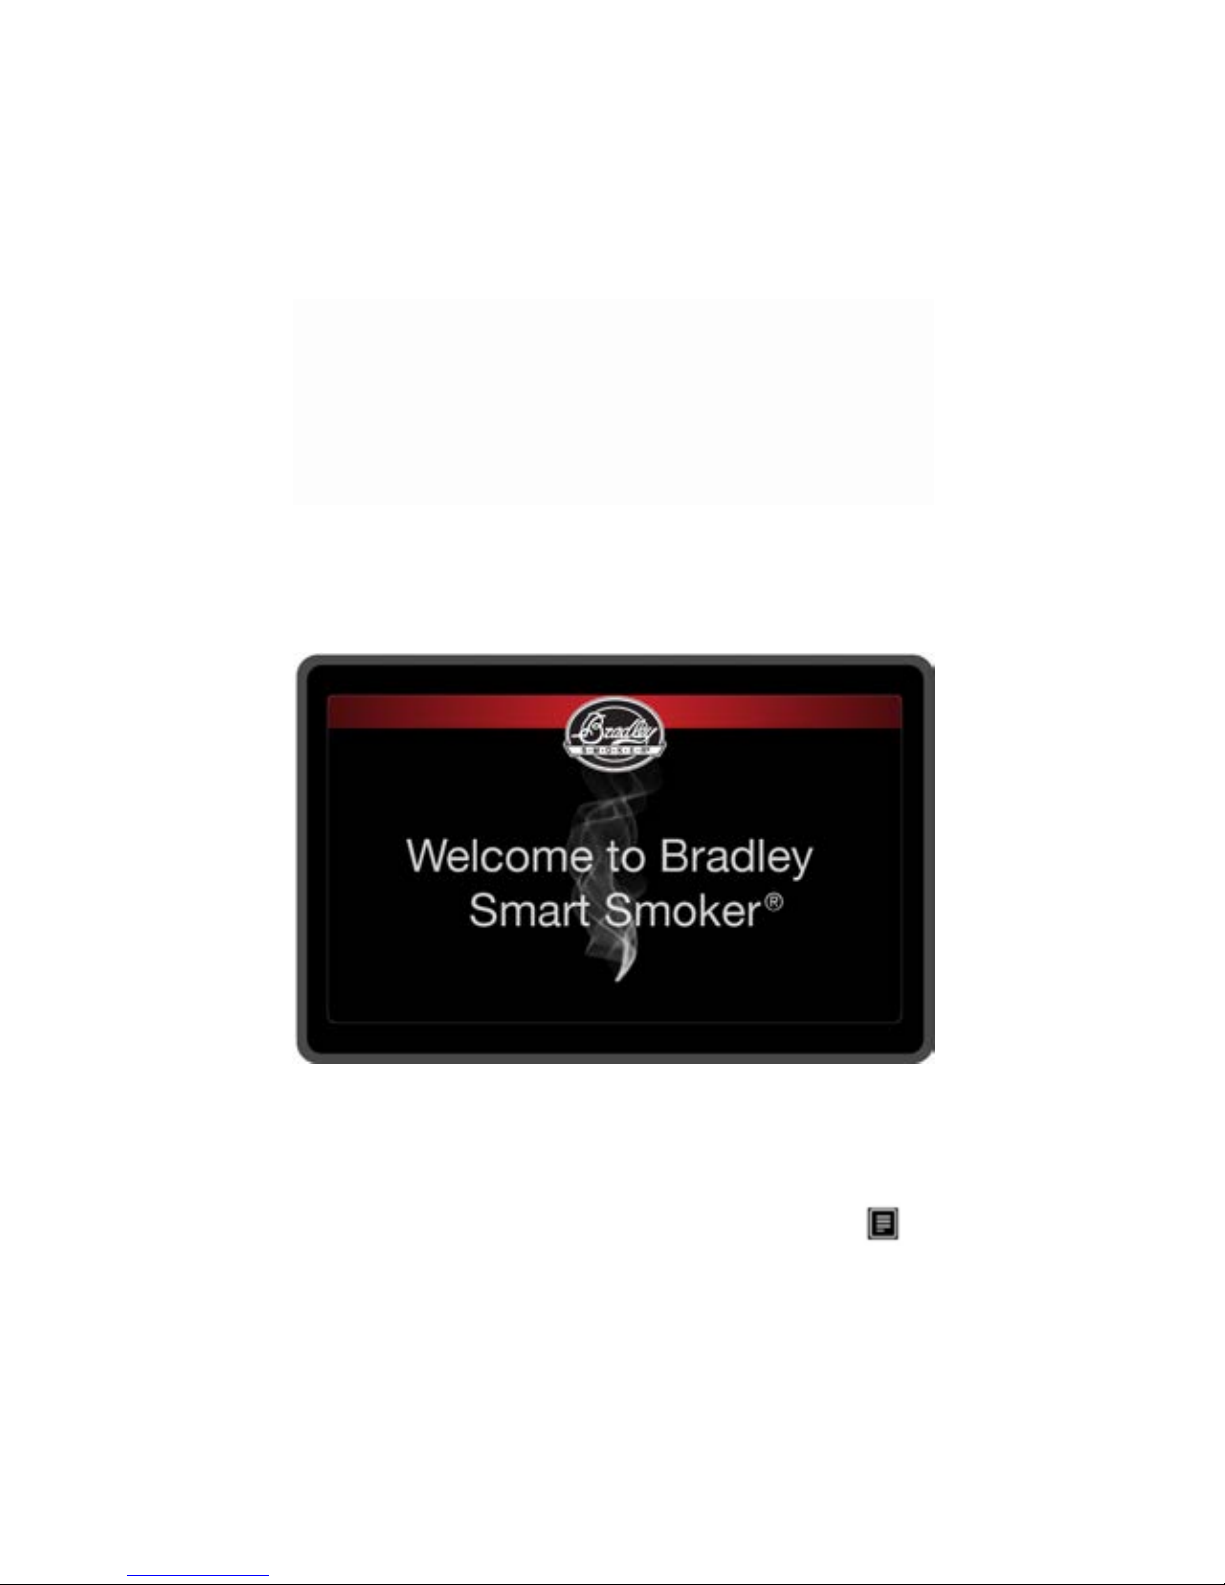
Display Function Guideline
After connecting all the cables touch screen will initiate and “On/Off” button will be
illuminated at the bottom left hand corner.
Press the i
lluminated “On/Off” button to start up the generator screen. The Generator
screen will go through the animated start screen.
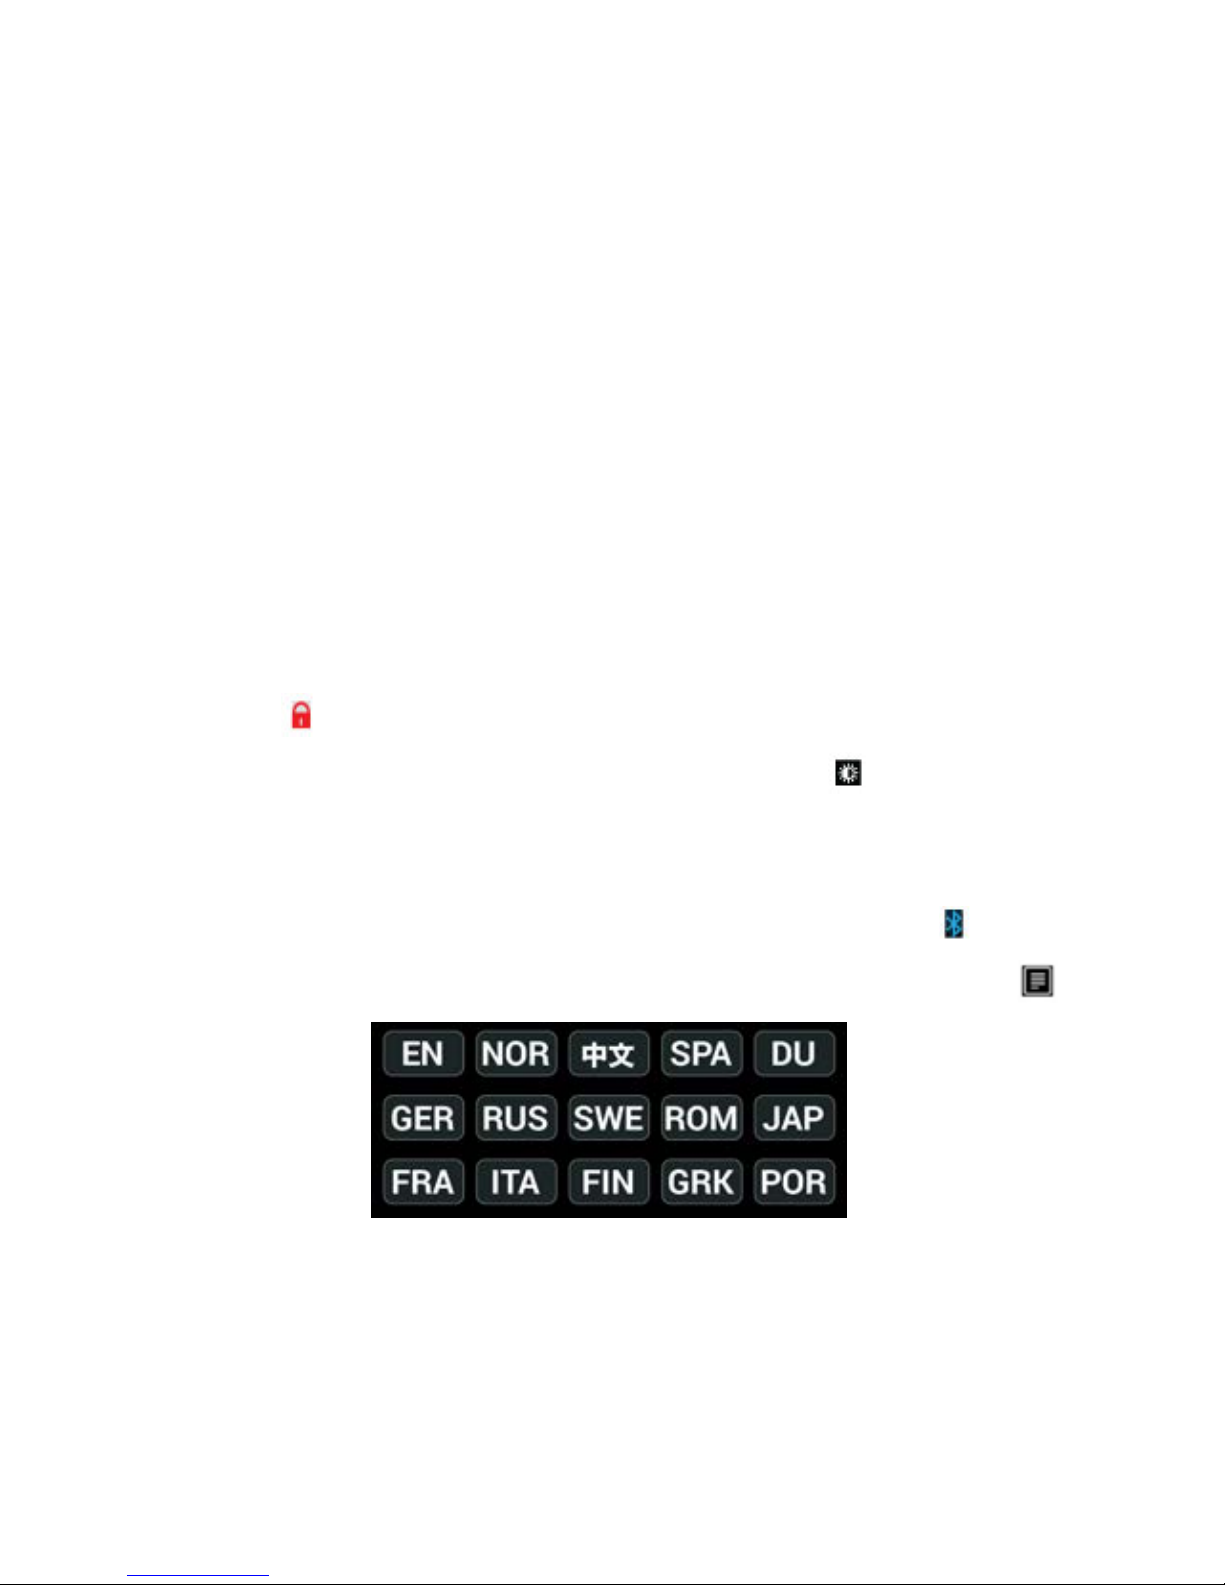
Choose you
r operating language. (Language selection will happen only very first time you
power the smoker on.) There are 15 operating languages to choose from.
Note: If
you choose the wrong language, press the statistics button
and you can change the language again.
22
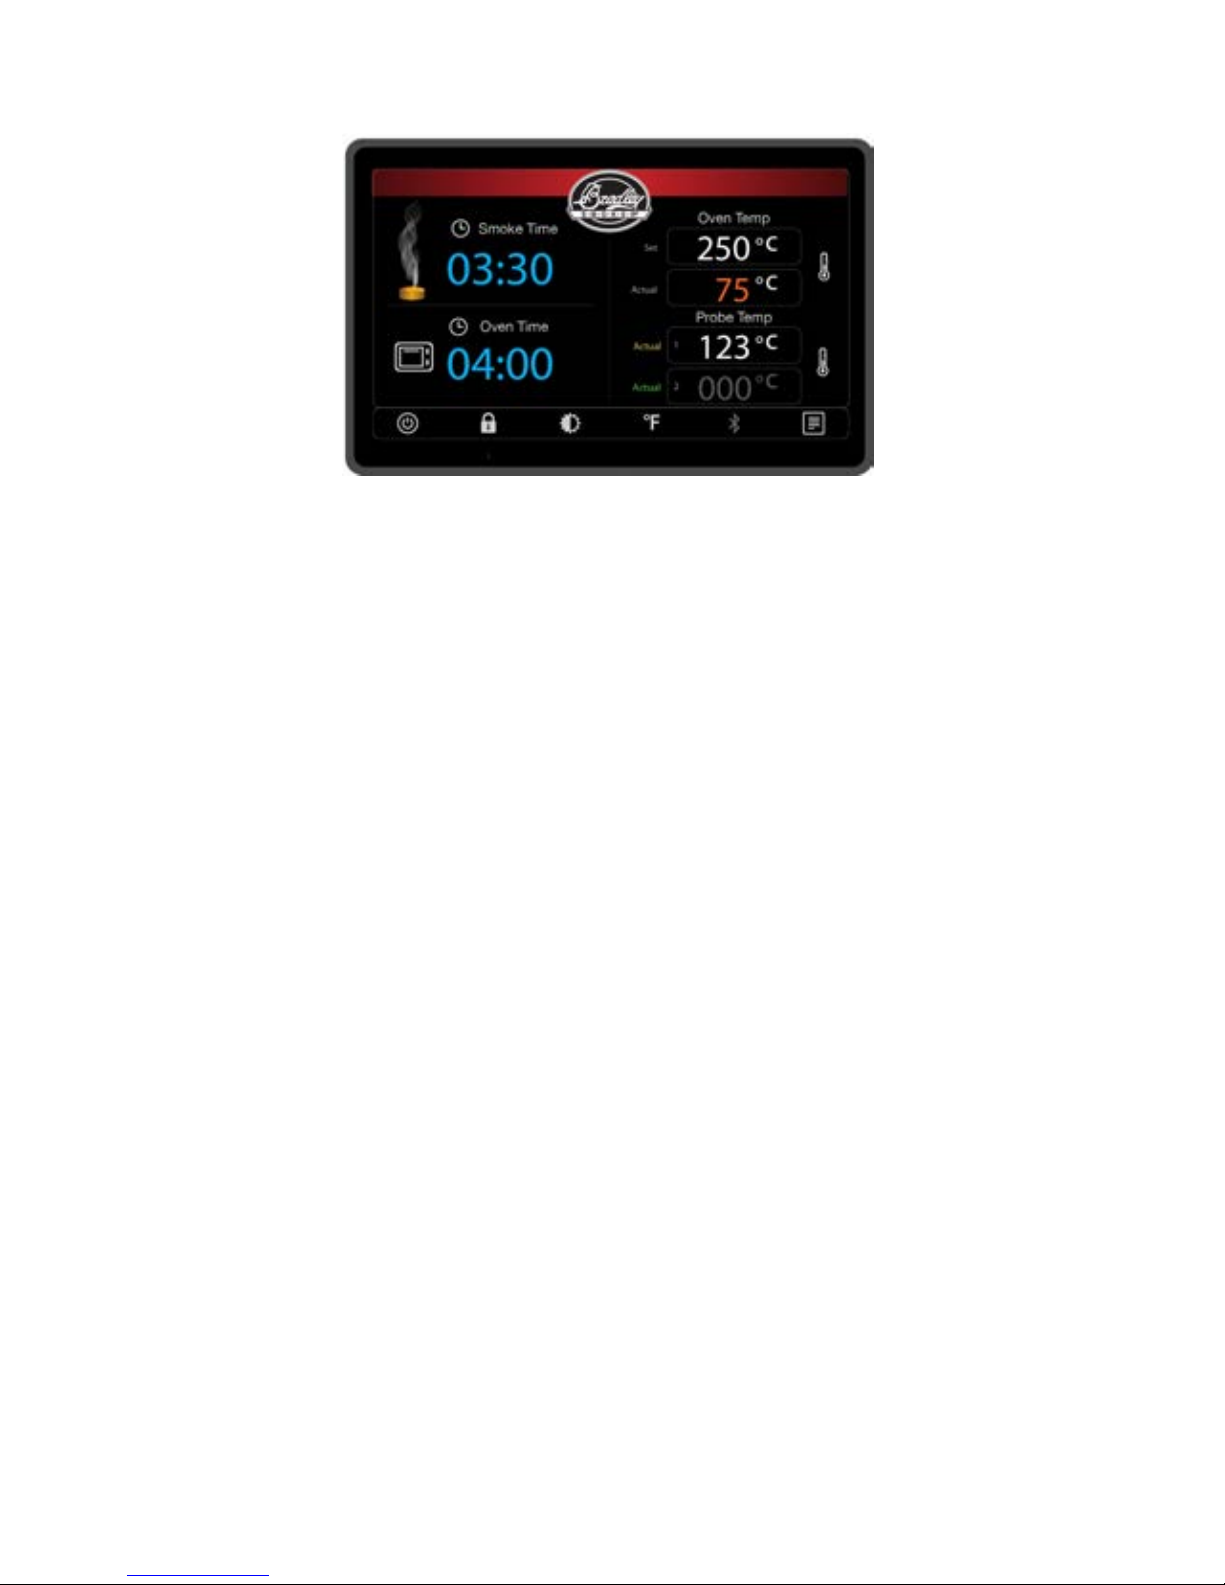
Display Function Main Screen
The Touch Screen Display is divided into three sections:
On the left hand side there are timers and on the right hand side there are temperature
controls. At the bottom of the screen there are auxiliary controls. Pressing the Bradley
Logo at any time returns to the Main Screen.
Smoke Timer
Touch or press Smoke Time numbers to adjust desired smoking time.
Example: For 3hrs and 30 mins press 0-3-3-0. After 2 seconds the timer will start and the
main screen will return. Longest smoke time setting is 9:40 hrs.
Advancing the Bisquette
Touch or press the Smoking Bisquette icon and choose 1 or 2 to advance bisquettes onto
burner once or twice respectively. After the Bisquette has advanced the main screen will
return.
Oven timer
Touch or press Oven Time numbers to adjust desired cooking time. Example: For 3hrs
and 30 mins press 0-3-3-0. After 2 seconds the timer will start and the main screen will
return. Longest oven time setting is 9:40 hours.
Setting Oven Temperature
Touch or press Oven Temperature number to adjust desired cooking temperature.
Example: For 249°C press 2-4-9. After 2 seconds the main screen will return. Actual
temperature shows the current inside temperature of the oven. Highest oven temperature
setting is 160°C / 320°F.
Do not exceed the temperature of 140°C / 280°F
Temperature can be changed between C and F by pressing C and F respectively.
23
Setting the Temperature Ratings for Meat Probes
There are two color coded temperature probes supplied with Bradley Smart Smoker
BS916. Insert the desired color coded probe(s) into the color coded receptacle(s) located
below the screen on the generator.
Press Prob
e Temperature digits and Meat temperature adjustment screen will pop up.
Choose the desired setting between two options By Temp or By Pre-set.
Choosing B
y Temp option will enable you to manually set the desired target internal
meat temperature.
Choosing B
y Pre-set option will enable you to customize the desired target internal
temperatures by built-in selection of meats and internal cooking temperature levels.
Auxiliary Display Functions
Child safety lock disables all the touchscreen functions on the generator and the lock
turns red. This will not affect the remote device.
Screen br
ightness can be adjusted by pressing the brightness icon.
Temperature can be changed between Fahrenheit and Celsius by pressing F or C icon
respectively.
When Bluetooth connection is established the Bluetooth sign will turn blue.
To view various statistics or change your operating language press the statistics icon.
Note: If you choose the wrong language, press the statistics button and you can set your
language again.
To access the manual for iSmoke Technology, please download the Bradley iSmoke
app from iTunes or from the Google Play store.

24
Operating Guidelines
For The Bradley Smart Smoker® with iSmoke Technology® Model BS 916 and BS 916 CE
Refer to Part Numbers in External Components List Page 17.
Seasoning & Preparation For Use
Operating range for your Bradley Smoker is
between 4°C to 21°C (40°F to 70°F).
Extreme temperatures lower or higher will
affect the performance and outcome of the
food. Do not store in freezing
temperatures.
Seasoning Method
Seasoning the Bradley Smoker® is an
ongoing process, the more you use it, the
better tasting your foods will be.
• Clean Racks, Bisquette Cover, Drip Bowl
and rectangular Tray and place in smoker.
• Fill the Drip Bowl 3/4 full of water.
• Load the Feeder Tube with 5 Bisquettes.
The 2 extra Bisquettes are to push the final
Bisquette onto the Burner. The last 2
Bisquettes will not advance to the Burner.
• Note: each Bisquette burns for 20 minutes.
• Open the Damper at the top of the
Smoker Tower.
• Plug smoker into its own designated
outlet.
• Turn on the Smoke Generator by
pressing the Generator On/Off Button
(Page 21).
• Pre-heat Bisquette Burner for 20 minutes.
• Press Bisquette Advance Button until a
bisquette is on the Bisquette Burner (E).
•
Turn on the smoker (Page 22) and set the
temperature to medium about 66°C
(150°F). Wait for 20 to 30 minutes.
• Smok
e the tower continuously at 66°C
(150°F) for 1 hour, or until Bisquettes are
out.
• Your Smoker will be seasoned having
reached 66°C (150°F) and having produced
smoke for 1 hour.
Getting Started
• After seasoning the smoker, refill the Drip
Bowl 3/4 of water.
• Turn on the Smoke Generator by
pressing the Generator On/Off button.
This pre-heats the Bisquette Burner.
• Press the Bisquette Advance Button to
push a Bisquette onto the Bisquette burner
(E).
Note: After the advance button has been
pressed, a new cycle will start, (or) in
approximately 20 minutes the next Bisquette
will advance.
• Preheat oven to the desired temperature
you want to cook at. Place your food onto
the cooking racks and load them into the
smoker.
• Set the damper at the desired opening.
Do not close the damper all the way when
the smoke is running, as this could damage
the smoke generator
• You may need to adjust the oven
temperature to reach the desired set point.
Note: The actual temperature is the air
temperature inside the tower. To get a more
accurate temperature of the food being
smoked, use supplied meat probes (12). Keep
in mind that the ambient temperature will
affect the cooking temperature of the smoker.
Remember to clean your smoker after
each use.

25
WARRANTY
The Bradley Smoker carries with it a 1 year limited warranty
against manufacturing defects.
Requirements and Limitations:
Warranty is effective from the date of purchase. Keep your sales receipt as proof of purchase
date. Warranty is limited to repair or replacement of part as determined by Bradley
Technologies Inc.
Brad
ley Technologies Inc. at its discretion will provide a replacement part for any component
found by Bradley Technologies Inc. to be defective and shall not be responsible for any reassembly.
This limited warranty is non-transferable and becomes void if product is used for commercial
or rental purposes. Warranty covers manufacturer’s defects only. This limited warranty will
not reimburse you for the cost of any inconvenience, food, personal injury or property
damage.
Warranty is valid only in the country of purchase. Shipping and handling charges are the
responsibility of the original consumer/purchaser for all out of warranty parts orders.
Serial number of the smoker must be provided on all warranty claims.
Bradley Technologies excludes from its warranty the following:
Defects, damage resulting from accident, abuse, misuse, alteration, improper assembly
/installation and vandalism are not covered. Damage resulting from weather conditions
including but not limited to hail, hurricanes, tornados, earthquakes, wind, rain or snow are
not covered.
Norma
l wear and tear, chipping and scratching on surface finishes is not covered.
Discoloration from exposure to sunlight, heat or chemicals is not covered by this warranty.
Fail
ure to perform regular maintenance, safety checks and service including but not limited to;
removal of grease build up resulting in a flash fire, damage caused by grease fires is not covered
by this warranty.
To ensure your satisfaction and for follow- up service, register your smoker online at:
www.bradleysmoker.com
For warranty and customer services please call: 1 866-508-7514 (toll free)

Manuel du Propriétaire
pour
Bradley Te
chnologies Canada Inc.
1-866-508-7514
info@bradleysmoker.com
www.bradleysmoker.com
Imprimé en Chine
Mars 2016
Model Name 120V Models
240V Models
Bradley 4 Rack Digital Smoker
Bradley 6 Rack Digital Smoker
The Original Bradley Smoker
The Original XLT Bradley Smoker
The Bradley Smart Smoker
BTDS76P
BTDS108P
BS611*(A-Z)
BS815XLT*(A-Z)
BS916
BTDS76CE-EU
BTDS108CE-EU
BS611*(A-Z)
BS815XLTCE*(A-Z)
BS916CE

1
Madame, Monsieur,
Techno
logie de fumage révolutionnaire pour les chefs cuisiniers à la maison
Nous v
ous souhaitons de bien profiter de l’exceptionnelle expérience du fumage et
de la cuisson lente par grillage dans votre propre arrière-cour. Le fumoir Bradley est un four de
fumage isolé conçu pour générer automatiquement une circulation continue de fumée propre.
Il s’agit d’un appareil électrique conçu pour l’extérieur permettant de cuire, de griller et rôtir
ainsi que de fumer à chaud ou à froid des aliments en obtenant chaque fois des résultats
supérieurs avec un minimum d’efforts.
Le fumo
ir Bradley est unique en son genre, car il produit une fumée qui est quatre
fois plus propre que celle produite par les copeaux brûlés dans les boîtes de combustion
classiques*. Parce que le fumoir éteint automatiquement la bisquette consumée, il évite la
formation de gaz et acides libérés à températures élevées. En outre, le fumoir Bradley satisfait à
toutes les normes pour les appareils utilisés en Amérique du Nord et en Europe.
Les briquettes de bois aromatiques Bradley Flavor Bisquettes®, fabriquées
spécialement pour votre fumoir, sont offertes en 11 essences de bois : aulne, pommier, cerisier,
caryer (hickory), érable, mesquite, chêne, caryer pacanier, mélange du Pacifique, mélange
spécial et chêne au whisky. Consultez les idées de recettes offertes dans le livret de recettes
inclus et sur notre site Web : www.bradleysmoker.com.
Nous v
ous recommandons également d’essayer notre collection de recettes Bradley,
les assaisonnements Bradley, les grilles à viande boucanée (jerky) Bradley, les grilles et supports
originaux Bradley, les crochets à saucisses, les housses de protection imperméables, les
casquettes et tabliers, et notre thermomètre numérique Bradley avec sonde à viande qui
élimine les incertitudes lors de la cuisson et du fumage des viandes.
Je vous
souhaite de nombreuses années de plaisir à cuisiner et fumer vos aliments préférés avec
notre fumoir intelligent.
Avec mes sincères salutations,
Wade Bradley
*D’après des études et des essais effectués à l’institut de technologie de la Colombie-Britannique (The
British Columbia Institute of Technology).

2
Importantes consignes de sécurité
Veuillez conserver ces instructions
Lisez bien toutes les instructions avant
l’utilisation
Précautions de sécurité fondamentales
• Lisez attentivement les instructions de
montage pour préparer le fumoir à
l’utilisation.
• Ne touchez pas les surfaces chaudes.
Utilisez les poignées ou les boutons.
• Pour prévenir les décharges électriques,
n’immergez pas les cordons d’alimentation
ou les fiches électriques dans l’eau ou autre
liquide.
• Exercez une étroite surveillance lorsque
vous utilisez quelque appareil que ce soit en
présence d’enfants ou lorsque ceux-ci les
utilisent.
• Débranchez l’appareil de la prise lorsque
vous ne l’utilisez pas ou avant de le
nettoyer. Laissez refroidir l’appareil avant
d’y fixer ou d’en retirer une pièce.
• Ne faites pas fonctionner un appareil
lorsque le cordon ou la fiche sont
endommagés, lorsque l’appareil lui-même
est endommagé de quelque manière que ce
soit ou après un défaut de fonctionnement
de l’appareil.
• L’utilisation d’accessoires n’est pas
recommandée par le fabricant de l’appareil,
car cela peut entraîner des blessures.
• N’apportez pas de modifications à votre
fumoir. Laissez-le à l’état d’origine.
• Ne laissez pas le cordon pendre sur le bord
de la table ou du comptoir ni entrer en
contact avec des surfaces chaudes.
• Ne placez pas l’appareil sur un élément de
cuisinière au gaz ou électrique chaud ni
dans un four allumé ou à proximité.
• Il faut prendre d’extrêmes précautions en
déplaçant un appareil contenant de l’huile
chaude ou tout autre liquide chaud.
• Toujours commencer par fixer la fiche à
l’appareil avant de brancher le cordon dans
la prise murale. Avant de débrancher
l’appareil, tournez tous les boutons de
commande à la position Arrêt (« OFF »),
puis retirez la fiche de la prise murale.
• N’utilisez pas l’appareil pour un autre
usage que celui pour lequel il est destiné.
• N’utilisez aucun autre type de bois que les
briquettes aromatisées Bradley Flavor
Bisquettes®.
• Faites attention en soulevant et déplaçant
le fumoir pour éviter foulures et blessures au
dos.
• Faites attention lorsque vous déposez ou
prenez des aliments dans le fumoir ou
lorsque vous vous déplacez autour de celuici.
• Nous vous recommandons de placer un
extincteur à portée de la main près du
fumoir. Vérifiez auprès des autorités locales
pour connaître la taille et le type
d’extincteur requis.
Lisez attentivement les instructions de
monta ge pour préparer le fumoir à
l’utilisation
 Loading...