

Page 1

OWNERS MANUAL
for
BTIS1
e Black
Bradley Smoker
120V
BTDS76P
Bradley 4 Rack
Digital Smoker
120V
8380 River Road, Delta, BC, Canada V4G 1B5
Canada 1-800-665-4188 USA 1-866-508-7514
BS611
e‘Original’
Bradley Smoker
120V
BTDS108P
Bradley 6 Rack
Digital Smoker
120V
Z1079
BTISCE240EU
e Black
Bradley Smoker
240V
BTDS76CE-EU
Bradley 4 Rack
Digital Smoker
240V
Bradley Technologies Canada Inc.
info@bradleysmoker.com
www.bradleysmoker.com
BS611EU
e‘Original’
Bradley Smoker
240V
BTDS108CE-EU
Bradley 6 Rack
Digital Smoker
240V
Printed in China
2011
Page 2

Dear Sir or Madam,
“Revolutionary Smoking Technology for Household Chefs”
Welcome to the wonderful experience of backyard smoking and slow
roast cooking. e Bradley Smoker is an insulated smoker oven designed
to automatically generate a continuous flow of clean smoke. It is an
outdoor electrical appliance that enables one to cook, roast, hot smoke,
as well as cold smoke food with consistently superior results using
minimal effort.
e Bradley Smoker is unique in that it produces smoke which
is four times cleaner than traditional burn-box chips*. Because it
automatically extinguishes the spent Bisquette, it prevents the formation
of high temperature gases and acids. In addition, the Bradley Smoker
meets both North American and European appliance standards.
ere are nine different woods of the Bradley Flavor Bisquettes that
are made especially for your smoker - Alder, Apple, Cherry, Hickory,
Maple, Mesquite, Oak, Pecan and Special Blend. ere are a number
of recipe cards that come packaged with the Bradley Flavor Bisquettes
which are also available in the Bradley Recipe Collection, Volume
One. Other items of interest are the Flavor Cures, Bradley Jerky Racks,
Bradley Original Racks, Sausage Hooks, Weather Guard Covers, Bradley
Cooking DVD, Caps, Aprons, and the Bradley Digital ermometer
with meat probe that takes all the guesswork out of roasting and
smoking meat.
I wish you great cooking and smoking for the years to come.
Sincerely,
Wade Bradley
*Based on studies and tests performed at e British Columbia Institute of Technology.
1
Page 3

Important Safety Warnings
Basic Safety Precautions
• Read all instructions.
• Do not touch hot surfaces. Use handles or
knobs.
• To protect against electric shock, do not
immerse cord or plugs in water or other
liquids.
• Close supervision is necessary when any
appliance is used by or near children.
• Unplug from outlet when not in use and
before cleaning. Allow to cool before putting
on or taking off parts.
• Do not operate any appliance with a damaged
cord or plug or after the appliance malfunctions
or has been damaged in any manner.
• e use of accessory attachments is
not recommended by the appliance
manufacturer. May cause injuries.
• Do not modify your smoker from its
original state.
• Do not let cord hang over edge of table or
counter, or touch hot surfaces.
• Do not place on or near a hot gas or
electric burner or in a heated oven.
• Extreme caution must be used when
moving an appliance containing hot oil or
other hot liquids.
• Always attach plug to appliance first, then
plug into the wall outlet. To disconnect, turn
all controls to “off”, then remove plug from
wall outlet.
• Do not use appliance for other than
intended use.
• Save these instructions.
• For household use only.
• Lift and move smoker with care to prevent
strains and back injuries.
•
Use caution when reaching into or around smoker.
• It is recommended that a fire extinguisher
be placed near the smoker. Refer to your
local authority to determine proper size and
type of fire extinguisher.
• If an extension cord is required, the cord
must be an approved 3-prong (grounded)
heavy duty cord not over 6 feet long.
• A short detachable power supply cord
should be used to reduce the risk resulting
from becoming entangled in or tripping over
a longer cord.
• Longer detachable power supply cords are
available and may be used if care is exercised
“Carefully read through Assembly Instructions to prepare smoker for use”
in their use.
• e extension cord should be a grounding
type 3-wire cord.
• e marked electrical rating of the cord set
or extension cord should be at least as great
as the electrical rating of the appliance.
• e cord should be arranged so that it will
not drape over the countertop or tabletop
where it can be pulled on by children or
tripped over unintentionally.
• Outdoor extension cords should be used
with outdoor use products and are surface
marked with the suffix letter “W” and with
a tag stating “Suitable for use with outdoor
appliances”.
• Risk of Electric Shock. Keep extension
cord connection dry and off the ground.
• Do not expose to rain.
• Do not use any other type of wood other
than Bradley Flavor Bisquettes®.
• Properly dispose of all packaging.
• Use caution when assembling, operating,
handling or cleaning your smoker as some
edges on the metal parts may be sharp.
When in Use
• For semi-outdoors use only. Do not
operate in an enclosed area.
• Do not leave unattended.
• Do not plug in the smoker until it is fully
assembled.
• Do not cover or seal the racks or drip tray
with aluminum foil. is can cause severe
damage to your smoker
• Do not move smoker.
• Do not exceed a temperature of 280°F.
• Always wear oven mitts or gloves to
protect hands from burns.
• Do not wear loose clothing or allow hair
to hang freely.
• Do not use packaging box to cover the
smoker.
• Use only approved grounded electrical
outlet.
• Do not allow rainwater
to come in contact with
smoker at any time. Place
unit under center of 3 x 3
x 2.5m shelter.
(Continued on next page)
2
Page 4

When in Use (cont.)
• Do not use during an electrical storm or in windy conditions.
• Do not use near gasoline or other flammable liquids, gases, or where flammable vapors may
be present.
• Place in an area where children and pets cannot access.
• Do not immerse in water.
• Empty drip bowl every 2 to 3 hours of burnt wood bisquettes and refill with fresh water.
After Each Use
• Unplug smoker when it is not in use. See Maintenance Procedures.
• Place extinguished Bradley Flavor Bisquettes® at a safe distance from all structures and
combustible materials.
• Store the smoker in a dry covered place out of reach of children.
• Clean out any grease. Grease build up may cause fire.
General Maintenance
Refer to the External Components List & Internal Components List Diagrams
Important Safety Precautions
• e Bradley Smoker must be maintained and cleaned after each use.
• Unplug the Long Power Cord prior to commencement of any maintenance or cleaning.
• Do not immerse smoker in water.
• Do not spray inside of smoker with any kind of appliance cleaner.
• Do not cover or seal the racks or drip tray with aluminum foil. is can cause severe
damage to your smoker.
• Do not leave unattended when in use.
• Do not spray or clean the smoker with excessive amounts of water. Instead use a damp cloth.
Maintenance Procedures
• Use caution when handling and cleaning your smoker as some metal edges may be sharp.
• Clean out the Drip Bowl. Dispose of all burnt Bisquettes carefully as they may still be hot.
• Wash the Drip Tray, Racks, Bottom Rectangular Tray and Drip Bowl with hot water and
dish detergent or put them in the dishwasher.
• Remove food particles and grease residue from the smoker. If the inside needs cleaning,
wipe it with a damp cloth.
Note: e tower should have smoke or black residue on the inside. e more residue, the better the
product will taste.
• e Smoke Generator should be kept clean and free of wood chips and grease at all times.
If loose wood chips have collected in the Smoke Generator, simply blow or vacuum these
particles away. Unplug the Long Power Cord before removing the Smoke Generator from
the Smoke Tower. Refer to “Remove Smoke Generator” in “Assembly Instructions”.
• e Bisquette Burner should be lightly scraped using a wire brush or scraper to remove any
residue that has been left by the burning process.
• Clean the Damper (at the top of the Smoker) to ensure it is not stuck.
• Wipe the Door Seal with warm water and dish detergent to remove any leftover residues
and food particles.
After Cleaning
• Replace Racks, Drip Tray, Bottom Rectangular Tray and Drip Bowl into the smoker,
making sure all parts are clean and dry.
• Insert the Smoke Generator back into the Smoke Tower.
• Make sure the Long Power Cord is unplugged.
3
Page 5

Trouble Shooting
No Power to Smoker:
Check that all plugs are correctly and firmly inserted into sockets.
Check fuse (located on smoke generator). Check to make sure
the outlet, Ground Fault Circuit Interrupter (GFCI), has not
been tripped.
Bisquettes will not Advance:
Check the drive guide and clear all loose wood chips. By cleaning
the smoke generator, bisquette jamming and undue wear and tear
can be avoided.
Bisquette does not Burn Completely:
Check to see if other electrical equipment is plugged into the
circuit. e smoker should be plugged into its own dedicated
wall circuit. Check to make sure the bisquette burner is free of
residue build up.
Smoker Oven Not Reaching Temperatures:
Allow smoker oven time to preheat. Remember, once food is put
in the oven, the temperature will drop, and slowly rise again. Try
closing the Damper slightly and keeping the smoker out of the
wind. Next, try using a separate thermometer inside the smoker
oven to ensure the temperature is reading correctly.
Note- Normal cooking temperature is between 200° F – 250° F. Keep
in mind that the Temperature shown on the Display is for reference only
and is not intended to give exact internal temperatures of the food. e
internal temperature will be higher closer to the Heat Element.
If these tips don’t work, please call our Customer Service at
Canada 1-800-665-4188 or USA 1-866-508-7514
4
Page 6

Assembly Instructions
e Black Bradley Smoker (Models: BTIS1; BTISCE240EU)
For e Original Bradley Smoker See Page 9 For 4 and 6 Rack Digital Smokers See Page 13
Refer to Part Numbers in the Bradley Smoker External Components List and Internal
Components List Diagrams
How to Assemble the
Bradley Smoker®
1. Remove smoker from box.
2. Take all packaged parts out of
smoker.
3. Remove all protective packaging
materials from parts.
Install Smoke Generator:
• Attach smoke generator (1) to
the smoker tower (2).
• Aim the bisquette burner (F)
toward the tower opening.
• Align smoke generator key holes to
smoker tower locating supports (3).
• Secure the generator by pushing
down firmly.
• Insert the feeder tube (4) on top
of the smoke generator and push
down firmly then load it with the
desired number of Bradley Flavor
Bisquettes®.
• Plug the short power cord (E-not
shown) from the smoke generator
into the smoker tower.
Set Up Smoker Tower:
• Place Racks (C) onto side
supports.
• Place Drip Tray (B) “V” facing
down beneath the Racks on the
brass side pins.
• Place the Rectangular Tray (J) on
the bottom of the Smoker.
• Fill the Drip Bowl (D) half full
of water and place in the center
of the Rectangular Tray to catch
burnt Bisquettes. During a long
smoking period, the Drip Bowl
will require changing the water
every 2-3 hours. Plug the Long
Power Cord (A) for the smoke
generator into an approved
grounded electrical outlet.
To Remove Smoke Generator:
• Unplug short jumper cord (E).
• Detach smoke generator from the
smoker tower by raising the smoke
generator gently upward and pull it
outward.
Handling of Packaging
All packaging should be discarded
as per the regulations in your area.
e box can be used only to store
smoker when not in use. e box
should not be used as a cover when
smoker is in use.
5
Page 7
e Black Bradley Smoker®
7
2
4
16
10
1
5
12
9
13
8
3
14
153 116
BTIS1 and BTISCE240EU
External Components List
External Parts List
1. Smoke Generator
2. Smoker Tower
3. Generator Supports
4. Feeder Tube
5. Smoke Generator Indicator Light
6. Bisquette Advance Button
7. Damper with handle (not shown)
8. Door
9. ermometer
10. Temperature Heat Control Switch
11. Heat Indicator
12. Generator On/Off Switch
13. Door Seal
14. Lower Face Plate
15. Rubber Feet
16 Bisquette (not included with smoker).
6
Page 8

C
H
E
I
A
B
L
G
D
KJF
e Black Bradley Smoker®
BTIS1 and BTISCE240EU
Internal Components List
A) Long Power Cord
B) Drip Tray
C) Cooking Racks
D) Drip Bowl
E) Short Jumper Cord (not shown)
Connects Generator
Internal Parts List
G) 500 Watt Heating Element
H) Flavor Bisquettes® (not included)
I) Drive Guide
J) Bottom Rectangular Tray
K) Door Hinge
L) Porcelain Holder
F) Bisquette Burner
7
Page 9

Operating Guidelines
for the BTIS1 and BTISCE240EU - e Black Bradley Smoker
Refer to part numbers in the External Components List Diagram
Seasoning & Preparation
For Use
Seasoning the Bradley Smoker® is an ongoing
process, the more you use it, the better tasting
your foods will be.
Seasoning is mainly to remove the impartial
smells from your smoker. e smell of your
new Bradley Smoker® is not necessarily how
you want your food to taste.
Seasoning Method:
• Clean Racks, Drip Tray, Drip Bowl and
Rectangular Tray and place in smoker.
• Fill the Drip Bowl half full of water.
• Load the Feeder Tube with 5 Bisquettes.
(note: each Bisquette burns for 20 minutes).
e 2 extra Bisquettes are meant to push the
final Bisquette onto the Burner. ese last 2
Bisquettes will not advance onto the Burner.
• Open the damper slightly at the top of
the Smoker Tower.
• Plug smoker into its own designated
outlet.
• Turn on the smoke generator by pressing
the Generator On/Off Switch (12).
• Pre-heat Bisquette Burner for 20 minutes.
• Press Bisquette Advance Button (6) until
a bisquette is on the Bisquette Burner (F).
• Turn on the smoker by moving the
temperature heat control switch (10) to
medium. Wait for 20 to 30 minutes. e
thermometer (9) should read 66°C (150°F).
If it is higher, bring down the temperature
by adjusting the temperature heat control
switch to the left to lower and vice versa
when the temperature reads lower than 66°C
(150°F).
• Smoke the tower continuously at 66°C
(150°F) for 1 hour, or until bisquettes are
out.
• Your Smoker will be seasoned having
reached 150º F and smoked in for 1 hour.
Getting Started
• After seasoning the smoker, refill the Drip
Bowl half full of water.
• Turn on the Smoke Generator by pressing
the Generator On/Off switch (12) this preheats the Bisquette burner.
• When the Smoker Generator indicator
light (5) is on, this means the Generator has
power.
• Press the bisquette advance button (6) to
push a Bisquette onto the Bisquette burner
(F). Note: After the advance button has
been pressed, a new cycle will start, (or) in
approximately 20 minutes the next bisquette
will advance.
• Pre-heat oven to the desired temperature
you want to cook at.
• Place your food onto the cooking racks
and load them into the smoker.
• Set the damper at the desired opening.
Do not close the damper all the way when
the smoke is running.
• You may need to adjust the Heat Control
Switch to reach the desired temperature as
per the door thermometer.
Cold Smoke - use the smoke generator only.
Unplug the Short Jumper Cord.
Hot Smoke - the smoke generator and
temperature heat control switch will be on.
Note: e thermometer will only read the
air temperature inside the tower. To get
a more accurate temperature of the food
being smoked, use a meat thermometer.
Keep in mind that the ambient temperature
will affect the cooking temperature of the
smoker.
“ Remember to clean your smoker after
each use.”
8
Page 10

Assembly Instructions
e Original Bradley Smoker (Model: BS611; BS611EU)
For e Black Black Smoker See Page 5 For 4 and 6 Rack Digital Smokers See Page 13
Refer to Part Numbers in External Components List, Internal Components List and Electrical
Connection Set Up
How to Assemble e
Original Bradley Smoker®
1. Remove smoker from box.
2. Take all packaged parts out of
smoker.
3. Remove all protective packaging
materials from parts.
Install Smoke Dial Generator:
• Attach smoke dial generator (1)
to the smoker tower (2).
• Aim the bisquette burner (F)
toward the tower opening.
• Align smoke dial generator key
holes to smoker tower locating
supports (3).
• Secure the smoke dial generator
by pushing down firmly.
• Insert the feeder tube (4) on top
of the smoke dial generator and
push down firmly then load it with
the desired number of Bradley
Flavor Bisquettes®.
• Plug the short power cord (E-not
shown) from the smoke dial
generator into the smoker tower.
Set Up Smoker Tower:
• Place Racks (C) onto side
supports.
• Place Drip Tray (B) “V” facing
down beneath the Racks on the
brass side pins.
• Place the Rectangular Tray (J) on
the bottom of the Smoker.
• Fill the Drip Bowl (D) half full
of water and place in the center
of the Rectangular Tray to catch
burnt Bisquettes. During a long
smoking period, the Drip Bowl
will require changing the water
every 2-3 hours.
• Plug the Long Power Cord (A)
for the smoke generator into an
approved grounded electrical
outlet.
To Remove Smoke Dial Generator:
• Unplug short jumper cord (E).
• Detach smoke dial generator
from the smoker tower by raising
the smoke dial generator gently
upward and pull it outward.
Handling of Packaging
All packaging should be discarded
as per the regulations in your area.
e box can be used only to store
smoker when not in use. e box
should not be used as a cover when
smoker is in use.
9
Page 11

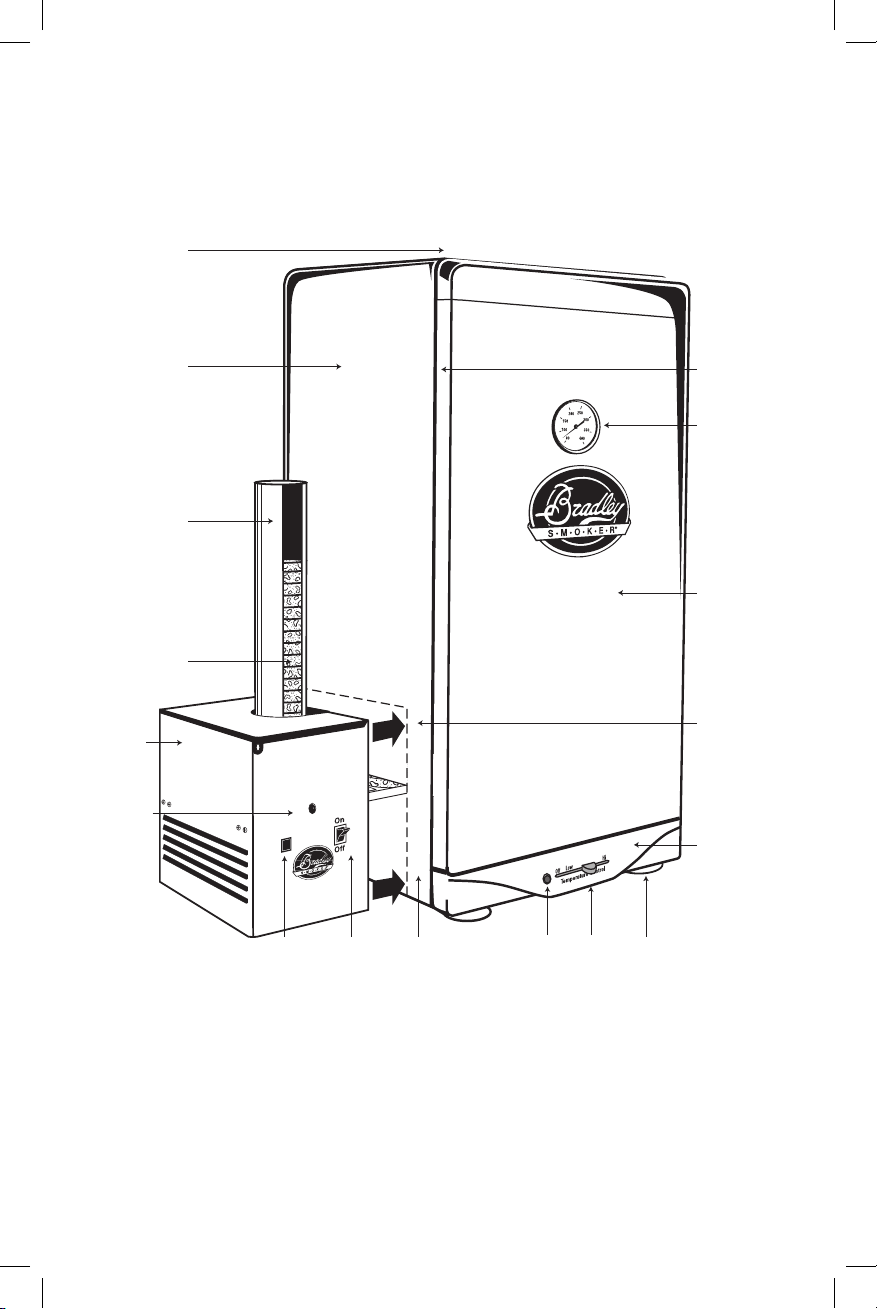
e Original Bradley Smoker®
BS611 and BS611EU
External Components List
7
2
250
200
100
120
300
80
140
60
160
40
180
350
20
0
200
°C
0
°F
400
12
9
4
14
5
OFF
LOW
HIGH
8
3
10
ON
MEDIUM
1
TEMPERATURE
BISQUETTE
OFF
ADVANCE
14
External Parts List
1. Smoke Dial Generator
2. Smoker Tower
3. Generator Supports
4. Feeder Tube
5. Smoke Generator Indicator Light
6. Bisquette Advance Button
7. Damper with handle (not shown)
13311 6
8. Door
9. ermometer
10. Temperature Heat On/off Control Dial
11. Generator On/Off Switch
12. Door Seal
13. Rubber Feet
14. Bisquette (not included with smoker)
10
Page 12

e Original Bradley Smoker®
BS611 and BS611EU
Internal Components List
H
E
A
C
B
L
G
D
ON
BISQUETTE
ADVANCE
OFF
I
Internal Parts List
A) Long Power Cord
B) Drip Tray
C) Cooking Racks
D) Drip Bowl
E) Short Power Cord (not shown)
Connects Generator
F) Bisquette Burner
KJF
G) 500 Watt Heating Element
H) Flavor Bisquettes® (not included)
I) Drive Guide
J) Bottom Rectangular Tray
K) Door Hinge
L) Porcelain Holder
11
Page 13

Operating Guidelines
for the BS611 and BS611EU - e Original Bradley Smoker
Refer to part numbers in the External Components List Diagram
Seasoning & Preparation
For Use
Seasoning the Bradley Smoker® is an ongoing
process, the more you use it, the better tasting
your foods will be.
Seasoning is mainly to remove the impartial
smells from your smoker. e smell of your
new Bradley Smoker® is not necessarily how
you want your food to taste.
Seasoning Method:
• Clean Racks, Drip Tray, Drip Bowl and
Rectangular Tray and place in smoker.
• Fill the Drip Bowl half full of water.
• Load the Feeder Tube with 5 Bisquettes.
(note: each Bisquette burns for 20 minutes).
e 2 extra Bisquettes are meant to push the
final Bisquette onto the Burner. ese last 2
Bisquettes will not advance onto the Burner.
• Open the damper at the top of the
Smoker Tower.
• Plug smoker into its own designated
outlet.
• Turn on the smoke generator by pressing
the Generator On/Off Switch (11).
• Pre-heat Bisquette Burner for 20 minutes.
• Press Bisquette Advance Button (6) until
a bisquette is on the Bisquette Burner (F).
• Turn on the smoker by rotating the
temperature heat on/off control dial (10) to
medium (about the 6 o’clock position). Wait
for 20 to 30 minutes. e thermometer (9)
should read 66°C (150°F). If it is higher,
bring down the temperature by rotating the
temperature heat on/off control dial to the
3 o’clock position and vice versa until the
temperature reads 66°C (150°F).
• Smoke the tower continuously at 66°C
(150°F) for 1 hour, or until bisquettes are
out.
• Your Smoker will be seasoned having
reached 150° F and smoked in for 1 hour.
Getting Started
• After seasoning the smoker, refill the Drip
Bowl half full of water.
• Turn on the Smoke Generator by pressing
the Generator On/Off switch (11) this preheats the Bisquette burner.
• When the Smoker Generator indicator
light (5) is on, this means the Generator has
power.
• Press the bisquette advance button (6) to
push a Bisquette onto the Bisquette burner
(F). Note: After the advance button has
been pressed, a new cycle will start, (or) in
approximately 20 minutes the next bisquette
will advance.
• Pre-heat oven to the desired temperature
you want to cook at.
• Place your food onto the cooking racks
and load them into the smoker.
• Set the damper at the desired opening.
Do not close the damper all the way when
the smoke is running.
• You may need to adjust the Heat On/
off Control Dial to reach the desired
temperature as per the door thermometer.
Cold Smoke - use the smoke generator only.
Unplug the Short Power Cord.
Hot Smoke - the smoke generator and
temperature heat on/off control dial will be
on.
Note: e thermometer will only read the
air temperature inside the tower. To get
a more accurate temperature of the food
being smoked, use a meat thermometer.
Keep in mind that the ambient temperature
will affect the cooking temperature of the
smoker.
“ Remember to clean your smoker after
each use.”
12
Page 14

Assembly Instructions
4 Rack Digital Smoker (Model: BTDS76P; BTDS76CE-EU)
6 Rack Digital Smokers (Model: BTDS108P; BTDS108CE-EU)
For Original Bradley Smoker Assembly Instructions See Page 9
Refer to Part Numbers in External Components List, Internal Components List and Electrical
Connection Set Up
How to Assemble the
Bradley Digital Smoker®
1. Remove smoker from box.
2. Take all packaged parts out of
smoker.
3. Remove all protective packaging.
Install Digital Smoke Generator:
• Attach digital smoke generator (1)
to the smoker tower (2) by placing
the Bisquette Burner (E) through
the left side opening of the tower.
Align the generator keyholes to the
two supports (3) on the side and
push down to secure in position.
• Insert the feeder tube (4) into
the top of the smoke generator.
Push down firmly. Load with
desired number of Bradley Flavor
Bisquettes®.
• Plug the Long Power Cord (3)
into the power receptacle (E).
Set Up Smoker Tower:
• Place Racks, either four or six (B)
onto side supports.
• Place Drip Tray (A) “V” facing
down beneath the Racks on the
brass side pins and under pin (I).
• Place the Rectangular Tray (D)
on the bottom of the Smoker.
• Fill the Drip Bowl (C) half full
with water and place in the center
of Rectangular Tray (D) to catch
burnt Bisquettes. During a long
smoking period, the Drip Bowl
will require changing the water.
• Plug the Long Power Cord (3)
from the Smoke Generator into
an approved grounded electrical
outlet (4). (see page 16)
Electrical Connection Set Up (see page 16)
• Plug the Sensor Cable (1) into
the back of the Smoke Generator
Sensor Receptacle (A) and Smoker
Tower Sensor Receptacle (B).
• Plug the Short Power Cord
(2) into the back of the Smoke
Generator Female Receptacle (D)
and then into the back of the
Smoker Tower Male Receptacle
(C) - push firmly.
To Remove Smoke Generator (see page 16)
• Make sure the Smoke Generator
has had time to cool down.
Unplug Long Power Cord (3)
from the wall outlet (4) and from
the Smoke Generator (E). Detach
Sensor Cable (1) and Short Power
Cord (2) and then remove Smoke
Generator from the Smoker Tower
by raising it gently upward and
pulling it outward.
13
Page 15

e Bradley Digital Smoker®
BTDS76P and BTDS76CE-EU
BTDS108P and BTDS108CE-EU
External Components List
Exterior Parts List
1. Digital Smoke Generator
2. Smoke Tower
3. Generator Supports (not shown)
4. Feeder Tube
5. Digital Display Panel (see page 17)
6. Damper
7. Door
8. Door Seal
9. Rubber Feet
10. Sensor Cable, Short Power Cord &
Long Power Cord (not shown, see page 16)
14
Page 16

e Bradley Digital Smoker®
BTDS76P and BTDS76CE-EU
BTDS108P and BTDS108CE-EU
Internal Components List
A) Drip Tray
B) Cooking Racks (4 or 6)
C) Drip Bowl
D) Bottom Rectangular Tray
E) Bisquette Burner
(Bisquettes not included)
Internal Parts List
F) Heating Element
G) Top Door Hinge
H) Lower Door Hinge
I) Brass Pin
J) Porcelain Insulator
15
Page 17

1. Sensor Cable A. Sensor Receptacle
2. Short Power Cord B. Sensor Receptacle
3. Long Power Cord C. Male Receptacle
4. Wall Outlet D. Female Receptacle
E. Male Receptacle
16
Page 18

Display Function Guideline
Digital Smoke Generator
• Smoke Generator operated by left side control buttons.
• Press “On/Off Smoker” to turn Smoke Generator on.
• Press “>>> Wood” to advance Bisquettes onto Burner. Each press advances
Bisquette one spot.
• Press “Smoker Timer Set” and then “v ^” to desired length of smoking time.
• Press “Smoker Timer Set” again to start 20 minute automatic advance.
• Press “On/Off Smoker” to turn Smoke Generator off.
Smoker Oven
• Smoker Oven operated by right side control buttons.
• Press “On/Off Oven” to turn Smoker Oven on.
• Press “Oven Temp Set” and then use “v ^” buttons to set desired temperature.
• Press “Oven Temp Set” again to set the temperature.
• Press “Oven Timer Set” and then use “v ^” to reach desired length of cooking
time.
• Press “Oven Timer Set” again to set cooking time.
• Press “On/Off Oven” to turn Smoker Oven off.
Display Function
Once the “On/Off Smoker” button has been pressed to turn the smoke generator
on, the “Smoker Timer” display will flash until the desired time has been set. e
“Oven Temp” will start to read the internal temperature right away. Once the “On/
Off Oven” button has been pressed to turn the oven on, the “Oven Timer” display
will flash until the desired cooking time has been set. e “Temp Setting” will also
flash until the desired temperature has been set.
Press the C/F Button to change the setting from Celsius to Fahrenheit.
17
Page 19

Operating Guidelines
for the BTDS76P, BTDS76CEEU, BTDS108P and
BTDS108CEEU - e Bradley Digital Smoker
Refer to part numbers in the External Components List Diagram
Seasoning & Preparation For Use
• Seasoning the Bradley Digital Smoker is an ongoing process, the more you use it, the
better tasting the foods will be.
• e Seasoning Process is mainly to remove the impartial smells and flavors from your
smoker. e smell of your new Bradley Digital Smoker is not necessarily how you want
your food to taste.
Seasoning Method
• Clean Racks, Drip Tray, Drip Bowl and Rectangular Tray and place in smoker.
• Fill the Drip Bowl half full of water.
• Load the Feeder Tube with 5 Bisquettes. Note- Each Bisquette burns for 20 minutes.
e 2 extra Bisquettes are meant to push the final Bisquette onto the Burner. ese last 2
Bisquettes will not advance onto the Burner.
• Open the Damper slightly at the top of smoker tower.
• Press “On/Off Smoker” to turn on.
• Pre-heat the Bisquette Burner for 20 minutes.
• Press “>>>Wood” to advance a Bisquette onto the burner.
• Set the “Smoker Timer Set” for 1 hour.
• Press “On/Off Oven” to turn on.
• Set “Oven Temp Set” to 150° F (66° C).
• Set the “Oven Timer Set” to 1 hour.
Note: Your smoker will be seasoned having reached 150° F and smoked in for 1 hour.
Getting Started (see “Display Function Guideline”)
• After seasoning the smoker, refill the Drip Bowl half full with water.
• Load desired amount of Bisquettes into the Feeder Tube.
• Press the “On/Off Smoker” to turn the smoke generator on.
• Pre-heat the Bisquette Burner for 20 minutes.
• Press “>>>Wood”. Allow time for Bisquette to advance. Repeat this step twice to
move a Bisquette onto the burner.
• Press “Smoker Timer Set” for length of smoking time.
• Set the Damper to the desired opening. Do not close damper all the way when smoke
is running.
• Press the “On/Off Oven” to turn smoker oven on.
• Pre-heat the Smoker Oven to the desired temperature you want to cook at.
• Press “Oven Temp Set” to set the heat.
• Press “Oven Timer Set” to set length of cooking time.
• Place your food onto the Racks and load them into the smoker.
• Empty Drip Bowl every 2 to 3 hours of burnt wood Bisquettes and refill with fresh water.
• Cold Smoke - Use the generator only. Unplug the Short Power Cord (2).
• Hot Smoke - Use the generator and the oven together.
Note: e Digital Display will only read the air temperature inside the tower. To get a more accurate
temperature of the food being smoked, use a meat thermometer. Keep in mind that the ambient
temperature will affect the cooking temperature of the smoker.
“ Remember to clean your smoker after each use.”
18
Page 20

WARRANTY
e Bradley Smoker carries with it a 1 year limited warranty
against manufacturing defects.
Requirements and Limitations:
Warranty is effective from the date of purchase. Keep your sales receipt as proof of
purchase date.
Warranty is limited to repair or replacement of part as determined by Bradley
Technologies Inc.
Bradley Technologies at its discretion will provide a replacement part for any
component found by Bradley Technologies to be defective and shall not be
responsible for any re-assembly.
is limited warranty is non-transferable and becomes void if product is used for
commercial or rental purposes.
Warranty covers manufacturer’s defects only.
is limited warranty will not reimburse you for the cost of any inconvenience,
food, personal injury or property damage.
Warranty is valid only in the country of purchase.
Shipping and handling charges are the responsibility of the original consumer/
purchaser for all out of warranty parts orders.
Serial number of the smoker must be provided on all warranty claims.
Bradley Technologies excludes from its warranty the following:
Defects, damage resulting from accident, abuse, misuse, alteration, improper
assembly /installation and vandalism are not covered.
Damage resulting from weather conditions including but not limited to hail,
hurricanes, tornados, earthquakes, wind, rain or snow are not covered.
Normal wear and tear, chipping and scratching on surface finishes is not covered.
Discoloration from exposure to sunlight, heat or chemicals is not covered by this
warranty.
Failure to perform regular maintenance, safety checks and service including but not
limited to; removal of grease build up resulting in a flash fire, damage caused by
grease fires is not covered by this warranty.
And for follow- up service, register your smoker online at:
For warranty and customer services please call:
Canada 800-665-4188 USA 866-5087514
To ensure your satisfaction
www.bradleysmoker.com
19
Page 21

 Loading...