

Page 1

Tesla 2 W8
Complete User Manual
Page 2

Tesla 2 W8
Complete User Manual
About This Manual
ENGLISH
Tesla 2 W8
The bq team would like to thank you for purchasing your new Tesla 2 W8 tablet. We
hope you enjoy using it.
With this device, you can browse the internet, check your email, play games, use
apps (which you can download directly onto the device), read e-books, transfer les
via Bluetooth
®
, record audio, watch movies, take photos and videos, listen to music,
chat with your friends and family.
About This Manual
· To make sure that you use your tablet correctly, please read this manual carefully
before you start using it
· Some of the images and screenshots shown in this manual may differ slightly
from those of the nal product.
· Due to rmware updates, it is possible that some of the information in this
manual does not correspond exactly to the operation of your device. To obtain
the most up-to-date version of this manual, please go to www.bq.com.
· bq shall not be held liable for any issues relating to performance or compatibility
resulting from modication of the registry settings by the user. Nor shall it be
held liable for any incompatibility issues with third-party applications available
through the app stores.
2
Page 3
ENGLISH
Icon guide
Danger: This icon indicates situations that could pose a risk to personal safety
or health.
Warning: Situations which pose no risk to personal safety or health, but could
pose a risk to the correct functioning of the device.
Tip: Additional information to help you get the best out of your device.
Complete User Manual
Icon Guide / Trademarks
Tesla 2 W8
Trademarks
The bq logo is a registered trademark of Mundo Reader, S.L.
®
is a logo and registered trademark of the Intel Corporation.
Intel
Microsoft Windows is the name of one of the proprietary operating systems of the Microsoft Corporation.
Microsoft Ofce is a proprietary ofce suite of the Microsoft Corporation.
®
is a registered trademark of the Wi-Fi Alliance.
Wi-Fi
®
Bluetooth
MicroSD
HDMI
Silicon Image, Inc.
All other trademarks are the property of their respective owners. All rights reserved.
is a registered trademark of Bluetooth SIG, Inc.
TM
and the corresponding logo are registered trademarks of SD-3D, LLC.
®
(High-Denition Multimedia Interface) is a registered trademark of HDMI Licensing, LLC, subsidiary of
3
Page 4

Tesla 2 W8
Contents
Complete User Manual
Contents
ENGLISH
6 BEFORE YOU START
6 Box Contents
7 Product Overview
8 GETTING STARTED
8 Inserting/Removing the MicroSD Card
9 Switching the Device On and Off
10 Charging the Device
11 Transferring Files
13 Setup Wizard
14 DESKTOP
14 Lock Screen
15 Start Screen
17 Extending the Start Screen
20 Charms Bar
22 Icon Guide
22 Keyboard
23 Apps Menu
28 CONTROL PANEL
29 System and Security
29 Networks and Internet
29 Hardware and Sound
29 Programs
29 User Accounts and Family Safety
4
Page 5

Complete User Manual
ENGLISH
Contents
29 Appearance and Personalisation
30 Clock, Language and Region
30 Ease of Access
31 EMAIL
31 Microsoft Account
34 Setting up Other Email Accounts
35 Sending an Email
35 Replying to an Email
36 PERFORMANCE SETTINGS
36 Optimising the Battery Life
Tesla 2 W8
37 MULTIMEDIA
37 Camera
38 Playing Music
38 Playing Videos
39 APPLICATIONS
39 App Store
39 Preinstalled applications
39 Web Browser
40 Text Editor, Spreadsheets and Presentations
40 Calendar
41 Maps and GPS Navigation
41 Live Tiles
42 TOOLS
42 Calculator
42 Alarms
43 Sound Recorder
44 APPENDICES
44 APPENDIX A: Technical Specications
45 APPENDIX B: Cleaning and Safety
48 APPENDIX C: Information on Exposure to Radio Waves
and SAR
49 APPENDIX D: Disposing of this Product Correctly
50 APPENDIX E: Declaration of Conformity
5
Page 6
Complete User Manual
Tesla 2 W8
Before You Begin
ENGLISH
BEFORE YOU START
Box Contents
Before using your bq device for the rst time, please check the contents of the box.
If any of the following items are missing, contact the retailer that sold you the device.
Tesla 2 W8
Charger
Documentation:
Quick Start Guide
Warranty and Safety Manual
bq Accessories
6
Page 7
ENGLISH
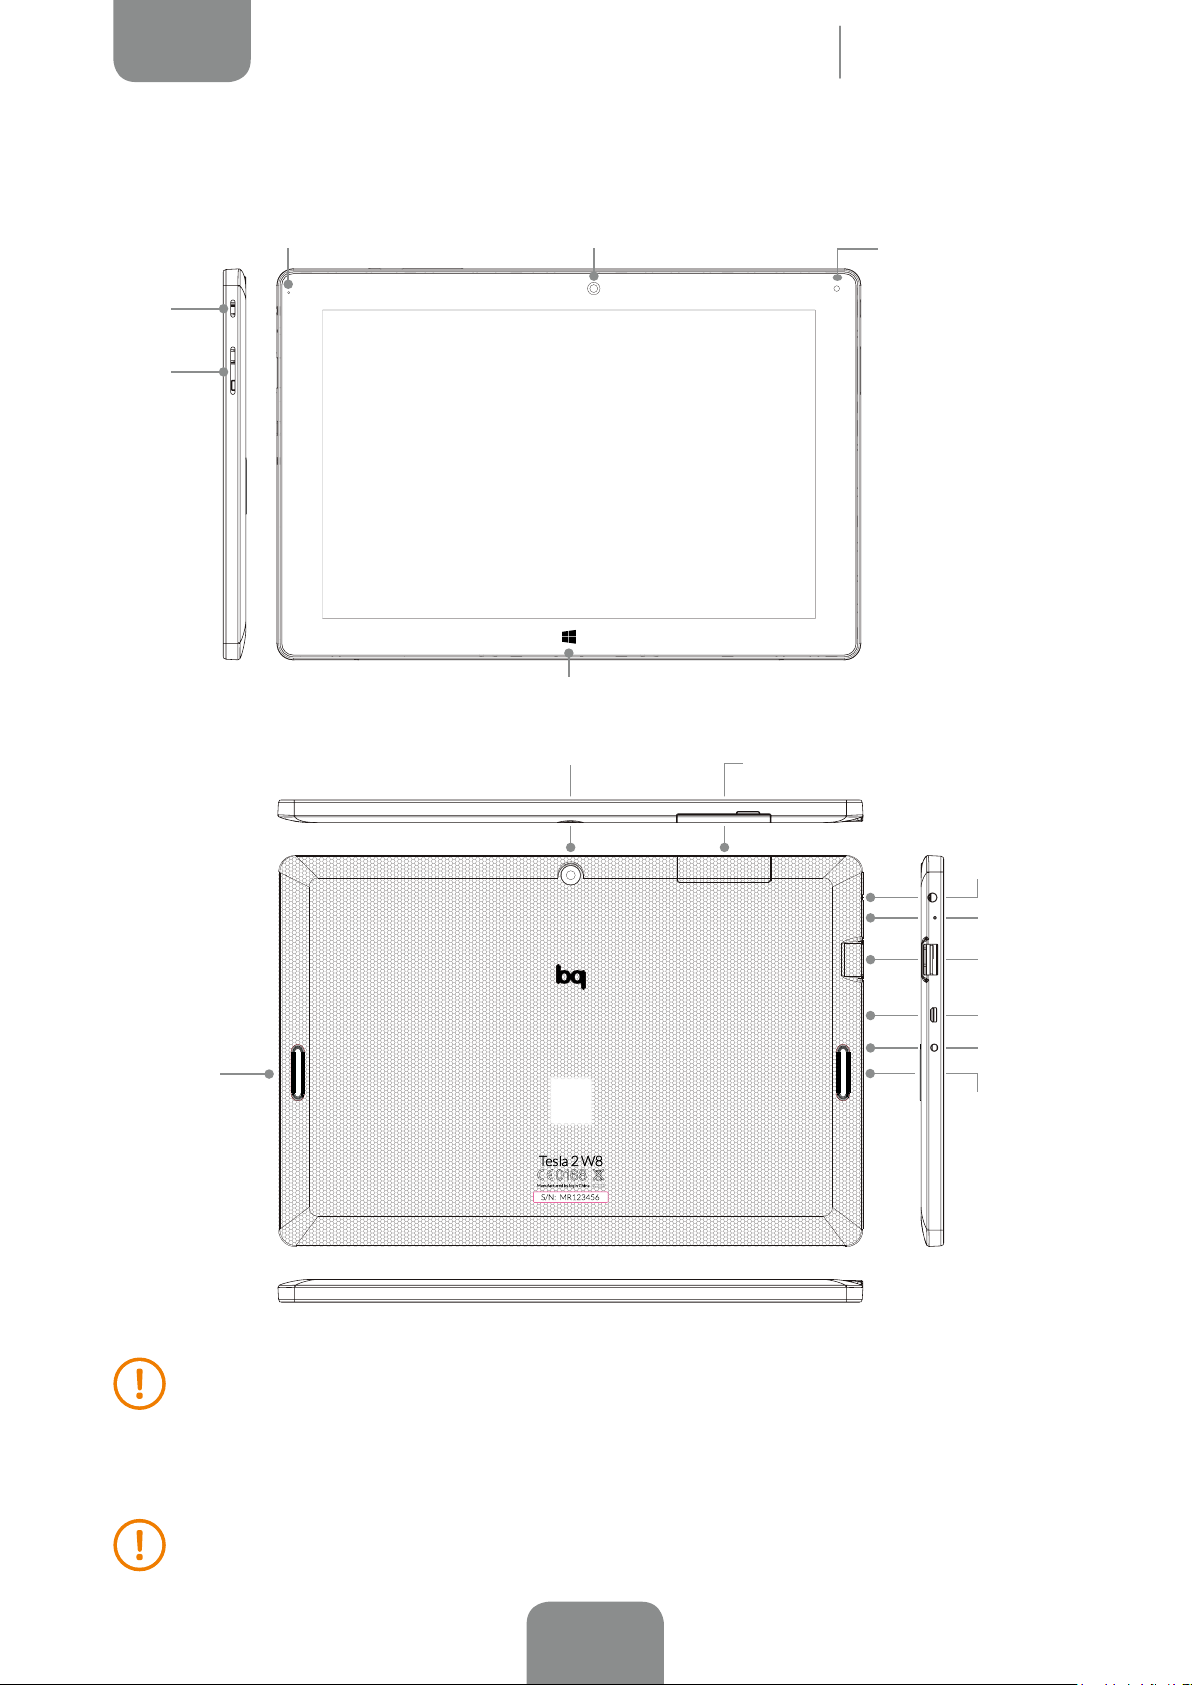
Product Overview
Complete User Manual
Before You Begin
Tesla 2 W8
Power button
Volume keys
Charging LED
Front camera
Start button
Rear camera
Light sensor
MicroSD
slot
Speaker
Do not attempt to remove the rear cover of your bq Tesla 2 W8, as this may
damage the device.
Headphone
jack
Microphone
USB port
Micro-HDMI
Socket
Speaker
Do not remove the battery by any means. Removing it may invalidate the
warranty.
Do not insert any pointed objects into the opening as this may damage the
microphone.
7
Page 8
Complete User Manual
Tesla 2 W8
Getting Started
ENGLISH
GETTING STARTED
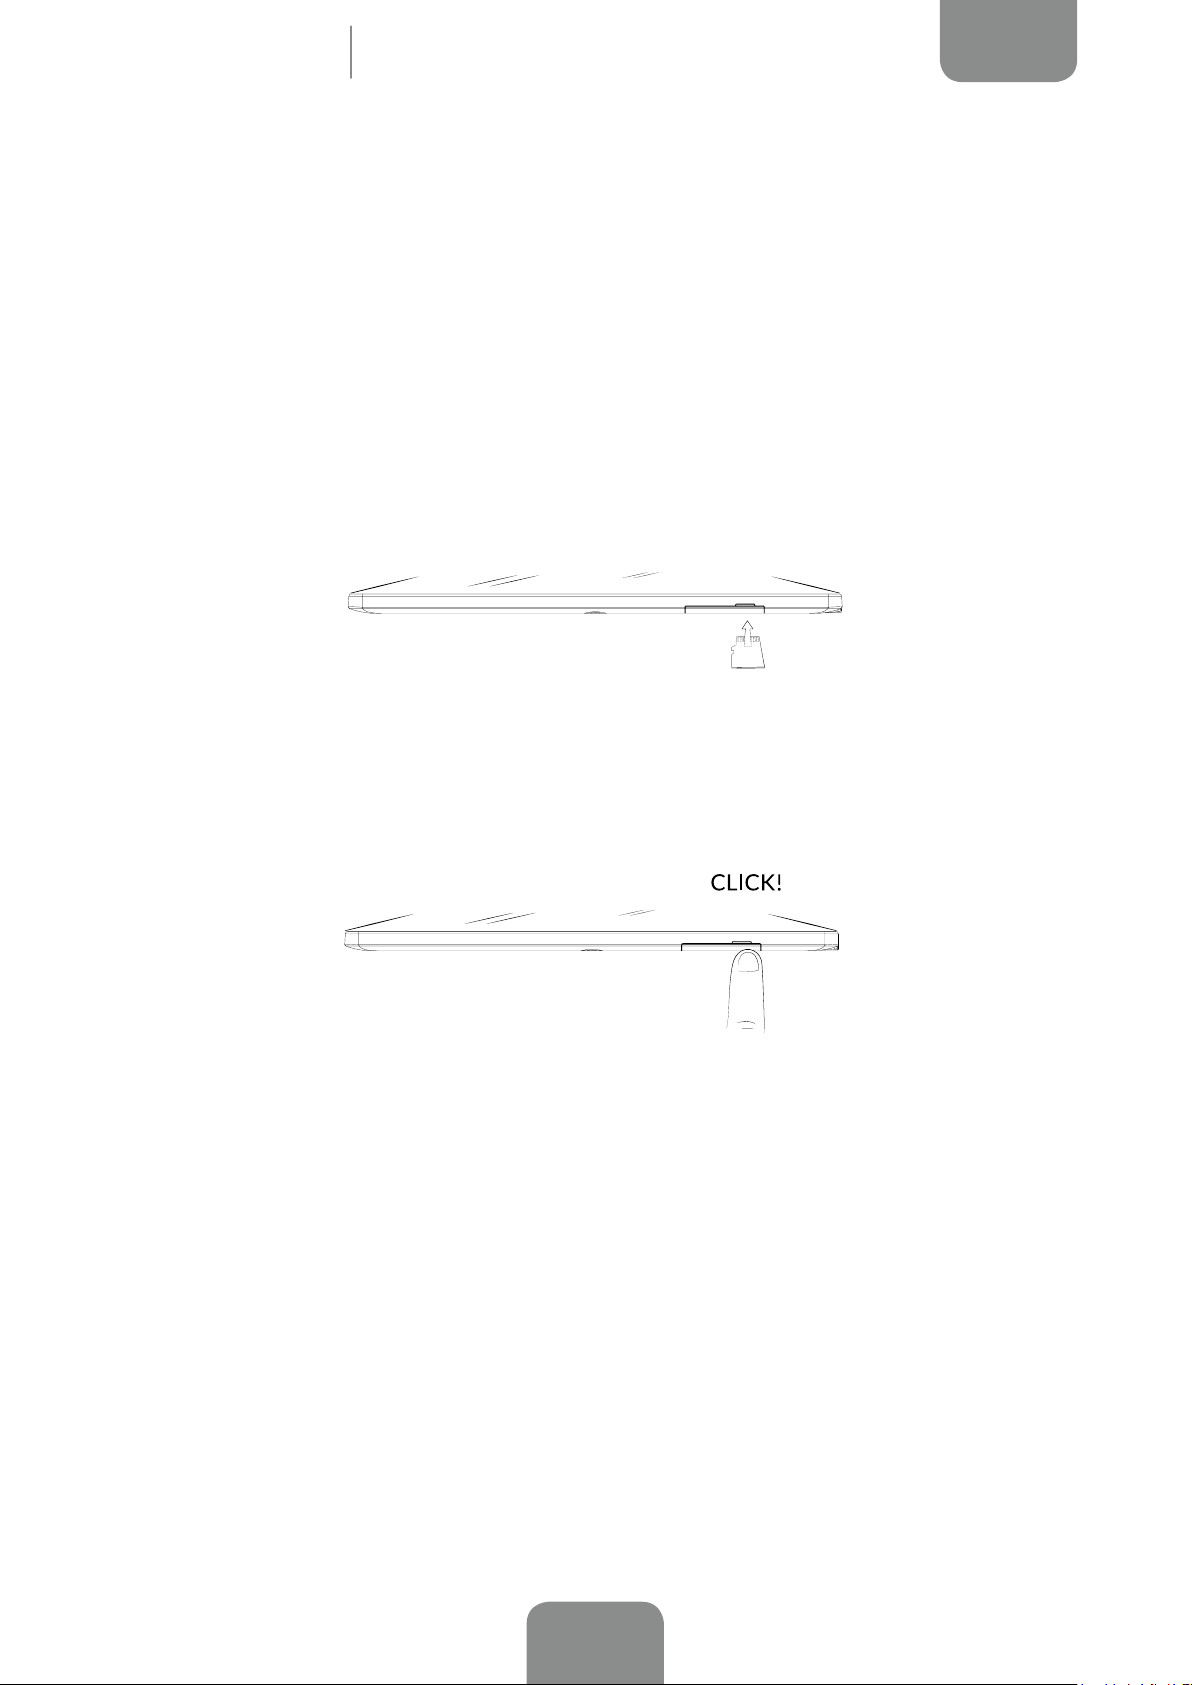
Inserting/Removing the MicroSD Card
Your bq Tesla 2 W8 has an internal memory that can be expanded to 32 GB by using
a MicroSD card.
To insert a MicroSD card, follow these steps:
Insert the MicroSD card into the slot, making sure that the metal pins are at the bottom
and facing towards the screen, as shown in the diagram:
Push the card in until you hear a slight click, which indicates that it has been inserted
correctly. If the card is not inserted correctly, the device may not recognise it and its
content will not be available.
To remove the MicroSD card, follow the steps above in reverse, bearing in mind the
following recommendations:
a) For safety purposes, switch the device off before removing the MicroSD
card.
b) If you need to remove the MicroSD card while the device is switched on, rst
unmount it in order to avoid damaging the card and losing any data.
To unmount the card, press the triangle icon on the bottom right of the
desktop taskbar. Select the USB connector icon in the box that appears.
When you see a message stating that it is now safe to unmount the MicroSD
card, you can remove it.
8
Page 9

Complete User Manual
ENGLISH
Getting Started
Tesla 2 W8
To unmount the card, push it in until you hear a slight click to indicate that the card
has been released.
You can choose whether to store your multimedia files on the tablet’s internal
memory or directly onto the MicroSD card. Remember that any content stored on
the MicroSD card will not be available when the card is removed, and any apps stored
on there will no longer function.
Switching the Device On and Off
To switch on your bq Tesla 2 W8, press and hold down briey the On/ Off button
located on the side of the tablet.
To switch off the device, press and hold down the On/Off button until a divided
screen and a message instructing you to Slide to shut down your PC
If you press briey on the On/Off button, the screen will switch off but not the
device.
.
9
Page 10

Complete User Manual
Tesla 2 W8
Getting Started
ENGLISH
Charging the Device
Your tablet has a rechargeable (non-removable) 7000 mAh battery which is charged
via the AC/DC connector located on the left side of the device. A mains adapter is
provided with the tablet for charging the battery. To charge it using the adapter,
follow these simple steps:
1. Connect the 2.5 mm jack of the mains adapter to the tablet.
2. Connect the mains adapter to any standard plug socket (220V/50Hz).
The battery in your bq Tesla 2 W8 is non-removable. If it is removed by anyone
other than our Technical Support staff, your device could be damaged and the
warranty invalidated.
Allowing the battery to charge fully is recommended when you charge it for the
rst time, as this will help calibrate the battery metre. Bear in mind that some
batteries perform better after a number of full charge/discharge cycles.
10
Page 11
Complete User Manual
ENGLISH
Getting Started
Tesla 2 W8
Transferring Files
You can transfer les to your tablet using a USB/HDD memory, a MicroSD card or
wirelessly via Bluetooth.
In either case, simply connect the devices to the tablet and it will detect them
automatically. You have several options for browsing through the content:
a) Touch the DISK D: message that appears on connecting the external storage
device and then select the Open folder option to view the les. This will give
you direct access to the contents of the removable memory.
b) Press on the PC monitor icon on the Windows 8 desktop to open This PC,
where you can access all internal/external storage units.
11
Page 12
Complete User Manual
Tesla 2 W8
Getting Started
ENGLISH
From the removable directory of folders and les on the device, you can copy/cut
and paste them to a le path of the Tesla 2 W8’s internal memory. This ensures that
they will always be available when the removable memory is not connected. You can
also move or copy les from the internal memory of the tablet to an external device.
To send/receive les via Bluetooth, you can access the Bluetooth data transfer menu
by pressing on the arrow in between the keyboard icon and the notication ag in
the task bar of the Windows Desktop.
Remember that all files in external devices or removable memories, will
no longer be available once they have been disconnected from your Tesla
2 W8.
Do not disconnect the device or external memory while files are being
transferred as they could be damaged.
12
Page 13

Complete User Manual
ENGLISH
Getting Started
Tesla 2 W8
Setup Wizard
The rst time you switch on your bq Tesla 2 W8, a setup wizard will help you to
congure the basic settings for your device:
13
Page 14

Complete User Manual
Tesla 2 W8
Desktop
ENGLISH
DESKTOP
Lock Screen
Your tablet screen will lock itself after a prolonged period of inactivity. To congure the
screen timeout interval, press the Menu button
the screen and lock the device manually, briey press the power button.
To unlock it, briey press the power button again and the screen turn on, and the unlock
option you have set up will appear.
, followed by Lock screen. To turn off
14
Page 15
Complete User Manual
ENGLISH
Desktop
Tesla 2 W8
Start Screen
On switching on your tablet the Start screen will appear, where you can view emails,
apps notications, updates from your friends and the next event in your calendar,
without needing to open a single app. You can start a session with different Microsoft
accounts, which allows the icons, colours and backgrounds to be personalised.
If you are using an app or doing something else on your tablet, there are various
ways to return to Start:
a) Press the Start
b) Swipe your nger from the right and press the Start icon on the Charms bar.
c) Swipe your nger from the top of the screen to the centre and press Start.
button on the tablet.
Lock Screen
To adjust the screen lock time interval, go to Desktop and swipe your nger from the
right to pull out the Charms bar. Press on Settings > Control Panel > Power Options. If
this option does not appear, go to View by and change from Category to another option
to view a longer list. You can choose or customise an existing power plan, and you can
also Create a power plan yourself.
If you want to lock and turn off the screen, briey press the power button.
15
Page 16

Complete User Manual
Tesla 2 W8
Desktop
ENGLISH
Adjusting the screen rotation
In some applications, the screen automatically rotates from portrait (vertical) to
landscape (horizontal) and vice versa, according to the position that your device is
placed in. To lock the screen rotation, swipe your nger from the right of the screen,
go to Settings > Screen and press the screen icon
, and a padlock will appear .
Customising the Start screen
You can customise the Start screen by using your own background images. You can
organise it by adjusting the size of the tiles and arranging them as you like to make
it easier access the apps, folders, sites and contacts that you use the most.
Pinning tiles to the Start screen
1. Go to Start and press and hold the tile you want to move.
2. Drag it to the desired location and release.
Change the size of a tile on the Start screen
1. Press and hold down the tile you want to adjust. A menu will appear at the
bottom of the screen.
2. Select the Resize
icon from the menu and then select the option you
want.
The tiles that you use most could be larger and those that you use the least could
be smaller.
You can adjust the size and arrange the tiles however you like.
You can also group several icons together to make it easier to keep track of the
apps and use them more effectively.
Taking screenshots
You can take screenshots easily by pressing the volume key and the Start button
simultaneously. They will
saved automatically in Desktop > Pictures > Screenshots.
16
Page 17

Complete User Manual
ENGLISH
Desktop
Tesla 2 W8
Learning to Use the Multi-Touch Screen
Your tablet has a capacitive multi-touch screen with various simultaneous detection
points. Different movements can be made over these points which are linked to
different functions:
Touch. Touch the screen briey to select an icon, open an app, activate a text-entry
box, etc.
Touch and hold. Touch the screen (either a clear area or an icon) with your nger
and hold for approximately 2 seconds to bring up the menu of available options.
Drag. To move an icon, press and hold down, drag it to the desired position and then
release.
17
Page 18

Complete User Manual
Tesla 2 W8
Desktop
ENGLISH
Swipe or slide. Press briey on the Start screen, slide your nger left or right to
access the extended screens, or slide your nger up and down to scroll through
webpages, app lists and menus.
Pinch. Place two ngers on the screen at the same time and move them towards one
another or spread them apart to reduce or enlarge an image. You can also doubletap the screen quickly to zoom in on or out of an image, when viewing photos or
browsing a website.
Double-tap. Tap the screen twice in quick succession to increase the zoom. Repeat
the action to zoom out again. You can also use it to activate the screen.
18
Page 19

Complete User Manual
ENGLISH
Desktop
Tesla 2 W8
Common functions with touch screens
Go to the last app. Swipe from the left of the screen.
See a list of recent apps. Swipe your nger quickly from the left of the screen and
back again, without releasing it.
Close an app. Drag the app up to the top of the screen and then down to the bottom.
Select an element. Swipe your nger over the element or press and hold down to
select it.
19
Page 20

Complete User Manual
Tesla 2 W8
Desktop
ENGLISH
Charms Bar
To view the Charms bar, swipe from the right of the screen. These ve features will help
you with the most common actions: Search, Share, Start, Devices and Settings.
You can search the internet or your tablet, print documents and send photos and links
via email.
Search
The Search feature enables you to search your tablet, the web, some apps and the
Windows Store. Via a simple search, you will get all the results and you can go back
to them later without having to search again.
1. Pull out the Charms bar and press Search.
2. Enter the search time. A list with search results and suggestions will appear
as you write.
3. If you are searching for an app, le or option found on the results page, press
or click to open it.
Share
You can share les, photos and information with people easily or save it for later,
without having to leave the app you are using.
You can share your les via most apps, email or OneDrive.
20
Page 21

Complete User Manual
ENGLISH
1. Press and gently drag the element downwards to select it. If you want to
deselect the element, press briey drag it downwards again.
2. Pull out the Charms bar and then press Share.
3. Press or click on app you want to share via and follow the instructions that
appear on screen.
Desktop
Tesla 2 W8
Start
As well as pressing the Start button you can also access Start via the Charms bar.
Or alternatively, if you are already in Start, you can use this feature to return to the
previous app.
Devices
Via the Devices option, you can quickly send les and information to other devices
connected to your tablet, such as the printer, the Xbox, phone, speakers, television
or projector. The list of devices available under Devices depends on which ones are
connected to the tablet.
1. Open an app and swipe quickly over the element or le you want to send to
a device in order to select it.
2. Pull out the Charms bar and then press Devices.
Conguration
From Settings you can congure some common options quickly:
1. Pull out the Charms bar and then press Settings.
2. Press or click on the option you want to change.
To change your PC settings
You can change most of your PC settings (rather than via the Control Panel), such
as personalisation and other things, such as devices, accounts, OneDrive, network
and language.
1. Pull out the Charms bar, press Settings > Change PC settings.
2. Touch the option you want to change: Notications, Search, Share, General
Use, Privacy, Devices, Networks, etc.
21
Page 22

Complete User Manual
Tesla 2 W8
Desktop
Information Icons
They are shown on the Lock Screen and Start. Some of the main icons are:
Battery empty
ENGLISH
Battery charging
Battery fully loaded
Wi-Fi on and connected to a network
*
Wi-Fi on and not connected to a network
Flight mode enabled
Enable the keyboard for writing
Keyboard
On pressing on any text eld, the virtual keyboard will appear.
7
6
1
2
4 53
Enable/disable capital letters.
1
Change from letters to numbers and symbols, or vice versa.
2
Combine this key with another to use a quick function.
3
Space.
4
Select the keyboard display mode.
5
Enter/line break.
6
Delete.
7
You can set up text entry via Settings > Control Panel > Keyboard.
22
Page 23

Complete User Manual
ENGLISH
Desktop
Tesla 2 W8
Apps Menu
In the Applications view, you will nd all your apps, including desktop programs such
as Word and Excel.
To access it, go to Start and swipe quickly from bottom to top. Swipe right to left to
browse the menu and see all the applications.
It locates and installs apps for your tablet
The apps make using your PC easier by offering new ways to work and have fun. If
you want to nd apps to install on your tablet, touch Store on the Start screen. You
must be connected to the internet and logged in with a Microsoft account.
Within Windows Store, you can explore the apps and lists shown. If you don’t know
what type of app you want, you can start with the apps that appear in the Store. Go
right to browse lists of the most popular apps, according to categories such as new,
paid or free. To view of all the apps of a particular list, simply press on the name.
23
Page 24

Complete User Manual
Tesla 2 W8
Desktop
ENGLISH
After you have installed an app from the Store, it will appear under Applications
with the rest of the applications installed on your tablet.
Pinning apps
To pin an app to the Start screen, hold down and drag it gently until a bar appears at
the bottom of the screen with the Pin to Start option. The pinned apps will appear
at the bottom of Start screen.
You can rearrange the pinned apps, resize tiles, and group related apps together.
Unpinning apps
If you want to remove an icon from the Start screen, you will need to unpin it.
Unpinning an app does not uninstall it, as it will still appear under Applications.
24
Page 25

Complete User Manual
ENGLISH
Desktop
Tesla 2 W8
To unpin an app from Start:
1. From the Start screen, press and hold the tile until an options bar appears
at the bottom and press Unpin from Start.
You can also select multiple tiles and unpin them all simultaneously. To delete
the selected tiles from the Start screen or under Applications, press or click
on an open area of the screen or on Customise.
2. Press on Unpin from Start.
Using your apps
To start using an app, click on it on the Start screen (if pinned) or under Applications.
The tasks that can be carried out with an app depend on the app installed, however,
here are some basic suggestions for you:
See the app commands
App commands help you to carry out different tasks in apps. To see the commands
available in an app, swipe down from the top of the screen or swipe up from the
bottom, and then select the command.
25
Page 26

Complete User Manual
Tesla 2 W8
Desktop
ENGLISH
Using charms in an app
In many apps you can use the Charms bar to Search, Share, send les to printers or
other Devices and change the Settings. To use the charms in one app, swipe your
nger from the right to pull out the Charms bar then select a charm.
Closing an app
The app in the Windows Store has been designed so that they don’t affect the
speed of your tablet. When you nish using an app, Windows leaves it running in
the background and it will eventually close itself if you don’t use it.
However, if you want to close an app and make it disappear, drag it to the bottom
of the screen.
To view or return to applications that were being used and have not been closed,
swipe your nger gently to the centre and, without releasing, pull this screen to the
left. All the recently-visited applications will appear.
If you want to close an app and make it disappear, drag it to the bottom of the screen
and it will be removed.
26
Page 27

Complete User Manual
ENGLISH
Desktop
Tesla 2 W8
Installing your apps on other devices
All your Windows 8 and Windows 8.1 apps will appear under My apps in the
Windows Store. You can see which apps have been installed on the different devices
that you use and you can install apps from here directly, to avoid having to nd them
in the Store and to install them on each one.
1. On the Start screen, press the Windows Store icon.
2. Go to the Account menu and then to My apps.
3. Swipe your nger down on the apps you want to install and then hit Install.
You can install Windows 8 apps on a device with Windows 8.1 but not the other
way round.
27
Page 28

Complete User Manual
Tesla 2 W8
Control Panel
ENGLISH
CONTROL PANEL
The Control Panel provides access to all the tools for conguring your tablet. You
can personalise the system, adjust the security settings, manage the apps and the
hardware or adjust the network settings.
To access it, slide your nger from the right to pull out the Charms bar the press
Settings > Control Panel.
You can view by Category, Large icons or Small icons.
View by Category
View by Small icons
28
Page 29

Complete User Manual
ENGLISH
Control Panel
Tesla 2 W8
System and Security
Here you can review the status of your device’s system security, manage the
connected devices and how they operate, as well as the Power Options and Storage
Spaces, etc.
Network and Internet
From this section, you can see the status of your networks, add/connect to new
networks, determine the congurations and manage your device’s internet options.
Hardware and Sound
Adding new devices such as printers, mouses, keyboards can be done via this
menu. You can also adjust the audio volume and settings, personalise the display
(resolution, backgrounds, remote screens, etc.) and congure other accessories.
Programs
From this section you can uninstall programs and control the advanced settings. The
application update settings are also available here.
User Accounts and Family Safety
From here, you can manage the different user accounts that can access your
device, and you can also enable and congure Family Safety. You can also access
the Credential Manager via this menu to manage web logins and passwords.
Appearance and Personalisation
This menu enables you to control the themes and colours, backgrounds, notication
sounds, navigation, accessibility or the font type and size of the text display in
different windows.
29
Page 30

Complete User Manual
Tesla 2 W8
Control Panel
ENGLISH
Clock, Language and Region
Here you can adjust settings such as the date and time, the time zone and the region.
Add a language
This option allows you to select the language for your Tesla 2 W8. You can have
various different languages installed on different user accounts.
Change input methods
Here you can control the input method of the keyboard and the language
preferences, including punctuation and the date and time formats.
Changing the date, time or number formats
Here you can set the time of the Windows clock and indicate the correct date. If you
sync the PC clock with the internet you will always have the exact time.
You can also dene two clocks with different time. Another option is to add a desktop
clock gadget that shows the time in your chosen location.
Ease of Access
This menu has two options aimed at improving accessibility for people with some
type of disability:
Let Windows suggest settings
We can allow Windows to select the most suitable conguration for each type of
disability.
Optimise the visual display
Allows different accessibility options to be controlled, including voice recognition.
The Control Panel includes a wide variety of tools to make using Windows easier for
people with disabilities or anyone with problems in using it with the default settings.
30
Page 31

Complete User Manual
ENGLISH
Mail
Tesla 2 W8
Microsoft Account
Account
To obtain apps from the Windows Store, to make backups using the free cloud
storage facility, to update and sync your favourite apps and multimedia les (devices,
photos, friends, games, settings, music, etc.), you will need to have a Microsoft
account to log on to your tablet.
It is free of charge, easy to set up and you can use an existing Microsoft email account
or to create a new one in just a few steps.
If several people are using the same Tesla 2 W8, each of them must have their
own account. Each account can personalise the device with their preferred
background colours, favourite apps, account picture, inbox, etc.
If you have children, you can also make a child account with extra security
measures and supervision (with or without email) so that your children only
see what you want.
If you have used Microsoft services before (Xbox, Hotmail, Outlook, SkyDrive,
Messenger, Skype or Windows Phone), you will already have a Microsoft account
(the email address you used to log in). If you can’t remember which email address
you used, you can easily create a new one totally free of charge.
To check if you are signed in with a Microsoft account:
1. Pull out the Charms bar, press Settings > Change PC settings.
2. Hit click Accounts then Your account.
If you are already signed in with a Microsoft account, you will see your name and
email address displayed with the account picture.
If you have signed in with a local account, Local account will appear beneath your
username.
31
Page 32

Complete User Manual
Tesla 2 W8
Email
ENGLISH
Signing in
If you have logged on to the tablet with a local account, there are various ways to
change to a Microsoft account. Pull out the Charms Bar, hit Settings > Change PC
settings > Accounts > Your account > Change to a Microsoft account. Conrm the
current password if necessary. Then select one of the following options:
a) Signing in with a Microsoft account. Even if you are not logged on to your
tablet with a Microsoft account, if you have already used other Microsoft
services such as Hotmail, Outlook Skype or Xbox, you will most likely have
one.
Enter the email and password that you use for these services, hit Next and
then follow the instructions.
b) Signing up for an email address. Follow the instructions for lling in the
personal and security information to create a new Microsoft account.
32
Page 33

Complete User Manual
ENGLISH
Email
Tesla 2 W8
Access
Your Microsoft account is the key that provides access to the free online storage,
mobile entertainment, apps from the Windows Store and other Microsoft products
and services (such as Xbox Live or Windows Phone), and it allows you to easily
connect to your devices and accounts.
Obtaining apps from the Windows Store
You will need a Microsoft account and Windows 8.1, Windows RT 8.1, Windows 8
or Windows RT to obtain apps from the Windows Store. You also can install your
apps on several devices without needing to buy them again.
Syncing your contacts
Link your Facebook, Twitter, Outlook and LinkedIn accounts to the People
application to see the contact information and updates of your friends in one place.
Sync your conguration
Enjoy the same themes and colours, the Start design, your browser favourites and
history, the content of your apps, your photos and even the conguration, such as
language and other preferences, across several devices. All you have to do is sign in
with a Microsoft account and sync the conguration.
Get free storage in the cloud
If you have a Microsoft account, you can take full advantage of the free cloud
storage facility through OneDrive, which enables you to view, save and share your
documents and photos. The Microsoft account links your PC to OneDrive, so that
you will always have your les to hand.
33
Page 34

Complete User Manual
Tesla 2 W8
Email
ENGLISH
Setting up Other Email Accounts
To be able to send and receive emails from any account, you can use the Mail
application on the Start screen, under Apps.
The rst time you use this app, you will be asked if you want to add another account:
1. Select an email provider: Outlook.com, Exchange, Google, Yahoo! and
Other account.
2. Enter the email address and password and sign in.
3. Read the data to be shared and accept. You can share this account with
other applications without having to re-enter the data.
4. Once the conguration is nished, synchronisation could take a few minutes
to bring up all the emails on screen.
34
Page 35

Complete User Manual
ENGLISH
Email
Tesla 2 W8
Sending an Email
1. Open the Mail application and press the Compose button.
2. Enter the recipient’s email address, the subject and body of the message.
3. Hit the Send
To attach les hit the
button.
button and select the le you want to send.
Replying to an Email
There are three ways of replying to emails which are open:
· Reply: only the person that sent the last message will receive your reply.
· Reply all: all the users listed as recipients of the last email will receive a copy
of the answer.
· Forward: you can send forward the contents of an email to a different user.
The forward option on some email clients only allows the attached files of the
previous email to be sent.
35
Page 36

Complete User Manual
Tesla 2 W8
Performance Settings
ENGLISH
PERFORMANCE SETTINGS
Optimising the Battery Life
You can prolong the battery duration by disabling features that you don’t need. You
can also can control how the application and system resources consume the battery
power. To optimise the conguration, pull out the Charms bar and go to Settings >
Control Panel to access the PC settings.
· If you are not using Wi-Fi, Bluetooth or GPS, you can configure it under
Settings, as explained earlier.
· Adjust the brightness of your screen according to the current ambient light
conditions.
· Set a time delay before the screen goes off under Settings > Control Panel >
Power Options.
· Switch to Flight mode by holding down the power button until a window
displaying this option appears, or go to Settings then Network to select it.
36
Page 37

Complete User Manual
ENGLISH
Multimedia
Tesla 2 W8
MULTIMEDIA
Camera
The front camera allows you to take photos and video simply by touching the screen,
and selecting the camera or video icon, as desired.
To take a photo, press the icon of the photo camera. To record a video, press the
video icon lightly when you want are ready to start or stop recording. Slide your
nger from top to bottom to icons to see the camera roll, to switch from front camera
to rear, to set the timer or adjust the exposure.
37
Page 38

Complete User Manual
Tesla 2 W8
Multimedia
ENGLISH
Playing Music
Your tablet comes with the Xbox Music player as standard. Add music to your library
from the Windows desktop. Select Explore to browse and buy. Pressing Radio also
enables you to listen to your favourite radio stations.
Playing Videos
Your tablet comes with the Xbox Video player as standard. This application allows
you to play all the videos stored on your device, and it also provides lm and TV
stores.
38
Page 39

Complete User Manual
ENGLISH
Apps
Tesla 2 W8
APPLICATIONS
App Store
Your tablet comes with the Windows Store as standard, where you can download
all kinds of applications, games, music, films and books, etc. For each type of
download, you will nd intuitive subcategories to help you nd exactly what you
are looking for at any time.
Important: be aware that not all downloads are free and additional costs may
be incurred. For downloads that are not free, the price will appear next to app
description, and you will be asked to conrm before downloading to avoid being
charged unintentionally.
Preinstalled Apps
To access the list of preinstalled apps, press the icon and slide upwards. You will then
see all the apps installed on your device.
Web Browser
Using your web browser, you can open multiple URLs in different tabs simultaneously.
Access your browser by pressing the
Internet Explorer
icon. When you open a new tab, you can enter a URL manually
or you can follow suggestions in the centre of the screen, which are based on the
pages you visit most frequently.
icon at the bottom of the tablet and press the
39
Page 40

Complete User Manual
Tesla 2 W8
Apps
ENGLISH
Text Editor, Spreadsheets and Presentations
With this management tool you can create and publish documents, spreadsheets
and presentations. You can also sync the application with your OneDrive account,
save your les in the cloud and access them remotely via any compatible device. It
is compatible with Word, Excel and PowerPoint, and it also reads pdf les. From this
application you can also directly attach les to emails.
Calendar
With the Calendar tool you can manage your daily tasks and sync them with your
electronic email account so that you can share appointments, meetings and events
with your contacts. It also enables you to set up reminder alerts and notications so
that you never forget an appointment. The app also allows you to sync the calendar
so you can view it from any other mobile device.
To create a new event, access the application, swipe from top to bottom and press
New
with your email or select a background image.
. In addition to this option, you can choose how to view your events, sync
40
Page 41

Complete User Manual
ENGLISH
Apps
Tesla 2 W8
Maps and GPS Navigation
Using the Maps application that comes installed on your tablet, you can view
your current location on a map, as well as satellite images and real photos of the area
surrounding a given point. You can also use the search option to get directions on
how to reach a destination from your current location, either on foot or in a vehicle. It
also provides a location service to identify afliated companies and establishments.
NB: your bq Tesla 2 W8 does not have this type of connection, to obtain it you
will need wireless connectivity via an external device (for example, a smartphone
or USB router, which are not provided with your tablet).
Live Tiles
Weather: shows the temperature and current weather conditions, as well as the forecast
for today and tomorrow, based on the current location.
News: displays information of general interest, and you also can add the RSS of your
favourite newspapers (if available) to determine which sources of news will be used.
Store: different suggested apps and their prices appear every so often.
Health and Wellbeing: displays daily advice to improve your quality of life, aimed at diet,
physical exercise and healthy habits.
Food & Drink: displays daily tips and recommended recipe suggestions.
Sport: similar to the News tile, except it only displays news from the sports world.
Money: displays the up-to-date status of key global stock markets.
41
Page 42

Complete User Manual
Tesla 2 W8
Tools
ENGLISH
TOOLS
Calculator
You will nd various tools on your tablet, such as the calculator which enables you
to carry out basic sums, as well as some more scientic or advanced ones. To switch
between the different types of calculator, press View and choose from the options
available: Standard, Scientic, Programmer and Statistics.
Alarms
Go to Apps then Alarms to manage all your alarms, and also to access the timer
and stopwatch.
You can set up different alarms at the same time, and adjust settings such as the
name of the alarm, the number of times it sounds, which days of the week it is
repeated, the alarm tone and whether it vibrates or not.
42
Page 43

Complete User Manual
ENGLISH
Tools
Tesla 2 W8
You can create new alarms and delete them as often as you want. To temporarily
enable or disable an alarm (without deleting it), simply slide the icon located to the
right of the alarm time over to the left.
The Clock app also allows you to view the local time in any location around the
world, and contains other useful functions such as a fully congurable timer and a
practical stopwatch with interval feature.
Sound Recorder
Another of your tablet’s tools is the Sound Recorder. This app allows you to record
audio with ease.
To start recording, simply press the red icon located in the middle of the top part
of the screen. The counter above will start. You can pause the recording or end it
using the relevant icons. After you have pressed stop, you can play, trim, delete or
rename your recording.
43
Page 44

Complete User Manual
Tesla 2 W8
Appendices
ENGLISH
APPENDICES
APPENDIX A: Technical Specications
You can nd all the technical information for your device by visiting this link and
selecting the corresponding model: www.bq.com/gb/tablets-prices-sale.html
After selecting your model, you can access the full description by clicking on
Specications on the bar at the top of the page.
In the table you will nd information on the following:
· Dimensions and weight
· Screen
· Internal memory
· Processor
· Battery
· Operating system
· Connectivity
· System functions
44
Page 45

Complete User Manual
ENGLISH
Appendices
Tesla 2 W8
APPENDIX B: Cleaning and Safety
Cleaning
Before cleaning your device, make sure you have switched it off and disconnected all
cables. After cleaning, make sure the screen is completely dry before reconnecting
any cables and switching the device back on. Do not use any liquid or spray cleaner
directly on the surface of the screen or the casing.
Screen: Use a clean, soft, lint-free cloth to remove dust and dirt from the screen.
To remove ngerprints and marks, you may apply a small amount of mild cleaning
product to the cloth.
Casing: Use a soft cloth with a small amount of mild cleaning product. After cleaning,
rinse the cloth in clean water, wring it out thoroughly and wipe the casing to remove
any leftover cleaning product.
Safety
To reduce the risk of an accident, follow these safety instructions:
· Do not use power cables, connectors or plugs that are damaged or contain loose
wiring. Do not bend or damage the power cable. Do not touch the power cable
with wet hands. Do not pull on the cable to unplug the charger.
· Do not use the device while it is charging. Do not touch it with wet hands.
· Do not hit the charger or cause it to fall. Do not charge the battery using
chargers that have not been approved by the manufacturer.
· Do not use the device during electrical storms. Handle and dispose of the
battery and charger with caution.
· Do not handle Li-ion batteries that are damaged or leaking.
· Do not use the device in the vicinity of a pacemaker. If possible, try to use it at a
distance of more than 15 cm from the pacemaker, as it could interfere with the
pacemaker’s operation.
· Do not use the device in a hospital or in the vicinity of any medical equipment
that may be susceptible to radio frequency interference.
· If you regularly use medical equipment, make sure it is protected against radio
frequency interference. If you wear a hearing aid, consult the manufacturer with
regard to potential interference.
45
Page 46

Complete User Manual
Tesla 2 W8
Appendices
ENGLISH
· In potentially explosive environments, switch the device off. Always observe
the site regulations, instructions and warning signs
.
· Do not use the device in refuelling areas (e.g. petrol stations) or in the vicinity
of ammable and/or explosive chemical products
.
· Do not store or transport ammable liquids or gases or explosive materials in
the vicinity of the device or any of its parts or accessories.
.
· Switch off the device upon boarding an aeroplane. The electronic components
of a motor vehicle may malfunction as a result of radio frequency interference
from the device.
· Prolonged exposure to high levels of sound pressure may cause permanent
damage to hearing. It is recommended that you do not wear headphones while
cycling, running or walking through areas with heavy trafc or excessive noise.
· Use of the device while driving: Some car manufacturers prohibit the use of
mobile devices in their vehicles unless they are equipped with a hands-free
kit and external antenna. Ask the vendor of your vehicle whether your mobile
device or hands-free Bluetooth kit will interfere with your car’s electrical
systems. Always devote your full attention to the road while driving and respect
the local regulations and laws on the use of wireless devices while at the wheel.
· Location/GPS-based functions: Location-based functions are offered “as is” and
“for all corresponding effects”. Mundo Reader, S.L. does not claim or in any way
guarantee the accuracy of any location-based information.
· When the device is using location-based information, it may suffer from
interruptions or failures and its dependence on network availability will increase.
Note that functionality may be reduced or obstructed in certain areas, such as
inside buildings or in areas close to buildings.
· Use the GPS function with caution, to make sure you are not distracted while
driving.
· Antenna: Use of the device with an antenna other than that supplied by Mundo
Reader, S.L. may damage it, impair its performance and generate SAR levels (see
Appendix D) that exceed the limits established by law. Do not cover the antenna
with your hand.
· Flight mode: Use of Bluetooth and WLAN functions may be prohibited on
aeroplanes and in other places where radio transmissions are not permitted. In
these locations, please request authorisation before enabling any of the device’s
Bluetooth or WLAN functions, even in Flight mode.
46
Page 47

ENGLISH
Complete User Manual
Appendices
Warning!
This product must be used with a power supply
that has the following specications:
INPUT: 100-240 V ~ 50/60 Hz 0.5 A max.
Tesla 2 W8
OUTPUT: 9 V
The use of power sources other than the ones
indicated may damage your device and pose a
risk to the safety of people and property.
1.5 A
47
Page 48

Complete User Manual
Tesla 2 W8
Appendices
ENGLISH
APPENDIX C: Information on Exposure to Radio Waves and SAR
(Specic Absorption Rate)
The design of this mobile device complies with the current regulations governing
exposure to radio waves. These regulations are based on scientic guidelines that
include safety margins designed to ensure the safety of everyone, regardless of age
or state of health.
The guidelines on exposure to radio waves use a unit of measurement known as
the SAR (Specic Absorption Rate). SAR tests are carried out using standardised
methods, with the mobile device transmitting at the highest certied level of power
on all the frequency bands it uses.
The maximum SAR levels recommended by the ICNIRP (International Commission
on Non Ionizing Radiation Protection) is 2 W/kg, measured on 10 g of tissue.
The highest SAR levels recorded for this tablet are as follows:
Tesla 2 W8
When used in direct contact 0.715 W/kg (10 g)
This device complies with the guidelines on exposure to radio frequency both when
it is used in the normal position next to the ear and when it is positioned at least
1.5 cm from the body. In order to send data les or messages, this device requires
an adequate network connection. On certain occasions, the transmission of data
les or messages may be delayed until an adequate connection becomes available.
Until the transmission has been completed, make sure you follow the instructions
on separation distance mentioned above.
48
Page 49

Complete User Manual
ENGLISH
Appendices
Tesla 2 W8
APPENDIX D: Disposing of this Product Correctly
(Electrical and electronic waste).
(Applies within the European Union and in European countries with
selective waste collection systems).
To prevent any damage to the environment or human health, separate these products
from other types of waste and recycle them correctly. This will help promote the
sustainable use of material resources.
Household users should contact the retailer that they purchased the product from
or the relevant local authorities to nd out how and where they can recycle this
product safely and without harming the environment.
Business users should contact their supplier and consult the terms and conditions of
the purchase agreement. This product and its electronic accessories should not be
disposed of with other waste materials such as the box and non-electronic materials.
49
Page 50

Complete User Manual
Tesla 2 W8
Appendices
APPENDIX E: Declaration of Conformity
Mundo Reader, S.L.
Pol. Ind. Európolis
Calle Sofía, 10
28232 - Las Rozas - Madrid (Spain)
Tel. +34 91 787 58 59
CIF: B85991941
Made in China
Declares that this tablet:
bq Tesla 2 W8
ENGLISH
complies with the provisions of Directive 1999/5/EC on Radio and
Telecommunications Terminal Equipment (R&TTE), Directive 2006/95/EC on
Electrical Safety for Low Voltage Equipment, and Directive 2004/108/EC on
Electromagnetic Compatibility, in addition to the following harmonised standards:
EN EN60950-1/A2:2013, EN 50566: 2013, EN 62479: 2010, EN 62311: 2008,
EN 62209-2: 2010, EN 301489-1 V1.9.2, EN301489-3 V1.6.1, EN 301489-17
V2.2.1, EN 55022:2010/AC:2011, EN55024: 2010, EN 61000-3-2/A2:2009, EN
61000-3-3: 2008, EN 300328 V1.8.1, EN 300440-2 V1.4.1.
You can request a copy of the Declaration of Conformity by writing to the address
given above.
Madrid, November 2014.
Alberto Méndez Peydró
CEO
50
Page 51

Firmware version
bq Tesla 2 W8: 20141205_2323
Page 52

www.bq.com
www.mibqyyo.com
 Loading...