

Page 1
Complete User Manual
Page 2

Trademarks
The bq logo is a registered trademark of Mundo Reader, S.L.
Ubuntu and Canonical are registered trademarks of Canonical Ltd.
Wi-Fi
®
is a registered trademark of the Wi-Fi Alliance.
Bluetooth
®
is a registered trademark of Bluetooth SIG, Inc.
MicroSD
TM
and the corresponding logo are registered trademarks of SD-3D, LLC.
All other trademarks are the property of their respective owners. All rights reserved.
Page 3

bq Aquaris E4.5 Ubuntu Edition
The bq team would like to thank you for purchasing your new Aquaris E4.5
. We hope you enjoy using it.
The Aquaris E4.5 is an unlocked smartphone with dual SIM (micro-SIM) function,
which means you can use two SIM cards at the same time, regardless of network
operator.
Ubuntu introduces a new way to enjoy content and services on smartphones,
without relying on traditional apps. The Ubuntu interface only uses touch gestures
on the screen, and does not use physical access buttons on the front.
This guide will walk you through the basic steps required to set up and use your
Ubuntu phone - and help you to make the most of its unique features, such as the
Scopes.
Ubuntu’s Scopes make it faster and easier than ever before to nd the things you
want. Within minutes, you’ll be navigating to the music, photos, videos, apps and
services you want to use much quicker than you can with other smartphones.
Page 4
About This Manual
· To make sure that you use your Ubuntu phone correctly, please read this manual
carefully before you start using it.
· Some of the images and screenshots shown in this manual may differ slightly
from those of the nal product.
· Due to rmware updates, it is possible that some of the information in this
manual does not correspond exactly to the operation of your device. To obtain
the most up-to-date version of this manual, please go to www.bq.com.
· bq shall not be held liable for any issues relating to performance or compatibility
resulting from modication of the registry settings by the user. Nor shall it be
held liable for any incompatibility issues with third-party applications available
through the app stores.
Icon guide
Danger: This icon indicates situations that could pose a risk to personal safety
or health.
Warning: Situations which pose no risk to personal safety or health, but could
pose a risk to the correct functioning of the device.
Tip: Additional information to help you get the best out of your device.
Page 5

ENGLISH
Complete User Manual
5
Contents
9 BEFORE YOU BEGIN
9 Box Contents
10 Product Overview
11 GETTING STARTED
11 How to Insert SIM Cards
12 Inserting/Removing the MicroSD Card
14 Switching the Device On and Off
15 Charging the Phone and Transferring Files
17 Setup Wizard
18 Learning to Use the Multi-Touch Screen
21 How to Unlock Your Phone
22 Finding Your Way Around Your Phone
23 Searching Your Phone
24 Accessing the Indicators
24 Accessing the Launcher
25 Personalising the Launcher
26 HOW TO USE SCOPES
26 How to Use Scopes
27 Adding Scopes
27 Managing Scopes
30 APPS
30 Finding and Using Apps
31 Switching Between Apps
32 Opening and Closing Apps
Contents
Page 6

ENGLISH
Complete User Manual
6
Contents
33 THE UBUNTU STORE
33 Finding New Scopes and Apps in the Store
33 Deleting (Uninstalling) Scopes and Apps
34 VOICE CALLS
34 Making Calls
34 Receiving Calls
35 Returning Calls
37 Making a Conference Calls
38 Turning on the Loudspeaker During a Calls
38 Forwarding Calls
39 TEXT MESSAGING
39 Sending a Text Message
41 Sharing Photos and Media Files with a Text
41 Deleting Text Messages
42 USING EMAIL
43 MANAGING YOUR CONTACTS
43 Creating a Contact
44 Deleting a Contact
45 USING THE WEB
45 Integrating Your Online Accounts
46 Browsing the Web
48 ALARMS AND CLOCK SETTINGS
48 Setting the Date and Time
49 Setting an Alarm
50 MAPS AND WEATHER
50 Using Maps
51 TAKING PHOTOS AND VIDEOS
51 Using the Camera to Take a Photo
52 Accessing the Flash Settings
52 Using the Camera to Record a Video
Page 7

ENGLISH
Complete User Manual
7
Contents
53 MANAGING YOUR PHOTOS AND VIDEOS
53 Viewing your Photos and Videos in the Gallery
53 Sharing a Photo
53 Playing Videos
54 PLAYING AND MANAGING YOUR MUSIC
54 Playing a Track
55 CONNECTIVITY AND NETWORKING
55 Viewing Your Mobile Network
55 Turning Roaming On or Off
56 Managing Wi-Fi Networks
57 Using Bluetooth
58 Turning Flight Mode On and Off
60 SECURING YOUR PHONE
60 Locking Your Phone
61 Setting or Changing your Passphrase
62 PERSONALISING YOUR PHONE
62 Changing Your Ringtone, Message Tone and Alarm
62 Changing the Phone’s Language and Keyboard
62 Changing Your Background Images
63 Deciding What to Show on the Welcome Screen
64 ABOUT YOUR PHONE
65 UPDATING AND RESETTING YOUR PHONE
65 Updating the Software on Your Phone
67 Resetting Your Phone
68 USEFUL TIPS
68 Copying and Pasting
68 Locking the Display to Landscape or Portrait Orientation
68 Checking Data Usage
68 Taking Screenshots
69 Optimising Battery Life
Page 8

ENGLISH
Complete User Manual
8
Contents
70 APPENDICES
70 APPENDIX A: OTA Updates
71 APPENDIX B: Technical Specications
72 APPENDIX C: Cleaning and Safety
75 APPENDIX D: Information on Exposure to Radio Waves
and SAR
76 APPENDIX E: Disposing of this Product Correctly
77 APPENDIX F: Declaration of Conformity
Page 9

ENGLISH
Complete User Manual
9
Before you begin
BEFORE YOU BEGIN
Box Contents
Before using your bq device for the rst time, please check the contents of the box.
Please contact us if any of the following items are missing.
bq Aquaris E4.5 Ubuntu Edition
USB to micro-USB cable
Mains charger
SIM key
Documentation:
Quick Start Guide
Warranty and Safety Manual
bq Accessories
Page 10
ENGLISH
Complete User Manual
10
Before you begin
Do not attempt to remove the rear cover of your bq Aquaris E4.5 Ubuntu
Edition, as this may damage the device.
Do not remove the battery by any means. Removing it may invalidate the
warranty.
Do not insert any pointed objects into the opening next to the rear camera, as this
may damage the noise-cancelling microphone.
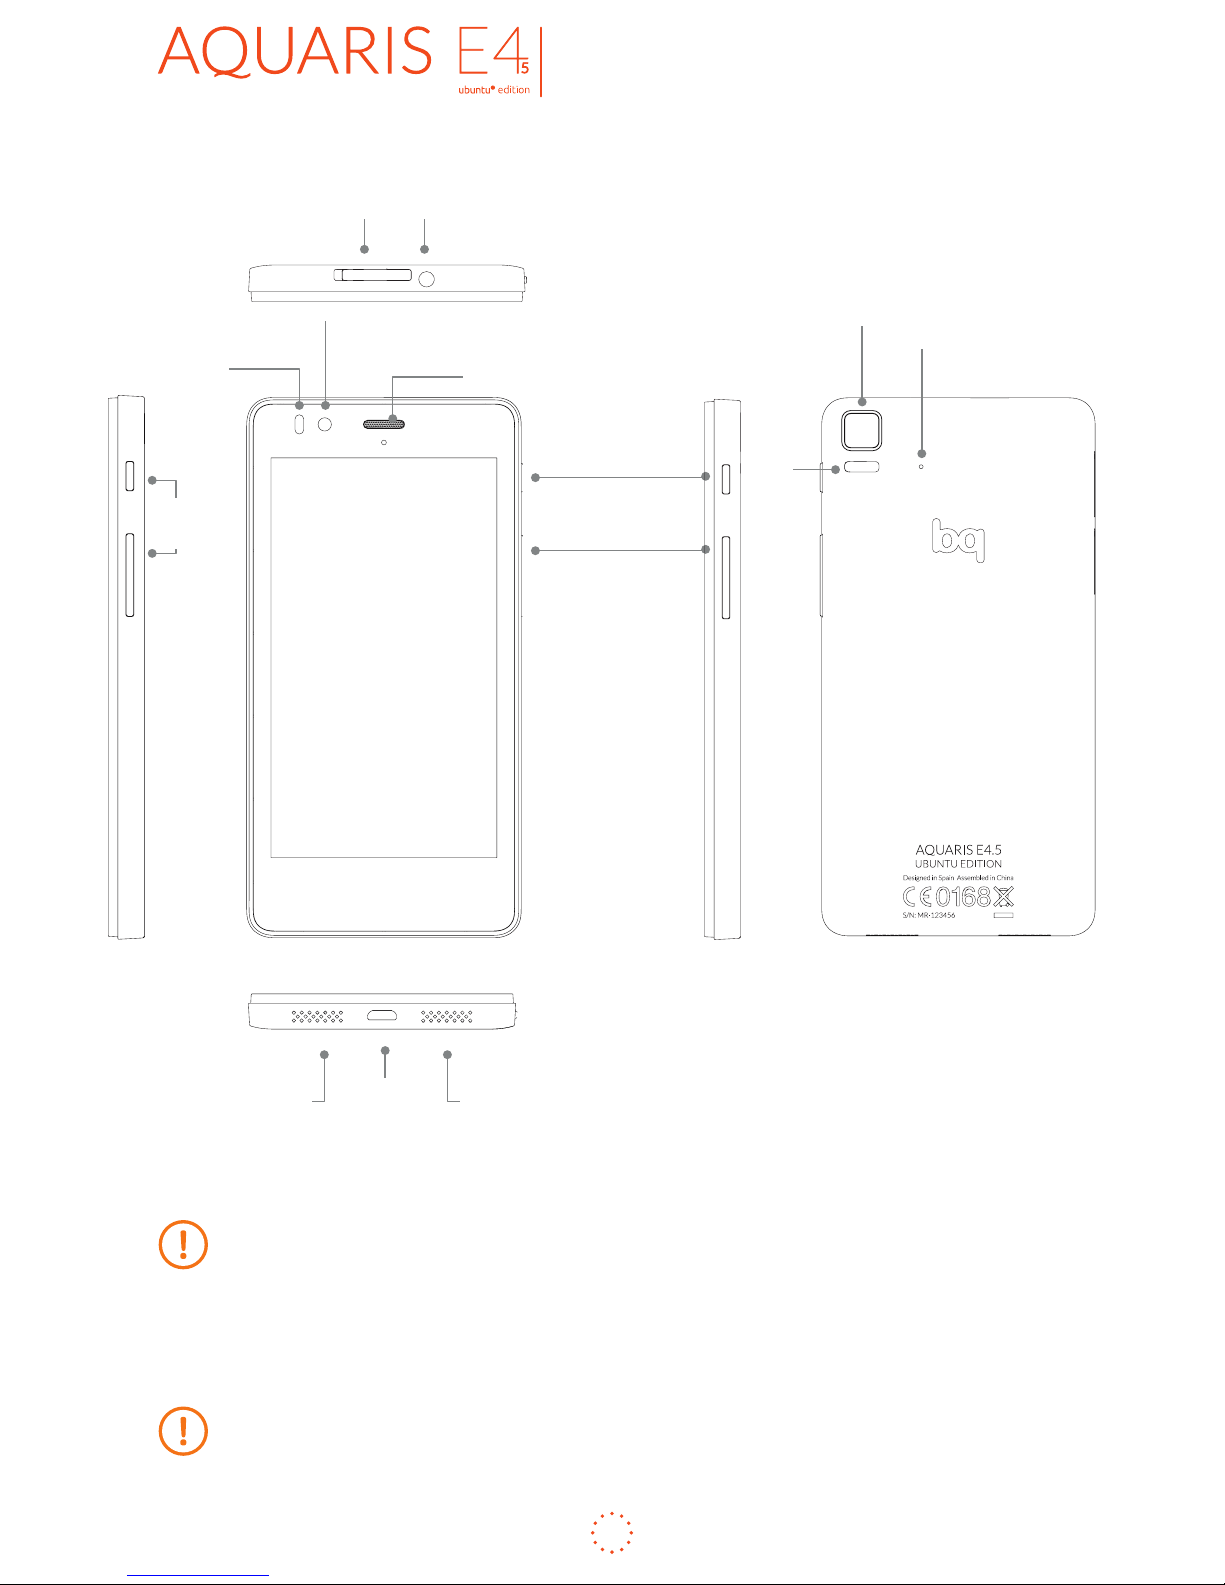
Product Overview
MicroSD slot
Notication
LED
Front
camera
Microphone
Speaker
Micro-USB
port
Flash
Rear
camera
Receiver
Volume buttons
On/Off/Screen-lock
button
Noise-cancelling
microphone
Headphone jack
Micro-SIM
slots
Page 11
ENGLISH
Complete User Manual
11
Getting started
GETTING STARTED
This guide will walk you through the basic steps required to set up and use your
Ubuntu phone and will help you to make the most of its unique features, such as
the Scopes.
Ubuntu’s Scopes make it faster and easier than ever before to nd the things you
want. Within minutes, you’ll be navigating to the music, photos, videos, apps and
services you want to use much quicker than you can with other smartphones.
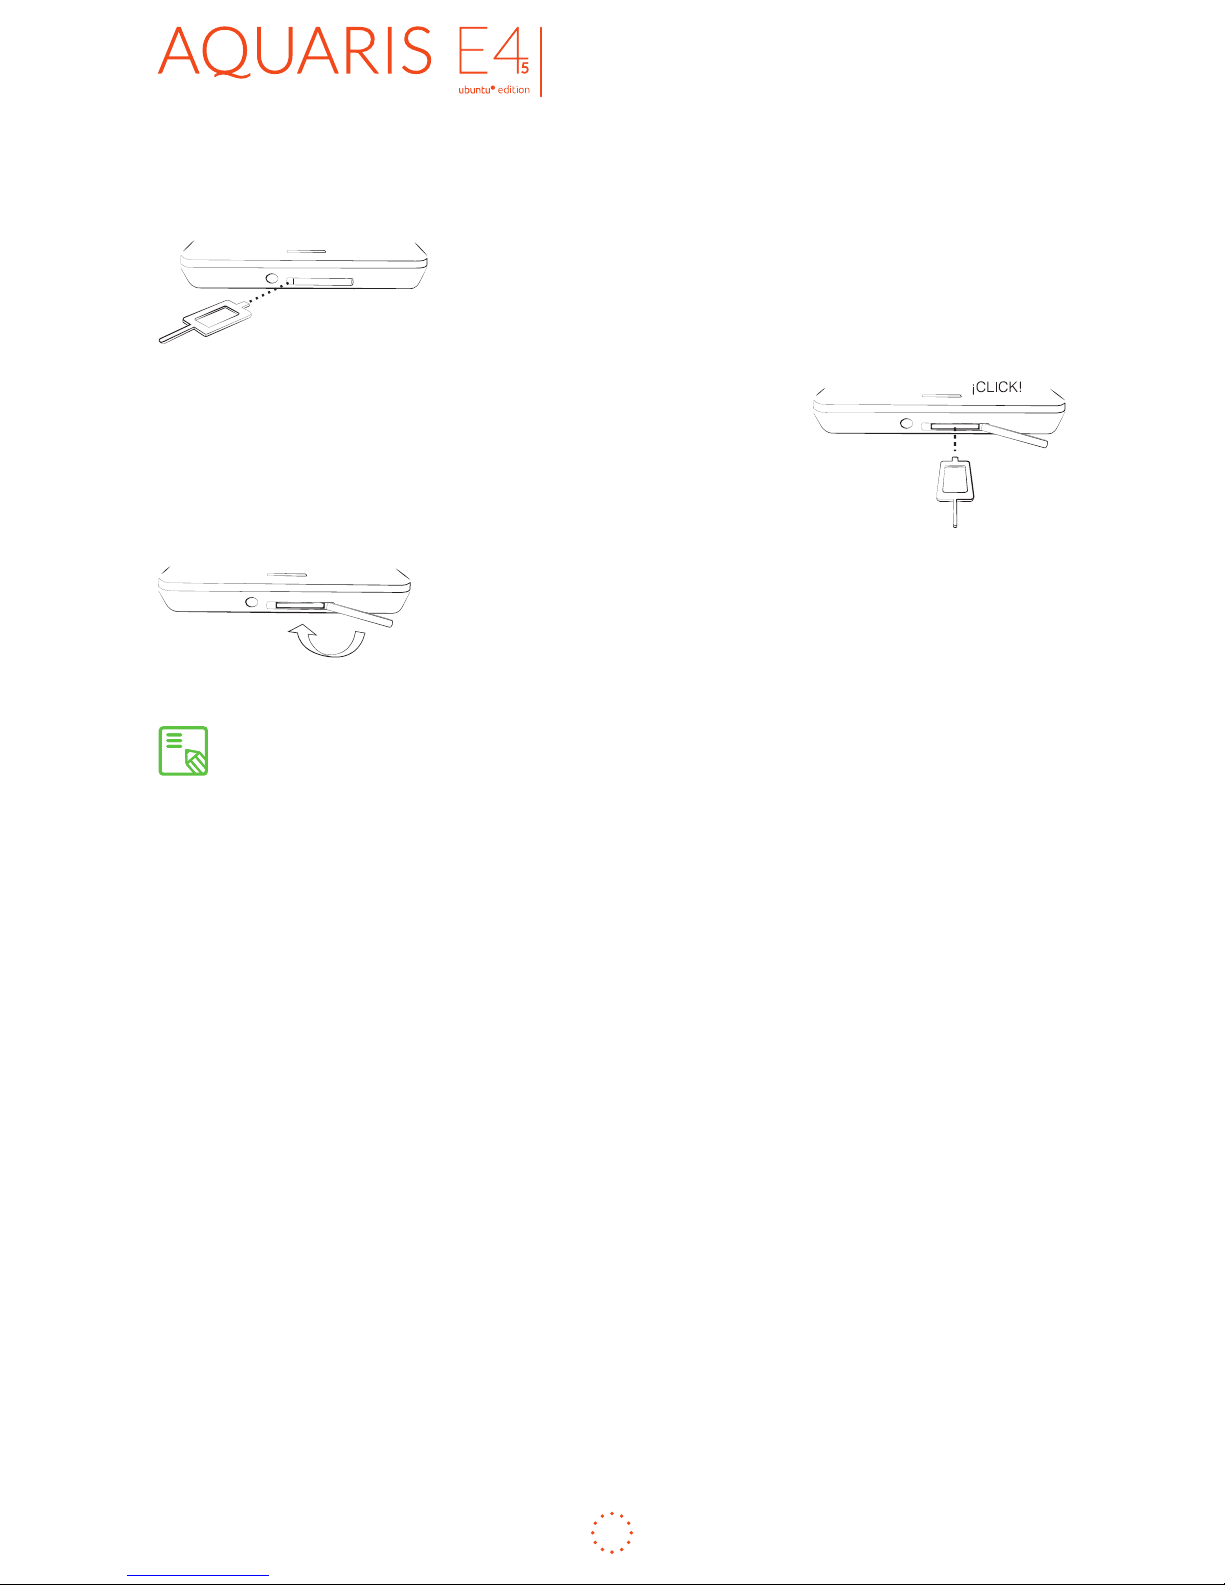
How to Insert SIM Cards
Your bq Aquaris E4.5 Ubuntu Edition is a dual SIM (2 x micro-SIM slot) smartphone.
The SIM trays are accessed from the phone’s exterior; the rear cover should not be
removed under any circumstances.
We will explain how to congure and use the dual SIM feature later, but rst, the
steps below will show you how to insert your SIM card(s) into the phone before
starting to use it.
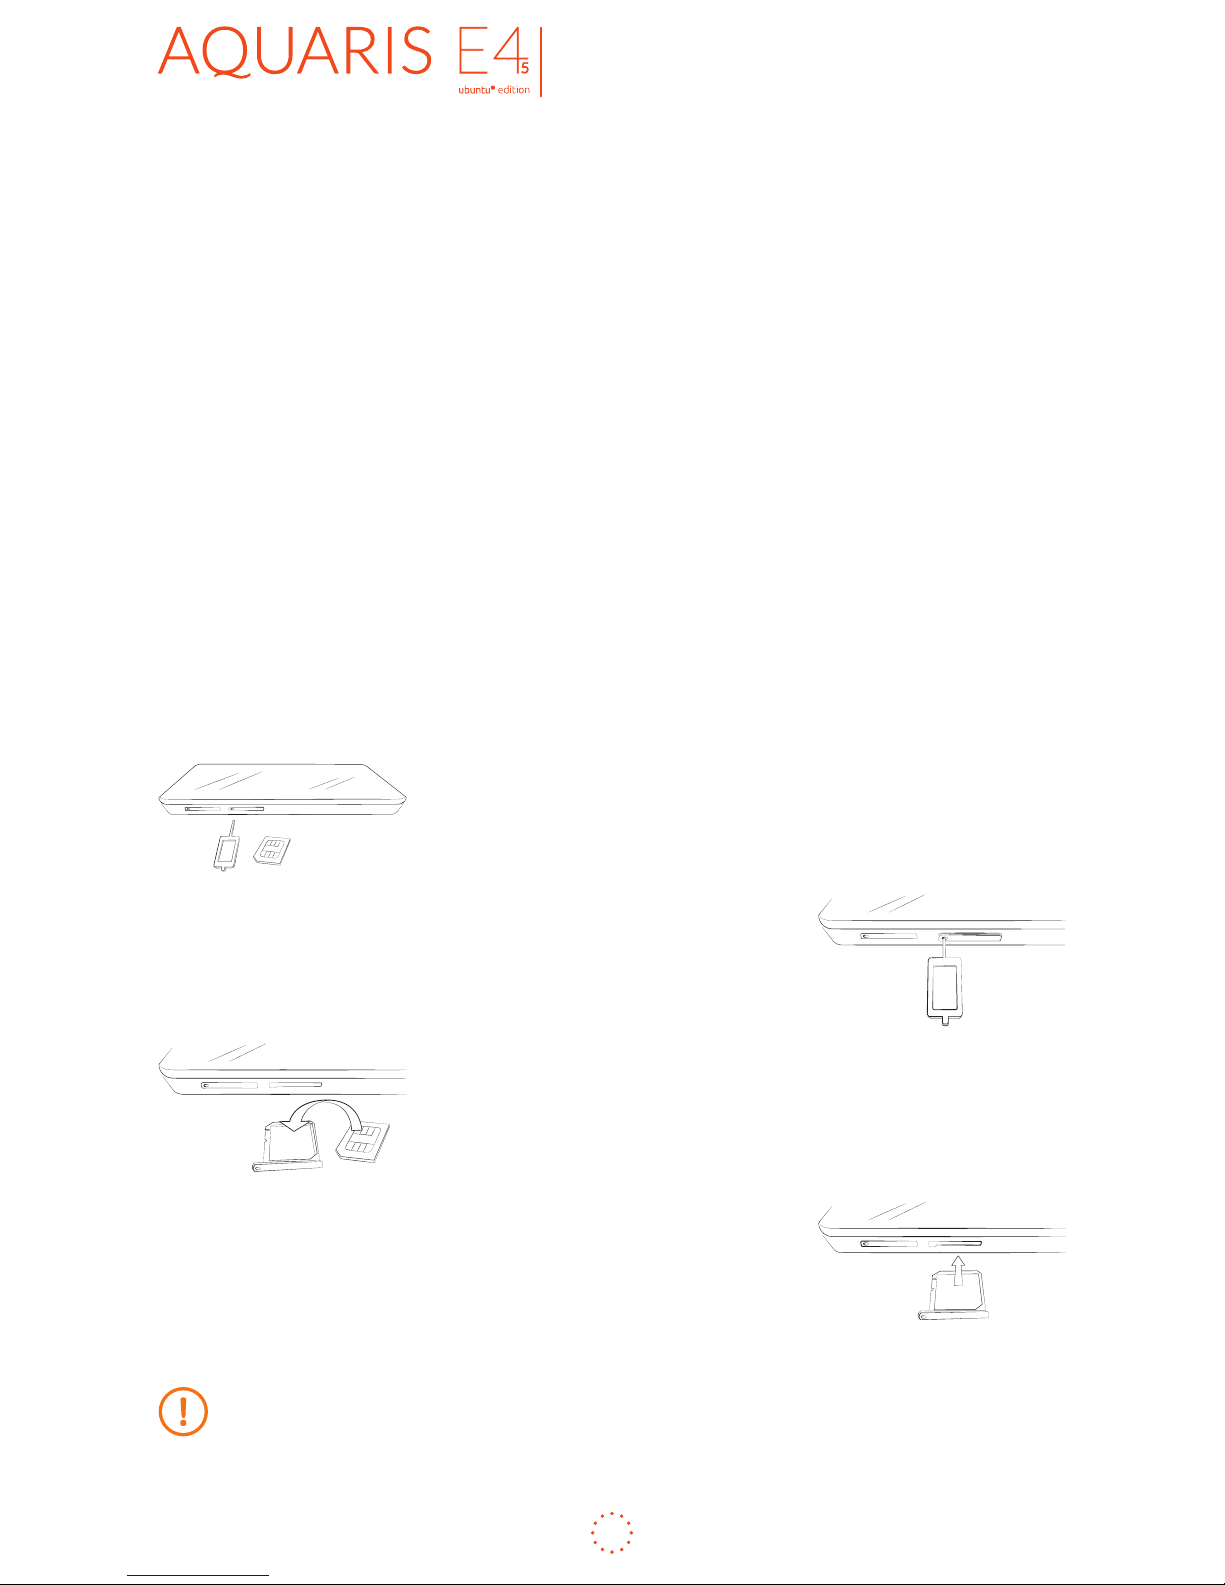
You will nd the SIM key and the device documents in the
box.
Making sure the device is off, insert the end of the SIM
key into the orice of the SIM slot you want to use.
Place your SIM card in the tray. Make sure it is in the
correct position (use the notch on the corner for guidance:
see image).
Once the SIM is in position, insert the tray back into the
slot.
If you insert a new SIM card into the device while it is switched on, you will need
to restart the phone so that it will recognise it.
Page 12

ENGLISH
Complete User Manual
12
Getting started
Inserting/Removing the MicroSD Card
Your bq Aquaris E4.5 Ubuntu Edition has an internal memory that can be expanded
to 32 GB by using a MicroSD card.
To insert a MicroSD card, follow these steps:
Remove the cover that protects the MicroSD slot
(located at the top of the phone).
Place the MicroSD card in the tray ensuring that the metal
pins are closest to the interior and facing upwards towards
the screen.
Push the card in until you hear a slight click, which
indicates that it has been inserted correctly. If the card is
not inserted correctly, the device may not recognise it and
its content will not be available.
Make sure you replace the protective cover to prevent
dust and dirt from entering the device, and to avoid
accidentally ejecting the MicroSD card.
To remove the MicroSD card, follow the steps above in reverse, bearing in mind the
following recommendations:
a. For greater security, switch the device off before removing the MicroSD
card.
b. If you need to remove the MicroSD card while the device is switched on, rst
unmount it in order to avoid damaging the card and losing any data.
Page 13
ENGLISH
Complete User Manual
13
Getting started
To do this, swipe to the right to access your smartphone´s Launcher menu, tap on
External Drives and then go to SD Card Management > Safely Remove.
Then remove the cover that protects the MicroSD slot
(located at the top of the phone).
Push the card in until you hear a slight click to indicate that
the card has been released. When you remove your nger,
the card will slide partially out of the slot, allowing you to
remove it completely.
Make sure you replace the protective cover to prevent
dust and dirt from entering the device.
You can choose whether to store your multimedia files on the phone’s internal
memory or directly onto the MicroSD card. Remember that any content stored on
the MicroSD card will not be available when the card is removed, and any apps stored
on there will no longer function.
Page 14
ENGLISH
Complete User Manual
14
Getting started
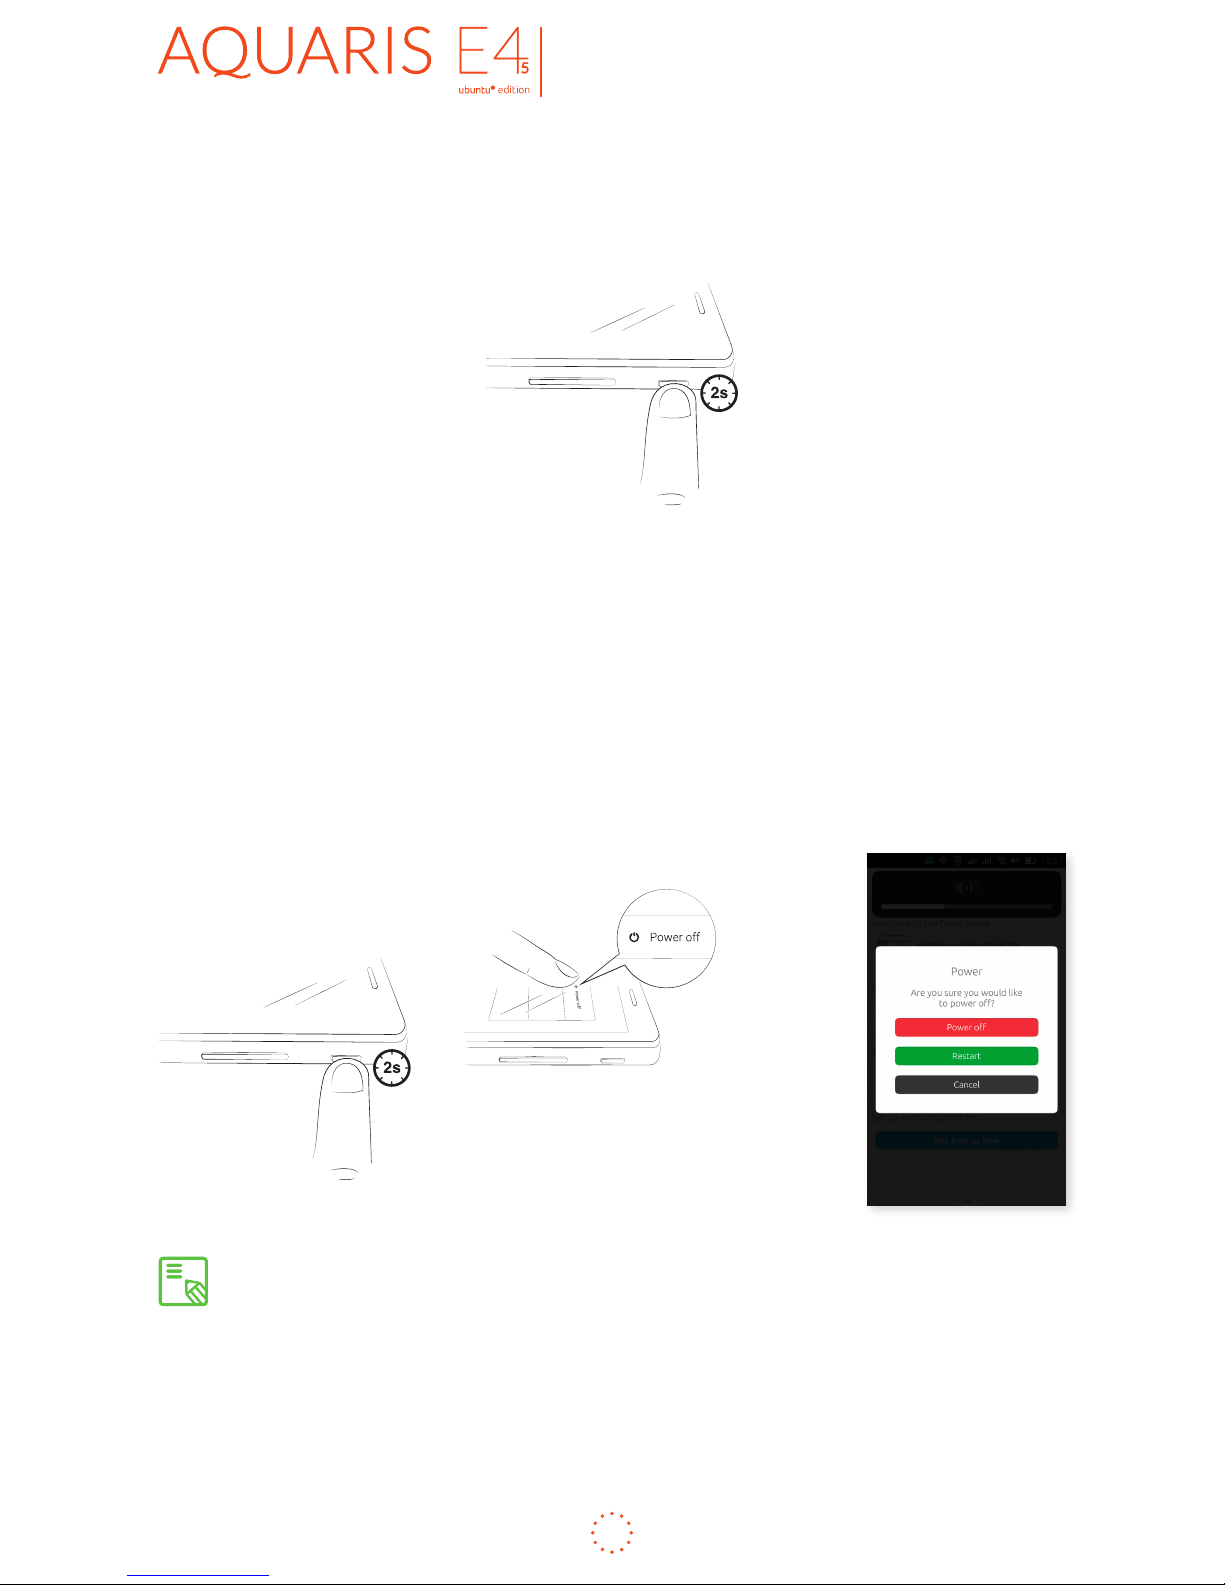
Switching the Device On and Off
To switch on your bq Aquaris E4.5 Ubuntu Edition, press and hold down (for a few
seconds) the On/Off button which is located on the side of the smartphone.
If you are using two micro-SIM cards in your Aquaris E4.5 Ubuntu Edition, on
switching on your device, you will be asked to enter the PIN number for each SIM.
Remember that if you insert a new SIM card into the phone while it is switched on,
you will need to restart the device for it to recognise it.
To switch off the device, press and hold down the On/Off button for two seconds,
a menu will appear on screen with various options. Select Power off to turn off the
device completely, or Reboot to restart it.
If you press briey on the On/Off button, the screen will switch off but not the
device.
Page 15
ENGLISH
Complete User Manual
15
Getting started
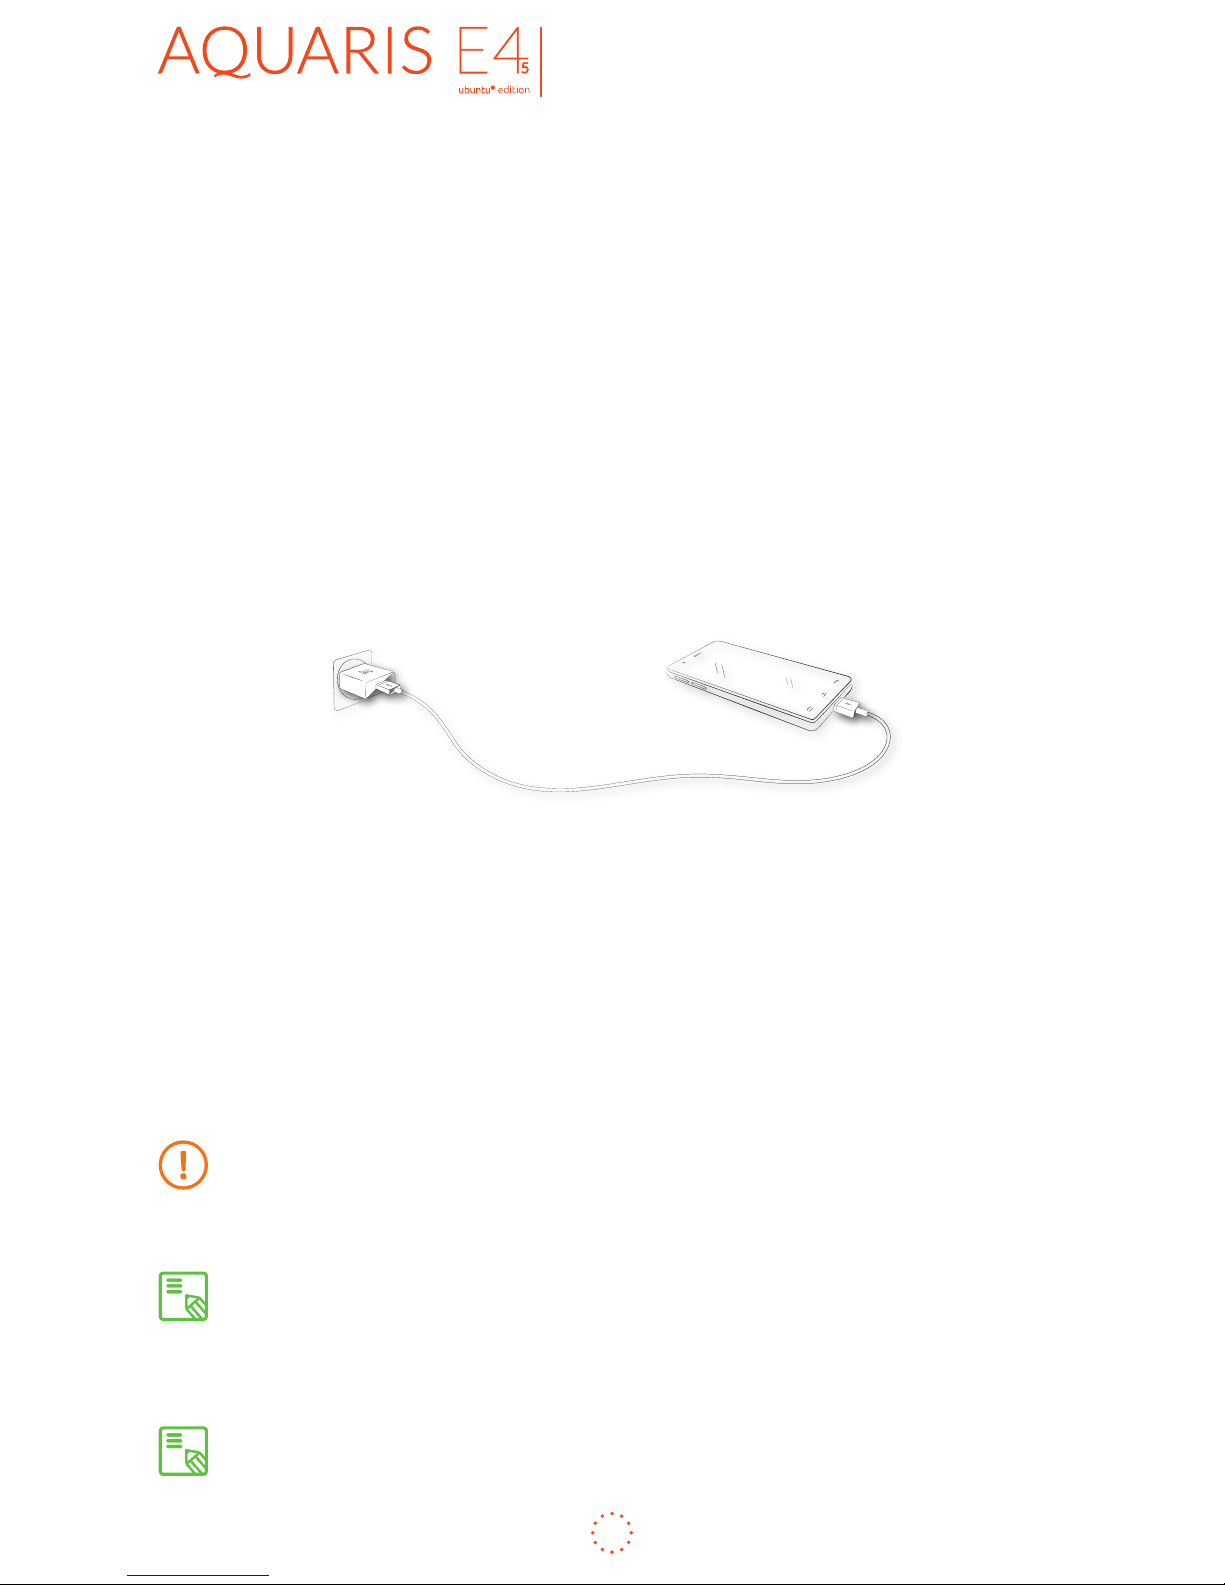
Charging the Phone and Transferring Files
Your smartphone has a rechargeable (non-removable) 2150 mAh battery which is
charged via the micro-USB port at the bottom of the device. A USB to micro-USB
cable and mains adapter are provided with the phone. To charge it, follow these
simple steps:
a) Using the mains adapter:
1. Plug the USB cable into the mains adapter.
2. Connect the mains adapter to any standard plug socket (220 V/50 Hz).
3. Plug the other end of the cable into the micro-USB port on your
smartphone.
b) Using a laptop or desktop computer:
1. Plug the USB cable into a compatible USB port on your computer.
2. Plug the other end of the cable into the micro-USB port on your
smartphone.
The battery of your bq Aquaris E4.5 Ubuntu Edition is non-removable. If it is
removed by anyone other than our Technical Support staff, your device could
be damaged and the warranty invalidated.
Allowing the battery to charge fully is recommended when you charge it for the
rst time, as this will help calibrate the battery meter. Bear in mind that some
batteries perform better after a number of full charge/discharge cycles.
The time required to charge your phone may vary slightly depending on whether
it is charged via the mains adapter or via a computer USB port.
Page 16
ENGLISH
Complete User Manual
16
Getting started
If you connect your smartphone to a computer using the USB cable, you can also
transfer les between the two devices (to/from the phone’s internal memory, or
the MicroSD card, if one is in use ). This will allow you to use, copy or store images,
videos, music, text documents, etc. on one or both devices.
To transfer files in MTP mode from your phone (and/or MicroSD card) onto
a computer running Mac OS (and vice versa), you will need to download
and install the free Android File Transfer app onto your computer: www.
android.com/filetransfer/.
Do not disconnect the cable while les are being transferred.
Page 17
ENGLISH
Complete User Manual
17
Getting started
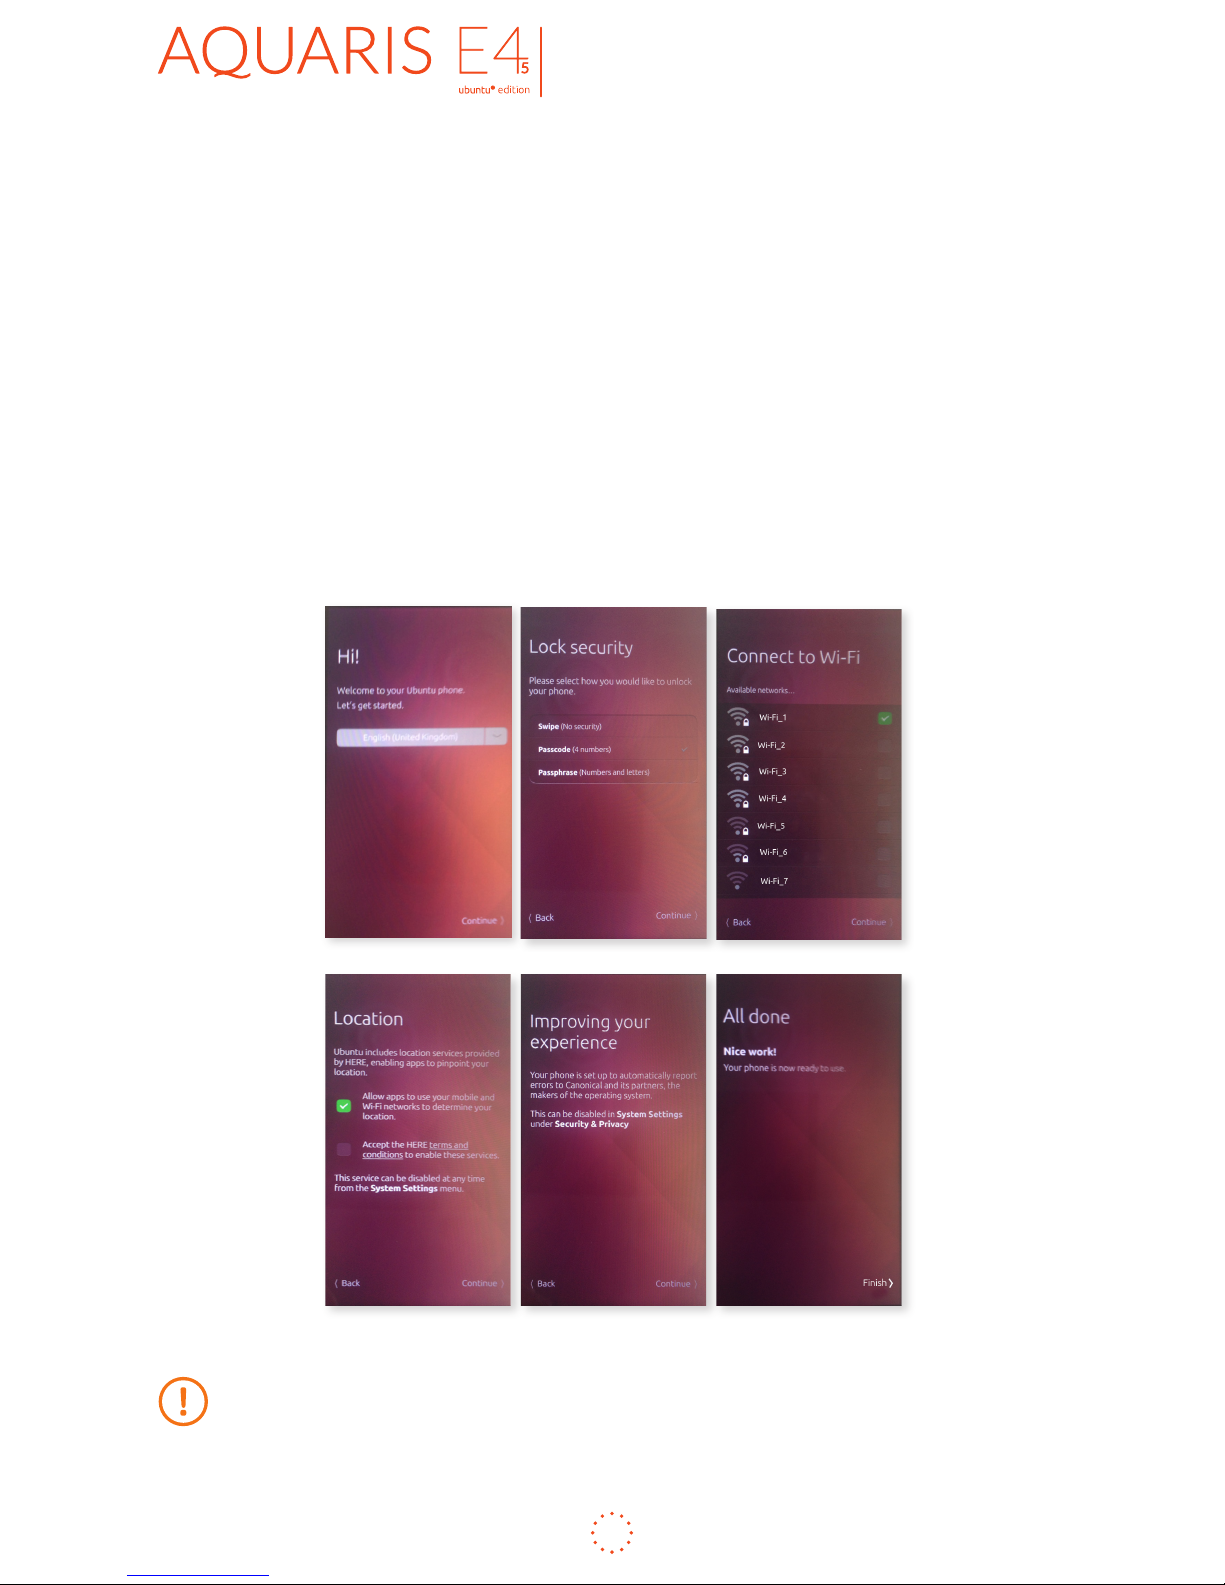
Setup Wizard
When you switch on your bq Aquaris E4.5 Ubuntu Edition for the rst time, or if you
have carried out a factory reset, you will be asked to precongure a number of basic
settings before you start using it.
· Language
· SIM cards
· Lock security
· Connect to Wi-Fi
· Location
· Improving your experience
To access the GPS location service on this device, you must accept the HERE terms
and conditions during the setup wizard. They can also be accepted at a later stage
by going to Settings > Privacy & Security > Location.
Page 18
ENGLISH
Complete User Manual
18
Getting started
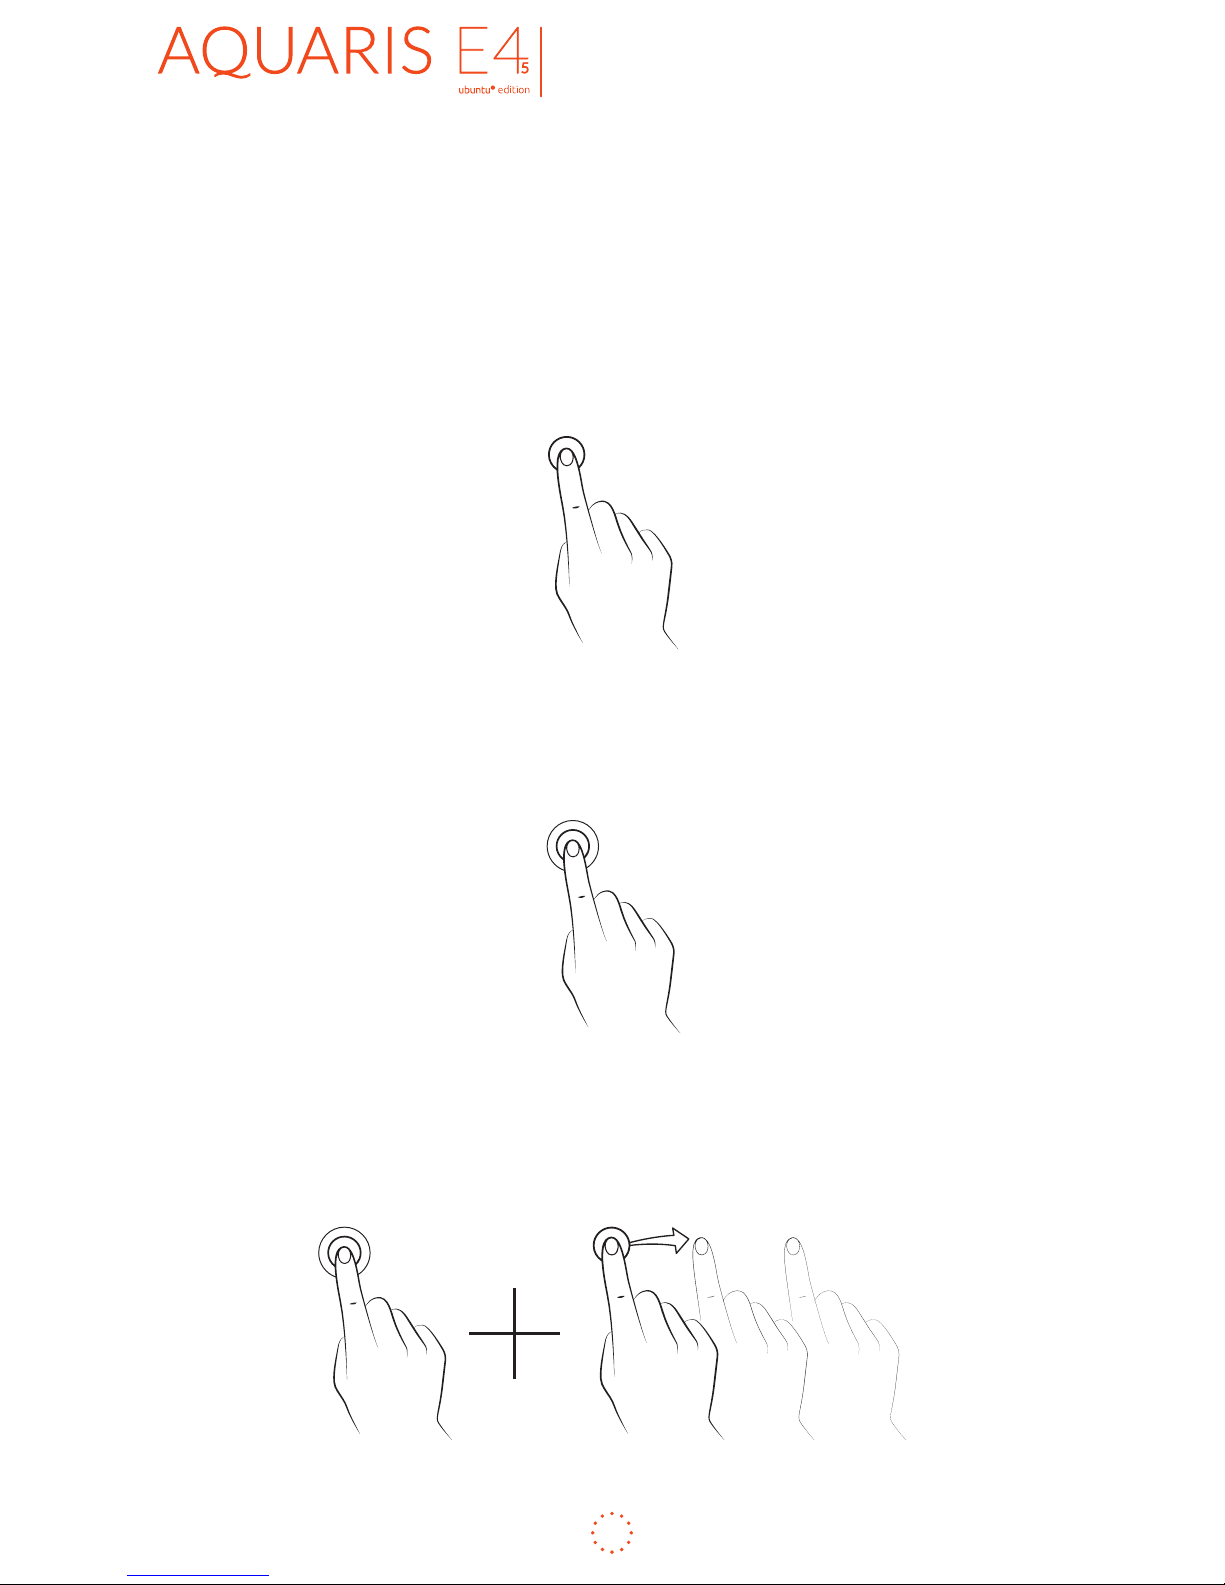
Learning to Use the Multi-Touch Screen
Your smartphone has a capacitive multi-touch screen with various simultaneous
detection points. Different movements can be made over these points which are
linked to different functions:
· Touch. Touch the screen briey to select an icon, open an app, activate a text-
entry box, etc.
· Touch and hold. Touch the screen (on either a clear area or on an icon) with your
nger and hold for approximately 2 seconds to bring up a menu of available
options.
· Drag. To move an icon, press and hold down, drag it to the desired position and then
release.
Page 19
ENGLISH
Complete User Manual
19
Getting started
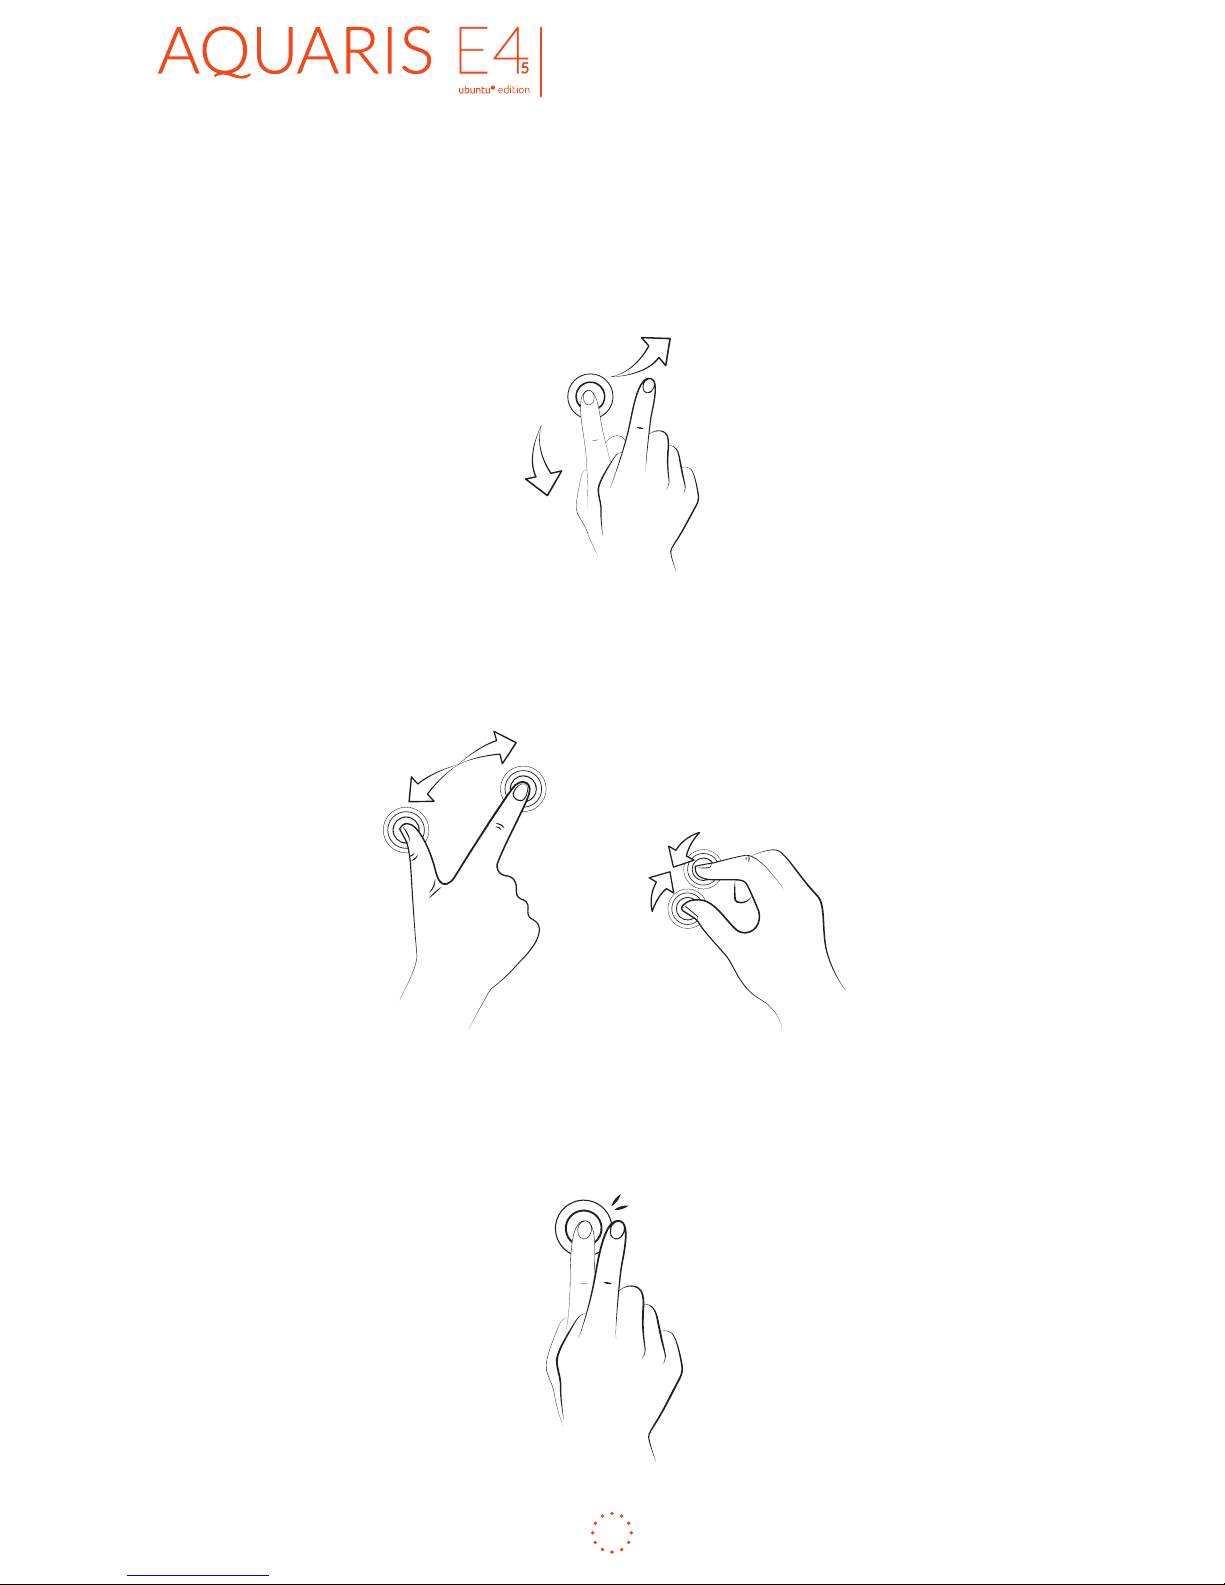
· Swipe or slide. Slide your nger from the left to see the Launcher or from the
right to see all the apps you have running and with a quick swipe you can switch
between Scopes or apps or, slide your finger top to bottom to access your
notications and the phone settings or from the bottom to view the controls
and then hide them again when you´re done.
· Pinch. Place two ngers on the screen at the same time and move them towards
each other, or spread them apart to reduce or enlarge an image.
· Double-tap. Tap the screen twice in quick succession to zoom in on an image,
and tap twice again in order to zoom back out.
Page 20
ENGLISH
Complete User Manual
20
Getting started
After the initial preconguration, a wizard will quickly guide you through the key
gestures needed to navigate your new Ubuntu device, such as how to unlock the
phone, how to access the indicators, close the conguration screen or quickly access
apps with the Launcher.
The main thing to remember is that rather than a single home screen, there is a
Launcher on the left where you can pin your favourite apps for quick access, plus
the Scopes, which make it quick and easy to nd content.
To access the Scopes:
1. Swipe from the left to reveal the Launcher.
2. Tap the Home icon .
To see the different Scopes on your phone, just swipe left or right in the title bar
of the current Scope.
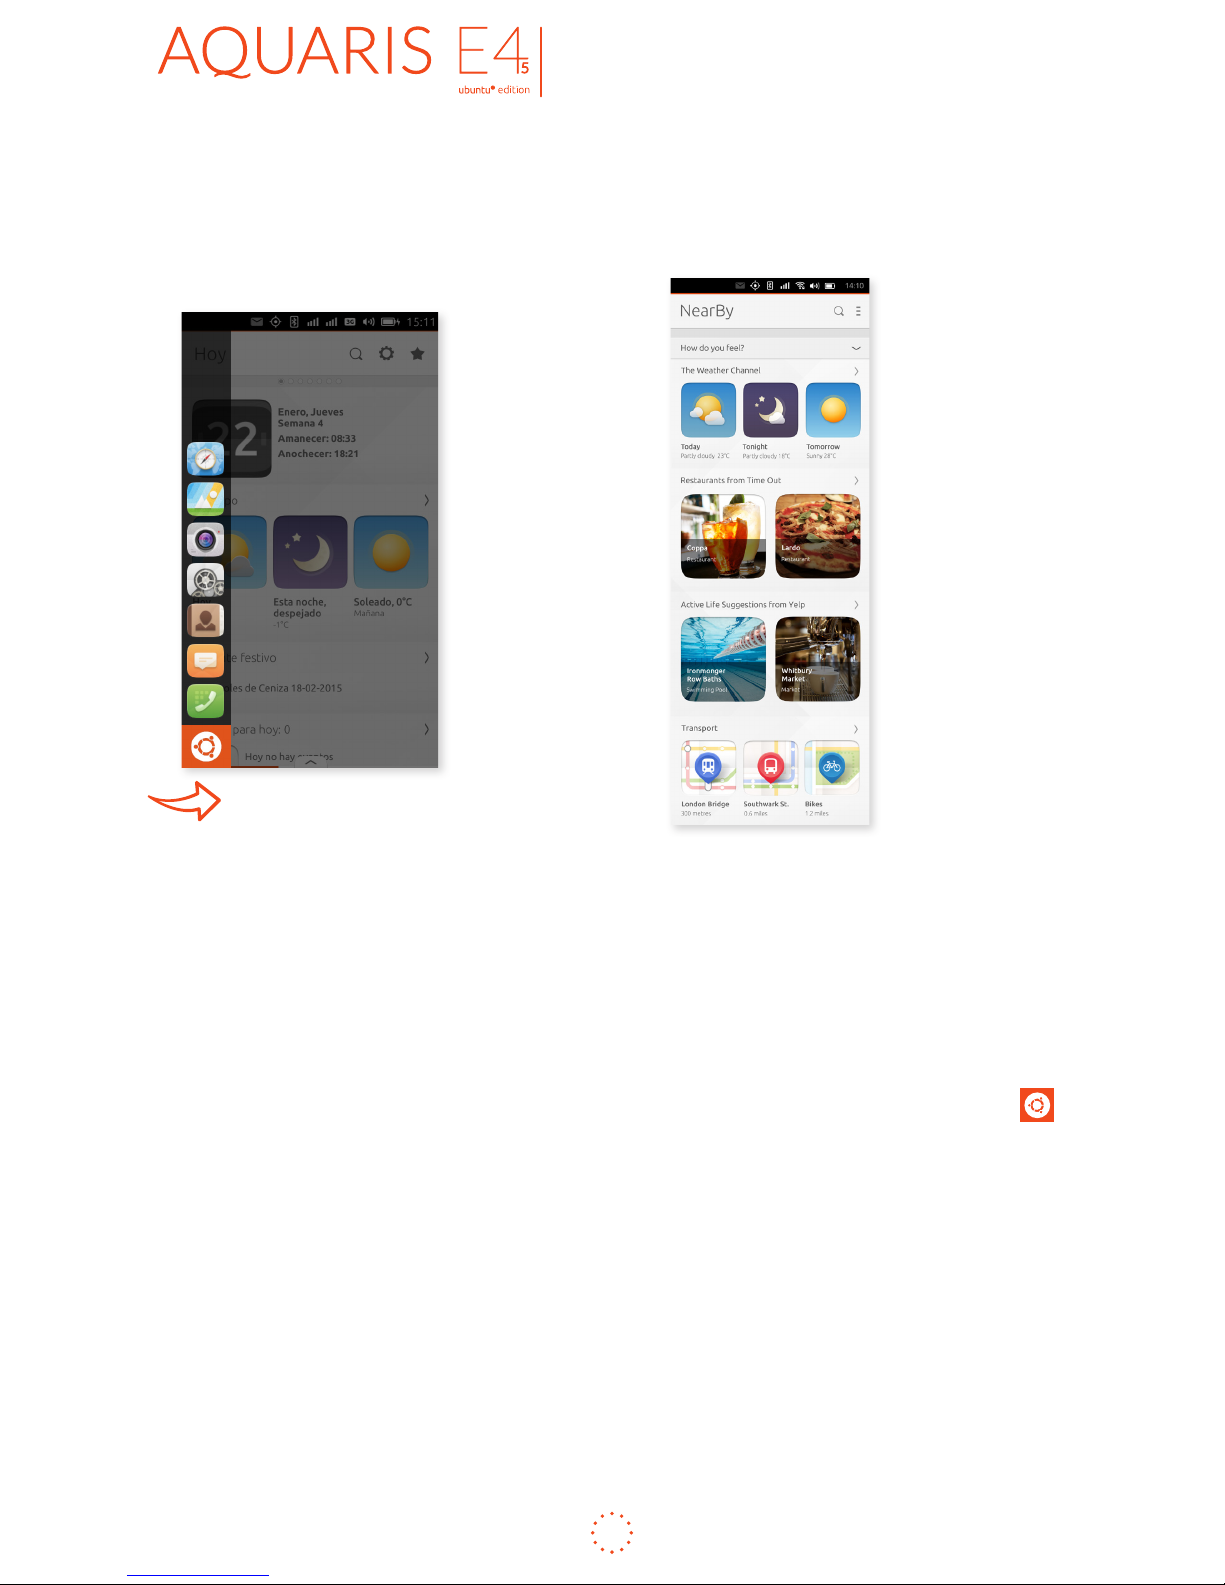
Scopes make it quicker and easier to do things with your phone, whether the content
and services they involve are saved on your phone or available on the web. For
example, the NearBy Scope shows nearby restaurants, gigs and other things to do,
alongside suggestions for the closest public transport locations. The Apps Scope
shows the apps installed on the phone and gives you access to the Ubuntu Store,
while the News Scope keeps you up to date with the latest international, sports and
technology news from various sources. There are also Scopes for music, movies and
many more types of content with new ones being added all the time.
To switch quickly between the app you are using and the app you used last:
· Give a short swipe from the right edge (no further than the centre of the screen
to return to the last app you used).
To switch from one Scope to another:
· Swipe quickly to the left or right.
To access your notications and phone settings:
· Swipe from the top to the bottom.
To access the controls:
· Swipe from the bottom to the top.
Page 21
ENGLISH
Complete User Manual
21
Getting started
How to Unlock Your Phone
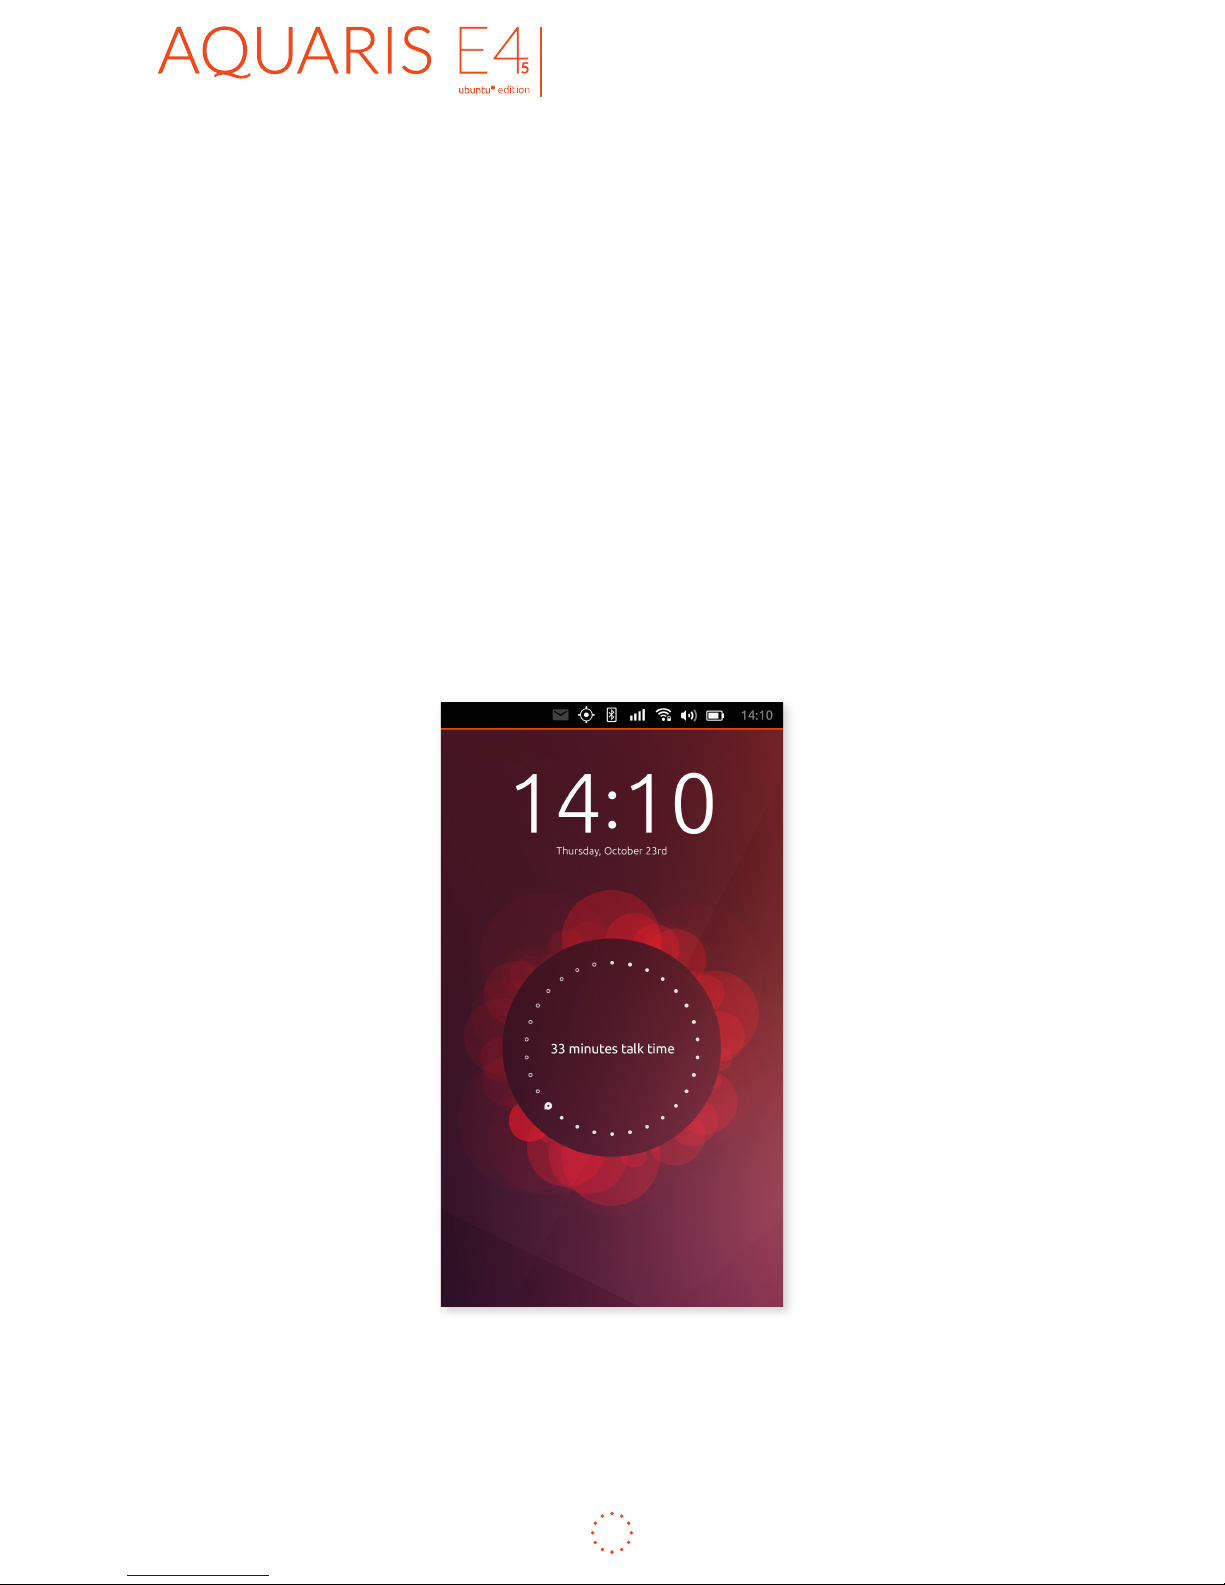
When you switch your phone on or when the screen awakes from sleep, you’ll see
the personalised Ubuntu welcome screen.
This is a picture built from the data collected as you use your phone – the number
of text messages you send, calls you make and so on. The more you use your phone,
the more it changes - and it’s always unique to you. A double-tap on the centre circle
will change the information displayed.
To unlock the phone:
1. Swipe from the left or the right and the welcome screen will slide to one side.
2. If you have a PIN enabled, you will see a keypad into which to enter your
PIN before you can use the phone. If not, you’ll be able to use the phone
straight away.
Page 22
ENGLISH
Complete User Manual
22
Getting started
Finding Your Way Around Your Phone
To nd your way around your phone, there are only one or two basic actions you
need to know.
You can access your favourite features via the Launcher. To reveal the Launcher,
swipe from the left edge of the screen.
By default, it contains icons for features like the Phone Dialer, Camera, Browser,
Address Book, Messaging, System Settings and Home. You can add others, remove
and reorder them.
To access Home, which enables you to nd music, videos, photos, local services
and more, swipe from the left to reveal the Launcher and tap the Home icon
.
To switch between Scopes, swipe left or right in the title bar at the top of the screen.
Page 23
ENGLISH
Complete User Manual
23
Getting started
Searching Your Phone
The results will be displayed in the Scope below the search bar. Depending on the
Scope you use, it may include content available for download on the internet as well
as les already stored on your phone.
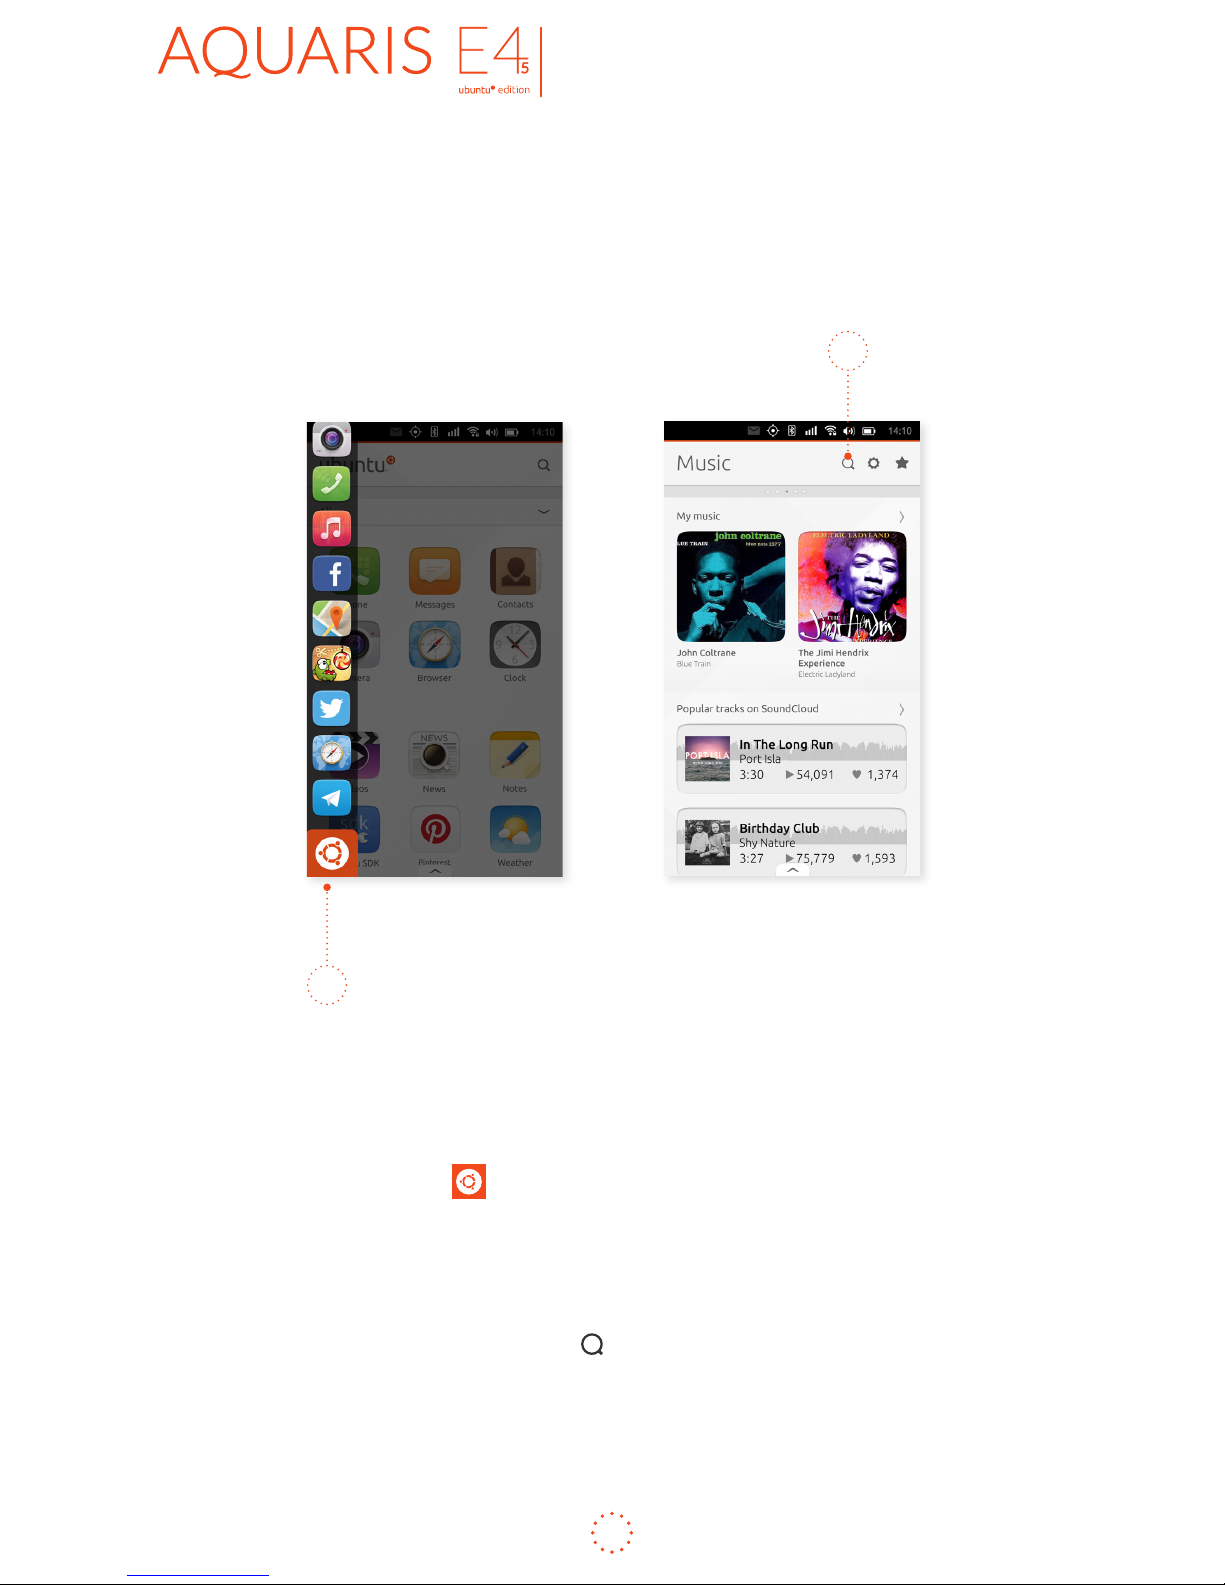
Searches are entered in Scopes:
1. Swipe from the left edge to reveal the Launcher.
2. Tap the Home icon .
3. Swipe left or right to nd the Scope that best suits the kind of content you’re
looking for. So if you’re looking for movies, use the Video Scope. If you’re
looking for music, use the Music Scope, and so on.
4. Tap the Magnifying glass icon in the title bar to reveal the Search eld,
then enter your search terms.
4
2
Page 24
ENGLISH
Complete User Manual
24
Getting started
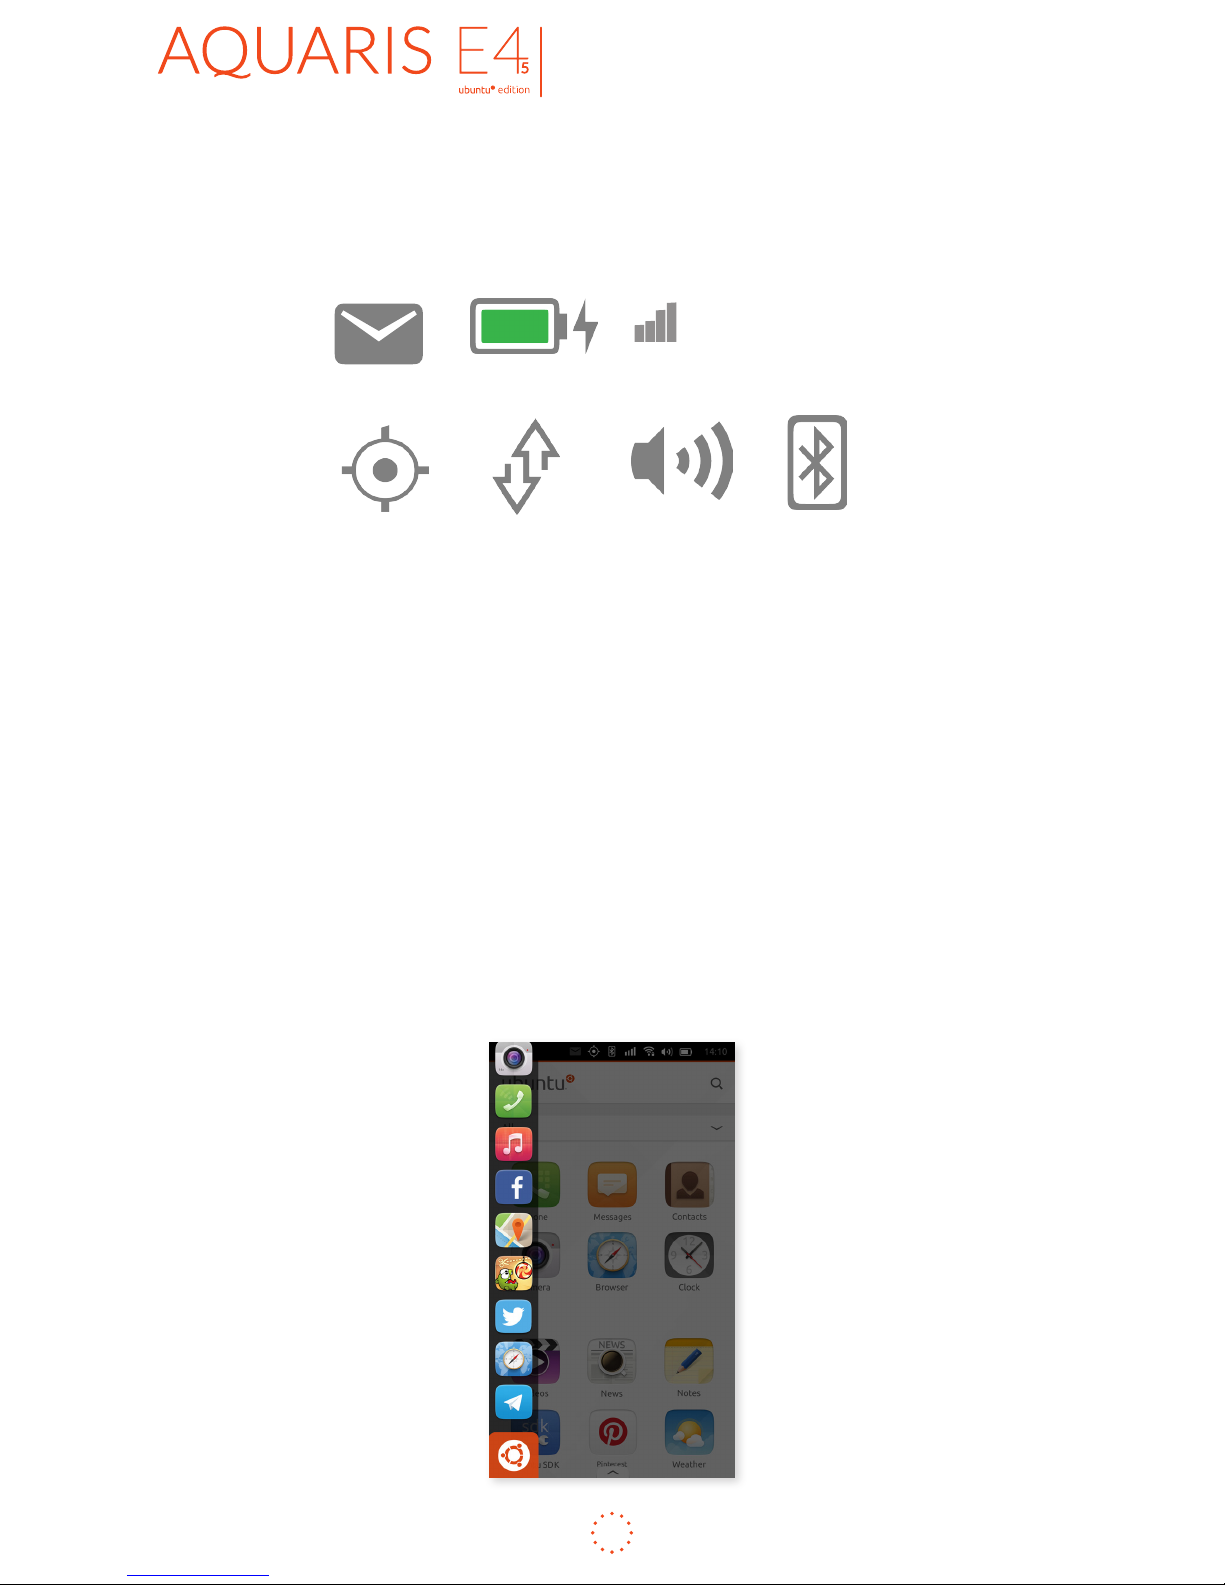
Accessing the Indicators
The phone’s indicators are lined up across the top edge of the screen. They include:
A swipe down from any of these indicators gives you more information and options
to act on each one. In the Bluetooth indicator, for example, you can turn Bluetooth
on or off and access the Bluetooth section within System Settings.
Accessing the Launcher
A swipe from the left reveals the Launcher, where you’ll nd the icons for your most
commonly used features. You can access the Launcher at any time, whatever you’re
doing with your phone.
By default, the Launcher includes the icons for the phone dialer, text messaging, web
browser, camera, systems settings and, most importantly, Scopes.
Notications
Battery
Location
Sound
Network
Files
Bluetooth
Page 25

ENGLISH
Complete User Manual
25
Getting started
Personalising the Launcher
When you rst use the Launcher, it will contain icons for fast access to the most
commonly used features, but you can customise it to suit the way you use your
phone. Icons can be added, moved or removed.
To add an icon for an app:
1. Go the Apps Scope and open your app. This will temporarily add it to the
Launcher.
2. Swipe from the left to reveal the Launcher.
3. Tap and hold on the icon for your app.
4. Tap ‘Pin shortcut’ in the menu that appears.
To remove an icon you have pinned to the Launcher:
1. Tap and hold the icon.
2. Tap ‘Unpin shortcut’ in the menu that appears.
Page 26

ENGLISH
Complete User Manual
26
How to use the Scopes
HOW TO USE SCOPES
How to Use Scopes
Scopes are windows into a wealth of content and services, based on your location
and interests.
To access them:
1. Swipe from the left edge of the screen to reveal the Launcher.
2. Tap the Home icon .
Next, swipe left or right in the title bar to select the Scope that best suits the kind
of content you’re looking for. So if you’re looking for a tune, swipe until you see the
Music Scope. If you’re looking for news, select the News Scope – and so on.
Scopes present all sorts of content and services by default. But if you don’t see what
you’re looking for, you can search. A search within a Scope will include content online
as well as on your phone. The results will be organised by location or provider, but
they’ll all be relevant to your search.
To search, tap in the Search eld
at the top of the Scope screen to reveal the
keyboard and enter your search terms.
Page 27

ENGLISH
Complete User Manual
27
How to use the Scopes
Adding Scopes
You can nd a range of new Scopes in the store. To access the store:
1. Swipe from the left edge of the screen to reveal the Launcher.
2. Tap the Home icon .
3. Scroll down to the bottom of the page and tap the Store icon.
Managing Scopes
Some Scopes organise their results into sites, applications or smaller Scopes. In the
Ubuntu Store, for example, there are several retailers.
If you want quick access to one of these sites in particular, without seeing results from the
others when you search, you can make it a favourite. This turns it into a Scope of its own
which can be accessed more easily by swiping left and right in the title bar.
3
2
Page 28

ENGLISH
Complete User Manual
28
How to use the Scopes
To create a favourite:
1. Swipe from the left to reveal the Launcher.
2. Tap the Home icon .
3. Swipe left or right again to get to the Scope containing the site or category
you’re interested in.
4. Tap the section of the Scope you’re interested (e.g. Grooveshark within the
Music Scope) then tap the Star icon
★ in its title bar to promote it to full Scope
status. From then on, it will appear alongside Music and the other Scopes,
rather than just being a section within Music.
4
Page 29

ENGLISH
Complete User Manual
29
How to use the Scopes
You can access the manager from whichever Scope
you are in. Simply swipe quickly from the bottom of
the screen. Or if you are at the top of any page, near
the menu, the icon will appear when you touch the
bottom of the screen, and a quick swipe upwards will
also bring up the Apps manager menu.
You can attach a Scope from the manager. Simply press the ✩ icon next to the list
of apps or at the upper menu bar within each Scope. The app will then move up to
the Home menu and the star icon will change to bold ★.
In order to remove a Scope simply press the ★ icon again in the upper menu bar or
from the Manage menu and it will disappear from the Home menu.
Page 30

ENGLISH
Complete User Manual
30
Apps
APPS
Finding and Using Apps
You can access the most commonly used apps by swiping from the left edge of the
screen to reveal the Launcher.
To see all the apps installed on your phone, you need to access the Apps Scope:
1. Swipe from the left edge of the screen to reveal the Launcher.
2. Tap the Home icon .
2
Swipe in the Scopes’ title bar until you get to the Apps Scope, which displays all
the apps installed on your phone.
Page 31

ENGLISH
Complete User Manual
31
Apps
Switching Between Apps
To switch between apps, give a full swipe from the right edge of the screen to the
left side to see all your running apps in a stack. You can page through them and tap
any one to switch to it.
Sometimes, you might want to switch quickly between two apps – if you’re copying
and pasting from one to another, for example, or if you’re on a call and you want to
access data in the last app you were using.
To switch quickly between the app you are using and the app you used last:
1. Give a short swipe from the right edge (no further than the centre of the
closed screen to return to the last app you used
2. Swipe again until you return to the app you were initially using and tap on it.
3. Repeat as many times as you need to.
Make sure that when you swipe from the edges, you start your swipe on the very
edge of the screen.
Page 32

ENGLISH
Complete User Manual
32
Apps
Opening and Closing Apps
All apps can be opened by tapping their icon. To access your most frequently used apps,
swipe from the left edge of the screen at any time to reveal them in the Launcher.
For the rest:
1. Swipe from the left to reveal the Launcher.
2. Then tap the Home icon to view the Apps Scope.
3. You will be taken to the Apps Scope, showing all the apps on your phone.
To close a running app:
1. Swipe left across the screen from the right to reveal all your running apps.
2. Tap on the app you want to close.
3. Swipe up without taking your nger off the screen.
2
Page 33

ENGLISH
Complete User Manual
33
The Ubuntu Store
THE UBUNTU STORE
Finding New Scopes and Apps in the Store
Swipe vertically to scroll down to the bottom of the screen and tap the Store icon.
1. Swipe from the left edge of the screen to reveal the Launcher.
2. Tap the Home icon at the bottom, then swipe in the title bar until you see
the Apps Scope.
Deleting (Uninstalling) Scopes and Apps
You can’t delete the main Scopes and apps that were
on your phone when you took it out of the box. All the
others – the ones you have downloaded and installed
yourself – can be deleted (or uninstalled) by visiting
the Ubuntu Store and searching for your app or
Scope. In the preview screen for the Scope or app you
want to delete, you will see options to either update or
uninstall it. Tap ‘Uninstall’ and let Ubuntu do the rest.
The quickest way to access the preview screen for
an app is to give a long press on the icon in the Apps
Scope.
2
Page 34

ENGLISH
Complete User Manual
34
Voice calls
VOICE CALLS
Making Calls
The quickest way to make a call from your phone is to swipe from the left to reveal
the Launcher and tap the Phone icon
.
To call someone listed in your contacts:
1. Tap the person icon in the top right hand
corner of the phone keypad screen, to reveal
your contact list.
2. Tap on the name to expand that contact.
3. Call someone by clicking on the phone icon
next to their number, or alternatively, send
them a text message by clicking on the speech
bubble icon.
You can search for a contact by typing into the search box at the top of the screen.
If you want to return to the dialer keypad at any time, tap the back button next to
the search box.
Receiving Calls
To pick up an incoming call, simply swipe the green receiver icon you see on the
screen to the center when the phone is ringing.
1
Page 35

ENGLISH
Complete User Manual
35
Voice calls
Returning Calls
To make a call from your phone call history:
1. Swipe up slowly from the tab marked ‘Recent’
at the bottom of the keypad screen, to see the
three most recent calls.
2. Take your nger off on revealing the number
you want to call.
3. Tap the green phone icon to call.
If you drag left on the contact’s name, it will reveal options to view and edit the
contact details if he/she is already in your contacts list, or to add the person if not.
Continue to drag left and you’ll see a grey messaging icon appear. It will change
colour as it comes into view. Release once it has done so to send a text message
directly from within your recent calls list.
Dragging right gives you the option to delete that number from your recent calls list.
1
Page 36

ENGLISH
Complete User Manual
36
Voice calls
Another way to access your phone history is via the Incoming section of the Indicator
controls:
1. In the indicators at the very top of the screen, the Notication icon informs
you of an incoming message or call by turning from white to green. A swipe
down from the bell will reveal the indicator details.
2. The Incoming indicator will show you any missed calls. If you have one, you
can return it by tapping on the contact name or number.
Page 37

ENGLISH
Complete User Manual
37
Voice calls
Making a Conference Call
During a call, you can put the person you are currently talking to on hold and dial
another person in.
1. Tap the ‘+1’ logo shown on screen while the rst call is in progress.
2. Call the second person – the rst person will be put on hold automatically.
3. When the second person picks up your call, you will see a button labelled ‘Merge’.
4. Tap ‘Merge’ to bring both callers together into one conference call.
If your operator provides this option, you will need to enable call waiting in order
to use it:
1. Swipe from the left edge of the screen to reveal the Launcher in order to
access the complete list of phone settings.
2. Tap the System Settings icon.
3. Tap Phone within System Settings.
4. Tap ‘Call waiting’.
5. Tap the icon in the top right corner of the screen to save your changes.
2
3 5
Page 38

ENGLISH
Complete User Manual
38
Voice calls
Turning on the Loudspeaker During a Call
To turn the loudspeaker on during a call, just tap the loudspeaker icon shown on
screen while the call is in progress.
Forwarding Calls
To forward all your calls to another phone number automatically:
1. Swipe from the left edge to reveal the Launcher and tap the System Settings
icon.
2. Scroll down and tap the Phone icon , then tap Call Forwarding and enter
the number to which you want your calls to be sent.
Page 39

ENGLISH
Complete User Manual
39
Text messaging
TEXT MESSAGING
Sending a Text Message
The easiest way to send a text message (SMS or MMS) to a contact from whom
you’ve never received one is:
1. Swipe from the left edge of the screen to reveal the Launcher.
2. Tap the Contacts icon to access your contact list.
3. Tap the speech bubble icon next to the relevant mobile number in the list.
Alternatively, you can:
1. Tap the speech bubble icon in the Launcher to go to your chats.
2. To send a message to someone with whom you have already exchanged
messages, tap their name in the list to go to that chat.
If you haven’t had any text message contact with the person before:
1. Swipe up from the tab at the bottom of the screen to enter the number of
the person you want to chat with manually or, if you have already saved their
number in your contact list, tap the people icon to select them from the list.
2
For new chats, swipe upwards from the ‘New Chat’ tab at the bottom of the
screen.
Page 40

ENGLISH
Complete User Manual
40
Text messaging
You will be alerted to incoming messages whenever they arrive. When you receive
any message or call, the envelope indicator at the very top of the screen turns from
white to green.
To reply to an incoming message:
1. Drag down from the envelope indicator in the top bar to reveal all messaging
notications.
2. Tap the incoming message to reveal its text.
3. Reply in the text box that appears and tap to send.
To send messages directly from the Recent Calls menu:
1. Swipe from the left edge to reveal the Launcher.
2. Tap the Phone icon .
3. Drag the tab at the bottom of the screen labelled ‘Recent’ upwards, to reveal
your recent calls.
4. Swipe to the left on the number to which you want to send a message.
4
3
4
Page 41

ENGLISH
Complete User Manual
41
Text messaging
Sharing Photos and Media Files with a Text
To add a photo or video from the Gallery to a text
message:
1. Type your message.
2. Tap the Camera icon to its left before sending.
3. Tap the Gallery icon.
4. Browse the Gallery to nd the photo or video
you want to share.
Deleting Text Messages
To delete a single text message:
1. Tap the chat you want to edit.
2. Tap the message you want to delete.
3. Hold your nger on it and swipe to the right.
4. Tap the trashcan icon that appears.
To delete multiple messages in a chat:
1. Tap the chat you want to edit.
2. Tap and hold one of the messages you want to delete. Checkboxes will appear
next to all the messages in the chat.
3. Select the messages you want to delete by tapping the checkboxes or tapping
the icon in the header to select them all.
4. Tap the trashcan icon in the header.
To delete an entire thread from the list of chats:
1. Tap the chat you want to delete and hold your nger on it.
2. Without removing your nger, swipe to the right.
2
Page 42

ENGLISH
Complete User Manual
42
Using Email
USING EMAIL
Email is provided via Ubuntu’s Gmail web app – a standalone version of the Gmail
website with its own icon and an interface adapted for ease of use on the phone.
If you enter the details of your Google account in System Settings, you will be alerted
to the arrival of new email messages in the indicator bar at the top of the screen.
To add your Google account details:
1. Swipe from the left to reveal the Launcher.
2. Tap the System Settings icon.
3. Scroll down and tap Accounts.
4. Inside ‘Add account’ tap ‘Google’ and create an account if you haven´t got
one yet.
5. Enter your account details.
6. Select Mail, Contacts and Notications in the list of features.
Gmail is the only email provider with a web application, however a native email
application, supporting all common email account formats, will be added in a future
software update.
2
3
Page 43

ENGLISH
Complete User Manual
43
Managing your contacts
MANAGING YOUR CONTACTS
The rst time you access the application, it will ask you if you want to sync your
contacts from your Google account. If you choose not to, you can sync them at a
later stage using the Today Scope.
Creating a Contact
To create a new contact:
1. Swipe from the left edge to reveal the Launcher.
2. Tap the Contacts icon to reveal your contact list.
3. Swipe up from the tab bearing the ‘+’ sign at the bottom of the screen to reveal
a form where you can enter your new contact’s details.
2
3
Page 44

ENGLISH
Complete User Manual
44
Managing your contacts
To edit a contact already in your list:
1. Select the contact from the list.
2. Tap the contact icon to the right of the name to
open the full entry for that contact.
3. Tap the menu icon in the top right hand corner of
the screen.
4. Tap edit icon from the top menu. You will be
given two options: Add Field or Delete.
5. Tap Add Field and select the type of information
you want to add from the list.
Deleting a Contact
To delete a contact:
1. Swipe from the left edge to reveal the Launcher.
2. Tap the Contacts icon to reveal your contact list.
3. Scroll to nd the contact you want to delete and when you nd it, swipe to the
right on the name.
4. Tap on the red icon that will appear to delete the contact.
4
4
Page 45

ENGLISH
Complete User Manual
45
Using the web
USING THE WEB
Integrating Your Online Accounts
To integrate your online accounts (e.g. Facebook) with your phone:
1. Swipe from the left edge of the screen to reveal the Launcher in order to
access the complete list of phone settings.
2. Tap the System Settings icon.
3. Tap Accounts within System Settings.
4. Tap ‘Add account’. You will see a list icons for popular social media services.
5. Tap on any one and you will see a screen asking you to log in with the username
and password you usually use for that servic e. Depending on the service you
have selected, you may also be asked to grant other applications access to that
account.
2
3
Page 46

ENGLISH
Complete User Manual
46
Using the web
Browsing the Web
To access the web browser:
1. Swipe from the left edge of the screen to reveal the Launcher.
2. Tap the web Browser icon.
To enter the address of a website into the browser:
1. Tap the Menu icon to the right of the address bar.
2. Tap ‘New tab’.
3. Tap in the address bar – the on-screen keyboard will appear.
4. Enter your text (search terms or a web address) and tap the return key.
To bookmark a page, tap on the star icon that appears in the browser’s address bar
as soon as the page has nished loading.
To see your bookmarks:
1. Tap the Menu icon to the right of the address bar.
2. Tap ‘New tab’ – all your bookmarked sites appear in the new tab.
3. Tap on any bookmark to go to the site.
2
Page 47

ENGLISH
Complete User Manual
47
Using the web
To see your browsing history:
1. Tap the Menu icon in the top right corner of the screen.
2. Tap ‘History’. This will show you the web sites you have visited.
3. To see a list of the pages you have visited on a site, tap the site’s name.
To return to the page you were viewing, tap ‘Done’ at the bottom left corner of the
screen.
To share a web page:
1. Tap the Menu icon in the top right corner of the screen.
2. Tap ‘Share’.
3. Tap to choose which app you want to use to share the URL.
To access all your open tabs:
1. Tap the Menu icon in the top right corner of the screen.
2. Tap ‘Open tabs’.
3. Scroll down the page to see all your open tabs.
4. To return to normal browsing, tap ‘Done’ in the bottom left corner of the
screen.
5. To add a new tab, tap the Menu icon in the top right corner, then tap ‘New
tab’.
Page 48

ENGLISH
Complete User Manual
48
Alarms and clock settings
ALARMS AND CLOCK SETTINGS
Setting the Date and Time
Your phone sets the time and date automatically. If you need to adjust it:
1. Swipe from the left edge of the screen to reveal the Launcher.
2. Tap System Settings.
3. Tap Time & Date under the System heading. From there, you can adjust and
save the time, date and time zone.
2
3
Page 49

ENGLISH
Complete User Manual
49
Alarms and clock settings
Setting an Alarm
1. Swipe from the left to reveal the Launcher.
2. Tap the Home icon at the bottom, then swipe in the title bar until you see
the Apps Scope.
3. Tap the Clock app.
4. Swipe upwards from the tab at the bottom of the screen to reveal a list of your
alarms once the clock is displayed.
5. To set a new alarm, tap the
+
icon.
6. Enter the time for your alarm and tap the icon to set it.
To edit the time, title, sound or how often the alarm repeats:
1. Tap its title after activating it and edit it as you see t. You can even choose
which of the days in the coming week you want your alarm to be active.
2. Tap the icon in the top right corner of the screen to save your changes.
4
5
6
1
2
Page 50

ENGLISH
Complete User Manual
50
Maps and weather
MAPS AND WEATHER
Using Maps
Ubuntu includes Nokia HERE Maps to help you get around. To access it:
1. Swipe from the left edge of the screen to reveal the Launcher.
2. Tap the Home icon at the bottom, then swipe in the title bar until you see
the Apps Scope.
3. Tap the HERE Maps app.
Web-based map services such as Google can be accessed via the web browser.
2
Page 51

ENGLISH
Complete User Manual
51
Taking photos and videos
TAKING PHOTOS AND VIDEOS
Using the Camera to Take a Photo
1. Swipe from the left edge of the screen to reveal the Launcher.
2. Tap the Camera icon.
3. Check the icon in the circle at the bottom centre of the screen looks like a stills
camera rather than a movie camera. If not, tap the stills camera icon to select
your shooting mode.
4. To take your photo, tap the Camera icon.
To take a sele, tap the spinning camera icon to the right of the stills camera, which can
be used to switch between the rear and front cameras.
4
3
Page 52

ENGLISH
Complete User Manual
52
Taking photos and videos
Accessing the Flash Settings
To access the ash settings:
1. Swipe upwards from the control tab at the bottom of the screen to reveal the menus.
2. Tap ash icon to select one of the three options you want to use: ash on, ash
off and auto (which allows the camera to decide whether to use the ash or
not, based on the light levels it detects).
Using the Camera to Record a Video
To record a video:
1. Swipe to reveal the Launcher and tap the Camera icon.
2. Switch from photography to video by tapping the video camera icon and hit
the red on-screen button to start recording. Hit the button again to stop.
1
All videos, like your photos, are automatically stored in the Gallery app.
Page 53

ENGLISH
Complete User Manual
53
Managing your photos and videos
MANAGING YOUR PHOTOS AND VIDEOS
Viewing Your Photos and Videos in the Gallery
Every photograph you take is automatically stored in the Gallery app. Immediately
after taking a photo, you can view it in the Gallery by swiping to the left from the
centre of the screen while you’re using the camera.
Sharing a Photo
To share a photo directly from the Gallery:
1. Tap the icon in the top right hand corner of the screen.
2. Select and your preferred method of sharing (e.g. email or Facebook) from
the drop-down list.
Playing Videos
Videos that you have shot yourself are automatically stored in the Gallery with your
photos. To play a video in the Gallery, just tap it to start the media player app.
1. Swipe from the left to reveal the Launcher.
2. Tap the Home icon .
3. Swipe left or right to reveal the Video Scope.
4. Search for what you want to watch. The results will be displayed below,
whether they’re stored on your phone or available for streaming or download
on the web.
3
Page 54

ENGLISH
Complete User Manual
54
Playing and managing your music
PLAYING AND MANAGING YOUR MUSIC
Playing a Track
The best way to nd and play music, however, is to use the Music Scope.
1. Swipe from the left to reveal the Launcher.
2. Tap the Home icon .
3. Swipe left or right to reveal the Music Scope.
4. Search for what you want to listen to. The results will be displayed below,
whether they’re stored on your phone or available for streaming or download
on the web.
5. Tap on any track you see in the Scope to play it.
After you rst opened the Music Scope you can access to your music collection by
swiping from the left edge of the screen to reveal the Launcher, then tapping the
Music icon.
3
Page 55

ENGLISH
Complete User Manual
55
Connectivity and networking
CONNECTIVITY AND NETWORKING
Viewing Your Mobile Network
To see the type of network to which you are connected (e.g. 3G):
1. Swipe from the left edge of the screen to reveal the Launcher.
2. Tap the System Settings icon.
3. Scroll down to the Network section and tap the Cellular icon. The network
to which you are currently connected is displayed in ‘Connection type’.
Turning Roaming On or Off
To turn voice or data roaming on or off:
1. Swipe from the left edge of the screen to reveal
the Launcher.
2. Tap System Settings.
3. Scroll down to the Network section and tap the
Cellular icon.
4. Use the and icons for data roaming to
turn it off or on.
2
3
4
Page 56

ENGLISH
Complete User Manual
56
Connectivity and networking
Managing Wi-Fi Networks
To view and manage your Wi-Fi connections:
1. Swipe from the left to access the Launcher.
2. Tap the System Settings icon.
3. Scroll down to the ‘Network’ section and tap the Wi-Fi icon.
4. Tap on the to enable wireless connections. Your phone will then begin
scanning for networks, displaying every one it nds in a list below.
If you do not see the network you are looking for in the
list, it may be private. Tap ‘Connect to hidden network’
to enter its name manually.
You can also access your Wi-Fi connections by swiping
down from the top edge of the screen to access the
indicator details and then swiping left or right until you
see Network. This displays your current connection
status and gives you a link to the main Wi-Fi settings.
2
3
4
Page 57

ENGLISH
Complete User Manual
57
Connectivity and networking
Using Bluetooth
You can see whether Bluetooth is switched on or off in
the indicators at the very top of the screen.
There are two ways you can switch Bluetooth on. You can:
1. Swipe down from the top edge to access the
indicator details.
2. Swipe left or right until you see Bluetooth.
3. Tap on the to enable Bluetooth and your
Ubuntu phone will begin looking for Bluetooth
devices in range, which it will list below.
4. Connect to one by tapping its listed name
5. Enter the details when prompted.
Alternatively, you can:
1. Swipe from the left edge of the screen to reveal the Launcher.
2. Tap the System Settings icon.
3. Scroll down to the Network section.
4. Tap the Bluetooth icon.
2
3
4
Page 58

ENGLISH
Complete User Manual
58
Connectivity and networking
Turning Flight Mode On and Off
To turn off all network services so you can use your phone in ight:
1. Swipe from the left to reveal the Launcher.
2. Tap System Settings.
3. Tap the icon next to Flight Mode, the option at the top of the screen.
Alternatively, swipe down from the top edge of the screen to reveal the indicator
details and then swipe left or right until you see Network, where you can toggle
Flight Mode on and off.
Page 59

ENGLISH
Complete User Manual
59
Connectivity and networking
On disabling Flight Mode, you will need to enter the PIN code again as follows:
1. Swipe down from the top edge to access the indicator details.
2. Swipe left or right until you see Network.
3. Tap on Unlock SIM and enter your PIN code.
3
Page 60

ENGLISH
Complete User Manual
60
Securing your phone
SECURING YOUR PHONE
Locking Your Phone
To set your phone to lock automatically after a given period of time without use:
1. Swipe from the left edge of the screen to reveal the Launcher.
2. Tap the System Settings icon.
3. Scroll down to the ‘System’ section.
4. Tap the Security & Privacy icon.
5. Tap ‘Phone locking’.
6. Select from the following options:
- Lock security
- Sleep when idle
- Access the Launcher and notication settings when the phone is locked
2
3
5
Accessing the Notications and quick settings while the device is locked could
affect security, as it is possible to partially modify the conguration.
Enabling the Launcher while the device is locked will take you to the selected
app on entering your PIN
Page 61

ENGLISH
Complete User Manual
61
Securing your phone
Setting or Changing your Passphrase
When you rst set up your phone, you’ll be invited to set a passphrase.
To change it at any time:
1. Swipe from the left edge of the screen to reveal the Launcher.
2. Tap the System Settings icon.
3. Scroll down to the ‘System’ section and tap the Security & Privacy icon.
4. Tap ‘Lock phone’.
5. Tap ‘Lock security’
6. Choose from the three options:
- Swipe (no security)
- 4-digit passcode
- Passphrase
If you do not already have a passphrase, you will be asked to choose one then, in the
box below, enter it again to conrm it. Then tap to conrm.
Page 62

ENGLISH
Complete User Manual
62
Personalising your phone
PERSONALISING YOUR PHONE
Changing Your Ringtone, Message Tone and Alarm
To access the sound settings:
1. Swipe from the left to reveal the Launcher.
2. Tap the System Settings icon.
3. Tap Sound under the Personal heading.
4. Proceed to toggle silent mode on or off, change and test ringtones and message
tones. For each one, you can set the phone to vibrate when silent or making a sound,
or both. You can also toggle sounds for the on-screen keyboard and phone lock.
Changing the Phone’s Language and Keyboard
To change the language used on your phone:
1. Swipe from the left to reveal the Launcher.
2. Tap the System Settings icon.
3. Tap Language & Text under the Personal heading
4. Select the language you want to use from the list.
To change the on-screen keyboard, select Keyboard layouts.
Changing Your Background Images
1. Swipe from the left to reveal the Launcher.
2. Tap the System Settings icon then.
3. Select Background, under the Personal heading.
4. Tap to select from the available images.
If you prefer to use one of your own photos, you can opt to
import one from the Gallery:
1. Tap Custom
2. Tap Add an image…
3. Tap to choose a source application, e.g. the Gallery or
the Camera
4. Tap the icon
Page 63

ENGLISH
Complete User Manual
63
Personalising your phone
Deciding What to Show on the Welcome Screen
1. Swipe from the left to reveal the Launcher.
2. Tap the System Settings icon.
3. Select Security & Privacy within the System section, then tap to toggle
welcome screen stats on or off.
If you allow statistics to be displayed, the welcome screen will display activity-based
alerts such as how many text messages you’ve sent, or how many minutes you’ve
been talking for on your phone.
2
2
3
Page 64

ENGLISH
Complete User Manual
64
About this phone
ABOUT THIS PHONE
From this section you can access information on the serial nº, IMEI, Bluetooth address,
storage capacity and availabilty, the software, and you can also check for updates
(more information in APPENDIX A of this manual) and access developer mode.
1. Swipe from the left to
reveal the Launcher.
2. Tap the System Settings
icon.
3. Select About this phone
within the System section.
You need a passcode or passphrase set to use Developer Mode.
2
3
Page 65

ENGLISH
Complete User Manual
65
Updating and resetting your phone
UPDATING AND RESETTING YOUR PHONE
Updating the Software on Your Phone
When an update is available to download, you will see a number representing the
number of updates available in the System Settings icon in the Launcher.
In addition, the bell icon in the indicators at the top of the screen will turn green.
To see details of any software updates for your phone:
1. Swipe from the left to reveal the Launcher.
2. Tap the System Settings icon.
3. Scroll down to the System heading and tap Updates, where you’ll see any
updates downloaded and not yet installed as well as the option to check for
updates there and then. Alternatively, you can select a schedule on which your
phone will check for updates. You can also choose whether you want your
phone to automatically download updates in the background.
1
2
3
Page 66

ENGLISH
Complete User Manual
66
Updating and resetting your phone
To change the auto-download settings:
1. Swipe from the left to reveal the Launcher
2. Tap the System Settings icon.
3. Scroll down to the System heading and tap Updates.
4. Tap Auto-download.
5. Choose from the options in the drop-down list: ‘Never’, ‘When on Wi-Fi’ or
‘On any data connection’.
1
2
4
When checking for updates, your phone will also check to see if any updates
are available for apps you’ve installed. If there are, you’ll be given the option to
update them.
Page 67

ENGLISH
Complete User Manual
67
Updating and resetting your phone
Resetting Your Phone
There are several reset options, including a partial reset that preserves all your
personal data (including contacts, apps, music, photos and videos) and a full factory
reset (otherwise known as a hard reset) that restores the phone to the state it was
in when rst removed from its box.
To reset your phone:
1. Swipe from the left to reveal the Launcher.
2. Tap the System Settings icon.
3. Scroll down to the bottom of the page, where you’ll find the icon marked
‘Reset phone. You will then be given the option to reset the Launcher only,
which will not erase any of your data, or a complete reset, which will delete
everything saved on your phone and return it to factory condition.
2
3
Page 68

ENGLISH
Complete User Manual
68
Useful tips
USEFUL TIPS
Copying and Pasting
To copy a word or a section of text:
1. Tap and allow your nger to rest on it for a second, without removing it. A
menu of options will then appear, including the option to select the word on
which you’ve clicked, the whole section or to undo your last action.
2. Conrm your selection and then the option to copy it appears. Tap to select it
and copy your text.
3. Paste the copied text, tap and hold in the location in which you want the text
to appear.
4. Tap the paste option that will appear in the menu to paste your text.
Locking the Display to Landscape or Portrait Orientation
To prevent the display from switching from landscape to portrait (or vice versa)
when the handset is tilted:
1. Swipe from the left to reveal the Launcher.
2. Tap on the System Settings icon.
3. Tap the Rotation Lock checkbox near the top of the screen.
Checking Data Usage
1. Swipe from the left edge to reveal the Launcher.
2. Tap the System Settings icon.
3. Tap Cellular to reveal more detailed data use information.
Taking Screenshots
You can take a screenshot at any time by simply pressing and holding down the
volume key. The screenshot will be automatically saved in the Gallery, in the
“Screenshots” folder. If you are accessing the phone via the computer, go to
Pictures > Screenshots.
Page 69

ENGLISH
Complete User Manual
69
Useful tips
Optimising Battery Life
You can prolong your battery life by disabling features you don’t need. You can also
congure how the system resources consume battery power:
1. Swipe from the left to reveal the Launcher.
2. Tap the System Settings icon.
3. Scroll down to the System heading and tap Battery, where you’ll see ways to
reduce battery if you are not using Wi-Fi, Bluetooth or GPS and you can set
your display brightness
2
4
3
If you have not optimised the settings, when the battery has almost run down, a
warning message will appear giving you the option to adjust the settings.
Page 70

ENGLISH
Complete User Manual
70
Appendices
APPENDICES
APPENDIX A: OTA Updates
OTA stands for “Over The Air”, and refers to the way in which rmware updates are
sent to your phone; i.e. via your data connection, with minimal intervention required
on the part of the user and without any complex updating procedures to go through.
Your phone will periodically check whether updates to the operating system are
available. Updates generally incorporate improvements to system performance or
additional features for your device. If an update is available, a pop-up window will
appear to inform you of this fact and will request permission to install the update.
Using a Wi-Fi connection to download the update package is recommended.
The system will guide you through the installation process, to ensure that it is
completed as quickly and conveniently as possible.
You can also check for updates manually, by going to System Settings > About this
phone > Check for updates. A message will appear to tell you that the system is
searching for available updates. If an update is found, the installation process is the
same as described above.
Page 71

ENGLISH
Complete User Manual
71
Appendices
APPENDIX B: Technical Specications
You can find all the technical information for your device by visiting this link and
selecting the corresponding model: www.bq.com/gb/smartphones.html
After selecting your model, you can access the full description by clicking on
Specications in the bar at the top of the page.
There, you can nd information on the following:
a. Dimensions and weight
b. Screen
c. Internal memory
d. Processor
e. Battery
f. Operating system
g. Connectivity
h. System functions
Page 72

ENGLISH
Complete User Manual
72
Appendices
APPENDIX C: Cleaning and Safety
Cleaning
Before cleaning your device, make sure you have switched it off and disconnected all
cables. After cleaning, make sure the screen is completely dry before reconnecting
any cables and switching the device back on.
Do not pour or spray any liquids directly onto the phone. To clean it, do the following:
Screen: Use a clean, soft, lint-free cloth to remove dust and dirt from the screen.
To remove ngerprints and marks, you can apply a small amount of mild cleaning
product to the cloth.
Casing: Use a soft cloth with a small amount of mild cleaning product. After cleaning,
rinse the cloth in clean water, wring it out thoroughly and wipe the casing to remove
any leftover cleaning product
Safety
To reduce the risk of an accident, follow these safety instructions:
· Do not use power cables, connectors or plugs that are damaged or contain loose
wiring. Do not bend or damage the power cable. Do not touch the power cable
with wet hands. Do not pull on the cable to unplug the charger
· Do not use the device while it is charging. Do not touch it with wet hands.
· Do not hit the charger or cause it to fall. Do not charge the battery using
chargers that have not been approved by the manufacturer
· Do not use the device during electrical storms. Handle and dispose of the
battery and charger with caution.
· Do not handle Li-ion batteries that are damaged or leaking.
· Do not use the device in the vicinity of a pacemaker. If possible, try to use it at a
distance of more than 15 cm from the pacemaker, as it could interfere with the
pacemaker’s operation.
· Do not use the device in a hospital or in the vicinity of any medical equipment
that may be susceptible to radio frequency interference.
· If you habitually use medical equipment, make sure it is protected against radio
frequency interference. If you wear a hearing aid, consult the manufacturer with
regard to potential interference.
Page 73

ENGLISH
Complete User Manual
73
Appendices
· In potentially explosive environments, switch the device off. Always observe
the site regulations, instructions and warning signs .
· Do not use the device in refuelling areas (e.g. petrol stations) or in the vicinity
of ammable and/or explosive chemical products .
· Do not store or transport ammable liquids or gases or explosive materials in
the vicinity of the device or any of its parts or accessories .
· Switch off the device upon boarding an aeroplane. The electronic components
of a motor vehicle may malfunction as a result of radio frequency interference
from the device.
· Prolonged exposure to high levels of sound pressure may cause permanent
damage to hearing. Wearing headphones while cycling, running or walking
through areas with heavy trafc or excessive noise is not recommended.
· Use of the device while driving: Some car manufacturers prohibit the use of
mobile phones in their vehicles unless they are equipped with a hands-free
kit and external antenna. Ask the vendor of your vehicle whether your mobile
phone or hands-free Bluetooth kit will interfere with your car’s electrical
systems. Always devote your full attention to the road while driving and respect
the local regulations and laws on the use of wireless devices while at the wheel.
· Location/GPS-based functions: Location-based functions are offered “as is” and
“for all corresponding effects”. Mundo Reader, S.L. does not claim or in any way
guarantee the accuracy of any location-based information.t
· When the device is using location-based information, it may suffer from
interruptions or failures and its dependence on network availability will increase.
Note that functionality may be reduced or obstructed in certain areas, such as
inside buildings or in areas close to buildings.
· Use the GPS function with caution, to make sure you are not distracted while
driving.
· Emergency calls: The ability to make a phone call cannot be guaranteed under all
conditions. Never place your trust solely in mobile phones to make an emergency
call. With certain mobile networks, certain network services, certain functions
activated and in certain areas, it may not be possible to make a phone call.
· Antenna: Use of the device with an antenna other than that supplied by Mundo
Reader, S.L. may damage the phone, impair its performance and generate SAR
levels (see Appendix C overleaf) that exceed the limits established by law.
Do not cover the antenna with your hand, as this may affect call quality and
energy consumption and may shorten the talk time and standby availability.
Page 74

ENGLISH
Complete User Manual
74
Appendices
· Flight mode: Use of Bluetooth and WLAN functions may be prohibited on
aeroplanes and in other places where radio transmissions are not permitted. In
these locations, please request authorisation before enabling any of the phone’s
Bluetooth or WLAN functions, even in Flight mode.
Warning!
This product must be used with a power supply
that has the following specications:
INPUT: 100-240 V ~ 50/60 Hz 0.3 A máx.
OUTPUT: 5.0 V
1.0 A
Polarity must be as indicated below:
The use of power sources other than the ones
indicated may damage your device and pose a
risk to the safety of people and property.
12345
Pin 1 “+”
Pin 5 “-”
Micro-USB
Page 75

ENGLISH
Complete User Manual
75
Appendices
APPENDIX D: Information on Exposure to Radio Waves and the SAR
(Specic Absorption Rate)
The design of this mobile device complies with the current regulations governing
exposure to radio waves. These regulations are based on scientic guidelines that
include safety margins designed to ensure the safety of everyone, regardless of age
or state of health.
The guidelines on exposure to radio waves use a unit of measurement known as
the SAR (Specic Absorption Rate). SAR tests are carried out using standardised
methods, with the mobile device transmitting at the highest certied power level in
all frequency bands used.
The maximum SAR levels recommended by the ICNIRP (International Commission
on Non-Ionizing Radiation Protection) is 2 W/kg measured on 10 g of tissue.
The highest SAR levels recorded for this phone are:
Aquaris E4.5 Ubuntu Edition
Auditory use 0.582 W/Kg (10 g)
When used in direct contact with the body 1.003 W/Kg (10 g)
This device complies with the guidelines on exposure to radio frequency both when
used in the normal position next to the ear and when positioned at least 1.5 cm from
the body.
In order to send data les or messages, this device requires an adequate network
connection. On certain occasions, the transmission of data les or messages may
be delayed until an adequate connection becomes available. Until the transmission
has been completed, make sure you follow the instructions on separation distance
mentioned above.
Page 76

ENGLISH
Complete User Manual
76
Appendices
APPENDIX E: Disposing of this Product Correctly
(Electrical and electronic waste).
(Applies within the European Union and in European countries with
selective waste collection systems).
To prevent any damage to the environment or human health, separate these products
from other types of waste and recycle them correctly. This will help promote the
sustainable use of material resources.
Household users should contact the retailer that they purchased the product from
or the relevant local authorities to nd out how and where to recycle this product
safely and without harming the environment.
Business users should contact their supplier and consult the terms and conditions of
the purchase agreement. This product and its electronic accessories should not be
disposed of with other waste materials such as the box and non-electronic materials.
Page 77

ENGLISH
Complete User Manual
77
Appendices
APPENDIX F: Declaration of Conformity
Mundo Reader, S.L.
Pol. Ind. Európolis
Calle Sofía, 10
28232 - Las Rozas - Madrid (Spain)
Tel. +34 91 787 58 59
Tax Code (CIF): B85991941
Made in China
Declares that the:
bq Aquaris E4.5 Ubuntu Edition
complies with the provisions of Directive 1999/5/EC on Radio and Telecommunications Terminal Equipment (R&TTE), Directive 2006/95/EC on Electrical Safety
for Low Voltage Equipment, and Directive 2004/108/EC on Electromagnetic Com-
patibility, in addition to the following harmonised standards:
EN 301489-1 V1.9.2, EN 301489-3 V1.6.1, EN 301489-7 V1.3.1, EN 301489-17 V2.2.1,
EN 301489-24 V1.5.1, EN 62479: 2010, EN 301908-1 V6.2.1, EN 301 908-2V5.4.1, EN
301511 V9.0.2, EN 300328 V1.8.1, EN 300440-2V1.4.1, EN 60950-1/A12:2011,
EN 50360:2001/A1:2012, EN 50566: 2013, EN 62209-1: 2006, EN 62209-2: 2010,
EN 55022: 2010, EN 55024: 2010, EN 55013:2013, EN 55020: 2007/A11: 2011.
You can request a copy of the Declaration of Conformity by writing to the address
given above.
Madrid, March 2015.
Alberto Méndez Peydró
CEO
Page 78

Firmware version
bq Aquaris E4.5 Ubuntu Edition: Ubuntu 14.10 (r18)
Page 79

www.bq.com
www.mibqyyo.com
 Loading...