

Page 1
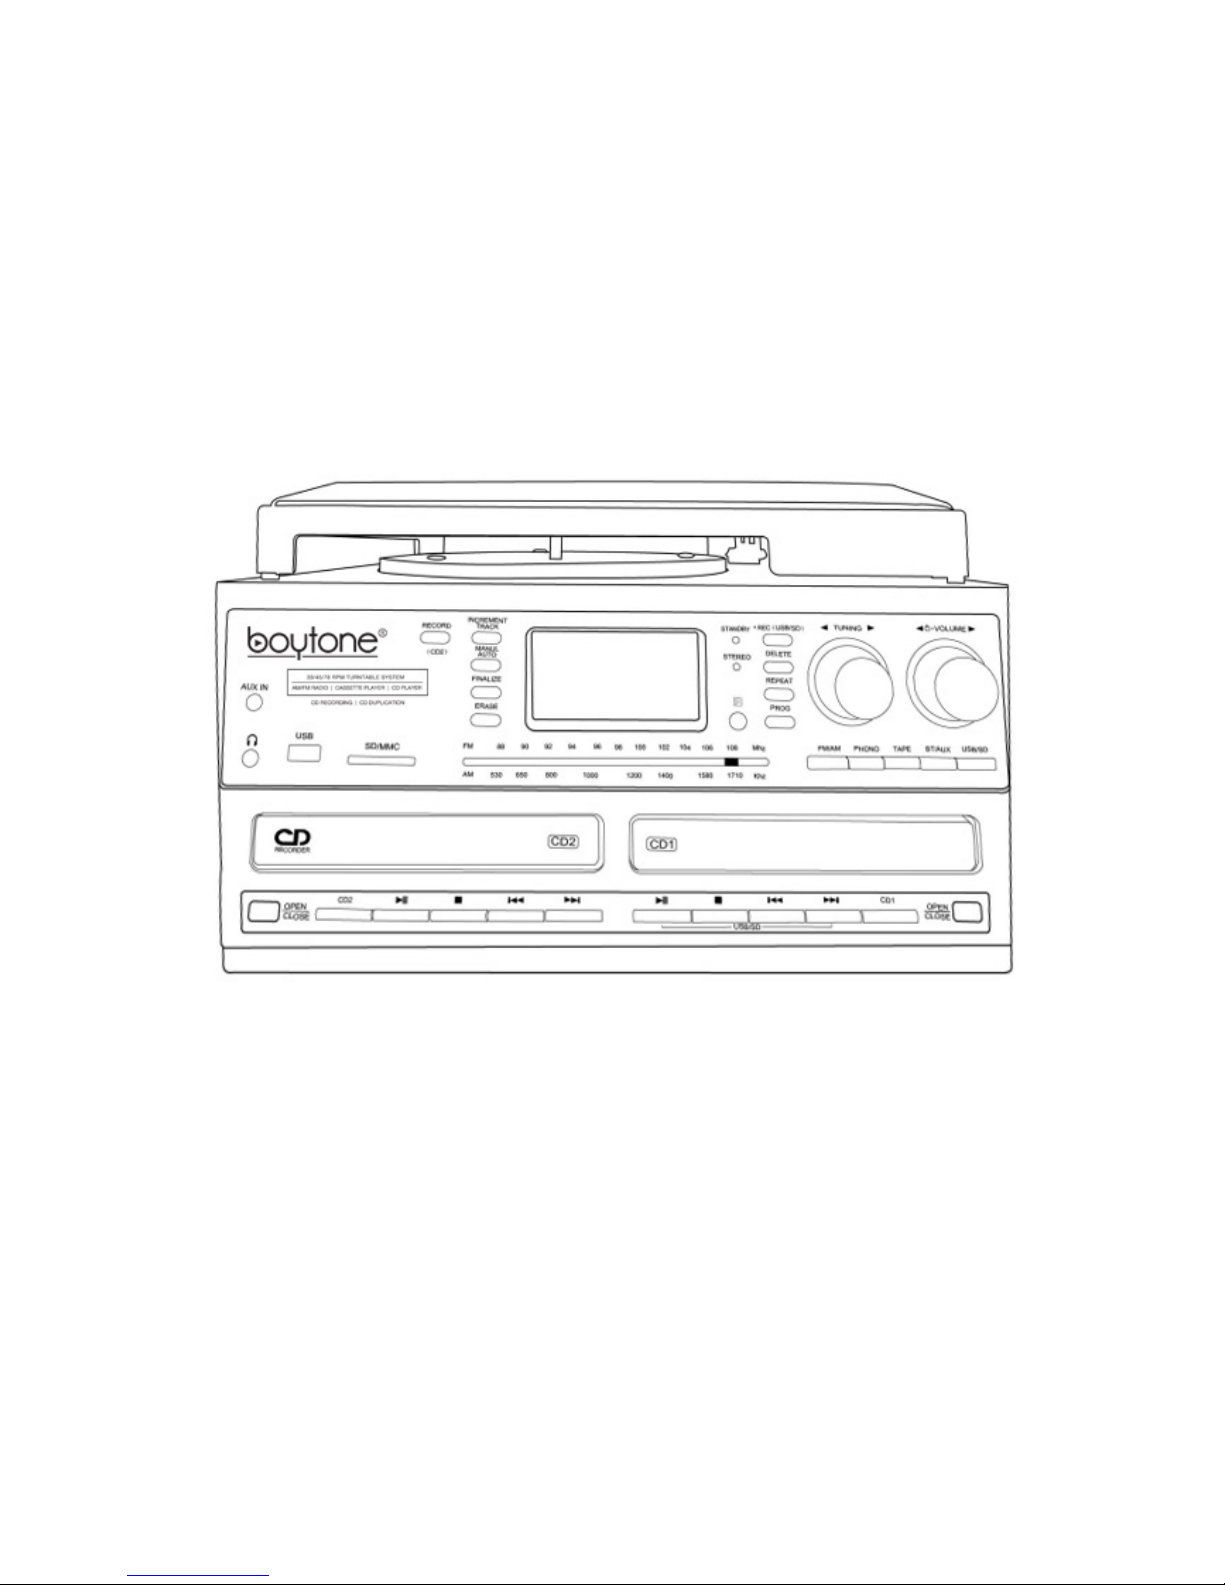
BOYTONE
®
Turntable with CD Player, Cassette, Analog Radio
MP3 Encoding to USB/MMC & CD Cloning
MODEL(S): BT29B | BT29W
------------------------------------------------------------------------------------
Operating Instructions Manual
Page 2
TO PREVENT FIRE OR SHOCK HAZARD, DO NOT USE THIS PLUG WITH AN
EXTENSION CORD,RECEPTACLE OR OTHER UNLESS THE BLADES CAN BE FULLY
INSERTED TO PREVENT BLADE EXPOSURE. TO PREVENT FIRE OR SHOCK HAZARD, DO
NOT EXPOSE THIS APPLIANCE TO RAIN OR MOISTURE.
IMPORTANT SAFETY INSTRUCTIONS
1)Please read these instructions and keep them for future reference.
2) Pay attention to all warnings.
3) Follow all instructions.
4) Do not use this apparatus near water.
5) Clean only with a dry cloth.
6) Do not block any ventilation openings.
7) Install in accordance with the manufacturer's instructions. Do not install heaters,
stoves, or other apparatus (including amplifiers) that produce
8) Protect the power cord from being walked on or kinked, in particular where the plug is
fitted and at the point where it exits from the apparatus.
9) Only use attachments / accessories specified by the manufacturer.
10) Unplug this apparatus during lightning storms or when unused for long
11) Refer all servicing to qualified service personnel. Servicing is required such as power-
supply cord or plug is damaged, liquid has been spilled or objects have fallen into the
Page 3
apparatus, the apparatus has been exposed to rain or moisture, does not operate normally,
or has been dropped.
12) This appliance should not be exposed to dripping or splashing water and no such as
vases, should be placed on the apparatus.
13) Do not overload the wall power outlet. Use only power source as indicated -
i.e.100V AC mains.
Avoid installing this unit in places exposed to direct sunlight or close to on top of other
stereo equipment that radiates too much heat, places lacking constant vibration and/or
humid or moist areas.Do not attempt to clean this unit with chemical solvents as this might
damage the finish.Use a clean dry cloth.Operate controls and switches as described in make
certain the AC power cord is plugged in.Store your CDs, Cassettes in a cool area to avoid
damage from heat. When moving the set,be sure to first disconnect the power cord.
UNPACKING AND SET UP
1) Carefully remove the unit from the display carton and remove all packing
2 ) Unwind the AC power cord and extend it to its full length.
3) Unwind the FM Antenna wire and extend it to its full length.
4) Place the unit on a stable, level surface, convenient to an AC outlet, out of Direct sunlight,
and away from sources of excess heat, dust, moisture, humidity or strong magnetic fields.
5)Remove the opaque white plastic stylus cover from the phonograph stylus by sliding it
forward and down.
6)Discard the stylus cover.Remove the twist-tie that was used to secure the tone arm during
shipment.
7) Release the tone arm lock lever.
8)Connect the plug to your AC outlet.
POWER SOURCE
Page 4
This product is designed to operate on 100V 50∕60Hz AC Mains only. Attempting any
other power source may cause damage to the system,and such damage is not covered by
your warranty. NOTE: You will note that this system is equipped with domestic standard AC
power plug. If this plug does not fit into your existing AC outlet, do not try to defeat this
safety ,If this plug will not fit into your outlet, you probably have an outdated non-
polarized AC outlet.You should have your outlet changed by a qualified licensed
electrician.
Note: When finished all function ( no sound output program), it automatically starts ERP
(automatic energy-saving standby)
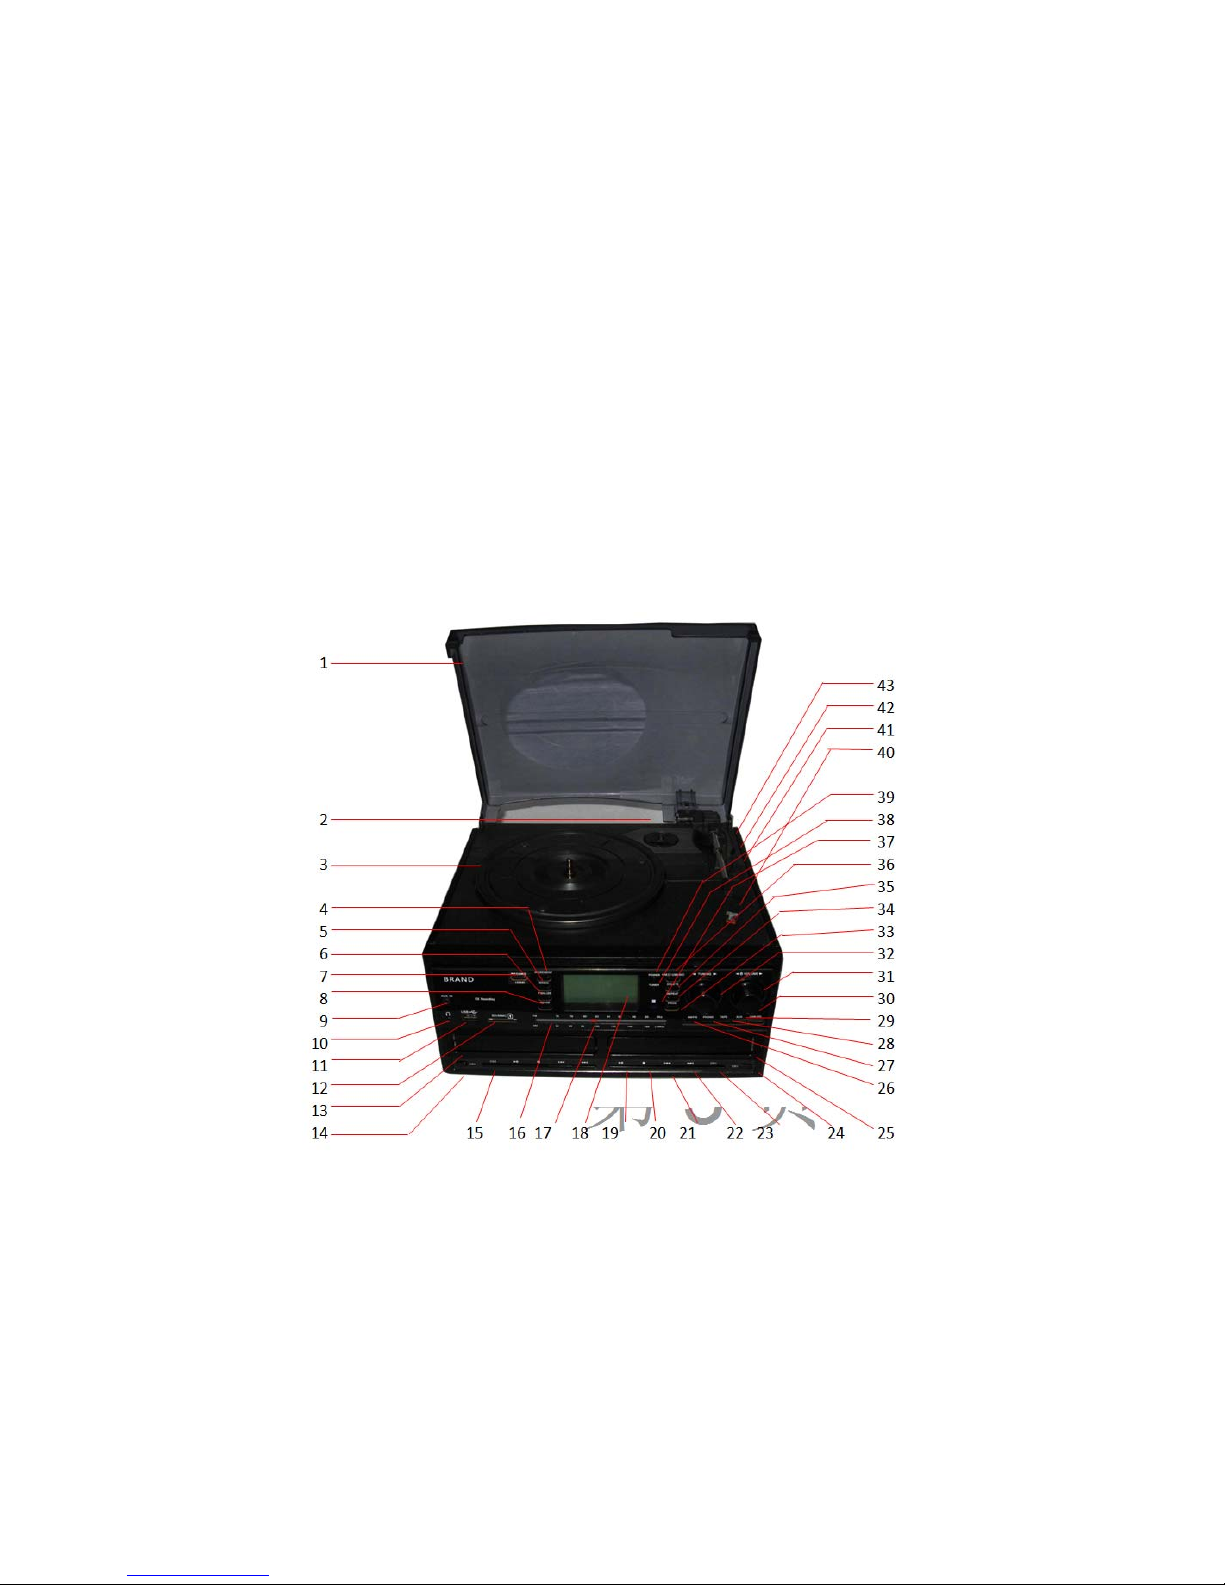
LOCATION OF CONTROLS AND INDICATORS
FRONT PANEL
Page 5

1)Dust cover
29) Aux in Function Button
2) 45RPM Adapter
3) Turntable
4) Increment Track Button
5) Manul Auto Button
6) Finalize Button
7) CD2 Record Button
8) Erase Button
9) Aux in Socket
10) Eadphone Socket
11) USB Socket
12) SD∕MMC Socket
13) CD2 Tray
14) CD2 Tray Open/Close Button
15) CD2 Function Button
16) Dual Lens
30) USB/SD Function Button
31) Power & Volune Knob
32) Tuning Knob
33) Voice Button
34) Repeat Button
35) Delete Button
36) USB/SD Record Button
37) Remote Receive Window
38) Stereo Pointer (Red LED)
39) Voice Pointer (Red LED)
40) Needle
41) Speed Selection (33,45,78 RPM)
42) Auto Stop Control
43) Tonearm Lift Lever
31) Power & Volune Knob
17) Tuning Pointer
18) LCD Display
19) Play/Pause Button
20) Stop Button
21) Skip down Button
22) Skip up Button
23) CD1 Function Button
24) CD1 Tray Open/Close Button
25) CD1 Tray
26) AM/FM Radio Function Button
27) Phono Function Button
28) Tape Function Button
BACK PANEL
32) Tuning Knob
33) 33) Voice Button
34) Repeat Button
35) Delete Button
36) USB/SD Record Button
37) Remote Receive Window
38) Stereo Pointer (Red LED)
39) Voice Pointer (Red LED)
40) Needle
41) Speed Selection (33,45,78 RPM)
42) Auto Stop Control
Tonearm Lift Lever
Page 6
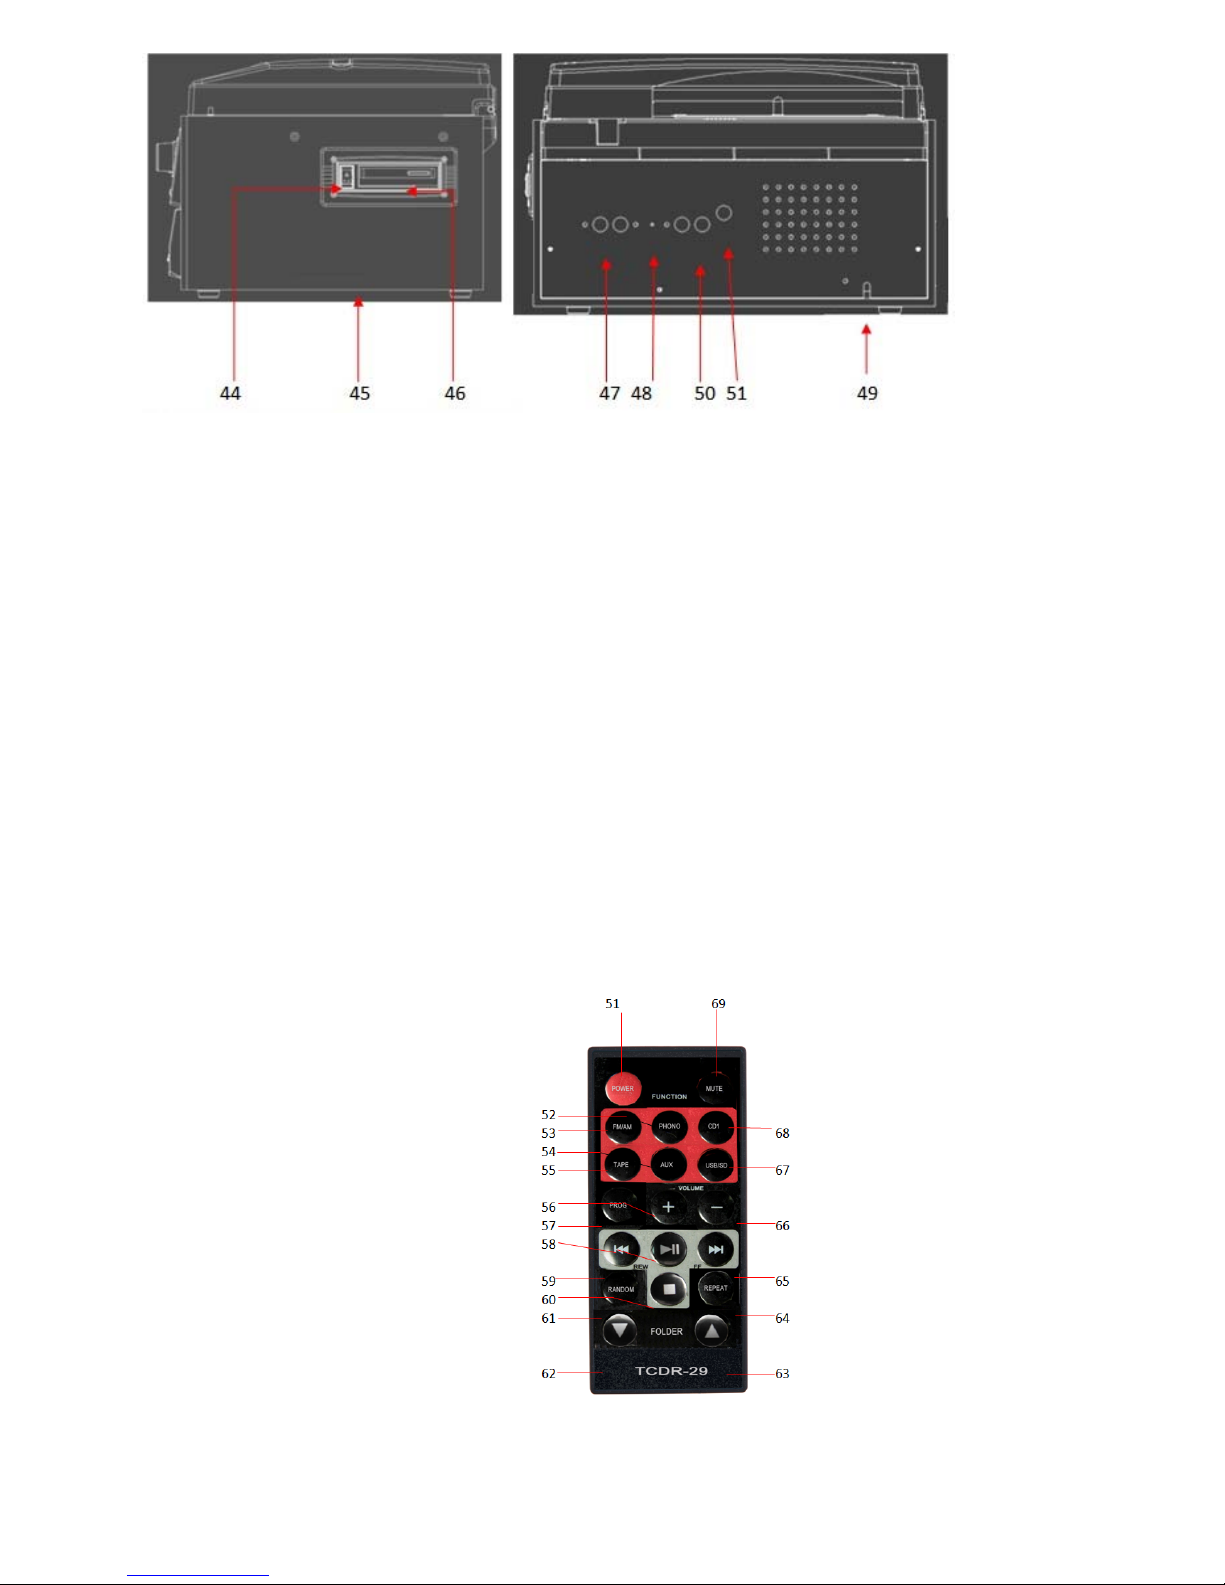
44) Cassette EJ/FF Button (Eject/Fast Forward)
45) Speaker
46) Cassette Player Slot
47) RCA Line out jack
48) FM wire antenna
49) AC power cord
50) Microphone input
51) Mic. Volume
REMOTE CONTROL
51) Power Button
52) Phono Function Button
53) FM/AM Radio Function Button
Page 7

54) Aux In Function Button
55) Tape Function Button
56) Volume Up Button
57) Programming Button
58) CD1/USB/SD Play/Pause Button
59) CD1/USB/SD Skip down Button
60) CD1/USB/SD Stop Button
61) Random Button
62) USB/SD Folder Down Button
63) USB/SD Folder Up Button
64) Repeat Button
65) CD1/UAB/SD Skip Up Button
66) Volume Down Button
67) USB/SD Function Button
68) CD1 Function Button
69) Mute Button
OPERATING INSTRUCTIONS
Listening to radio
1. Press Power & Volune Knob gently, open power supply,Turn the volume knob in a
direction to turn the equipment on.
2. Press FM/AM Radio Function Button(Default is FM channel, press once more time to
change AM channel).
3. Slowly rotate around Tuning Knob till to select suitable redio programs.
4. Adjust the volume knob to your desired volume level.
5. AM reception: the receiver has a built-in AM bar antenna. If reception is weak, slightly
rotate or reposition the unit to improve AM reception.
6. FM reception: the receiver has a built-in FM wire antenna hanging at the rear cabinet. For
best reception, completely unravel and extend this wire.
7. When you have finished listening to the radio, turn the volume knob in a counterclockwise
direction to switch the unit off. Unplug it from the power supply if you are not going to
use it for a while.
Phono Operation
1. Press Power Knob gently,Turn the volume knob in a clockwise direction to turn the
equipment on.
Page 8

2. Press PHONO Function Butto, selector to select PHONO mode.
3. Open the dust cover.
4. Set the speed selector to the appropriate position: 33, 45 or 78, depending on the record
to be played.
5. Set the auto stop control to ON if you want the turntable to stop turning when it has
reached the end of the record. If the switch is set to OFF, the turntable will continue turning
at the end of the record.
6. Place the record on the turntable (use the 45 rpm adaptor,if required).
7. Move the lift lever towards the back to raise the tone arm from the arm park,then slowly
move the arm to the record, as illustrated on the right. The turntable will start rotating.
8. Move the lift lever towards the front, the tone arm will gently drop onto the record and
playback will start.
9. To stop playback, move the lift lever towards the back to raise the tone arm. The turntable
will still be rotating but the record will stop playing. To continue playback,move the lift lever
towards the front.
10. To play a different piece on the record, move the lift lever towards the back, move the
raised tone arm to the start and then move the lift lever towards the front to lower the tone
arm and start playback. To adjust the volume level, turn the volume knob to the right or left.
12. At end of the record, move the lift lever towards the back to raise the tone arm and move
it back to the tone arm park, and then move the lift lever towards the front to lower the arm
onto its rest.
13. Alternatively, lift the tone arm off the record and return it to the arm rest manually.
14. When you have finished playing records, engage the tone arm lock to protect it from
accidental movement. Turn the volume knob in a counterclockwise direction to switch the
unit off.
15. Unplug it from the power supply if you are not going to use it for a while.
Phono encoding
1. Record Phono to USB∕SD:
(1) Insert USB/SD into a right directly to USB/SD Socket when play Phono.
(2) Press REC(USB/SD) Button → Press CD1 Function & to select the Save Path
(USB/SD)
→ then press once more time REC (USB/SD) button to process confirm
→ begin to copy (the icon of USB/SD is flashing on display screen ) → Press button
for end copy
Attention: Please Press STOP or the copy will can't be saved on USB/SD.
Page 9

NOTE:
The recording speed is 1:1. Recording will take as long as playing the record.
The recording format is preset at MP3 bit rate 128 kbps.
2. Record the content of Phono to CD-R/CD-RW:
(1) Press "Open/Close Button"of CD2 when play Phono, put CD-R&CD-RW on Tray, then
press "Open/Close Button" and close Tray and automatically identify the type of CD-R & CD-
RW.
(2)Copy directly: Press RECORD (CD2) Button → Press function CD2 PLAYER button to
confirm
→ begin to copy →Press to End copy.
(3)Copy of INCREMENT: Press MANUL AUTO Button → to select the recording the signal of
the level(-20,-30,-40dB)
→ Press RECORD (CD2) button → Press CD2 FUNCTION PLAYER button to confirm →
to begin to copy→ Press INCREMENT TRACK Button on process manual TRACK →Press
button for end copy.
(4) Copy of MANUL AUTO: Press MANUL AUTO Button → to select the recording the signal of
size of level (-20,-30,-4-dB)
→ Press RECORD (CD2) Button → Press CD2 Function to continue confirm → to begin
copy→ it will track automatically (AUTO TRACK words on the screen) → Press button for
end copy.
Remark:
1) It will display REC icon and the type of copy disco( CD-R & CD-RW) when you copy.
2) It will display the time, TRACK, the size of the level and other info when you copy CD2.
Cassette Operation
1.Turn the volume knob clockwise to turn the equipment on.
2.Use the function selector to select TAPE mode.
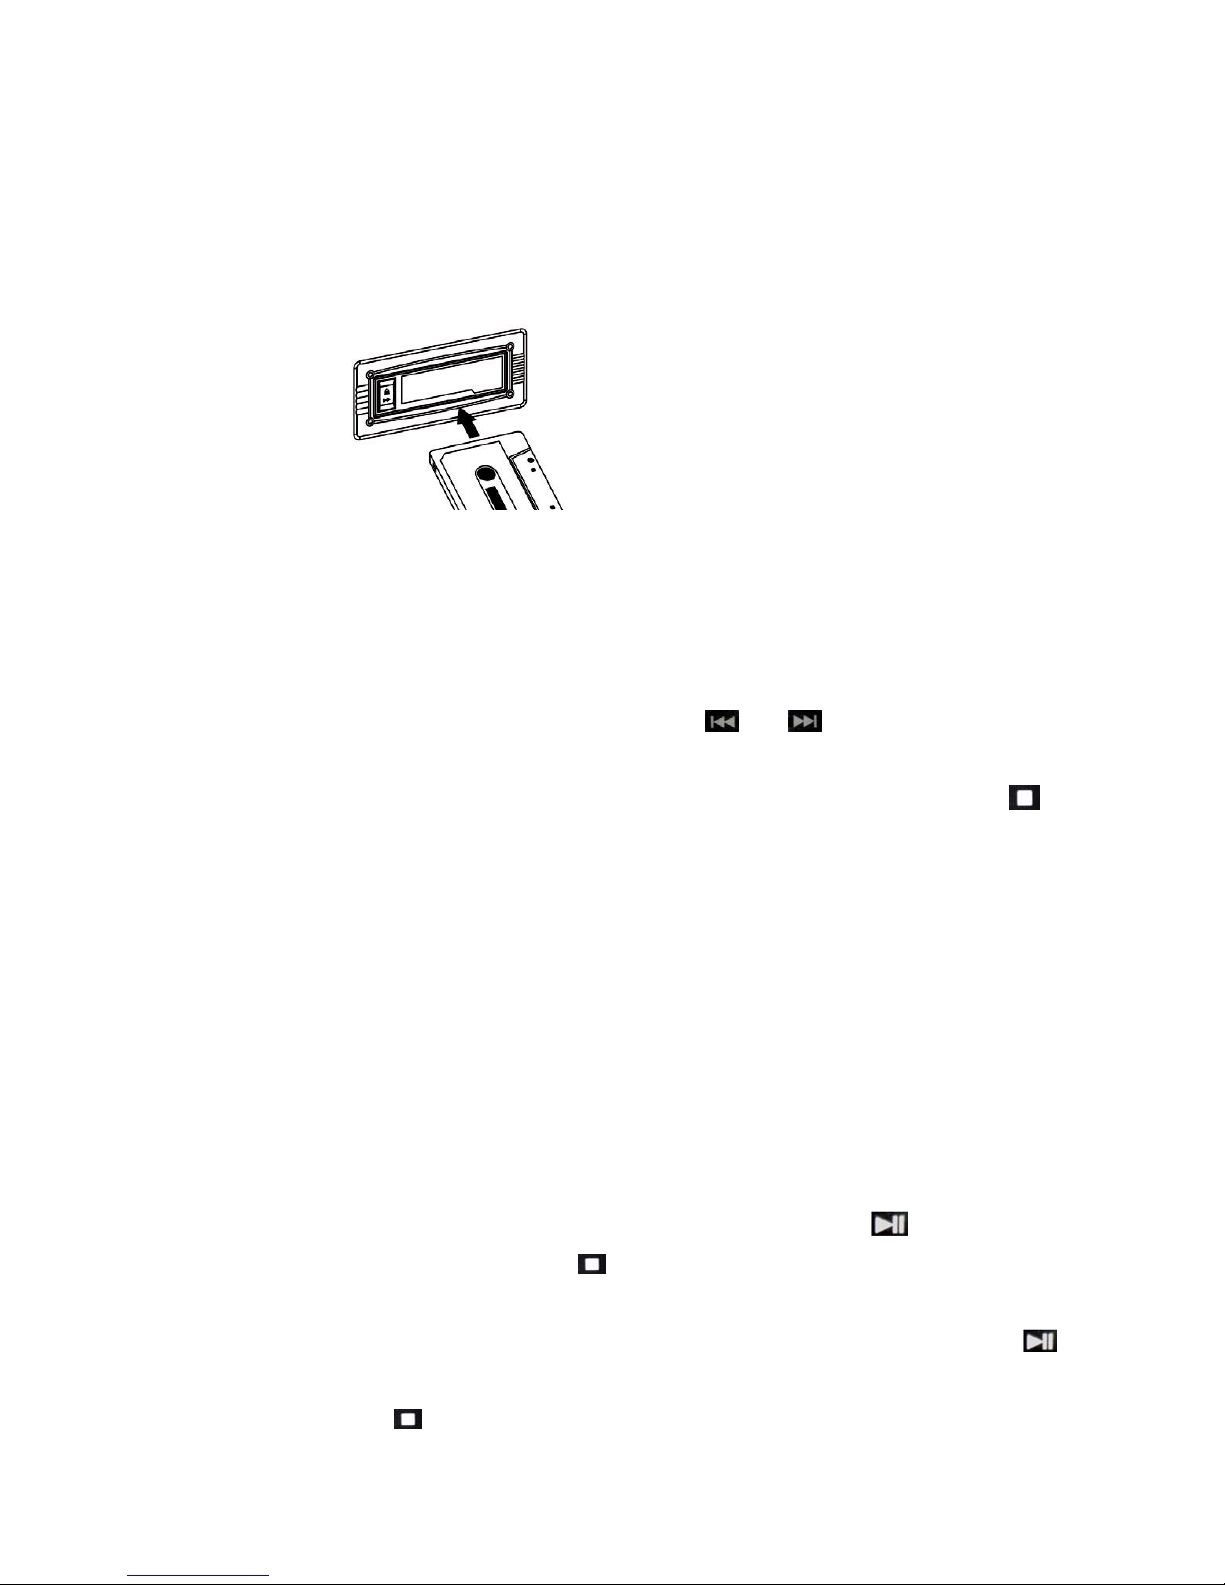
3. Insert a cassette with tape facing away from you, as illustrated on the right. The
EJECT/FAST FORWARD button will pop out
4. Turn the volume knob to your desired level.
5. To fast forward the cassette tape, press the EJECT/FAST FORWARD button halfway down
while the cassette is playing. The tape will be advanced forward rapidly.
6. To resume normal playback, slightly press the EJECT/FAST FORWARD button again. The
button will fully pop out again.
7. To stop playback, press the EJECT/FAST FORWARD button completely. Playback will be
stopped and the tape will be ejected.
Page 10
IMPORTANT!
When using the cassette deck:
●Make sure to insert the cassette in the correct direction.
●To avoid damaging the cassette, we strongly recommend taking it out of the equipment
after playing the cassette.
Cassette encoding
1.Copy the content of Tape to USB/SD.
(1) Please put USB/SD in a right direction to USB/SD Socket when you play tape.
(2) Press REC (USB/SD) Button → Press CD1 Function & button to select the
savepath (USB&SD) → then press once again REC (USB/SD) Button to process confirm →
begin to copy (the icono will flashing for USB/SD on the display screen) → Press stop
button for your end copy.
Attention: Please Press STOP or the copy will can't be saved on USB/SD.
NOTE:
The recording speed is 1:1. Recording will take as long as playing the record.
The recording format is preset at MP3 bit rate 128 kbps.
2.Copy the content of Cassette to CD-R/CD-RW
(1)Press "Open/Close Button"of CD2,and put CD-R&CD-RW disc on Tray, then press
"Open/Close Button" and close Tray and automatically identify the type of CD-R & CD-RW.
(2) Copy directly: Press RECORD (CD2) Button → Press CD2 Function player button to
process confirm →begin to copy → Press button for your copy end.
(3) INCREMENT TRACK COPY: press MANUL AUTO Button → Select the recording the size of
the signal level(-20,-30,-40dB) → press RECORD(CD2)Button → press CD2 Function
player button to confirm →begin to COPY→press INCREMENT TRACK Button for manual
track →Press stop button for your end copy.
Page 11
(4) Manul Auto Copy: Press Manul AUTO Button →to select the recording the signal of the
size level (-20,-30,-40dB) →Press RECORD(CD2) Button →press CD2 Function player
button to confirm.
Remark:
(1)It will display REC icon and the type of copy disco( CD-R & CD-RW) when you copy.
(2) It will display the time, TRACK, the size of the level and other info when you copy CD2.
CD Operation
1.CD1 PLAY:
(1)Press "CD1 Button" on lower right corner,turn the Function to the Mode of CD1.
(2)Turn the volume knob clockwise to turn the equipment on.
(3)Press the CD-Rom switch ,then the disk tray door opens .
(4)Place the CD face up inside ,making sure it is fully placed .Then press the CD-Rom
switch again ,the disk tray door closes .
(5)To play a different piece on the record, Press the skip up or skip down
button to select the desired piece .
(6)Press button when you need be stop.
(7)To adjust the volume level, turn the volume knob to the right or left.
Remark: Other function can be controled by the small remote controller
when CD1 play.
2.CD2 PLAY:
(1) Press "CD2 Button" on lower right corner,turn the Function to the Mode of CD2.
(2) Turn the volume knob clockwise to turn the equipment on.
(3) Press the CD-Rom switch ,then the disk tray door opens .
(4) Place the CD face up inside ,making sure it is fully placed .Then press the CD-Rom switch
again ,the disk tray door closes .
(5) To play a different piece on the record, Press the skip up or skip down button to
select the desired piece .
(6)Press button when you need be stop.
(7)To adjust the volume level, turn the volume knob to the right or left.
Remark: It will replace display the time and content on display screen when play CD.
CD encoding
1. Copy the content of CD1 to CD2.
Page 12
(1)Press "Open/Close Button"of CD1 on lower right corner,put CD-R&CD-RW on Tray, then
press "Open/Close Button" and close Tray and automatically identify the type of CD-R & CD-
RW.
(2) Press ''Open/Close Button" on lower left corner, put CD-R&CD-RW on Tray,then press
''Open/Close Button" and close Tray and automatically identify the type of CD-R & CD-RW.
(3) (3)Press Button of CD1 Function(transfer to CD1PlayerBack Mode)→CD1 player will
automatically play from TRACK1→Press REV Button & F.F Button to choose the
content you need to copy.
(4) COPY directly:Press RECORD(CD2)Button →Press the player of CD2 Function to
confirm→Begin to COPY→COPY finished press button.
(5) INCREMENT TRACK COPY: press MANUL AUTO Button → Select the recording the size of
the signal level(-20,-30,-40dB) → press RECORD(CD2)Button → press CD2 Function to
confirm → begin to COPY→press INCREMENT TRACK Button →Press stop button for
your end copy.
Remark:
(1) It will replace display the time and content on display screen when play CD.
(2)It will display REC and the type of COPY(CD-R & CD-RW) when CD2 COPY play.
(3) It will display TRACK, TIME, the size of COPY level and other info when CD2 COPY play.
(4) Only CD, CD-R,CD-RW Disc PlayBack function for CD1.
(5) And CD, CD-R, CD-RW Dis PlayBack & encoding function for CD2.
2.COPY the content from CD1 to USB & SD .
(1)Press "Open/Close Button"of CD1 on lower right corner,put CD-R&CD-RW on Tray, then
press "Open/Close Button" and close Tray and automatically identify the type of CD-R & CD-
RW.
(2) (2)Press button on CD1 Function(transfer to CD1 PlayerBack Mode)→it will be on
playing from TRACK 1 CD1 →Press REV Button & F.F Button to select the content
you need COPY TRACK
(3) Put USB∕SD in a right direction and insert into USB∕SD Socket respectively.
(4) Press REC(USB∕SD)Button → press CD1 Functio & COPY( ONE &ALL )→ and press
once REC(USB∕SD)Button → press CD1 Function & to save(USB/SD) →at last press
REC(USB∕SD)Button to confirm→begin to COPY→ the icon of USB/SD will flashing on display
screen(when copy)→COPY finished press button.
Attention: Please Press STOP or the copy will can't be saved on USB/SD.
NOTE:
The recording speed is 1:1. Recording will take as long as playing the record.
The recording format is preset at MP3 bit rate 128 kbps.
Page 13

Aux In
1. Aux In external input signal after amplification
(1) Press "Power & Volune Knob" gently, and open Power Supply
(2) Press "AUX Function Button", transfer to AUX status
(3) CD, MP3, Music or other player signal through 3.5mm plug cord → insert into Aux In
Socket of panel left→ open the external player →continue the external player signal
(4) Turn the volume knob to your desired level.
2. Copy the signal of Aux In to USB∕SD:
(1) Press "Power & Volune Knob" gently, and open Power Supply
(2) Press "AUX Function Button", transfer to AUX status
(3) CD, MP3, Music or other player signal through 3.5mm plug cord → insert into Aux In
Socket of panel left→ open the external player →continue the external player signal
(4) Turn the volume knob to your desired level.
(5) Insert USB/SD to the right direction into USB/SD Socket respectively
(6) Press REC (USB/SD) Button → Press CD1 function & to select SavePath
(USB&SD) → then press again REC (USB/SD) Button to confirm → to continue COPY → the
icon of USB/SD will flashing on display screen (when you are copy)→COPY finished press
button.
Attention: Please Press STOP or the copy will can't be saved on USB/SD.
NOTE:
The recording speed is 1:1. Recording will take as long as playing the record.
The recording format is preset at MP3 bit rate 128 kbps.
3. Copy the signal of Aux In to CD2:
(1) Press power/volume knob to turn on device.
(2) Press AUX Function Button,switch to AUX function
(3) Insert outside audio source signal (such as CD player, mp3,other audio device) into"
Aux in "socket of mainbody, via 3.5mmm-jack cable .---> start play the outsource
device(CD,MP3 ect)
(4) Turn the volume knob to your desired level.
(5) Direct copy . Press CD2 OPEN/CLOSE Button, then put CD-R &CD-RW on Tray, and
press Open/Close Button,close Tray, it will identify automatically the type of CD-R & CD-
RW.
(6) Press RECORD (CD2) Button → Press Function CD2 PLAYER to confirm →
begin to COPY →Press button for end.
Page 14
(7) Copy for INCREMENT TRACK: Press MANUEL AUTO Button→Select the recording the
size of the signal level(-20,-30,-40dB) → Press RECORD (CD2) Button → Press INCREMENT
TRACK Button to process manual operation TRACK →Press button for copy end.
(8) MANUL AUTO COPY: Press MANUL AUTO button → to select the recording the signal
of the level (-20, -30,-40dB) → Press RECORD (CD2) button → Press Function CD2
PLAYER buttoon to confirm → to begin copy→ it will automatically TRACK (display AUTO
TRACK words on screen) → Press stop button for copy end.
Remark:
(1) It will display REC icon and the type of the disc (CD-R & CD-RW) when you copy
(2) It will display the time, TRACK, the size of the level and other info when you copy CD2
(3). Because the external player types of output pin is difficult to unity, so the machine is
no additional configuration 3.5 mm audio line.
The USB Port and SD Card Slot
Playback of music in MP3/WMA format via USB device or memory card
The system is able to decode and playback all MP3/WMA files stored in the memory
media connected to the USB port or SD/MMC card slot..
1.Turn the volume knob clockwise to turn the equipment on.
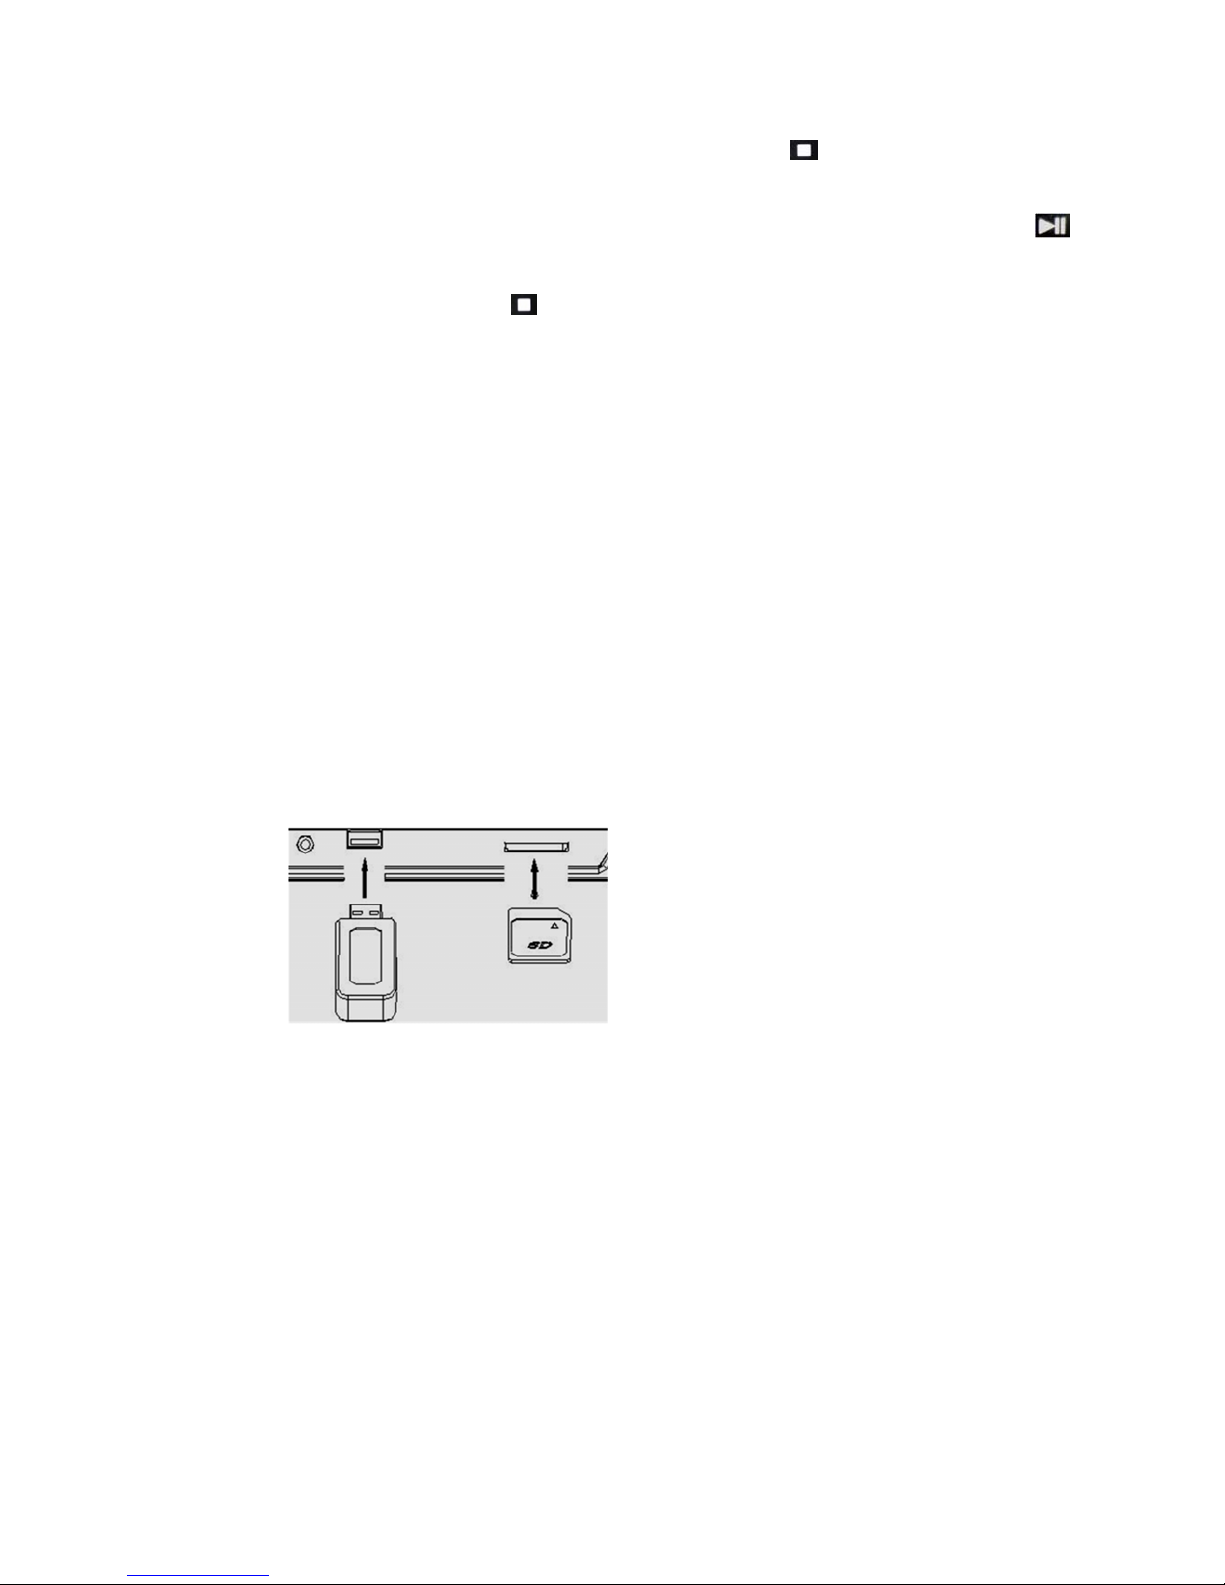
2. Following the illustration below, insert a USB device face up into the USB port, making sure
it is fully inserted. Alternatively, insert a memory card in the direction of the arrow (as
shown on the label next to the memory card slot), making sure to insert it straight without
bending.
IMPORTANT:
Connecting the USB device upside down or backwards could damage the audio system or
storage media (USB drive, SD or MMC card). Check to ensure the direction is correct before
connection.
3.Set the function selector to USB/SD mode. (If you have both a USB device and a memory
card inserted, press the MODE button to toggle between USB and SD mode).The system
Page 15

will start reading the storage medium automatically after mode selection and will display the
total number of folders and MP3/WMA files.
4. The system will then start audio playback from the media storage device (USB or SD card)
automatically.
Playback controls
PLAY/PAUSE :Press this button once to stop playing, press it again to continue.
STOP : Press this button to stop audio playback, the display will then show the total
number of MP3/WMA files.
SKIP UP : Press this button once to play the next file, press and hold this button to fast
forward through the files/tracks.
SKIP DOWN : Press this button once to play the previous file,press and hold this button
to fast reverse through the files/tracks.
USB∕SD Mode: Press this button to toggle between USB and SD Card mode.
Important notes
The system can detect and read files in MP3 / WMA format only via the USB port or SD card
slot.You can connect an MP3 player to the system via the USB socket, however, some MP3
players may not be able to play via the USB socket. This is due to variances in the MP3
encoding format, it is not a malfunction of the system. There are numerous USB and SD
device producers and their products vary in solution and format. We therefore cannot
guarantee that this unit will support all USB and SD devices from every brand. This system
supports SD cards up to 16 GB.
MP3 / WMA track format requirements:
MP3 bit rate: 32 kbps~256 kbps;
WMA bit rate: 32 kbps ~320 kbps.
Programming tracks for playback (USB∕SD)
Up to 64 tracks can be programmed for MP3 / WMA file playback in any order. Before
programming, however, be sure the system is in STOP mode.
1. Set the function selector to USB/SD mode, then press the stop button.
2. Press the program PROG button, MEM will be flashing on the LC display, and it will
indicate the program number and digits for the track number to be programmed.
Page 16

3. Press the SKIP UP or SKIP DOWN button to select a desired track.
4. Press the program PROG button to store the track into the memory.
5. Repeat steps 3 and 4 to enter additional tracks into the memory.
6. When all desired tracks have been programmed, press the PLAY/PAUSE button to play
the tracks in the assigned order.
7. To cancel programming, press the STOP button twice.
Copying of MP3 / WMA files
The system allows you to copy files from USB to SD/MMC or vice versa. You can copy a single
file/track, a folder of files/tracks, or all files/tracks on the storage medium.
Copying a single file/track
1. Insert a USB storage device and SD/MMC card, then select USB/SD mode (as described
previously).
2. Press the record REC button during playback of the track you want to copy: “ONE”will
be flashing on the display. Press the record REC button again to confirm.
3. The USB or SD icon will be flashing on the display while the system is copying the file.
4. Once the file has been copied, the unit will stop playback automatically. “END” will be
shown on the display and the system will revert to USB or SD mode.
Copying a folder
1. Insert a USB storage device and SD card, then select USB/SD mode (as described
previously). When the system has recognised the device, press the stop button.
2. Turn the tuning knob to select the desired folder for copying.
3. Press the record REC button: “ONE” will be flashing on the display. Press the SKIP
UP or SKIP DOWN button.
4. The USB or SD icon will be flashing on the display while the system is copyingthe folder.
5. When the folder has been copied, the USB or SD icon will stop flashing on the display.
Copying all files/tracks
1. Insert a USB storage device and SD card, then select USB/SD mode (as described
previously). When the system has recognised the device, press the stop button.
2. Press the record REC button: “ONE” will be flashing on the display. Press the
SKIP UP or SKIP DOWN button to select “ALL” on the display. Press the record REC
button again to confirm.
3. The USB or SD icon will be flashing on the display while the system is copying the
files/tracks.
Page 17

4. When all files/tracks have been copied, the USB or SD icon will stop flashing on the
display.
NOTE: If you press the record REC button during playback in USB or SD mode, the file will
copy from USB to SD or via device.
Deleting files from the USB device / SD card
The system is able to erase files stored on the USB drive or SD card. You can delete a single
file/track, a folder of files/tracks, or all files/tracks on the storage medium.
Deleting a single file/track
1. Insert the USB storage device or SD card, then select USB/SD mode (as described
previously).
2. Press the delete DELETE button during the playback of the track you want to delete:
“ONE”will be flashing on the display. Press the delete DELETE button again to confirm.
3.”DELETE” will show on the display while the file/track is being deleted until the deletion is
complete.
Deleting a folder
1. Insert a USB storage device and SD card, then select USB/SD mode (as described
previously). When the system has recognised the device, press the stop button.
2. Turn the or to select the desired folder for deleting.
3. Press the delete DELETE button: “ONE” will be flashing on the display. Press the SKIP
UP or SKIP DOWN button to select “DIR” (directory) on the display. Press the delete
DELETE button again to confirm.
4. “DELETE” will show on the display while the folder is being deleted until the deletion is
complete.
Deleting all files/tracks
1. Insert a USB storage device and SD card, then select USB/SD mode (as described described
previously). When the system has recognized the device, press the stop button.
2. Press the delete DELETE button: “ONE” will be flashing on the display.Press the SKIP
UP or SKIP DOWN button to select “ALL” on the display.Press the delete DELETE
button again to confirm.
3. While the system is deleting the files/tracks, the USB or SD icon will be flashing on the
display until the deletion is complete.
NOTE: Pressing the delete DELETE button will completely delete all files/tracks on the USB
device or SD card.
Removing the USB device / SD card
Page 18

First move the function selector to another mode (tuner, phono, tape), then off the power.
To remove a USB device, pull it out of the USB port.
To remove a memory card, press the memory card inwards and then release it.
The card will be released (partially ejected) and you can remove it by hand.
EADPHONE JACK
1."EADPHONE JACK" be set on panel, can insert EADPHONE to listen when you need be
quiet.
2.Used "EADPHONE" to control the voice by adjusting the"VOLUNE KNOB".
Remark: Without additional configuration EADPHONE.
Karaoke & Voice Function
1. When play LP,Radio,TAPE,CD,AUX in(Line in)music ,slot in Microphone in Mic
jack in back panel.(refer 50)
2. Adjust Mic. Volume , can choose your favorable Mic sound .
3. Press "Voice cut" button (33)if you want to cut the original singer sound. Only keep music.
Voice cut indication lamp In front panel will be light on (Red LED)
4. Repress "voice cut"(33),then stop this function. The indication fade off.
Remarks:
1. Voice cut can fade down the singer sound , but can not remove it all.
2. Voice cut function realization effect is based on the music source itself .
(1) If the music is only for Karaoke Music,then Voice function is good.
(2) If origin misic is stereo-mode or L/R channel record by separately, Voice cut function
obviously.
(3) If origin play music is Mono , then voice cut effect is not strong as above two model。
About CD-R and CD-RW discs
CD-R discs can be recorded once only,Once they have used for recording,they cannot be
erased or re-recorded,However,if space is available on the disc(and the disc has not been
finalized),additional material can be recorded.By contrast,a CD-RW disc can be used in
much the same way as CD-R disc,but the last track or tracks recorded can be erased, the
space on the disc can be re-used for other recordings.However,you should note that an
audio CD created using a CD-RW disc may not playback satisfactorily on every audio CD-
player/CD-R,by contrast,may be played satisfactorily on the majority of audio CD players.The
display will show “busy CD” and the disc is reading.wait until the reading is complete
before next step.
Page 19

NOTE:Make sure“NO TOC”and“ CD-R”(or CD-RW)indicators lights on the display,or the
RECORD function will not work.
Important tips after CD encoding
Finalizing
AS has been explained earlier,in order for A disc to become a standard CD , it must have s
Table of Contents (TOC)written to it.This process is known as finalizing.
1. press the FINALIZE button in the stop mode.
“FiN-d”appears on the display.
TO cancel the finalizing process,press the STOP button.
2. press the PLAY button to start finalizing.
The display will show “---BUSY”during finalize.Wait until the busy disappear to
complete the finalize.The finalize time is subject to the contents of record,The finalize time
is subject to the contents of record,it may take few minutes in some case. when the
operation has been finished,the NO TOC indicator turns off and the display returns to the
track/time display.During finalizing, no button works.Never turn the power off nor unplug
the power cord.Although finalized CD-R discs may be blayed on ordinary CD players,
remember that finalized CD-RW disc may not play on ordinary CD players.
Erase or Unfinalize a CD-RW
It is possible to erase the last recorded track,it is also possible to erase a whole disc.Erase
procedures are possible only on an unfinalized CD-R disc. If a CD-RW disc has been
finalized,unfinalize it prior to erasure.Remember that it is not possible to perform any
Erase or unfinalize procedures on a CD-R disc.
1.press the CD button to select“CD”
2.Load a recorded CD-RW.
3. press the ERASE in the stop mode.
(1) Wait until“BUSY”disappear on the display.
(2) Press the player button to begin erase the last track.
(3) Repeat to press Erase button to continue the next track.“Er”and the last track number
appear when the disc has been finalized.Each time the ERASE button is pressed. The display
changes as follows:“Er”and the number of the last track recorded on the disc select this to
erase the last track on the disc.This will not appear then only one track is recorded on the
disc.
Page 20

4.Erase ALL
Select this to erase all the tracks.To cancel the erasing or unfinalizing process,press the
STOP button.
(1).Press and hold the “Erase”button till the display show “Erase All”.
(2) Press play button to begin the erase.
(3) Display will show 0000000 to confirm the disc is clear.
The remaining time for the operation appears in the display.When the operation has been
finished,the display returns to the track/time display.During erasing/unfinalizing,no buttons
will work.Never turn the power off nor unplug the power cord. This operation cannot be
undone.If you are going to erase a track or tracks,make sure that they are recording that you
really want to erase. The copy CD-RW disc from other unit can’t be erased one by one in
this unit.but can be erase all.
Troubleshooting Guide
If you are experiencing problems with your USB Turntable with Cassette Deck and
Radio,check in the section below whether there are any quick and easy checks you can do
that may help you solve the problem. If you cannot solve the problem by yourself, contact
our after sales support line for advice. Do not attempt to open, repair or modify the
equipment yourself.
Problems with sound
- Clockwise rotate the power/volume knob to increase the volume.
- Make sure the unit’s power cord is connected to an appropriate electrical
-Make sure the wall socket is switched on.
-Make sure the function switch is set to your desired function: TUNER, PHONO,
TAPE,AUX,USB/SD,CD1,CD2 .
- When playing records, make sure you have selected the correct speed (33, 45 or 78 rpm).
- When playing a cassette, make sure it is properly inserted.
- When playing a CD ,make sure the CD is dealt face up .
-When playing a CD via the AUX IN connection, make sure the cable is firmly connected, all
controls on the CD player are properly set, the disc tray is closed and the disc is clean and
undamaged.
-When playing music from a USB device (or SD/MMC card), make sure the memory device is
properly inserted in the USB port (SD/MMC card slot) and the correct MODE is selected.
Problems with radio reception
-Make sure you are in an area that can receive signals for your selected radio station.
Page 21
- If AM reception is weak, rotate or reposition the equipment to improve reception.
-If FM reception is weak, try the following to improve reception:
-Completely unravel the wire aerial at the back of the cabinet.
- Slightly move the wire aerial for better reception.
-Try moving your radio to an alternative location to see if the reception improves.
- Check that you do not have other electrical equipment too close to your radio,which may
cause
NOTE: Do not exert too much force with using the TUNING KNOB
Specifications
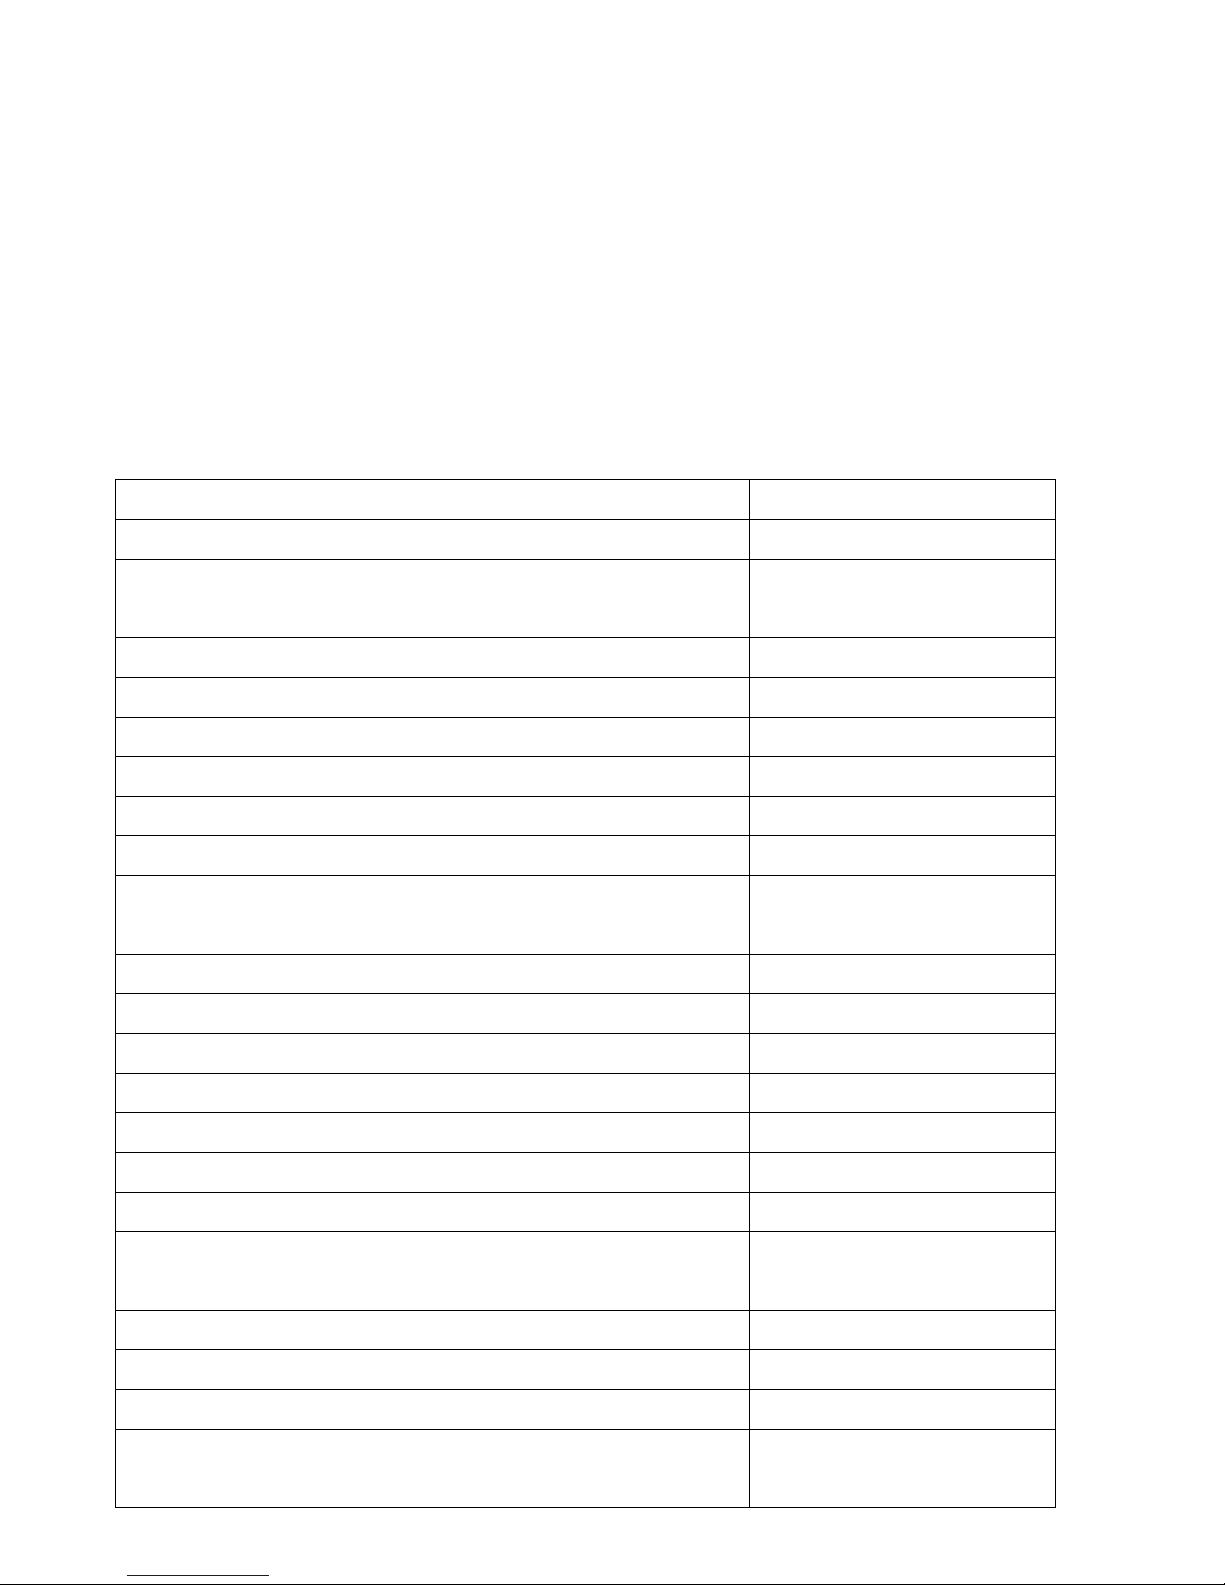
AMPLIFIER
section Output power 1.5W +1.5W
Frequency
100 to 16,000 Hz
Response
TUNER section
FM section
Frequency Range 88 to 108 Mhz
Am section
Frequency Range 520 to 1629 Hz
CD PLAYER
section
Frequency Range 100 to 16,000Hz +/-4dB
Signal-to-Noise Ratio 50 dB(IEC-A)
CASSETTE DECK section
Track System 4 Track,2 channel stereo
Tape Speed 4.75cm/sec
Wow and Flutter 0.4%(WRMS)
Frequency
125 to 6300Hz +/-6dB
Response
RECORD PLAYER section
Motor DC servo motor
Drive System
Belt
Drive
Page 22
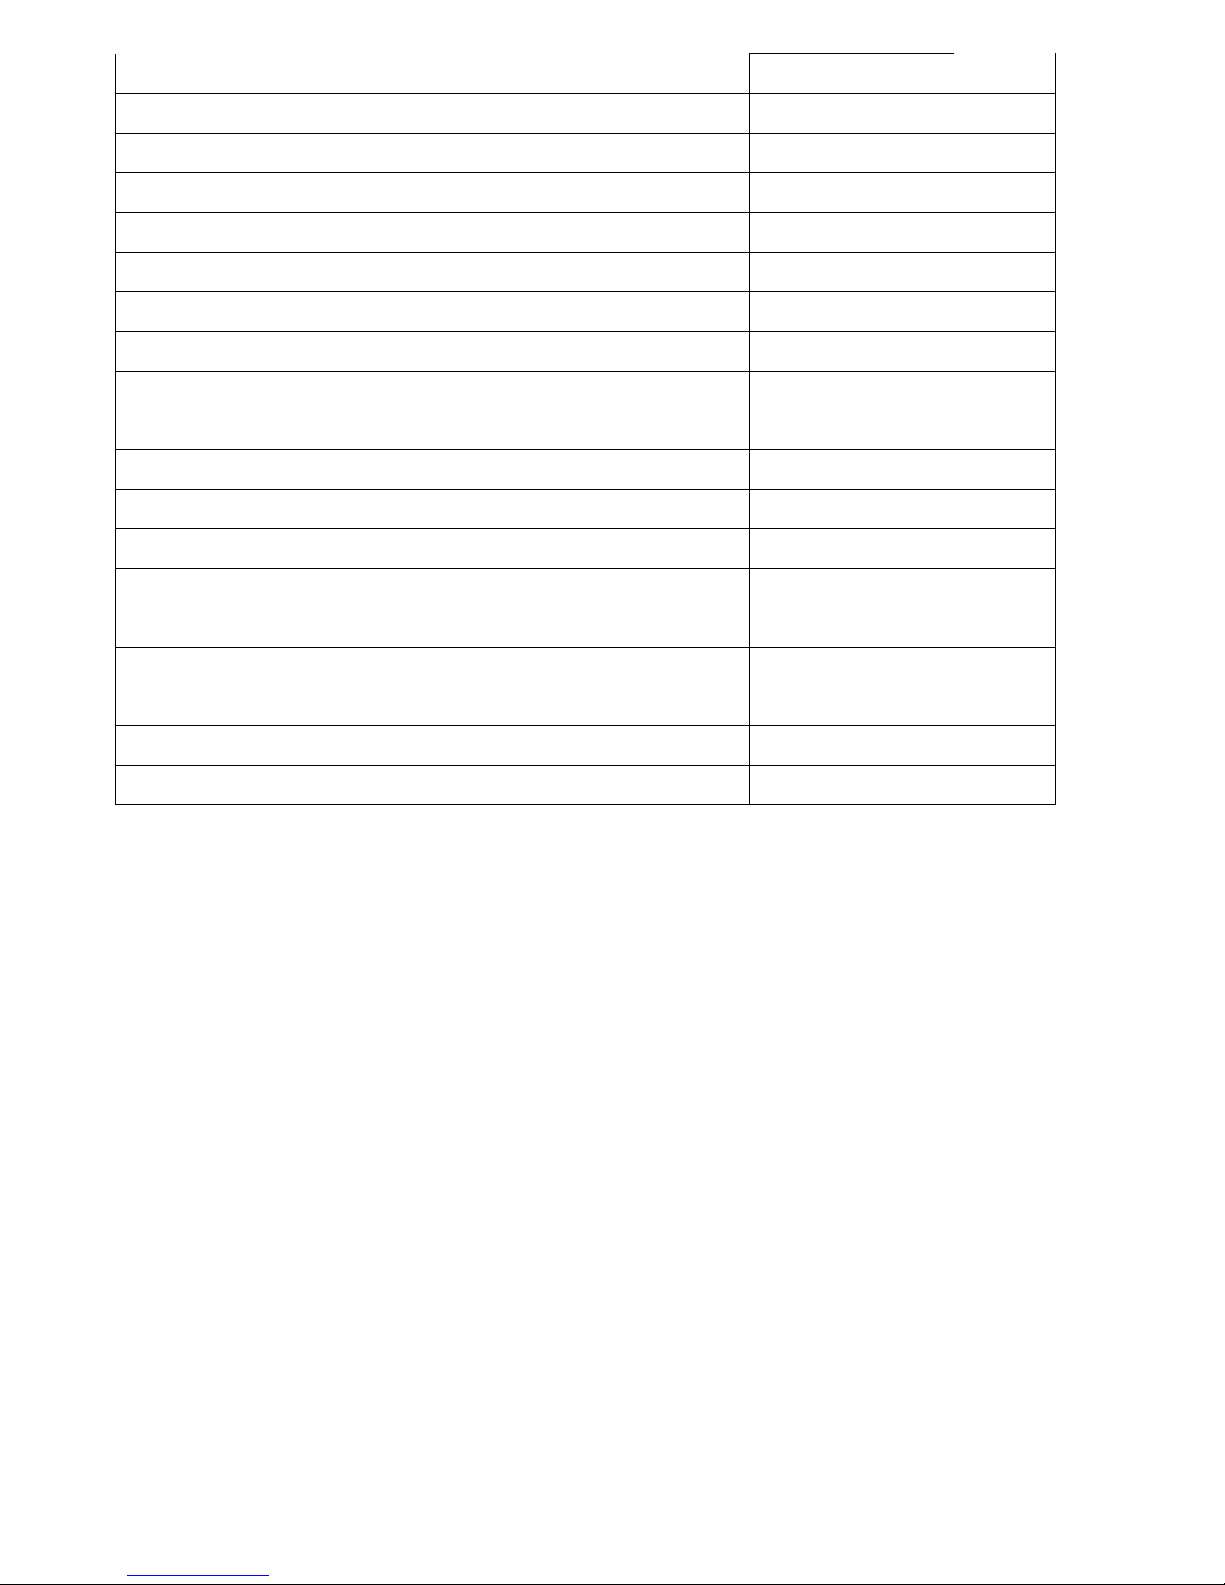
Speeds 33.3,45,78 RPM
Wow & Flutter Less than 0.35% (WTD)
S/N Ratio More than 50 dB
Cartridge Type Ceramic Stereo Cartridge
SPEAKER SYSTEM section
Type 1 way
Impedance 4 ohms
Input power
3W
max
GENERAL
Power Requirements 230V~50Hz
Power
Consumpiton
Dimensions(LxWx
330x300x205m
H)
m
Weight
 Loading...